


Datsun280z
-
Posts
75 -
Joined
-
Last visited
Posts posted by Datsun280z
-
-
- Popular Post
- Popular Post
SSRs...

-
 38
38
-
-
- Popular Post
- Popular Post
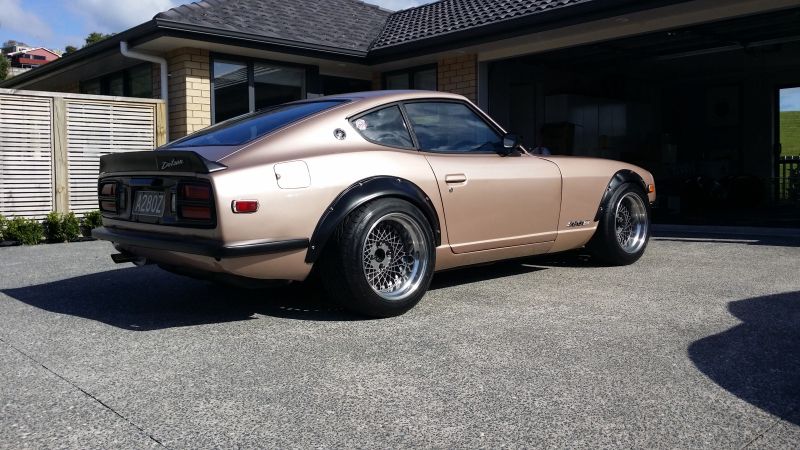
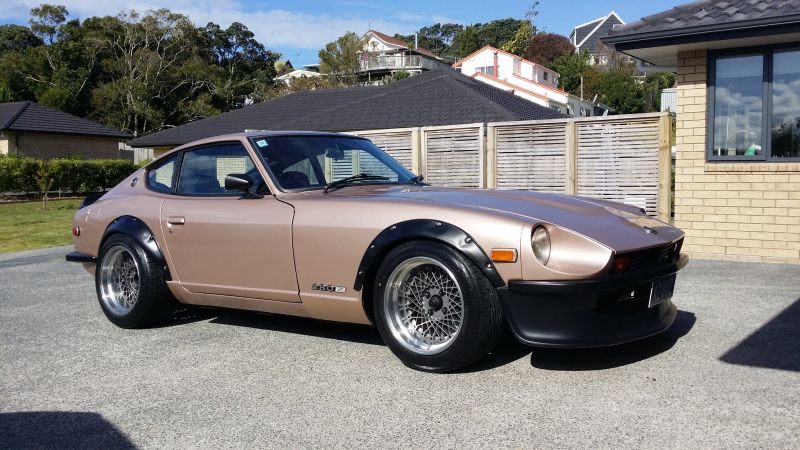
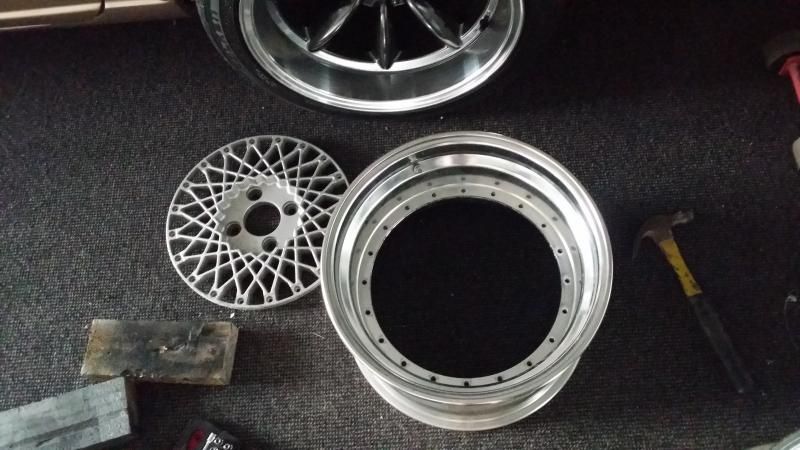
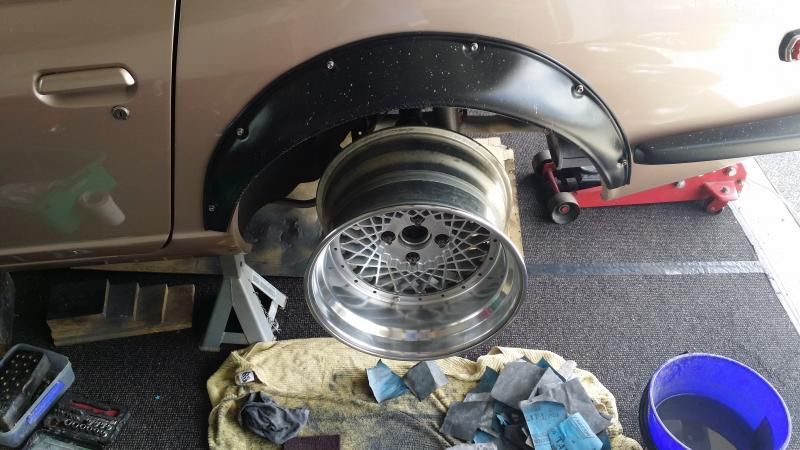
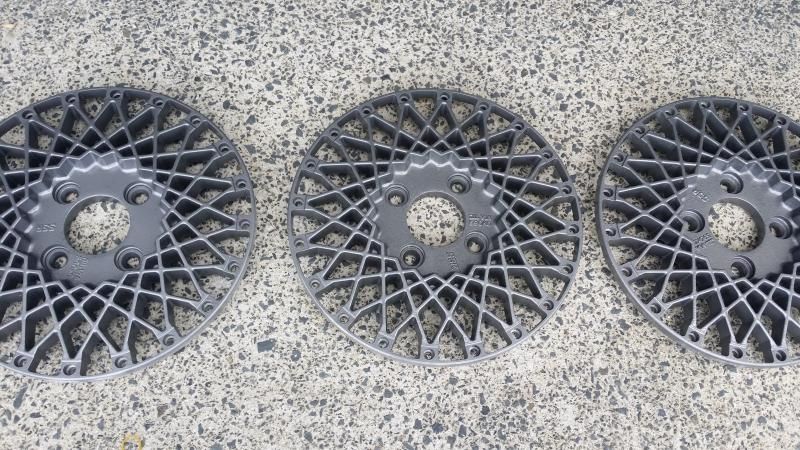
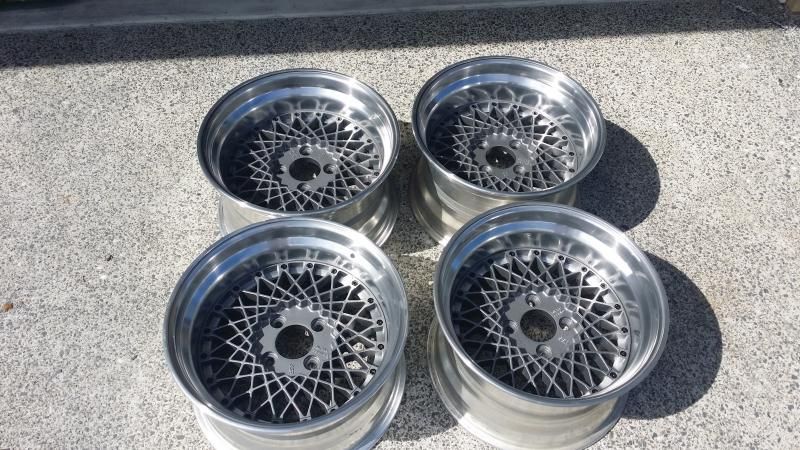
Started giving the SSRs a tidy up.They had a bit of curbing on the lips and the clear coat had pitting in places. Should have sent them off to a polisher but thought i would have a crack at doing it myself.Split the centers and barrelsStripped off the old clear coat with rubber stripping disc. Then jacked up the back of the datsun and used as a poor mans polishing wheel. Bolt on wheel, throw in 3rd at idle and work your way through sandpaper grades.Stripped back the flaking paint of the centers and resprayed gunmetal. Also repainted all the cap screws black.All done and bolted back togetherCame out Ok for a rangi home job. Tyres going on this week fingers crossed.
-
12
-
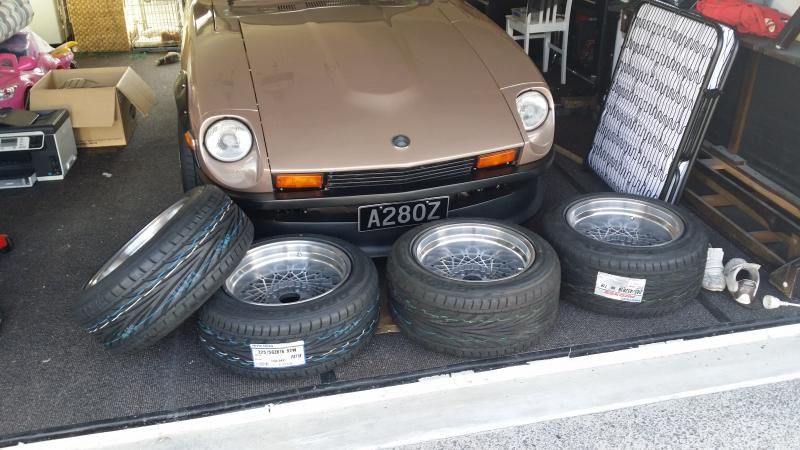
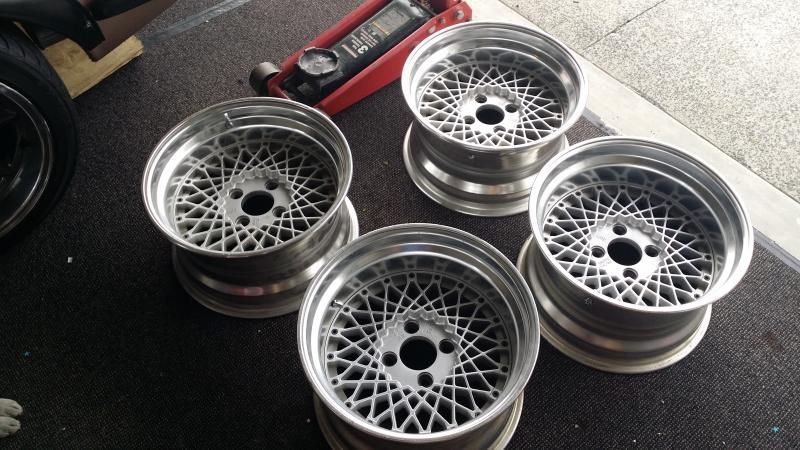
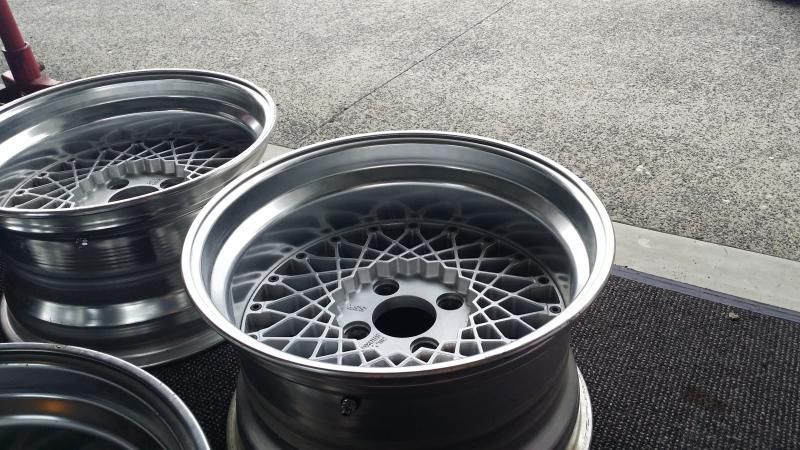
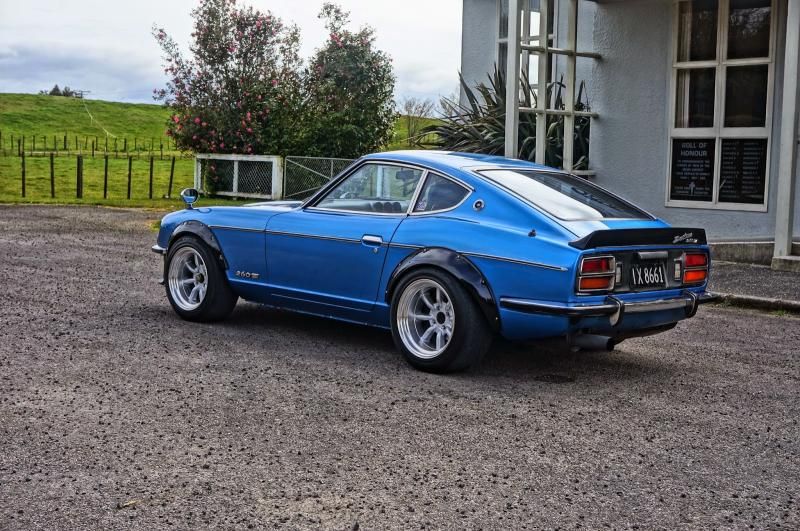
So this happened...SSR Formula Mesh, 16 x 9 -14 and 16 x 9.5 -16Wasn't looking for wheels but opportunity came up. They will get a bit of a tidy and centres will be painted gun metal. Have to sort tyres for them now.
-
7
-
-
- Popular Post
- Popular Post
-
17
-
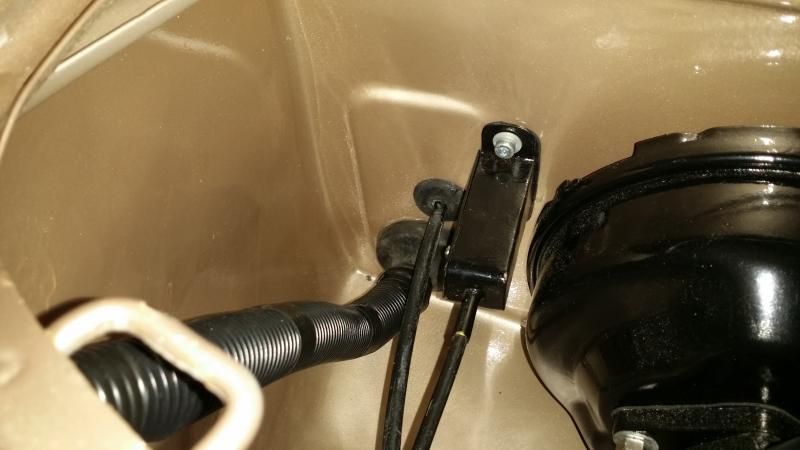
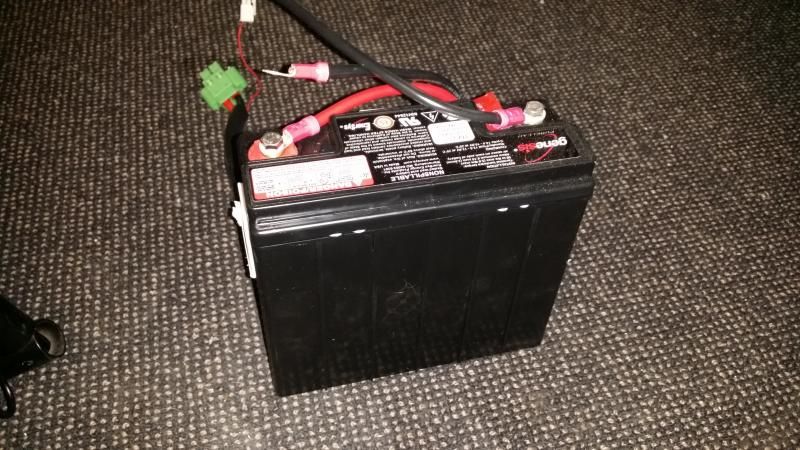
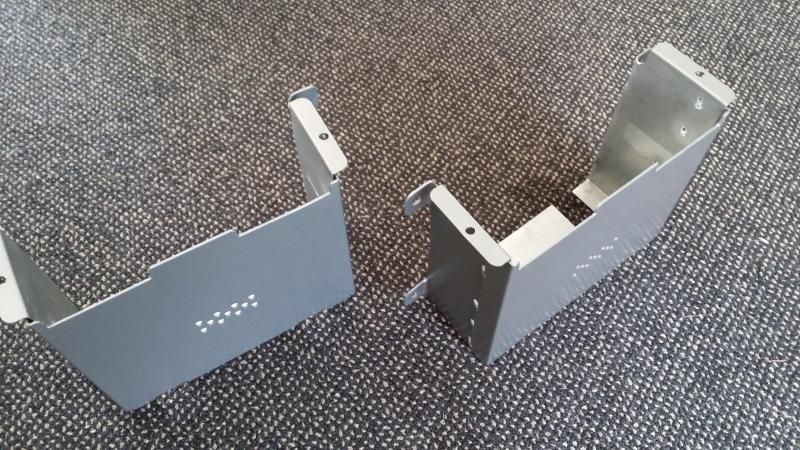
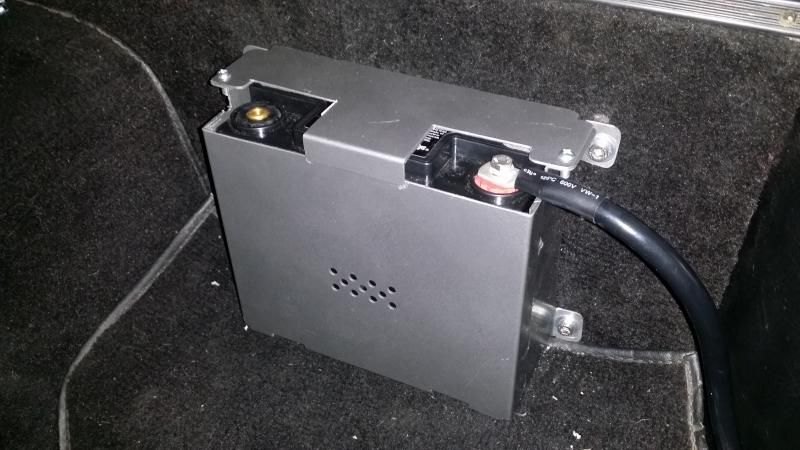
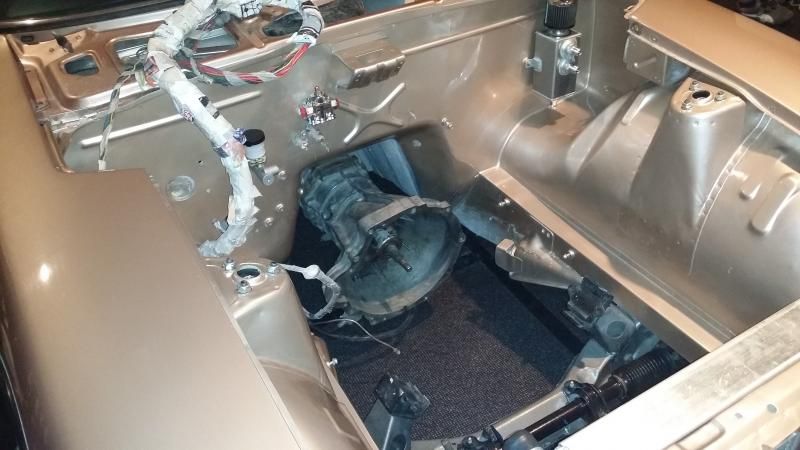
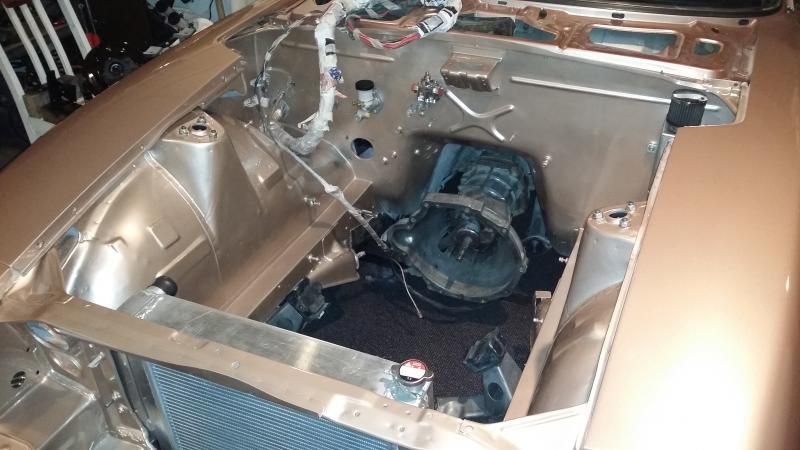
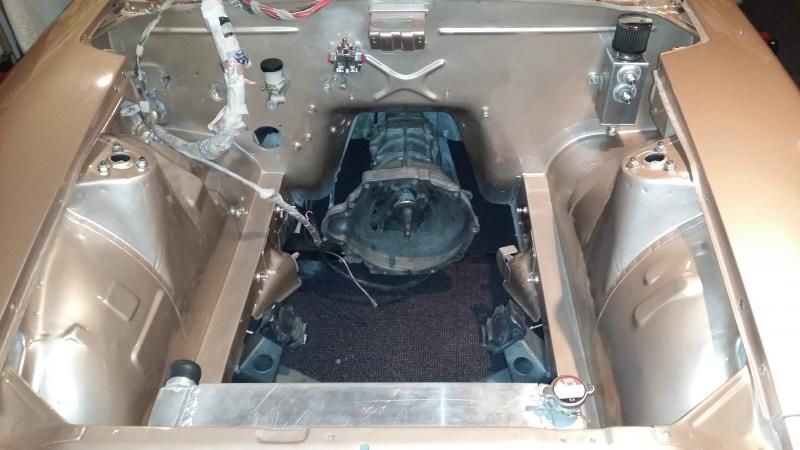
Started making some headway on the wiring. The original loom was in a pretty messy state due to years of people cutting and splicing not to mention my car having had a LHD to RHD conversion along the way. I have cut away as much of the old redundant fuel injection wiring as possible.Front end done. Replaced a few of the old connectors and tried to route as neat as I can. All wiring now runs through the guard as wanted to try and keep the engine bay clean.Engine bits finished. New 2G cable running to battery in the back of the carThrough firewallI managed to score some sweet sealed 12V battery's from Craig260 to replace my old dead one, chur bo! These things are nice and small which is cool. One should do the trick but am going to use two.Knocked up these guys to mount themDecided to mount behind the rear seats, they just squeeze in there.
-
4
-
-
- Popular Post
- Popular Post
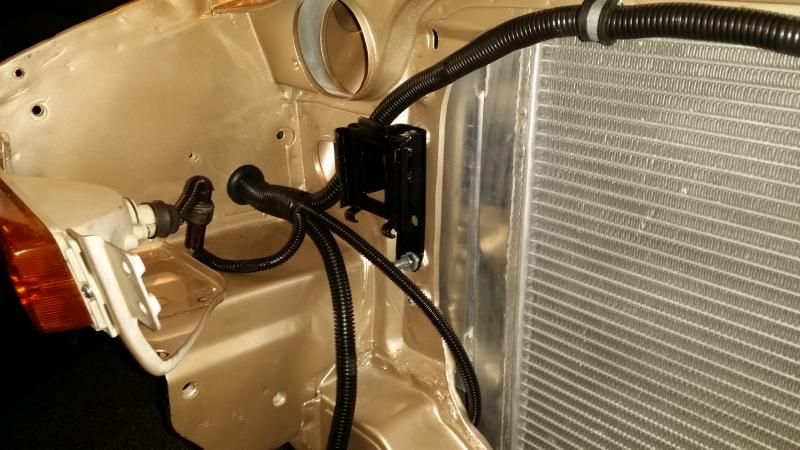
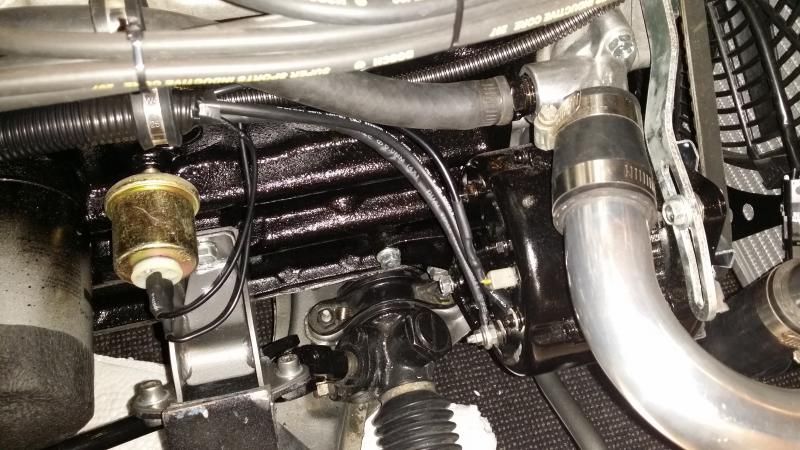
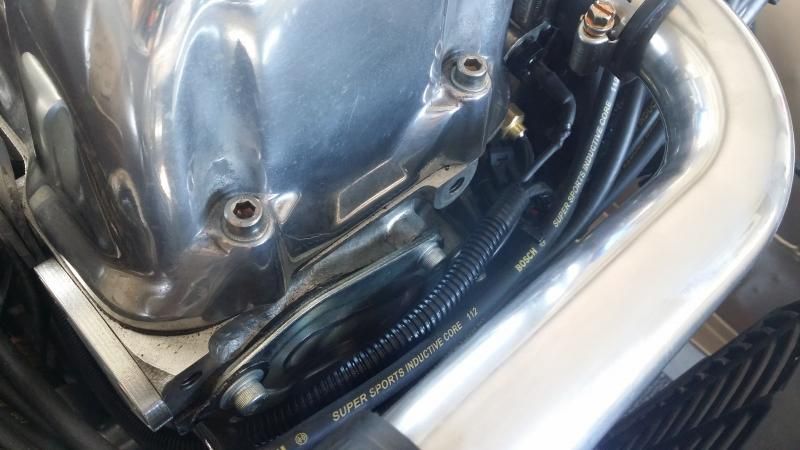
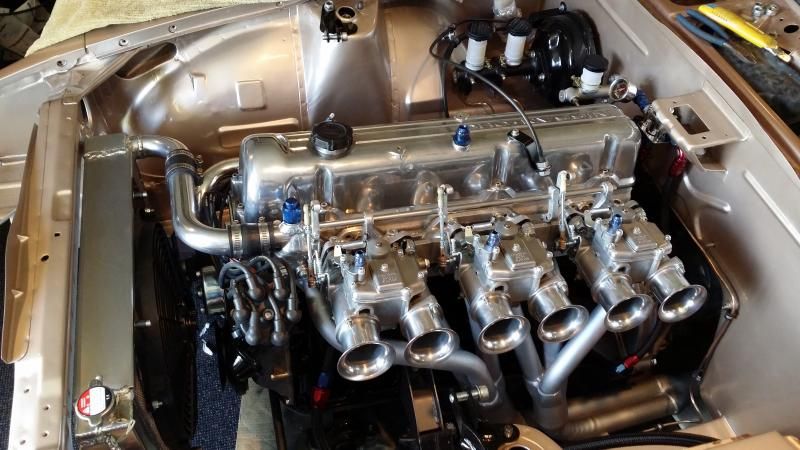
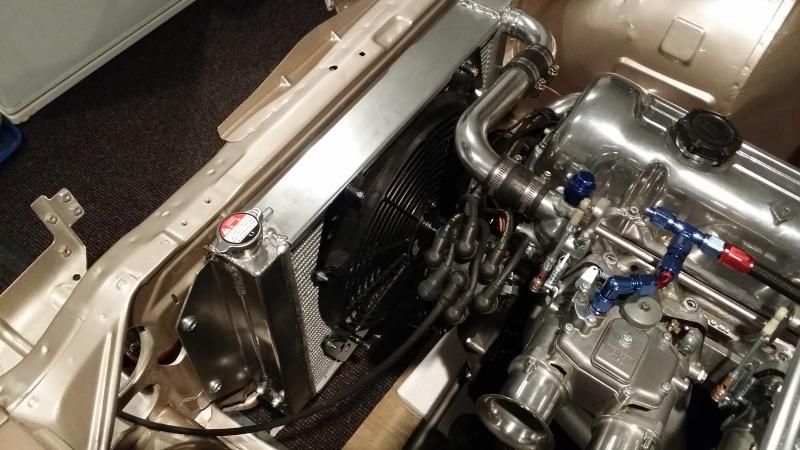
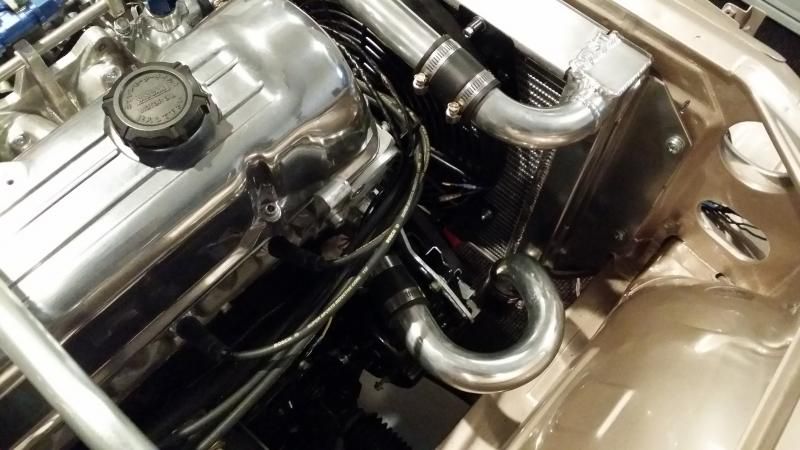
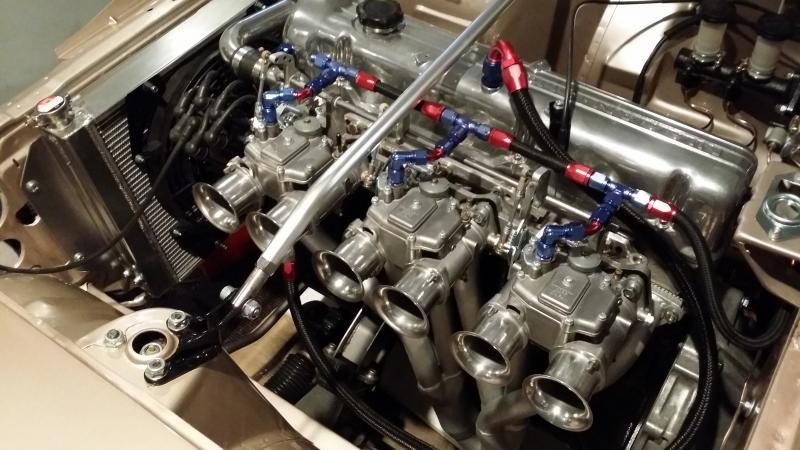
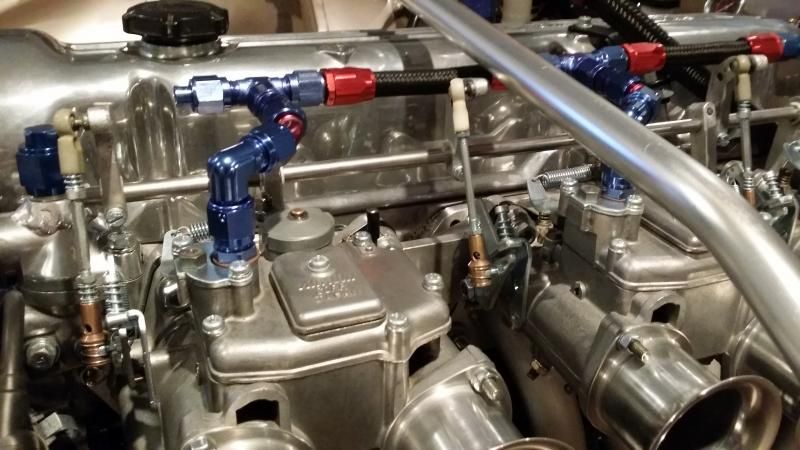
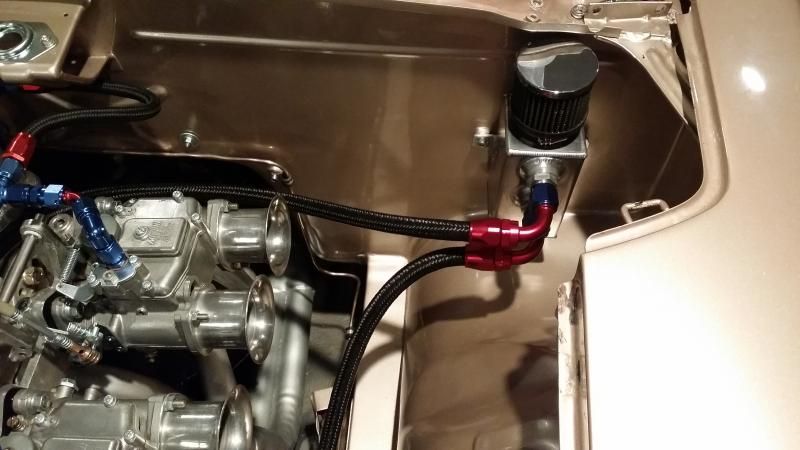
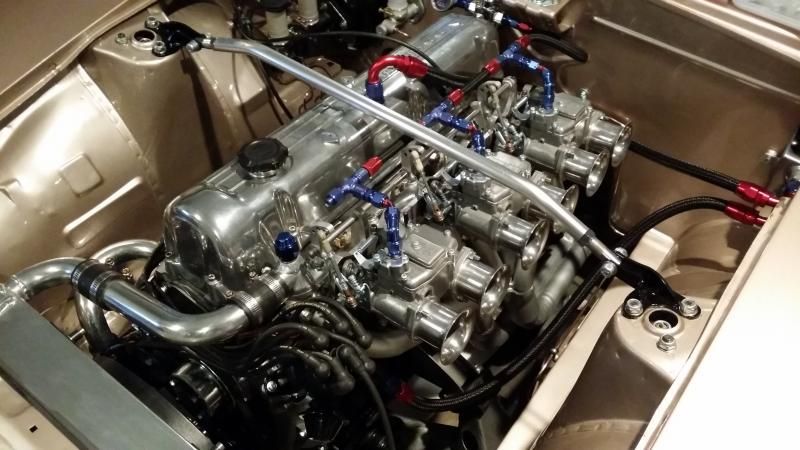
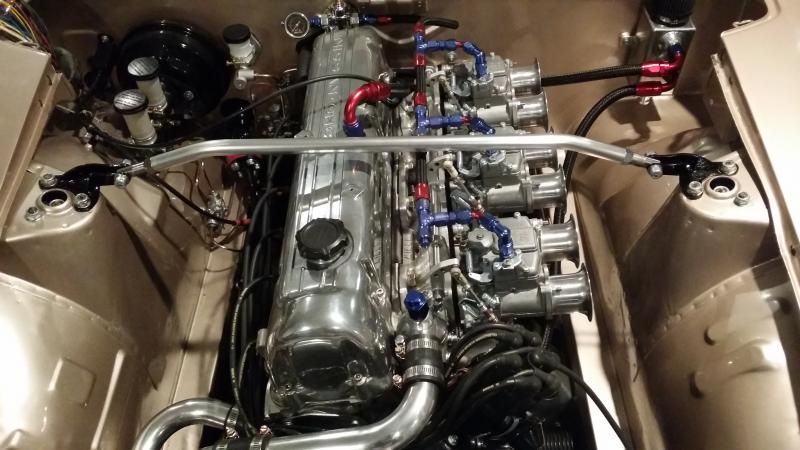
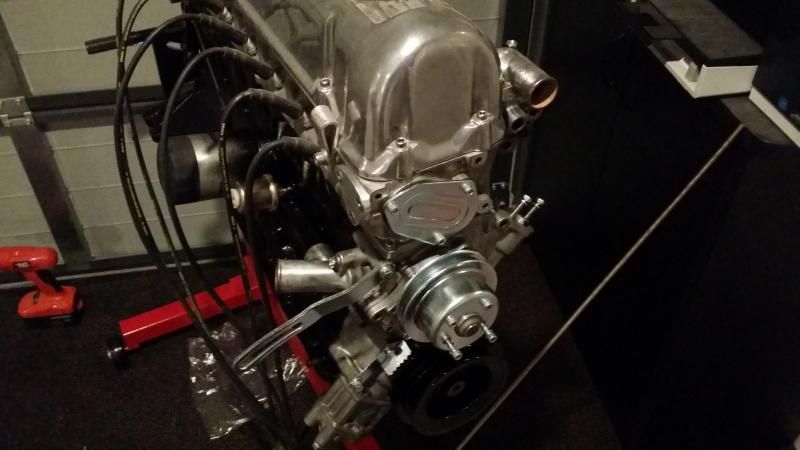
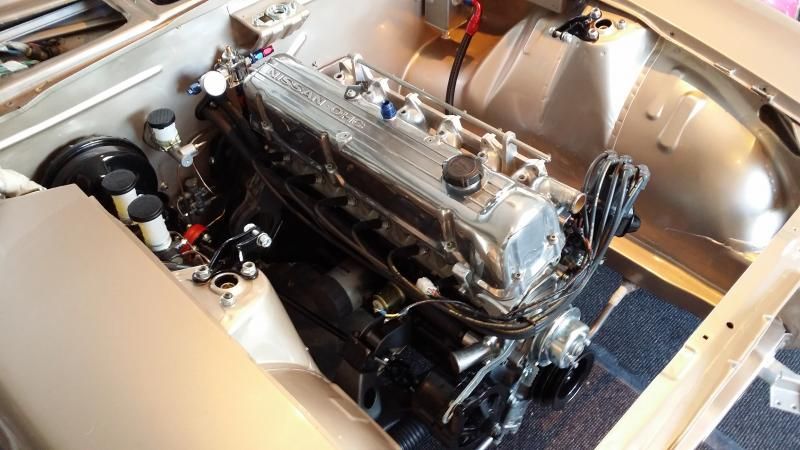
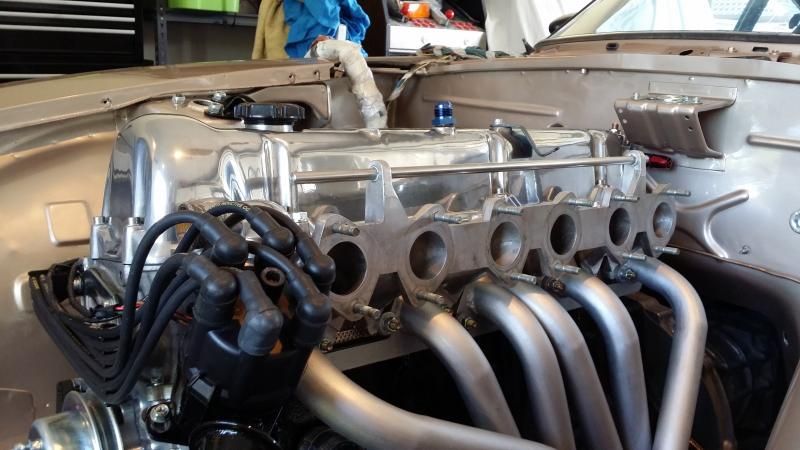
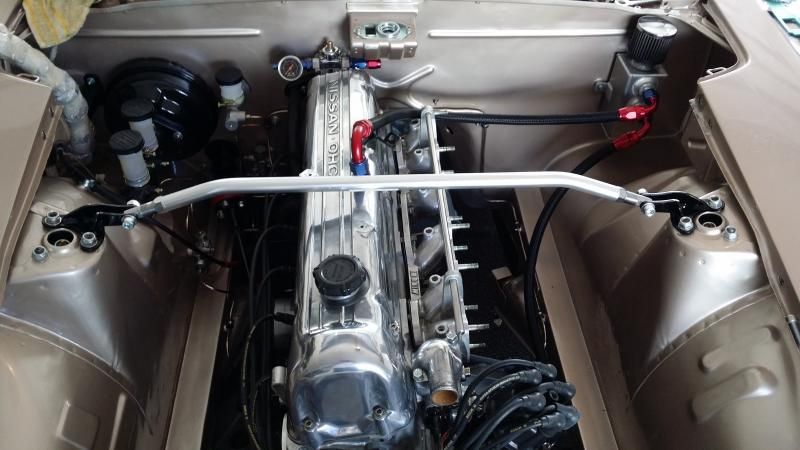
Bit more progressLast few bits back from electroplaters so could finally put the carbs back together and bolt them back on.Radiator mounted for the last time hopefully and water hard lines done.Because of my new home made strut brace I had an issue with my old fuel line setup not clearing. So had to get all crazy with AN fittings to make it work, yep its totally ridiculous but only way I could make it clear brace and throttle linkage gear.Shes pretty tight..Catch tank mounted and plumbedCoil up frontAs it sits now, pretty much all the mechanical stuff now doneWiring nightmare now begins...
-
27
-
- Popular Post
- Popular Post
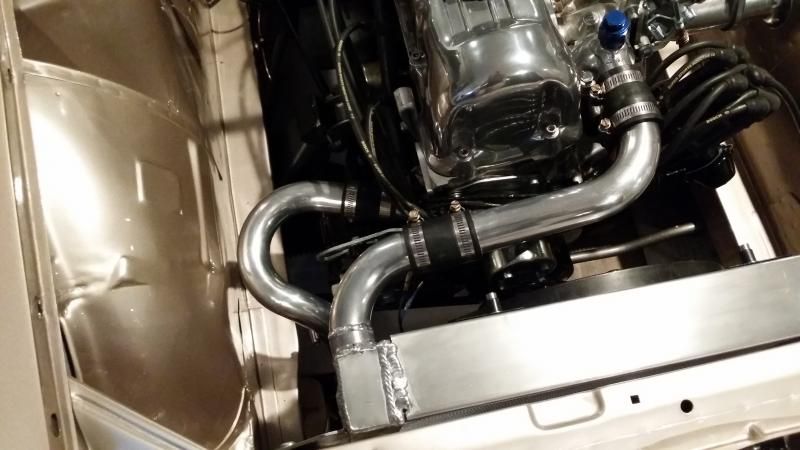
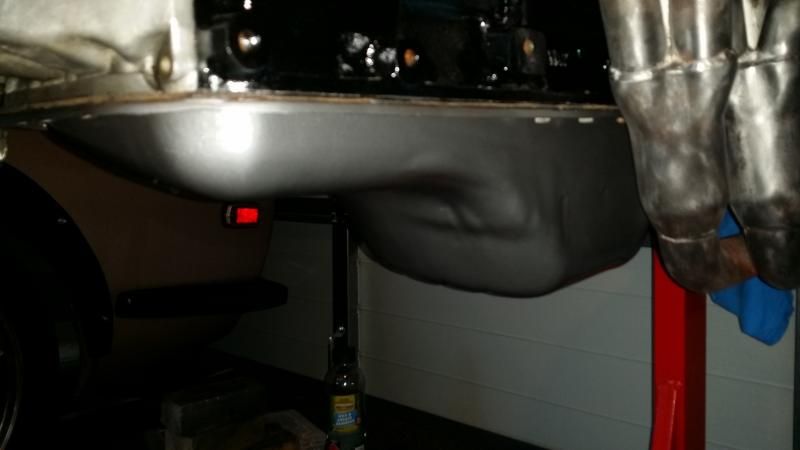
Attempted to make the engine look a bit tidier.Sent a few bits out to be re-plated, still waiting a some stuff to come back.Painted block and a few other bitsRemoved sump, stripped and painted then threw back onWith motor looking a bit better time for it to get back in the carReplaced some small stuff like leaky oil pressure sender and exhaust studs as old ones were shot. Still waiting on a few parts to reassemble the carbs.Mounted fan on radiator. Still need to get piping to plumb it in.Trial fit the rangi strut brace I hacked together and it looks to clear everything okStart on wiring this week.
-
10
-
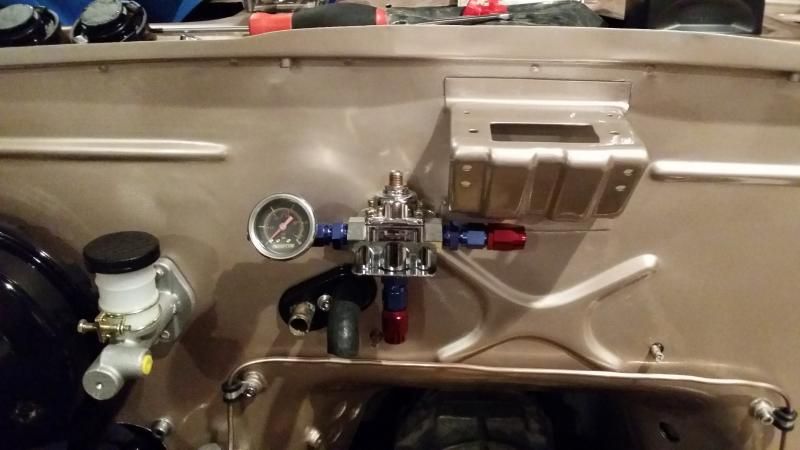
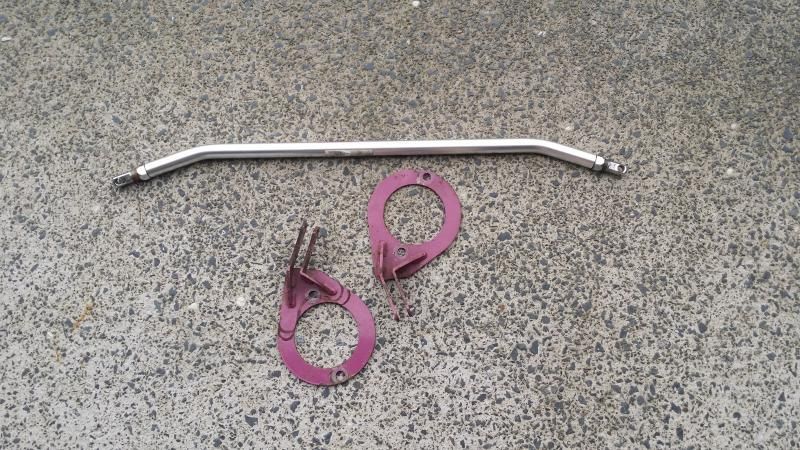
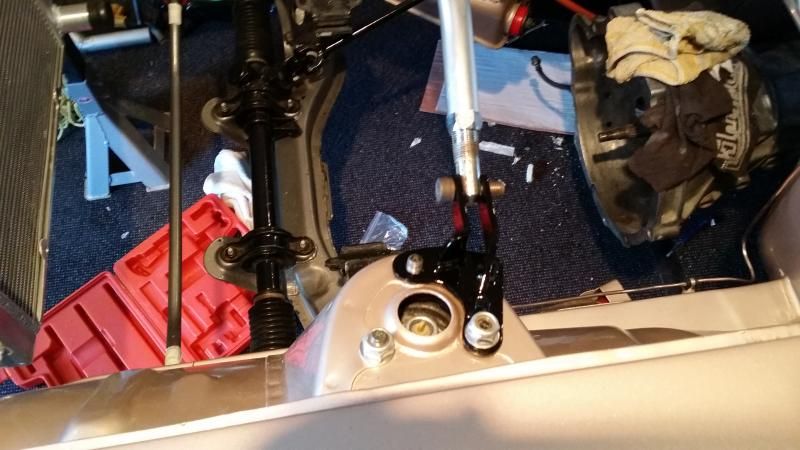
Few small bits done. Brake lines finished off and bled. Couple of leaks due to my poor flare technique but got them sorted so hopefully done for good.Fuel regulator mounted up and new hose made. I am moving to a carter electric pump from the old mechanical unit.I wanted a strut brace for both the front and rear towers. Yea I know they probably do nothing but I figure anything must help the old S30 chassis...Rather than buy one from overseas I thought I would have a crack at making one.Scored a crusty old R33 one from the Tarde for next to nothing. Purple for extra awesomeness.Proceeded to hack it to bits, weld some stuff and drill some holes. Then paint black to hide the horror.And now I have something that resembles a brace.I have one for the rear towers too that I have started working on. But I need to focus on actually getting the engine back in the car rather than this stupid stuff.My motivation, some guy has been driving this thing....
-
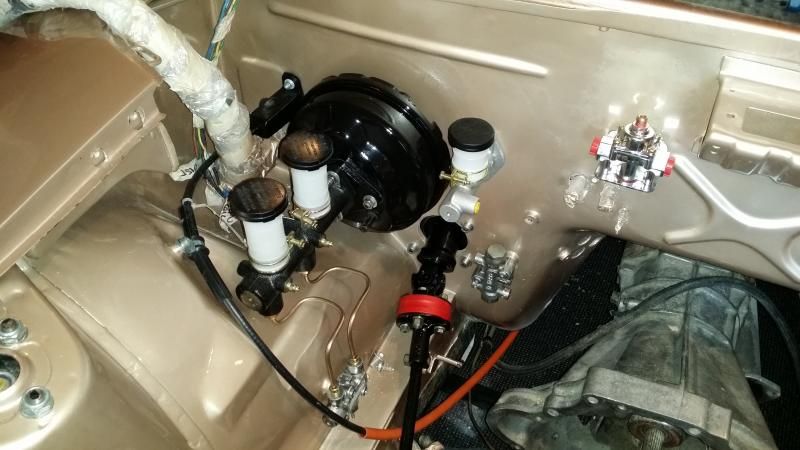
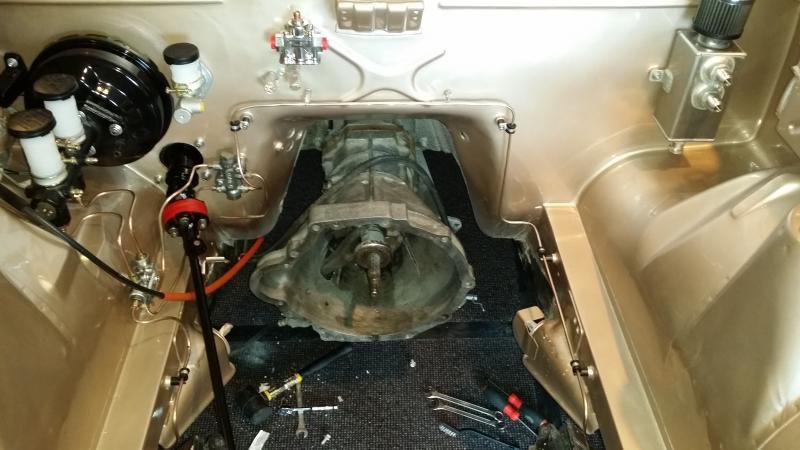
Got the brake booster, MC and steering rack back in.Brake lines installedCleaning up engine now.
-
3
-
-
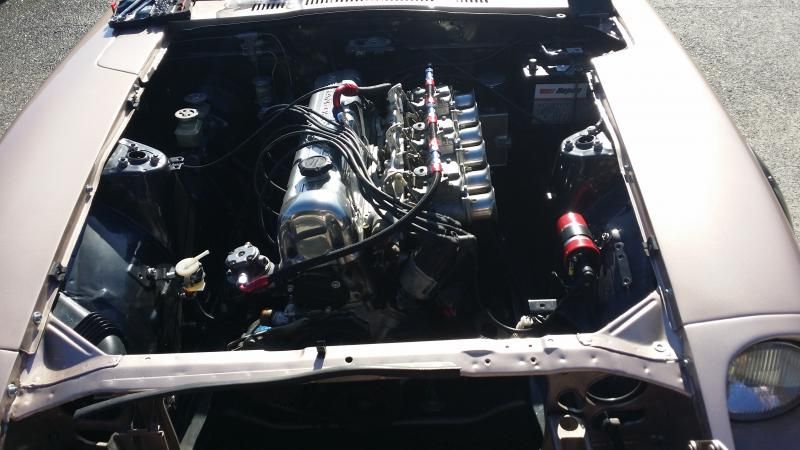
Finally got the colour on it. Came out ok for a rangi garage job. Looks better than it did so I'll take it.
Managed to get the correct colour code which made matching the colour easy. Installed a few parts back on again.
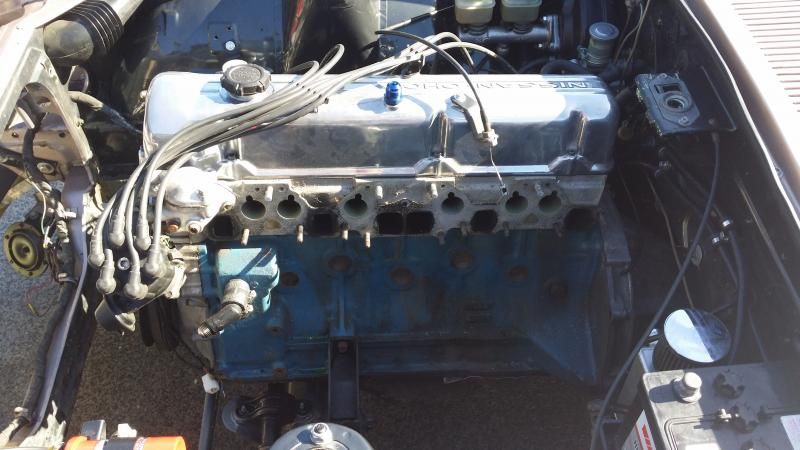
Started stripping down motor to tidy a few things up.
Polished a few old alloy bits
Starting on new brake lines this week.
-
4
-
-
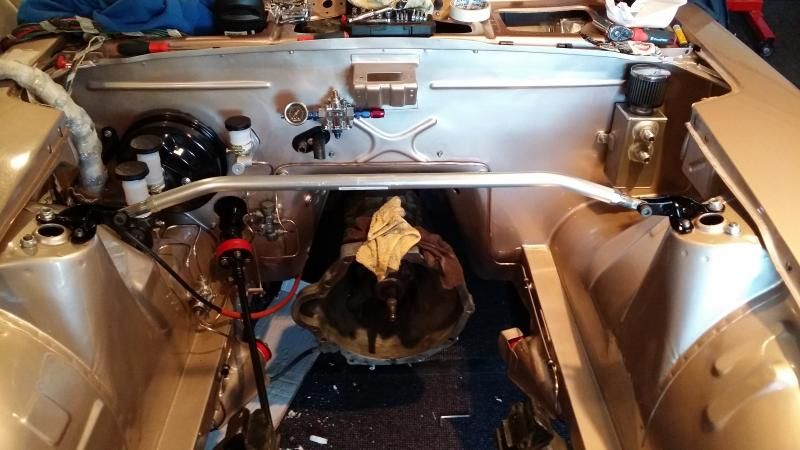
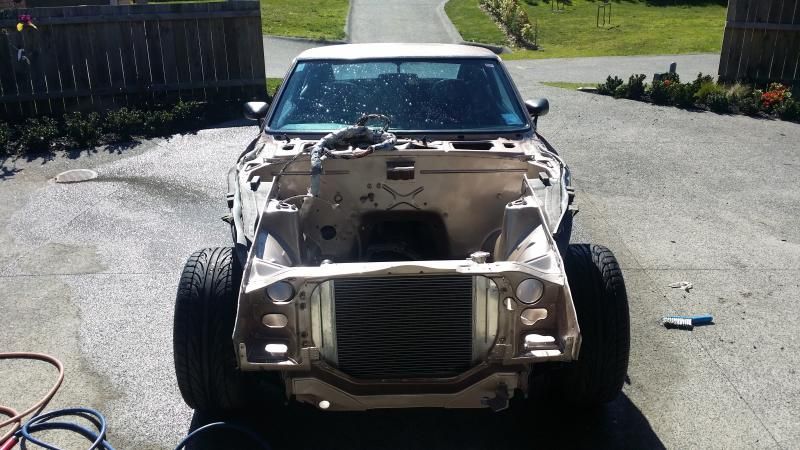
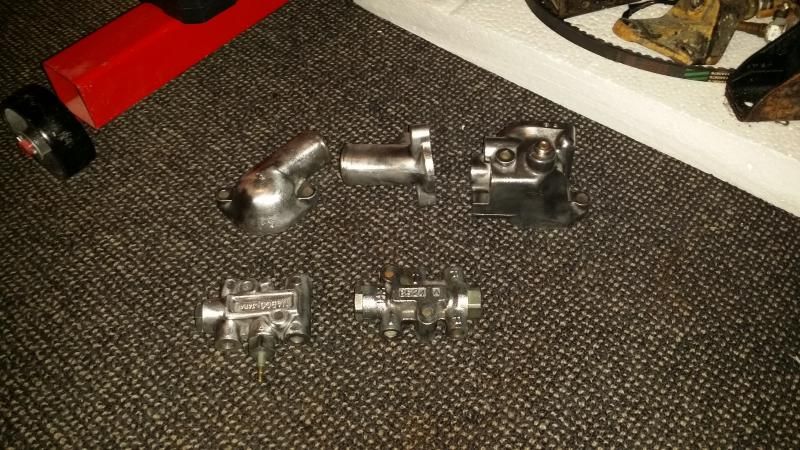
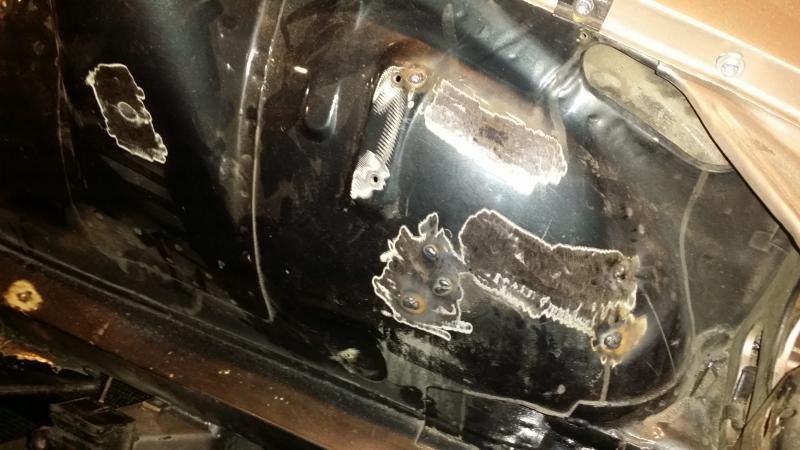
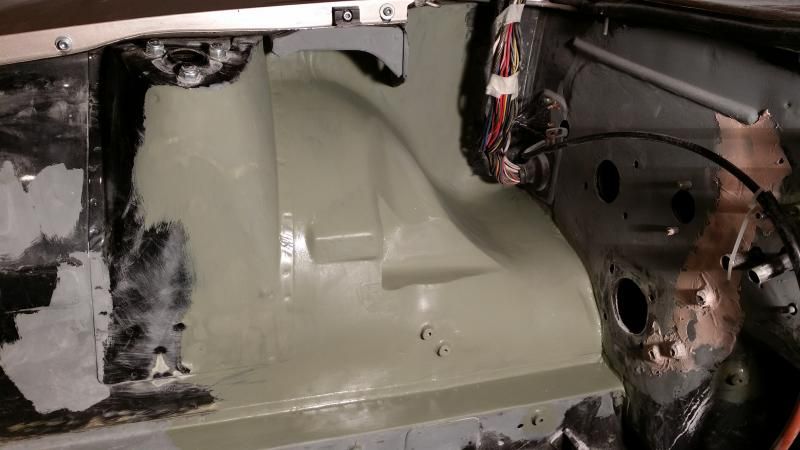
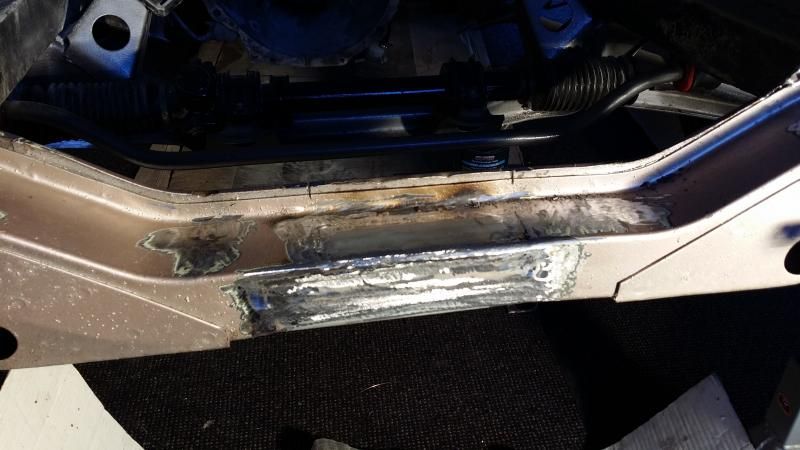
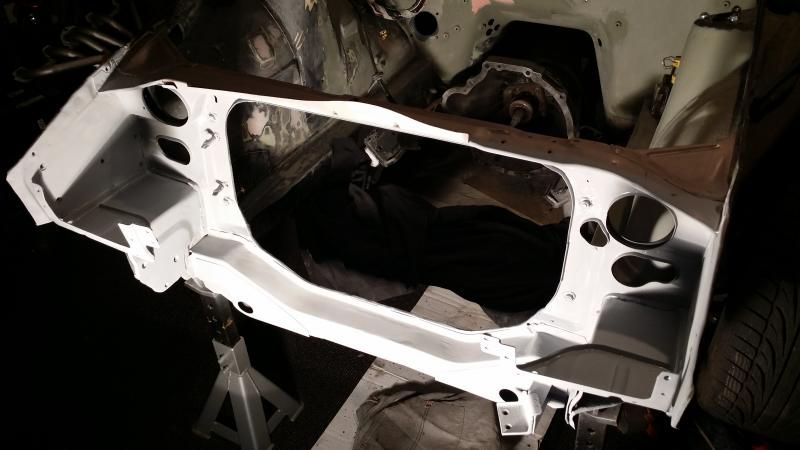
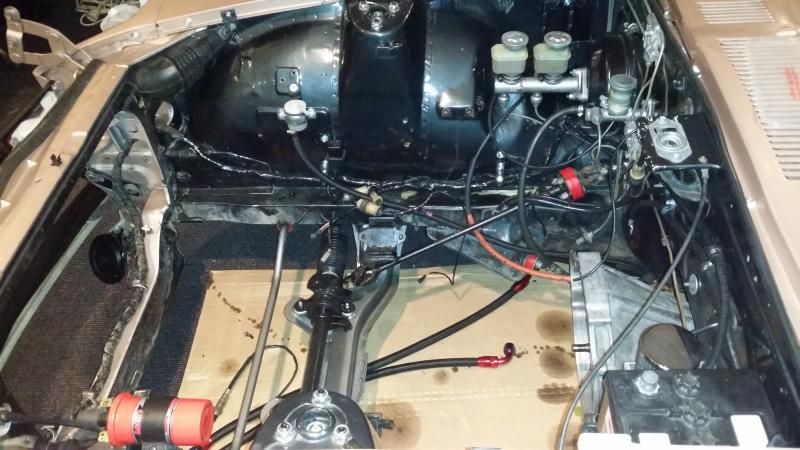
So what was meant to be a quick engine bay clean and repaint has somehow got a bit out of hand. I decided it would be a good idea for some stupid reason to weld up all the holes in the firewall and smooth it out as best I could which has taken longer than I expected due to the fact my car has had a LHD to RHD conversion.
This was the state of the firewall after engine was removed. Note the brake lines all over the place due to the conversion. I am guessing when they did the conversion they just relocated everything to wherever they could make it fit easily. Also patched up the old AC pipe holes etc.
Started by cutting off all the old unused brackets and welding up the hundreds of holes that have been drilled into it over the years.
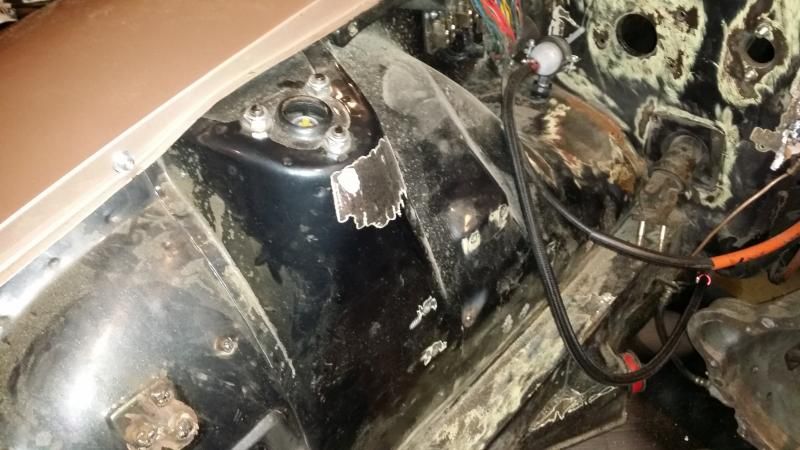
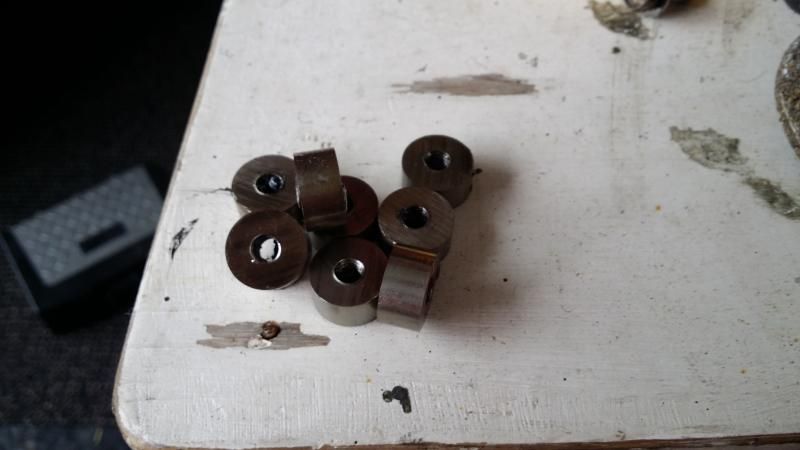
Made up some of these little guys to weld to the firewall for mounting stuff too rather than holes through the firewall to try and keep fumes out. Just a steel rod drilled and tapped and cut into 10mm sections.
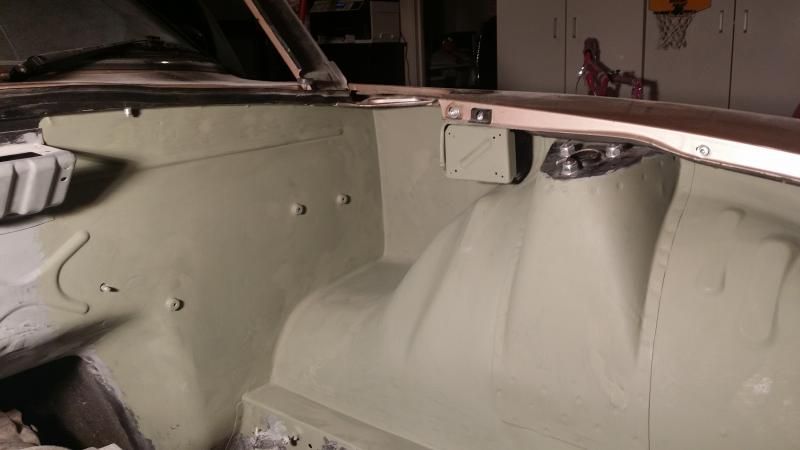
One half of the firewall semi tidy and in primer
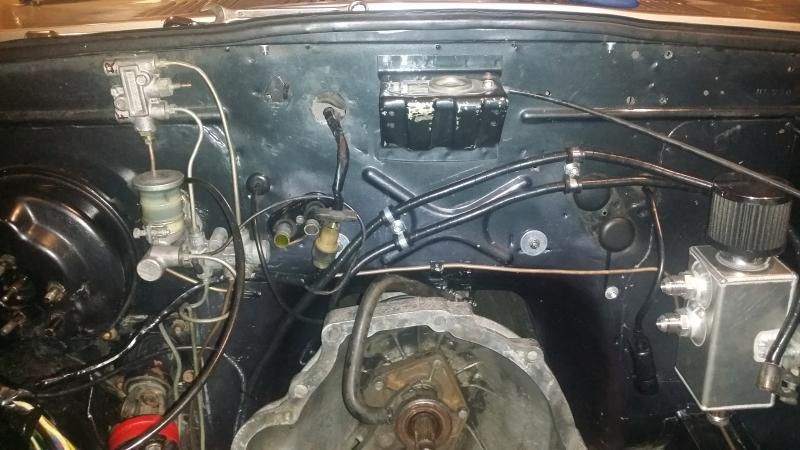
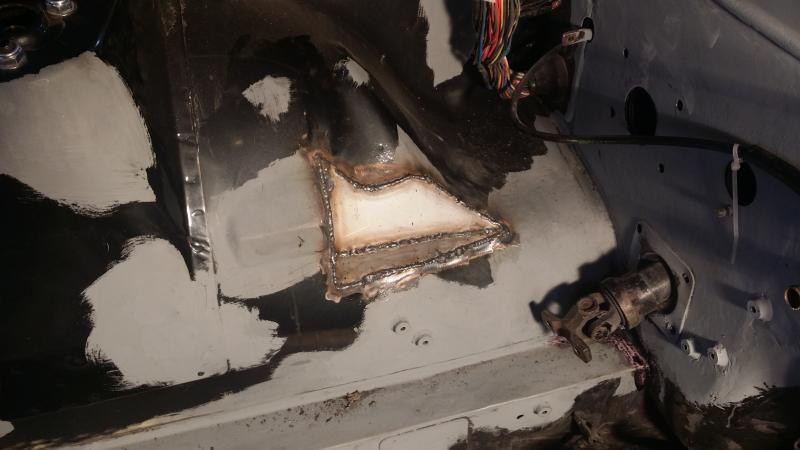
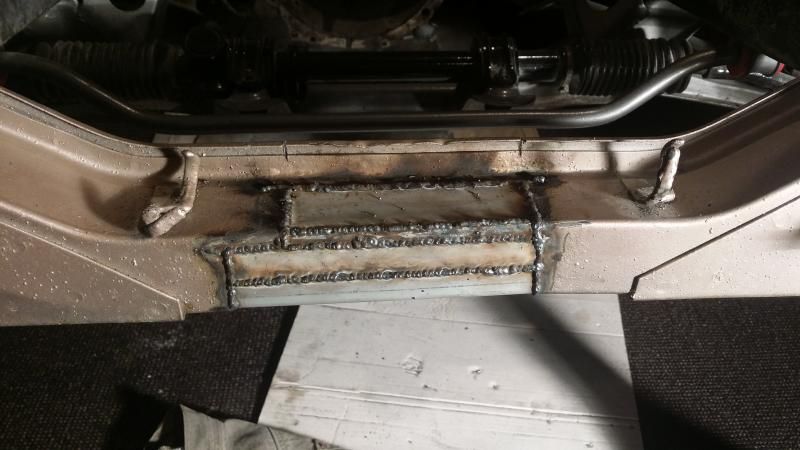
Another issue I had was that the brake master cylinder was hard up against the inner guard previously. This is another result of the RHD conversion. This caused an issue of the brake lines having virtually no clearance coming out of the master cylinder so my fix was to cut a big hole and weld some stuff
.
Came out okish and now I have plenty of clearance for everything
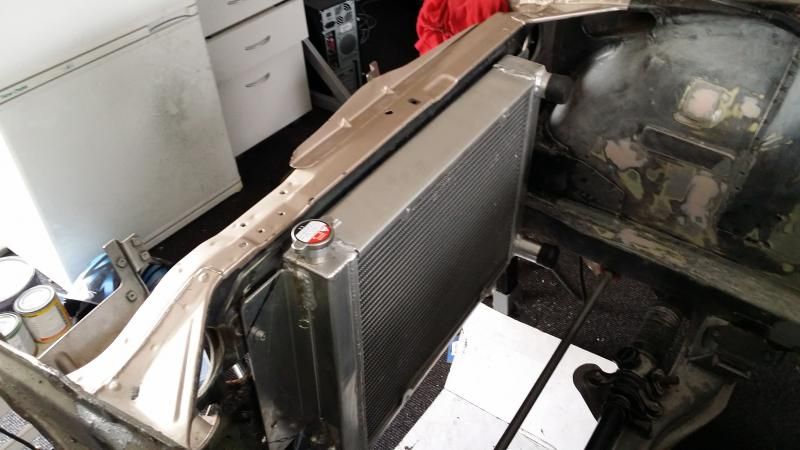
The old radiator that was in it was stuffed, copper core was falling to bits and it was leaking from the top tank so throwing in an alloy guy. Quick test fit looks ok.
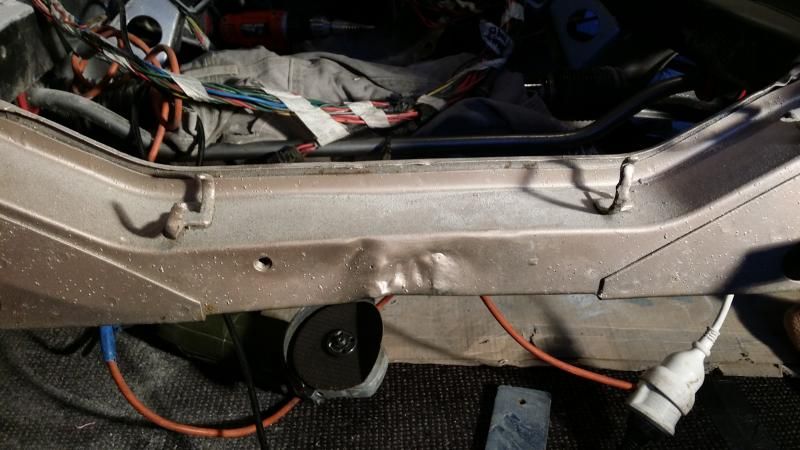
Next thing I decided to tidy as it annoyed the crap out of me was the front radiator support. It was bent and beaten up and looked rough as.
Cut out all the damaged metal and patched. There was no rust in behind which was a bonus. Treated inside as best as I could before welding shut.
Quick grind and its done, not flash but looking better than it did at least. Removed the stupid wire holder bendy things at the same time.
A million hours on the wire wheel and sanding and it finally has a first coat of etch primer down.
Long way to go yet....
-
5
-
-
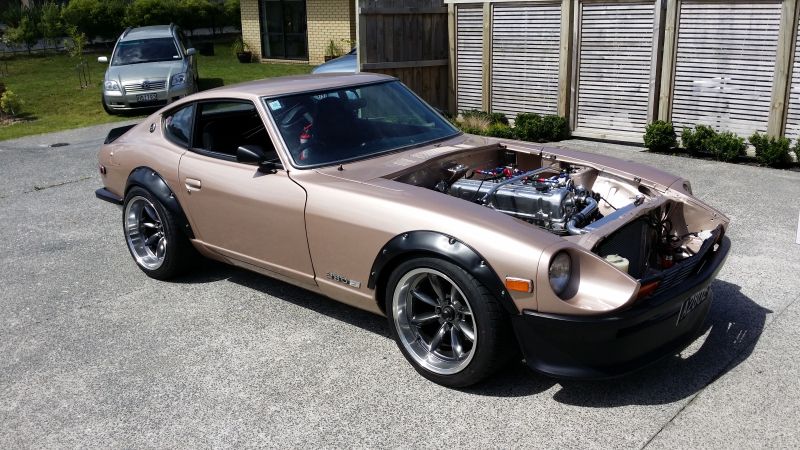
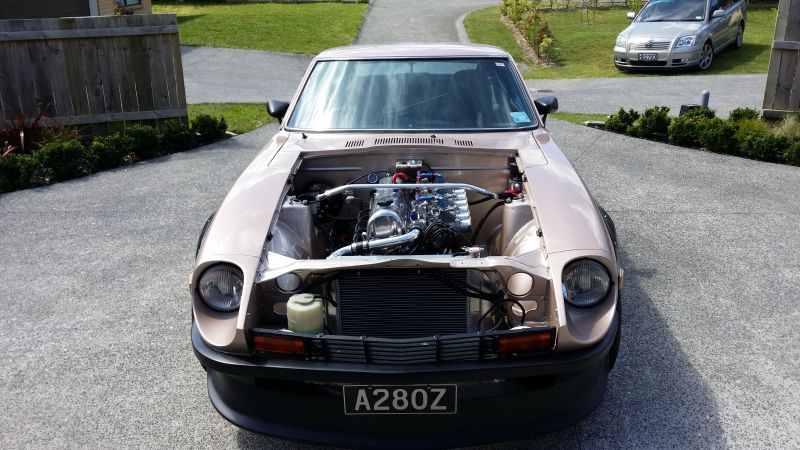
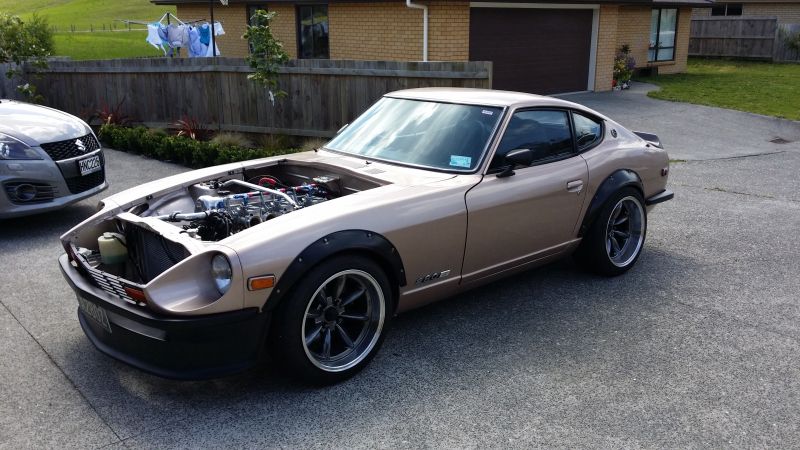
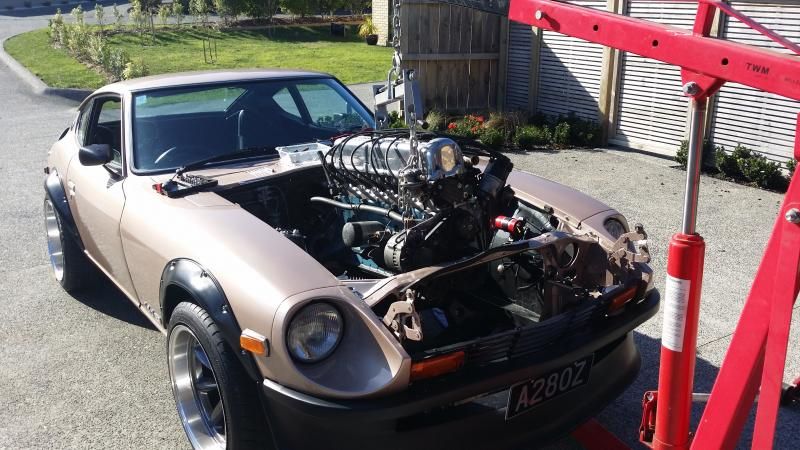
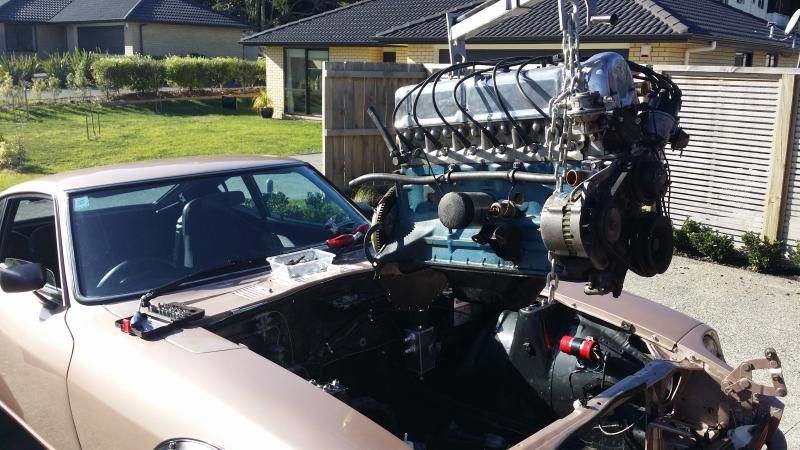
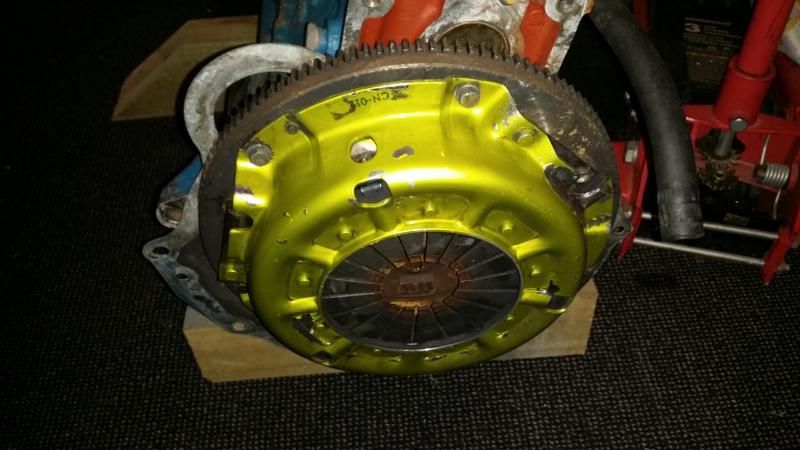
Went and got new warrant for the car, flew through which was sweet. Weather was mint, should have gone for a drive but instead went home and did this...Plan is to rewire, re do all brake lines and respray engine bay to match body colour. Also new radiator to go in and tidy the L up a bit. Plan is to turn it around in a month all going well.As it sits now ready to start hacking the loom...Also found it has some kind of semi cool clutch in it. No brand name on it so not to sure what it is
-
- Popular Post
- Popular Post
Some cool shots Pedey took of the cars at Whenuapai Airbase
-
13
-
I needed to sort out the rear suspension on the car. At the track day and on hard cornering I was getting lots of guard rub due to the rear springs bring way to soft. They came with the car and so have no idea what brand they are. The car was pretty much riding on the bump stops the whole time. One thing I didn't want to do is raise the car up though.Decided to go with the moog springs guys in the states have had some success with and Craig is running in the front of his 260. They are meant for a 1980 Chevette V8 or something so spring rate is pretty firm. They are really cheap too compared to "lowered spring kits" but shipping blows as always.After waiting forever they finally arrived, ordered two sets so will do the fronts when RB is in.Obviously the springs are way to long stock so they have to be cut sown to suit. Before chopping I sectioned the rear shocks, removing 45mm so the shorter springs will be still be captive.Now time to cut them up. Install, measure, cut, remove, repeat over multiple times. The aftermath...Compared to the old unknown springs. Hard to tell in pic but black springs much are much thicker.I installed new poly bump stops, trimming them down from 45mm to 30mm. Threw everything in and boom, I am no longer driving on bumps and ride height is acceptable. Would like it lower but need some travel sadly.I also managed to score the original rear sway bar for the car that the old owner had removed years ago which was a bonus. Cheers Bruce! I was missing the proper mounting plates for the SB so made up my own and welded on some additional mounting brackets. Installed new poly bushes and job done.Hopefully that is the rear suspension sorted for good. Have lost count of how many times Ive pulled it all apart
-
1
-
-
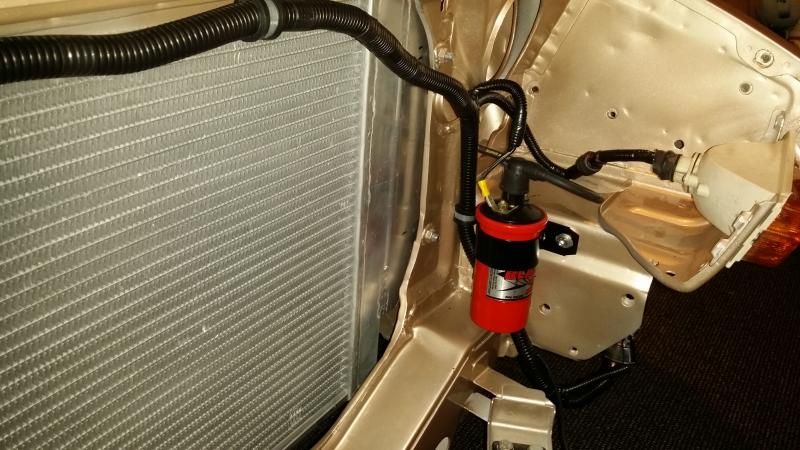
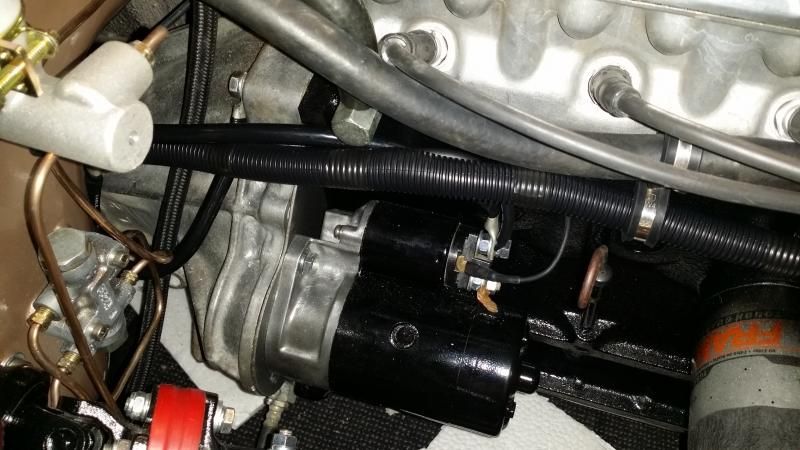
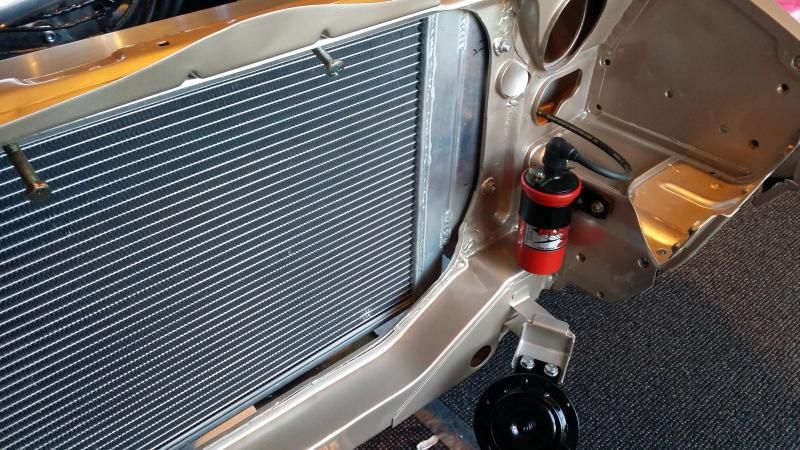
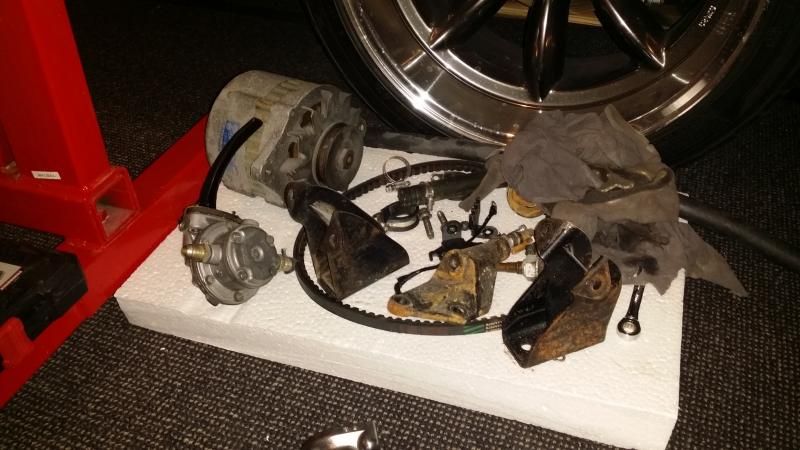
Started having some issues with the car not charging. Thought it was the alternator or voltage regulator but turned out to be this guy..Awesome fusable link had semi melted. Rather than stuff around with those crusty old things decided to scrap them for something a bit more modern and hopefully reliable so picked up this stuff. Matched the fuse ratings to the fusable link ratings and hope nothing catches on fire.These guys must goHacked the loom upRe routed the wiring, made up a backing plate and mounted the fuses under inspection panel. Painted the fuse covers black to try and hide them a little.Everything still seems to work and no fire so job done.Also decided to relocate the oil catch tank as when the RB goes in it wont be able to stay where it is. I originally put it here which I never really liked.Decided to move to other side of the engine bay and more out of the way. I still think turbo down pipe will foul on it but we will see.
-
1
-
-
- Popular Post
- Popular Post
-
24
-
-
So after waiting forever for replacement R31 brake rotors from OZ they finally arrived. Old ones off the donor car were past minimum thickness and had pretty bad score marks so didn't want to waste time with them.
Rebuilt callipers with new seal kits, tidied up and threw in some new pads.
Then throw everything back on the car and bleed the system. All looks ok so far with no leaks etc.
Just modified handbrake bracket to go back in then the brake mission is finally sorted. Not sad to see the end of rear drum brakes.... -
Finished off front brake upgrade, new R33 GTST rotors and SP500 pads
Started on rear brake conversion also. Am using R31 rear callipers. First job was to pull the suspension arms and tidy them up, more of the horrid blue to get rid of.
After degrease, water blasting, wire wheel and sanding they looked a bit better. Don't want to do that job again any time soon. Didn't have the balls to attempt the spindle pin removal...
New poly bushes thrown in
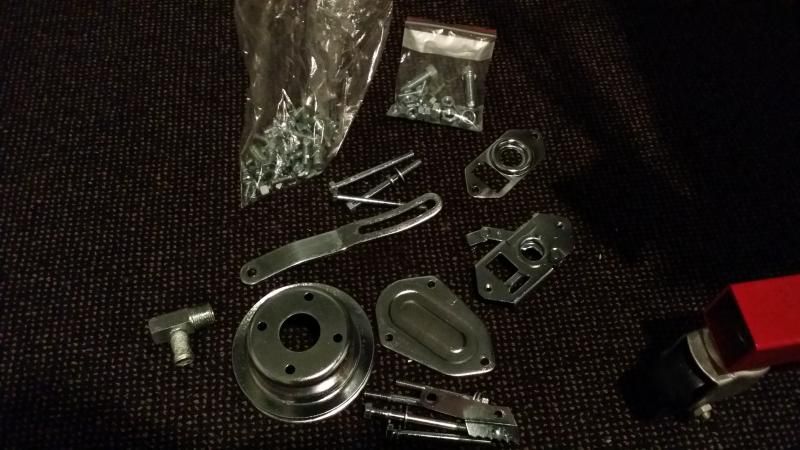
Made up some brackets to mount the handbrake cable to suit the new callipers. I am mounting them at 12 oclock as they are stock on the R31.
Handbrake cable and calliper bracket mounted up.
Now waiting on calliper rebuild kit and new rotors and pads to arrive from OZ. Hopefully finish it all off this weekend. -
So after taking the cars to Taupo for a track day and doing a bit of this
It confirmed what I already knew, my brakes are mud. The rotors were stuffed and the pads were an unknown quantity and pretty much turned to dust. So decided to have a crack at upgrading them. Probably should have gone the tried
and tested route of the Toyota upgrade but I wanted to try and fit Nissan callipers/rotors due to the massive choice in pad and rotor selection available aftermarket. I scored a really tidy set of callipers and 280mm R32 rotors
and got stuck in.
The biggest issue was to make up an adapter bracket to fit the Nissan 4 Pot to my 280 strut. These brackets can be sourced ex Japan but it is not entirely clear what rotor they require (possibly Honda Odyssey?)
Shout out to Mikey who had already started down this road and had drawn up a basic profile for the bracket. I took his design, tweaked it a fraction, had it CADed up and rapid prototyped at work so I had something to start with.
I used this as the basis for my measuring to make sure everything fitted ok and offsets were correct.
In order to make a Nissan rotor work a few things need to be done. I plan to run with R33 GTS25T 296mm rotors so bracket is designed to fit them but I used the R32 rotors for testing fitment etc (both are identical offset and thickness)
First rotor needs to have the centre bore opened up to suit the 260/280 hub and re -drilled to suit. I am lucky that my work has a very advanced engineering facility with NC Mills and 5 Axis CNC gear and the boys down there hooked me up.
Next step is hub needs to be milled down fractionally to set correct rotor offset and clearance
When happy that everything was fitting right with the prototype brackets I had the boys CNC me two new brackets which came out super sweet!
I gave the Nissan callipers a bit of a tidy up also
Then bolted everything together and it looked pretty good. The Nissan callipers came with hard lines (from an S14) which I was able to use with a few tweaks to fit up to the stock 280 strut brake hose connection point. The old stock
280 ones would never have worked.
And this is how it came out. I still have to install the R33 rotors but you get the idea. From a cost perspective it has worked out pretty good because I have access to all the gear at work. I think you would definitely
be better off buying a known brand kit or going the Toyota route if you had to pay for all the machining and fabrication.
I still have to install the 15/16 Master Cylinder (Shot to Mike and Ben for helping me out there) which I stripped down and cleaned.
-
1
-
-
So with track day coming up next weekend had to get a few things sorted on both cars. The 260 getting new rear shocks and springs. Mine getting new Konis in the front to replace the Koni Reds to give me a bit more travel as I didn't have any.
Went with the Koni Sport 8641-1115s after seeing some of the guys on this forum having success with them.
Everyone has seen the process 1000 times.. cut strut tubes top off
Cut out section of unwanted tube
Weld strut top back on
Grind down welds and paint
One of the boys at work machined out the original gland nut to take the new Koni and made me a spacer for the shaft. Also had the strut top isolator drilled out and tapped so shock screws into it as the new Koni is not keyed like the old one.
Reassemble and job done. Have gained around 45mm of travel so worked out pretty sweet.
Threw new oil in diff also, Redline 75W90.
So ready for something to explode at the track day.... -
So decided I need some sort of stereo in the car as driving on a long trip gets pretty boring.
Installed a super budget JVC USB/AUX only head unit
Needed to make something to fill up the nasty holes a previous owner had hacked in to the rear plastic back in the day. They had wood screwed in some sweet old pioneer 5 1/4 speakers.
Made up some really basic speaker pods to cover the mess and hold some basic Fusion 6X9s. Painted satin black to try and match plastics. Random shape is to try and match plastic panel where possible and cover all the hole.
Lined the back of the panel with foam to try and make it sound a bit less crappy. Mounted it all up and now I have some very basic sound.
-
After driving a little over the holiday break I had an issue that needed sorting.
I hadn't done anything with the block breather pipe so oil mist and splatter was ending up on extractors and fired around engine bay.
So made up one of these
And fitted to some hose and braided line
Connected to block like this
And to catch tank
Problem solved-
1
-


Datsun280z's 280 of slowness
in Project Discussion
Posted
Na man, this is the only z I have had