advokit Posted February 6, 2014 Share Posted February 6, 2014 I thought it was about time I started a build thread for what has become a far larger project than what I had initially thought when I purchased it. So far its 2 years in the build so I will update as much as I can to catch up to present day. In the meantime Ill get the ball rolling. Back in January 2012 I found this 1983 Toyota AE85 Trueno on trademe, it wasnt exactly what I wanted as I had originally planned to start with a KE70 Sedan however it was listed for $800 so I thought it would be rude not to have a look.Discuss Here : //oldschool.co.nz/index.php?/topic/42303-advokits-ae85-trueno-notch-jap-style-build/Turns out the rear end was pretty rusty and it had been sitting in a back yard for several years. It was also de-reged, but it was in original unmolested condition. Nothing that couldn't be sorted with time and money I guess. So I parted with the grand total of $700 and we returned a few days later to tow it home.So I slowly started cleaning all the moss, dirt and flaking rust off to get a better picture of what I was dealing with. Turns out that with a polish the paint was in pretty good nick for its age, it makes me wonder if it spent some time under cover during its life.The original plan was to get the factory 3AU running, replace bushes, bearings, rebuild brakes and essentially get it up to compliance standard so it could be road legal again. From there I was planning to strip it back and do the full build. Well after talking to compliance guys and certifier guy it was decided that I would be spending a hell of a lot of money and time twice. So I decided to take my time and do the whole thing right the first time.I had spent some time mucking around trying to get the 3AU running and actually drove it down the road and back but it had a major death rattle and was smoking like an 80s Mitsubishi. It was time to go hunting for a 4AGE! 1 Quote Link to comment Share on other sites More sharing options...
advokit Posted February 6, 2014 Author Share Posted February 6, 2014 I found a panel beater who was willing to do the rust work for a good deal, so I started stripping the car so that it was ready for the panel work. The engine was removed as there was some rust in the engine bay, I also removed the tail lights and drilled out the spot welds to remove the rear tail light panel. 1 Quote Link to comment Share on other sites More sharing options...
advokit Posted February 6, 2014 Author Share Posted February 6, 2014 After a couple of weeks it was done. The guy who did the panel beating used zero bog and spent a fair bit of time folding up pieces to make it all look right. He did an awesome job for the price! I also replaced the boot lid with one I found online as the original one needed rust repairs and it was cheaper just to buy a whole boot lid. I also at the time purchased a set of 14x6.5" SSR HART Fins. 3 Quote Link to comment Share on other sites More sharing options...
advokit Posted February 6, 2014 Author Share Posted February 6, 2014 After getting it back from the Panel beaters the real work could begin. I primed and painted the back panel just to get it all back to white, I didnt bog anything so currently its pretty rough but I figure once its certed and road legal I can then save up and spend the time and money on getting the exterior looking mint again. At this stage panel and paint is not high on the list of priorities. Now the worst thing about AE85s is that they were carburettor so going to EFI would require either an AE86 fuel tank or a surge tank type setup. In trying to keep certain elements of the car factory looking I wasnt that keen on a surge tank etc hanging around in the boot so I kept an eye out for an AE86 fuel tank. My god.. Takumi tax sux.. an AE86 EFI tank could fetch as high as $300! screw that. So I ended up buying a TE71 tank from Ryan in Auckland which I was told would bolt straight in. Not quite.... The tank was the same shape but due to the different shape rear end between E7* chassis and AE86 the filler pipe just wouldnt work. After some measuring and cutting a solution was sorted by cutting down the original AE85 filler and modifying the breather for the TE71 tank into the side of it. The great thing about the TE71 tank is that it has the larger EFI pickup and surge bowl setup in the bottom of the tank. So add an external pump and its good to go. New Tank cleaned up and painted. Quite a big difference in the fillers. Mocked up to see how it would work. Finished product. Im not by any means a fabricator or engineer so I didn't think it was a bad effort. Also cleaned and painted the tank straps for that tidy factory look. 2 Quote Link to comment Share on other sites More sharing options...
advokit Posted February 6, 2014 Author Share Posted February 6, 2014 In April 2013 myself and a few of the lads went to Japan for a boys trip. Among seeing D1GP a JCCA Race meet and a Team Burst Drift day at Meihan we saw many tuner shops. The main one I wanted to see was Motorfix in Gifu. If you dont know who Motorfix are you probably aren't that into old Corollas...... This is us with Nozomu Sakai's famous 20v Black top powered Wagon. I also picked up a Classic Nardi which in my opinion is the only steering wheel worth putting in an AE86. After the trip to Japan my vision had changed slightly, I had a better idea of what I wanted to do with the AE85 and it also pushed me to spend more time downstairs working on it! 7 Quote Link to comment Share on other sites More sharing options...
advokit Posted February 6, 2014 Author Share Posted February 6, 2014 Luckily one of the guys I went to Japan with was Shane from Racelign. After many conversation were had in Japan we devised a plan for the suspension side of the car. Suspension is one area where I didn't want to scrimp so I went with Shane's recommendations. When we got back I got Shane to build me some front Coilovers from some MX73 Cressida front struts. The Cressida struts have much bigger vented brakes than even the AE86 has, plus they are easier and cheaper to buy than AE86 stuff so that was a bonus. Shane threw in some Bilstein inserts and Tein 6kg front springs with adjustable platforms. I then grabbed some steering knuckles and Camber tops from, T3 in the USA. Some rear Bilsteins were sourced as well and were re-valved to the 4-4.5Kg rear spring rate I intend to run. New height is pretty sweet. Unfortunately I had to sell the SSR Harts to free up cash for the Suspension. Its ok though as I had already ordered some Starsharks from Japan. 1 Quote Link to comment Share on other sites More sharing options...
advokit Posted February 6, 2014 Author Share Posted February 6, 2014 The SSR Starsharks finally arrived from Japan. They turned out to be wider than advertised... Bonus! 14x6.5 Front and 14x7.5 Rear. I was going to get new lips made anyway so now I can run 7.5 on the front which is perfect, I can then widen the 6.5 out to 8 Inch which should be just right. I also threw in an AE86 Dash cluster so that I have a check engine light and an oil pressure gauge. I forgot to add that before going to Japan I had purchased a Blacktop 4AGE and T Series Disc rear end from one of the other guys I went to Japan with. So after much deliberation I decided that a T50 was going to not only be an expensive option but possibly be a serious weak point in the build. So I harassed Brendon from Nightparts and bought one of the Prototype adapters to run a J160 6 Speed Altezza gearbox behind a 4AGE. I saw guys in Japan using them and they seemed pretty sweet as far as both ratios and strength of gearbox. Better still the J160s can be picked up for as little as $500 and being a much newer box than the T50 its unlikely I would have to spend hundreds of dollars re-building it. I also found a J160 at a local wreckers for $500 so that was a done deal. All that needs to be done is the front of the Bellhousing needs to be machined down by about 14mm so that everything fits. You can also run an Altezza 3SGE starter motor which is a much stronger/cheaper option than a 4AGE planetary starter. 4 Quote Link to comment Share on other sites More sharing options...
advokit Posted February 6, 2014 Author Share Posted February 6, 2014 Picked up a Cusco strut brace which looks awesome. I also received my Hydraulic clutch pedal from Motorfix in Japan. So I grabbed a clutch master and made the necessary holes in the firewall to make it all fit. Lastly I grabbed a KE70 Booster (much smaller) to allow longer intake trumpets to be run. Ideally I would like to run 100mm intake trumpets if they will fit. Also a AE111 Brake master went in to boost up the braking power, Motorfix recommended this upgrade as he runs the same setup in his V8 Ke70. He also recently sent me over a rear brake bias valve to suit the disc rear end. So this pretty much puts us to present day. There are many small things Ive missed as I havent documented the entire build over the last couple of years. Have just sourced some BC rear spring platforms to get some rear height adjustment, just need to buy the matching 4.5KG BC rear springs to make it work. 3 Quote Link to comment Share on other sites More sharing options...
advokit Posted February 7, 2014 Author Share Posted February 7, 2014 More progress - the BC rear coilover platforms arrived. The threads near the top are a bit dodgy but I will never be winding them that high anyway. I may look at machining them shorter and welding a piece inside so that can bolt to the factory bumpstop mounts like others I have seen. A while back I picked up a rear toe adjuster from an AE101 at the local pick a part. I gave this and a factory panhard rod to my buddy Kelvin. Some cutting and tig work and its done. Interesting paint job Kelvin - if I wasnt trying to go for that semi factory look I would almost keep it that way. Chances are though it will get some factory subframe black like everything else under the car has got or is getting. I also spent some time fitting the rear brake bias valve I got from Japan and bending brake lines to suit. Looks pretty good I think? The green tape is the end I need to get re-flared. Forgot to add I spent most of the summer holidays removing the Aircon/heater core as the heater core I had cracked pipes. It was easier than I thought but you have to take your time and remember where it all goes. So next on the list is add keeper springs to the front coilovers, replace the front wheel bearings, rebuild front calipers and add RCAs. I would ideally like to do this in one go so I need to order some RCAs stat - unless someone has some 30mm Cressida RCAs floating about for cheap? 3 Quote Link to comment Share on other sites More sharing options...
advokit Posted February 20, 2014 Author Share Posted February 20, 2014 So not a hugely exciting update but an update all the same. Today my 3SGE starter arrived, I now need to take it along with the J160 bellhousing to a machinist to get some bits machined down so it will all fit. The new 1.4KW starter. What I need it to look like once machined down. Hopefully this should turn over a Blacktop 20v nicely! 1 Quote Link to comment Share on other sites More sharing options...
advokit Posted March 12, 2014 Author Share Posted March 12, 2014 So I had to go over to Tauranga today for a work meeting. I have been meaning to get over to the Tauranga pick a part for ages so I threw some tools in the car and after my meeting dropped in to see what treasures I could find. Well I hit the jackpot this time. 4 x 2NZ Coil on Plugs and an AE92 external Thermostat setup - two of the major things I need to get the 20v conversion done. What made it even better is the whole lot was $48!! Its also looking highly likely I will have my Engine and T series Diff housing within the next couple of weeks. Progress! 4 Quote Link to comment Share on other sites More sharing options...
advokit Posted March 16, 2014 Author Share Posted March 16, 2014 Made the trip up to Auckland today to visit Zebra U Pick. Found a few more goodies! MX83 Front Calipers, which bolted straight up to my MX73 Struts (My MX73 Calipers have pitted bores. MA45 Driveshaft which has W series front yoke and T series rear (part of it may be useful). Also grabbed an external fuel pump from another GX series cressida. MX83 Calipers bolted up to my MX73 Struts. They are pretty much the same but have a larger pad area and a slightly larger piston. They are really tidy and at this stage I dont think I will rebuild them. GX Fuel pump with mounting bracket etc. Should be able to make this fit and look factory-ish. MA45 Driveshaft laying next to the Altezza front half I already had. T3 RCAs are on order along with the full Prothane Bush Kit. Have already ordered new Balljoints from Racelign so when it all arrives I will send the LCAs up to racelign for them to fit new bushes and balljoints. I want to get this front suspension finished so I can move onto finishing the rear end. 1 Quote Link to comment Share on other sites More sharing options...
advokit Posted March 24, 2014 Author Share Posted March 24, 2014 Picture-less update today. On the weekend I picked up 2 x aftermarket seat brackets, another Dash (in better condition than mine), a full 2.25" exhaust and a boat load of interior stuff. Soooooo I just caved and ordered a Bride Brix recliner from Japan - now I have to wait a couple months for it to get here. Have also ordered brand new front rotors and brake lines. With some luck my RCAs should be due any day too. 2 Quote Link to comment Share on other sites More sharing options...
advokit Posted March 30, 2014 Author Share Posted March 30, 2014 So I picked up my diff housing yesterday. Still have to go back through the storage container and find the diff head nugget, I have a 4.3 ratio single spinner stashed in there somewhere. Brand new Kouki (Big Spline)axles - Was almost cheaper to buy new than pay 86 tax...... So I am currently mocking up brakes, axles etc and figuring out what I need to order. At this stage I have everything except Bearings, new filler and drain plugs, new seals and caliper kit. I already have an OEM 1.5 or 1 Way LSD which will do fine for now. Just realised there werent any recent interior pictures - So here is one showing off the Nardi. 2 Quote Link to comment Share on other sites More sharing options...
advokit Posted April 1, 2014 Author Share Posted April 1, 2014 I got bored tonight and made this out of some ali I had laying about.Should do the trick. Still need to tidy it up a little bit. Brand new rotors arrived today too, ill save the photos till they are installed. 3 Quote Link to comment Share on other sites More sharing options...
advokit Posted April 4, 2014 Author Share Posted April 4, 2014 Finally my Prothane bush kit has arrived so tonight I started pulling out the front suspension. My RCAs apparently didnt get sent so have to wait another 2 weeks........ Anyway tonight I did this: Finally fitted the keeper springs My shocks are so pornographic it hurts. New bearings and front rotors. Will pull LCAs out and hopefully send off on Monday to get the Bushes pressed out/in and get the Balljoints replaced. Much to do this weekend! 2 Quote Link to comment Share on other sites More sharing options...
advokit Posted April 11, 2014 Author Share Posted April 11, 2014 Last weekend there was much work done in the front end. Got the LCAs out and sent away for bushes and ball joints. Pulled front swaybar and tension rods out so I could paint and replace bushes in these also. Now the crossmember looks a bit shabby also, I found some newly plated bolts on Trademe so grabbed them yesterday. Sooo looks like im now pulling that out to clean, paint tidy. Tension Rods Painted While the LCAs were away I started thinking maybe I should be strengthening them as most Jap guys that race/drift AE86s seem to buy Silk Road type modded LCAs. Long story short I sent a photo to Shane and set it in motion. End result = Much Win! Nice and strong, new low profile Balljoints and new bushes fitted. Now I just need to get the crossmember sorted so I can put the puzzle back together. 5 Quote Link to comment Share on other sites More sharing options...
advokit Posted April 25, 2014 Author Share Posted April 25, 2014 Alright so I finally pulled out the Crossmember and cleaned/painted it. While it was out I also took the opportunity to replace the rack ands and tie rods as they were looking pretty tired and lets face it, Ive replaced everything else. Crossmember is now in place with newly plated bolts. LCAS painted up, new bushes. Just waiting on these Roll centre adjusters to arrive from MRP/T3, its taken almost 8 weeks now so hopefully they turn up soon. Will also need new brake lines, still trying to decide on OEM vs Braided type brake lines. Anyone got real life experience in the difference? Hopefully can pick up the 20v next weekend all going well! 2 Quote Link to comment Share on other sites More sharing options...
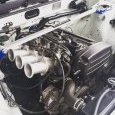
advokit Posted May 3, 2014 Author Share Posted May 3, 2014 Picture-less update. I could finally get access to the container that had my engine in it today!!! One was mine and one was a mates but its been so long we had to spend a bit of time working out which was which. Finally got it out and onto and engine stand for a clean up. I really wanted to get the 1NZ coils in place so I spent the afternoon filing and sanding them down so that they would fit the 20v spark plug tubes. Also spent some time pulling off unnecessary crap like dizzy cap, rear thermostat housing etc. Its currently sitting in my mates workshop but I think I may bring it home next weekend so I can test fit it in the car. Quote Link to comment Share on other sites More sharing options...
advokit Posted May 13, 2014 Author Share Posted May 13, 2014 RCAs finally arrived. So spent Friday night putting all the front suspension back in and finally got the car back down onto the ground. Finally rolled the car out for the afternoon and cleaned out the shed to prepare for the next stage. Just have to sell off a few spare bits now so I can afford to buy my rear bearing kit. So next on the list: - Buy Rear Bearings - Re-assemble Diff, Axles etc. - Make Hub spacers for MA45 Rotors - Get all Callipers Re-built - Fit Brakes - Fit Diff to Car After that I can start focussing on Driveline. Happy days. 5 Quote Link to comment Share on other sites More sharing options...

Recommended Posts
Join the conversation
You can post now and register later. If you have an account, sign in now to post with your account.