KLR250 Posted August 16, 2011 Author Share Posted August 16, 2011 Quote Link to comment Share on other sites More sharing options...
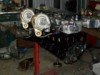
KLR250 Posted August 16, 2011 Author Share Posted August 16, 2011 No real updates, just posting pictures because i like pictures lol starting to bolt things in the engine bay and make bracketry for stuff, need to get all the lines routed before i continue prepping the bay, saves scratching the paint when im all done. decided to mount my power steer resouvour on the firewall. Hopefully this week i can buy all my mandrel bends so i can start on the dumps, the exhaust system will be mandrel bent twin 2.5", ill be running twins all the way with a small balance pipe. The front turbo will be the passenger side exhaust and wiill cross over between the bell housing and engine, theres plenty of room there. gotta get the C9 bolted in to, its just heavy, and i cbf atm lol heres a shot underneath, I have the motor sitting 15mm higher than stock, and 10mm forward, more dump pipe space and better tailshaft position when its slammed. The engine is level, but the sump is only hanging on by 2 bolts and drooping on one side random pics Quote Link to comment Share on other sites More sharing options...
KLR250 Posted August 16, 2011 Author Share Posted August 16, 2011 Picking the IRS up on the weekend hopefully, Im using a Jag XJ40 IRS The story, Initially i was going to run AU IRS, Until i realised how heavy it was I also discovered the wheel bearings can be a head**** to change, to the point where you can destroy the hub pressing them out, id also need to perform sugery on the spare tyre tub etc etc Plan B was a XJ6/12 Jag IRS, but i really disliked the fact they have inboard brakes, it would look a bit retarded with my open style rims, and I also wasnt keen on pad changes and brake bleeding under the car. The other issue with the older Jag units is it seems LSD's are not that common, lsd's were mainly behind XJS XJ12, maybe optioned on other models, not sure, but i couldnt find a LSD. and lastly, you need to run trailing arms with the older jag IRS, I didnt want to do that. So i looked at later jag rear ends, XJ40 X300 etc, they retain the jag design, using the half shafts as upper control arms (half shafts support the hub through wheel travel and control the camber curve) and are really simple, they dont require trailing arms and mount to the car in 4 locations anyways, Thats how i decided on the jag XJ40 rear end.... Quote Link to comment Share on other sites More sharing options...
KLR250 Posted August 16, 2011 Author Share Posted August 16, 2011 finished cleaning it up, everything looks to be in great nick, no slop or anything, no oil leaks, will tear it down to paint once its been mounted in the car and its all finilised. very well made bit of gear. will most likely replace the ouput shaft bearings and seals, hub bearings and seals and universal joints all the wires in the pic's are the ABS sensors and speedo sensor, all that shit will be going in the bin. tommorrow i hope to get it jacked up in the car for a look. very happy with the purchase, half shafts and uni's are massive, half shaft a forged solid units, should handle most of what i plan to throw at it. I reckon its going to look nuts painted and detailed Quote Link to comment Share on other sites More sharing options...
KLR250 Posted August 16, 2011 Author Share Posted August 16, 2011 what a b1tch of a job. good news is, it looks like its going to work. Got it jacked up and roughly in place heres some pics. Its a bit tight in the shed atm, so it hard to get many decent angles Good news is, its tight, but i have enough room for exhausts. also, the front mounts end up in an ideal spot, i can fabricate some bolt on brackets that utilise the falcons upper control arm holes through the rails. I can utilise the falcons lower control arm mounting points for a bracket to reinforce the mounts and make it double sheer like the jags had it set up. the rear mounts are easy, remove the watts link brackets, weld in a crossmember and required brackets. Im sure im going to have a few headaches, but so far so good. I was really hoping to be able to run the exhausts underneath, much like the new commodores, but i have suspcisions they may sit to low. the unit needs to come up another inch yet, but i cant until i remove some bracketry Quote Link to comment Share on other sites More sharing options...
KLR250 Posted August 16, 2011 Author Share Posted August 16, 2011 been building front mounts for the IRS, these will utilise the upper control arms holes in the chassis rails. Cut all the peices out, tacked it all together for both sides and decided i need to use thicker material, will jump up to 6mm.....4 hours down the tubes and back to the drawing board lol but this is the idea I could gusset them and box em, but i want them to look clean and simple, so ill make the second set on the long weekend. Hey, least its bolted in at the front now lol excuse the crap iphone pic Quote Link to comment Share on other sites More sharing options...
KLR250 Posted August 16, 2011 Author Share Posted August 16, 2011 4mm gusset down the middle to tie the four peices together cardboard version hole is just an access hole basically Quote Link to comment Share on other sites More sharing options...
KLR250 Posted August 16, 2011 Author Share Posted August 16, 2011 Been bugerising around a bit lately, not getting a whole lot done, but nearly finished the front mounts, just finishing welding them up the 4mm gusset up the middle has increased the strength enormously. Should look good when there painted crappy iphone pic Quote Link to comment Share on other sites More sharing options...
KLR250 Posted August 16, 2011 Author Share Posted August 16, 2011 Finished both front mounts tonight which is good Drivers side Passenger side Off to a machine shop to get some mounting spigots machined up and Ill weld them onto my brackets, then i can start on the rear mounts finally. Sorry about these shit quality pics, my camera is rooted and im using Donnas iphone Quote Link to comment Share on other sites More sharing options...
KLR250 Posted August 16, 2011 Author Share Posted August 16, 2011 well, after a few hours of drilling cutting, getting covered in grinding sparks I have the watts link crap removed, what a bastard of a job and heres whats left....good riddance to it put the IRS back in to check how the rear mounting struts will sit the drivers side rail opens up to the spare wheel tub, so it looks like ill need to shorten that rod 2". I think ill shorten both rods, as i want them to looks the same. Ill make the rods adjustable, this way i can adjust my pinion angle easily Out of interest, this pic shows just how well things line up. I used an old watts link rod to see how the lower spring mount on the jag IRS lines up with the spring tower In this pic you will see where ive marked out this peice in the middle, its close to touching the diff, so it needs a minor trim and a bit of sheet will be welded in and a few random pics for good measure Quote Link to comment Share on other sites More sharing options...
KLR250 Posted August 16, 2011 Author Share Posted August 16, 2011 wheel travel is awsome, theres no universal bind at all, and thats without springs, going to be awsome bagged Quote Link to comment Share on other sites More sharing options...
KLR250 Posted August 16, 2011 Author Share Posted August 16, 2011 Boring update, received my ford to chev hub adapters, Dropped them off at the machine shop to get the centre bores machined out to 74.1mm. They will machine in about 20mm, ill then get some solid spigots machined up that will slide in from the back side and sit against the ledge, so it actually gets held in by the factory hub and the rim, the speedy cheetah wheels have a 71mm bore, so it all works out well, more pics soon. Cant wait to be able to bolt some wheels up. should have my adjustable mounting rods finished this week, will get some pics up. Once wheels are bolted on and im sure the wheel position is good i can starting fabbing a crossmember Quote Link to comment Share on other sites More sharing options...
KLR250 Posted August 16, 2011 Author Share Posted August 16, 2011 picked up wheel adapters from the machine shop today been itching to get home from work to bolt the wheels up, Tucked 265's! wheels still turned with no bind at this height. Very strange to see camber on the rear of a falcon lol Quote Link to comment Share on other sites More sharing options...
KLR250 Posted August 27, 2011 Author Share Posted August 27, 2011 Ive been really slack lately, like really really slack! anyways, made my adjustable mounting rods for the rear supports omn the jag IRS. Ive ditched the factory jag rods and made some new ones utilising some XF watts link rods. I needed the rods to be shorter than the jag ones, just because of the differnt shape of the floor and how far up inside the car i have the IRS assembly. Cutting down watts link rods made a bit of sence, there thicker walled, bigger in diameter, buysh's are available in nolathane, and there free. First i cut the rods down and tapped a 14 x 1.5mm thread into them, I wanted the thread resonably fine for better adjustment, and 14 x 1.5mm was as fine as i had. Inital plan was to buy some grade 8 all thread, but it doesnt seem to exist, so i bought some long grade 8 bolts, cut the heads of and got the threads cut on the lathe, so now ill be able to easily adjust pinion angle on the diff. Here you can see the jag tube diamter vs the XF watts link all done, Jag vs New rod and this is how i plan to set them up, the RHS is just some old shit i had lying around, but this is the size ill use, it will tuck up a bit higher and have the required bracketry welded on to secure the rods. The twin exhausts will pass in between the rods and diff centre hmmmmm camber Currently im working on the spare lower control arms I have, Im actually shifting the hub mounting brackets forward, as im not happy with the wheel position, and i dont want to shift the whole assembly forward. as it stands i have room for the exhausts to pass over and id rather not hack the floor for room, so rather than shift the entire assembly forward im just shifting the hubs forward on the lower arms. This involves cutting of the brackets, jigging them up so the brackets sit where i want and re-welding them....not to hard, and really, if you had to do this conversion most people would move the IRS assembly forward, but i like I said, i like the room for the exhausts. anyways, ill get some pics of that later Quote Link to comment Share on other sites More sharing options...

Recommended Posts
Join the conversation
You can post now and register later. If you have an account, sign in now to post with your account.