KLR250 Posted August 16, 2011 Author Share Posted August 16, 2011 Starting trial fitting the EL dash, looks like its going to fit nicely (Once i trim and mod it) suprisingly, the curvature at the top match's the XF not quite sitting right yet, gotta do some mods. Managed to score the sunroof ive been after (EL XR). These dont require a rolled edge like the old style ones do, just a hole to be cut, then the rubber seal slips over the cut Quote Link to comment Share on other sites More sharing options...
KLR250 Posted August 16, 2011 Author Share Posted August 16, 2011 just found a front set of shockwaves on ebay, At least $250 cheaper than normal from airide melbourne so i bought them. now i just have to chase up some rear shockwaves. Ill be using SKW8000 series for the back with a stud mount top. These will go where the factory shock's would normally bolt. Because of the diameter of the shockwaves ill have to extend the lower shock mounting on the diff housing to acheive the travel i want, the body of the shockwave will not fit up inside the factory shock tower, so i need to pancake the shock tower (make it shorter) and gain the extra travel on the diff. Quote Link to comment Share on other sites More sharing options...
KLR250 Posted August 16, 2011 Author Share Posted August 16, 2011 Finished welding the cowl back on, few more welds to go around the windscreen, but apart from that the hard yacka in that department is done. Just about ready to smooth the firewall with filler, so ive stripped the firewall and cowl to bare metal. The corner peices i welded and and blended them into the innerguards etc. I also cut the top lip off the cowl where it joins the firewall some pics blended corner peices in this pic i welded a small strip in to join the inner guard to the cowl lip stripped To ensure everything is really smooth the whole lot will be covered in filler, obviously 95% of it will be rubbed off so, the plan is to start smoothing the firewall and work my way forward, ive still got plenty of welding to do, so ill just keep poking along Quote Link to comment Share on other sites More sharing options...
KLR250 Posted August 16, 2011 Author Share Posted August 16, 2011 More pics. The corners are tricky, its slow going, but i spent 5 hours sanding and filling today beleive it or not, bear in mind, im not what youd call efficient at using filler lol, im learning as i go still more coats to go, then a glaze coat once ive gotten things close Quote Link to comment Share on other sites More sharing options...
KLR250 Posted August 16, 2011 Author Share Posted August 16, 2011 I had to epoxy the firewall, Im far from finished the filler work, but i needed to keep the surface rust away,and also get an idea on pinholes,edges,corners etc. I reckon i have 15 hours left just in the firewall I feel like doing what glenn suggested and removing the rib on the passenger side of the firewall, and also cutting those heater box mounting bumps out of the centre and the passenger side, will clean it up a heap nicer. also have to get into the trans tunnell and sort those wrinkles out Im wrapped at how its turning out,considering all my filler work is only roughed in Front airbags will be here tommorrow, dunno why im excited, its not as if i can use them for ages lol Quote Link to comment Share on other sites More sharing options...
KLR250 Posted August 16, 2011 Author Share Posted August 16, 2011 look what greeted me at work this morning The Quality of this stuff is unbeleivably good, the finish, maching etc is just awsome. You know what its like, you see pictures on the net, looks bling, you get it, its not quite as bling as the pictures suggest, this stuff is awsome I couldnt help myself, had to put them together lol (I put the tops on upside down lol) Quote Link to comment Share on other sites More sharing options...
KLR250 Posted August 16, 2011 Author Share Posted August 16, 2011 Made my first slide show! haha anyways, just for shits and giggles i uploaded it to Youtube Been doing a bit to the car, Ill take some pictures on the weekend and make a decent update all going to plan Quote Link to comment Share on other sites More sharing options...
KLR250 Posted August 16, 2011 Author Share Posted August 16, 2011 Ive been pretty busy over the last couple of days, I wont have pics till saturday though, just gotta sort them out. Ive stripped the front suspension out completly and am slowly welding up all the seams. Ive welded the strut towers inside and out, and have also welded up the outide of the chassis rails. Im about to fill all the holes on top of the strut towers and redo them to look better with the allloy billit tops of the shockwave airbags. I also want to make some strut braces from the towers to the firewall lip Also found some Tribal graphic vectors online and have done a few photoshops of a few ideas Georges car gets photoshopped for the 1000th time Im thinking a mettalic silver graphic painted on, Im really liking the two tone now, excuse my dodgy photoshop skills, Im really considering the two tone option Quote Link to comment Share on other sites More sharing options...
KLR250 Posted August 16, 2011 Author Share Posted August 16, 2011 Update time Bear with me as my keyboard is buggered and i cant find my spare the fullstop doesnt work Suspension removed so i could start welding the other side Started welding up the front end to get the thing a bit stiffer Then started welding up the top of the shocktowers to get a smooth uncluttered look I repositioned the mounting holes Lots of other shit but im having issues lifting the pictures of my memory stick ill give it another crack tommorow Quote Link to comment Share on other sites More sharing options...
KLR250 Posted August 16, 2011 Author Share Posted August 16, 2011 Today i decided to get rid of some surface rust, so i applied some phosphuric acid and rubbed everything with a red scotch brite pad, then i deactivated it by using a damp cloth (damp with water) then finally applying some wax and grease remover, ill repeat this a few times before i lay down some epoxy. this procedure for surface rust removal works really well. Then i started on smoothing the drivers side shock tower reapeting the procedure id previously done on the passenger side shock tower, I welded in some 1mm sheet The filler i neglected to prime on the firewall will now be removed, bare filler left to long should not be painted over, as its porous and can allow rust to start underneath, not to mention any moisture that the filler will absorb over time, so ill have redo it More soon Quote Link to comment Share on other sites More sharing options...
KLR250 Posted August 16, 2011 Author Share Posted August 16, 2011 and here it is after grinding and smoothing with a flap disc, for the most part the metal work on the towers is done, just have to run a skim of filler over them and grind down the remaining welds Quote Link to comment Share on other sites More sharing options...
KLR250 Posted August 16, 2011 Author Share Posted August 16, 2011 By flipping the bump stop around I can get them to sit at a better angle, I dummied up the upper wishbone and airbag so i could double check it all worked. The factory bump stop touch's the wishbone 5mm before the internal shockwave bump stop touched, and once all the weight is put on both bumpstops are firm, so it worked out perfectly Quote Link to comment Share on other sites More sharing options...
KLR250 Posted August 16, 2011 Author Share Posted August 16, 2011 Finished welding up the passenger side today, Bump stop plate is welded in, nearly ready to use some filler on the inner guards also had to do some shrinking on the inner guard, i put to much heat into it and warped it good, so i did a series of spot welds and quenched them with a damp cloth. Normally you would use an oxy to heat things up, i dont have one. its come up pretty good, just needs some finnessing with a hammer and dolly now Hopefully i can get a start on my strut brace this week Quote Link to comment Share on other sites More sharing options...
KLR250 Posted August 16, 2011 Author Share Posted August 16, 2011 i decided to dummy up my suspension to double check a few things. Because ive moved my bumpstop plates up they end up moving further out, so there is a concern the tyre may hit it. Looks like its all worked out, no clearence problems so far. The suspension will squash lower than this with the full weight of the motor and drivetrain all in all im pretty happy, im able to retain the factory bump stops, but still get it slammed, the factory stops will stop the shockwaves ever getting damaged,, added insurance, and the bump stop plates strengthen the front end by quite a lot being welded in on 3 sides. this picture shows the steering almost at full lock ( couldnt quite get the last bit as the trolley jack is in the way) One thing i definatly will do is alter the radius rod bushings, ill either replace them with a big rose jont and cross bolt them through the factory bracket, or buy the rrs bearing assembly's, as the bushings really put a lot of tension on suspension causing quite a bit of bind. Interestingly, the factory ball joints still have a fairbit more movment in them before they bind, they have a lot more travel than a lot of the aftermarket ball joints ive seen Quote Link to comment Share on other sites More sharing options...
KLR250 Posted August 16, 2011 Author Share Posted August 16, 2011 Just cut the drivers side mounting plate out, Ive run out of thin cutting discs, so im perservering with 2.5mm cutoff wheels, they suck Dummied in position view from under the car Quote Link to comment Share on other sites More sharing options...
KLR250 Posted August 16, 2011 Author Share Posted August 16, 2011 Decided i had to tack it together so it was one unit, bit easier to work with, here it is Quote Link to comment Share on other sites More sharing options...
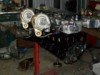
KLR250 Posted August 16, 2011 Author Share Posted August 16, 2011 Ive had 0 Motorvation this weekend Pick up a steering Rack of gary next weekend all going to plan. Am about to start on my engine mountings, this is where i wouldnt mind some opinions. I want to fabricate something like this to weld onto my mounting plates and make something like this to bolt to the engine Id weld these things directly onto the engine mount plates which will utilise a urethane bush with a grade 8 bolt through it. is there any reason everyone puts the urethane mount on the engine, with the receiver on the chassis? i want the urethane mounting on the chassis with the receiver on the engine...get me? Quote Link to comment Share on other sites More sharing options...
KLR250 Posted August 16, 2011 Author Share Posted August 16, 2011 Went down and picked my steering rack up from gary (XdEE) today, Thanks Gary It bolted up, and so far i reckon my measurments were pretty good, rack height seems ideal. Need to shorten the arms slightly and tap some thread Uni joint angle looks spot on to. Tie rod taper appears to be the same as X series which is handy. i didnt really clean anything, just bolted it up, Once i shorten the steering arms i can start on bump steer measurments Quote Link to comment Share on other sites More sharing options...
KLR250 Posted August 16, 2011 Author Share Posted August 16, 2011 Okay, pressure washed the rack today, all the paint came off and it looked like brand new, Gary really looked after me on this one, its immaculate! For the first time ever my measurments were spot on with everything, this NEVER happens when i use a ruler or tape lol With the 6mm spacers i made between the rack and the cradle it fits beautifully Here you can see how well the steering shaft is poitioned, uni joint angle is minimal, there should be no bind whatsoever Height is spot on, tie rod angles look really good Quote Link to comment Share on other sites More sharing options...
KLR250 Posted August 16, 2011 Author Share Posted August 16, 2011 Got both the rack ends shortened this week, bolted them up last night to check steering lock etc I dont quite get the maximum lock yet as i still have to shorten my steering arms on the stub axles, theres another 10mm before it hits the steering stop on the stub axle. Danny (Xdrift) has kindly lent me his 7deg reamer so i can ream out new tie rod holes. Initial bump steer measurments are no where near as bad as i thought they were going to be, from full droop through 4" of travel shows a maximum of 2.5mm toe change, but so far things look promising, as the actual area of travel you would be driving the car in wouldnt be to bad at all. This is with the stock lower control arms, so im pretty happy. Mind you, ive only done this with a tape measure, im going to set up a better measuring rig with a laser level Quote Link to comment Share on other sites More sharing options...

Recommended Posts
Join the conversation
You can post now and register later. If you have an account, sign in now to post with your account.