zep
-
Posts
4662 -
Joined
-
Last visited
Everything posted by zep
-
This is what I paid:

-
I bought mine from Brantz UK. You couldn't buy directly from their site, they had to email me a payment link. You could also try and buy through brantz.co.nz
-
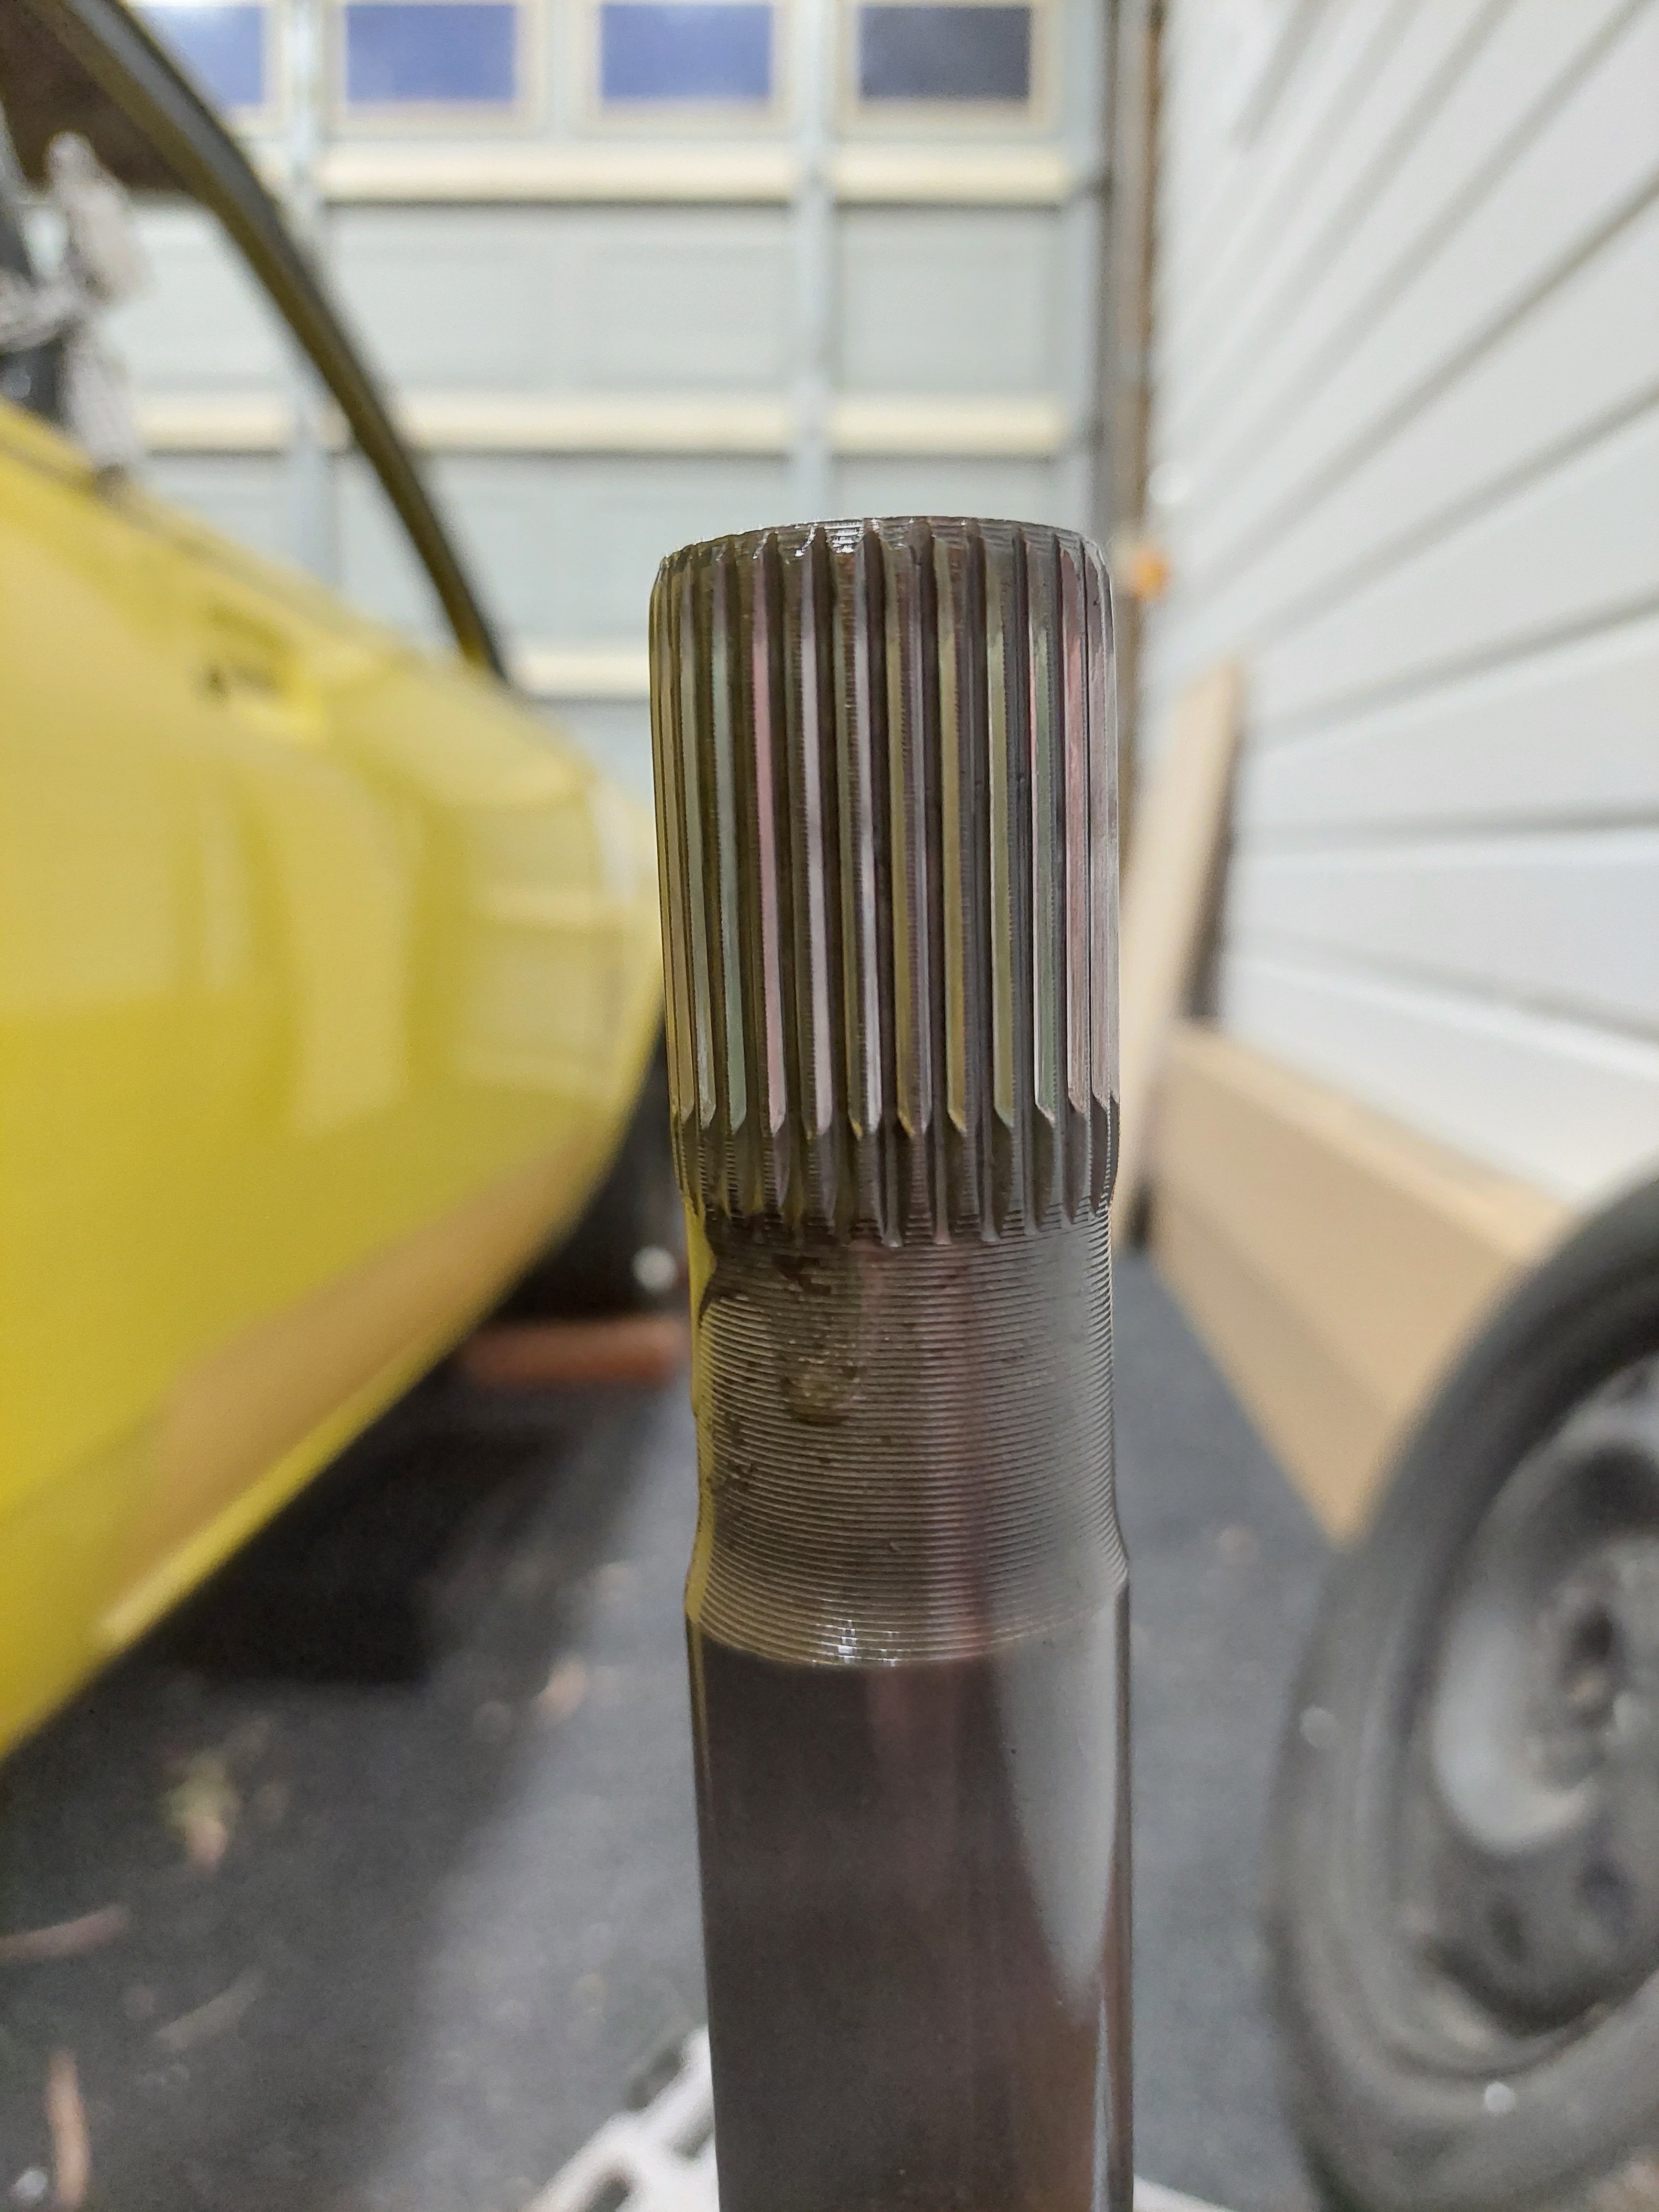
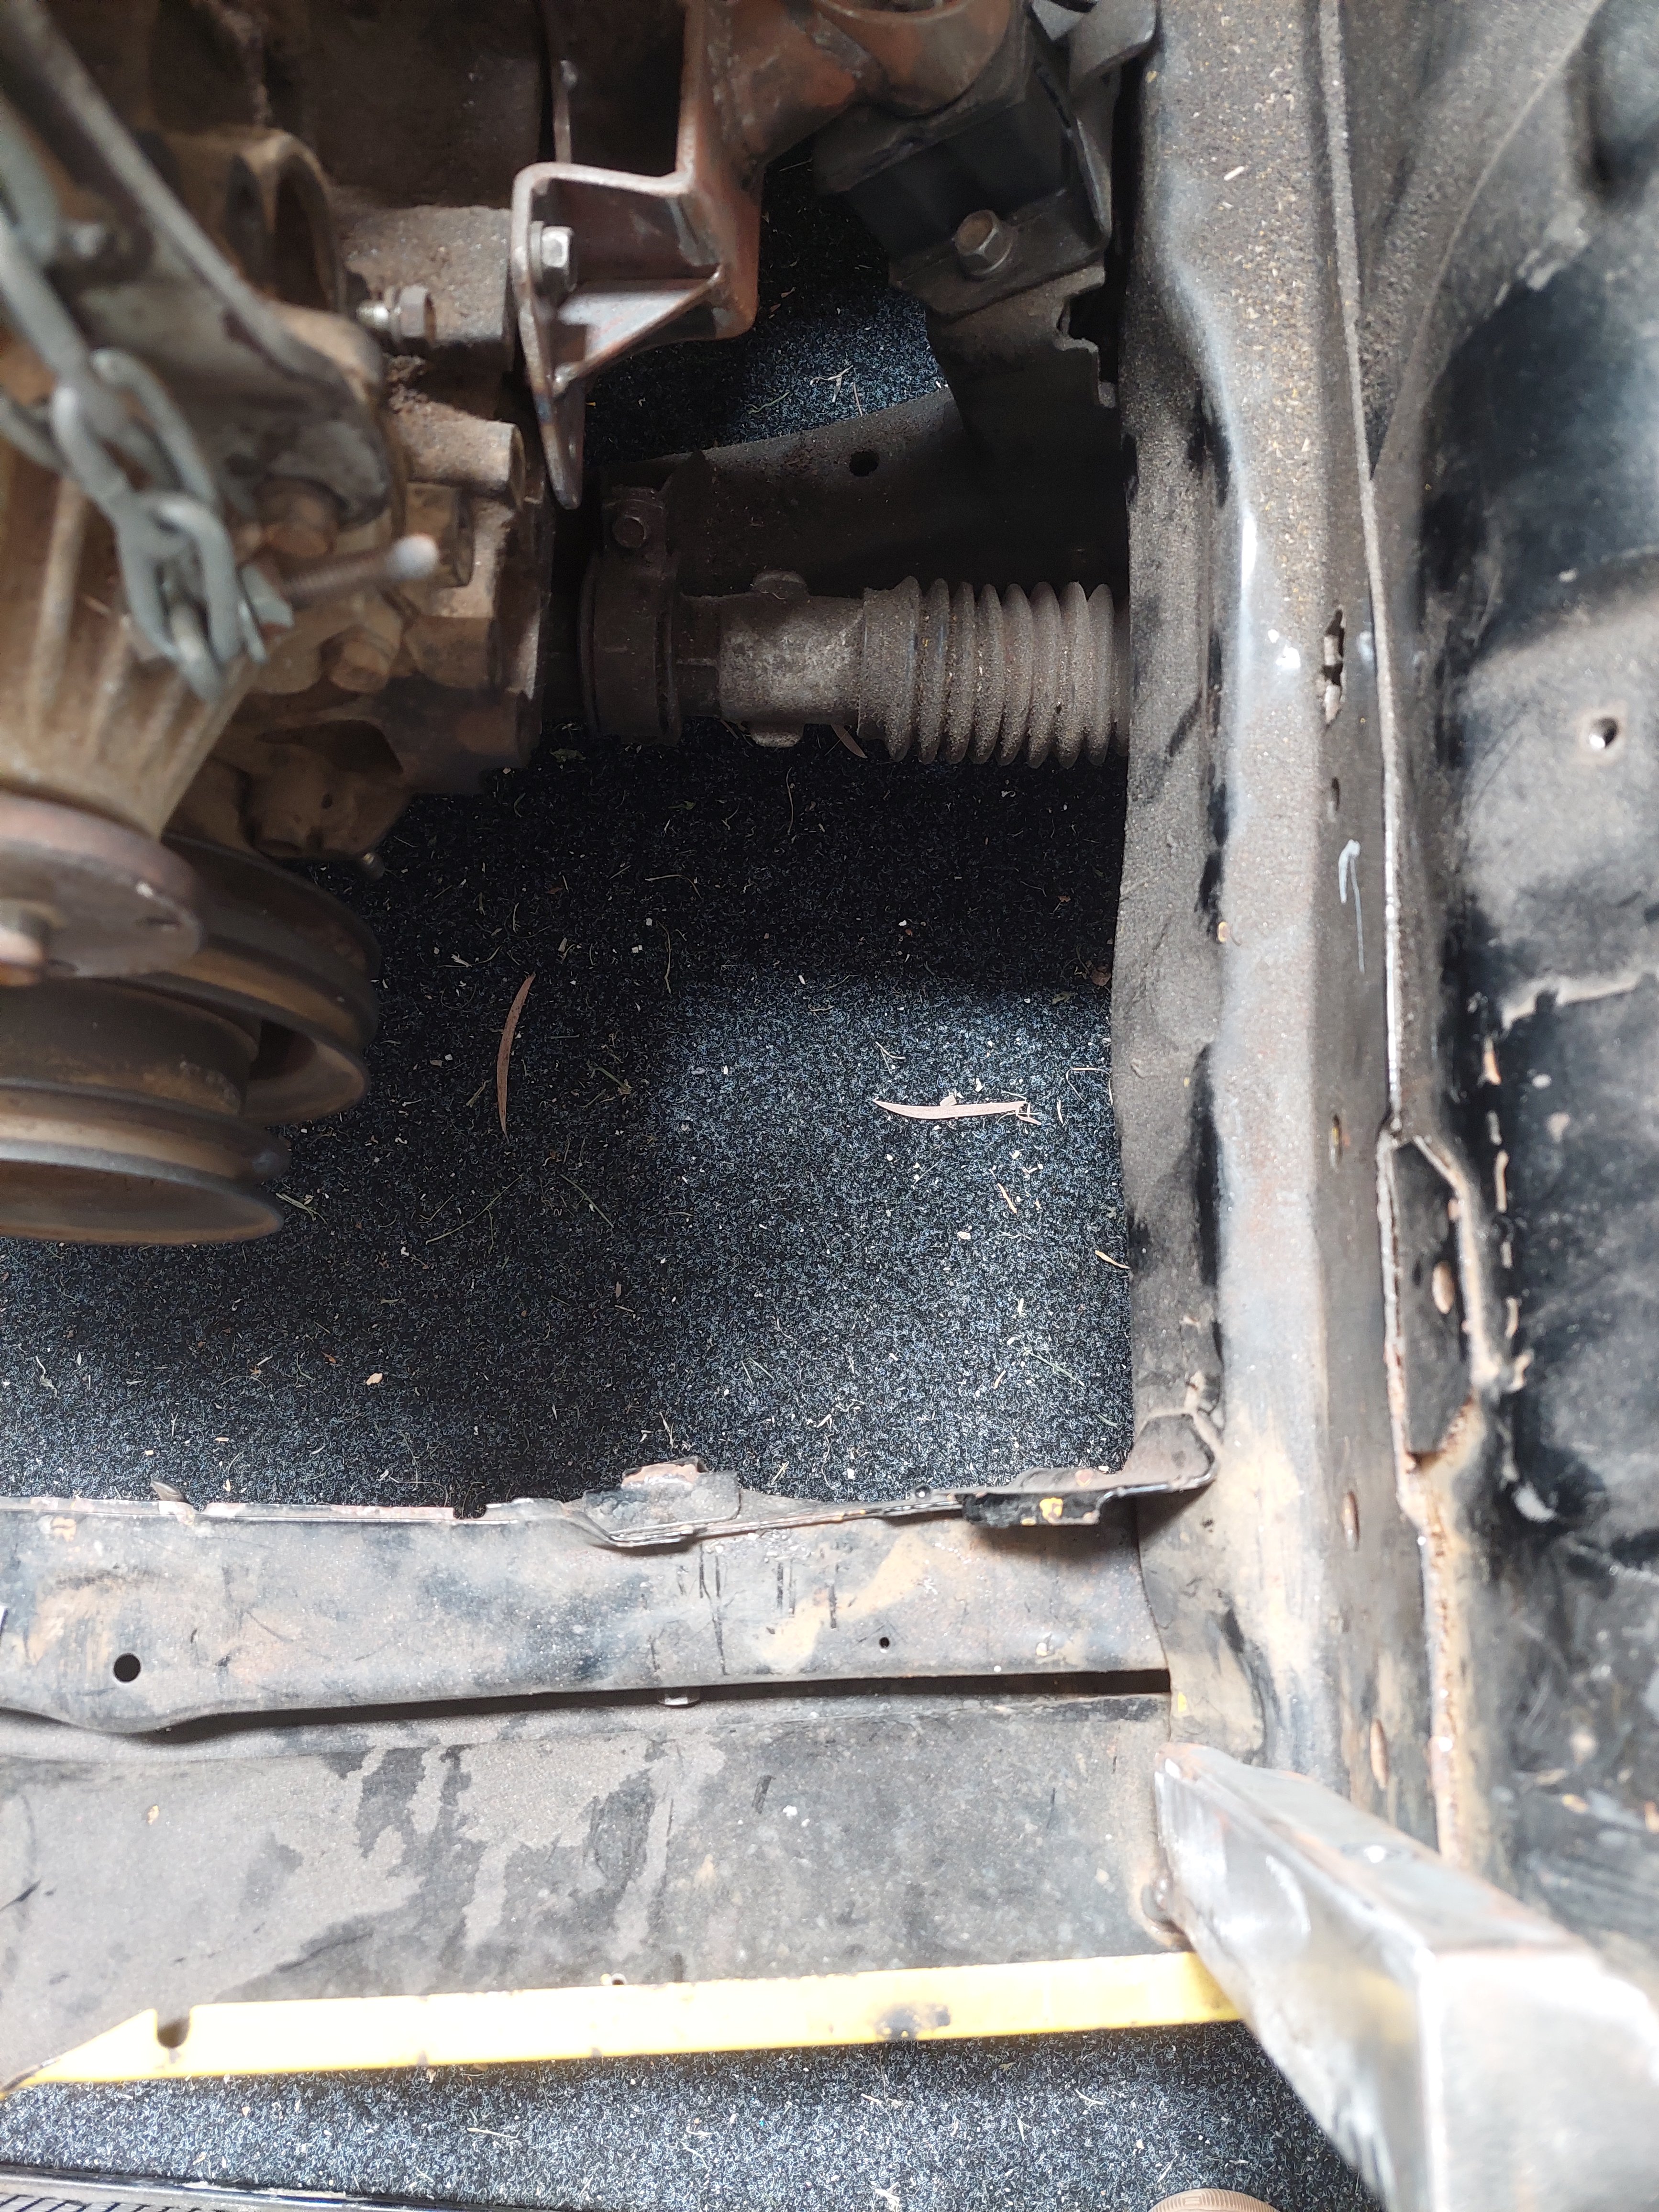
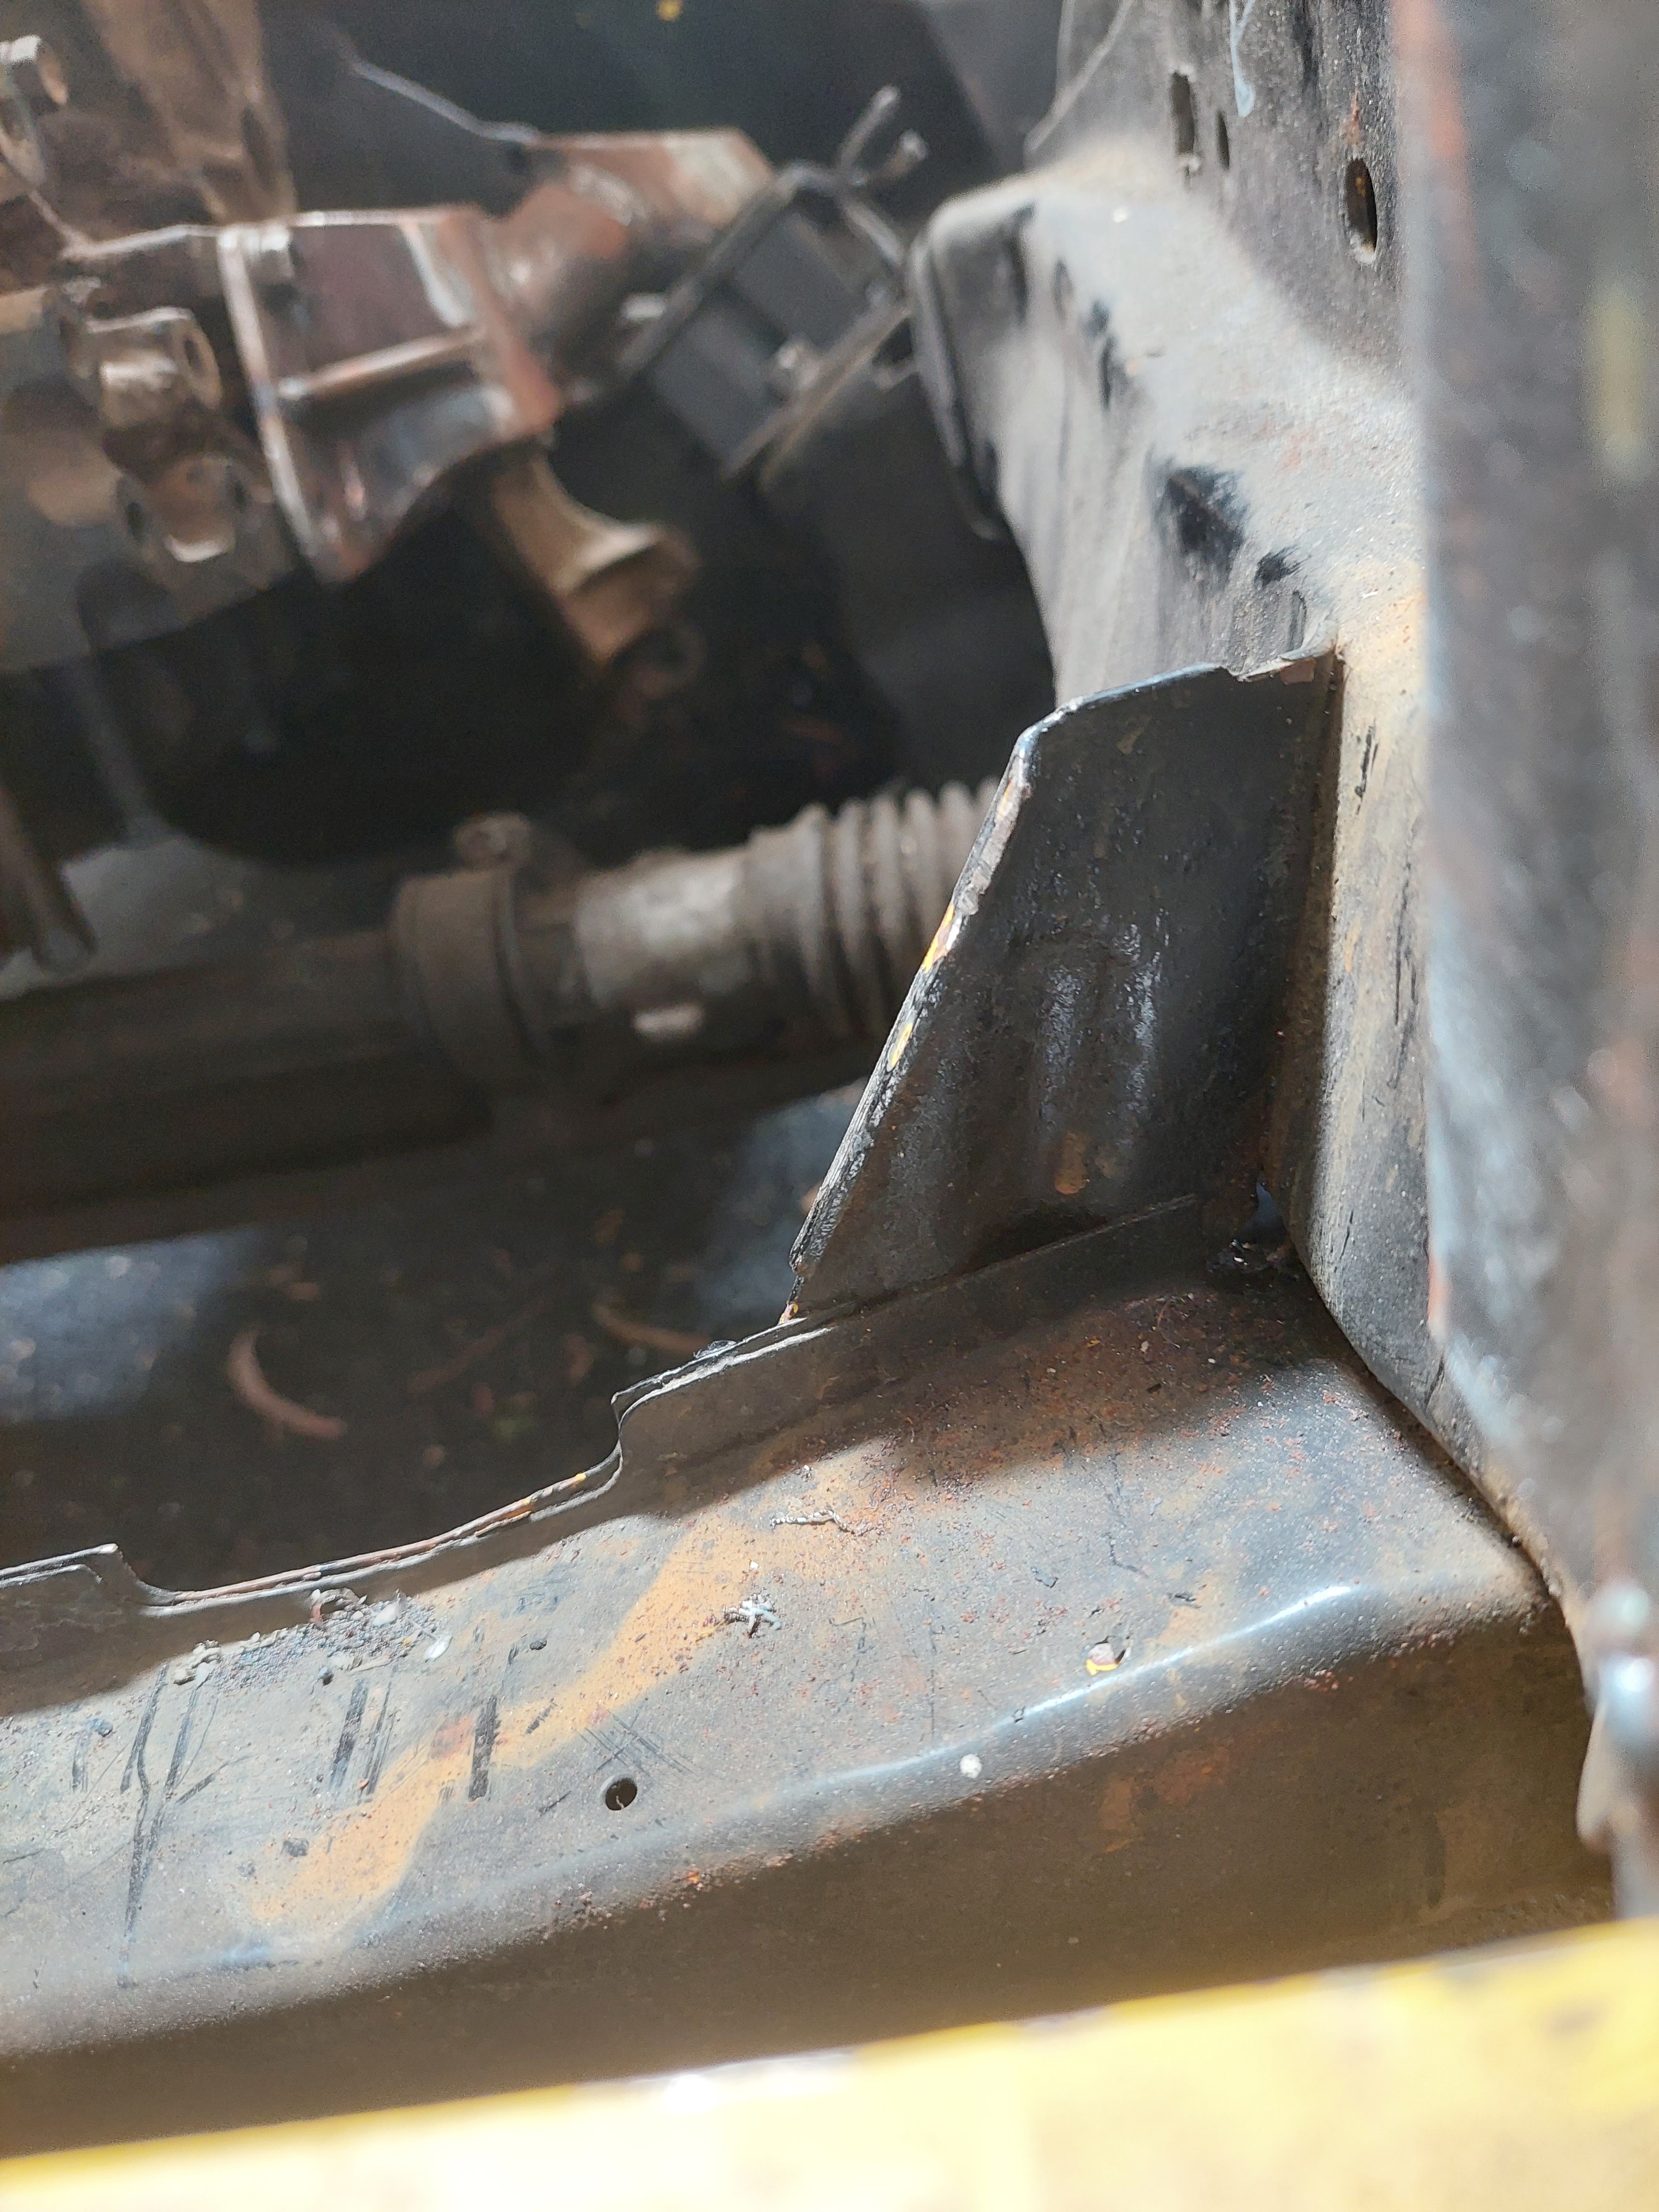
I finally got around to fitting the rear wheels to assess how much room I have in the wheel wells and see how much I need to shorten them by. Turns out I have hit a snag that might turn into a blow out of a range of proportions. Here's where I'm at with the fitment: Looks like I have about ~33mm to try get in the arches. Looking from the other side, there is about 50mm between the tire and the chassis rail, so I figured that's not too bad. However, there is a decent amount of meat where the inner and outer guard skins meet, so I'm really working with only about 10mm of extra space in there. From the outer fitment point of view, I will definitely have to pull out the guards some -the plan is to keep them looking as stock as possible. I thought I could remove the inner skin where it meets the outer and weld it back in higher - not sure if this is a legit thing to do or not? Do I need double skin all the way down? The other issues is this: I only have about 7mm of spline I can cut off. And because the axle tapers in, I can't put the splines in the exact place I need them to be if I were to cut new ones. I've spoken to a bunch of diff places and none recommend filling and cutting new ones, so I figure I have 3 options. 1. Find some longer 5 stud axles that I can cut off after the taper and respline. I've looked around and turns out 5 stud ones (with the right centre bore diameter for my wheels) are pretty hard to find. Most seem to be 6 stud. 2. Get some billet axles. There are PLENTY of places that will make axles to a custom length in 30 spline and whatever stud pattern you want. The main problem is that none of them make an axle with the hillux bearing size. I could go down this route and try to find a bearing that will match the housing on the outer and whatever axle I choose on the inner. I did a quick check on ford 9" and couldn't find any in the right specs. I need to look a bit harder and longer as there are heaps of different axle diametres out there. 3. Convert to full floating. Today I spoke with a guy who makes full floater kits. You cut off the housing flange and weld on the one he give you, buy his axles which will be made to fit, and bob's your uncle. This is considerably more expensive than just buying axles and from what I've read, the only real benefit comes from if you ever snap and axle, which I feel like I'm unlikely to do. Any thoughts on this?
-
Awesome, thanks
-
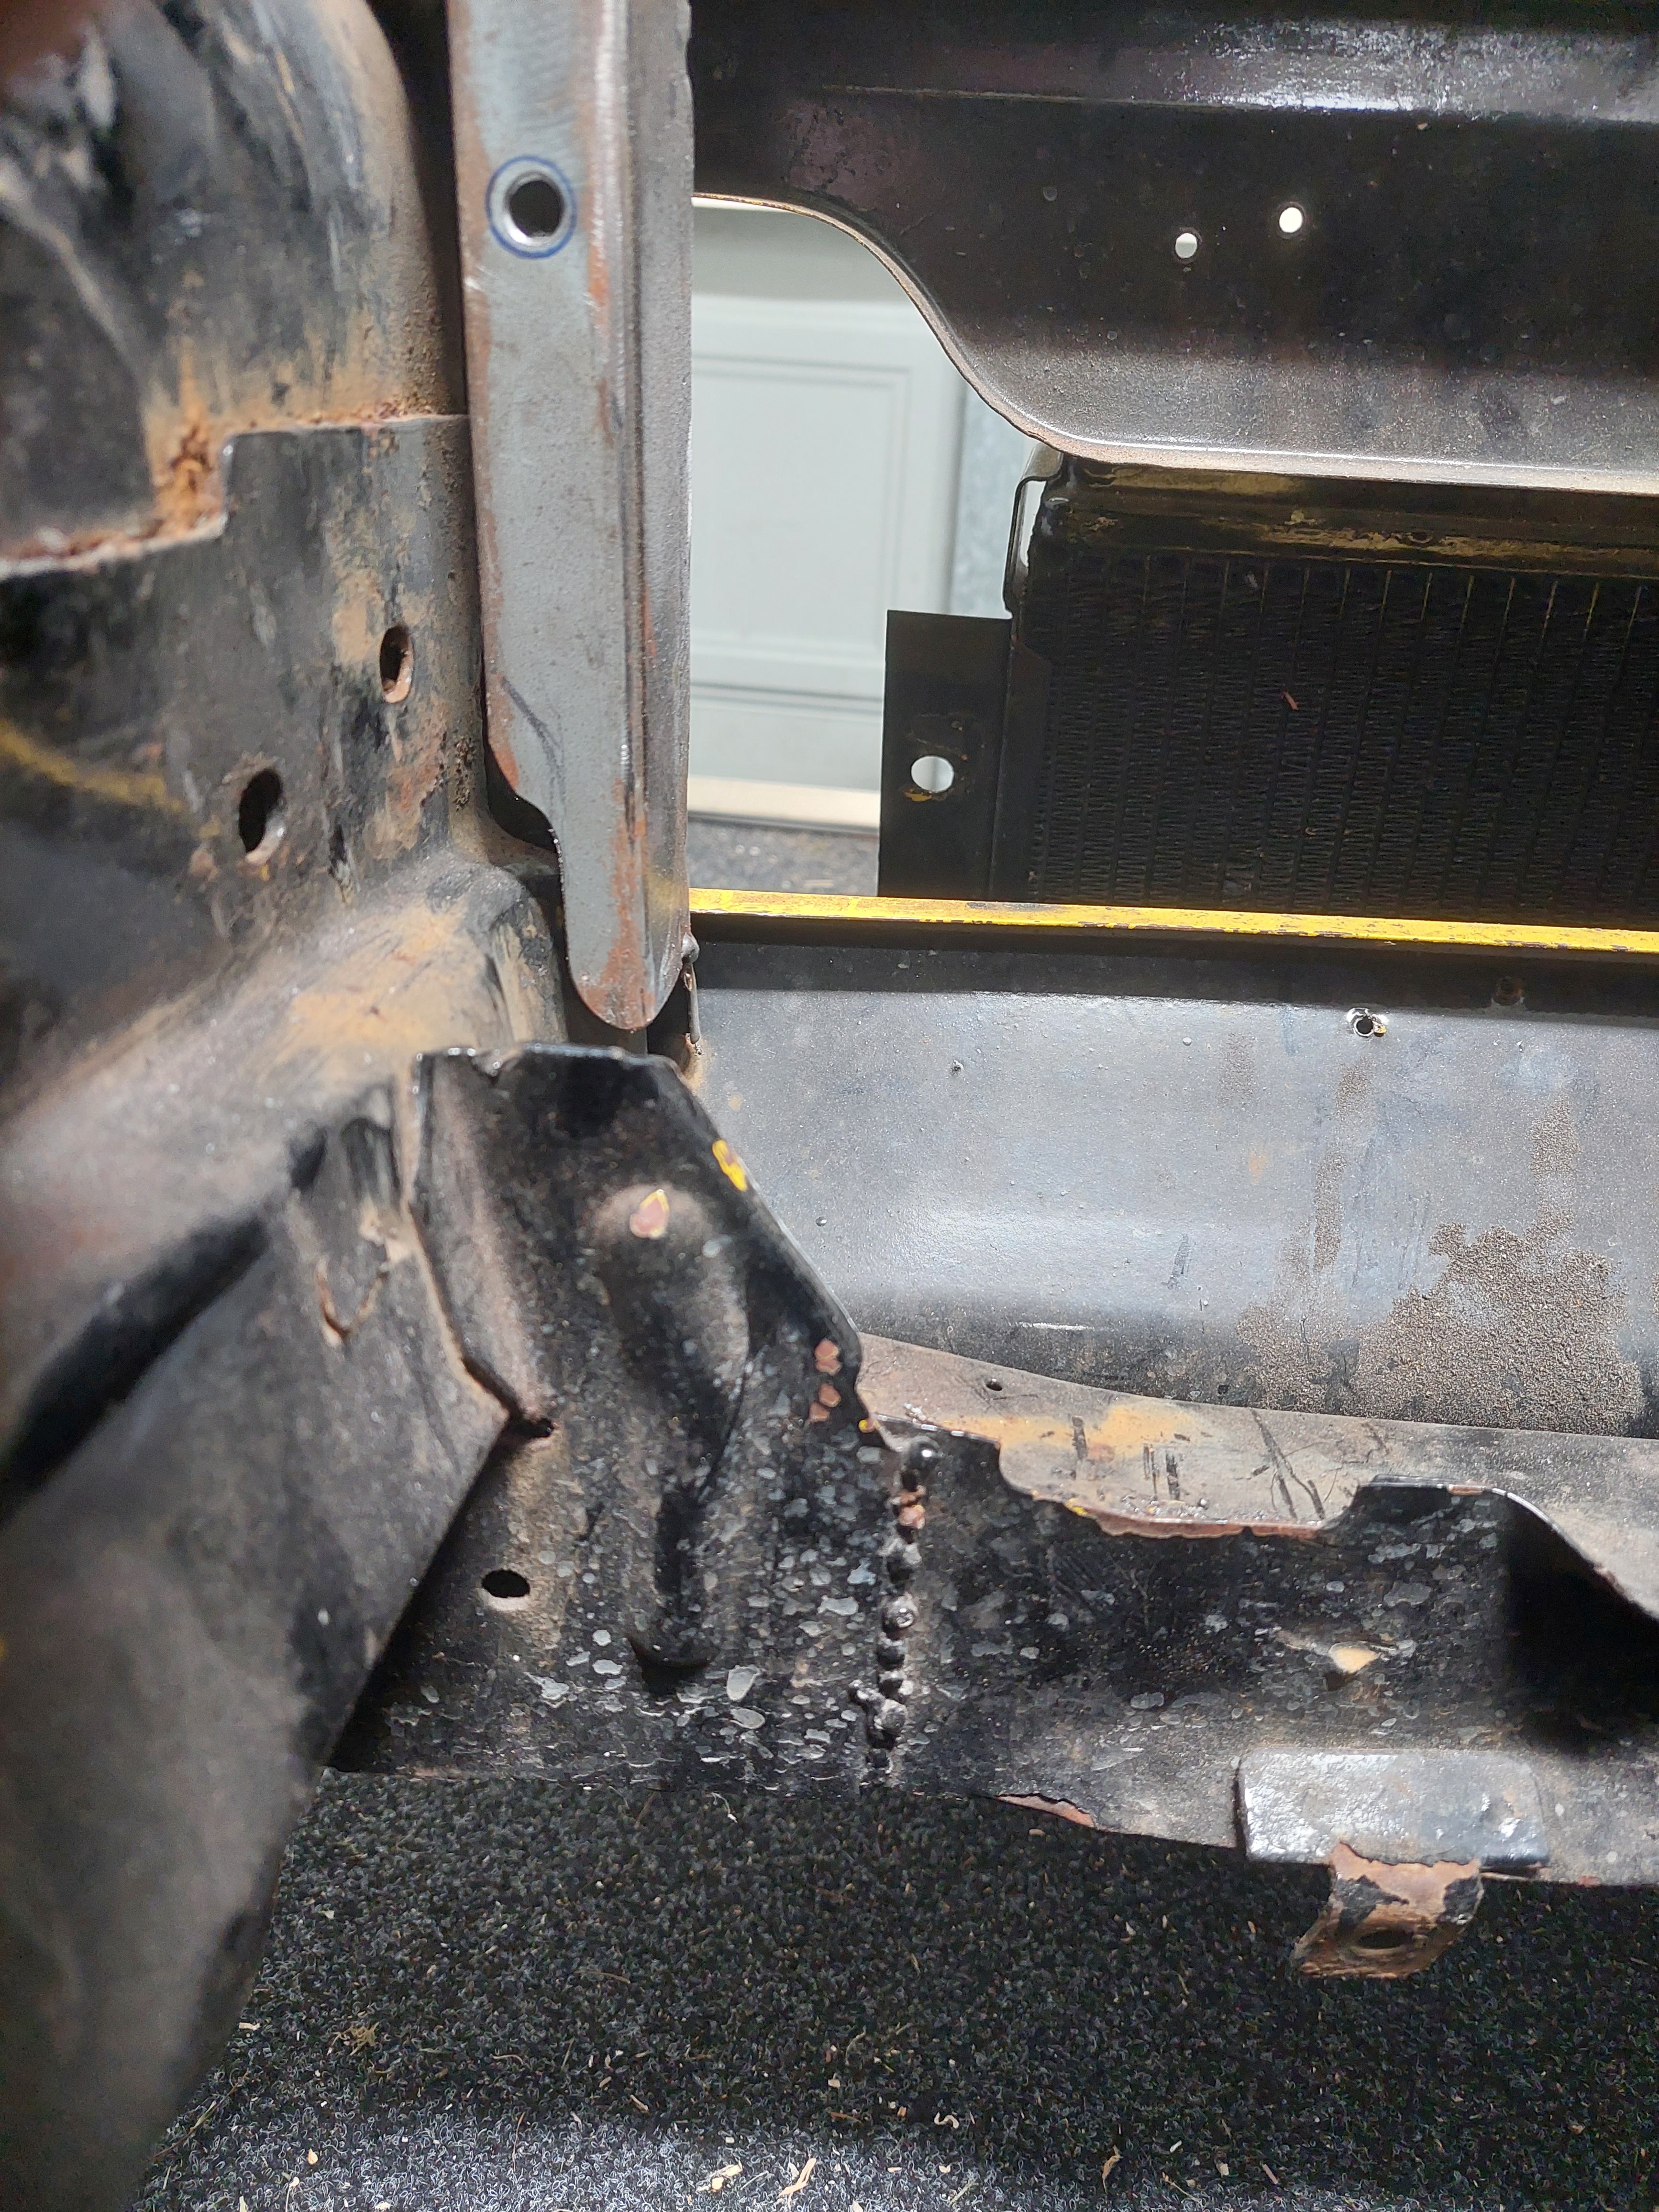
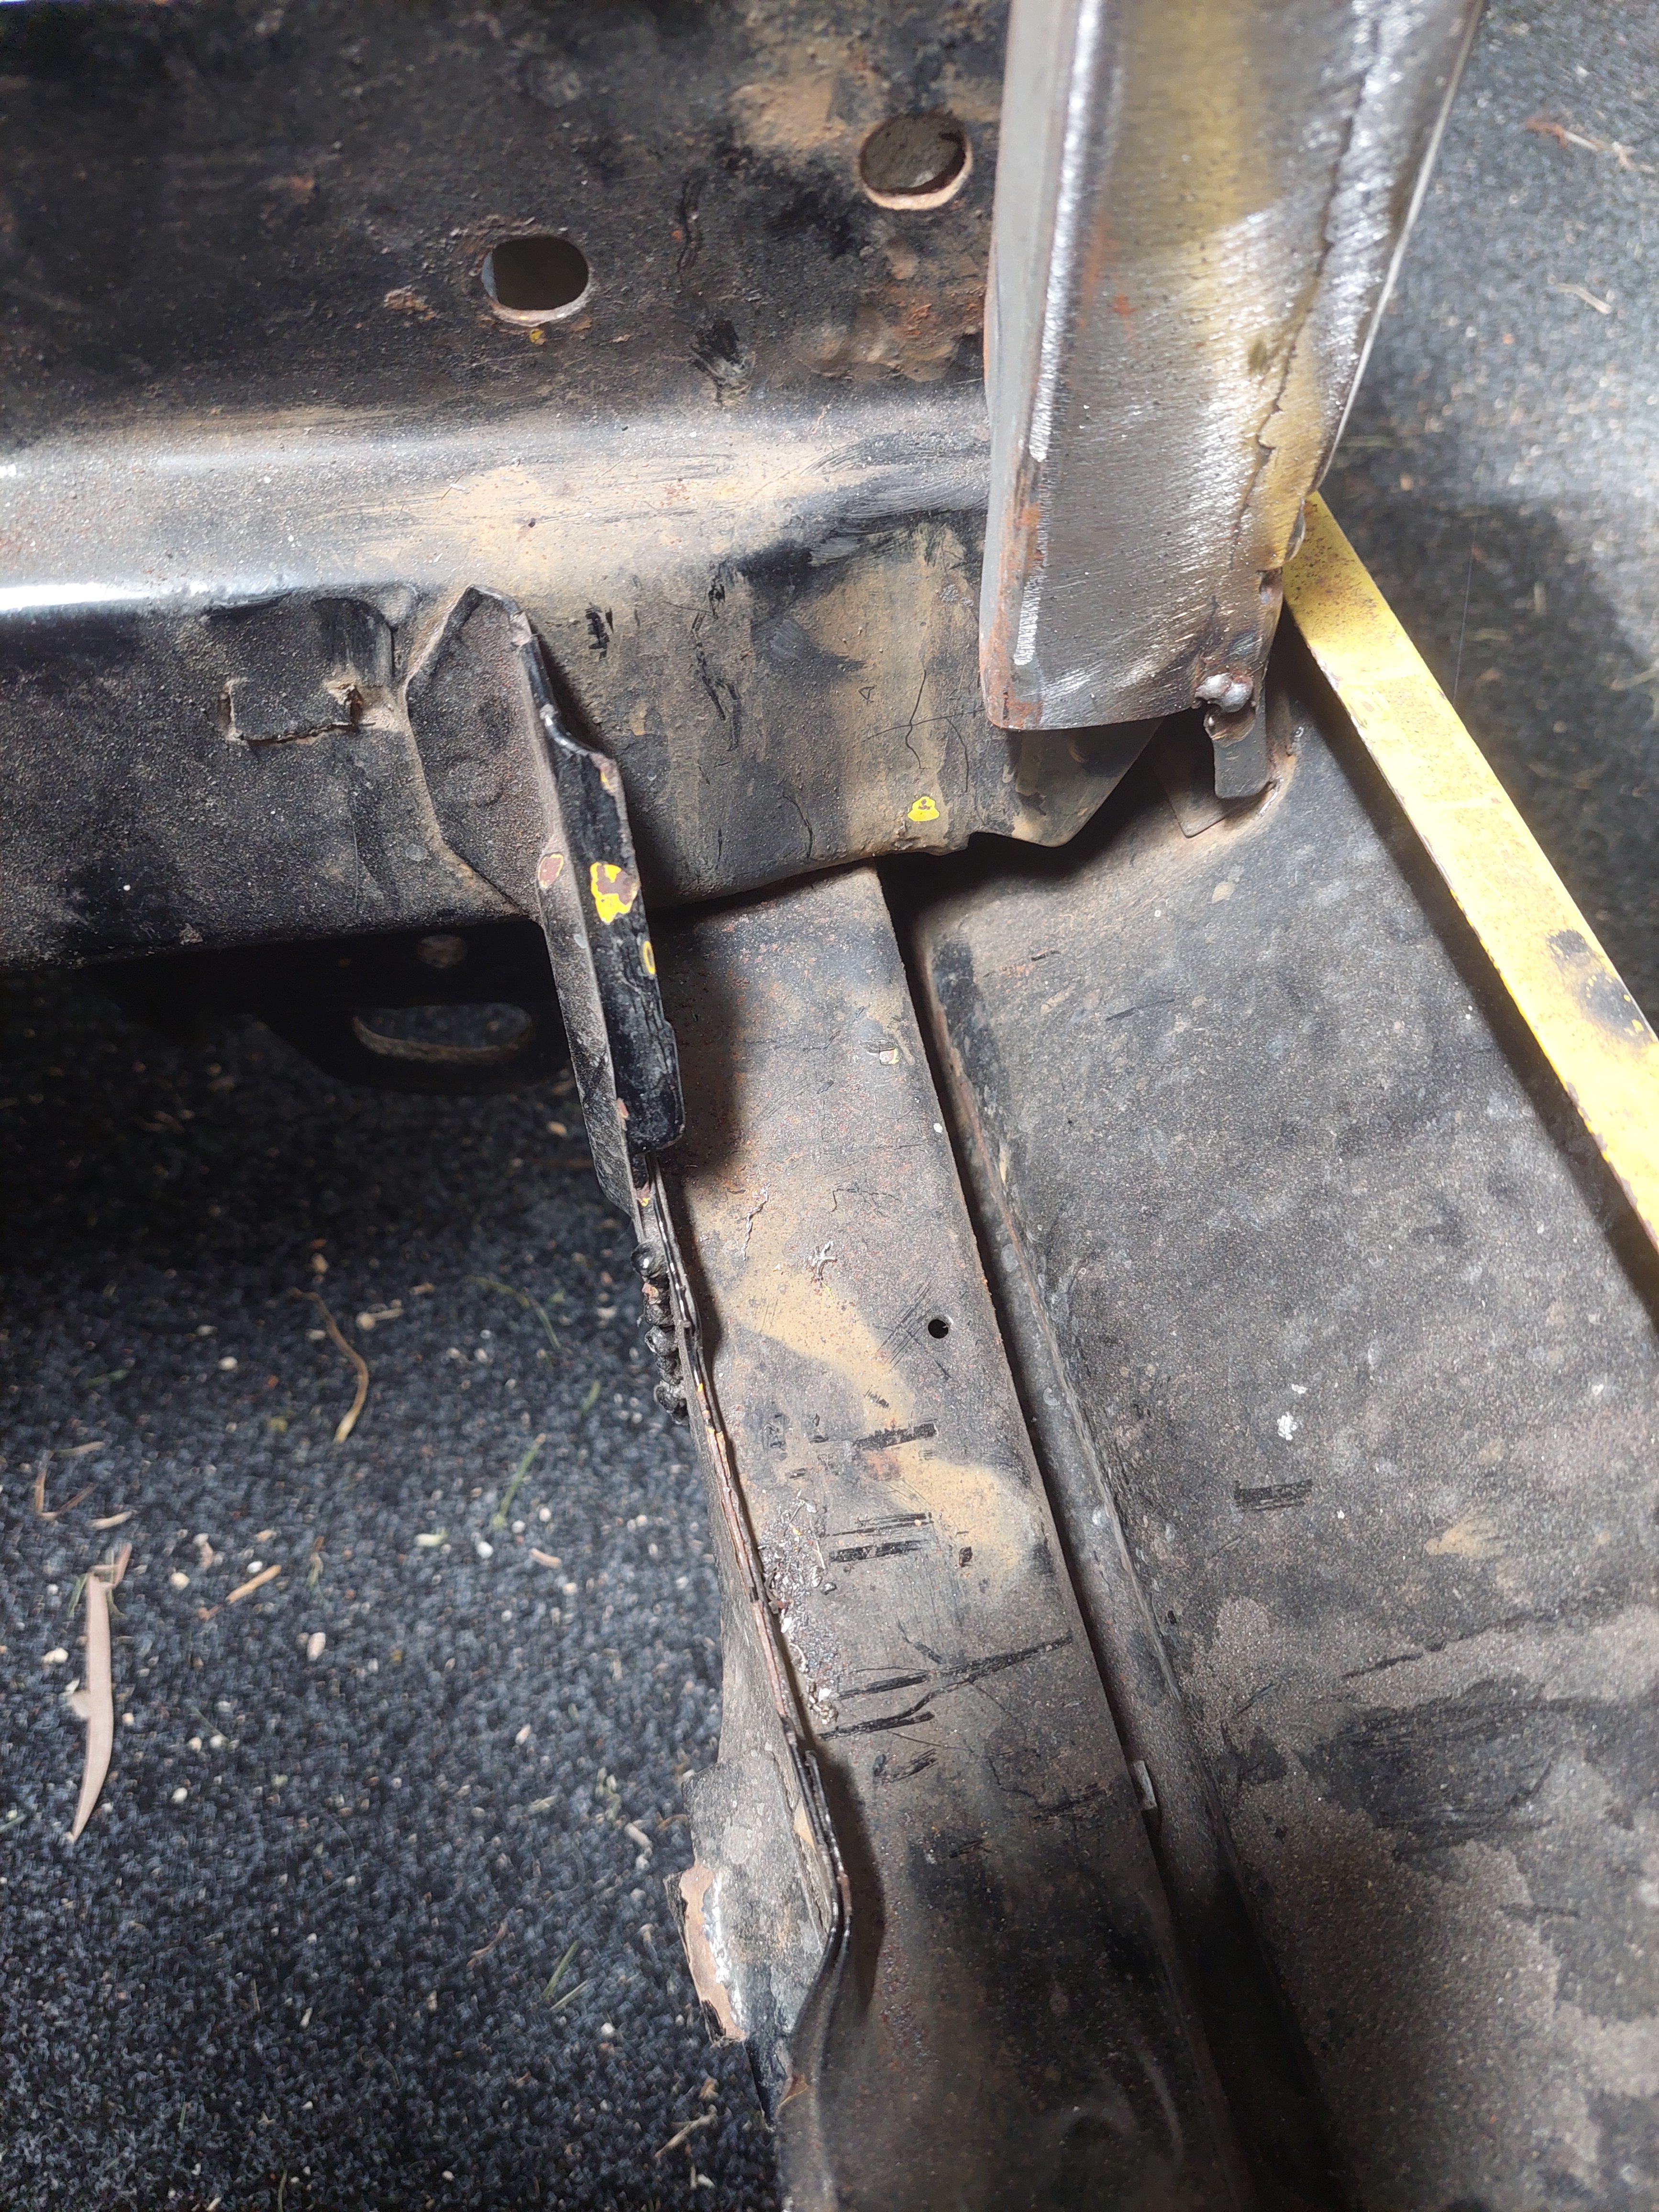
I want to fit a thicker radiator but this gusset which joins the lower front support to the chassis is in the way. Can I modify it (it doesn't really look that strong from factory) or remove and rebuild it to gain some space?
-
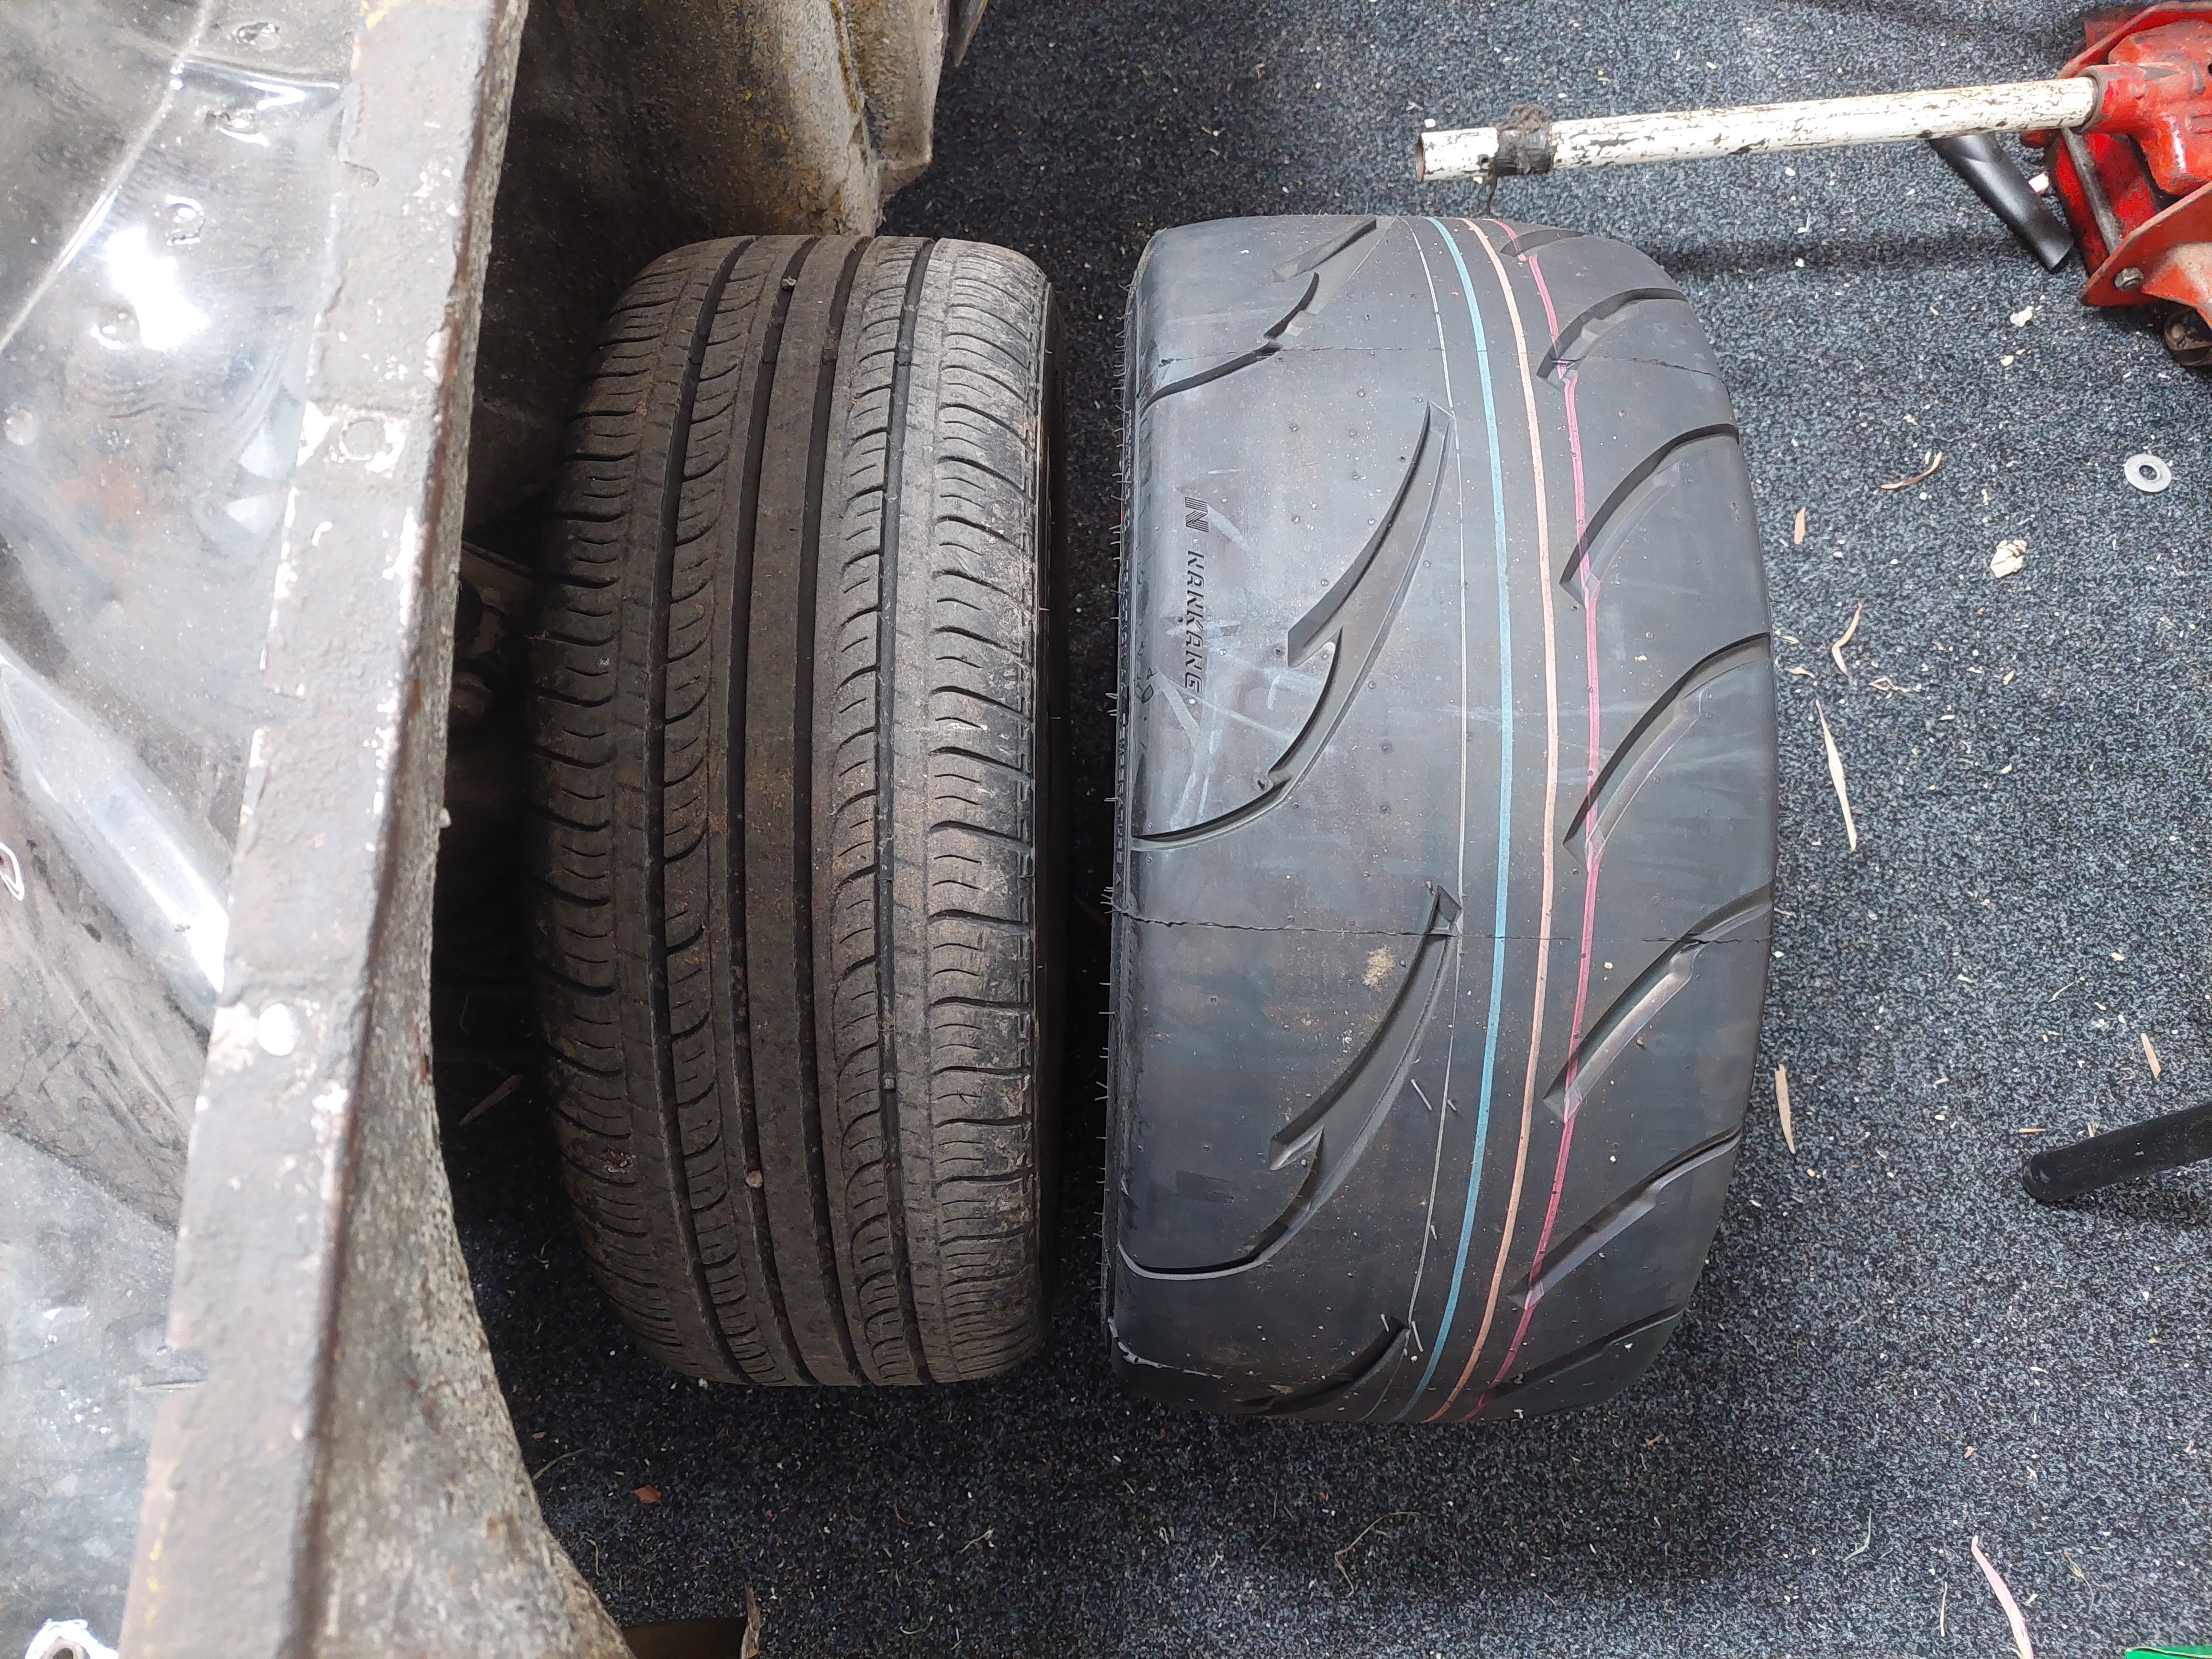
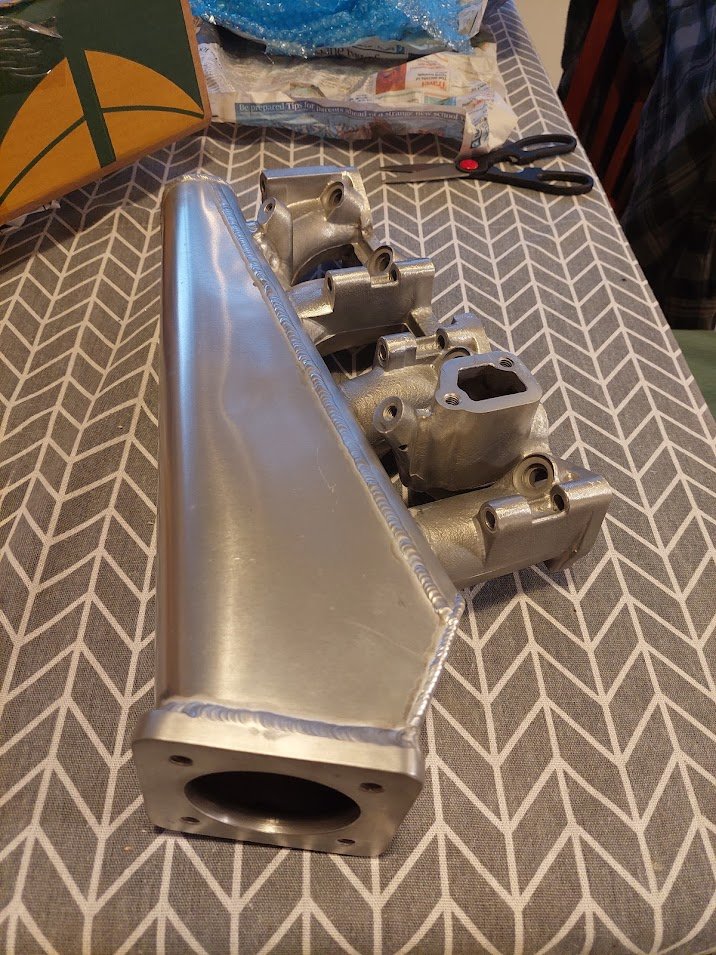
Not a huge amount to update. The Gem is back in my (work in progress) garage for the time being, which is nice. I got the tires fitted to the wheels: 225/45 semi is so much bigger than a regular 195/50! And I because I have the car back, I was able to have a go at fitting the intake manifold. Looks good to me!
- 73 replies
-
- 32
-

-
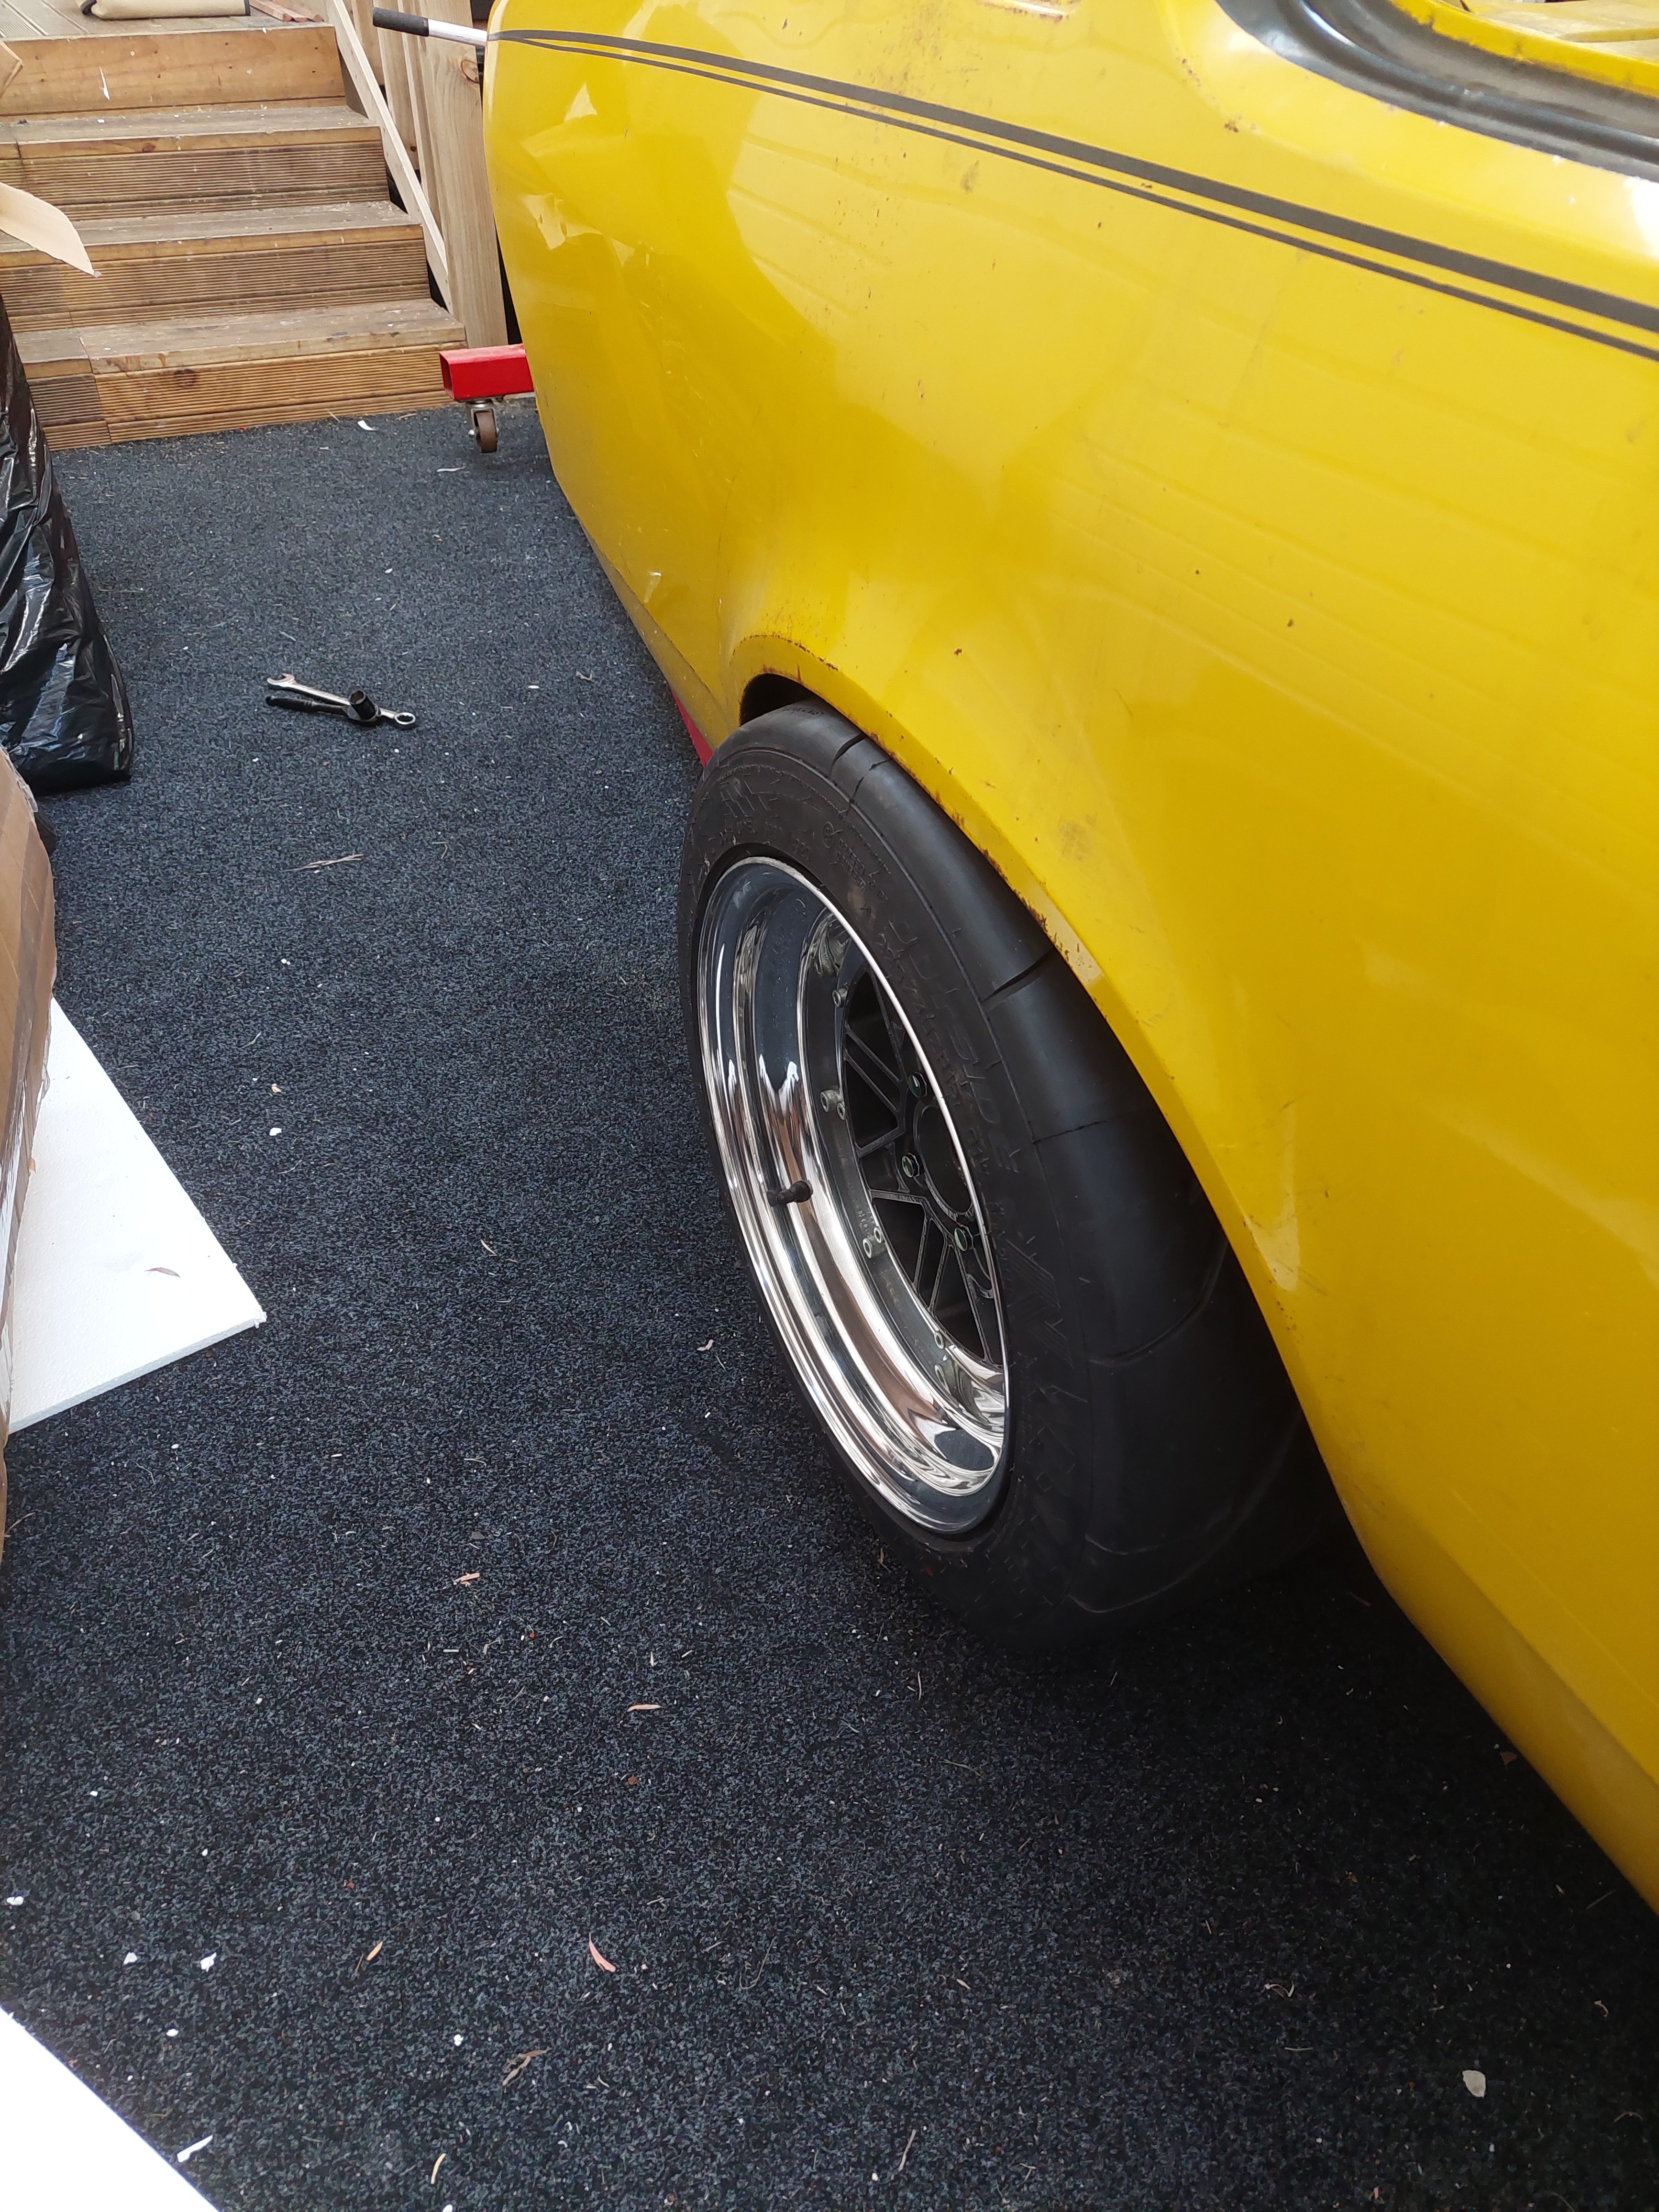
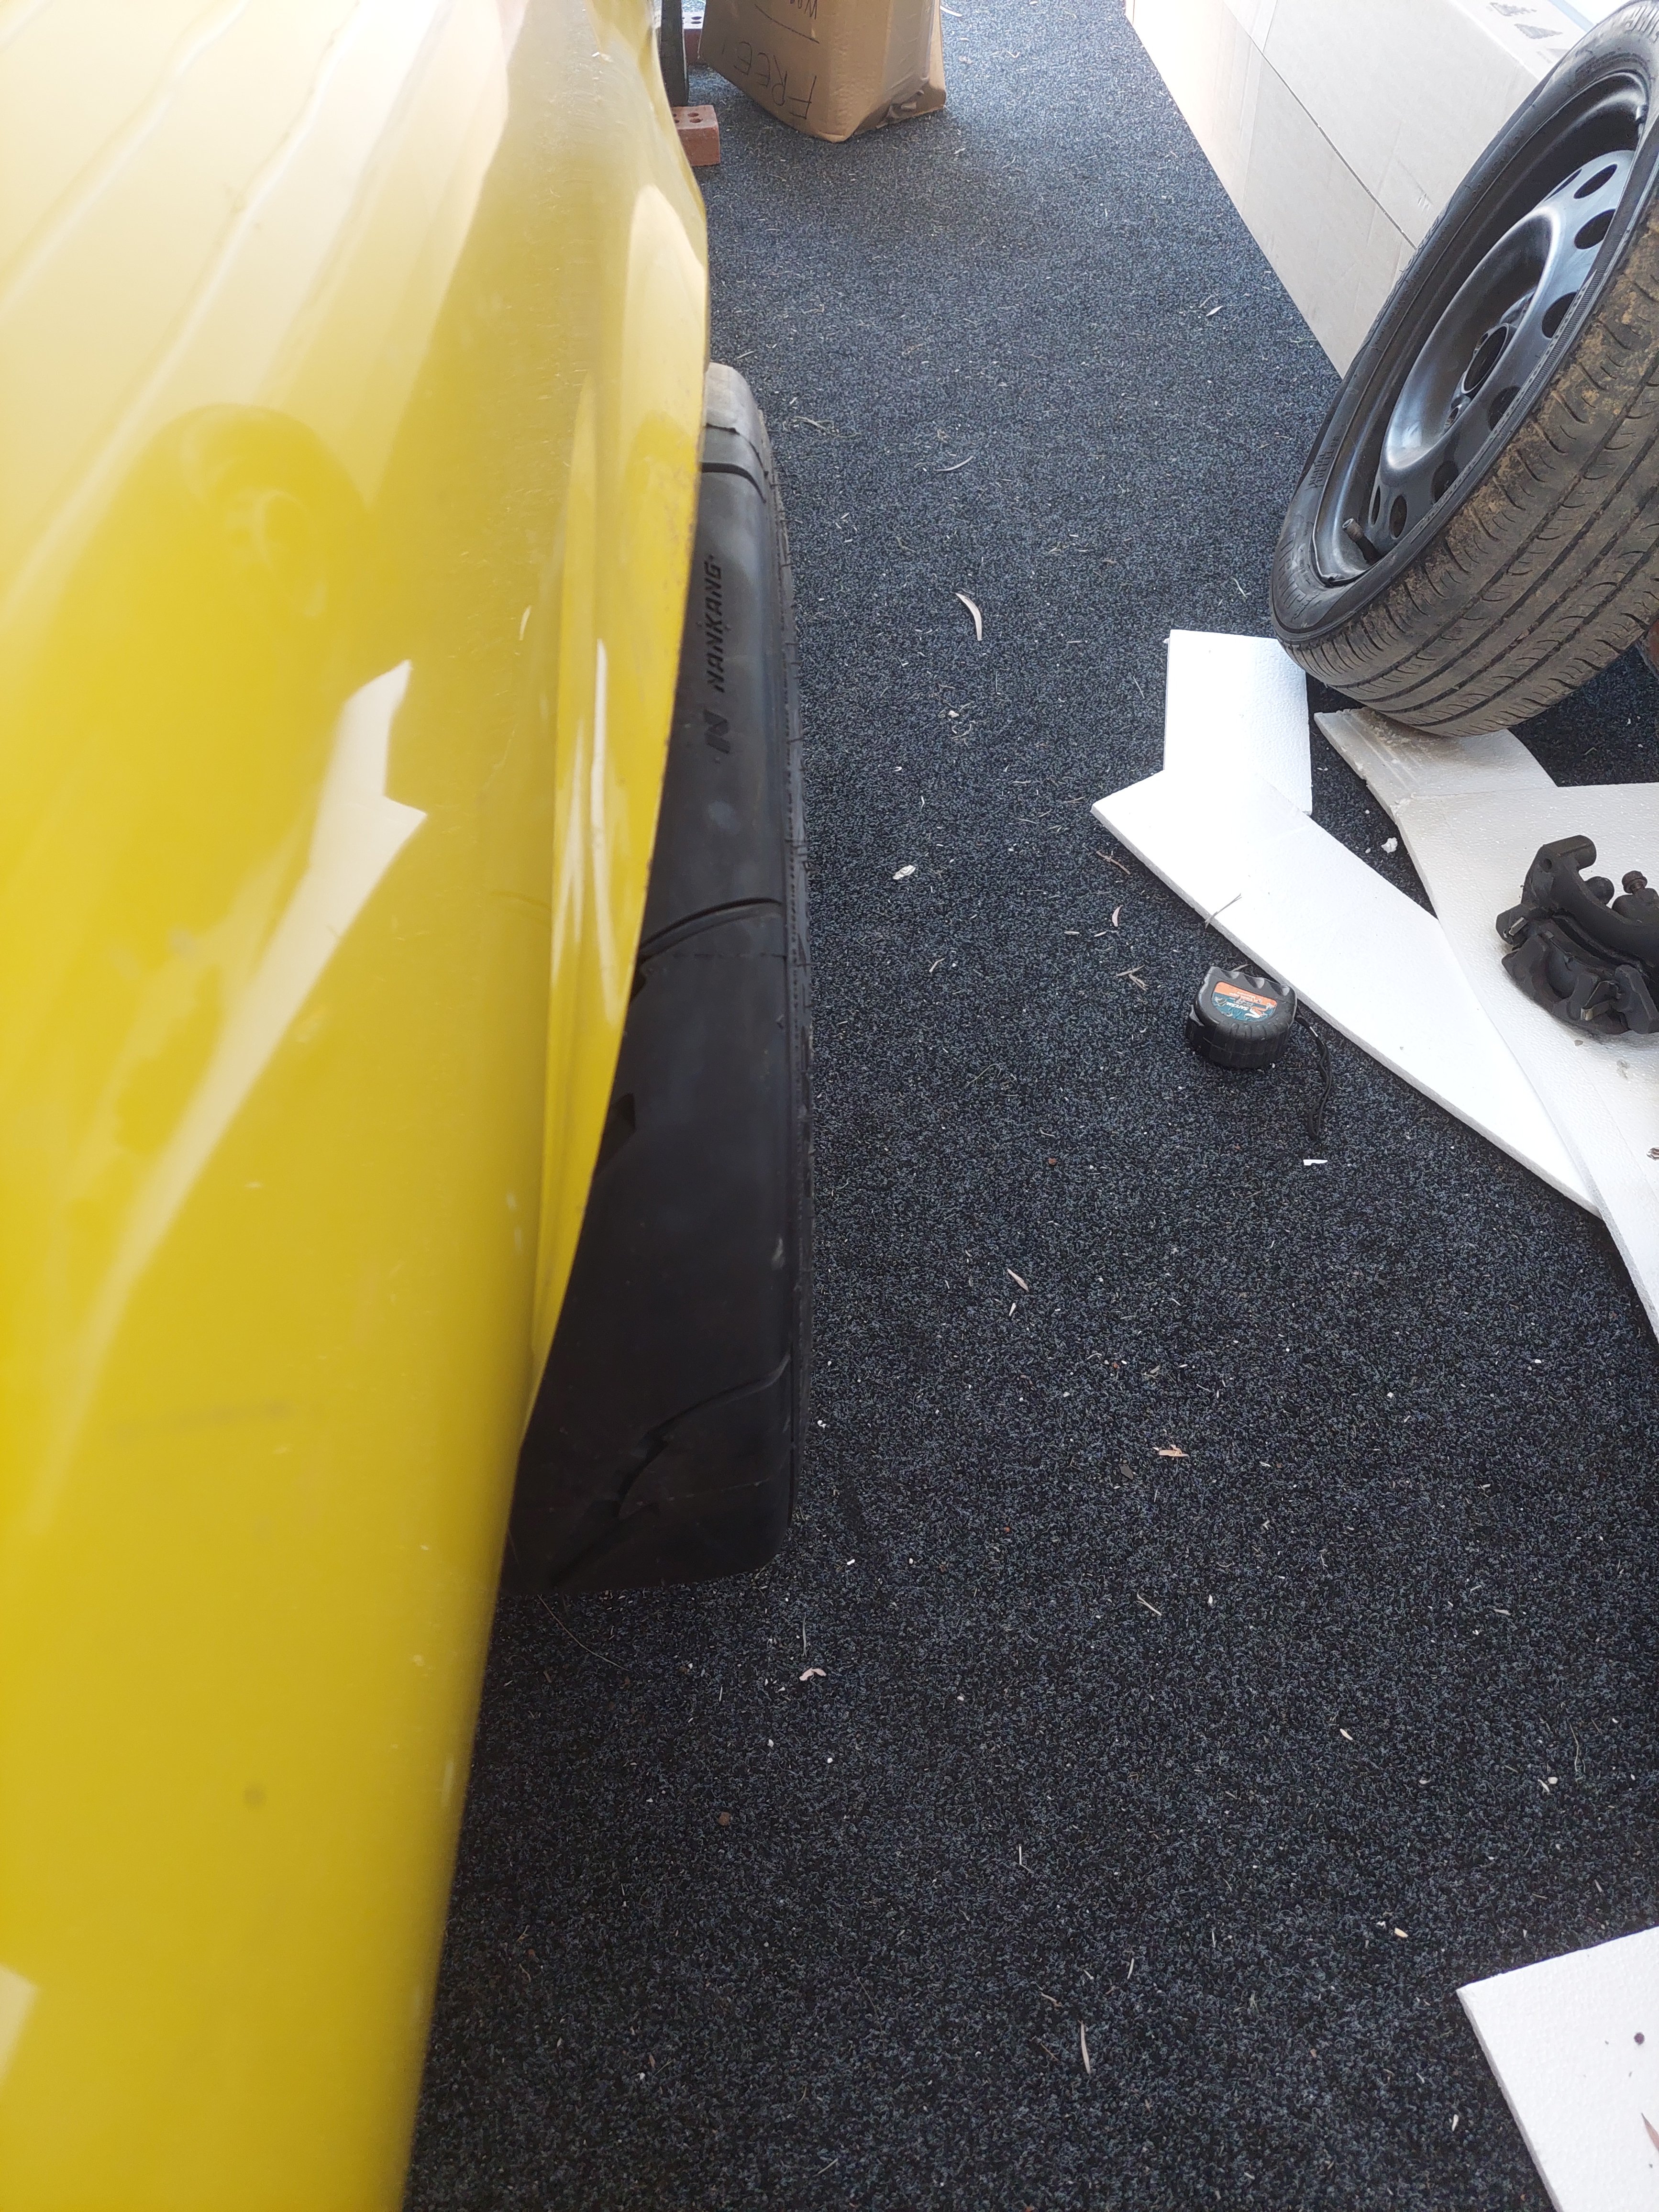
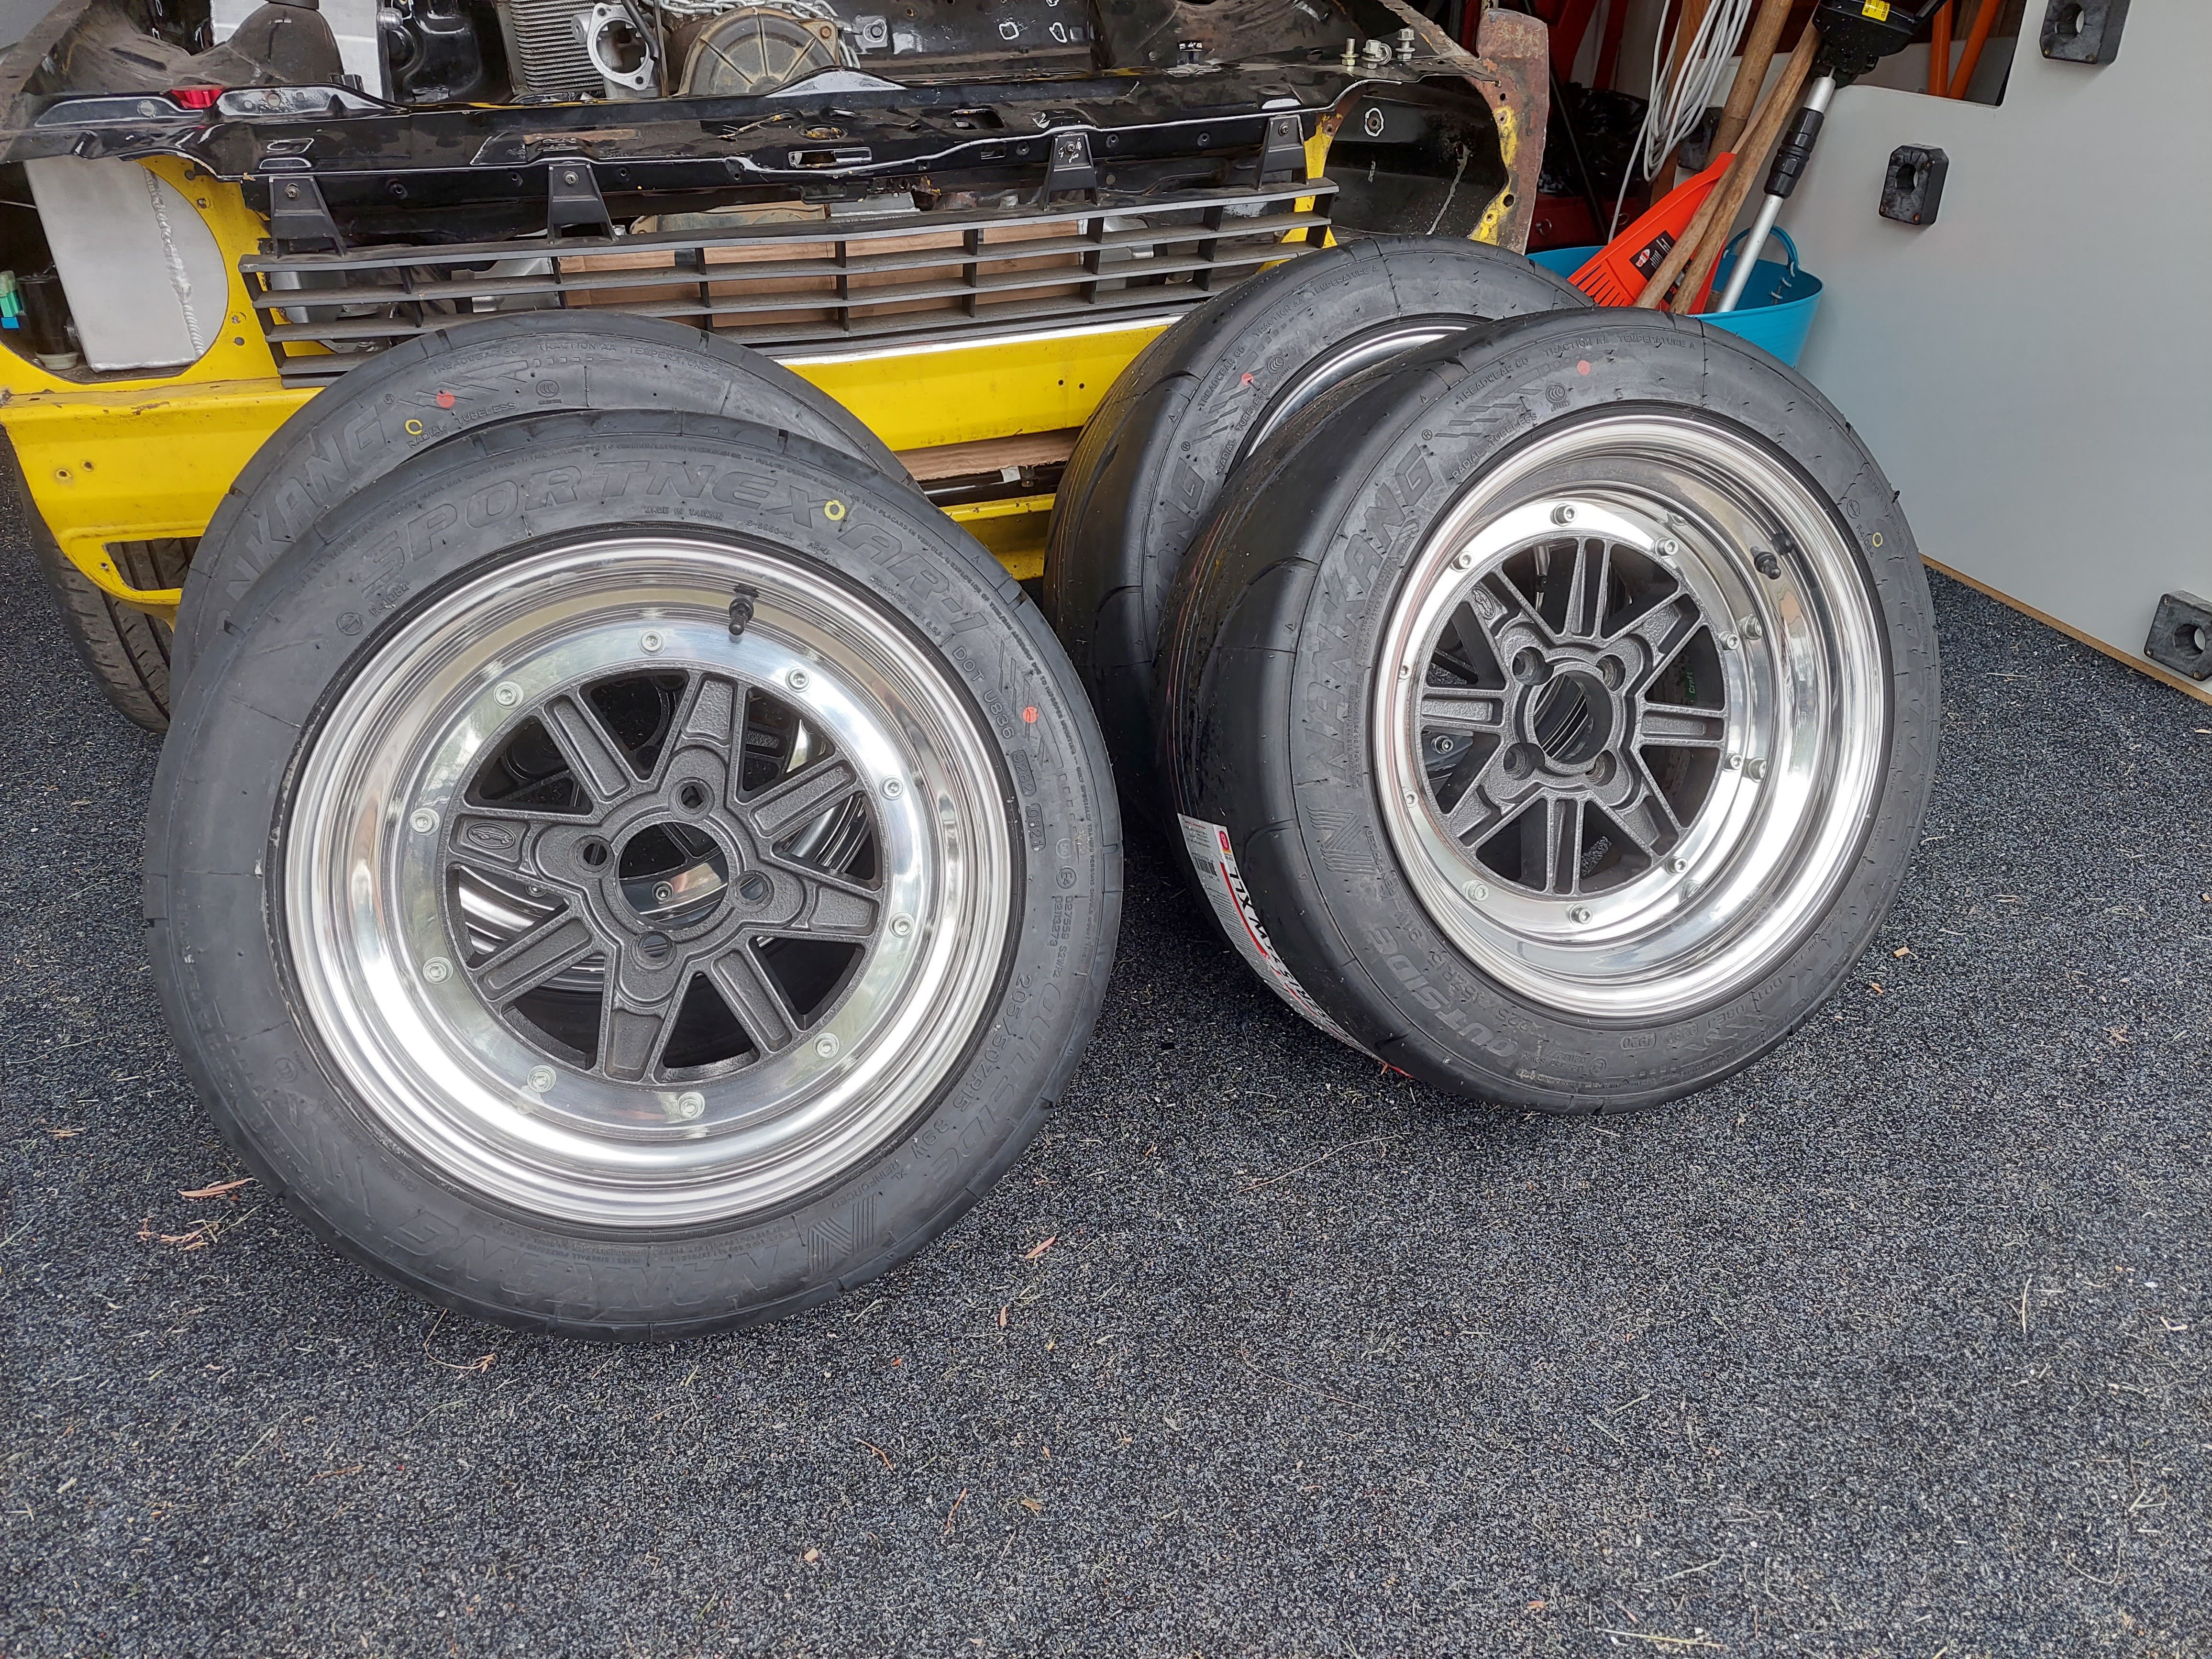
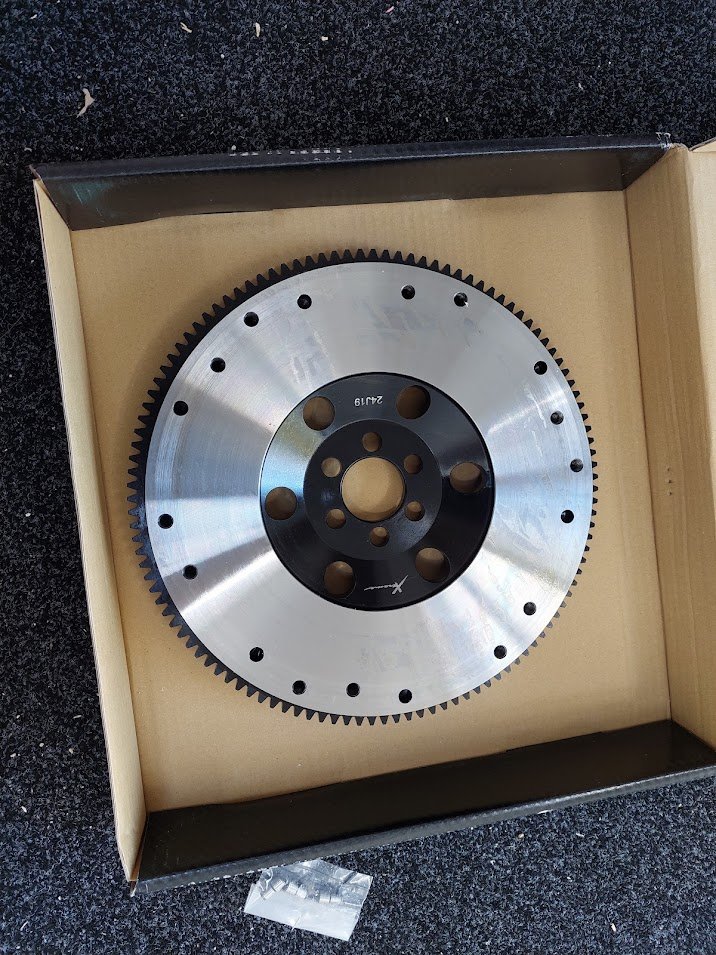
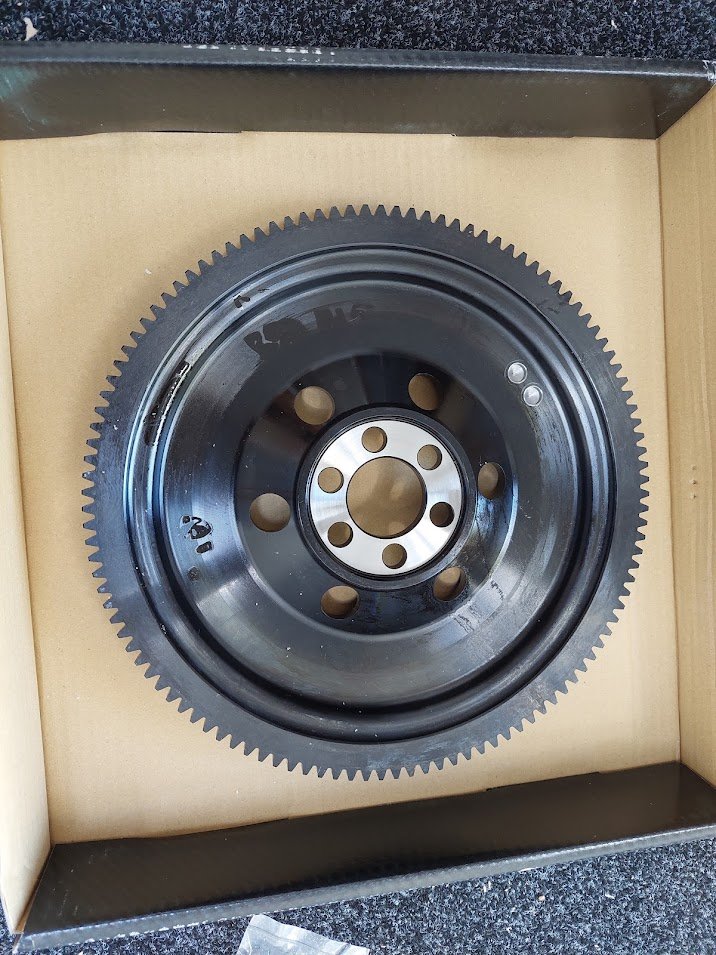
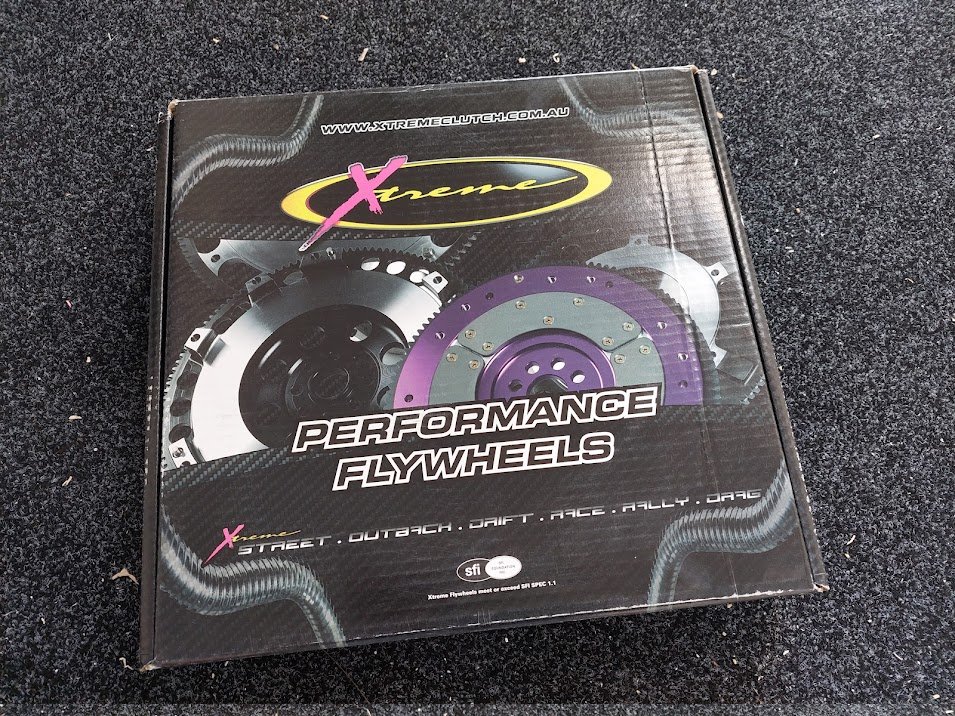
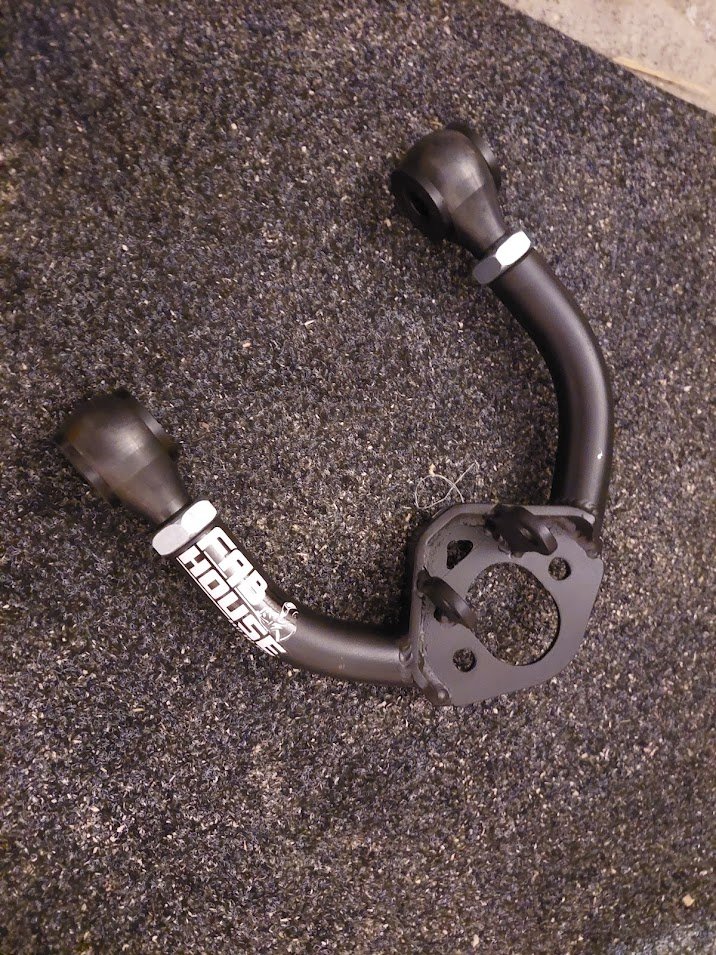
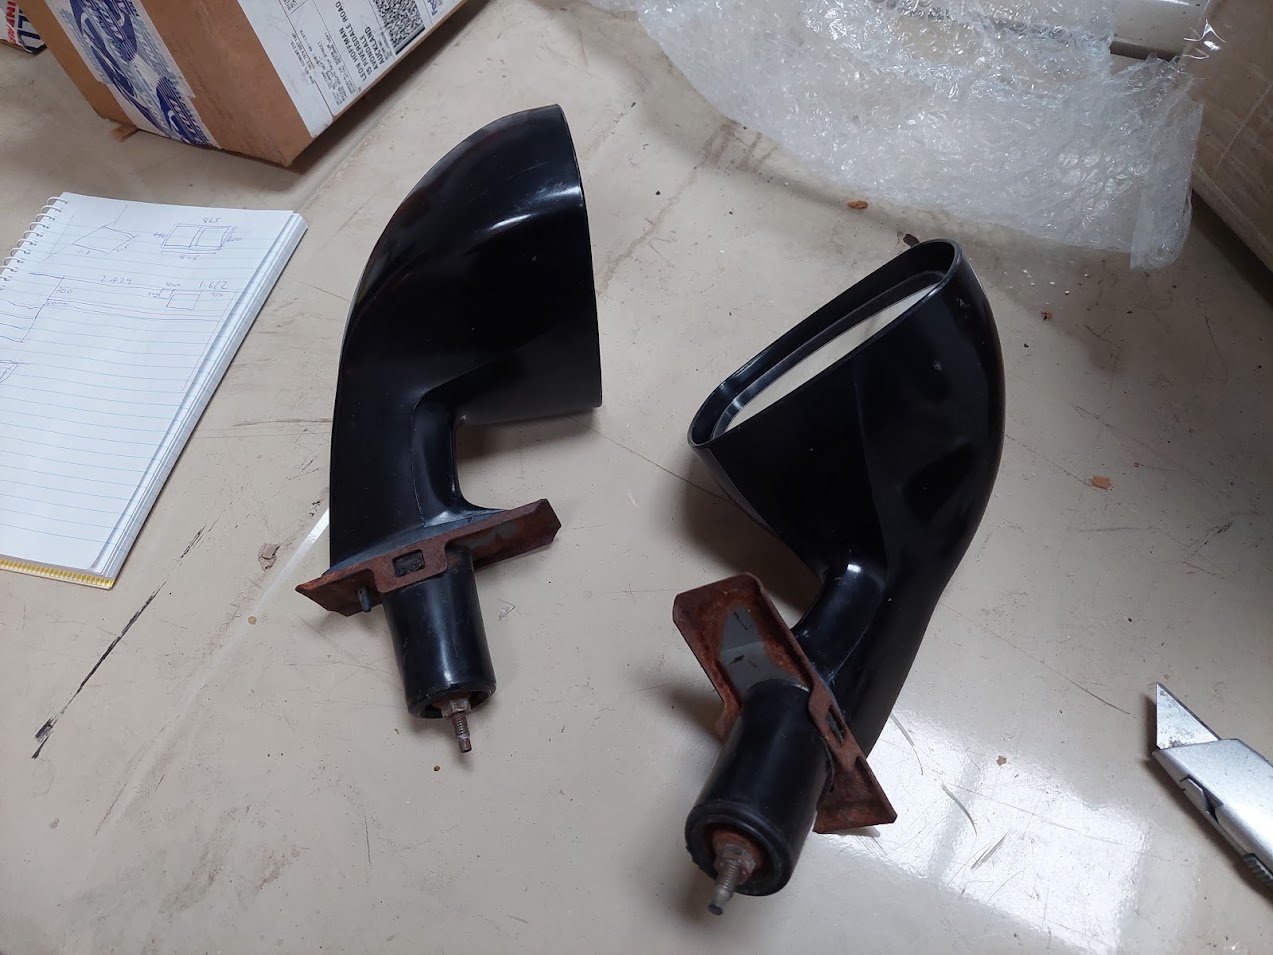
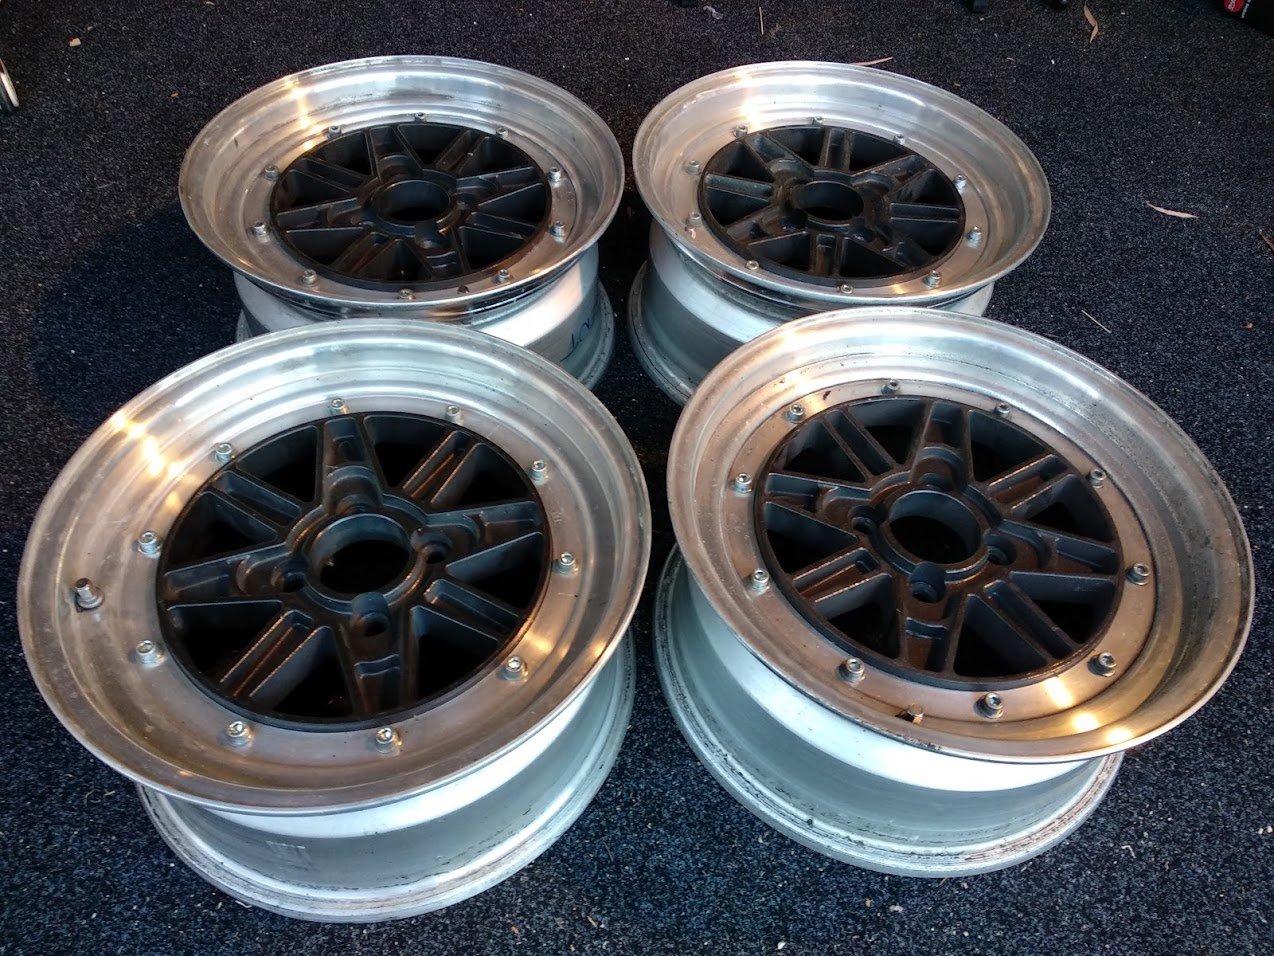
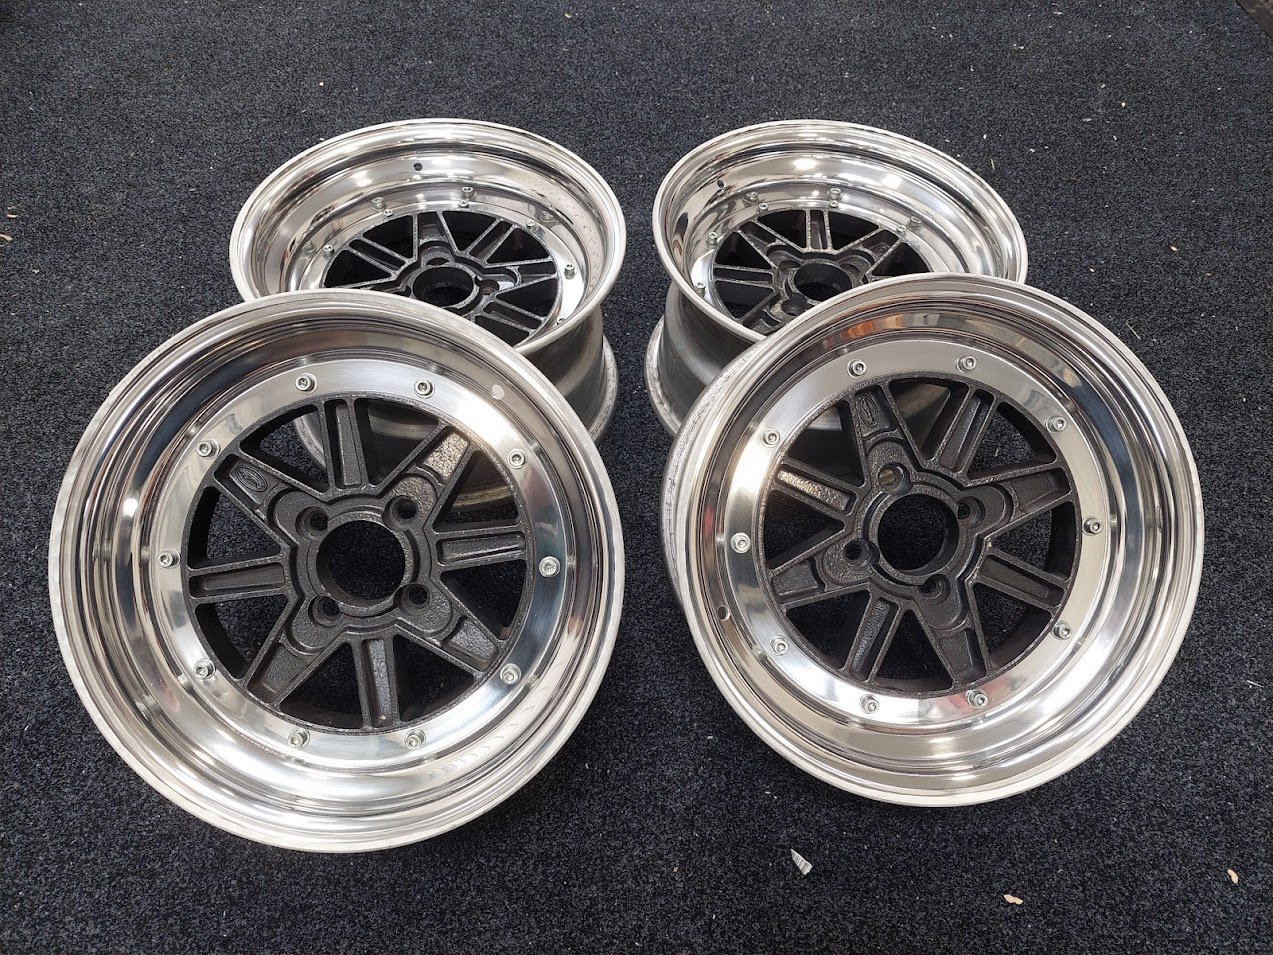
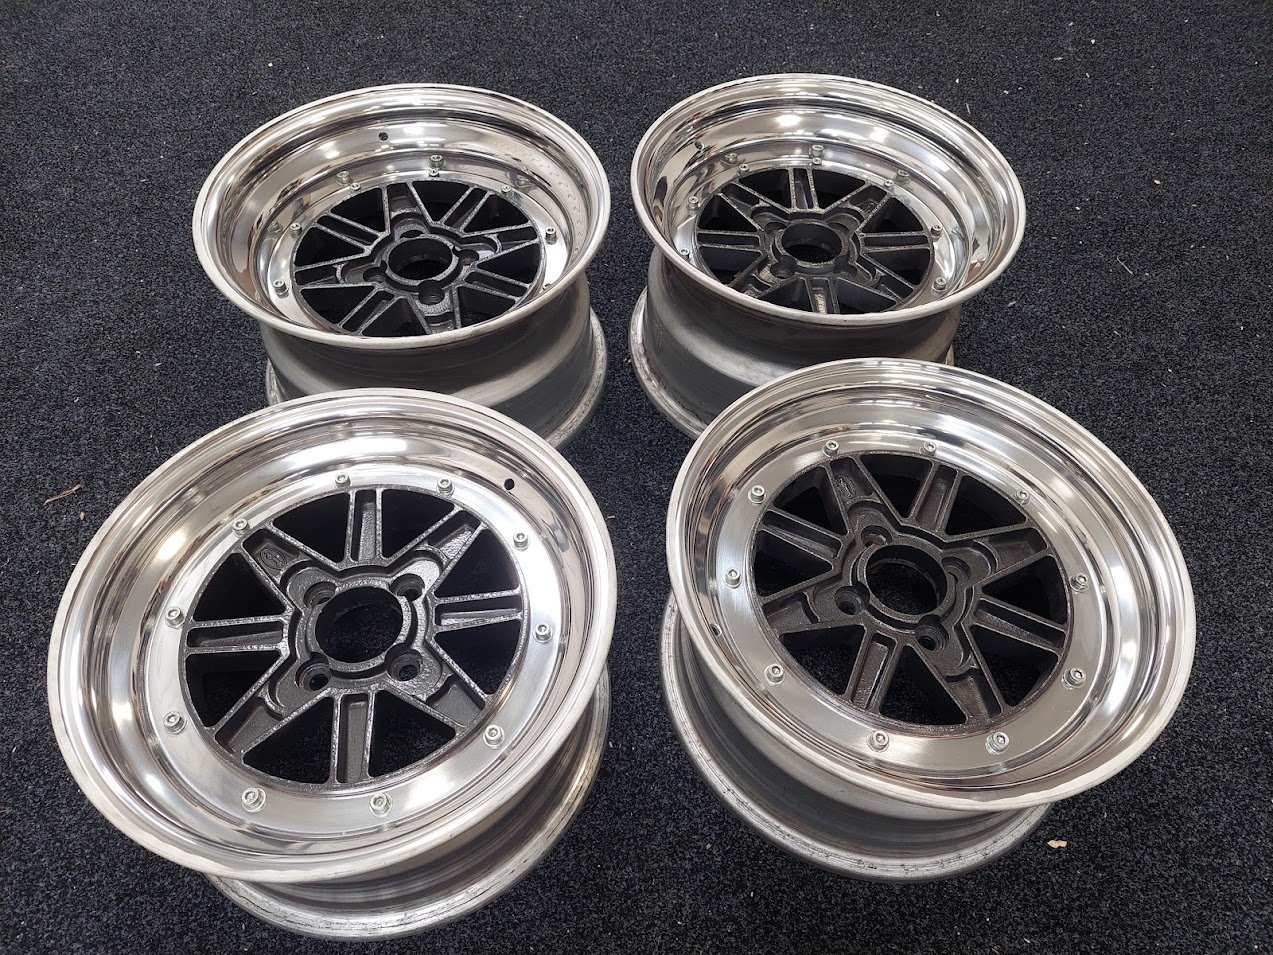
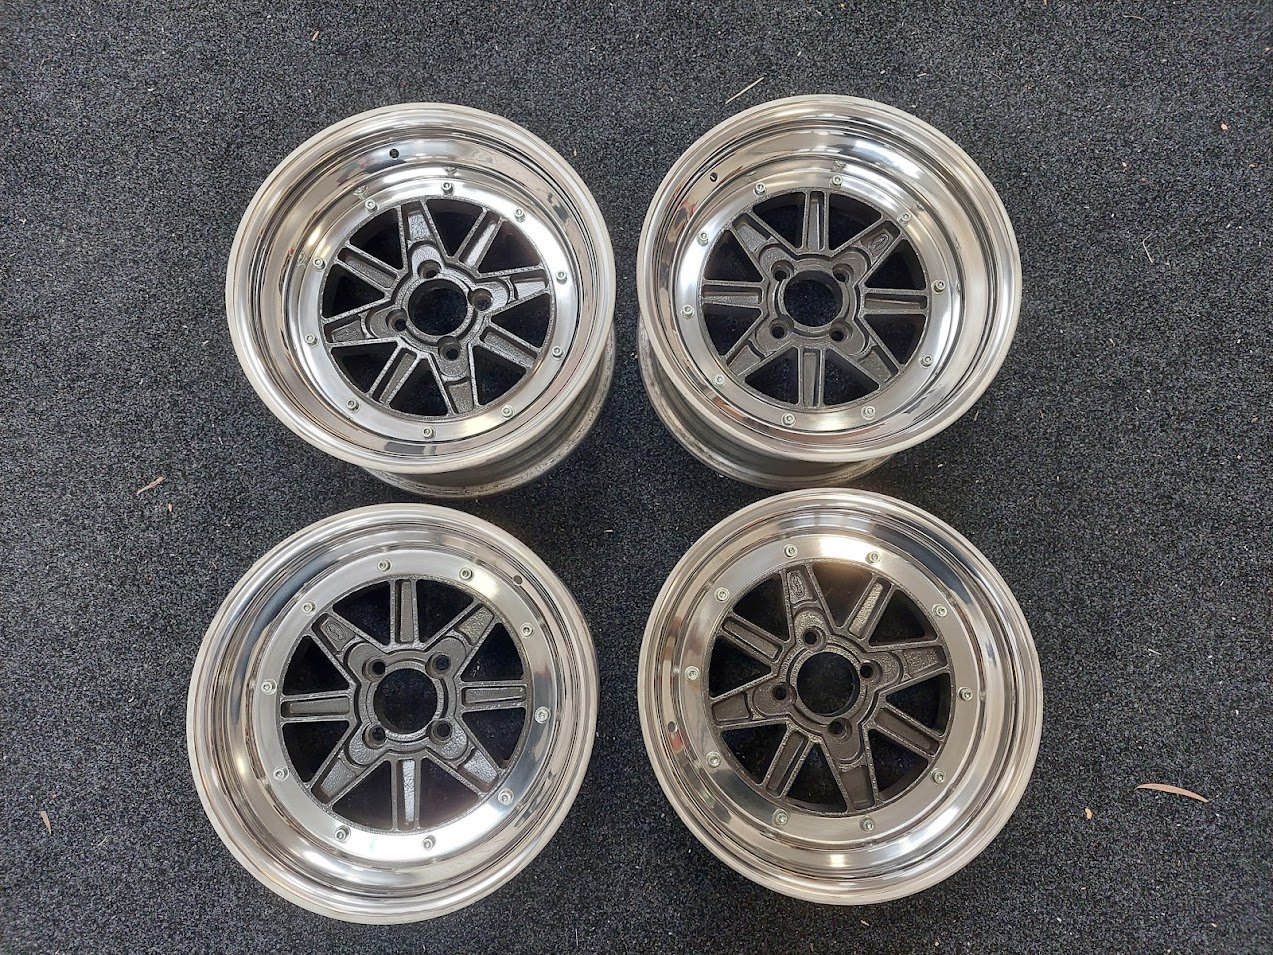
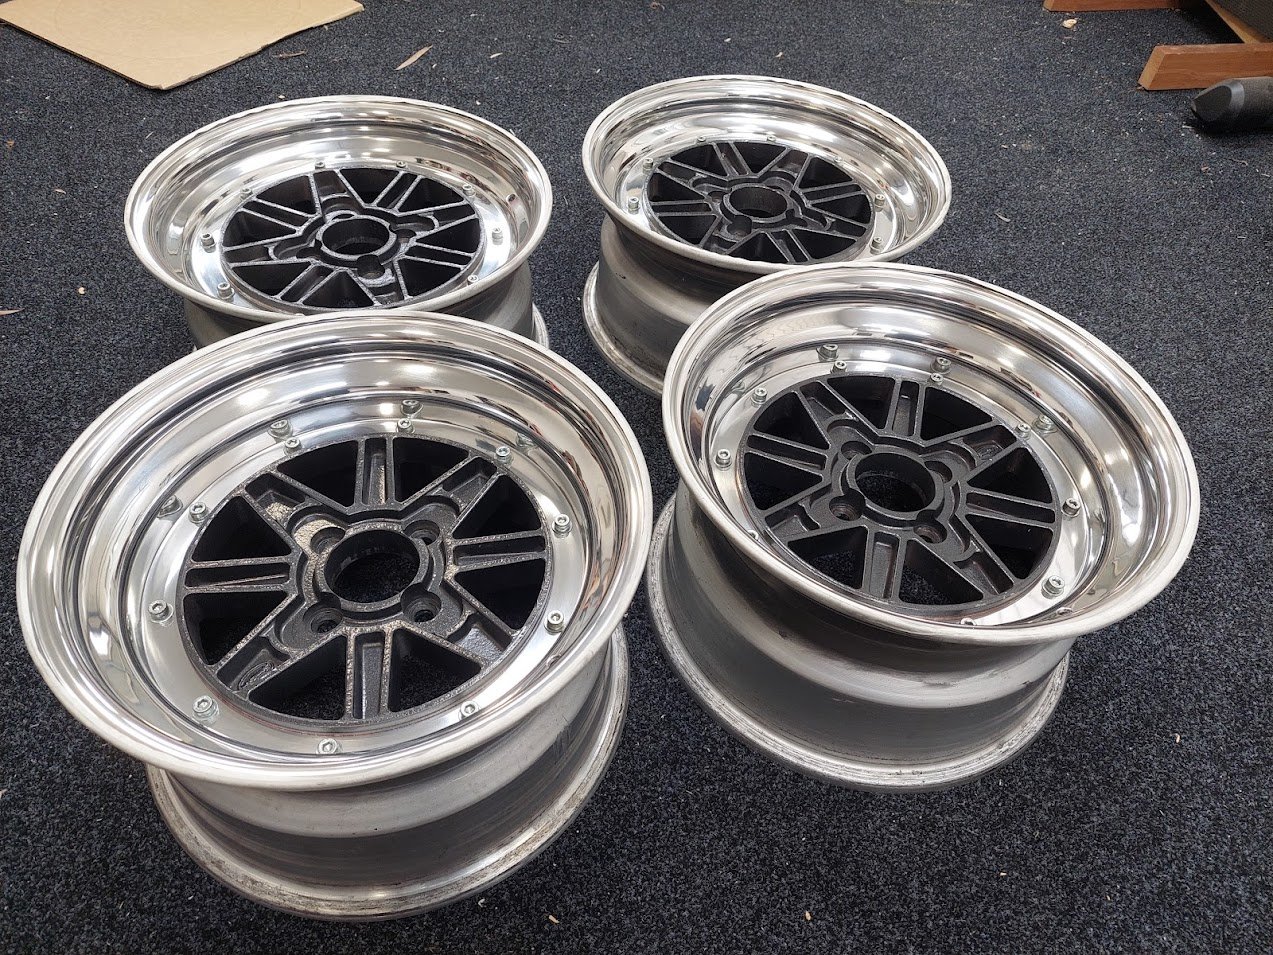
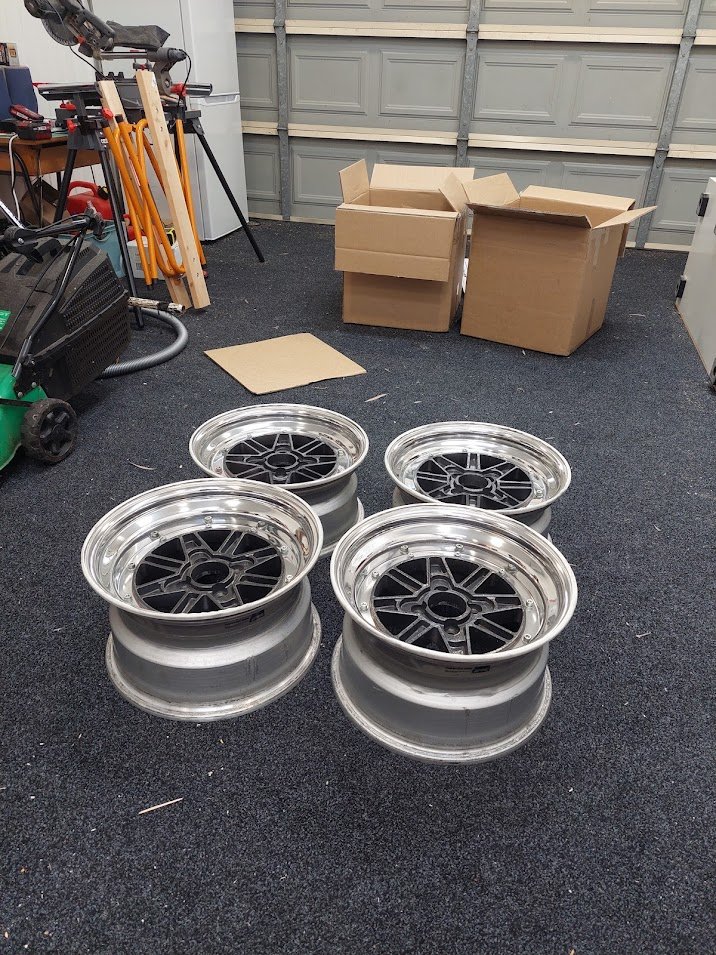
A few more additions to my reckless spending that may or may not be necessary. A post popped up on the Gemini Owners Facebook Group with a guy selling new, billet lightened flywheels for G200Z engines. Luckily the 4ZD1 uses the same 6 bolt flywheel (the E1 flywheel is slightly larger and uses an 8 bolt pattern). I jumped on this immediately and had one sent over. It's about 2.5kg lighter than stock and looks great: Next Next, another dude who runs a shop called FabHouse posted up that he was now selling tubular upper arms. The benefit of these is that they have a much larger platform to enable an adjustable ball joint to slide to its maximum camber. They are also adjustable where they mount to the cross member, meaning that I could pull them in for even more camber if necessary. I am not that clued up on wheel alignment stuff, so I'm not sure how this will also affect the toe in/out. I guess I just have to make sure they are both adjusted to exactly the same point? Bit of a potato-y photo. There are a few things I'm not sure about: the ball joint platform is not knurled and is powdercoated. The joints themselves have knurling on them, so I hope that is enough to stop them moving around. Also, the holes in the platform - the bolt holes and centre - appear to be hand drilled, and not exactly perfectly. They are not terrible but not perfectly round. I hope that none of these things are going to be a problem once it's all bolted up. I certainly hope that this is not going to affect the ability to cert them. Especially because the same shop will be making similar lower arms to enable the use of a coilover spring on a threaded insert, allowing height adjustment. My talks with @cletus have tentatively approved this type of suspension mod, but I guess in the end it will be determined on how well the parts are made. I guess the upside of being in NZ is that the x-member modification to allow the new spring seat to be inserted will need to be welded locally (as I'm not going to send a cross member to Aussie), so can be better watched over. The shop also said that the spring locator is also laser cut, so no hand drilling! Here's hoping. I've also managed to find some factory Isuzu fender mirrors out of Malaysia. Funnily enough, my car actually came with fender mirrors but they weren't cool when I was 18 so I pulled them off. I don't want to think that I got rid of them, but I have a haunting memory of throwing them in the bin. What an idiot. Anyway, I've got these replacement ones that are more proper than the ebay specials I had on there before. They definitely are not perfect so will need some cleaning up and I think I am going to have to 3d print a new mounting plastic part as one is chipped and finding a new one is basically impossible. . For now, last, but most definitely not least - ya'll remember my SSR MkIIIs that I bought off of @mikuni (ex his Piazza - trying finding this stuff in 4x100!) years ago and have had on the car for ever, well, here's them: Anyway, these were going to look way too Aussie drag-spec for my liking when trying to get 225s on them (they are 15x7 ET26). Me and old mate @EURON8 spent many evenings mucking around trying to figure out where I could find some rims that were going to be wide enough to suit the tires. I finally settled on some Minilites after looking around. However there were some issues. The first is that the they only come in 15x8 or 15x9. The cert rules said that 9" wide was out of bounds for a 225 tire. The other thing was that despite it being quite obvious that I was going to have a shorten my diff, the highest offset on the 15x9s, and even the 15x8s, was too low. I would have ended up having to really push my fenders out or run some flares in order to keep the brake calipers inside the wheel wells and from hitting the floor on full compression. It was a similar issue on the front, waaay too low of an offset, even despite the fact that I had decided that I was going to have to run a staggered setup to avoid similar issues on the front. Anyway, after much much mucking around, many nights with measuring tapes, and difficult emotions in leaving the SSRs behind, I decided to change tack. I spoke with my panel beater and he was certain that if the fenders needed to be pulled out, that he could do this without too much disturbance to the stock lines of the car. The one thing I was super anal about was ensuring that the the vertical section on the outside of the wheel arch (does this have a name? I've noticed on modern cars this has got really massive!) needed to stay intact. I am NOT a fan of those rolled up wheel arches which push the vertical section out and into a point, if that makes sense. Pretty common on "stance" and drift cars when they're trying to fit wider rims. Anyway, I digress, with this information from the panel beater I decided that I could go wider on both the front and back (still with a diff shortening) without an issue - I hope! So I boxed up the wheels and went to the post office. Then I waited, and waited and waited. Then these showed up!\ A huge thank you to Aidan at Pine Engineering for adding 0.5" to the fronts and 1.5" to the rears. So now I'm running 15x7.5 ET17 on the front and 15x8.5 ET4 on the rear. I'll be running 205/50 on the front and 225/45s on the rear, which are within a few mm of each other in terms of side wall. I'm so stoked with how these turned out! Annoyingly, perhaps, the tire to wheel width cert rule changed while they were down at Pine! The next step is to mount up the tires - Nankang semis - and see how they fit. Once I've done that I can determine how much diff I need to shorten on the rear, and whether or not I want to muck around with the brake setup on the front to reduce the track which is currently +10mm on each side due to the current brake upgrade. There are options to go back to stock track if I make some changes, but I also want to make sure that the fender pull is relatively even front and rear, so we'll see. The car is still at @EURON8's place and I can't go over because of lockdown. Covid's really wrecking progress here! Anyway, that's the gem update for today. As per usual, click on discuss coupe in my signature to let me know what you think. I'm keen to chat! Extra pics:
- 73 replies
-
- 24
-
-
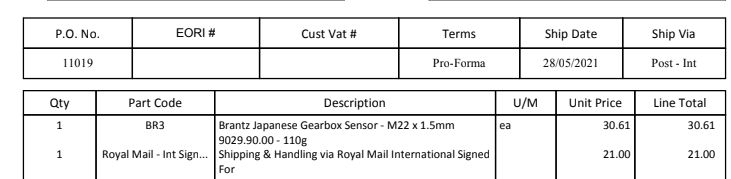
Strangely enough the Brantz site doesn't say, but this reseller does: https://ears.ie/brantz-japanese-m22-gearbox-sensor/ 4 per revolution, which seems like it'd work perfectly for you!
-
Hey Alex, I got it direct from Brantz in the UK. It literally just sits in between the gearbox and the cable, and is supplied with a little pin so everything still works. Mine is M22 ("Japanese" gearbox), but they have others - https://www.brantz.co.uk/sensors
-
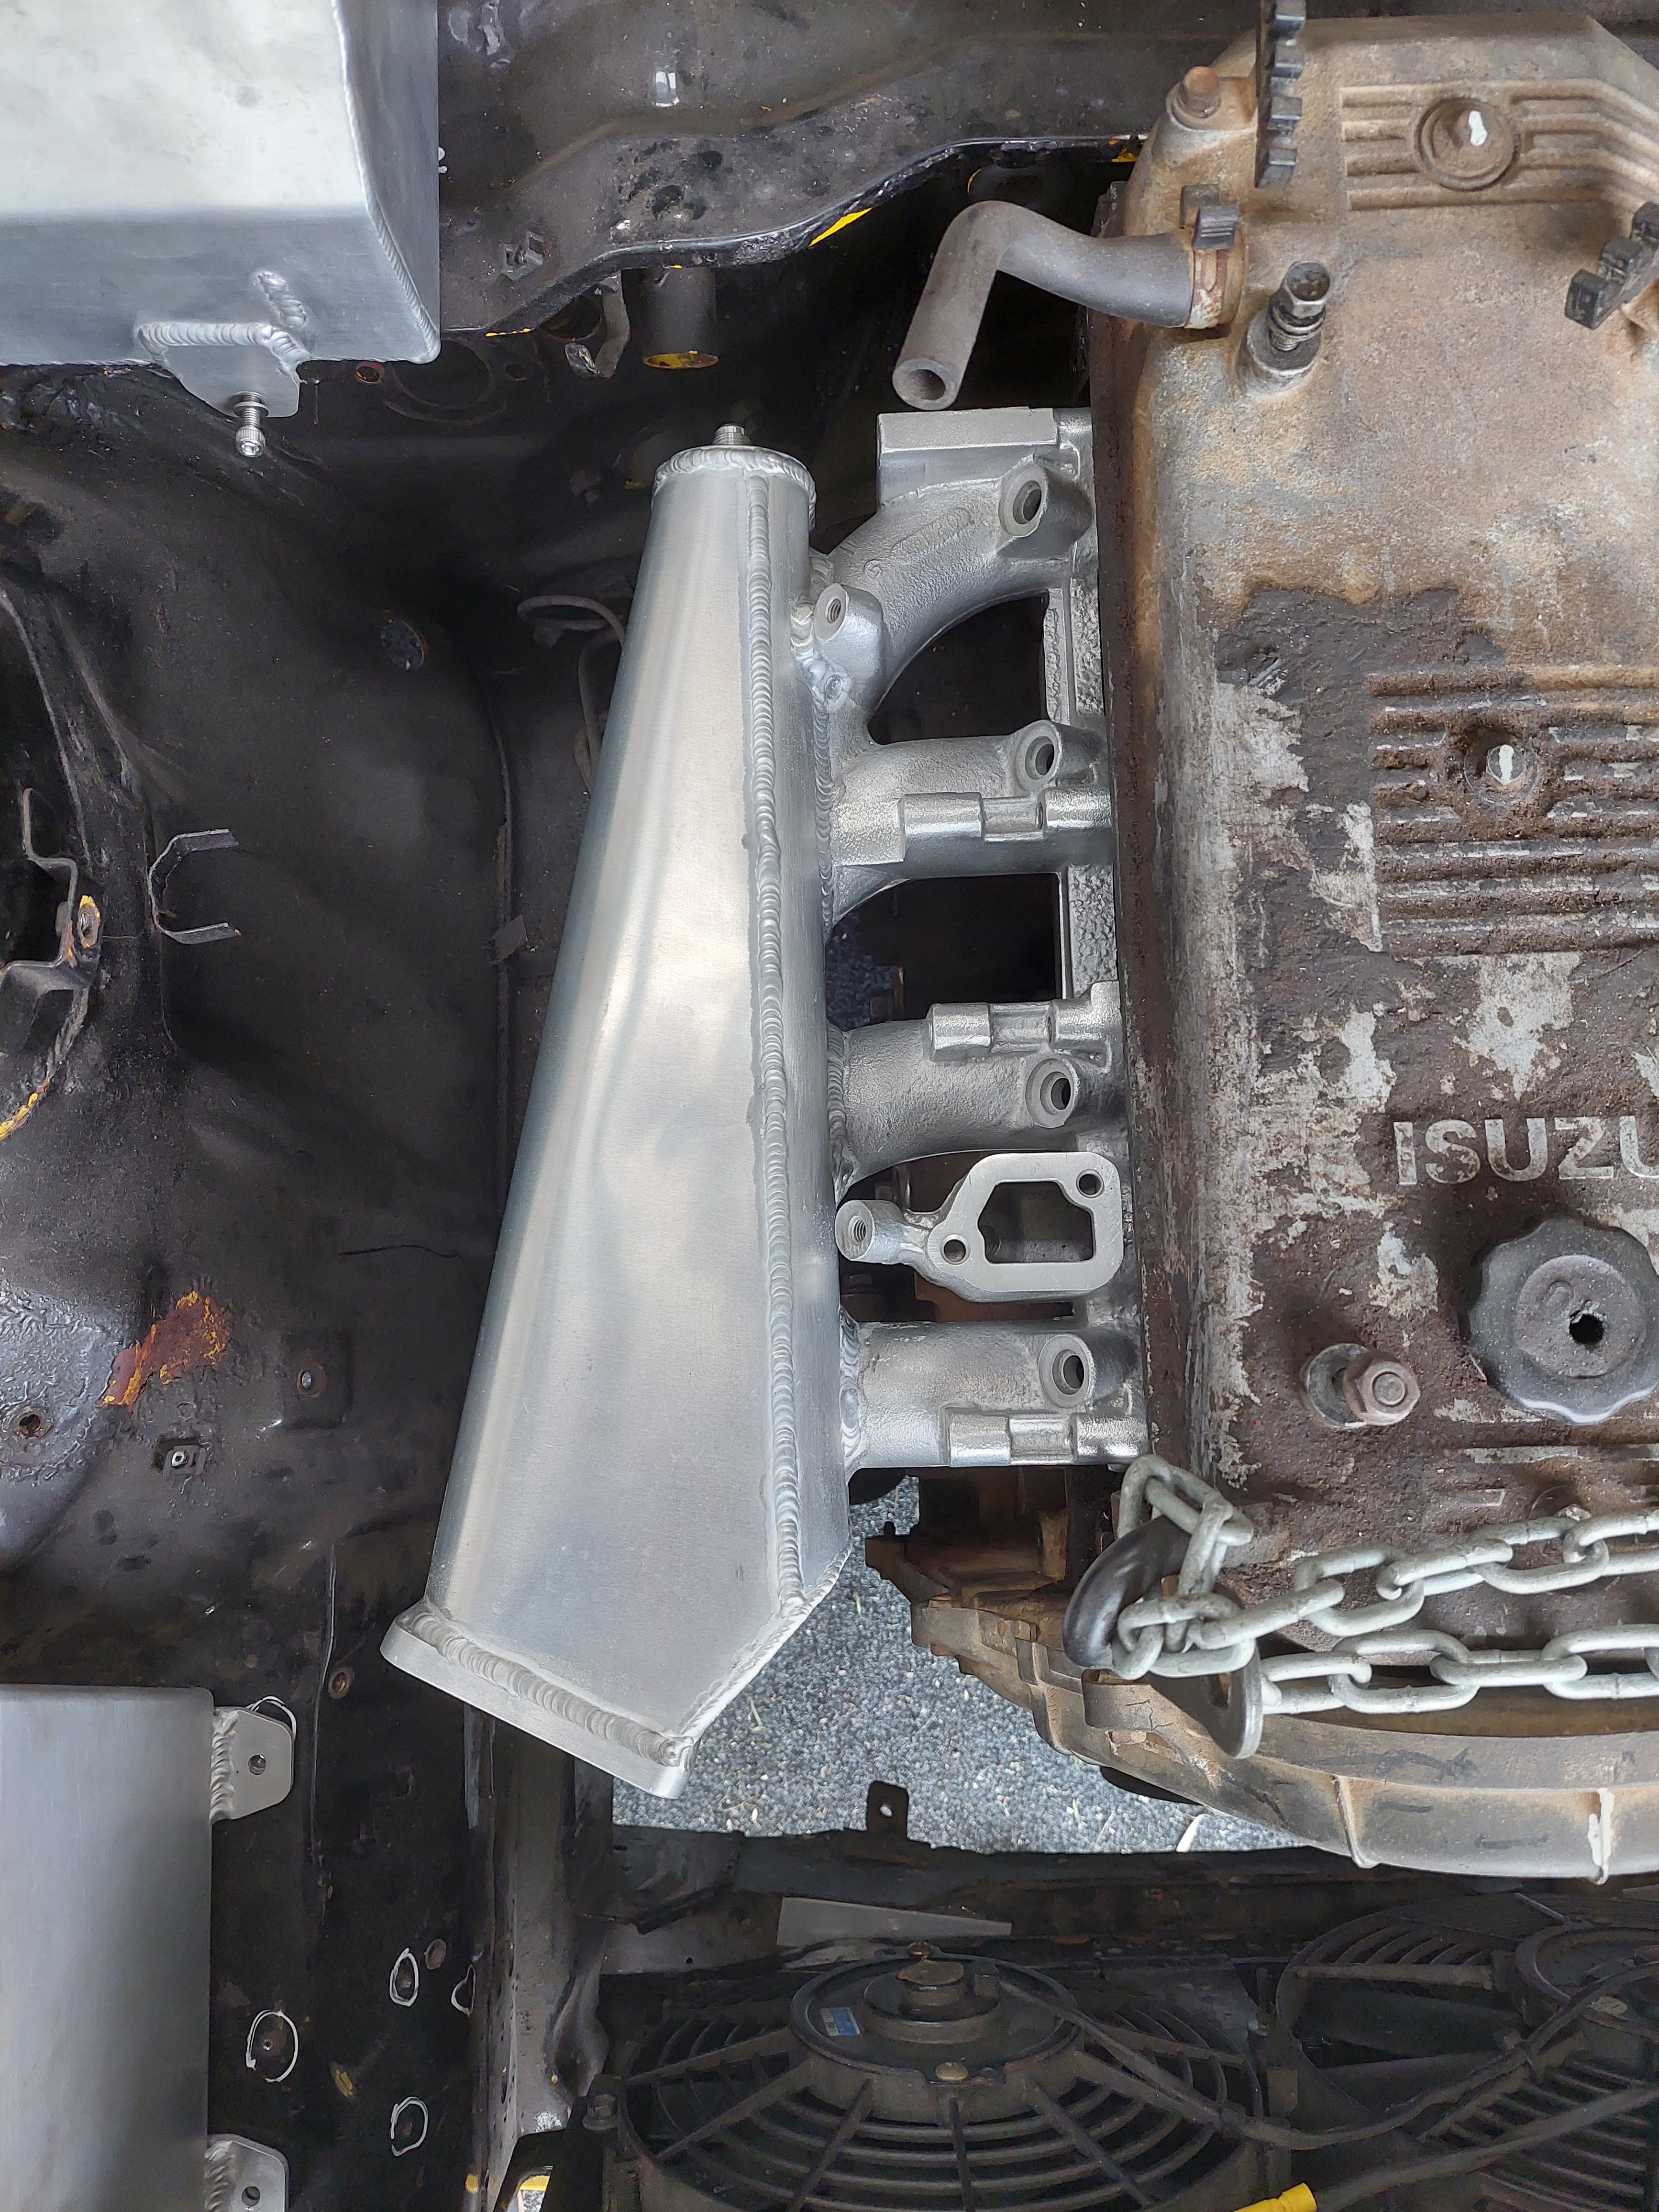
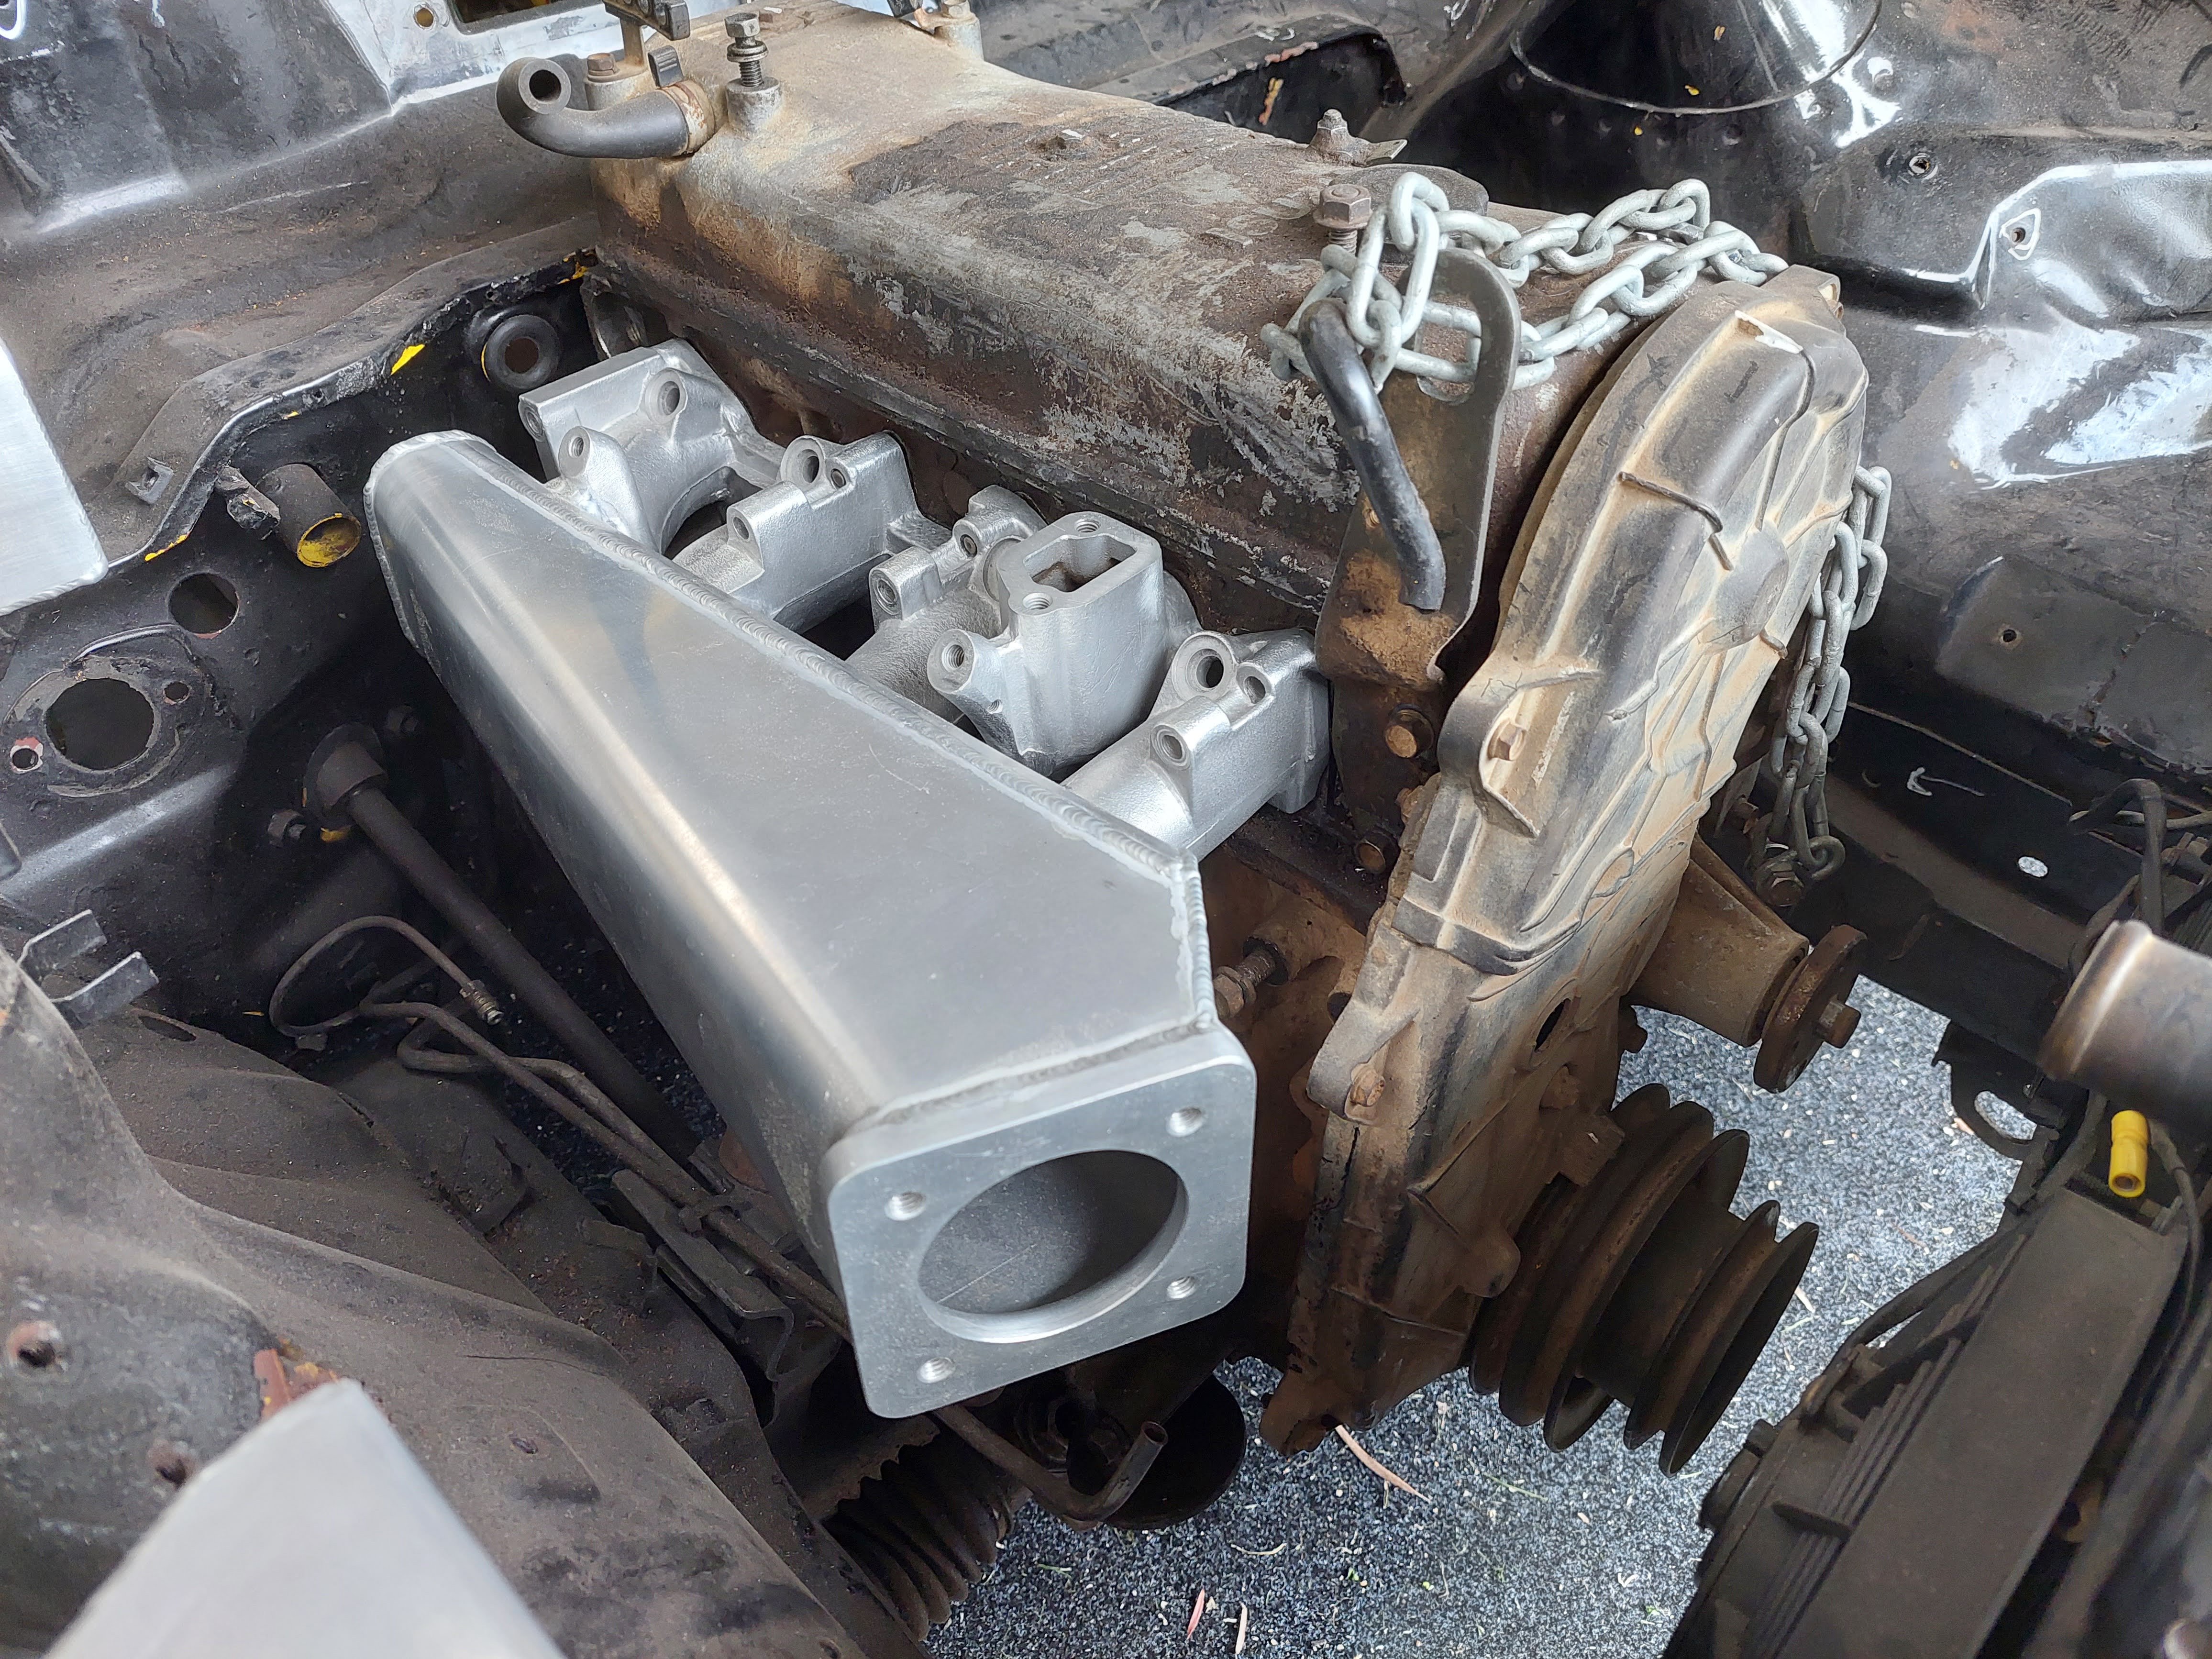
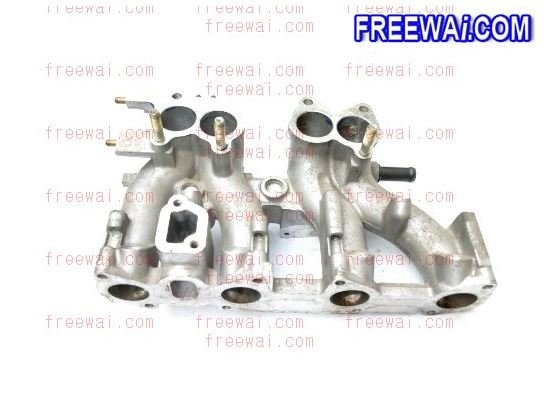
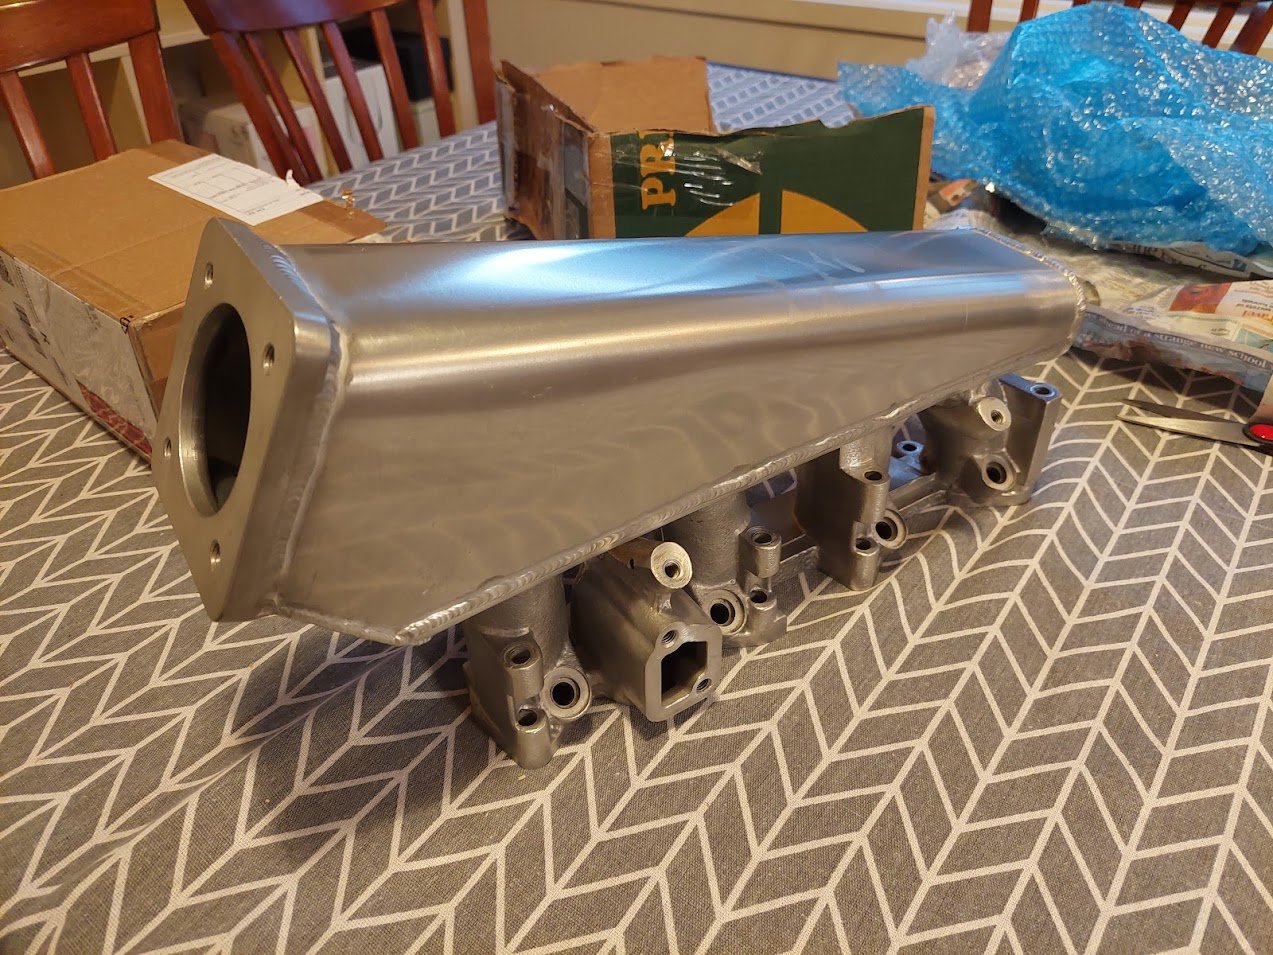
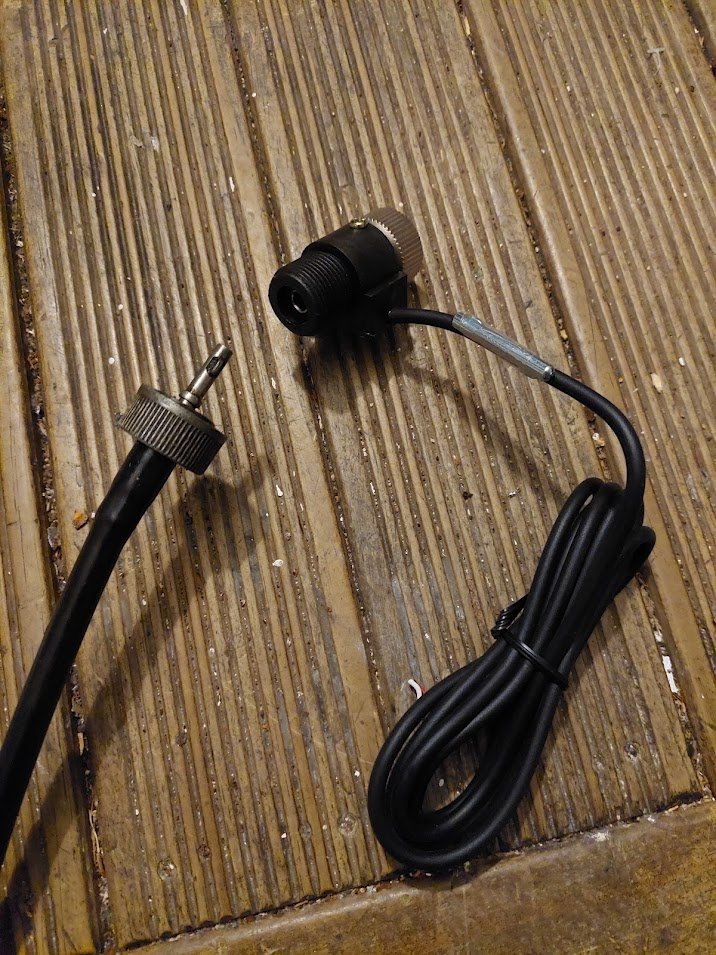
While the tail light surrounds were happening, I sent my inlet manifold over to a dude in Tasmania who modifies the stock rails with custom plenums, for a very good price. I guess I could have had this done locally but he had a bit of a production line going and it ended up cheaper this way. Plus, I think it's good to support people in the Gemini community. I don't have a before picture, but essentially I sent him this (excuse the stolen image): and received this in return: It's nicer than I expected. The plenum to runner transition is fully smoothed out on the inside and looks great. While I'm here, I want to run boost by gear and was trying to figure out the best way to get a speed signal into the ECU. I could have built some kind of trigger system at the rear hubs, but that seemed like a bit of a pain. Taking it from the gearbox seemed to be a way better option, especially as I'm already running some wiring for the reverse sensor anyway. The problem was that I also need to keep the cable for my speedo. This was one of those moments when you know what you need but just can't find it, even though it MUST be out there somewhere. I'd seen adapters for converting speedo cables to a signal for an electronic speedo, but needed one that still enabled the cable to be used. Fortunately, after some searching I came across the Brantz gearbox sensor, which fits between the box and the cable, and sends off a pulse. Pretty cool! Anyway, here's Wonderwall some pics :
- 73 replies
-
- 28
-
-

-
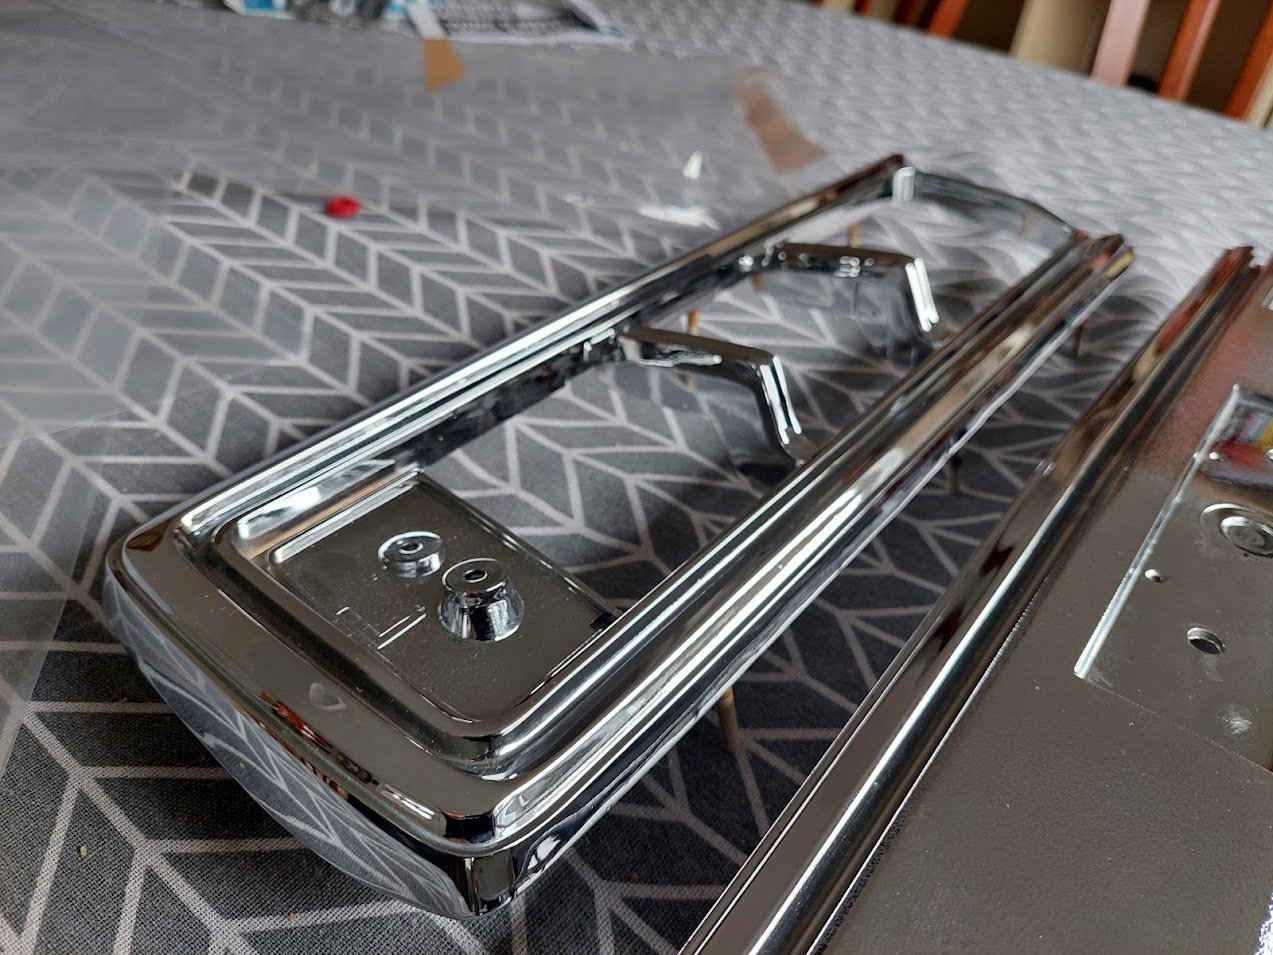
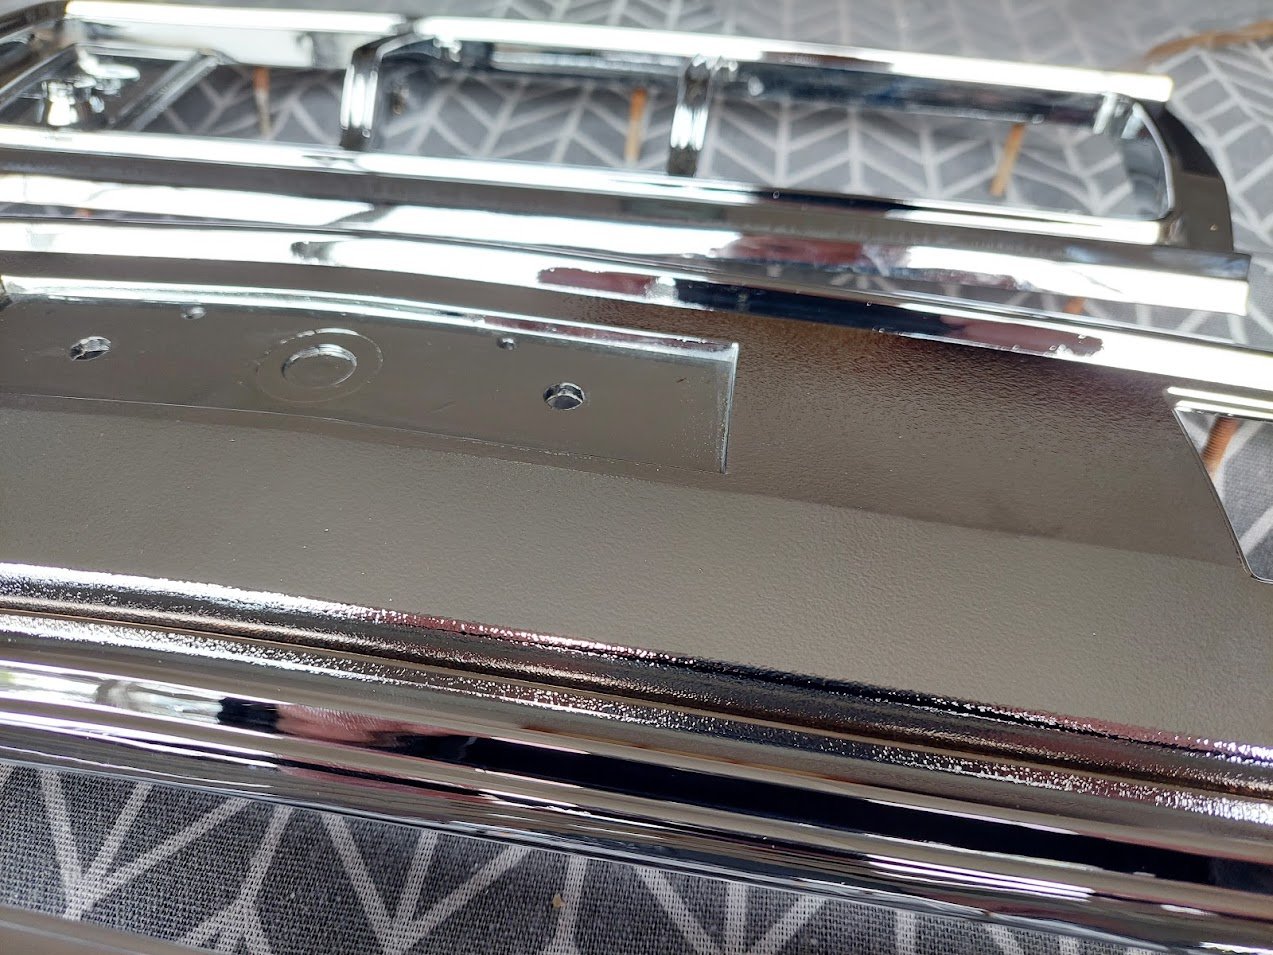
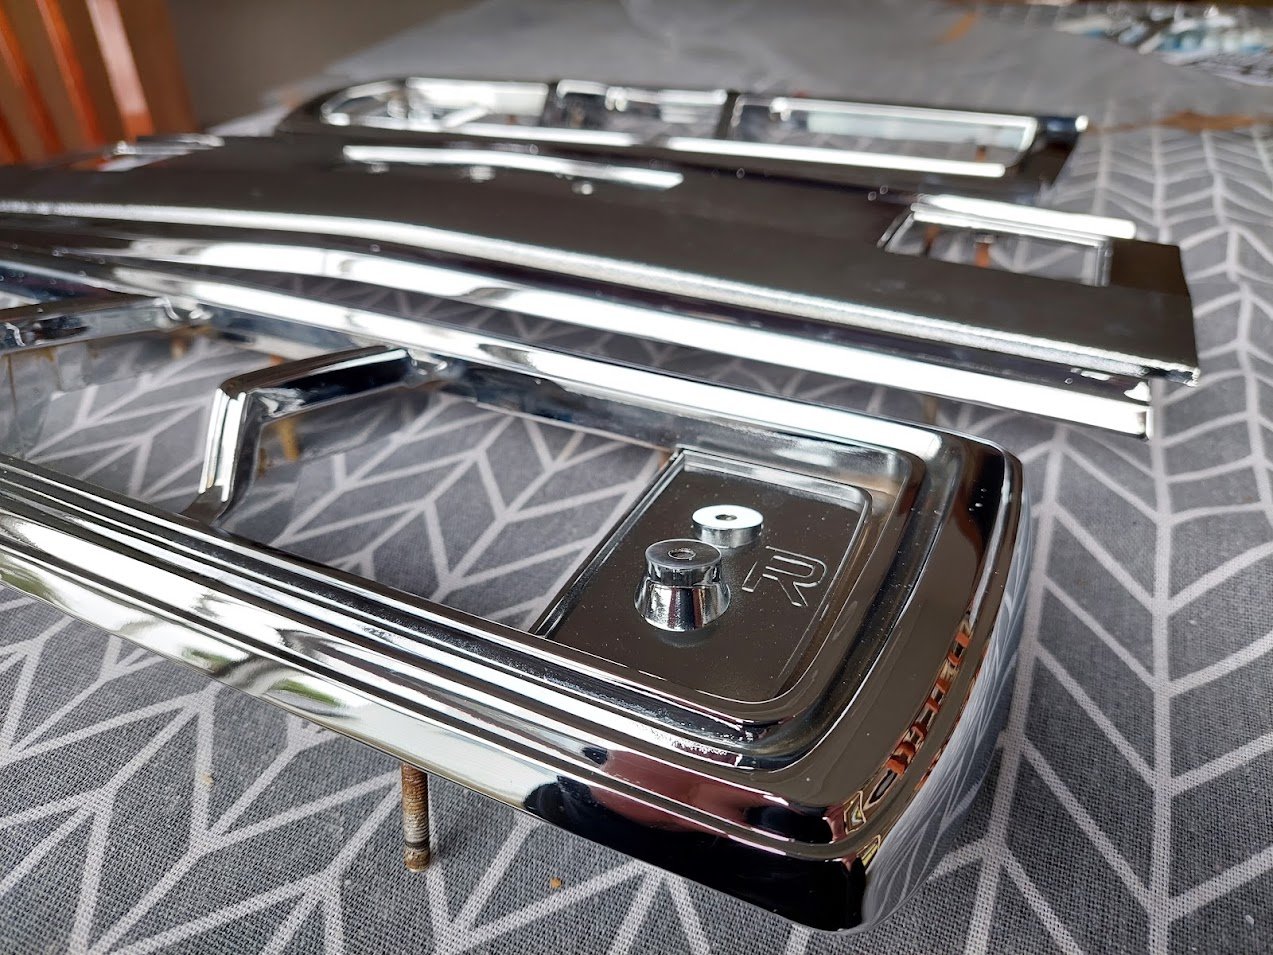
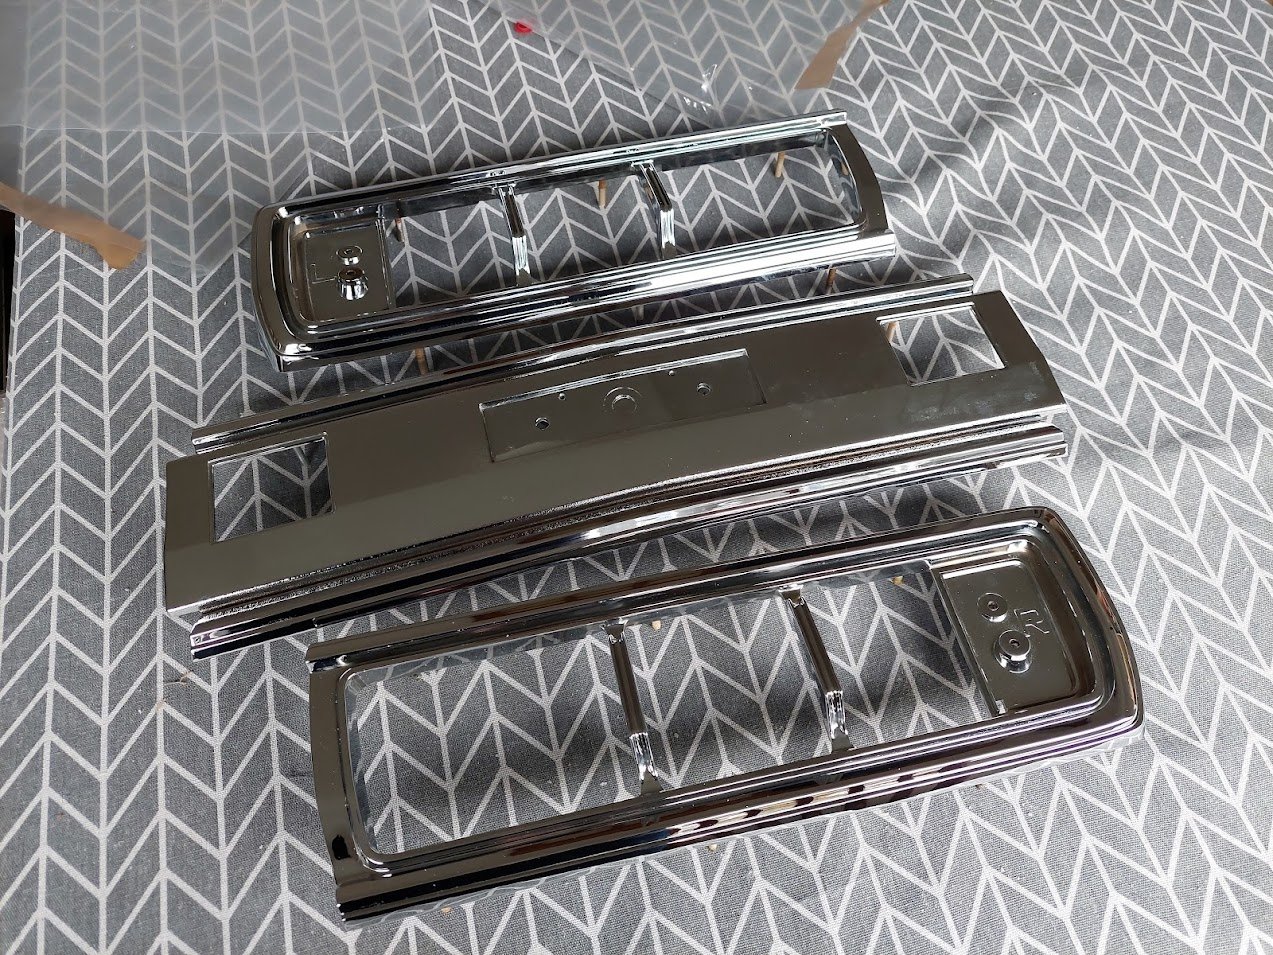
I think this thread is due an update. Let's do it multi-part. If you look at the top of this page, you'll see where I got to with trying to have my tail light surrounds vacuum metalised. A bit of a stalemate in trying to find somewhere to restore the chrome on them. I ended up deciding to look in Aussie and found a place called A Class Metal Finishers, south of Adelaide, who said they could rechrome the ABS plastic. No one I could find in NZ told me that they could do this, or if they could, that they could guarantee it would work. A Class said no problem. I sent over 2 sets of surrounds, they chose the best ones and put them through a full rechroming process, similar to what would have been done at the factory. And I am very happy with the result. These pictures do not do them justice. I actually think these might be better than from the factory - they feel about 25% heavier than the ones I sent away! Now they just need to be repainted in the right places and I'll be ready to start cleaning up the lenses and other bits of the tail lights.
- 73 replies
-
- 31
-
-
Thanks. I'll do a bit of searching and see if this is a common issue with this kit (although I'd imagine they are all similar).
-
For my daily - how can I determine if a strut spacer lift kit will be certable? I'm looking at this one which seems to be well designed and includes subframe spacers to ensure the alignment is not wrecked, as well as adapters for the longer brake hoses, etc. https://lpaventure.com/collections/outback-2010-2013/products/lp-aventure-2-lift-kit-2010-2013-outback The installation PDF in there has heaps of install pics.
-
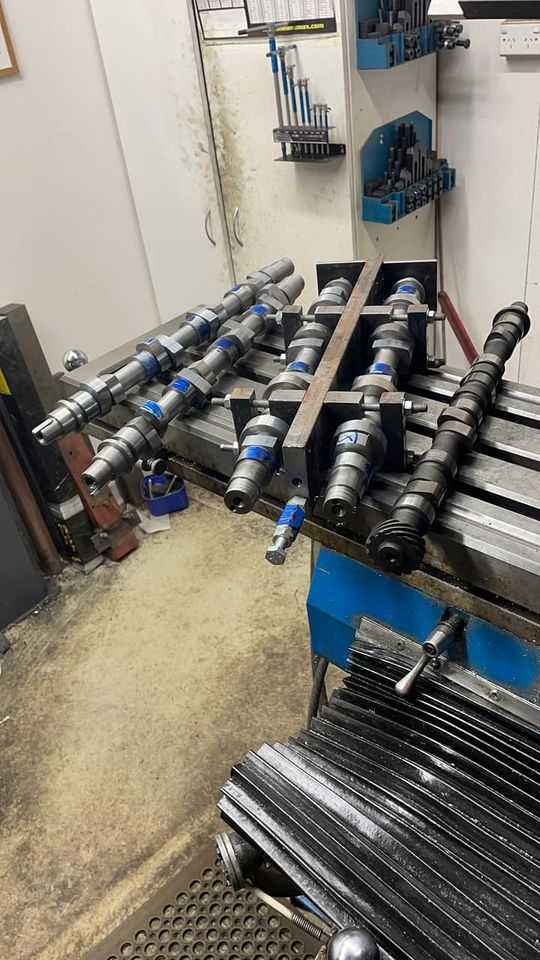
I've been waiting for this picture for a long time - we started talking about these cams during the first lockdown last year, so I'm glad that they're finally here! One of these 4 blank cams - which haven't ever been made with this much juicy lobe for a 4Z engine - is mine. I mentioned above that it is getting the "Brawler" grind. Hopefully that's not too far away.
- 73 replies
-
- 22
-
-
-
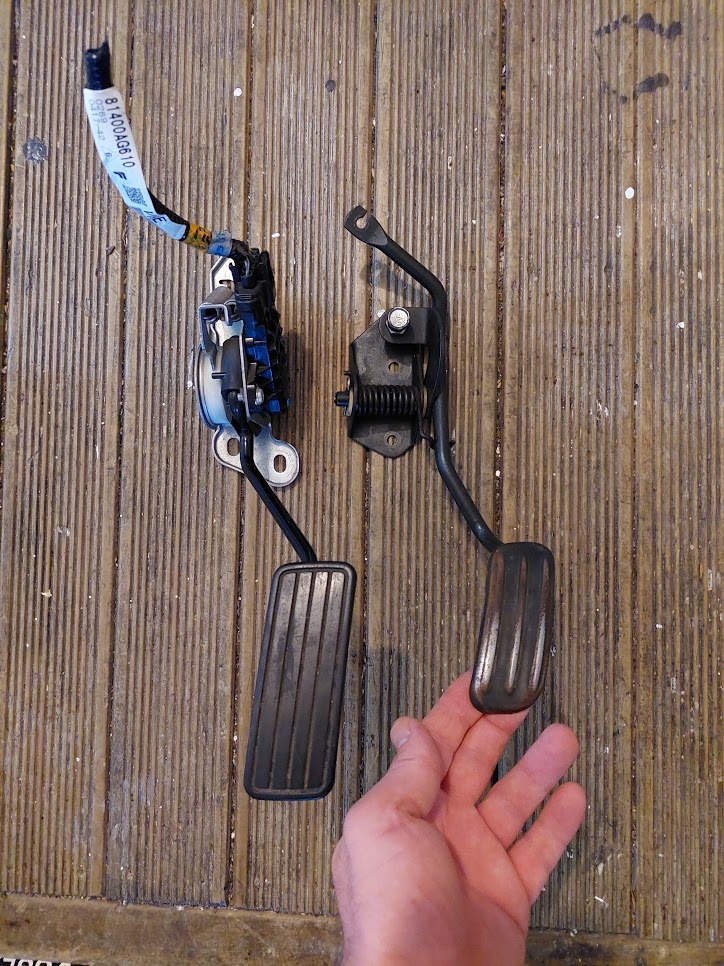
@Abarth and I hit up Pick-a-Part and Zebra yesterday and I managed to get a Subaru e-pedal. It doesn't have the look of the plastic lattice motorsport ones, but I think it's still good, and the shape is non too dissimilar to the stock Gemini one. I am still debating as to whether or not I try to cut and shut the Gemini pedal to the Subaru arm, keeping a stock look. Either way, it looks like it should not be too difficult to mount. The biggest issue I can see is that the pedal to mounting point distance on the Subaru unit is about 30mm deeper than the Gemini one - I need to have a better look at the firewall in the car though, see where everything fits.
- 73 replies
-
- 12
-
-
Maxspeeding rods are $325 on eBay, versus $490AUD for Spool rods. I'm kinda leaning towards Spool as at least they will have proper support if something is a bit funky.
-
Thanks for the tip. I'll do a bit of reading.
-
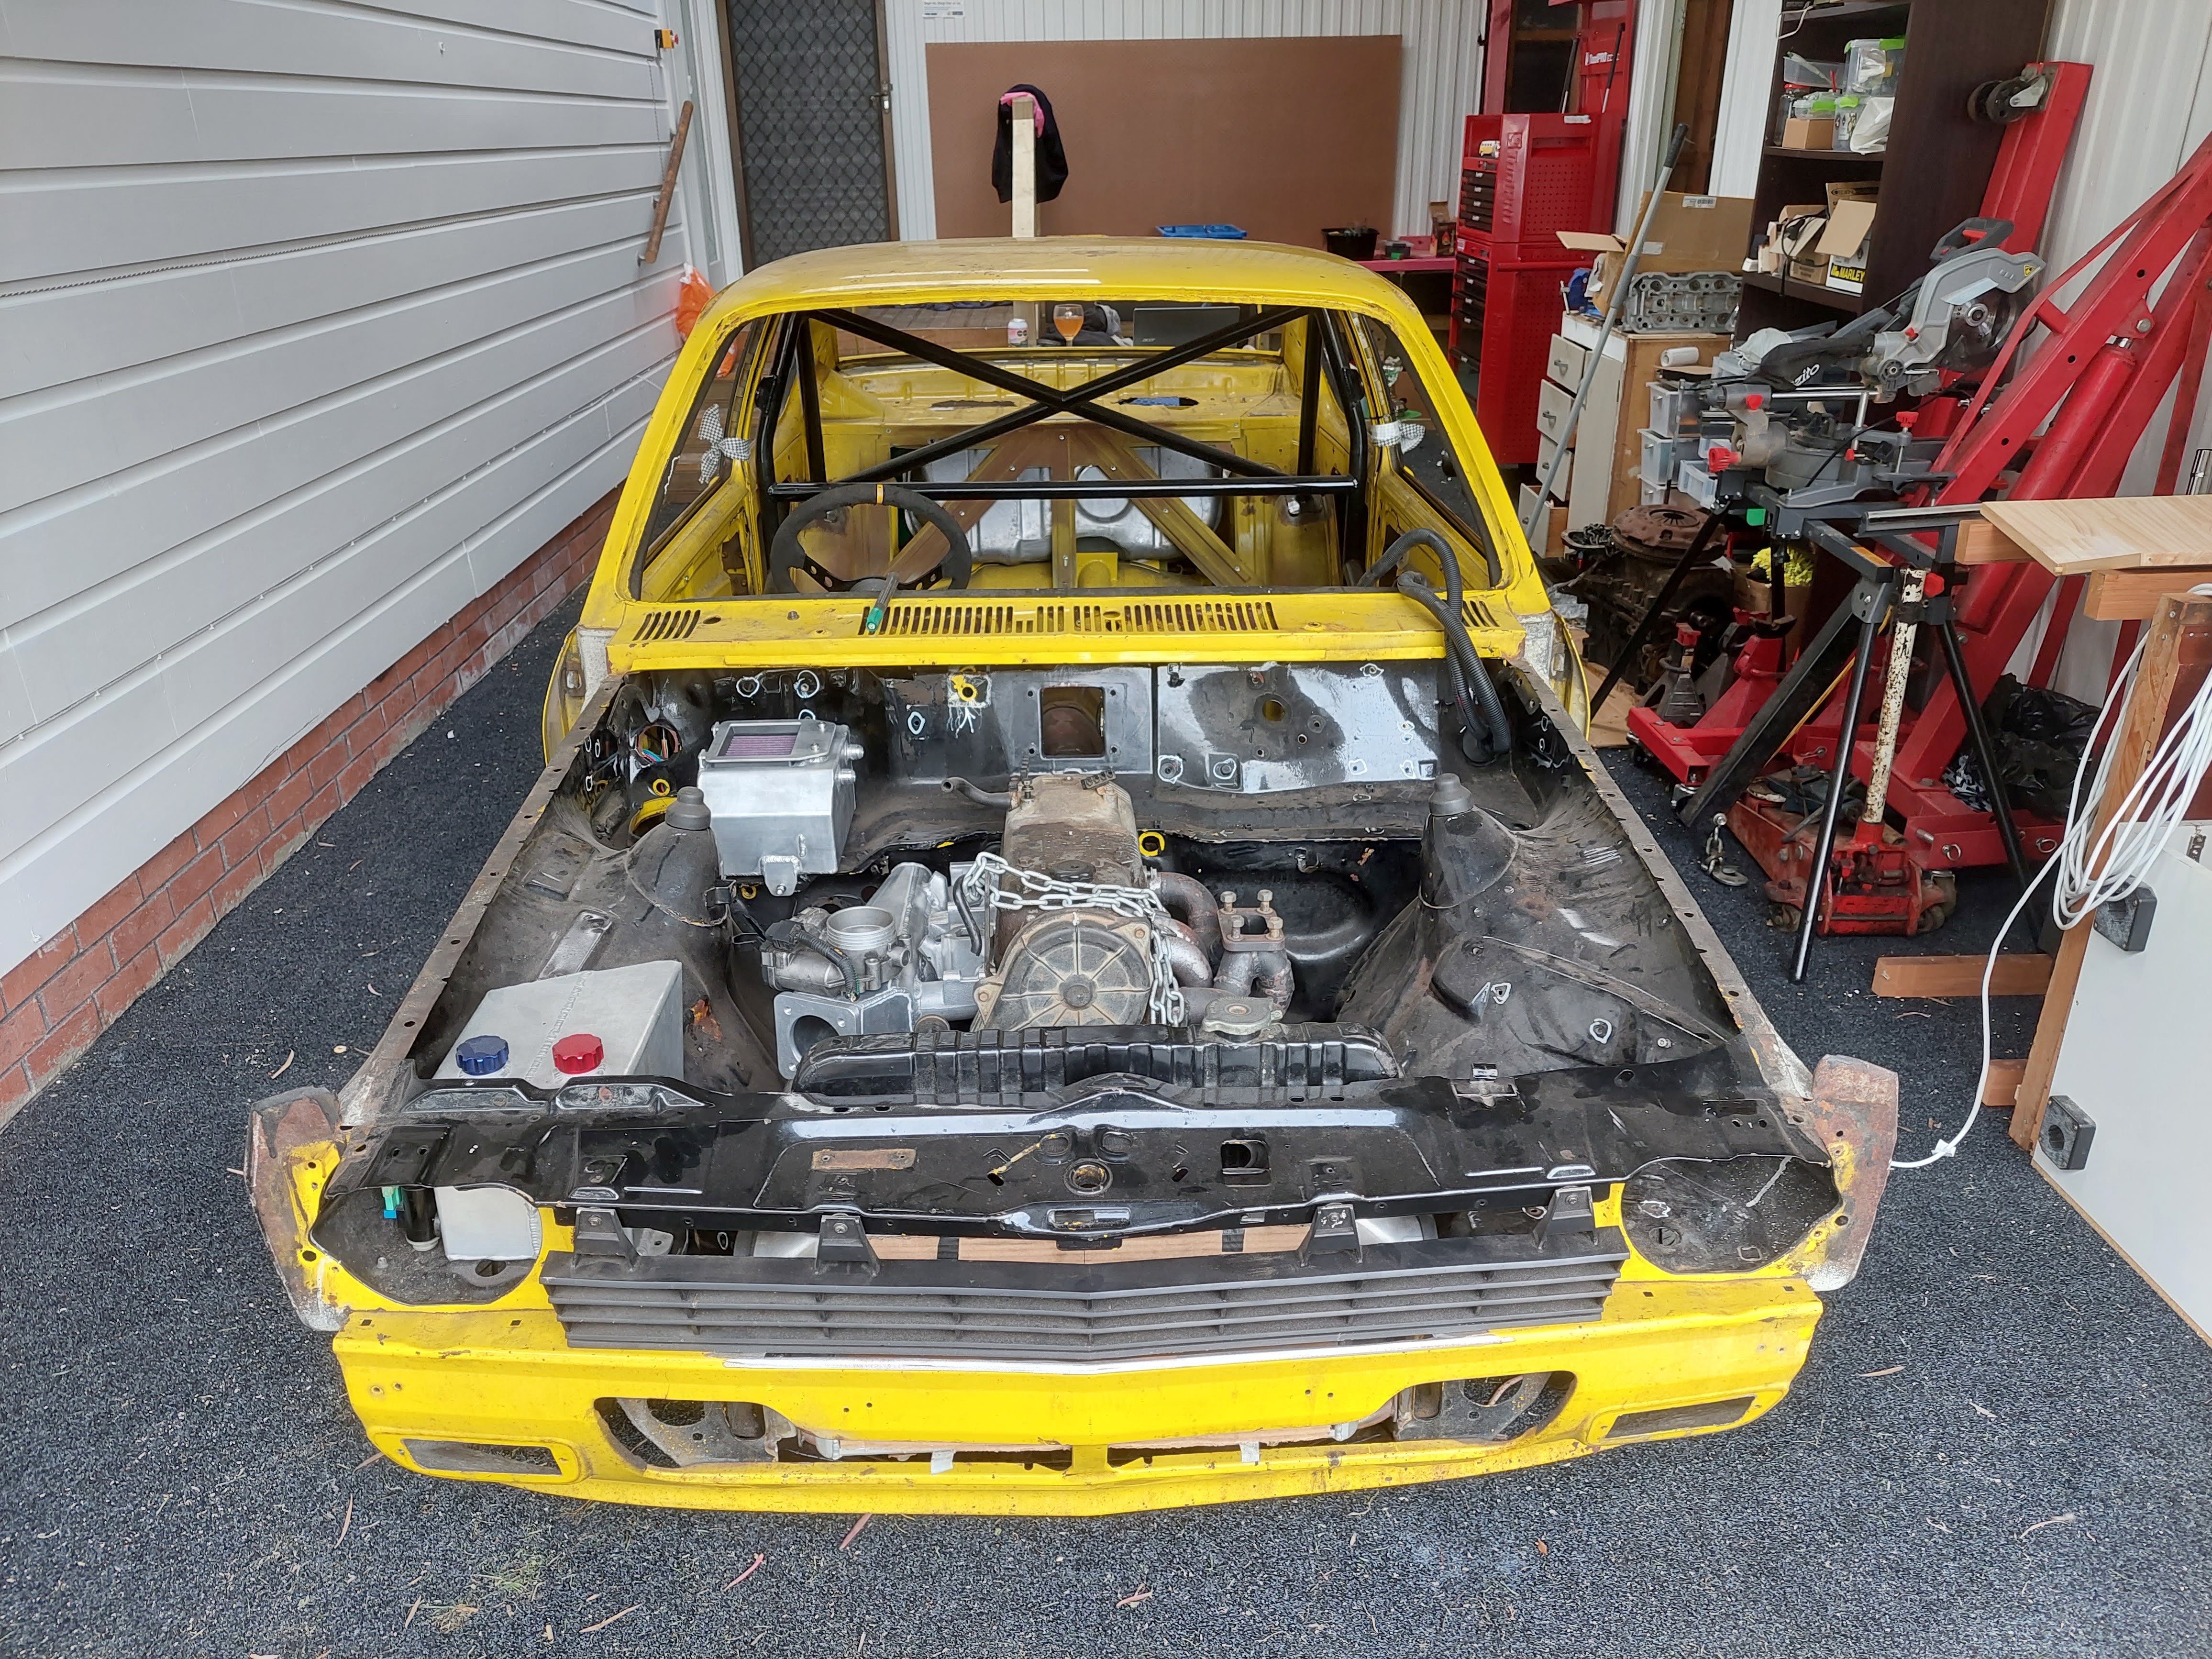
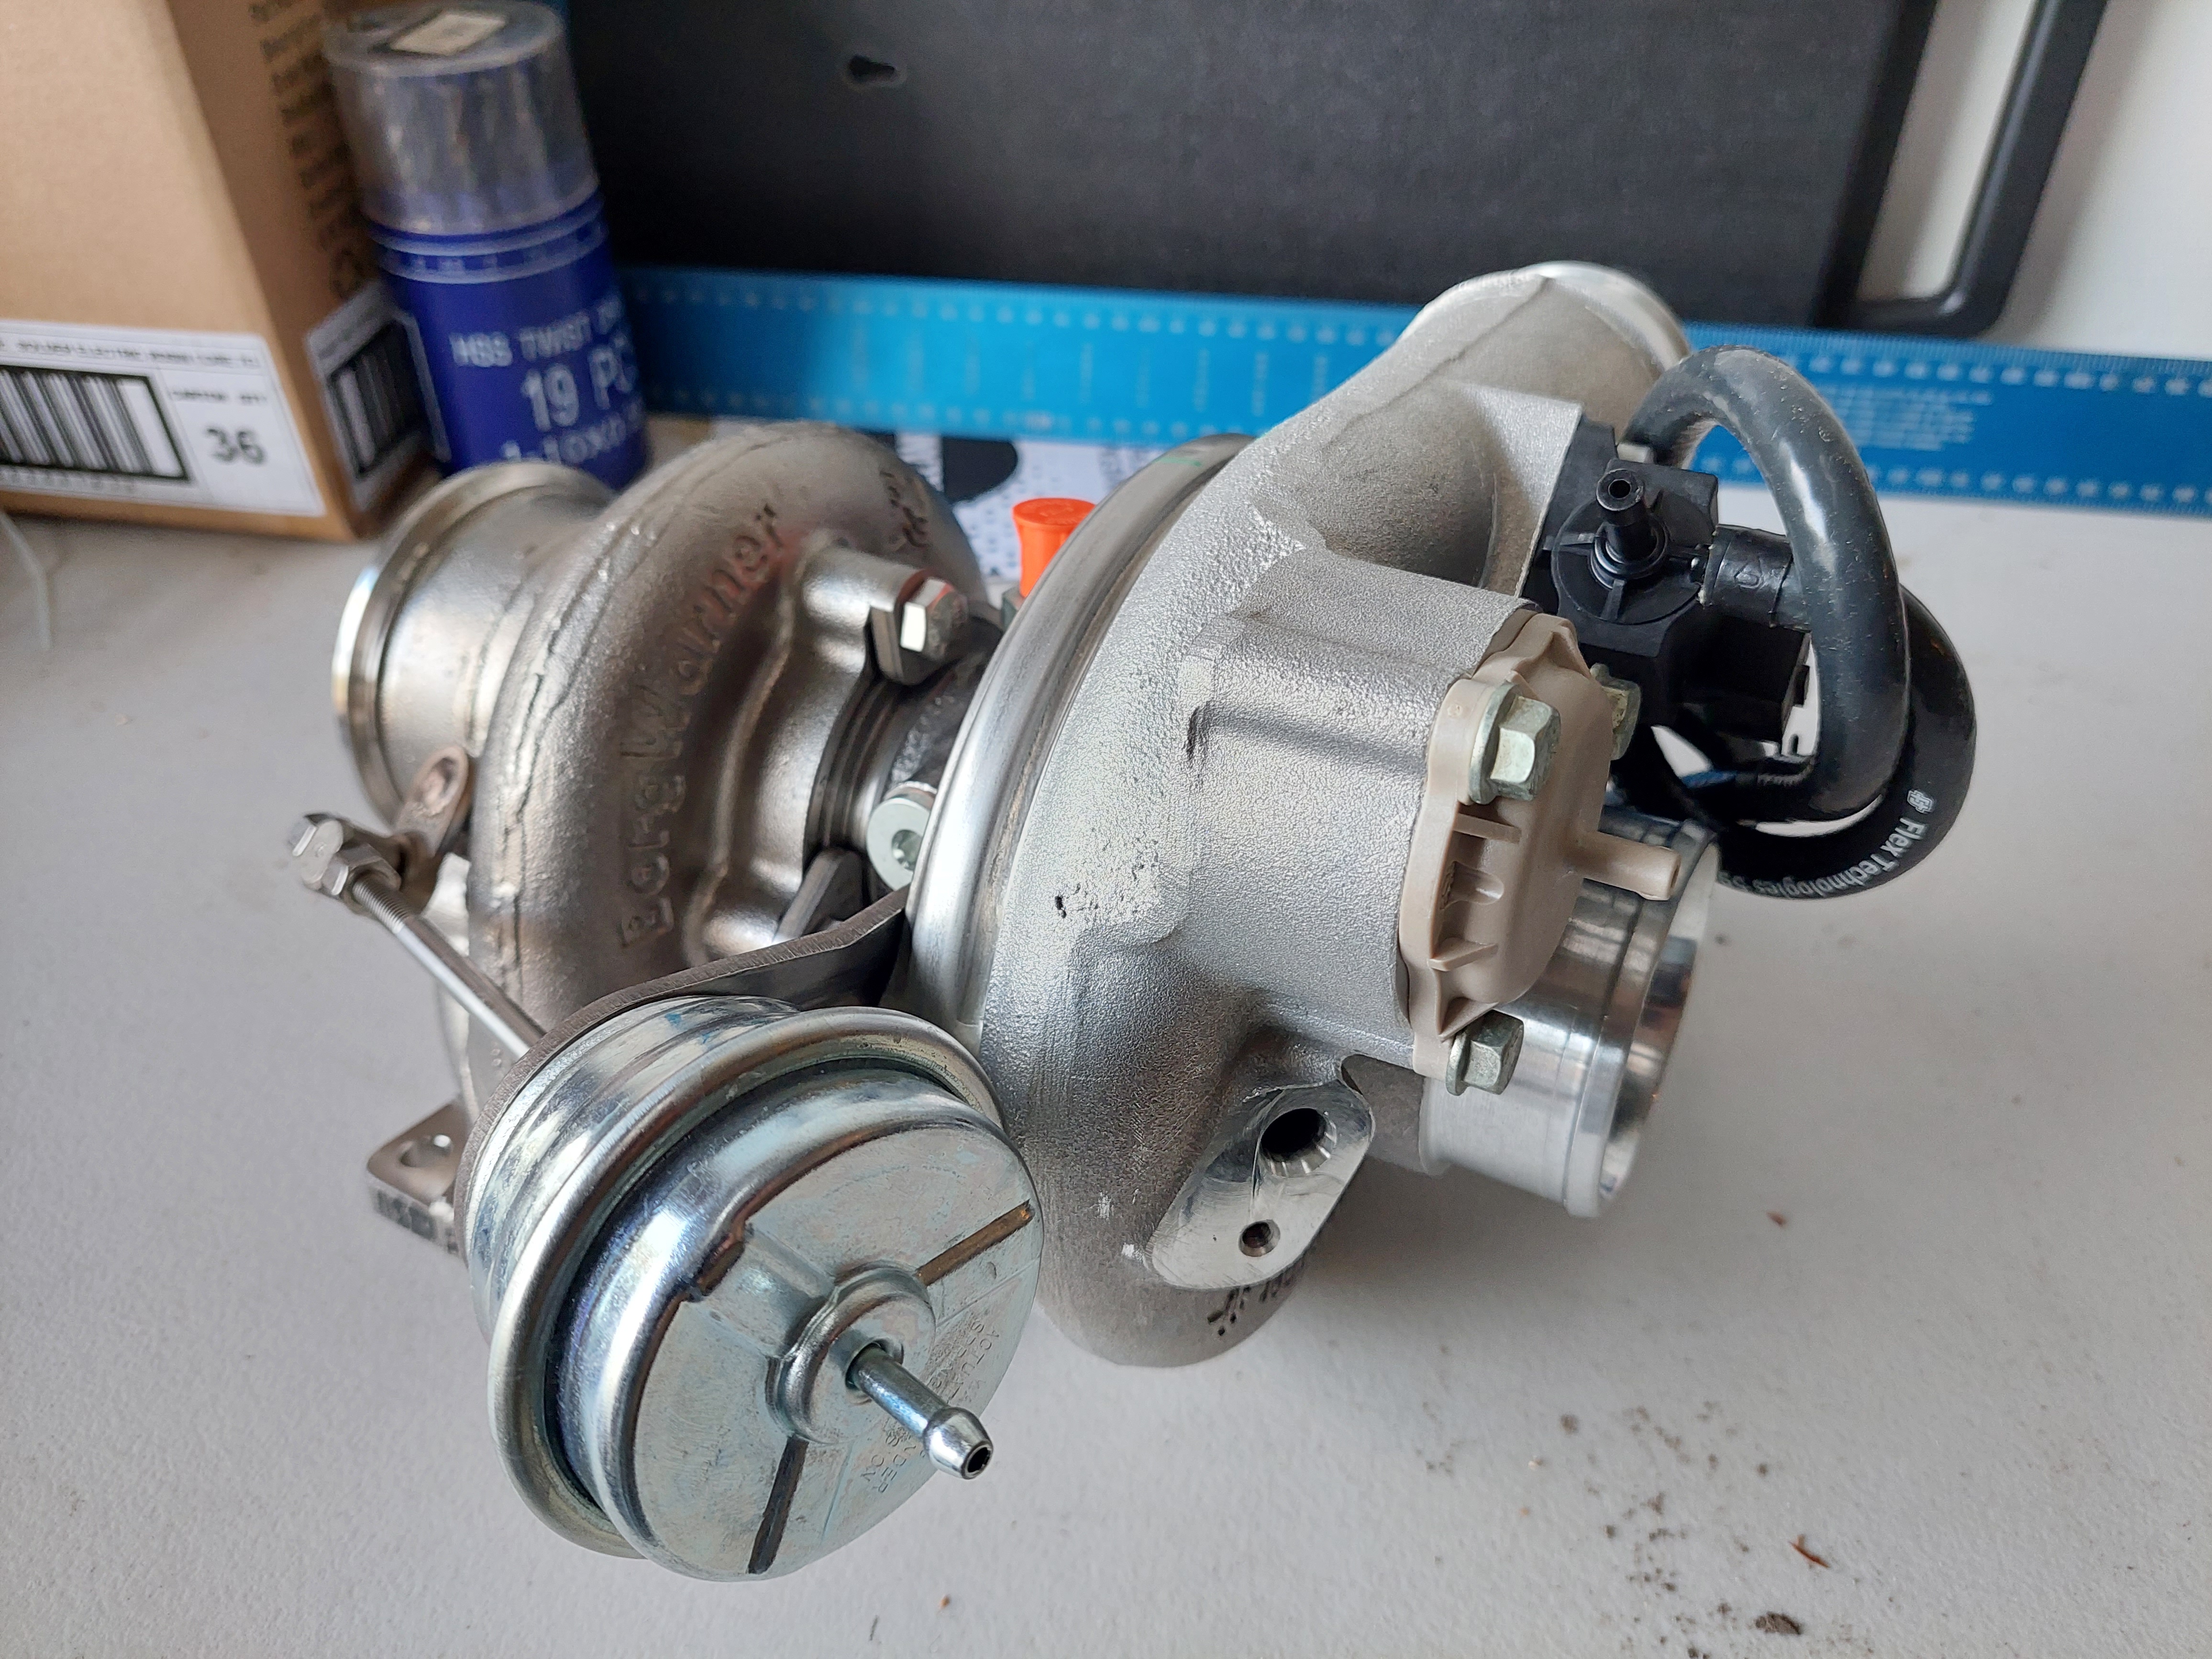
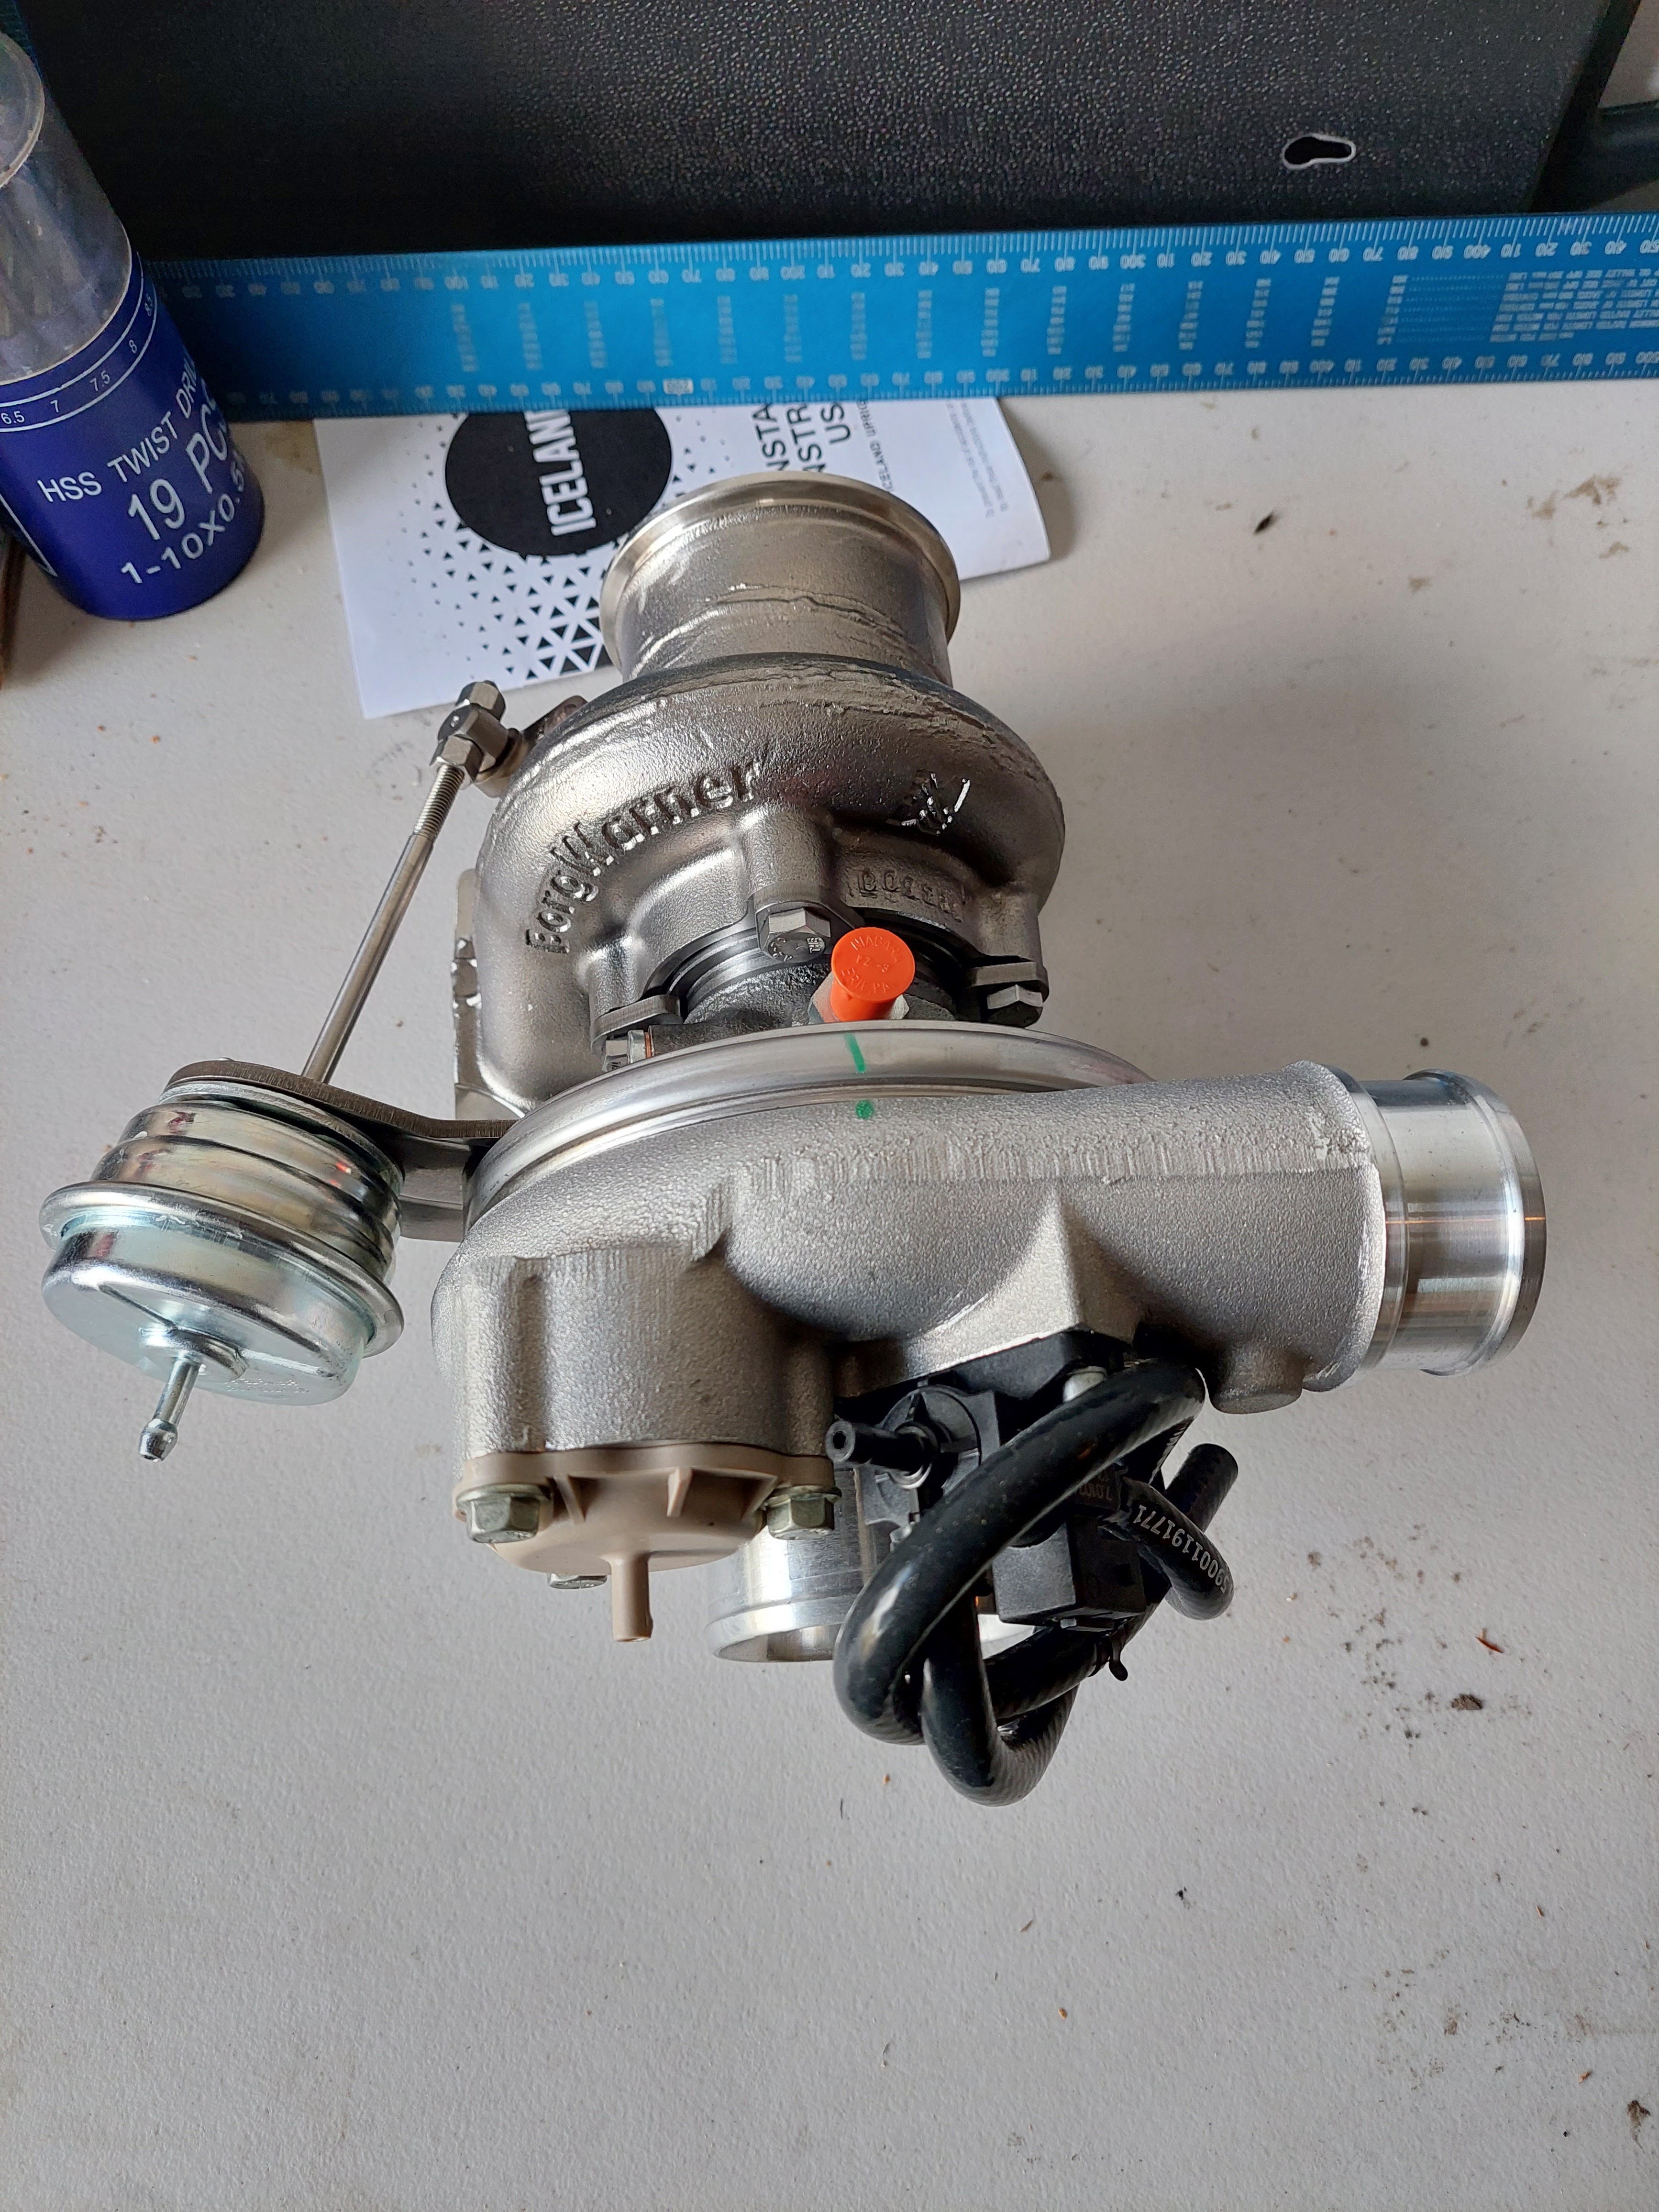
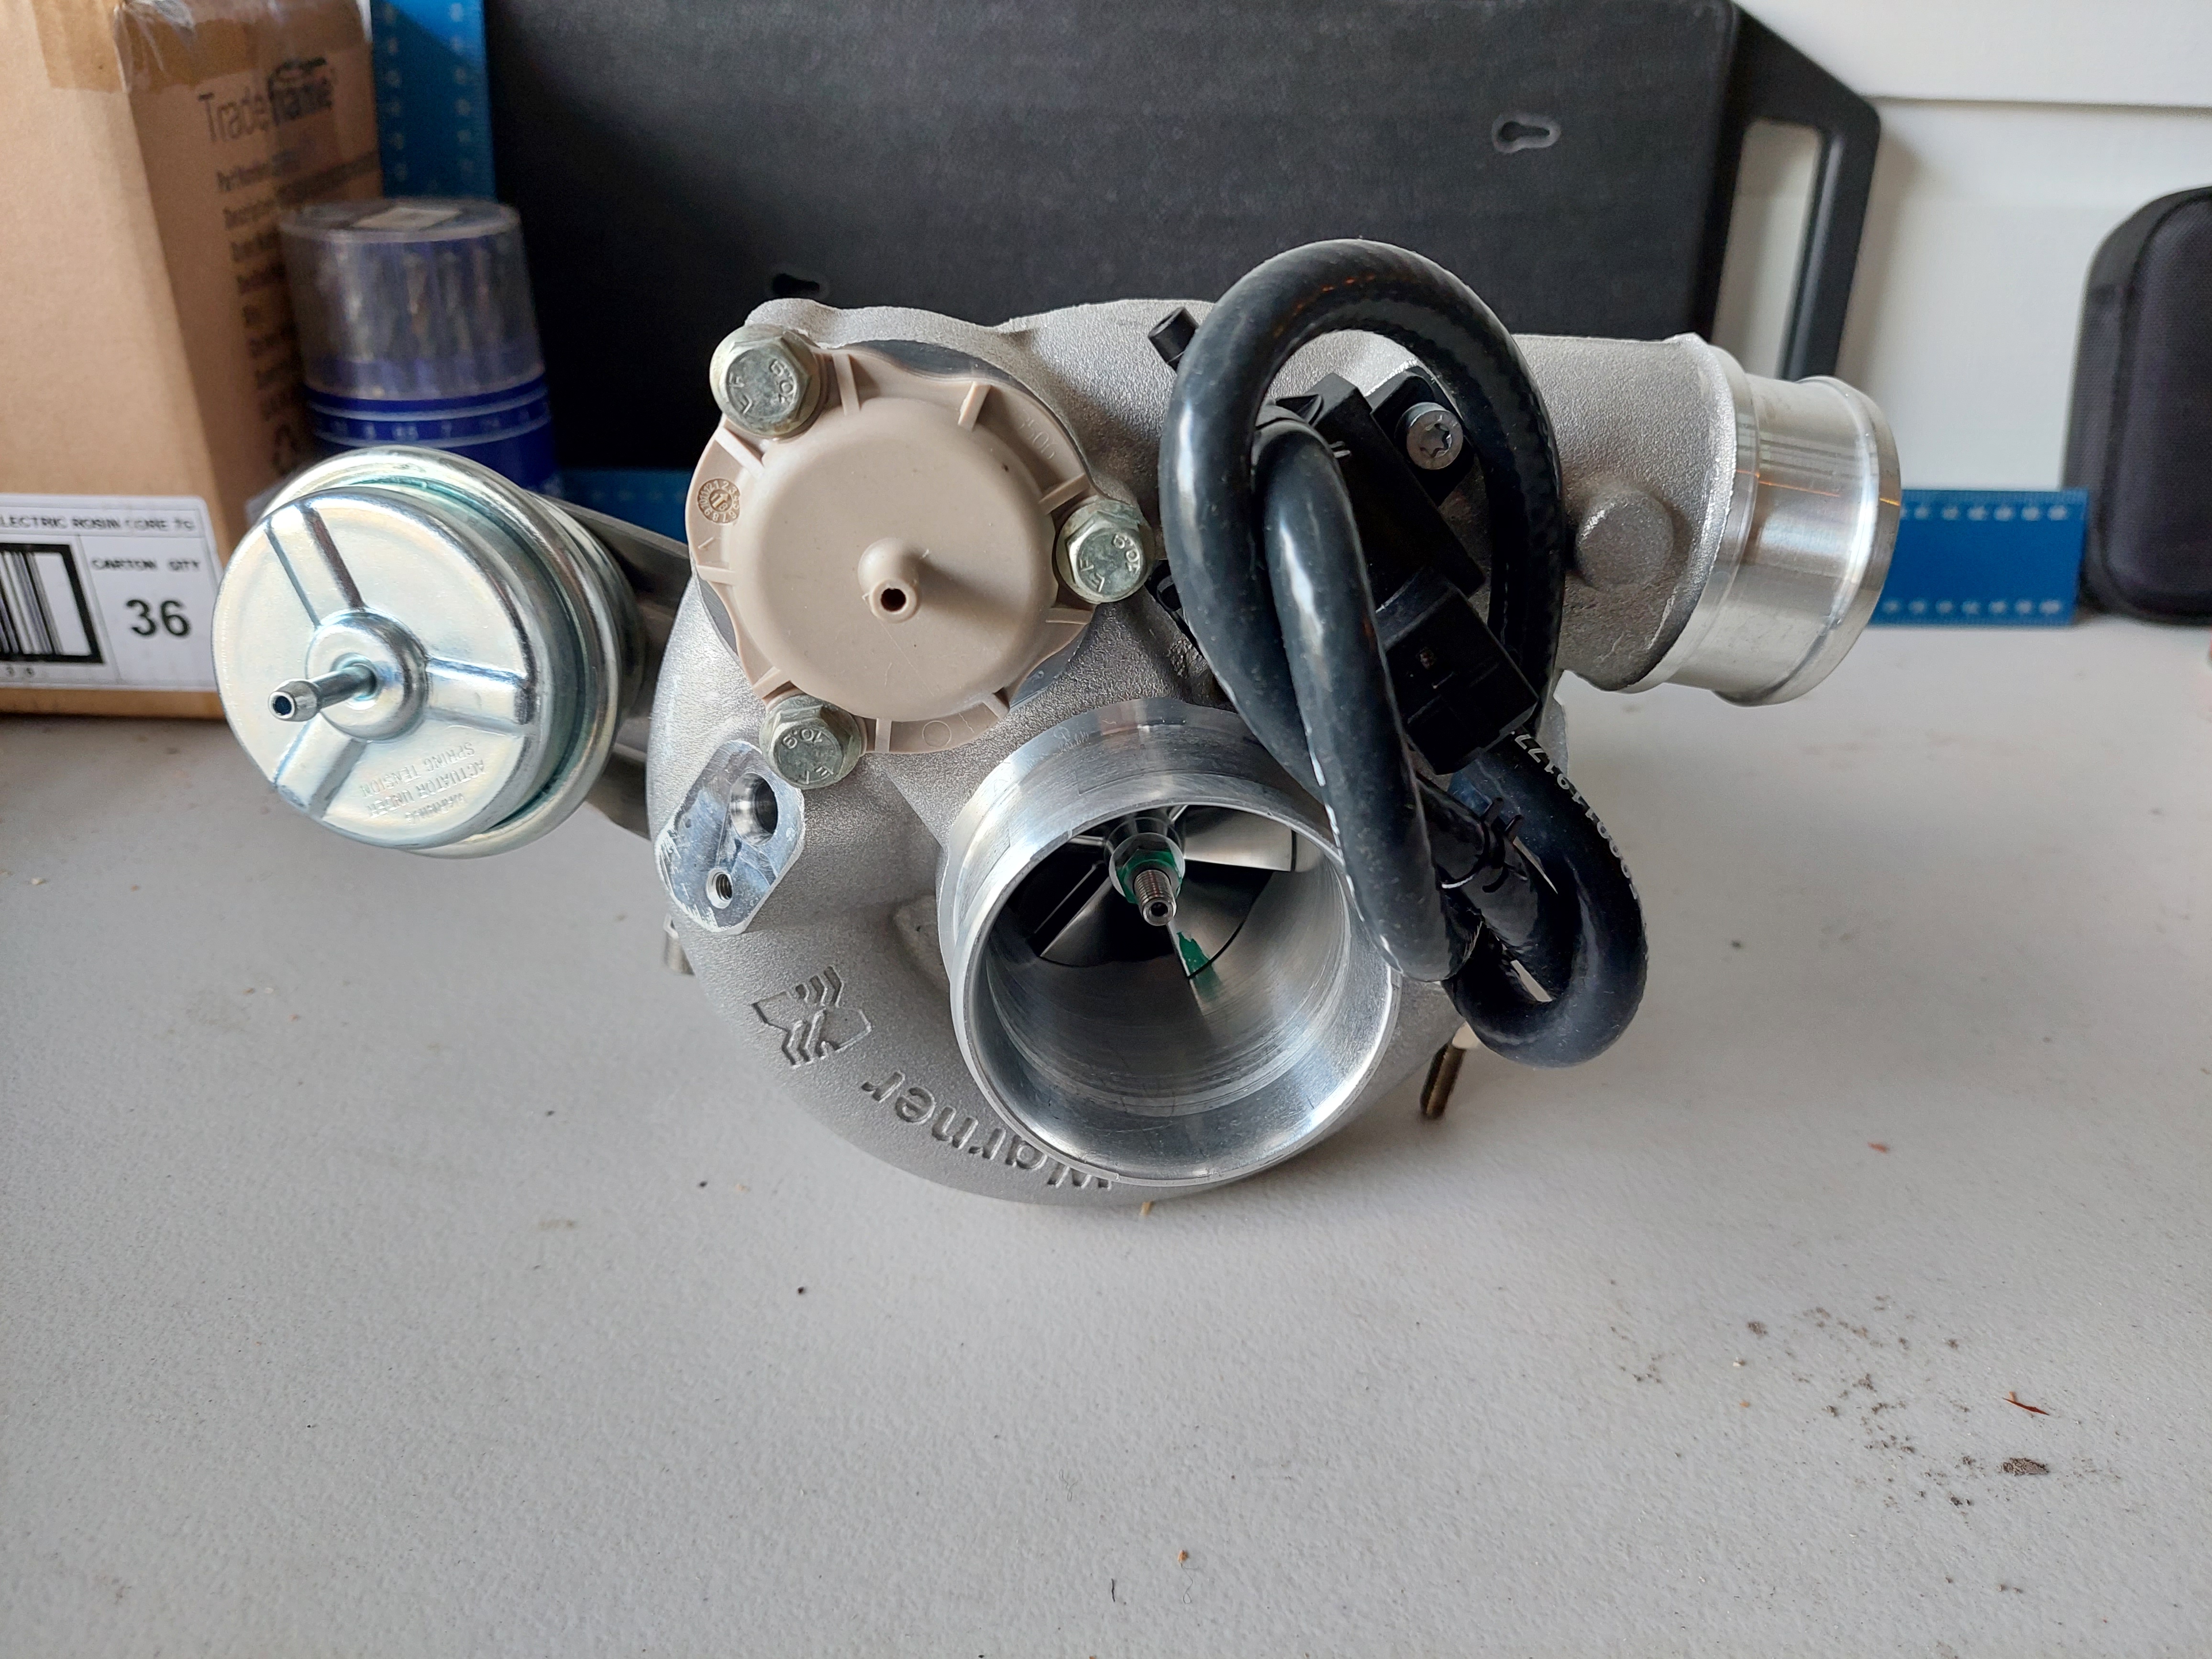
Hello everybody and welcome to another installment of Guess what expensive thing zep just bought! Today we're really ramping up the costs with a really fast spinny thing. No, it's a not a fidget spinner, and no, not chatter rings. What could it be? Third time's a charm and you guessed it, a Borgwarner EFR6758 T25 0.64 turbo charger! This is not a huge turbo but it's the biggest I've owned! I went with the lower A/R to get maximum low down boost. The wheels are 67mm on the compressor and 58mm on the turbine. It's rated for between 250 and 500 hp, so more than enough room to play with. I guess this is a better time than any to outline my plans for the engine. As you would have read, I've ditched the G161z and am upgrading to a 4ZD1, which is a 2.3 litre 4 cylinder - still Isuzu, it comes out of a Trooper. The 4Z engine series are essentially a new version of the G series, the main difference being that they are belt rather than chain driven, and of course come in larger capacities (2.0, 2.3 and 2.6). There has and continues to be a lot of development for both the 4Z and G series engines over in Aussie. For the 4Z, most of it is happening around the 2.6 4ZE1 but it applicable to all engines. My engine will be a 4ZD1 with a 4ZE1 head, which has much larger ports than the D1 head. The head will also have Brawler light weight high-ratio (1.8 I think) rockers, Brawler light weight valve springs and retainers, and a brand new, super hard billet cam with a Brawler grind, both of which are newly developed. The high ratio rockers are designed to work in tandem with the new cam grind. For now I will just keep the stock valve sizes, which are 38mm and 44mm, but will make sure the ports flow well. The bottom end will have custom CP pistons, also made in conjunction with Brawler, to bring the compression up to about 9.0:1 and make sure the valves have plenty of space to play with. For rods I'll use MaxSpeeding or Spool, not sure yet. No plans for the crank, is it worth mucking around with it? Obviously I will be running this turbo on the exhaust side, and the inlet is a 66mm Bosch throttle body. A crank pulley mounted CAS will provide the signal and four LS1 coils will give it spark. Everything will be controlled with a new LINK G4X Xtreme, which might just be the focus of the next installment of Guess what expensive thing zep just bought!, so keep that in mind!
- 73 replies
-
- 16
-
-
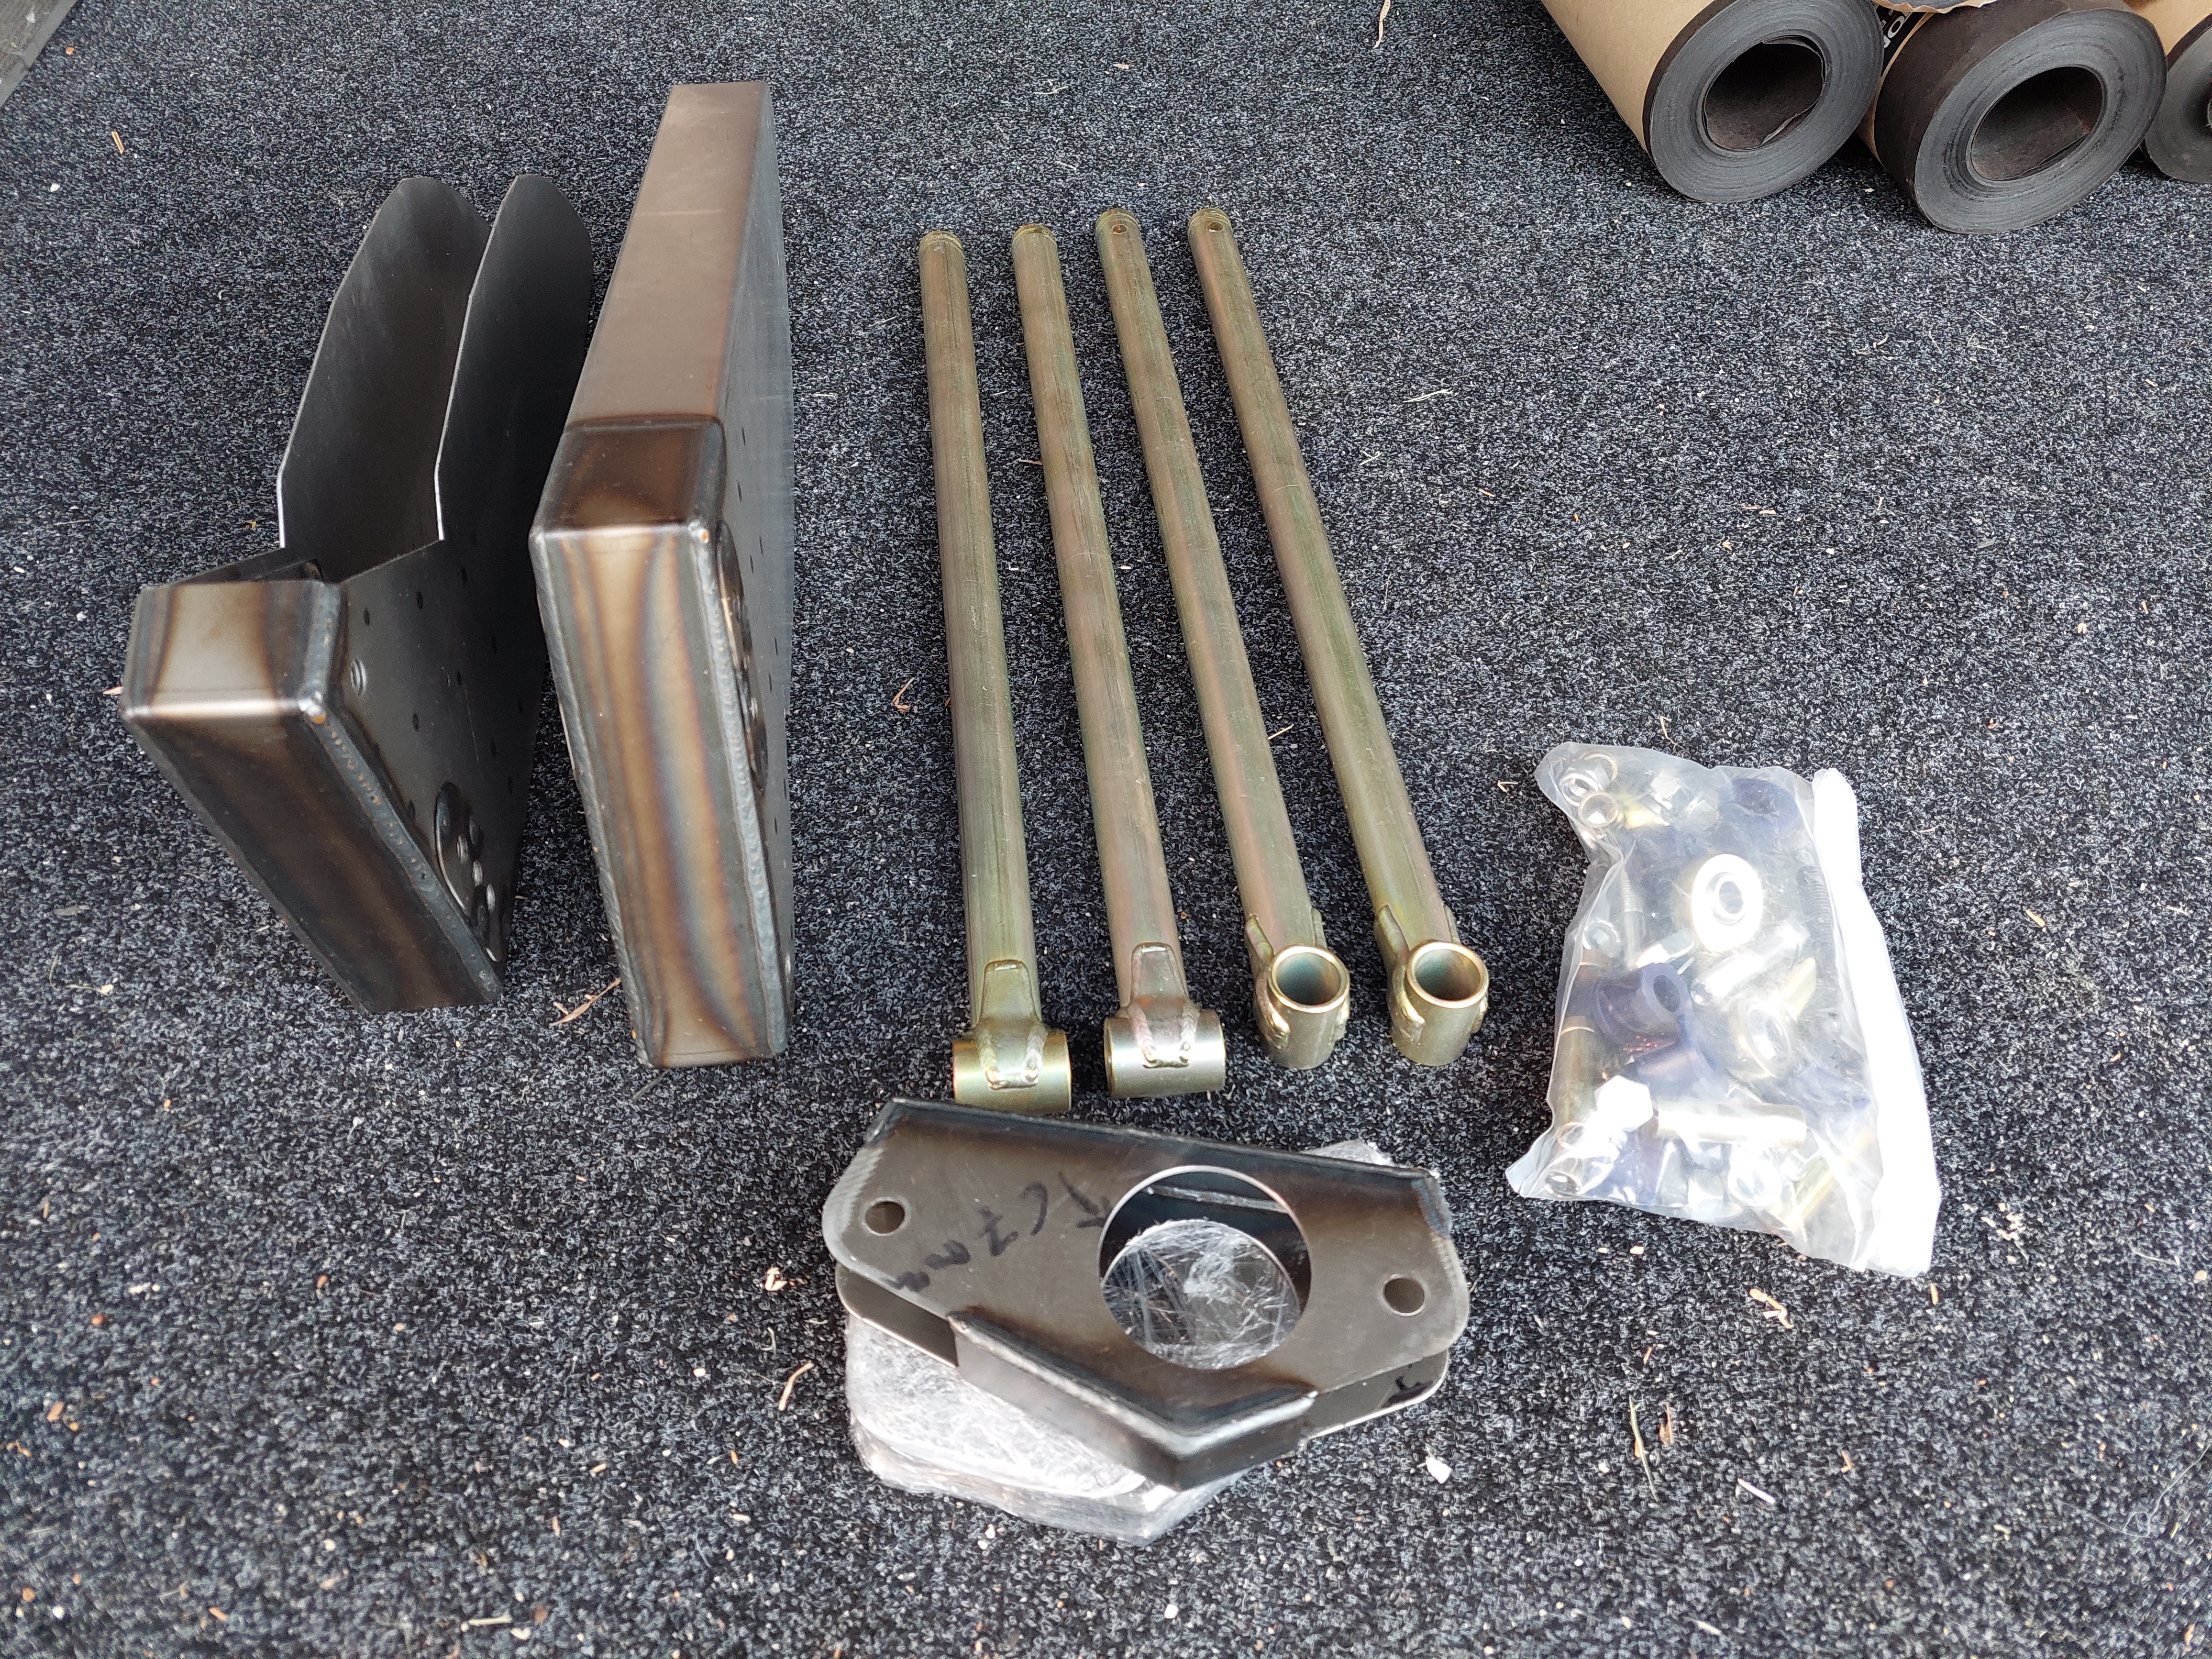
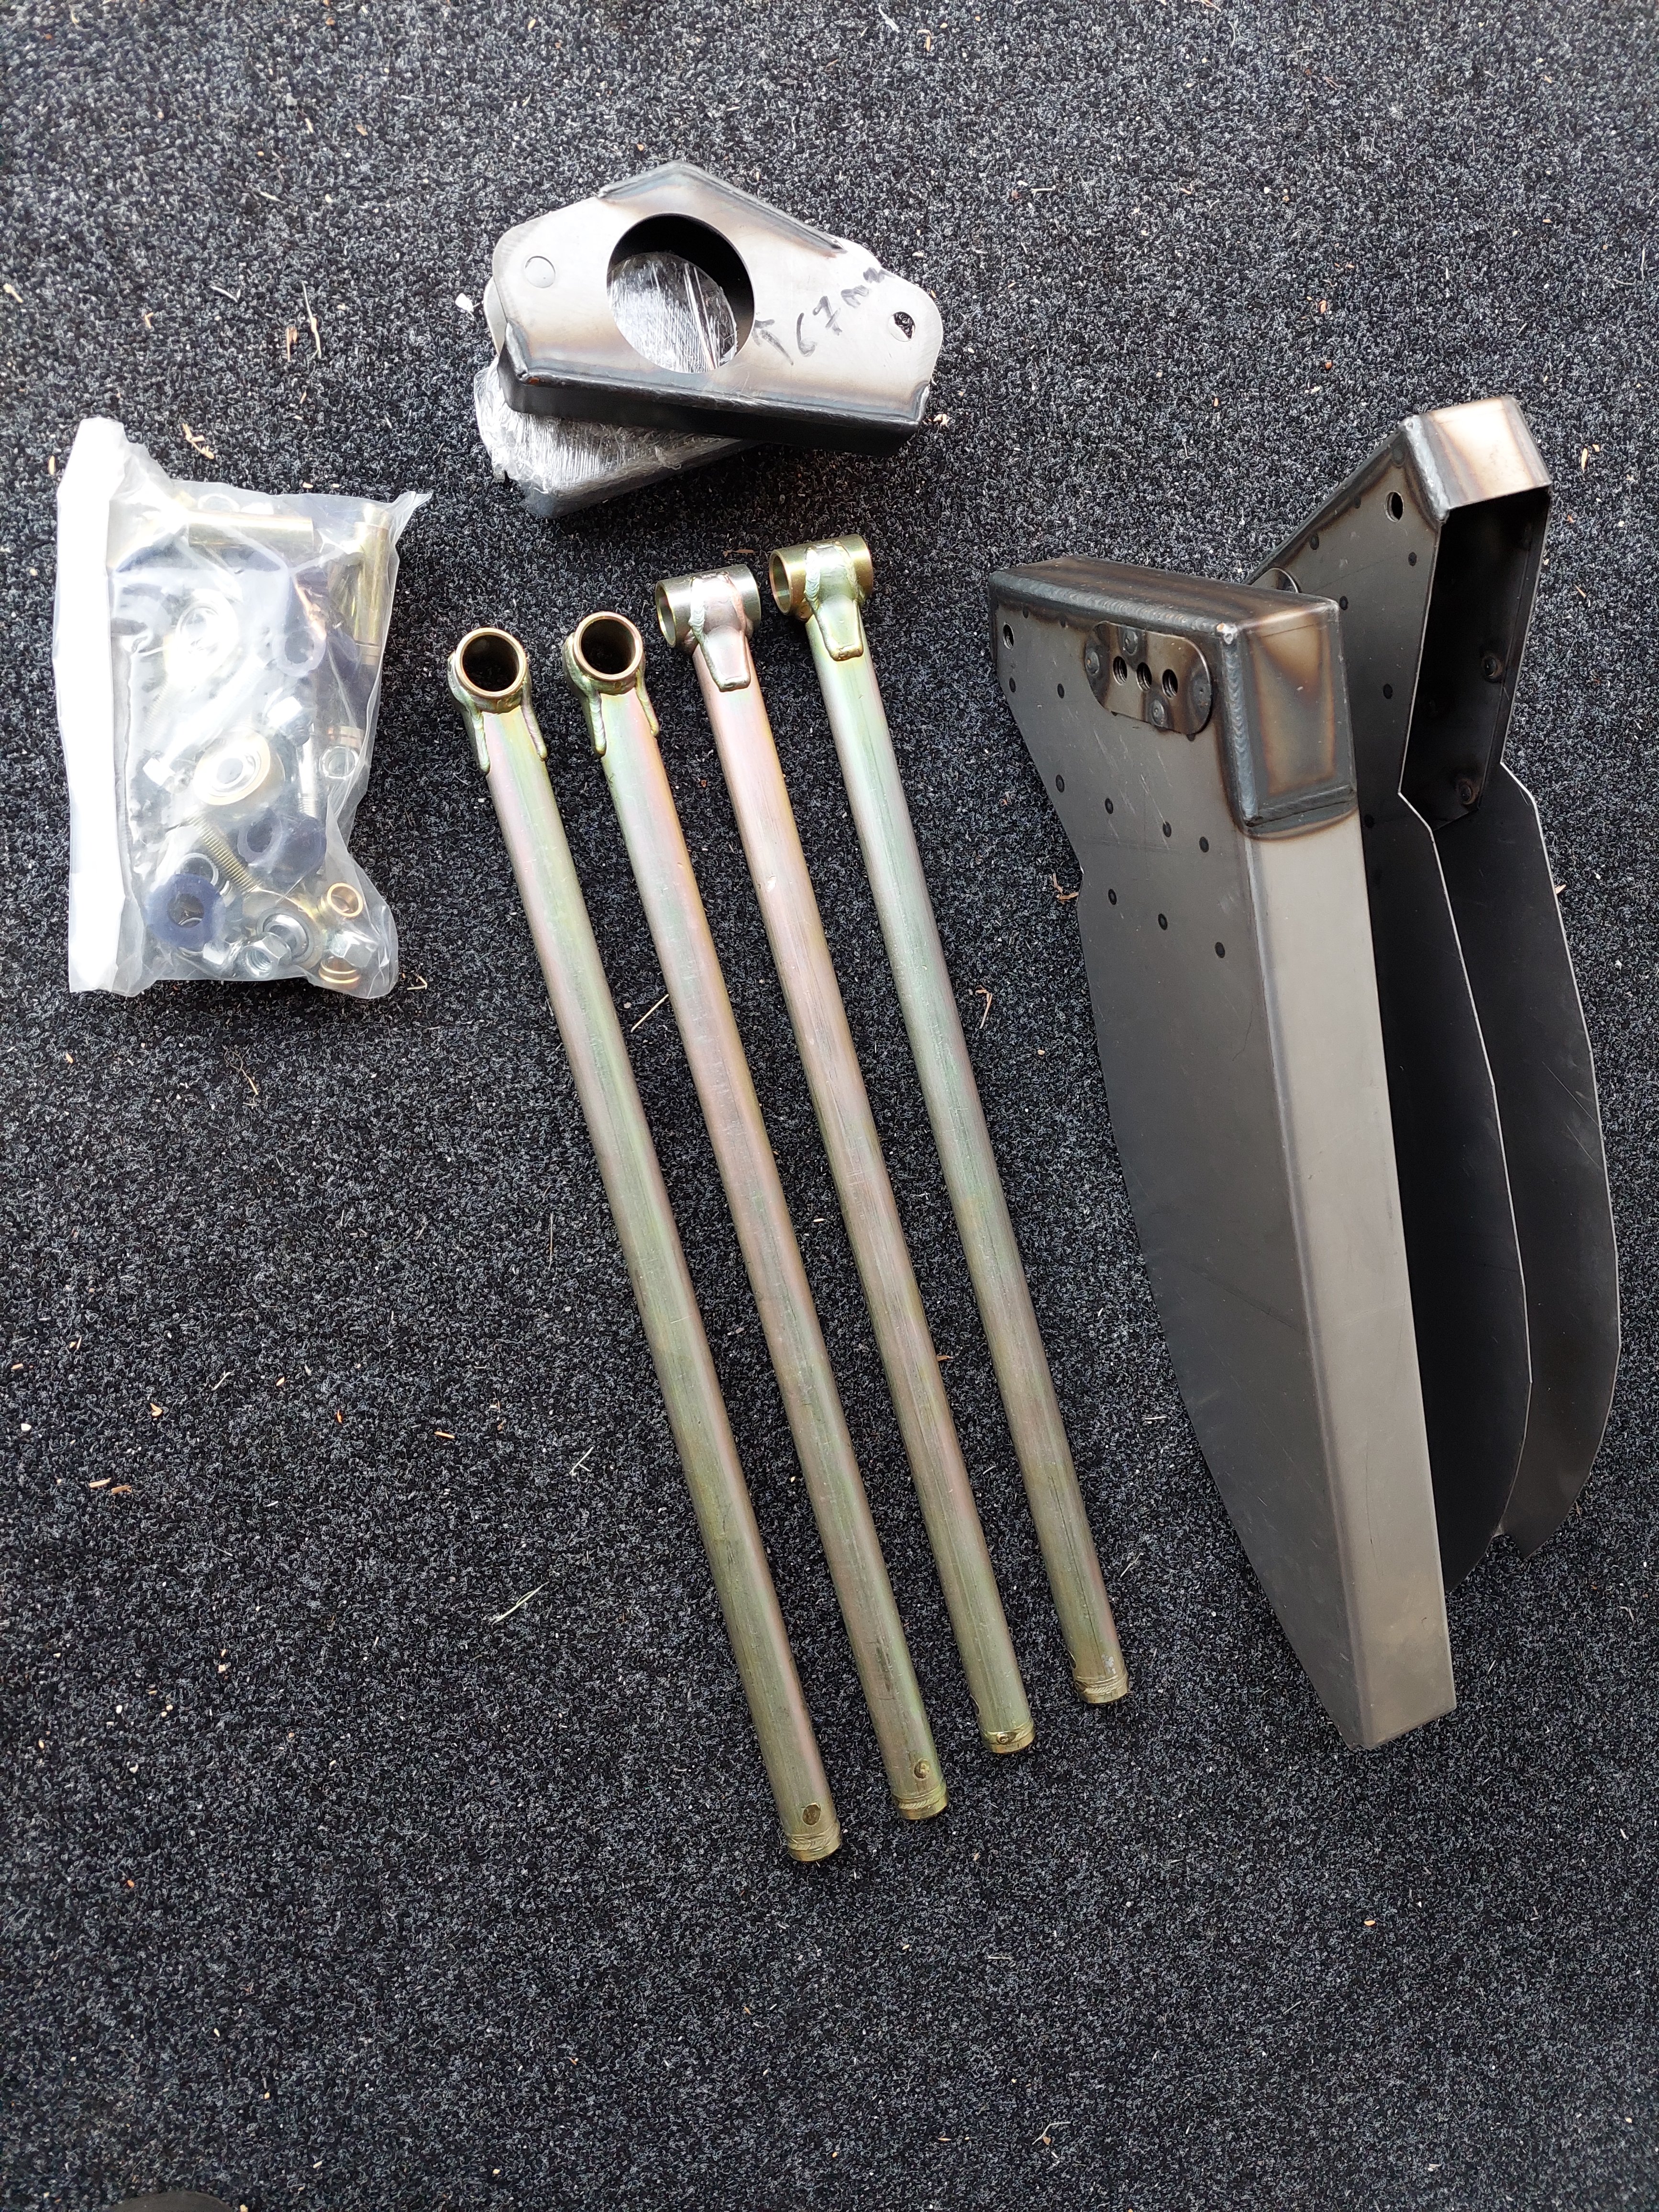
The 4 linking project begins! After a whole lot of research into building a 4 link from scratch, I ended up taking to a dude in Aussie who has built a few rally Geminis. His suggestion was to buy a kit from Group 4 Fabrications in Ireland. He's given me all the info on exactly how to go about mounting it correctly so I'm pretty stoked that this has shown up.
- 73 replies
-
- 26
-
-
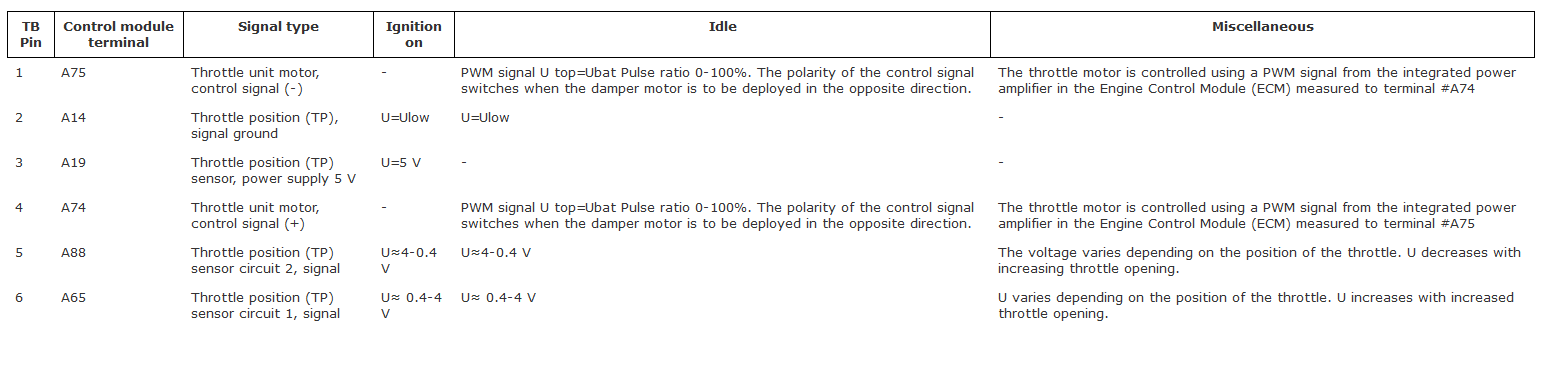
So it looks like I might have been a little to quick to pull that pedal out. The thing is, e-throttle pedals have two APSs (Accelerator Position Sensors), they both read the same thing but are used for contingency so it can't get stuck on or something. Essentially, the ECU reads both sensors and if they are the same it says "go". They are both 0-5v. The Hella units are not designed in this same way. They have one APS that is 0-5v, and another PWM 12v output that is not supported by either Link or Haltech. The workaround is to split the single APS output from the pedal into two wires at the ECU, essentially sending the same signal to each. However, this eliminates the contingency. I've had a stuck accelerator pedal before and it's not fun. In light of that I think I'm going to try and find a Bosch unit that has the correct outputs. There seem to be plenty - I've already seen some on eBay that are cheaper to buy and ship to NZ than it is to get from Pick-A-Part. I hope my mistake has been enlightening for others! Otherwise, I'm just dropping this wiring info for the Bosch throttlebody here:
-
If you read the tech forum you'll know I was trying to figure out where I could score a drive-by-wire throttle and pedal without having to pay over $500 for new Bosch motorsport units. On the weekend I went to Pick-A-Part to look for some rear calipers, but ended up finding exactly what I needed for the throttle setup. Turns out that almost every Euro from 2000 onwards has the right setup - the 68mm Bosch throttlebody. There are a few variations in them as some have water passages, etc, so I ended up removing about 4 or 5 before I found one I liked, which came from a Volvo V50 (2004-2012). It has no water lines and is pretty tidy. I wanted to get the pedal from the V50 too, but with the seat in the way and unmovable due to lack of power I couldn't get up under the dash properly to remove the bolts. Instead I found one from a an earlier (2000-2007) V70. It's made by Hella but looks suspiciously like the Bosch unit of the same era. I'm pretty sure the V50's pedal was a Hella also, so I am assuming these should work well together. Like the throttlebodies, there were quite a few pedal options from different euro cars, especially VWs, but some had weird mounting patterns etc. I took this one mostly because of how similar it looked to the Bosch unit, with the plastic lattice bracing in the arm, rather than a thin metal arm. The plan is to get a Link G4X Xtreme or Fury to run these.
- 73 replies
-
- 16
-
-
-
Thanks man.
-
@cletus I saw in another thread you mentioned that Wilwoods with integrated handbrakes have failed the cert test. I wonder if you had heard or seen anything about these: https://fastlanespares.co.nz/products/wilwood-powerlite-caliper-with-handbrake
-
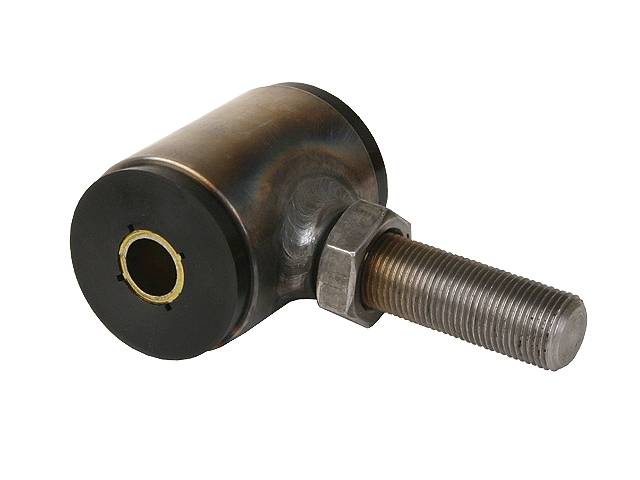
Thanks. I've checked the manual and it seems easy enough. I wanted to use regular bushed joints at each end to fully reduce the harshness. I guess that I could always swap them out for heims if the thread is the same.
-
When building 4-link bars, how do I determine what bush ends are legit and what are not? Also, are there per-determined widths that they should be? Most seem to come in 2.5" and 3". What about the centre bore/bolt size? Some are forged and some are welded: vs