Lord Gruntfuttock
-
Posts
13014 -
Joined
-
Last visited
-
Days Won
26
Everything posted by Lord Gruntfuttock
-
Idle screw should only affect idle. Picking it's float level causing the miss/soot...
-
Electrical system OK? I've chased 'carb' issues before and was spark related...
-

Baldies XC Falcon discussion
Lord Gruntfuttock replied to Bearded Baldy's topic in Project Discussion
Yeah just checked some calculators, you're right. Surprising... -
Baldies XC Falcon discussion
Lord Gruntfuttock replied to Bearded Baldy's topic in Project Discussion
600 would be wayyy overcarbed for a 6...? -
Cool. Love an old girder fork bike...
-
LG's Old Pest Brewery - setting up from scratch...
Lord Gruntfuttock replied to Lord Gruntfuttock's topic in Other Projects
Had one last night. Can completely upend big bott to pour all beer out with no residue. Think it's improved sitting in the fridge a couple of days, yeast cake stays stuck to bottom of bottle, and rinses out fine with bit of hot water afterwards. Might have a small sesh tonight with some cobbers to see if they work... -
LG's Old Pest Brewery - setting up from scratch...
Lord Gruntfuttock replied to Lord Gruntfuttock's topic in Other Projects
Yeah man. Sounds good. I'll PM my ph #. Cheers... -
LG's Old Pest Brewery - setting up from scratch...
Lord Gruntfuttock replied to Lord Gruntfuttock's topic in Other Projects
Heating's easy. It's finding a $20 fridge that cools that's the hard part. Here's a tip tho. I was looking at wiring up a 3 pin plug to some flex (as they cut the plug off at the tip) but you can buy a 2m extension cord for like $2.90. Cut the socket end off and connect to appliance, done... -
LG's Old Pest Brewery - setting up from scratch...
Lord Gruntfuttock replied to Lord Gruntfuttock's topic in Other Projects
Put a brew down yesterday and took pics for my own reference, so thought I'd bore entertain you with an all-grain process pictorial. Did it early morning as daughter's birthday, so was 6:30 am start. Made some adjustments to my brew table, extra shelving and better storage (plus new quad switched socket, so good)... Apart from water, just need the ingredients from my local brew shop, around $40 worth, measured values of milled grains, hops, yeast and lactose... And put a shelf up for breakables after losing a hydrometer. A toasty 6 degs in the shed... Start by measuring out the mash water, via calibrated jugs... 24 litres for this brew (a heavy milk stout, winter is coming)... When up to temp (65 degs) with the malt pipe and fittings in, start putting the grain in, stirring as you go to ensure there are no doughballs... Rubber cap stops grain getting where it shouldn't... And top screen and cone overflow on, and get the pump running, so hot water washes over the malt, for 80 mins in this case... And yep, still frosty... Checked temp at output of pump as the kettle unit thermometer is right by the elements, had to put SP at 66 degs to get 65 out. Already looking stouty... And key is getting flow right, you don't want it to go through the bypass overflows, as you lose sugars and risk clogging the pump if loose grains get through... When mash is done you lift the malt pipe to drain, I'd started sanitising the ferment bucket and prepping other tasks while mash was going... Wort draining from malt pipe. You then rinse the grains (sparge process) by adding a measured quantity of 75 - 80 deg water slowly and letting it drain though to the kettle... When it stops dripping you remove the malt pipe and grains, top screen removed here... Leaving you with 28-odd litres of hot wort, that I like to pump through a sieve before starting the boil (not supposed to use pump at boiling temp)... Hop time, measure out the weight as per recipe and add to the wort in a hop spider or hop sock... And take your pre-boil gravity reading when the sample has cooled to 20 degs, right on target here, around 1.052, or 13 Brix... Get to a rolling boil before you add the hops, and hold at an hour, adding extra hops, nutrients, salts etc as per the recipe... After an hour for the hop oils to release you begin chilling. Can see hop sock and immersion chiller in here, plus whirlpool arm. Pump must have blocked post boil though as I had no whirlpool action. The chiller goes in with 10 mins to go for sterilisation... And final gravity after the boil was a healthy 1.065 (slightly inflated as I added 500g of lactose, which won't be fermented)... And after chilling via the immersion tube (works well with cool tank water) it's into the fermentation vessel, aerating as much as possible to help the yeast out. The only time you want oxygen near the process... Checking the colour in the sun. Darryl the black ram likes a look. He's a friendly bugger, but a massive sex pest... When cooled to correct temp (16 degs in this case) you pitch the yeast, close everything up, insert the airlock and away it goes for 14-odd days. This type of yeast calls for the temp to ramp up to 21 degs after starting relatively low... And that was my brew day...- 44 replies
-
- 10
-

-

-
LG's Old Pest Brewery - setting up from scratch...
Lord Gruntfuttock replied to Lord Gruntfuttock's topic in Other Projects
Yep. Had a 745 last night. Get 3 nice beer glass pours out of it. Can completely empty without sludge falling into glass if you pour gently enough. No biggy if some goes in, won't affect taste, just looks grungy. Wouldn't drink out of the bottle though... -
LG's Old Pest Brewery - setting up from scratch...
Lord Gruntfuttock replied to Lord Gruntfuttock's topic in Other Projects
The other fridge sadly didn't cool (coil holed where someone had enthusiastically de-iced it), so I pulled the gubbins out and gave it a quick sand and paint job... Nice vintage mint colour, I rate these spray bomb primer/paints, so easy... Squeezed it into the garage... And it's running an Ali STC-1000 controller, works well... This will be a bottle conditioning fridge and should work well enough over winter.. Will free up the other one for fermenting... Whacked some labels on while I was shifting botts over. A Barry forum told me to use milk as an adhesive, works bloody well... Mix of 500ml, 745 and 750ml bottles... plus a label on the top with brew info... And important safety message...- 44 replies
-
- 17
-
-

-
LG's Old Pest Brewery - setting up from scratch...
Lord Gruntfuttock replied to Lord Gruntfuttock's topic in Other Projects
Bottled first brew and it's conditioning while I impatiently wait to try it. My cheap bottling wand was a ballache, took 2 1/2 minutes each bottle, which sucked, but got there. The bottle tree was a great investment... And made some ply shelves for both fridges, varnished them as there is no treated 12mm ply available apparently... After a few days the plastic PET bottles had pressurised and sediment settled so looks promising... And after 7 days I cracked one as a quality control exercise. Way too early but keen to see if it was shit... It wasn't too bad. This was a dedicated test bottle, the dregs from the bottling bucket so not surprised at the cloudiness. But best thing was it tasted pretty good, wanted another afterwards which is a good sign, and at 4 standard drinks the single bottle gave a slight beer buzz...- 44 replies
-
- 10
-
-
LG's Old Pest Brewery - setting up from scratch...
Lord Gruntfuttock replied to Lord Gruntfuttock's topic in Other Projects
Yeah have seen the temp probe taped to the fermenter while Barrying about on brew forums, looks a simple improvement, cheers. I had the week off and it was a good chance to tidy the shed up a bit, plus I like to have places for stuff. Just chilled by running the hose through the immersion chiller, pretty rapidly cooled things down, but I'll do it a bit longer next time. Don't know how sustainable that method'll be given we're on tank water though. Might look at an ice-bath/pump setup, or using the fire tank water that never gets used. Regards clarity, I chucked half a whirfloc tablet in with about 10 mins of boil to go. Not sure if I needed it but wanted to try it out. Recipe is just a Brewfather Sierra Nevada clone with different hops. I'll post it up if it works out ok. Wanted something easy and drinkable for first brew, will get more adventurous as we go. Will prob bottle next week then when they're conditioning I can put down something different. It is quite a consuming hobby... -
LG's Old Pest Brewery - setting up from scratch...
Lord Gruntfuttock replied to Lord Gruntfuttock's topic in Other Projects
Just hopstand additions for this brew, been looking at some hazys with dry hopping, but since it's been cold lately I'll prob do a stout next, seems more appropriate... Also had to use a shorter 3-piece air lock as the s-shaped ones were too tall. And yeah the rack groans a bit with the load on. A support is on the cards... -
LG's Old Pest Brewery - setting up from scratch...
Lord Gruntfuttock replied to Lord Gruntfuttock's topic in Other Projects
Also did some building, turned this... into this... Has different levels to help with sparging, siphoning etc. Bit of a gamble design-wise before I've actually done anything, but should work out ok. Cleared out a corner of the garage to put it in... And put down a brew last week. Simple all-grain APA, with NZ hops... And malt pipe lifted for sparging... Into the fermenting bucket. Hygiene is everything so fastidious cleaning and sterilisation as you go... Original gravity came out around 1.058, pretty good sugar levels... And into the brew fridge. No airlock fitted here yet, was just lifted into place after pitching yeast once it had cooled to 21 deg C, almost exactly 20 litres of wort... And ticking away doing its thing. My lovely little yeast cells are making things bubble away... So will hold at 20 degs for 10-14 days. Will take gravity readings later on then siphon into bottling bucket, add conditioning sugar and bottle. Then another couple of weeks... Took about 6hrs as it was my first time and I had initial equipment cleaning to do etc, I'll get better as I have learned how the temps go now and I'll be able to multitask once things are under way. Been interesting...- 44 replies
-
- 25
-
-
-
So I bought a Brewzilla all-grain brewing device recently, and while I was waiting for it to arrive I started gearing up my mini-brewery. I grabbed a rusty old fridge at the dump for $20 cos I liked the styling. I was only intending to use it as an insulated box with a small heating element, but when I wired it up it ran beautifully, so I have heating and cooling available... The interior door was buggered. I thought of replacing it with a flat sheet of plastic but the shelves would be useful for bottle conditioning, so looked at patching it up to re-use... Just laid fibreglass tape around the edge and filled with epoxy... And it cleaned up well with a bit of a sand... And the seal was in surprisingly good nick, bit of a scrub in some bleach and it cleaned up ok... Came together well... Then gave the door a sand and bombed it with some Rust-Oleum paint and clear coat... It was a Prestcold brand. Think the new name is an improvement... And made up a new label for under the handle... And it looks sweet after some detailing... I've ordered a 45W heating element, but as it hasn't arrived I chucked a $10 reptile heating lamp (50w) in to get things running... And fitted a s/s plate above it to dissipate the heat a bit, avoiding a hot spot directly above the lamp... And my PIR controller also hasn't arrived, so I hooked up an Inkbird controller, fitted a couple of glands and some interior grommets for the heating and temp sensor cables... Came out so good I bought another one ($25). As a fermenting fridge plus a conditioning fridge will make things quicker/ easier... such a fridge Barry...
- 44 replies
-
- 28
-
-
-
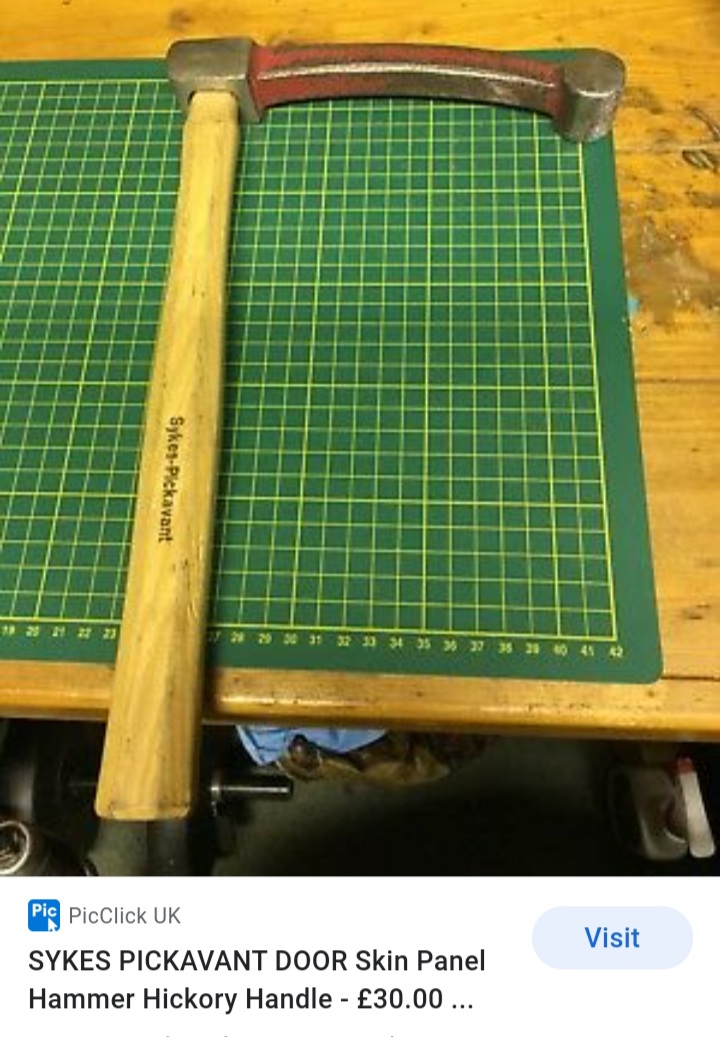
Got Sykes written on it. Picking it's one of these. Now it's sort of obvious, but was scratching my head...

-
No prob. Makes sense being left in a door, was wondering if it was a dolly type thing. PM your address and I'll send it...
-
Amazing...
-
Shit no. Exact opposite...
-
Got a shed....?
-
Ebay screenshot. Could prob get cheaper ones somewhere but I was in a hurry and these looked like they'd work... [Edit] price was for 4 of them...
-
Yep was going to say same thing. I made a grease nipple adapter that screws into bleed screw hole. Few pumps on grease gun should shift things. Just make sure you're not compressing a bubble of air with it...
-
Lord Gruntfuttock's 1971 XY Fairmont
Lord Gruntfuttock replied to Lord Gruntfuttock's topic in Projects and Build Ups
Shifted the car so could work on driver's side, same deal, spent ages scraping all the old tape and mastic off... And found this in rear door, no idea what it is, prob been there for decades... Pulled grubby gubbins out of both doors, and cleaned up lots of grime with solvent and a bath in the ultrasonic cleaner... But the latch mech was very worn on the drivers door... Looked at welding up and cutting out new slot, but a little research found these... So ordered. Have also received my non-setting mastic/butyl and my shiny new handles... Plus the rubber boots, so I cut holes with a chassis punch, so neat. Door side positioned at the dimple mark I'd pre-drilled earlier... And there was a dimple on the side that lined up with a hole behind the kick panel, so cut that as well... But when I test fitted it, it was a bit stretched for my liking, so cut another hole in the door 50mm lower... And it's much better, seems to hold it's shape opening and closing ok. Shame I have a hole to fill but will just chuck a solid rubber grommet in it and install things properly on the other side... Have to figure out how to do the rear doors next...- 149 replies
-
- 14
-
-
Lord Gruntfuttock's 1971 XY Fairmont
Lord Gruntfuttock replied to Lord Gruntfuttock's topic in Projects and Build Ups
Front door, cleaned up old mastic and masking tape, quite time consuming, ended up using WD40 on dry old tape remnants and scraping off with plastic card... And same deal, made up a flat alloy bracket more rigid than the supplied one. Bit trickier clearing window glass, this is how things will sit behind panel, but more to the left, operating on the vertical lock rod... And mounting bar installed, had to drill one larger hole for access to bottom screw of actuator, which is slightly angled to align with rod... And mounted up, putting it here gave access to clamp on lock rod too... And clearances ok inside, have to pull door/lock mechanisms out and clean up/lube yet, but lock works ok on 12v... So will repeat on other side, I made matching front/rear brackets at same time, so should be fairly easy, just time consuming. Have to wait for rubber boots and butyl rubber to arrive before can do anything else anyway. Suppose I could look at running wires though, not quite sure how to do that yet...- 149 replies
-
- 10
-