Ashkellybarr
-
Posts
512 -
Joined
-
Last visited
Everything posted by Ashkellybarr
-
Yeah I did think a push bike sprocket hanging out the side of the head would look pretty mad max haha im trying to be a Jew to get the thing done and in haha theres a place across from work that dose water/lazer and milling stuff on contract to manufacturing shops. 'Lmaybe I'll go over for a yarn at lunch
-
Or trim the edge down of their spacer?? lips not that big
-
I asked a couple onto it people about this. Using push bike sprocket. All said cause the teeth tapper to an almost point/curve their not ideal as hall sensors operate better and clearer with straight edges. i did wonder if you could get a moto sprocket and lathe the end of the teeth off to give a sparser edge
-
Cheers! I'll have a look at them. Haven't actually got started yet so I'm open to suggestions still. it seems as though their trigger wheels are designed to fit only their alloy crank pulleys, so I'd need to buy their setup im not looking to spend much, think I can get it sorted with an off the shelf trigger wheel, and make a spacer for less then $100 if I get their pulley/spacer/trigger wheel it'all probably run over +$200
-
Ash's 82 AA60 rina of rustic glory
Ashkellybarr replied to Ashkellybarr's topic in Projects and Build Ups
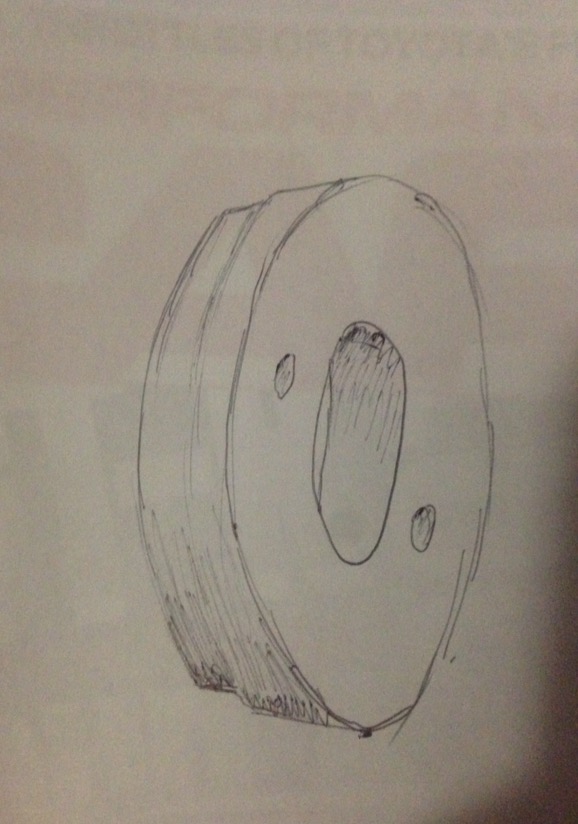
After fluffing around with what to do about engine speed pickup I've scrapped the idea of running VR input in favour of hall sensor and crank trigger wheel. next was what hassle free bolt on were available. theres the t3 trigger wheel. Witch is cheap and looks nice. But it only fits on their alloy pulley, and worse part cause it fixes to the back you can't run the lower cam belt cover so I'd haft to fluf around and mark out new timing position reference points. decided I'll run it on the front instead. no cheap products off the shelf I'll haft to make something up. consistion of an alloy spacer/insert that mounts to the factory crank pulley using the tapped holes already. from there I can fix a trigger wheel to the front. see if I can lathe it up at work to save moollar
-
Ash's 82 AA60 rina of rustic glory
Ashkellybarr replied to Ashkellybarr's topic in Projects and Build Ups
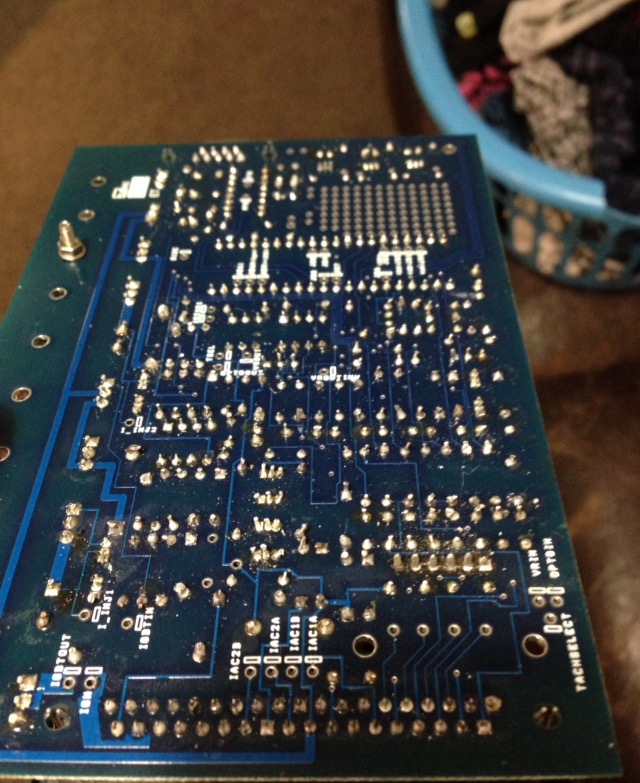
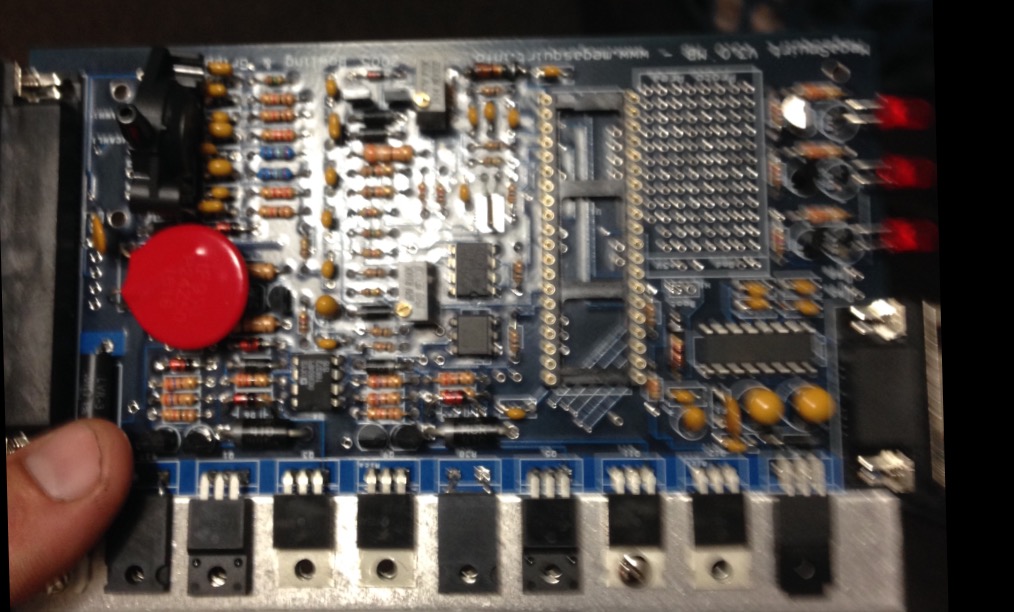
Making progress slowly. picked up another new piston to replace the odd one witch is sweet. so just needs machine work and its good to go together! bought a mega squirt kit and made the most of the rainy weekend. pretty happy with it so far, more simple then I thought to get together. Although i jumped the gun and put the MAP input on the wrong side witch is amateur AF. with no solder sucker I can't get the bastard out either haha ah ffs Open to suggestions for that seems people have had trouble with the VR input of the CAS, I've been talking to quite a few people trying to get some solid info but I'm getting different answers from people with mixed results. Unsure if I should dodge the an of worms or persist with fingers crossed
-
Ash's 82 AA60 rina of rustic glory
Ashkellybarr replied to Ashkellybarr's topic in Projects and Build Ups
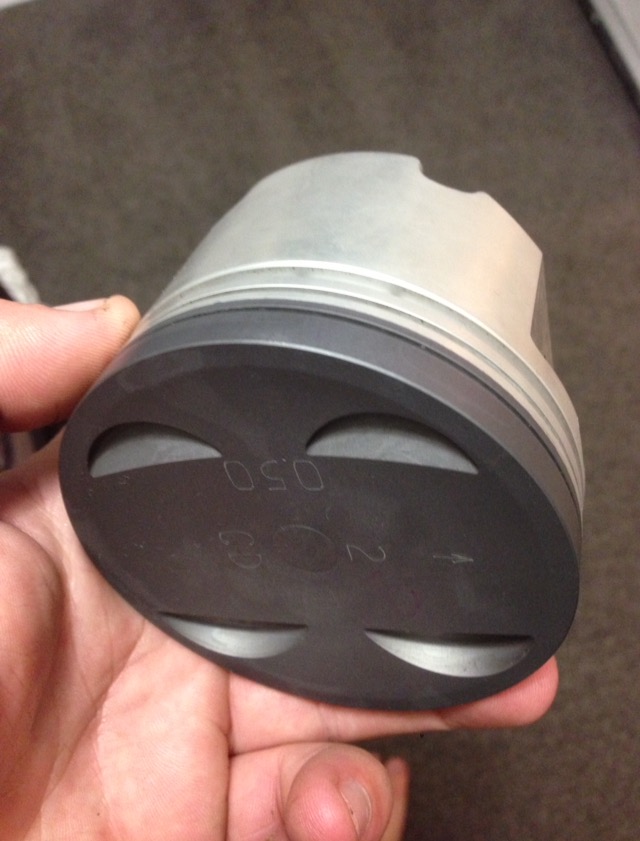
Back at it, silly season and other cars have seen this slow. Out with the old, in with the new. x3 new over size Pistons installed. x1 I've had trouble with tolerance, my rods top falling a tad to tight, and new piston/pin falling a bit over the threshold, I've got anouther on order so should be sweet. Heads nearly done, just need to go over the ex ports with the final grade to get a smooth surface and it'll be ready for assembly. as it stands with a TRD 0.8 HG it will sit at 10.11:1 comp. ideal for what I'm trying to acheave as its the daily beater, turning over on start up and sidies on a cold motor with any more comp might make for a pig of a daily. might be some taken off the head/block but that's up to the machinist. And doubt it'll go over 11:1 of need be
-
'80S KID Part II: Ed's AW11 SC chit-chat
Ashkellybarr replied to 0R10N's topic in Project Discussion
Super lame factory option
-
Then I'll get your other tank off you and do the same Thought about PWM on fuel pump for low rpm and idle? I know some powerful factory cars do it to extend pump life and stress on the system
-
I'll put photos in spotted
-
Winner! Cheers mate! Dunno why this didn't come up in my many searchs http://www.mr2.com/forums/threads/104536-4AGE-high-idle-FIXED!-idle-air-control-valve-readjustment Can't seem to add photos sorry. But I can assure you it's super tidy and all factory turbo get up. Even says turbo on the seats and steering wheel. And has hi/low boost switch on dash with a little bar graph type boost gauge
-
Been working on a ep71 turbo. Found vac leak causing hunting. Seems the waxstat isn't sealing Sits on cold start flat, once warm and cold start turns it starts to hunt 1k-1600 I've temporarily made an alloy plate with some barbs for idle speed control and all is good now but cars mint and original so would like to fix it. I haven't been able to find any shop manuals or exposed diagrams to pull part numbers from. Most of the 2E's are carb not injection let alone turbo, I've compared it to 4A 16v ones but no luck on similar parts. Not wanting to half ass it and it shit out again I'm wondering if I can make an electronic one using an air bleed solenoid and a temp sensor..? Or if anyone's fixed them before and has some suggestion?
-
Ah yeah, and first time I've seen in the flesh too. Super clean man! Nice car
-
I remember Barry Manon posting something about the pulleys and a possible solution so maybe flick through his page. He'll probably be able to sort brand new spankers too... $
-
Ash's 82 AA60 rina of rustic glory
Ashkellybarr replied to Ashkellybarr's topic in Projects and Build Ups
Couldn't sleep so jumped on the calculator. Writen it up so that it'll help others too Ratio's j160 (s15 6th gear) - F code diff J160-3.9 195/50/14 6500rpm 1st - 44.63kph 2nd - 79.49kph 3rd - 116.5kph 4th - 141.36kph 5th - 172.98kph 6th - 225.41kph 3000rpm 1st - 20.6kph 2nd - 36.69kph 3rd - 53.77kph 4th - 65.25kph 5th - 79.79kph 6th - 104.03kph 55kph 4th 2529rpm 95kph 6th 2739.4rpm J160-4.1 195/50/14 6500rpm 1st - 42.45kph 2nd - 75.65kph 3rd - 110.82kph 4th - 134.47kph 5th - 164.45kph 6th - 214.41kph 3000rpm 1st - 19.59kph 2nd - 34.9kph 3rd - 51.15kph 4th - 62.06kph 5th - 75.9kph 6th - 98.96kph J160-4.3 195/50/14 6500rpm 1st - 40.48kph 2nd - 72.09kph 3rd - 105.66kph 4th - 128.21kph 5th - 156.81kph 6th - 204.44kph 3000rpm 1st - 18.68kph 2nd - 33.27kph 3rd - 48.77kph 4th - 59.81kph 5th - 72.37kph 6th - 94.34kph J160-3.9 205/50/15 6500rpm 1st - 47.5kph 2nd - 84.6kph 3rd - 123.99kph 4th - 150.45kph 5th - 184kph 6th - 239.9kph 3000rpm 1st - 21.92kph 2nd - 39.05kph 3rd - 57.23kph 4th - 69.44kph 5th - 84.92kph 6th - 110.72kph 55kph 4th 2376rpm 95kph 6th 2438.5rpm I've go something cool turning up later this week, won't be in for ages (year or so) as that has its own head aches and things to figure out. But for the ultimate goal it looks like the altezza 3.9 ratio is the go As far as I'm aware the tezi CWP can swap into a solid axle case, the pinion just needs a spacer and to set..?? If so then that's all good and I'm on the look out for one of those. Since the new motor will be in for cert and I don't want to cert twice there's no point in turboing a 4A so all that stuff can get sold. And I'm possibly swapping the 4AGZE for a high comp bottom end, so at least I've got a cam'd small port with 11.5:1 to run around in for a year or so till I get all this gearbox, motor and diff jaz worked out, done and funned -
Ash's 82 AA60 rina of rustic glory
Ashkellybarr replied to Ashkellybarr's topic in Projects and Build Ups
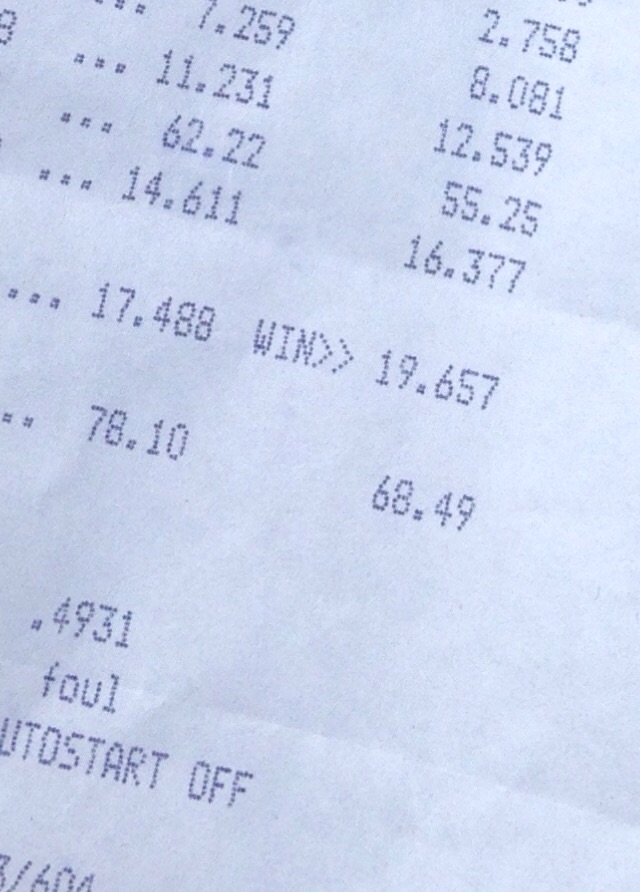
Oh and I won a DYO 19.6 with a 19.65 hahaha Epic day! -
Ash's 82 AA60 rina of rustic glory
Ashkellybarr replied to Ashkellybarr's topic in Projects and Build Ups
Sooooo many lols Awesome day at drag day. Cheers to the organisers and support crew! Nice to get the 3A down the strip before it gets pulled out haha Consistent 19.7's all morning so I was super keen to get some DYO in haha Tried to do a braking burn out so I could sit there and pull a sick one wheeler peeler but as I eased on the brake the motor started to stall haha 34 years, 260,000kms, bad rings and 20w50 to hide thoughts bad rings certainly wasn't helping haha Now with more motivation I'll pull the 4AGE out of anouther car next week so if I get my A into G and finish that small port head then the long block will be finished. Picked up the loom from storage so can start cutting that back to basics and hopefully find the RPM rectifier Ben made for the wasted spark setup. Might haft to call on some help to double check the ignitions configured properly
-
The Night Rider's 1986 Toyota MR-2 AW11 - Discussion
Ashkellybarr replied to The Night Rider's topic in Project Discussion
I'm wrecking a manual AW btw -
I did what's that?
-
Ash's 82 AA60 rina of rustic glory
Ashkellybarr replied to Ashkellybarr's topic in Projects and Build Ups
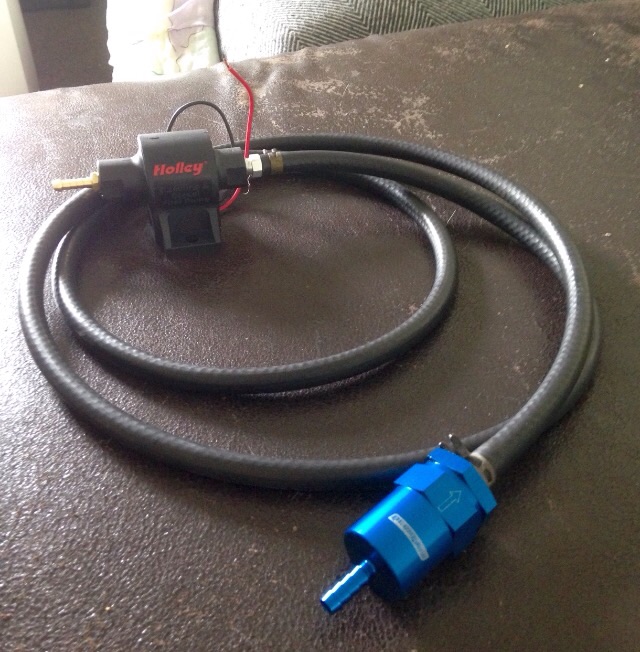
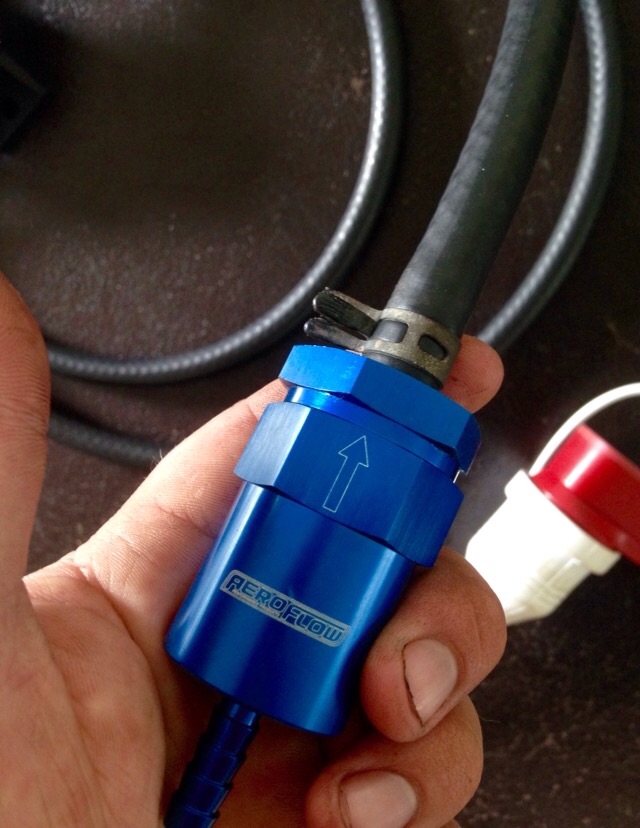
Picked up some bits Went into segedins to ask about pumps and was pretty surprised with price so bought off their shelf Holley solid state pump and pressure regulator. Also a nifty fuel filter from aeroflow, was only $20 and can be opened so the filter can be changed/cleaned and looks pretty pro too Just got to sort out mounting. I don't want to touch the hardlines as they will be used when I go to EFI with a return system. There's soft hose that goes from tank to hard line so I'll put it between there. Was suggested to mount as low as possible but with out modifying the hardline it's not easy. I'll mount it on the chassis with the filter above it and put a loop in the hose from filter to tank and hopefully that will help keep fuel in the hose for start up. Have a relay from a security system I'll use for the pump feed. Leave extra slack under the carpet so there's enough length for an EFI in tank pump later on Wiring and fuel pressure gauge and then that's done
-
Ash's 82 AA60 rina of rustic glory
Ashkellybarr replied to Ashkellybarr's topic in Projects and Build Ups
Update and to do list. Plan was to sell a 4AGZE and some other things to find the 7A. I've zero interest in my 4AGZE and they seem to be selling real cheap at the moment so instead of spending loads on a new bottom end I'll re-use the 4AGZE bottom end. Picked up a blacktop flywheel and clutch for a reasonable price. Got some cheap average RWD headers. Things to do: Finish smallport head. Get head to shop for reassembly with new valve train. Insert frost plugs into injector holes. Sort loom for wasted spark and RPM read out. Find EFI fuel tank that bolts in. Buy fuel pump and regulator for delodortos. Thankfully ben made reciterfier thingy for that red AW's RPM read out I can use if it's still in that loom and I'll reuse the coil packs as well. I've got a spare dif that someone's locked at some point I'll swap in. Haven't figured out the ratio yet and I'll need to get it re-welded as its cracked and open but hopefully get at some drift practice/learner days
-
Ash's 82 AA60 rina of rustic glory
Ashkellybarr replied to Ashkellybarr's topic in Projects and Build Ups
Preping for OS dag day haha
-
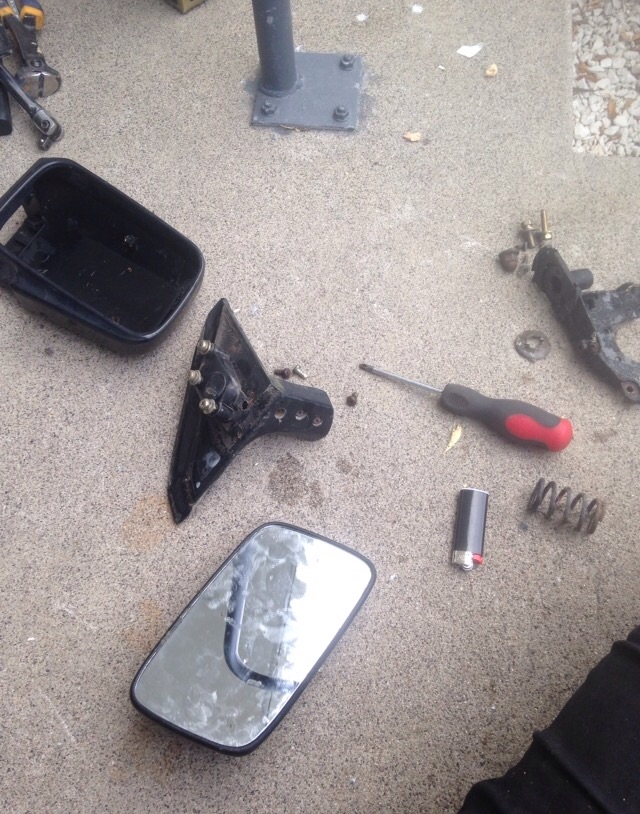
Ash's 82 AA60 rina of rustic glory
Ashkellybarr replied to Ashkellybarr's topic in Projects and Build Ups
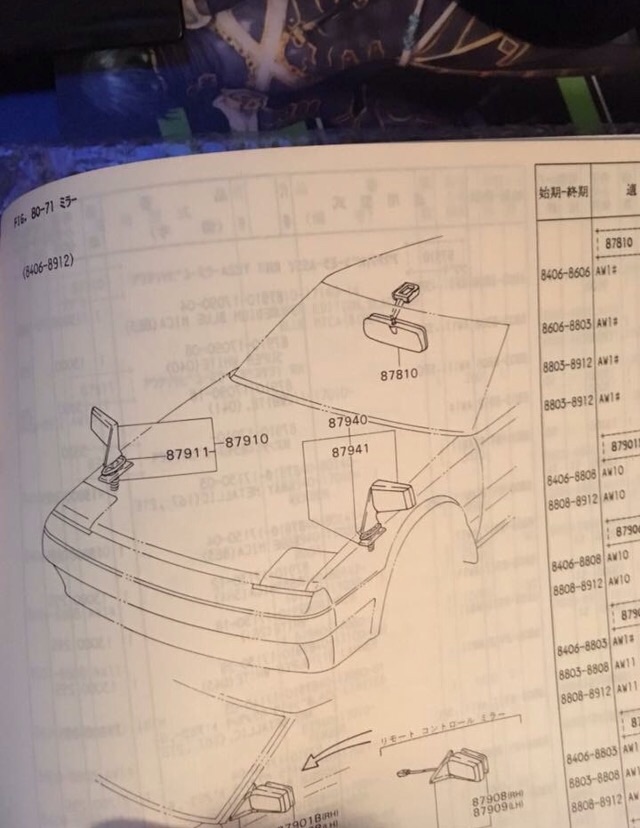
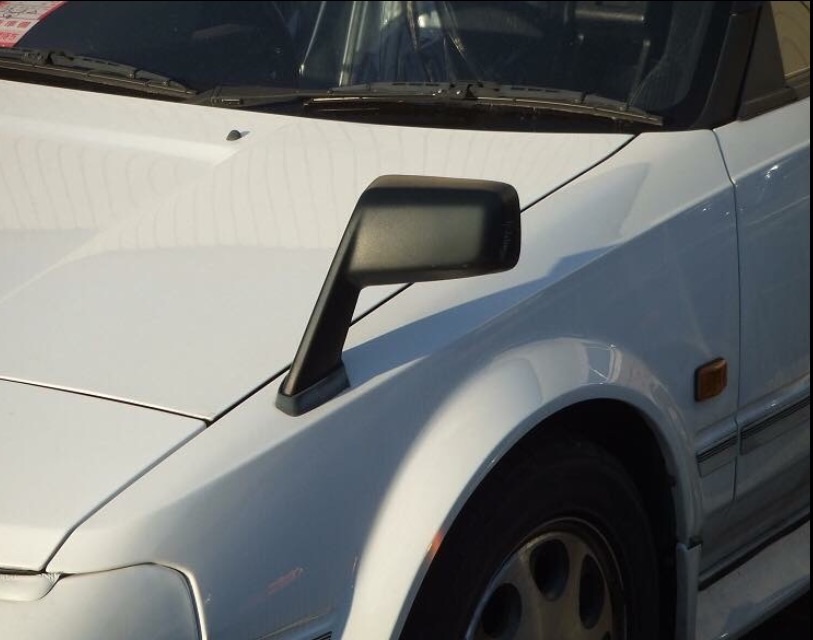
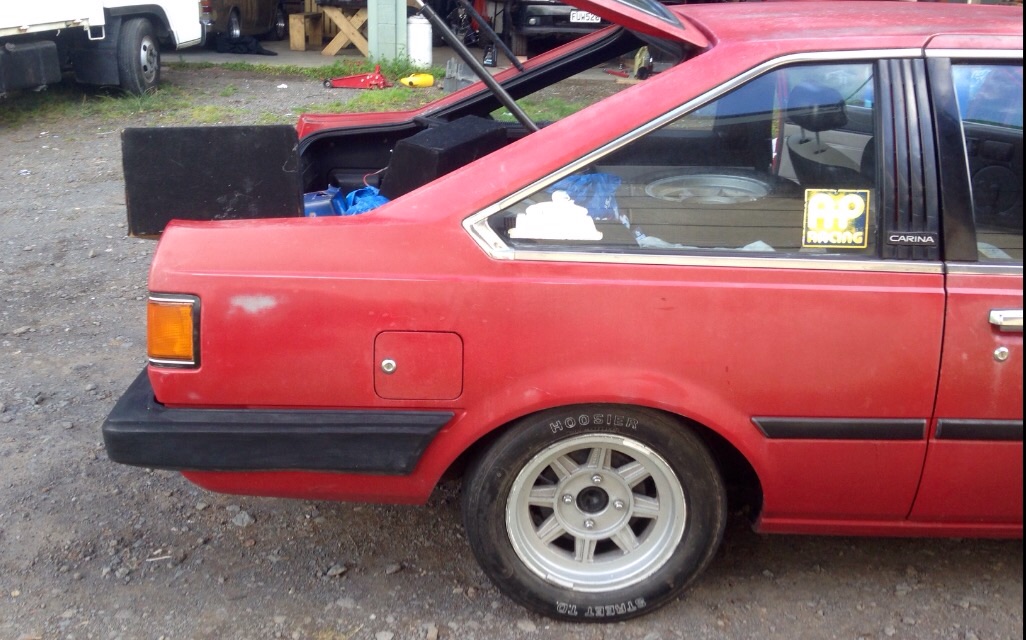
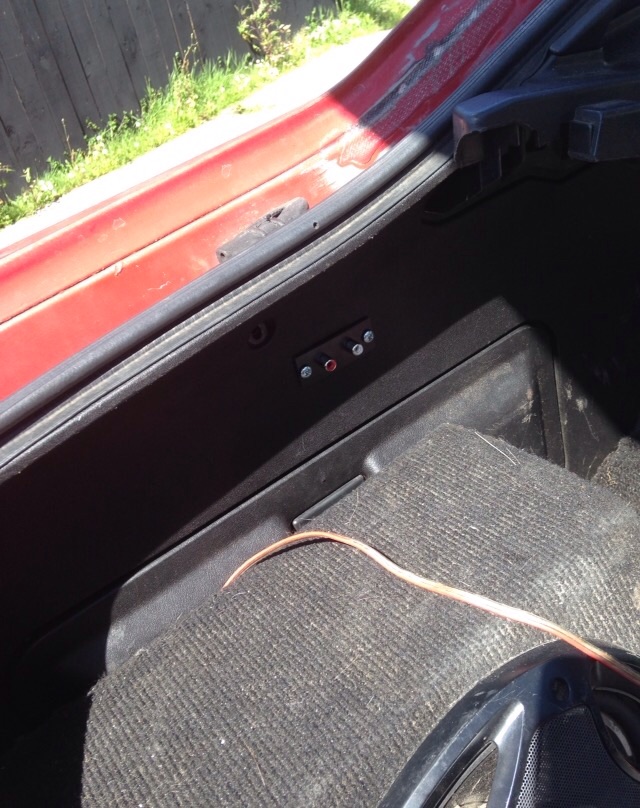
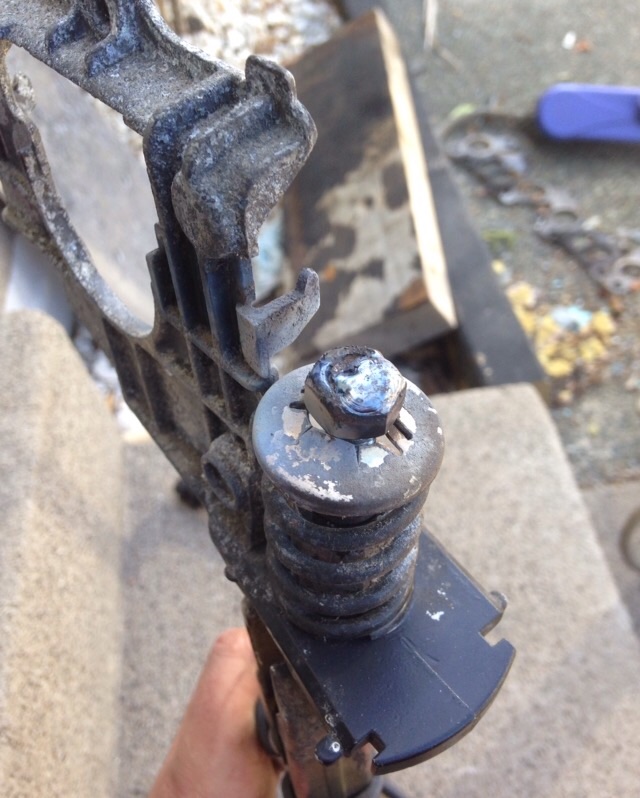
Since the car is pretty much a daily driven ute I thought I'd make life a little easier. 6x9's make for a good sound system on long trips but moving wheels/engines and other crap is a pain in the ass. Thought I'd keep it OG with the White and red plugs. Sorced from jaycar they didn't break the bank and make every day useage miles easier. Other thing that's been bugging me is the hideous repco wing mirrors someone put on. Prefacelift mirrors are ok I guess, big improvement over repco jobies. Just running drivers side. Big ups to the bloke who drilled holes in my doors for no reason Spring thinger retainer clip thingy had come off on both mirrors of donor car, nor did they want to go back on. Stopped by steel masters and picked up a bolt long enough with an 8mm shank. Had to cut the head down to clear mounting bracket. And I welded the nut on for good measure. Was pretty fiddly pulling apart and getting back together so want to avoid doing that again
-
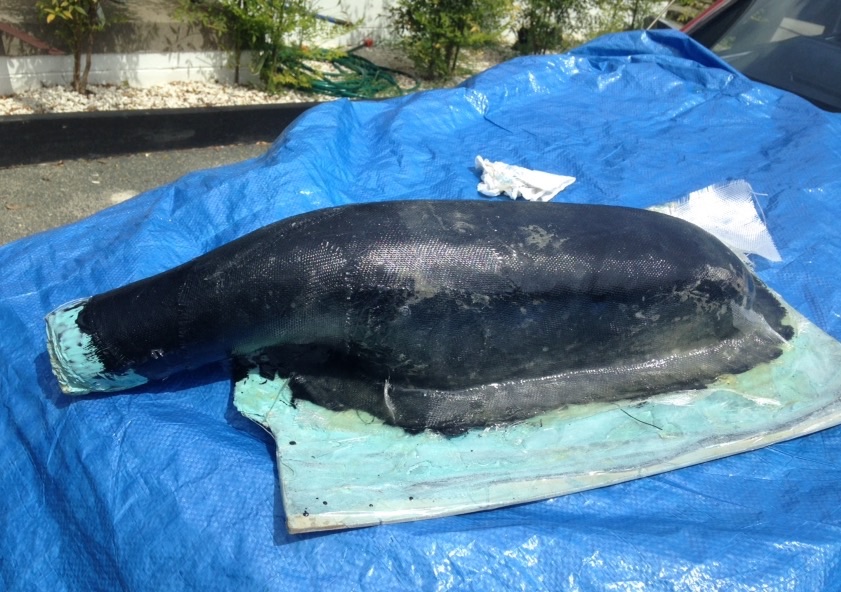
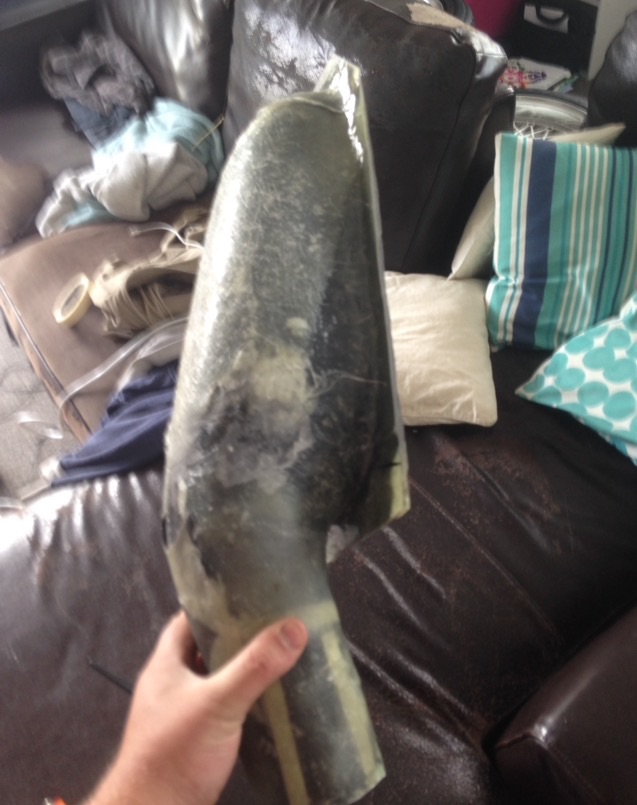
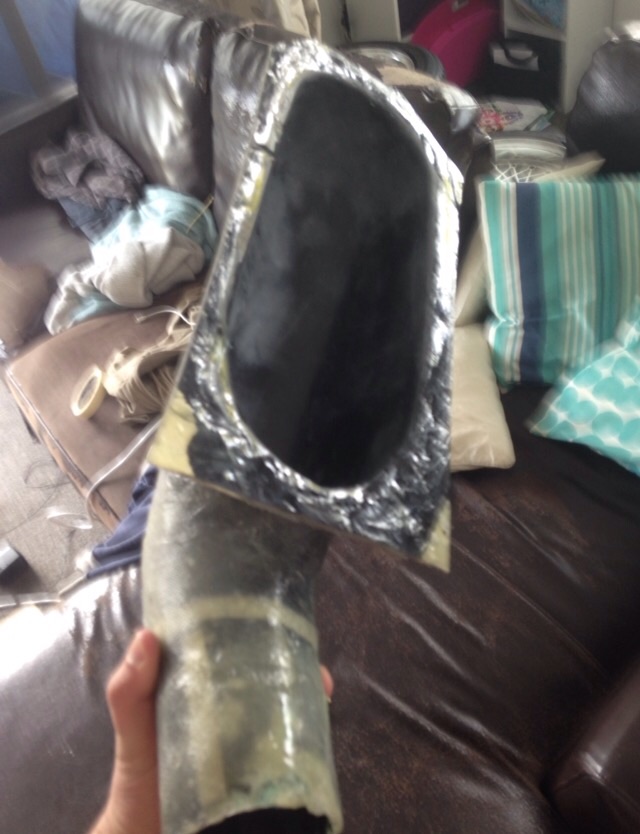
Nah, just going to make it 2ply then crack it, leave it in and then add strength layers. Far more time effective and won't need to sand then polish the mould seam. The neck gets progressively smaller. For the silicone joiner I'll add a strip or two of carbon to the end on the outside, then sand and paint a layer of epoxy onto to smooth it out and make a good sealing surface. Same as I did for the fibre glass flanges I made for my aw11
-
Ash's 82 AA60 rina of rustic glory
Ashkellybarr replied to Ashkellybarr's topic in Projects and Build Ups
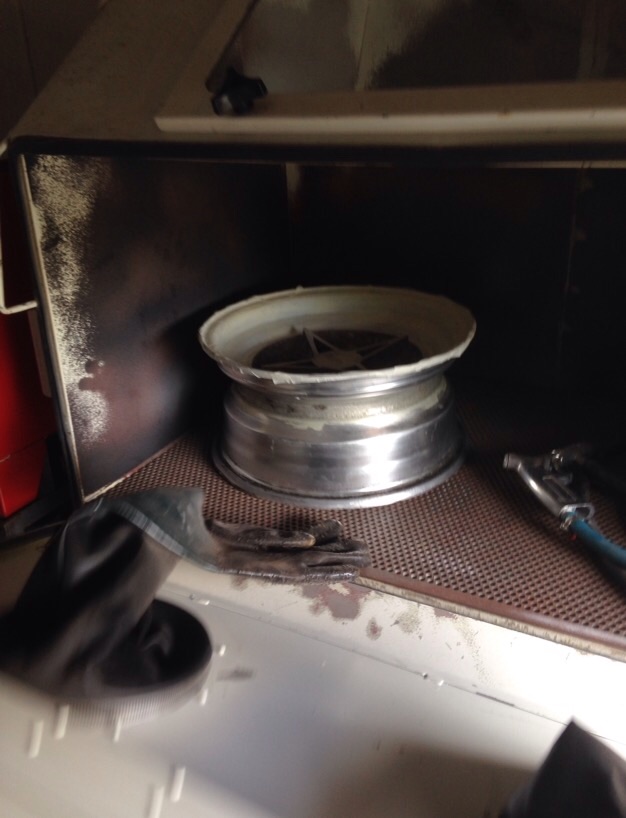
Moulds getting there, little more to do still. Haft to touch up the gel coat where I got s bubble between the gel and glass. I little support to do and maybe a base so it sits flat. Went to a mates and started sand blasting some OG wheels I picked up. Finally picked up a drivers side window mount mirror so can pull thoughts hidious rep I things off!! Cars got fender mirror door on passenger side so I can probably just run drivers side and if get hit up I'll just say it's factory like that