
_Matt
-
Posts
453 -
Joined
-
Last visited
-
Days Won
5
Everything posted by _Matt
-
Need to do updates more often so they're smaller! Put the tray on as I needed to see where I could run the fuel and brake lines. Also borrowed a pair of wheels off one of my parent's cars, to test the tire sizing. Bought a fuel filter and made a stainless steel bracket to hold it. Made some mounts for the rear bumper to bed brackets, as they were welded on before. Got out the LED tail lights that I've had for ages and made up some stainless brackets and polished them. Started running the brake line out of copper-nickel tube. Also got some 5/16" lines for the fuel lines. Made some stainless clamps to hold them all together and to the firewall and chassis. Made some bits for the column change linkage. Top middle piece mounts on the firewall around the column and has some little stoppers that make it so the gear stick needs to be pulled out to change from certain gears. Left bit is what goes over the stoppers and pivots with the gear stick to push the rod bit down, which then pushes the right piece down and change gear. Thought at first it would have to be some super complex system with cables and stuff but this way was actually pretty simple to make work. Then I needed to make up a indicator on the column to show which gear it was in. Drew on up in Solidworks and laser cut it out. The accelerator cable needed some modifying to work, it's wasn't quite long enough to reach the pedal, so made a new bracket that moved the housing closer to the throttle, which allowed for more cable out the pedal end. Then all it needed was a plate with a lot in it that bolted to the pedal to hold the little ball on the end. Have had some big train air horns for ages. Couldn't find anyway with enough space to fit them, as they were originally mounted together in a triangle shape. So pulled them apart, made some new brackets and bolted them up under the cab to the chassis. Need to just run some lines to them. Some boxes of stuff finally arrived from America. They included some front windscreen stainless trim, door panels and the surrounding trim. Might replace the door panels one day as they weren't as good as I thought they'd be for the "deluxe" spec ones. Also arrived were some wheels. 15x8 Artillery steel wheels with baby moons and beauty rings. Spent ages trying to figure out what colour to paint them, didn't really want to go red (what everyone does) or black (spent too much money on them for them to be hidden). Decided a bronze colour would look good and hopefully not too out of place. Then spent more time trying to find a nice bronze.
- 90 replies
-
- 69
-

-
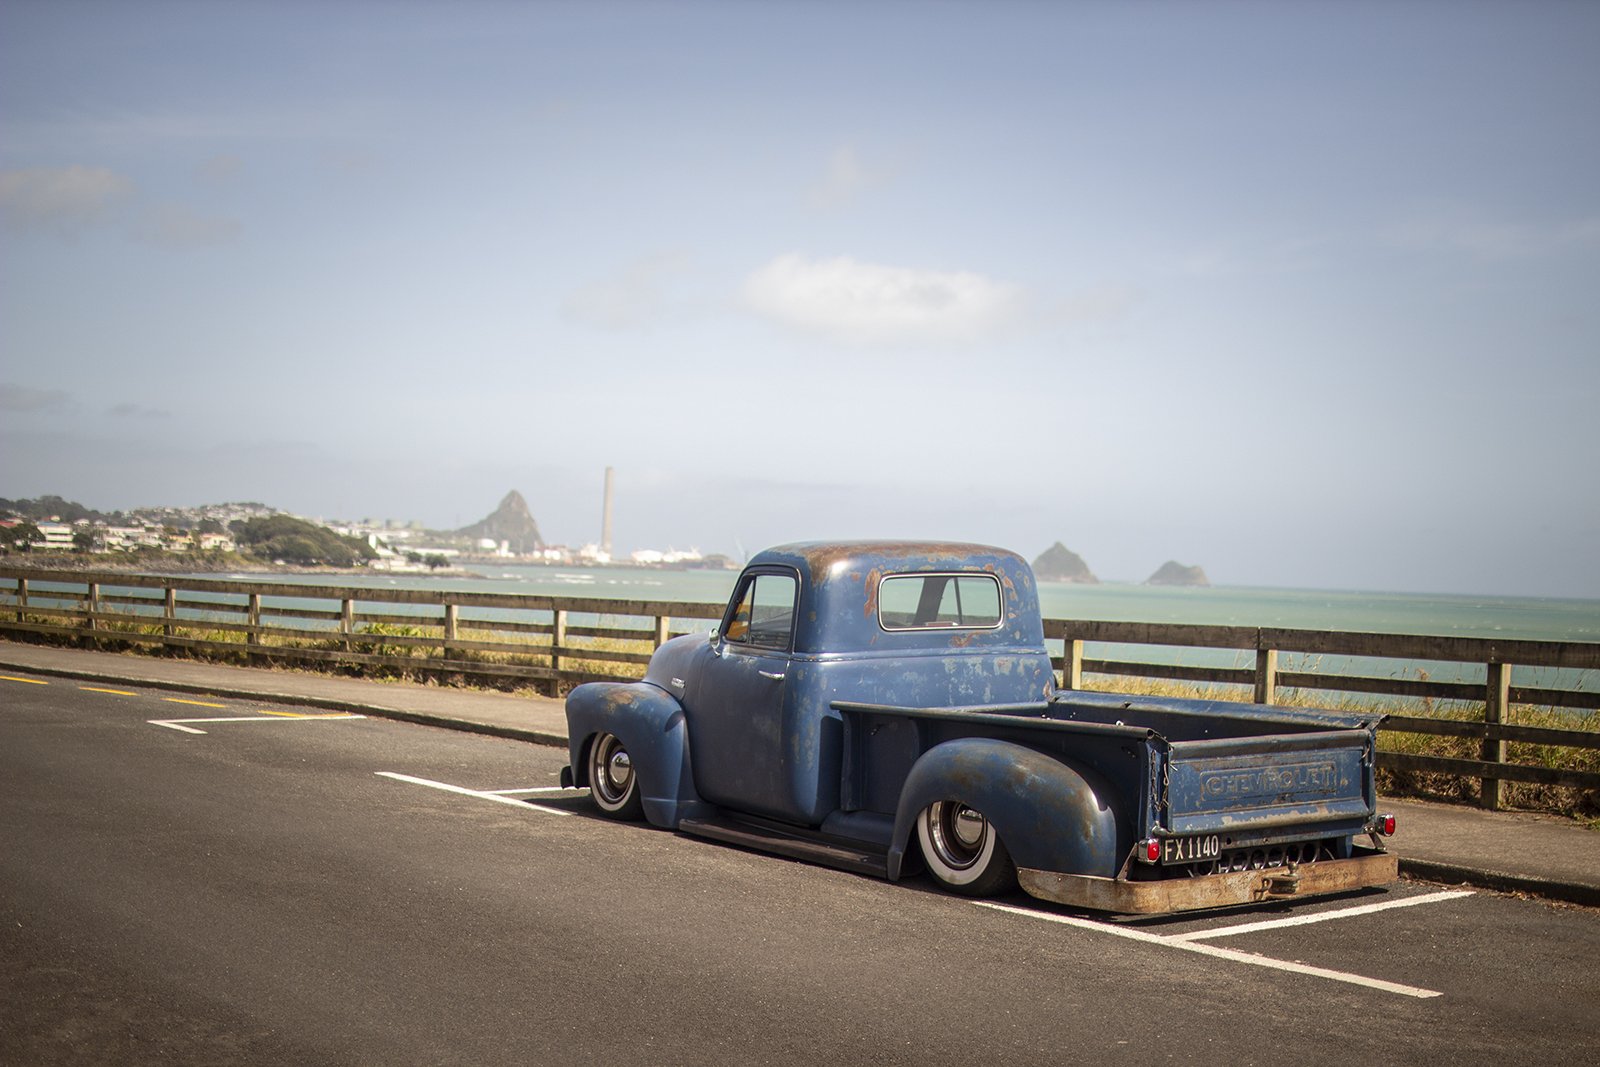
All the bits are clearcoated. Came up alright, got way too many runs on the cab, but that's okay as I'll be re-coating it all again once it's assembled with some flatter clear. At least it's all sealed up now. Installed some black fender welt between the bed and the guards. Started installing some of the parts. Put the door latches in, had to replace one of the springs behind the interior handle on the left side as it had snapped. Squeezed some Dynamat on to the outer skin of the doors and wooow what a difference that made to the whole door including the inner skin. Couldn't wait to see what the gauges looked like, so in they went. Got the door windows and quarter windows in, what a frustrating time that was, since they had to be installed in the right order and it all has to be fitted through the small slot in the top. Put an LED in the original interior light housing, wired it up and fitted. Puts out some decent light. Pulled apart the old headlight surrounds and put in new spring and seals. Gave them a bit of a polish up as well. Bought some new sealed beams, no-one could seem to find any semi-sealed ones with the domed glass when I was looking. Found some in America after I bought these though, but will try these out for now and if they're rubbish change them later. Fitted one of the inner guards when the engine was in and realised that trying to make headers was waaaay too much effort, time consuming and there really just is no space in there, plus the factory ones already fitted perfectly. So cut off the ugly heat shields on the factory headers, tidied up some of the welding, ground out the lumpy weld on the inside of the flange, painted them with high-temp paint and then wrapped them in heat-wrap, look much better. Would of really liked to build my own headers, maybe on the next project, as I have 20x 1-5/8" U-bends arriving from America next week haha. Put the cab on so I can see where the brake and fuel lines can run. Looks like it could actually be finished sometime soon haha.
- 90 replies
-
- 68
-
-

-
A bit overdue on an update. Undersealed the cab, came up pretty good! Flipped the cab back over and sanded all of the inside and door jambs. Then put some epoxy primer on. High build primed the dash and a few of the panels that will be visible once done, so they sanded up smooth and just sprayed the primer as a surfacer on the rest. Once I got it all sanded down and filled the little bits that needed doing sprayed some colour on. Pretty happy with how it turned out, other than a couple of small sags on the dash, but I'll sand them out later. Picked up a couple of boxes of Dynamat and covered it everywhere I could get it. Made a decent improvement, just need to get some inside the doors somehow and also do something with the gap in behind where the top seat belt mount is. I needed to sort a radiator as the original one wasn't in the greatest of condition. Tried searching for a couple of weeks to find somewhere to buy an aluminium core the sizes I want, but seemed to be pretty hard to get anything. So went and bought one of those universal Chevy cross-flow things that had a core close to what I needed. Cut off the tanks, drew up the radiator and support in solidworks and designed the mounts and new tanks from there. Top tank is angled at the front and with the gap at the top allows me to bring the air intake through there, as there's not really anywhere else for cold air. Drew up some aluminium brackets to mount the electric fan as well. Should clear the engine if I trim some of the pulley bolts that stick out a bit much. Started on prepping the rest of the body panels for clear coating. Left side is sanded with 800 grit which seems to work pretty well, cleans it up nice. The seam at the back was pretty rusty so gave it a sand, rust kill and then seam sealed it. The blue colour I was using for the rest of painting was quite the same as the patina'd paint some had some different stuff mixed up and used it to blend in the repairs. Came out really well! Fixed up the patches where I welded up the old mirror, spotlight holes and the area around the cowl vent.. The sanding brought back some of the original pinstripping around the cab which is cool. Had to clean up this seam on the tray as well since it was rusty and needed touching up.
- 90 replies
-
- 39
-
-
new page pls
-
My parents came back from America and brought back a bunch of parts for me. Nothing really too exciting, just some headlight parts, steering column rebuild bits and various rubbers that I needed. The slightly exciting parts here were door arm rests and exterior door handles. There is some cool bits coming in a container soon though! They also picked up some NOS optional fog lights for a Chevy truck which are cool. The ignition switch that I got didn't work in the original bracket that fits into the dash, so tried to come up with ideas on where to put it. Came up with this, has the ignition switch and light, rpm gauge, wiper switch and oil pressure light or something. Would probably cover it in black leather to match the door cards, don't know how I feel about it though, sorta looks a bit bulky. Might revisit it later again once the inside is painted. Also needed somewhere to mount the airbag controller. Made it hinge down under the panel and pivot up when it's needed, which worked alright. Other option is to modify the original ash tray and put it in there, which I would prefer but requires more work and cutting up the dash panel. Dropped the engine back in and regretfully put the old rusty jag wheels back on to roll it off the hoist. Bought some Durapox clearcoat with flattener in it awhile ago and have tried it on quite a few different parts with varying outcomes. Unsure what's going wrong but it doesn't seem to flatten off if it's put on more than just a light dusting coat, just stays glossy if too much is put on, but it's sorta patchy/rough if it's too light. Have gotten these bits good enough, but seems like it's going to be a real pain to try and get the whole truck consistent. Had an attempt at patina-ing the grill guard. Doesn't look too bad I think, will have to see once the grill and guards are back on though. As I was having problems with the clearcoat, I did some research and turns out the suction feed gun I was using had a 1.8mm tip which is a bit big for painting/clearing, more used for primer. So we went out and purchased a new decent gravity feed spray gun. Took the rattle can primer off the firewall to put some epoxy primer on. Epoxied. High build primered, and then filled all the spot welds, little dents and welded holes that needed doing. Then spent ages sanding! Once it was smooth enough I remasked it and applied some paint with the new gun, which is quite a bit better. Isn't perfect, but good enough for a firewall. Made up some plates that bolted to the upper door hinge mount on the cab and then welded a long piece of RHS between them. Then used some tie-downs wrapped around the hoist and flipped the cab on it's back, which sits on some inner tyre tubes.
- 90 replies
-
- 41
-
-
Gave the exhaust a paint with some high temp paint and then tried to assemble it all with out getting too many scratches, wasn't too bad. Bought some new braided rear brake hoses from Australia. The steering rack rebuild kit I got from England was the wrong one so just left the current seals as is and hope they are alright. Sanded it all back and gave it a coat of paint and assembled it back together. Made a new filler tube for the fuel tank and added a drain plug. Since it then needed painting again I sent it off to get powder coated instead. Cut some rubber up for the mounting straps. Just had enough rubber left over for the fuel pump seal. Pulled the engine out and gave it a good clean up. Still isn't the best as some of the aluminium parts are a bit oxidized. Whilst I cleaning the engine I got sick of looking at the hideous standard headers, and ages ago I drew up some exhaust flanges and cut them from 10mm mild steel. So I'm going to try and make some headers with the very little space available. There's heaps of room upwards so maybe try and do some high-rise ones. Started by making some ob-round to round transitions by bumping them on a pressbrake from two pieces. Worked really well, they were quite accurate to size. Need to put the engine back in, cab back on and fit the inner guards so I can build some jigs.
- 90 replies
-
- 38
-
-
Painted the diff, came up pretty good considering how rusty it was around the hubs. First time changing brake shoes, thought it would be harder than it was. Hardest part was just trying to pull the springs into the slots, but got there in the end. Bolted almost everything back into the rear end. Finally cut down the 4-link bolts that have been annoying me for ages as they had about an inch of extra thread. My Dad (www.acecustoms.co.nz) makes these diff head covers to suit Holden/Falcon diffs as well as others. So I grabbed one, trimmed some material off the fins (so it didn't hit the fuel tank crossmember), rumbled it all day at work and then polished the fins. Also made another brake hose bracket, as the previous one didn't work with this cover.
- 90 replies
-
- 58
-
-
-
Received the order of parts from England, had to pay GST which was a bit annoying. My dad had some spare Jaguar hubs and calipers laying around and they had better condition calipers on them than what my ones were, so swapped them and gave them a sand blast ready to paint. Painted and installed new seals, pistons and dust boots. Fully assembled caliper with all new parts, apart from the pad pins and anti-rattle springs because the ones I bought ended up being too short to fit for some reason. Painted the front end and all the other bits that needed doing. Sent off some small bits and bolts to get electroplated. Hub assembly all together with new wheel bearings, bolts, ball joints and rotors. All bolted together ready to bolt onto the chassis. Brought the chassis back into the main shed to put it back on the hoist to start some assembly. Got the front end mounted on the chassis and all the bolts torqued up. Looks really good I think. Need to rebuild the steering rack and paint the diff now.
- 90 replies
-
- 51
-
-
Spent a few more hours sanding the chassis down. Once that was done I borrowed a rotisserie off our neighbour and made some brackets that bolted through the bumper mounts. Worked really well, was very balanced and didn't want to spin around by it's self. So then sprayed some epoxy primer down. After much deliberation I decided to paint it with some Hammerite. Since it comes only in certain colours I bought some silver and black and mixed them until it reached a colour I was happy with. Was quite difficult to paint as it was getting lots of overspray on parts I'd already painted and drying too quickly. But eventually got it reasonable enough. Isn't quite as dark as it looks in the photos. Now the chassis is done it was time to start on the front and rear end. Did a bit more welding and tidying up of the front clip, once it was all stripped down. Made some solid mounts for the front since the rubber ones weren't really doing anything as it's already solid mounted. There's quite a few bits to it once it's all in pieces. Going to take awhile to paint it all. Sent the front end to get sandblasted as it's easier to get someone else to do the bigger stuff since it doesn't fit in the cabinet. I did all the little bits which took most of a day. Bought some new brake rotors, pads, shoes and a rebuild kit for the rear calipers locally. Have purchased everything else to rebuild the Jag front from England, which should be here next week hopefully. Gave the rear calipers a tidy up by sandblasting, replacing the seals, better condition slide pins, new pads and a coat of paint. Now they just need new hoses.
- 90 replies
-
- 33
-
-
Went and painted the seat frame and the interior window frames. Terrible photo but came out really well. Awhile ago I made some stainless steel bracket things to hold the airlines down. Did some others to fit further along the chassis but they didn't work well enough so I think I'll just use some P clips. Mounted the airbag height sensors on the 4-link bars. Got them pretty good to the movement needed throughout travel, but then I jacked it up with the airbags inflated and the diff drops further than what the bags pump it up, so it was pulling on the sensors a little. To fix that I made some travel limit straps and got them sewed at a local auto interior shop. These also helped with the rear brake hose that goes from the diff to chassis as there was just too much travel for it. Now that every thing chassis fab related was done (that I know of for now) it was time to strip everything off to the bare chassis. A few hours later and... Now the cab was off it was a good time to sort out the battery tray that I bought in from america to replace the rusty on that was originally there. Once I got the old one off I decided that it would be better to just make a box that bolts in there instead. So drew one up and made it from some 2.5mm ali. Hoping that I can either fit one really big battery or a couple of smaller ones in there, so one can run the air compressors. Flipped the chassis and started to finish welding all the little bits I never fully welded previously, until I ran out of argon, so I made a start sanding it all back and then I ran out of sanding disks for now. I can't decide on what colour to paint the chassis, will be a gloss or metallic of some sort and the front and rear end will most likely be gloss black. So far the decision is gloss black (everyone does that though) a darkish grey either metallic or just 2k. Also have thought about going all out and doing something like purple flake, but I feel like it would just be wasted as hardly any of the chassis will be visible and will cost a bit more.
- 90 replies
-
- 37
-
-
Made some mounts for the gauges. Also made a mount to add some strength between the pedal box and dash. The wiper motor was just dangling around with the single mount so made another that connects it down to the bottom of the dash. Once they were made there wasn't much else that needs access from behind the dash so I welded the dash in. This is the second heater mount I made, the other one didn't look right as it didn't go up as high and wasn't the correct angle. Attached it with some rivnuts on the original firewall stiffeners or whatever they are. Found a high stop light in my pile of parts so decided to make up a bracket to sit on the seat frame. Gave all the dash parts, cowl vent and handbrake a sandblast and rustkill ready to paint. Painted with 2k gloss black. Made up a new brake line mount on the diff because the other one was fairly close to the exhaust. Have ordered a new line and fitting for it. Finished all the lines for the airbags. Here's a video of them working, the back still goes up very quick but that should hopefully slow down once there's more parts/fuel.
- 90 replies
-
- 33
-
-
-
I'm sure you guys are referring to plastic tube? I did all of mine from aluminium tube, which comes in straight 5m lengths
-
I just use one of these and spend ages working out were the bends need to be. Don't worry I do have a pile of messed up ones as well haha
-
Went and bought a bunch of things to finish of the air bag system. Got a couple of water traps between the compressor and tank now. There's already a decent amount of moisture in them from a few fills as you can see. Bought a pressure gauge as well, just to check on what it's doing occasionally. Trying to get all the correct fittings for everything to work was a mission haha. The 3/8" line coming off the tee is for the huge air horns that I have, it's sooooo loud! Waiting on the laser cutter at work to be fixed so I can cut out some brackets to hold all the lines in place. Undersealed the running boards and the radiator panel. Split apart the grill bars that were all the riveted together so I could sandblast and paint the backside of them. No progress pics but here's some of them done. Painted the back ones cream underneath because they were originally that colour on top but they have some blue overspray on them. It should mostly clean off with a scotchbrite, as that needs doing all over the body panels before it gets clearcoated anyway. Started to assemble the front grill/radiator panels. All went together well apart from the fastener sets I got from America not having the correct amount or just missing things all together. As you can see in the above pics I also assembled the park lights, I had new lenses, bulb sockets, gaskets and chrome surrounds but no new housings. The original ones looked pretty bad before I pulled them all apart and gave them a sandblast, but cleaned up like new with some silver zinc paint. The new bulb sockets I bought were double contact ones to run park lights and indicators on a dual filament bulb, but I had some orange/amber LED's laying around that fitted, so may use them and just have parklights in the headlight housing and have these just as indicators.
- 90 replies
-
- 26
-
-
Thankyou! Neither can I!!! You're more than welcome to call in, if there's others convoying as well I'm sure they can come as well
-
Fixed all the rust holes in the lower radiator panel. Forgot to take photos of the progress but nothing really exciting anyway. Bogged up all the pitting in it and gave it a couple coats of paint, along with the brackets that go behind the grill bars. Made up the air lines that go to the rear air bags. Made the left hand one with not too much trouble and then made the other side incorrect, as it had to go a different route because of the fuel tank fittings, and would of fouled on the deck frame. Got it right the next go though. Of course had to give it a test!
- 90 replies
-
- 38
-
-
Never really thought about water traps and my dad never mentioned it to me, but just did some research and from what I could find a large majority just drain the tank every so often. Corrosion won't be an issue for me because everything is ali or brass. Otherwise it seems like it's better to have the trap between the tank and valves from what I found.
-
Have now finished both inner fenders. The first one seemed to come out better for some reason, had a bit nicer shape to it, but they aren't too noticeably different. At this point I pulled apart the whole front clip and took the fenders, radiator support, lower grill panel and a couple of fender supports to the sandblasters. Got them all back and epoxy and filler primed the inners, then bogged up all the bits that needed doing. Didn't really need much at all, pretty happy with how they turned out. Painted the radiator support at the same time, should really try and have more things ready to paint at once as I've already gone through 4 litres of epoxy primer and paint and a decent amount is just waste. Primed and painted the inside of the fenders as well. Every time I mask up the patina I realise how much easier it would of been to just paint the whole thing haha. Need to give them and the inners a coat of underseal now. This is the lower grill/radiator panel, it needs quite a lot of rust repair. Have already done a patch in the middle awhile ago but haven't gotten around to it since. The grill is going to be great fun cleaning up the backside and painting Again should of painted the whole truck haha. Painted the deck frame with hammerite and then installed it and c--notch cover into the bed. The latch works how I'd hoped it would. Added a gusset on to the bed frame hinge as it didn't quite seem strong enough when all the weight of the wood will be on there. Received the cut windows back. Got green tinted ones because I wanted some sort of tint and grey looks too modern/yuck on old cars. ' Ordered a couple lengths of 1/2" aluminium tube and bent up some of the air lines for the valves to air tank.
- 90 replies
-
- 46
-
-
Finished off the left side of the inner fender and have nearly finished the other side. Decided on where to put the fuel filler, so went and bought a flush pop-up filler cap so it can be hidden on the c-notch cover. Came with a steel weld-in bung, was really good quality over-all (unlike the chinese one I tried first), but didn't like how the cap had a slight roundness on top, so chucked it in the lathe which fixed that. Bung welded in and cleaned up. Wanted the c-notch cover to be painted some sort of satin black but also to be pretty durable. Decided to try and give some Hammerite a go. Looks pretty good I think. So went a head and painted the airbag tray with it as well. Since I mounted the two compressors too close together to fit standard 90° fittings in the intake ports, I had to make some of my own up. Turned the thread down so they wound all the way in and then cut off the female threaded end and added some turned down hose-tails. Finished fittings welded and painted. The original trim that held the rubber on the bottom inside of the doors were pretty rusty so folded up some new ones and gave them a coat of black paint. While I had the paint ready I gave the fuel tank a coat. Moved on to the latch for the bed that lifts up. Bought a coupe of bear-claw latches from Ebay and made a box for it to fit in, which then gets welded in to the box section frame. Made it that way just so water and crap wouldn't fill up in there. A package arrived last week as well. An Accuair E-level Air Management system.
- 90 replies
-
- 39
-
-
Sandblasted and zinc sprayed all the parts that go inside the doors. Also stripped the rubbers and glass out of the vent window frames, sandblasted, epoxied, primed and painted them in 2K black. Did the same to the door and bonnet hinges except did them in the blue. I have already used just over 3 litres of blue so far! Will need to get some more at some stage. Now that all the glass has been removed I made some wooden templates and sent them off to get some new ones cut. Should be done next week sometime and then the doors can be assembled. I have also made a start on the inner guard where the engine was too wide. Have changed my mind many times about how to go about this. Decided it was easier to try and make in two pieces rather than attempting to get one the right shape and fitting nice enough to weld. Although it ended up being made in 3 pieces, because the front compound curved part ended up too small. Worked out really well this way, as I just started with a rectangular sheet of steel with the edge folded, then just trimmed it down until it fitted in the gap. Once it was fitted and tacked in I could make up the compound curved piece to fit. Test fitted it back on and there is heaps of clearance, wasn't sure if there was going to be enough at first. Took it back off to fully weld and sand. Has come out pretty good and it's all quite smooth/blends in very well. Made a start on the lower flange. Needs to raise up in the middle where those two lines are to clear the engine mounts on the chassis.
- 90 replies
-
- 31
-
-
-
Bolted on the fenders and sprayed some underseal on to them. Moved onto sanding down the doors ready to paint. Needed a little bit of filler in a few small dents and some spot welds right in the middle, otherwise they're really straight. Happy with how they came out, will give them a wet sand and polish since a few bits of dust landed in there when I was painting. Next up was the bonnet. Used a strip disk and DA sander to remove as much rust and paint as I could and then used the sandblaster to remove the rest I couldn't get to. Finally got a couple of runs, not too bad though as one gets covered by the latch panel.
- 90 replies
-
- 27
-
-
Got all the bits back from electroplating, came out pretty well! Finished off the handbrake as well. Found the original 2-piece hand brake linkage and one of the pieces was the perfect length to use in this setup. Only just clears the driveshaft, exhaust and crossmembers. Sprayed some 2k black on the underside of the runningboards. Have got some underseal that I'll spray on them, as well as under the guards and cab. Masked up and painted the bed last weekend, took longer to mask up than to actually paint it. No pics of it painted for some reason though. Whilst I had paint in the gun I painted the heater. Has come out pretty good! Have yet to get a paint run on anything! Have painted the embossed bits on the badge too, looks a lot better I think. Still need to make up another badge for the big front door where the slots are.
- 90 replies
-
- 46
-
-
These updates are getting a bit big, should really post more frequently. Made a new badge for the front of the heater since the old one wasn't in the greatest condition. Think it came out pretty good, but I reckon it could be better. Will give the low areas a paint and see how it looks. These are the dies I used to press it. Here's the finished thing made from 0.7mm stainless. Got the parts back from chroming. Shoutout to Wanganui electroplating for not charging for them to be done. My parents had some bumpers there to be done as well. The ashtray is a bit pitted but the raised bits aren't too bad and I was thinking of painting the low stripes anyway, so should look fine. Discovered there was no gap for the seat belts to fit between the seat, so bent up some 10mm steel tube and welded together some ovals for them to pass through. Made some new ecu mounts. Spent more time drawing up the triangle cutouts to look right than anything else. Couldn't quite get enough length from the wiring to mount them all the way back as I would of liked, but this will do. Took the rear fenders off the bed and took them, the runningboards, splash aprons and a couple of bonnet latch panels to the sandblasters. They did a good job so looks like it will be staying patina for a bit longer haha. Primed them all up on the weekend, would be soooo much easier if I was painting the whole truck! Sprayed some paint on today, pretty happy with how it turned out! Will be undersealing the fenders and running boards but gave them a quick spray with what I had left over. Was going to strip apart the front clip to take to the sandblasters, but decided not to as I still needed to finish the cutouts in the inner guards for the engine, as this was way easier to get right as one piece. Will sorta look like this except the bottom profile will have more of a "S" shape to it. Going to be a lot of work but hopefully should be able to blend it all in nicely.
- 90 replies
-
- 34
-
-
Got the re-cored heater radiator back, still fits which is a relief! Bought a heater motor off Northwestern Ford, it wasn't exactly the same, pretty close just a little bit taller. It needed to sit lower so the fans were in the right place and didn't hit the radiator. So marked out a hole to cut for the motor to sit through. Made up a mount for it out of stainless and gave it a polish. Possibly one of the shiniest things I've made so far haha. Also the motor shaft was 8mm instead of ~ 6.2mm, so the fans needed drilling out or the shaft machined down. Decided drilling out the fans was the easiest. They had riveted in bosses so I welded around them first so they didn't fall out and then drilled them out larger. No pics of that though. Gave the fan unit a beadblast, going to get them sent off to electroplating this week as well as a few other pieces. Got the seat belt plates in as well. Need to modify the seat frame for the belts to go through now. Since I lifted the cab up to do the seat belt plates I started on trying to get the engine loom to reach under the seat. There's two ecu plugs, one for the main computer and I assume one for the trans. The trans wiring was quite a bit (maybe 400mm) shorter then the other, which was only just long enough as is get to the seat. So stripped off all the tape and lengthened and reordered some wires and managed to get enough length out of them to reach. Need to cut a hole in the floor now and then I think I'll lengthen the fuse and relay box to fit under the seat as well.
- 90 replies
-
- 19
-
-
Have patched and welded all the cracks and broken off brackets on the running boards and then bolted them back up to the fenders and tray, so that I could mount the tray in the right place. The tray was originally sitting 10mm to one side at the back, I have halved that which is as good as it's going to get without cutting off the bumper brackets which I can't be bothered with doing. Cut off the airtank mounts and welded some new ones on the bottom and made them a bit higher so the compressors fit underneath it. Need to get some fittings and lines to plumb it all up now. Pulled the heater fully apart and gave it a beadblast, also sent off the door flap things to the chrome platters, as well as the ashtray that goes in the dash. Took the heater core to get re-cored as well, apparently it was 90% blocked up with crap. The old handles on the heater flaps where pretty worn so I made some new ones out of stainless. It was a expensive week this past week, bought some epoxy primer and some blue 2K paint to do the engine bay and interior etc. Also went and bought some new seatbelts, damn they cost alot! Since I wan't happy with how I made the rear sway bar links the first time I tried again, this time used some rose joints, which allowed more rotation than the bushes. It's starting to seem like it's actually getting reasonably close to being finished (still sooooo much to do though!), going to try and get all the panels that need painting underneath sandblasted soon and then hopefully paint most of the stuff during christmas.
- 90 replies
-
- 28
-
-