kp60nick
-
Posts
237 -
Joined
-
Last visited
Everything posted by kp60nick
-
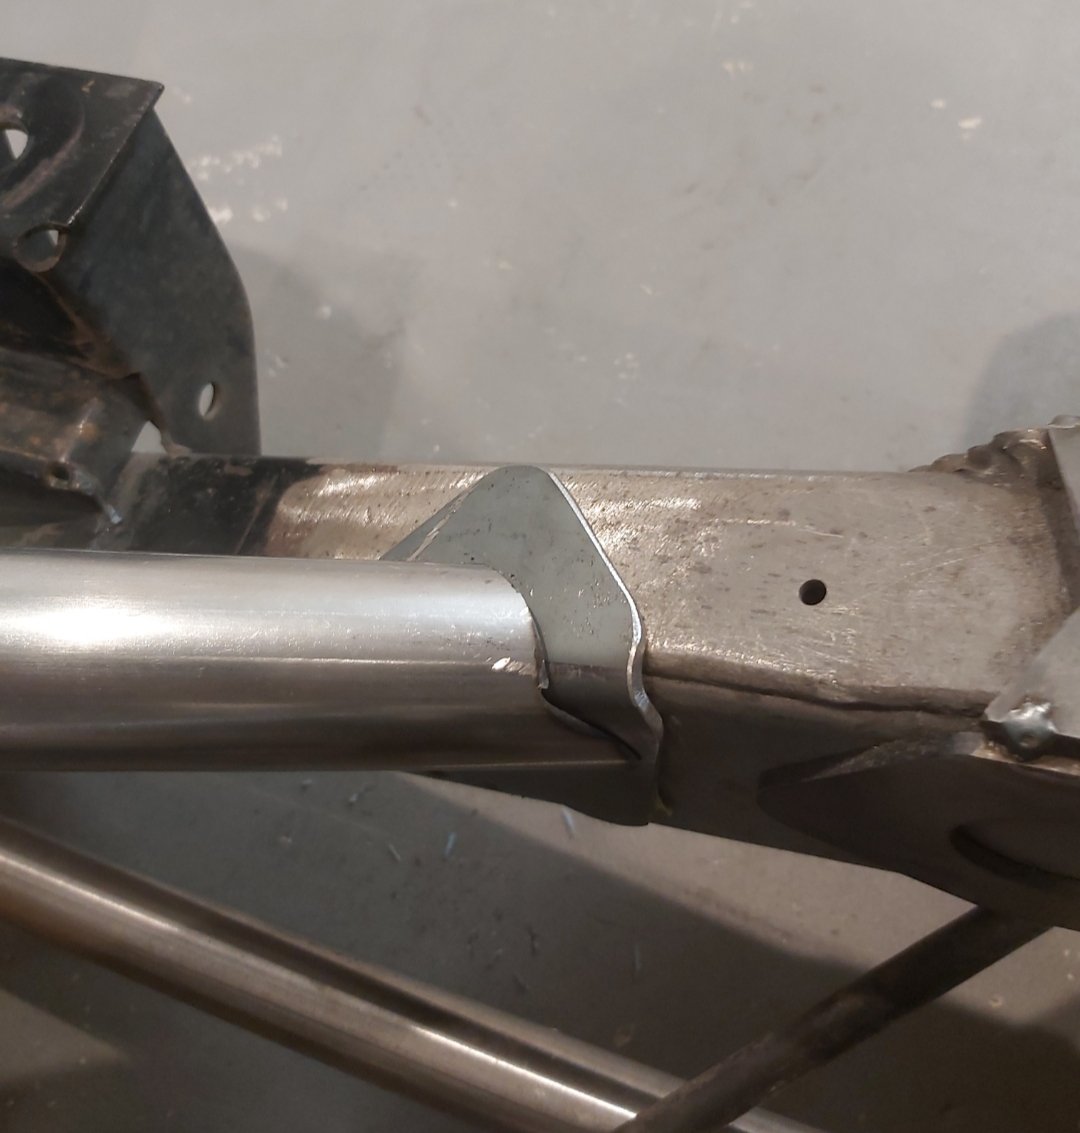
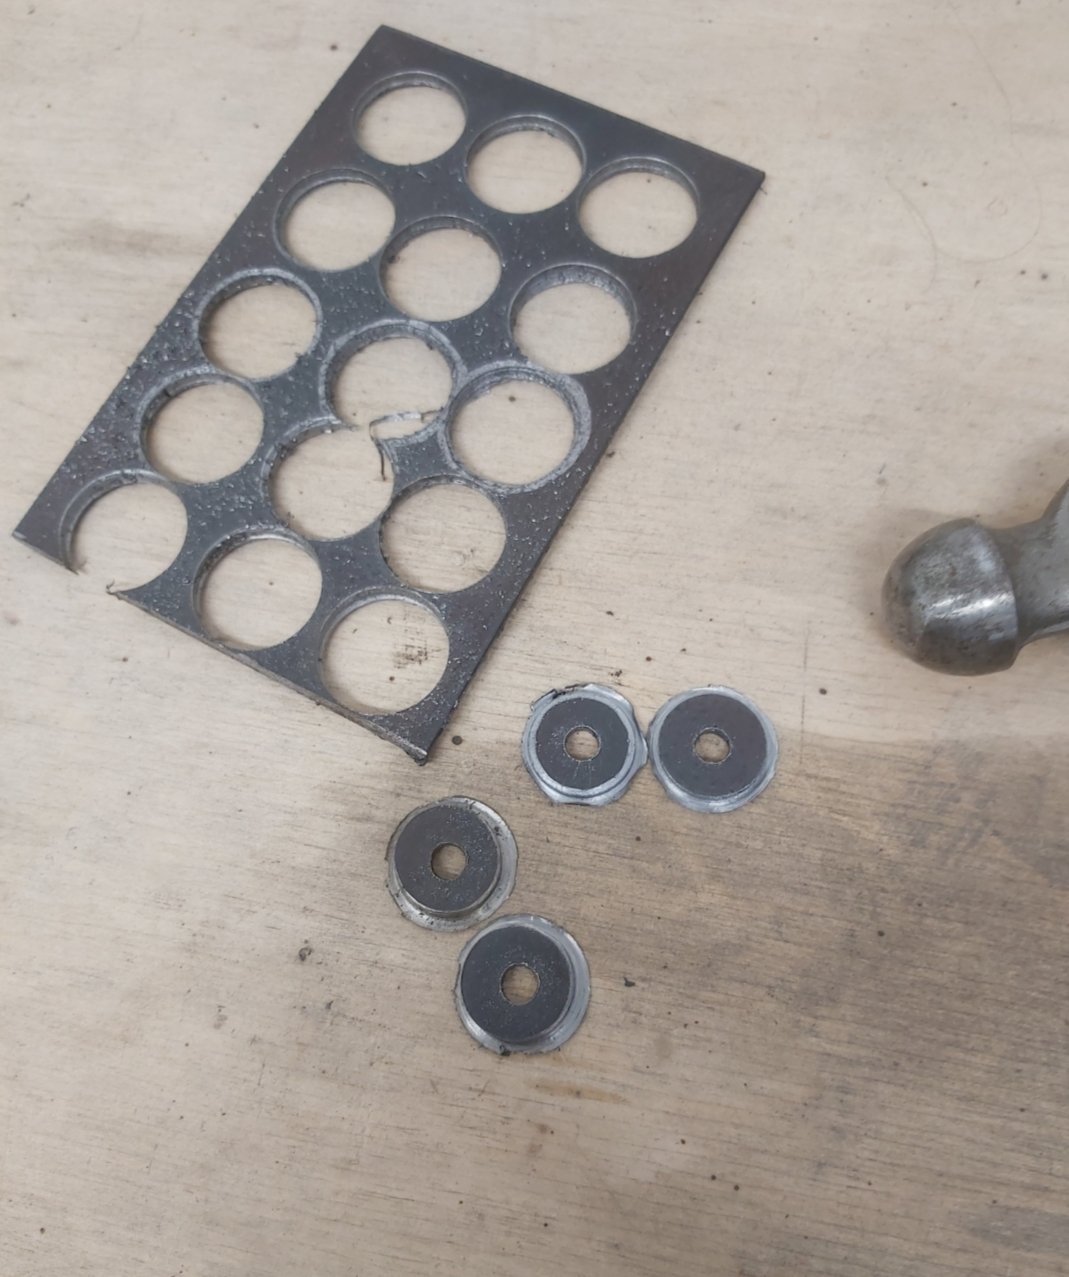
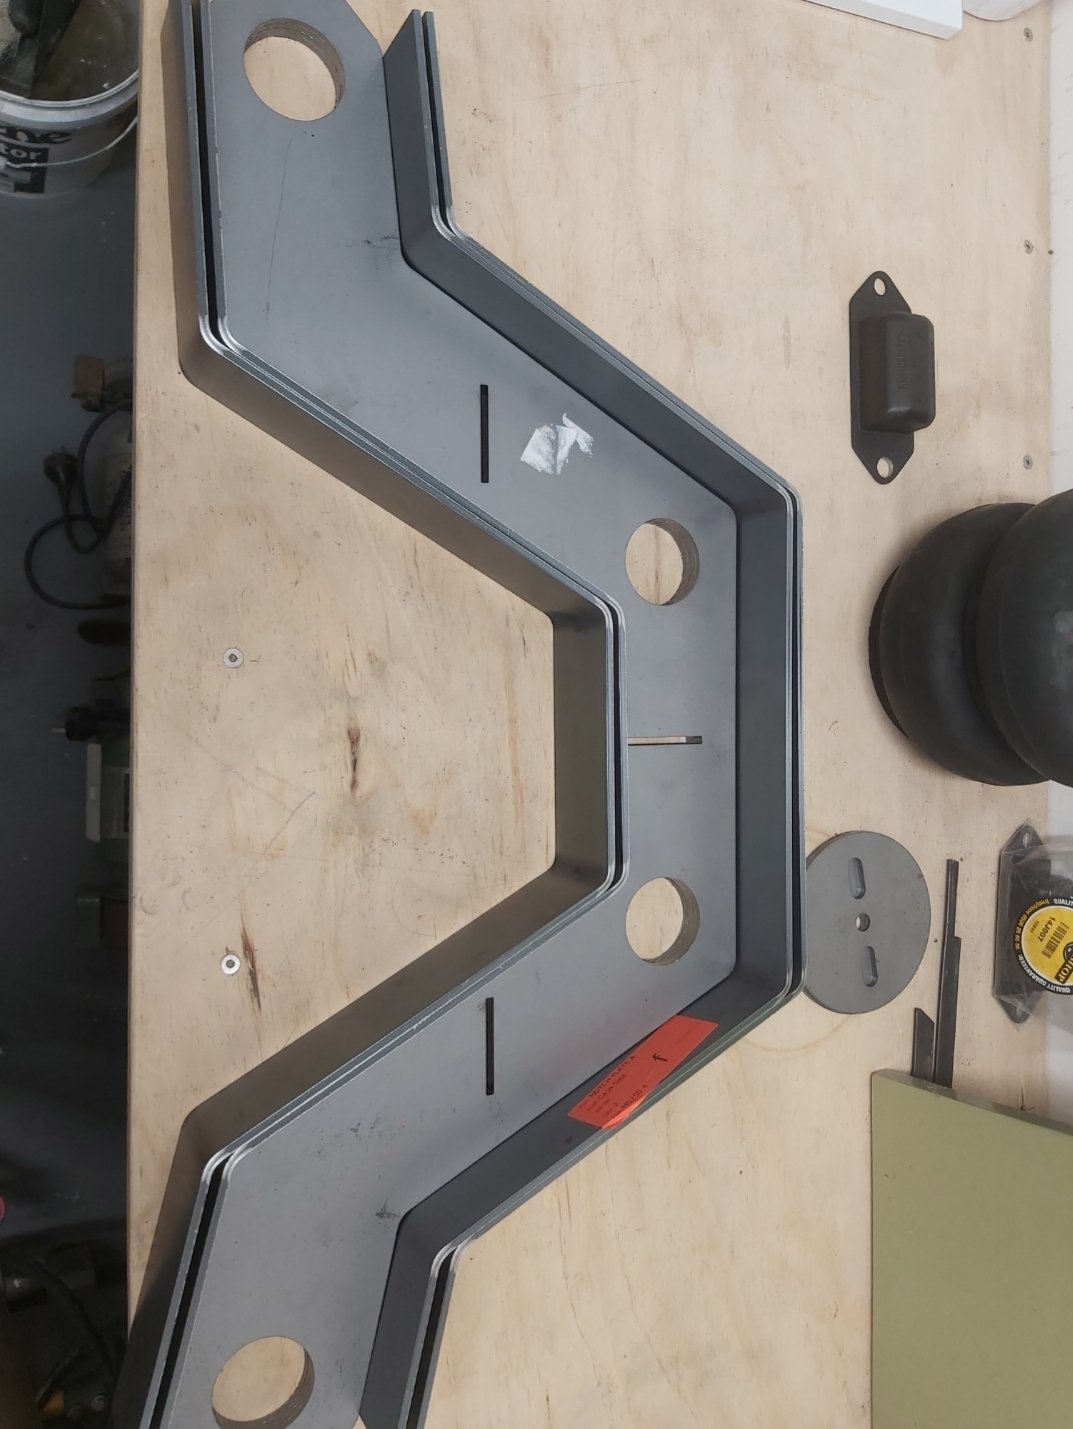
Question regarding plating chassis rails for welded in tube crossmembers. I made a cardboard template of what I wanted the plate to look like but once I made it and bent in 90⁰ it lost length and no longer spans the whole height of the rail. Is this a problem should I remake plate? Picture for better explanation.

-

Kp60nick's D21 kingcab Soon to be Bagged on Cadillac Escalade rims
kp60nick replied to kp60nick's topic in Other Projects
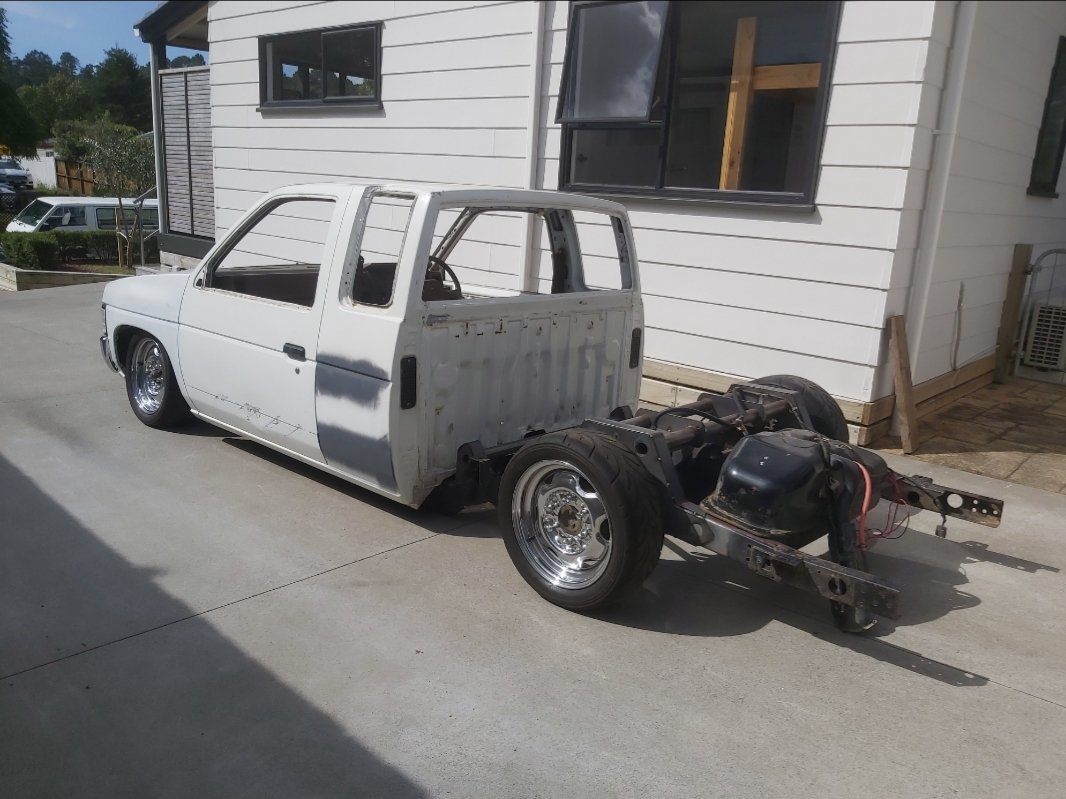
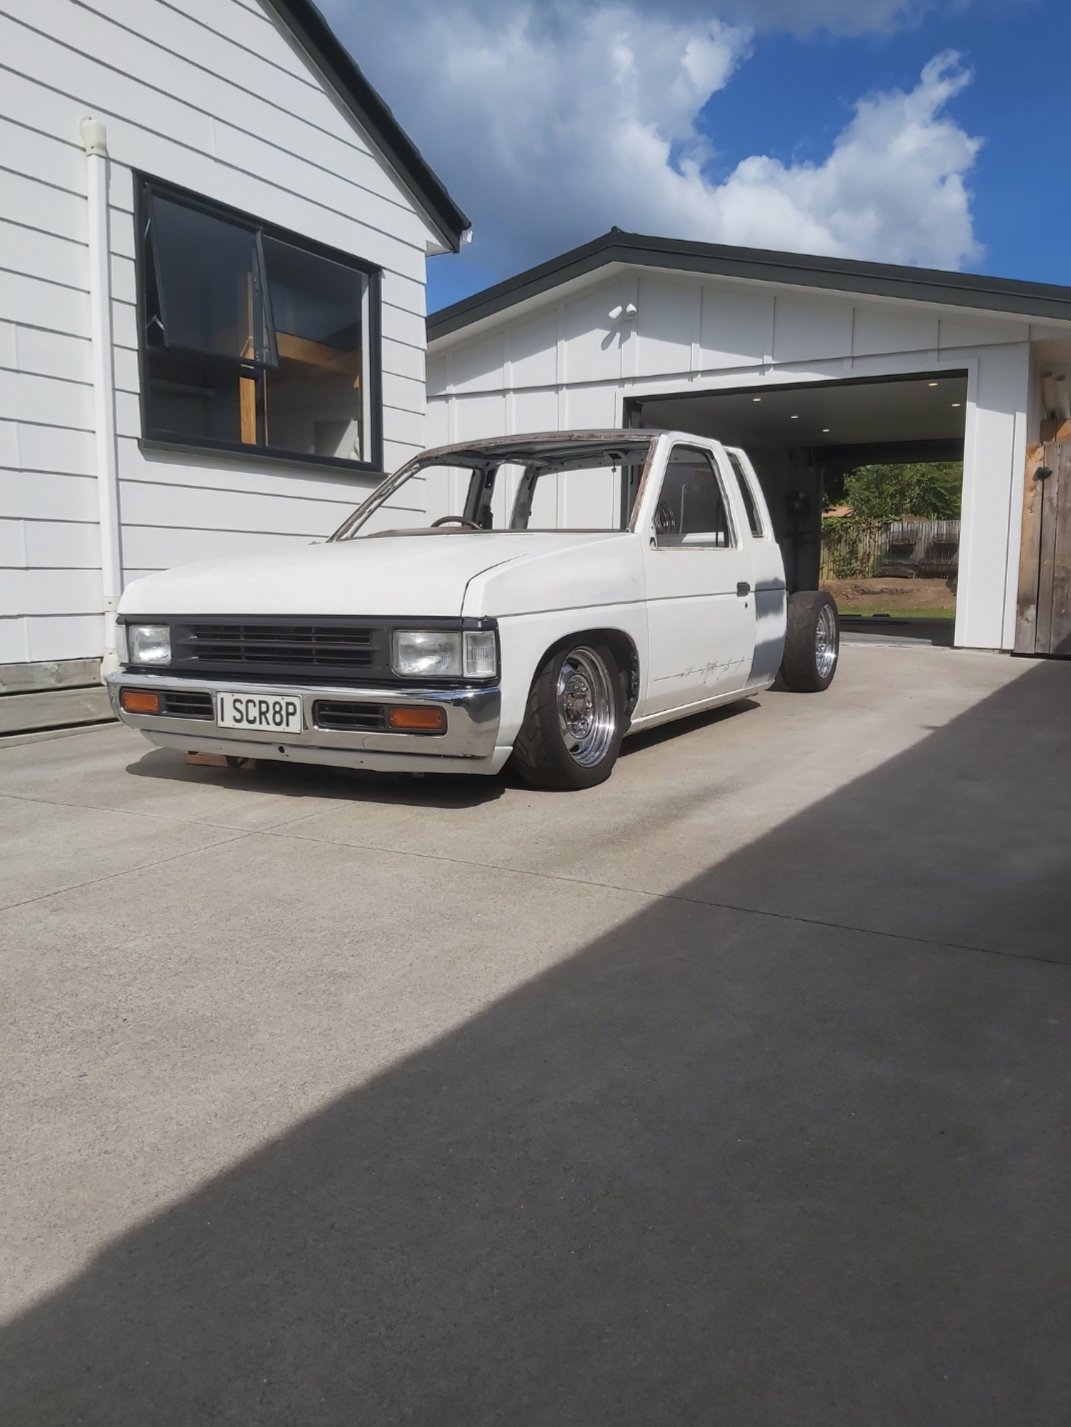
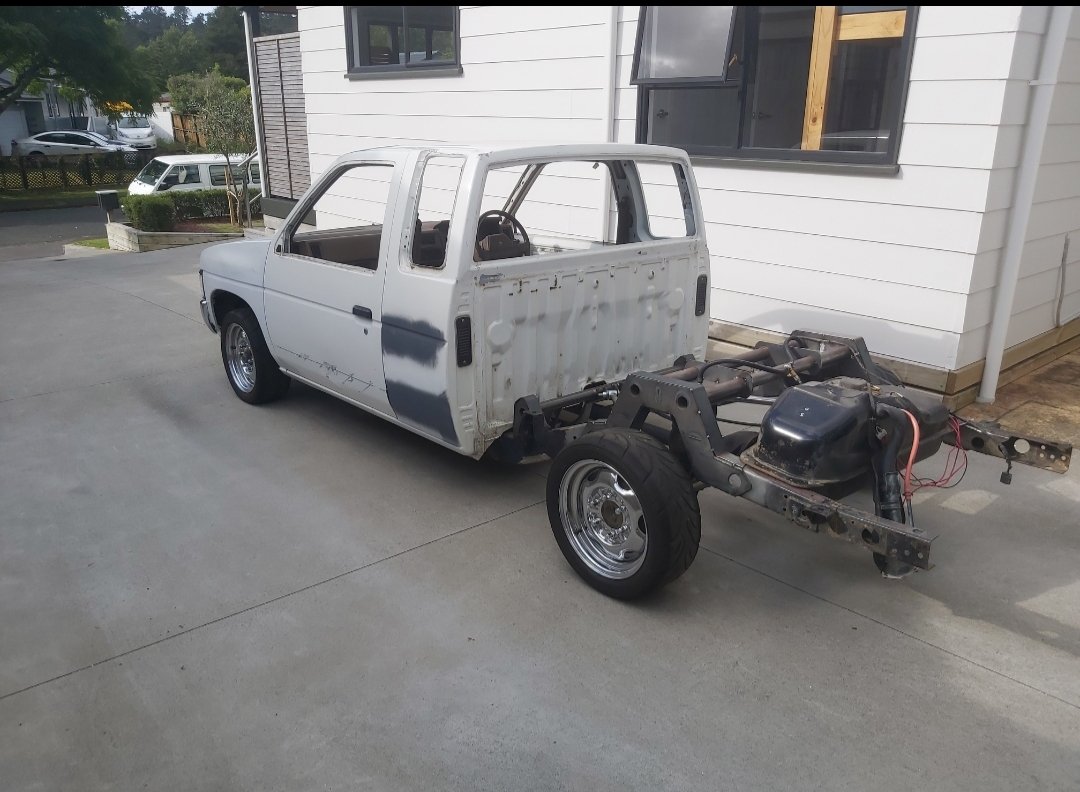
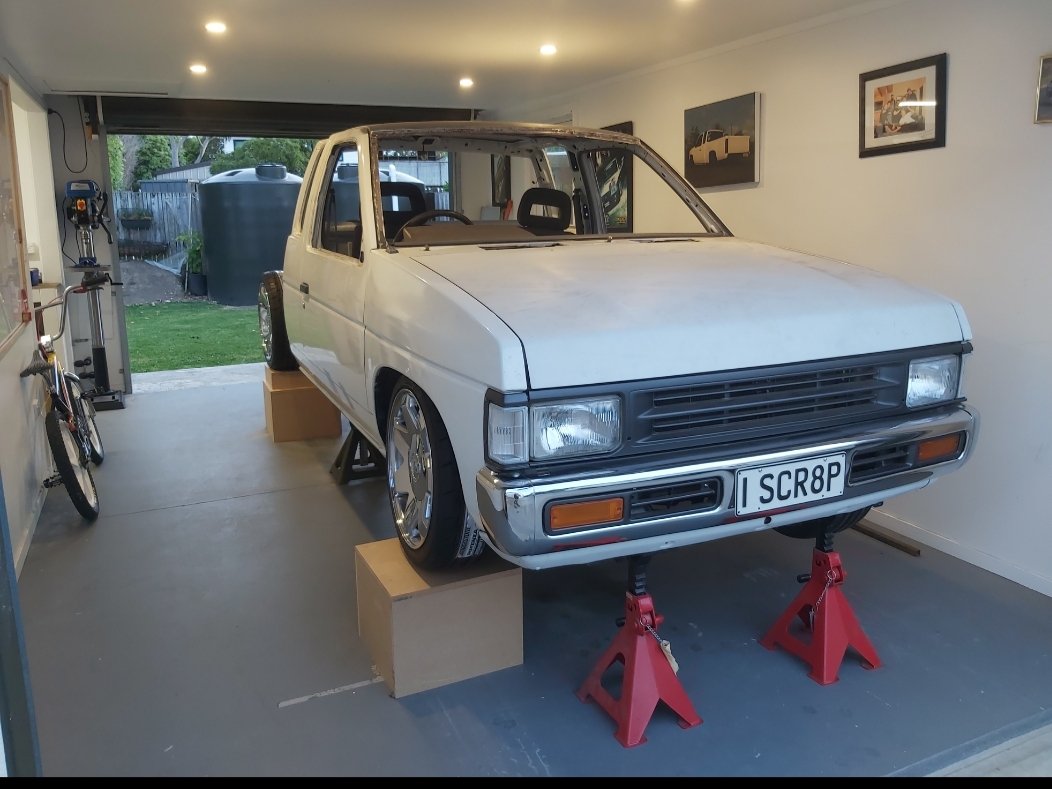
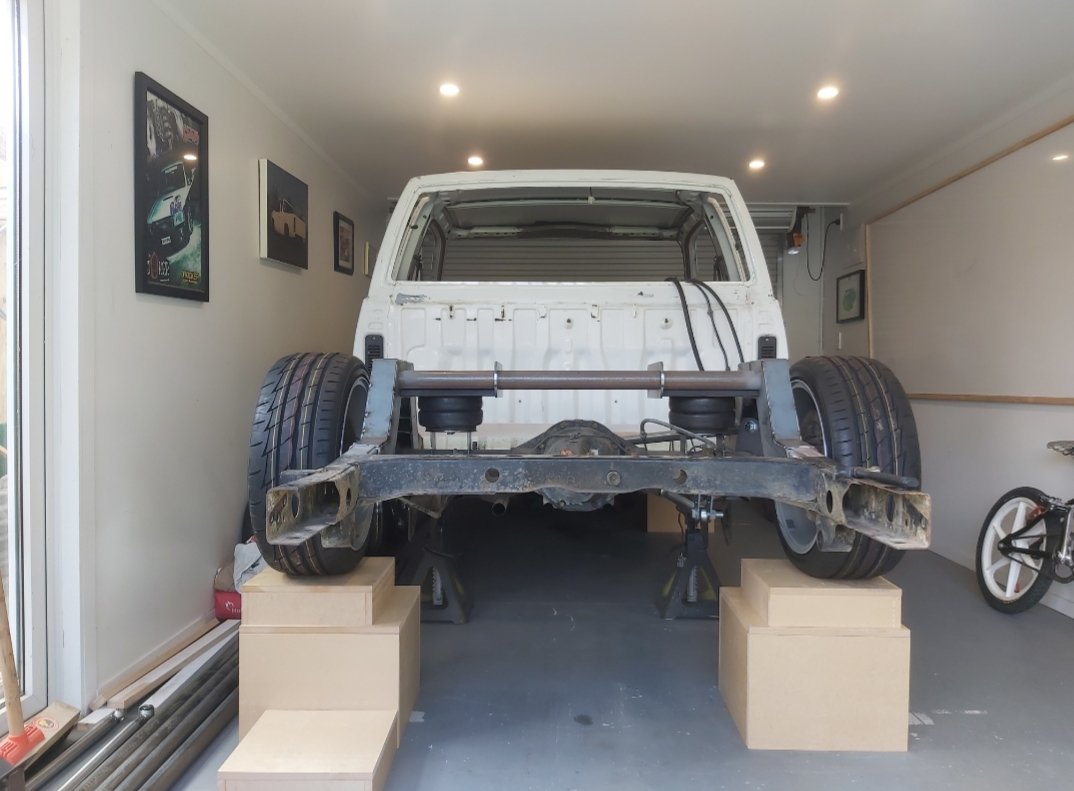
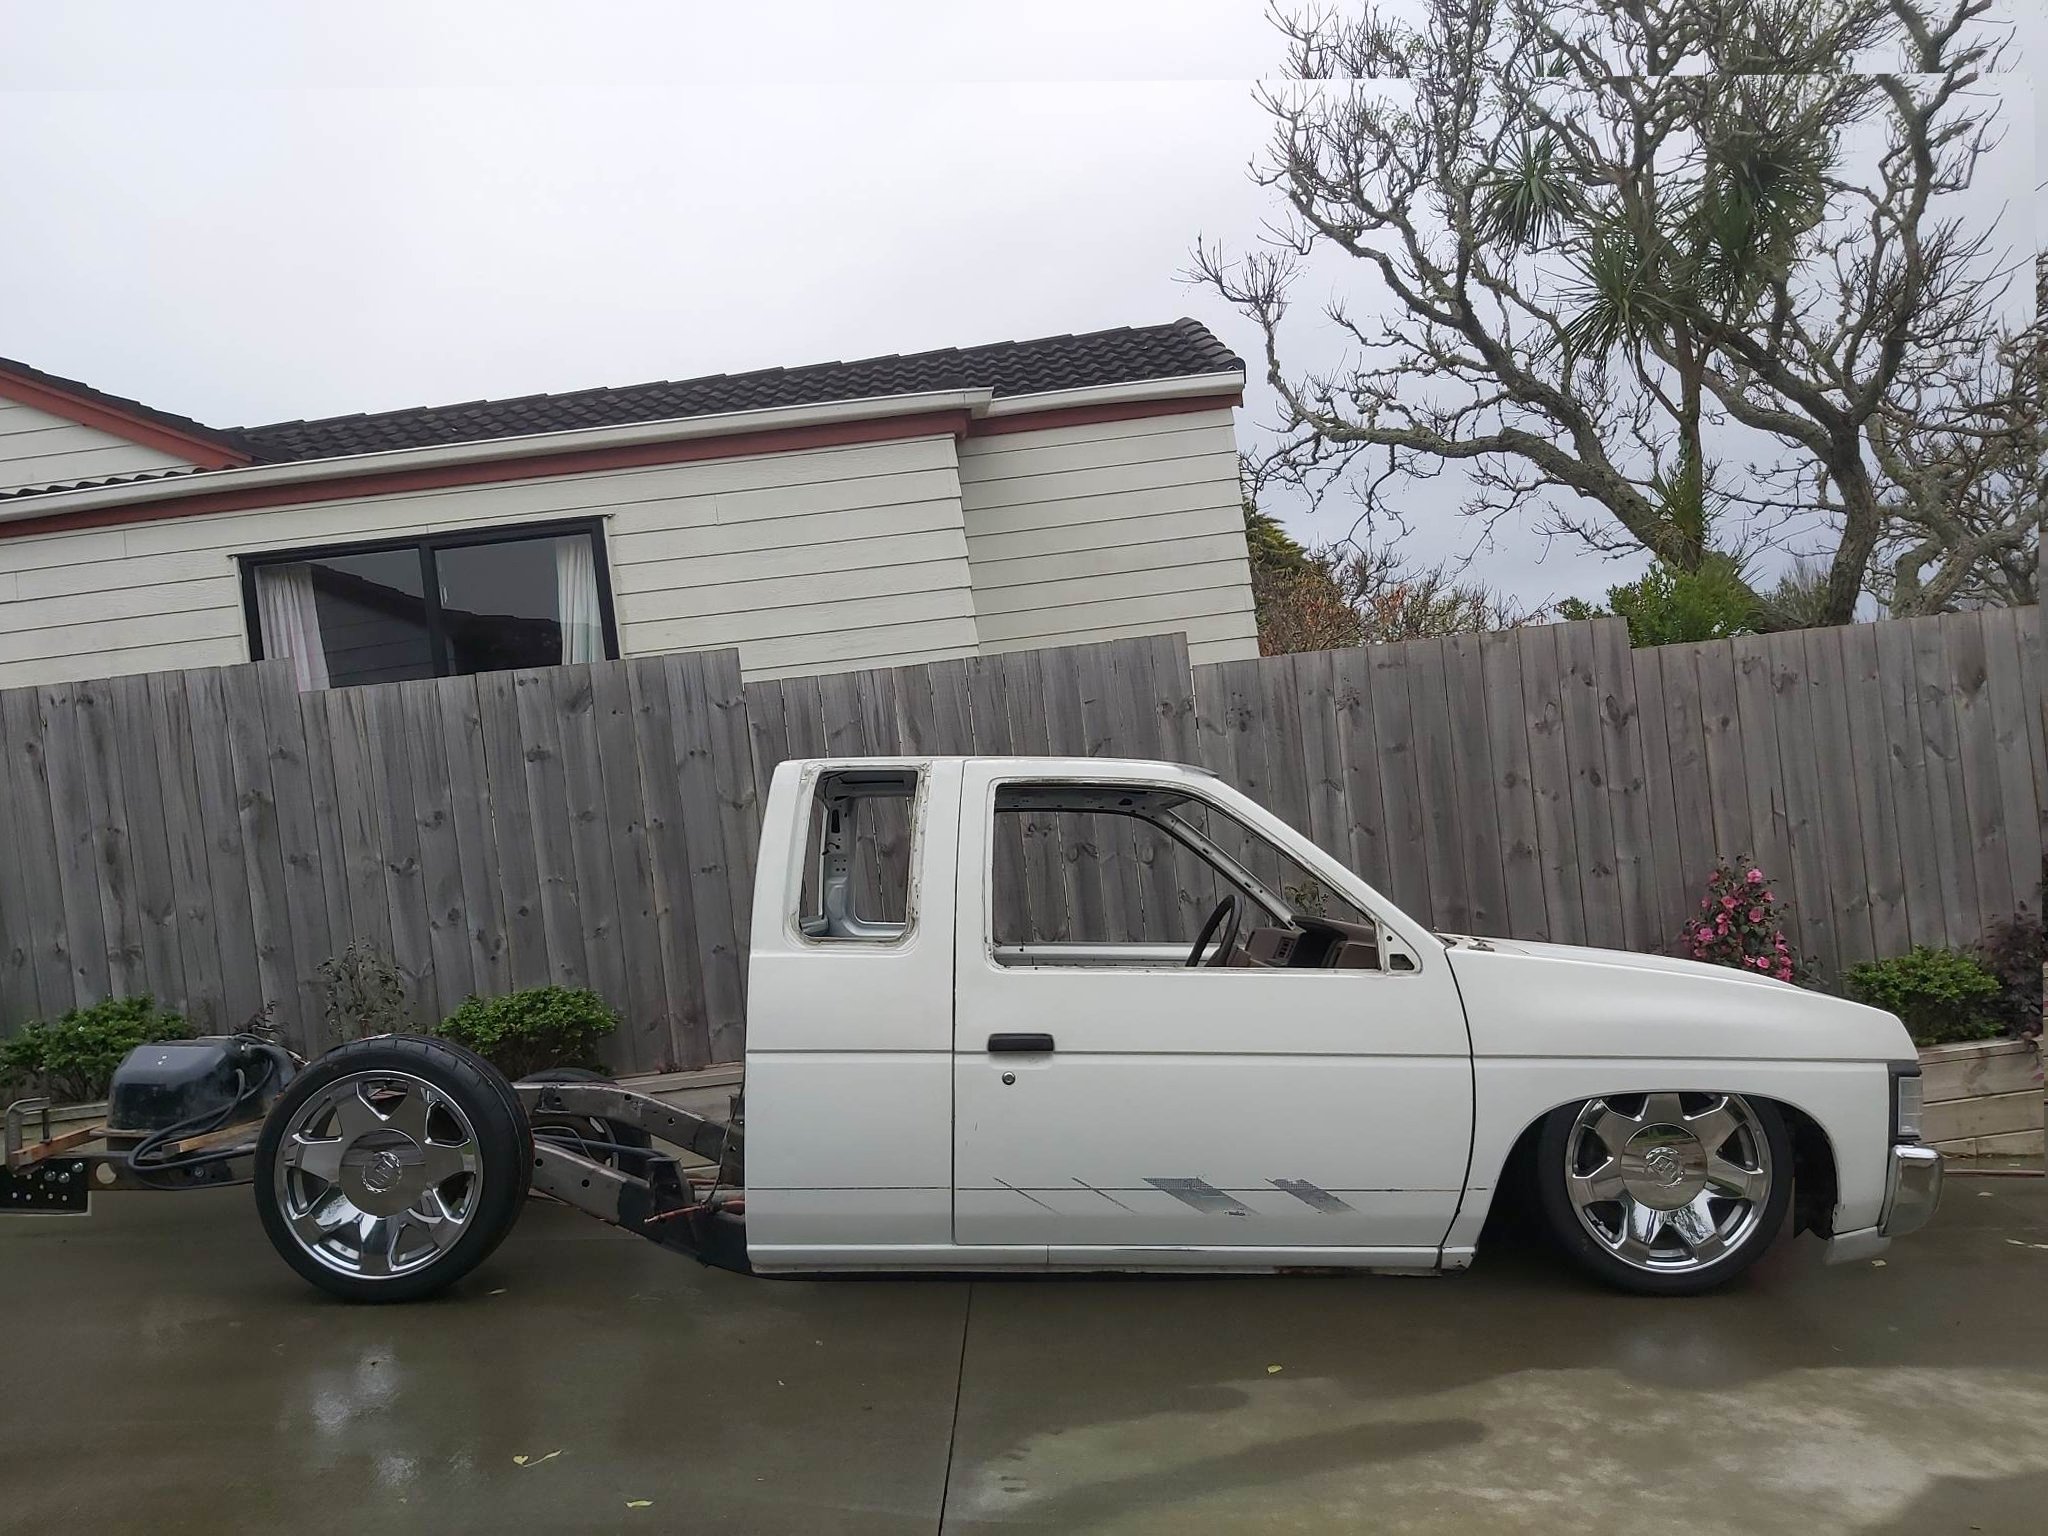
Been through a few ups and downs with this lately. Pardon the pun. Took it off the axle stands to get the full lay frame experience but unfortunately my bag mount bracket on the diff is a bit to tall. Same with the top link bracket. Unsure if it's also got something to do with the front not being fully slammed yet. But once the 15s on it sits quite healthy on the ground. Pushed outside today for a bit of sunshine. Here are the results. As far as progress is concerned there has been none apart from planning how I intend to rectify the problem. Thanks for looking.
- 53 replies
-
- 13
-

-
I have a part number somewhere for some short shocks that suits these things if you're interested.
-
Do you need the factory fuel filler neck?
-
Kp60nick's D21 kingcab Soon to be Bagged on Cadillac Escalade rims
kp60nick replied to kp60nick's topic in Other Projects
Thank you @Nominal. 30 second google search. Equals results
-
Kp60nick's D21 kingcab Soon to be Bagged on Cadillac Escalade rims
kp60nick replied to kp60nick's topic in Other Projects
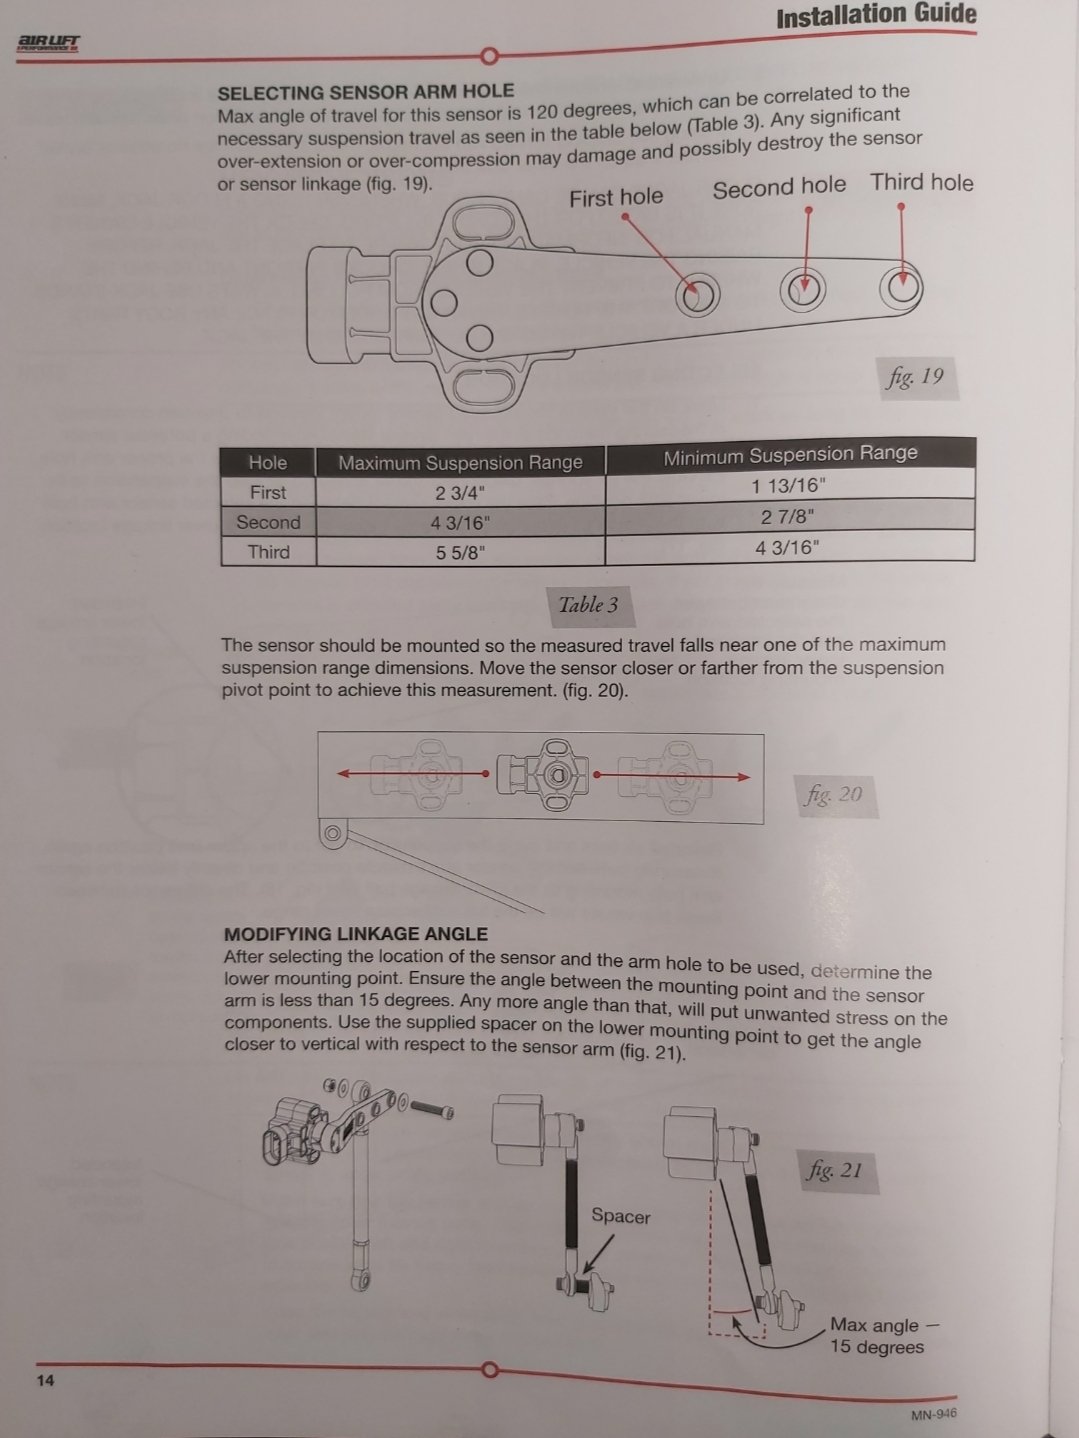
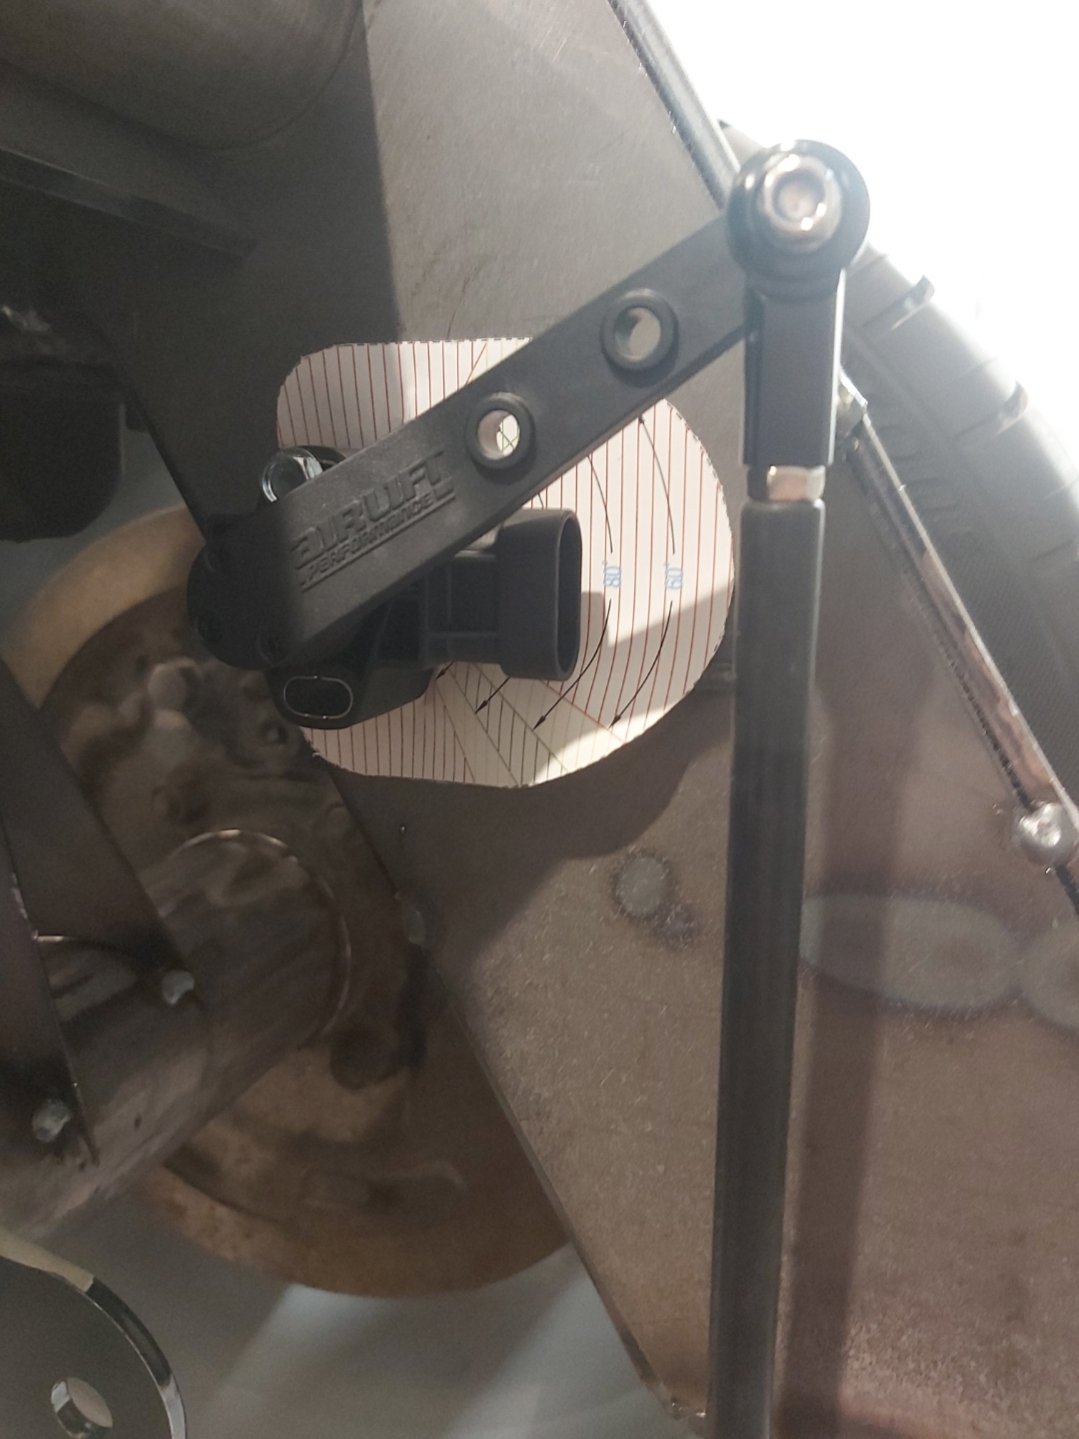
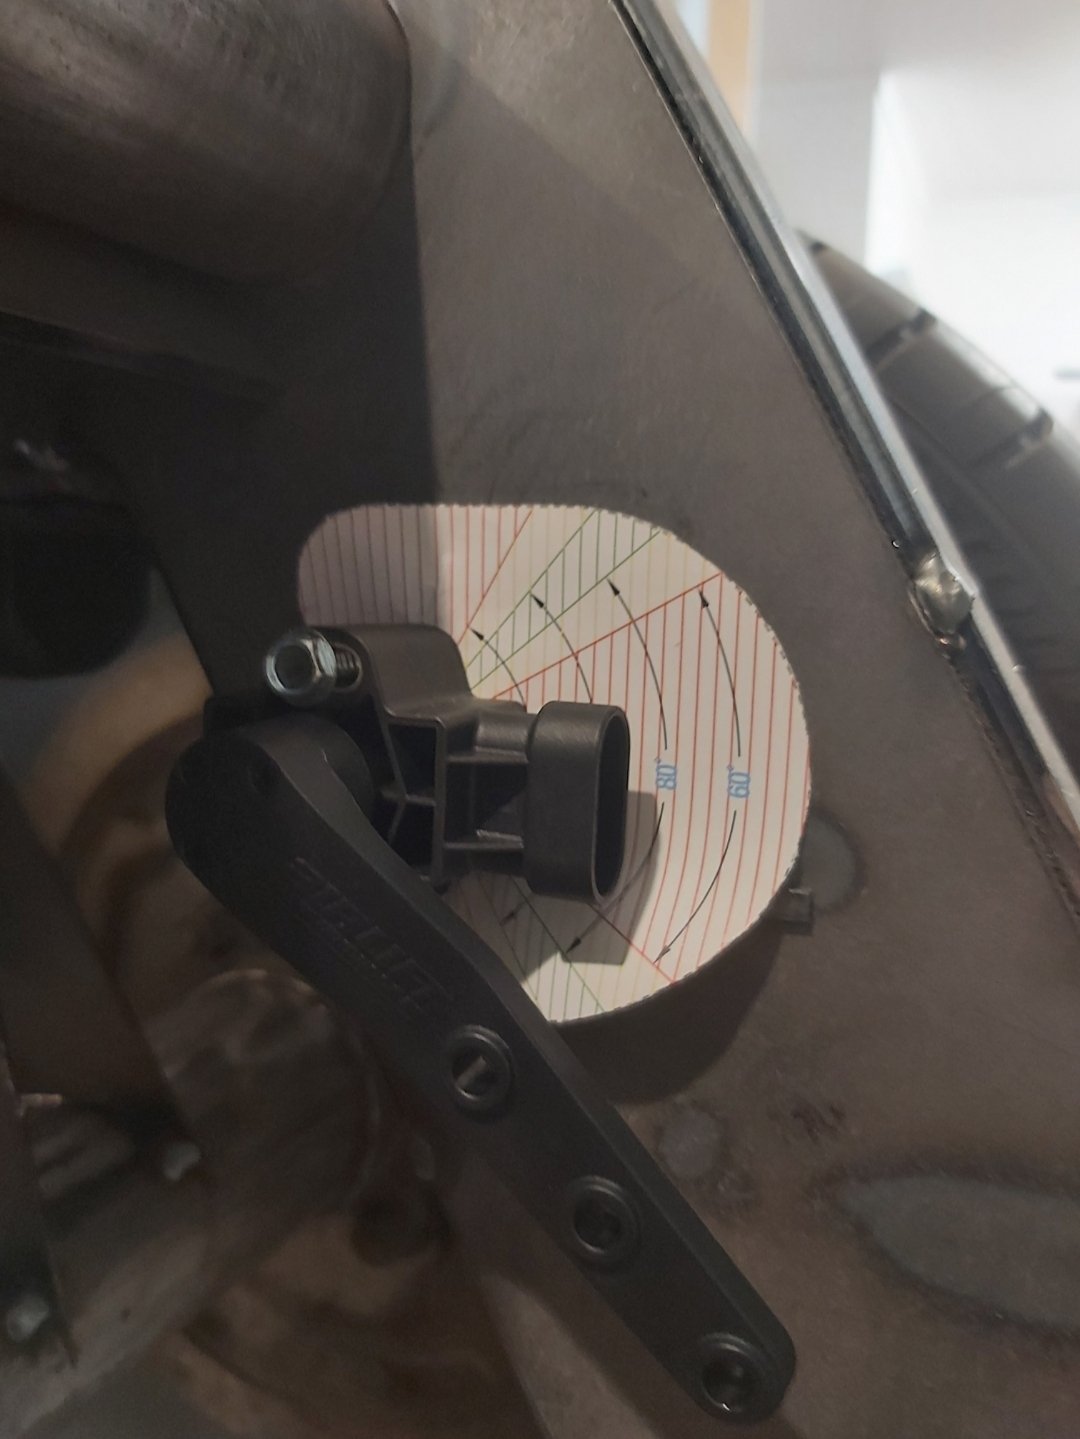
Shocks mounted and work great in the range of travel. Had to do a bit of grinding to get the brackets to work so they didnt fowl the shock body. Next up is the air lift performance height sensors. I'm not having much luck with keeping it within the 120⁰ range. And in the manual it says move sensor closer to pivot point which means mounting on one of the arms but I cant see that working in my case as the arms are adjustable and need to spin? Or am going to have to make a tramp rod looking bracket that comes off the diff so I can mount a tiny little m5 bolt? Haha maybe a bracket that clamps to the arm that would need to be loosened if the arm was ever needed to be adjusted? anyone had such experience? Thanks for looking Nick
-
Check out the hobby manual page 175 chapter 6.54.2 it touches on this. I cant remember where in the hobby manual exactly it was but I'm pretty sure all four wheels need to be covered. It said something like hard lid over tray is expected. I'll keep looking for that. Edit: I found its chapter 6.54.3 lol
-
Kp60nick's D21 kingcab Soon to be Bagged on Cadillac Escalade rims
kp60nick replied to kp60nick's topic in Other Projects
Here is the second attempt at the up and down stuff. First attempt was a flop I was using leftover fittings from the recent laundry renovations. Got some fittings and a Tap hooked up to garage compressor. Man so happy to have it to this stage. I've wanted this for a long time. I was surprised to start with as i didn't feel like i was getting enough lift but at this stage I'm just assuming that once the front goes up and down as well it will all work itself out.- 53 replies
-
- 10
-
-
Kp60nick's D21 kingcab Soon to be Bagged on Cadillac Escalade rims
kp60nick replied to kp60nick's topic in Other Projects
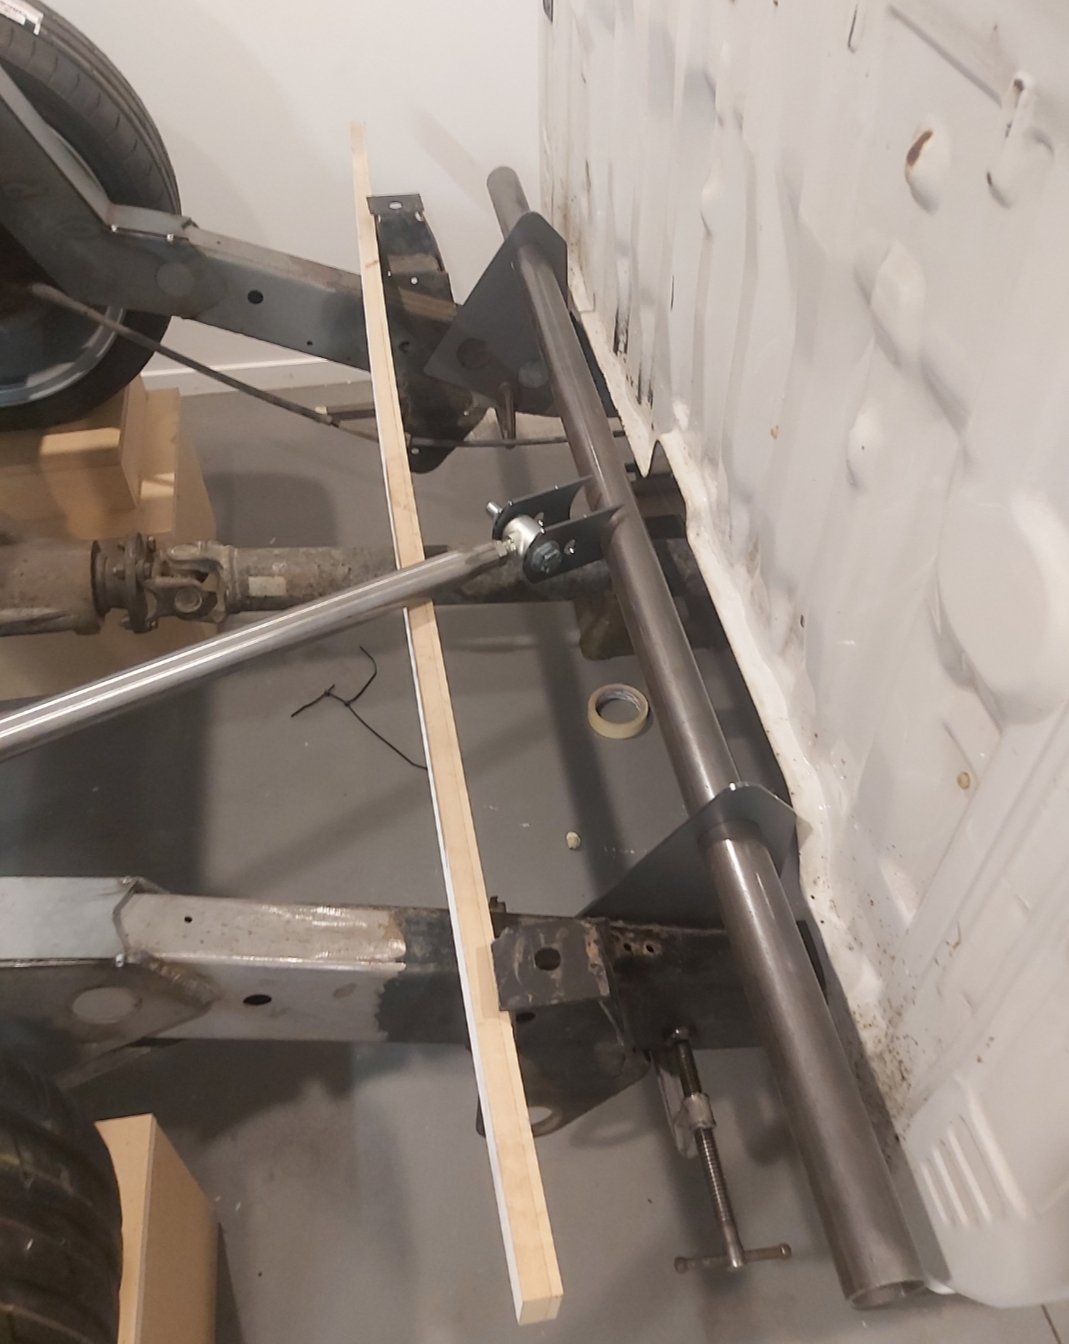
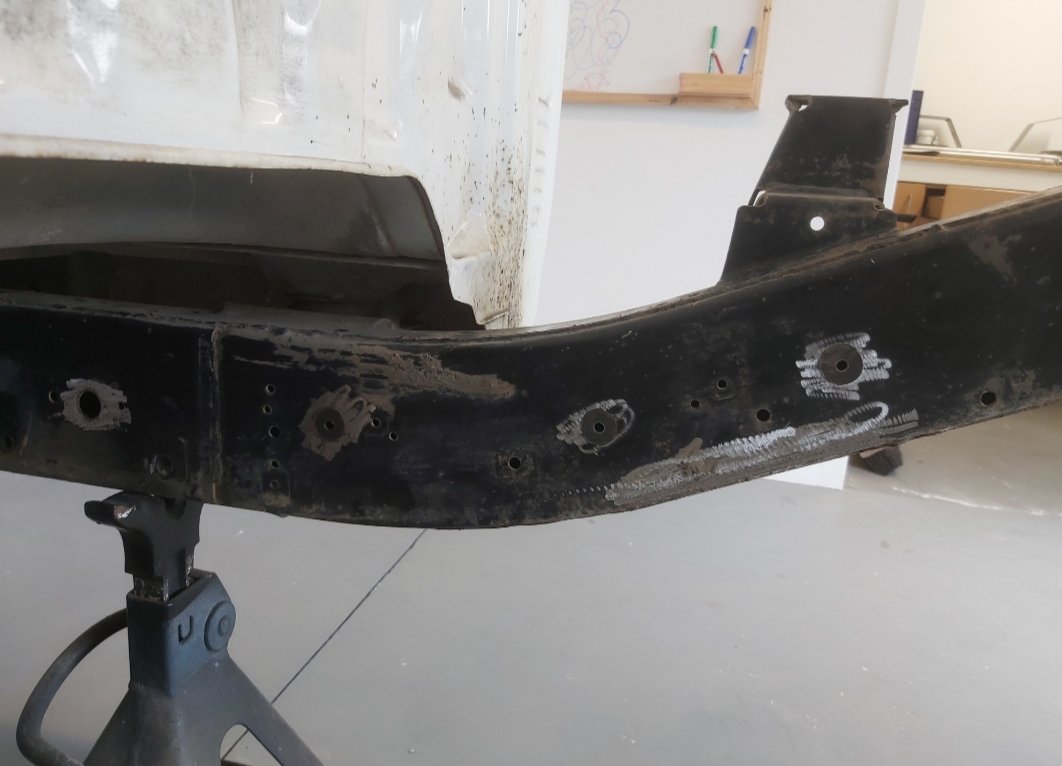
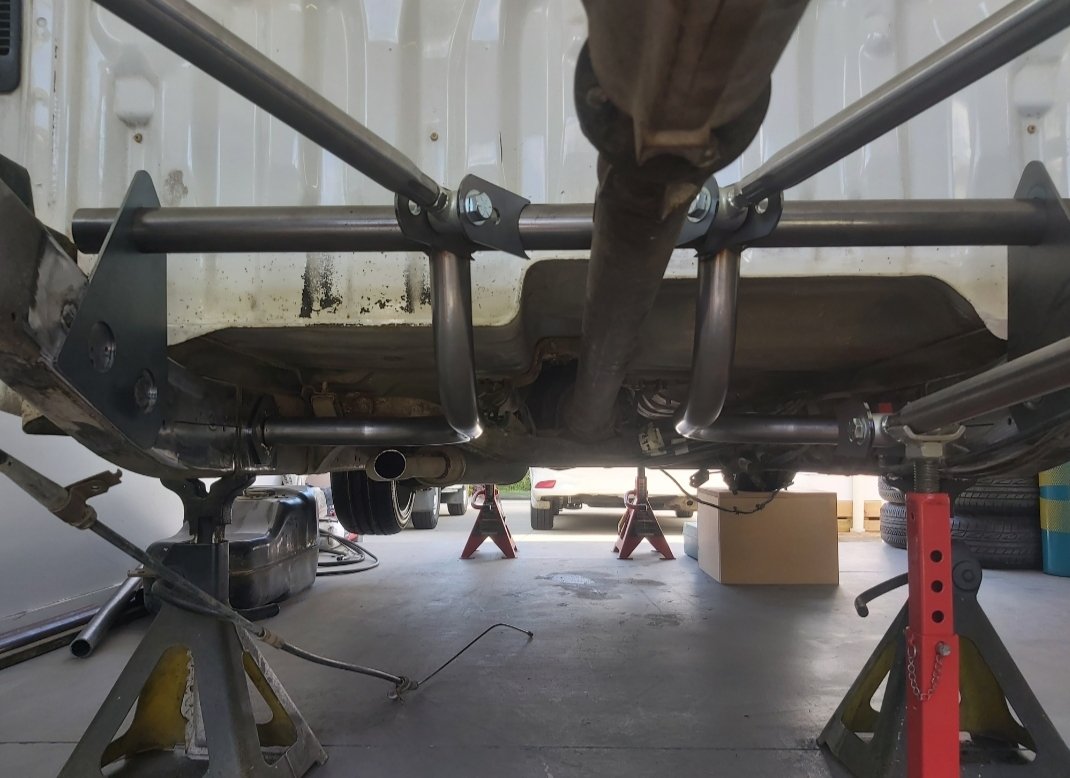
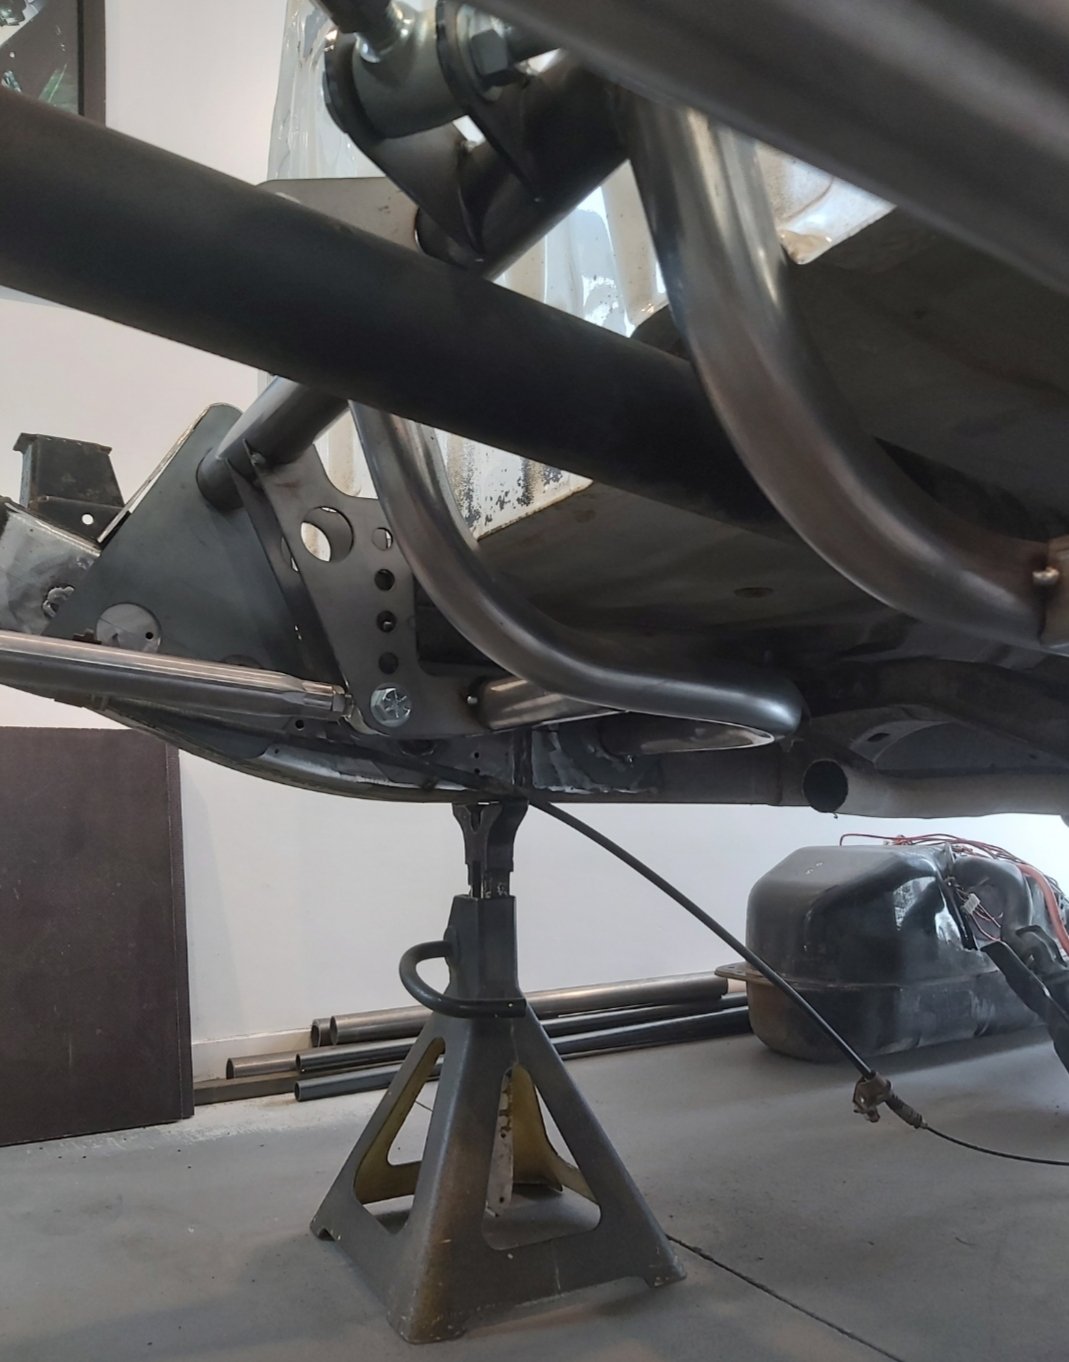
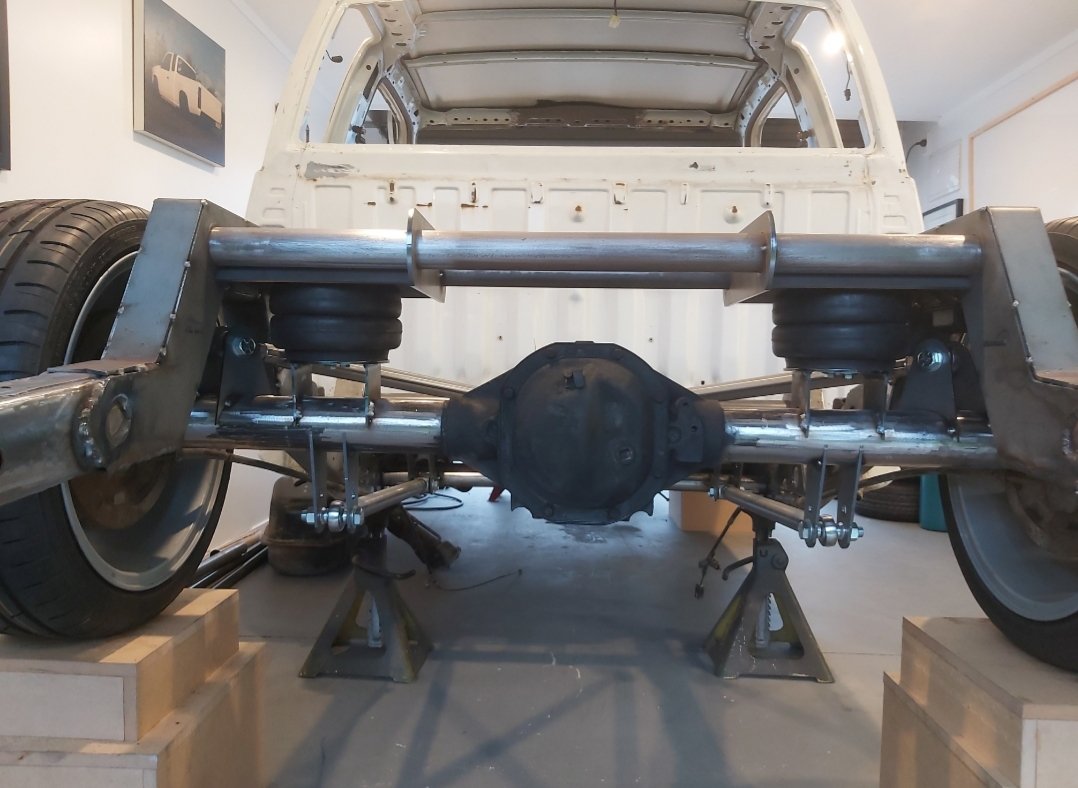
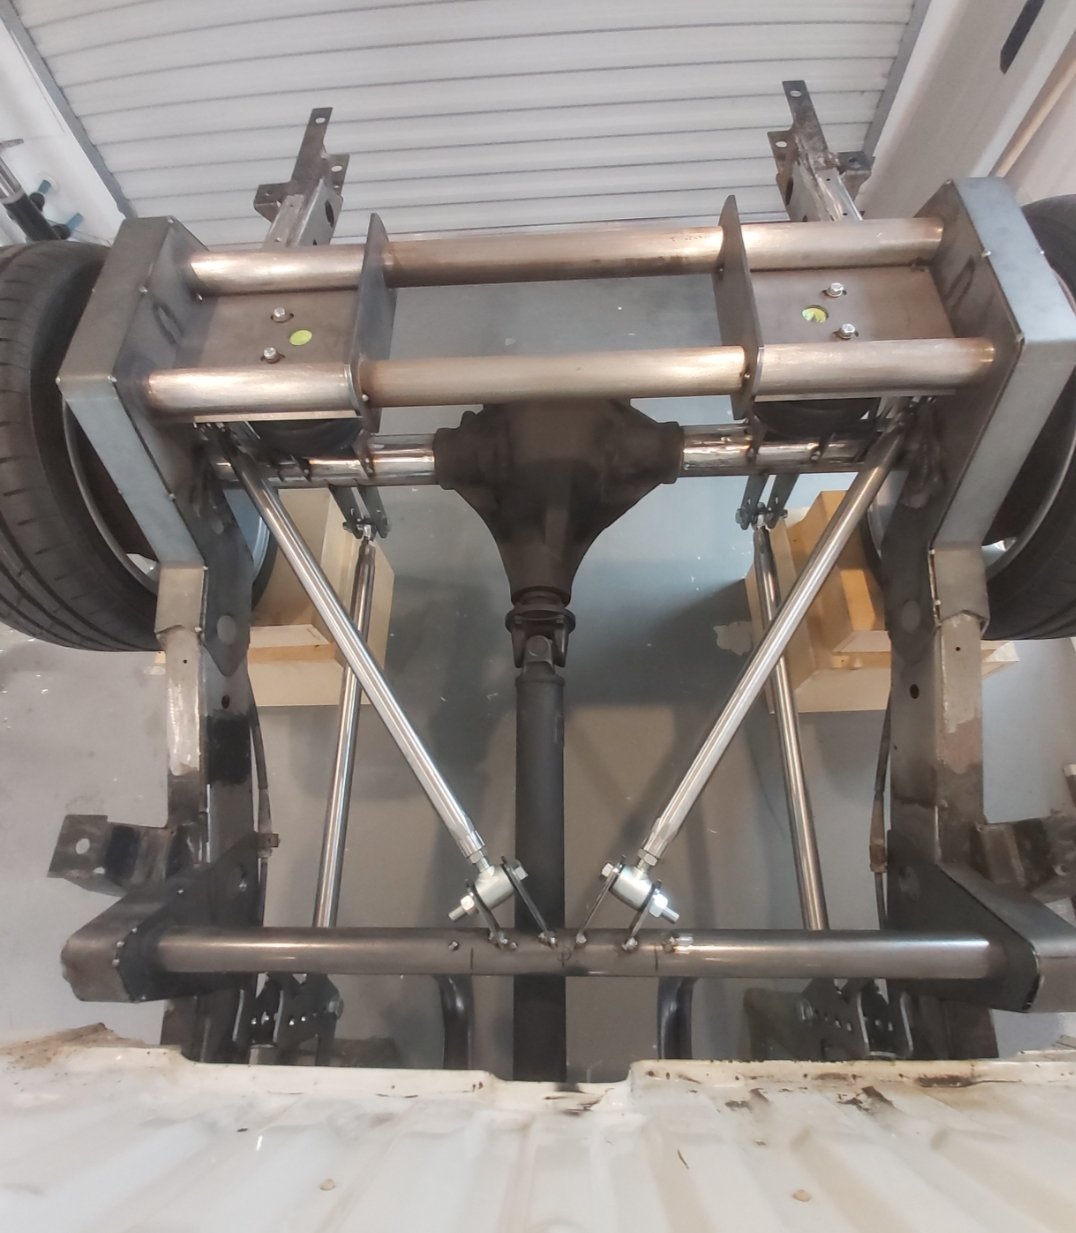
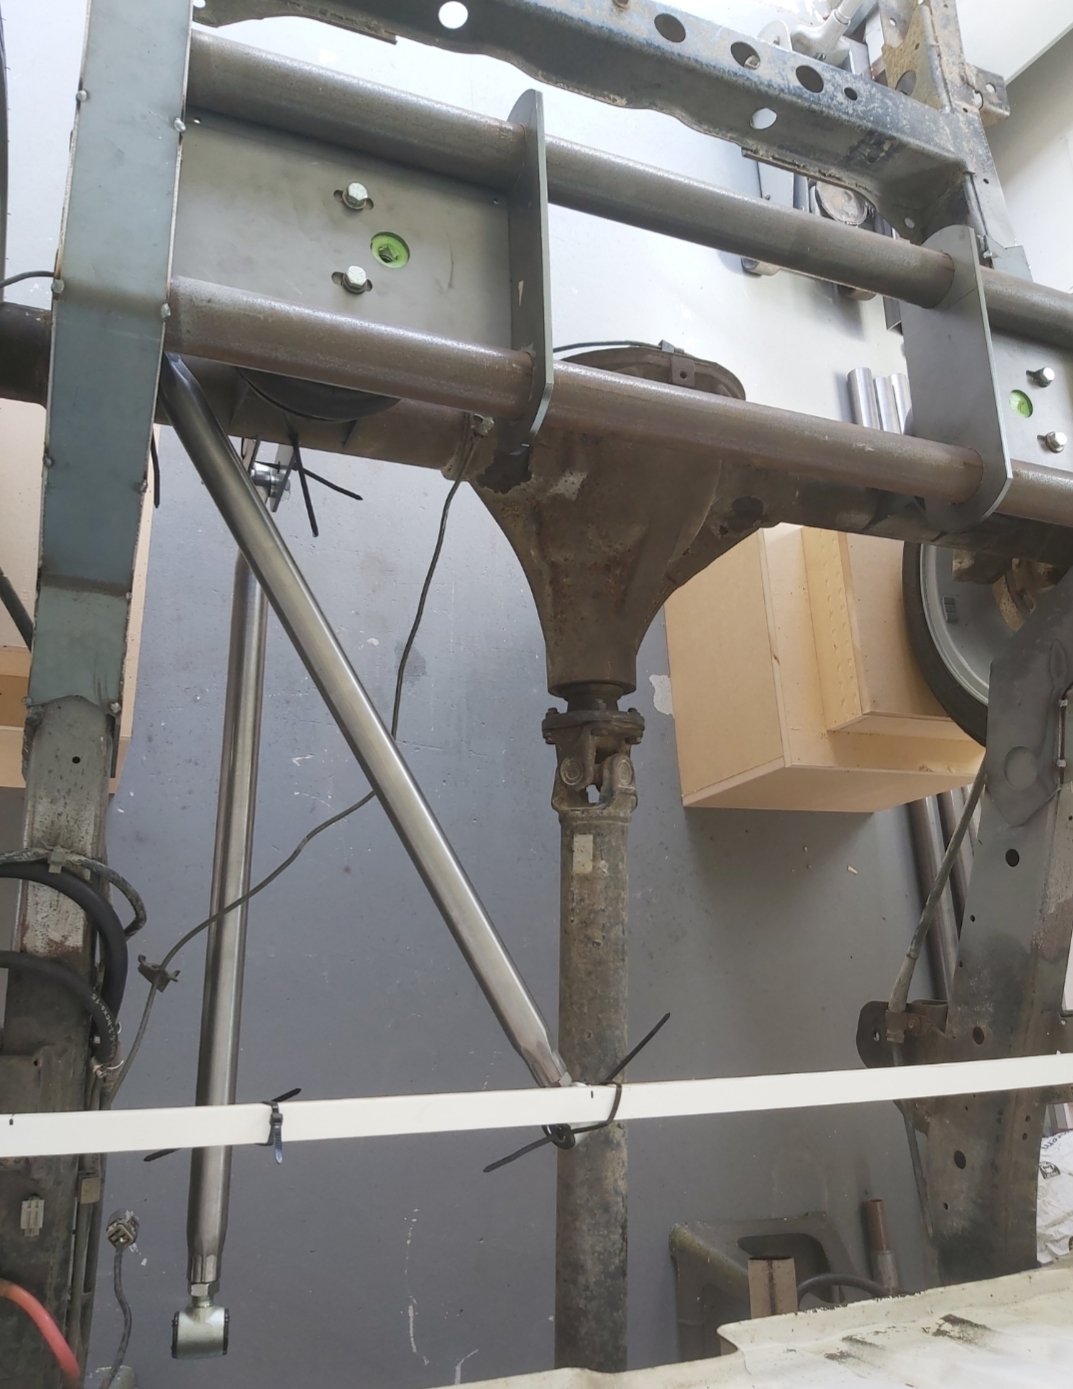
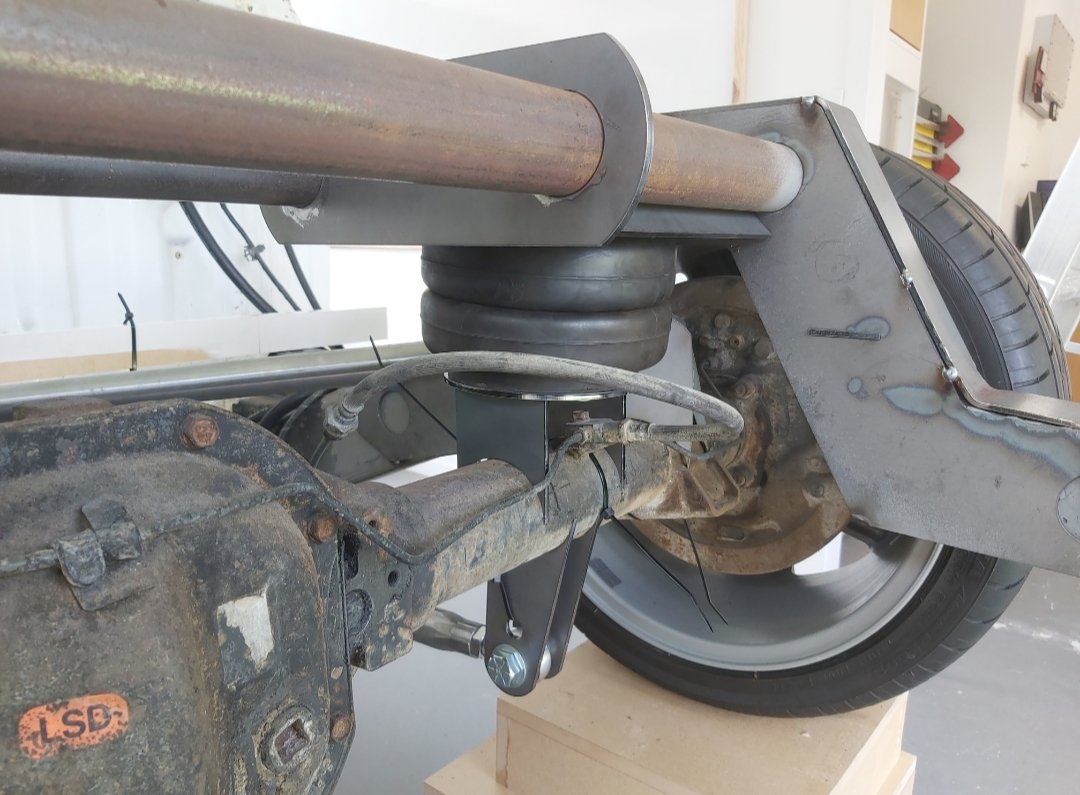
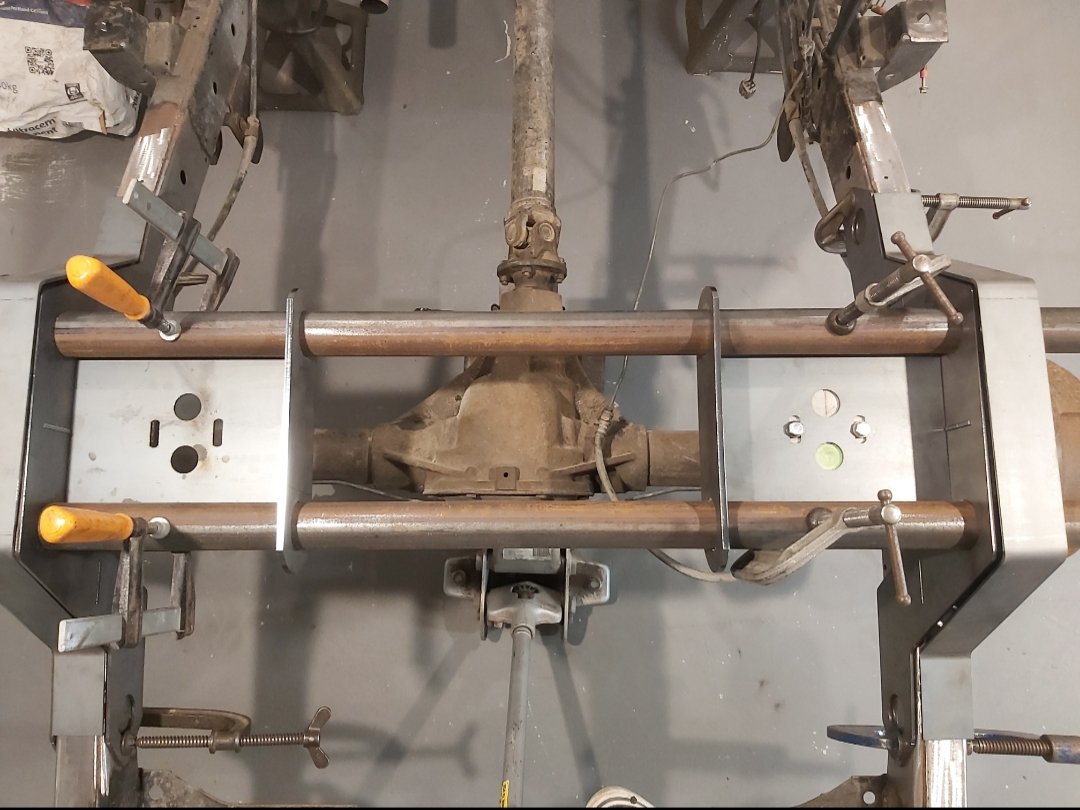
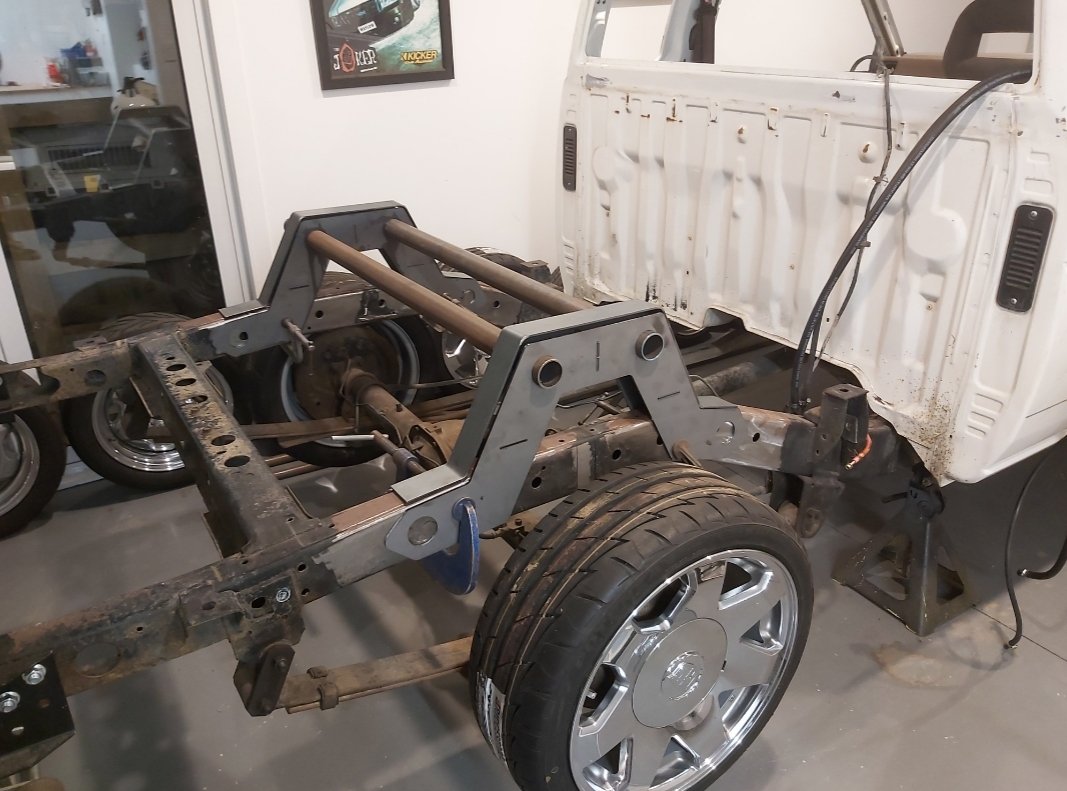
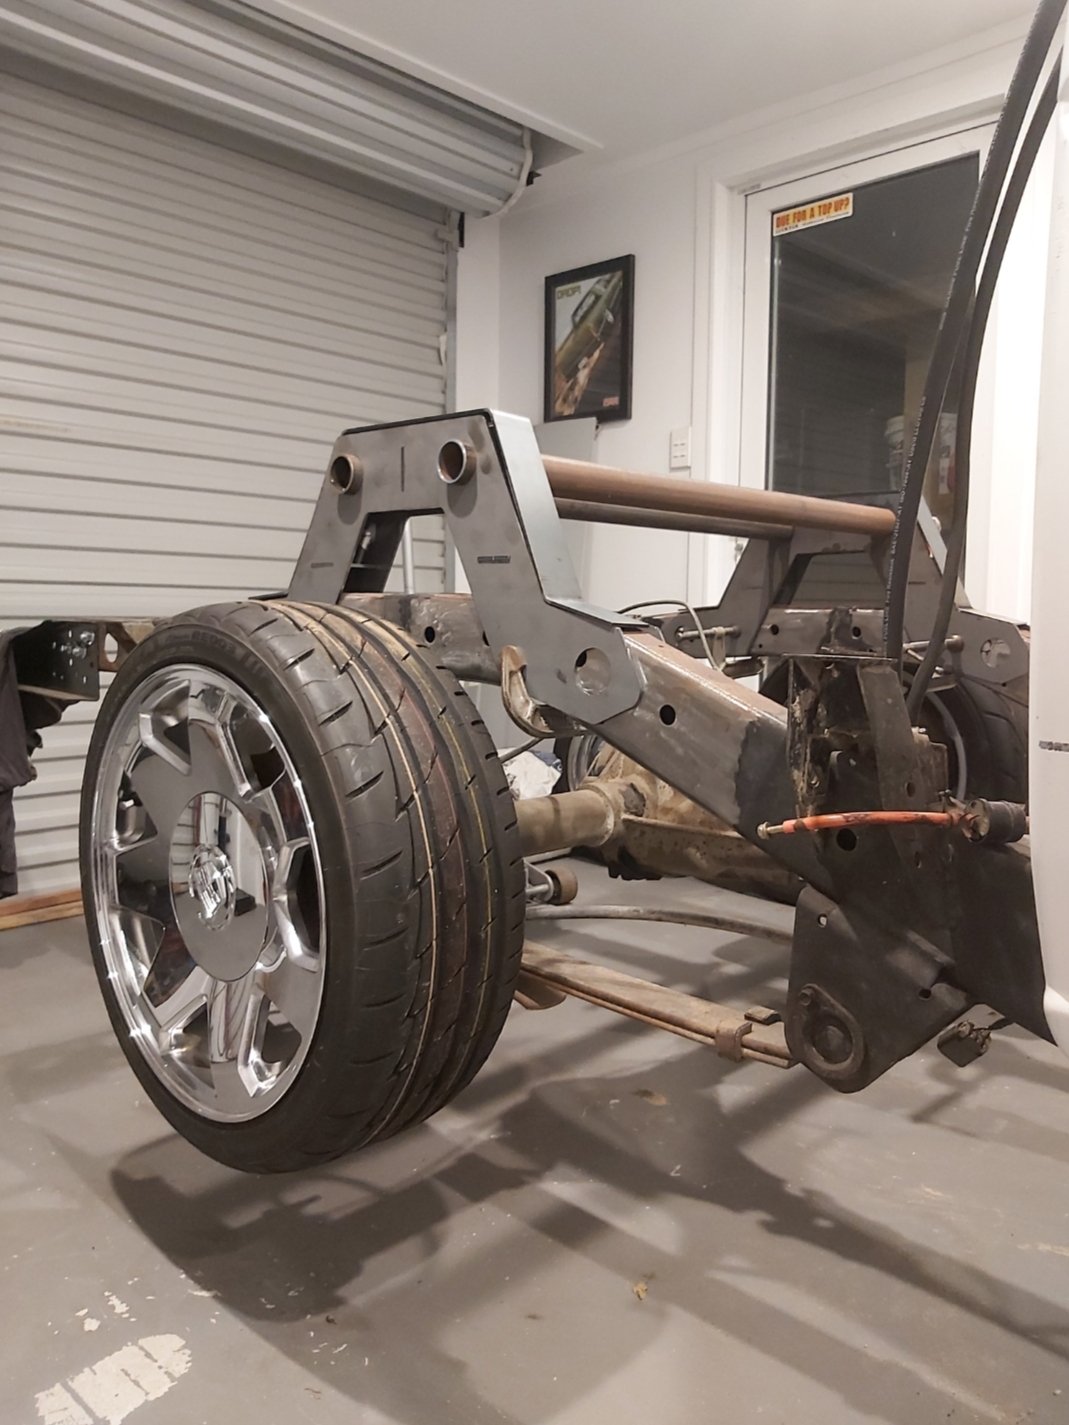
Over the break I got some time to work on this. First thing was to clean the chassis rails as I needed to make a crossmember for the upper links to attach to the chassis. Got the leaf spring mounts off the chassis pretty easy and clean. Next up was to fill a few of the holes in the rails as the mounting for the crossmember plate was going to end up half over them. Ended up putting a bit of 3mm plate in the drill press and got a hole saw with the right inside diameter as the hole and cut heaps of plugs. welded them up and smoothed them off. Got my domino's pizza brackets that I worked out and got cut before xmas clamped them on made sure the drive shaft at full air out doesn't hit the tube and that the angle of the top link matches my calculations. Once that was welded I was able to work out the tube the lower link is attached to. I didnt want to mount the bottom link under the chassis as I didnt feel that the bars would be long enough. Under the rail would have been around 600mm and I've gone with a 750mm to try keep the ark fairly big. So got some 44mm rollcage tube which is smaller than the crossmember tube (48mm) but only because have we only have 44 tube bender dies. Did a double bend from crossmember down to plate on chassis rail. Is a shame the driveshaft is so far offset but I cant do anything about that. At this point I was waiting for a couple more brackets from one stop cutting shop. I moved onto cleaning up the chassis rails behind the notch where the fuel tank and air tank and compressors mount. Once the brackets were ready got straight back into it and carry on finishing the 4 link. The lower bracket is probably a bit over kill and most of the holes are just for looks. But it ties the crossmember and the support tube to each other. Tacked the bag plates to the chassis inside the c notch crossmember and cleaned up the diff tube. Removing leaf spring mounts was a messy process. Once that was sorted lined up the diff in place using my jig I made earlier and tacked the bag mount to the diff and all the link brackets to the diff. Once that was done was able to bolt bags in and wait till to get some air fittings to see how/ if it all worked. Probably heaps I've missed and haven't shown any of my head scratching time or the laser cutting process. So far everything is just tacked but plan on taking body off in the near future so will be easier for someone with more welding skill than me to do that. Any questions I'll be happy to answer. I'm loving the motivation I have at the moment hope I can keep it rolling. Thanks for looking Nick
- 53 replies
-
- 10
-
-
Kp60nick's D21 kingcab Soon to be Bagged on Cadillac Escalade rims
kp60nick replied to kp60nick's topic in Other Projects
Finally picked up my balls! C notch is welded (sort of) chassis is cut, 4 link arms, brackets, bag plates, more tube for crossmembers and 4 weeks off work have all been acquired. Time to smash all that together and see what I can create. I purchased my 4 link arms from rod ends nz. I Was very happy with their service. At my door the next day. Thanks for looking Nick
- 53 replies
-
- 15
-
-
Looking at $500 in glass or $800 in carbon fiber. still yet to pull one from the mould can start making them early next year.
-
I have an og trd fiberglass roof wing from jp that I've had a mould made. Could potentially get one made if you are interested?
-
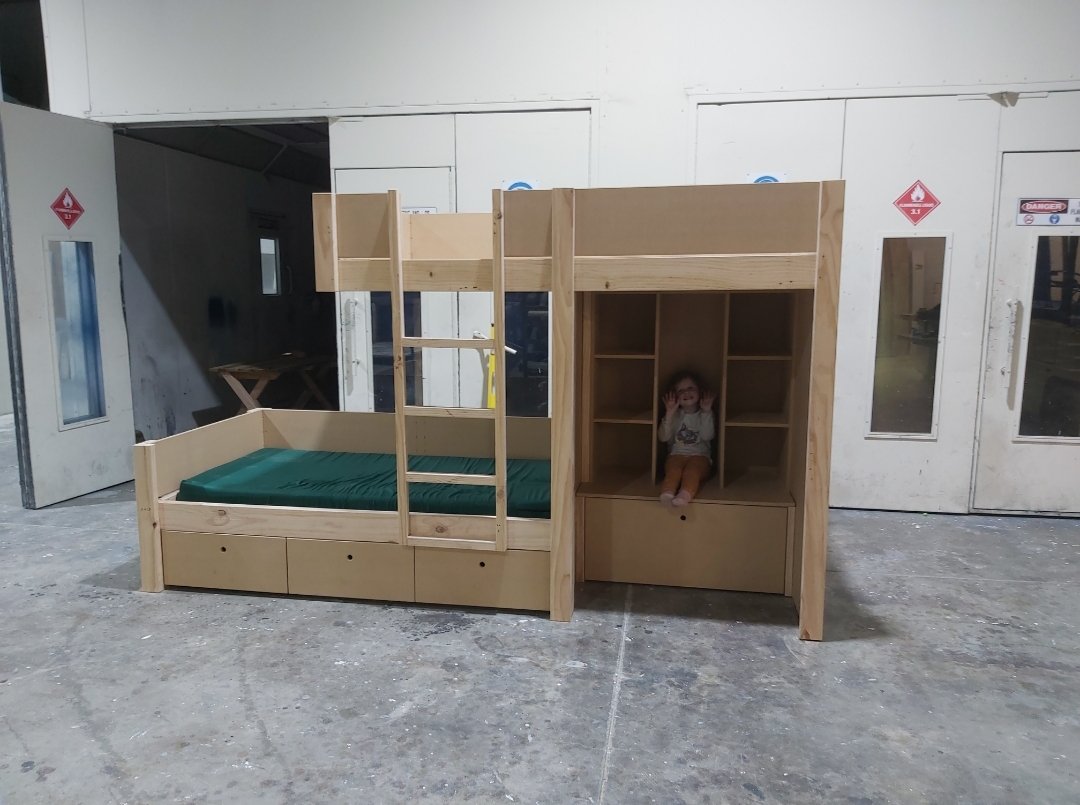
Random slightly cool stuff you built but not worth its own thread, thread
kp60nick replied to h4nd's topic in Other Projects
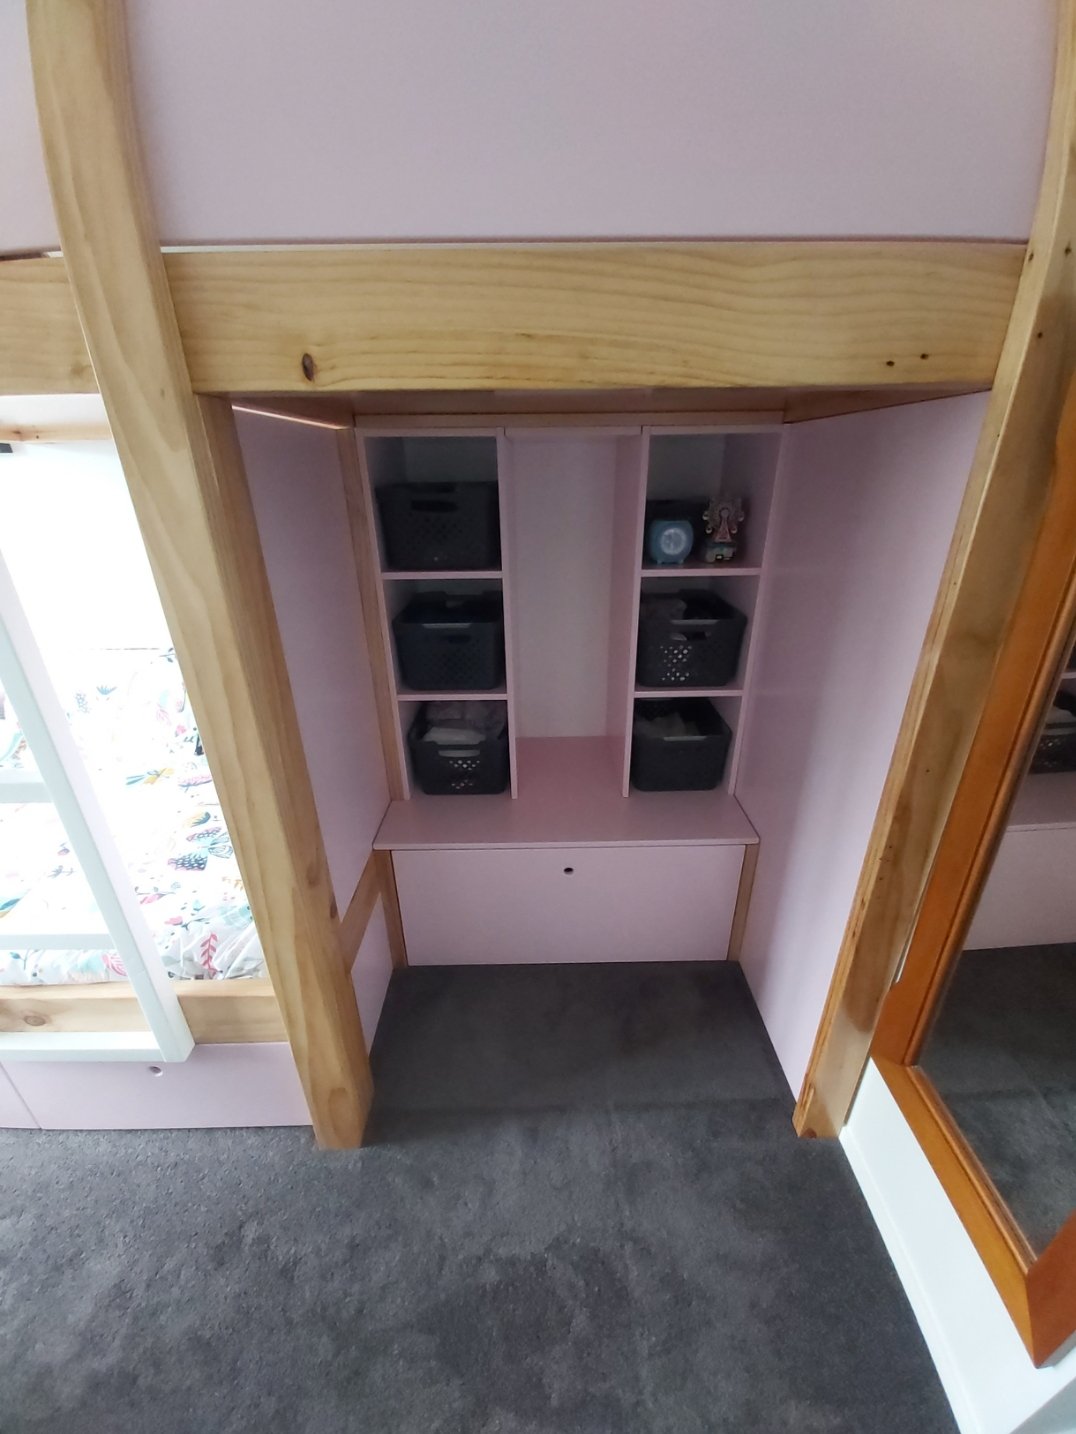
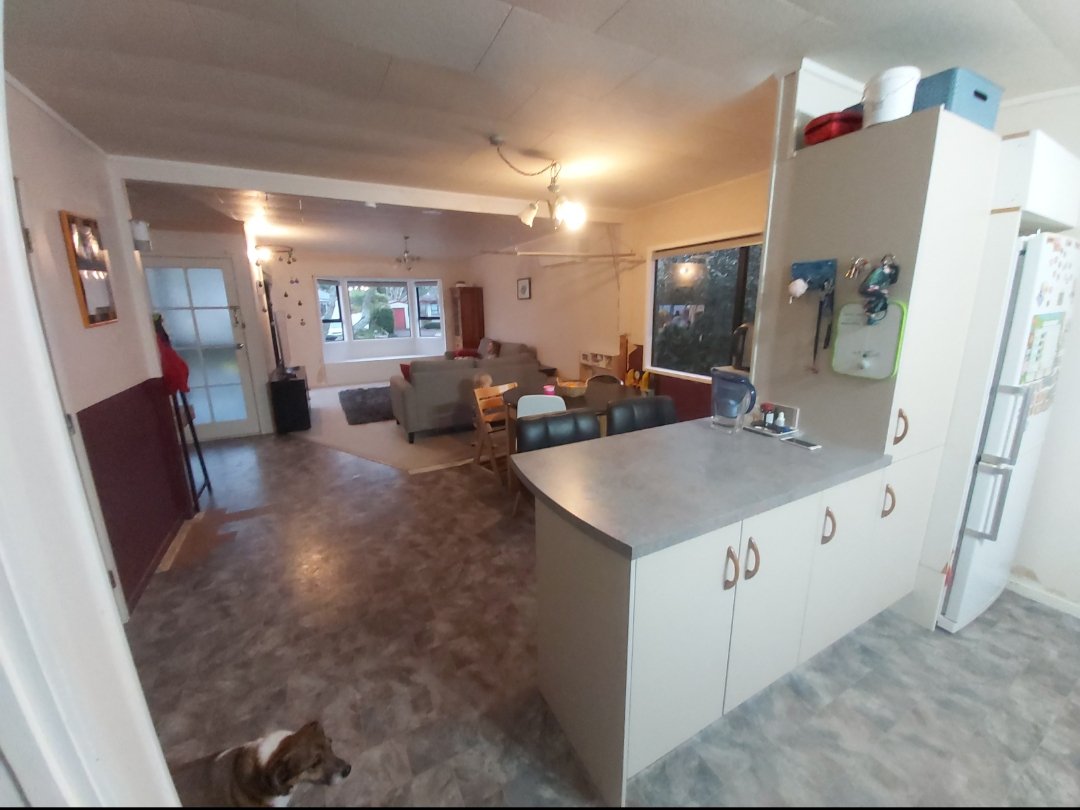
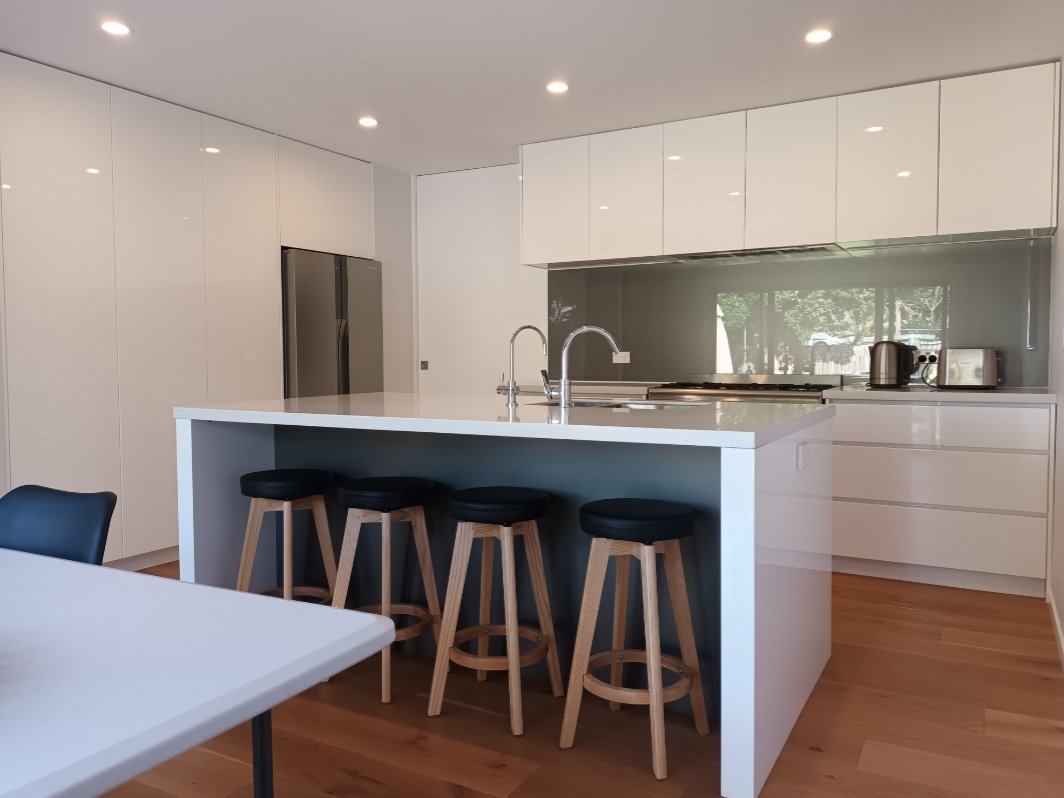
Of course we had make one for each kid. This one slightly different as we removed her wardrobe when we did the renovations to fit the fridge in the new kitchen so we incorporated the wardrobe into the bunk bed.
- 1282 replies
-
- 42
-
-

-
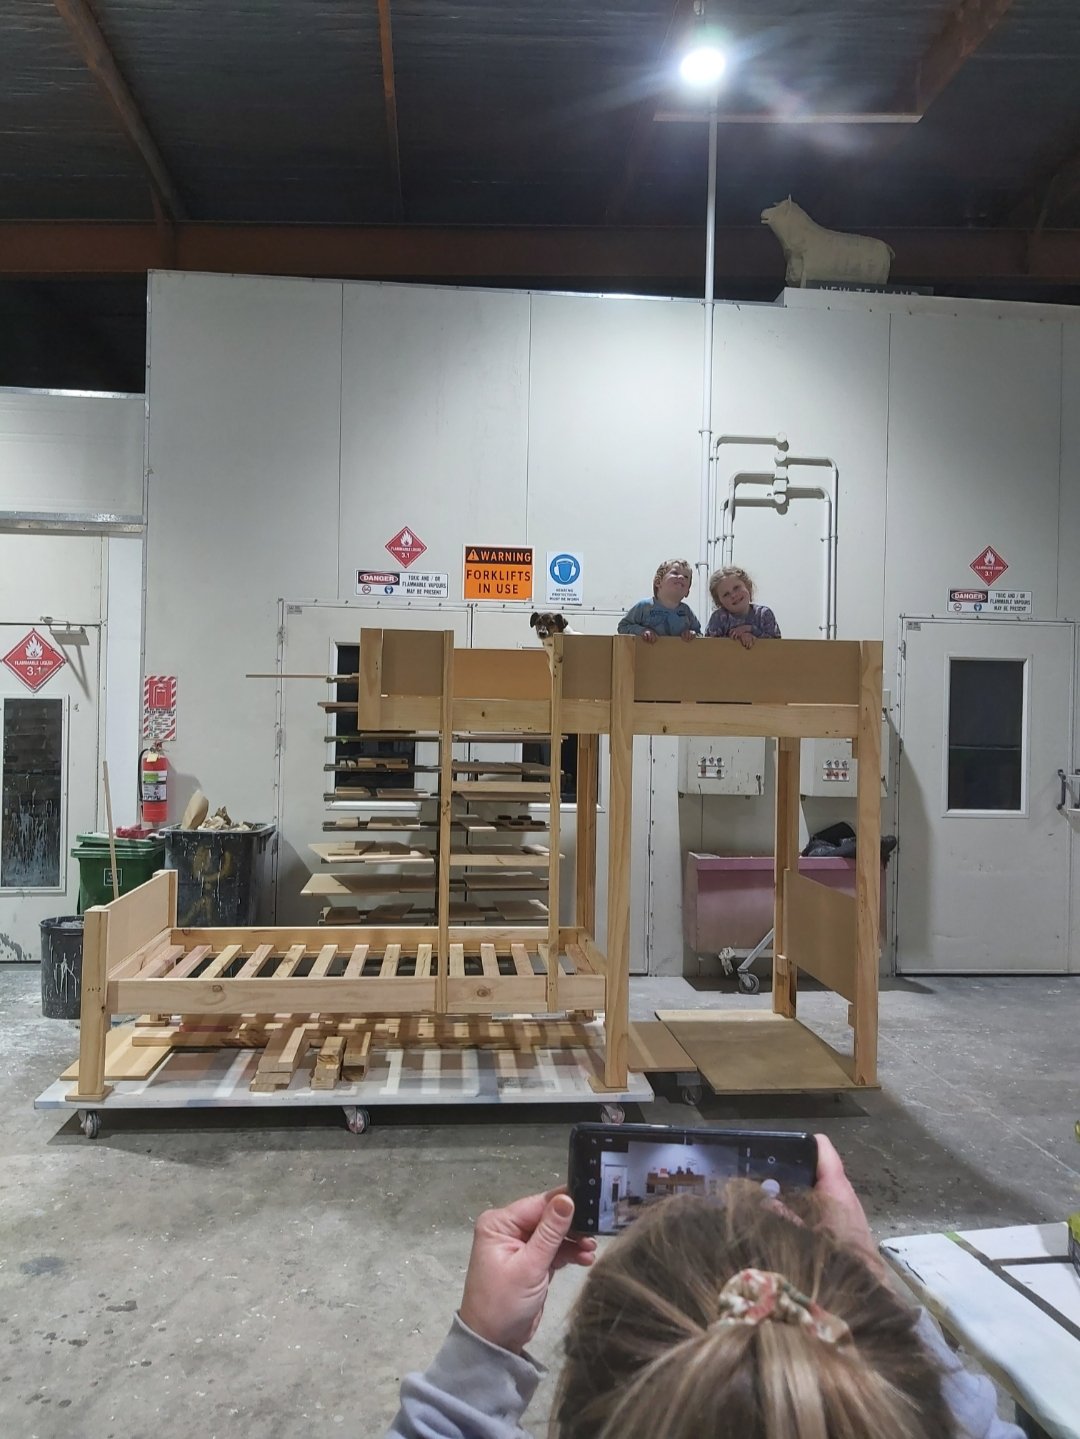
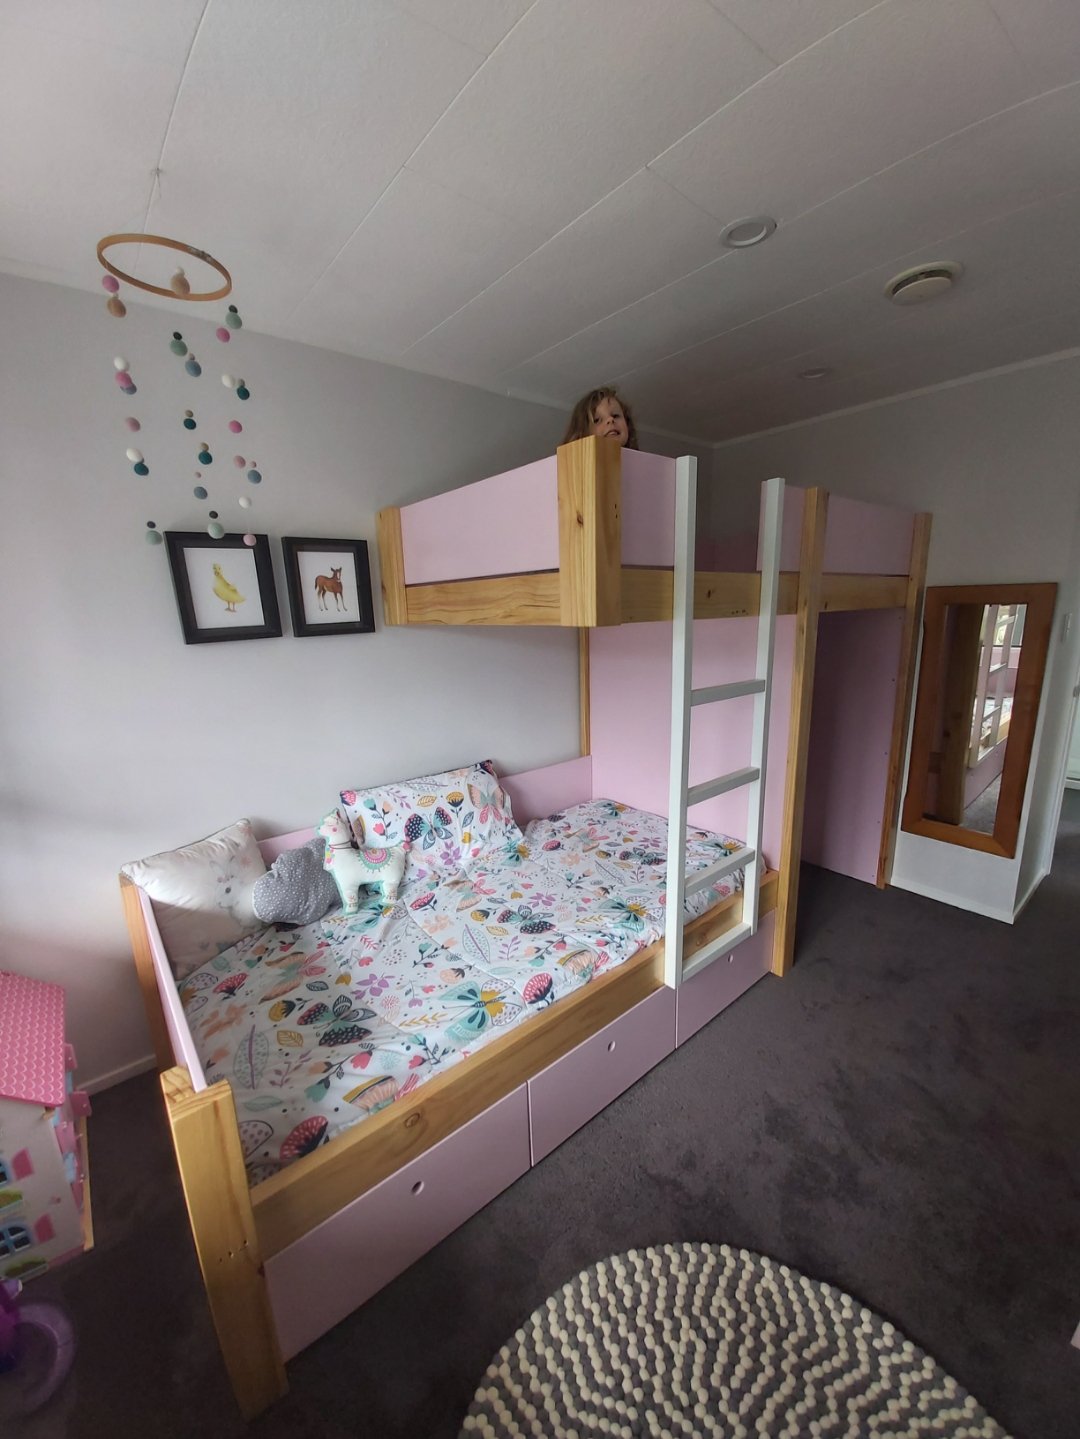
Random slightly cool stuff you built but not worth its own thread, thread
kp60nick replied to h4nd's topic in Other Projects
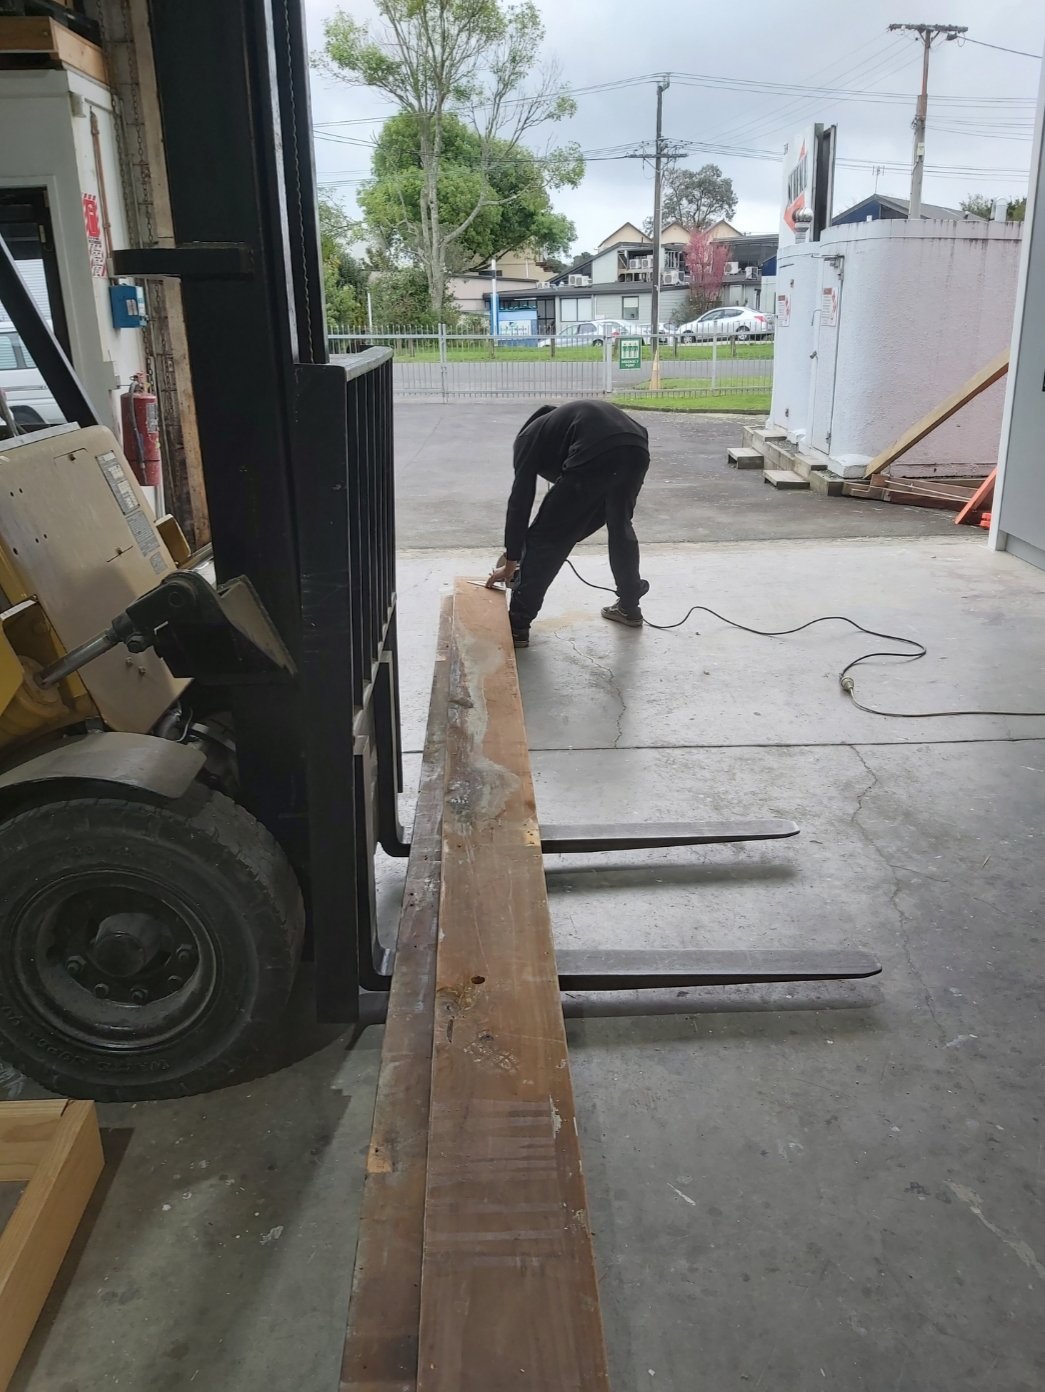
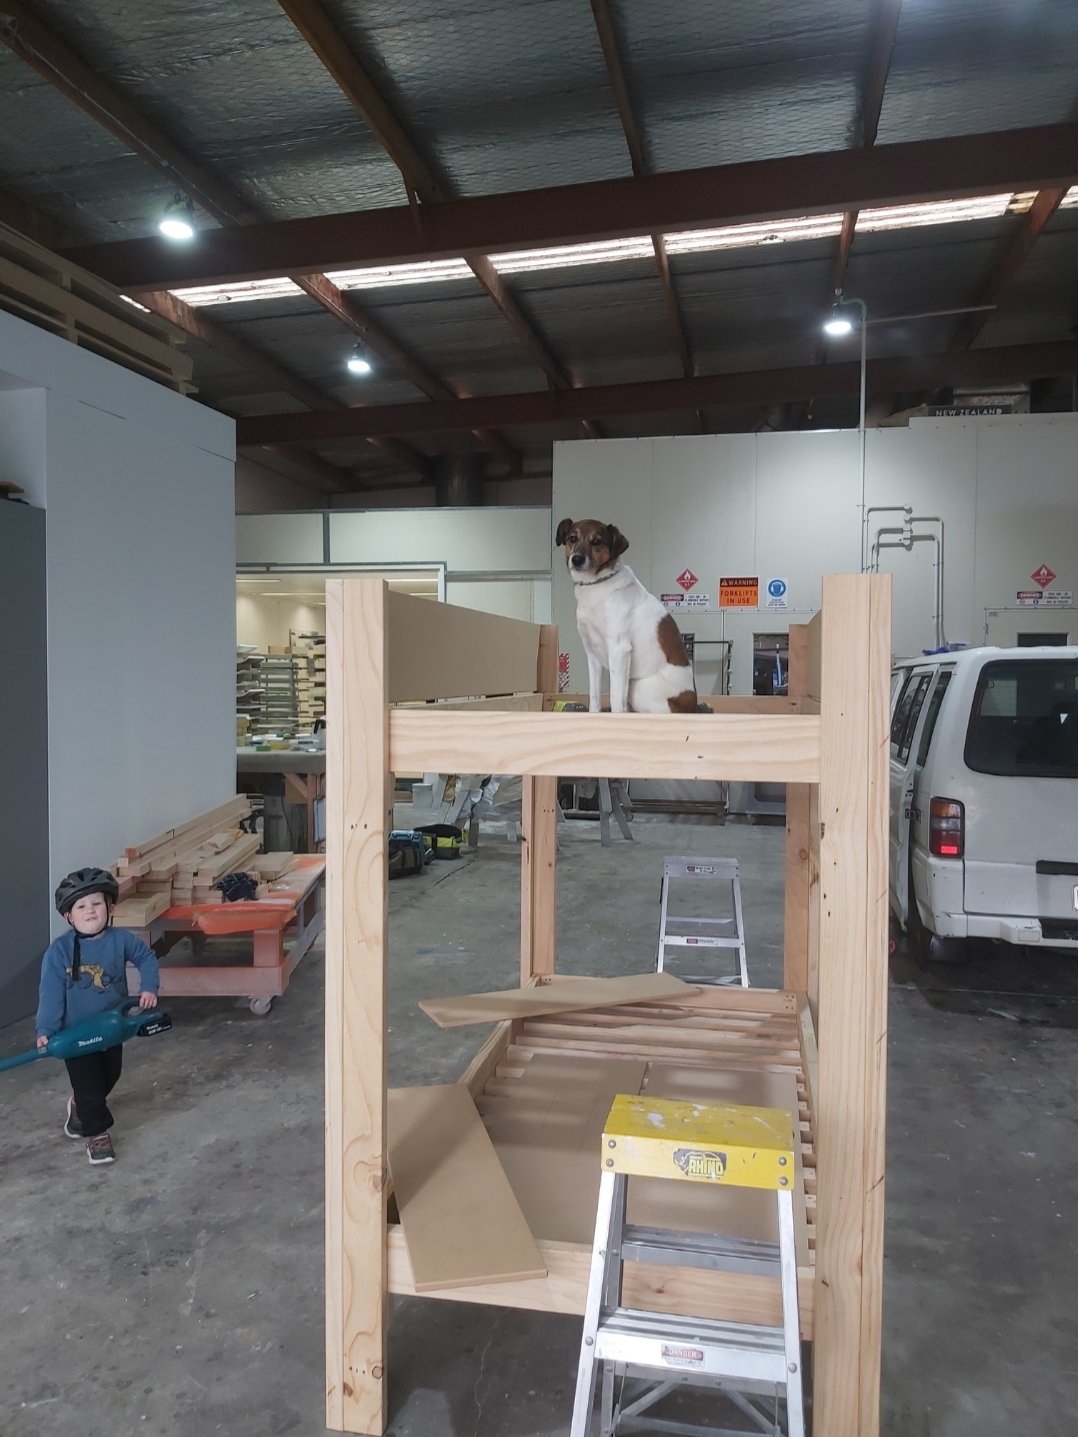
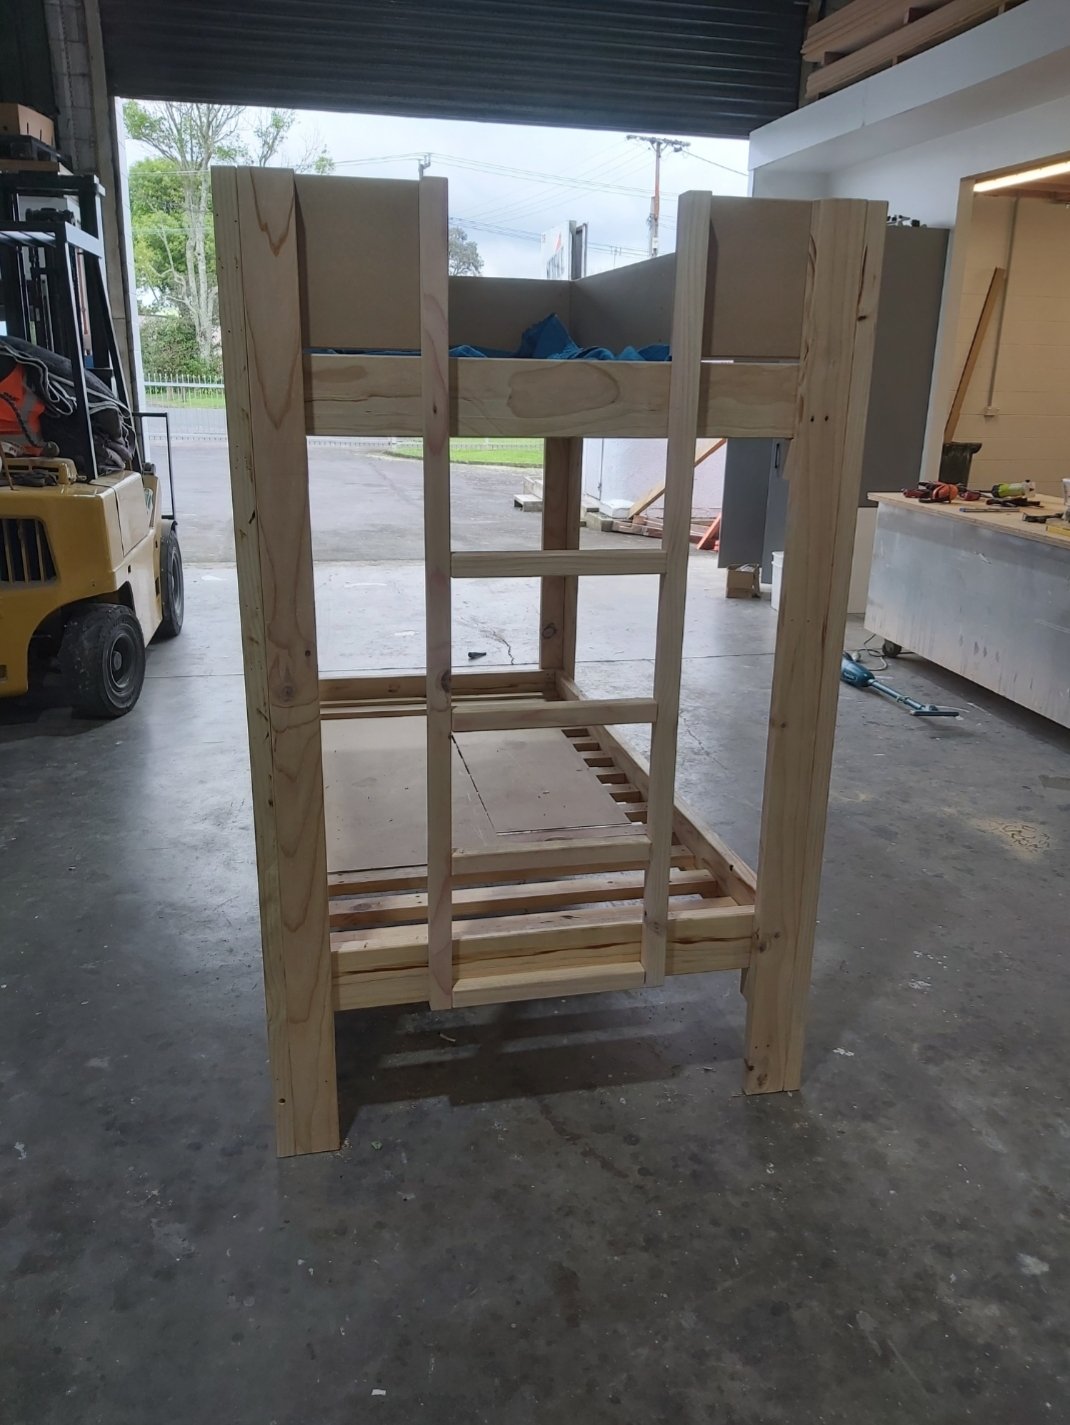
The wife and I wanted to make the kids bunk beds for their birthdays this year. Didnt really have to much of a plan on how to make them watched one youtube video got the general idea and got to work. Middle of last year we removed an old spray booth from our factory but kept the timber. Which worked out perfectly. I ripped it down to size put it through the thicknesser and it came out better than expected. It was a great project for the family got the kids involved and learnt heaps. First photo is timber before going through the thicknesser. we ended up moving the ladder. not enough space to climb up. I painted all the parts in polyurethane as thats what I do for a job. The gap between the beds is a 1m but we wanted to future proof ourselves hopefully get more than 10 years out of them.
- 1282 replies
-
- 25
-
-
Kp60nick's D21 kingcab Soon to be Bagged on Cadillac Escalade rims
kp60nick replied to kp60nick's topic in Other Projects
This was also a purchase I made over the weekend. The are very rare for a d21 so I was very happy to get my hands on it. Factory tinted glass too. This means i will probably need to tint the two rear side windows to suit.
-
Kp60nick's D21 kingcab Soon to be Bagged on Cadillac Escalade rims
kp60nick replied to kp60nick's topic in Other Projects
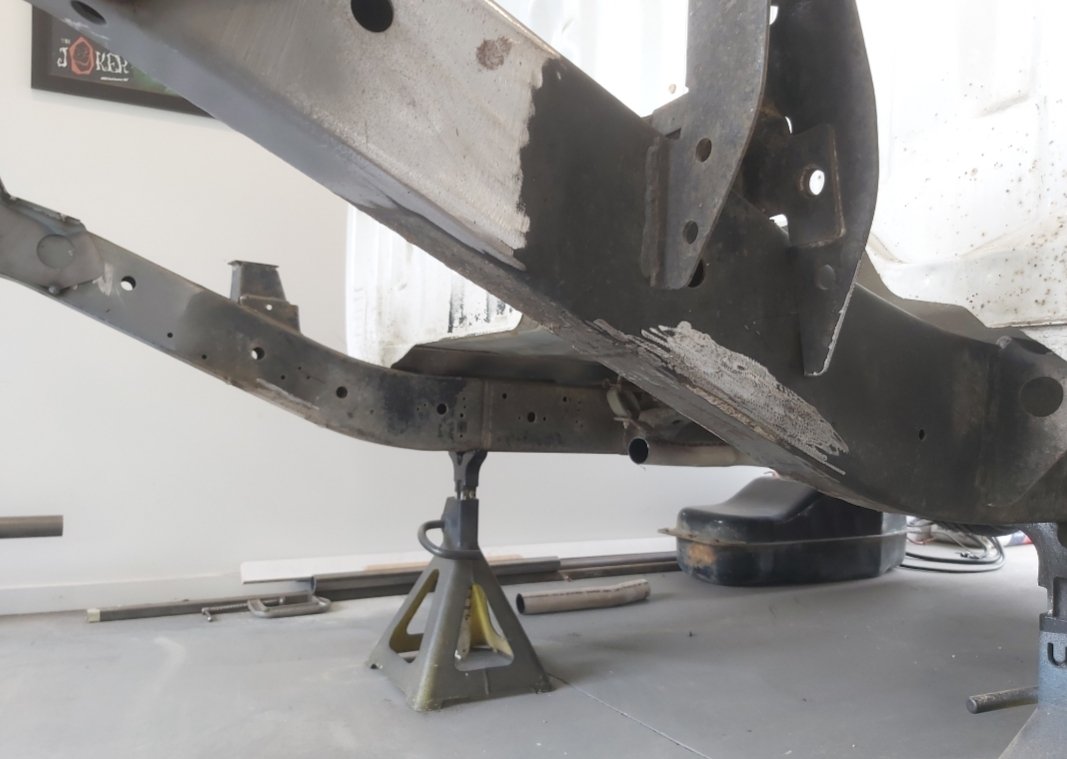
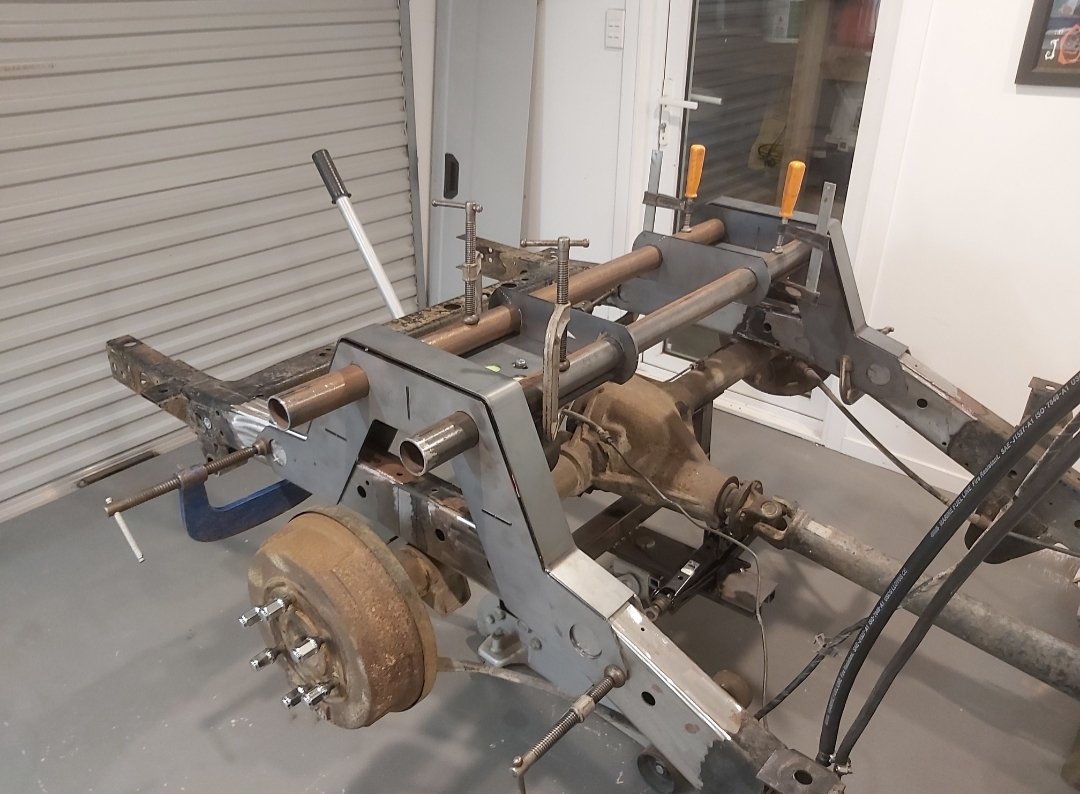
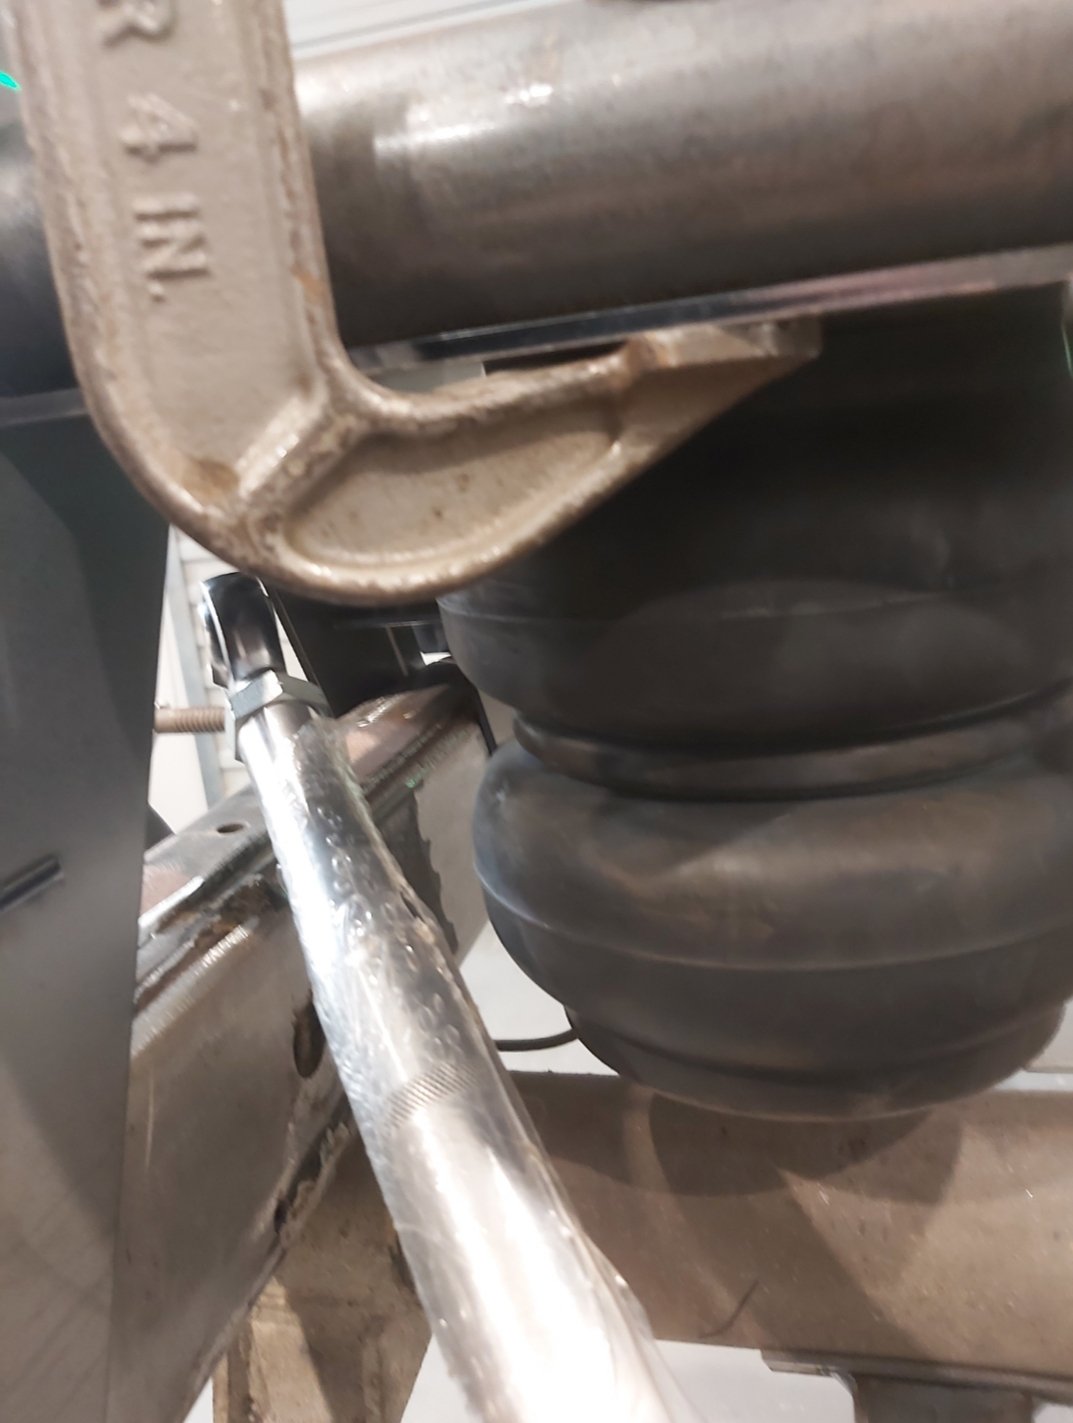
So you guys must be sick of c notch updates but for something that seems fairly simple. I wanted to make sure I do it right. So here (thanks to my neighbor Danny) the notch is hopefully set in the final place. I've been waiting for the two 6mm plates that slide on the bar and finish off the bag plate. I will be cutting the crossmember tubes shorter. =) Ive been waiting for everything to come together to check this space between chassis rail and top link. Thank god it seems to have ample clearance.
- 53 replies
-
- 11
-
-
Any updates on this?
-
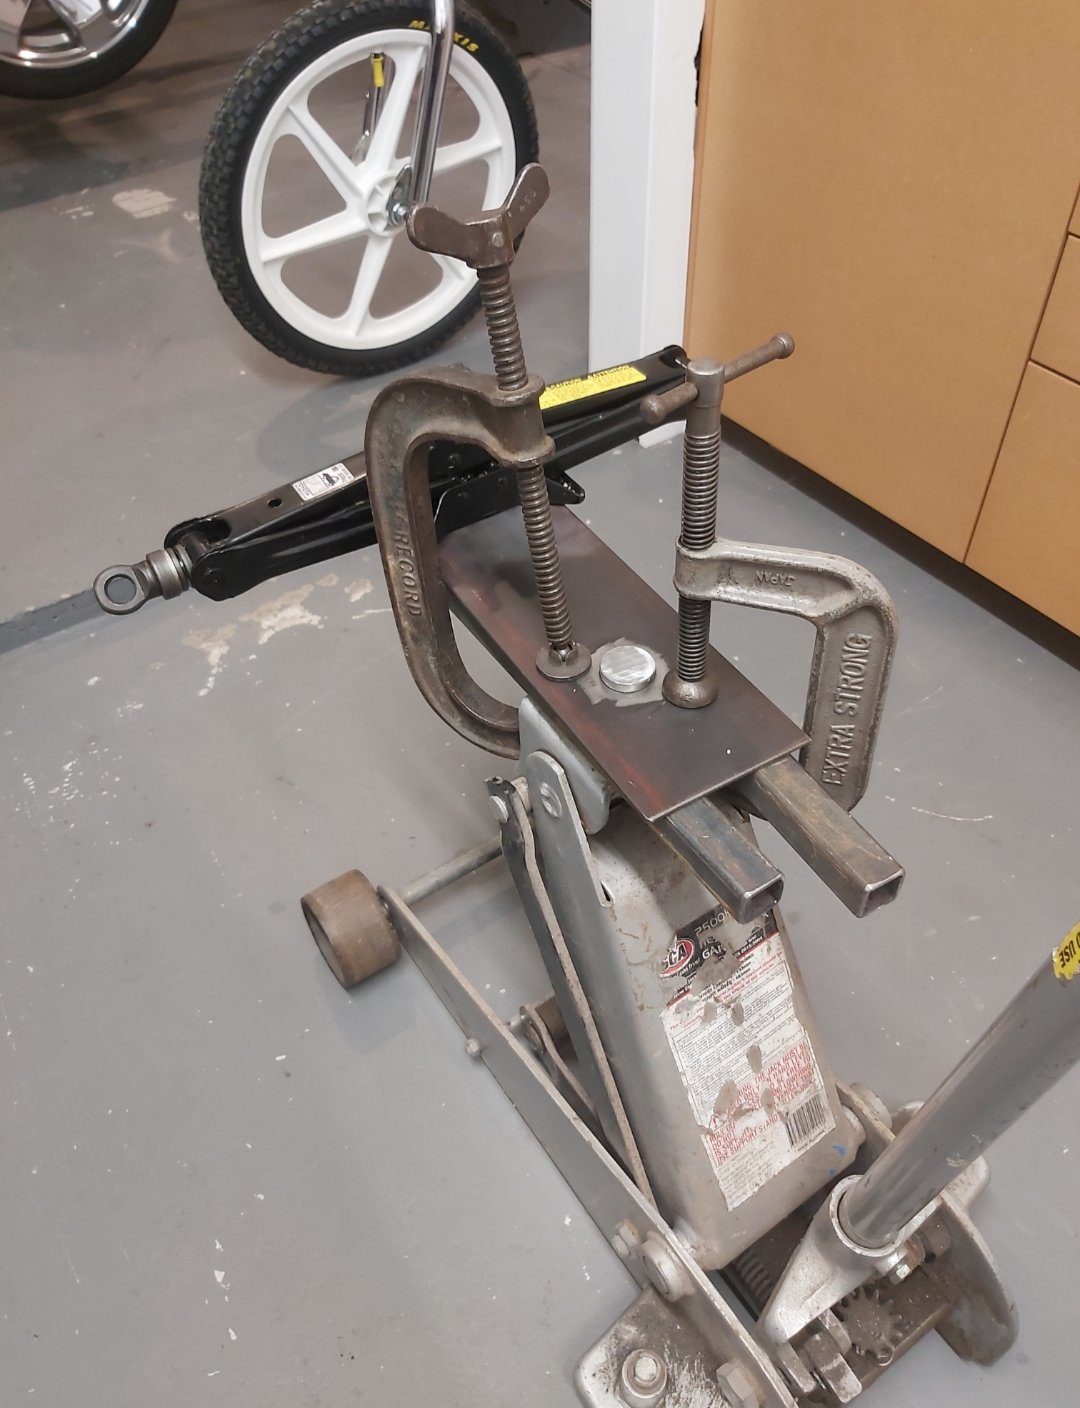
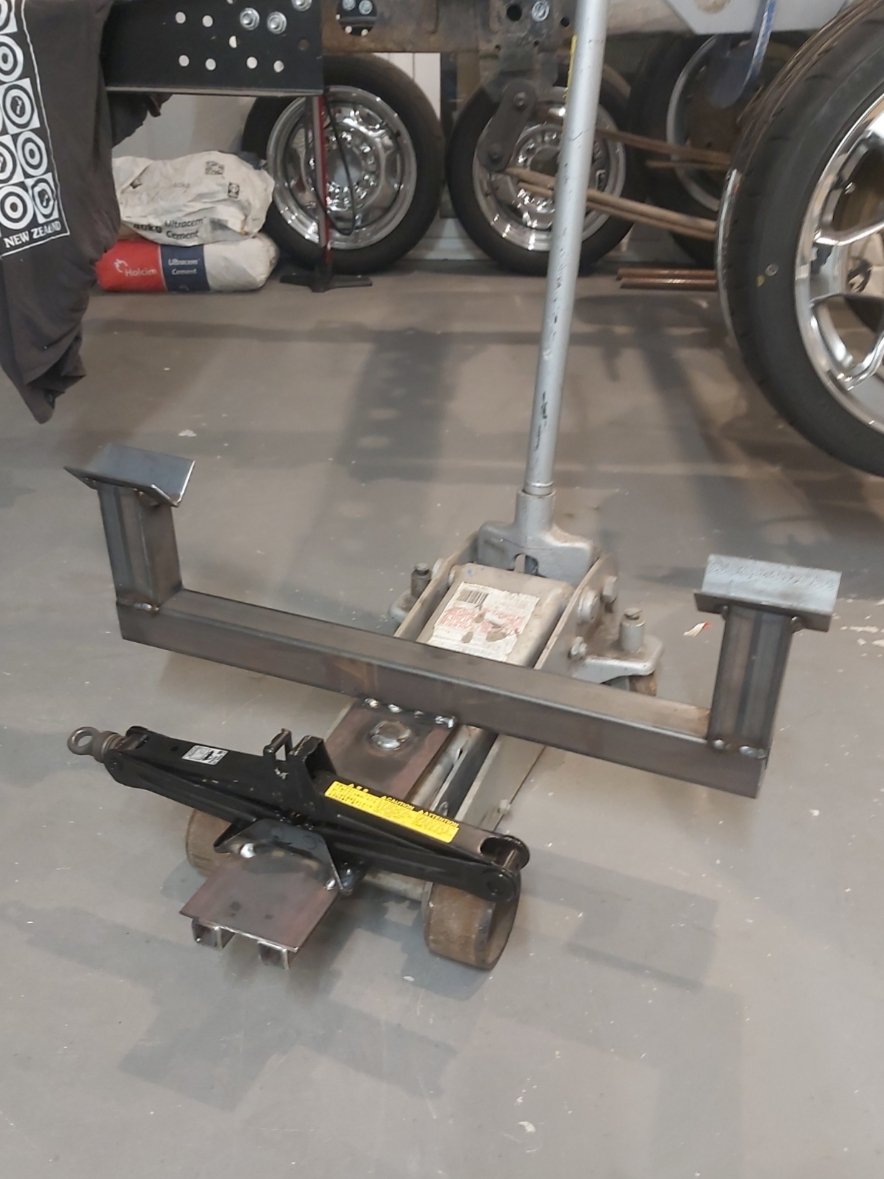
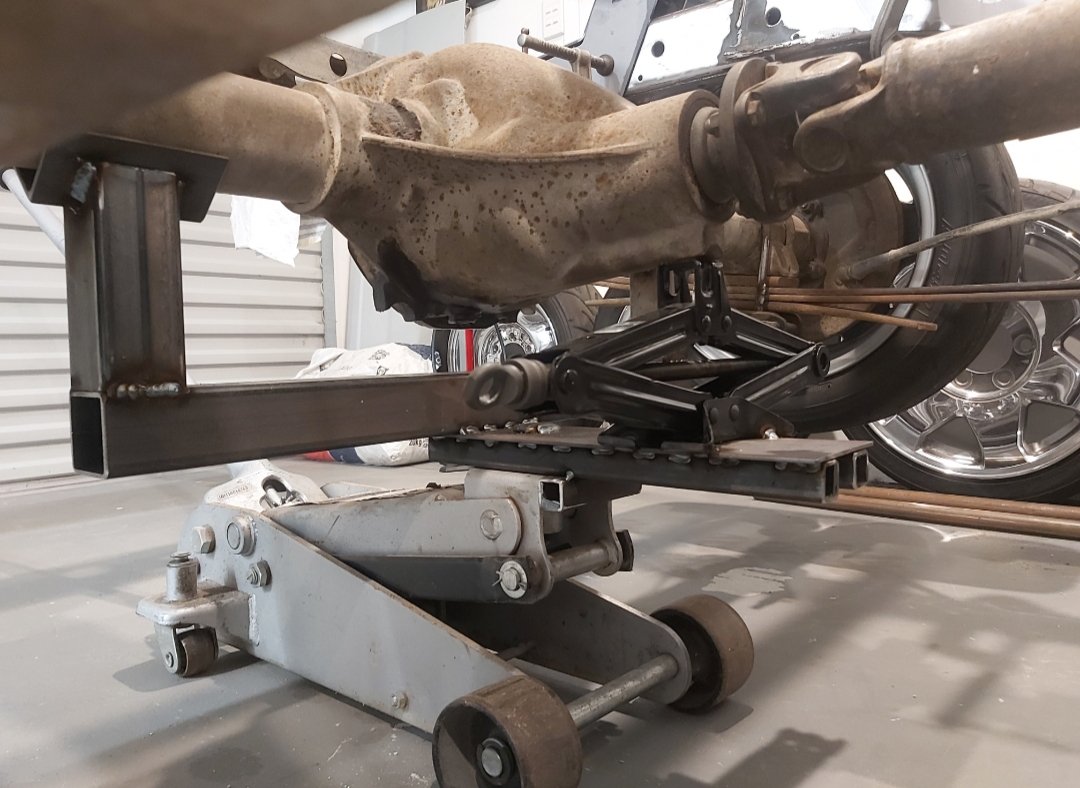
Kp60nick's D21 kingcab Soon to be Bagged on Cadillac Escalade rims
kp60nick replied to kp60nick's topic in Other Projects
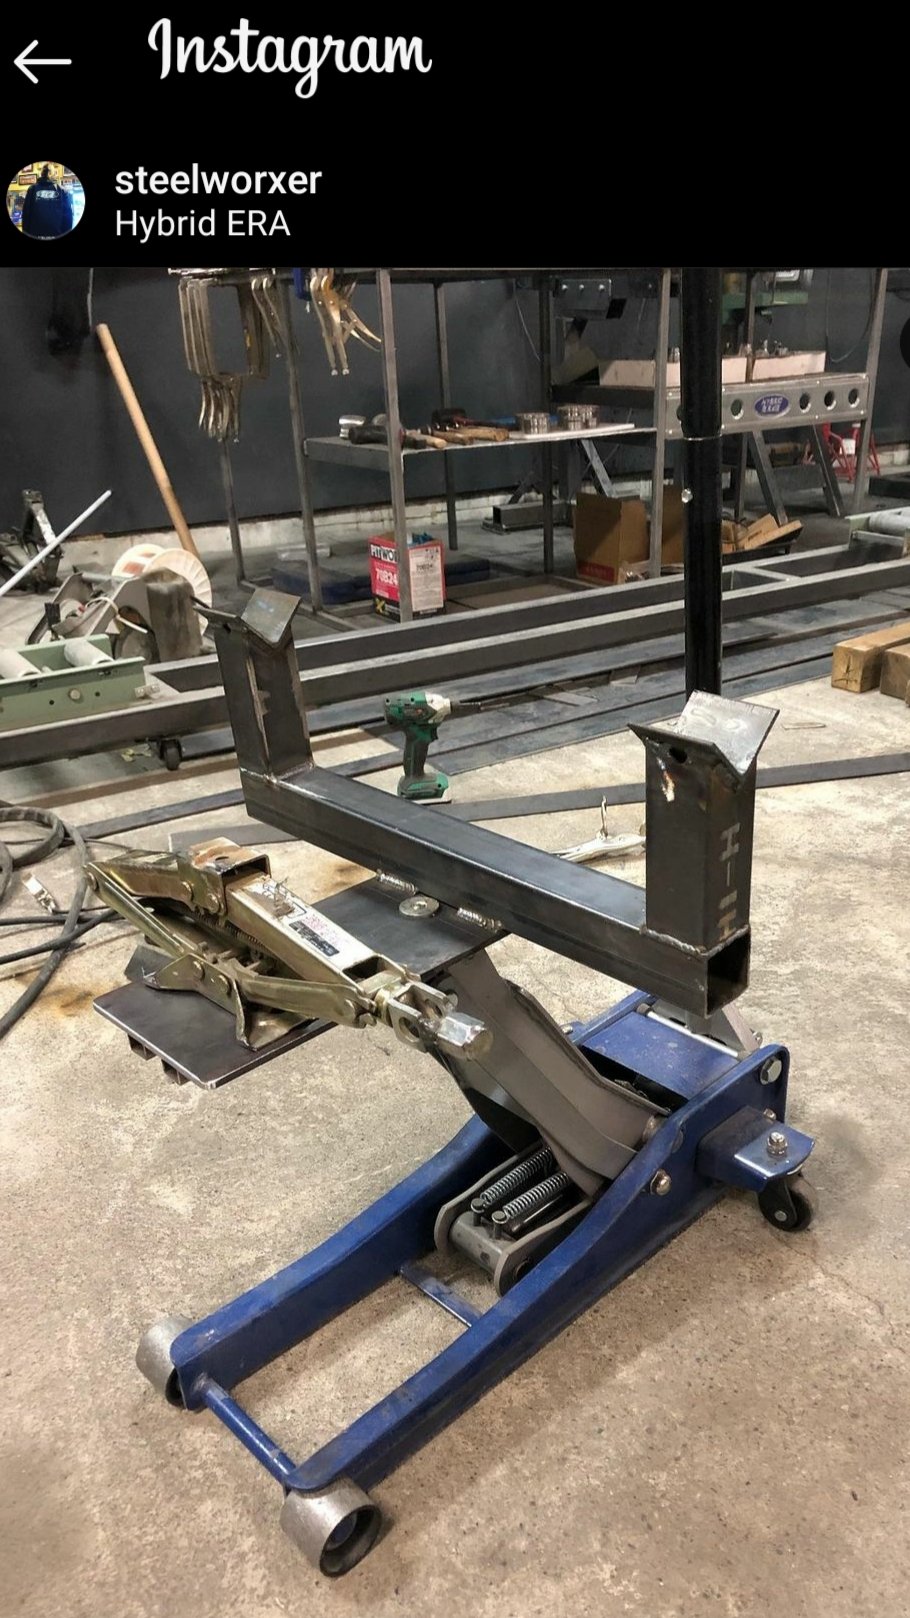
Tonight I built a stand for the diff that fits to my jack. Stole the idea from a Japanese dude from Instagram. Picked up a scissor jack from pick a part from a Prius. it looked brand new.
- 53 replies
-
- 18
-
-
Kp60nick's D21 kingcab Soon to be Bagged on Cadillac Escalade rims
kp60nick replied to kp60nick's topic in Other Projects
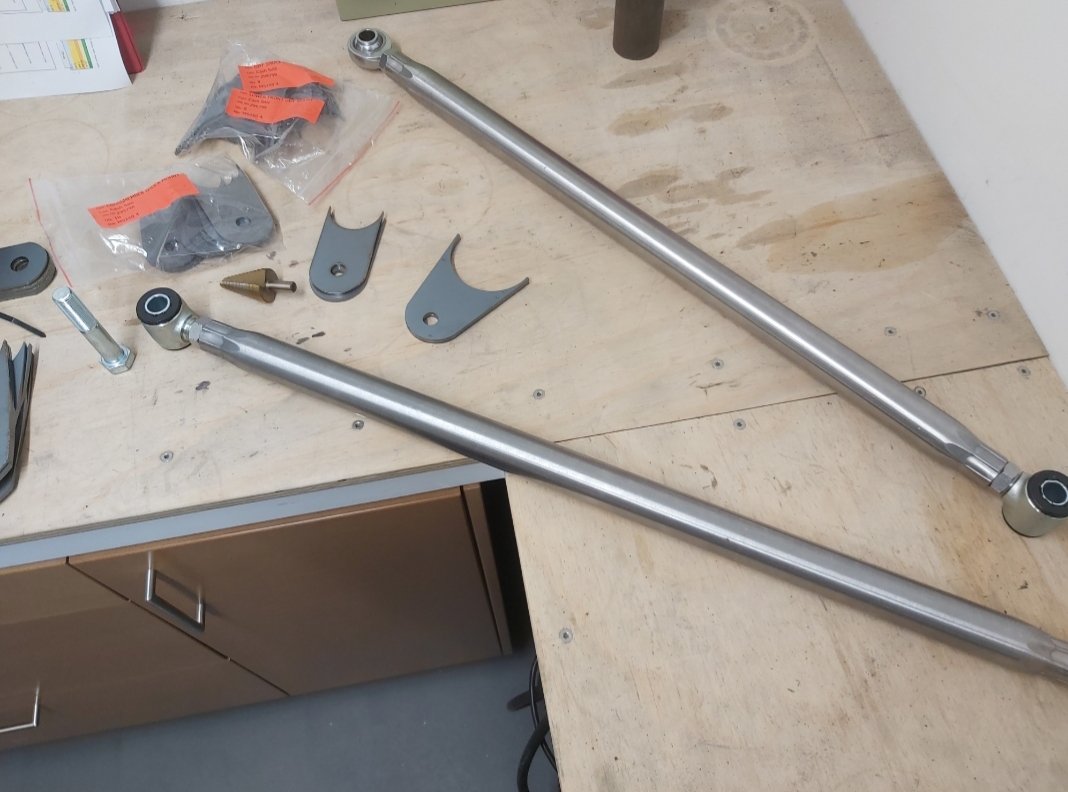
@shizzl I cant seem to find the one I previously used at the start of this year. But just did some digging and busted knuckles 4x4 has a free download of the v4 4 link calculator. Seems like there is more options for more inputs. https://bustedknuckleoffroad.com/products/4-link-calculator It me a while to work out how to use the calculator. I didn't realize they did link kits. Will have to check them out. (Edit) i looked at kruzin kustoms kits any idea how long they are? Cut end and re thread? Thanks -
Kp60nick's D21 kingcab Soon to be Bagged on Cadillac Escalade rims
kp60nick replied to kp60nick's topic in Other Projects
Thanks @shizzl I'm no engineer but I'm doing lots of research. Planning on doing some scale modeling before doing any welding on 4 link. -
Kp60nick's D21 kingcab Soon to be Bagged on Cadillac Escalade rims
kp60nick replied to kp60nick's topic in Other Projects
Tried lining up the notch by myself. Going to need two people before final set up before welding. Waiting for a couple more laser cut bits now. This notch is taller by 50 mm to give me more clearance for top link bracket.
- 53 replies
-
- 10
-
-
Kp60nick's D21 kingcab Soon to be Bagged on Cadillac Escalade rims
kp60nick replied to kp60nick's topic in Other Projects
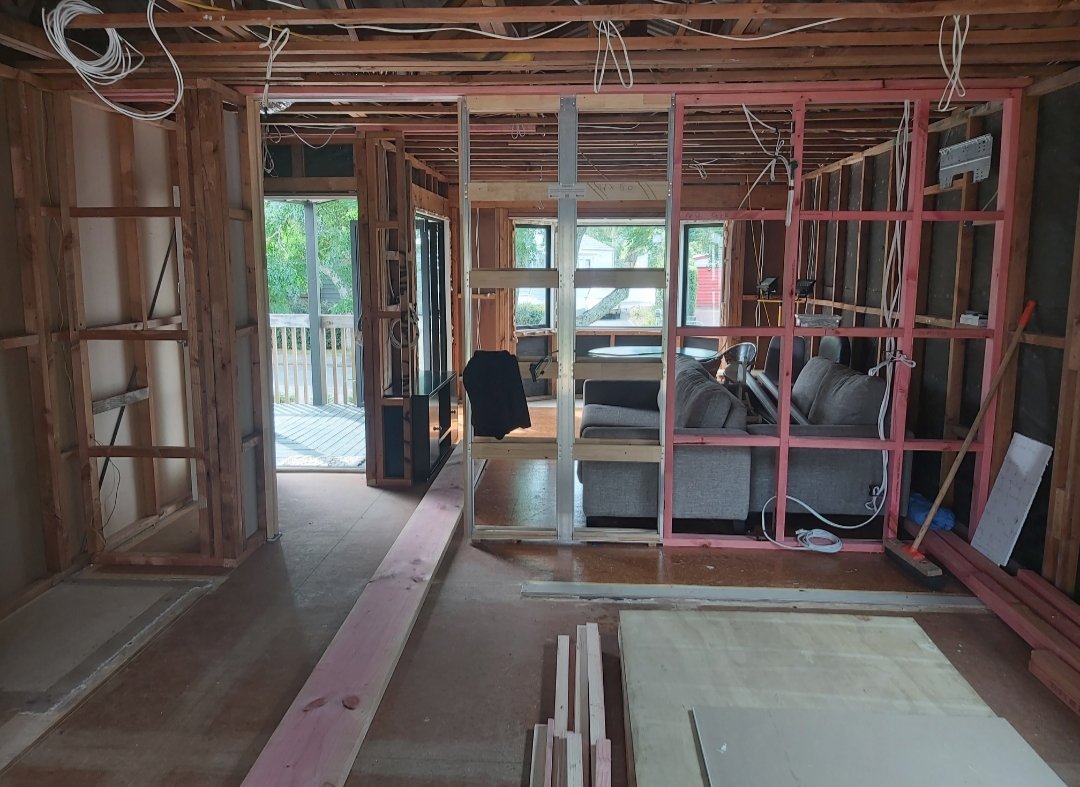
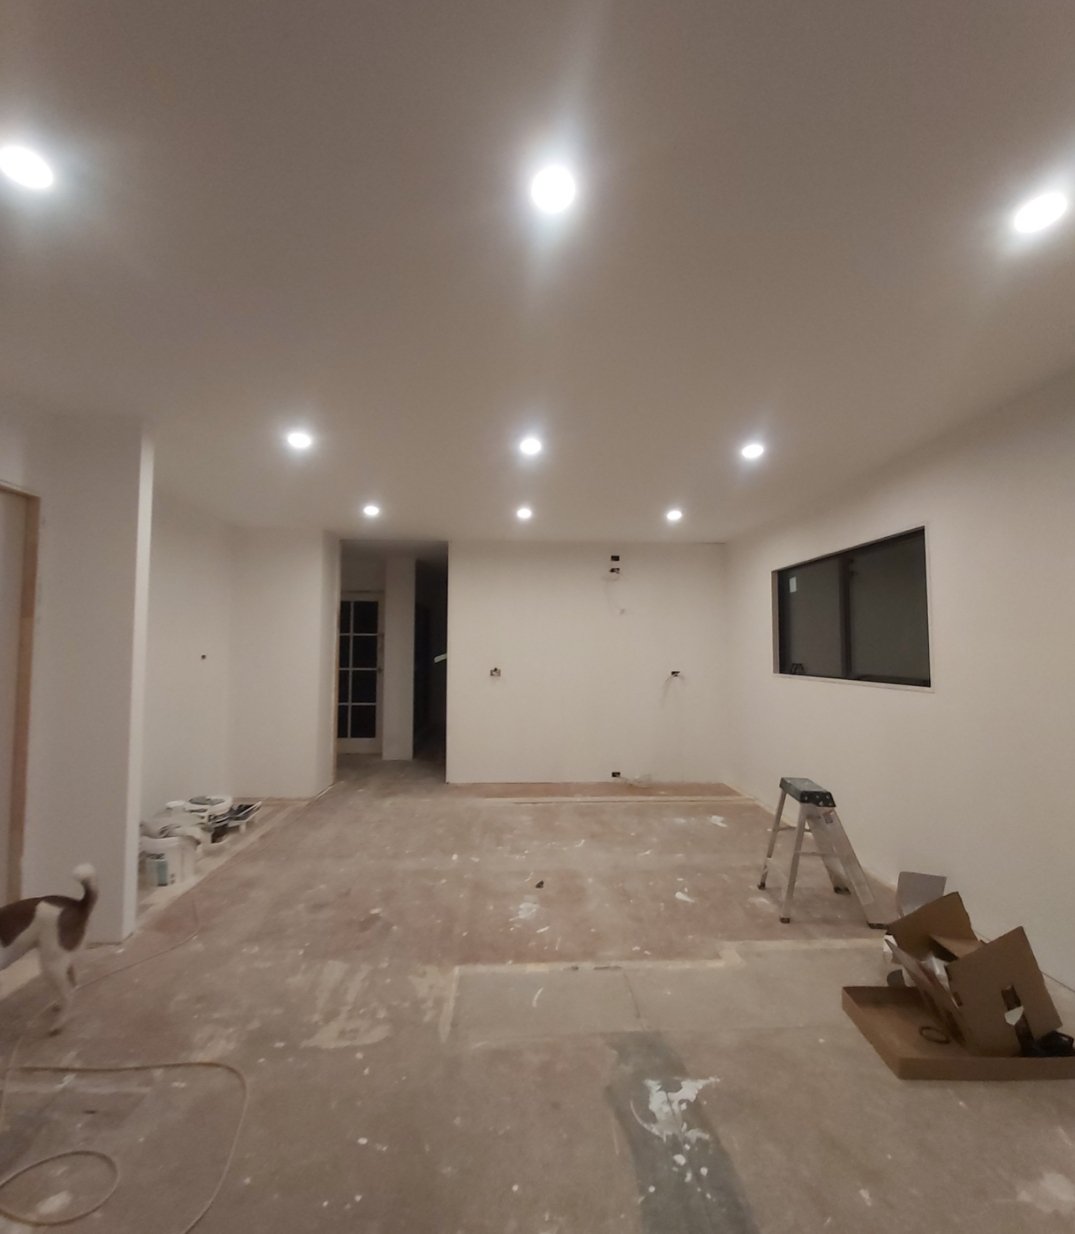
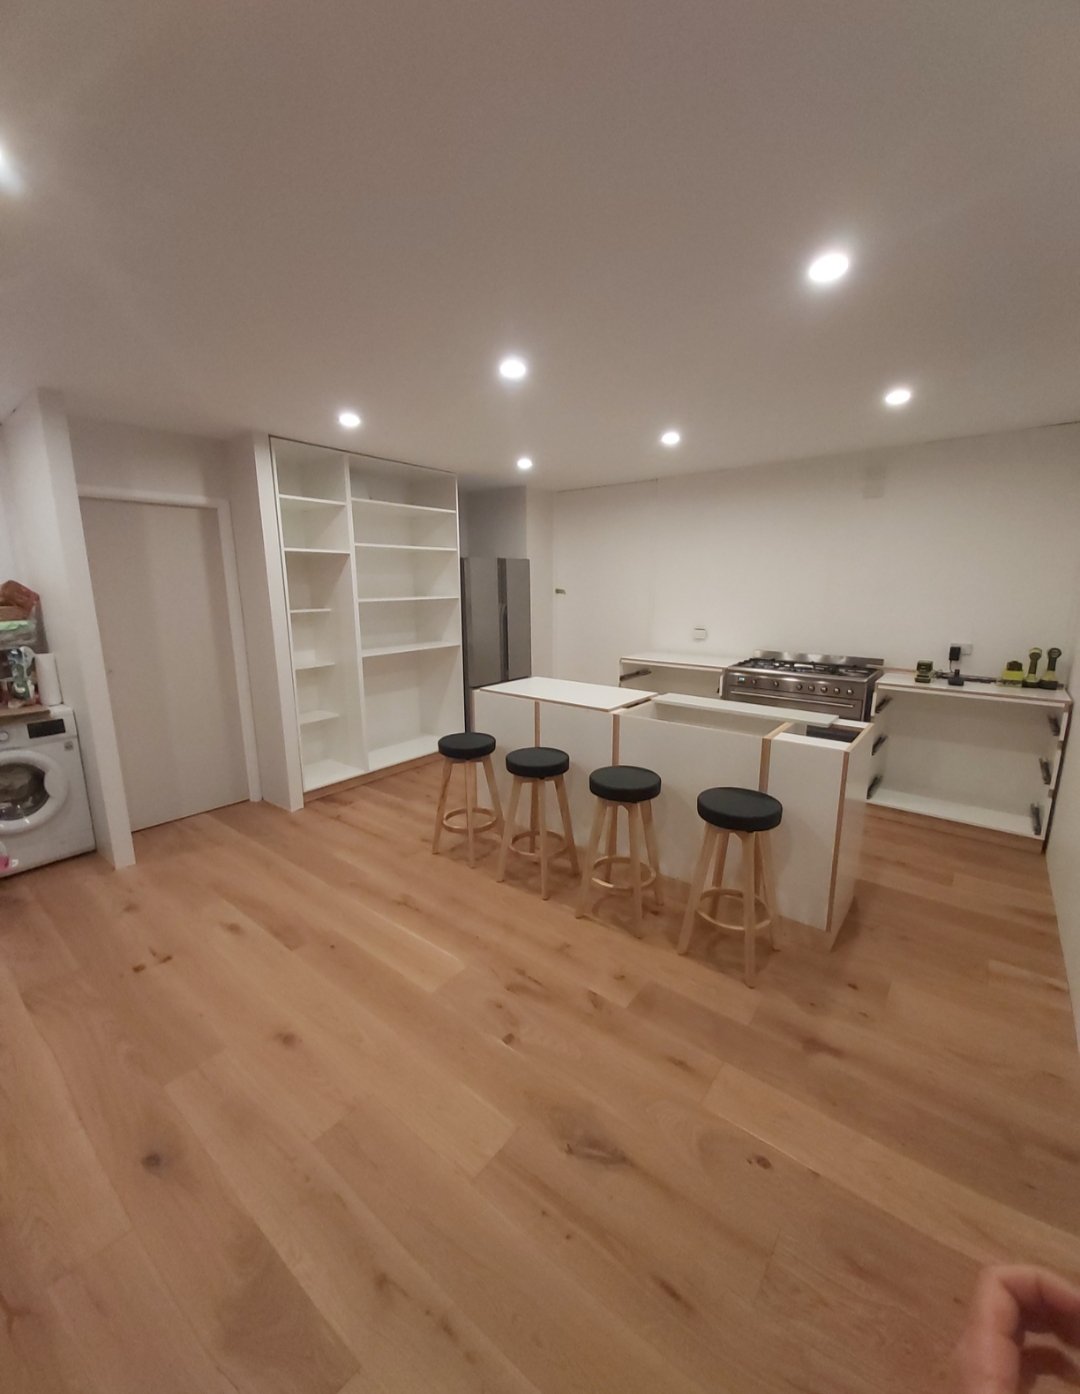
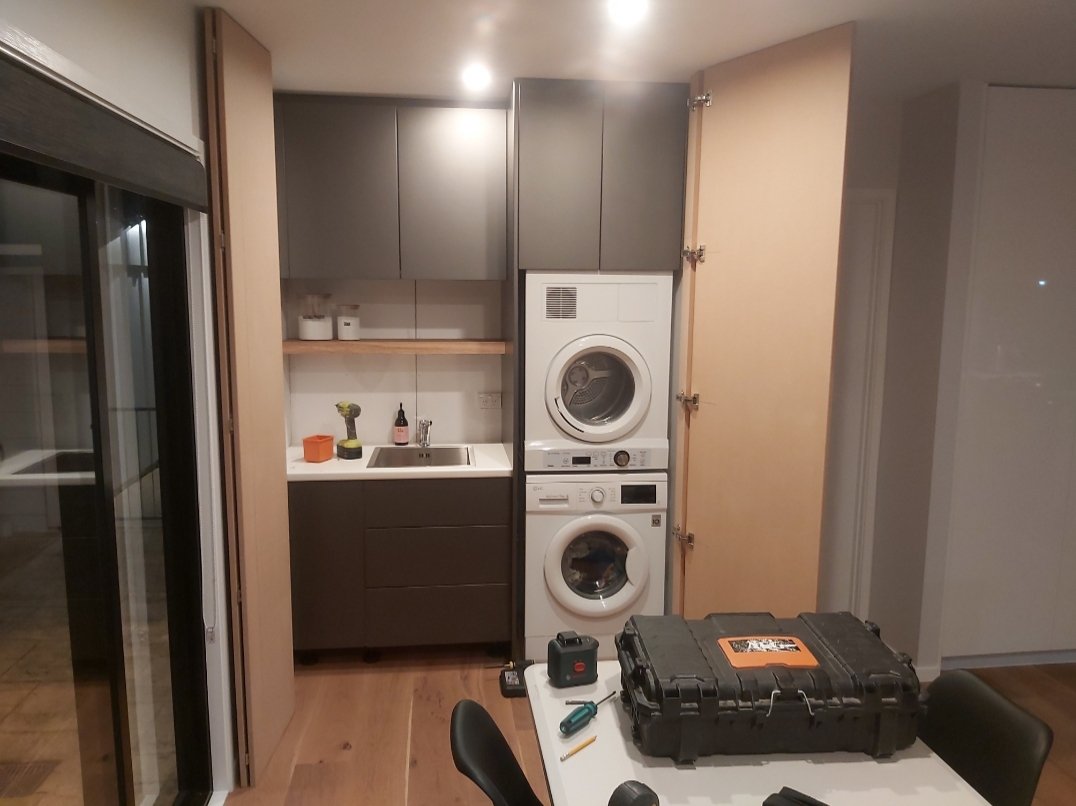
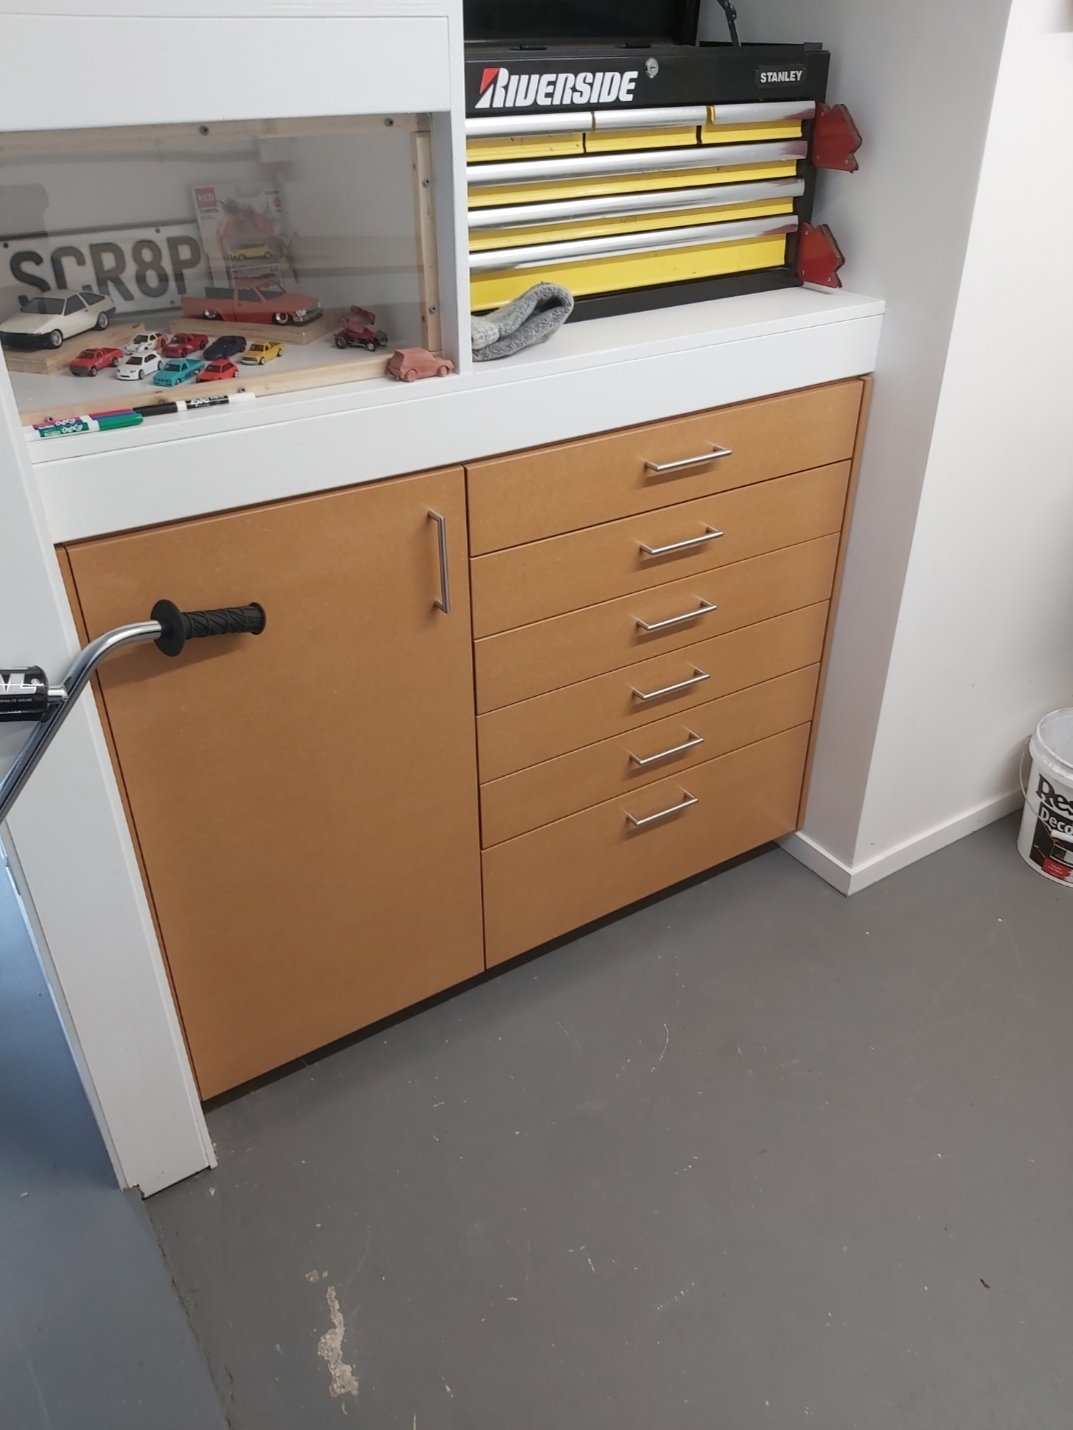
Thanks @63Ragtop but I feel like I should explain my situation a bit more so you dont all think I'm lazy. For the last 5 years cars have taken a back step while focusing on other things in life. Most of my time is taken running a kitchen spray painting/kitchen remodeling business the rest of my time is kids and house Reno's with the last year being focused on the kitchen, dining, laundry and lounge. But in the past few weeks I have had some motivation I've made a cabinet for the garage to get all my shit off the floor, have made another one have just got to clear coat it before I bring it home. Had the c notch re made and brought some pipe for the crossmember. Hopefully have it welded in before the 3 year anniversary of ownership. Brought a drill press and a great set of drill bits (used all my good ones doing all the Reno's) Thanks for looking.
- 53 replies
-
- 12
-
-
Kp60nick's D21 kingcab Soon to be Bagged on Cadillac Escalade rims
kp60nick replied to kp60nick's topic in Other Projects
Old stan lee G did some photo shop for me to hopefully spark some inspiration. Safe to say I'm still looking for said inspiration.
-
Kp60nick's D21 kingcab Soon to be Bagged on Cadillac Escalade rims
kp60nick replied to kp60nick's topic in Other Projects
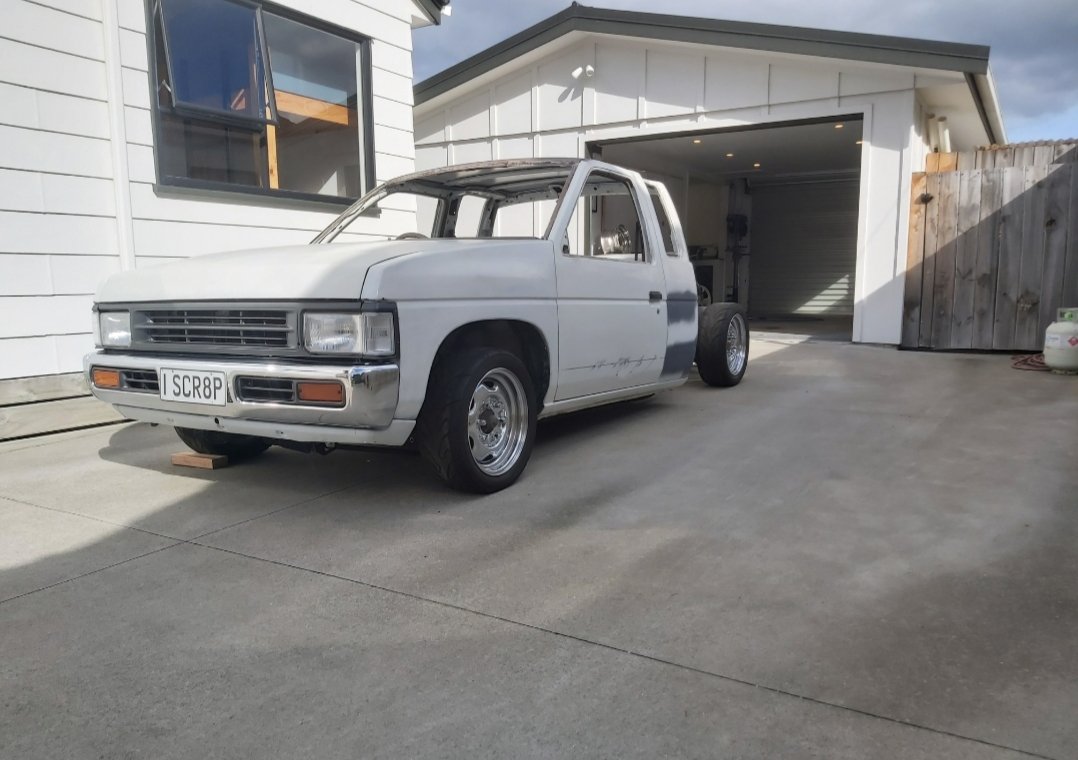
Super lacking any motivation on this at the moment. In the hope ignite the spark again I chucked the Cadillac rims on one side. Didnt get a picture but this is the proof.
-
Kp60nick's D21 kingcab Soon to be Bagged on Cadillac Escalade rims
kp60nick replied to kp60nick's topic in Other Projects
@Beaver I have plans on chopping this ones roof down to be level with cab. But if I see another one I will let you know.