kws
-
Posts
3702 -
Joined
-
Last visited
-
Days Won
3
Everything posted by kws
-
Ive used these guys to send me sheets of panel steel before https://www.dunedinsheetmetals.co.nz/ I had real trouble finding anyone locally that would sell half sheets, or deliver small quantities to residential addresses.
-
I didn't hate the old wheels, but wow the BBS completely change how the car looks. Looks excellent
-
Good point, it was about 10pm and outside lol
-
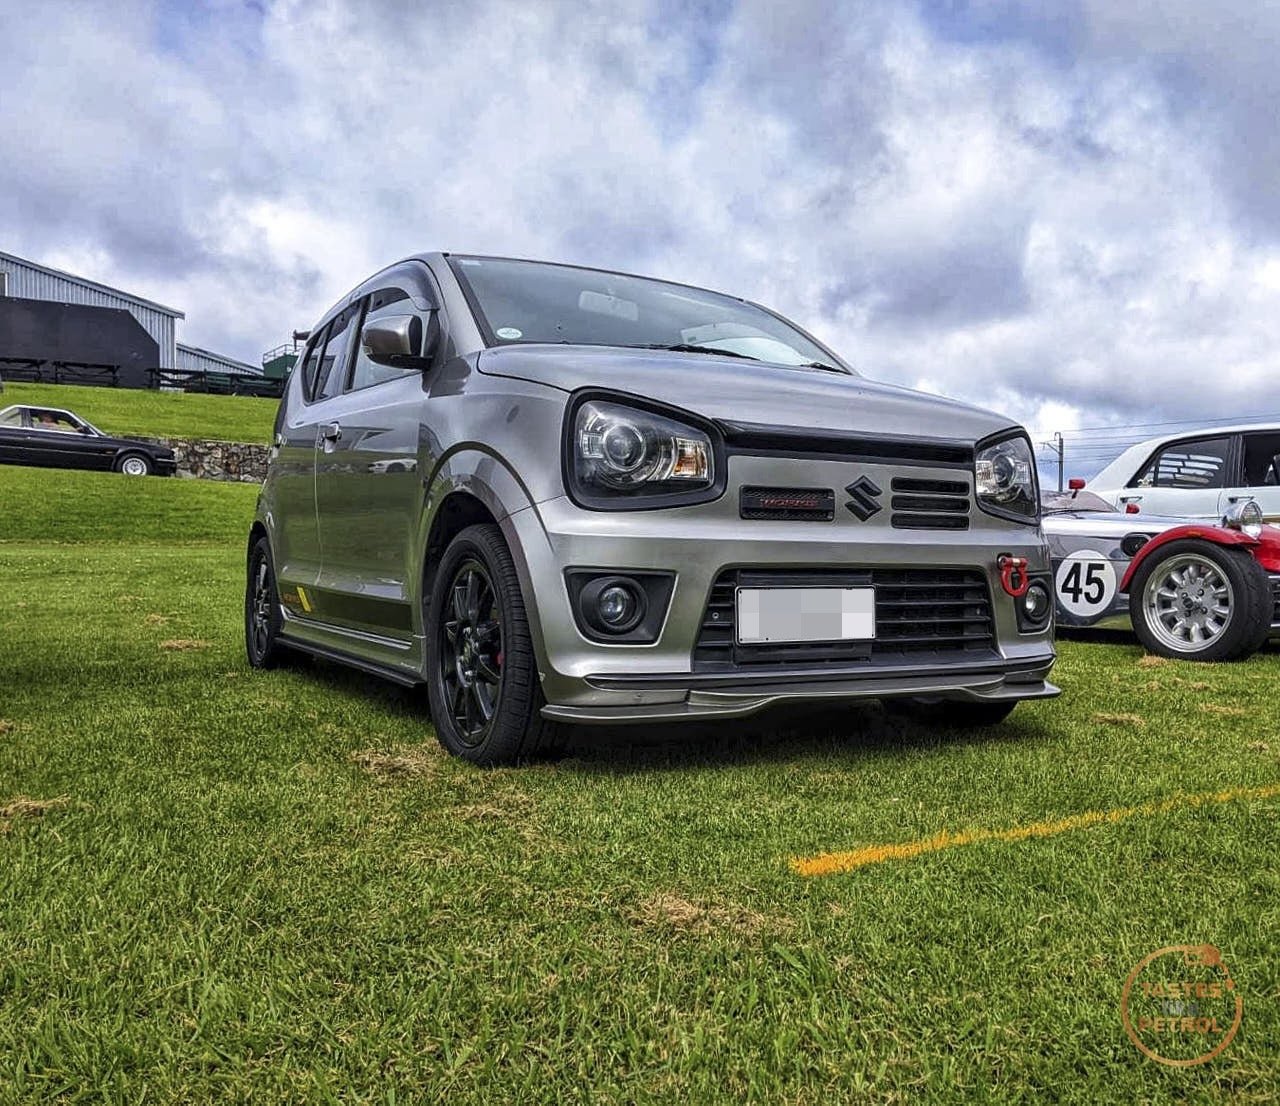
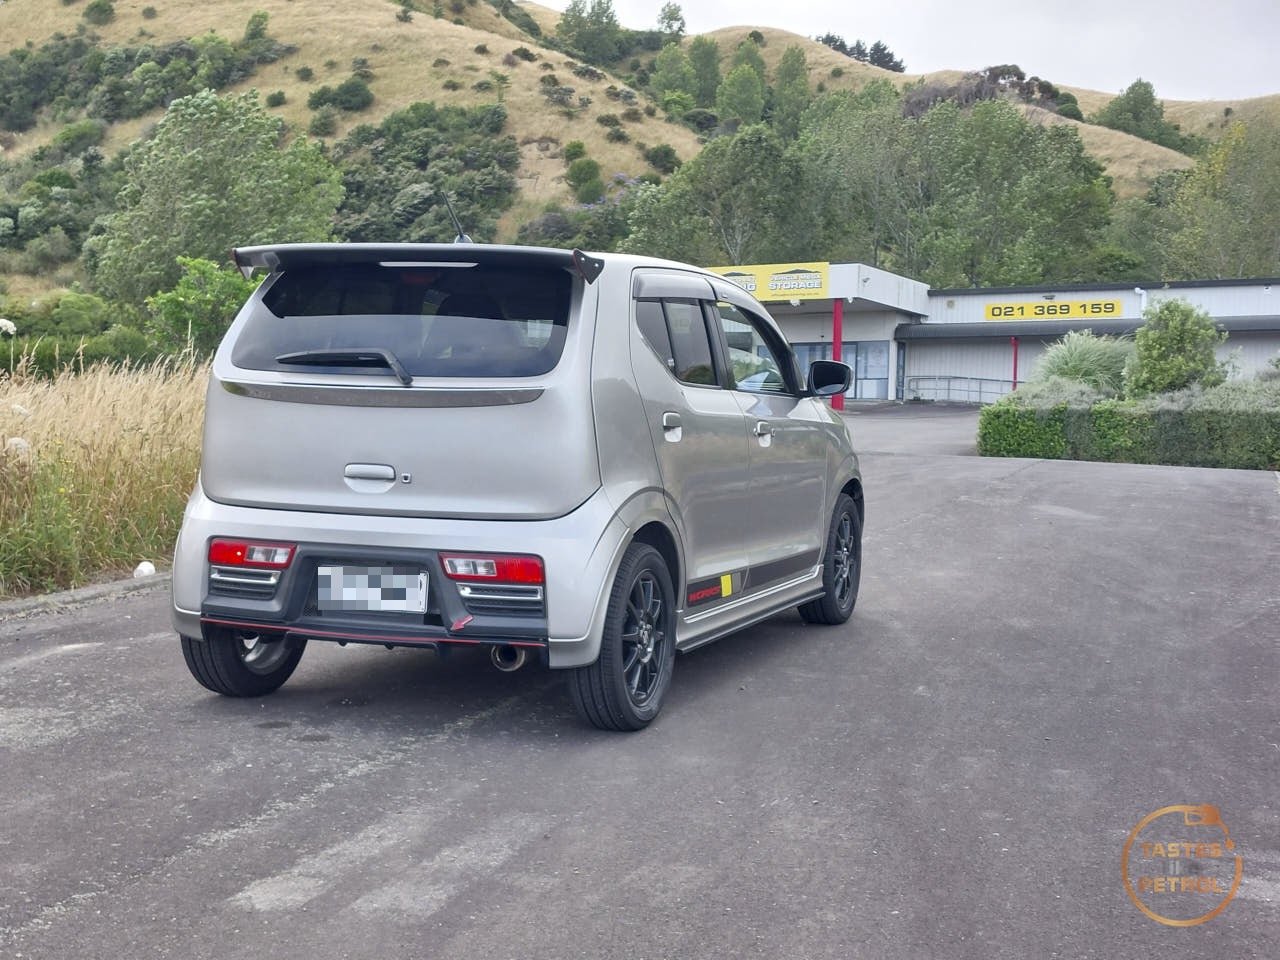
The final lot of parts from Yahoo Japan arrived the other day, so it was time to do some more work. But first, it was time to clean the little nugget up and take it for its first outing to Cars and Coffee up the coast. I stopped on the way to catch up with a friend who was also going to C&C, and my wife suggested we grab a couple of photos while we waited. It's such a cool wee car I didn't take many photos at C&C, but the Alto drew quite a bit of attention. Had a chat with a fellow Kei (AZ1) owner, and even a GR Yaris owner who was interested in importing a Works himself as a daily. Back home again, it was time to do a couple of quick upgrades The first was to finally fit a set of carpet mats to protect the expensive new carpet I had previously fitted. These aren't genuine mats, but the seller makes a strong point that they are "made in Japan" and of very high quality. I tend to agree, they are made very well and are a good fit, and at about half the price of genuine ones, it's a win in my books. They came with fitting hooks for both front mats to stop them from sliding. I don't know if it's just because my carpet is new, or if an Alto had never had mats fitted if the mounting holes for the hooks will be punched out or not, but in my case they weren't. I initially thought the mats would mount using the clips the carpet also uses to secure it on the drivers side under the seat, but it uses two other holes in the cross-member which are hidden under the carpet. In order to access the holes the factory has perforated a couple of little squares in the carpet where the holes are I carefully used a sharp knife to cut the bottom tab so I could lift the squares up and access the holes I'm really happy with the mats. They're very plush, and fit well. We're well on our way to luxury car now The drivers one fits nicely under the Monster Sport footrest The rear mats don't hook in place, but all the mats have a non-slip backing on them, and they're shaped well to stay in place Looks a lot nicer than the brown paper I had been using, and a lot more secure for track use next week The next upgrade I did was to replace the bulb in the high stop lamp in the tailgate with an LED board. I wanted to do this because I wanted a brighter light to catch attention better. The brake lights on the Alto are way down the bottom of the bumper and these days well below the level of visibility of cars on the road. If the high stop light is brighter, hopefully I'll have more chance of someone seeing it instead of rear-ending me. I bought this off Yahoo Japan, and looking at it, I believe it must be handmade. It's very nicely assembled and looks good. Through-hole components are also unseen these days, it's nice to see. To fit, first, you remove the cover over the lamp. This just sides away from the glass. This is how you would normally change the bulb. The bulb just untwists from the housing. Next, you remove the lamp housing from the tailgate, by removing the two bolts. Once removed, I used a thin flat blade screwdriver to carefully pry out the two tabs holding the lens into place. It was easiest to carefully pry between the black housing and the lens The board just slips into place It's a tight fit against the reflector and I believe it should be retained in place by the lens clips. If not, I'll need to remove the light and secure the board with some glue. You can just make out the grid of LEDs through the lens The wiring is in two parts. The first is the base of a bulb with two wires sticking out of it. This plugs into where the bulb would normally be. This then needs to plug into the two wires that are coming out of the back of the board. Because LEDs are polarised and can only flow electricity one way, it's best to plug it in and test it before fully assembling it, as like me, you might need to swap the two wires over for it to work Once I knew it worked, I carefully tucked the wiring in the housing and reinstalled the bulb holder I then reinstalled the lamp onto the tailgate It seems quite effective. It was very sunny outside, but hopefully it's more visible now. The last thing that arrived in this shipment was something I had been trying to buy for ages, but was loath to spend the price for a new one; a Genuine Suzuki workshop manual for the Alto. I had a saved search on Yahoo Auctions, so as soon as a NOS older version of the manual came up, and confirmed it still supported the turbo models (Works and RS) and was about half the price of a new one, I jumped on it. One of the main reasons I wanted this was to troubleshoot an issue I was having with my keyless entry buttons, which didn't work (Keyless start works, remote locking worked, but the buttons on the doors were all dead). I knew the basics, but need to know the system layout, trouble codes and wiring diagrams. Unfortunately as this disk is old, its support in modern systems is very limited. In the end, I had to build a virtual machine running Windows XP, so I could run OG Internet Explorer (doesn't run in Edge, Chrome, Firefox etc). I did get it running though Yes, it's all in Japanese, so Google Translate gets a real workout, but the information is all there. For my particular issue, I navigated to the correct location in the manual and ran through the troubleshooting guide. Most steps refer to Diagnostic Trouble Codes from the Body Control Manual, something I didn't have. I knew it would have a DTC though as the security light in the cluster was flashing on startup. I tried my OBD scanner, but that wouldn't talk to the BCM. I started looking into all manner of diagnostic tools to run the Suzuki diagnostic software, but in the end, I remembered that for my Swift I had previously had success with a piece of free software called SZ Viewer, which I even still had installed on my tablet. I fired it up, plugged my ELM327 v1.5 cable in and hit connect It connected to all modules and even alerted me to two DTCs in the BCM. Success! I'll look into B150A later, I think that is related to the AC system and isn't causing an issue currently (and isn't lighting a malfunction indicator lamp). B1106 was what I needed to see; there was an issue with the Passengers side antenna circuit. Before now, I didn't even know there was an antenna on the passengers side! Reading the workshop manual, suggested to locate and inspect the antenna. The system overview shows it on the B pillar behind the upper trim (22) Digging deeper, it gave specific details If what I found there didn't fix it, there were a few more steps to follow I pulled back the B pillar trim and found the wires running up the B pillar I gave them a wiggle and heard the distinctive sound of the plastic head of a plug rattling freely in the pillar That'll do it then, it's not even plugged in! A quick peek behind the upper trim shows the antenna in place, but the connector wasn't looking to flash Some jiggery pokery with a set of needlenose pliers allowed me to remove the antenna from the two clips holding it in place. This confirmed the part of the connector that should latch to the plug was completely missing. There is some "damage/modification" to the B pillar trim in the area, so suspect it got damaged during cage install and never fixed. That ain't nothing a ziptie can't fix though Once clipped back into place, I shut all the doors and pressed the button on the drivers door. "beep" *clunk* - All the doors locked and the mirrors folded in. I tested all the buttons and all worked perfectly. Very happy with that fix. I might have stumbled on that wire by accident at some point, but the manual and SZ Viewer were the real heroes here. Now that all the nice clean hands stuff was done, there were two jobs left for the day. I jacked the car up and put it on four stands. The first job under the car was to drain a small amount of gearbox oil, and add some Redline friction modifier to hopefully help the Cusco LSD be a bit more civilized when it's cold. At the moment it clunks, bangs, binds and sounds like the axles are in bits. I know this is normal to a degree, but it'd be nice if it was slightly lessened. I drained off some fluid, and using a syringe added a minimum recommended amount of additive, 30mls (or 1oz). I don't want to over dose the oil and risk the LSD slipping too much and not working. A quick drive (including some tight circles in a carpark) shows it might be a little better already, but I need to get the additive cycled around the box a bit, so tomorrow's drive to work will be interesting. Finally, I wanted to give all the brakes a quick flush. I know for compliance the pads were replaced with RDA Phantom Ceramic pads (the same I'm running in the Jazz), and the fluid looks clean, but I wasn't sure if they had also bled the rear brakes. A quick vac with the bleeder, and now I can have a bit more confidence knowing it's done. The old fluid wasn't worrying, so maybe it had been done. So for now, until a couple of other specific parts arrive from Japan through the local dealer, that's all I have for it. Next Monday will be the little nuggets first outing on the track, so I'm both excited and nervous about that. Hopefully, it all goes well, and I can beat some of the times I put down in the Jazz last year. We'll see.
-
Took the angry little nugget to Cars and Coffee today. Got heaps of attention. Love it when people pass me trying to work out what it is, since it's devoid of badges on the back.

- 51 replies
-
- 14
-

-
Good luck, mine nearly bankrupted me by the end. Great cars but let down by years of bad owners when they were "cheap" and now most are suffering. Was it the black one you bought?
-
Places like Total Body Shop can also make up a couple of litres of paint matched paint to go through a gun, instead of cans. Might be the better option for me too, I just wanted to be lazy but 20 odd cans to do a car might be a bit much
-
The rear window on my TVR was very cloudy, as can't see through it, cloudy. I just took it for a WOF with the top down and they never put it up to check.
-
Looks great for rattle cans. Dare i ask how many cans you needed? Any tips from what you have learnt? Love how the little thing looks. A+ taste in mods.
-
Today in this episode of "things that don't need to be internet-connected"...
-
More parts arrived, so with some time up my sleeve this weekend I got cracking on fitting them. There were some checks to do before getting into the "fun" stuff. I had noticed while driving the car to work last week that there was a knock from the front suspension, particularly when turning or going over a bump, so I wanted to spanner check the suspension and make sure everything was tight. I found out last time I needed to jack the car up that my jack didn't fit as the front lip was too low, so I ended up having to drive the car up on a pair of old brake rotors to get some extra clearance. I decided this time it's about time I finally forked out and bought some low-rise ramps to help jack my cars up. A quick trip to Repco got me these They only lift the car 65mm, but it's more than enough to be able to get my jack under and lift the car up onto stands. Way easier than using random bits of wood/junk from the garage. The only thing was that I had to hold a mirror out the window to spot myself, and make sure I didn't drive off the end (not that it would matter, unlike big service ramps, these wouldn't hit anything if you drove off them). Rolling around under the car, everything appeared tight, until I went to check the lower balljoint on the RH swaybar link and noticed it clicked. Looking further into it I could see the top balljoint moving in the shock, causing the clicking noise. It turns out the nut was finger tight, and this was because someone had rounded out the hex in the end used to stop it from turning, so it couldn't be done up tight with a spanner. I whipped the wheel off for more space, and hit it with the rattle gun to great success. Nice and tight, and no more clicking. It pays not to ignore noises. One mod I had been waiting to install was my new-to-me Trust Greddy intercooler. The standard intercooler is tiny But before I installed the new intercooler I wanted to check the intake temps and see how both intercoolers react. With my headunit running native Android I can run TorquePro on it. This allows me to read a bunch of different sensors from the engine, including coolant temp, intake temp and even the factory wideband O2 sensor. Ignore my reflection and ugly layout; the layout is just thrown together quickly to display the most important stuff I will need on the track at a glance. With the standard intercooler, running 14.7psi, and an ambient temp of about 18c, under sustained load, the intake temp would rise quickly and hit about 50c. This would slowly drop back once off boost again. Not great results. The Greddy intercooler is a beast. It includes a new, much bigger shroud on the top, which fits the standard intake hose. Removal of the old intercooler is quite simple. Four (unless you're missing one) clips secure the shroud, two on each side. The intake hose just pulls off the shroud. Remove two hose clamps, one at the front of the intercooler and one under the rear, and then two bolts on the front of the intercooler hold it to a bracket. With those removed, the intercooler pulls free. Side by side with the new intercooler, and it's a slight size difference And in thickness too The previous owner had modified the stock intercooler, with something that Google translates as "processing", which means removing the end tank and insert crushed bits of alloy tube between the core tubes to try and smooth air flow on the hot side of the intercooler It turns out some of these had come free in my intercooler and were sitting in the end tank Thankfully they appear to be accounted for and are on the inlet side of the intercooler, so couldn't really go anywhere The new intercooler just bolts straight into place I noticed when test-fitting the shroud that there was a large gap along the rear edge, where air could just freely escape instead of being forced through the intercooler. I decided to run a bead of non-setting butyl tape along the gap to seal it against the shroud The standard intake and carbon duct work nicely with the new shroud While in the area I also replaced the hose blank where the BOV used to go on the intake pipe, as this was showing signs of cracking and had been weeping breather fumes Now done in the engine bay I moved on to the interior. I had ordered brand new carpet from Japan which arrived the other day, so no time like the present to get it fitted. It arrived in a massive box, which barely fit in the back of the Alto. Thankfully, it weighed nothing. Barely a kilo. The first job was to clear the interior out. Remove the seats, the center console and the scuff plates. The seats come out easily enough. Four torx bolts on each. Slide them to the mid position on the rails, and (un?)recline them forward about 45 degrees. They will then easily fit out the front door openings. Remember to disconnect the connector under them first. I didn't need to remove the back of the rear seat, just the base squab. A sharp tug on each front edge will disengage the front tabs, and then there is a tab on the rear that goes over a hook on the back of the seat belt buckle bracket, you need to push the squab towards the rear of the car to disengage this (or as I did, fold the seat back down, reach under it and lift the tab off the hook by hand). The center console is a pain. The rear half is held in with two bolts into the floor, one under a cover at the rear, and one that is uncovered once the front half of the console is lifted up. The front half is held in place with a screw on each side and is clipped to the rear half. The catch here was that it would be easier to remove the front half completely. To do so you would need to remove the gear knob. Suzuki used a press-fit knob on these, which I couldn't get off. Instead, I undid the four screws that secure the gear boot to the center console, which let me remove the console without the knob or boot attached. There is also a section in front of the gear shifter that needs to be removed. This has one clip on the RH side, and then a quick sharp tug should disengage the clips holding it to the center stack on the dash. With those removed, I set about giving everything a real good clean. I vacuumed up all the excess dust and dirt from the panelbeaters, and then gave everything a quick wipe down with APC and a cloth. From factory, the Alto Works had an underlay under the carpet. I wanted to replicate this without having to buy the pieces from Japan. Thankfully I still had a large part of the roll of underlay from when I did the carpet on my TVR After some quick measuring and some cutting, I had four pieces to fit Some trimming is needed to get them around the seat mounts, but otherwise they just sit in the footwell. Just like factory. Both sides had the same treatment Next, I unboxed the carpet and carefully dumped it in a heap in the back of the car After MUCH faffing about fitting the Monstersport foot rest, and poking holes in my new and expensive carpet, I refit the console and suddenly it looked a bit more like a car again. Don't forget to pass the seat plugs through the carpet! It tucks nicely under all the side trims There were two clips under the drivers seat, one clip under the rear seat, and one screw on clips on the front corners of the carpet. When refitting the front scuff trims I decided to remove all the faux carbon wrap they had on them It may have looked nice when new but was looking a bit tatty and dated now Thankfully once removed it uncovered nice near perfect condition trims. Much nicer (look for it in the below photos). I gave all the seats a quick vacuum as they were all also quite dusty, and then refit them So how does that flash new carpet look? Much better. It's practically a luxury car now. I have a set of carpet mats on their way from Japan, but until they arrive, it is brown paper time. Don't want to get that new carpet dirty now! Driving the car to work today had a few results; Firstly, the suspension knock. Gone. It is one of those things that must have been worse than I noticed because the noise is very conspicuous in its absence now. Secondly, the intercooler. The bigger volume hasn't affected response, if anything, it feels like it spools a bit quicker, maybe less restriction? Temps have dropped. Doing the same sustained high boost pull with similar ambient temps results in a 5-10c decrease in max temp, but the drop when coming off boost was much quicker, it was dropping degrees a second, so it not only cooled the intake charge better but shed the excess heat much quicker. Hopefully that keeps the intake temps in check on the track. Lastly, the carpet. Road noise is significantly decreased, as is exhaust drone on the open road. The exhaust might be more bearable at 100kph now since the car isn't acting as a big echo chamber. The car feels more civilised in general. It's funny how just refitting carpet can make such a big difference in how much of a "car" it feels. A+ changes. Very happy with how the Alto is coming along. It's less a track monster, and more a weekend warrior now, but much nicer to live with.
- 51 replies
-
- 33
-
-

-
Not really needed, with the correct spindle the driver's side goes hard for what it is. Not that I intend to drive it in the rain much anyway
-
It's such a classic bodge though, lets give the drivers side the massive wiper curve so they can't see where they're going. My first Marina had that pattern. I think I'll be doing well under 100kph if it starts to rain, just so I don't die.... the wipers lifting off will be the last of my worries
-

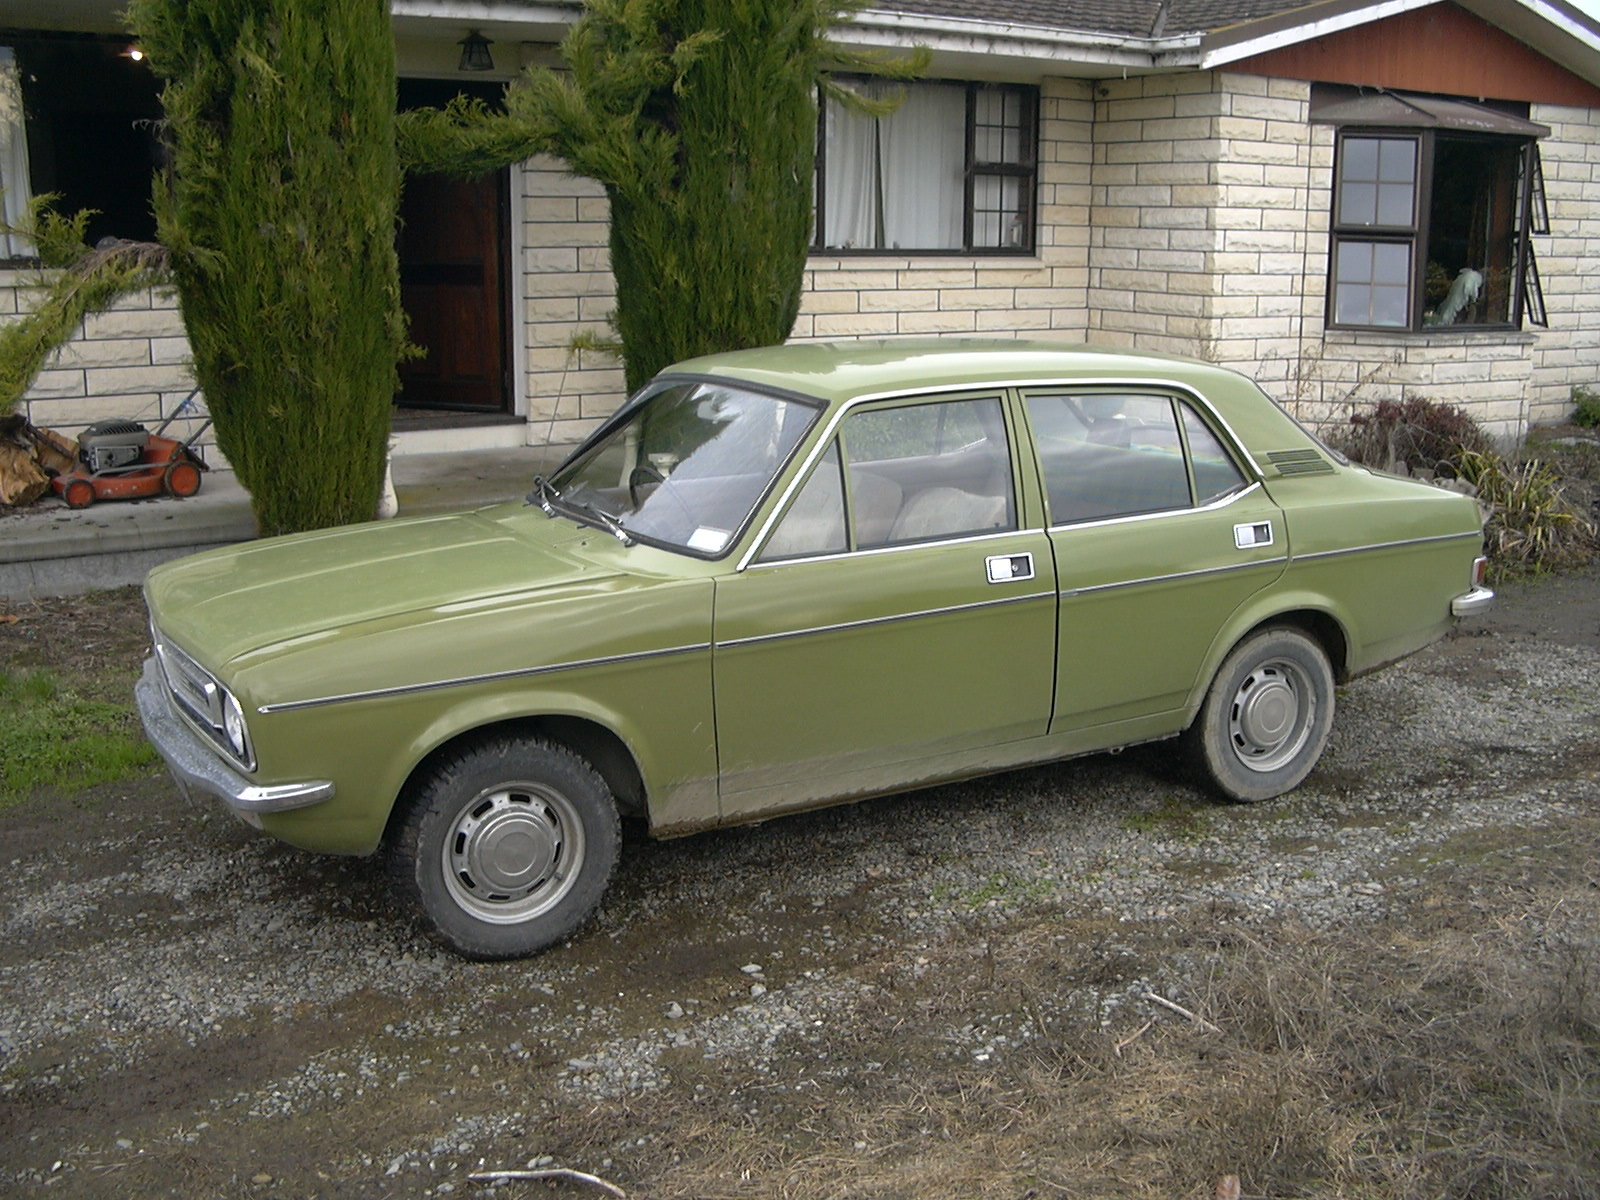
Going a full circle into a Marina again. KwS's 1973 Morris Marina Coupe.
kws replied to kws's topic in Projects and Build Ups
It was nearing the end of the holiday period, and a little Marina waited patiently for some attention. Now that the Alto was up and running again, I could focus some time on the Marina and check off another item on the pre-WOF list. One of the main things I needed to sort, that I had everything for, was to fix the wipers and washers. I removed the whole wiper system a couple of years ago because it was seized and didn't work. The motor didn't function, one of the wiper boxes was jammed solid and the washers didn't respond to the button. I started with the washer system. The Aus spec Marina uses a bespoke washer bottle with an integrated pump. I removed the bottle, removed the pump, and found it full of rust. Trash. There were a couple of options for a replacement pump, but in my eyes the easiest option was to convert the system to the UK spec bottle and remote pump. It's not as tidy, but easier to get parts for. I started by scrounging up a good used bottle and cap, some new hose, a new pump and a used mounting plate for the firewall as the bracket is different. The bracket is spot welded to the mounting plate, so I carefully drilled out the spot welds and removed the bracket. Here I had also prepped it for welding. I considered using rivnuts to mount the bracket, but it's flat on the back so has no space for the bolt heads once the bottle is fitted. The only option was to weld it to the original mounting plate (or paint the replacement one, drill out the rivets and swap the whole plates over). I marked it out and cleaned the paint off the weld points And gave it a quick tickle with the sparky glue. I also welded up the lower hole for the Aus spec bracket as this had been letting water in. A quick prime and a flick of paint and it didn't stick out so much A test fit with the new bottle I pulled out all the old perished washer hose and ran all new 4mm hose. Unfortunately during this one of the washer jets crumbled to bits. With the bottle and hoses in place, I just needed to adapt and install the pump. The connectors are slightly different, so I had to change the wiring to a pair of female spade terminals, but other than that it just plugged straight into the pump and worked. Dark green was positive, and it grounded through the switch. I drilled a couple of small holes and used a pair of new self-tappers to mount the pump. Also note the nice new hoses to and from the pump, including a one-way valve inside the bottle. A quick test with some water in the bottle and we finally had water outside the car, albeit in a stream, not a jet A quick trip to Supercheap resulted in a pair of generic twin jet washers, which I quickly set about fitting They looked ok and didn't stand out too much And they worked a treat. Ignore the spoiler regarding the wipers.... Next on the list was to sort the wipers. When I originally removed everything I had to remove one of the spindles with the rack as it was seized solid and you normally slide the cable through it to remove it. A bit of brute force got the cable out without damage. The wiper system is quite interesting really. Instead of linkages like cars have these days, it was operated by a motor pushing and pulling on a spiral wound cable through some steel tubes. This cable engaged teeth on the wheels in the spindles, which caused them to rotate back and forth, thus moving the wipers. It's quite simple, with not many places to go wrong. Except mine had. The motor was dead and one of the spindles was seized solid. I also discovered that one of the steel tubes had been bent to get around a bracket (which it should have passed though) which was causing huge resistance on the cable. I removed the motor which is done by removing the mounting screw and bracket, removing the wiring and then flipping the motor over. Unless you can/want to remove the whole cable with the motor, you need to disengage it from the motor. This is done by removing the circlip from the arm, remove the small washer and then the arm comes free. The cable is attached to this arm on a pin. A quick bench test showed that although dirty, the motor was working correctly. Even the park function worked. I removed and cleaned the park switch too. It's worn, but still functioning. I have a spare for the future, if needed. Everything got a thorough clean and then regreased. I started by grabbing a pair of good working wiper spindles and fitting them to the cowling panel. This wasn't a job I enjoyed, so there are no photos of it. It involves having to hold the spindle up under the dash with one hand, while pushing on the rubber seal, washer and screw on the nut with your other hand. Next was fitting all the steel tubes (including a replacement one between the spindles to replace the bent one) and attaching the gear covers, mostly with one hand due to space. Good fun. Once all that was in place I greased the cable up, attached it to the motor and threaded it into the tubes, watching as the spindles rotated as it went through. The motor was then refitted to the inner guard, and plugged in. A quick test showed everything worked correctly, so I installed the original wiper arms and blades. Note the correct side parking position, which was reversed on the later Marina for whatever reason. For the first time in a couple of years, the Marina had wipers. To celebrate, I poured some water on the windscreen (since the washers didn't have jets yet) and turned them on Hmm, something wasn't quite right. It wiped well (ignoring the ancient rubbers smearing the glass), the wipers had plenty of speed and parked perfectly, but the sweep was.... tiny. It barely cleared the drivers vision. I tried adjusting the position of the arm up the screen, but by the time I could get enough sweep on the glass, the arm was basically in the middle of my vision. At best I got this much wipe I ruminated on it for a bit and came to realisation that I had cocked up. Ages ago, knowing one of my spindles was seized, I bought a couple of second hand replacements. What I had ended up doing, was fitting UK spec spindles, to the AUS spec motor. This had created a mismatch in the gearing, meaning the wipers didn't move as far as they needed to. I confirmed this by checking my photos taken when I removed the spindles, as to which type were fitted originally The remedy? I needed to swap the drivers side spindle out for my one remaining good Aus spec spindle with the correct gearing. It means the passengers side doesn't wipe as far as it should, but the drivers side is the one that matters. Thankfully the drivers side is the easier one to get to. I removed the wiper arm, dismounted the motor and pulled the cable out enough that it disengaged the spindle. I then removed the back cover so I could remove the tubes from the spindle. It's obvious in this photo, compared to the one above, that the gear on the spindle is bigger and has a different design. Once removed I put them side by side and you can see the difference here. Aus spec on the left with the smaller gear. With the Aus spindle installed, how was it? MUCH better. It now cleared right up to the A pillar, from the arm being horizontal. The Triangle of Doom is horrific though, Hubnut would not be impressed. The ultimate solution would be to source another Aus spec spindle and replace the passengers side one too, but this will do for now. It will get me through a WOF inspection anyway, well, once the new blades arrive to replace these smeary old things. This is a good-weather car anyway. One last thing for the week was to sort out the source of jokes from my wife https://youtu.be/Zzyfcys1aLM?si=lo3PLbRUwQmSkoZ7 I had previously tested the wiring, so knew the issue was the headlight itself and being a sealed beam unit where the whole light is essentially the bulb (not a lens and reflector with the bulb in it) the only option was complete replacement. This one was an ancient GE unit (ignore the upside down photo...) I bought a pair of sweet NOS Hella H4 units a couple of years ago and have been waiting to fit them Date stamped 1996, about a year after this car was last on the road These are a lens and reflector unit with a replaceable H4 bulb They were a direct drop-in replacement. The Hella, on the right of this photo, has a slightly whiter shade My only real issue with them is they don't have the nice pronounced curve in the lens like the old lights (and other new replacements available) Old New I'll use them for now, but will look to replace them again in the future with curved lens units, which is a shame because the Hella ones are really nice quality and really expensive to buy new now. They don't quite look right though with the flat lens. They do light up really well though Since I have changed the ride height of the car and levelled it out some, I had to adjust the lights to bring them back to level. This is done with the adjustment screws on the light bowl. With the grille panel refitted. It somehow changed the face of the car not having curved lenses. It looks surprised. We're one step closer to a WOF and about three more things crossed off the list. The pre-WOF list is getting pretty small now. I need to reinstall the rear quarter glass, install some carpet, reinstall the seats, install the seatbelts, make a door card and have the exhaust rear section replaced and we should be good to give it a try.- 62 replies
-
- 27
-
-
Going a full circle into a Marina again. KwS's 1973 Morris Marina Coupe.
kws replied to kws's topic in Projects and Build Ups
Finally? -
Going a full circle into a Marina again. KwS's 1973 Morris Marina Coupe.
kws replied to kws's topic in Projects and Build Ups
Jeez -
Going a full circle into a Marina again. KwS's 1973 Morris Marina Coupe.
kws replied to kws's topic in Projects and Build Ups
Now? -
Going a full circle into a Marina again. KwS's 1973 Morris Marina Coupe.
kws replied to kws's topic in Projects and Build Ups
Cmon -
Going a full circle into a Marina again. KwS's 1973 Morris Marina Coupe.
kws replied to kws's topic in Projects and Build Ups
.... -
Going a full circle into a Marina again. KwS's 1973 Morris Marina Coupe.
kws replied to kws's topic in Projects and Build Ups
... -
Going a full circle into a Marina again. KwS's 1973 Morris Marina Coupe.
kws replied to kws's topic in Projects and Build Ups
Too many photos. Soz. -
Going a full circle into a Marina again. KwS's 1973 Morris Marina Coupe.
kws replied to kws's topic in Projects and Build Ups
Sadface -
Going a full circle into a Marina again. KwS's 1973 Morris Marina Coupe.
kws replied to kws's topic in Projects and Build Ups
Without a new page -
Going a full circle into a Marina again. KwS's 1973 Morris Marina Coupe.
kws replied to kws's topic in Projects and Build Ups
But still, here we are -
Going a full circle into a Marina again. KwS's 1973 Morris Marina Coupe.
kws replied to kws's topic in Projects and Build Ups
Took me ages to scroll down