
- Popular Post

advokit
-
Posts
94 -
Joined
-
Last visited
Posts posted by advokit
-
-
Thanks guys, years of working on it is coming to the finale. Car still needs some minor panel work and and new paint job in the future but for now I'm just going to drive it for a bit and enjoy some Touge.
-
 1
1
-
-
- Popular Post
- Popular Post
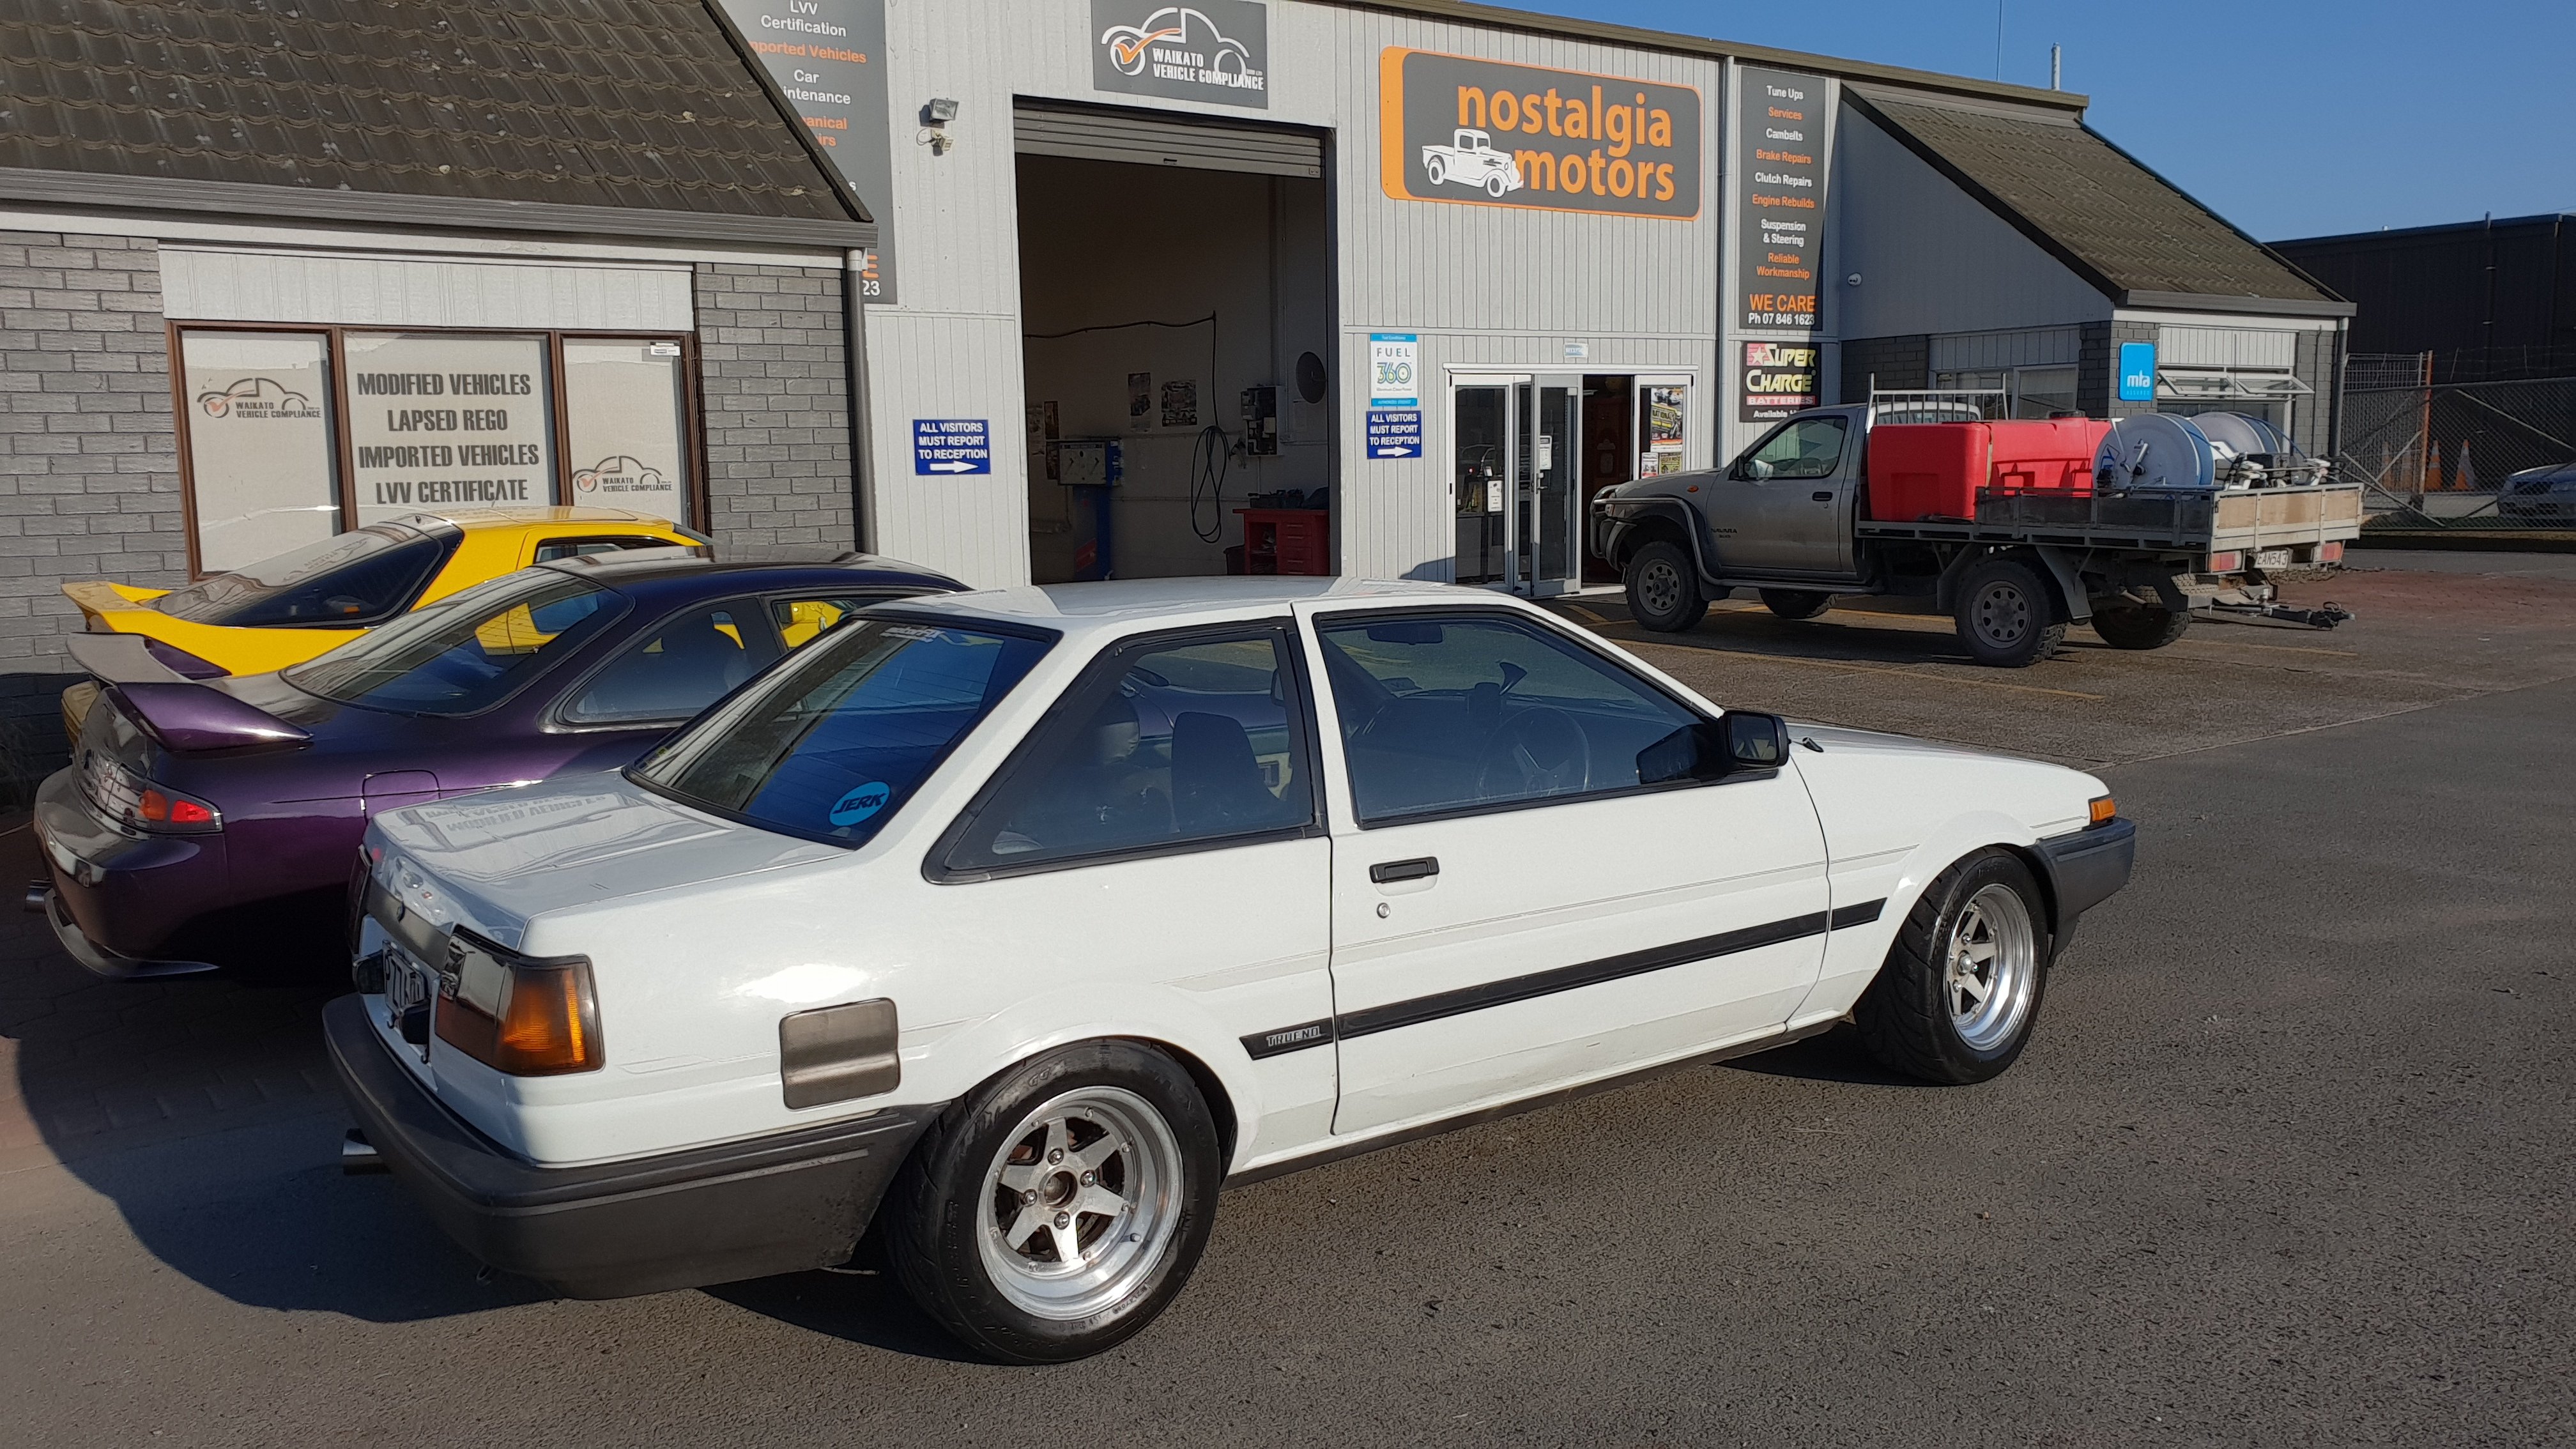
Friday update.
Dropped car off at certifier the day before Waitangi day. The car only got pulled up on the way the rear brake hoses were run. (I guessed it would fail on this). Everything else was sweet.
The certifier was so happy with the way it was done he brought forward the Compliance check which was done last Friday. Compliance guy had a slightly bigger list but nothing major.
- Align headlights
- RH wheel rubbing (center steering rack)
- Bride seat fouling on seatbelt stalk (there is some adjustment to clear this)
- Repair gouge on inside of LF wheel
So in short nothing major!
Seeing as I'm back in full swing at work I gave the guys at the cert place the go ahead to remedy everything but the wheel. I dropped this off to a trusted repairer yesterday and should get it back next week.
So depending on how long it takes for the cert plate to arrive the car should be all legal within the next couple of weeks, happy days!
Goal of making Toyotafest this year is looking good.

-
17
-
- Popular Post
- Popular Post
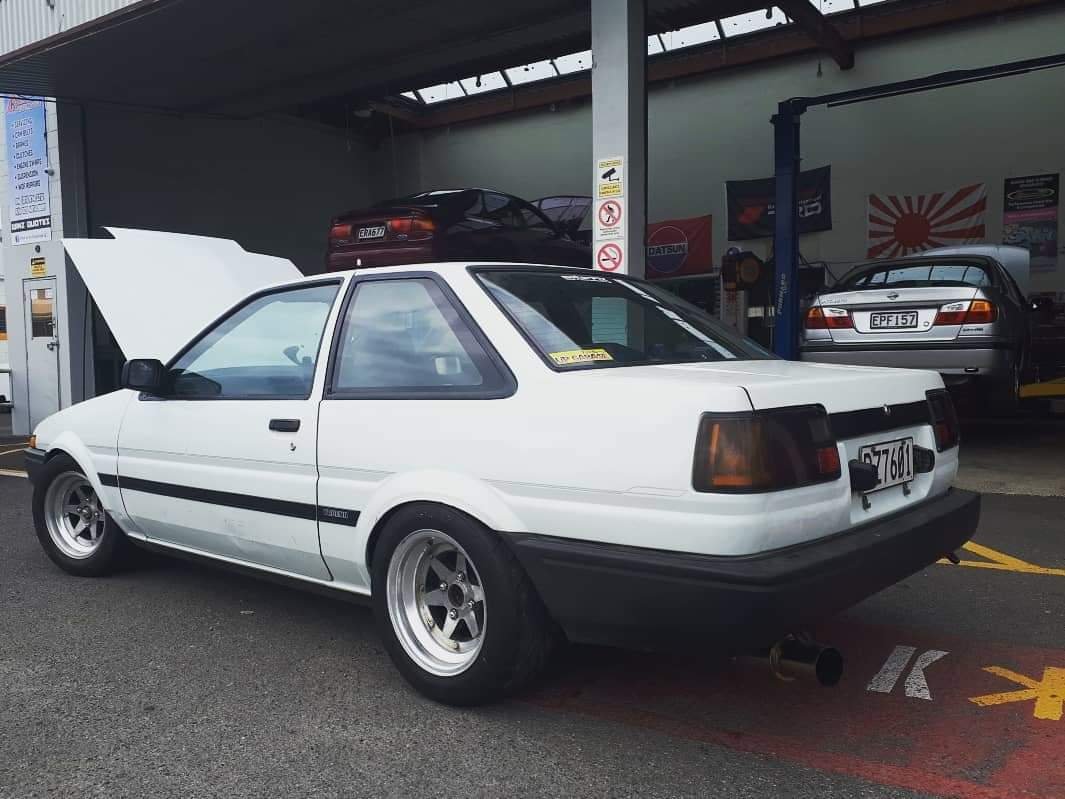
Long time no post. Been working away trying to get this thing legal, work and kids with a splash of house renno really make the time fly.
So as it currently stands everything is ticked off for Cert in 2 days. Got my cousin to assist with welding up the last rust holes in the doors and fixed up the hole in the exhaust.
Also fitted new seat belts for compliance purposes as the old ones didn't retract well and were god knows how old.
Finally took the car to K-Tech and got the rack ends all sorted out and a cert wheel alignment done. I had to raise it up about 10mm to accommodate the 205/55/14s which are the legal tyre on a 7.5inch wide rim.
I even pulled it out this afternoon and gave it a clean and polish so it looks tidy for the Cert man. Finger crossed that it doesn't come back with a 3 page list of things to fix!
-
10
-
More progress over the weekend. Car is pretty much sorted now for the Track day just need a wheel alignment now.
As for getting it legal I will leave most of that till after Taupo now.
Fitted up the larger of the AE86 accelerator pedals. Mine had the smaller plastic one which was useless for heel-toe action. Ive since painted it black.
Also finally received my replacement Speedo driven gear, I ended up buyng from Amayama as it was half the price from local Toyota dealer. The one I had was 33/10 (driven gears/drive gears) the replacement is 35/10. Slammed it in and now the Speedo is pretty much bang on.
Also made a last minute purchase of Cusco front and rear swaybars, we installed them over the weekend and man do they make a difference! I just need to find 20mm rear swaybar bushes in Prothane/Nolathane. The ones that came in my bush kit only go up to 16mm I think. Factory rubber ones will have to suffice for now.
Cant wait to give this thing a good thrash at Taupo now.
-
8
-
-
So long time no update. Have been chipping away at the minor things over the last year to get this thing closer to being road legal. Not too many things to go to get legal but have been working on getting it track ready for this Octobers Jerkfest track day.
Finally got the Bride Brix mounted up and sitting at an acceptable height.
Also picked up a TOM'S ECU - makes a fair amount of difference to mid range torque compared to factory ECU. Also removes speed cut and up rev limit to 8400rpm.
Found some new/old stock Pioneer parcel shelf speakers.
Got around to undersealing the whole bottom of the car and also made up some driveshaft loops. Also painted the gearbox crossmember and shortened the studs on the runner mount.
Also managed to do a few more bits like fitted rear the swaybar, bought some Direzza ZII Semis, fitted AE86 accelerator pedal. Did Cambelt,Water pump etc also.
As it sits currently:
So the list to get it legal currently stands at:
- NSDT cert for the front struts
- Fit new speedo pickup
- Fix rust spots in doors
- Replace seat belts
- Fix hole in rear muffler
- Align Headlights
- Do skids (oh wait, too late)
Im aiming to drive it to Leadfoot this year so I better get cracking!
-
9
-
-
Hey man, yes it's great it's finally going after all this time. I still have a lot of work to get it road legal but will work over summer on this and hopefully be able to attend some of the ae86 meets!
-
1
-
-
Here is some raw video taken in car (using my phone and a windscreen mount haha).
-
3
-
-
The day finally arrived. Up at 4am to pickup and tow the car down to Taupo. Pics below for your viewing pleasure.
Car went solidly all day, the gear ratios of the J160 is amazing on the track and the Cusco LSD certainly helps keep the car planted. I did really notice the lack of rear swaybar though (ran out of time to fit it) and of course my cheap chinese tyres, but it was still the most fun I have had in a long time!
So now I have a solid list of thing to work on before the next track day and also working towards getting it certed/road legal. Happy days.
-
4
-
-
So a crap load of hours went into this thing in the lead up to last weekend. I didnt document everything as it was full on trying get everything ready.
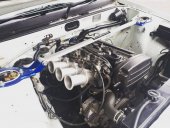
Finally got the trumpets tacked on to the flanges and tidied up engine bay as much as time would allow. Had to wrap the extractors as they are way too close to the starter motor and under bonnet temps were getting pretty high.
Turns out my Japan spec tyres on my rims were dodgy and one blew out during a spirited test drive. So Jordan lent me his Longchamps and I threw my tyres on. Great thing is I now know that 7" on the front and 7.5" on the back is pretty much perfect.
Took it for a wheel alignment and setup as per what I though would be the best spec for a track grip session. Its running -1 Camber, +3.5 Caster and .5 Toe out each side.
Thanks again to Jordan and Kelvin for helping me out getting it all ready!
-
Did a bit more work today tidying up wiring. Still more to do but its starting to look pretty sweet. The AE111 fuse/relay box looks pretty factory too.
Threw the door and guards back on and took it for another doort up the road. Badly needs a wheel alignment.
So a few finshing touches and it should be all good for Taupo. Will post some vidoes up of test drives soon.
-
4
-
-
What a week. Things have progressed quite quickly this week as we worked on the car most nights till midnight.
So it was a huge effort on the wiring front, AE111 relay/fuse box is mounted in the bay and everything plugged in as it should. Connected up DLI box to run the Coil on plug setup too. Thanks to Jordan for all his hard work here. Will post some pics when I have some decent lighting (ie: not midnight)
The extractors I had must have been modded for a Starlet or similar as output flange was fouling on floor. Thankfully I had Kelvin on hand to modify flange plus make exhaust go under diff and mount my Apexi muffler.
Mounted the Fuel pump and pre filter, bent up some lines and ran wiring for pump. Did some fuel system tests, had a couple of leaks but just needed some tightening up. Im using the original breather line as main feed and main feed as return. The original return line is too tiny so may use it as a breather and keep charcoal canister up front to retain that 80s spec look.
Fired it up and moved it outside under its own power!! almost 5 years of ownership and its finally running.
So we took it for a quick drive to test everything out. All I can say is Wow! it exceeds my expectations. Engine pulls nicely and 6 speed with 4.3 ratio keeps it on cam. Suspension feels great, tight but not harsh. Diff is super tight, can confirm it twin spins nicely. Also exhaust sounds pretty sweet, not too loud as I still want to hear the doorts from the bay. Brakes need some bedding in but pulls up really nice.
So a list of things to sort before track day:
- Fit doors
- Wrap all wiring
- Mount ECU and DLI box
- Sort clearance of extractors to starter motor
- Fit bonnet
- Fit trumpets and profit from all of the Doorts
Will post up some photos of wiring etc after I go out today.
-
1
-
-
Hey man, thanks for the feedback. Yeah it's progressing quite quickly now. Started it last night! Trying to get it going for track day next weekend but we will see. Def keen to link withere like minded 86 owners, watch this space. Should be posting up more progress over the weekend.
-
So... Long time no update. Have still been working away but have not had time to post up anything for a while.
Finally got the Cusco LSD head installed and setup, I requested a solid pinion spacer rather than a crush tube which will hopefully hold up strength wise. Its super tight!
Then pressed the bearings onto the Axles and fitted it all up. Lastly before it went into the car I had to sort Brakes.
I made the decision to sell my MA45 brakes and copy what they use on the N2 cars in japan, its using AE101 calipers and the handbrake cables clip straight up.
Also picked up a short shifter for those gearbox shattering quick shifts.
So last weekend we towed it out to my mates place to start the wiring mission. This is the first time I have laid eyes on it from a decent angle and it looks pretty sweet!
Wiring mission has commenced. Plan is to run the AE111 Engine loom and use the AE111 relay and fuse box so it all looks factory. Will post pics once its mounted.
So I have a small list of stuff to sort out before it can be started.
- Mount Fuel Pump
- Sort Fuel Hoses
- Find Radiator Hoses
- Tidy up exhaust
- Mount seats properly
All going well I should be able to start this thing by the end of this week.
-
8
-
-
Personally I would throw some SSR MK2s on and drop it a little but im partial to Japan styles. Nice build, enjoy driving it!
Just checked out the progress, I like very much! Nicely done RX3 and now with more Japanese flavour.
-
More progress! Picked up all required parts for the Diff rebuild, the only thing I didnt buy was the pinion crush tube as I will get a solid pinion spacer made up while the LSD gets swapped in and setup.
Axle bearings, seals and wheel studs.
Diff bearings and seal with new flange nut.
Next step for the rear end is to get the centre etc up to Steely Gears to be setup, in the meantime Ill press the bearings and studs onto the axles.
Also on a positive note, test fitted the MA45 front driveshaft and it appears that the length is pretty much bang on! I need to jack up the car and double check the distance it is engaging the rear output spline but it feels like its around an inch from the end. So happy days, I may not need to get a driveshaft shortened and I amy be able to piece a good one together from the bits I have on hand.
Tomorrow we start mapping out the wiring and measure up for gearbox crossmember - its looking positive that 2016 is going to be the year this thing is going.
-
3
-
-
So yesterday was a glorious day as I finally got the engine in the car!!
Step one was bolting up the Niteparts adapter plate, the starter, flywheel and clutch etc. I hope the starter doesnt fail as I would now have to remove the gearbox to replace it. (I did test it worked before fitting). Totally forgot to take a photo with the Exeedy clutch in place.
Gearbox meet motor.
Car assuming the position.
After a lot of screwing about we had to drop the crossmember to get it to clear with the J160 attached. Managed to snap off the hose that comes out of the heater core so I will now need to strip the dash out again to repair replace that but im not bothered because the engine is in! My 90mm trumpets clear the smaller booster with ease, I can definitely go to 100mm ones if I decide to splash out and get some billet ones at some stage.
I had to cut a bit more out to get the shifter in the correct position, its quite far back compared to the factory position - however I am pretty happy with where it sits as it lines up nicely with my wheel now that it has a hub spacer. I have to sit pretty far back to actually fit in the car (Im 6ft 4) so wheel and gearknob are in the perfect position for me. Ill have to mod the interior as it doesnt fit with the shifter in its new position, hopefully I can re-work it so it still looks factory-ish.
So just waiting for my end of year bonus to come through so I can purchase up all that is required to assemble the diff, Ill also need to make a gearbox crossmember. Hopefully all of the wiring can be completed over the Christmas break so that come January I can get a driveshaft made up and get it started up!
-
3
-
-
More progress.
So before the motor goes in there were a few things that needed to be sorted out. Firstly I needed to get the water piping completed as it would be a nightmare to do this once the motor was in. I mocked up and made the top outlet out of Aluminium then got it welded up by a good mate. Then Sinco put some nice swages on the ends and added the bung for the radiator fan sender.
Pieces of top outlet.
Ready to be welded.
The next step was to make some ITB filter screens, Jurbride make some but they are over $200 so that wasnt an option. So a $5 Sieve and some high temp rubber was acquired.
Completed filter screens.
Lastly I had to fit up the external thermostat and top outlet, I also made up a bottom outlet that comes out near wear the bottom outlet is on the radiator. Note I also had to move the ICV down to make way for the heater outlet on the SQ rear bypass plate.
Now we are ready to bolt it all together and throw it in the hole!
-
1
-
-
So not a super exciting update but still progress none the less. Modified the alternator bracket today so that the top water outlet can exit above the alternator. As always I ripped into it and forgot to take a before photo, basically took a semi circle out in the middle so a 32mm pipe will clear its way through.
After some cutting and grinding - then add paint and re-fit. Looks factory ish. Can see the water pipe flange sitting in place. Also spot Trumpets now have cap screws.
I dont currently have any alloy pipe, so I mocked up basically where it will go so I can get the correct length and bends. ill probably get someone local to cut//bend and add a swage to a piece of 32mm alloy and the weld it to the flange.
Things to do before motor goes in:
- Remove sump and re-seal windage tray
- Refit sump
- Fit flywheel, Clutch and Spigot Bearing
- Fit Gearbox
Not far now!
-
2
-
-
Hey thanks man, ill check and maybe use a longer bolt. I was thinking of grabbing the SQ engineering rear engine mount so if it looks dodgy I may just do that.
-
My laser cut parts arrived today!
So I pressed the trumpets into the flanges and they look great.
Then I bolted them up to the motor. I need some nice new stainless bolts for them now, once motor goes in I will confirm length works and then get them tacked on to flanges.
Lastly just need small length of alloy tube to weld to the top water pipe flange and that part is done.
-
3
-
-
Almost ready to fit flywheel, clutch and then gearbox. Spent some time today adding rear engine hook, modifying the 16v extractors and giving them a paint.
Clutch, flywheel and pressure plate with brand new pressure plate bolts.
Fitted the SQ engineering blanking plate to the what is now the rear of the engine, this used to be the top outlet that went to radiator.
Sealed and attached SQ engineering rear water bypass - also fitted the rear engine hook I pulled from the 3au before I sold it. Gives a bit more clearance, still not sure if the Dash temp sensor will fit.
Finally got around to cutting out the shifter hole to make way for the J160. Im still thinking I may need to go back another 10-15mm but will wait till we fit engine and box. Would rather not cut too much out.
Modified 16v extractors, Im still in two minds about running washers on the ends like that. I think I may get someone to weld some extensions on to the flange so it bolts on better and looks less dodgy.
Oh and Gearbox has been picked up from Brendan so its now all ready to bolt up, he also modified the 3SGE starter for me. Laser cut flange is being picked up tomorrow so all going well (and depending on engine crane availability) we could have an engine and box sitting in the car in the next week or so.
-
8
-
-
I too am following this build with anticipation. While I was in Japan I saw many TE27s and thought it would be awesome to own one at some stage.
On the topic of 7AGE - I have considered going this way myself and have done some research. Its not the cheapest solution as to get a decent amount of power upgrade from the build you will need cams/cam gears, new pistons, rods, crank balance, some tricky parts from MRP to stitch it together. You will also need an aftermarket ECU and tune. However from what I have seen its well worth it if you want to keep A series engine. Massive torque increase if done right (correct Cams are super important)
It would of course be far cheaper to throw a 3SGE beams in and get 200HP standard but depends what you want to achieve really.
I would however strongly suggest you consider ditching the T50 and go to J160 6 speed. Will cost you about the same dollars as buying and rebuilding a T50 but will be much stronger!
Good luck with the build.
Oh and check this if you want to see what a well built 7AGE can do
-
1
-
-
Soooooooo Jealous bro. Almost makes me want to sell my AE85 and land myself a Kenmeri haha.
I look forward to it being road legal so you can take me for a spin and pop my Hako cherry.
-
Some great progress over the last few weeks.
J160 Gearbox and my flywheel are now up with Brendon aka Niteparts getting the front part of the bellhousing machined off to fit the adapter plate. Brendon is also making the necessary mods to the 3SGE starter and machining my flywheel.
I finally have a clutch too, managed to score an exceptional deal on an Exeedy HD setup. Its also the Silver HD type not the Pink one which I am told is better being made in Japan.
For any one that is doing a W series or J160 conversion and using 20v or smallport flywheel ie: 212mm you can use a 7K Liteace Van clutch kit. It has the same dimensions as AE111 kit but uses larger spline. (No need to get custom made clutch).
Codes below (Exeedy Part Numbers)
TYC549 Cover plate (same as AE101/AE111)
TYD034U disc - 212mm OD, 140 ID, 29.8mm x 21 tooth.
BRG2155 bearing (w series setup- J160 needs Niteparts CNC adapter and supplied bearing)
Kit codes:
TYK-7146 OEM Clutch kit
TYK-7146HD HD Clutch Kit
Have also got ITBs flanges all made up in Cad (Thanks Jordan!) plus the top water outlet also.
Just need to get Trumpets welded on to flanges and some pipe on the water outlet and then bolt flywheel, clutch and gearbox to motor!!!!!! Then in the hole it goes.
Target is to have it wired and started before Christmas - fingers crossed.
-
2
-


Advokit's 1983 Toyota Trueno AE85
in Projects and Build Ups
Posted
So things didn't exactly go to plan with Cert.
Long story short, the rules have changed around suspension. To pass with the Cressida struts and custom knuckles the car would have to pass a bump steer swing check. After failing twice I made the call to switch back to Ae86 front struts and OEM knuckles. Pulled the trigger on some Wilwood front brakes too.
So finally after a couple of months of fluffing about the car is finally legal!
It looks like iforce hosting has died so I'll go back and update all my photos at some stage.
Anyway time to go smash some doorts to celebrate.