
Leaderboard


Popular Content
Showing content with the highest reputation on 22/07/26 in all areas
-
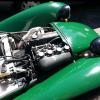
Wof fail, boo On the bright side, thats quite possibly the best ever brake balance result for this car! But fail on 4 simple things, some engine bay wiring was taking the piss on lack of restraint, exhaust hanger bolt loose, brake hardlines needing grommets where they pass through the body and front wheel alignment. All 4 were about 30min after work to sort out, wheel alignment was just with stringlines for now, I initially set it up as it came apart but was excessively toe in, that with the mud tyres made quite a noise on the wof station floor! I do need to machine up some shims in preparation for caster and camber, it can't be too far off as so far handles as I remember. On the list to fully assess, stay tuned as they say. With all that down a return to the testing station yielded that small sticker of dopamine Warm fuzzy feels, darn cool to have the old thing back on the road! No rest and straight to work, trailer of greenwaste to the dump and back via the hardware store, good laugh at the rally mudflaps, wasn't sure where to trim them so put them on straight out of the pack, with a bootload of supplies they were dragging a bit too much. Must trim before the first offroad trip... The cold weather is making starting a bit of a challenge, either need to sort out a choke linkage or wait a few weeks, a good chance here to prove the value of procrastination. Another current issue is a bit rough running at 50-60kph cruise, likely an air leak on the carbs so set up the CNC to cut out some new gaskets with a drag knike and will investigate when I next get some shed time.
 12 points
-
Haven't done fuck all on this thing for awhile, haven't needed to!! Apart from what turned out to be a lose fuel pipe it been pretty reliable. I did balance the carbs again, which made a huge difference as it would stall at the lights.
10 points
-
I pulled the rusty piece off to see what fun times lay beneath . Not toooo bad but there's a bit of work to do. I welded the first two pieces together then set about making the channel that the seal glues into. I've made pieces of this channel before but never this long and deff never in one piece. This is one thousand percent the most difficult piece I've ever made. It's a channel but more of a retarded V shape than a U shape and is curved in both directions and the curves tighten at the ends. It fits Perfectly. Fuck I'm so happy to get this right. I'm going to have a celobrateobeer and bask in the glory until tomorrow when I fuck it up.
9 points
-
Mmmmm sleepy time bubble bath 🫣4 points
-
Building the 1961 Datsun 310 Bluebird - Lower Rear Quarter - Parts Making. The small repairs to the lower rear quarter structures has escalated just a bit. And where does it stop? Should I just go ahead and repair the rest of the trunk/boot floor while I'm at it? Maybe. The parts in-work manufacturing progress...not done yet. Summertime travels, fun, and numerous other interruptions and obligations have slowed things down a bit. New metal in work on the left and rusted parts on the right. Lower left part is done, sanded, acid etched and treated with a zinc phosphate chemical film. Other parts still need a few finishing touches or more. How I made one of these things. This is the horizontal, far right hand side of trunk/boot pan that supports the dropdown panel. A couple of deep indents, made separate, then cut openings in panel and welded them in. I got a bit impatient with all the tack welding, went fast and crazy with stitch welding instead and warped the heck out of it. After much heating with a torch and beatings it was fixed. No pics of the embarrassing warpage! Have to slow down next time. A rusty pile of junk. I may still salvage the bit on the upper right as it has a only few craters that need drilling and plug welding.
4 points
-
I decided I couldn't be bothered, sold the gearbox, bellhousing, and car. I always liked my VG better so I kept that.3 points
-
Hung that boy in the hole and spent some time tweaking the position. Its fairly straight and flat and hangs free, and can move 10 or 20mm in each direction before it hits things. That's without any massaging of sheetmetal so very pleasing. I started to look at the mounts, these all seem pretty doable. I may just see if I can tweak the existing headers and give them a bit more angle rather than remake them... They already clear pretty well but another 20 or 30mm would be primo.
3 points
-
Played around with this a wee bit. Chucked some wheels on that I had to see what fitment would be like. Somehow they fit well, slight rubbing on the springs at the front, but got a second hand 195/50/R15 chucked on one to replace the semislick 215/50/R15 that was on it (came off a KP racecar), and they clear. Have about a 30mm stickout that will need a flare, but not a major. Bit of a difference in width haha Got some roofracks, chopped 300mm off em and mounted a wee 1500 wide awning I had on it, had a previous life over the rear door of my 80 Series Landcruiser. Sorry about the terrible glary photo. Moved on to doing something that is actually required for legal driving, the wipers not working properly, drivers side one in particular. Pulled the dash for access, plus to clean up the wiring and clean up in general. Lucky its an hour job on one of these, probably half that if I had to do it again. Cleaned this and pulled the heater box out too since the photo as I need to replace the blower motor resistor and replace the foam on the joins. (Have no idea where I can source one of these, wish me luck? Haha) Found the problem with the wiper, the bit around the wiper shaft should be square and is captive inside the back side of the wiper panel, but the casting said no. Shouldn't be a major, will get a piece of ally flat bar and remake that square piece, then have someone tig it on for me because my tig is DC only. The bushes on the wiper arm are also cooked. Luckily for me the wonderful @ThePog has offered to help me in attempting to model and 3d print replacements for these. That and a small bit of rust in the rear left wheel well (seen above, hopefully only one skin so shouldn't be too bad) were apparently the only two things that it got picked up on the previous warrant check, so figured I would address them first before taking it in myself. I'm sure it will have plenty more though when I do take it in. Have some sound deadener on the way to make it a bit less tinny to be in, so that will go up behind the dash while it is out and in the doors once the stereo goes in, think that may be turning up on my birthday in August from my better half (she wants to be sneaky but doesn't know much about stereos so has had to ask some questions haha) Sat one of the Recaros in (temporarily stolen from the Datsun, they do need a very good clean) to see if it fits. Looks like it should bolt up with some adapters made from 50x5 flat bar to make it bolt through the factory mount holes and then bolt in to the seats. May need to be out for WOFs until it gets a cert in future, but the seatbelts and buckles are all seperate so I'm not too worried. That's where I'm at, will try and get it for a WOF check this month, but I am not overly concerned on the timeline of this one, it's fun to work on for the moment but the offroad camper trailer should really be the priority at the moment.3 points
-
This years plan: -Attendance -Exhaust not sound shit -Hoosiers -flat shifting and launch control setup -10k rpm -Send it (possibly to Valhalla)2 points
-
And damn right i printed off the page from customs nz stating i have no duty to pay for the invoiced amount. Actually i added 15% to the amount to allow for error, and it still said clear $0 fees. So bonus.2 points
-
Fair enough. Was gonna say if you needed it stored i have grass behind the shed that could use a frostcover lol2 points
-
I have a 4HP22 automatic. I did not know this was remotely feasible. I'm thinking it wouldn't make a manual conversion without a donor car much easier though. I grabbed an ECU from a 3.6 XJ40, and it worked in my XJ-S. I doubt that the XJ40 just happened to be a Japanese import. I've seen stuff online about hotting up a 3.6 AJ6: People use an 'Andy bracket' to reposition the crank angle sensor for more ignition advance on the stock ECU. You can fit the larger airflow meter and throttle body from a 4.0 car. A resistor is inserted so the stock ECU sees the same reading from the 4.0 AFM as it got from the 3.6 AFM, though the value of this resistor is proprietary information. They make extractors for the AJ6 overseas, but they'd be very expensive by the time they landed here.2 points
-
2 points
-
Why did my brain jump to a series of vrod engines, linked to a single twist grip on side of the bath, so when you want hot water you do some full throttle chorus nangs2 points
-
run the water through an engine lovely warm water plus the soothing sounds of internal combustion2 points
-
You're allowed again. It'll annoy a few people and that's OK with me.2 points
-
day 6 on the big valve head. Still a bunch of material to come out of the port entry. But everything works out a lot nicer starting with smallport head, even though this one has been pretty aggressively ported. Material needs to come out of the top where new port meets the head, which is just part of changing in to "high port" rest of it all lines up pretty close with nice even ports and spacing, unlike bigport head. Just a little zing here and there with die grinder will sort it
2 points
-
I kindof needed to know before getting too carried away.. Its kindof tight because of the exhaust, looks like I will need to remake it or mod it a bit tighter to the block. But in essence, yes.
2 points
-
What about the T5's? I say that because there seem to be a billion of them and they all come with yokes, clutch, tailshafts due to everybody having dreams of converting their VP commy and then realising it's a VP commy.1 point
-
FYI, throttling a centrifugal pump reduces the load on the motor. I use this technique to get away with running a 10kw motor on a cable thats only good for 6kw...1 point
-
An r154 is a pretty big gearbox You won't break a w58 with a aj6 in a road car You'd be pretty safe putting 350hp through one before it has issues1 point
-
So yeah...... got bored did a turbo conversion. Intercooler powder coating looked like a urinal after a year in weather so got the dulux recon. Added 2 additional oil pressure gauges in engine bay oil main pressure and turbo reguator pressure so i can keep an eye on the filters in turbo feed (2 filters) good to see im back to having 40psi at idle for some reason it dropped Naturally Aspirated to mid 20s. Took about 2 hours all up to refit everything bumper off etc find all associated bits bolt on then nip up leaks. Had a few AN line leaks they just needed reseating and seemed happy. Has a base map in it at moment only 8 degrees of timing as boost ramps in by 2500rpm rising to 12 degrees at about 4500rpm than just rides out 12 to 6000rpm rev limit. Definitely some room to make that more punchy but a conservative start is good it still boogies! Even on 8psi. Cautious about using the high stall from stationary yet but she lights off the turbo instantly if you stab it transient response is great.
1 point
-
Ordered the panel pieces out of aus, lets see how bent the arrive... Rear inner and outer lower quarter panels, new taillight panel, and a 60cm section of preformed A pillar skin to hopefully do both sides.1 point
-
Started work on the lower bracket for the pivot points. This piece will follow the curve of the front sheet metal and be mounted where the front pan and fenders bolt together. using a 25 x50 x 2mm bar with drilled and filled holes.
1 point
-
Haha that will do it. I'm probably going to modify the one from the 4hp22 automatic to fit a Toyota box in mine tbh. Did a similar adapter job from a Discovery v8 automatic bell housing to a t5. Did you decide about ecu/ running the engine or still looking at going carbs?1 point
-
My winning personality and a rare non offensive cash offer scored them. I believe the seller had a couple of gearboxes but with flywheels probably outlasting most of us here and bellhousings able to be separated from the actual gearbag, he was cool. Leaning towards an R154 presently. Chatted to a guy online who raced an XJS and lunched three w58 gearboxes under load in third.1 point
-
Surely a 150000km 1kz, then the water gets heated directly by the combustion gases rather than by convection through the metal. Significantly more efficient.1 point
-
Ned and I will be there if I am allowed again, not sure if Ned will race but it's not like you need two of us whispering up the quarter.1 point
-
4&rotary Nats at Hampton downs. Ute got an absolute hiding and took away a trophy. overall the event was a bit meh. they’ve definitely lost the flair it used to have. have Te Poi next weekend, then it may or may not be getting some more work done to it. Not sure yet
1 point
-
I went to the model trains place today, and it was ace. I got yarning to a friend (ex yank) who's a member of the society, and I got started trying to con him into building a 'Turbin' powered loco. He's not stupid: it is of course a terrible idea. No one wants a train that melts bridge decks anymore: https://en.wikipedia.org/wiki/Union_Pacific_GTELs ... and you'd need to find some unobtanium RC turboprop engine to pull the power electricity off the shaft. like these: https://pacificrcjets.com/collections/kingtech-turbines/products/kingtech-k-30tpg4 but he wants to find one of the tiny kubota engines, and build the clubs first actual diesel electric. Anyway, I got to looking at tiny gas turbine engines, (like car turbocharger ones), and of course, everyone's doing it wrong (😁). Radial compressor and turbine makes good sense for small units below 10-20kW, but -hobbyists don't tend to put in heat recuperators (25-40 thermal efficiency gains), and interestingly, china can help here from just $116 https://www.aliexpress.com/item/1005006746007538.html But as I pondered state of the art, i remembered some amazing microwave lenses a dude was working on, using 3d metal printing: https://www.youtube.com/watch?v=3YMRfw0uWlw and I realised, of course! 3d print heat exchangers! Sure enough, someone had thought of it before, so: https://hackaday.com/2022/10/31/3d-printed-heat-exchanger-uses-gyroid-infill-for-cooling/ The other problem is, that people line up the input shaft with the output shaft for easy coupling: so then the (very high speed) airflow has to bend all over the show, and the ratio of in/out RPM is fixed, so the efficiency goes to shit. Piece of cake nowadays to put a modern BLDC motor / generator on each of those shafts, to line up the airflow nice and straight, and allow tuning the ratios for max eff use 3d printed heat-exchanger / recuperator with nice thin walls for efficiency (per kg cheaper), and bang a 2nd turbine after the 1st, to scoop up more of that sweet enthalpy so, turning the turbine blowtorch into part blowtorch, partly more useful turbo generator engine, for your track bogie DC motor needs. and noise. I'm H4nd and that's my story, and I regret to admit that the law considers me an adult.
1 point
-
I have been daily driving this now for the past couple of weeks, because, why not 🤷🏻♂️ I’ve loved every minute of it. It’s beautiful to cruise in, just feels good to drive. Being out in the elements a bit is seeming quite hard on the patina, and it was all getting quite active and tea staining all over the place. So this afternoon I washed it, wire wooled it and then washed it again. That tidied up most of the tea staining and got rid of all the orange rust. Next I went over the car with turtle wax, not so much to try and make it shiny, but more to try and get some kind of moisture barrier over the little exposed edge pieces down the side of the car. Lastly, I put a layer of penetrol across the hood and front guards. Tomorrow I’ll add another coat of penetrol and wax on the bits I think needs it. It looks much nicer than it did yesterday 👌🏼
1 point
-
The polishing is coming up good
1 point
-
Primer on and safe and dry
1 point
-
Outstanding blasting service West Auckland - old school hotrod guys and Kyle is a legend. This came up mint and I laid primer down asap. headers will get the pacemaker blue high temp paint. The remainder of the exhaust will be painted black. I’d imagine I will need the end section to extend the exhaust to the rear of the car. Those are $340 for a pre bent pair.
1 point
-
Started Bending metal. It takes a while when you haven't been doing it for a while to get back into it but I'm starting to get the hang of it. Still a million hours to go yet but this is a good start.
1 point
-
I need to find a 1kz and have a look under one. Ironically I have got the Jag humming quite well so the starter carb finally fixed itself although it is running off a boat tote tank. I should prob start a thread on it.
1 point
-
Copper coating blocks the case hardening /carburizing. The pivot/bores are under size. When you heat treat and case harden they go a bit oval. So they need to be reamed to size, but if they were case hardened that would basically be impossible. With a reamer anyway. Theres probably other reasons for it but that’s my understanding. It’s all new to me too.1 point
-
Most Of my te Kamo cars have a wof you’ll find, is it a legit wof? Well I’ll let you be the judge of that1 point
-
Imagine if OS Drag Day opened itself up to no reg no wof cars. You'd have half of Te Kamo bringing their clunkers down.1 point
-
FG Barra has a factory rear sump. FYI.1 point
-
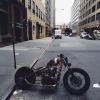
With a bit more tidying up of the wiring, I mounted up the modern motorcycle company headlight and Speedo that came with the bike. I found an old motorcycle guard I had laying around and trimmed that down, drilled and tapped the fork brace for Acouple of mounting hole bought a polished aluminium guard off aliexpress for the rear which was actually good quality, welded acouple of tabs on and mounted that up. went and took acouple of beauty shots of it.
1 point
-
Building the 1961 Datsun 310 Bluebird - Inner Lower Rear Quarter Structure (trunk drop down). Moved over to the left side as it was deemed slightly more useable for pattern making. Cut the outer skin away exposing the rotten metal. Decided to deconstruct it a bit further by removing, as an assembly, the upper bit also. Extracted assembly. What a huge hole I've created! The seriously thick undercoat, where it could be applied anyhow, worked very well on the bare metal. Laden with asbestos? These are the nut plates for the jack holder bracket. Not seized and easily removed. Top side. Drilled and separated the welds. Top bit on left is salvageable as is, just needs clean up and paint. This is what I'm after for pattern work. Btw, I made extensive use of a hand held pneumatic hammer to chisel several spot welds that could not be located and drilled. It resulted in some injury to my hand and I had to ease off the project for a few weeks. Pattern making via tape method again. Built some blanks and got to work. I've left a small excess around the perimeter in case it's needed, otherwise will be cut off. There will be those twin indents created via cut, hand form and weld on the bottom flanges for drainage, it's just not shown on the blanks. Male and female die making using 3/16 inch plate steel, tripled the thickness on the male die, angle grinder and files. Ran several test stampings before applying to the actual blanks. Some shearing occurred but was remedied with a bit more gentle radius on the die edges. The tests demonstrated a huge amount of inward metal draw that has to be countered by extensive tack welding the female die to the blank, then press it via hydraulic ram and cut the tacks. Getting it done! The three long depressions are done on both blanks. I'll have to modify the dies to make the short ones on the end. The tack weld residue is ugly for now but cleans up nicely with a bit of disk grinding and sanding. The edge flanges will be developed later on by applying the bead roller and a tipping die. Anyhow, a lot of time has been invested in these drop downs. A lot of detail tool and other work for a part that is generally never visible. Meanwhile, I continue to take pleasure in driving this ancient Datsun Bluebird 1200 around my neighborhood every other day or so and have racked up about 700 miles since March of 2025. It performs really good with no issues, always completing each 4.5 mile loop. I did have to throw some foam and blankets over the "temporary openings" to muffle the exhaust noise and CO exposure. Plus, I fixed the radio by replacing the internal speaker to further mask the noise signature.
1 point
-
Building the 1961 Datsun 310 Bluebird - Lower Rear Quarter Panel Rust. More metal work is underway to repair both rusty lower rear quarter panels. After scraping off some very old fiberglass and filler repair. This is the worst side. Other side similar. I also expect to find damage to the trunk drop down panel sandwiched behind here once this is cut out. The patch panels will be made slightly oversize up to the body line to use as a datum of sorts and then trimmed just below that for some rigidity at the future weld line. Making a masking tape pattern from the other slightly less damaged side. The repair area is not flat but is just slightly crowned in the vertical and twists and wraps around the trailing edge, thus the tape method. Then peeling it off for my pattern. Trimmed it and laid the pattern on the 20G sheet metal for tracing an outline. Now getting ready to cut the metal blank after adding a bit for the flanges. I used a combination of tin snips and handheld reciprocating shear to trim out the blank. I cut out another duplicate blank for the other side as well. I ran this through an english wheel to impart a very slight vertical crown with a bit more curvature bias toward the aft end. Then, using the bead roller and tipping die, ran the flange lines to begin the flange development. Then used a shrinker tool on the flanges to form the overall wraparound toward the aft end. The sharp corner was "shrunk" using a needle nose locking pliers to twist the metal a bit. Shown here at the stage with only partially bent flanges. So the patch panel is now in fitting and fine tuning stage. On and off dozens of times, tweaking the shape every which way to get it nice and flush before cutting the old metal away. Getting there, but tedious. It might take a while to complete, and then I still haven't seen the inner panel damage. One side at a time and I'll get it done.
1 point
-
Semi pointless update. I did score these for a reasonable price. 6.5inch 3way JBLs. Asian dude selling several pairs for dollar reserves on TM, look brand new, he had the boxes etc but was selling the grills separately, which I didn't want anyway. I'll 3D print a trim to cover the screws. Plan to make proper front pods like this. Also, this Bluetooth unit sucks! Will have to replace it with something better.
1 point
-
Drove this thing to work today. Unhooked the el-cheapo blueteeth module, test the amp with a rca plug, fine, reconnected the module and it works fine. It does get random electrical interference, the old turn off and turn it back on gets rid of it. Took the gas tank out the other night and turned the tie rod half a turn, tracks much straightnesser. It's running real nice now, once she's all warmed up it just hummms.
1 point
-
After a month in the shed it needed a good wash, also gave all the windows a good clean which really tidy it up. Next thing is the Bluetooth amp has fucked out and I need to sort the long tie rod, I think it's gotten bent hitting the bottom of the gas tank, low life problems.
1 point





































This leaderboard is set to Auckland/GMT+13:00