
Leaderboard


Popular Content
Showing content with the highest reputation on 06/30/22 in all areas
-
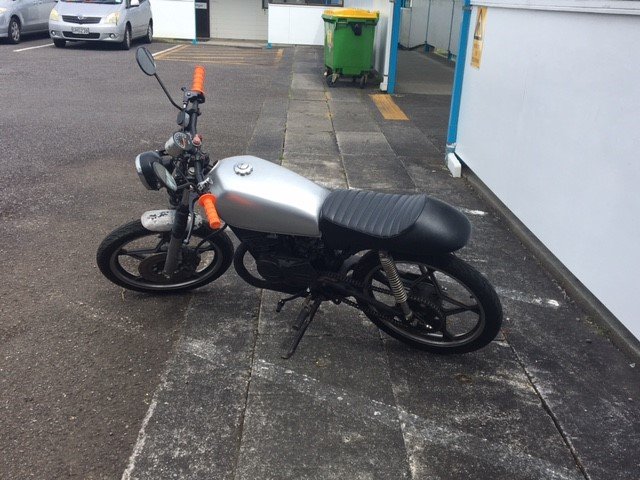
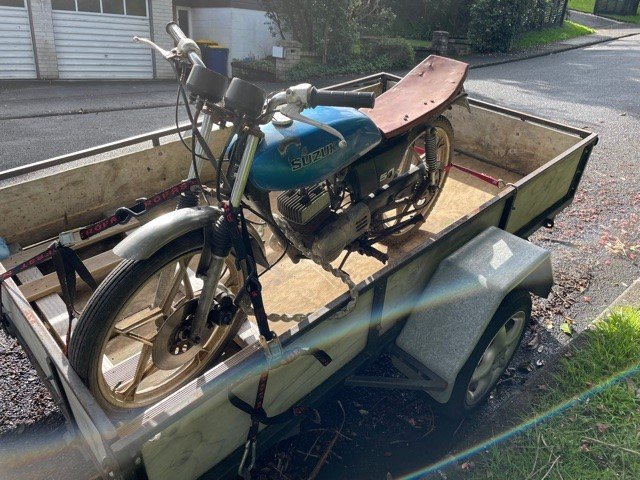
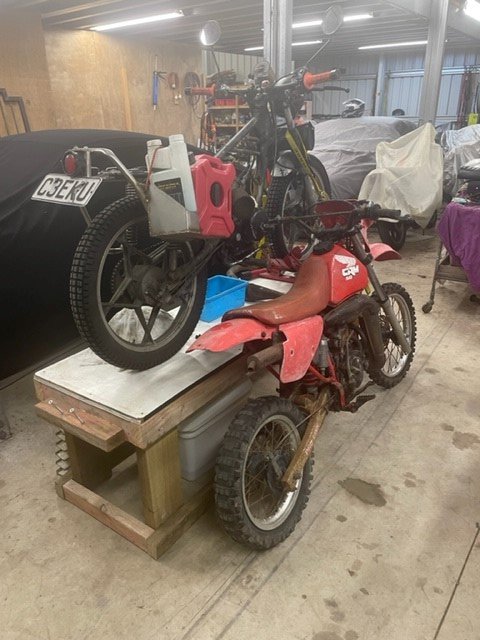
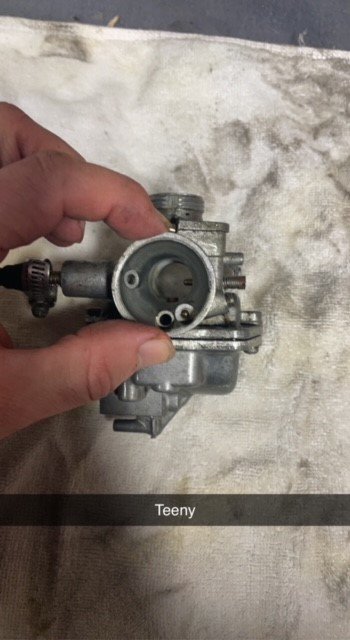
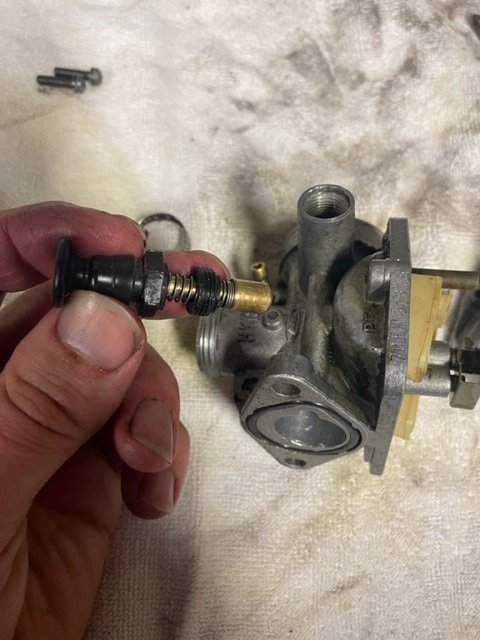
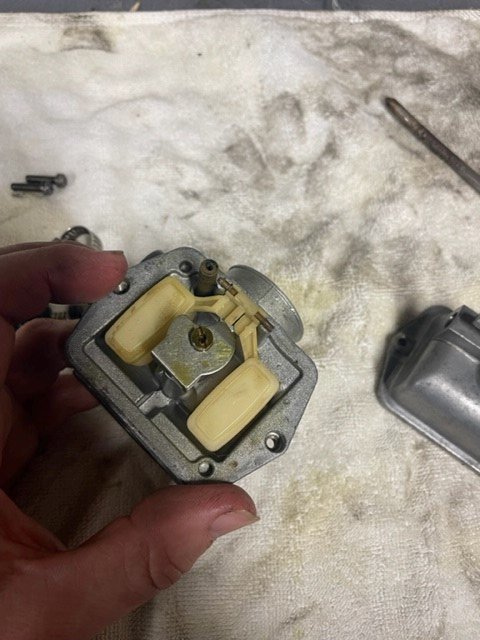
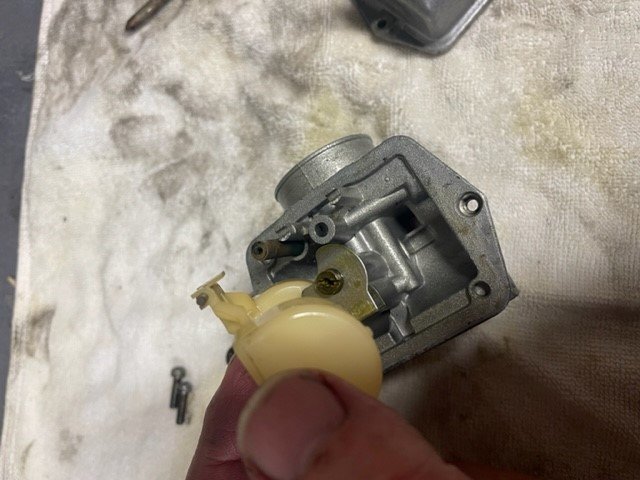
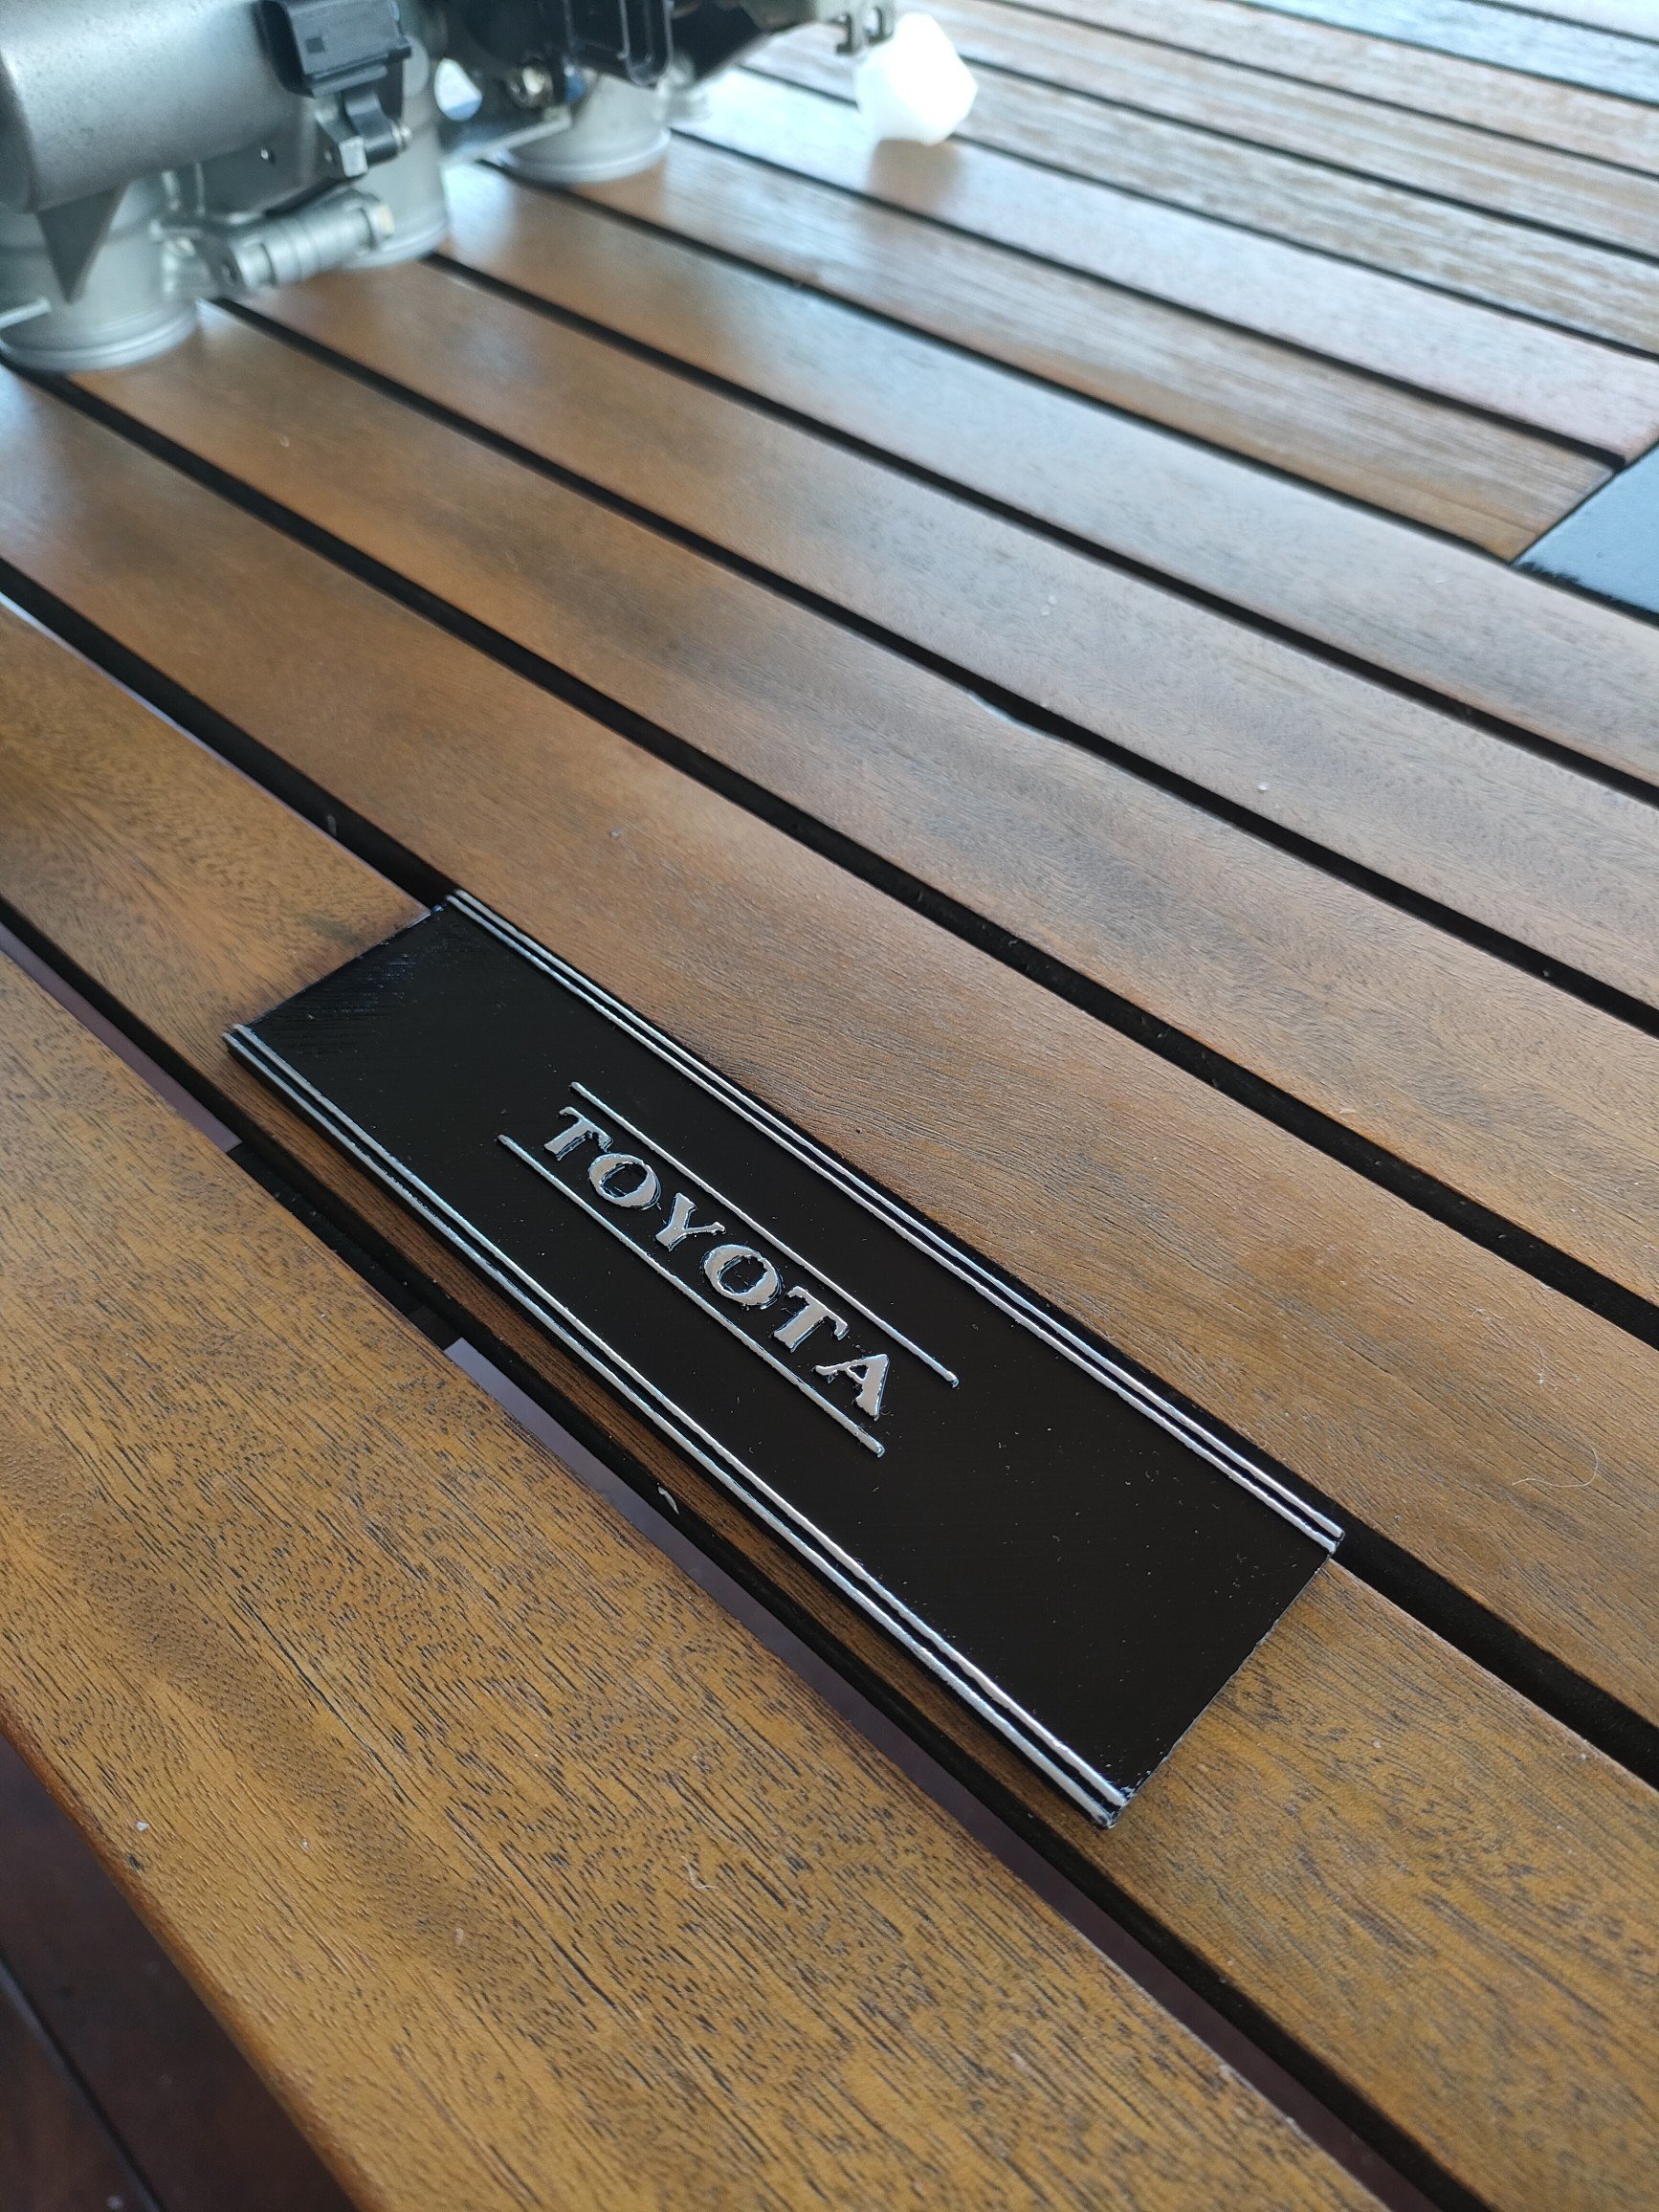
OK so my small bike experience has started to escalate... so I'm changing this thread to be a catch-all... First is the GT"50" - Silver Bullet Then there is the GT50. Its tucked away waiting its turn - hint, its been queue jumped... The RGV50 Frame is still in the shed. I still haven't quite figured out why I brought it. And then this happened... Scrolling the old Facebook buy and sell one night, and up popped this CRM50. It looked rough in the photos but mostly complete, the price was OK, and it was local! So I jumped on it and started messaging. Then I started getting messages from other oldschoolers asking if I could go and look at an old Honda for them haha. No sorry, its mine! Its been tucked in the shed for a few months due to lack of time, but with the next east cape ride looming I've decided to start seeing if I can get it sorted. Seller says "It will run, but pisses fuel out of the carb". I've had it started, so it does run, which is great! Last night I pulled the carb out for a look-see. There as definitely been some diddle fingers here... First thing is the choke plunger is broken and was held together with a hose clamp. Then I pulled the bowl off to clean and set the float needle. That doesn't quite look right The float needle is missing.
 5 points
 -
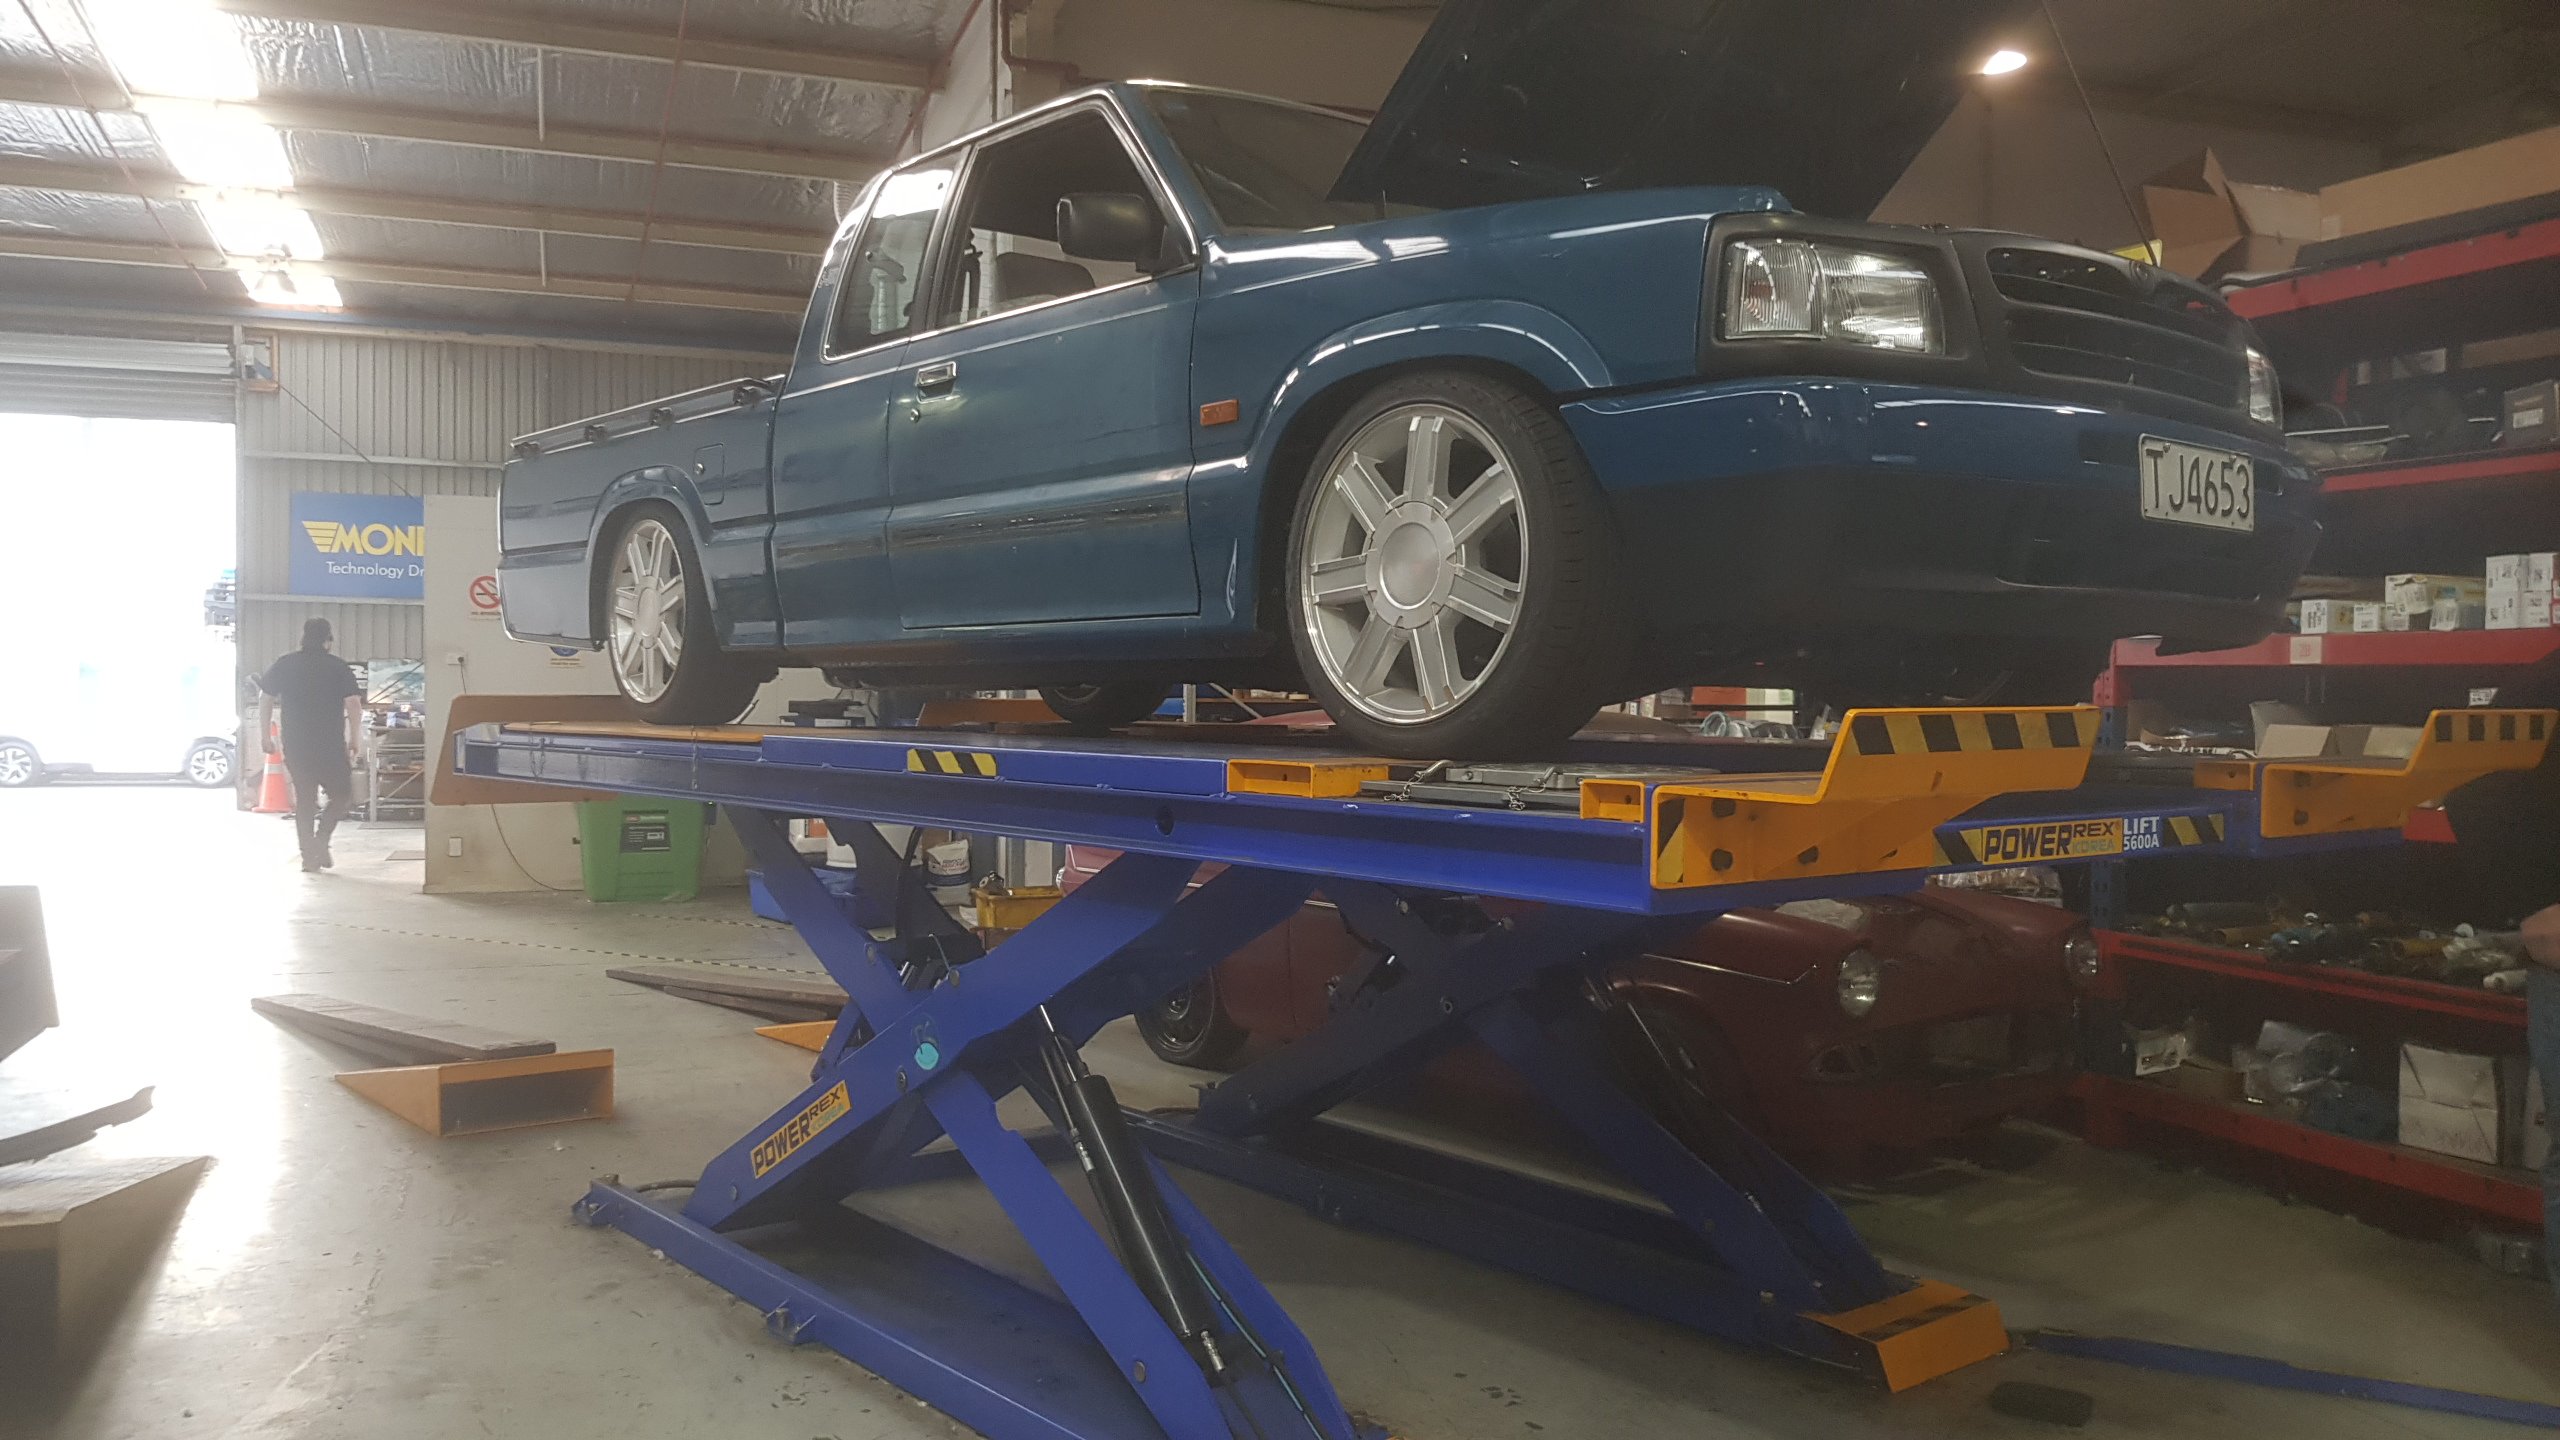
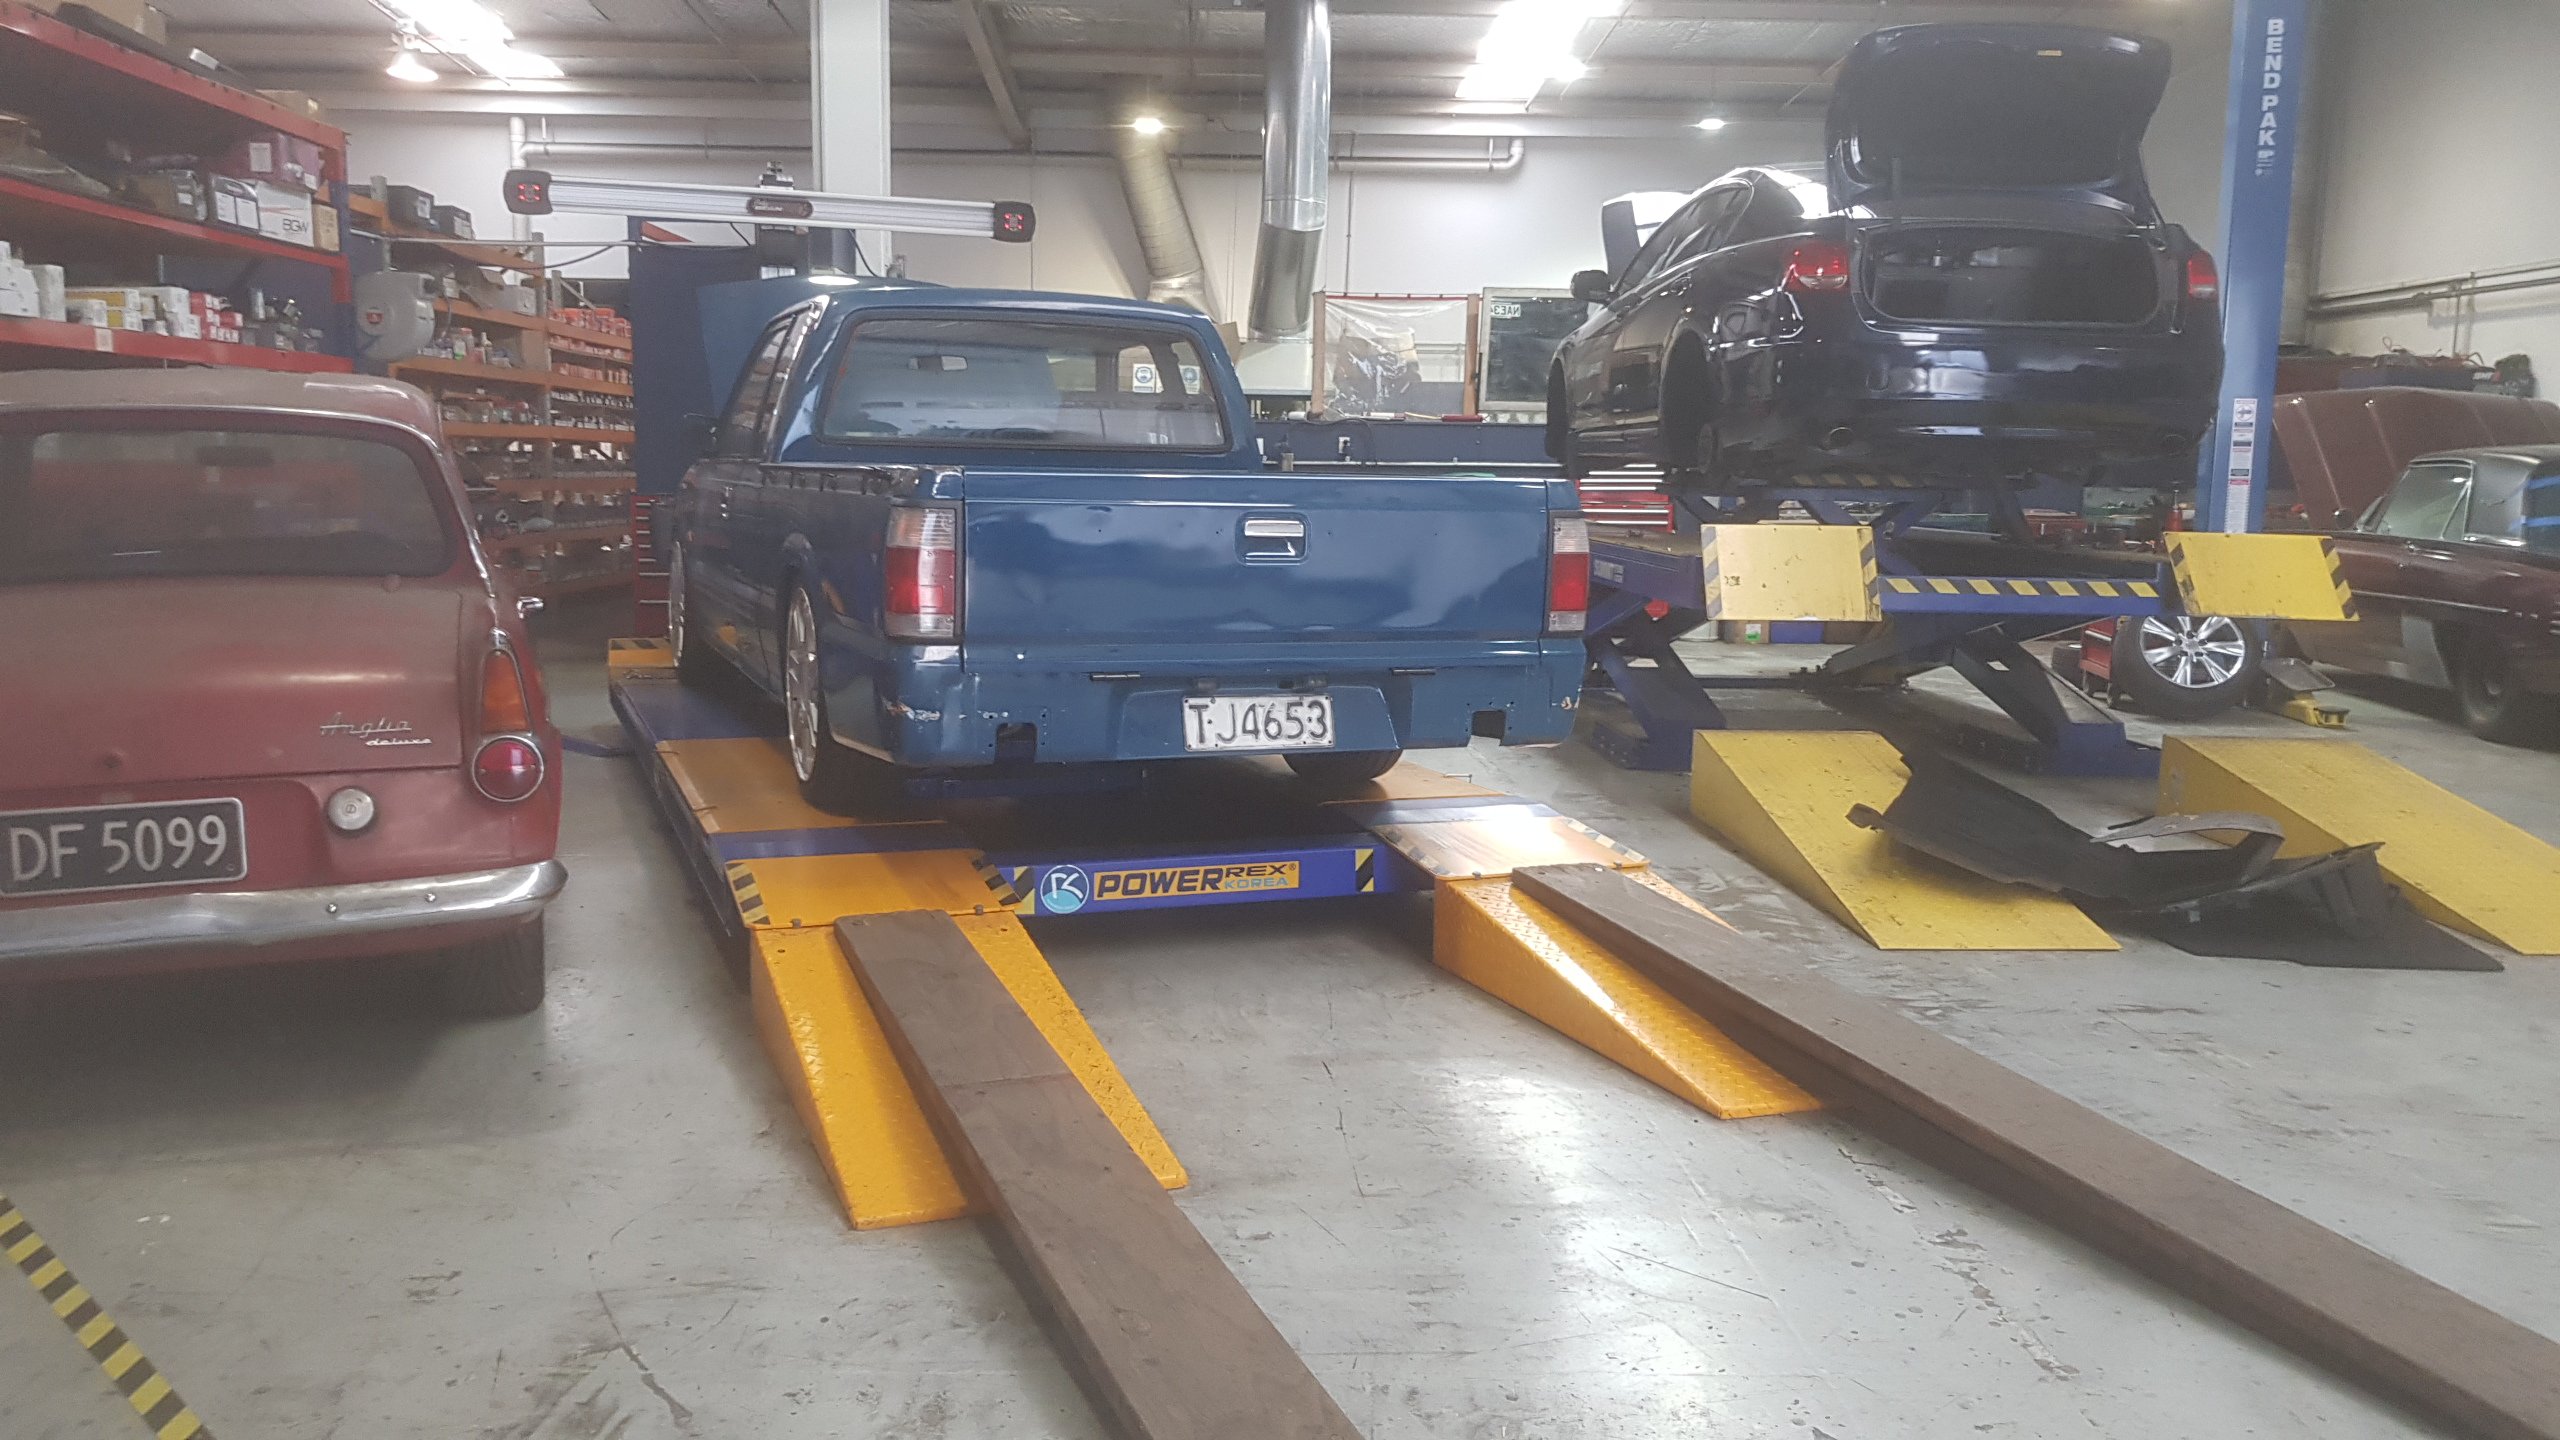
Truck went on a hot date with Iain at Racelign Tuesday and he dialled it in a bit more. Turns out my eyes are pretty well calibrated. All my eyeball front caster/camber/toe settings were within spec. Almost ready to take this thing for a hoon around the neighbourhood. 1 week til Cert day with @cletus. Still got a bit to button up but I'l make it happen.
5 points
-
My mate fritz made a video of our trip back from Christchurch last July in this thing3 points
-
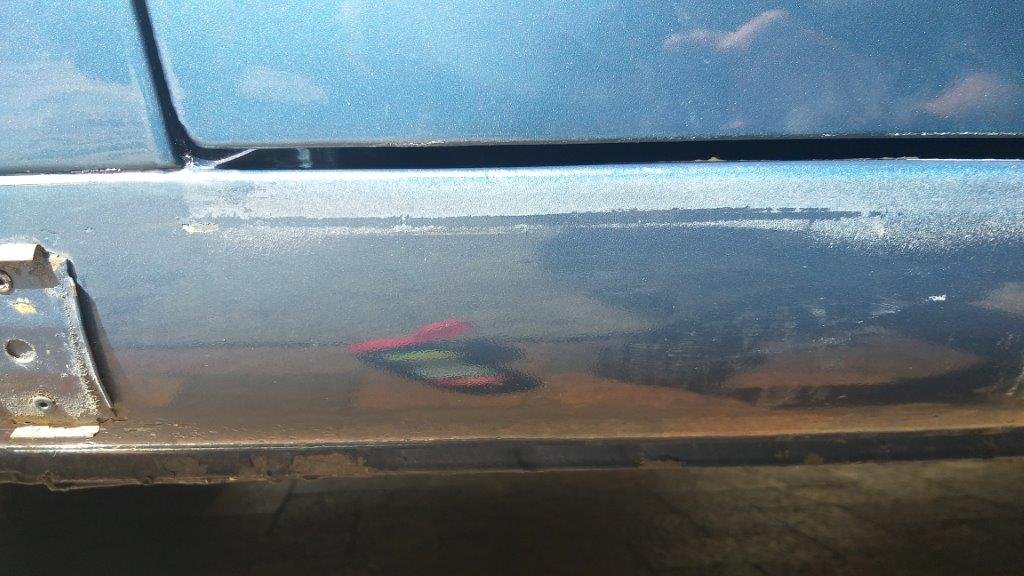
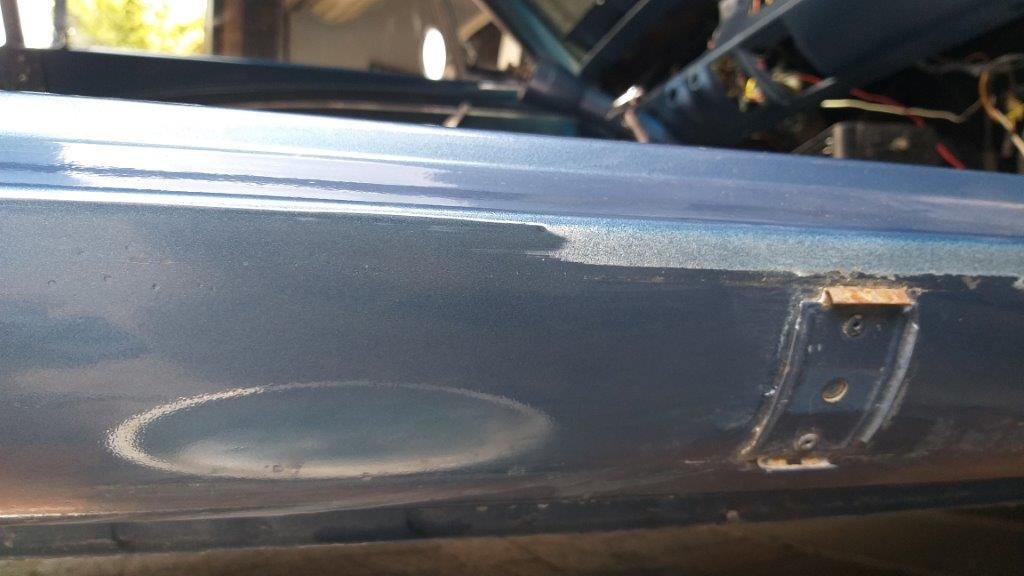
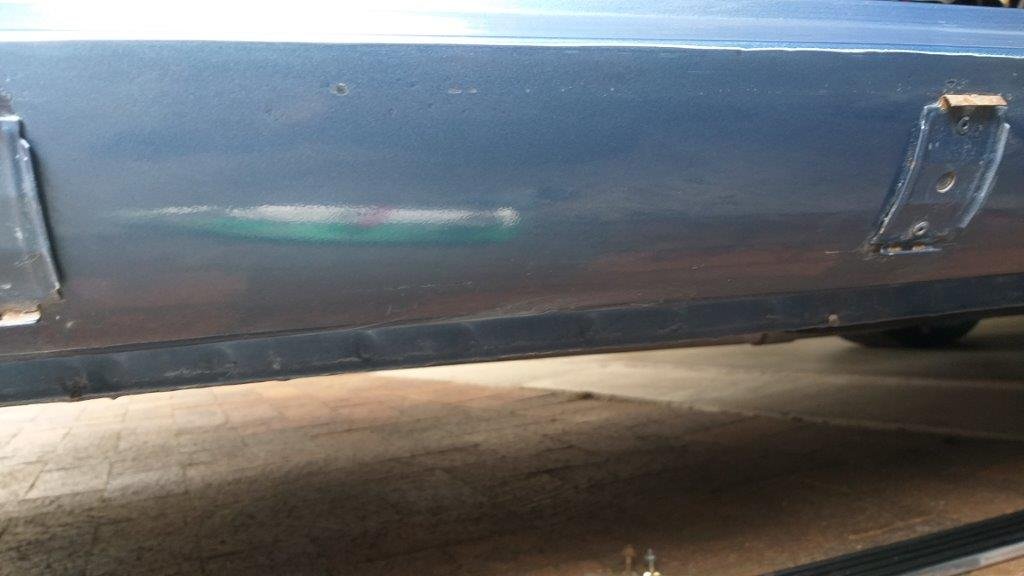
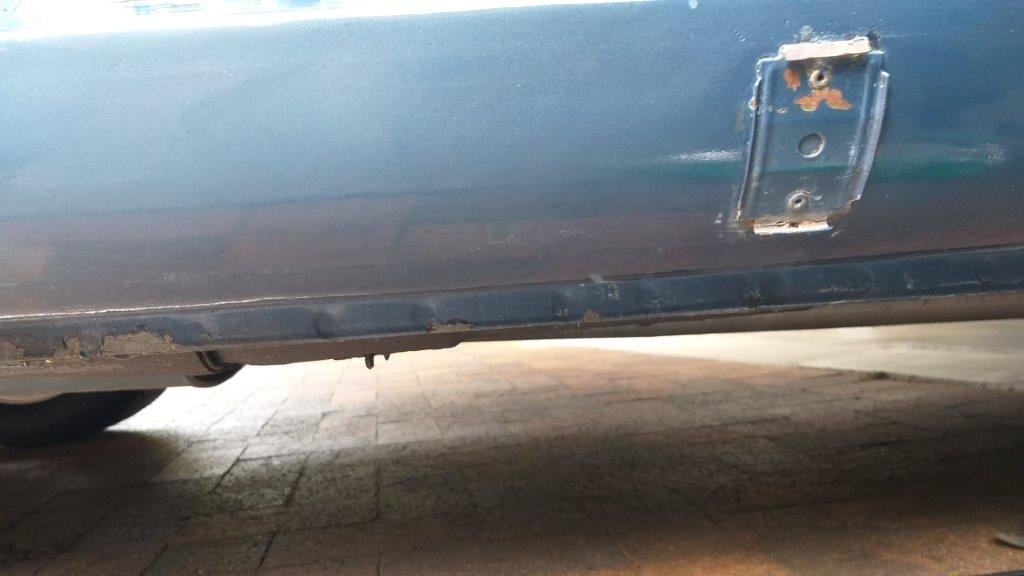
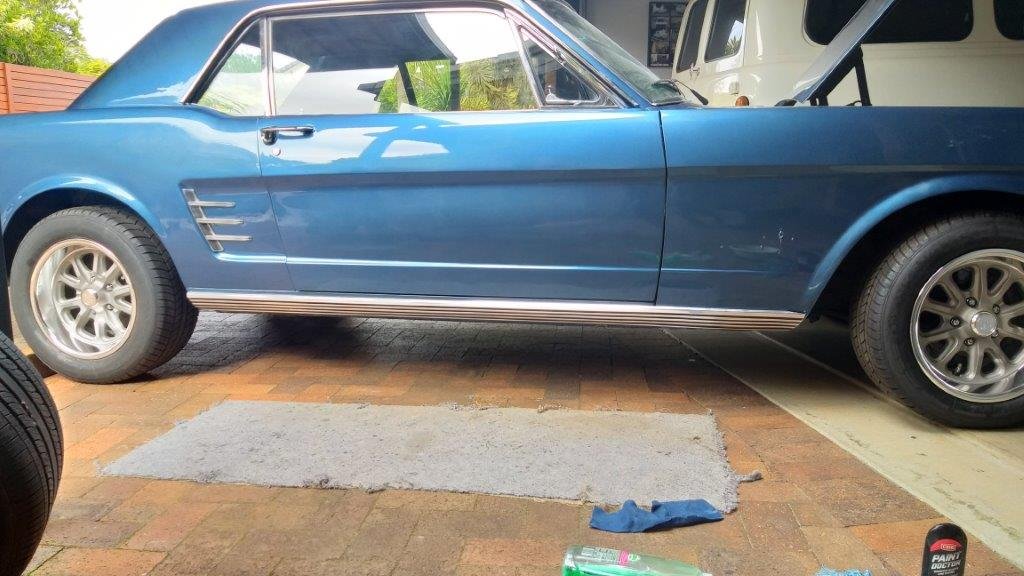
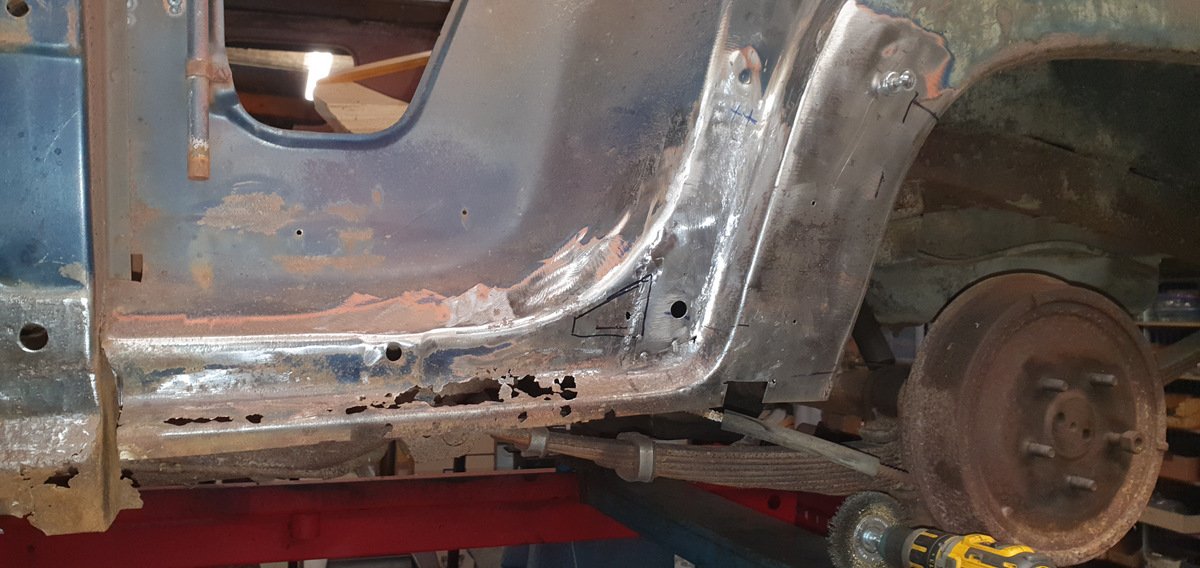
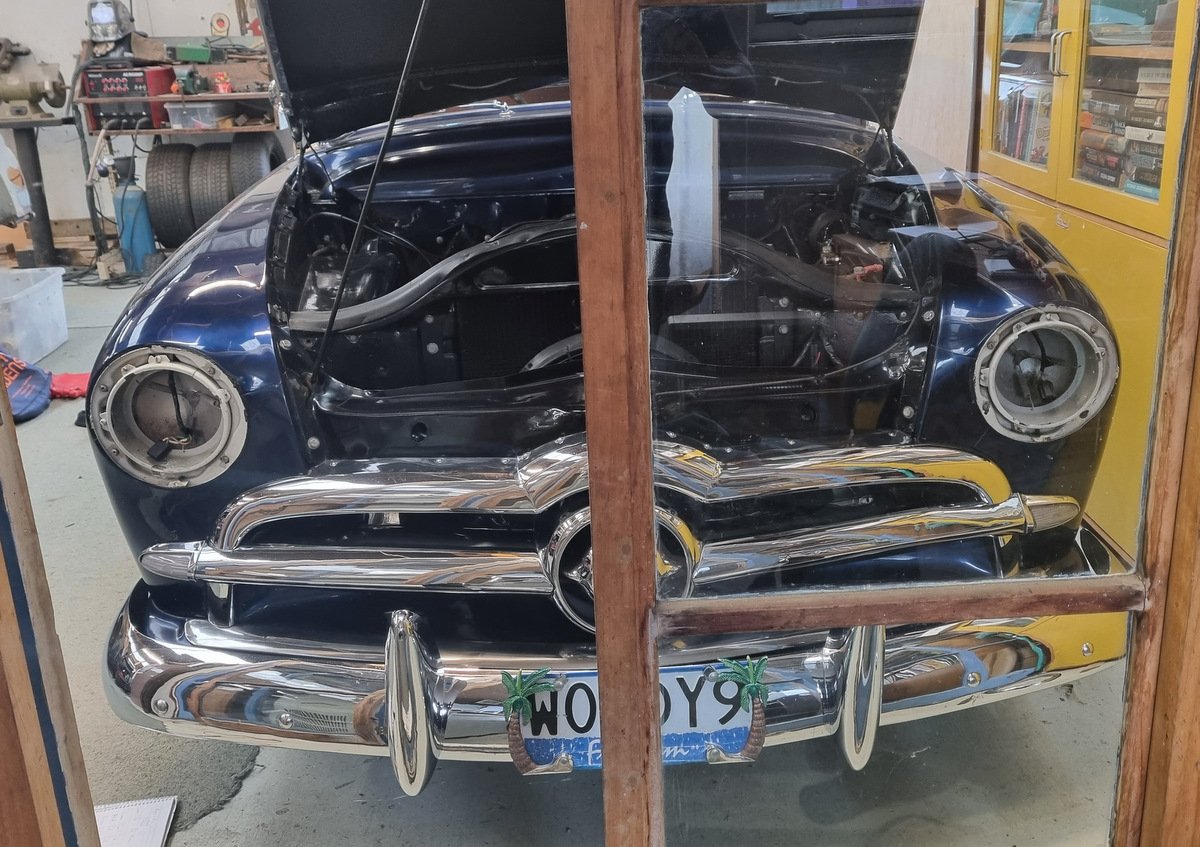
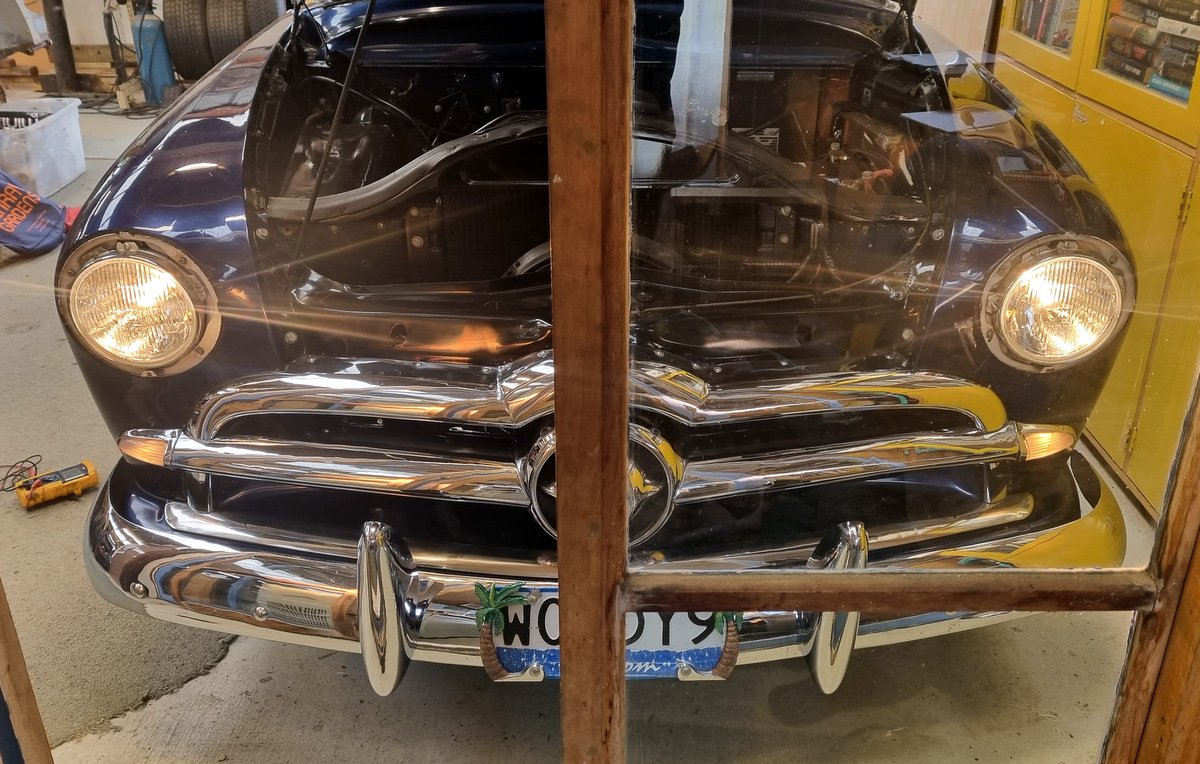
Thought I'd quickly chuck the side trim on this morning before moving on to other things. Err....... no ..... The $1,000 USA respray from 2010 comes back to haunt me once again. Looks like the door jambs must have been painted after the lower side valance and I only noticed the ugly over spray when I got down and personal. If it was just colour that would have been okay, but it's bloody primer too. If I'd have noticed it earlier we could have painted it at the same time as the doors, but oh well. Managed to ease most of it off with a piece of 1200 grit water paper followed by a bit of rubbing compound. It's not perfect, but it's a lot better than it was. Thanks for looking.
3 points
-
Lapped the valves in Gave up fighting the keepers so called it a night after only getting two sorted2 points
-
In the listing description.. "these trucks with V8 power, solid axles and link suspension would kill all those wee Suzuki off roaders. Skirts around the fact its British and has lucas electricals2 points
-
Well Monday/Tuesday didn't suck. Spent some time Monday buttoning up a few things to be able to drive it. Hammered up the inner lip on front guards and adjusted the toe a little more. Wired the elec fan and tested its effectiveness. Connected Amp wiring to tick off the Audio side. Sounds great, all I need now is a bumper mounted siren. And got it loaded on the trailer ready to drop to Racelign on Tuesday morning.
2 points
-
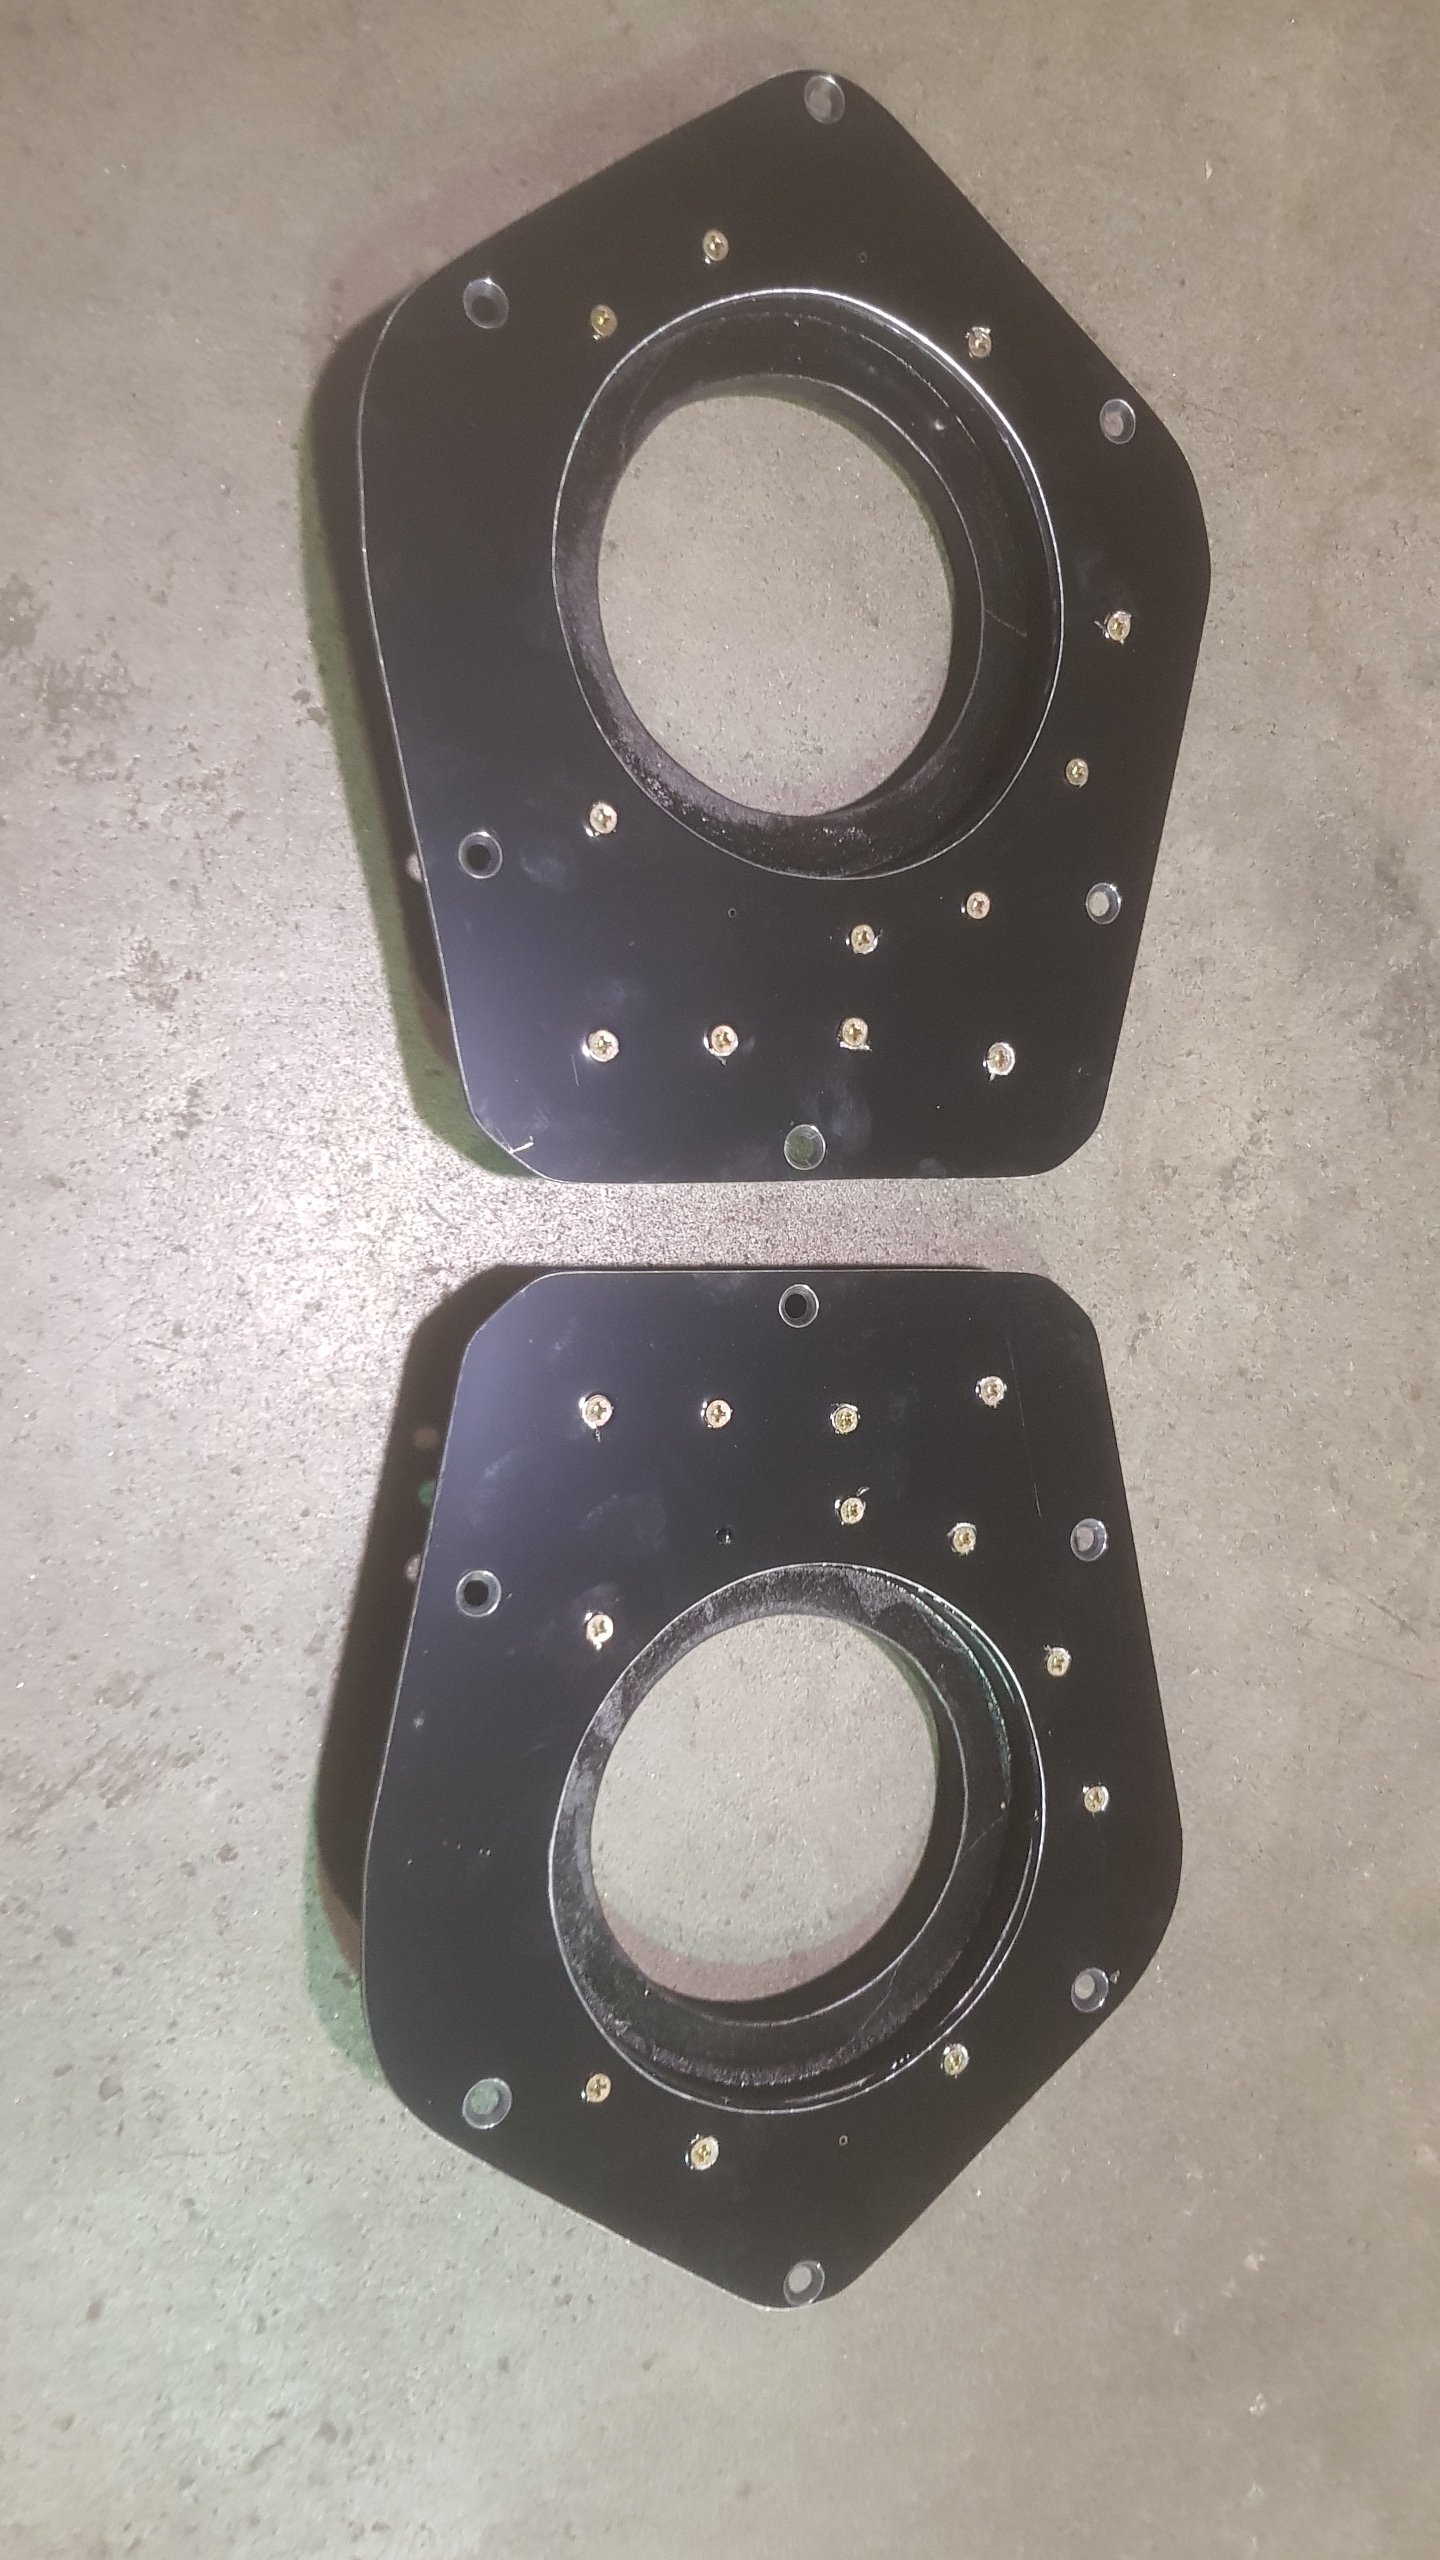
Spent Matariki Friday making the mounts for the rear 1/4 speakers. I didn't have the factory optional mount so I got creative. Probably a bit overkill but I needed to recess them in so they didn't hit the trim panel. They sound awesome so pretty happy with the result for someone who doesn't do much woodwork.
2 points
-
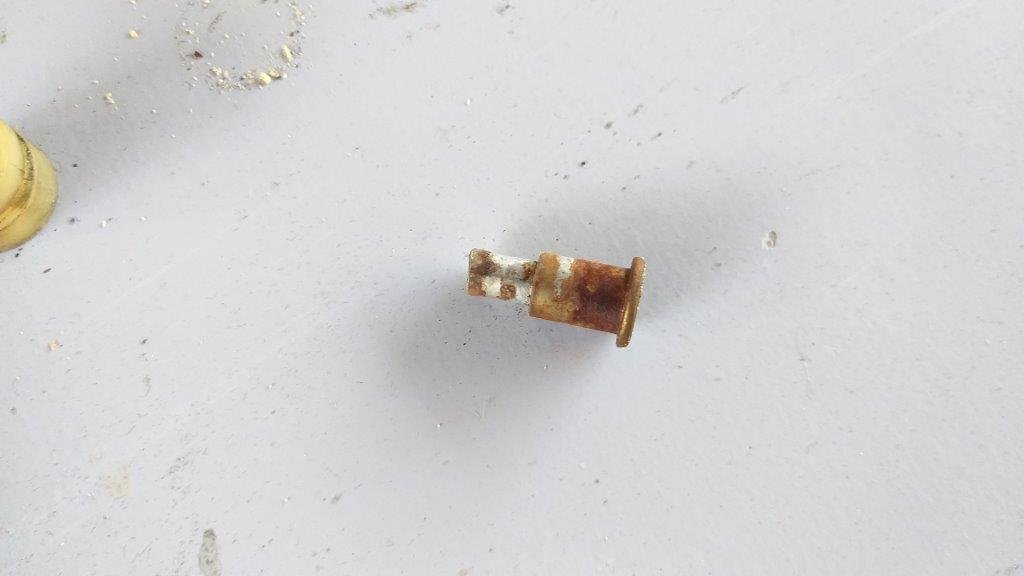
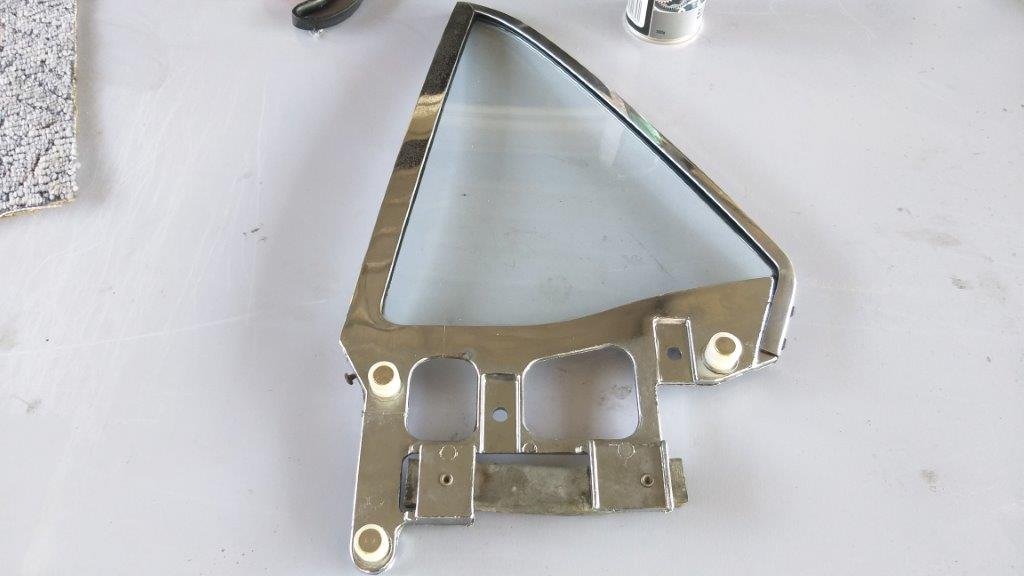
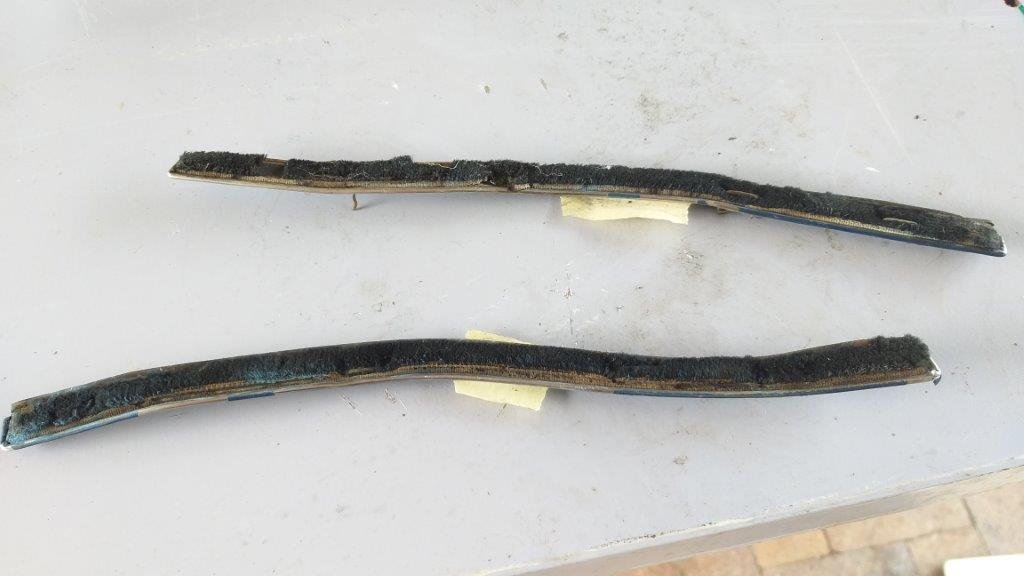
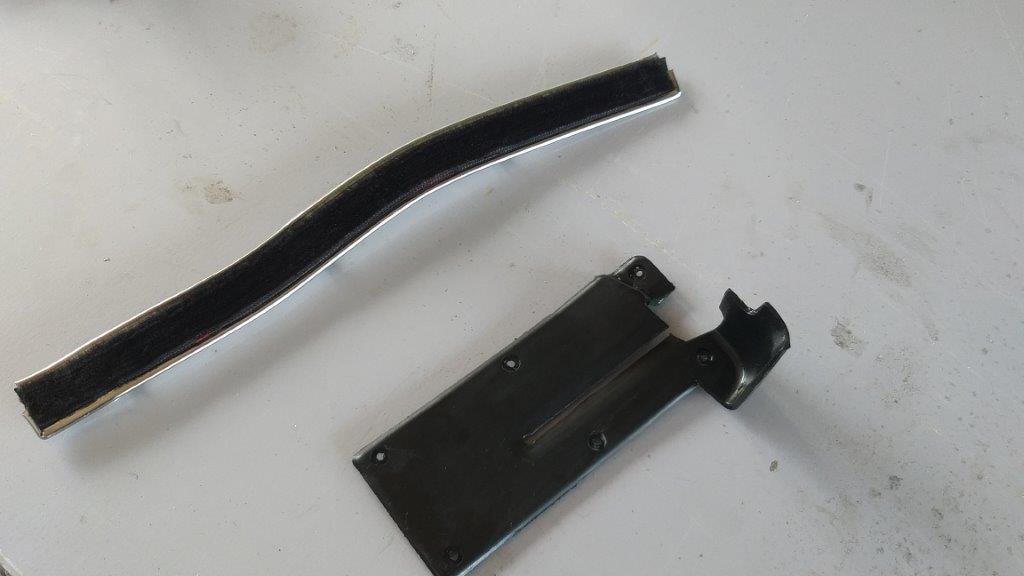
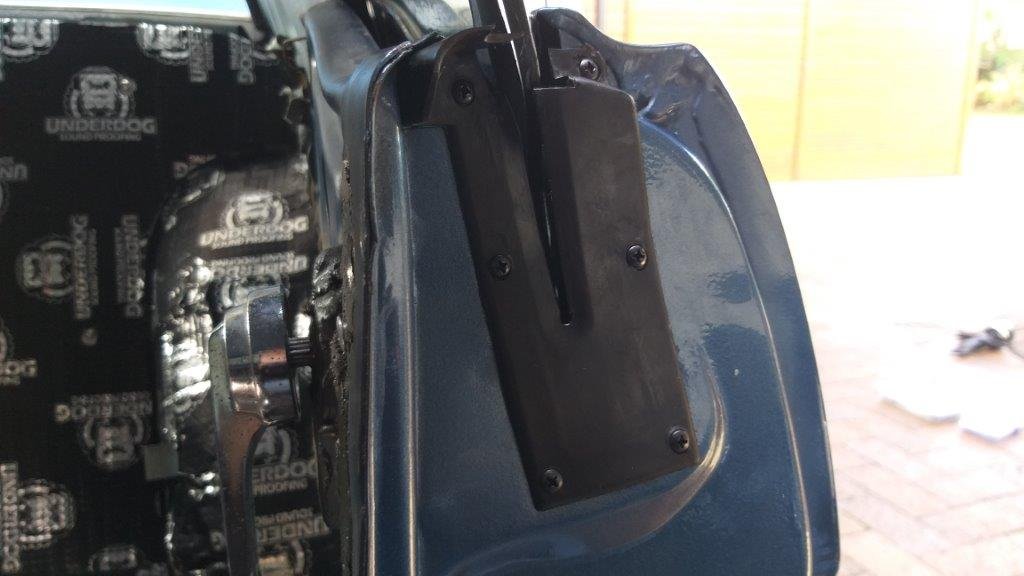
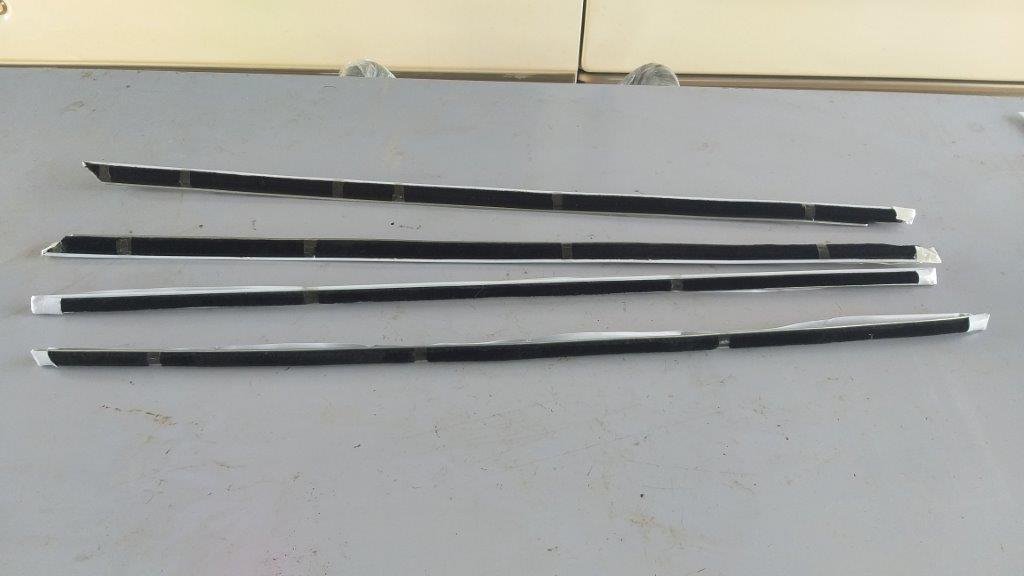
Today's mission was the driver's side rear quarter window. Again all 3 rollers riveted to the window frame were seized solid, so first step was to replace those. The little roller pins were well rusty. Before installing the window backing plate I wrapped the rear wiring harness in new cloth tape and threaded it through to the boot. Gave the rest of the window components a liberal coating of spray grease and wrestled that puppy back into place. With both rear quarter windows now installed I was able to finally fit the new weather strips and rubber end plates. You can see just how bad the old belt lines were. I'd even sourced new screws for the rubber end plates cause I'm a lost case. Thanks for looking.
2 points
-
I friend in blighty does it and among the jobs he's done was one where he welded the fins back on to a 911 barrel (iirc.. I think it was a barrel, or something too costly to just replace) Does a neat job where there's very little room, no mess, no clean up needed.1 point
-
I did see that, but not sure if its a 4.0 or 4.6, and the rest of the gubbins around the engine (body, chassis etc) are surplus to requirements. It is the right price though.1 point
-
Anyone dealt with laser welders? Seems interesting This video they are welding 12mm plate which isnt ideal for it IMO, but seems like it would be legit for thin stuff. More talking about a working environment vs car work1 point
-
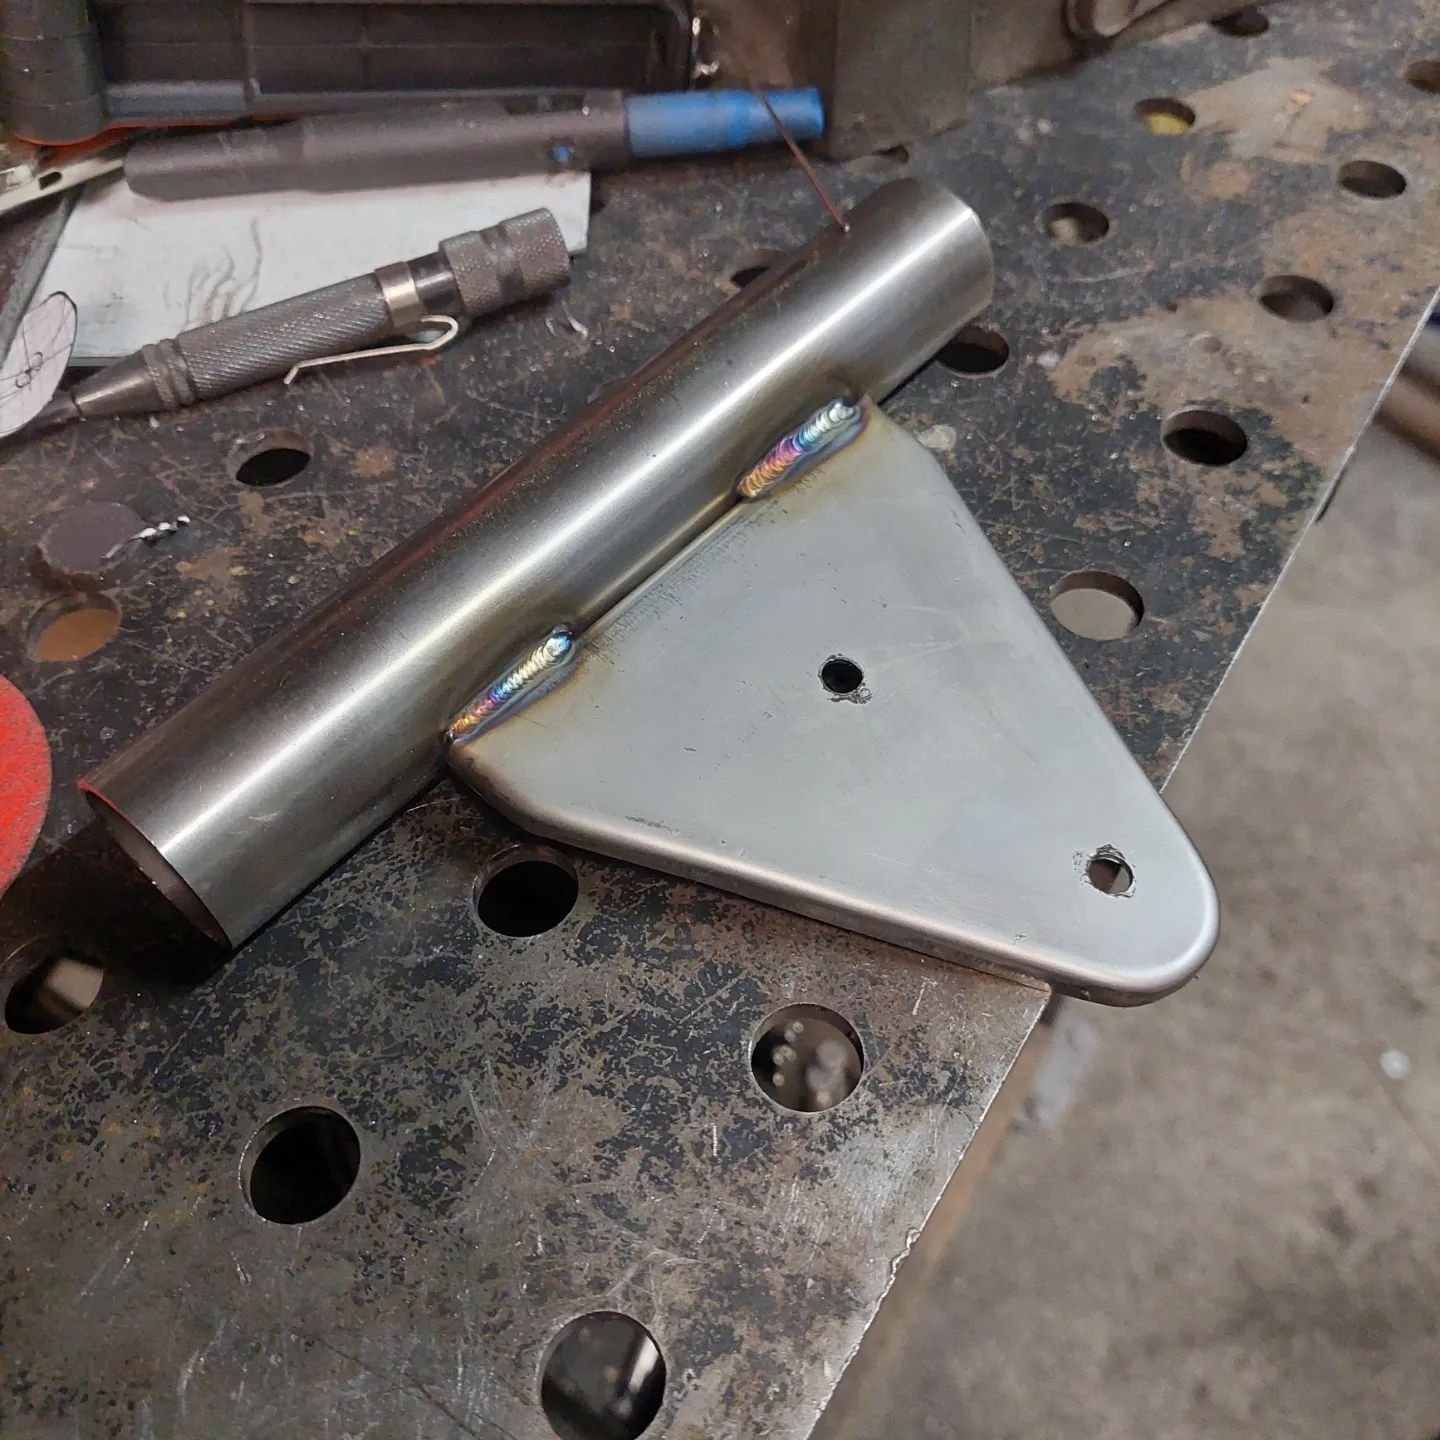
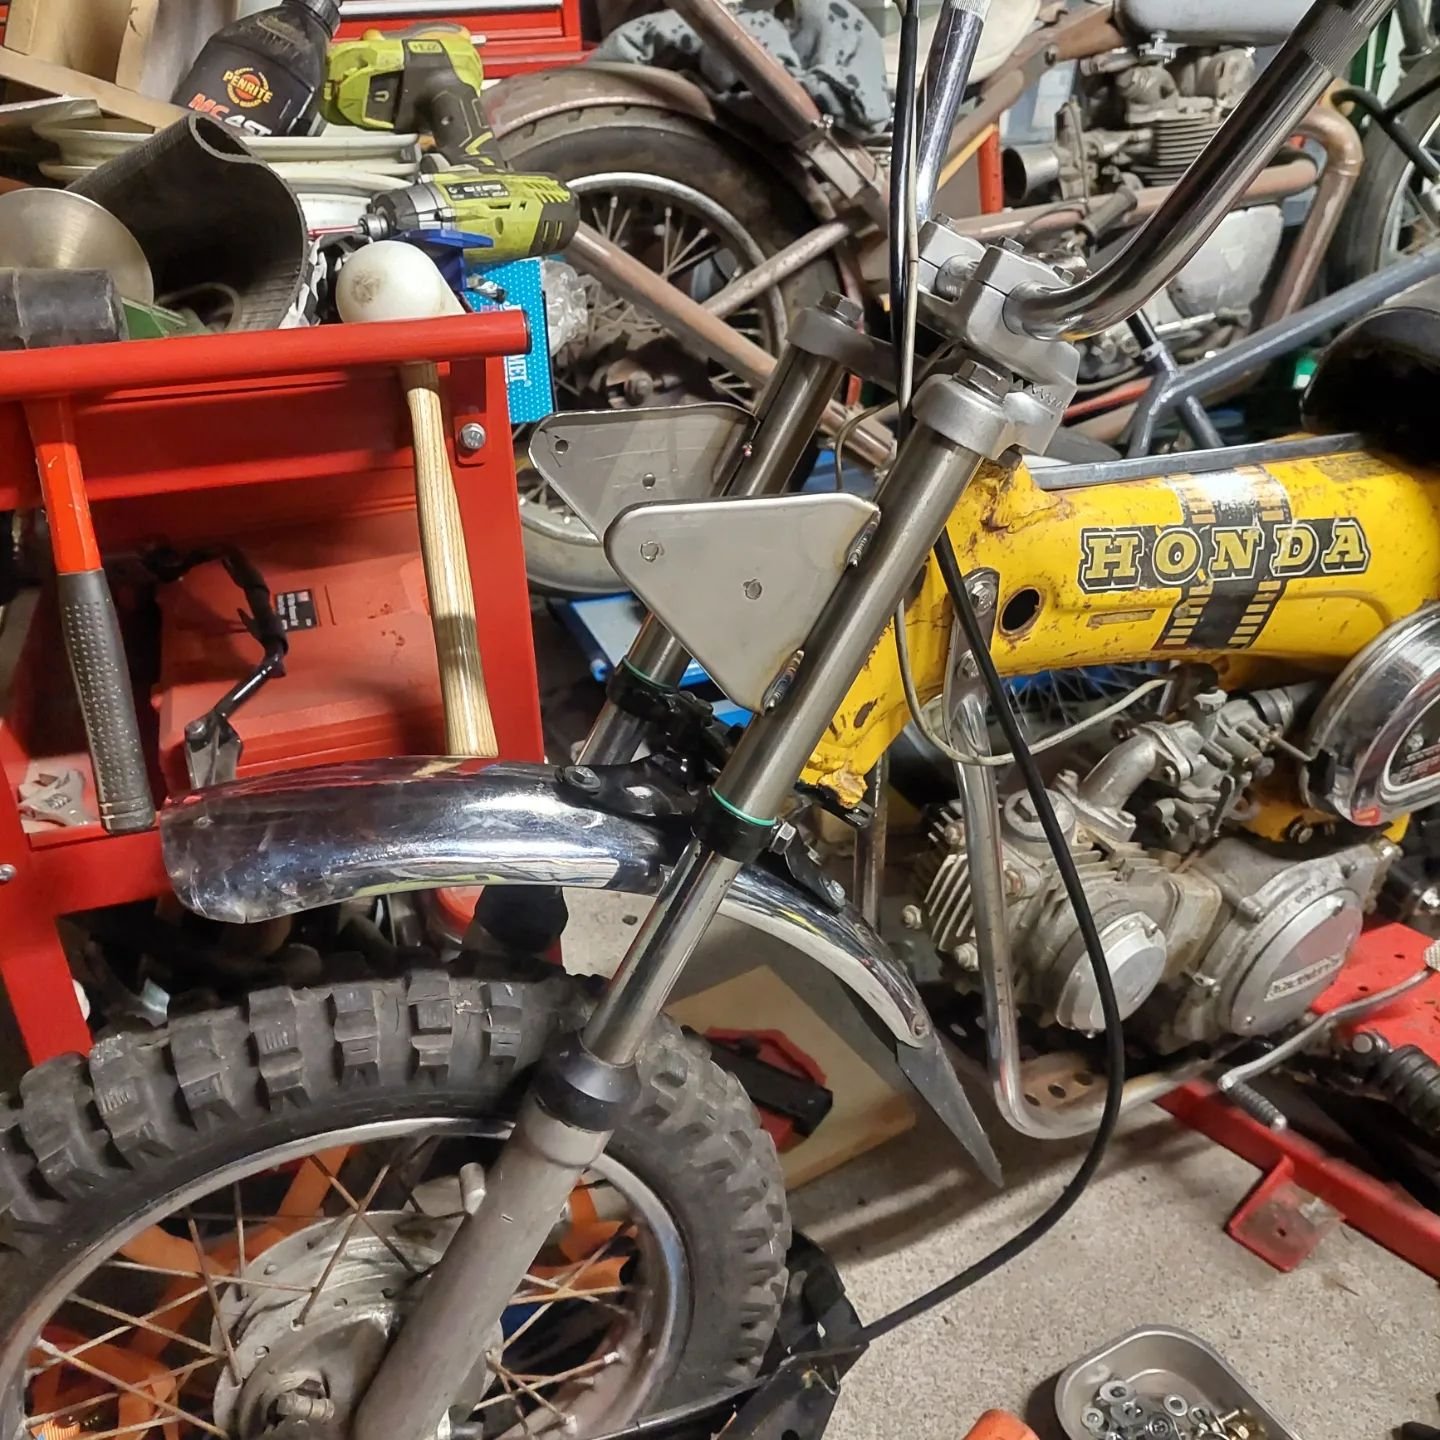
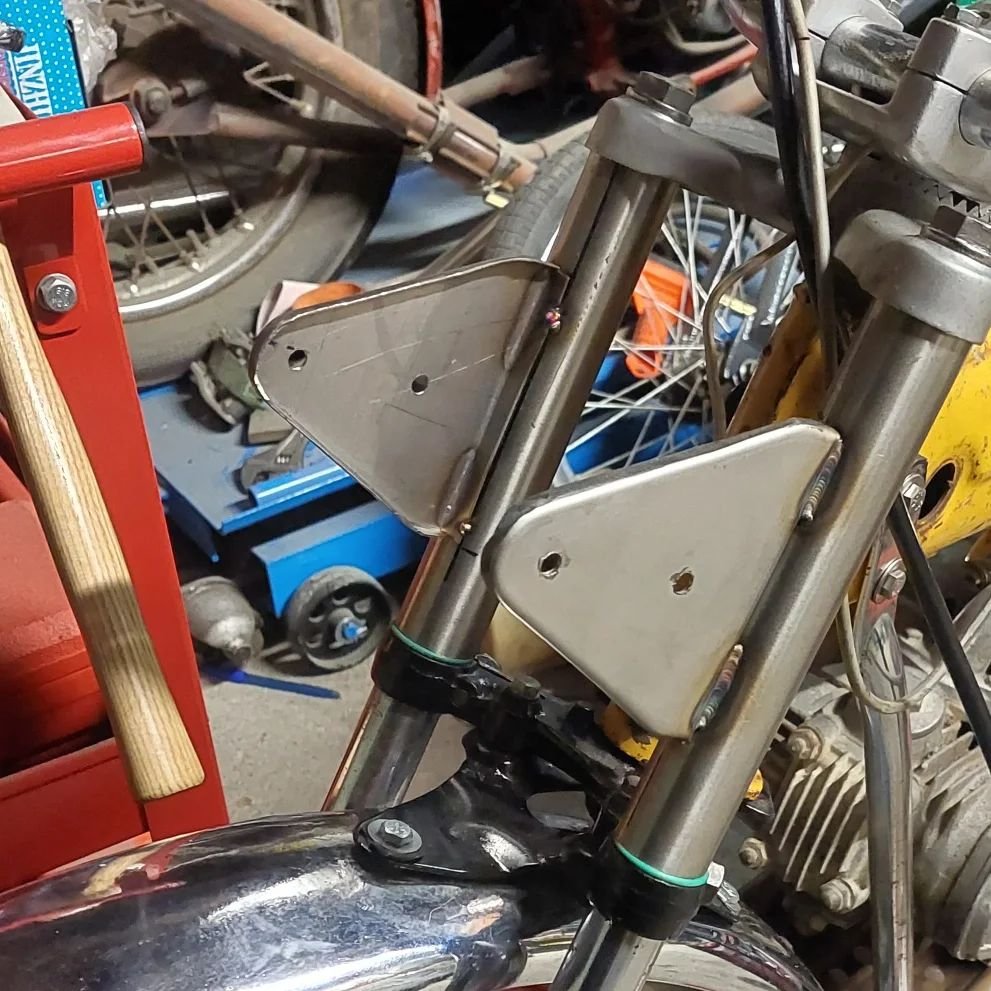
I'm still looking for a headlight and bucket but have sourced a speedo. So in the meantime I made some headlight ears that will also double as indicator mounts. The original indicators clamp to the knurled sections on the handlebars. I cut some lengths of 31.8mm stainless tube from work then hammer formed some 18g stainless to make the ears and glued them together
1 point
-
I've decided to sell my cars and do something different. Left job, moved to a new town 5 hours away. My Mrs plan was to get a caravan and tow it with her Outlander. Finance issues and it being CVT put a quick end to that. Still did some work with it, thinking it would be our daily. Got a roof box from Wanganui that was worse in real life than the pics, plus smelt like dog and was unclean Halfords UK spec 470l approx. GHFWII. No way I'm putting that on a relatively clean car Not pictured but I also filled a crack with baking soda and super glue and then body filled it, plus rubber blocked+sanded it down. Also did the wheels: Also wiper Cowl, wipers, badges etc The end result Trademe "warewell" roof accessories, not keen on rhino rack/thule/etc prices1 point
-
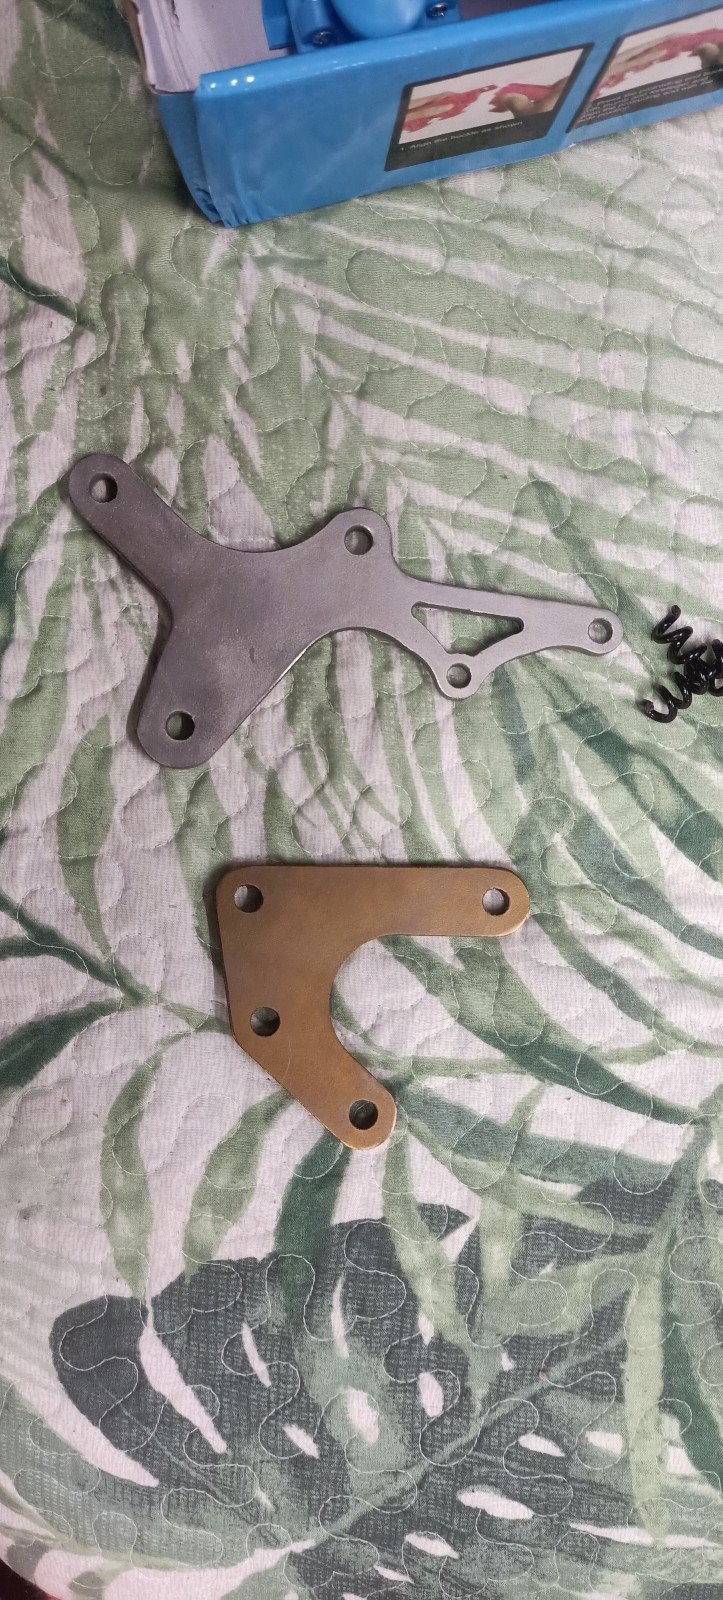
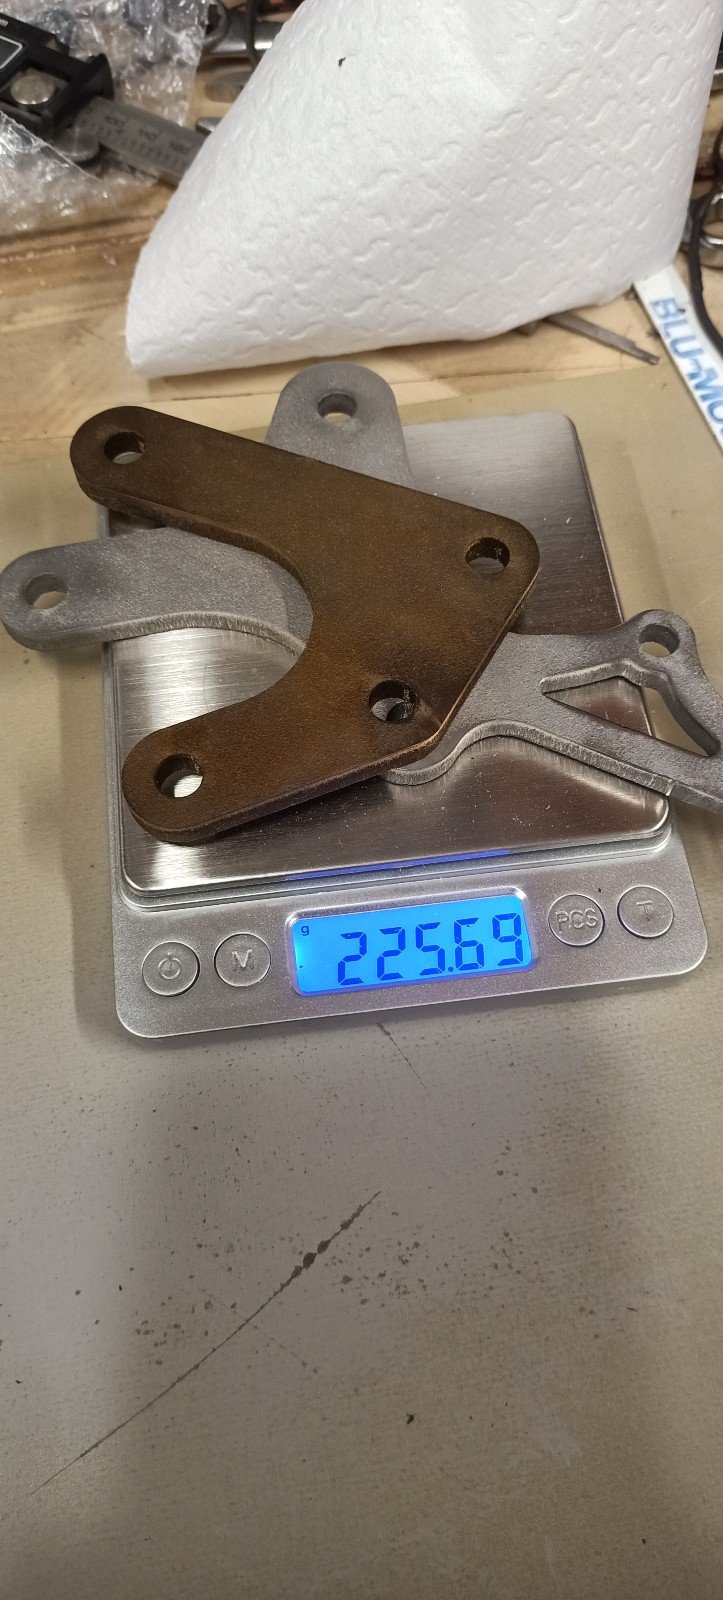
So I started again with grade 5 titanium. By this stage I'd stopped taking photos as I'd run so many simulations it was getting a bit old, but the results were good, the anticipated weight of each component was great, and I'd never played with titanium before so seemed like a good time. I sent some emails out within NZ and China. Its sad because companies in NZ really can't be fucked with smaller jobs and the associated admin. I got a few replies after waiting a few days and these replies ranged from not being able to secure the material (they couldn't be bothered) to having a minimum cut fee which made this only economically viable if I got three sets cut (I ain't paying for enough material to make that happen). China made me feel like a king with absolutely great customer service, though I was still not 100% that I wasnt getting scammed... But after a few weeks my titanium rearset plates arrived! I haven't had much time for filling around but need to tap some holes and buy some pegs, then they are good to go on permanently. Weight saving from the change to these Ti plates is 500g, however when I include the change to the associated light weight pegs, nicer bolts etc will be well over 1kg. Colour change is due to some DIY anodising- super easy with titanium!!
1 point
-
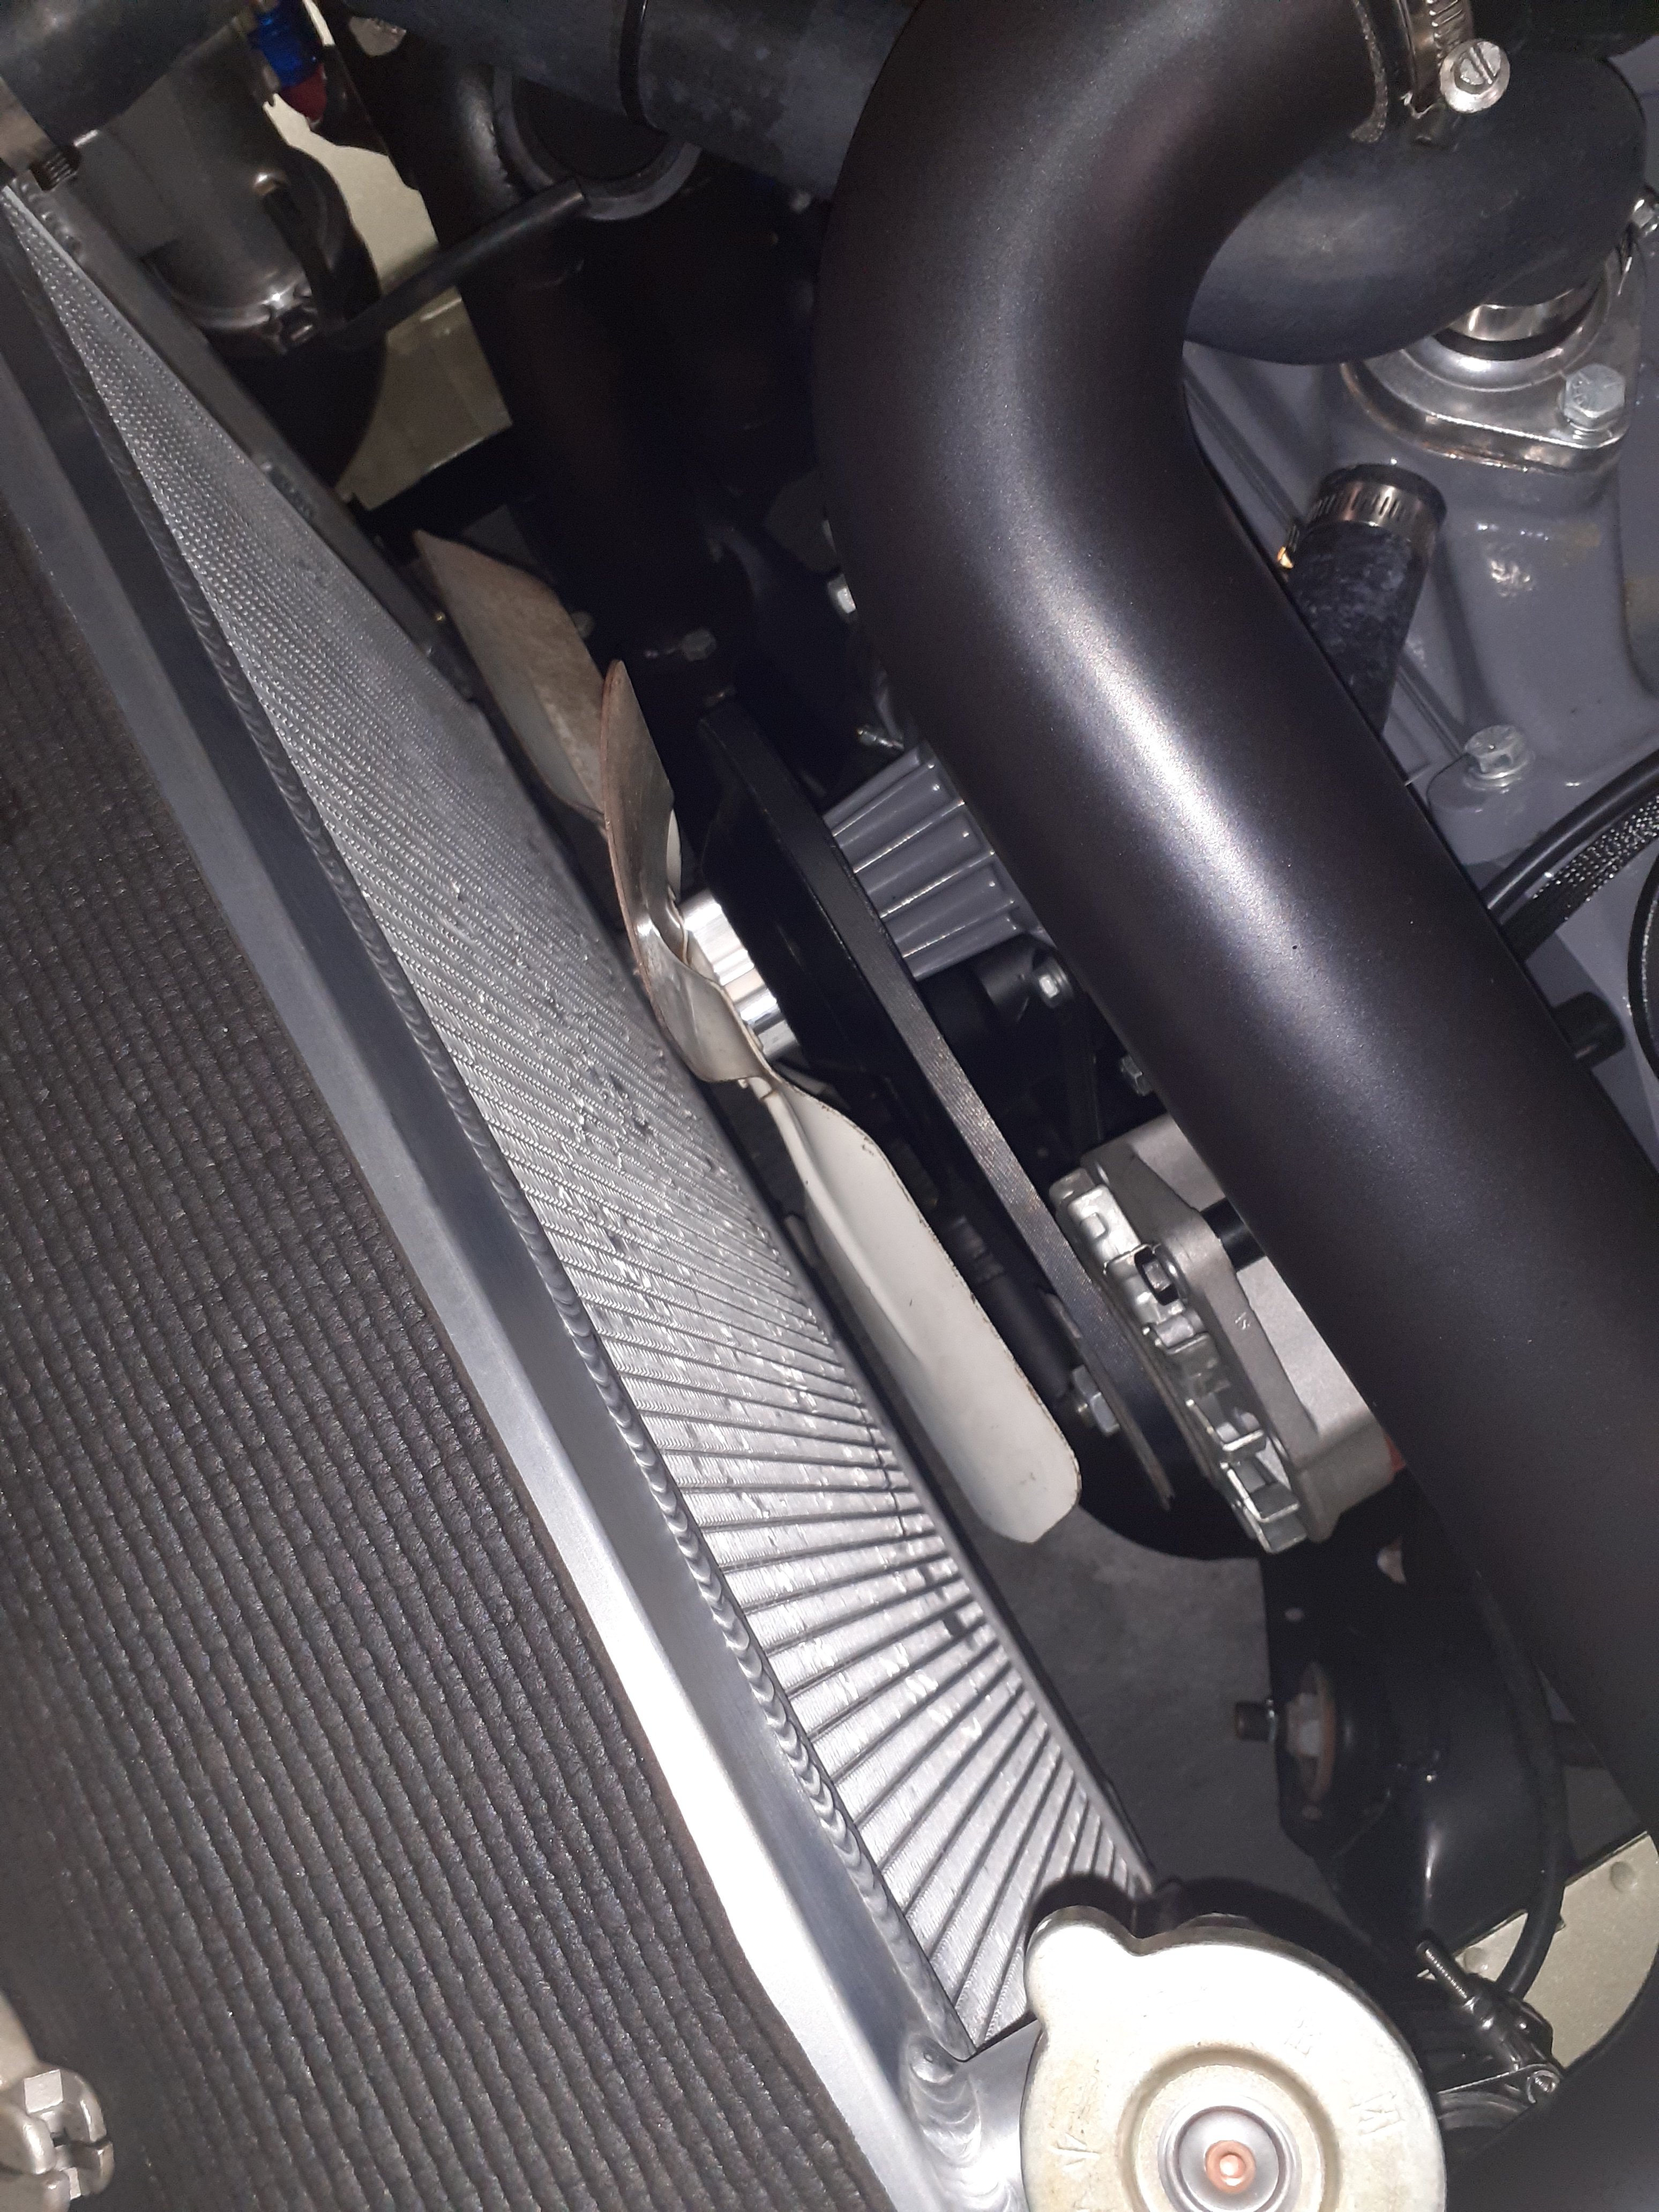
The 2 tight spots are where the water pump and alternator are, there are other areas where a motor could go but they are not really areas where you could fit a big fan in I have gone in a different direction for now, a mate is making a fan shroud and I'll use some sort of engine driven fan, either this stock steel fan or a alloy/steel flex fan, they are both 17" I wanted to stick with electric because Hp- but no use making another 10hp if I can't drive it because it goes chernobyl Noise, it's not that bad anyway, can't hear shit over all the whizz psh noises Efficiency, it's carb and turbo so I'm a wanker if I think a fan makes any difference I'd done fancy wiring to the fans, well now I have 2 spare 15a potential accessories at the front, maybe a light bar and a winch? If it's still no good maybe a small auxiliary radiator and fan. Even with no shroud it's better than the electric fans, fingers crossed a shroud fixes it completely
1 point
-
A 2.2 petrol landie engine you say?1 point
-
No 3.9 or 4.6 has magically come up for sale locally, which sucks and all the good engines are either crazy money or miles away (like the one above). On the plus side, the previous owner is apparently shipping down a crate with the original engine in it, or something that might resemble parts of the original engine. Not sure what I will end up with yet, we will see. If there is enough to rebuild, and its not completely ruined, that might become the plan.1 point
-
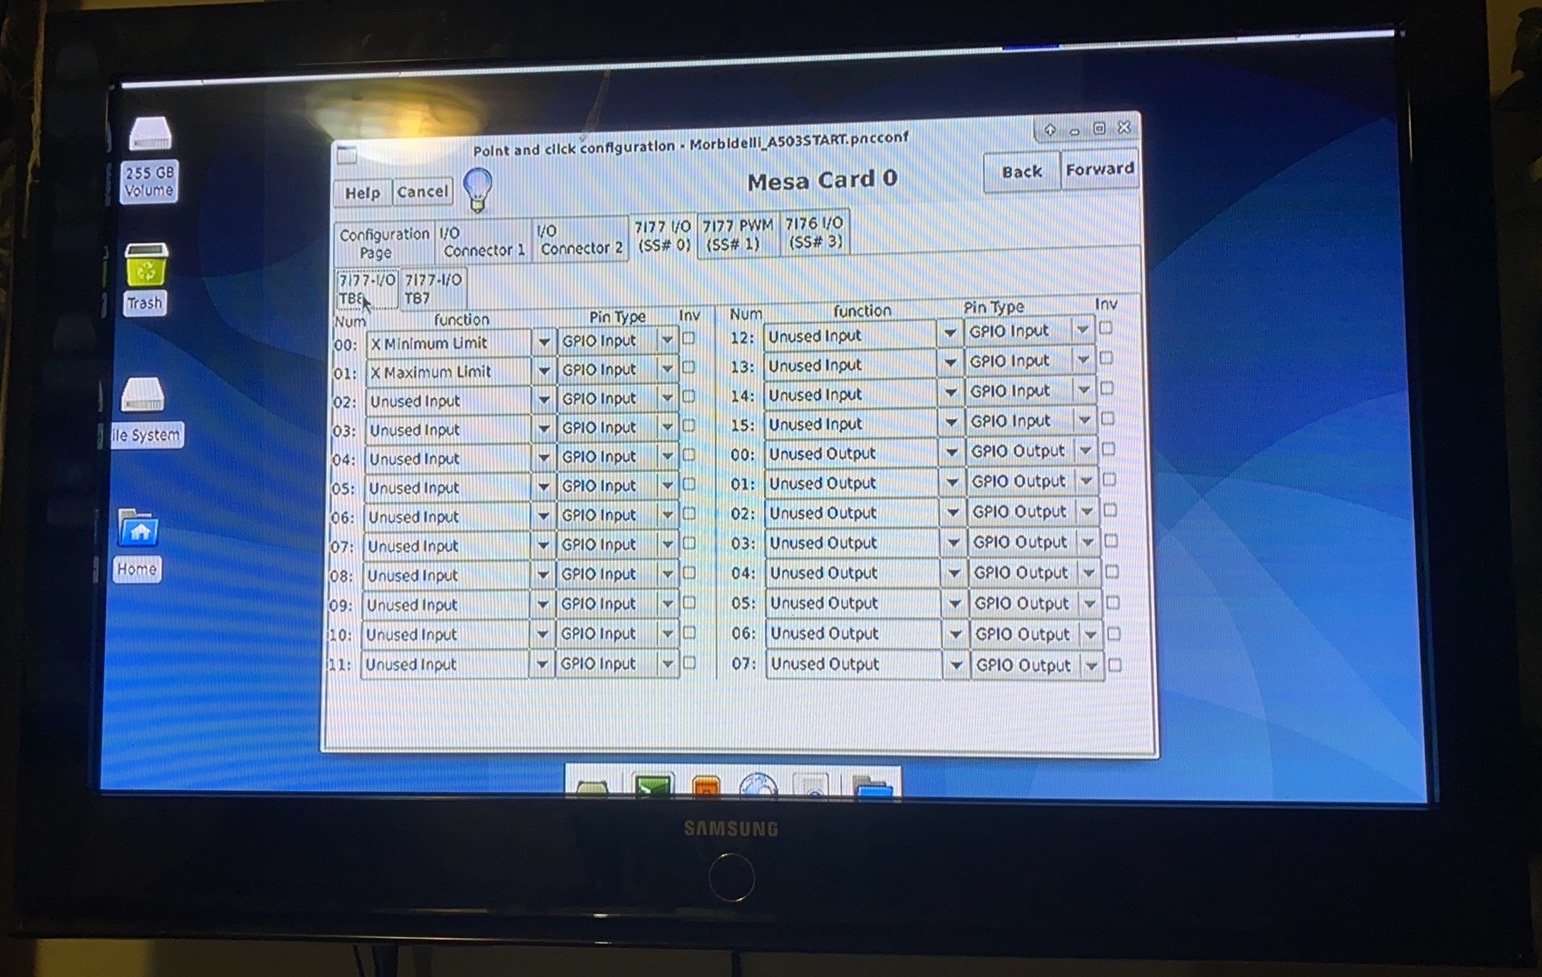
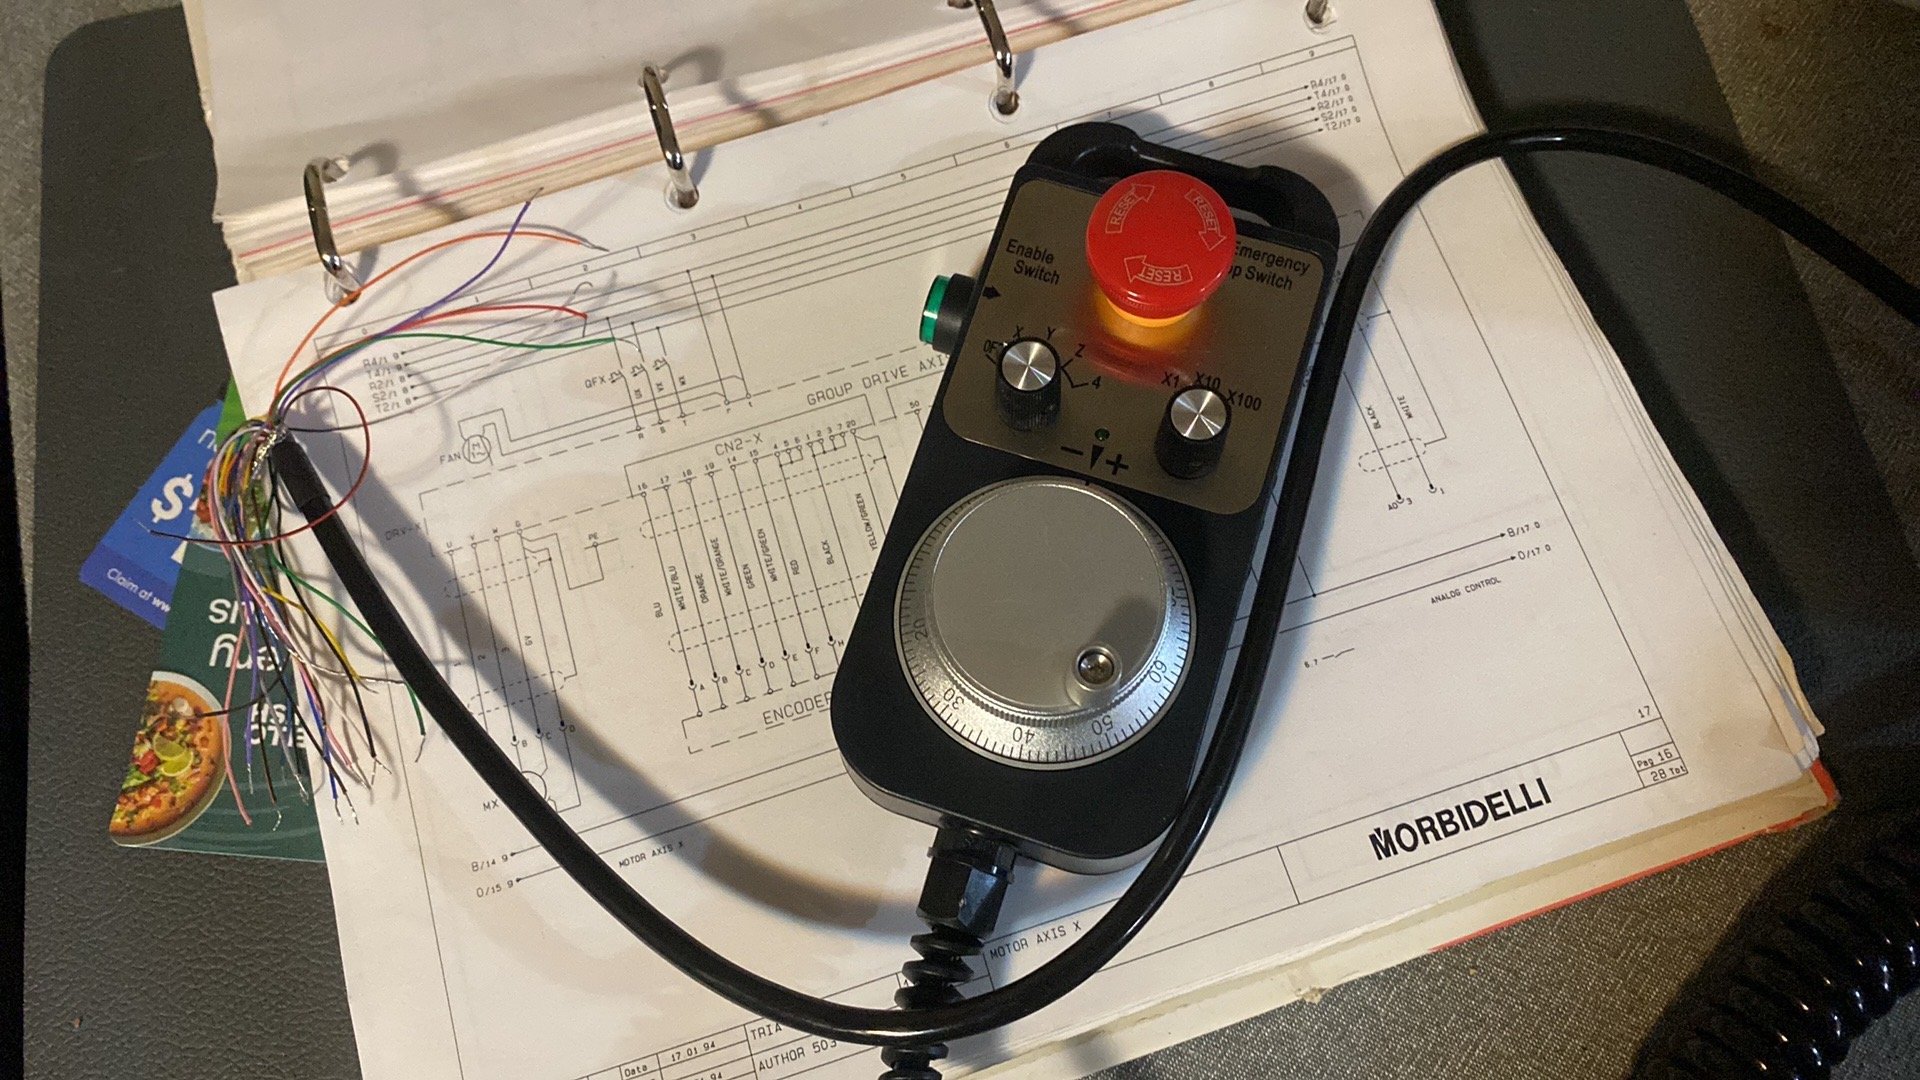
Fun hands on stuff is beginning! Cheers to @- i5oogt - for sorting me a PC, unfortunately my ancient screen didn't have hdmi/dvi so the TV took over. Standby for noob problems, this is my first ever PC, fumbling through BIOS and formatting bootable USB drives somehow happened (Credit youtube/google) and we have linuxcnc loaded up, running latency tests was square in the 'not suitable' window ~1,000,000ns but for now I will ignore it, as my confidence grows i'll work through diagnosis and checking suspects off the list. Its a massive steep learning curve, but happy to have booted linux and loaded up a mock machine, most of it makes sense and the few questions that arose were easily researched and answered if the "help" tab top left couldn't assist. A few weeks back I was informed to buy a certain MPG from our dear friend Ali, in record time it arrived, decent quality and heavy in the hand, hopefully it performs as expected. The MESA boards should be on the way, might be some long nights when they turn up! All for now, stay tuned!
1 point
-
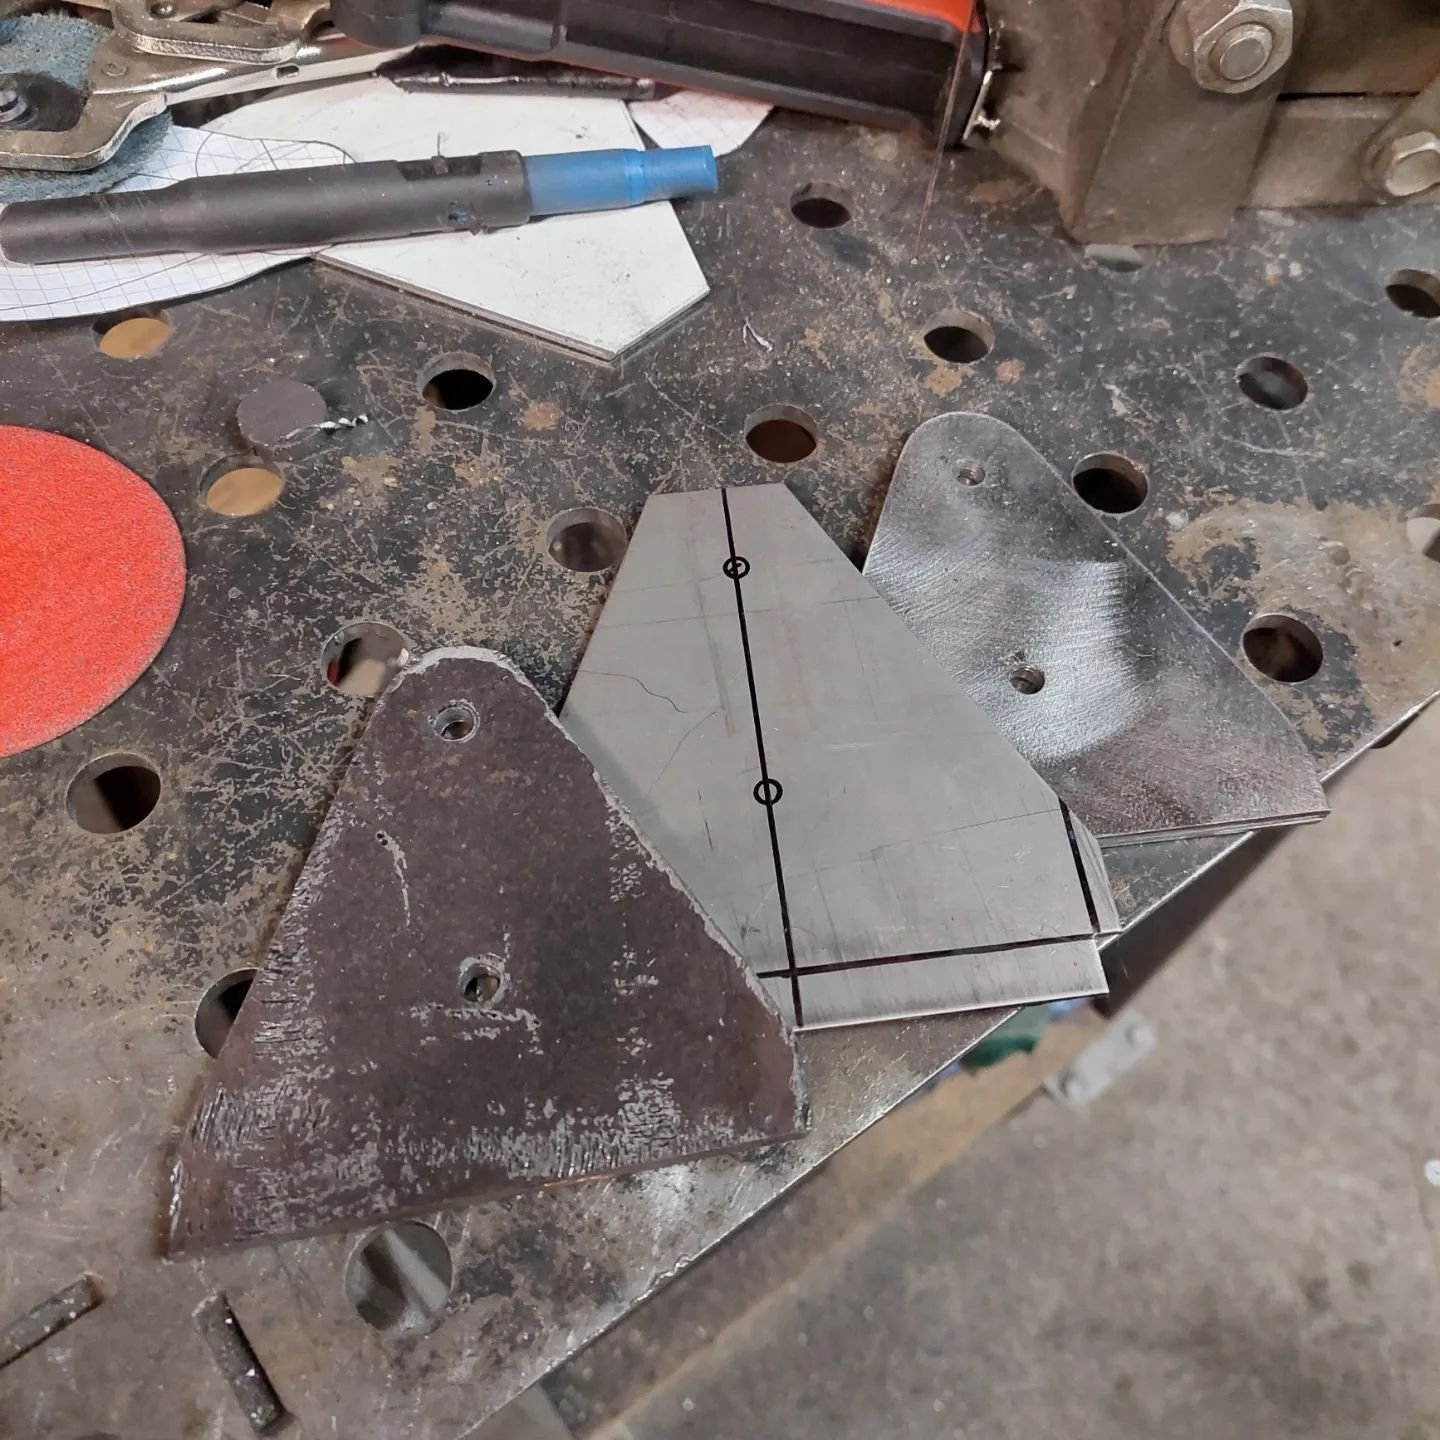
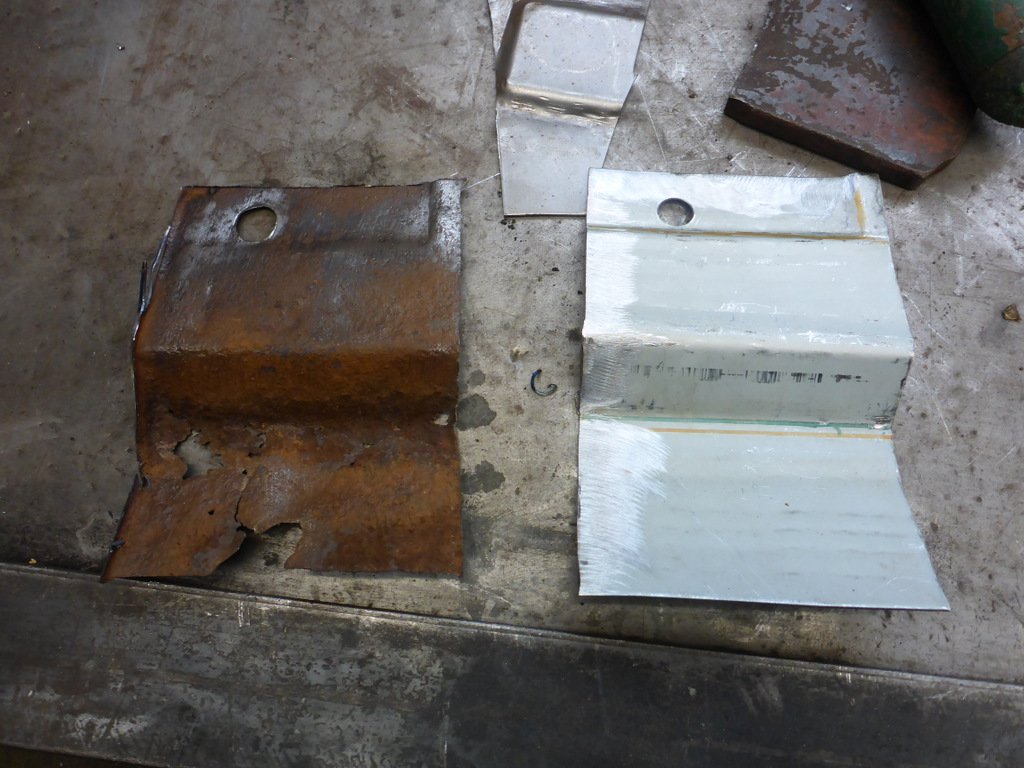
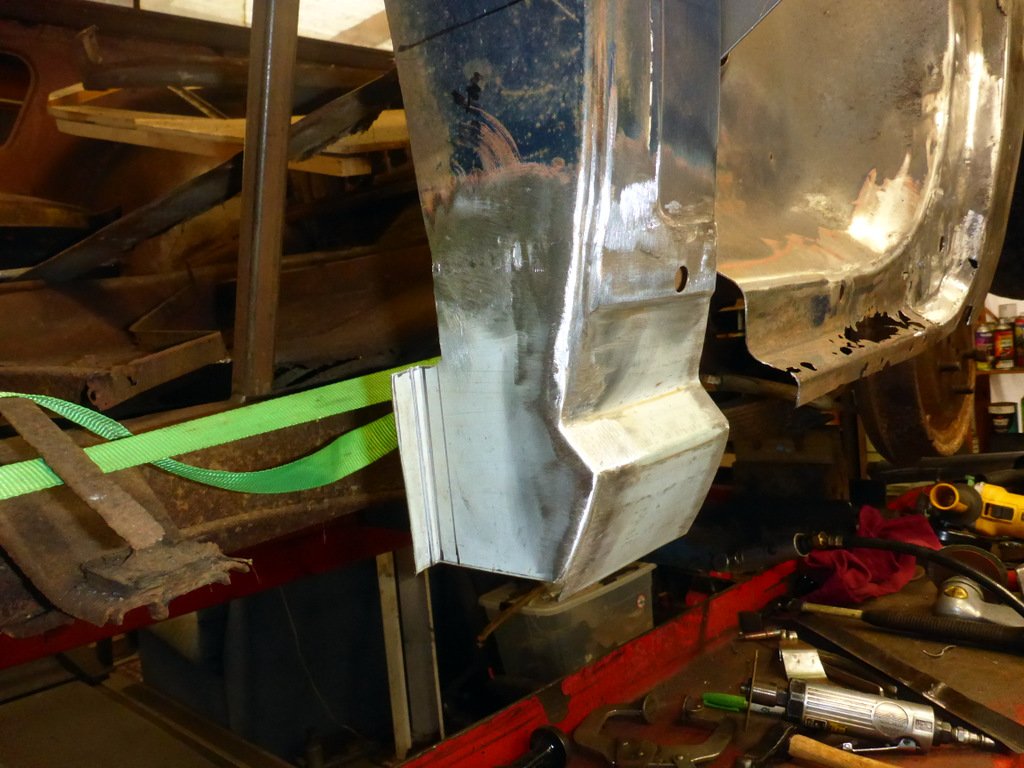
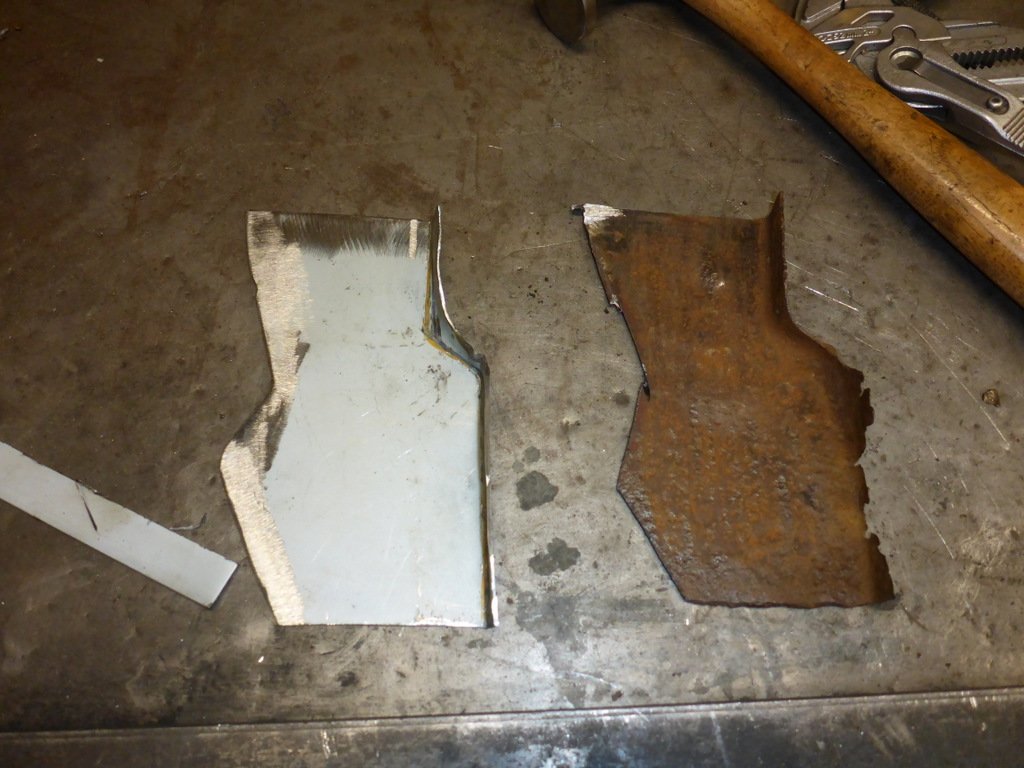
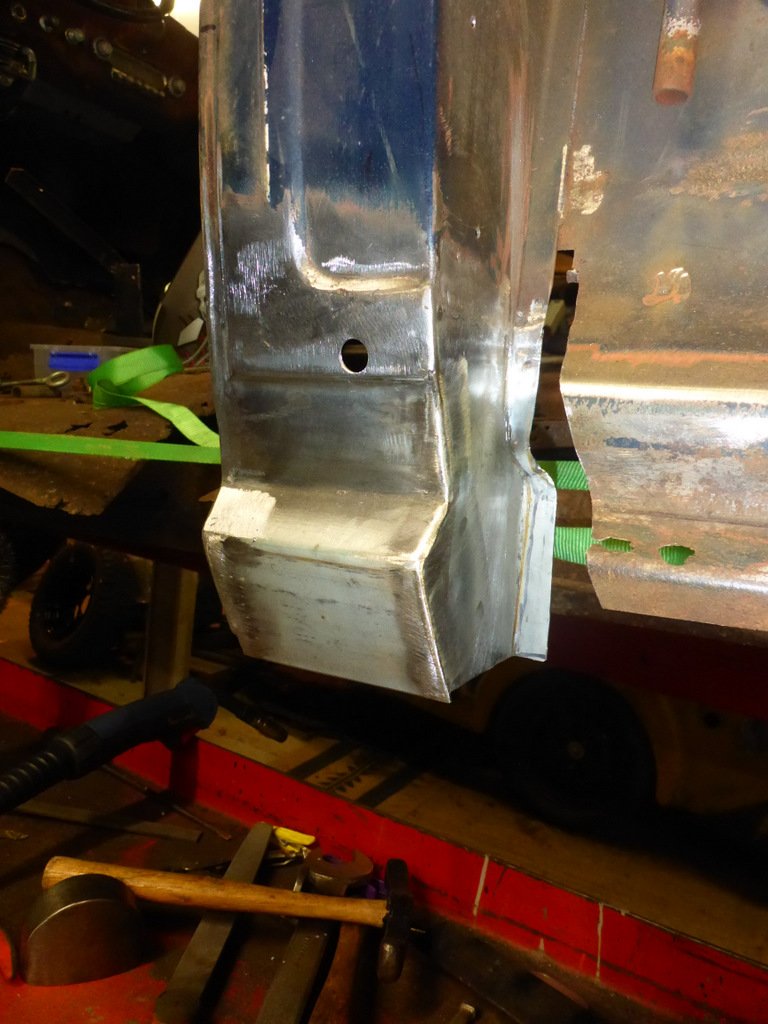
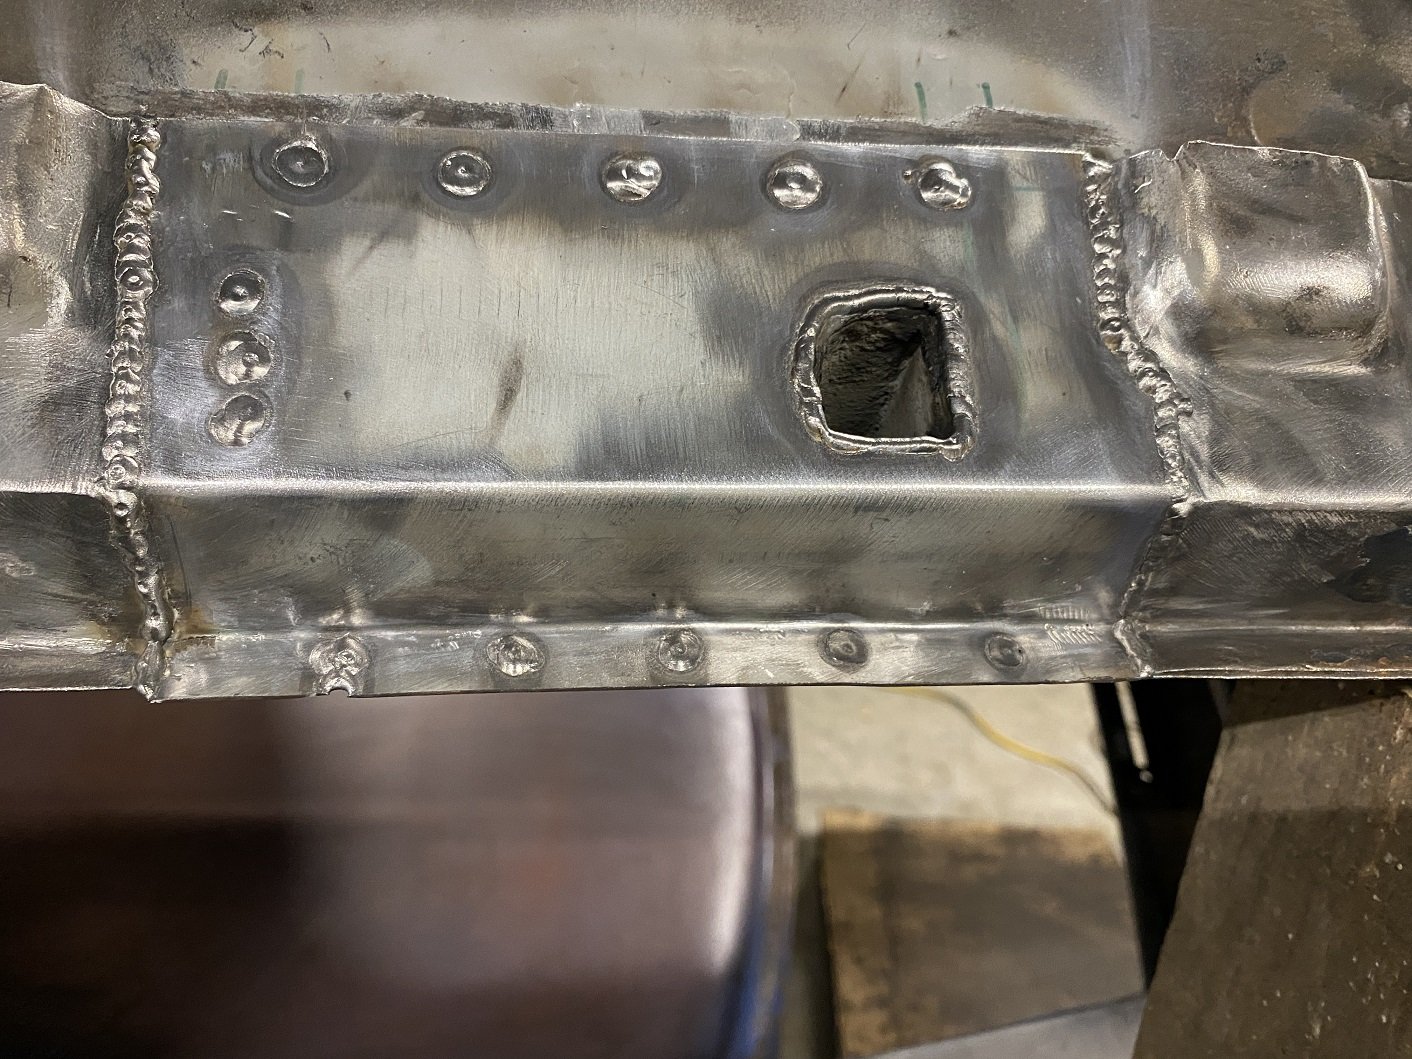
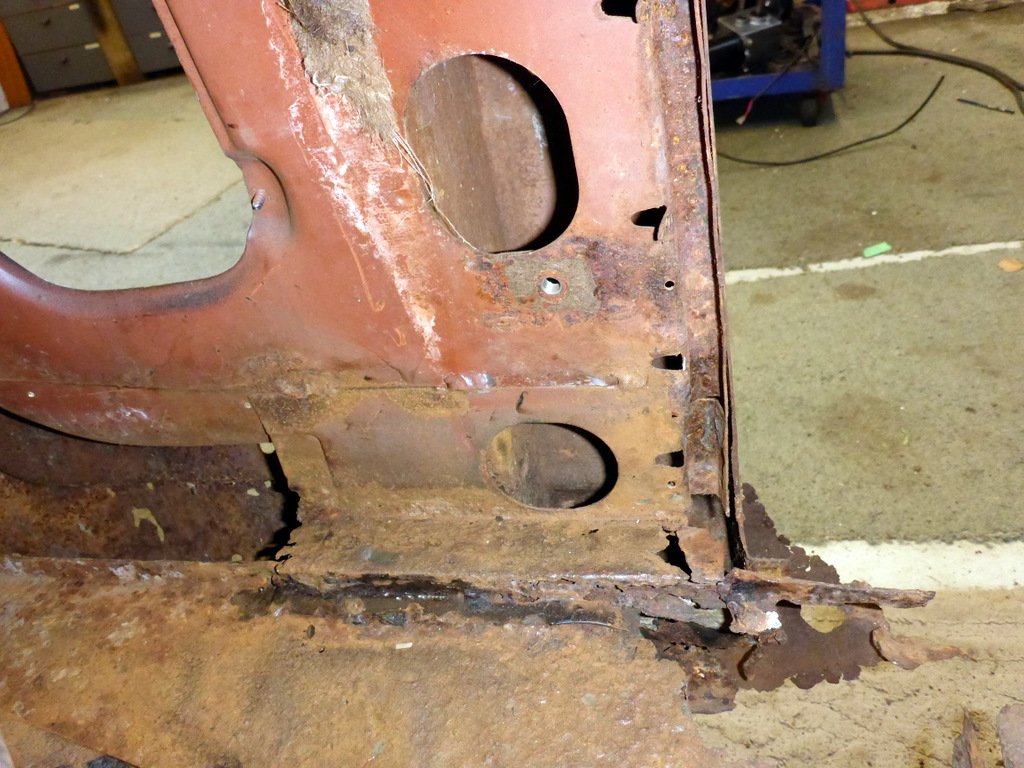
The continuing process of remaking the bottom of the B-pillar. I've been doing it in smaller pieces to keep the shape references. This area is almost all hidden when the wood and sills go on anyway.
1 point
-
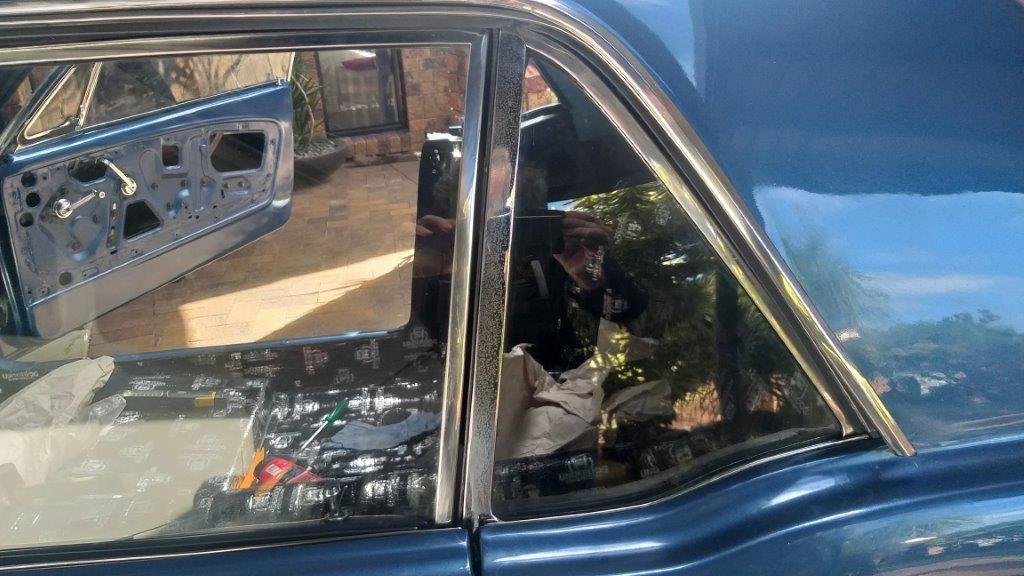
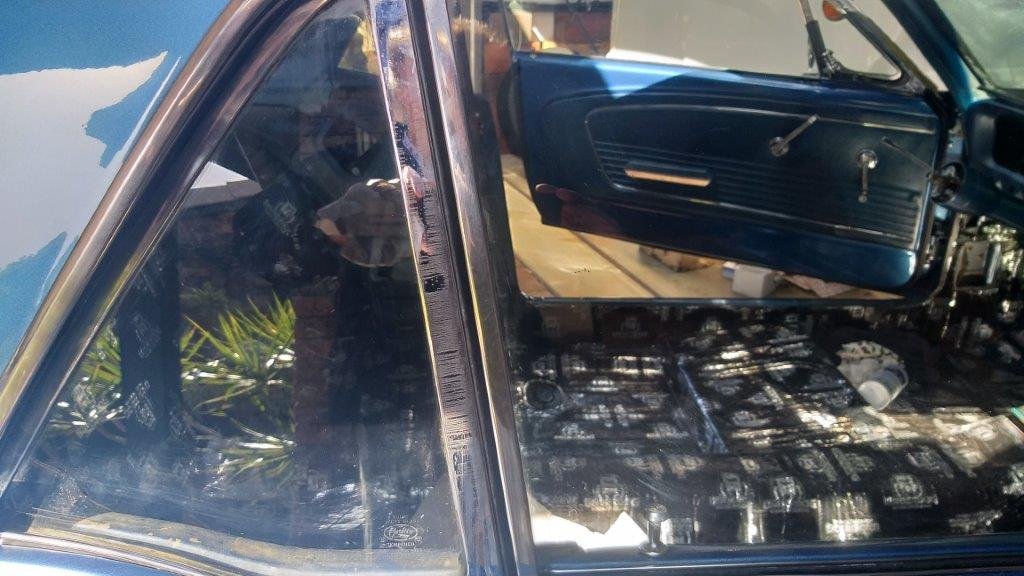
It's a bit of a feeble update today. Doesn't look like much but it took me a good while to align the rear quarter window frames with the door window frames. Gaps are almost spot on now. Just need to clean my dirty paw prints off the chrome. With this out of the way I can now install the rear quarter inside panels and then the parcel shelf and back seat.
1 point
-
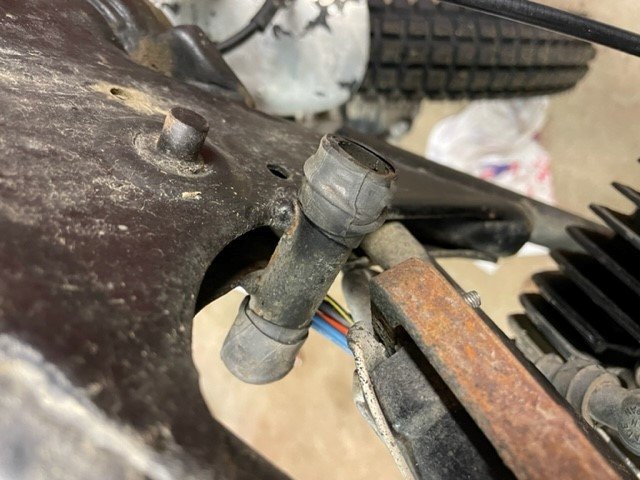
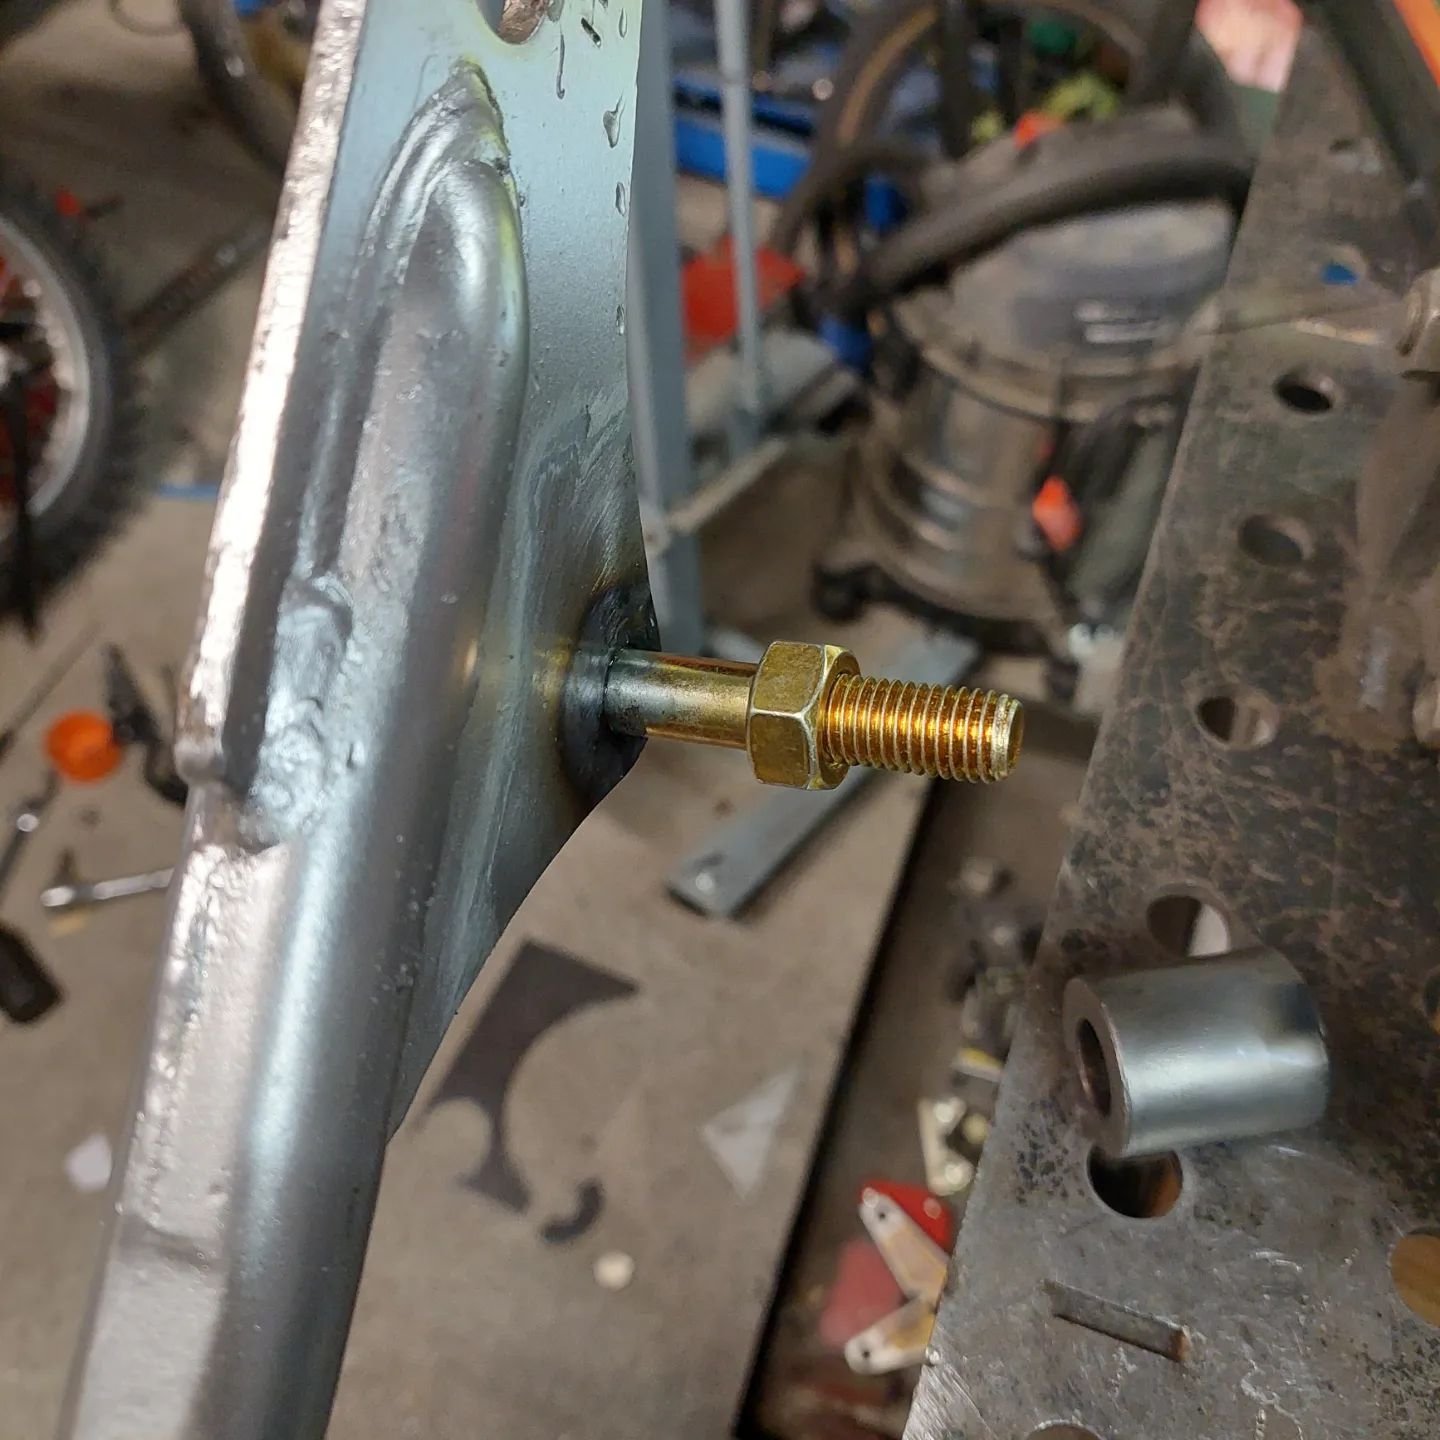
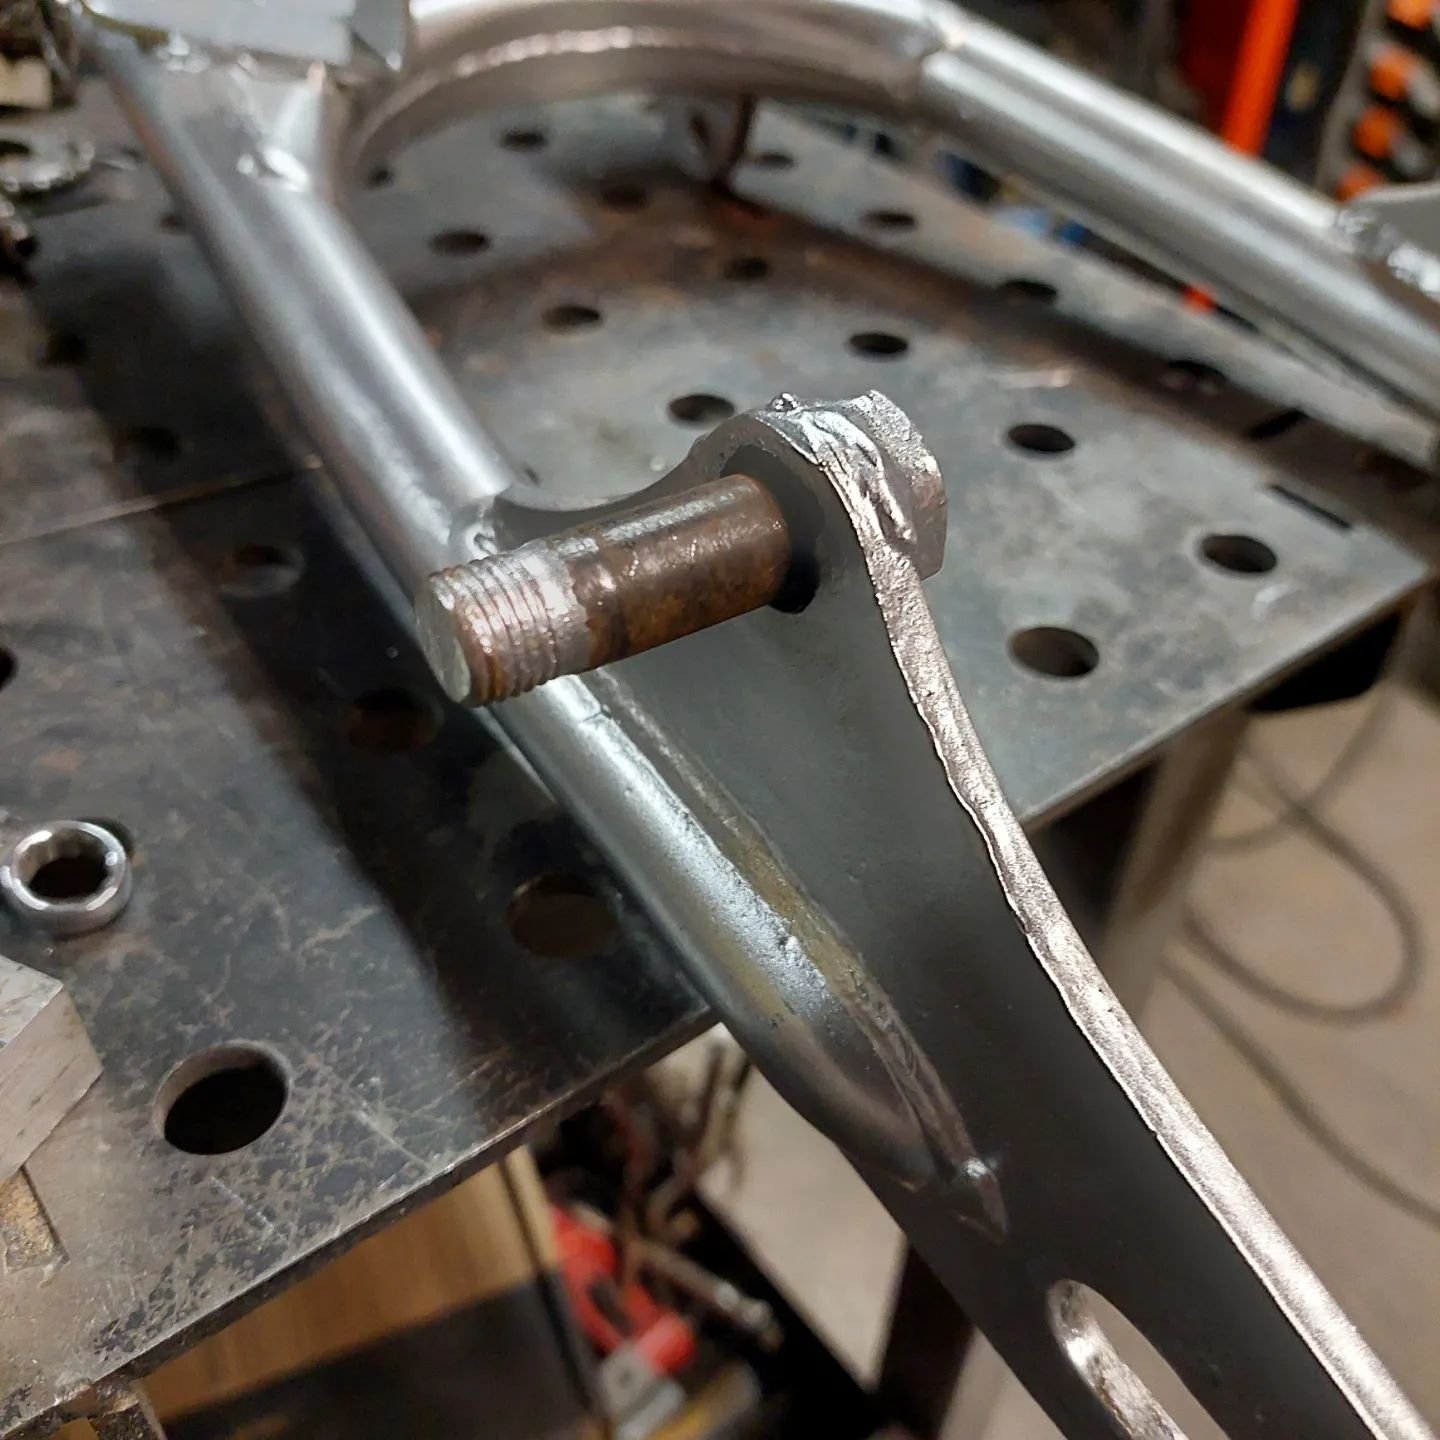
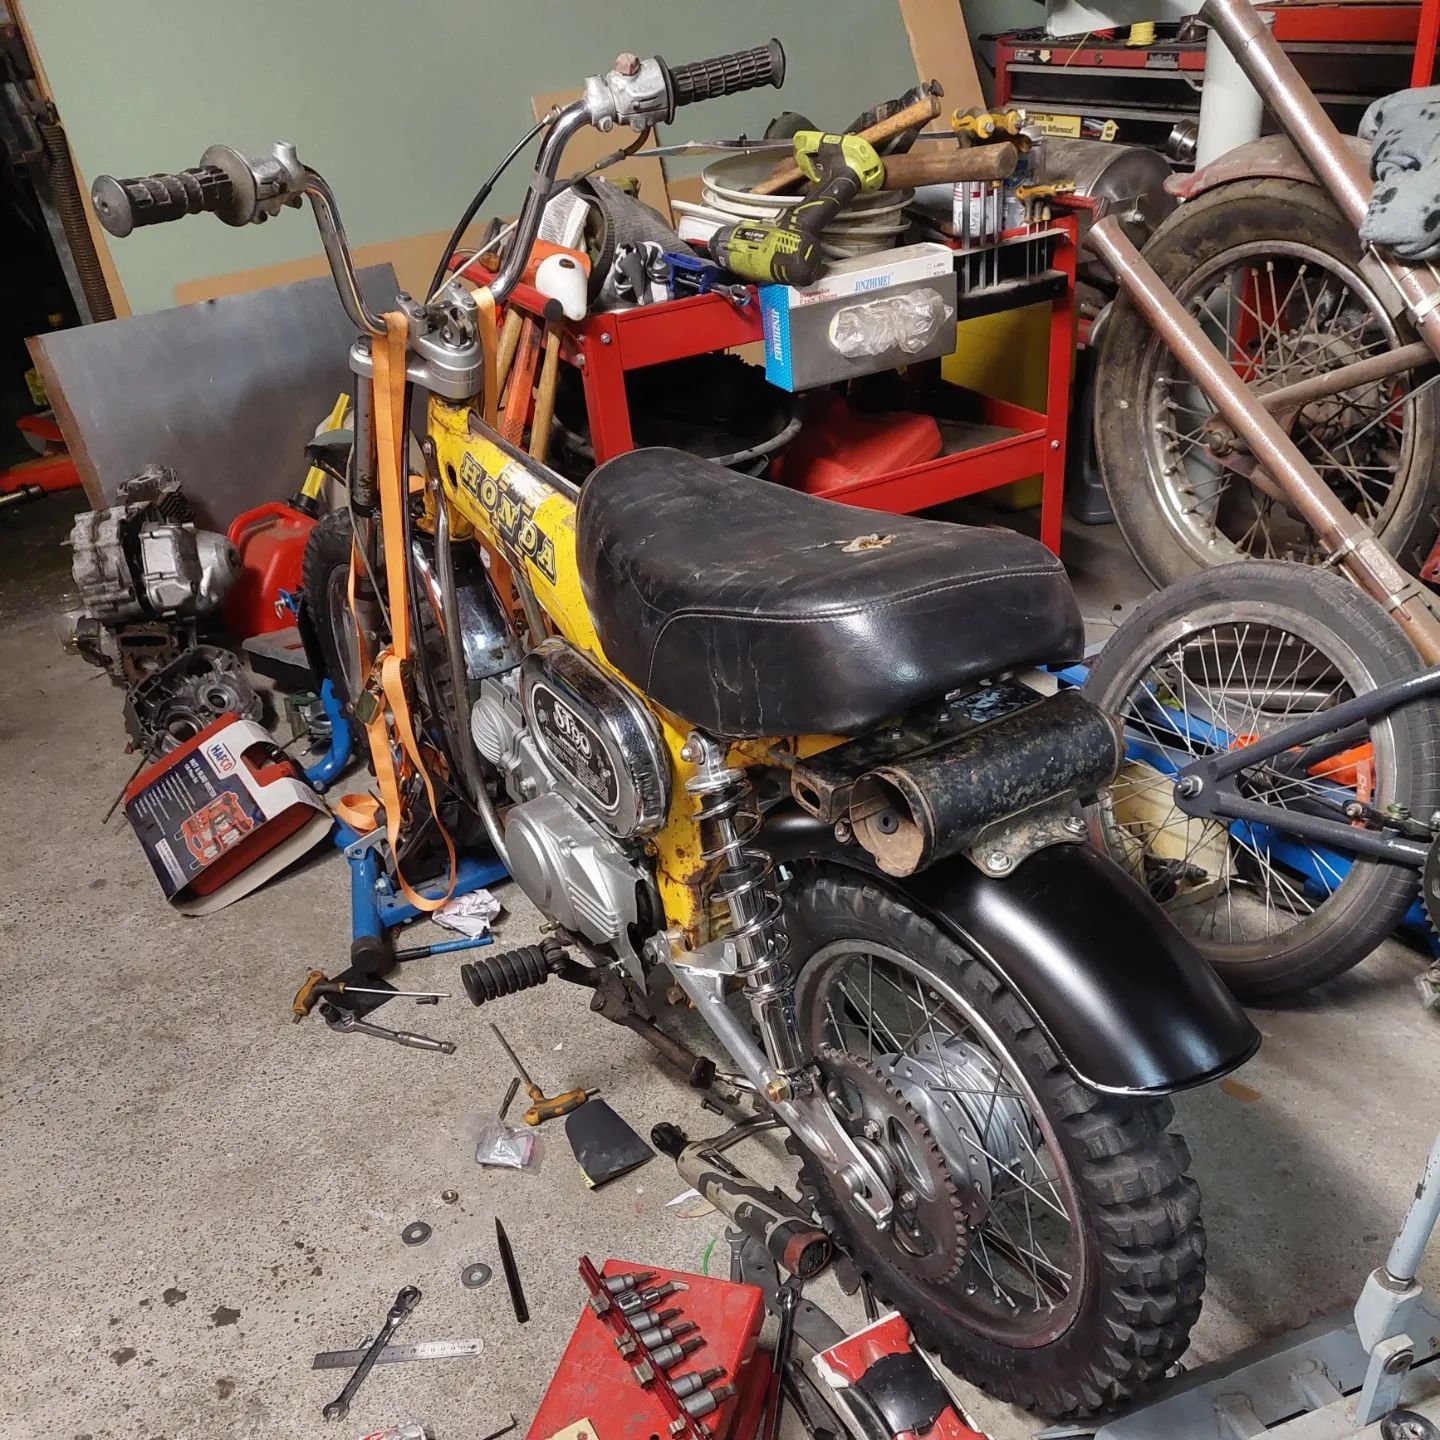
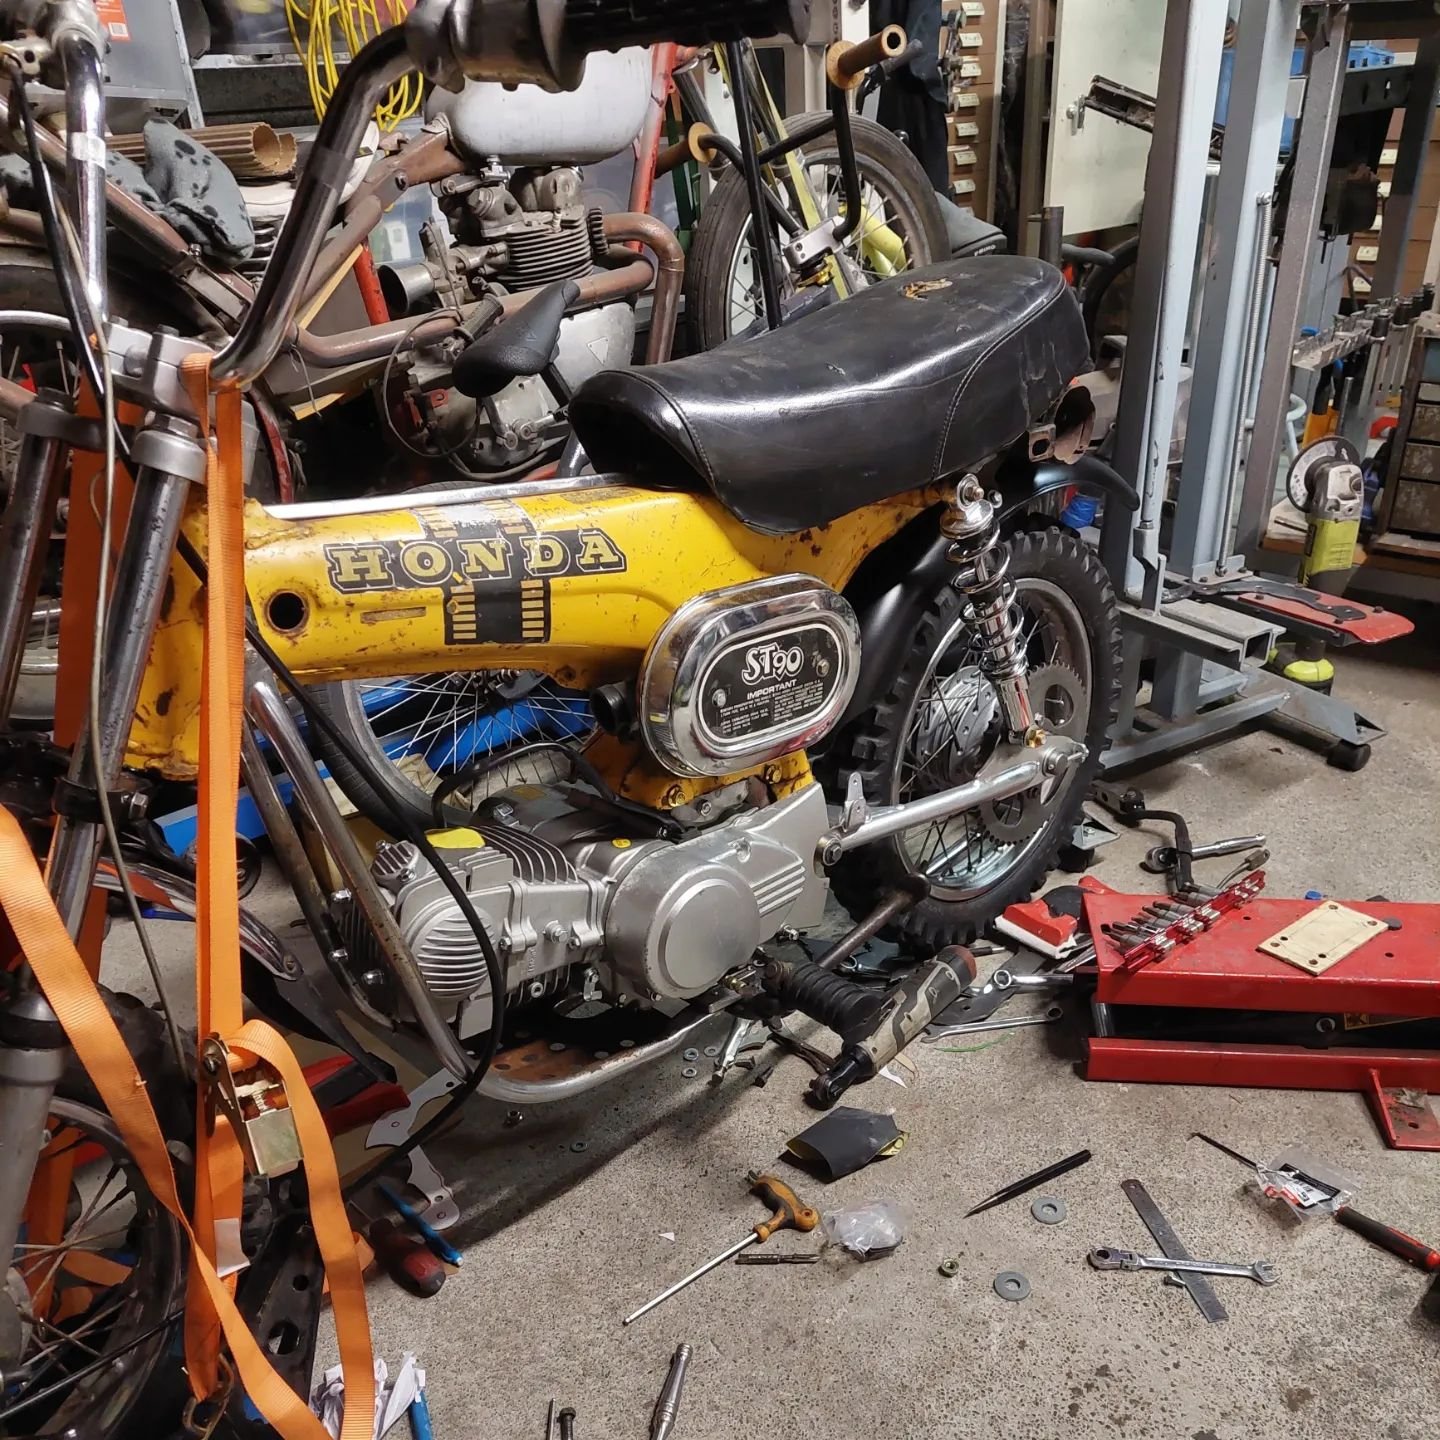
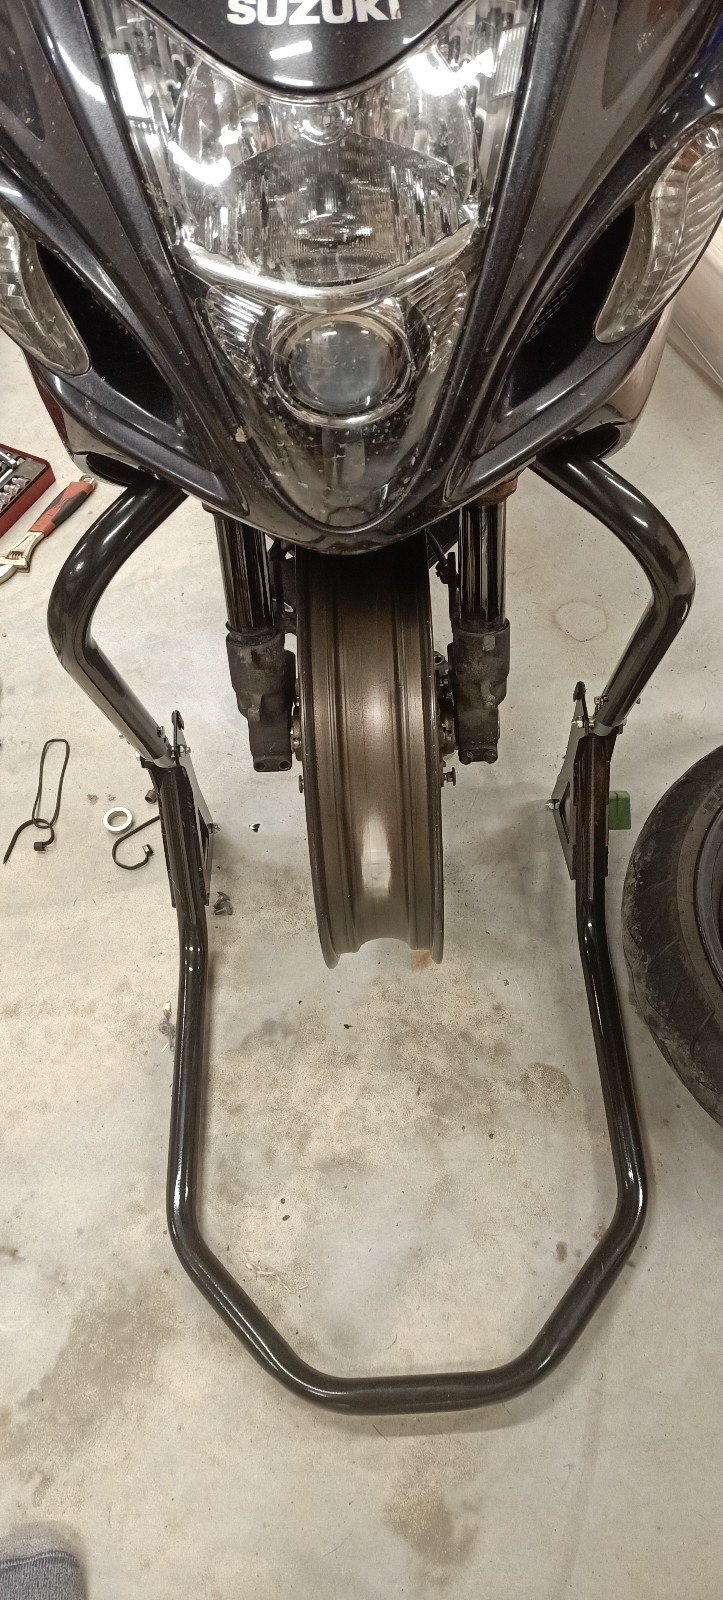
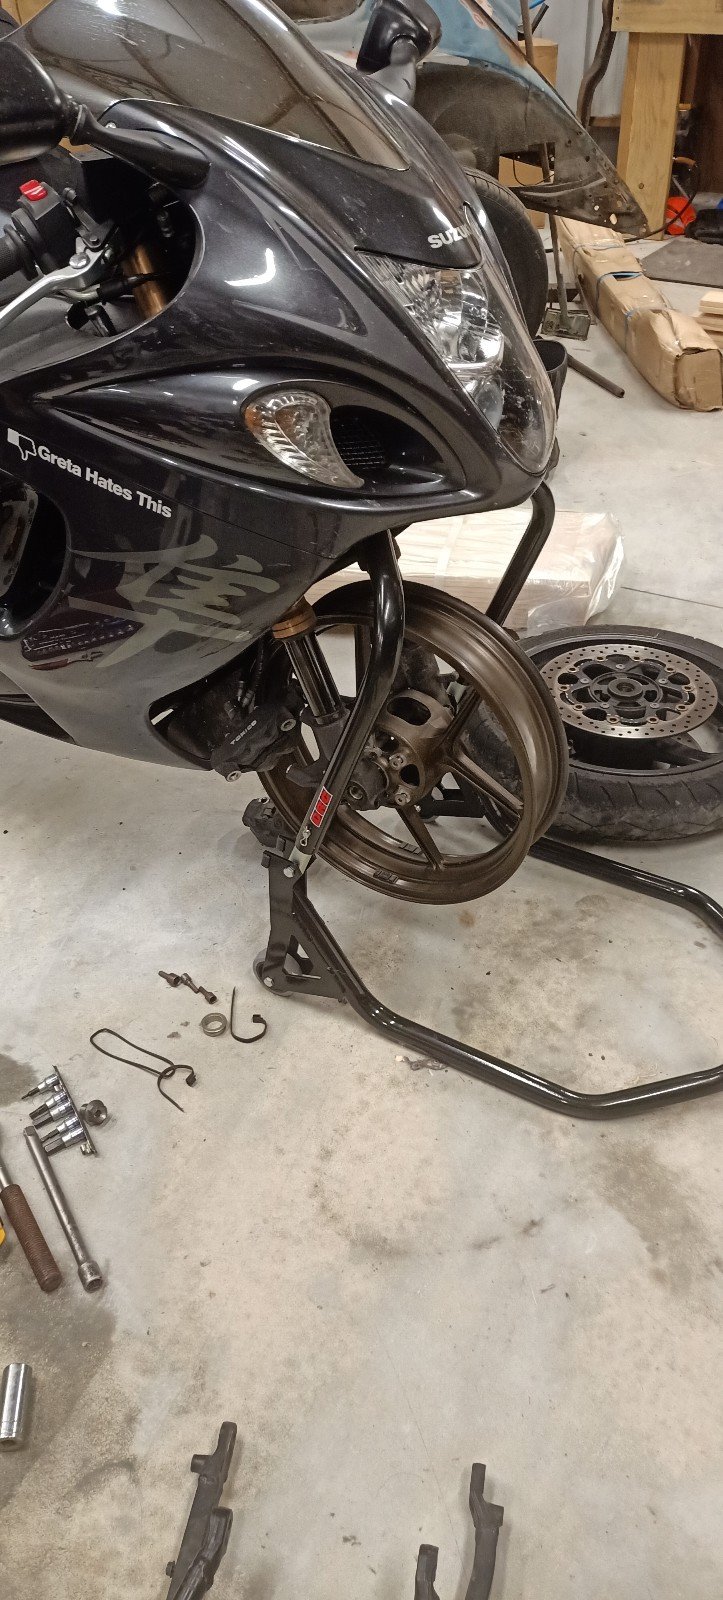
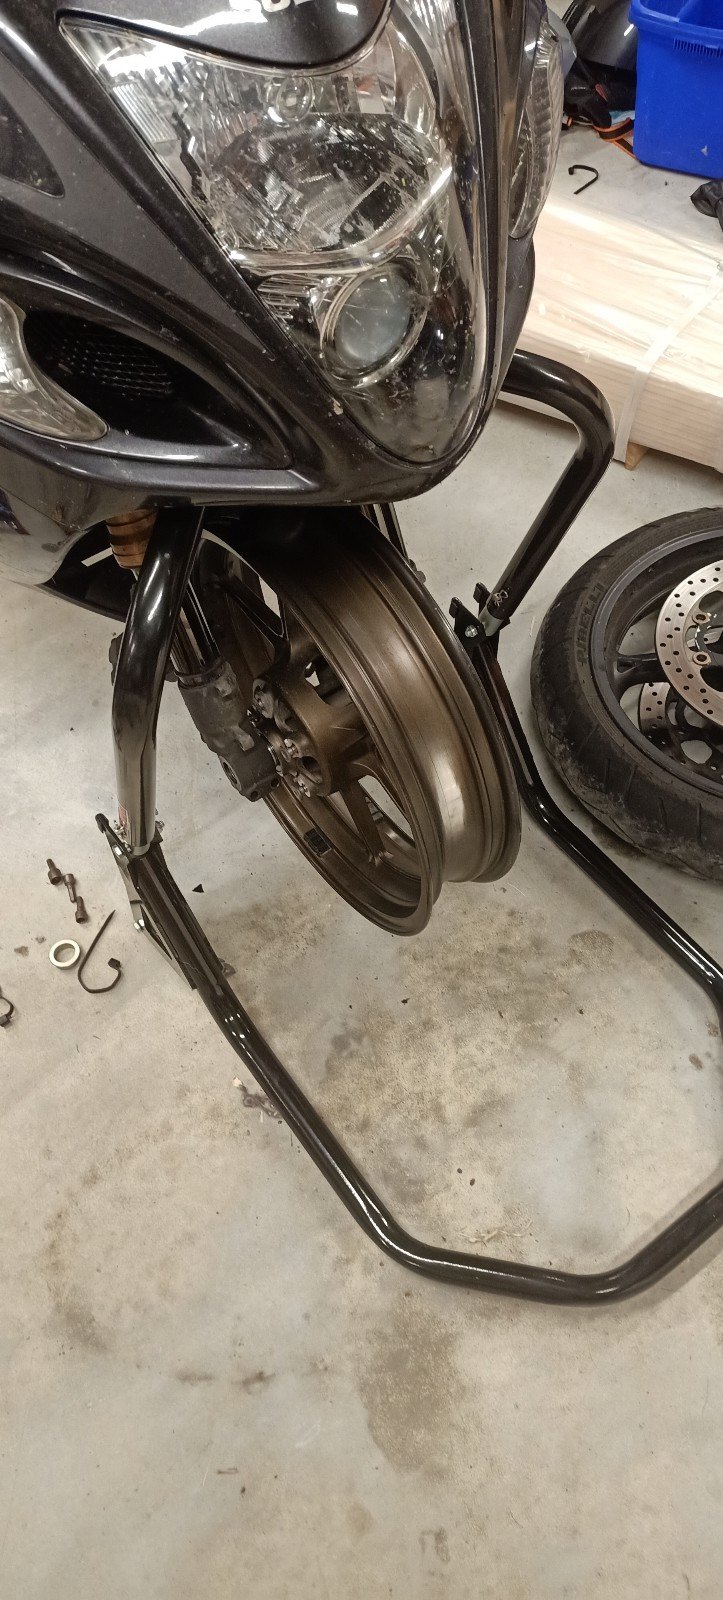
So by the end of the last east cape ride this had a really horrid vibration, made more horrid by the petrol tank rattling. Last time I took it out for a ride I had a fairly solid look over it all to work out where more issues might be. I found the chain was quite loose, the cush drive sloppy, the petrol tank issue and a loose engine mount. I'm hoping the engine mount might be what was letting the vibrations out. I got a new tank rubber set from Ali, machined up a thing and set about modifying the mount: Much better! Last night I cleaned and tightened the chain, and have whipped the wheel off to inspect the cush drive. Yup that's fucked. So I need to sort that out, clean the air filter, advance the timing and then start thrashing it to work again, hopefully keeping my will to live intact.
1 point
-
Becaue everyone likes pics of honda stuff here's some more Grabbed some dowls from work that actually fit Borrowed the 14mm hex of the neighbor and put in the an fitting into the block so I'll actually have a chance at pcv stuff. Next time I'm at lockup I'll grab a catch can and see if it'll fit1 point
-
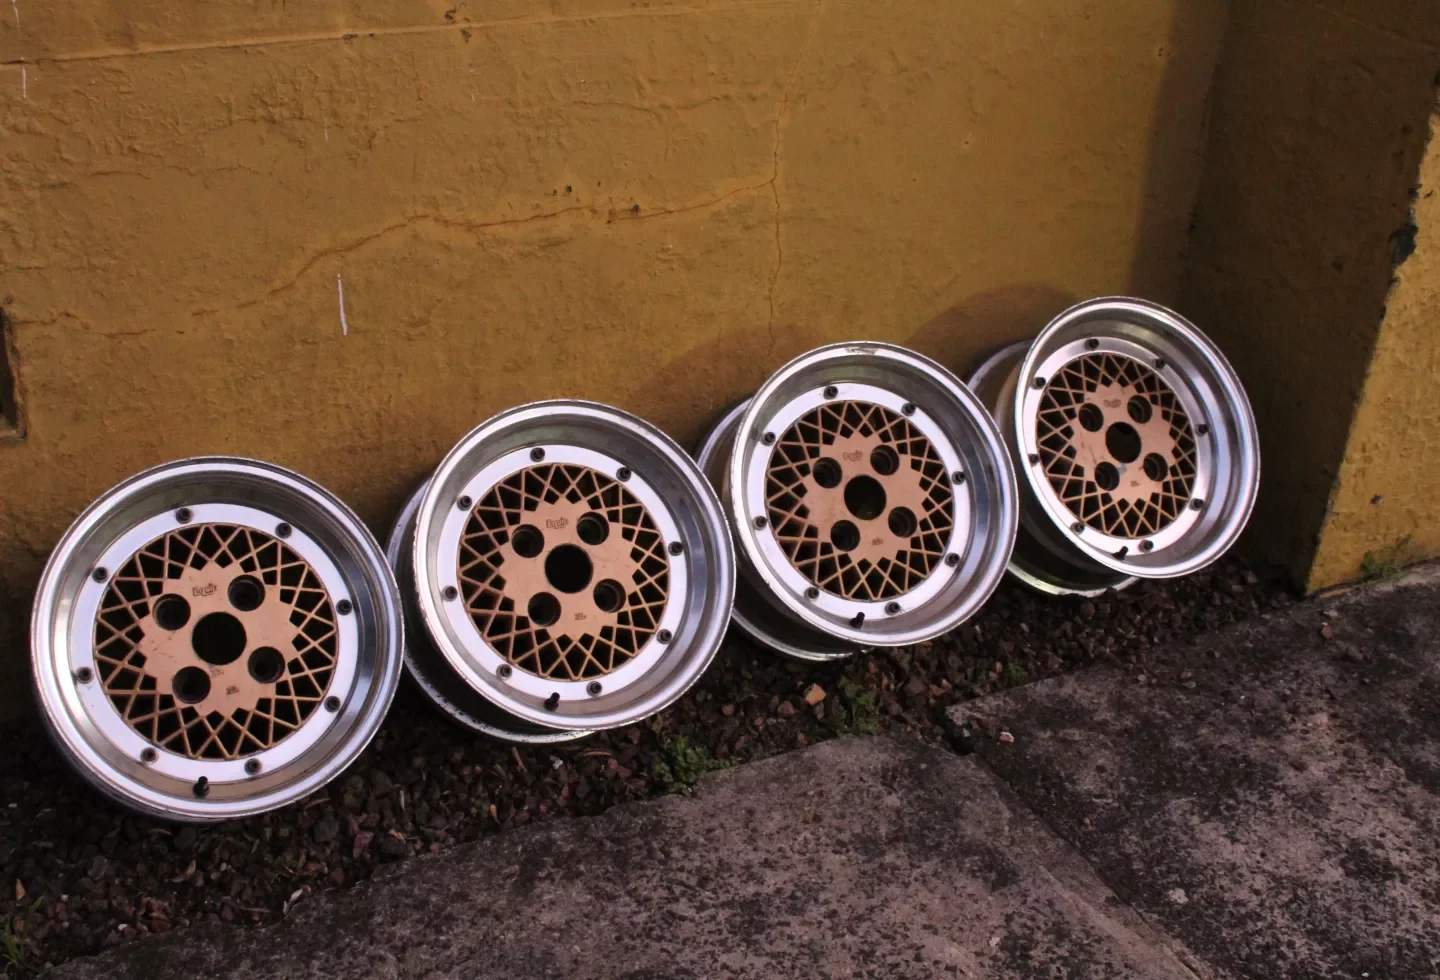
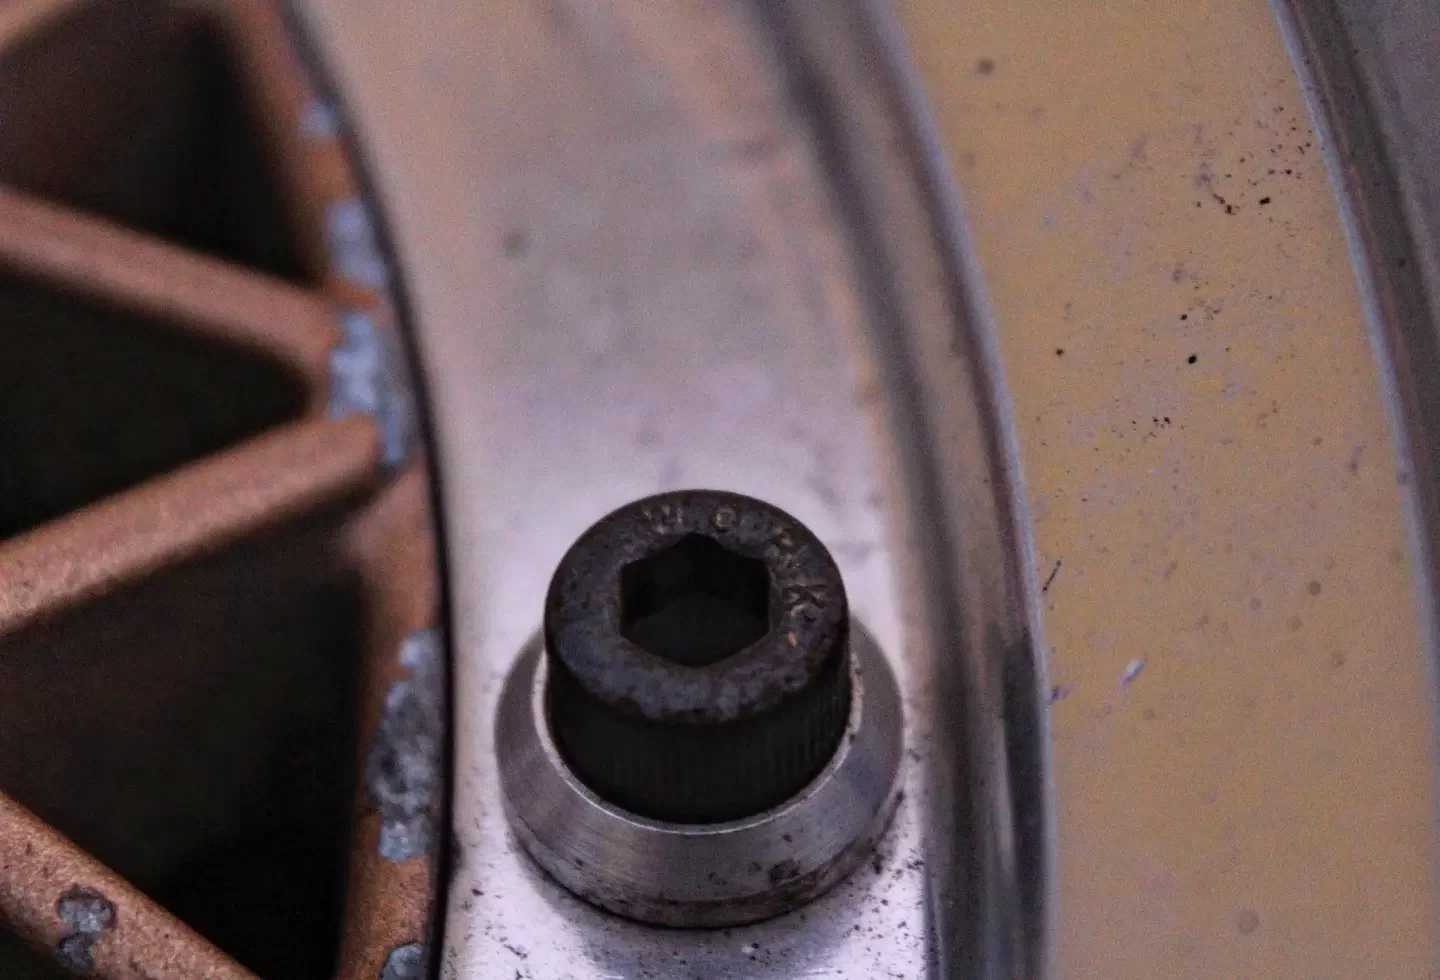
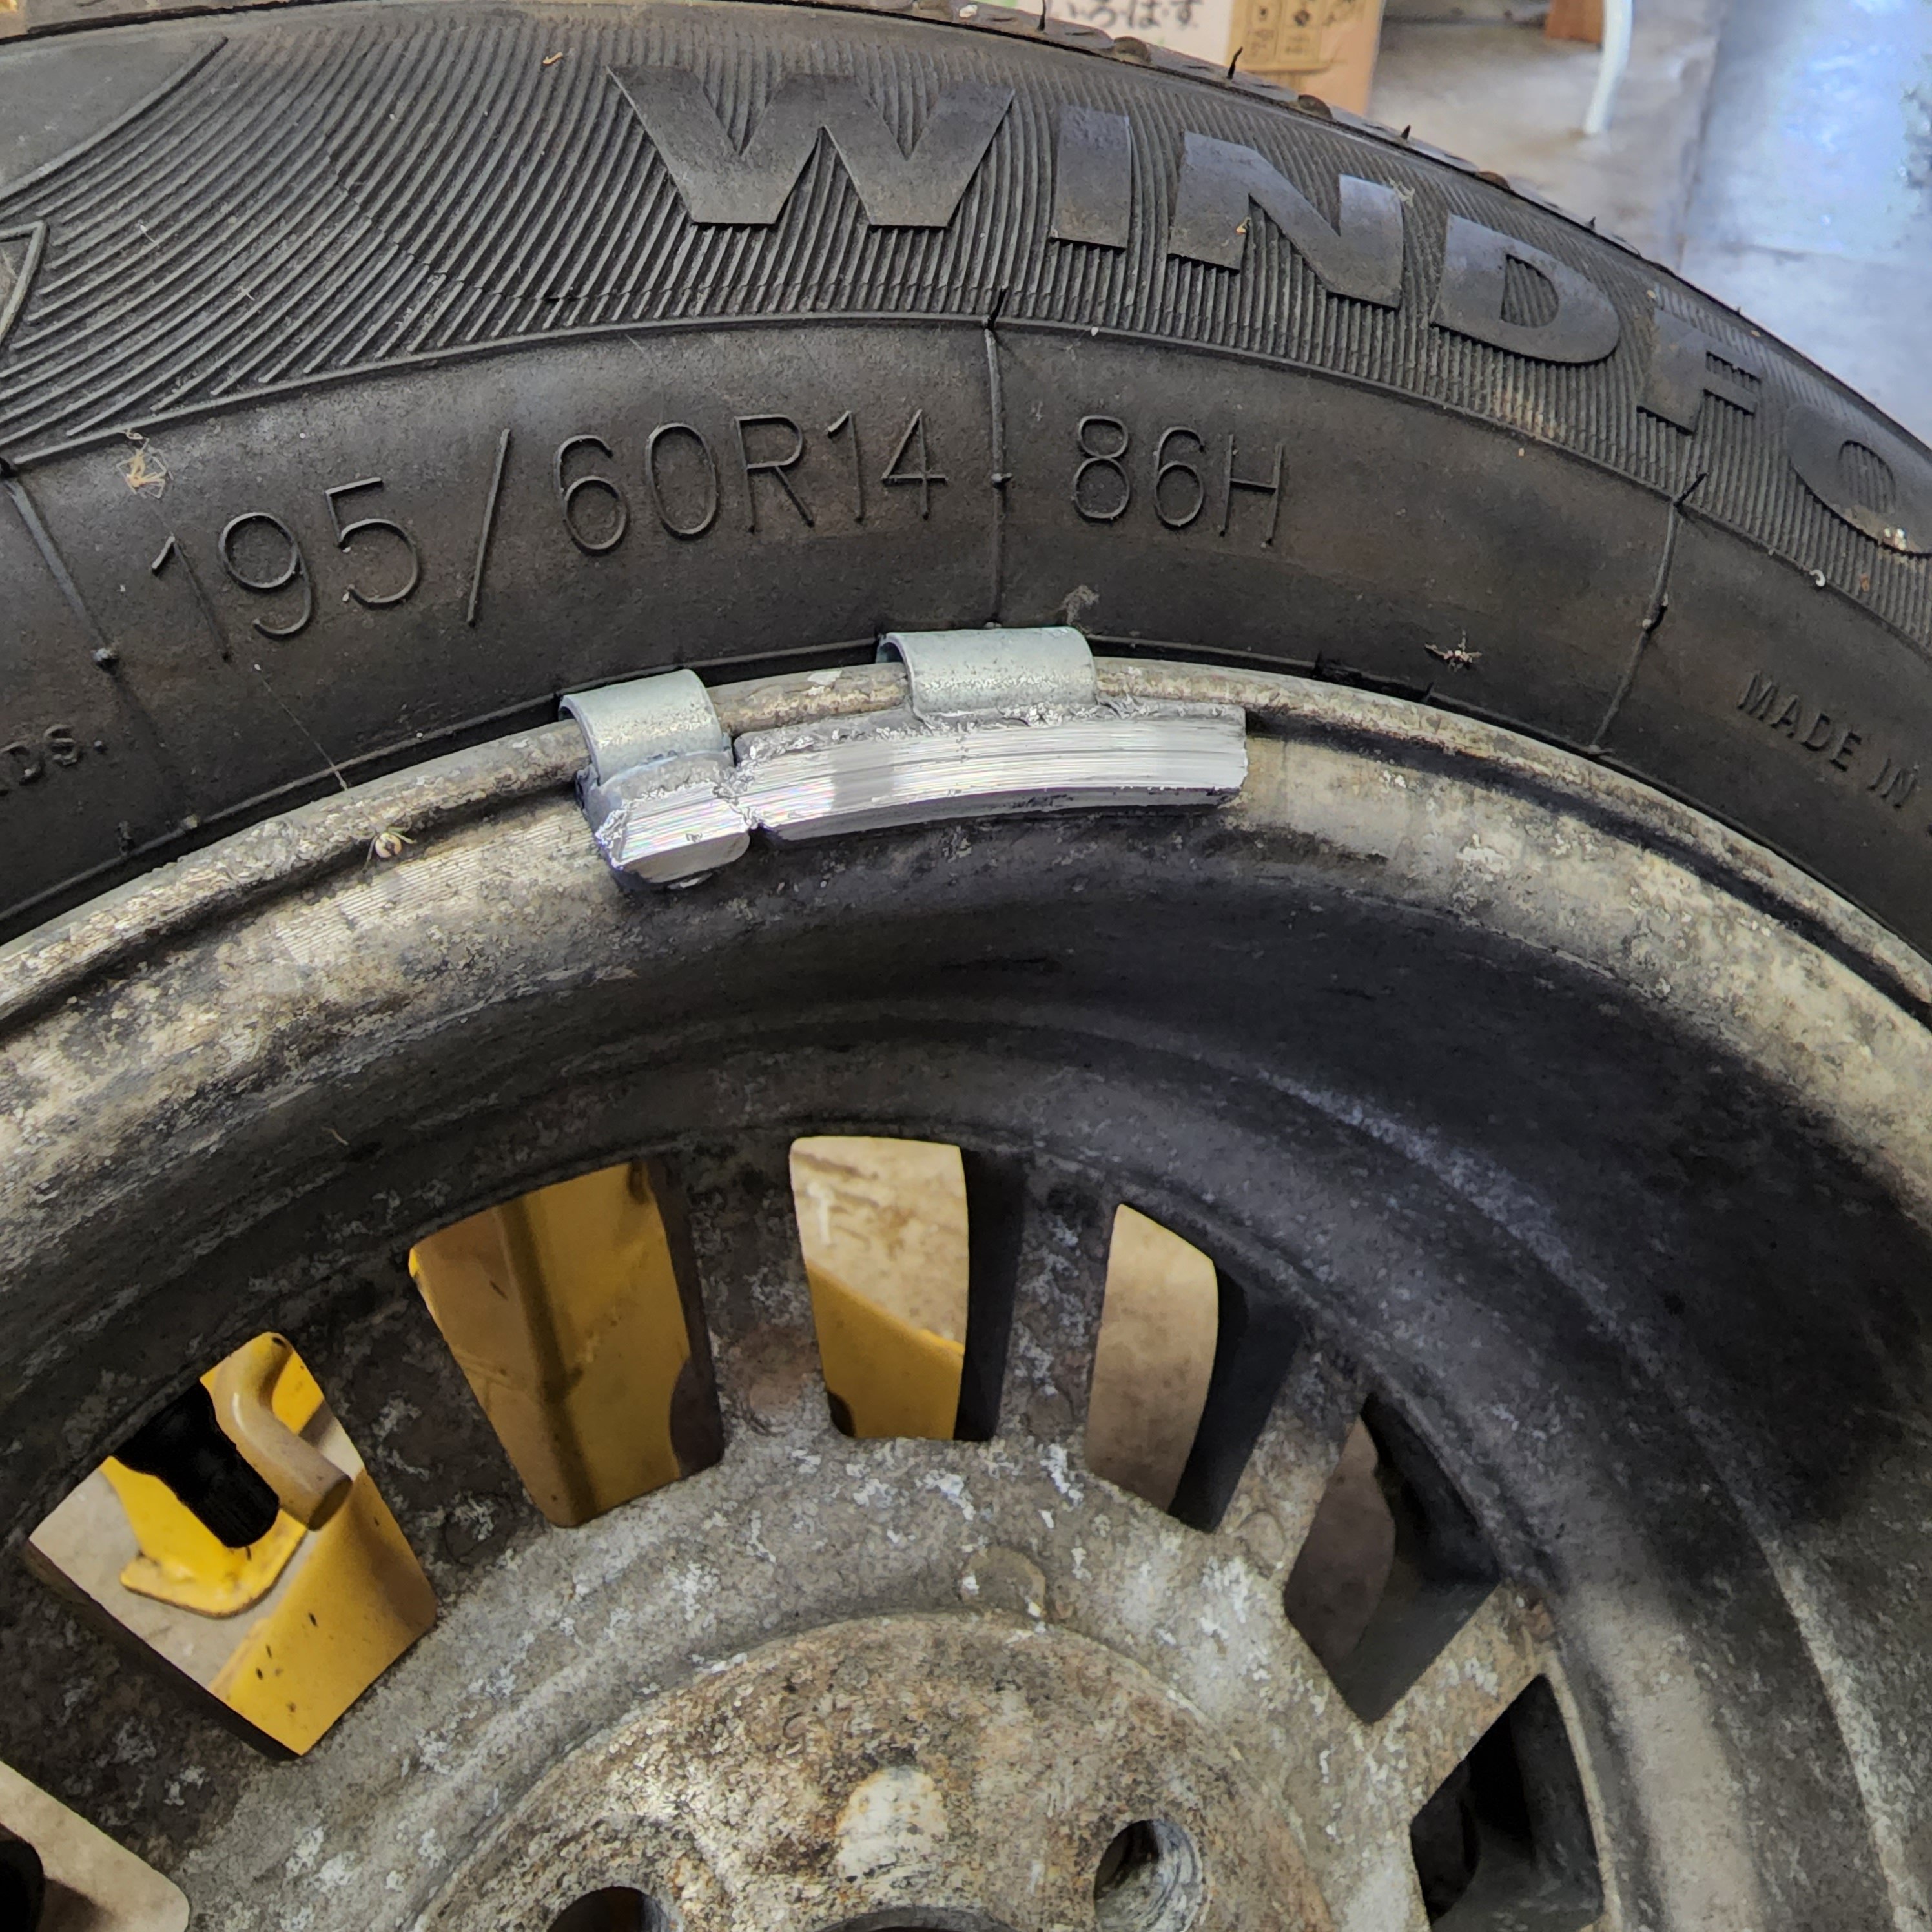
Tried them with another 14" A type wheel and they will work as long as tyre isn't bulging past the rim. Saw these pop up and grabbed them since I haven't seen them before. They are an uncommon 14" work equip mesh Each of the hex head bolts are engraved with 'work' And they have pretty cool black valve stems/caps. These will be widened to a 9/10J stagger as the potenza tr-3 were. I've managed to get a pair of 225/40 toyo t1r to try on and see how they work with the rear flares.
1 point
-
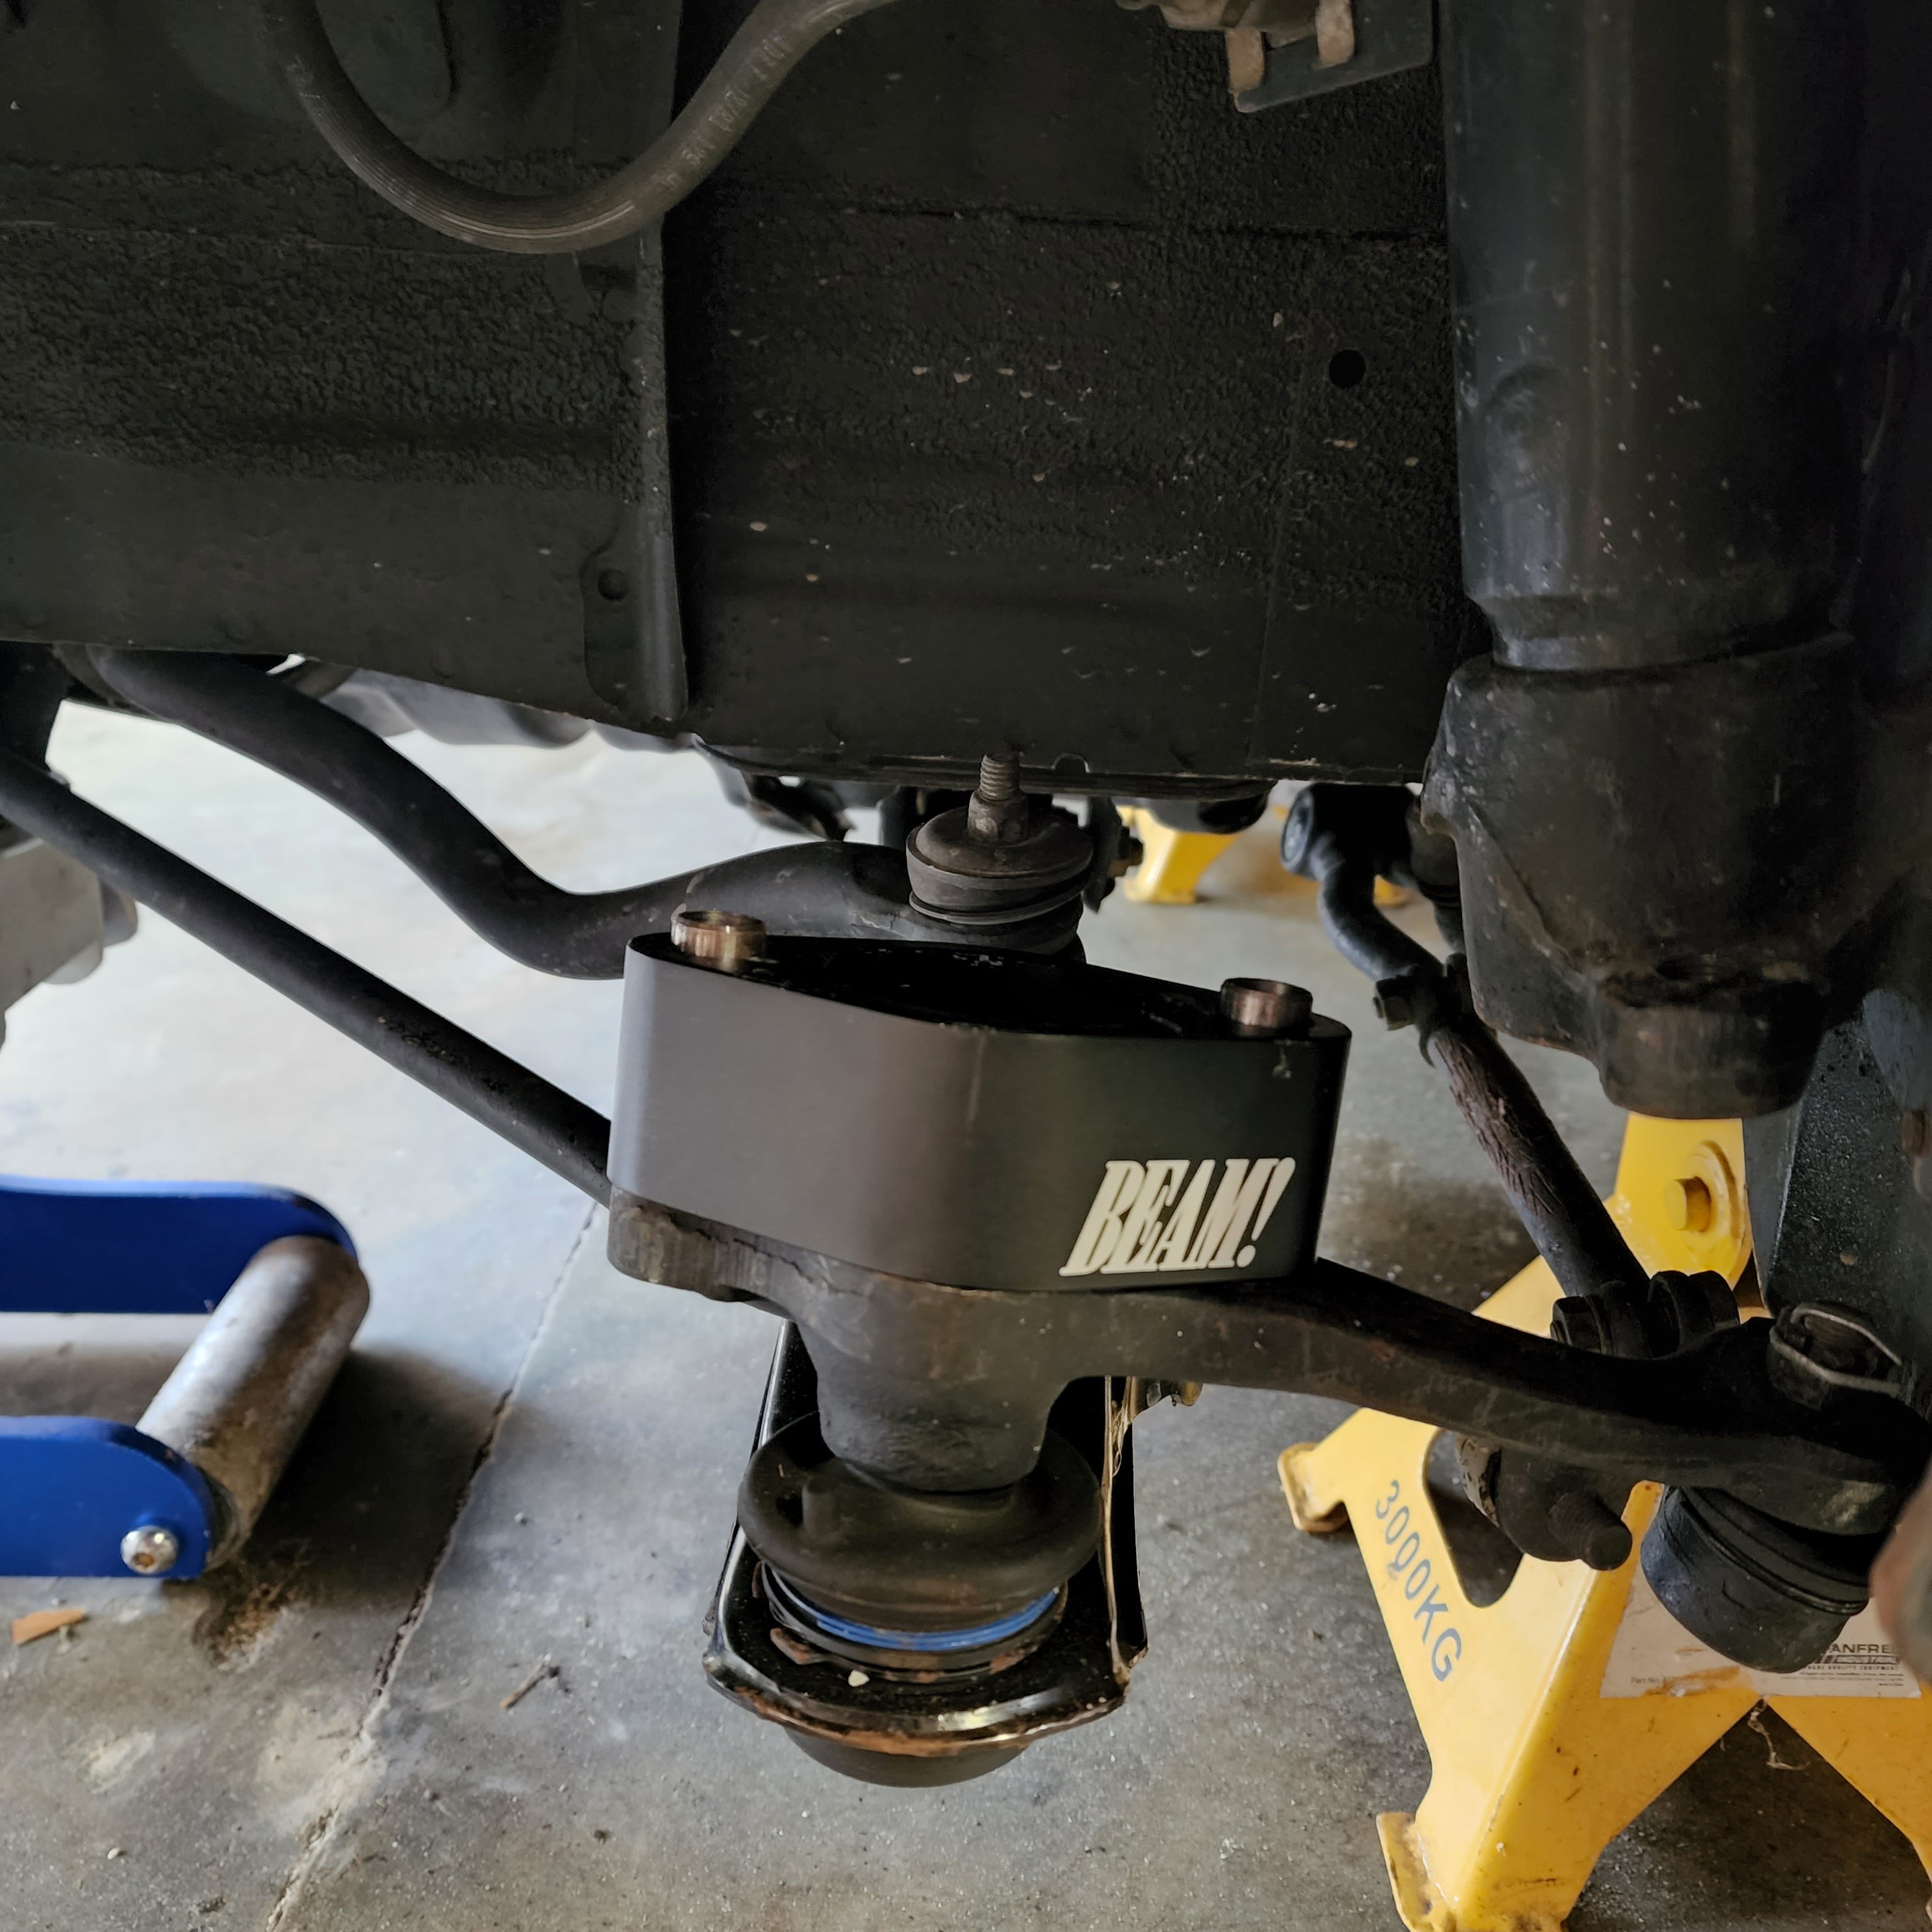
I did a bit of work on this a few months back to try get a warrant and fine tune some suspension bits but it didn't really pan out so it's just been sitting. I also sold the Bridgestone tr-3 to a friend who needed something quick to build his car around. Purchased some of these beams! 40mm roll centre adjusters from Australia Stuck them in and went for a drive and heard a horrible grinding It was clarencing the wheel weight on
1 point
-
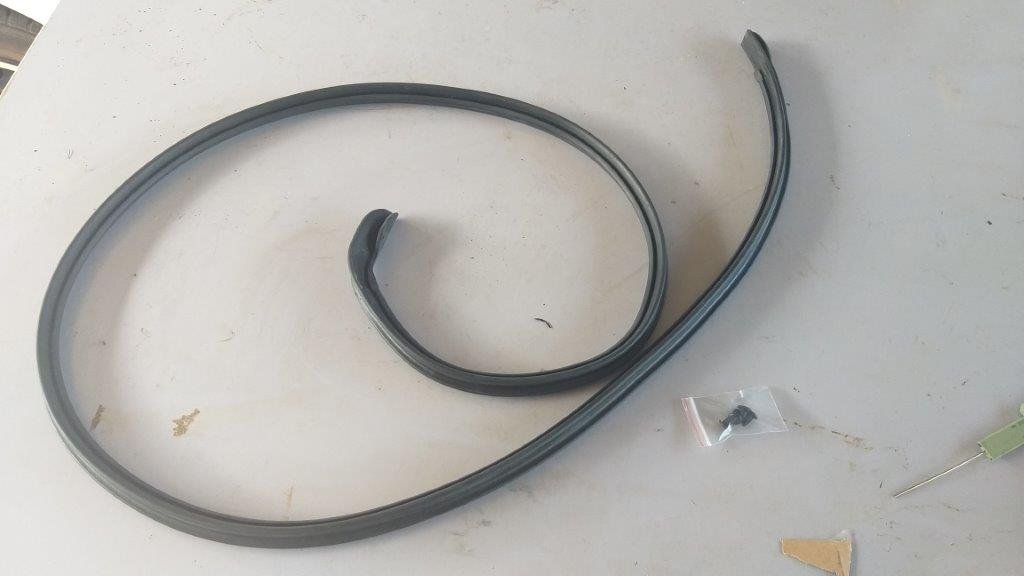
Spent the morning fitting the glass and winder mechanism into the driver's door. Wow, what a difference the refurbished winder mechanism makes. Smooth as silk. Cracked out the new weather strips and door seal and fitted those too. Final step was to fit the interior door panel and related bling. And, that's the driver's door ready to rock and roll.
1 point
-
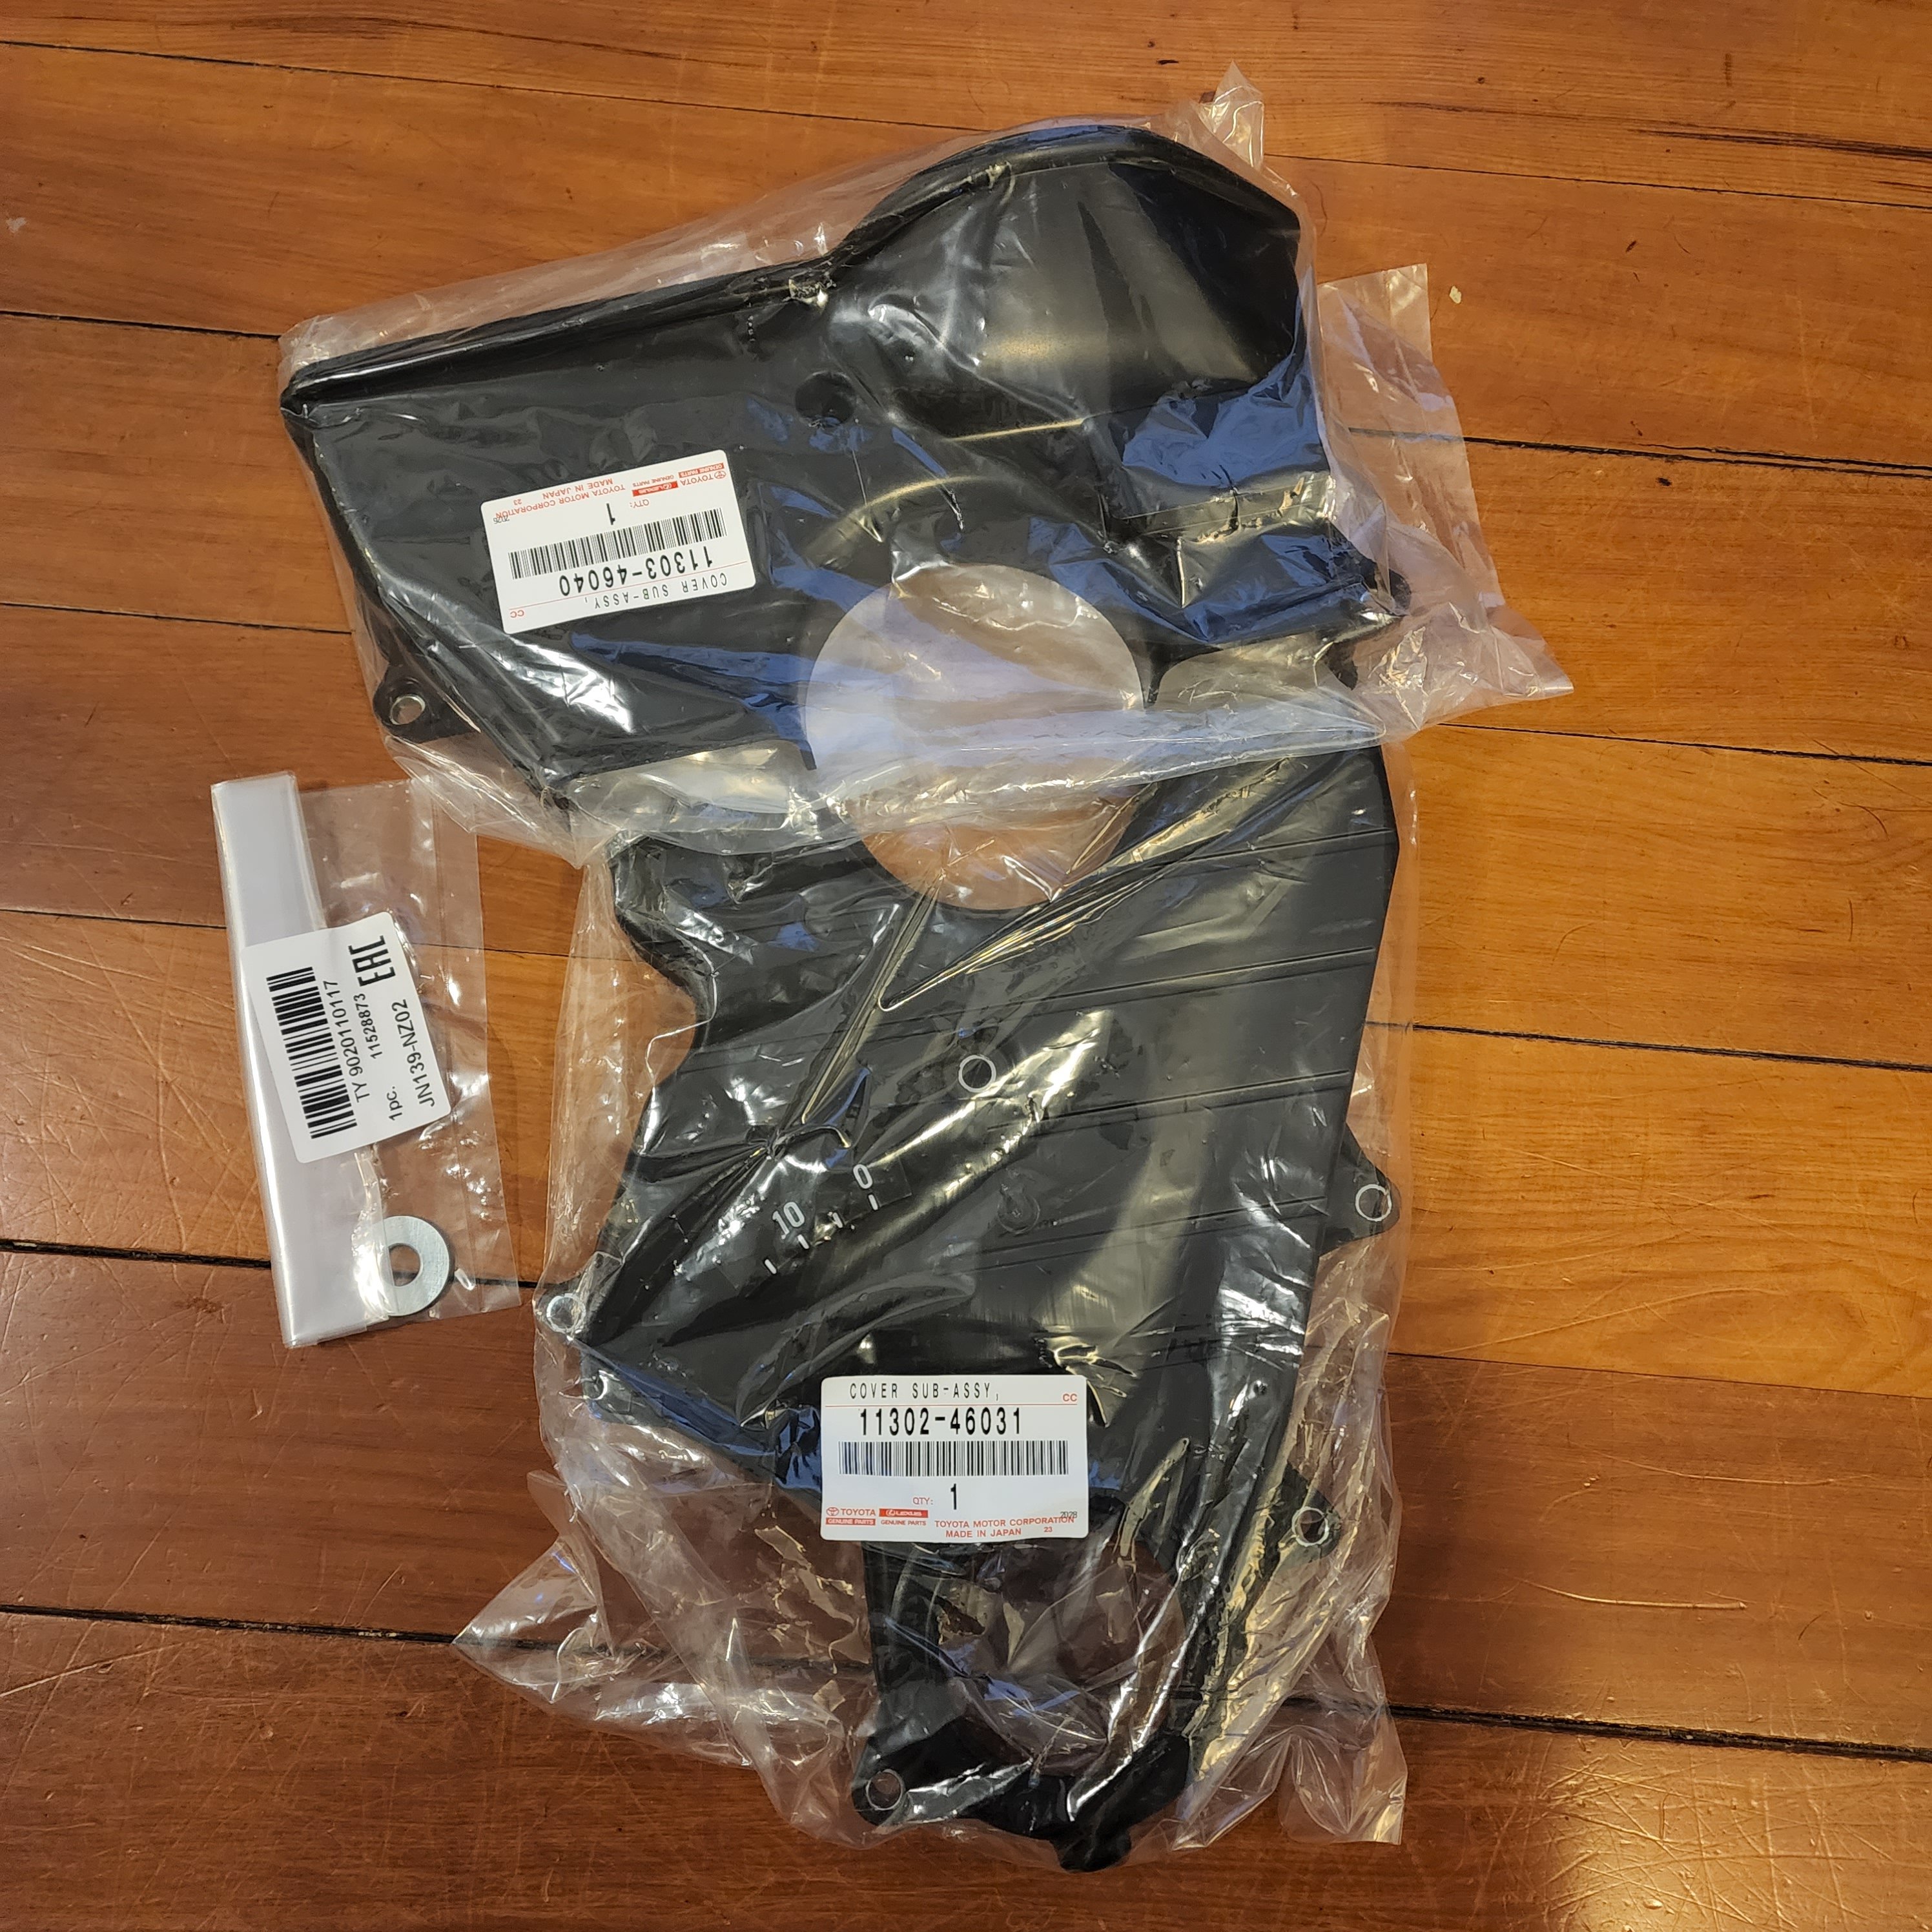
Have been a bit slack on this as of late, will blame the weather. Had a few weeks off from my day job and thought I would make a start on installing the new cambelt and water pump tensioner etc I had purchased. Couldn't find the washer to space the tensioner out so ordered new with a few new engine plastics also. I think I have it all to put the front of the engine back together including cam seals and front main seal These are a bit nicer than the cracked and scraped ones the car came with and cheaper than you think.
1 point
-
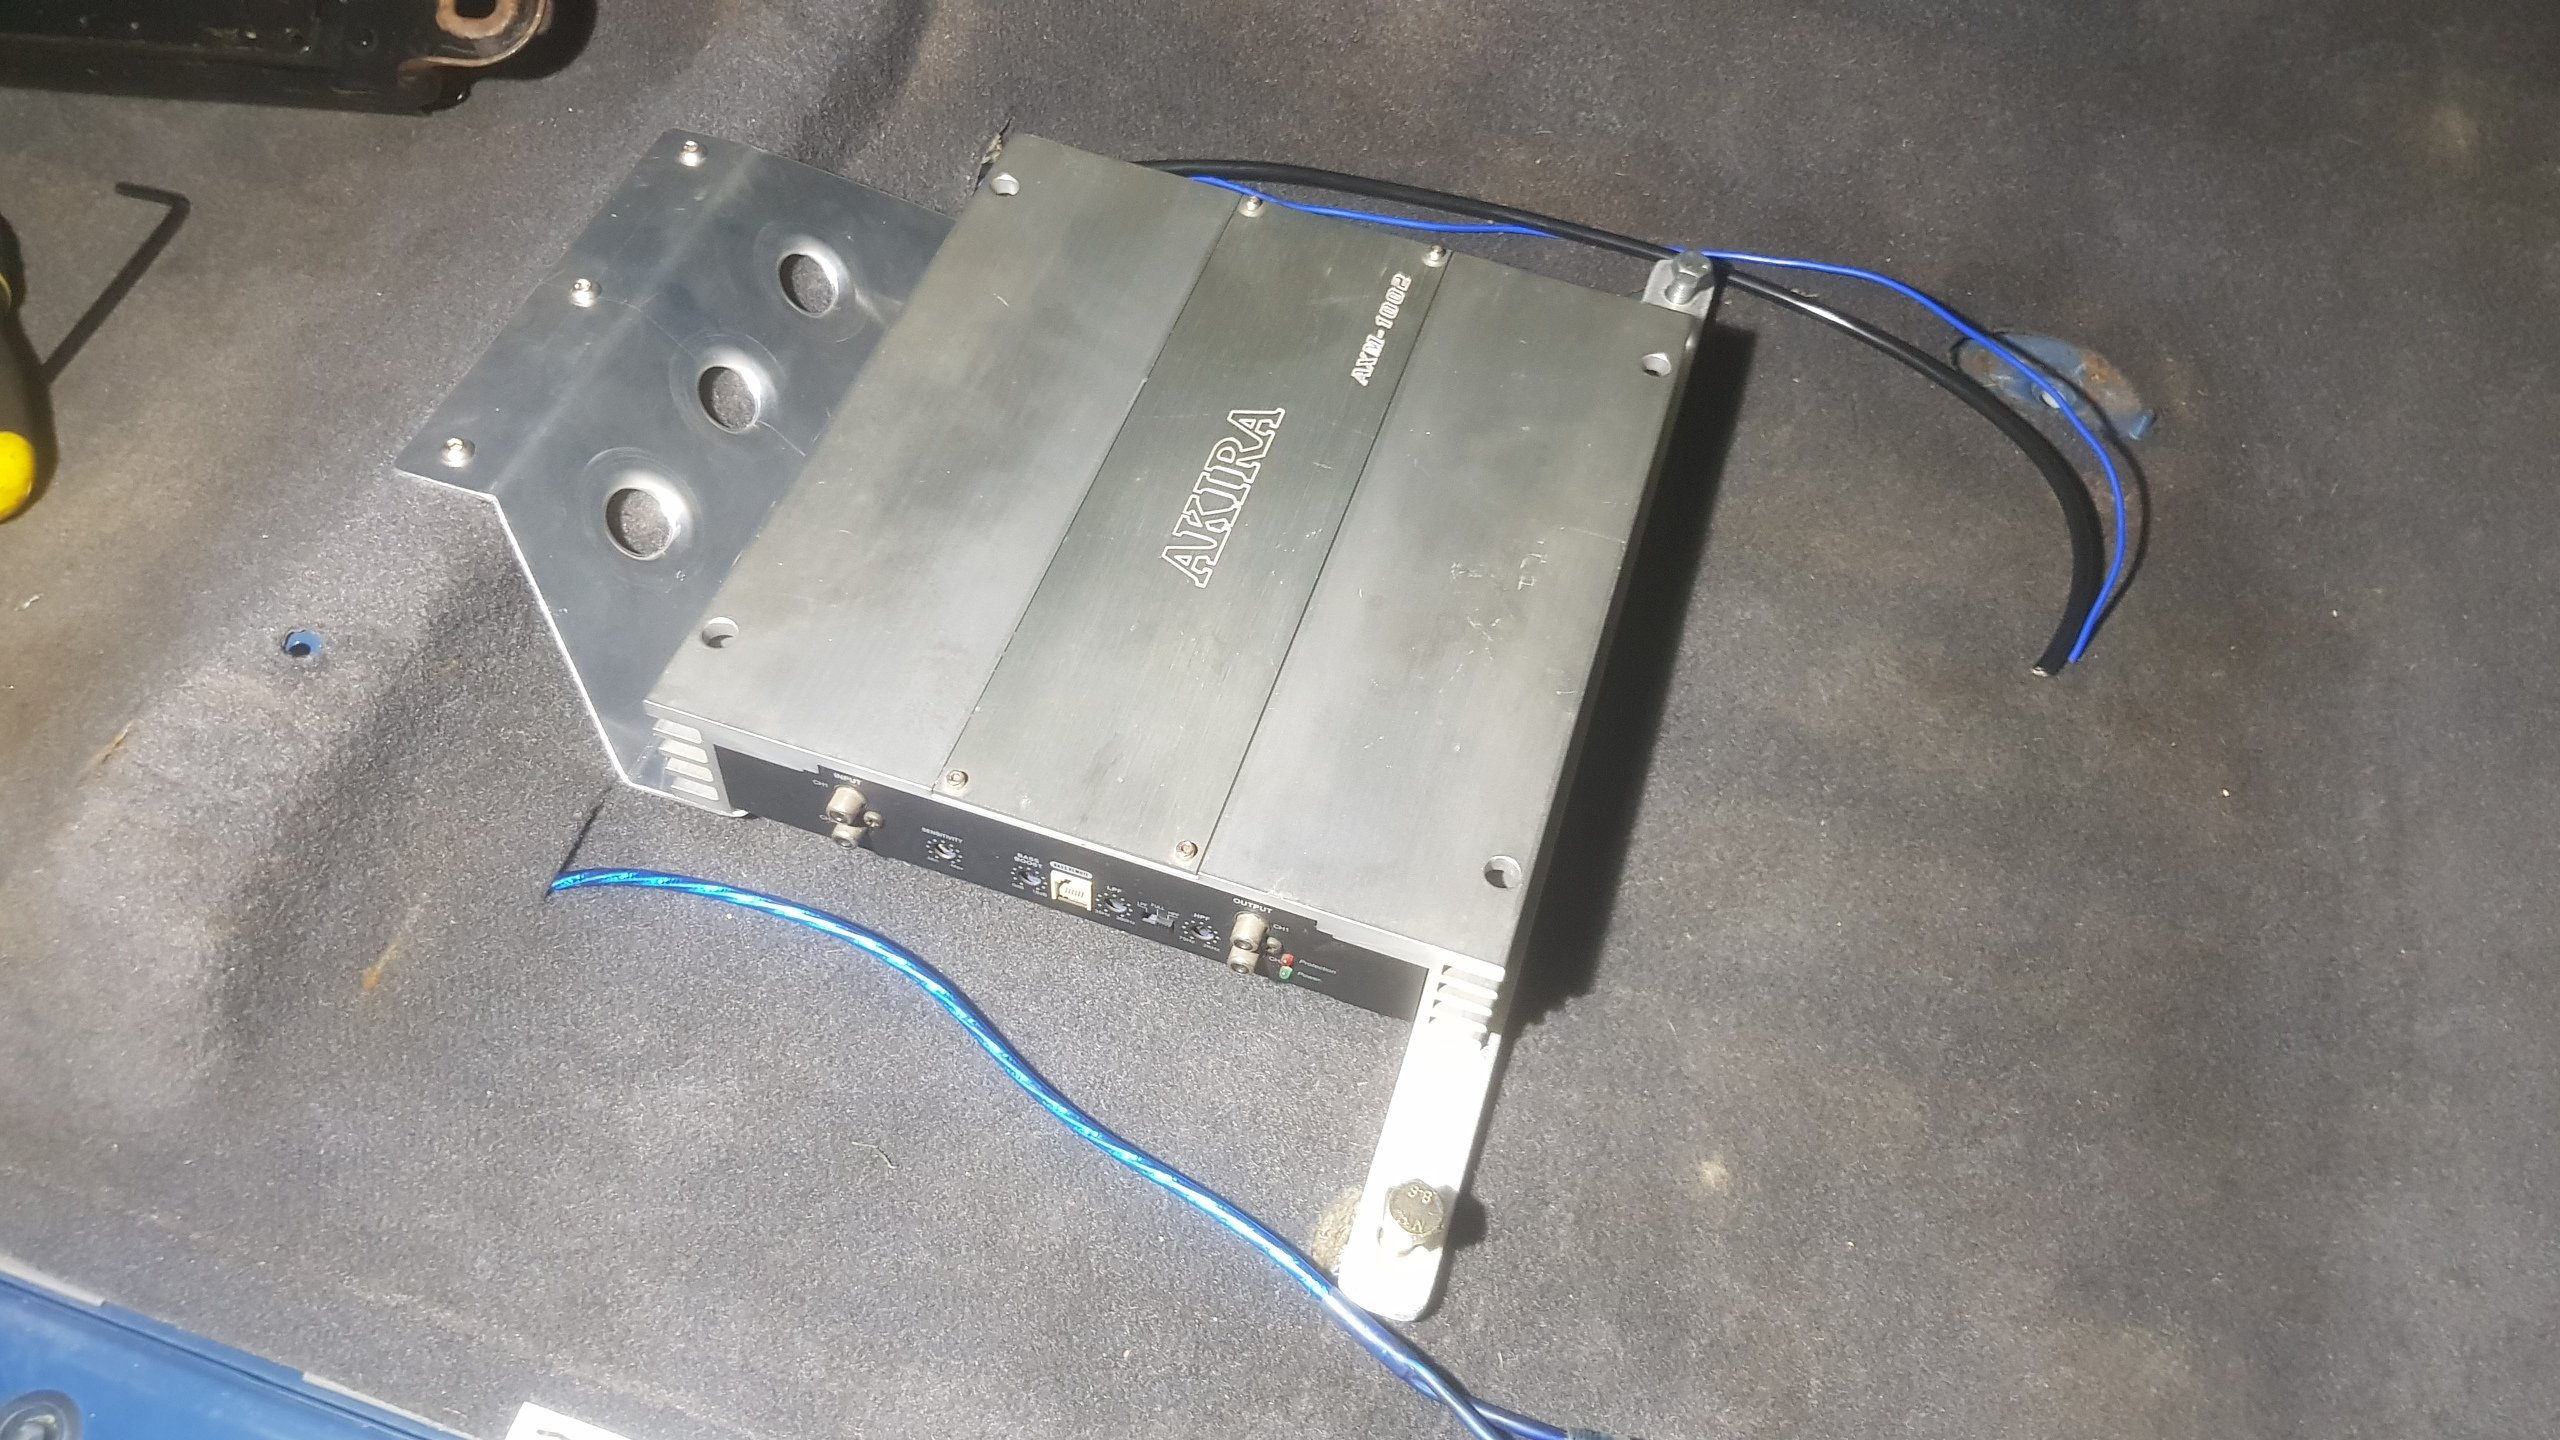
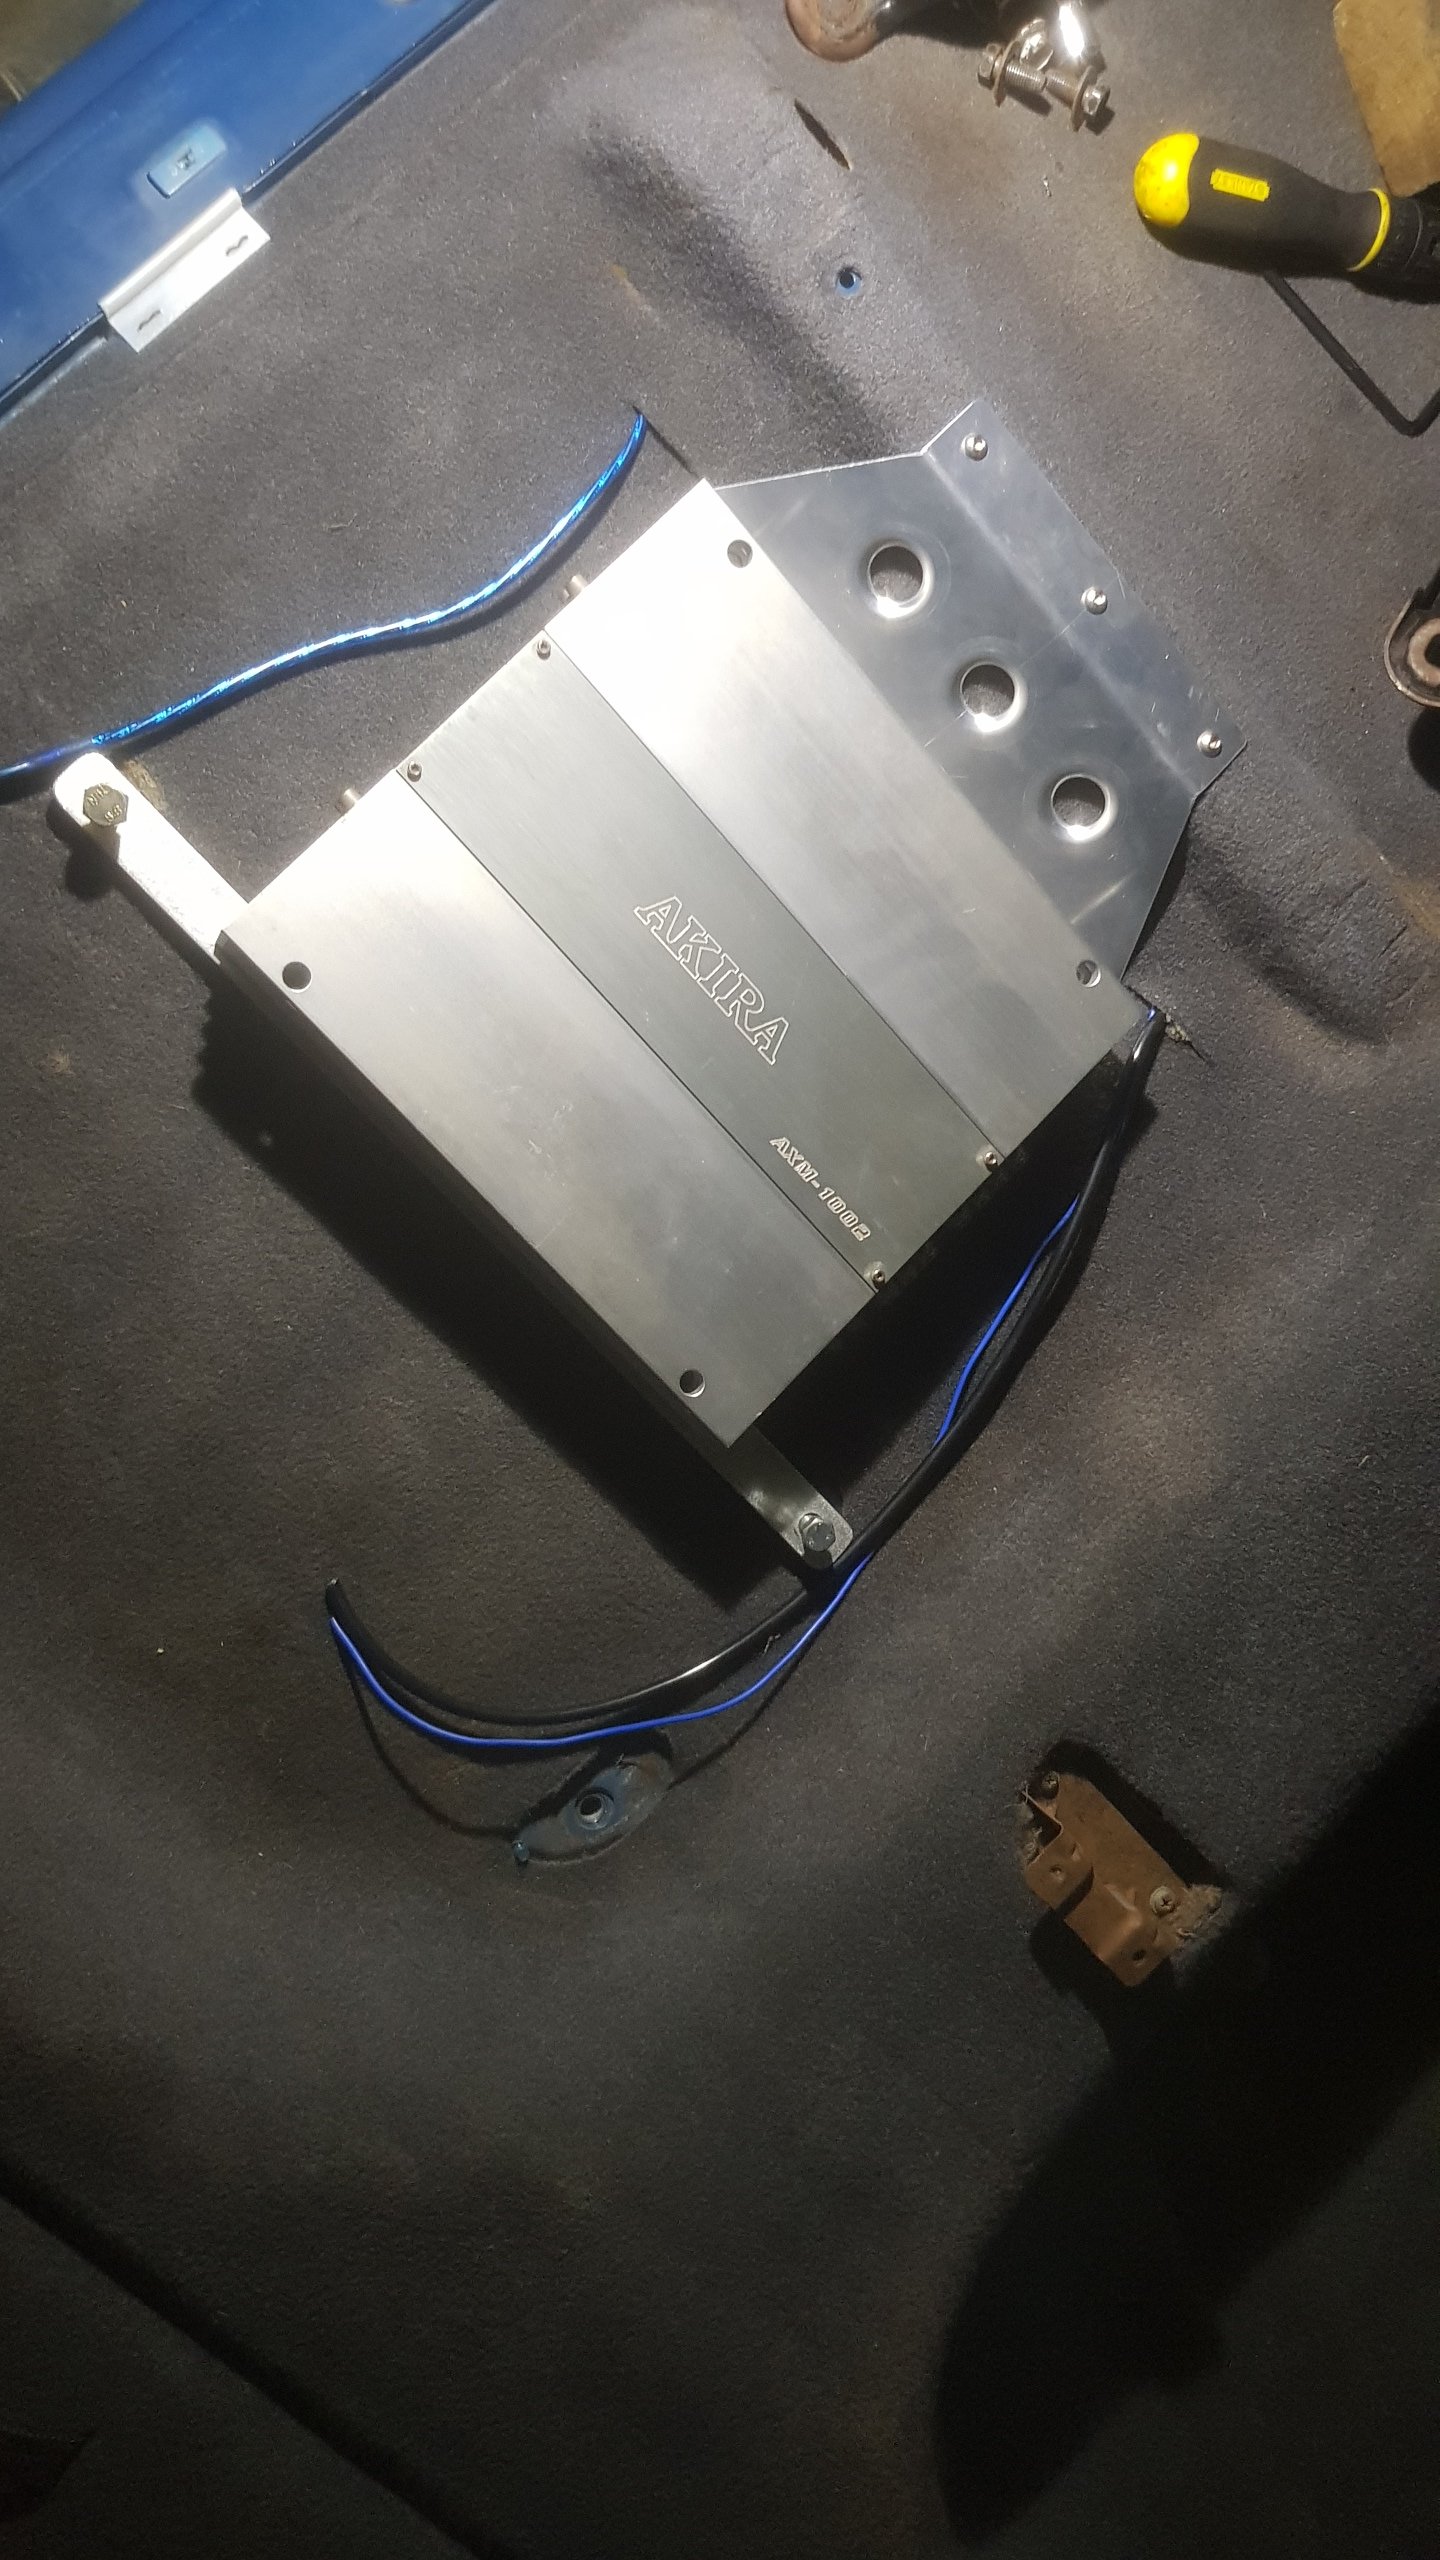
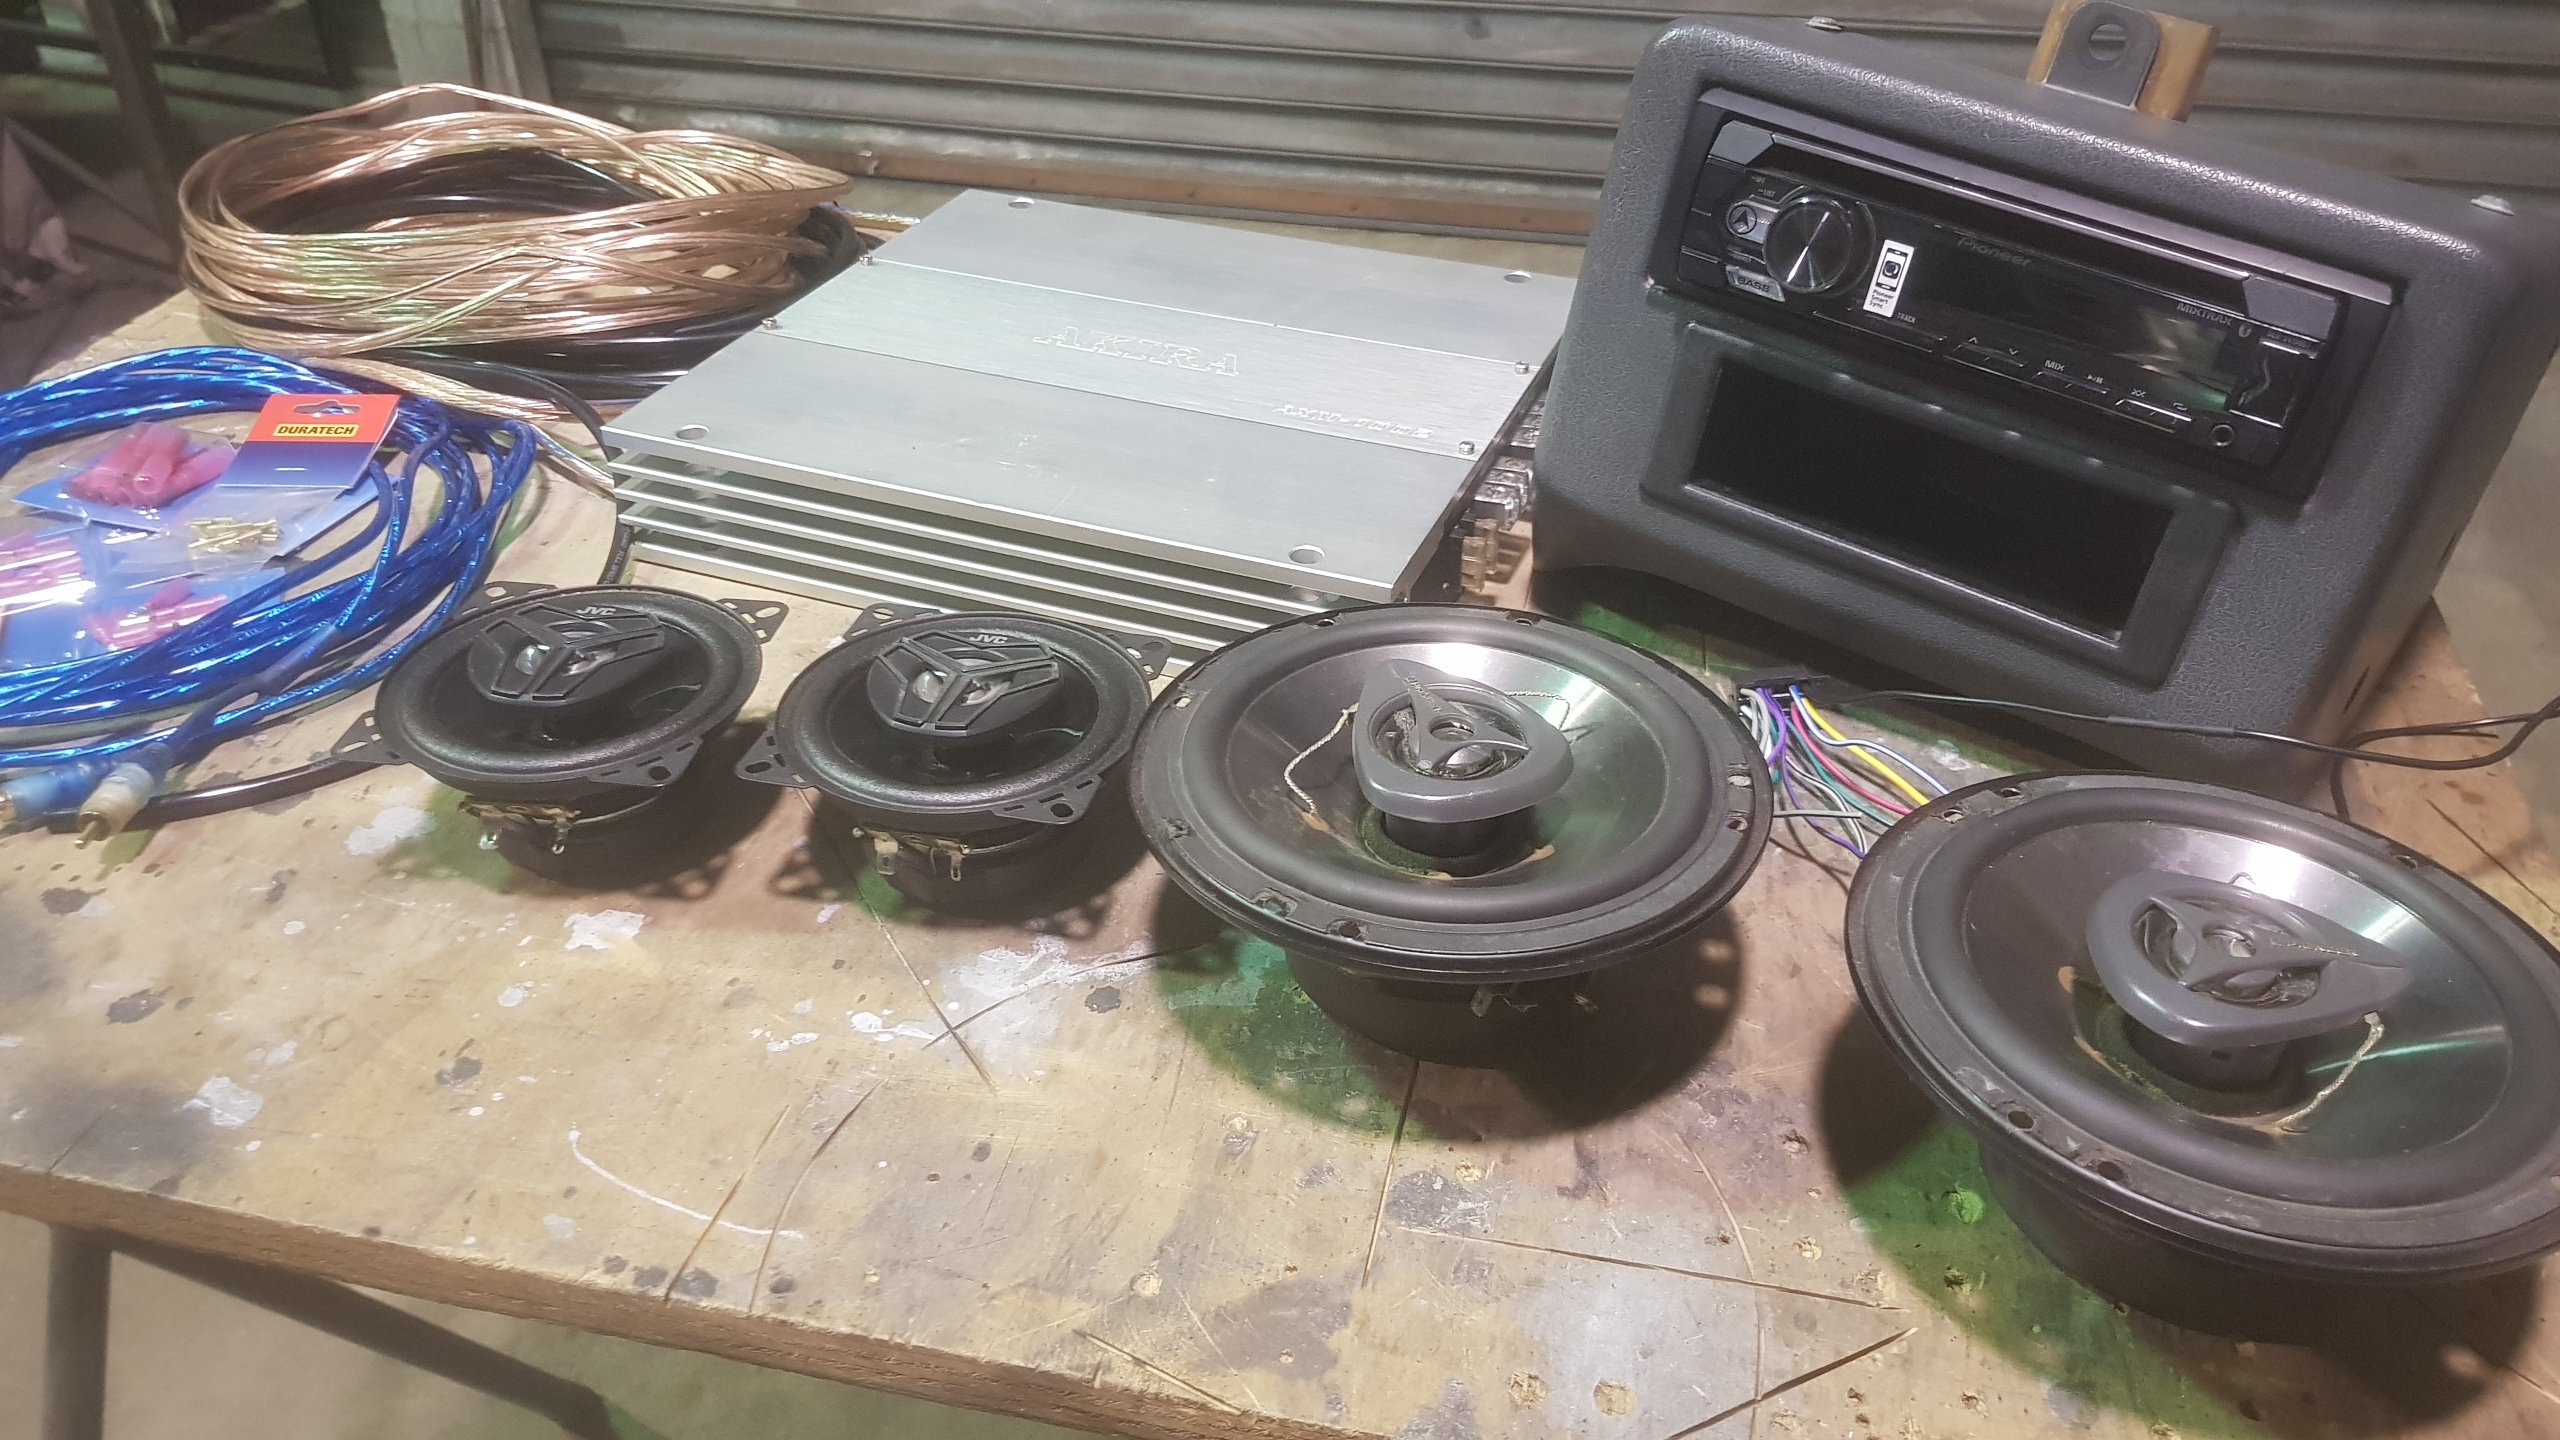
It was a tight fit, but I managed to fit the Amp under the passengers seat. I lifted it up off the carpet a little incase it gets warm from bulk doof doof. Whipped up some simple mounts this afternoon that allow the amp to be removed with taking the seat out if need be. Not that its hard to take seat out. I'l finish wiring the Amp tomorrow, hook the Sub up and see if I can rattle any bog out.
1 point
-
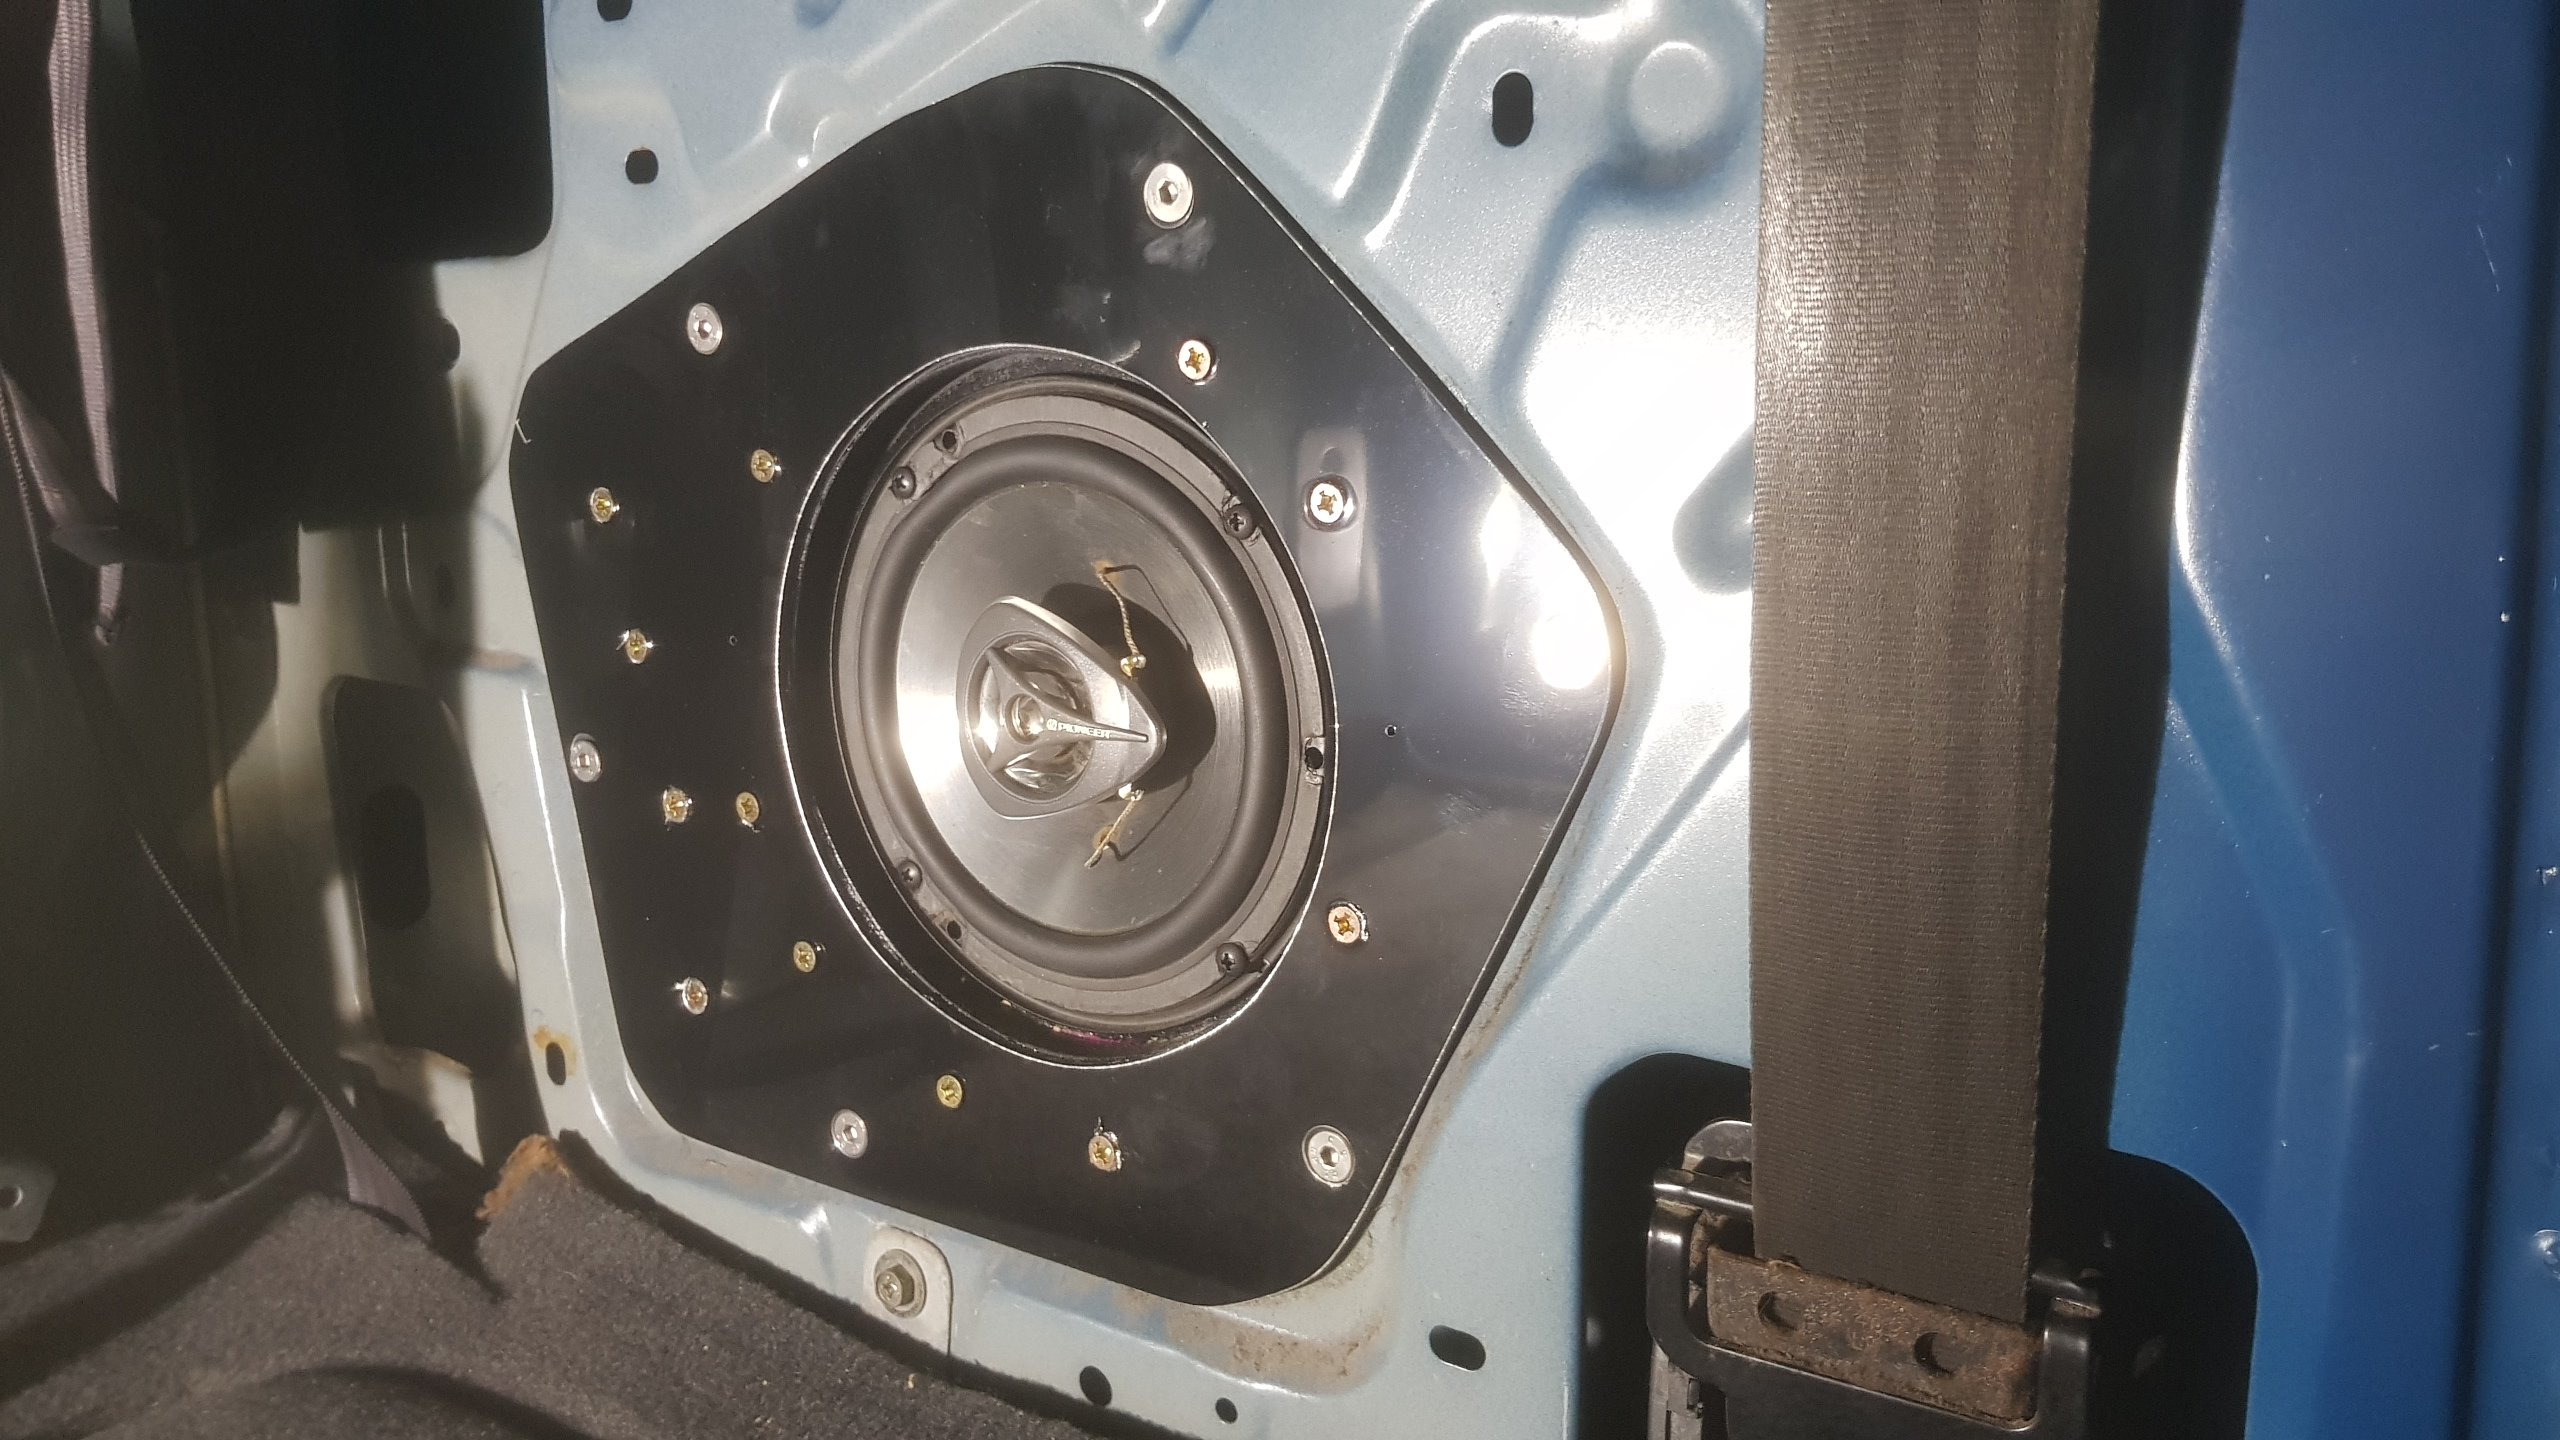
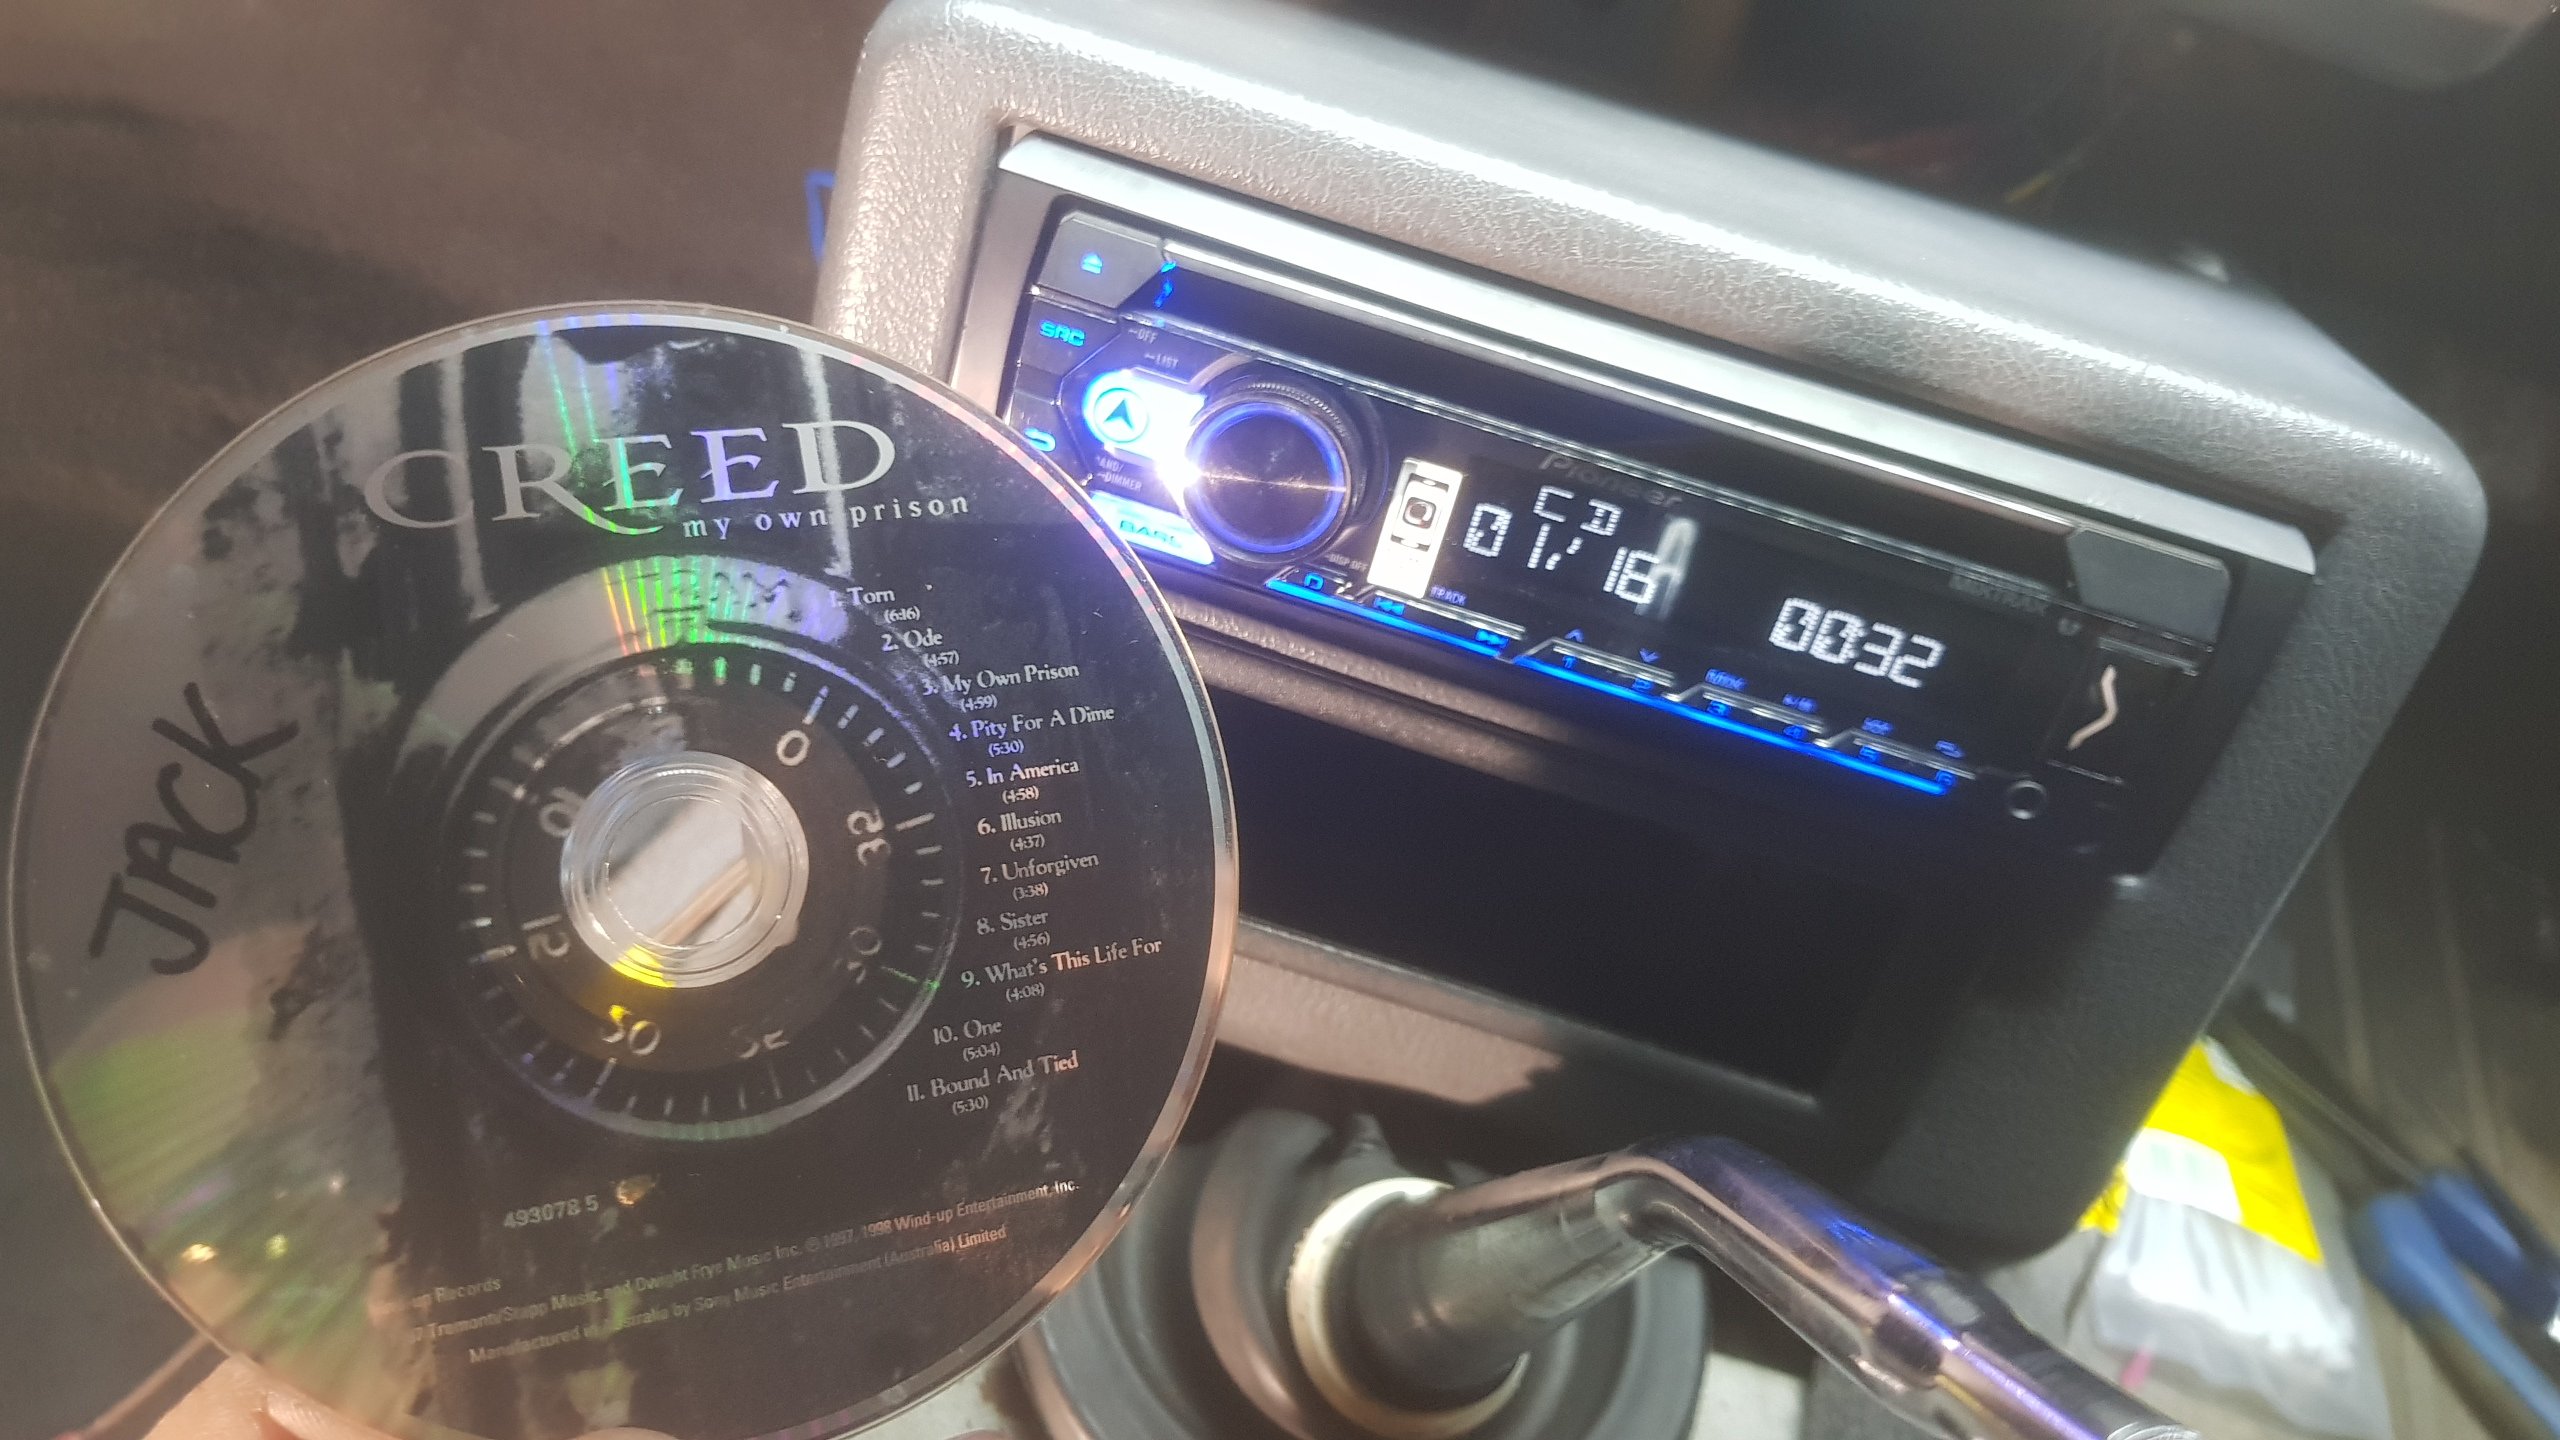
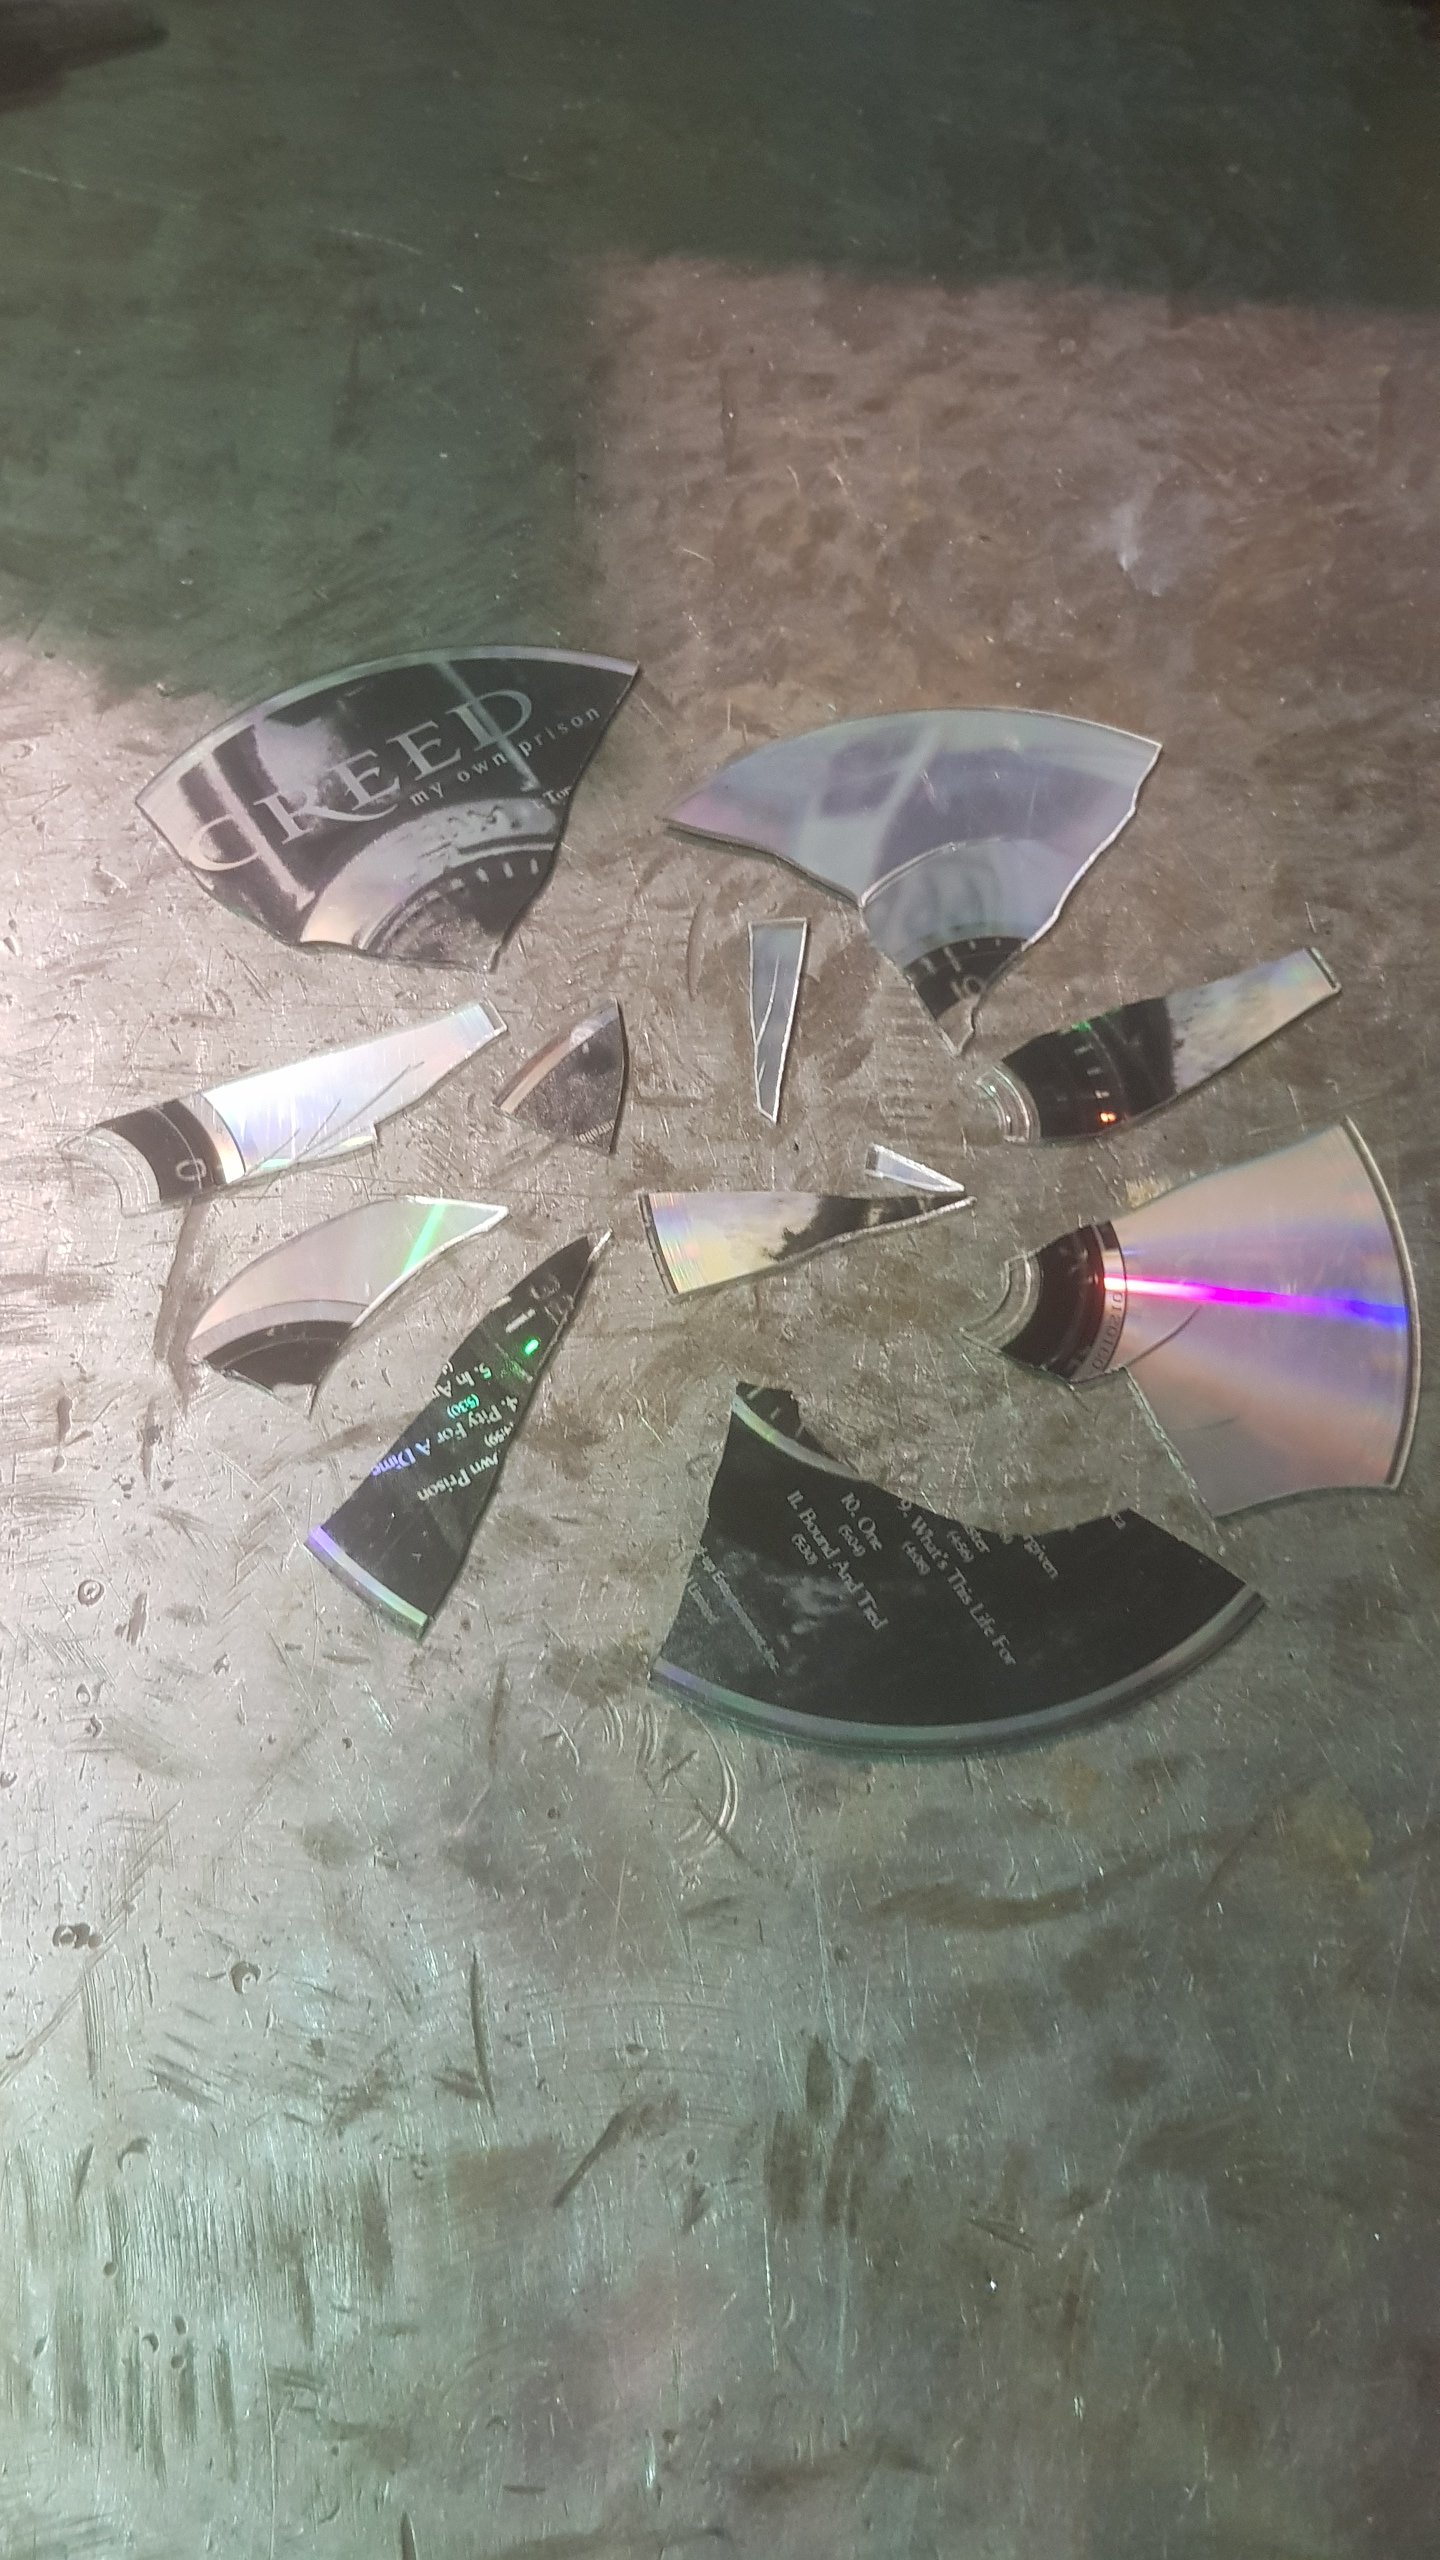
Got the all the wiring run, main fuse to Amp mounted and front speakers mounted. Wired headunit and powered it up. It spits out a Creed CD, so I did the world a favour.
1 point
-
After running the engine a couple Fridays ago, I noticed a leak from steering box output shaft. Whipped it out on the Monday and dropped it down to PG Hydraulics. They put a new seal in and bench tested. Collected it on the Thursday and threw it back in that night. I'm not a huge audio guy, but have had a bunch of gear lying around for years. Sorted through some bits and made a decision on what to run. Pioneer bluetooth headunit that came out of my Lexus. Pair of Pioneer 6" speakers in the rear 1/4s. I keep them when I sold my old Vt commy because they sounded good. Some 4" Jvc speakers to go in the factory dash speaker location. And an old Amp and Sub that a customer didn't want when he put new gear in his truck. Even had an Rca cable to suit in my stash of bits. Just had to buy a fuse and some speaker / 12v+ cables for it all.
1 point
-
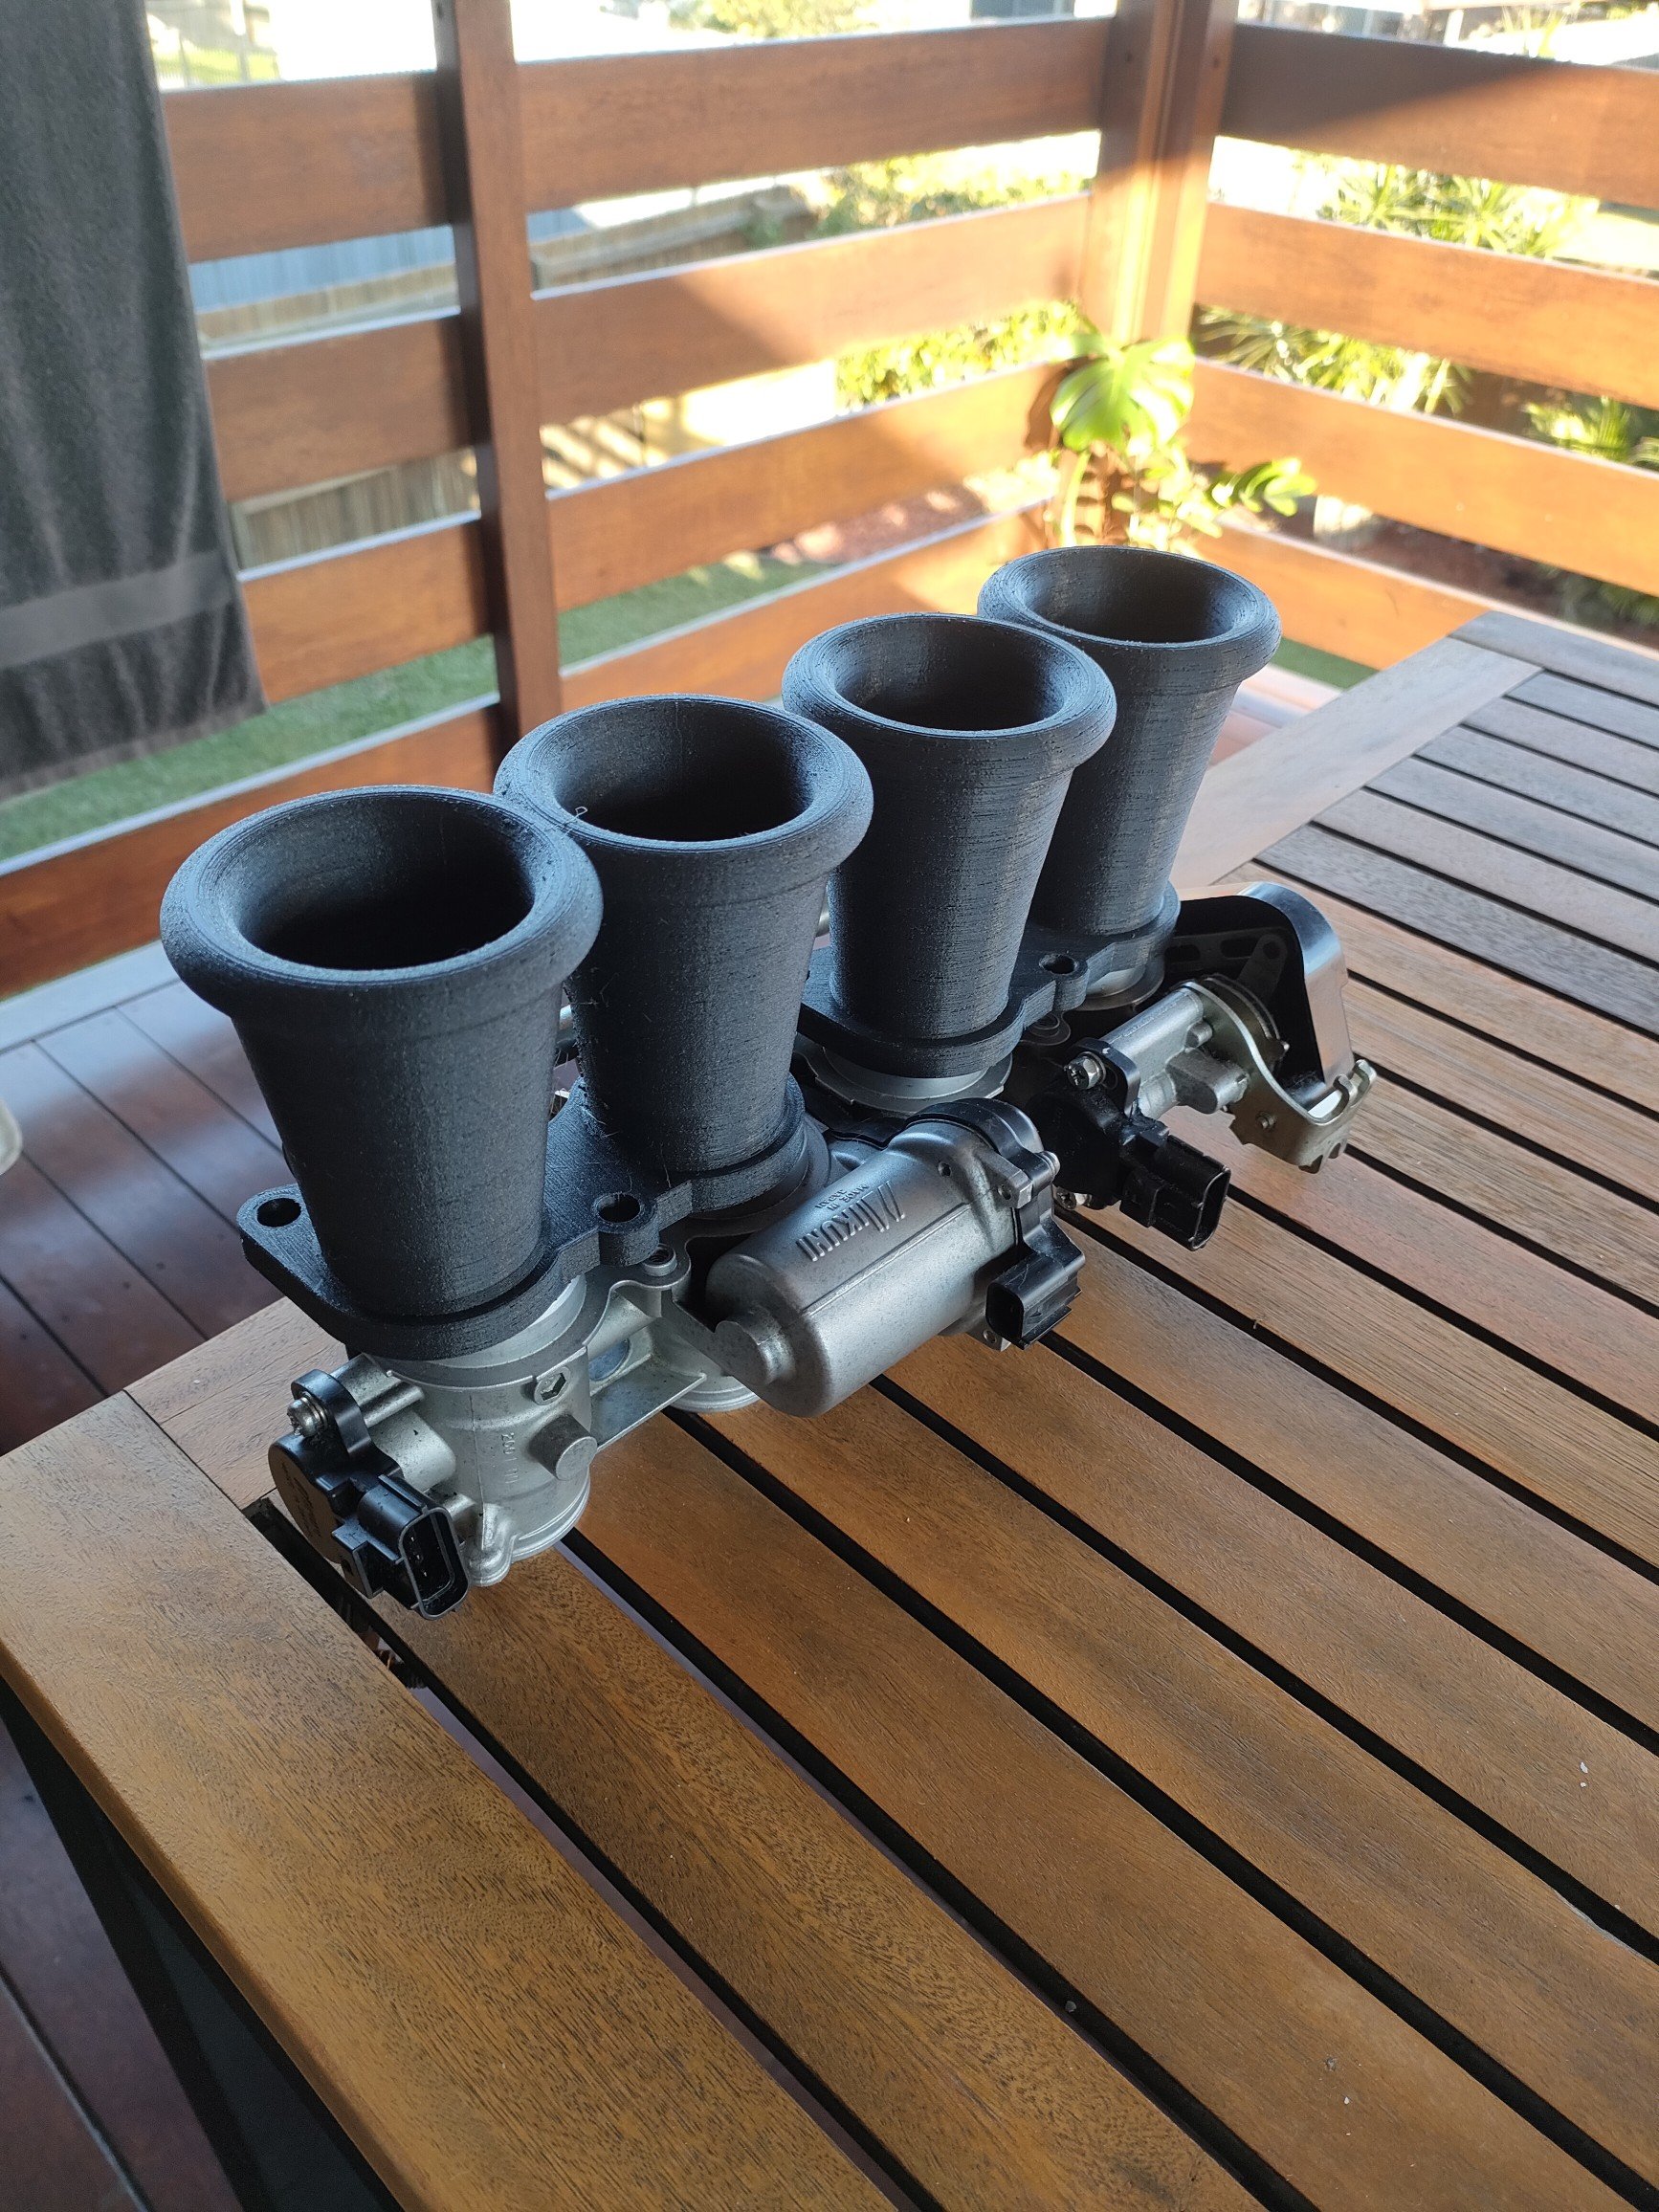
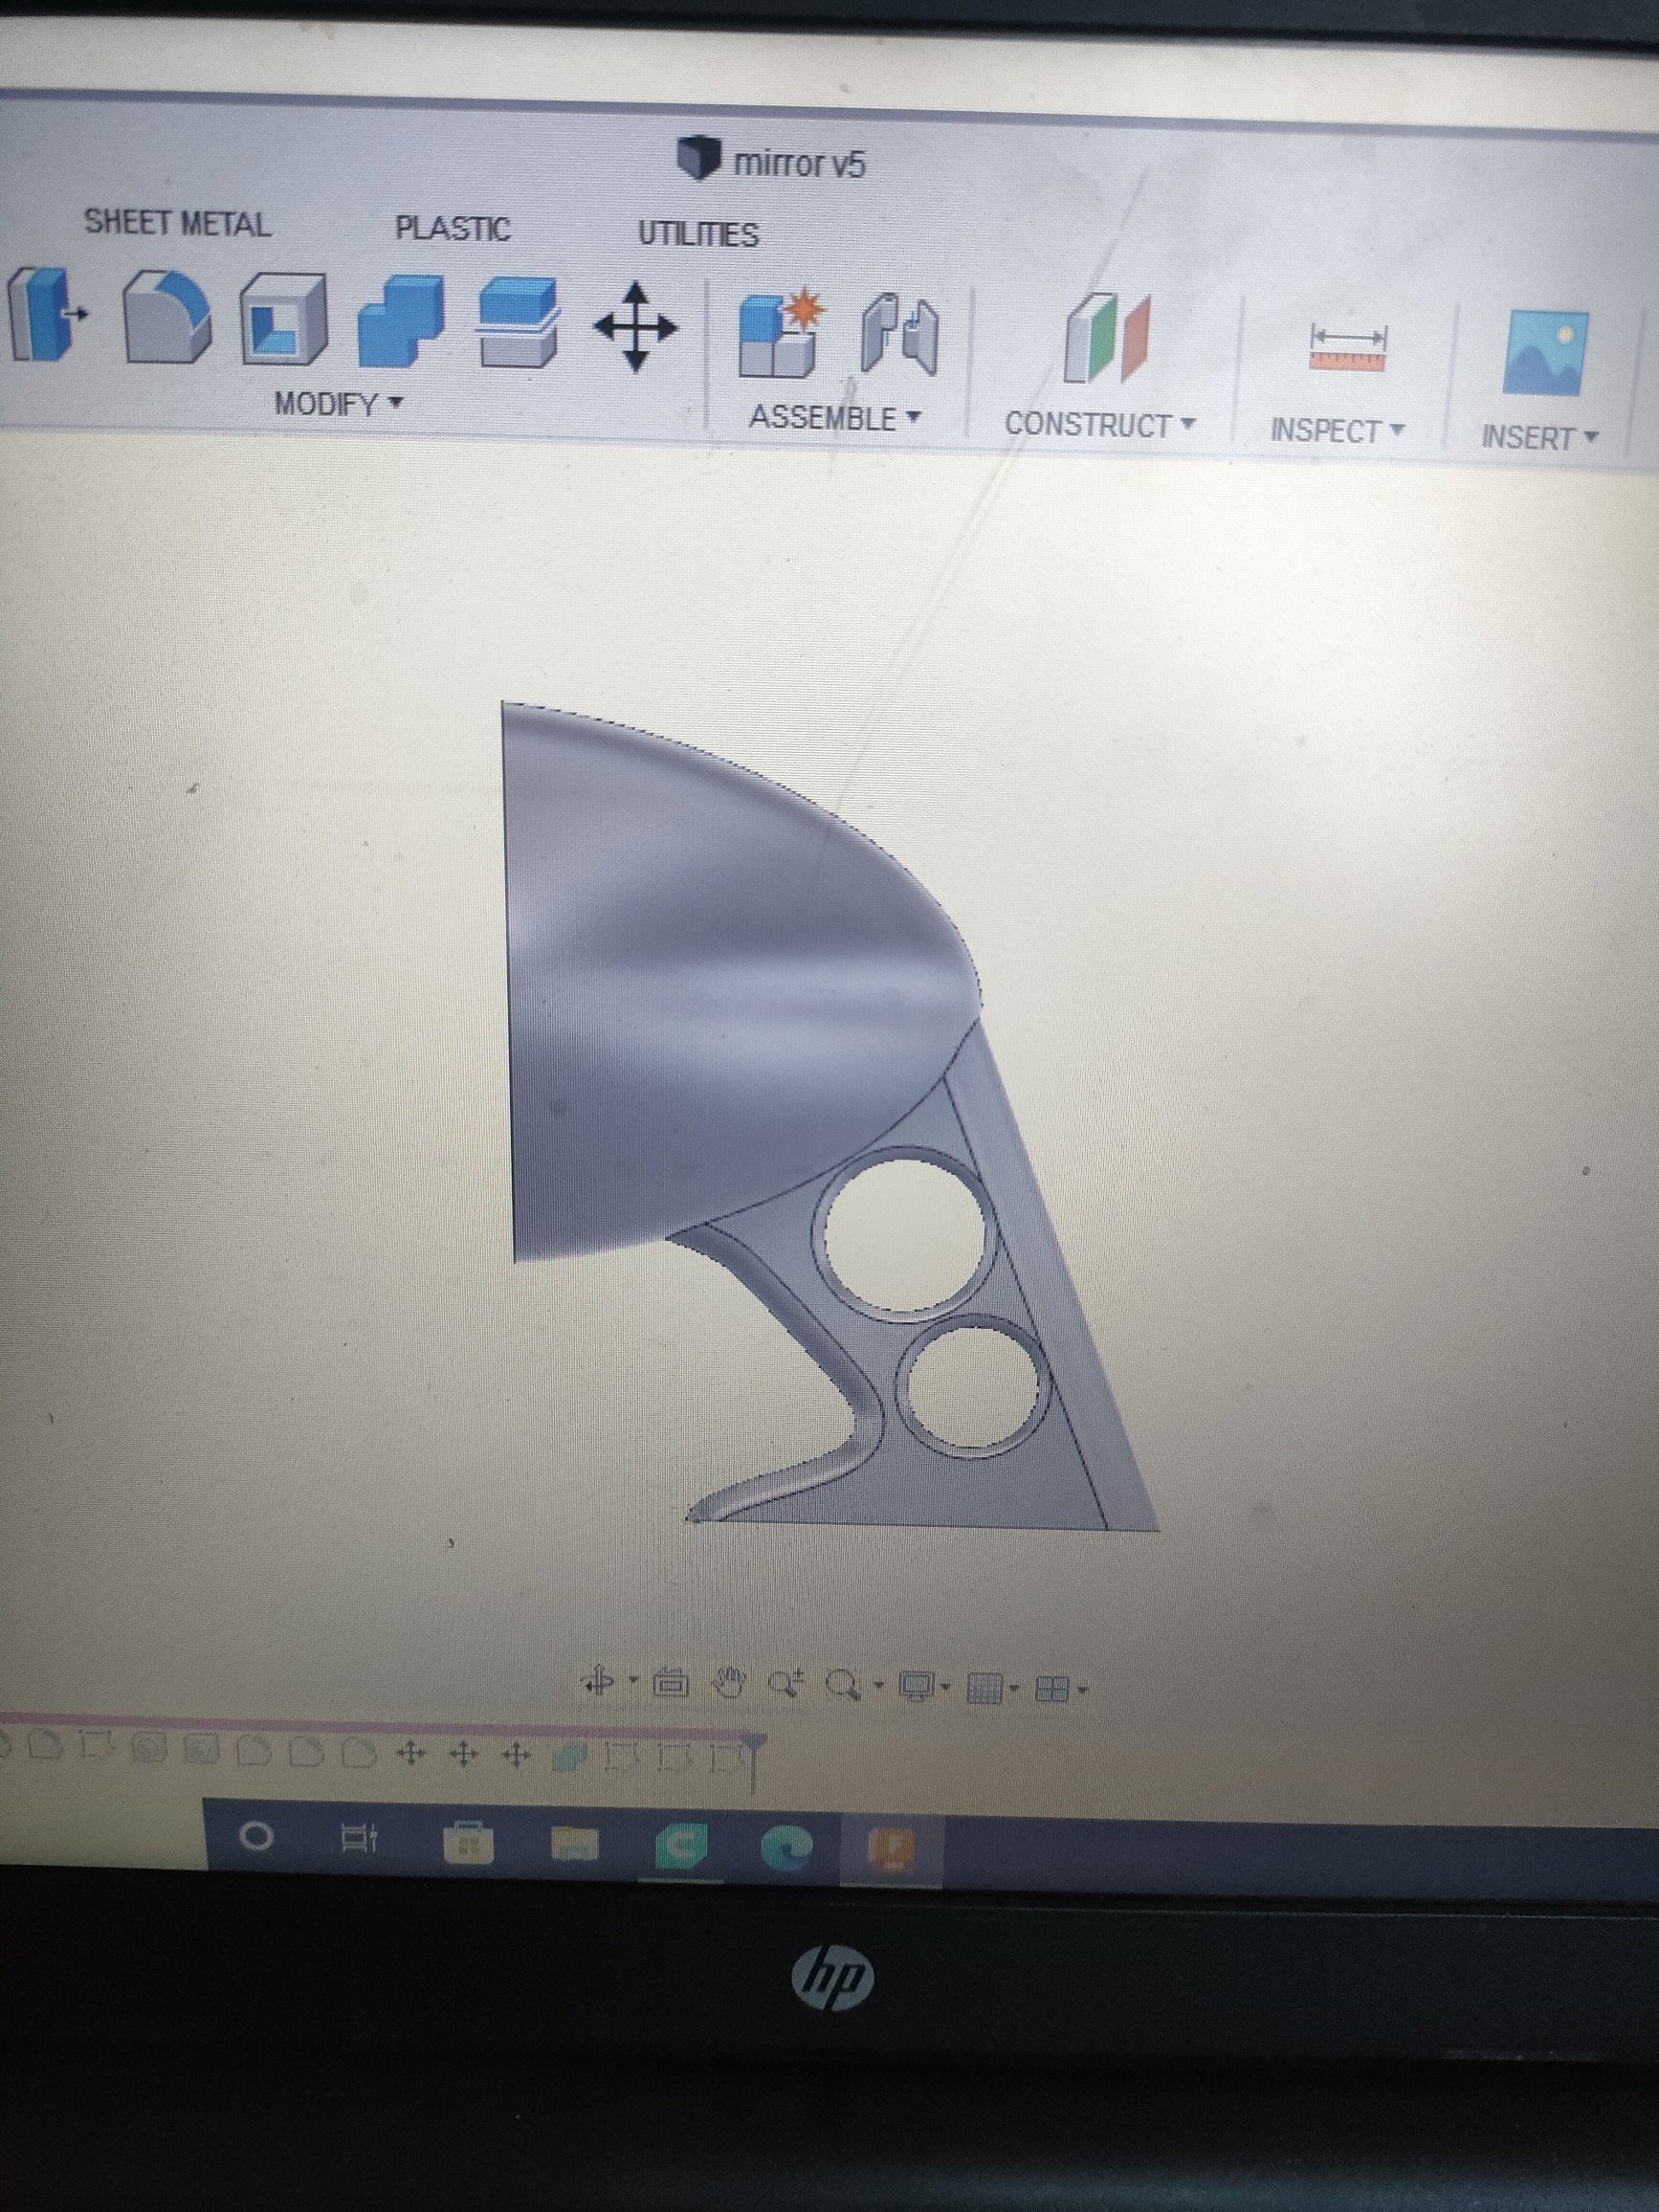
Not much progress on this lately, unfortunately. Looks like I'll be changing plans to a different style IRS rear end. If I use the MX5 one, I can't run a rear seat. I did however buy a 3d printer. So been learning how to use fusion 360. So far made some velocity stacks for some R1 itbs, and a radio delete plate for the wagon. Will try a flatter paint next time. Was supposed to be satin, but looks too glossy for for my liking. Some guard mirrors are next. If anyone has dimensions for either the mirrors, or radio plate, that would be amazing.
1 point
-
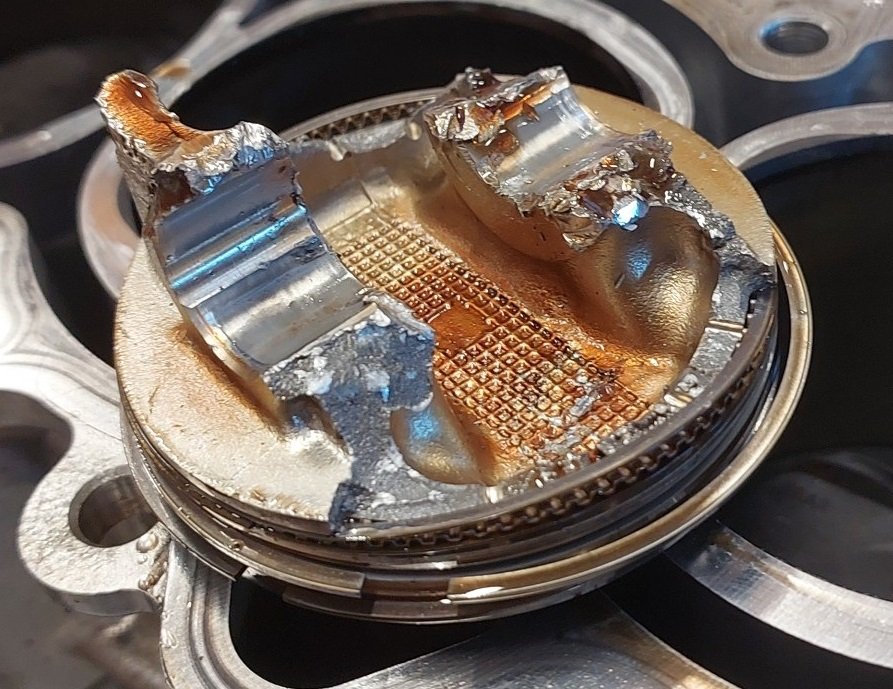
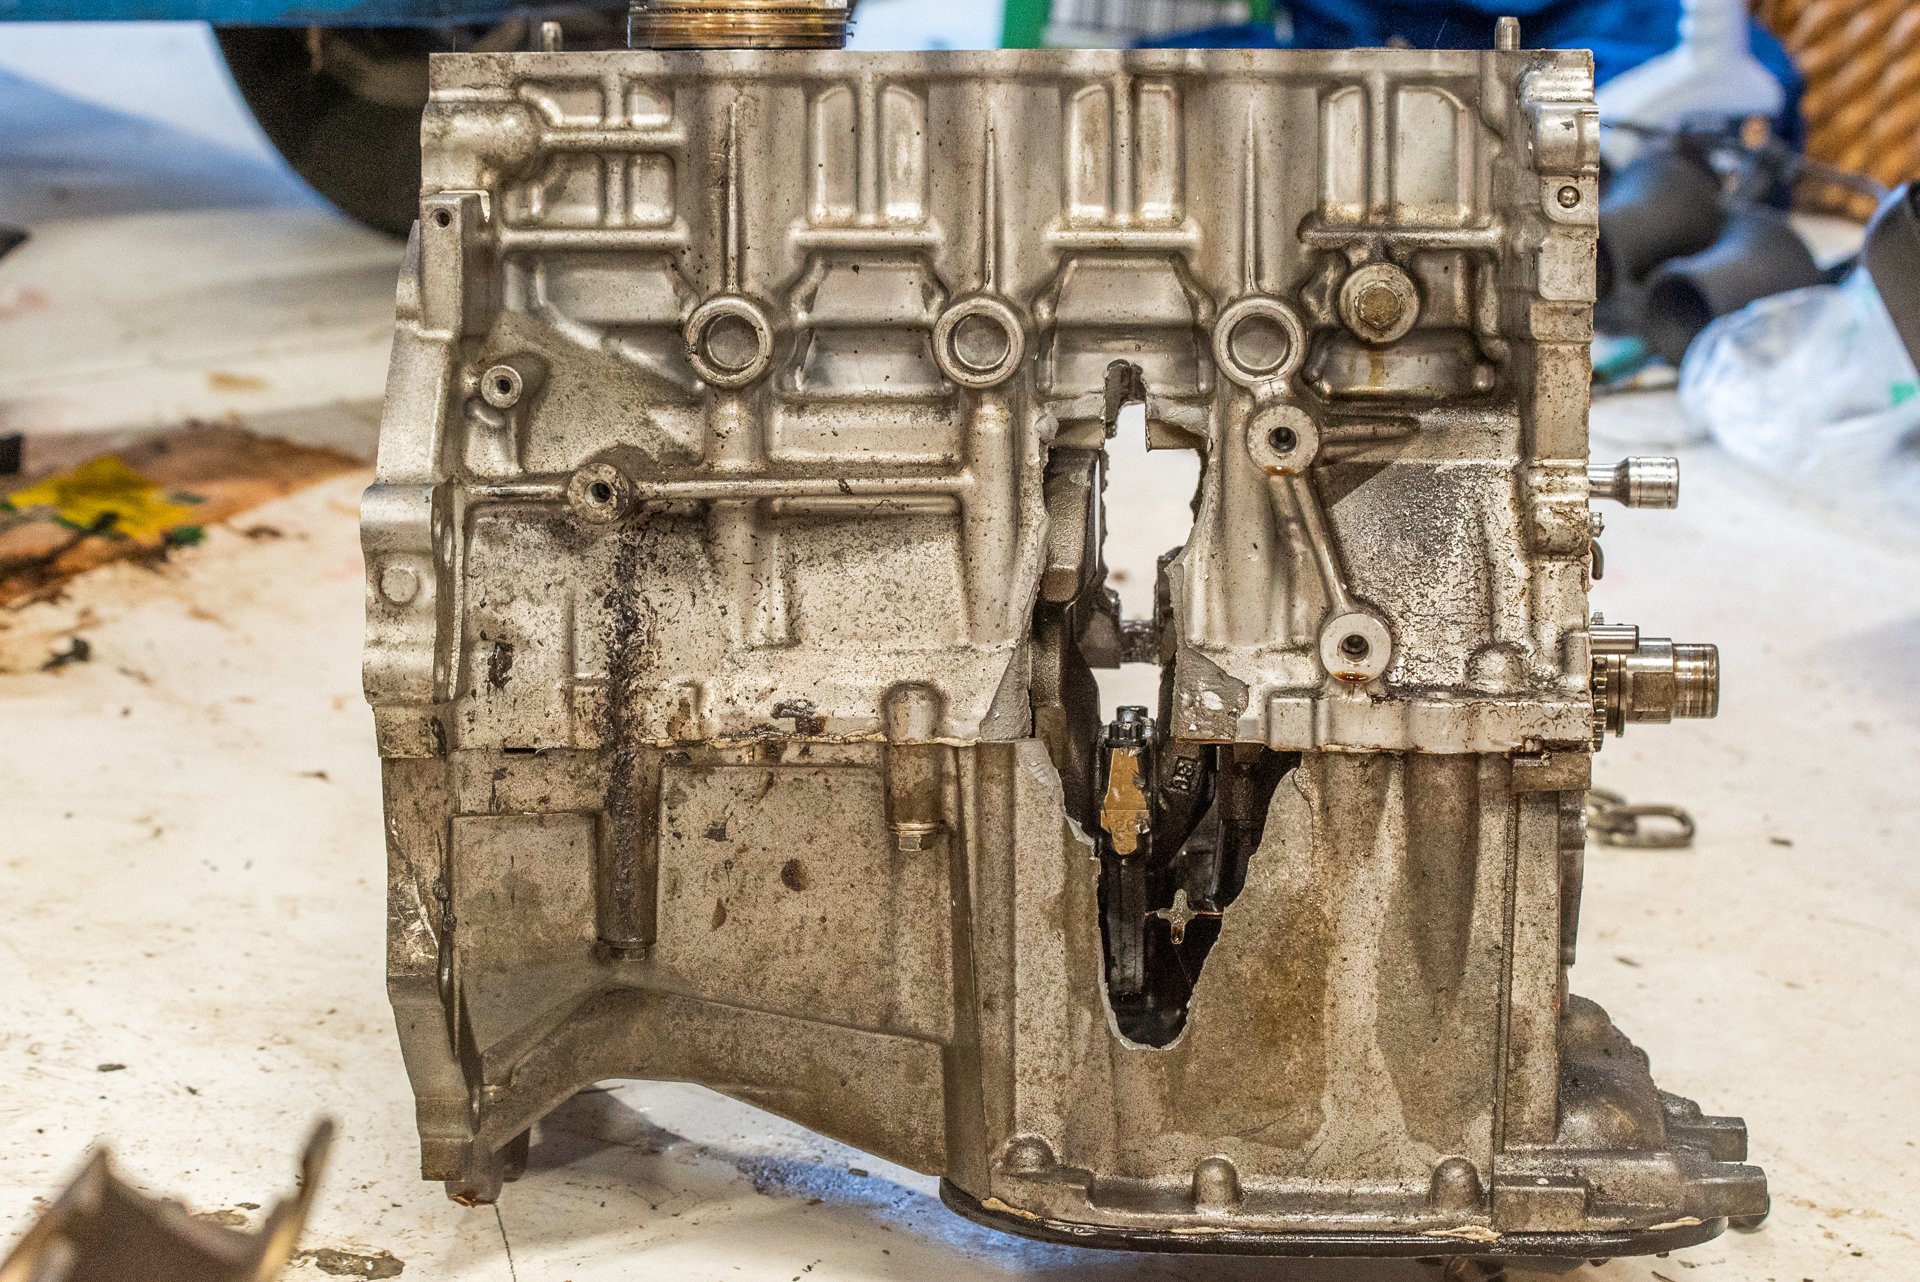
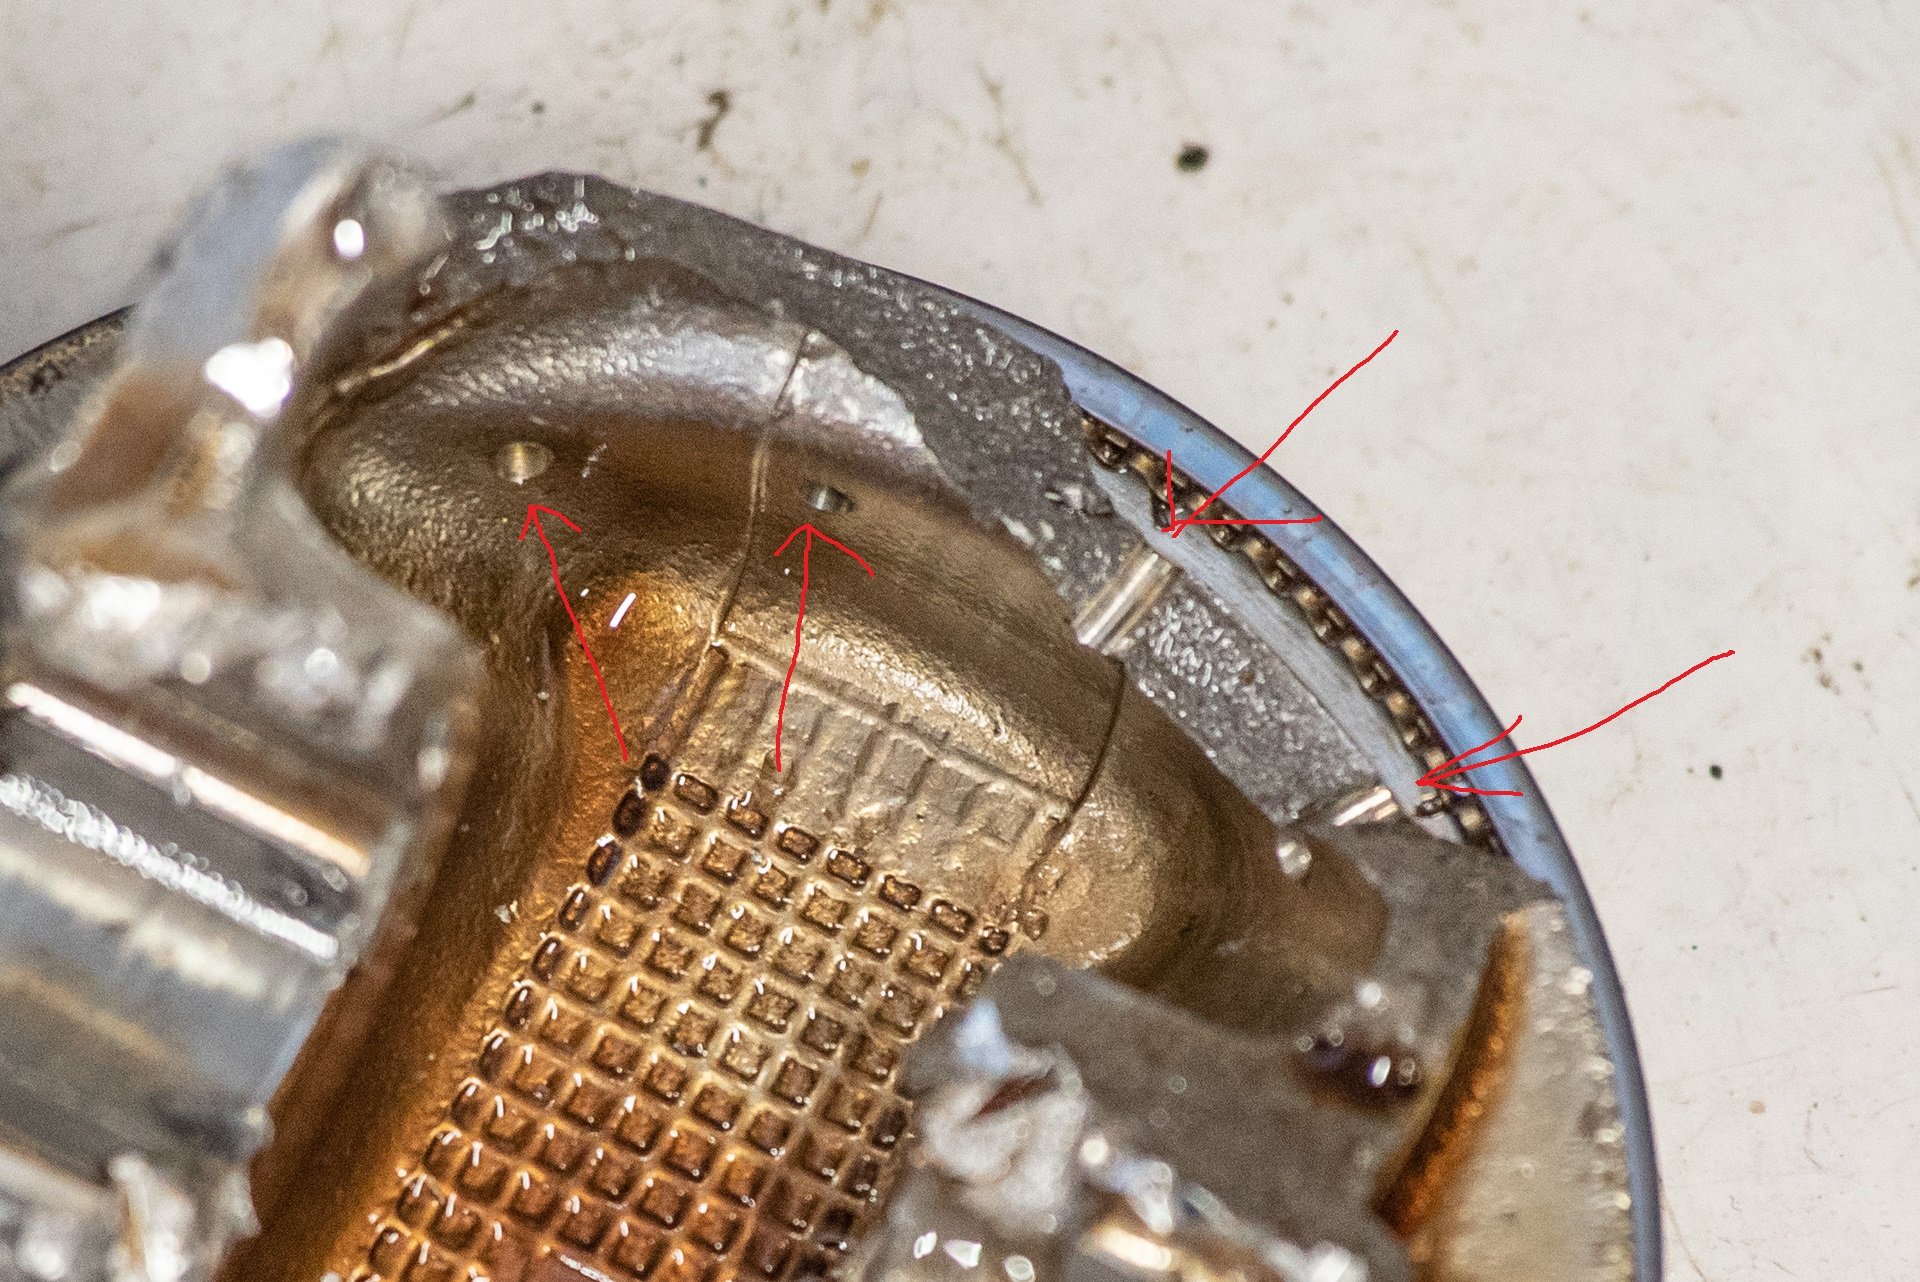
Finally had some time to get the old motor out. I was busy just dealing with the nuts and bolts of the situation, undoing things etc... It wasnt until the motor was completely out, that I had a look at the back side of the block and had a hearty chuckle So I got the motor and gearbox out, split the gearbox off. Then I wanted to get the piston and the top half of the rod out, to see if there's any evidence of how/why the rod broke. So I used an extension bar and tapped the piston up until it popped out. Well, part of it anyway... And then I laughed some more, oh man, I wasnt expecting that carnage! I cant find the wrist pin or the top of the rod anywhere. I suspect I might have to go for a long walk up the road to go find it. So one concerning thing about this, is now I'm not sure what broke first. If the rod broke and caused the damage, that's fine. Easy, just put stronger rods in. But it looks like the piston broke along the line of the oil return holes from the oil control rings: Which maybe makes me think that the piston sorta... fell in half. Then caused rod carnage. However I'm thinking this is less likely, based on the lack of damage to the cylinder head. Either way, it might be a good idea to drill some tiny chamfers on the oil holes next time for stress relief. But I'm not sure if you can get a drill anywhere near it while the piston is intact. So, hopefully the rods are the problem and not this haha. Maybe the remaining 3 pistons and rods might show some extra clues.
1 point
-
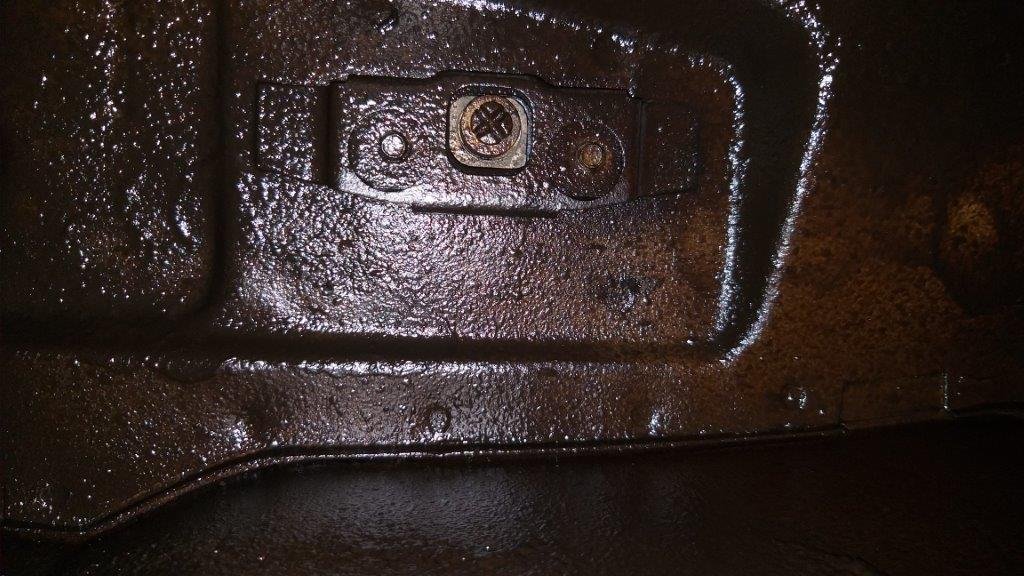
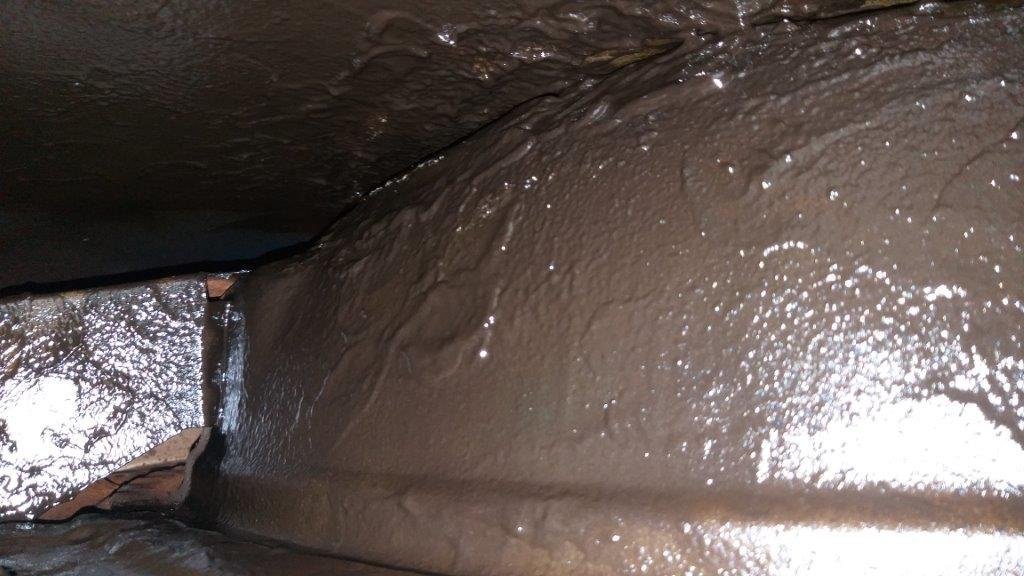
And .... that's the last of the rust proofing done. Pumped two litres of goo into the driver's side rear quarter inner as well as both front chassis braces. Then spent the rest of the morning cleaning up the mess. With that mucky job behind me at least now I can get on to the good stuff, being the reassembly.
1 point
-
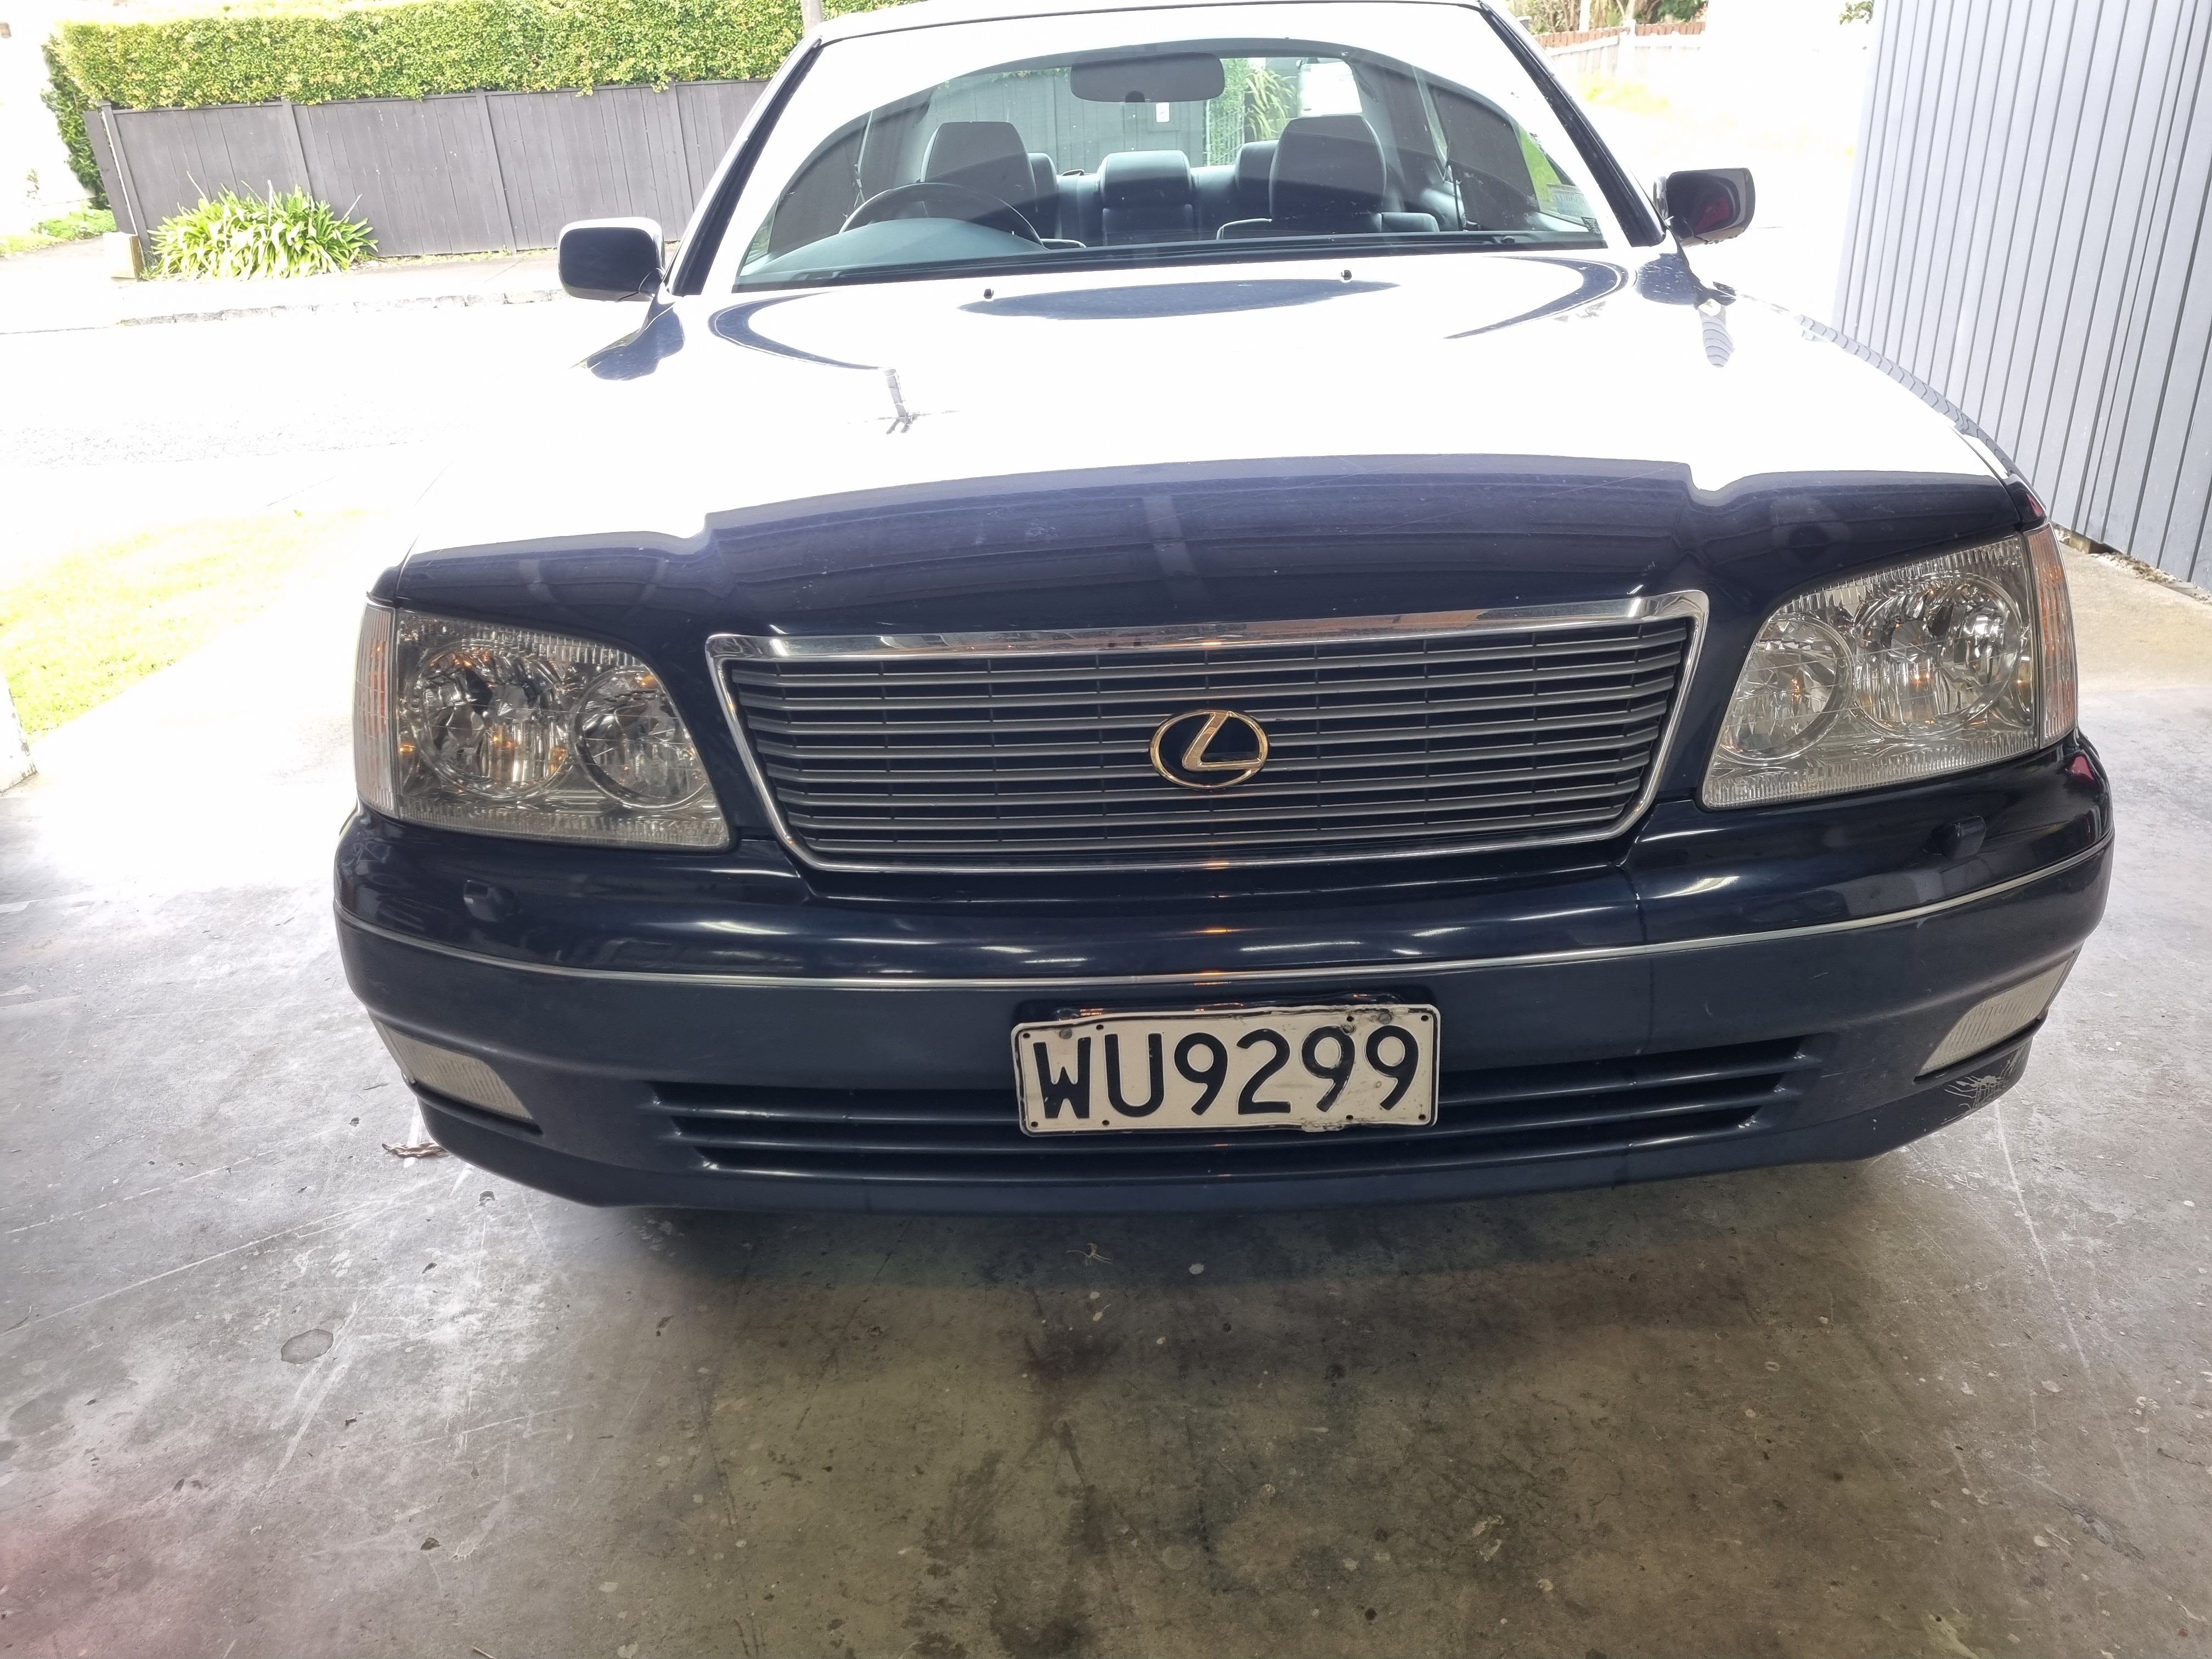
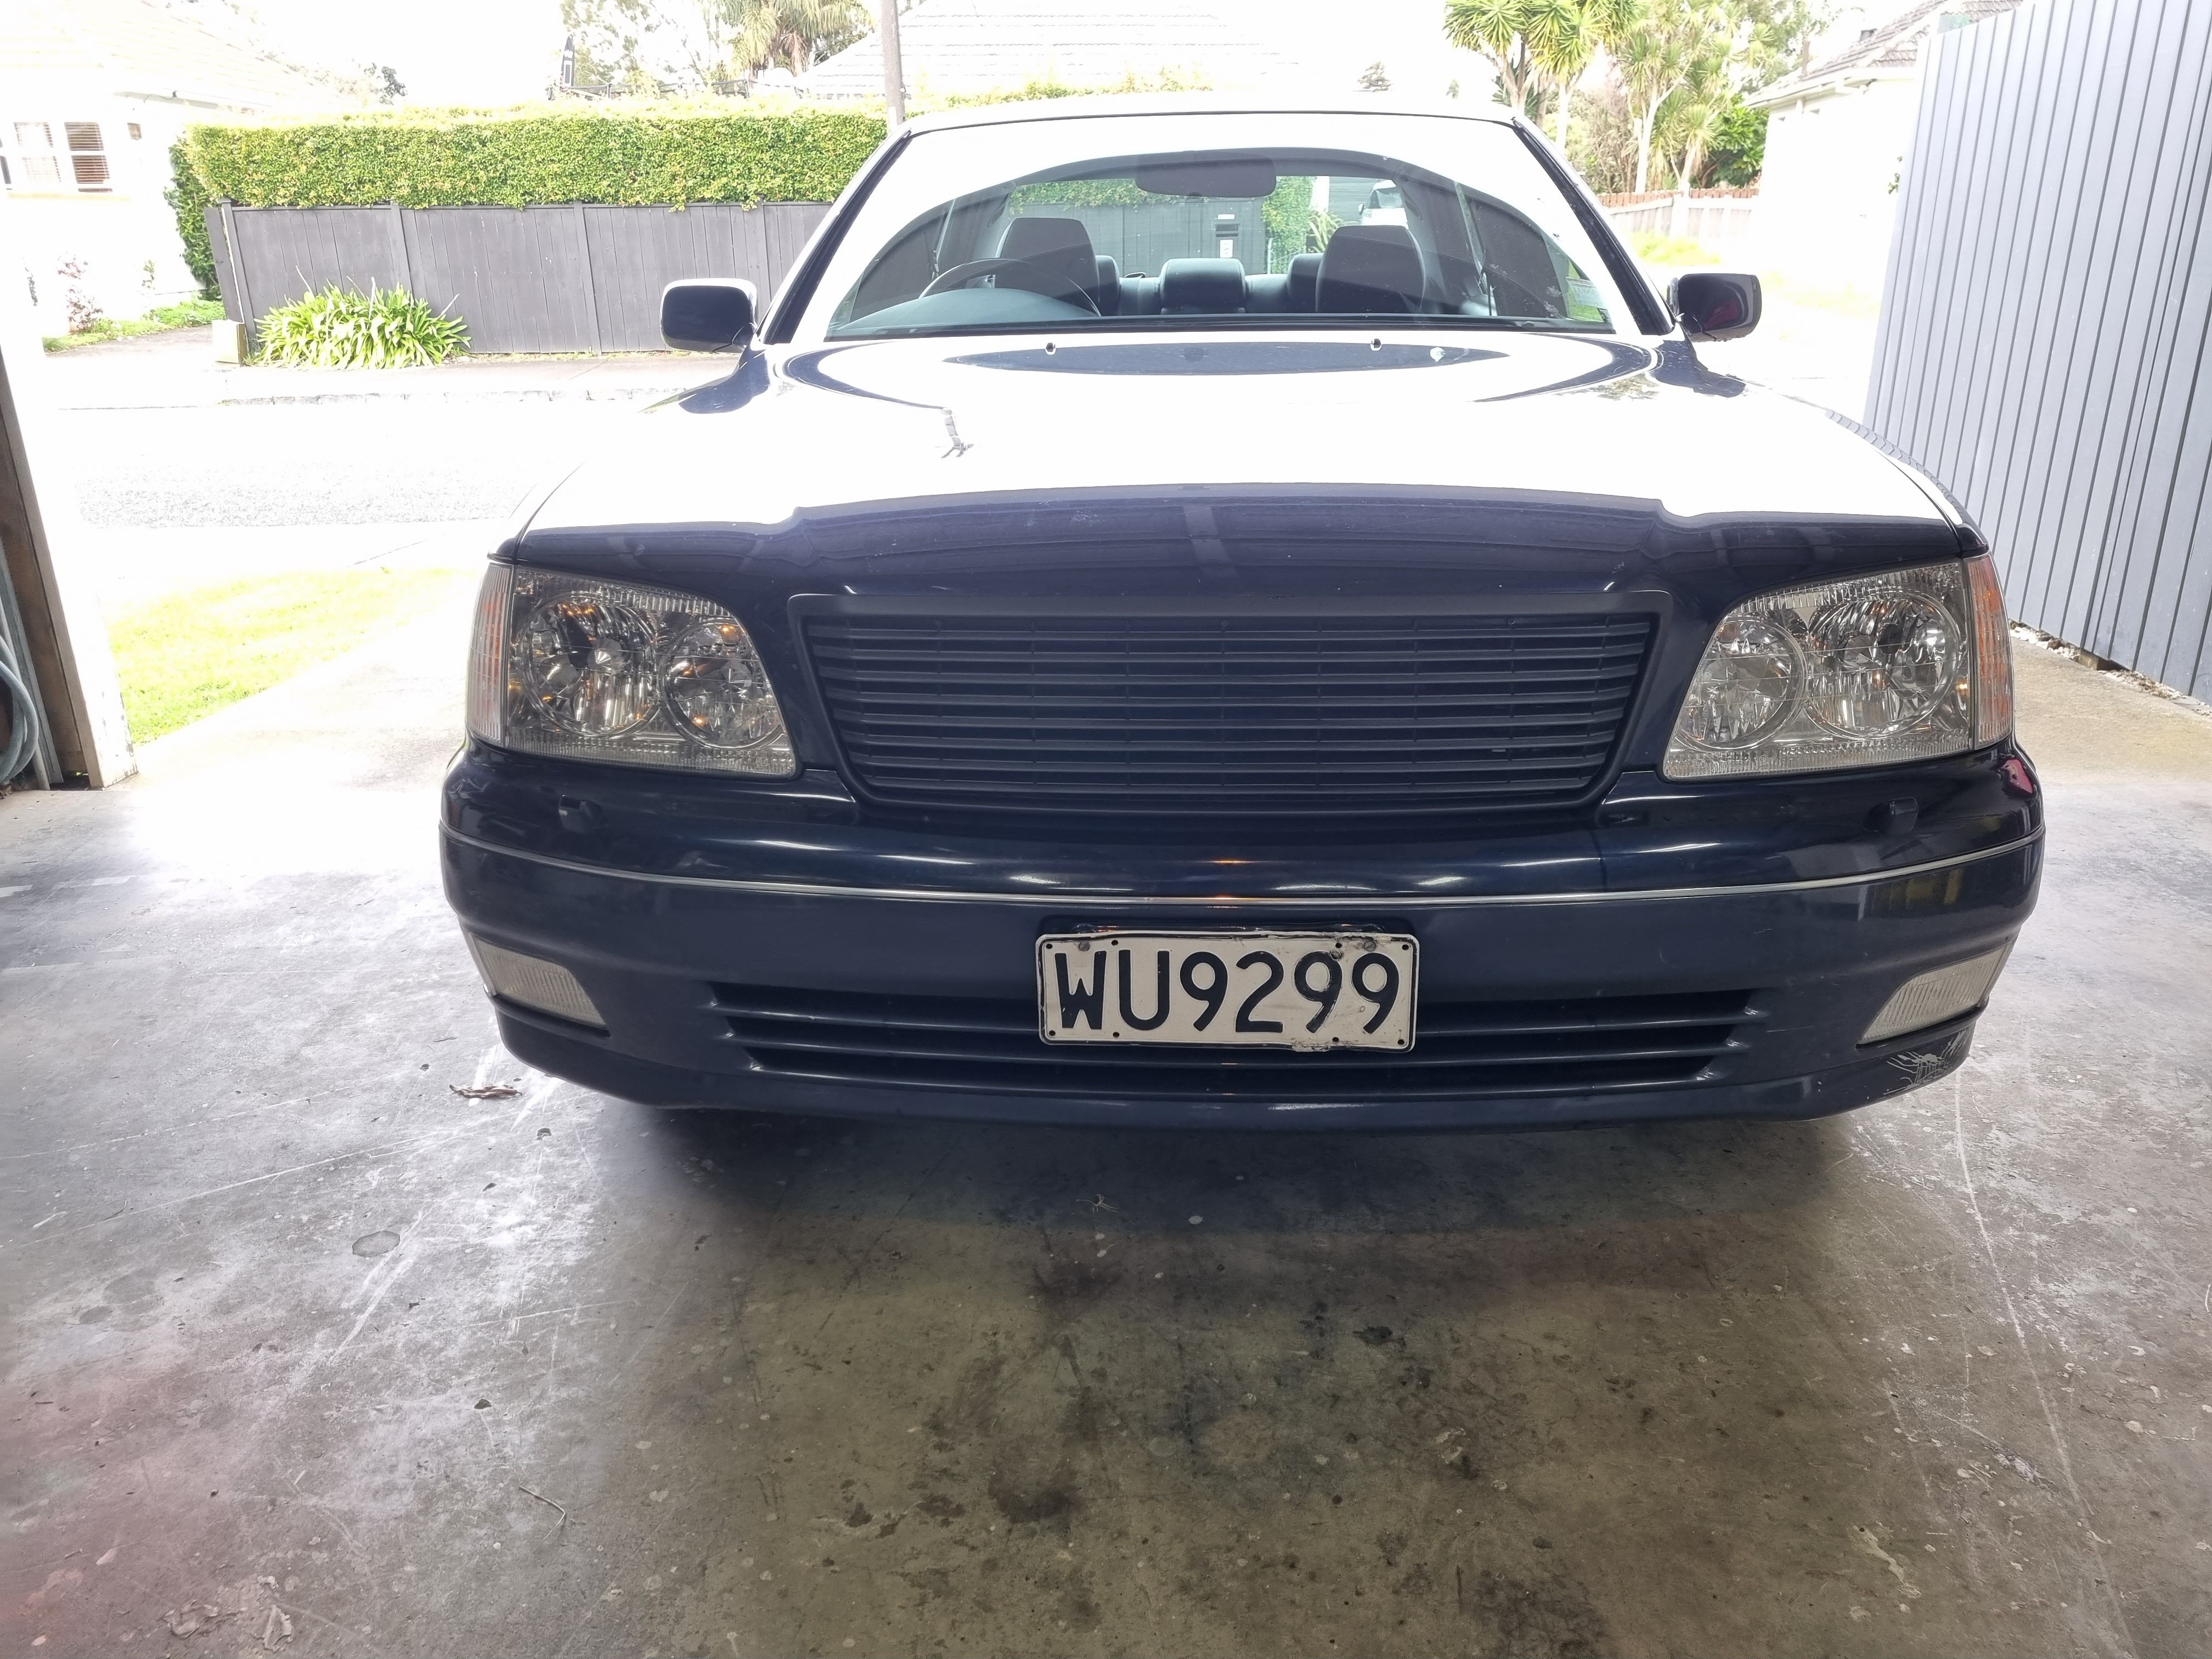
Top one is clearly a Lexus, bottom one is a A32 Maxima?1 point
-
1 point
-
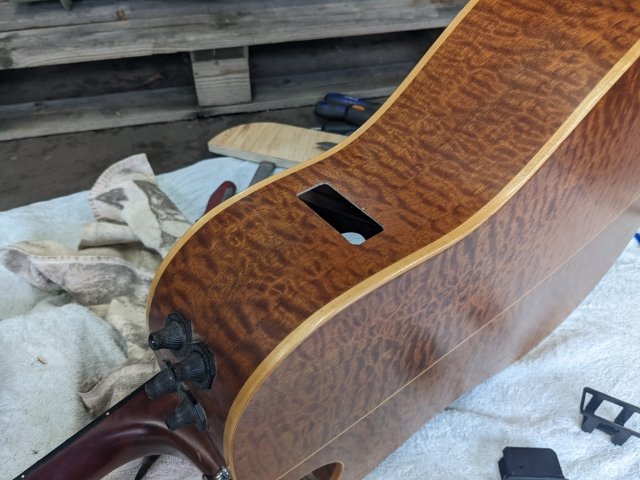
Yea so I have set up a budget recording studio in my shed, it works pretty well. I have been playing with getting a good sound when recording acoustic guitar. My main go to acoustic is a K. Yairi that I bought brand new in 1992. It has amazing looks, sound and playability, but access to the battery for the pickup has always been a drag, you have to loosen off the strings and get a fat hand in through the soundhole. Also if it is left plugged in it will drain the battery. So I ordered a Gotoh panel mount battery box and got to work. This was pretty scary as this guitar is pretty much my most prized possession. All seems good. I added a switch to isolate the battery as well, so if I leave it overnight plugged in and set up it will still work the next day...
1 point
-
Some crane action for yiz; That's a massive Mikuni bus heater that I bought to heat the lined and insulated bit of the shed. It cost $100, still had half a tank of diesel in it, they are big tanks so I am probably at a net profit.
1 point
-
I'll make an exhaust for it if you want.1 point
-
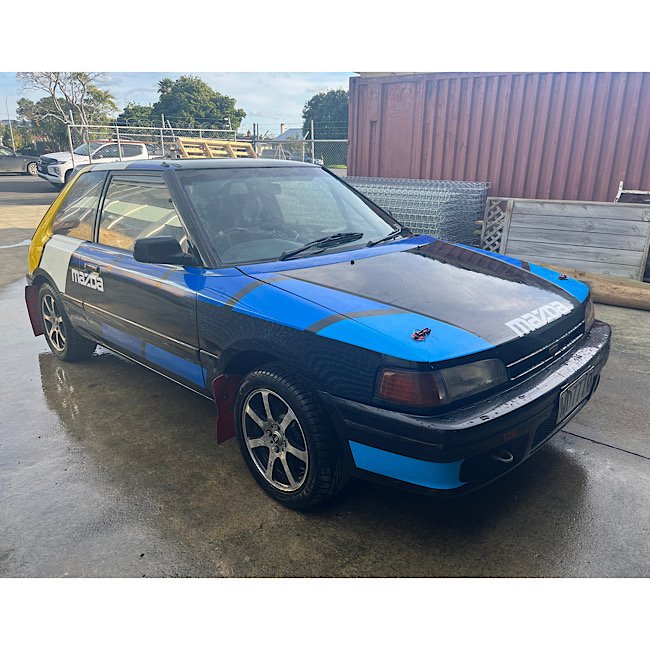
Had a date with the hose this arvo. Have the little gem a wash. still has lime/clay/mud residue stuck to it from its last hiding. looking forward to getting this legal . I think I might chuck the 14” rally wheels on it for a looksy
1 point
-
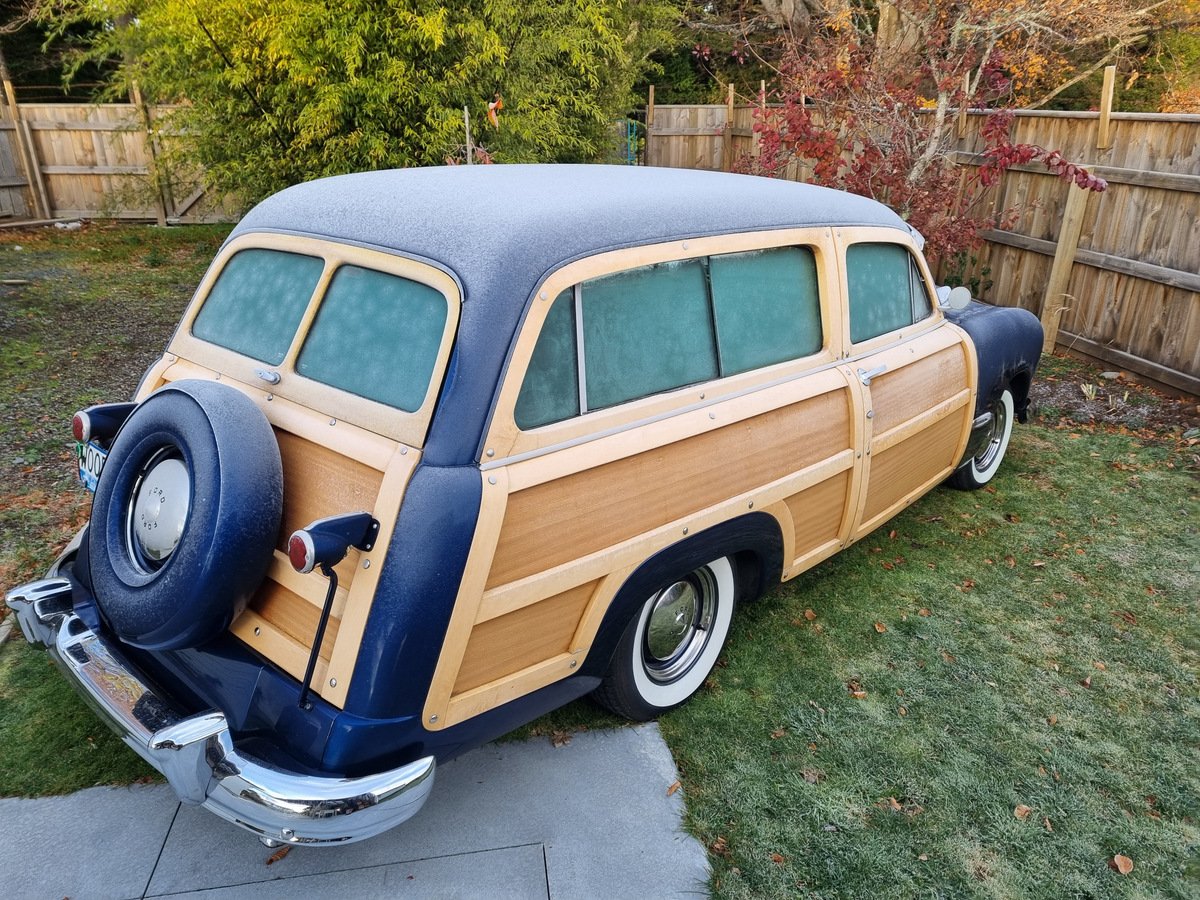
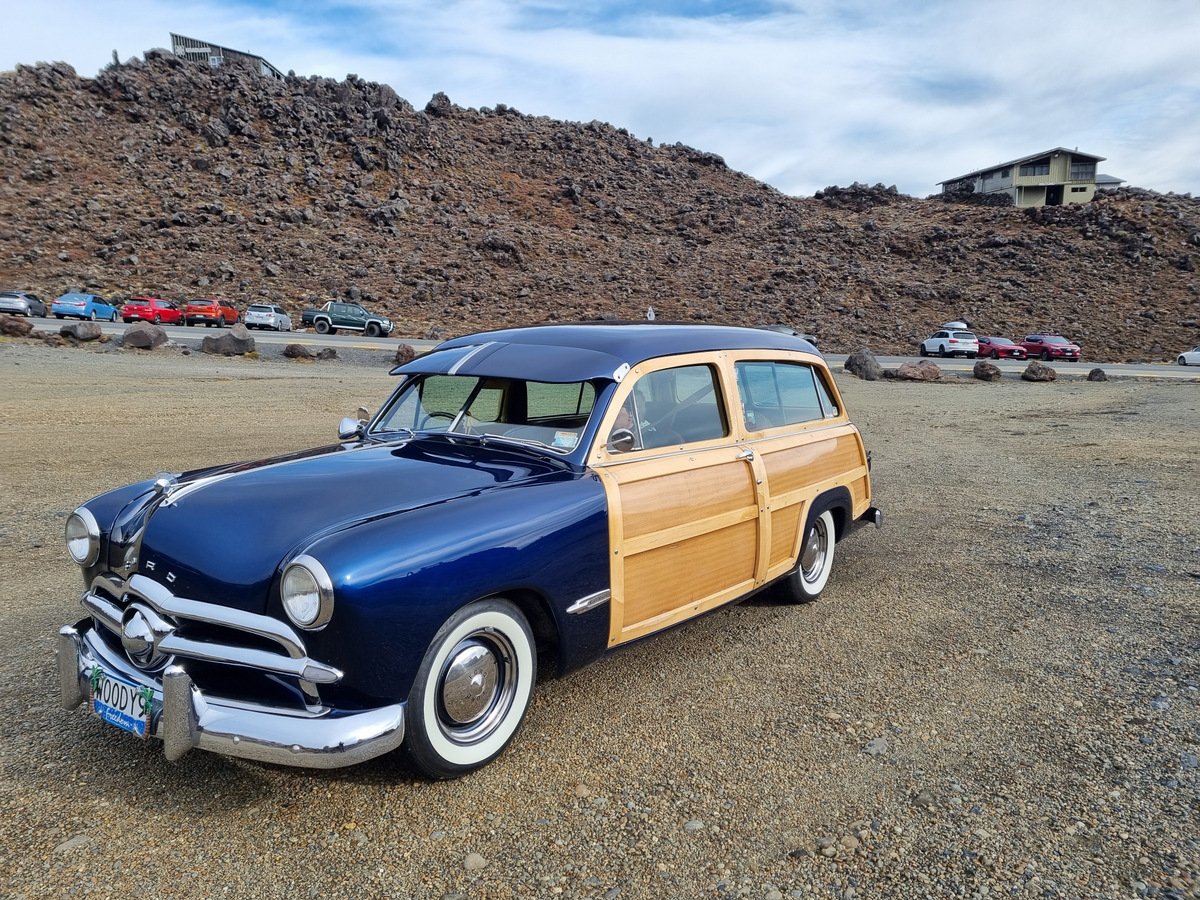
Took the working one away to Ohakune. Went well even after the frost so took a spin up to Whakapapa. Annoyingly left the petrol cap at National Park g.a.s and it wasn't there when I went back 90 minutes later so who knows what happened to it. Managed to find a substitute at Horopito Motors after sneaking entry on a Sunday when they were sort-of closed.
1 point
-
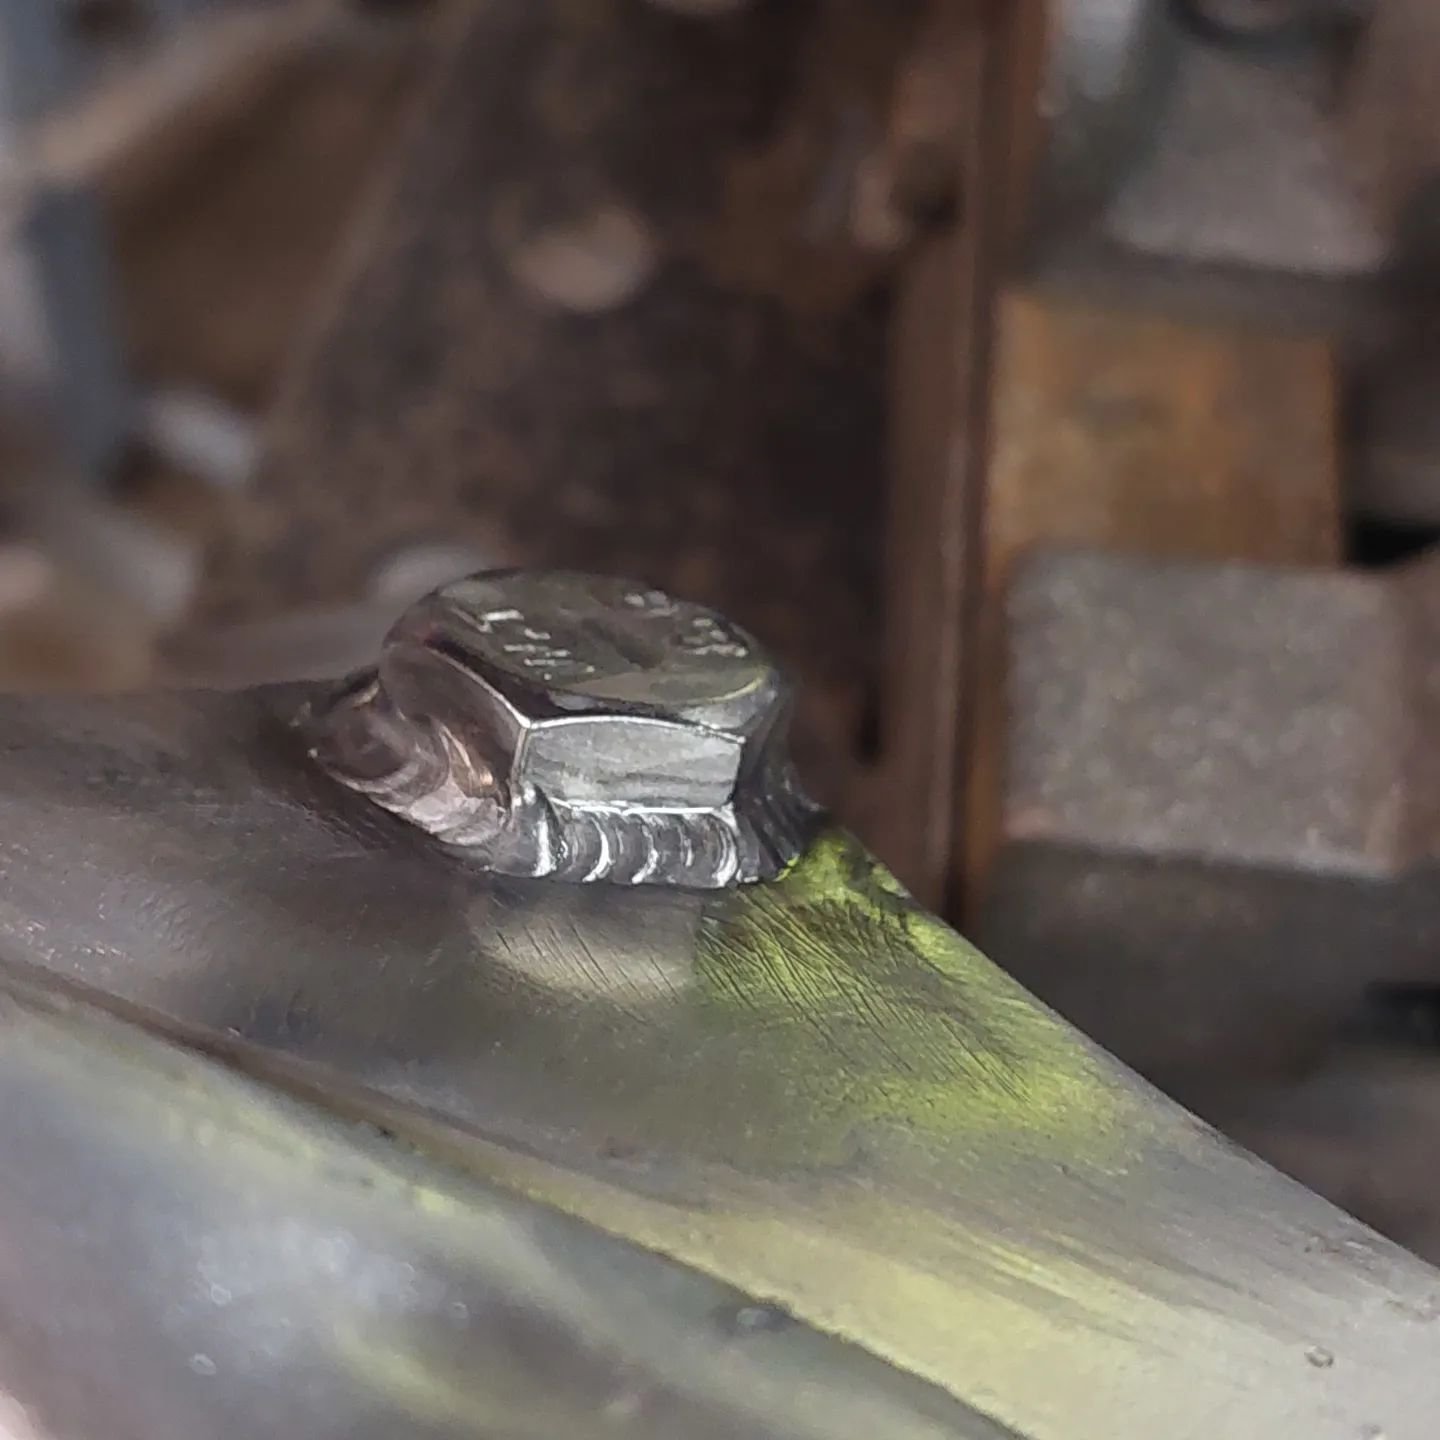
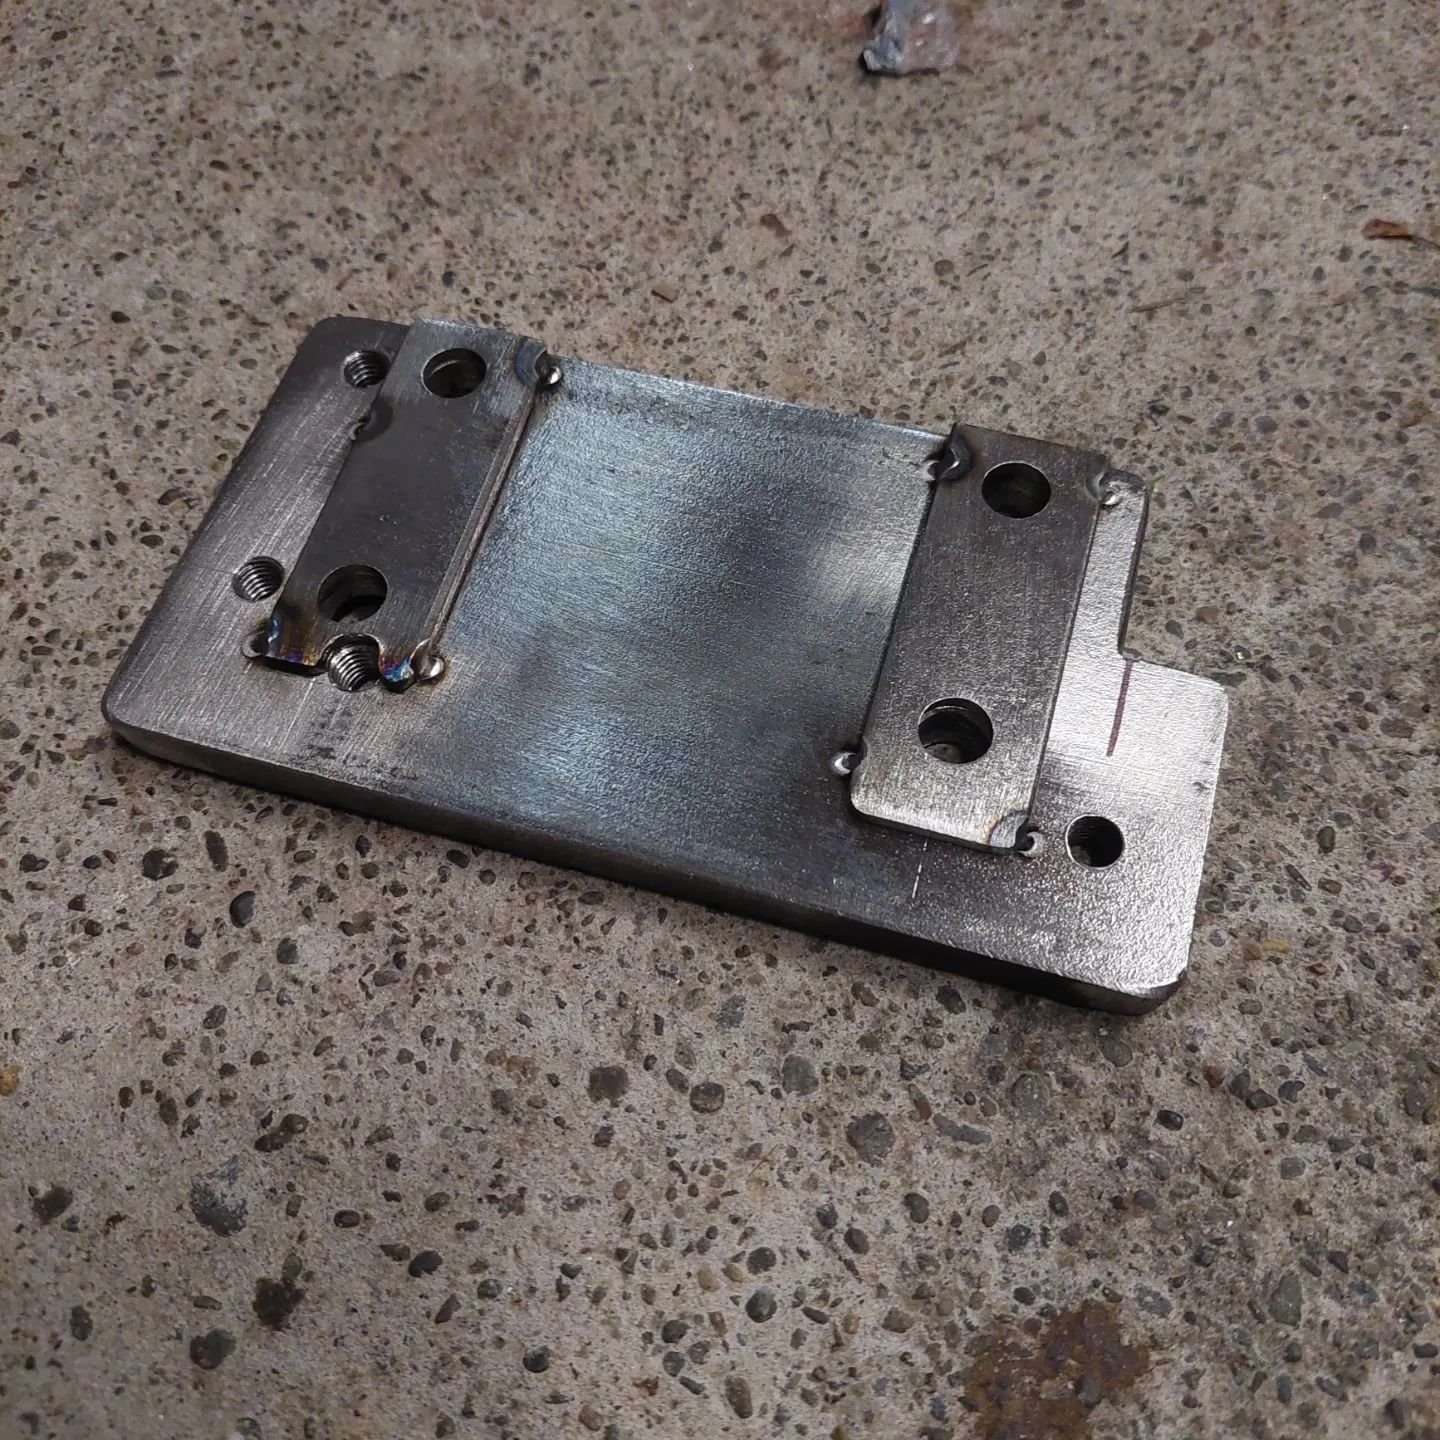
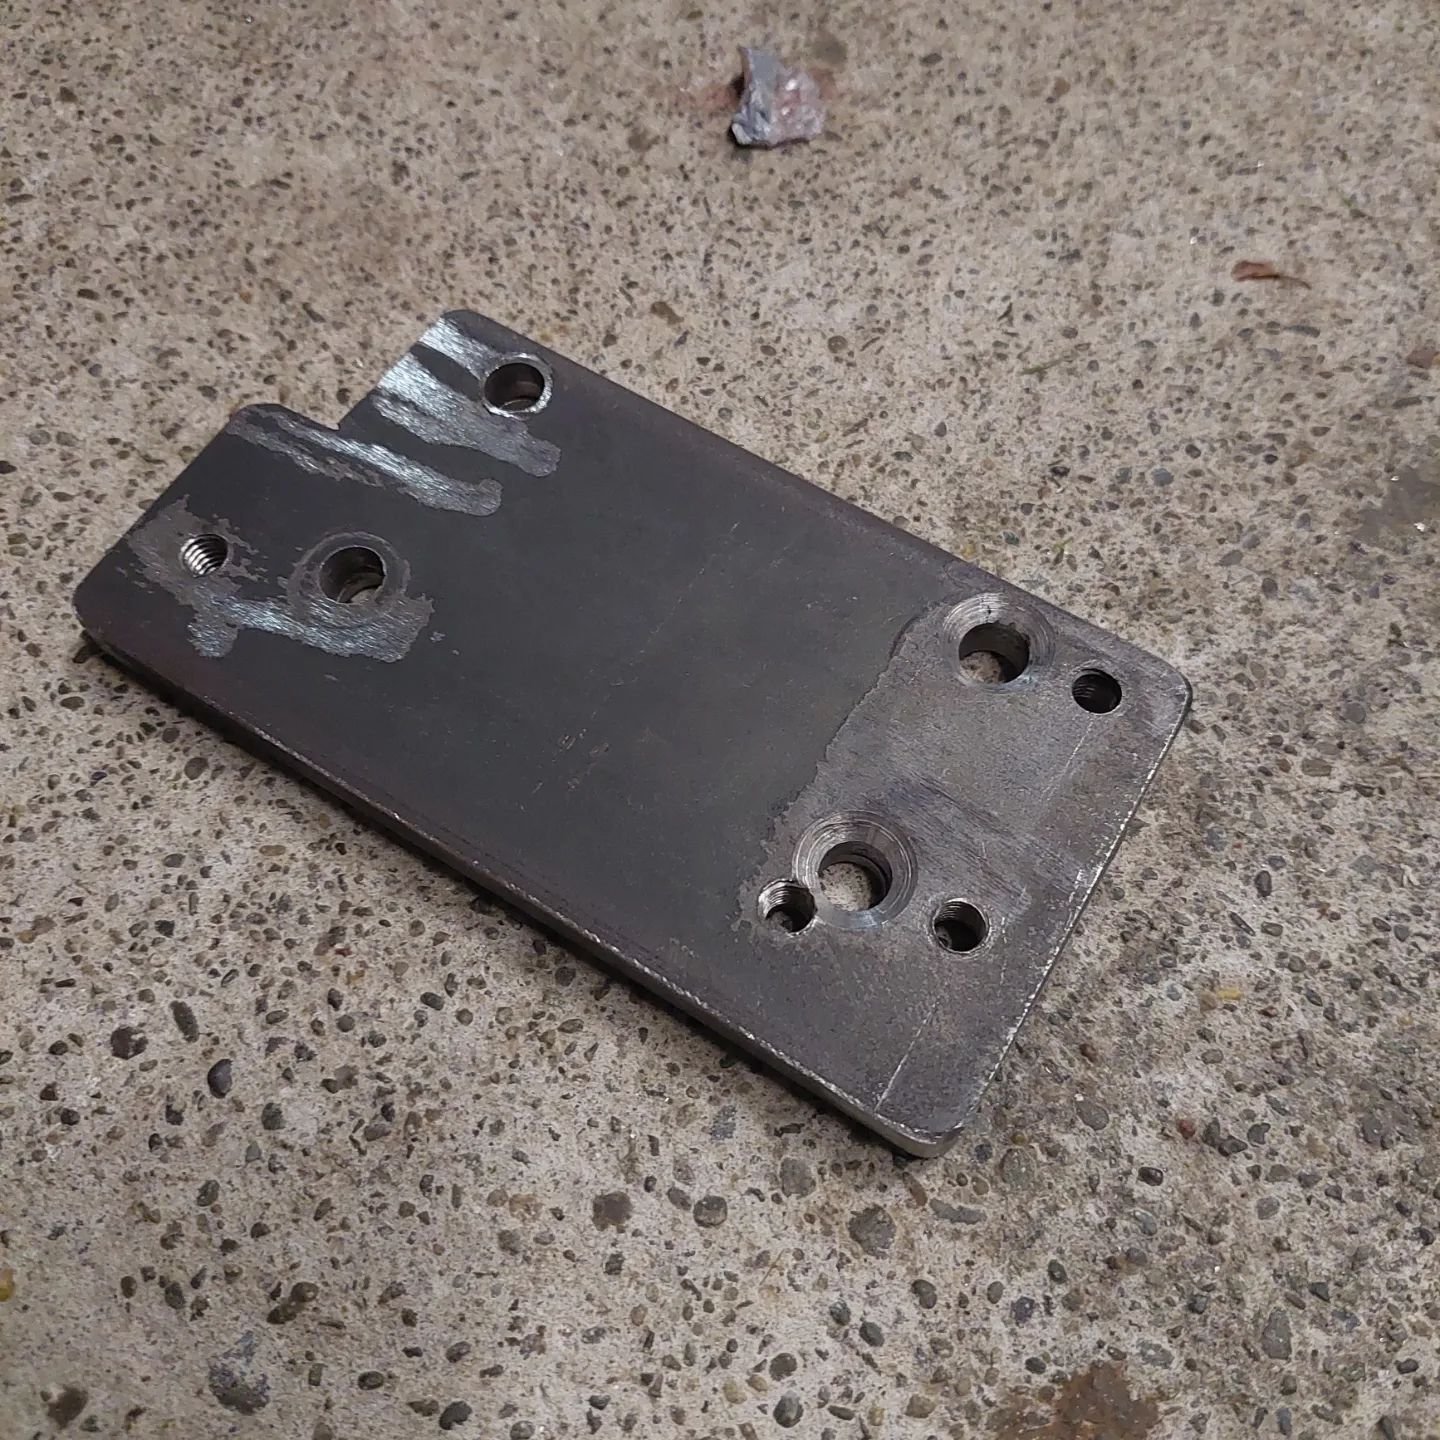
The rear shocks on dads st were pretty poked so I got a new pair of Thai style from mBike. But when i went to install them I found out that a 14mm bolt had been used as the lower shock mount. The shocks I bought from mBike are 12mm. So I cut off, ground it flush and beat fuck out of it so it could be replaced with a hi-tensile M12 bolt. The traces of gold zinc left on the bolt and my argon bottle nearly empty made it a prick to weld I made some adapter plates to mount a lifan whilst still keeping the original mounting holes incase I ever want to put the original engine back in, same with the mounts for the original foot rests and bashguard. I gave the plastic mudguard a paint of satin black to tidy it up whilst i look for an original metal chrome one. The swingarm has been painted satin black too but Im waiting for the paint to harden before I mount it.
1 point
-
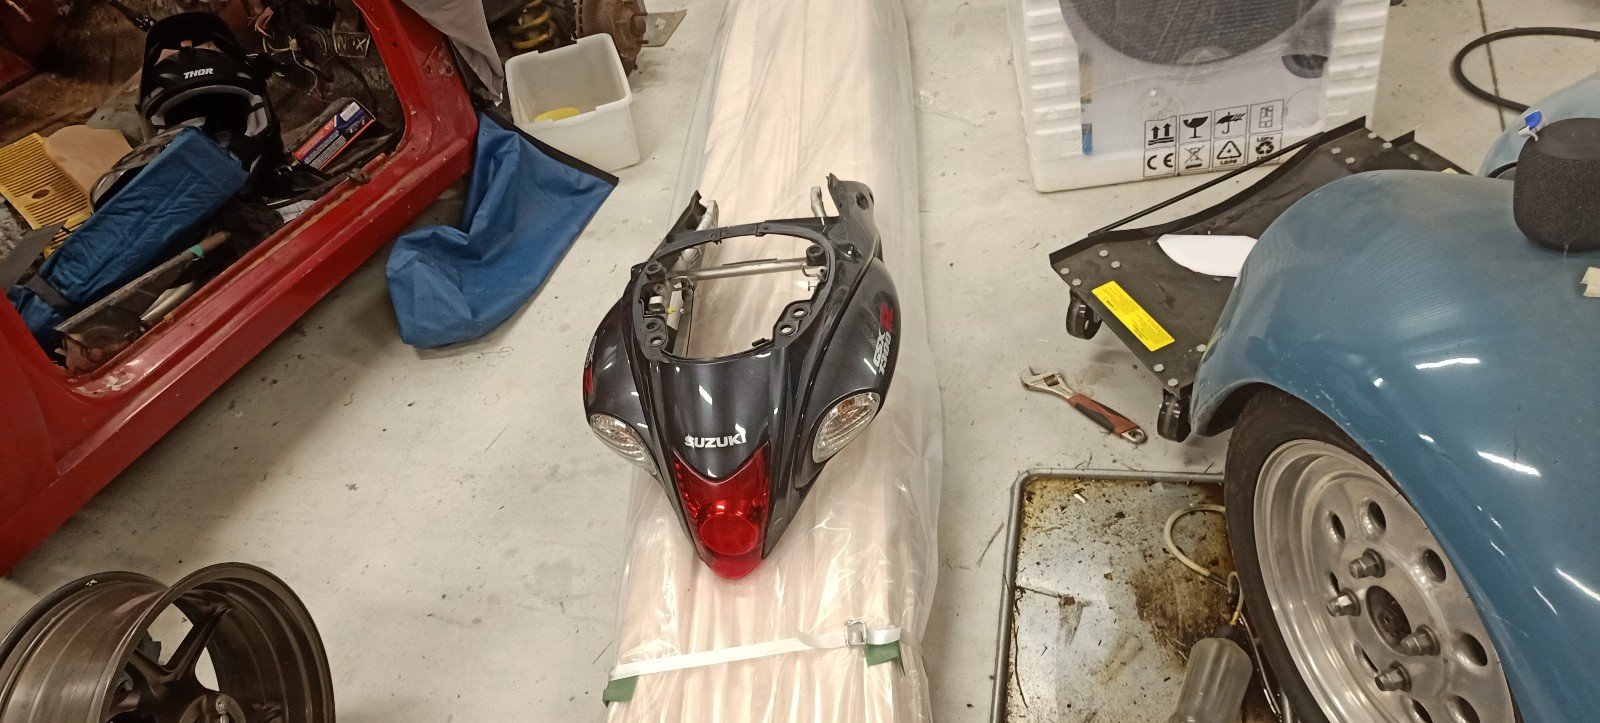
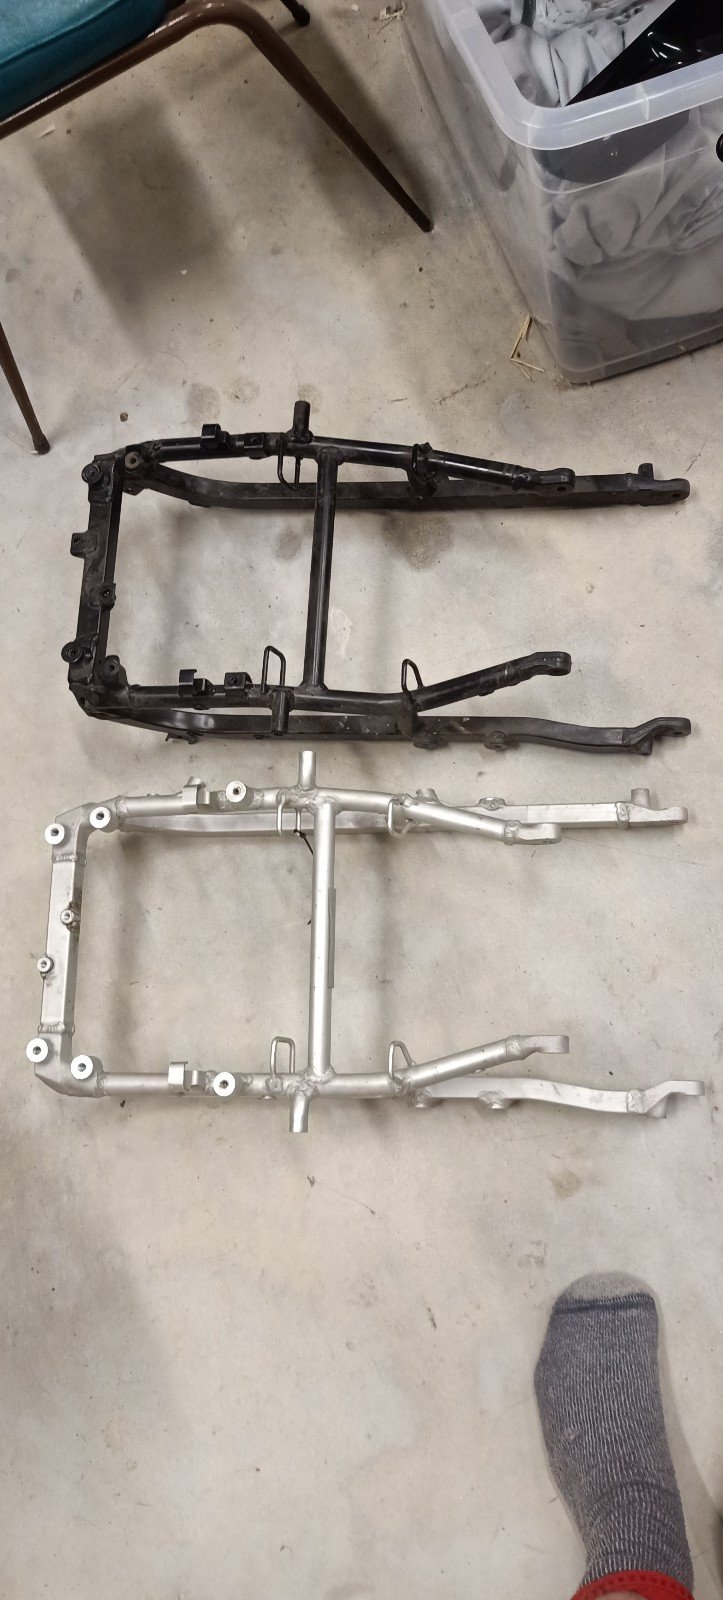
Also happening in parallel with the wheels is a weight loss plan involving nearly everything else. I bought some digital fish type scales and have my super accurate resin scales, so I started just pulling stuff off and finding lighter weight replacements. A list of weights so far is below- the Exhaust was done by the previous owner but the factory exhausts were included so I was able to weigh and compare. The most fun of these items was the rear subframe. This is an aluminum subframe as used during the first three years of Hayabusa manufacture and I bought it in from Norway (ebay). IT was bloody cheap, but after freight and conversion etc came out to around 190 NZD. There was one recently on trademe for $400, so thats a bargain. Its needed a huge amount of bracket trimming and cleaning up- I'm still not quite finished (have some threaded aluminum bosses being made for me which will need to be welded to the frame) but the comparison when you compare the weights is incredible. Being for a gen1 some of the fairing mounting bosses are in the wrong place- but there's enough in the right place to mean its not too big of a job to get the alignment correct- and the important things like rider seat retention loops are in the correct place. The other items were all very very easy- footpeg weights to lessen vibration, pillion pegs, etc etc. Also, strikes me as funny that they go through the trouble of using subframe mounting bolts which are drilled and relieved for weight reduction- when basically none of the other bolts on the bike are. Just seems futile considering the very minute savings. All in all, 16.3 KG is not bad so far! but lots more to go (lighter wheels etc will help, plus stuff covered below)
1 point
-
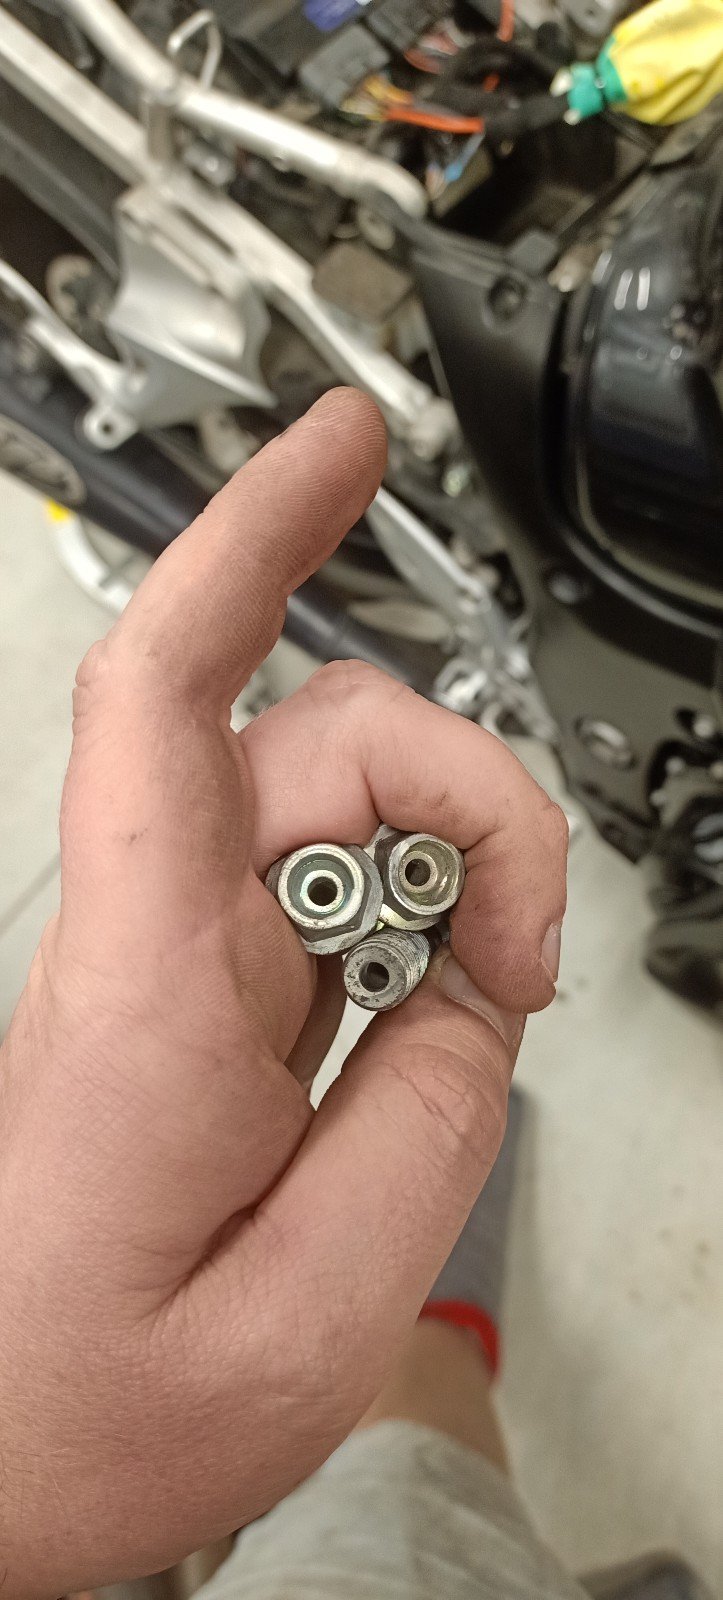
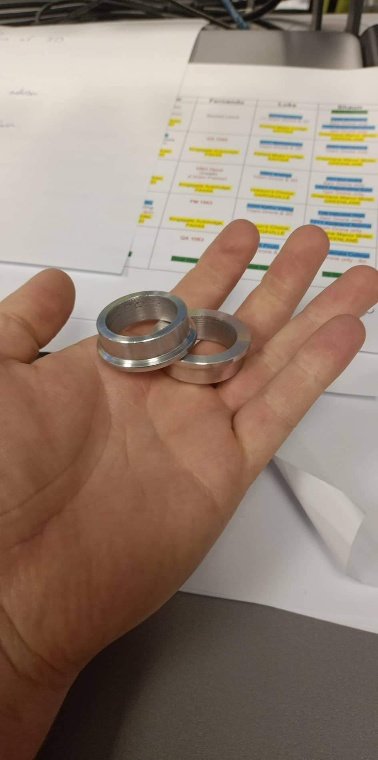
I then started researching ways to chisel weight from the big thing. If you have a million bucks its EASY. You can purchase carbon or forge wheels, carbon fairings, titanium axles and bolts for the whole bike, etc etc etc. I'm always more interested in the more DIY approach which utilizes factory parts where possible. Its still expensive, but comparatively cheap. Big news on busa forums is the R1 wheel swap idea. Guys take R1 wheels, buy a conversion axle for the front plus theres a few spacers required for the rear. The R1 wheels are lighter (though finding an accurate measurement is difficult) and they look a ton better than the factory tri spokes. But. R1 wheels are not readily available here in NZ. They are also expensive when they do become available (1k for the pair) and the conversion axle for the front wheel is less than elegant (its a smaller OD to fit the smaller R1 bearings, has ugly sleeves to step up to the hayabusa forks, is SOLID rather than hollow like the factory item and uses an ugly industrial bolt and washer to pull the lot together. Once I figured that out about R1 wheels I decided to do my own research. Just because that swap exists, doesn't mean its actually the best solution! I went on Trademe and FB Market place and found modern sports bikes being wrecked. Eventually I found a couple which had wheels available so I enquired to find pricing and then hit Google to figure out widths and bearing sizes. I settled on gen1 ZX10R wheels which were 400$ for the pair and most importantly, share the same size axles and seals as the busa. I paid the money and they arrived a week later, then I slid the front wheel onto the busa axle with busa spacer and took some measurements. It fit near perfectly with the only modification being to the factory wheel spacer, which required 1.25mm taken off its length to center the kawasaki wheel. I have weighed the bare wheel, this looks to be 450 grams lighter for the bare front wheel than a bare Hayabusa wheel, so not bad and in line with the best case measurements I've seen for the R1 front wheel swap (+ the lighter factory front axle!) Also, these wheels are made by enkei and look fucking great. I had some chap machine me up the new shorter front spacer. Theres a spare for a mate with a few race bikes, he is wanting to swap to these wheels now too. Next up, I need to buy some new front discs from a gen2 zx10r. They have the same wheel PCD and the same diameter as the hayabusa. At worst these discs will require some thin washers to center them perfectly in the caliper
1 point
-
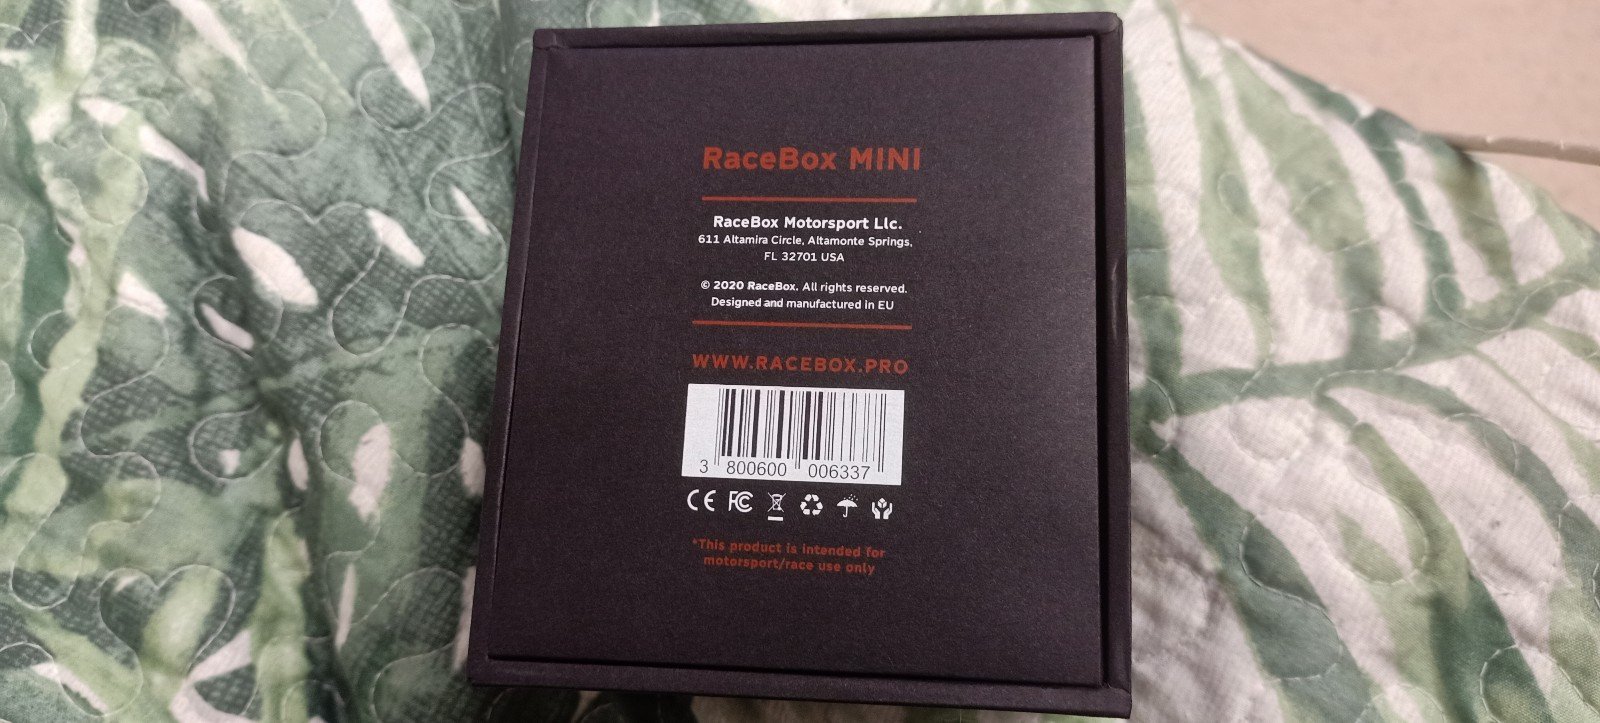
When I was very young I had a Gtech timing device for my cars. No idea what happened to it but practicing 0-100 times was a hoot. I'd love to take the busa to the strip one day (The solid clutch center contributes to this) and so when I stumbled across an indegogo project for the RaceBox Mini, I was pretty excited. Its basically a compact GPS/G sensor unit which mounts on the bike (or car) and then provides a huge amount of data on acceleration, timing, lean angles and G forces via your smart phone. I'd never signed up for any kickstarter type thing before so I was anxious, but the result couldn't have been better. But yeah unfortunately the bikes now in bits and the rain had set in prior to disassembly so its not even been used .... But unboxing pics below. Its a quality bit of kit! https://www.racebox.pro/products/racebox-mini
1 point
-
1 point
-
@Vintage Grumble Update, I built a thing
1 point
-
Sprayed some durepox on the cleaned up bits Pulled a window winder out of the molasses tank and cleaned it up. Might take it up to the electroplaters and see how it goes as an assembly. Started picking away at the rust again tonight. Also fixed the headlights on the other one. High beam light was always on, and lights were dim too. WOF man said last time to sort it out so finally had a look. Don't really drive at night anyway. Turned out that the PO has some Hella H4 lights fitted but whoever did the job (I don't think it was him) didn't know that you need to swamp the ground and low beam wires in the plug for the new lights. So basically there was mess where both filaments were always on in various combinations. Works mint now though (even the high beam light) and new WOF acquired.
1 point
-
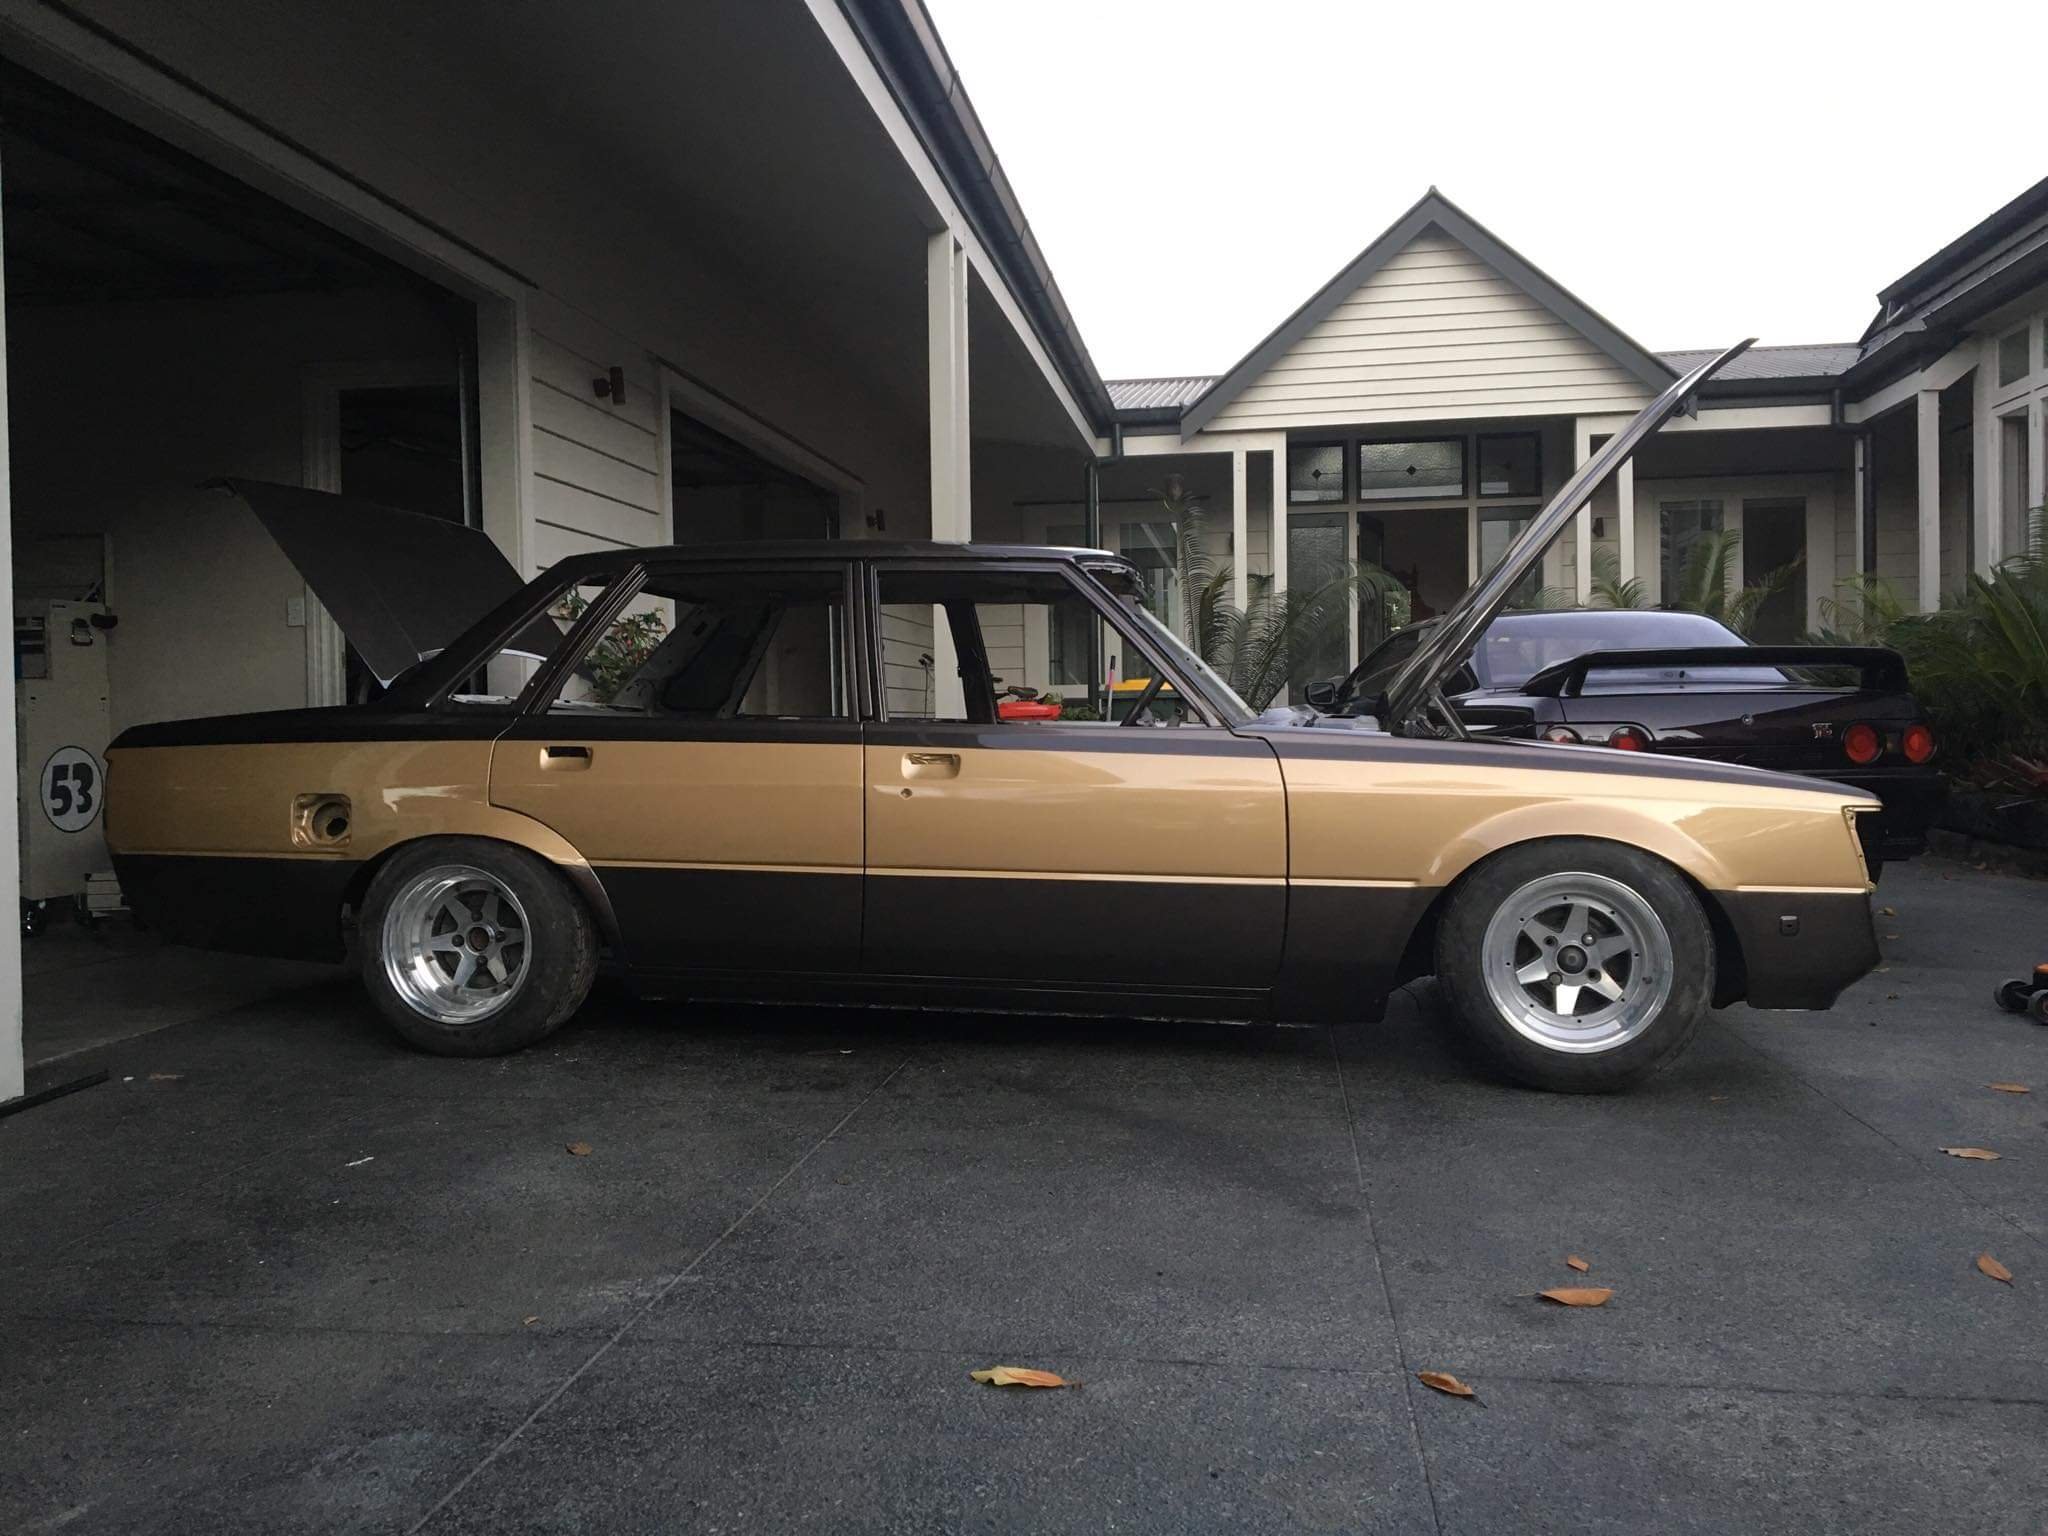
Couple of photos from the Trademe listing. 1981 Toyota Cressida RX60 It's had a full panel and paint with all the door jambs and everything done as well as underside. JZX81 steering rack mounts and engine mount towers have been grafted onto GX60 engine crossmember and 81 rack fitted. S13 front coilovers, hubs and castor rods have been fitted up front, I'm just having some brackets made up to locate castor rods onto factory cressida body mounts Ae86 coilovers have been fitted to the rear with the E series solid rear still there. It's had a late model chaser sedan front installed and late model mark II tail lights have been grafted on. There's a 2JZGE VVTI with the gte covers fitted, W55 and a flywheel has been located to manual convert the motor.
1 point
-
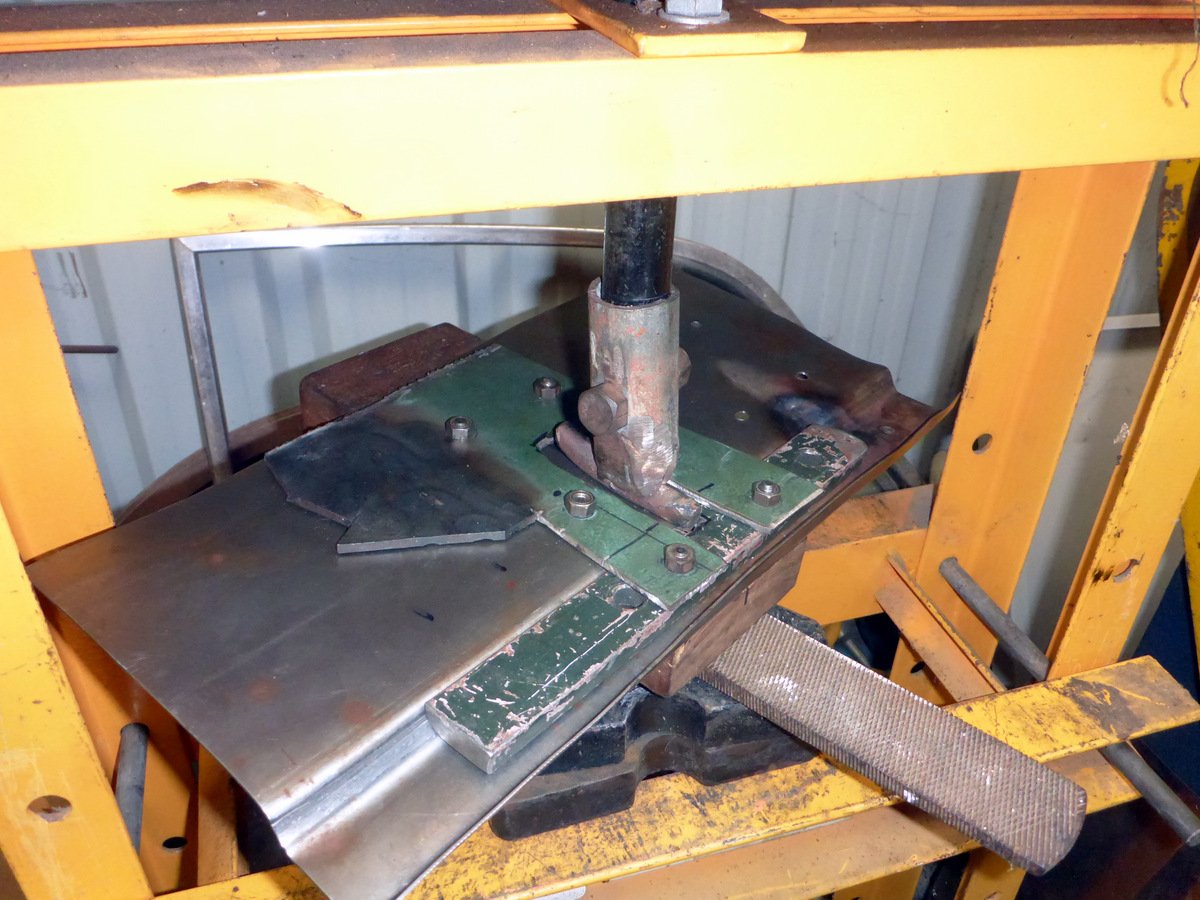
Finally got back to this. Revised the tooling a bit and tried a longer test piece. Came out usably OK I think. Quick squirt of zinc it just to remove the reflections. I haven't filled the holes in this test one, but they'll need to be done for the proper pieces.
1 point
-
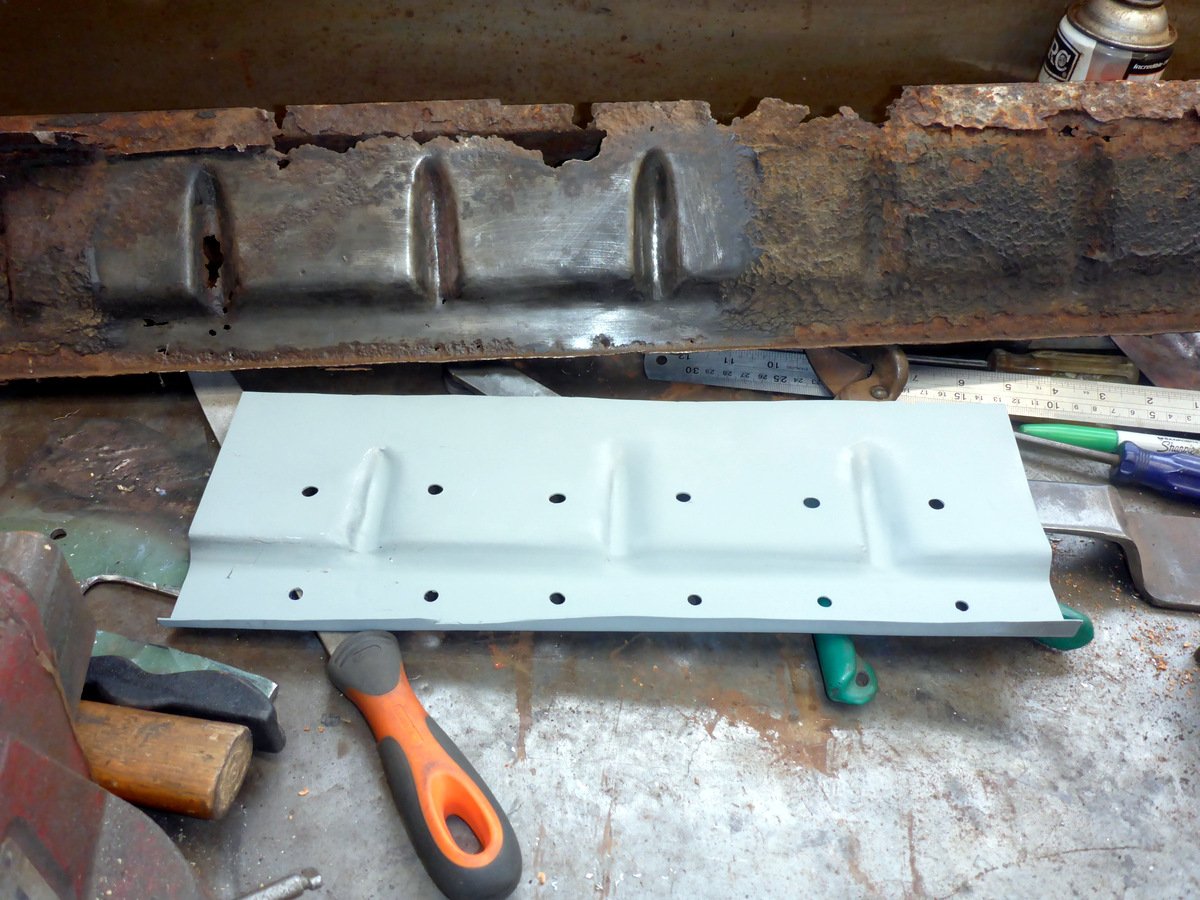
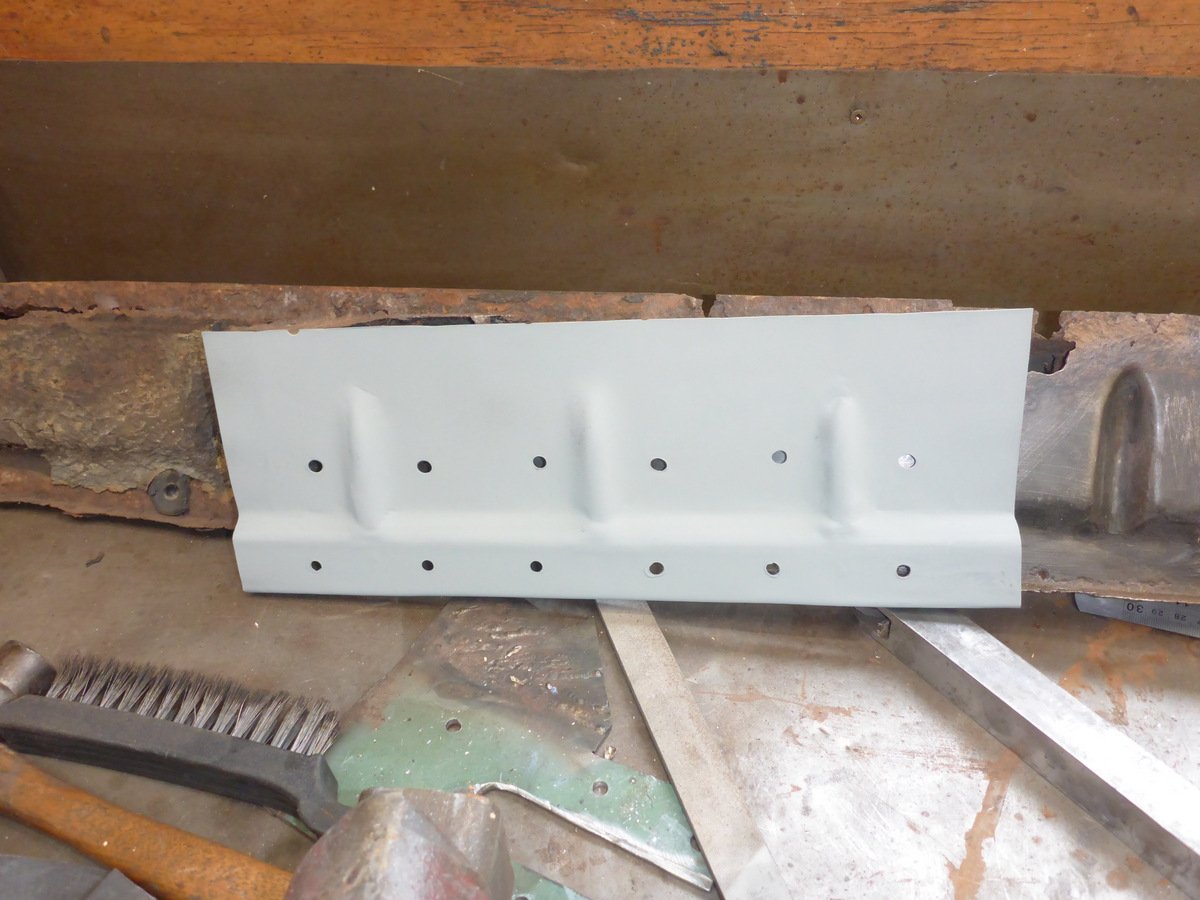
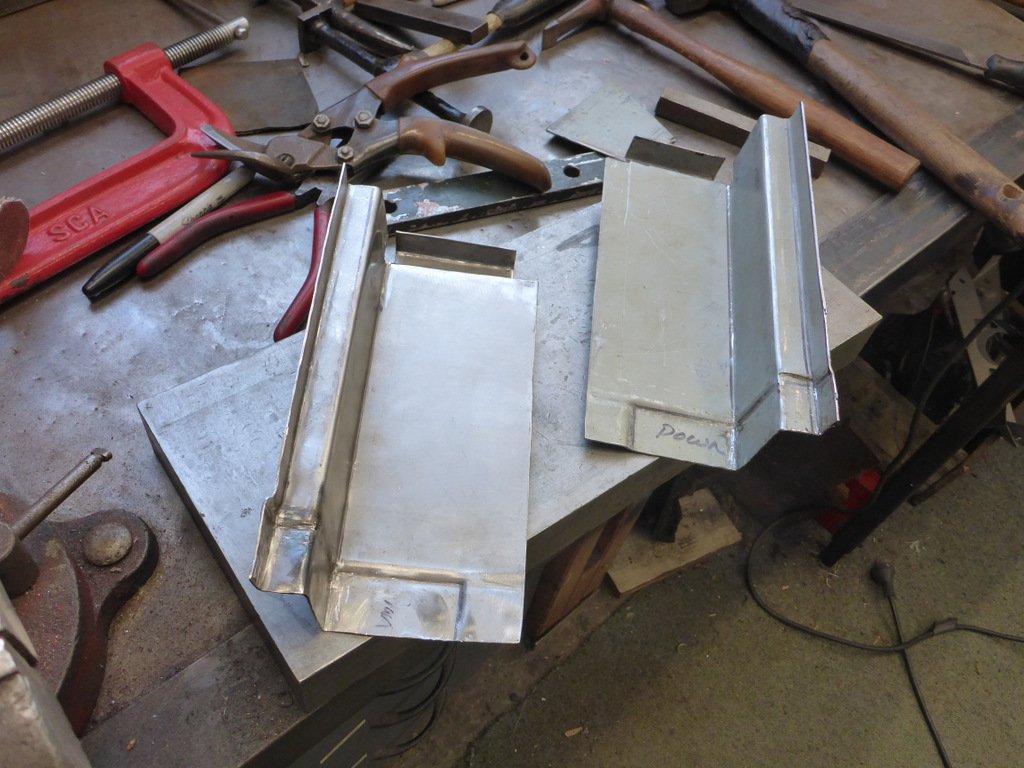
Got sidetracked into Holden and Morris brake work-overs for a few weeks. Took out the remainder of the back seat support structure which has been soaking in the molasses for a few weeks now. Made two new pieces for the bottom of the B-pillar, one for each side. Surprising how much softer the non-zintec steel is, even though they are both 18g. I'm out of the zintec right now but have most of a sheet of normal CR sheet to work with.
1 point


.jpg.c5ee675bb29516d5fdf619d5ceeed8be.jpg)
.jpg.a3b9134e316c1905d19660e24f3756d3.jpg)


This leaderboard is set to Auckland/GMT+12:00