
Leaderboard


Popular Content
Showing content with the highest reputation on 05/27/22 in all areas
-
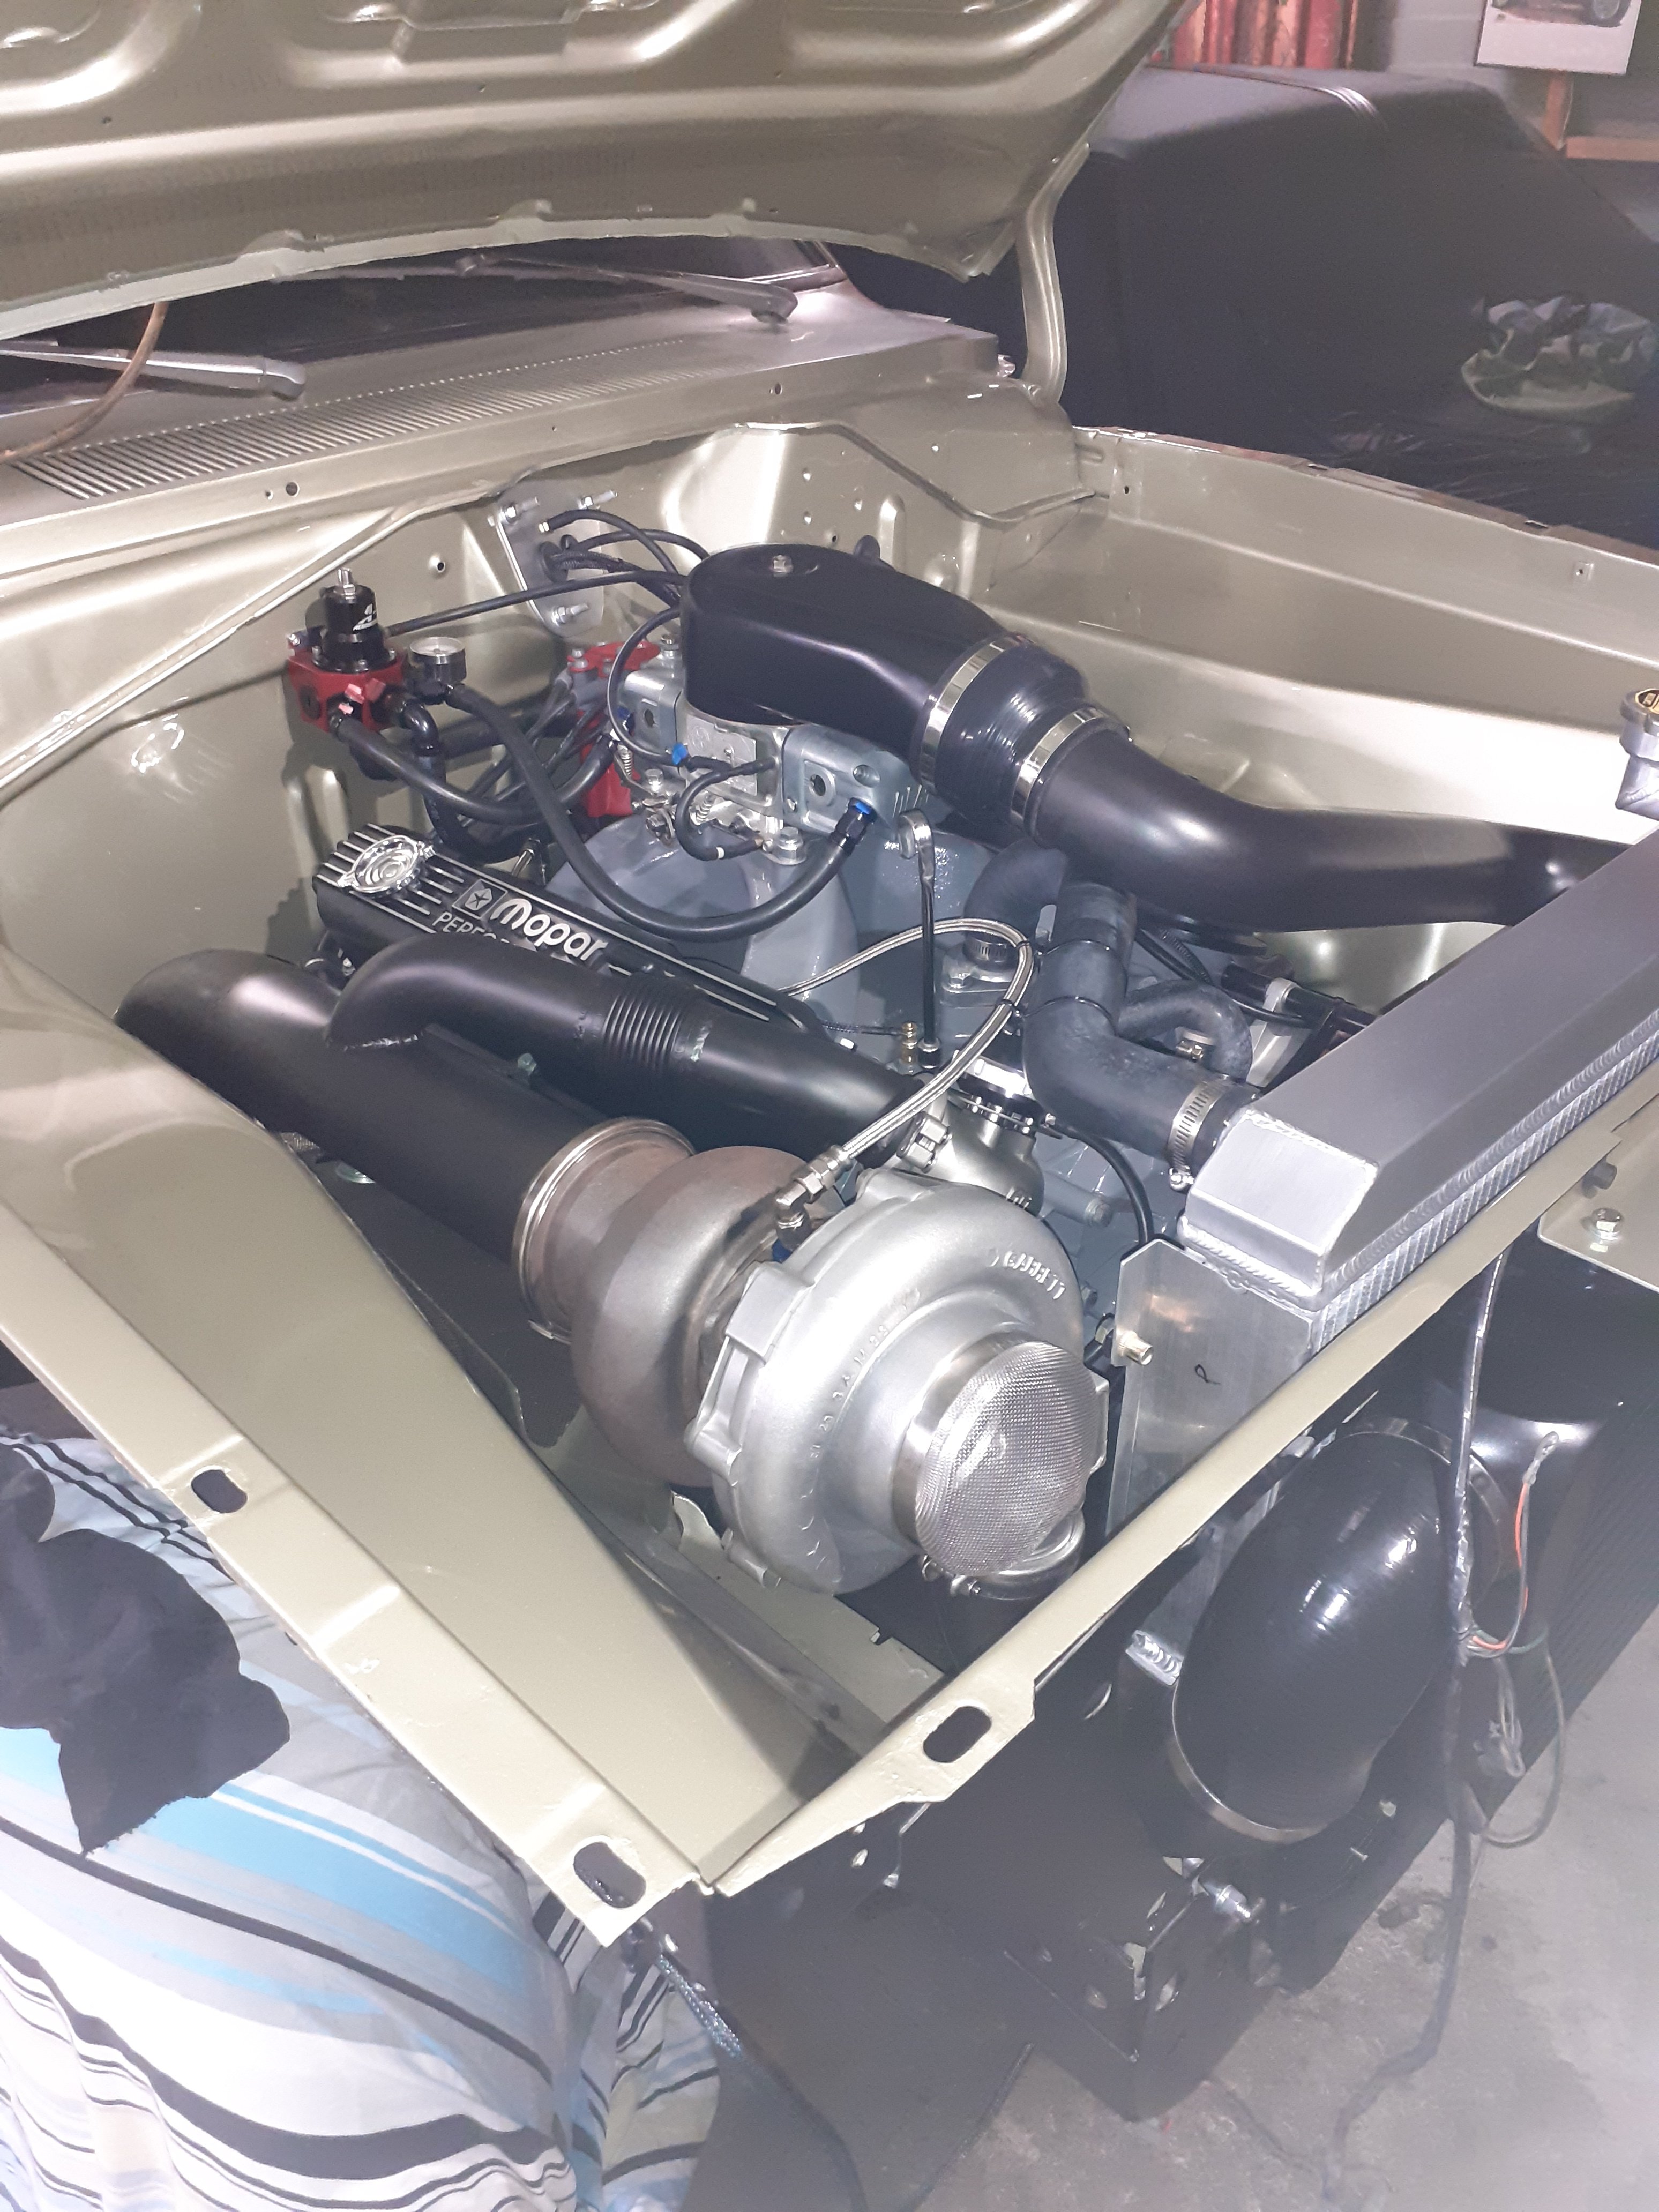
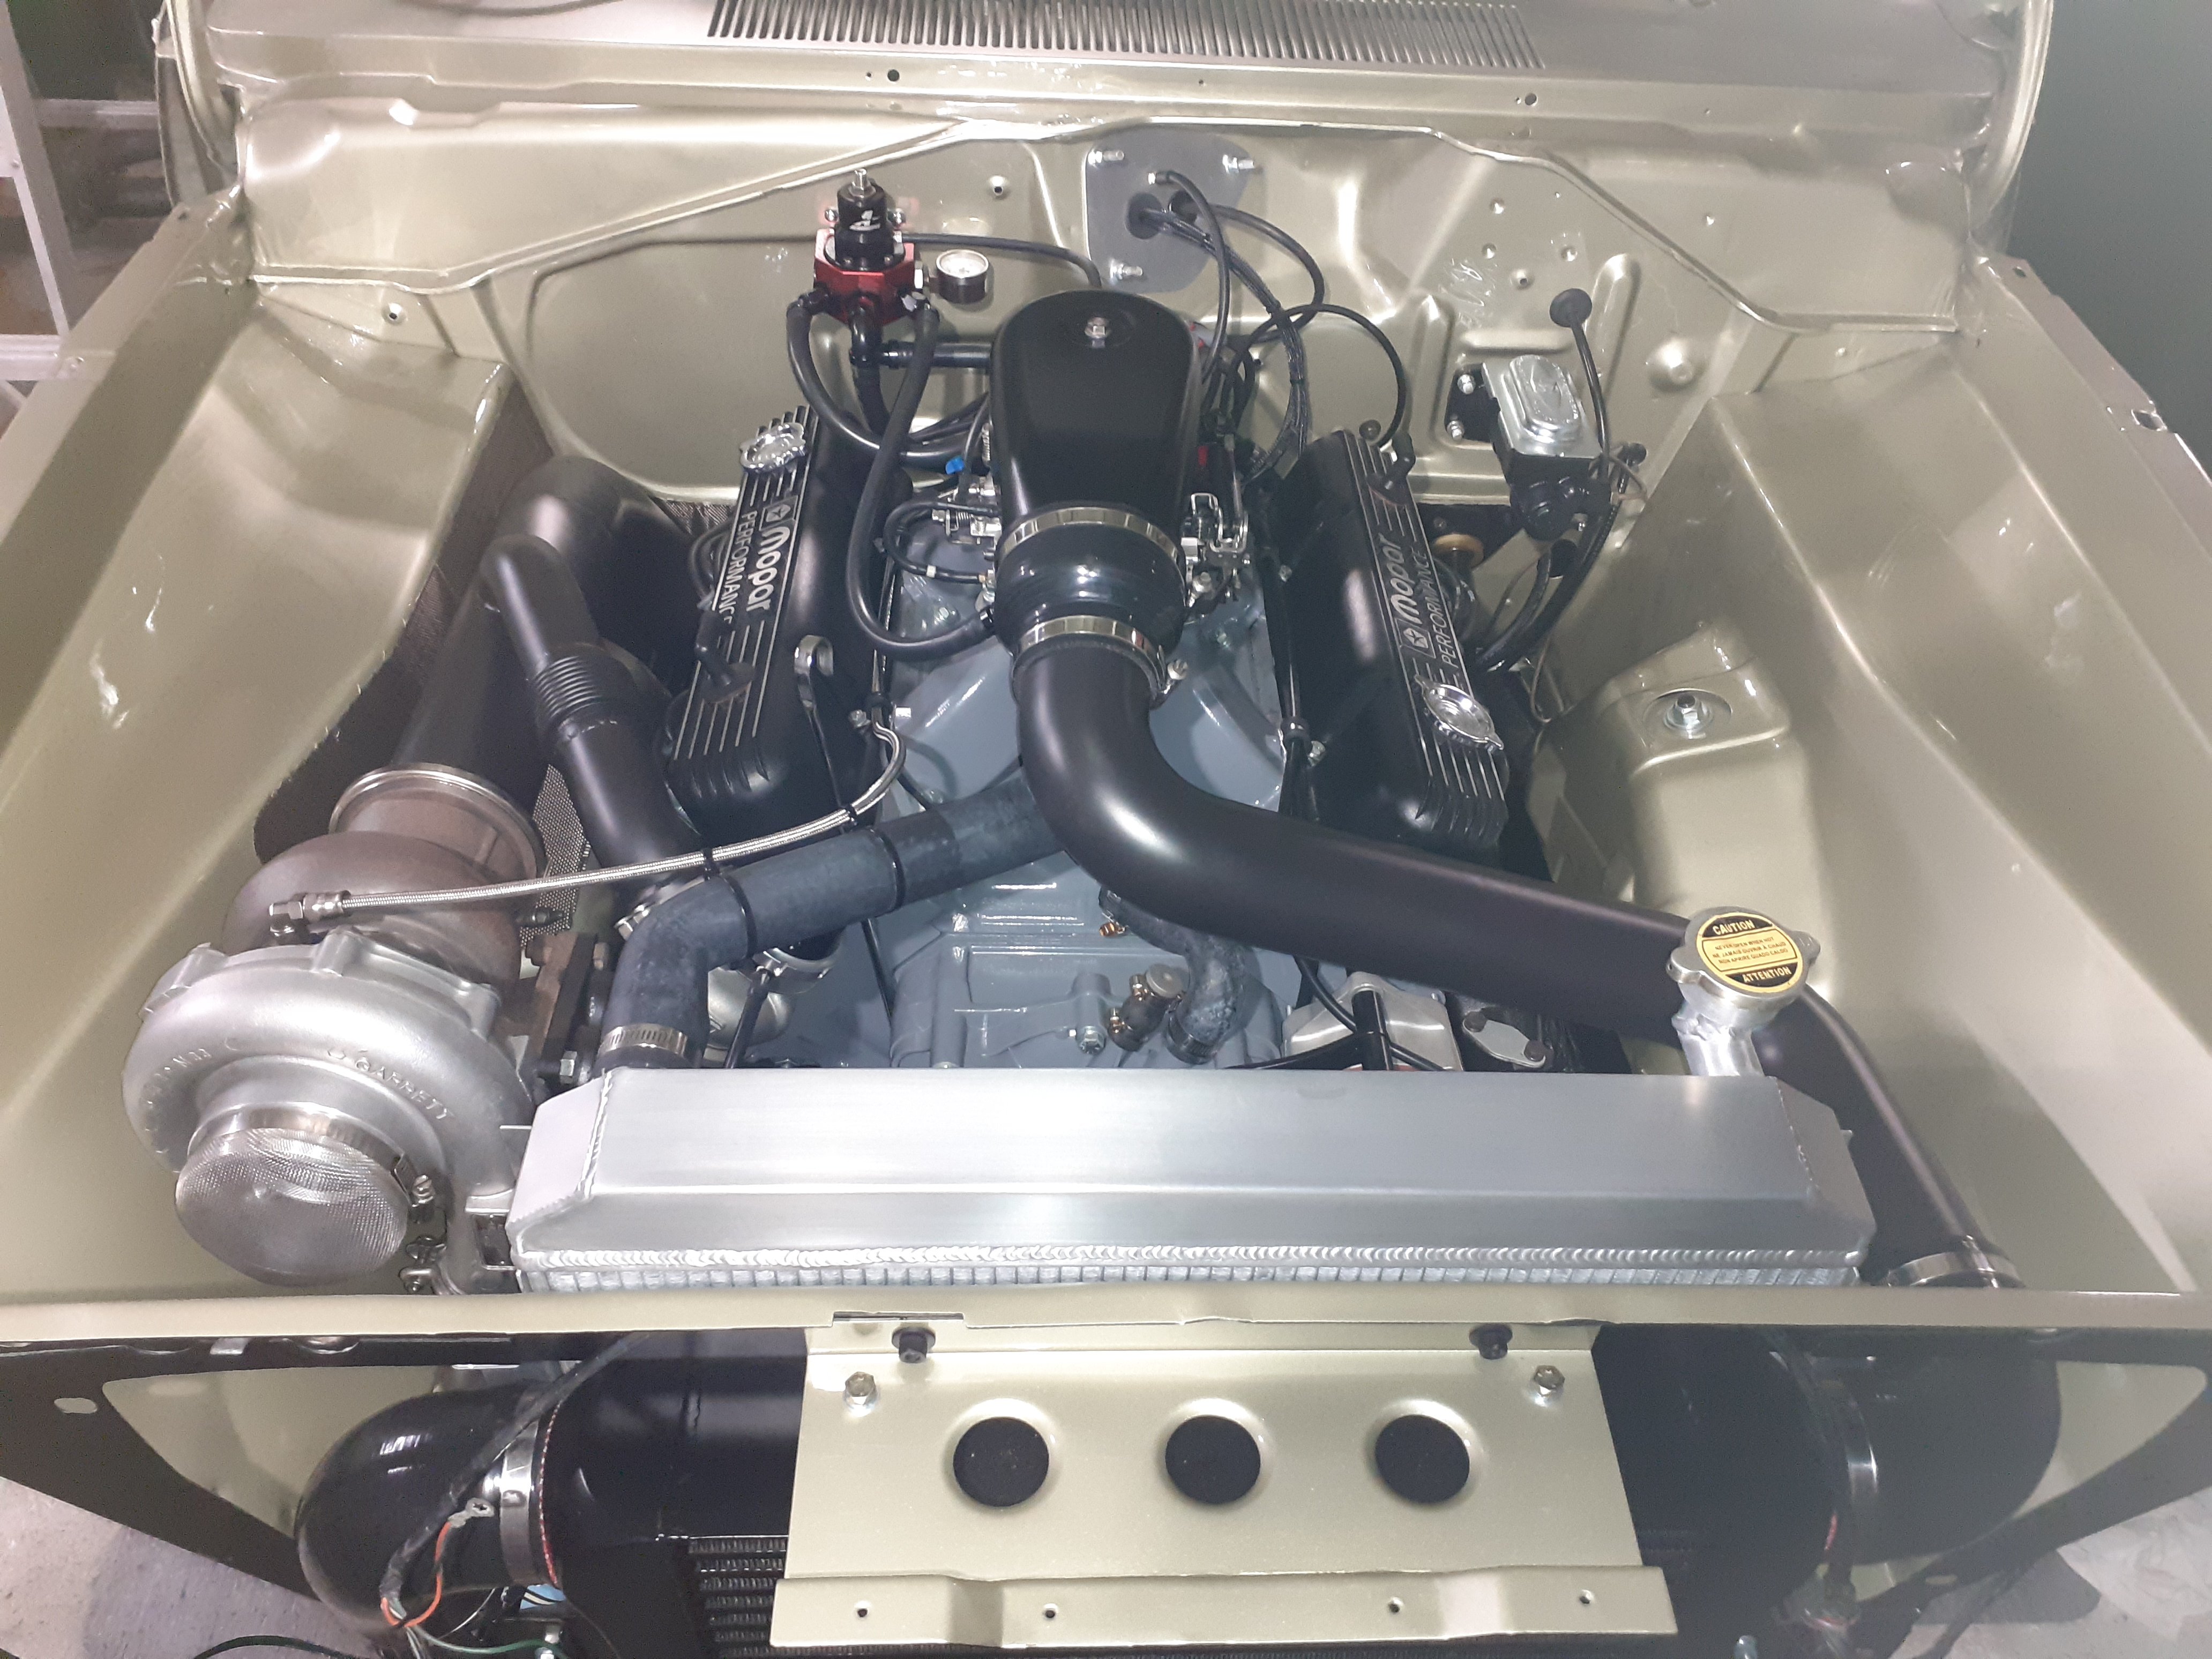
Engine is an easy fit... seats mounted ecu in gear shift working, have a radiator need to work out airflow and water plumbing front to back, or is it back to front... still a big list but chipping away at it.
 12 points
 -
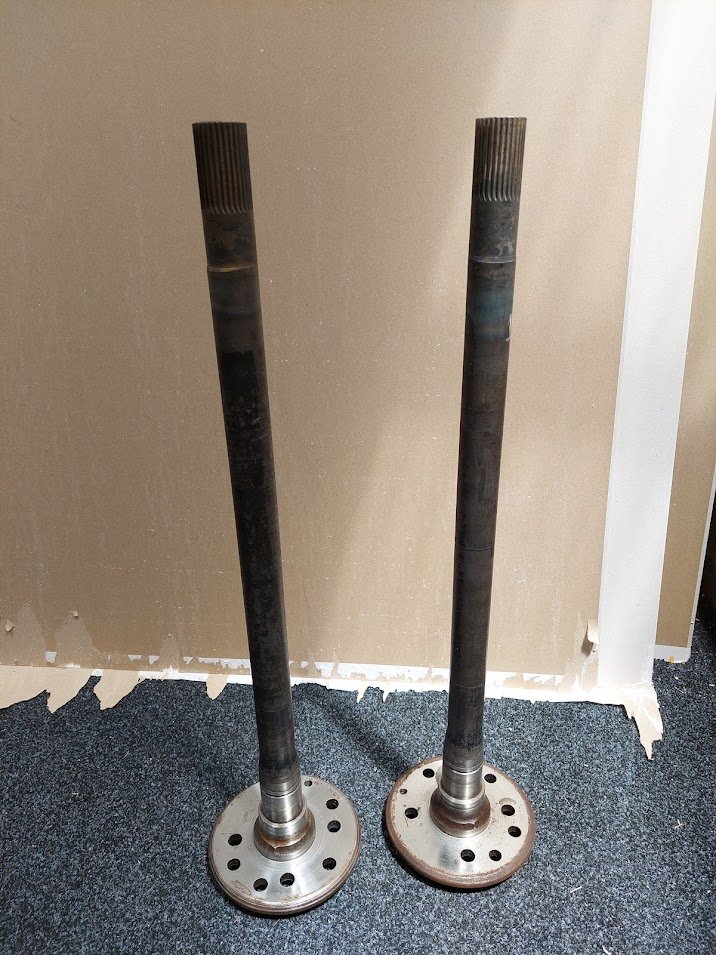
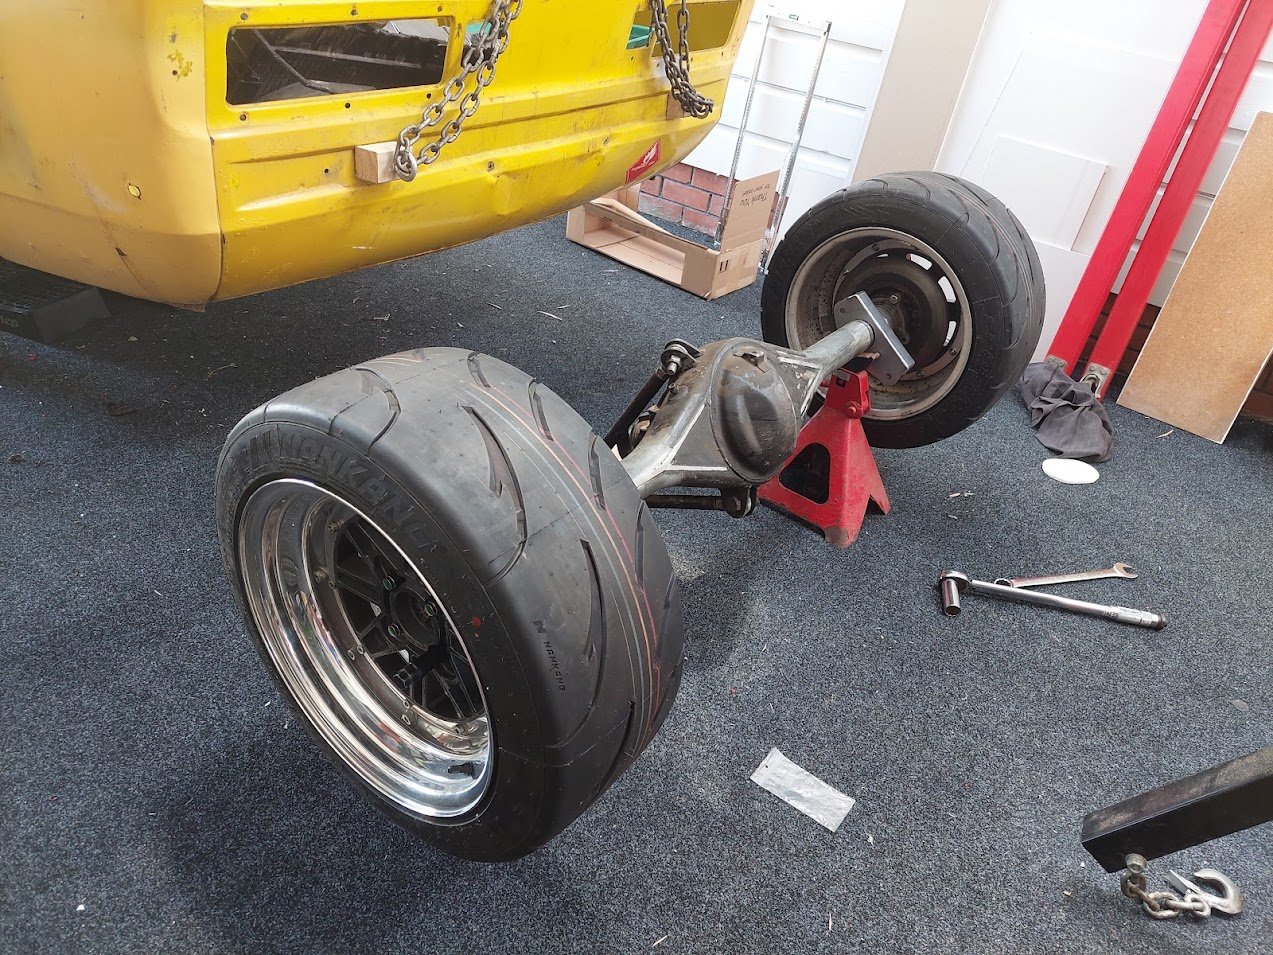
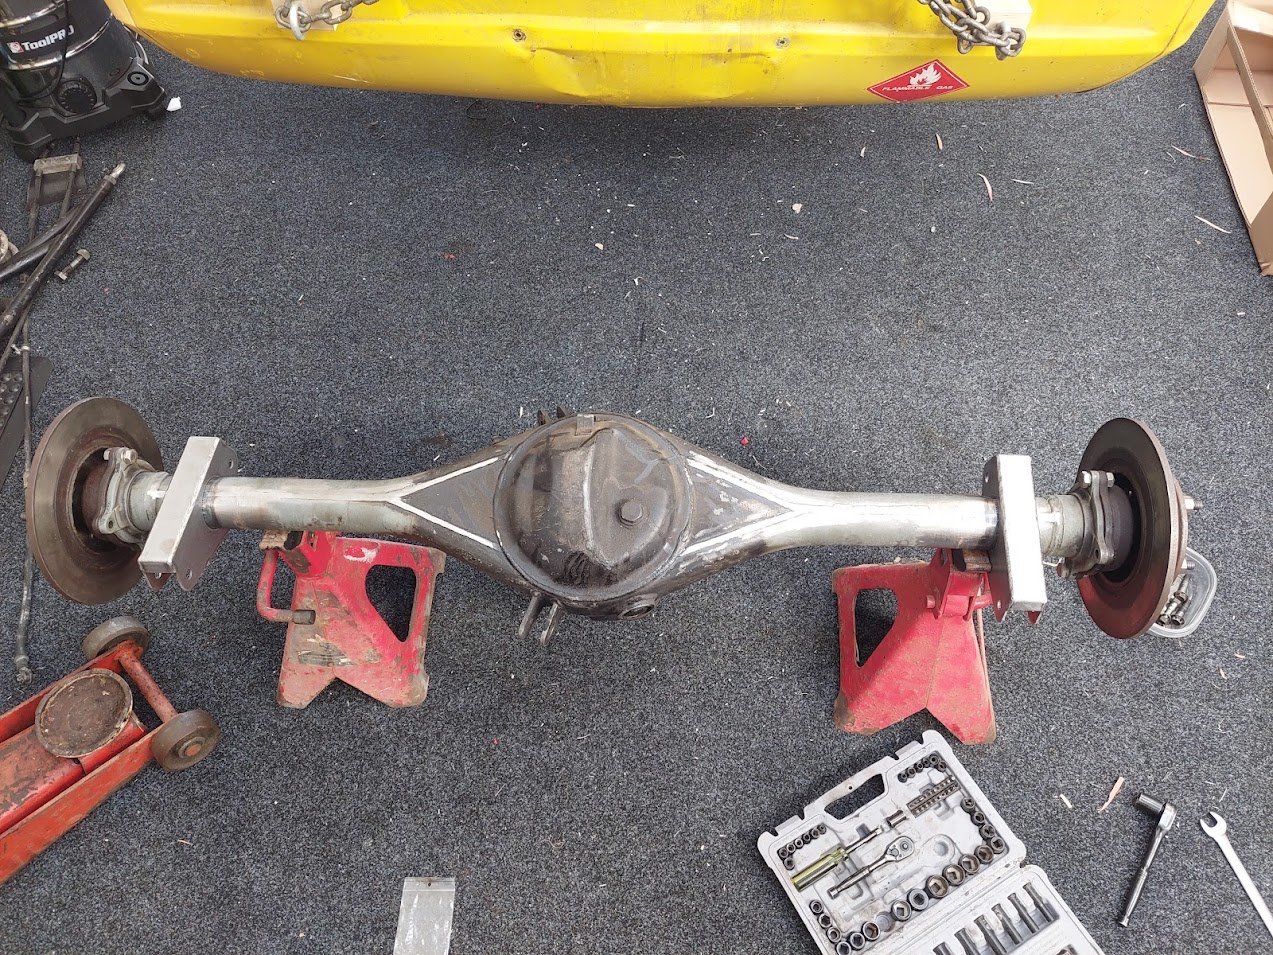
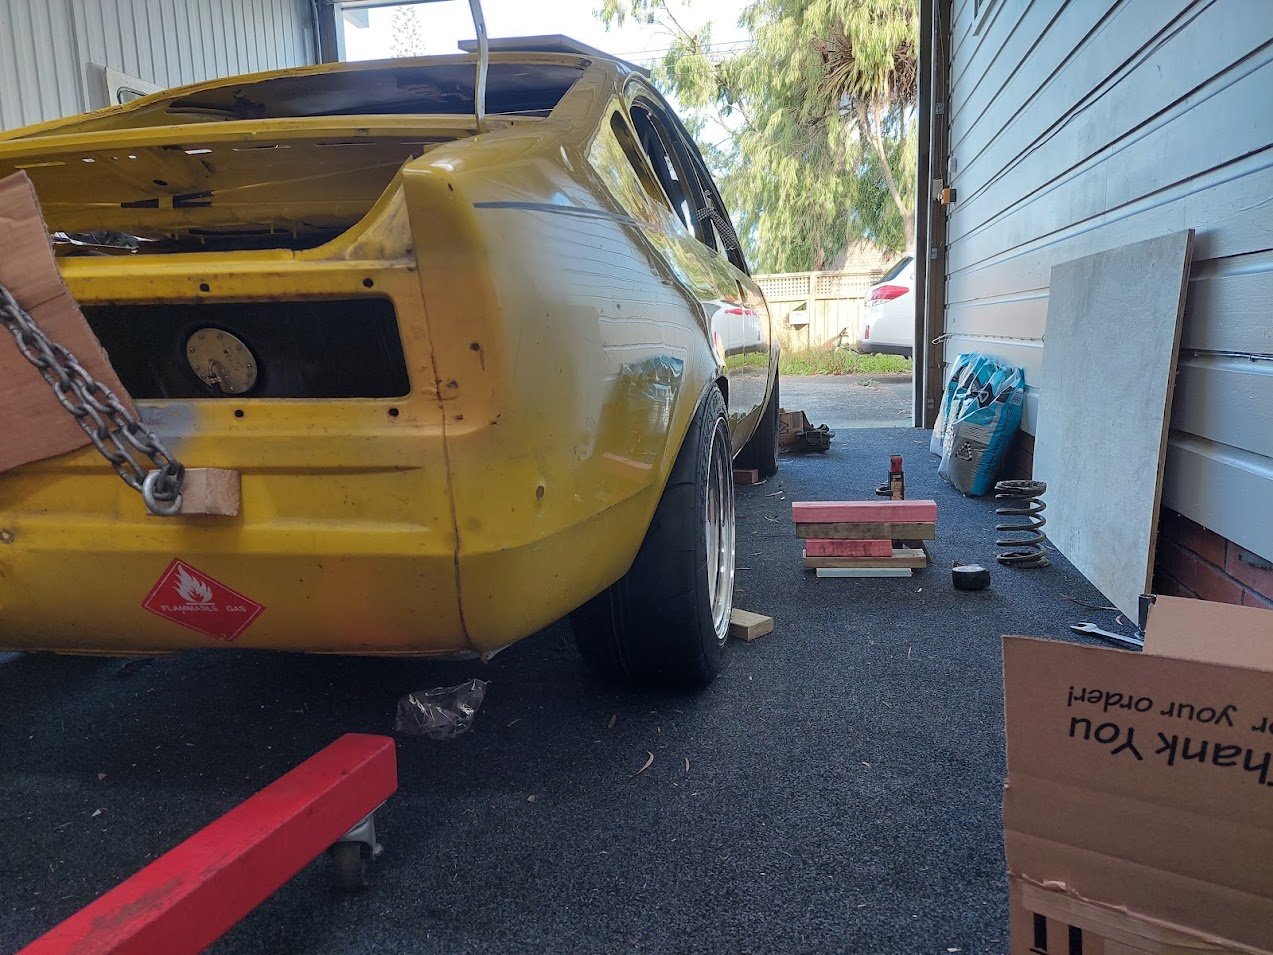
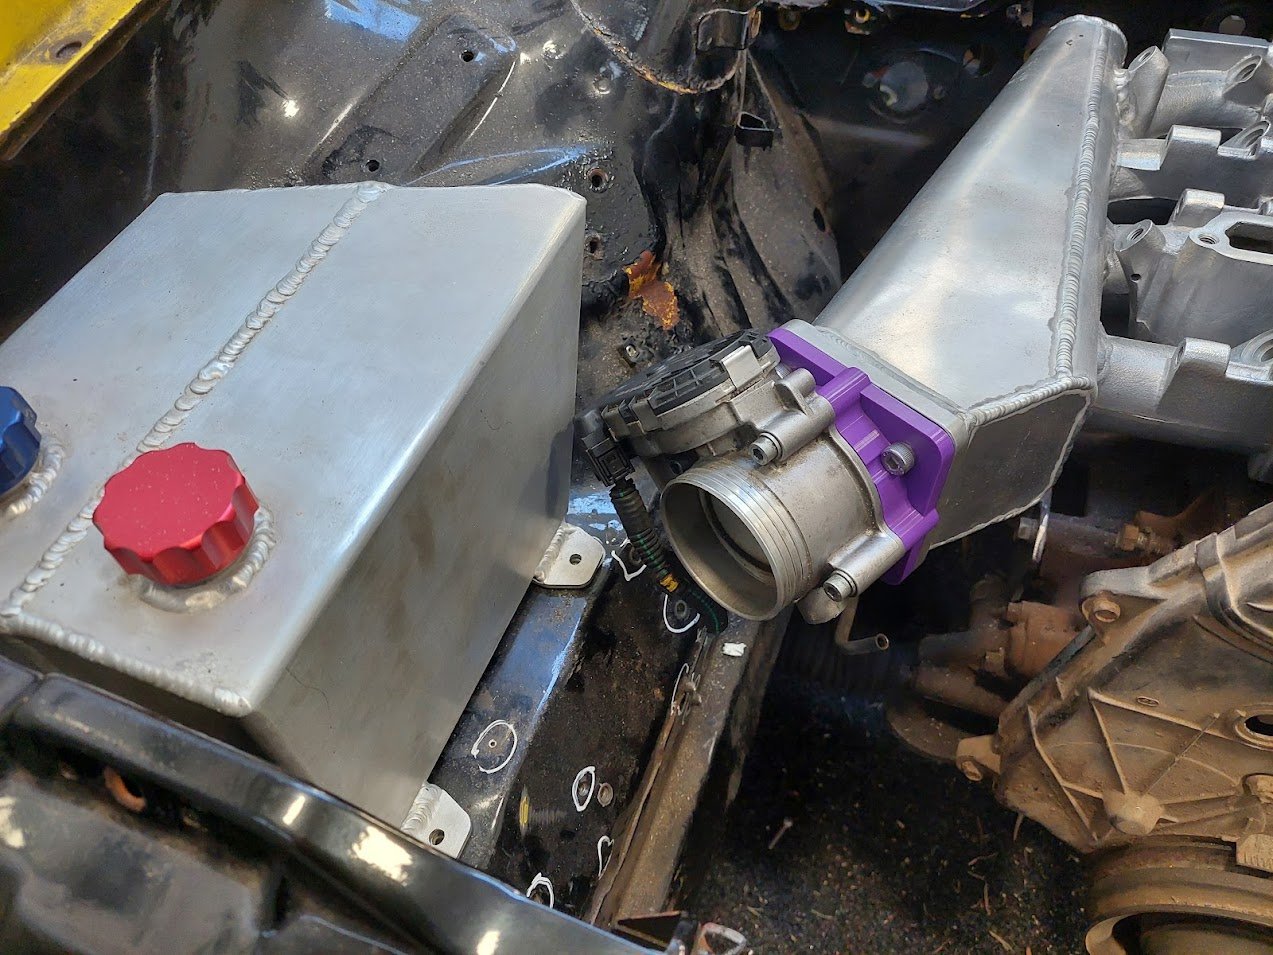
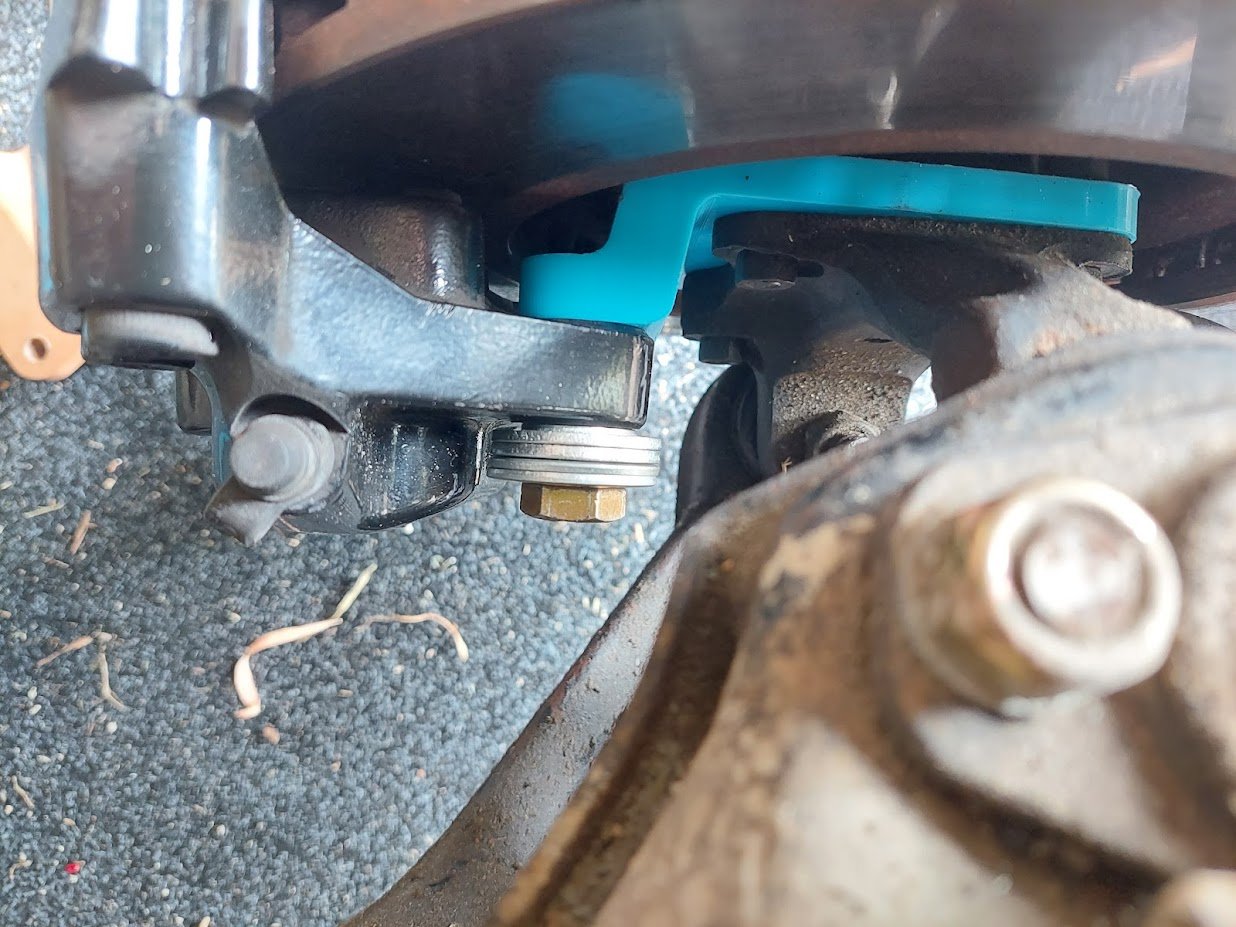
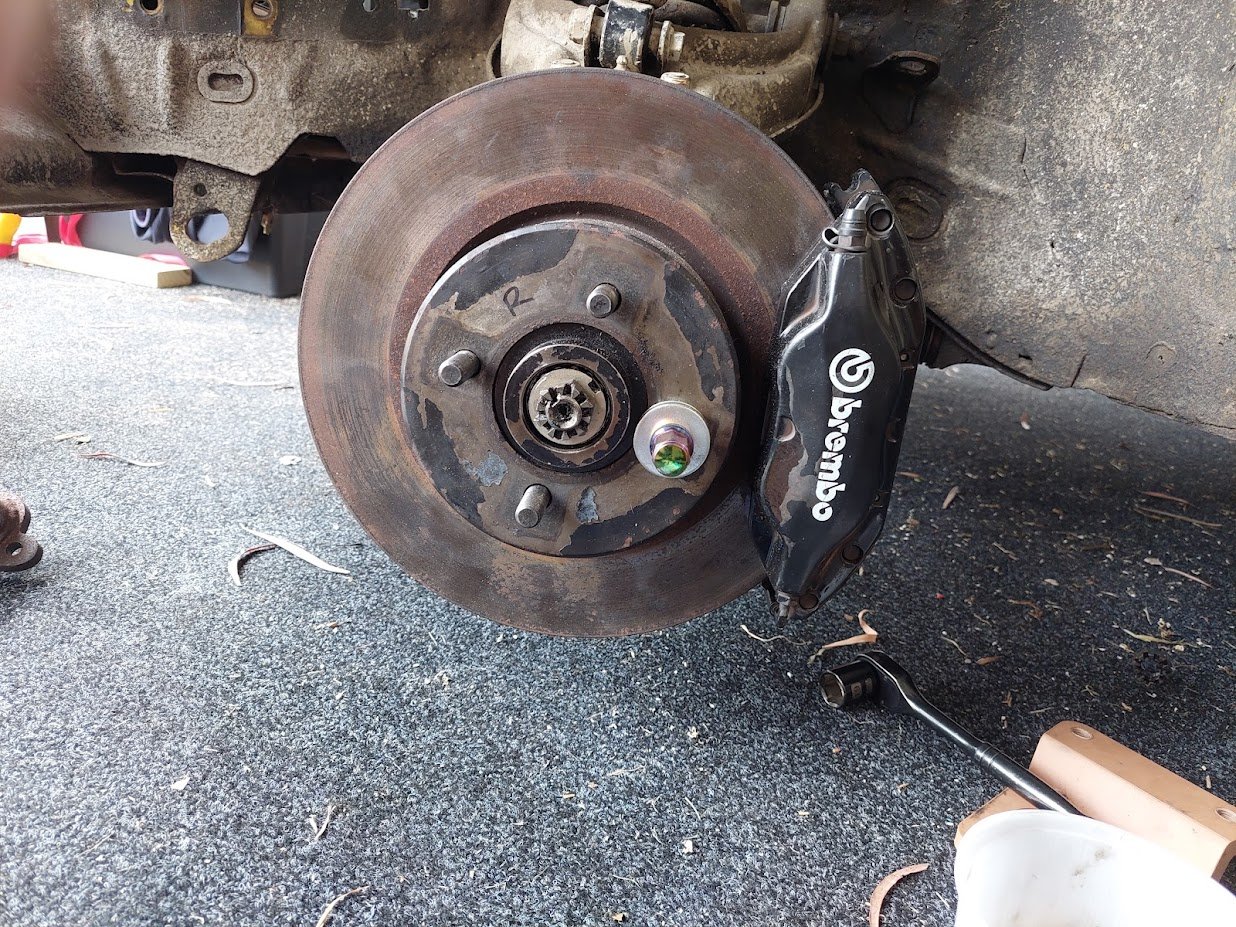
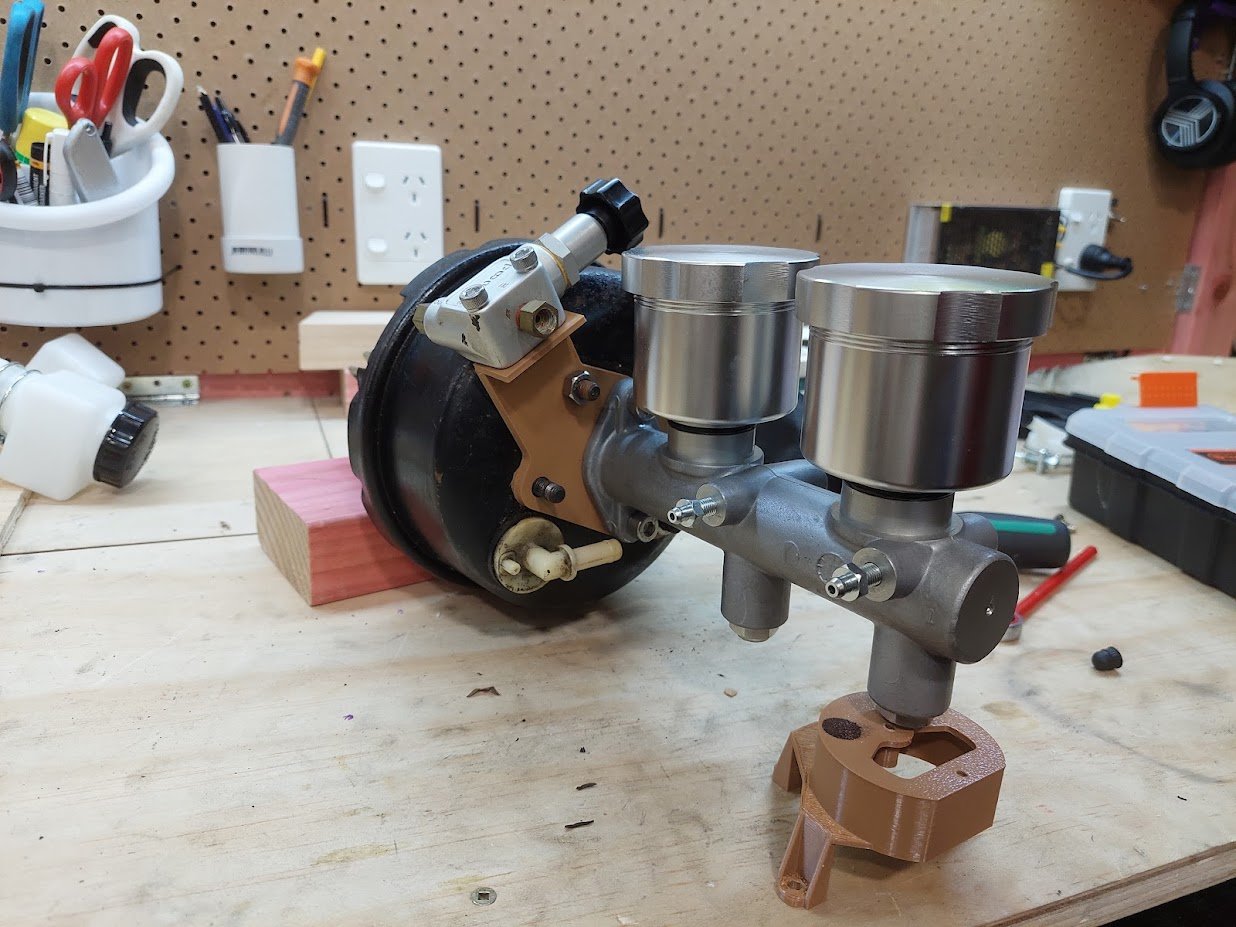
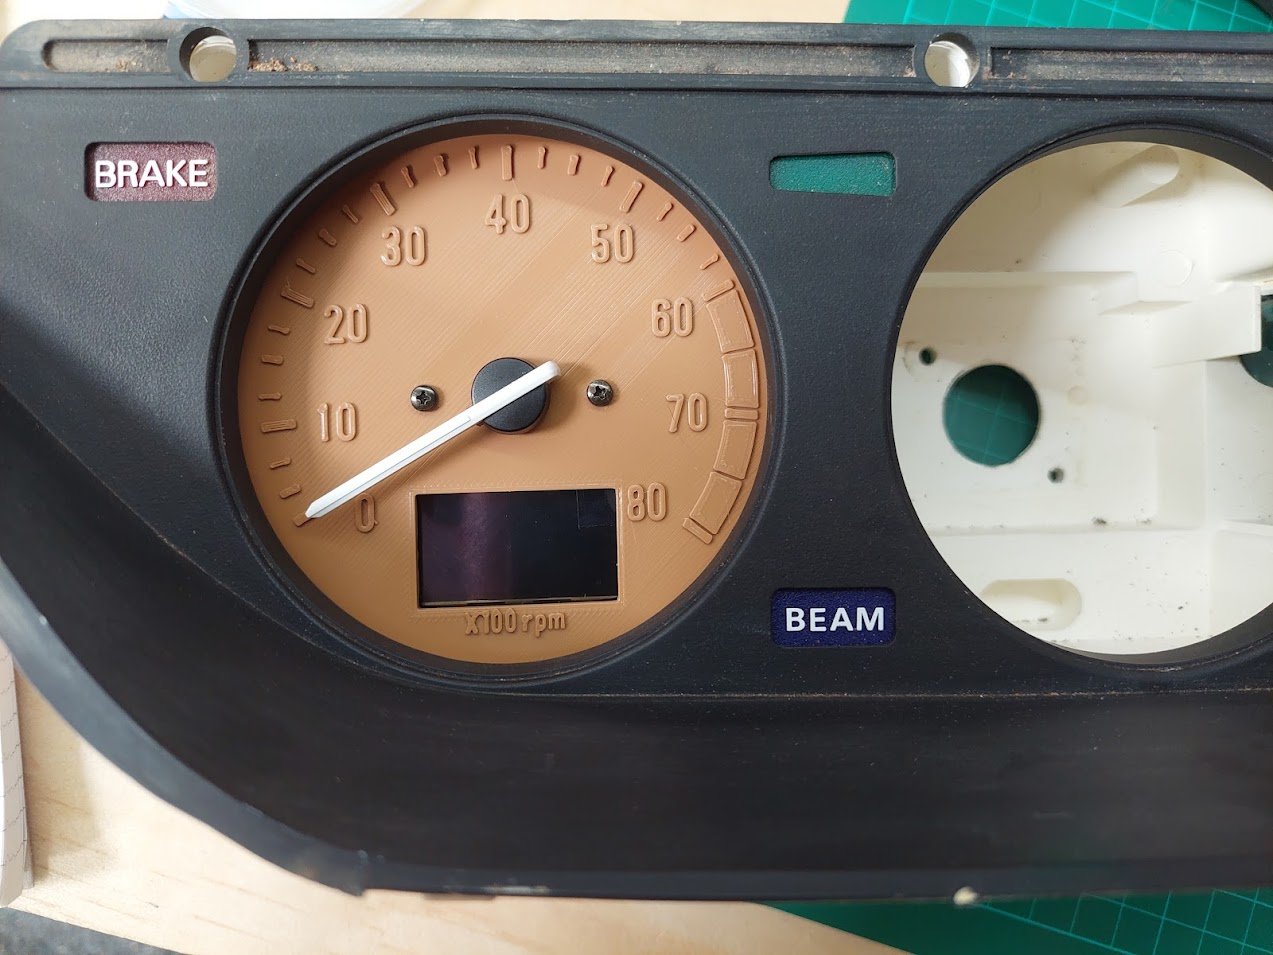
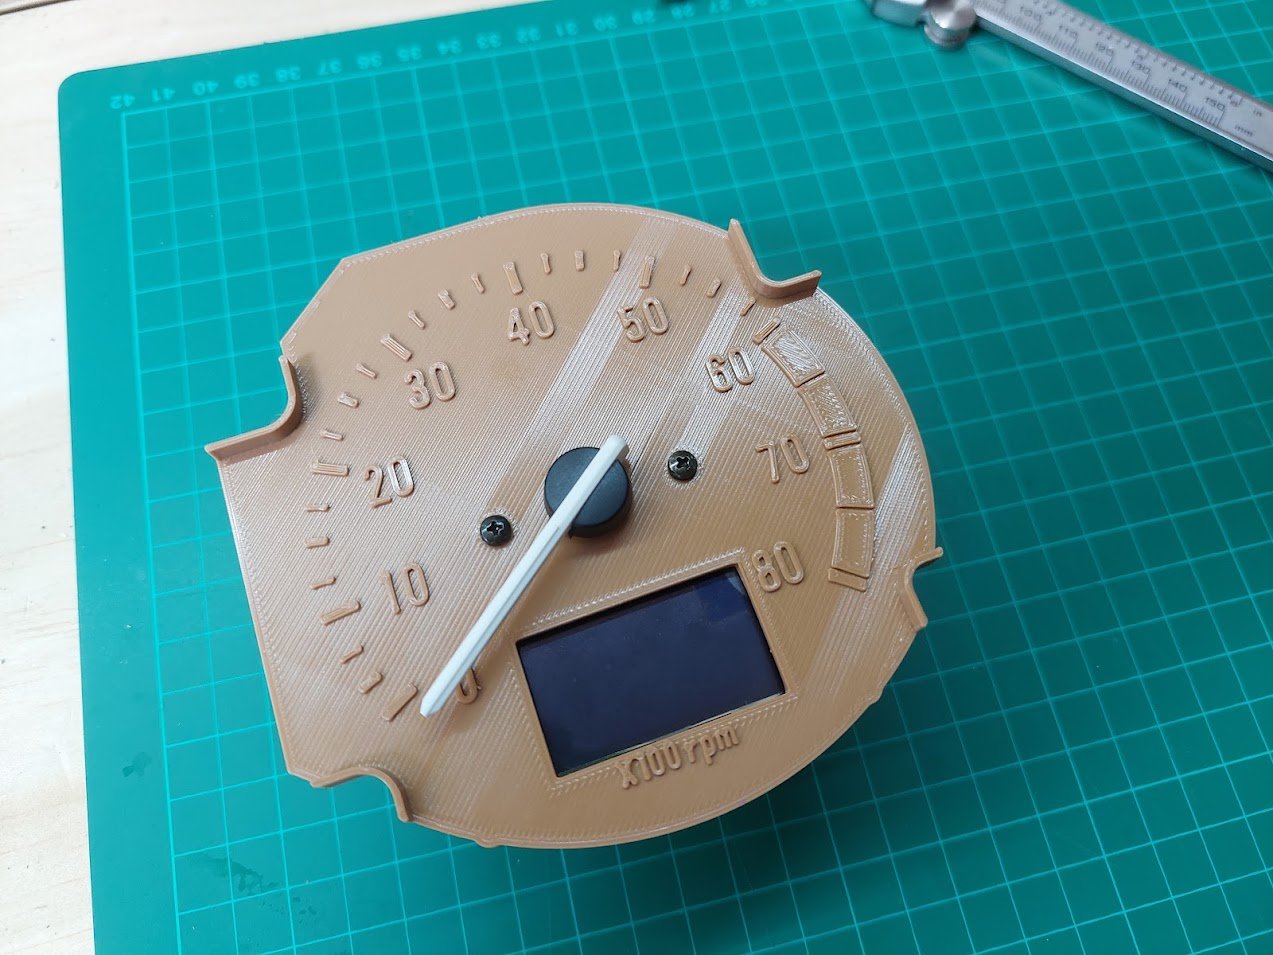
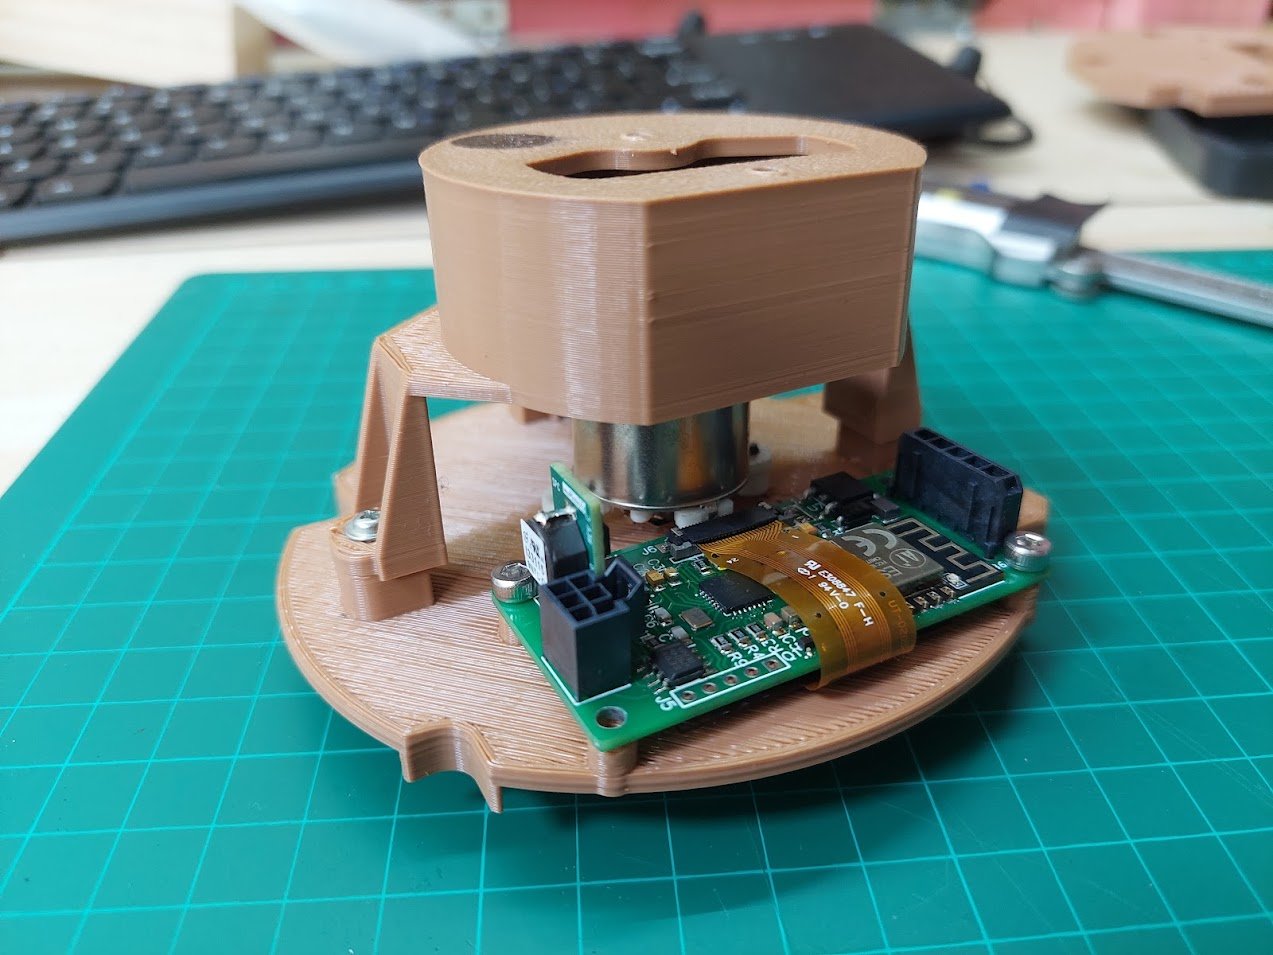
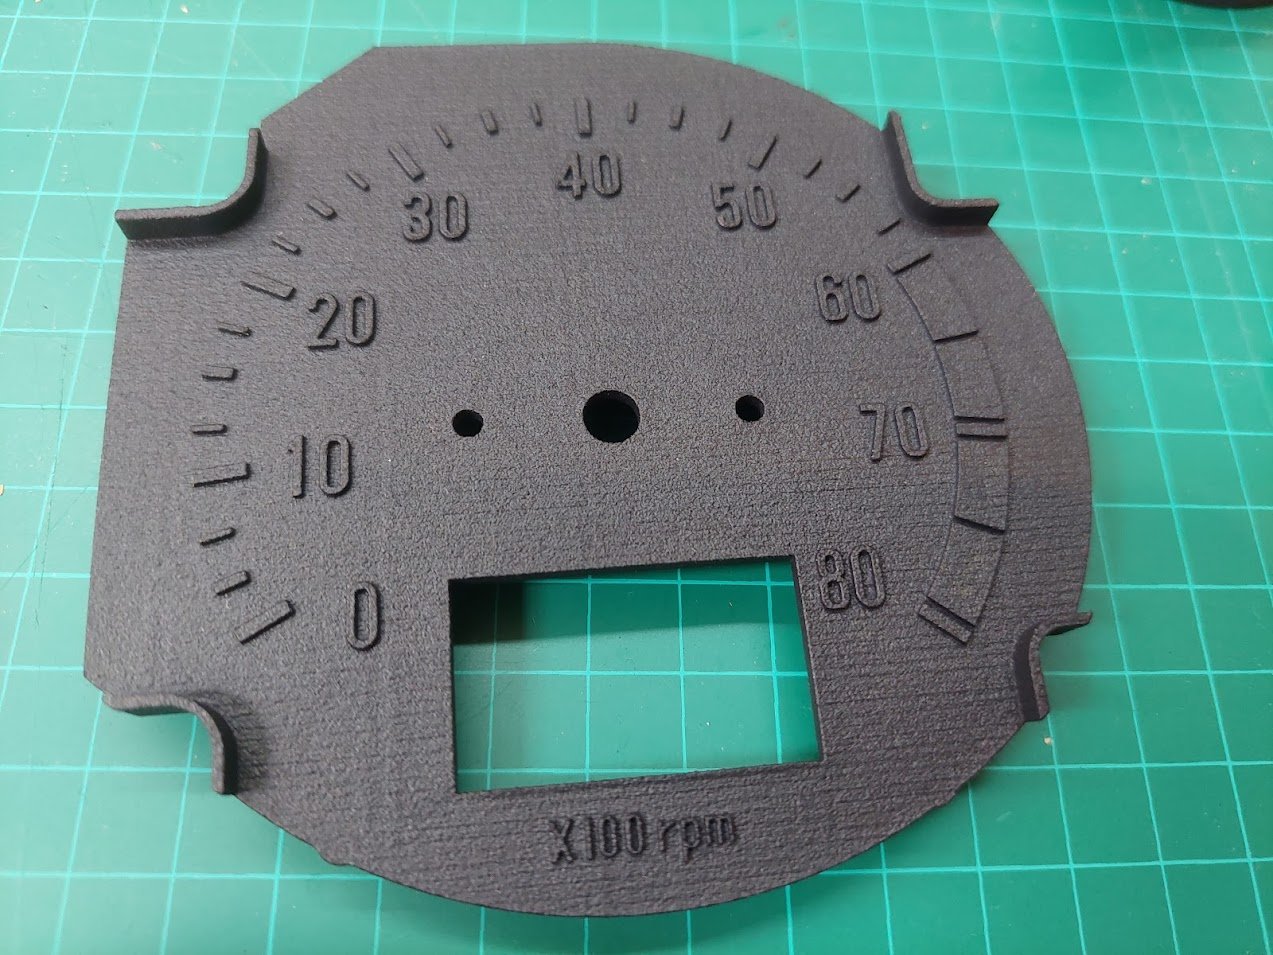
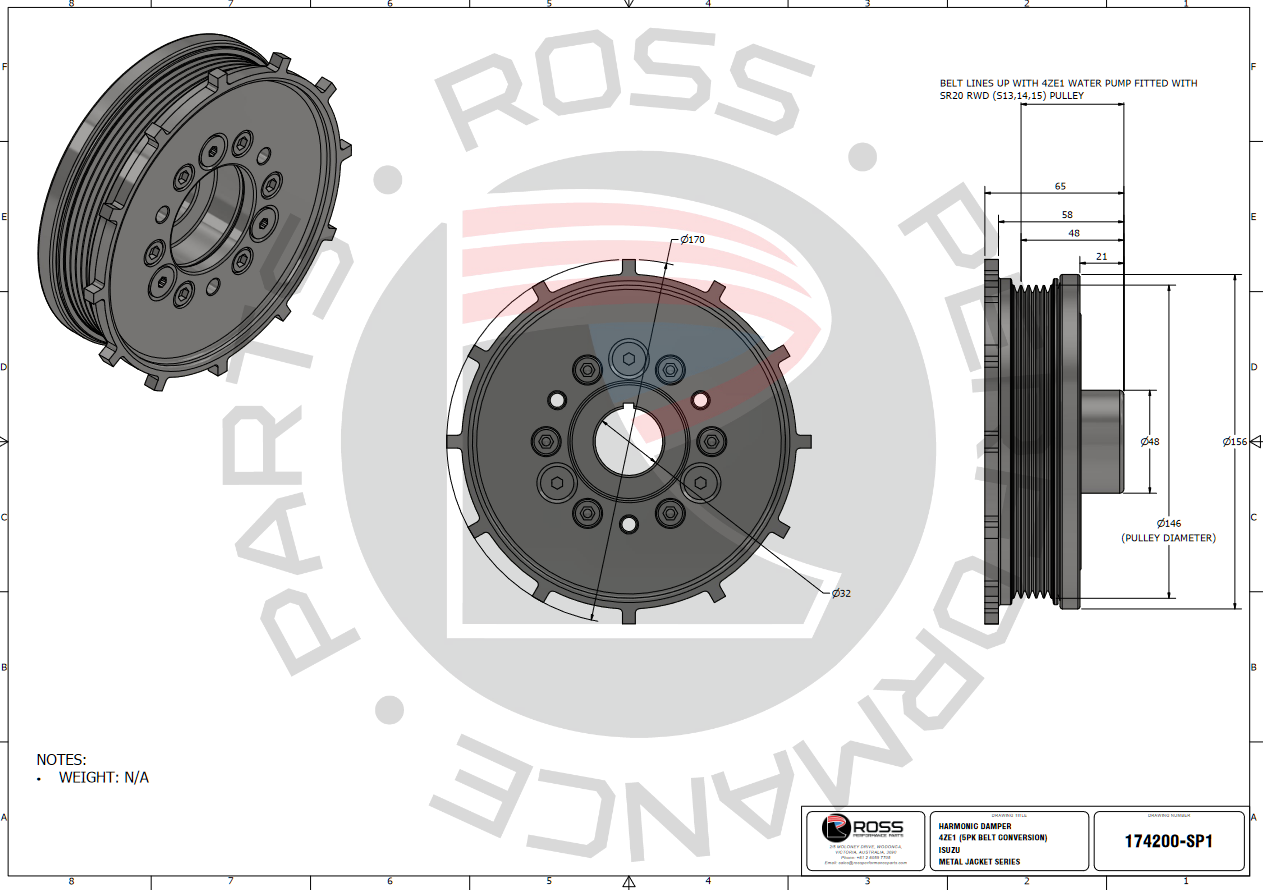
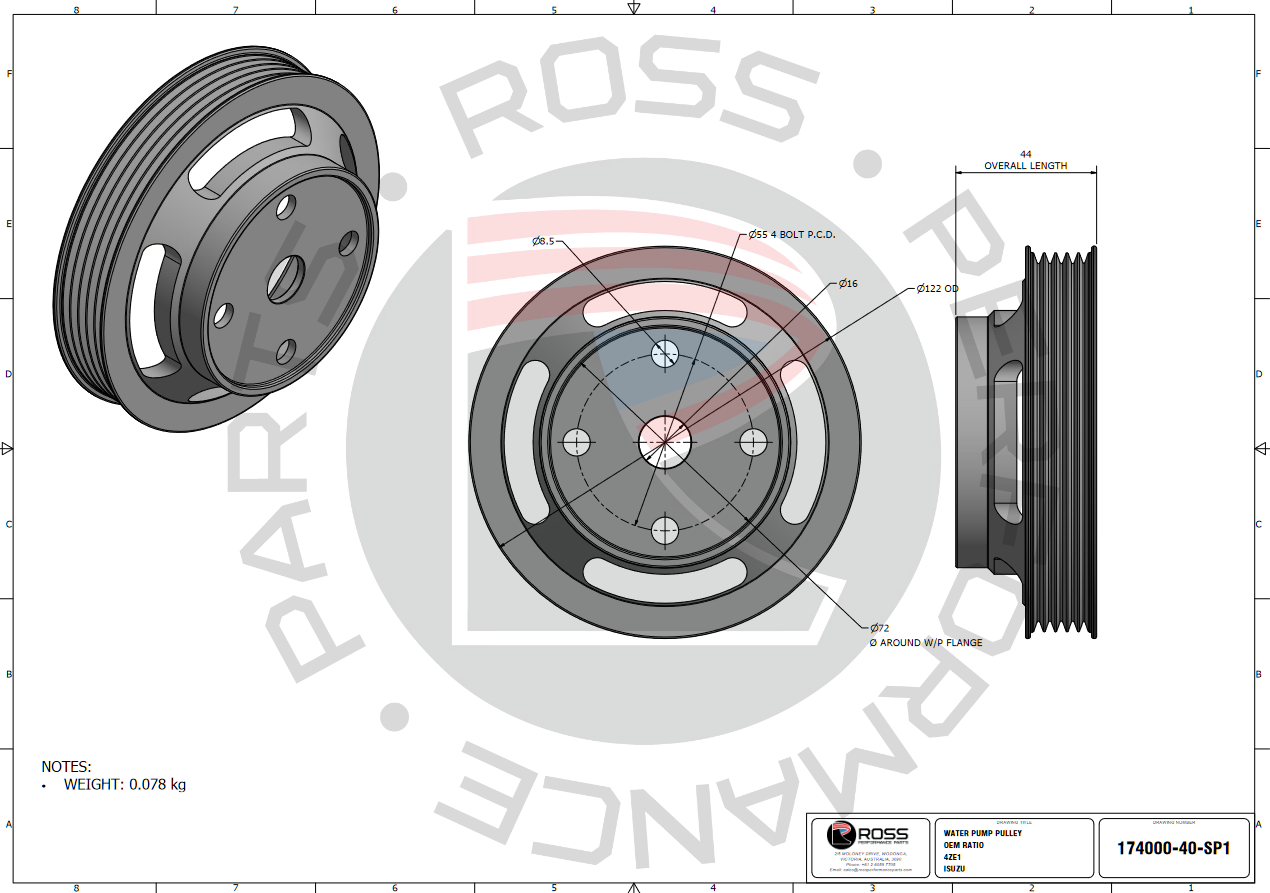
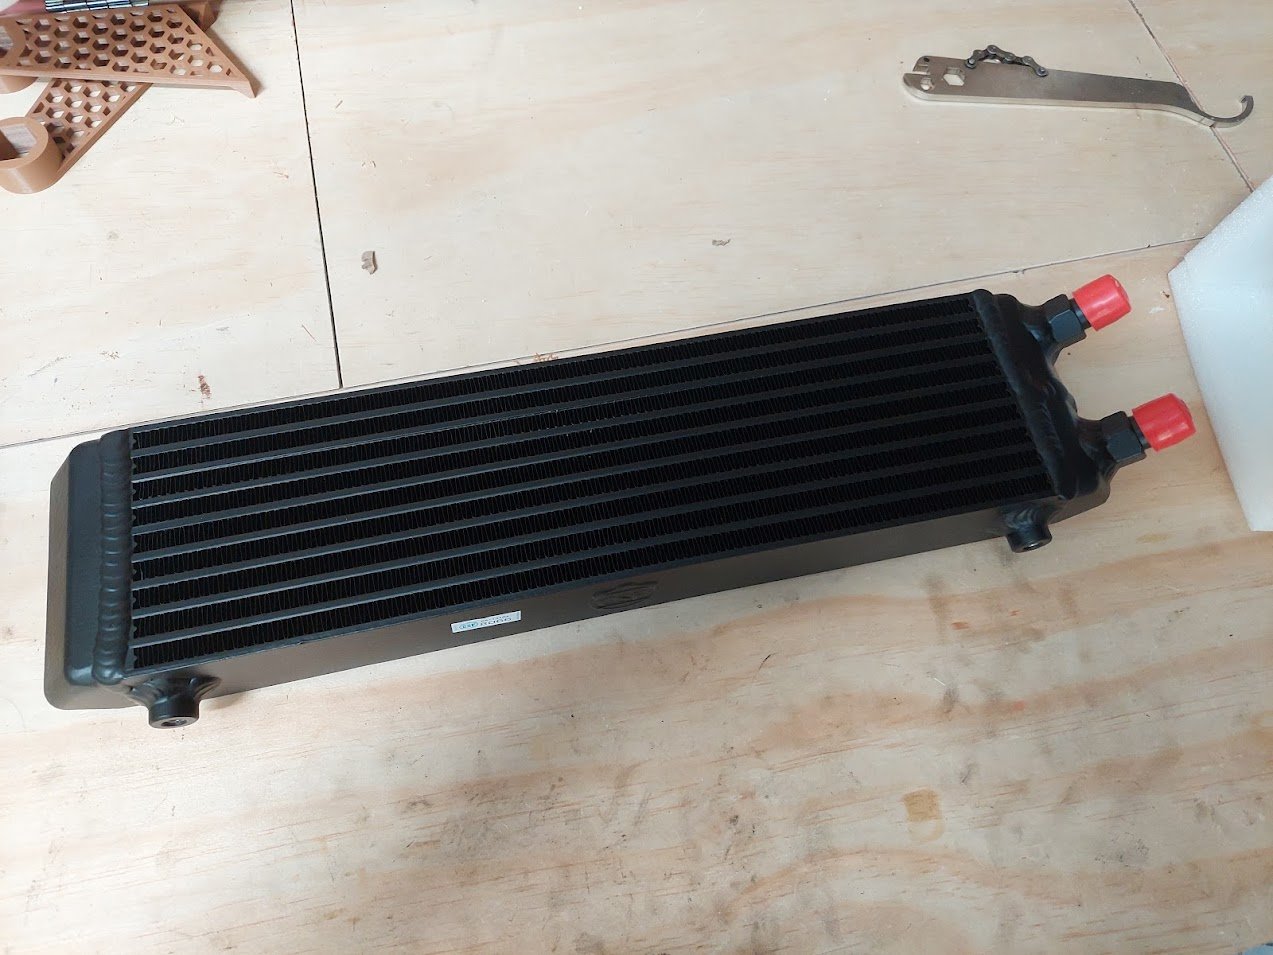
Wow! I really haven't updated this in a while. There's been a bit of progress in the last 7 months, but not a heck of a lot. I've been mucking around with brakes, dashes, diffs and cooling. In the end, I decided that shortening my axles the "build up and machine down" way was going to be okay, so I sent them to Howat Engineering and had 35mm lopped off and the splines cut back on. I then took the housing to Tin Tricks where it had the Gemini mounts cut off, was shortened and had the 4-link brackets slid on. I left the ladder bar mounts on so it still had a way to mount to the car when I had to move it. Turns out I was spot on with my measurements. The wheels just sit inside the arches - will need some work done to get unobstructed bump - and I have about 15-20mm clearance on the inside. So pretty happy. I've also spent a bunch of time prototyping up some parts with the 3D printer. Throttle body adapter: Brake caliper adapter: Master cylinder adapter: And for those of you who recall ages ago I was trying to make a new tacho face for my dash, I've gone in too deep. I've designed and printed up an adapter which uses all the stock mounting points and screws, as well as a new face which has the cutout for my CAN screen: I then had it MJF printed in PA20 nylon. Unfortunately it warped so I need to have another go and add some ribs in to strengthen it. I was planning to paint it myself using modelling paints, but I'm not sure that I have the ability. I spoke with Charlie's Pinstriping out west who said they could do it. When I get around to fixing up and printing a new version I'll take it up. Last thing that I've been doing for quite a while is working with Ross Performance in Australia to develop a harmonic damper and water pulley for the Isuzu 4Z engines. They have pretty much finished, I'm just waiting on one or two people to test some 3D printed templates to make sure everything lines up. And lastly I have been talking with Skeleton Welding down south to build me a new radiator. It's been a bit of a packaging saga to try and fit the radiator, intercooler and oil cooler up front. But I think with a bit of ingenuity I'll be able to make it work. Speaking of the oil cooler, I got this "cool" one from CSF: The car is now in at Shores NZ having the 4-link boxes welded in and the rear turrets strengthened for coilovers. So progress is happening!
11 points
-
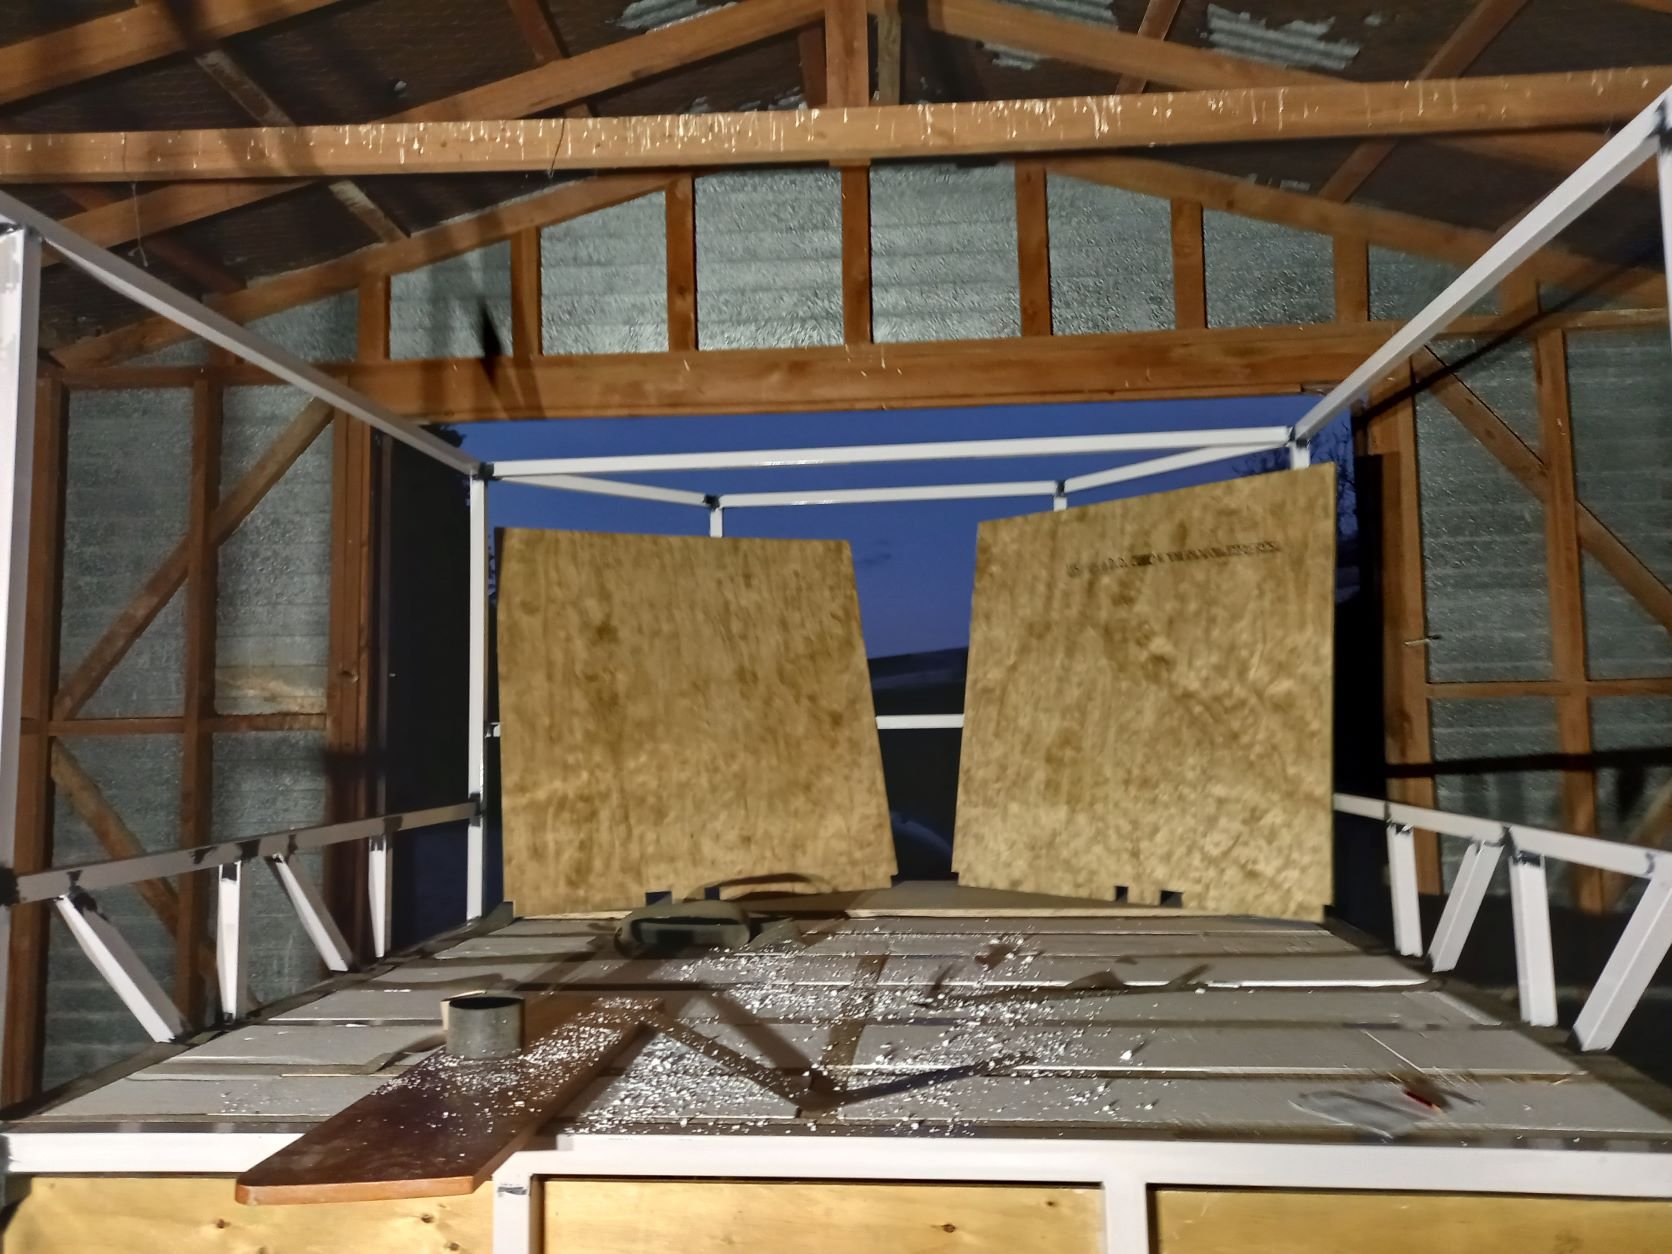
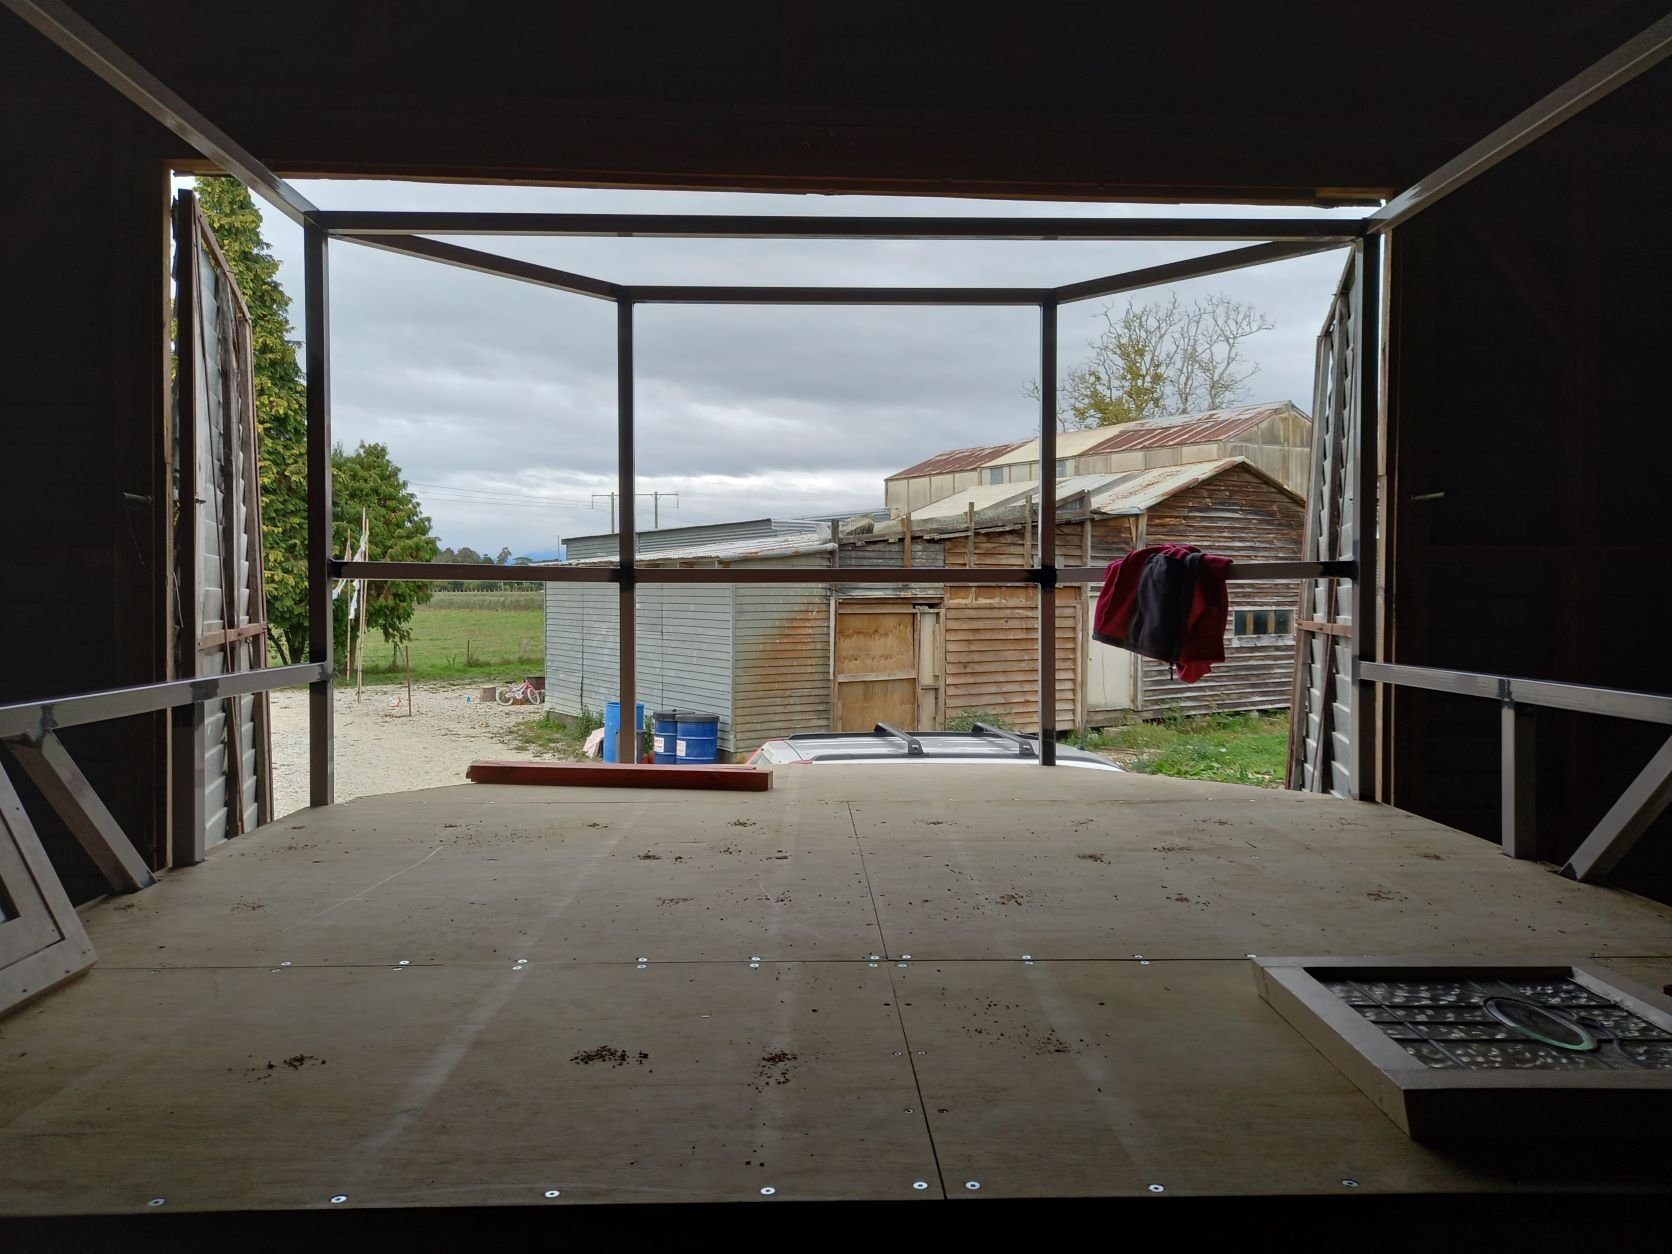
She came back on Sunday morning. despite putting bungs in all the holes then electrical tape over the bungs, and stuffing plastic into the rear quarters; still managed to fill the rails and quarters with wet sand. If it wasn’t wet it was ultra fine silica sand and goes every fucking where especially eyes..it’s been in the shed with dehumidifier on ever since and I’ve spent hours blowing, vacuuming, slicing around down seams with a hacksaw blade, digging it out with my fingers through the holes and sweeping it. It looks grouse though..did expose about 20 pinholes and a few weak areas I needed to address. Feeling confident, I booked the repair cert inspection for Wednesday and started into it the evenings. Several engagements popped up which will hinder progress but yesterday I got the call to say the garage company wants the shed levelled by Wednesday to rip up the pad and start our new 4-car garage which is months late (summer) but earlier than their next ETA (deep winter). FUCK I should have the car done after the weekend, then have taken leave to pack, move and demo the current sheds. Having a bare metal car at this time of the year is shit. Not having somewhere at home to store it, or etch primer it after inspection (all going to plan) is shit too! Fear not: git ‘er done now, die of stress related health issues later..and try not to damage all our possessions it the damp weather
9 points
-
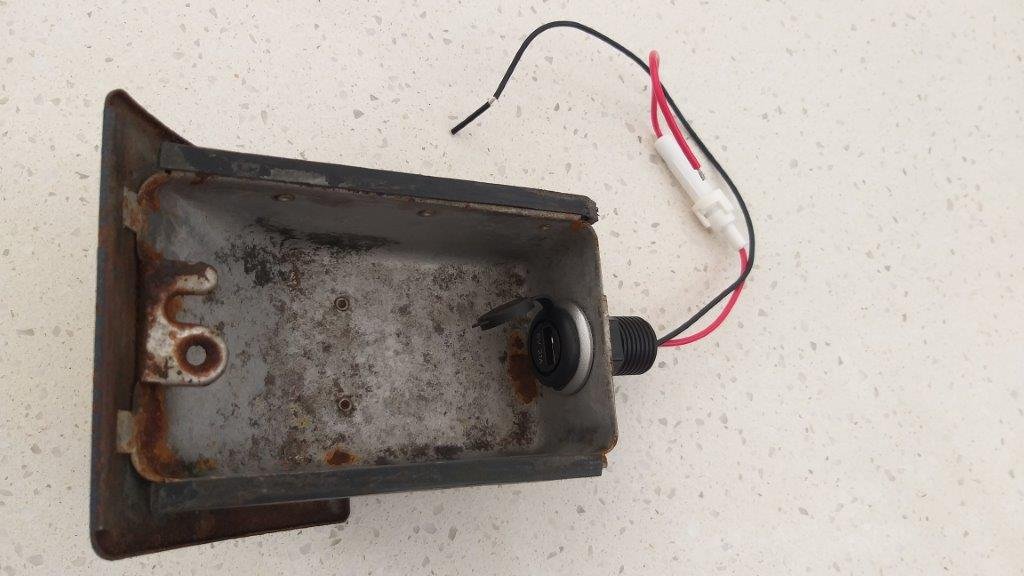
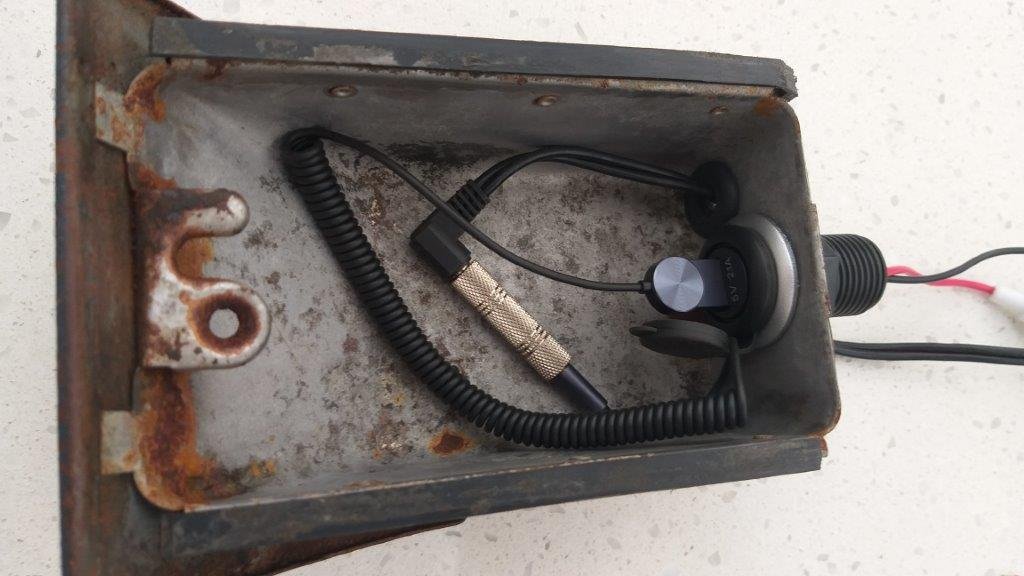
Before I clean up the rest of the ashtray I thought I'd poke some holes in it. I'm never going to use the ashtray, so it is getting a second lease on life as the hidey hole for the USB power socket and my blue tooth dongle for the head unit.
8 points
-
Depends on the car and application A long shaft has a lower critical rpm , a 2 piece shaft you end up with 2 short shafts so that max rpm figure is higher http://www.wallaceracing.com/driveshaftspeed.php A single piece shaft can be made to handle high rpm but then it has to be bigger Also depends on the combo. If it's a car that isn't going to see high rpm or speed then you will likely get away with it . However things that rev to the moon and or have overdrive gearboxes are more likely to have problems. I know of 2 situations where people put LS motors in old cars (one was a 57? chev and the other was an impala) and they spat driveshafts out on a dyno due to exceeding the critical rpm of the shaft. I wish I still had the pics of the impala, it nearly wrote it off, because the shaft lets go in the middle at high rpm it absolutely destroyed the floor, it was very fucked. The other trap is the tunnel shape, if the car was designed for a 2 piece shaft then they don't always have room for suspension travel and the front half of the shaft going up and down. Early commodores have that issue when fitted with a single piece shaft, they rub on the tunnel in the middle of the car, and it's usually made worse by the shaft having to be a bigger diameter In my VG when it had a good engine in it, I did a burnout in top gear once, it got near the rev limit and made a horrible high frequency vibration that I'd never felt before, I'm picking that was the limit of the stock shaft. I heard a story not long after that of a guy with a turbo 6 valiant that the shaft let go somewhere around 200kph6 points
-
5 points
-
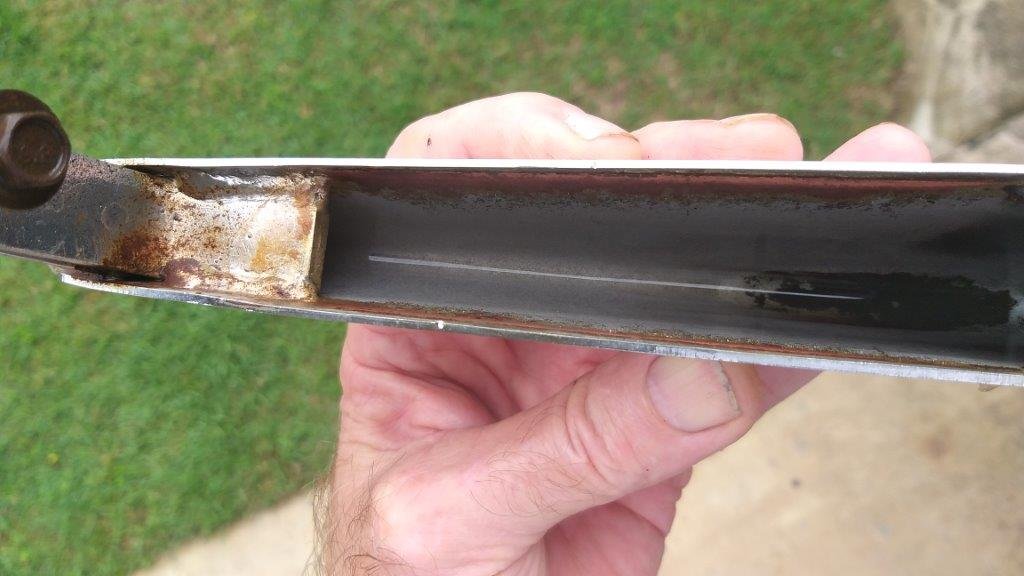
More mucking about, this time connecting the stripped down bike loom into the car, it'll be powered through a fused relay off the car ignition switch. I ended up writing three pages of notes on what each circuit needs to do to run the engine, some more simple than others and a few sneaky ones. For example the side stand switch is just a simple join the wires whereas bypassing the bike ign switch needs a resistor on a particular wire as the ecu uses it as a rudimentary antitheft device. A sneaky one which doesn't seem to be very well known is the clutch switch, most people seem to just join this one too but apparently there is an ecu feed on it and if you just join them the ecu will only detect the circuit activating once when starting so will think the bike is in neutral and run a fuel map for it. I just happened to have an appropriate switch so I'm just going to hook it up to the pedal and keep it as is. Having the big rust hole that I am yet to patch has been a godsend for accessing the wiring behind the dash but I still found myself upside down in the tiny footwell. I had to make a platform next to the car to lie on, then ended up lifting my legs up onto the seat so I wasn't banana-ing my back on the sill, 6/10 would trade again4 points
-
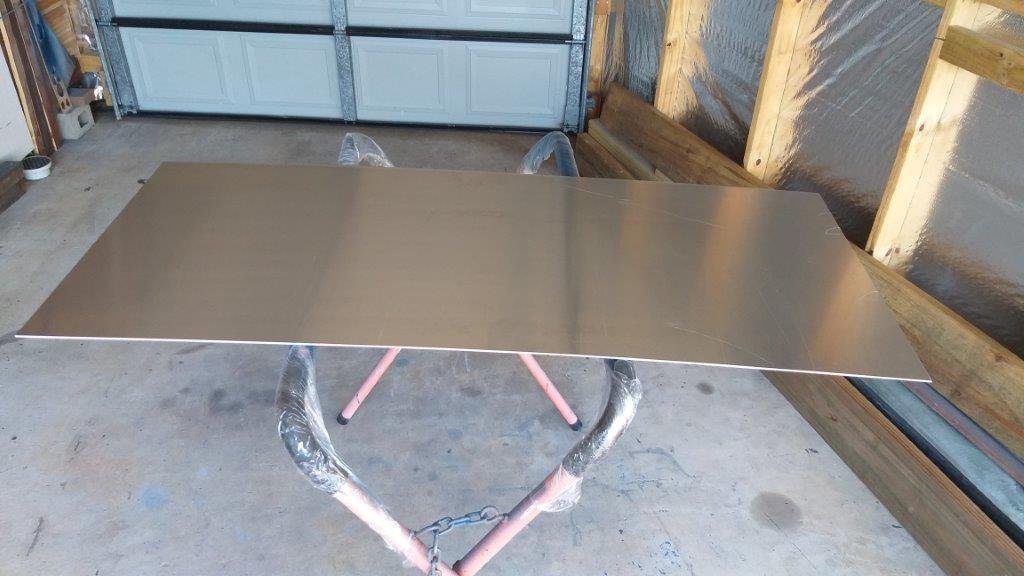
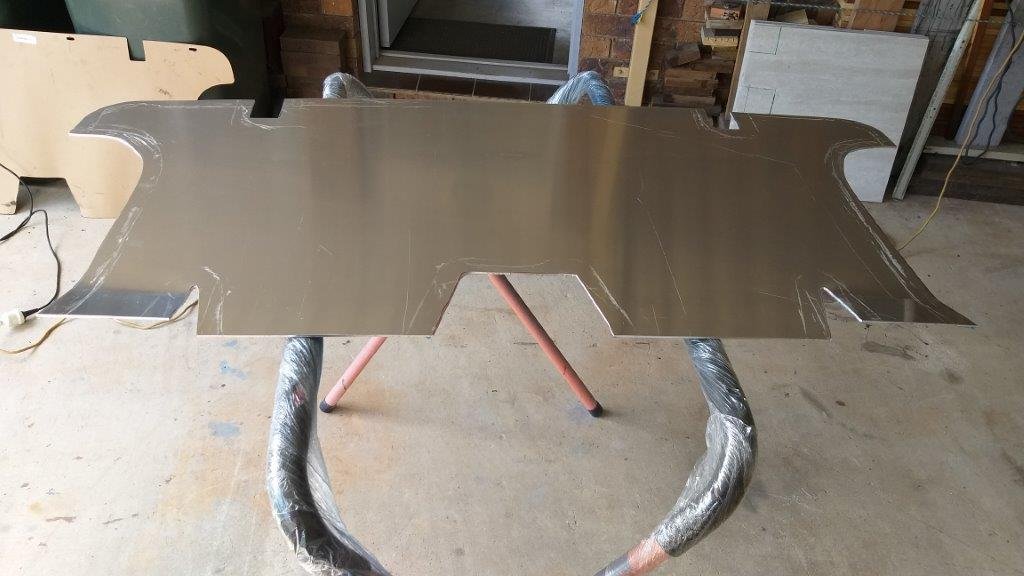
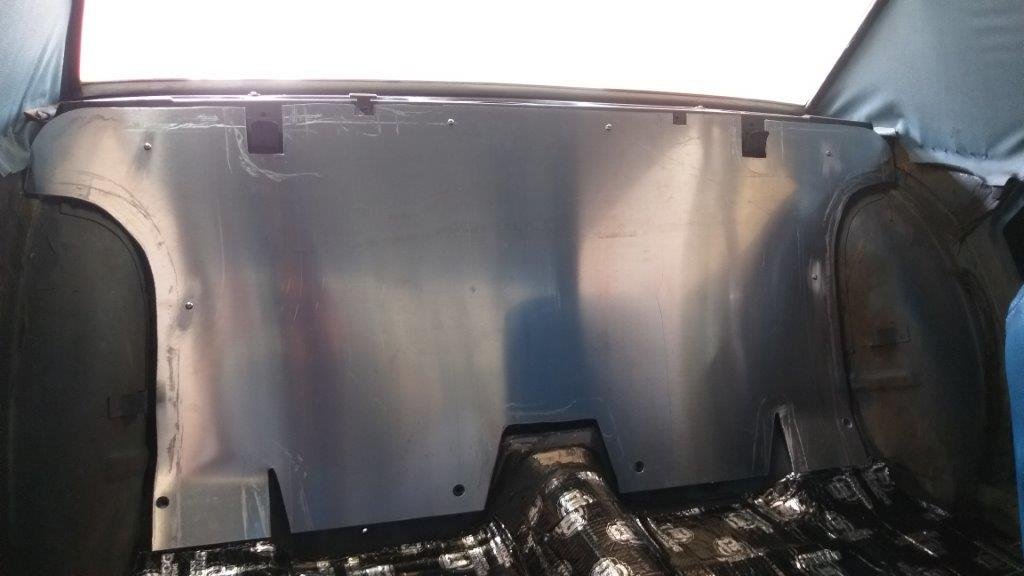
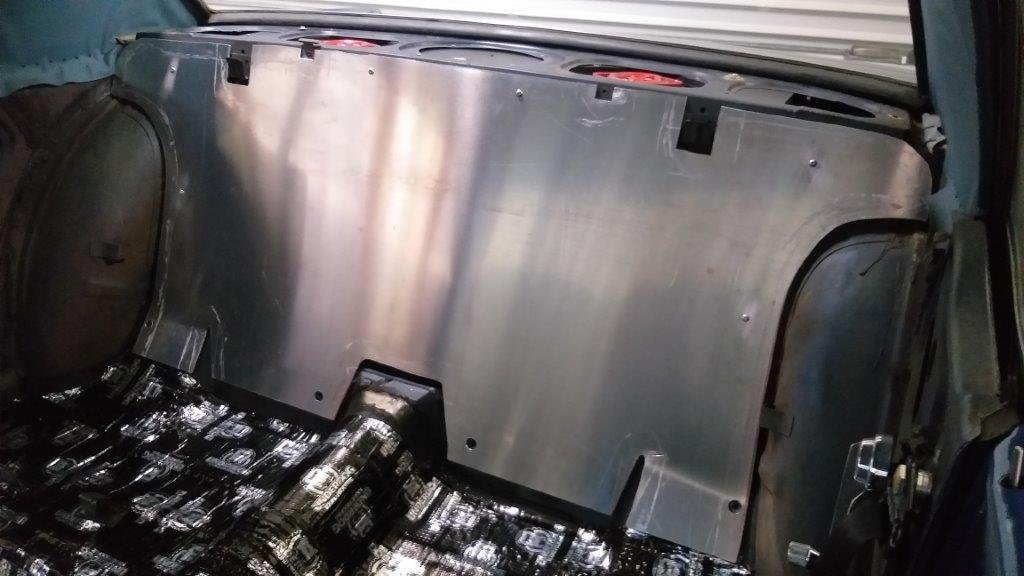
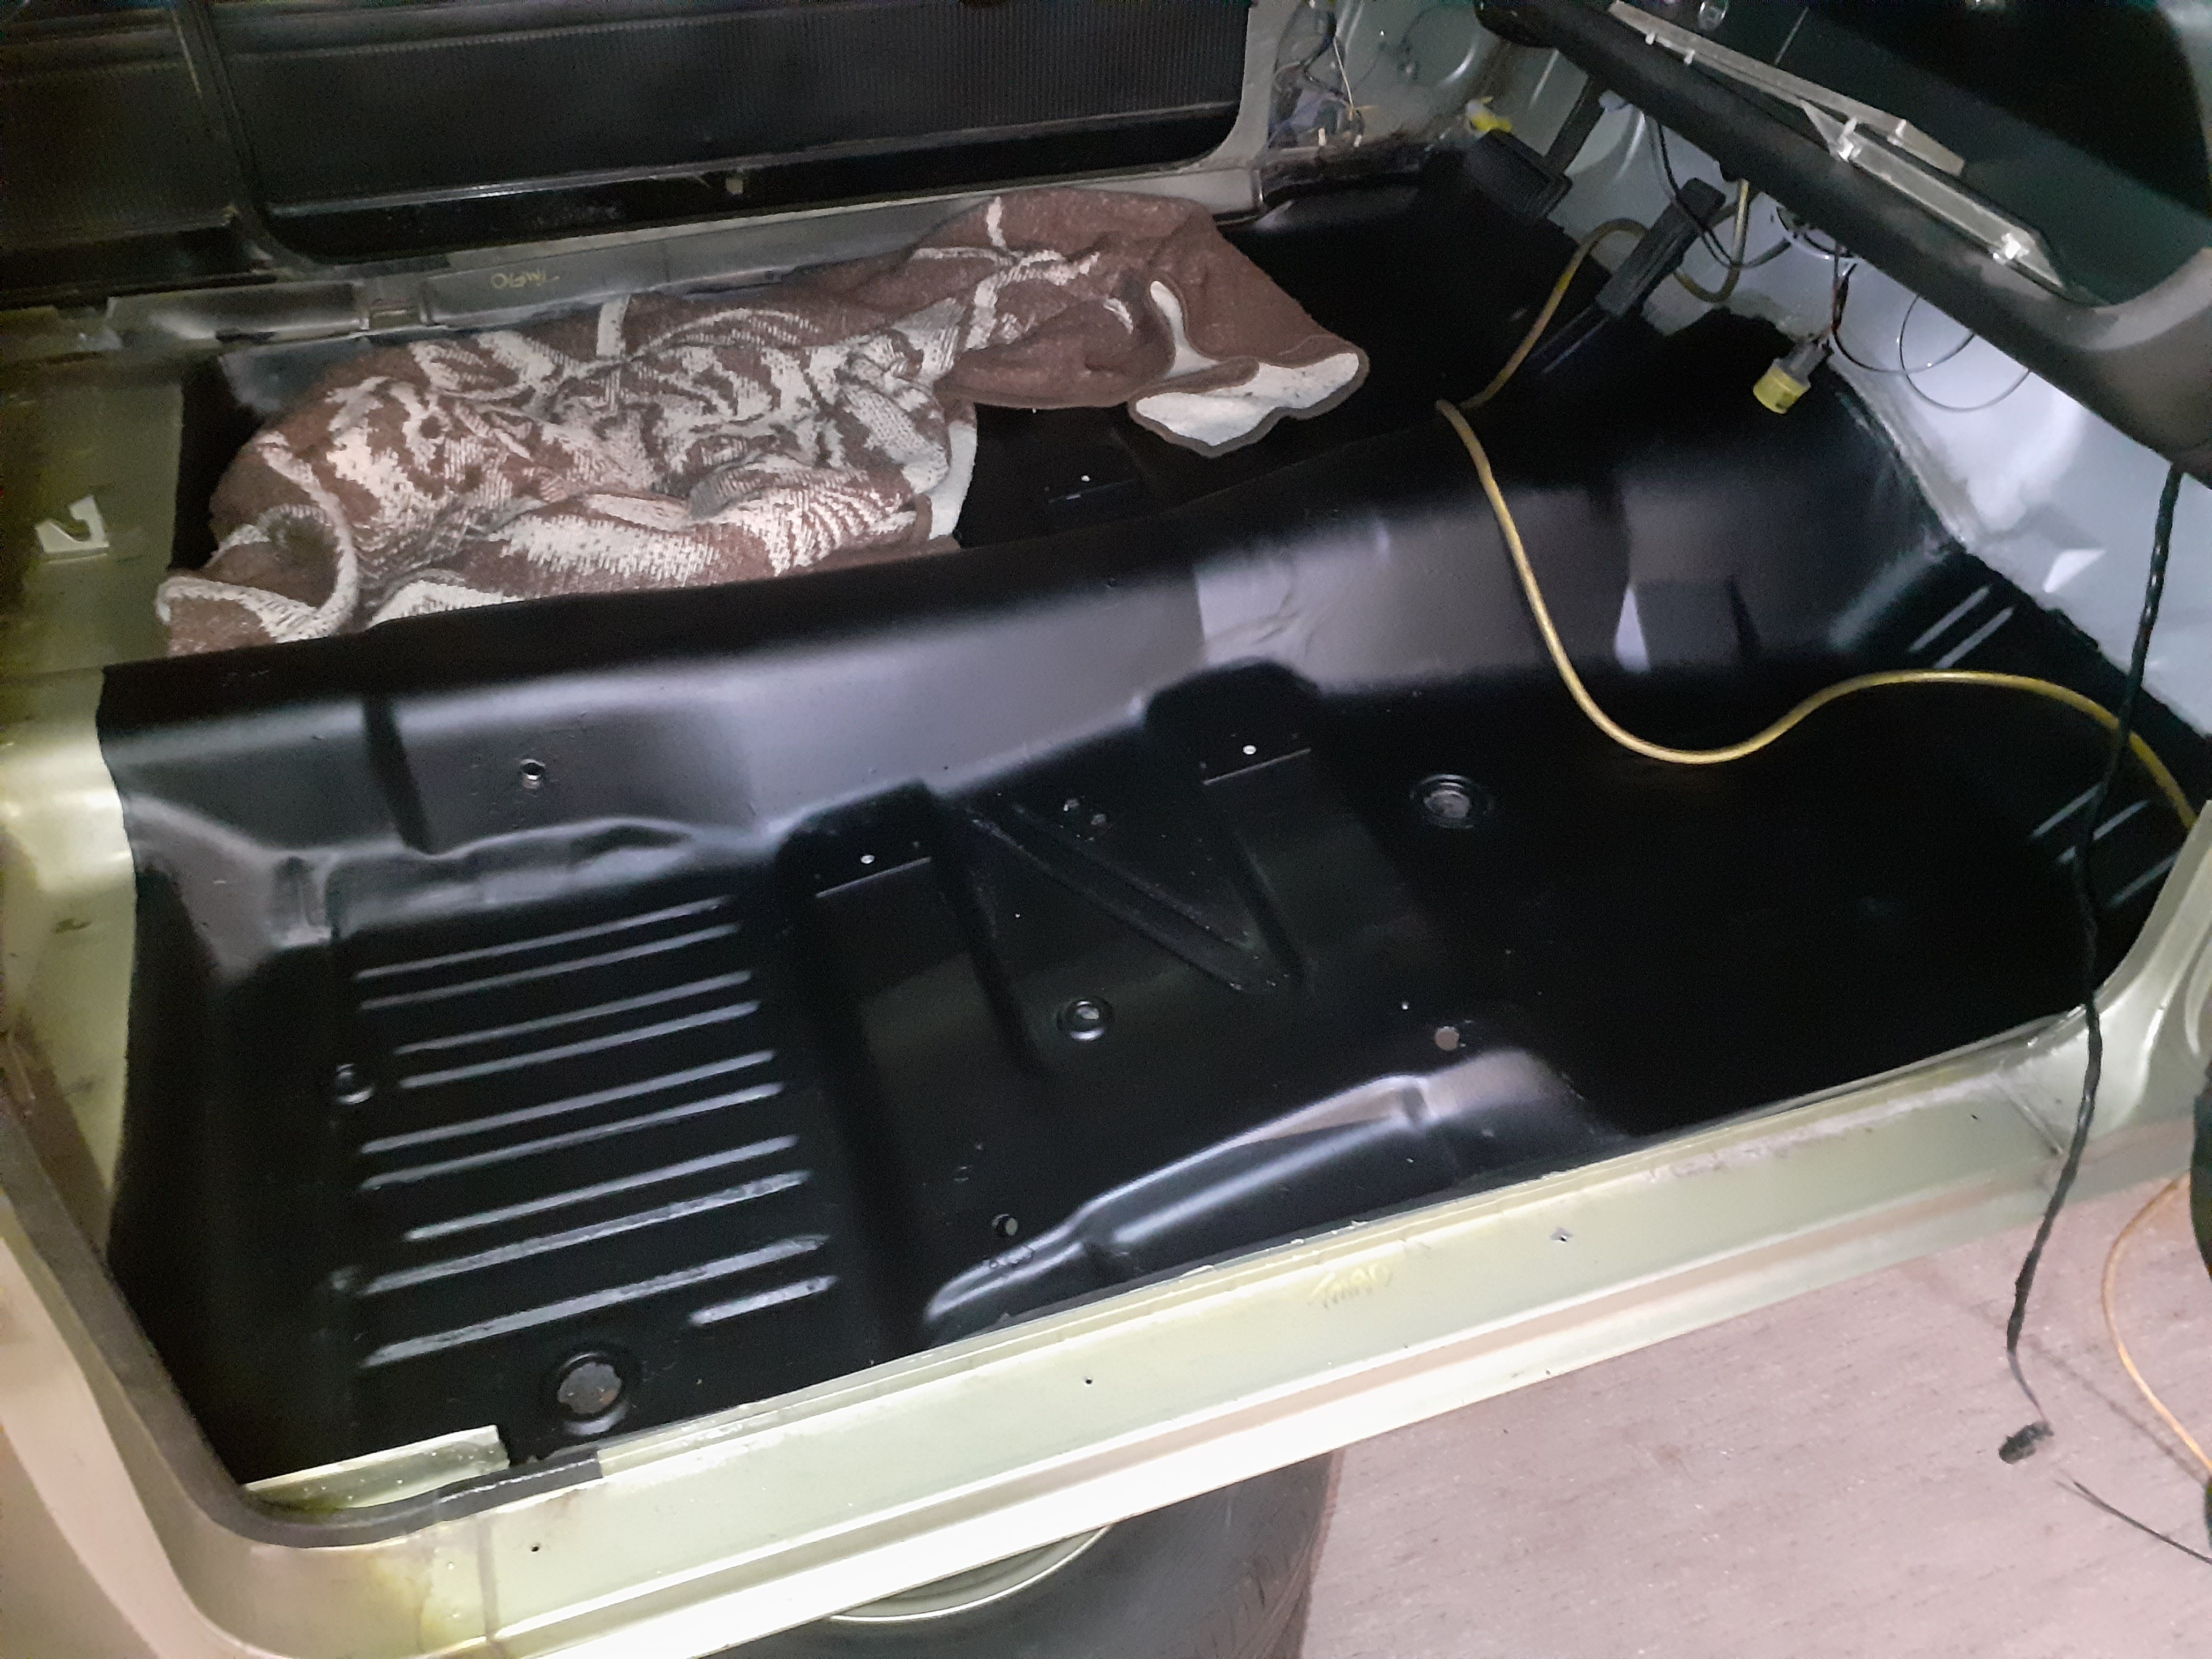
This morning I turned my attention to the panel that separates the cabin from the boot. I'm not sure how robust the original factory panel was, but my Muzzy has been fitted with one of Scott Drake's replica items. The little production label tells me that this beauty was manufactured on 11th February 2014. It is made of only the finest hand picked 2mm cardboard and has obviously passed through the loving hands of a skilled Taiwanese craftsman. It's clearly one of Mr Drake's superior quality products and I hope that he is well proud of this achievement. Anyhoo from the date stamp I'm guessing it was procured by Tom the previous owner and fitted at the same time as the 3 point rear seat belts and the twin baby seat anchors. I'm not altogether unhappy as it has made a lovely template for my slightly more robust replacement panel. So earlier in the week I hit my old mate Cameron up for a piece of 3mm aluminium plate which I picked up yesterday arvo. First thing this morning I got jiggy with my jigsaw and in next to no time I had my own interpretation of this part. I managed to use some factory holes in the seat back brace panels to bolt the panel into position. Marking the holes had to be done from inside the boot and much fun was had squeezing my lanky 6 foot 2 frame into the boot to get them marked. It was well worth the effort. The 4 lower seat belt anchor bolts will hold the bottom of my new panel firmly in place when I refit those. All that is left to do is to poke a hole and fit a grommet for my new rear speaker wires and I'll also cover the new panel with some sound deadening when my next batch arrives. Apart from that I'm very happy with this improvement. Thanks for looking.
3 points
-
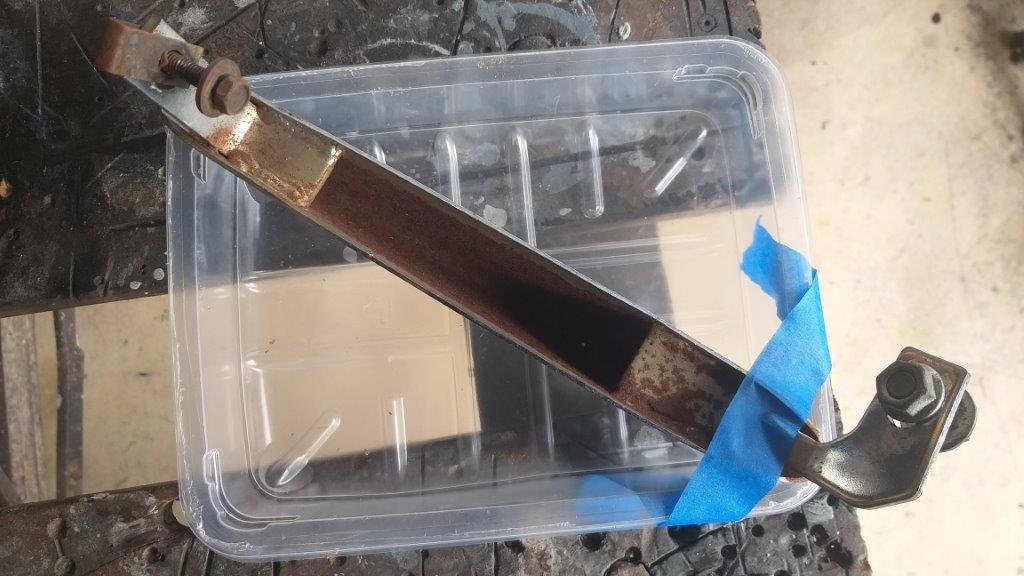
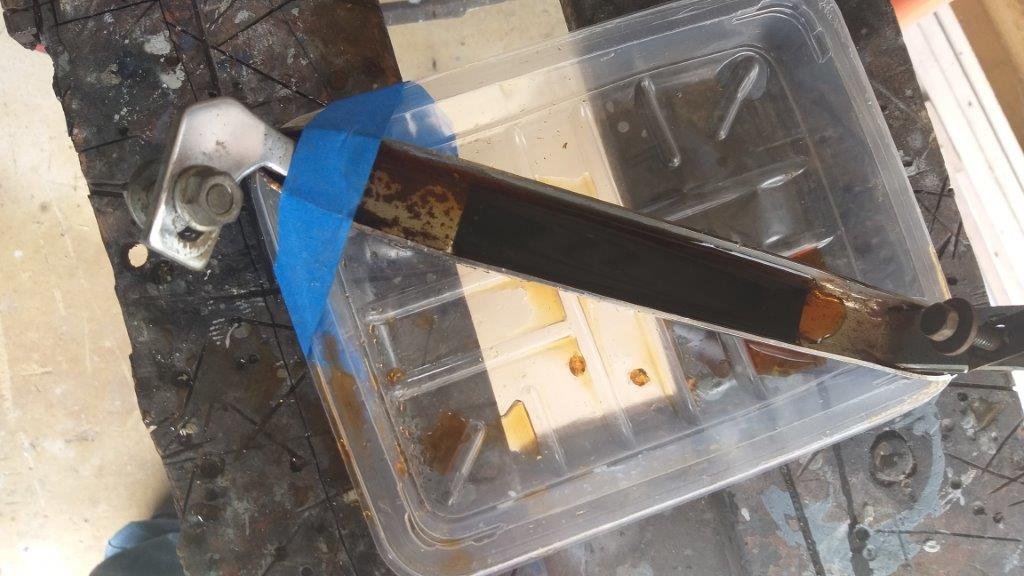
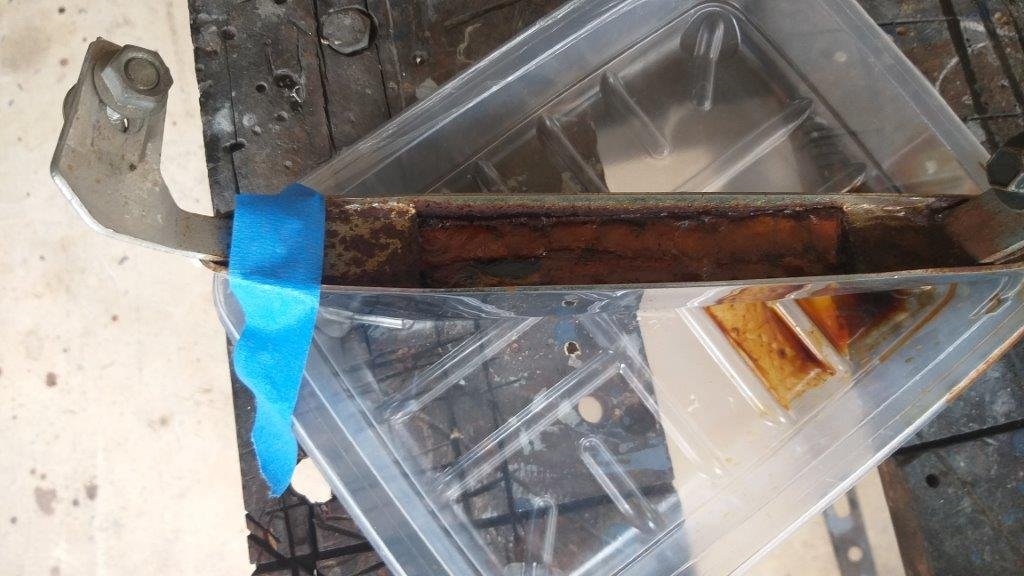
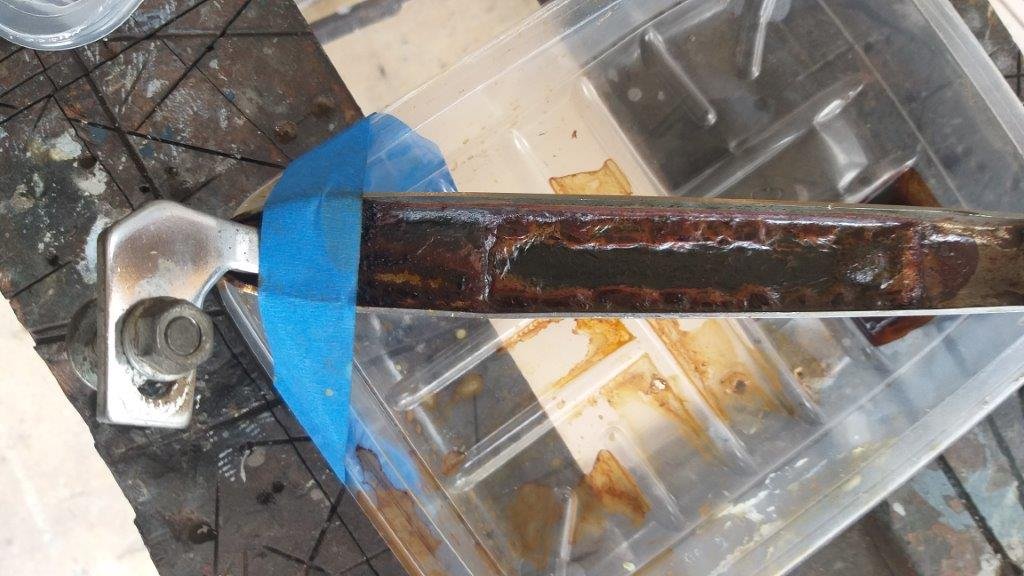
Earlier this week I started putting the front bumper over riders and the metal ashtray through my vinegar process. They are looking a lot cleaner now, just some minor bits to sand, then I'll chuck some rust converter on them before giving them a good coat of 2 pac primer.
2 points
-
2 points
-
So another 2 years passed and I said goodbye to this unfinished project. Is it for sale ? came up in conversation with my mate Hogan who has built two oustanding Ironheads in the past couple of years . Yeah everything is for sale and for the right money Ill happily see it gone. Hogan had a mate who wasnt up to speed with working on bikes bit knew what style he wanted and turns out my bike was his style so a deal was done and its now getting finished by Hogan and then passed onto his mate to enjoy the chopper buzz. My life has taken twists and turns over the years and the chopper thing hadnt really been exciting me for some years now so was to happy to see it gone and the money invested into a bathroom reno.
2 points
-
Here are some of my current fleet. I will update with my other cars when I get new pics. 1972 Datsun B110 with Mazda BP swap Datsun 521 with KA24E & automatic swap 1973 Subaru GL coupe (recently sold and going back to Japan) Still to come -1972 Dodge Colt hardtop and wagon (Galant GB) -1974 Dodge Colt (Galant GC) -1966 Datsun 311 with turbo Efi U20 -1972 Toyota TE28 with Mitsubishi 6G72 swap Built, not bought.2 points
-
In typical fashion I'm working on everything at once so I'm also deep in spaghetti I thought I would chop out all the unneeded stuff like lights etc, was disappointed that it didn't thin it down much I'm working from right to left so one side is tidy at least, gonna have to shorten a whole lot of stuff soon. At this point I realised I'm gonna have to attend to the list of brackets I have to make in order to establish the final positions of various things. I hate making brackets so onto something else. The shift lever (buttplug for reference) Looks good with the 10" steering wheel Look at all them snazzy gauges Now I need to make a bracket for it...fuck2 points
-
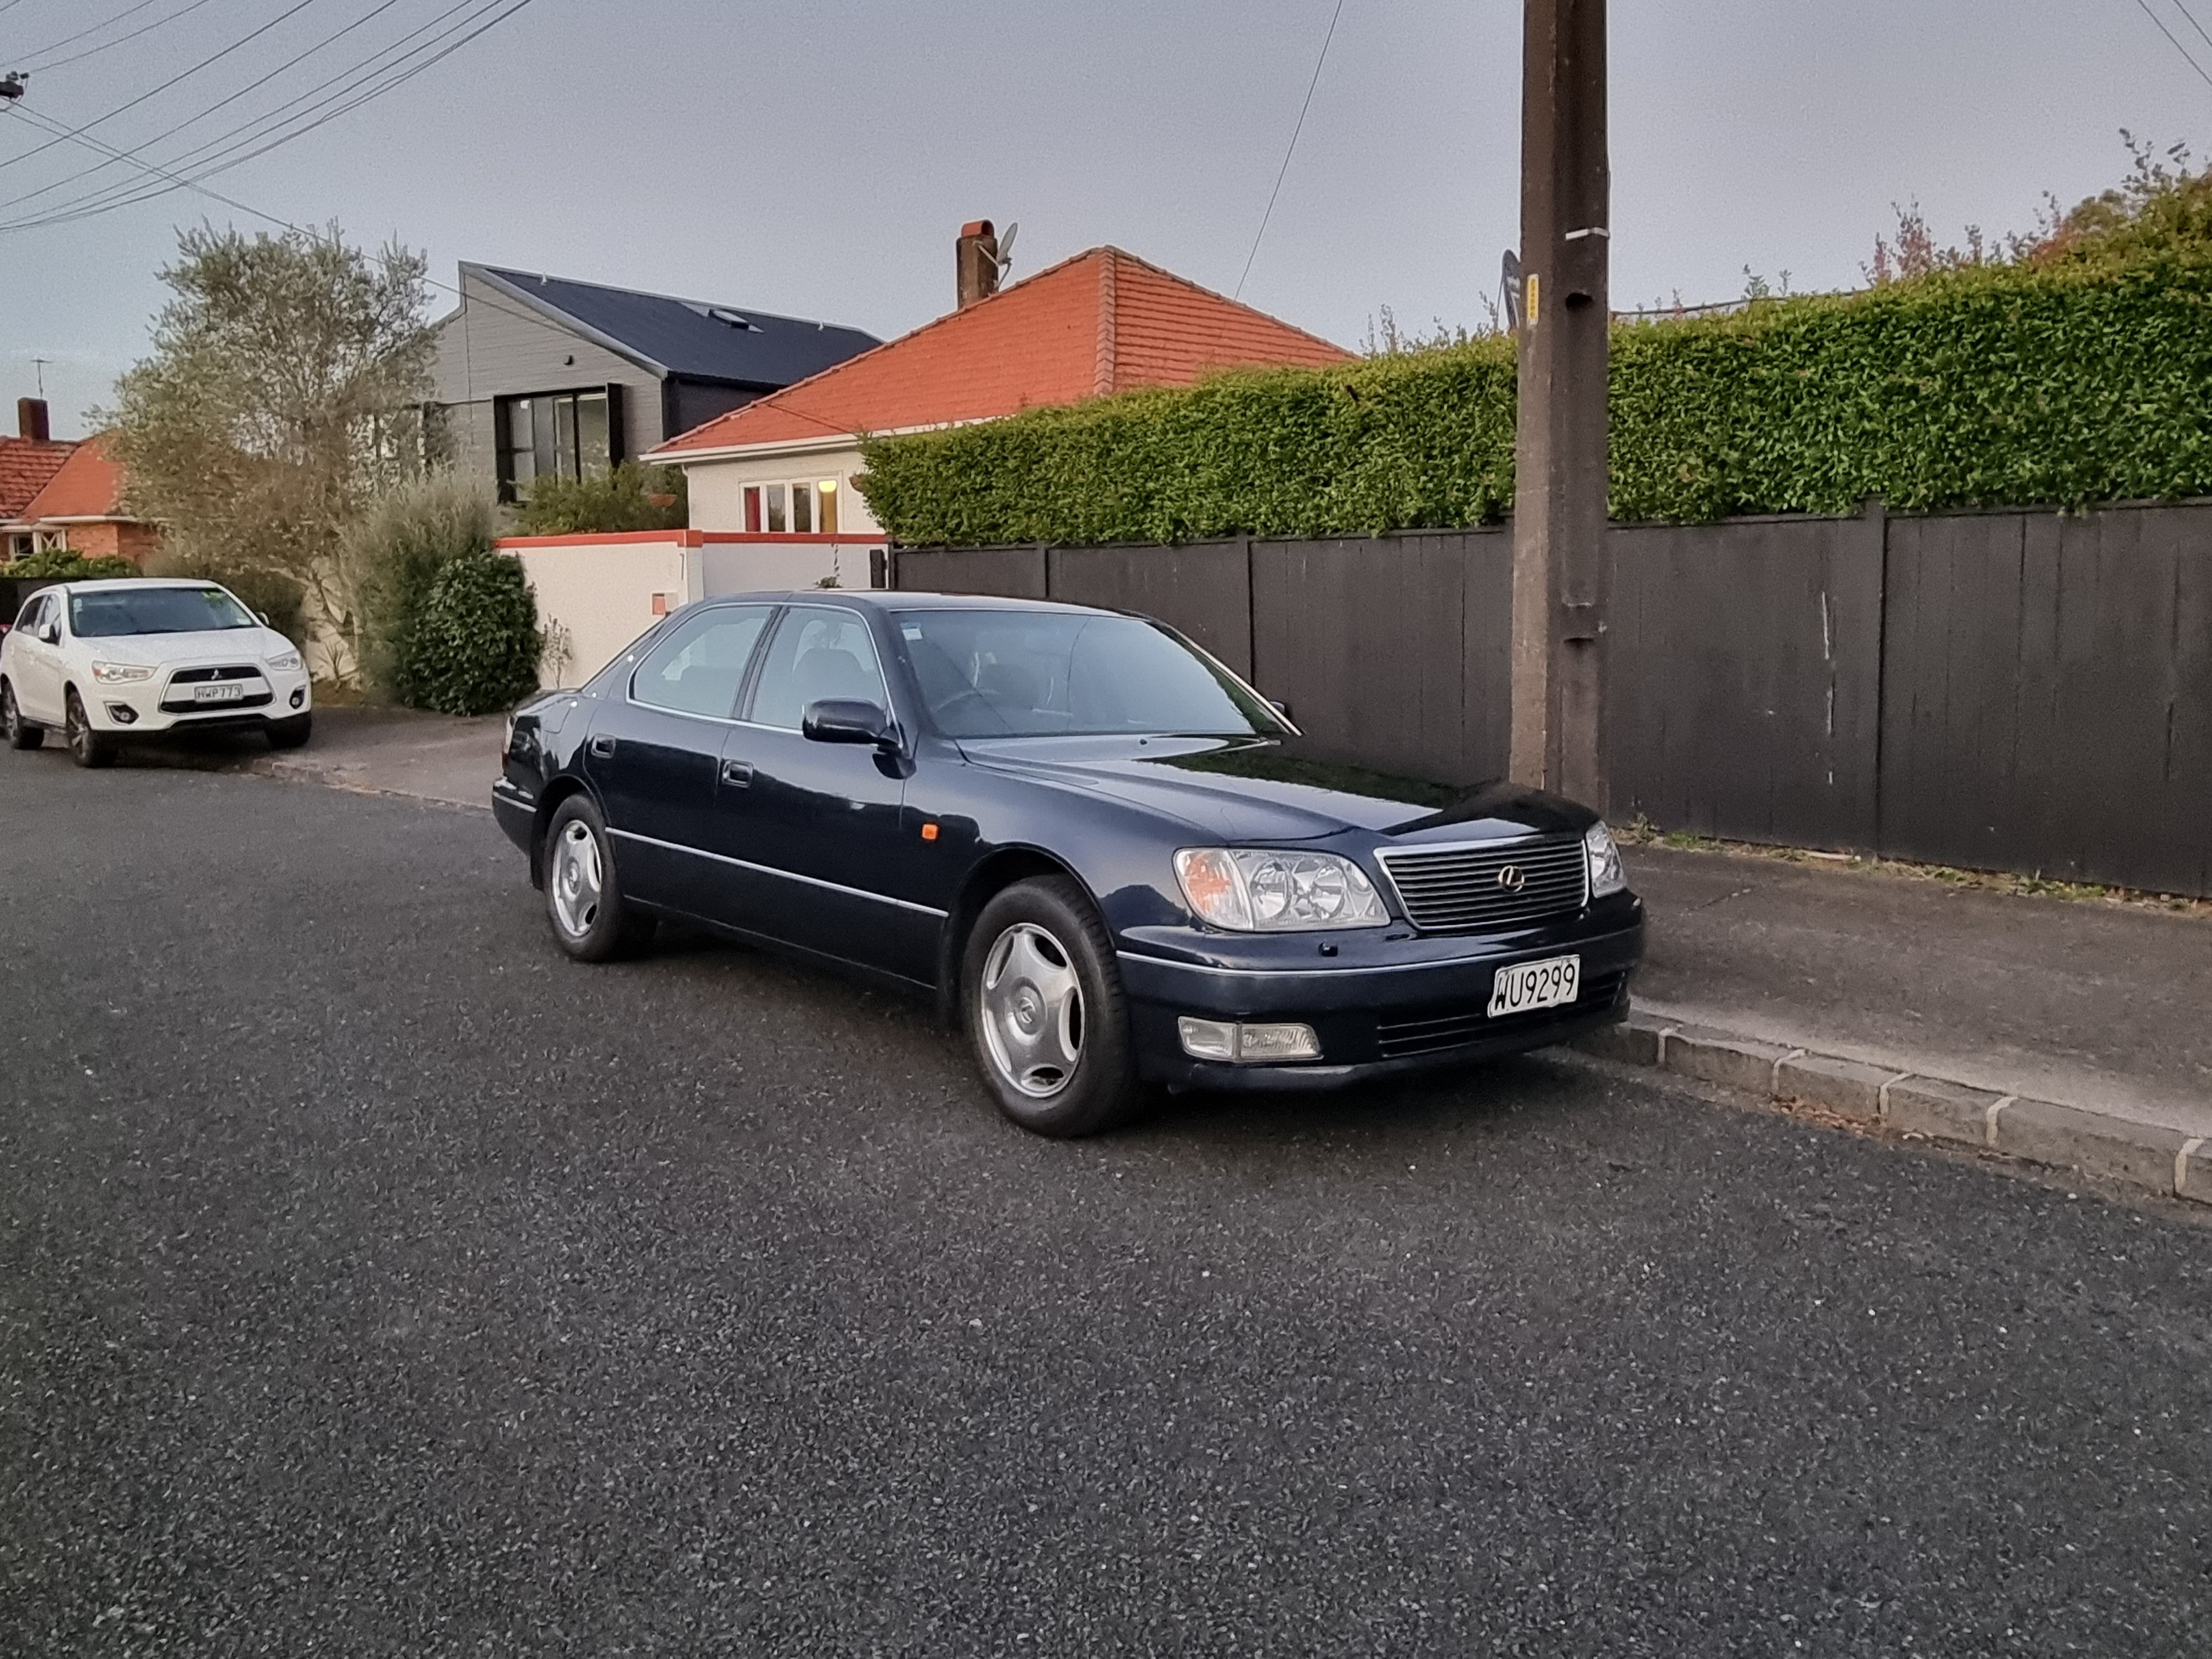
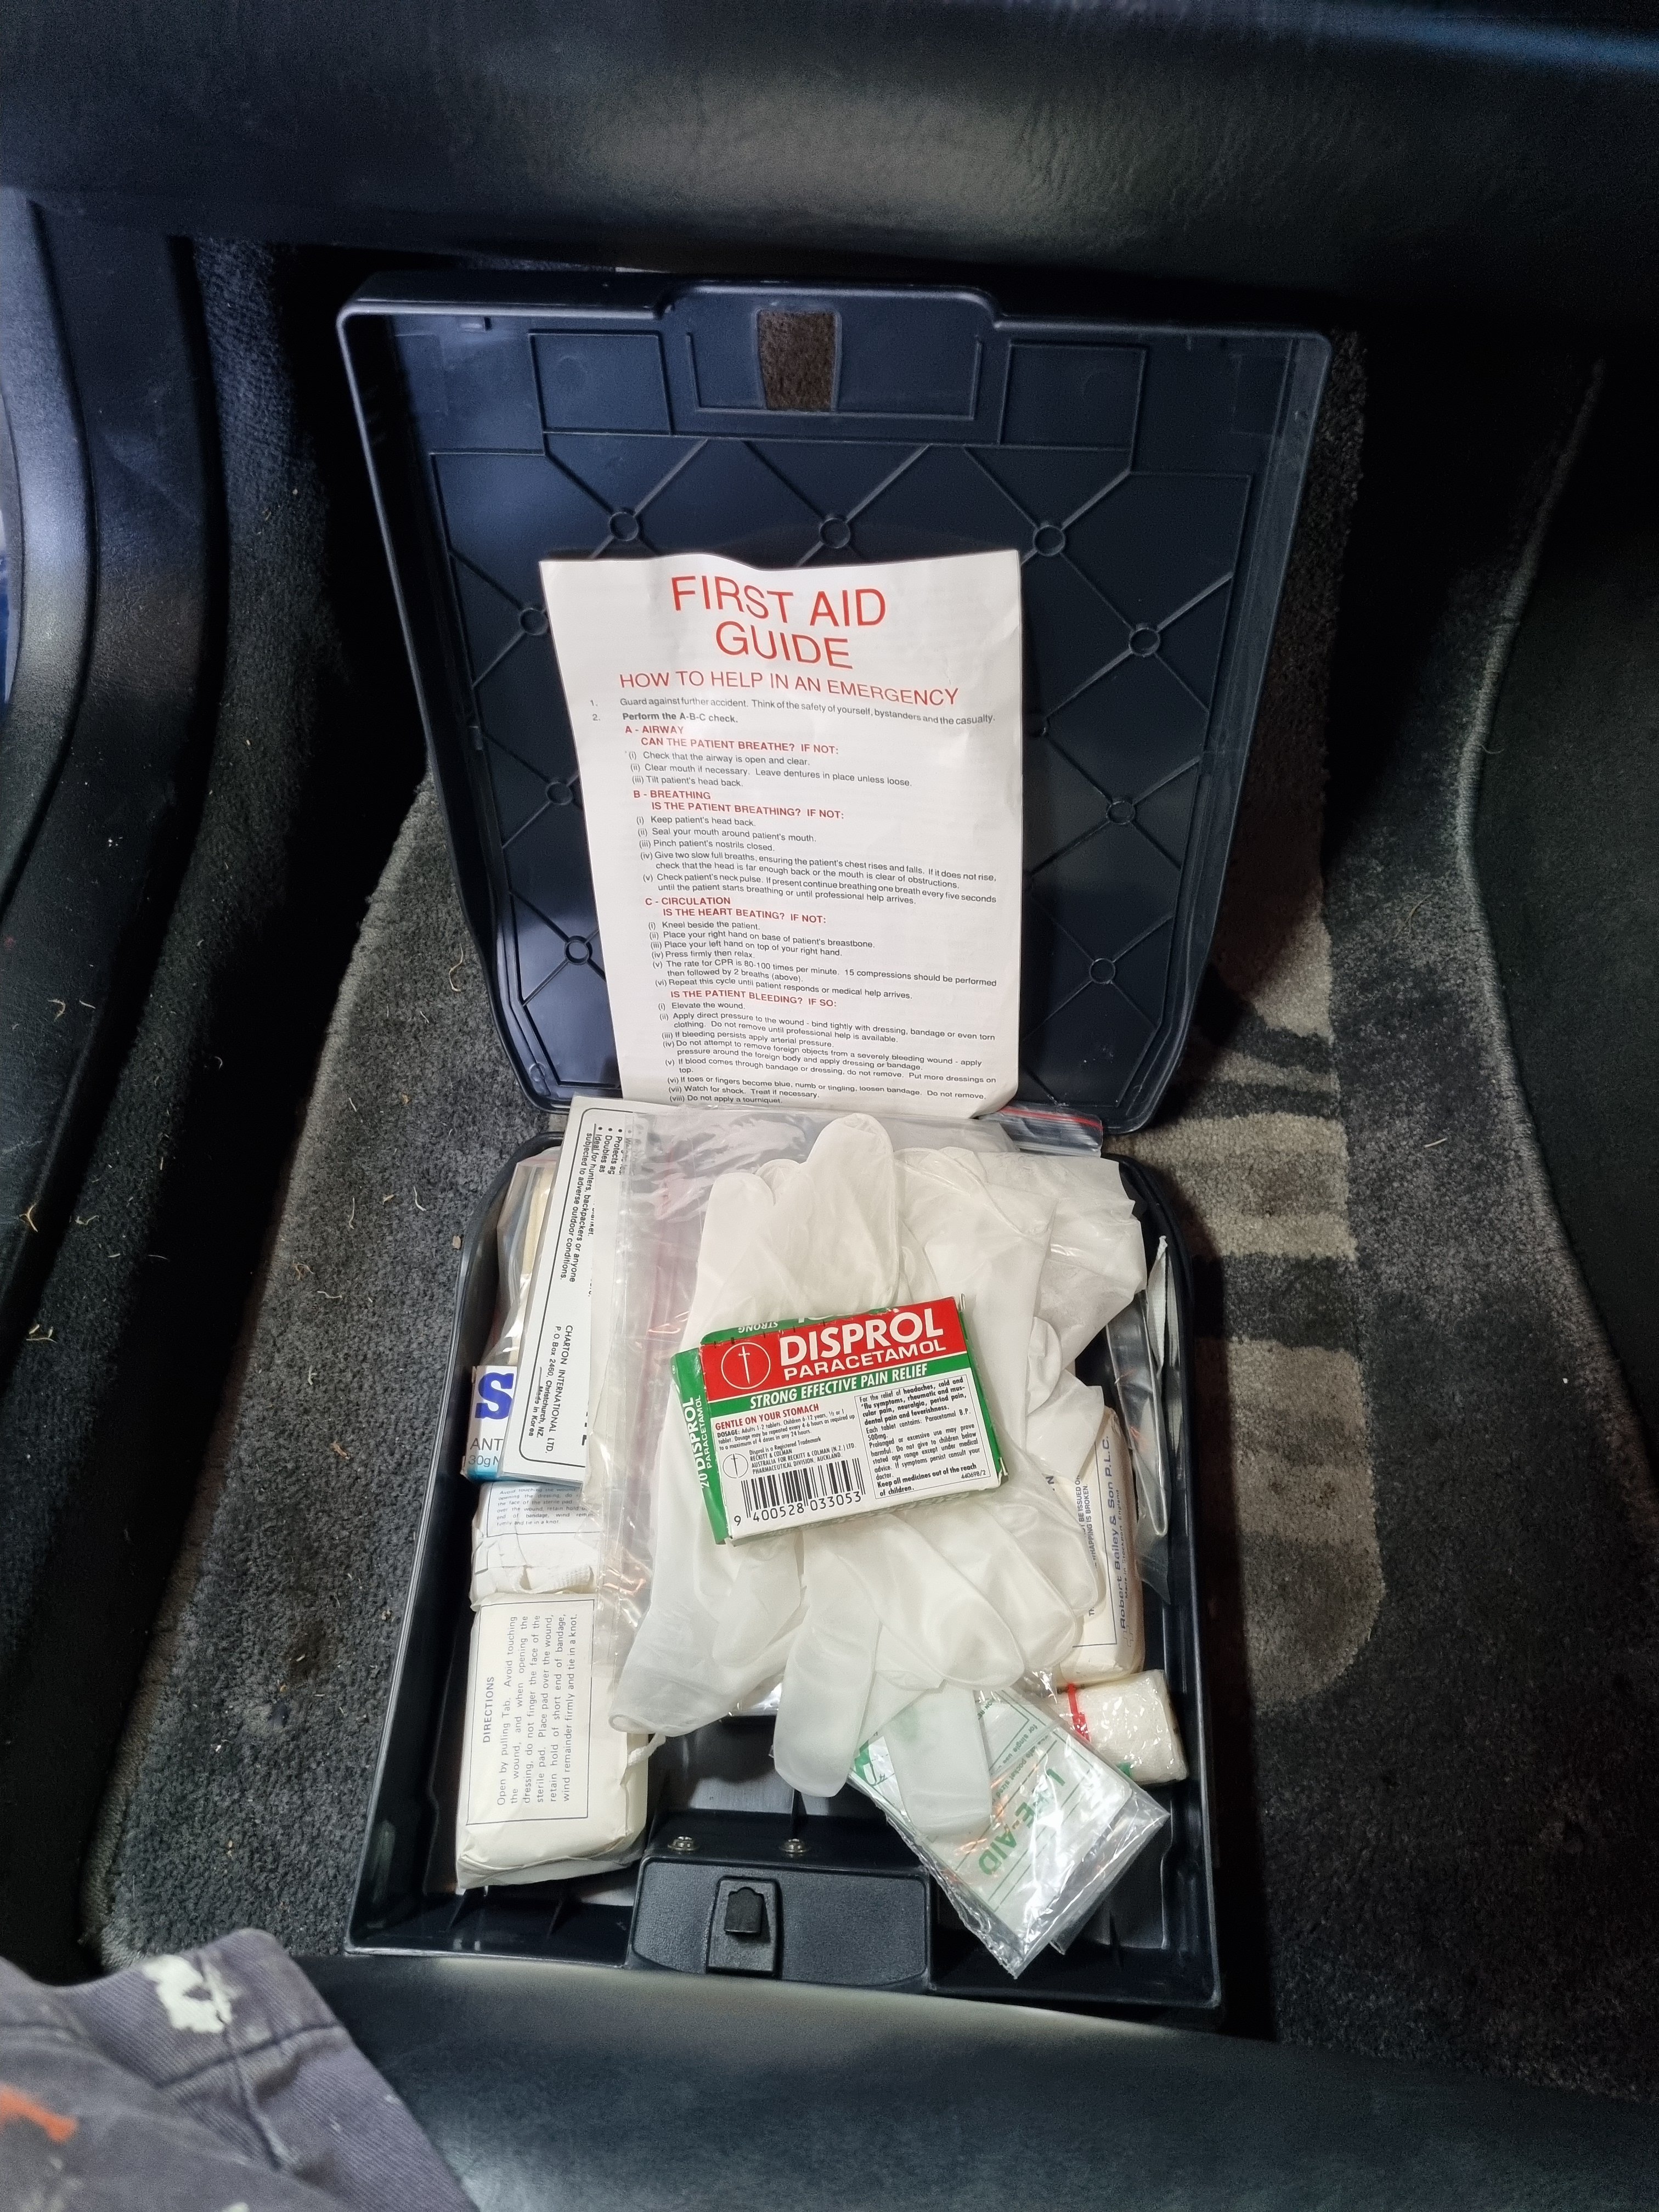
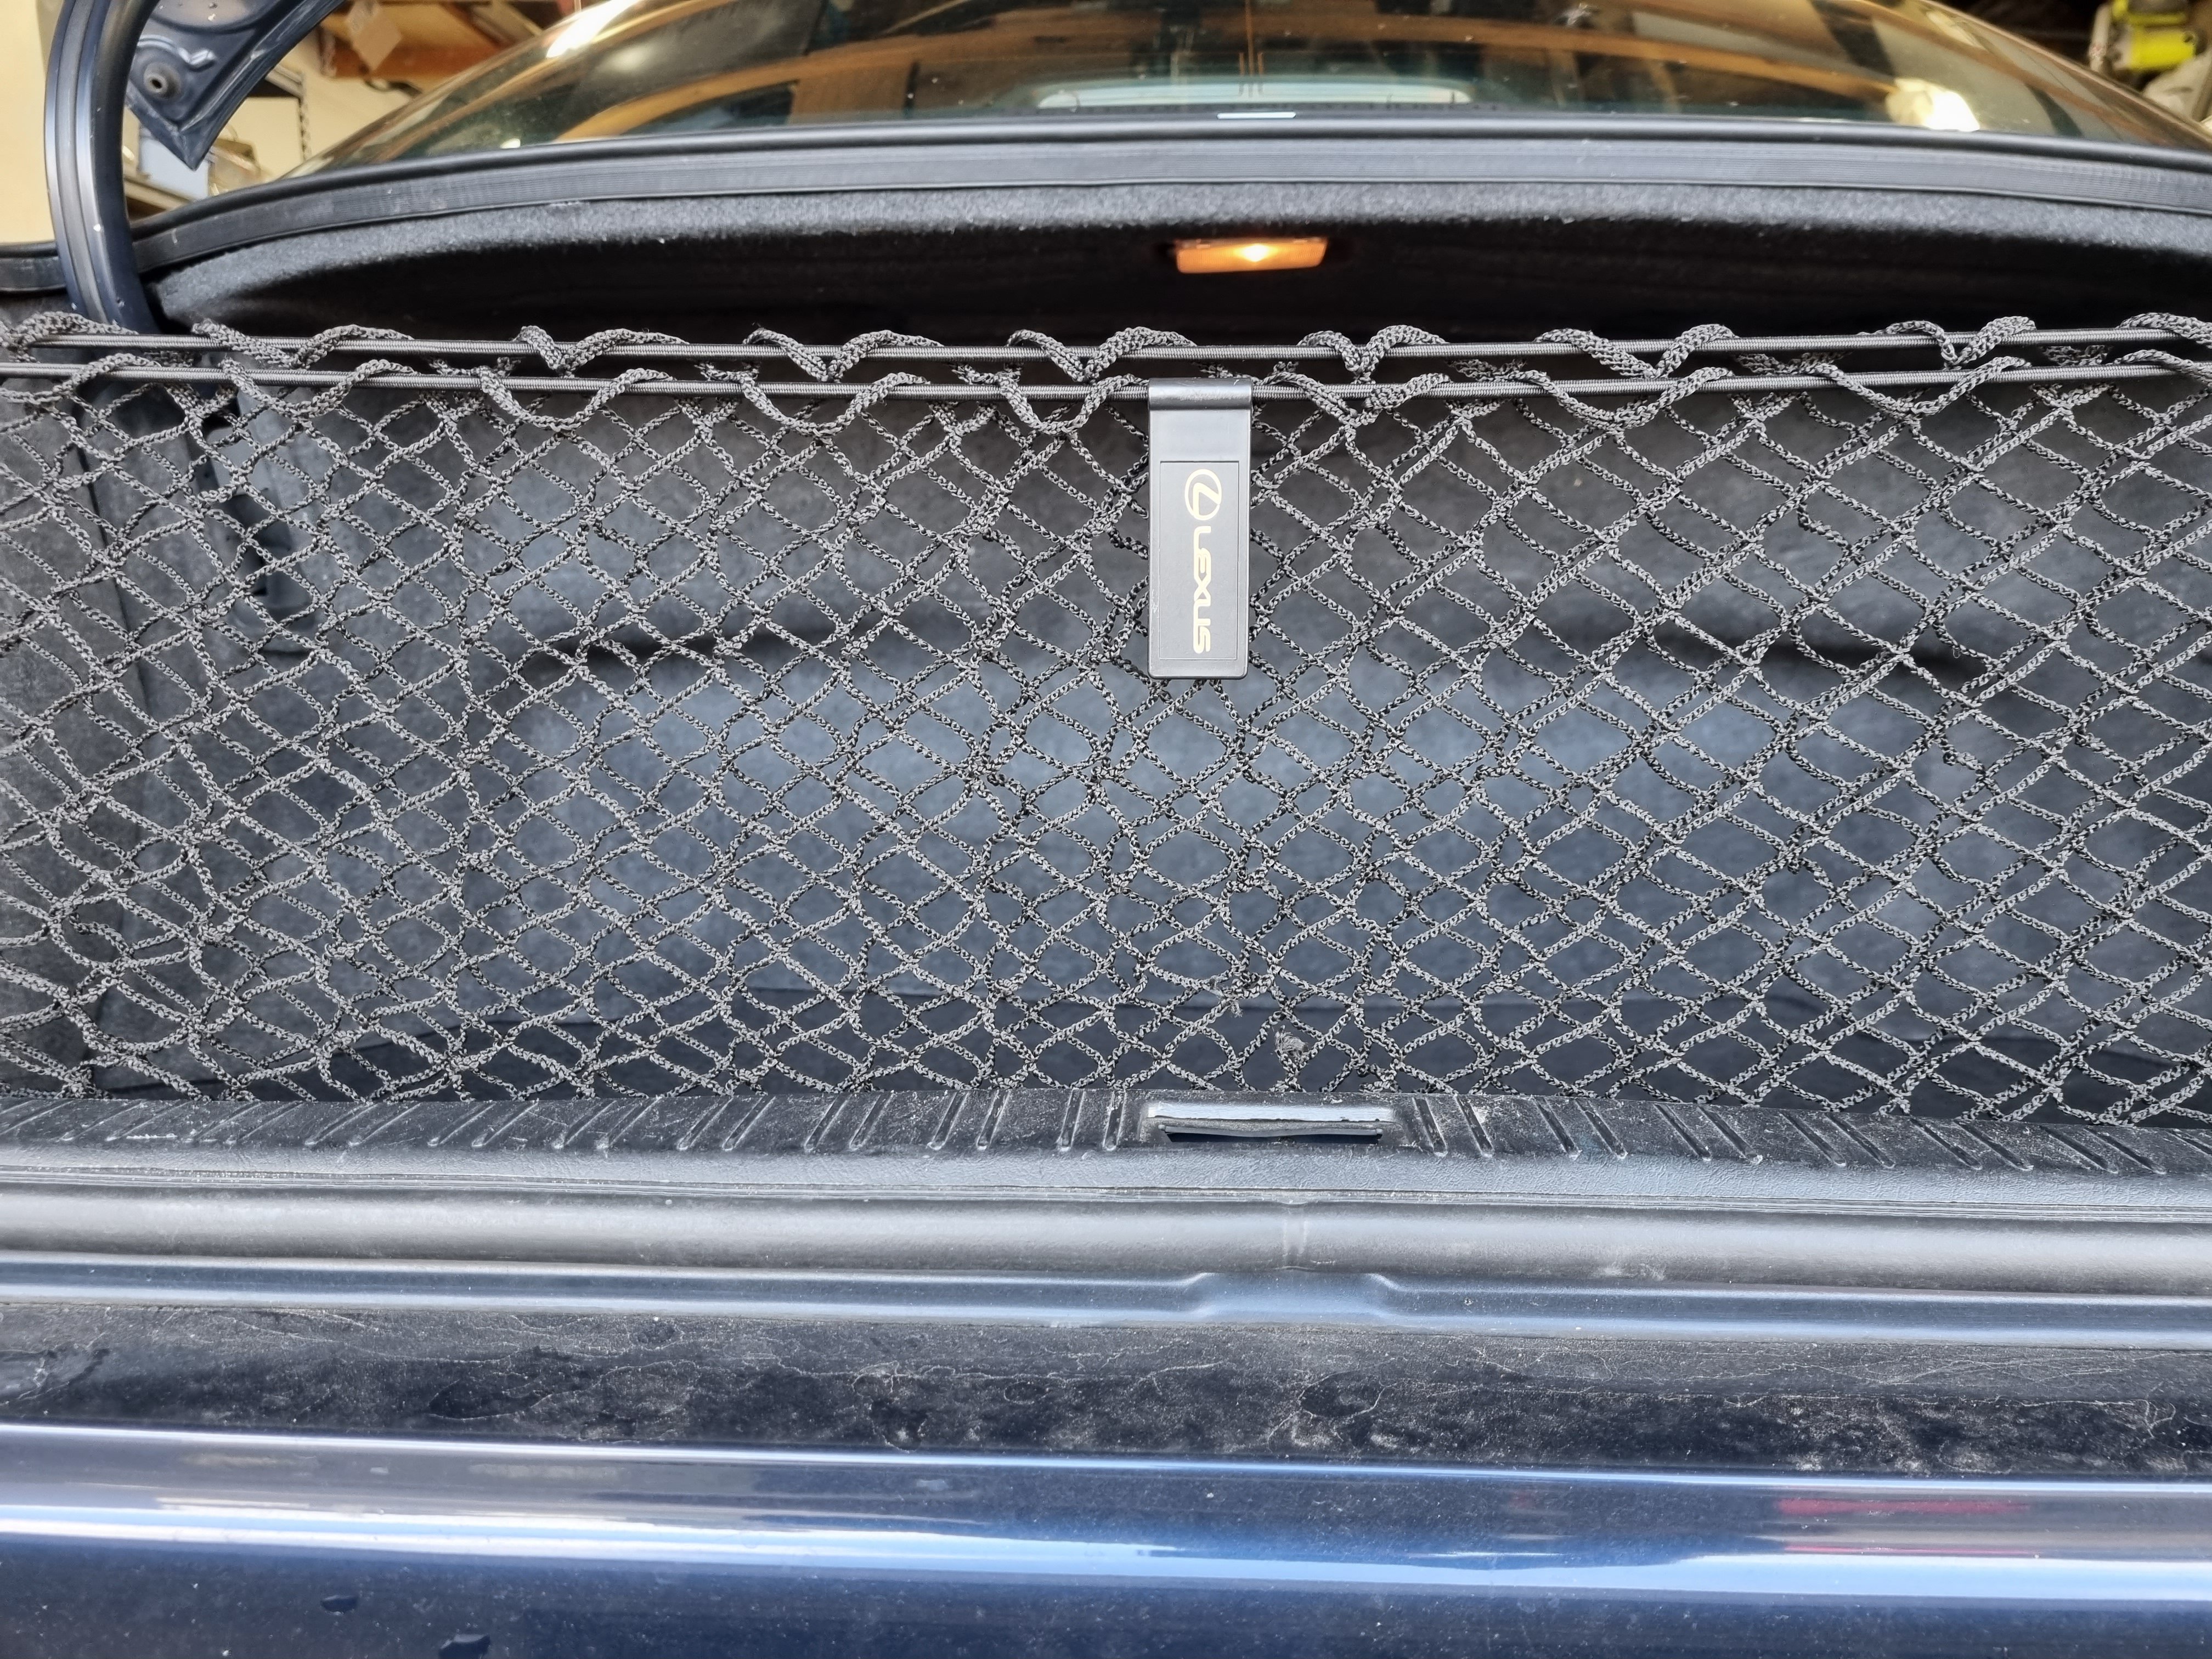
I had one of these a few years ago and it ruled. It was the wife's daily so I never did anything to it except maintenance. Now I've bought another one that is going to be my daily. I've done over a hundred thousand Ks in each of my celicas and quite frankly, it's fucked them. So now imma daily this. NZ new 98 LS400. Has the vvti engine. No sunroof, totally stock, fastidiously maintained 140 000ks. Dark blue with black interior. Every factory accessory is still there including the factory gloves, factory leather conditioner, luggage net and factory first aid kit. Plan is low, wheels, exhaust and an apexi neo fuel computer.
1 point
-
I'd use paint stripper. The stuff from super cheap that has dichloromethane in the ingredients is safe for aluminium. Stinks terribly, I think it has ammonia in it. Works great for removing carbon from pistons and valves and stuff without scratching too. Don't get it on your skin, even a tiny little bit will start to burn in a few seconds.1 point
-
Given the huge revs that doritos can do, youd wanna be mindful of your tail shaft speed.1 point
-
My stock LSA runs a 8 rib micro v belt on the supercharger, 600hp and 25000 ks without changing the belt. Don't see the point of Gilmer unless you are running a 6/71 blower etc.1 point
-
Yeah its got to be designed to be fit for purpose. I would like to think the drive shaft manufacturer would know all about it and ask you what kind of speeds you are expecting and what kind of diff ratio / wheel size etc, and design the shaft to suit. i.e If you are going to be doing 200km/h with 13" wheels and short diff gears, then that shaft is going to be singing, and likely need to be a bigger diameter.1 point
-
There's one in my blue car. 670hp and live axel.1 point
-
Midschool Honda meet? No swaps?1 point
-
Modern daily meet?1 point
-
Anyone wanna do a dark rainy evening moody photo op and tunnel drive?1 point
-
It's been done in a P6 before, but apparently it won't clear the sd1 firewall/tunnel. I'm yet to see any conclusive proof it won't fit though, just rumours.1 point
-
Wonder how easy it would be fit a ZF 4HP22 from a V8 Disco using a BMW rwd tailshaft housing (seen it done in a build thread on FMM).1 point
-
I generally just warn them the car isn't insured for them regardless and it's a break it you bought it situation. Hasn't bit me yet. Same with no reg or wof, it's at their risk.1 point
-
Just a small but significant update today. With all the work on the column switches completed, this meant that I could finally take the car for a quick spin around the block to see how it actually drives and if it highlights any further issues. The cold start was really good, only needing a couple of turns to come to life. I wasn't too impressed with the top end rattle though, I will need to get some new oil in there and hope it's not a sign of things to come. The oil in there will be at least a year old, if not two, and I don't know what grade. Before I could back the car out of the drive I had to raise the steering column, as all the wiring work was done with it at its lowest height. Overall the car drove really well. The weird notchy feeling in the steering seemed to clear up, so hopefully that's just from lack of use. It tracked and drove straight, without feeling too rolly polly on the suspensions, so maybe it's not completely poked. The engine pulled well, although I forgot how lazy the autos are; but that's what I like about them. The revs stay low, and it just rides that low end torque and gains speed quickly without fuss. Say what you will about automatic transmissions, especially ones from the 80s, but this old GM 3 speed shifts beautifully. The previous owner claims it was rebuilt, but I have no proof of that. The shifts are smooth and seamless, and kickdown was snappy. I didn't check the trip computer, but everything else seemed to work. The gauges all rose, the speedo and tacho worked, and all the lights worked. The low coolant light worked a little too well though, the bottle and radiator are full, but the light is still on. Will need to do some digging. The Rover SD1 has such a commanding presence on the road. I can't imagine what it's like for the average joe to see one driving around in a sea of boring beige appliances.1 point
-
Seems easy enough
1 point
-
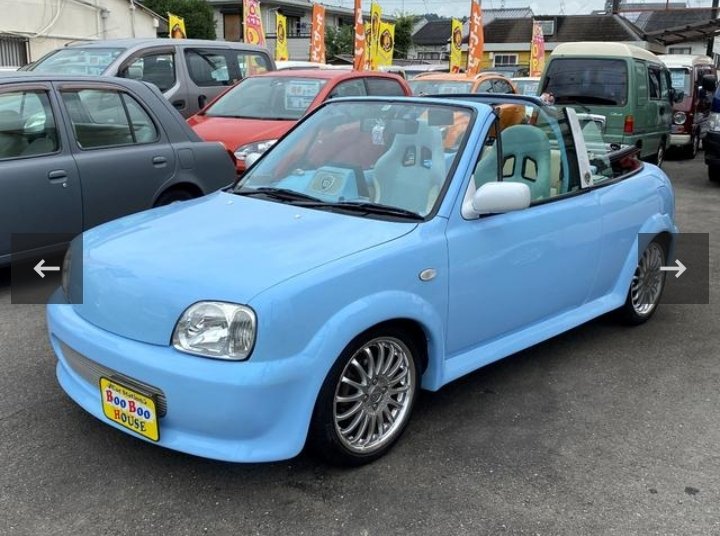
A month or so ago our friendly local wreckers gave us a heads up on a K11 cabriolet they might be getting in. "Its owner had a whoopsy, smashed the front guard in and needs a bit of work. Reg and wof'd. Would you be interested in it?.." "yes" was the obvious answer. They collected it today, gave me a phone call and we were at the yard as quick as a flash. This beauty greeted us.. First thing we both spotted were the wheels. Even covered in dirt they still looked new. Pretty nice look and we thought they'd suit a yellow car better. Good tyres too. 185/55 15 are about 10mm bigger OD then the 175/70 13s we currently have on Minky and Martha. Might have to try them out for size... if we bought the car that is. Best check it over and not get carried away. Looked over the rest. Needs a guard, bonnet needs straightening in the front corner, headlight bracket is broken and the windscreen is cracked. Cant tell on the rest- test drive will show up things but the chassis legs looked ok. I think the guard/light/bonnet took the brunt of the shunt. Worst thing is a smashed drivers side window. Not exactly one of these cabs on every street corner so that could be a search as its quite different in shape. But I could just throw a plastic one in for now. Wing mirror smashed off, no doubt into many little pieces. Again - not the same as other k11s. Checked the windscreen size and it appears to be the same as a bog standard k11. Phew. We had a quick skim over the rest of the car, because in our minds we'd already 'bought' it by now - for the wheels alone and little dose of shits and giggles to even just own it, sample the k11 drop top life and have a laugh no matter what happens. YOLO. 1.3 with only 126k on the clock. Neat. Oh. Nissan N-CVT slushbox. Not so neat but how bad could it be? Ka-ching. Sold! I'll drive it home. We grabbed a guard and wing mirror (I'll cobble together something that satisfies the the legal requirements of having both mirrors but it might not look pretty) and put our name on the screen that remains on the k11 we've now been robbing for quite some time. I fastened the loose guard liners with cable ties, checked the coolant (oooh -strut brace!) and kicked the tyres. With the top lowered (its electric!) I cruised off into the evening sun, the huge exhaust tip droning away, enhancing the wonderful monotone revs holding of the CVT. Watching the gauges like a hawk (oooooh - a full tank of petrol. $500 k11 was suddenly only $374 * ). Temp sat bang on. Everything works. Steering seems fine. Doesn't pull. Wheels seem ok. No shakes there. But wow- scuttle shake. Not terrible but noticeable. Main thing is its fun! Heater works sweet as which was a good thing on another crisp clear and cool Tasman evening in winter (apparently winter. I'll stick with late summer) Once happy that Mandy, her name decided almost as soon as Hannah had paid for her, was not going to lead me off into a hedge or die in a cloud of steam I was able to relax and just enjoy the ride. I felt no need to drive fast. I cruised along, noticing many looks from other drivers, no doubt wondering what the backstory was for the funny little car that looks like a March k11 but is a drop top and has one front side caved in, no bumper, a headlight hanging at an angle and its mirror smashed off. I fumbled with the stereo. Does it work? Ooh the previous owner had left a cd in it. What's going to be this evenings music??? Bruno Mars. Bloody perfect! I cranked it up loud and rang my fingers through my hair. Hannah took some pics as we cruised to the beach for a photo shoot. Sadly the sun was gone from the beach so took some pics near the forestry.. Drove home. Parked it inside because no side window and a frankly threadbare looking roof does not a rain tight car make. More pics. Its better side (like...has a mirror) The modified exhaust looks terrible and sits too low off centre. Friend at wreckers wants it so we'll put a stock on in place. Less CVT drone for better living. The donkey up front... Someone bought a Nissan sticker pack from Bob's $2 auto emporium ... Huge boot.. Pull a lever and pop the back seat down for the skis/ironing board/golf clubs/ french sticks... Pretty much a Jaguar interior... Its those little things... Wow. What an afternoon. Plans are to fix it, drive it, enjoy it. Then sell it on for someone else to enjoy... ...he says now. Oh and pinch them wheels to try out for size. Not totally set on the style/size yet until they are washed and fitted to Minky.1 point
-
1 corner in 3 to go .. fark, a lot of work
1 point
-
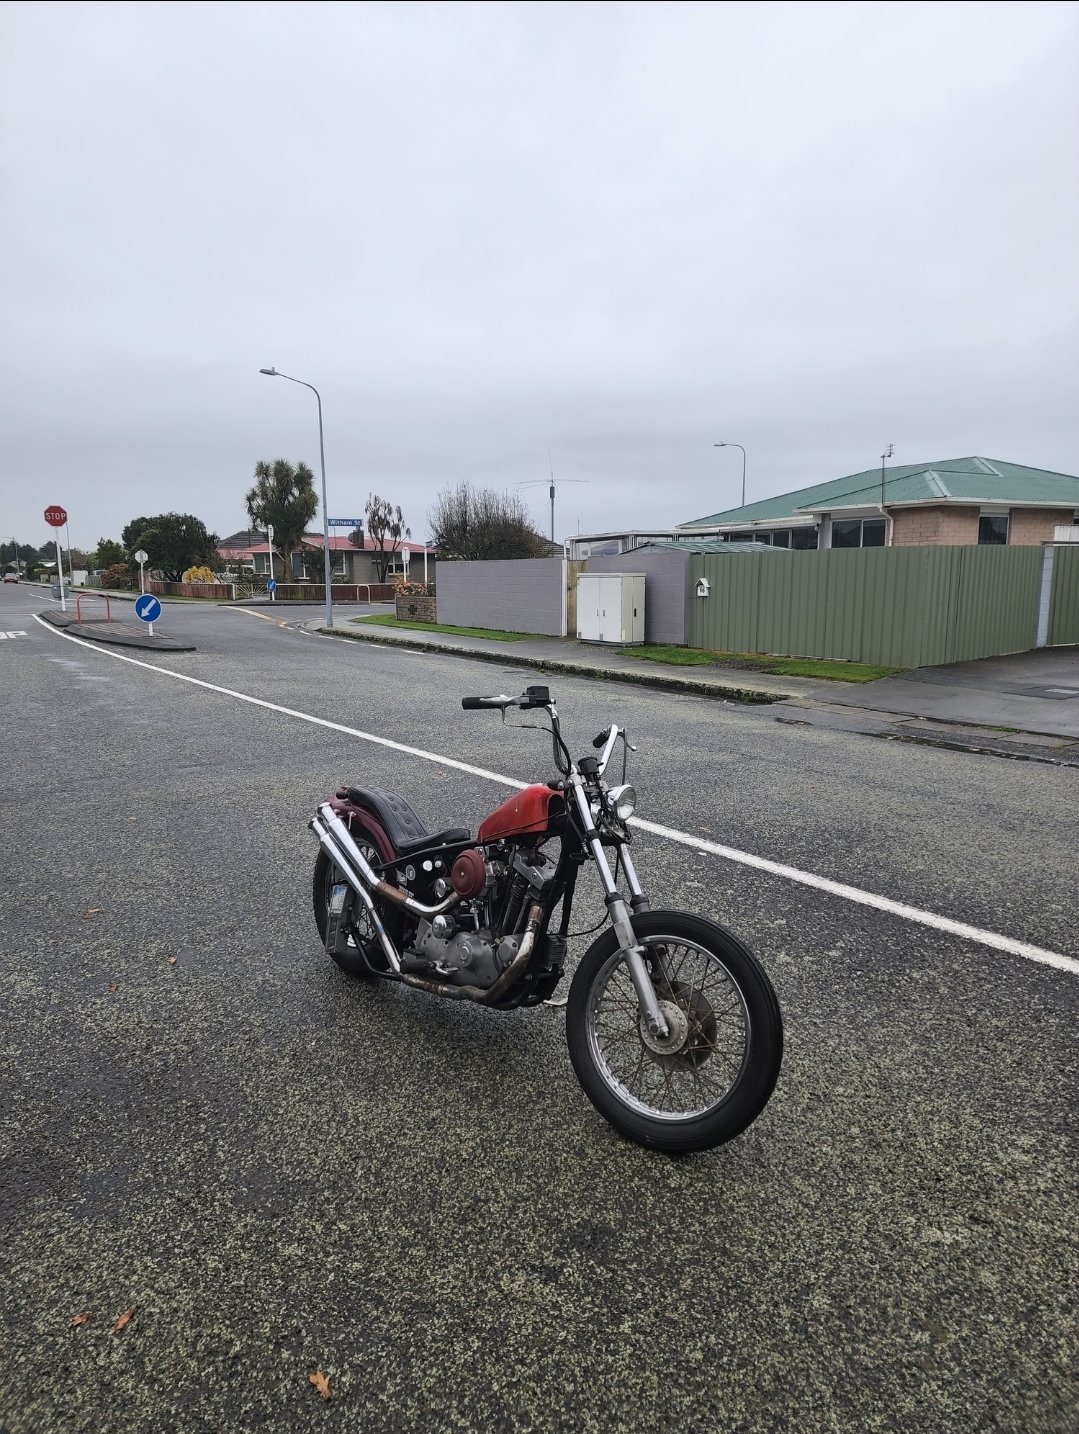
Still goes hard. Makes all the great noises and is sketchy as fuck to ride. Still use for across town missions where I cant carry shit on a pushy.
1 point
-
This thing still goes hard for what it is ! Well over 20k on the Lifan 125. Getting harder to start and possibly now starting to burn oil but still sticks with bigger bikes on the twistys and takes everything thrown at it as per the last two years of top of the south gravel adventures. Was gonna strip it this winter and rebuild with new engine but probably wont . Its likely the only ride it will be on each year as I prefer to cycle to work and run on the weekends but when I do ride it I fucking love it
1 point
-
1 point
-
Set float levels, idle mixture, decided there was no better time than now to get all the piping back on for good. Now goes waaahhhpishhh tested all gears, wheels go round. I think the cooling might be borderline, it gets pretty warm (195f) and twin 10" fans was as big as I can fit. I'll see what it's like once it's mobile and can be driven in traffic, I might have to get some better quality fans
1 point
-
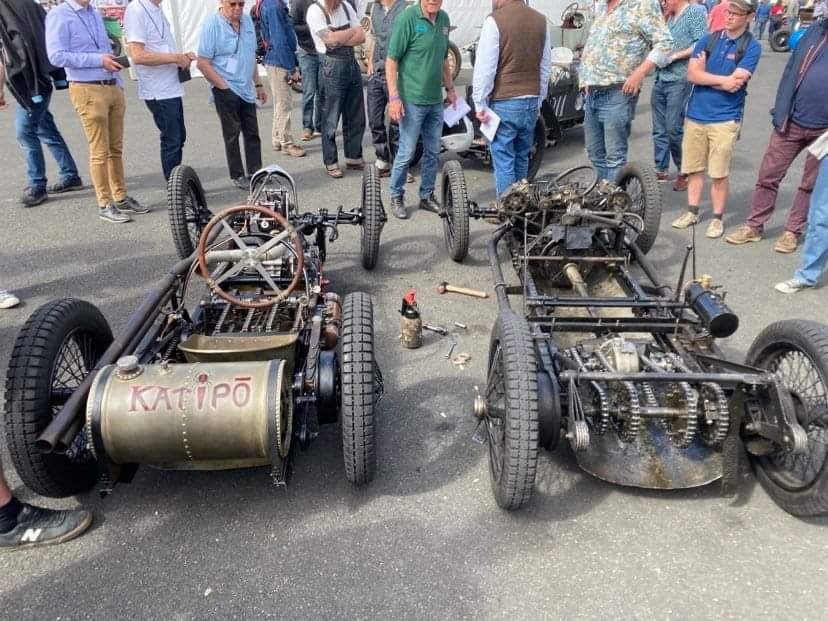
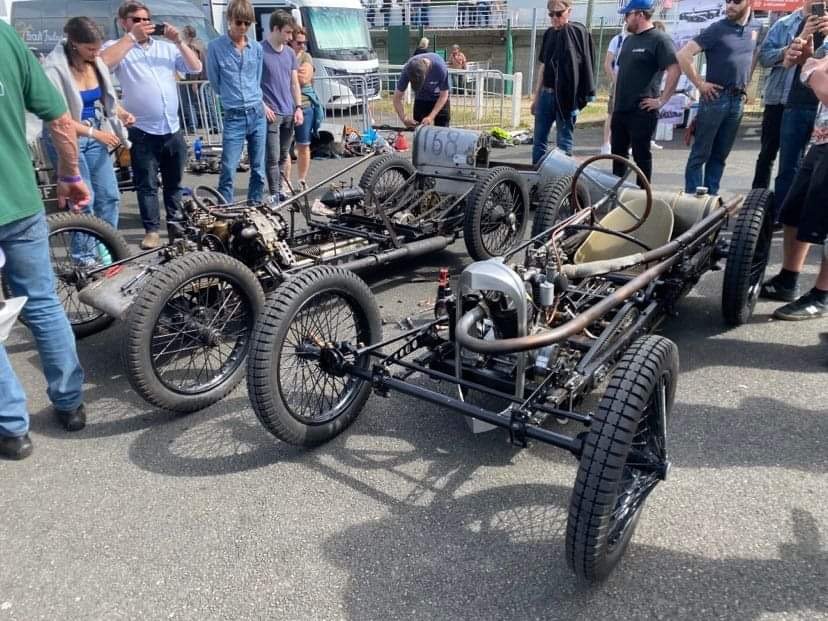
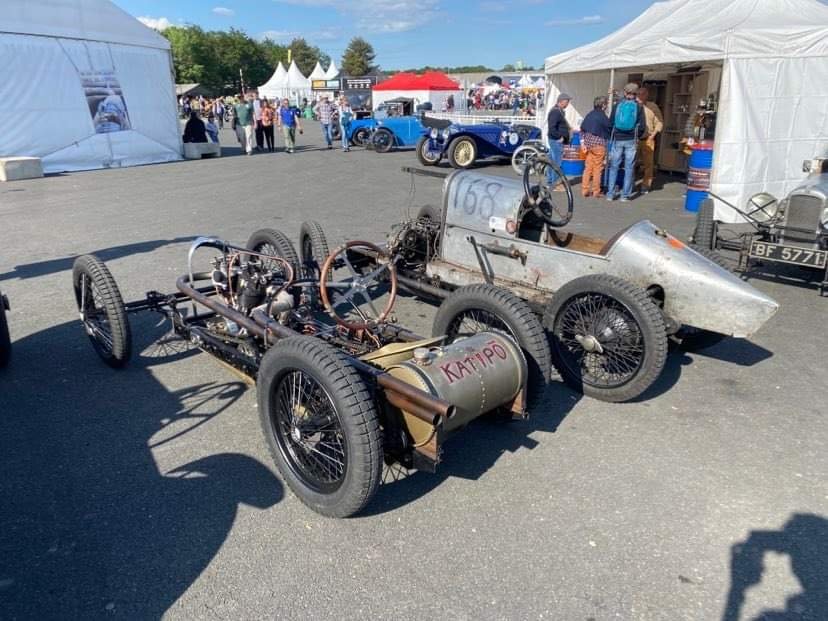
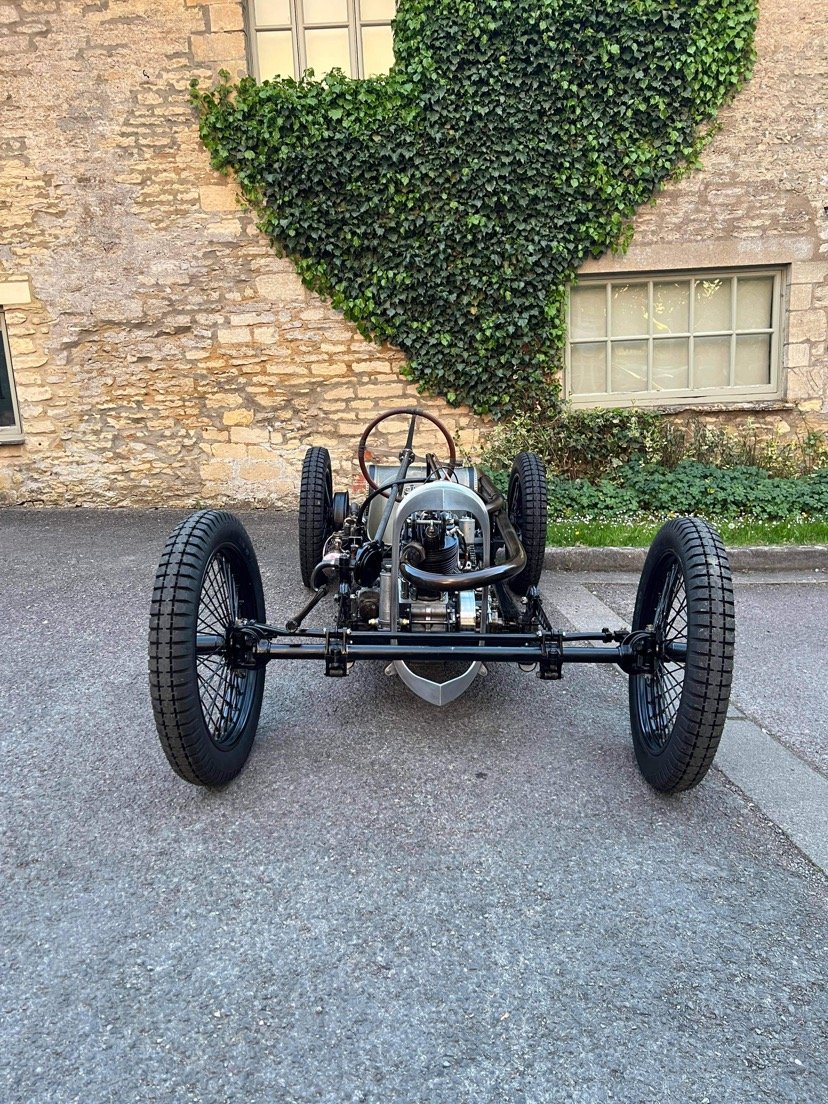
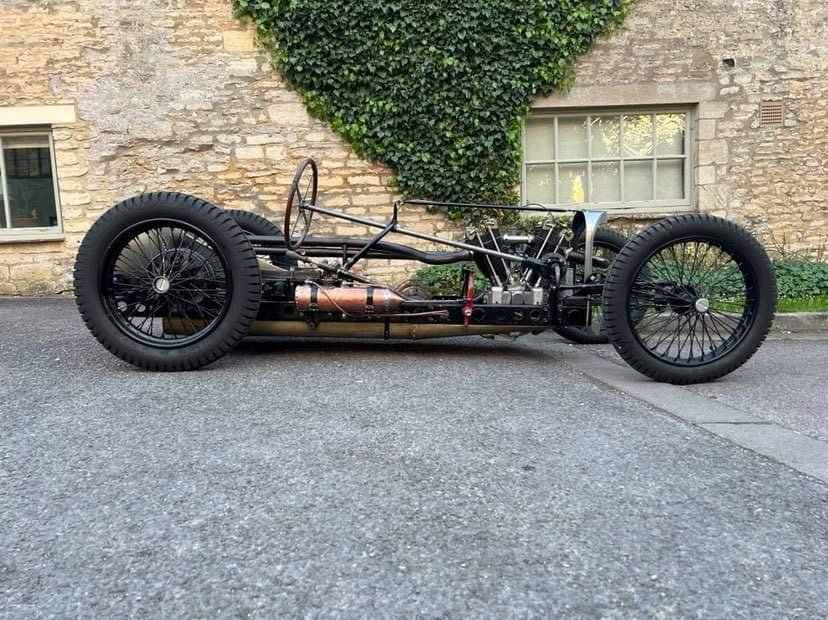
A couple of weeks ago it had its big debut at the the Vintage Revival event at the very historic Monthlery banked circuit in France. A couple of the other GN specials from the U.K. went over, GN Parker, GN thunder bug and the most legendary of them all GN Spider These pics were taken when we had the body off Spider to do some adjustment to the clutch, it shows the standard position of the chains on the axle. Spider was built by a hillclimbing legend called Basil Davenport and held many records in period and would routinely beat far more advanced works cars like the ERAs, Maseratis and Bugatti’s of the time. The engine is a derivative of the lightly tuned 90 degree v twins that the road going GN came out with standard. Constantly developed by Basil turning it into the 1500cc methanol burning chain driven over head camshaft monster that it is now
1 point
-
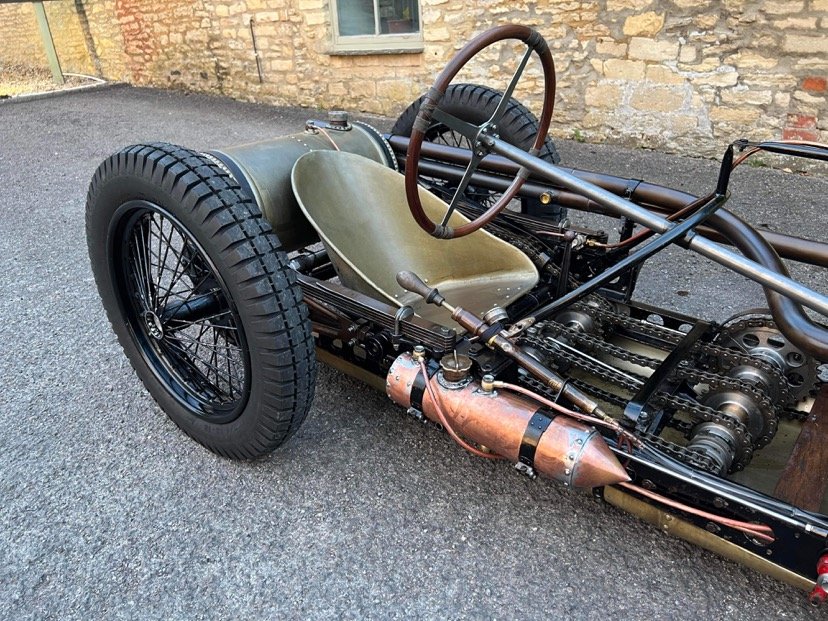
Having now been in the U.K. for 3 years my ideas and inspirations have changed slightly from the wooden chassis cyclecar I had originally intended. I’ve been very lucky to get quite involved in the vintage racing scene over here and have made some very good friends because of it. A GN cycle car was always the dream although with none available in NZ to look at and the closest example being in Aus it was quite hard to fathom coming up with one. Since being over here I’ve managed to collect enough GN parts to put together this which is my take on the Hillclimb special concept of the 20s-30s. Going to all the swap meets in the calendar i managed to get hold of all the other groovy bits and pieces that I needed for the build. The defining feature of a GN is its chain drive transmission and solid back axle. 4 different ratios with dog selection. An incredibly simple but extremely effective system with large scope for easily changing ratios. Normally on a GN these chains are on the back axle but on this car I’ve moved them forwards so they are under your legs, this means you can have a low down far back seating position that you can’t get with the chains on the axle. Of course It needed a name to get the poms scratching their heads....
1 point
-
Ok that's enough, first the range hood, now this, leave some blood in my head ayy.1 point
-
Kicked er in the guts trev
1 point
-
@Vintage Grumble Update, I built a thing
1 point
-
Doesnt look like I've done much but I've got 80% of the wiring sorted Everything I've wired so far works, and makes no smoke or sparks so I'd call that a success. And all the remaining wiring, I have a plan for, and know what goes where
1 point
-
Pretty much on everything that had a side draught , they are the best Check the throttle spindles for wear or you will forever be chasing a random lean condition as air seeps in, otherwise just the old Cork type seals on the choke leak Burlen in the UK sells all the parts for them, and have a lot of info on original set ups and different needles. Costs a bit tho1 point
-
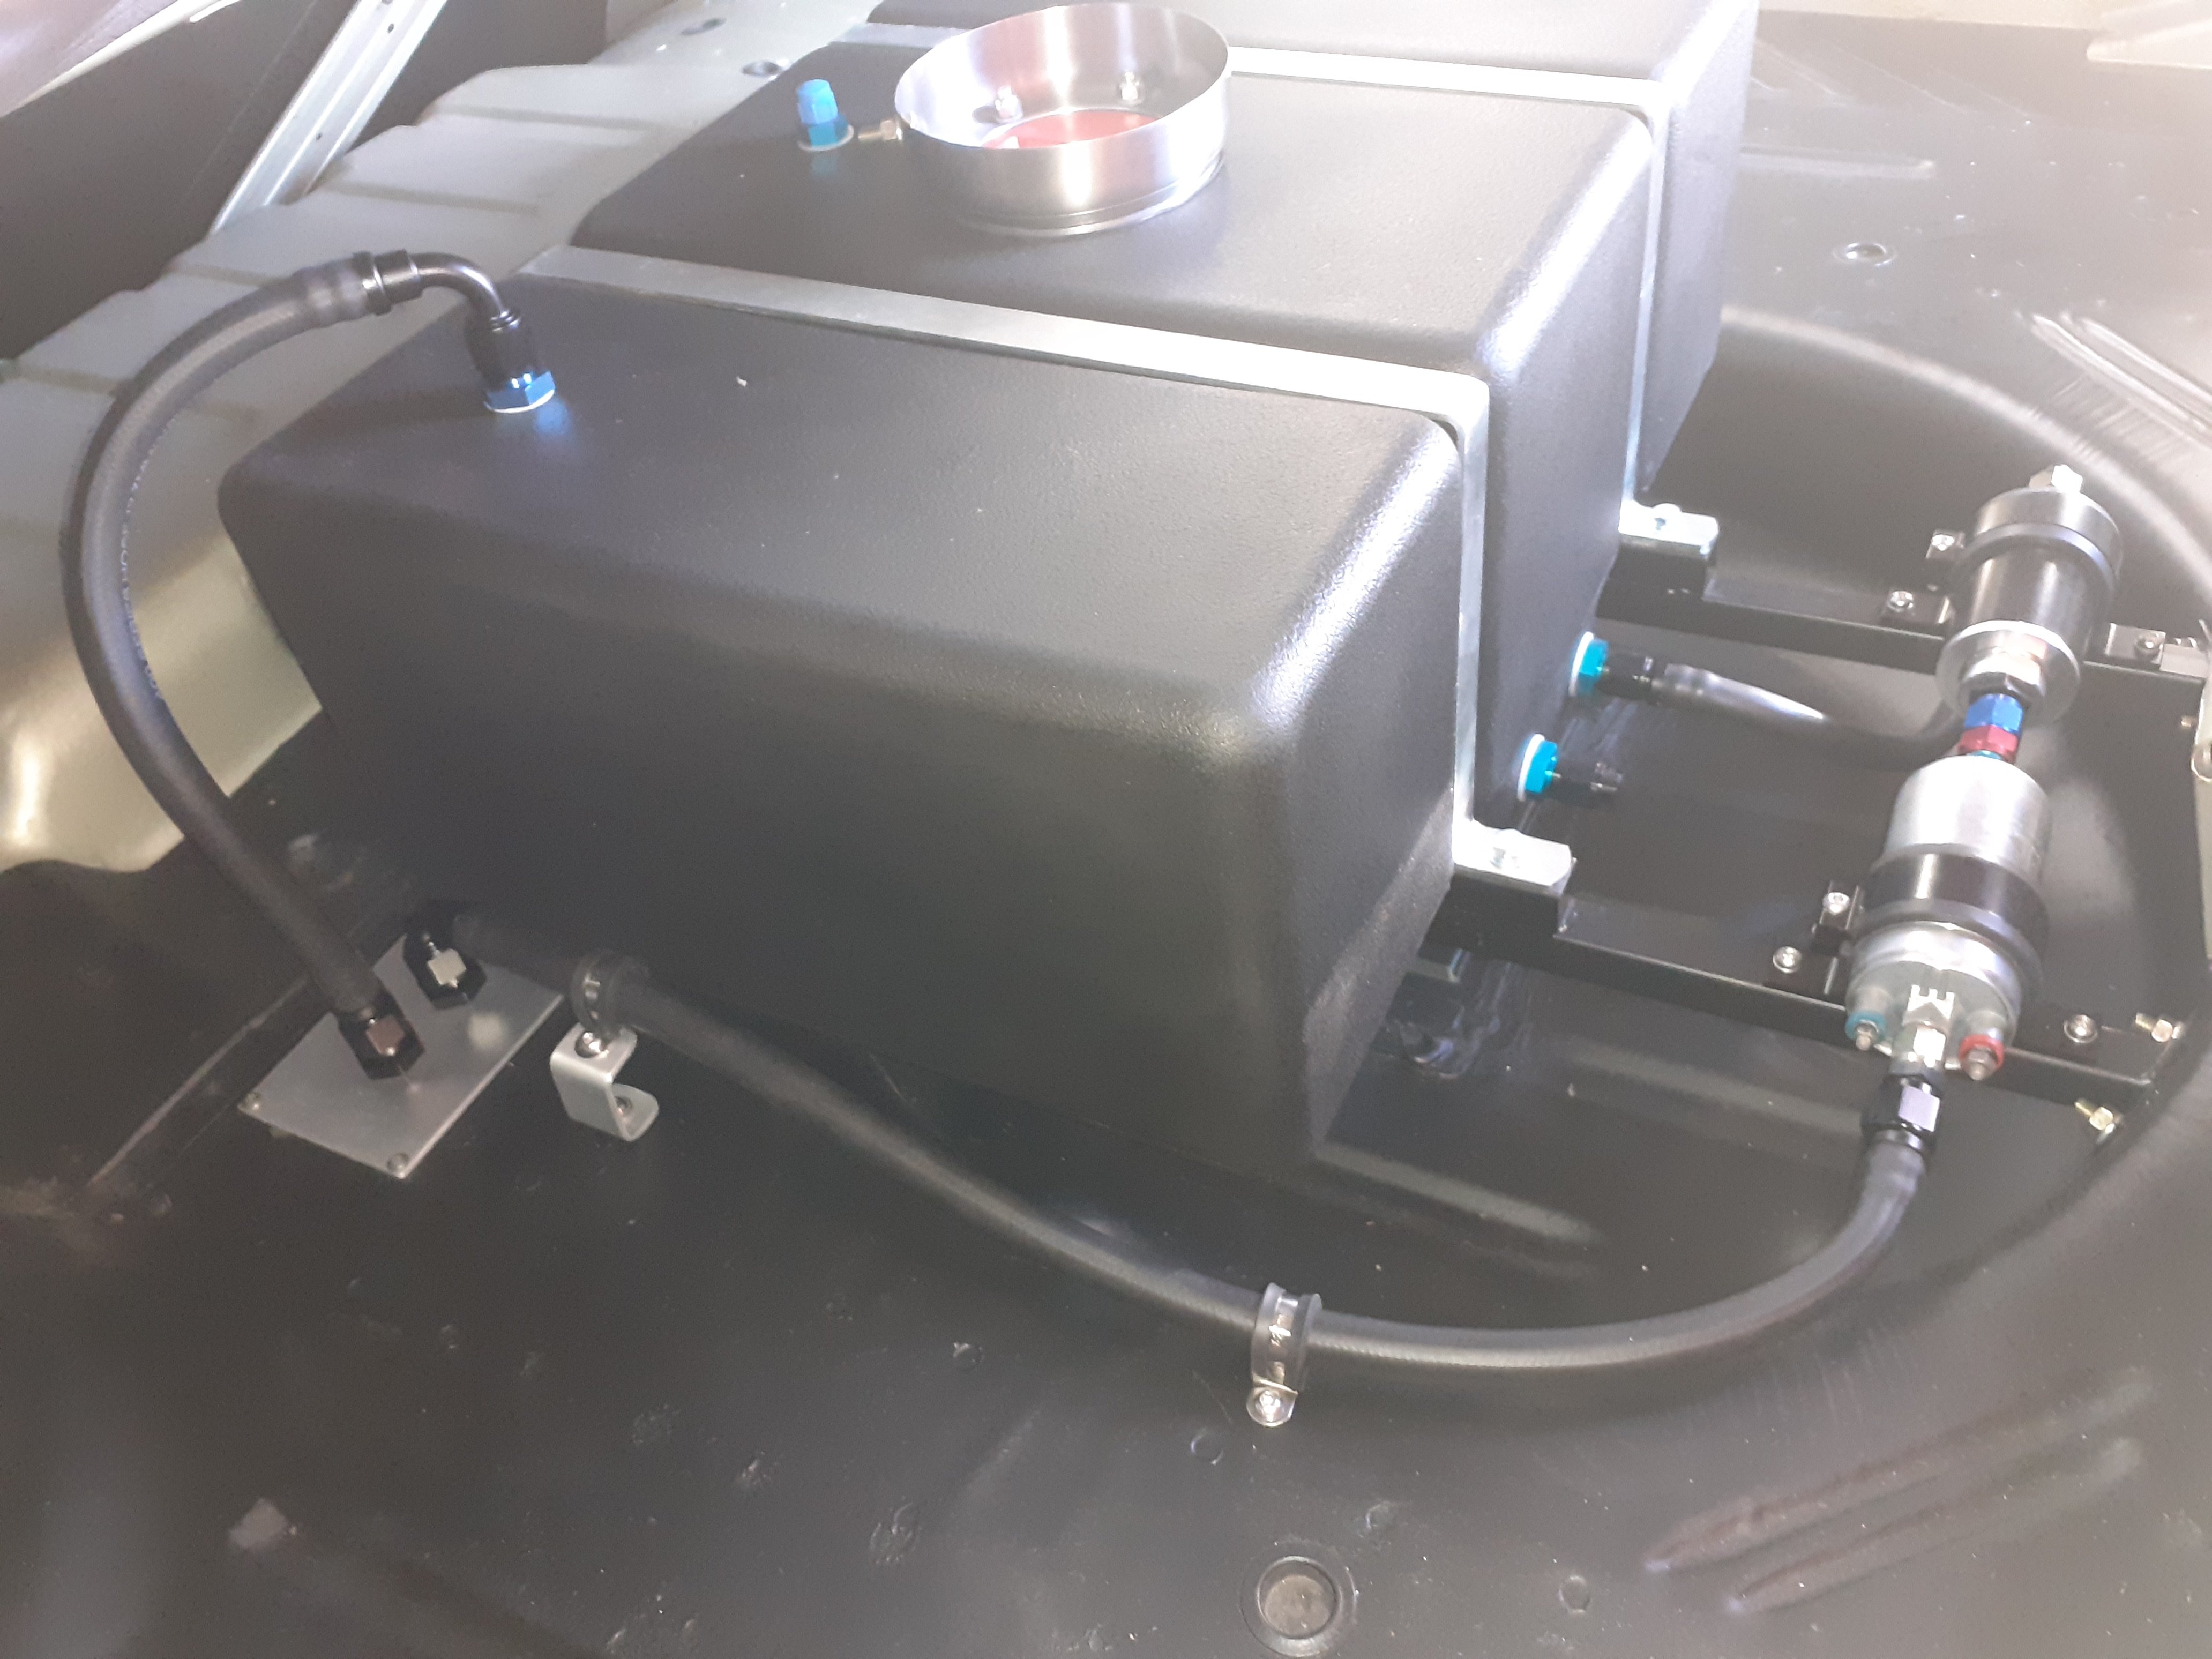
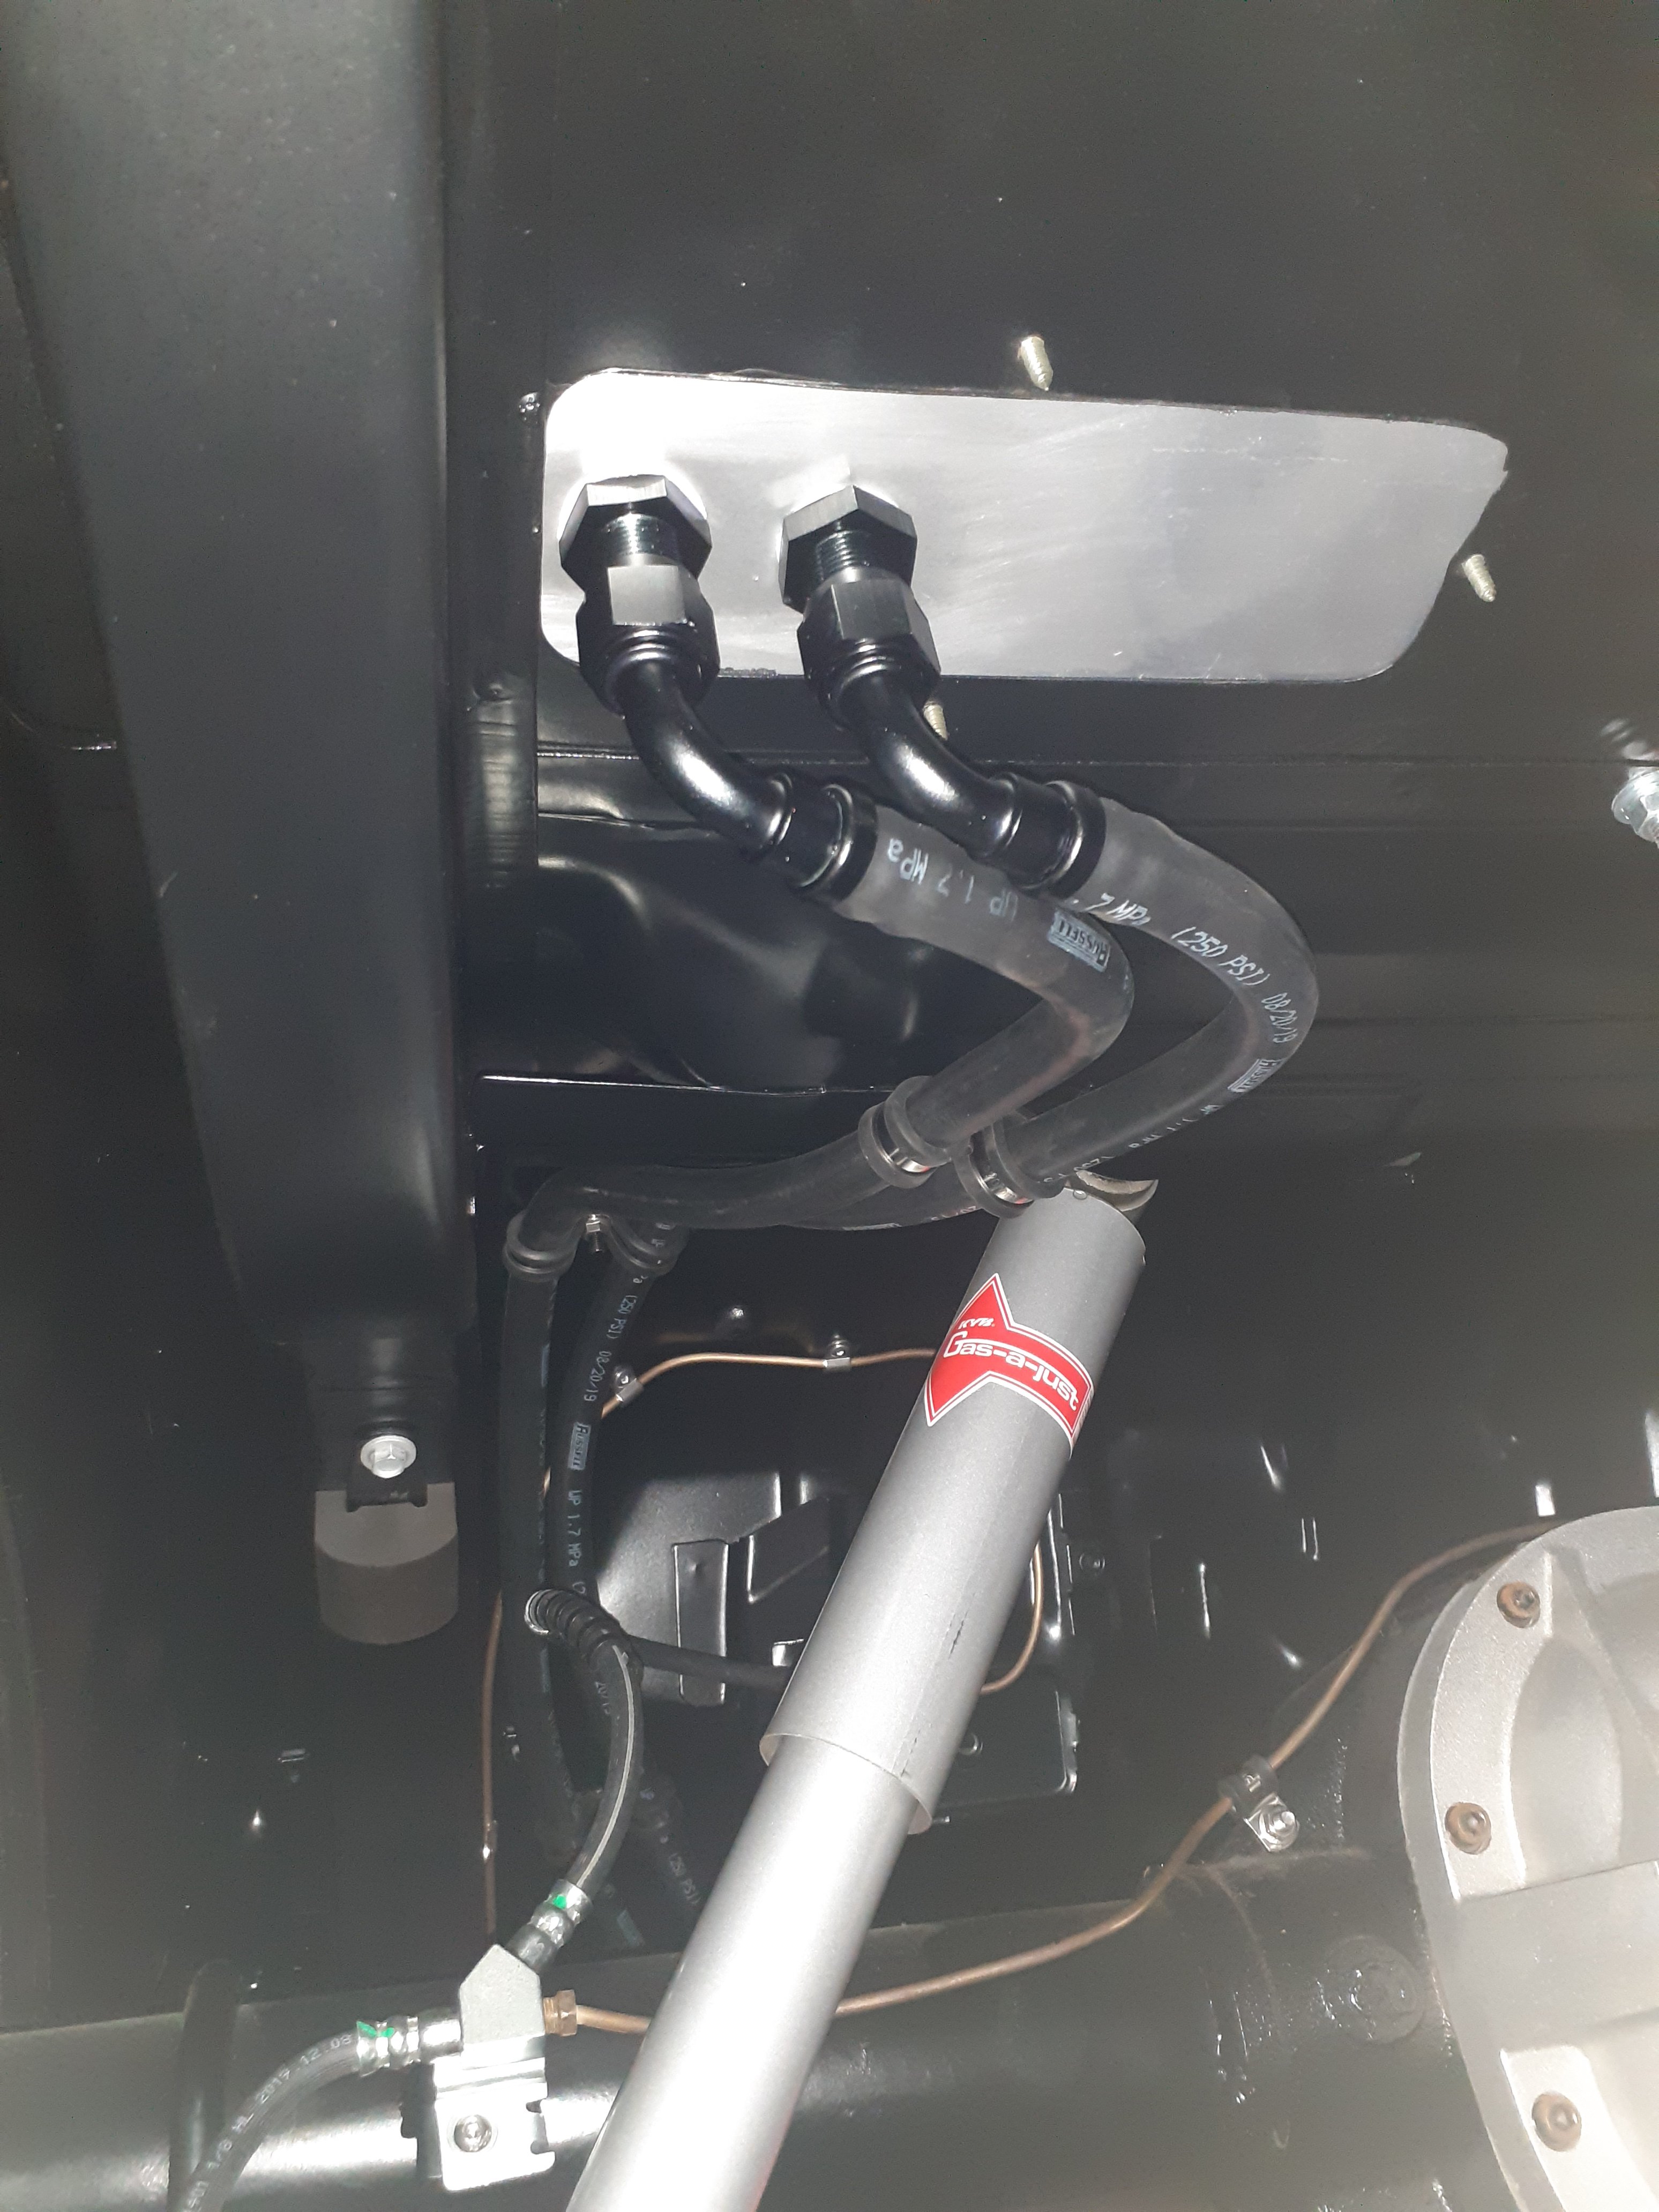
The fuel system was a bit tricky, using a surge tank was the easiest option rather than mucking about putting a pump in the tiny 20-something litre factory tank. The tank had some pretty funky gas in it, so I had to seal it up till I could take it to the radiator shop as it would stink out my Leaf whenever I parked it in the garage. They cleaned it up and chucked in a return line for me I wanted to keep everything stock as far as the fuel pump was concerned so I bought a universal surge tank and chopped up the bike pump hanger until it fit. This had to go into... ...this. Please excuse my temporary shelf rail brackets and $6 lift pump, they helped me work out the fuel hose route, I'll have to swap them out for nicer ones later.1 point
-
I got distracted with engine stuff. Pulling apart the sweet 3 cyl 2 stroke engine I found a blown bigend. I still intend on rebuilding it but after reading some cool builds on the net I bought one of these to go in first.1 point
-
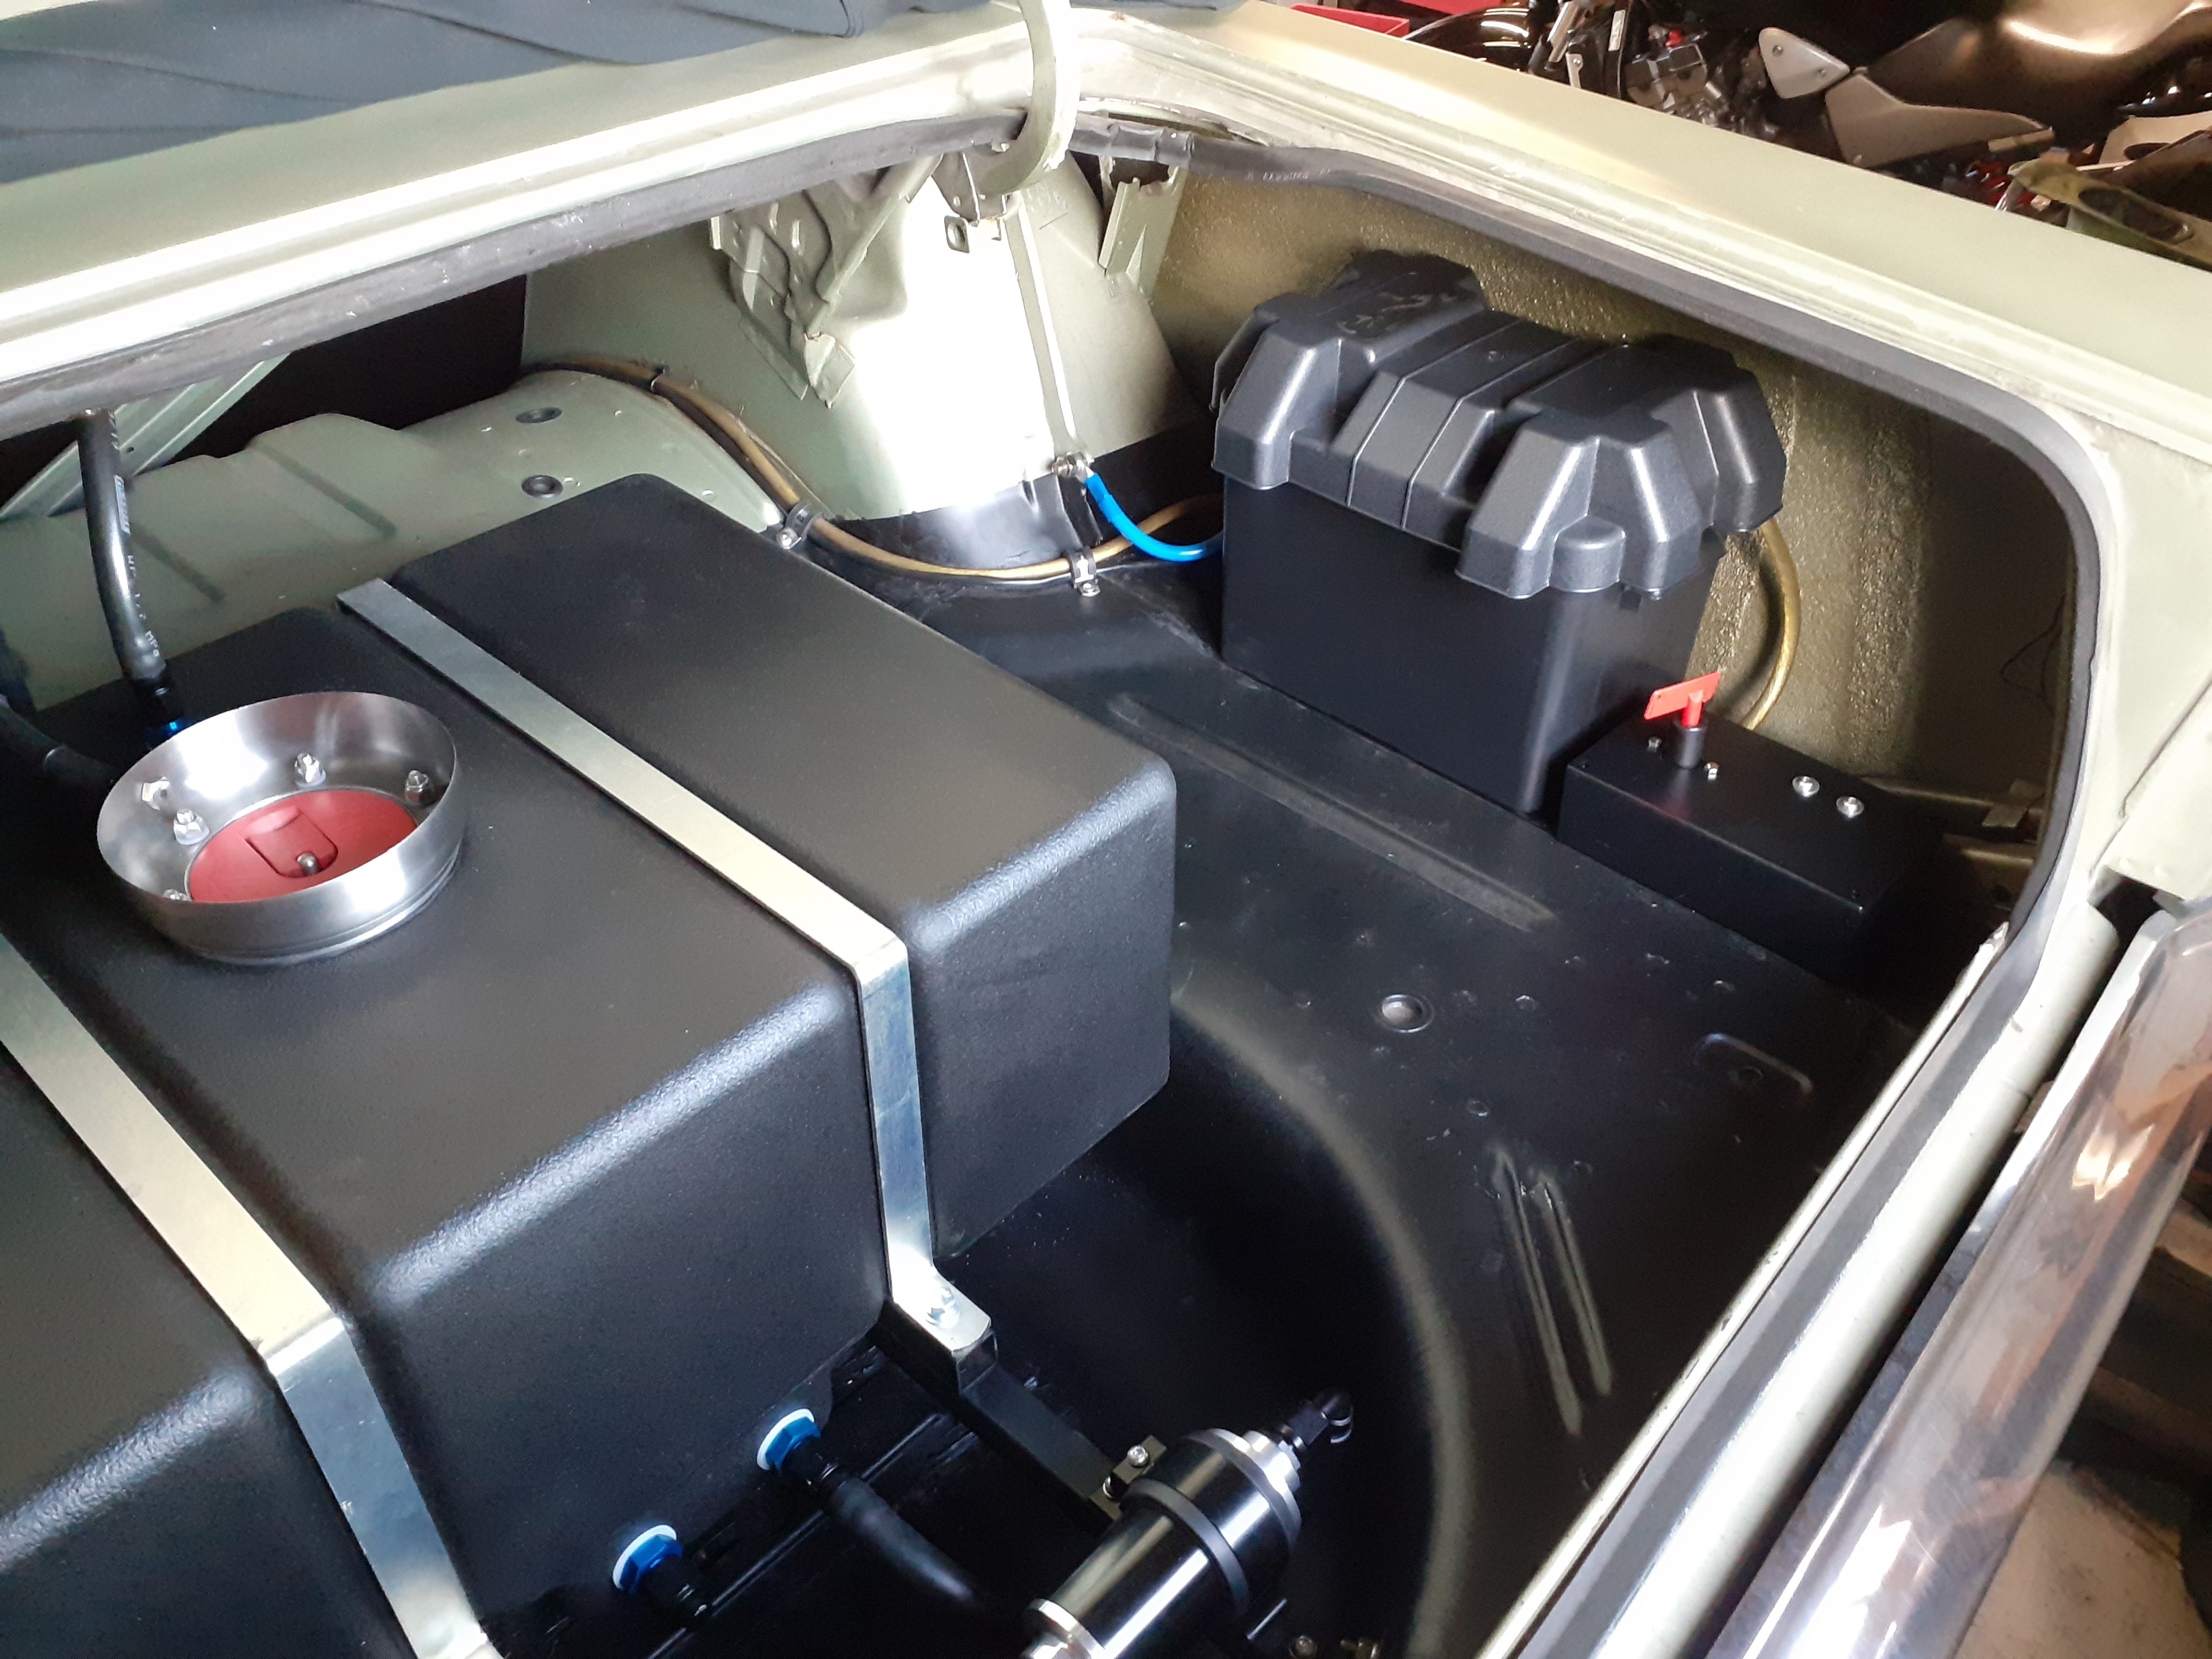
Battery mounted in a box, battery switch and fuel pump relay mounted inside an insulated box, main power wire to starter done, fuel pump wired up
1 point
-
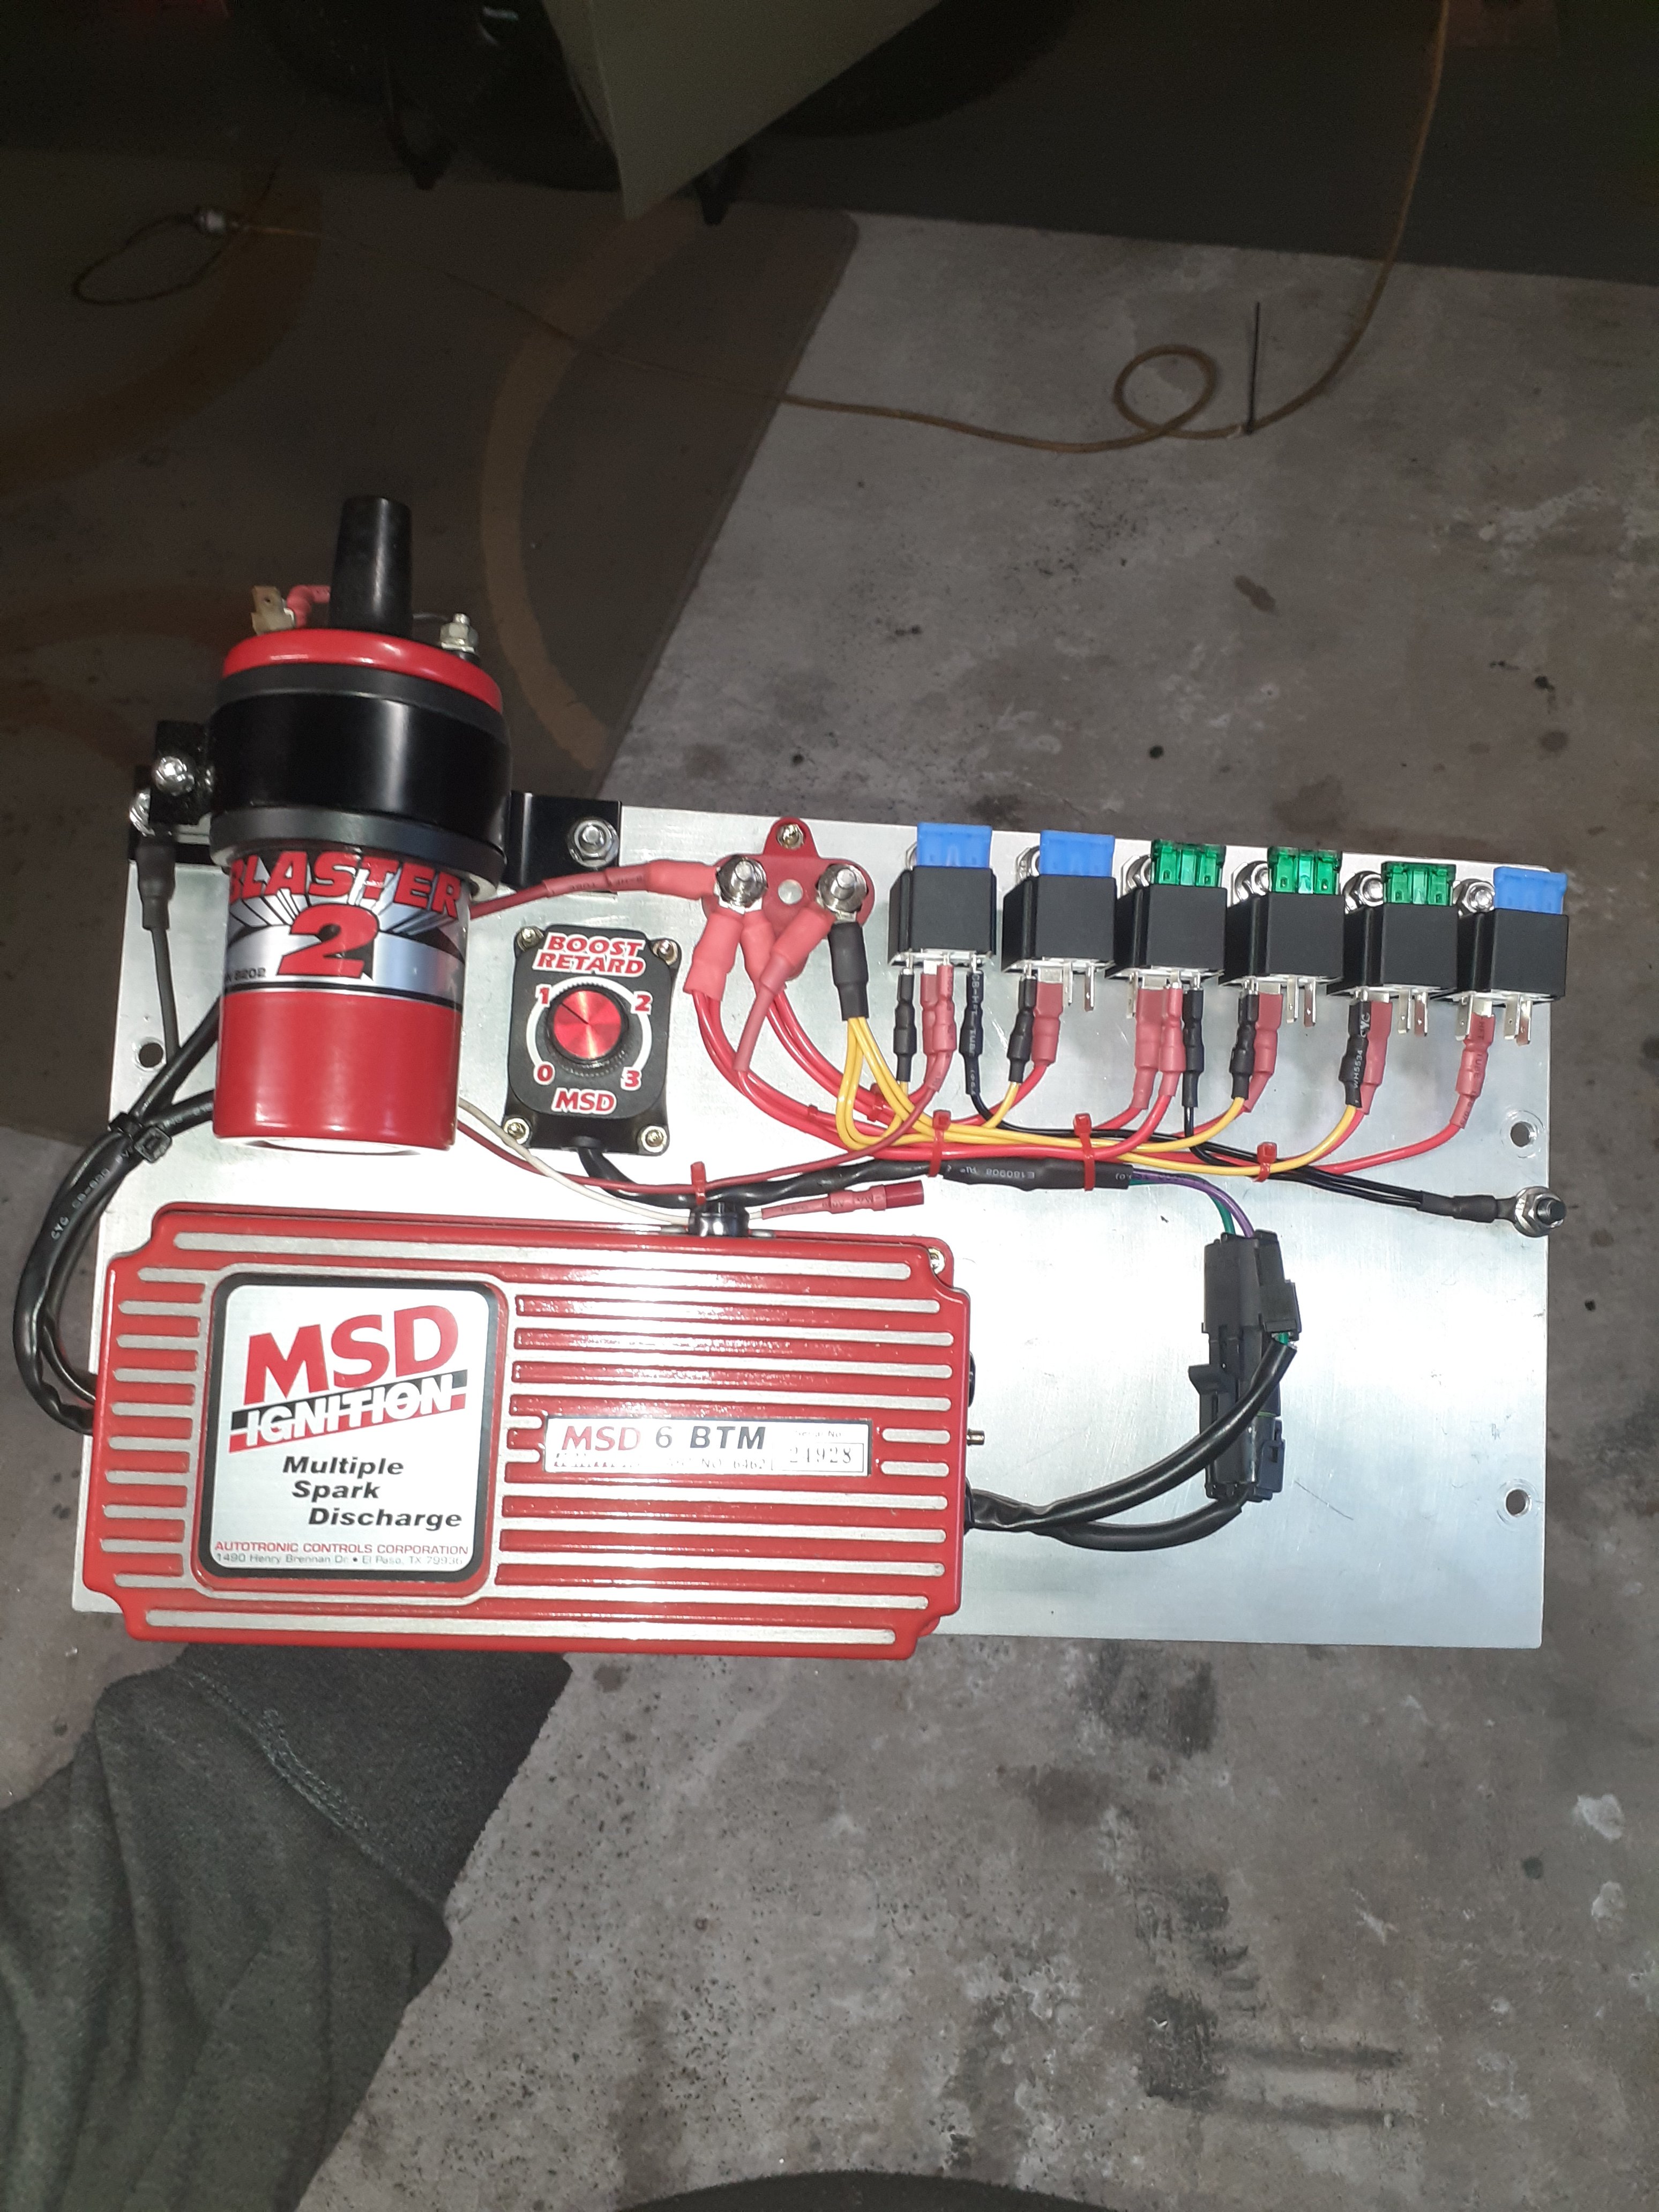
Relays done and half the wiring to them sorted
1 point
-
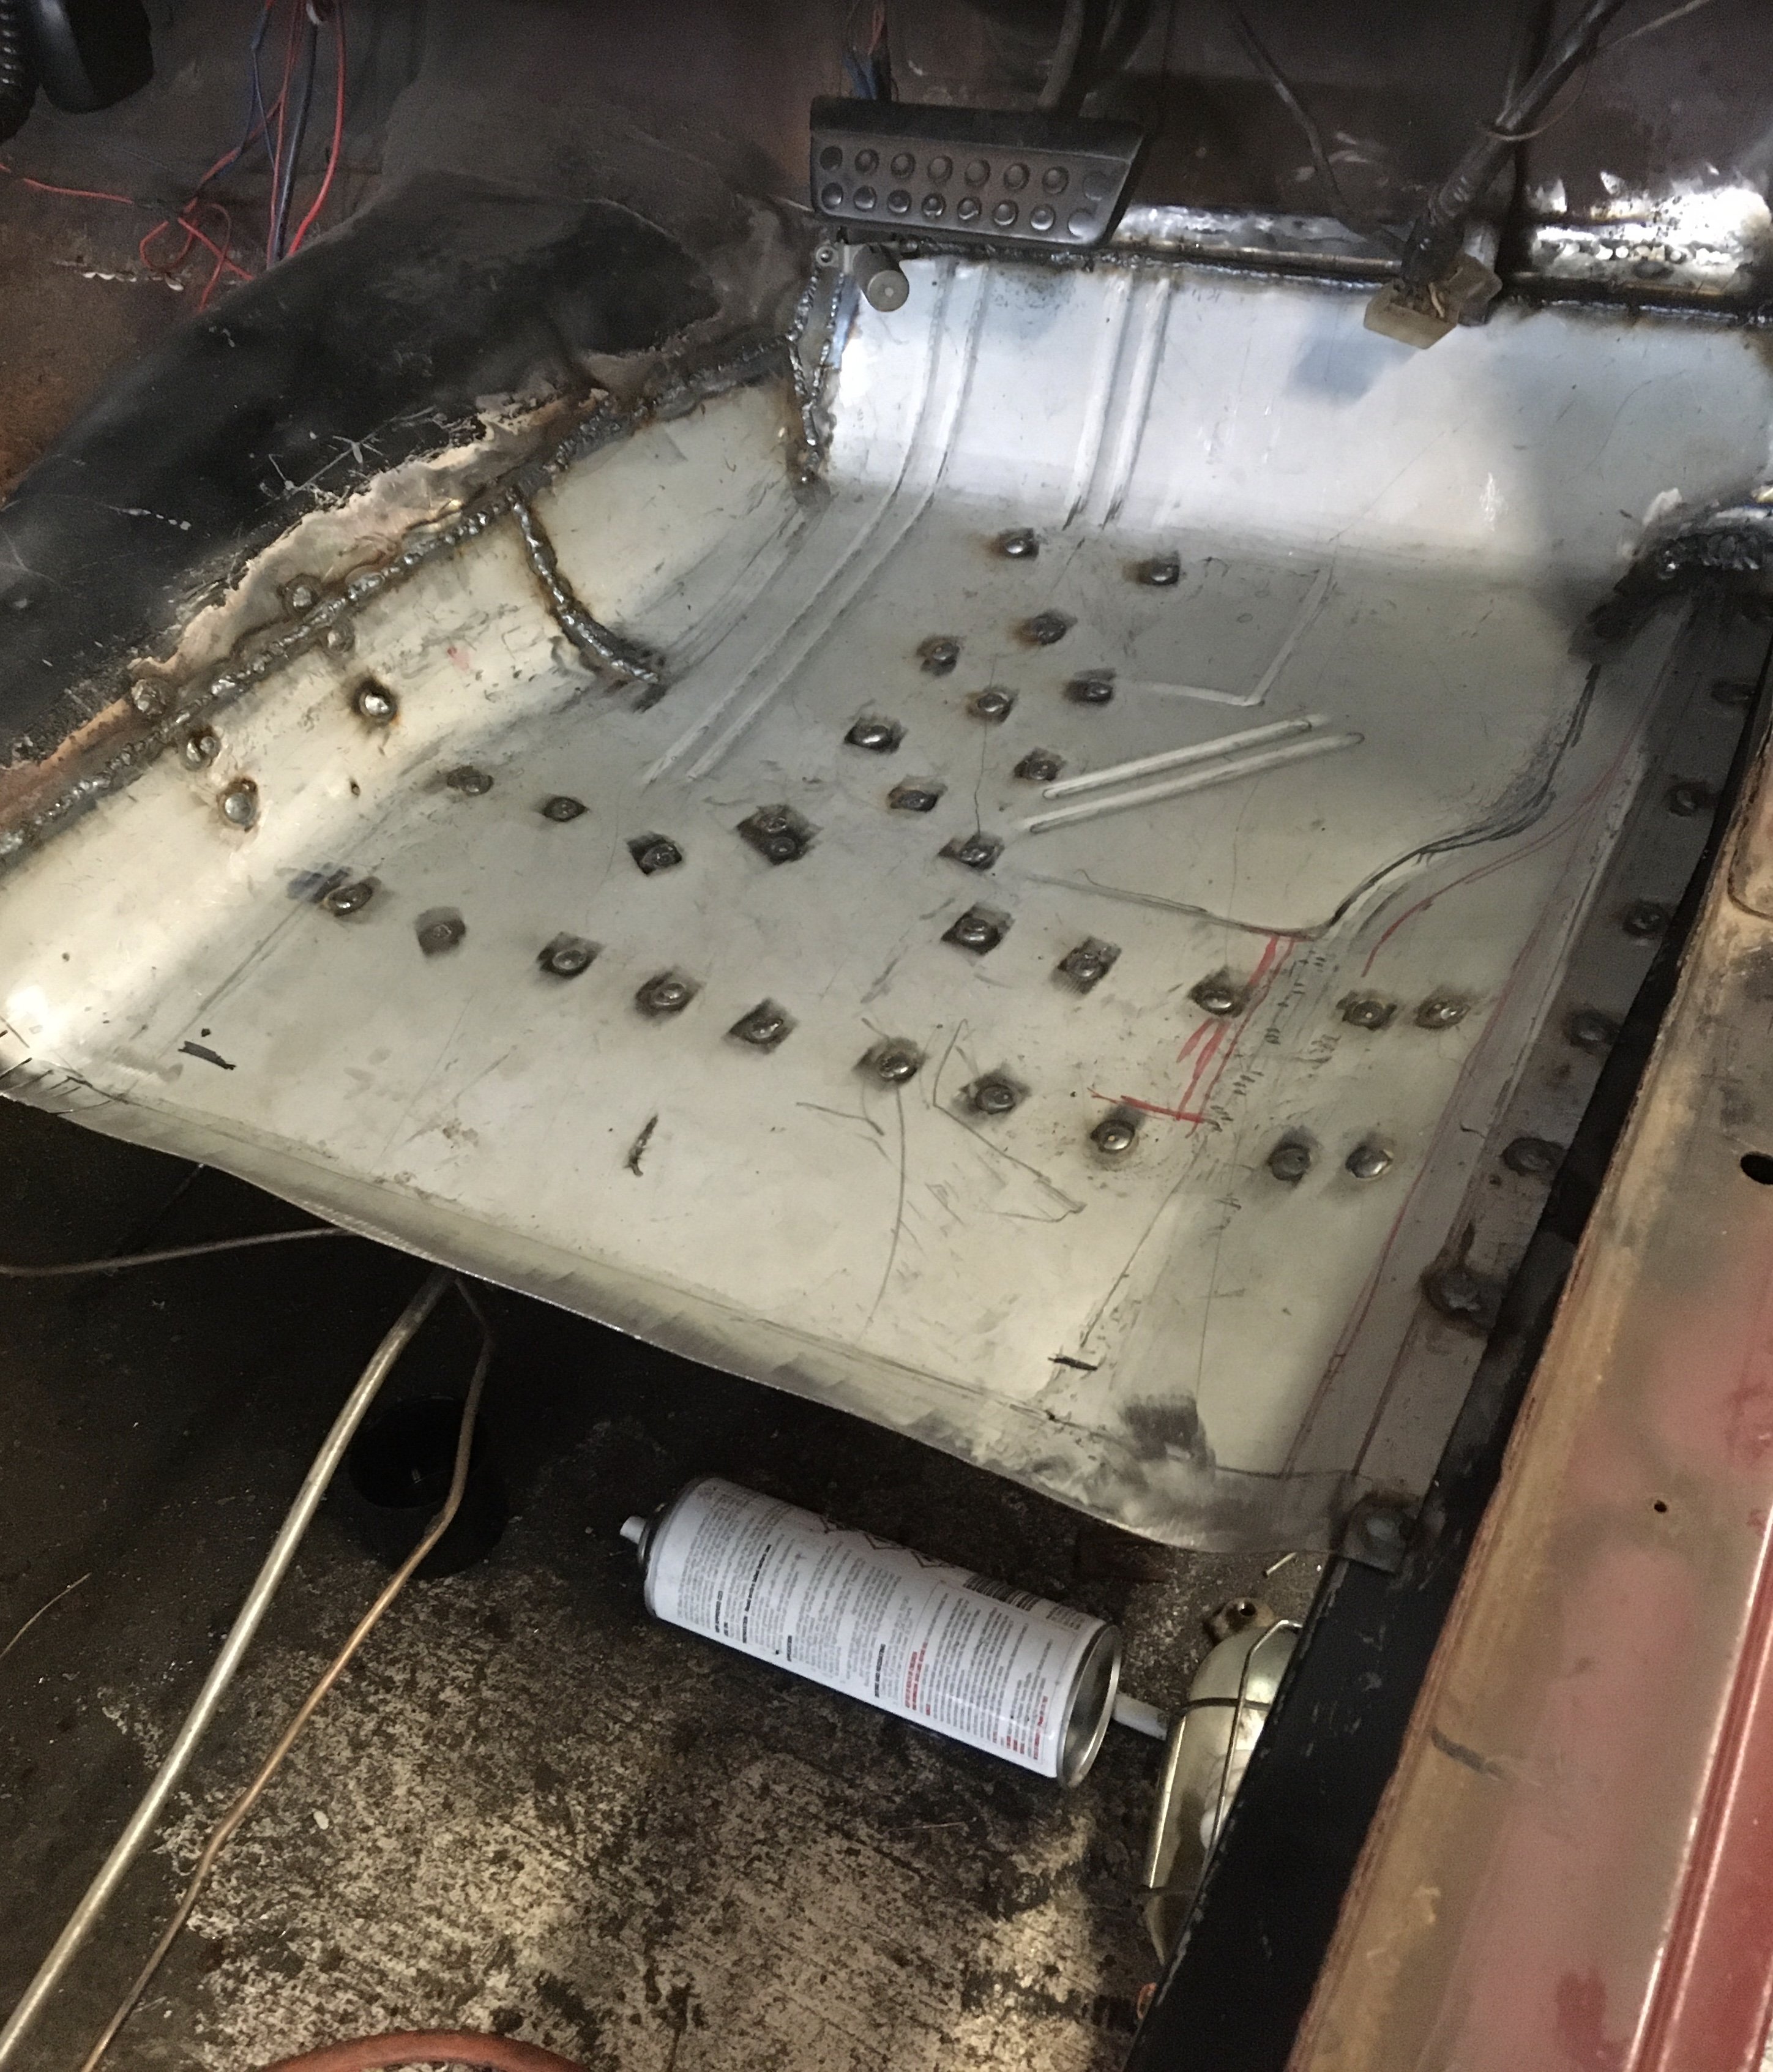
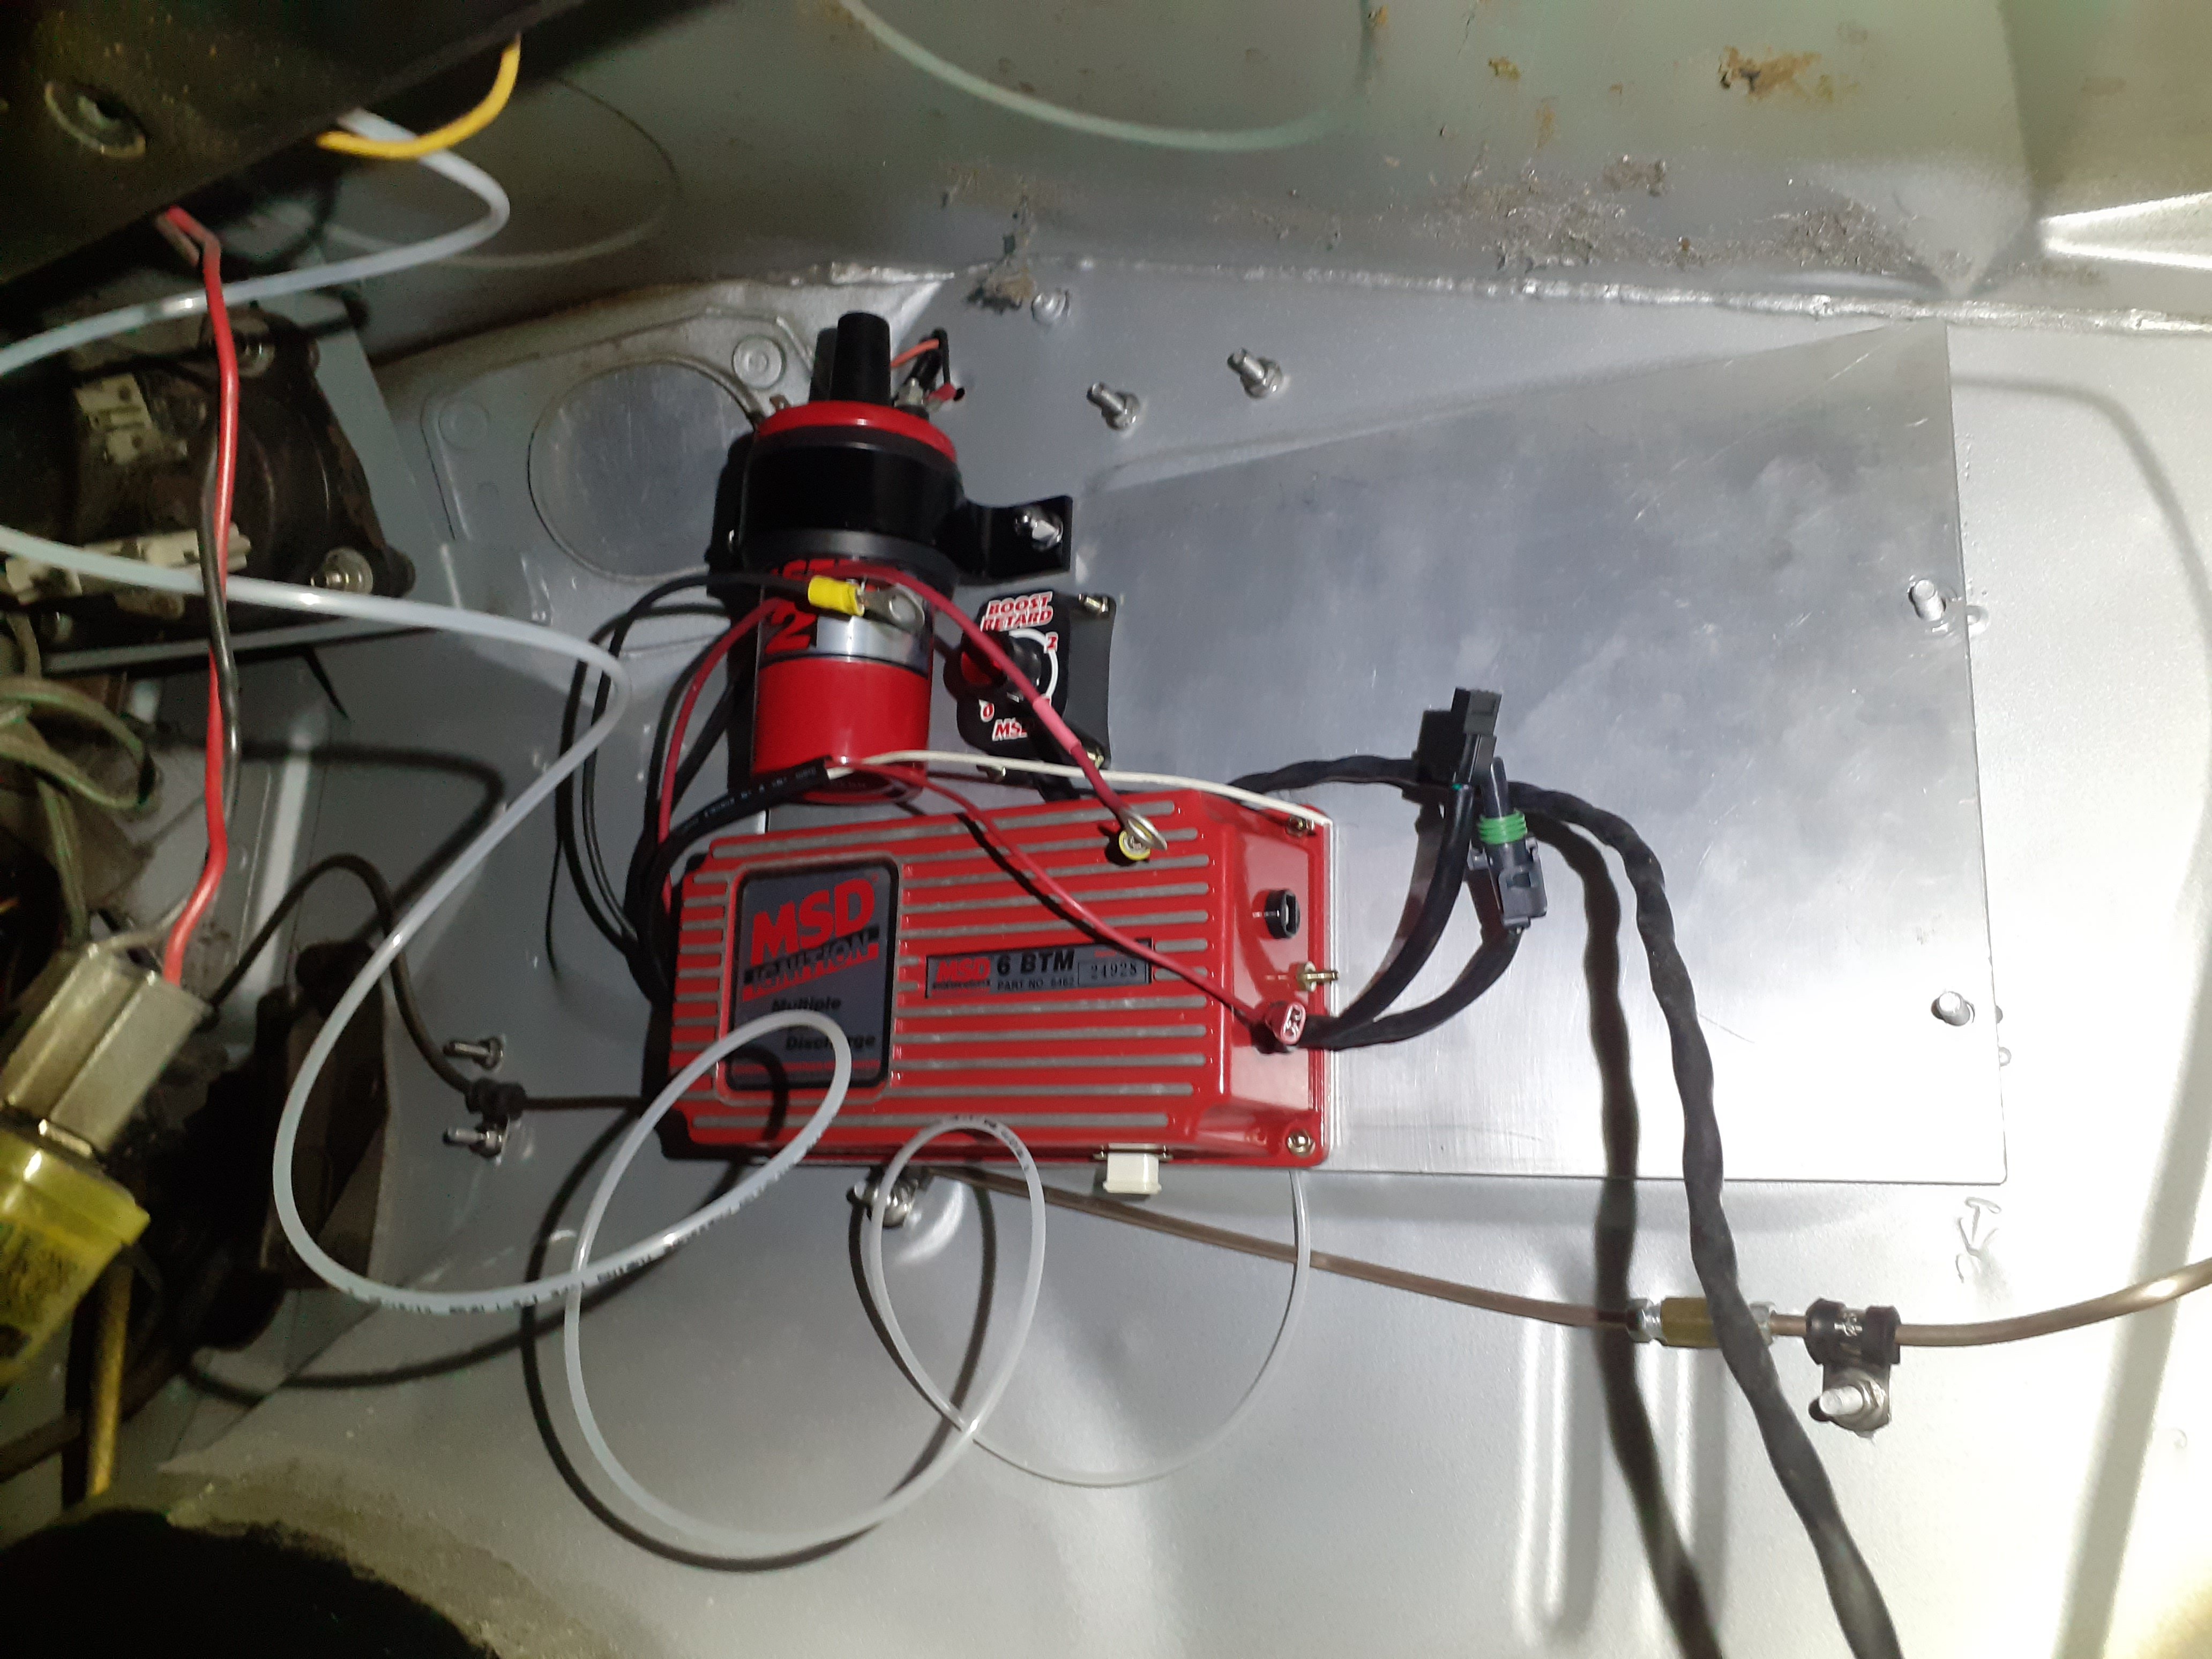
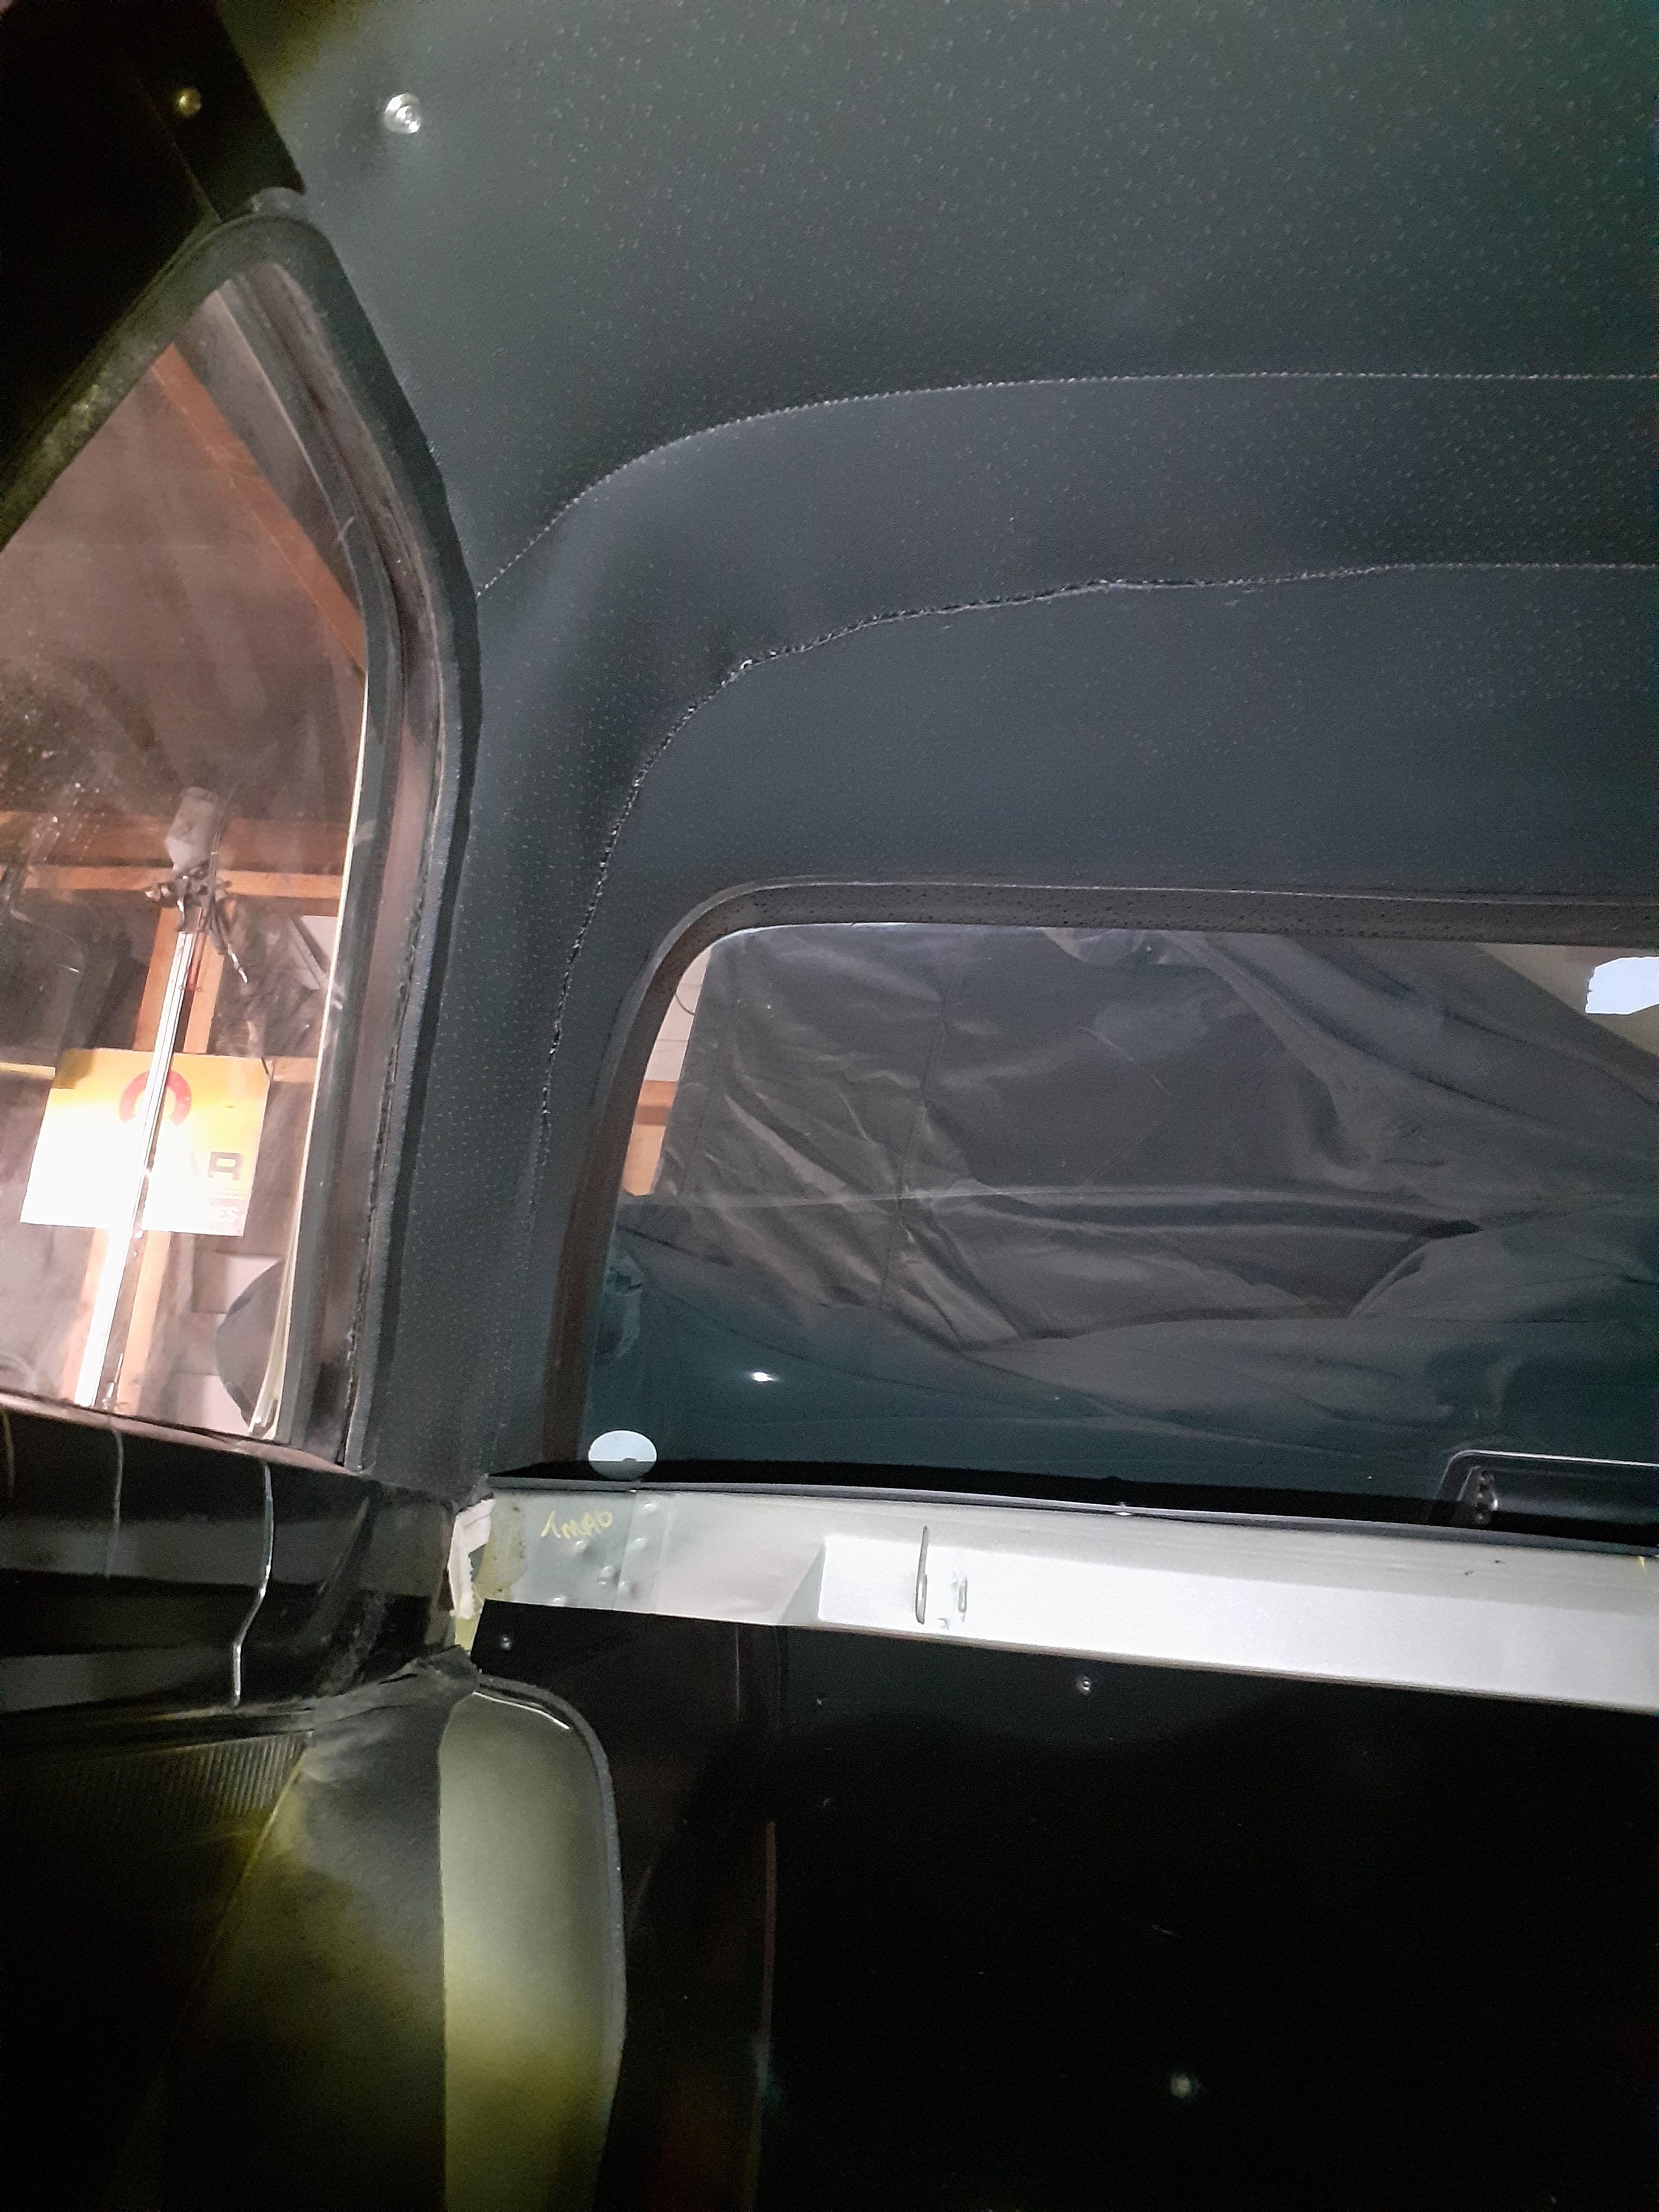
Made a start on some wiring stuff. I welded some bolts to the inside of the firewall before it was painted and made an aluminum panel that bolts on. Then I can mount all the electrical stuff , relays etc to the panel Painted the floor, I might put some dynamat or something on it. Not sure yet. Ran a cable for the battery to check length and I'll put a 5 core wire front to back for things like fuel pump , alternator wire and potential other things later And Mrs cletus fixed the hoodlining that autoblast managed to rip. Its not great but it will get a new one someday so will do for now
1 point
-
1 point
-
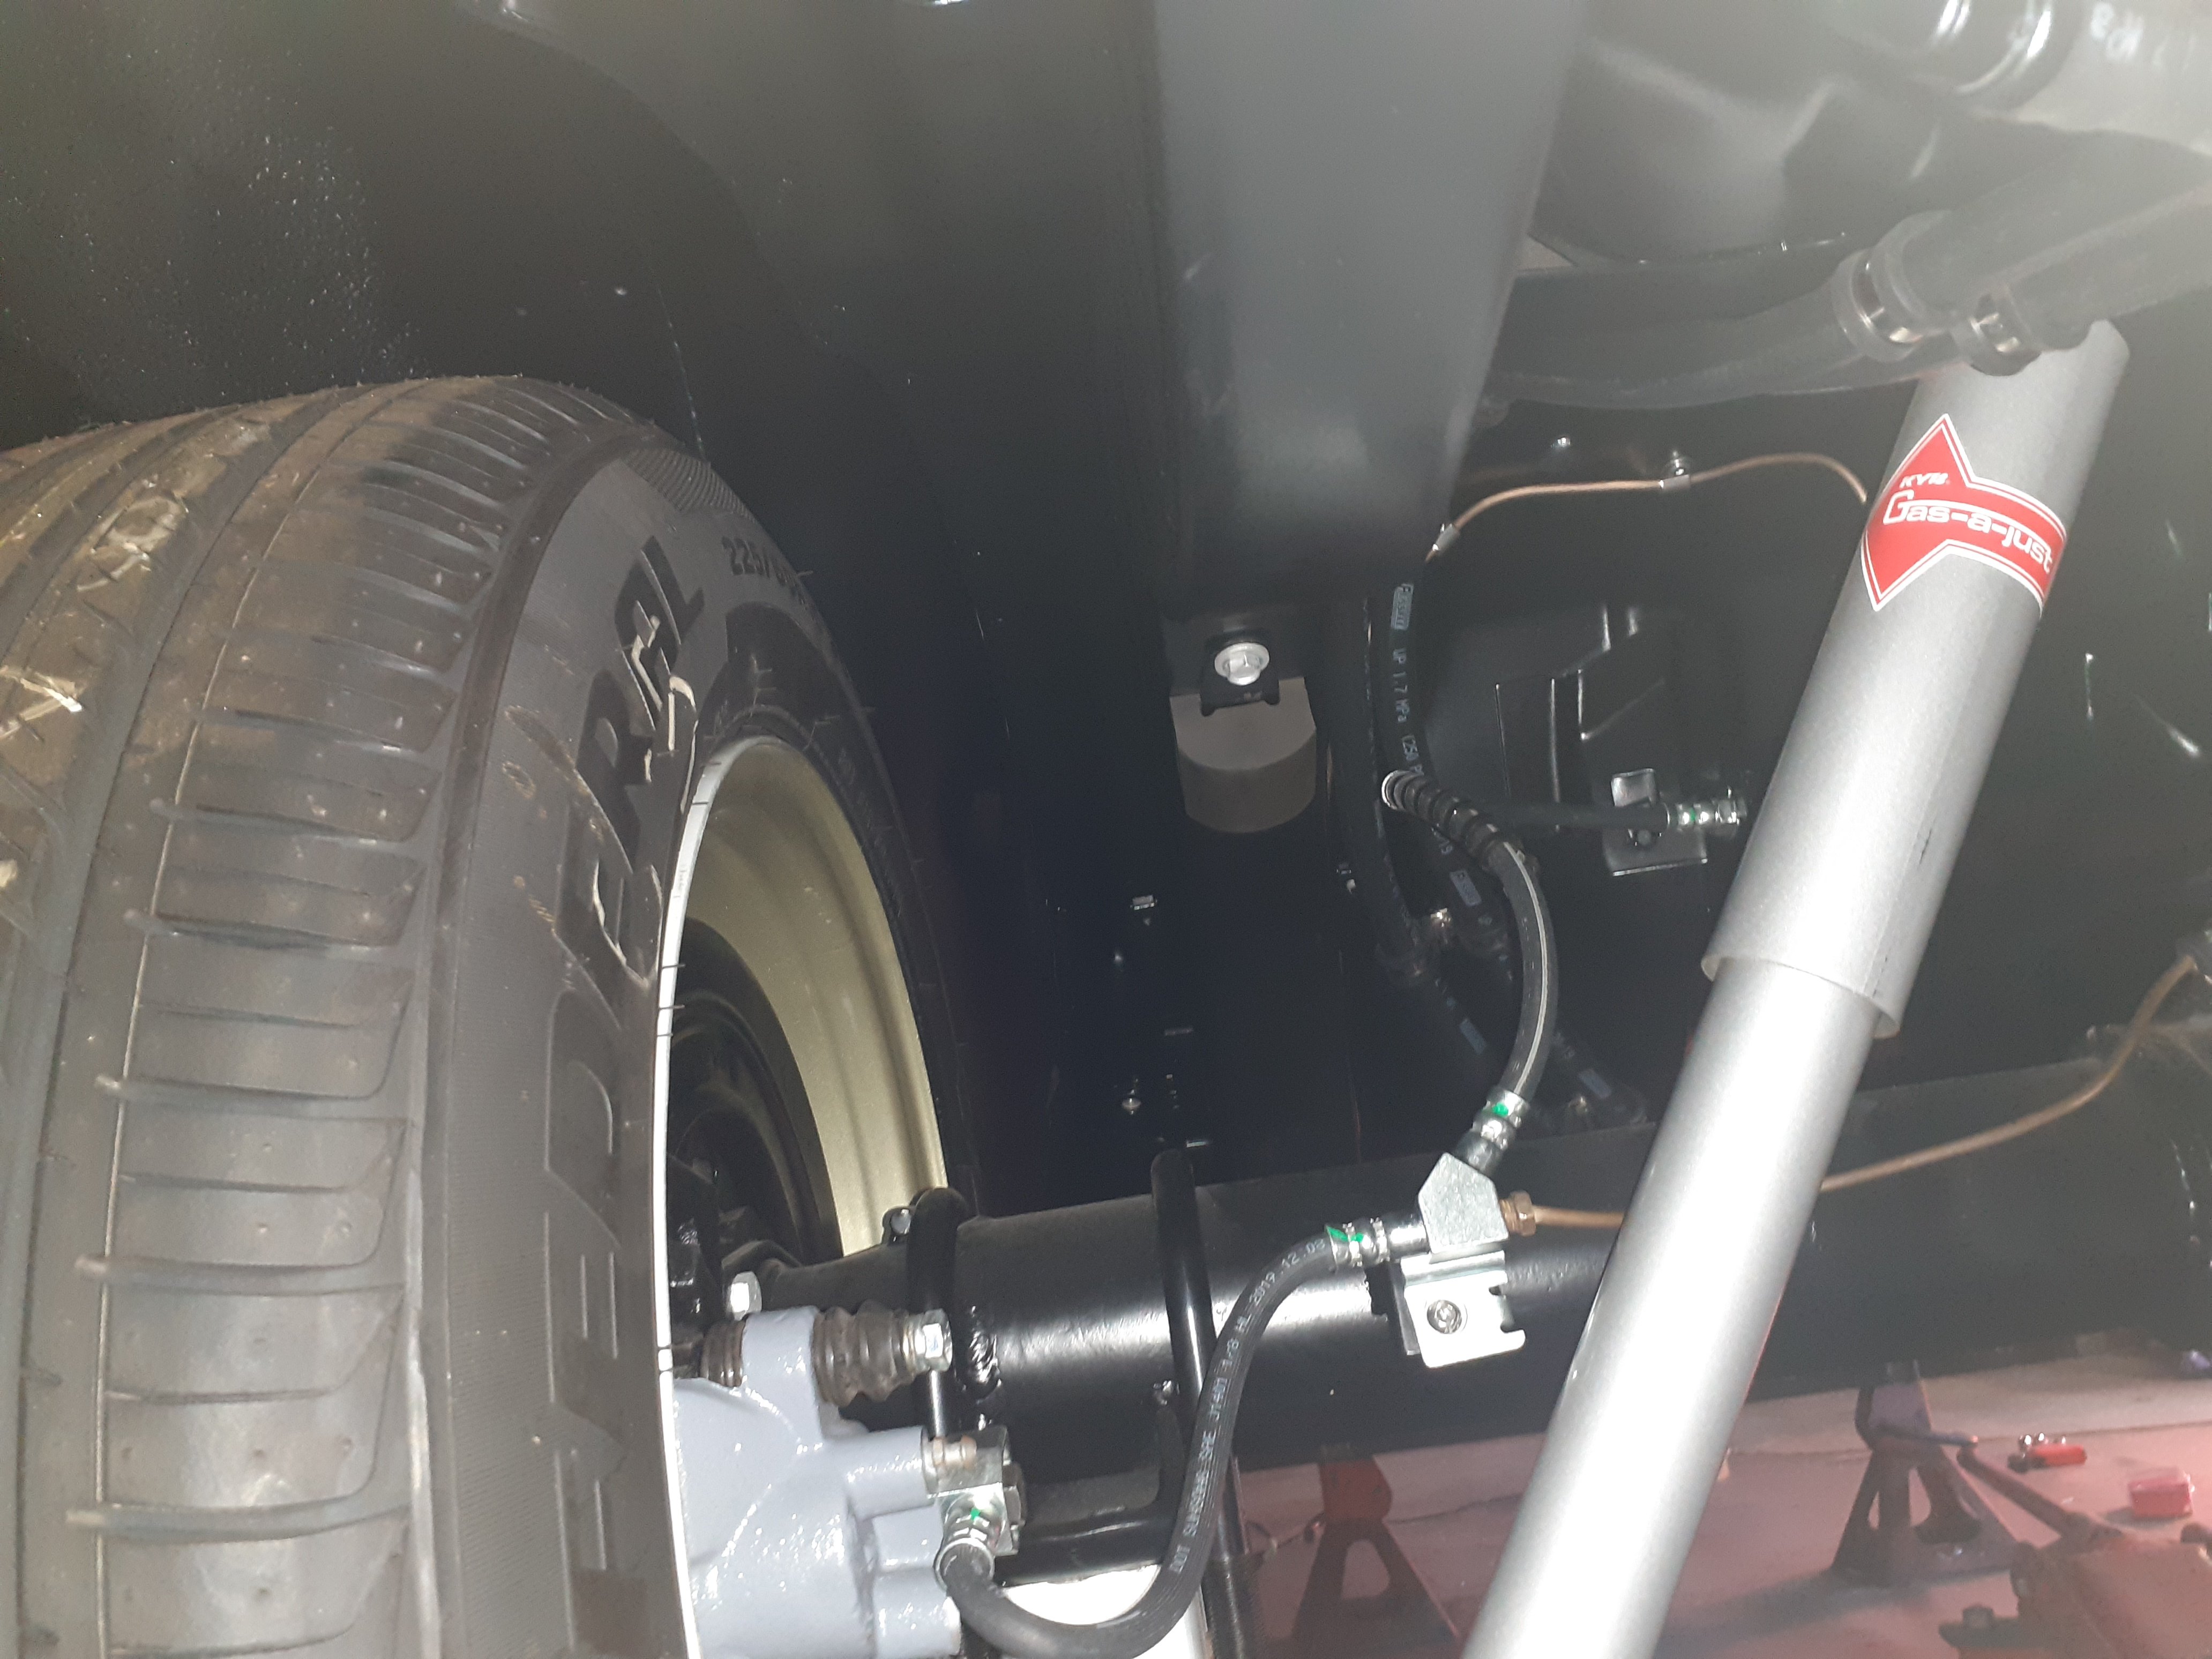
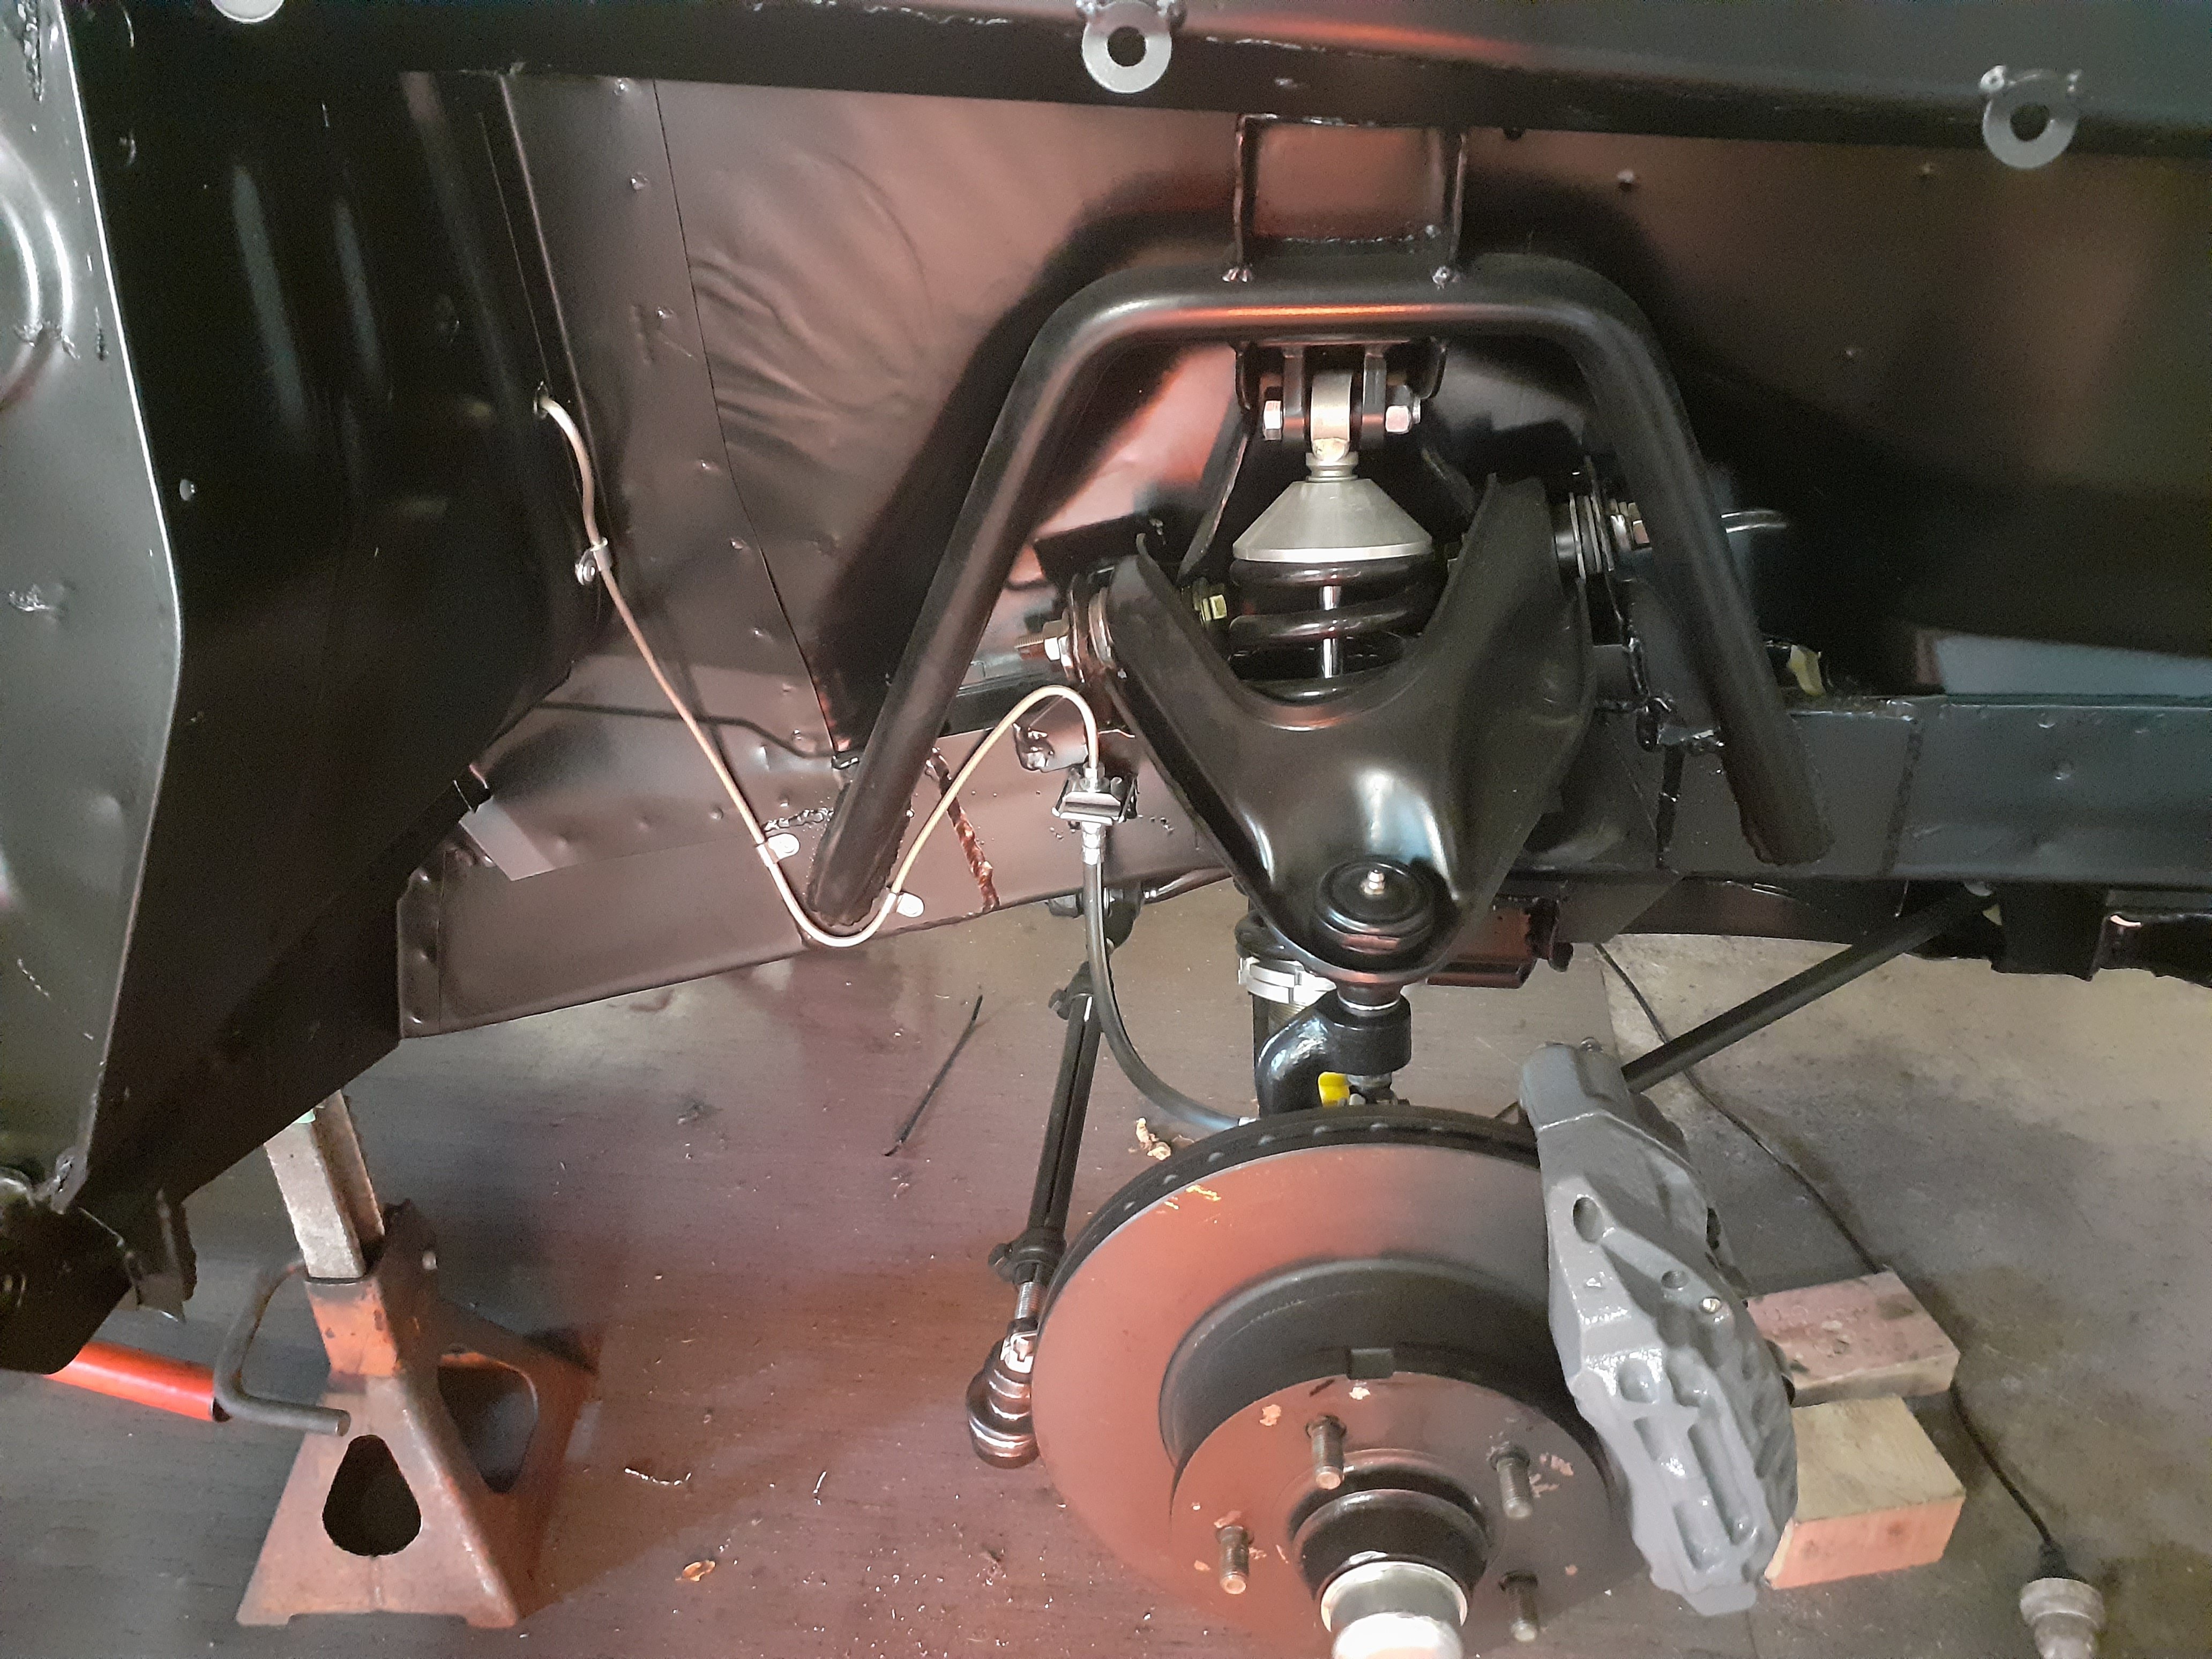
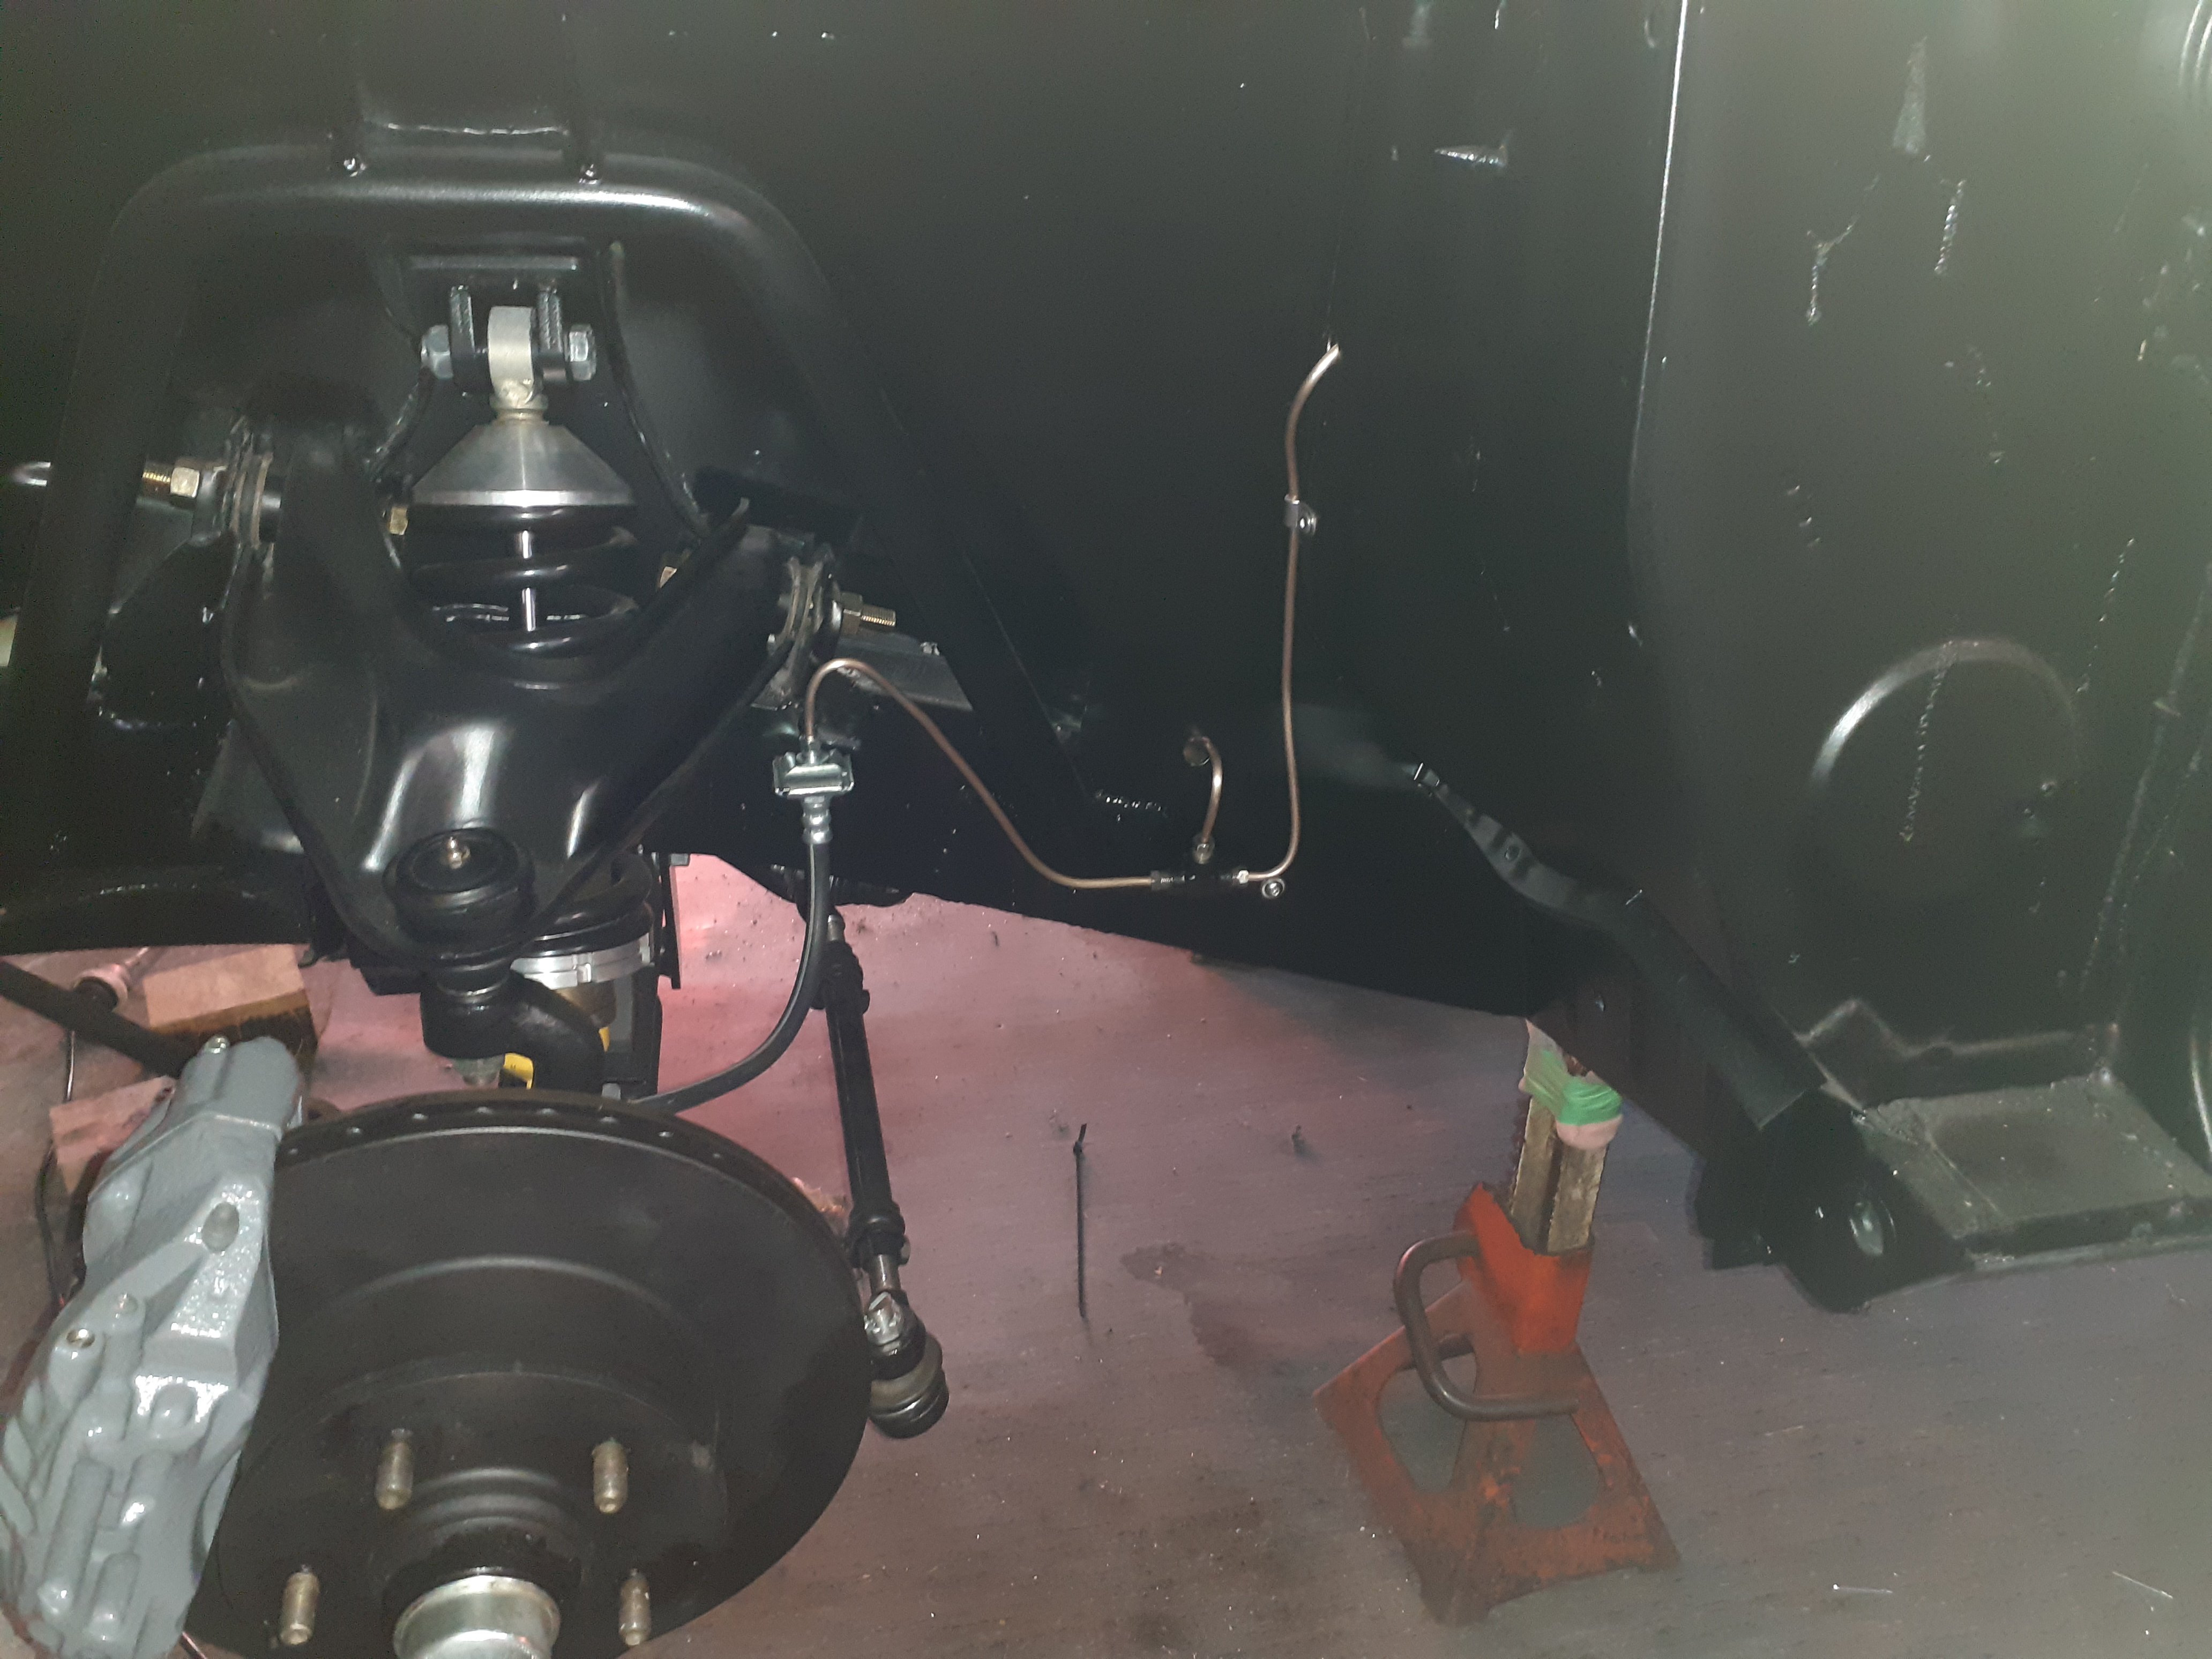
Fuel hoses done, apart from a breather I borrowed a far superior brake pipe flaring tool from @RX FORD which made life a lot easier, and got all the brake pipes done. I'll get some brake fluid tomorrow and fingers crossed no leaks I wanted to keep the pipes as hidden as possible so are routed a bit different to original, the rf one goes across the firewall above the carpet on the inside of the car, to keep it from being cooked by exhaust. I'd welded some 6mm bolts on before it got painted to mount the pipe to
1 point
-
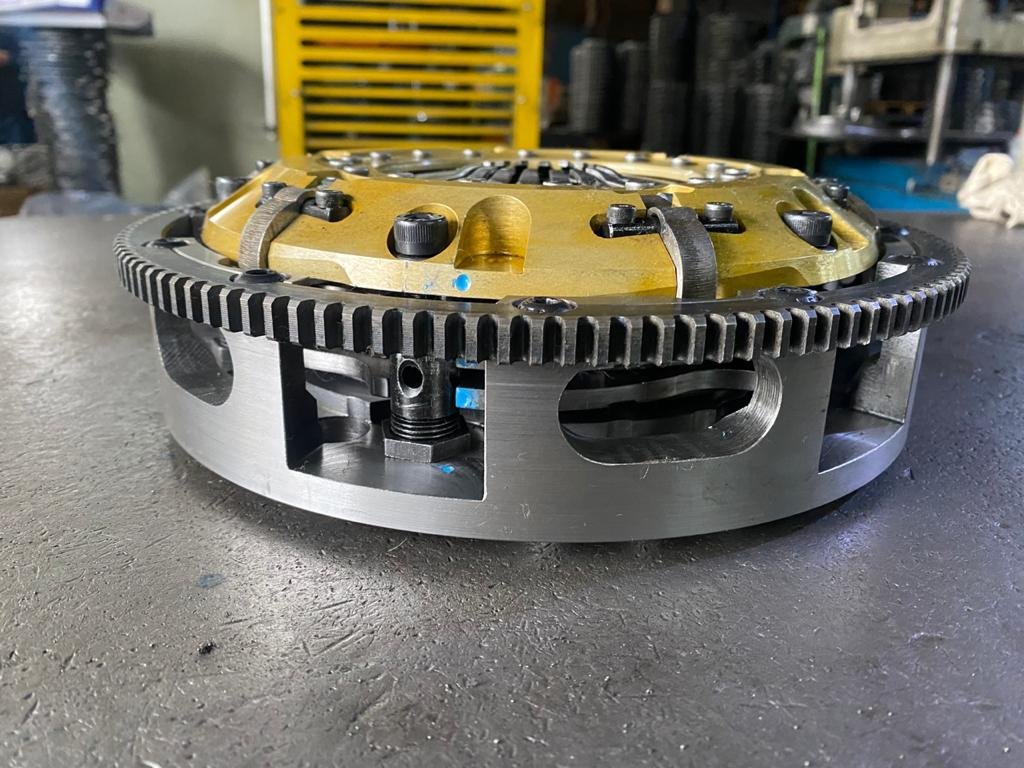
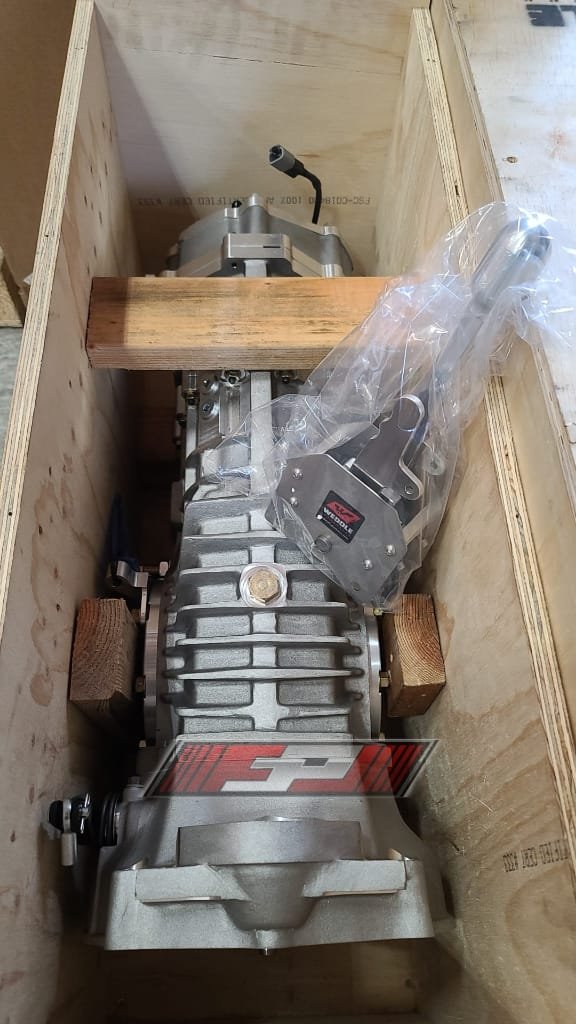
Clutch and gearbox porn... Weddle MD5S 5 speed sequential, triple plate clutch. My kids are going to inherit so many shiny parts, bless them...
1 point
-
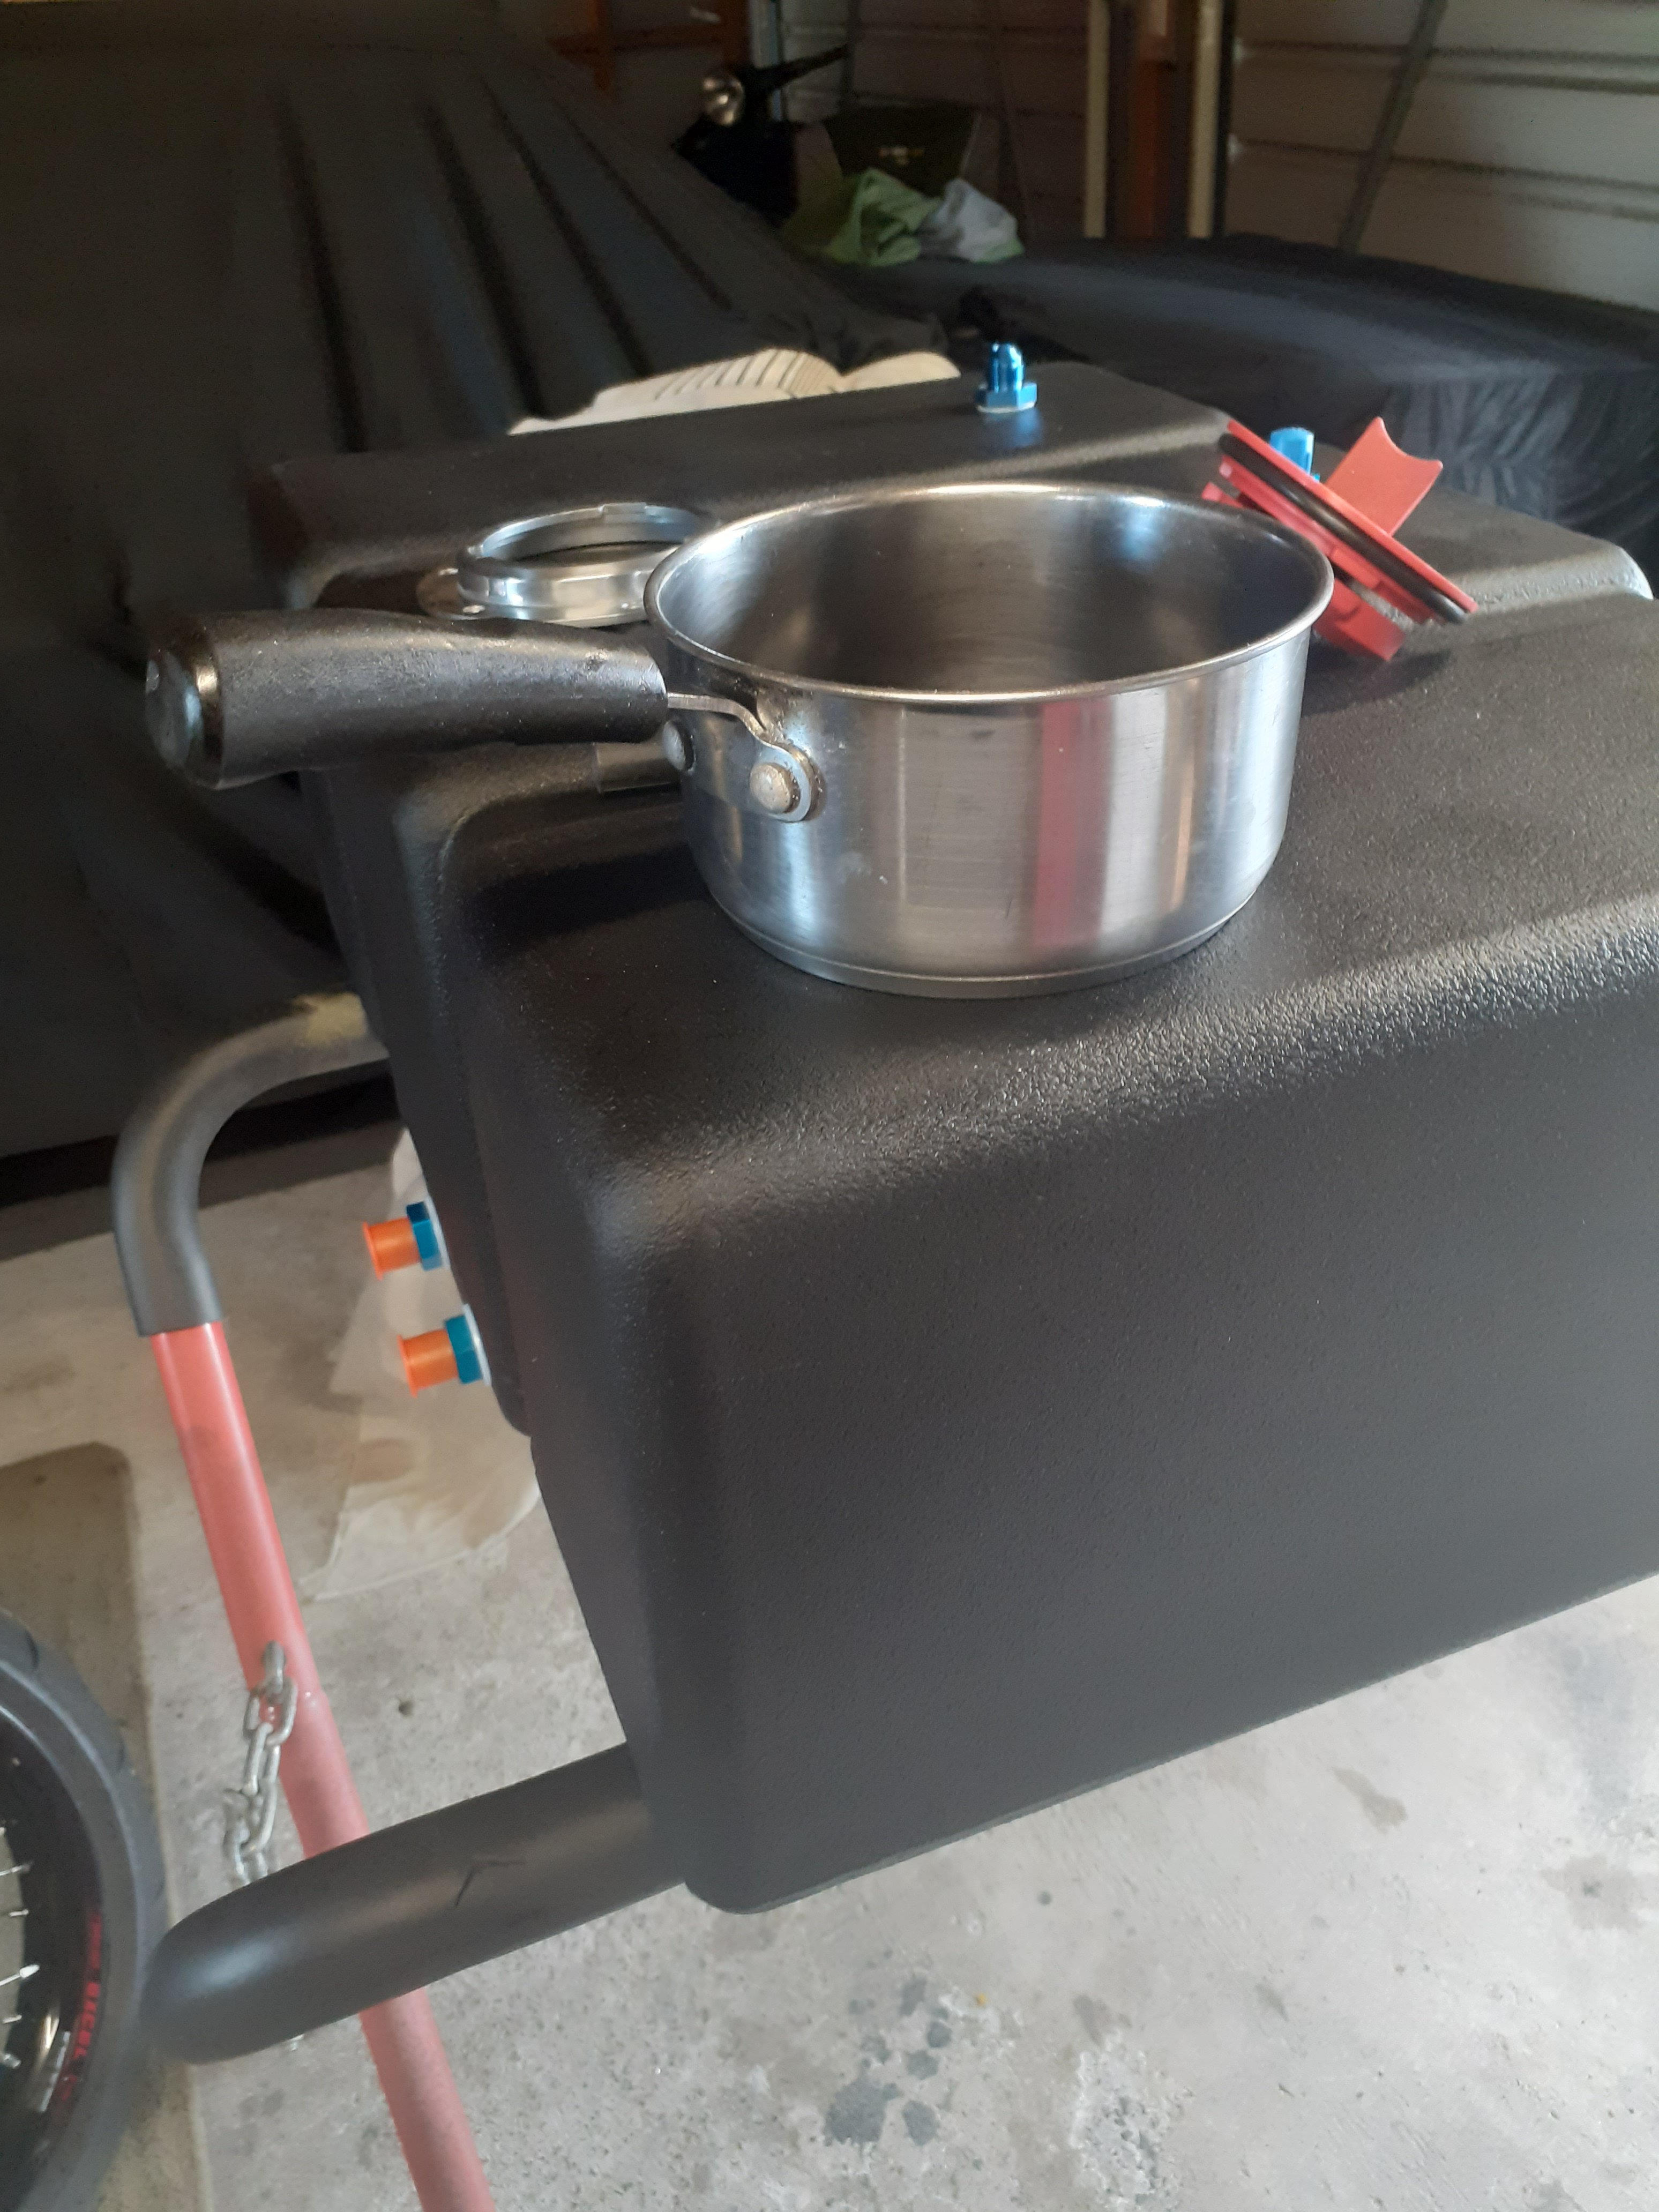
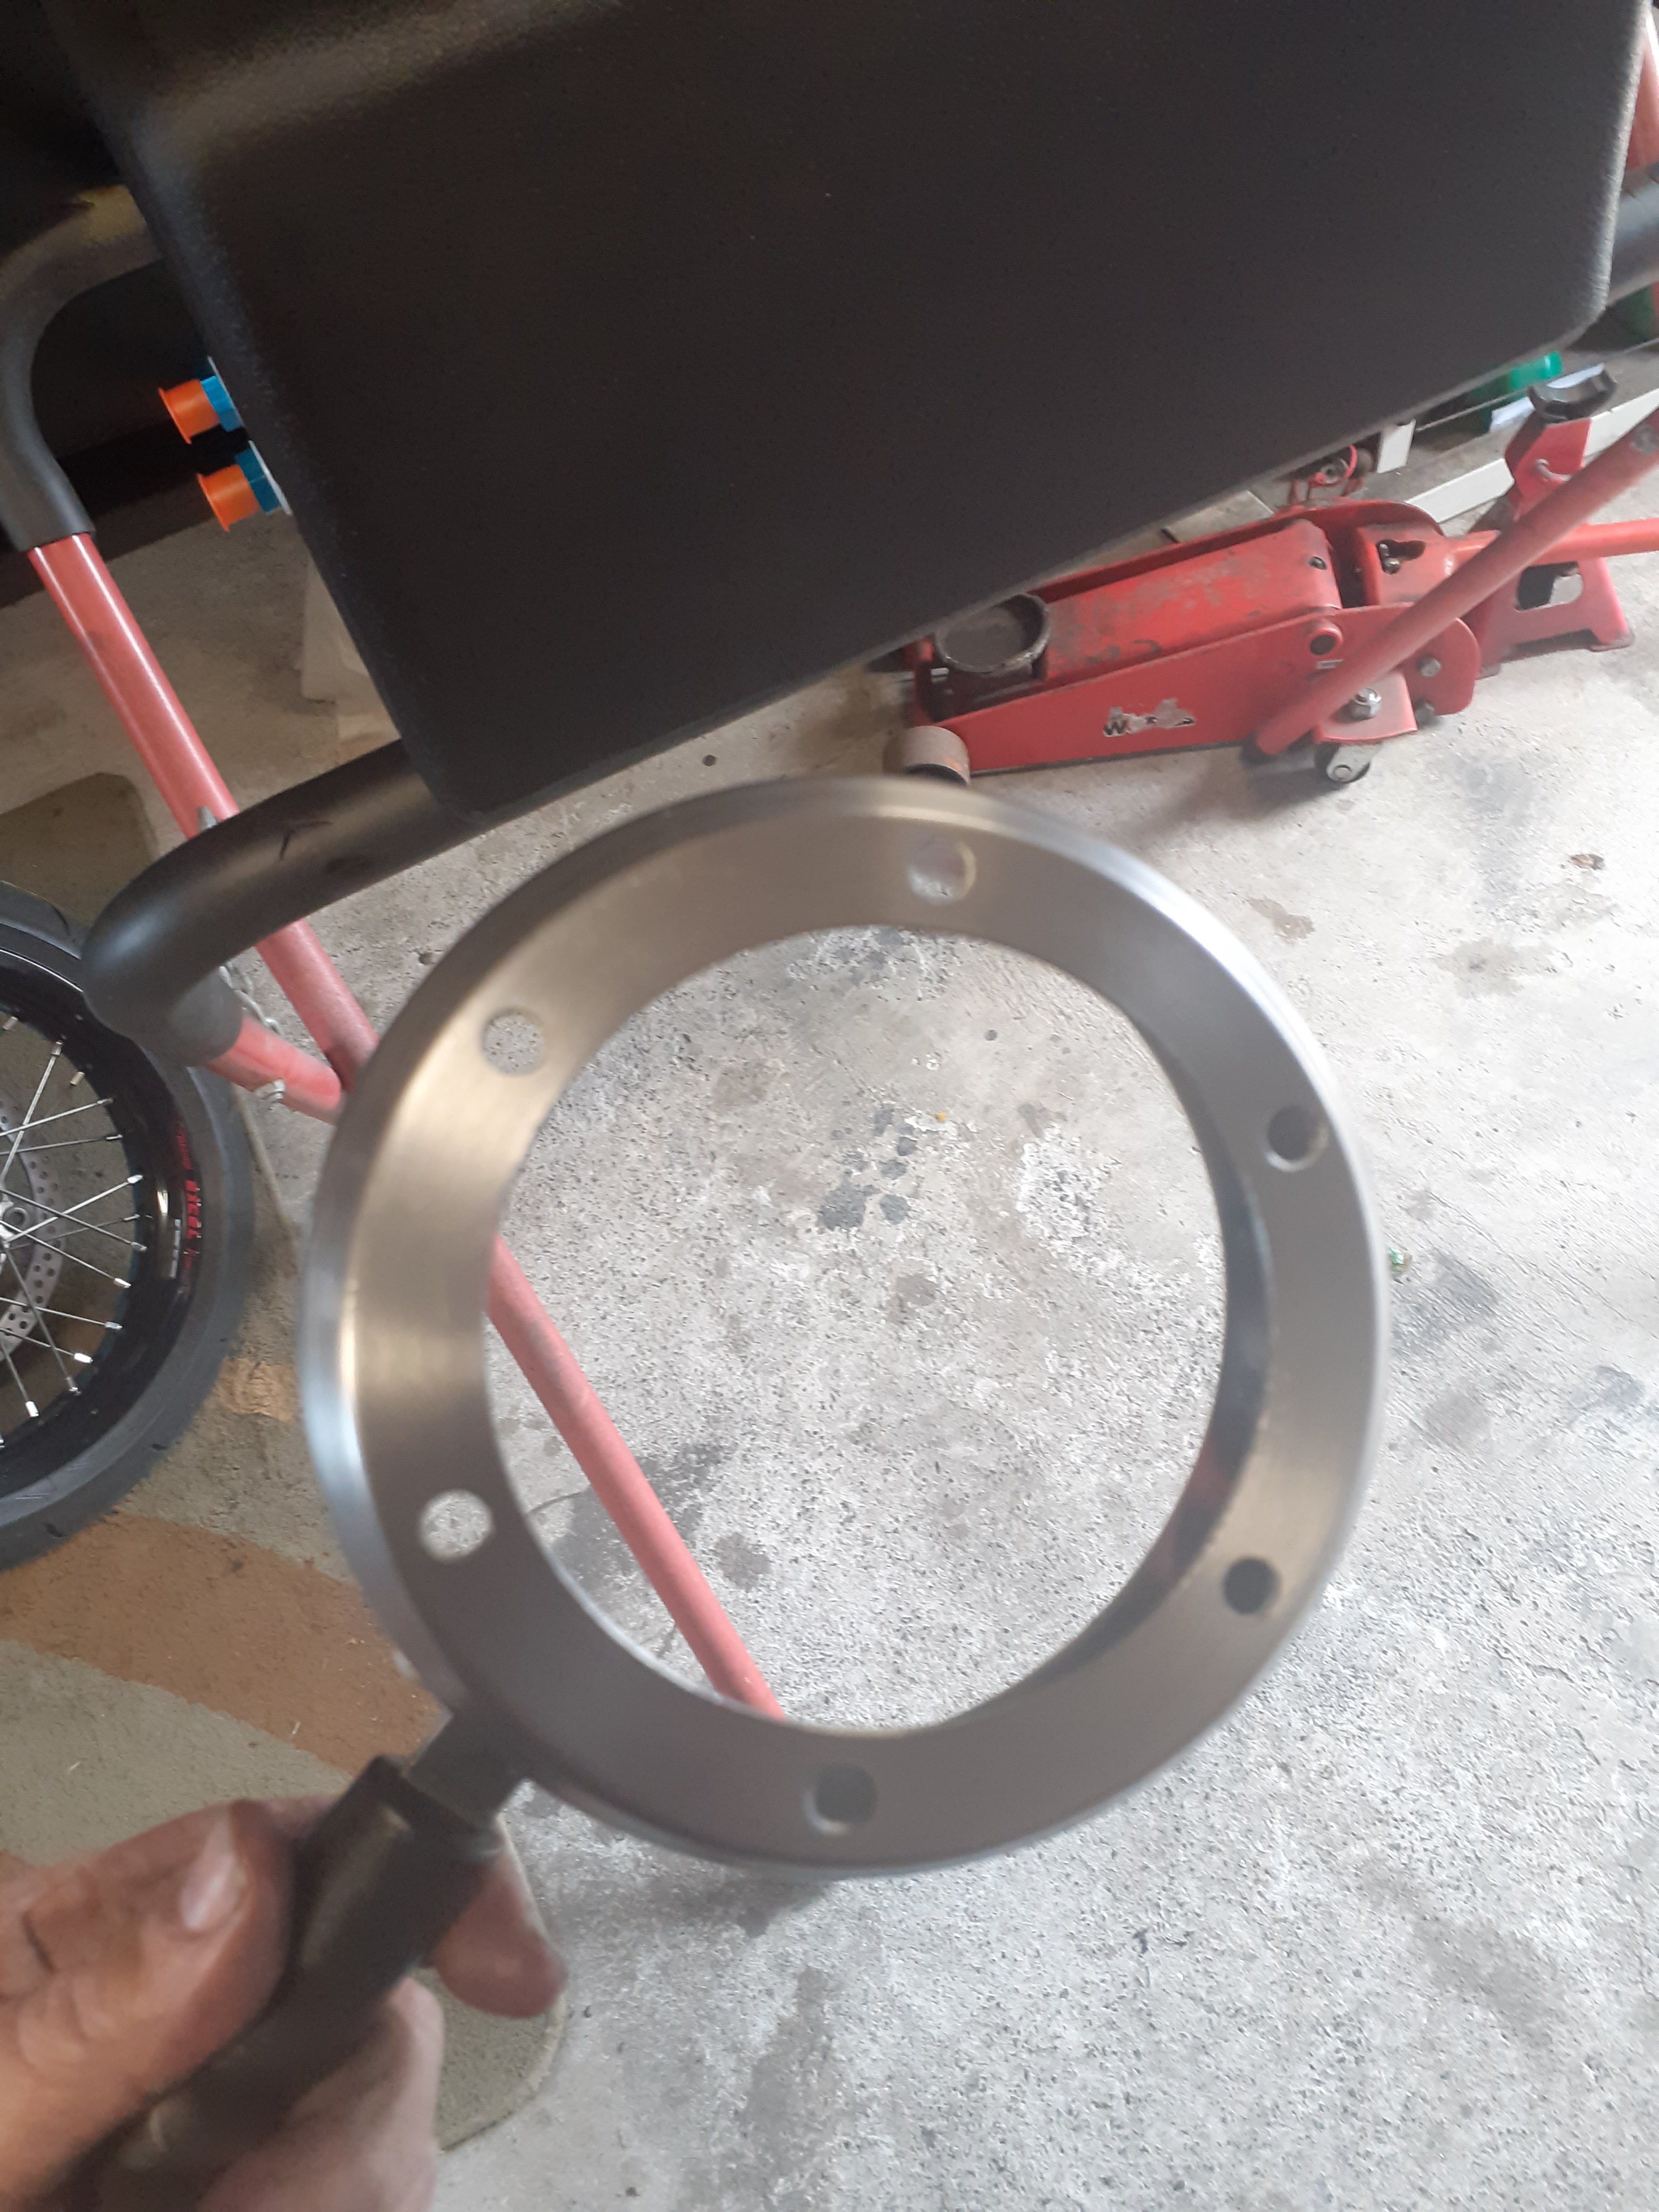
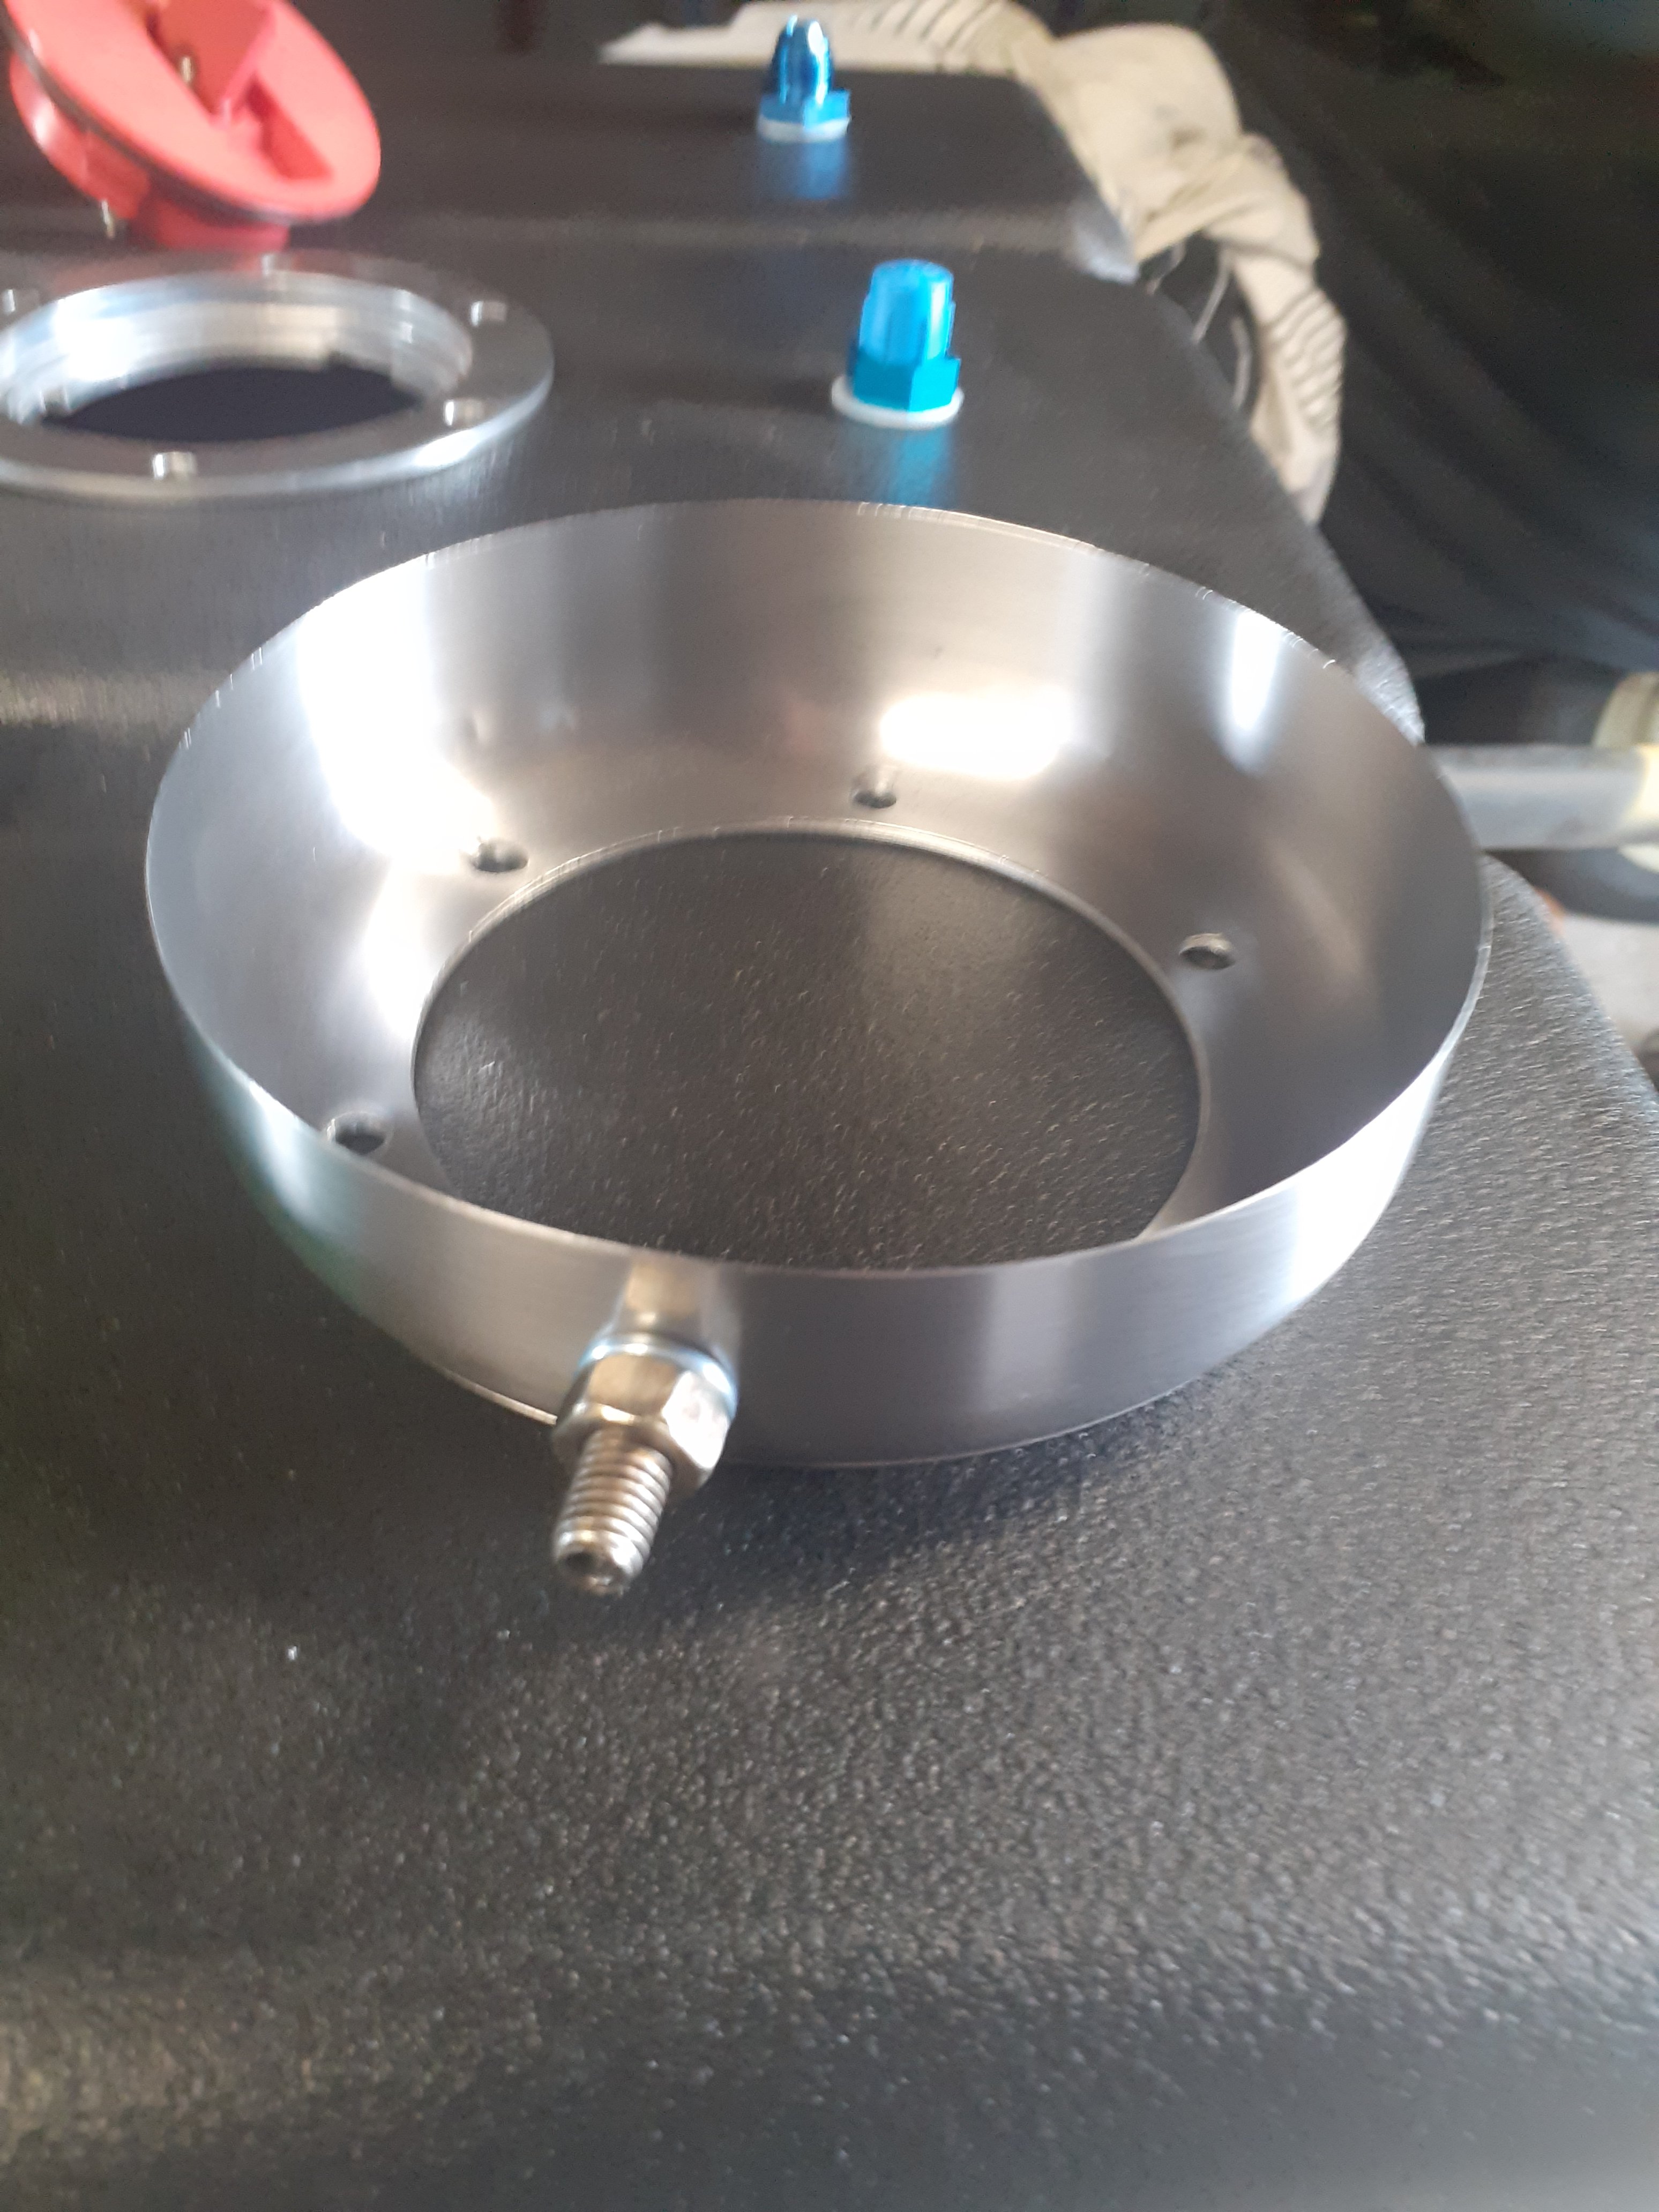
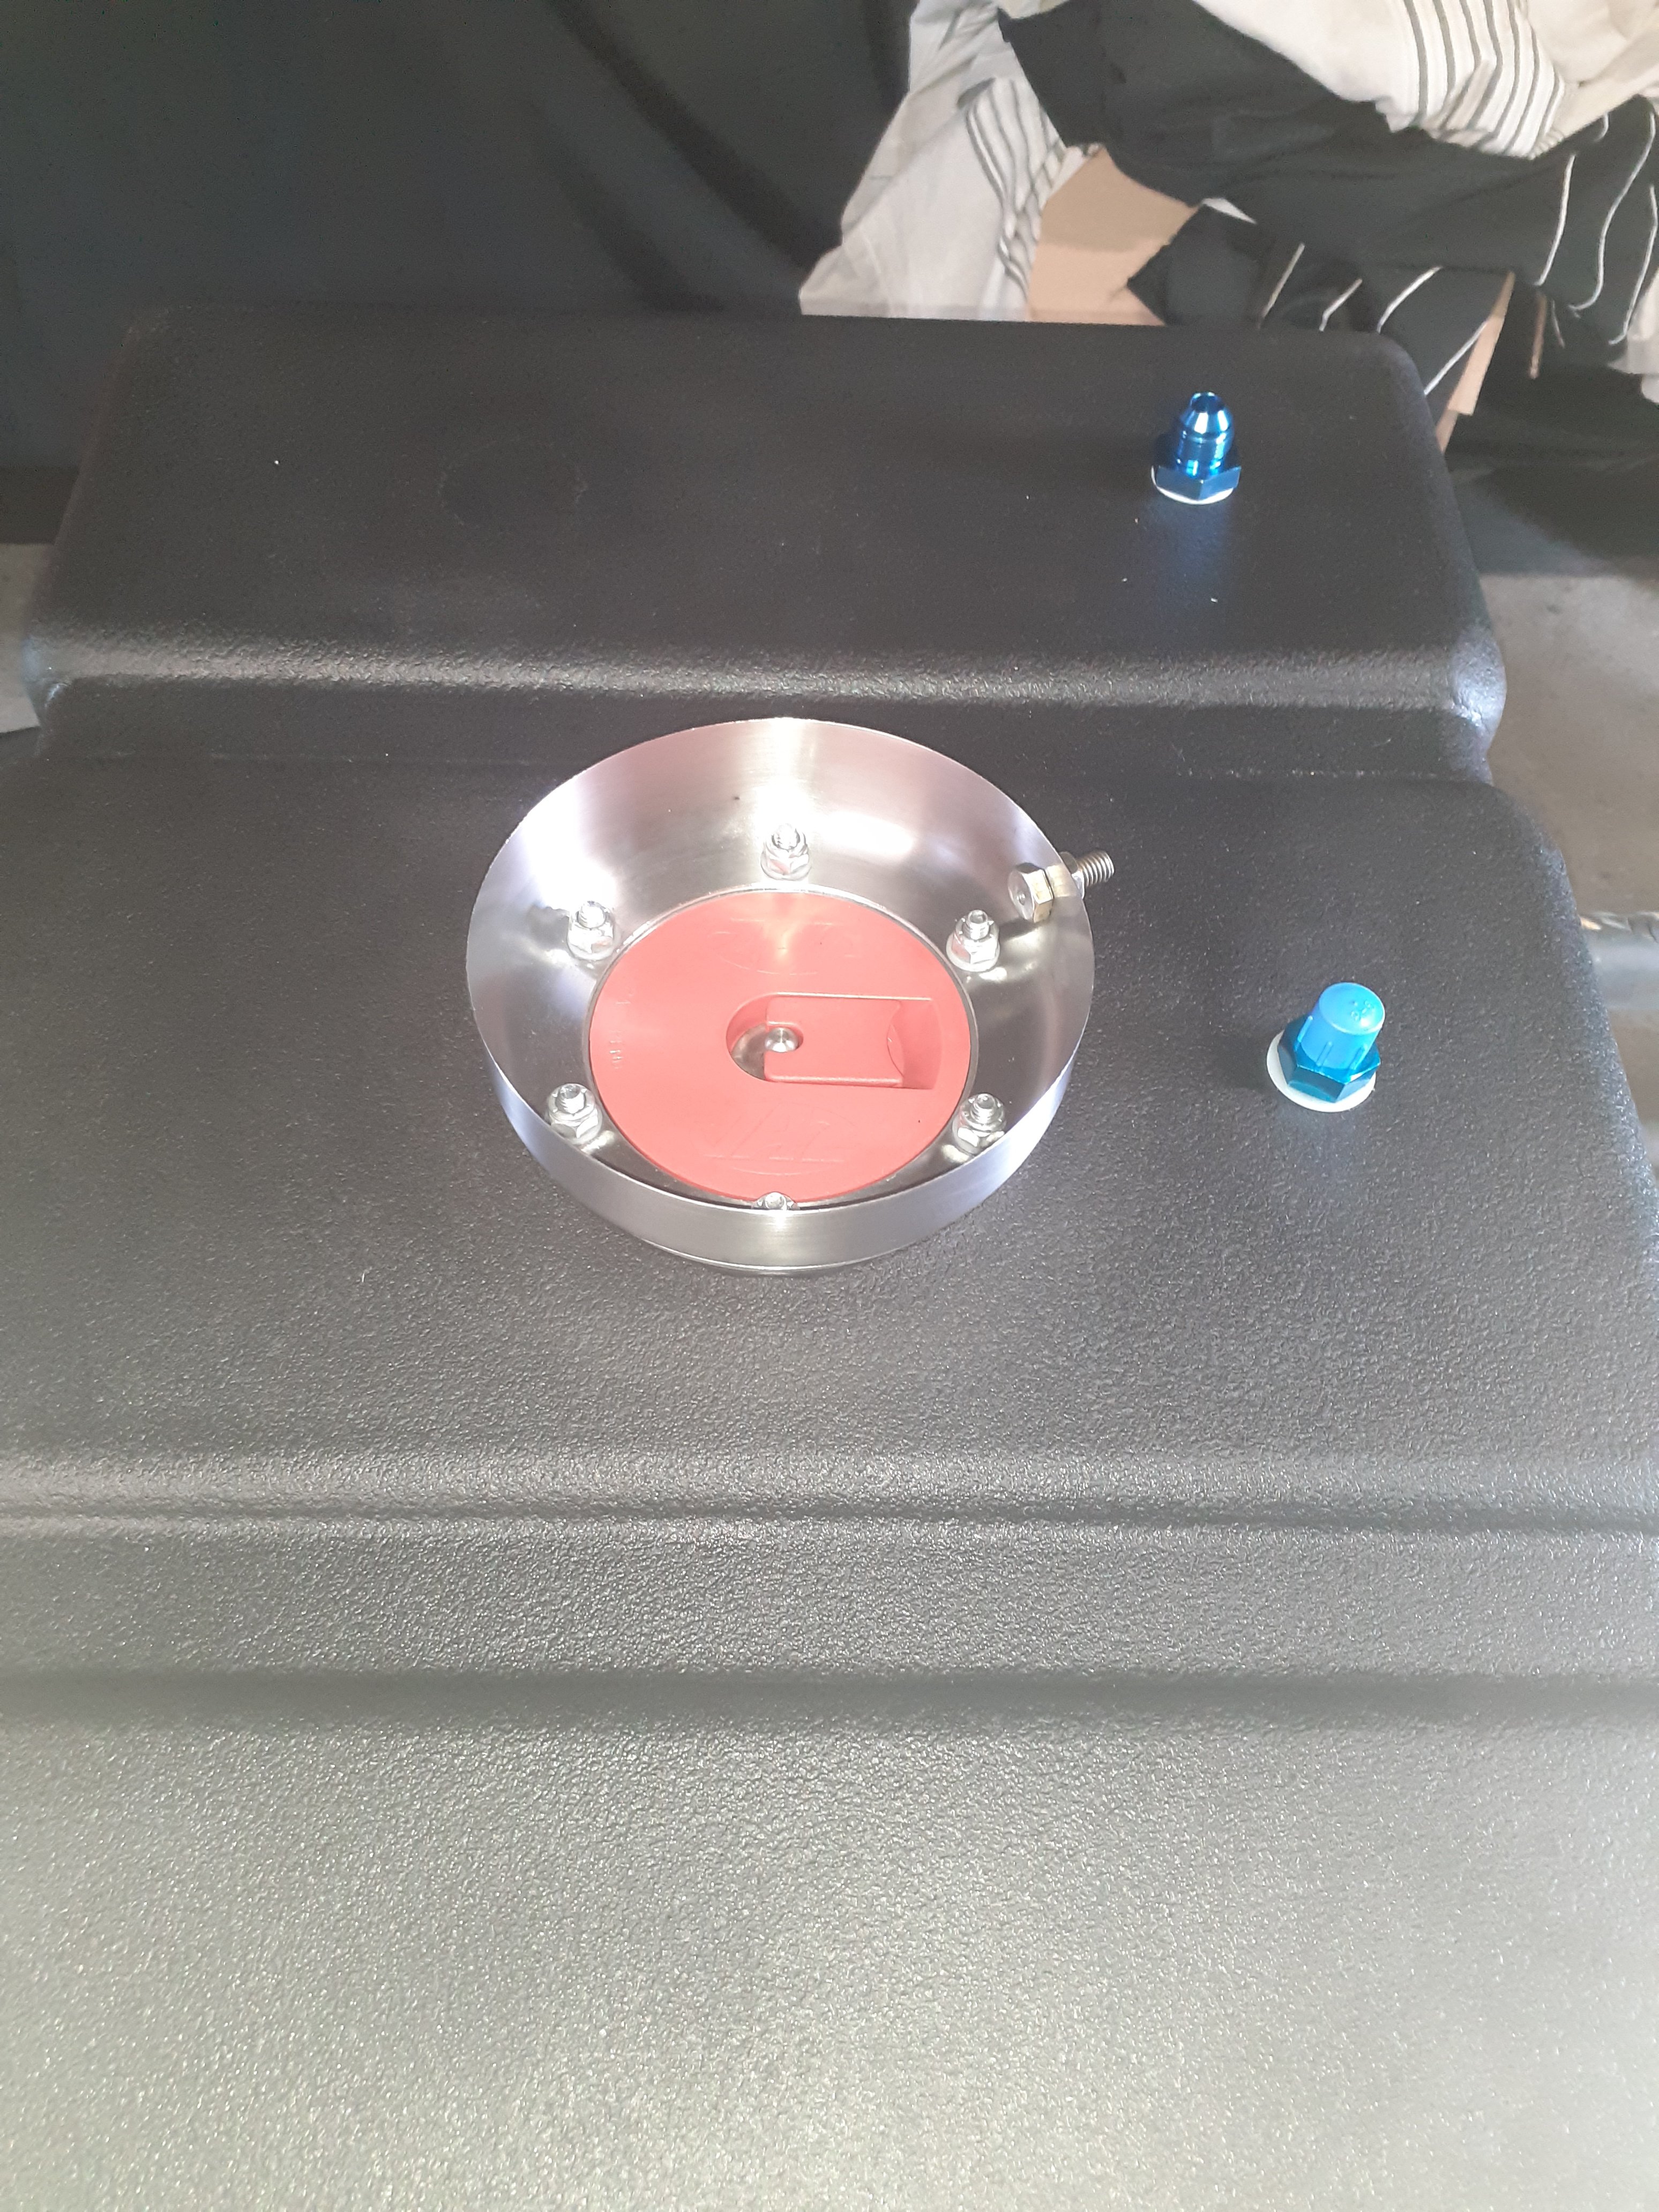
Fuel tank stuff Put a bulkhead fitting in for a return in the top And made a spill ring Find pot with correct diameter, luckily I had one set aside for camping, also had correct holesaw in stock, wang some holes in, briefly consider leaving the handle on, shorten pot, drill a hole in a bolt to enable fixing of a ground wire and also a drain hose, done.
1 point
-
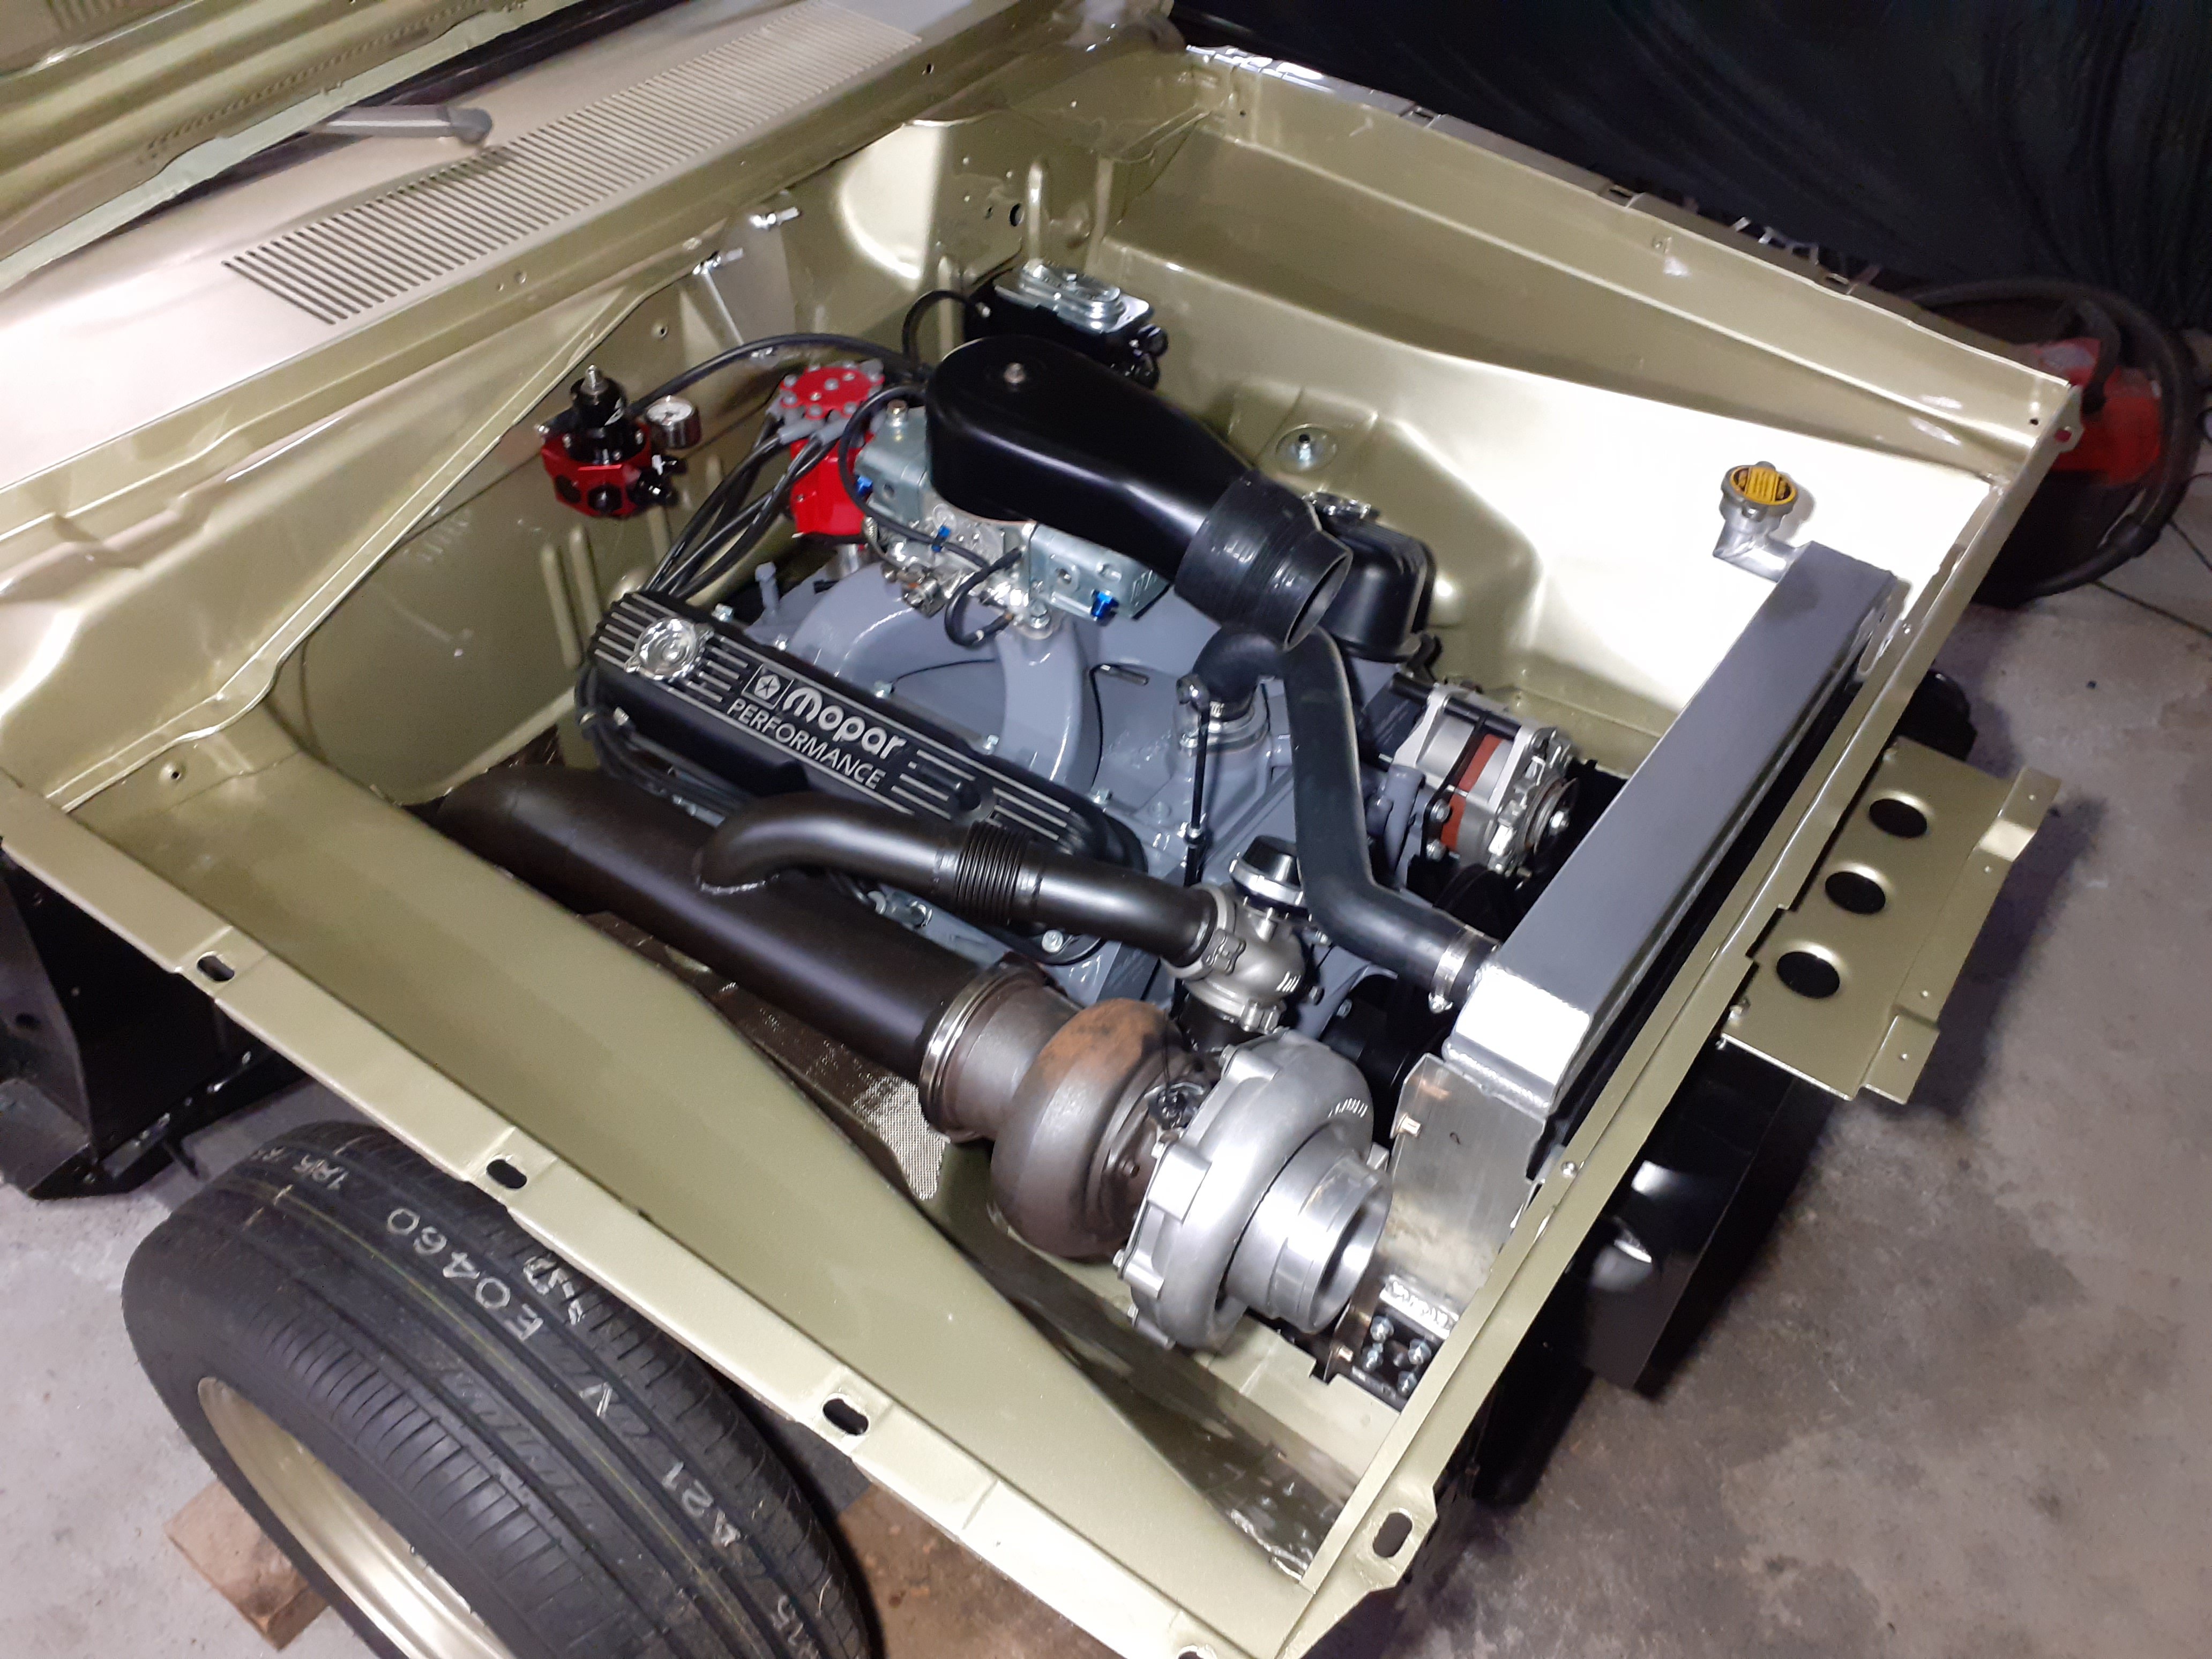
Better post some progress for @RUNAMUCK Painted the boot floor Made alloy panel to fill hole for wiper motor New plugs, cleaned and fitted the plug leads Painted and fitted master cylinder Mounted fuel pressure reg Recycled some pushlock hose fittings It's been a bit hard to get things done, have to only do activities I have parts in stock for
1 point


.thumb.jpeg.384ff72c8d2b0ee0d34a7bdedb55bdcf.jpeg)


This leaderboard is set to Auckland/GMT+12:00