
Leaderboard


Popular Content
Showing content with the highest reputation on 06/07/21 in all areas
-
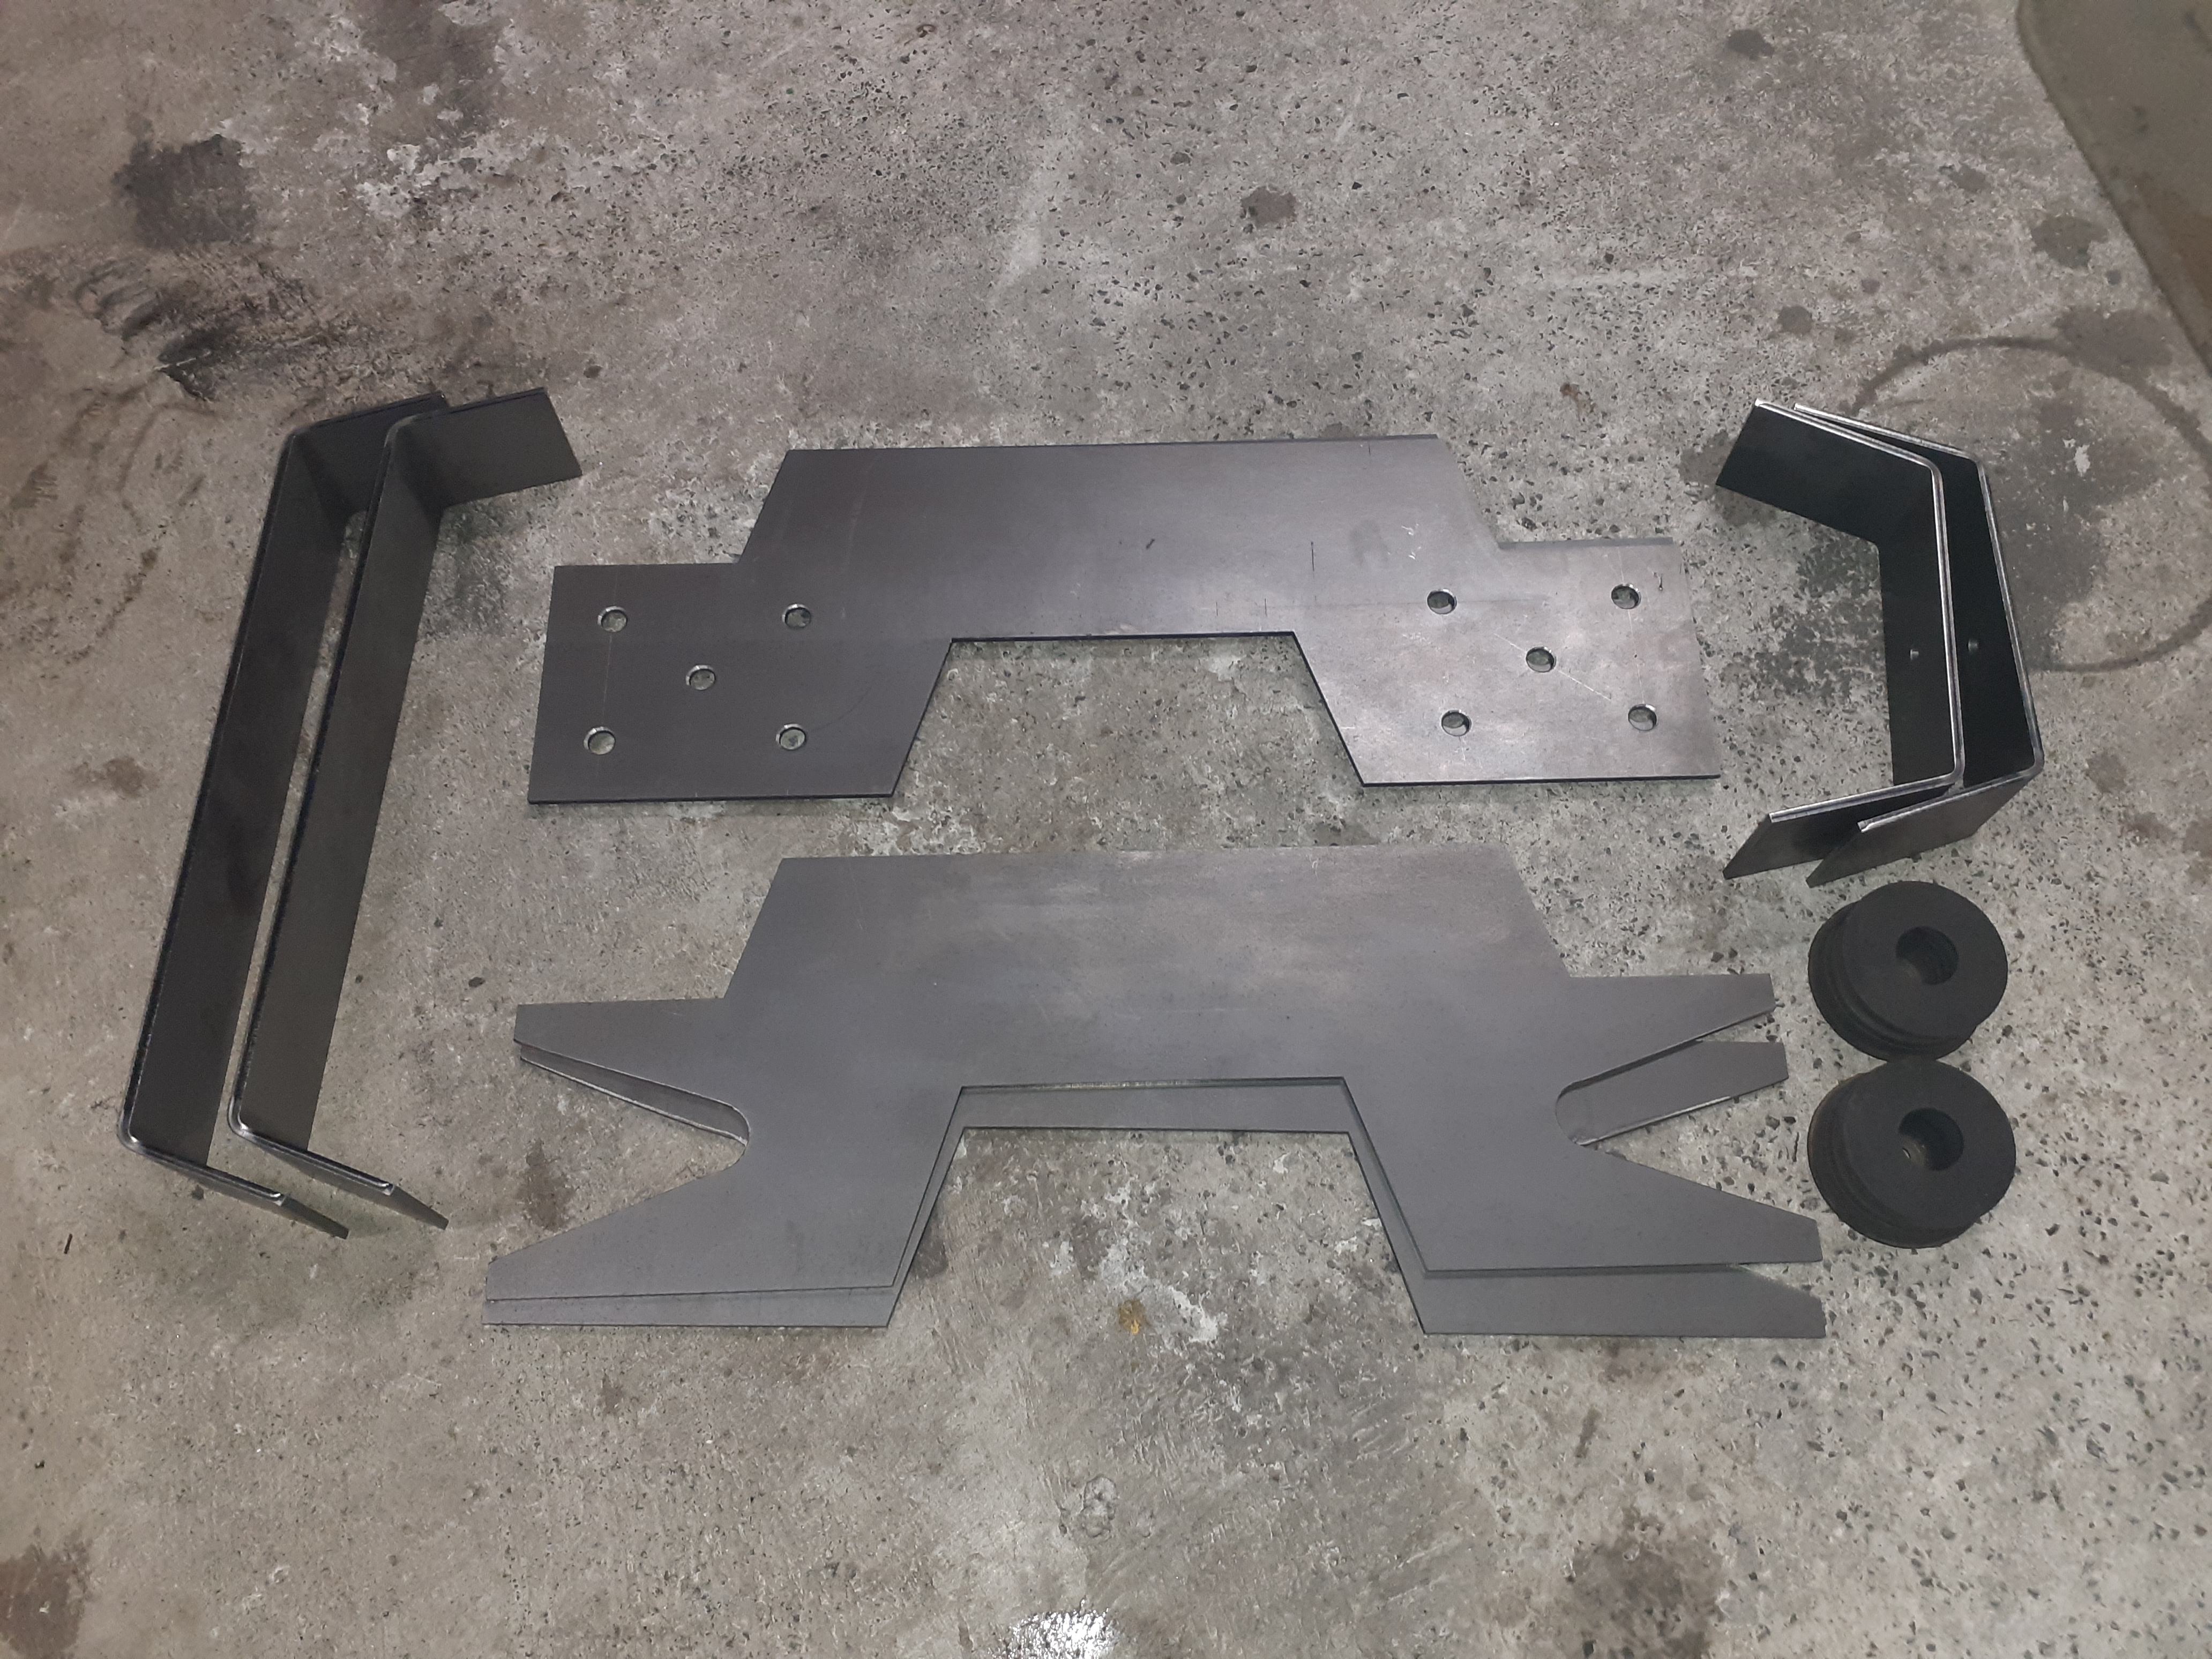
Notch kit ready to fit I drew it on some cardboard and got it laser cut from 4mm and the top and bottom folded If my measurements are right it should fit under the tray floor with 1x tray crossmember removed , retains 100mm chassis rail height, and 40mm suspension travel before it contacts the bump stops so it meets all the cert minimum requirements The outers are drilled for plug welds and the inners have a big fish mouth to help the transition from floppy channel chassis to box. I did those bits myself cause I figured it was easier than trying to explain to the laser cutting guy what I wanted
 14 points
 -
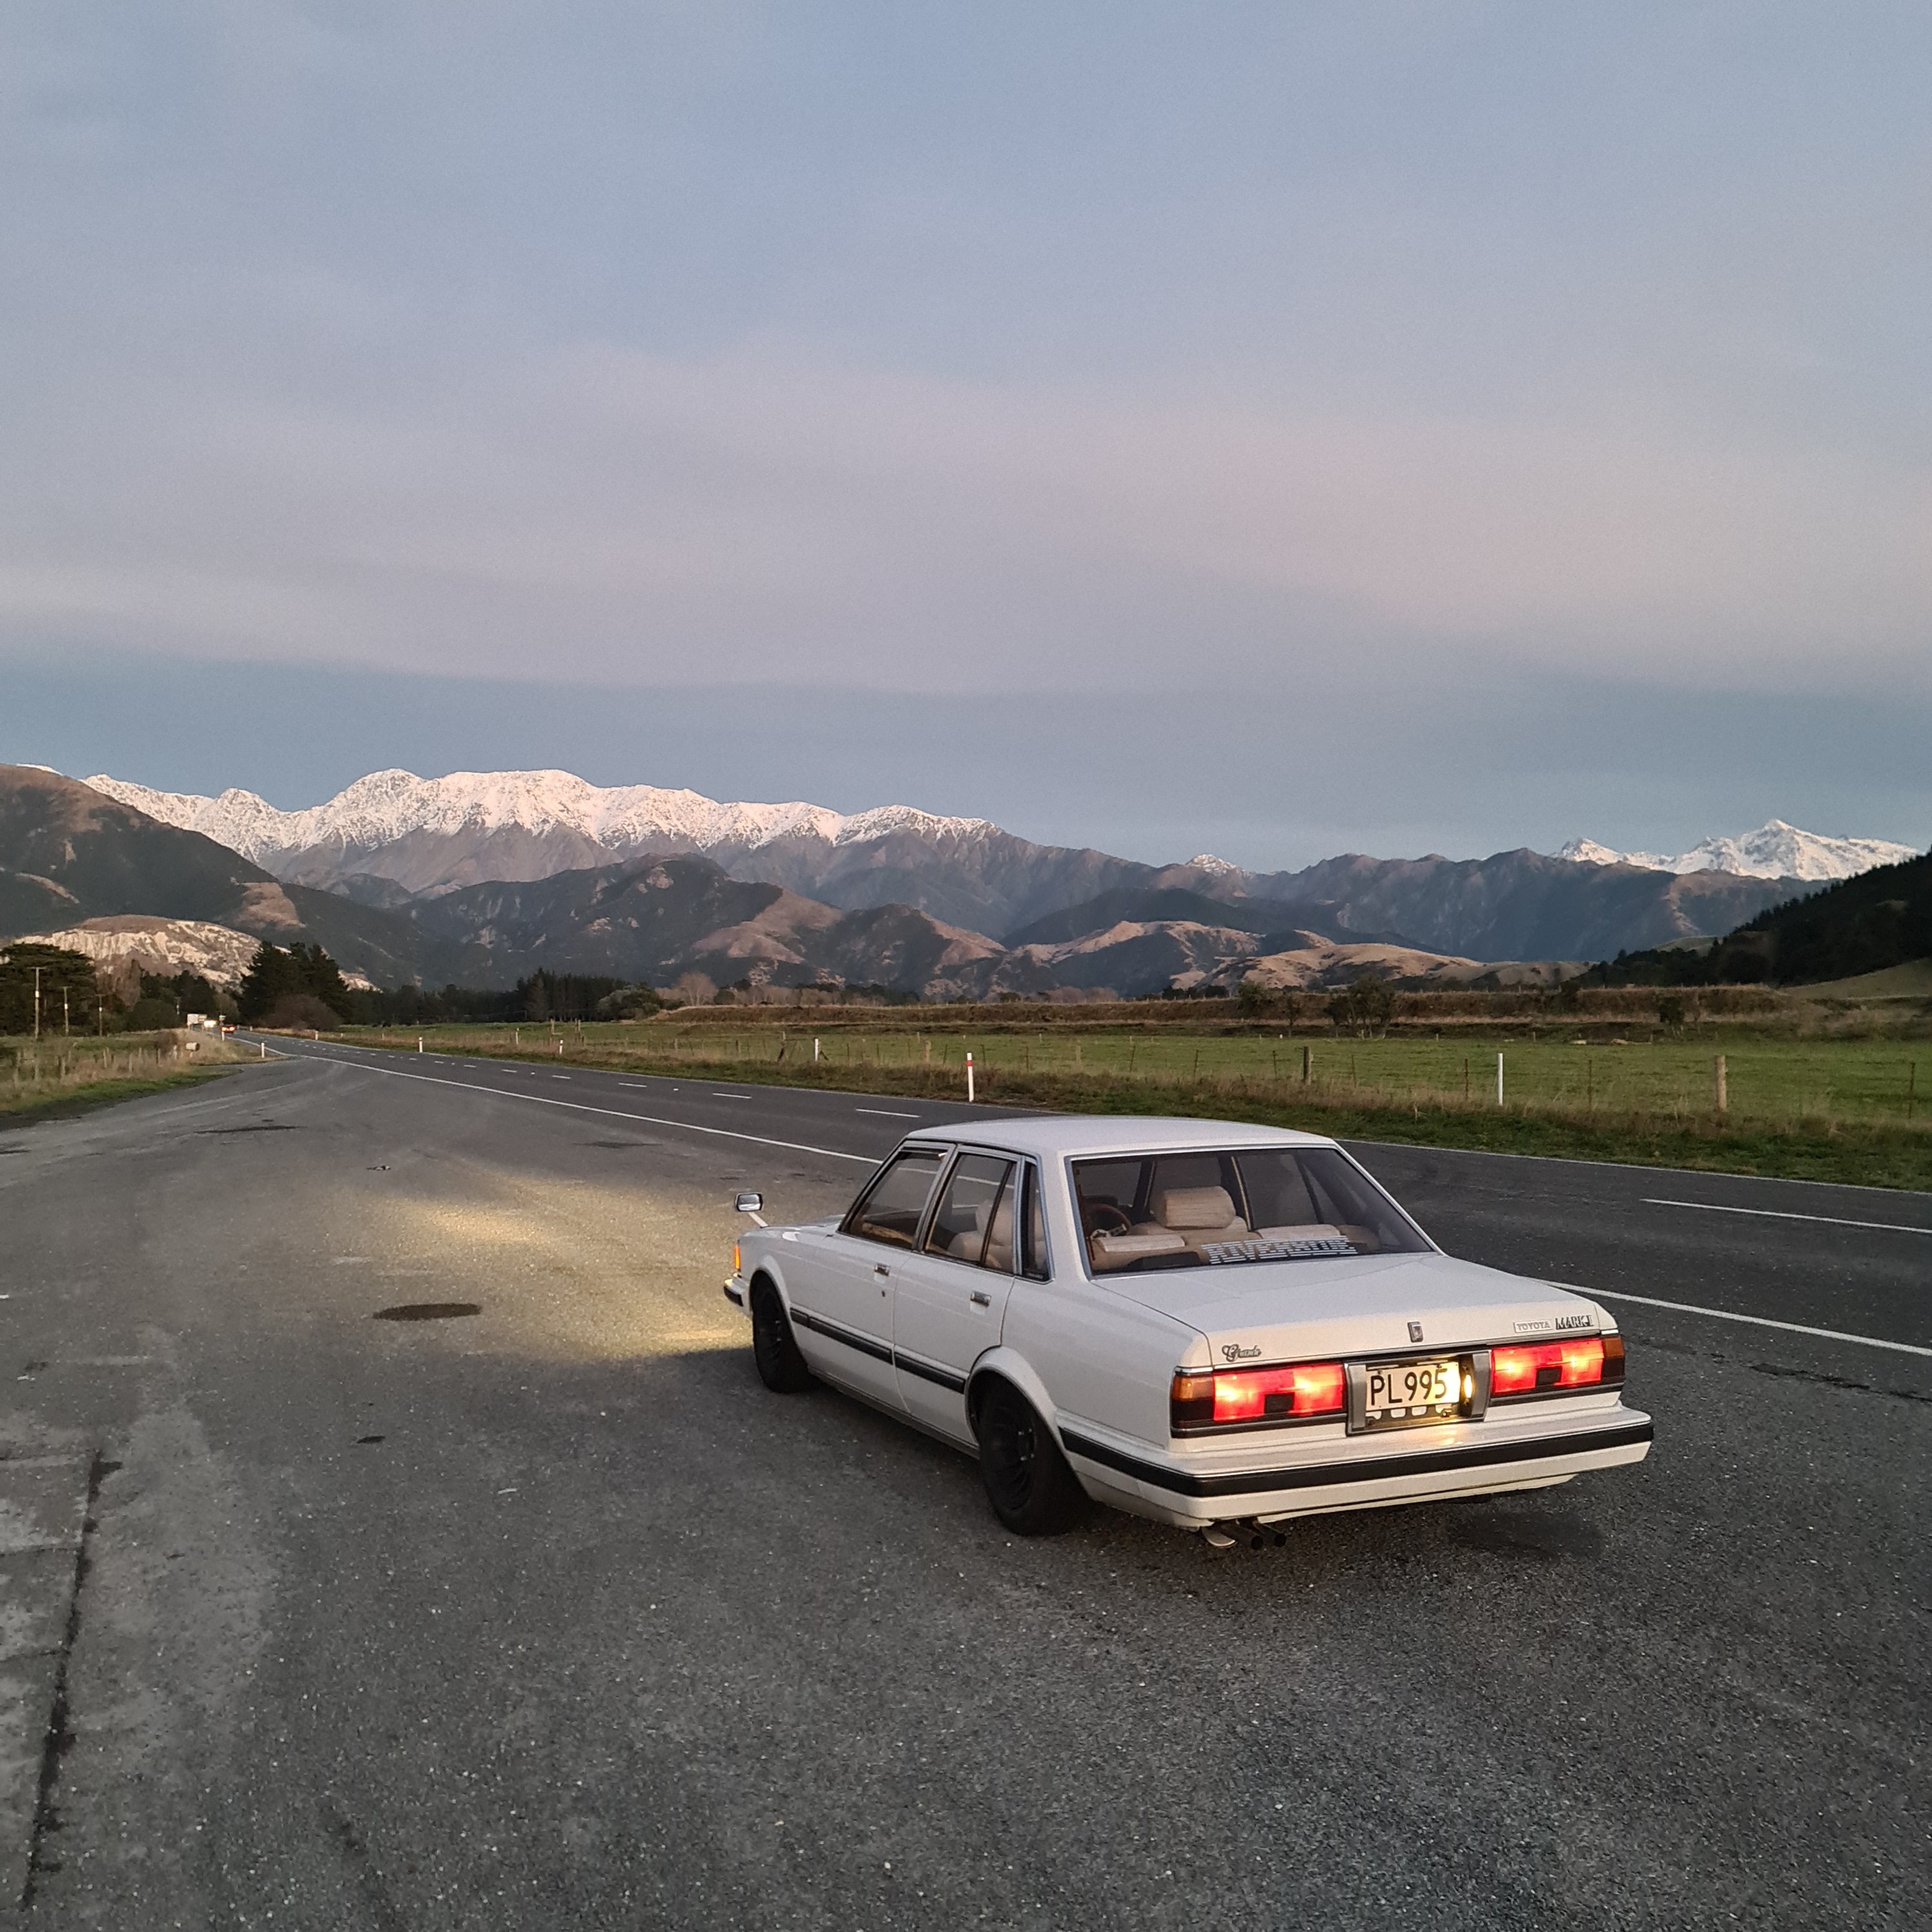
Made the trip from Auckland to Christchurch, had a good look around at horopito / smash palace again. Never get bored of seeing the same rare wrecks. Used two 50L tanks of 98 on my 1000km trip running the 3.7 diff 2950rpm @ 100km/h Took this photo in Clarence along the Kaikoura coastline. Prior to making the trip I removed the wideband and Graphic control computer so I could spend time sorting out the wiring while the car is down south (left it down to split the drive up). Had it on a friend's hoist down there and a few things need attention before I'm happy to drive it back. One of my front ball joints (2000kms old) has a lot of play so ordered a couple new AC Delco complete front lower control arms from Rock Auto. A coolant leak from around the heater line section at back of the engine and rocker cover gaskets leaking also. I managed to pick up another F series complete Head in 4.1 ratio as a placeholder to get my 3.7 setup better (currently has nearly ¼ driveshaft turn backlash...
13 points
-
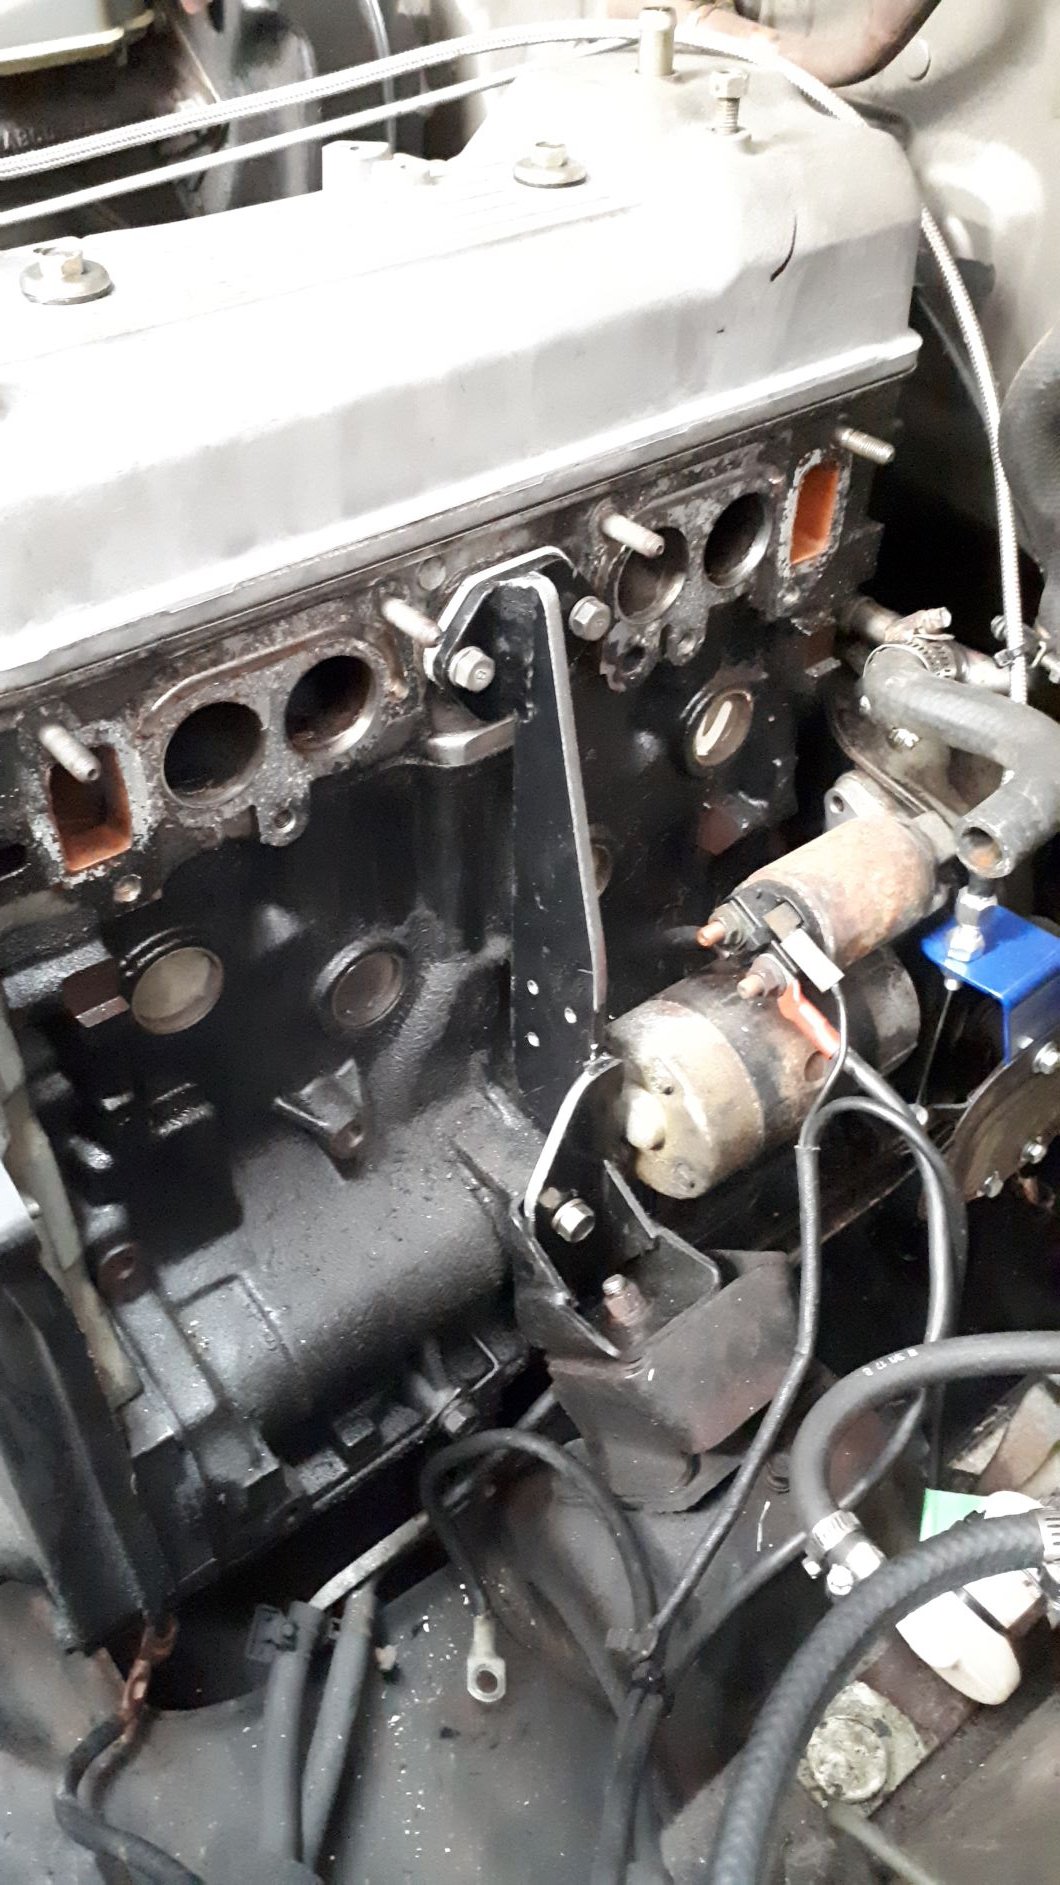
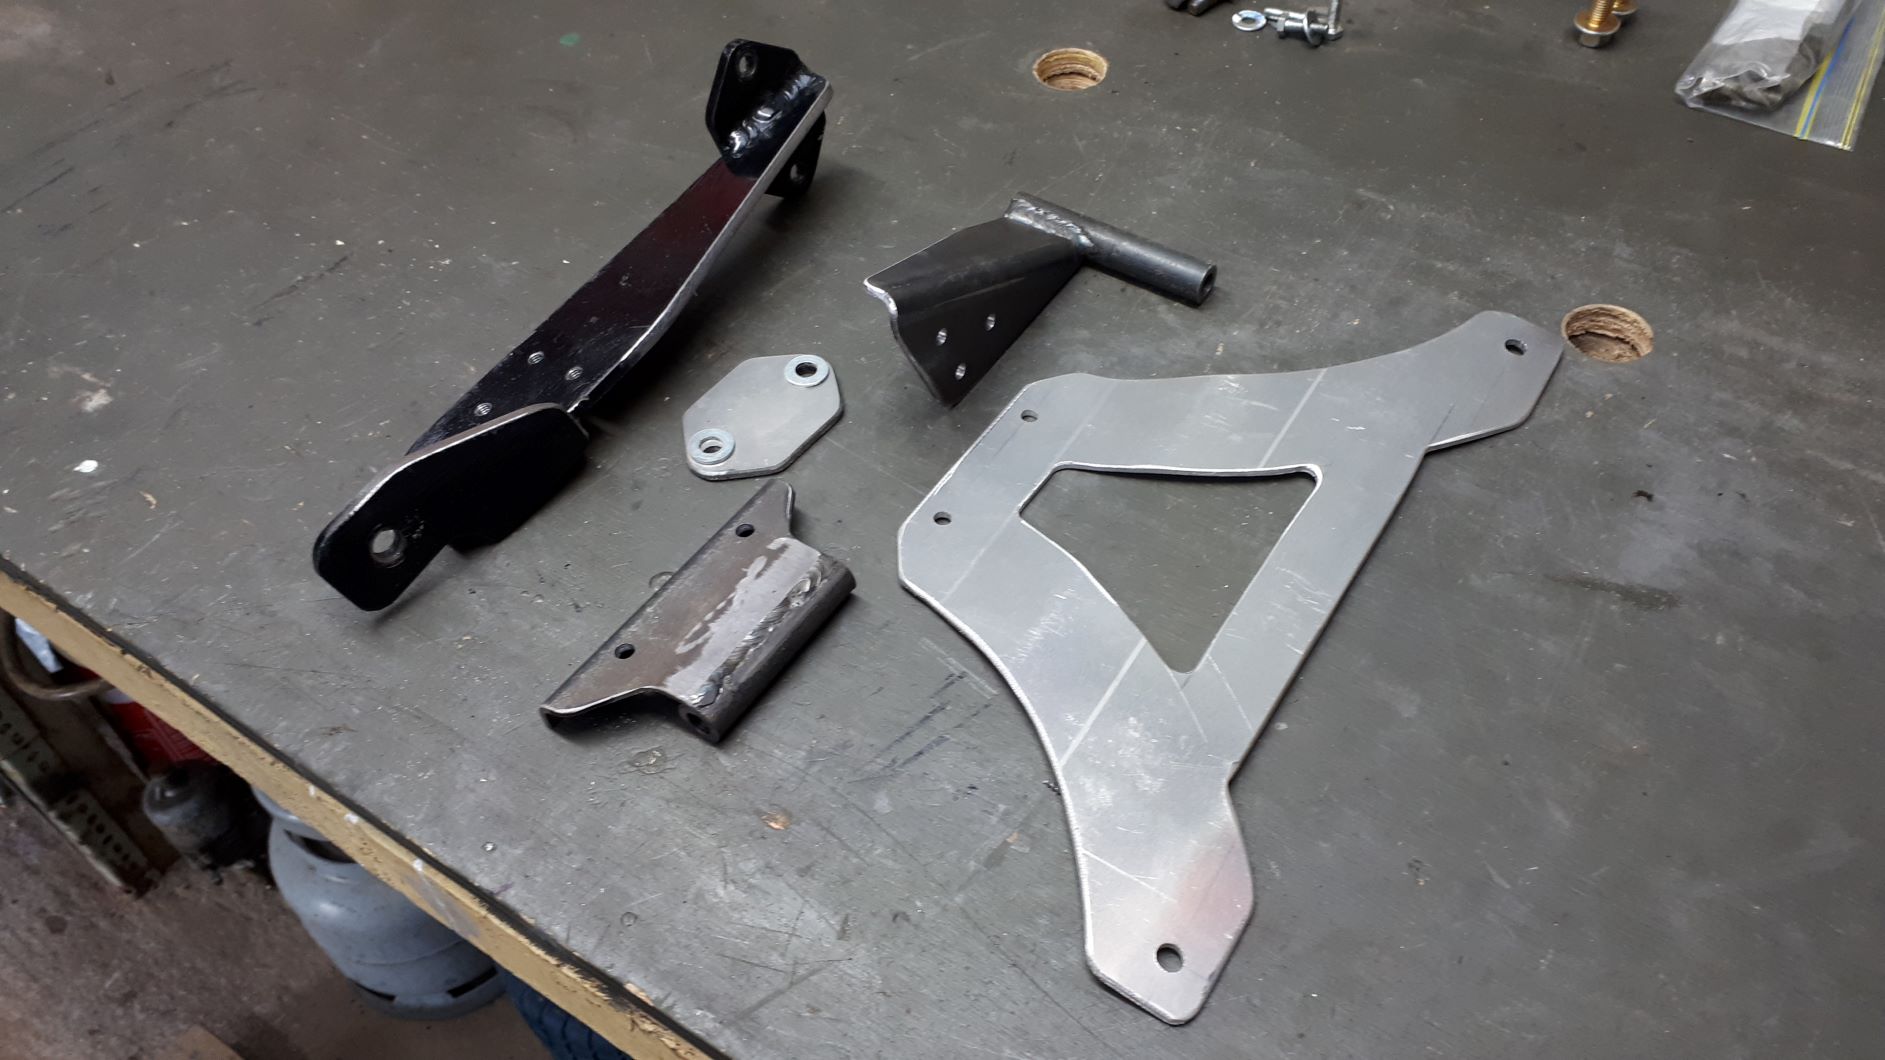
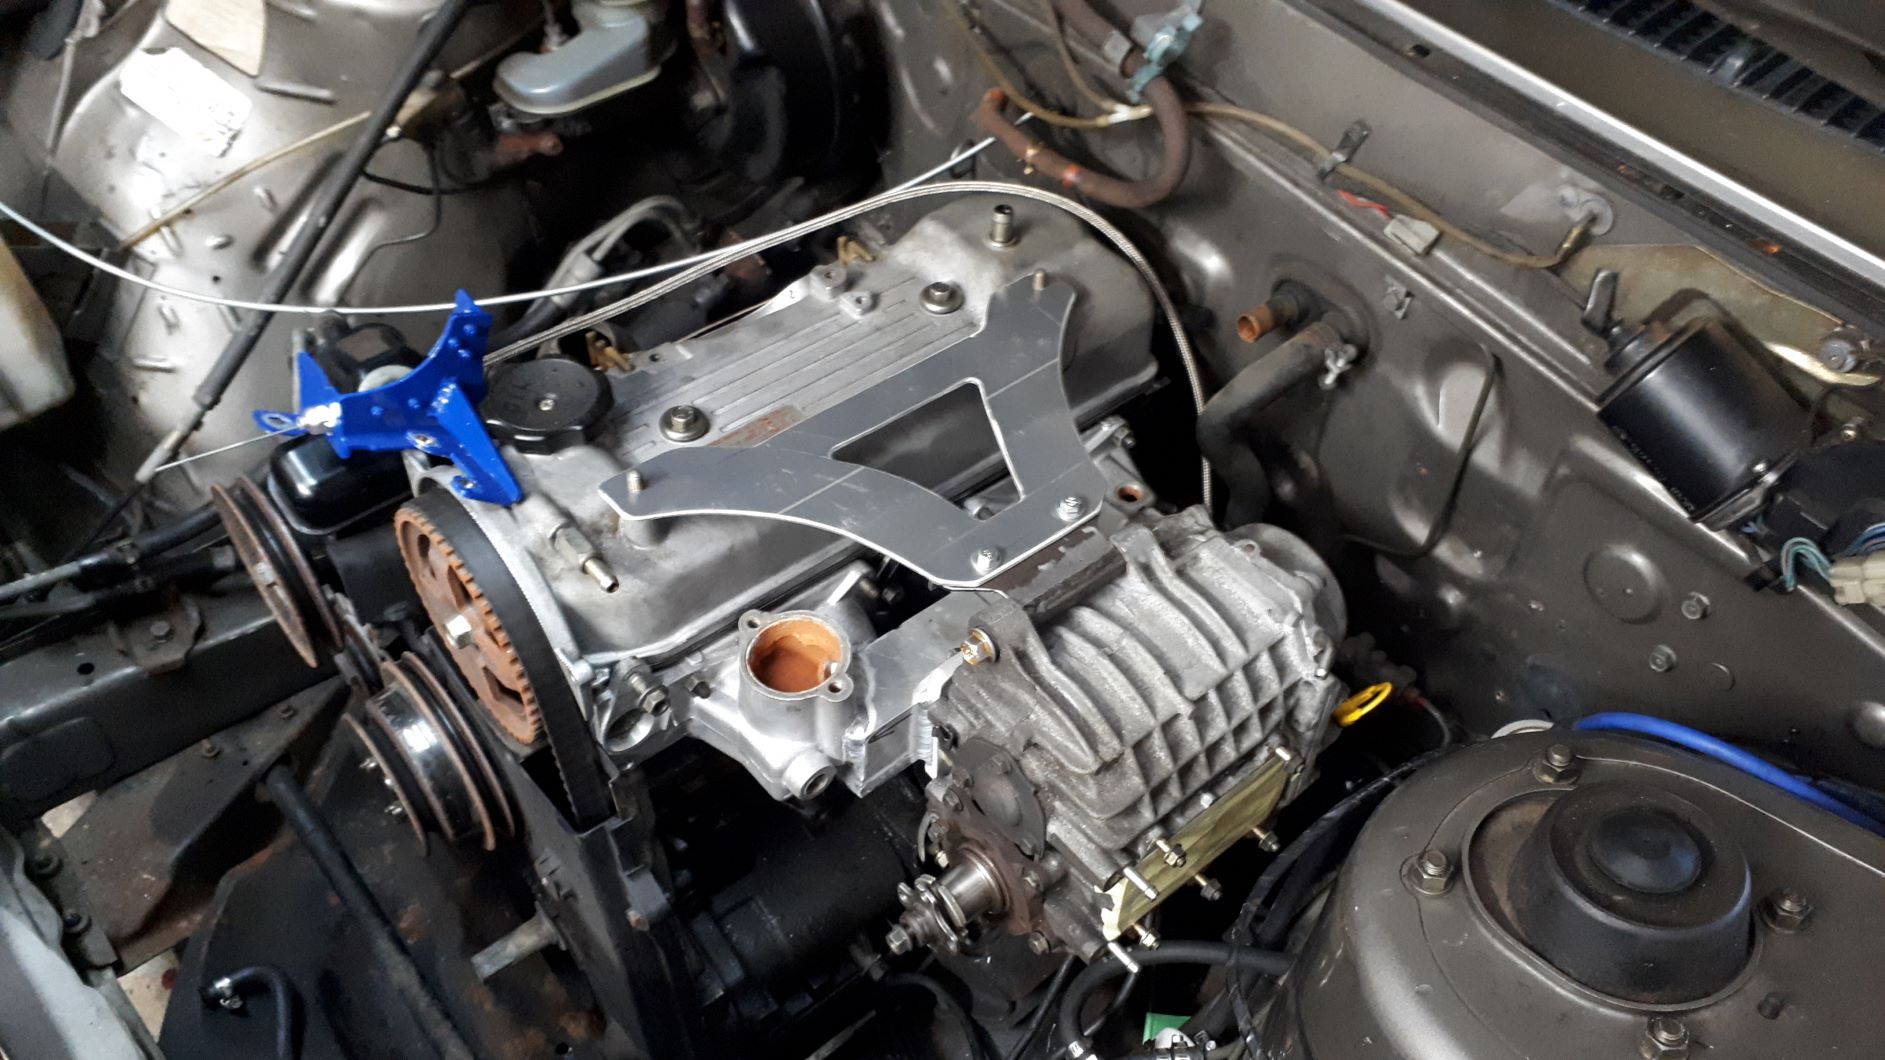
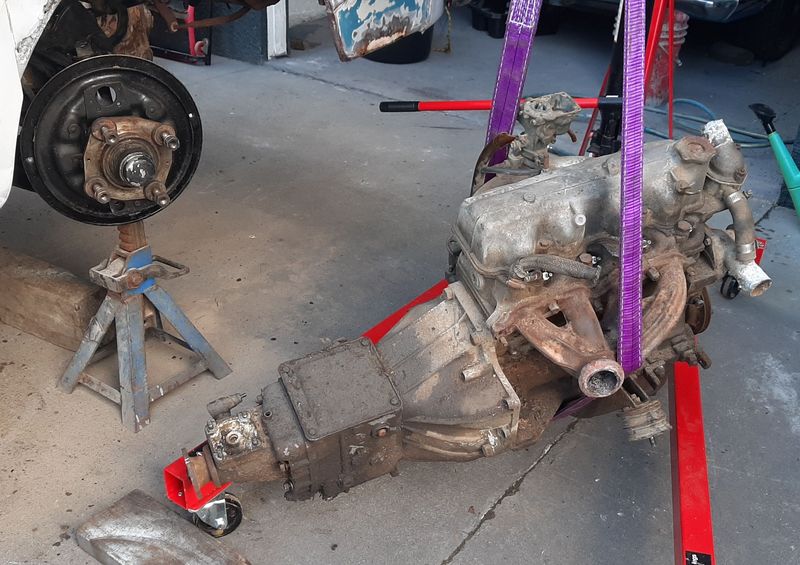
This weekend has been all about making some brackets so the supercharger isn't just dangling off the manifold. I am going to use an electric fuel pump so I decided to repurpose the fuel pump mounting location and made a bracket to support the lower supercharger mount. The upper mount is fastened back to a couple of studs on the engine that used to support the air filter assembly, I hope this is strong enough but didn't really have a lot of other options for this one.
9 points
-
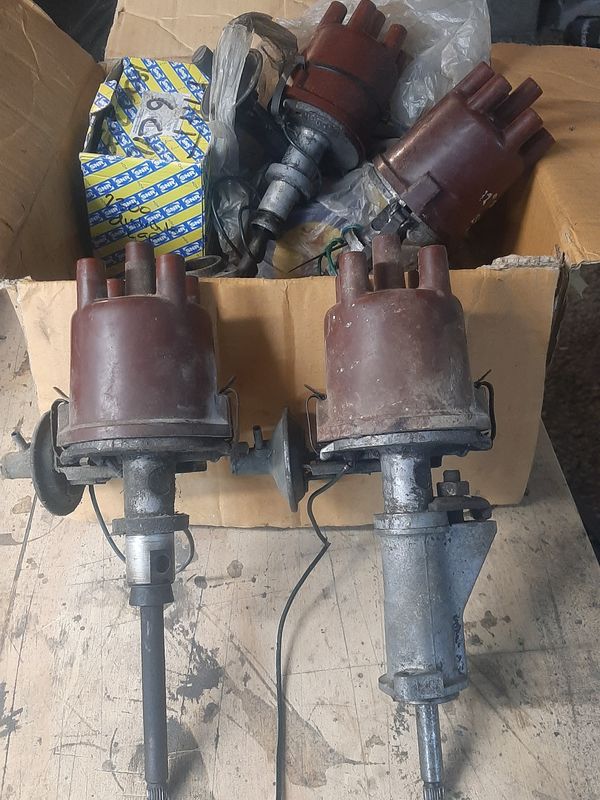
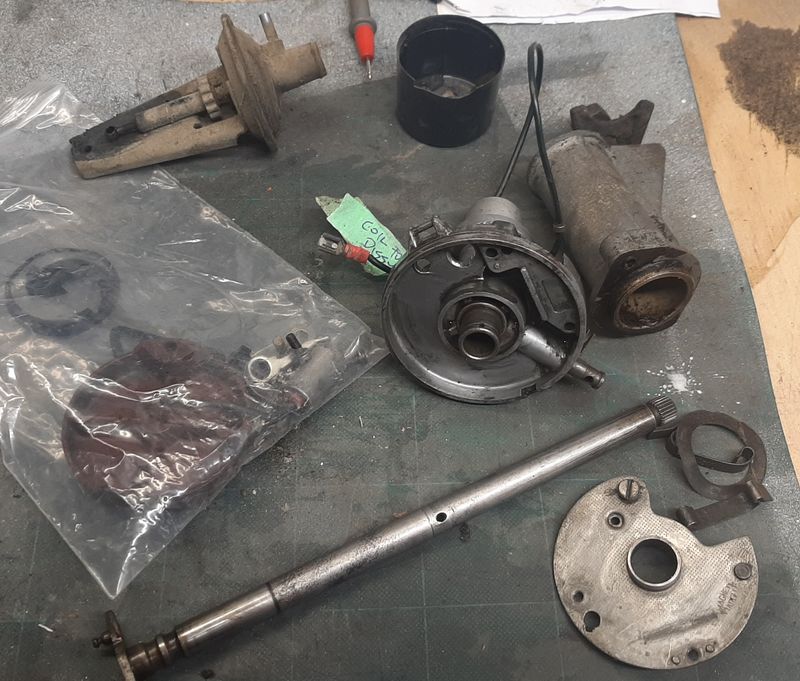
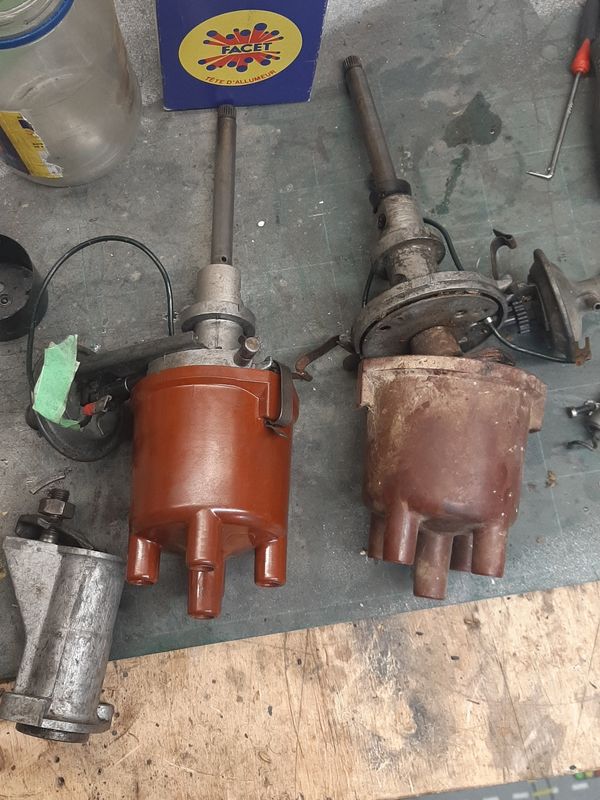
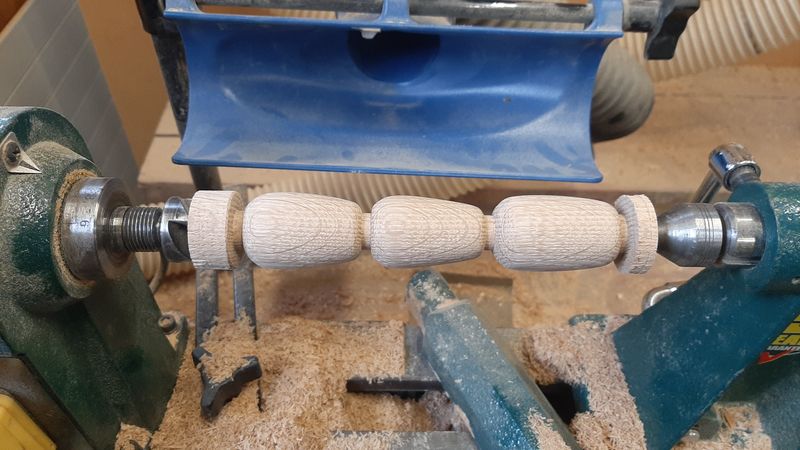
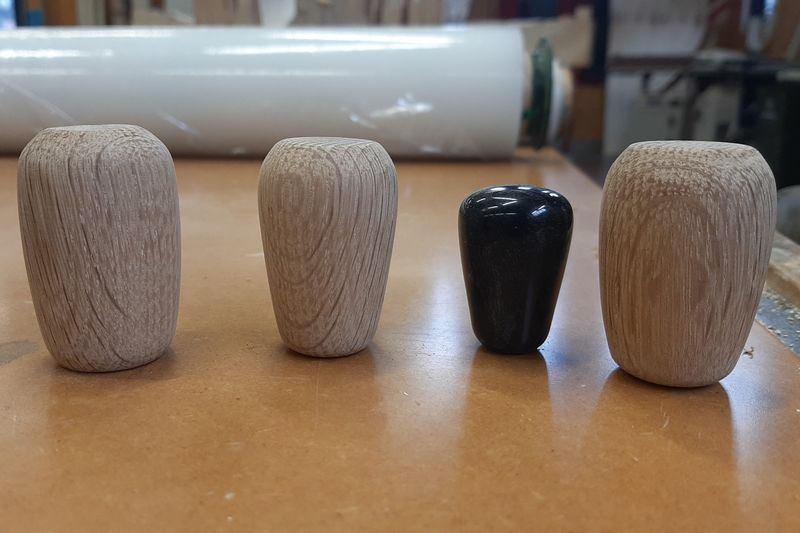
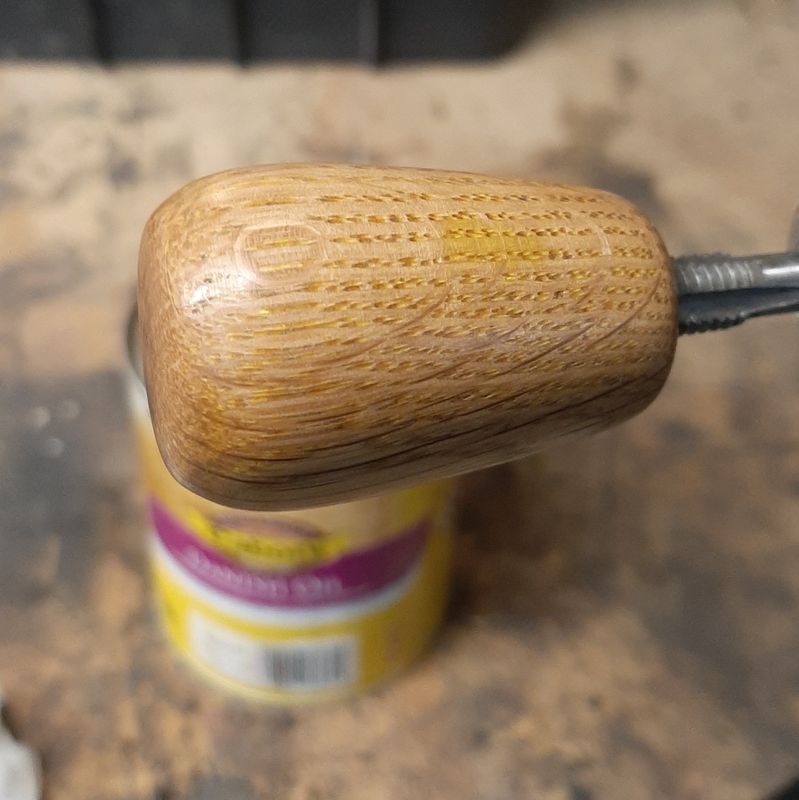
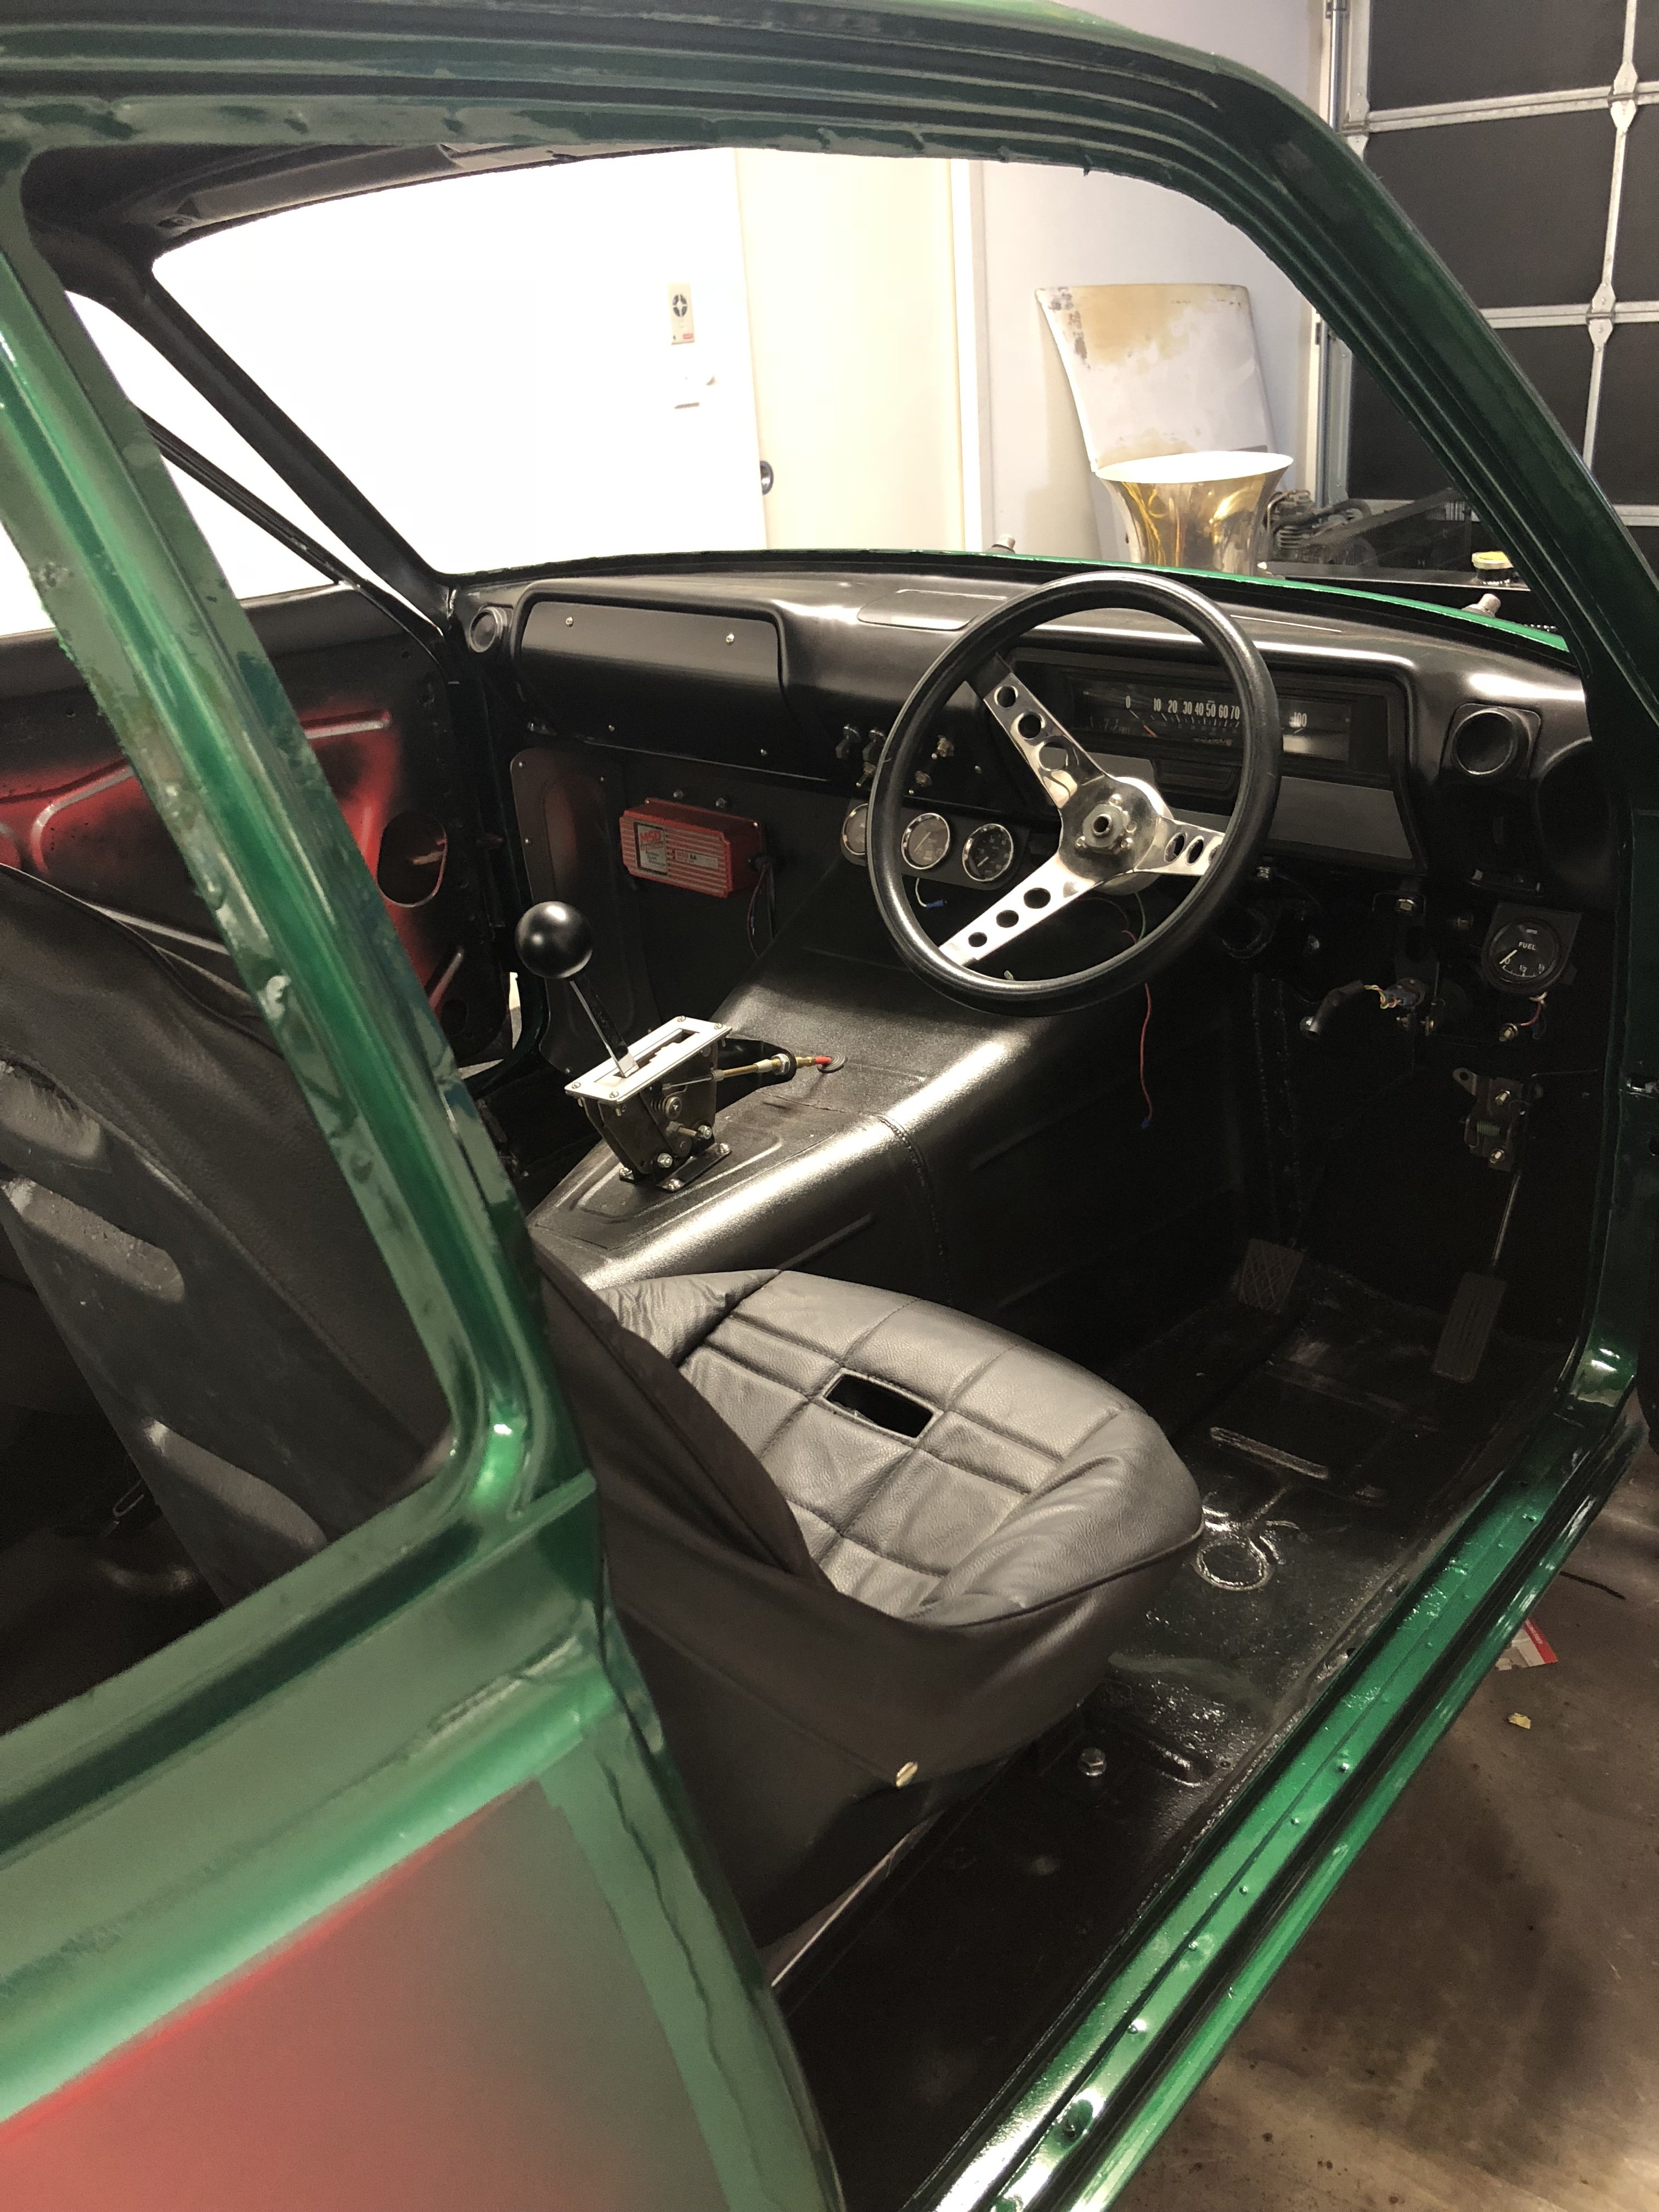
Been poking away at things. Ol' mate runs a Tech room at the local high school, so i did a C+ effort on turning up some oak gear knobs one weekend The black one is the knob off the 2300 wagon, which would be close to if not the exact factory size on the van - ie pretty small, about 25 diameter x 40 long. I havnt been able to find these for sale anywhere, and they are an usuay (for a gear knob) thread The other ones might get used on some other cars. M8 x 1.25 threaded tap into a 7mm drilled hole, and some danish oil. Also tidied up the dizzy. One off each engine, one slightly better nick then the other. Very similar design to the 2300 one (box of bits in the background) but I didnt need to steal any bits. As i managed to make one good one from the two, one set of points was pretty much new, one vacuum advance worked, etc. Reassembled and adjusted up. Got a couple of cheap NOS dizzy caps in a recent order so unboxed that and all looking good.
8 points
-
in a week or so the crown is going to get the seats fixed and a couple of other things. one of which is a carpet for the boot. i decided that the old sub box i had made took up to much valuable boot space so i made a new one that goes hard up against the back seats. its out of the way up there and makes the boot much more usable. so thats done now. heres the old one, 2021-06-06_02-57-26 by sheepers, on Flickr and this is the new one. 2021-06-06_12-10-19 by sheepers, on Flickr 2021-06-06_12-10-36 by sheepers, on Flickr 2021-06-06_12-10-43 by sheepers, on Flickr 2021-06-06_02-57-33 by sheepers, on Flickr 2021-06-06_02-57-20 by sheepers, on Flickr 2021-06-06_02-57-13 by sheepers, on Flickr8 points
-
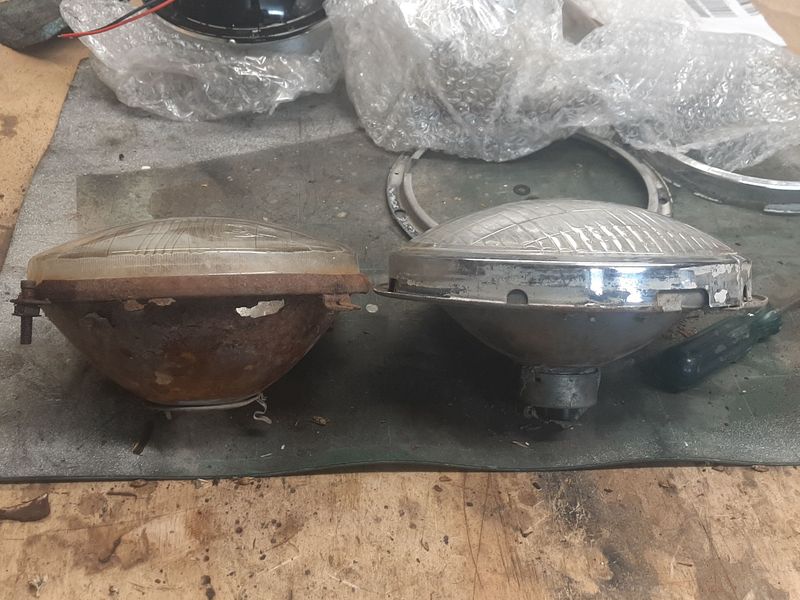
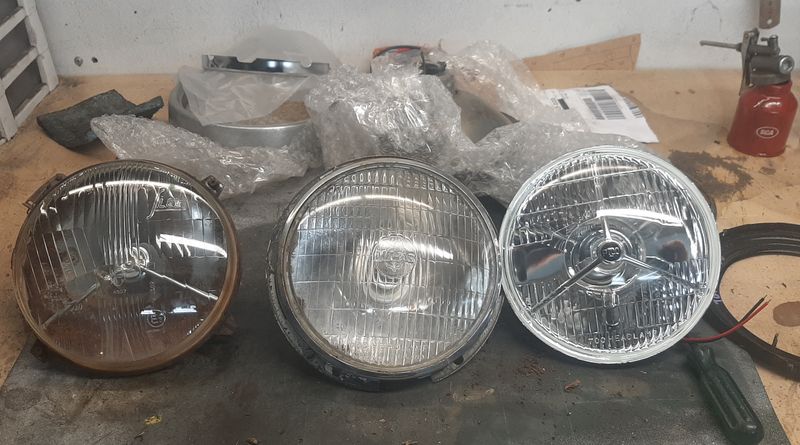
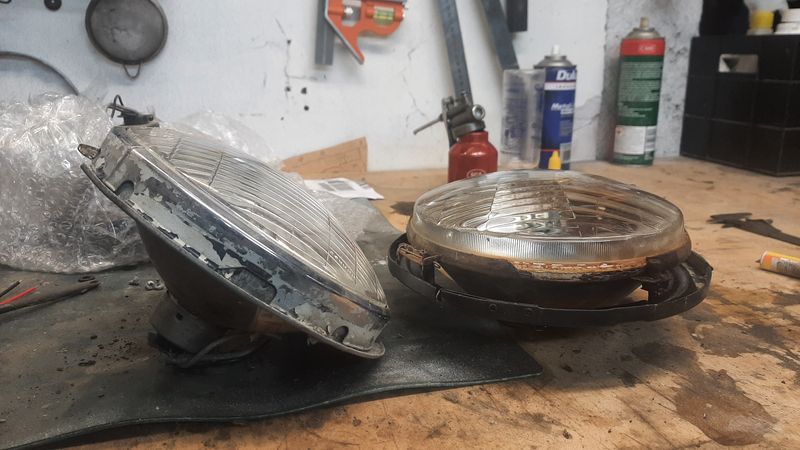
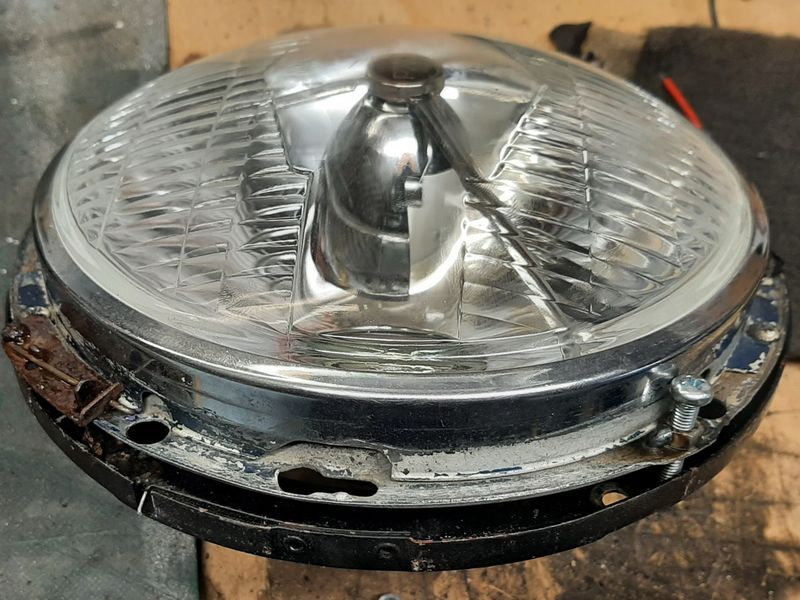
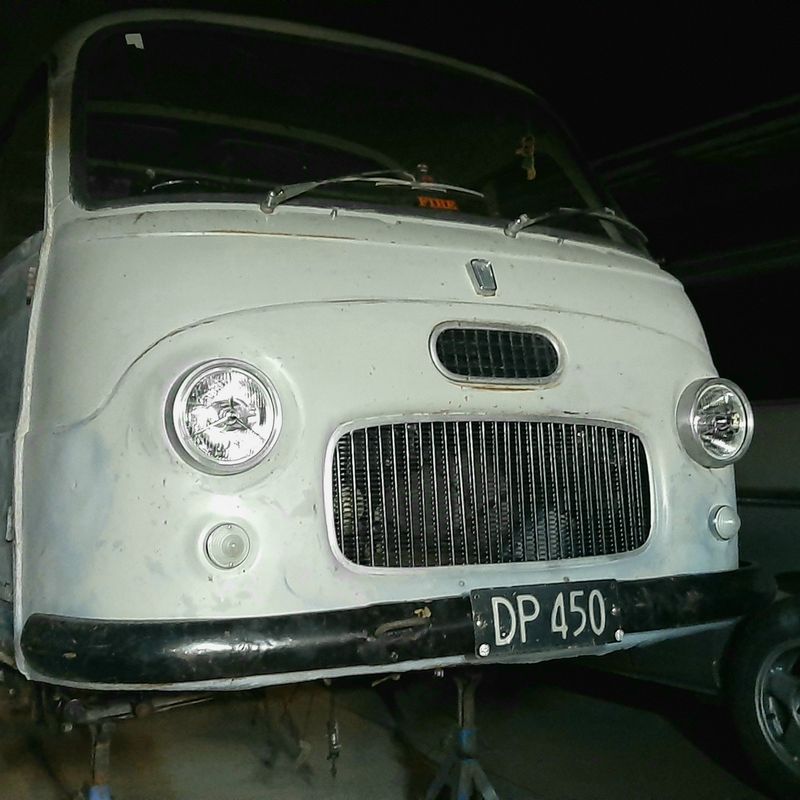
Headlights These take a 7" H1 bulb headlight, which seems common enough, but the bulb housing has the mounting and adjustment built in and clip on to the bucket and are only available NOS, like these for only $500NZ + postage, and these aren't even RHD. https://www.ebay.com.au/itm/124135811511 So i bought the cheapest 7" headlights i could find with a peace symbol which tuned out are Lucas STYLE 700 lamps from here along with some other stuff: https://www.classiccaraccessories.co.nz/collections/lighting/products/classic-lucas-style-p700-headlamps?variant=29025370636376 Unfortunately they didn't mount quite how i imagined but luckily some actual Lucas headlights popped up on FBM and they had the mounting rings too, so I could fabri-cobble something together. OEM SIEM light (H1 bulb), old Lucas 700 with mounting ring (bayonet style bulb) , modern Lucas 'Style' 700 lamp (H4 bulb) The SIEM lamp has a 'long' side glass which gives room for adjustment within the light trim ring. The mounting ring on the lucas makes it a bit tighter Reusing the original mounting buckets (they have small clips for the trim ring built in as well) meant cutting one wee clip off the old headlights, cutting some slots and adding some captive nuts to make some adjusters And they actually fit! Van finally has its face back. H1 and H4 bulb wiring is pretty much the same but ill probably add some relays in for these and a few other things at some point This is normal right? Classic OS, 'saving' money on buying the right thing, by spending almost as much buying old junk that doesn't quite work and spending hours making it fit. Should have probably just bought these, but they were out of stock or I would have https://www.classiccaraccessories.co.nz/collections/lighting/products/7-inch-headlamp-cone-assembly-metal-with-gasket
7 points
-
7 points
-
Sweet road with some serenity even on a shitty day6 points
-
Looking at going the full hog . Body off chassis.zinc plate all bolts and brackets . Im thinking a janekits zinc plating kit from oz
6 points
-
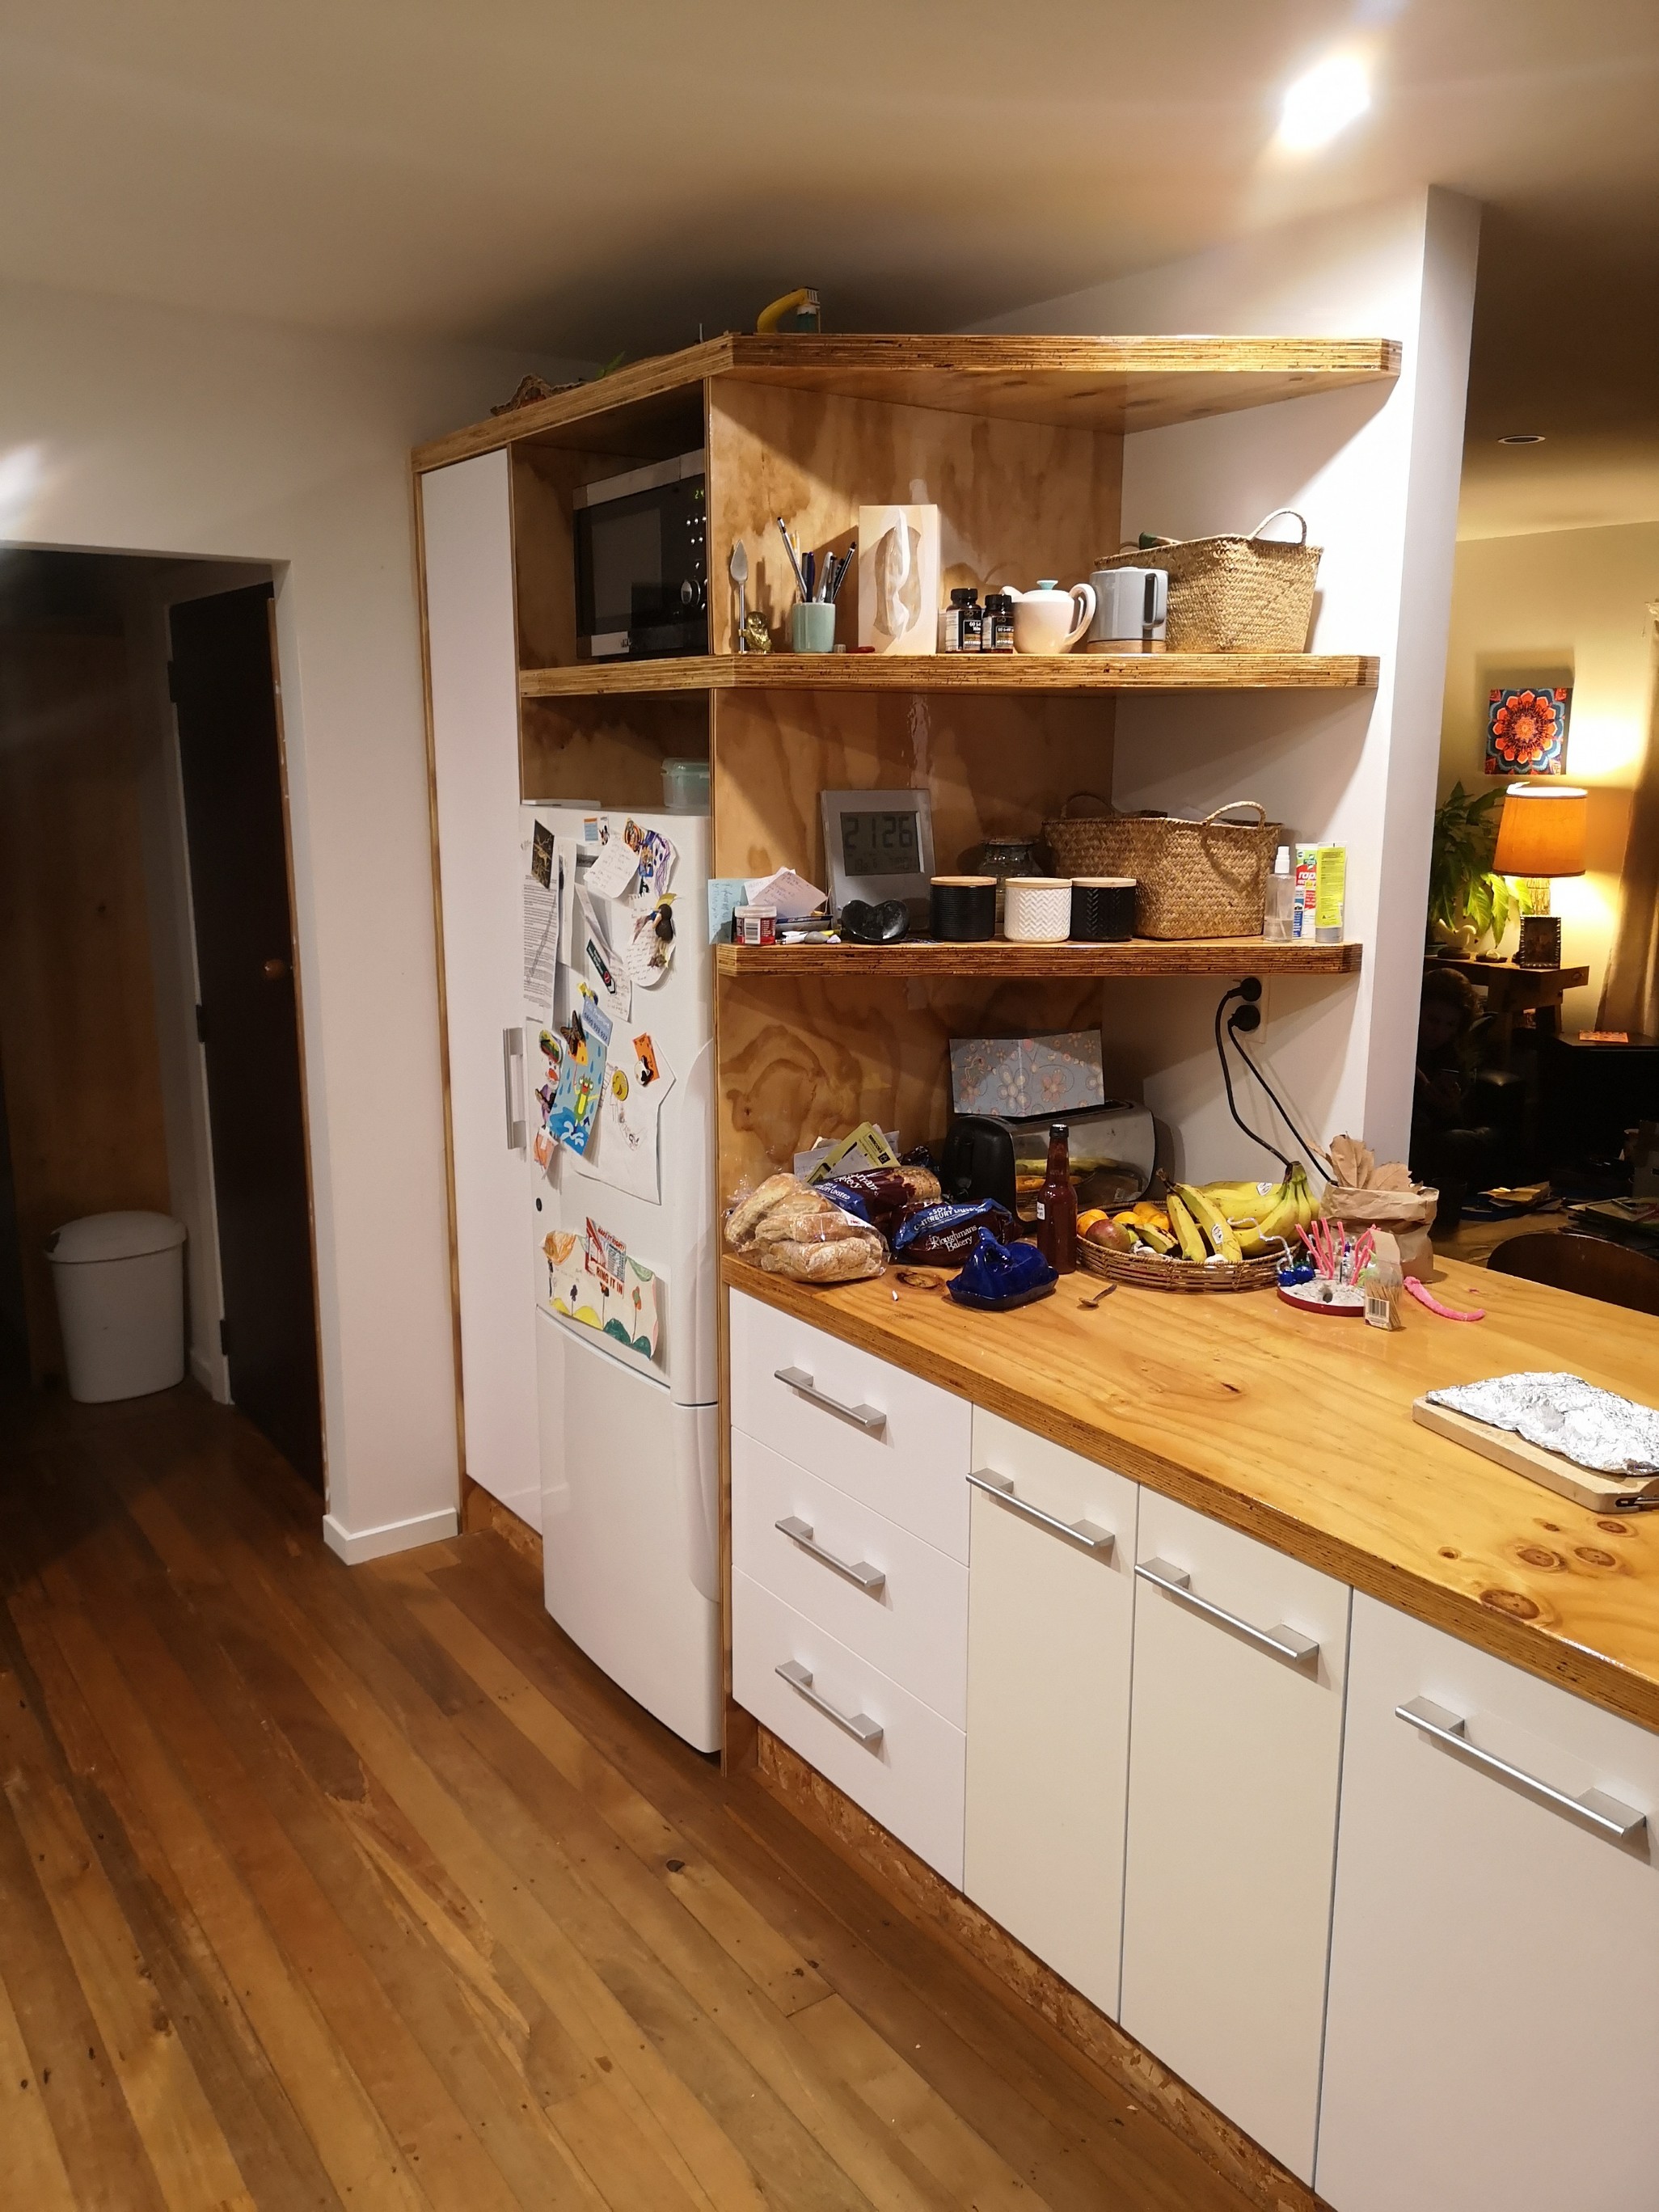
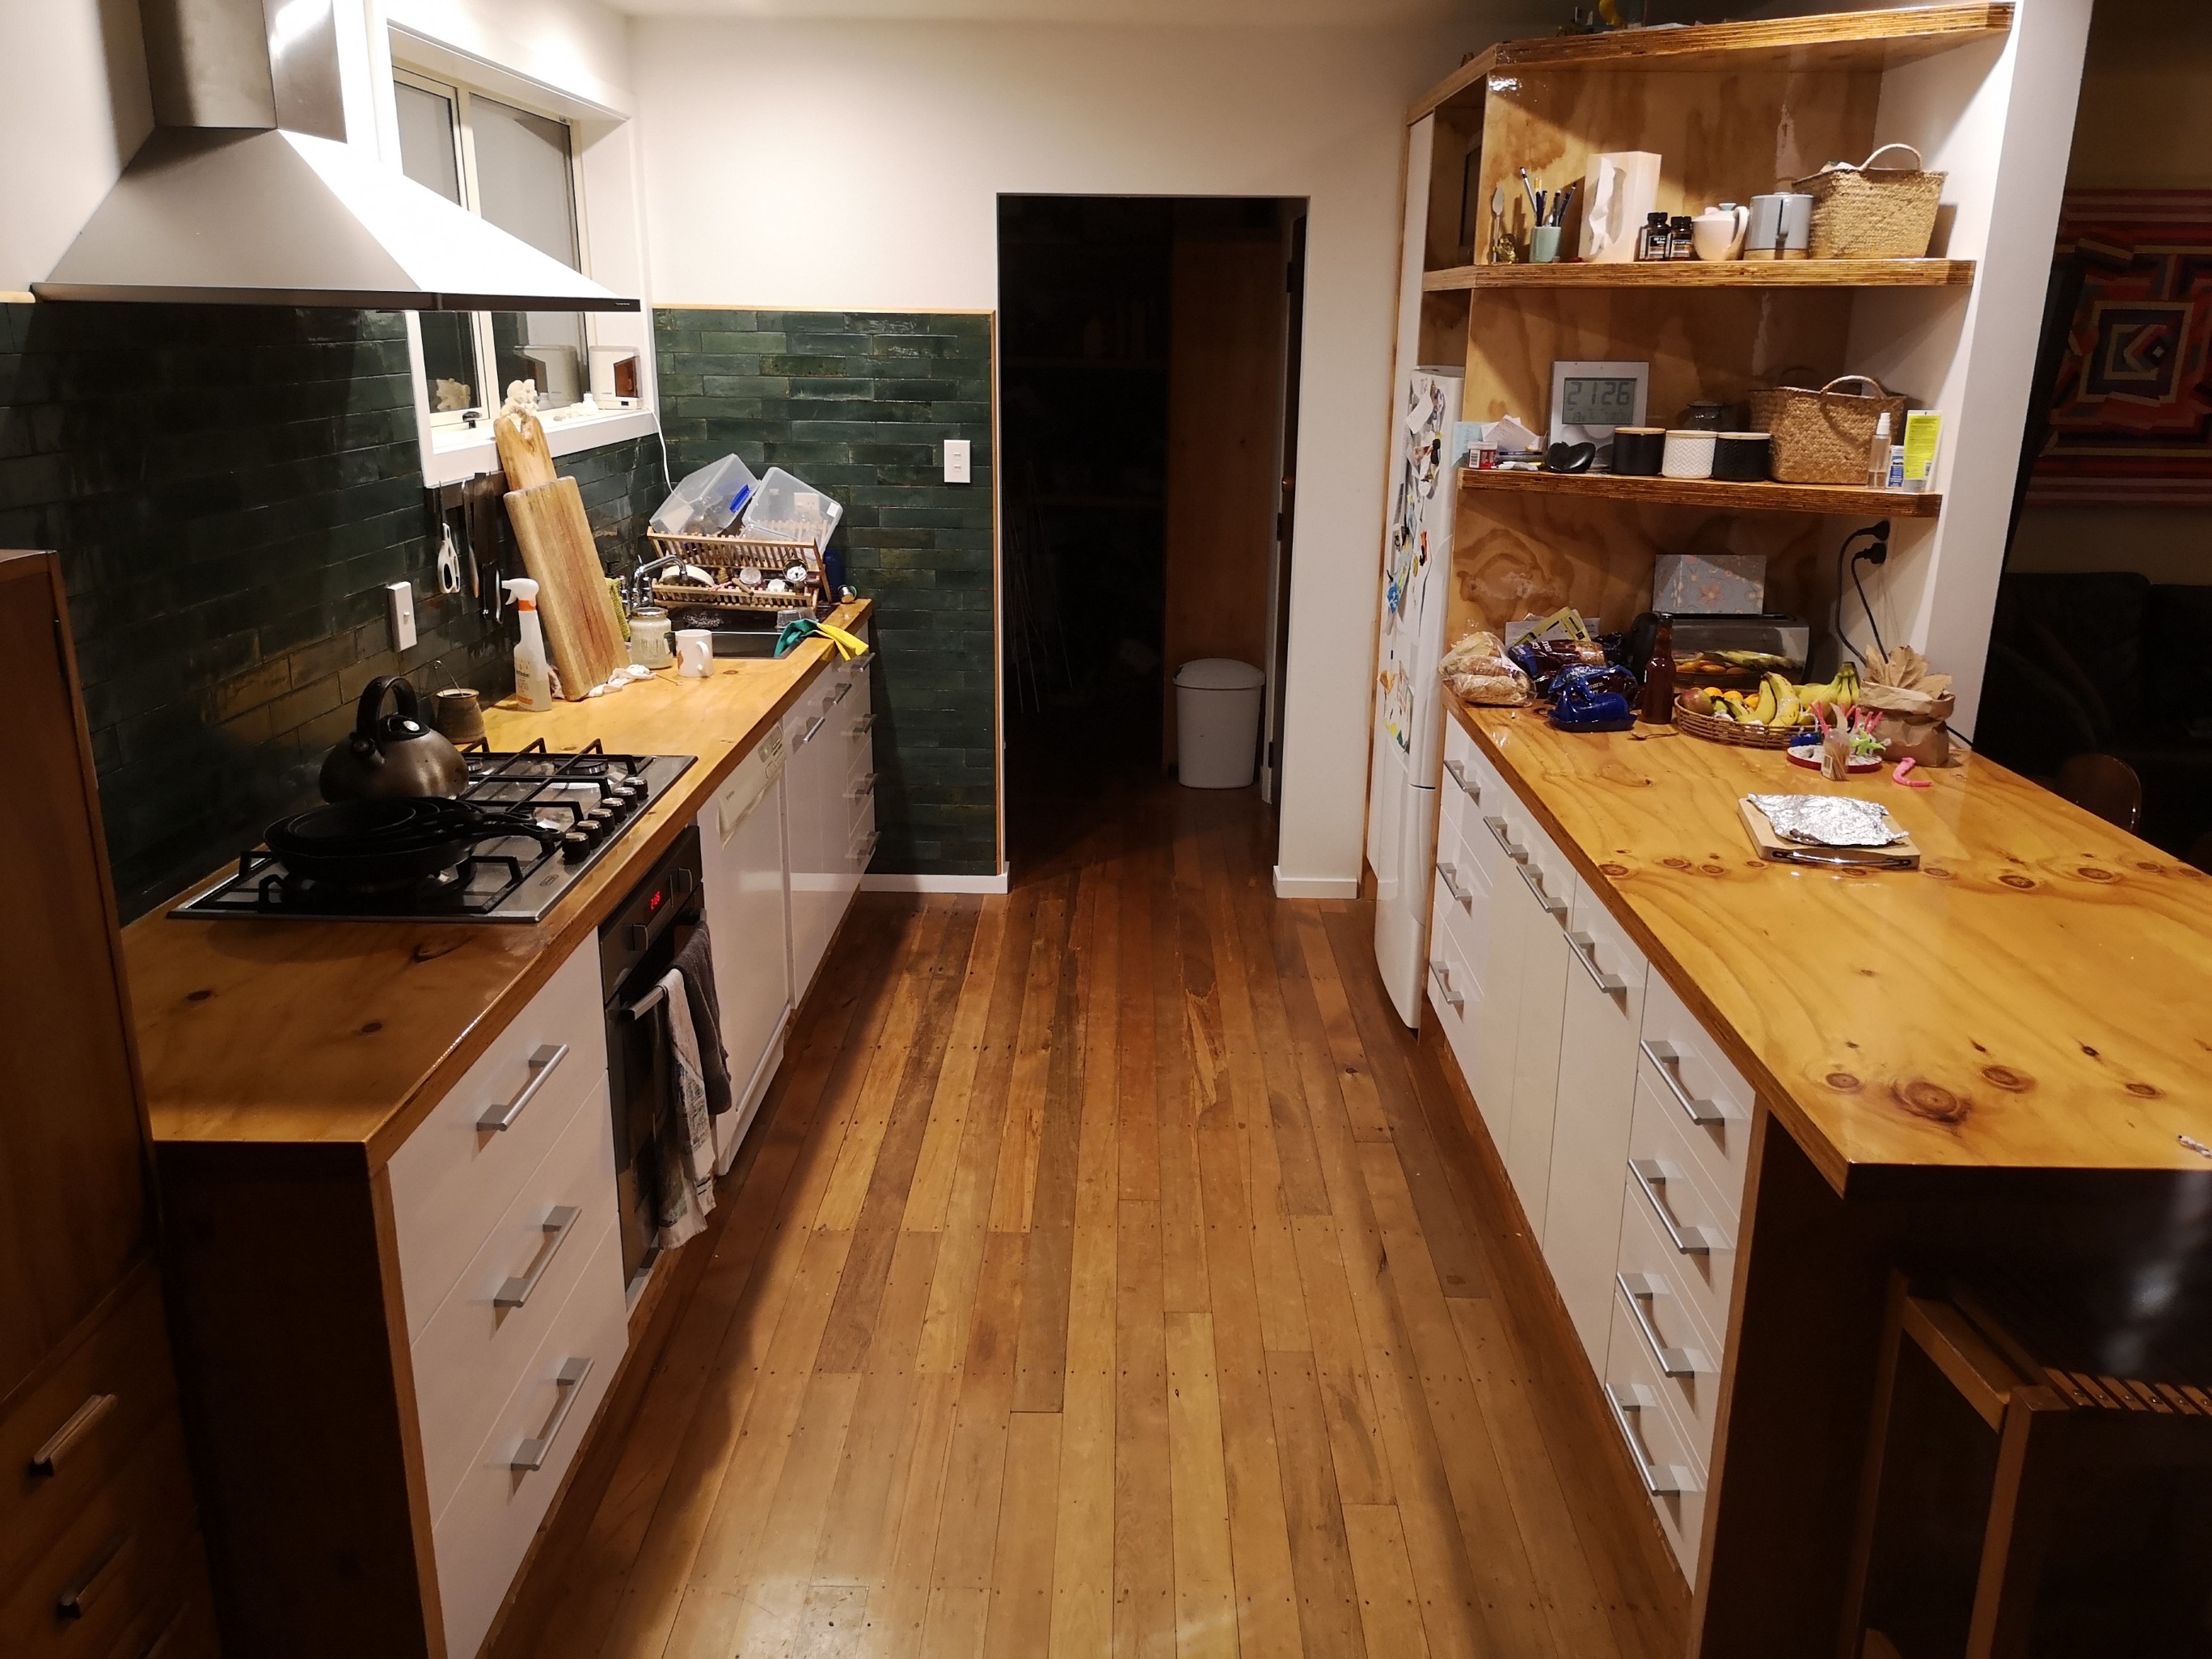
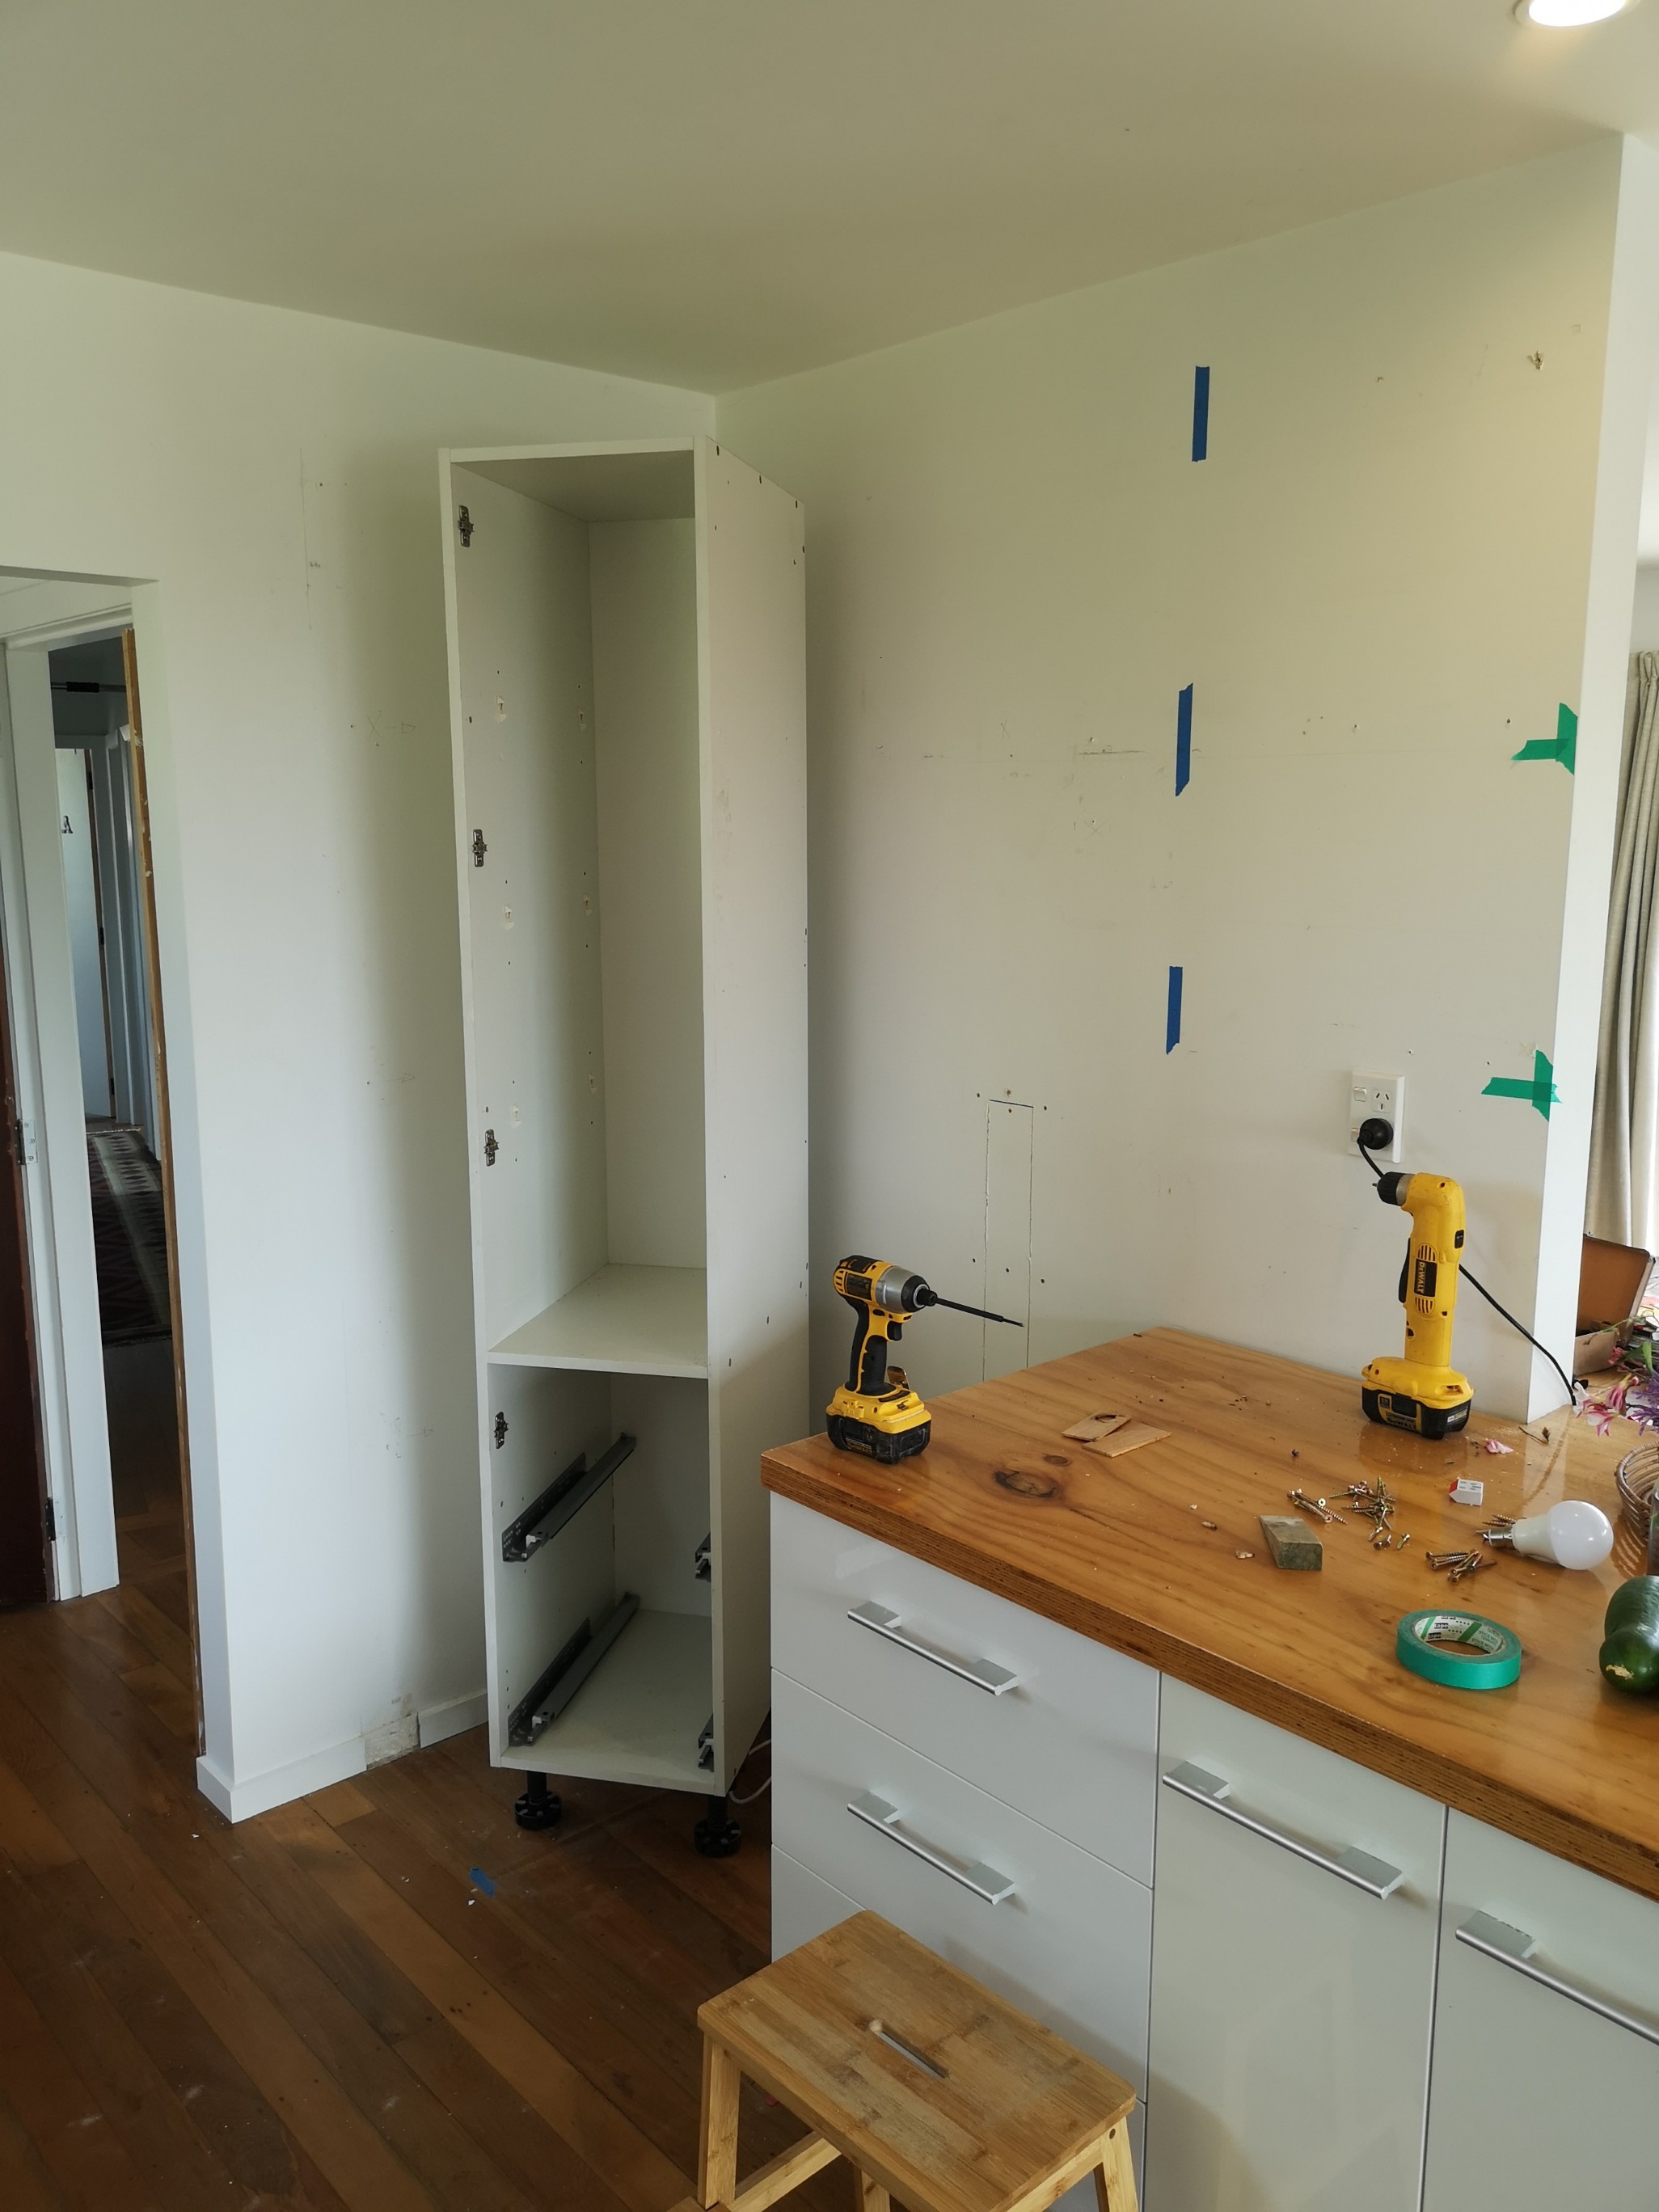
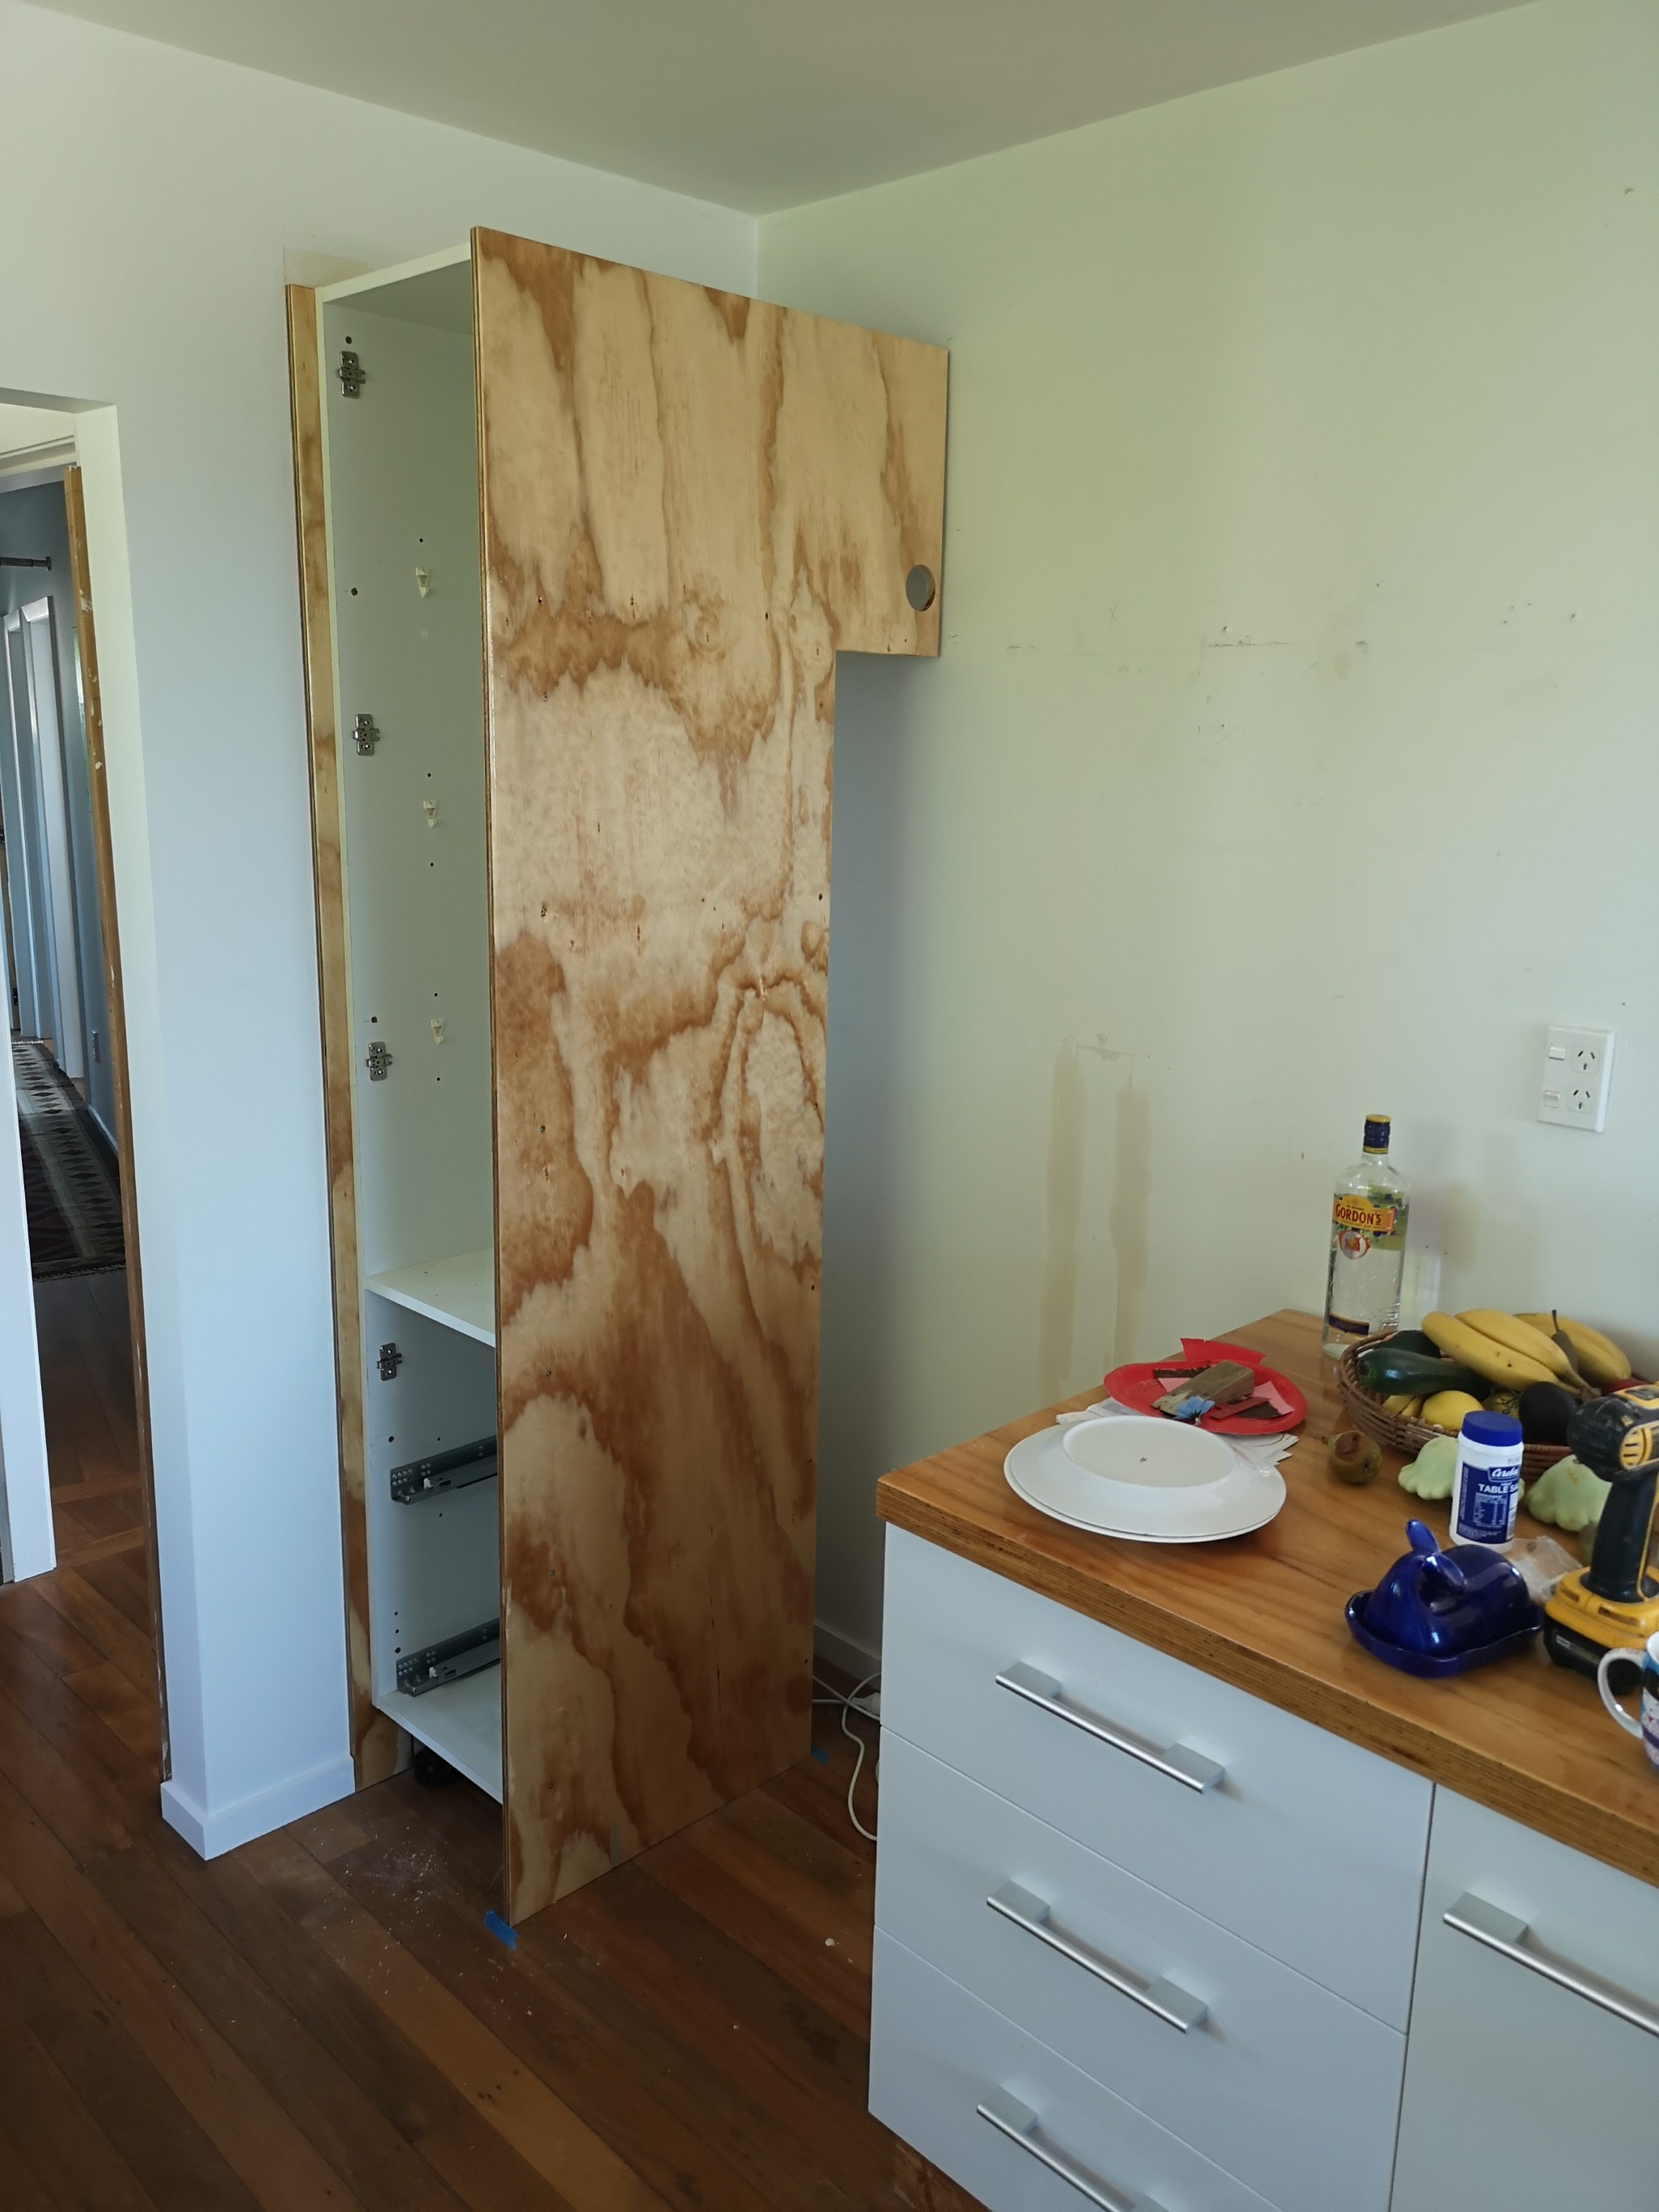
Kitchen finished (besides the extra little bit of plaster and skirting from the aforementioned fuckup) Another place to store crap.. (note the off colour cupboard doors)
5 points
-
Just returned from ~9hr daytrip with @HighLUX (although google maps said 10.5) to check out slightly unknown section of new route. Will have a new thread in the next couple days hopefully.5 points
-
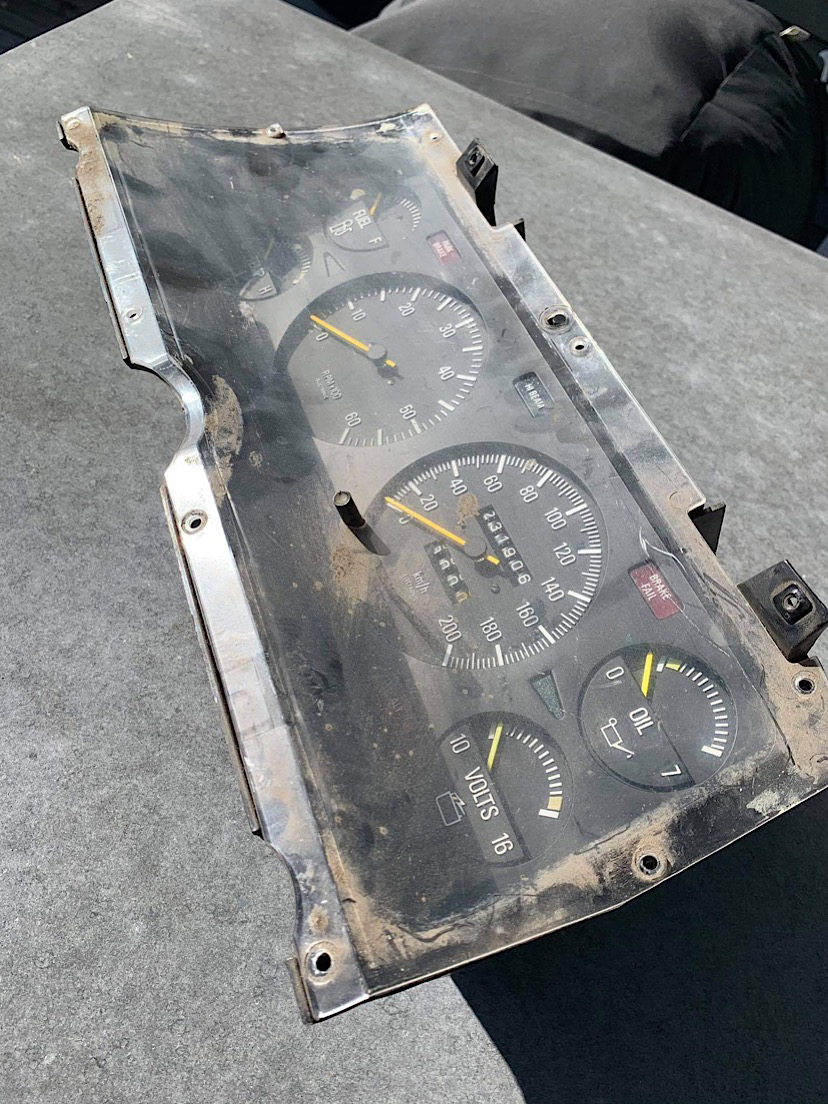
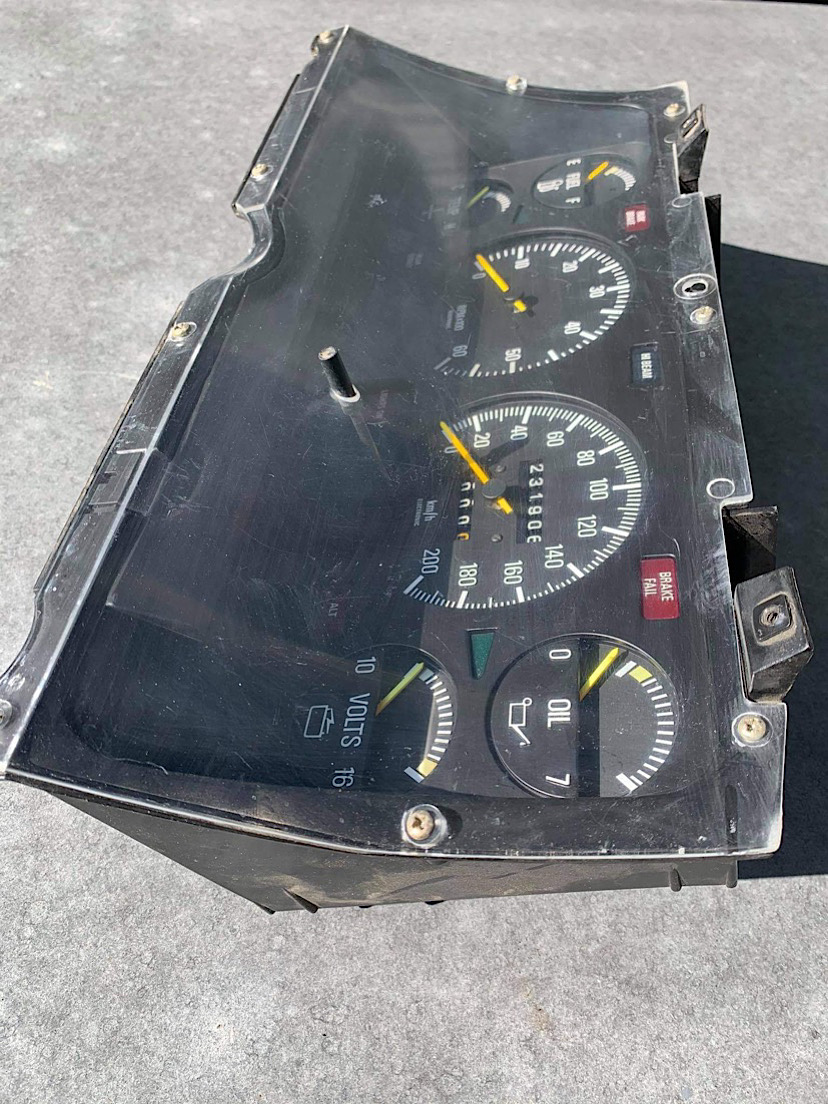
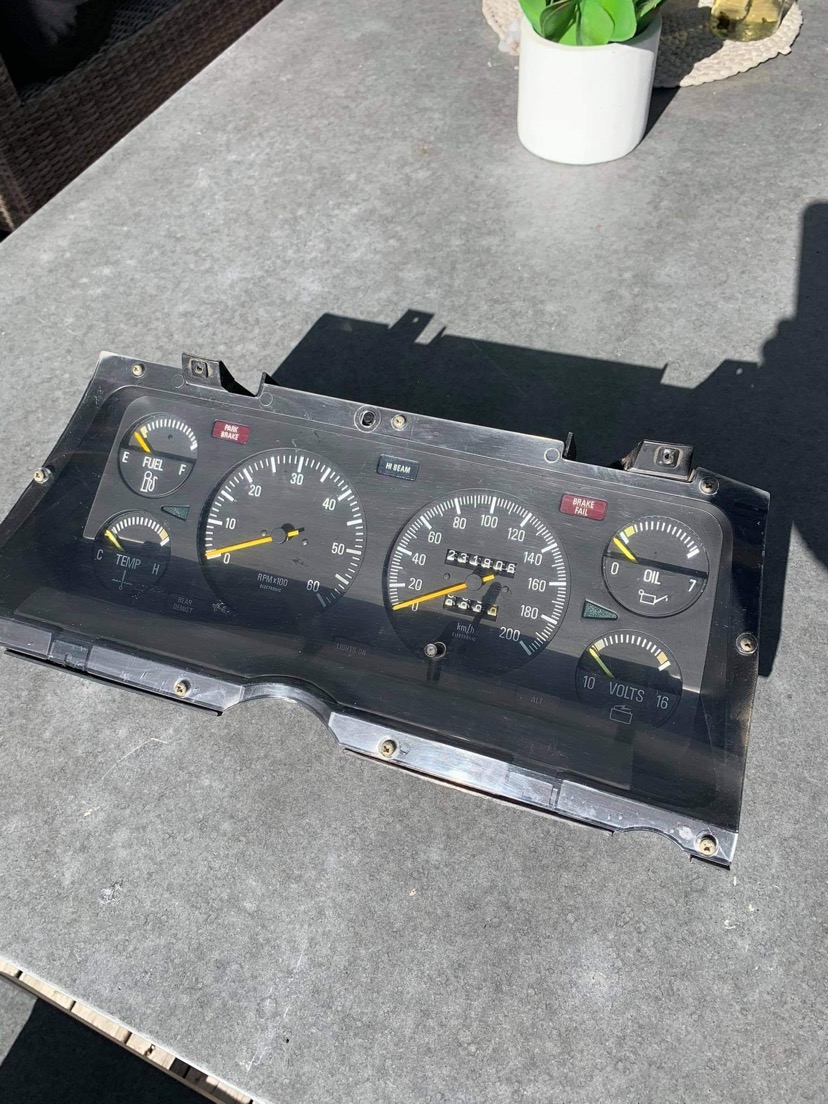
I also paid $50 for Fairmont Ghia speedo (usually $200 plus) as this has the rev counter where my povo pack Falcon only came with an “Econo Gauge” which appears to work on vacuum when you plant your foot and shows you how uneconomical your driving is. What a great invention that was I gave the speedo a but of a clean up too and it's ready to be put in.
5 points
-
Common sense?5 points
-
I swear Deferred Maintenance should be the title of all my posts, because sure enough, here we are again. It was kind of expected though since the seller didn't really know or care what he had and was running it on 91, I couldn't expect he kept up with the maintenance more than just the odd oil change. I've been collecting various bits and pieces for a while now, getting ready for this lot of work. I need to get the car in for a wheel alignment and then a WOF, so this weekend was a perfect chance to get cracking on it. The first job of the day was to get the car up on stands and drop the engine oil. The oil level was a bit low, so I topped with the finest thin synthetic 5W40, started the car up and ran it for a bit first to get some heat into the oil, and then drained it. It came out fairly dark, but not jet black and there were no chunks. The filter didn't look too old either, so I suspect it probably had the usual Kiwi "service" of an oil change and nothing else. Better than nothing I guess. The filter on the 20v is a bit easier to access than the 7AFE as it has a spacer behind it. I'm not sure why, it's not an oil cooler, it's just a passthrough shifting the filter away from the block. I poured in 3L of Penrite semi-synthetic 15W40, started the car up to check for leaks, and when there were none moved onto the next job. The next fluid to change was the gearbox oil. The gearbox shifts OK, with no grinding or crunching but 2nd gear can be a bit stiff. It turns out this fluid may have been changed somewhat recently too, as it was a clean reddish colour and smelt like clean gear oil. Either way, I drained it and replaced it with Penrite 75W90. Always open the fill plug first, just in case it's seized and you find yourself with a drained box and no way to fill it. The fill plug is on the front of the box, covered in filth. The fill and drain are both 24mm. The drain is under the car, on the very bottom of the gear box, kinda in line with where the filler is. Be aware that when you remove the drain plug the fluid will come out with some considerable gusto, especially if you have completely removed the fill plug, so get ready for it to shoot half way across the floor. To fill the gearbox I used the flexi pipe that comes with the fluid, and extended it with some extra hose and just let gravity fill the gearbox until it started to dribble out again. Easy. It took about 2.3L or so. A 2.5L bottle was plenty. The last fluid I was curious about was the clutch fluid. I replaced the brake fluid when I replaced the brakes, and the fluid was black and very festy. The clutch fluid was no better. I didn't want to drain the whole thing and introduce air into the system, so took to doing a few flushes whilst adding new fluid. It's not so dark now but certainly isn't as clean as the brake fluid. One of the main jobs I had to get done was the front control arms, and the RH axle. I wanted to remove the arms and replace the bushes with poly bushes. The axle needed to be replaced as the outer CV had decided it wanted to be heard and was singing the song of its (broken) people, both when turning but also when accelerating, which was novel. The control arms are really easy to get out. Undo the three nuts/bolts on the lower balljoint, remove the nut for the lower swaybar link, and then it's a series of bolts holding the swaybar bracket on and one big bolt through the bushing. With the control arm out it was easy to pull the axle out and have a good look. I pulled it out and assessed its condition from the safety of the bin. Since I was only doing the outer shaft, I just removed the band from the inner CV boot and split the shaft that way, leaving the fixed section in place. Needless to say the boot was stuffed But the joint was even worse. All the grease that hadn't previously ejected its self everywhere, was turned to a hard putty-like substance. There was also noticeable play when twisting the CV on the shaft. I have no idea how this wasn't identified in the WOF inspection! The replacement shaft had good boots, so all I did was clean the old grease out, pack new grease into the inner CV and reassembled it with a new clamp on the boot. Next was the fun task of pressing the old control arm bushes out. Thankfully I have a press, and with some creative use of big sockets, It wasn't too bad of a job. One side came out easy enough, the other side got a bit stuck and the inner rubber came away from the outer shell. This left me with a metal sleeve stuck in the arm. The easiest way to sort this was to was a reciprocating saw to cut a notch in it and use a chisel to crush the sleeve slightly and knock it out. The new poly bush pressed in easy, you just need to make sure its even on both sides when done. These are a multipart bush, with the main bush, a tube and washers/spacers on each side. And when completed they should look like this The front bushing pressed out easily too, but needed some jiggery-pokery to get it into place in the press. I'm not sure this is an officially supported method, so don't try it at home. I wouldn't do this to a metal sleeve bush, but these are an easy press fit rubber bush with no outer sleeve. The strap is only to stop the rear of the arm from coming up. The outers for the polybush press in by hand, but I used the press to push the tube through. You could easily use a vice, or if you are a bit rough, a hammer. One complete arm. Refitting the first arm was something of a nightmare and not a job I want to do again in a hurry. Lining everything up was a real ball-ache, and at one point when the pry bar slipped, a face ache. The second arm went a bit smoother. There isn't really any trick to it other than not attaching the balljoint to the arm until the very end, and using a dead blow hammer to get the front bush into place. To get the bolt into the rear bush you need the arm as flat as possible in the horizontal plane, but the front bush is also very sensitive to twist and angles. It's a lot of trial and error. With both fitted though, everything got torqued to spec and I moved on. I had a quick interlude from big work, mainly because I was at the end of my tether after the control arms and small jobs are easy wins. The RH side fog light was secured in place with zip ties, and neither worked. I wanted to know why. As it turns out, neither were plugged in. Both actually work once the connectors are... connected. The RH side one has a broken mount and cracked lens though. Thankfully all the bits are there though, so I can fix it and the lens isn't letting moisture or dirt in. Someone had tried to fix it before, using what I presume is either a cheap superglue or PVA glue. It didn't stick at all. They also failed to key the surface, so the glue was sitting on the surface. On the plus side, it was really easy to remove the old glue. I mixed up a batch of super-strong Araldite, and after keying the surface with a wire bush, slathered it on. And some creative taping kept pressure on the joint overnight. It seems pretty strong today, but I'll give it a couple of days to fully cure before refitting. Another small win was to fix the front plate, which was 90 shades of bent out of shape. Some swift beating with a plastic hammer made it look somewhat normal again. It won't ever look perfect on the car because the mounting points are twisted and bent, but since they are moulded into the bumper cover I'm kinda stuck with it, but it's better than it was. You can actually read it now. Whilst fiddling around on the front of the car I decided to cut the tie wire and remove the random gopro mount from behind the grille. This also gave me the chance to realign the grille, which wasn't hooked in properly at the bottom. The grille looks better now It is all in a dire need of a clean, but that will come later. The next day, before starting the under bonnet work I slid under the back of the car and wire brushed the "surface rust" on the "fuel pipes" that the car failed its WOF on. To be fair, there was a little surface rust under there, but it was on a brake pipe and was minor (less than the fuel pipe on the liftback had). This was followed by some rust convertor, and later in the day, epoxy zinc. Back in the engine bay, I replaced the ancient fuel filter, which was full of black rubbish. No photos of this because it's a real bastard of a job. Most of the access is through a cutout in the LH wheel well, and a lot of the work is done blind. Not much fun, but it's done. After that, I pulled the shitty pod filter intake out. It was just a pod filter stuck into the end of the standard intake pipe, resting on the bottom of the stock airbox with a foam pad to stop it from rubbing through (which going by the sealant on the top of the filter, it had done already). The intake air temp sensor had been relocated to a bottle cap with a hole poked through it. With the intake off, I couldn't help myself but to check out the reason you buy a 20V... the ITB trumpets. Very big and trumpety. Before refitting the standard intake, I removed the bottom of the airbox to clean it and decided it wouldn't be any easier than now to replace the thermostat (which was sticking open). It turns out the thermostat housing had also been leaking, as shown by this mess on top of the gearbox. Removing the housing gave an idea of what was going on. A pinched and torn gasket, and any colour you like as long as it's orange-brown. You can see where the housing was leaking once the thermostat is removed. It was just seeping out the side, through the stuffed gasket. The poor gasket had seen some shit. Some of it was even stuck in the thermostat, obviously jamming it. The "coolant" wasn't just like rusty water, there was something thick and slimy in it. I presume it's that old bastard Stop Leak. Ugh. I flushed some coolant through the top hose with the thermostat out, and got more brown mud out of the system. I'll need to run it for a bit and do a couple of flushes I guess. They probably put it in to stop the thermostat housing leaking... instead of, you know, fixing it. The new thermostat and gasket looking mighty fine. Remember to place the jiggle pin at the top. And the freshly cleaned housing goes back on. The old thermostat had a date stamp of 97, so probably original. Unfortunately this is where it all came a bit unstuck for a bit today. When checking out the hoses and front engine mount I noticed the radiator was looking a bit worse for wear. Sure enough, once removed you can see a whole bunch of fins have rotted away, and there are signs it's been leaking in the past. I knew I'd have to replace the radiator eventually, but didn't think it would be this soon. There was no point in reassembling with that radiator though, so in the bin it went, fan and all. I noticed the fan made a grinding noise when spun by hand, so had no desire to keep that. The car has been running cold for ages so it probably hasn't needed the fan. A quick trip to Pick A Part ended with a clean enough radiator and fan from an AE111 liftback (like mine but 4AFE powered). There were remnants of clean red Toyota coolant in the system, and the sticker said it had been changed a few years back, so that's better than nothing. Some fins are a little out of shape from use, but no signs of leaks and it looks clean inside. I suspect it may have been replaced at some point as it doesn't have any Toyota logos on it like my original one. Interestingly, the NZDM AE111/AE112s have a nice plastic fan shroud, whilst the Carib had a metal shroud that was starting to look rubbish due to surface rust. The plugs are the same and as tested, it works fine in my car. While the radiator was out, once again, there wouldn't be an easier time to replace the front engine mount. I had replaced the rear recently, but there was still quite a bit of shunting coming on and off the throttle. Hmm, something doesn't look right What way should the "forward" arrow be facing? Not backwards? Oh, okay then. A couple of bolts and out the mount comes, showing the full horror of fitting a mount backwards. Torn to bits. No wonder the engine flopped about. I made sure to fit mine with the arrow pointing forward. Now I could refit the radiator and move onto other things, like fitting the intake. Of course, I couldn't just fit the stock intake and hide all that intake noise away, so I pulled back the guard liner and whipped the big resonator out. The intake now draws air from inside the guard behind the liner, and from the snorkel behind the headlight. The K&N panel filter I picked up cheap used, had a clean and oil and then got fitted. Followed by the rest of the intake, including refitting the diagnostic connector where it should be, and not taped to the charcoal canister. Spark plugs were next on the list, so off came the cover. The whole valley is coated in old oil that had turned kinda sticky and gooey. I suspect it's a mixture of the oil cap leaking due to a very compressed seal, and some hamfisted top-ups. The spark plugs weren't as gross as I expected, all the spark plug tubes are bone dry, but the spark plugs are the wrong heat range (BKR5) and the EYA variant isn't the recommended plug. Not to mention the HUGE gap due to wear I measured them at about 1.4mm, when they should be 1.1mm, but thats at the highest point, and the wear slopes away towards the ground strap. They also read quite lean to me, being very white. The new replacement plugs I used are BKR6E-11. These are the standard version of the recommended platinum plugs. The only real difference is the shorter service interval, which for me is fine, but the previous owner probably could have done with the platinum plugs. The spark plugs leads are looking very tired. One was rubbing, and possibly arcing, on one of the center nuts (the below photo is after I moved it to the correct location, see photo a couple above for where it was). Another is wrapped in tape and I'm too scared to find out why I gave the valley a quick clean down and moved onto one of the sources of the oil leaks; the distributor oil seal. I marked the starting location with a paint pen, so I can refit it in the same place. Whether that is the right place or not, I'll find out later when I crack out the timing light. There is one bolt holding the distributor in place, and with that removed some careful levering will pop the distributor out. I think mine had been leaking a little... The old O-ring practically broke in half when I tried to cut it with a knife. It's also very flat. The new O-ring was carefully placed into the groove after some vigorous cleaning (but taking care not to rotate the distributor). Some rubber grease on the O-ring before assembly, and all should be well. The final job to do before giving it a quick degrease was to fill and bleed the cooling system. I was going to praise this funnel setup I have, which did a really good job of keeping the system topped up... Until it decided, when it was half full of hot coolant, that it no longer wanted to be part of the cooling system and came out of the filler neck, tipped over, and poured coolant everywhere. Well, it wouldn't be me if there wasn't coolant on the ground. The good news is that it bled up OK, no obvious leaks and the temp came up quickly and held steady. Unfortunately, the heater is a bit average, so I will probably need to flush out the heater core. Another day. Since there was now coolant over EVERYTHING on the LH side of the engine bay, I had to push forward on getting the car out of the garage so I could clean the coolant off before it dried and stained. This did give me a good opportunity to flood everything with degreaser and make it look a bit better. Hopefully this will help me identify where leaks are actually coming from, and how old some of the grime was. I couldn't help but take it for a quick shakedown around the block. It's still a work in progress, and I'll feel more confident in the suspension once it's been aligned, but the engine does rev out very nicely. Unfortunately the VVT pulley is dead, so there is little to no low/mid-range power, and it feels slow compared to the liftback, but that will be sorted eventually and I'll have all the power back. The ECU will still be learning again too, since the battery was disconnected. There is also a difference in driving style between the two cars that I will need to get used to. With the 7AFE it's all torque, and it runs out of puff quickly, so you use lots of throttle down low and shift early. The 4AGE is all top end and all about revving the engine hard. Even with a new VVT pulley, I expect there will be minimal power down low, it's just the way it is. It's a screamer. I have some more cosmetic and interior work to do, and some more parts are on the way (leads, cap and rotor), but I'll book an alignment for next weekend and hopefully have it in for a wof that following week. Other than a couple of bulbs, I've pretty well nailed the old WOF sheet now.5 points
-
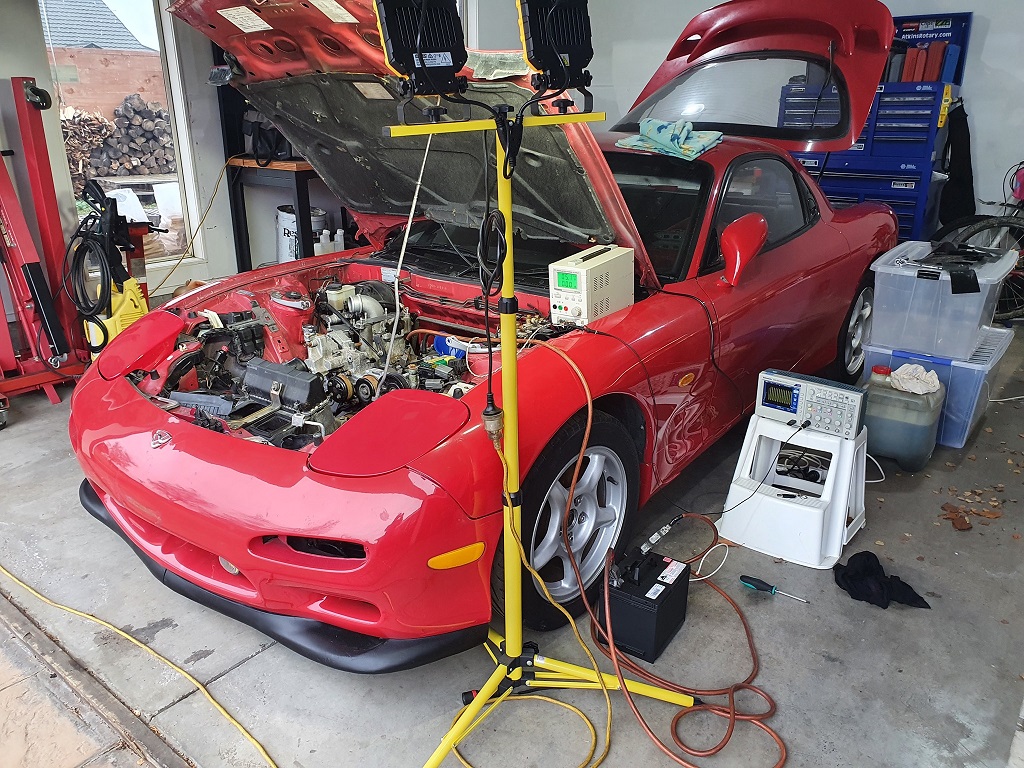
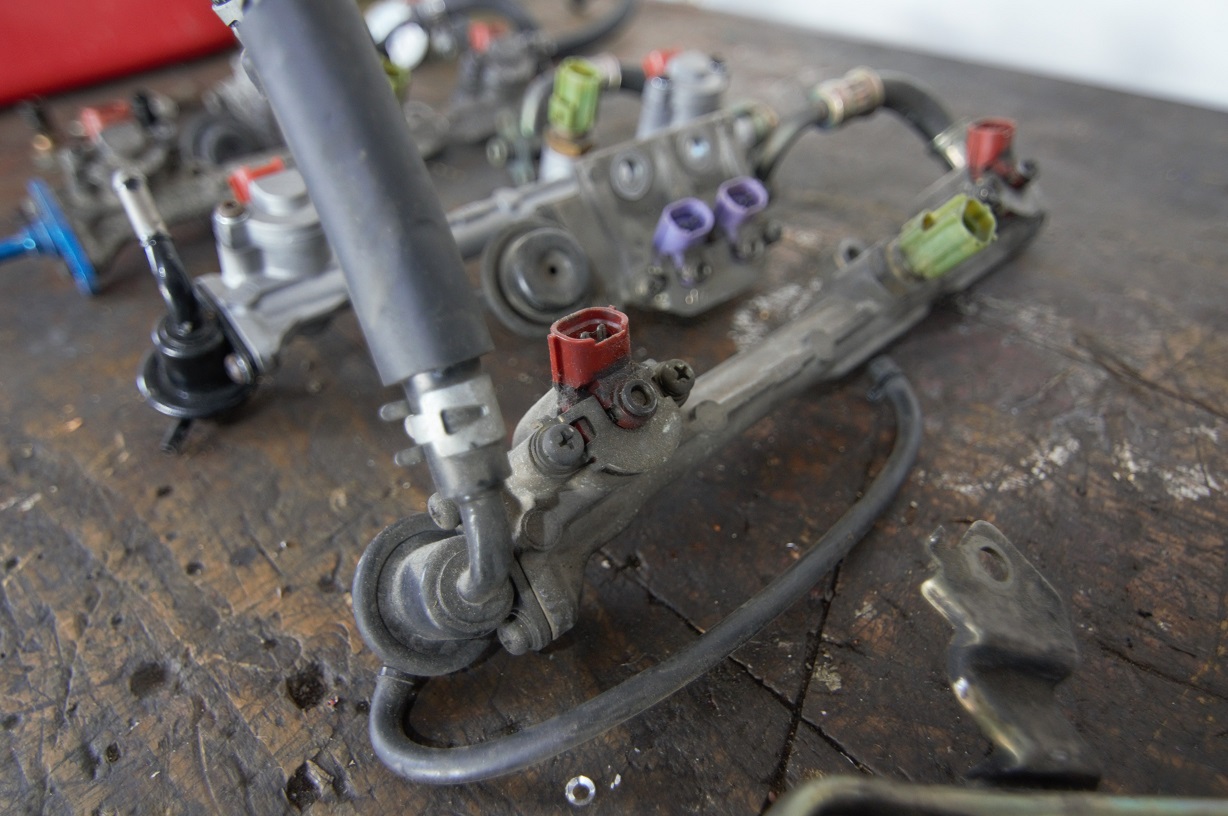
Couldn't wait, needed to know! Chucked a battery on it and jumpered to the starter. Pressure sensor installed in a modified junk spark plug, power supply, oscilloscope... A good hours work for some numbers. Front is around 100 - 105 - 105 (psig) Rear is around 110 - 110 - 105 (psig) Those are cold numbers, so a bit higher than what a hot test will show, but I'm pretty confident off that the motor is fundamentally healthy. A few k's on it for sure, but evenish readings and decent numbers. At the least it means it's worth piecing together the rest of the bay and getting it running before yanking the engine to change the turbos. I can also confirm the oil pump is working, because there is now a not insubstantial amount of oil over the garage floor. Onwards and roundwards :-).
5 points
-
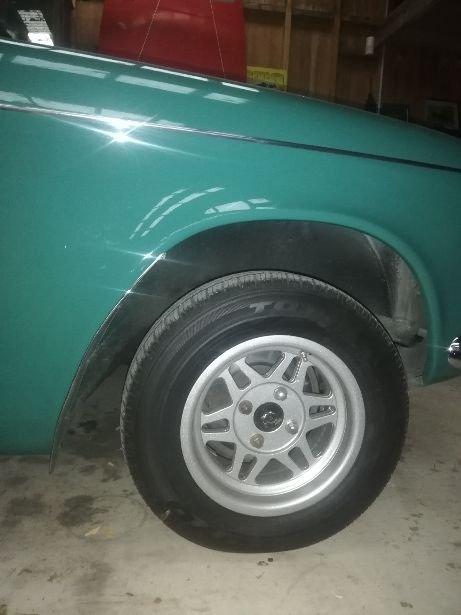
It's been a while but I have lowered the front 25mm and replaced the wheels with 15" with 60 series tyres to help fill the wheel archs better. Since this pic I have lowered the rear 20mm. Supposed to be 25mm but 20 is where it has come to. I think I will still lower the front another 25mm.
5 points
-
5 points
-
Dates look good. Build is about to commence.4 points
-
Get a good brand all season tire and get your brakes checked and adjusted.4 points
-
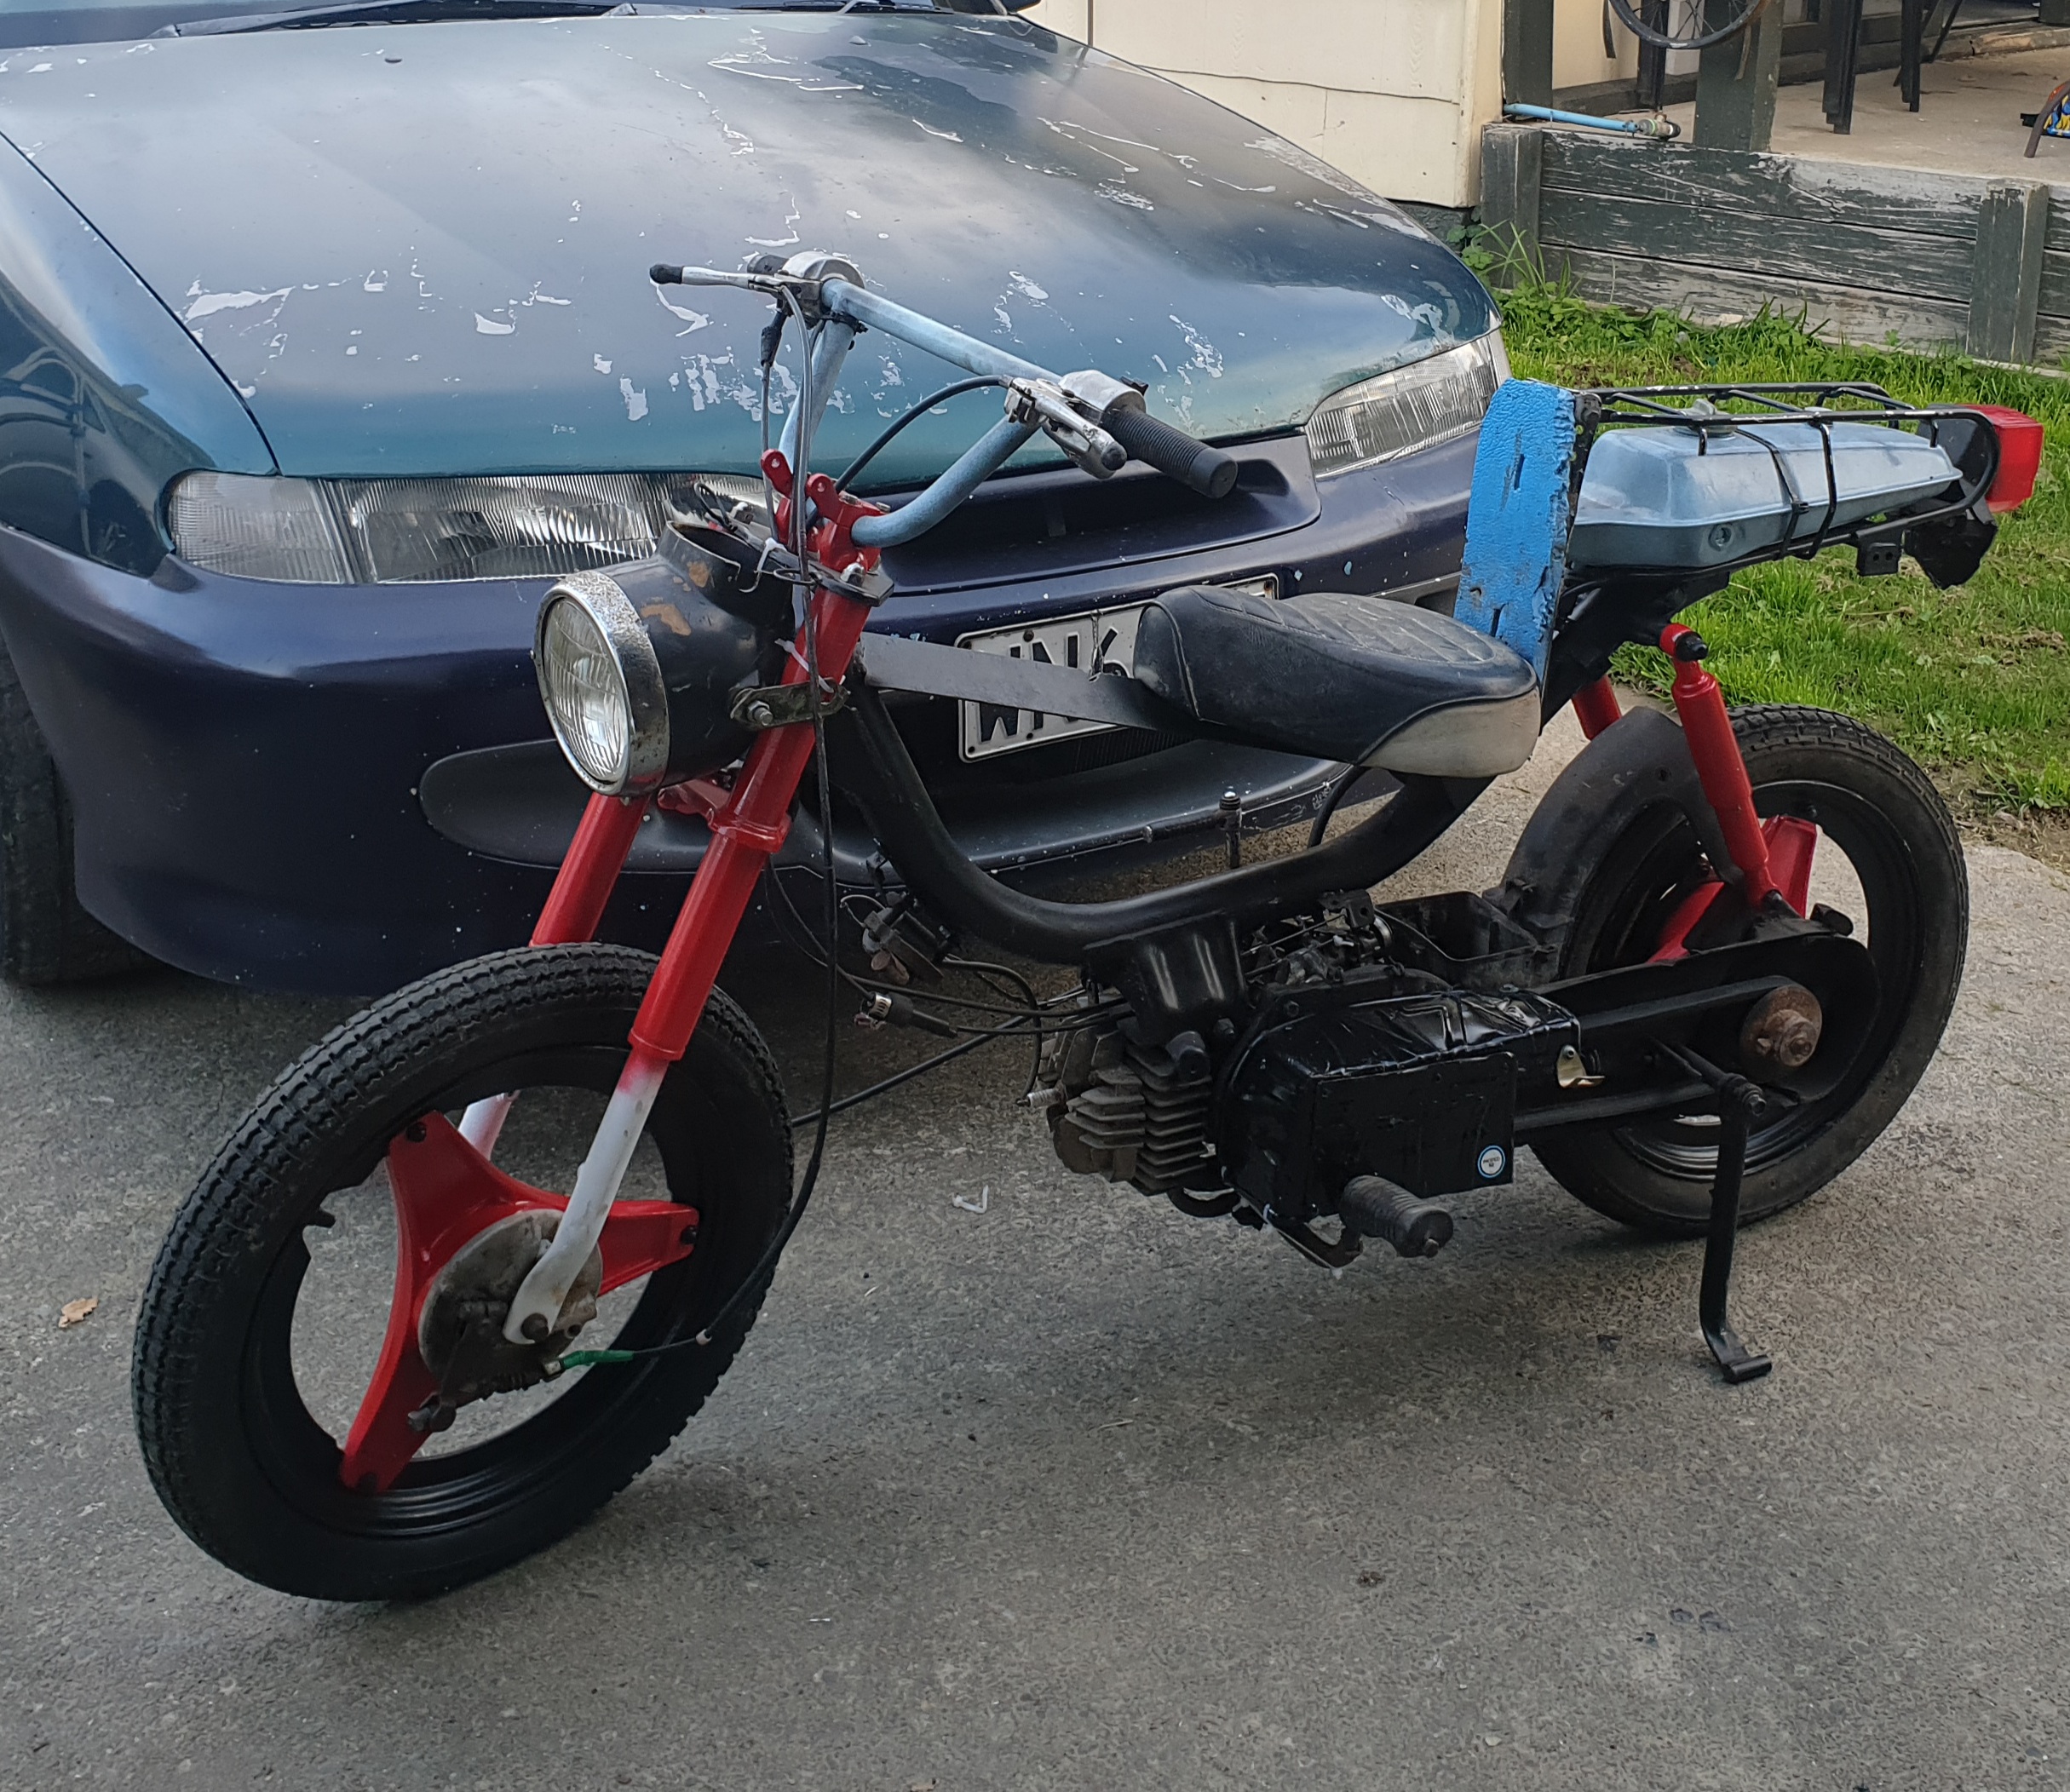
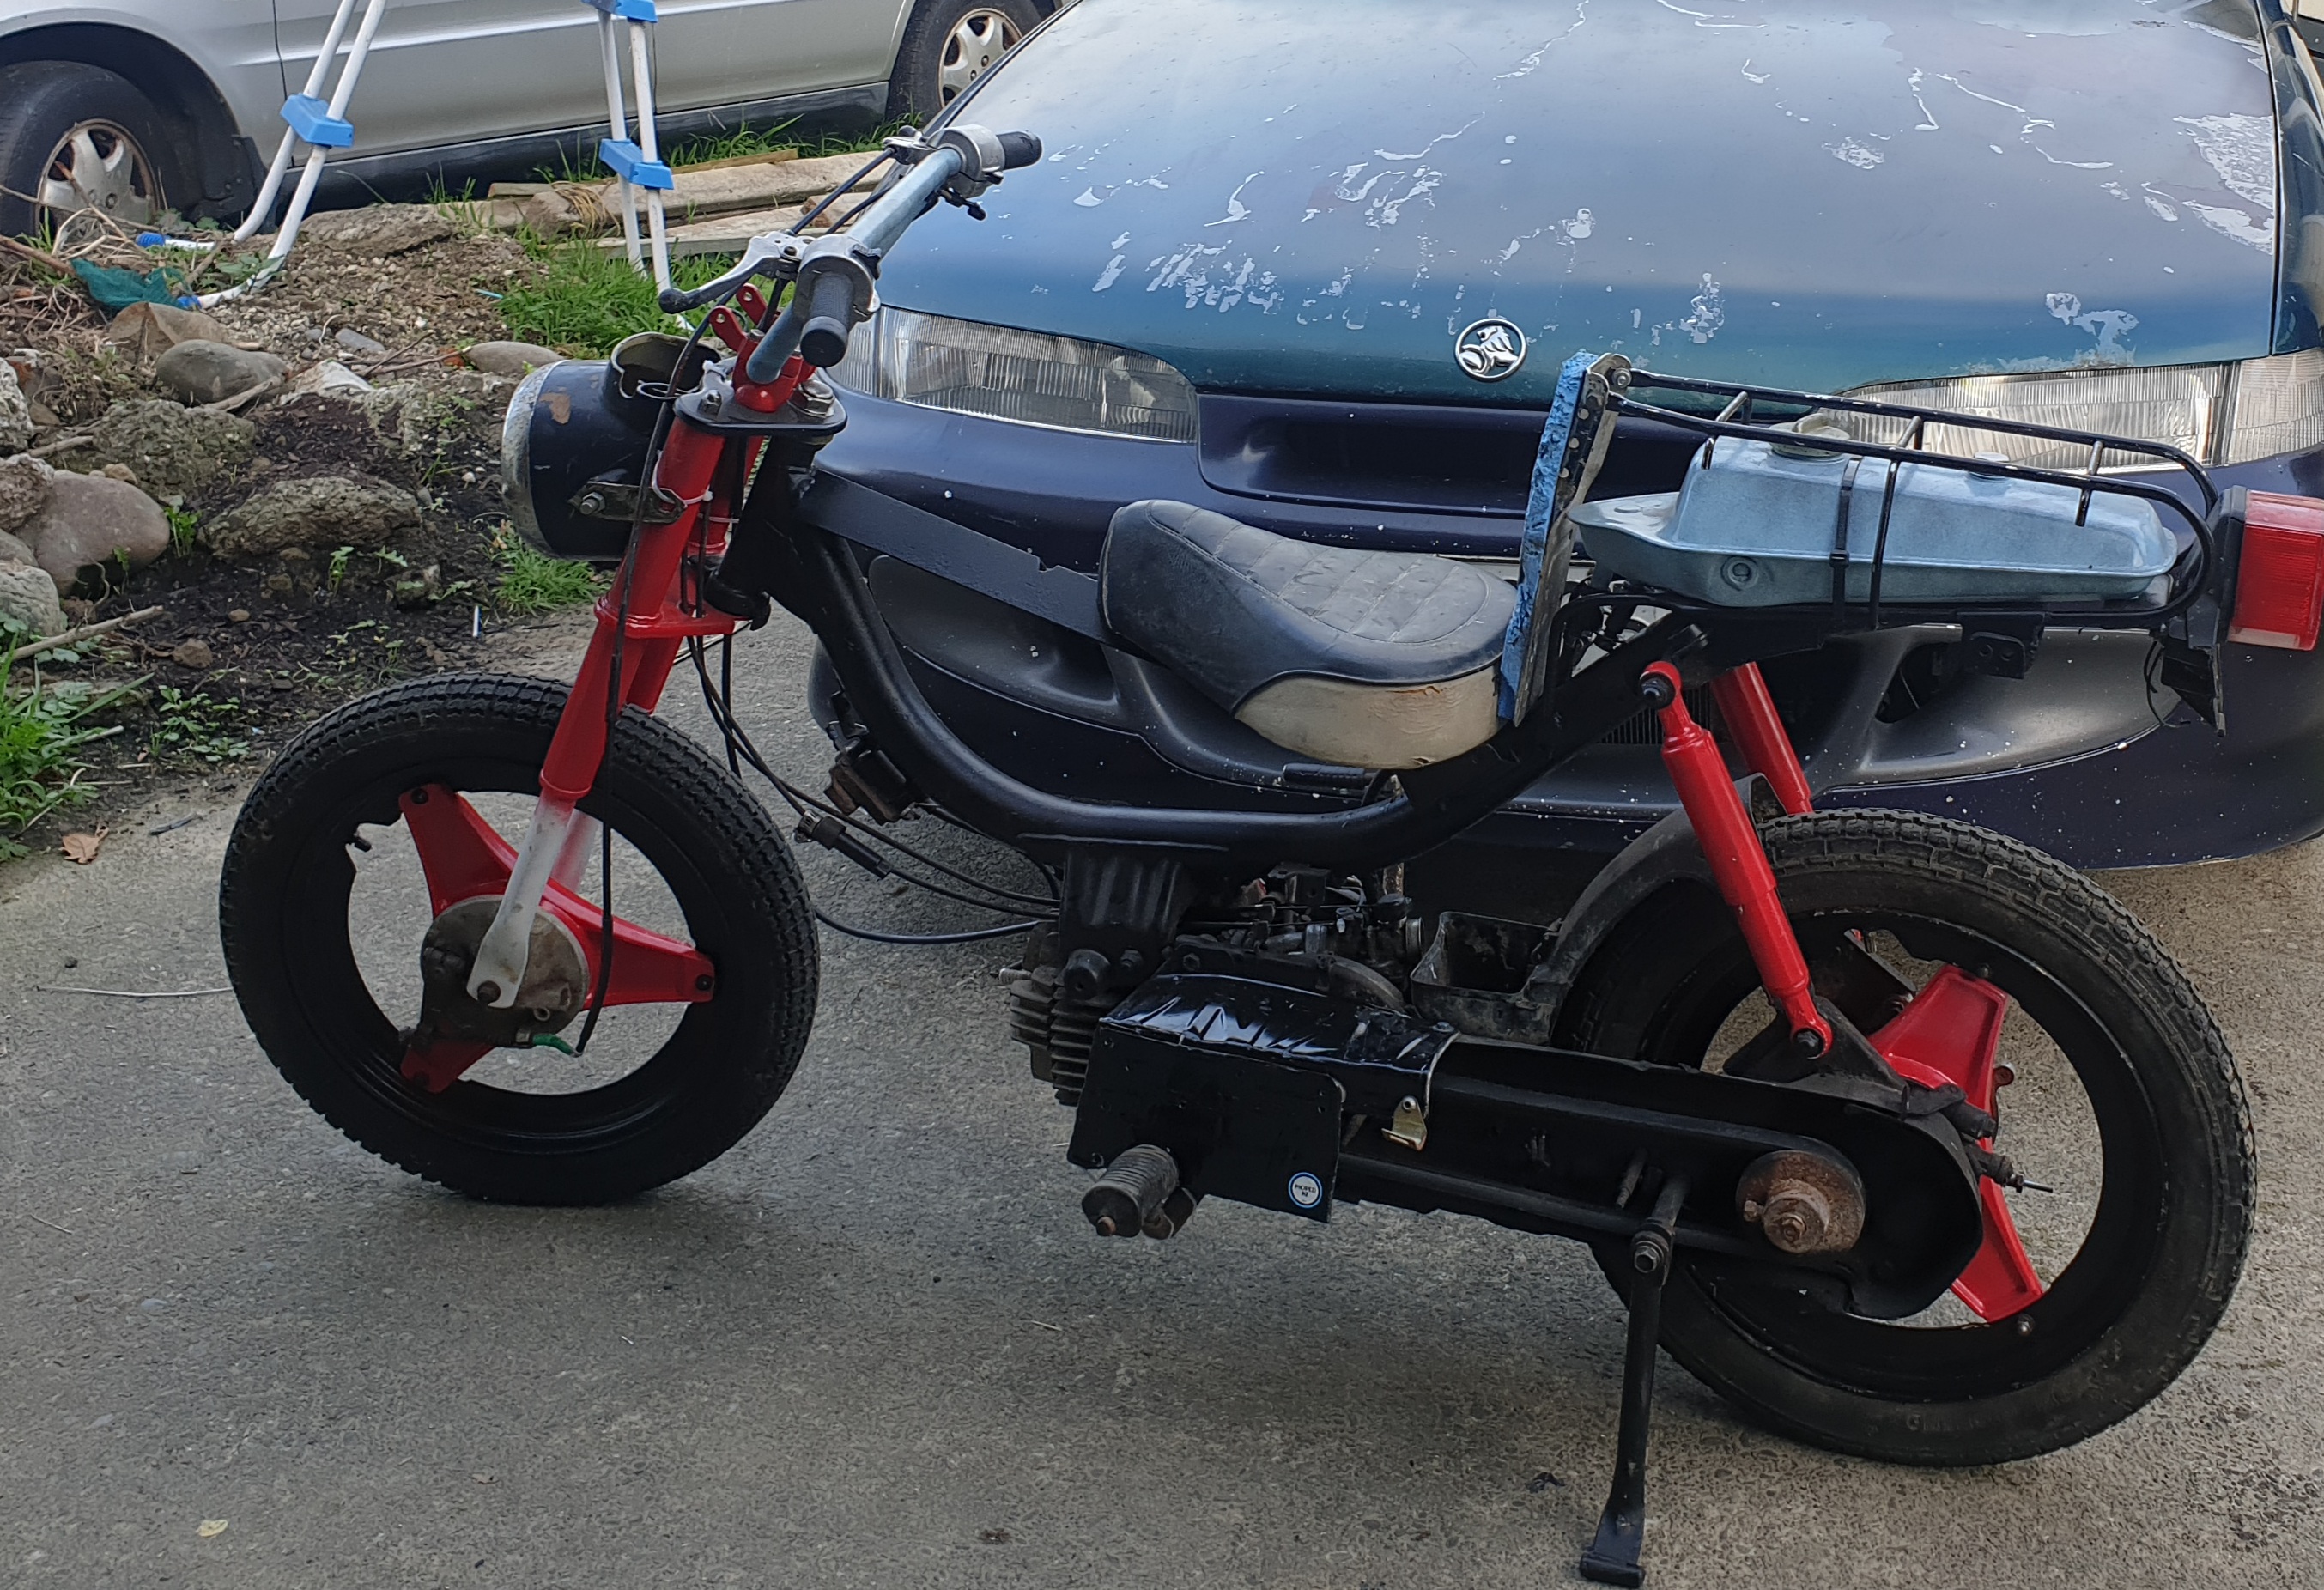
Soo done some stuff to this poor thing. Made a cover for the drive belt so kids don't destroy there ankels on it. Cleaned up the mess wires. Made a kick stand for it. Found some lights think head light a ct110 or sumthn like that. Rebuilt carb.
4 points
-
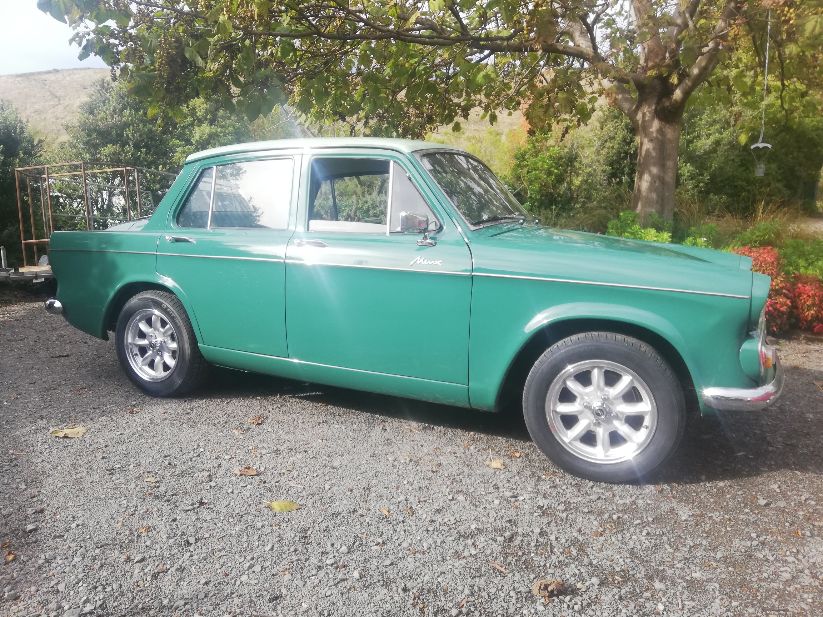
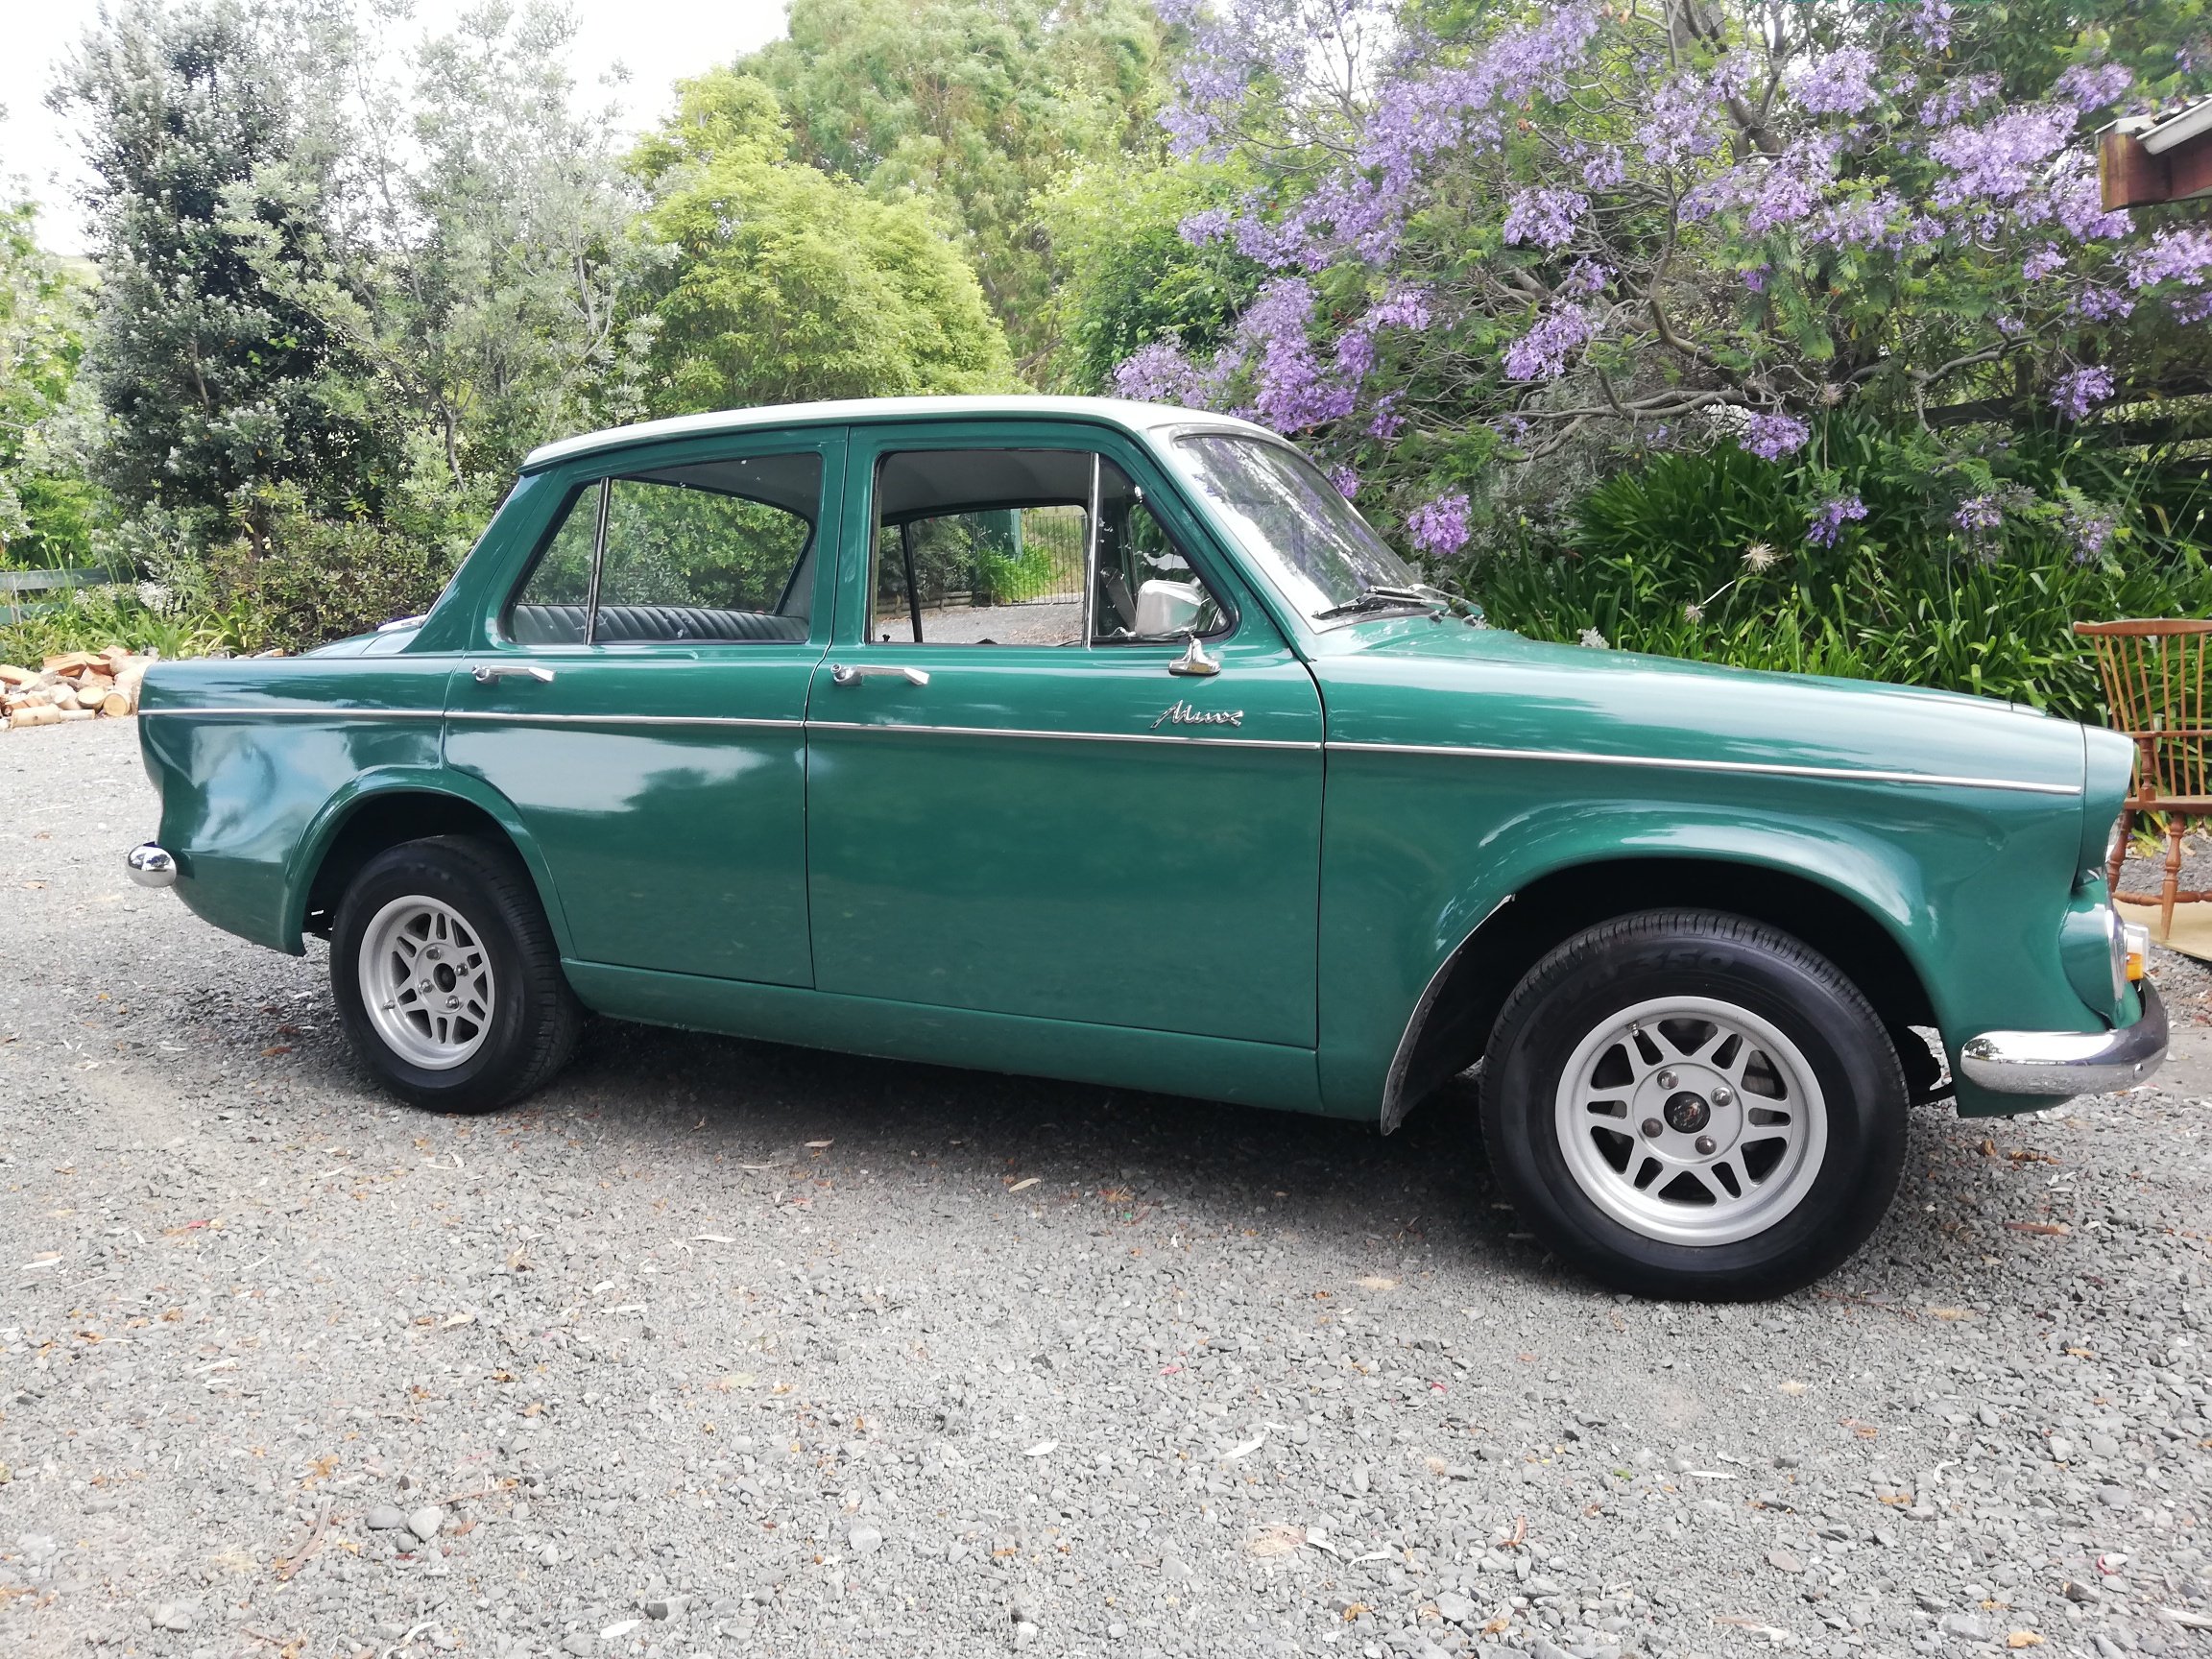
Hi everyone. My latest project is a 1964 Hillman Minx. I used to own one in the 1970's in my youth. I have fitted a 32 36 weber and made extractors for it. Probably got it up from 62hp to a massive 75hp now. These cars always sit to high in the front so I am going to lower it and probably increase the wheel tyre dia as well to help fill the wheel arches.
4 points
-
Far should probably update this aye...having a child kinda holds things up lol Couply photos of cleaning the cluster and final install of the dash Running a Nardi deep corn now but dont have any photos heres a video of the cornering lights working in correct function another shot found from the drift day made a few changes since also, painted the bumper correctly to the car, sent my a3a's to pine and have been widened to 8J which im suuuper stoaked with how they look now drove the car almost every weekend where i could, took her to a few car meets etc but the ol bluetop wasnt cutting it ive had this thing stuck with me for about 7 years now, what better time to use it than now! wanted to strip it apart again to make sure all checks out and change the crank back to standard as ive now learnt that knife edged factory cranks arent probably the way to go. Mated it up to the j160 i also have waiting, had to grind down the bell housing in a few spots and 'massage' the tunnel a little which turned out mint along with the shorter cusco engine mounts heres something that might be of interest, heres a comparison between (left to right) a buggered factory mount, new TRD & new Cusco - trd and factory should be the same height lol Engine and gearbox sitting happily on its own! decided to make my own vacuum block off plate with alloy from bunnings next job was to remove the fuel tank, so stoaked to find no rust inside the tank and barely any around the under body "Pockets are mint!" that should cover for this year...haha fingers crossed i can get this ol thing fired up in a months time. have all the parts basically to finish the job, sending driveshaft to engineers tomorrow to get shortened and i might seal the inside of the fuel tank with the kit from por15?3 points
-
Much tidier.. Hah.
3 points
-
Its fine, everyone will be fine3 points
-
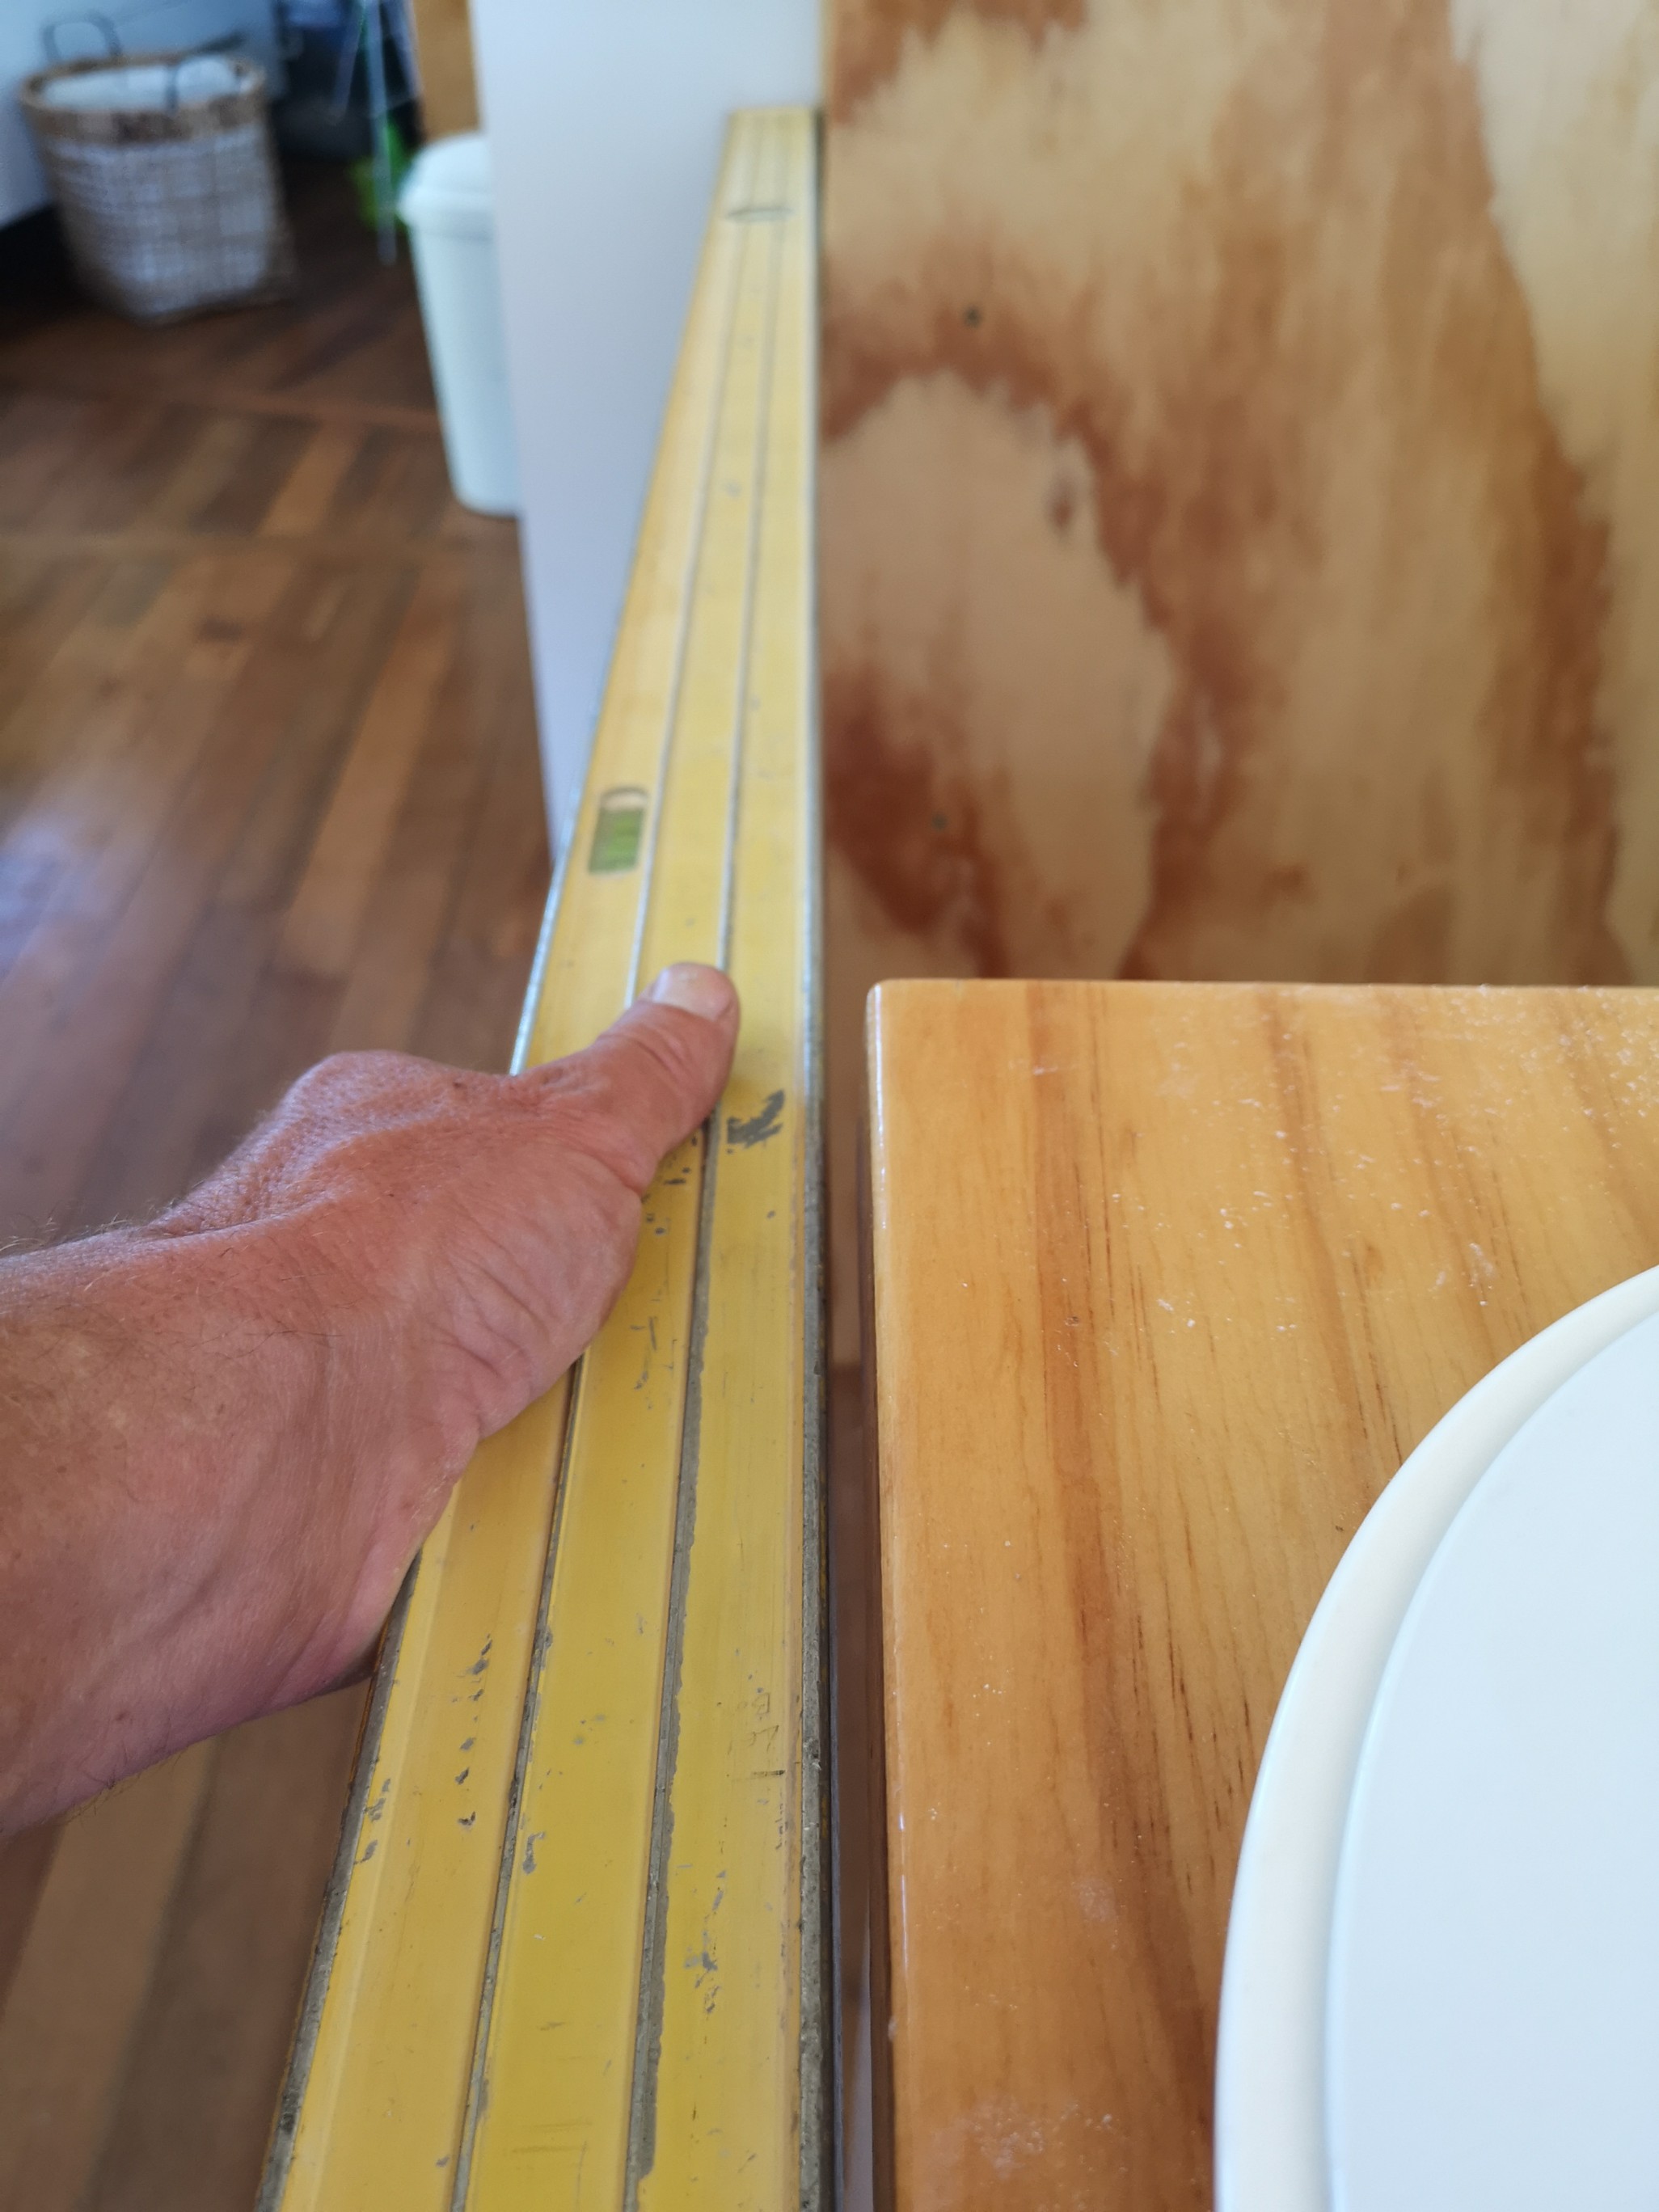
Shit, that time went quick.. Pulled the kitchen to bits Took longer to epoxy than the laundry as there were so many little bits and double sides.. Reassembled only to find...... Somewhere along the line we managed to get it out of alignment with the rest of the bench.. My ocd couldn't handle it and I had to pull it all out again to realign it, would've killed me if I didn't.
3 points
-
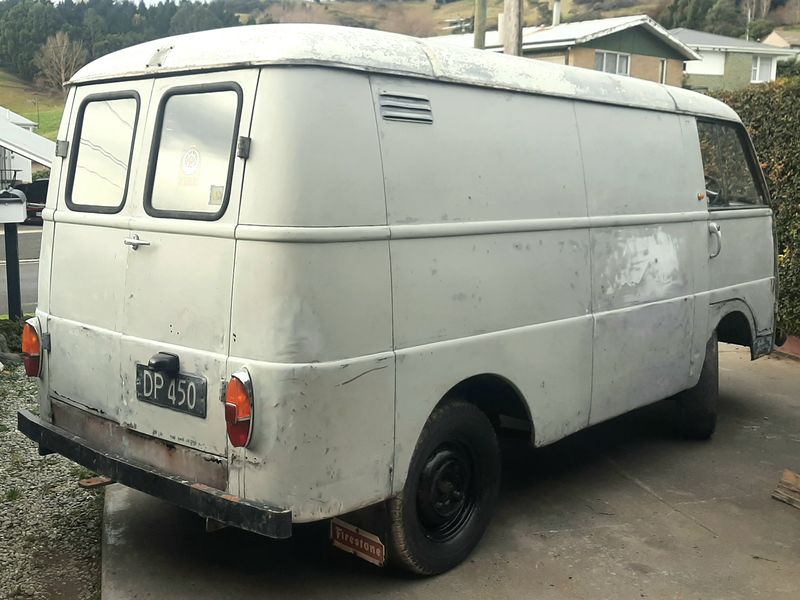
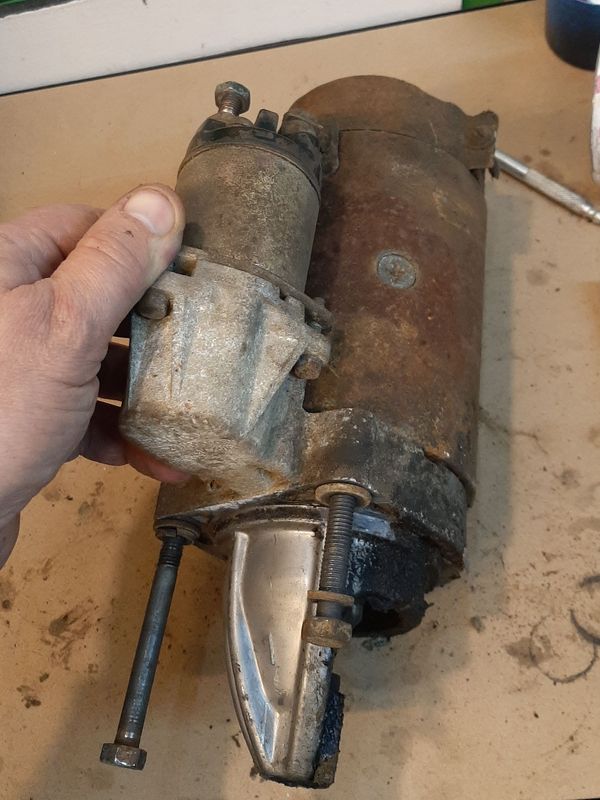
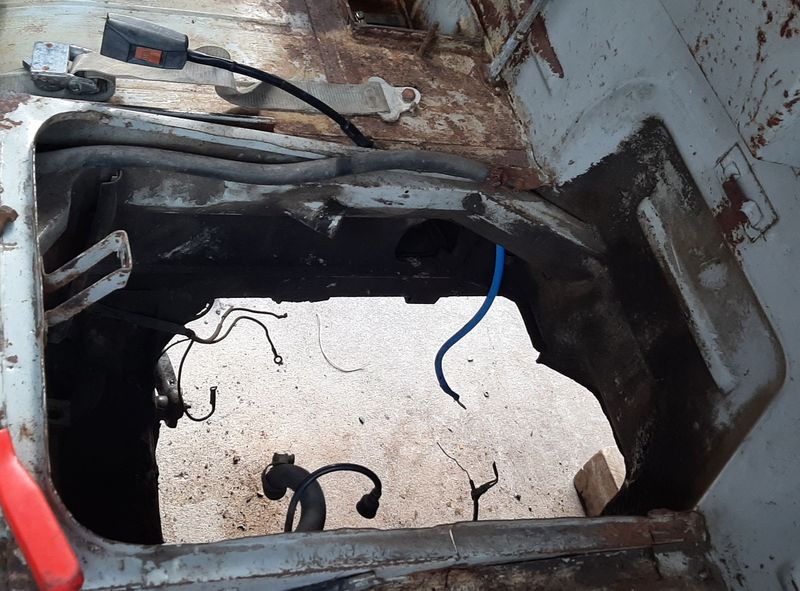
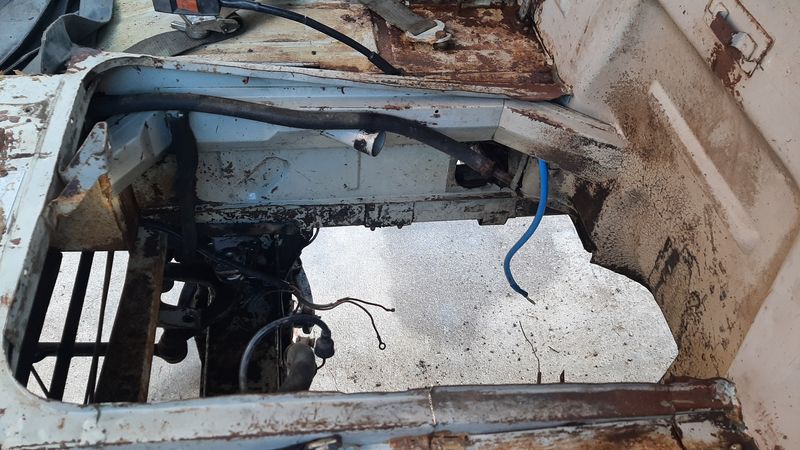
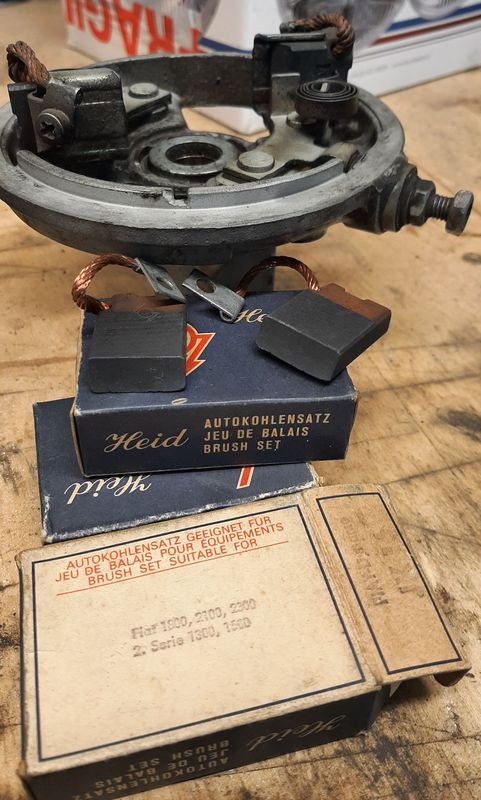
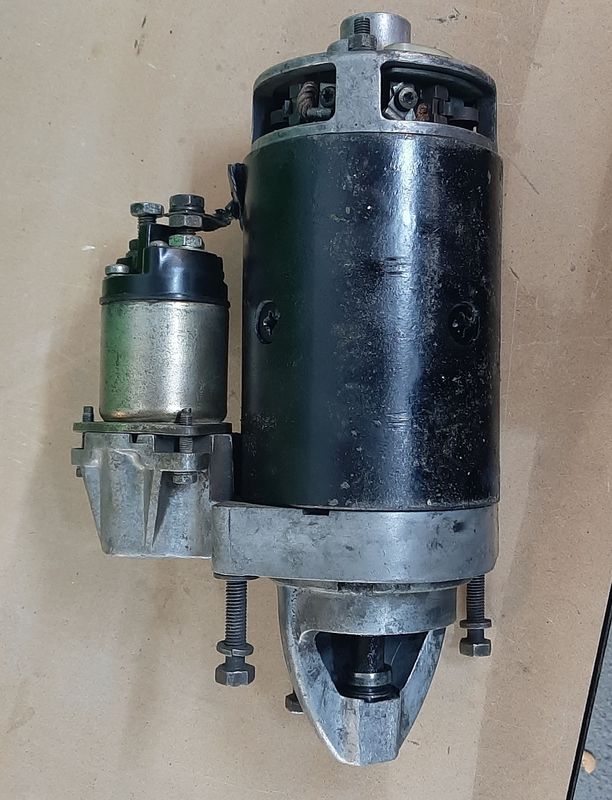
Had a combo of not raining and the Mrs in a mood to help, so got the van turned around. Not quite Austin powers 100 point turn style but nearly - i had a roller jack under the diff which made it a bit easier to pirouette. Jacked it right up, stuck the engine crane though the drivers door and after disconnecting everything (-1) eventually pooped this greasy lump out. Thats a single barrel Solex with about a 25mm venturi and the exhaust manifold is van specific to poke though the engine bay into the front wheel well. Smelly greasy hole Two cans of degreaser later and its much much better - the opening behind that loose pipe is for the exhaust pipe. What looks like a chassis rail the pipe resents on is actually the cold air feed, from in front of the radiator, dumping behind the firewall, with a smaller round hole for the carb - i wonder if that has a ram effects? Tidied up the starter motor, came up really nice, solenoid even has yellow plating still on it, and even bench tested successfully, and happily a bit smoother and quieter than it was before the tidy up Mid tidying up Fresh alternator brushes, I got 4 boxes of these these cheap as (like $10 euro for all four boxes?) ages ago for my 2300, quality West German made. I also swapped the starter bushes for the old 2300 ones i swapped were actually quite a bit longer than the ones in the one that came off the van engine (never throw anything away!) And compared the spare that actually looked slightly better on the outside (but felt a bit crunchy spinning).
3 points
-
Once the paint was dry i decided i needed to fit RS type strut top reinforcing plates ( even tho it has large plates there already ) these will be more for looks as the other plates won't be seen once the engine bay is finished.
3 points
-
You can't get decent tyres for snow tyre money. Save up and get something decent wet / dry. Snow driving will be like 1% of the time, so not worth dedicating much towards. Even free snow tyres are a bad deal.3 points
-
I dunno why you're complicating this, just goto the tyre shop and tell the guy what you want. Buying second hand tyres can get fucked for a daily tbh, you gotta check the date code to see how long you got till they fall apart. I've used motor treads in the past and he's been great for doing exactly what I asked of him.3 points
-
This thread sucks, do you ever finish anything?3 points
-
Bit of diff tidy up today, between the rain drops. I can't wait to move the carAuckland so that I can at least get started tinkering on it. Can't to put the 12 slots on it and slam it too. Before slamming, I might look to take it for a re vin at some stage too. After some new brakes and address any issue that rears up. Get it back live in the system so that I can get it under side blasted to give it a bit of a birthday. I'm ejecting the bench seat and will put factory ghia buckets in (albeit tan colour) and I will have the seats are trimmed Caribbean Blue as it is now.
3 points
-
Oh snap... So this just happened. Had a look at something yesterday which made me want to change direction from running modern turbo, to OS carb fixing.. Throw your guesses below what you think I'm replacing this with...
3 points
-
Some snow tyres are legal but they have a different tread minimum. They are garbage to drive on though. Heaps of tread squirm so they always have some 'slip' when braking/accelerating/cornering. Driving something powerful on snow tyres is lol3 points
-
Yeah they just as shit that’s why the don’t pass compliance3 points
-
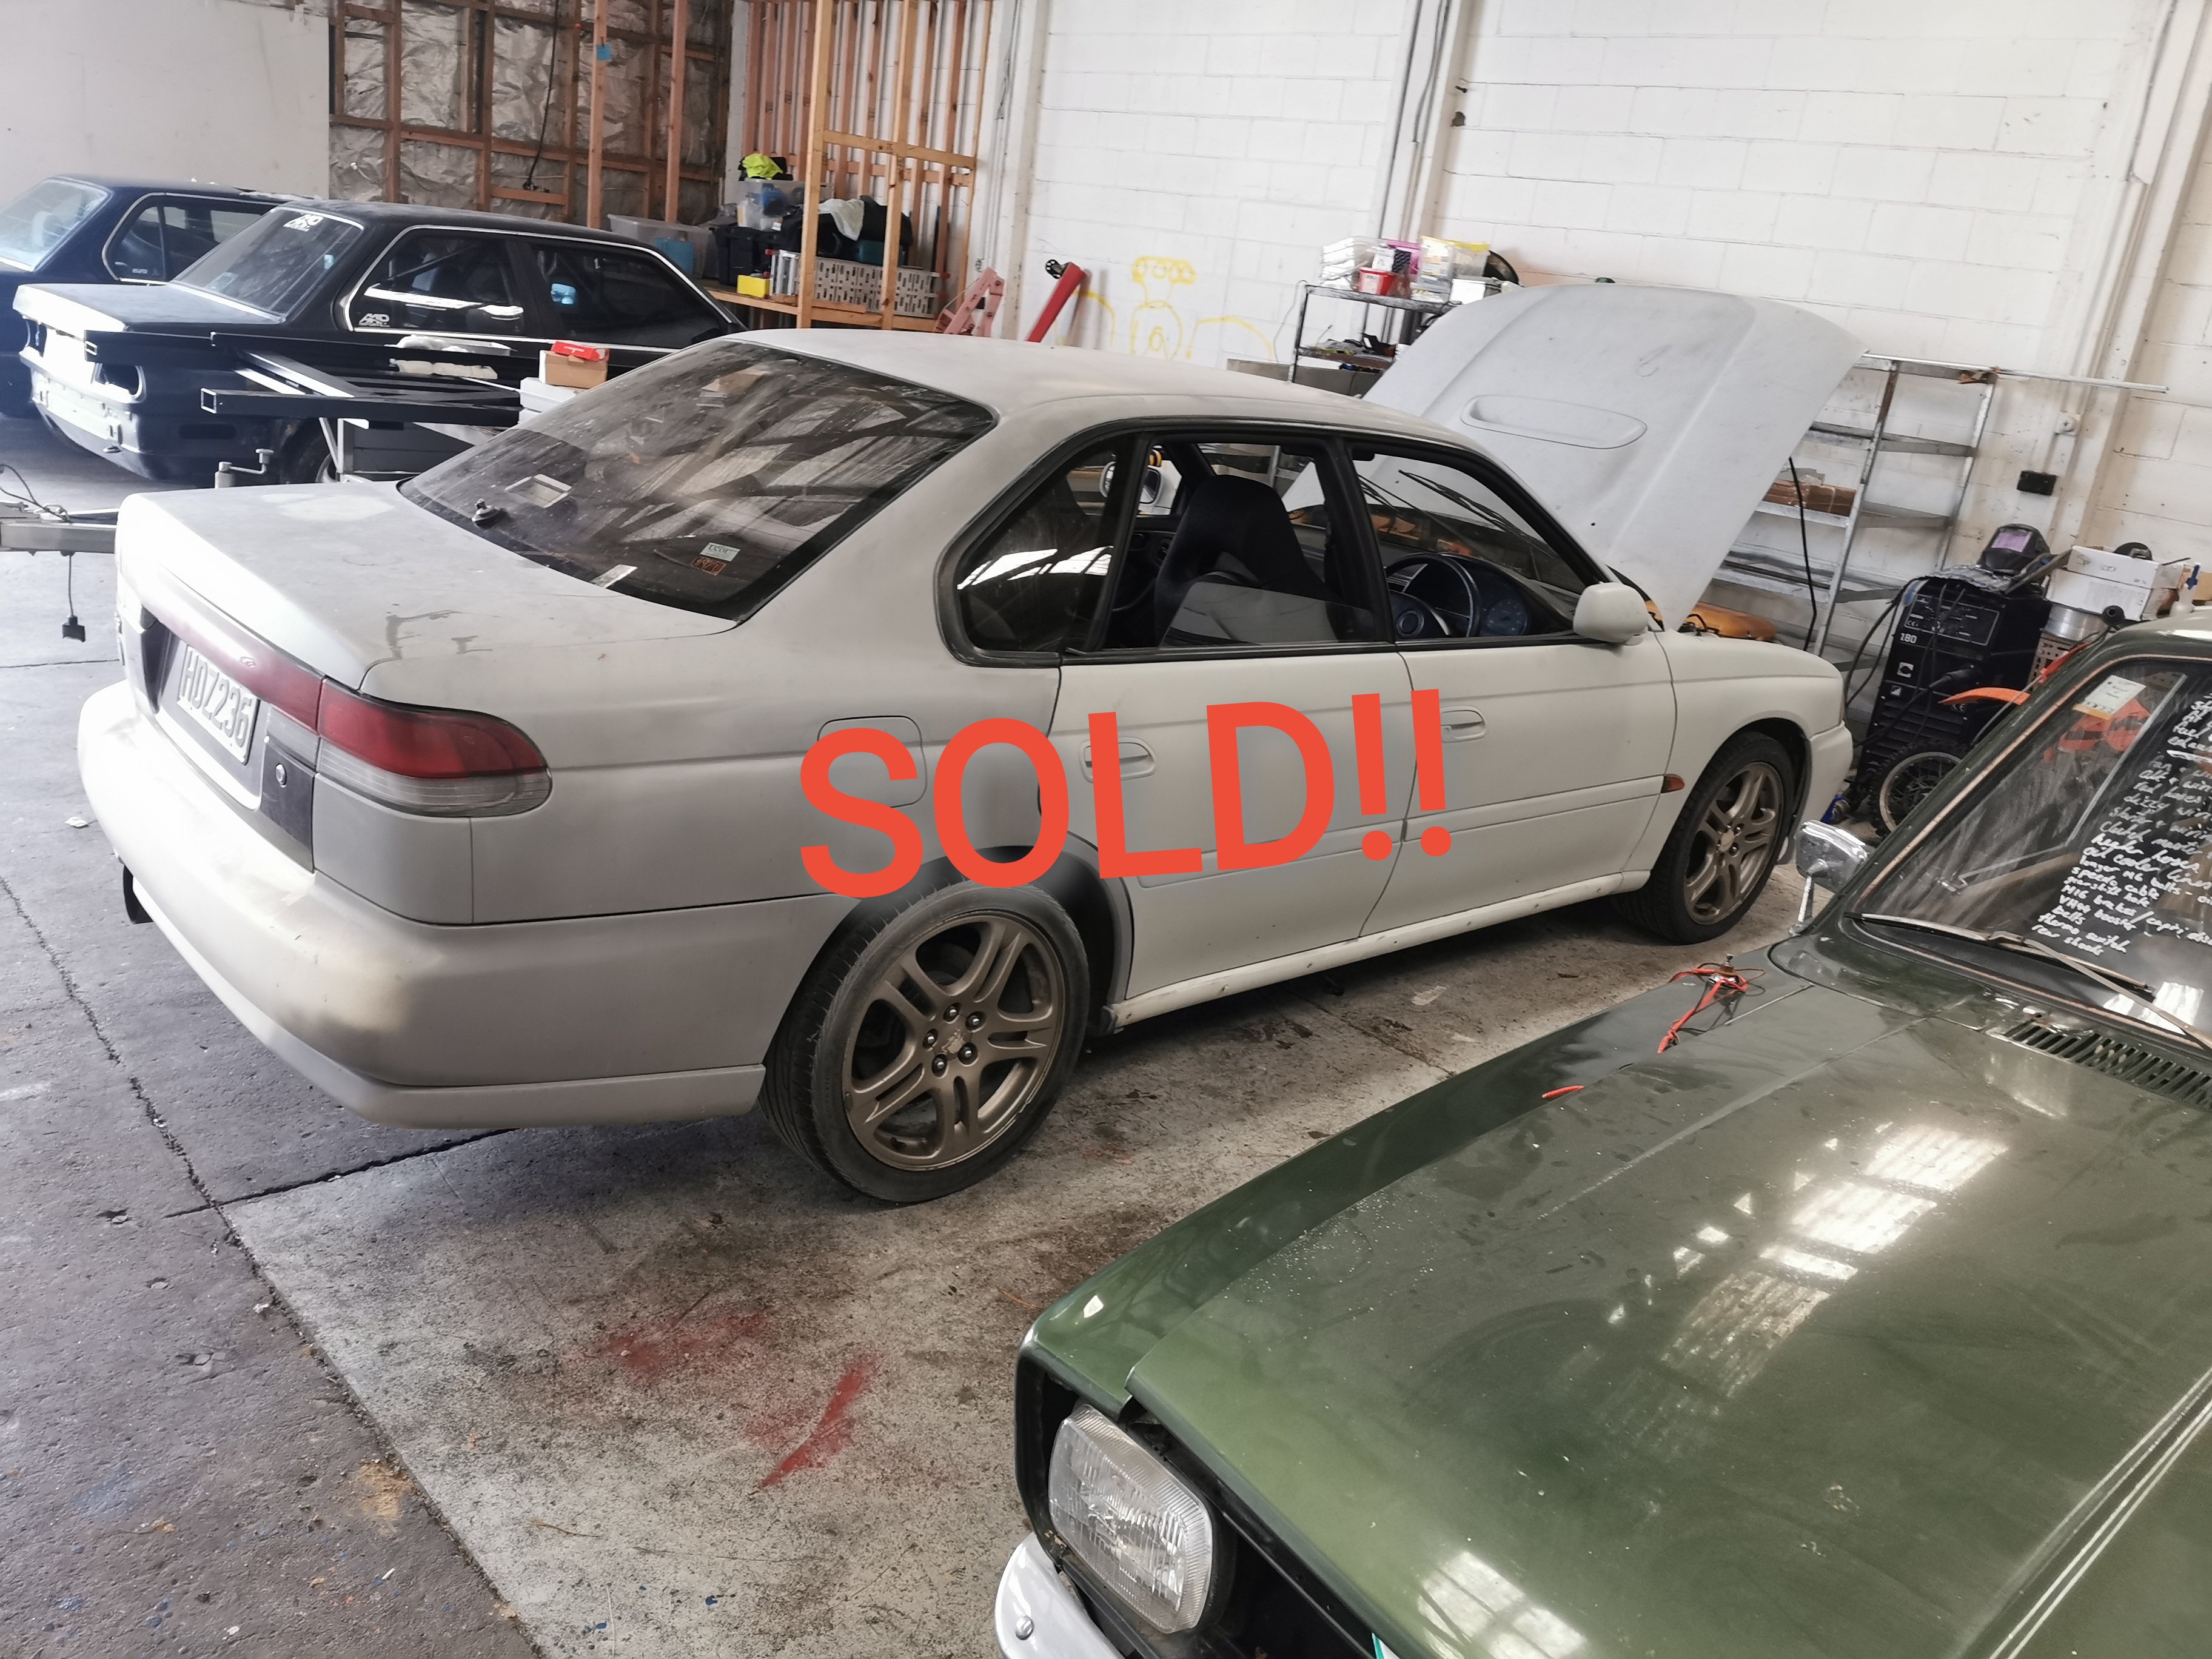
And the red interior is all gone
3 points
-
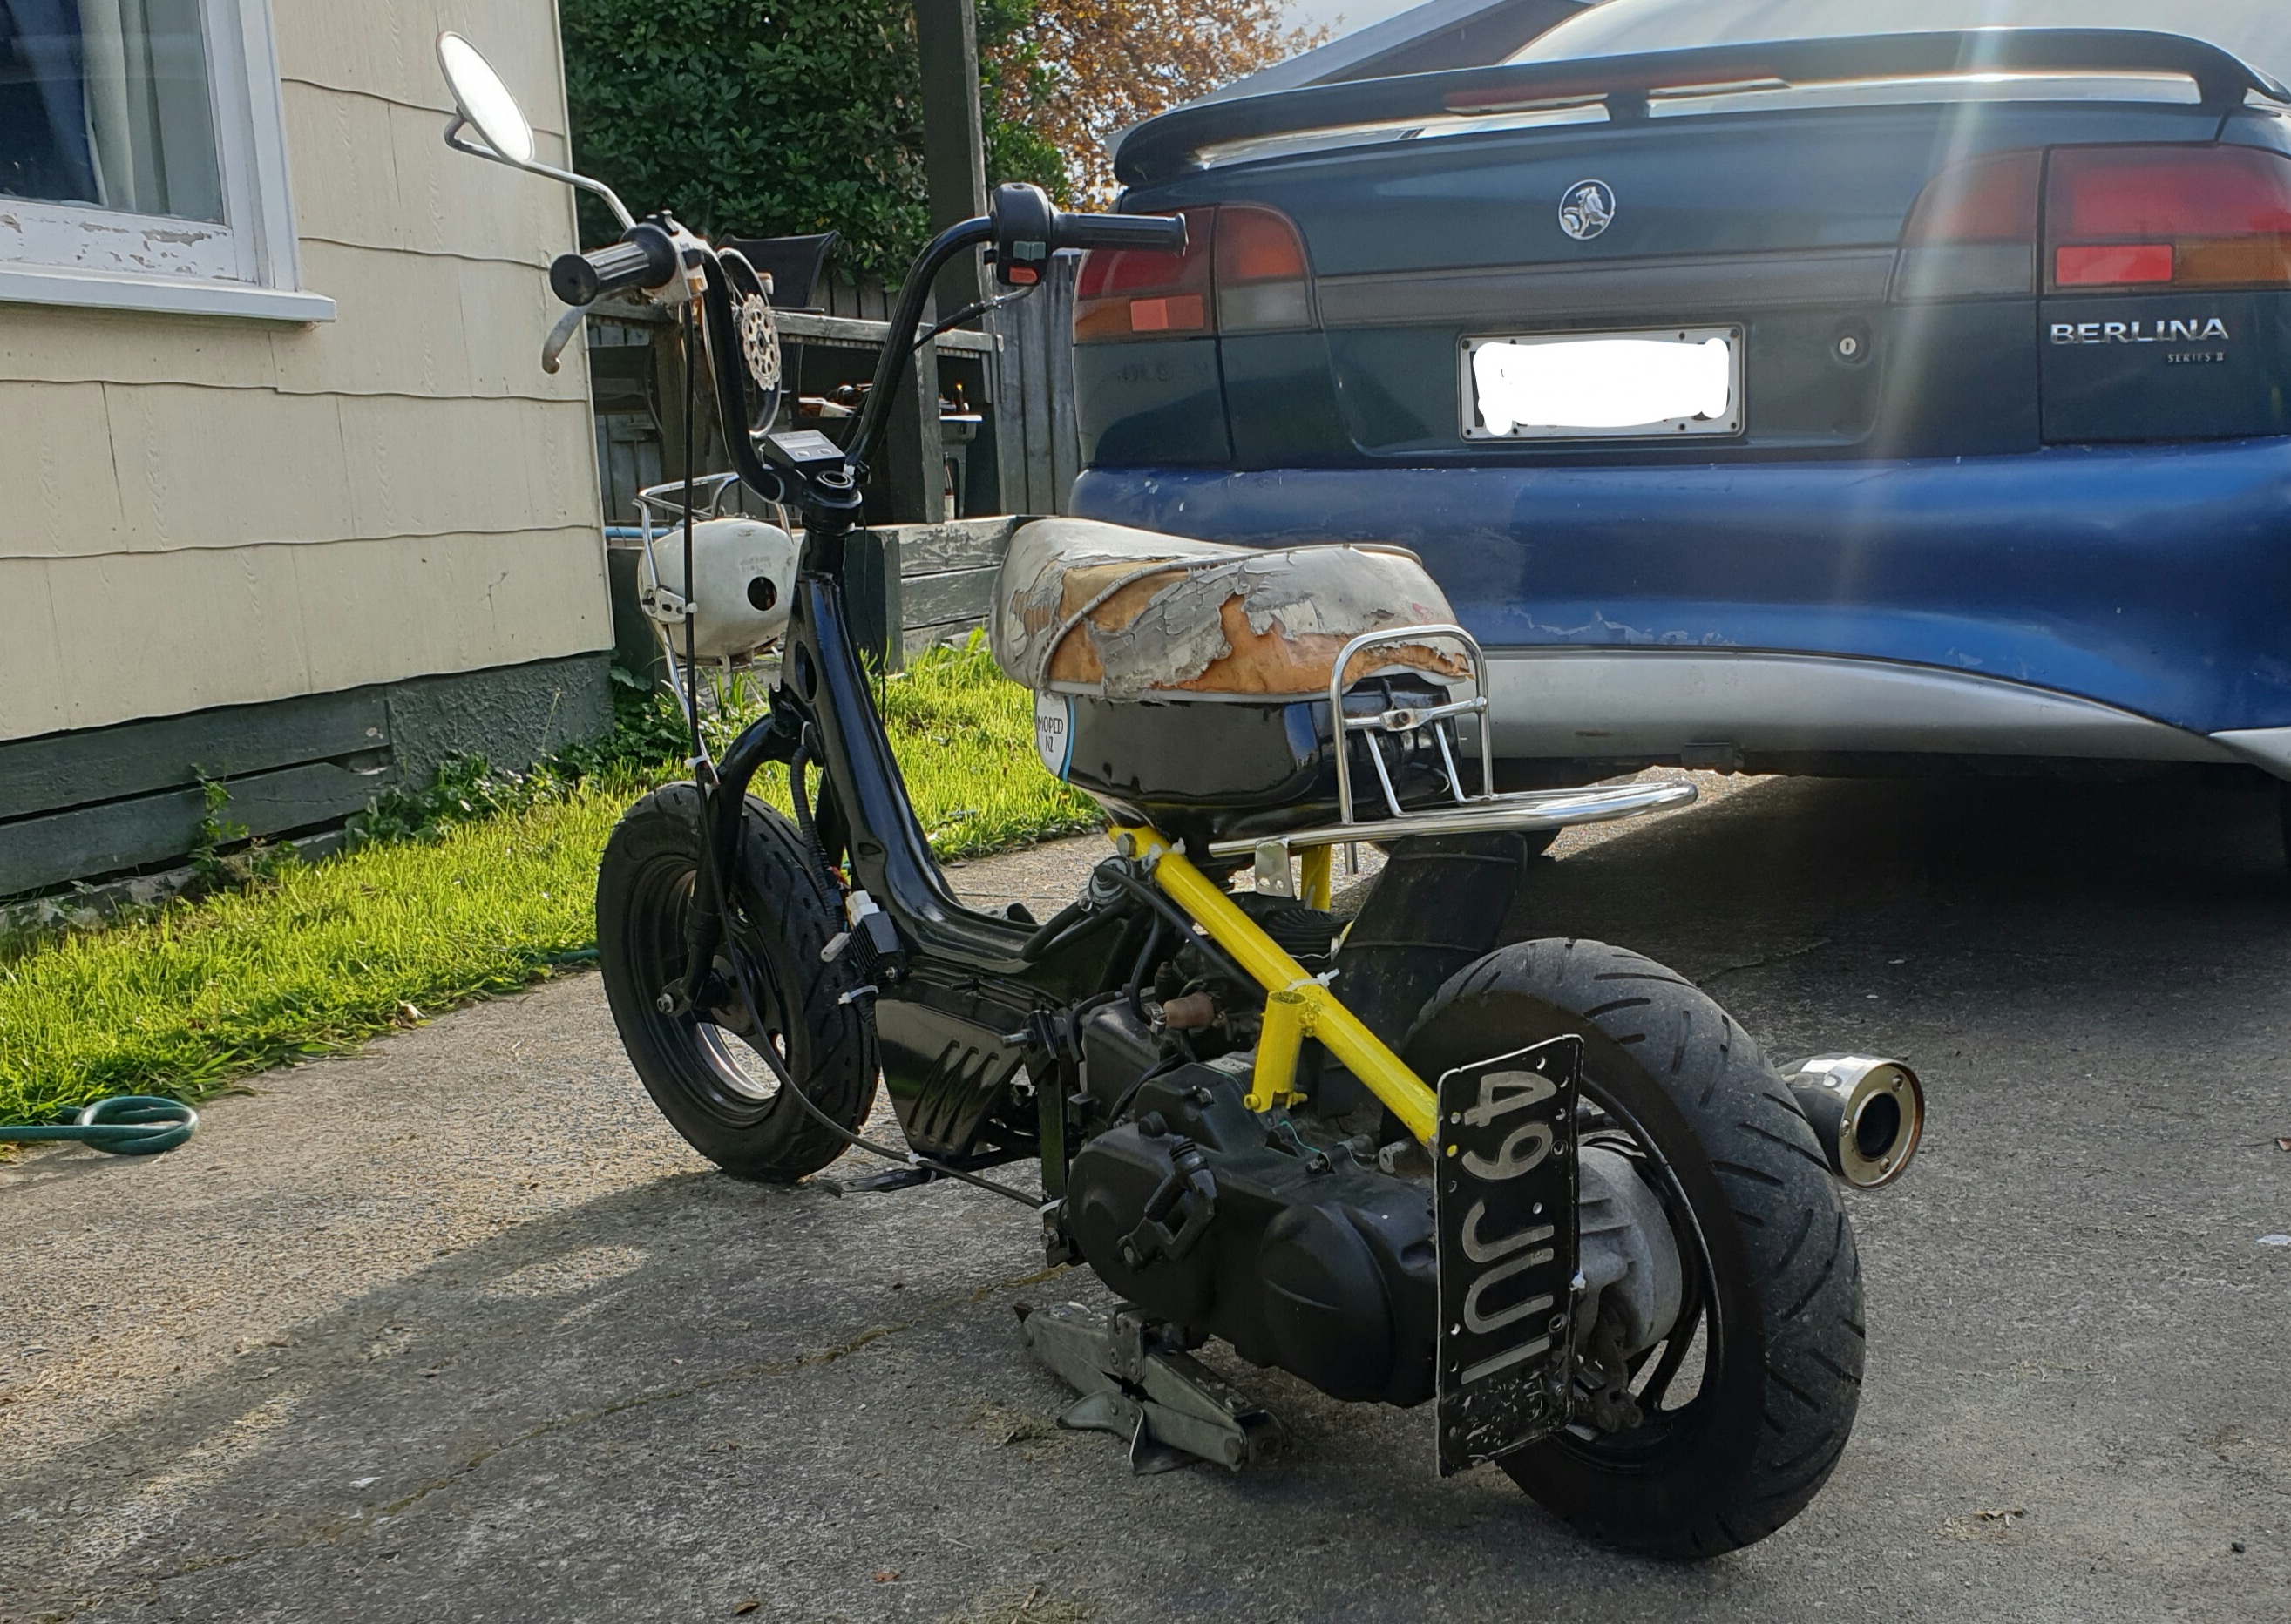
Siiiik my mate who i scored the frame from actually found its original plate prety pumped. Ive also put on a k and n filter Rejetted carb Going real solid now feels good on decnt rides. Gona put tail light on and go down to Christchurch for syds run. Chosen this over the others purely cause how low it is. Fits in my wagon no fuss at all. Were the other require taking bits off. This one slides in.
3 points
-
Long time no see - the XE is still tucked away awaiting the loving it so deserves. Hopefully I have found a place in Auckland to dry store it, so watch this space. I'm gaghing to get into it and start the tidy re vin process. Today I thought the XE Fairmont LSD disc rear end needs some love, so I got it outside and gave it a water blast. I also yanked and binned the old discs and brake pads as the diff weighs a tonne and I news to make it easier to move about my crowded shed. Next move will be to prime and paint the housing, buy caliper rebuild kits and new rotors with new hard line too. One slide pin is giving me issues in the caliper so sing out if anyone has a spare Ford one kicking about. I finally got my Ghia Fairmont bonnet and 12 slot mags with new eagers up from Christchurch to Auckland. Happy days
2 points
-
Yeah the studless ones I. E. The cheap ones that nz is the world's dumping ground for.2 points
-
Snow tyres are utter shit in the wet, 18yo me got 3rd gear spinning in my 1.1l laser on snow tyres2 points
-
Snow tyres are for the snow, not for rain Tho good quality winter tyres do OK on wet roads now, you are still better off with an OK set of normal tyres2 points
-
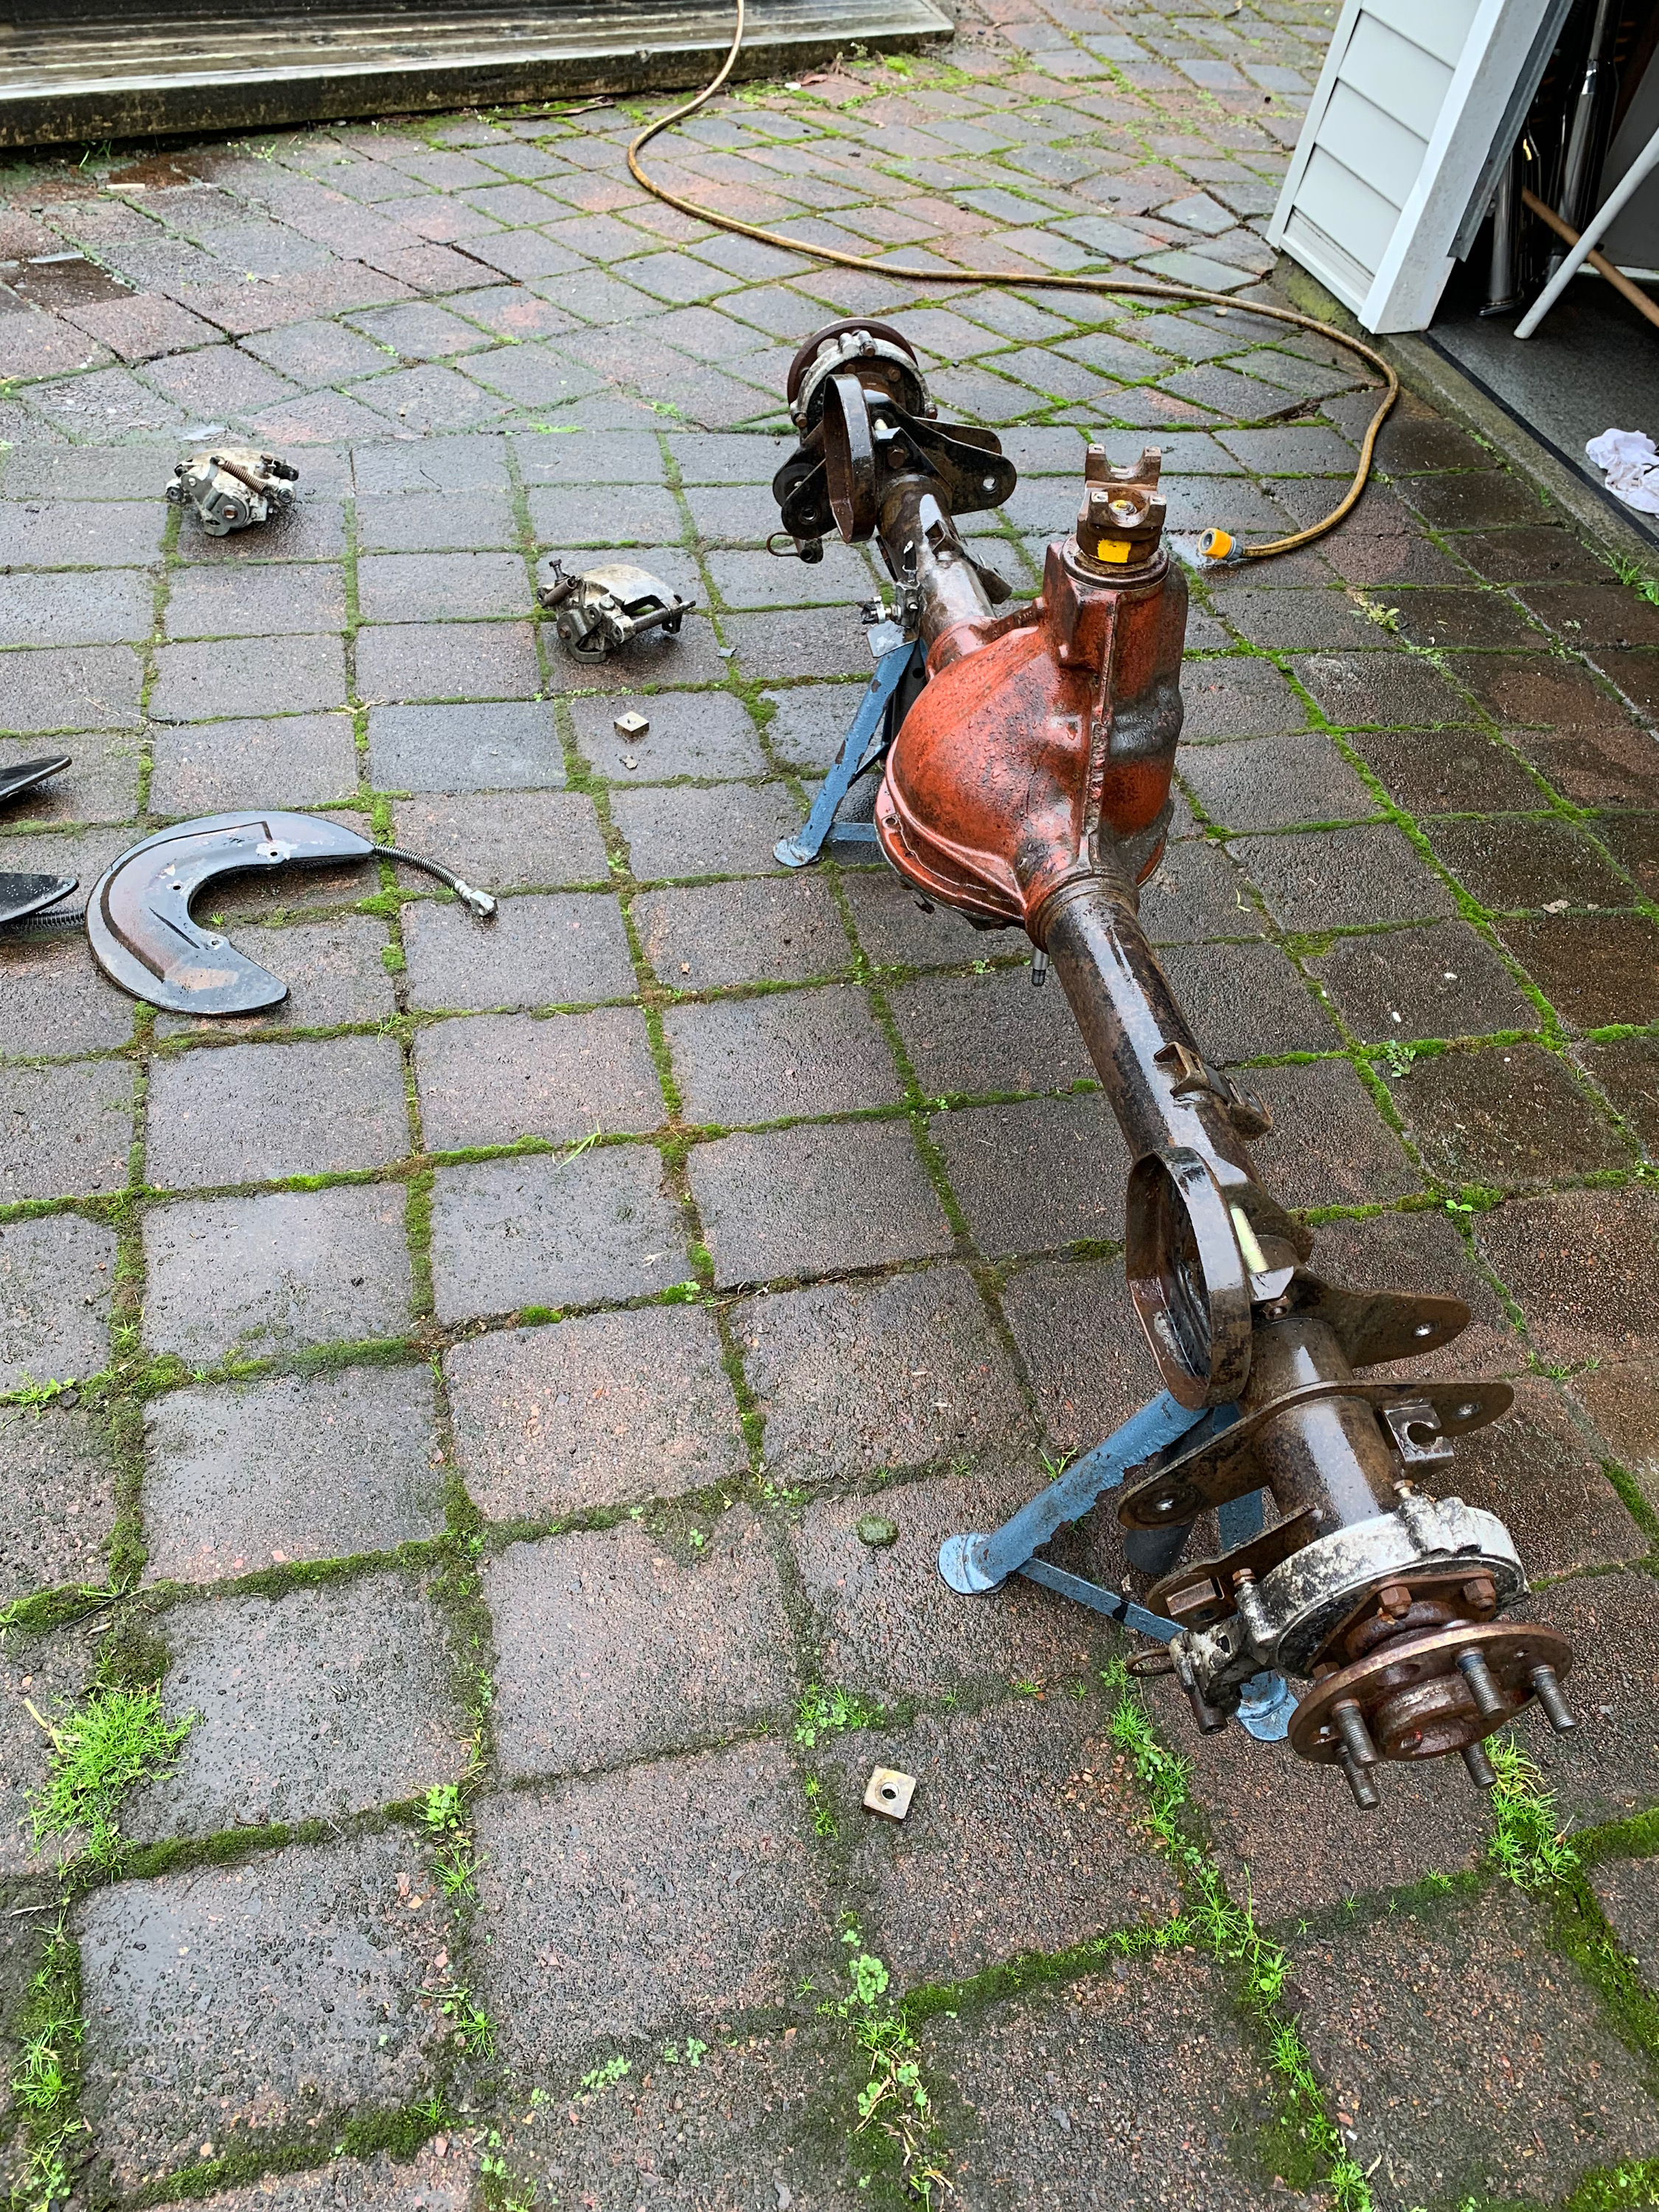
Carrying on with some updates from after work and today. Bit uncomfortable on wet carpet, heh! drivers front chassis: excuse the dirt and stains, had to chop into my thick steel I use on my bench top. finished the sill rest of the day was spent around the rear wheel arch/end of sill. Chipping underseal off where the spot welds are and melting out lead. Not so picture worthy yet Cheers2 points
-
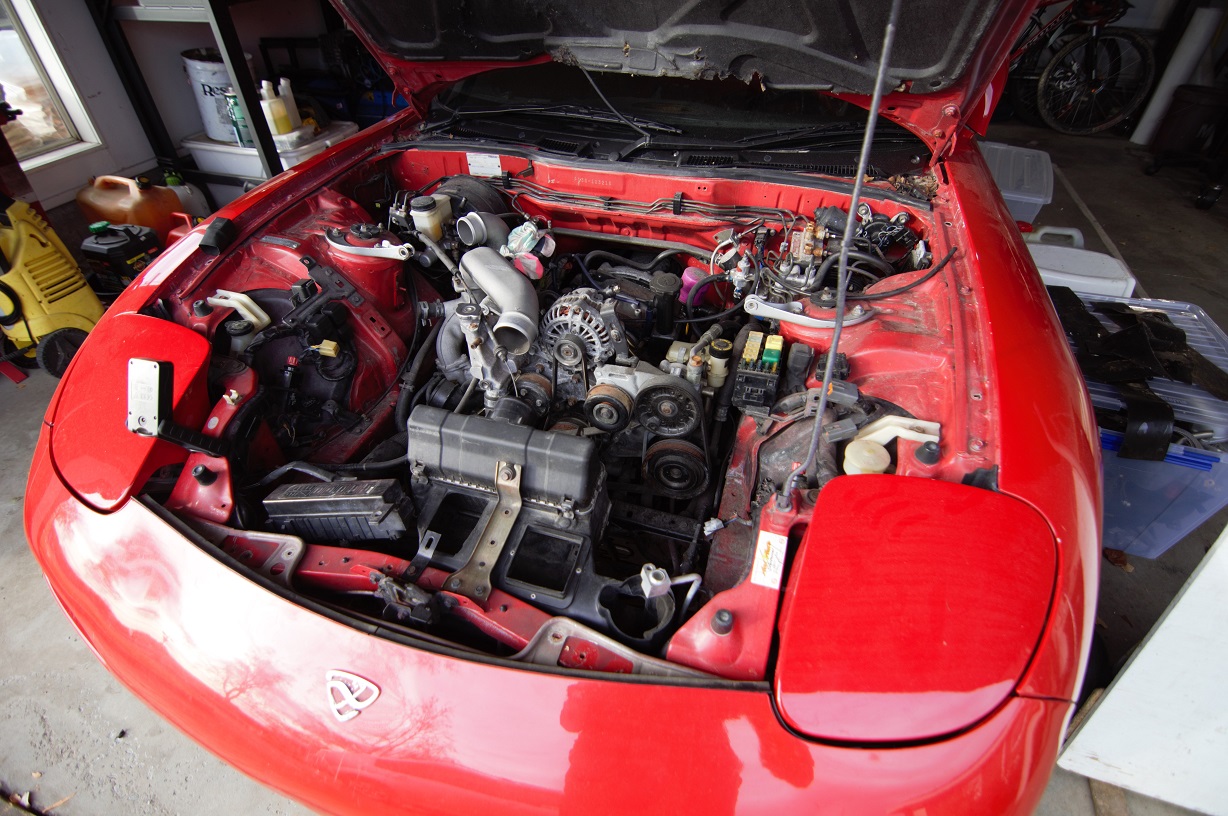
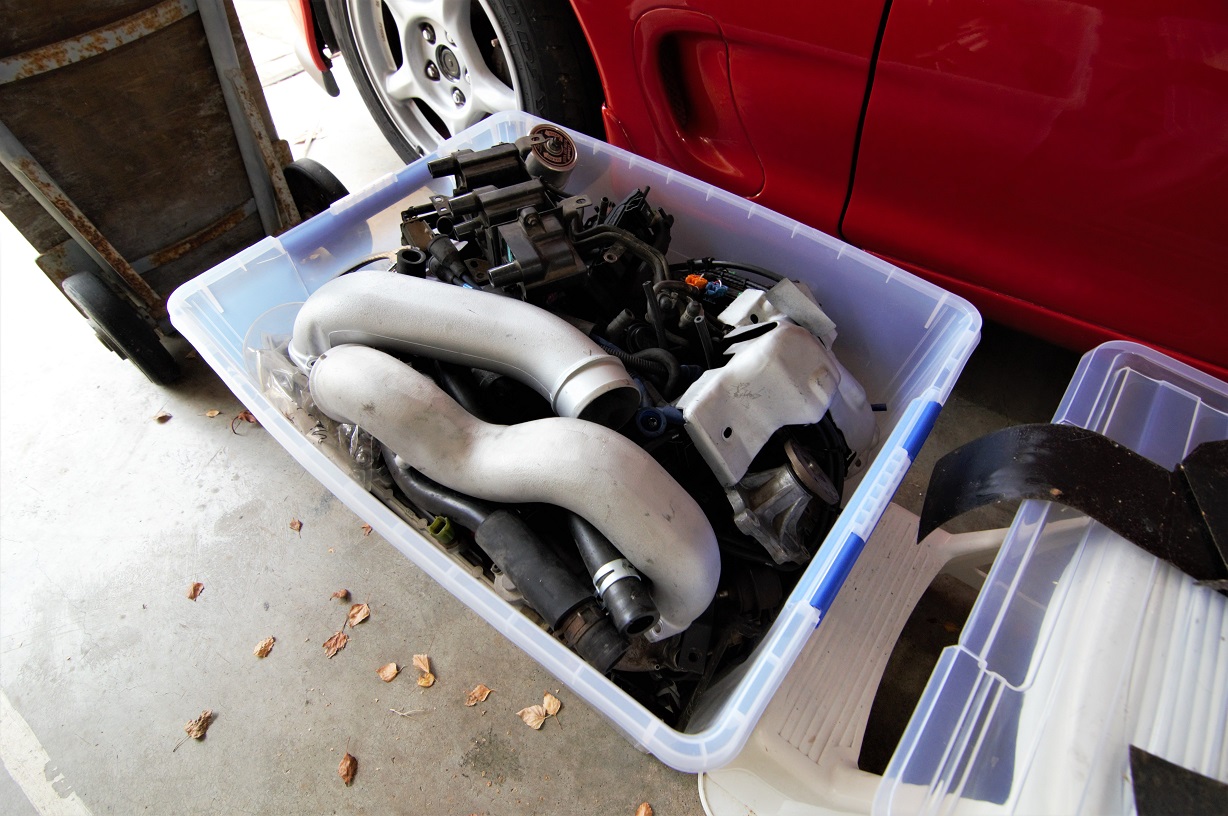
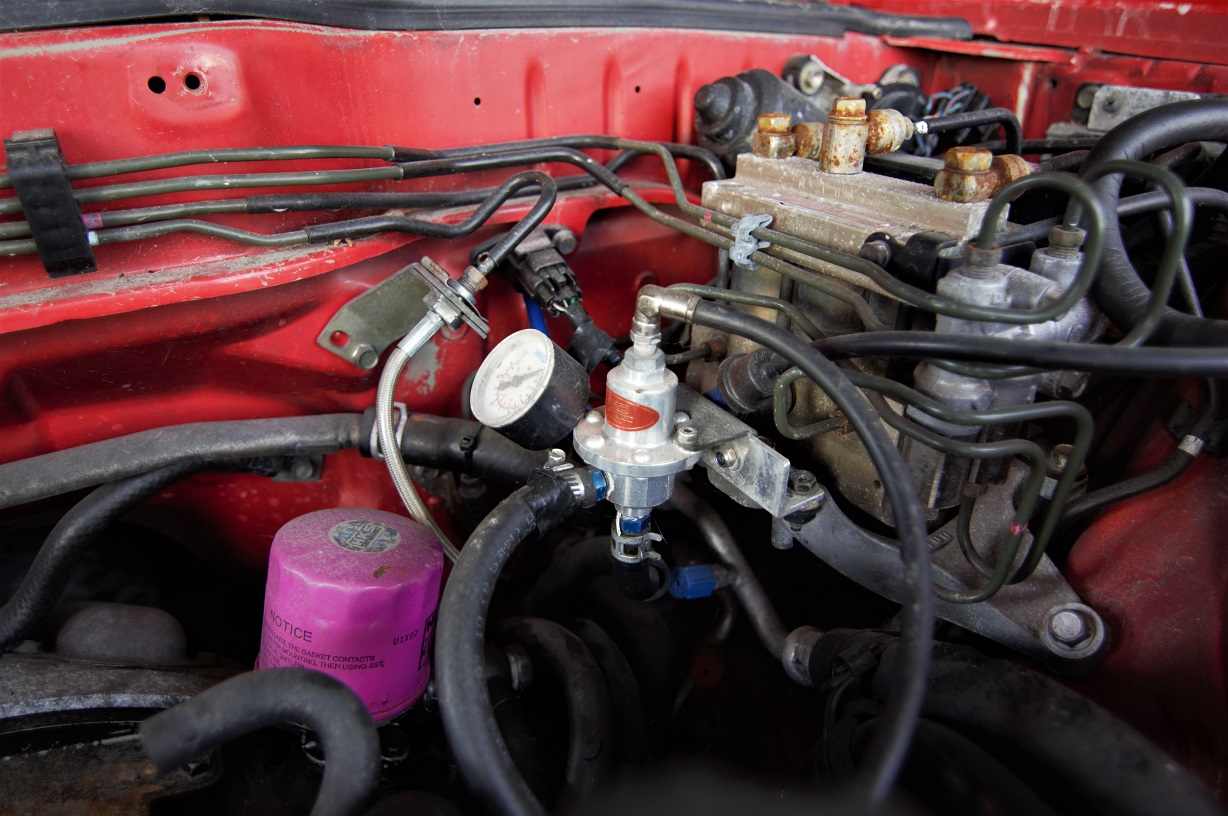
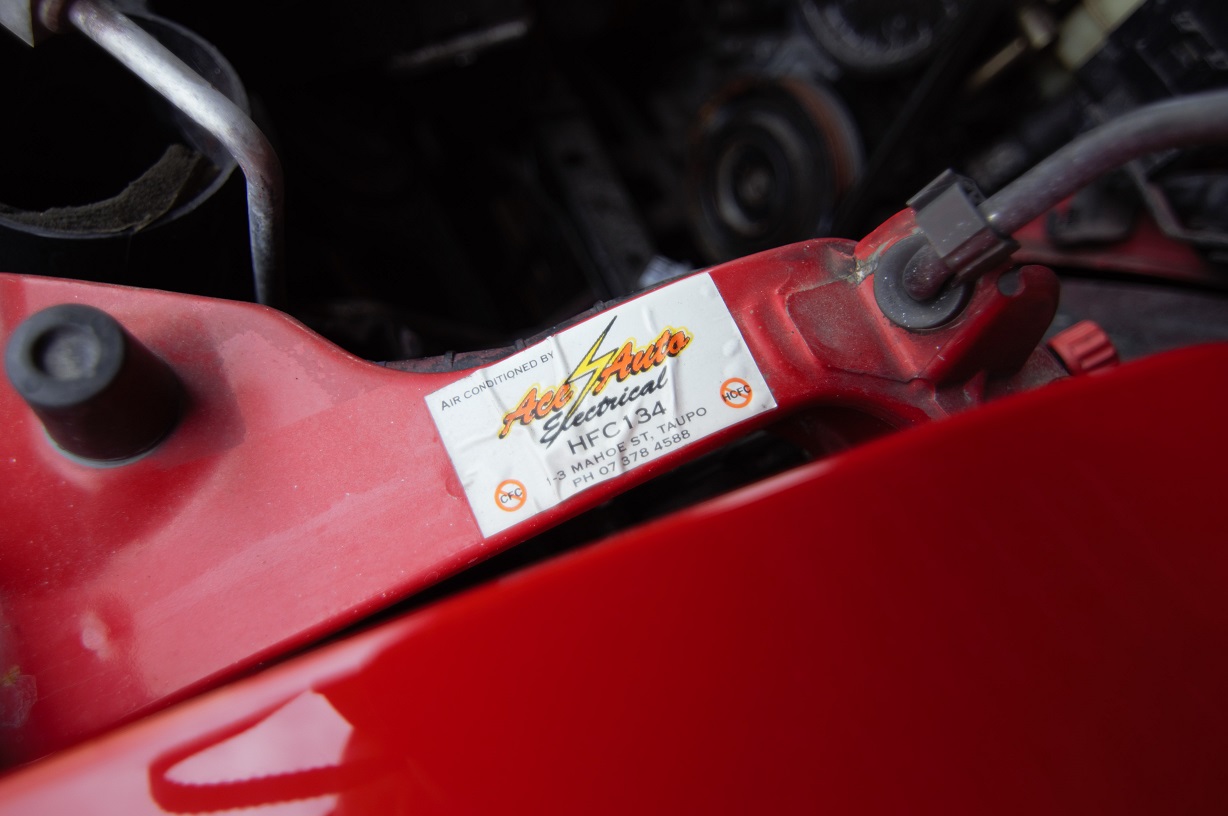
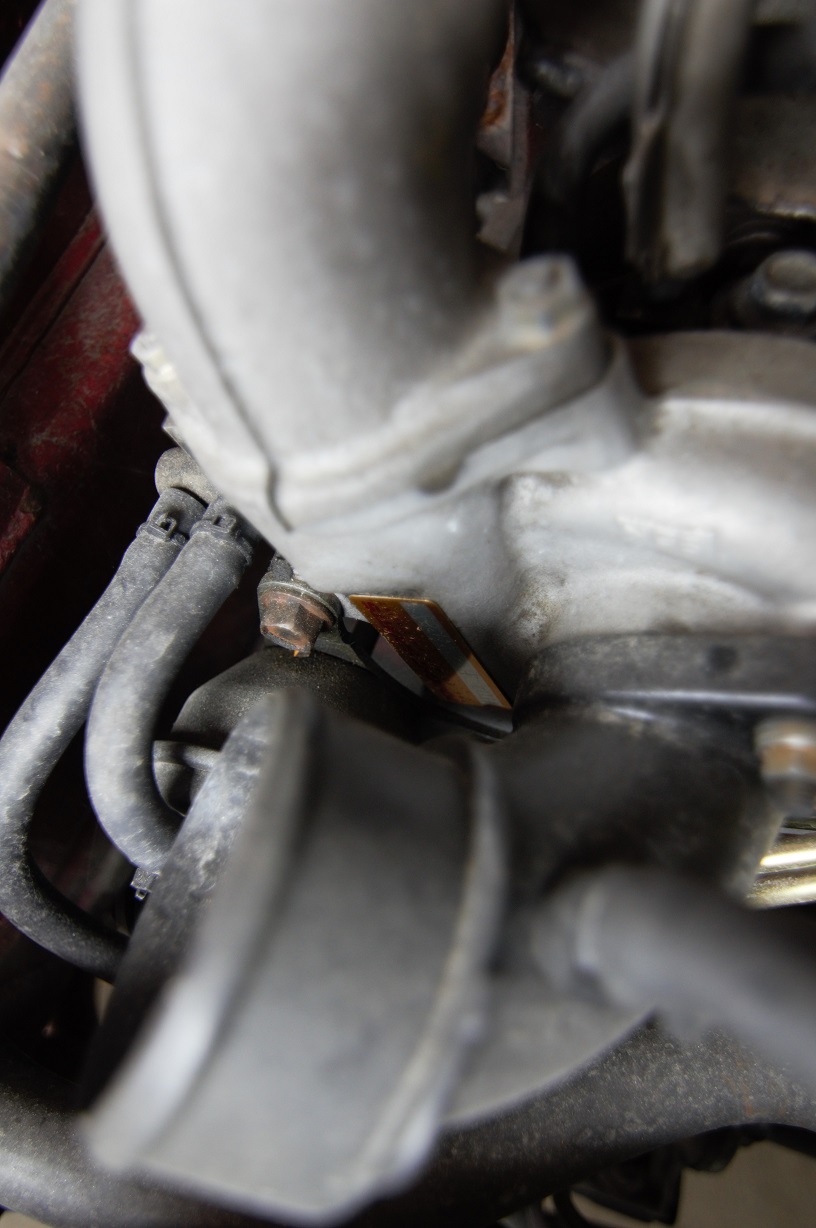
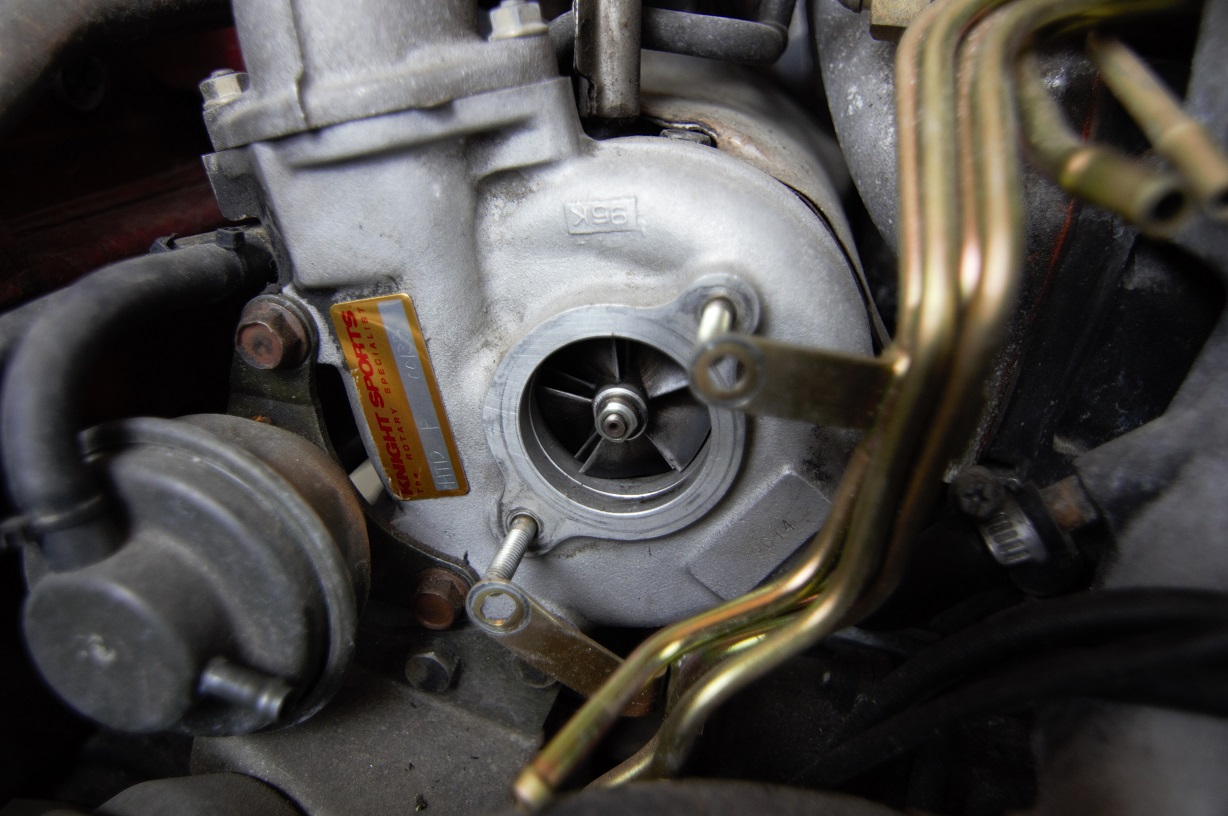
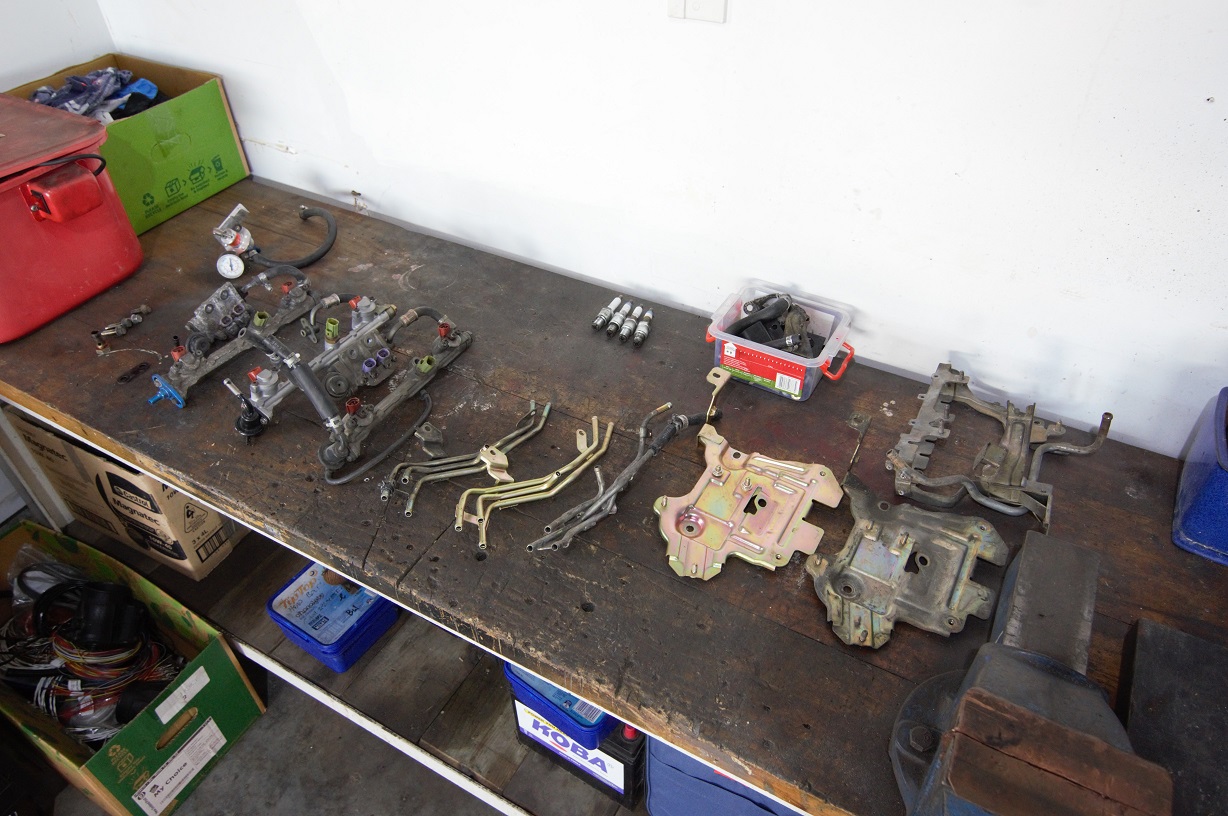
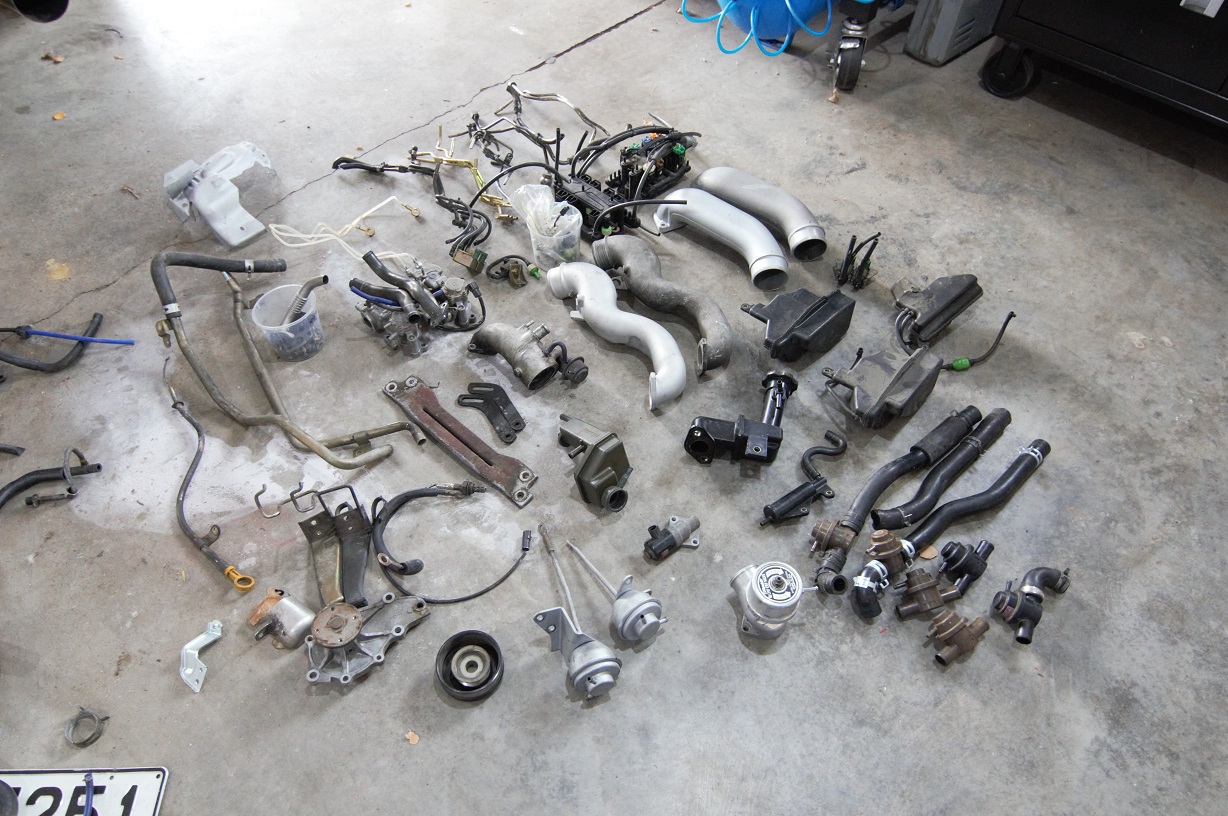
The wife and child are at the ballet today (fuck we're posh, eh?), so I'm spending some time in the garage. Good day for it too, not too cold. With the rear end sorted, and waiting on parts for the rest of the interior, it's time to dive into the bay and see what's what in there. First task was to give everything a good dust / blow down to get rid of all the trash. Plan of action is to: Remove all the aftermarket stuff Spin the thing by hand to make sure it's not locked up and makes no funny noises Source and fit a charging / body harness Crank it on the starter and check the cold compression. If that all checks out, then I'll start finding / refitting the pieces it needs to actually run. Couple of interesting finds when poking around: Sard AF. This car had a S4 single turbo on it at some stage, and this is part of that swap. The MAP sensor in the background is a 3 bar one too... I've got factory versions of both items kicking around, so will put them on for the initial getting it going. But it did come with a power FC, so the higher range MAP sensor might be useful for that.... Or it might make a good package deal if I sell it, hah. Looks like the AC system was converted to R134A at some stage. Being an early model it would have originally had R12. The condensor and dryer aren't with the vehicle alas, but I do plan to get the AC in it running at some stage. Hmmmmmm, interesting, I thought the Knight Sports upgraded turbos had different compressor covers... So it's entirely possible this is just a sticker put on there. When I whip them off I'll have a good look / measure up. I've got a set of turbos I did for my old white car still which I plan to put on this, but these might be interesting. Bit of JDM nostalgia cool if nothing else. A box of bits it came with, sorted through it to pull out all the fuel system components I could find. Looks like a mix of series 6 and 7 parts. Couple of coil and solenoid control boxes from the 7's. A mount for the series 6 stuff, but non of the actual valves. Plenty of goodies though, should be able to piece together a working stock fuel system. I'll order replacement injector o-ring and seal kits, and the diffusers, but will get it running on the ones that are in there at the moment. I dont plan on this thing making massive power, so I shouldn't have to put in bigger injectors, provided there is a good set in the bits here. There is still heaps more stuff in other boxes in the lockup, but this should be enough for now. Factory FPR, nice. I'll test everything while it's out of the car. get it all in place then go find an UIM and throttlebody and sort those out. Hopefully the bits I've got coming from yahoo auctions japan will be here in the next couple of weeks and I'll be able to actually power everything up and see where it leaks smoke / blows fuses ;-).
2 points
-
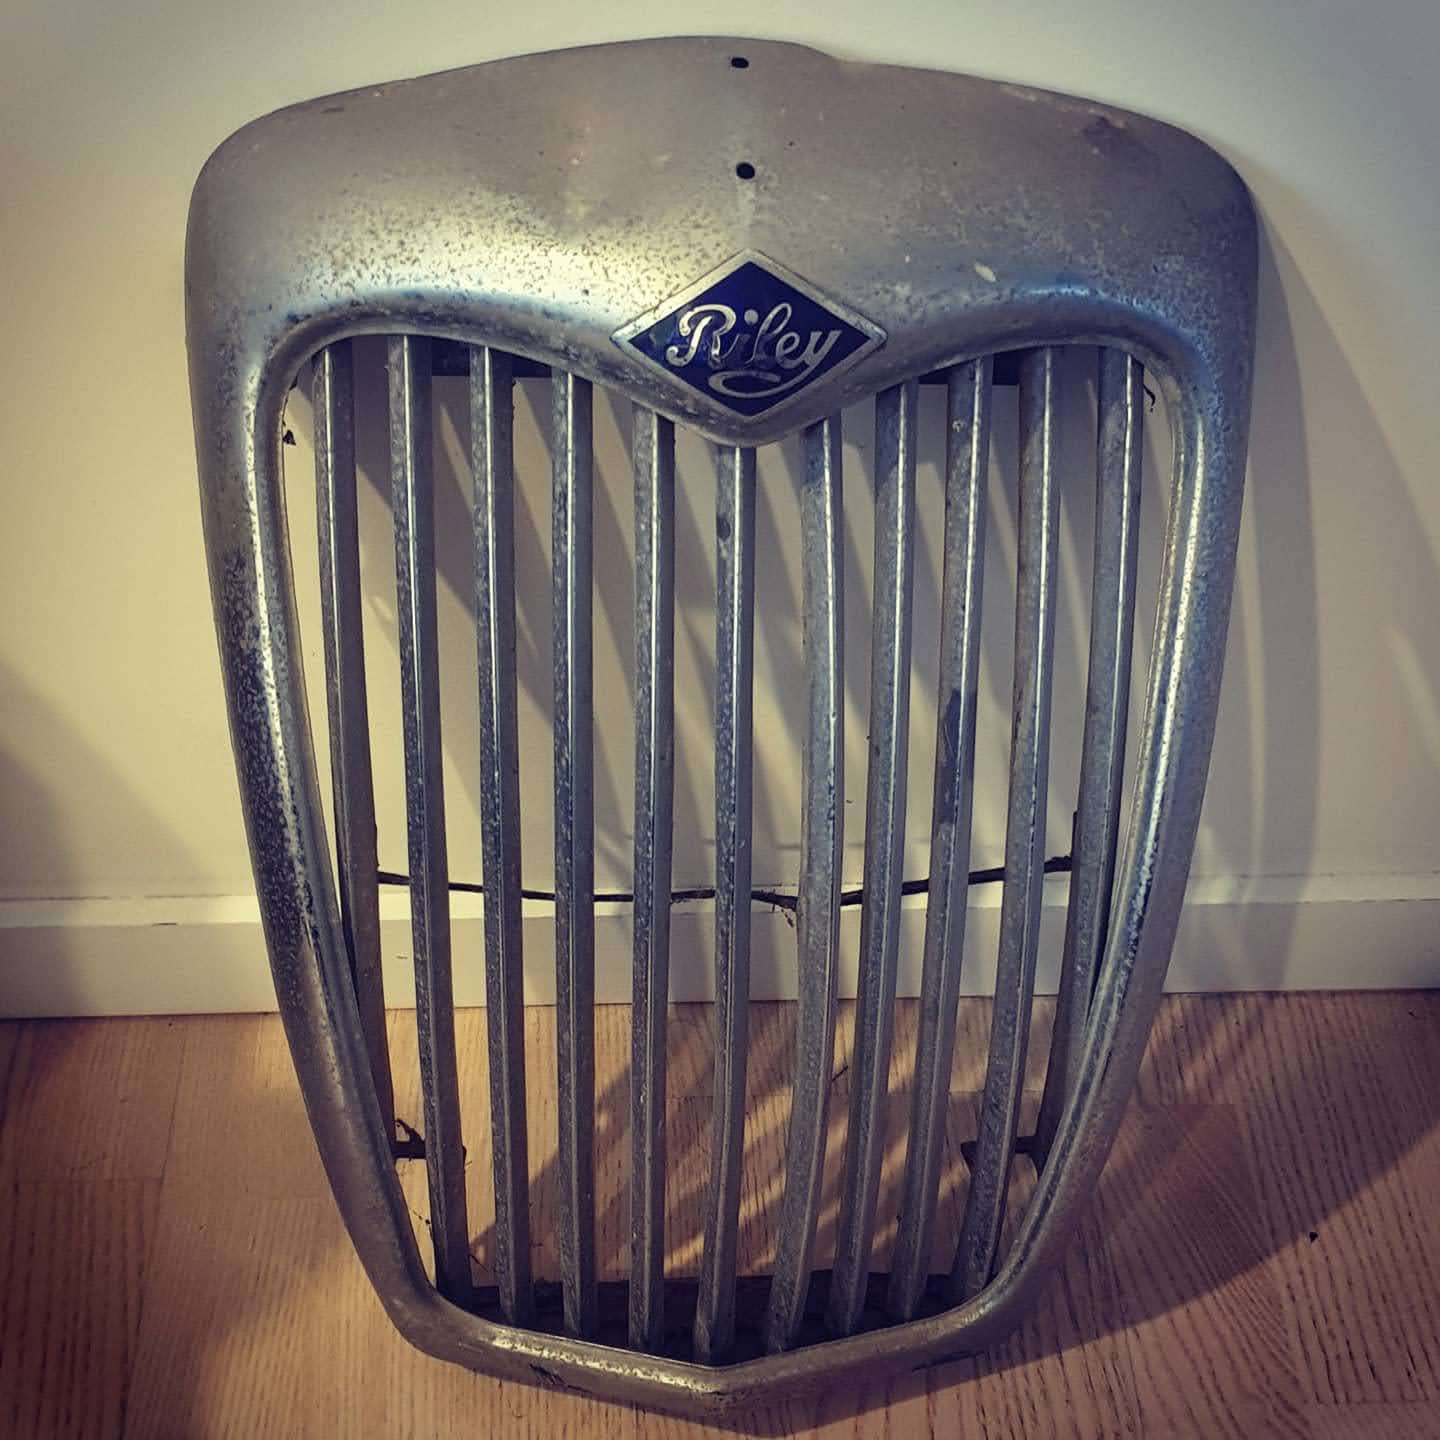
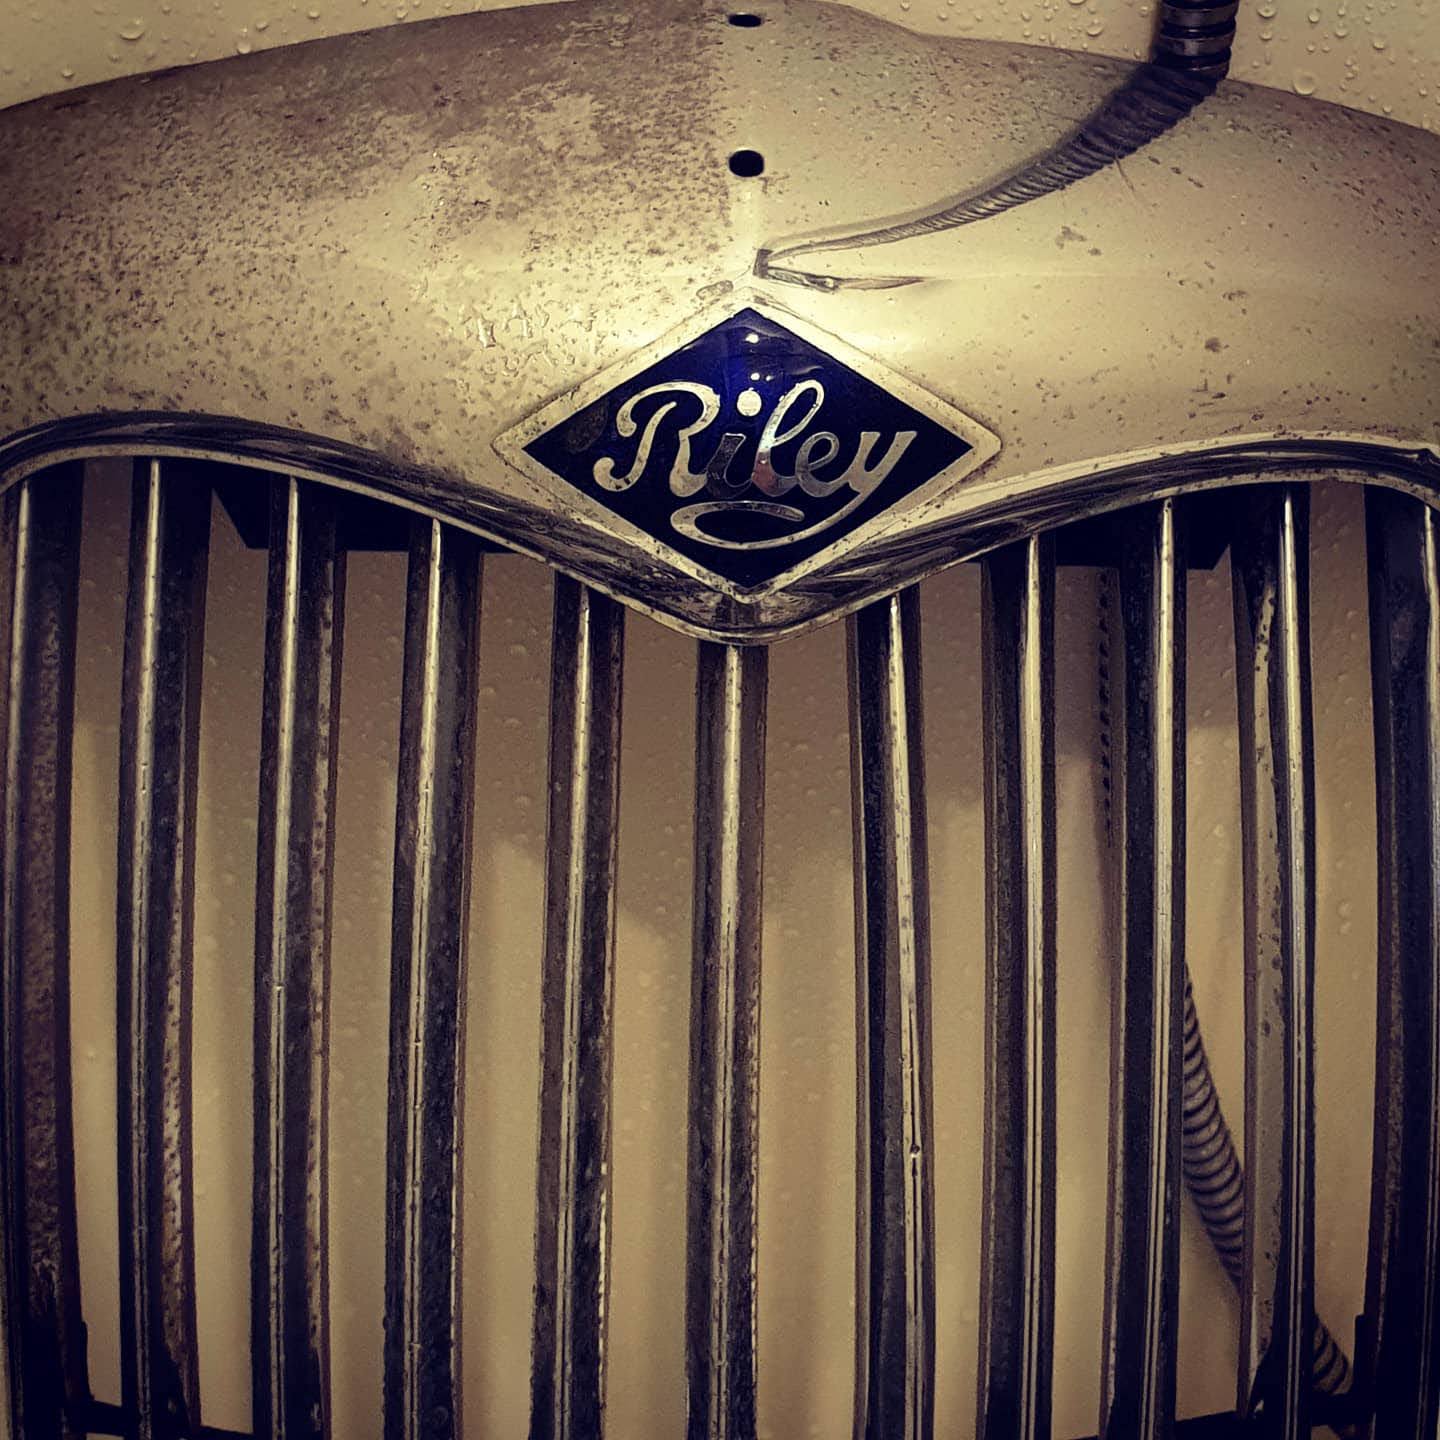
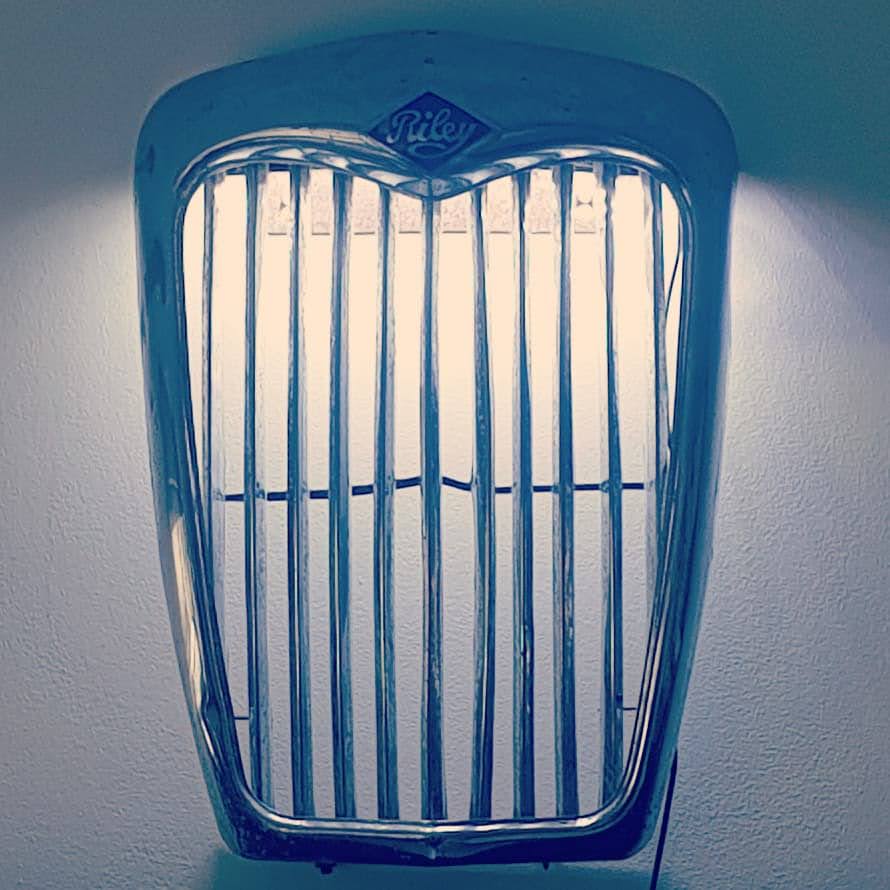
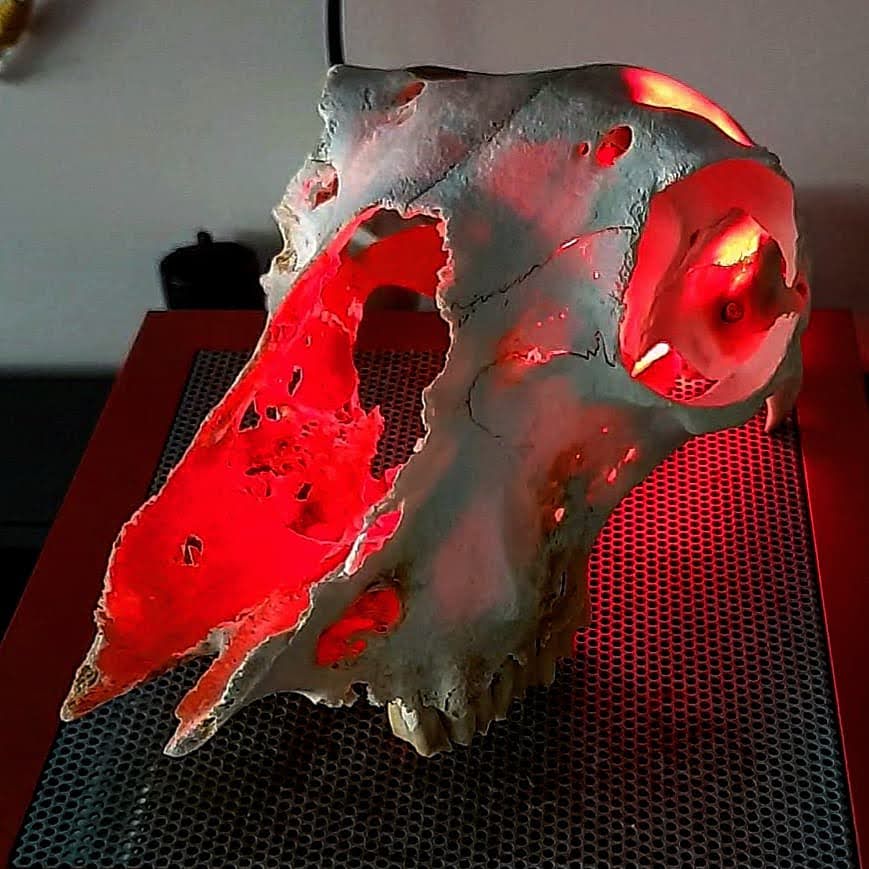
Made some lamps. $2 Unkown Riley grille from the tards. Bit of a coke and tin foil clean to remove the worst of the grot. Dismantled LED fishtank lamp. Boom! Plus, sheep skull, found the other weekend tiki touring around the Coromandel. Dismantled bicycle tail lamp (stupid mounts broke, so sitting around). Bit of tape and a cork. Boom/Hail Santa etc
2 points
-
Hatch and rad louvres on, side skirts and front garnish on... so just the front and back bumpers to go. Front bumper skeleton is off getting sandblasted, it's pretty shabby so will need to have some plates put in it I meataxed the downpipe together before deciding to get cute and run the wastegate outpipe separately for as long as possible for MAXIMUM POWER. so waiting on a matching 1.75" flexi to arrive. Then I'll take the bumper skeleton and tacked up exhaust to an actually competent welder at work to finish off Managed to sunburn everything from my biceps to my nipples putting the downpipe together, spicy! Tyres have gone flat from boredom. Wheels need a polish too I guess. Bet those friggin brakes have seized again in the meantime
2 points
-
Have found a couple of donor cars for parts. The plan so far is to pull the subframes out of the legacy and grab the Barra and trans and associated looms out of the Falcon. Other than I’ve just been far too busy restoring an old Fuso tow truck at work. This thing will see some love, always make time for the good things.
2 points
-
Mock up- inching closer
2 points
-
Finally got the suspension sorted at long, long last. The guys at Racelign have smashed it with a pretty full-on set up – sectioned struts converted to coilover with camber adjust top plates up front, reset leaves and blocks in the rear, custom shocks, custom urethane bushes all around, ball joints, tie rod ends etc etc. Rides great, looks great. I need to get some decent photos, but here's some cell phone quickies. Before: After: The lack of width of the rear wheels becomes even more apparent, but one thing at a time. I'm nearly done with the Enkeis, all polished up (which took aaaages), just need to finish painting them. I've done the first one, to test the colour, it's the same gunmetal grey as the steel wheels. Before (left) and after (right) showing how lumpy they were: Lots of sanding: Then LOTS of polishing and some paint: Daily driving it and it's fucking choice. Won't be doing anything else on it for a bit, while the bank account recovers.2 points
-
Quite often. Many waves and fist pumps, one truck driver was literally wriggling with excitement when our eyes met across a crowded intersection. I get bailed up by boys with so many questions about once a week but no claims of prior ownership yet. Many people throw themselves onto the ground and go underneath which lols me. Otherwise it is a lot of 'fuuuuuuck man' 'sweeeeeeeet' 'ah fuck yes bro' I enjoy all of this...2 points


.thumb.jpg.570970b401ac8d26ce9af7c1bf2bd8cd.jpg)


This leaderboard is set to Auckland/GMT+12:00