
Leaderboard


Popular Content
Showing content with the highest reputation on 04/20/21 in all areas
-
Finished and loaded up. Probably the most expensive and elaborate way to lower an El Camino! Looks like we'll see how good these bump stops are!22 points
-
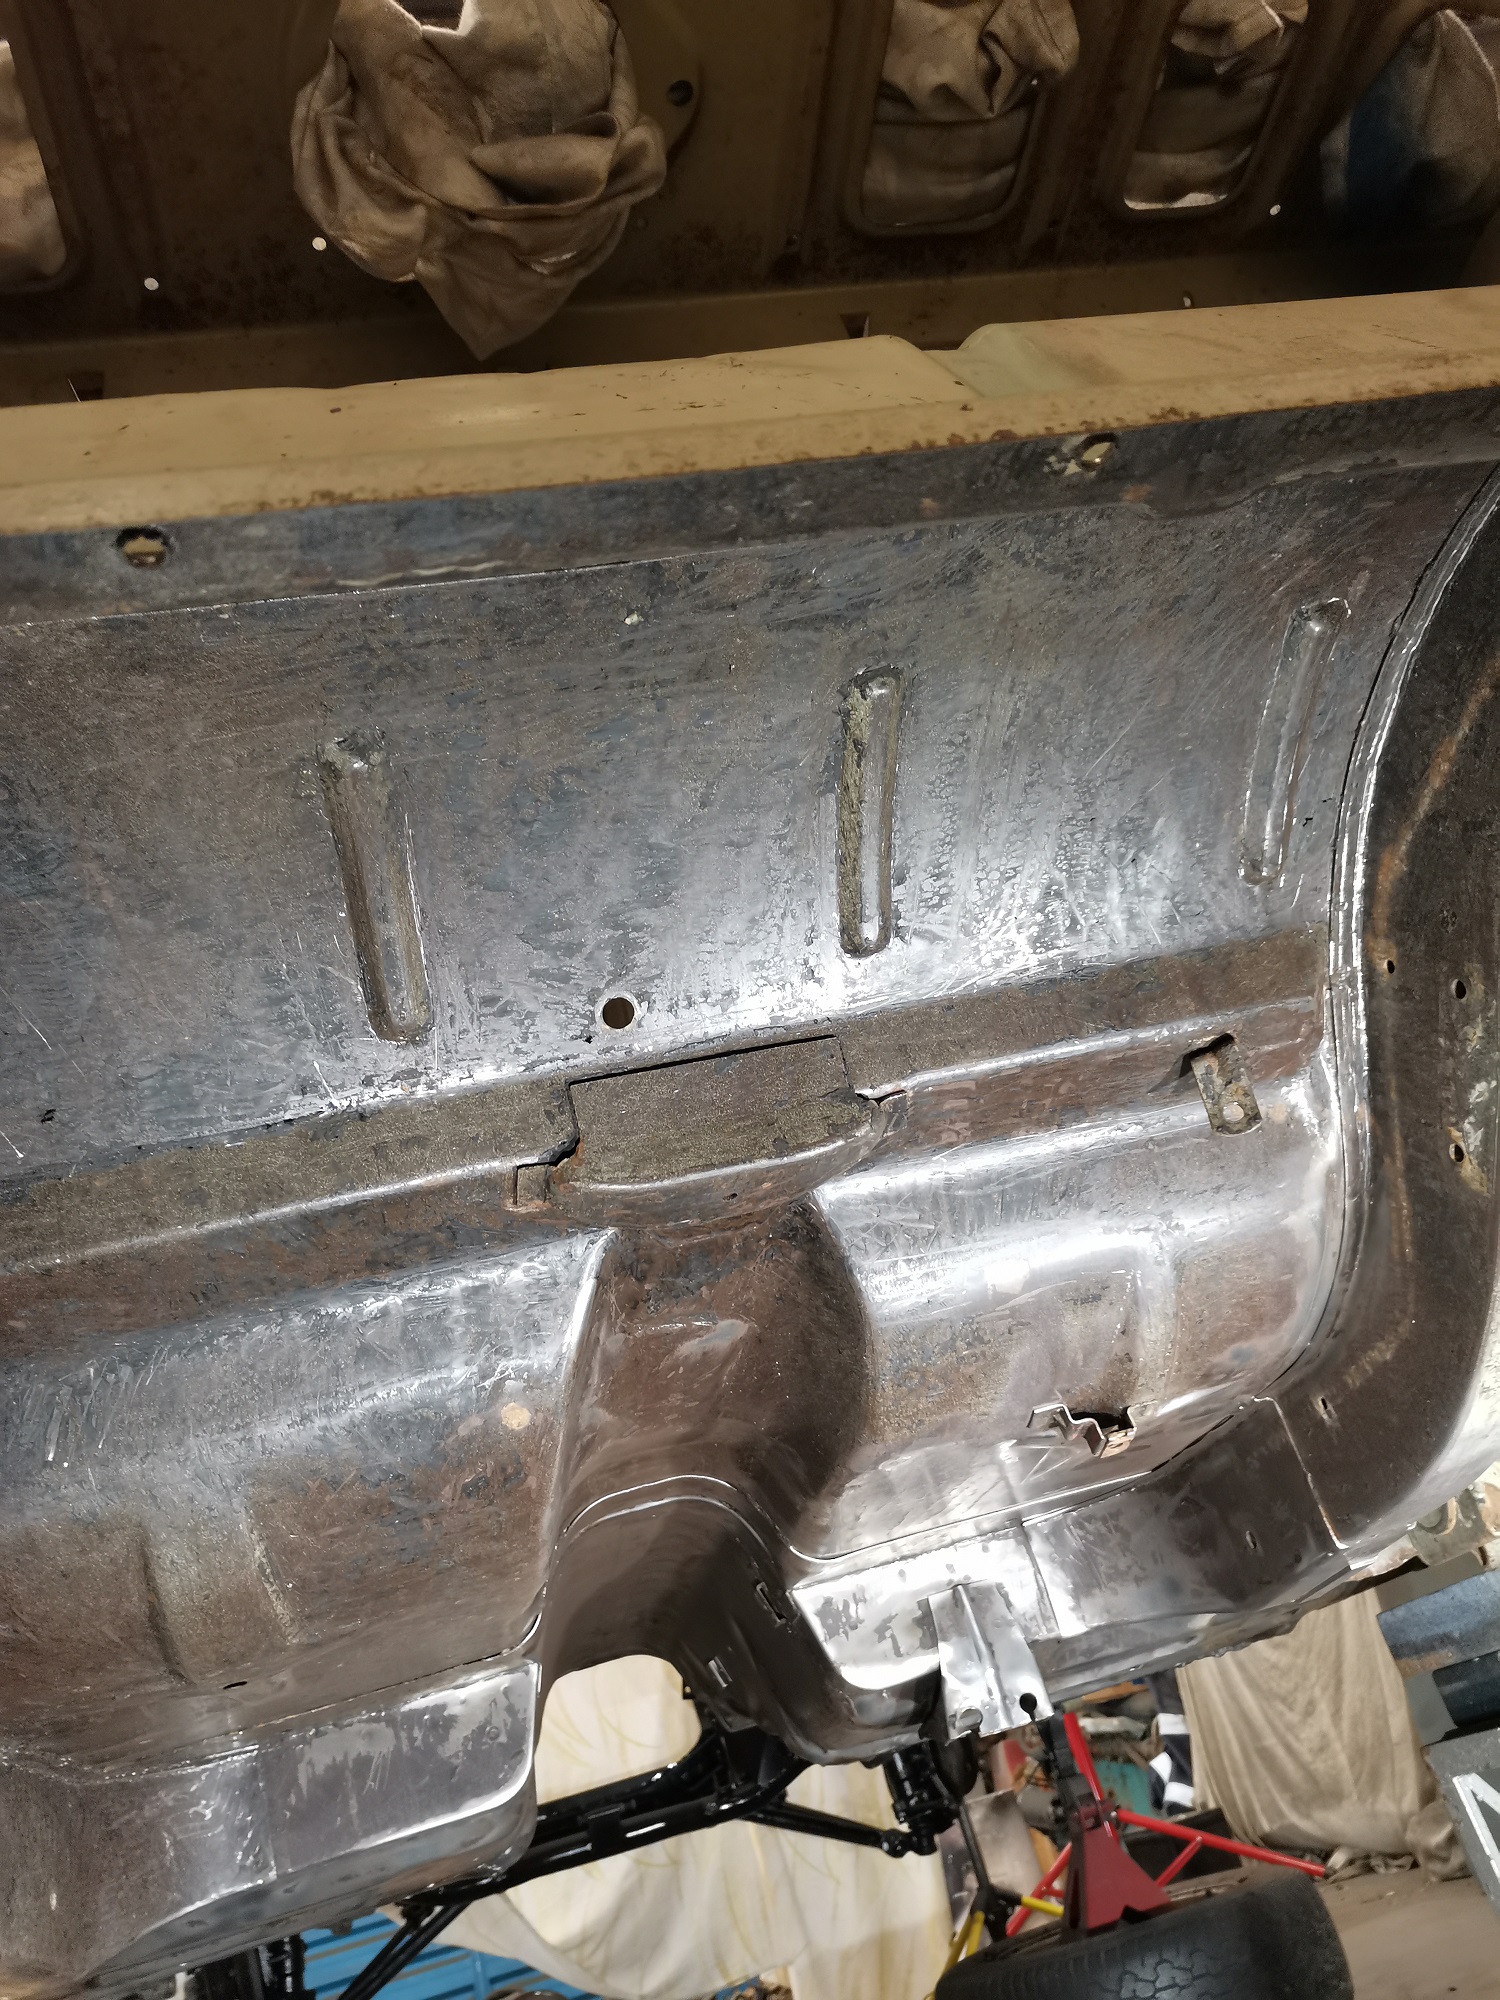
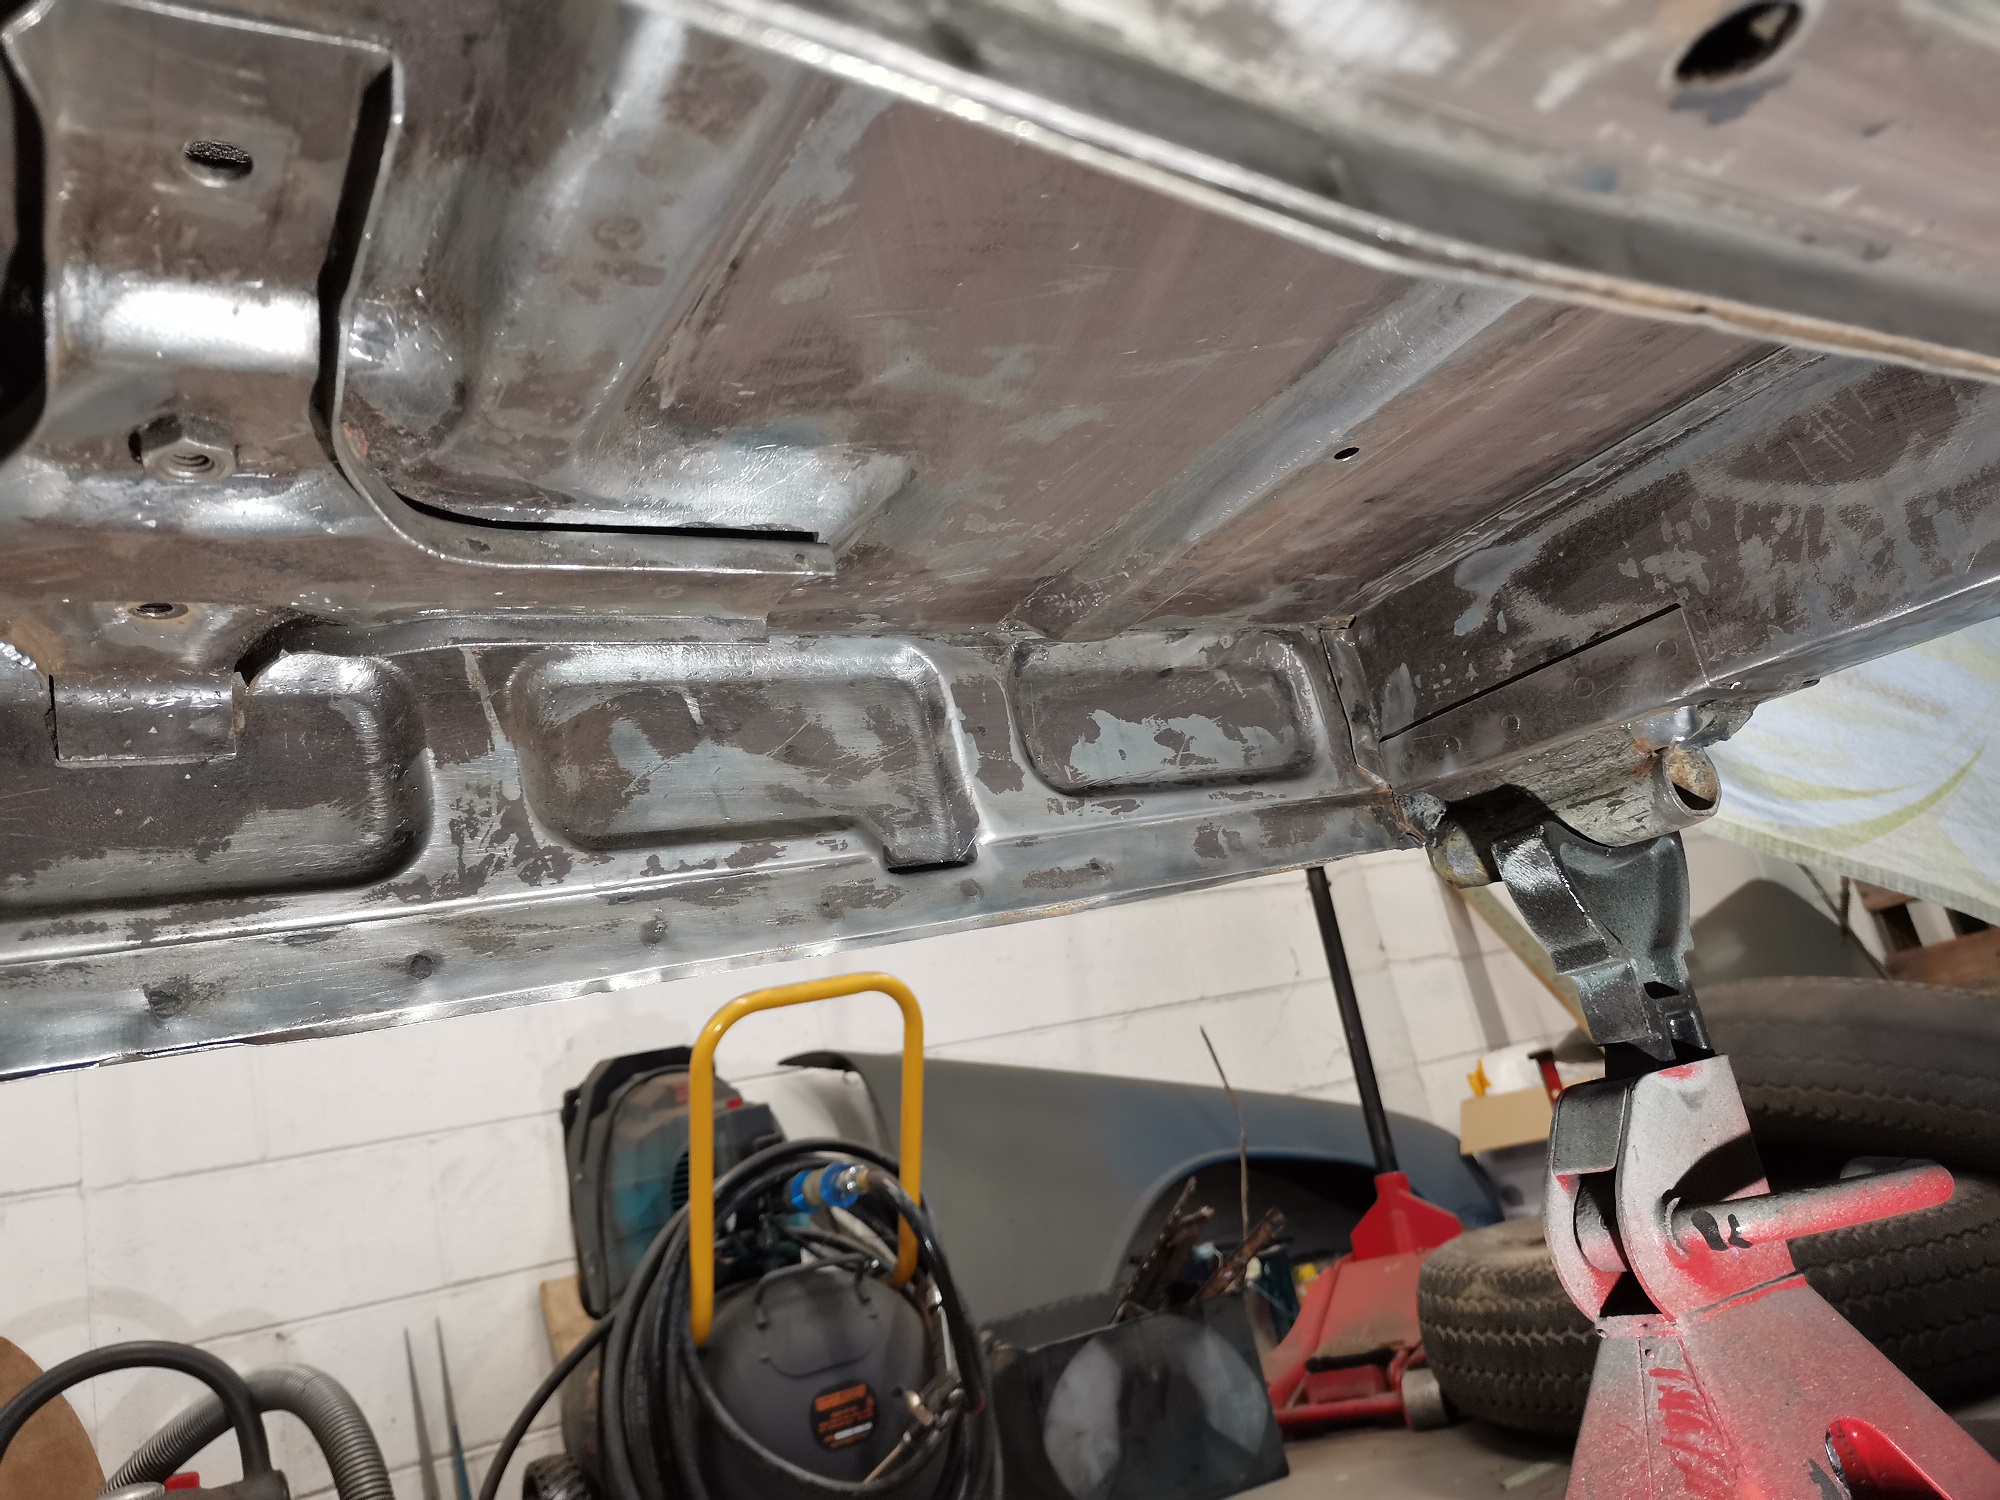
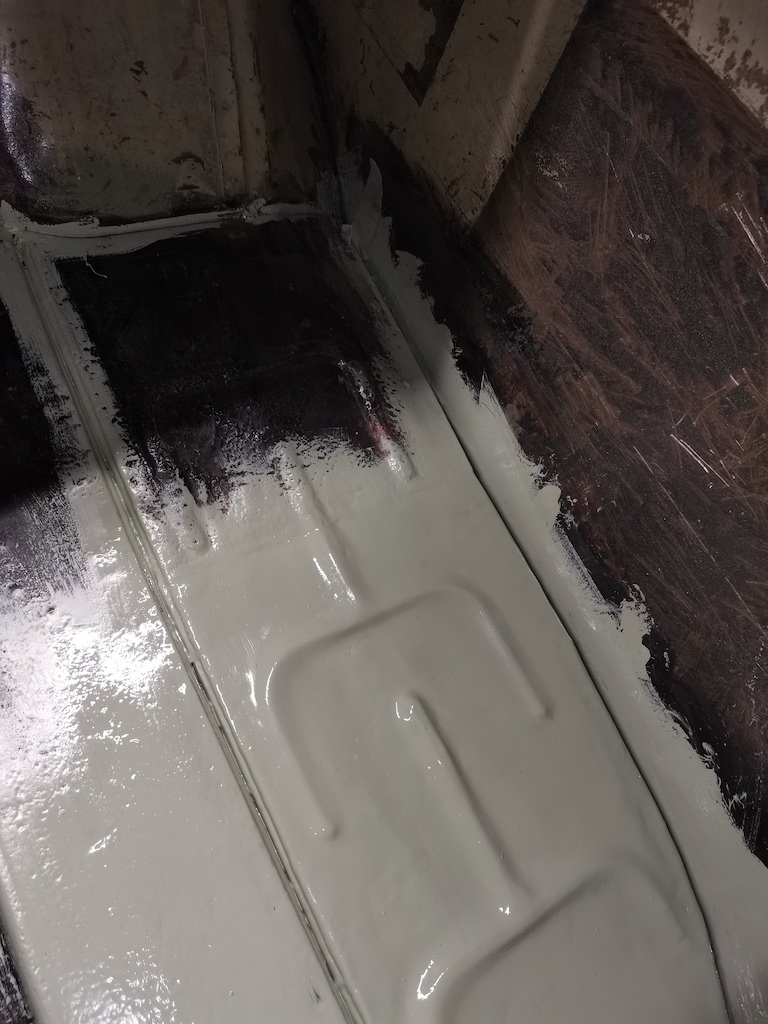
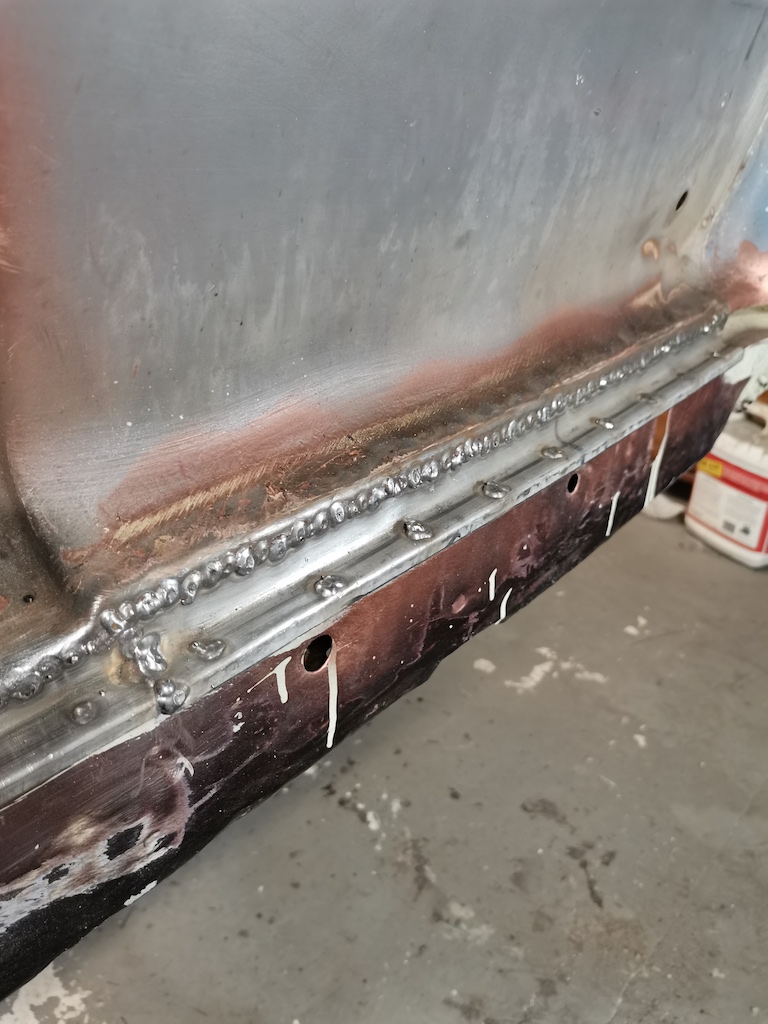
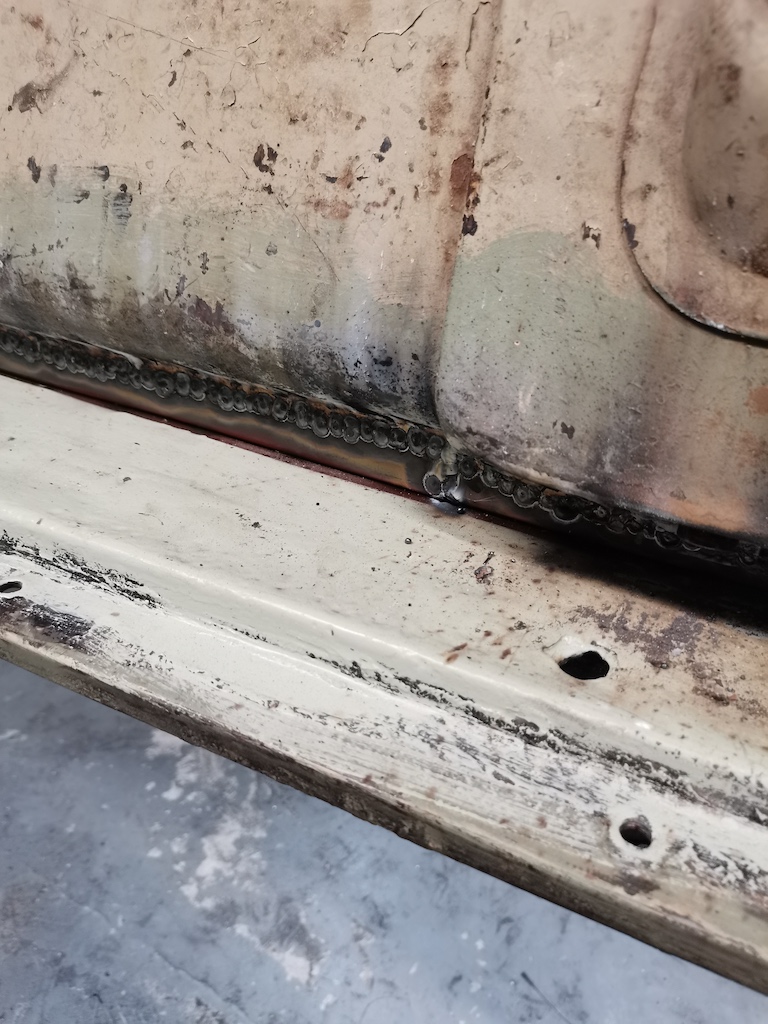
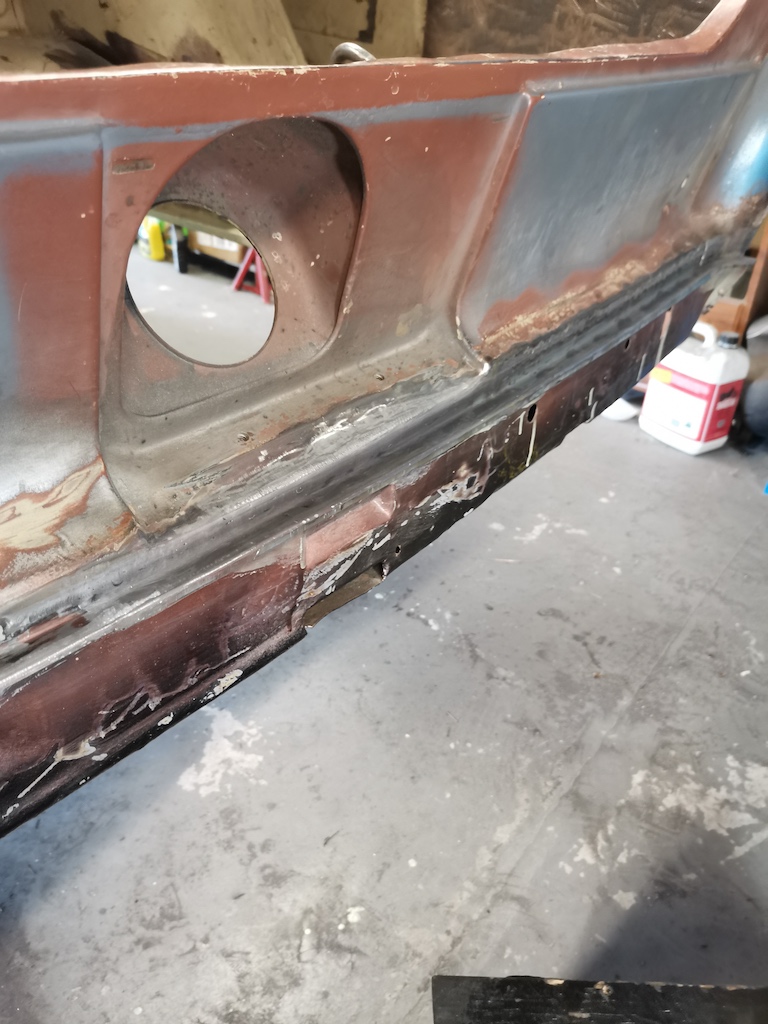
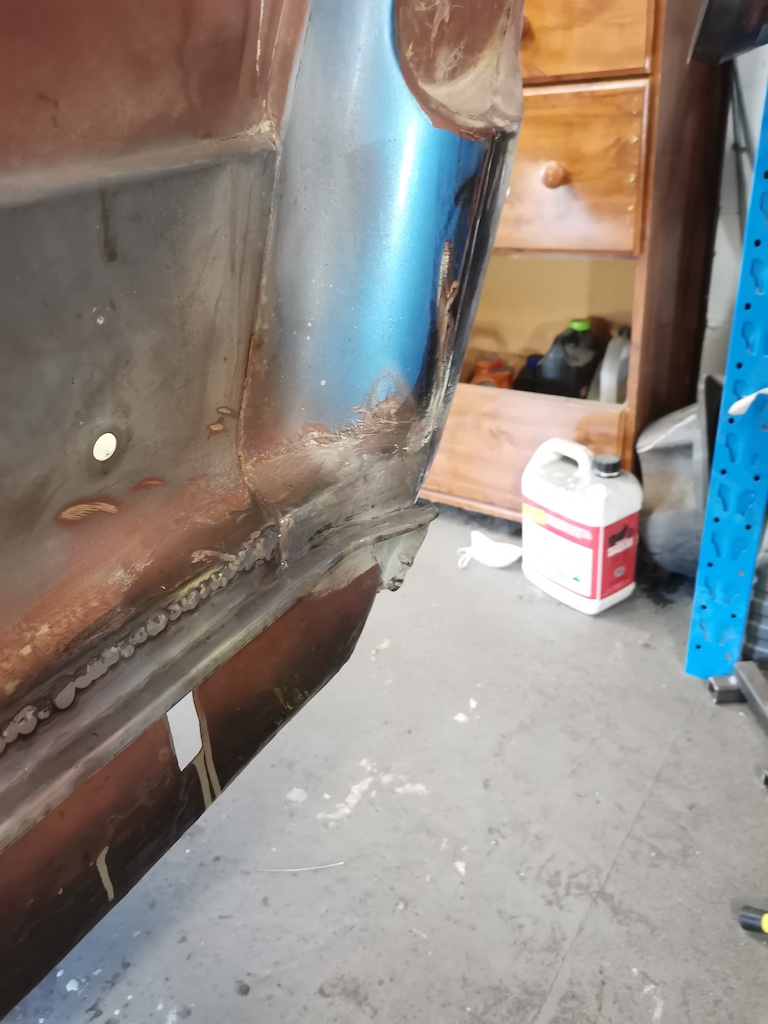
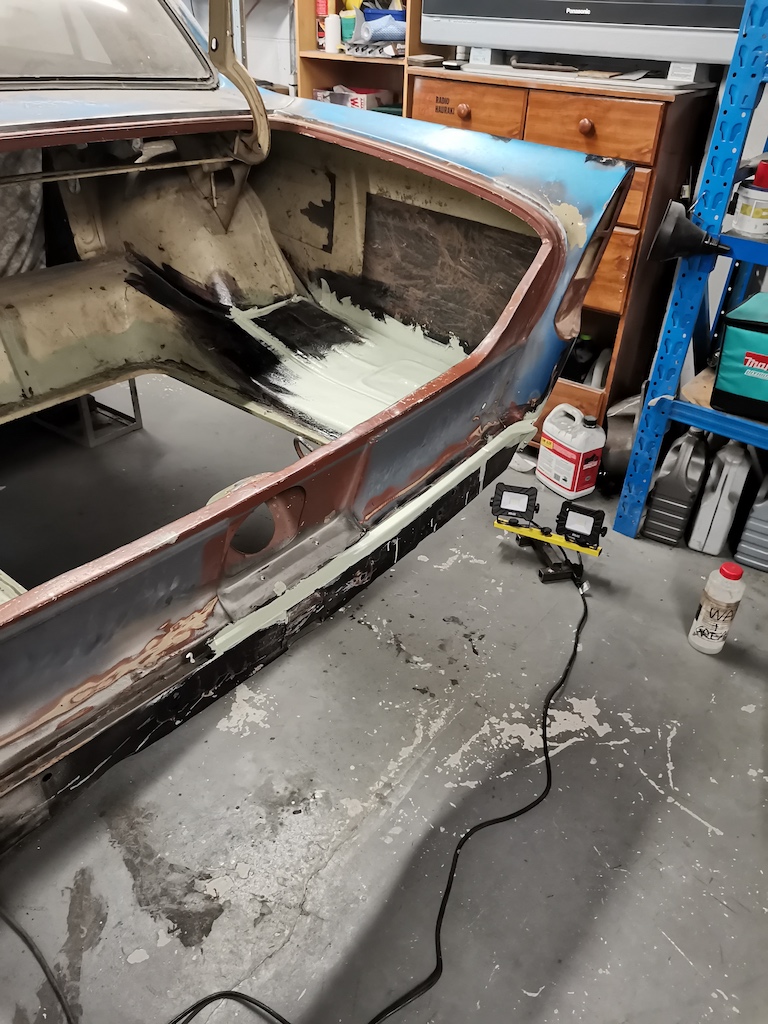
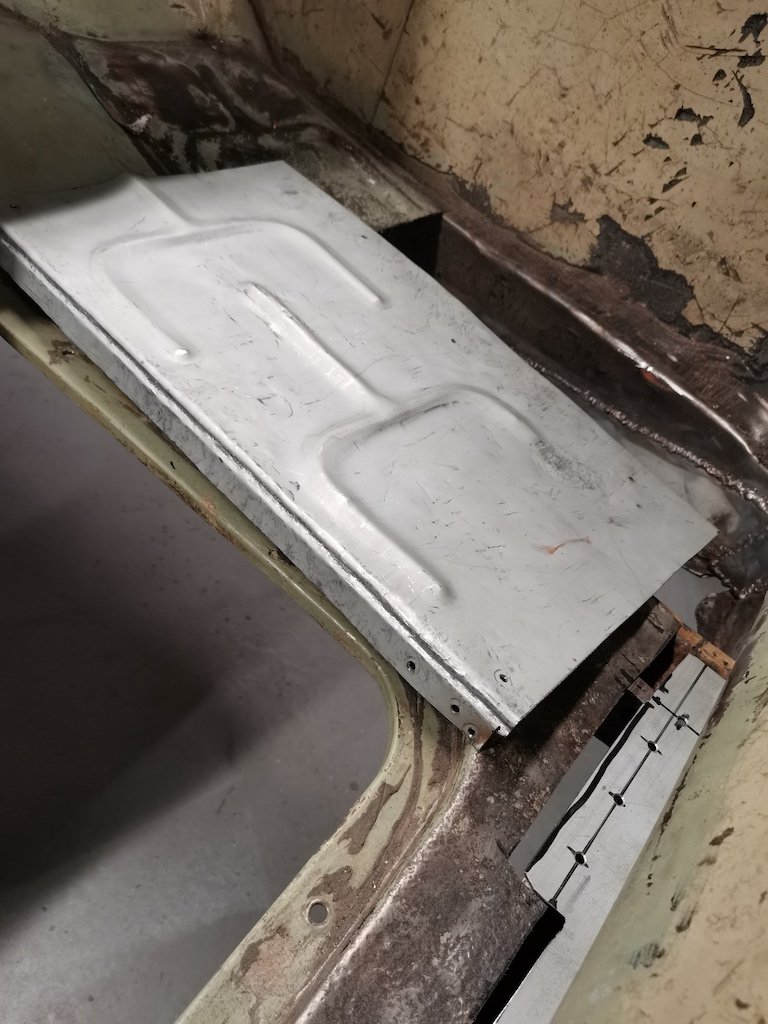
Finished removing the underseal. What a shit job, lying under the car scraping with a chisel. Only a bit of surface rust, cleaned up no worries with a strip disc and wire brush. Gave it a coat of Brunox, scuffed up with scotchbrite and brush painted with epoxy primer. Not mint, but good enough for the underside. Just need to move the stands and do the same for the jacking points now. Getting the fuel tank dipped and lined, rear brake cylinders sleeved at the moment. Next, I will tidy up and paint the diff and fuel tank.
 15 points
 -
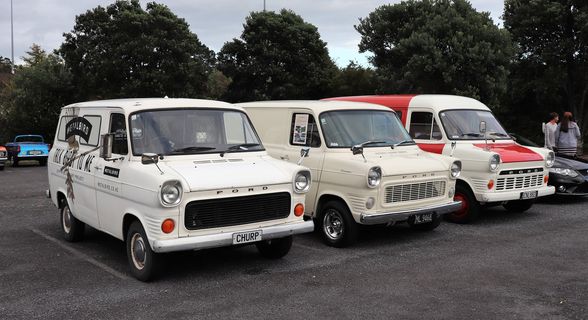
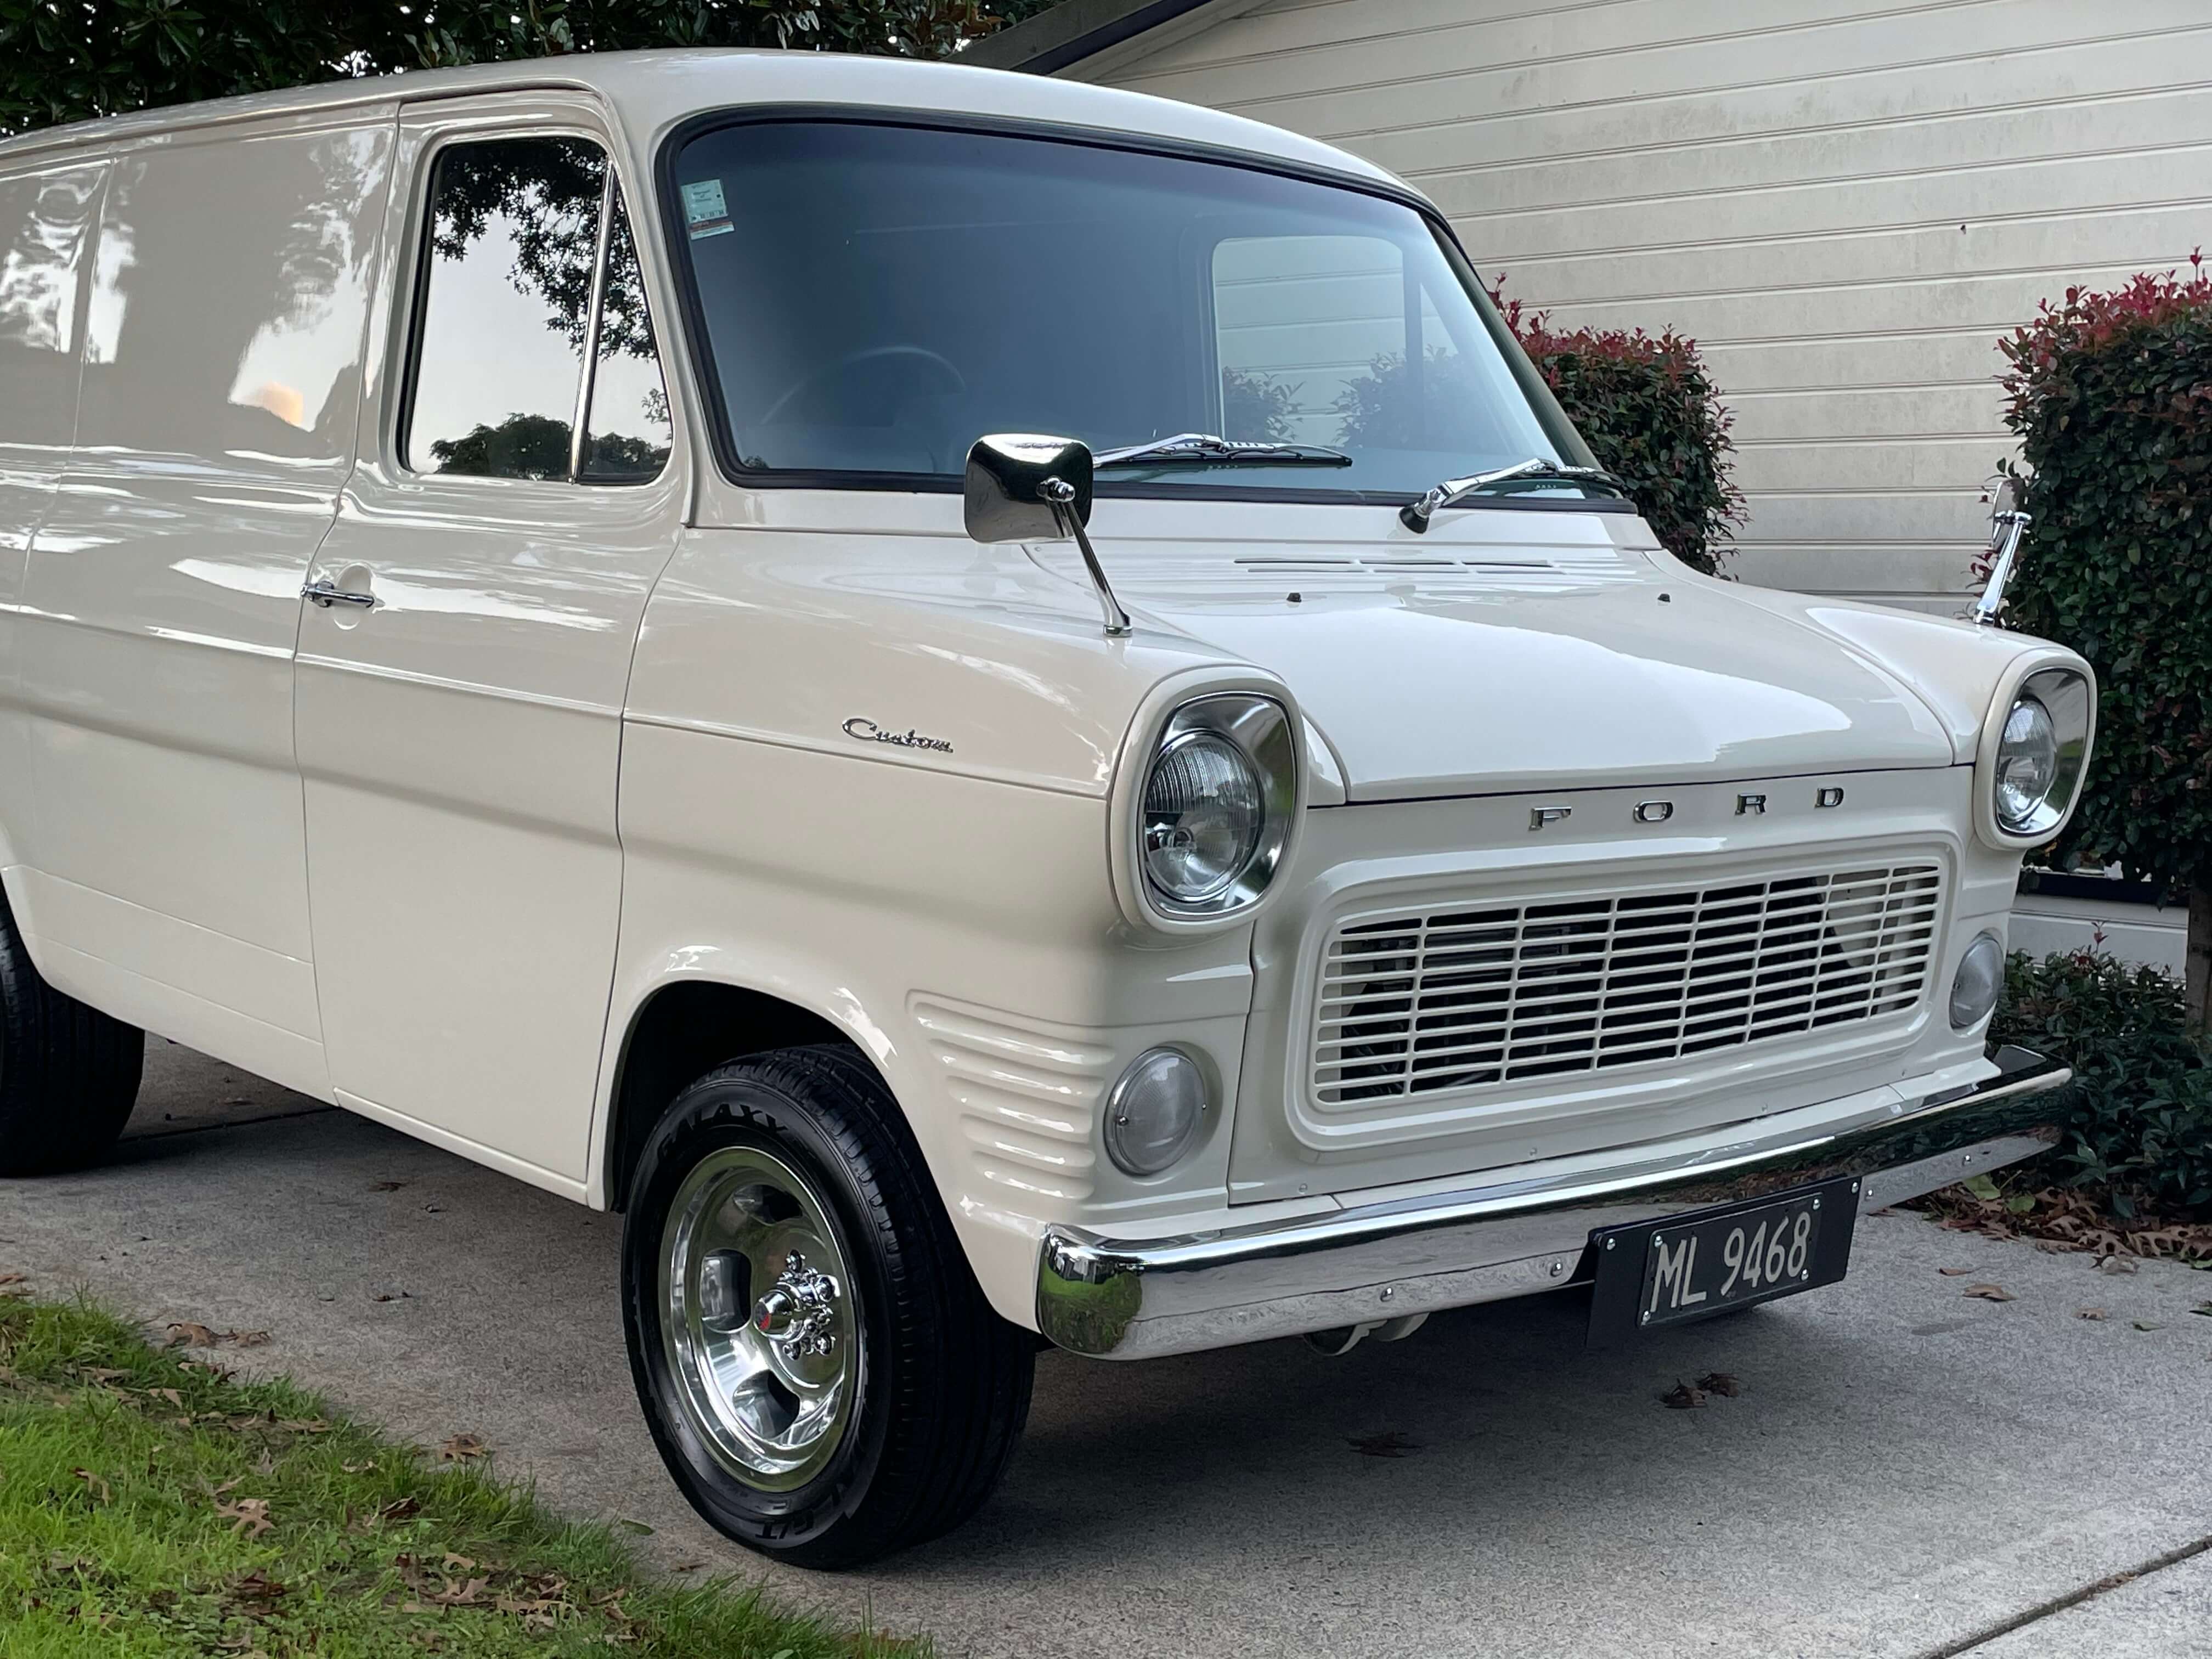
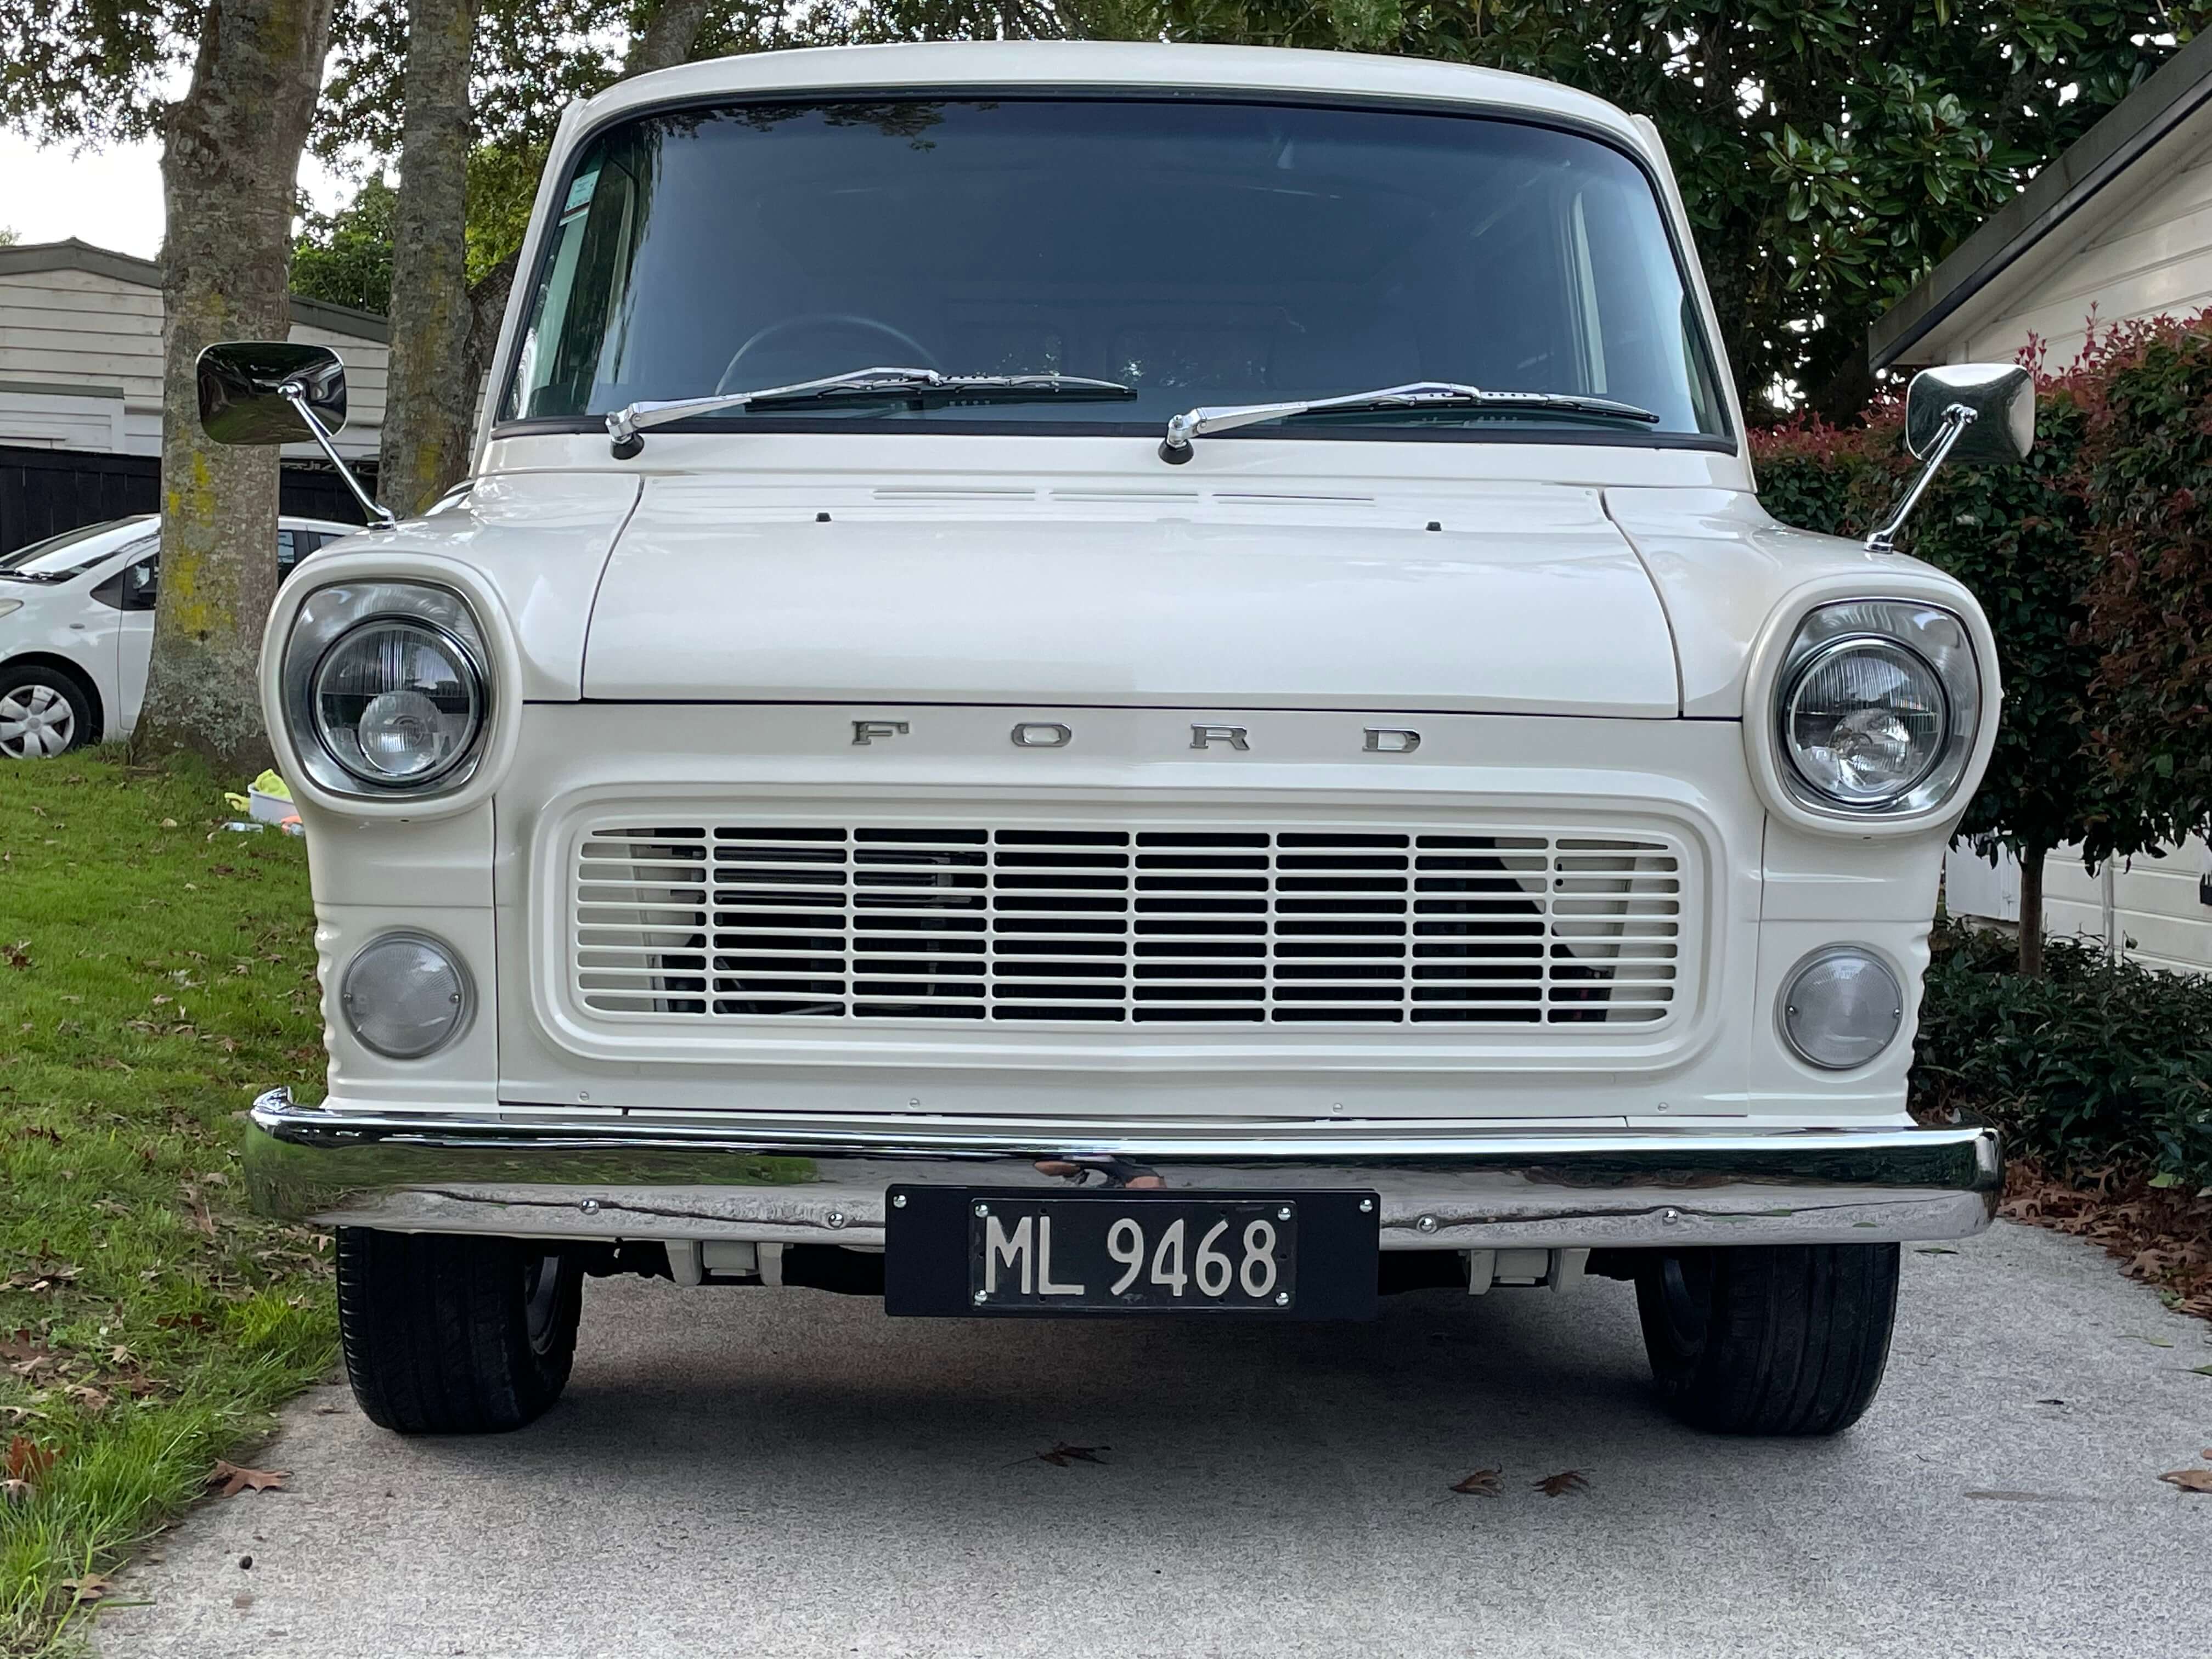
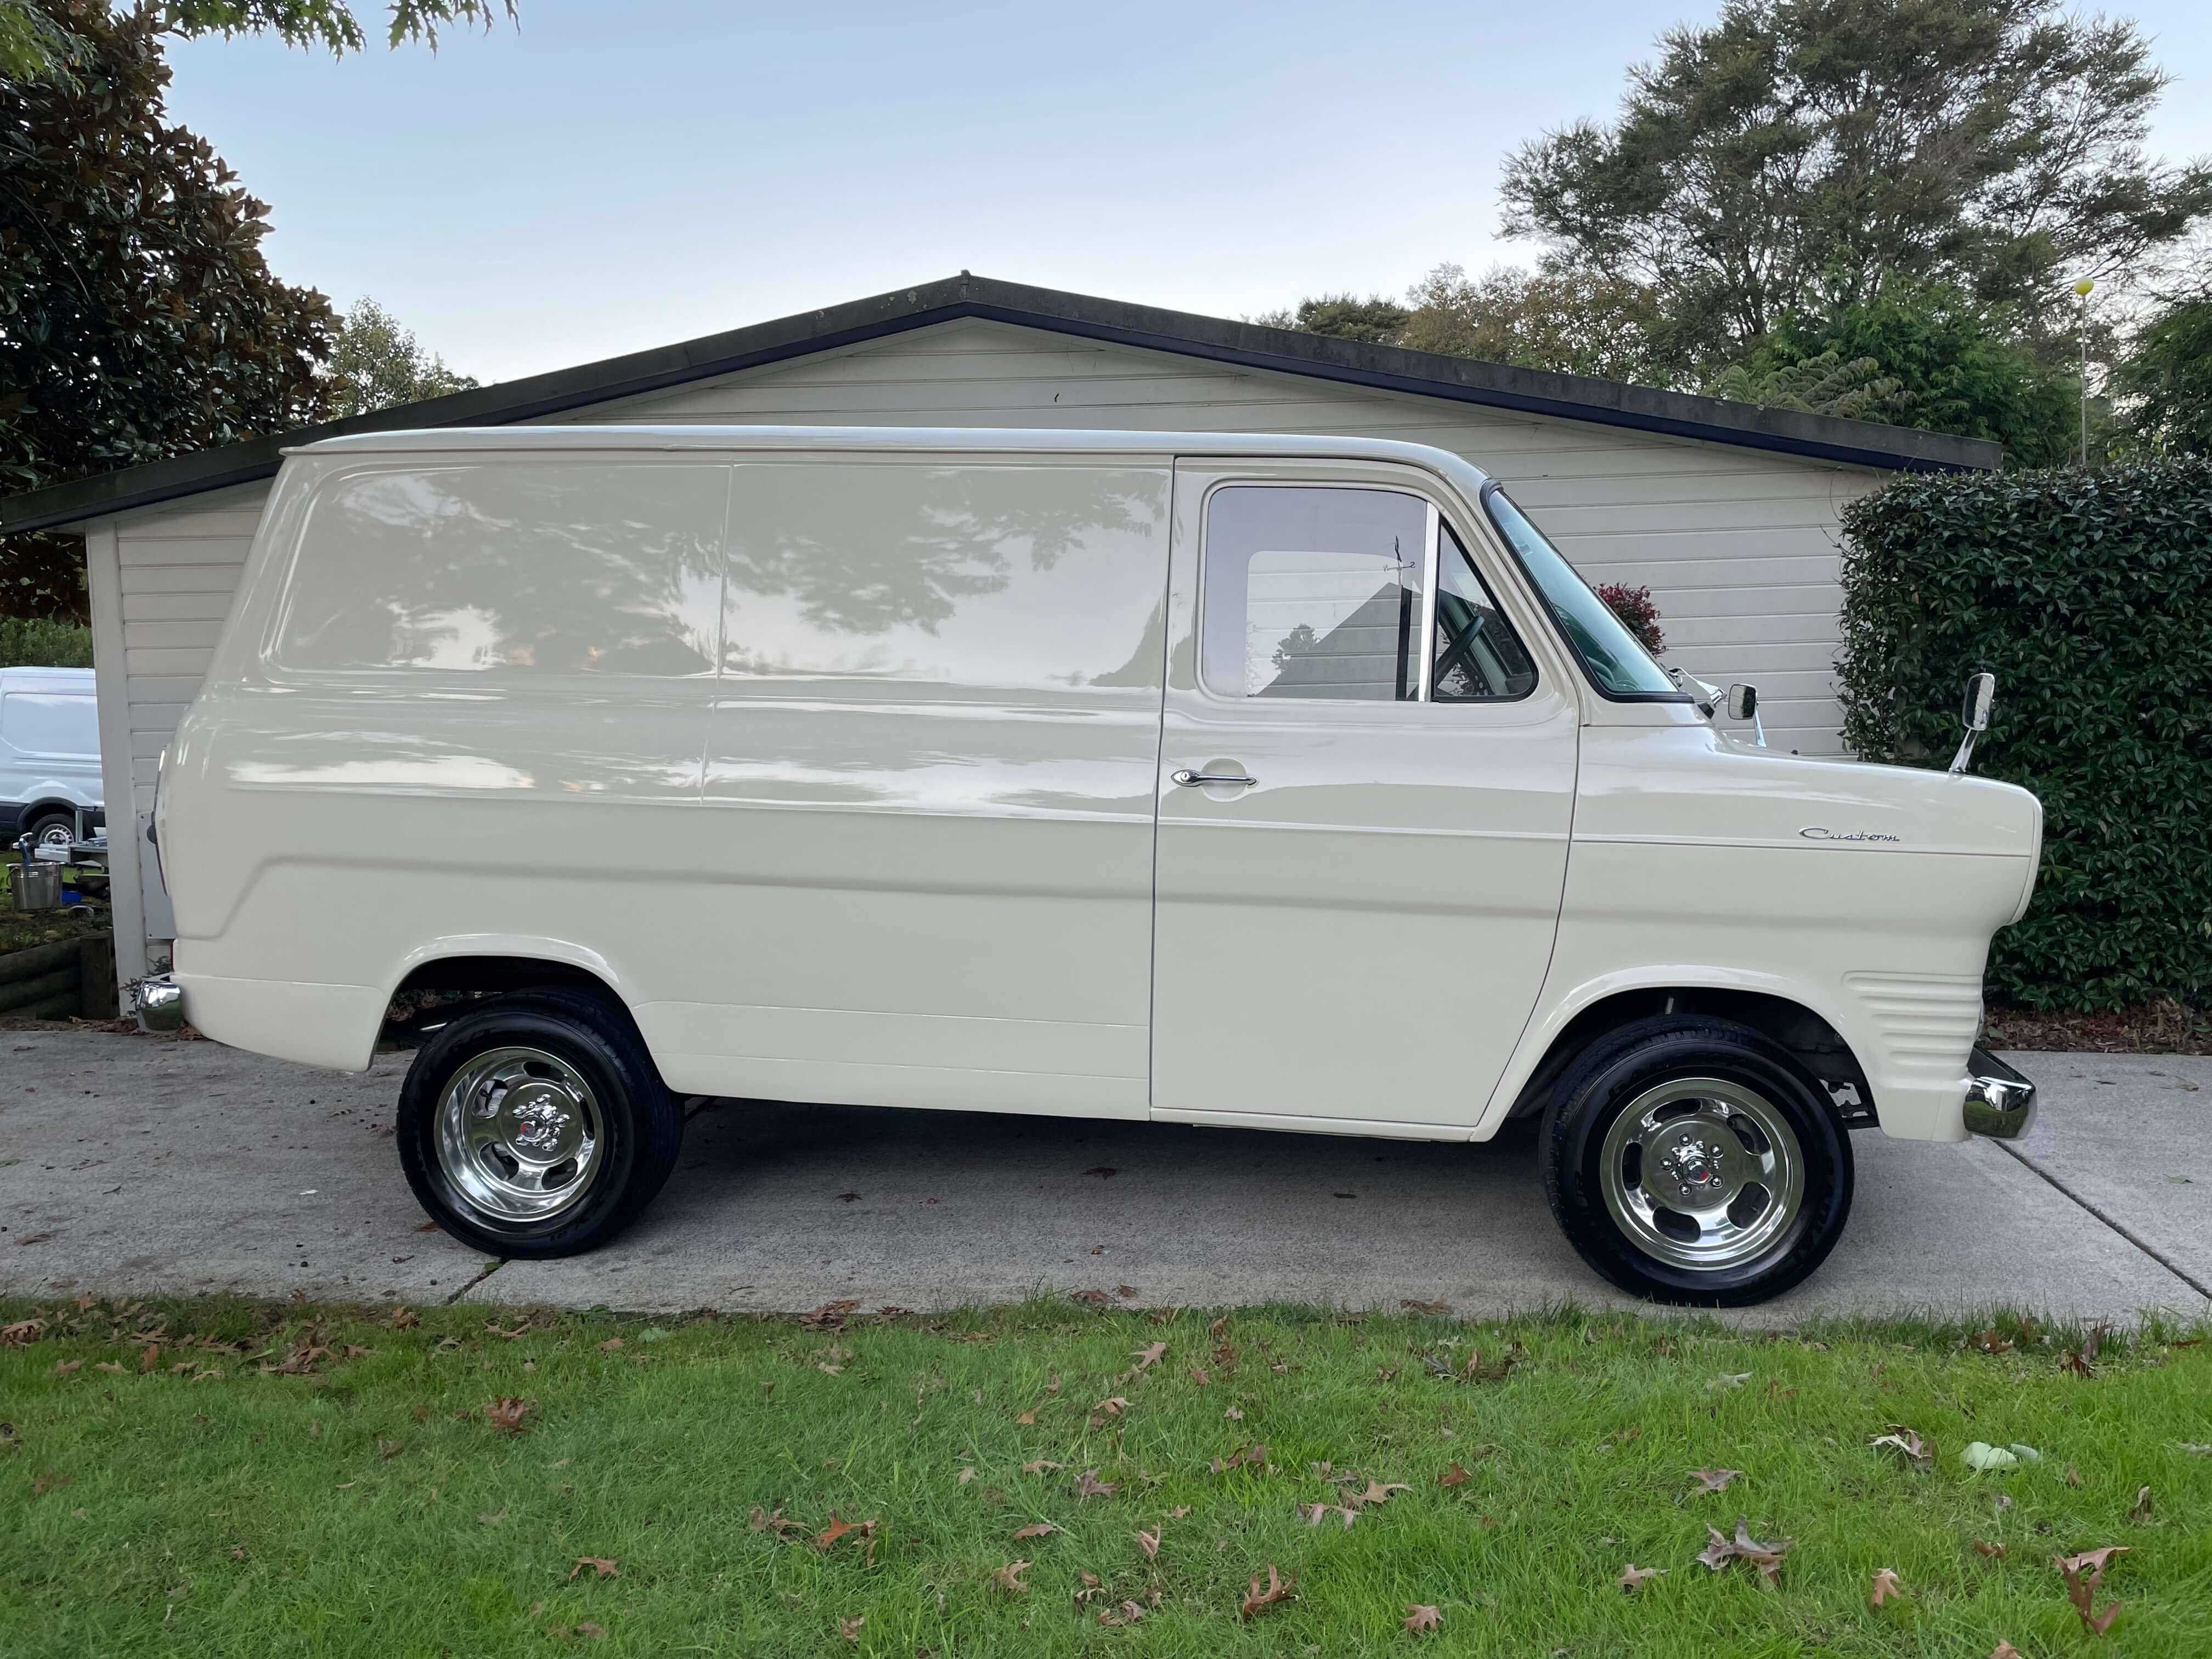
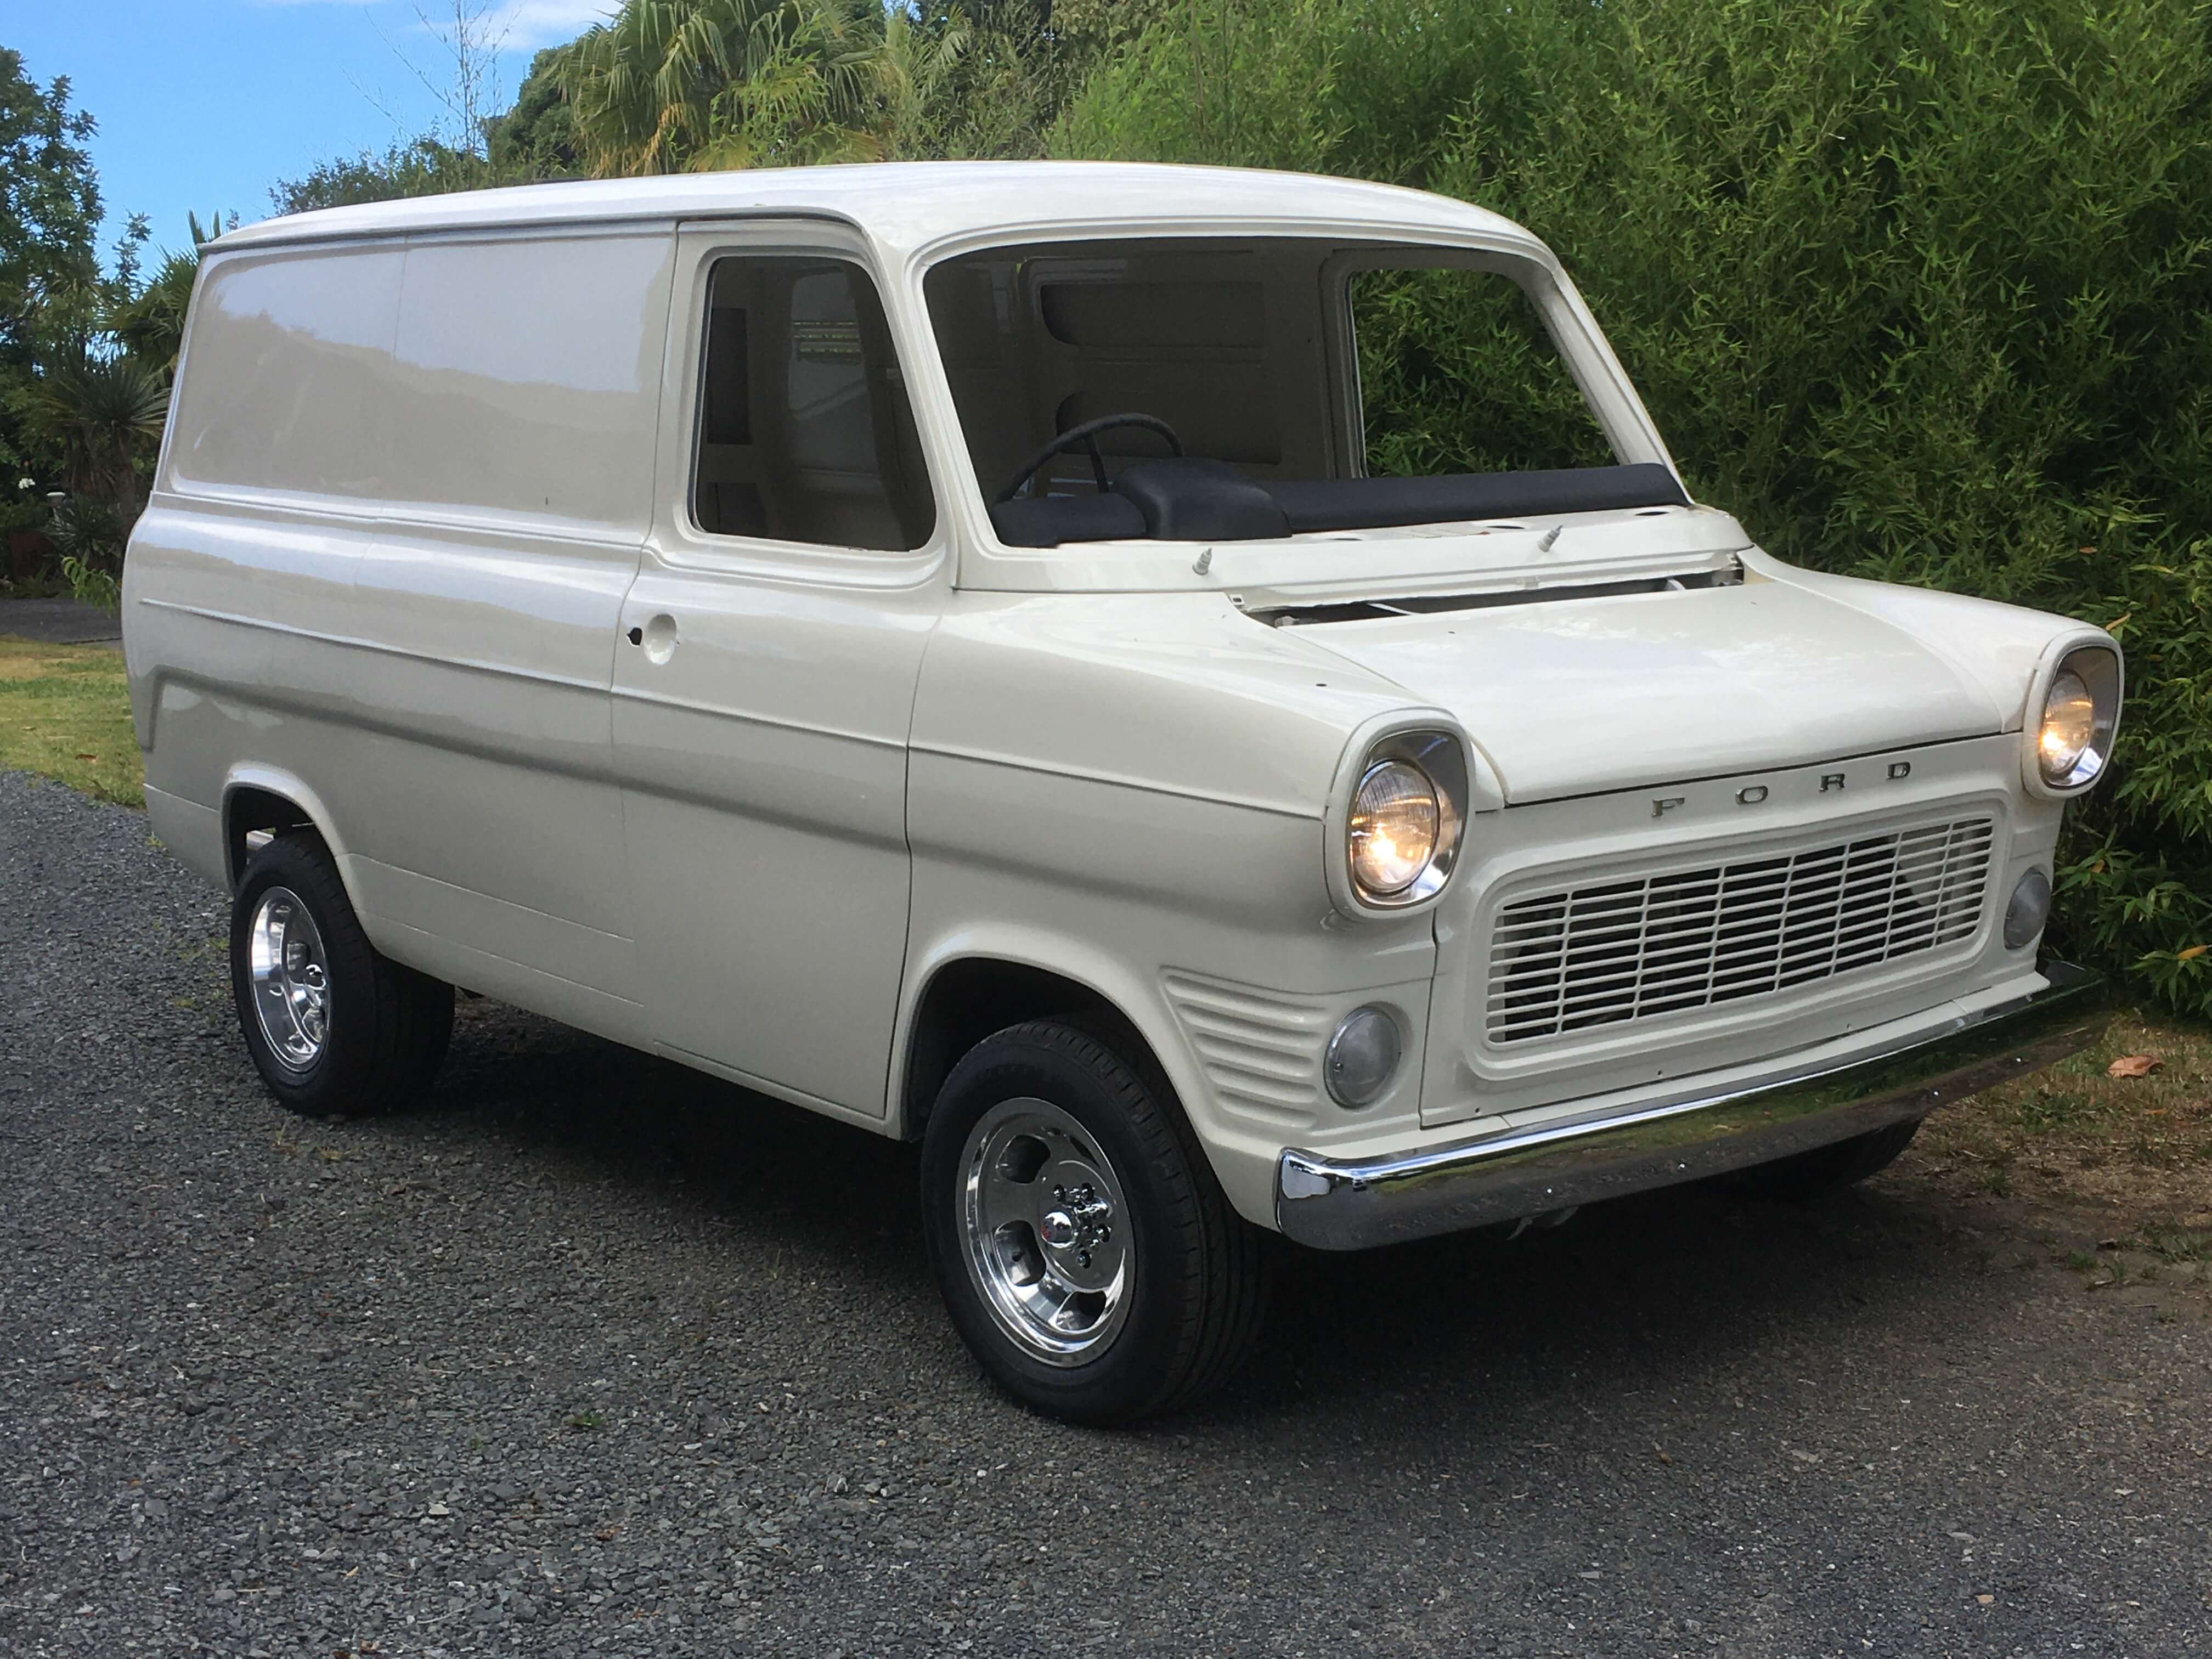
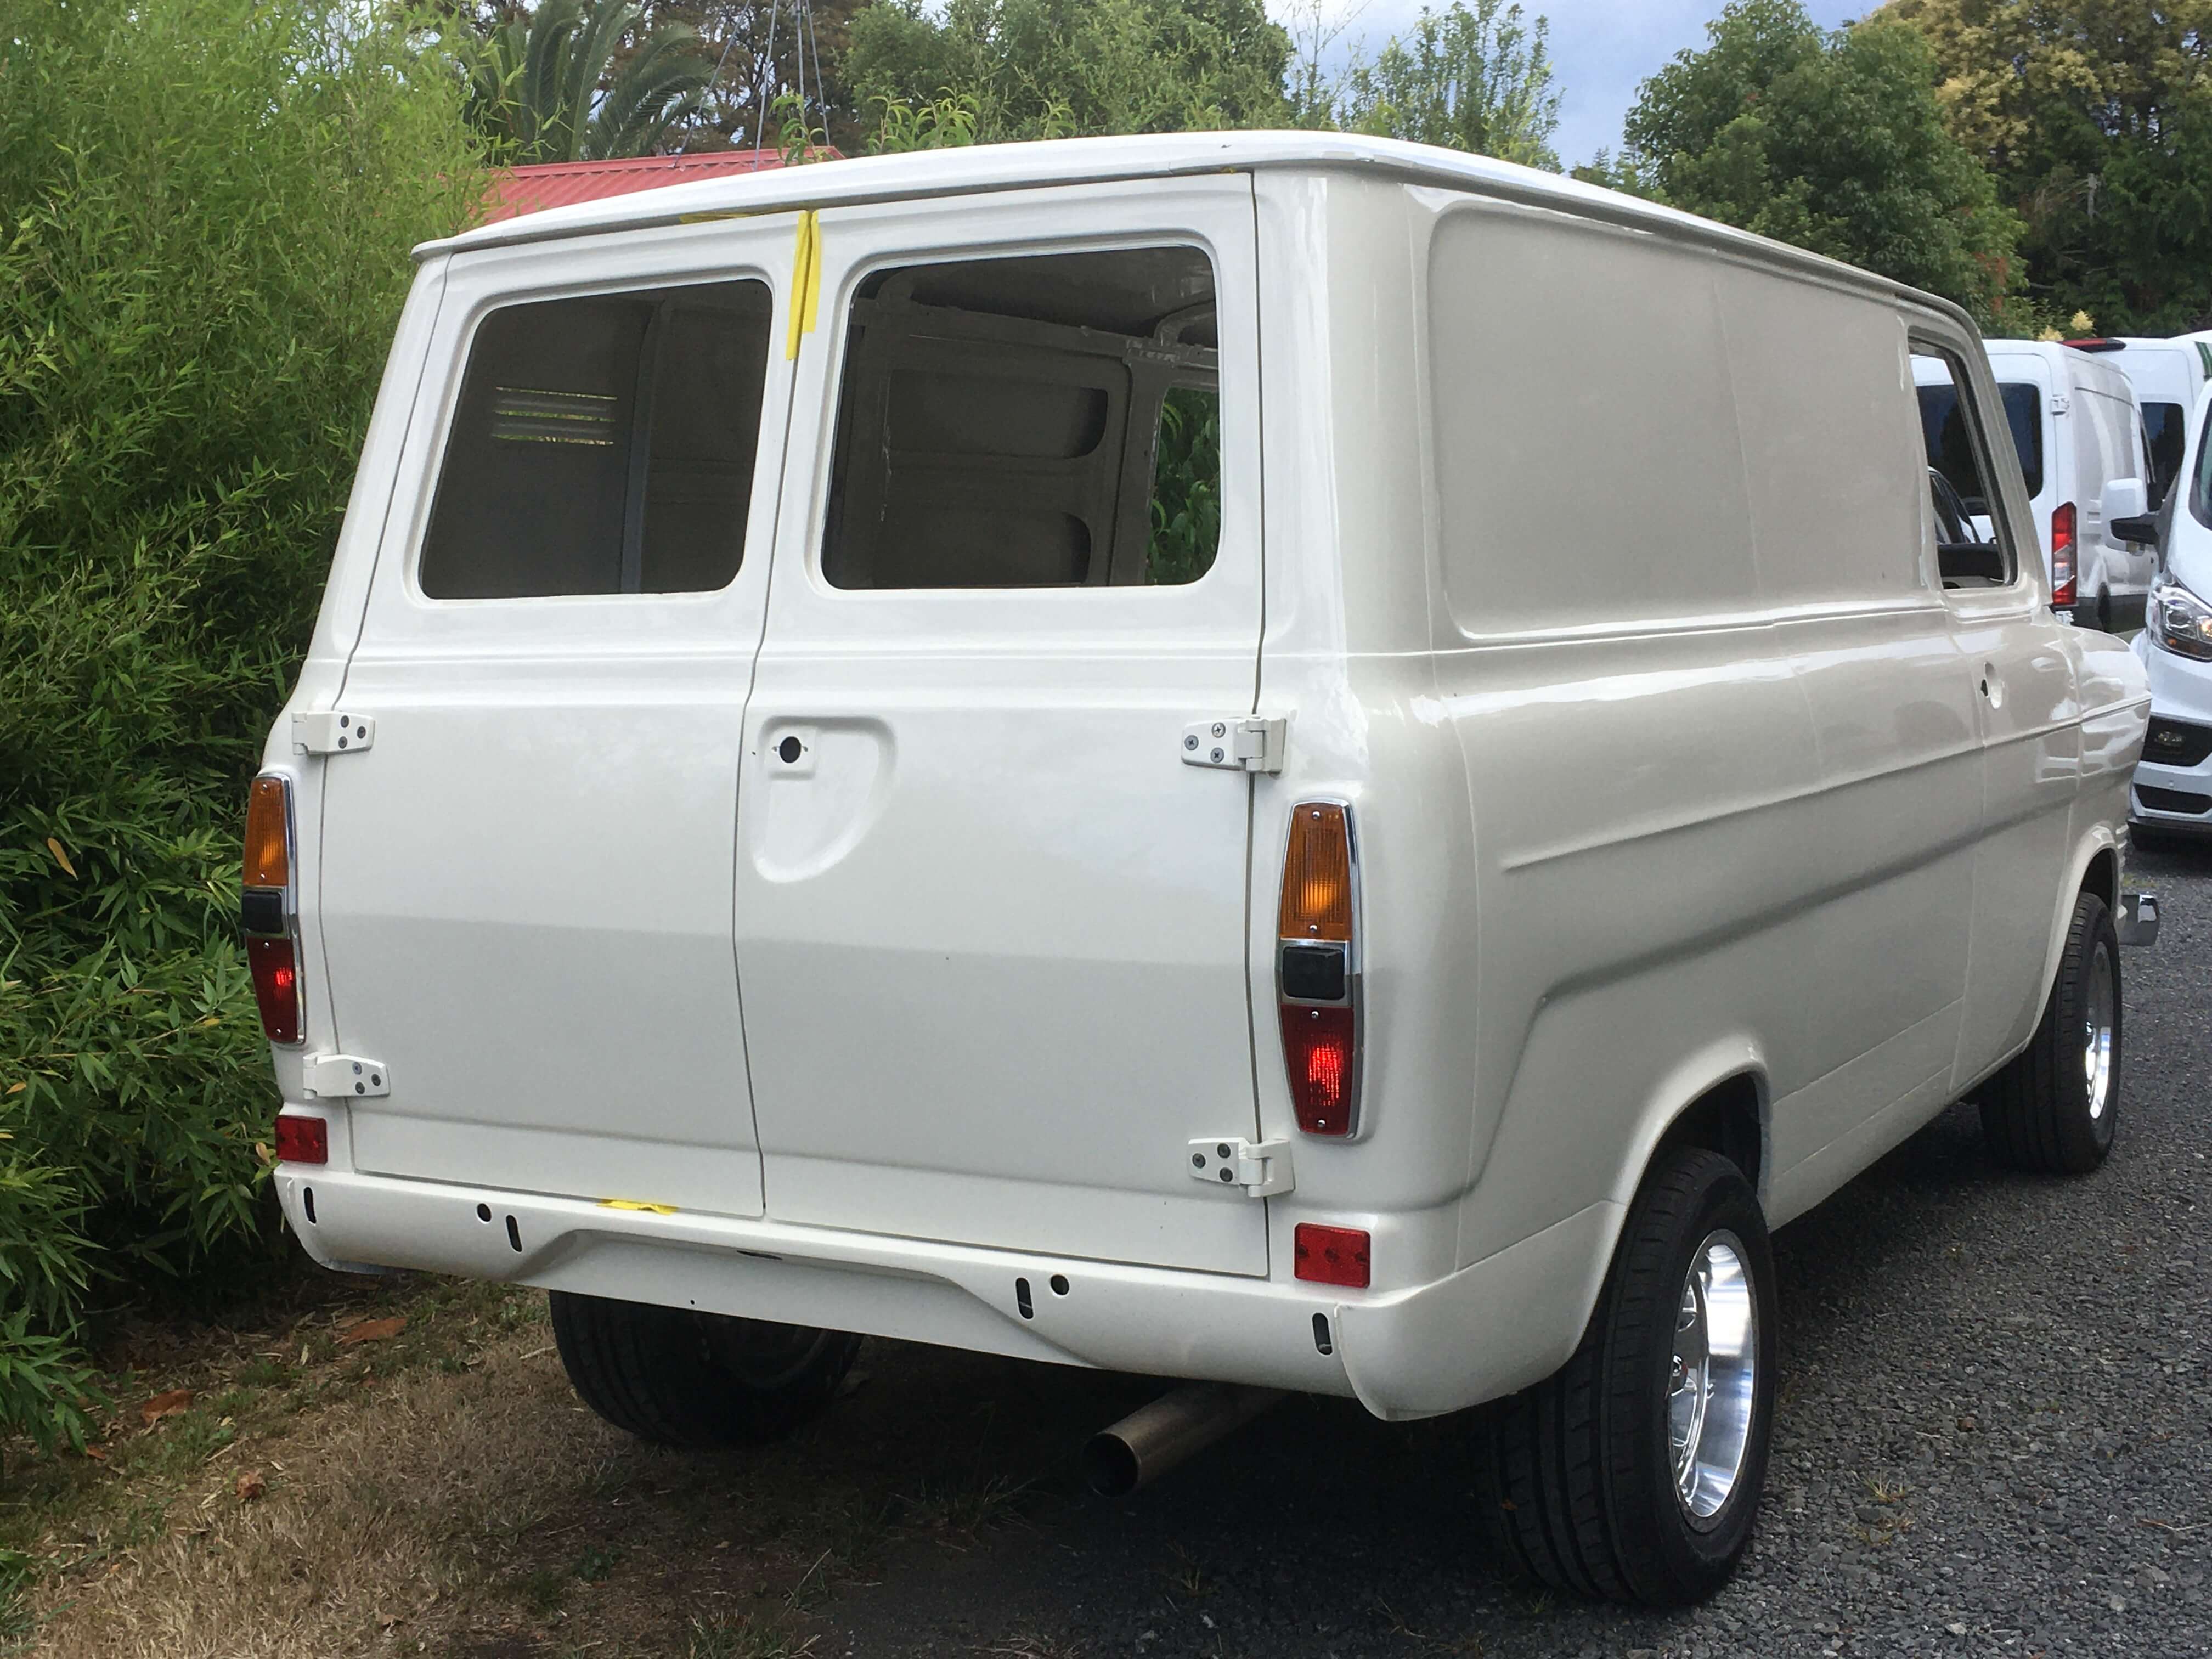
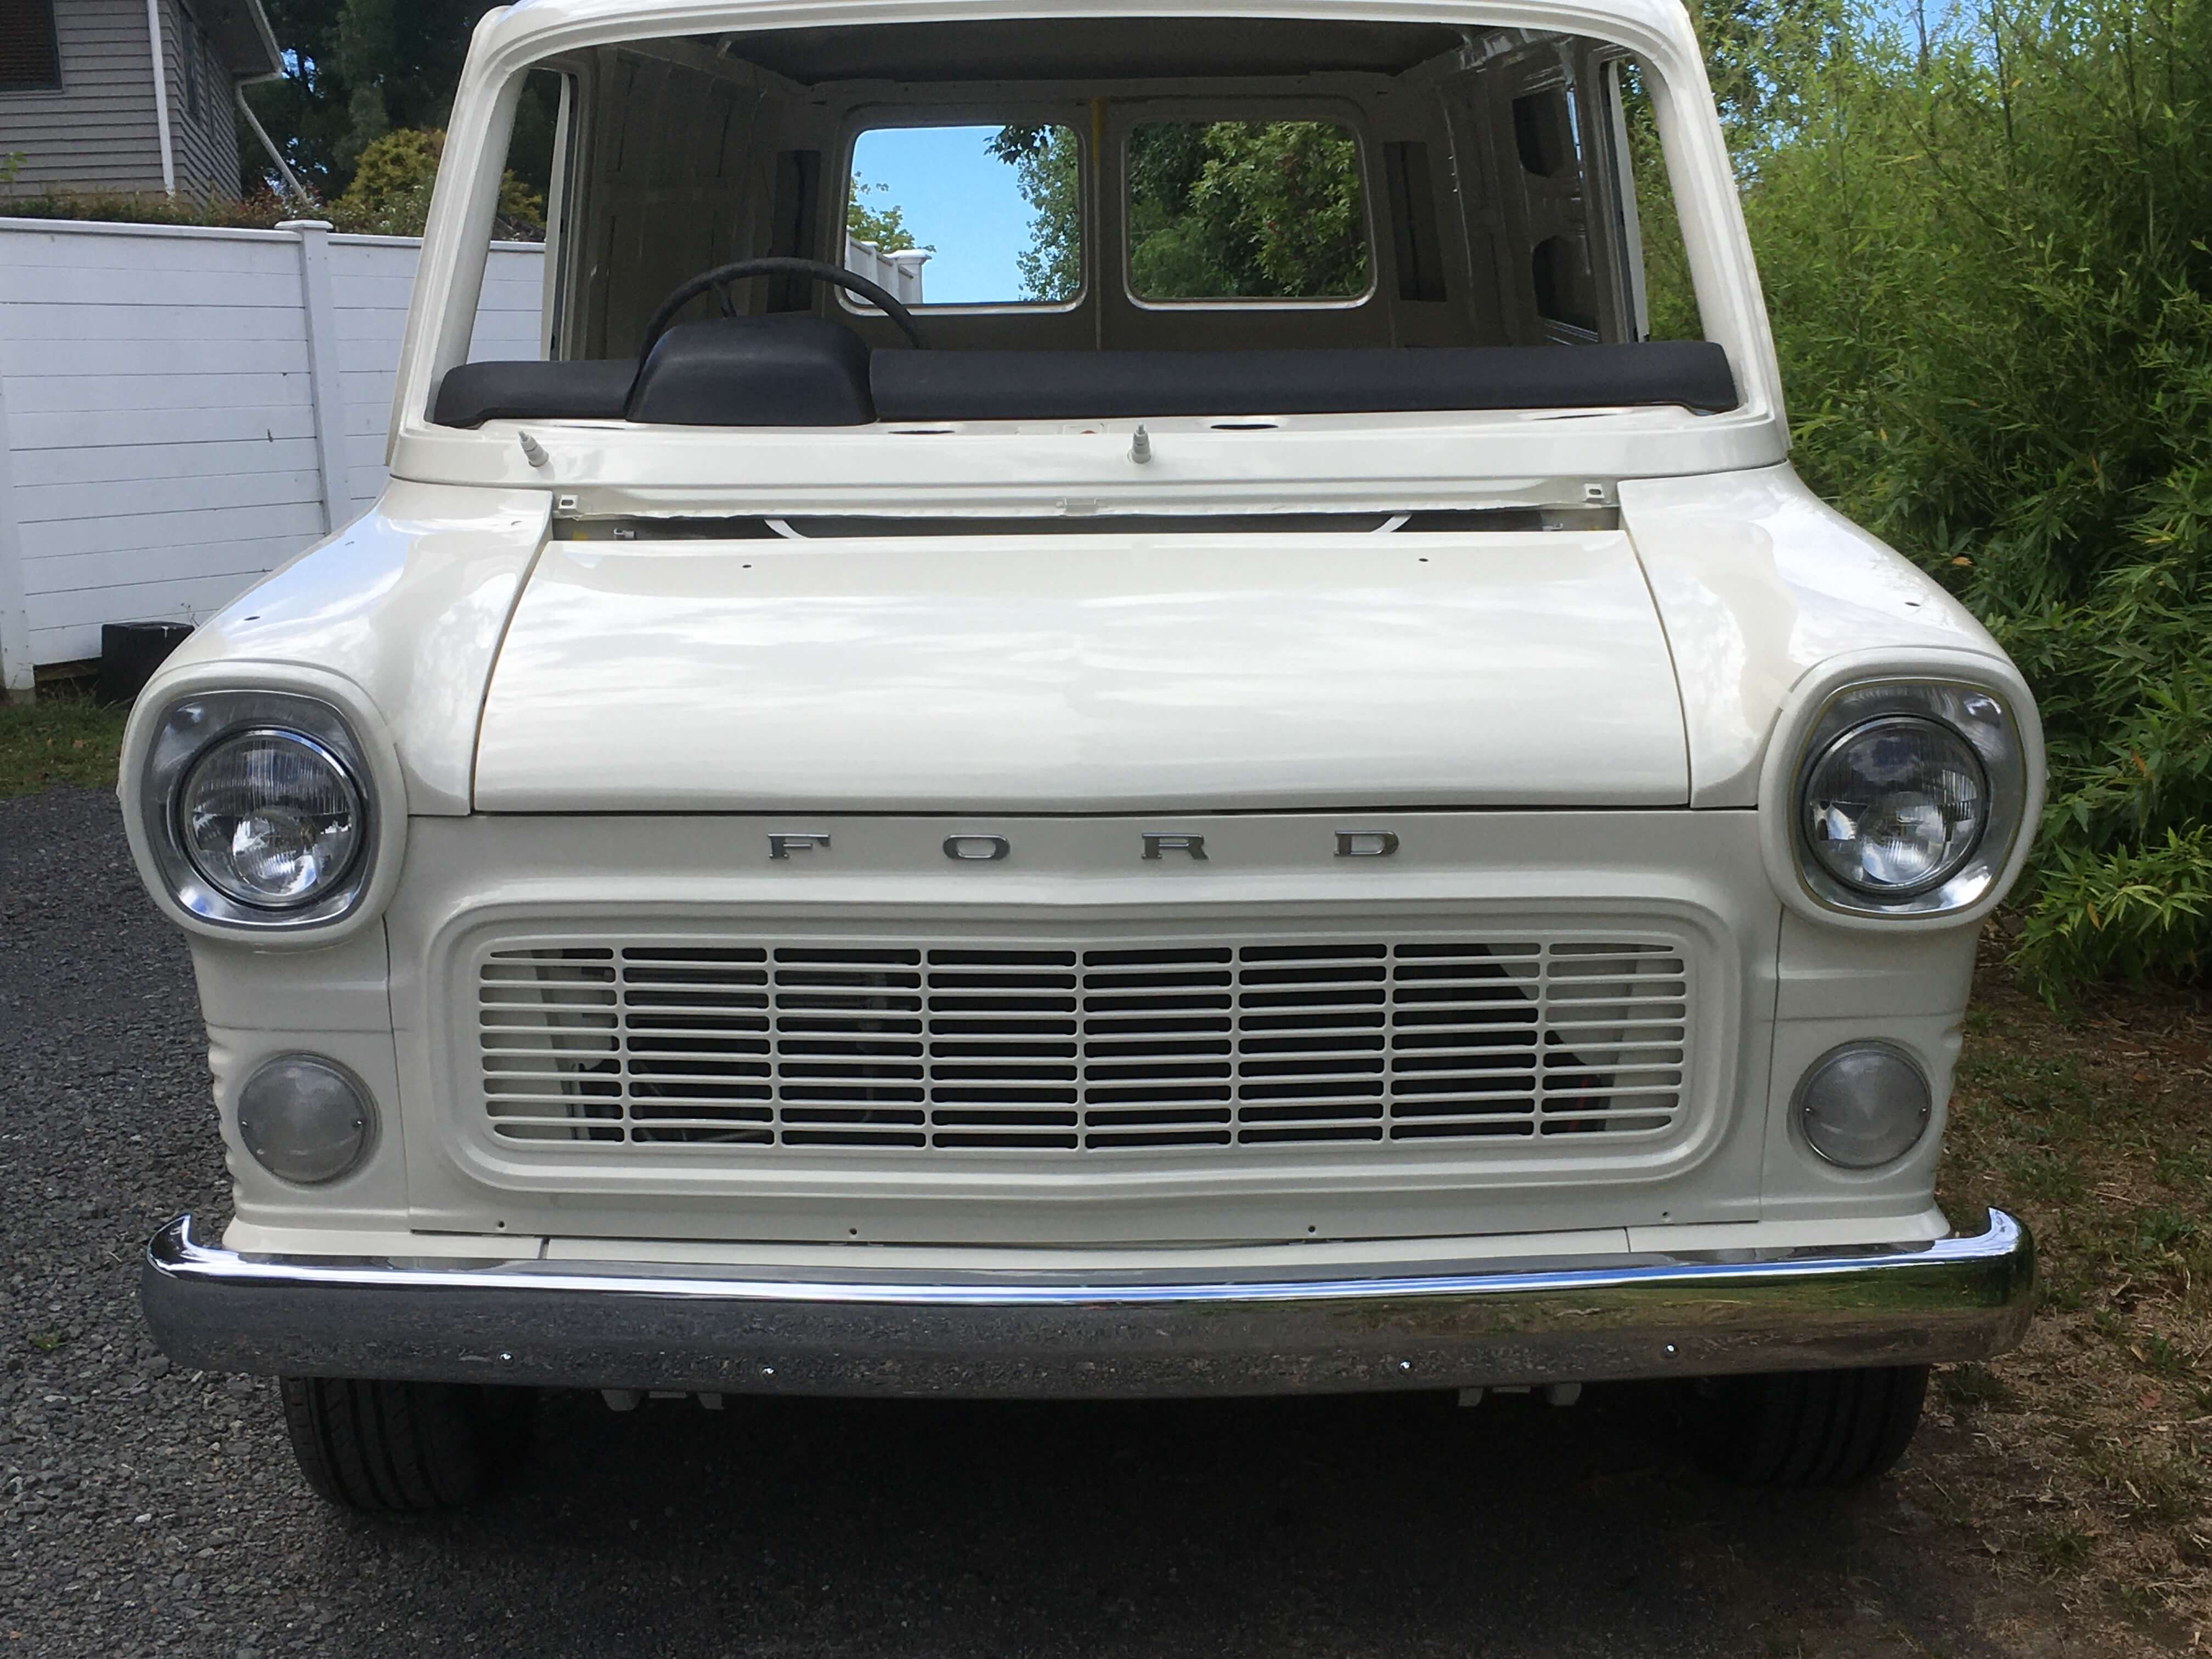
a few more pics......... Browndog's 1972 V8 Transit - Page 3 - Project Discussion - oldschool.co.nz
14 points
-
Finally, it's been a long time in the making, but for the first time in many years the Marina has brakes. In the previous post, I refurbed and reassembled the rear brakes, but in the meantime I had also been working on the rest of the system. Unfortunately, things like this take time and money, both of which are a sticking point for me at the moment (mainly time, I'm waiting over a month for parts from the UK). Even further back I started to strip the front calipers, which after some creative work with my compressor, I managed to do. First, I reinstalled the old pads, with a pry bar between them and used that to restrict the movement of the pistons, whilst pressurising the caliper and tapping the caliper body with a hammer. Eventually the pistons moved a little, but what made the biggest movement was using a punch and hammer to drive the piston out of the bore. Obviously, this is super destructive, so don't do this to pistons you want to keep (but pistons you want to keep shouldn't be stuck like these) Out came one piston, along with a lot of sludge This allowed me to slip the old piston back in after greasing it up, and using it to block the bore, and drive just the other piston out. I tried clamps, but there wasn't enough space with what I had, so ended up using a hose clamp to keep the piston from moving. It worked a treat, and I ended up getting all four pistons out of the calipers in this way. Now, before I go further, heed my warnings. Playing with hydraulics, compressed air, and brake fluid, is a dangerous game. Make sure you wear all your PPE. If it's not the crushing force of a piston flying out, it could be pressured brake fluid spraying into your face. I should know, at one point when forcing 100+psi into the caliper I ended up with a fine mist of brake fluid spraying into my face. Thankfully I had safety glasses on, which stopped me from taking an eyeful of brake fluid and being blind, but it still wasn't pleasant. I have now upgraded to a full face shield for work like this. As well as spraying my face, I didn't realise the fluid had travelled a meter or so behind me and ended up on the front of the Honda. Unfortunately, this sat on the paint and headlight overnight. The paint seems to have survived with only some minor marking, but the headlight has stained badly and will need replacing. So yes, take care of yourself and your surroundings. ALWAYS wear the correct PPE. Also remember that plain old water neutralises brake fluid, so that should be the go-to for cleaning it off. Hydraulics are dangerous, if you aren't confident in what you are doing, seek professional support for the job. Anyway, moving on, this is why the pistons were stuck. Deep corrosion. After scrubbing the calipers in the parts washer, they spent a couple of days in the Evaporust bath to remove the rust. They aren't perfect, and I probably should have painted them, but at the end of the day they are clean, internally rust-free and won't be seen behind the wheels. I purchased a seal kit to suit the Girling Type 14 calipers as used on the Spitfire, PN GRK5005, which worked a treat. These Girlock calipers are almost an exact copy of the Girlings. In went the piston seals, with lots of rubber grease. Make sure these sit flat, and arent twisted or pinched. Next it's piston time. The pistons I used are once again from a Girling Type 14, PN 516212. These are slightly different where the dust boot sits. The Girlock pistons don't have a retaining groove, just a lip. The Girlings have a recessed groove. I figure since the seals I'm using are for the Girling, the Girlings pistons will be just fine (and to note, the old Girlock seals are visually the same). The overall dimensions of the piston are the same. Girling on the left, Girlock on the right. The Girling piston had a much bigger lead in chamfer, which helps during assembly. Pressing the pistons in was easy enough by hand. Lots of rubber grease, place it square and press it in with fingertips. Once it seats a bit, I used a long spanner over the face of the piston to push down evenly with both hands (one hand on each side of the caliper). It should go in with minimal force. The dust boot is a prick. The inner lip sits in the piston recess, the outer lip just rests on the lip around the piston bore. A retaining ring holds it in place by friction. Getting this ring in place, without it pulling the boot off, took a few tries. I found the easiest way to do it was to line the ends of the ring up so they are touching (spreading the ring open), and working from the back (opposite the open end of the ring) work it around the boot, holding it in place whilst you stretch the open ends of the ring into place. It's hard to describe, and do, but will make sense after a few tries. Two calipers with new seals, pistons and boots. I cleaned up the bleed nipples, making sure they were clear (they weren't), and refit the hard pipes. That's the calipers done. Next in the firing line was the front rotors. I measured them a while ago and they came out as more or less new thickness, and have no lips. I feel like they were replaced not long before the car was laid up. Because of this, I don't want to replace them, that would be a damn waste. I was going to just send it, and use the pads to scrape the rust off them when it drives, but thought better of that when I had a good look. Crusty. The best thing in this case was to remove the hub and rotor, and send the rotors off to be skimmed. Before removing the hubs, I measured the runout in them. There should be 0.0245 - 0.1270mm play. This is to allow the bearings to expand when they warm up in use. Too tight and they will bind and fail. Too loose and they will wobble about and fail. Well, the Lh side had this much play 0.185mm play. Quite a bit above the maximum allowable. I'm getting an awful lot of use out of my dial indicator with these old cars! The RH side had zero play, not a thing. So both sides were set wrong. Glad I looked. The LH side split pin was.... split. It's missing a whole leg, and was only sitting in place. It also pays to loosen the rotor bolts whilst the hub is on the car, just in case you need to stop it spinning. The rattle gun did this with no effort. With the hub nut removed, the whole lot comes off pretty easily. The stub axle looks in good shape if a bit dirty. One hub with rotor. As a matter of course I bought a wheel bearing kit, as the old grease looked horrible, and there were signs of wear on the outer bearing races. The outer bearing was an LM11949 and the inner was L44649. The back of the rotor looks worse than the front Unlike the TVR, the rotors on the Marina came off easily with only minimal tapping with a hammer. I drove the old outer races out with a hammer and punch and gave the hub a good clean in the parts washer. The rotors were sent away to be machined and came back looking good. They could've skimmed a little more off, but I'm sure the pads will scrub them clean in no time. Before the rotor goes back on, the new bearings were pressed into the hub. The new bearings. The new race was pressed in with the old race, and a deep socket The rotor was loosely attached. Note the markings on the hub reminding me the rotor bolts aren't torqued. This can only be done on the car, using a long pry bar to lock the hub from spinning. The bearings were packed and fitted, along with a new seal. Before fitting the hub, I quickly swapped the old blocked front hoses for the new ones. These are Land Rover hoses, PN BR0764 And on goes the hub. Set to the correct runout With the caps and calipers fitted Both hubs had the rotor bolts torqued down, so the markings were removed The last few pieces of the puzzle were the master cylinder (which I sent off to be resleeved and rekitted), a new brake pipe from the master cylinder (since I damaged the old one removing it. A friend helped make a new one), and new pad fitting kit (in transit from the UK). The brake master and clutch slave I sent away to be resleeved came back looking lovely. Nice new stainless bores, as well as a good cleanup. Won't have to worry about these rusting up again. Of course, I couldn't just fit the nice clean cylinder to the rubbish looking firewall plate, so that got a wire brush and a coat of paint. It's hard to believe it's the same master cylinder, and the same cap. I cleaned and used Araldite to fix the crack in the cap. The pedals got new clevis pins, since the old ones had seen their share of work! And finally, the brake light switch was tested Which revealed that it didn't work. The switch is easy enough to strip, these tabs on the side need to be pressed to remove the bottom of the unit and pull the guts out How this switch works confused me for a bit. When you remove the top from the bottom, it actually moves where the internal contact is, and if you don't spot it during disassembly it can be confusing. It got to the point I purchased a cheap replacement so I could work out how it's assembled. This is whats inside the switch, and how it came apart As it turns out, as seen on this replacement switch, the U shaped contact goes under the two legs. It's a Normally Closed switch, so it makes a circuit when the switch is released. When the brake pedal is pressed it's releasing the switch, which makes the circuit, otherwise normally it's pressed in, which moves the U shaped contact away from the two legs. The spring sits under the U shaped contact which pushes it up. The replacement switch was a bit cheap, so instead I cleaned up the contacts of the old one and reassembled it. It takes some fiddling to keep the contact under the two legs whilst you slip the base in to the top housing, but it can be done. A test shows that when pressed, the circuit is broken And released, it makes the circuit The original Lucas Australia switch lives to fight another day. The pad fitting kit finally arrived today, so I fitted the NOS pads, new shims and new pins. It's a bit of a pain with new pads and new thickness rotors, its all very tight, but it's there. I then drew fluid through with a vacuum bleeder, until all three bleed nipples had clean fluid coming through. Then it was back to the old one-man bleeder to finish the job. The brake pedal is now firm, with good travel. The rear adjusters have adjusted up (can hear the shoes slightly dragging the drum), and the hand brake is working. Everything needs a good bedding in, but for now, everything is doing what it should, and there seems to be no leaks. I don't know when it last had brakes, but it may not have been in this millennium. Now all I'm waiting on is a clutch master cylinder, which is en route from the UK, and a drive shaft that will be on its way to me tomorrow from down south. Once they arrive, we should be good for a trip up the driveway. Excite.12 points
-
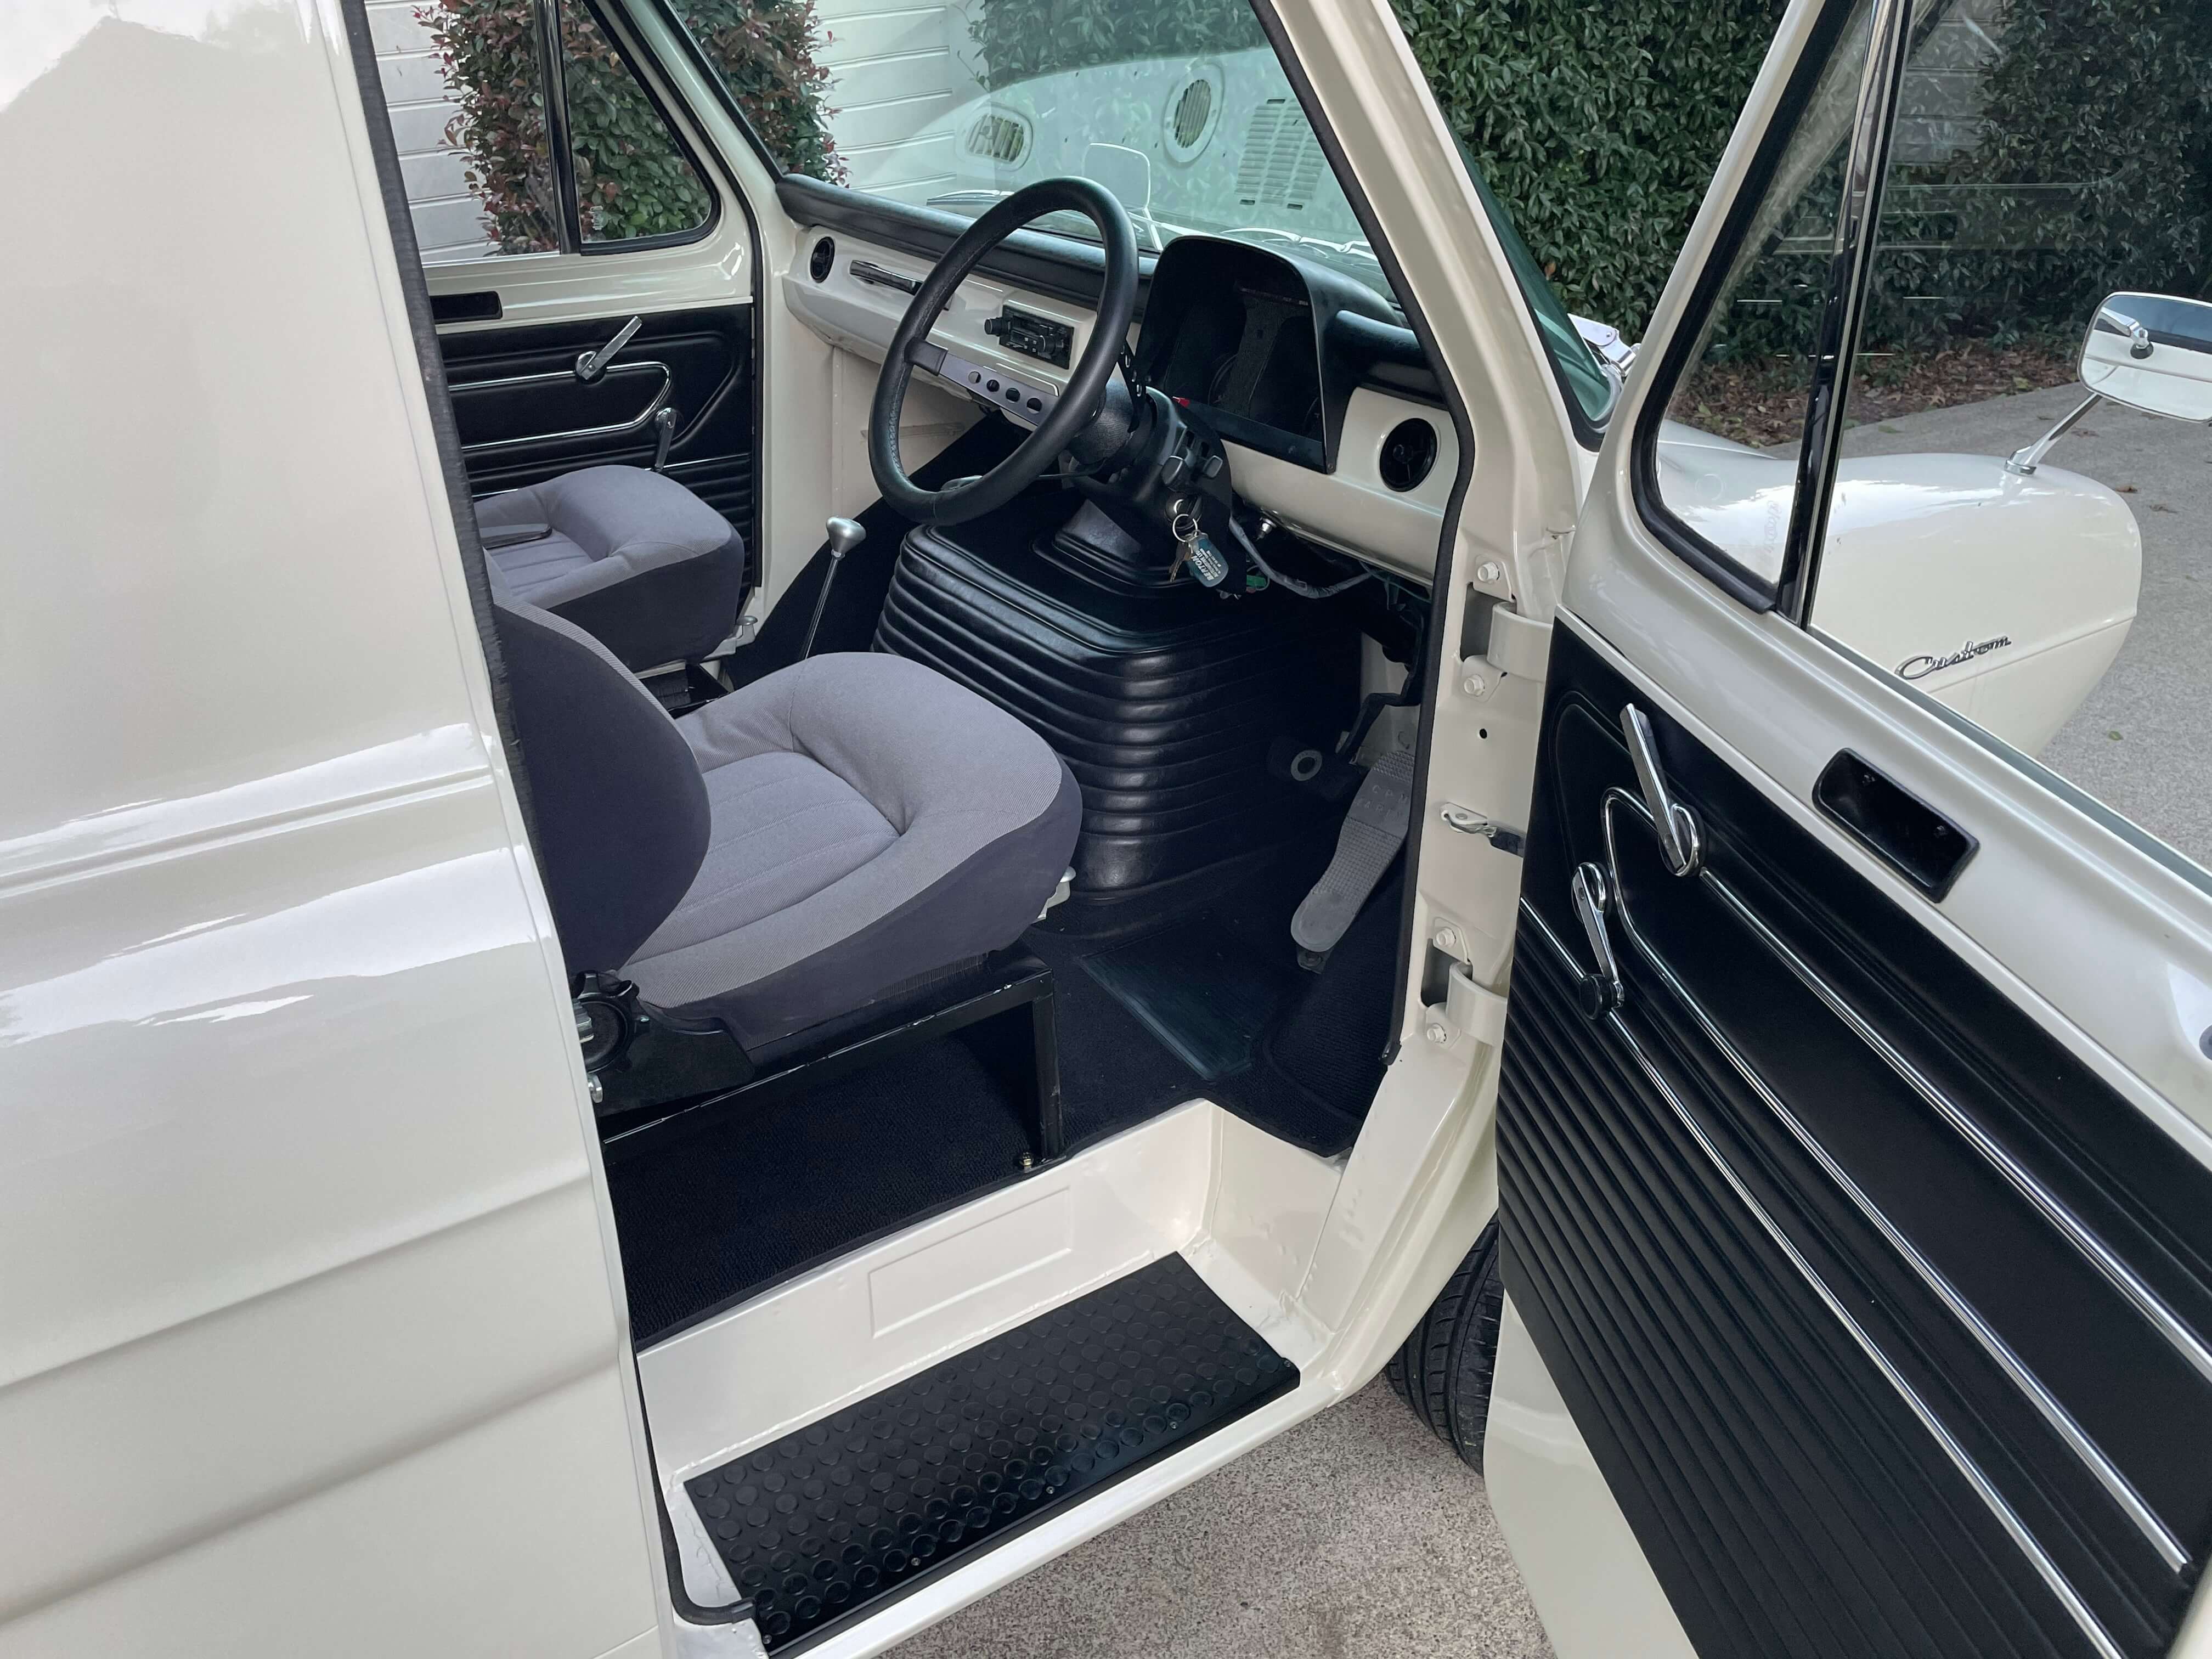
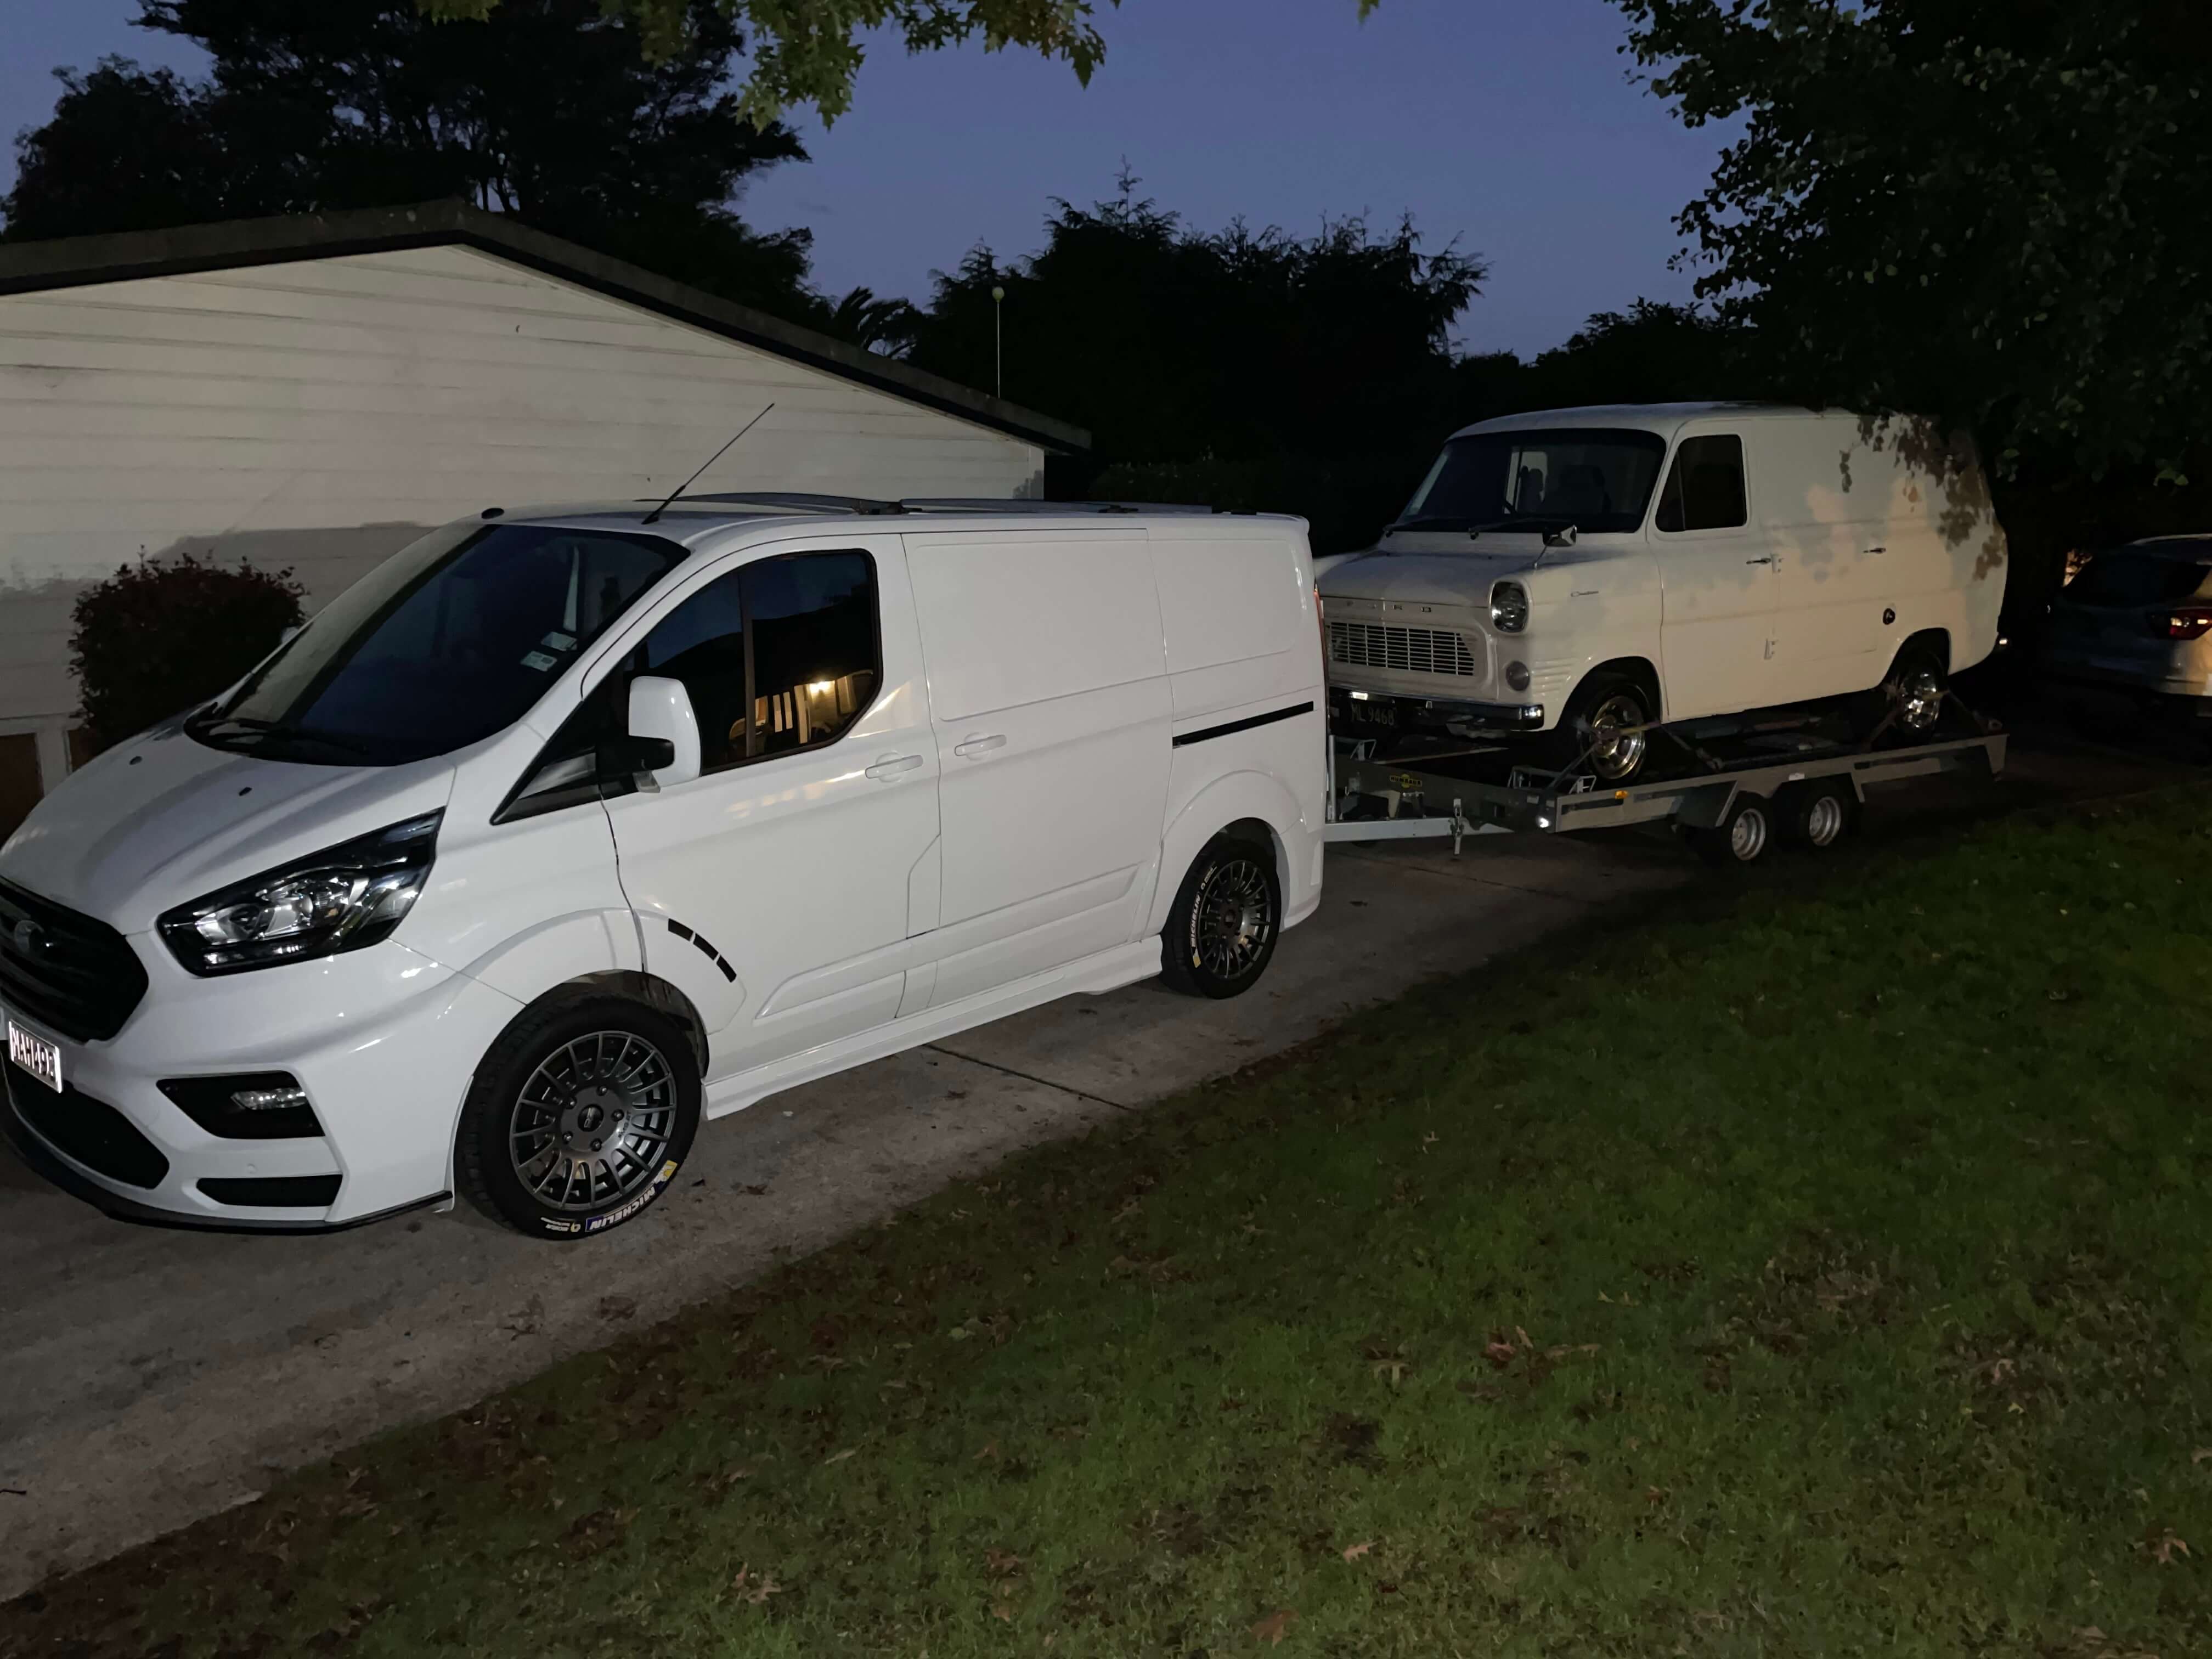
completed last week, and took it to the Auckland All Ford Day on Sunday Browndog's 1972 V8 Transit - Page 3 - Project Discussion - oldschool.co.nz
10 points
-
Got it down without dropping it or injuring myself! Been a productive weekend. Just need to add some walls and pack some extra sand around the areas im worried about. Then will be good to go to the foundry!7 points
-
If you read the tech forum you'll know I was trying to figure out where I could score a drive-by-wire throttle and pedal without having to pay over $500 for new Bosch motorsport units. On the weekend I went to Pick-A-Part to look for some rear calipers, but ended up finding exactly what I needed for the throttle setup. Turns out that almost every Euro from 2000 onwards has the right setup - the 68mm Bosch throttlebody. There are a few variations in them as some have water passages, etc, so I ended up removing about 4 or 5 before I found one I liked, which came from a Volvo V50 (2004-2012). It has no water lines and is pretty tidy. I wanted to get the pedal from the V50 too, but with the seat in the way and unmovable due to lack of power I couldn't get up under the dash properly to remove the bolts. Instead I found one from a an earlier (2000-2007) V70. It's made by Hella but looks suspiciously like the Bosch unit of the same era. I'm pretty sure the V50's pedal was a Hella also, so I am assuming these should work well together. Like the throttlebodies, there were quite a few pedal options from different euro cars, especially VWs, but some had weird mounting patterns etc. I took this one mostly because of how similar it looked to the Bosch unit, with the plastic lattice bracing in the arm, rather than a thin metal arm. The plan is to get a Link G4X Xtreme or Fury to run these.
6 points
-
All assembled. Quite a mission. Not my best work but I'm learning a lot. Total is about 380kg. Now I need to make a pallet and tie it all together well enough so that when it’s tipped over to horizontal it doesn’t shift around.5 points
-
yes it did. I put a little poster on each of the side windows telling its life story, and I think a lot of people enjoy that. I was walking past at one point and overheard one guy say to his friend "it's the Westside van!" World famous in Noo Zulland!
4 points
-
The need is that it makes the job a hell of a lot easier when you have the fluid behind the seals to create the pressure required to pump it through. Dry seals don't seal very well and it can take a bloody long time to get going. A fresh rebuild is different because you have presumably used fluid or rubber grease during assembly and is not comparible to a cylinder that has been sitting on a shelf for six years. There have been times I have regretted not bench bleeding a cylinder first. There have also been times they work near on straight away. I usually just dump some juice in the top and pump it till it jizzes all over the floor and that works good enough to bolt on.3 points
-
That's only because no-one from OS turns up anyway. Doesn't seem to be a huge desire from OS people regardless of the format, and that's fine. We don't have enough people to run our own, so rely on others (this was the same when they were at burger fuel, OS was the minority of people).The number of people who actually use OS as a means of communication/regularly check on what's happening is so small that organizing an event on here doesn't reach more than 5 people so its of minimal value. If someone wants to step up and organize things then please do. Tank @ CJC has been pushing pretty hard and keeping the flame alive and is more than happy to work with us, but even he has noted that hardly anyone turns up from OS, so again, it kind of fizzles out. Coming into winter as well, its hard to get people excited. I unofficially took over when Marku went south but that wasn't a conscious effort. To be brutally honest I have minimal desire to get involved in organizing things (so sue me) but will turn up when I can. If someone wants to take charge and push hard then please do. Nothing wrong with people having other priorities in life. Peace out.3 points
-
All the bits ready to go together.3 points
-
Nothing too wrong with the merc engine, but you've got my attention, what stage cam would you recommend for the drillport?2 points
-
Today I took the bull by the balls and poked a ruddy great hole in the sheet metal under the drivers seat for the additional brake fluid reservoir. Started with a 15 mm pilot hole which is the size of the bolt on my 50 mm chassis punch. The chassis punch made short work of the cab floor and I then poked the 3 smaller mounting holes for the bracket. I cleaned and painted the second hand mounting bracket that I got in from the UK and gave the new reservoir a few coats of satin black to match the existing one. I've ordered 2 meters of 3/8 EPDM fluid reservoir tube which should be more than enough to plumb the dual reservoirs to the brake master cylinder.
2 points
-
I needed to bench bleed the new starlet one before it would work properly. I think I just used some M10 fine pitch bolts in the outlet ports, slightly cracked loose so that the air could get past but not a huge amount of the brake fluid.2 points
-
From memory I've only bothered to bench bleed once or twice ever, regular old "pump it up hold it down " bleeding has always worked for me2 points
-
Usual bench bleed method is to make some short pipes that screw into the outlets and go into the reservoir below the fluid level so you pump fluid around and around until you get air bubbles out of the cylinder2 points
-
Yes- I agree with Bart on this one. It just makes sooooo much sense to ditch the Austin/Merc engine and fit a beer keg.2 points
-
oh yeah this was no dig or anything at anyone just a assumption on what was happening with current situations and replying to kims post. I personally was happy to help with the meets myself and let Marku know when talking to him but he didnt want me doing them anymore and made that pretty clear. myself with the new born i haven't really been attending as my life has changed a bit and other things come first these days. I remember when os was doing them at the base it was just 5-7 people around one table at burger fuel, hasn't really been a big number thing from when i started going to the monthly meets myself, but when we opened it up to public and had a regular location and date we seemed to drag more out due to larger interests and different vehicles to gander at. I'll keep watching for events and locations to see if i can attend them when time is available.2 points
-
My girl came through with more rock auto goodies! New fuel sender and radius rod bushes. I opted for the sender that has a built in return line in case I go EFI down the line. I stripped the loom out and and pulled the Dash after work too. Nothing broke
2 points
-
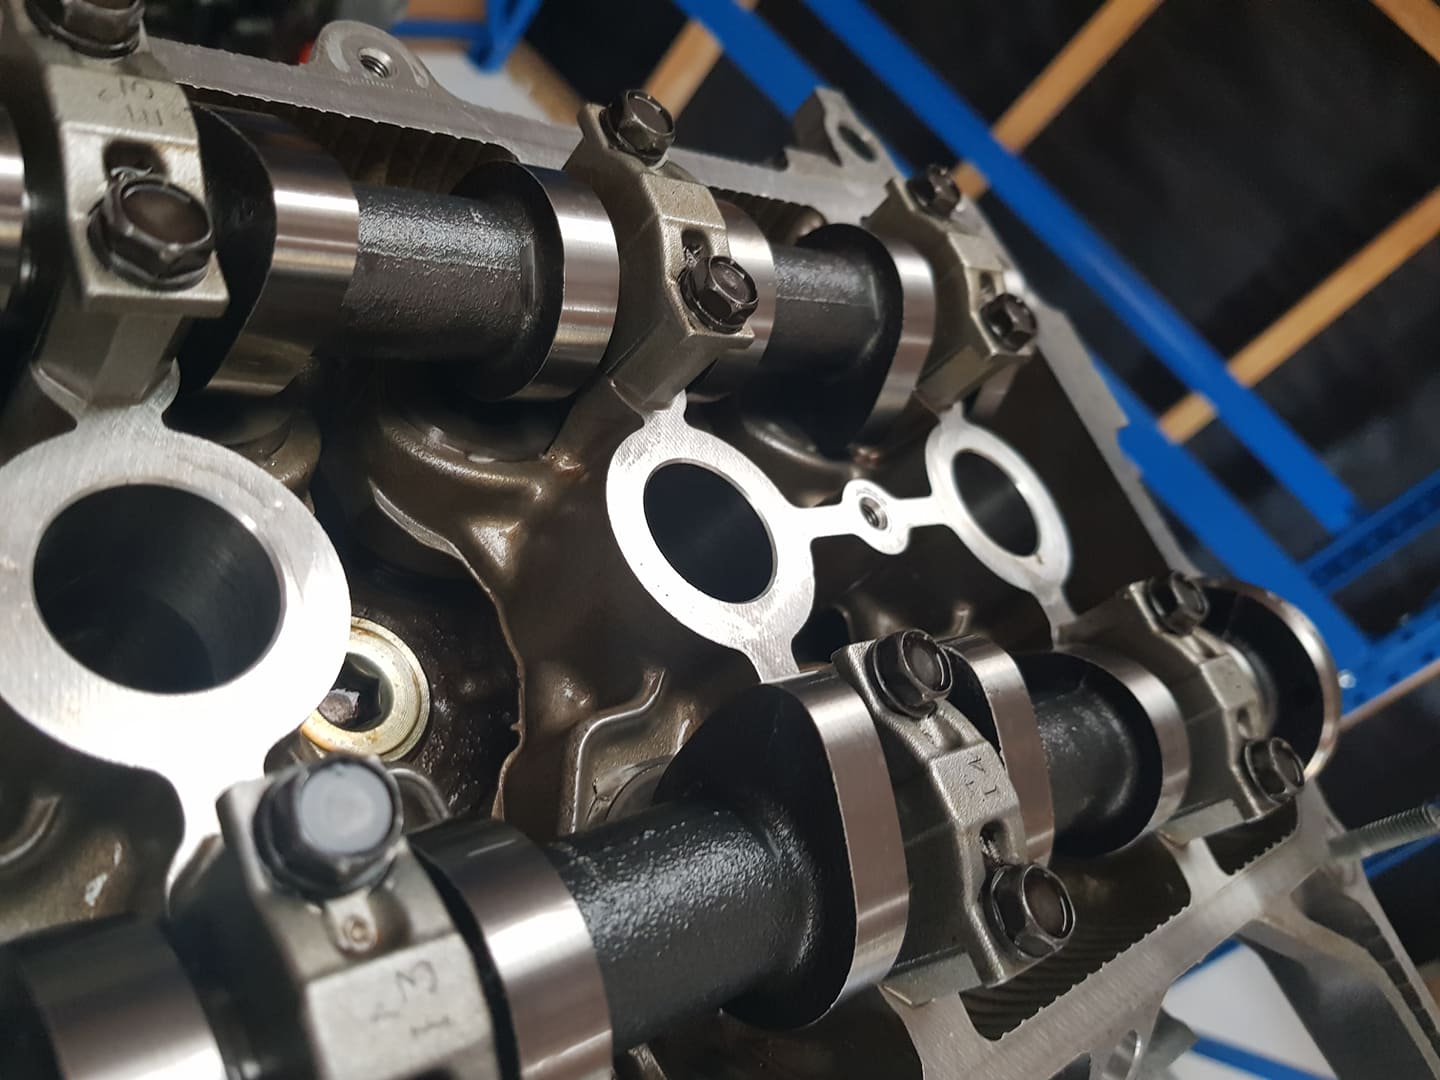
I found a diagram, it looks like the water return is internal in the block rather than an external pipe like on 3S etc. So the two main external lines are just the heater circuit. However yes there's all sorts of complicated shit going on apart from just a heater! Cams arrived today, and it's bloody exciting - I've never had non standard cams in anything before. Since an Echo is basically a more modern iteration of a Starlet, I shall keep with the established nomenclature and call this a 3/4 race cam. I hope it goes hard for what it is. Not sure if these will work without pinging gilliez though. I need a set of feeler gauges to check the clearances to the buckets, then order new buckets if needed as these are shimless (Prius race car technology) They've got numbers on the underside of the bucket that tells you the thickness, so that's handy. So might be able to scab some from pick a part. I think it's safe to jizz the sump back on properly, as the only thing left that I could risk dropping down an oil gallery at this stage is a head bolt washer. (will quote myself later when I do exactly this) I've well and truly spent all of my car money for the month, so might be a few weeks till more progress. I need to get my 3d printer back in the shed so I can mock up some brackets for alternator and hopefully the PS pump too. If the PS pump isnt going to work, I'll get a single row accessory pulley from an NCP91 instead as it's presumably a little bit lighter.
2 points
-
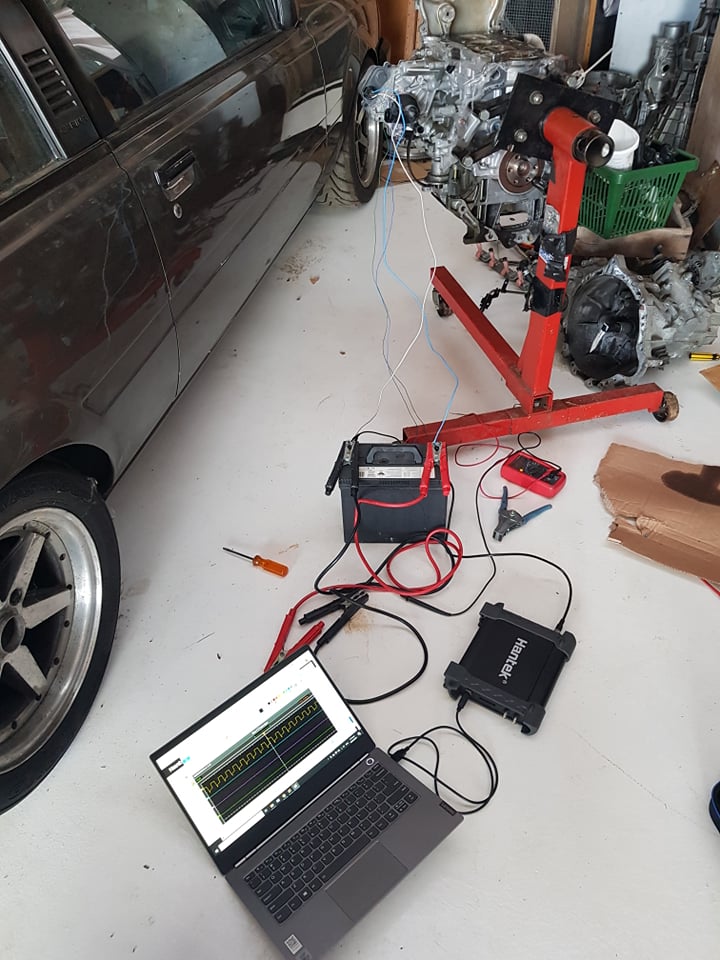
Figured out the EWP and got it working easy as. It's just 2 high current wires for 12v supply and earth. Then one is a pull to ground PWM signal to control pump speed. Then the other is a square wave pump speed signal which you can feed back to the ECU. (which is what I was hoping for) So you can tell if its jammed or stopped working before the motor overheats! Cool. It's got a failsafe so a high duty cycle on the pwm signal slows the pump down - So if there's no signal, it runs at full speed. Trying to work out the water line situation though, I'm not sure if there's a water bypass for if the thermostat is closed. What looks like a bypass hose also looks like a heater line. But if that's the case, no flow through heater core if the heater line is shut. There's also an extra heater sized water outlet on the exhaust side of the motor, which isnt there on the normal motor. Hmm. Might have to try find an engine manual that shows how it's supposed to go. Finally used my Aliexpress spec USB oscilloscope for something. I also got my head back from the engine shop with the new valve springs fitted, $75 saved me about 100 swear words and 10 hours so a good deal. Hopefully cams here on Monday.
2 points
-
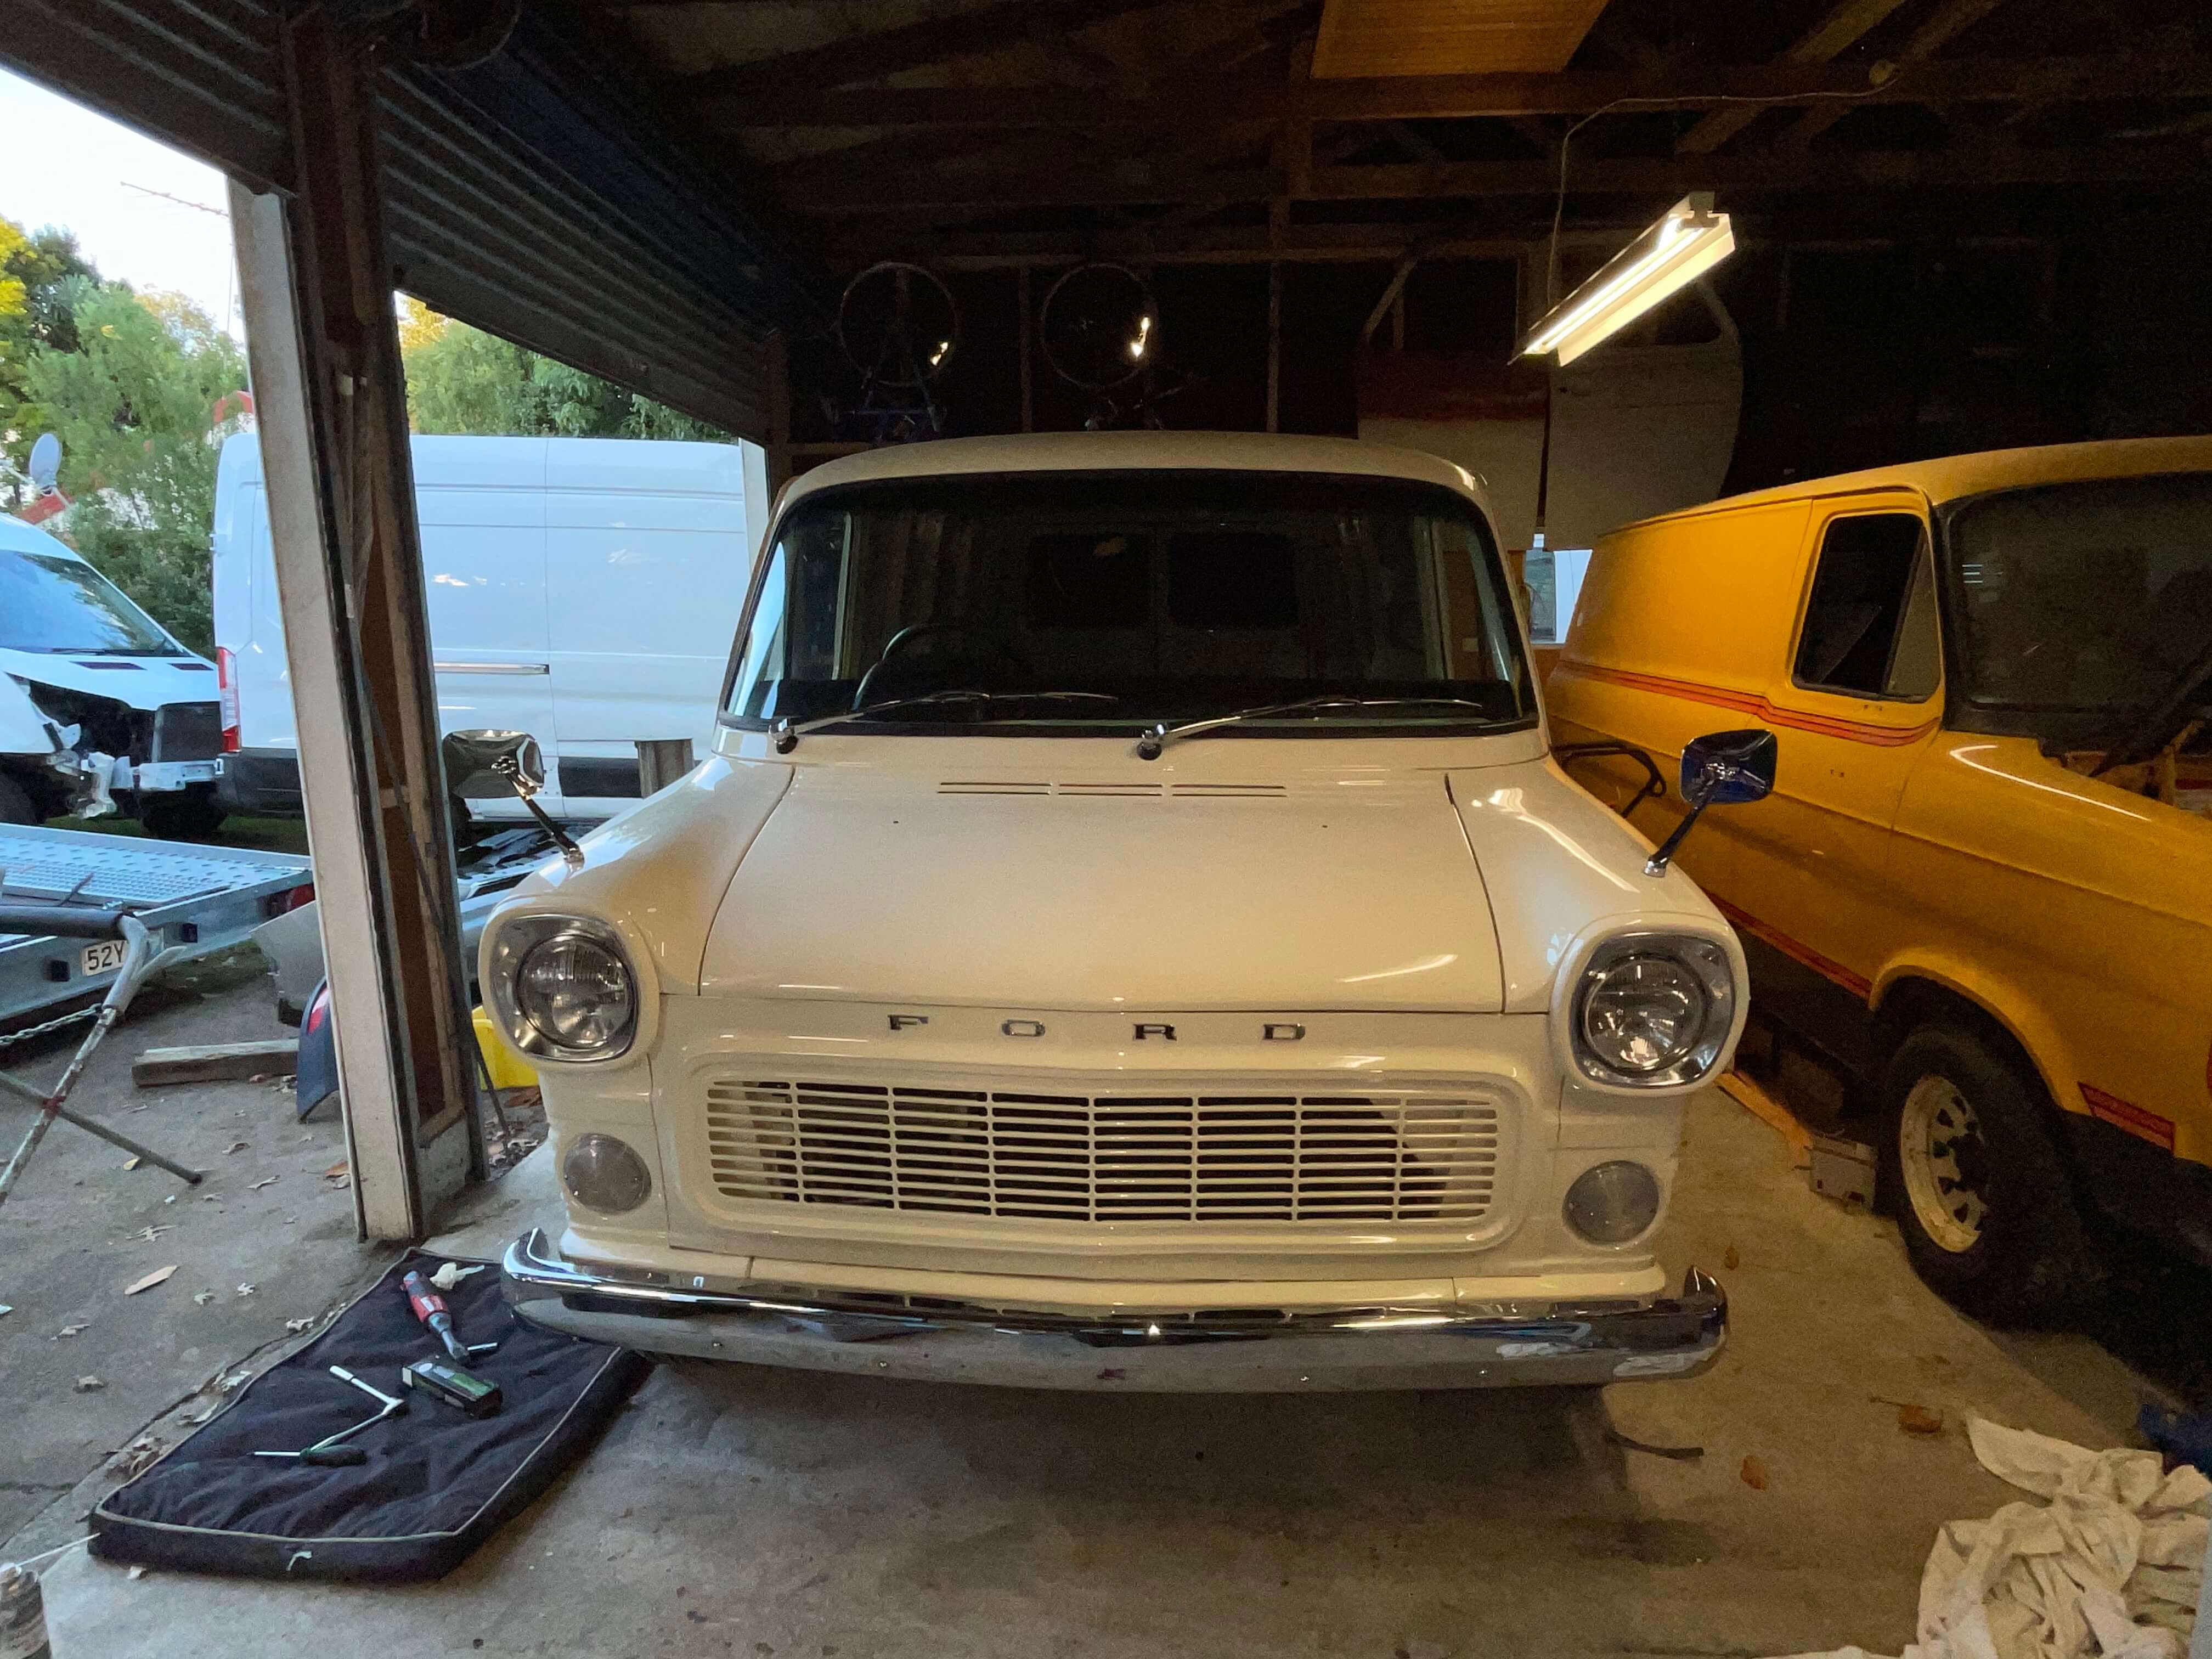
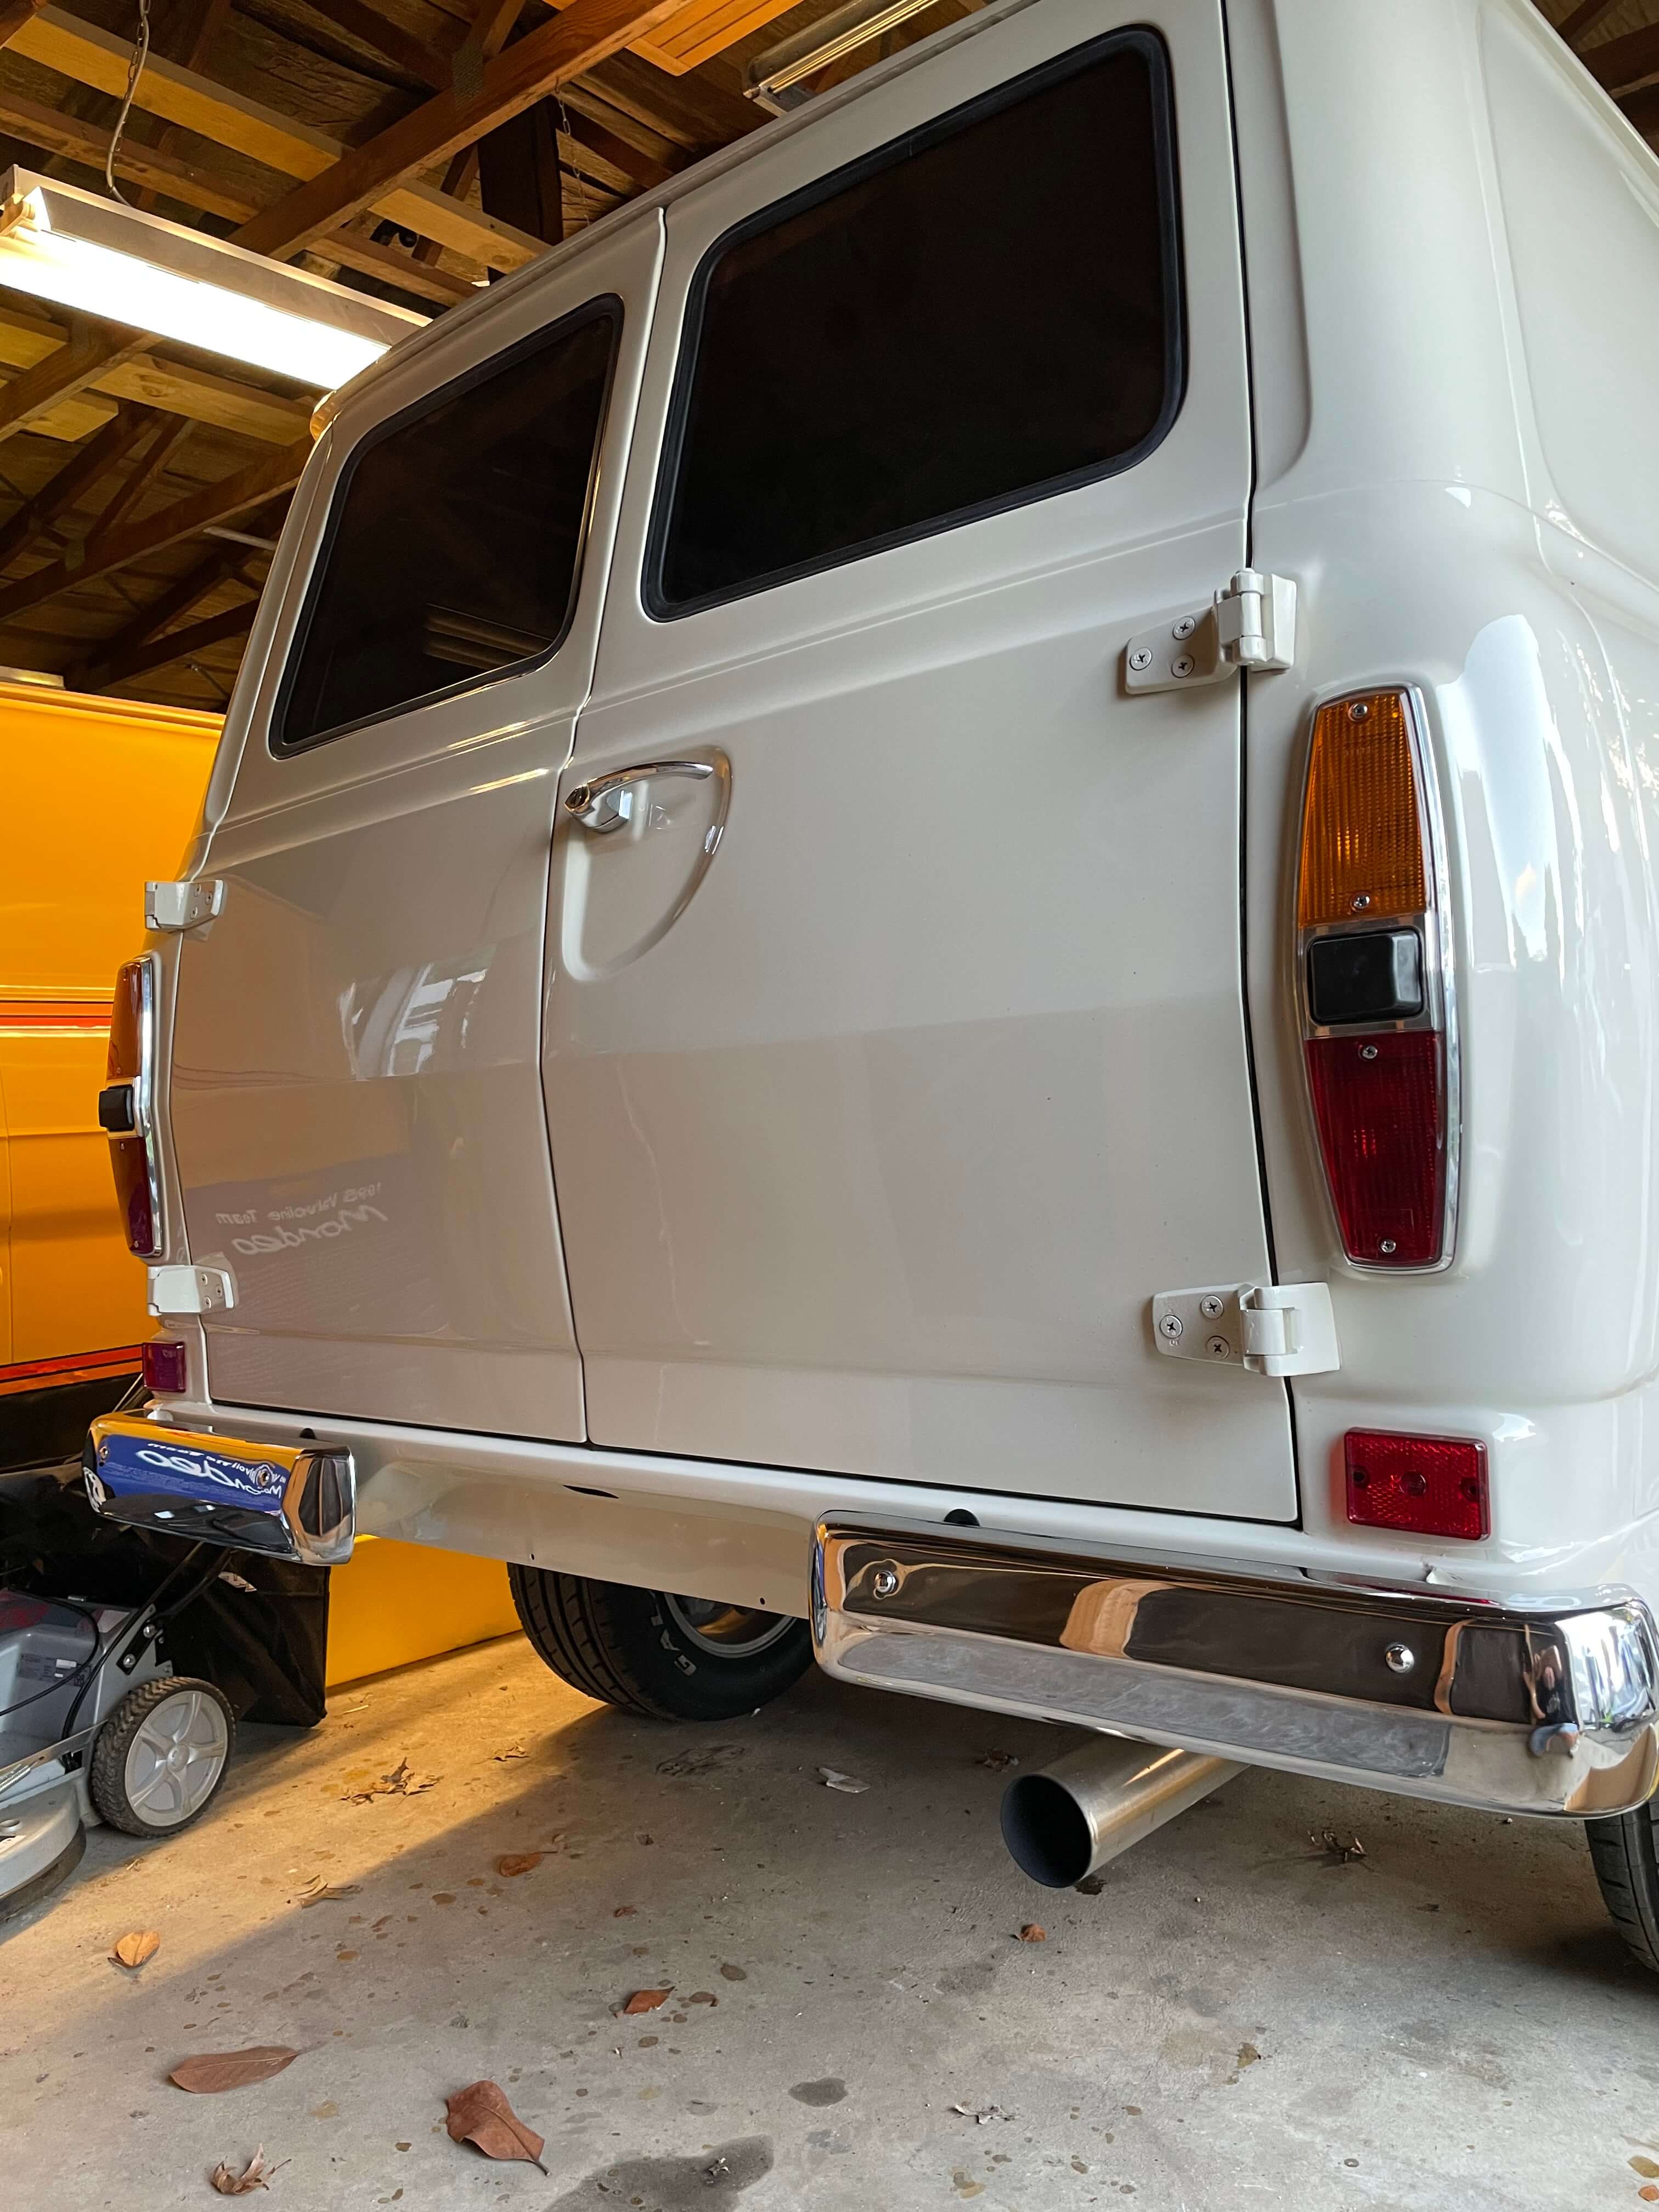
I thought it was time for an update. Been a bit busy on other things, so the Mk1 has not had a lot of attention lately. But just cracked into it a week or two ago, and it is nearing completion now. Lots of NOS parts being fitted, which is always fun. A few pics to show the progress.
2 points
-
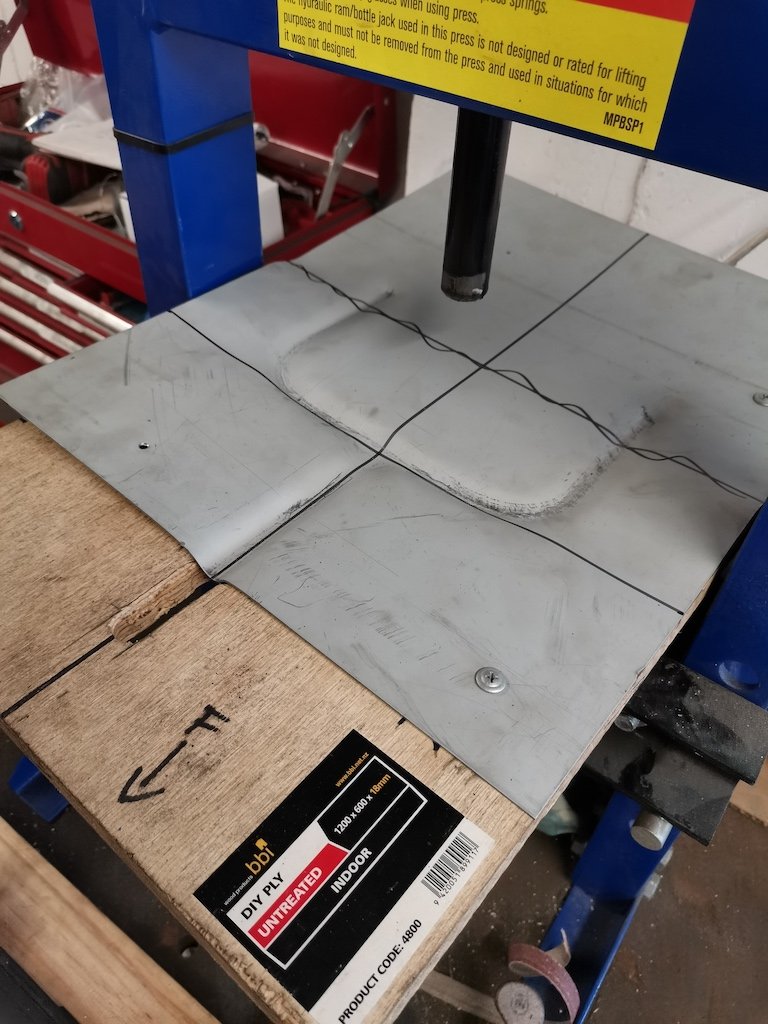
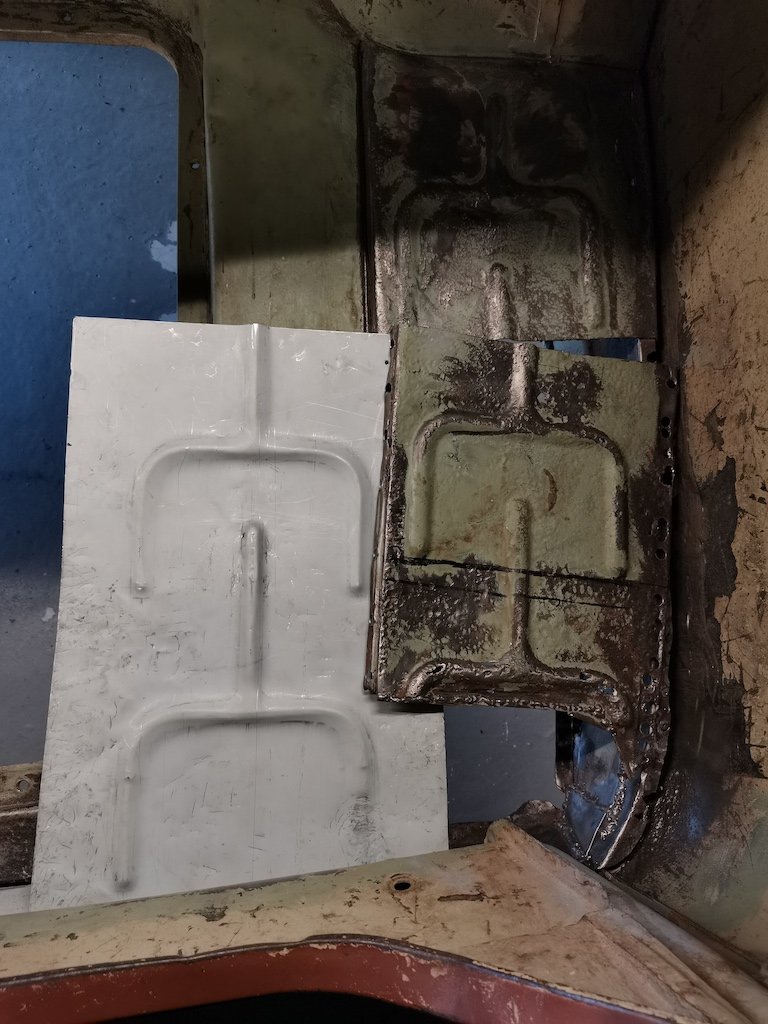
Slowly but surely getting on top of the rust. Got the boot floor patches all welded in and painted with epoxy. Been working on getting the outer edge sorted. Wasn't keen to section the whole length to get the curve right. Got myself a shrinker/stretcher which made things much easier. My first attempt was to make a jig which had the right curve, bend a right angle then hammer to form a profile. Results weren't great, so back to square one. Cut, bent and welded some box tubing to get a curve the same as the boot. Welded and clamped on the bent and stretched angle, hammered flat. I butt and plug welded it on. Now just working through smoothing out the welds with a flap disc and power file.
2 points
-
I spent a few hours today bolting on some parts; lots of NOS parts which I have been collecting for this project. Headlights temporarily fitted, new bezels, bumpers, clear front indicators, tail lights and rear reflectors. The headlights I bought a few years ago are an interesting thing for trainspotters like myself; a pair of Cibie Biodes. Invented in the late 1960's, before the H4 dual filament halogen bulb was invented, they take 2x H1 halogen bulbs. There is a separate reflector in the lower part of the headlight (which you can see) that is the high beam, and the upper bulb, which has a shroud and is not visible is the low beam. These were the choice of works rally teams in the late 1960's and early 1970's such as Ford Escort, Porsche 911 and Mini Coopers. Although very old technology, they are still give off an extremely good light output, even by todays standards. I was quite lucky to find these, they are extremely rare and sell for ridiculous money on Ebay.
2 points
-
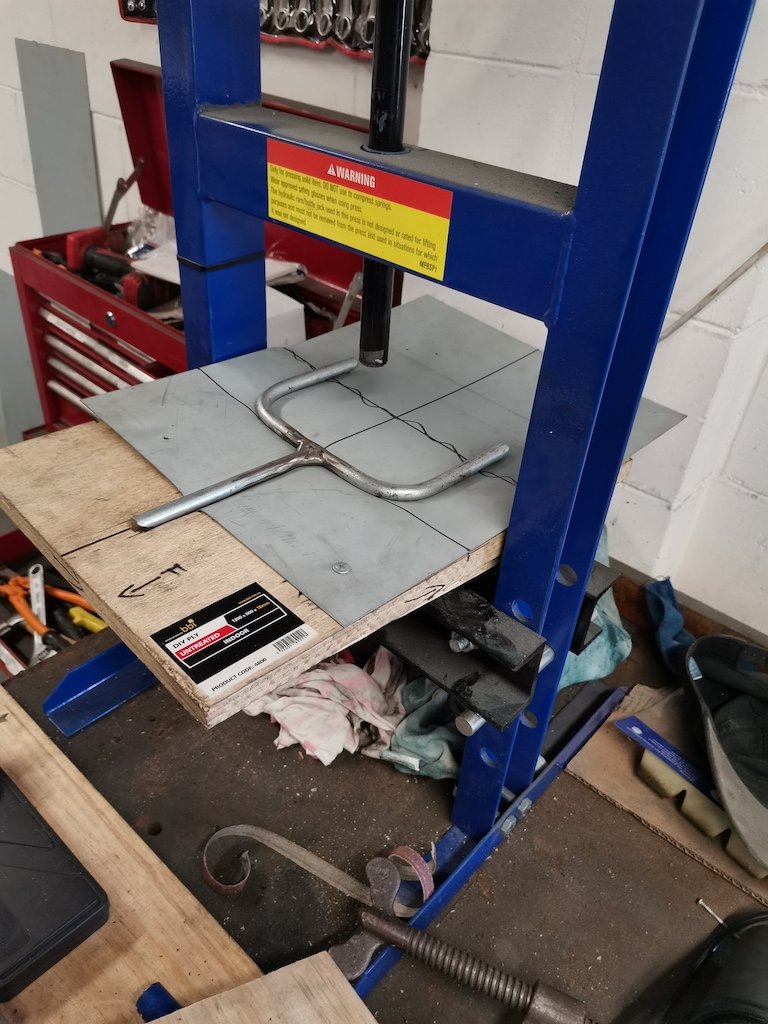
Got the spare tyre well sorted. Working on making up a patch for the boot floor. Made a template out of some rebar and plywood, used my hydraulic press to form the steel. Came up fairly well. Next step was to bend up the edge, I used two bits of EA welded together to make the basic shape, then hammered using a bit of flat bar.
2 points
-
I think i'll go with a combo of jizzing fluid all over my bench, then putting it in under vacuum bleed. I still need to fabricate some brackets, but i'm being optimistic at getting the master in tomorrow. Thanks for all the tips gents.1 point
-
https://www.assda.asn.au/blog/221-strengths-of-stainless-fasteners#:~:text=The vast majority of stainless,tensile strength of 500 MPa). some info here1 point
-
Probably easiest to grab 2 pipes off a master cyl at pap, just snip them off long enough that you can bend them up and over into the reservoir If it was me I'd try the vac bleeder first just to avoid getting brake fluid all over the place if you can worst case you can still do the pipes into the reservoir method once it's in the car1 point
-
Thanks. I am using PPG Epotec 408 primer1 point
-
yeah g size just never ever forget to turn off the valve overnight1 point
-
Yeah a few cam swaps I have messed with on bucket setups you bang them in and magically it all works out fine measurement wise. I don't know much about cams but I would guess that good aftermarket ones have base circles similar enough to stock that it stays in spec1 point
-
that was for last months meet and they are a closed event and invite only these days, no one has made one for this month so far that i have seen. usually would be this thursday been the 2nd to last thursday of the month, but mainly cjc people these days since going to new style of meet by the sounds of it.1 point
-
Started on the wiring today. Doing a push button start and getting all the engine sorted. Put a coil on, fuel line, battery, poured some juice in and it kicked into life! Ran for about a minute while l checked all the vitals. About 50psi oil pressure and purred like a angry kitten with its short straight pipe. Il put that on the list of things to sort asap as its real noisy and l like the people who live around here. Any way more pics to come of wiring tomorrow.
1 point
-
Maybe also improvements in automation for setting the valve clearances on day 1 I remember old mate Ken telling me about how he visited the Toyota factory in Australia. The block would come along, and a robotic probe would touch each of the valve stems (or whatever) then it would autopick the right bucket to suit the distance it measured. Like maybe as tech evolved it was just more economical to spend the money on the magic fingering machine, and less on parts for each engine (assuming hydraulic is more complicated, dunno)1 point
-
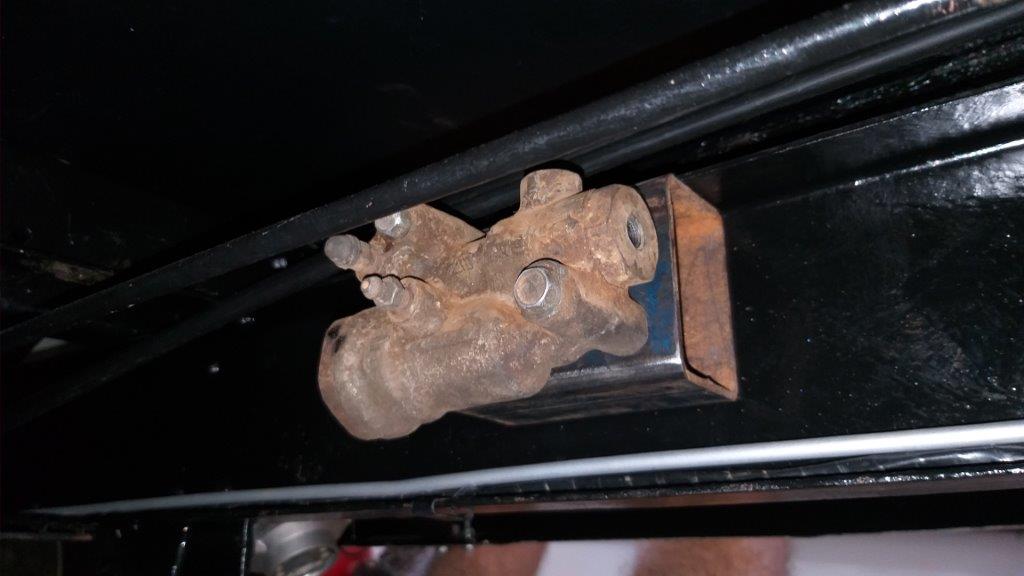
Managed to poke a few holes in the spacer for the load compensation valve that I harvested from the Starwagon and its now bolted up to the right hand side chassis leg. I'll leave it in position so I can bend up all of the pipework and I'll then whip it out again for a clean and paint. The two tubes floating about above the valve are my gear shift cables which still need to be bracketed to the chassis leg.
1 point
-
Oh man, I had a catch up. Saw the rust and was like omg... And then super happy to see you fix it and get it all back together ASAP. Well done!1 point
-
Another great days boating with @johnnyfive and @keltik. We did the Waimana and upper Whakatane river, and had a go at this little stream, Was surprised I made it that far tbh. Did a little bit of damage to the boat, but nothing major. Keltiks vid of the incident, It was quite a ride. All in all a good hoon, would hoon again, A++.1 point
-
Have been collecting parts for slammage, got some new belltech spindles and 3" lower springs. Called into a workshop and a guy there had bought a C10 and wasn't going to use a lot of parts on it so I got some spring mount plates and axle flip brackets , and set of 15x8 factory earlier model steelies for $100 so that was a good score, gives me another wheel option, I'll get them powdercoated silver and hopefully the stock 98 center caps work I like this one , it has later model van center caps though
1 point
-
1 use the gze clutch and pressure plate on mine running w55 gearbox. you will have to clearance the bellhousing for the gze setup to work as you can see in this pic
1 point
-
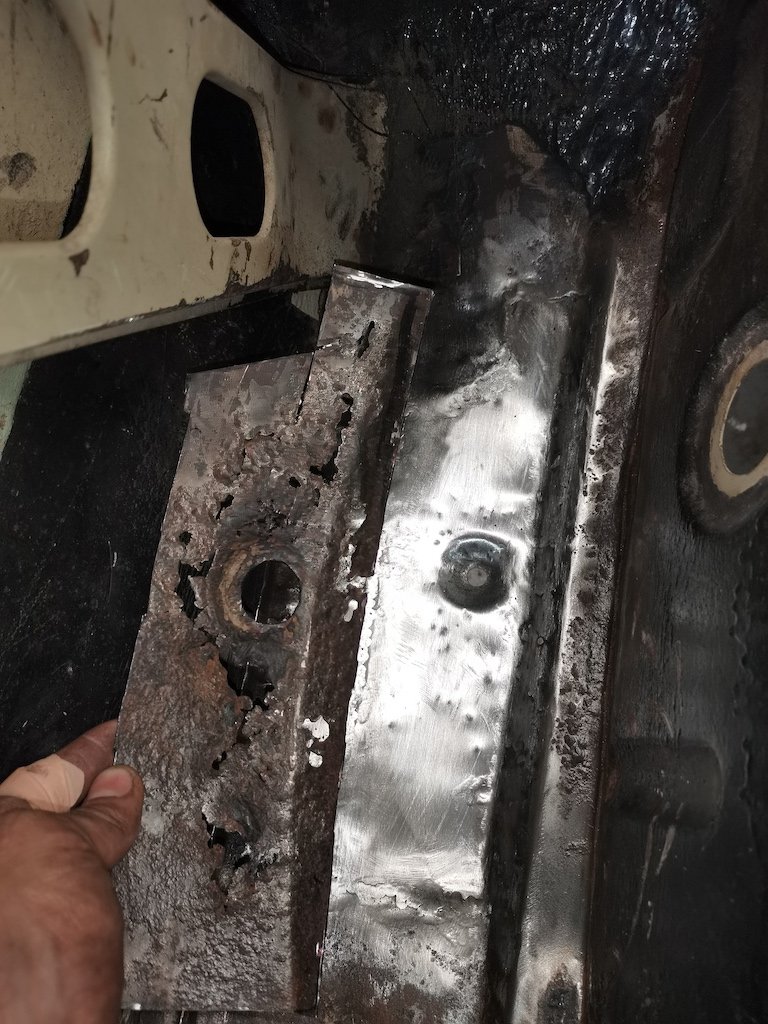
So, I've been digging with the stripping wheel on the grinder. I poked this scab a while back... And yesterday I went full bore at it. The previous owner was definitely a sculptor. There are places where the bog is 1-2CM thick. Its messy AF, so will leave the rest of the stripping until I can get the car outside and make the rest of the dust natures problem The strange thing is, the bog doesn't need to be this thick. I got a profile gauge today and using the good LH side as a sample, I compared it to the stripped RH side. Its not perfect, but its a lot closer to useable than I expected. There is no way it needed that much bog. Once I have the rest of the bog off I'm going to etch prime the panel (takes the shine away, which is making it hard to see the shape) and then try my hand at shaping it with a hammer and dolly. Not sure how much better I can make the swage line, as its almost gone in places, but we'll see. Worst case, I keep an eye out for a replacement panel cut.1 point
-
My new work car arrived, and it's by far the nicest car I've ever "owned". Some fun gimmicks like paddle shift, cruise control, decent power etc etc its a turbo deeez that goes hard 4 wot it iz It doesnt even rattle or anything. Amazing. Really nice on long work trips, which I do a lot of. However obviously the best part of all this, and why it's in this post. Is that this now means my Echo has been released from its daily driving obligations, so I can start on drivetrain swap soon. Time for a full blown big block fuck around! I've still got the engine in storage up at my Dads, but have collected most of the necessary other bits. Also because I am a financially reckless man-child I have also ordered some JUN cams, fuck you bank account
1 point
-
Looks all good in there now. the white around the lip is just in case I decide to go that way. not sure yet, I’m still undecided.Could still go all retro like the old wagon. what do you guys reckon.
1 point
-
Happy to have the engine back in the hole. Good motivating thing to get to this point.
1 point
-
1 point
-
After picking up the new battery, I couldn't help myself. It still cranks the engine fairly slowly, but after starting it a couple of times with Start Ya Bastard, it started to run on its own fuel. Not only that, but after a cough and splutter, it now runs as smooth as a modern engine. It's amazing. It even starts easily and runs with no choke. The oil pressure and charge lights are off, indicating good oil pressure and the alternator is even charging. I'm well chuffed. So much more work to be done, but knowing the engine seems to be in good shape is a huge boost to morale.1 point
-
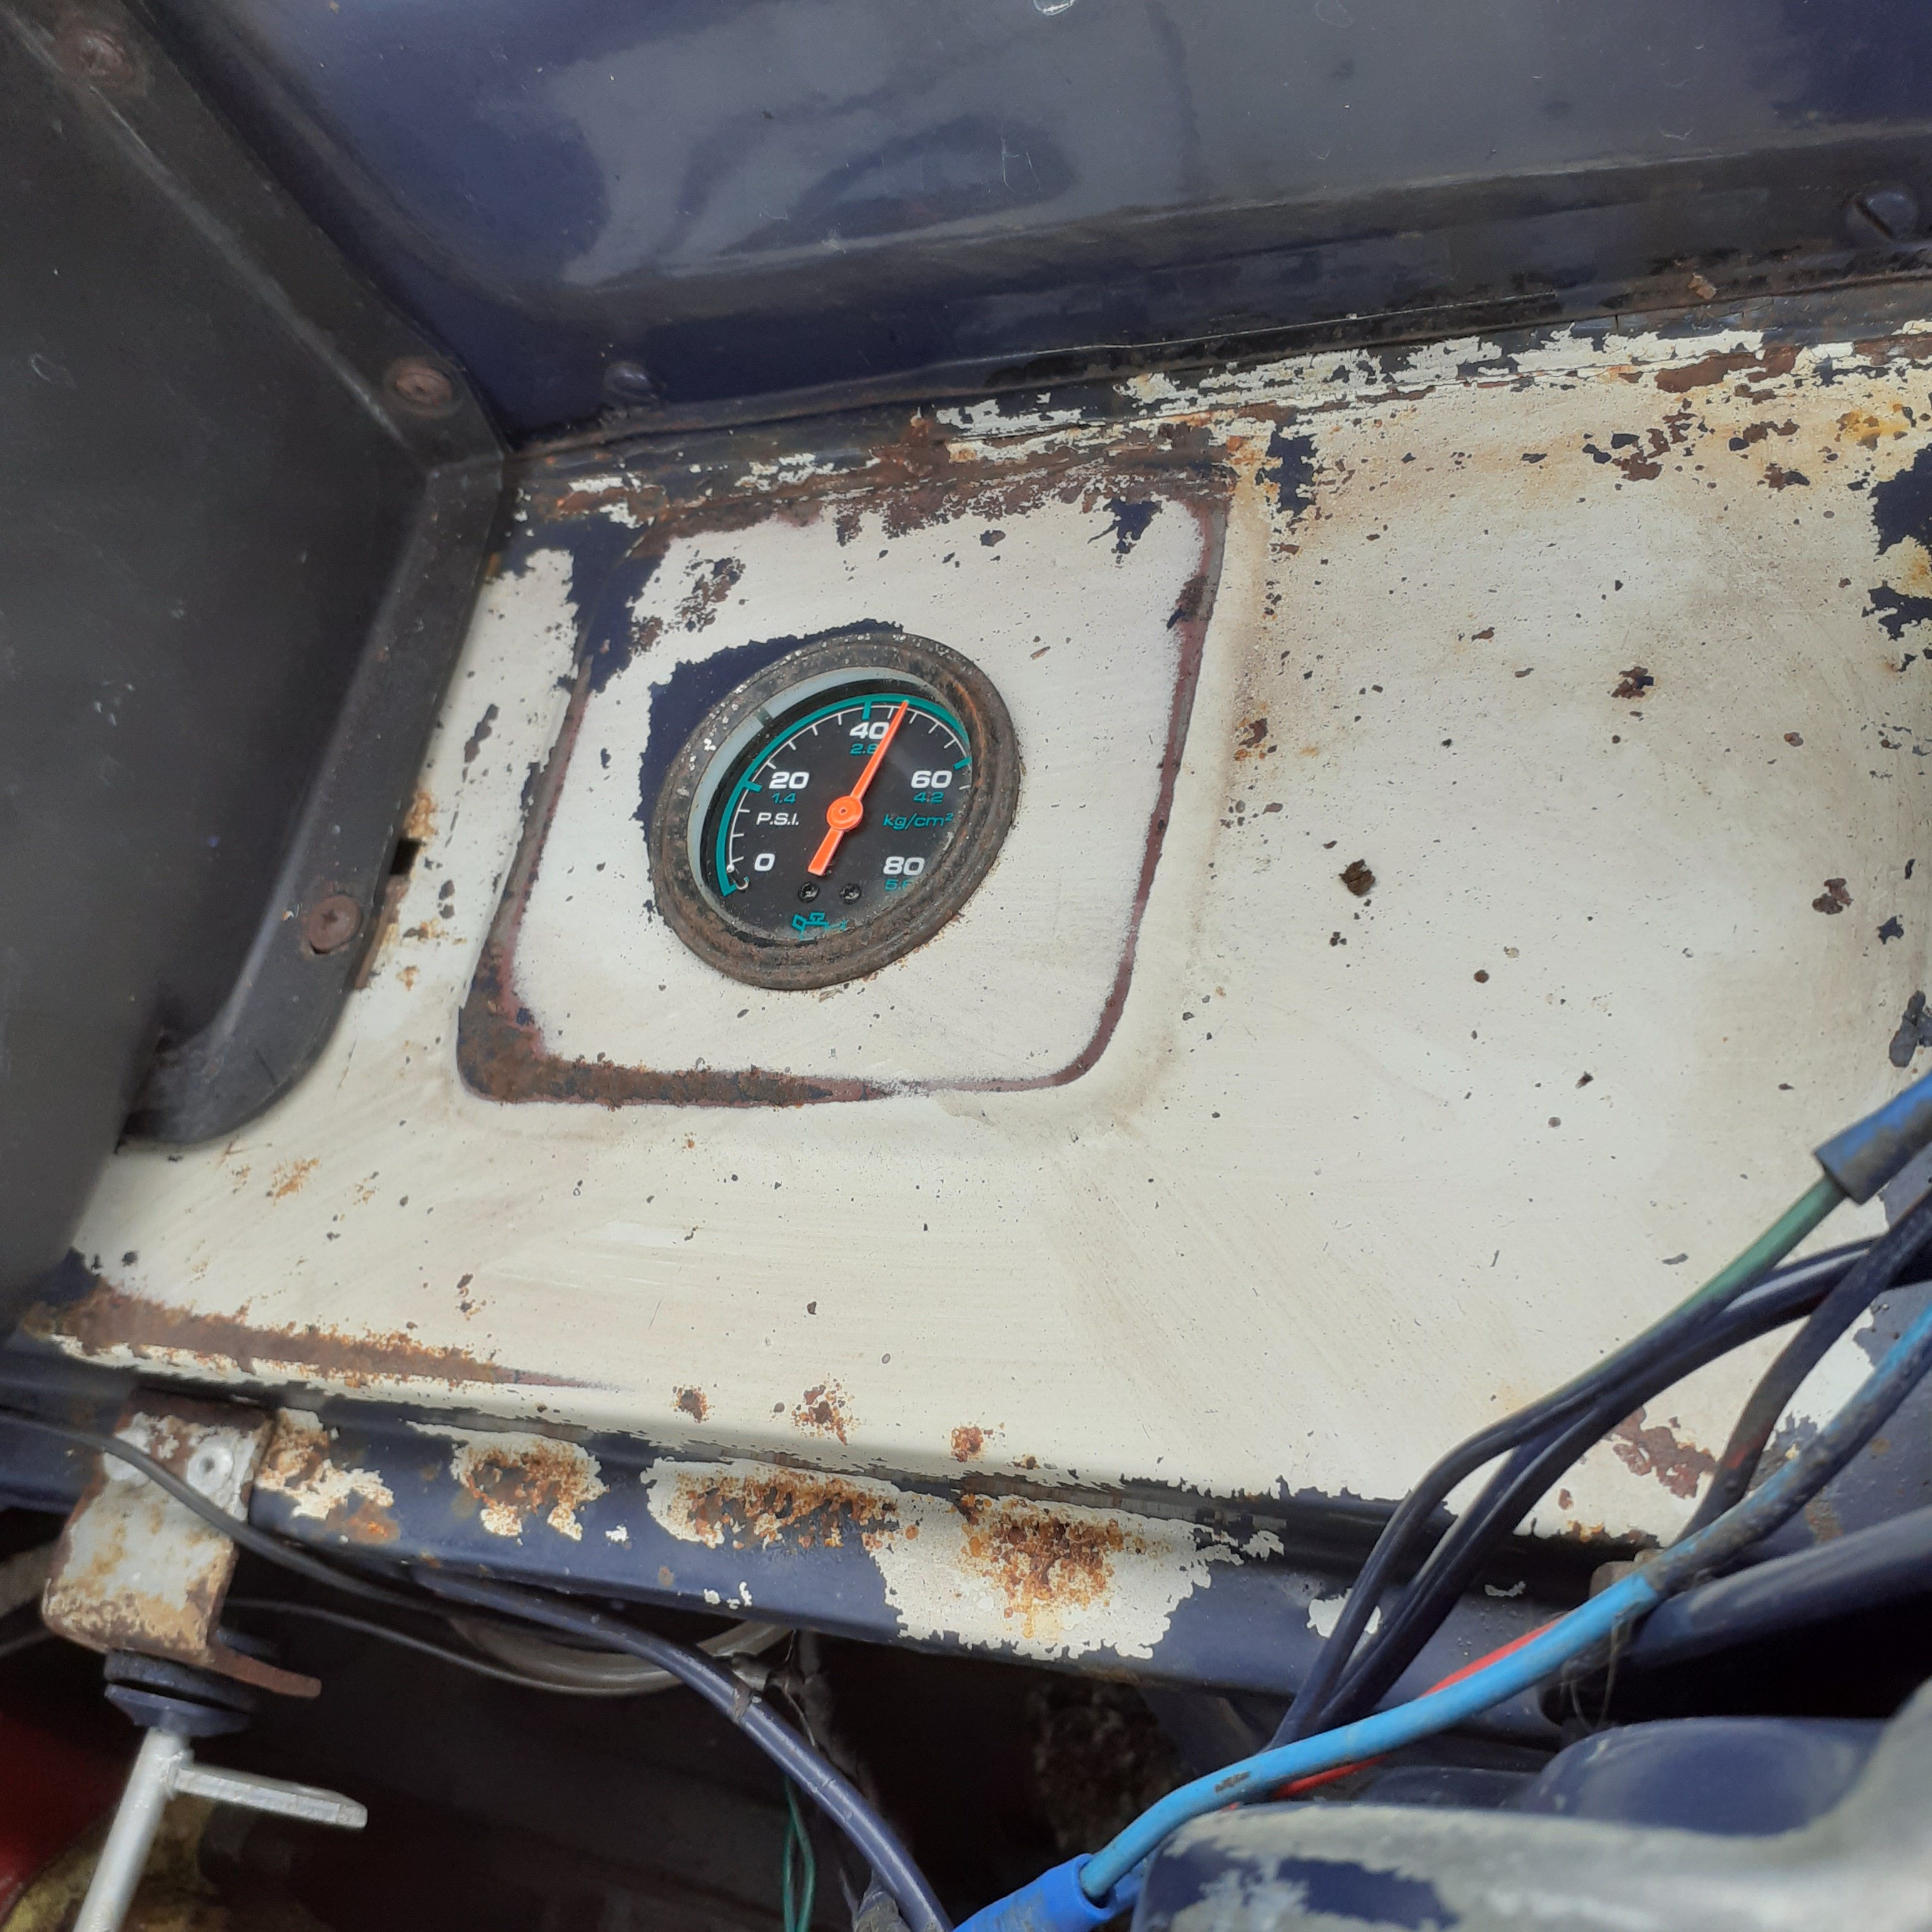
Today has been the first real day of work on the Marina. I got some important prep work out of the way, and had a good look around under the car. The first task on the list for today was to remove what was left of the interior and give it a vacuum out. I had to wait for the muck to dry first, and now that it was nice and dry I donned my gloves and mask and went to work. The boot got completely stripped. The carpet was old house carpet and was rotting. Thankfully the metal under it is in good shape. Cleaning the boot also showed where the rust is. The worst rust in the rear guard is where this little strip (to support the spare wheel?) is attached. It's basically rusted along that seam. The other side is solid. With all the seats removed the whole interior got a good vacuum. So much grot. Cleaning the floors shows the repair panels that have been riveted in and then sealed around. There are about four patches on the passengers side alone, including one against the inner sill, which will need some work where it joins to the floor. It's all pretty straight forward stuff to fix from what I can see. I'll need to work out how to press some strengthening ribs into the new panels, but I have a press and a welder, so I'll make something. The RH side was no better, so that got a good clean too. I did find a lot of screws under the driver's seat, but no surprises under the paving slabs. The rear wasn't missed. There was quite a bit of old mouse poo here too. With most of my chances of catching Hantavirus sorted I got the car up on axle stands, which is where it will live for a while. This gave me my first real look at the underside. The good news is that its extensively undersealed, which seems to have saved it from too much underside rust. The bad news is that its cobweb city. Oh, and the rust that does exist. Like the LH half of the rear valance. The RH side is almost perfect The big Borg Warner diff. Need to source a LH bump stop, and probably shocks. The exhaust has seen better days. Will patch it to get through the WOF and then look at the condition of the rest of the system and whether to just replace from the muffler back, or replace the whole thing. One annoying thing is the driveshaft center bearing has collapsed, so I'll need to drop the shaft and replace that. Will also assess the Ujs and see if they need doing too. Removing the driveshaft will give me the chance to replace the clearly leaking rear seal on the gearbox too It's OK, the tyres are only flat on the bottom. Cob webs. Everywhere. I took a broom to them, and they resisted my attacks. Moving forward, we see the ancient Ryco Z83B filter. I ordered a replacement and picked up it this morning. There is a high probability this filter is from the 90s. I think the moisture on the bellhousing is gearbox oil leaking forward from sitting. Its that, or the rear main is leaking, but since the car hasnt been driven anywhere it would be hard for the oil from the rear main to spread like that instead of just leaking straight down. It's amusing how HUGE the bellhousing is, and how small the gearbox is. Around the front and I'm greeted by this thing. I worked out from the owners manual that its a "Hinged Kerb Guard". Well, it was seized solid in the sticky outty position. It made a lot more sense once I freed it up and folded it back where it should be. I suspect it got caught at one point, maybe moving the car off a trailer or something, and overextended forward. What it does, is protect the sump, which hangs way down under the car. This is a tall engine. This is directly behind the guard. Yes, that hose in the front is the fuel hose from the pump... Once freed up and folded back it looks like this. It has pins on either side that stop it from going further back. I'm not sure why they bothered to "hinge" it. The "hinge" is just that it can rotate on the two bolts that attach it. If it was to make servicing easier, it would've been just as easy to make it fixed in place and removable. I'll just tighten the bolts in the furthest back position. Next, I drained the engine oil and removed the old filter. The old oil stank and was the darkest black oil I have never seen. It was like draining treacle. While waiting for it to slowly drain, I removed all the old spark plugs. The 4th plug was damaged at some point and the top was stuck in the (also damaged) ignition lead. Luckily the OE Champion plugs cross over with NGK BP6ES, which oh hey, I happened to have on the shelf. I gapped them down the specified 0.6mm gap, but before fitting I used my awesome Castrol oil can to put a little oil into the cylinders to help the dry cylinder walls out a bit. And now the new plugs went in The oil was still draining, so I fit the replacement filter in the meantime. Because the engine hasn't run for about 10 years, I prefilled the filter before spinning it on. I don't normally, but this made sense to me. Next was to replace the old fuel hoses from the carb back to the tank. The hose that had been put on the car from the pump to filter was... odd. I don't even know if it was fuel hose. Looked like a small garden hose, and was "food quality". I replaced all the hose with 1/4" ID Gates and Codan hoses (depending on what was on hand at the time). All R6 rated, so not rated for EFI or Ethanol, but not an issue for me as its carb and I won't be running E10 in it. When I did the Mini fuel system I got a filter at the time but didn't have the space to fit it. I've had that filter on the shelf since, so its good to finally put it to use. As per the above photo, I took the top off the fuel bowl to see what was in there. There was a little bit of old perished fuel in the bottom but otherwise looked OK. This was cleaned out with a rag and brake cleaner. I removed the dashpot and piston to clean. The inside of the carb was filthy, so that got a good clean. The old oil was drained and new 20W60 poured in on refitting. I may play with this dashpot oil if it's too thick, which I think it might be. It's not all nicely polished, but its clean inside, and that's what matters. I'll look into a rebuild kit later and redo the whole carb. Now it was finally time to pour in 3 litres of Penrite's finest HPR30 mineral 20W60. This stuff is gold for old cars. Total capacity is 3.4L including filter. With the level checked, and between the marks, I moved onto the cooling system. I knew there was water in the expansion tank but appeared to be nothing in the radiator. I sucked out the old rusty water from the tank and cut the old hose off. I fit some of my spare rubbish J30 R9 hose from the radiator to overflow (all that hose is good for since its no good for 40+ PSI EFI). I removed the bottle and gave it a damn good cleaning with the garden hose. Lots of chunks came out, but the lower outlet was completely blocked. It took me shoving a screwdriver through the outlet to clear it. Now that I had free flow between the radiator and expansion tank, all that was left to do was fill the system and see where it all comes out again. One of my recent tool purchases came in handy for this. I've been wanting a coolant funnel for ages, but they're usually so expensive, but I scored this off Trademe for cheap, near new. It increases the head height of the coolant, making it easier to bleed, and has a tap to stop me making a mess when the funnel is still half full but the system is full. Almost immediately there was a leak as soon as the level reached the top radiator hose. This isn't an original hose; someone has cut and shut it with a steel pipe in the middle. It should be one big S-shaped hose. I turned the pipe over which revealed why it was leaking. Mmm, crusty. It was damp down one end. I decided to try the other recent tool purchase, a radiator pressure testing kit. Its second hand and a bit rugged, but it still works. This highlighted quite clearly where the pipe had rusted through The rest of the system handled 15psi happily, once I applied duct tape to the pipe. Even the radiator, despite having a bunch of missing fins and generally looking haggard, held pressure fine. I need to work out a way to pressure test the heater core too, since it's been bypassed and removed, but that may just involve hooking it back up to the car cooling system and pressurising it all again. With all that work done, there was nothing left to do but see if the engine actually turns over. I refitted the damaged/old leads just in case it wanted to fire. I have replacements on the way though. I borrowed the battery from the TVR Turned the key and got dash lights! The indicators also kinda worked, although they are flashing super spastically, probably due to the missing/blown bulbs in the rear and not being used for 25 years. No horn or headlights though. Next, I turned the key further, and sure enough, the engine reluctantly turned over. It was kinda like an old man (me) getting out of bed in the morning. Very slow and kinda "eh, do I have to?". Adding a jump pack made it turn a little faster but it quickly ran out of juice and even then "faster" was still slow. I need to get the car its own battery, but I'm also wondering about the engine grounds now as that is apparently a common reason for shitty slow cranking. I'll try again and see if we can get it fired up this weekend. To celebrate its uh, not starting, I gave the car its face back. The center painted section still needs to be repainted and fitted, but otherwise, the difference with just the grille surround is quite large. Makes the car look proper. It'll come off again to see why the headlights don't work and to fix some minor rust in the panel, but it can hang there for now. Damn, I've just noticed the bumper is on the piss too. Guess thats something else to fix.1 point
-
This morning I poked a few holes in the bracket that holds the gate selector pivot arm, then glued it all together. I made up some 1 mm shims so that I can adjust how much the barrel on the gate lever engages with the "cotton reel" on the gear shift column. Test assembled it with three shims in place and the lever moves nice and smoothly, I had to shave a bit off the gear selection arm as it was helluva close to hitting the gate selector pivot at full throw, but it's now got plenty of clearance. I'm very happy happy with the result. Next step is to mount everything back in the van so I can get a final measurement for the modified steering column. I've already measured it twice, but I'm keen to measure it one more time just to make sure. With a bit of luck on Monday I should be able to drop the steering column off at the engineering works for a cut and graft job. Things are starting to come together nicely. Thanks for reading.
1 point
-
I picked up the handbrake rod from my mate Brenton this morning. He was able to glue the stainless steel reverse threaded rod to the original mild steel Thames rod for me, so I'm a really happy camper. I'll give it a lick of satin black when I paint the chassis so it doesn't look so blingy, but for now I'll tick the handbrake off the "to do" list.
1 point
-
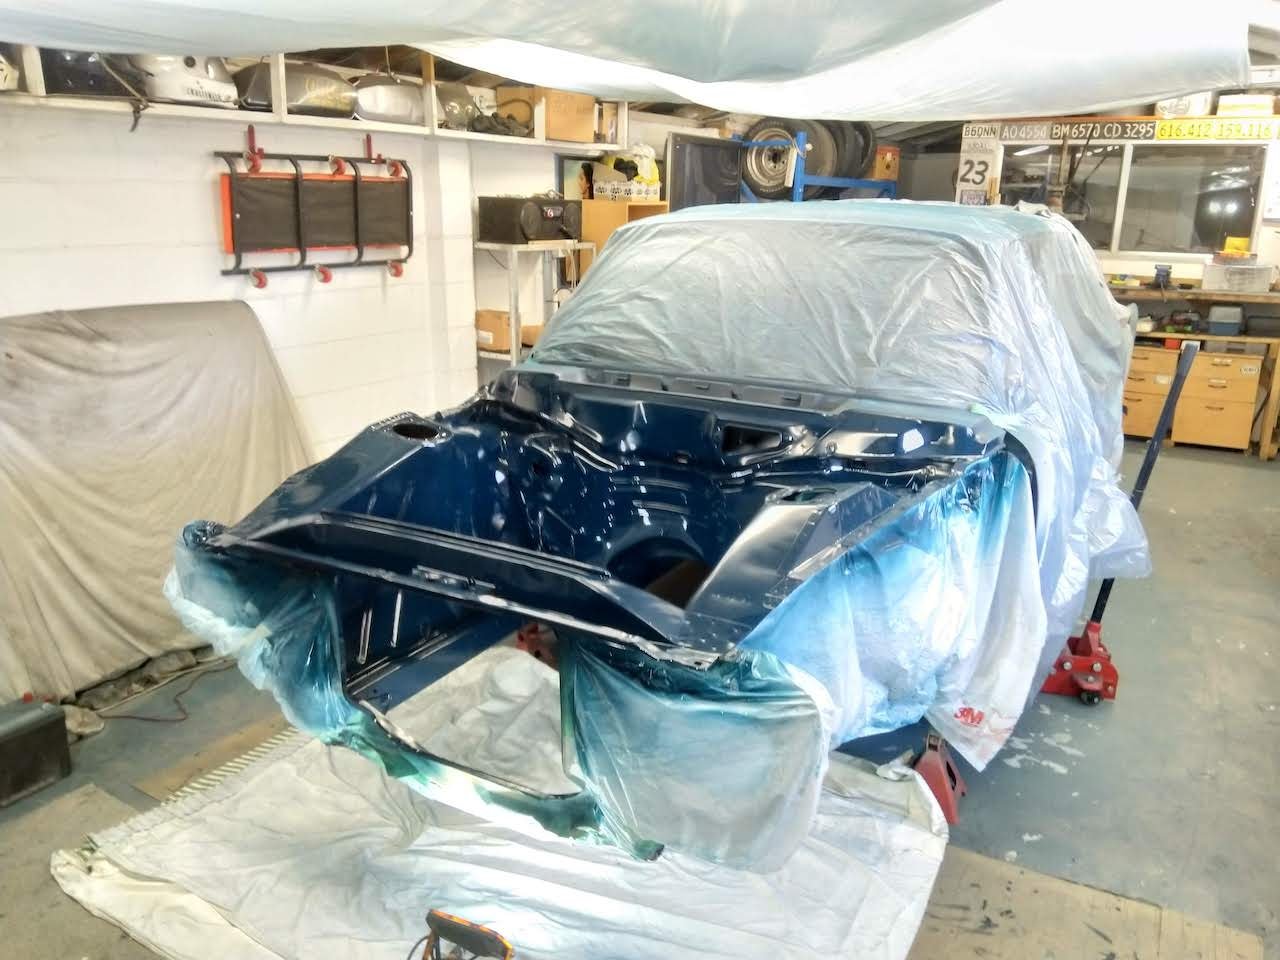
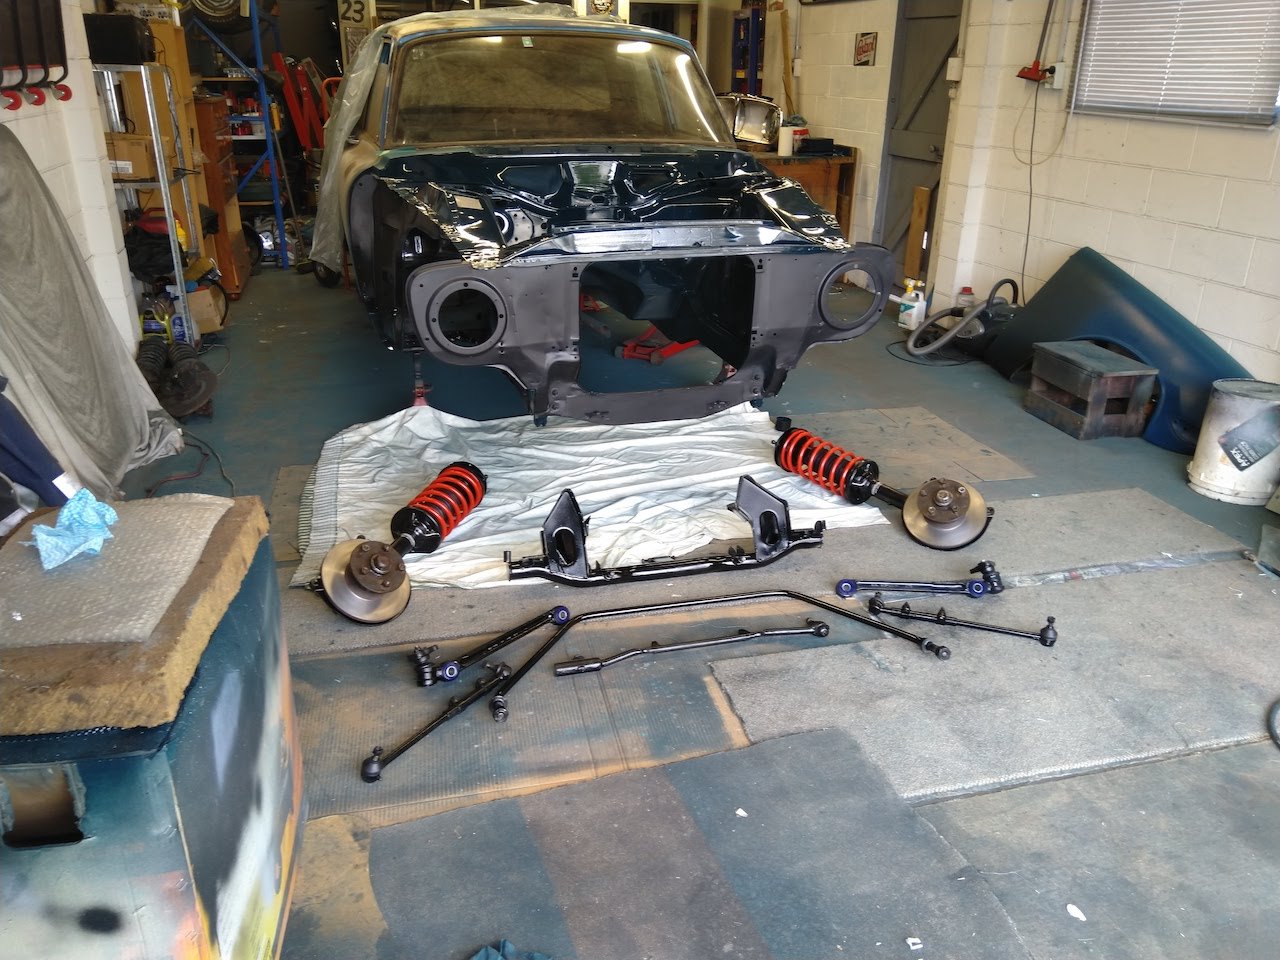
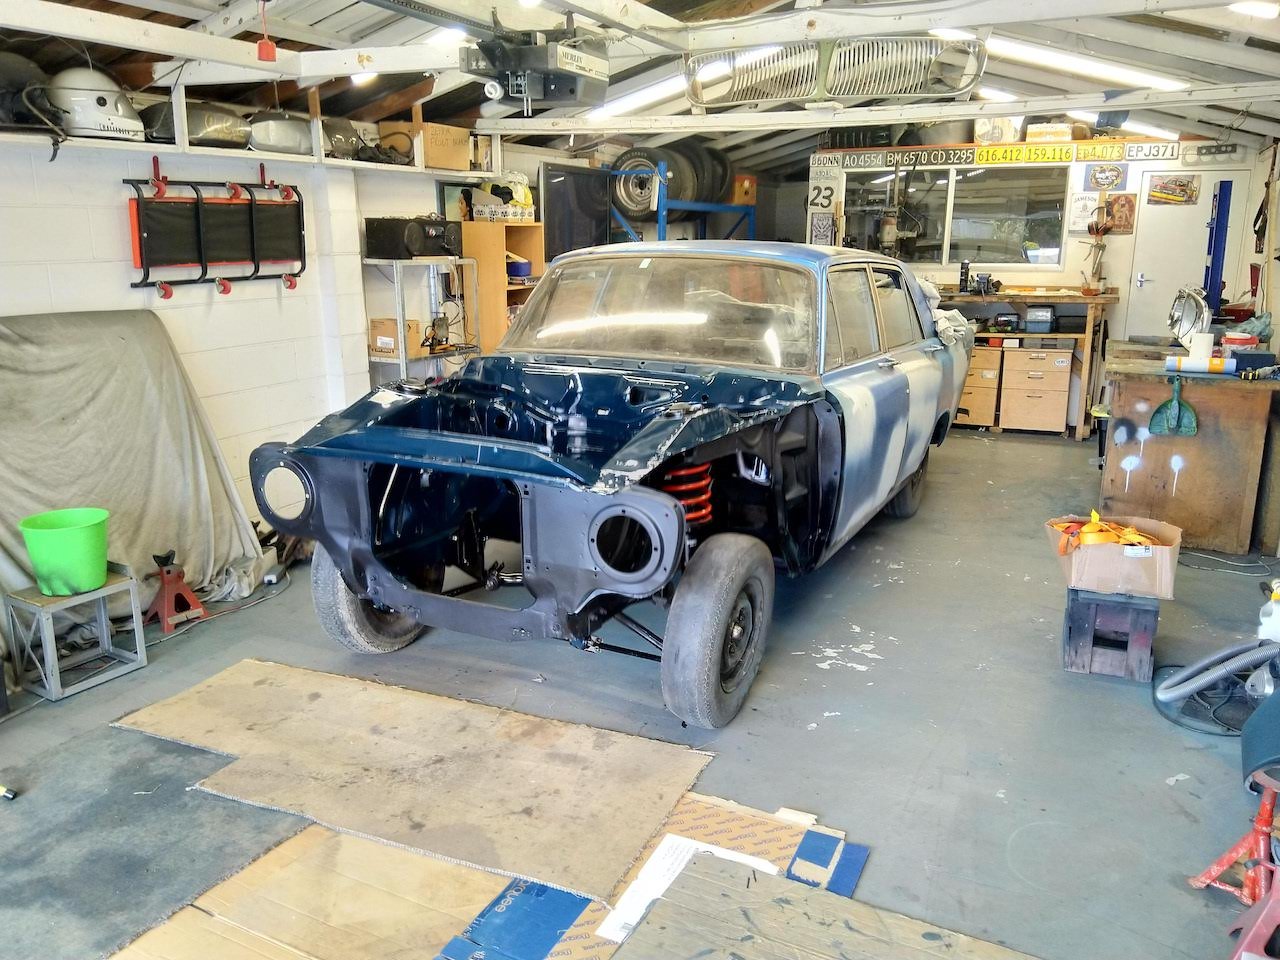
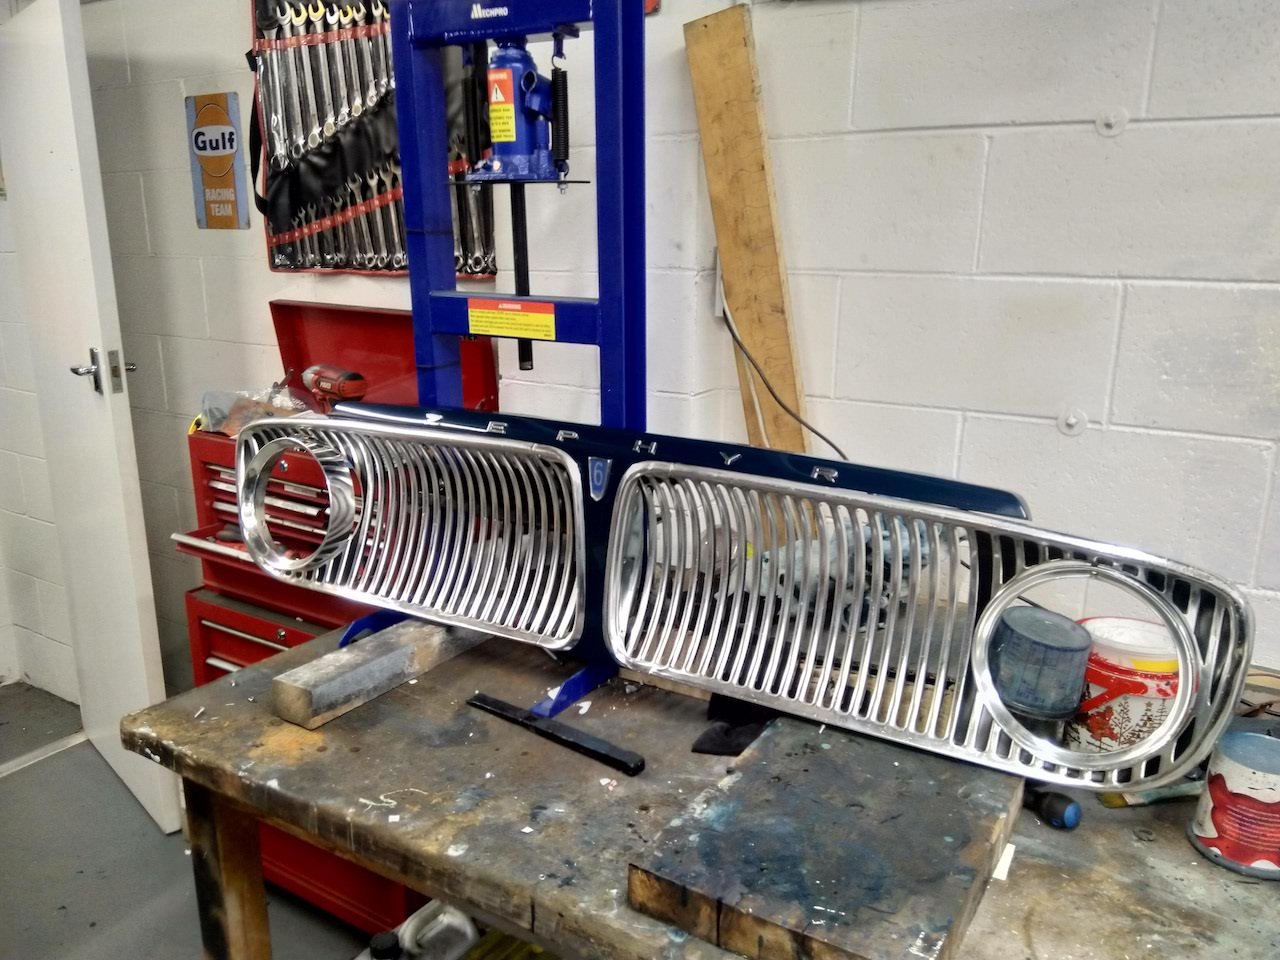
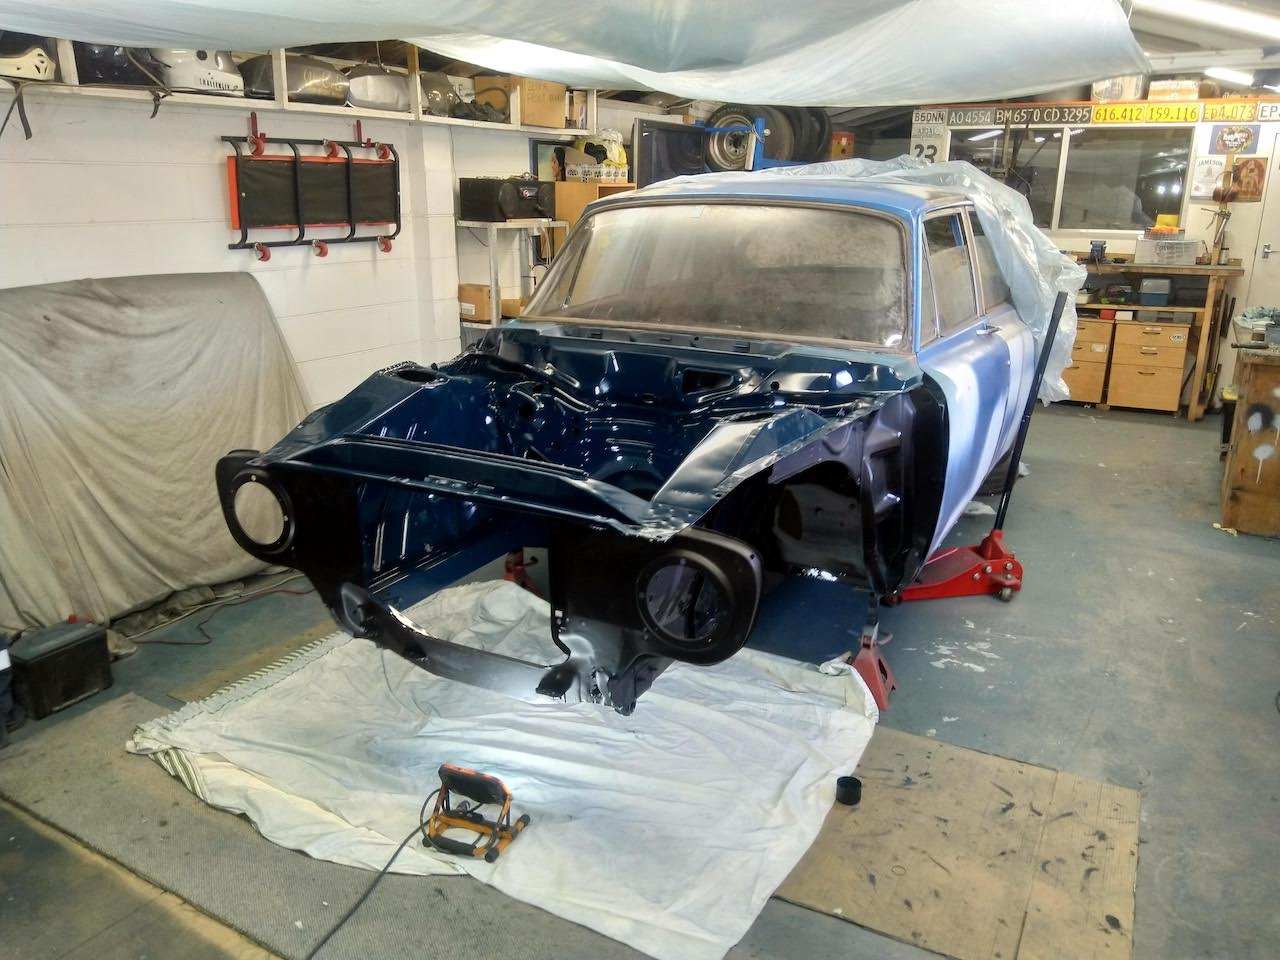
Got the engine bay and front grille into colour I've reassembled the front suspension, car kinda rolls now. No steering components yet. Next plan is to pull the diff and exhaust and start to tidy up under the car.
1 point


.thumb.jpeg.384ff72c8d2b0ee0d34a7bdedb55bdcf.jpeg)


This leaderboard is set to Auckland/GMT+12:00