
Leaderboard
.thumb.jpeg.384ff72c8d2b0ee0d34a7bdedb55bdcf.jpeg)


Popular Content
Showing content with the highest reputation on 03/24/21 in all areas
-
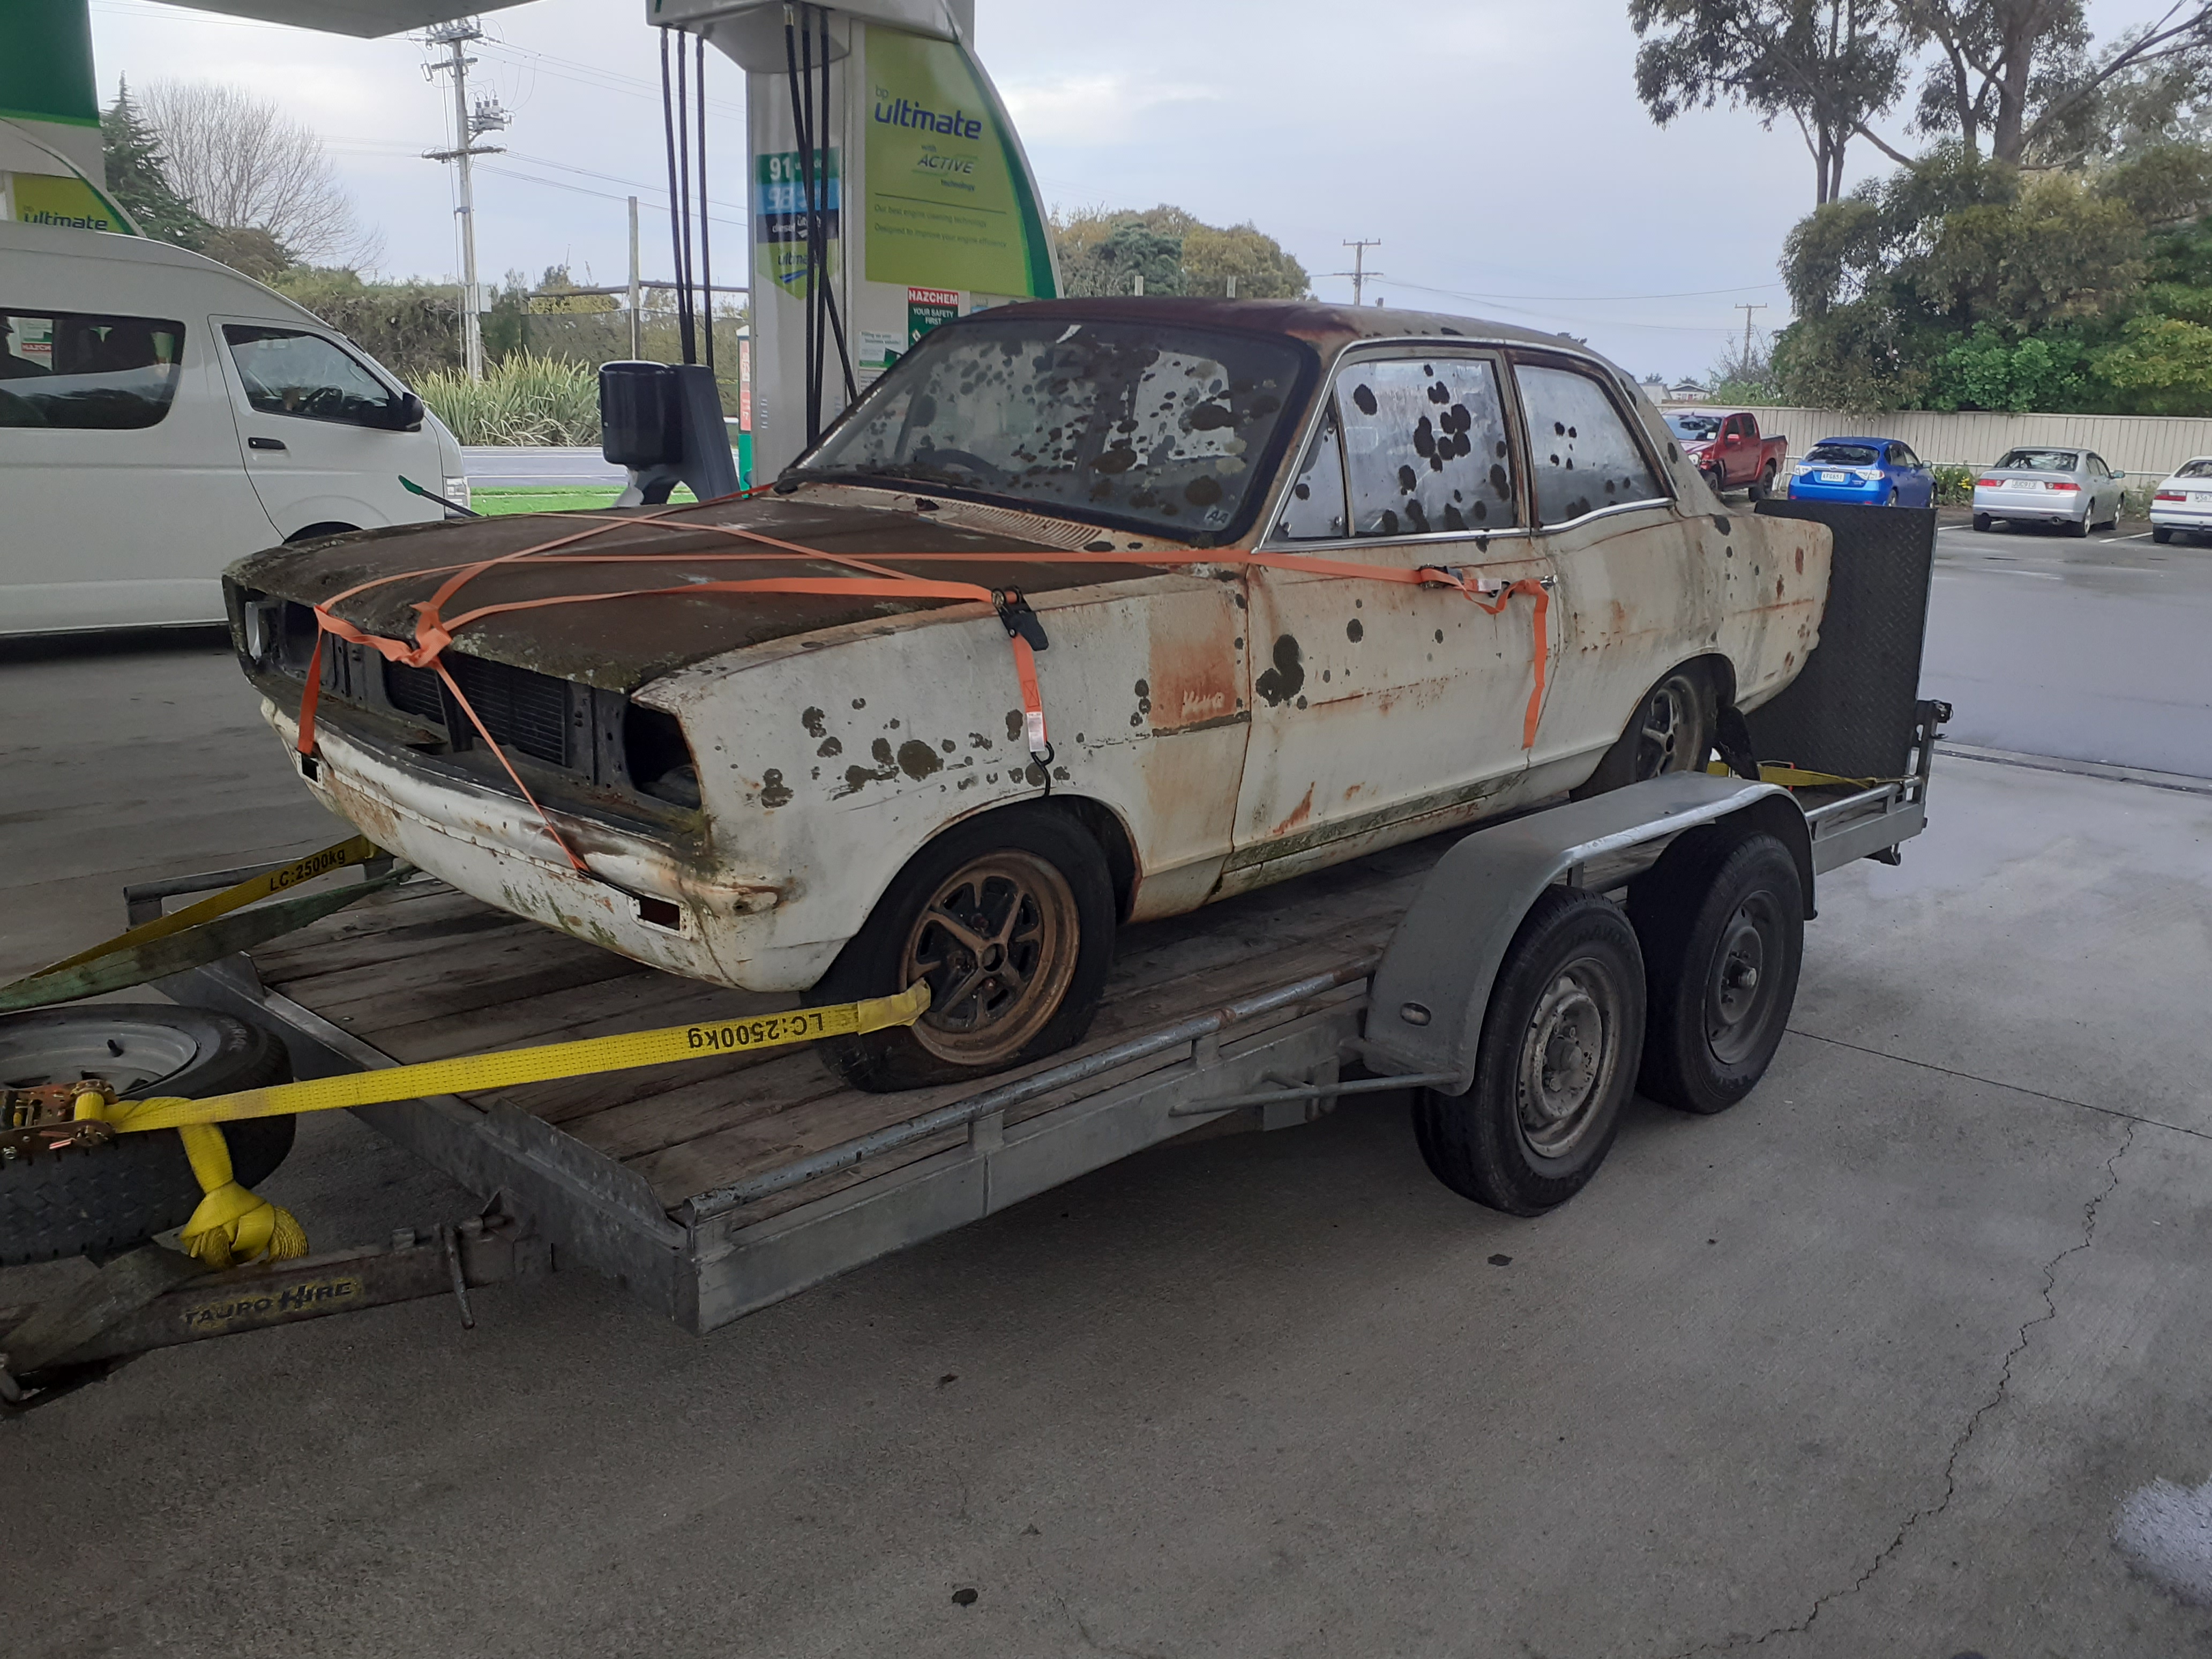
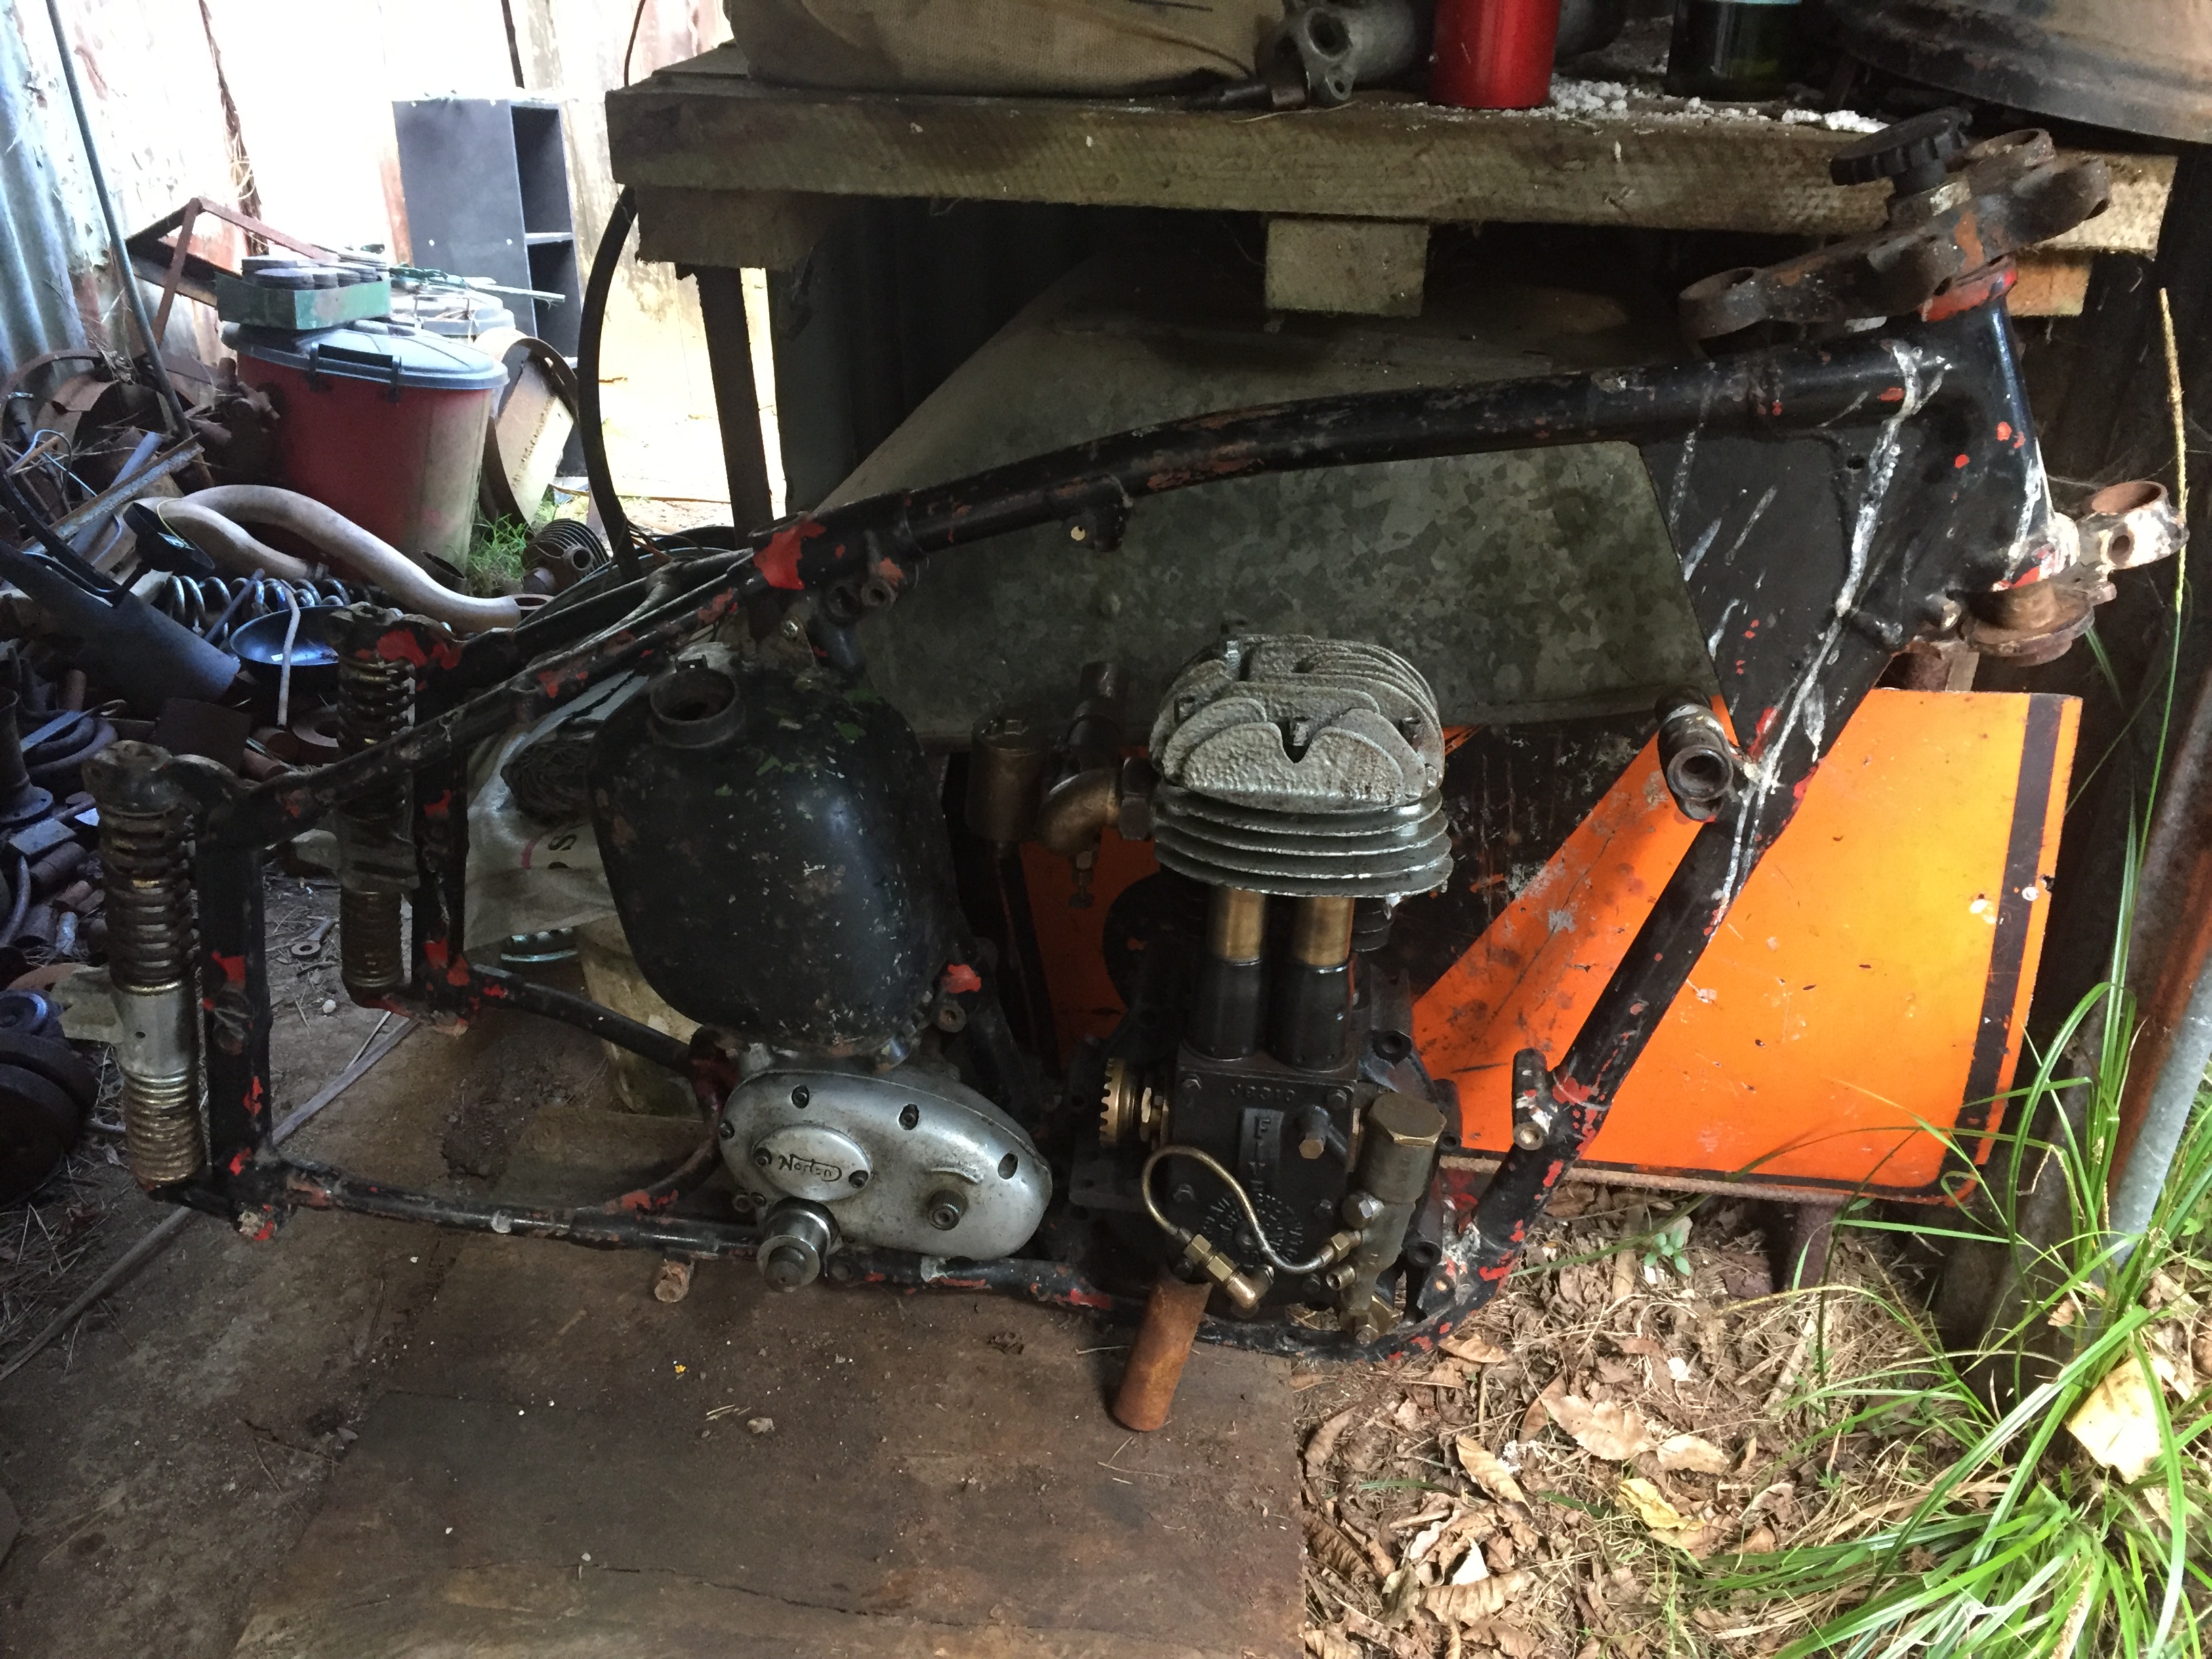
A few months ago a little rusty nugget was presented to me for sale and I couldn't help but add it to my fleet (I really shouldn't have but sometimes you just can't say no...) 20201122_190825 by phillipbaines, on Flickr 109925324_2747433878821944_9009724047312886256_n by phillipbaines, on Flickr I got it home, parked it up. forgot about it for 4 weeks whilst I waited for a few things to come from Japan. 20210321_143536 by phillipbaines, on Flickr The wiring loom that was in the car was the stock AE85 loom which was hacked and fudged. I thought it would be much easier to start with a clean base so I bought a set of AE86 looms. Now I know where everything is, it has wiring for a fpump, has EFI relays and wiring. I can just put in a stock 4A-GE loom and get it going with ease Cabin loom 20210321_110325 by phillipbaines, on Flickr Engine bay loom for headlights etc 20210321_105132 by phillipbaines, on Flickr Looking tidy enough 20210321_122314 by phillipbaines, on Flickr I've got everything there to get it going except a T series diff... (it has an S series diff so if anyone knows of a full T Series diff for AE86 I am a man in need) Discussion:13 points
-
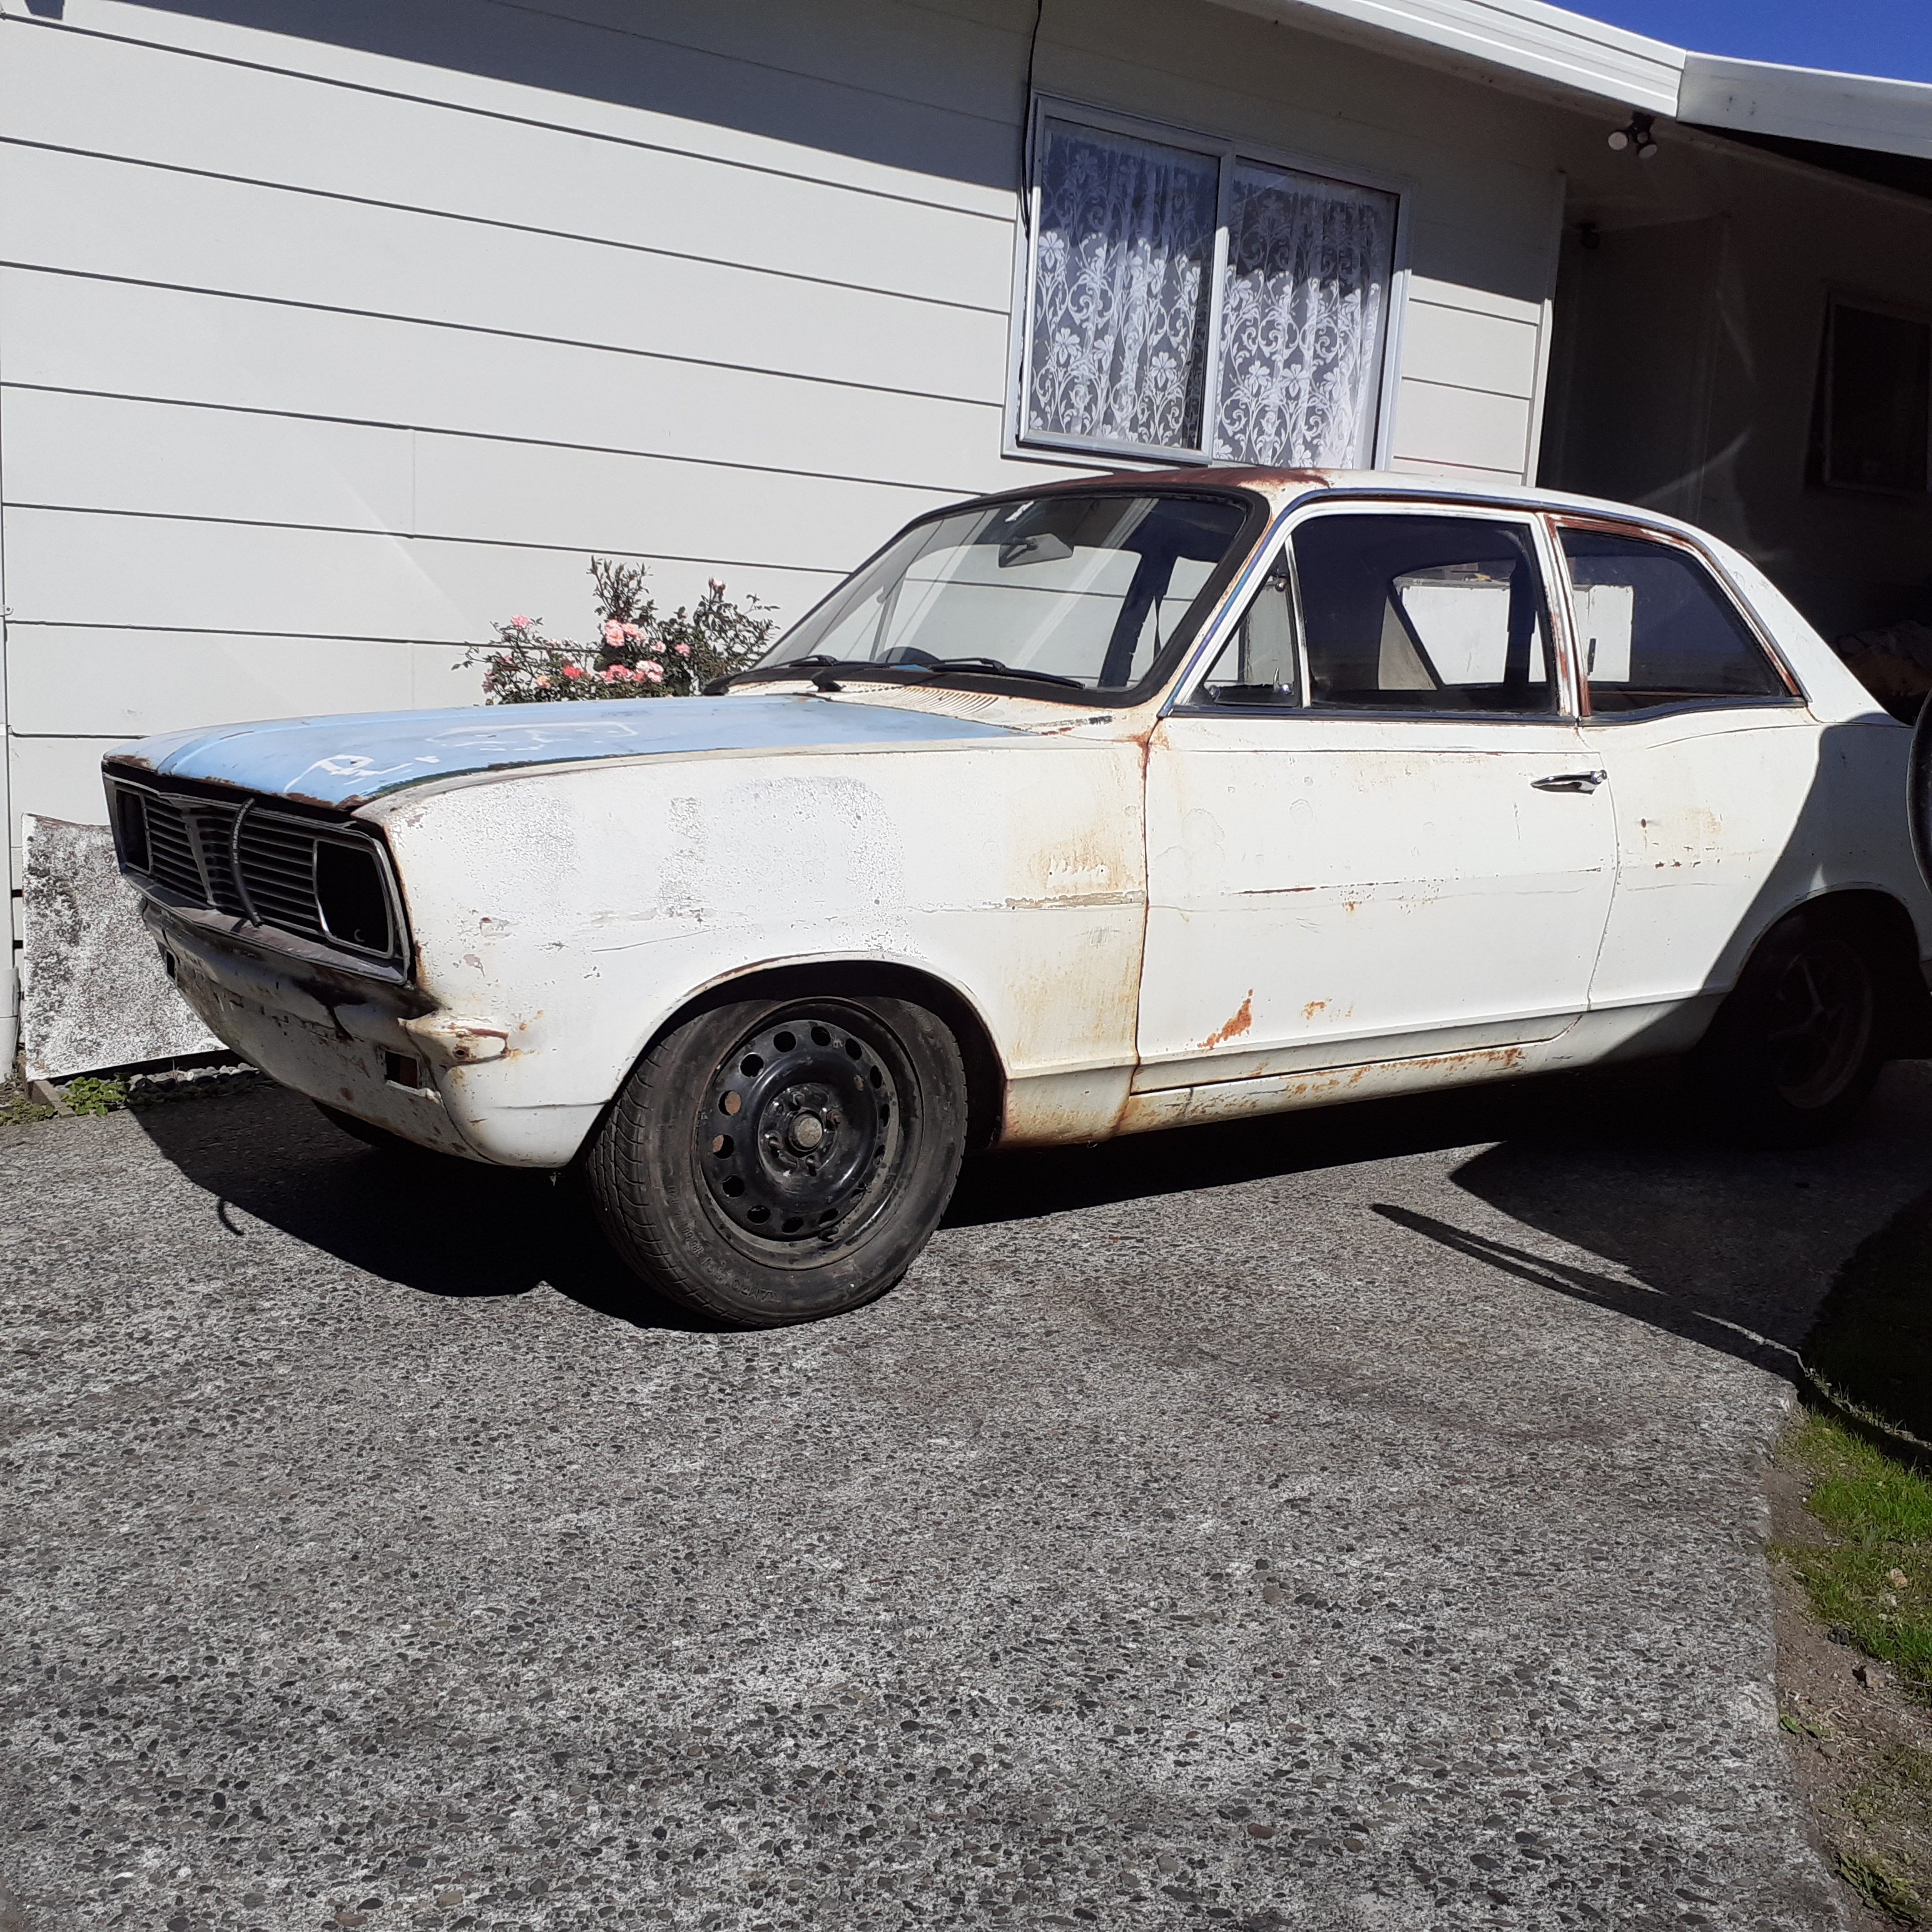
I first owned this in 1996. I put a 283 chevy in it and had some fun. Pulled the engine after a mate crashed his and sold the rolling body to him. He put his running gear in it (1900 Commy engine and magnum diff etc) but never finished it. I had been on at him to sell it back to me for a while. A few months back he messaged me to come get it as he was never going to finish it. This is how it looked when I picked it up
 12 points
 -
10 points
-
got the bumpers back from chroming. these pictures do absolutely no justice to how good it looks IRL. 2021-03-23_06-53-44 by sheepers, on Flickr 2021-03-23_06-53-54 by sheepers, on Flickr 2021-03-23_06-54-02 by sheepers, on Flickr 2021-03-23_06-54-10 by sheepers, on Flickr 2021-03-23_06-54-17 by sheepers, on Flickr 2021-03-23_06-54-24 by sheepers, on Flickr10 points
-
Gave it a clean...
9 points
-
Ground level up to something closer to normal. Plumbing is in, waiting on the pour
7 points
-
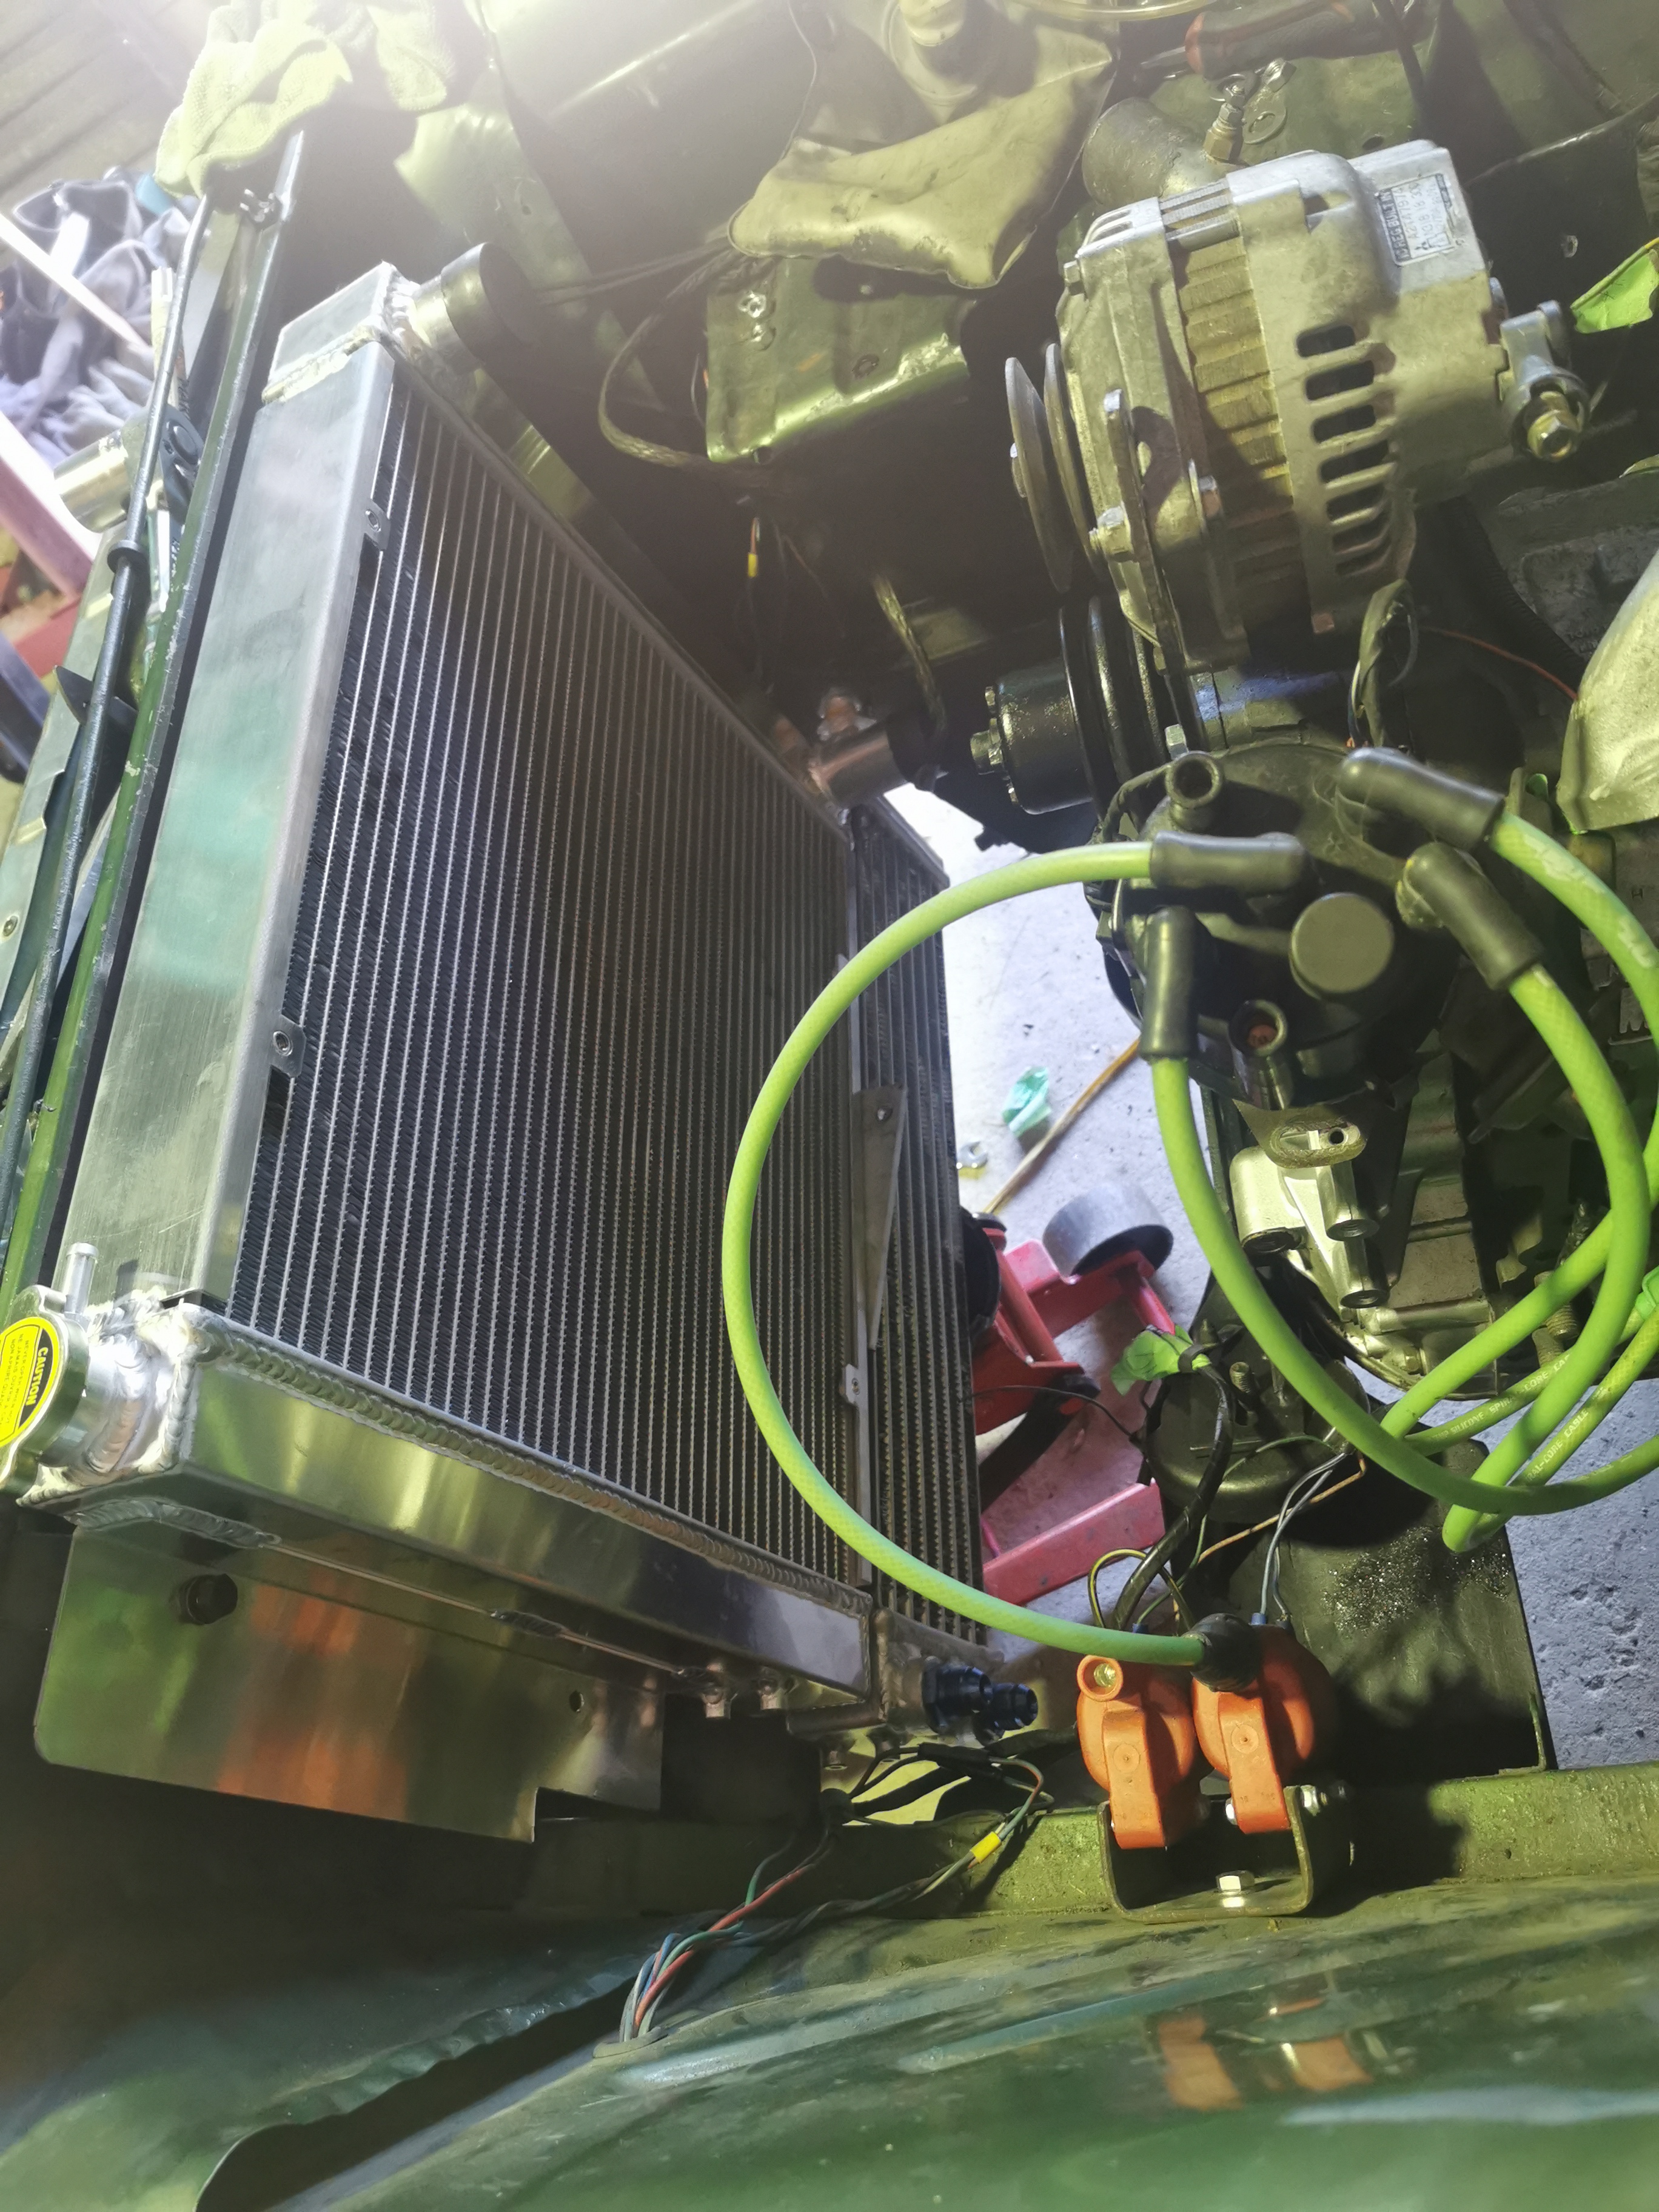
Radiator mounted, dummy fitting oil cooler.. Oil cooler is wider than the radiator so is a bit of a pig, not alot of options to mount this
7 points
-
Here's the passenger door after doing the block. I haven't put any effort in to adjusting it. Previously the gap was about 3 times the size and the door would just flop around.
7 points
-
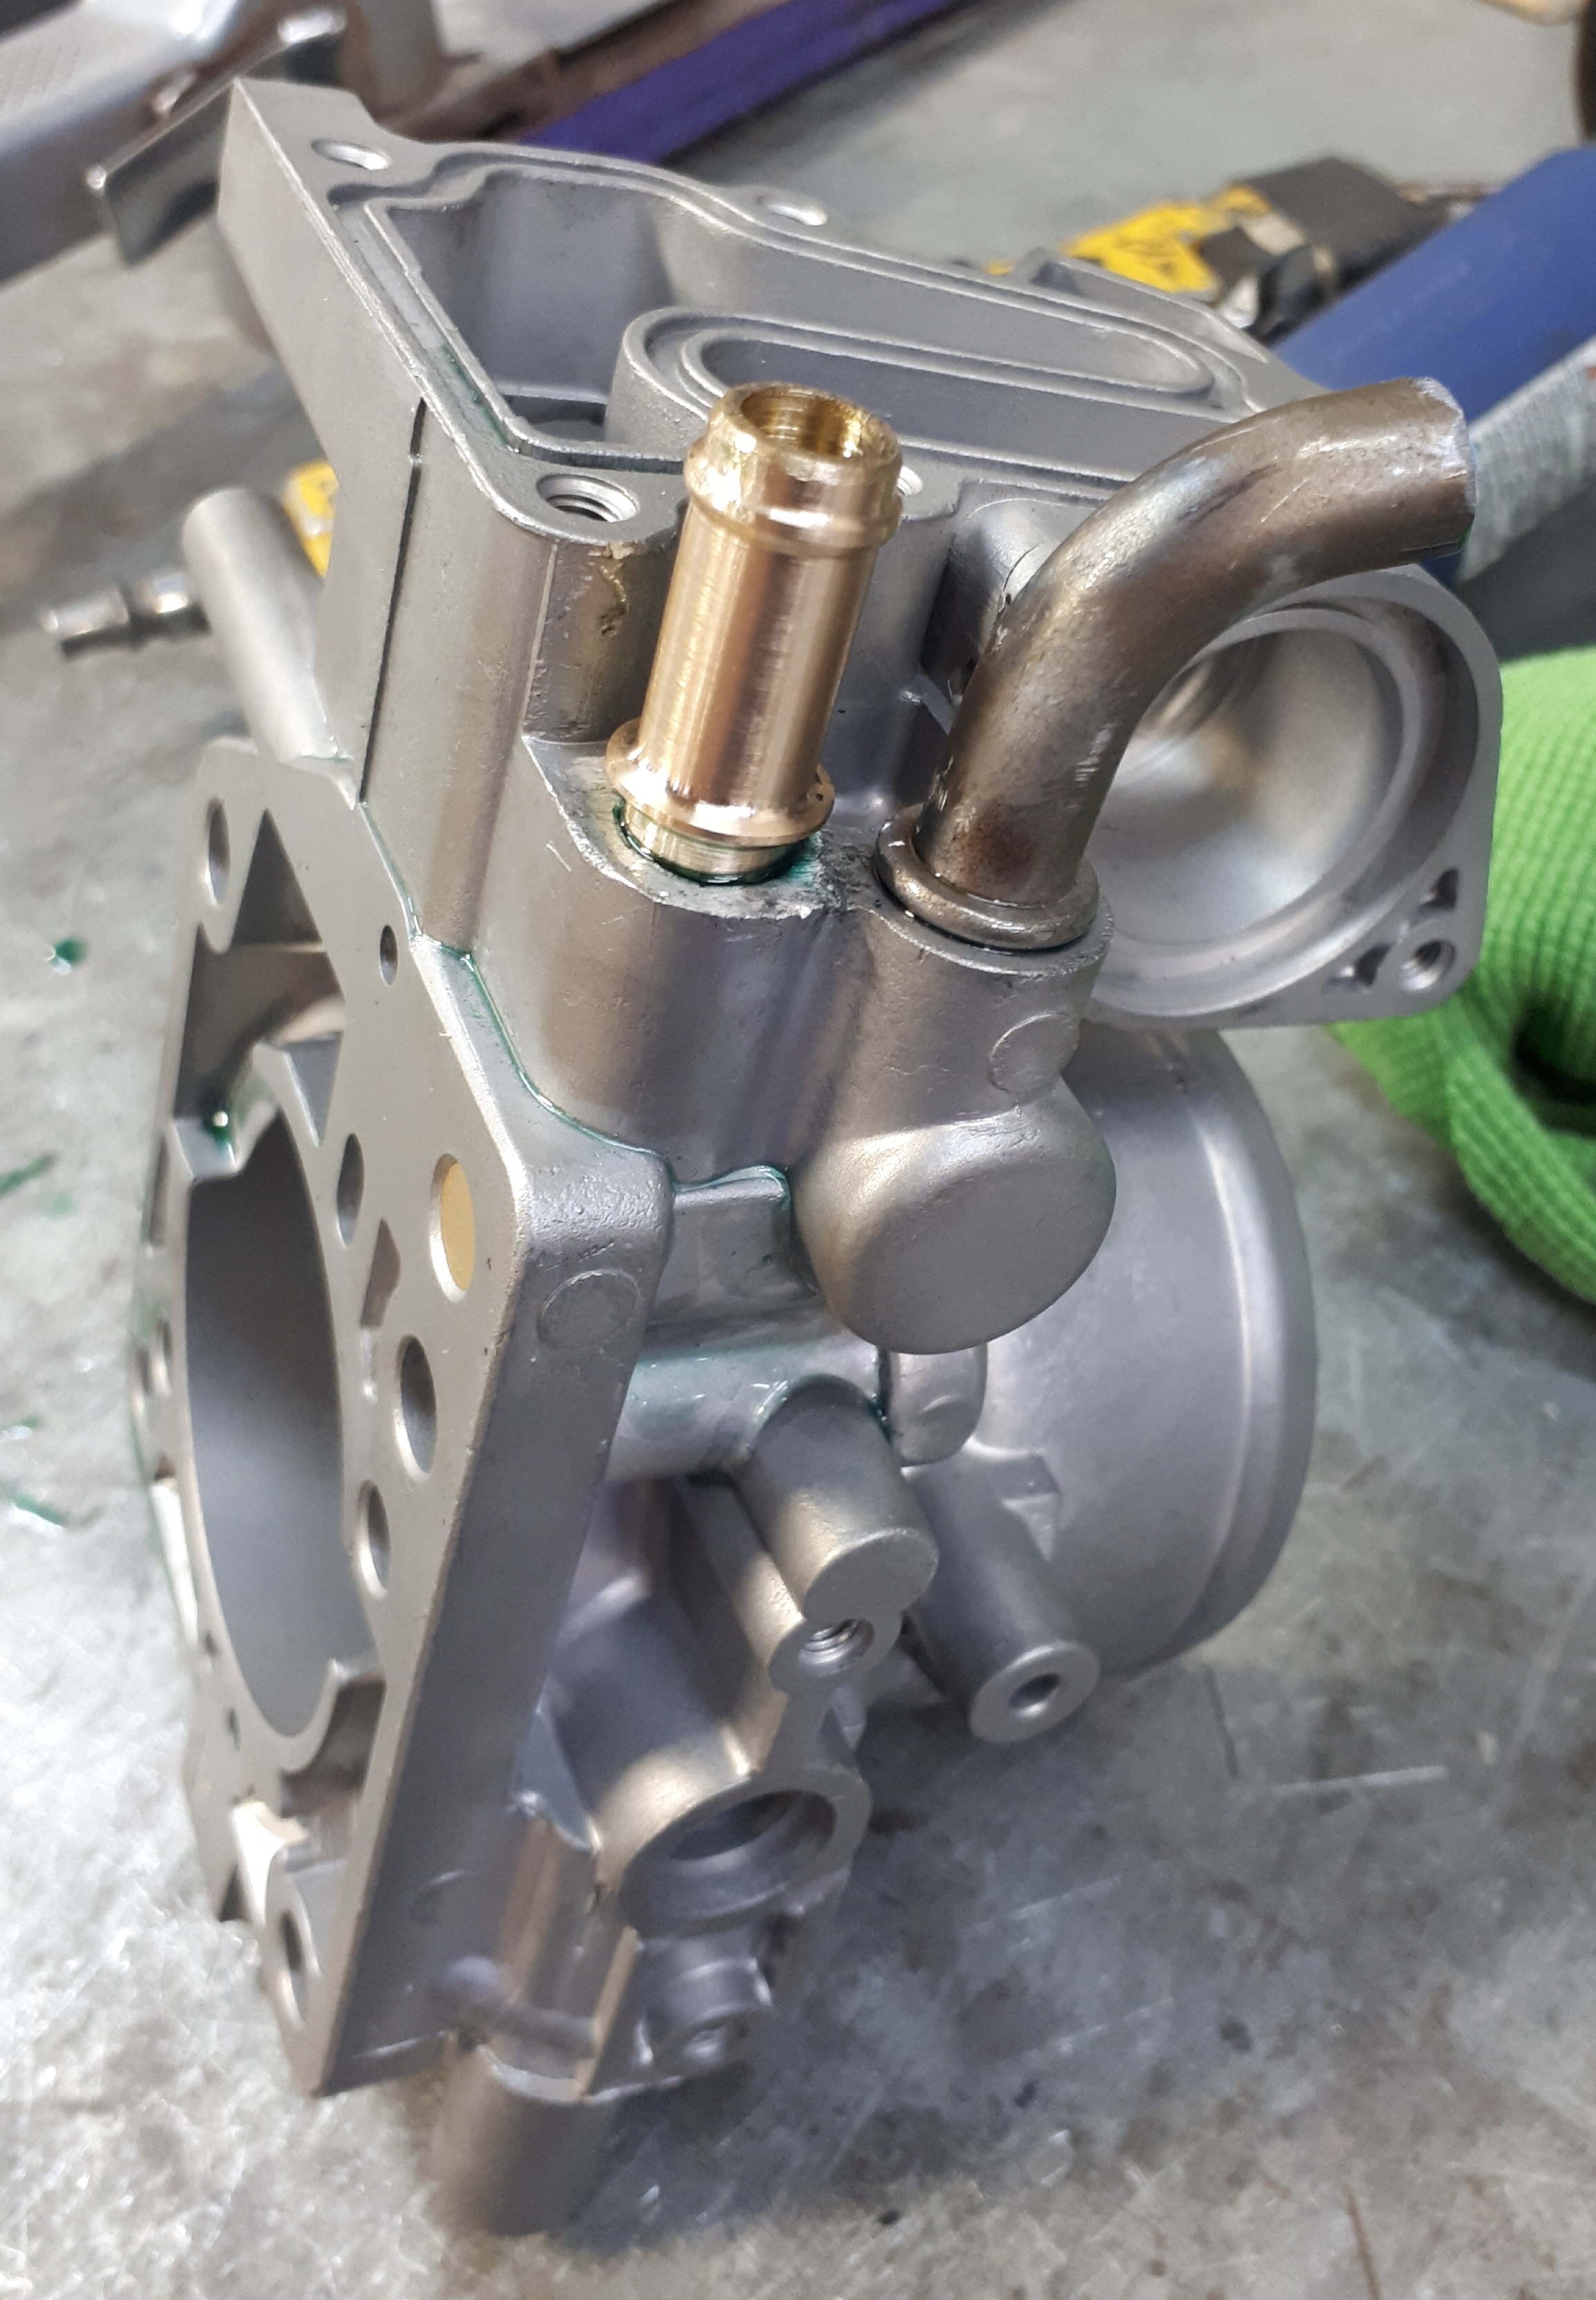
Did a bit more work on this today. Repaied a rusted coolant line in the throttle body.
6 points
-
Sometimes taking a car back to a blank canvas is a good idea. In my case this is a great idea. From engine mounts that were finger tight to burnt out electrics I am happy to be at the turning point. Only dealing with paint in the engine bay and radiator support panel so it is off to the media blasters to strip it back very shortly.6 points
-
Yeah g'day, been a minute eh. In fact I hadn't seen the car in something like two years but a couple of weeks ago the old man and I hired a trailer and picked it up from the panel beaters. The body has been taken back to bare metal, the rust has been sorted as well as a redo of a couple of old repairs for peace of mind. Theres still a few wee things to be sorted before it gets painted, I think years ago I told the panel beater I was keen to have a go but tbh I'll just pay an expert to do it and then get them to prep and paint it at the same time. Hopefully got someone coming to see it in a couple of weeks. Tbh I kinda cbf with paint, pretty tempted to just rattle can and slam it so I can actually drive the thing. Progress will likely be at my usual glacial pace, mrs and I bought a house a few months back and I'm unenthusiastically working my way through an apprenticeship so things are fairly busy but pretty exciting to have the thing tucked away in the garage after being away for so long! Yarn fred here:5 points
-
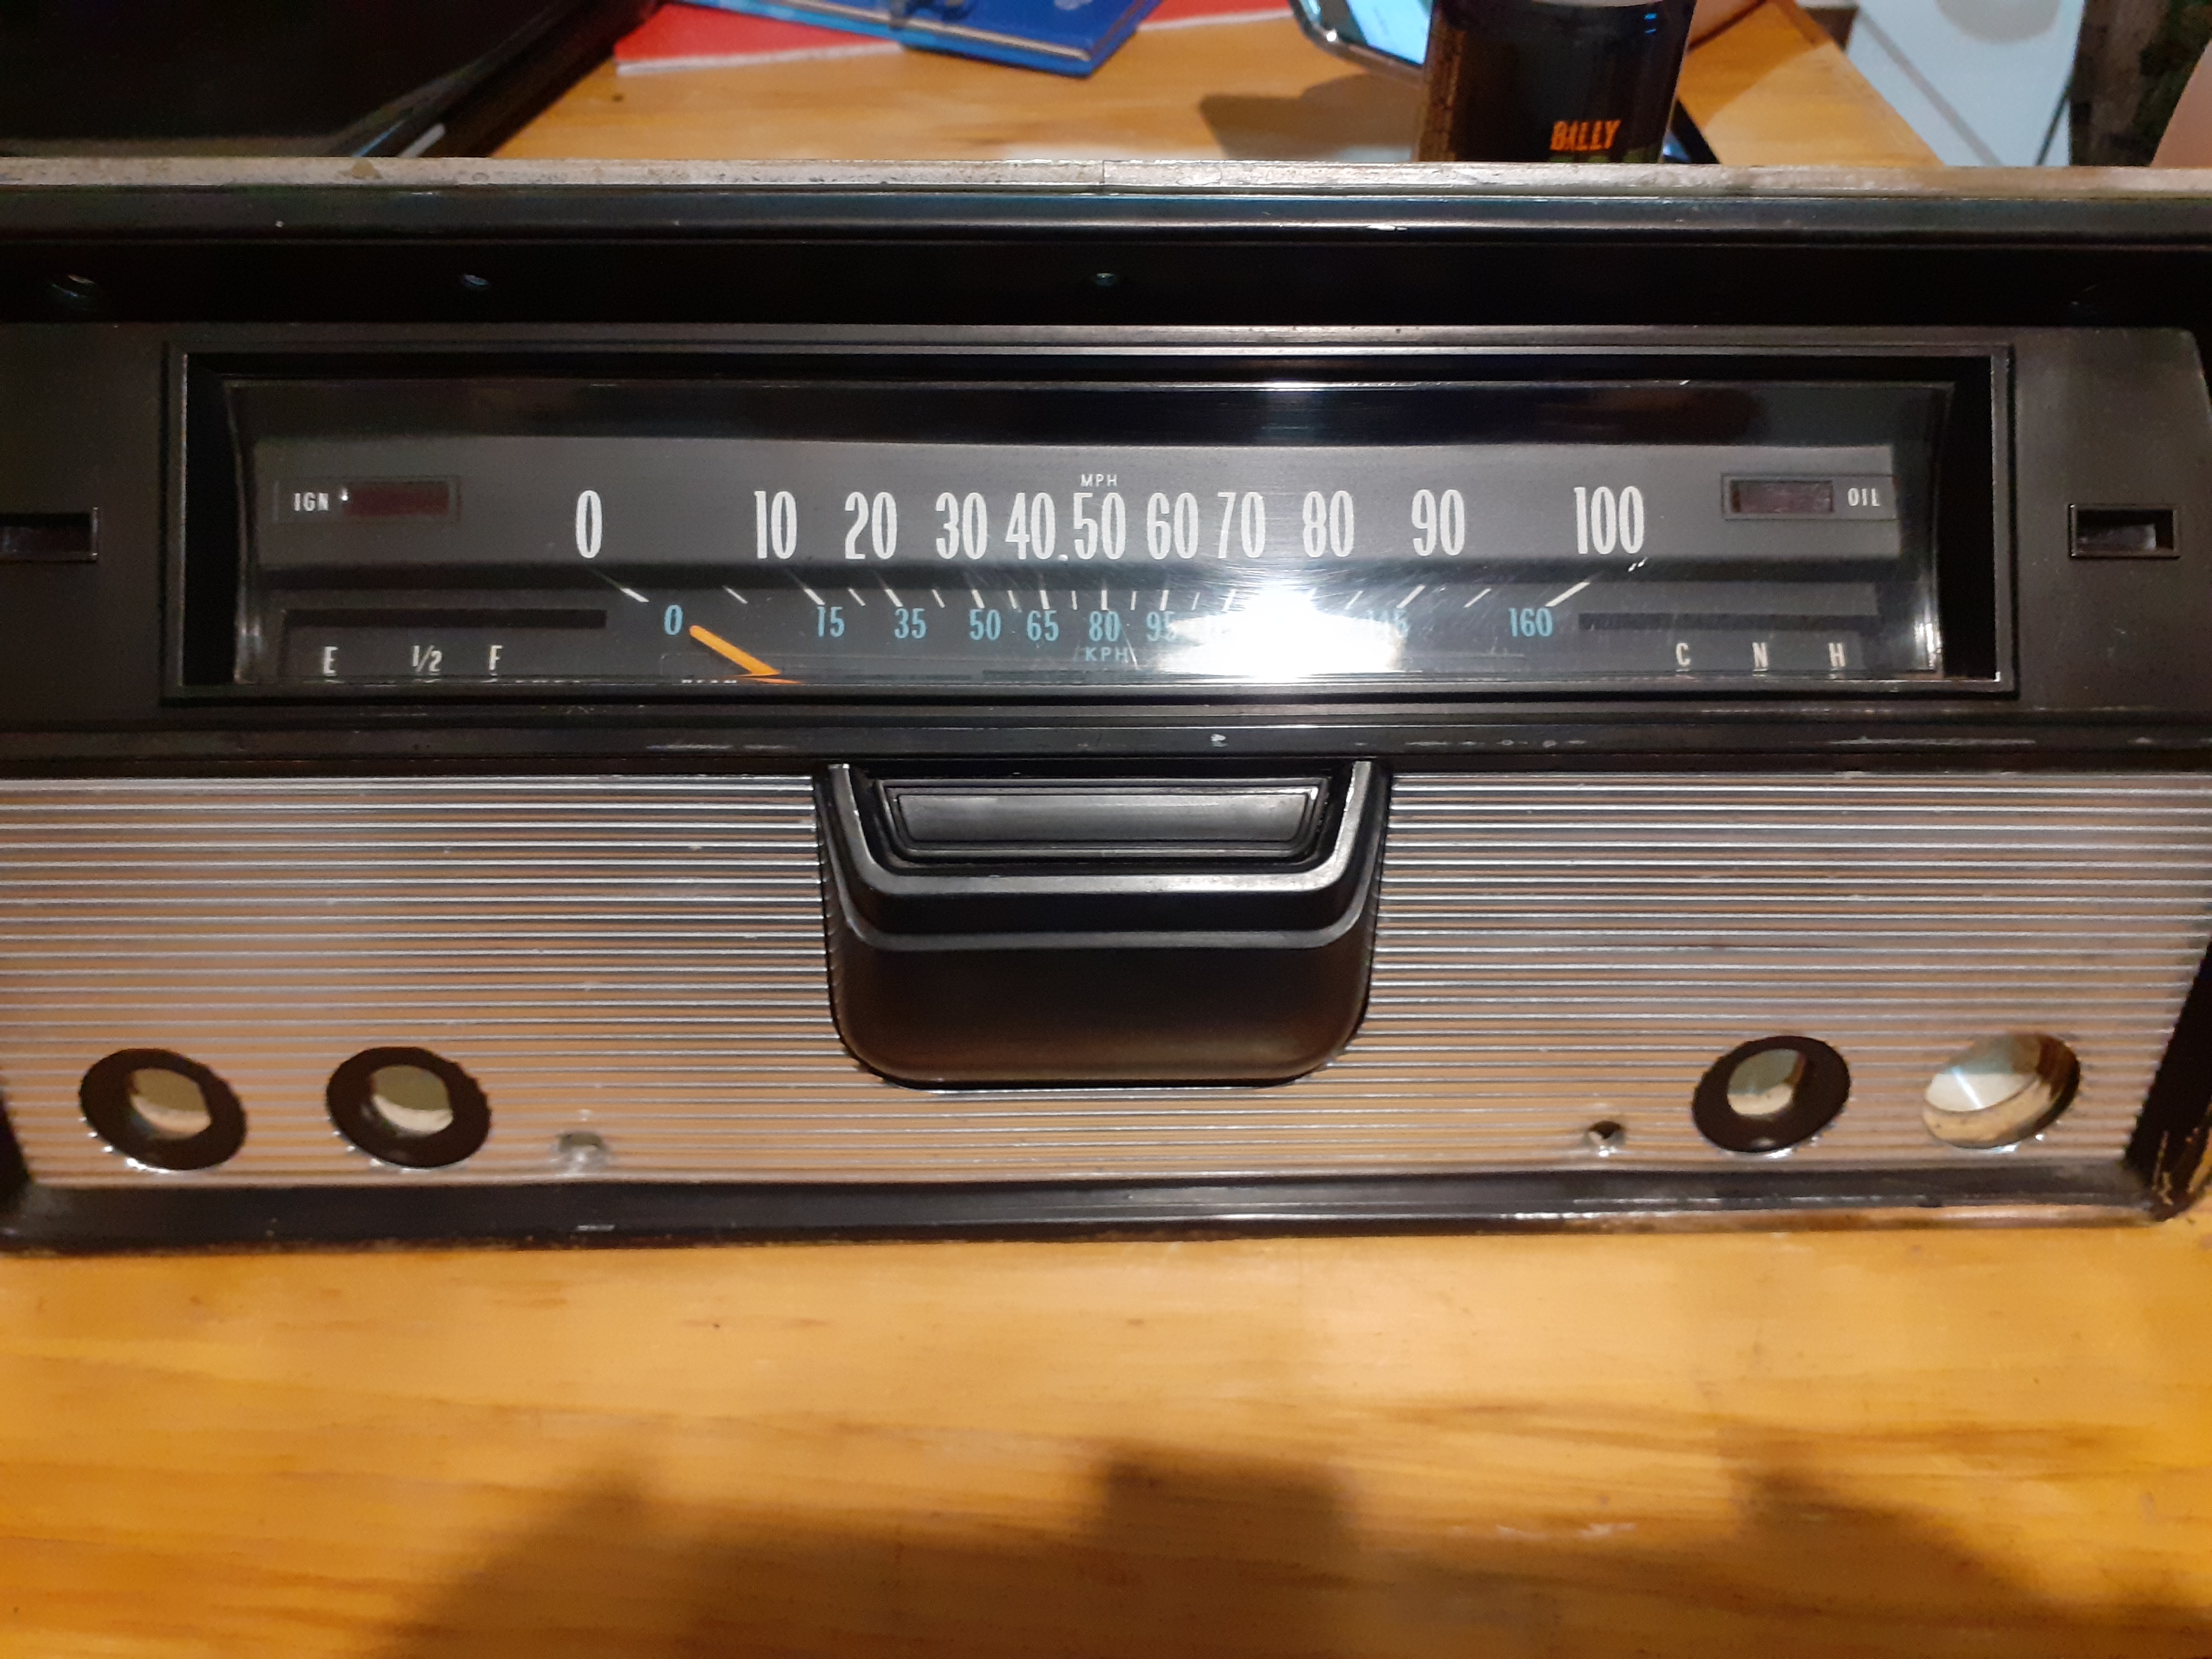
Progress on the Marina has been slow, but things are still happening in the background when funds and motivation allow. One such thing to happen was the purchase of a three-dial cluster during a recent trip to Horopito Motors (Smash Palace). They had a few clusters there in various states of physical distress, so I picked the best one they had. Unfortunately, it's from a Super so has a clock and not a tacho as I want, but since the housing is the same between them, all I need to do to fit a tacho is find the tacho unit and swap it out. The main thing is that all the mounting points are intact, and there are no cracks in the housing. I couldn't help a quick test fit to see how it looks. Much more upmarket than the two dial cluster. Now, being so dark in the rooms of Horopito, I didn't notice some damage to the cluster which needs fixing. The flexible PCB on the back has been torn and damaged the copper trace in the bottom corner And someone had previously repaired another damaged section of copper trace by wrapping it around some bare strands of wire It's not the end of the world though. I do have a good soldering station and I'm not bad at soldering. You just need to be damn careful not to melt the PCB and cause more damage. Interestingly, here is what I mean about being able to swap the tacho in. On the left in this photo is the clock module. it's attached to the other two dials by two screws, meaning it can be removed separately. I needed to strip the whole thing down as I wanted to remove the PCB to fix it, and also swap in my two dial cluster in place of this one as the speedo is for a 6 cylinder car and has a different ratio (not to mention the mileage is wrong, and the scale goes up to a crazy 200kph and doesn't have the MPH sub-scale). This allows me to keep my mileage correct. The first job is to remove the voltage stabiliser, along with its spade terminals. The stabiliser gently pries off the board, and the terminals are held in with a screw each and you can press them out from the front of the housing with your fingers Remove all the bulb holders, and the other various screws (including the four big brass ones) and start removing the little white push pins. I found it easiest to gently slide a flat blade screwdriver under the PCB (between the PCB and white housing) and under the head of the pin and then wiggle it. Take care not to poke or tear the PCB. Something like a butter knife might work well for this. With all the pins removed the PCB should just lift off the housing. Next, I removed the four screws holding the housing to the fascia and then five screws remove the fascia from the main frame of the surround Everything got a thorough clean as it was all filthy. The fascia woodgrain appears to be some sort of very thin veneer, maybe even a sticker. It had torn slightly in one corner and it's clearly faded. Still very useable though. To clean the fascia I removed all the silver rings. These are held on with a twist lock. Just take care when pushing the tabs through the holes not to catch the veneer and tear it. Now it was time to move onto the main dials. You can see the two main dials are just the standard unit from the two dial cluster and cannot be separated. Two screws remove the clock It was so filthy I couldn't leave it. I tried cleaning just the outside of the glass but found the inside was dirty too, so removed the glass. It is held on with three spring tabs. You can either remove the tabs as they are a press-fit onto the white housing, or just pull back the two on the left with one hand and then lift the glass out with the other. Take care not to touch the black surface inside the gauge as they will fingerprint badly. Don't damage the paper seal behind the glass either. The adjuster for the time has a tiny little slot screw at the end of it, and when you undo that the knob will come free (note for reassembly, the knob is keyed with a flat on one side) After a thorough clean I was about to store the donor dials away when I decided to swap the paper gaskets between those and my good dials as they had better seals and the warped seals could be seen when the dials were installed in the fascia. This spiralled into swapping a few other things. After removing the dirty glass from the donor unit I noticed something. The donor says ALT and OIL on the warning lights, something mine doesn't have! I love unmarked warning lights as much as the next person, but I was feeling fancy, so had to find out if I could swap the lenses over. As it turns out, it's easy to do. The lenses are attached to that black ring, which is only held on with the spring clips. Swapped, with cleaned glass and donor seal Obviously I couldn't leave the speedo looking like that, so I removed and cleaned the glass and swapped a better gasket onto it Now I could attach the clock to my refurbished two dial cluster I cleaned and refitted the rings. They're slightly tarnished but still useable. Now I had to fix the PCB. The best fix I could do was to bypass the damaged traces with a wire, soldered to the nearest big copper pad. First I cleaned the area I was going to solder on the PCB with a fibreglass brush to get any tarnishing or coating off the copper, and then tinned the PCB and end of the wire (yes, I stripped the wire way too far back. It'll be OK. The others are shorter). And then soldered the wire to the tinned copper pad. I tried to have the wire as close to the edge and as flat as possible so that it wouldn't interfere with the screw that goes through the PCB. That wire is quite long and I wanted to make sure it'd clear the housing. Since its installed back on the housing now I'll secure the wire with tape. You can just see the other repair below it. I snipped the previous "repair" and soldered directly to the pad and to the top of the plug contact. I reassembled it, and tested. It was all going so well until I tried to install an LED into the high beam indicator (as it's SUPER dim with a bulb in it) and when removing the LED to turn it around and change the polarity to see if it would work, the metal housing of the LED shorted on the back of the PCB and blew one of the traces to bits. Cue much swearing, and soldering a new link in to bridge the burnt-out trace. I had to insulate under this one as its really close to the other traces and I didn't want them to short out against the new wire. Another test shows that thankfully I didn't cock it up completely, and everything works again. Phew. Well, by "everything" I mean everything but the clock, since that is dead as a doornail. I tried feeding 12V straight into it and it will tick once, the second hand will move, and then it's dead until I remove and replace power, where it will tick once, again. Very disappointed. So now I'm left with a couple of options. Find a tacho module to swap in. Disassemble and break the clock more fix the clock. Or Find an aftermarket tacho that matches the size and style and 3D print a bracket to hold it in place. Not sure what I'll do yet, but I do have a lead on a stock tacho, so we'll see. Before giving up for the day I thought I would try some 303 Aerospace Protectant on the super dry vinyl dash. It came up surprisingly well. It's still very dry and has a lot of overspray on it, but its black, not grey now. It just drank the 303 up, so will keep applying more and see if it softens it over time. A bit different from how it looked before. I've got a wee box of bits waiting to go into the car, but I'm still waiting on a few more parts to arrive from the UK. I need the BMW to sell before I can really get cracking. It's listed for sale now, so hopefully someone falls in love with it soon.4 points
-
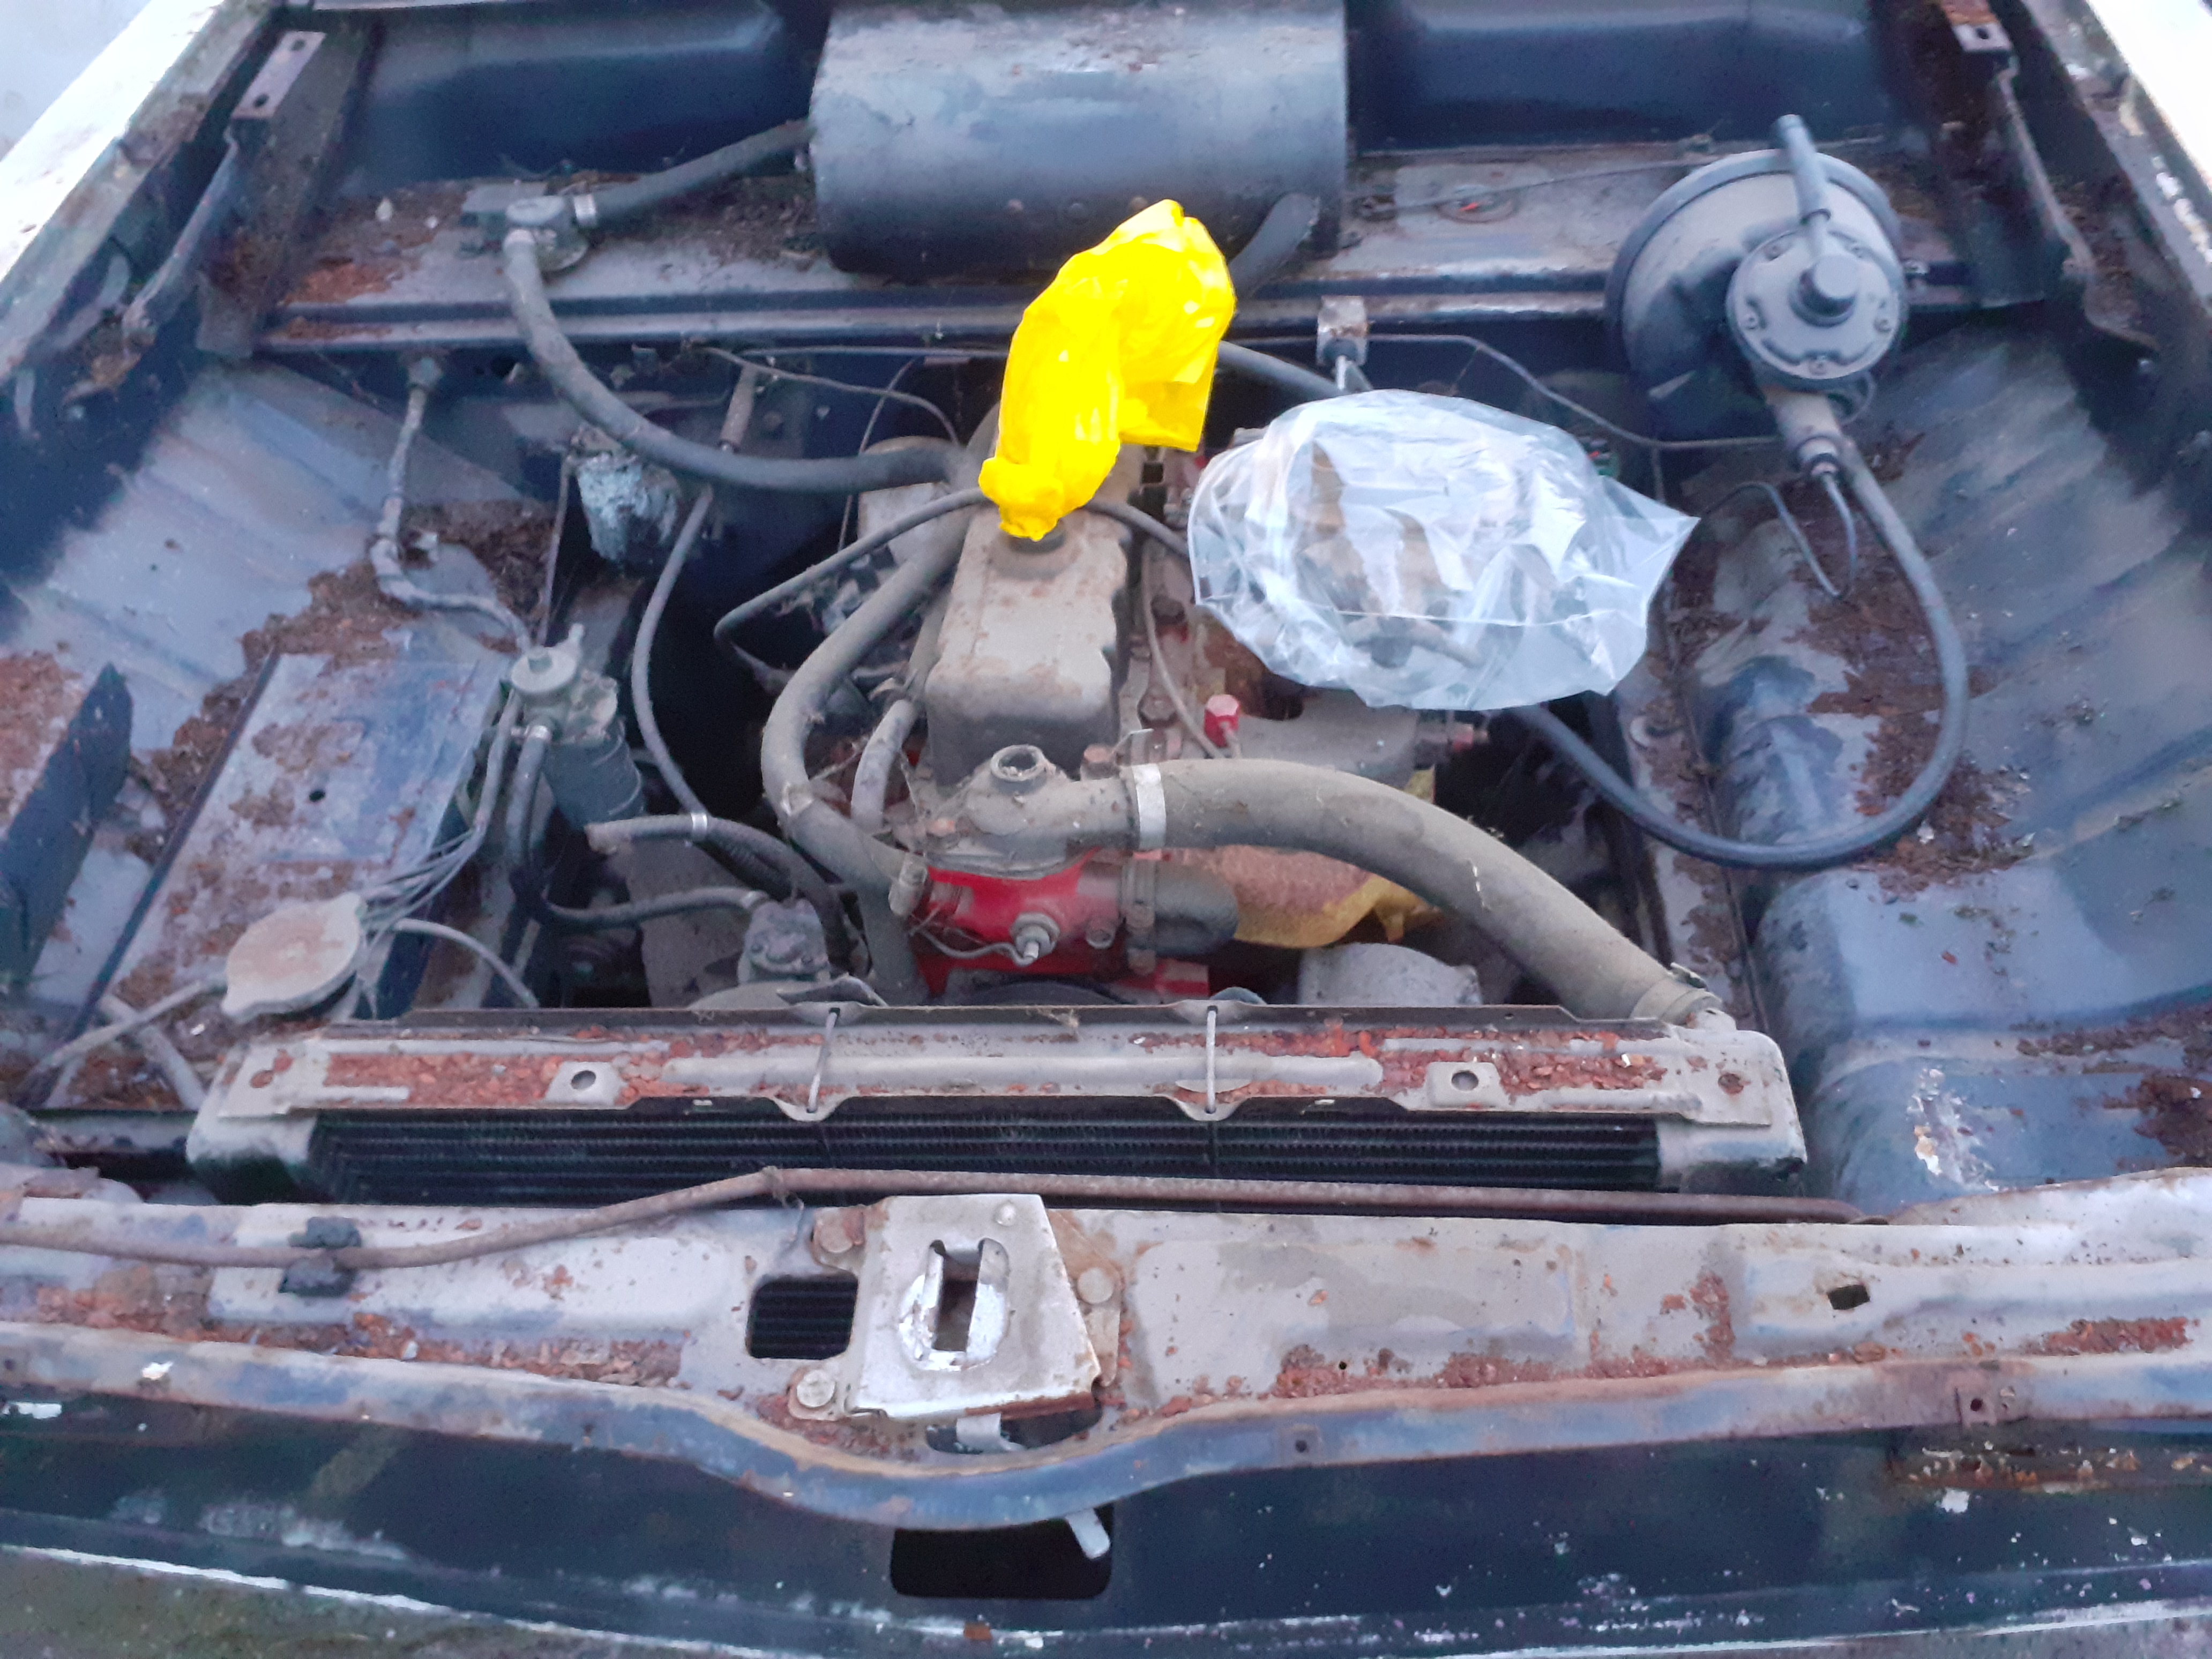
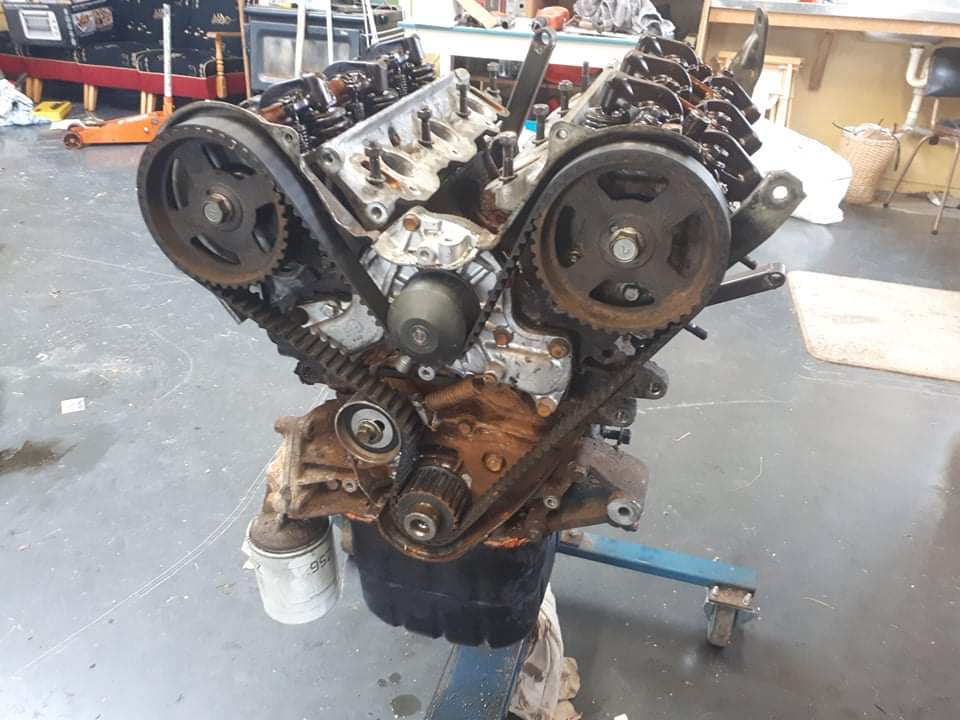
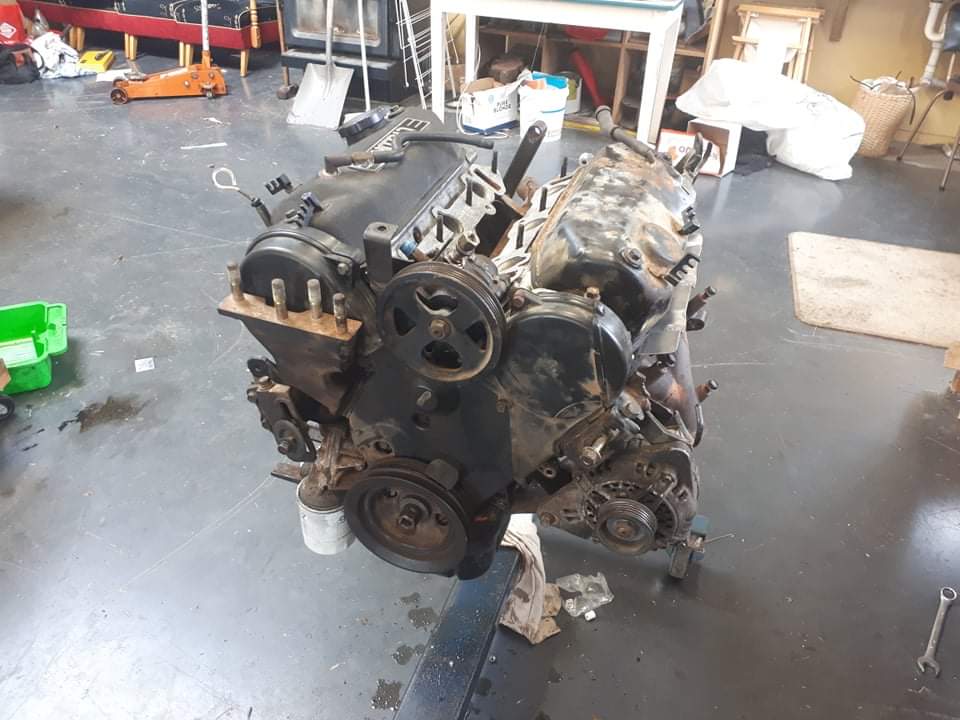
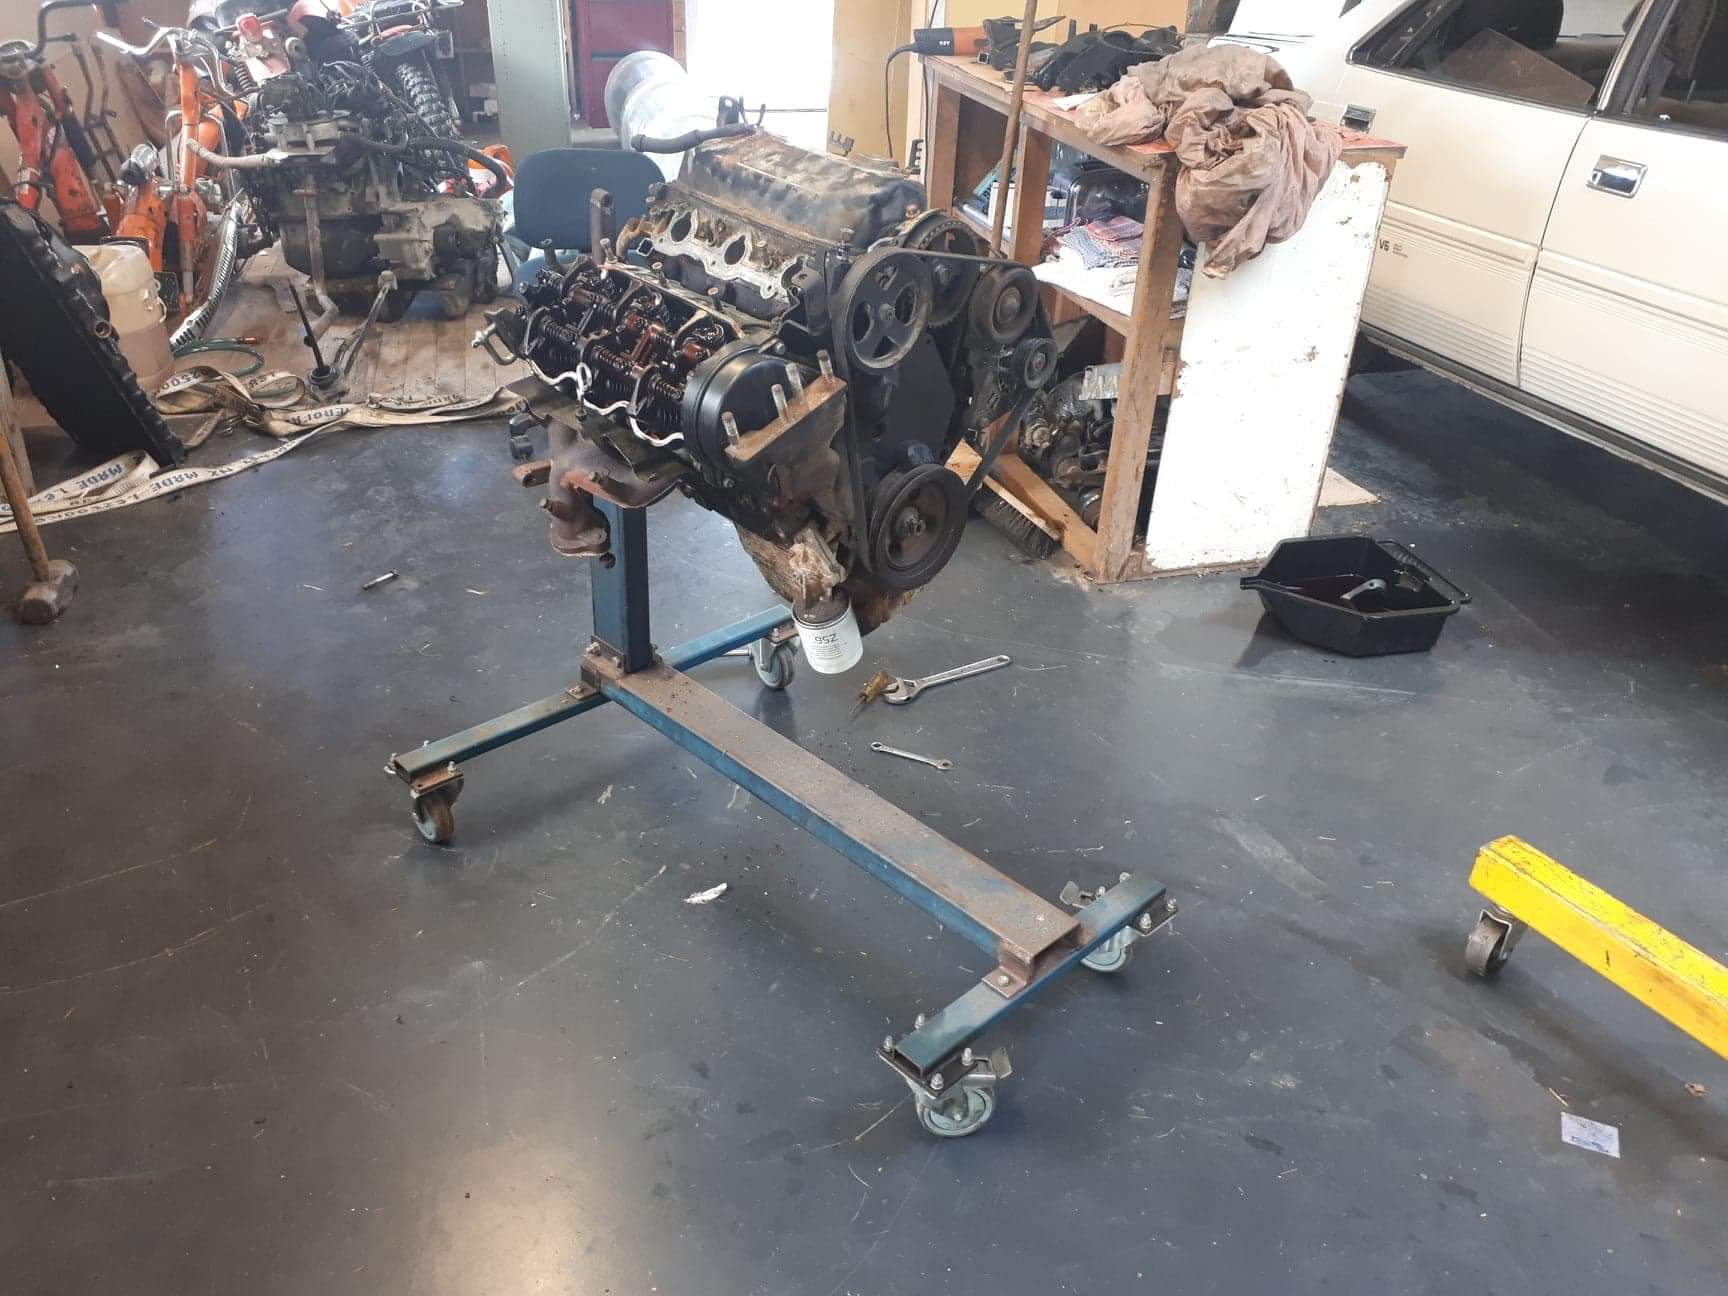
Dropped the head off at North Shore engine reconditioners today. getting 0.25mm removed, new valve springs installed, freshen up the valves and some new studs as 3 of the 6 were mostly stripped and require some helicoils. In my quest to find some gasket remover to get the stubborn timing cover gasket off I bought some CRC gasket aerosol it said it can remove carbon build up. Carbon be gone super impressed. One application got it almost all completely off. New cam/lifters are in. Sump is going back on with a a fresh seal. Due to get the head back on Friday. With any luck I may have this back running by Sunday.3 points
-
3 points
-
3 points
-
Plans you ask? Well, to start with i want to pull everything within reason out , clean , scuff and epoxy everything in floor paint pretty much. Then to suss the deal with the compressor. Go over it to ensure everything is tickity boo. Then we will see. they beauty about it, is a the huge amount of space inside. so tbh could jam the Kx in , a swag/ make little mezzanine floor to sleep in . has all the batteries. put some solar panels on the roof. then it can pretty much do anything. i mean , no sand bugging . but yeah. sweet rig. im fucking stoked,3 points
-
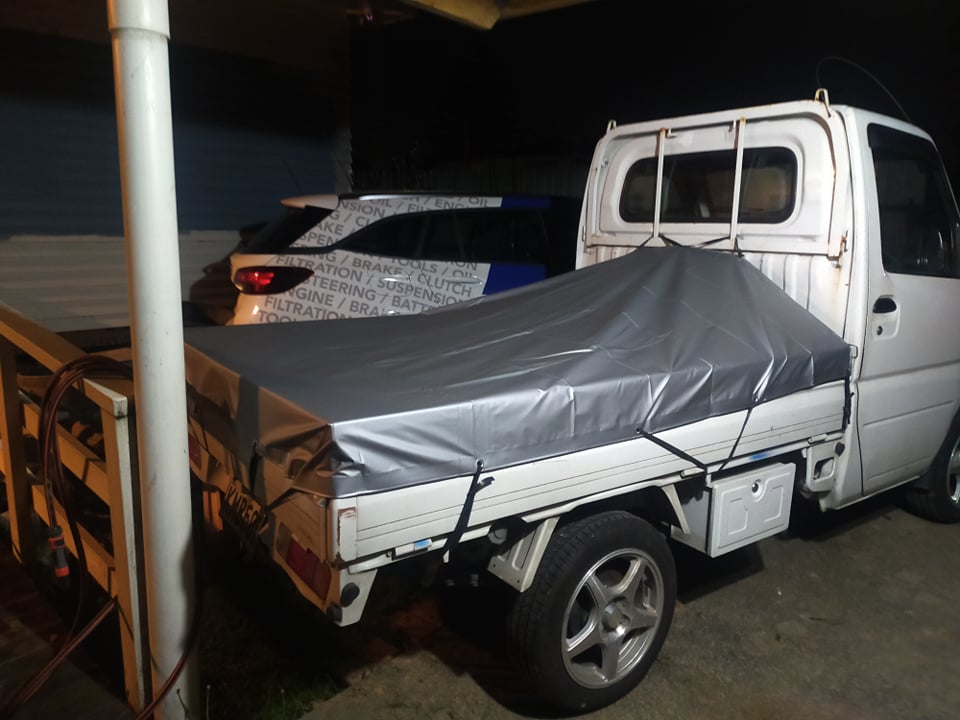
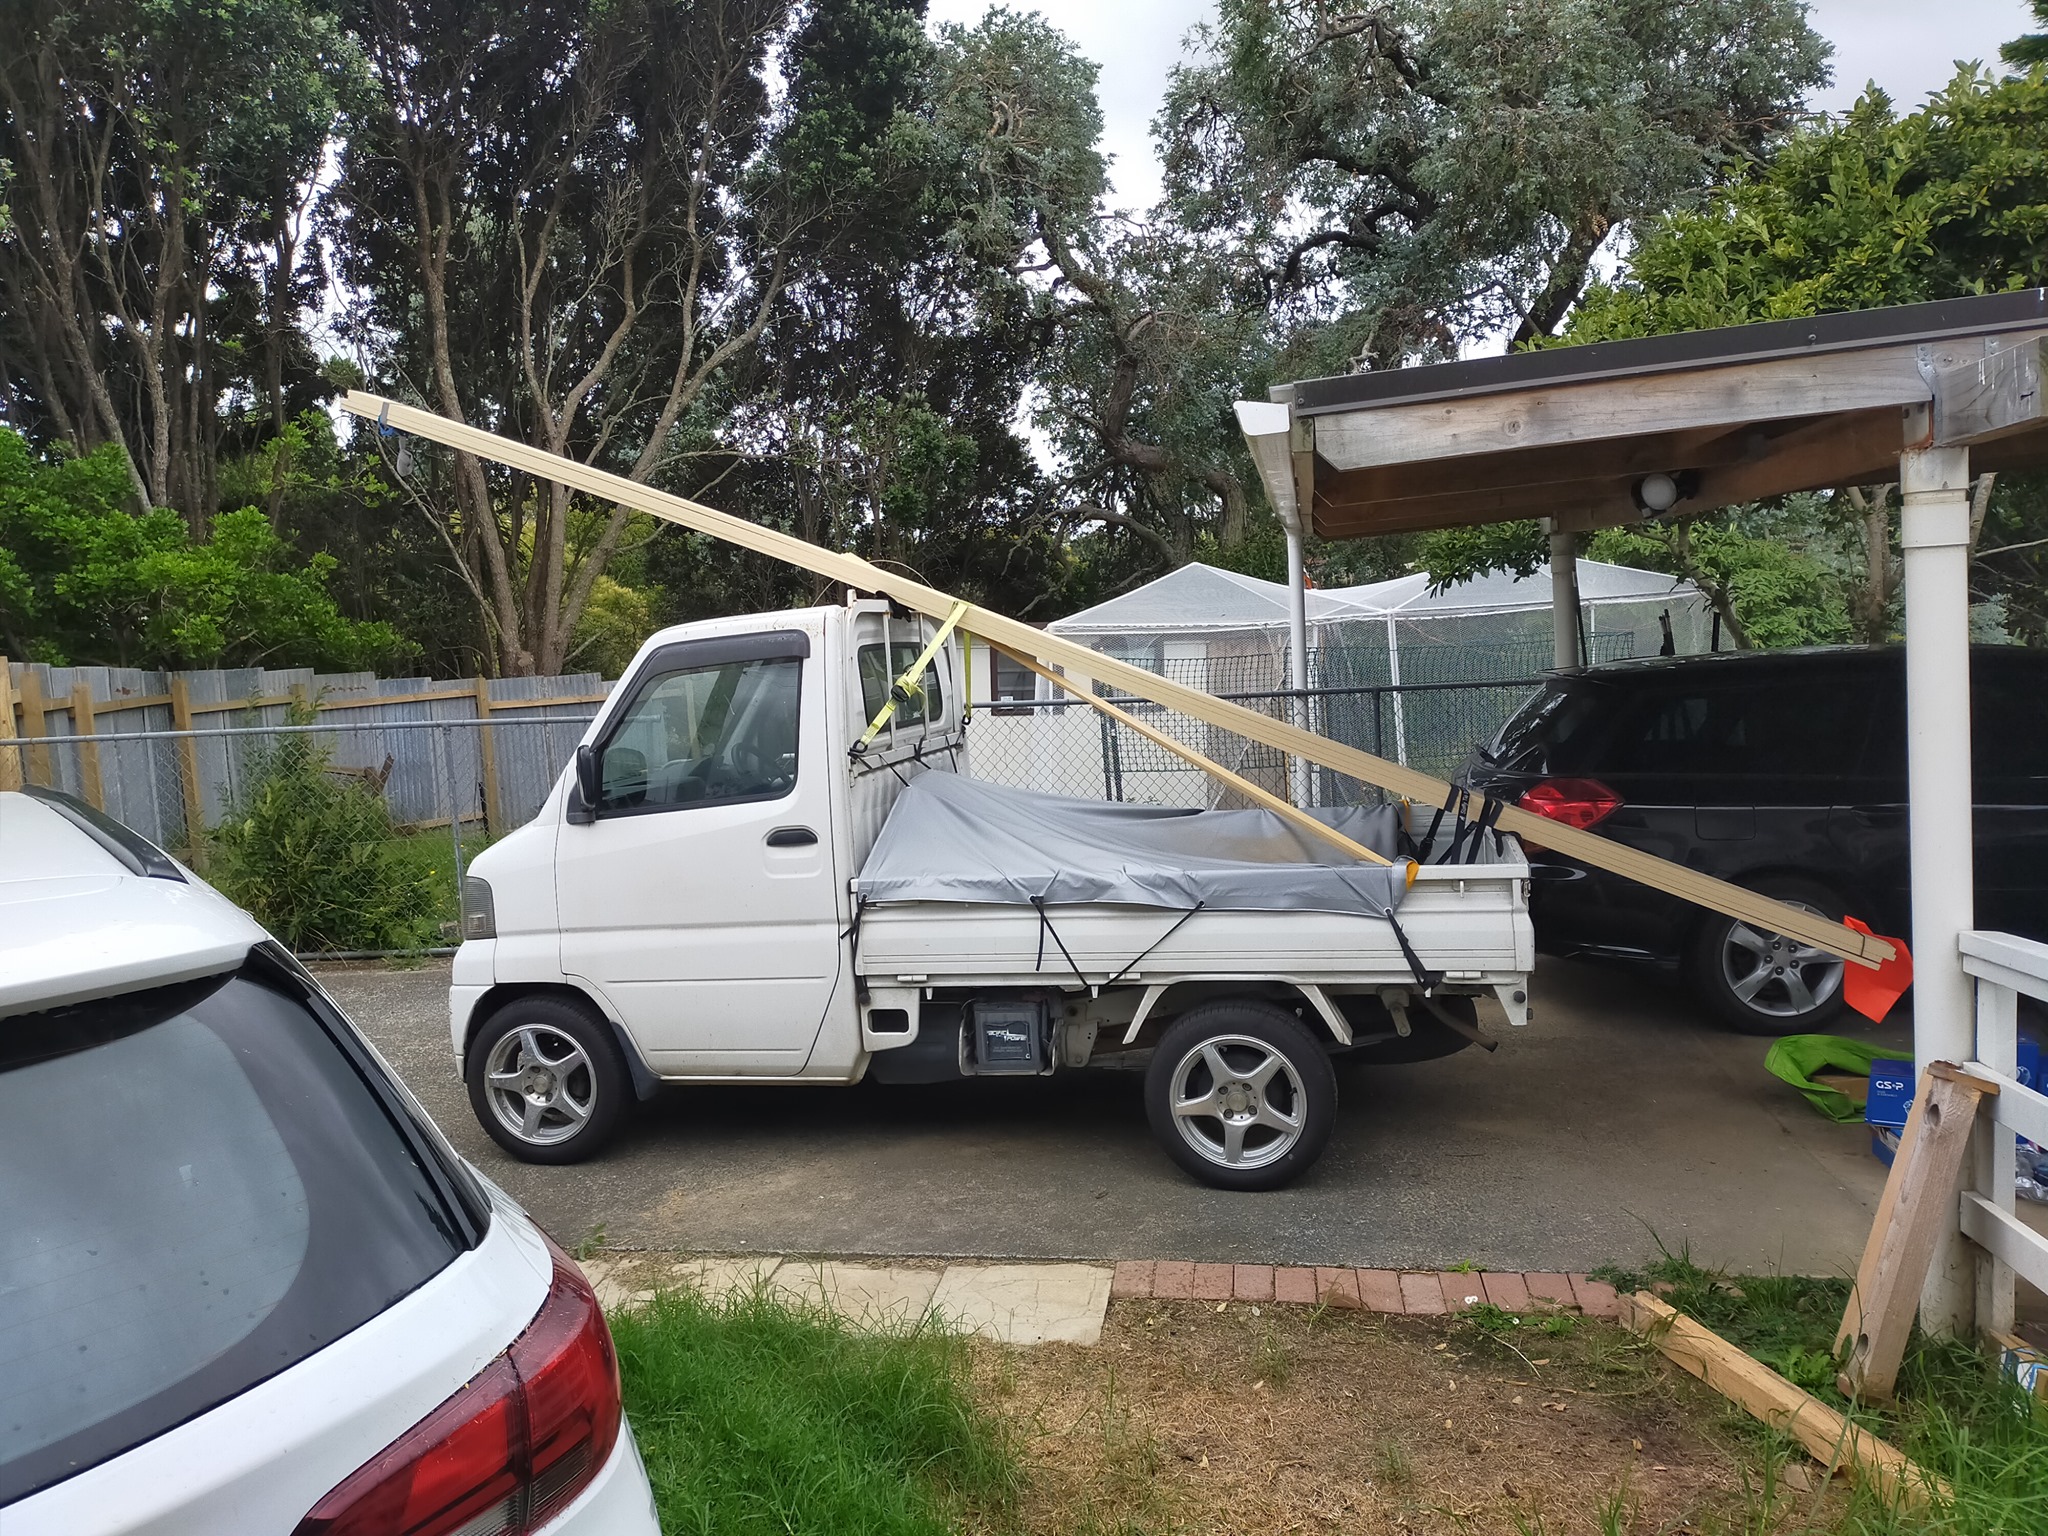
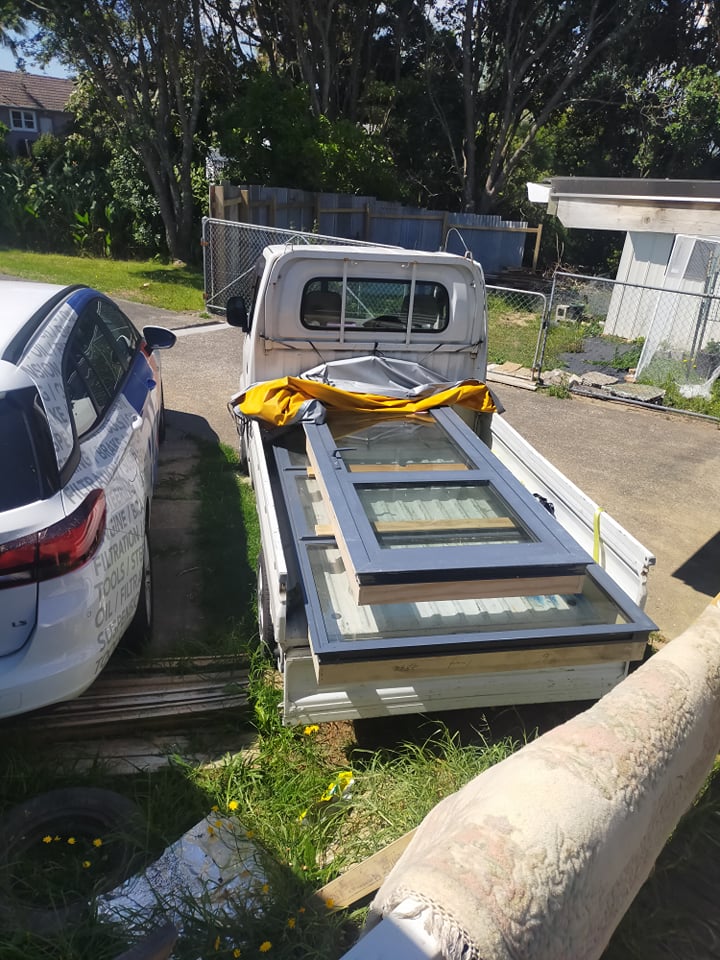
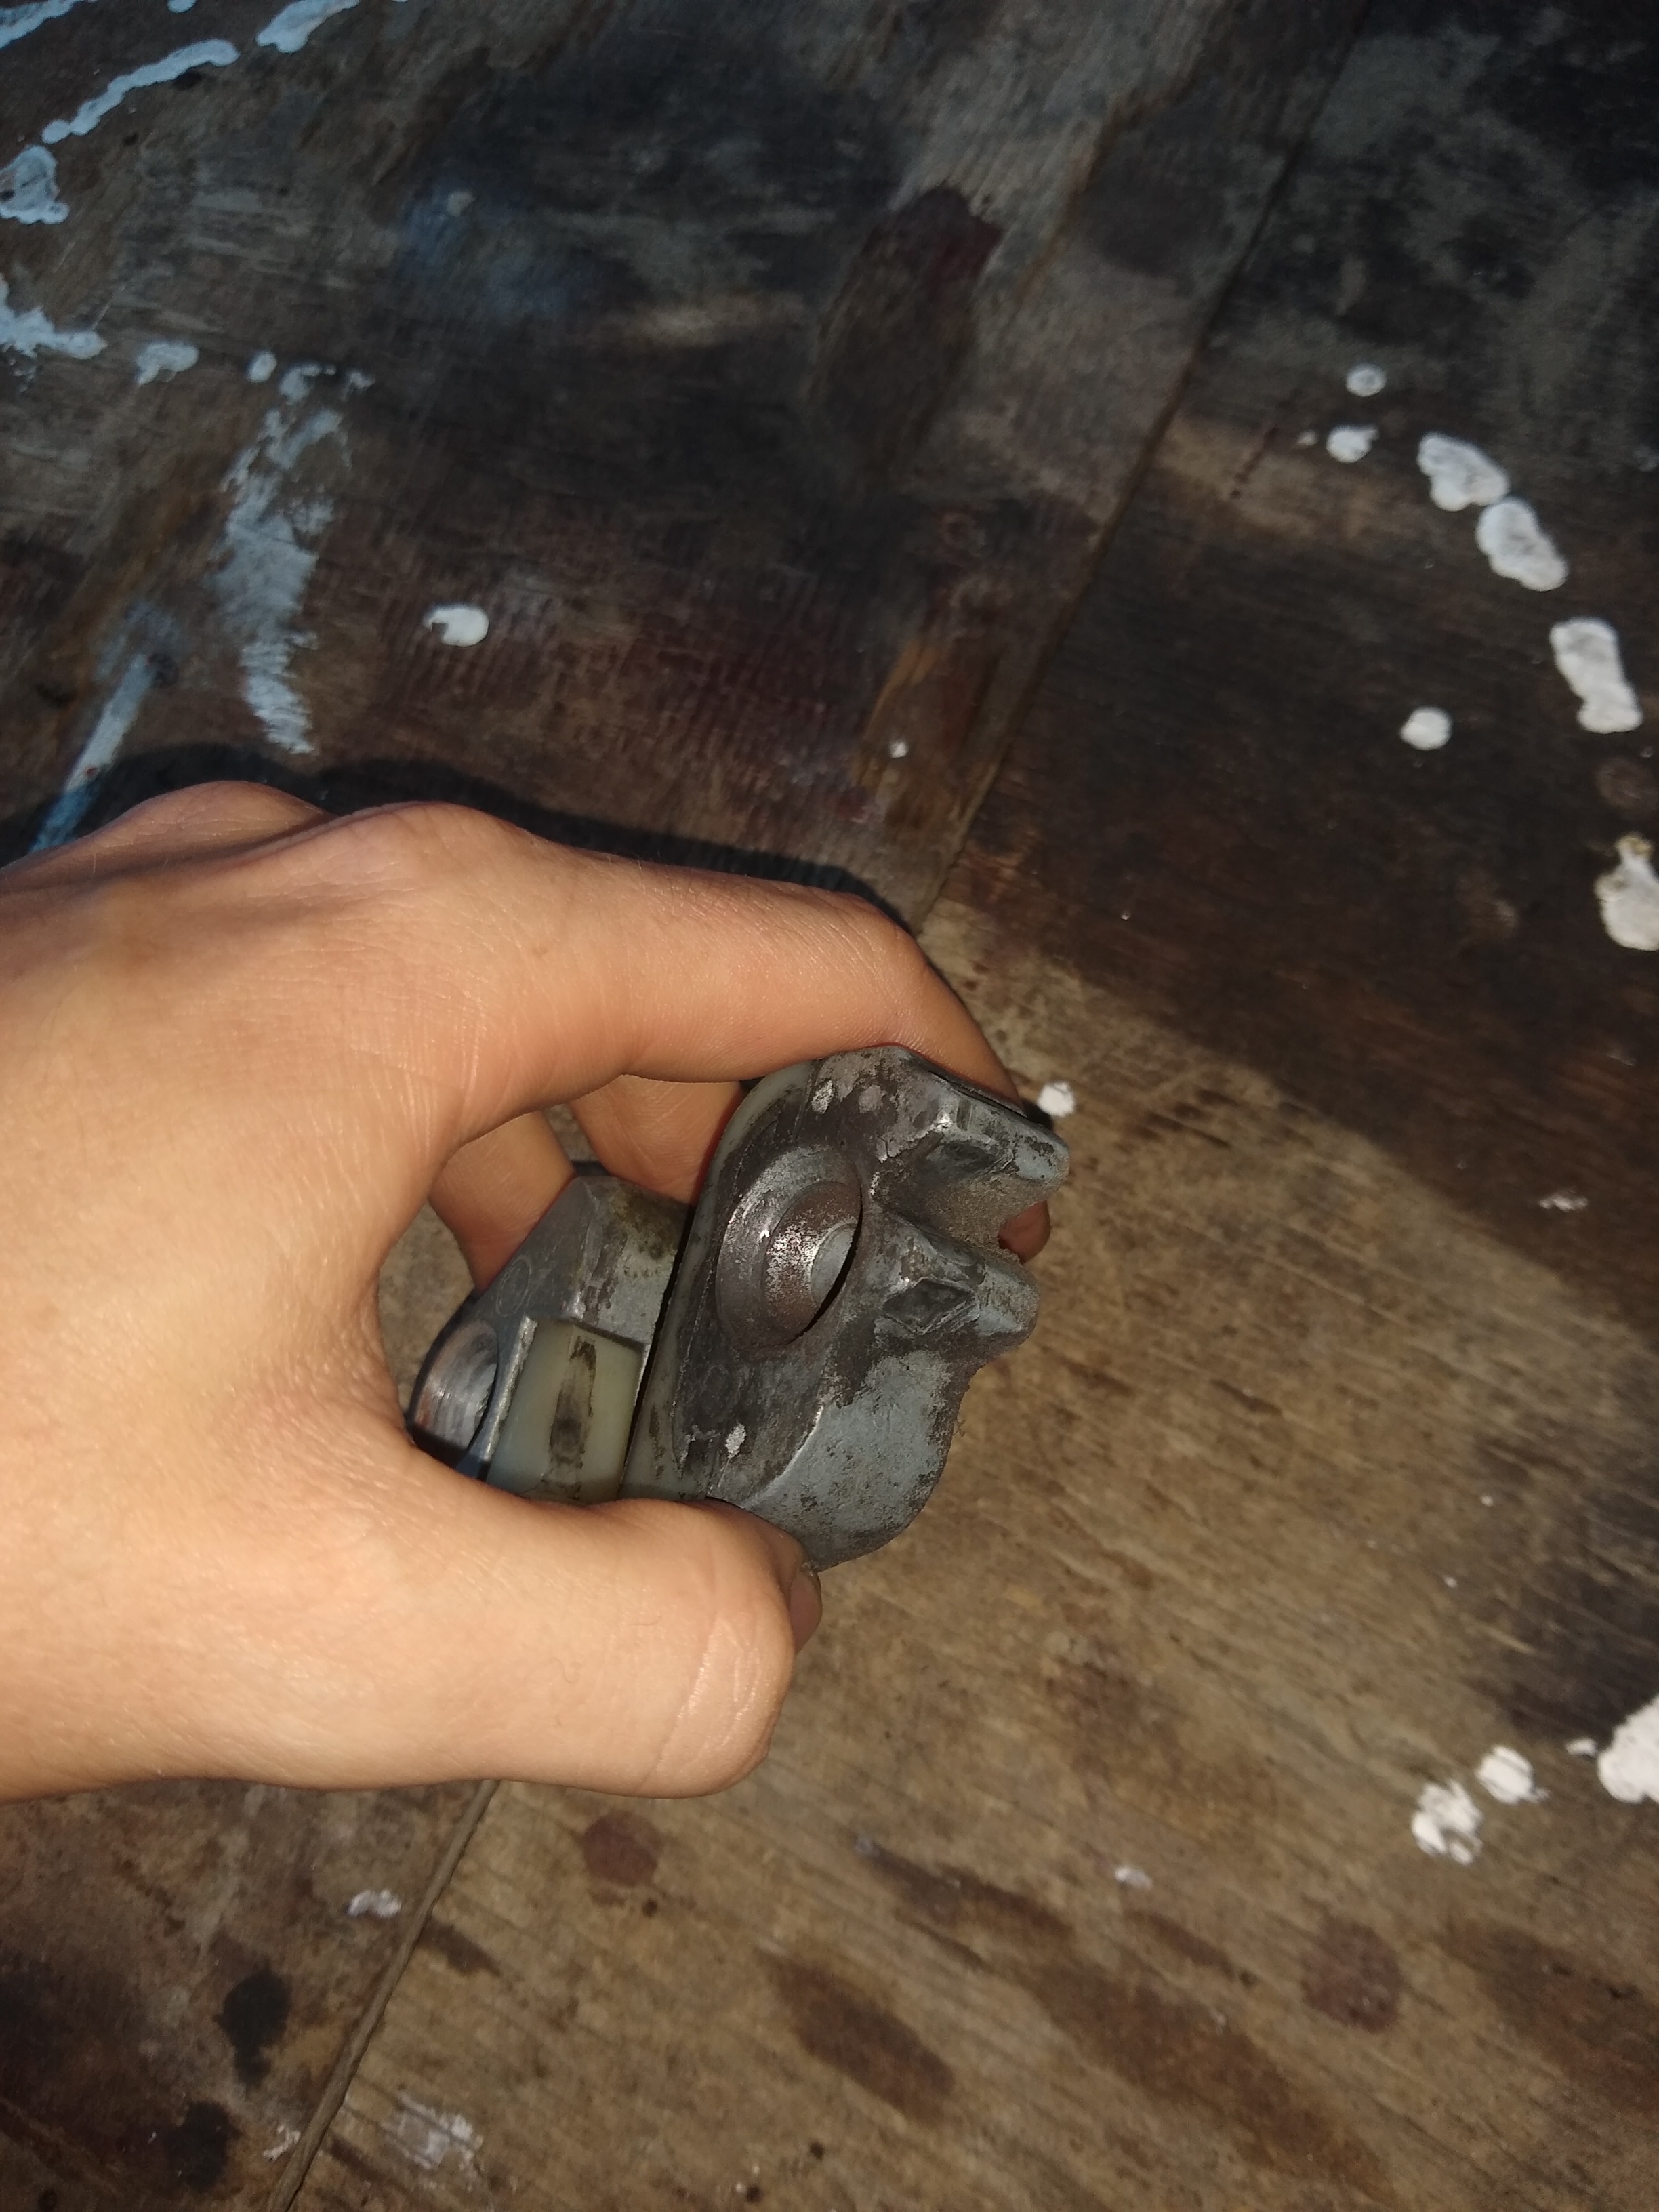
Trucks been doing a fair bit of work over the last year. Taking out a tree for a colleague. Found a tonneau cover that fits very tidily. Found an LSD on yahoo japan, 6" 2-way clutch type 6.666 ratio from a slightly earlier model. Was good that I'd bought it as i discovered the pinion bearing was toast in the original diff while swapping the new one in. Tiny axles on these trucks. Picked up some more windows for the house. And found out that 6m lengths of wood "fit" on it, will be building some front and rear ladder racks shortly. Next mods on the to-do list. -Make the flares out of sheet metal -Fit the new wheels. -Replace the AM radio -Build some limiting straps for the tailgate -Look into importing some lowering springs.
2 points
-
2 points
-
Nice job on the gauges. If you don't have any luck finding a tachometer, I have a spare.2 points
-
And the back2 points
-
The doors on this thing sit at least half an inch away from the body when closed. The culprit is worn latch blocks on the pillar. Following some Barry info from the internet, I pulled off one of these blocks and used some 'steel' knead-it type epoxy to build up the worn areas. The epoxy stuff doesn't seem to be quite as hard as I would like so I might have to do something else in the future. Or it will cure more over night. I wonder if I might be able to space the star wheel further from the door so it runs on the unworn parts of the latch block. Upon putting the latch block back onto the car in what looked to be the factory position, the door instantly closed reasonably well. A little adjustment and it might just do the trick. I'll do the driver's side next. Also, the WoF shop that gave this thing a warrant last weekend deserves a pretty thorough investigation. The brake imbalance is/was atrocious. It would pull hard to the right with a decent application of braking. I pulled the left hub off to inspect the brake and all looked good so I gave it a good cleaning and scuffed the shoes. I then regreased the bearings and reassembled it. I didn't have a quarter inch spanner so I couldn't adjust the brakes. After a few hard stops it seems to now stop in a straight line. I made a tool with a quarter inch square hole this evening so I will be able to adjust the brakes tomorrow evening. Hopefully I can get them in ship shape. I'll also grease the drivers side bearing and clean that brake too while I'm at it.
2 points
-
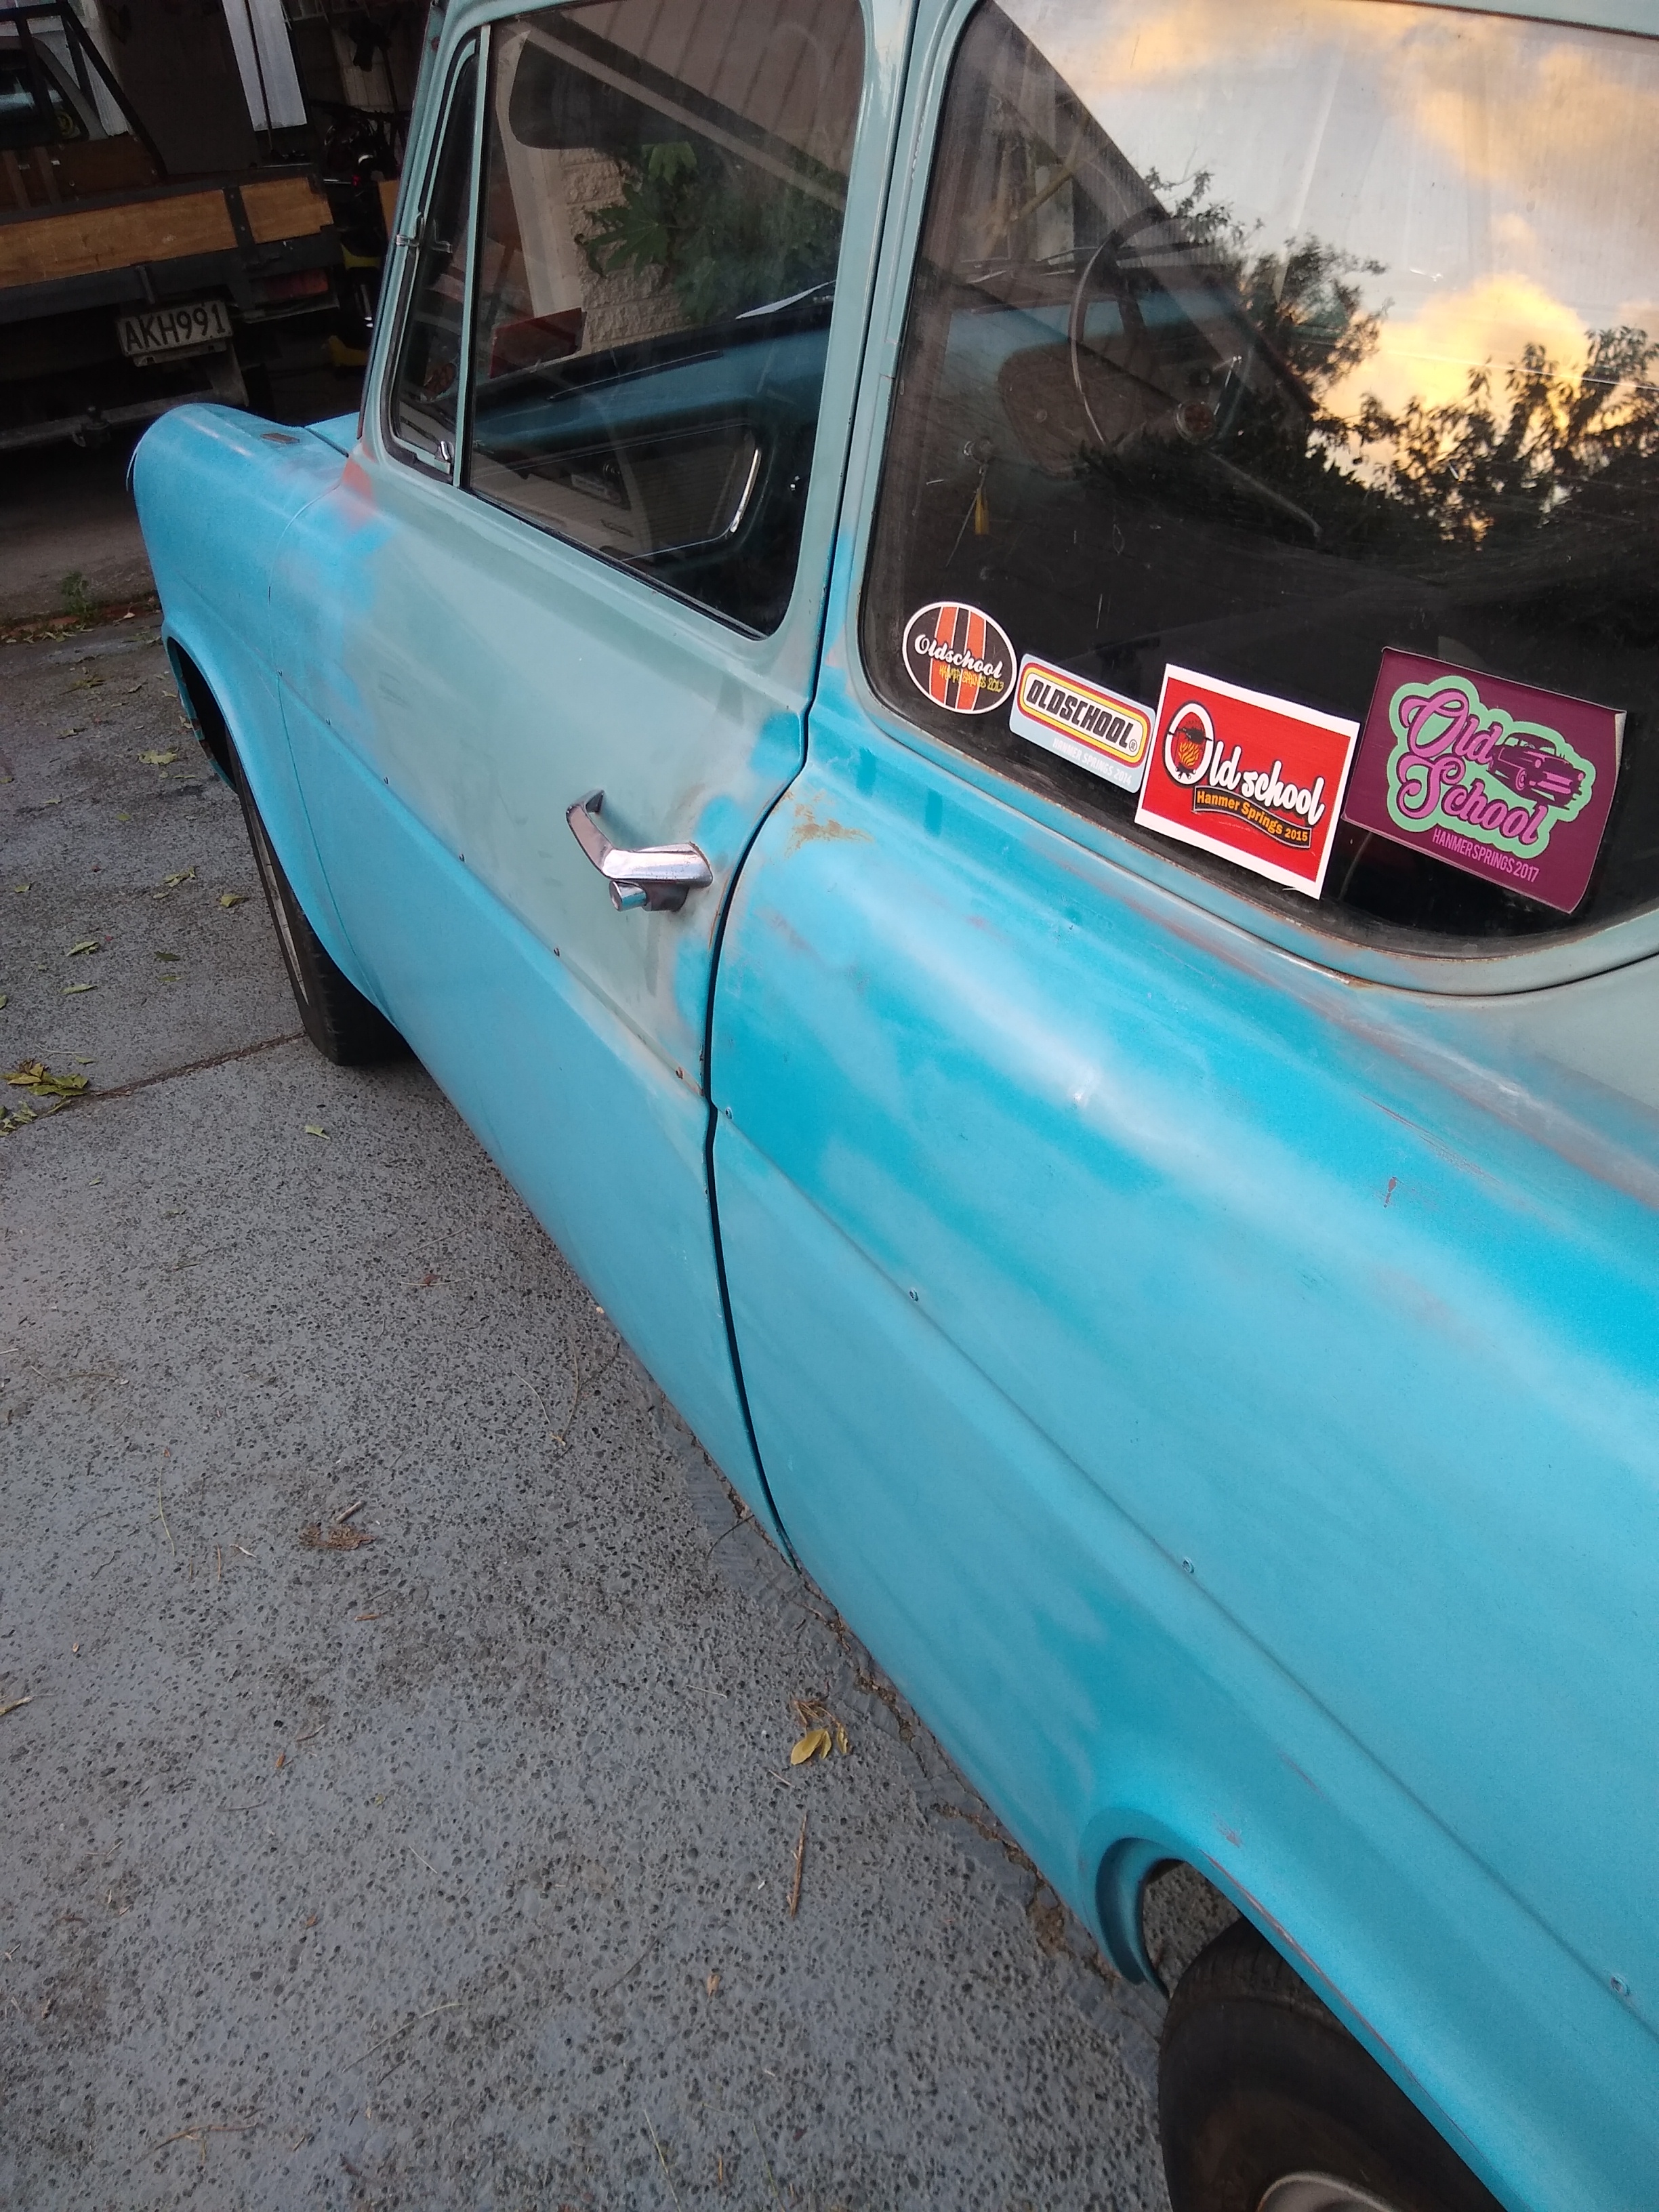
its coming along. im just tidying up all the little things that need doing. ive got some generic belt line rubbers coming for it then i can put the door cards back on. the bumpers are away being chromed and ill get them back in a week or so. not sold on the black center caps and i have another set on order should be here middle of next month. i drove it up the road to get some milk and i fucking love driving this thing, its fucking slow but its cool to just cruze along in and i can see myself doing a bunch of Ks in this as soon as i tidy u the last few things. believe it or not its still got a warrant! 2021-03-18_07-56-27 by sheepers, on Flickr 2021-03-18_07-56-37 by sheepers, on Flickr 2021-03-18_07-56-45 by sheepers, on Flickr 2021-03-18_07-56-52 by sheepers, on Flickr 2021-03-18_07-56-58 by sheepers, on Flickr 2021-03-18_07-57-04 by sheepers, on Flickr2 points
-
nice work....1 point
-
First things first, I am going to need some parts, need an engine of some kind, I wouldn’t mine a JAP stationary engine or something, I will sort the axels and bearings and forks and slap some kind of petrol tank on it.
1 point
-
Hi all , thought id make a thread for this as it will be a sort of project. So background story, THis was the truck I drove around when doing field service in Brisbane. pretty much from goldcoast to sunshine coast. it was a great truck , non turbs so will go forever. Anyhow I jumped on a plane to get Bess the C10 sorted. Caught up with my old boss and saw it parked up , so later in the day i messaged himand we ended up talking about the possiblility of purchasing the truck and body. Came to an agreement and I would head down to have a sticky beak . So I did and shook hands on the spot. Then he mentioned he couldnt be buggered taking the equipment out of the back . so he threw out a figure and did a walk round etc. Went back to the hotel and did some calcs. and rang him back saying yep pending roadworthy. so that ramped up quick. Put through the funds and they cleared today. So I now own this vehicle. its getting driven back to WA Ive have lost count of the pieces of paper for permits etc. Anyhow pics.1 point
-
I had such high hopes when you mentioned tang n desprang.1 point
-
Neat colour. Also, that seat pattern and colour is exactly the same as my VG valiant , must have been a todd motors thing?1 point
-
Both. Lucas changed from inductive (RVI) to single wire (RVC) in the early 70s, and it appears the Marina started with RVI then changed to RVC. The wiring harness should have the bullet connectors for a RVI, or a wire with a spade connector for the RVC. A GENTLEMAN’S GUIDE TO SMITHS ELECTRONIC TACHOMETERS Wiring a Marina Tachometer1 point
-
Cough* megasquirt......1 point
-
Its certainly been a long cashie haha. Once its painted progress shouldn't be too bad though, the running gear is pretty much done so that can all go back in. What state is yours in currently?1 point
-
Umm.. About time.. Although I can't talk..1 point
-
The consolidator fucked around for a week and we missed the container. Gotta wait another month until the next one, then another for it to float over. Fuck you Robert, I’m sour! Leisurely scraped some underseal + all the old deposits and shit off the diff to aid the sandblaster. Pulled the rear brake hose to match at work..it’s identical to the fronts just a little shorter so that’s a bonus. talked to the blaster tonight and will tee up a quick inspection in the weekend.1 point
-
1985 complete 1987 complete less brakes 2008 - complete (this one) parts 2003 - stripped and half sold off, some went on the 87 4 additional 1980s frames aboout 6 sets of forks 3 front wheels 3 small bins of misc parts and a dr2501 point
-
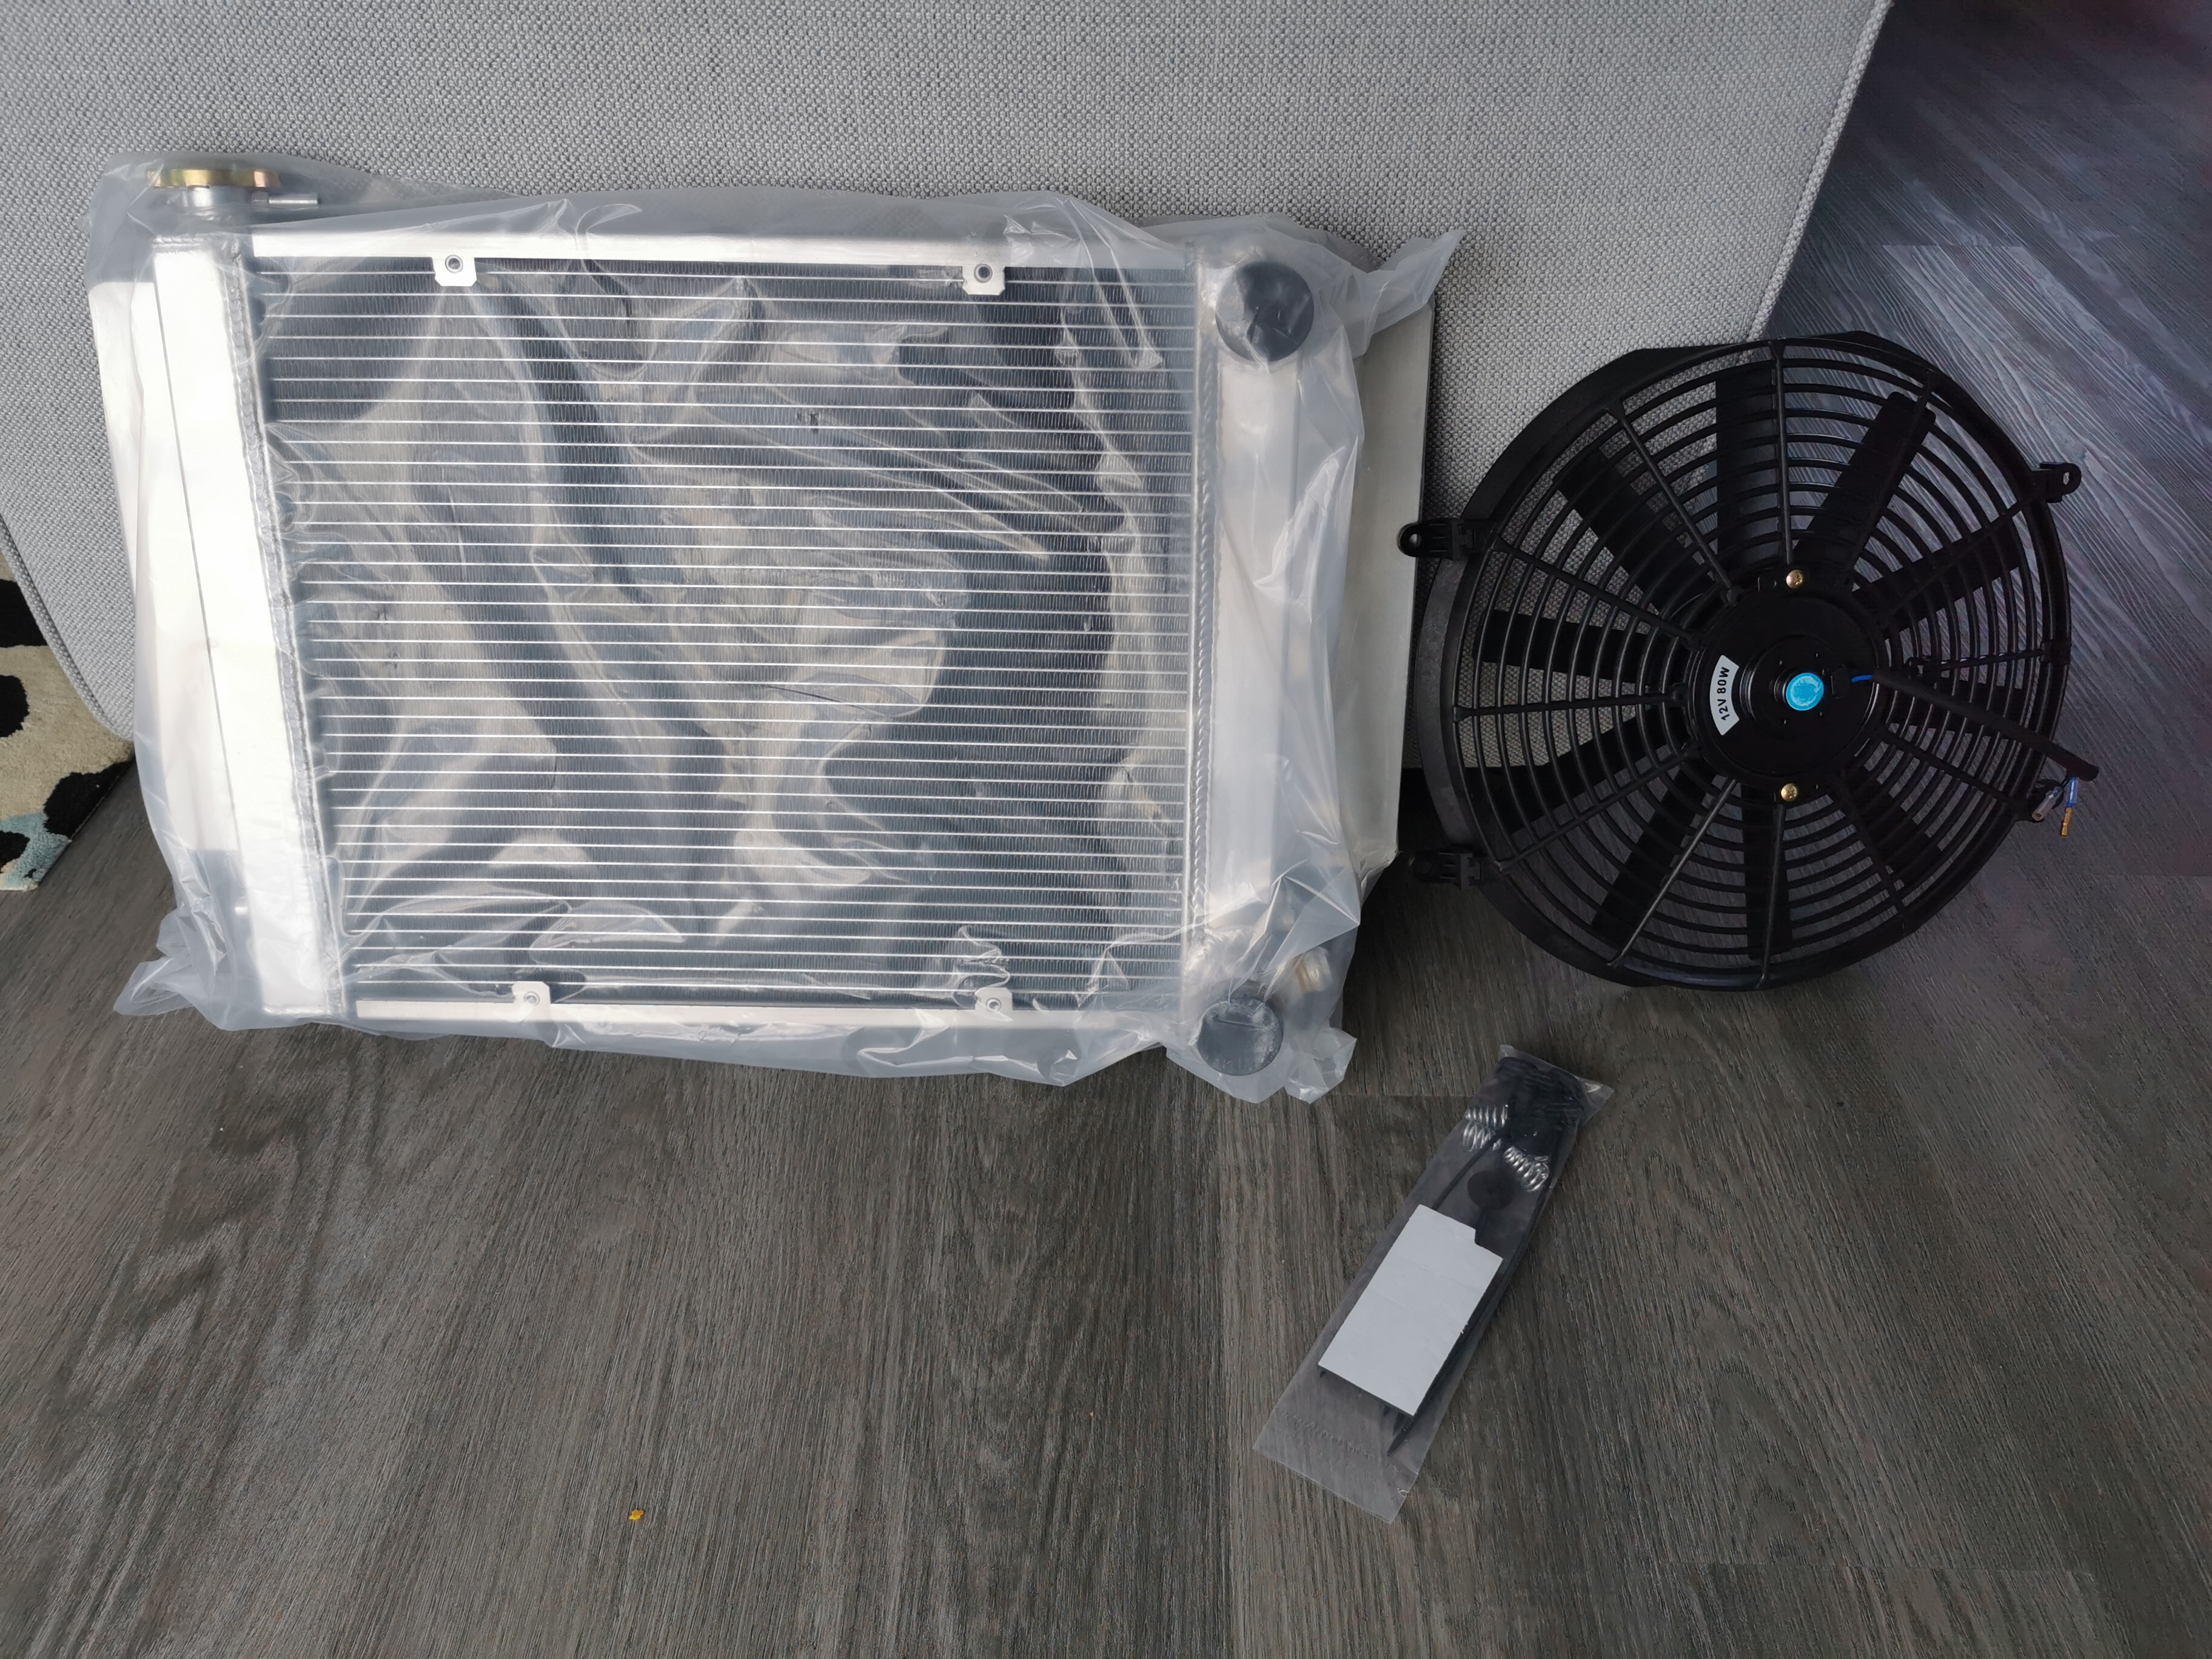
Ooooooh pretty parts have arrived Nice new alloy radiator and thermo fan..
1 point
-
I own this car now. It's now a 2L zetec turbo.1 point
-
Great to see the scree downhill from the rider.1 point
-
Didn’t get much video, just up the mountain.1 point
-
Well I think I got scammed on a cylinder head, payed a guy for a motorcycle head but no head yet. the one on this engine has the Finns going in the wrong direction for a motorcycle, but apart from that the JAP engine is an ok fit, I have over 50mm to make a new ignition system. A shit load of work is needed now
1 point
-
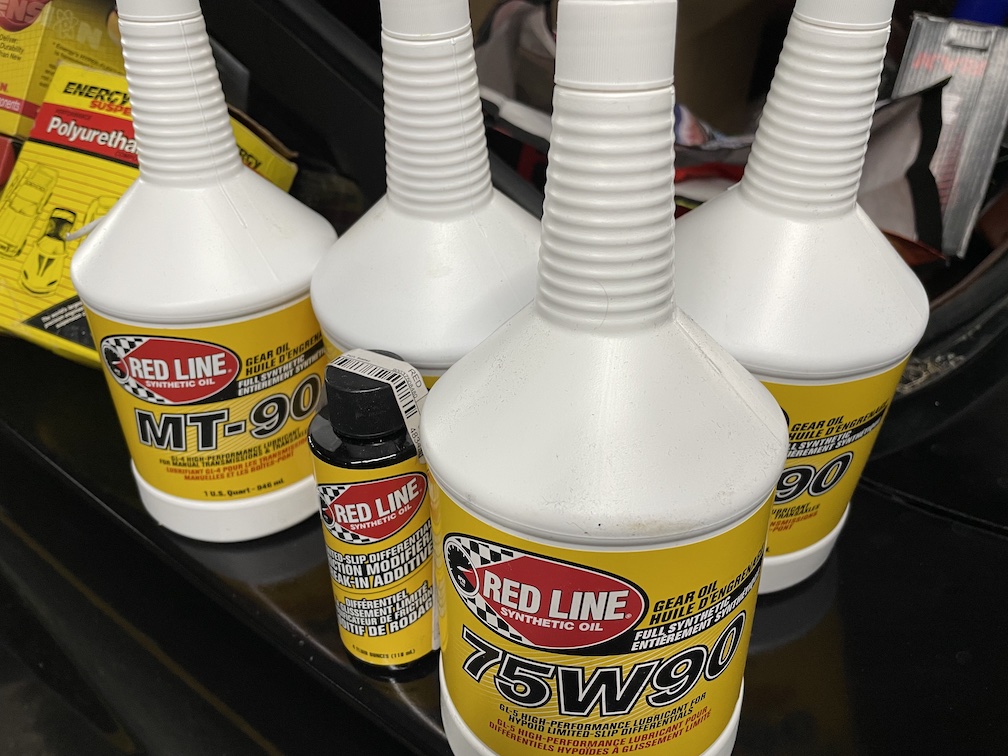
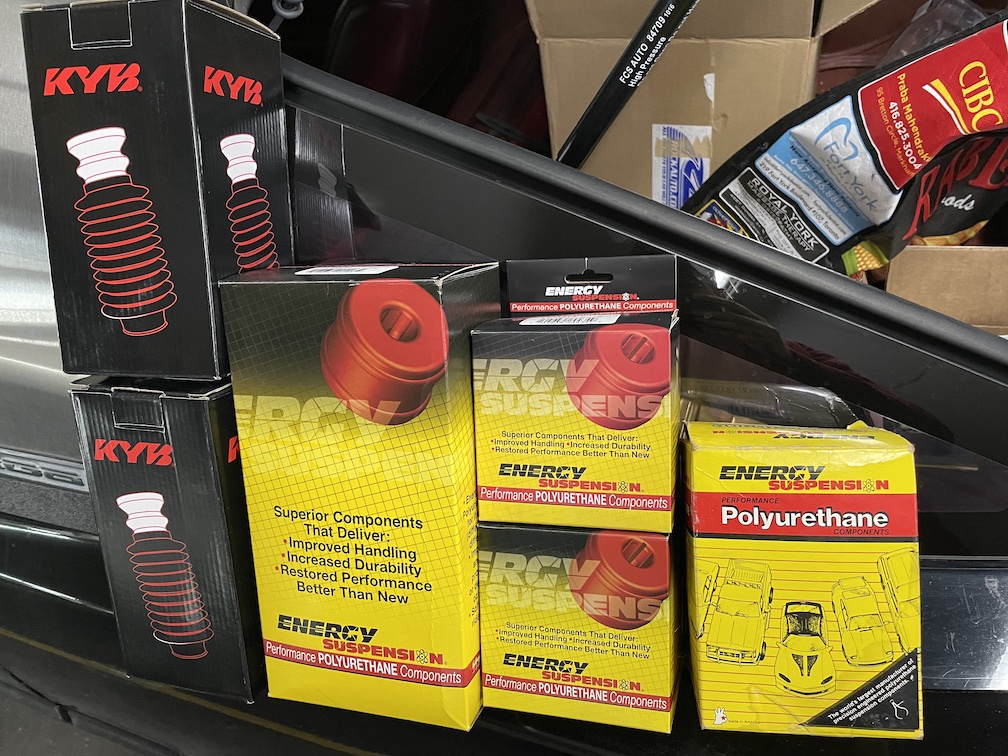
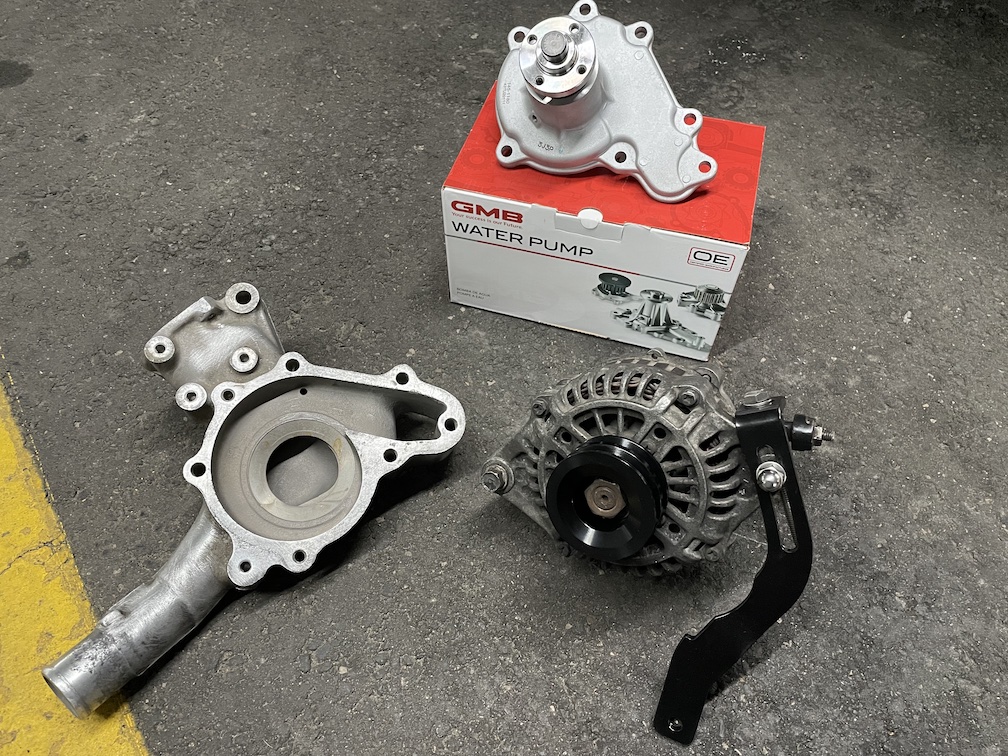
** discussion here - https://oldschool.co.nz/index.php?/topic/74793-helium-elbows-magical-rx-7-fb/ ** Some small progress Racing Beat exhaust now swapped on, deleted the air pump and associated components at the same time to shed about 5kgs and less components engine has to spin. It has definitely opened up the engine somewhat, it feels much less strangled now. There is a small problem of the number 2 rotor 6-port actuation shaft not spinning as freely as the number 1 rotor, so perhaps there is still some more power/drivability with that functioning perfectly. I am hoping to swap to S5 N/A complete injection with inlet manifold, CAS, AFM, coil packs etc as it's just that little bit newer, probably unlock a bit more drivability, power and slightly less fuel consumption. While the wheels were off I noticed the rear trailing arm bushes were pretty toast, and the front bushes aren't the best looking either so did another round of RockAuto shopping for more suspension components. Grabbed some Redline oil for the gearbox and diff too: I picked up a S5 80A alternator along with Banzai Racing double sheath pulley and adjustable alt bracket for some bling, also got a GMB aluminium water pump along with S4 N/A aluminium water pump housing (stock are both cast iron) which should save about ~10kgs up front. Will eventually convert to electric fan (apparently early 90s Ford Taurus fits almost perfectly and is super powerful and somewhat plentiful here) Have started pulling out all the original components (along with radiator, radiator bracket, shroud, air box, battery & battery tray etc to give them all a much needed clean up and give me space to do the water pump + housing swap. Also got the daily road legal (it had a leaking clutch slave cylinder, which lives inside the bellhousing on the throw out bearing, because Volkswagen) but couldn't help myself by getting some OEM Tiguan Savannah (how fitting) 19x9 +33 and some used Bilstein struts with H&R 1" lowering springs hopefully to achieve this look (pictured is a Passat CC but they are basically same car under the skin): Have got some Racing Beat lowering springs and sway bars on order too so hopefully they arrive soon! ** discussion here - https://oldschool.co.nz/index.php?/topic/74793-helium-elbows-magical-rx-7-fb/ **
1 point
-
Brushed all the alloy panels today and think they come up alright. im going to see how much it would be to anodise them black, was thinking all black interior might be a nice change from standard alloy panel interiors.
1 point
-
1 point
-
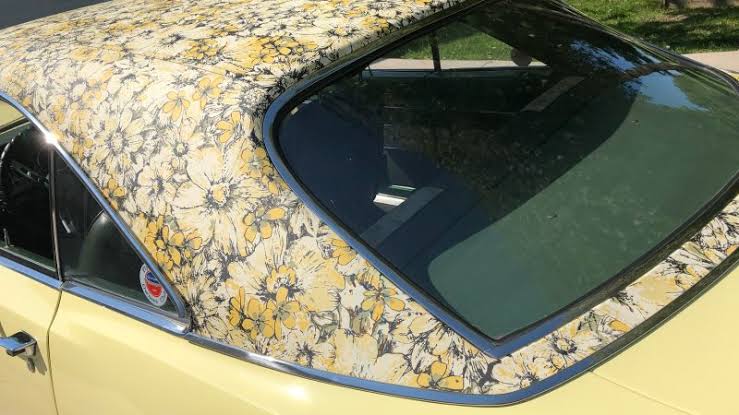
Chrysler rocked the vinyl. Mod tops and floral too!
1 point
-
Decided in the end to not bother getting a wof. I don't think i would drive it much, if at all anyway. It is going to become a competition car. I am going to build it for gravel sprints i think and will prob have the odd track outing aswell. So have begun by stripping the interior. Still have to pull dash out and center console. I will be looking at putting a cage in it in the near future. As far as i am aware this is the only rust in the car. Passengers footwell. I will need to start removing the sound deadening. Looking forward to that. Also have space for the starion in this shed so need to get that moved in aswell and then i can slowly chip away at them both.1 point
-
@Aubs if your in need of a mint radiator or a brand new carb diaphragm I have both of these available.1 point
-
Little bit more progress... they're back filling the foundation, you can see we've had to come up quite high on the blocks to satisfy the floor level with the council (flood hazard zone). It wont look as pronounced once we get the ground level back with some fill/top soil and there will be a small bit of decking around the front here. Have also had my negotiation hat on for the provisional cost revisions which are coming back, keeping em honest.
1 point
-
It fits well, I would have to make some kind of ignition system as the mag won’t fit with the gearbox
1 point
-
did a front main seal Refitted the timing belt and all the timing covers
1 point
-
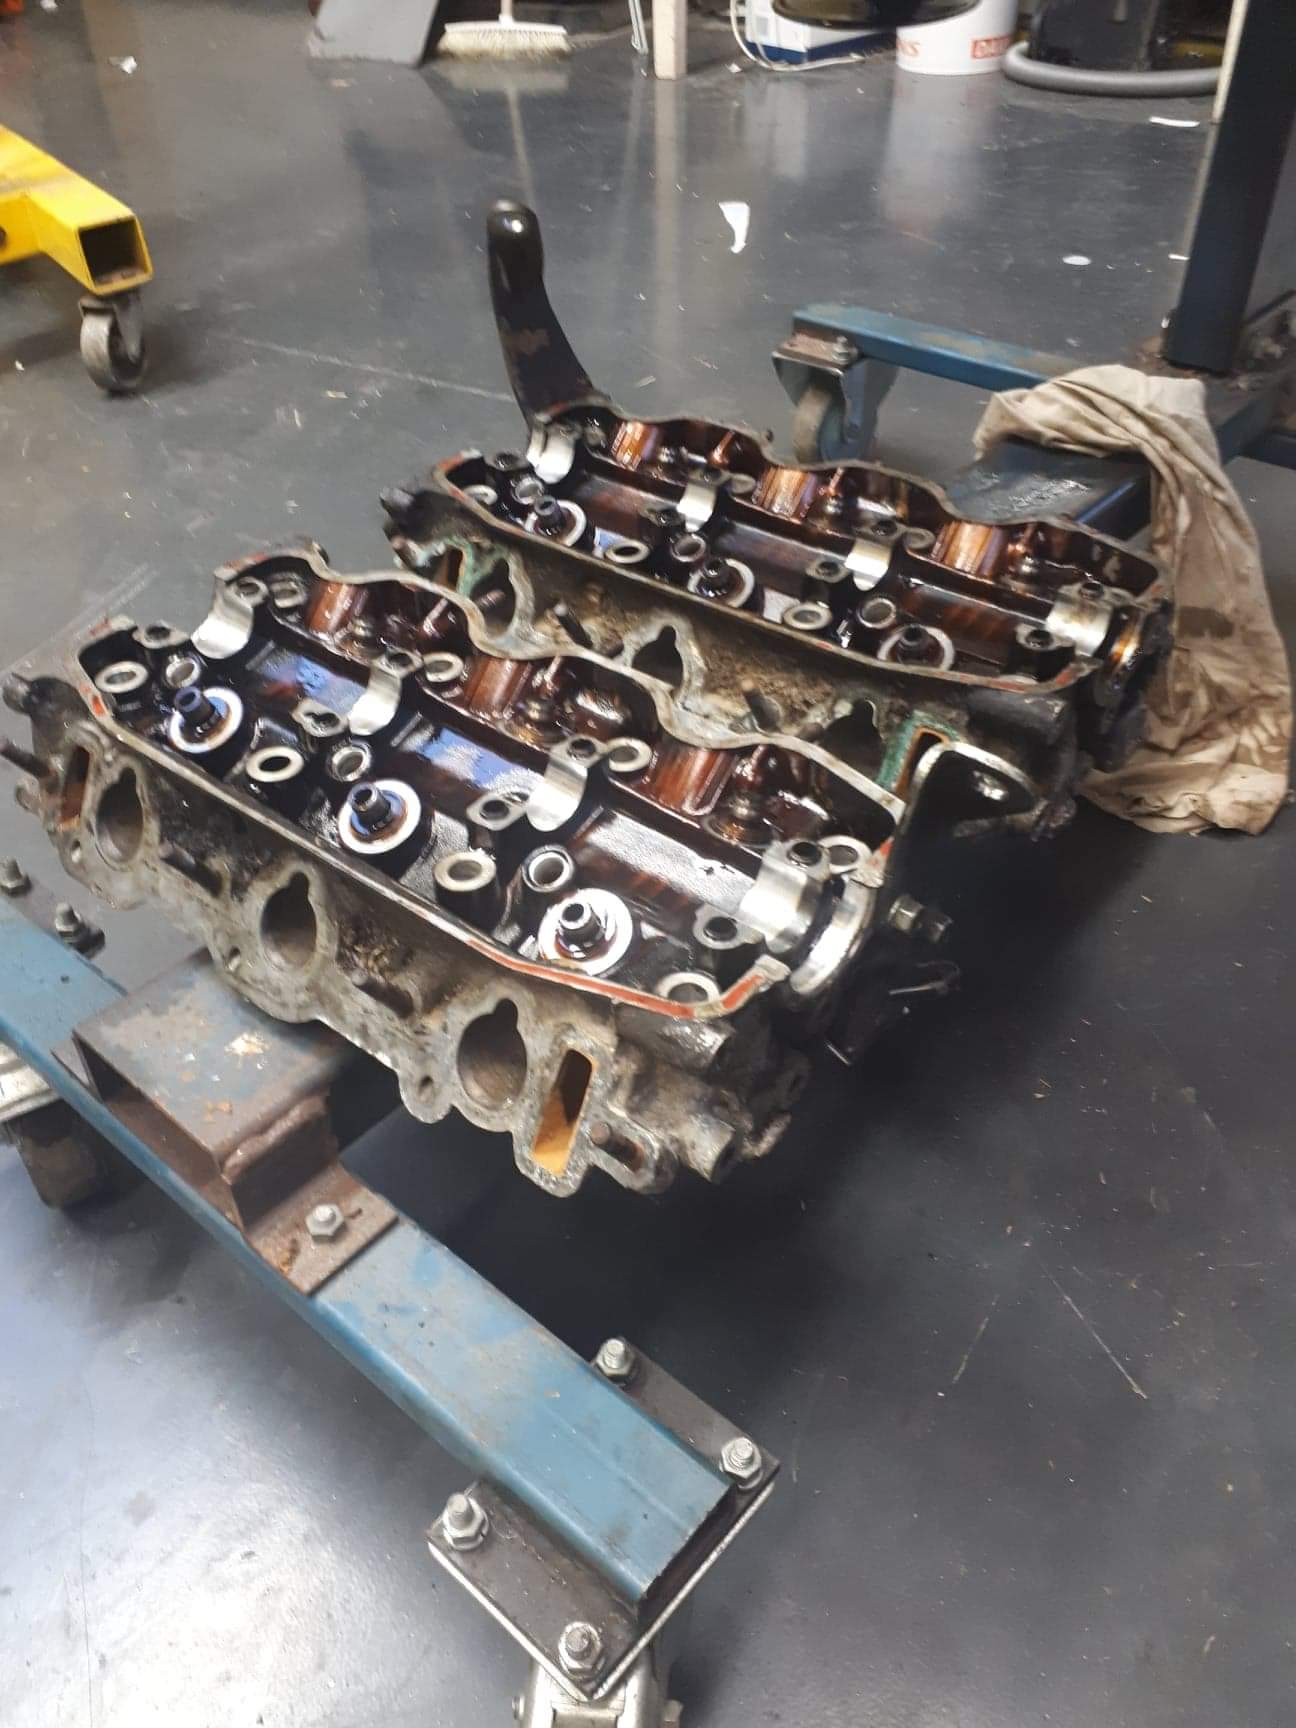
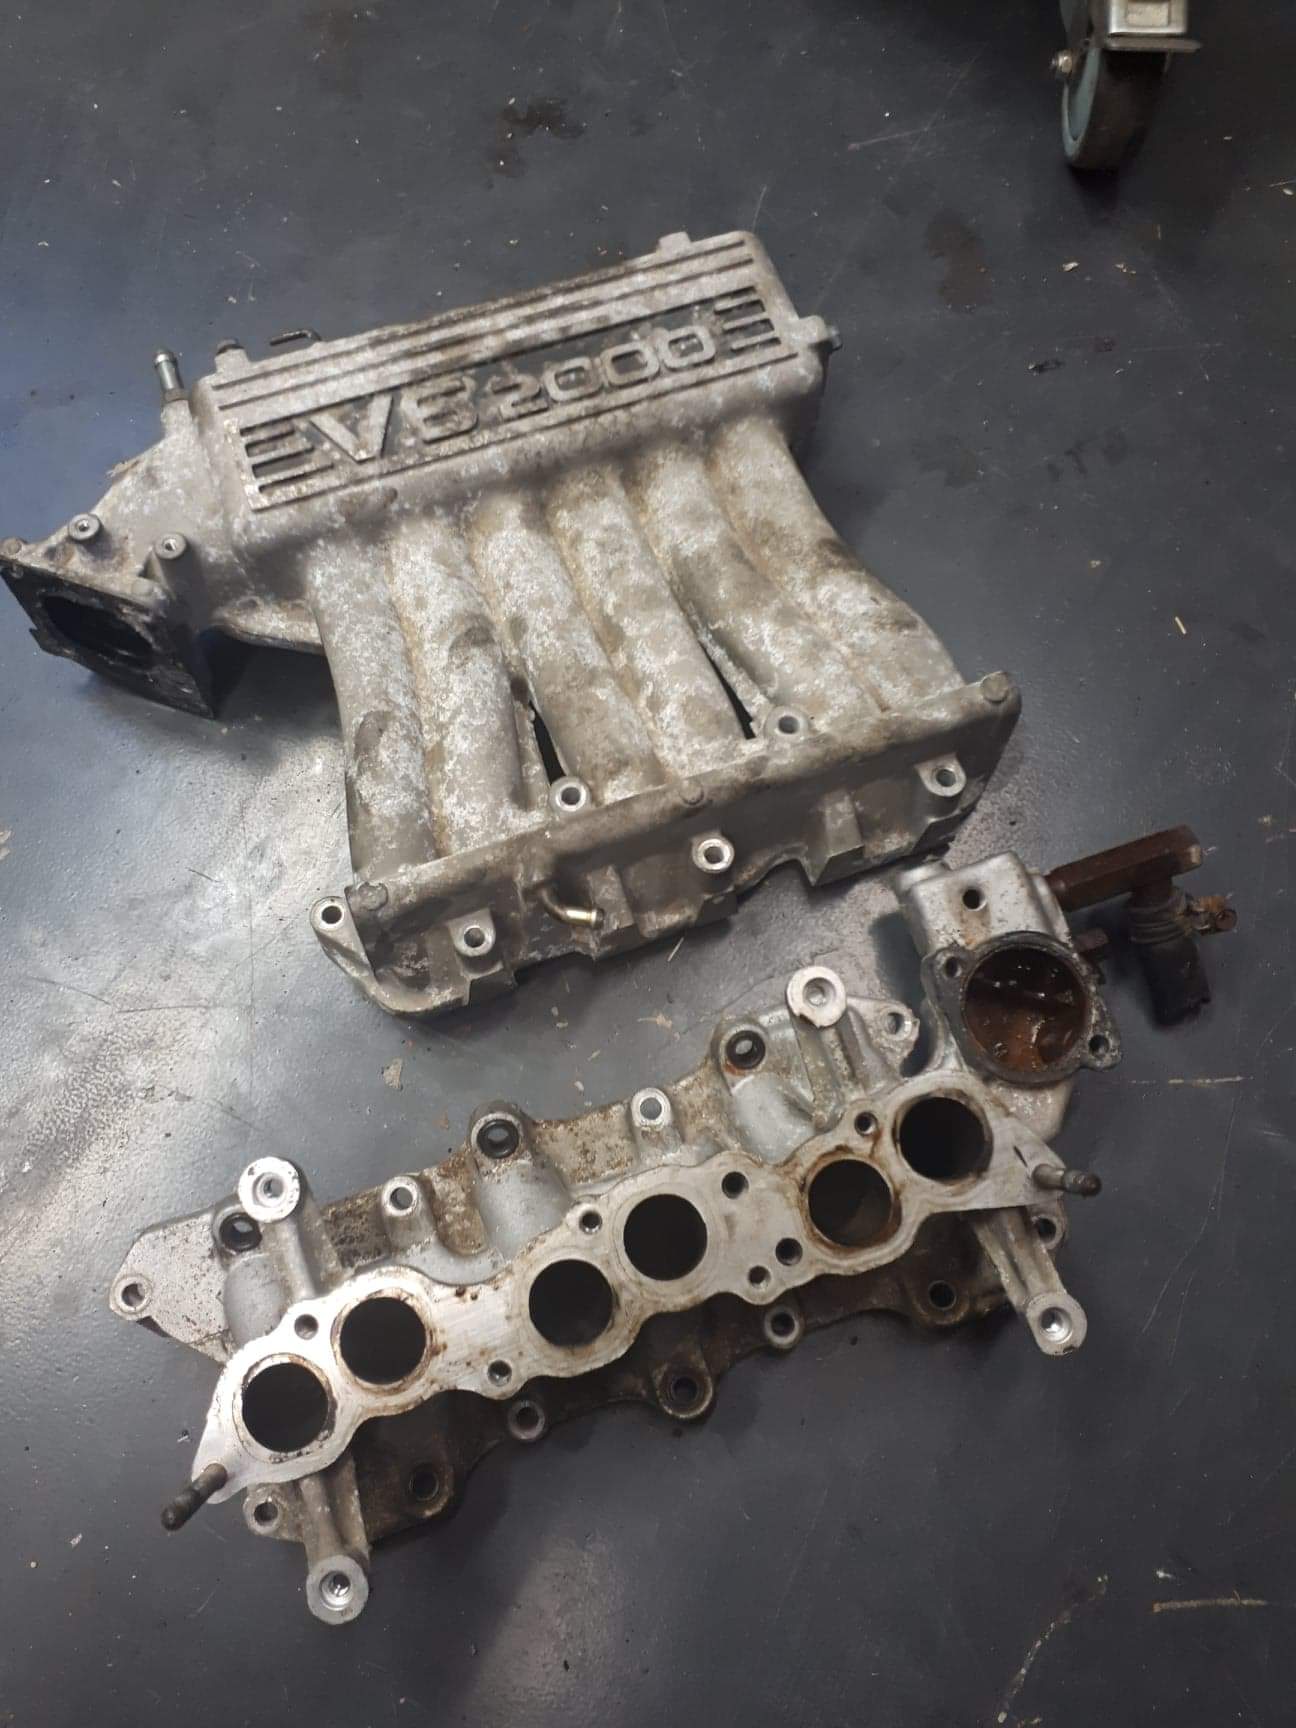
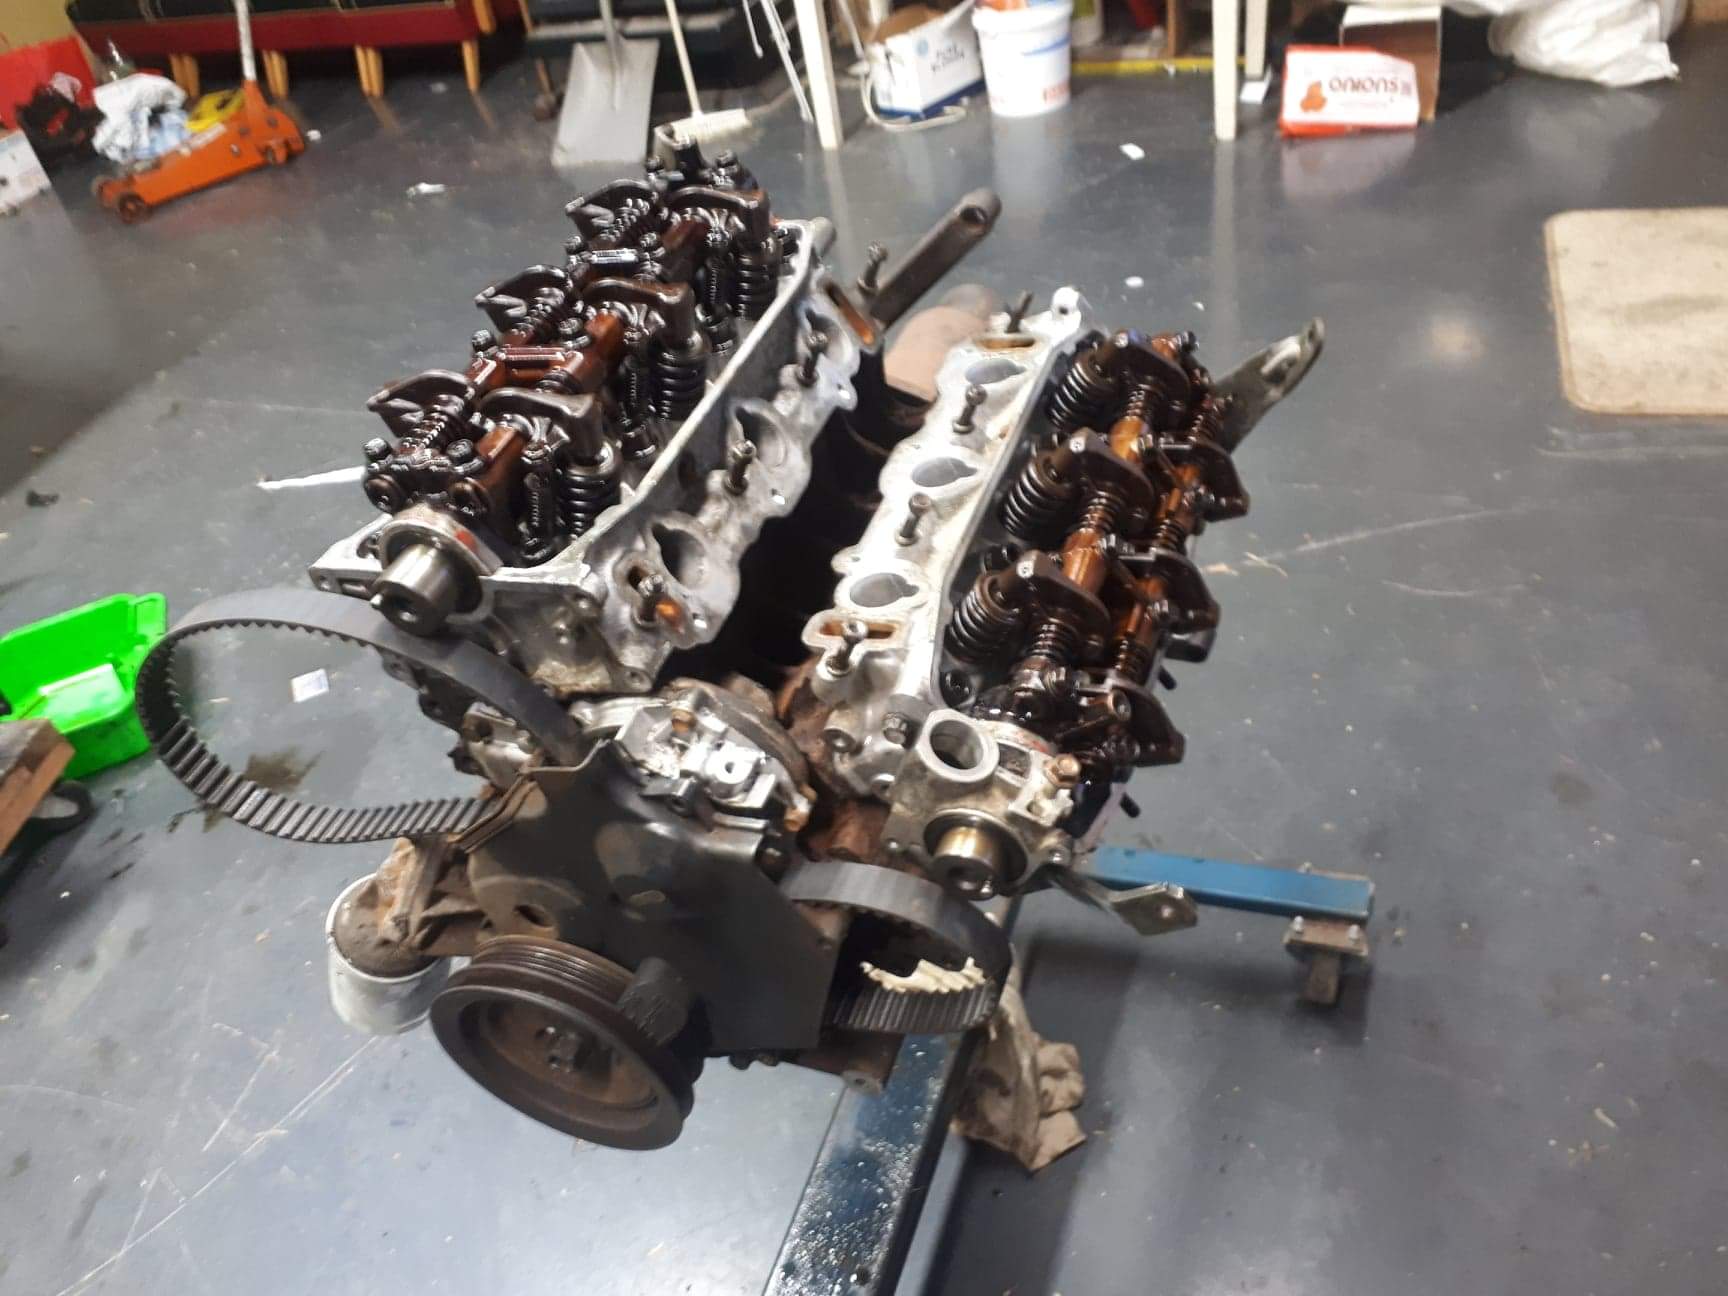
Next thjng was to pull the heads off and strip them for cleaning Valve guids were mint with little to no play. Dropped them off at cylinder head specialists in town for them to tank them clean and run a skim over them ended up taking 12thou off them to clean them up as they were pretty rotten from having water in it. Also got the intake manifold vapour blasted and then i repainted the black and it looks ace Put the heads back together with new stem seals tonight. And bolted them back on the block And thats where im upto now
1 point
-
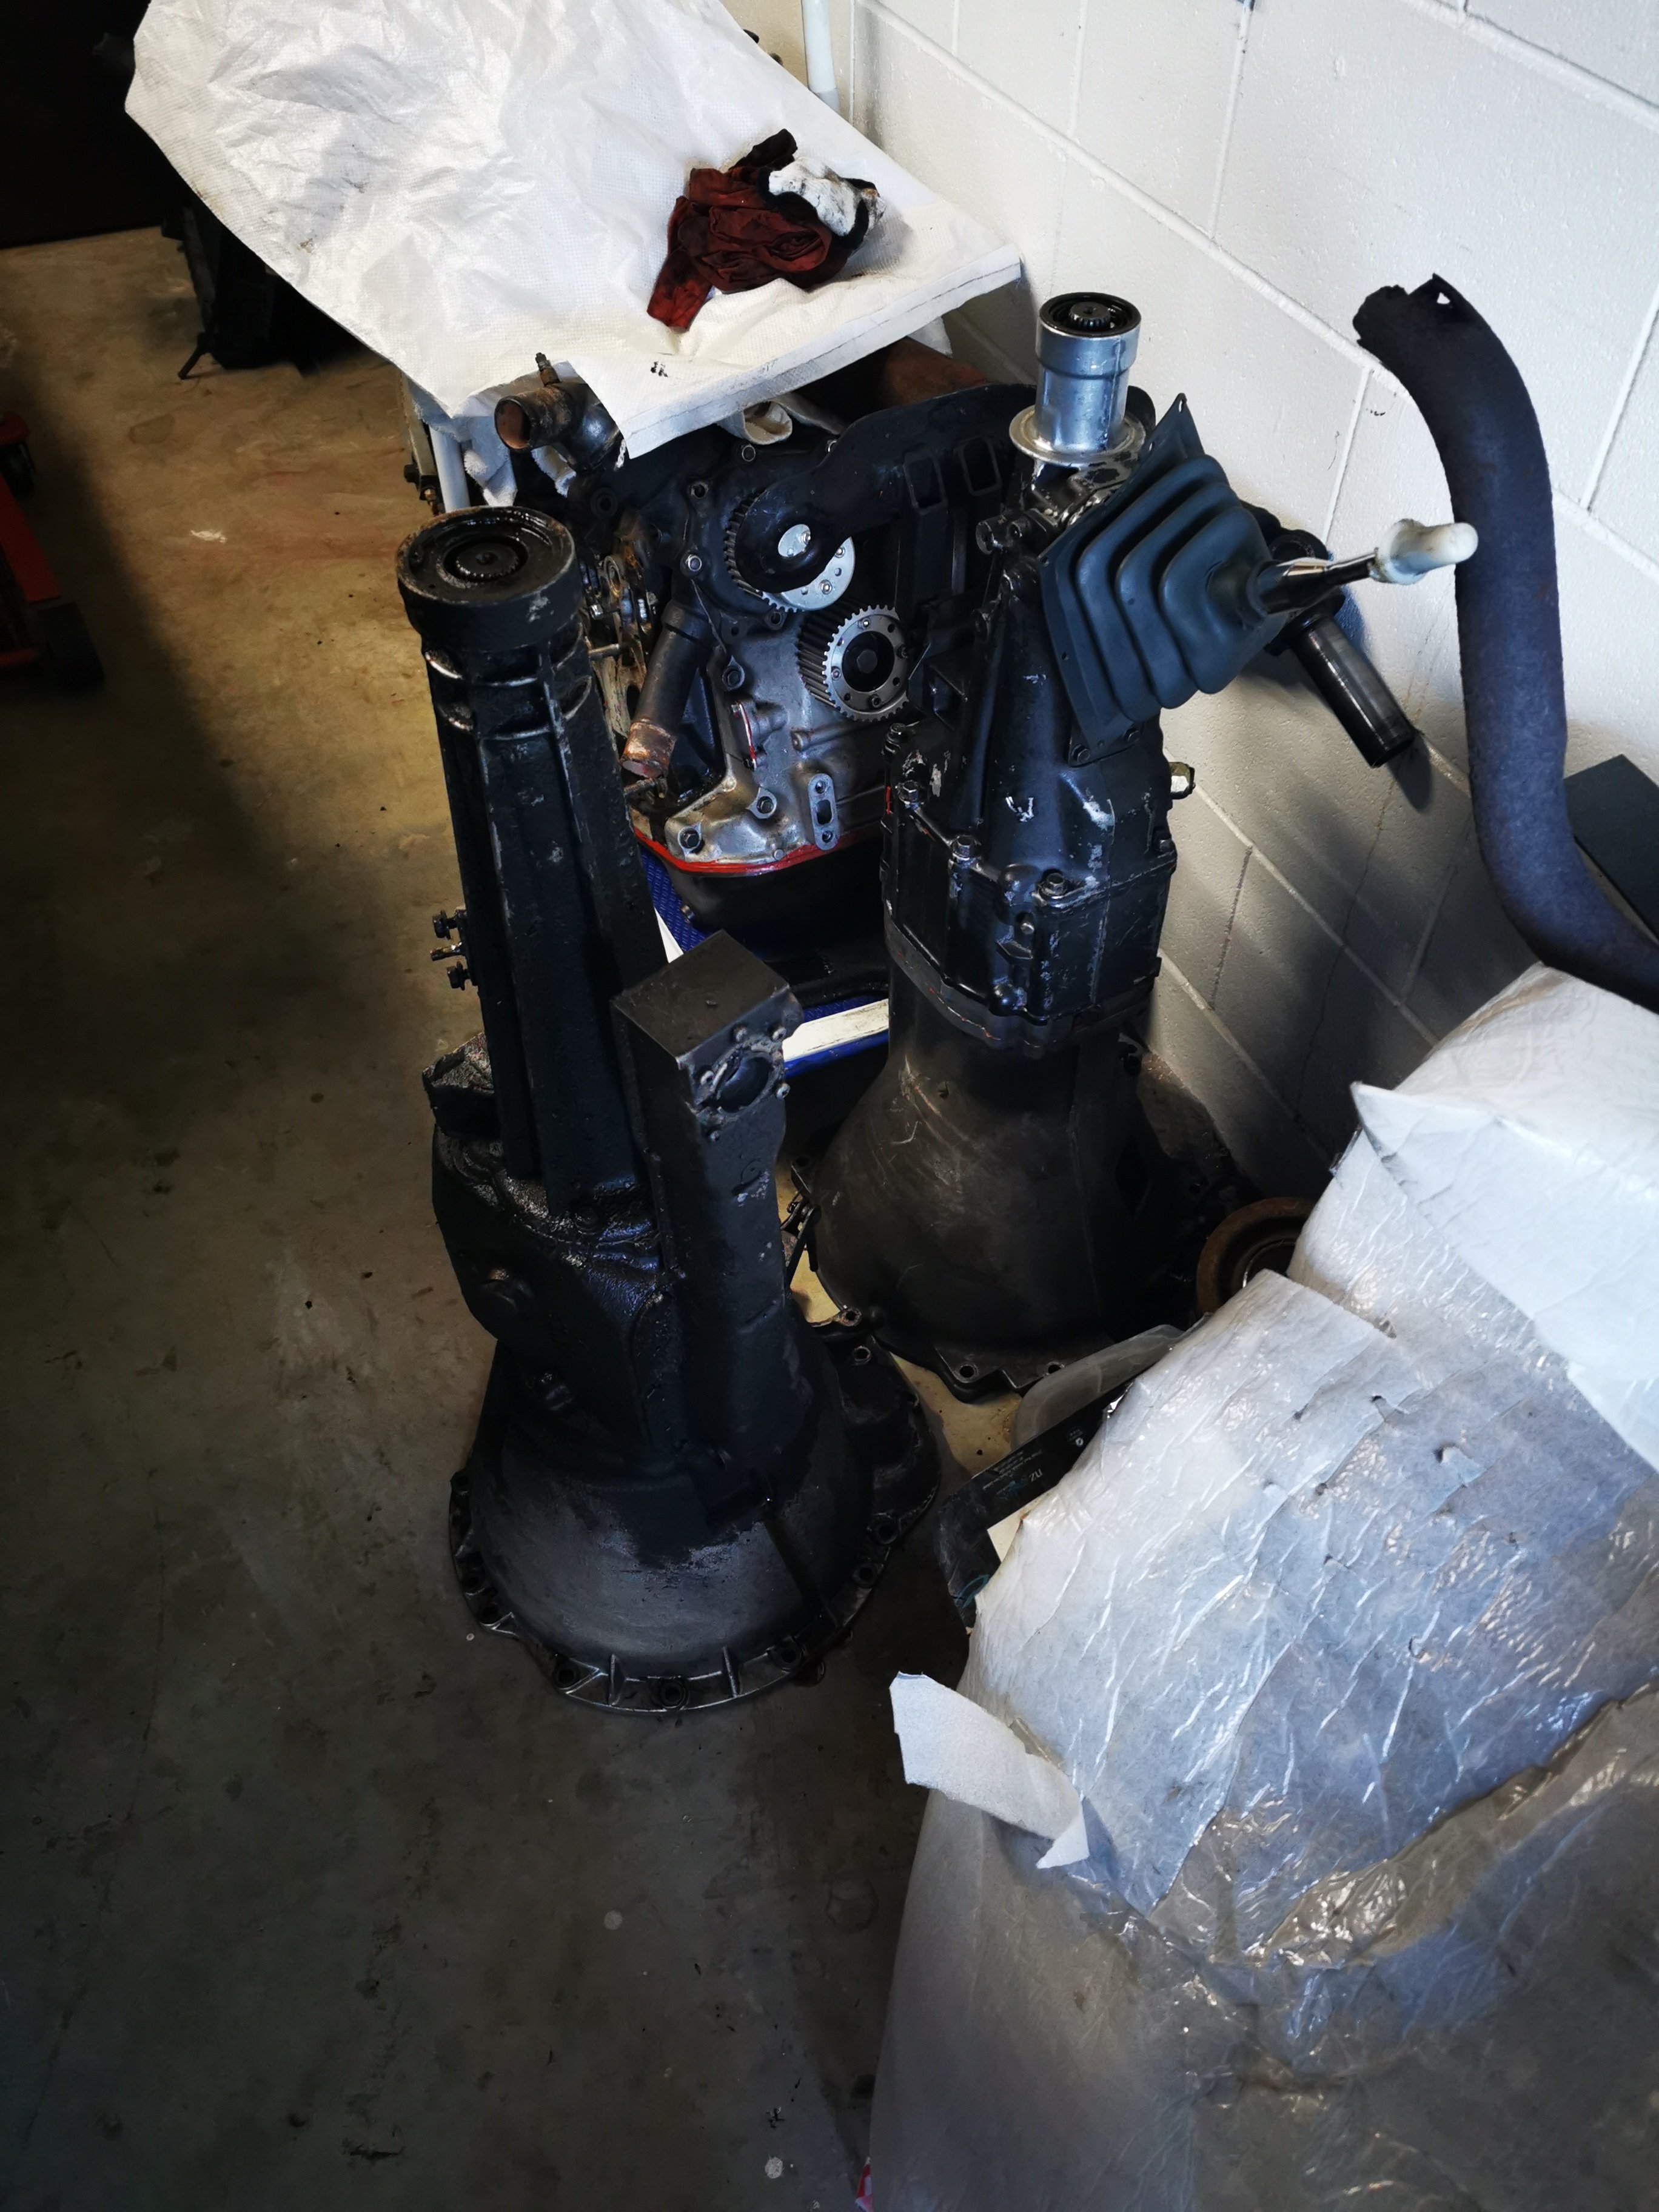
The hunter box is longer than the rx7 box. Shifter and box mounts are in very similar positions. Hunter box is taller due to the shifter rail.. Looking good for throwing in the hole
1 point
-
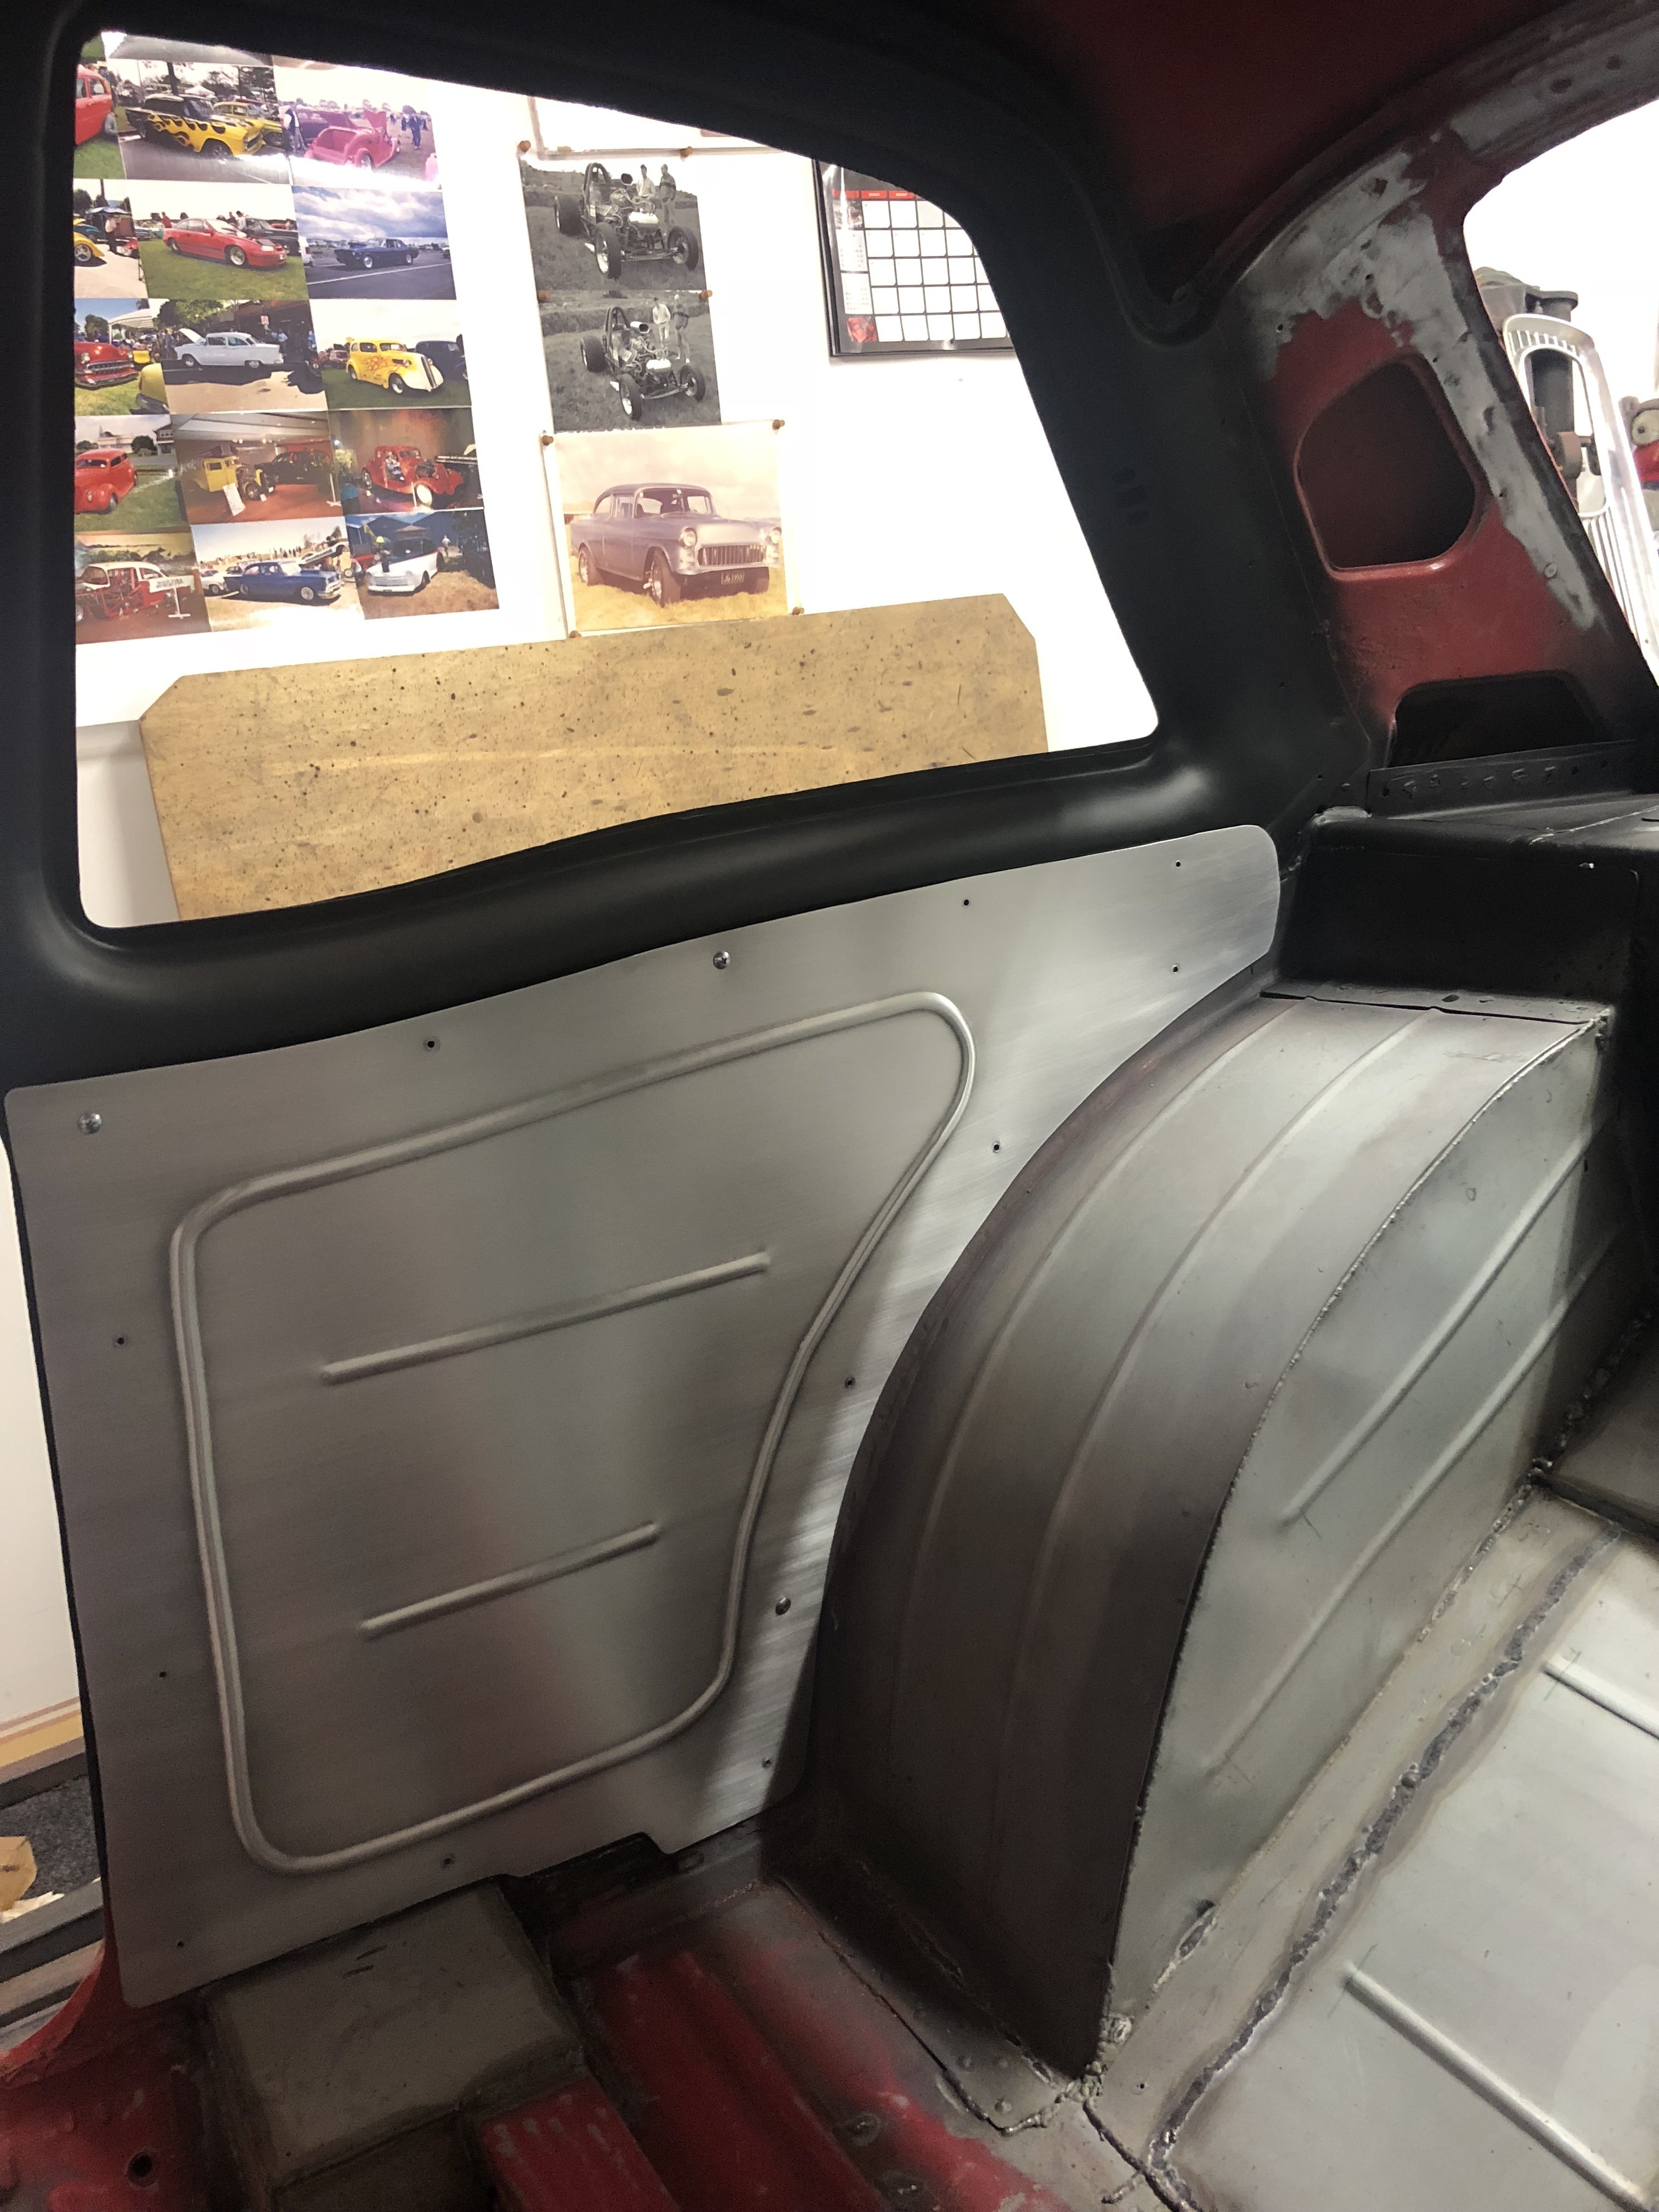
Hey, hi, hello. Time for my yearly update on this thing. This entire thread is 6 or so years out of date so I'll get the bodywork up to date and then go from there. Below is the first of the rust repairs. Overall the doors weren't too bad but we decided to replace the entire lower skin to save it having to do this again in a few years. I've skipped a fair few photos but this gives an idea of the state of the doors and front guards. Can't speak highly enough of the panels that Les has made, they line up amazingly and will require SFA filler.1 point


.thumb.jpeg.e0a4bff61111e0c8c7396950fcc94da1.jpeg)

.thumb.jpg.b5491dbec1053270a4d99ed376fc2c36.jpg)


This leaderboard is set to Auckland/GMT+12:00