
Leaderboard


Popular Content
Showing content with the highest reputation on 12/09/20 in all areas
-
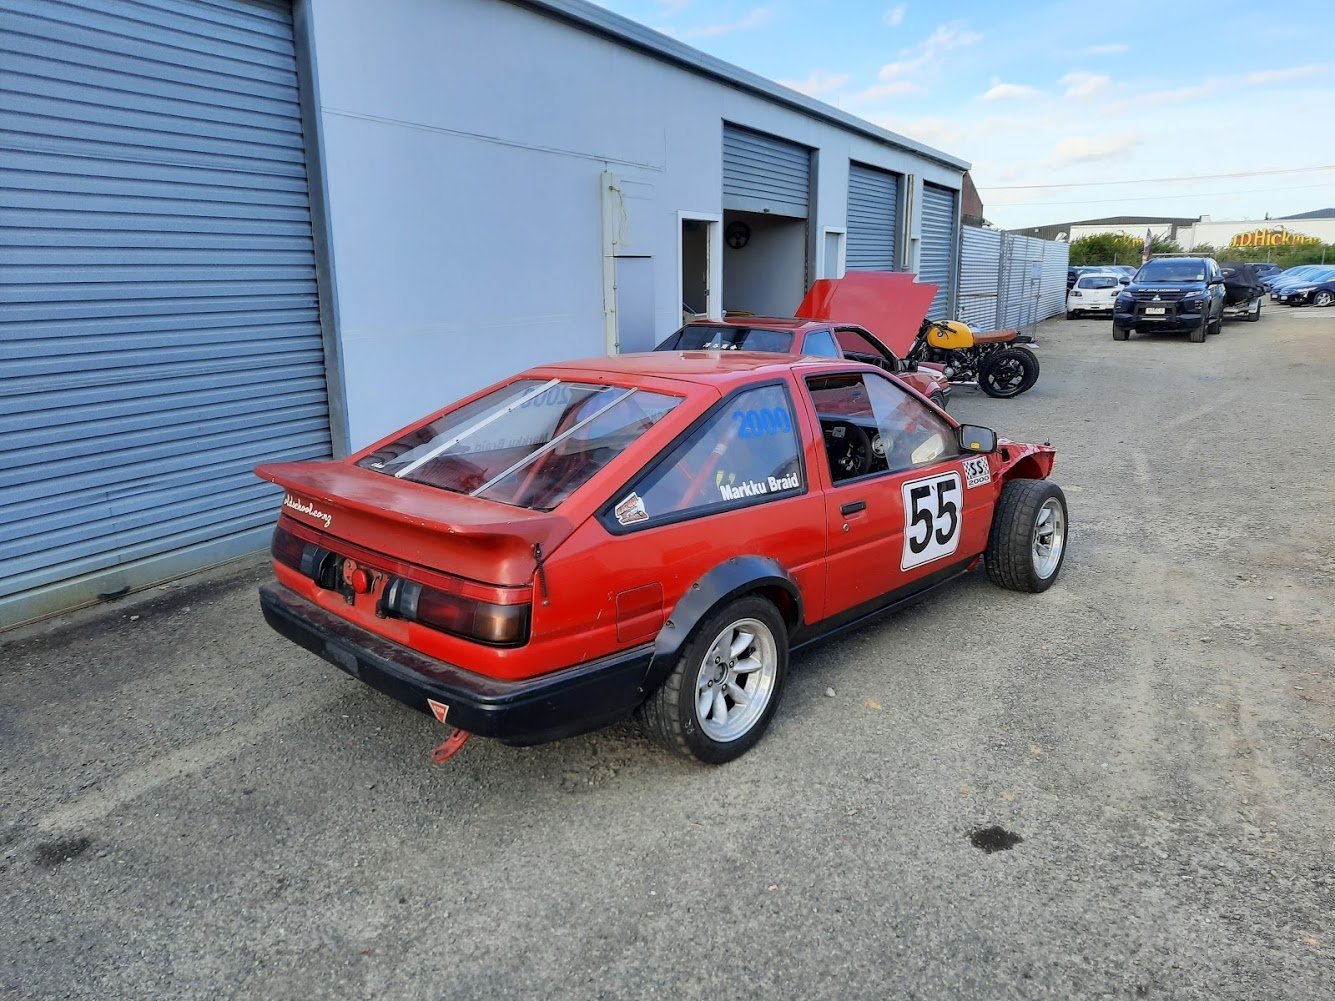
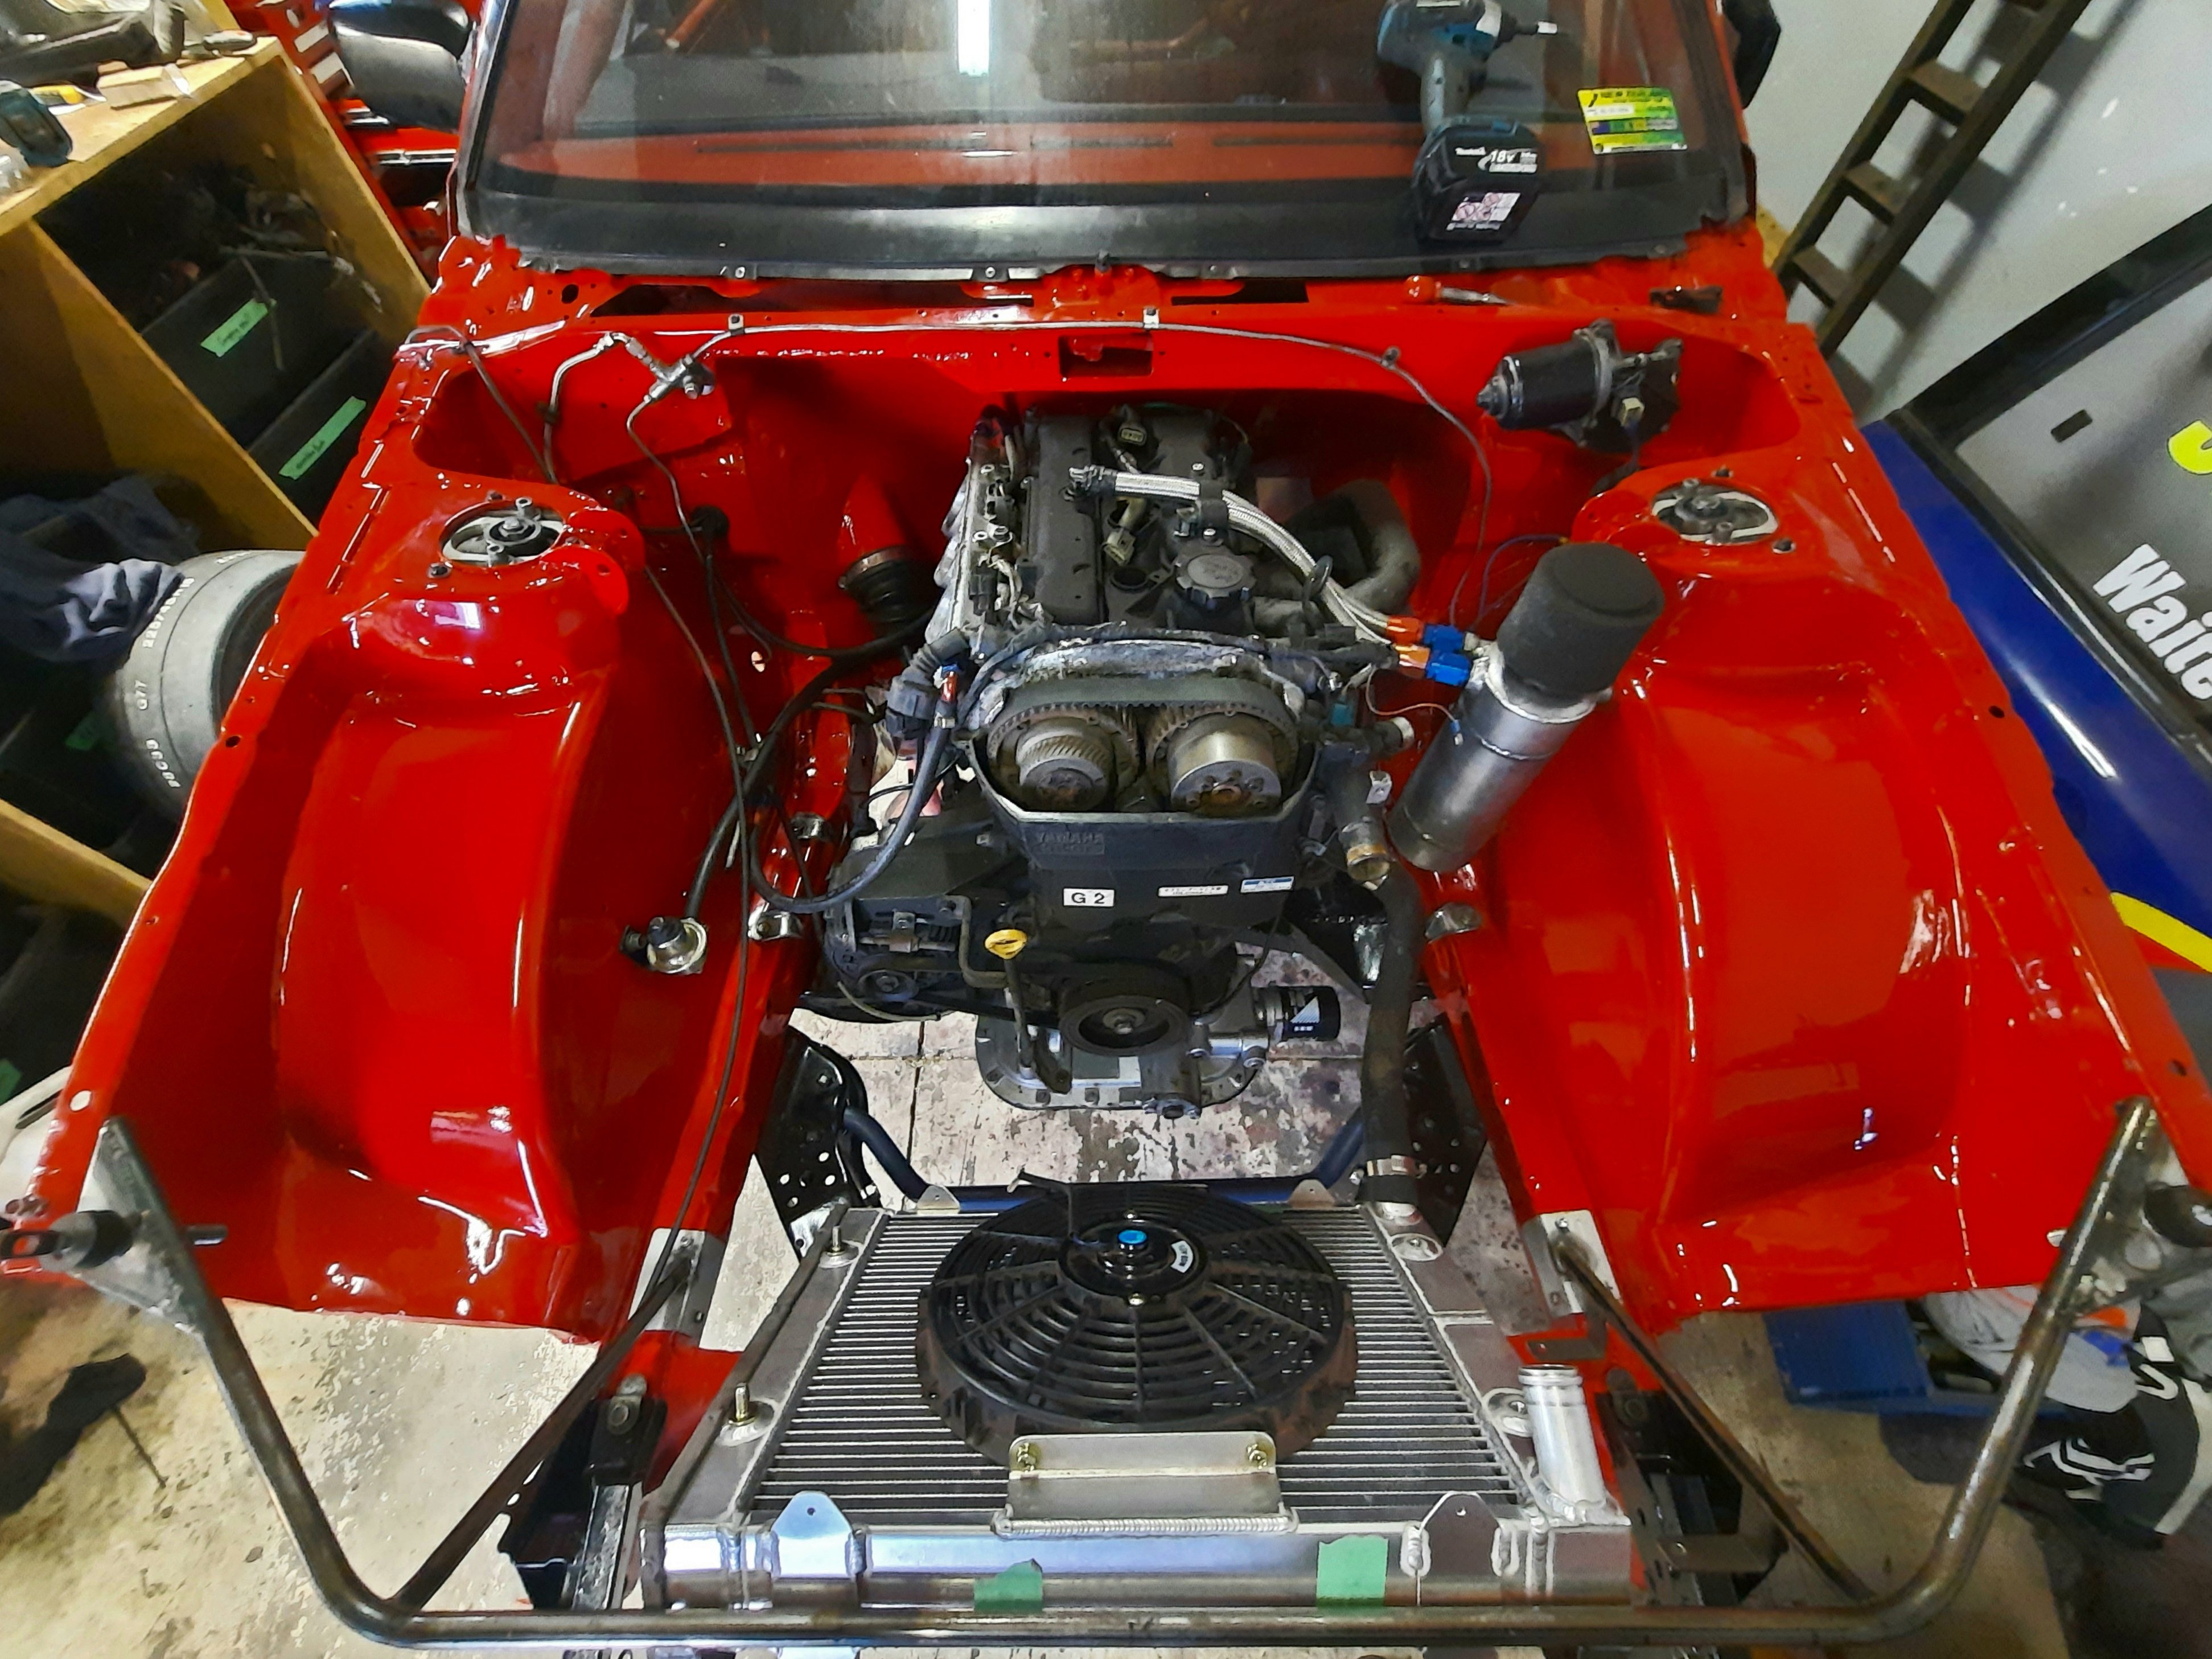
So most of the electrics are done, few niggly things left, looking to change to AIM dash maybe since it has icons for road use etc. Speed sensor input not working on haltech, waiting on oil and fuel pressure sensors. LiFePo4 Battery died on second dyno run, replaced with AGM equivolent, what a pain, but should get it going. Will need to remake the battery holder again. Dyno Run has been completed. 156.4 RWKW/ 209 odd RWHP of NA goodness should propel this little rocket nicely. A whole lot of stuff to tidy up though... Steering is a bit stiff need to look at that when I get it back. Diff breather to be moved for right to clear exhaust. Still not driven it!8 points
-
For next year
 8 points
 -
@Firebrand to the rescue! He happened to have the right one (we think) floating around and used the opportunity to offload a bunch of other stuff he was hoarding, for which I am extremely grateful. And most importantly, it fits! Finally!!! This is just a test fit - I'll need to get it properly in. Next up is to sort out the spark plugs, re-dinosaur the oil system and de-dinosaur the fuel system, then we're pretty close to test firing this beastie.7 points
-
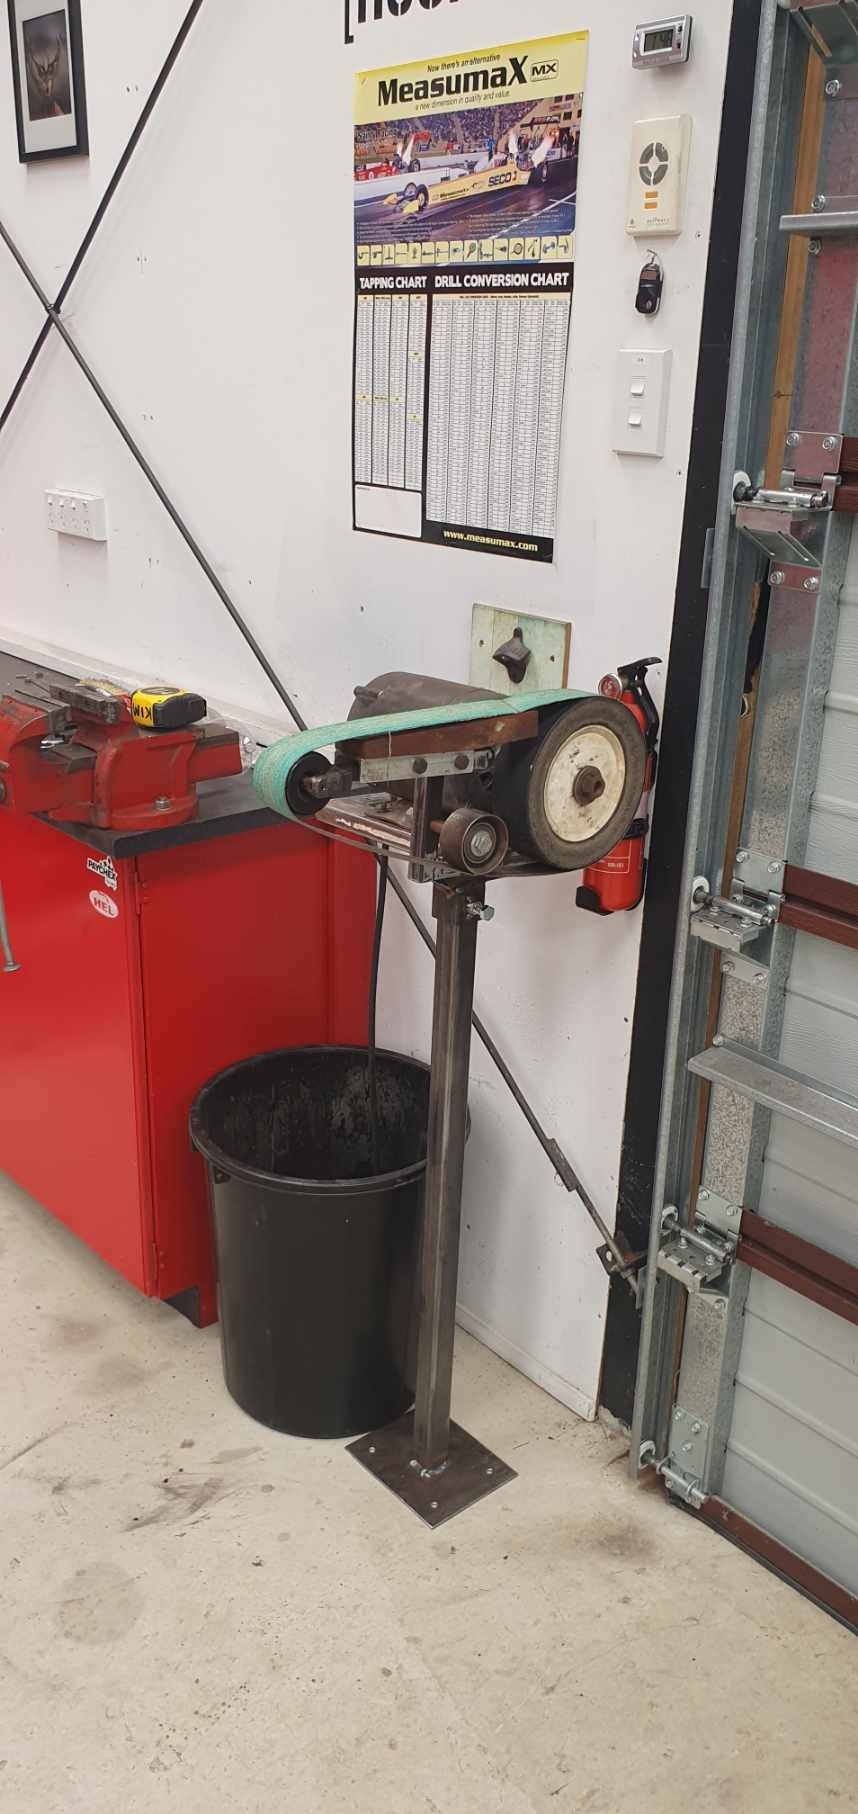
Full send, bolted down now and working great! The big lawnmower wheel adds a lot more velocity to the belt than my other linisher has, so that equates to faster rate of shit getting removed. The maths looks like this: Bs.M = SDF (Belt speed × material = shit done faster) Another win...
7 points
-
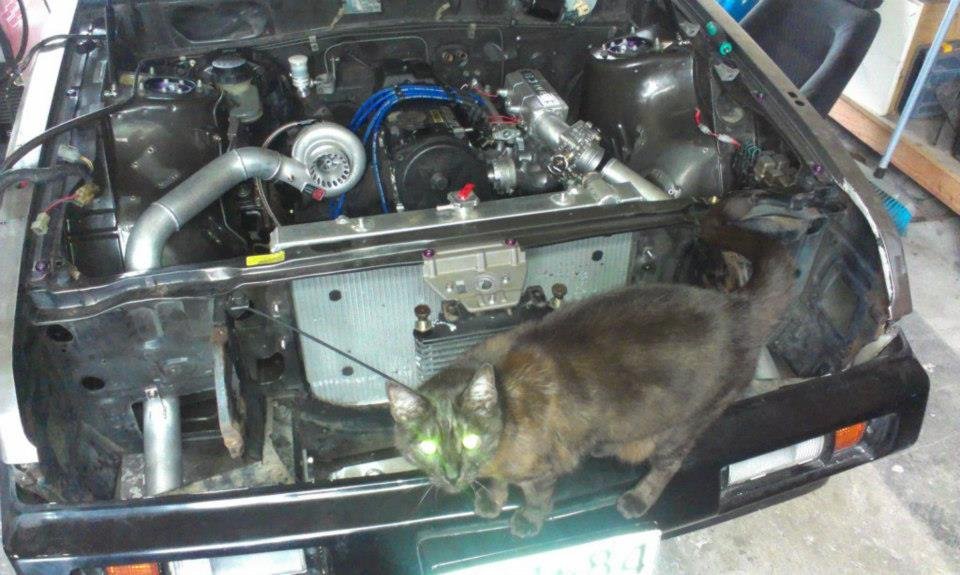
What a dude. Is his fur white underneath? Mine has lasereyes. He gives me the stare when I'm off task.
5 points
-
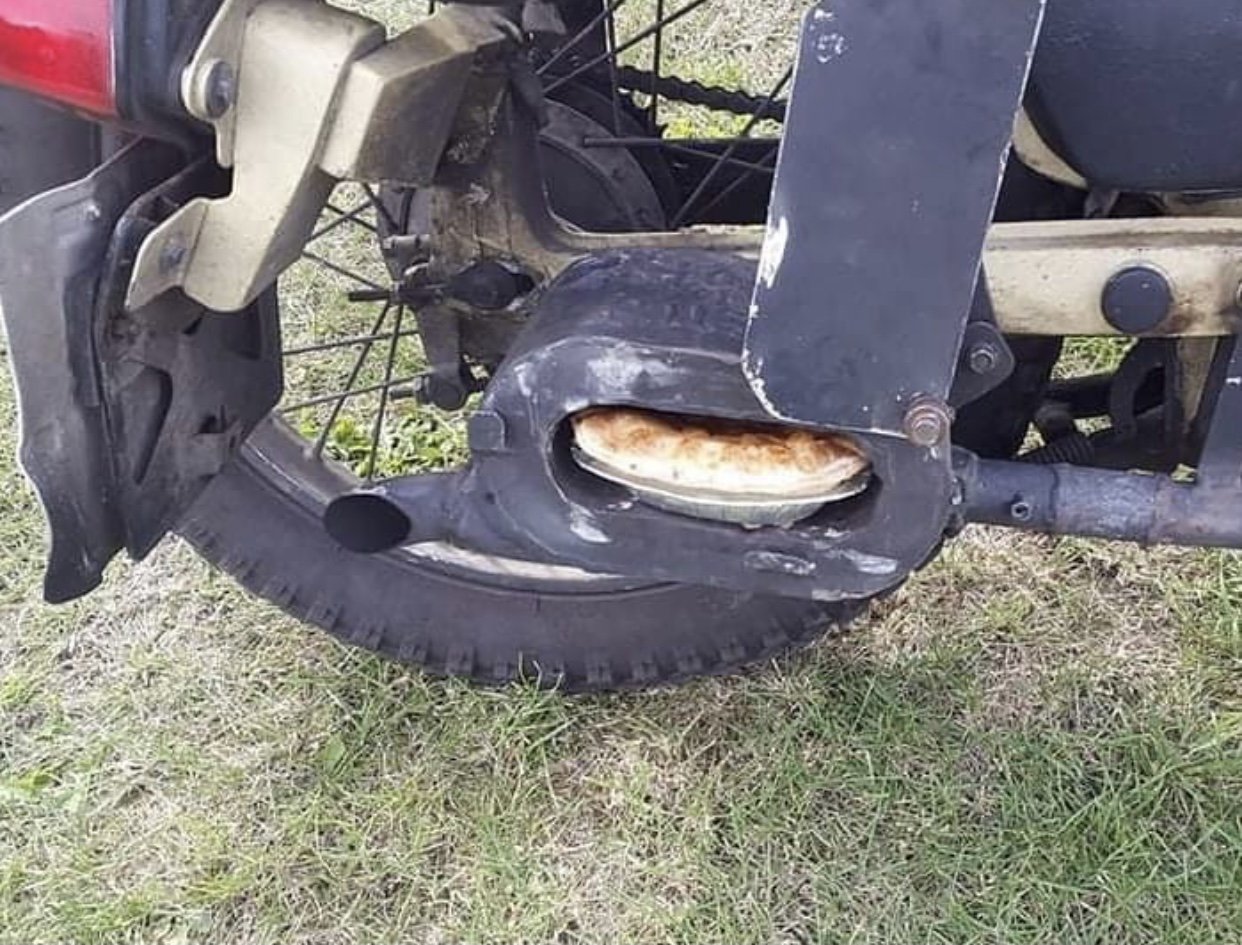
It's okay, it'll still tick and burn oil :-).4 points
-
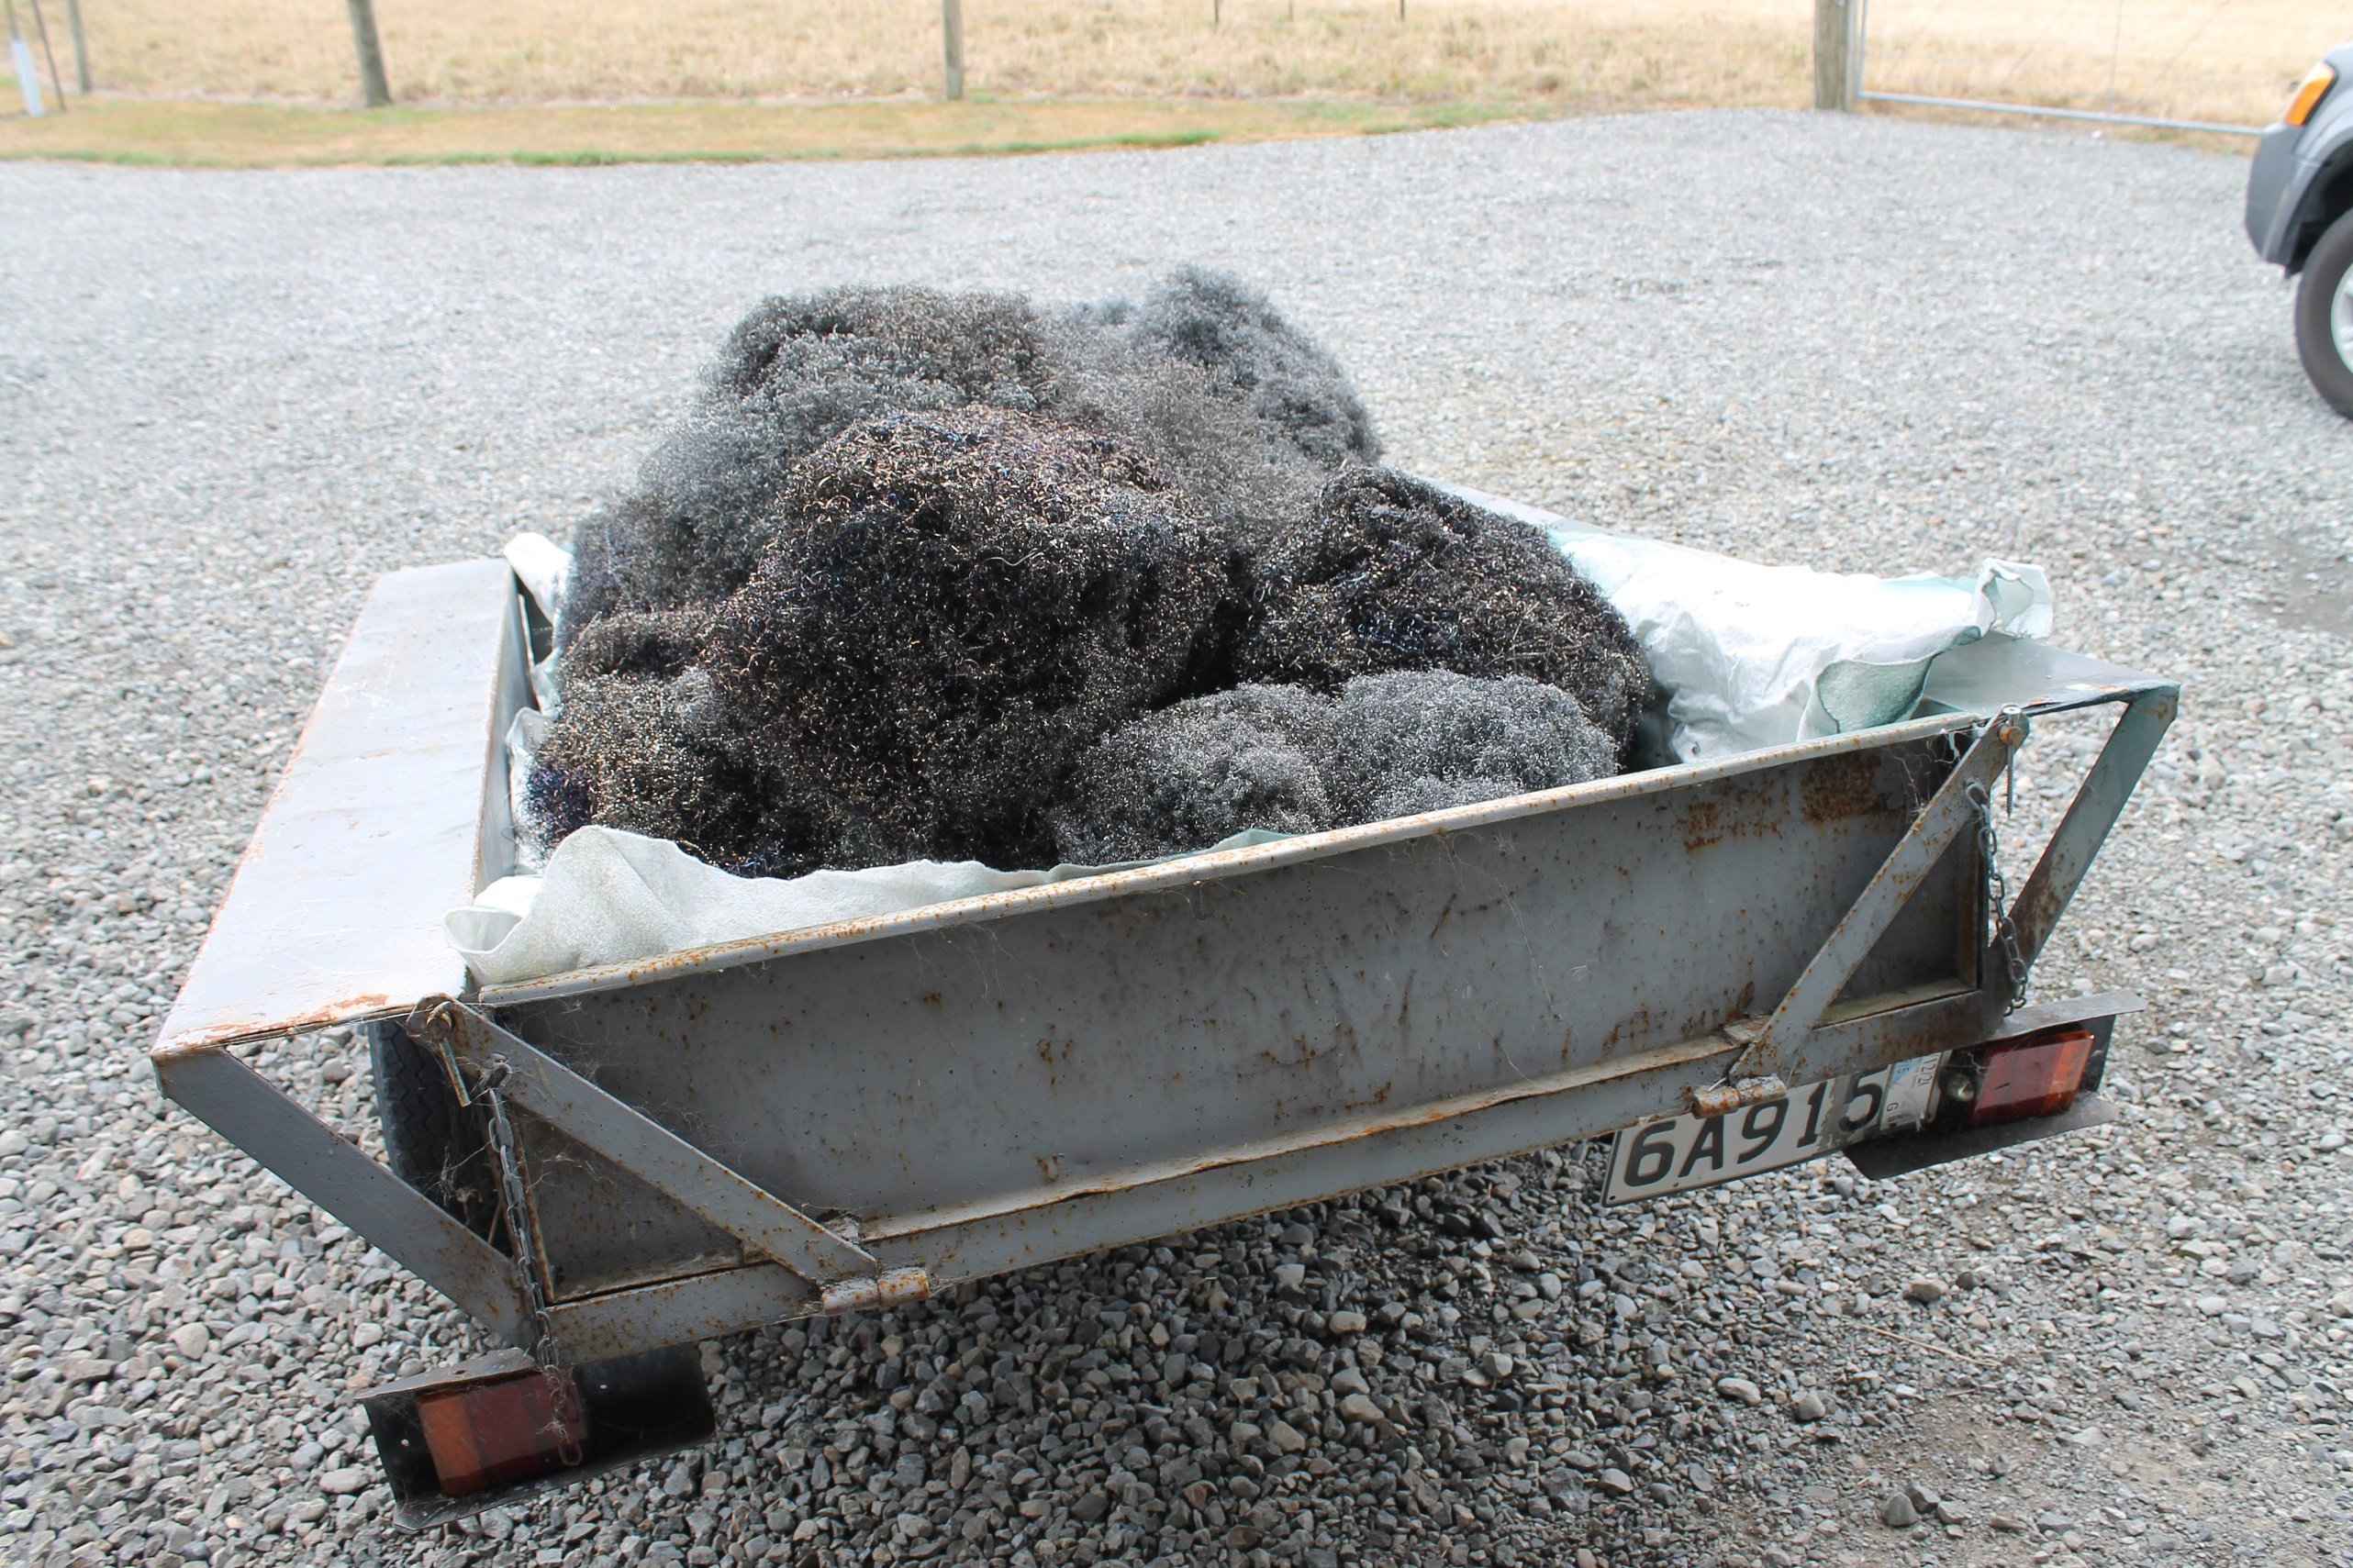
I uploaded a video of my cat who loves to hang out with me in the shed, even when I'm making loads of noise. The video also shows my redneck contraption in action Tortron, I think about 100kg of steel wool was made lol
4 points
-
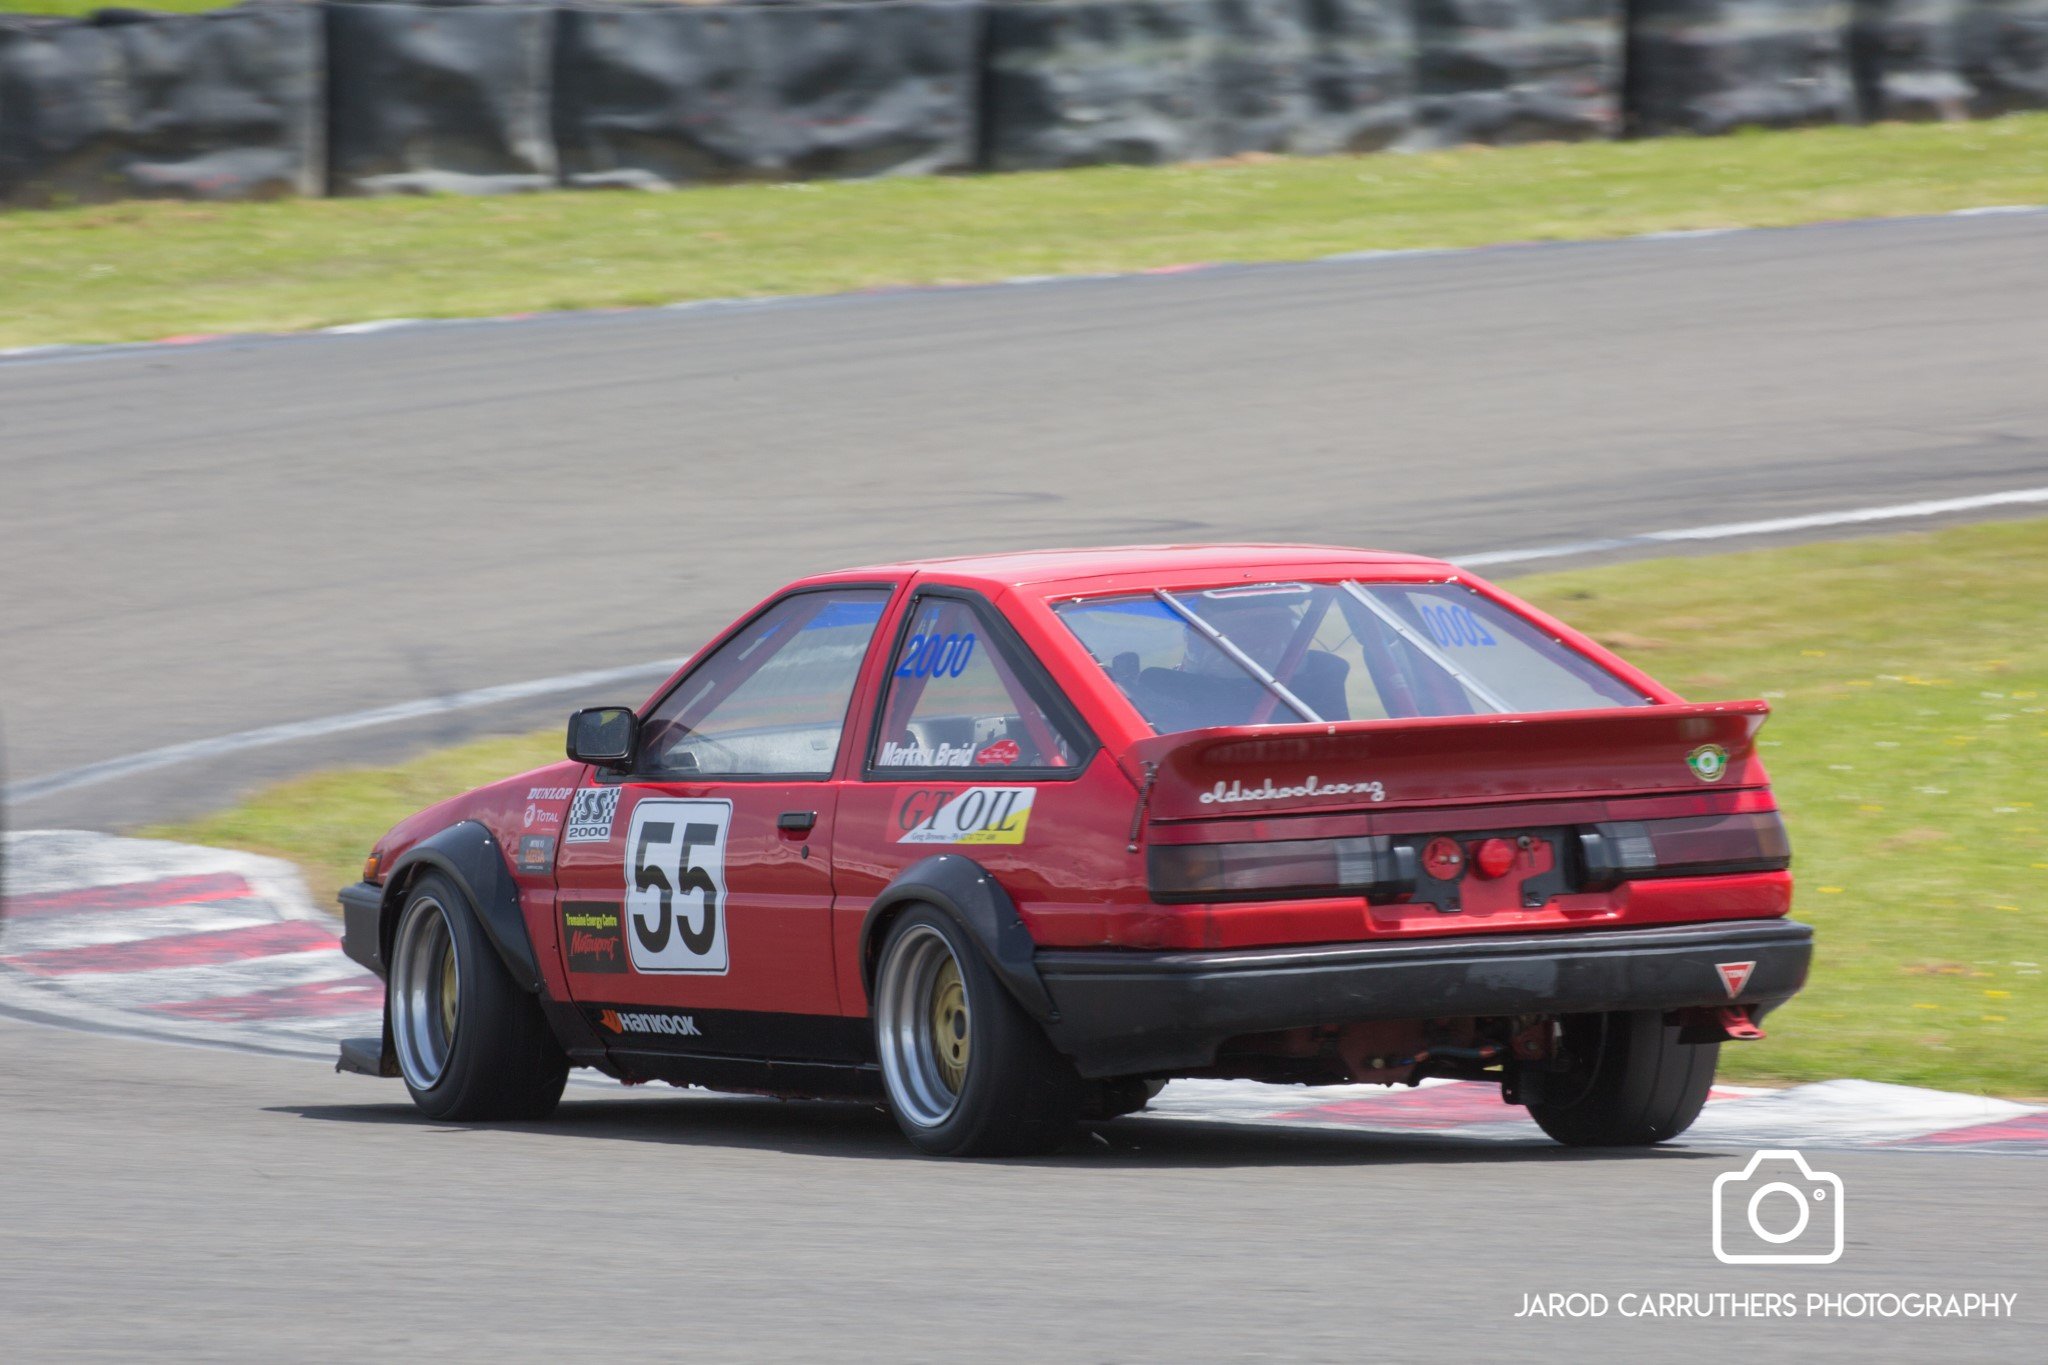
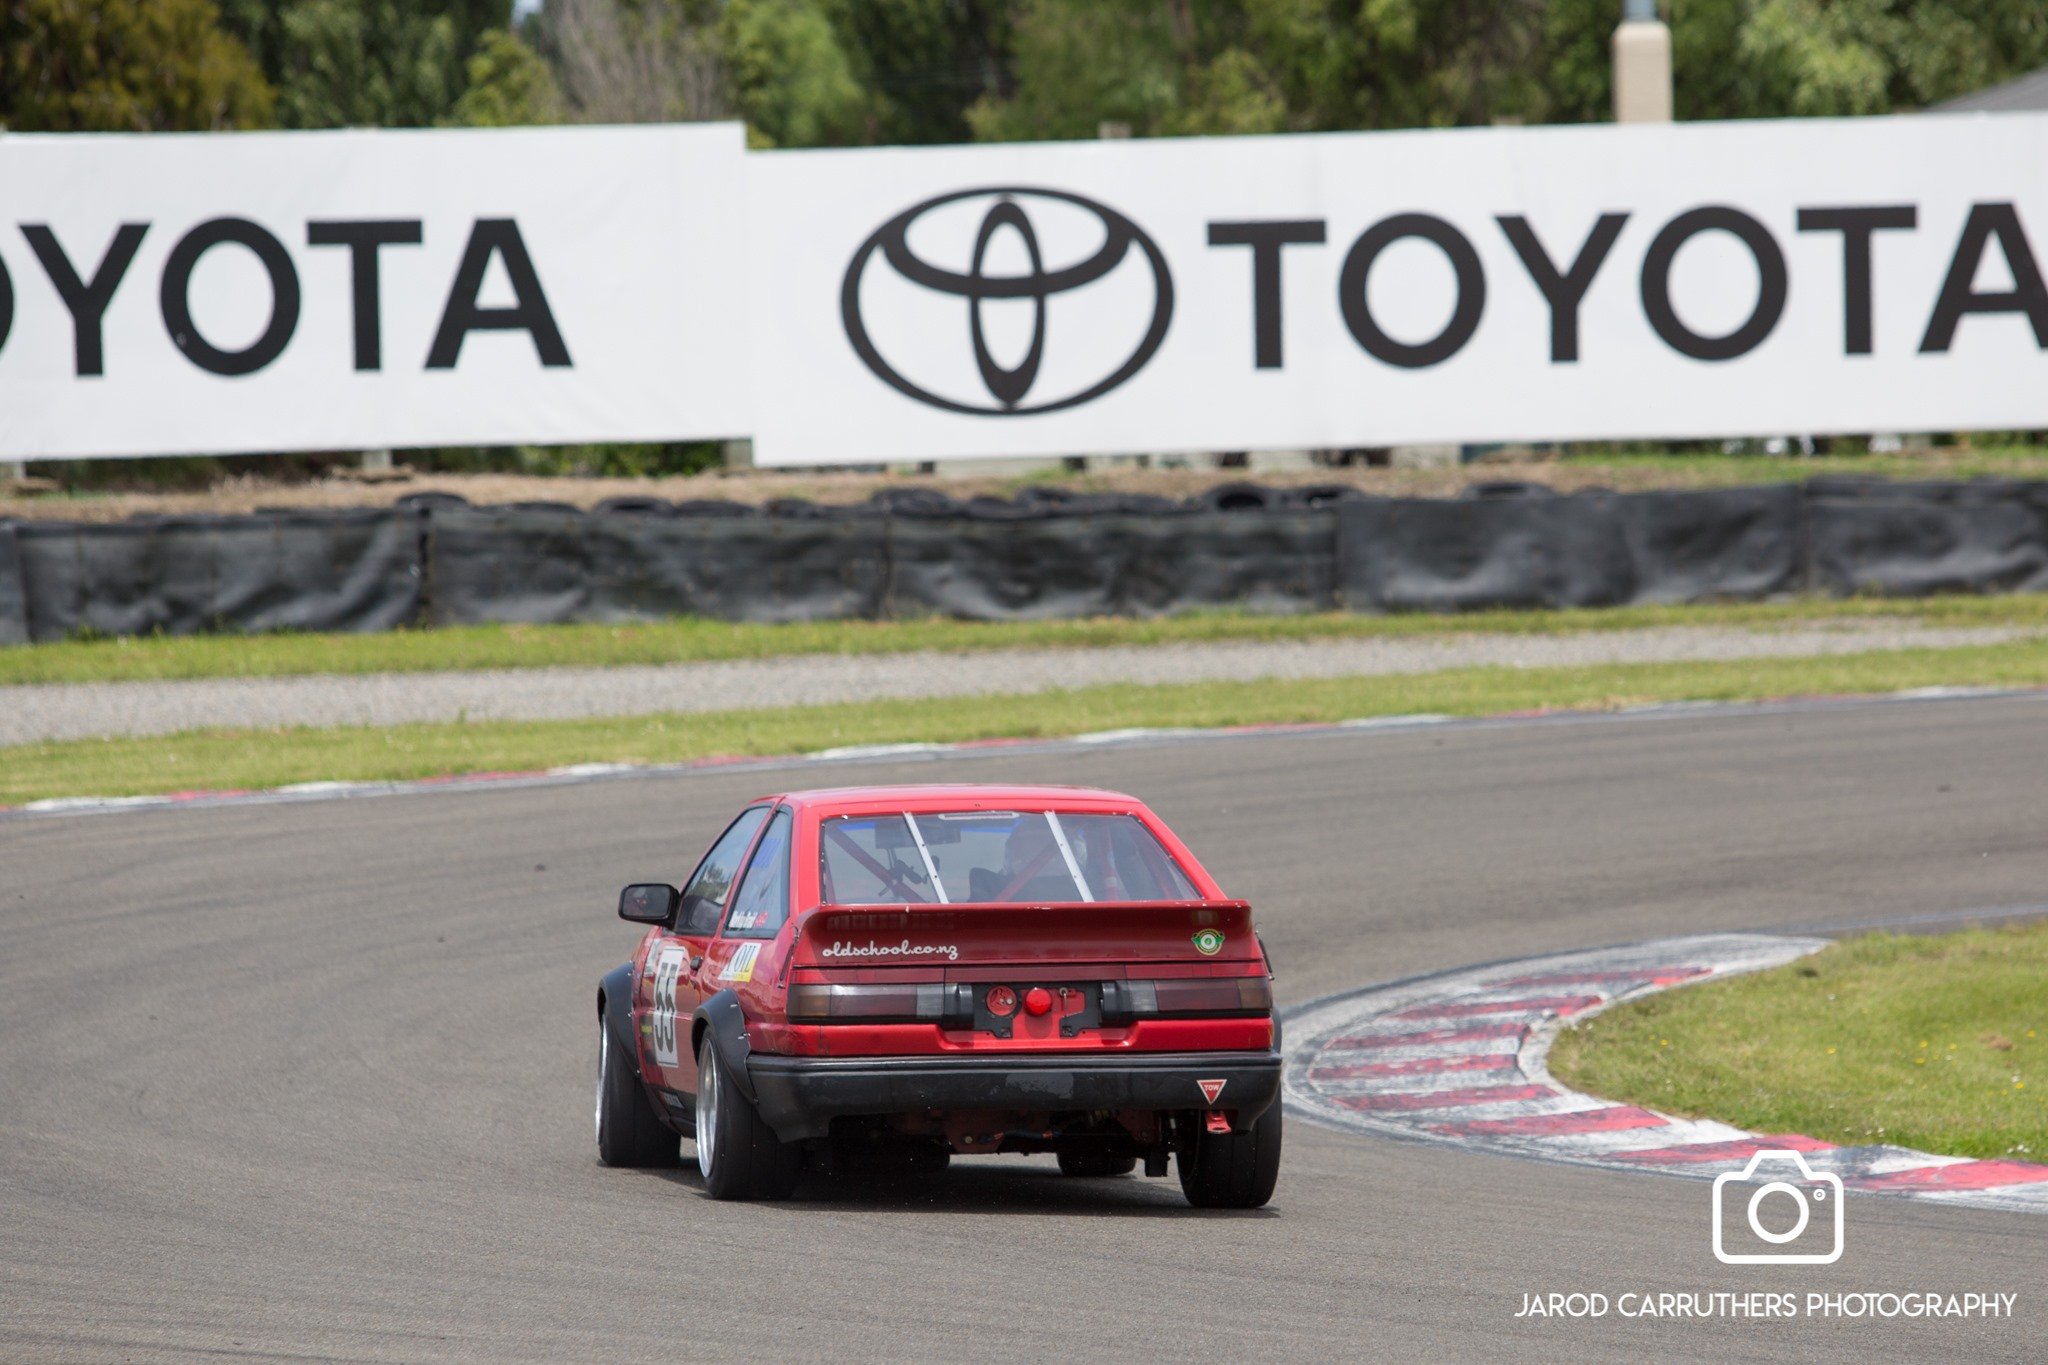
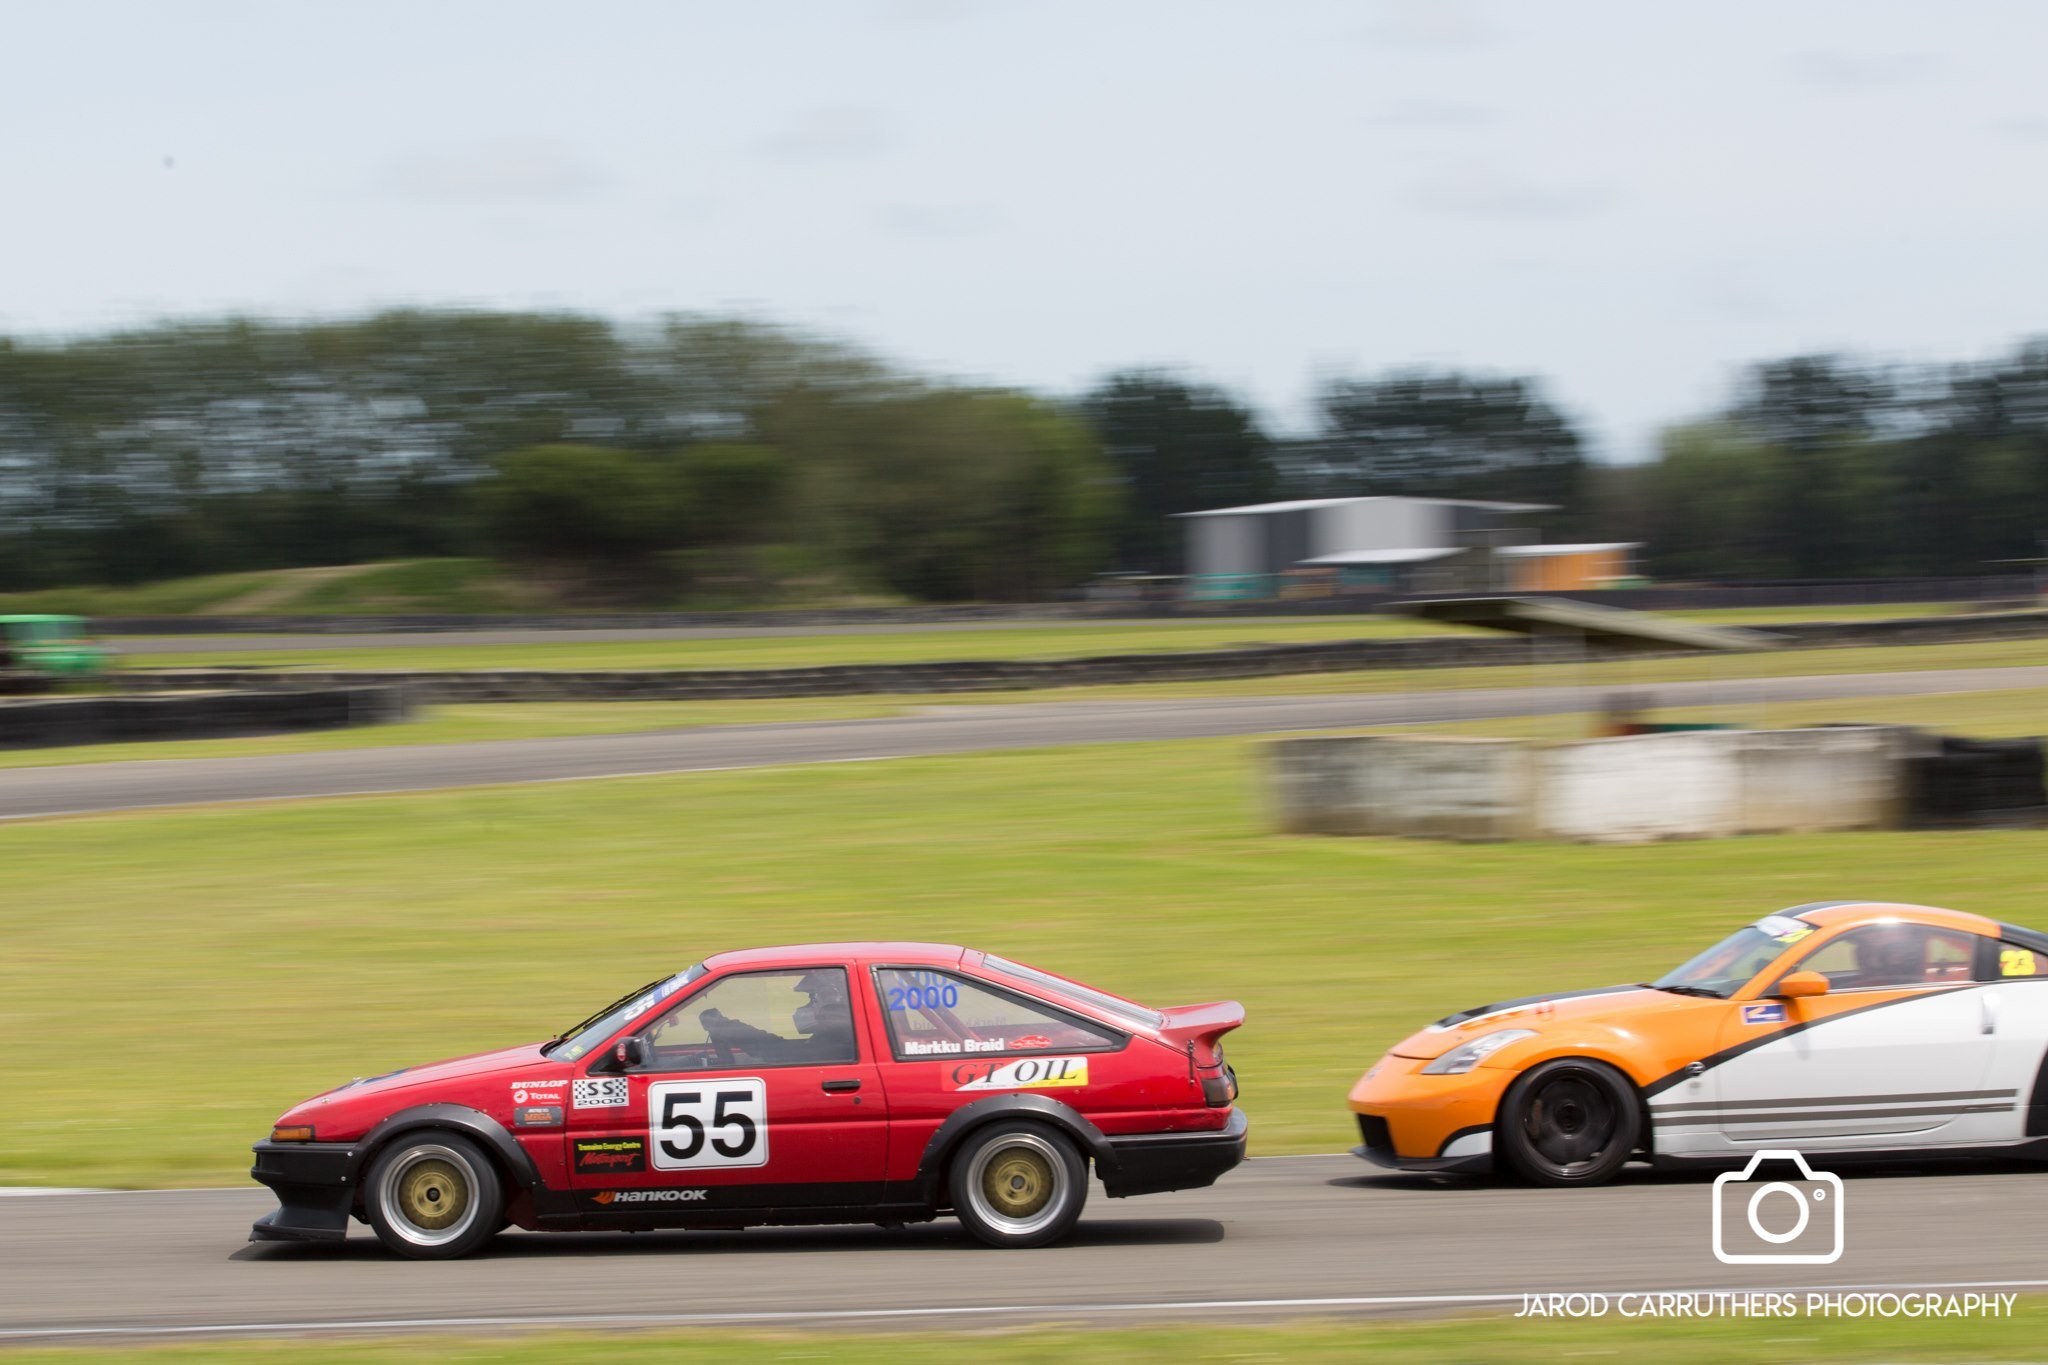
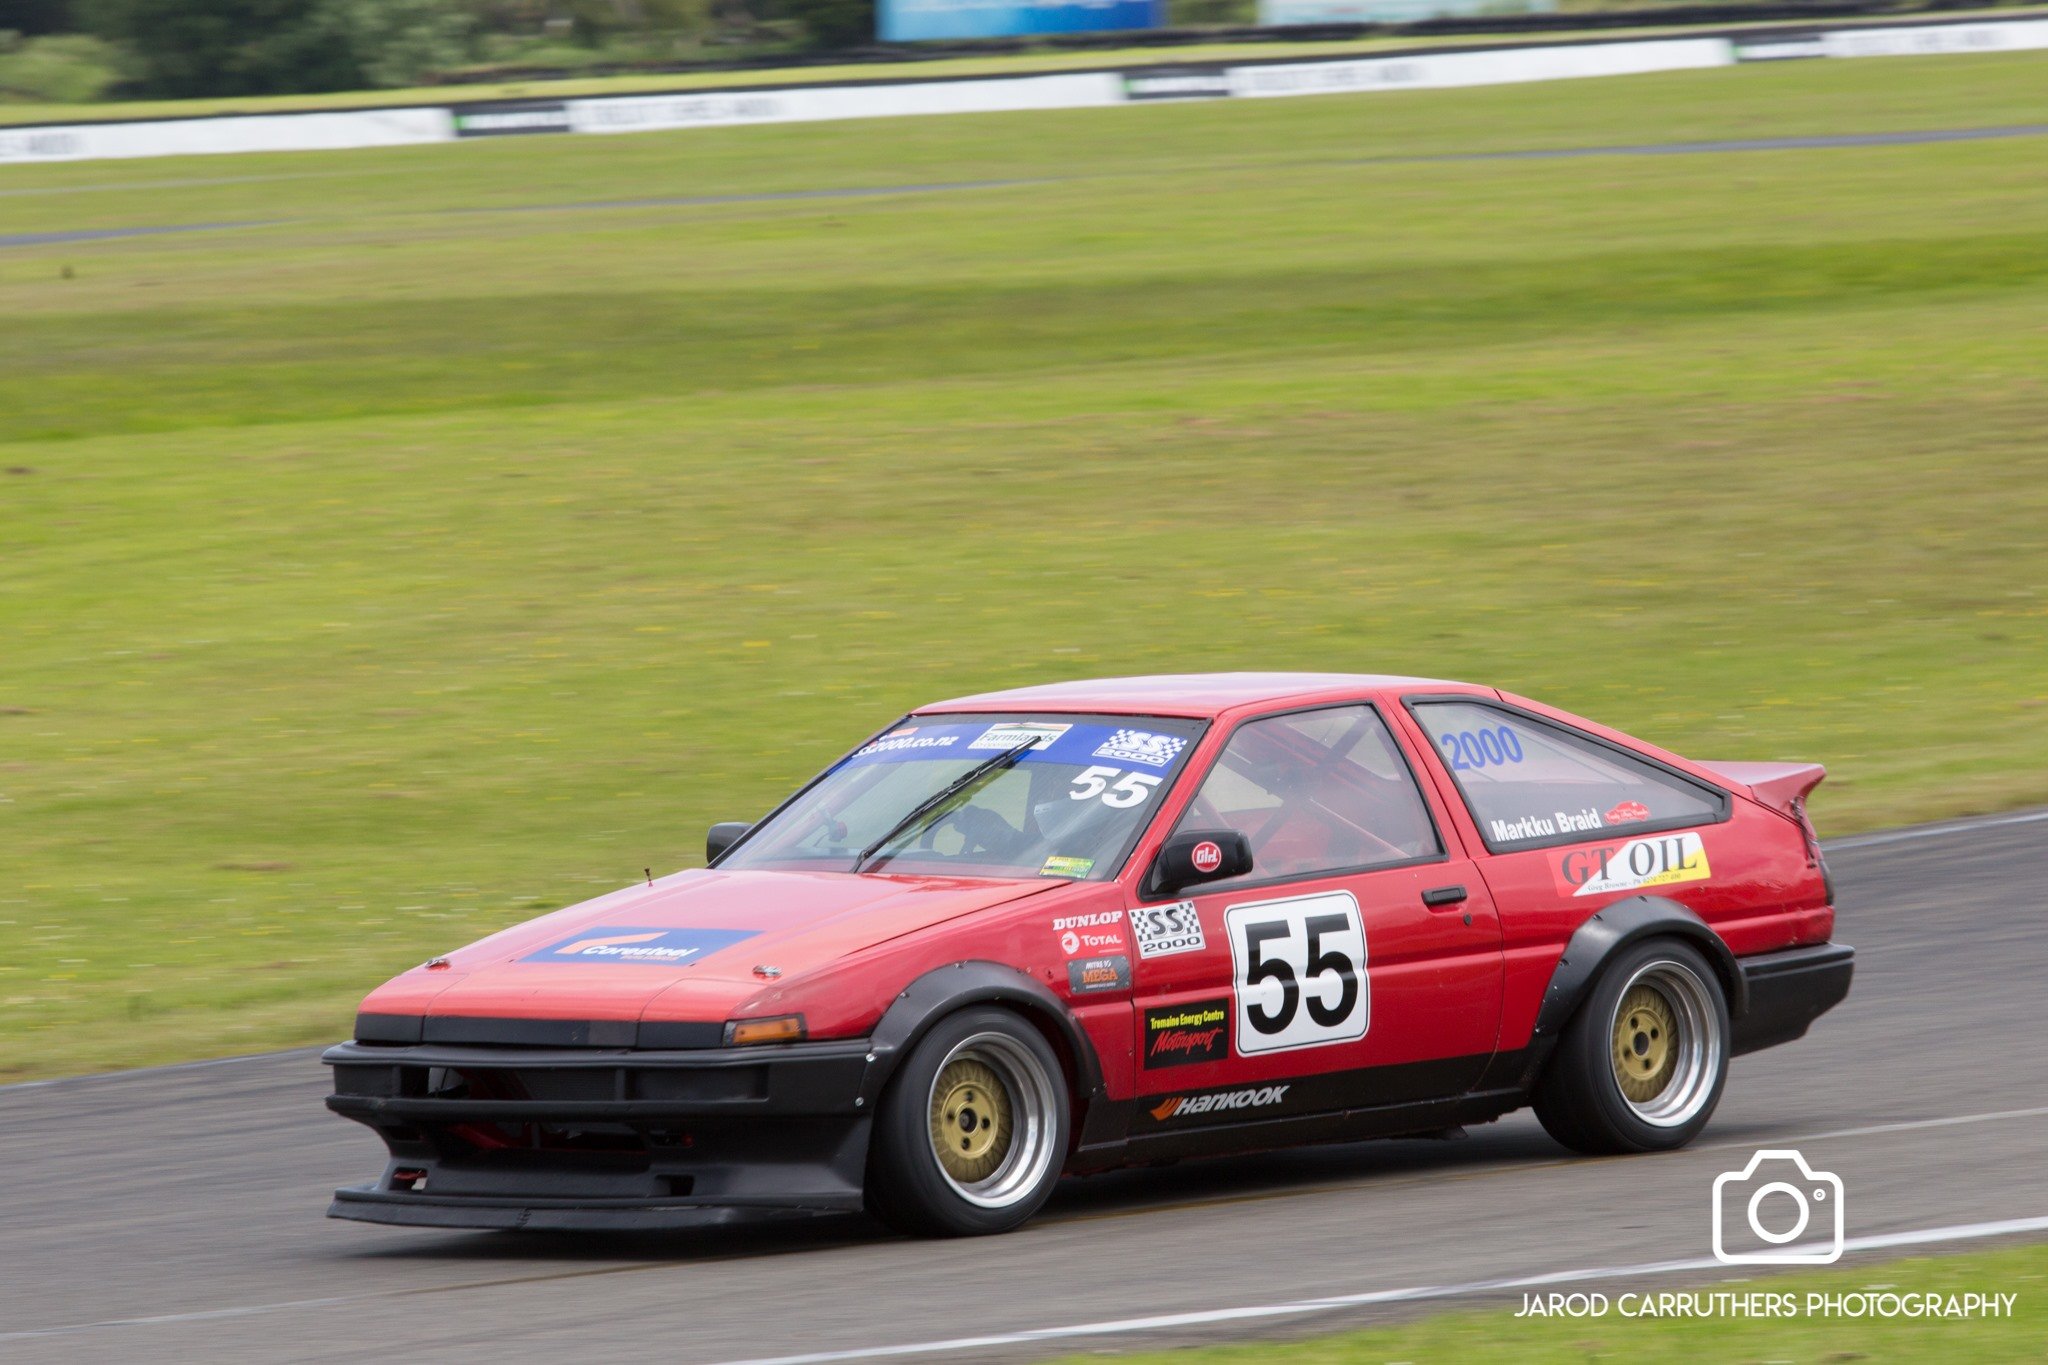
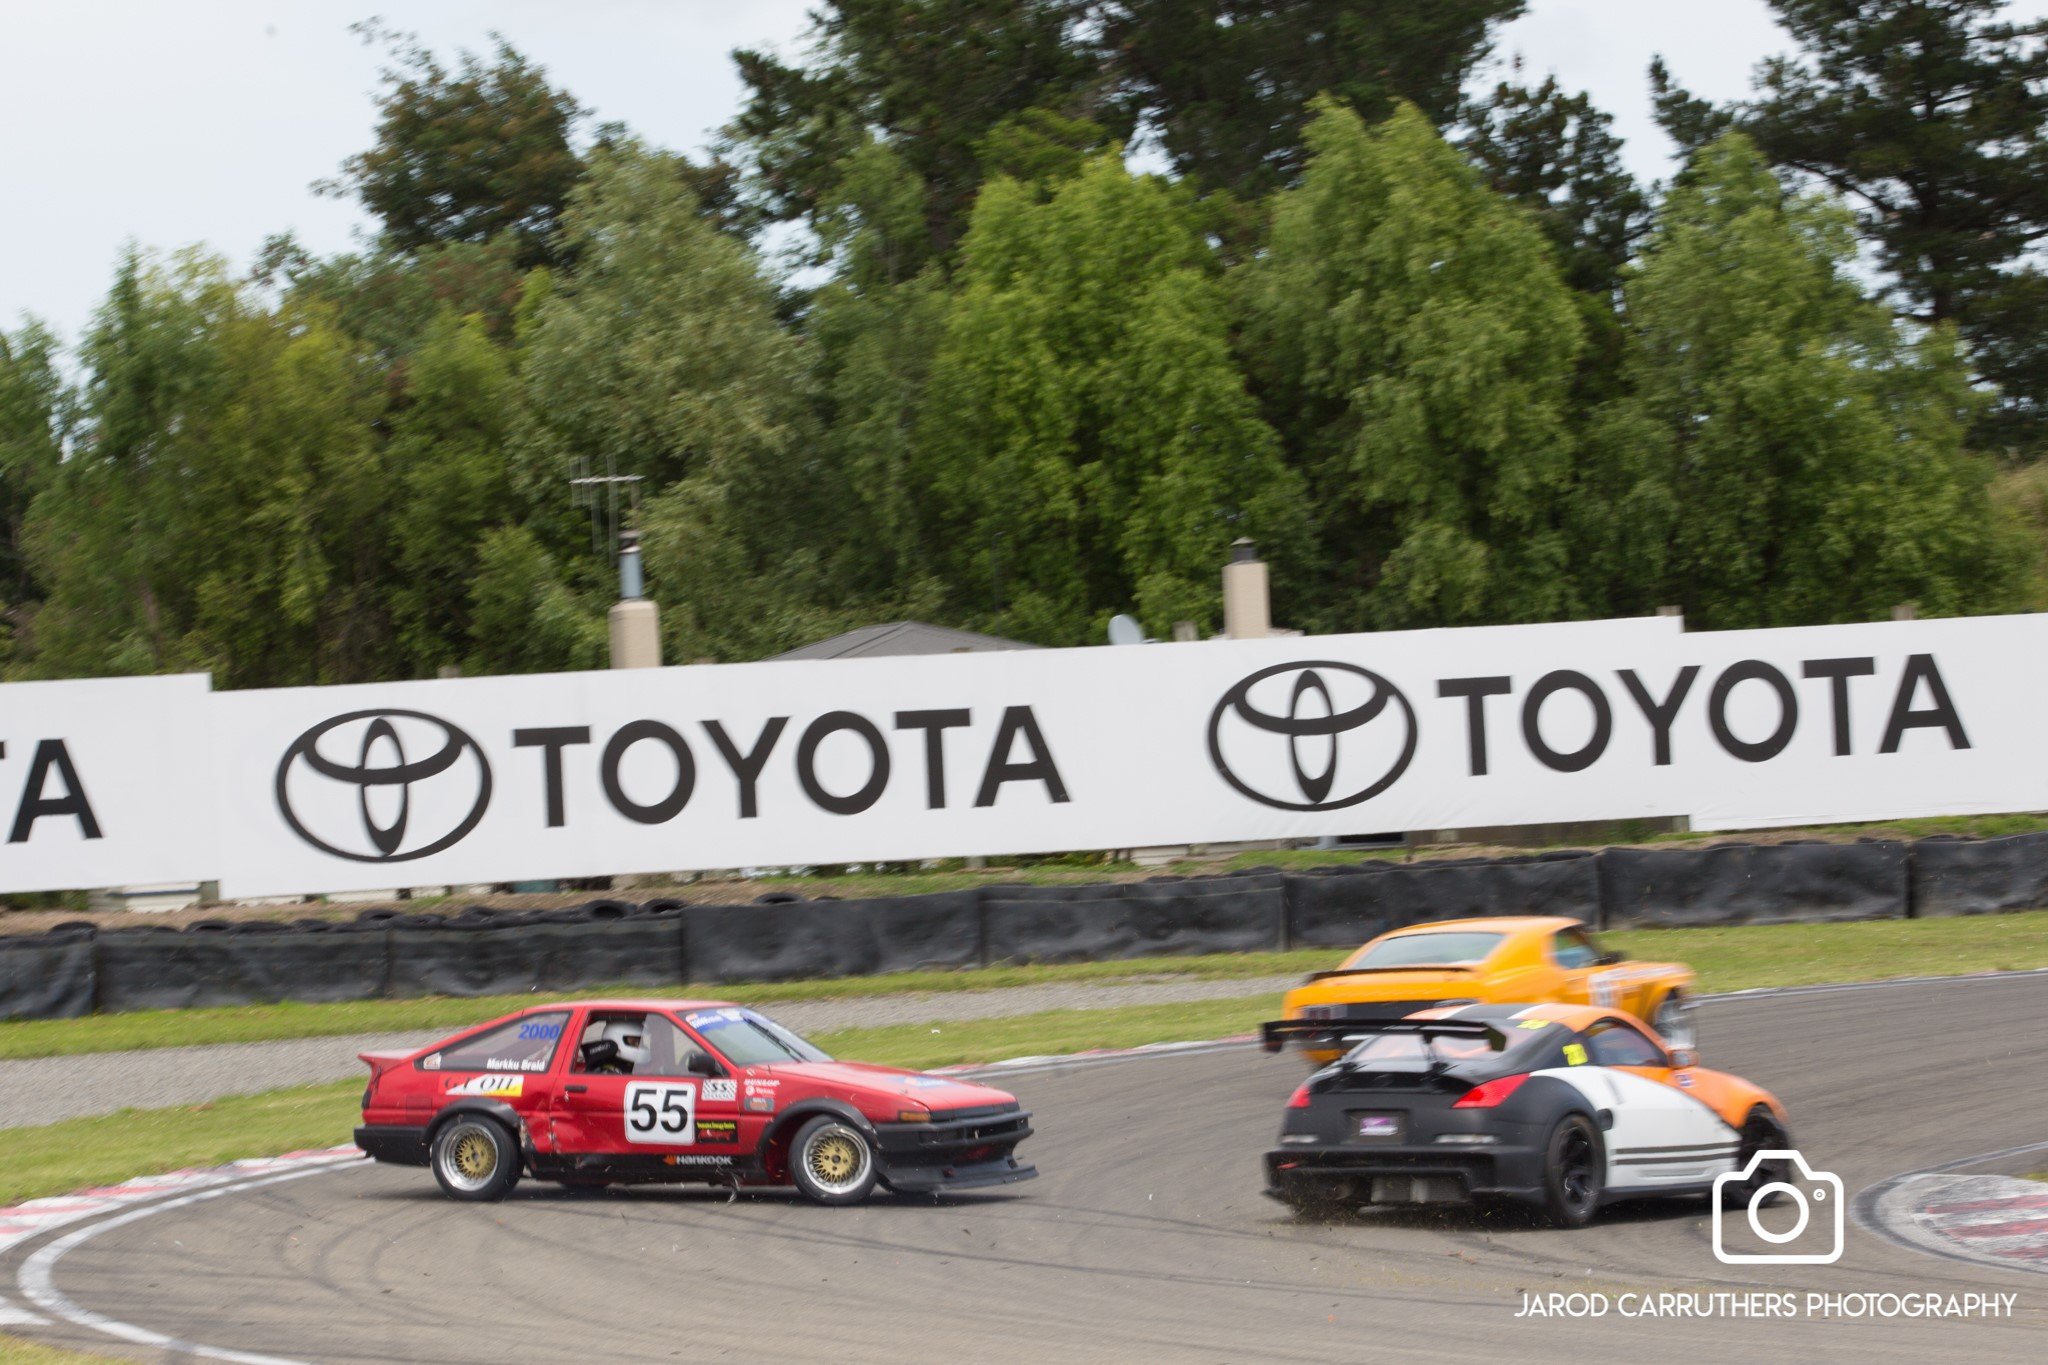
A few photos from the Jarod Carruthers Photography. The car looks like it's behaving itself really well! There's minimal dive under brakes and it's sitting quite flat in the corners.
4 points
-
VTec set to come in at 5000 RPM instead of factory 6000 or so, peak torque boost, thankyou Honda engineers u r awesome. I think it outputs more ATW than my stock 04 WRX did.3 points
-
I feel this in my bones, and is definitely the impression I've gotten over the last couple months - it's easier to modernise and get support for modern tech than it is for old stuff. One of the first things I was told is that I should get a modern turbo for eg. I'm definitely keen. I know that there are many more options out there for me that are more efficient, easily maintainable, powerful, etc. and I plan on diving into all that stuff at some point. In the mean time I want to get it to a "it works" baseline that I can work from, and the easiest way (again for me) is probably backwards. Just one piece I need to source and learn about (for now) instead of multiple different systems to learn for an engine that may or may not have other things wrong with it. Of course this assumes that the engine has nothing else crazy wrong with it, but even then it seems like this would be a more stable platform for a beginner to continue diagnosing from. I'm hoping this isn't a rookie mistake. Hopefully this dizzy that I'm picking up tonight fits the bill!3 points
-
well, after a very long day in which the gun blocked multiple times and i poured 500 mils of paint all over the bench i finally got a sealer coat on the car. the drivers side isn't done yet, ill turn the car around and do that tomorrow. now the fun job of sanding can begin 2020-12-06_05-31-17 by sheepers, on Flickr3 points
-
Once again thank you immensely to @Firebrand for coming through with not only a new dizzy but also a lot of other swag, including a new dash instrument cowl. We (told my partner) have massive smiles on our faces. He didn't even ask for any illicit favours. I've updated the project thread with pix of the new loot. Also thanks to @gibbon for checking and for @Sigma for offering up his as well, and to the other big brains in this thread offering me their wisdom - I am very appreciative and feel very welcomed. Here's the old cowl to show how good I have it.2 points
-
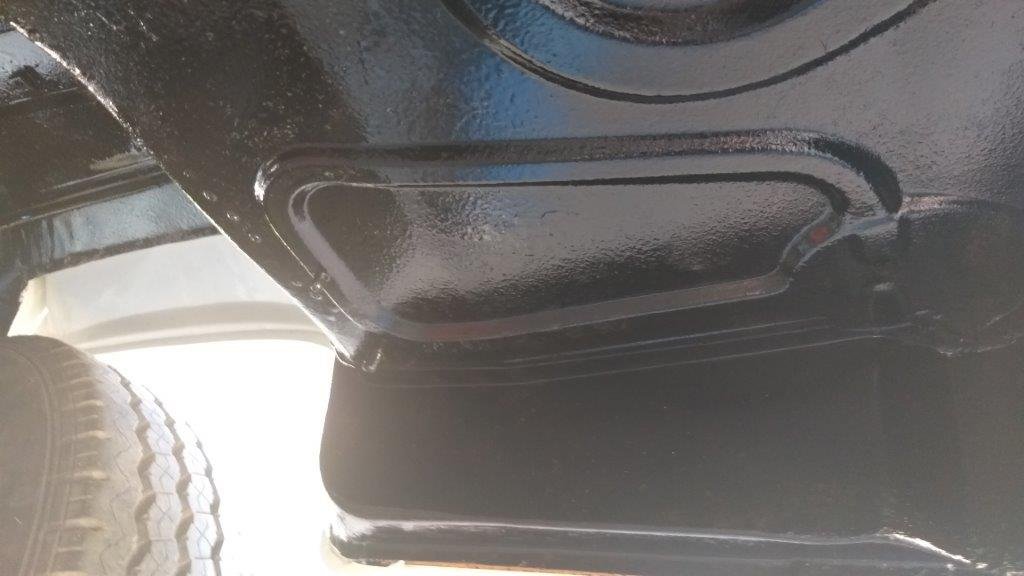
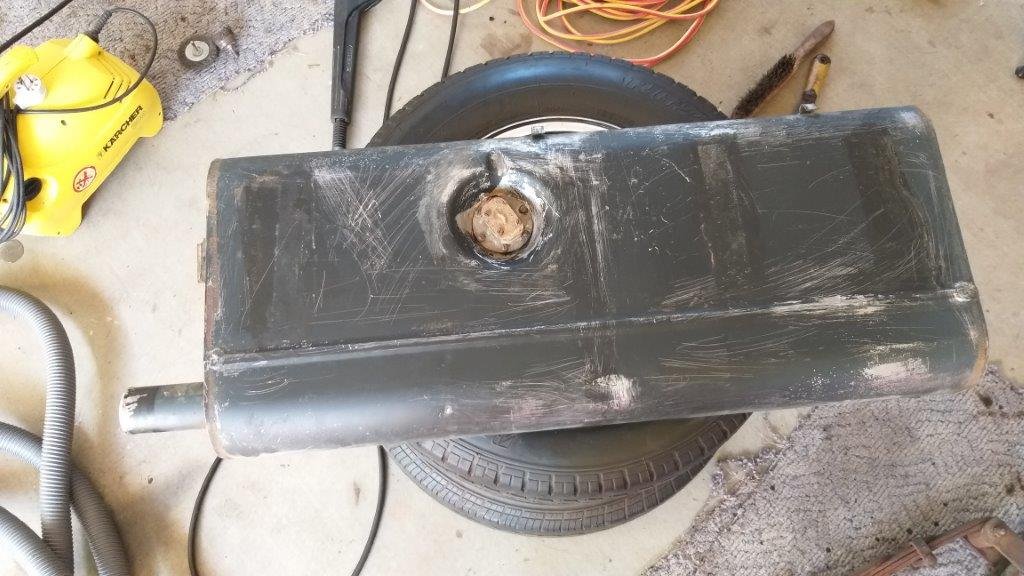
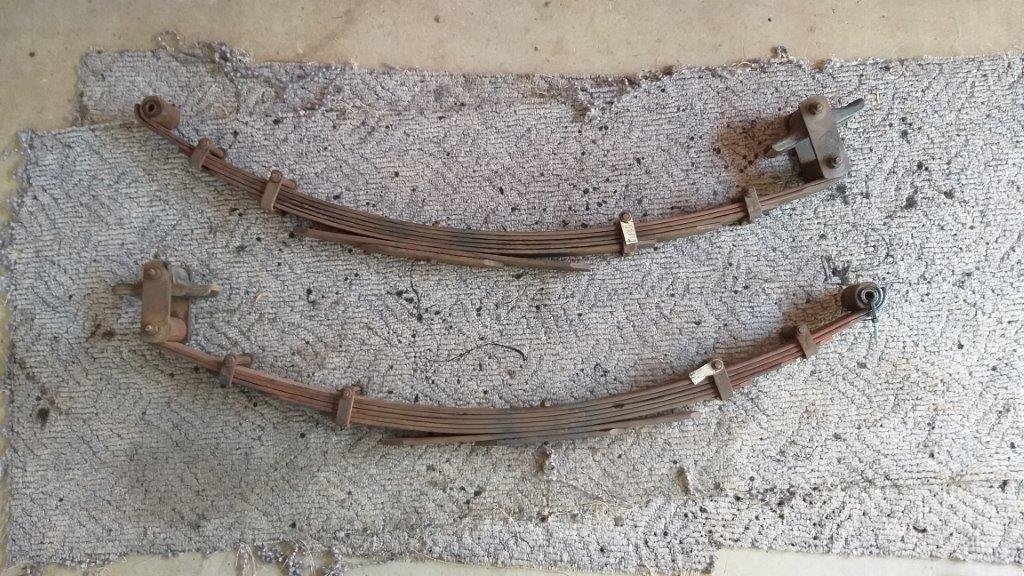
It's a bit of a lame update today. This morning I finished applying the final coat of paint to the chassis and underside. Even although it is satin black the paint has a textured finish so doesn't photograph very well, especially with my little potato camera, but I've included a shot of the underside of one of the foot wells after the first coat, just to give you an idea. With the underside done I can now concentrate on cleaning up the various bits and pieces before final assembly. I started the ball rolling by giving the fuel tank and the rear leaf springs a bit of a scrub. The plan for tomorrow is to refurb and mount the leaf springs. I've already sourced new rubber bushes which I will press in tomorrow. I'm planning to remove the two short lower leaves that the under mounted axle bolts up to in order to drop the rear ride height by a tad. More tomorrow.
2 points
-
The no fume one is no good for removing anodising - always get the toxic version2 points
-
He's been a pretty good inspector but it's hard to keep him focused on the job.
2 points
-
91 is fine to get it up and running and cruise it around a little, but it'll knock for sure if you start to give it the jandal. They're a surprisingly easy motor to make knock, and it kills the factory ring lands on the pistons really easily as they're very thin. I'd go with 98 :-). When you say your coolant was chocolate, do you mean that it was just brown (rusty water) or it was more like a milkshake? Put up the some pics of the dizzy you got :-). The basic process to getting and engine to fire is to check it has air (compression), fuel (in a reasonable quantity), and spark (at the right time). An engine will show signs of life with a surprisingly wide tolerance on these three things. Most fuel injected stuff has diagnostic procedures which can be super helpful to figure out what is going wrong, but not your generation of Starion unfortunately. This is just a stepping stone to getting the engine started, as you'll probably be able to get it to fire relatively easily, but that will expose further issues to sort. It's all fun though :-). For a Starion in particular, this is what I'd do: (once you've got a dizzy in place, are you familiar with how to fit the dizzy and make sure it's timed correctly?) Fuel: Remove the cross over pipe that connects the turbo to the intake manifold. Get someone to crank the engine and see if you can see any fuel spraying out of the injectors. You can do this because Starions are throttlebody injected, having two injectors placed above the throttle plate, not an individual injector per cylinder. If you can see fuel spraying (should form a pretty fine mist), move on to checking spark. If you can't see any fuel spraying, you've found a problem. Doesn't mean there aren't also many more problems, but this is certainly one! Check there is actually fuel in the tank, easiest way to do this is just be chucking $10 in. Then you know. Remove the fuel pump access panel in the boot. Passengers side, under the carpet. Single screw, probably sealed down with gum-tape stuff, pry it up nicely. With someone cranking the engine, feel the fuel pump to see if it is vibrating at all, or making any noise. If it seems completely still, its not running for some reason. Tap it lightly (the housing it aluminium, don't dent it) with a hammer and try again. If its still not running, its either a dead pump, dead MPI relay, or a wiring issue. How are you with a multimeter? If the fuel pump is running, but no fuel is spraying, your injectors are likely at fault. They could be gummed shut from years of sitting (most likely), or they're not getting a signal (ECU or wiring fault). There isn't really a way to check them that doesn't involve pulling the injection mixer apart. You can connect and LED (make sure to get the polarity correct) to the injector wiring going to the injection mixed and see if the LED flashes when you're cranking the engine to check there is some sort of signal. It's probably worth replacing the fuel filter (engine bay, passenger side, mounted down near the chassis rail) as a matter of course, but it's unlikely to be completely blocking fuel flow and stopping it from at least trying to fire. Spark: Remove the cross over pipe that connects the turbo to the intake manifold. Get a can of 'Start ya Bastard' from Repco / Supercheap. With someone else cranking the engine, spray this down the intake manifold, stand a little way back, and not directly in line with the intake manifold opening. This stuff is much easier to ignite than petrol, so even a really weak spark will set it off. Usually there are three outcomes to this: The engine fires normally, tried to run, and then dies (this is what you want to happen ) There is a backfire through the inlet manifold and some fire comes out. This probably means your distributor timing is 180 degrees out, and you need to refit the dizzy correctly, and make sure the plugs leads are in the right place. Your factory service manual should have a good section on this, just make sure when you time the engine to top dead center on cylinder 1, its on the compression stroke, not the exhaust stroke. This is the second best outcome as it's likely to be an easy fix . Nothing, just cranks and is dead as a doornail, Sad Panda. In the case of option three, you need to completely confirm that there is no spark. To do this, remove the no.1 sparkplug. Re-fit it to it's ignition lead, and run a small crocodile clip from the ground strap of the plug to the battery negative post. Get someone to try and crank the engine while you watch the plug (rest it somewhere, don't hold it). Chances are you'll see nothing, confirming that there is no spark. If there isn't a spark, I'd first check the coil. Using a multimeter, you can measure the resistance across it's two terminals. There will be a spec in the service manual for what this should be. If its open circuit, the coil is dead. Replace it with a 12V can coil for an electronic ignition system and try again :-). If the coil checks out fine, you're into the realm of needing to scope signals and what not... Not insurmountable, but requires a bit more gear A couple of things to be aware of when you're reading diagnostic stuff on forums; Starions run a completely divorced injection and ignition setup. The ECU in the cabin controls the fuel delivery only, with the igniter box mounted to the inner passengers fender controlling the ignition. This stuff is from the beginning of the fuel injection era. It's actually pretty robust, but a little different to troubleshoot :-). Also, most testing I'd usually do with the cross over pipe connecting the turbo to the inlet manifold removed, so I can see the fuel injectors firing. The engine will fire like this, but probably wont continue to idle, as the air flow meter isn't connected to the intake manifold, so the amount of air entering the engine isn't known by the ECU. Once it fire and want to start, reconnect this and give it another kick in the guts :-). Fingers crossed you can time it up, fit a dizzy, plug it in and she at least fires up :-). They're actually pretty reliable old girls, so I'd be cautiously optimistic as long as it hasn't been to fiddle-fucked by previous people playing with it :-).2 points
-
GOING DRAG RACING THIS WEEKEND
2 points
-
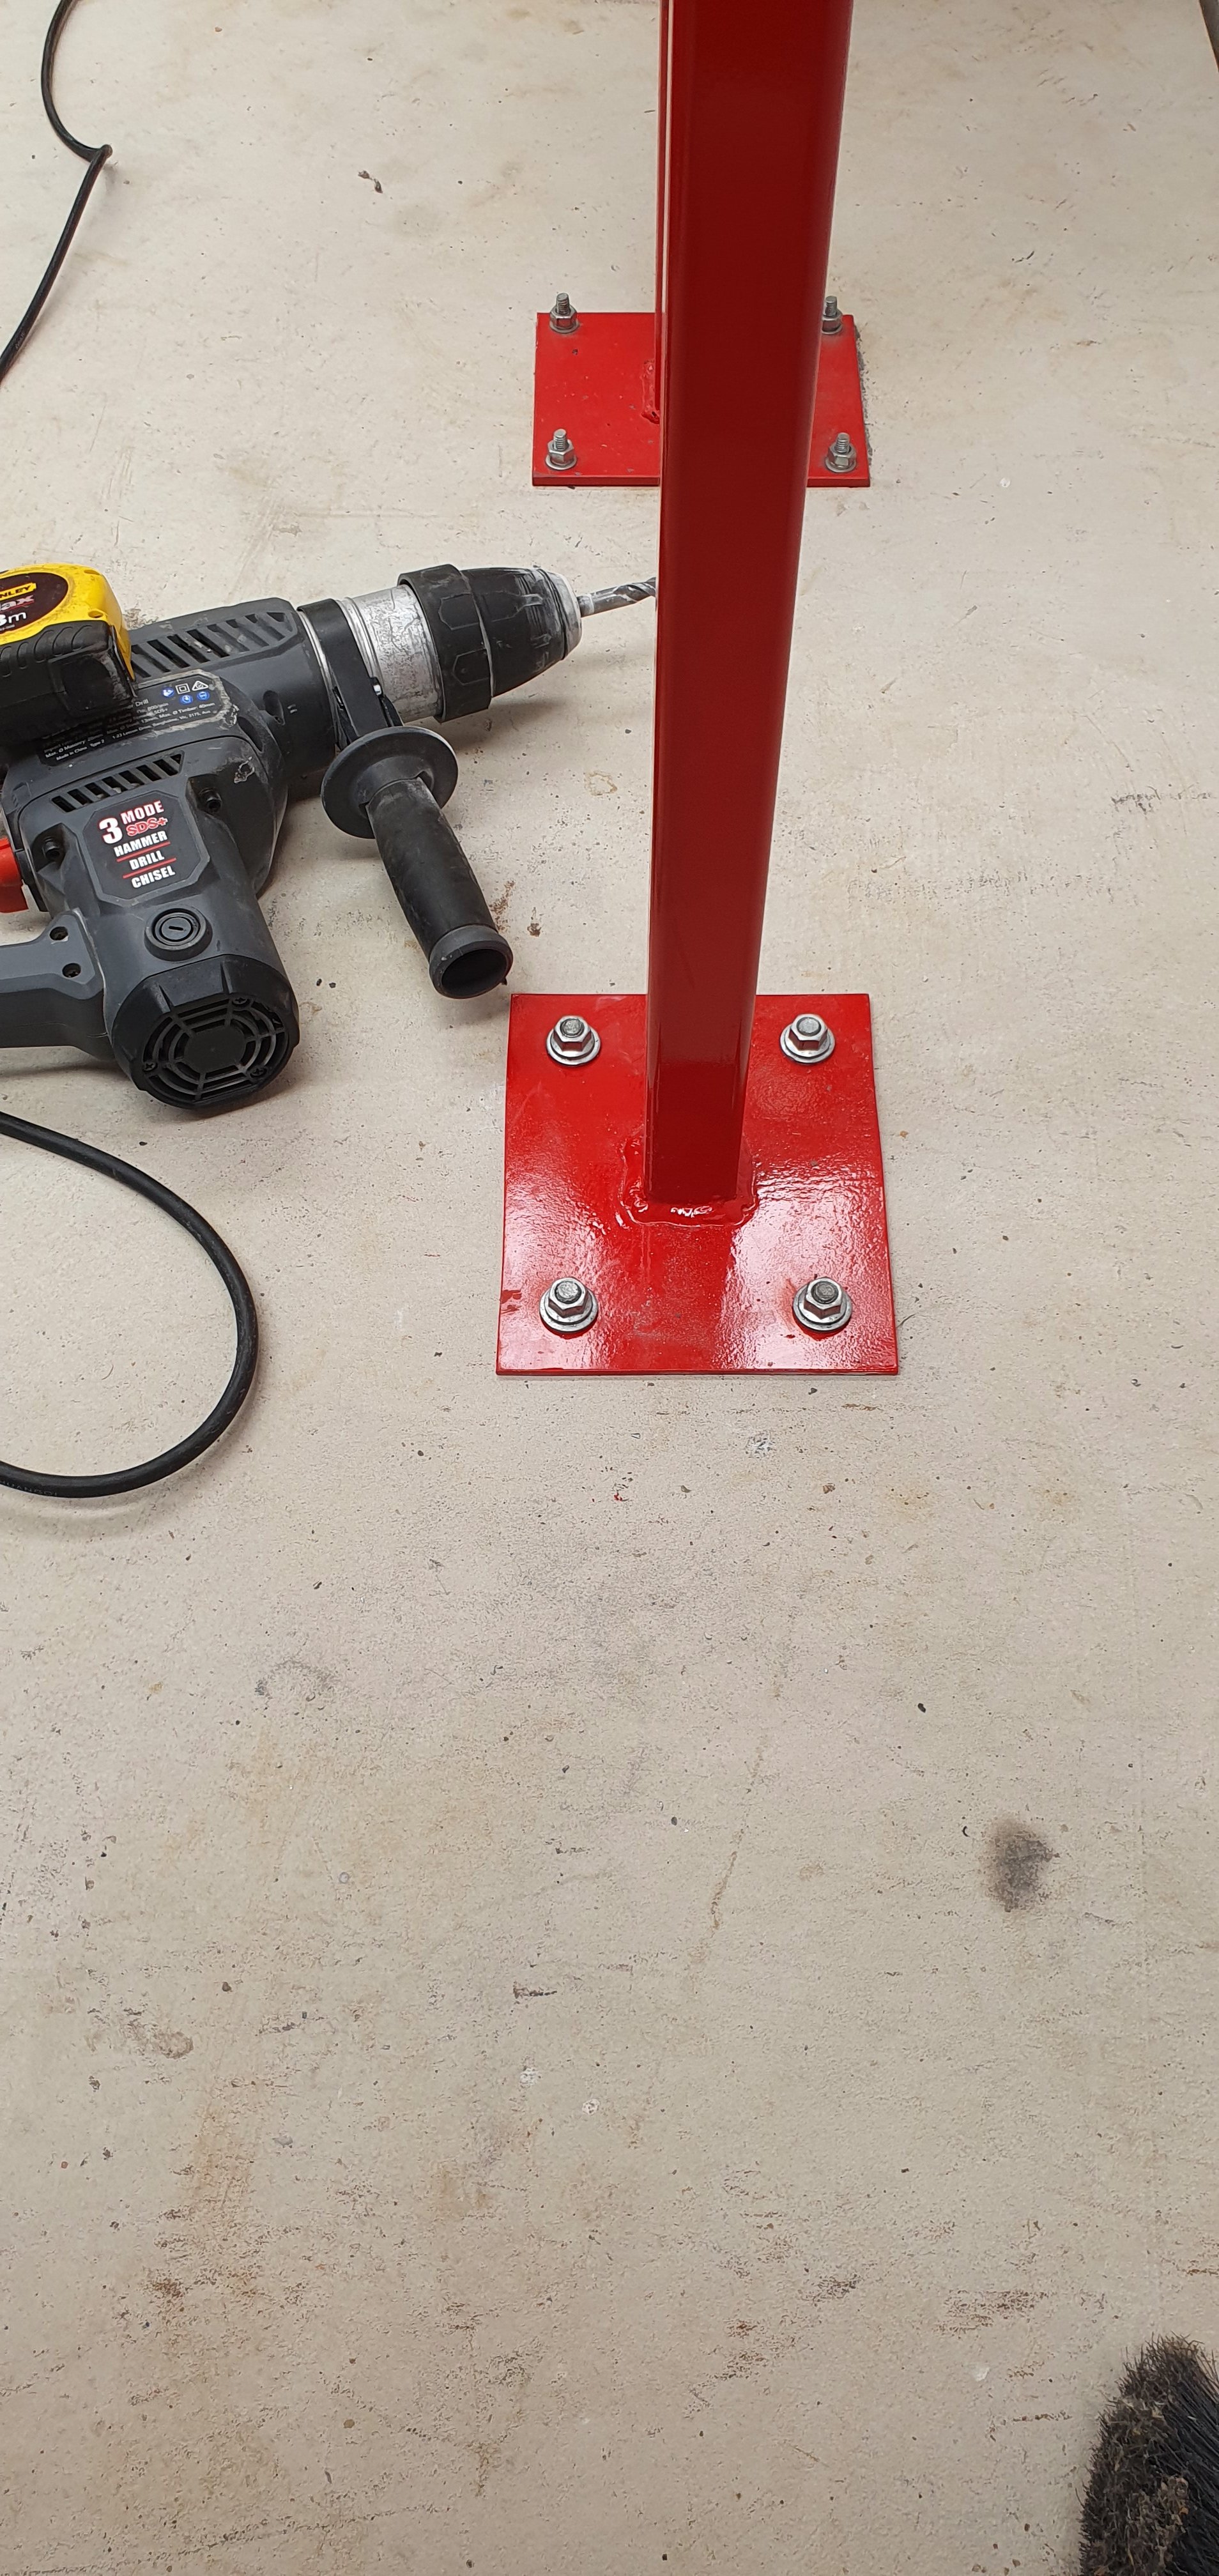
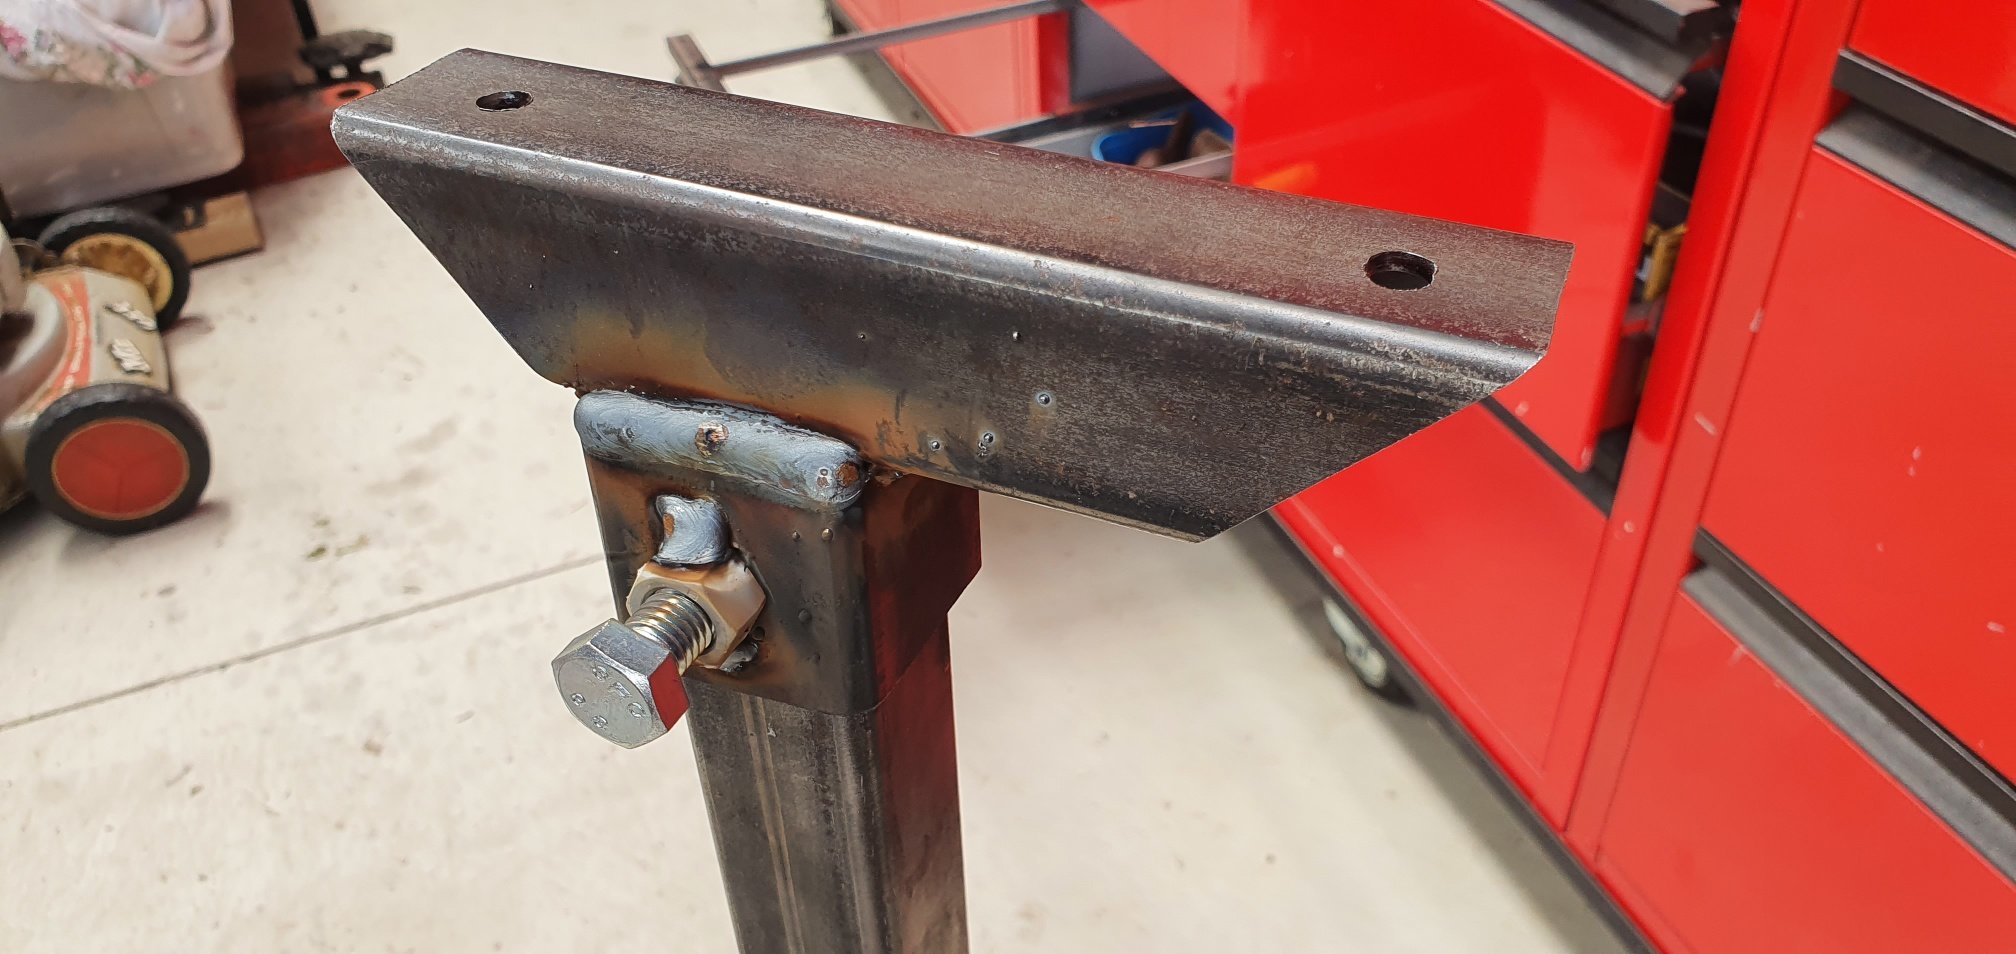
Finished and working great! Just need to bolt it down to the concrete so I can use it without fear of it toppling over.2 points
-
Well the last few days has been a bit emotional and busy. Did the last few tidy up jobs on the housetruck and added a few little features we had always intended to but never got around to (typical..) Main thing we added was a bit of decking on the roof. This serves a few purposes. The black butynol roofing gets fucking hot in summer, too hot to stand on. Not ideal for insulation or bare feet. It also gets a bit grubby = messy feet or shoes marking the floor or carpets. Plus the plywood roof is 12mm which is strong but still springy to walk on between the rafters. The decking is sat on runners above the rafters so now feels solid as. We got rid of the ugly old temporary pop out roof sheets of alloy that we'd put up after fixing the roofs and fitted new thicker shiny alloy with proper edgings. Also added gutters so now the rain wont run down the side of the popouts. So the last few days we emptied out all our stuff and moved it into the mezzanine or the cabin. Quite amazed at how much stuff we had collected and stashed away in the truck! Then a final clean up and moved the truck down into the yard. Ran it up hot and did an oil change. Took a few more pics of it. Here's one with Minky the Micra for scale... Then drove it to its new home. Luckily only 10 minutes away! We had to cut back loads of trees to get it down their driveway. The owners taking heaps of photos as we went. Finally parked it up... It wont stay in this spot for good. The young family that will be moving in are in isolation having just got back to NZ. In two weeks time I'll be popping round to run them through the ins and outs, packing it up for travel and setting it up etc. We'll go for a brief drive too so they can have a feel of what its like to drive. Then we'll set it up in its new home spot proper. But for now that's where it is. Hannah and I had a cup of tea and said bye bye to our reliable, comfortable, safe and cosy home of almost the last 9 years or so... Yes we are sad to see it go because its our home that we built. But also really excited because its another step in life. We can finish the mezzanine now, build a garage, do some other little projects but most exciting is we also get to build another housetruck! We left the truck went to the local cafe/bar and had a pint with local friends - where word throughout the village that we had sold the housetruck was already well out there. Suitably fizzed up on beer we walked home on a warm evening and discussed our next housetruck build... So that is this thread finished. Its been a great journey and I'm sure its entertained a fair few. I'm hoping its inspired many to try out this housing and lifestyle and also been a useful source of ideas, tips, designs and lessons for those who were already building or about to build a housetruck. I'll be back with another thread soon for what will be our 4th housetruck build (excluding a few vans along the way) As always we've learned loads of things and look forward to using the lessons learned and ideas gained for the next build We have both already been checking out the usual places for a suitable truck. Fun times! Alex2 points
-
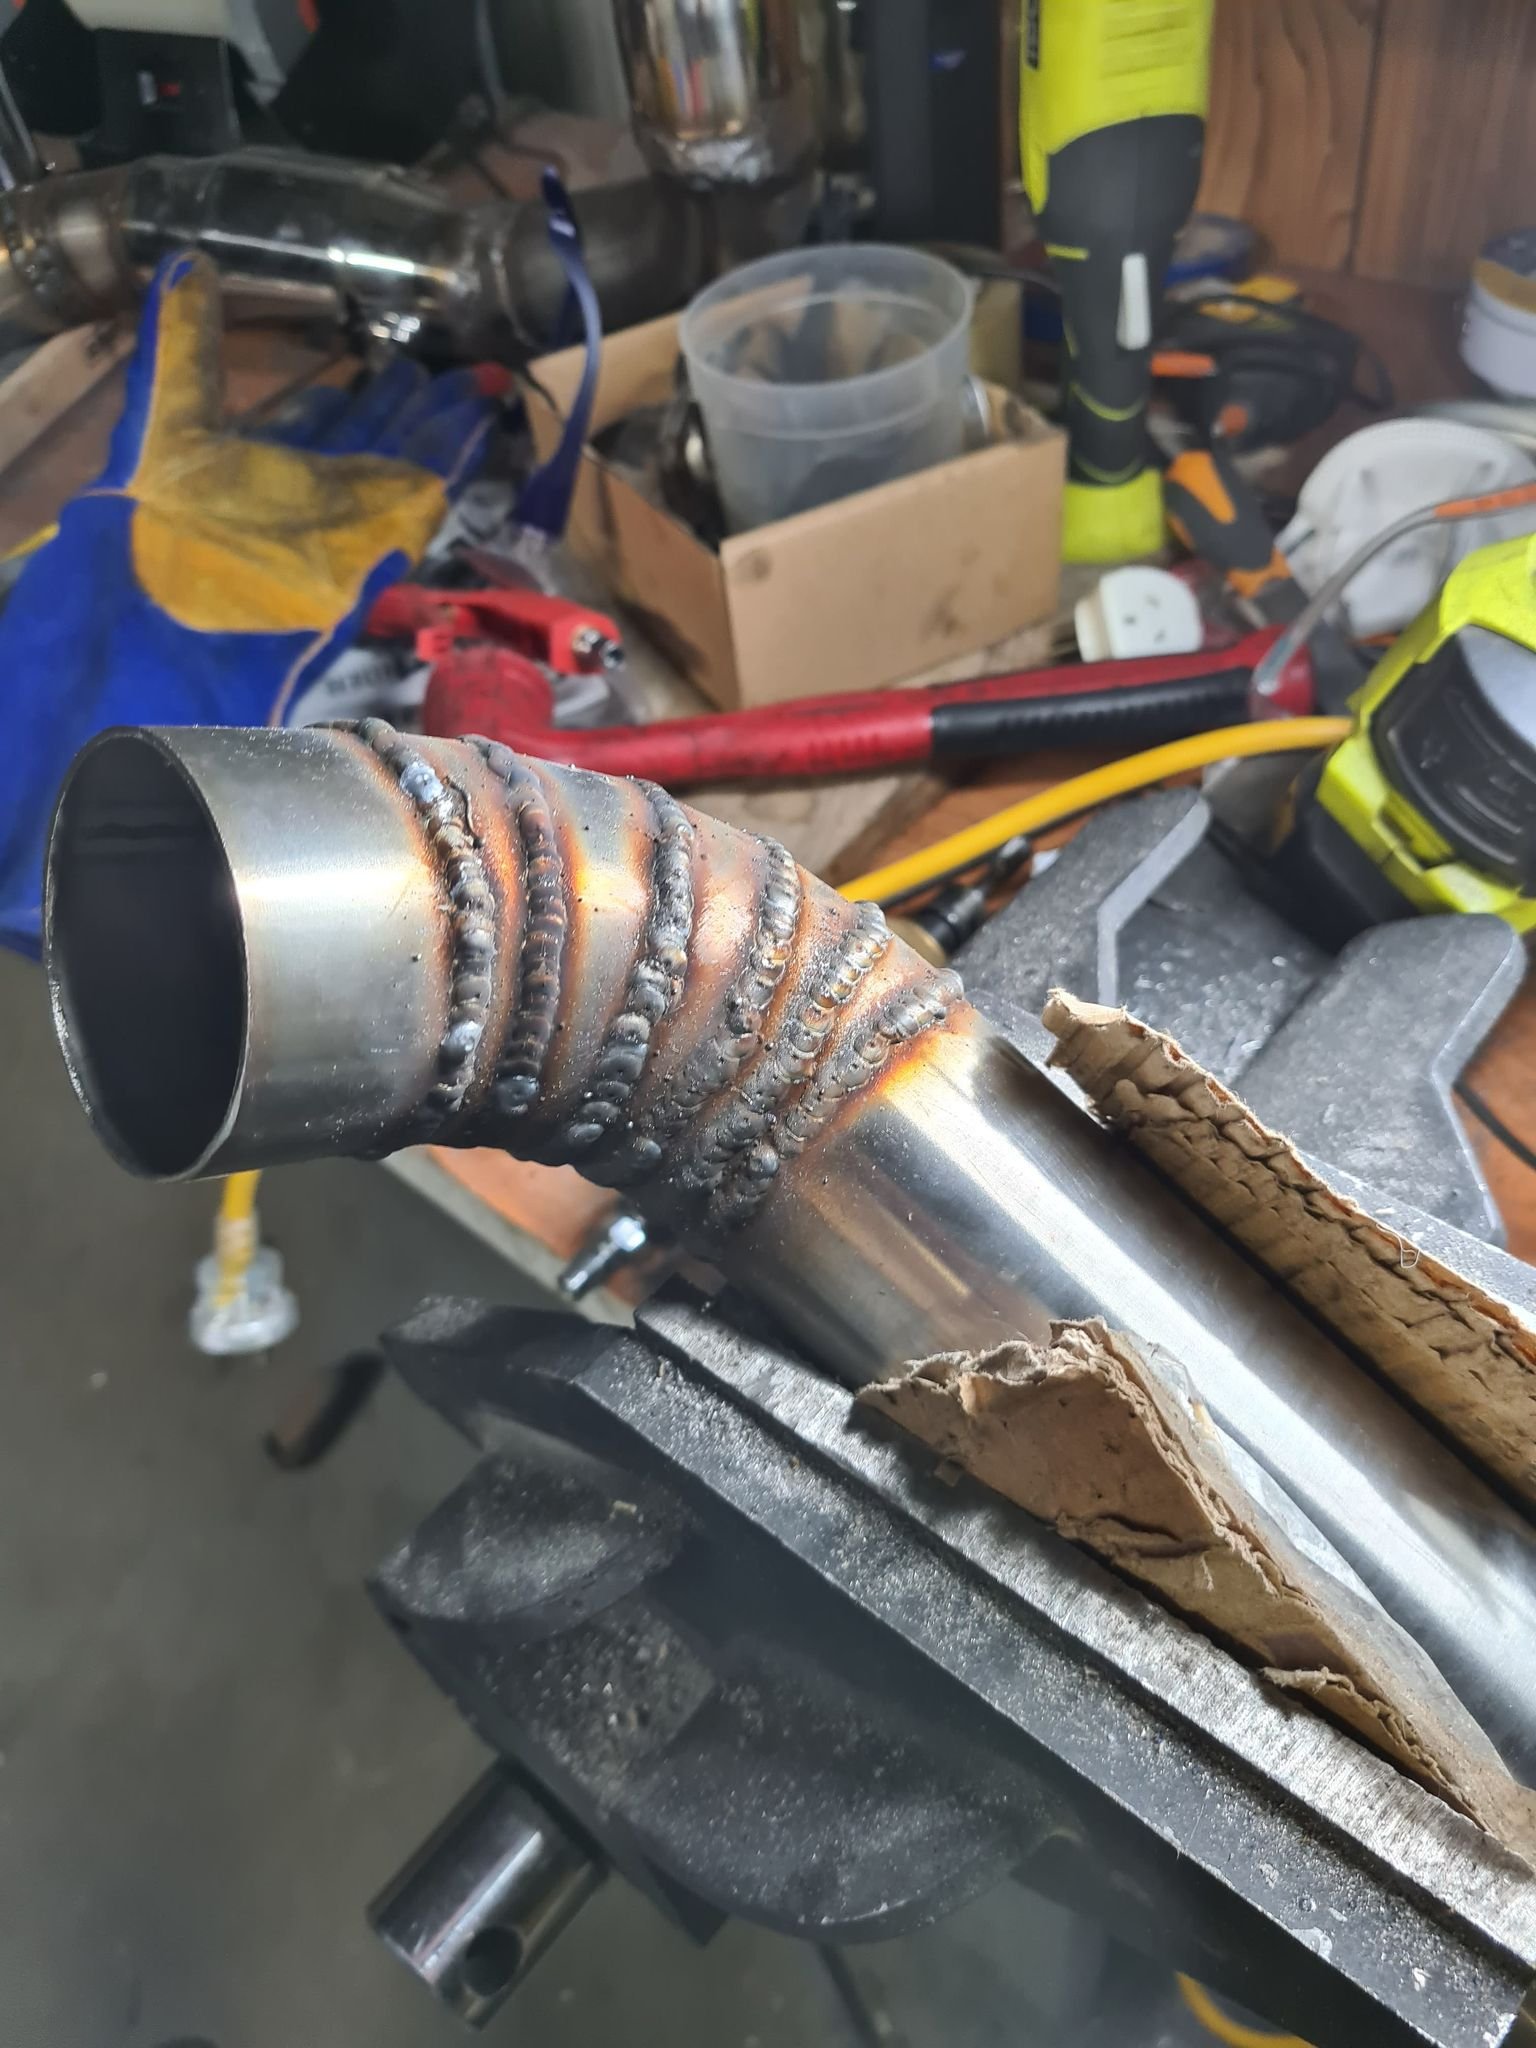
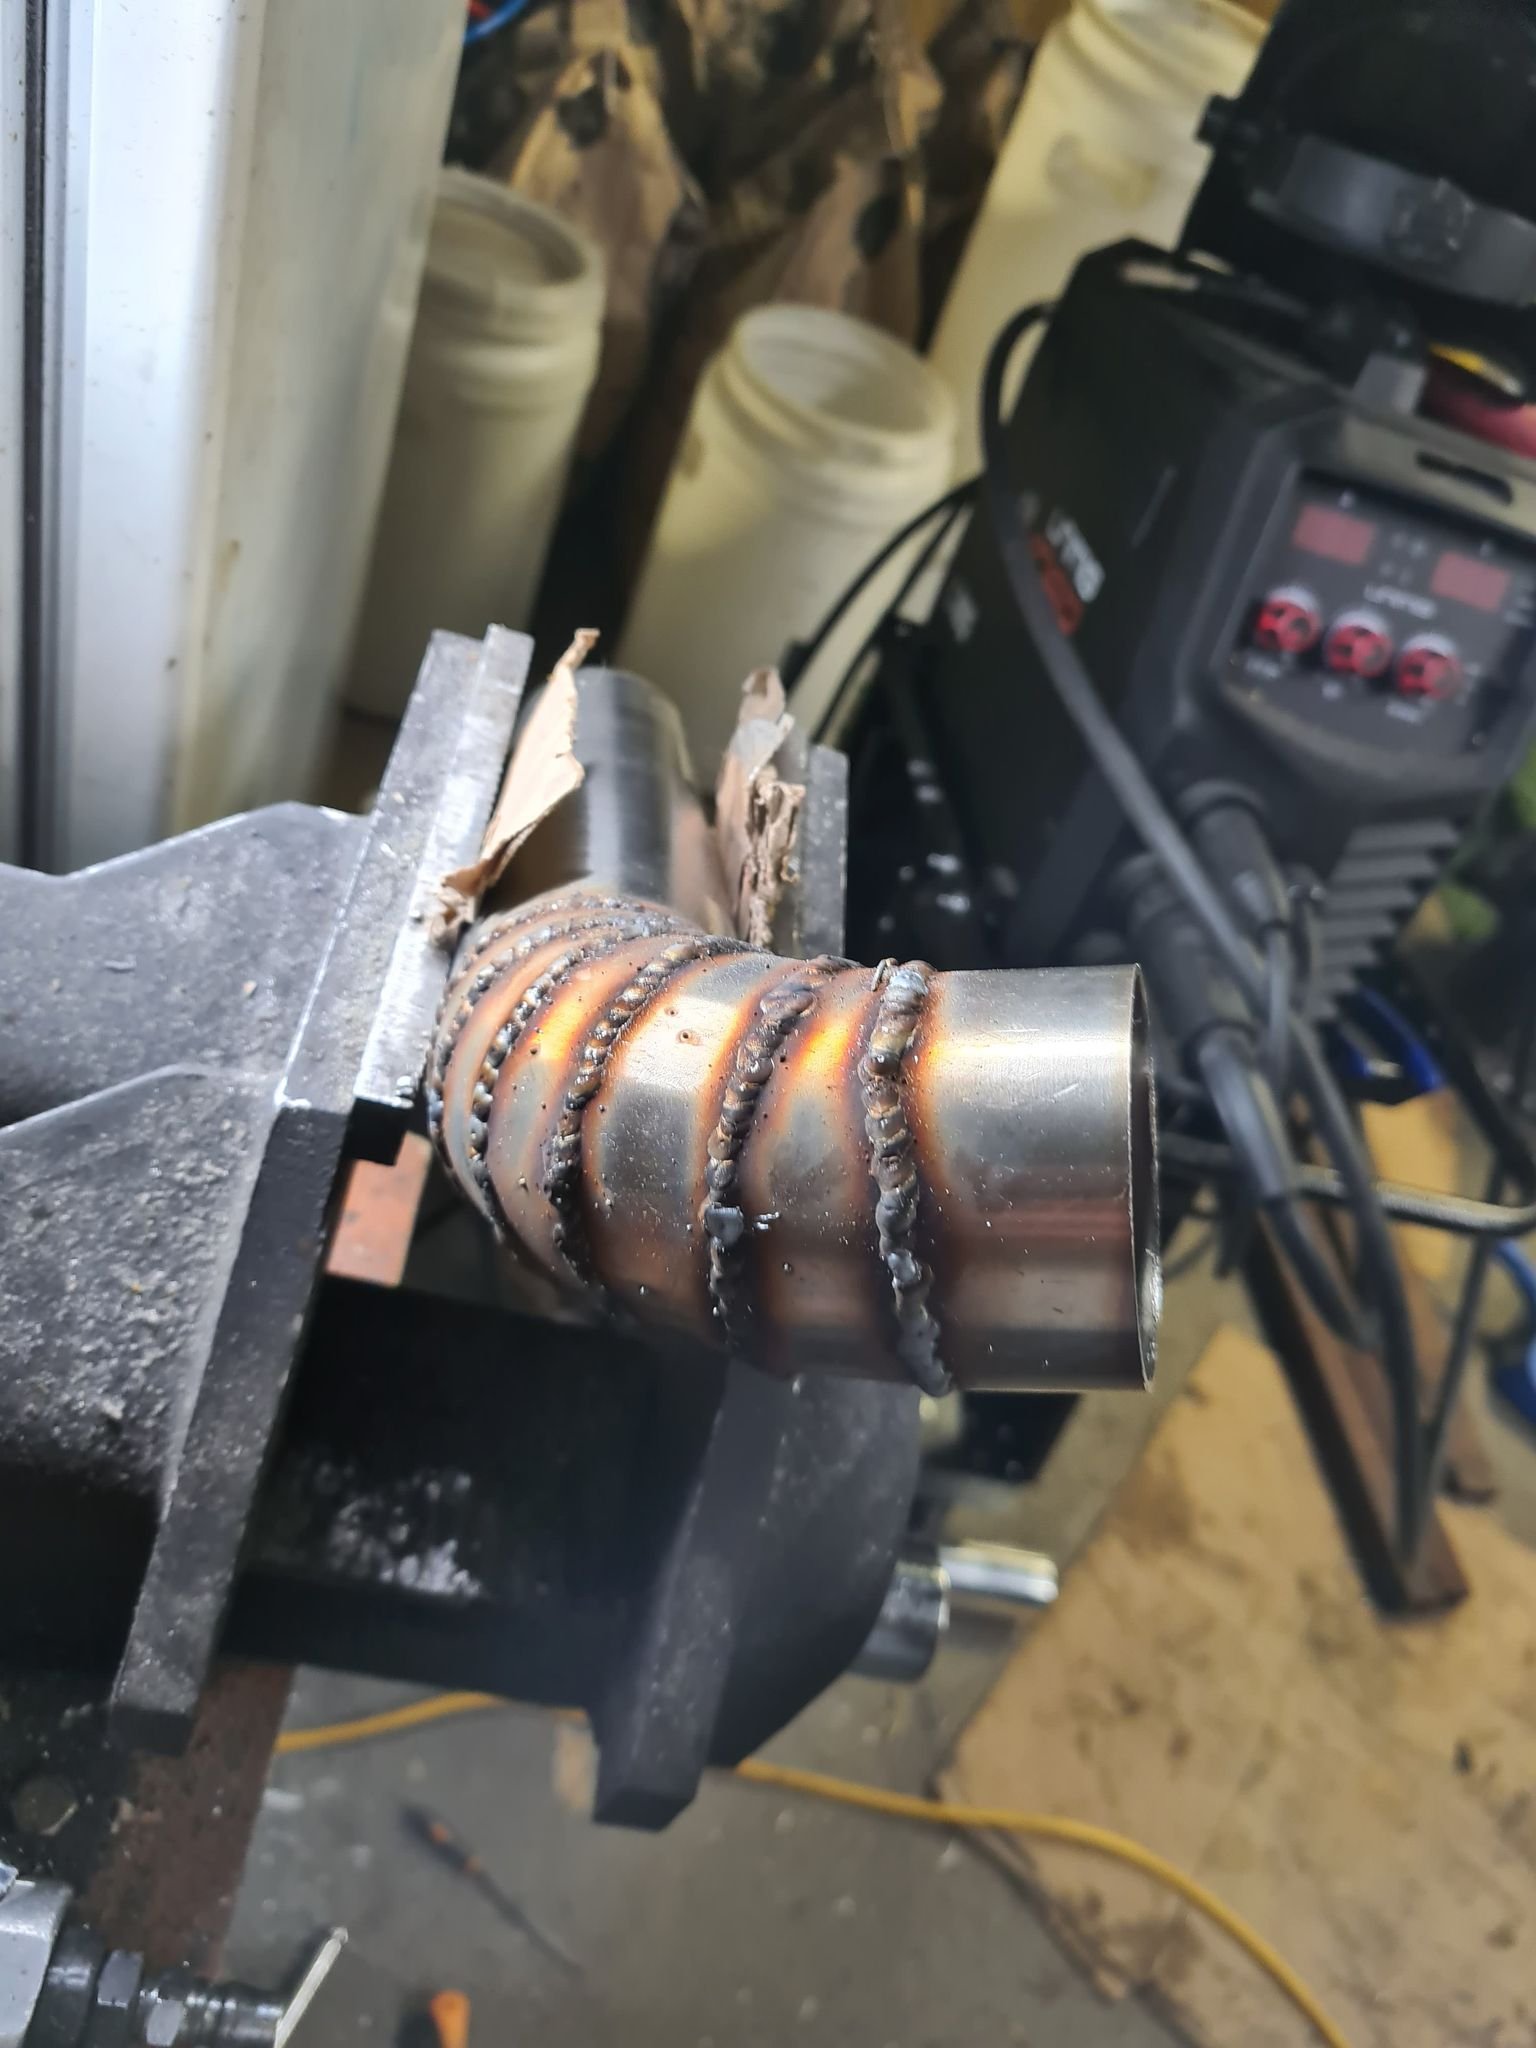
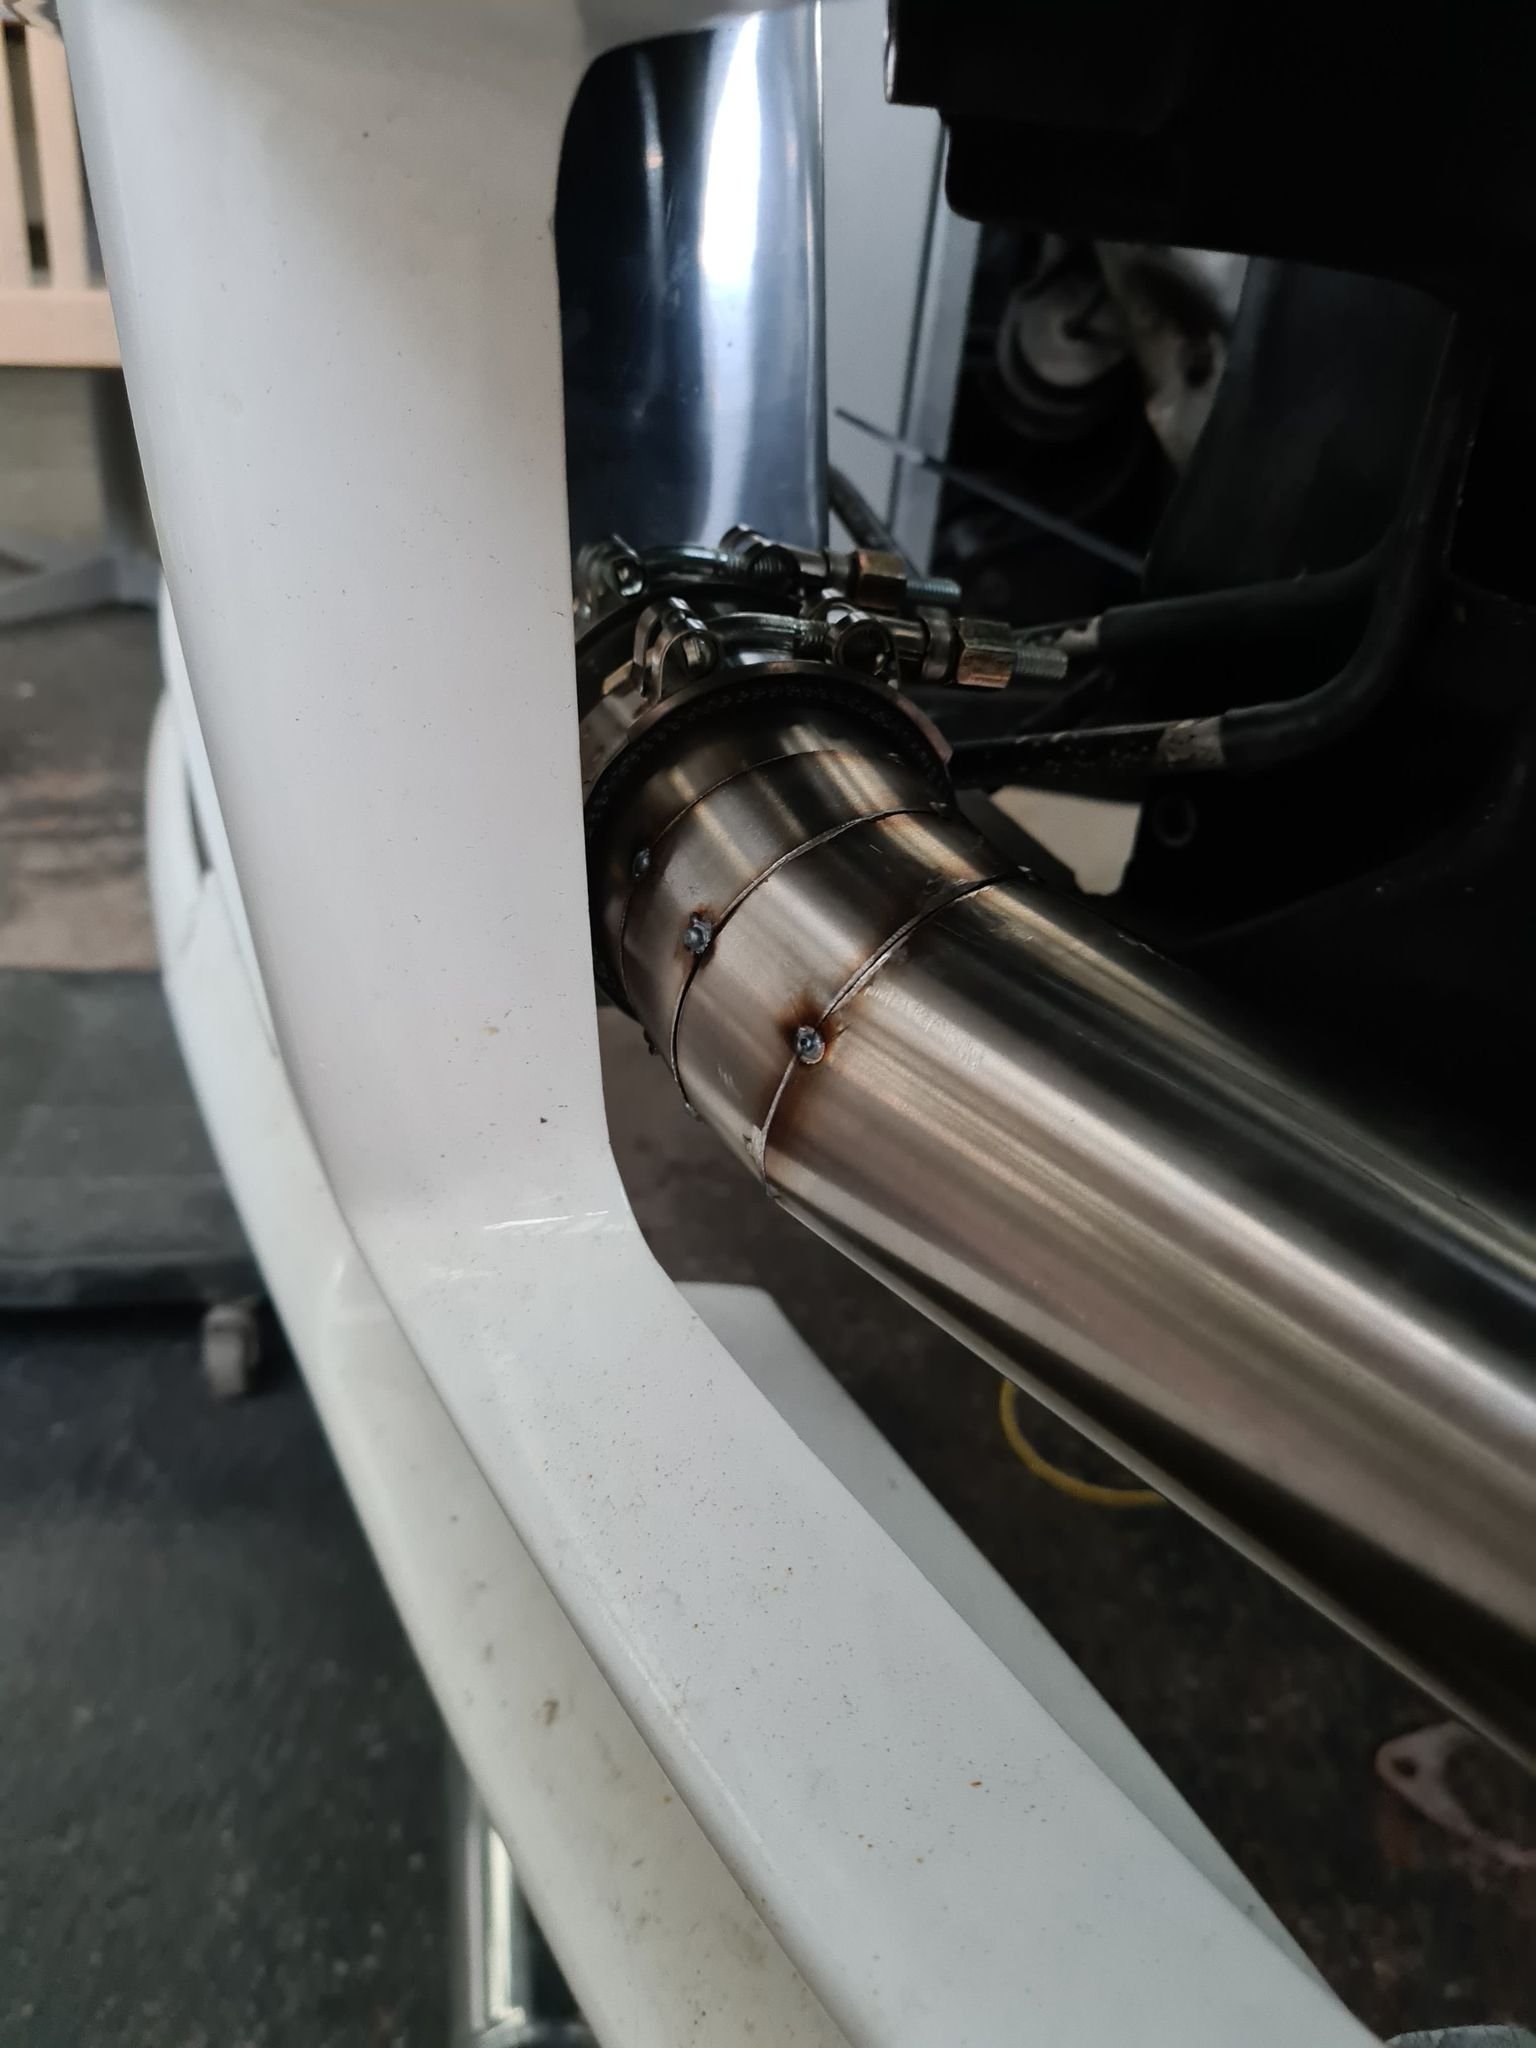
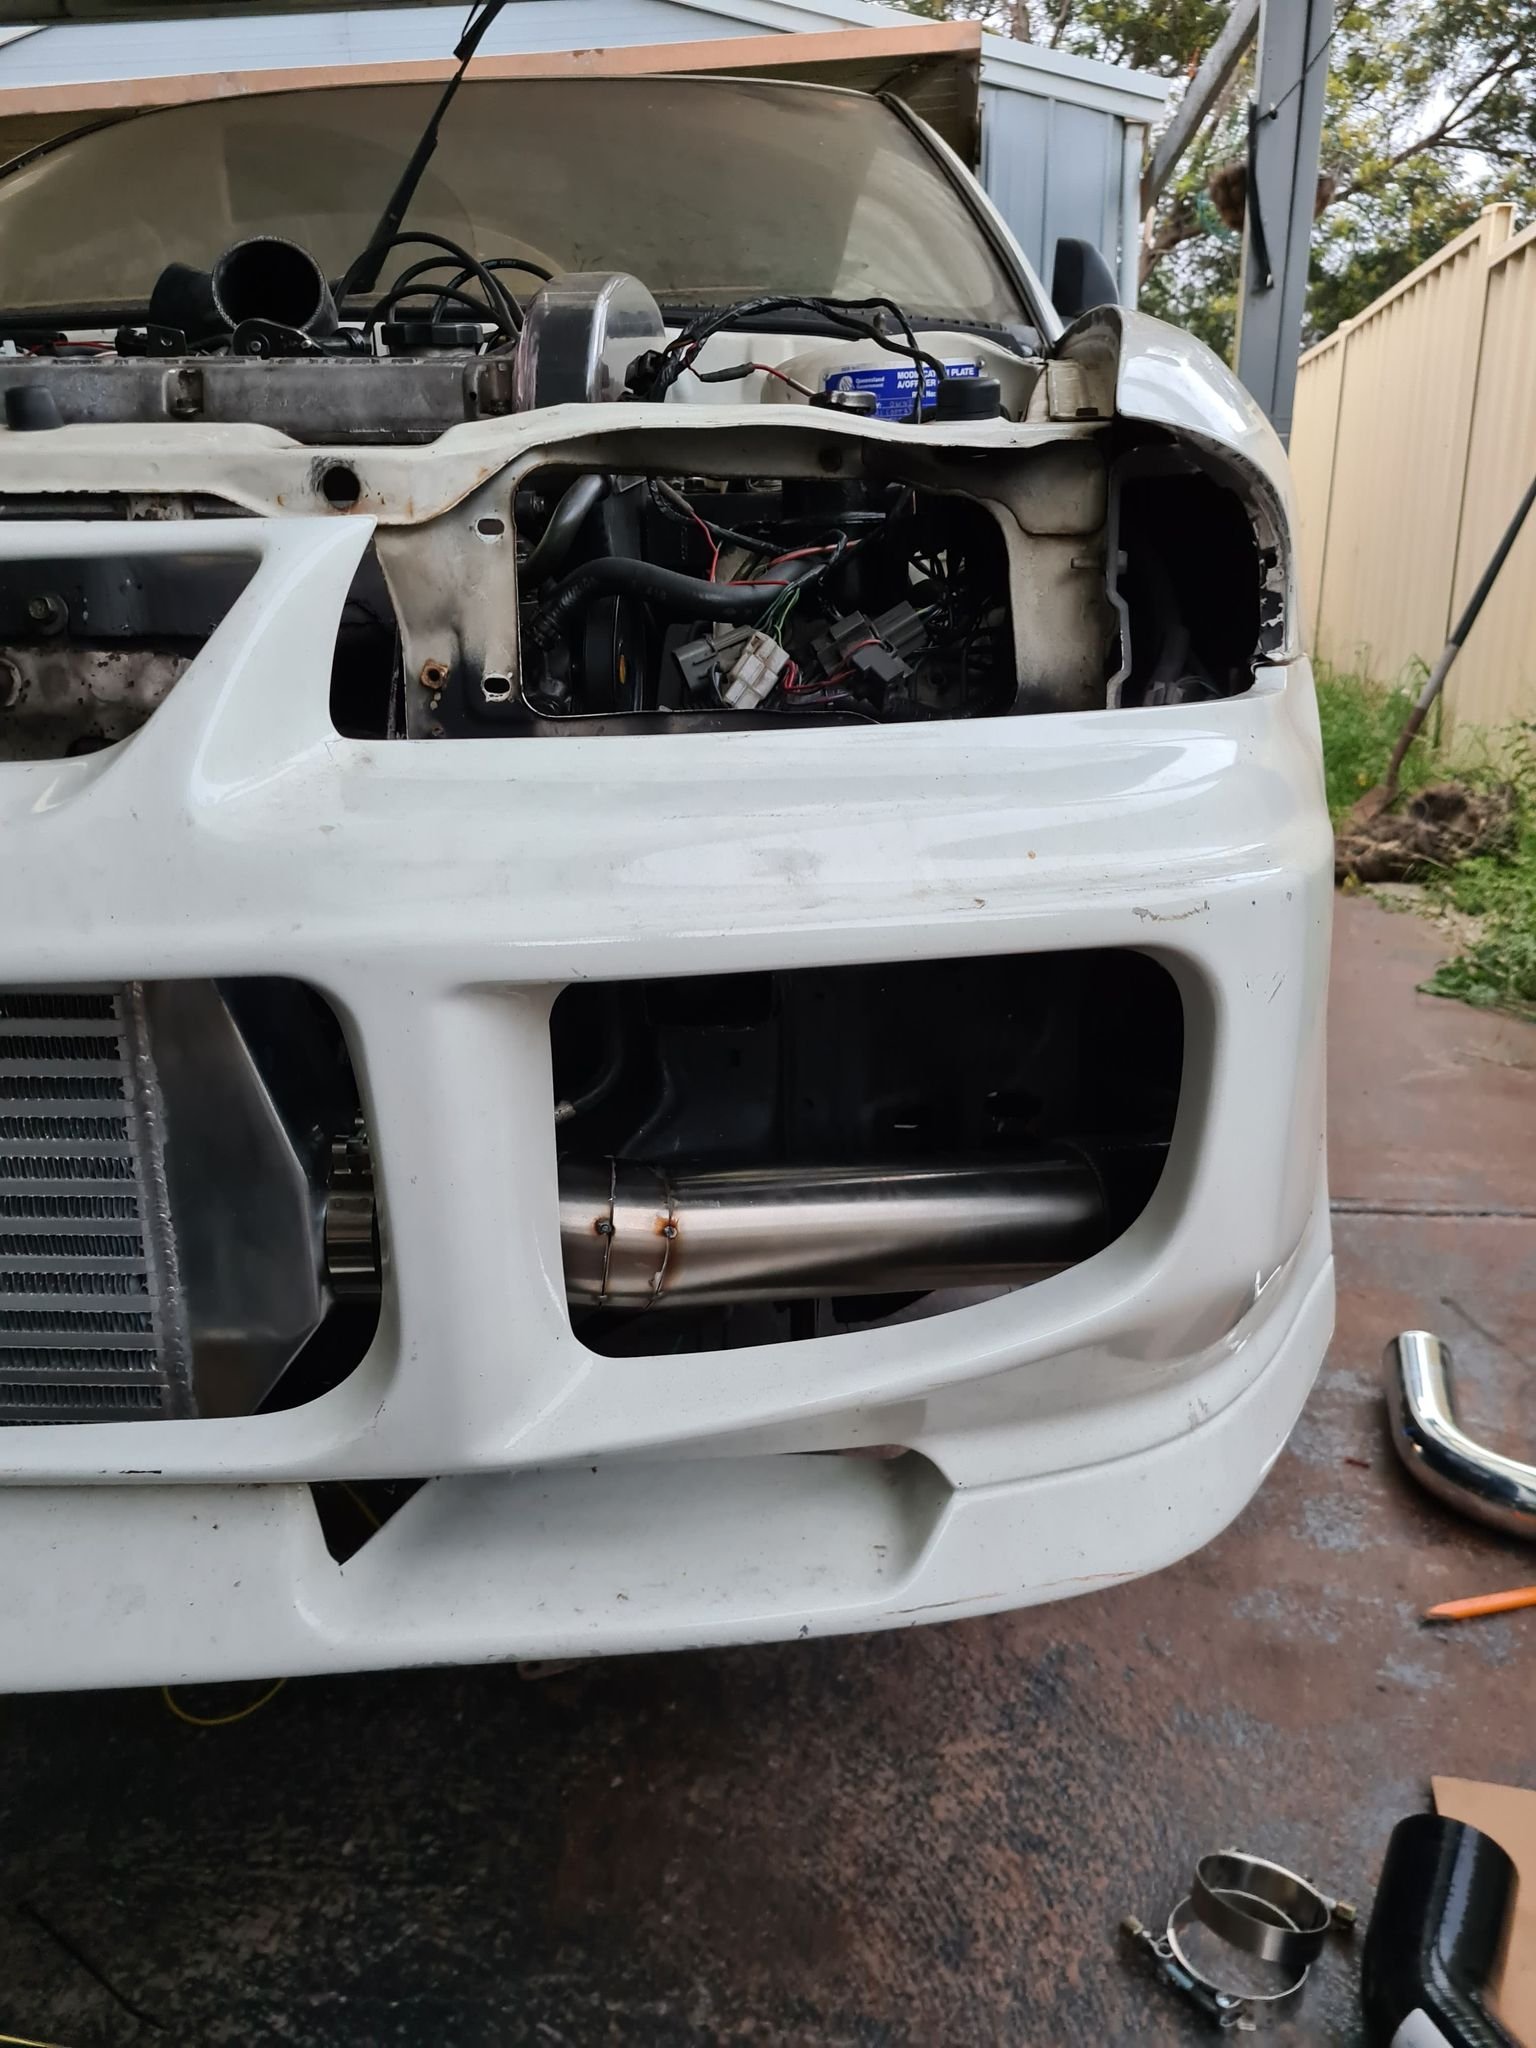
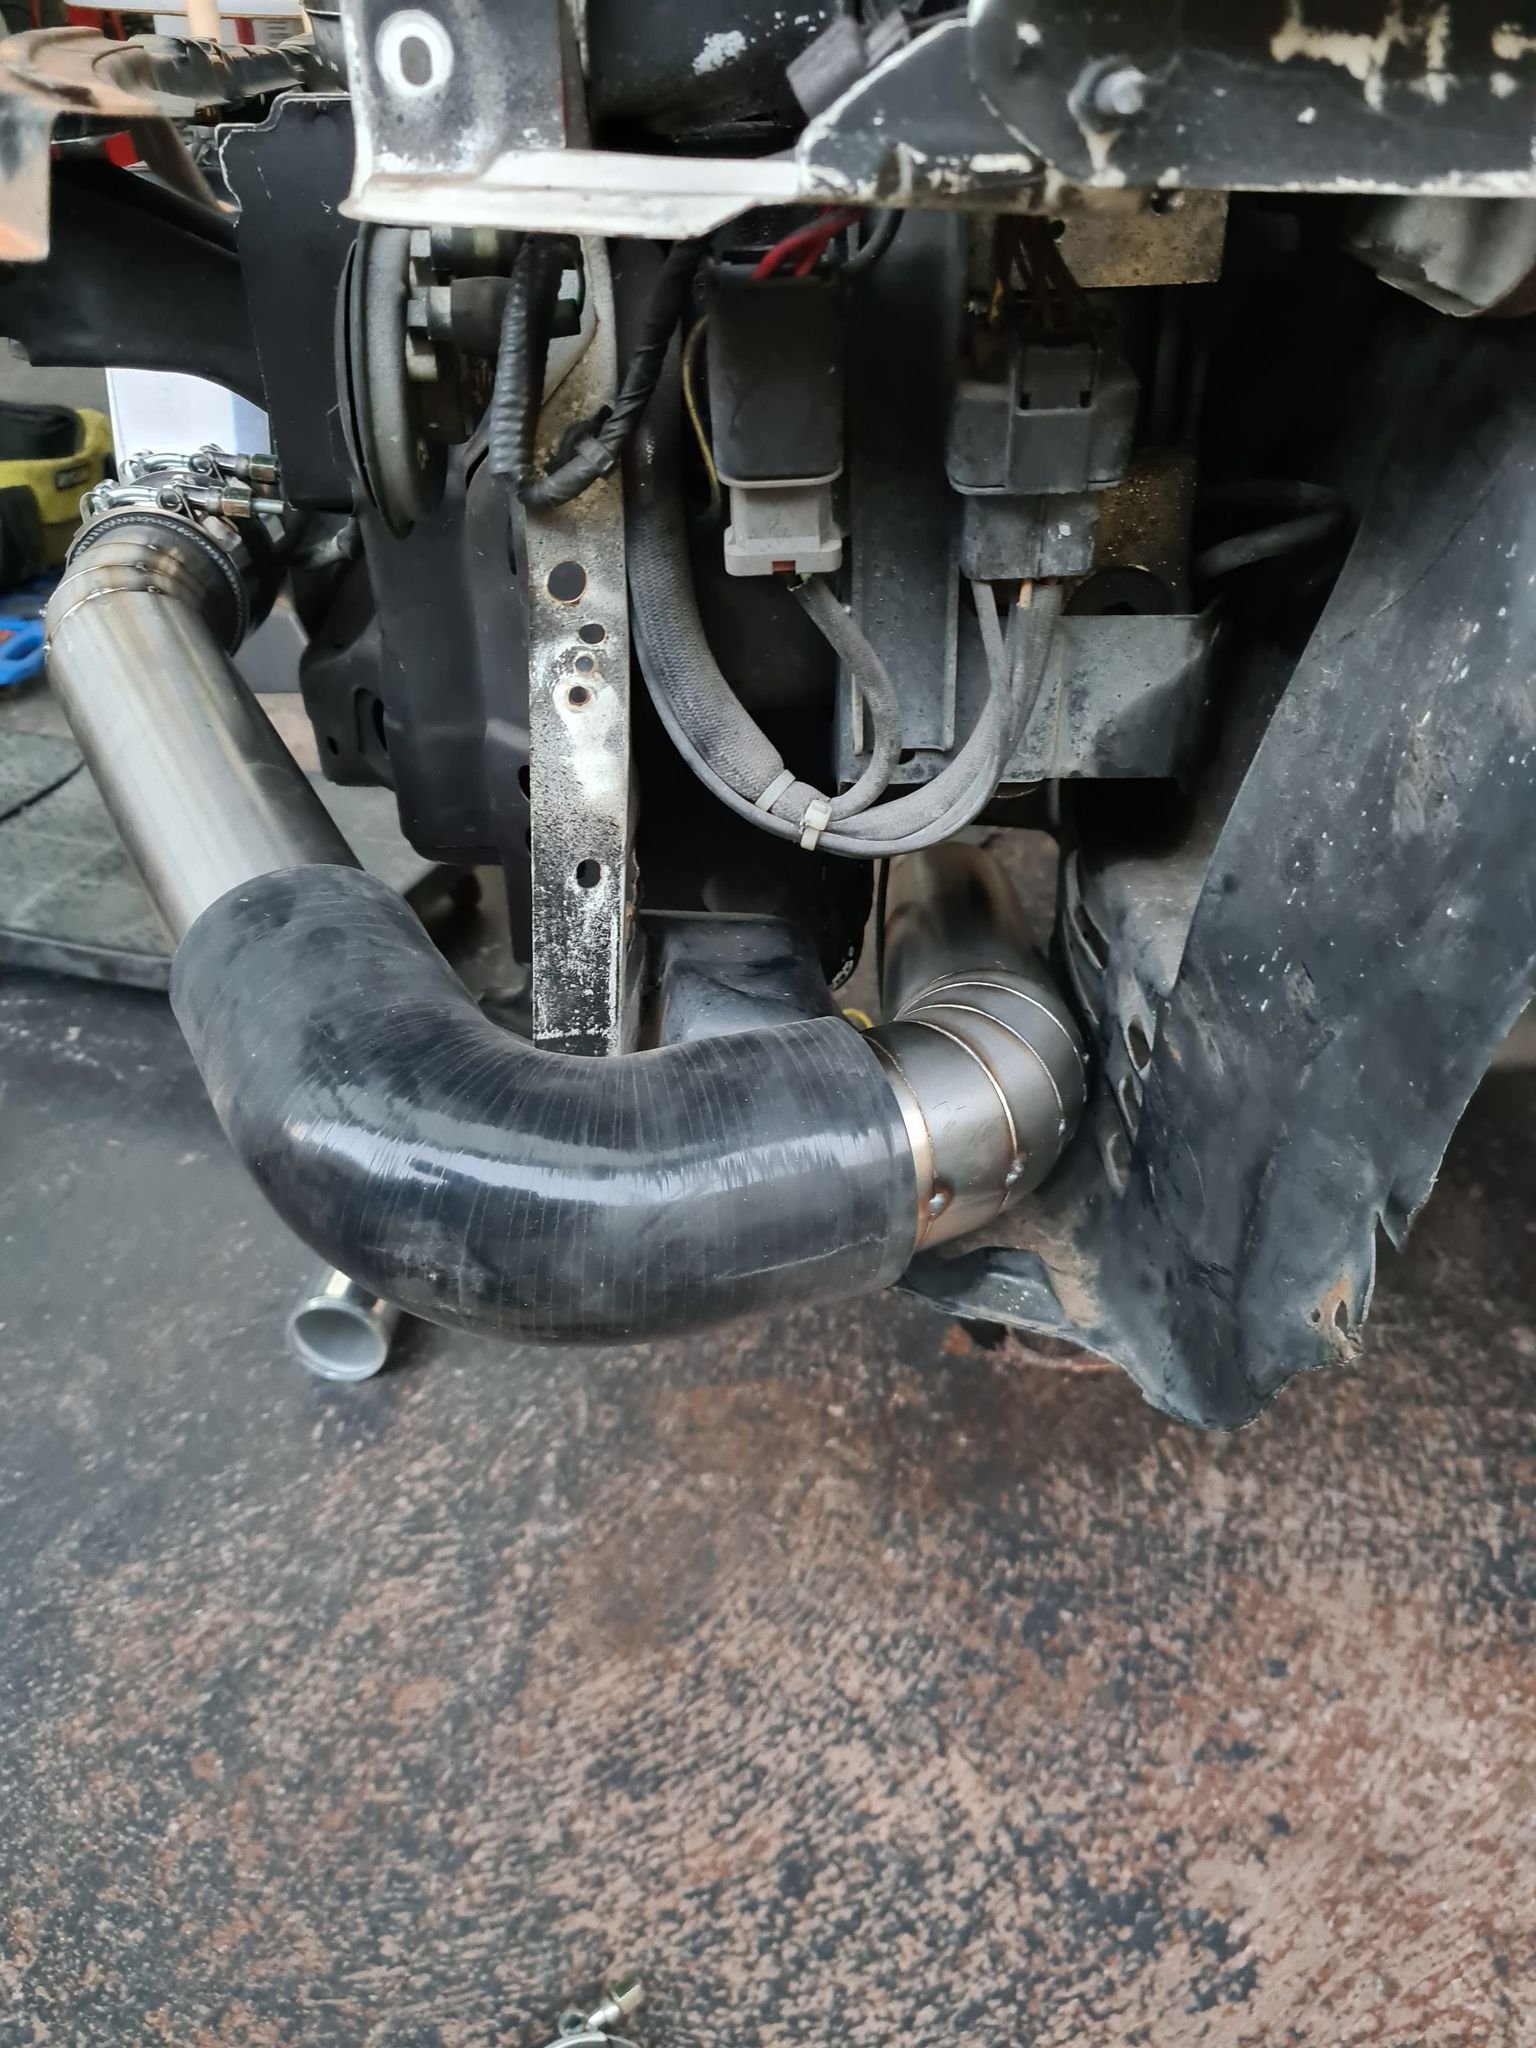
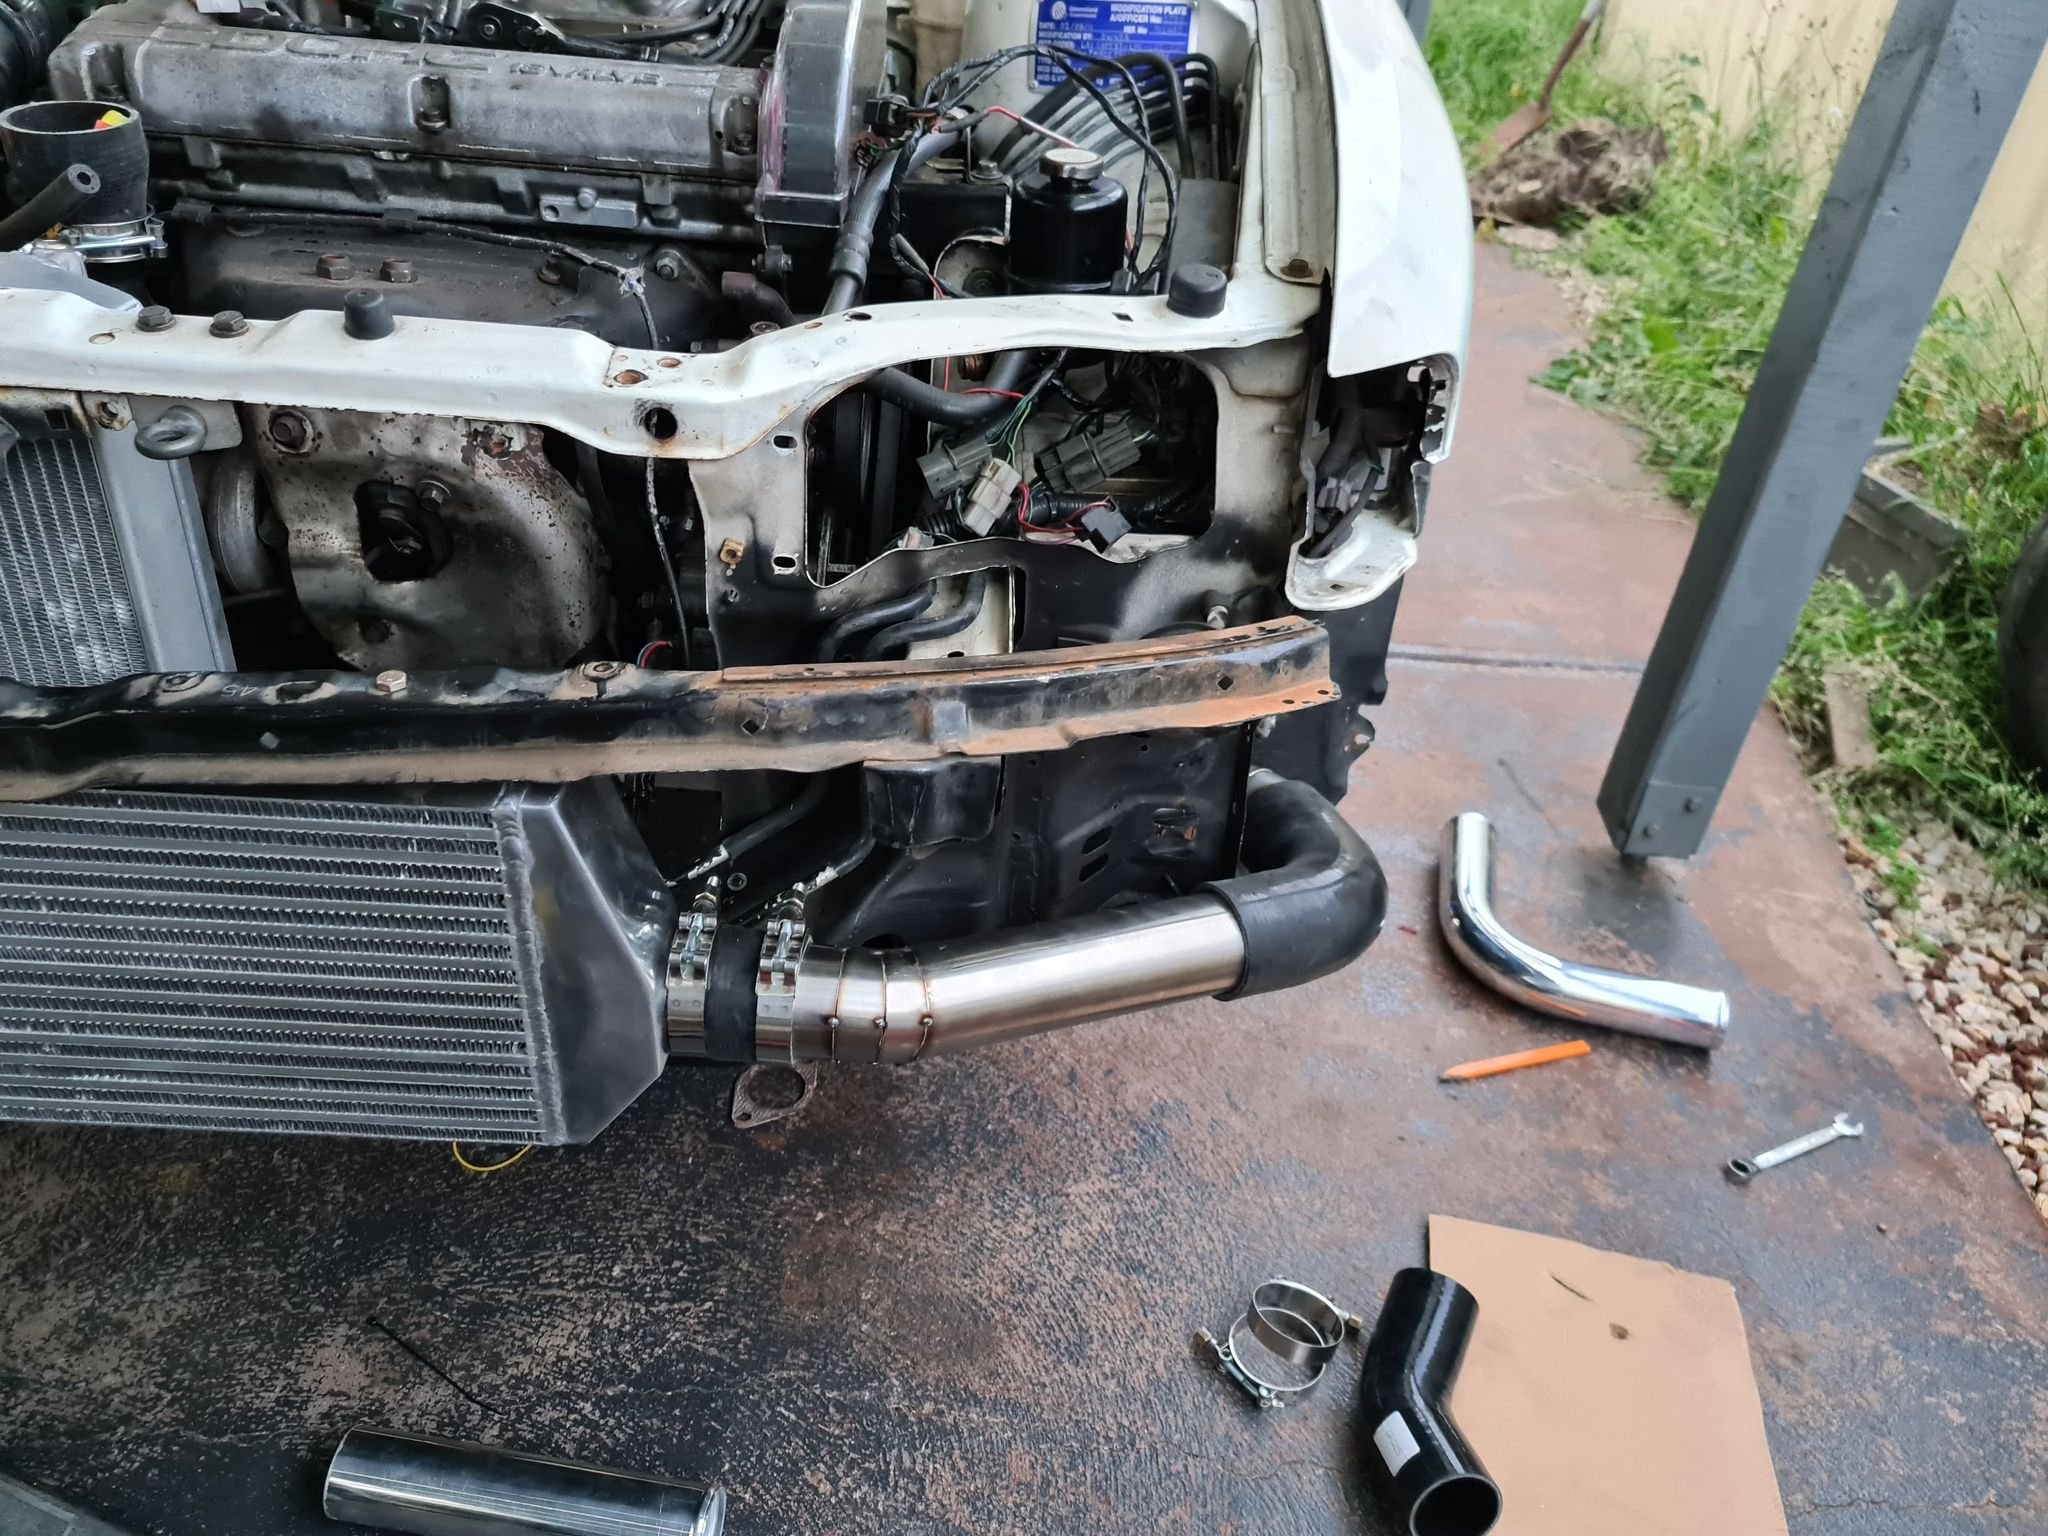
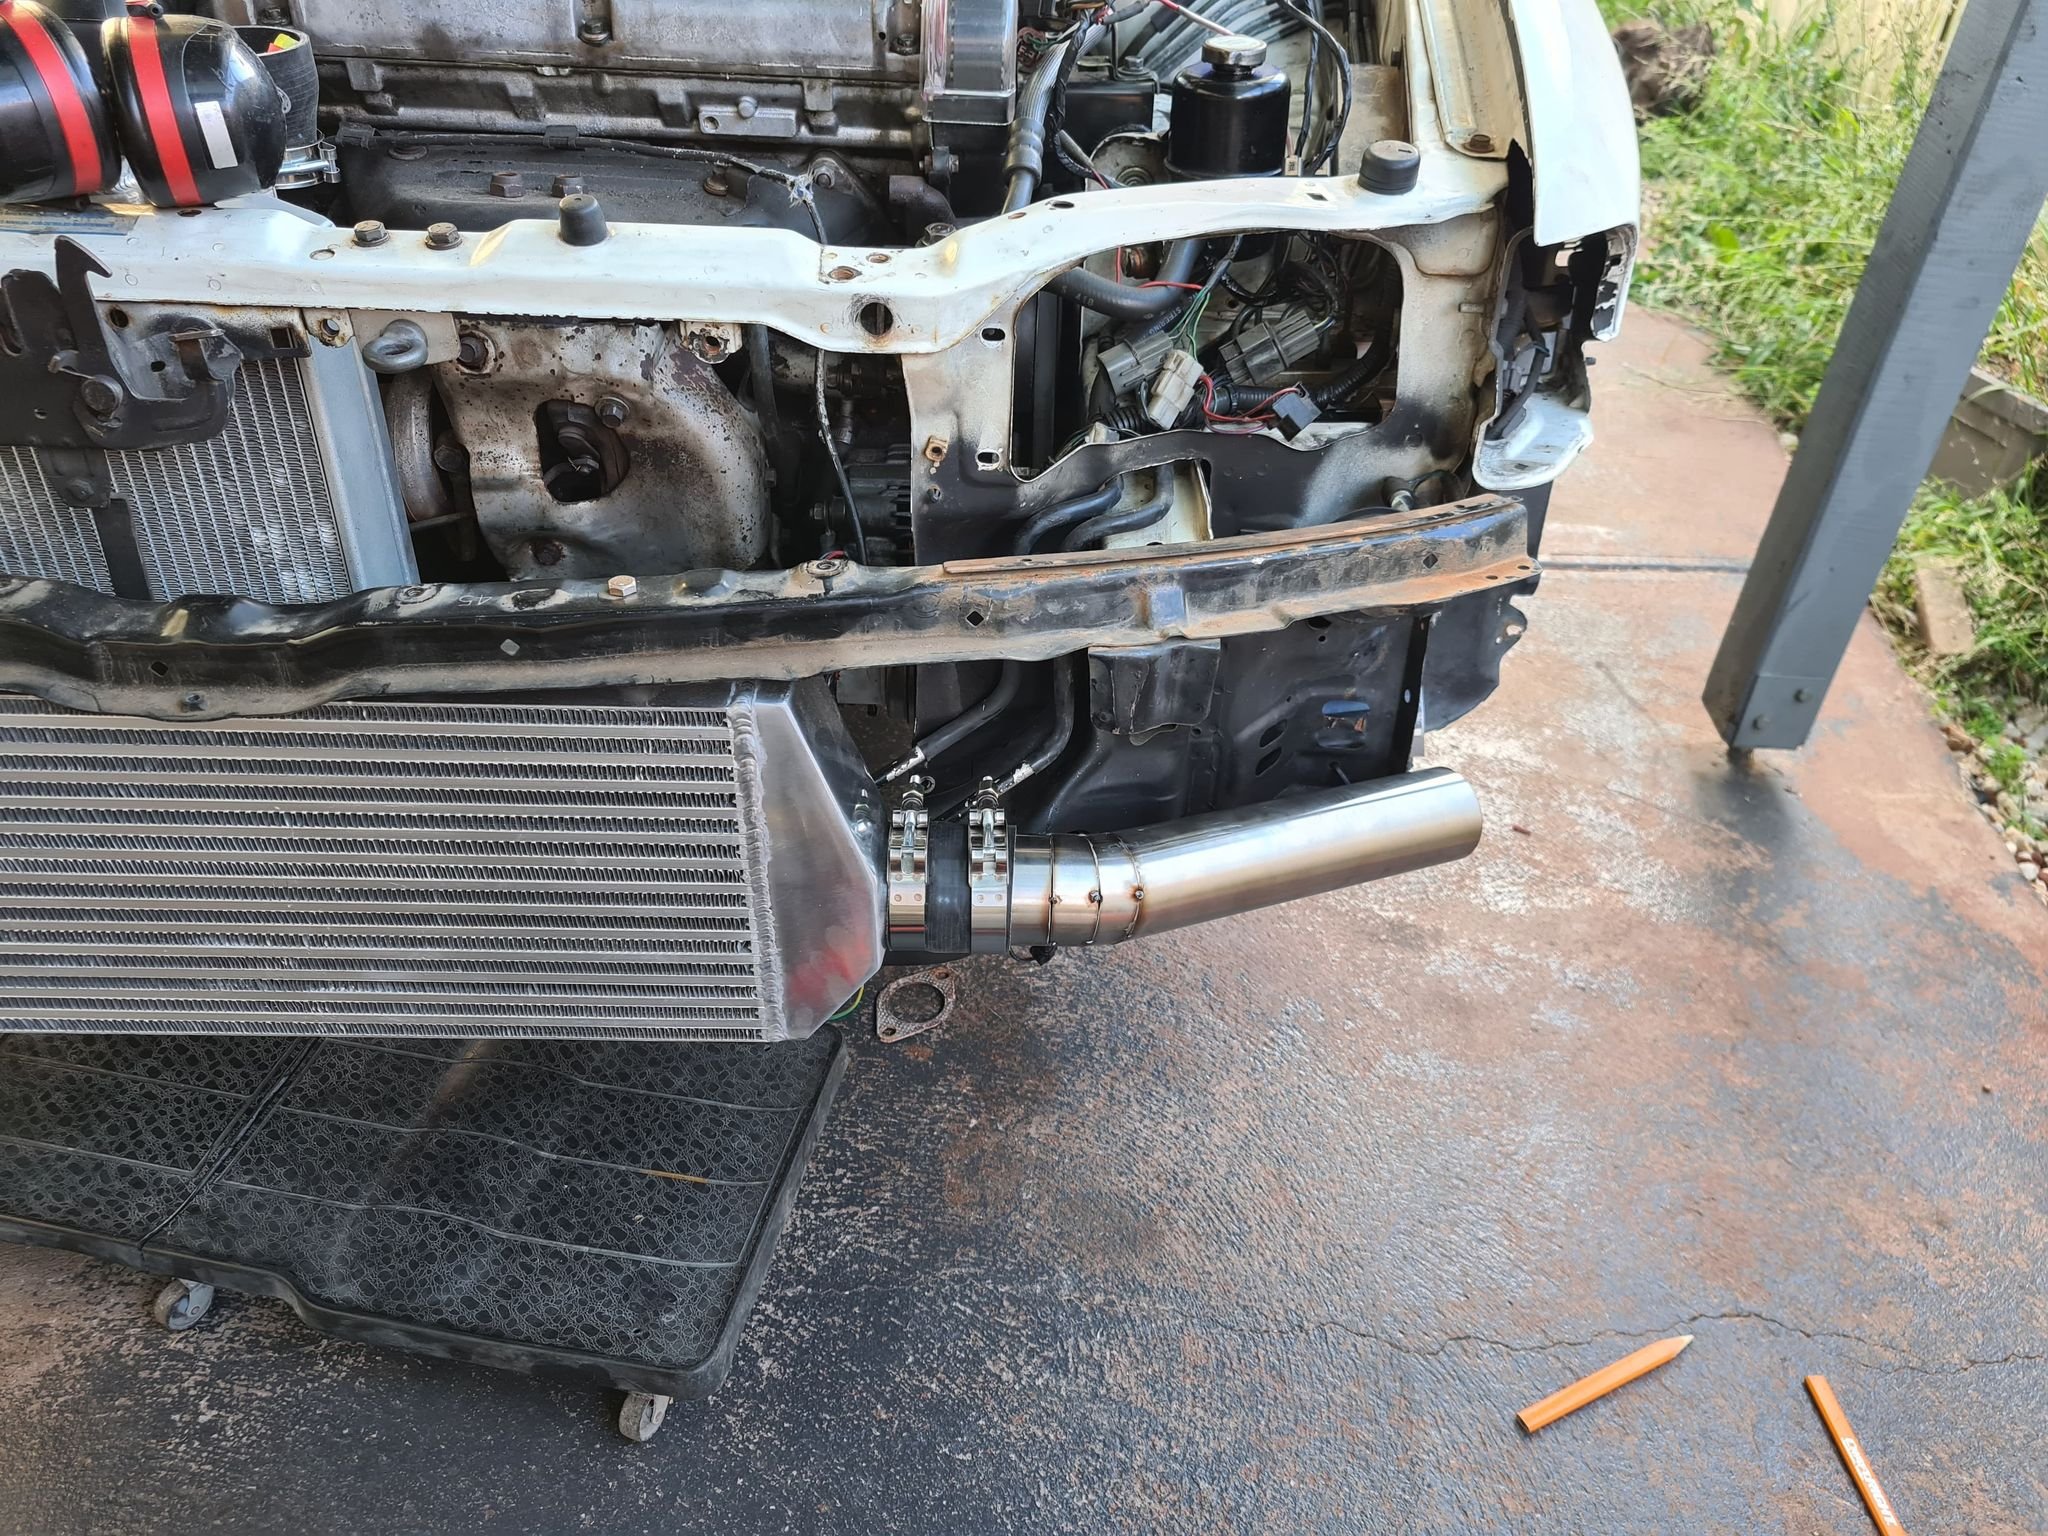
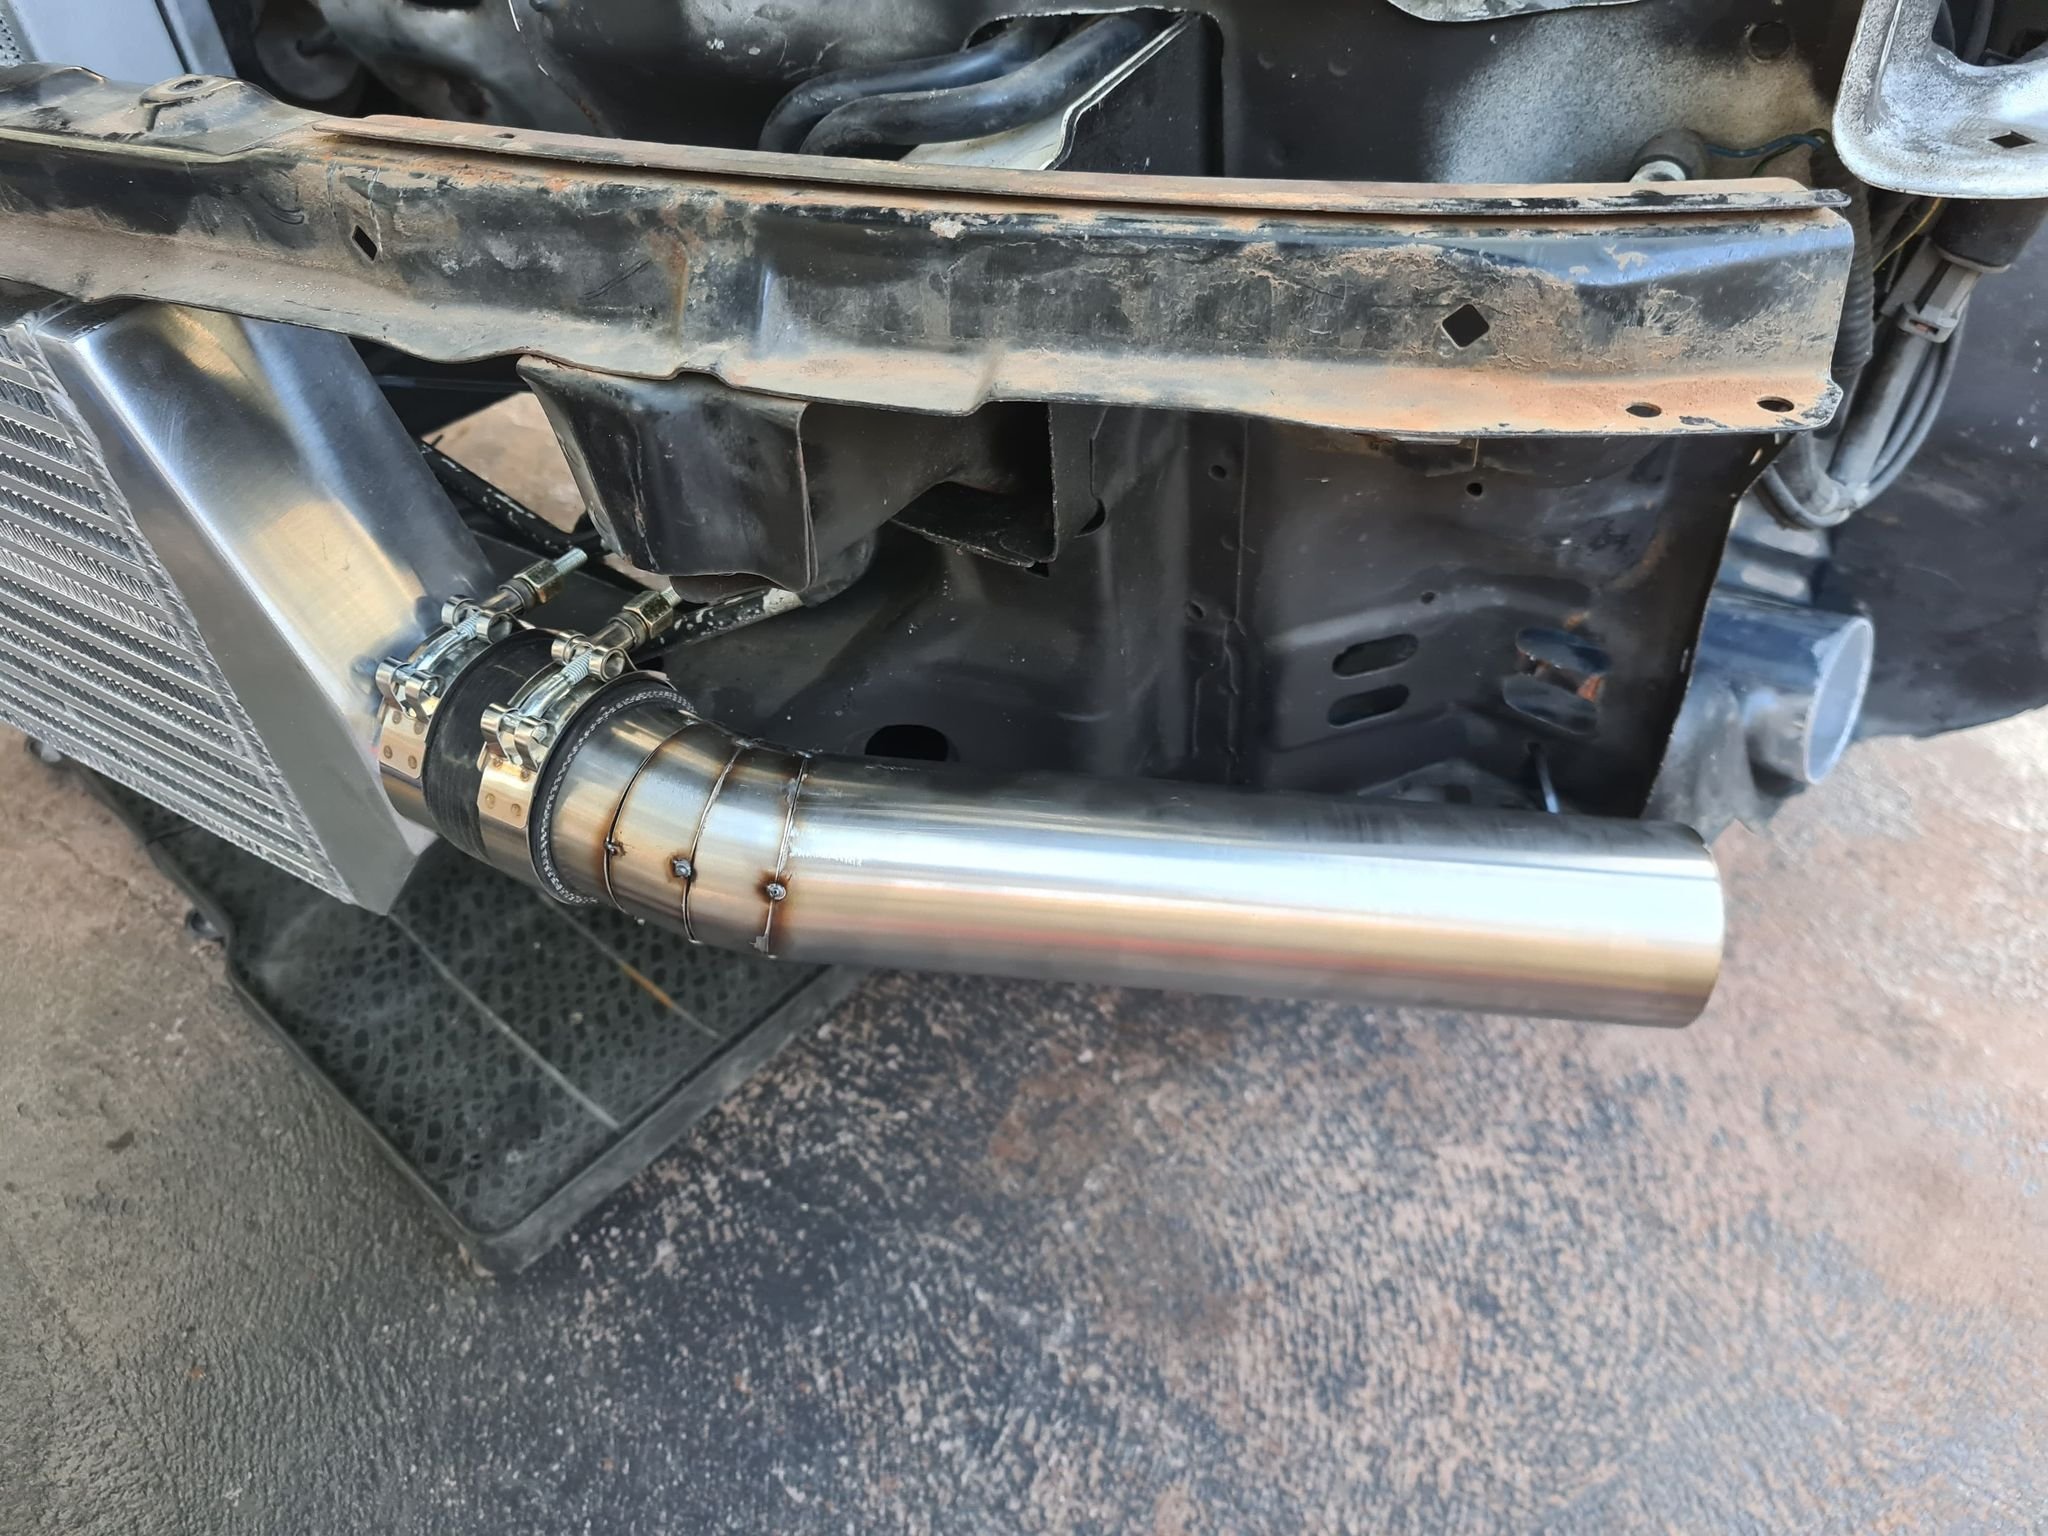
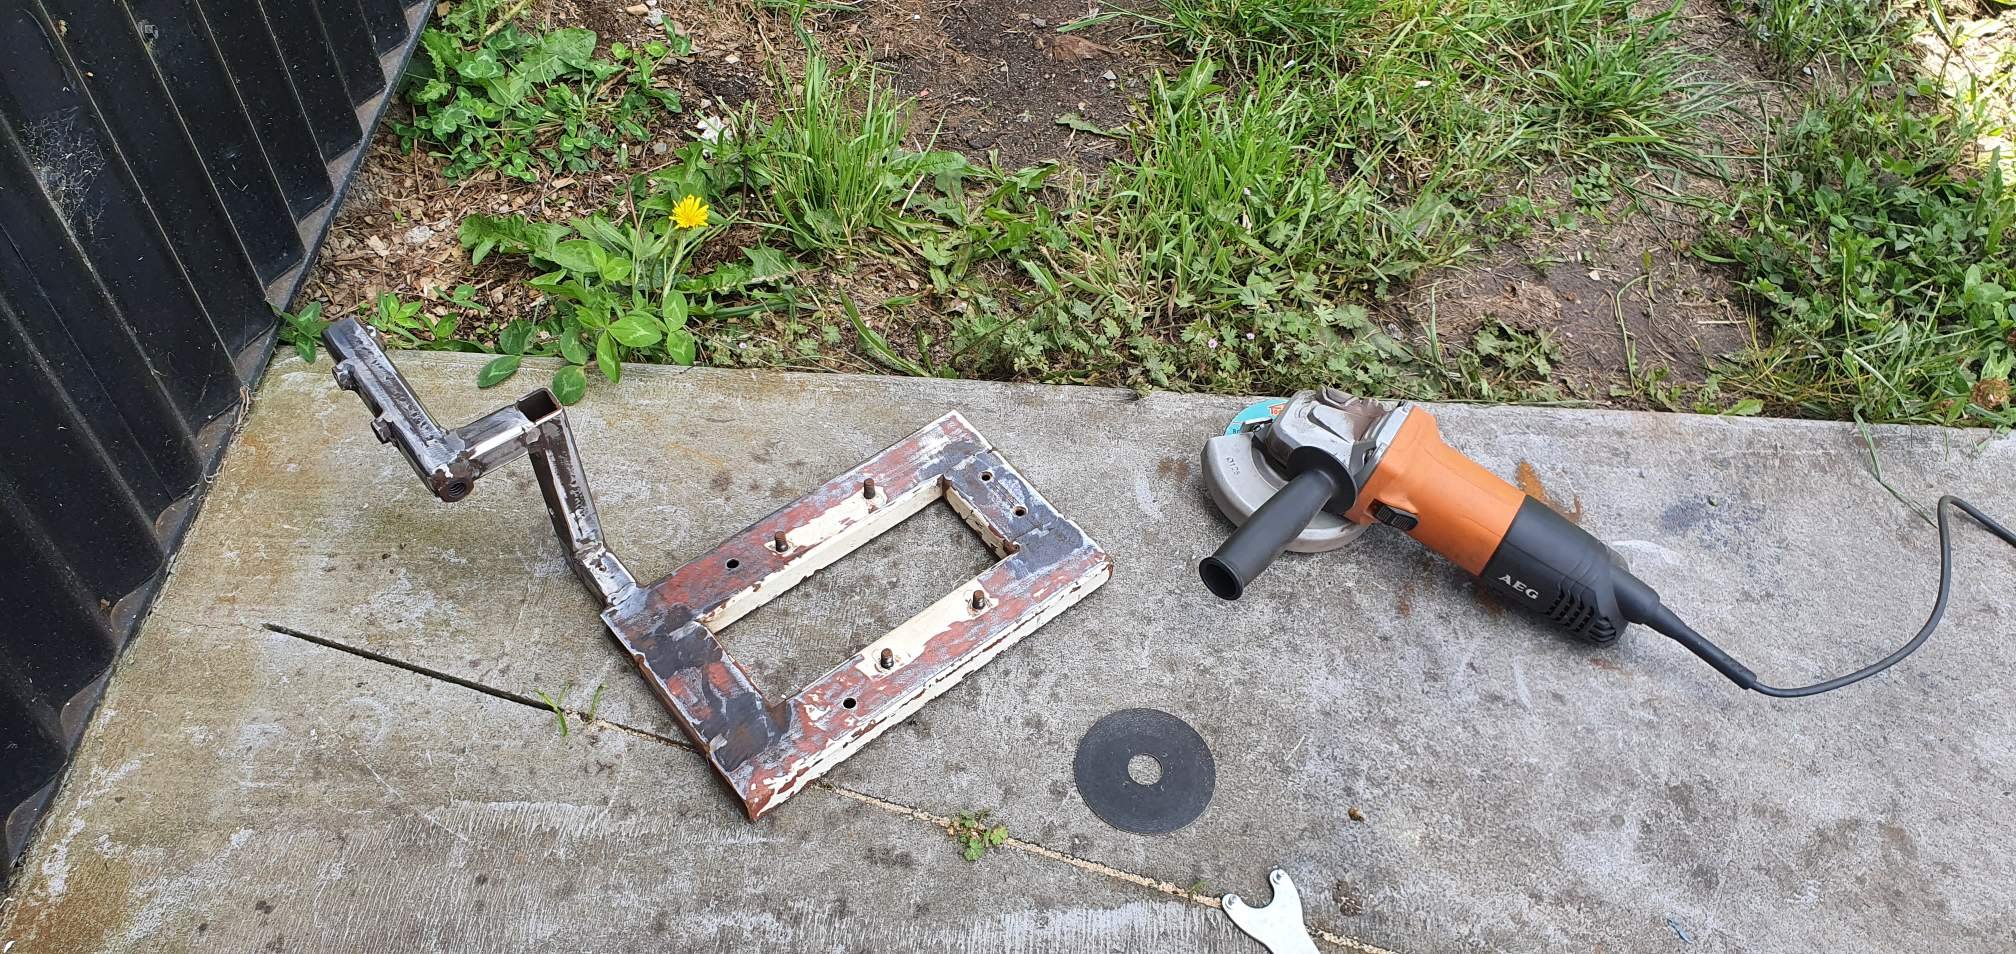
So more time cutting and cleaning up pie cuts gets me to here with a little welding thrown in Also the pie cuts are 7.5 and 7.5 degree so a total of 15 degree per cut roughly 20mm top and 10mm bottom when I cut them well, do have slight width ranges but I am getting more accurate Tacking Tacking, Nice and tight (as tight as I can go without worrying it will rub 90 Degree silicon bend so I can remove piping easily Test fitting the bumper for clearance before I start to weld it up Heaps of space Started welding the pipe that goes though the guard liner the angle is roughly 75degrees and then has a 30mm piece of straight welded on this goes into the 90 degree silicon joiner that's attached to the front pipe Welds aren't the best but they will do, shouldn't need to run a bead on this one as it should go far enough for the weld already on it to help hold it on with the T clamps Need to get the front pipe welded up then will clamp this all together, put the up pipe for the turbo back on and start doing the pipe up to the turbo Haven't started the other side yet but it should be similar, debating if I use the 45 degree alloy pipe I have over the gearbox and then make a stainless pipe from there or not I have some gold wrap to go on the piping in the engine bay anyway Also I am using normal mig wire so will either put some clear over it once I clean it up or will paint it black, went with stainless as it was cheaper then the mild steel I could source and is just all around nicer to work with Need to get some mesh for the bumper as well
1 point
-
(but seriously thanks all :D)
1 point
-
Wheel muck is AWESOME. Buy a bottle. Ive bene through fricken litres of it now and not had a wheel not cleaned from it.1 point
-
Ahhh, yeah, that just looks old and rusty, not mixed with oil which would be a bad thing. Your mate is right that its likely the water pump impeller rusting away :-). I got an email from HR last friday telling me I had too much leave and was against company policy.... So I'm now off till the first of feb. Have been doing some work on my Starion for once, which has been really, really enjoyable :-).1 point
-
Looks like a good route. I need to get my shit sorted and make this one.1 point
-
Apologies if I am teaching you to suck eggs with this next comment just trying to be helpful , fingers crossed the dizzy works But while you've been waiting do you know any of the below and I would probably do most of this before you try start it Have you done an oil and filter change? or at least topped the oil up (I vaguely remember you saying it was super low on oil) Do you have a good battery for it? Does the engine turn over (ie does it spin when its cranked?) or have you turned it over by hand (turning the crank with a socket) Have you drained the old fuel out of the tank? and replaced it? (what fuel should it run?) Are there any cracked vacuum lines or coolant lines Do you have access to a compression tester? Have you taken the spark plugs out and what do they look like? Do you know how to set the timing when you install the Dizzy? As always main things when you do start it is does it have Spark/Fuel and compression1 point
-
I won't be able to make it to drags but will make to burgers1 point
-
No fume oven cleaner works well doesn't fuck paint removes brake dust piece of piss. Dont use on bare alloy though it dulls it.1 point
-
No, and Yes. Starions had a separate external igniter box mounted to the LH inner guard, which took the VR signals from the dizzy and did the coil current handling. They had a timing curve programmed into them. There was also mechanical advance inside the dizzy, and the vacuum advance / retard dashpot... The combination of all three of these systems gave the final timing curve. Fucking malarky to get working properly when you don't have the original parts! Awesome project Tomble, you're in for a fun time. I've got lots and lots of parts, make sure to hit me up... Unfortunately I don't have any dizzies, but I'll ask around down this way. Chances of finding the exact model for your car are slim, but something that will get it running should be kicking about. I'd just retard the static timing a couple of degrees and it'll be safe :-). You might find this interesting, I wrote it around 20 years ago: https://web.archive.org/web/20130504232342/http://prozac.orconhosting.net.nz/eciguide/rebuild.html Once you remove the EGR (it'll be blocked up anyway), the vacuum plumbing becomes much simpler, can help there :-). Being a GSR-X yours will have auto climate control (So cool ) where all the blend actuators on the heater box are vacuum controlled. Also jealous of the Auto. I'm old now, and autos appeal :-).1 point
-
Wheel muck plus. Flouro green stuff in a spray bottle, I get mine from repco1 point
-
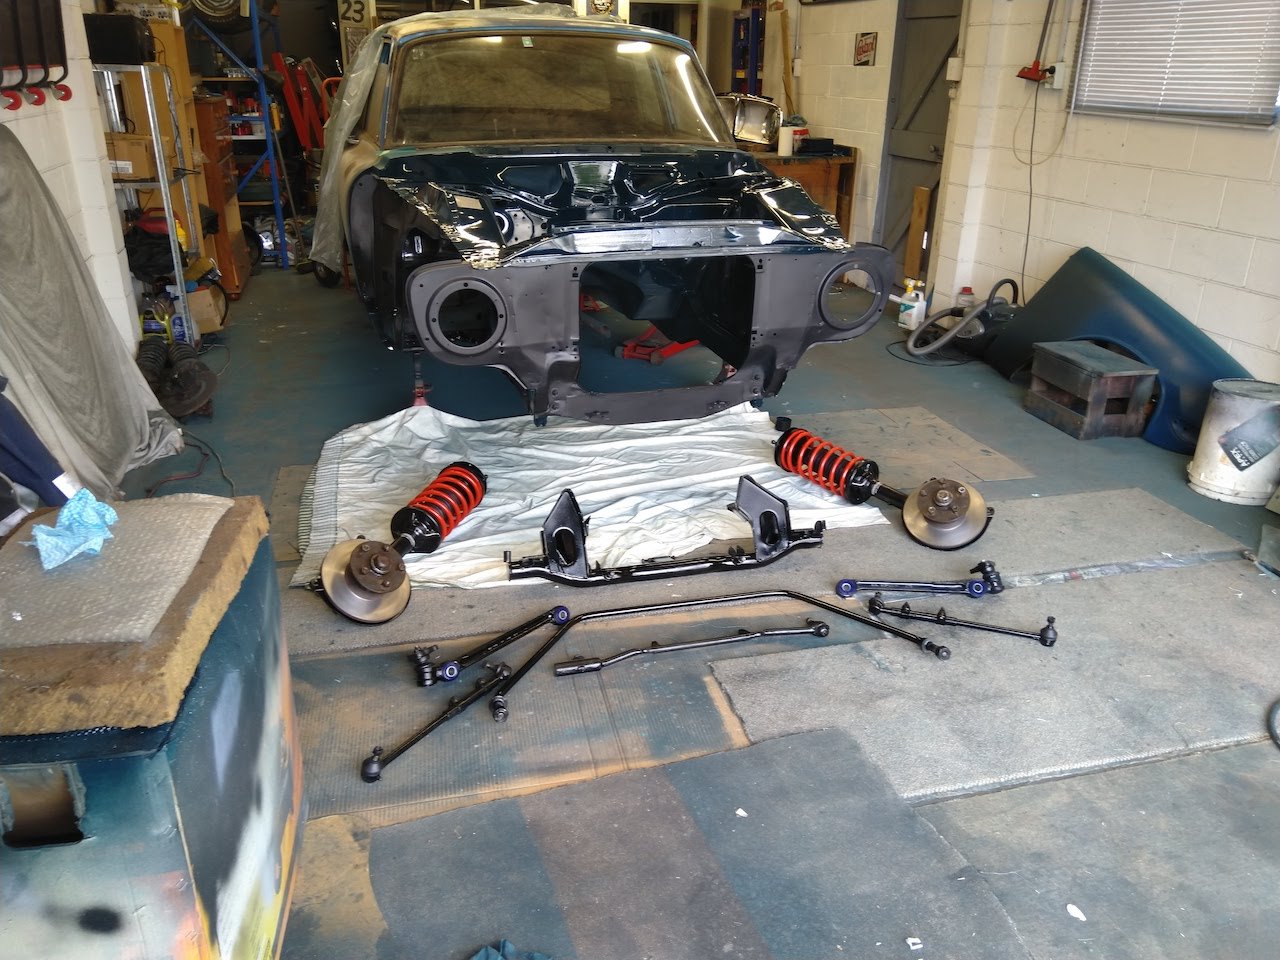
Got my struts back from getting modified to suit the MK1 golf inserts. He ended having to remove the spring perch and weld it back on to cut enough out. Very happy with the job though. Also got the carpet in and trimmed to suit. Not 100% happy with how it sits, but hopefully it will settle a bit.
1 point
-
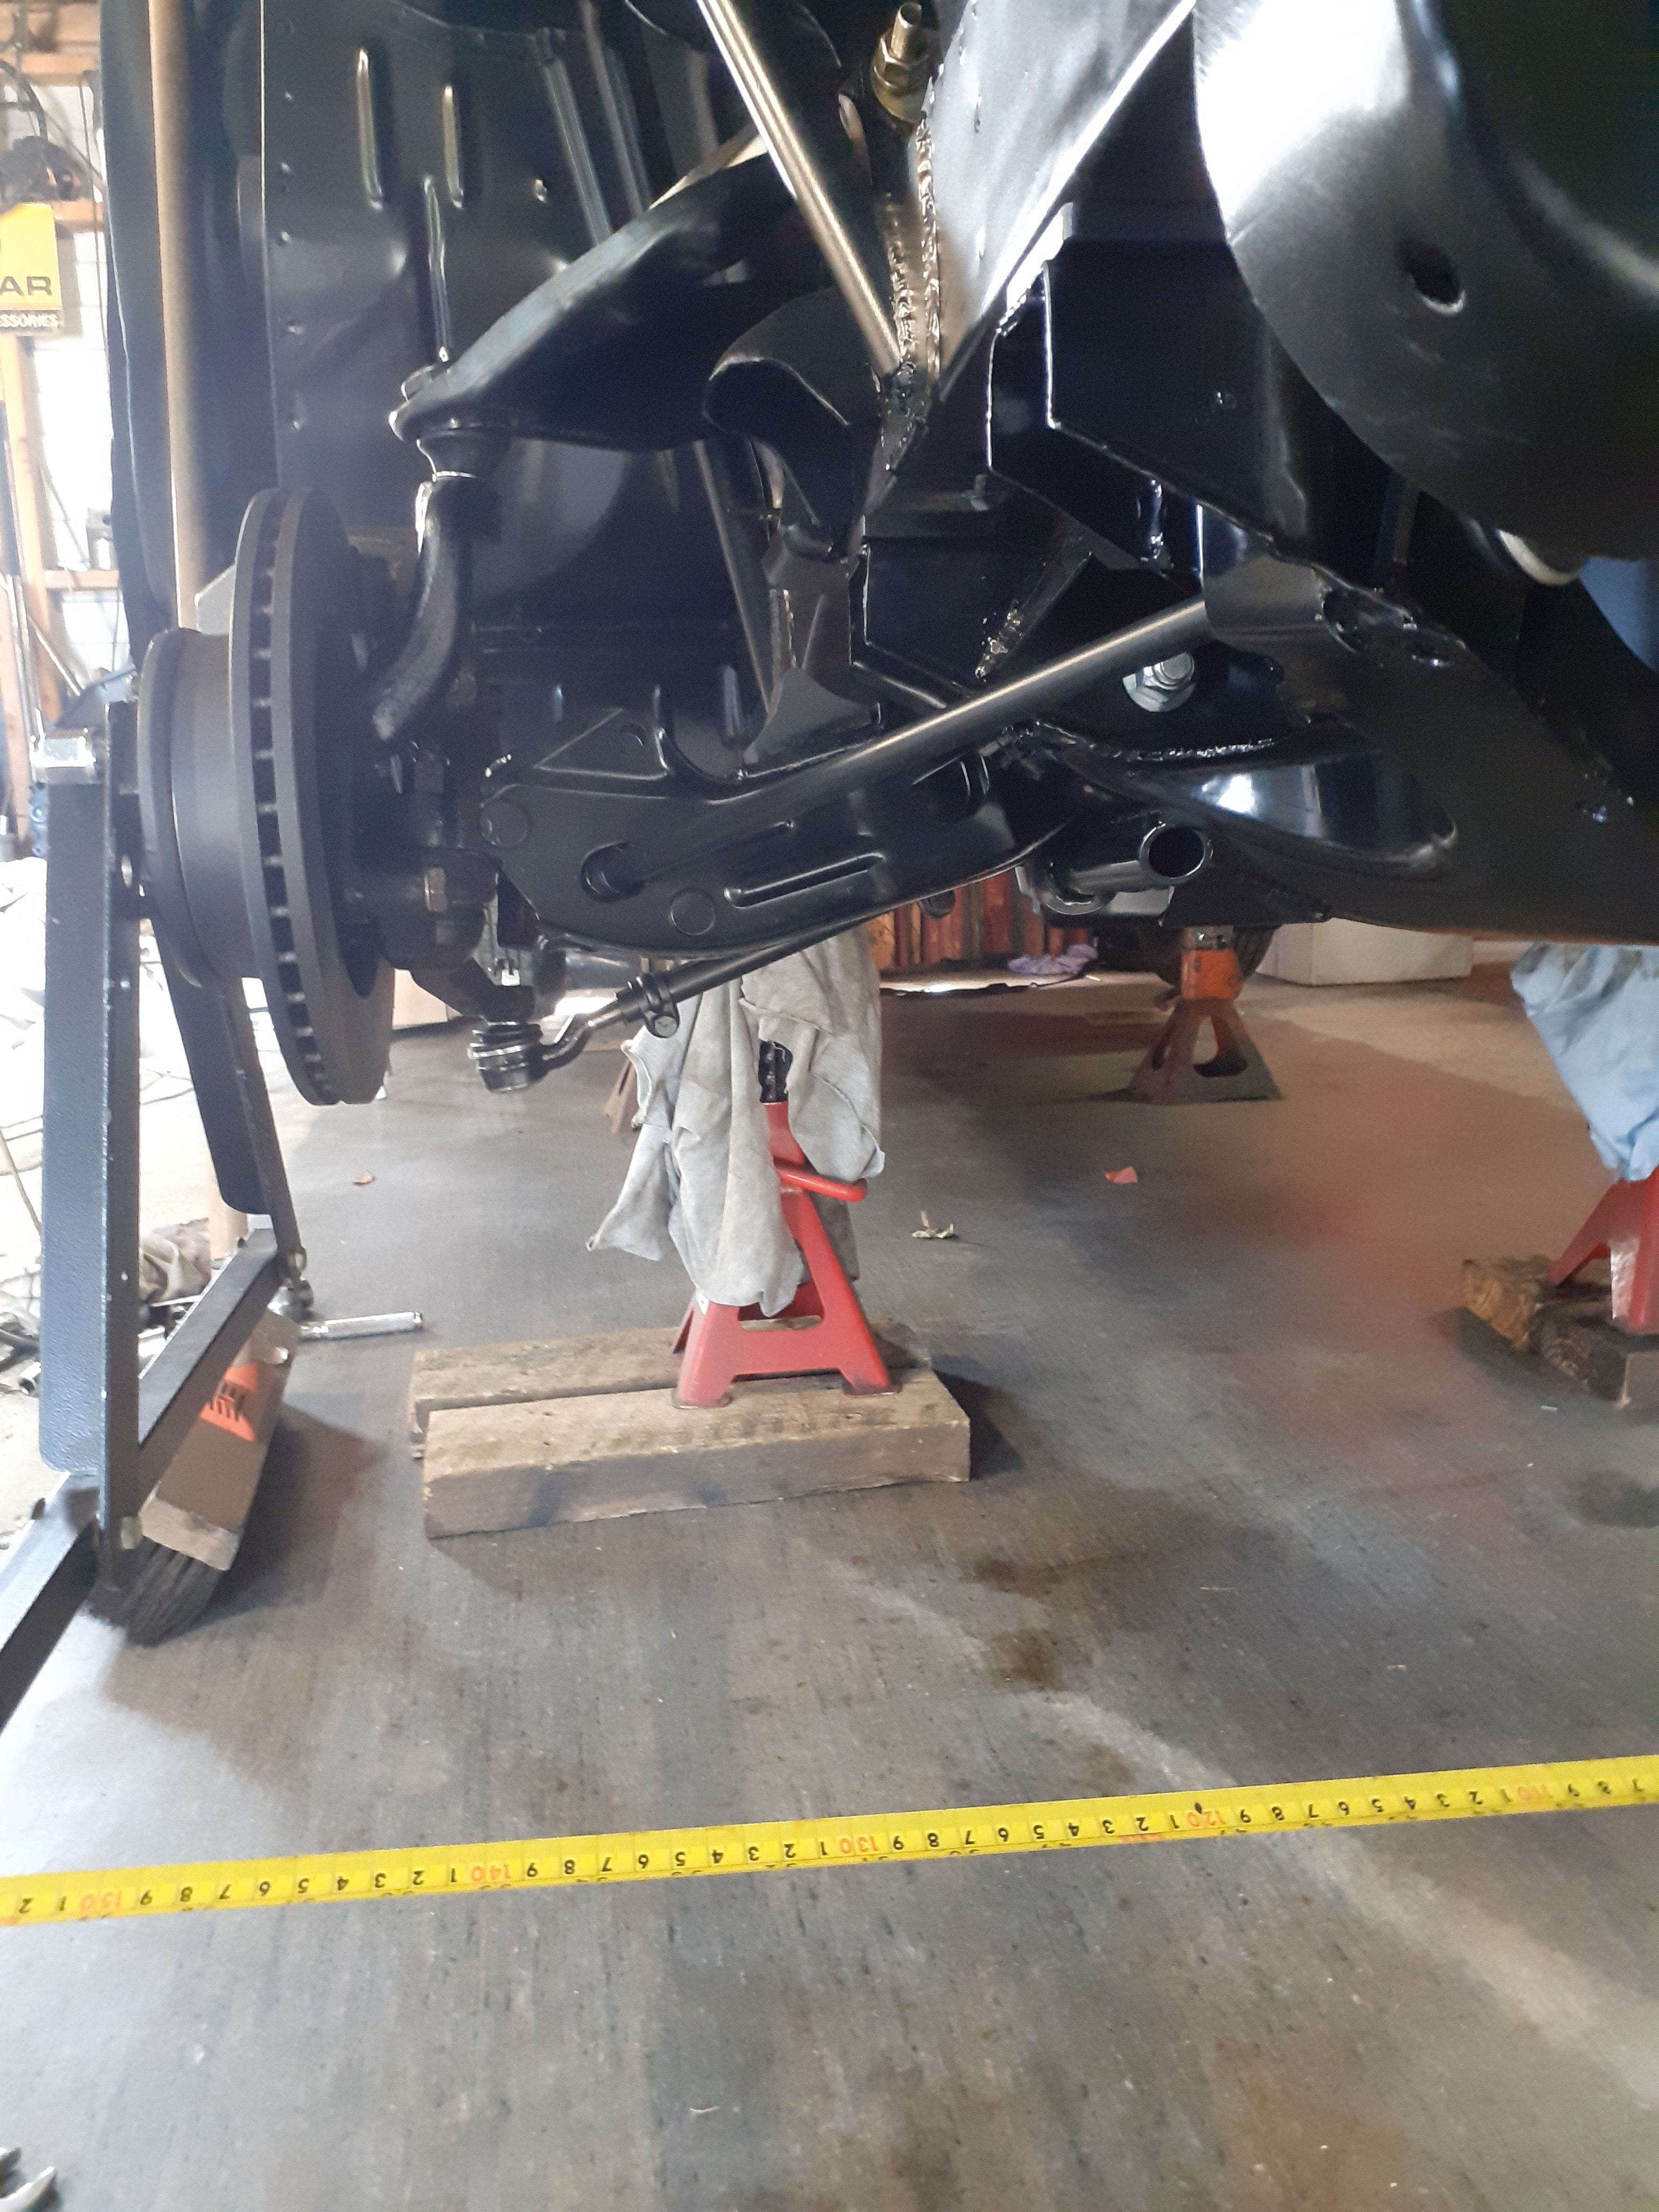
Today's job was bolt all the steering in and check bump steer Holy shit it was terrible. I've never actually bolted it all together with this combo. First check was over 70mm. Mucked around with different combos of tie rod ends and rod ends for hours and found the combo I have wont work so I I've ordered some different balljoints, the american balljoint has a slightly longer steering arm and the bit where the tie rod end bolts on is slightly higher. I was trying to use the aussie balljoint for quicker steering, my vg had needed a lower outer pivot to fix the bumpsteer so I was hoping this would be the same, but it appears to need the opposite. it looks like the ideal pivot center is right where the arm is
1 point
-
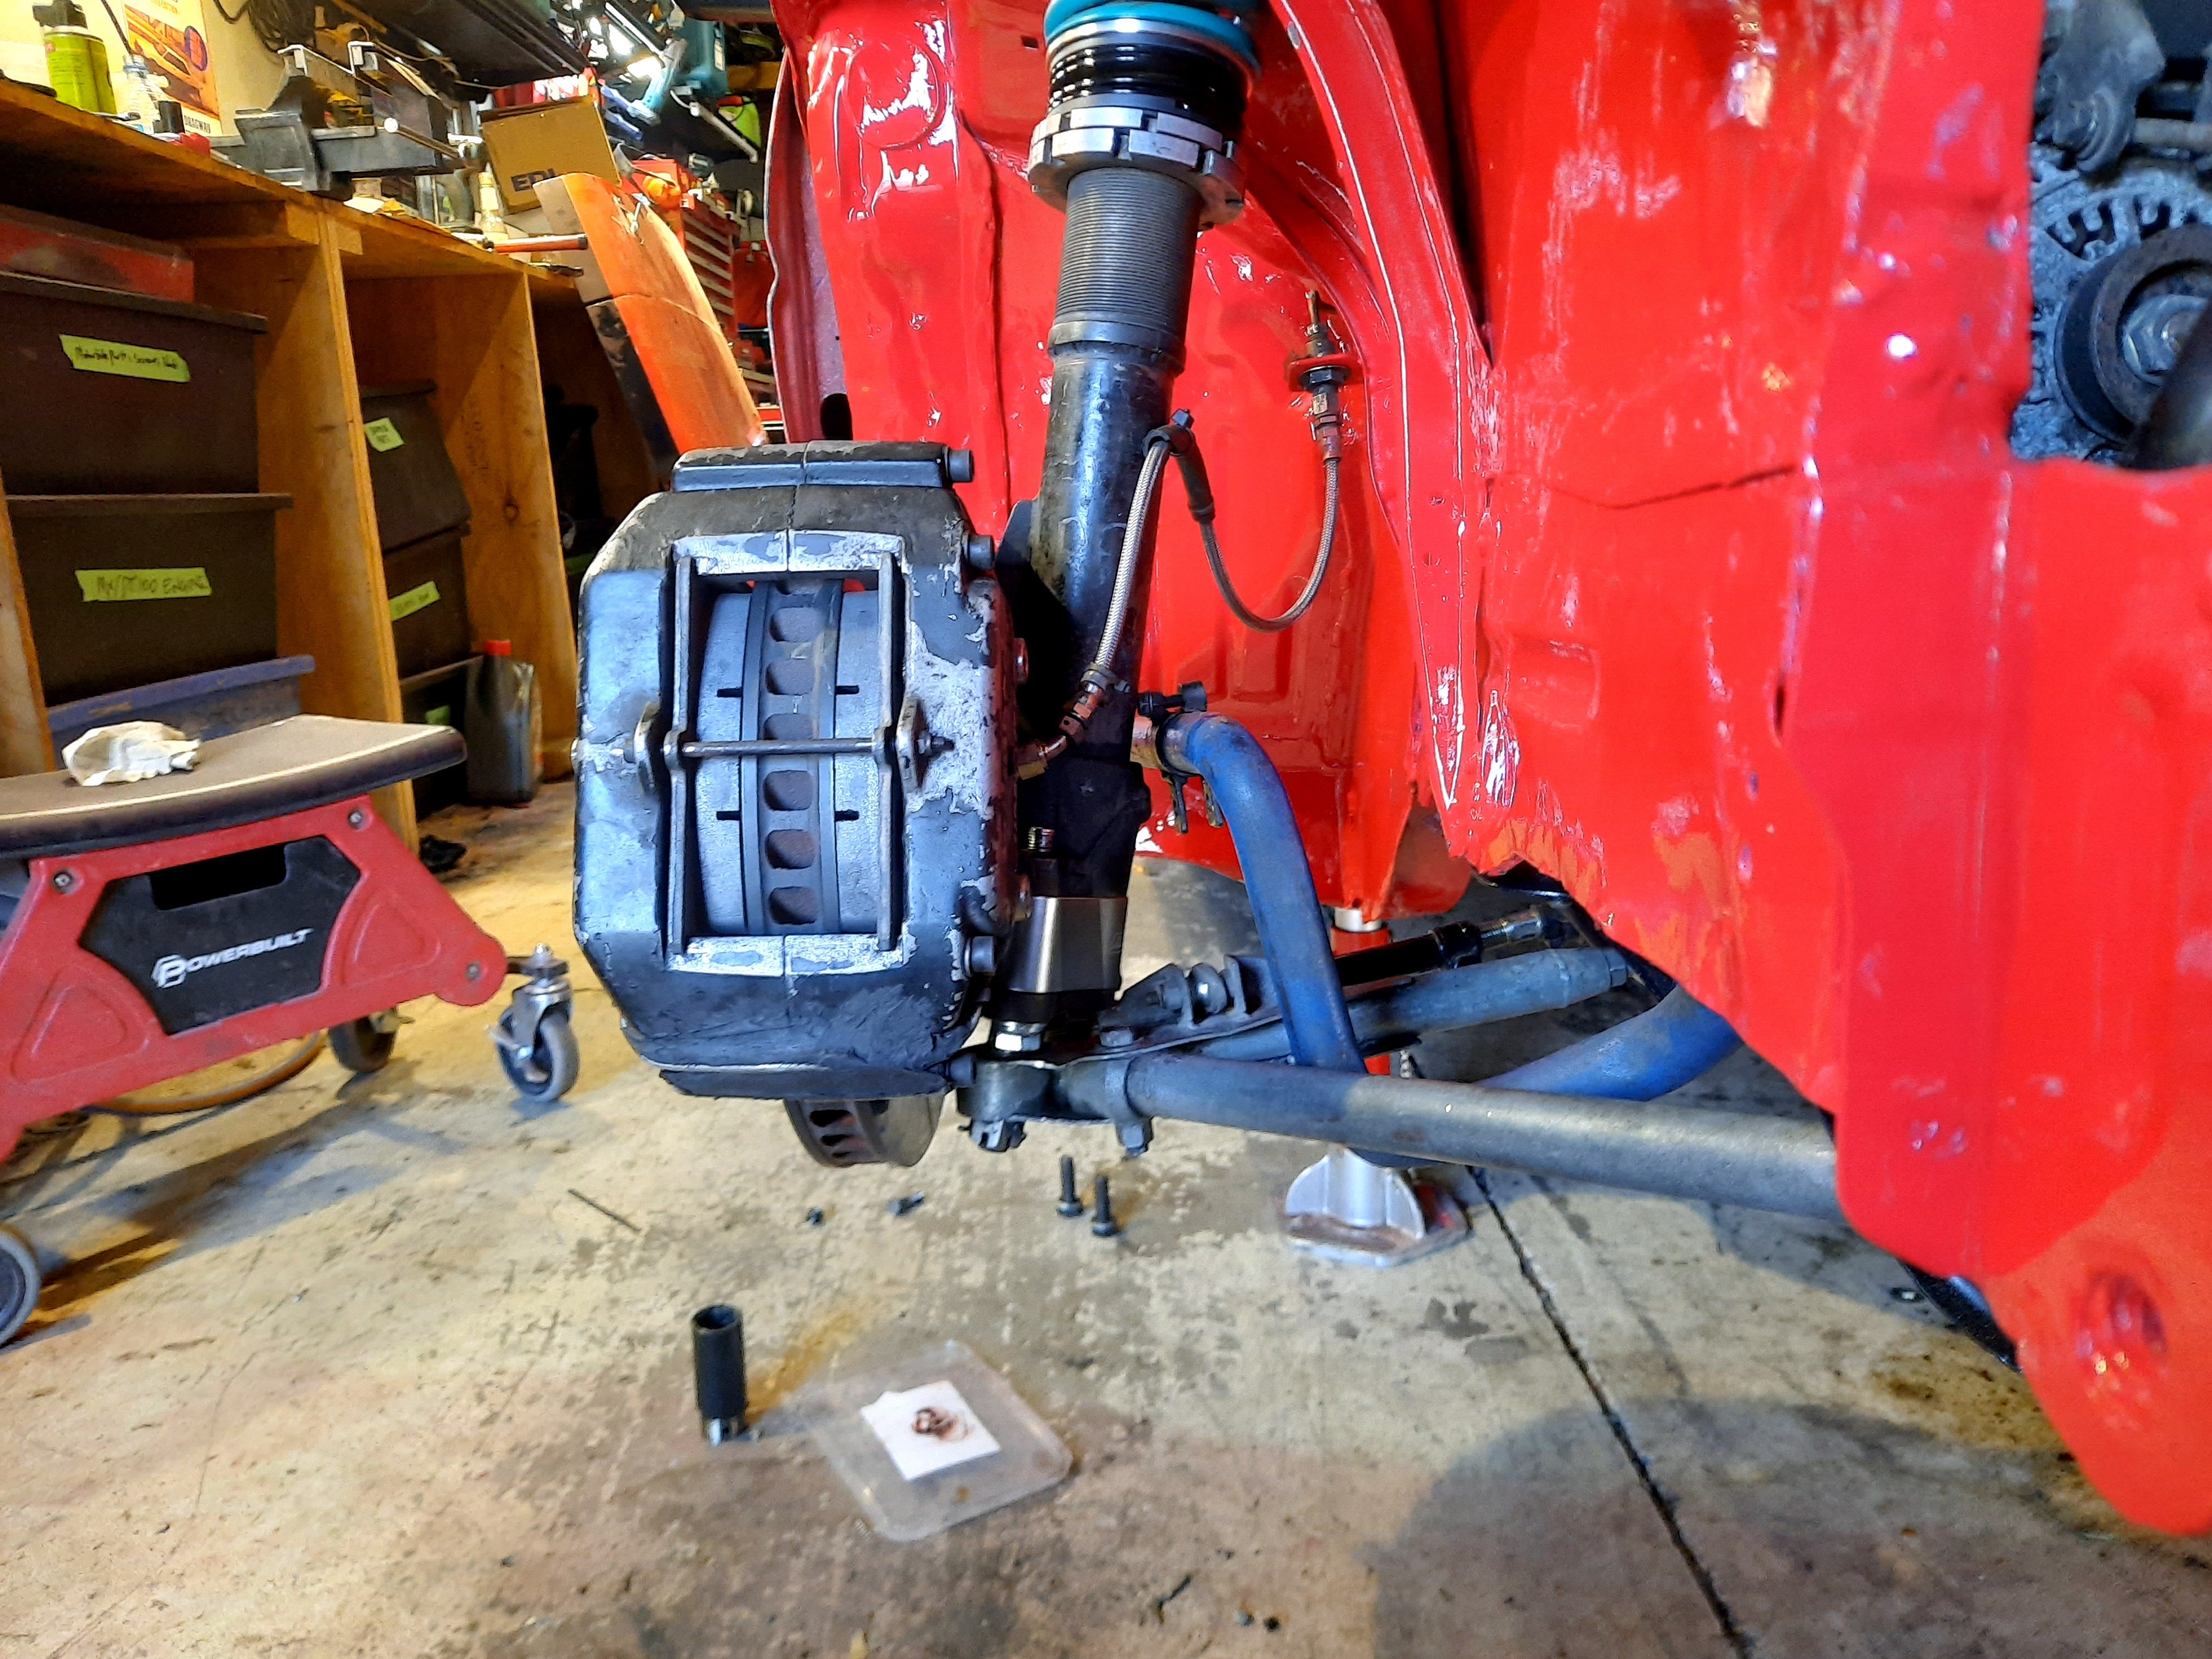
The brakes were well seized on to the point it was difficult to push around. Pulled the calliper off and couldn’t even get the pads out due to the amount of corrosion on/around them. I ended up having to hydraulic the lot out with a grease gun resulting in this mess. I spent some time with the parts cleaner/scotchbrite and a hone at work and it came up very good. -Bore is mint, Seal groove came up well, and exterior has some slight corrosion, but no pitting and surfaces are all smooth. Jammed it together with a new seal, piston and pads. Have taken some measurements, and am going to box the old brake hoses up to get a new one made to suit bars/ replacement master cylinder. M A I N T E N A N C E1 point
-
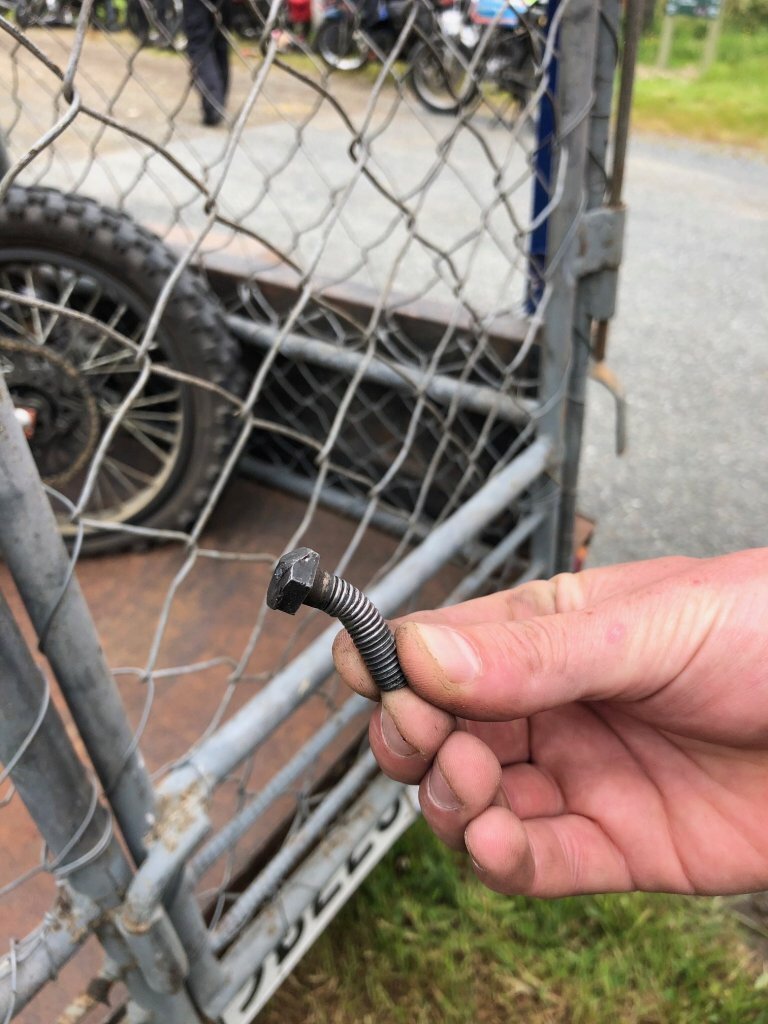
Te Urewera Undertaking successfully completed with a couple of hiccups The wires into the ignition snapped off so it was twist 2 wires together for headlight and dash to work Numberplate bracket snapped off on the last day and went byebyes down a bank into a swamp And the most exciting incident was just at the start of the Motu road Bolt holding the sprocket to the back hub worked its way loose past the lock tab and jammed into the swing arm while doing 75kph thru a corner resulting in a big lock up thinking id seized it then the tyre spinning on the rim and destroying the tube, it was exciting to say the least. Bunged it on the trailer for the day then fixed it in Gizzy with some decent cap screws and locktite for piece of mind
1 point
-
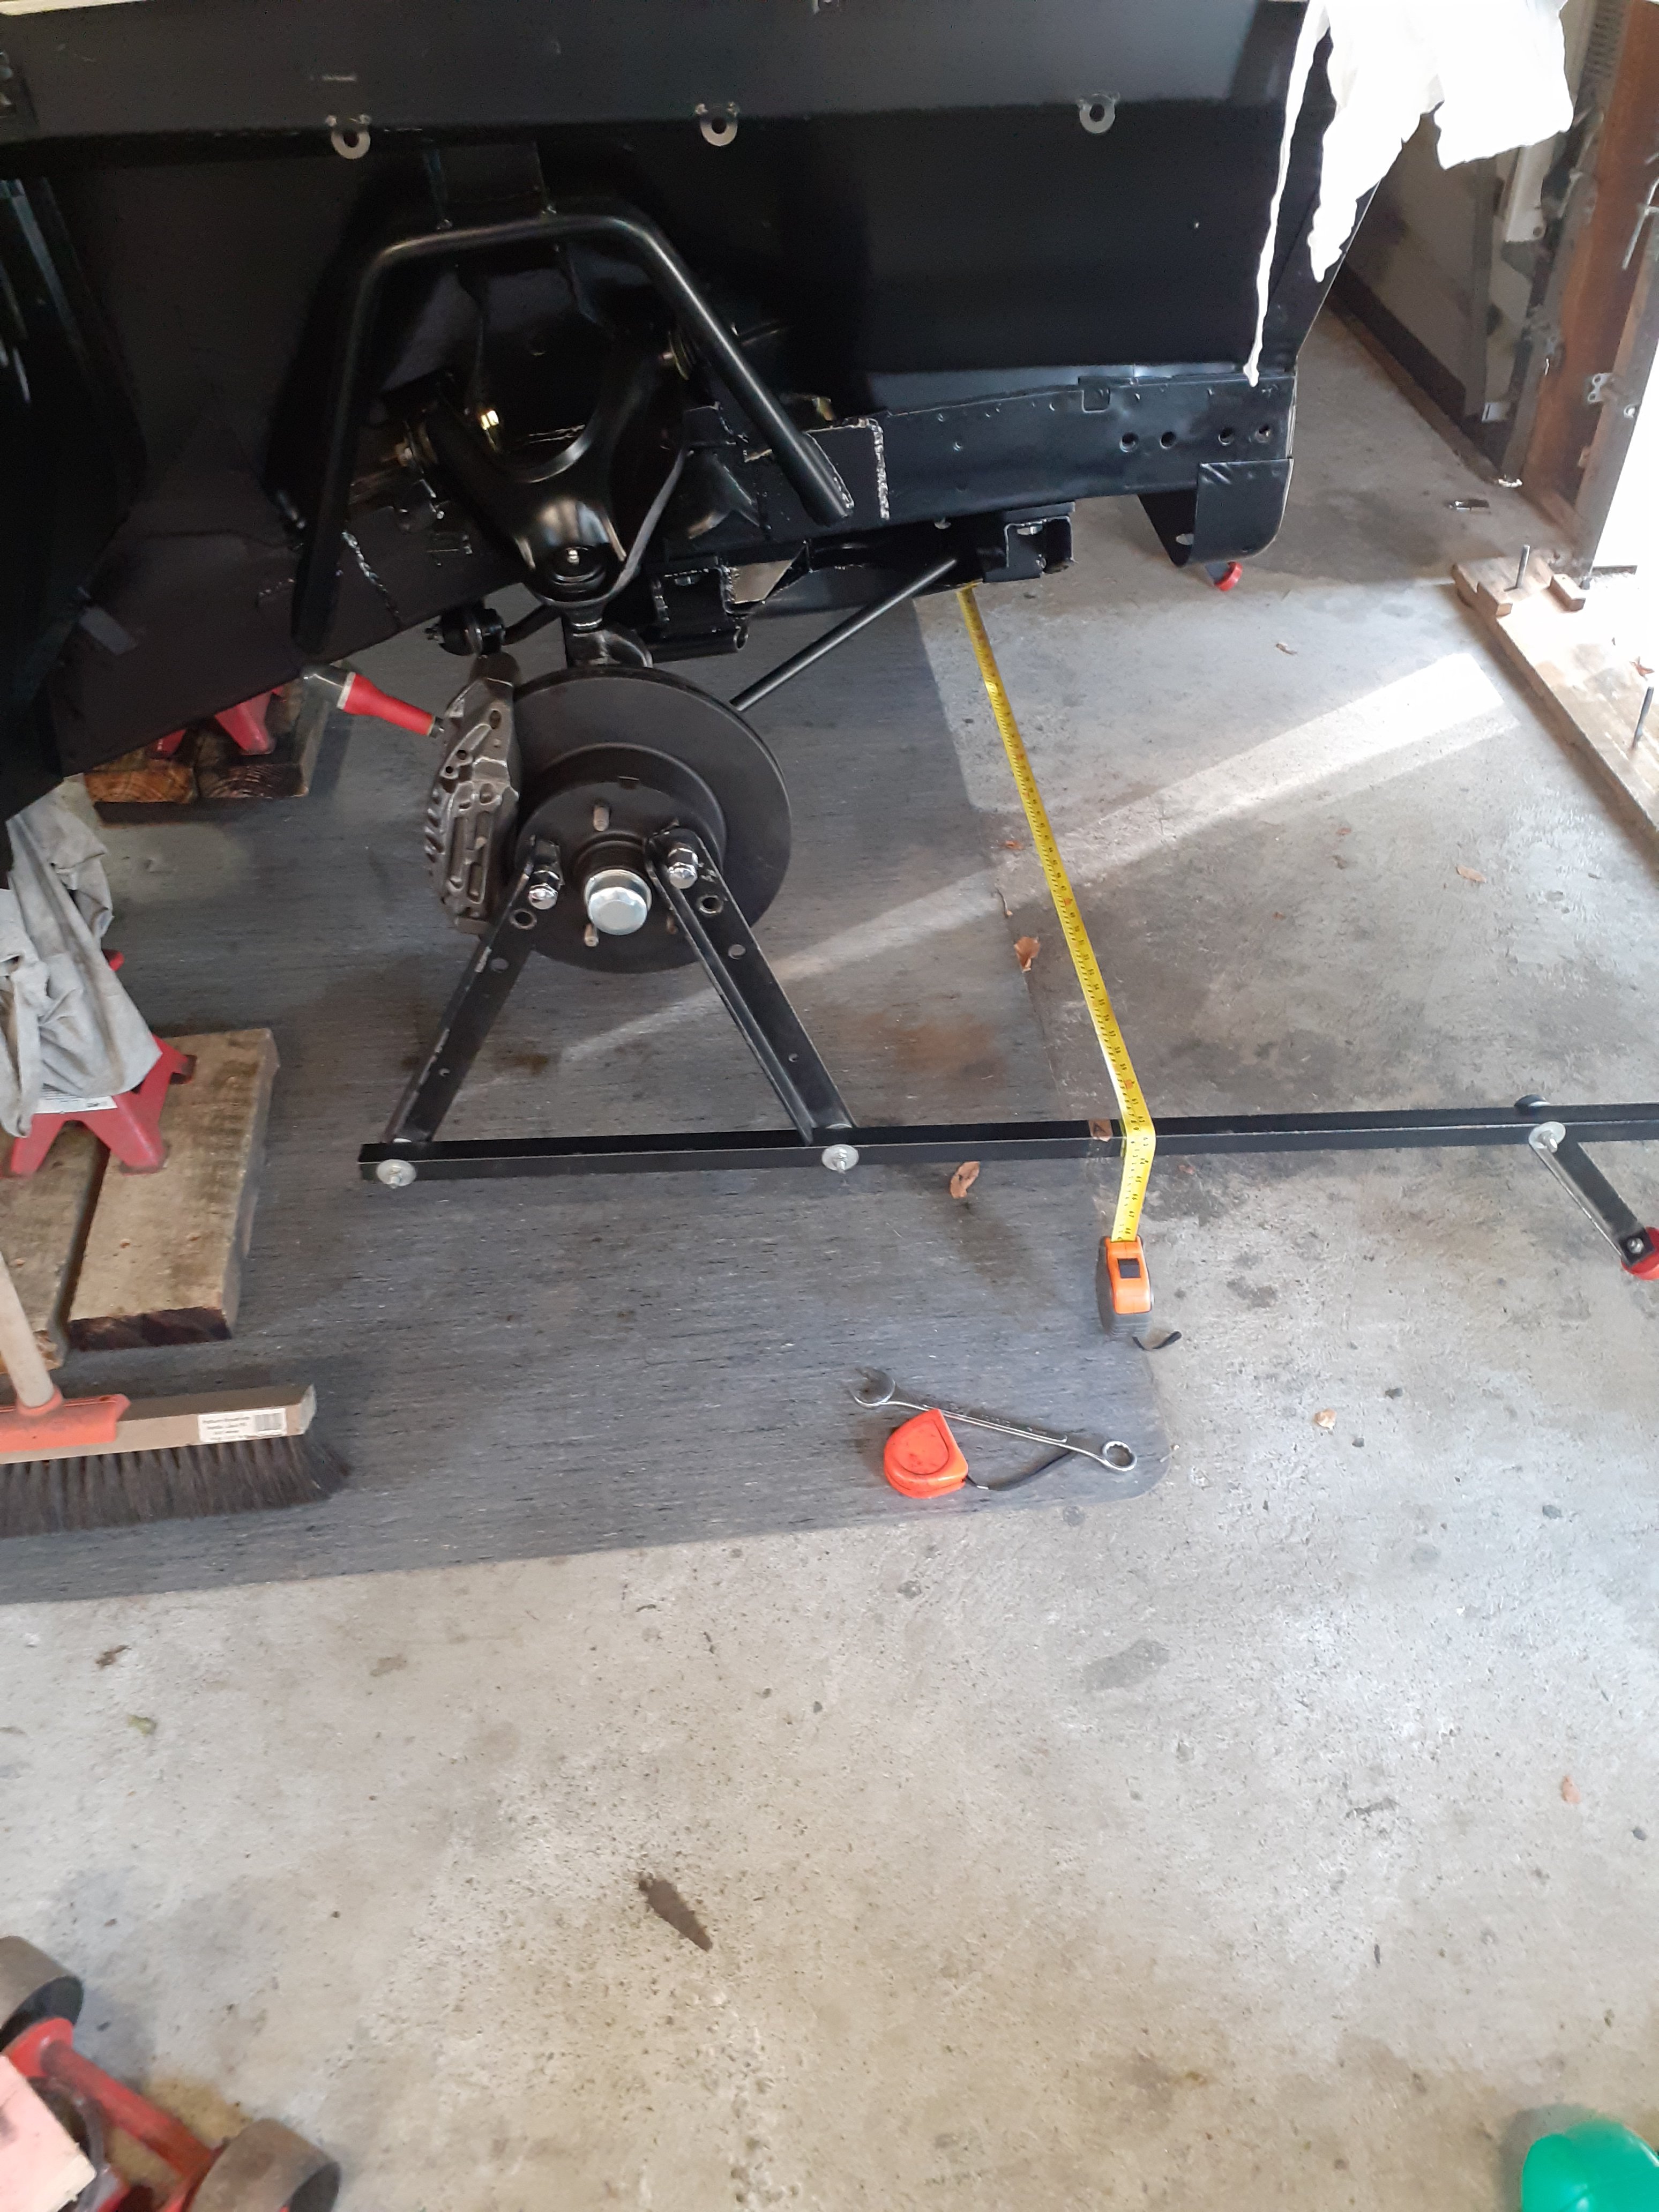
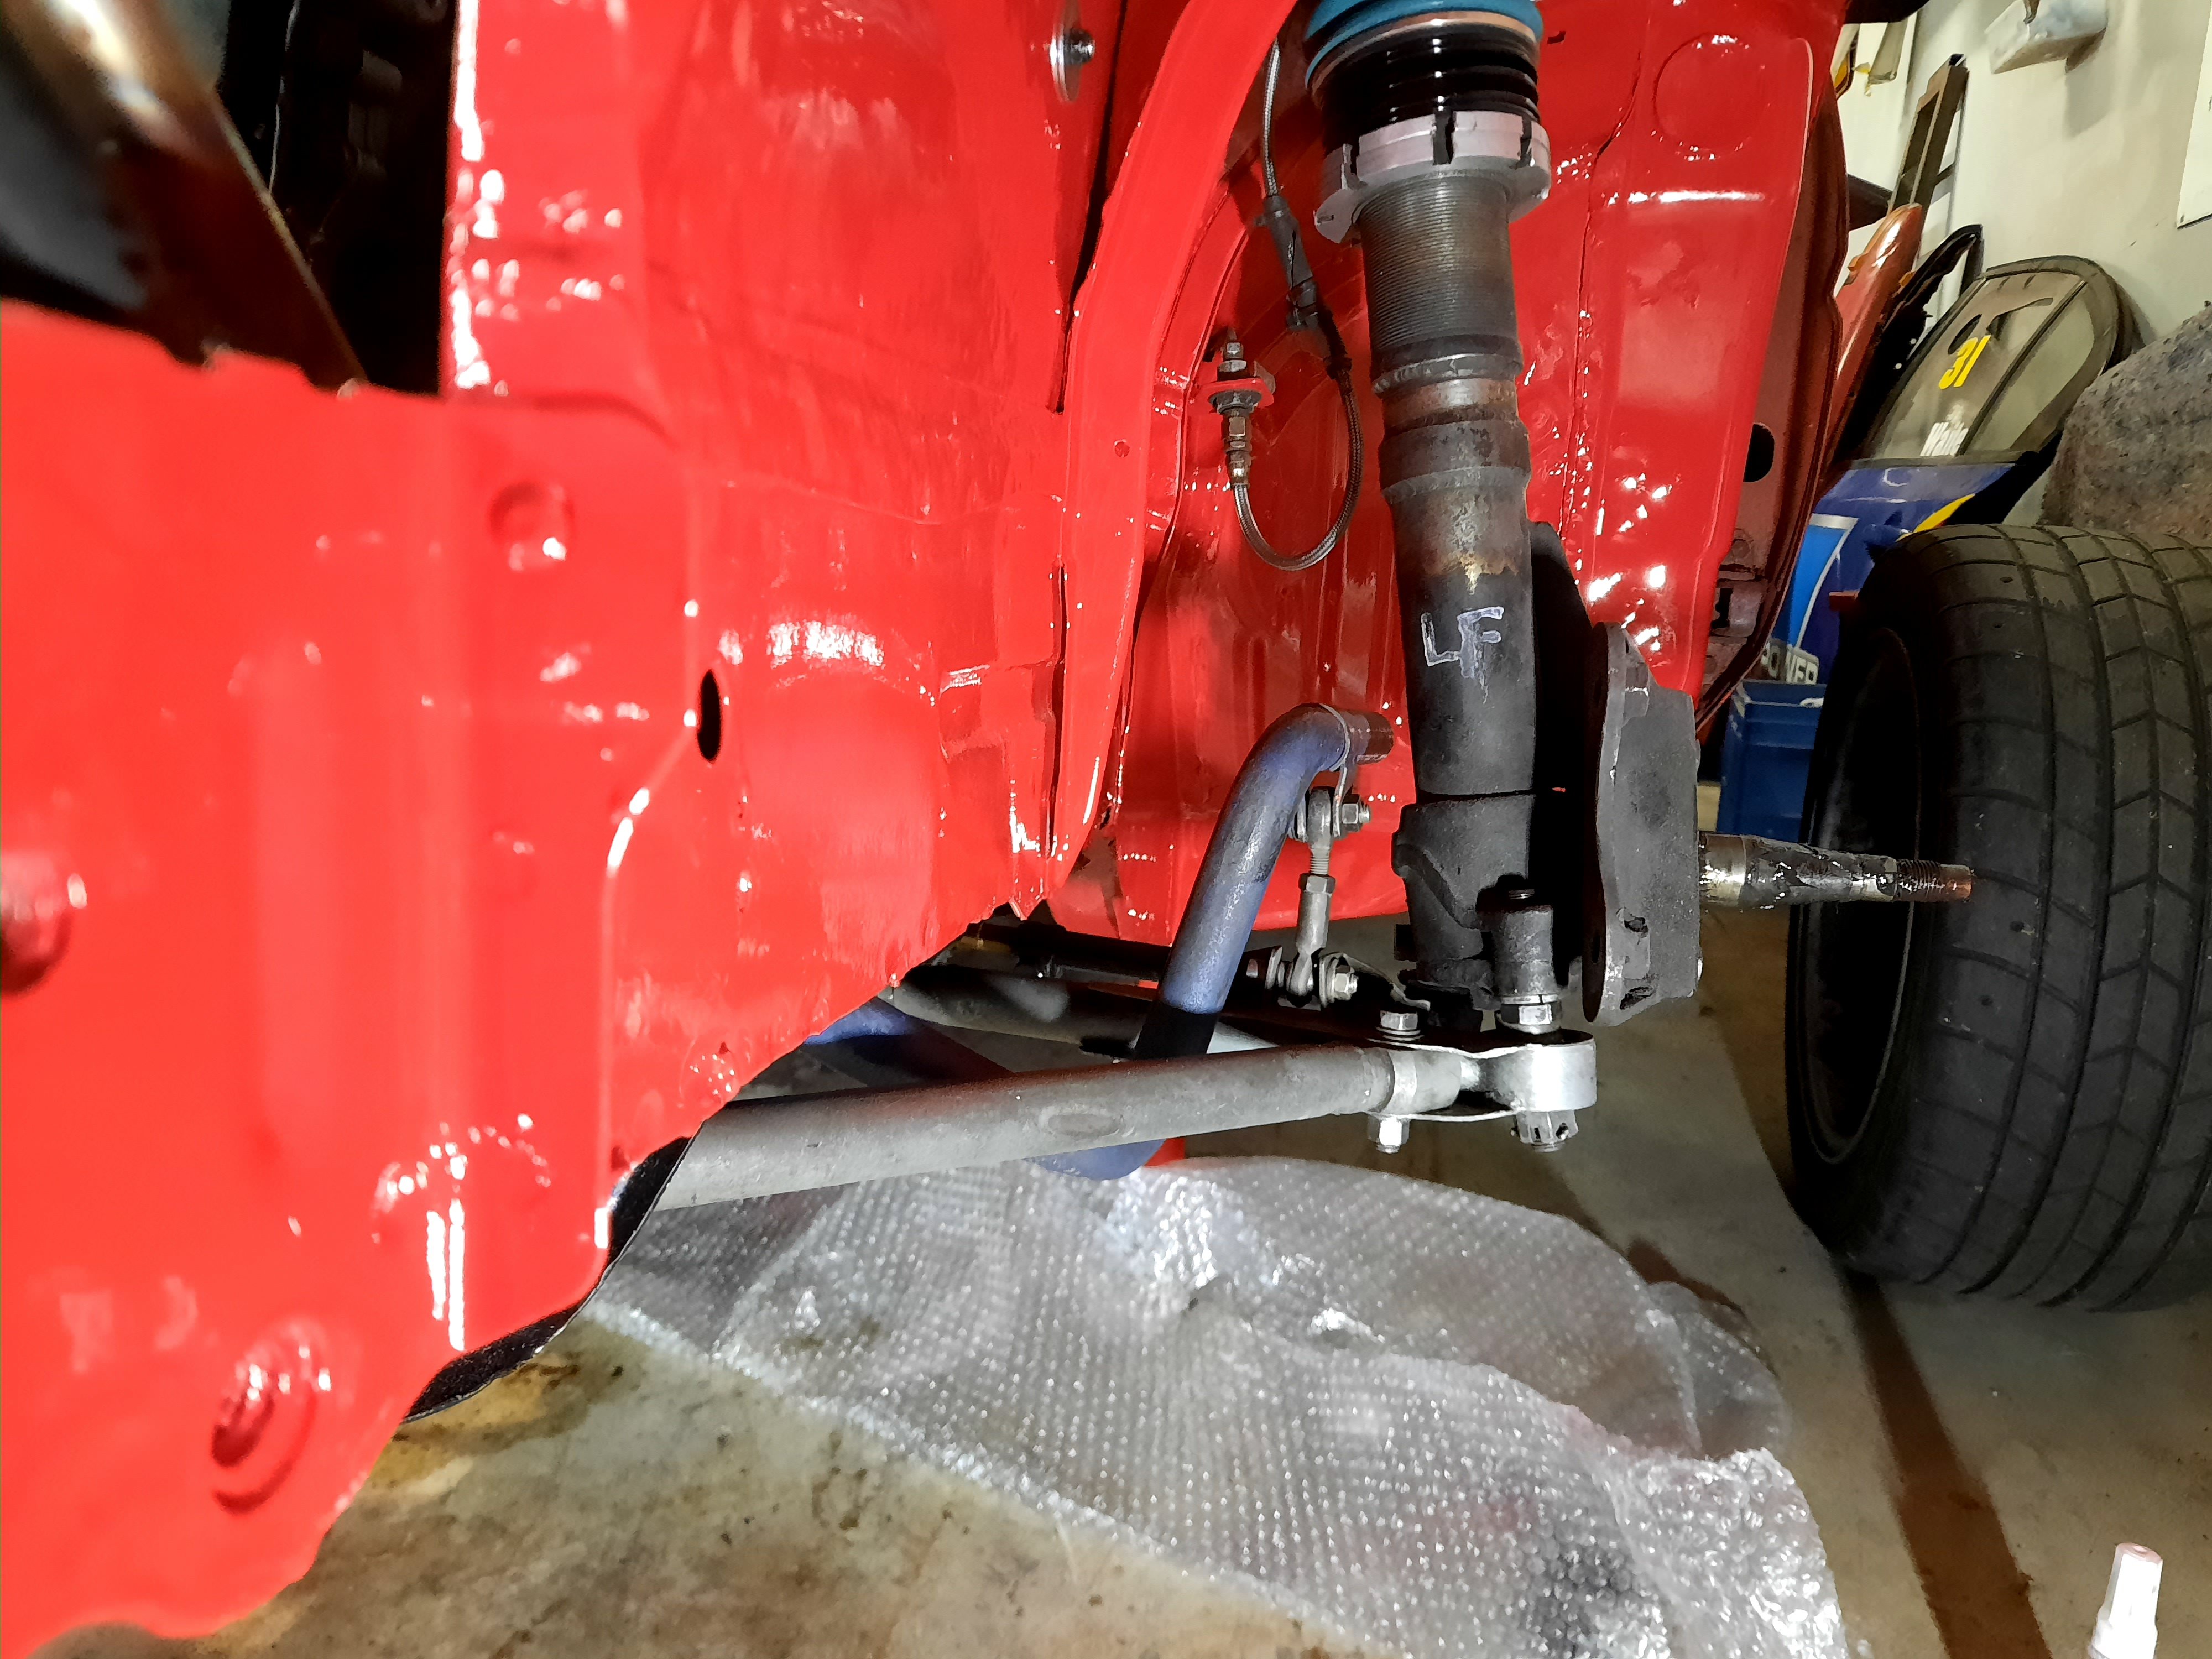
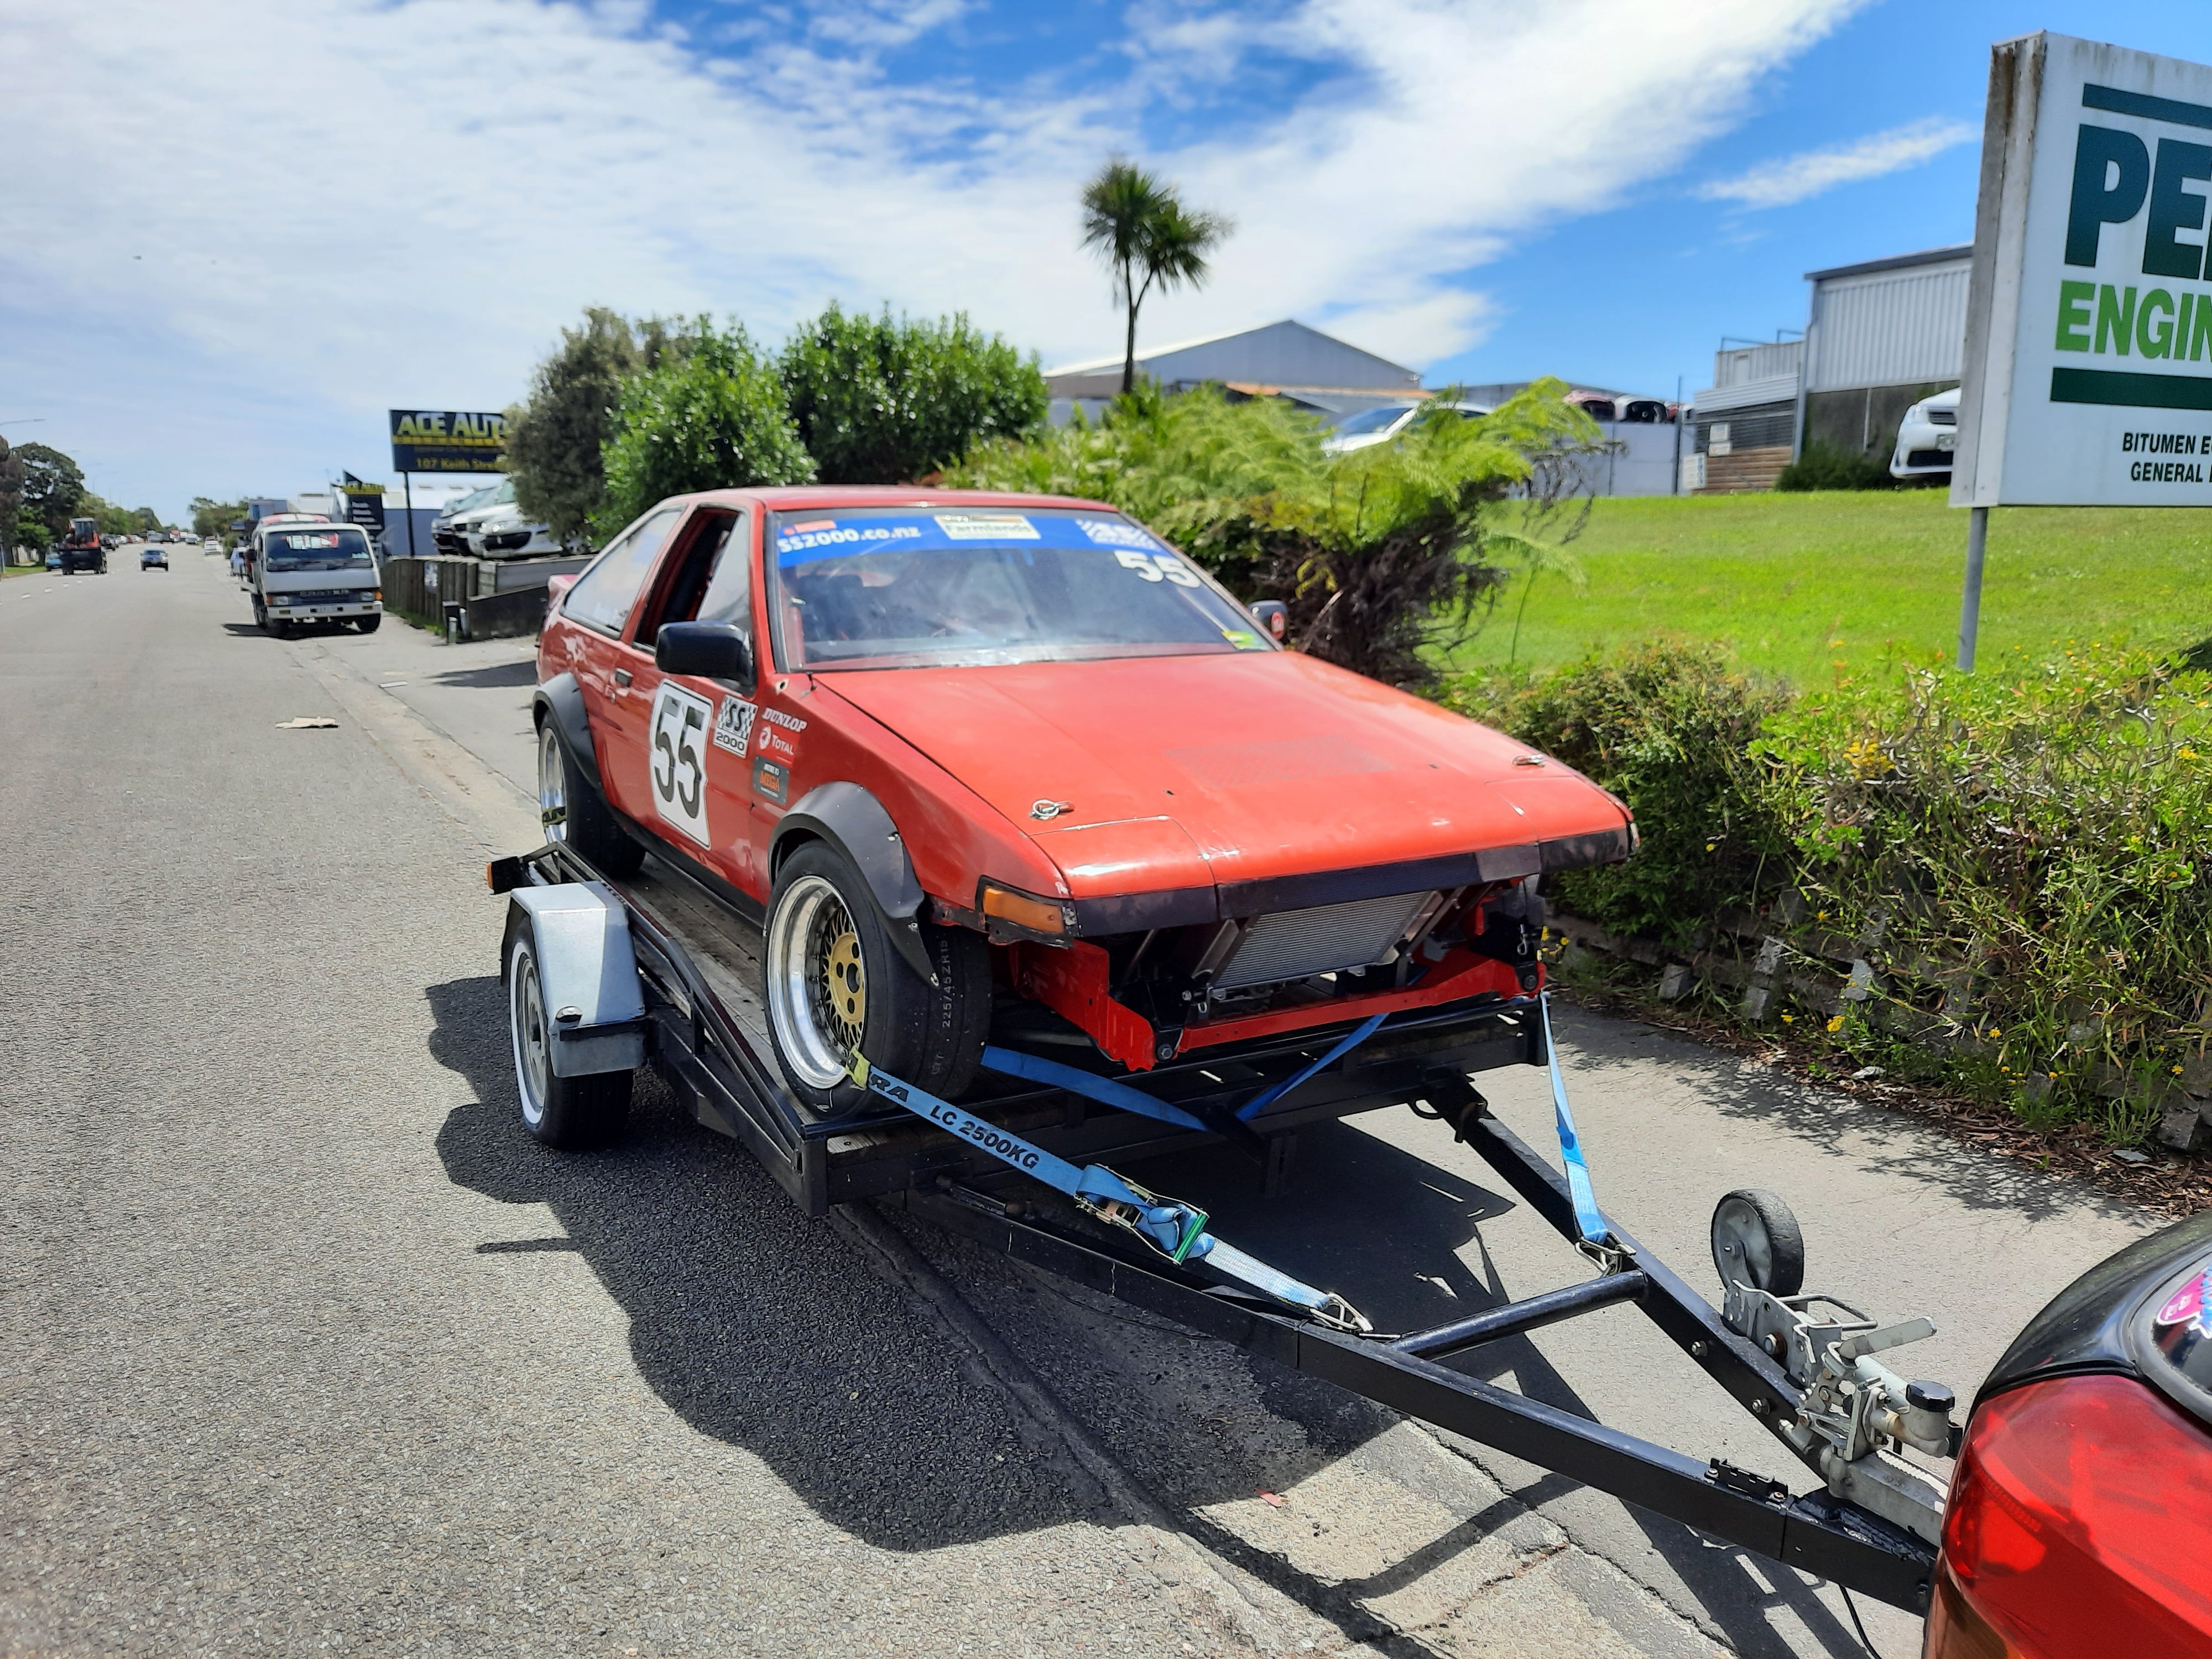
Ticked off a few more jobs in the last couple of days. My new RCAs, caliper brackets and rotor hats arrived from MRP late last week, so I spent a couple of evenings fitting everything. Old setup - the arms were basically level at full droop (not what you want). New setup - this is much better, but I could possibly go even bigger with the roll centre adjusters. These are 38mm. You can also see the old vs new calliper brackets in these photos. With the caliper installed: Popped it on the trailer and took for an alignment: Pumped the lower lower arms out by a decent amount. Ended up with about 3.5° camber, 6.75° castor and 3mm toe out in the front. Also squared up the diff while I was under there. The extra track width looks tough from this angle. Hopefully it works well too!
1 point
-
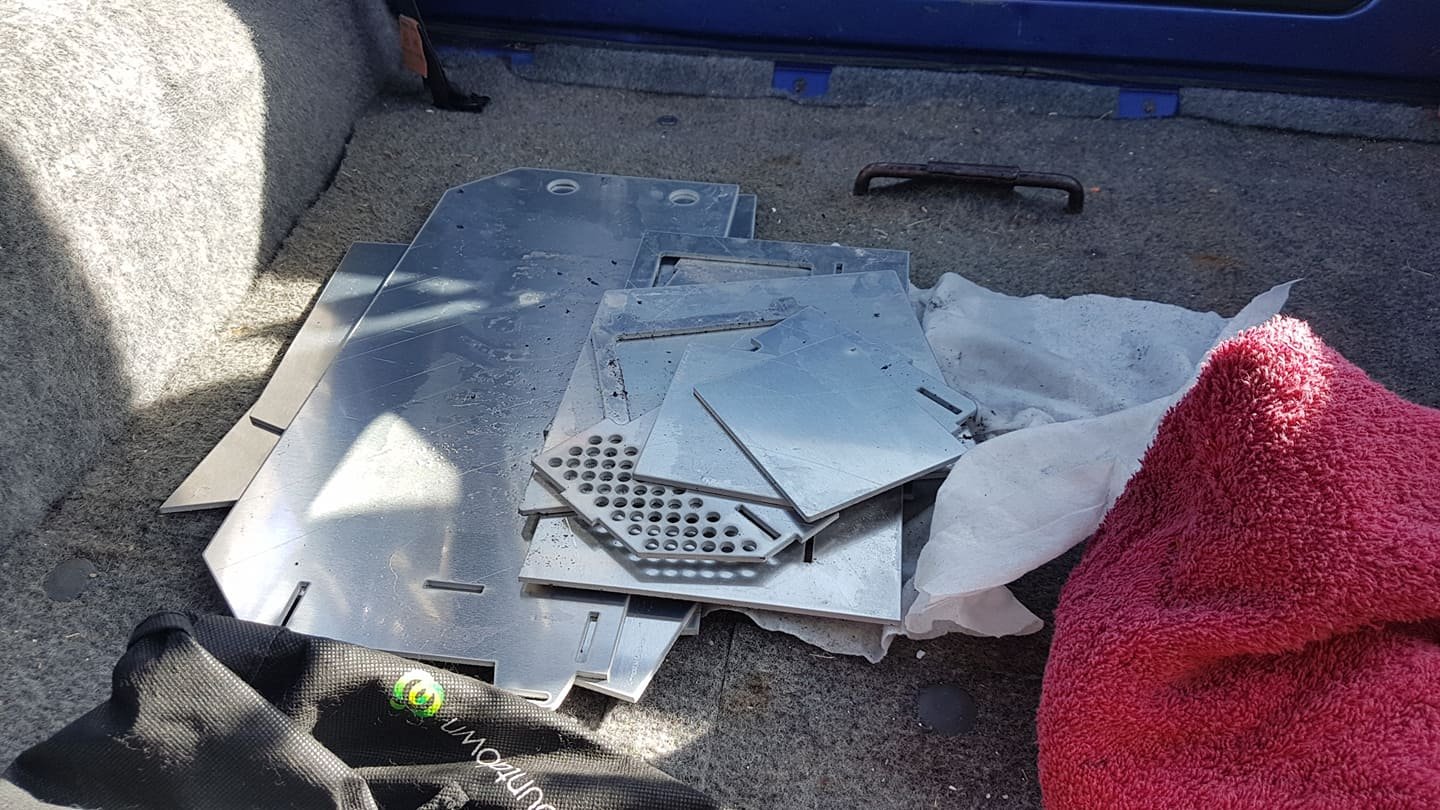
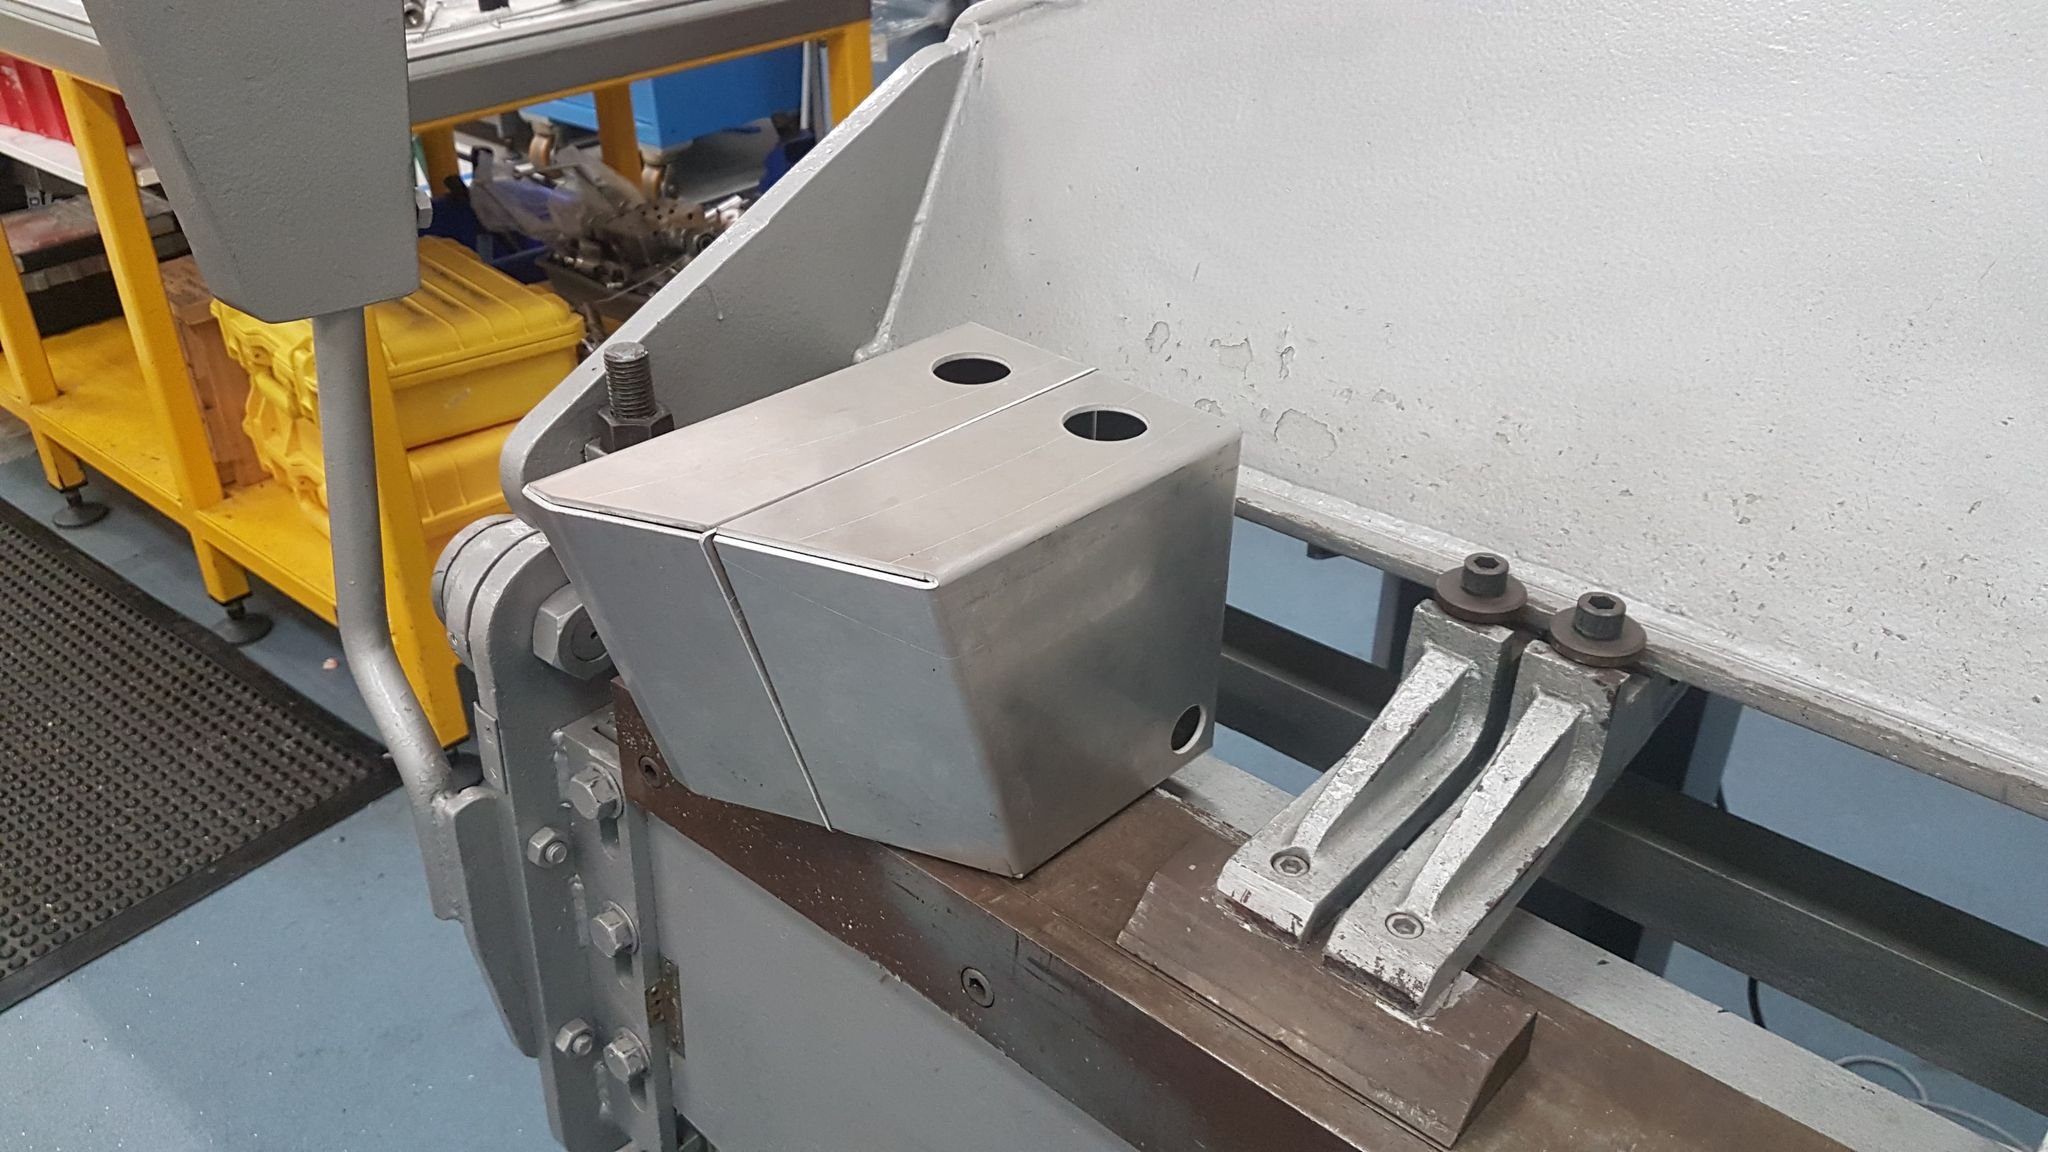
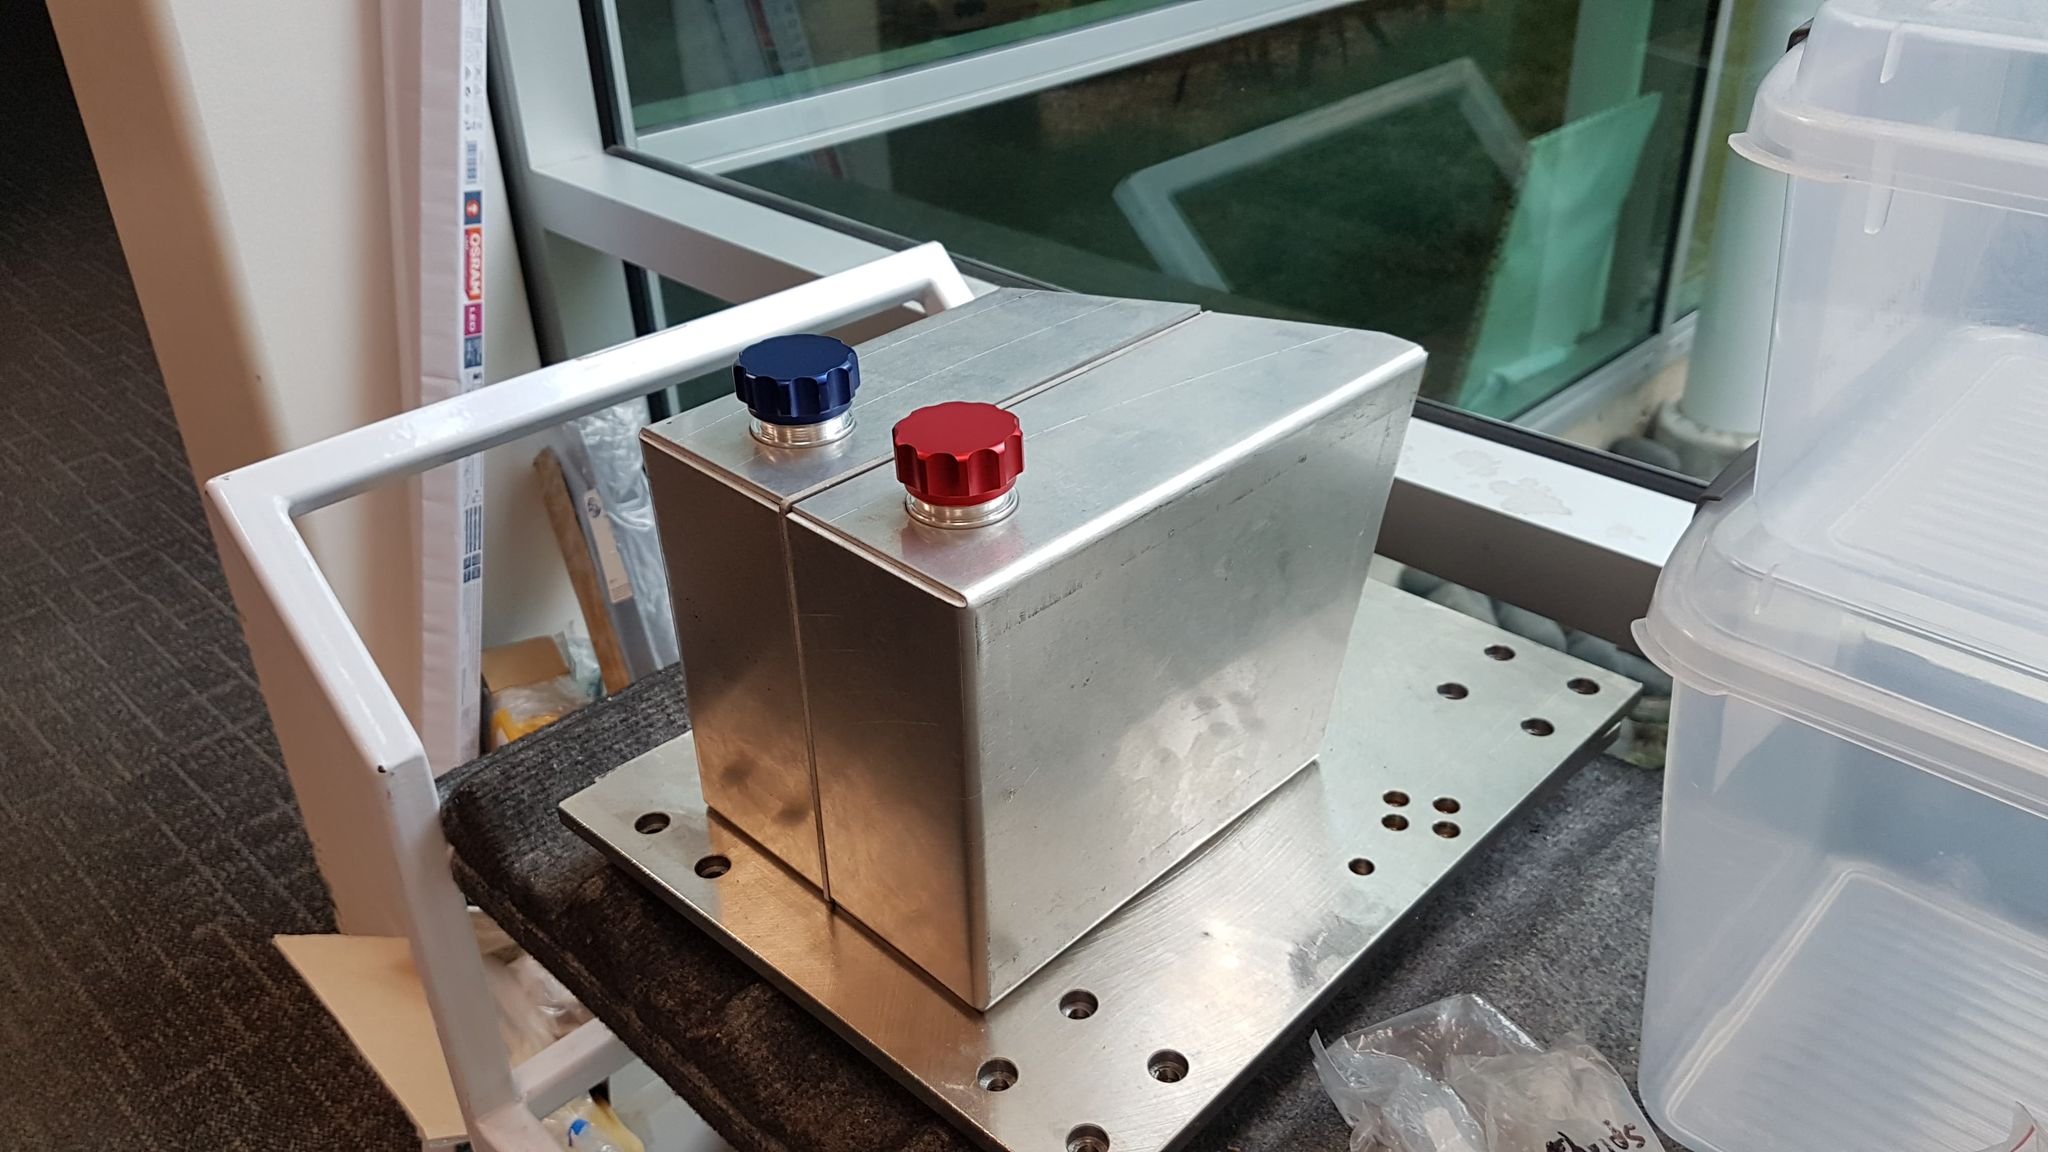
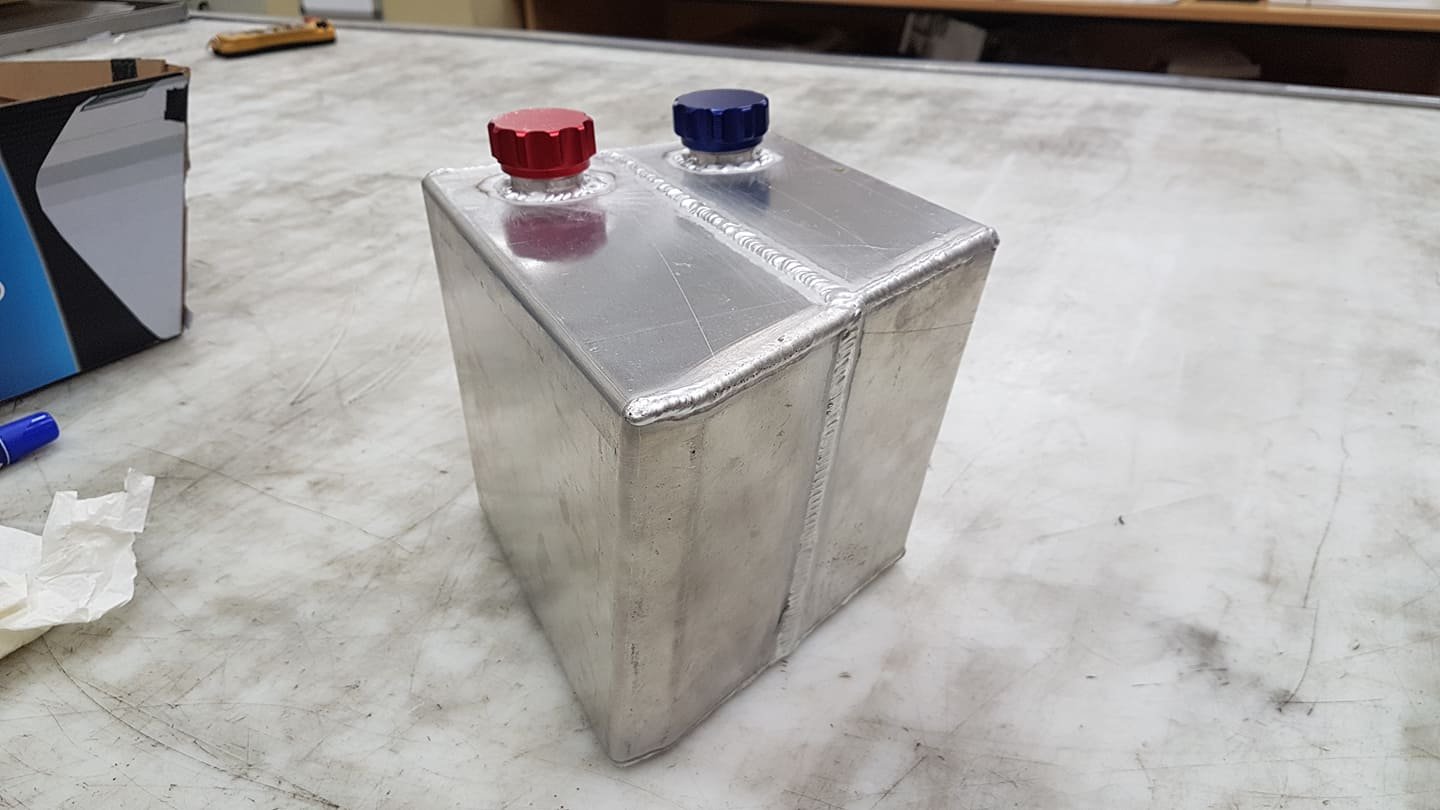
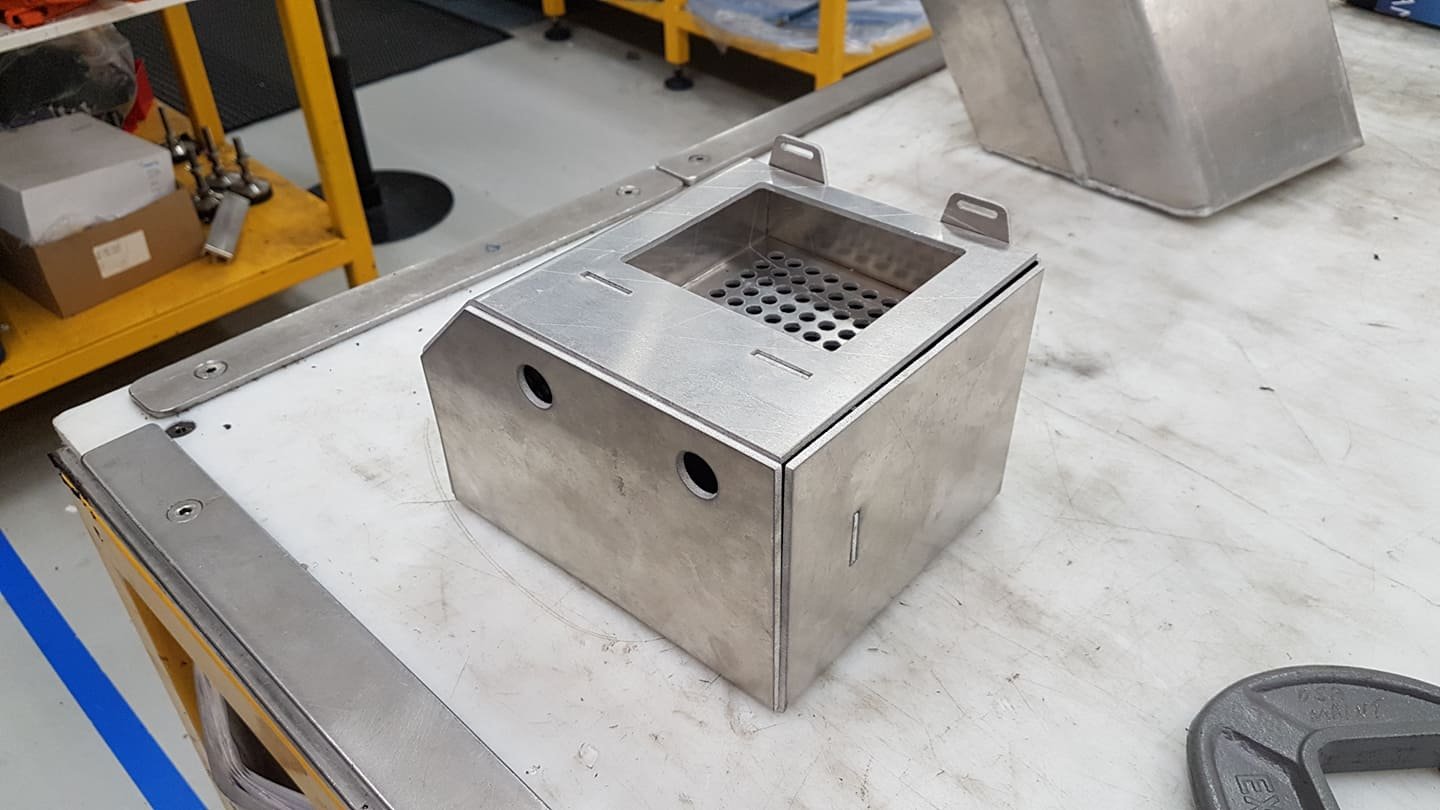
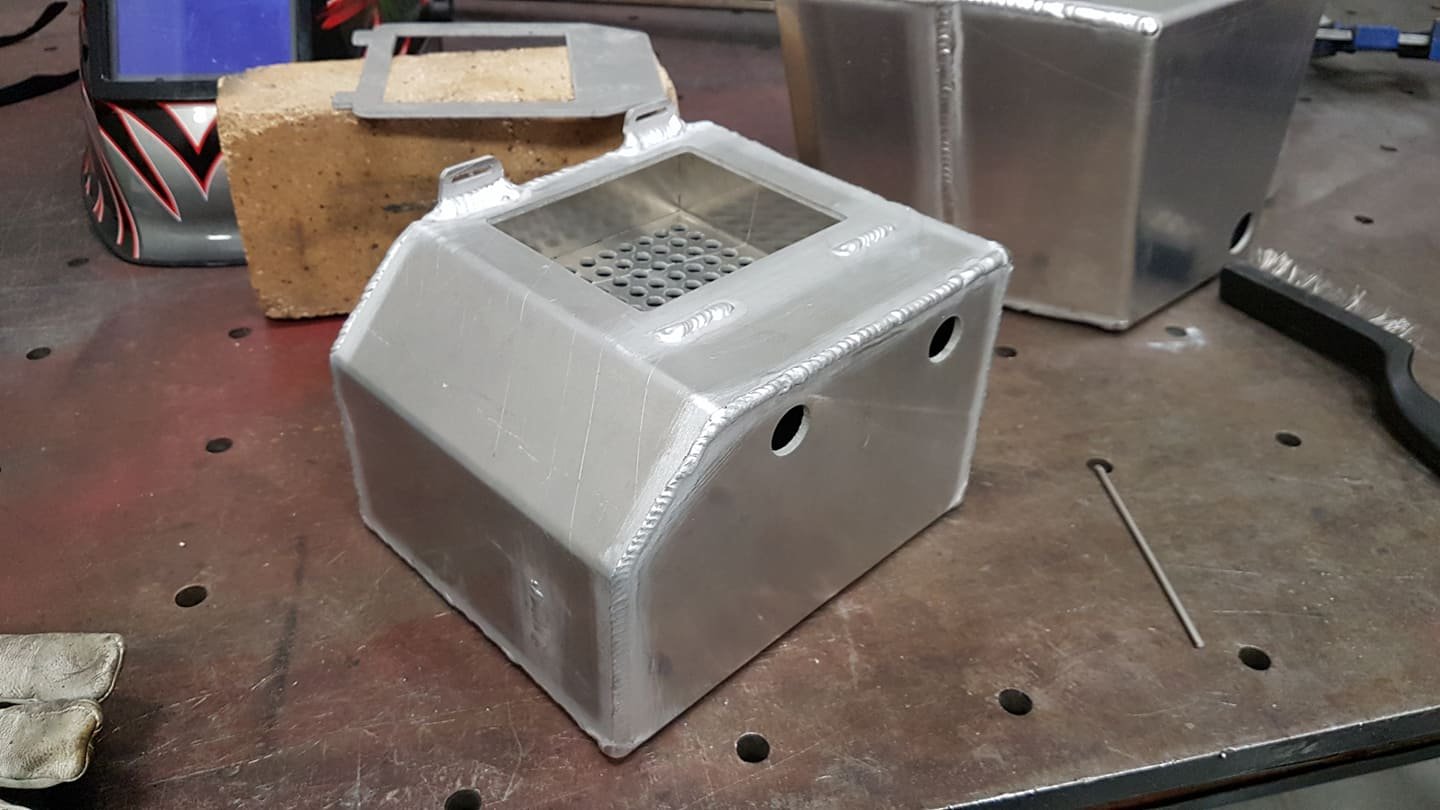
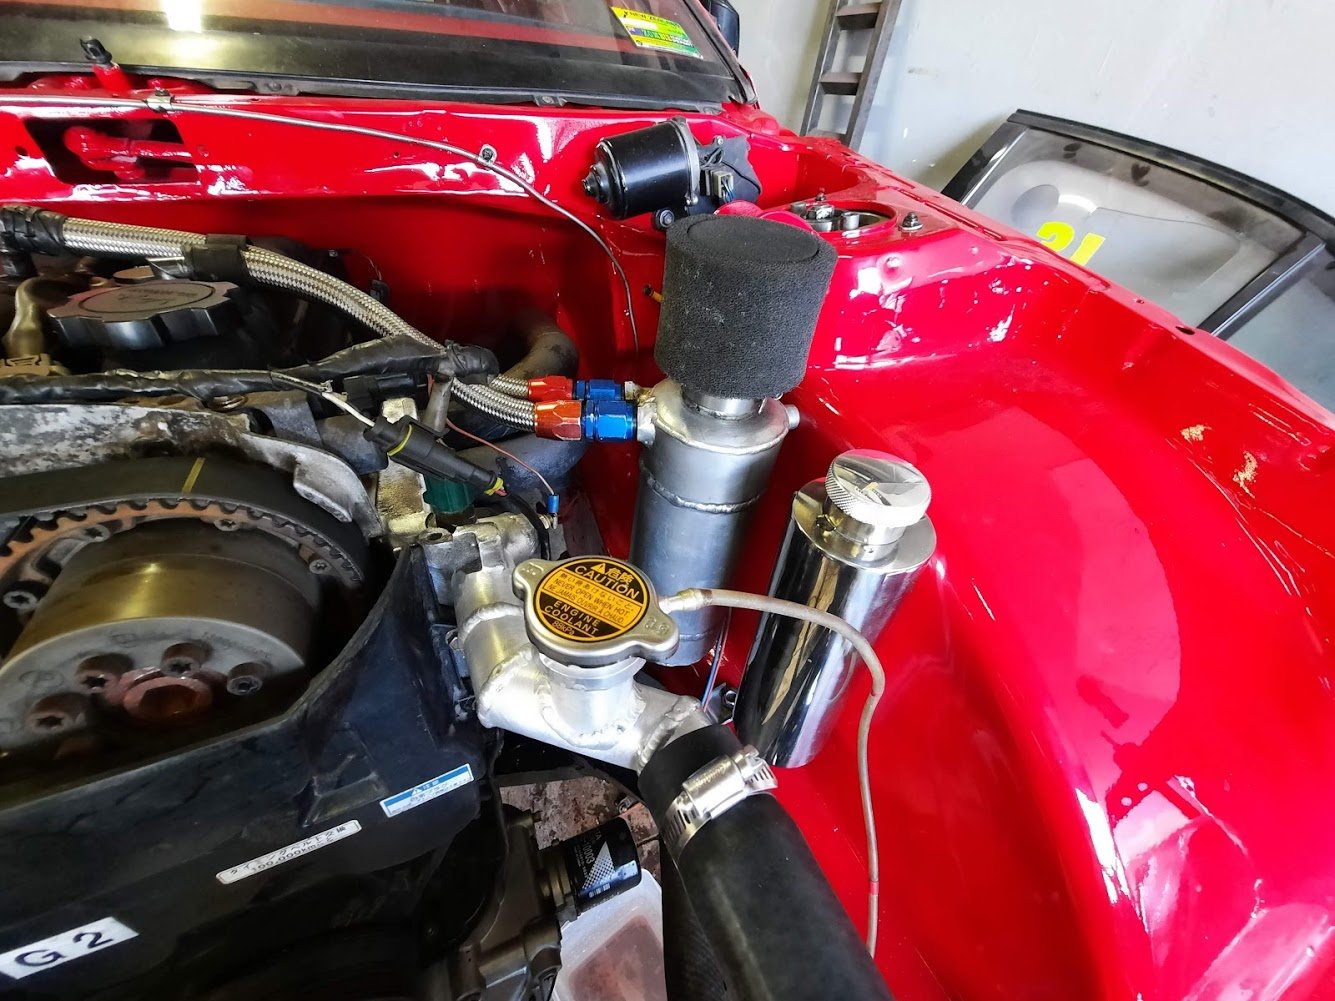
This update has been a very long time coming - just due to life and covid etc. Ages ago I got in contact with a friend of a friend who was willing to help me make an oil catch can and a combined sprayer reservoir and radiator overflow. All the parts cut up: Reservoir/overflow bent and mocked up: He warned me that he was newish to TIG welding, but I'm happy enough with how this came up: There are still a few bits to do on it to get the washer motor and overflow inlet attached, shouldn't be long now. The catch can bent up: And welded: Both items need to be blasted and scotched up, but I'm pretty happy with how things are going. Once these are sorted I can start thinking about starting the panel work in the engine bay!
1 point
-
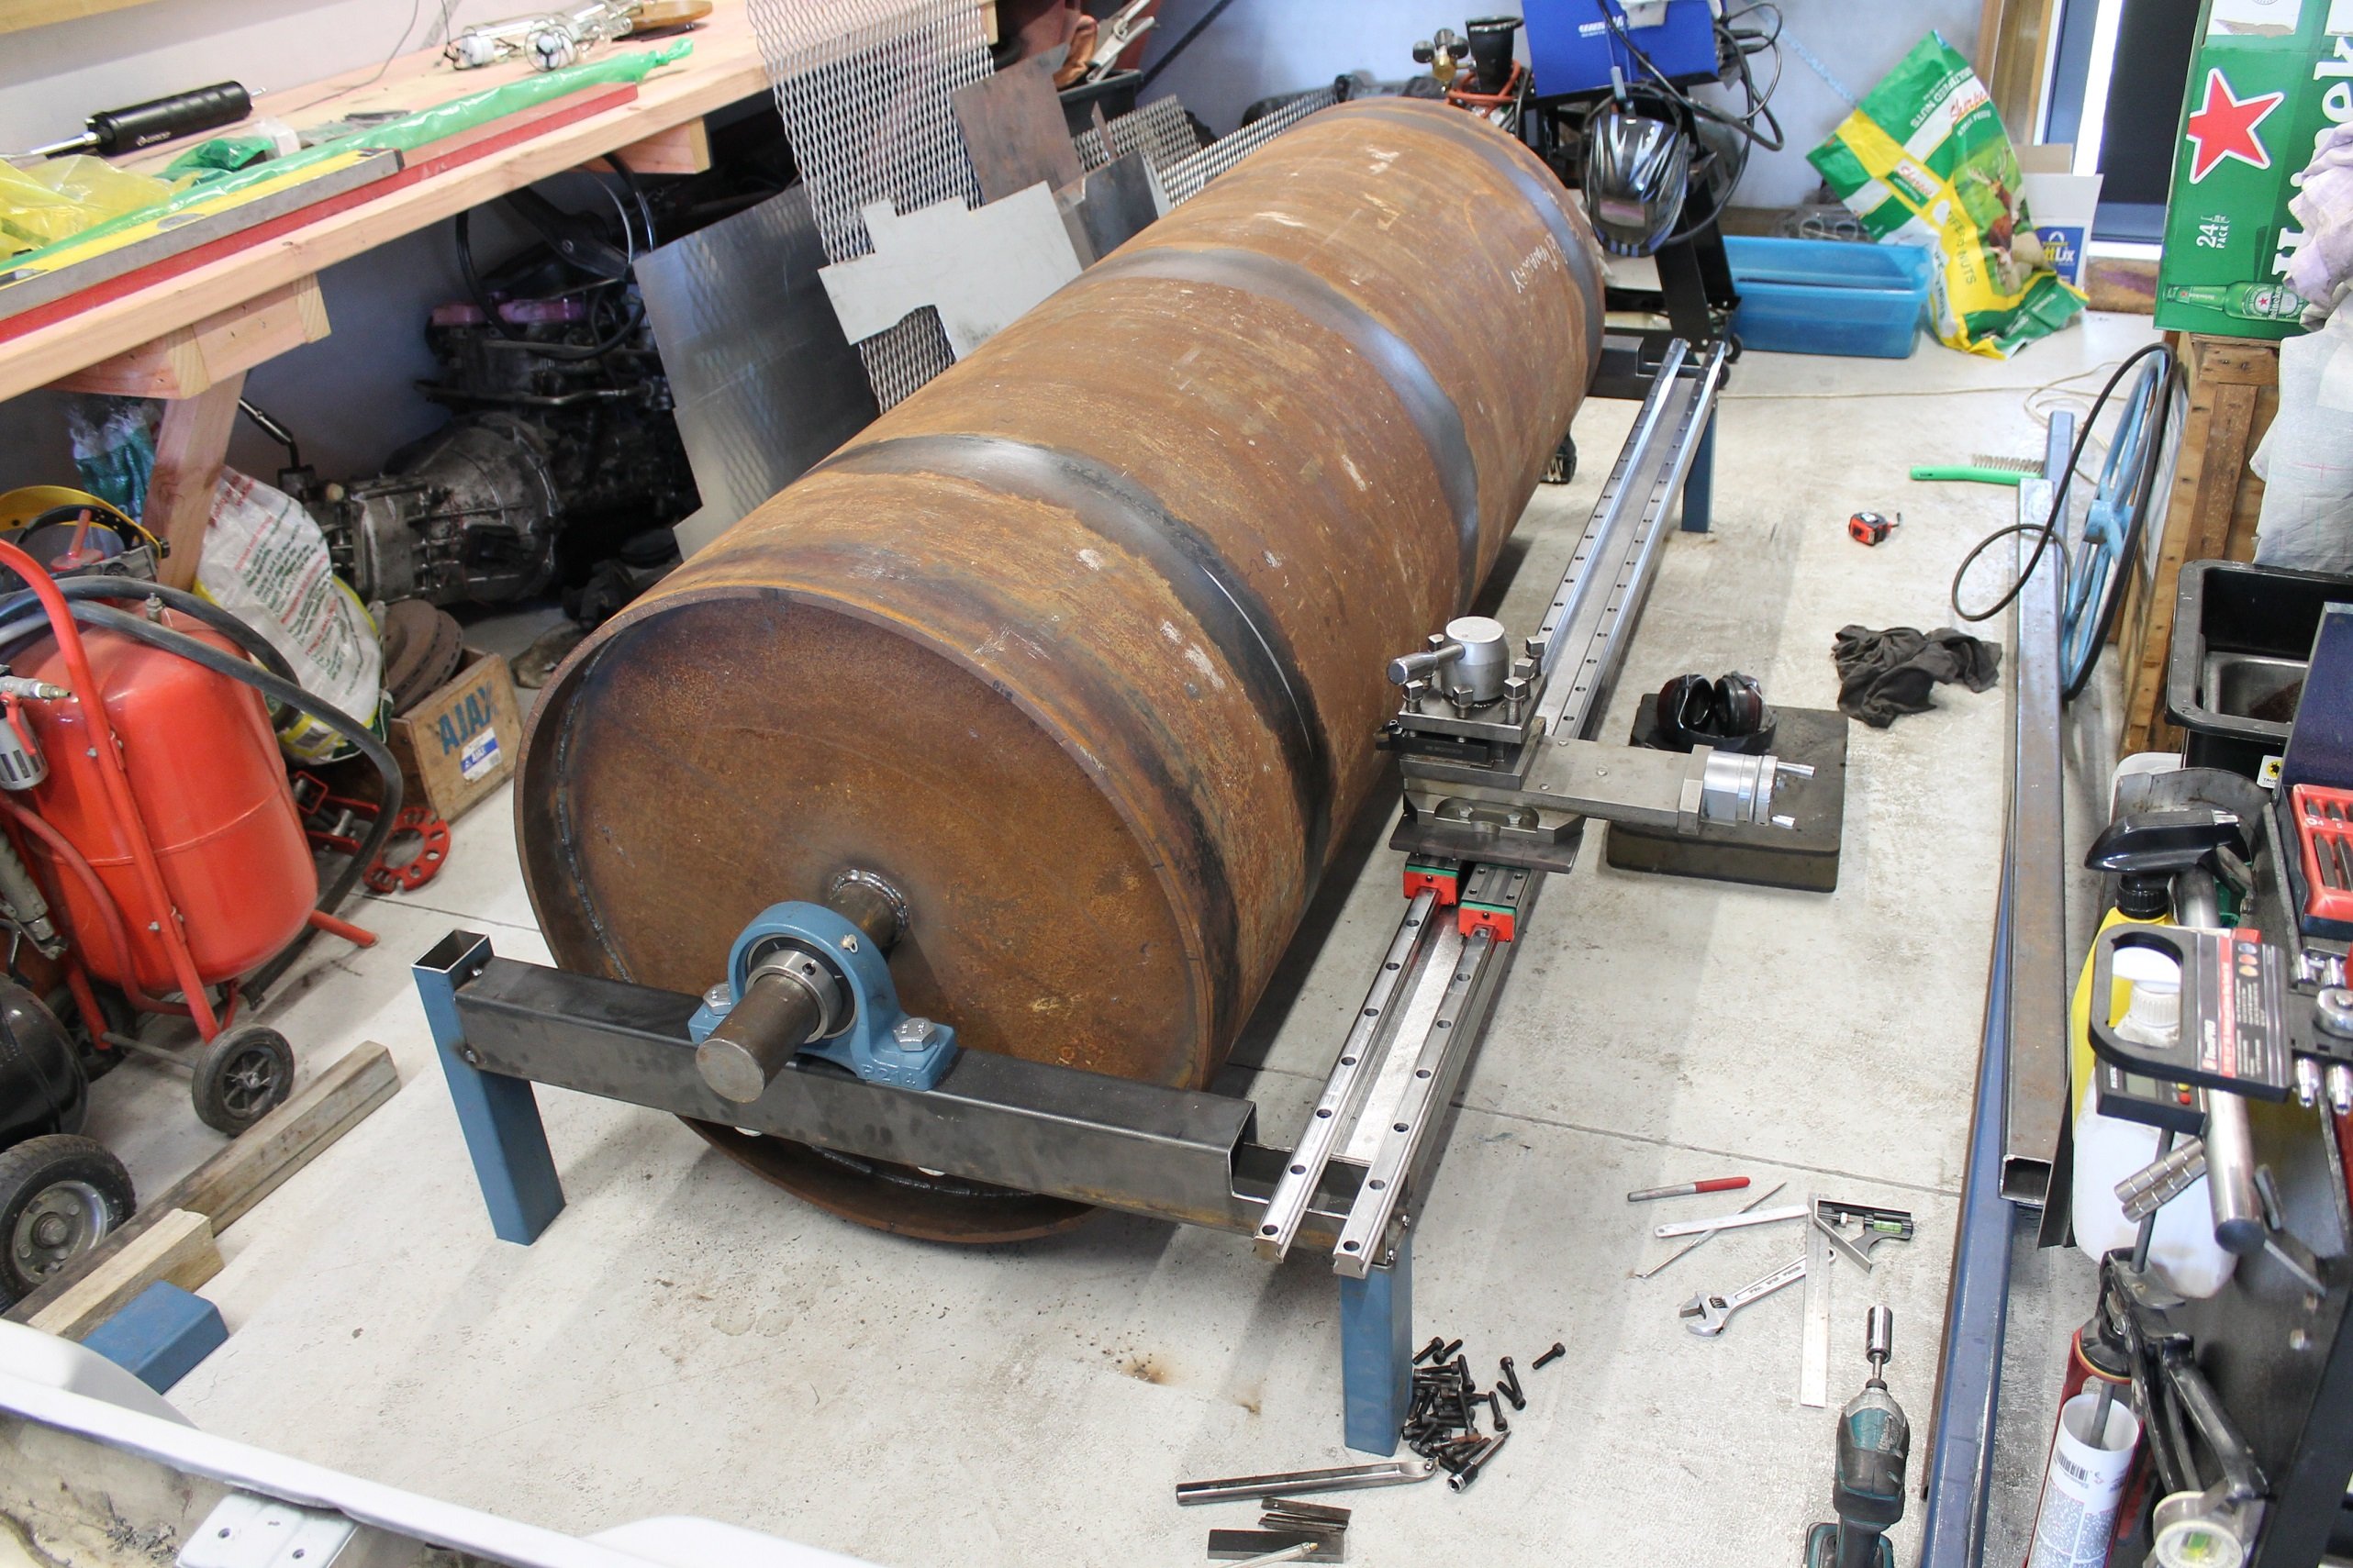
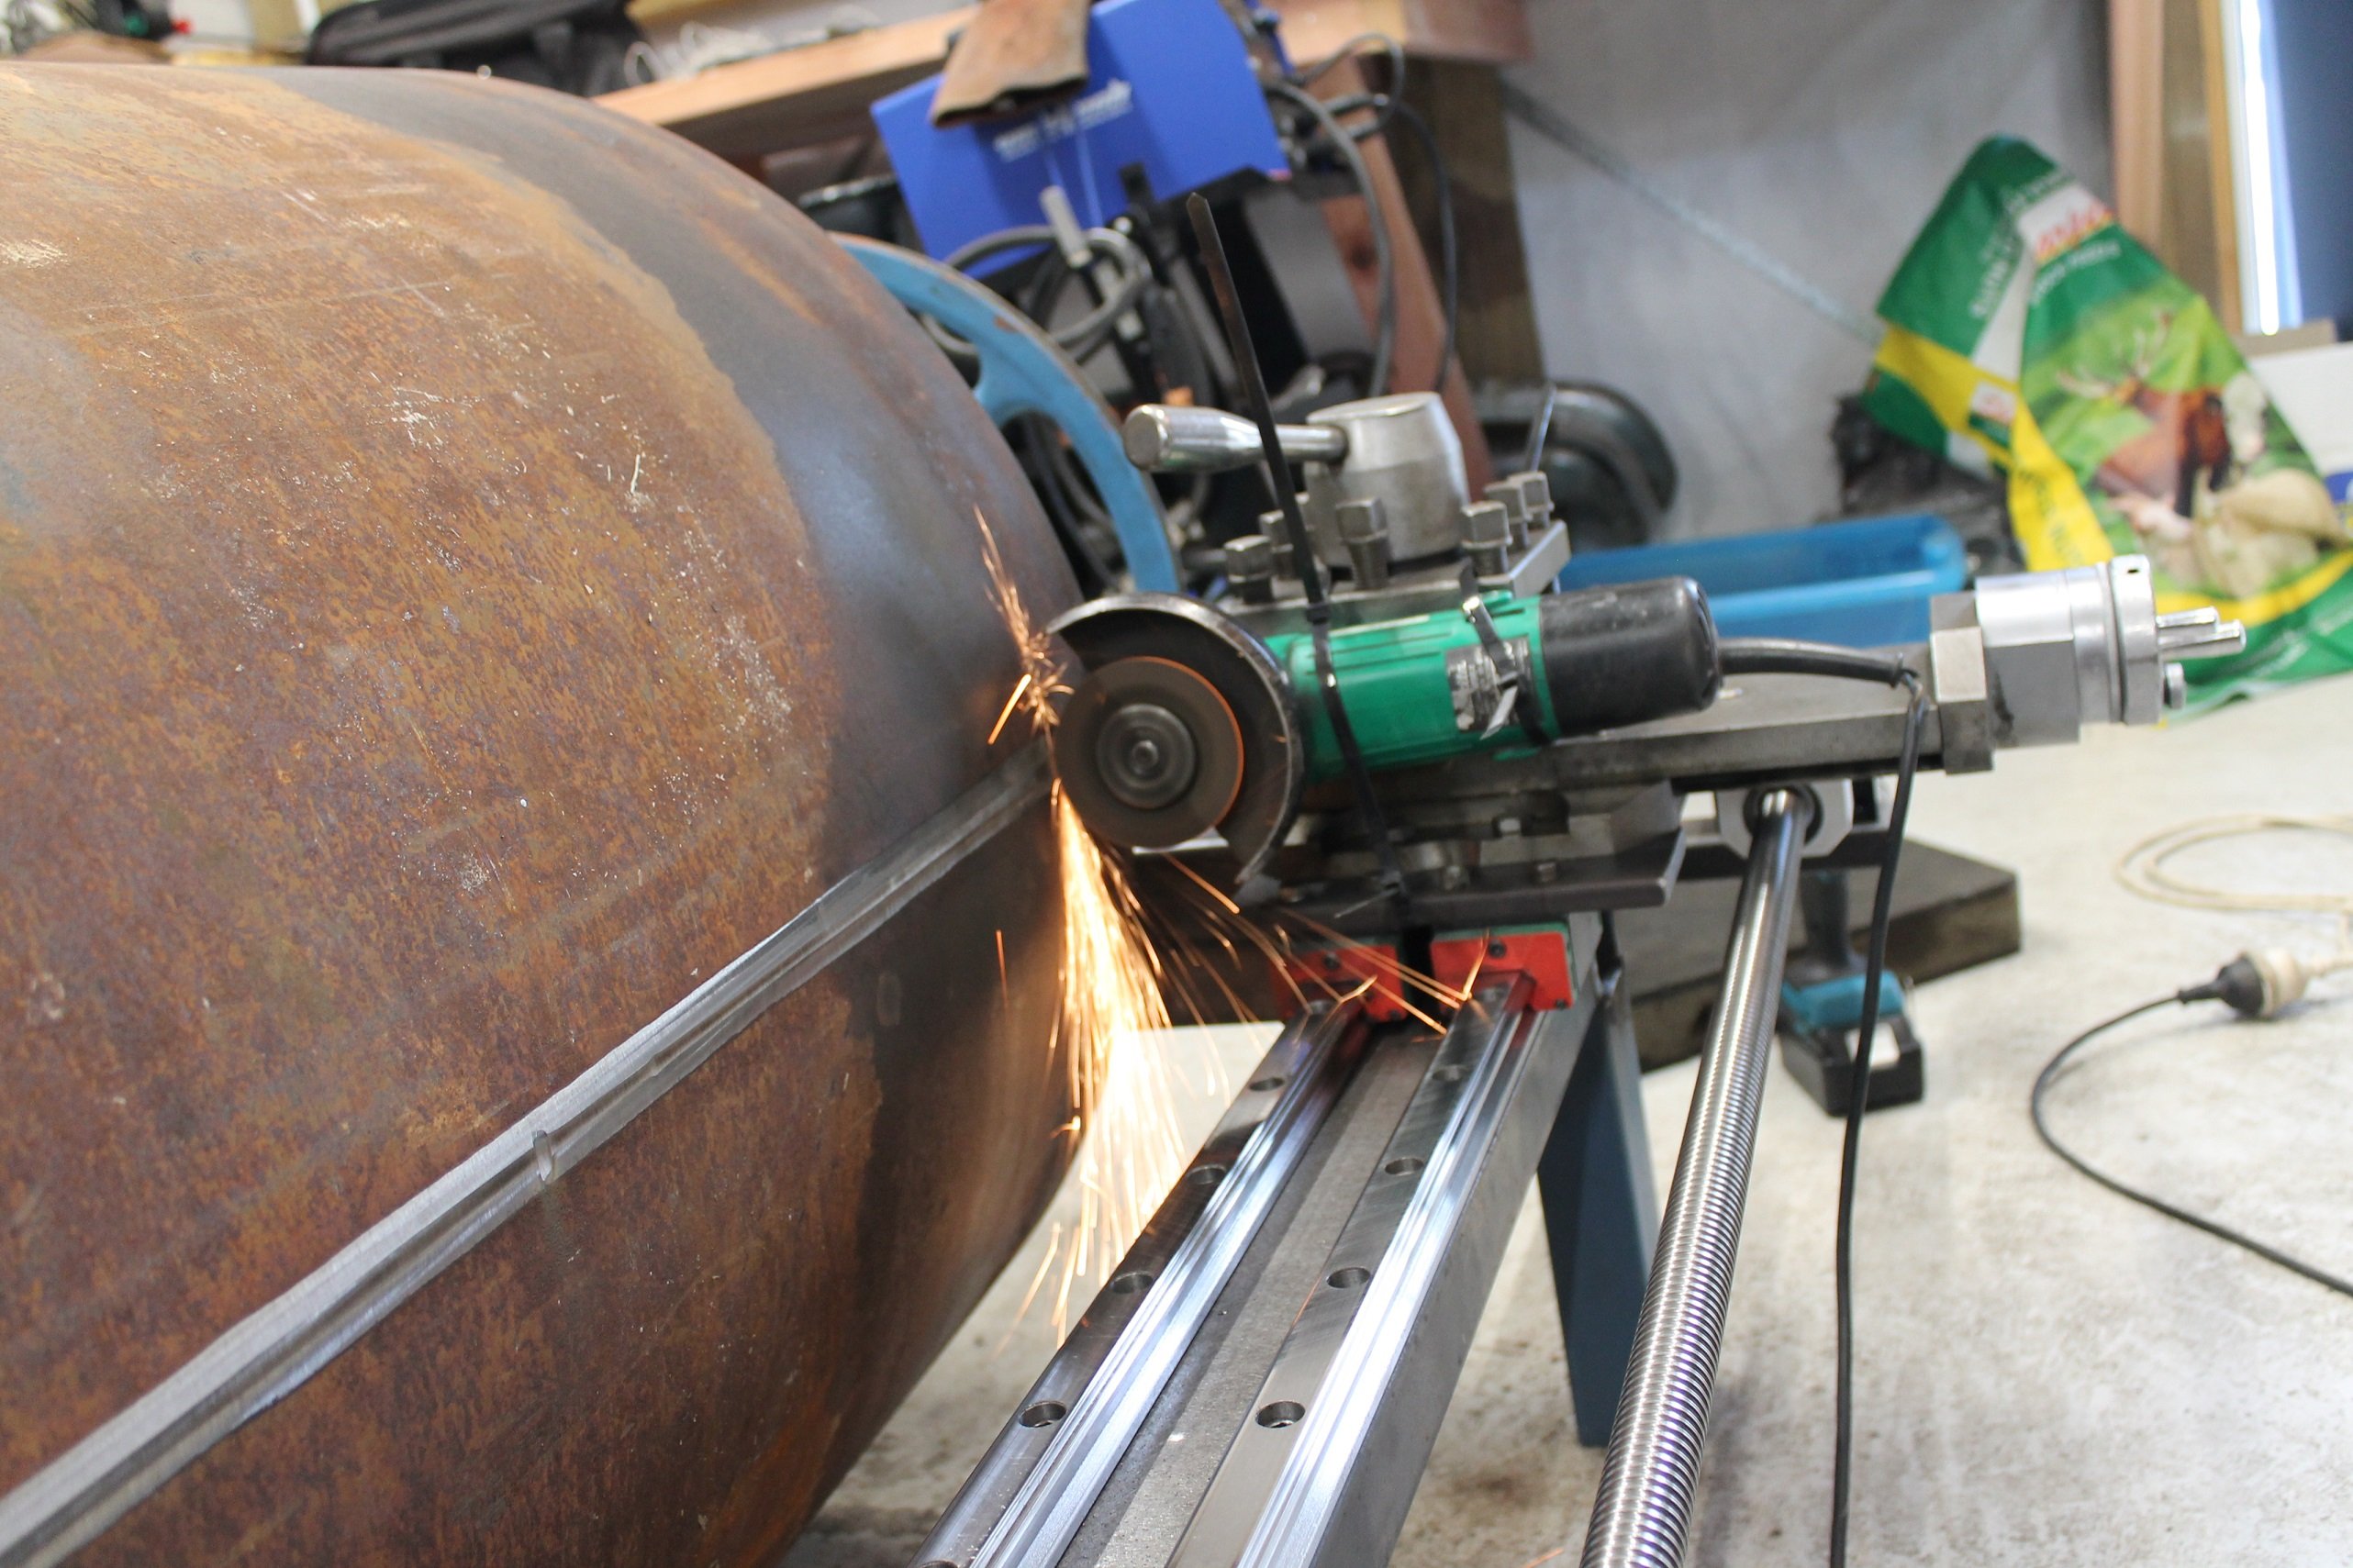
While I was fabricating the roller, I visited a bunch of engineers in the region and found that no one had a lathe big enough to machine it. Bugger. After getting some quotes from further abroad that would have blown my entire budget by themselves (15-20k). I decided that I'd just build my own lathe.. I jumped onto Ebay and ordered the cheapest set of linear rails I could find, including the ball screw and bearing blocks. 3-4 weeks later I got set to mocking up the "lathe" using the compound slide from my Stanko mounted to some adapters. Spinning the roll by hand with the compound slide clamped to the linear rail, I took the first test cut. "Fuuck yeah, this'll work" I said.. It would have taken forever to machine the 3mm x 25mm weld bead off, but I remember once when @kpr mounted his angle grinder in the lathe to cut through some hardening on a set of axles from memory? (that image is burnt into my mind, probably thinking it might be a useful trick one day. cheers dude!) The grinder worked really well and made short work of it. Spinning the ball screw with a battery drill.
1 point
-
1 point
-
This is much better, but it kind of reminds me of my grandad's home made belt driven table saw and home made belt driven wood lathe. Both in wooden frames. They both worked fine, but were fucking terrifying.1 point
-
Not finished...but you get the idea. I've made it so the top can move around in 90° increments, so you can use it in whatever position you need. Left, right, big wheel or little wheel etc...Paint to come next.
1 point
-
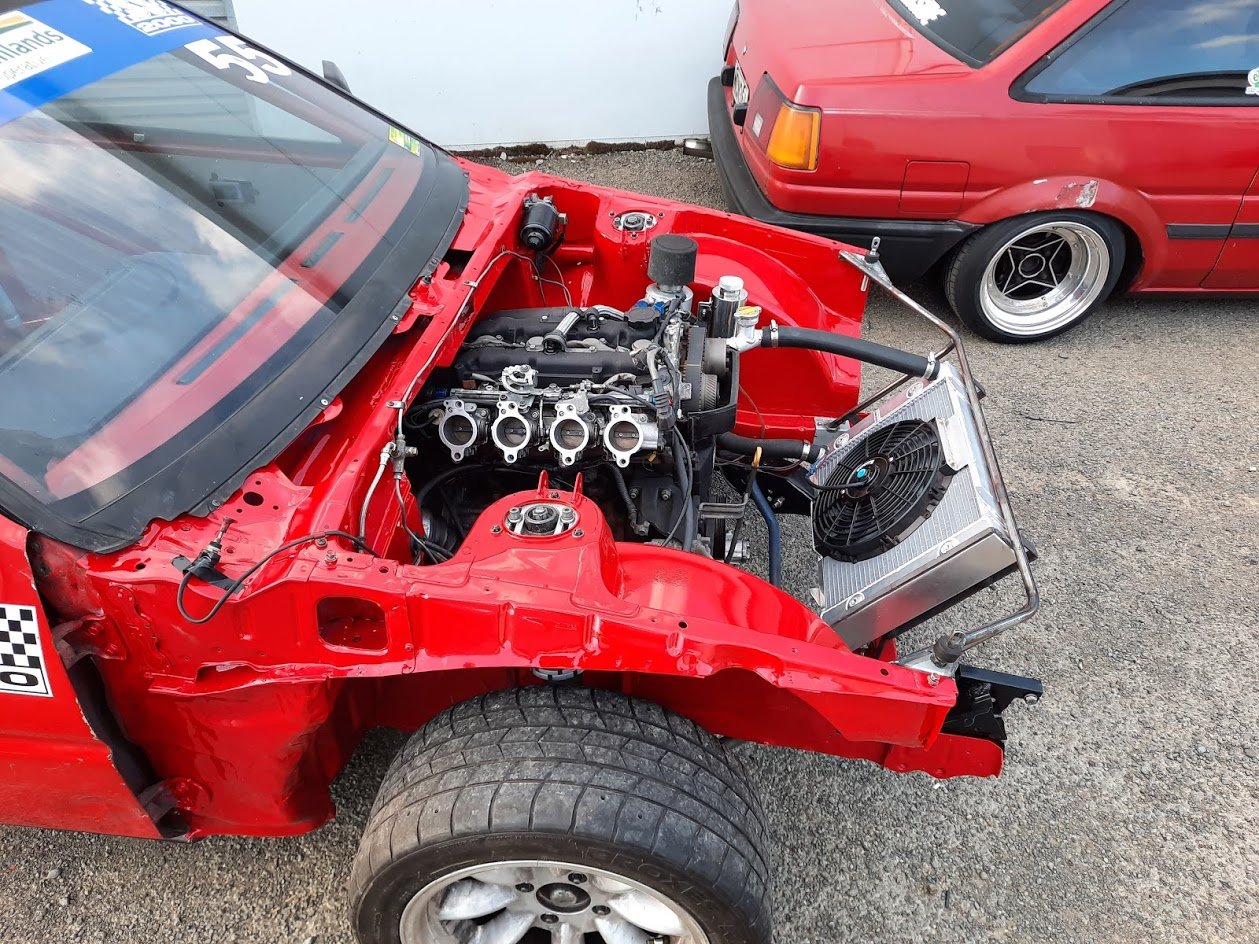
Progress - Had to get a few more Racepak cables in, sorted now. Engine running (!!!) with default tune, electronic dash and PDM operational, found baffle in muffler is loose so needs to be replaced, no major issues identified with plumbing. Waiting on fuel and oil pressure sensors and terminating CAN resistor. All default car functions hooked up to PDM. Still to do Air con wiring. Considering swapping out to AIM dash which is more street oriented with built in LEDs for all street functions. Will see, that dash looks a bit more modern than the IQ3.1 point
-
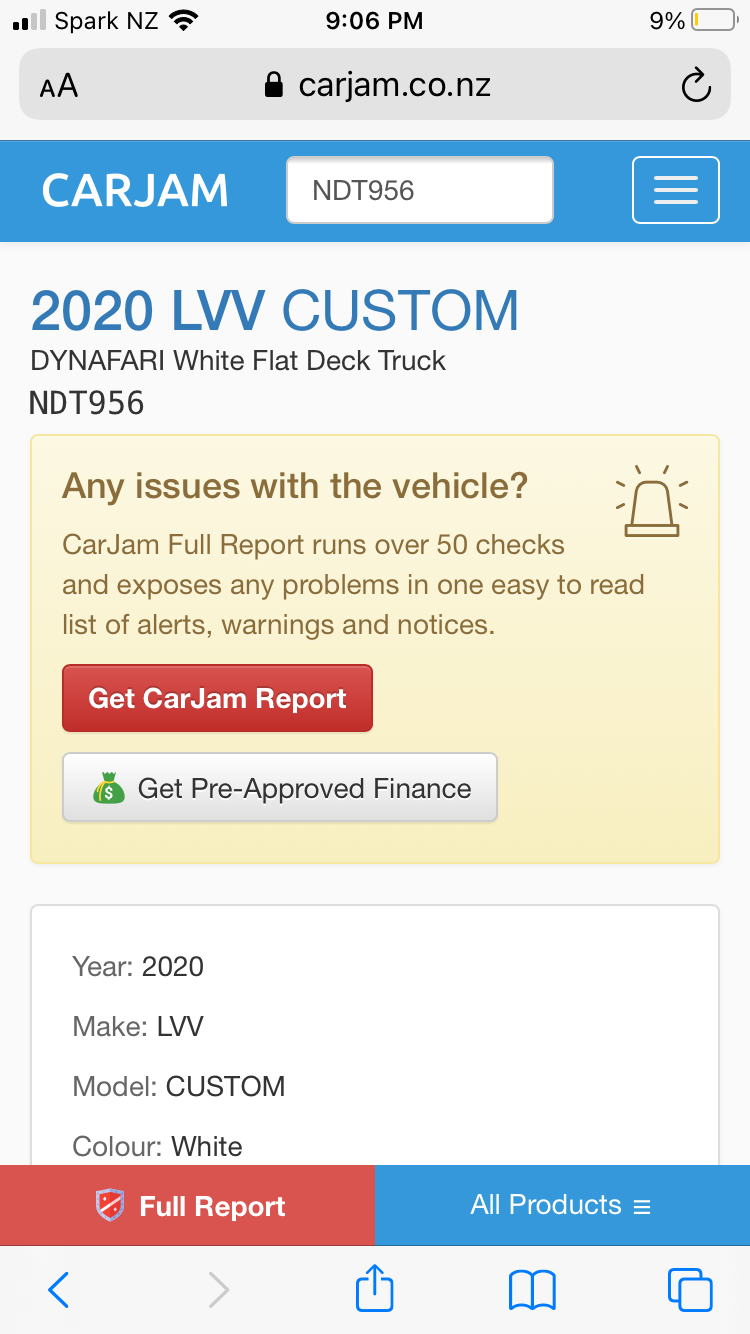
Dynafari! how good!
1 point
-
So, long time no update. I have been holding off as shit was so nearly there for fucking weeks but kept on dragging on... Early September it got shipped off to Wellington; Then early October it arrived back home with a very excited son of a truckie.. Then I got the list from the cert man and was pleased/kind of surprised how short it was; - Needs rear headrests - Extra size on the driveshaft hoop mounts - Front seatbelts needed to web clamp type not inertia - Change a vac hose for proper auto stuff - Wheel alignment That was it and apart from sourcing the seatbelts it was all done in that weekend with the help of some butty ramps I had made for this sort of thing; So if anyone needs a brand new set of vertical fit reels, hit me up. Then I waited for the cert man to approve all that and get the plate done - this was another couple of weeks... Then the compliance man was on holiday and couldn't do anything for another couple of weeks... Then I realised much to my disappointment that the head was probably cracked as it was using water and pressurising the system That will teach me to not get things checked by professionals and just trusting to the prime cause. So while I was waiting for the compliance man I dragged out the spare head out of the container and sent it to Mean Machine for crack testing. This came up sweet but the valves were dodgy and the surface was a bit banana. So I got it surfaced and the valves and seats recut, plus I got a spare set of injectors rebuilt as i didn't want to fuck up the newly sorted head. Getting it in and out was not too much of a drama with a bit of channel clamped to the forklift forks. I didn't really take any pics of all this as I was on a bit of a mission, just this one of the freshened head put back in place; New gaskets, head bolts, slightly thicker oil plus filters plus coolant and much money out of my account and the jobs a goodun. Then fast forward to today and we have this very very exciting situation early this morning... Resulting in this even more exciting situation this afternoon; Ah shit yes. Anyway there is still a bit to do, I am not happy with the radiator situation as it is pretty much relying on the fan even at road speed. I can fit a standard Safari rad in the same hole but with much bigger collection area, plus I have some cunning plans to duct more air toward it so at least on the open road it isnt cycling the fan. Still I'm pretty happy, it has been a long but satisfying road. Beer will be drunk tonight I imagine....1 point
-
That's sad news about drag day! Here's hoping your boss buys a new work car in the next couple of weeks? It's a shame, cause I won't be able to install your new windscreen banner now:
1 point
-
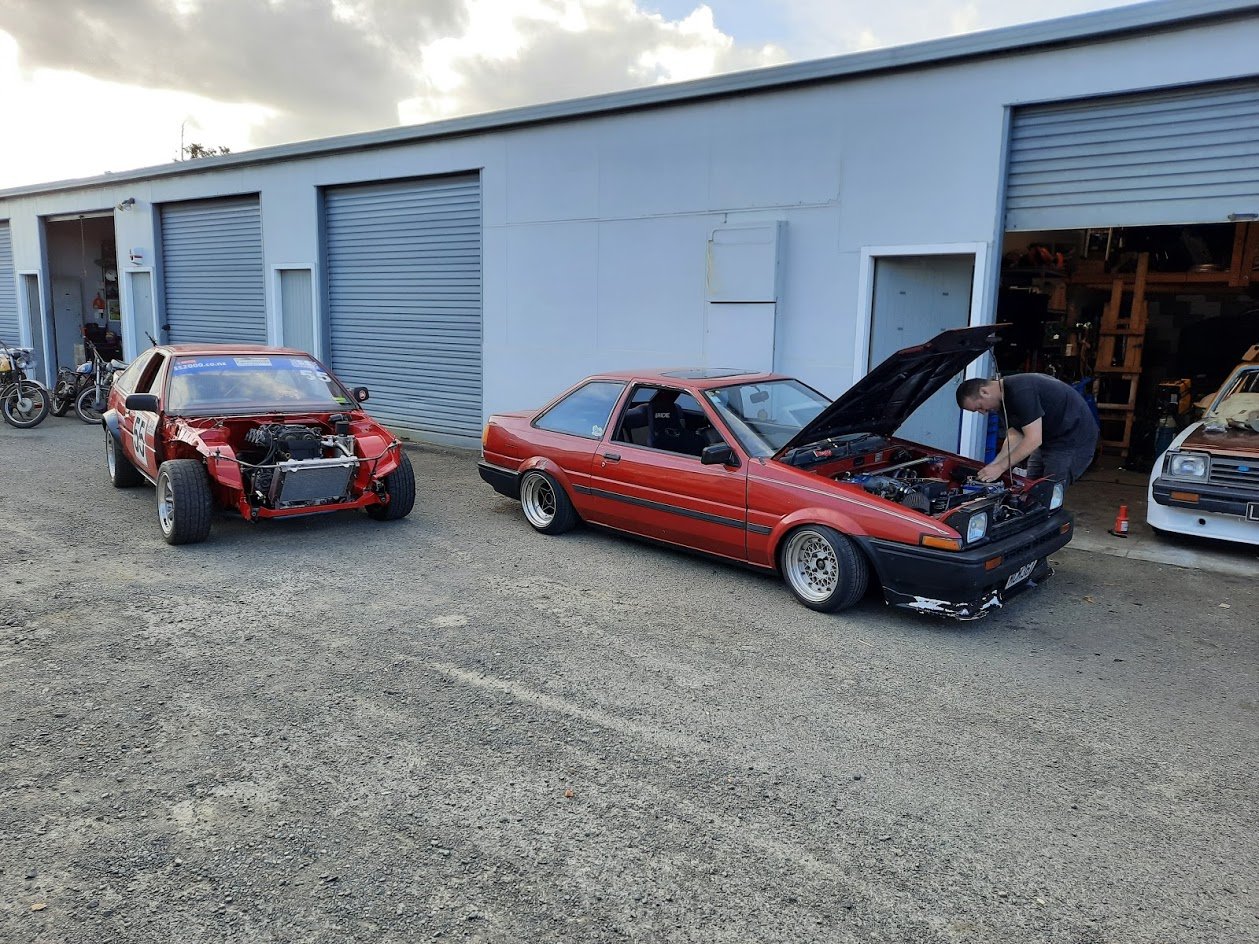
The car is running now. It struggled a bit at first and I was wondering why it wouldn't start and idle. Then I remembered the coolant temp sensor wasn't plugged in, so it had no cold start enrichment. Plugged that in and it fired straight up! The next job on the list was to fill it with coolant. My radiator doesn't have a filler neck and sits well below the highest point, so I had a friend chop and weld the top water fixture. This gives me the required offset to easily hook up the radiator and has a wee filler neck so I can actually fill it with coolant. I've also added a stainless coolant overflow tank. It's all working out to be tidy, so I'm happy. Both radiator hoses were very simple. The top one is just a 350mm straight piece and the lower is a trimmed factory Altezza hose. Got it out in the open air for the first time in a long time. It feels great to be able to drive it out of the shed instead of pushing it! The exterior will eventually get a tidy up to match the engine bay. It's fairly ripply and in need of a respray. Parked up next to @Mitch.W's AE while he prepared for a drift day: I took the car for a cheeky hoon up the road and it felt good. The engine sounded happy and pulled through the revs well. I'll get it onto a dyno for a safety check and then the engine's basically good to go. It's not far from "completion" now.I'm waiting on a few suspension and brake parts to arrive, then it can get reassembled, aligned and hit the track!
1 point
-
It's all coming together now. Just a few jobs to do before this wrecker motor can run.
1 point
-
Unbolt exhaust at the headers for drags? It's what a proper drag car would do And by proper drag car I mean a HQ with a tired 350/th350/2.75 geared single spinner 9 inch with a badly jetted 600 holley and one of those fake 3 hole scoops thru the bonnet and some rusty chrome rocker covers and an accel super coil and a moroso sticker and a jack daniels towel over the ripped rear seat top and a wildcat steering wheel with the center cap missing and a sticker on the back window that says only milk and juice comes in 2l1 point
-
Here's a few before and after shots: It's not perfect, but is good enough for this racecar owner.
1 point
-
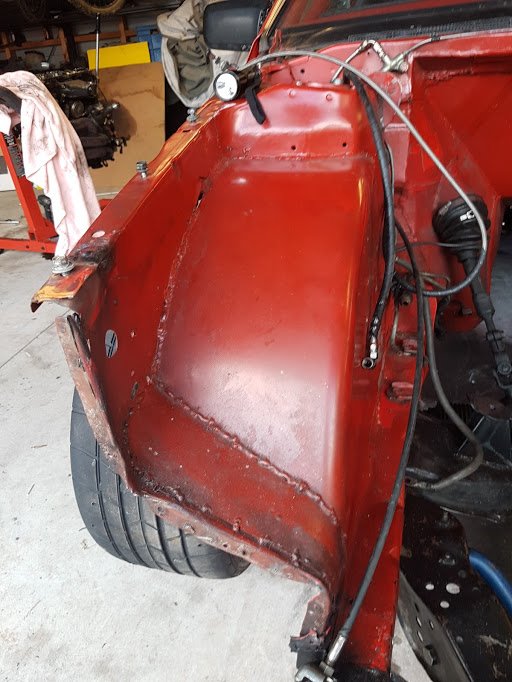
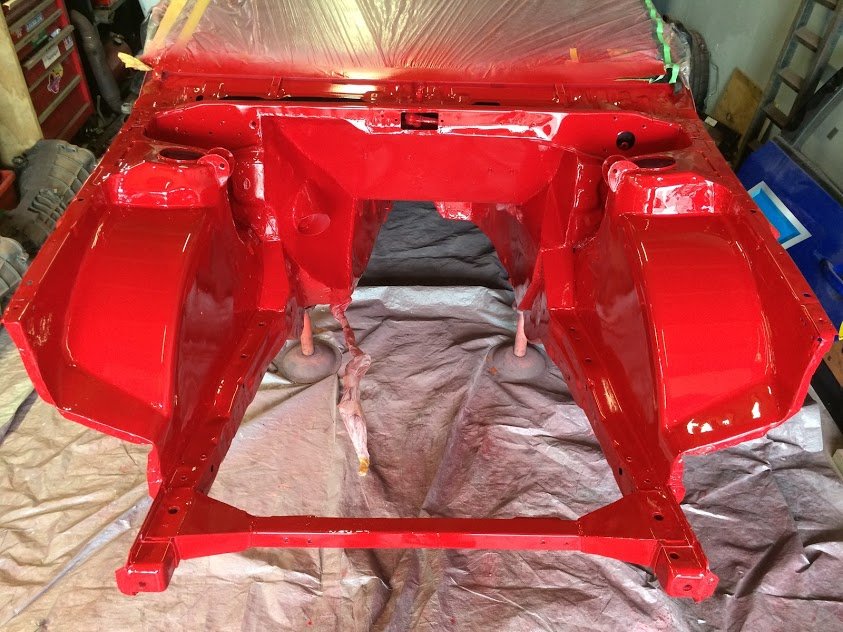
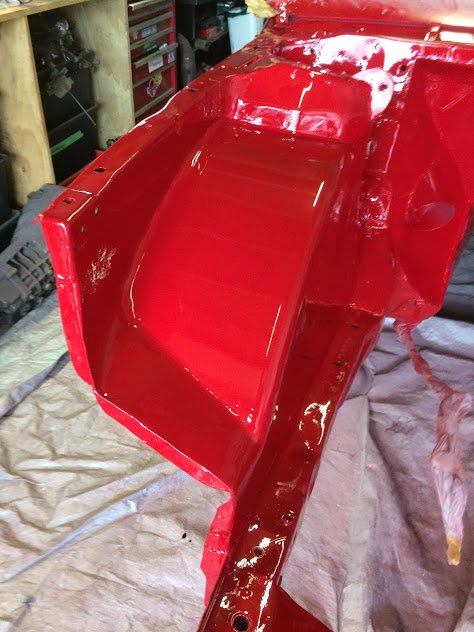
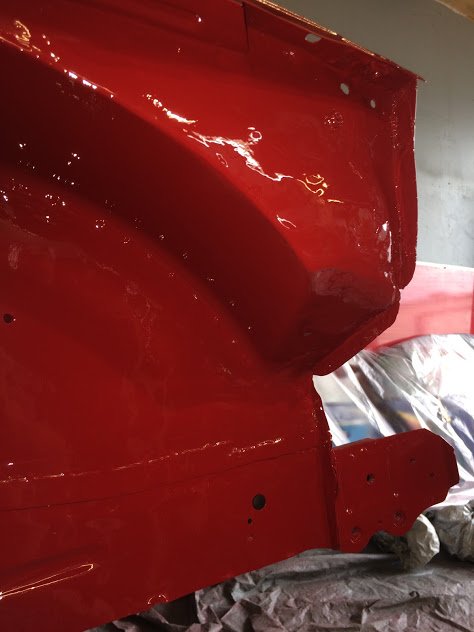
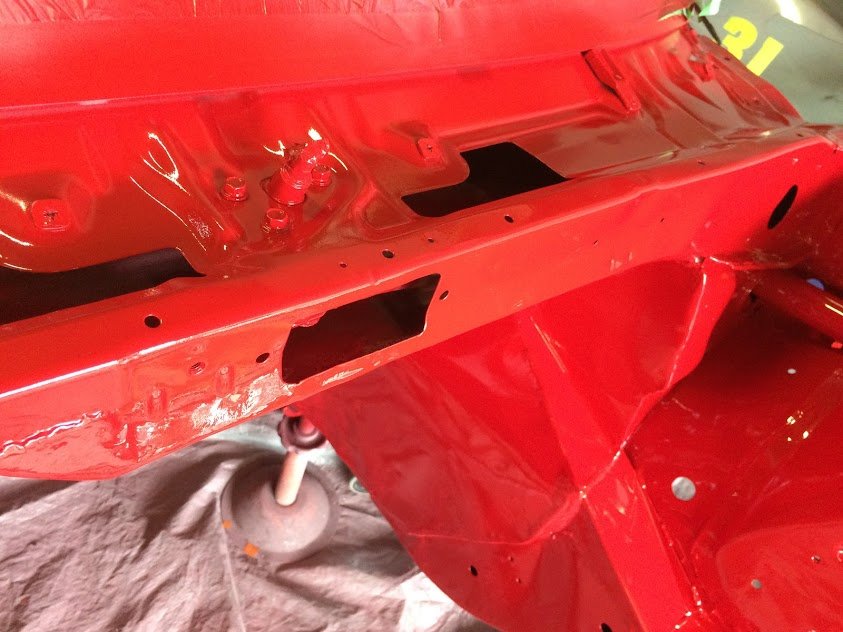
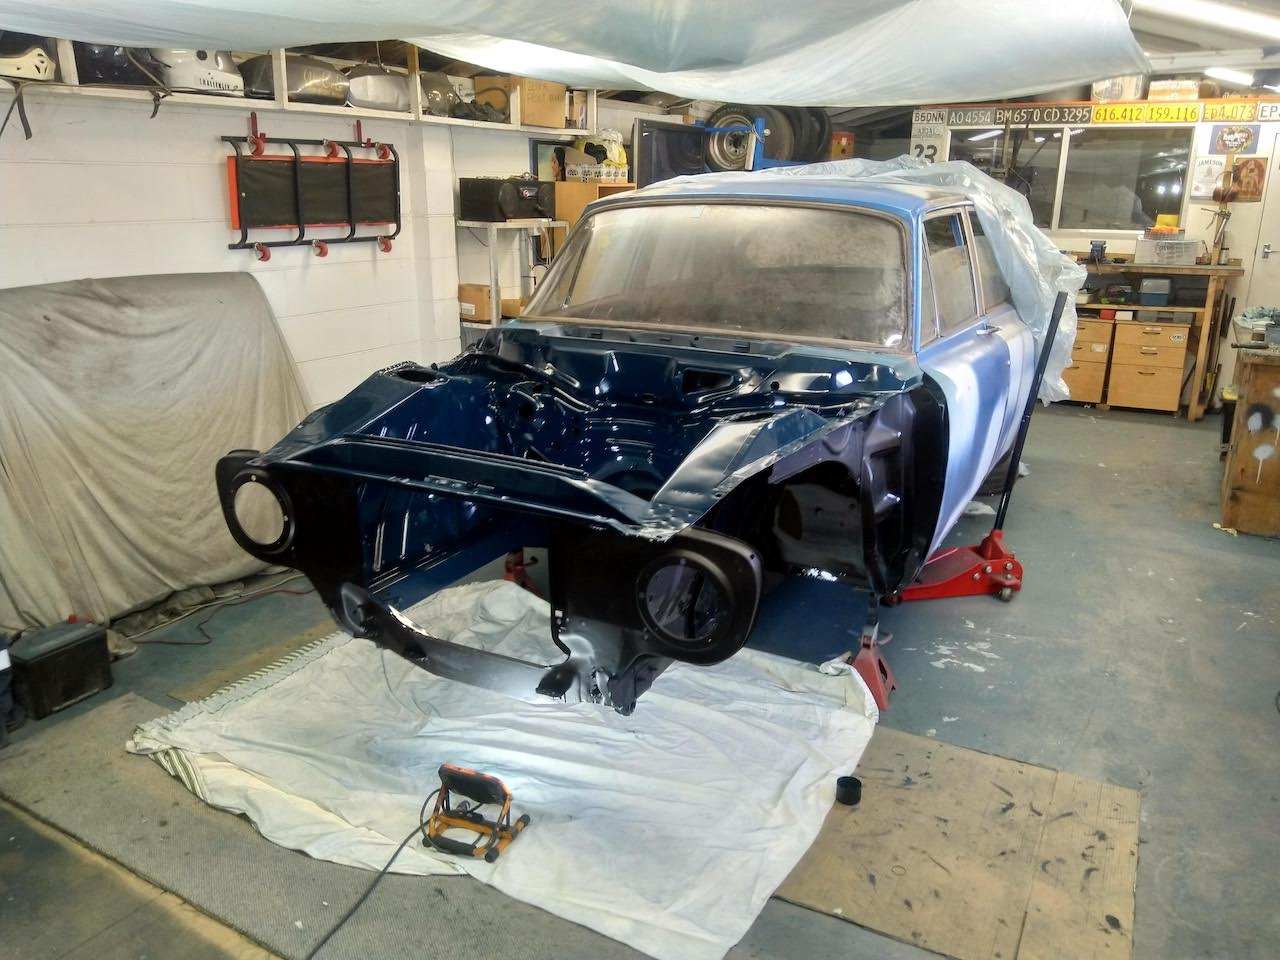
Got some colour onto the front end today. I’m stoked to be past this stage and am getting ready for reassembly now. The red is darker than the body, but I’m not too worried that it’s not a perfect match. Theres a few speckles of dust, which is to be expected of a shed job. The actual paint finish came out really nice, so I’m happy.
1 point
-
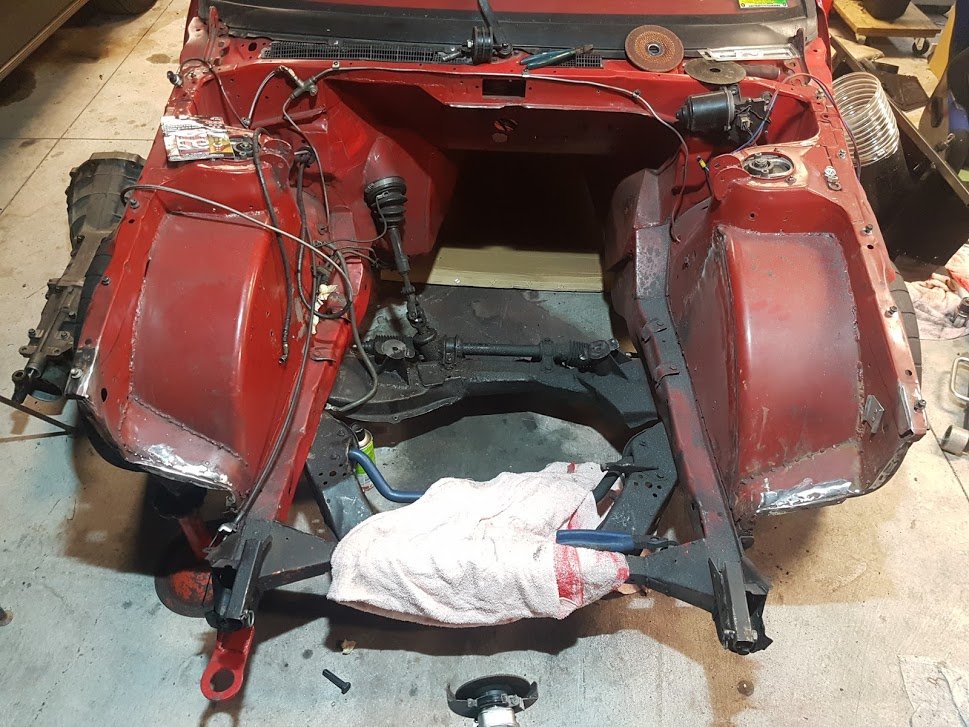
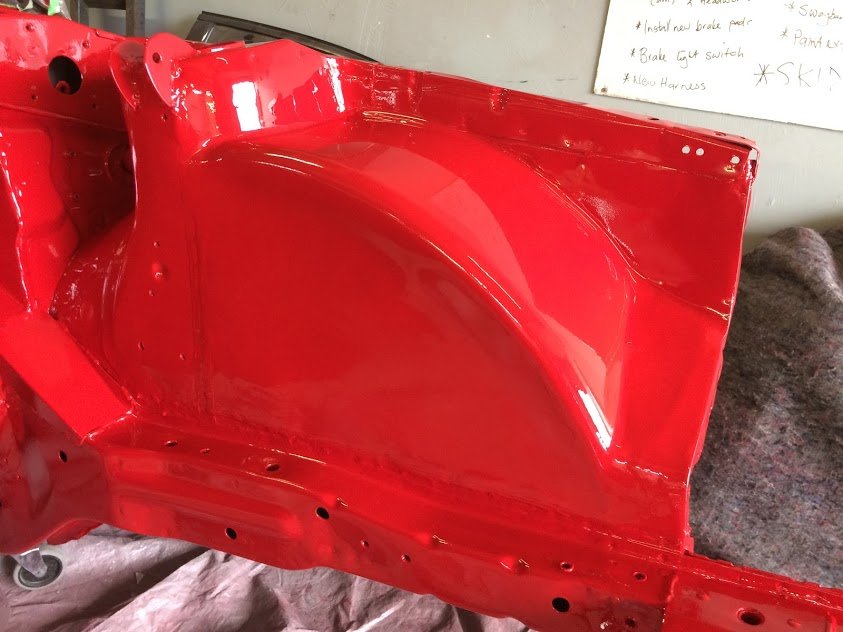
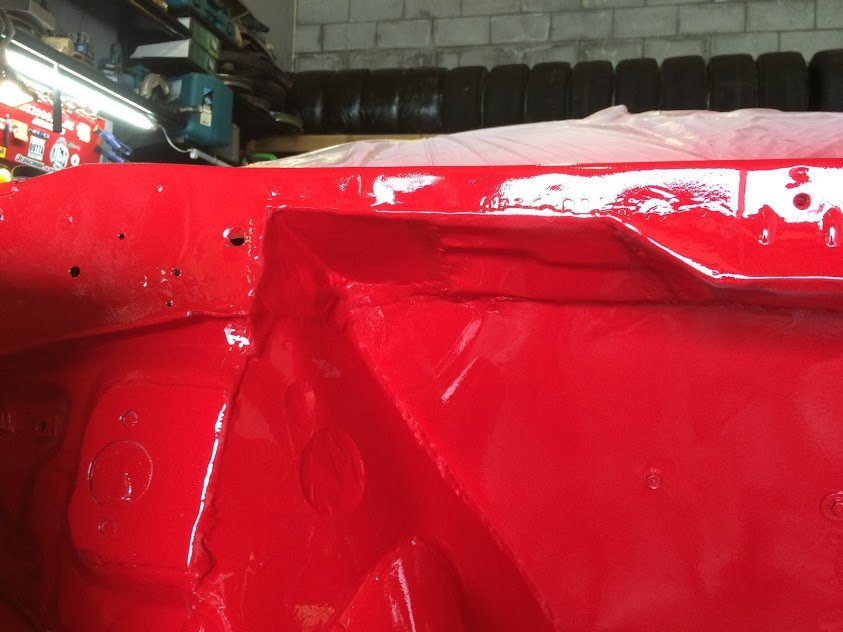
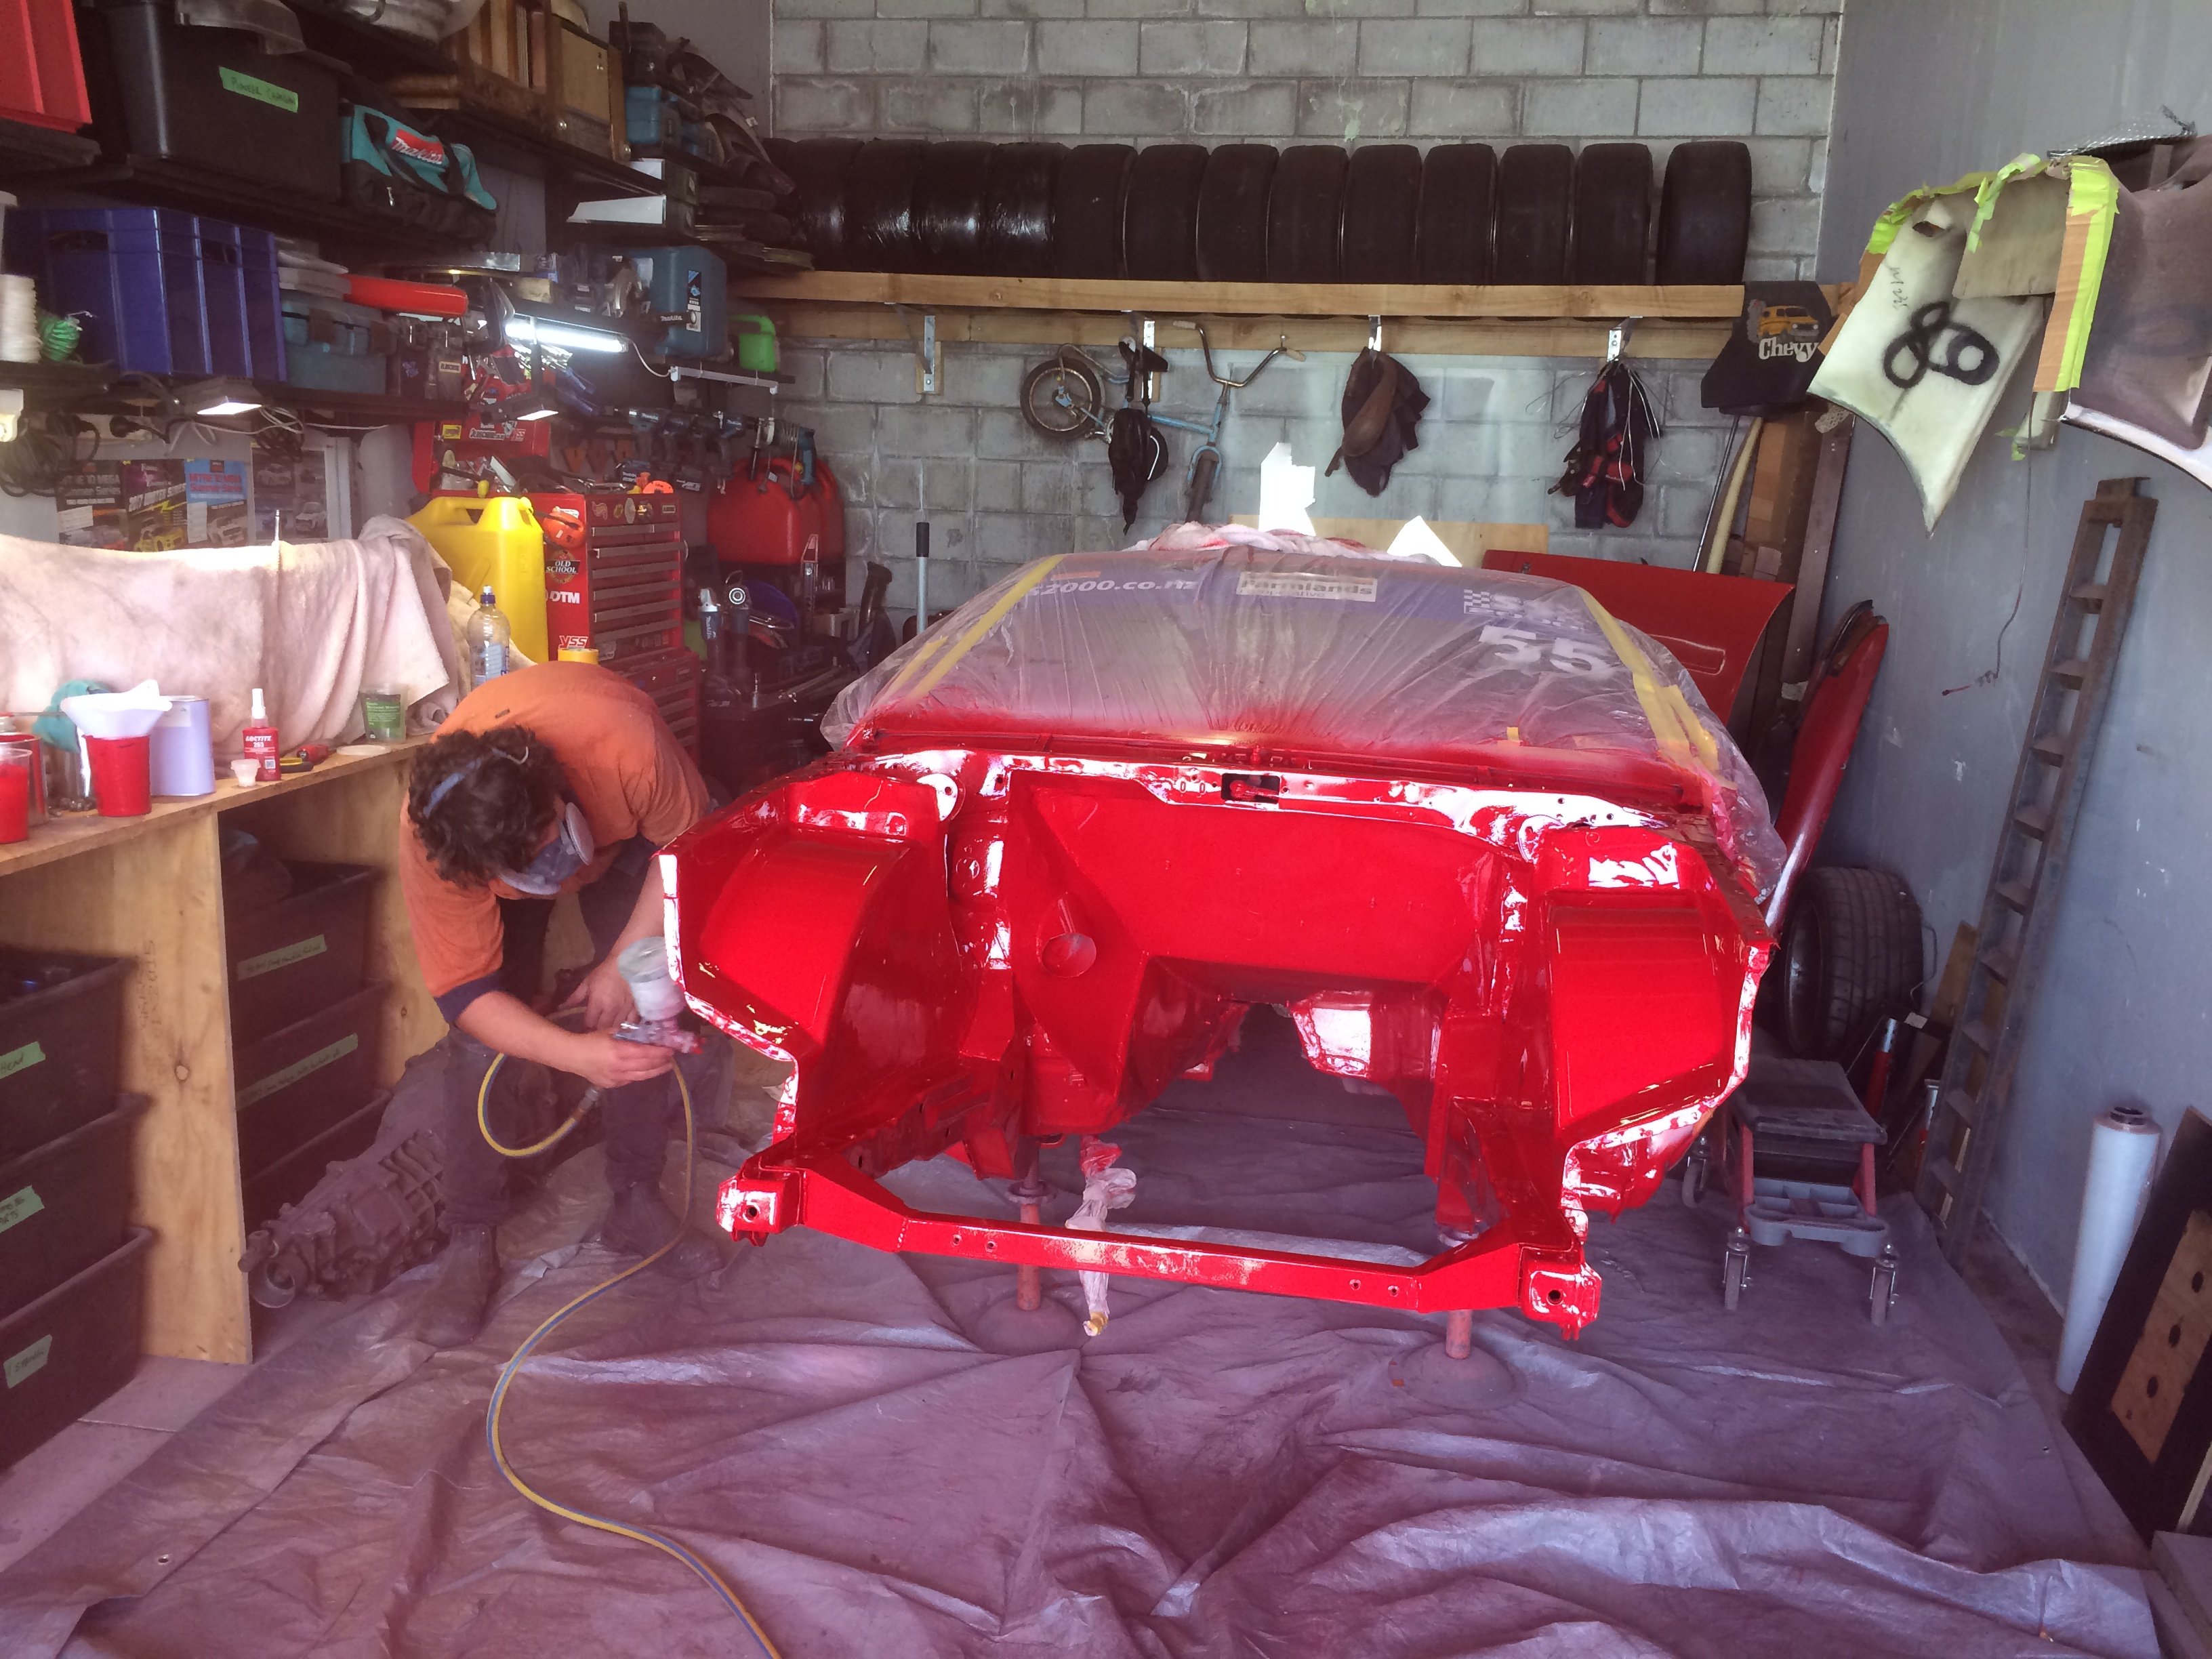
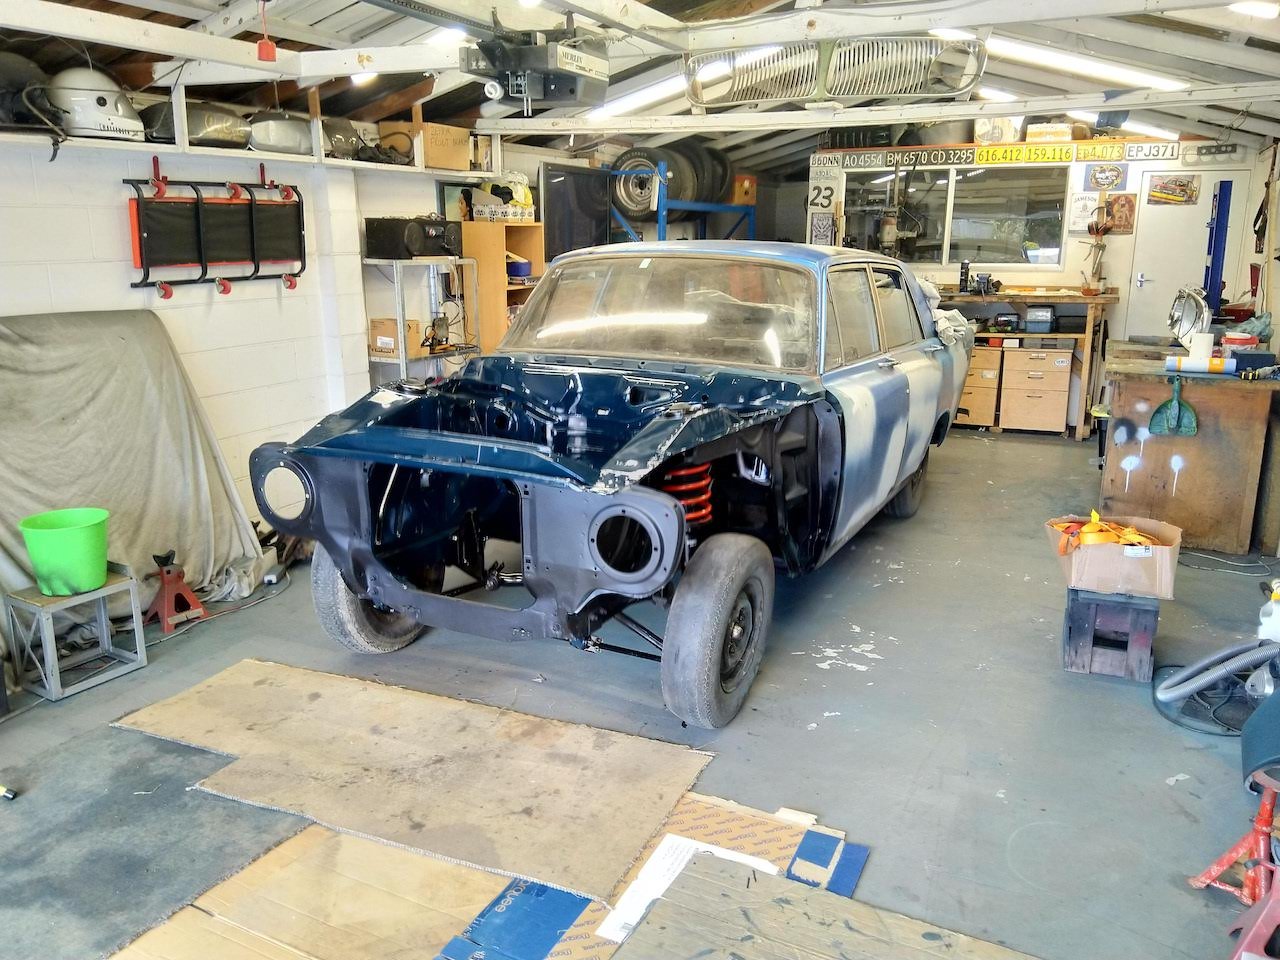
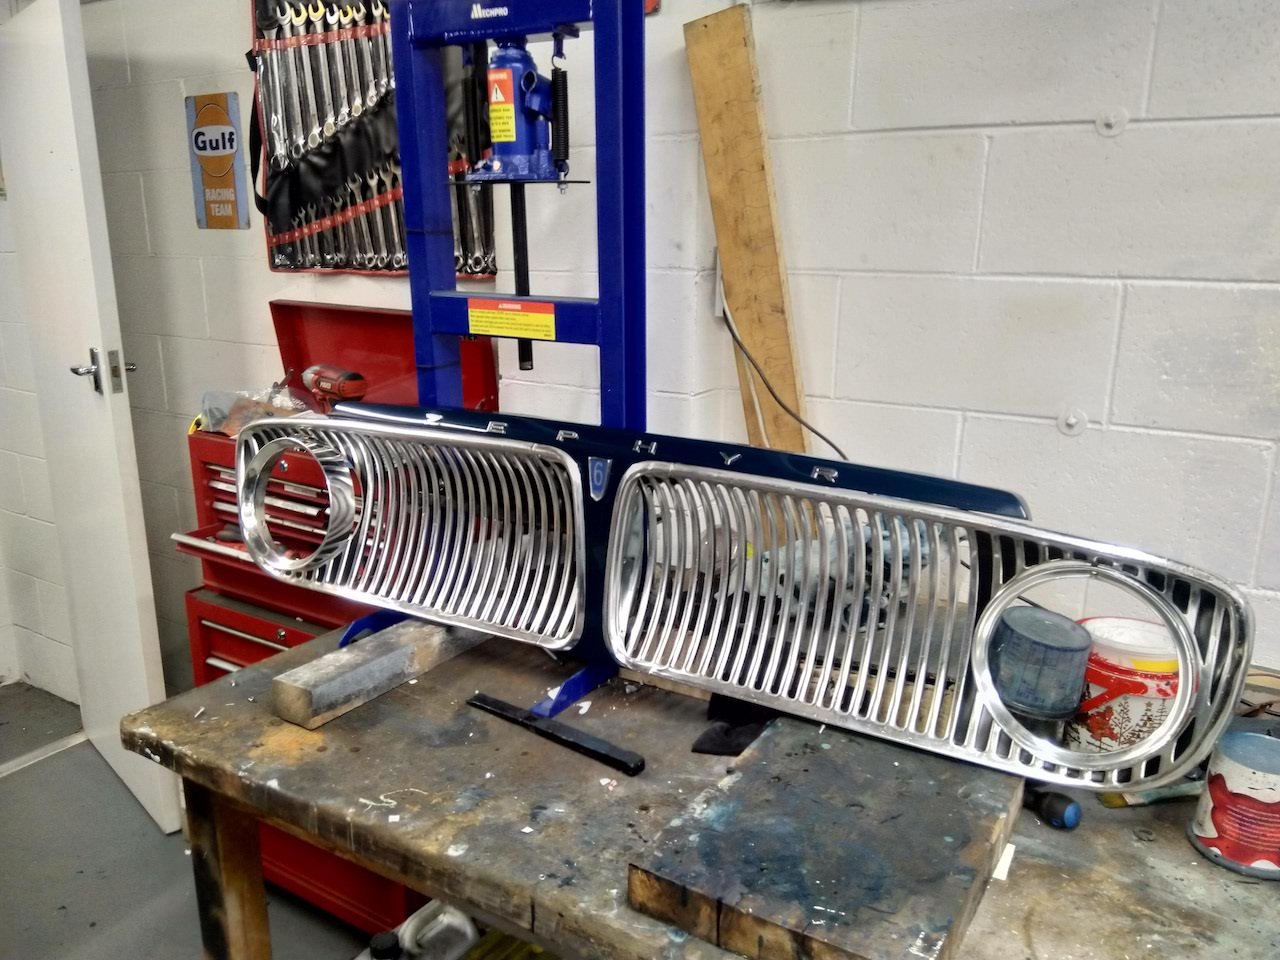
Got the engine bay and front grille into colour I've reassembled the front suspension, car kinda rolls now. No steering components yet. Next plan is to pull the diff and exhaust and start to tidy up under the car.
1 point
-
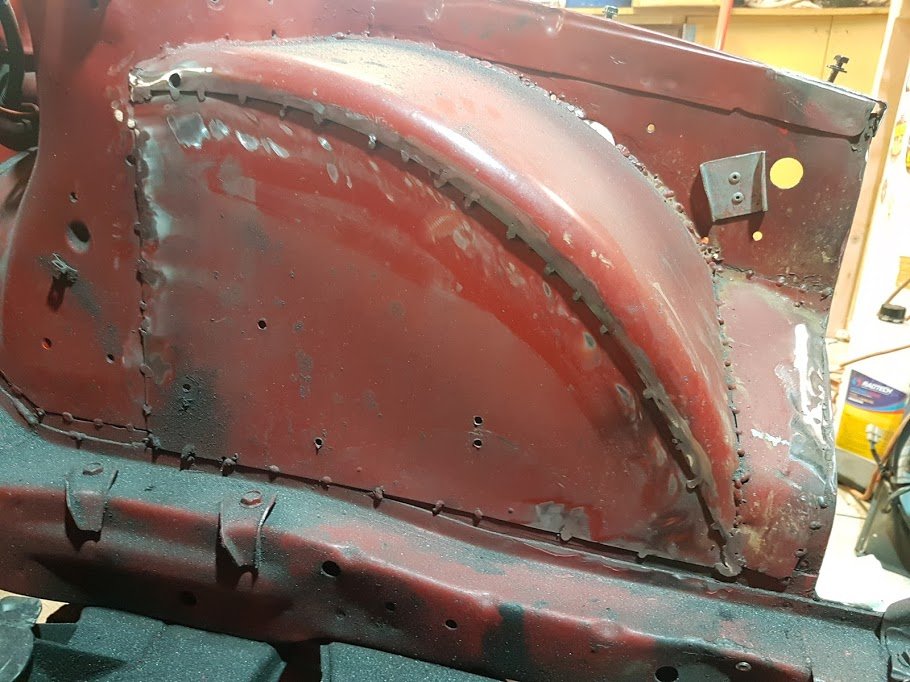
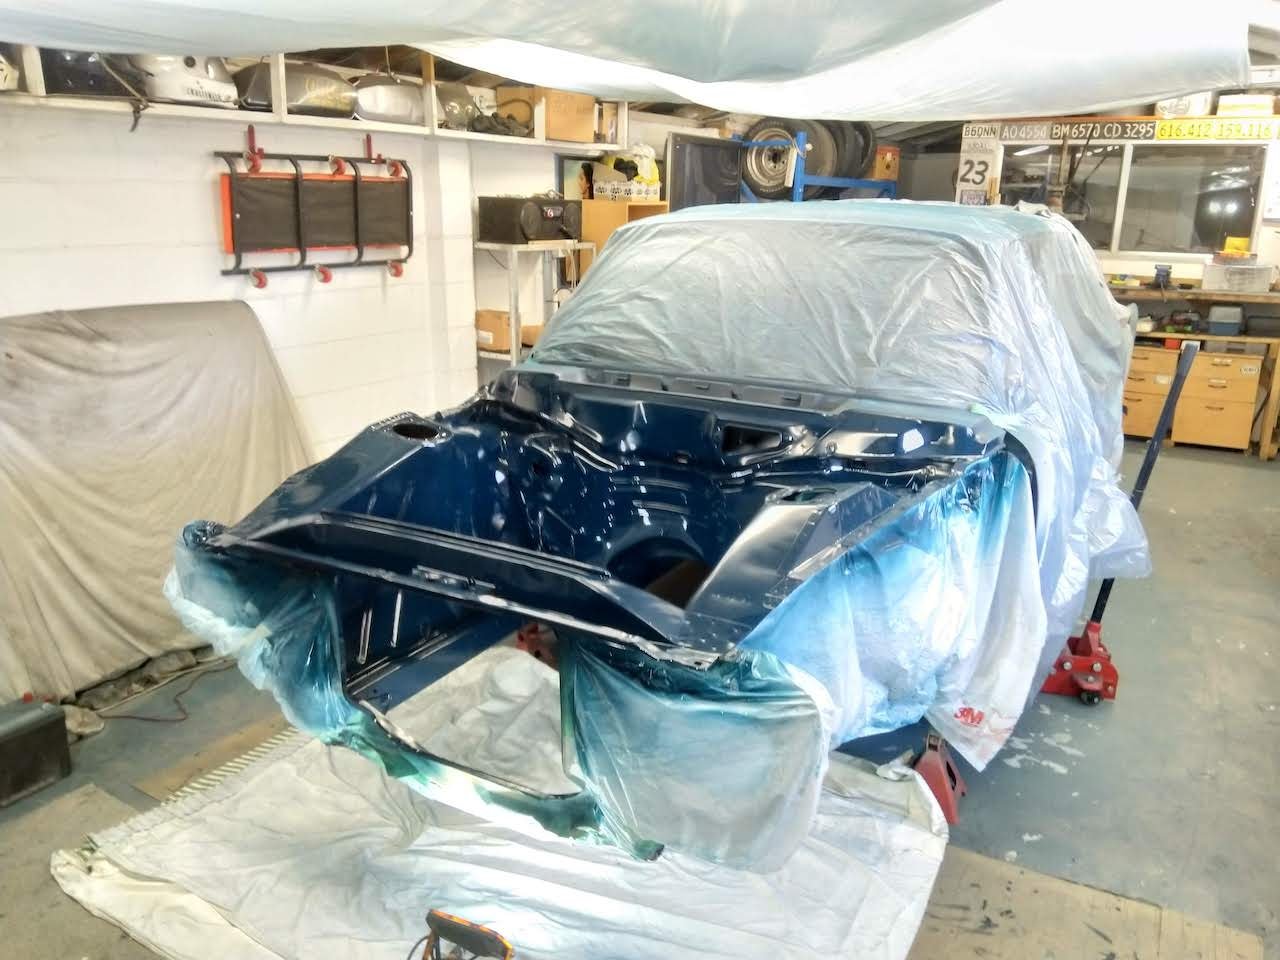
Starting to chip away at the paint on this. Bare metalled both sides of the bonnet, treated with some phosphoric acid then painted with epoxy primer. Didn't take any photos once I'd finished bare metalling, below is after the paint stripper starting on the bits close to seams and cavities. Got the first side done, will flip it over once the paint has dried and do the other side. Few wee runs, but generally happy enough with how it has come out.
1 point


This leaderboard is set to Auckland/GMT+12:00