
Leaderboard


Popular Content
Showing content with the highest reputation on 10/22/20 in Posts
-
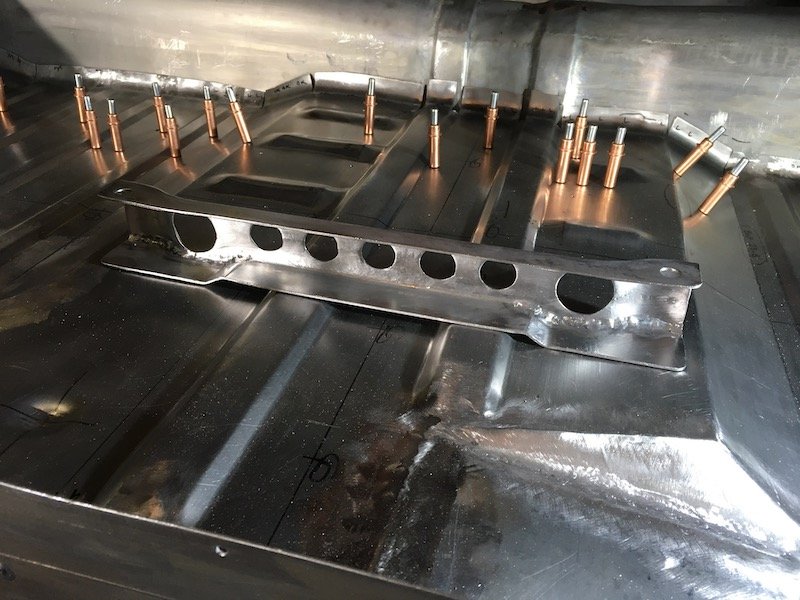
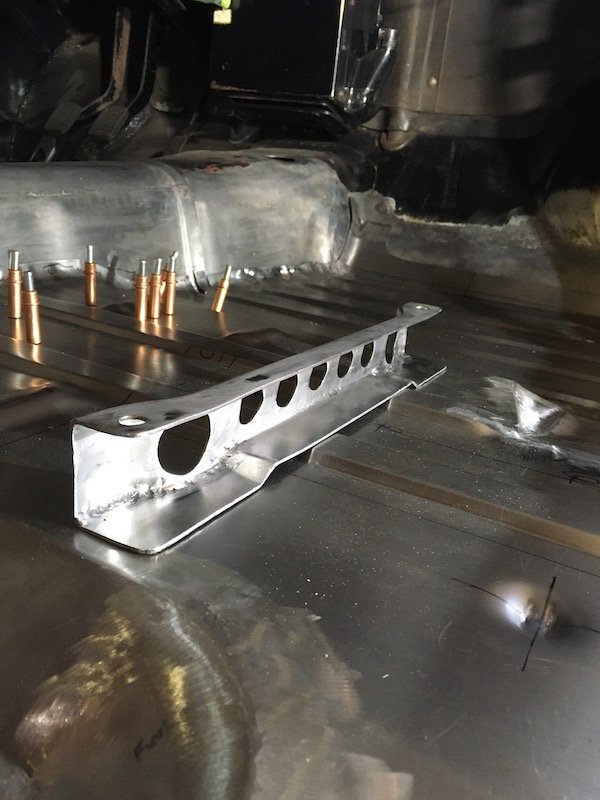
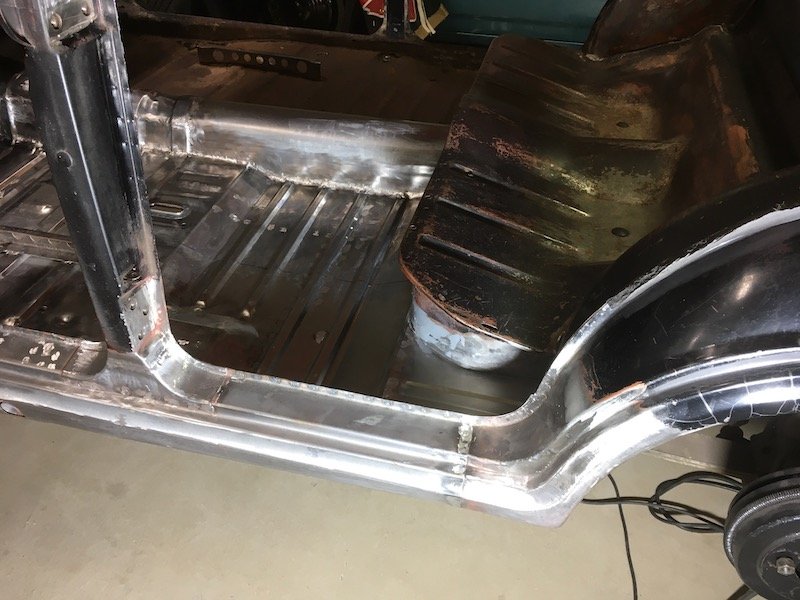
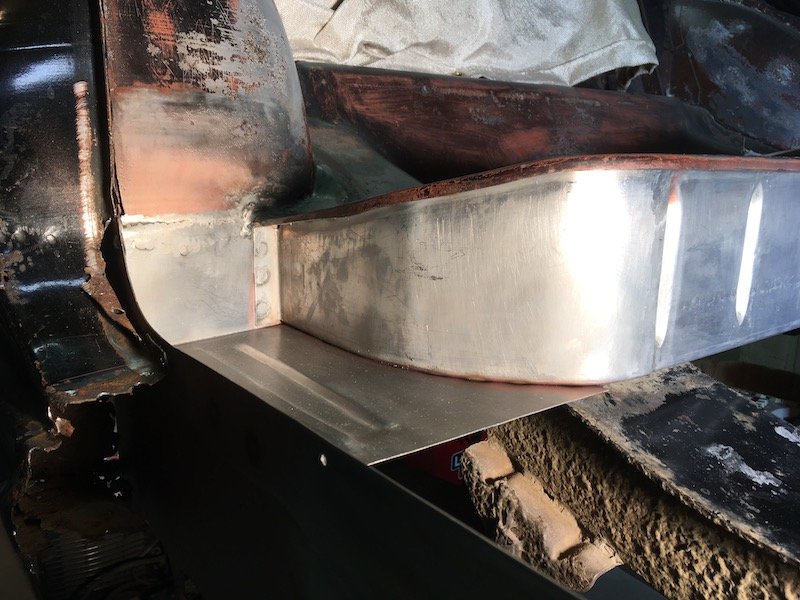
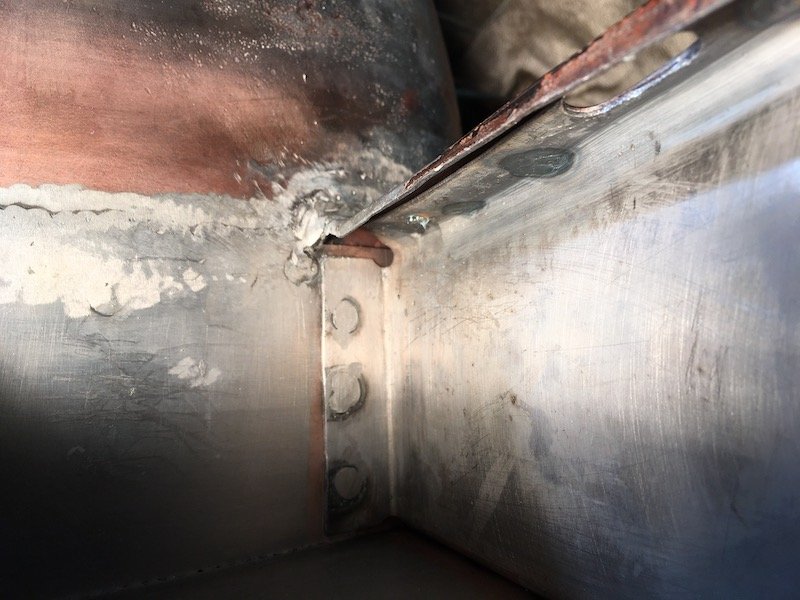
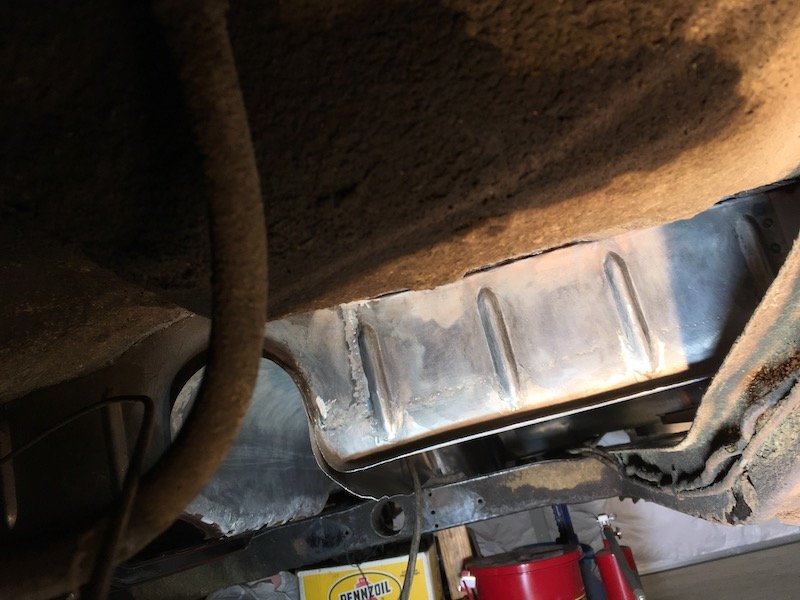
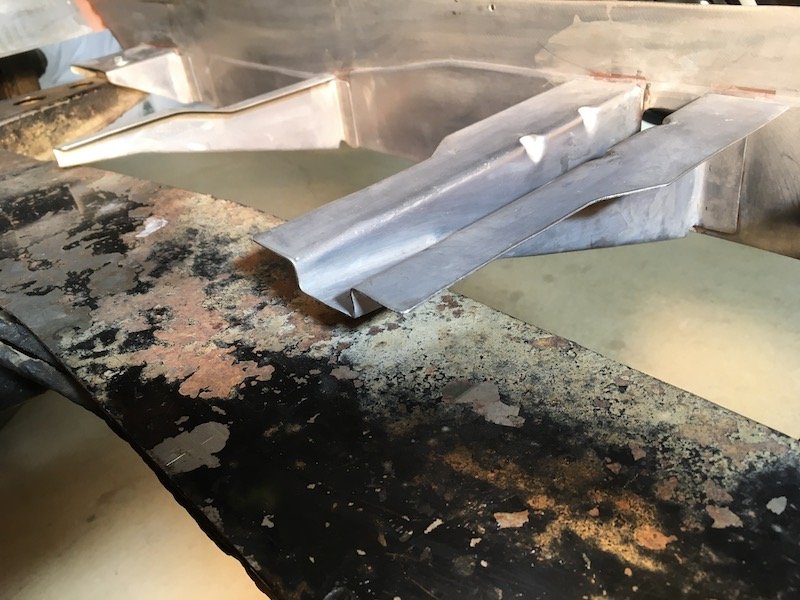
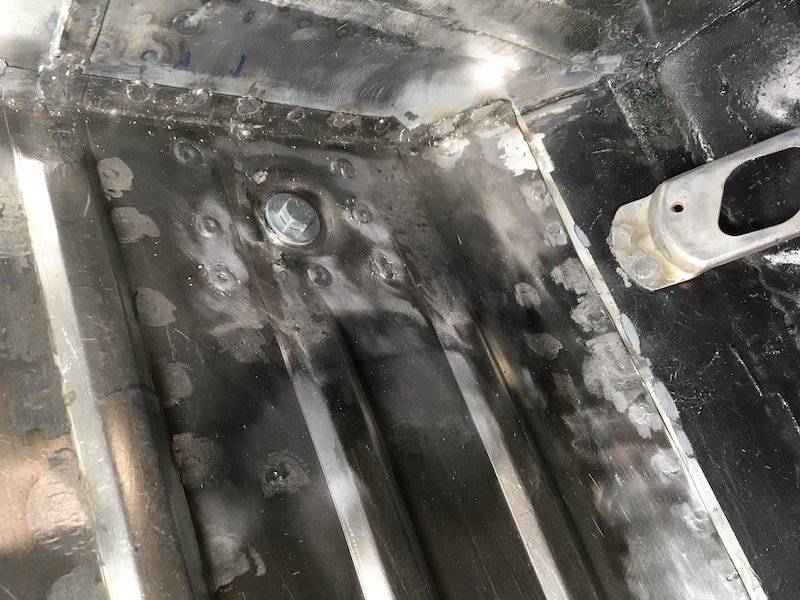
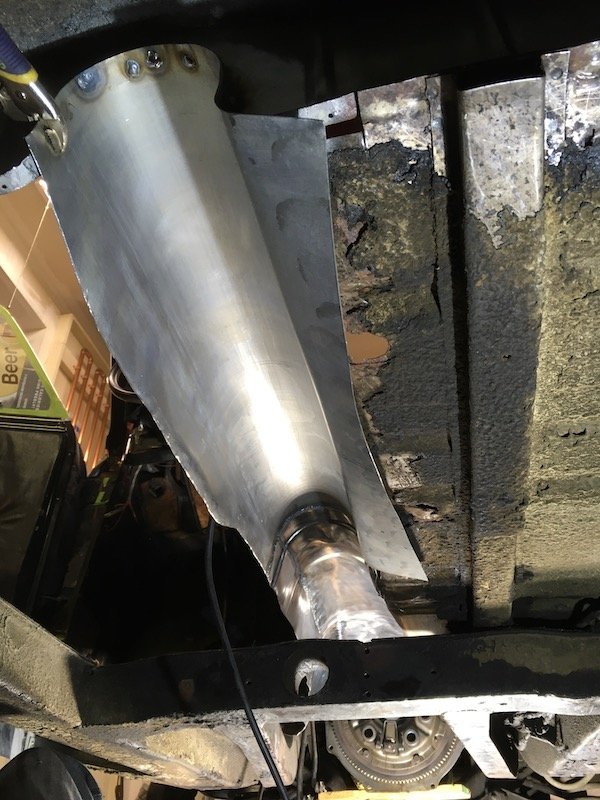
Long time no update, unemployed life has got me busier than ever. I’ll start where we left off and chuck up what little photos I took along the way finished the sump, no photos of rubber flappy baffles bat it’s all in there. Ended up with an extra 200ml of volume and a sump that’s above the crossmember so a bash plate can be fitted(yet to make) Before the engine got thrown back in I tidied up the wheel tubs and the recessed firewall Had to do the clutch as dual mass flywheels aren’t ideal. Let alone when there is 30°-40° of slack in the stock flywheel. Aftermarket single mass setup was a fuck around as the flywheel didn’t seat on the crank properly. Anyway sorted that out and fired the engine in the hole. Mocked up the rear of the headers. Before sending it down to Stu at Precision Wiring Solutions. let’s just say, he’s an absolute wizard and worth every penny. Factory ecu and speedo cluster were reverse engineered to make everything work. Only thing we couldn’t do was the fuel guage so just used a vdo sender and guage. We got the engine fired up while it was there and checked everything over. sorted the fuel tank to run the factory pump in a surge tank setup which it a part of the main tank to minimise lines used, and just a high flow low pressure vdo lift pump feeding the main pump got the rear wheel tubs all welded in and tidied up I managed to talk mike Shaw into knocking out an n2 kit so that was promptly fitted moments after getting home from collecting it And then there is the plethora of other jobs required to get the the car to the point where the car can be “safely” Driven . Having the power company cut the power to replace poles from 9am-3pm the day before you’re meant to be on track puts a spanner in the works, none the less. My ambitious nature got there in the end! Tux chucked a vid together as we managed a bit of an Oldschool takeover at the cjc jerkfest day all in all the car went bloody well for a first outing. So much fun to drive and so snappy. Need to get the brakes working better, hydro actually working and new coils to hopefully fix the random hesitation from the motor that seems to happen at the sketchiest of times. plans? Well getting my life sorted out after taking redundancy from fonterra. Get all my stuff (shit) into a container to clear the workshop ready for fabrication and customer work. It will be on the back burner for a while until business is up and running, then I can sort the odds and sodds on this and give it a lick of paint!12 points
-
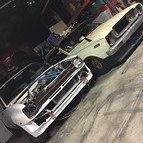
Hah very cool! Never heard of Ultem 1010 before. In other news, I've heard rumours but never seen it done till now. Look how well a 2ZZ fits in these. Glorious!
 8 points
 -
Organising long term projects and parts Got a lucky streak as @AE25 knew a guy that worked for a company that needed to clear out their old shelving. It's amazing how much stuff you can fit in a 40ft high cube8 points
-
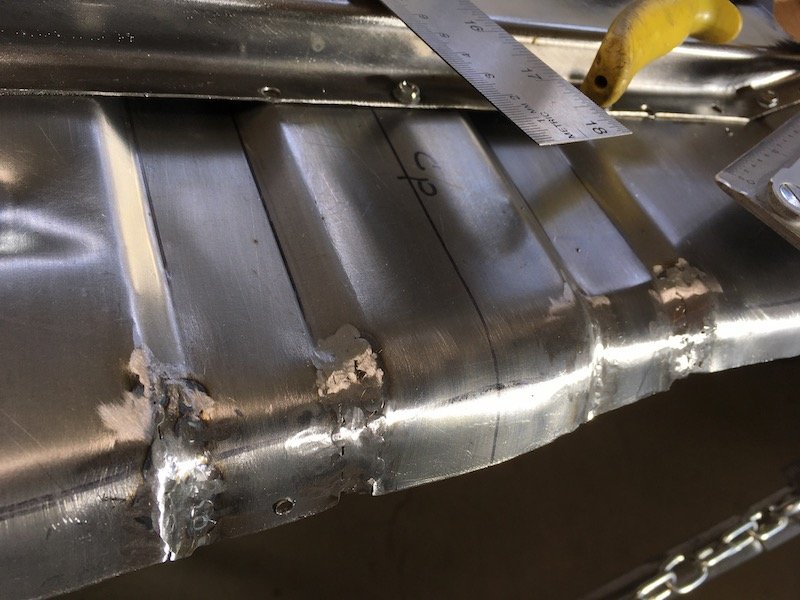
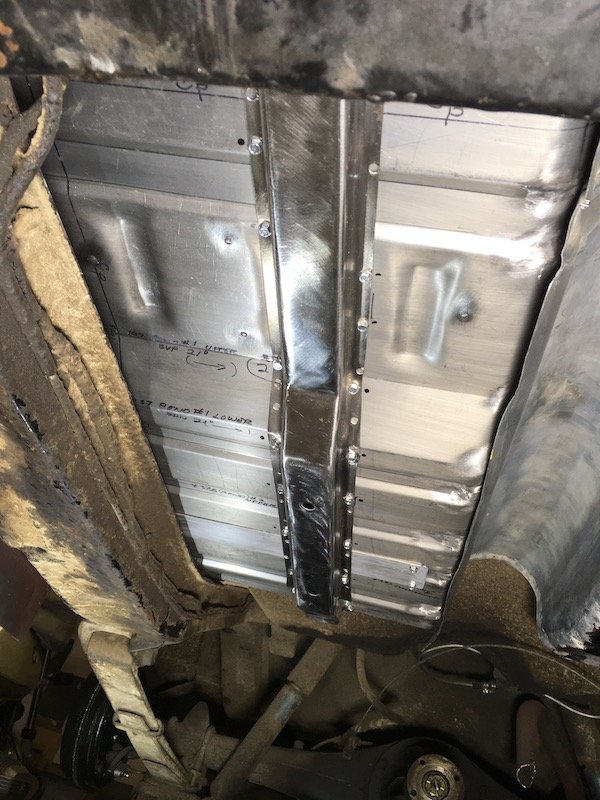
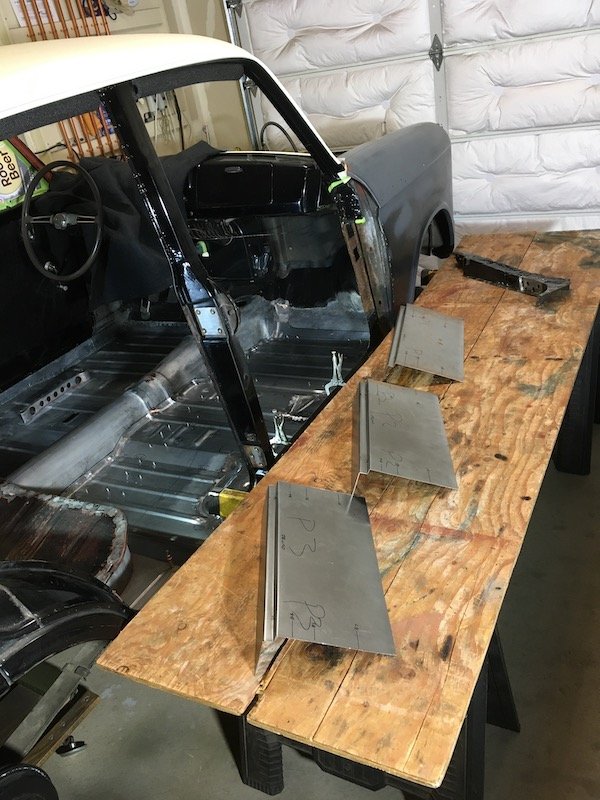
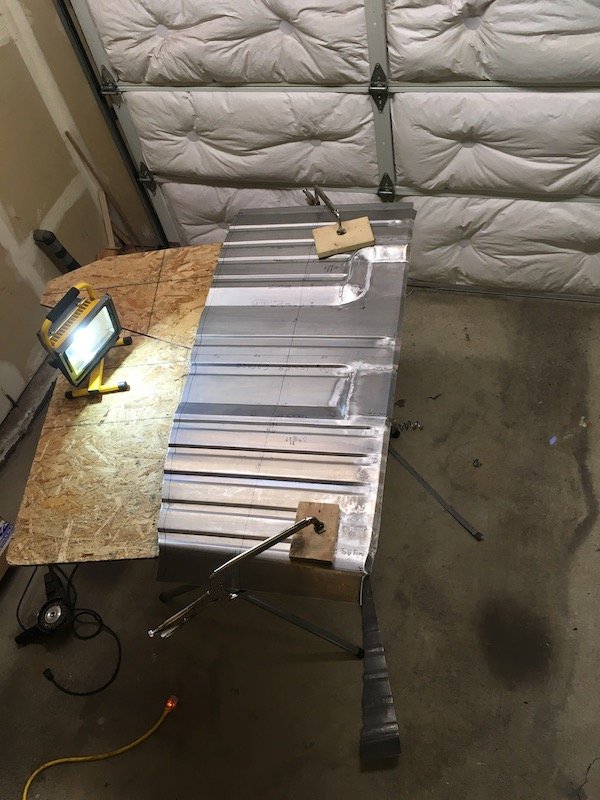
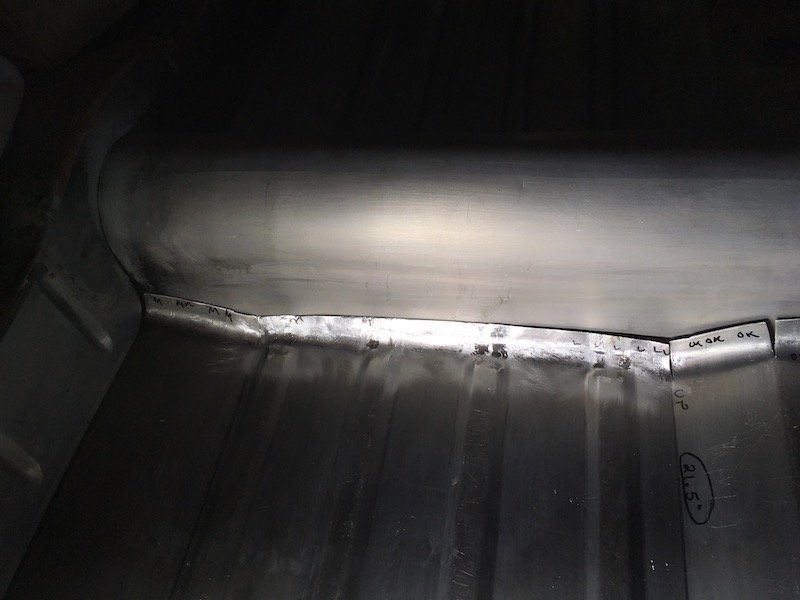
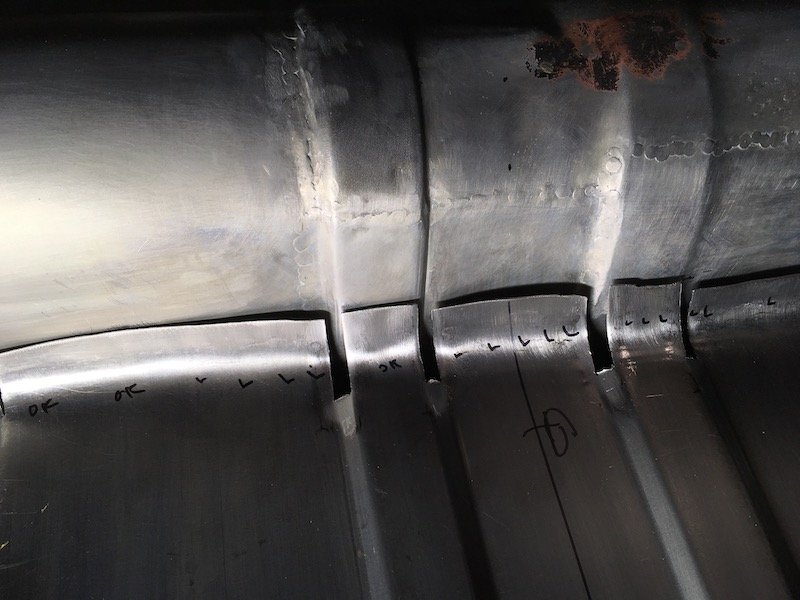
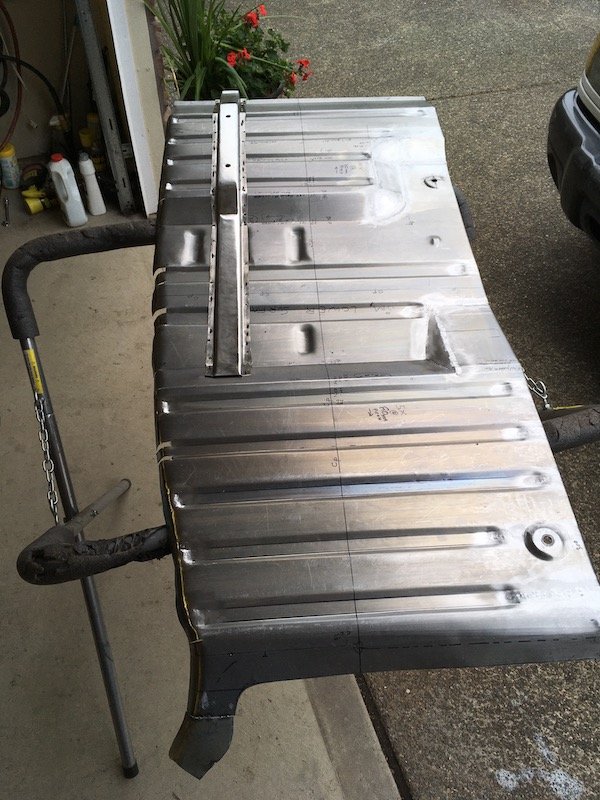
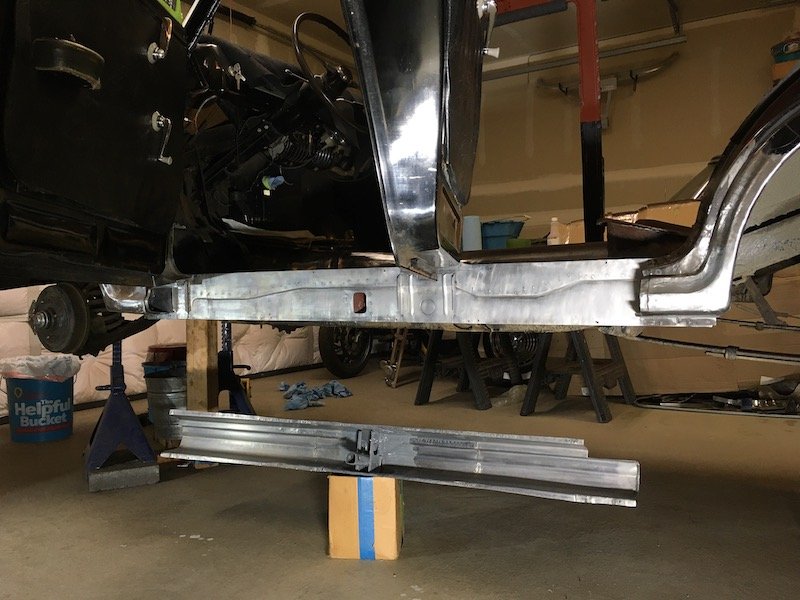
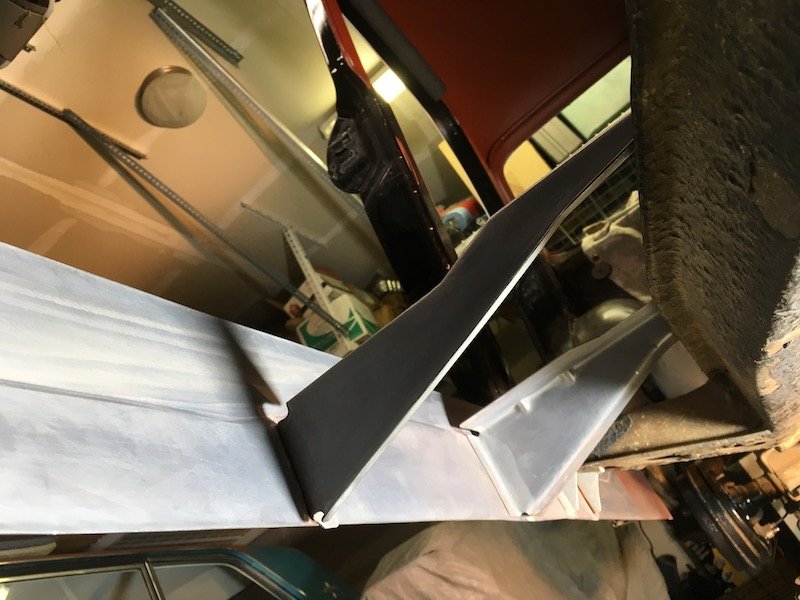
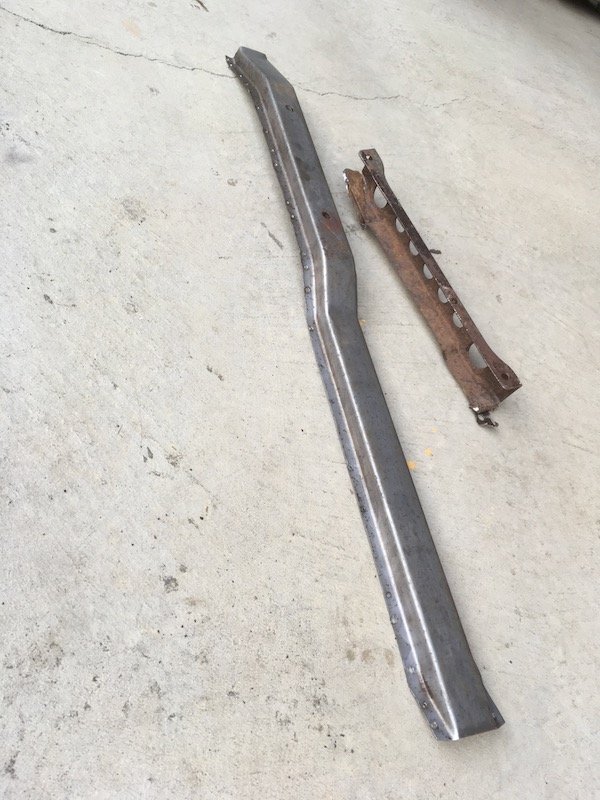
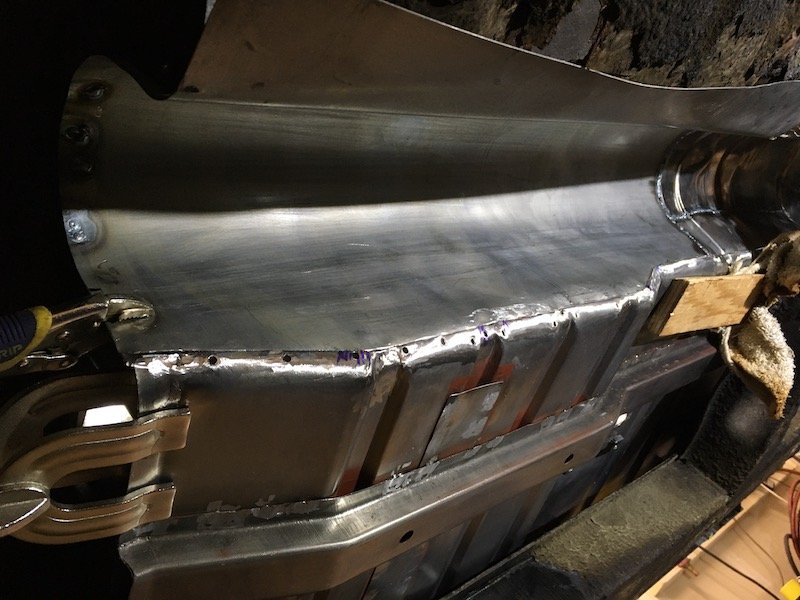
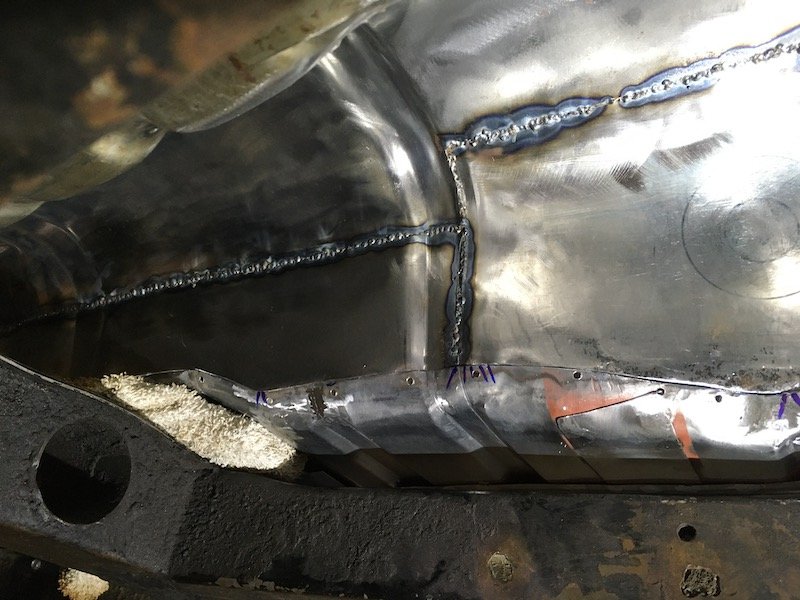
(continued from previous post today) Building the 1961 Datsun 310 Bluebird - RHS floorpan fabrication completed. Finishing up the story today by adding the two lateral straps underfloor and two longitudinal stiffeners in the front section. Tuned up the loose inboard edges a bit where the corrugations will continue over the trans tunnel. Cut up bits and welded in. Small but rather time consuming to fiddle with making fit and weld. Tacks and more tacks. Repeat six places. Then add all the underside straps, do another fit check in the car and take lots of pics. It's all fitting up quite well now. Very pleased with it. Permanent weld assembly of the floor parts and floor to car are to take place quite a bit later after scratch fabricating the outer sill, A-post, repair B-post, Dogleg and anything else needed to do a fit check with doors mounted. Oh and the door hinges need rebuilding. On the table slated for work next. These are the three segments destined to be the outer sill (old A-post in background). They have been sitting half complete for about two years now. Time to get er done! Discussion: https://oldschool.co.nz/index.php?/topic/60267-marts-pl310-61-datsun-bluebird-sedan/ Build: https://oldschool.co.nz/index.php?/topic/60264-marts-pl310-61-datsun-bluebird-sedan/
6 points
-
6 points
-
Hopefully you can read this.
5 points
-
2ZZ no shit?4 points
-
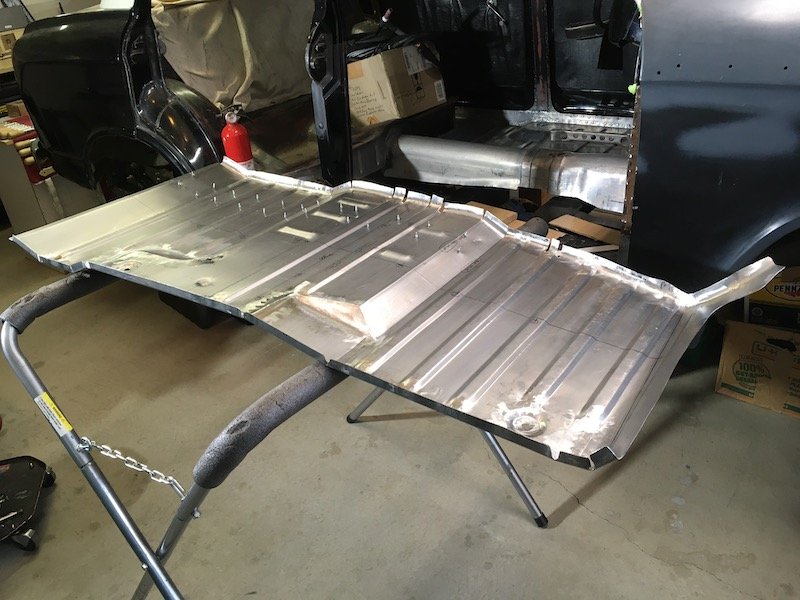
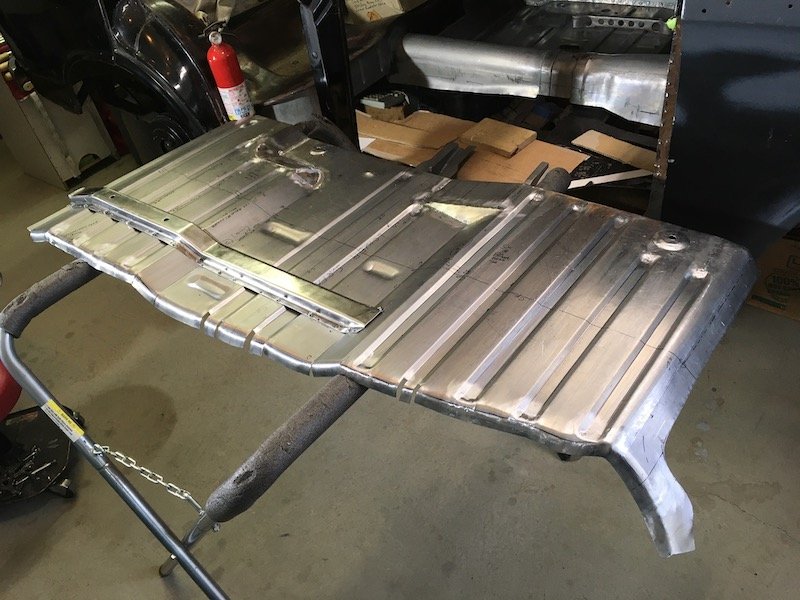
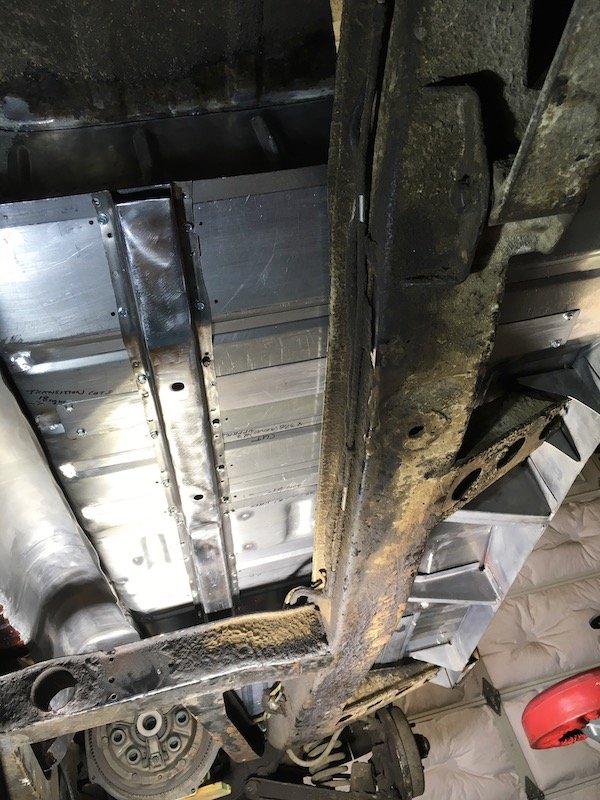
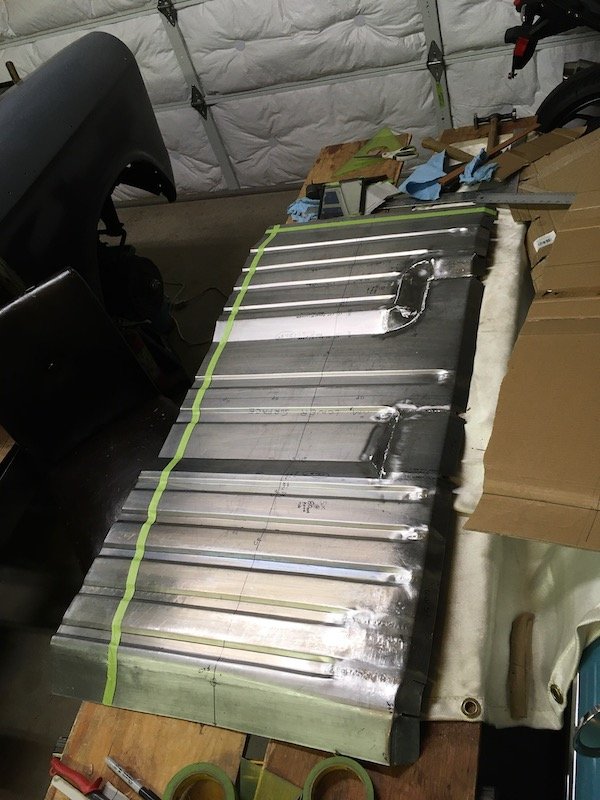
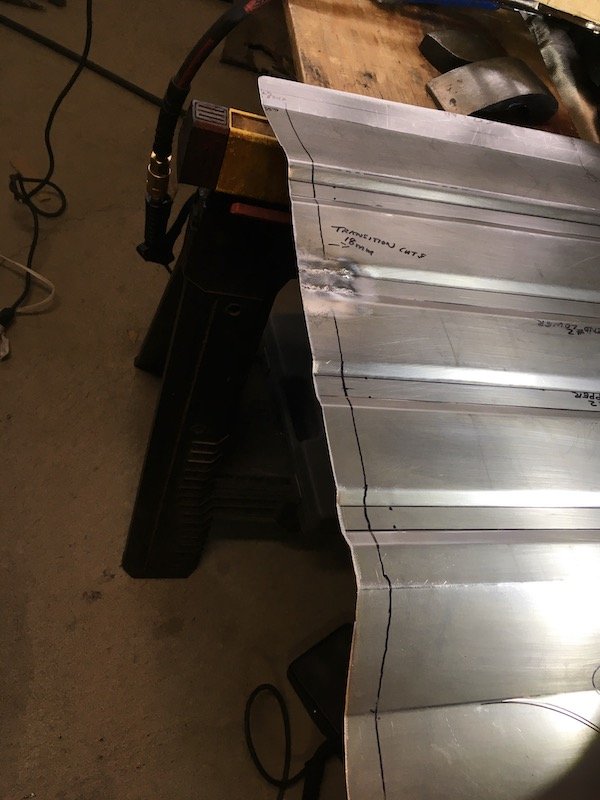
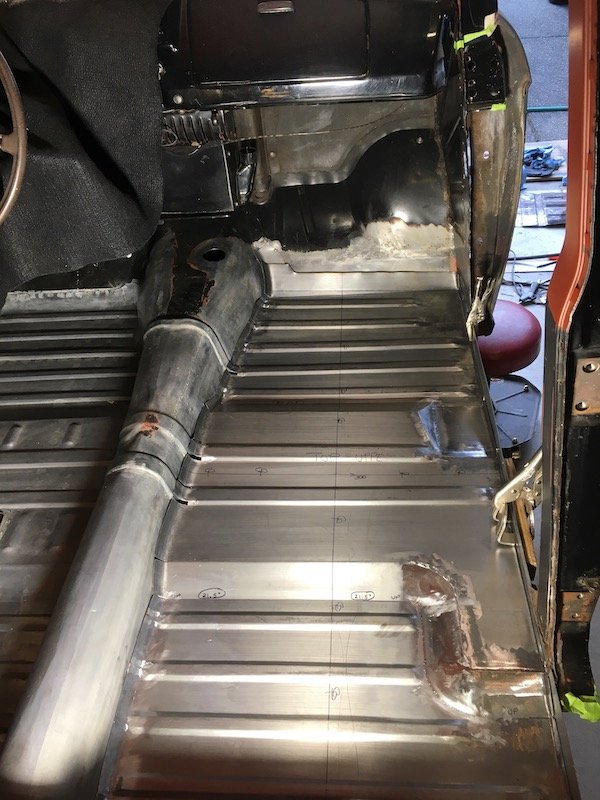
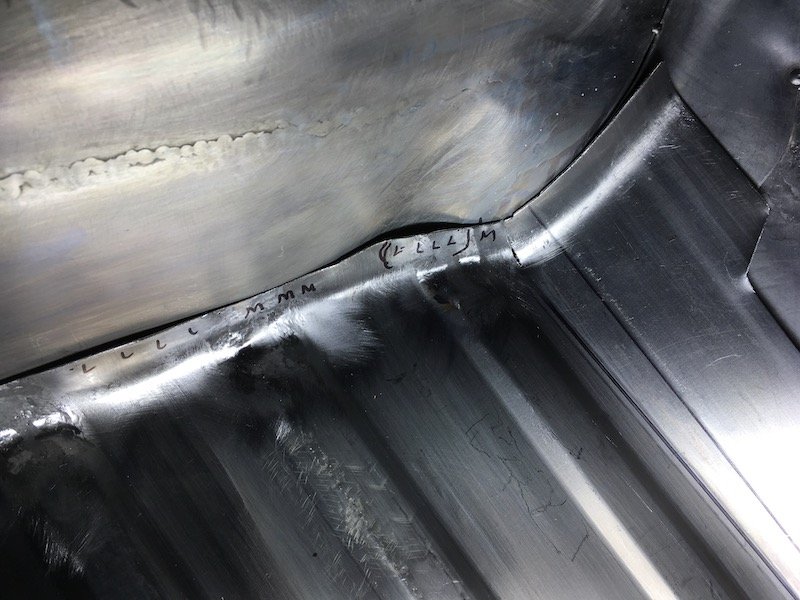
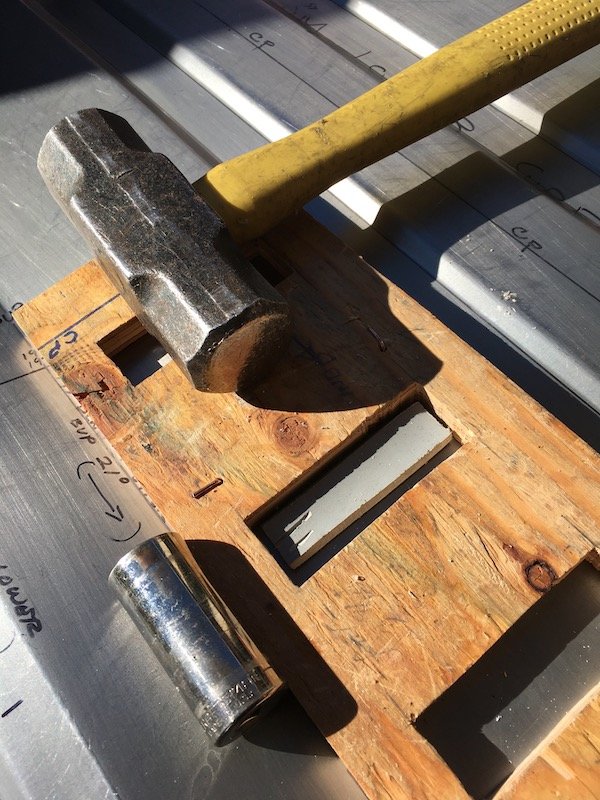
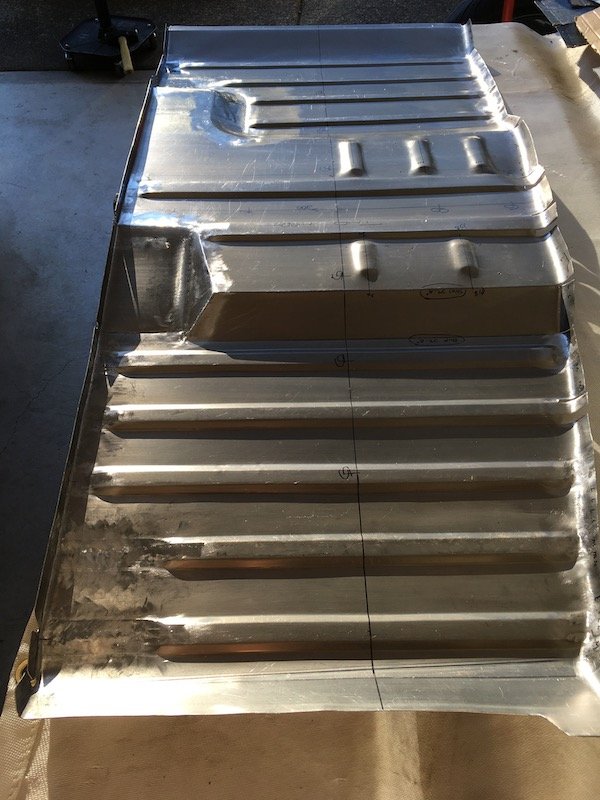
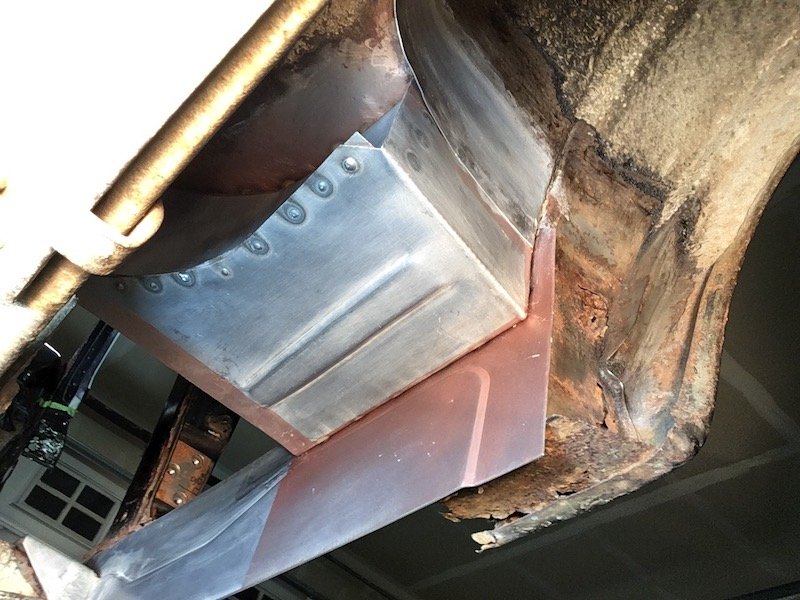
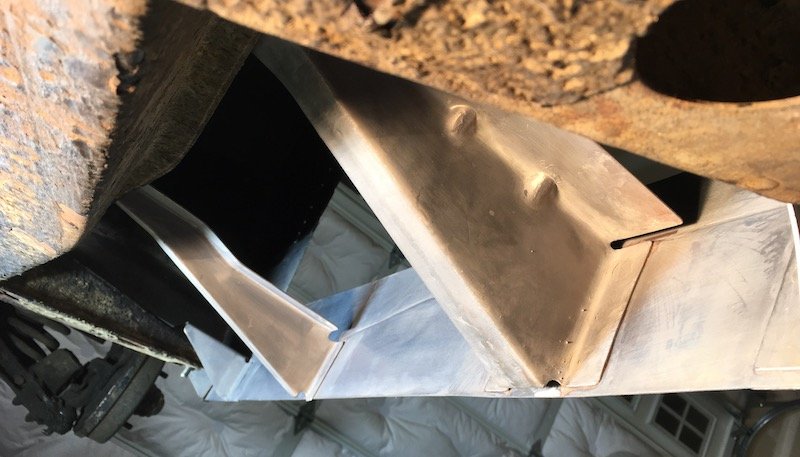
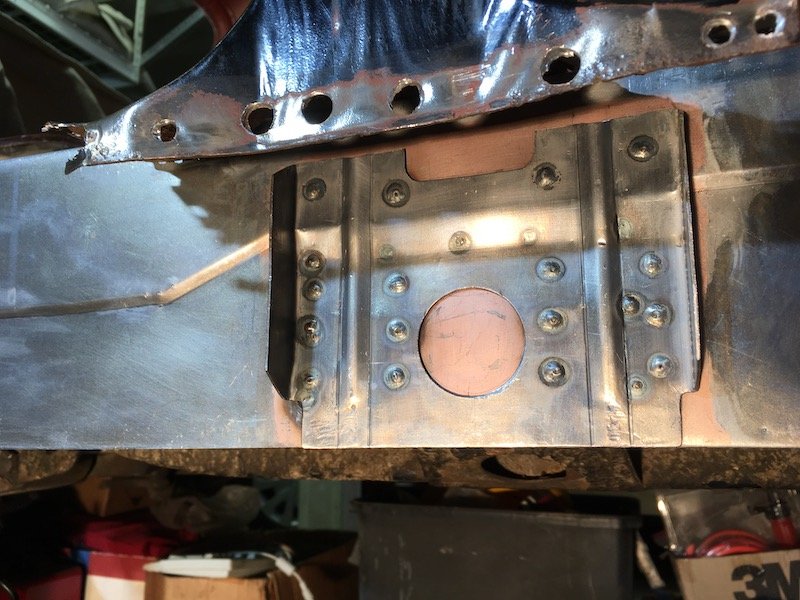
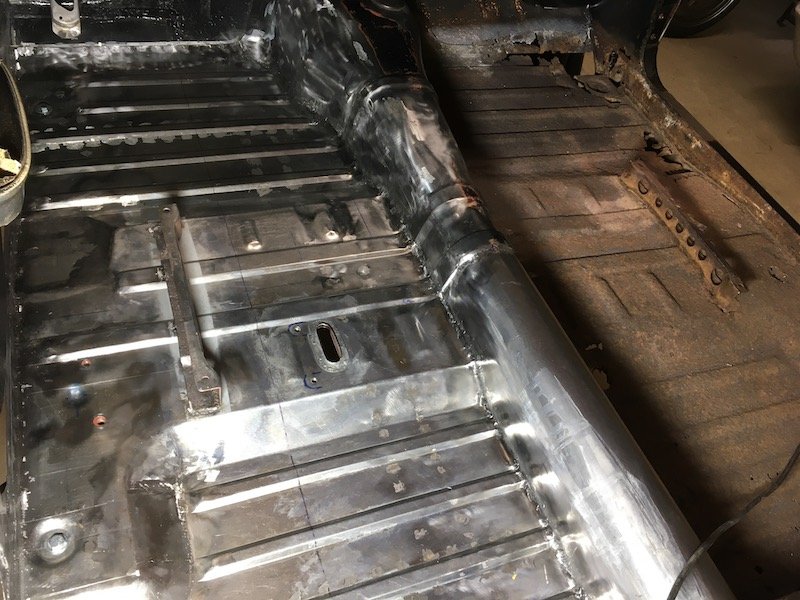
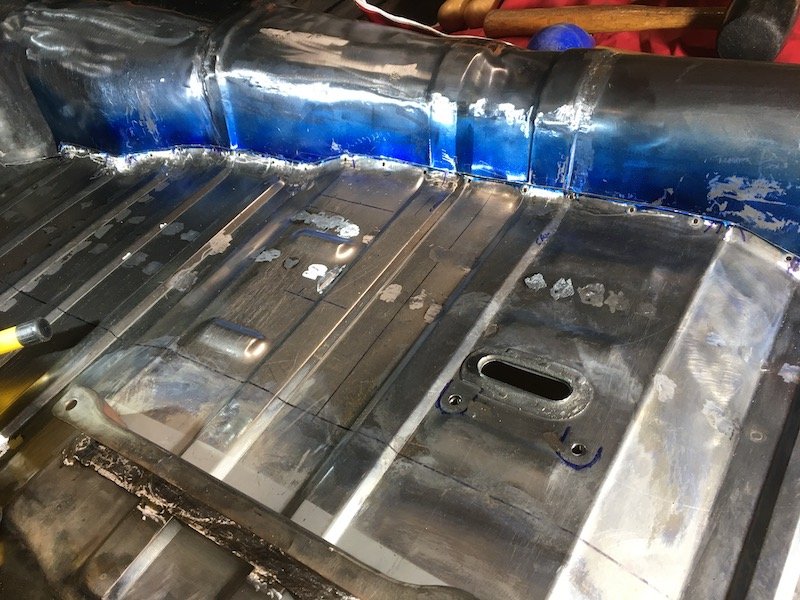
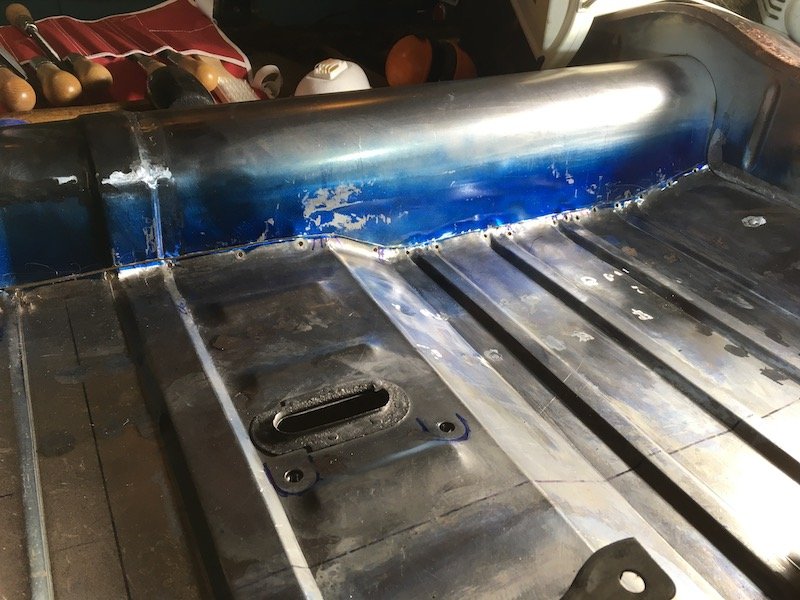
Building the 1961 Datsun 310 Bluebird - RHS floorpan fabrication completion. More progress on the Bluebird RHS floorpan. I've done a lot of work. Started by fully welding up the tacked up butt weld joints shown previously. Used mostly MIG process (tack, tack, tack and grind excess). Then used a large piece of cardboard to rough out the edge trim contour. Got it relatively close and then rolled a large washer with a marker on the ID to get the contour line against the tunnel. Final trimmed shape of the cardboard. Set the it on the pan and trimmed it. Left a uniform amount of excess to transition with a fillet against the tunnel. Blended the edge end of corrugations flat by making a couple cuts on each, pounding flat and welding. Then made a 90 degree flange to mate with the inner sill plate. The beat and rolled the tunnel edge into a fillet with hammer and dolly. Then did a somewhat successful first rough trial fit. Looks ok from a distance but up close it needs more finesse. Formed some stiffening bumps, same as factory floor, with homemade tools of plywood (male/female blocks), chuck of plastic pipe, deep socket and a big hammer. The forming process pulled in some adjacent metal on the ramps which were easily panel beaten back to shape. Cleaned up the hat section underside support that was salvaged and temporarily attached it. First with some Clecos, then later on used Teks. Wrong application for regular low tension Clecos due to the undulating contour and minor mismatch. Pounded in some depressions for the two body mount bolt locations. Also attached the stub at the extreme forward end to mate with the toe board. Running out of the allotted pic upload limit. More soon with repairs to the salvaged seat support bracket and other parts/stuff. Discussion: https://oldschool.co.nz/index.php?/topic/60267-marts-pl310-61-datsun-bluebird-sedan/ Build: https://oldschool.co.nz/index.php?/topic/60264-marts-pl310-61-datsun-bluebird-sedan/
4 points
-
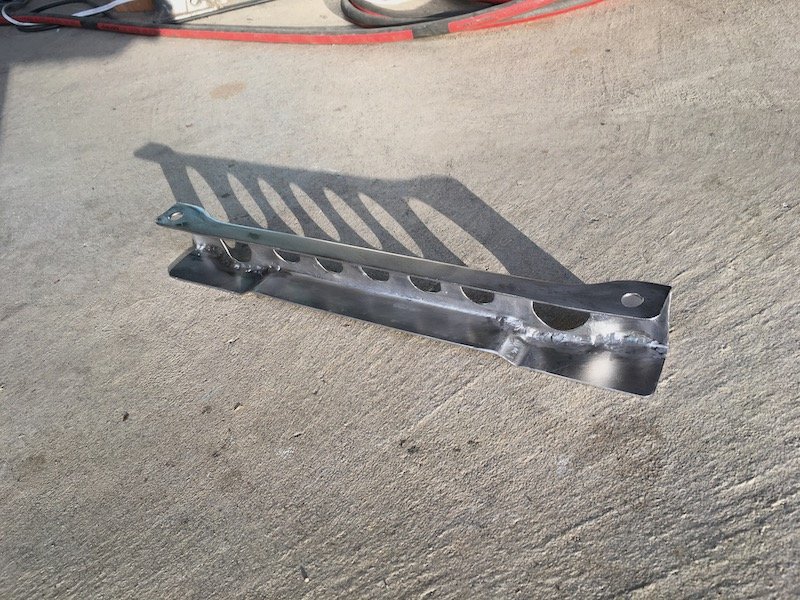
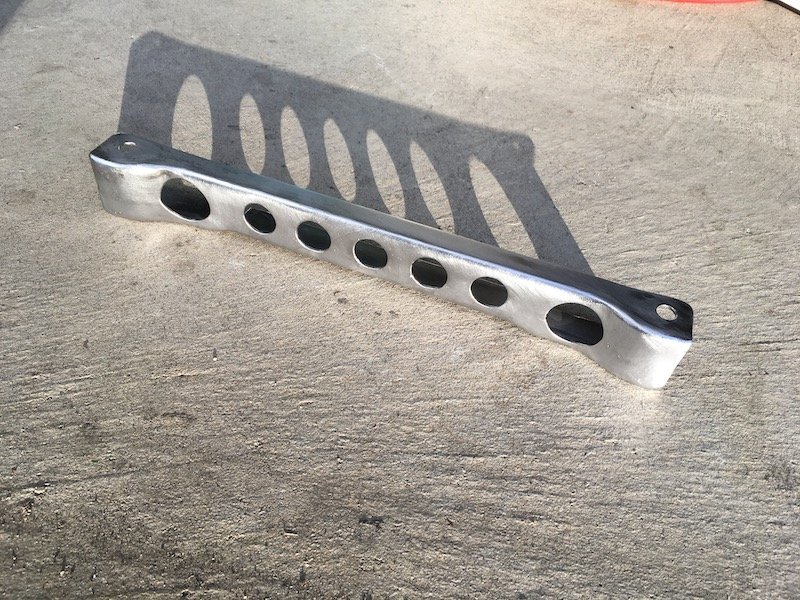
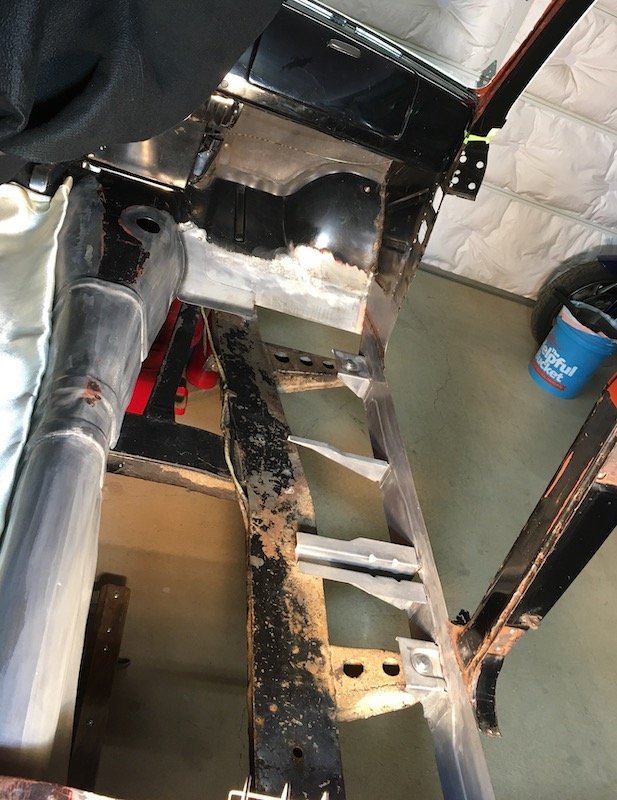
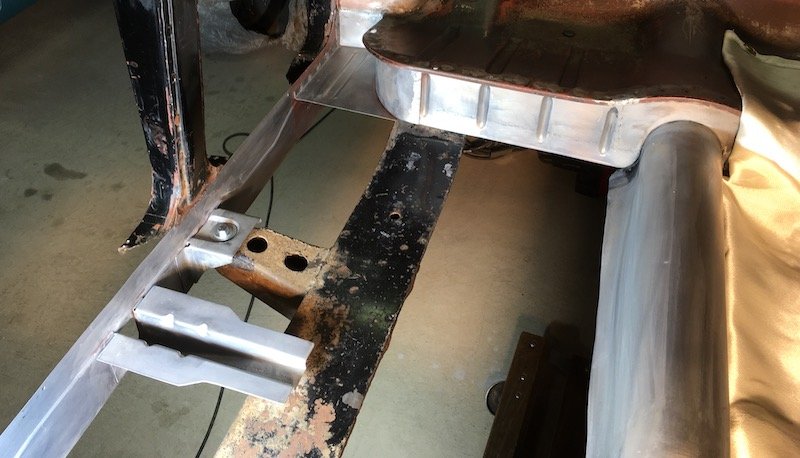
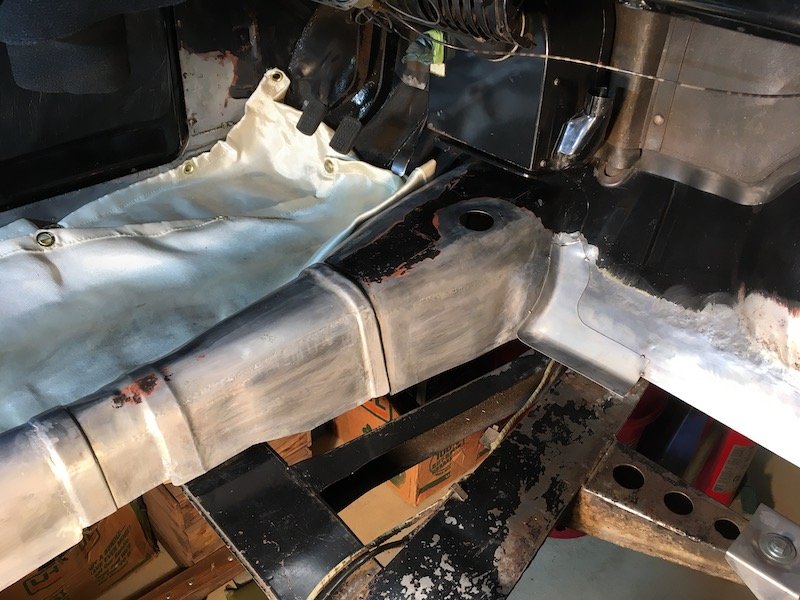
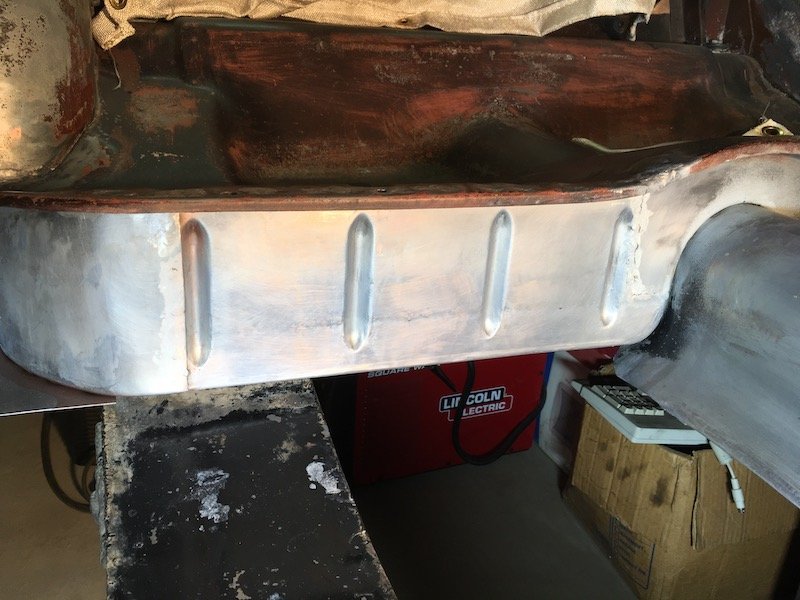
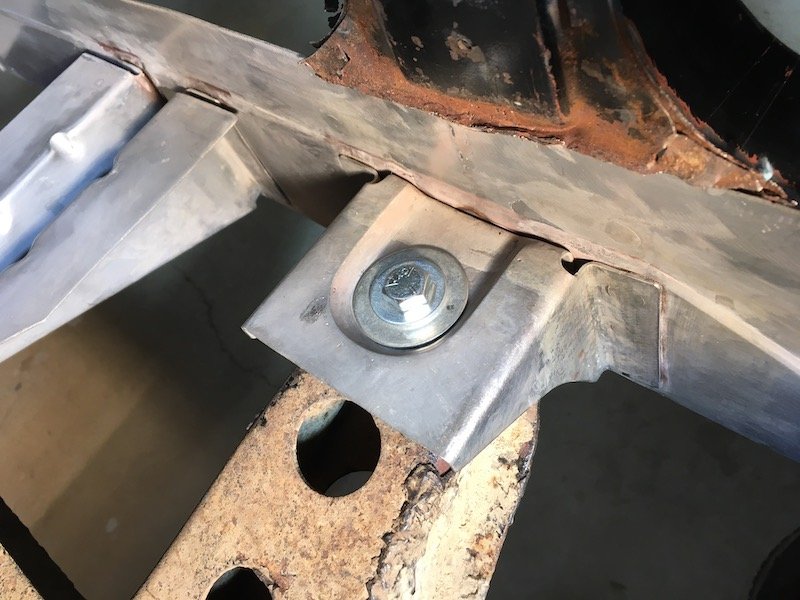
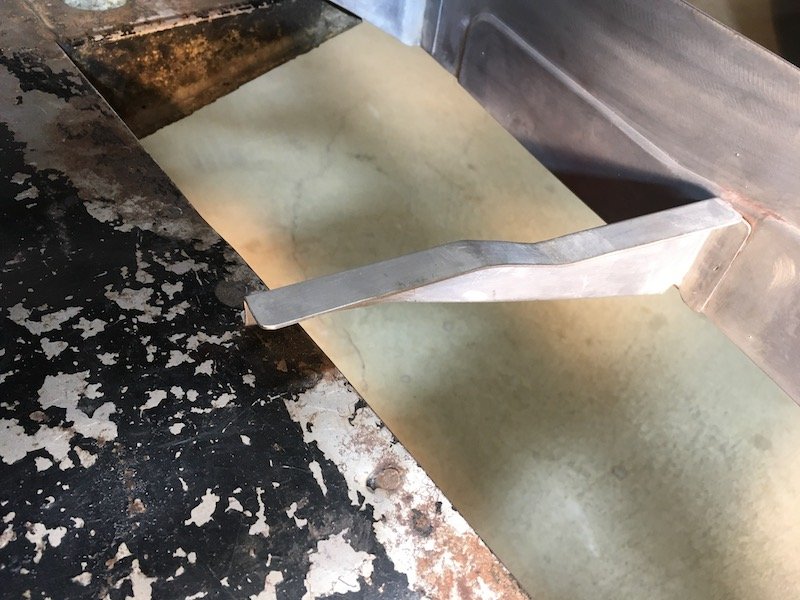
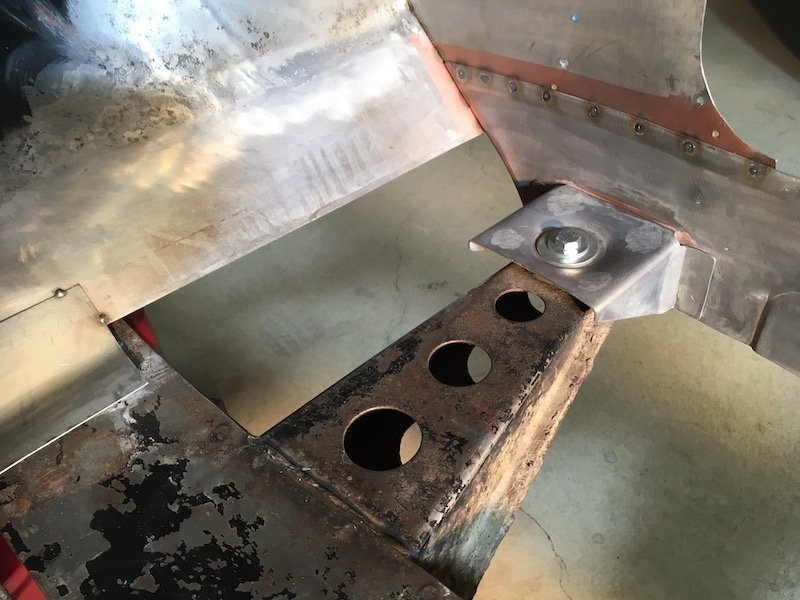
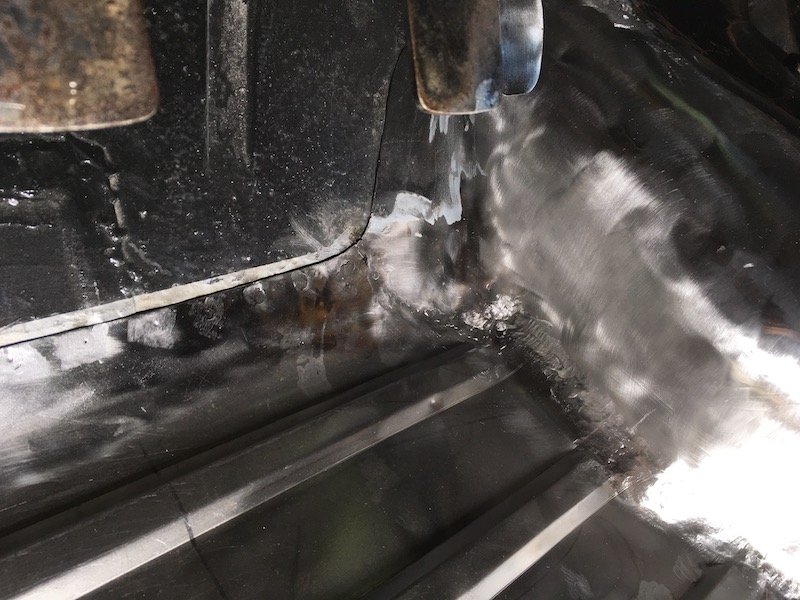
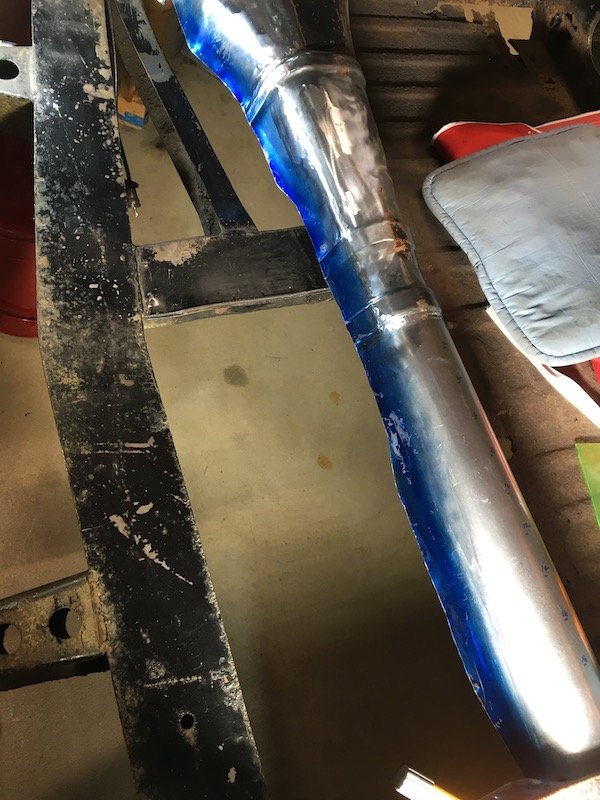
So I’ve been chipping away over the past weeks. So much done but still so much to do! Managed to get the whole rear end dialed Just need to cap the upper arm boxes (can’t decide if I should make removable or just weld them on) Caliper brackets made and calipers mounted Made a start on the sump as the factory lower pan would have sat 40mm lower than the crossmember made an intake pipe by stretching a 3” tube over a 3”-5” sch40 reducer. Bit of grease and the press did the job Trying to decide header layout also Fixing up some back yard rust repairs, it’s only a seat time car but you gott make it look good atleast once So I’m getting there slowly. Going to try get fuel tank/lines in and dump done by next week as the loom should be ready to put in then. Will be good to fire it up. with only 5 days left of regular employment, the aim is to get this completed before my nomadic stint in the bush over summer4 points
-
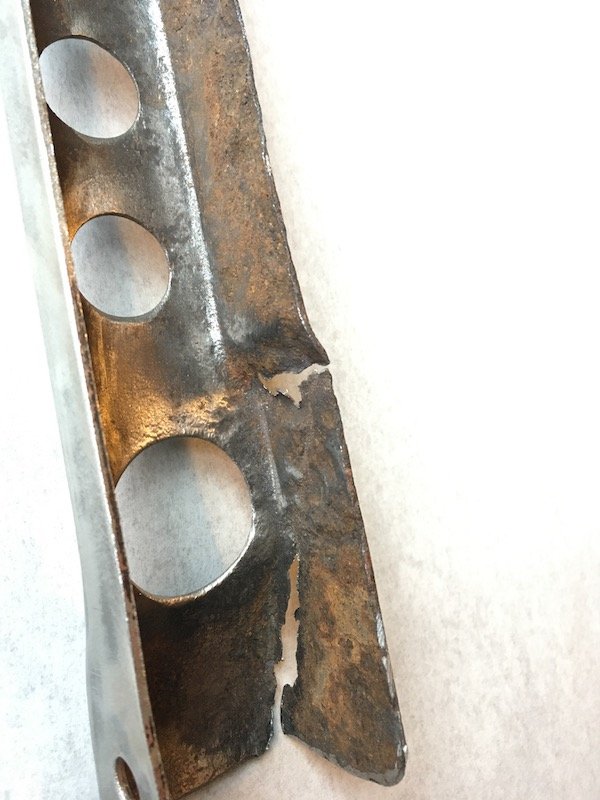
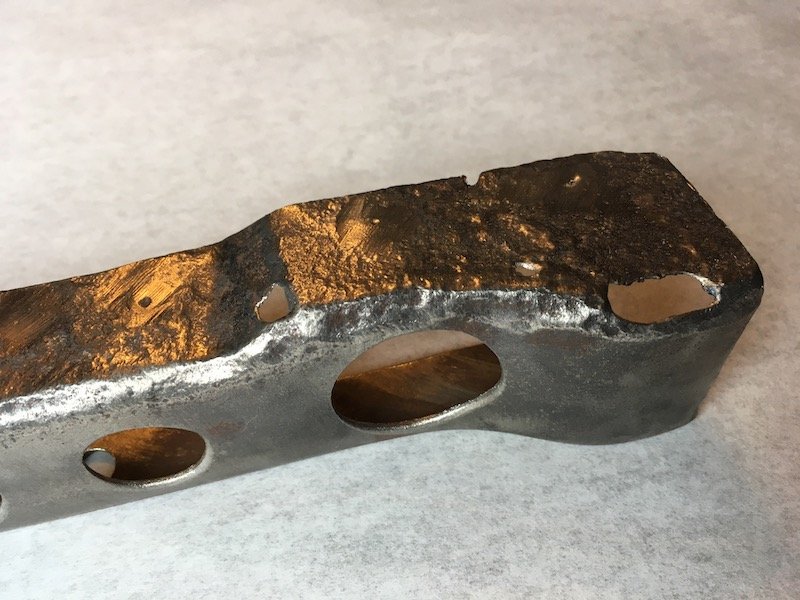
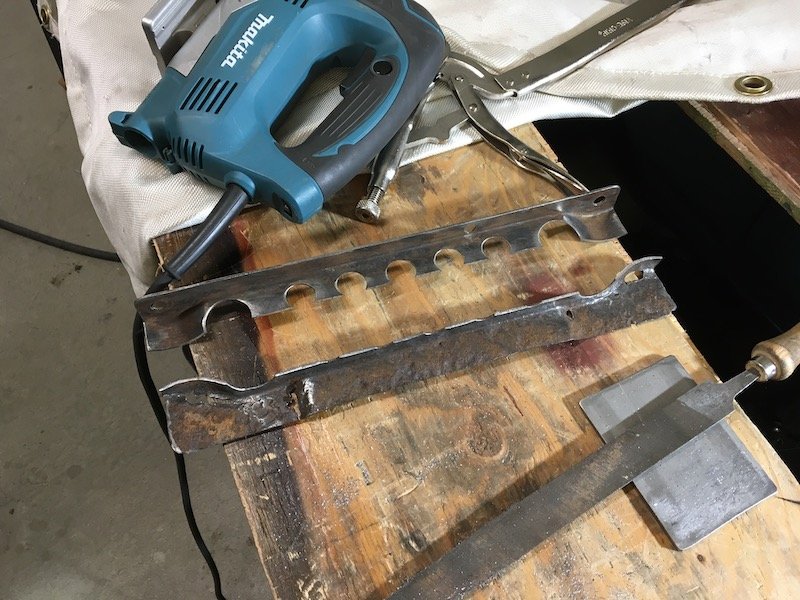
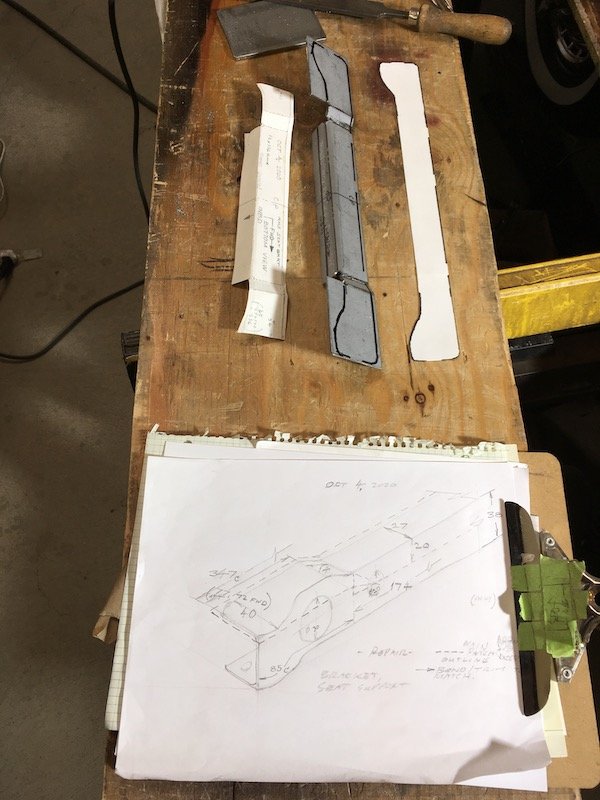
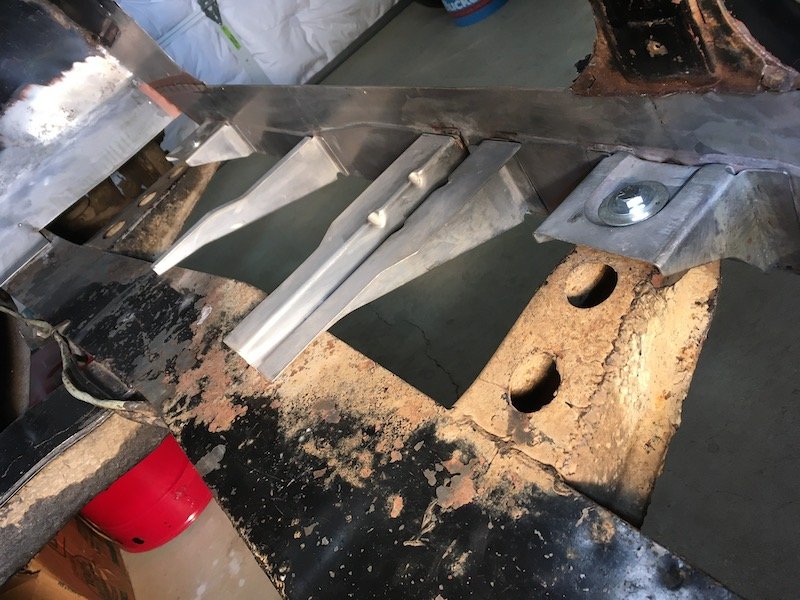
(continued from previous post today) Building the 1961 Datsun 310 Bluebird - RHS floorpan fabrication completed. Started work on this rusty old RHS seat support bracket. Salvage it with repair? Replace it? Make a new one? Chose to cut the rusty half off and salvage it. Made a sketch and got to work on the base using 2 mil thick steel. Easy to weld with a TIG compared to the thin stuff at least! The rest follows naturally and was a fun mini project. Tacked the new base half on with a MIG, filled in with small pieces on the ends and then TIG welded it the rest of the way. After trim of excess and smoothing the edges a bit. I had an existing hole on the top salvaged half rail that was not original and plugged it. Turned out ok with some of the weld in the fillet left unground. The seat bracket In its future location. The Clecos in the background btw were just an experiment and I used Teks instead for temp assembly as noted in prior post. I'll make third post tonight and wrap it up. Discussion: https://oldschool.co.nz/index.php?/topic/60267-marts-pl310-61-datsun-bluebird-sedan/ Build: https://oldschool.co.nz/index.php?/topic/60264-marts-pl310-61-datsun-bluebird-sedan/
3 points
-
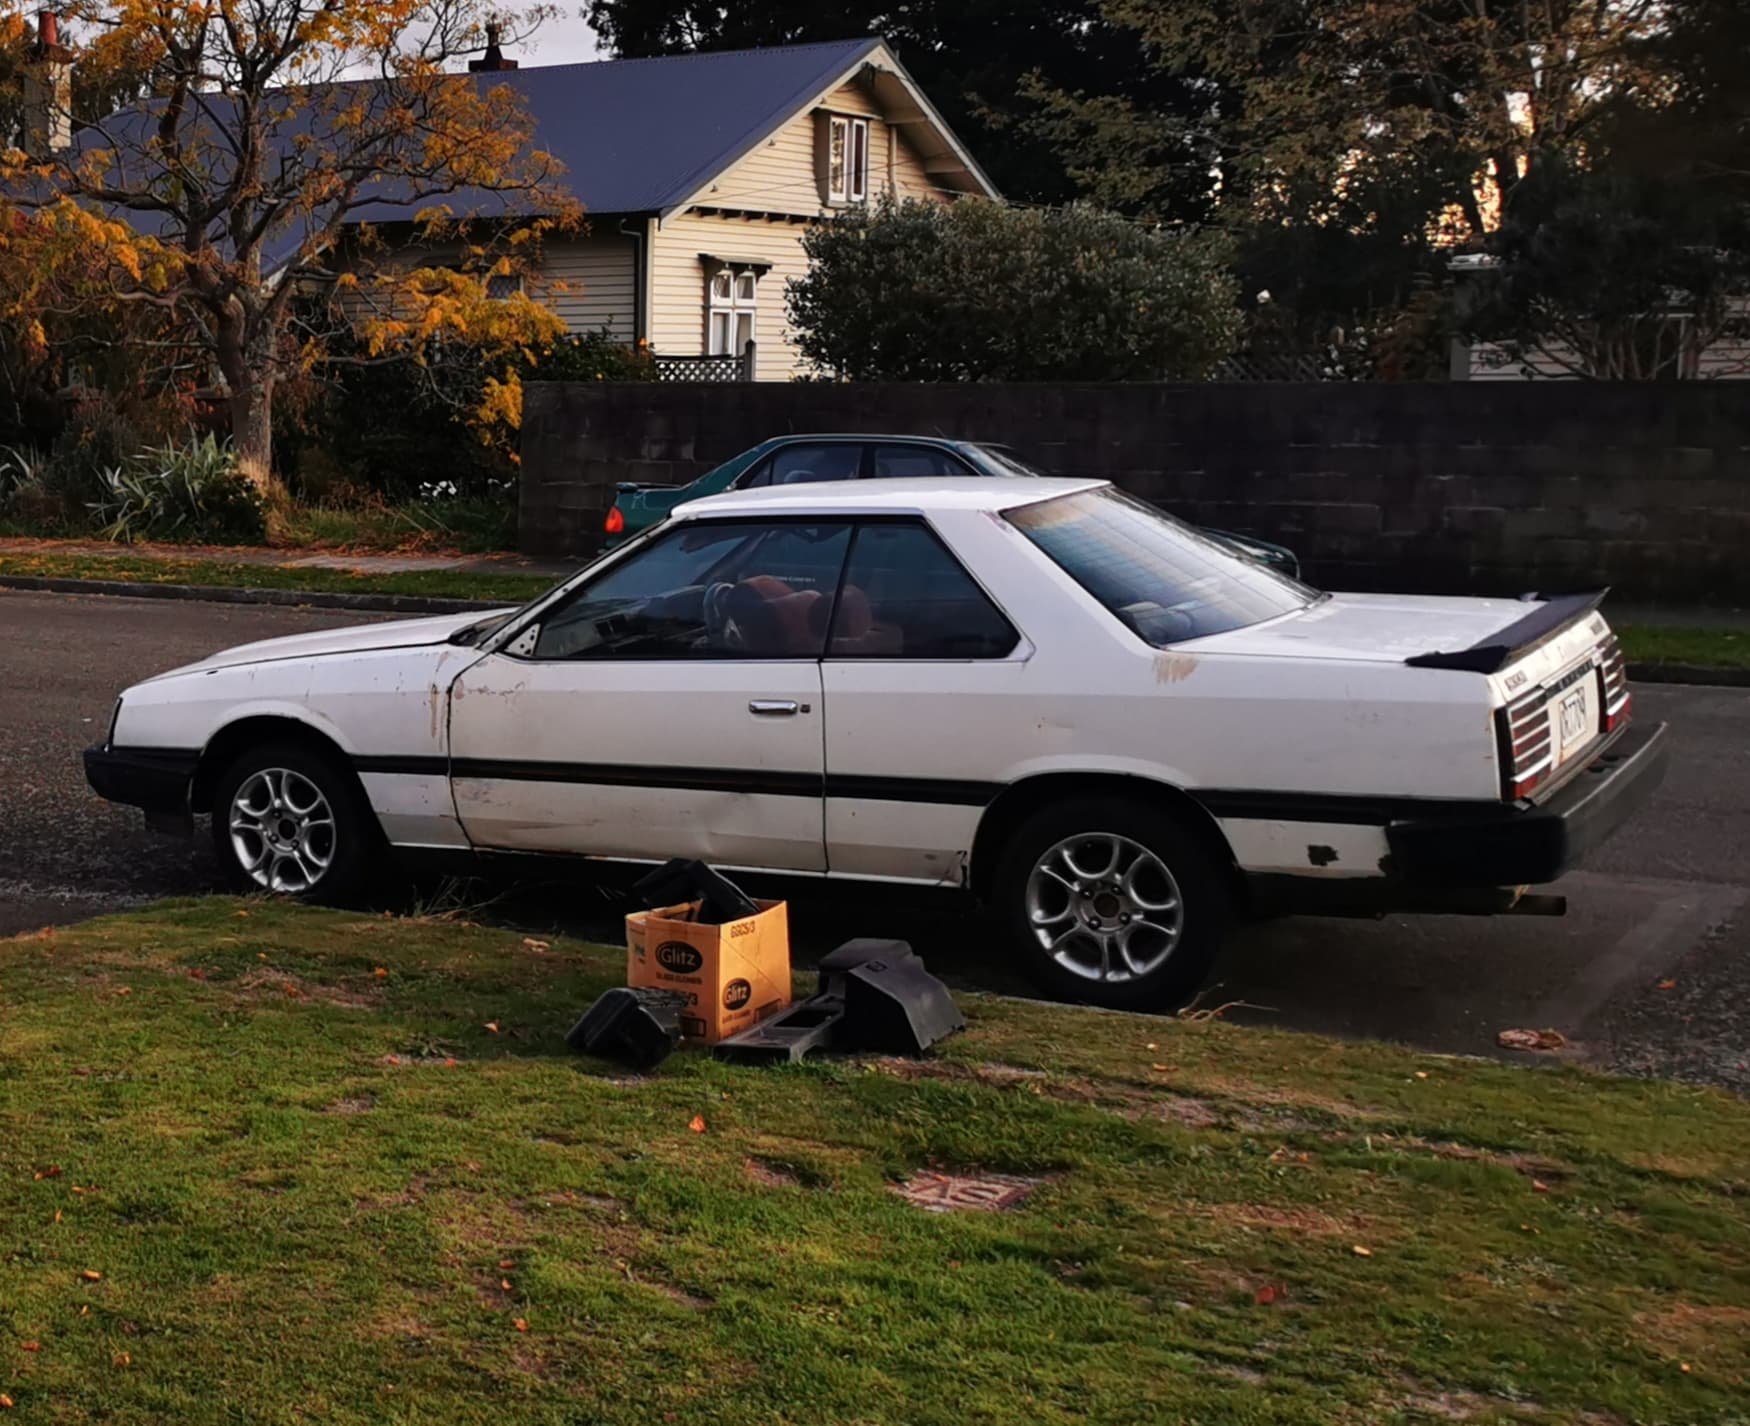
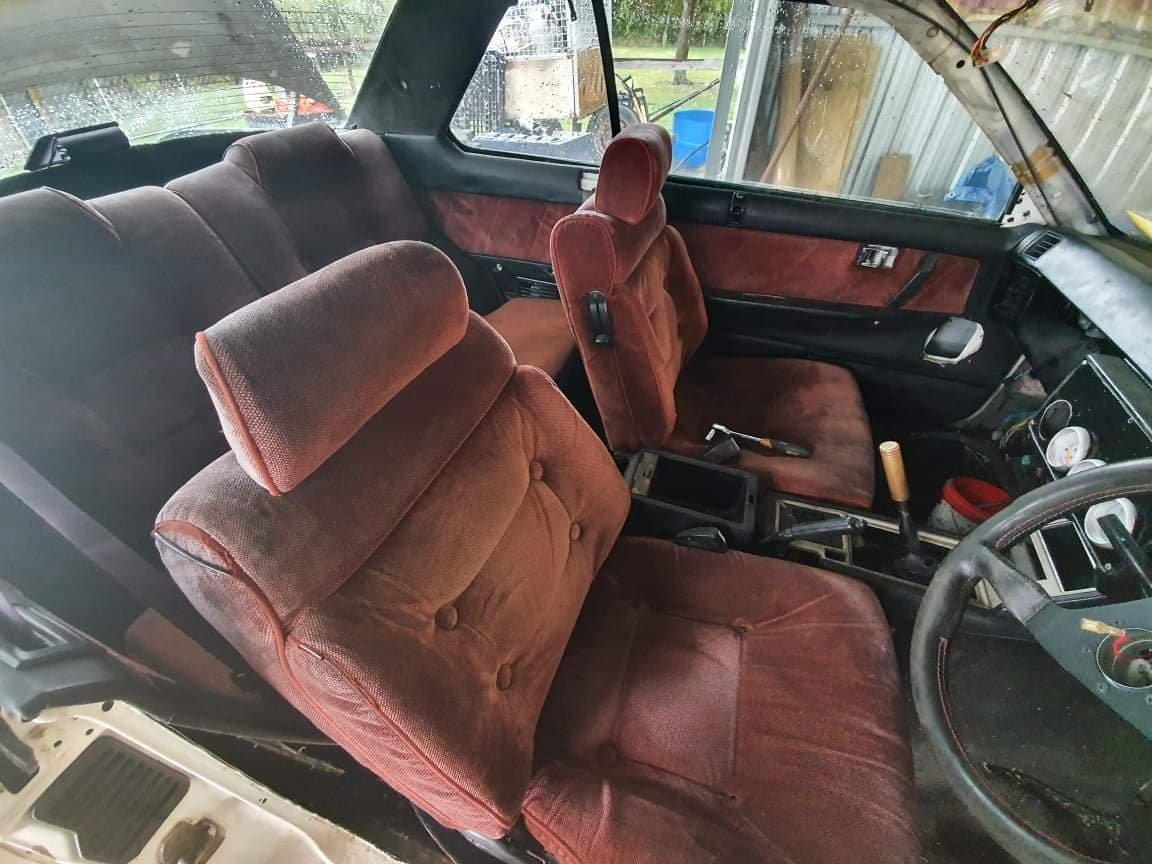
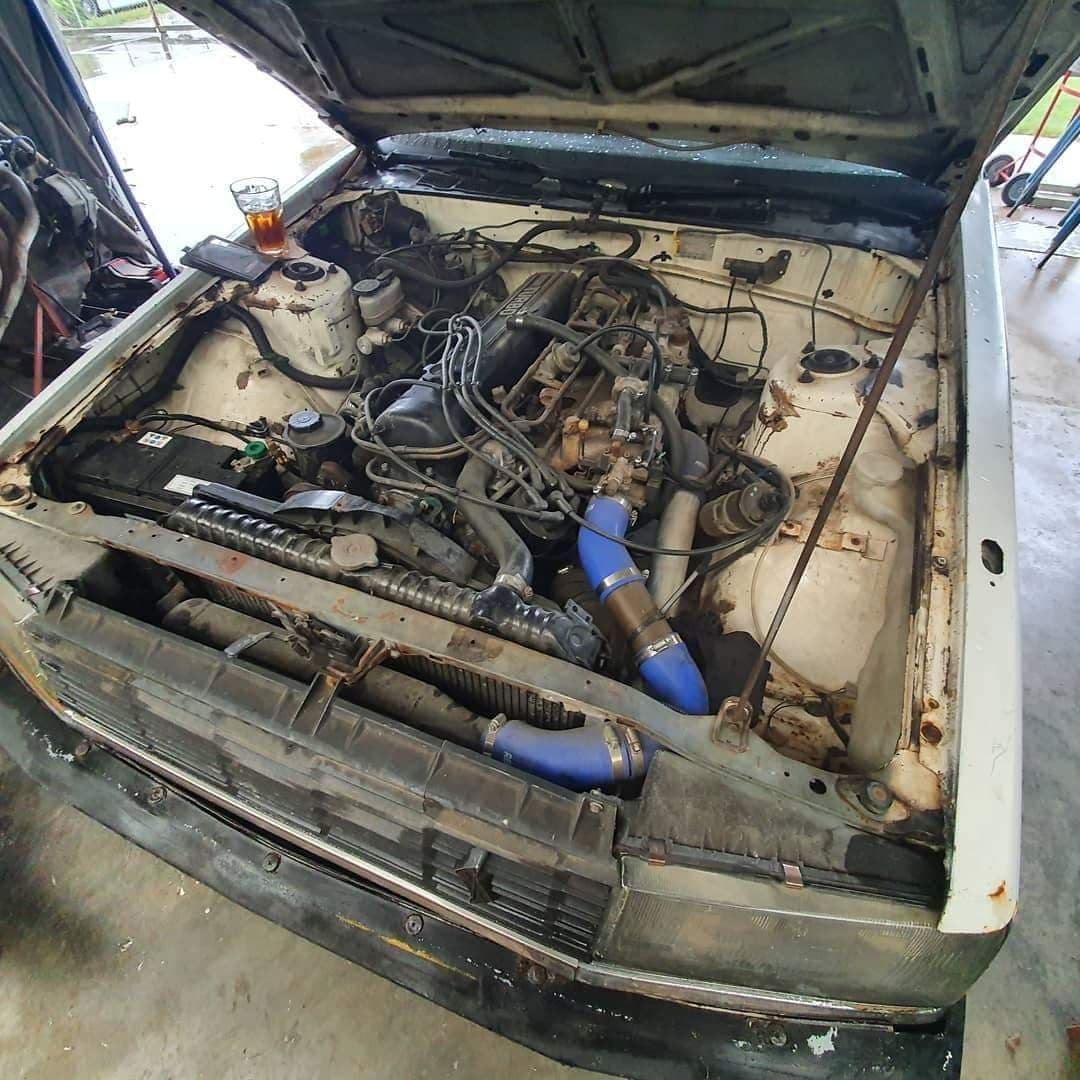
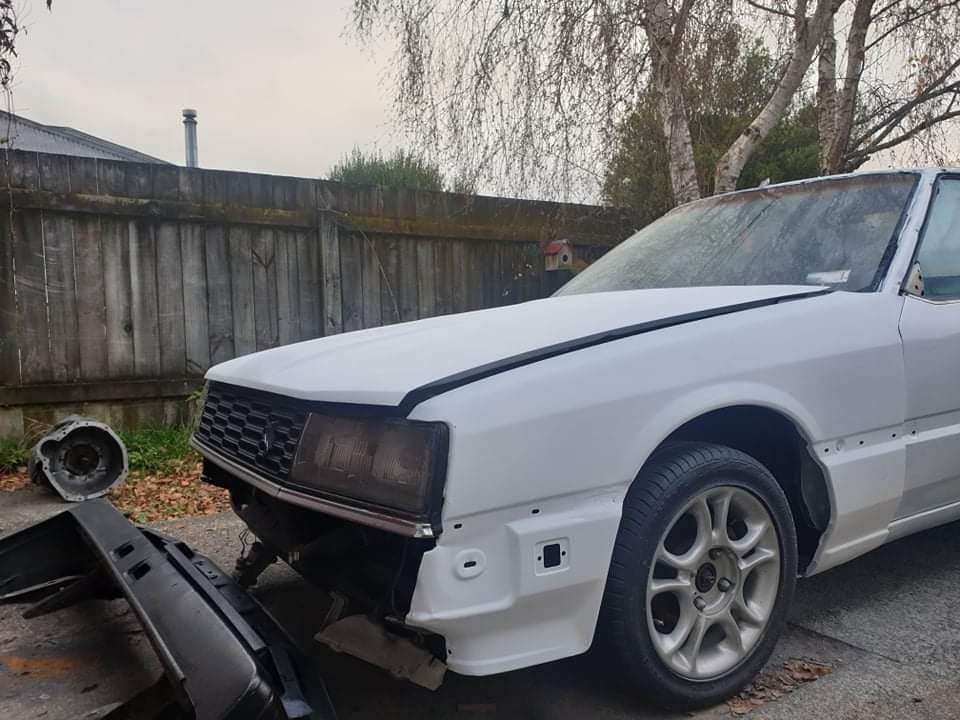
Discussion: https://oldschool.co.nz/index.php?/topic/77978-pediigrus-83-nissan-skyline-coupe-khr30/ Hey all, I'm pretty new around here but I've been in the old skyline scene for awhile. Most people know me for my 1986 Nissan Skyline Passage GT but I have a small habit for collecting hardtops cars as well. Earlier in the year I finally managed to pick up a KHR30 L20ET Coupe which has GT-ES Badges but I believe is actually a GT-EX. As you can see it's had a bit of a hard life so far. Overall it's in average condition. The interior when i got it was half put in with the roof liner ripped and closer than the ground than on the actual roof. When i first picked it up she didn't drive. Would just turn over and never start so I had to trailer it down from Napier to Wellington. The interior wasn't actually in to bad shape although it'll definitely need a proper cleanup in the future. None of he windows worked and the alternator was also cooked. The engine bay was an absolute rats nest of vac lines, loom and coil leads and just overall mess. Who knows what sort of rust is hiding underneath as well. Whilst the intercooler was a nice addition it doesn't help much when the L20et doesn't actually run. The car is an 83 pre-facelift with facelift bumpers on it which don't fit properly so I'll have to find the rest of the facelift parts or fork out the small fortune for an iron mask front end. The plan for the o girl is give her a good old tidy up and fix some of the classic RFB additions that have been made. Just looking at these pictures alone i can see there's going to be a fair wack of rust work that I've got to do, some panel and paint work, and then the engine. I'm planning to keep the L20et in it and rebuild it up for roughly 200hp. Not sure if I'll get there or not yet though. Next steps are stripping it down and find out what sort of rust is hiding under the car and panels and interior. I'll repaint it the factory white and most likely wrap the bottom half of the car silver to make it a bit unique. Hope at least someone finds watching my pain and suffering enjoyable as I strip this thing apart. Discussion: https://oldschool.co.nz/index.php?/topic/77978-pediigrus-83-nissan-skyline-coupe-khr30/
2 points
-
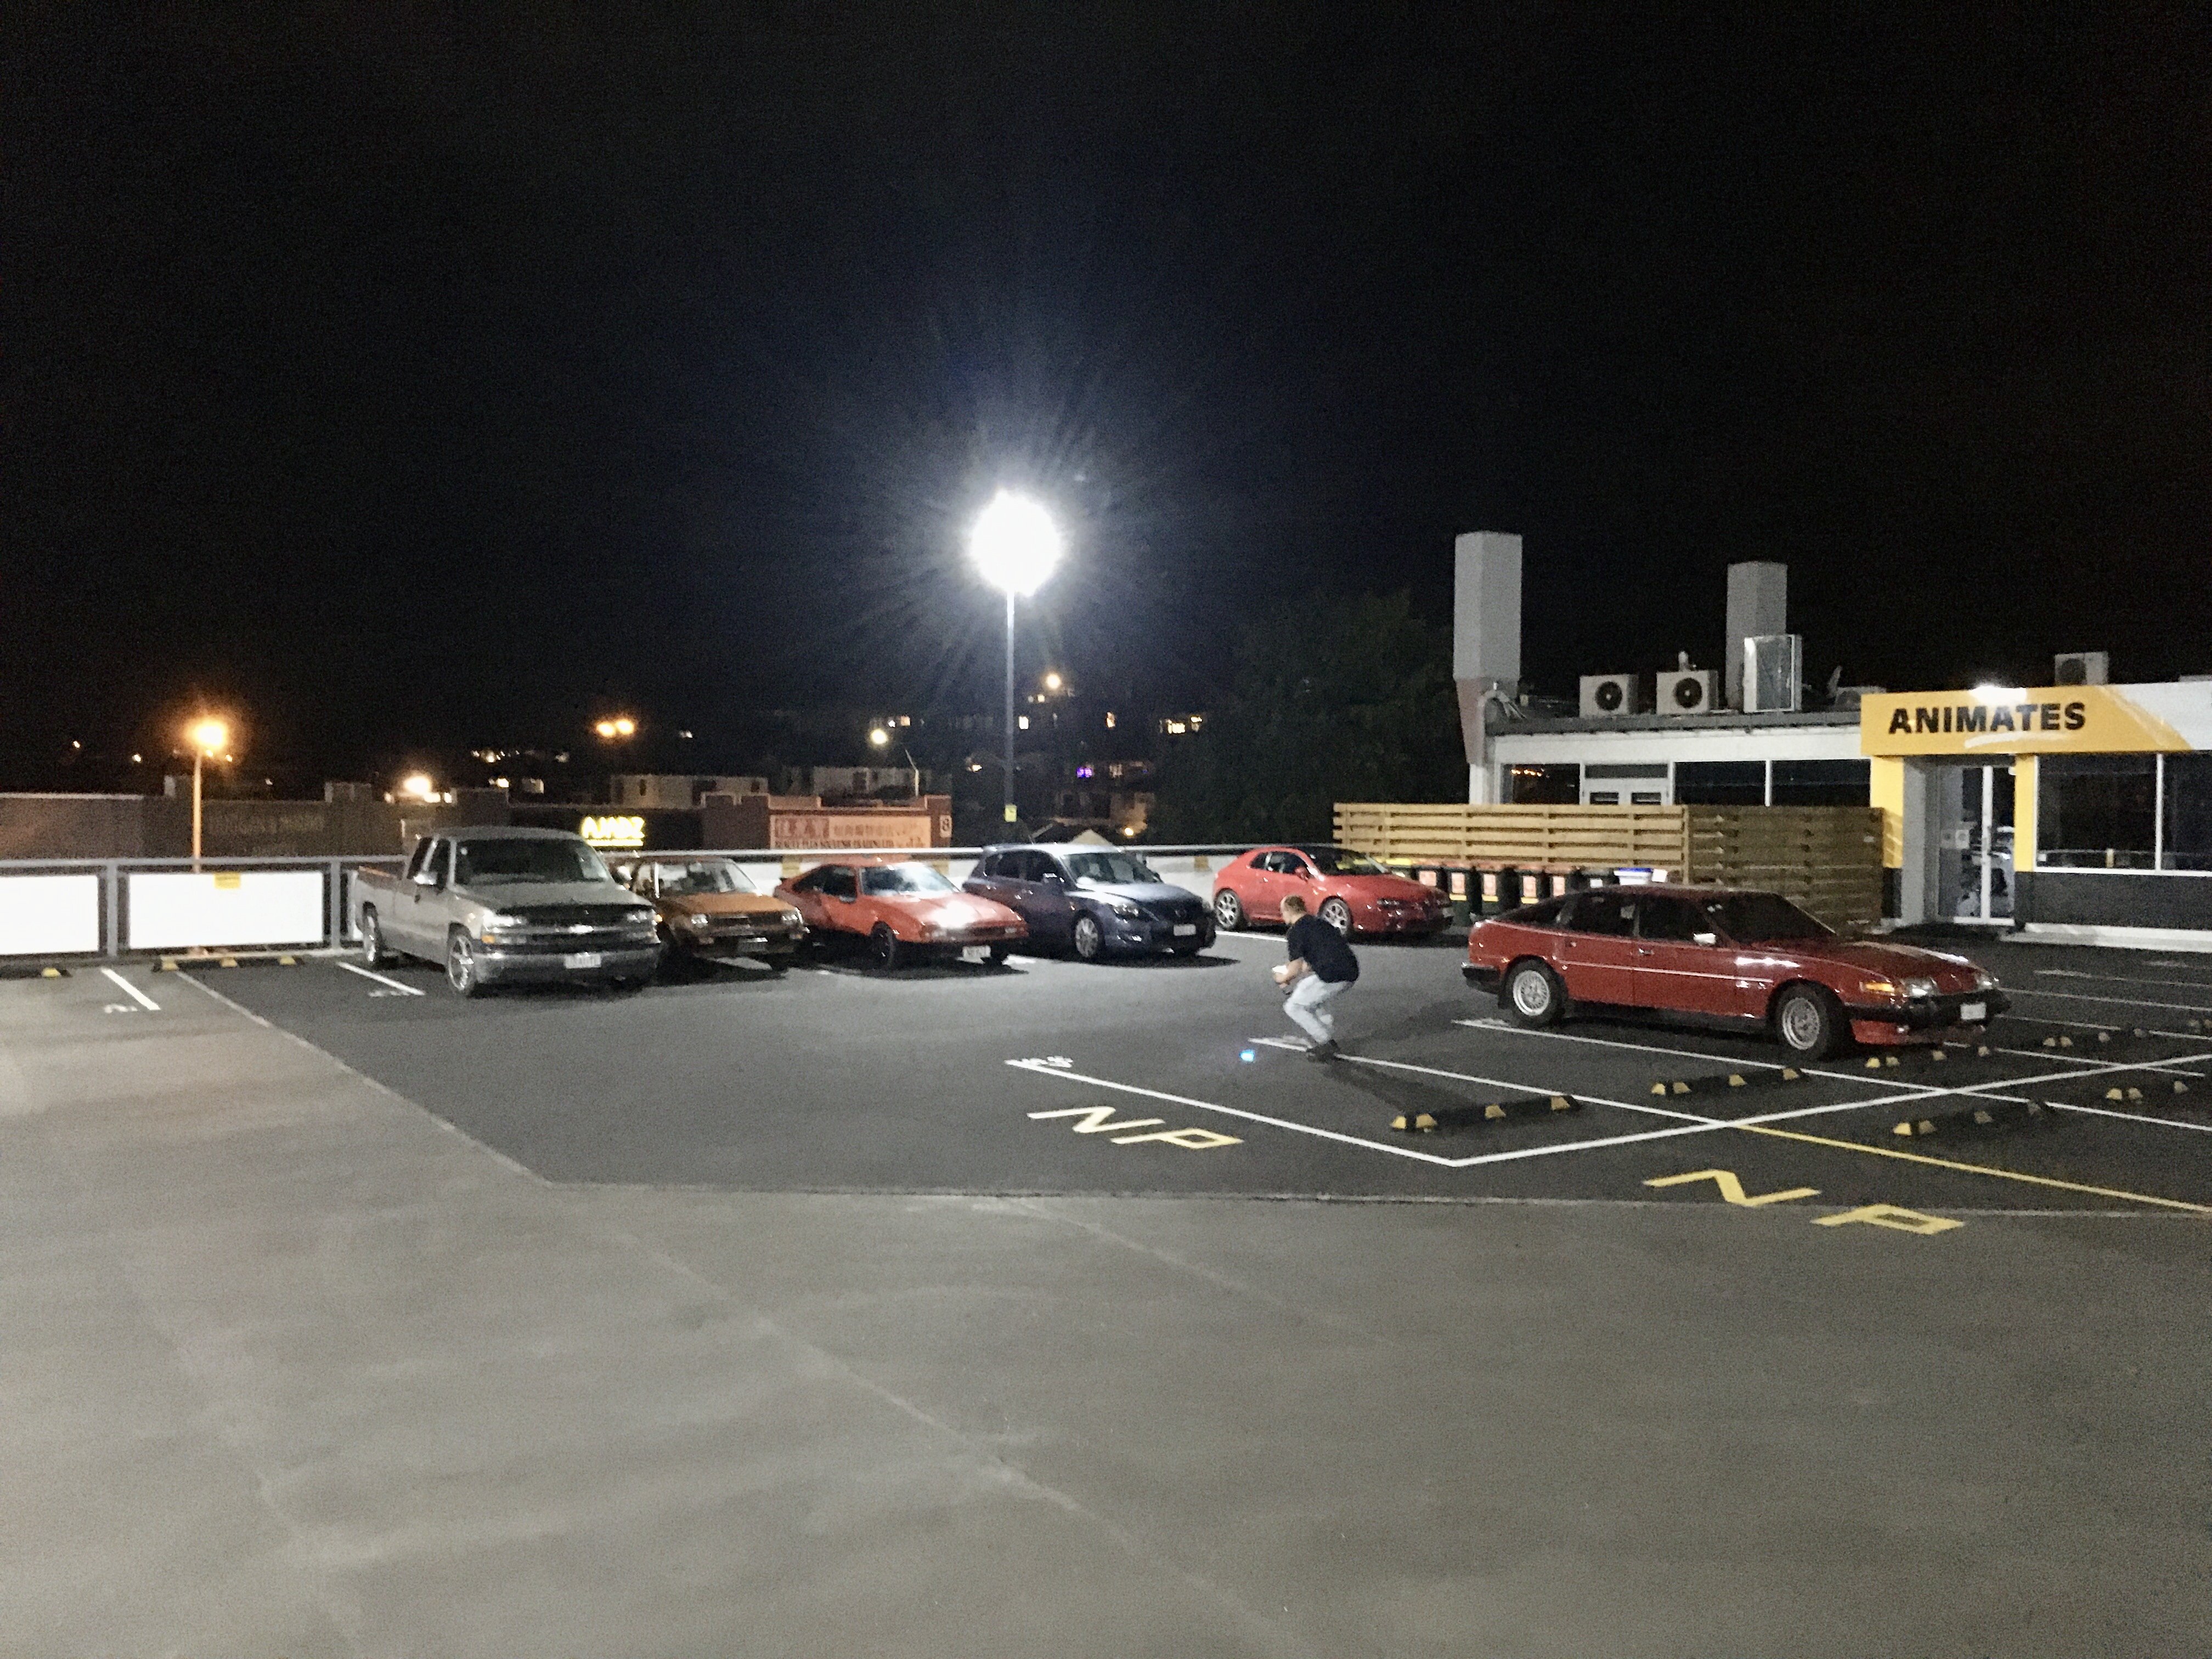
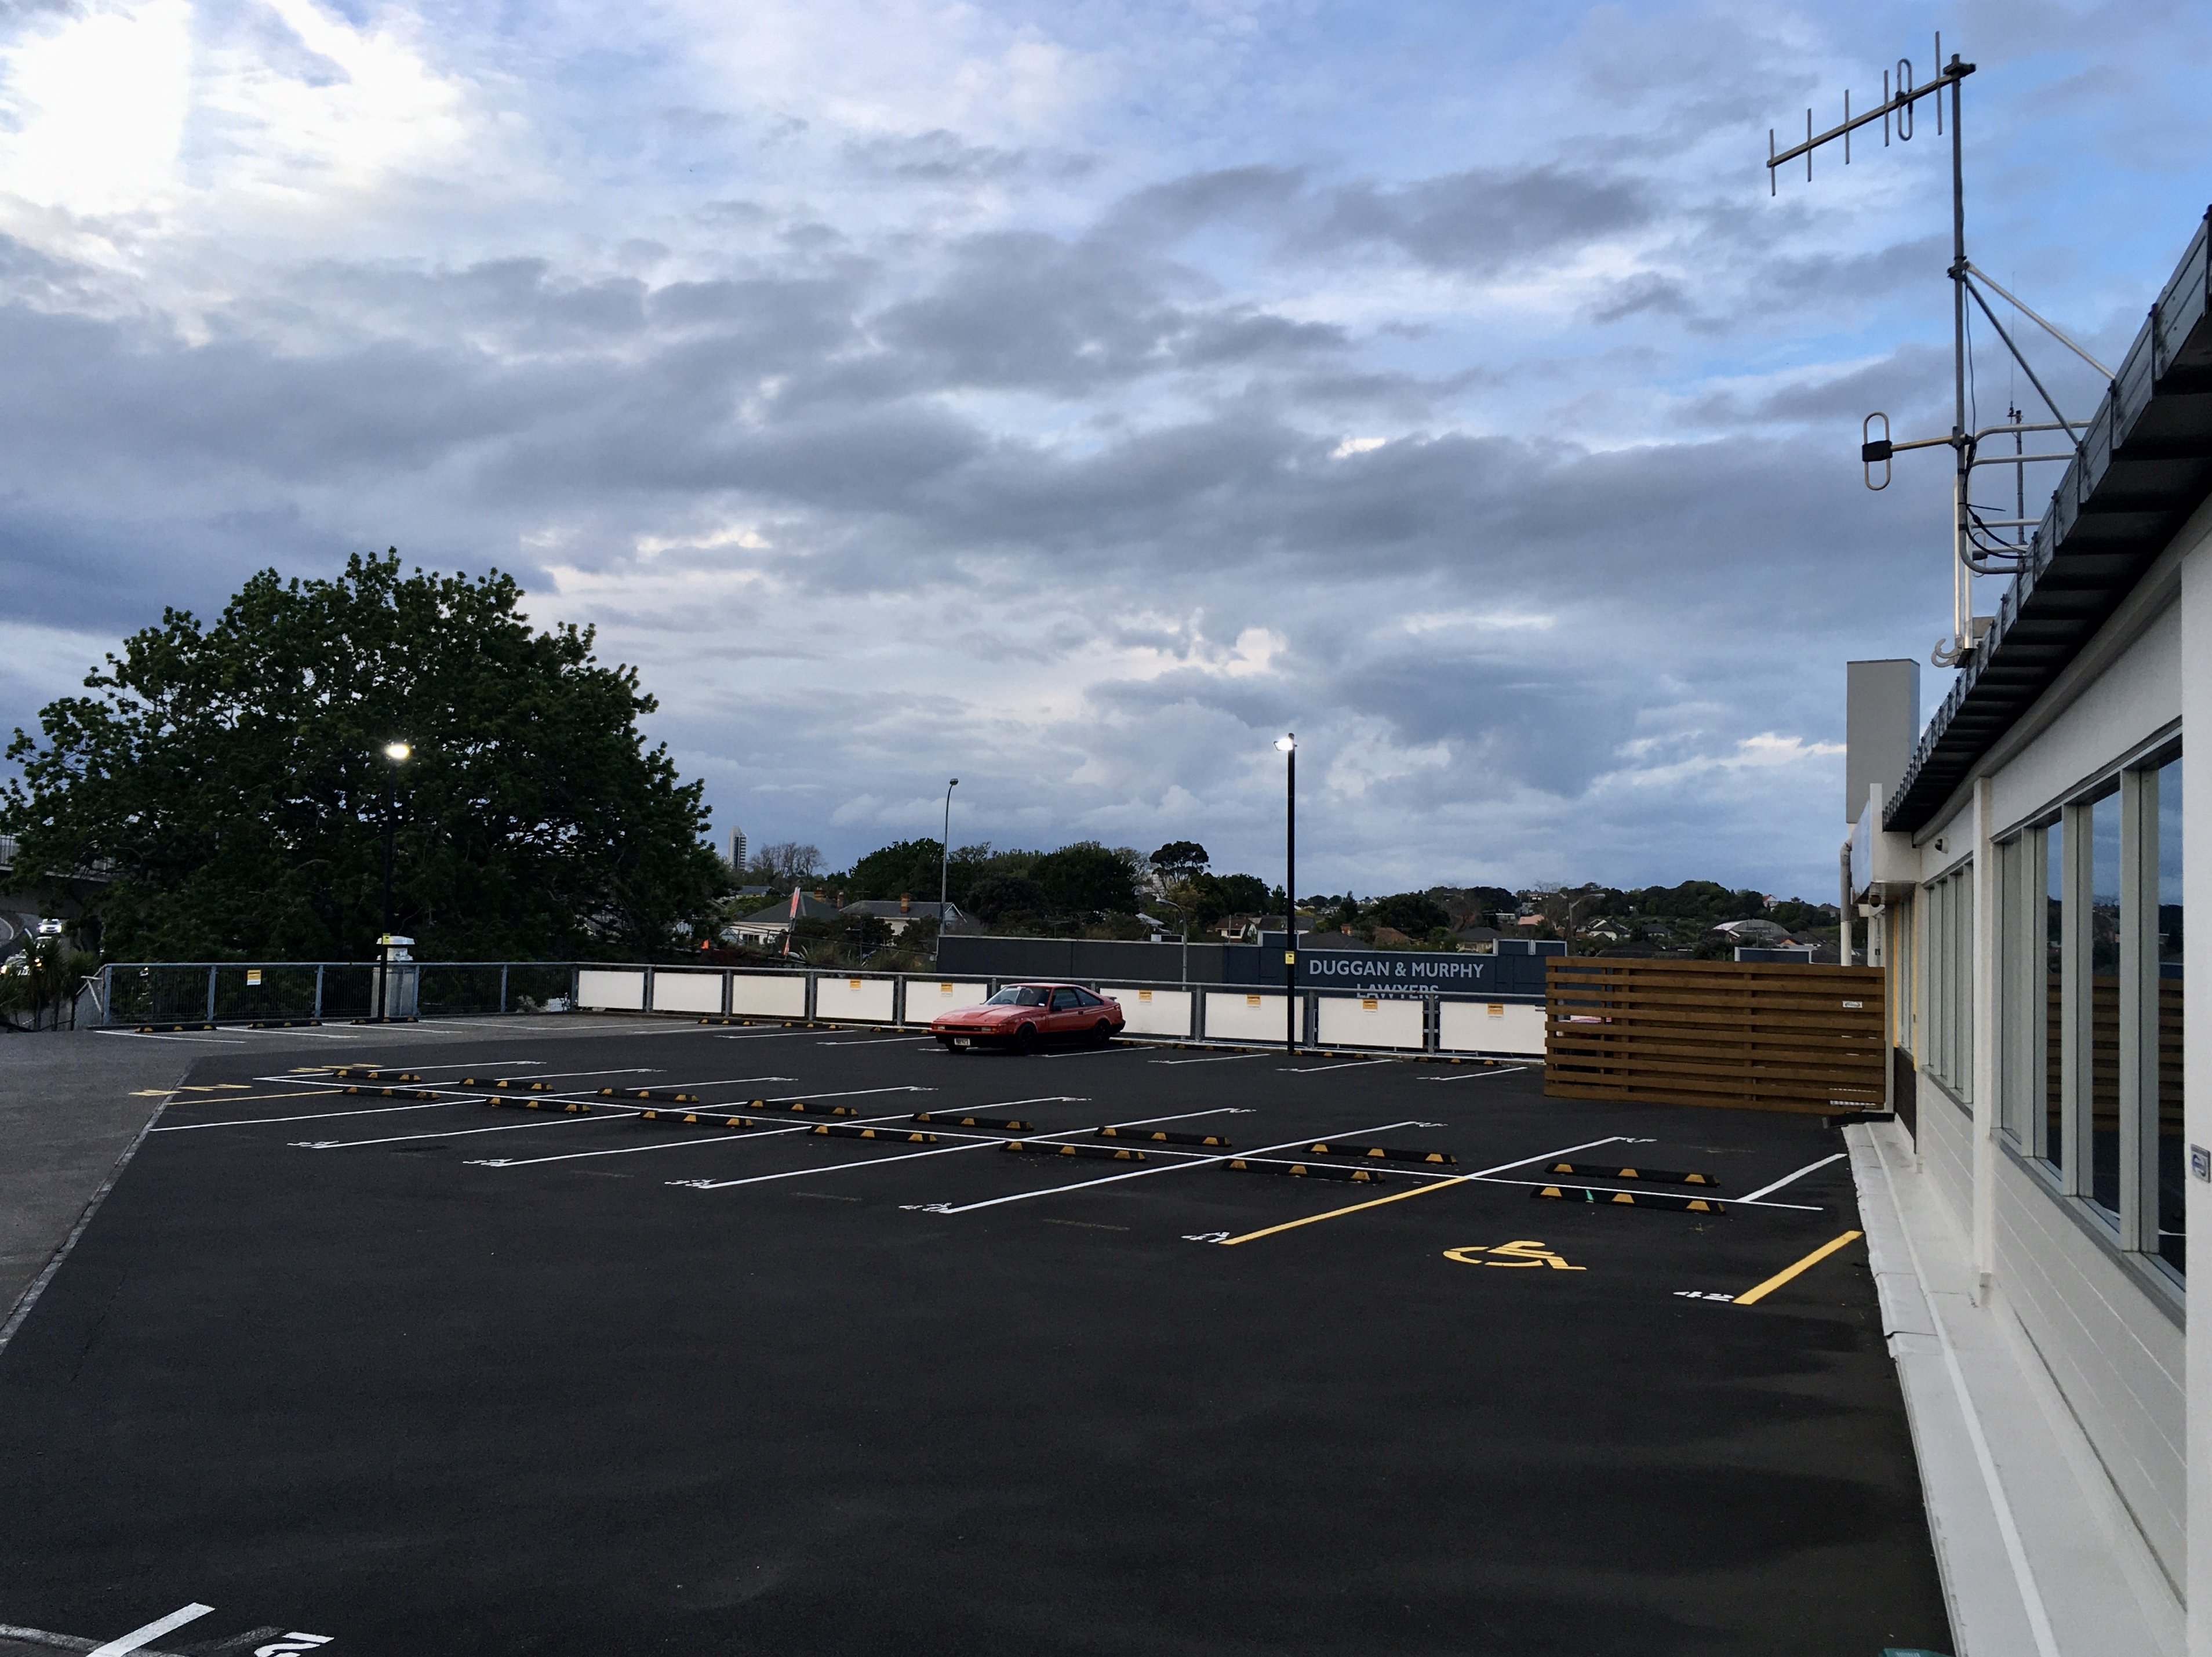
I think "goez hard 4 wot it iz" is a good description for last night Small turnout but great sharns, great burgers and great machines Going to do my best to make it to these more regularly and hope it picks up to it's former glory. Good to know that even if it doesn't pack out it's still a really good night out2 points
-
Hooray! Best result in a while...
2 points
-
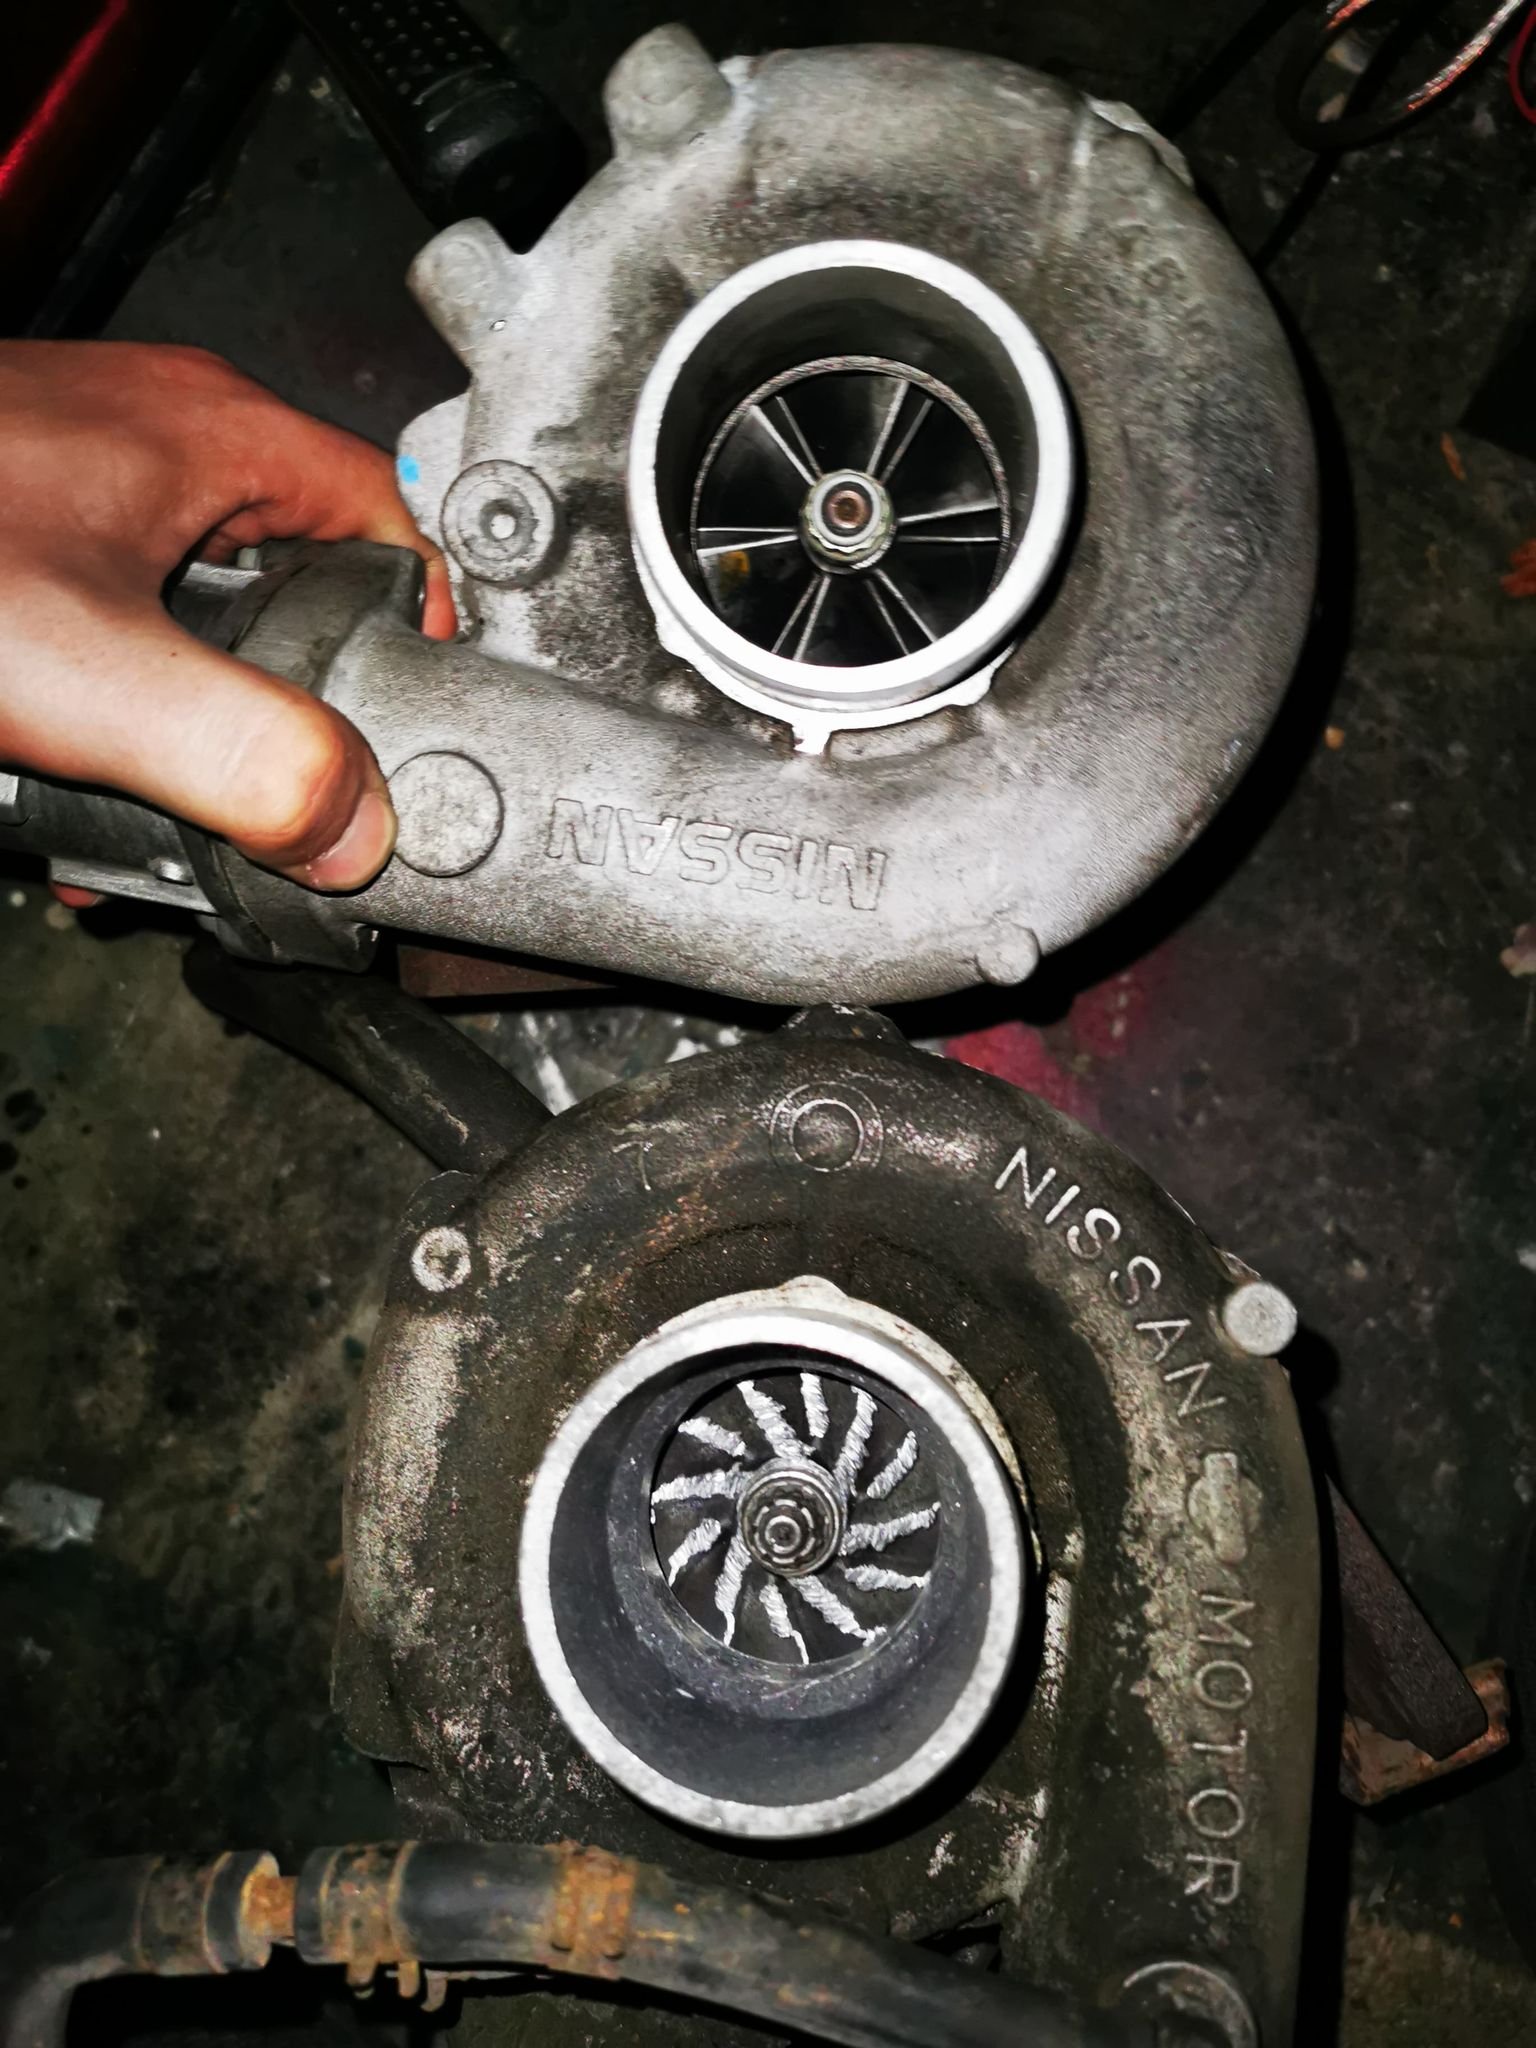
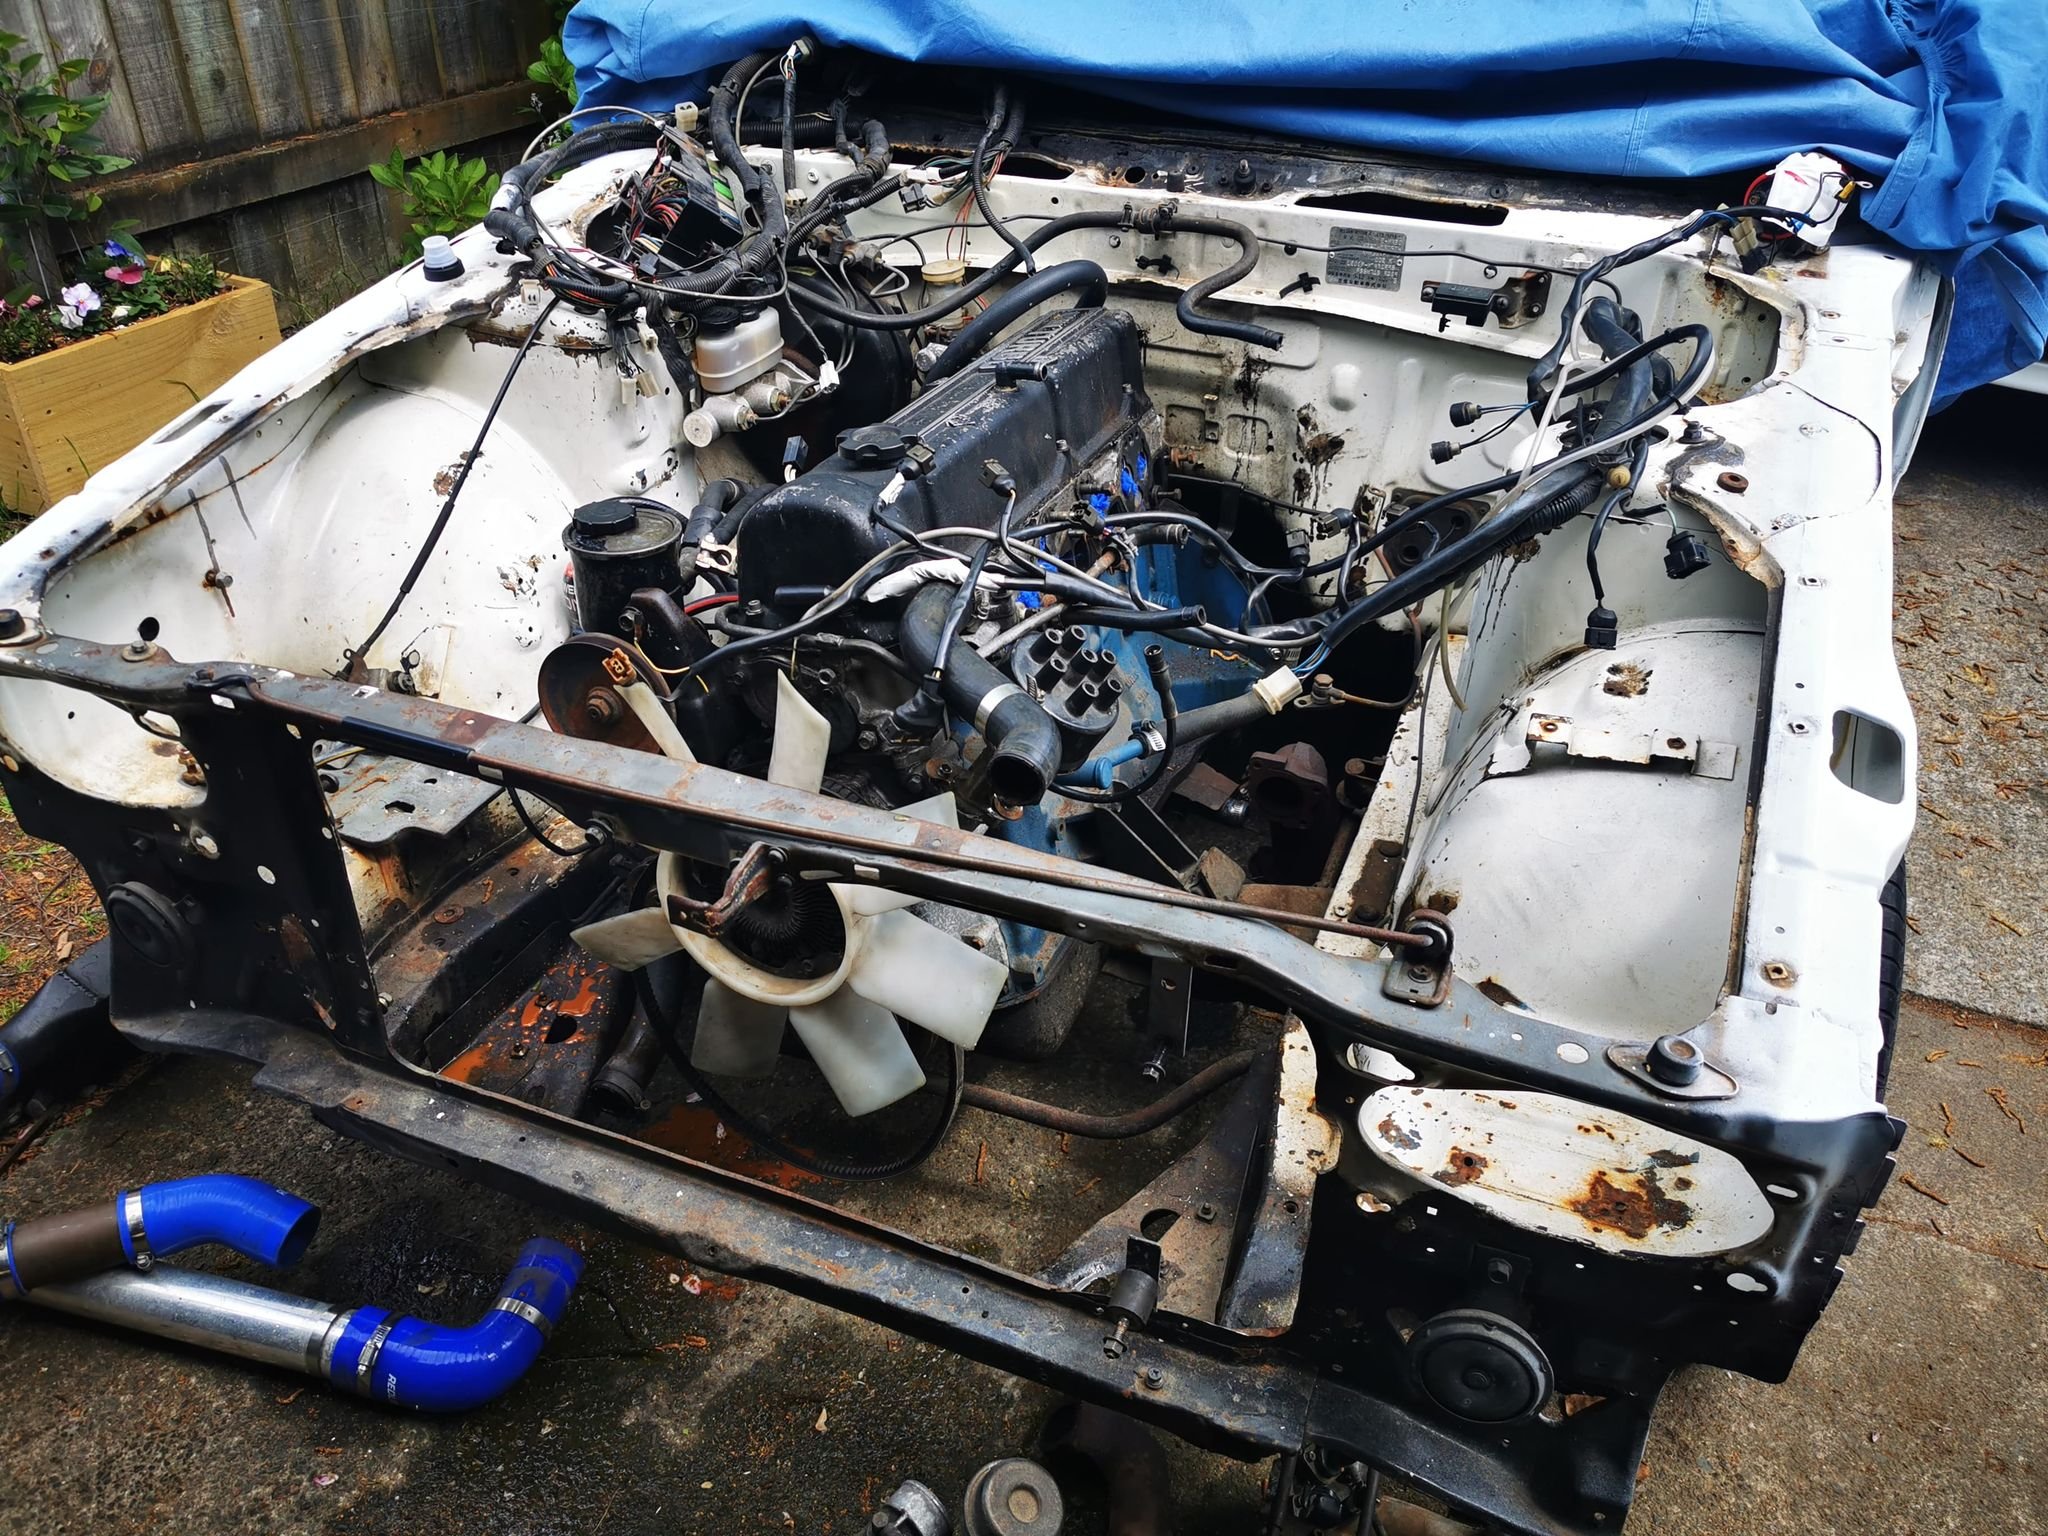
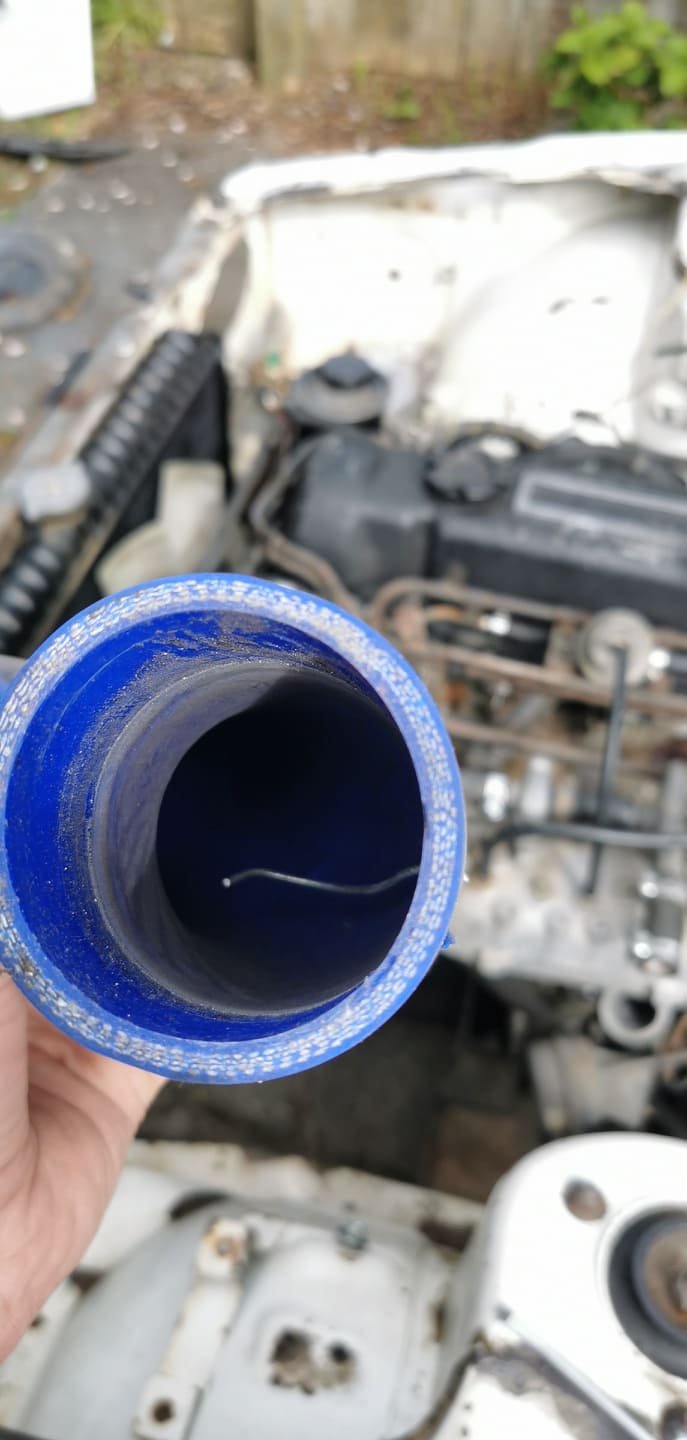
So here we are today. I've pulled mostly everything off the engine. I have the exhaust out and driveshaft out. And I'm planning to remove the gearbox today or tomorrow and then last the engine. I'll repaint the whole bay whilst i have everything out and just give the whole thing a general tidy up. The intercooler piping was horrible and I'm going to be putting in a new front mount intercooler and radiator and tossing up the idea of putting an oil cooler in as well whilst everything is apart. Unfortunately I still don't have access to a garage so keeping track of everything is a bit of a mission. I also worked out why it sounded like a hair drier and I'm surprised it was even making boost. there was a stud missing on the intake manifold and the turbo had pieces of metal all through it and in the intercooler intake piping. Here's a pic of the old l20 turbo versus the new 25det one that is going in. I'm also going to be putting in a new fuel pump at the same time as well as relocating AFM, tightening the AFM spring and putting new injectors in. I'll also be cleaning up the intake manifold and removing the rest of the EGR system that's left. Hopefully the next update will be the engine and transmission out and the bay being prepped for paint and the engine work being done.
2 points
-
2020-10-20_08-24-38 by sheepers, on Flickr 2020-10-20_08-24-30 by sheepers, on Flickr 2020-10-20_08-24-21 by sheepers, on Flickr 2020-10-20_08-24-08 by sheepers, on Flickr2 points
-
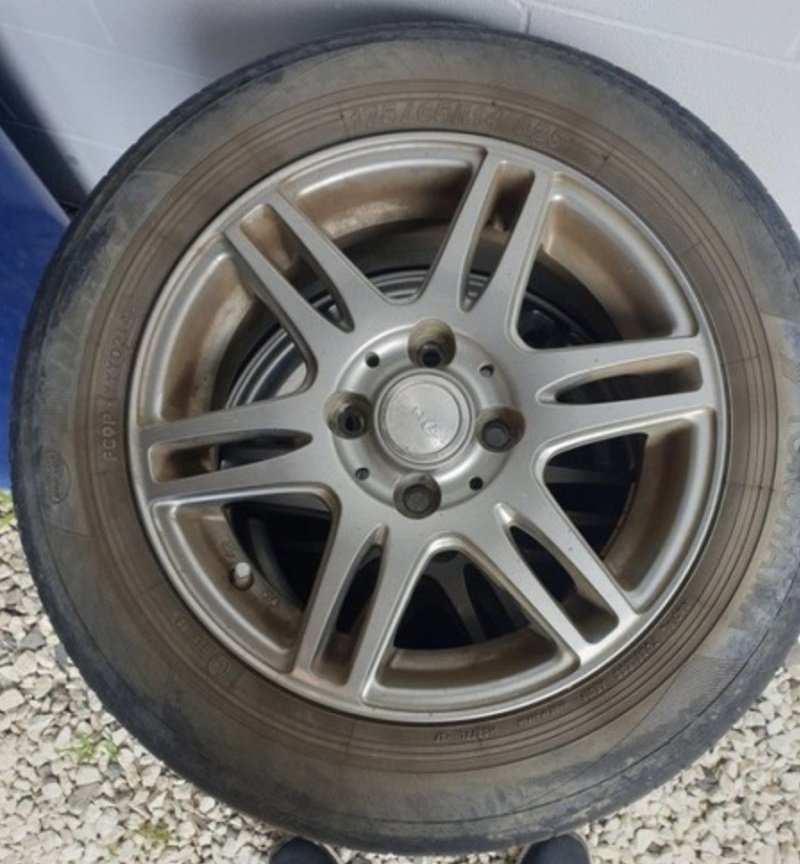
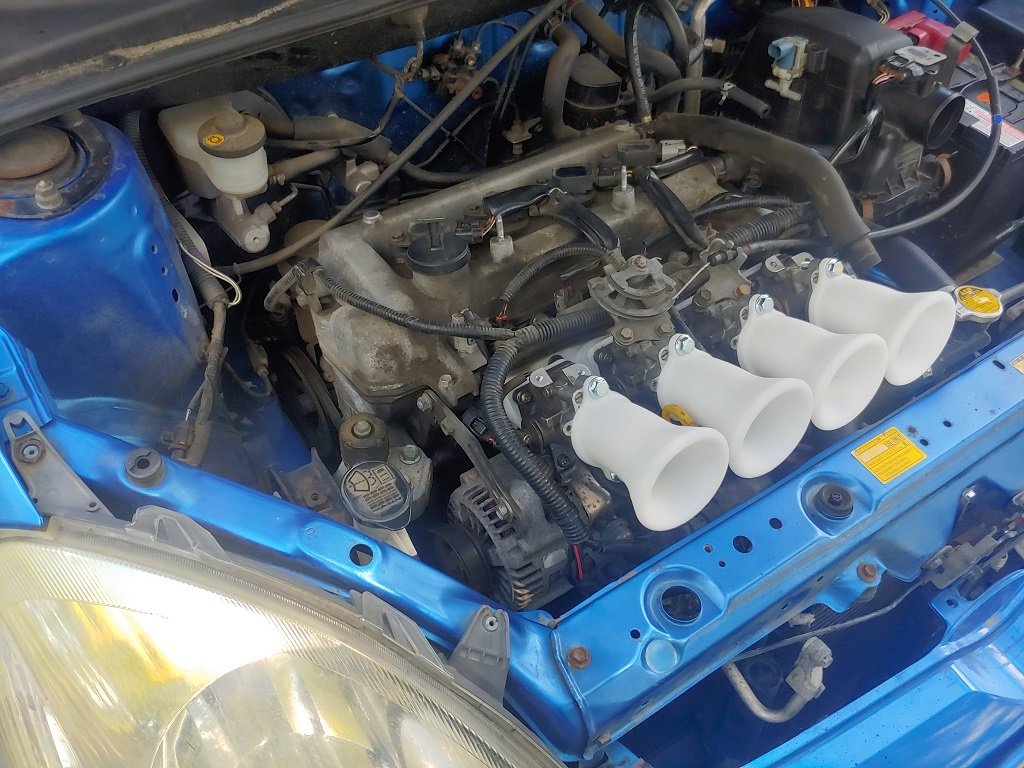
Got some wheels with shitty tyres for cheap 14x5.5, hopefully they're light. I've been working on the tune a bit more and I think I'm about there with the full throttle stuff. Since I'm rev limited I've printed some longer trumpets with correct bolt spacing for Silvertop trumpets. So far so good, will maybe go a little longer again as I've still got a bit of space. I'll reprint the manifold and trumpets in black later on though so they dont stick out like dogs balls in a dirty engine bay haha. Next time I'll carbon wrap the manifold part as although it's survived fine so far I'm still a bit nervous about it breaking. Trumpets will be fine but might make some out of just carbon later on maybe. I ended up smashing a whole heap more ignition timing into it and it's loved it. It's made it way punchier on/off the throttle. It's now lots of fun to drive aggressively, and downshifts are great with a dab of throttle. No knocking on 98 even when it's well past MBT. At cruising because there's so much throttle area and it needs so little hp to trundle along. It felt like the cruising powerband is all stuffed into the tiniest amount of throttle movement with the quads. So to try span this out a bit I've made it run progressively leaner more towards zero throttle and also added a lot more cam advance everywhere at part throttle. This way it likes staying with the throttle a bit more open for the same amount of air coming in, so it's a bit less twitchy. I took it on a drive today to Tokoroa and back for a work trip and got somewhere around 4.6l/100km give or take. Not 100% accurate but it would be within say 10% plus or minus. I've been learning a fair bit by spending some time tuning Alpha N and ITB setup for the first time properly. Its been fun. Firstly doort noises are about 95% dependent on cam overlap. More overlap = more noise pretty much! Retard the came and doorts go away. I think this explains why some people have fitted ITB and been disappointed by the lack of noise from them. It's a remarkable difference, especially at part throttle. Its also been interesting observing how ignition timing and cam timing both seem to work together more than I expected. I guess if you have conservative ignition timing, the gas is still expanding when it's being pushed out of the exhaust and lingering in the cyl. So if you have cam overlap it's going to try push out the intake as well. So it limits the amount of fresh air that can come in. But then if you advance the ignition timing, you get this happening less. So you can have more overlap without downsides. And god, isnt this thread just awful without any doort noises to go with it. Will get onto it haha
2 points
-
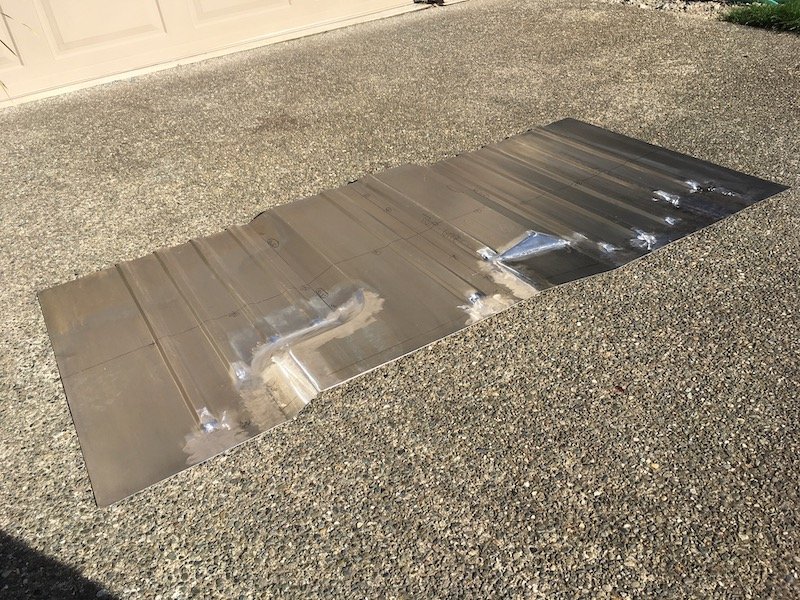
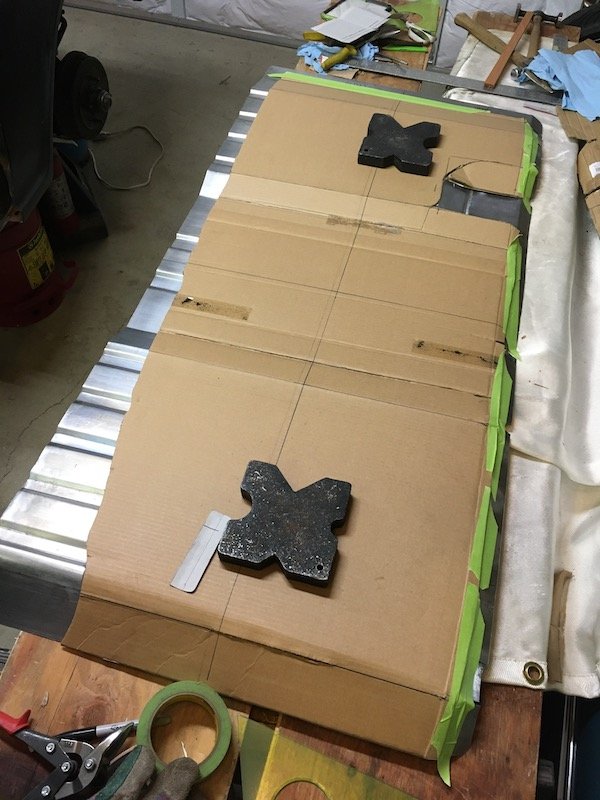
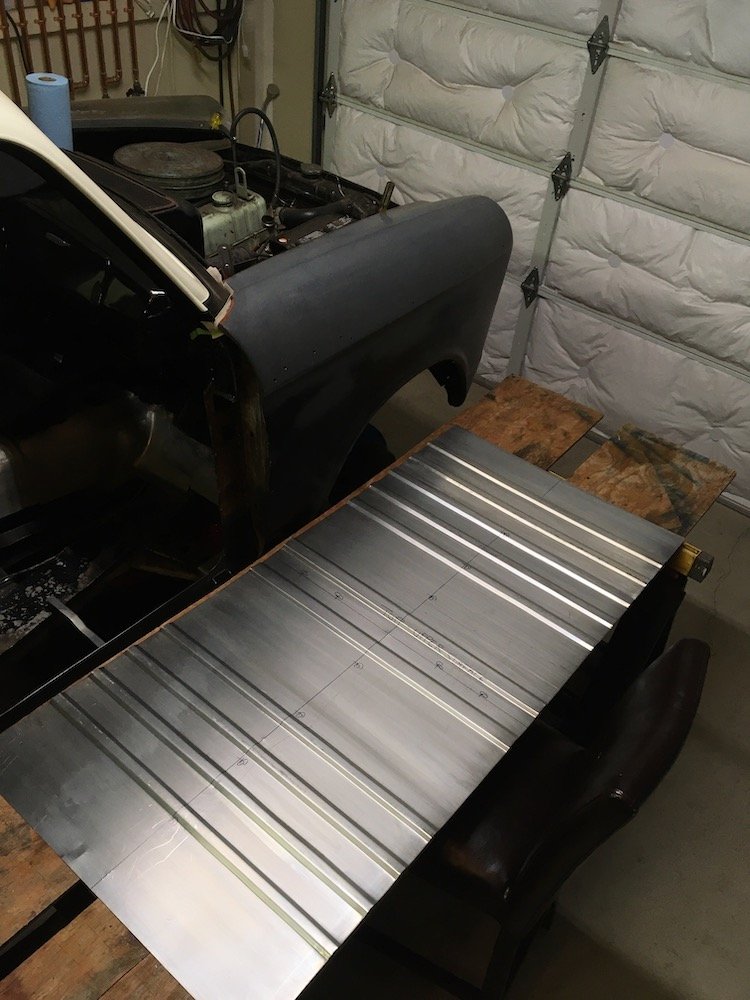
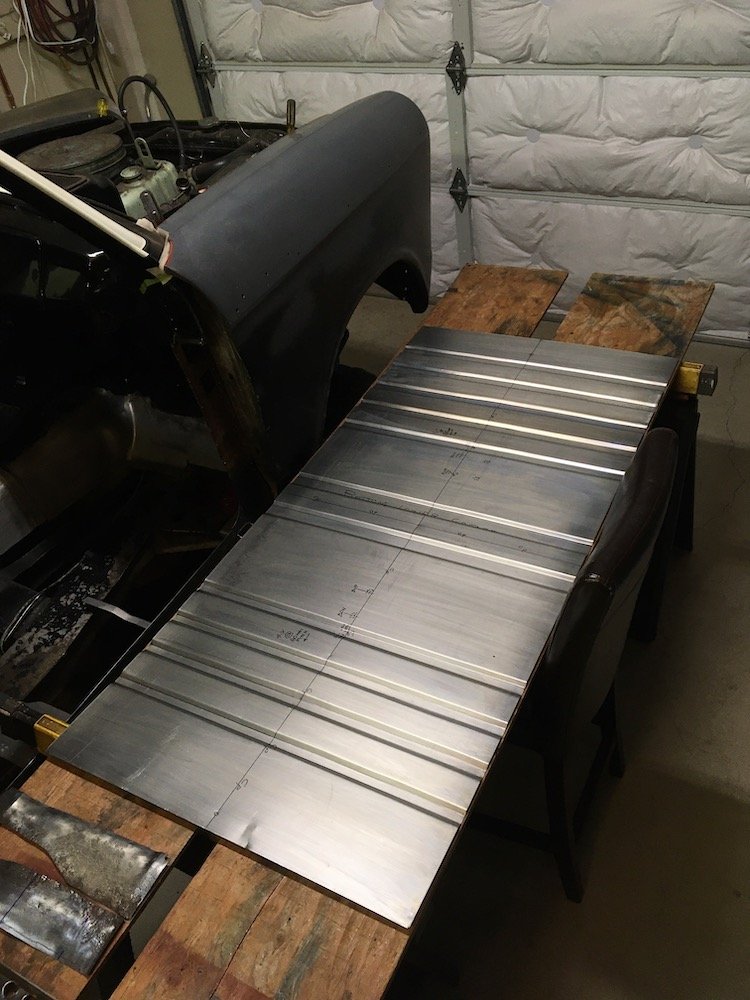
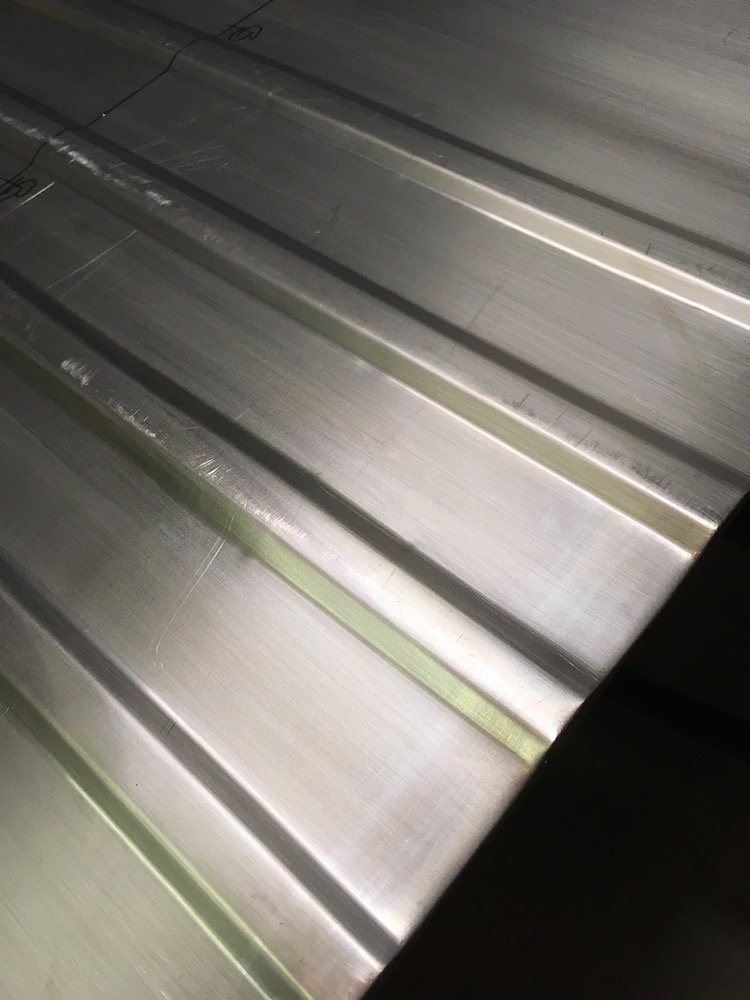
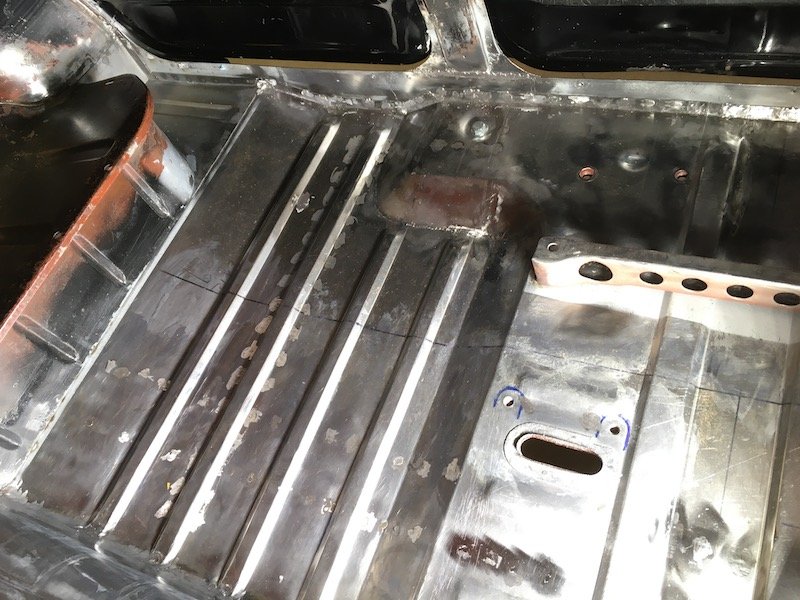
Building the 1961 Datsun 310 Bluebird - RHS floorpan fabrication started. Made some more custom corrugated floorpan tin last weekend. Started fab work on the RHS floorpan. It's a scratch build like everything else, Started with a 26 by 56 inch 20g blank sheet providing excess material all around as with the LHS. Bead rolled it to duplicate the original Datsun Bluebird 310 pattern. Two wide beads in the center underneath the front seat, five beads in the front footwell spaced at an 80mm pitch and four beads in the rear footwell again spaced at 80mm pitch. Eleven beads total. Takes two separate offset beads to combine and make one full bead. Three progressive runs for each formed offset. That's a total of 66 runs through the bead roller machine. Oh, and three people to support and guide the blank, me and two patient family volunteers. Upper side. Underside. I'm trying to improve it over the LHS floorpan build. I used a different set of dies compared to the previously completed LHS pan to more closely match the factory formed fillet radii. Used these rounded tipping dies in an offset mode instead of joggle dies. Offset the rounded dies like this just not quite that deep. Ran the blank through the machine in three progressively deeper steps for each half of an offset or large joggle type bead. Instead of using these joggle dies (below), as used on the LHS pan. The joggle dies have too small of edge radii, which tend to leave knife edge indentations in the metal. Results were a near perfect match to the original factory formed stiffening beads in shape, depth and locations. What i used to take some of my measurements from after scraping the old underseal off. Bottom side was used for measuring, using a flexible tailor's tape, since the top side is too heavily cratered. Discussion: https://oldschool.co.nz/index.php?/topic/60267-marts-pl310-61-datsun-bluebird-sedan/ Build: https://oldschool.co.nz/index.php?/topic/60264-marts-pl310-61-datsun-bluebird-sedan/
2 points
-
So I took a week or so off work going into level 3 lock down. Yay, get heaps done! Well nah, a lack of motivation turned up, kicked me in the dick and wasted most of my time off staring blankly at all of the things in the garage and around the house that needed attention. anyway I managed to get some things done all be it at a snails pace Up on stands so I can get all the rear end fab done. Will probably make rear section of the exhaust while I’m there and get the fuel tank made and installed. back to work tonight so I’ll bugger around and get the laser cutting drawings sent off to hopefully collect in around a weeks time. Hopefully it all goes together quickly. wiring man is happy to use stock ecu and engine loom so this will keep costs down. also scored bucket seats and harnesses for a steal so stoked about that2 points
-
lockdown has kept me busy. Transferred all the suspension from 1vaknd Kp across to the hack rack pushed foward 24mm, drivers mount moved in to better accommodate the 3s engine mounts (solid) Ke70 rack and pinion fitted to the Kp housing and trimmed the rack side flanges for boot clearance need to re build inner tubs for clearance building clearance for max low and can adjust height according to spring rates and travel Waiting for laser cutters to open up so I can get the upper link mounts cut and finalise the driveshaft tunnel So many wires, sorting loom arrangement so it can be all sent away and made to work, gearbox tunnel and firewall waiting on sheet metal to complete2 points
-
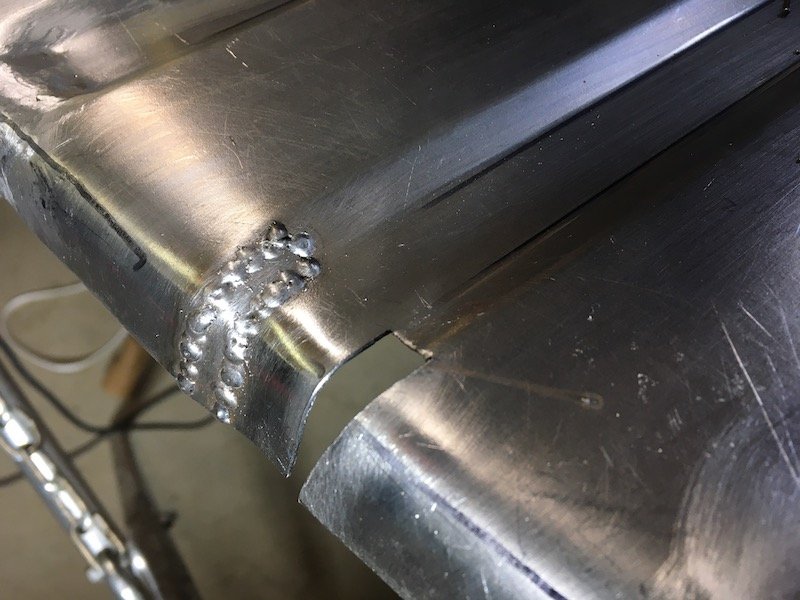
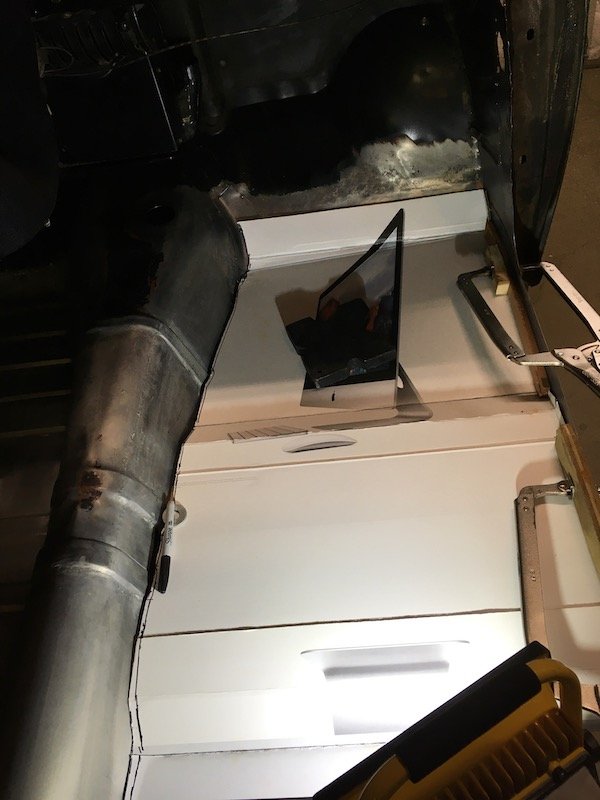
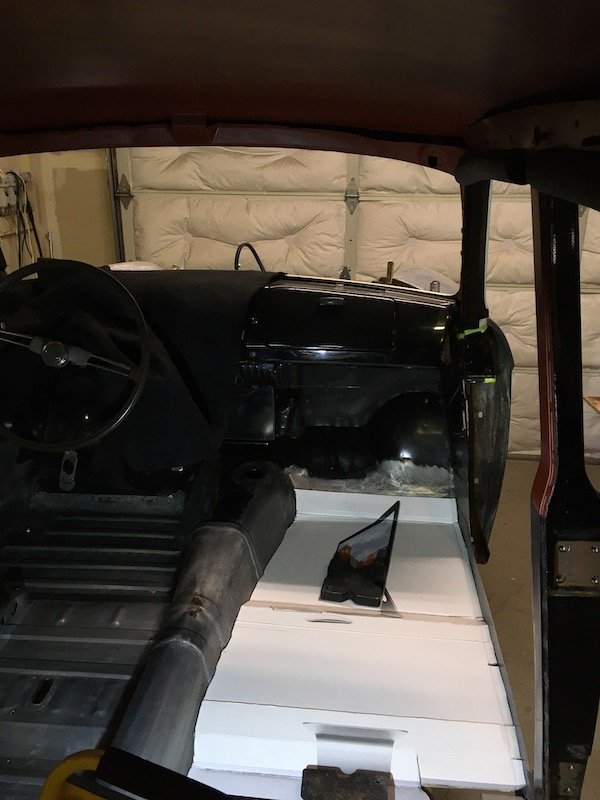
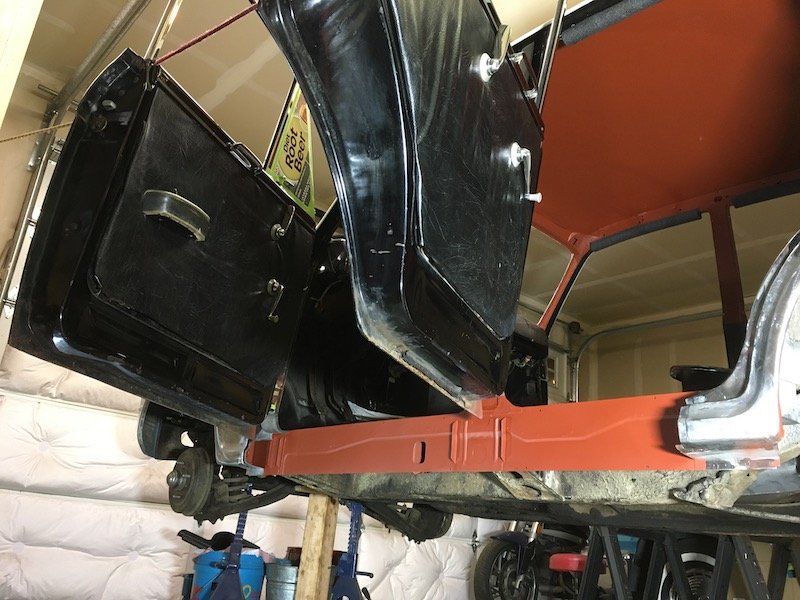
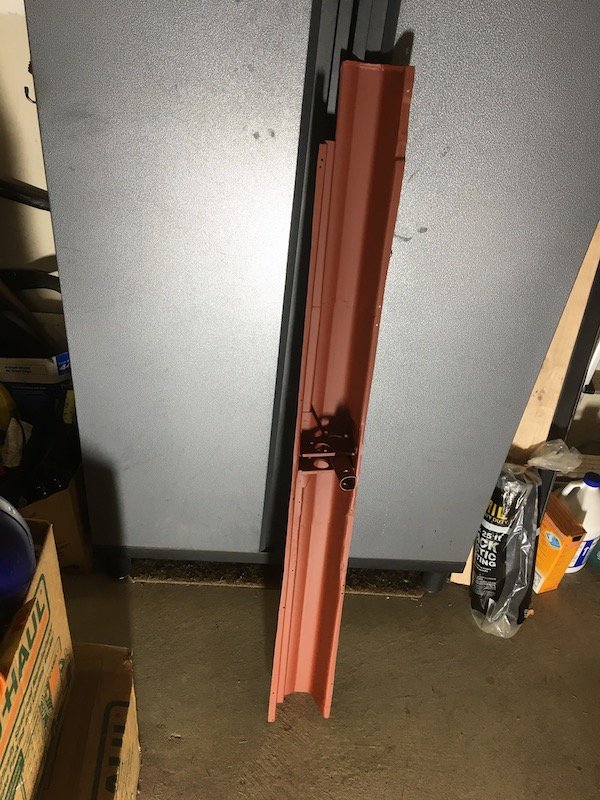
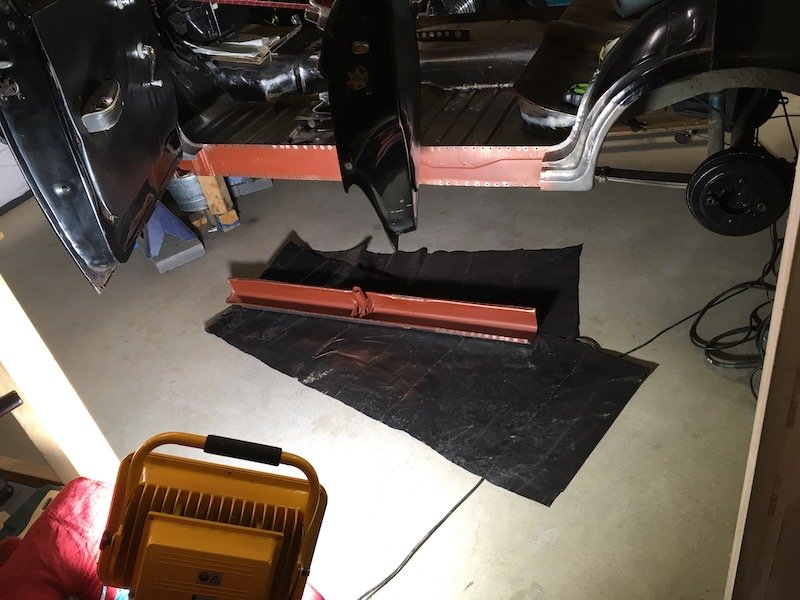
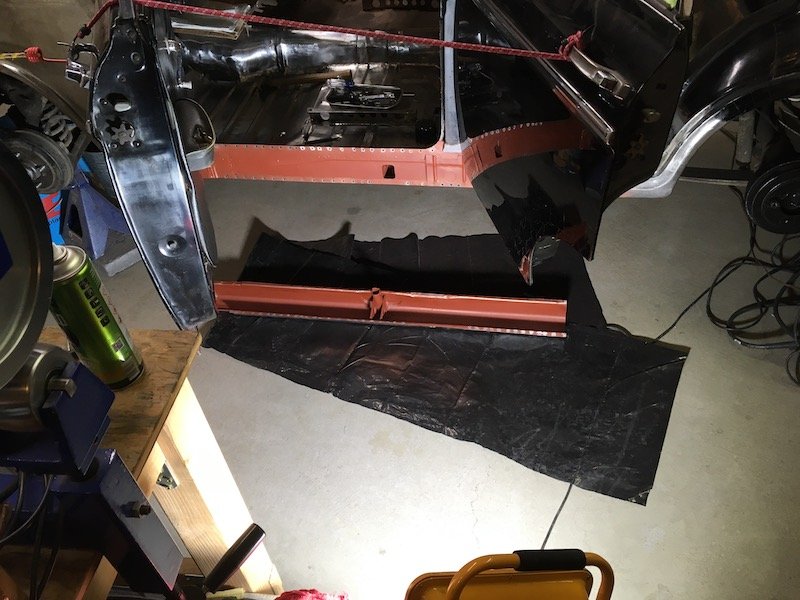
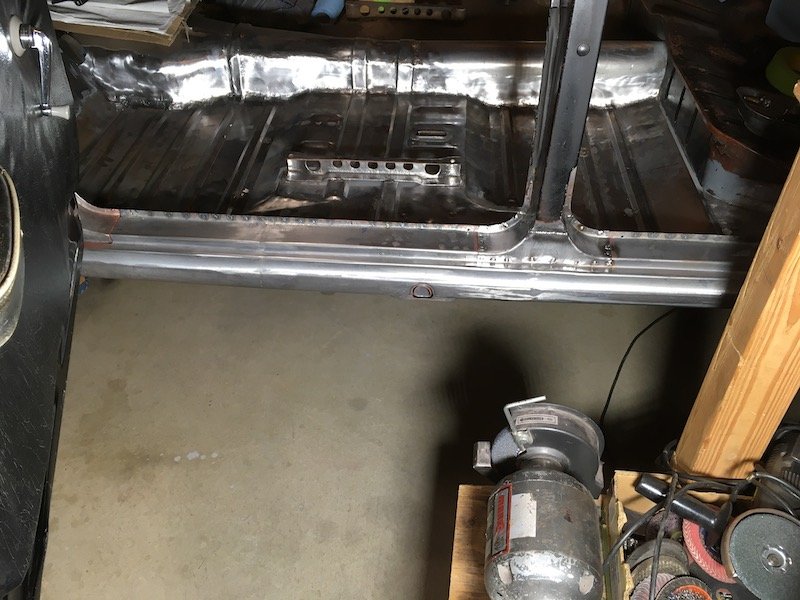
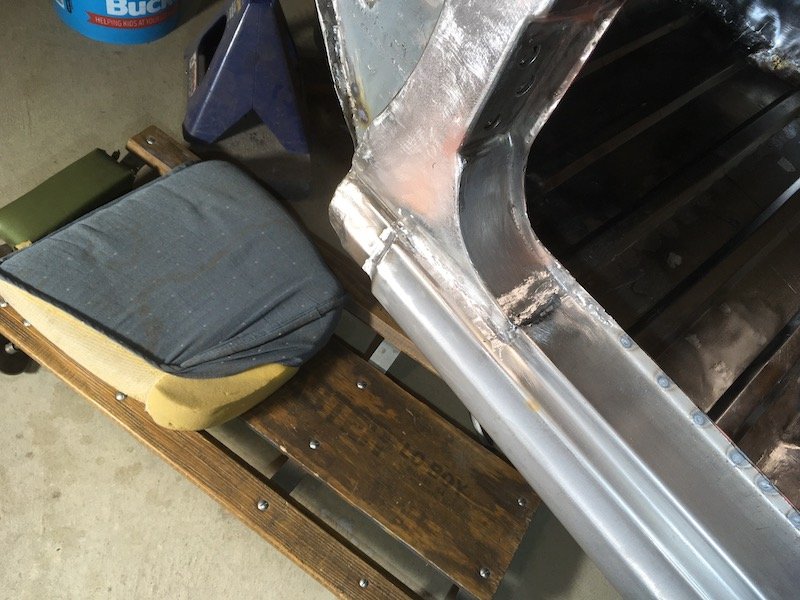
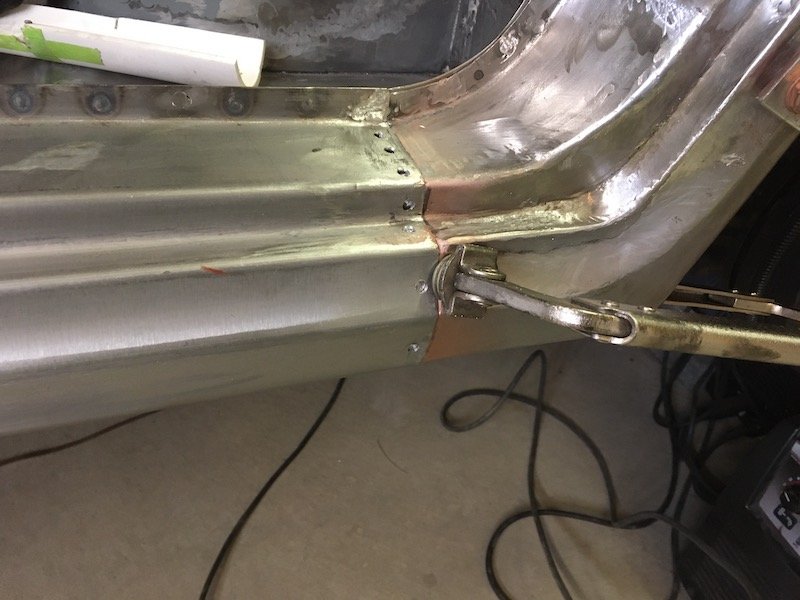
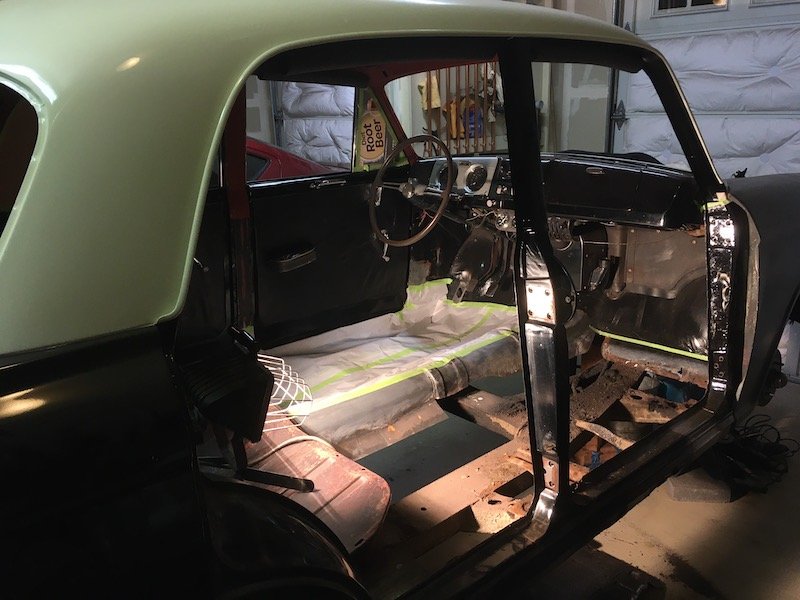
Building the 1961 Datsun 310 Bluebird - Painting the insides of the inner and outer sill and welding them into the car. Metal cleaned, etched and zinc oxide conditioned. Epoxy primed inner sill. Epoxy primed outer sill. Ready for plug welding. Doors getting in the way. I'd left them on for keeping a check on fit and gaps. . Made dozens of plug welds to attach inner and outer sill together and then went to work on the B pillar base and ends of sill. It's always a lot of fun to weld stuff shooting the wire feed straight up while laying on your back. Clamp and weld the aft end. Clamped it up and welded. A little rough but eventually cleaned up nice. Pinned it underneath at the body jack pipe to support bracket with a solid 3/8 inch rod. Maxed out the MIG power and wire feed and made eight ugly fat tacks then ground smooth. Shaping up with lots of now permanently attached and shiny metal, It has way more corrosion protection on the insides than original. A stark contrast to the right side now. Discussion: https://oldschool.co.nz/index.php?/topic/60267-marts-pl310-61-datsun-bluebird-sedan/ Build: https://oldschool.co.nz/index.php?/topic/60264-marts-pl310-61-datsun-bluebird-sedan/
2 points
-
Good to see everyone.1 point
-
@Kiwibirdman1 point
-
I used to have an 86 Mustang that had a bit of work done and it was a real weapon. I'll see if I can dig out the specs I had of it, but basically it had edelbrock aluminium heads, good flowing exhausts, 5 spd and 4:11 gears.1 point
-
Definitely. The ends of the wing will need a little love and repair but I'm planning to put it back on afterwards. I also have some R31 endcaps that look the part and fit pretty well so they'll go on as well after I've painted everything. When I pulled of the intake piping, I found pieces of metal wiring all through the turbo and intake, then on the pressurized side before the intercooler i found this jammed in the side. I have no idea how or when this got in there but it must have been before i got the car. Explains why it would boost at around 4500 though I'm surprised it boosted at all. The turbo sounded like a hair drier when it was on boost and that explains why.
1 point
-
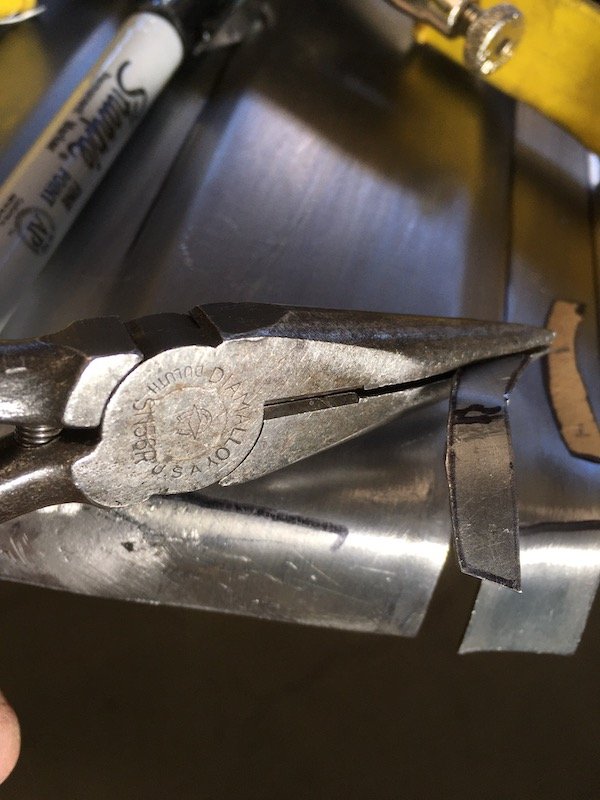
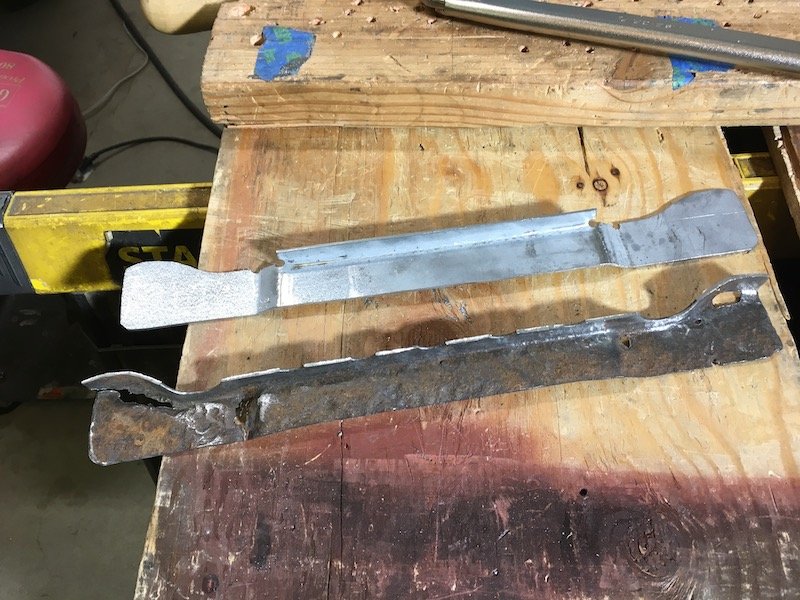
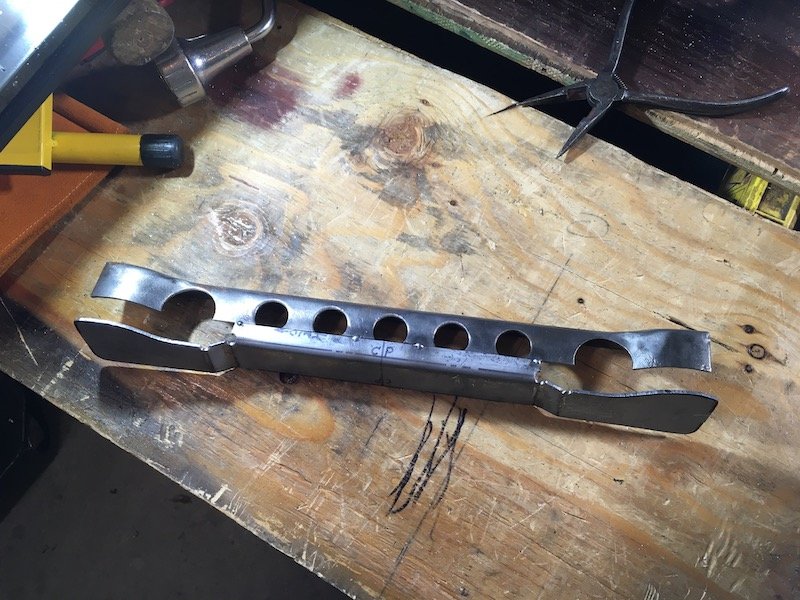
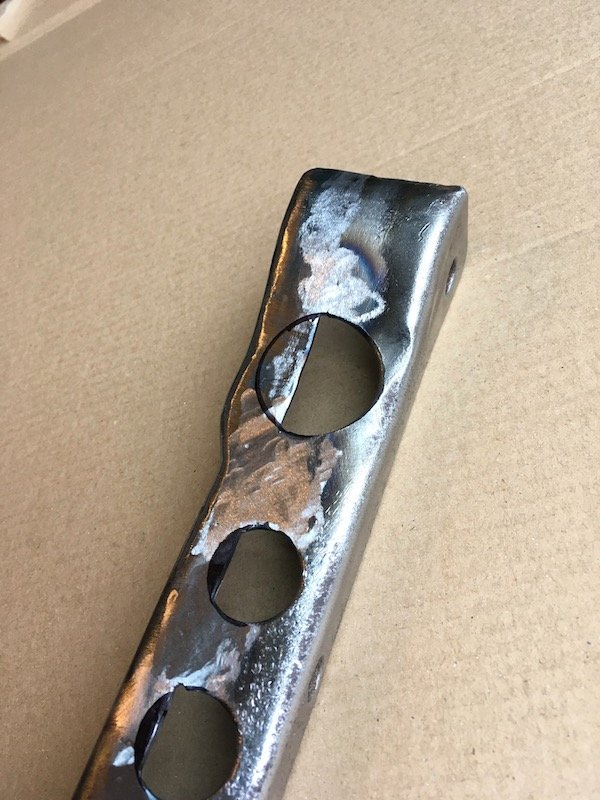
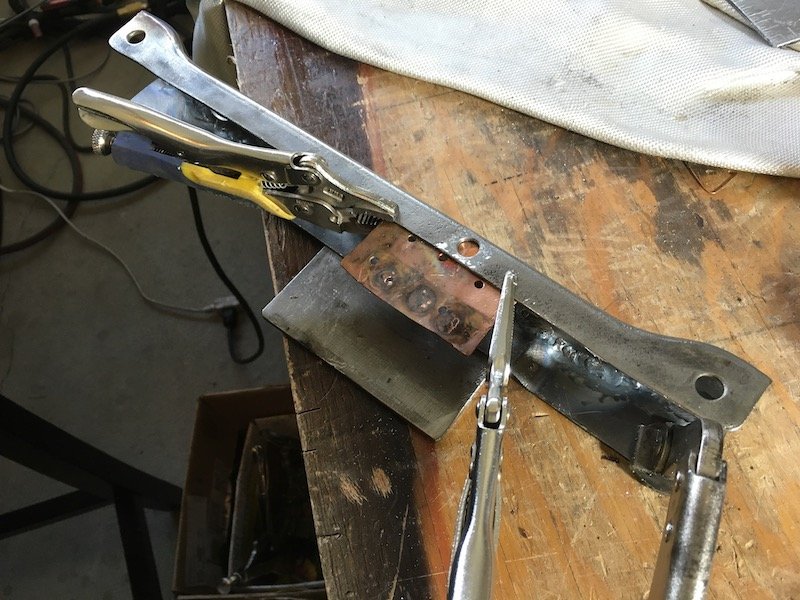
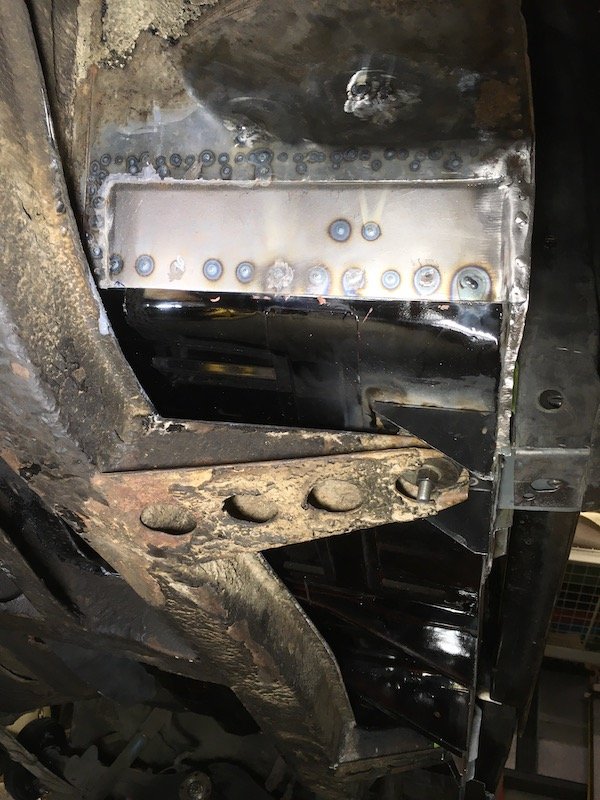
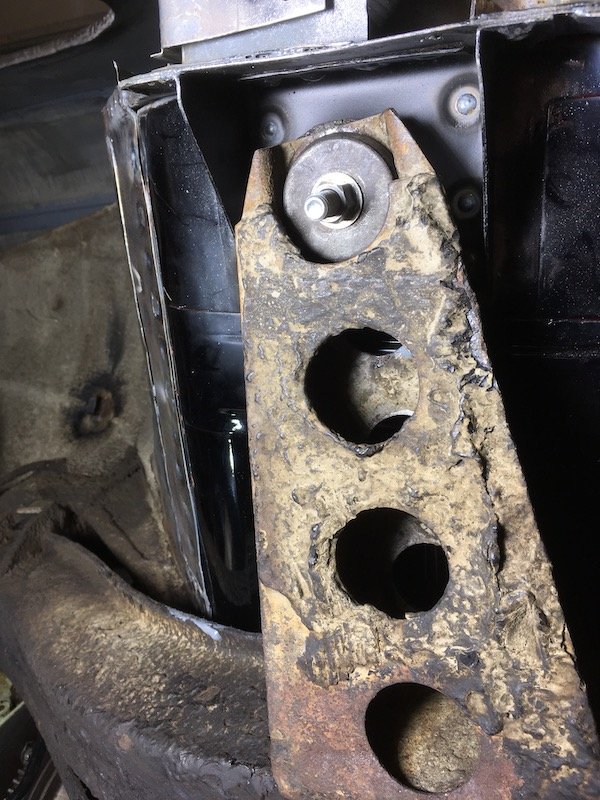
Tonight's tool tip. Clamp a piece of wood to your work to act as a sacrificial guide when using a hole saw on metal. You can also use the air duster through the vents on the drill to cool it off quicker when the smoke comes out and its too hot to hold. You always hear AvE complaining about modern tools shutting off with thermal overloads....well this Ryobi just keeps going until the brush holders melt right out of her Keep yer dick in a vice1 point
-
And here I was getting worried I was gonna be late...
1 point
-
Nice. I hope you've still got that rear spoiler to put back on? It's definitely worthwhile. Keep at it.1 point
-
Looks to be shaping up well, great job keep at it!1 point
-
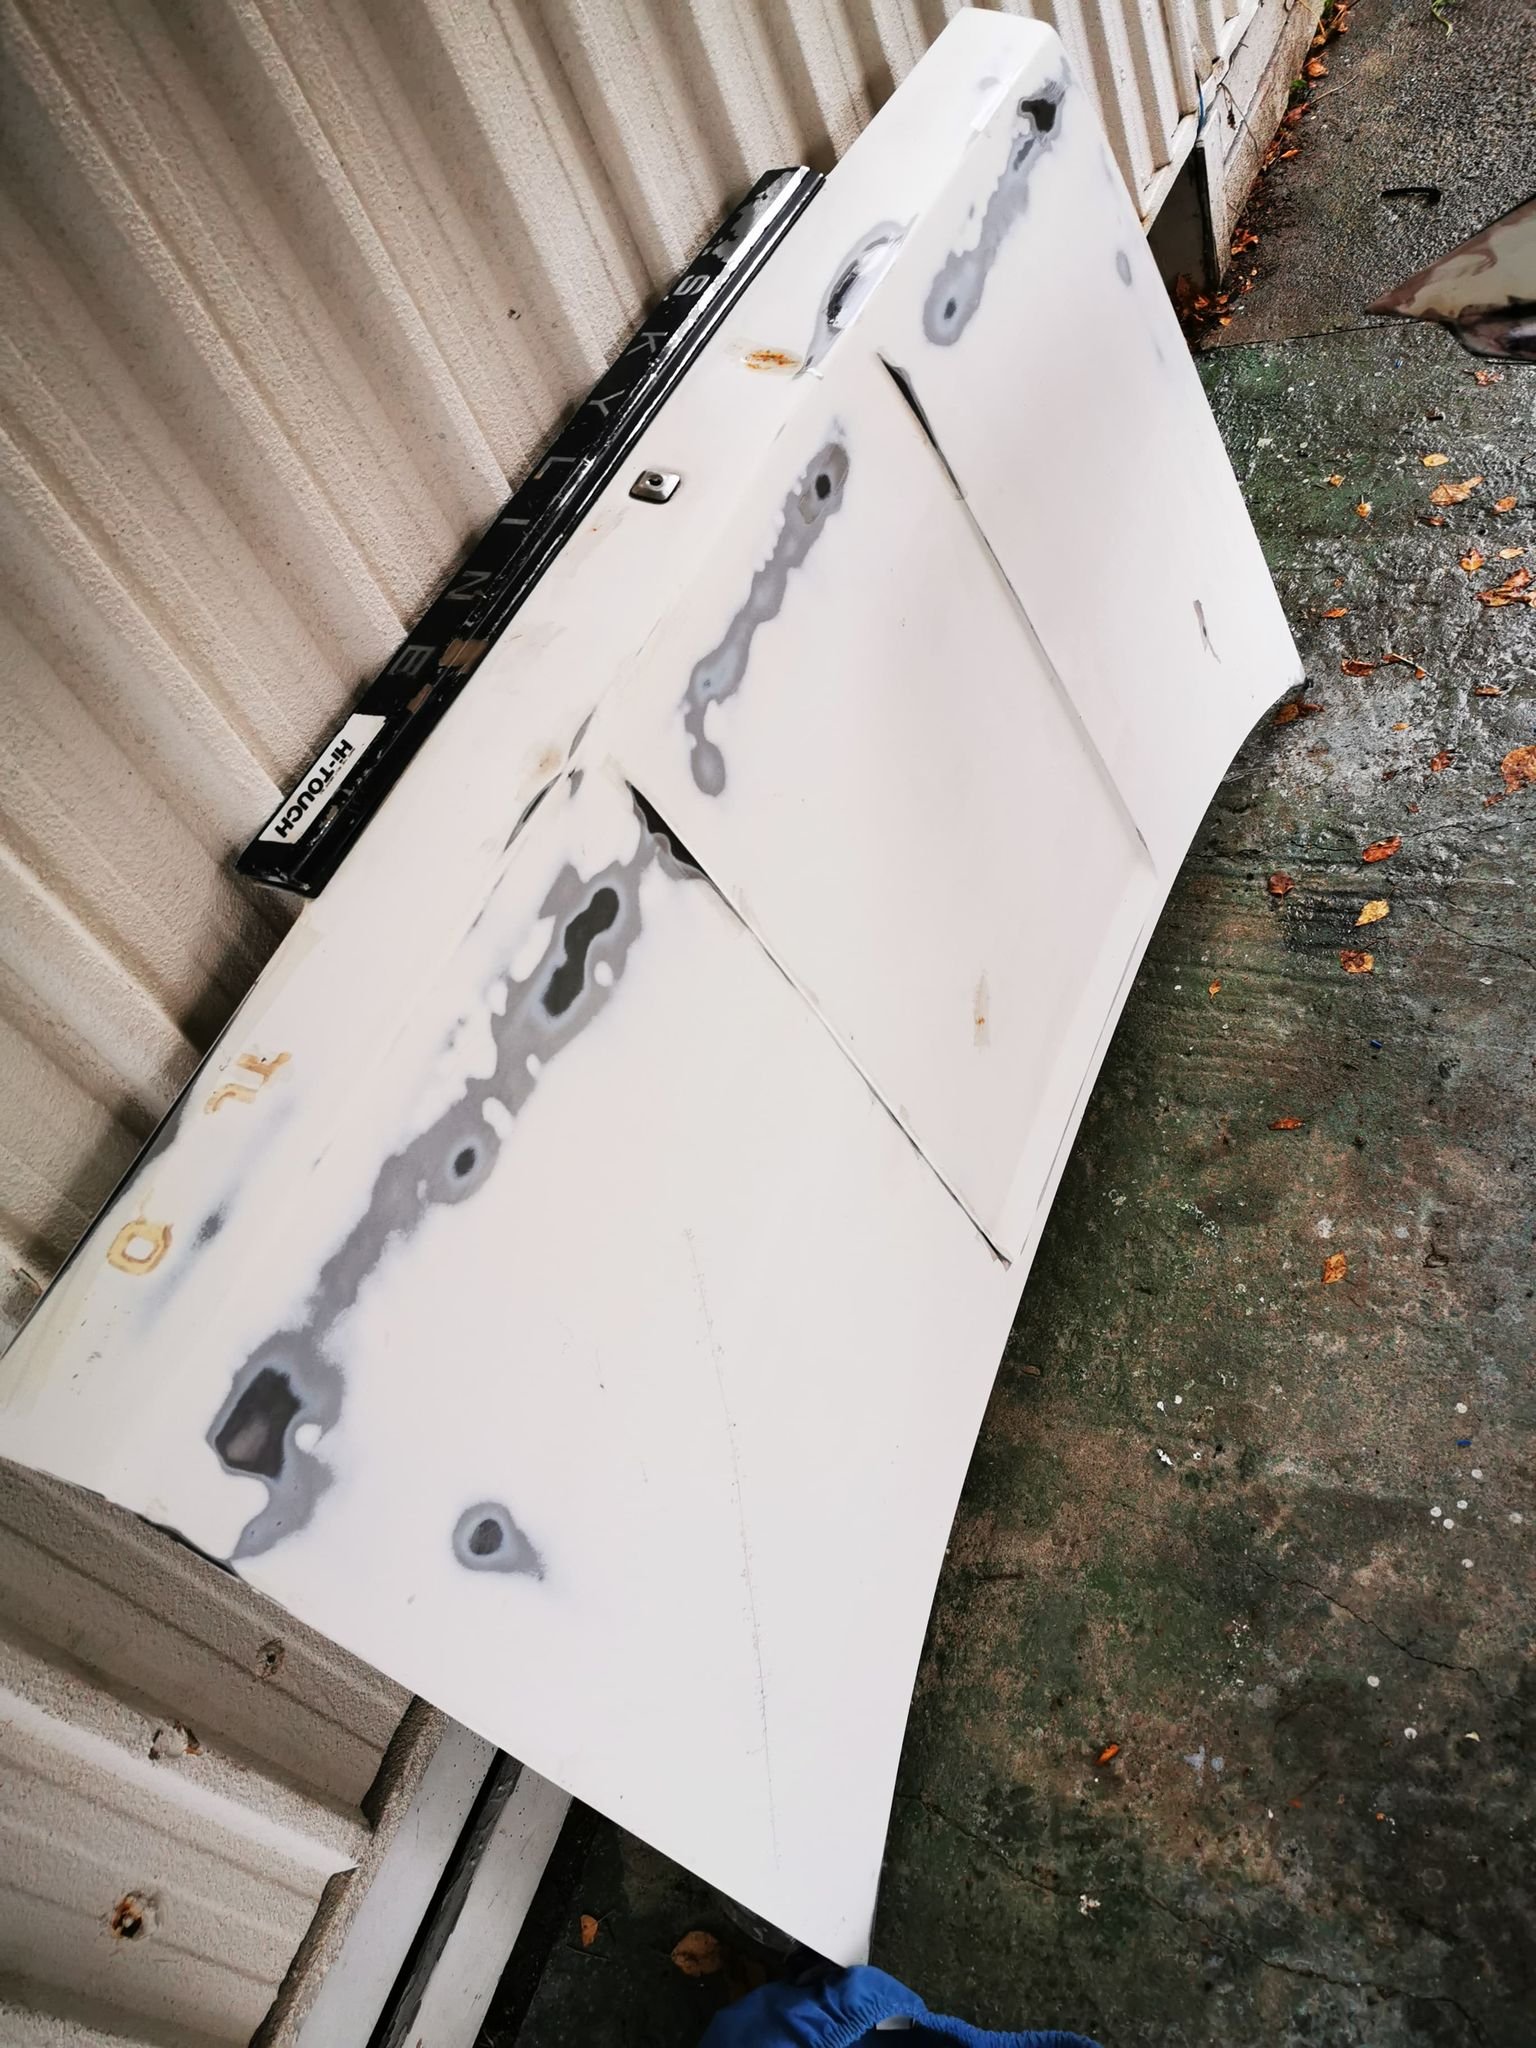
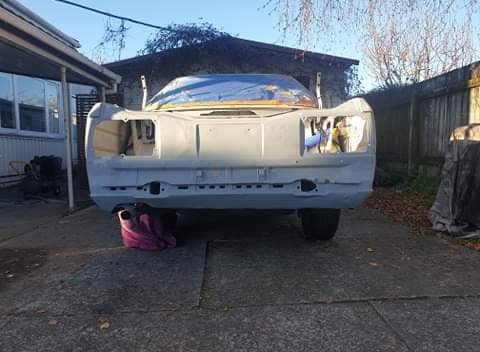
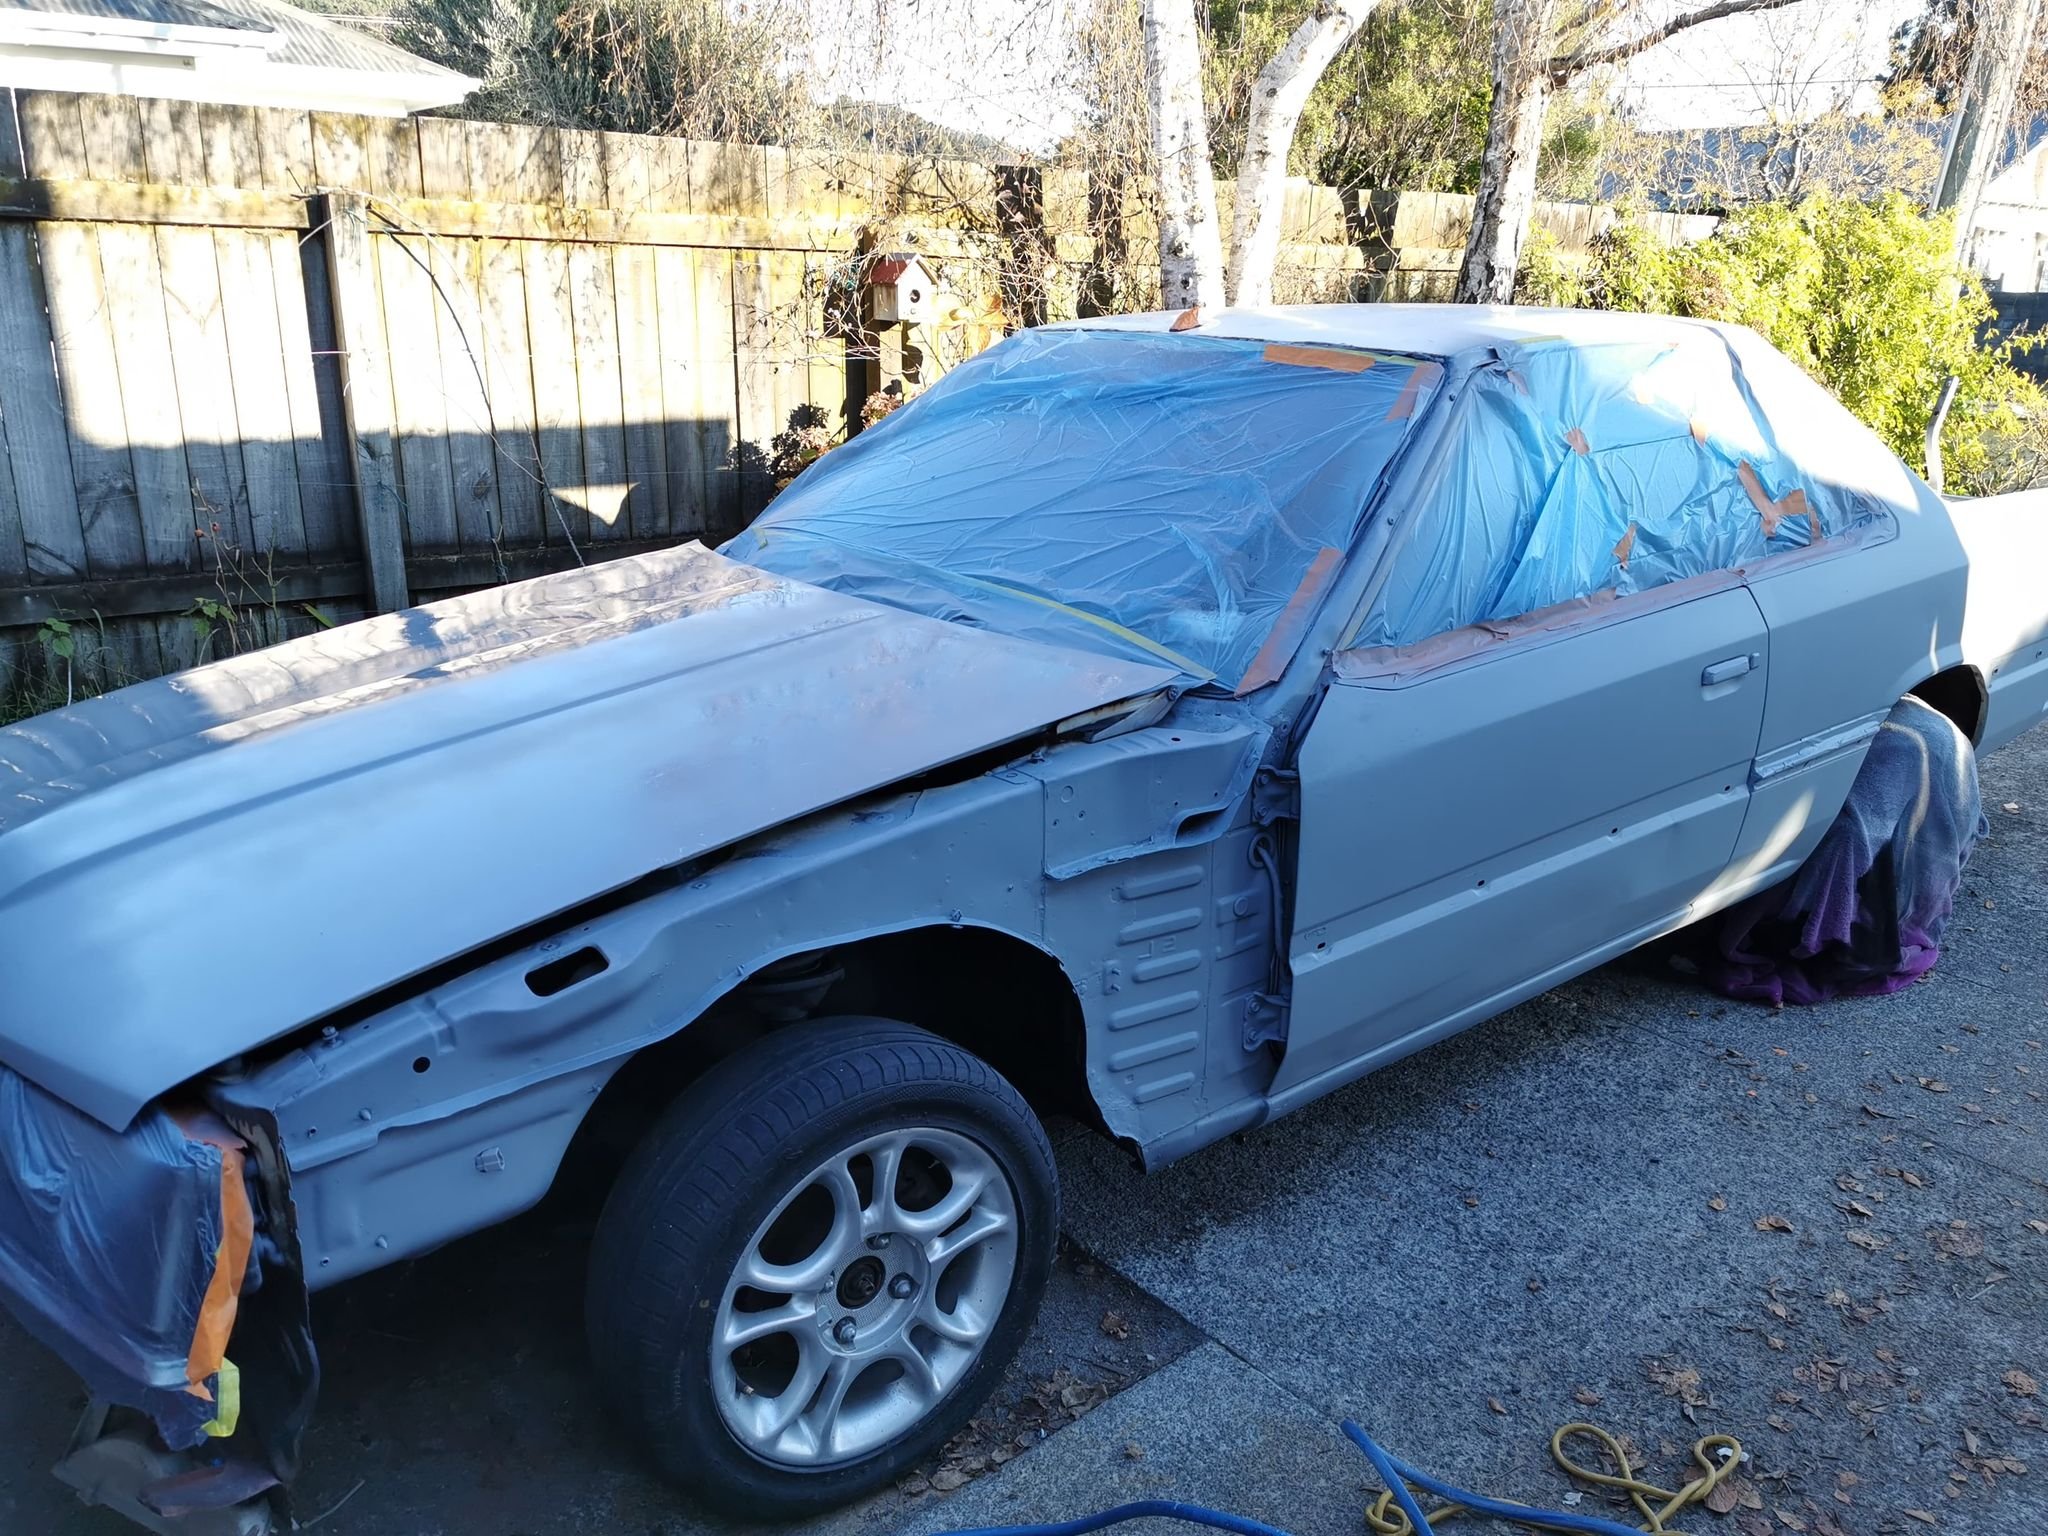
Well now the interior doesn't look so bad it really shows how bad the exterior looks. There's a few holes and dents here and there but i don't have time currently to panel the entire thing so it'll just be fix what i can for now and come back to the rest later. Pulled off the front panels and boot, removed the Adthree wing that was on it. That 3m sticky tape works good for keeping stuff on alright. Boot starting to get sanded down and filling in the dents and popping out the ones I can. I'm doing to ditch the SKYLINE rear badge as this one is pretty toast, I may see if i can fix it up later. The back of the car really cleaned up well. Sanded the surface rust down, hit it all with a converter and sealer then hit it with a high fill etch primer that will be sanded back down later anyway. There's still some dents that have to be filled but it's easier to spot these with the primer on than the old 002 white. Whole exterior sanded and primered. I'm going to redo this pretty soon and remove that last bit of Trim and do the bay and everything at the same time. You can really see how dented that passenger door is so I'll probably just end up getting a new one. I'm planning to re-underseal all under the arches and underneath of the car. Did a single medium coat of flat base white just so it's not ugly. This is going to get sanded down so I'm not to worried about the remaining dents and other problems. I also test-fitted the new rims on the back and they'll fit pretty good once I have the new shocks and such in. When I properly repaint the car I'll be doing the interior, exterior, door jams and engine bay as well as the boot so everything should look pretty good once I've gotten that far. The bumpers are a bit scratched but they should clean up pretty well. the front bumper has a layer of bog on it for some reason but I'm sure I'll work it out. Next up is undoing everything I've just done and stripping the engine bay and getting ready to pull the engine out and see what's going on. By this point in time I've replaced a few of the engine pieces and got it running but it's very rough and sounds like a hair drier. New coil, sparkplugs and dizzy cap later with a new ECU got it running.
1 point
-
The other day we went further up the main valley here and our friends let us pick apart this old cottage on their land. Sweet as cedar windows set into Rimu frames. There was also a big copper water cylinder there for grabs. We are going back to get the french doors before the place gets demolished by a digger. Shame really because the location is bloody amazing! By a river looking at the mountains. Then this afternoon we had a surprise visit from a fella here on oldschool who has been following the housetruck build and this thread. He's a builder and often has spare timber left over from housebuilds so he so very kindly thought that we could make use of it, along with a load of left over fastners etc! Far out- this was such an awesome gift to receive - the timber is exactly what we need to start with framing out the interior rooms in the mezz ! So a huge thanks goes out to Morris @CPR Sierra for going out of his way to help us out. He is restoring a sierra xr4i with a cossie body kit and I am hoping I have convinced him to start a build thread on here. I like sierras and its very rarely I ever see one about these days.1 point
-
What the fuck hahahhahaha. Incredible1 point
-
1 point
-
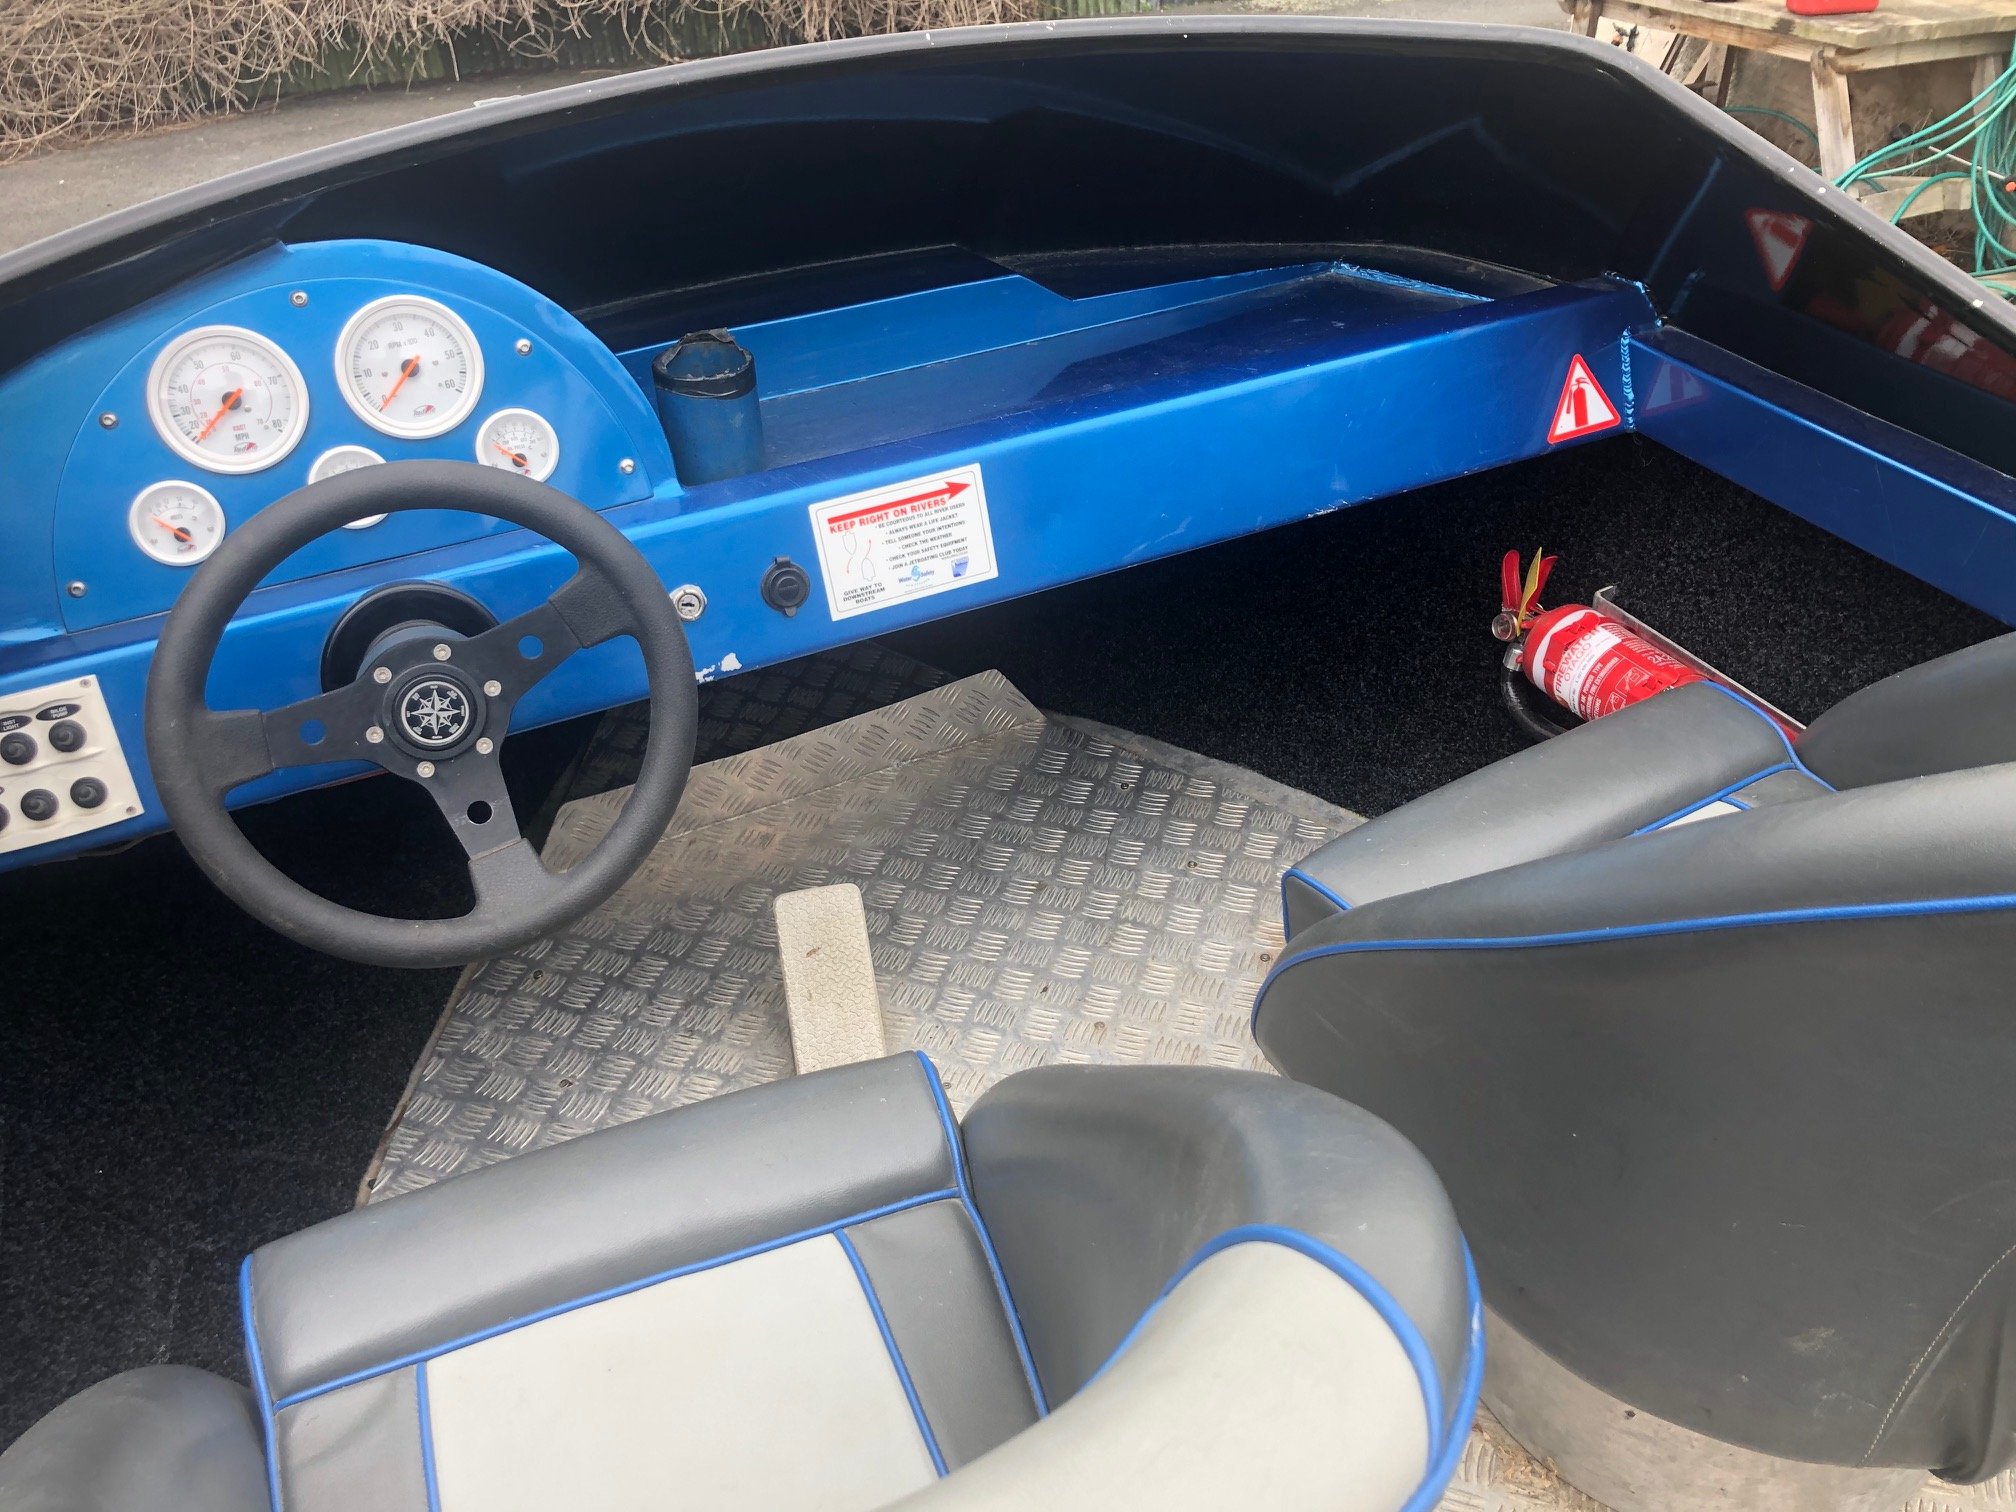
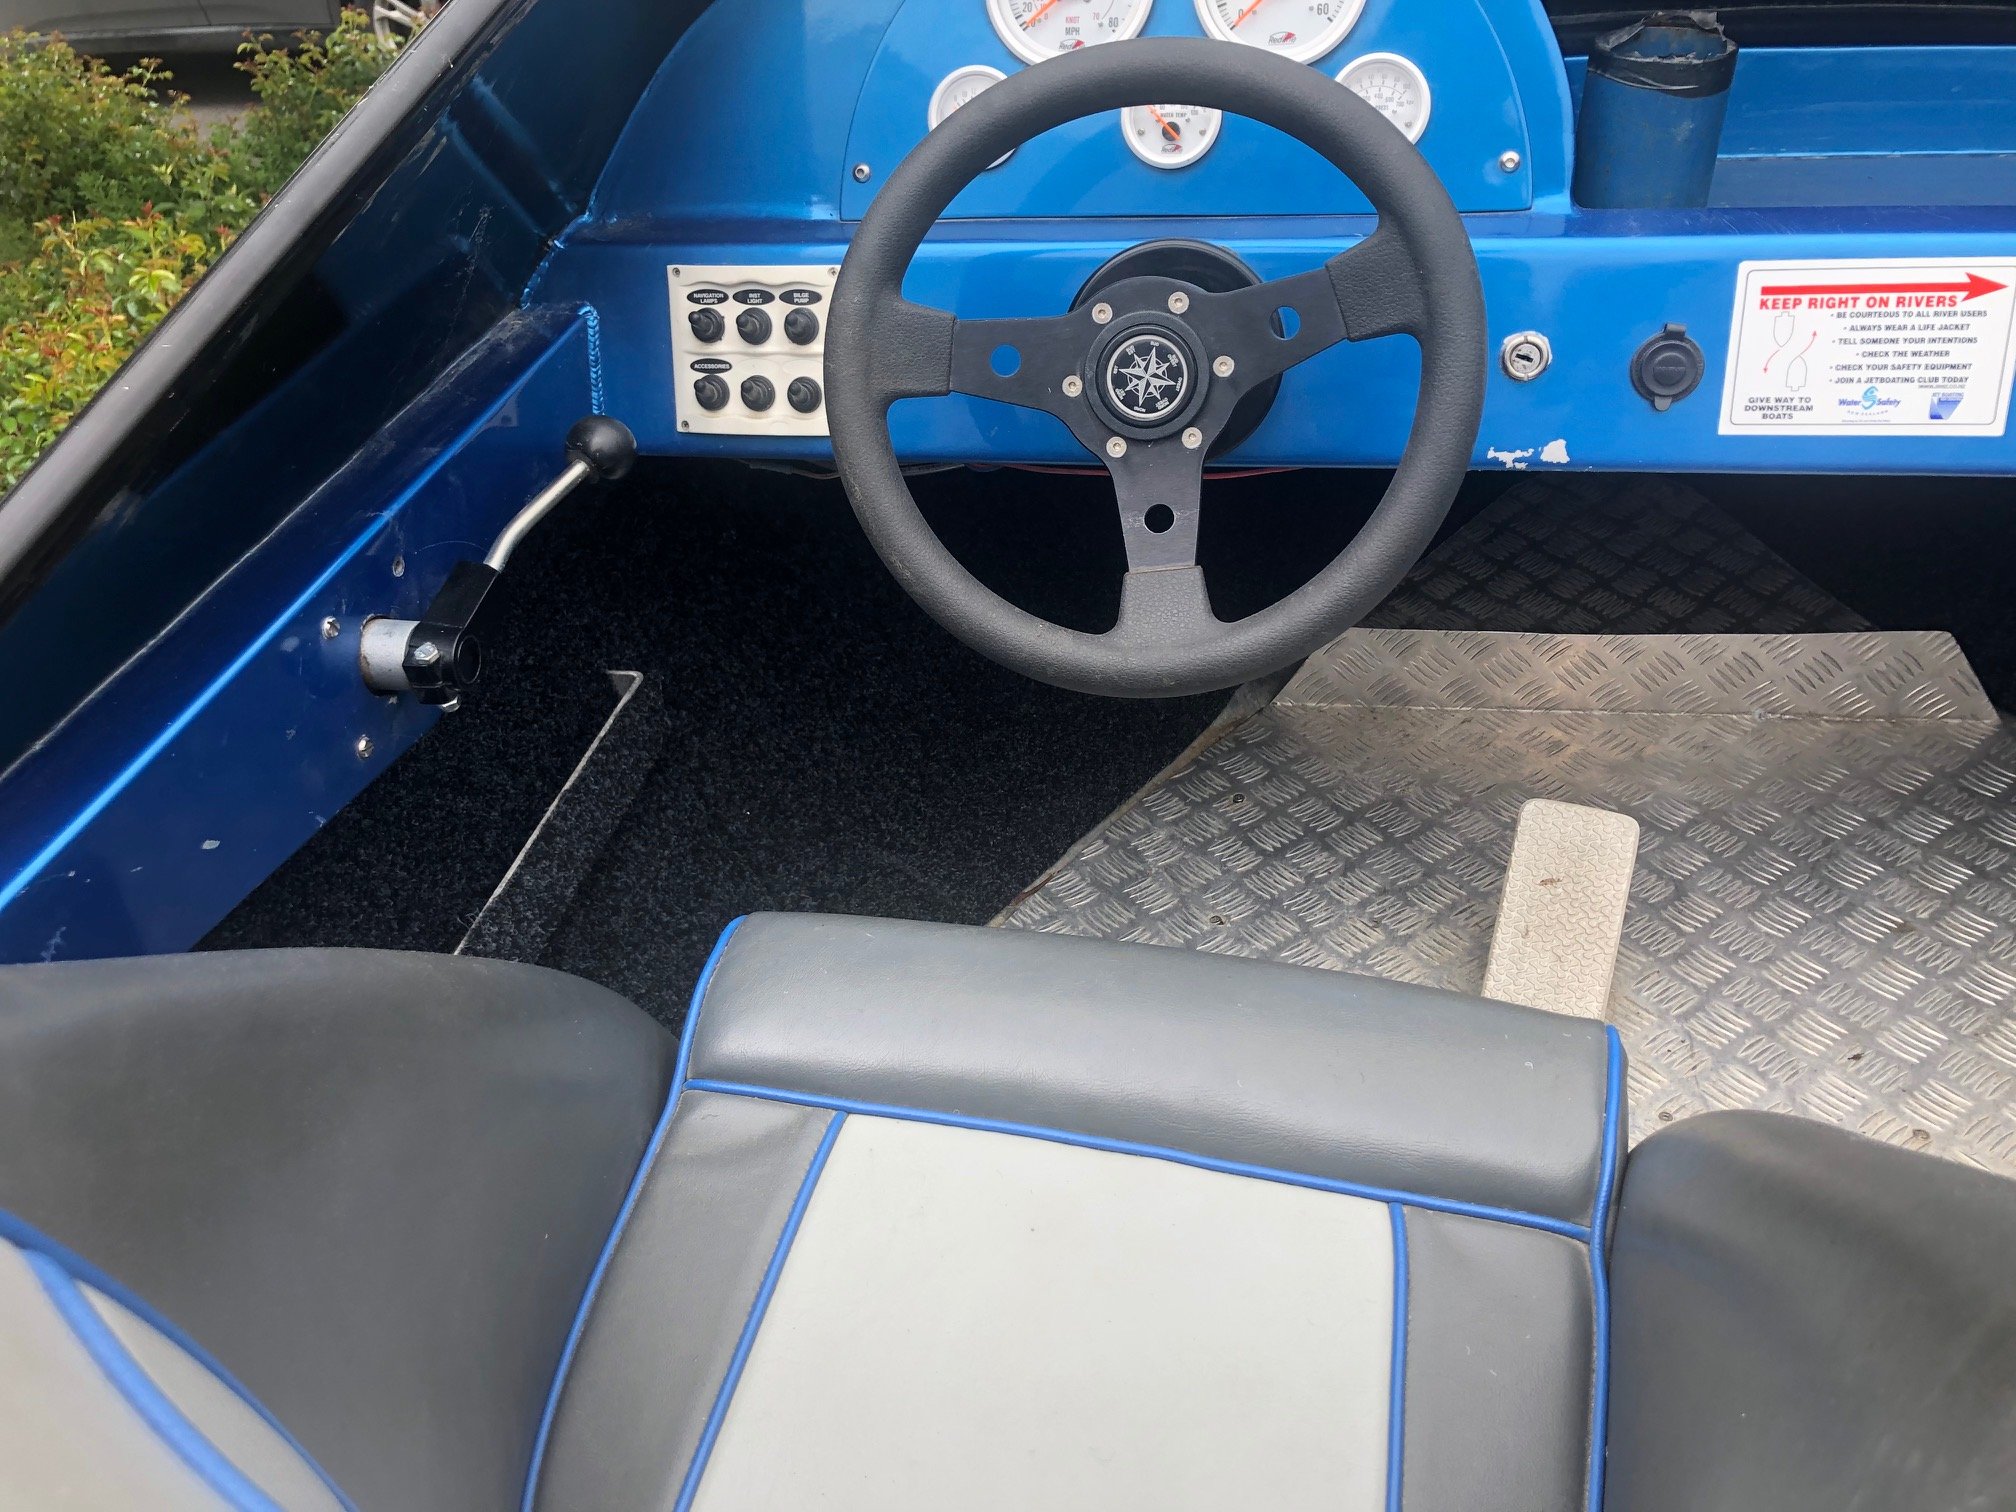
Bought a few m of marine carpet and glued it into the front hull and sides. Makes it look a bit tidier but also hoping it'll make the hull a bit quieter when on the water. Mounted in a new fire extinguisher, coz, you know, safety....
1 point
-
As promised here is Chaffy, the fat little Chaffinch this morning, waiting for his feed porridge... (I had to dust off the big boys camera to get this shot..)1 point
-
Valve bounce makes a terrible noise. I had a valiant that would do it at about 4800rpm . I was trying to impress a girl one night and I used to shift just as it made the noise, she thought I couldnt drive and was graunching gears It was auto...1 point
-
Space savers to go on the rear for drag day? 3 nuts per wheel instead of 4 :p ice on the ITBs? Rear and passenger seat removed 1/4 tank of fuel remove the battery and start with a jumper pack? lower the front tyre pressure to get a better contact patch and increase traction1 point
-
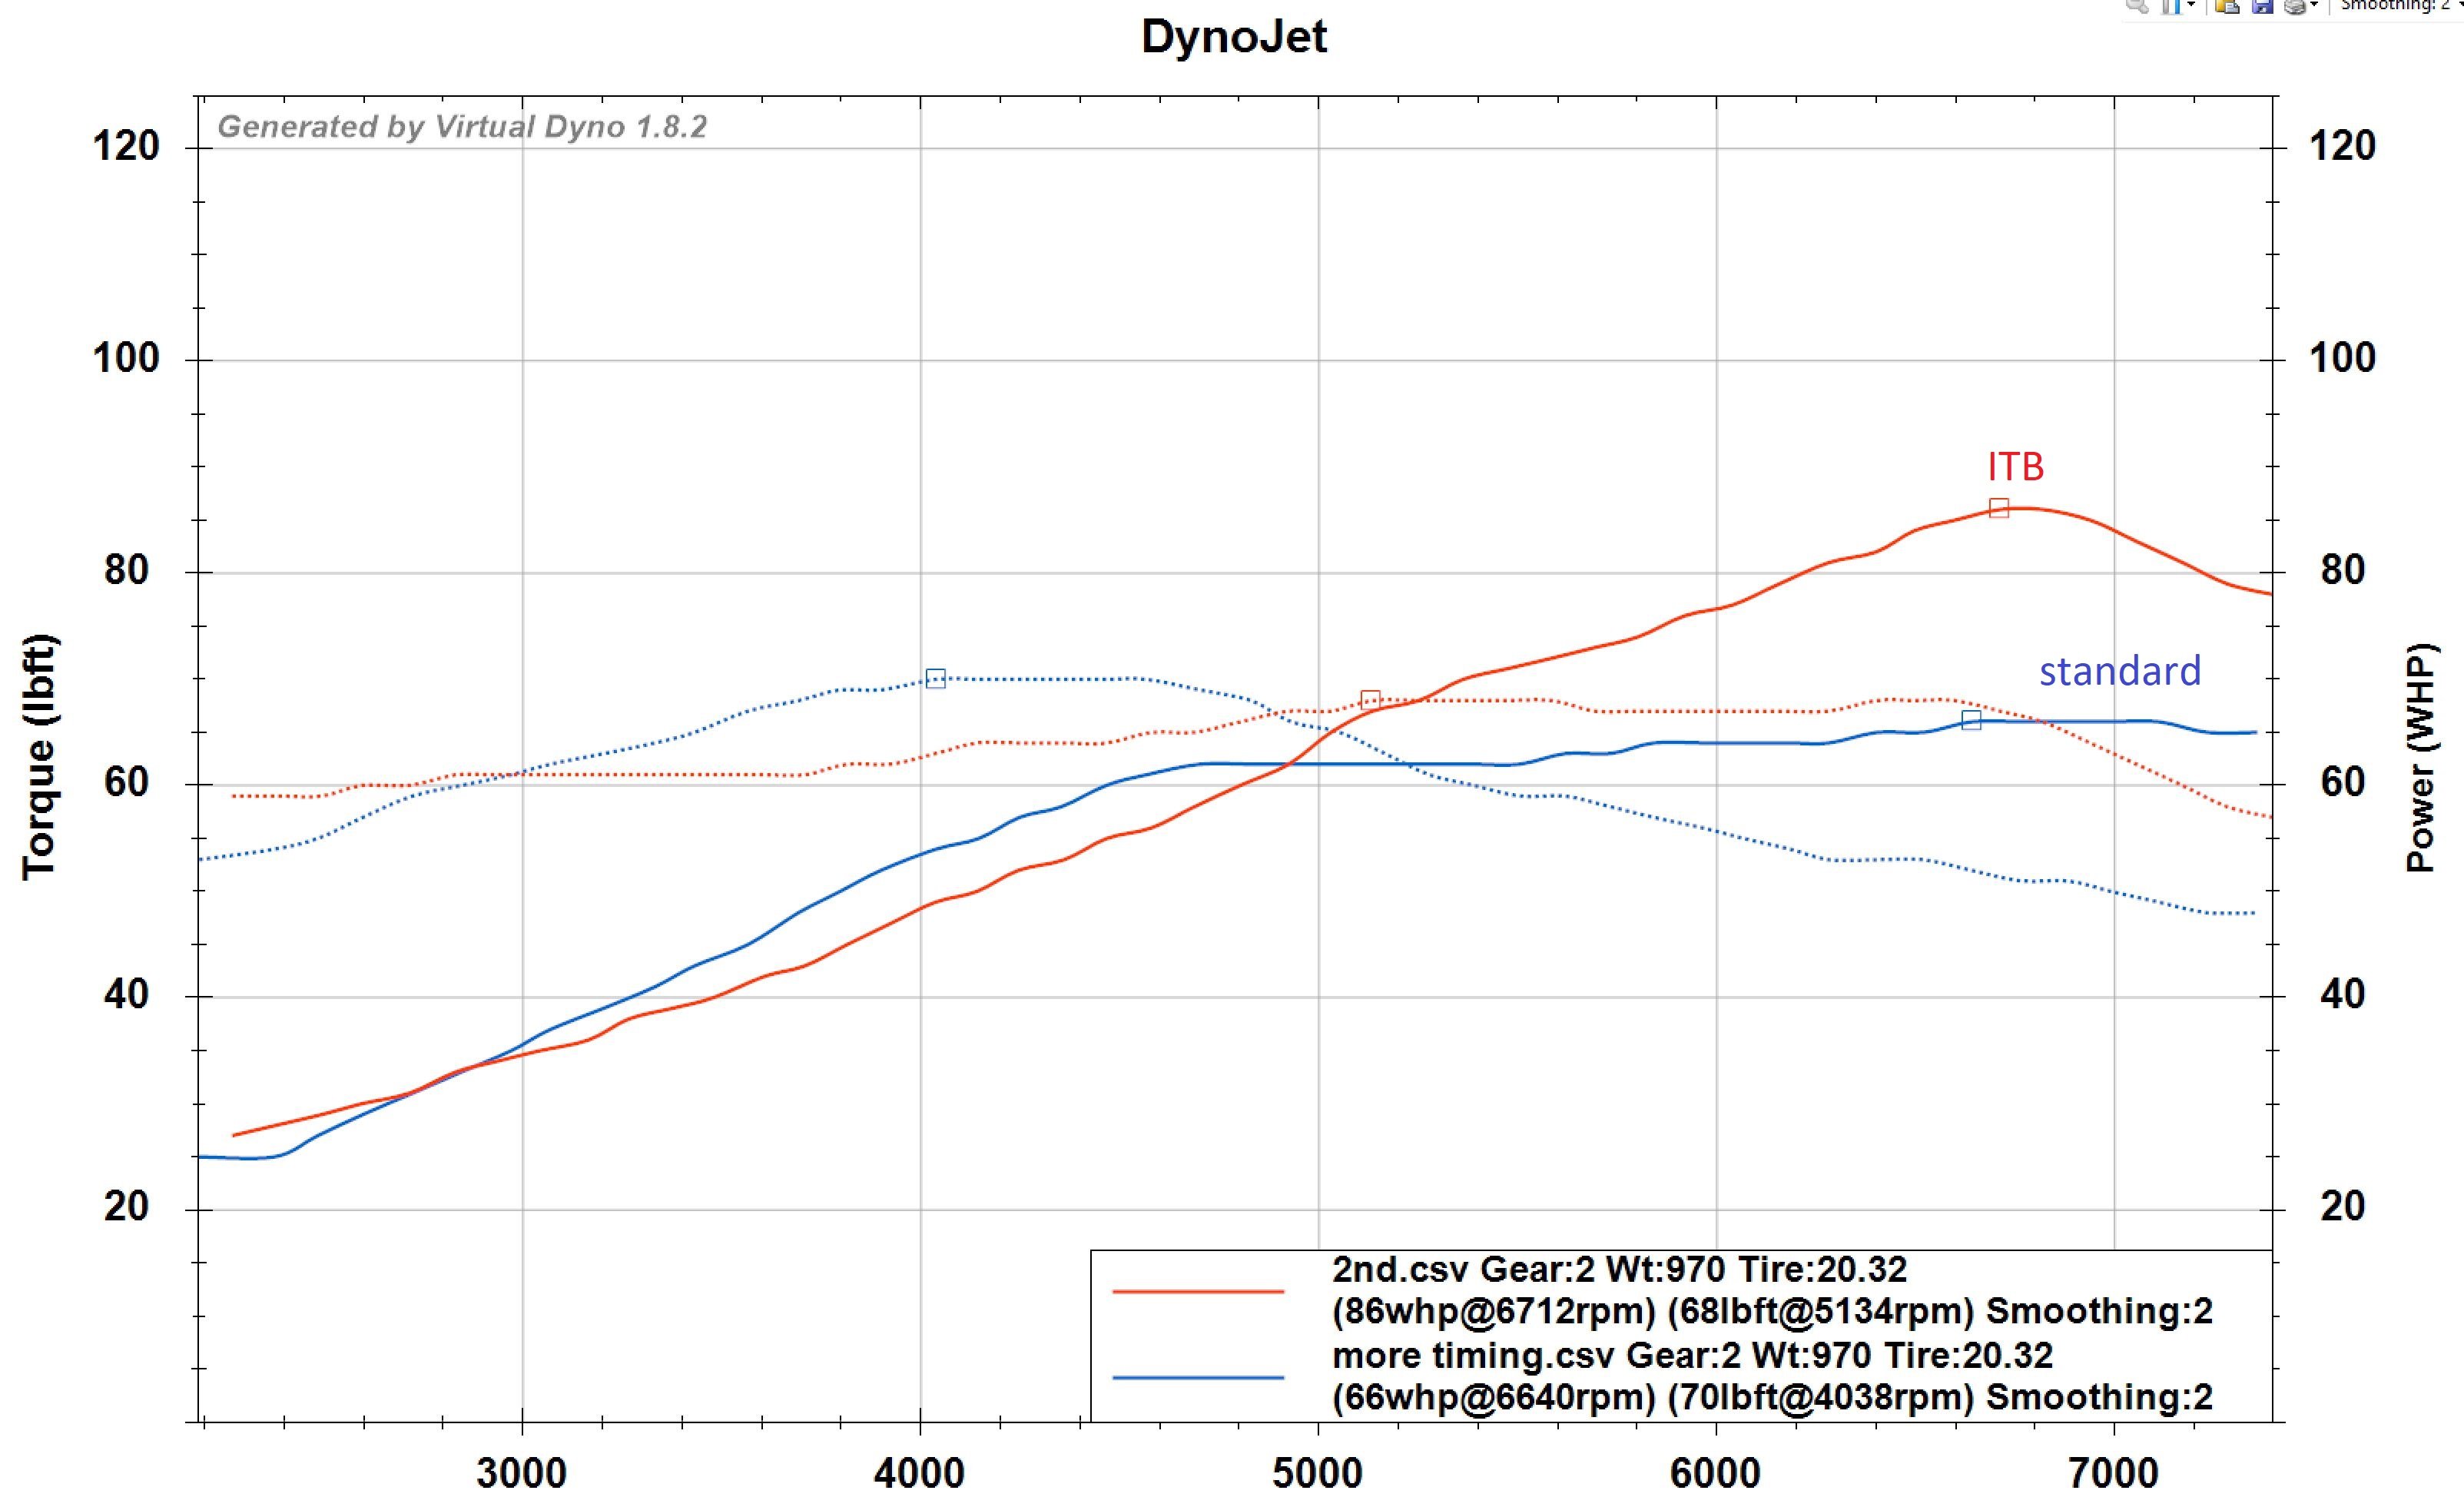
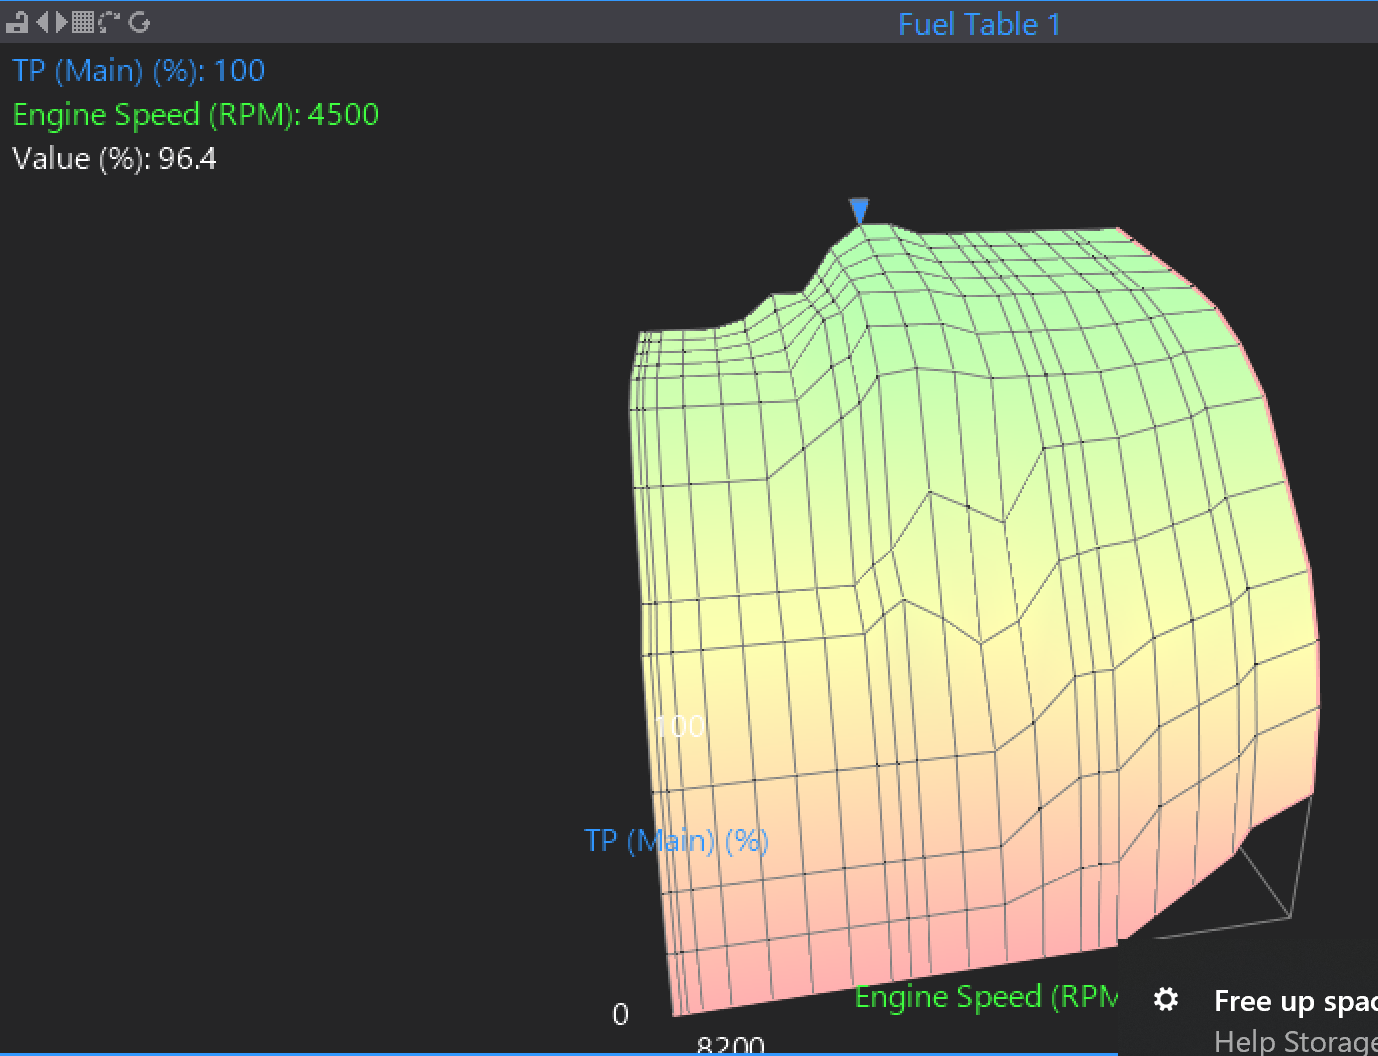
When you've got Bingo at 3, but Trackday at 5: The difference from this has been amazing! Max torque has moved up another 1000rpm, and then it has 20hp ATW more at peak(66hp to 86hp) It starts valve bouncing pretty bad, this might be what the sudden torque drop is at higher rpm. I thought I might have made a mistake with logging it in virtual dyno so I went back and a did a few more runs and they all looked the same. This has felt worth the effort. Also interestingly the VVTI cam range that it likes now is a bit more typical to what I'd expect. So moving the cam around (about 20deg on midrange then tapers off to 5 up top) and it was even better again. I bet there's some good improvements too from de-choking the exhaust side too, because its absolutely tiny on that side just like the intake was. I'm not that keen on spending $$$$ on getting an exhaust made up though so I'll have a think about this one. Also, yes it makes a big bloody racket at full throttle now haha.
1 point
-
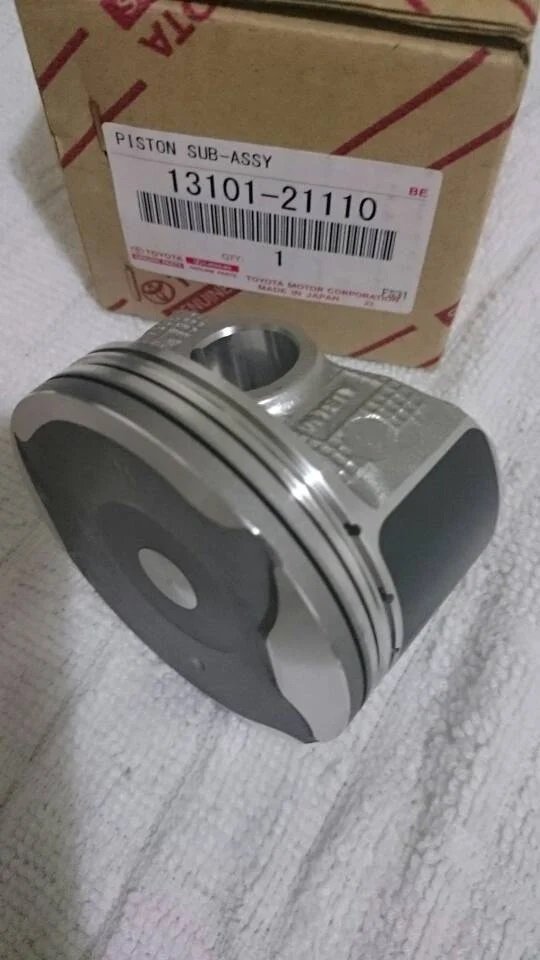
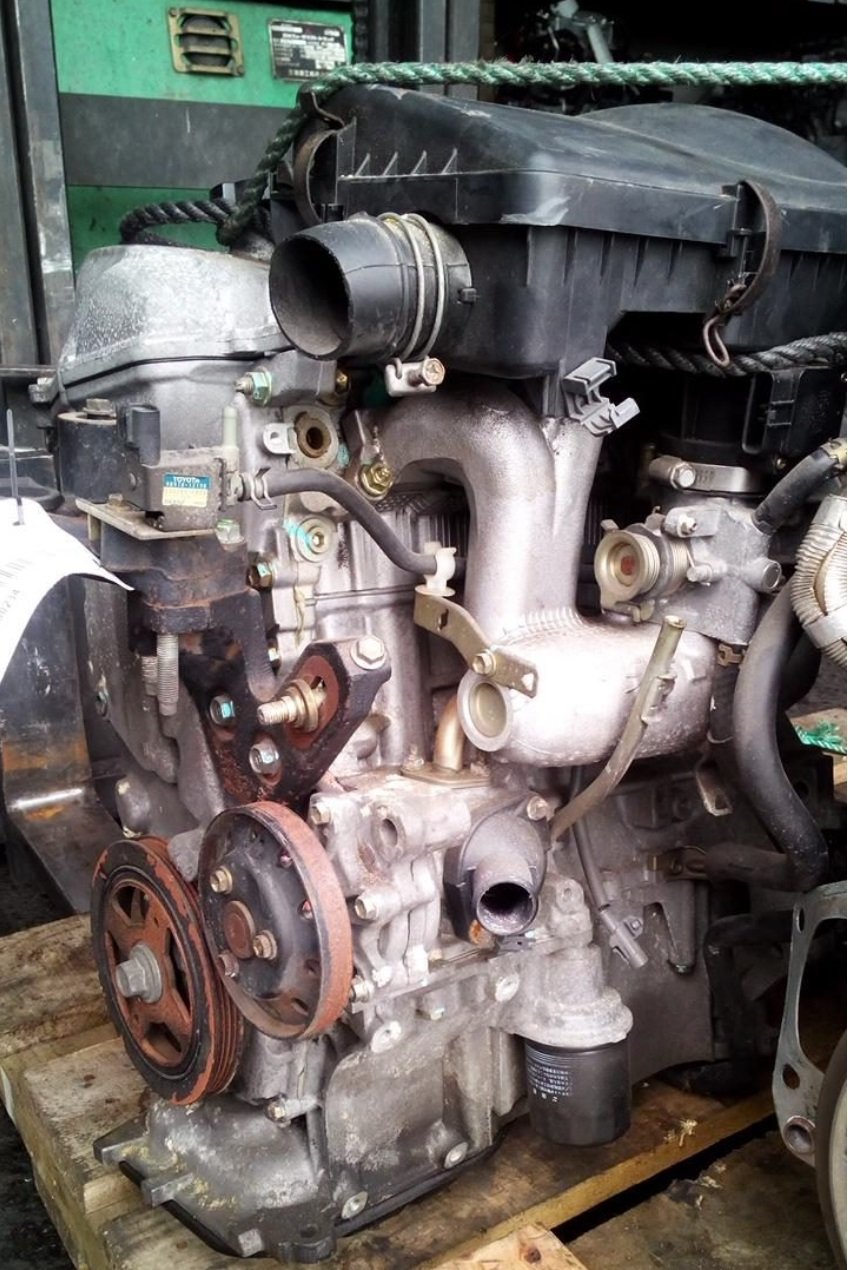
Okay so some 1NZ / 2NZ engine sharns. The 2NZ engine is the 1300cc variant. (as fitted) 10.5:1 compression, max torque @ 4000 max hp @ 6000. The 1NZ is a long stroke version of this which bumps it to 1500cc. Still 10.5:1 compression, max torque @ 4000 max hp @ 6000. So it gains power and torque but looks like the manifolds etc are the same which explains same rpms for max power and torque. So it doesnt look like there would be any worthwhile easy bolt on bits from the bigger motor. Howeverrrrrr The early Prius engine is a modified 1NZ engine that uses atkinson cycle and makes the worst power out of everything by far. But what's interesting and maybe relevant is how it does it. Atkinson cycle means it leaves the intake cams open for a lot of the way while the piston is still coming up so it pushes the air back into the intake manifold. So it reduces pumping losses but then has high static compression which is win win for efficiency. In order for this to work it needs a comparatively long duration intake cam (270 deg) It also means it has 13:1 pistons and an alloy intake manifold with what looks like shorter runners. Fancy coated pistons from factory: Alloy intake manifold to deal with air/fuel pumping back in and out of it: So the intake manifold might be a decent swap for a normal 1NZ And some prius weirdos have put the normal 1NZ intake cam in, to make it 13:1 comp in a more normal sort of way which is pretty lush. It would probably go decently by retarding the intake cam a whole bunch so its normal cycle then advancing inlet at high rpm when overlap is useful for power. It has forged steel rods but checking part numbers its the same as normal 1NZ. You can buy a whole prius engine for about 500 bucks. Definitely not going to do that any time soon but once my new shed is sorted I might buy one and tuck it away for a rainy day.
1 point
-
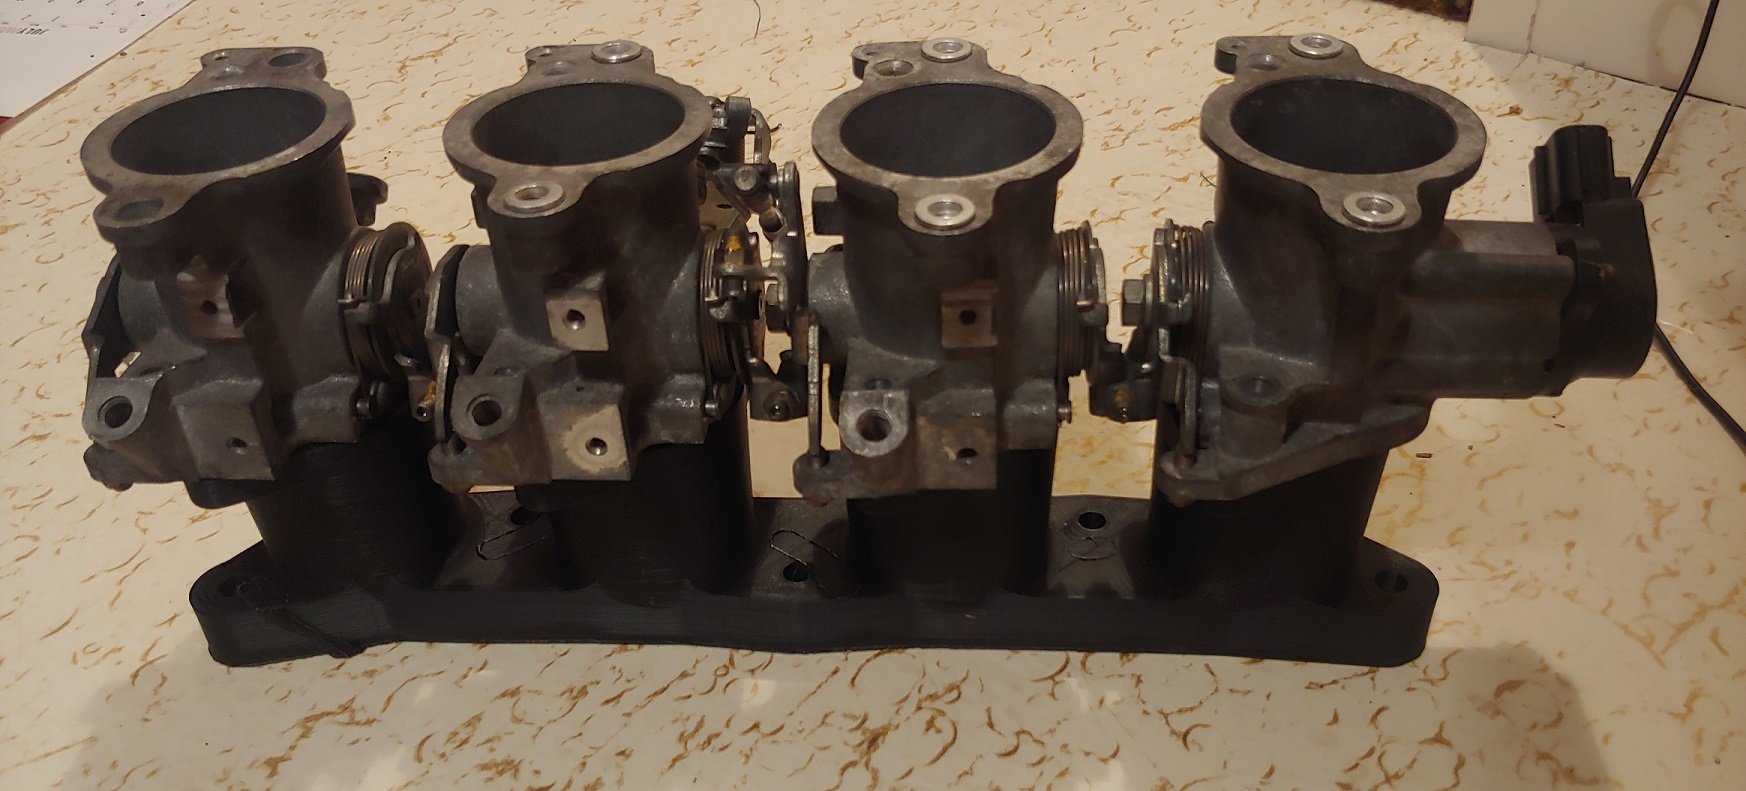
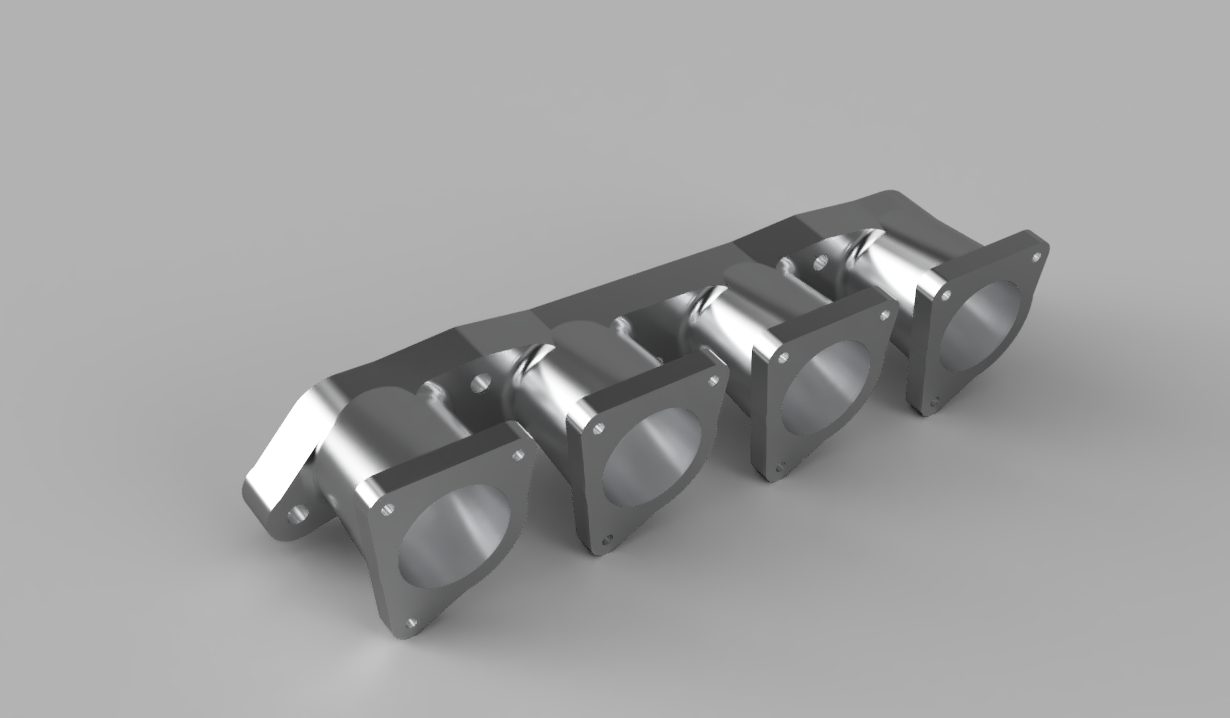
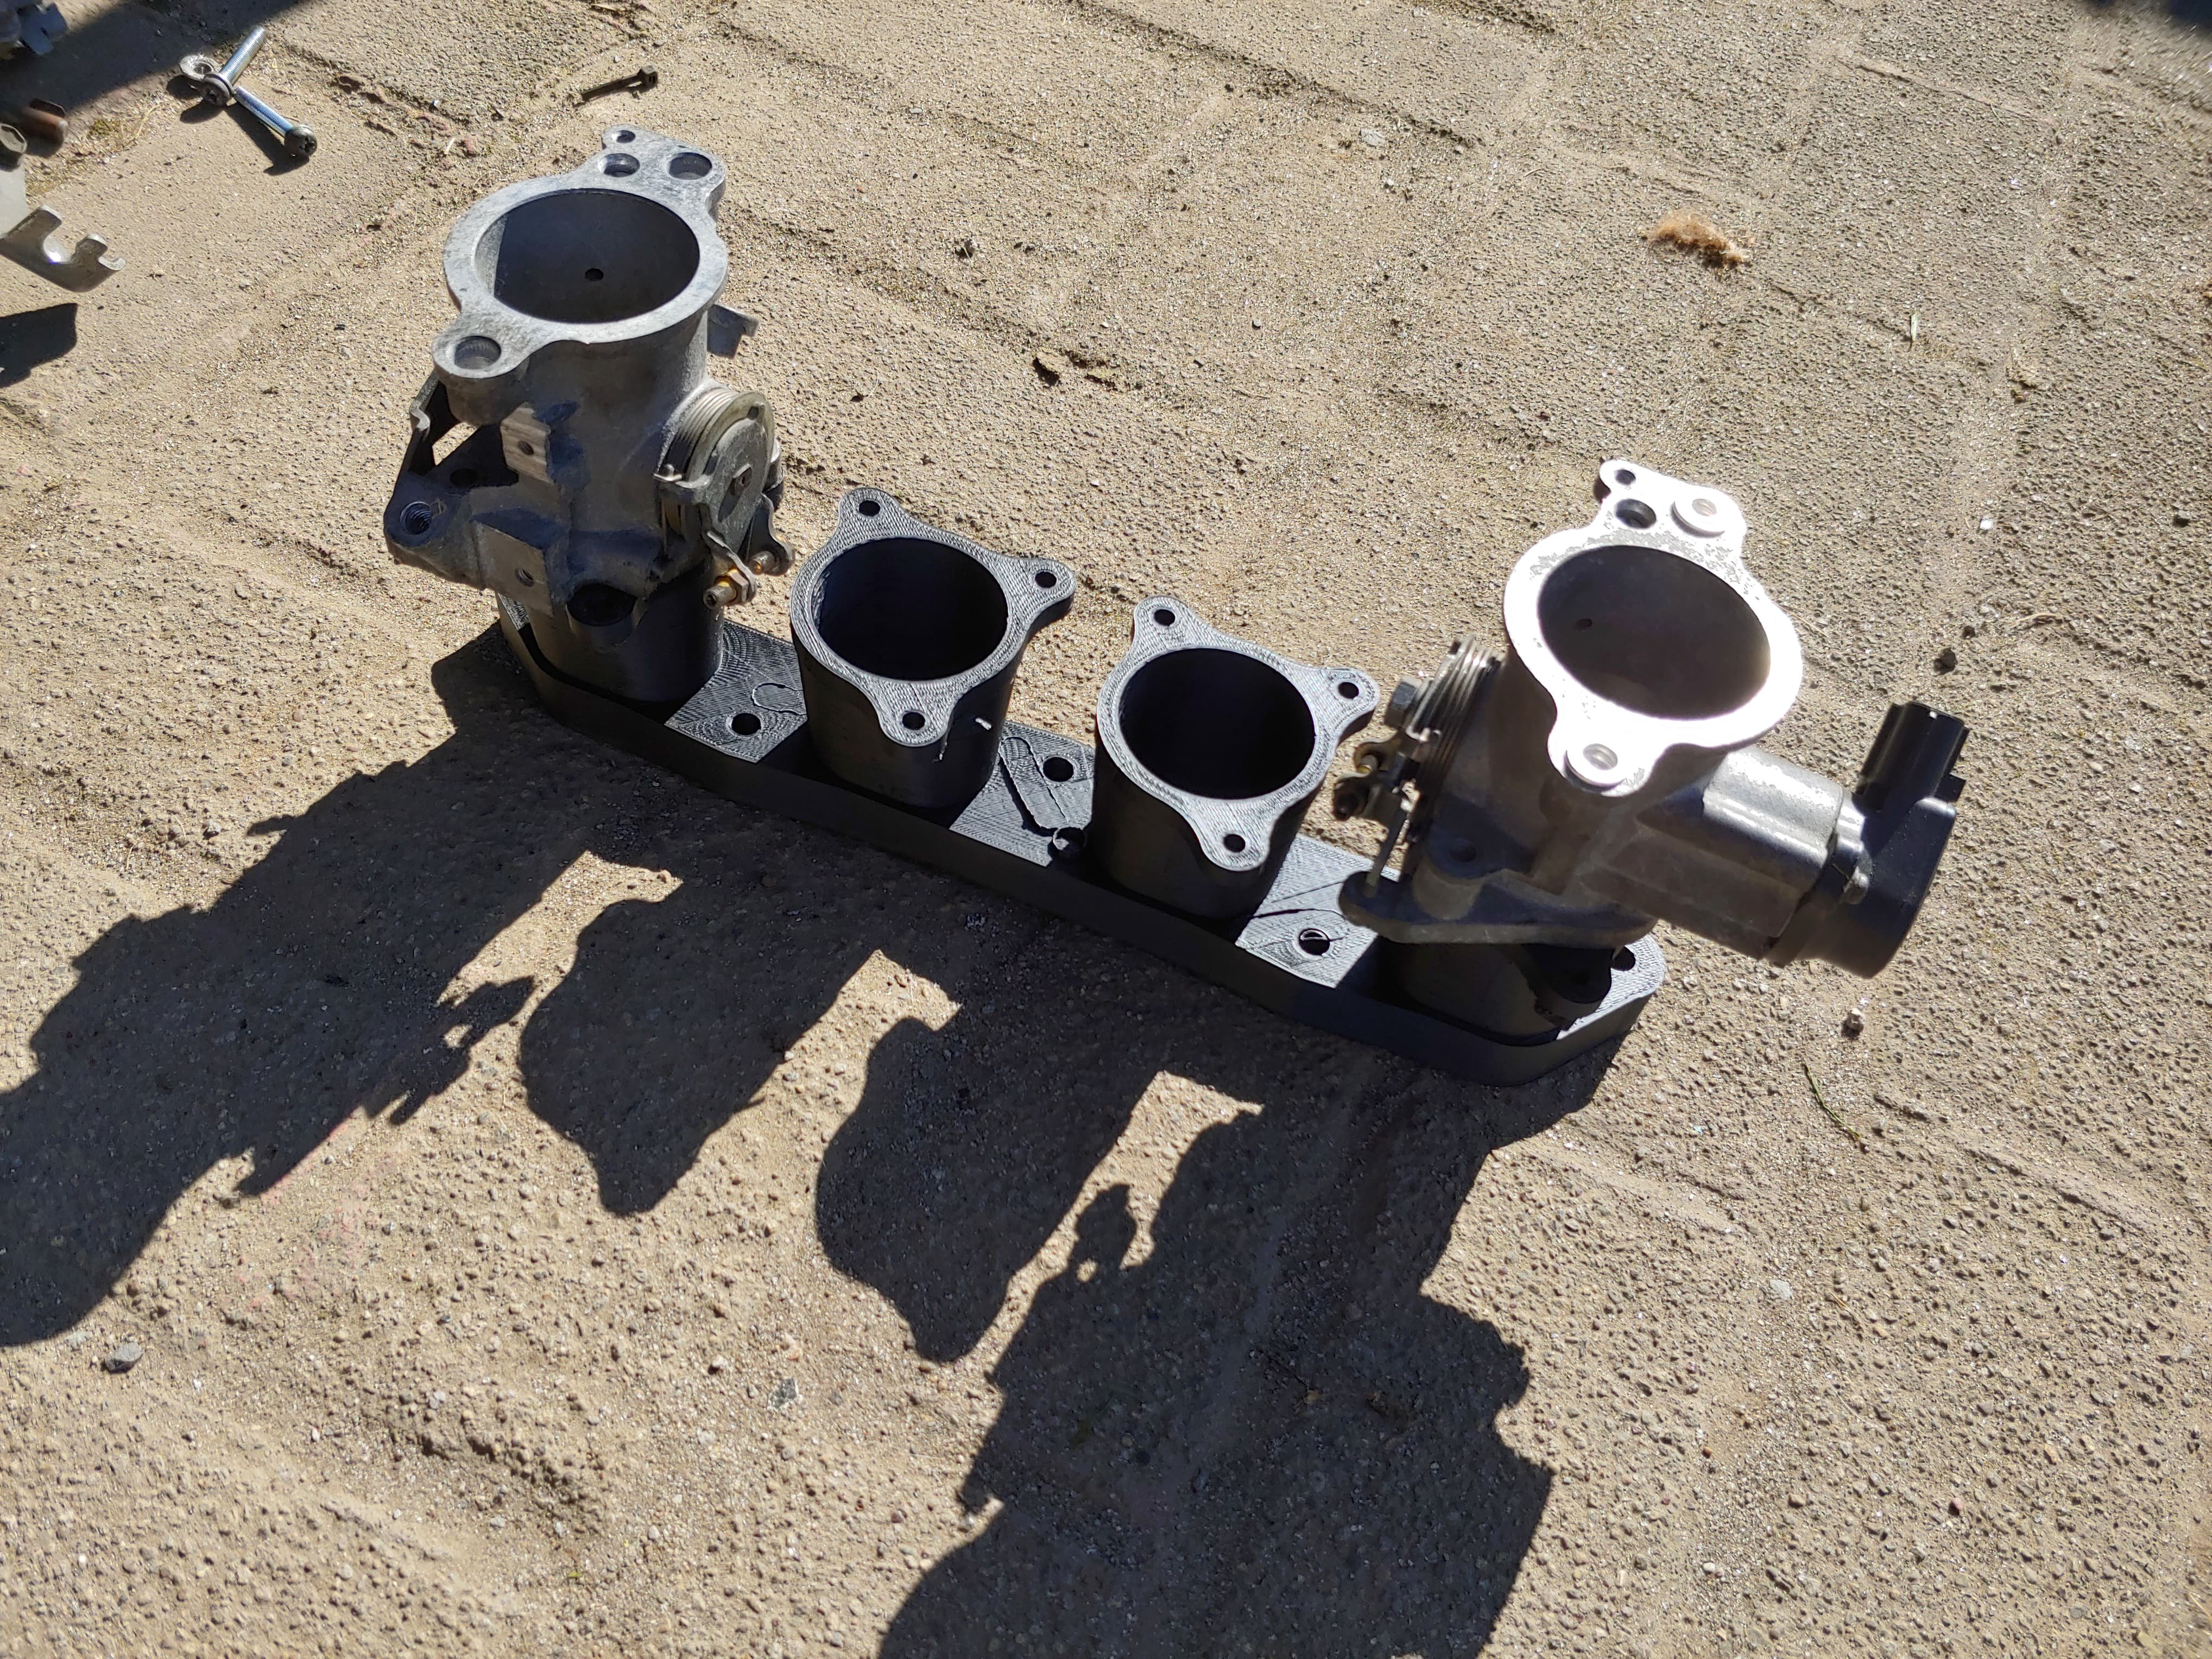
Ahhhh so I got enough info together to switch it over to modelled fuel, so the AFR target isnt built into the fuel map anymore. And it's starting to look a lot more similar. Except for that yours has top end power and mine eats shit right where it's supposed to get good haha. On the factory ECU with OBD2 it would show the odd spike up to 16,000rpm or something like that. It's definitely much worse with this ECU, it never really caused issues before but problems now. Somewhere around 2krpm at a very narrow window the car bucks and chokes and is awful then a couple 100rpm later it's dandy again from there until redline. Looking in the logs it's crank trigger errors and its thinking the rpm goes up to a zillion. I turned up the filtering on the trigger but no improvement. I'll double check I've got the shield wire connected though, possibly dont and it goes past a lot of noisy stuff. Looking on the internet there was a recall for crank trigger issues on these engines where they get internally contaminated with oil and need to be replaced. Looks like it's probably going to be a wanker of a job / maybe not. Also started looking into options for replacing the devilishly choked up intake. I drew a thing: Printed a thing, but guess who drew the throttle flanges upside down so all the holes are wrong: Then another attempt trying to keep the throttles as close together as possible as the port centers are closer than the standard throttle centers. It almost works but it's just maybe 2-3mm too tight even if the linkages were filed down as much as you can. I've got silvertop and blacktop throttles here, part of me thinks that given the small dia ports the silvertops will be better. I might use the blacktop throttles on the other engine one day so I dont want to file down the linkages when I'll later on need them spread apart further than the factory spacing. This all wasnt looking too great for fitment, thanks to the alternator. Until Matt told me that the supercharger kit for these engines tips the alternator further forward and uses an extension bracket and it's all super simple. Sounds easy enough so will have a look at that too. Will give this all a test fit over the weekend. I've still got 2 months till drag day so I'm pretty confident that even if it just runs as it currently stands, it'll be a little more fun with the extra rpm. Hopefully a little quicker but not holding my breath just quite yet. But it would be nice to try out a less wheezy intake and maybe go pillage a spare exhaust and see if there's any easy gains. If the rear muffler has a flap in it, replacing the whole thing with one that doesnt would probably help a little during low-mid rpm perhaps.
1 point
-
Haha that would be awesome. You can get one with sub 100,000km for 2-3 grand. pretty sweet. I got the VVTI working and went out to test the different cam angles to see what gives best full throttle airflow. Surprising results! (Colour scale is cam advance, red is 40 deg and blue is 0) I was hoping there would be a more useful sweep of cam angle in the rpm range it'll be doing at the drags, but looks like zero advance gives best overall. Down low below peak torque the situation reverses but the benefit doesnt look amazing. It was actually hilarious how slow it became with lots of cam advance at high rpm. My theories are that either the exhaust is so restrictive that high back pressure makes cam overlap a problem. And / or the restrictive intake generates pressure drop which exaggerates the restrictive exhaust and pulls intake charge back out. Will be interesting to see if changes to intake or exhaust will help make cam advance more useful. Maybe it needs some silvertop ITB. I've also still got no idea why the airflow ski jumps up like that, at high rpm. I think it might just be that it gets turbulence in the tiny MAF pipe or something. Will compare it against lambda readings and see if there's actually more airflow or its just a bad MAF signal.
1 point
-
1 point
-
Wof check was a F. But not a long list. An exhaust leak and hanger, handbrake cable adjuster, indicator lense broken and headlights to work properly (which is just cleaning up the fuse box).
1 point
-
I got the replacement clutch in and working but there's still something a little awry there that will have to wait until I get back from a couple of weeks holiday. I also discovered that I have a fairly common wobbly crank pulley issue so I should look into that before I get too carried away thrashing it. That said, I did enjoy taking it for a wee hoon after I got the clutch working and the hardtop on. More to come in the future but this is where we are at the minute: Once that was sorted I took it for a hoon to see my other white coupe...1 point
-
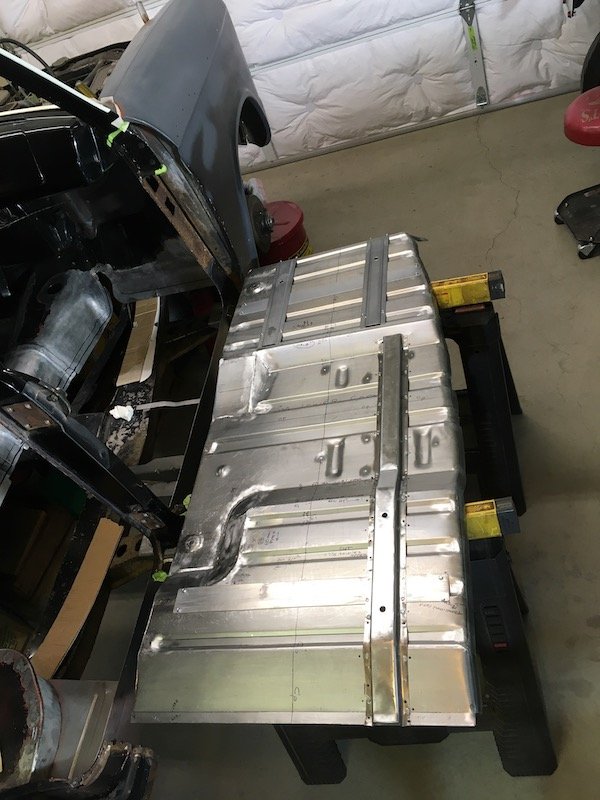
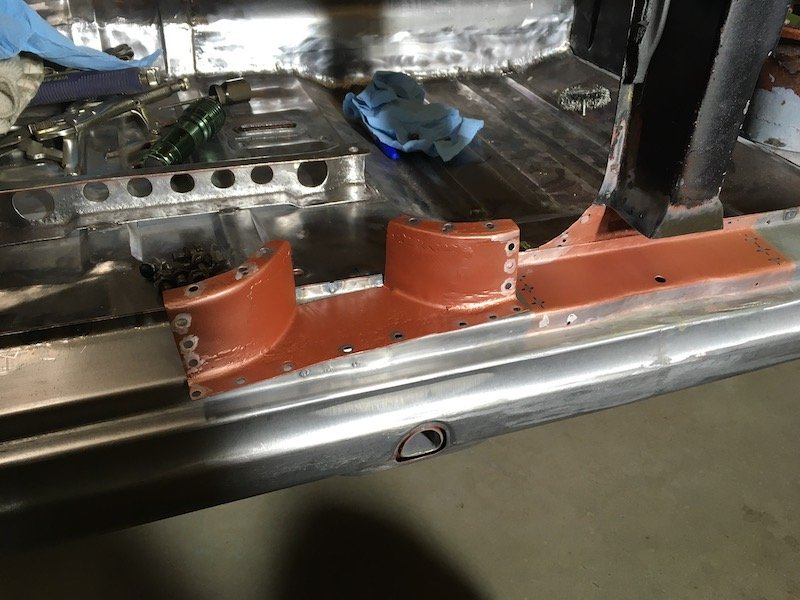
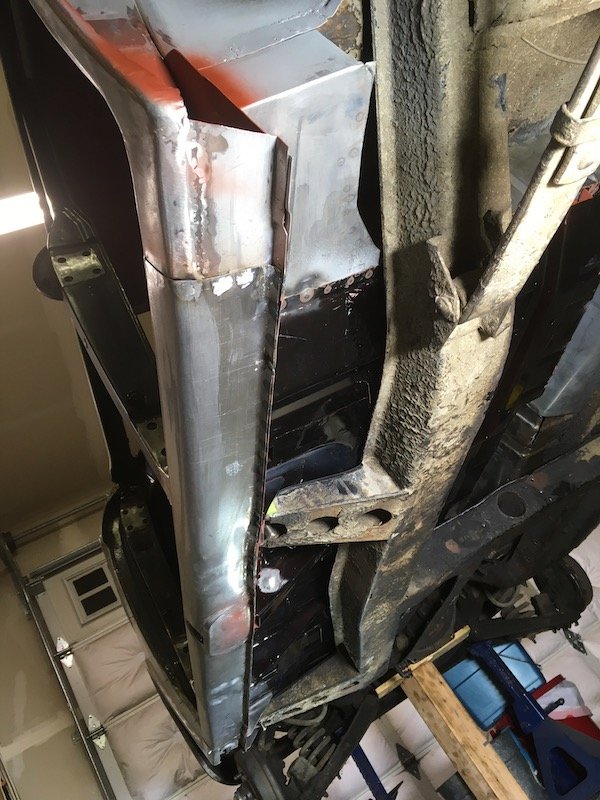
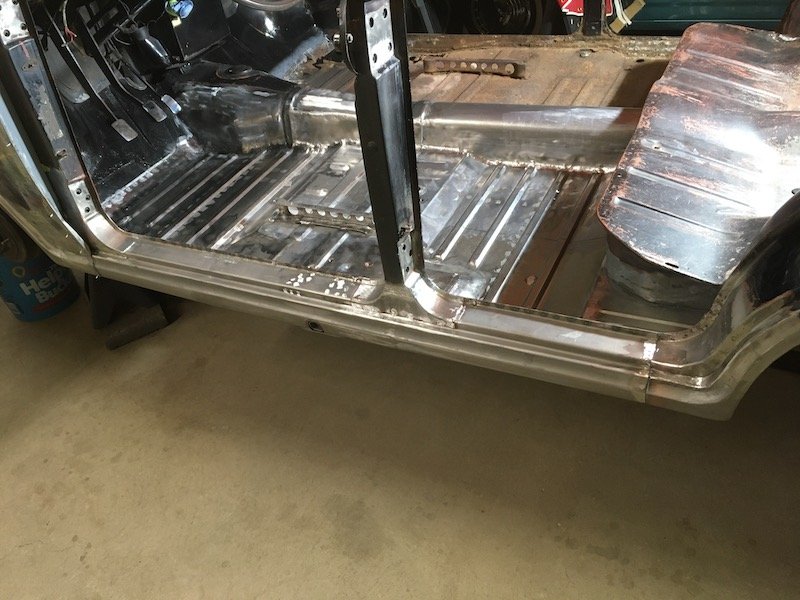
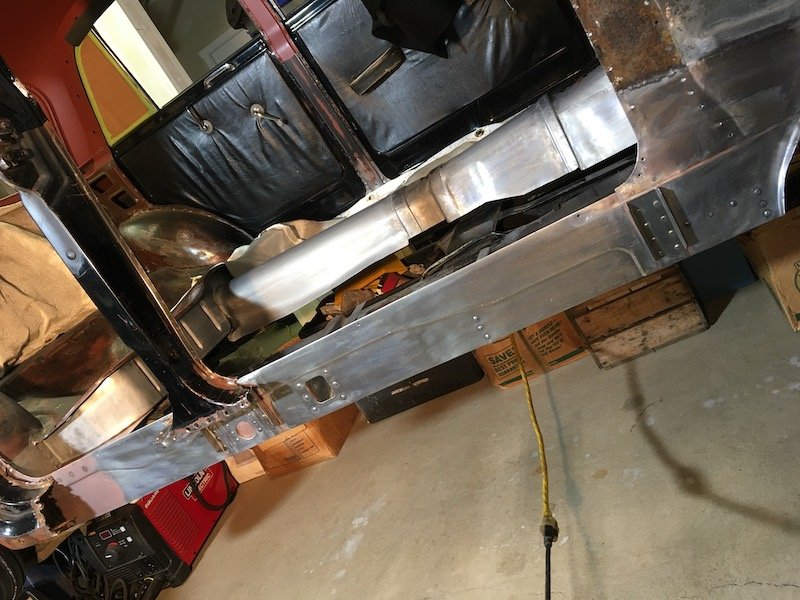
Building the 1961 Datsun 310 Bluebird - Right side completed periphery structures. A flood of pics to display the completed right hand side periphery structures. This will provide solid support for the future floor build. And on the work goes until the Bluebird rust be banished. Discussion: https://oldschool.co.nz/index.php?/topic/60267-marts-pl310-61-datsun-bluebird-sedan/ Build: https://oldschool.co.nz/index.php?/topic/60264-marts-pl310-61-datsun-bluebird-sedan/
1 point
-
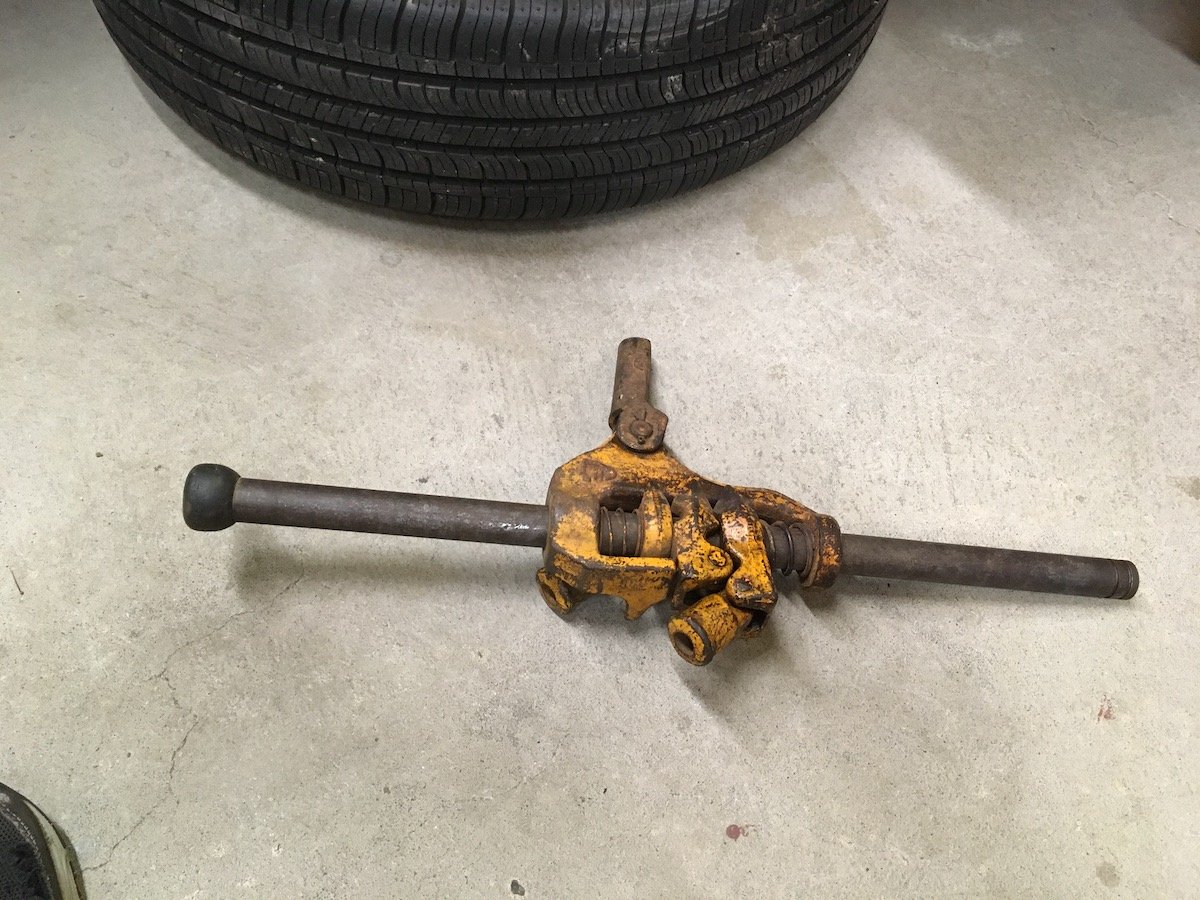
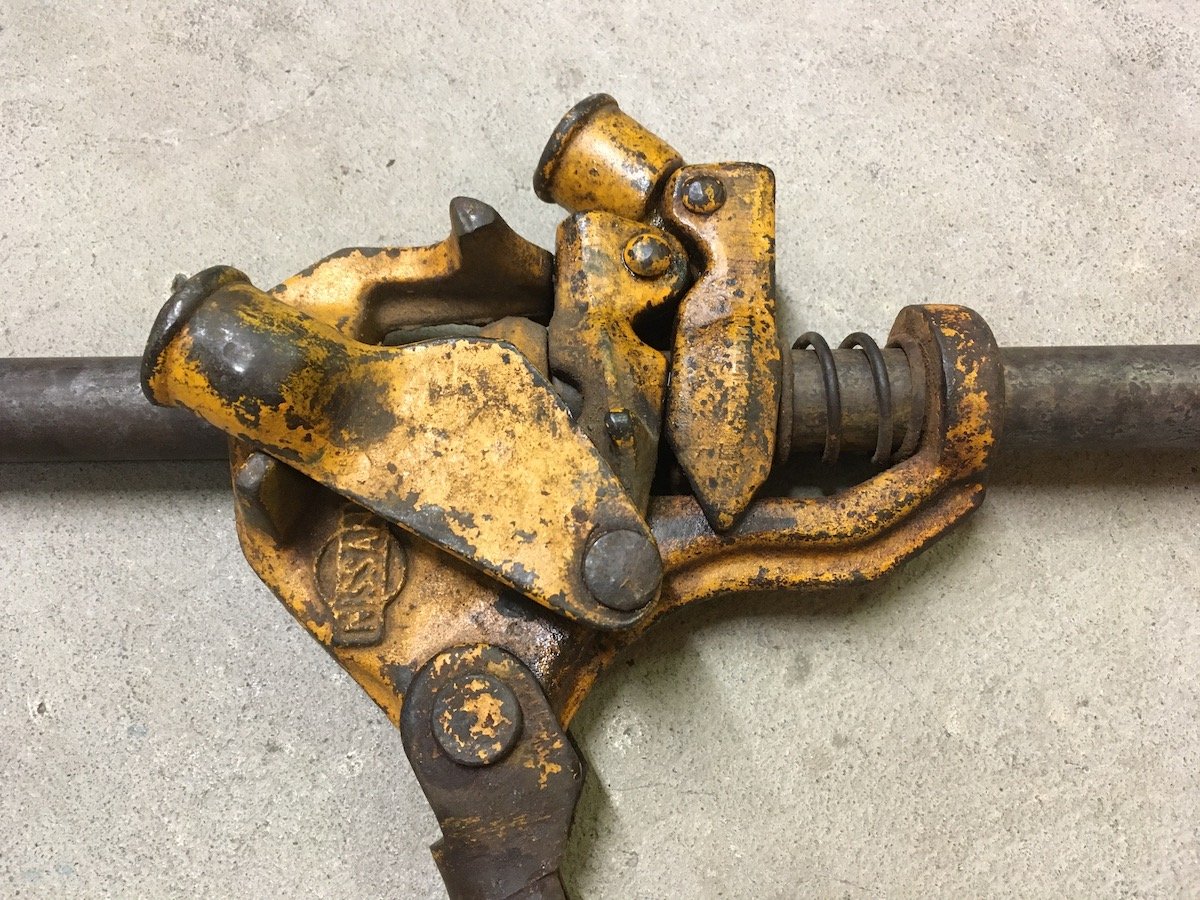
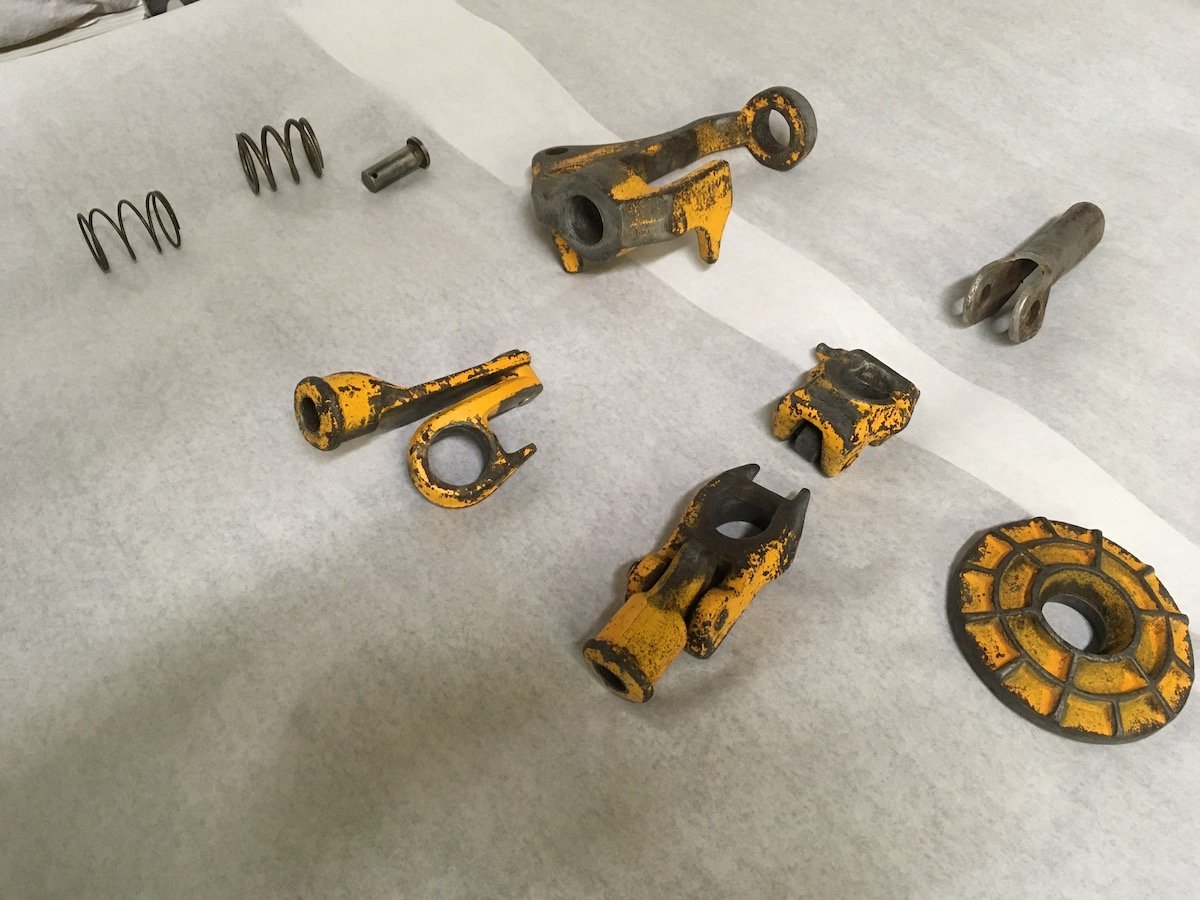
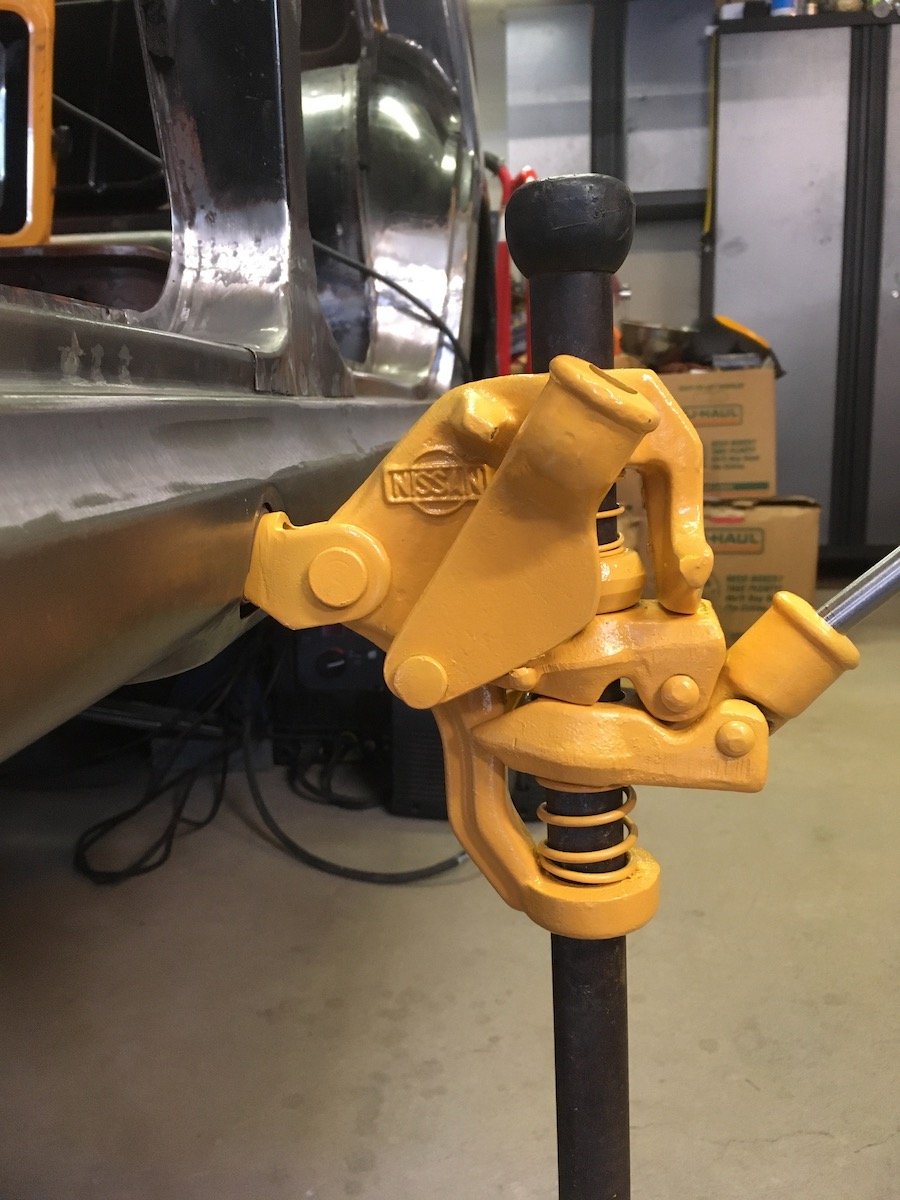
My interim diversion from the project metal work. Messed around with this Bluebird body jack thing a few weeks ago. Cleaned it up, disassembled, painted and tried it out. Lifted the left side of body an inch off the stands and set er back down again. Works great! Cut out the right side floorpan and posted that today in the project build thread. https://oldschool.co.nz/index.php?/topic/60264-marts-pl310-61-datsun-bluebird-sedan/
1 point
-
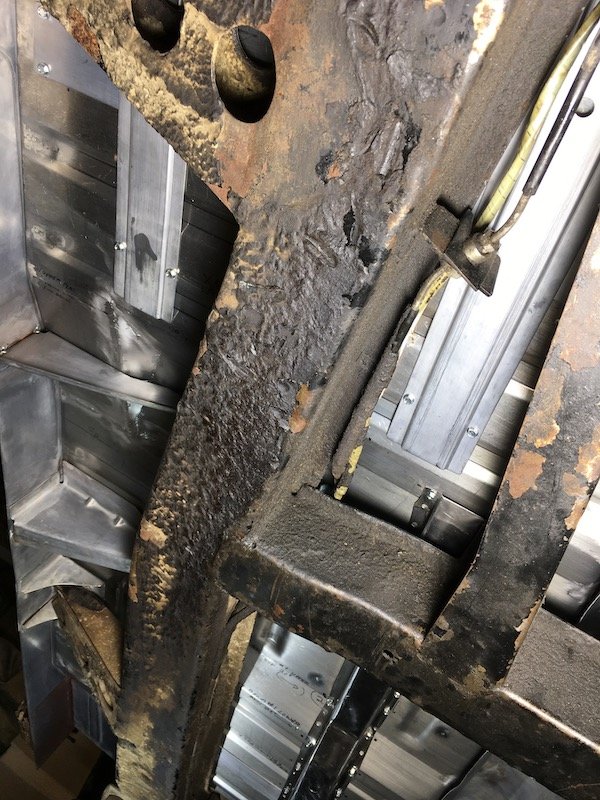
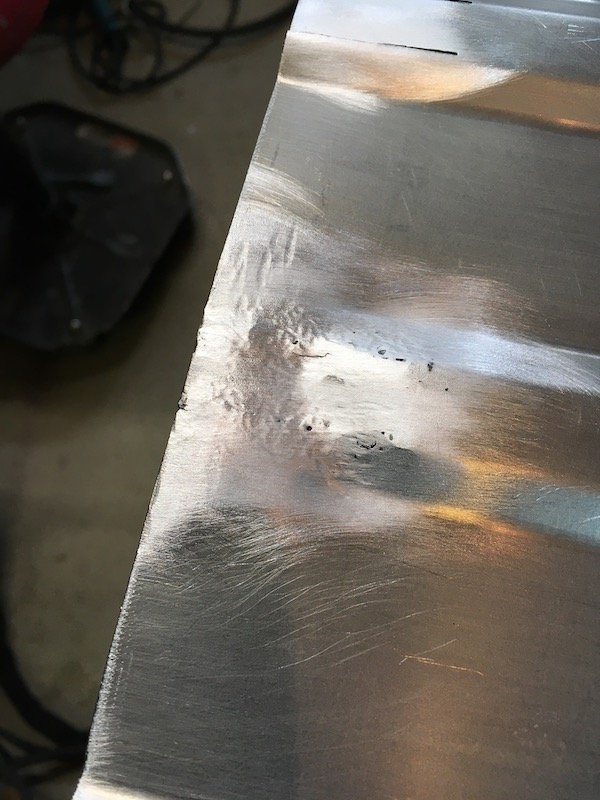
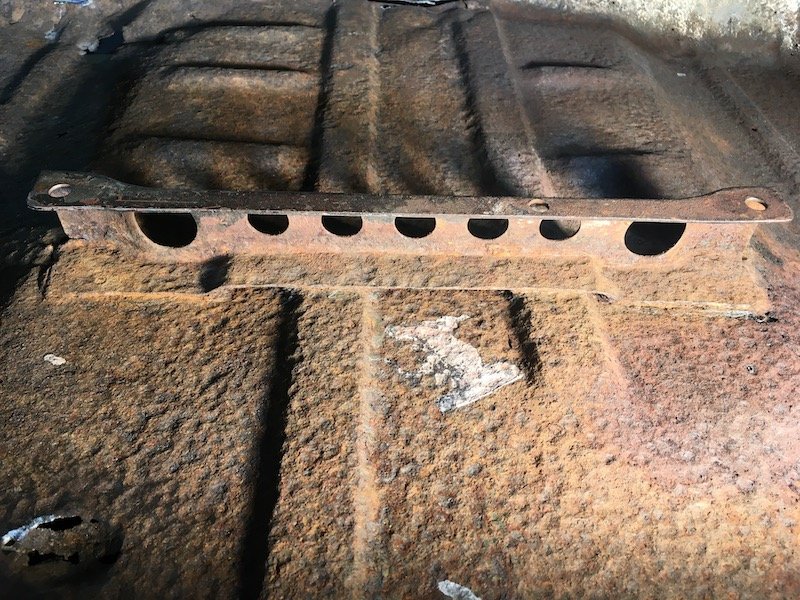
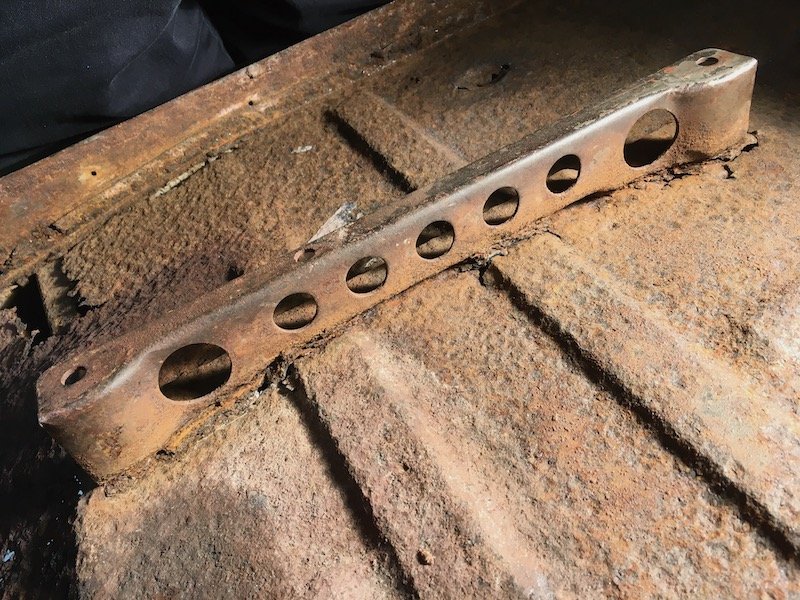
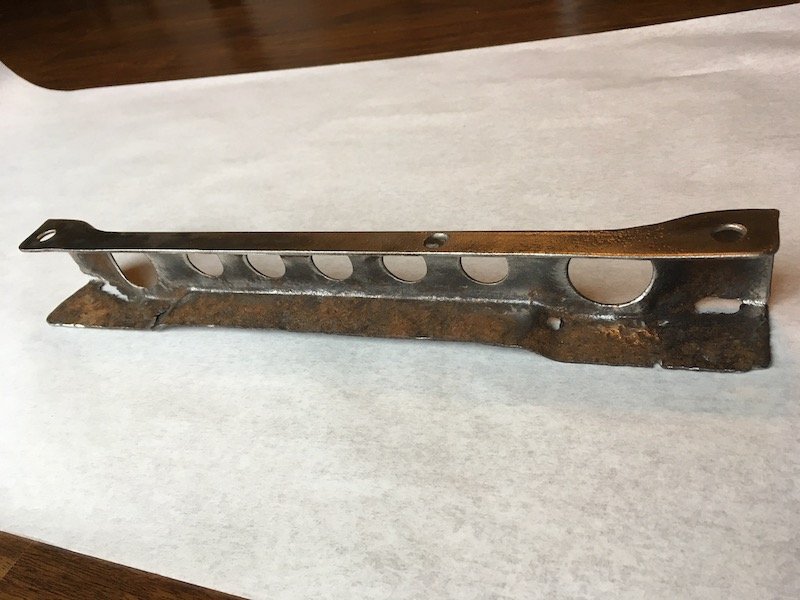
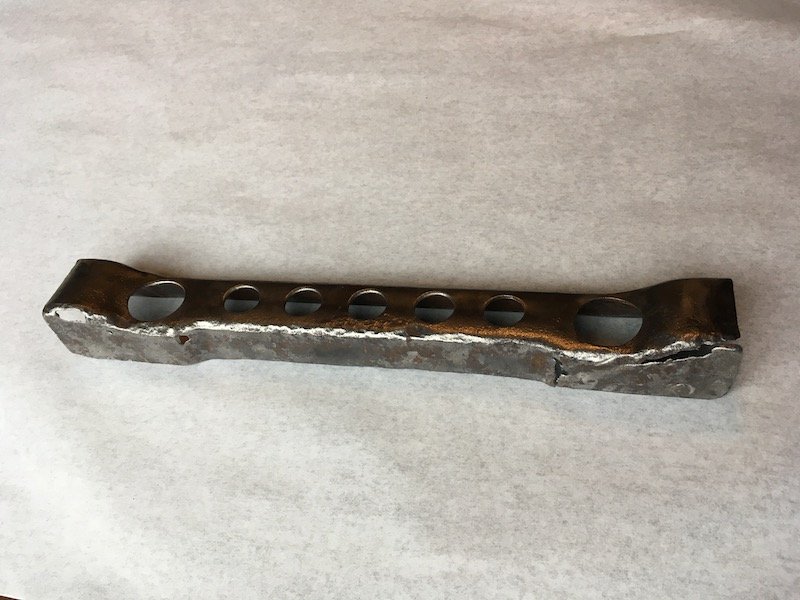
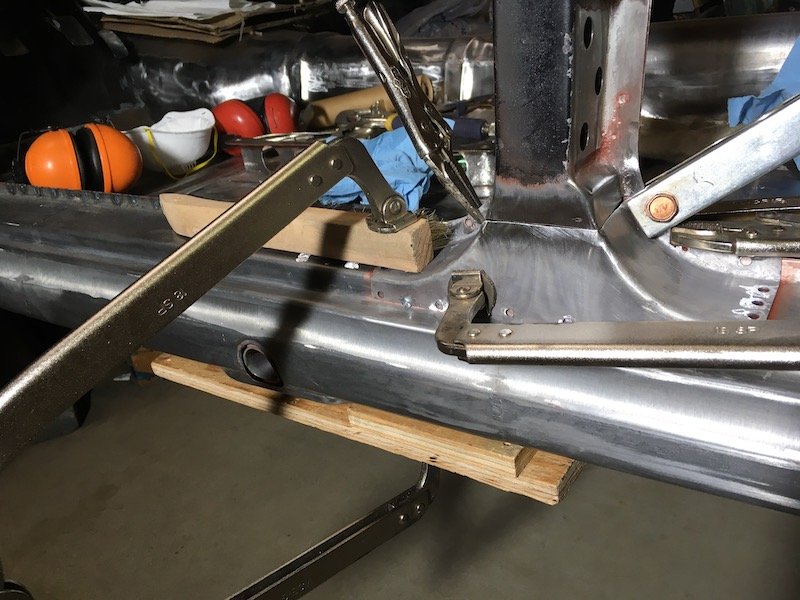
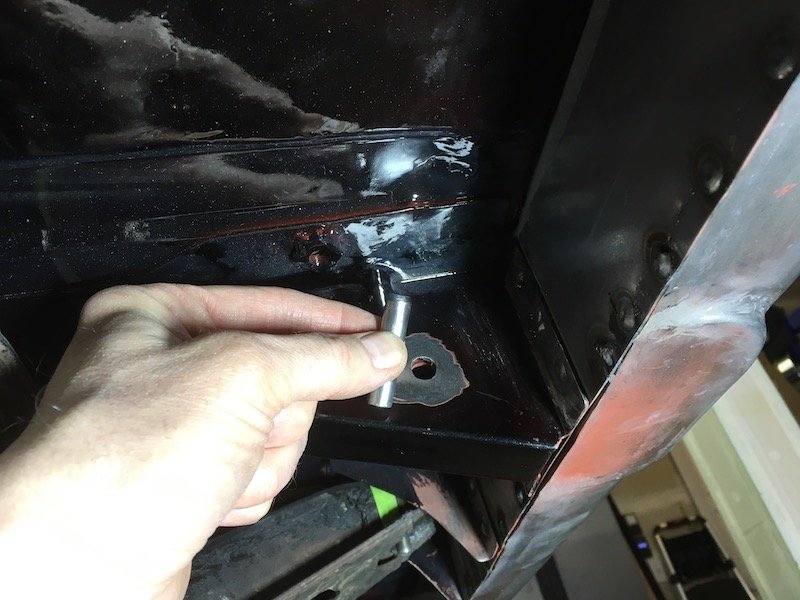
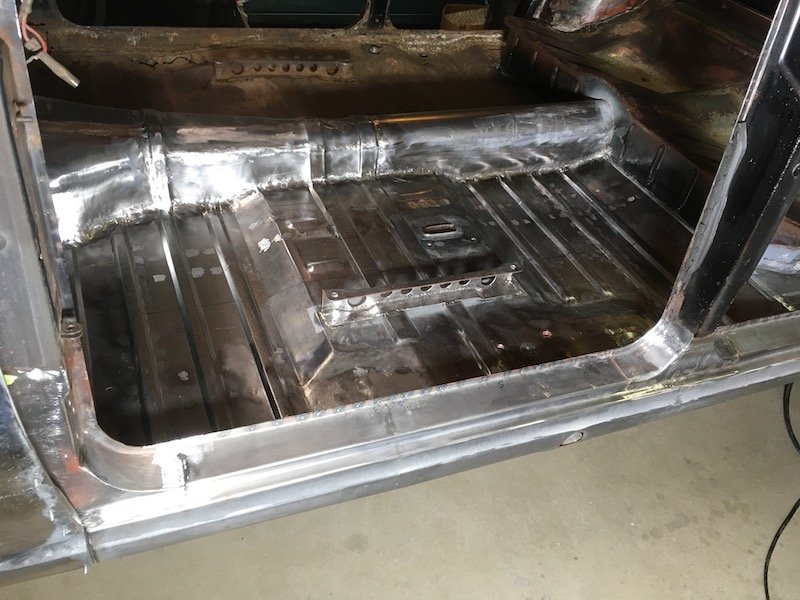
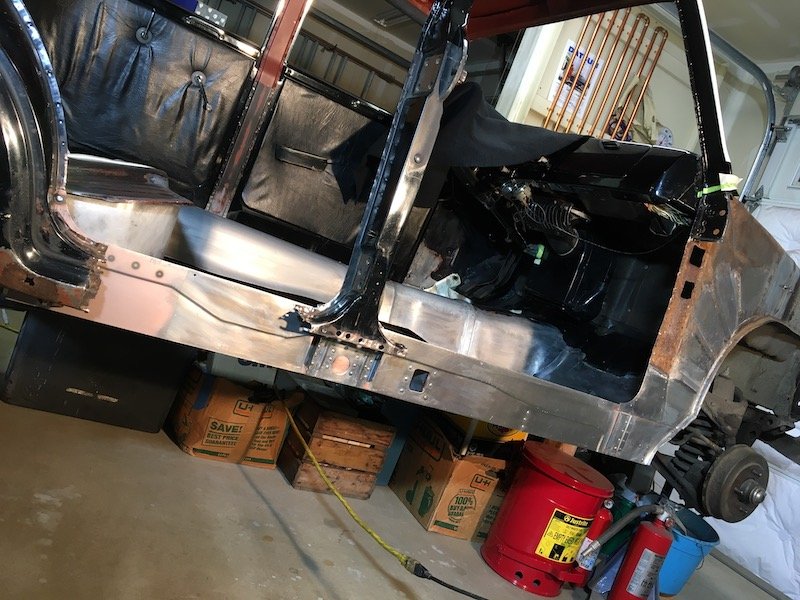
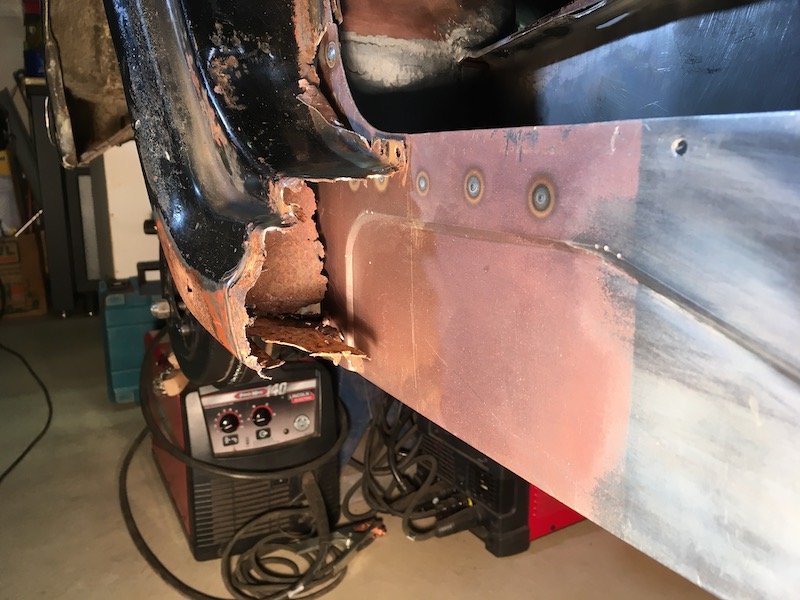
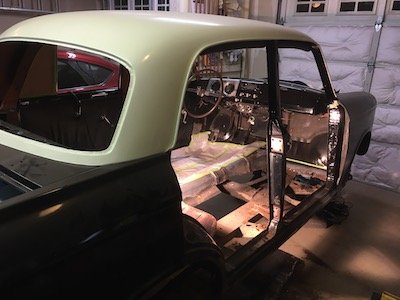
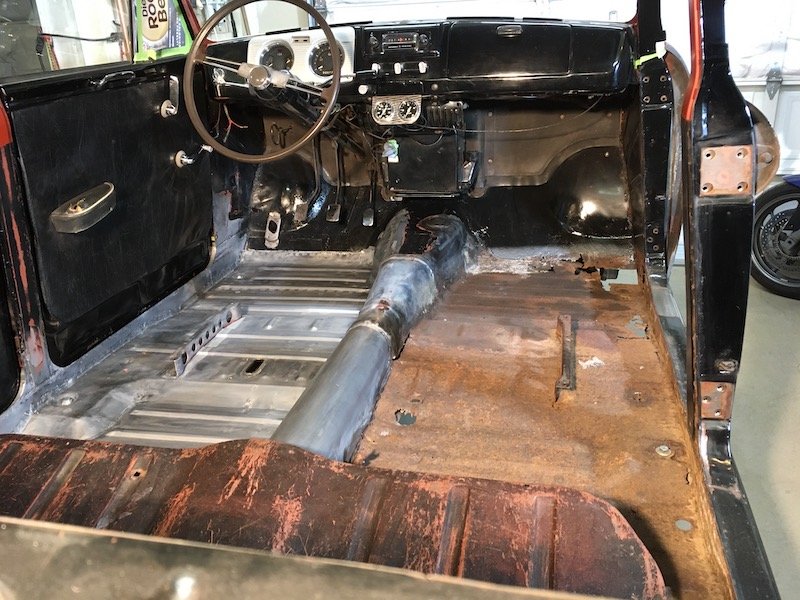
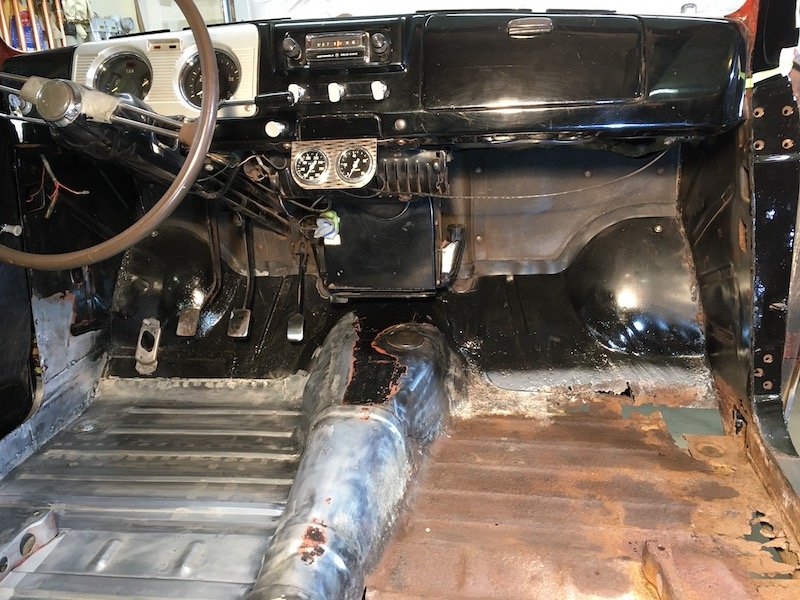
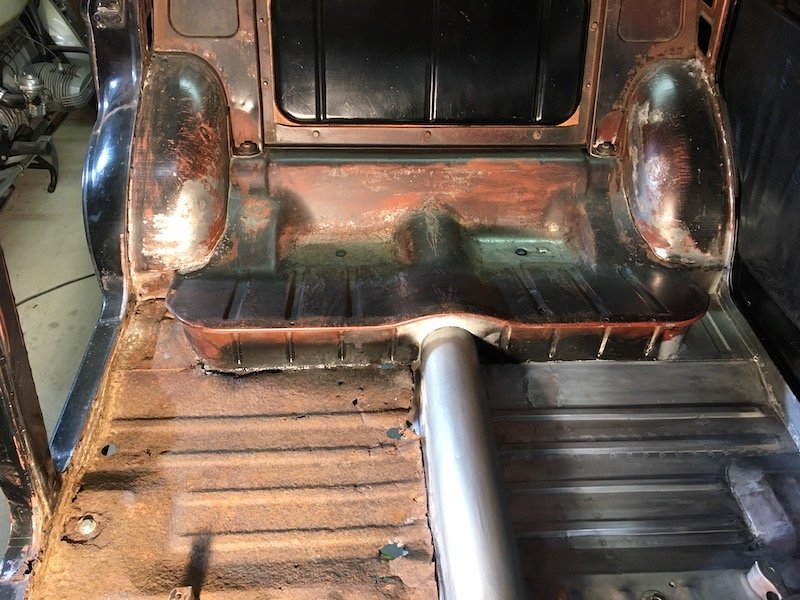
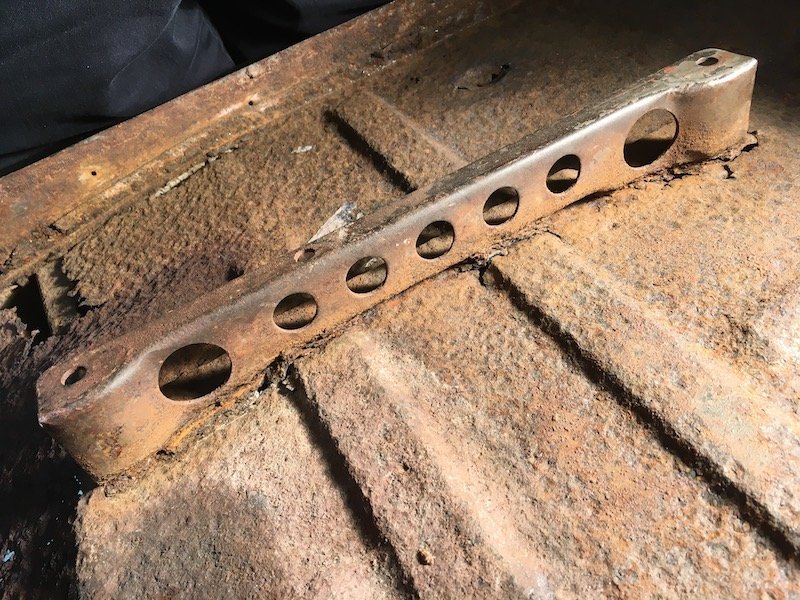
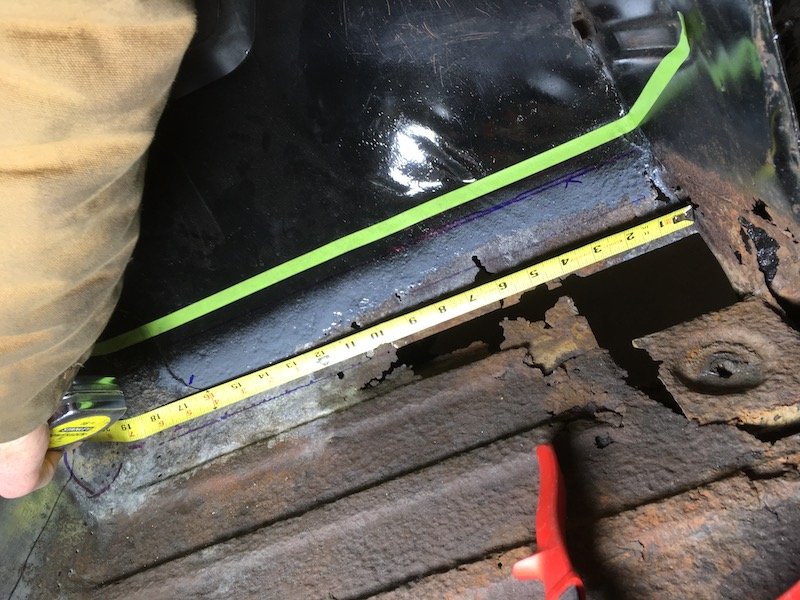
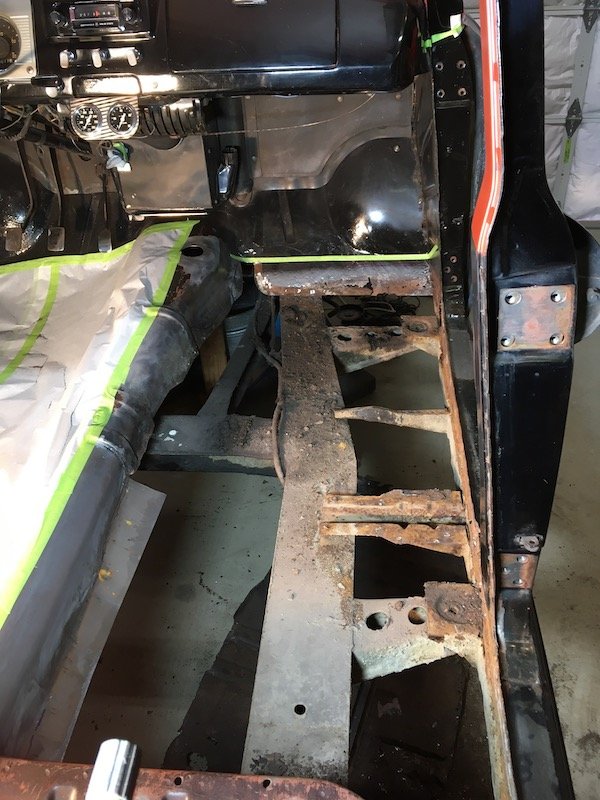
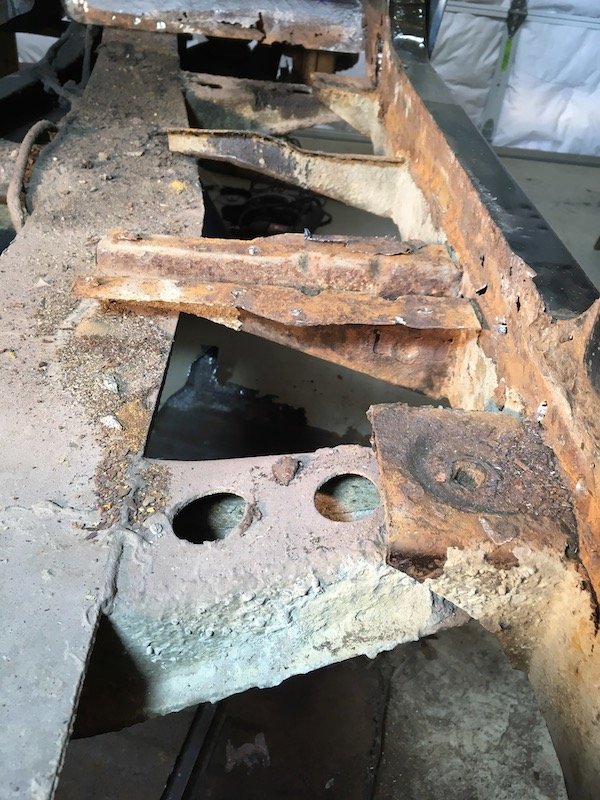
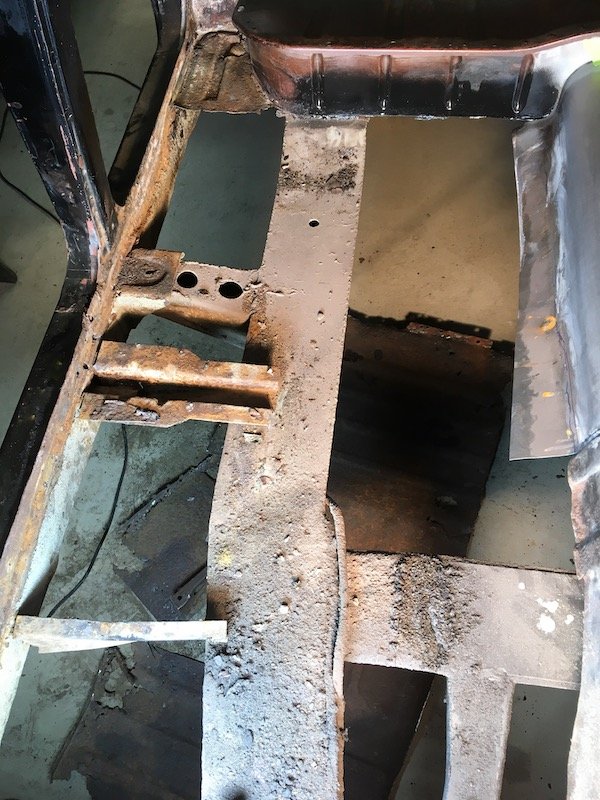
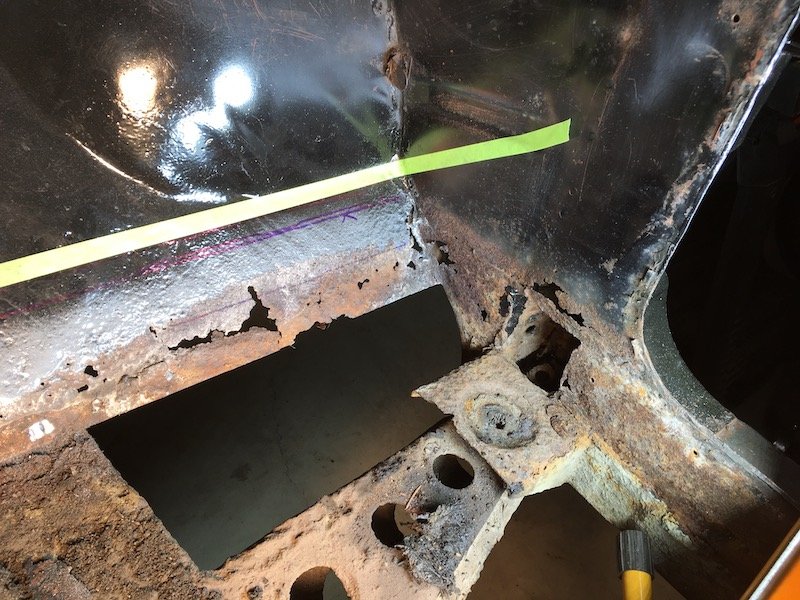
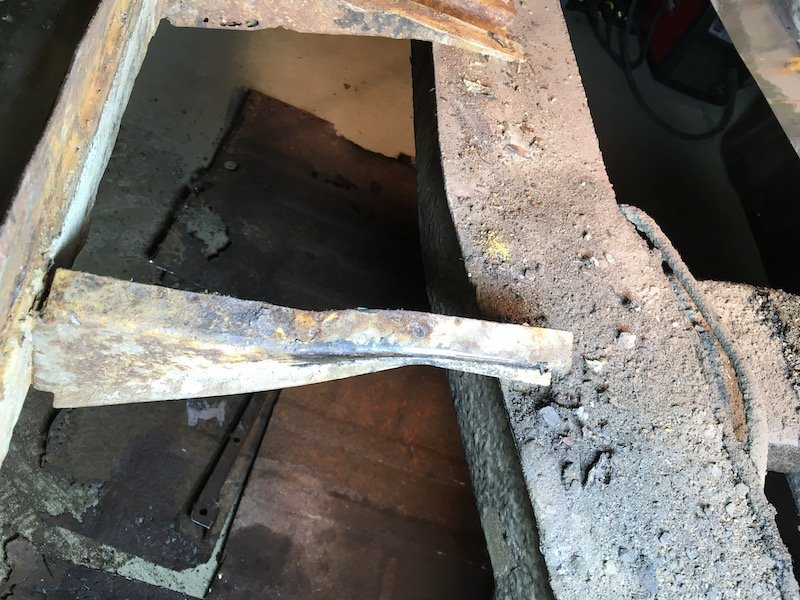
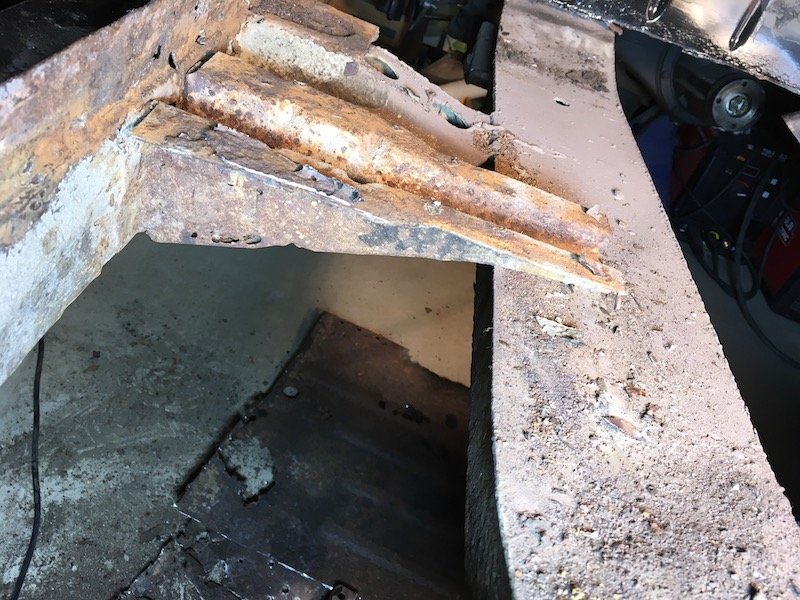
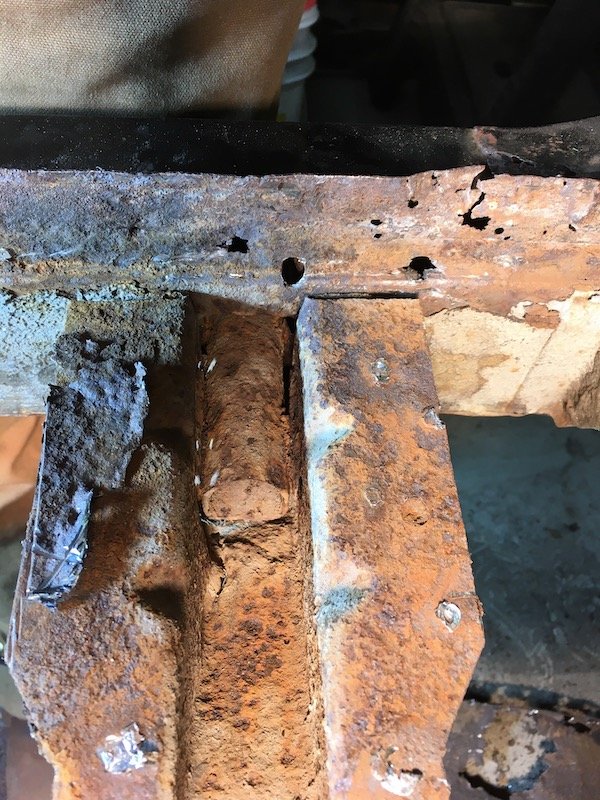
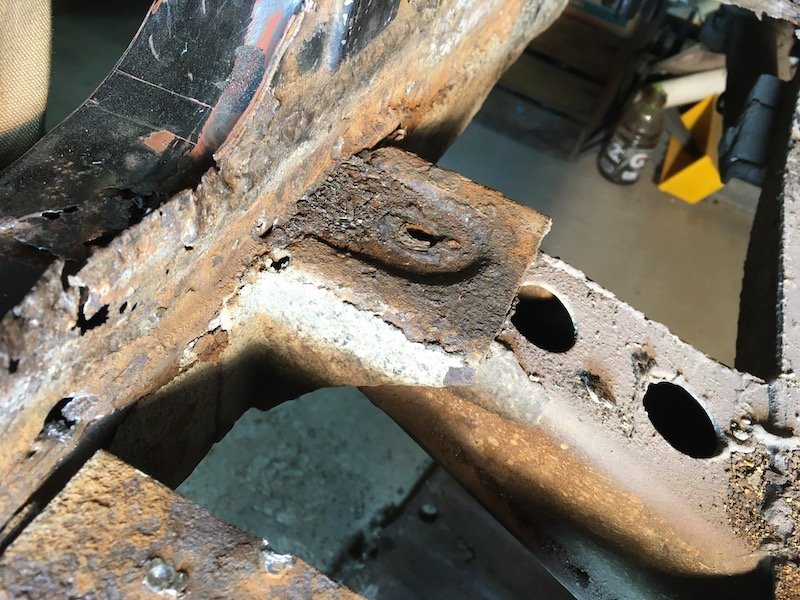
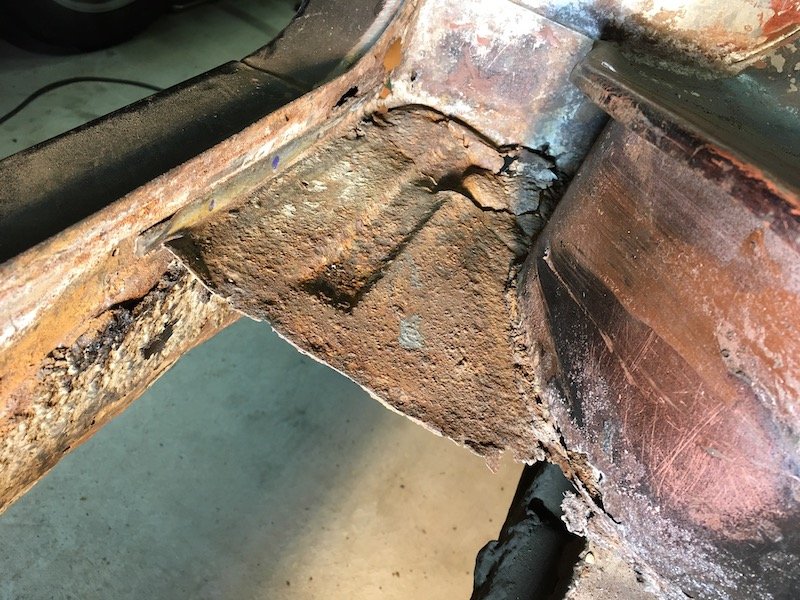
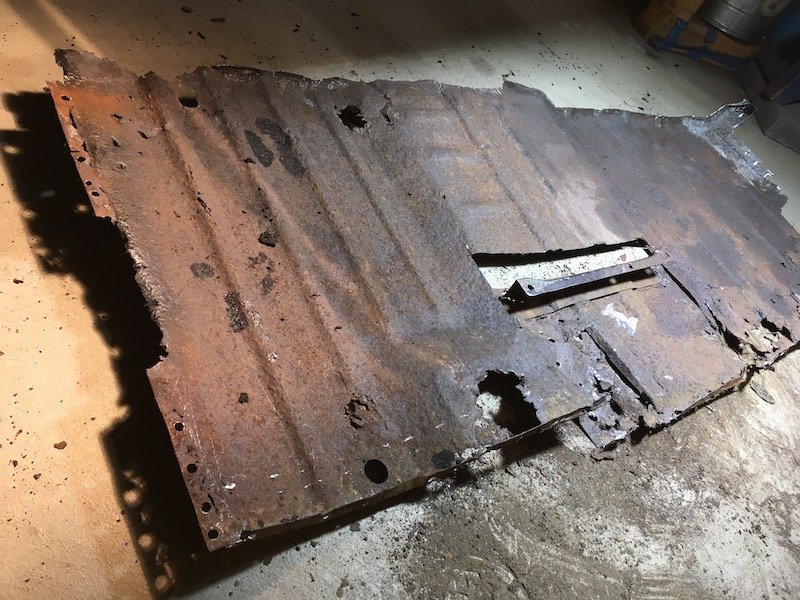
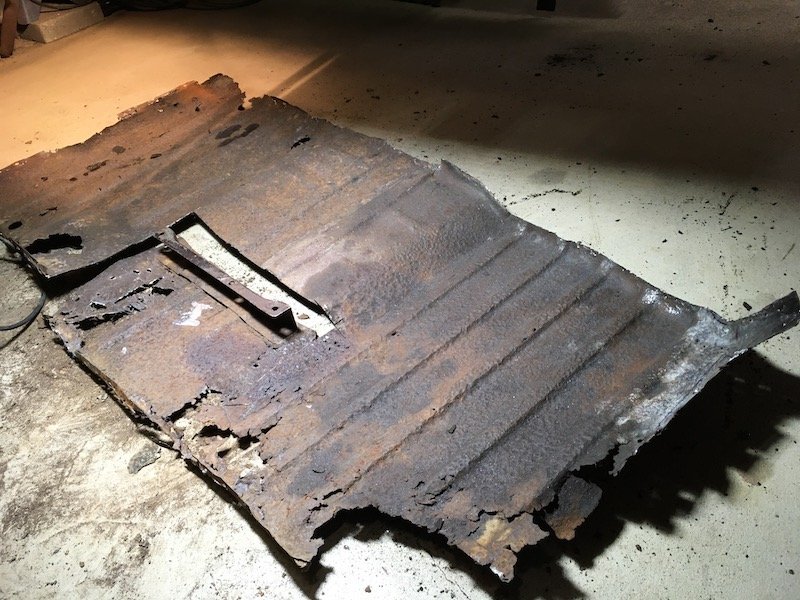
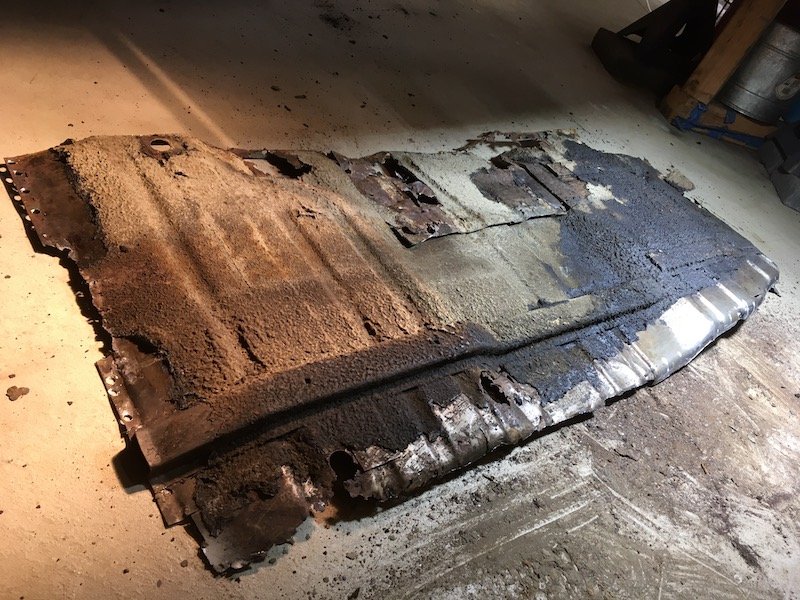
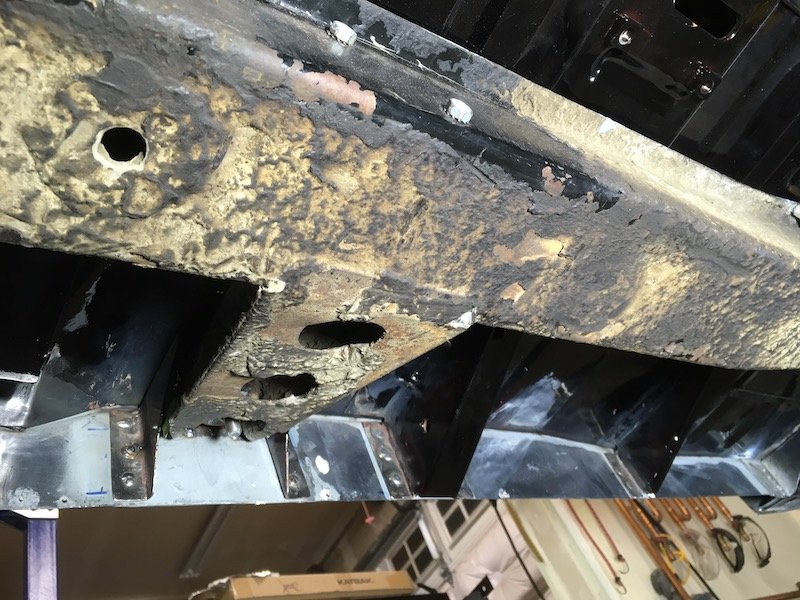
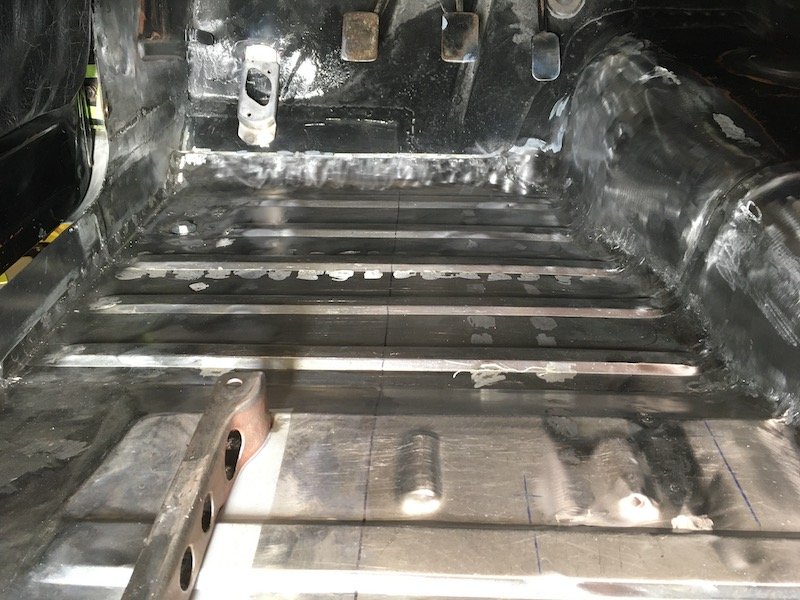
Building the 1961 Datsun 310 Bluebird - Removing the rusty right side floorpan and inspection. Finished the left side of car and I'm now just starting the right side. Recording and assessing the before state of the right floorpan and adjoining structure. That big hole on the middle lower right next to the tunnel is where an aftermarket seat belt was bolted directly to the then thin sheet floor by a previous owner back in the sixties. Sketchy. No secondary doubler plate, exhaust seal or anything. Local floor thickness remaining was nothing. Potential belt tensile restraint strength was zero. Plan is to salvage and repair the seat support bracket. The bottom flange is rusted out and the rest is not too bad. Measuring up the rotted toeboard before cutting the floorpan out. Plan is to cut the toeboard out later along the tape line. Cut the floorpan out. Survey of the underfloor brackets. Looking forward. Looking aft. Frame is not rusted, just dirty. Front A-post and body mount bracket. Rotted. It will be replaced. No. 2 (moving aft) bracket. It is twisted a bit due to some sort of abuse impact, and salvageable, but will be replaced since I've already made a new one. Side of body and jack lift point bracket. Rotted out on bottom. It will be replaced. B-post and body mount bracket. It might be salvageable. Floorpan, side of rear seat pan. Rotted. It will be replaced. Already have a new one made. Lower edge of rear seat pan vertical structure will be patch repaired. The remains of the removed right floorpan. Rust attacked it from the top down. Bottom view of same. An asphalt base underseal coating was applied against the otherwise bare sheet metal by the Nissan factory. This coating was relatively effective, it just didn't help the top side much. The only salvageable parts (so far). And the work continues... Plan is to go around counterclockwise and repair the perimeter structure starting with the toeboard before launching into making a new floorpan. Masking paper on the left side is to keep the cutting and grinding particles off. I'm also going to cover that completely with a protective welding blanket. Discussion: https://oldschool.co.nz/index.php?/topic/60267-marts-pl310-61-datsun-bluebird-sedan/ Build: https://oldschool.co.nz/index.php?/topic/60264-marts-pl310-61-datsun-bluebird-sedan/
1 point
-
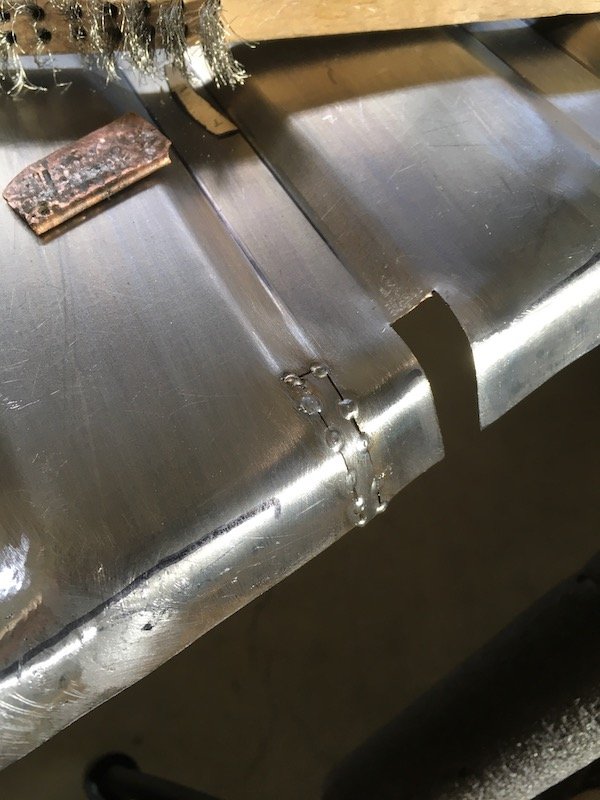
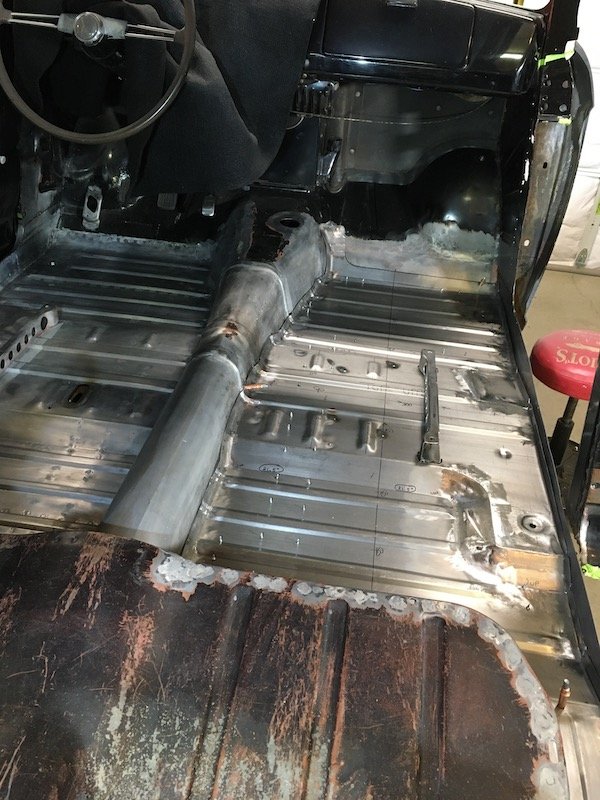
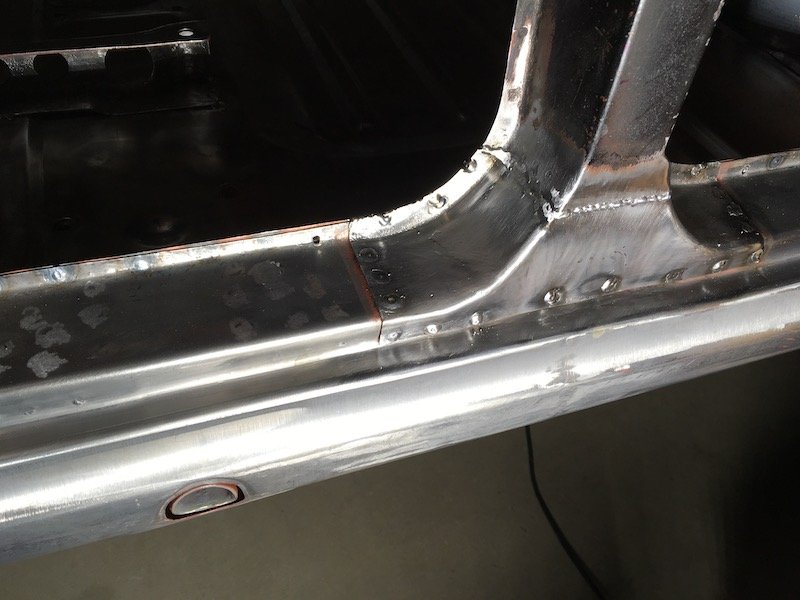
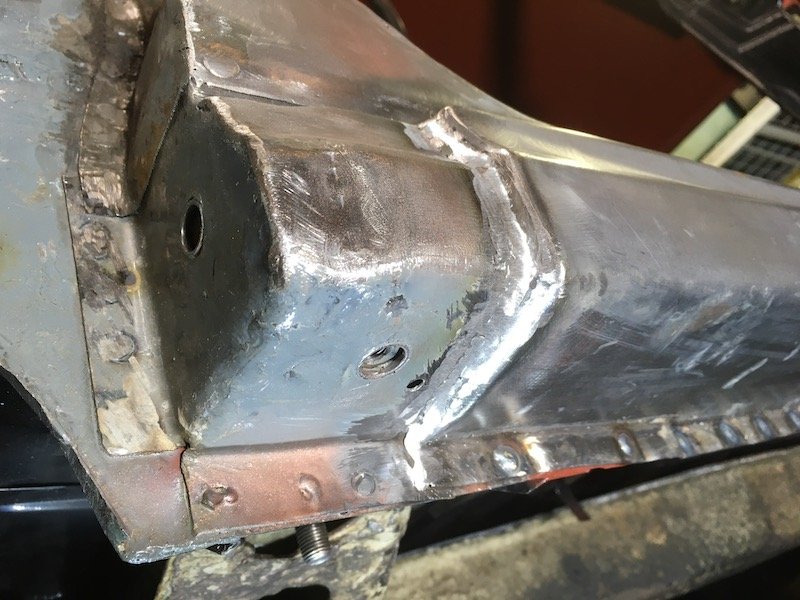
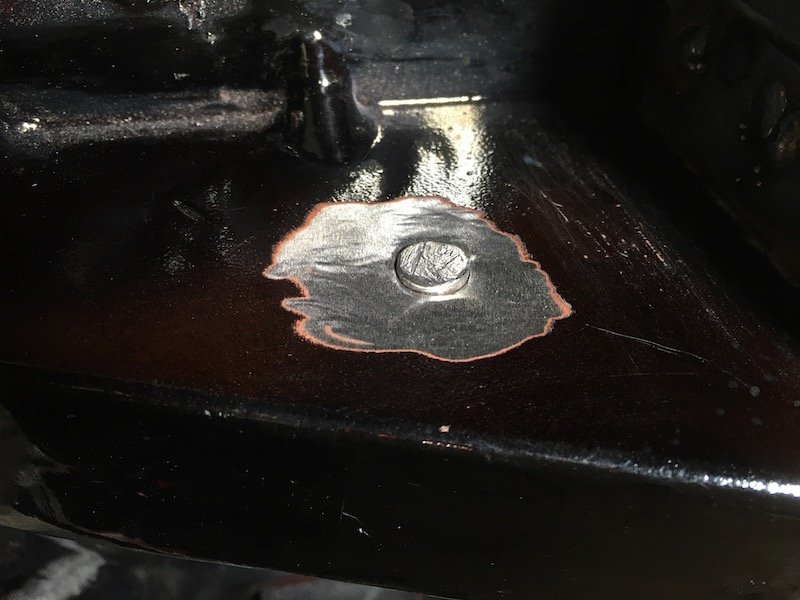
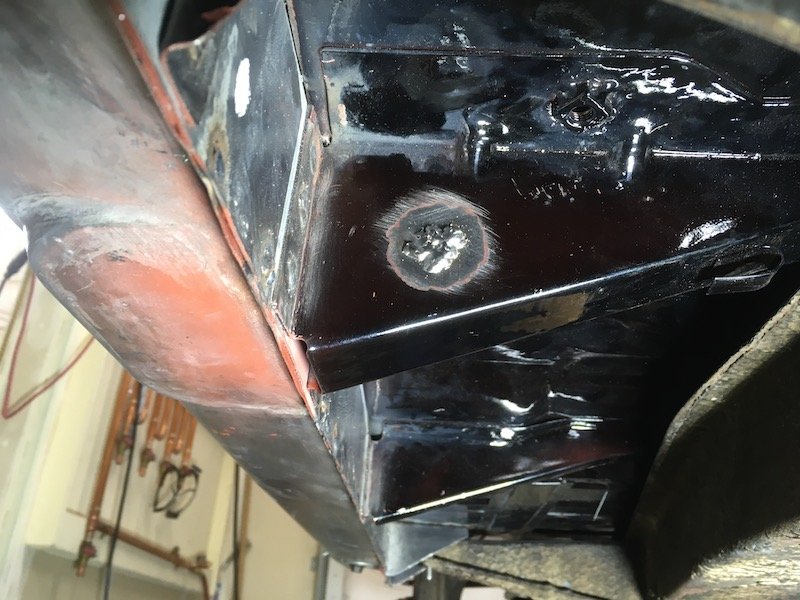
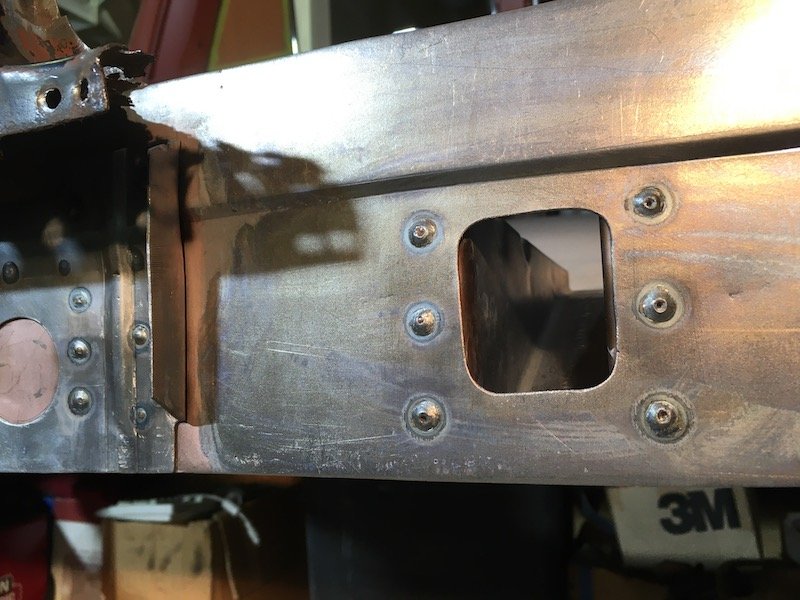
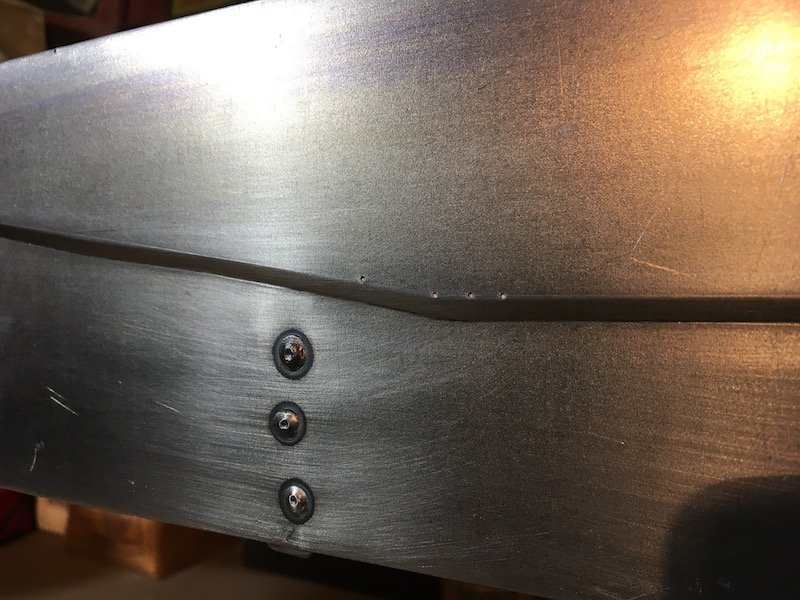
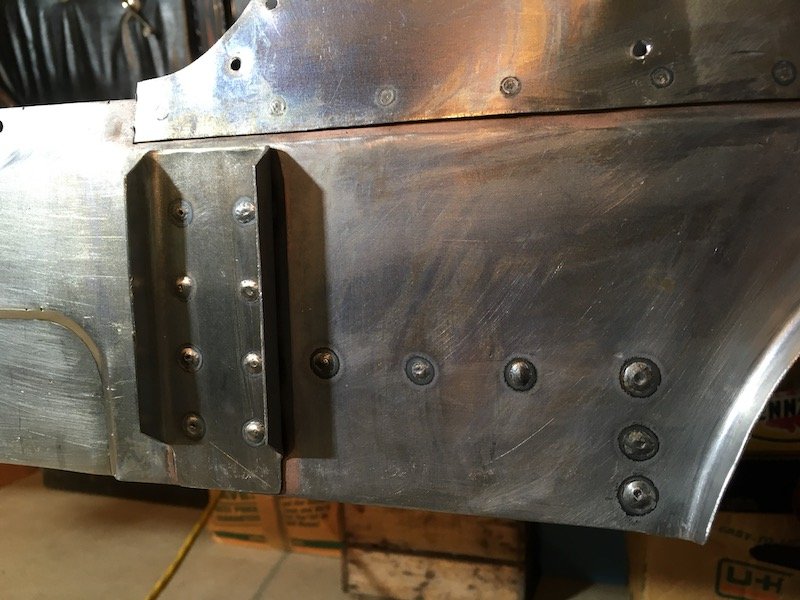
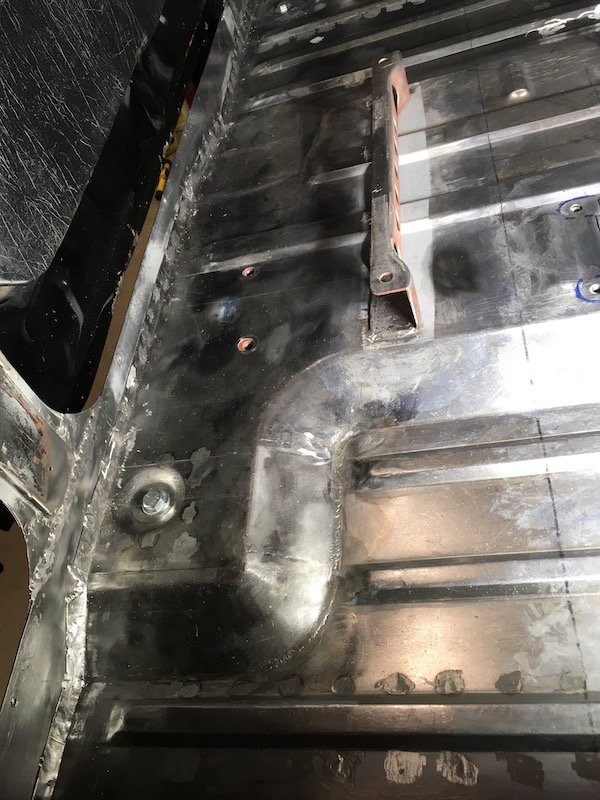
Building the 1961 Datsun 310 Bluebird Floorpan - Painting the underside and finally welding it into the car - Part two and last of the pics. Continued from previous post in the thread. Underside photos and a few more. Support bracket flange weld attachments to inner sill. Floorpan lap weld to prior toe-board patch. The far upper toe-board welds were from a couple of years ago and made a little too cold and random. I run the welder hotter now to get more melt thru and flatter welds. Sometimes though too much as in the extreme right weld melt thru. From previous post, the ideal weld melt thru I try to get. A nice shallow convex button of material. The outer sill will be welded onto the car next once I get all the hidden inside surfaces of both inner and outer coated with an epoxy prime. Should be a relatively easy task with no crawling back and forth under the car with my 60 plus year body. Too cold today though, freezing temps are prevailing. More topside pics of the completed work. Weld heads ground near flush for a clean look topside. Minutia. The black vinyl shown covering the door cards is not original. Probably from a late 60's redo. The original red and burgandy material remains underneath. The arm rest was salvaged from an ivory white parts car in mid 70's and sprayed black. Bezels for door handle and window cranks also salvaged from same PL311 parts car. Originals, PL310, were about same color as steering wheel, dark brownish gray. More of same. Again. Complicated and cramped location to access with welder. It was a little bit easier to get at this area. The structural welds to the A post body mount bracket will be left as is for best strength. The Hi/Lo headlight foot switch support bracket was salvaged and re-attached, but I had to replace the bottom flange due to rust thin-out. Yeah, so that's about it for now. Time to take a break, organize small tools and heal up from the under-car torture routine. Discussion: https://oldschool.co.nz/index.php?/topic/60267-marts-pl310-61-datsun-bluebird-sedan/ Build: https://oldschool.co.nz/index.php?/topic/60264-marts-pl310-61-datsun-bluebird-sedan/
1 point
-
Building the 1961 Datsun 310 Bluebird Floorpan - Tunnel trim completed and floorpan edge conforms nicely! Trimmed and fitted. Trim was three steps. First a rough cut with an angle grinder cutting disk to within 1/4 inch of the scribe line, then manual cut with tin snips the rest of the way, finishing with hand filing to clean and de-burr the edges. It's very tempting to just start welding it now. Just need to paint the underside and weld it in - finally! Discussion: https://oldschool.co.nz/index.php?/topic/60267-marts-pl310-61-datsun-bluebird-sedan/
1 point
-
@yetchh Thanks. The kind words of encouragement helps keeps me moving forward.1 point
-
@yoeddynz. Working the project at home in my off work time. My workshop is basically a home built wooden table, on wheels, containing an assortment of tools. Move the other car out, roll the table and welder out and have a go at it. MIG welding is fun, almost addictive, whereas forming flat bits of metal into original shapes is hard and is probably 95 percent of my labor time. Often the parts are made into rubbish and I start again. I feel like the welding action is my reward carrot for getting parts made well enough to look and fit good. Currently, I've about finished reconstructing the jack lift point structure that nests inside the outer sill panel. I'll try and post some more pics on the build tomorrow, time permitting.1 point


.jpg.b78b1e7c778a34336aa33d2fe6db245b.jpg)


This leaderboard is set to Auckland/GMT+12:00