
Leaderboard


Popular Content
Showing content with the highest reputation on 08/30/20 in all areas
-
Great news everybody! Things are going swimmingly. Air cleaner modified and painted. Cold air duct fitted. Vapour line made out of inch tube, painted and fitted. Liquid line run as neatly as I could. Tidied up the boot, fitted the tank, splashed some black paint about. everything ducted up. Fuel cap is done. Best of all. It's a runner! Fired up straight away. I'm super pleased! It only took a three months/A decade.14 points
-
Had my little helper today10 points
-
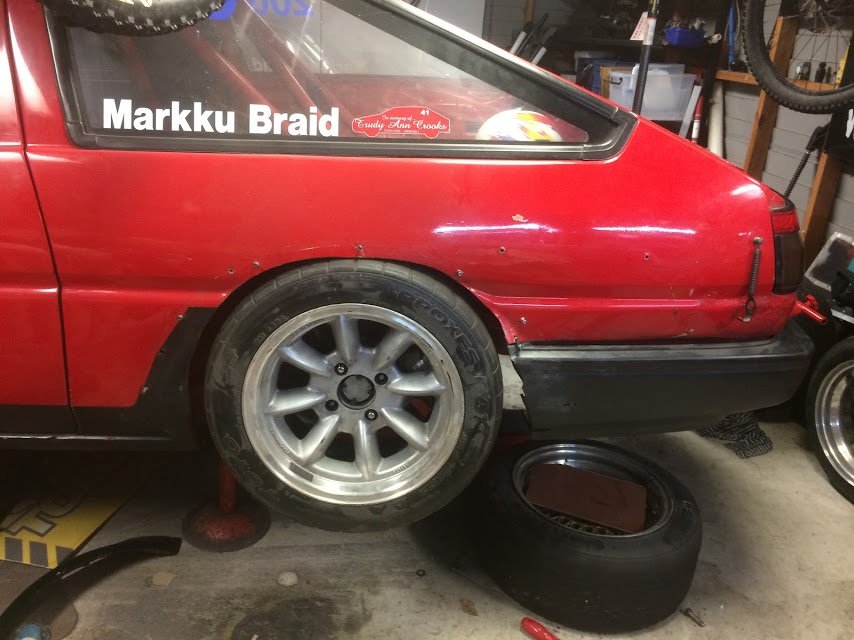
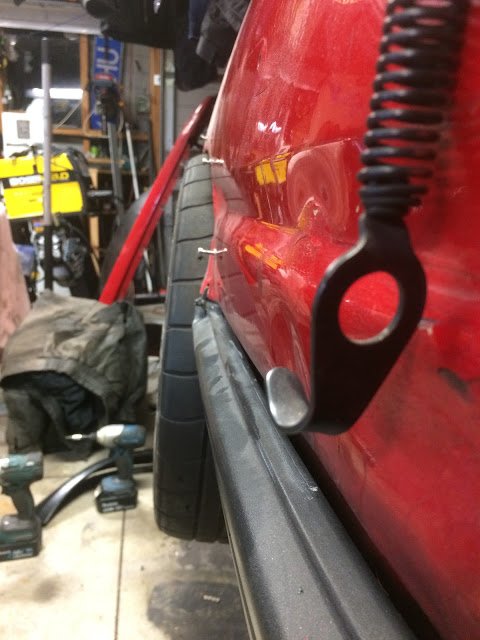
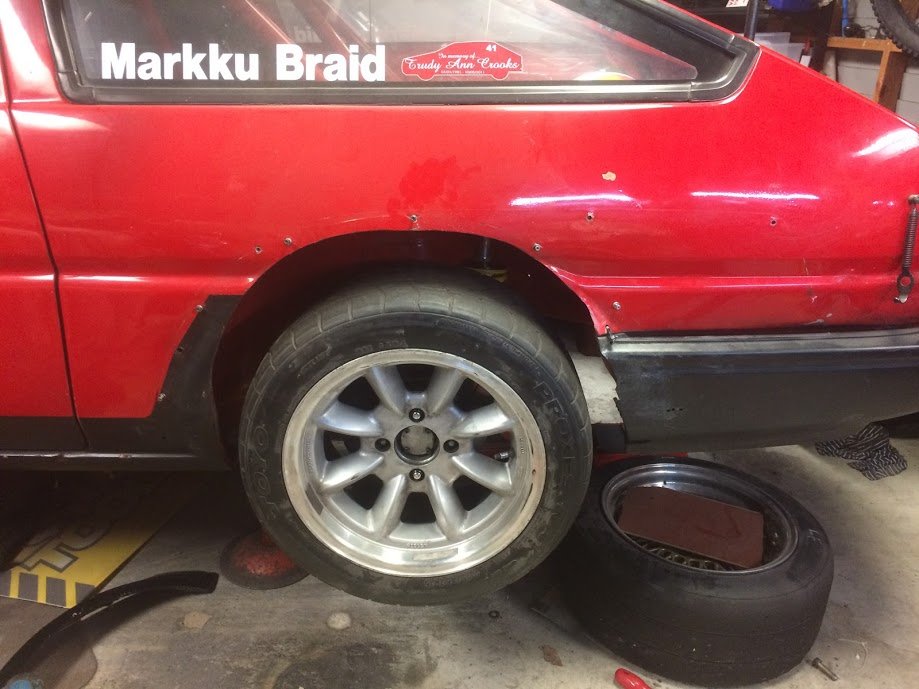
First things first, was to strip the horrid interior, and remove the front end to see what I was facing. It's been off the road since '03, where it appears someone had begun a teardown of the front suspension for a rebuild, but instead gave up, lost some important nuts, and roughly bolted it back together. Front steering joints had been unbolted, which made transporting it a mission. However this problem is fixed, and it only needs some new bushes/brake bleed to be operational. I sourced a brown ute bench seat (ute's have headrests and sedans/wags don't). Much harder to do than I had anticipated! But it's improved it 100%. I also found a premier wood dash facia, and a nice black dashpad that needs some straightening. I took the column apart and have restored all that, ready for reinstallation once my interior is black. Should give a much nicer feeling once I get it back together than mouldy, faded and split brown! Next up, I installed a 202/trimatic that came from an HZ ute. Runs nicely, and didn't take long at all to swap in as most of the engine mount bolts had been lost. The car didn't come with a driveshaft but I've managed to find one which is great. I took a look at my rad support panel to find that rust had gotten the better of the lower section, as they so commonly do with these. A replacement rare spares panel and a few hours later and it's as new. Spent today chopping away at the body, but also got keen to tackle the exhaust and get that setup. @MACKAZ did me a deal on a 2 barrel inlet/headers which is awesome, for now the 2 barrel setup will wait for the future but I thought to fit the headers as a start. However I didn't consider that these (probably commodore) headers may have fitment issues and found that they hit the firewall when I tried bolting them on. Some cutting and welding later and they fit and the exhaust is done. Fuel tank is full of 17 years of water/varnish mix and to be honest I'm not sure the engine enjoys running on it but nonetheless goes. Need to pull tank and drain, the lovely folk at holden didn't install a drain bung for me. The car as it sits. These come apart so easy, it's super good. Painted my steering wheel up and came out better than I thought. Hopefully it doesn't wear too bad.9 points
-
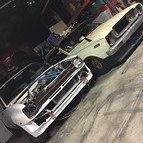
Sold my GX toyotas and acquired this gold HQ kingswood, tastefully equipped with a 202/traumatic. Reg on hold was the main selling point, plus I decided it looked reasonably solid during a hastily organised nighttime inspection. Got it home and dug straight into it! First to go were the VC commodore plush front seats, I've never sat in something so comfortable in my life but they're definitely not staying. After looking it over a while, I've found a few areas that need reconstruction but overall it's pretty solid for what these are. Standard bog spots around the place but overall a great base and something I can have on the road reasonably soon. For the next year or so I'll be keeping with the 6 cylinder powerplant, however next year I'd like to go for a V8. I have a few ideas but not letting them get the better of me at this stage, hoping to have this down to beach hop in November/OS drag day in December. Plan is simply get wof, tidy paint, wide steelies (or period mags potentially), and a few other mandatory wag bits and it'll handle daily duties as work's close/why not. cheers Gross under the bonnet. Inner guards are at the blasters, and this motor has been swapped out in favour of a good runner. The interior, with a hacked dash and VC seats before I stripped it.8 points
-
So I’ve been chipping away over the past weeks. So much done but still so much to do! Managed to get the whole rear end dialed Just need to cap the upper arm boxes (can’t decide if I should make removable or just weld them on) Caliper brackets made and calipers mounted Made a start on the sump as the factory lower pan would have sat 40mm lower than the crossmember made an intake pipe by stretching a 3” tube over a 3”-5” sch40 reducer. Bit of grease and the press did the job Trying to decide header layout also Fixing up some back yard rust repairs, it’s only a seat time car but you gott make it look good atleast once So I’m getting there slowly. Going to try get fuel tank/lines in and dump done by next week as the loom should be ready to put in then. Will be good to fire it up. with only 5 days left of regular employment, the aim is to get this completed before my nomadic stint in the bush over summer7 points
-
So lots cutting welding ensued for 2 hours today it now looks so much better and even moved under its own power....... the gearing is about 200% too tall though will swap old sprocket back over should vastly improve it. Test ride not possible though as the valve stem is dry rotted no drama will get new one stuck in this week. I also cant upload images for some reason Instagram it is.4 points
-
Had a solid weekend on this, I now have all the belts attached and tensioned up, plus all the servos mounted. It all moves pretty freely so I guess in the next day or two I will hook up the control stuff and see if it will move...4 points
-
@MACKAZ I was just going through my Impco lpg carb book looking for something else and spotted the formula to work out the cfm of your engine at a given RPM. It's CID x RPM / 1728 /2 x .85 So 250 CID x 5000RPM (Optimistic) = 1250000 1250000 / 1728 = 723.4 723.4 / 2 =361.7 361.7 x .85 =307.4 Your 4.0 will sip about 310 CFM at 5000 rpm I'd put the 600cfm on TradeMe and put the money toward a more suitable carb. As a side note. Big carbs on small engines tend to run lean. They dont generate enough vacuum in the venturis to draw fuel out of the main jets. People put large jets in them to try and overcome this but the idle and transition becomes very unstable.4 points
-
After doing some garden work yesterday, I got rewarded with some more quality time under the Thames this morning. With the gearbox end of the gate selector cable largely sorted I thought I'd start off by looking at the column shift end of the same cable. In order to push on this cable it would need to enter the pivot arm from the right. I temporarily clamped the cable into position and a problem was immediately apparent. The underside of the driver's side foot well doesn't have enough space to facilitate a lazy bend on the outer sheath resulting in a very stiff cable movement. So this option isn't going to fly. The only other option is to mount the cable so it enters from the left. Whilst this will allow sufficient space for the cable to make a lazy bend, it has two knock on effects. First challenge is that by running the cable this way it will be pushing when it should be pulling and vice versa. The second challenge is that the cable will be on the opposite side of the gearbox to the selector arms. I lay on my back thinking about my options for a while and then I had a light bulb moment. With the lazy bend the cable sits next to the left hand chassis rail and moves freely, so it's obviously happy in this position. So if I were to run the cable along the left hand chassis rail and then took another lazy loop crossing the gearbox just aft of its tail, not only will I then end up on the correct side of the gearbox, but I will also be pulling from behind when previously the cable should have been pushing from the front. Win and win ... I think. I'll just need to fabricate a different holding bracket for the cable at the gearbox end and will also need to factor in the additional cable length required when I get the cables made up. With a bit of luck I'm hoping to attach the new bracket to the gearbox housing somehow which would make me happier too. I tried to upload a picture of the failed option, but the upload failed for some reason so I'll try to share the picture later. Thanks for reading.3 points
-
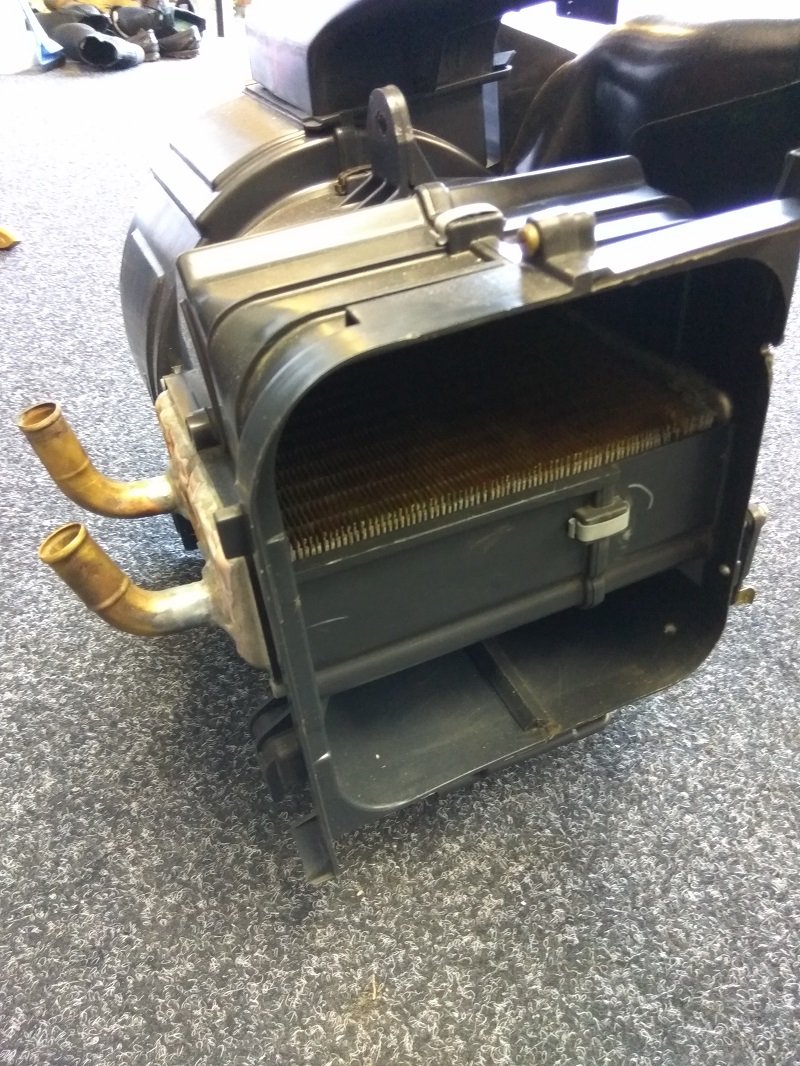
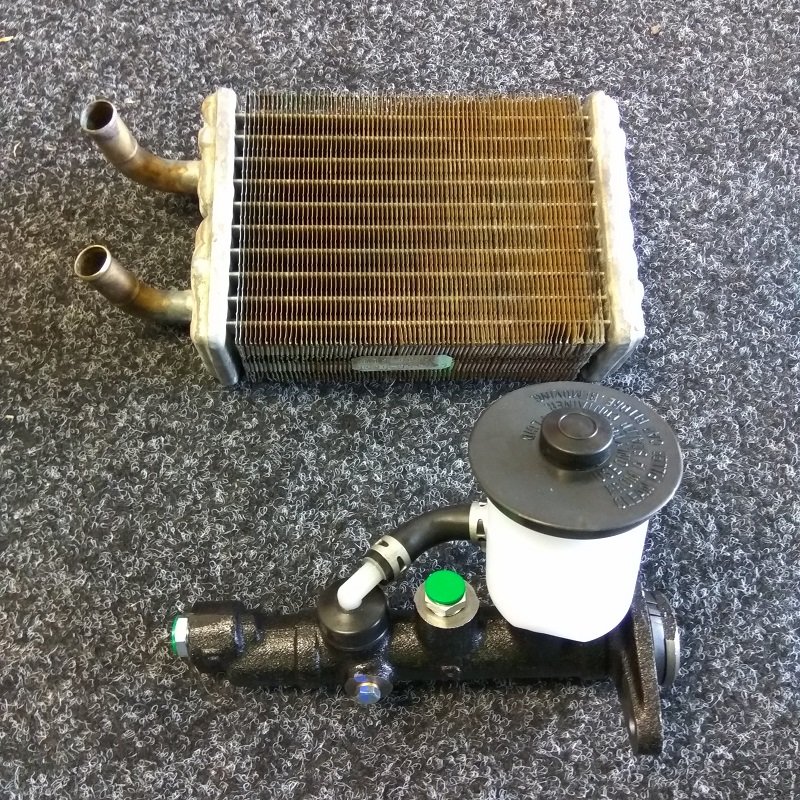
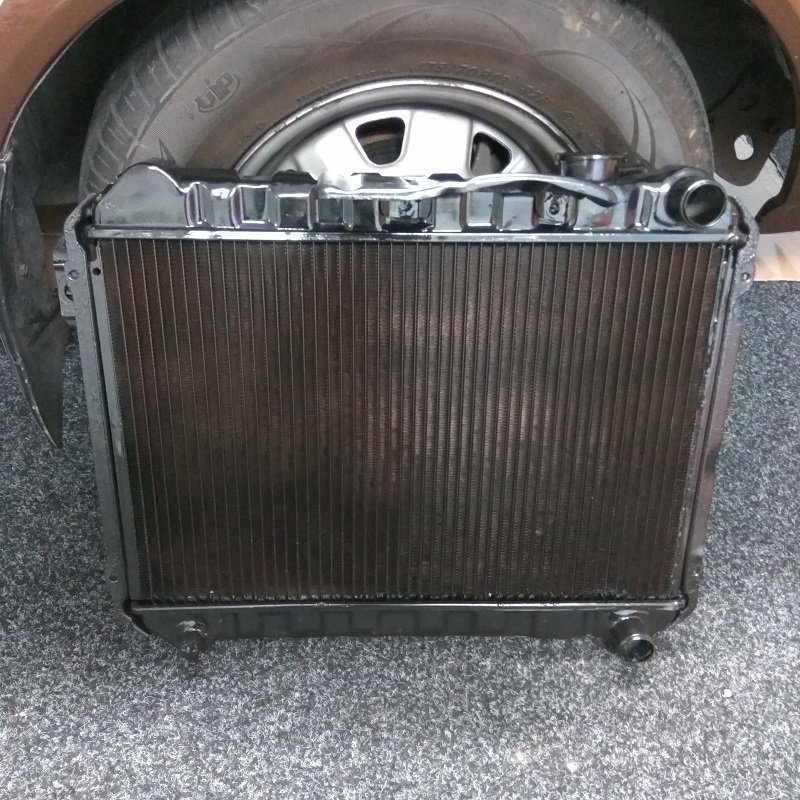
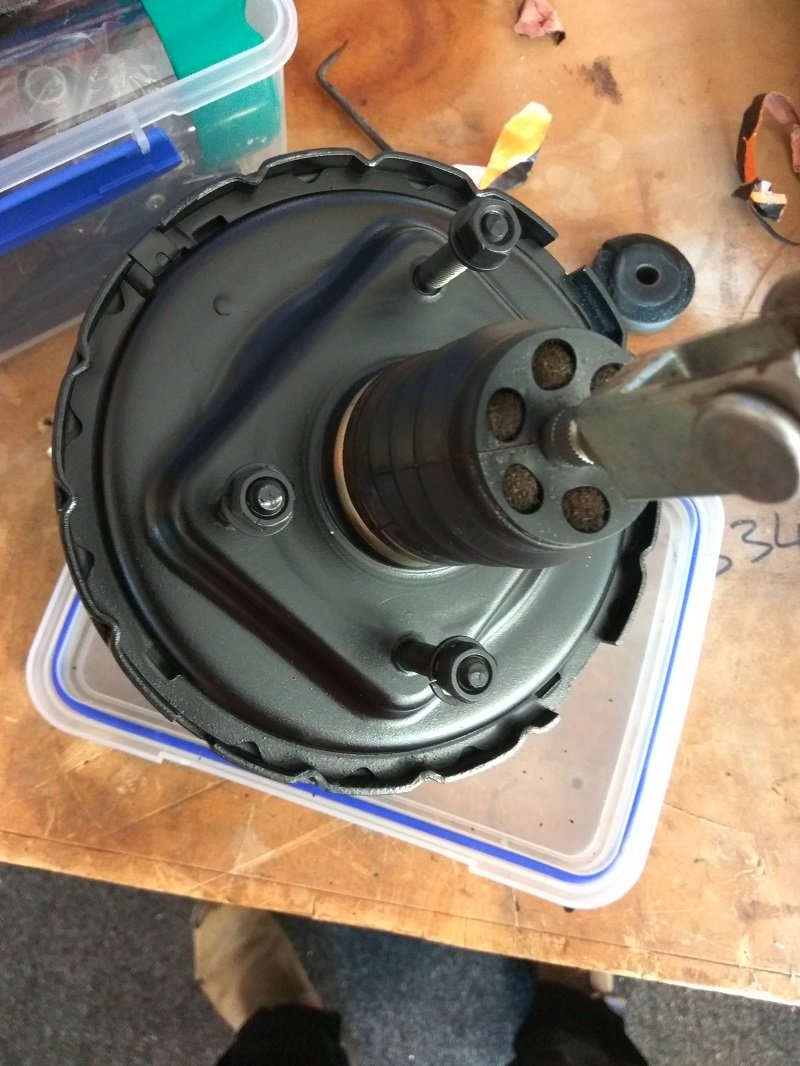
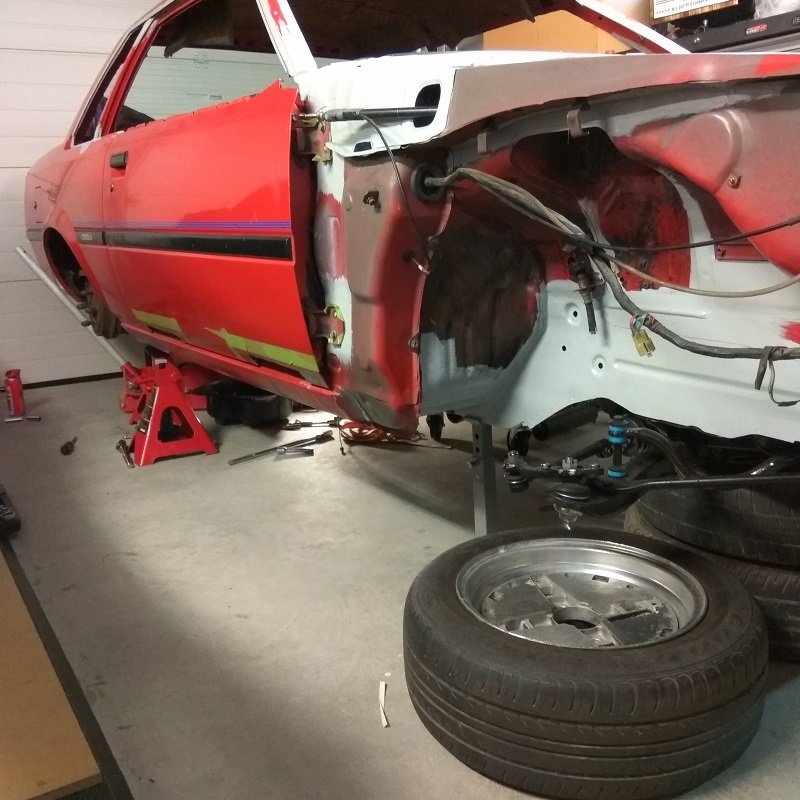
Yeah so it wasn't that sound after all... pwned. 10 months since I cut sections out of the doors, not much has changed there. Not really sure where the time has gone. Had the radiator recored with auto trans cooler removed. Had the heater core remade, reusing a couple of parts, but new core at least. A bunch more coin spent on new parts has chipped away at savings. Still chasing a few bits, and getting pissed around by people on facebook going back on deals. Shortened time frame due to next years addition (kids fred) means I need to properly pull finger on this. Dropped the diff into undercar service centre a while back, had them freshen it all up with new cylinders, shoes and skimmed drums. So that is waiting to go back in currently. Have some rust to sort in rear wheel arch, so will do that while diff is out due to bonus space. Not sure how to fix it though, so i've been putting it off. Battling a few other issues too, but will cover those in later updates. Anyway, some pics for fred. Those following along on Insta will have seen many of these. I removed the whole heater system, stripped it all down and cleaned it out. 38 years worth of grime wasn't pleasant. Had the heater core sorted at that point. Most of AC system has been removed for paint work, i've left all of the inside parts installed though so can easily put the engine bay parts back if wanted. Heater core and replacement brake master cylinder. Master was pretty gummed up so rather that fart around with it, I got a new one. Recored radiator, another thing off the list. Amazing how fast money goes down the hole. Gave the booster a good clean up too and paint job. Tested it before doing that though, seems to be functioning as it should. As it sits now, minus the diff. Space is limited to the point I need to be a contortionist to get to passenger side, which the guard needs fixing. Yay. Aiming for another update in a couple of weeks. Weather / motivation dependent.
 3 points
 -
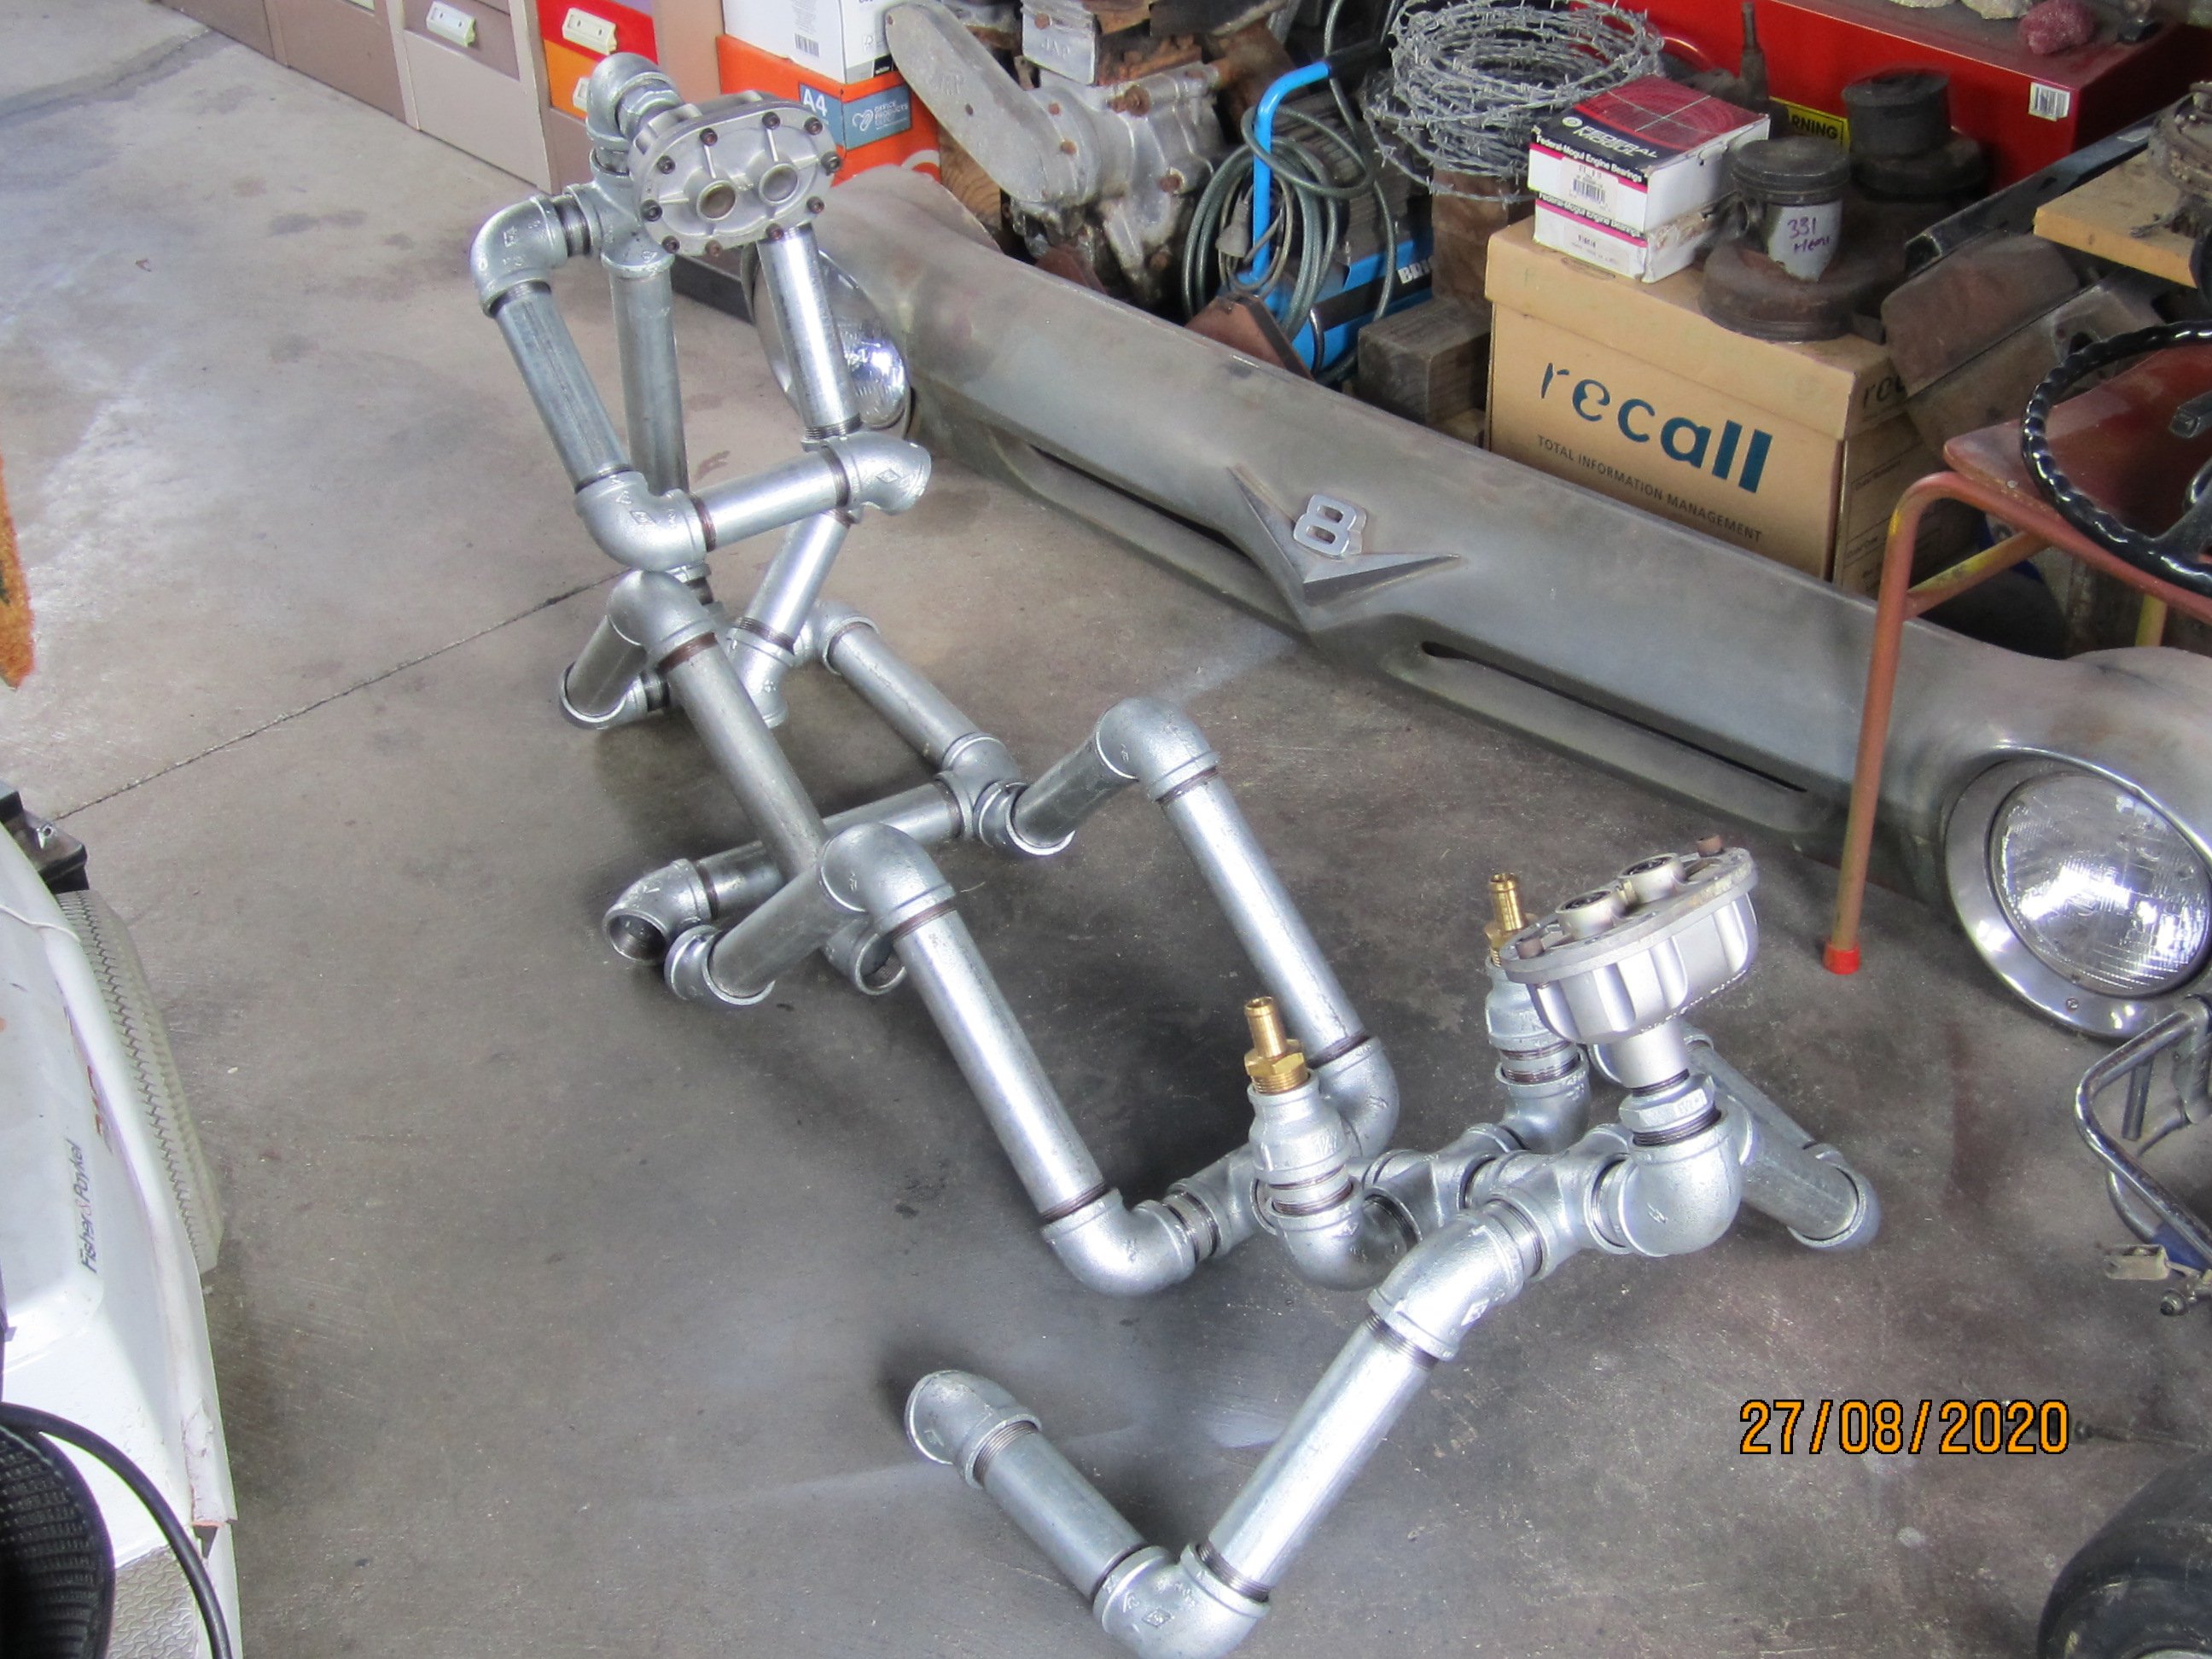
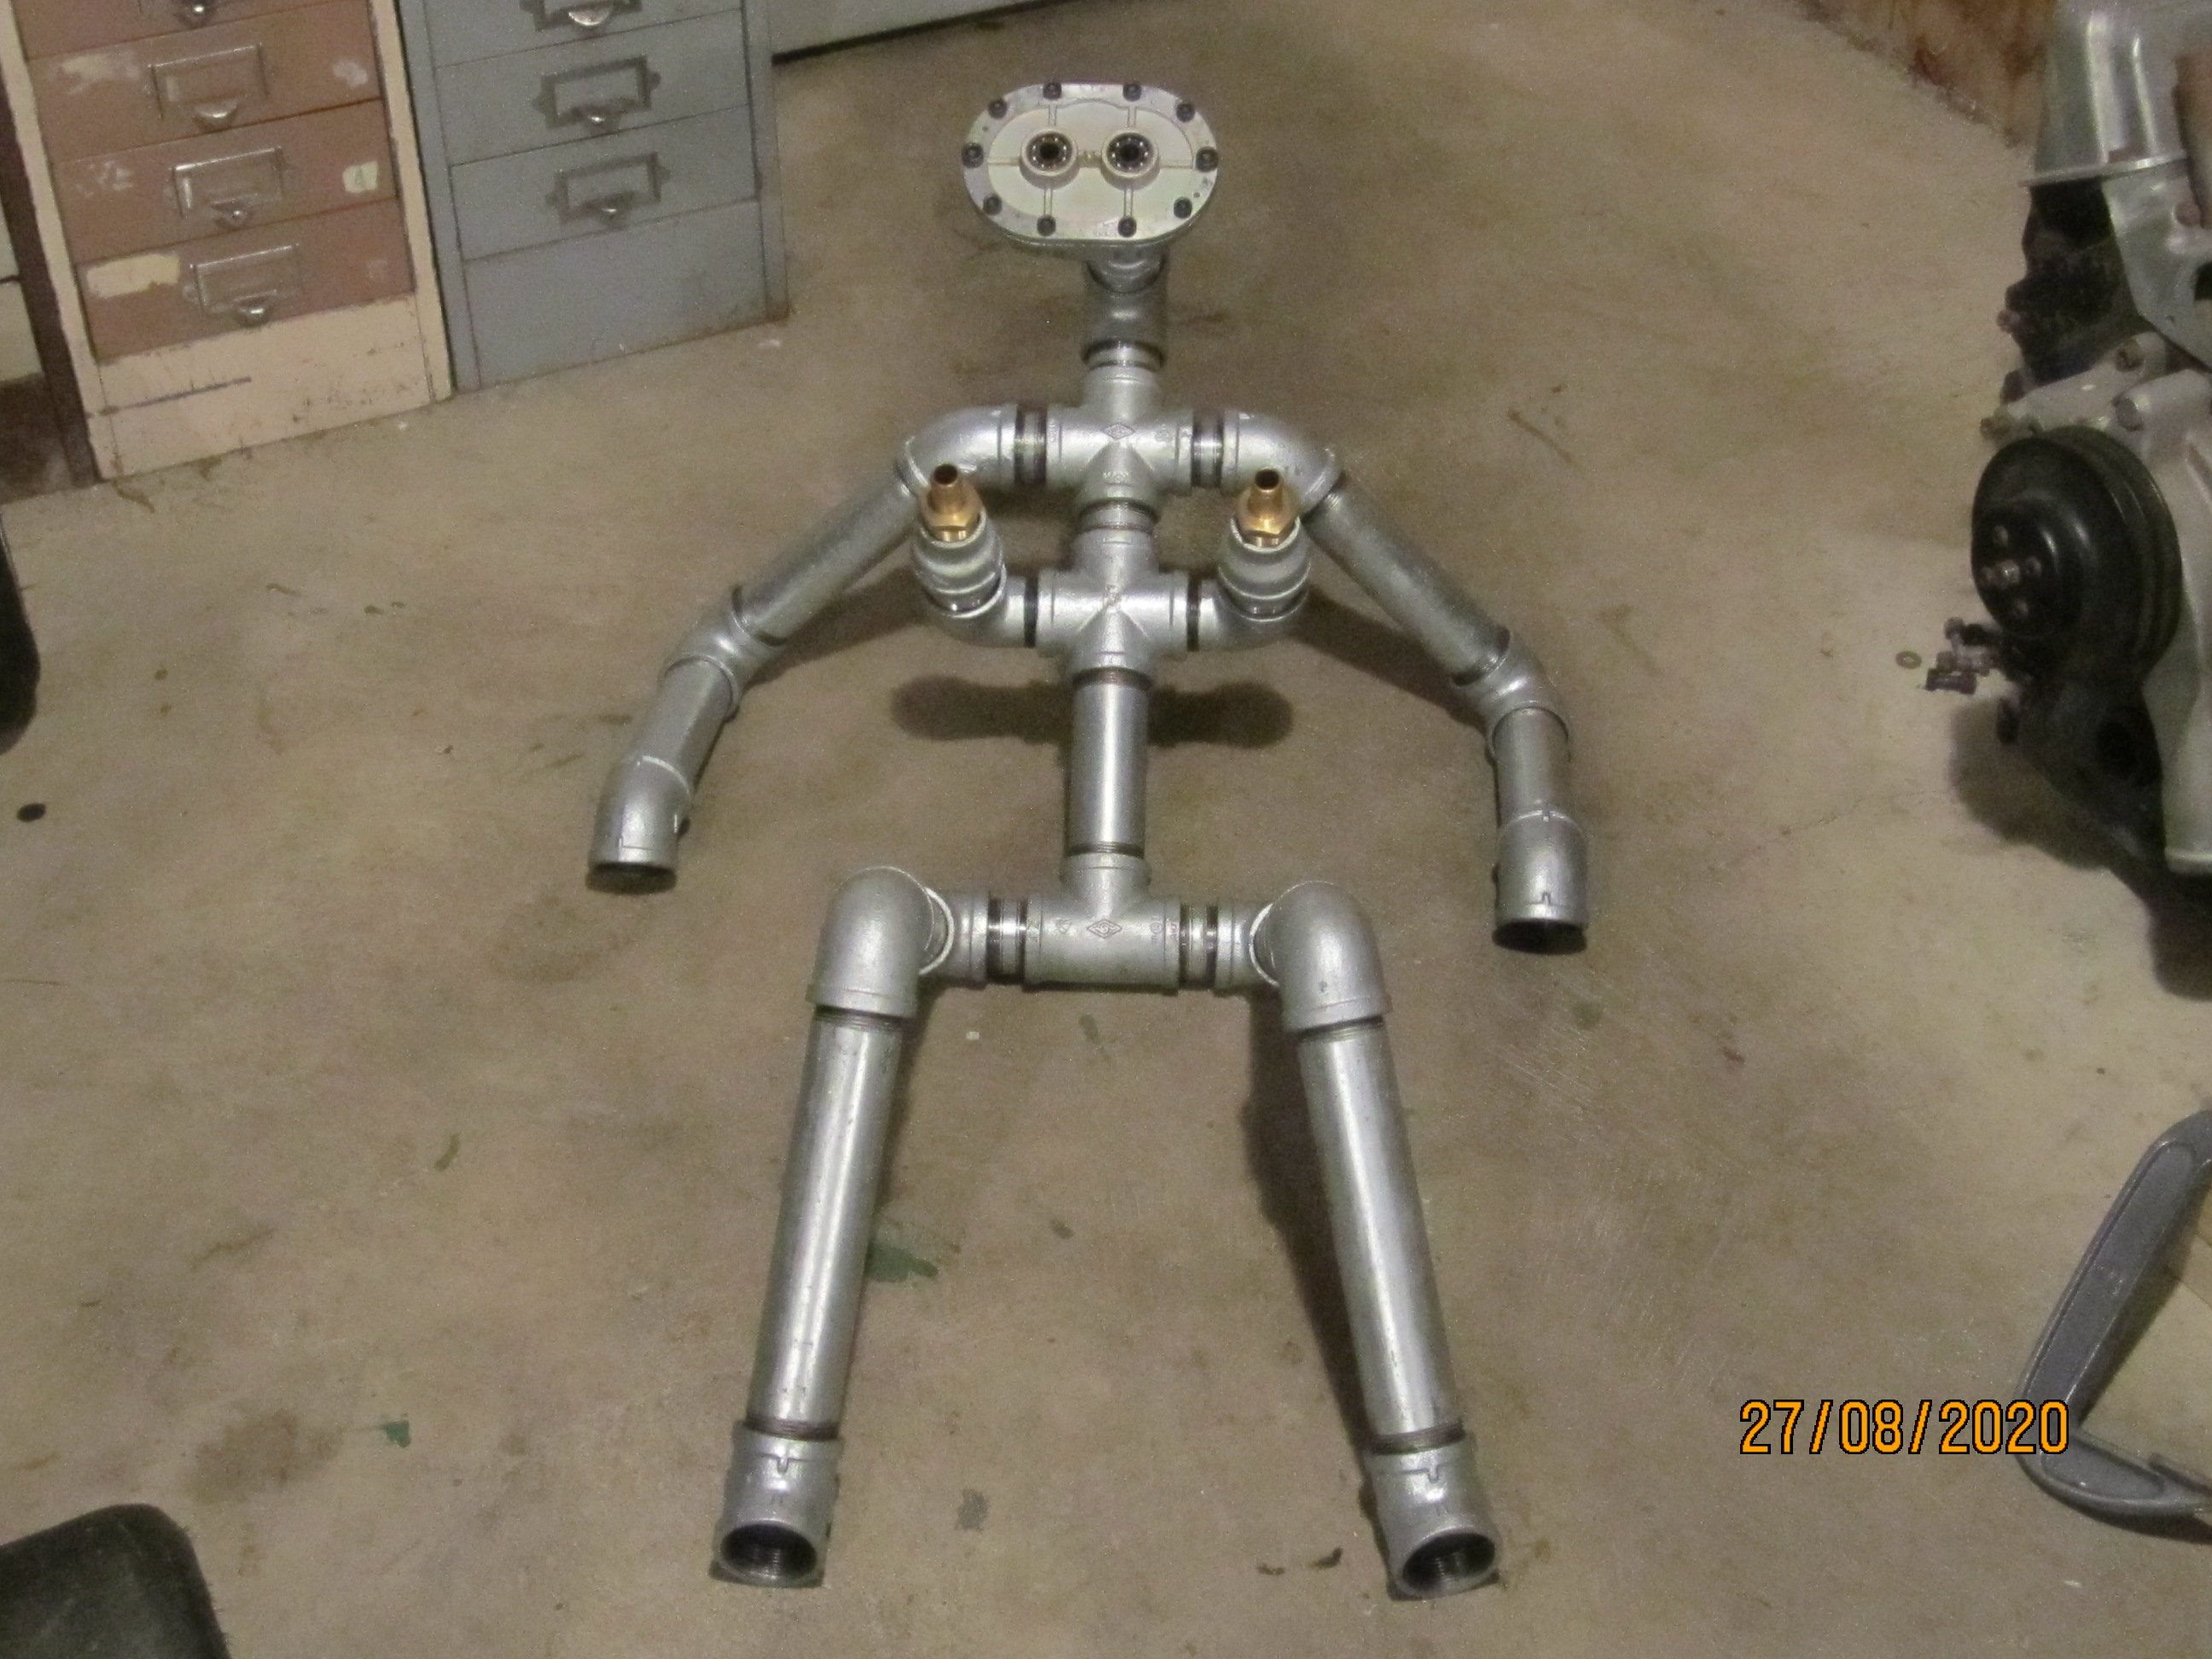
Made a pipe chick to go with the bloke I done back in March. Dem nipples.
3 points
-
discuss large golden vehicle just keeping it pretty much stock, probably with more low maybe this look? although I love this, pic taken from os somewhere ^2 points
-
Yes yes yes! Good work.2 points
-
I was expecting @Spencer to recommend a quadrajet2 points
-
Cars still running like crap.. ive set the carburetor to factory 4m specs but the carbs for a 5m. Idle and revs allgood but under load it really struggles and smokes like fuck. Managed to get couple drives up and down the road.. sump appears to still be leaking which is a real pain because the huge fuck off cross members in these crowns give no clearance to access all the bolts... think I'm going to have to pull the motor . Buggar Picked up a 6 pin voltage regulator off a mate of mine that came from his old ke35.. I assumed toyota would of used the same.. yep I was right. Well that sorts out the low 12.8v while car running issue Didnt fix the issue with how the cars running though..2 points
-
2 Door GT is finally off to paint this Tuesday so going to crack on with the 4 Door GT now. Waiting on a pile of panels to arrive from Steel Panels UK and then into it. Pics of some of the weapons grade bodge repairs done by some amateur years ago. Pics won’t up load ...2 points
-
Wow, that looks really good! Much more balanced with the chopper wheel on the back.2 points
-
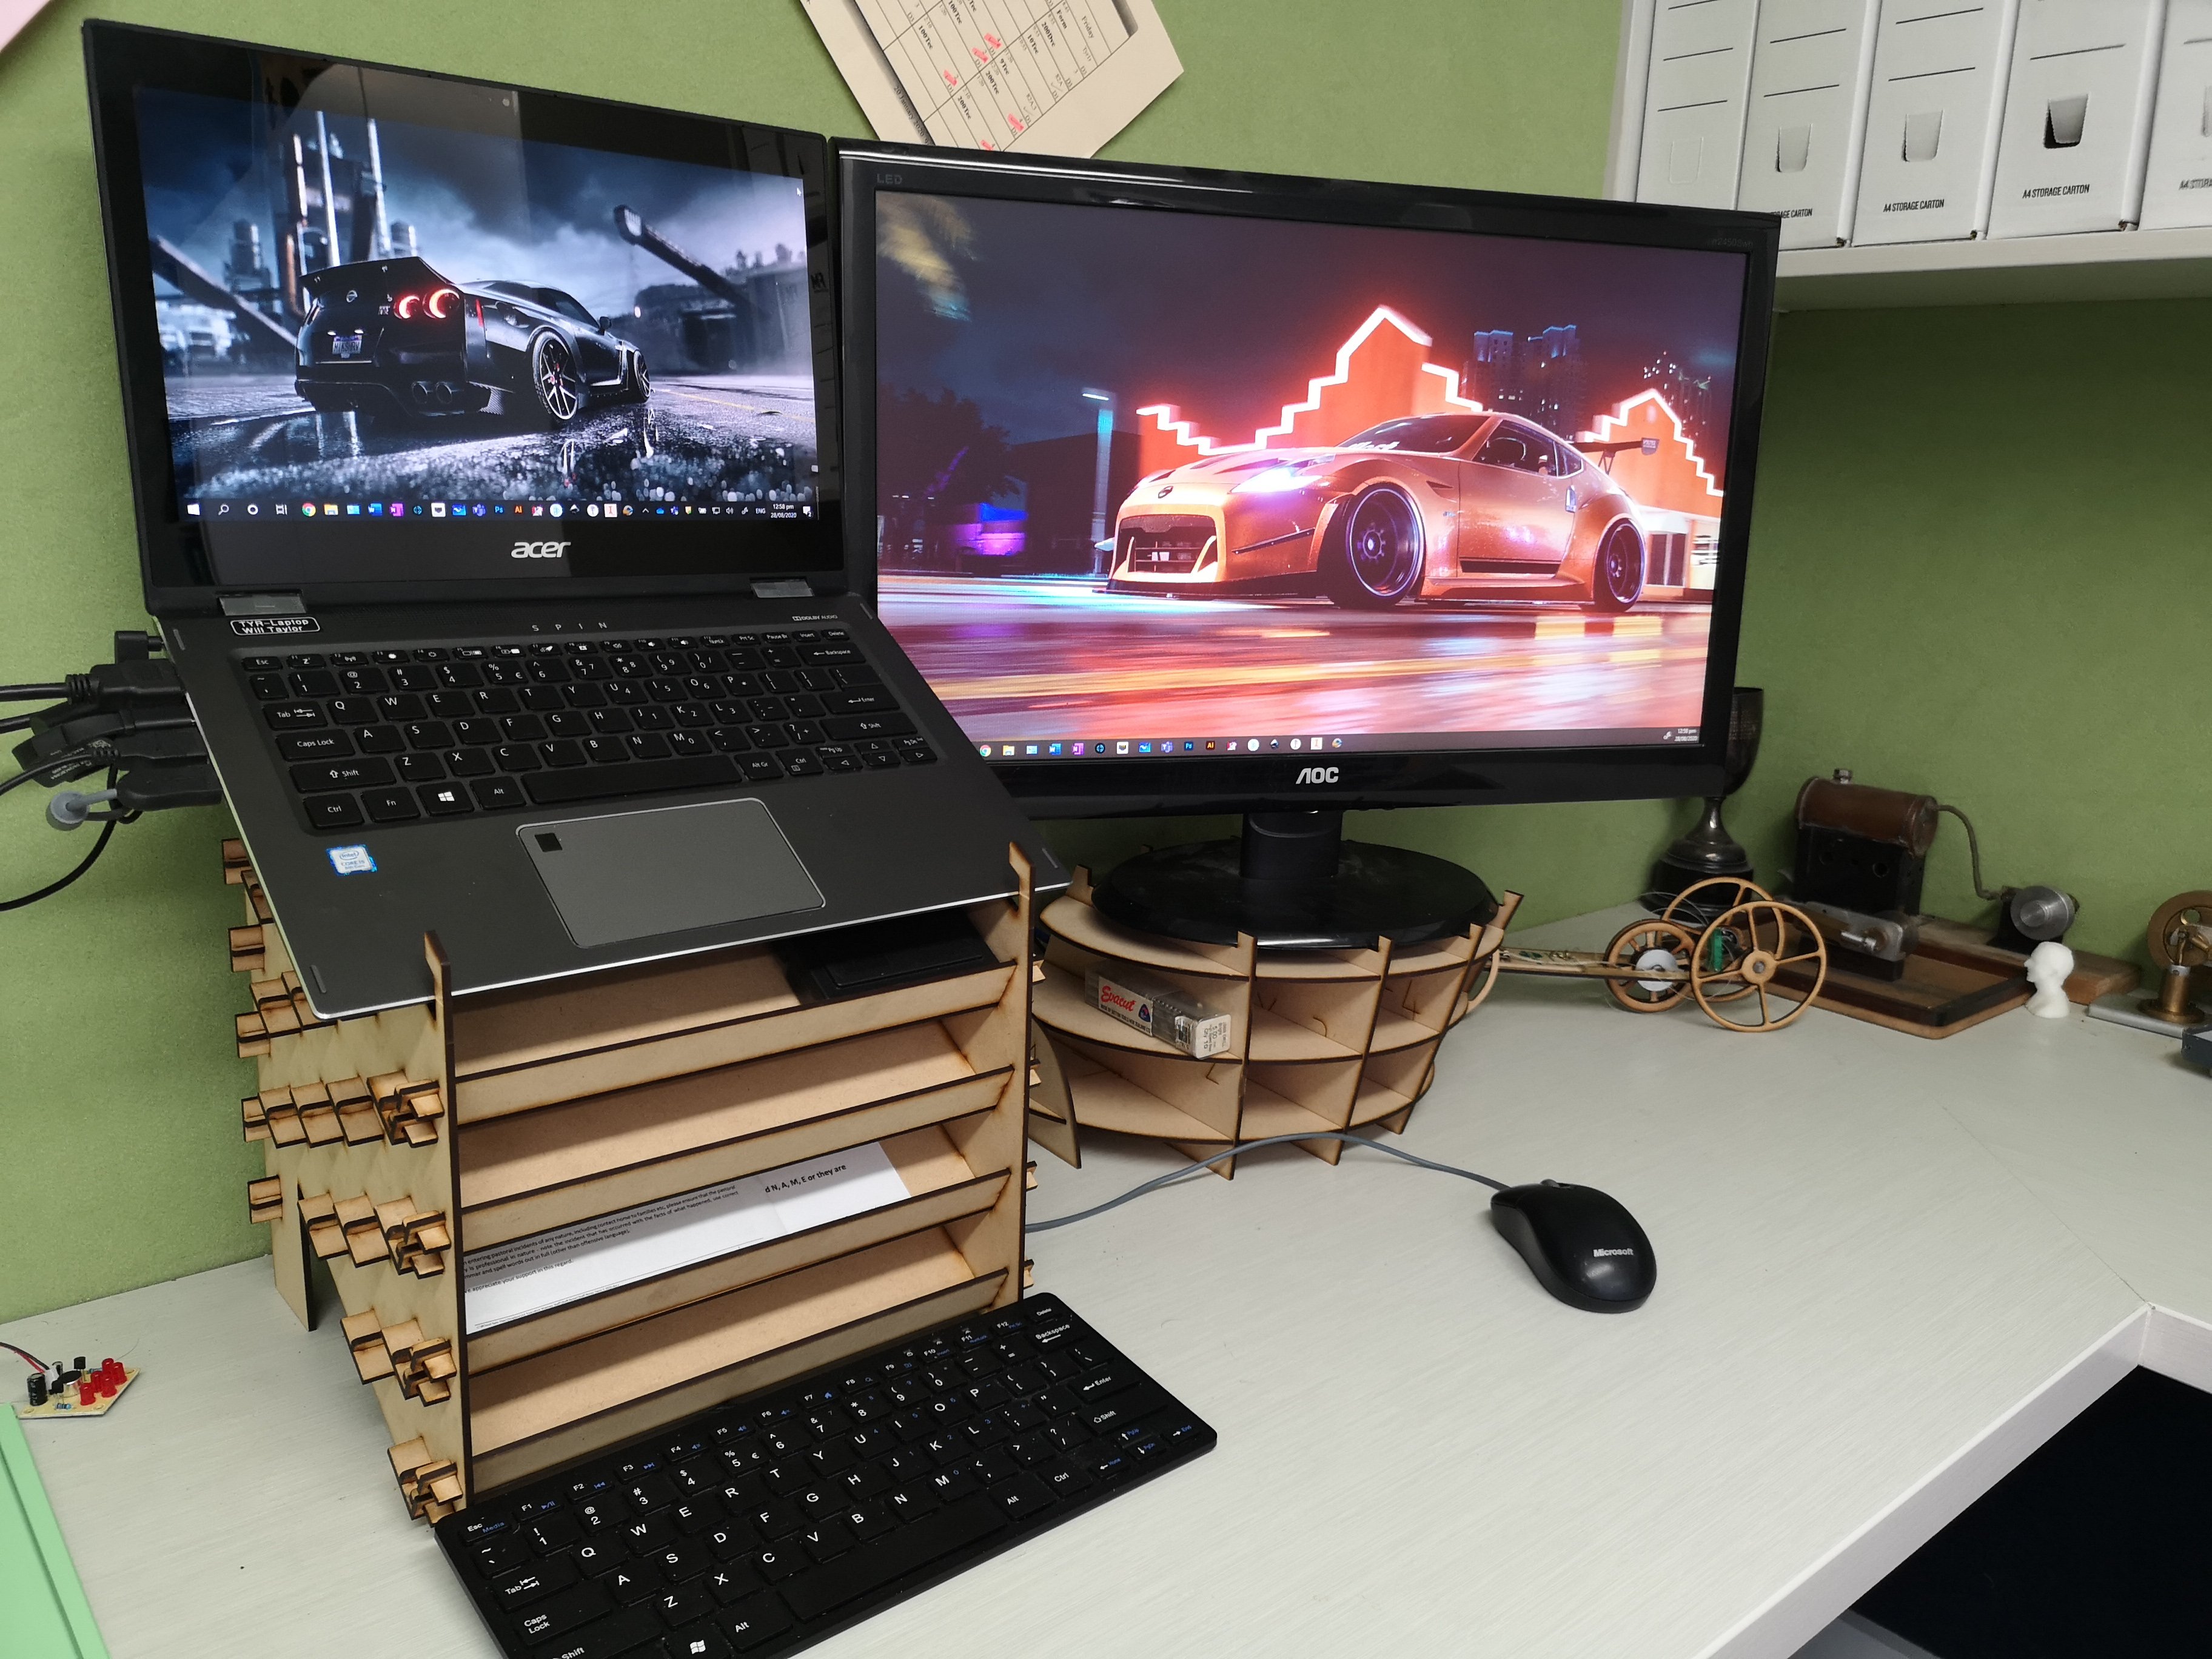
Playing with the laser cutter this week, using Inventor and Slicer for Fusion. All flat pack designs without glue.
2 points
-
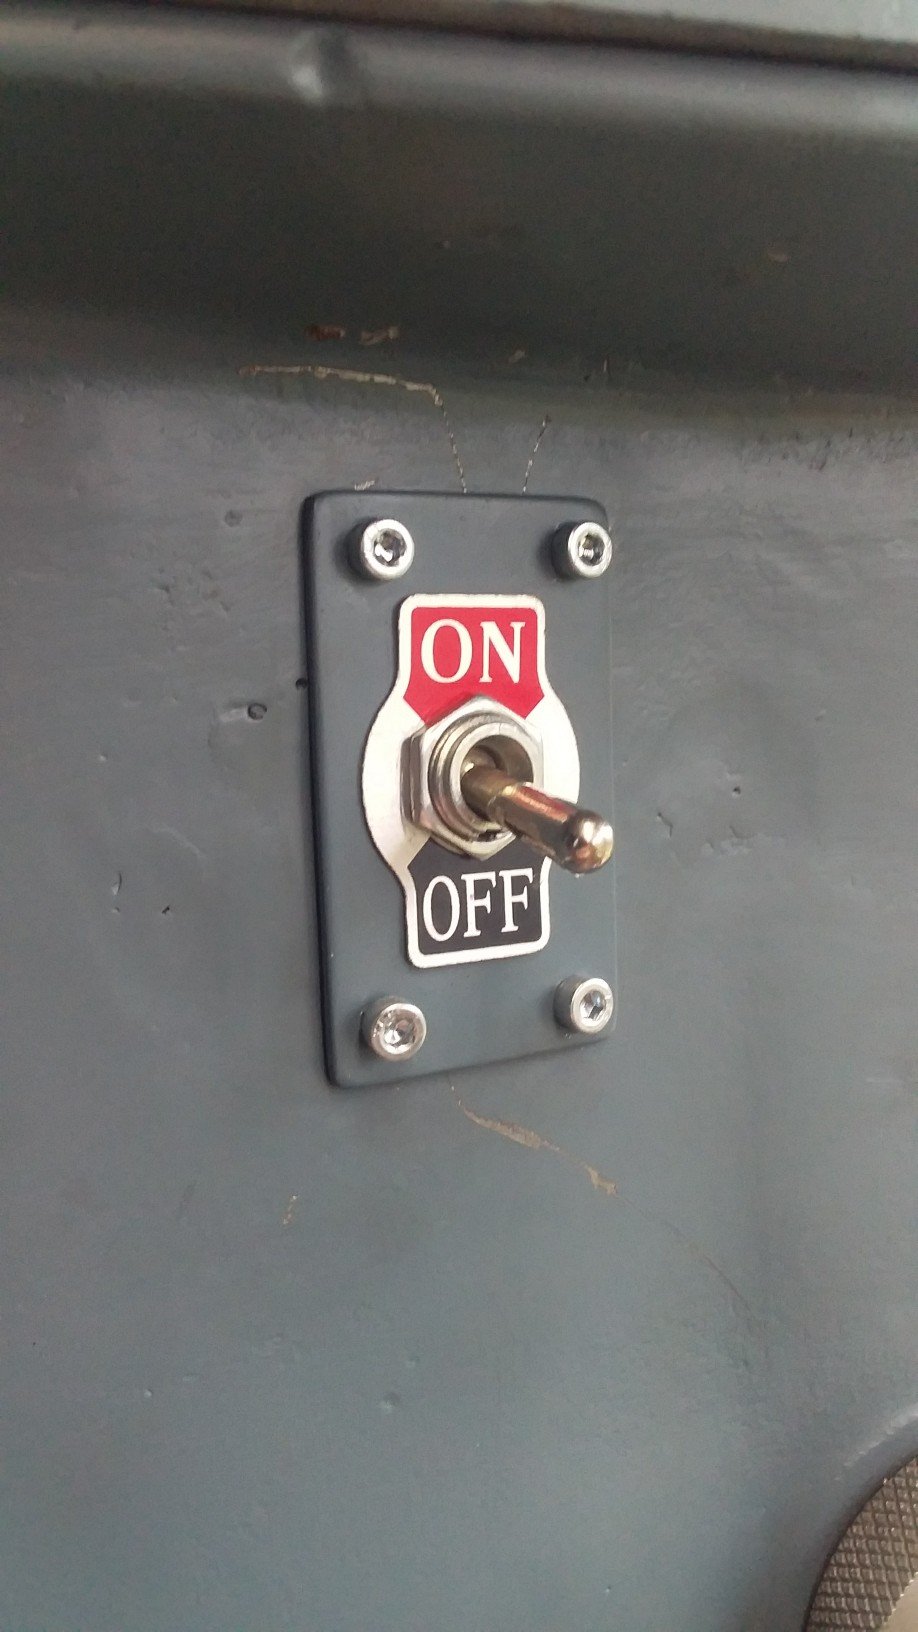
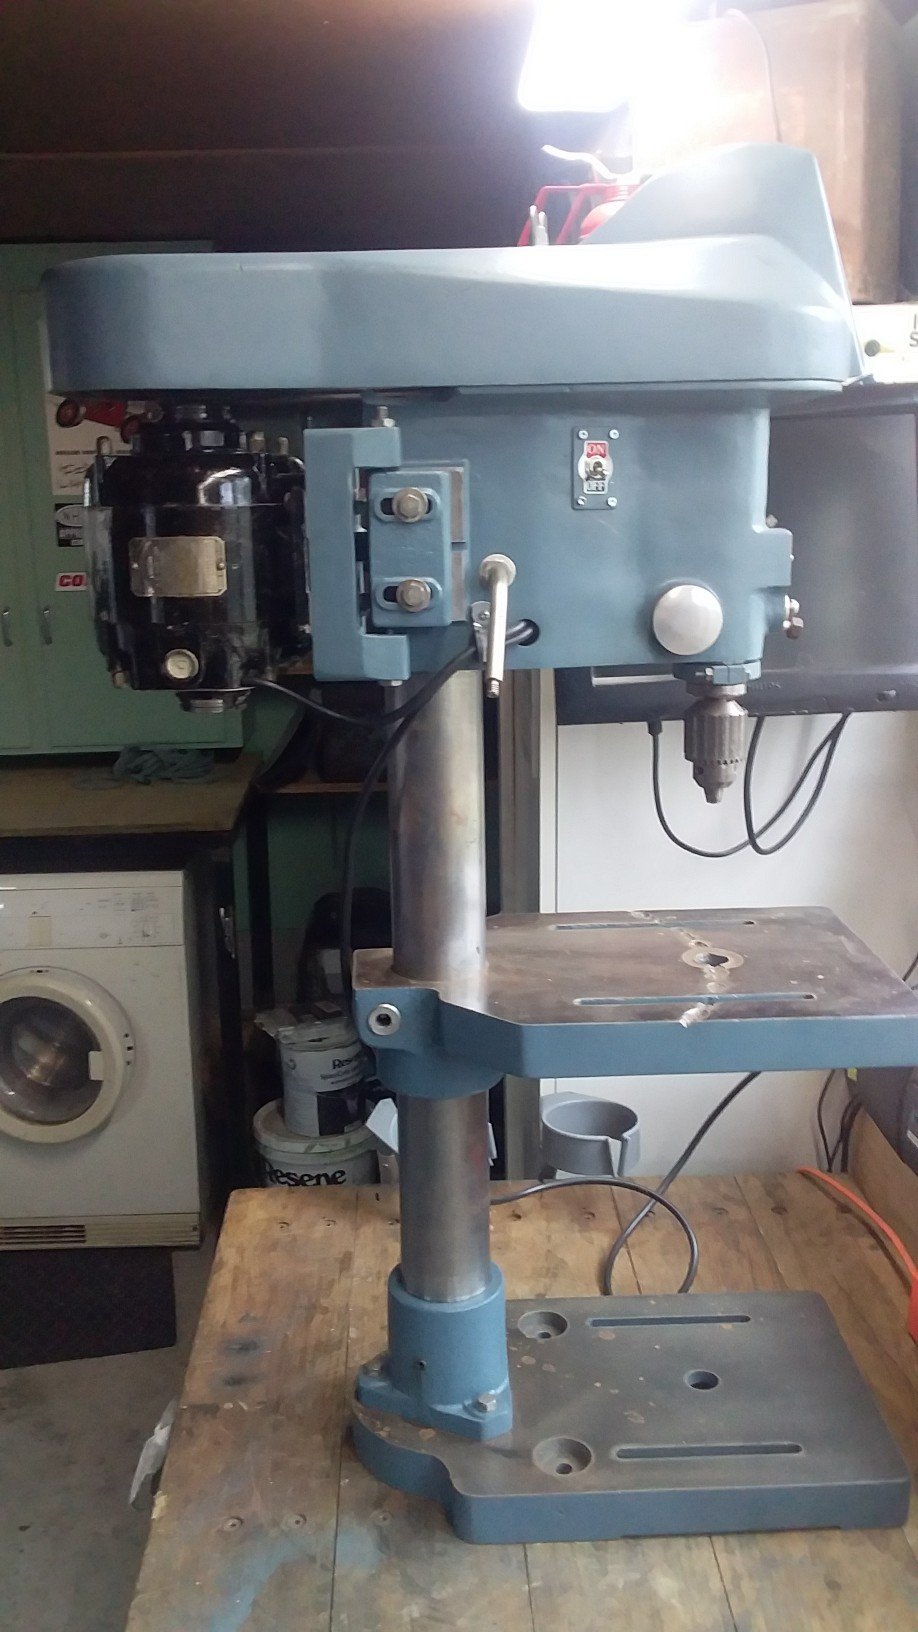
Finally got my old 1950s drill press finished. Had to make up this small plate to mount the toggle switch. Please with how it turned out, looks the part. all wired up thanks to my mate Darrell, and ready to go for another 70 years.
2 points
-
OK so love it or hate it here it is. The whole thing went a bit more OCD than I first intended... What it is. 1964 Valiant AP5. I draged it out of a garage about 2002 it was push button auto, brush painted and had a seized 225. Now. 383 b series big block. comp xe268 cam 906 heads Performer rpm intake 780 holley etc 727 Torqueflight 9inch ford diff with 3.0/1 open diff. Some other stuff too. I need to do a few things before its fully finished Mainly a better rear ratio with a spool/LSD It gets a bit warm in traffic Bit of panel work needs sorting. I'm sick of spending money on it at the moment so it will have to wait. Discuss here //oldschool.co.nz/index.php?/topic/28698-valiants-big-block-ap5/1 point
-
Fuck yes. Hopefully you have it ready for drags and we can have 202 battles1 point
-
basically lopped a big chunk off Truenotch's mini chopper and grafted it in to my back end. Will be slightly higher with air in tyre then before which will actually be great, this tyre is also not going to shit itself or the rim explode when giving it berries.1 point
-
Sure is, and I reckon its great OMG, WTF, Bbq material. No different to putting 45DCOEs on a Kent 16001 point
-
Nah this is Old School. Doing dumb things with old gear is great. I reckon you're way overcarbed but interested to see how you get on...1 point
-
Nothing worse than a oversized and old holley carb, throw it in the bin. Ask Bort about opportunity cost and sunk cost fallacy.1 point
-
Thanks, the jet holder wasn't available so I had to use what I had available. Yeah I'm pretty happy it's actually running well after this head scratching1 point
-
So now I'm not super tired and throwing toys out of the cot I had another look. My barry jet holder was leaking fuel past the jet so still running bad. I chopped the plunger off the solenoid and the jet fitted nicely which was good. Ground off the terminal and cap off the solenoid Pushed out the wiring and crap Chopped up a bolt and chucked it and welded it to seal it up Still needs tweaking/tuning but that'll be fiddling with the wideband later. I'll make up a throttle bracket, weld the exhaust hangers on and go for a longer test drive1 point
-
3.89 gears with quaife atb going in tomorrow
1 point
-
Interesting it seems like the original colour was burgundy1 point
-
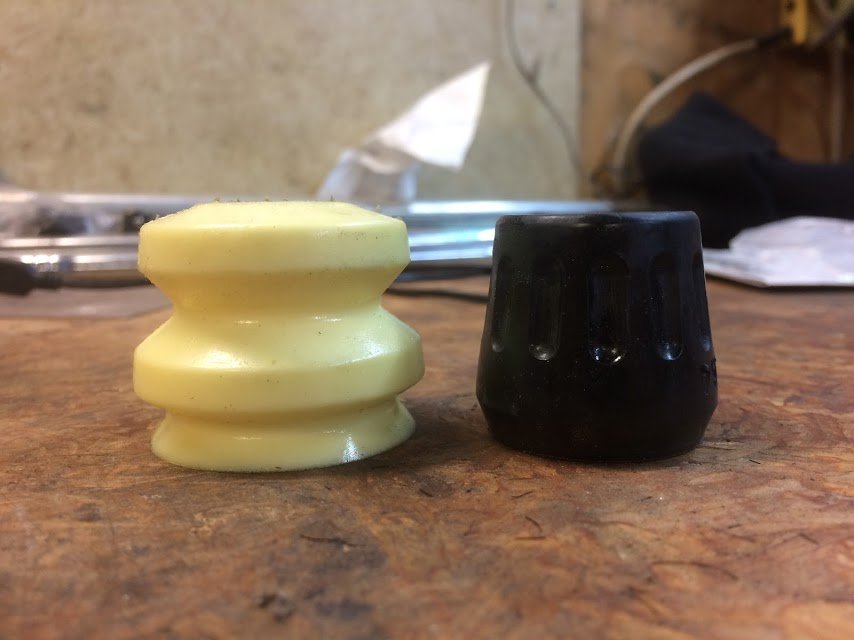
Posting these here for future reference. These photos are a year old. I spent a bit of time playing with bump stops, spring hats and keepers to make full use of my shock travel.
1 point
-
I got the replacement clutch in and working but there's still something a little awry there that will have to wait until I get back from a couple of weeks holiday. I also discovered that I have a fairly common wobbly crank pulley issue so I should look into that before I get too carried away thrashing it. That said, I did enjoy taking it for a wee hoon after I got the clutch working and the hardtop on. More to come in the future but this is where we are at the minute: Once that was sorted I took it for a hoon to see my other white coupe...1 point
-
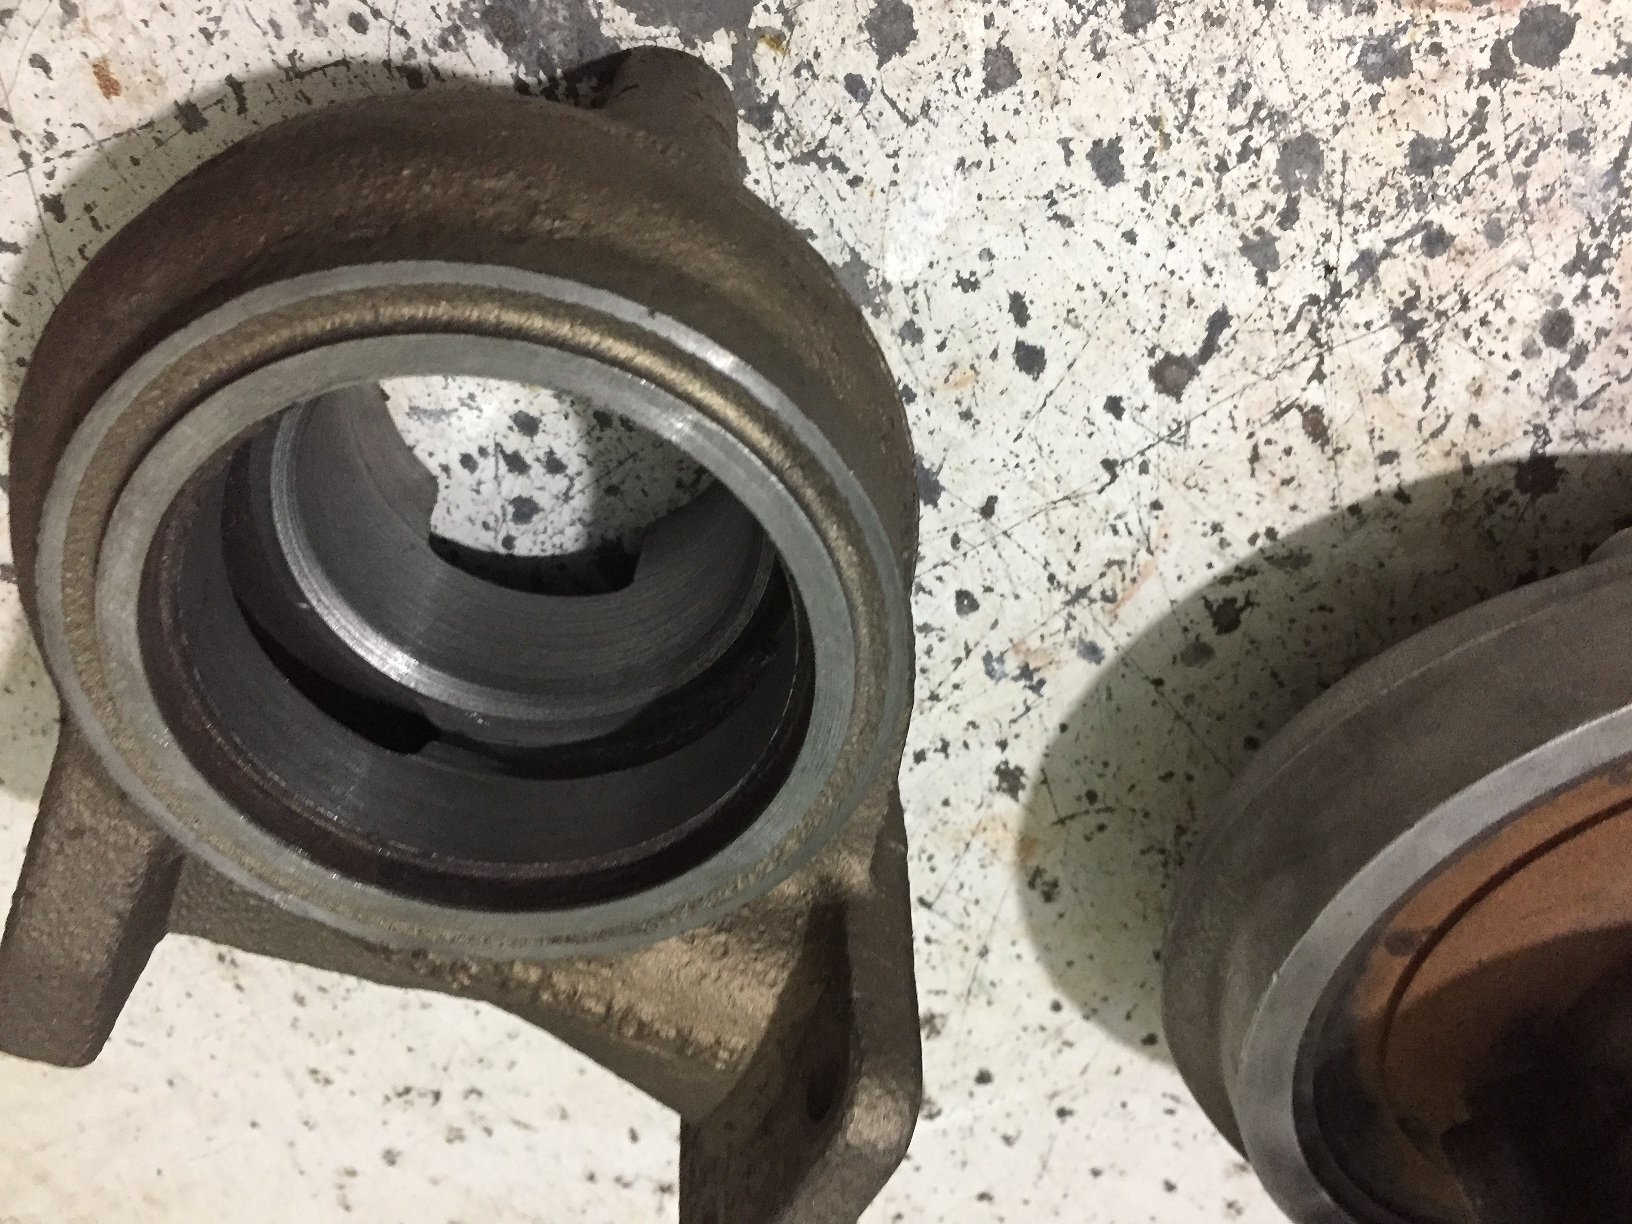
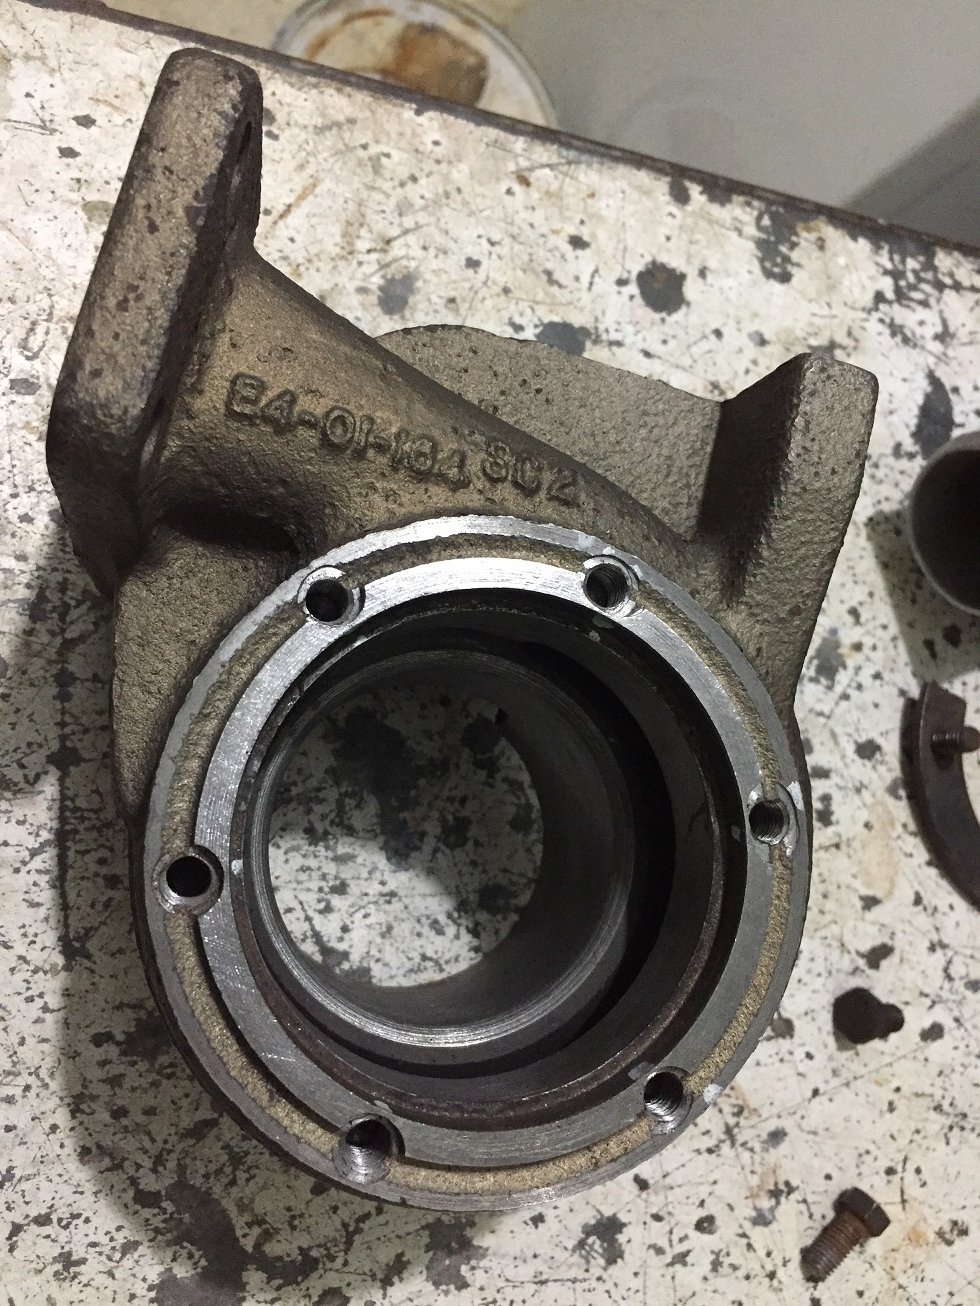
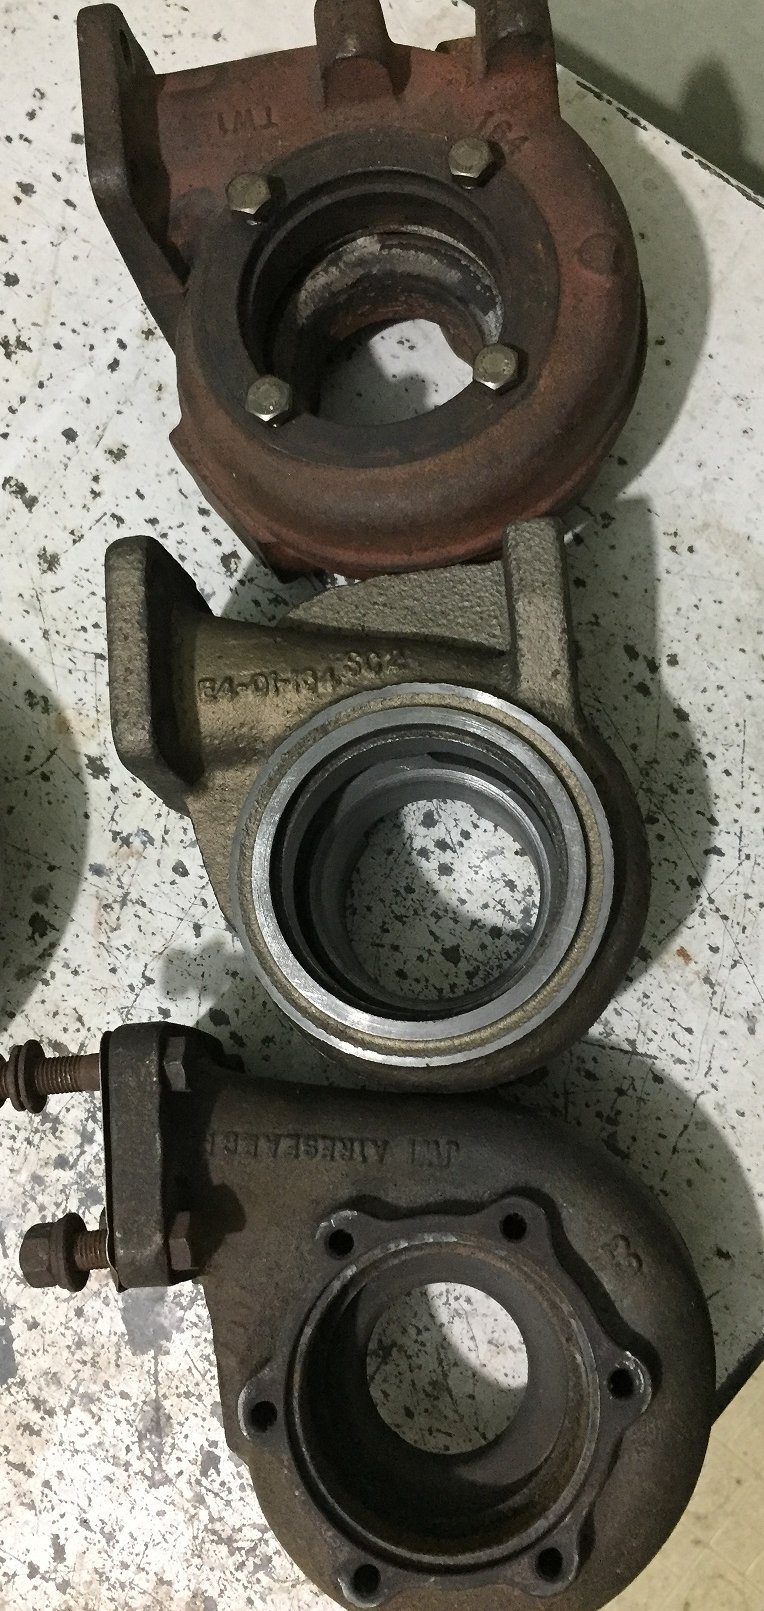
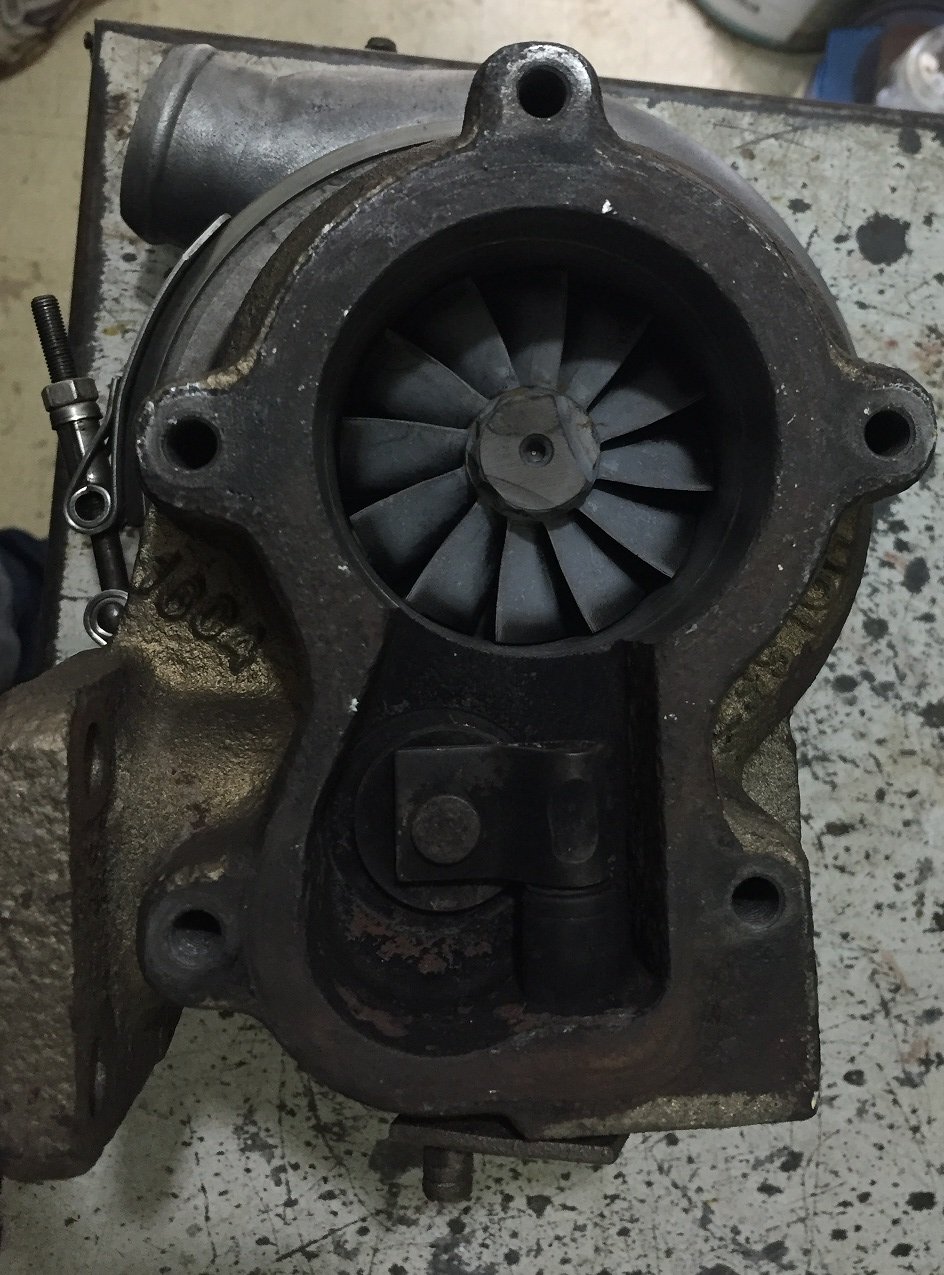
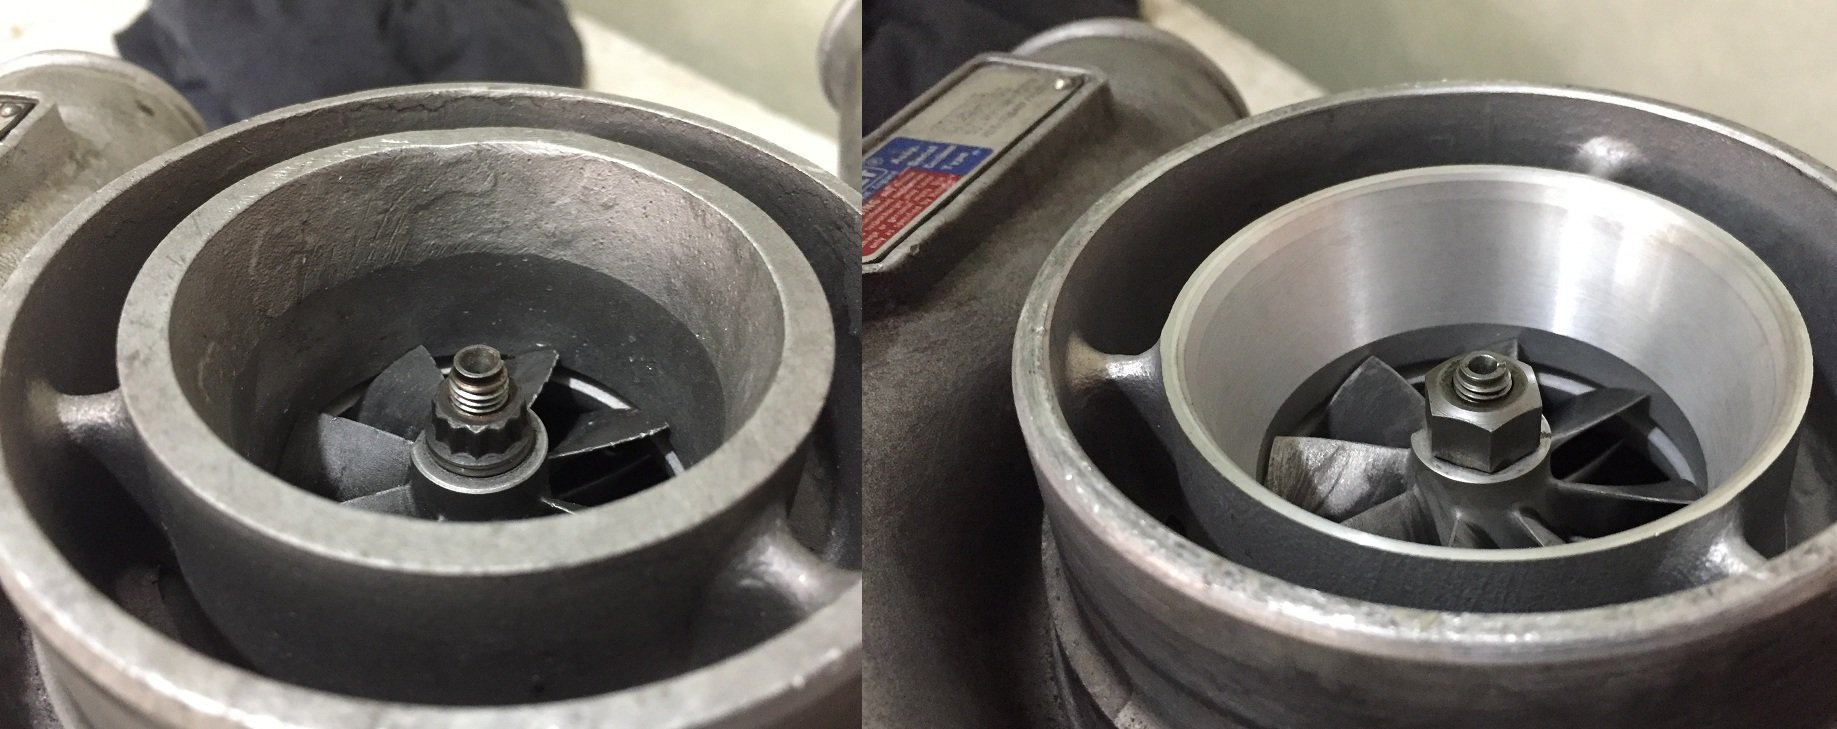
I wanted to put a hx40 into a smaller housing for use on a diesel, hunted through all my garrett housings and only found one that was suitable(saab 900 t3 0.63), but I wanted to save that housing for something else, all the 0.48's i had didn't really have enough meat on the sealing surface on the dump pipe... So I'd sorta given up until I remembered I had a Chinese hx30 on the shelf, it could be genuine but due to the fact the compressor snapped off the shaft and other small things I'm pretty sure it's from china Now those of you that know turbos will know hx30 is alot smaller than the hx40 and the turbine housing uses a V-band connection to the center, and a hx40 uses the traditional 6 bolts (like garrett etc) SO i thought this wasn't a possible combo, but after many measurements and checking I decided to give it a hoon... top is 14cm TS holset housing, middle is partly machined 8cm hx30 housing, bottom is 0.63 garrett t3 Here is the hx30 after the first lot of lathe work, v-band turned down, and inside from a 52/65mm wheel to 64/76mm turbine, The housing is clearly designed to take upto the 67/76mm wheel but machined to suit any size at the factory Next up it went to see Emily and had the 6 flat areas machined and then milled and tapped to suit the normal hx40 spacing+retainer plate, It will also require a spacer/clamp plate but I don't have right size steel for that and it's too hard to buy anything in auckland during lockdown And I thought it best to update the front housing while I was here, this is one of the smaller hx40 compressors, 54/82mm, more often this turbine would use the 60/82mm comp wheel. ,,
1 point
-
Just a small update to say that there wont be much work taking place on the engine for a few weeks because the workshop is now full of timber, wood shavings and dust as we build a rather large shelf (some might say a mezzanine floor but no Mr councillor, this is just a shelf to store stuff on...) I'm pretty damn excited about this shelf project it must be said. A chance to properly sort out the workshop and move all the non- engineering like stuff and various car spares upstairs. Its all a bit hectic though. There is loads of paid work on that we are putting off for a bit plus the housetruck sale has gone too contract so that is another load of things to sort out. But fear not- I am still mega excited about finishing the Imp off and luckily because the updates on here are a bit behind I still have a few more stages I can post up. I shall eek them out though, buy myself some time.. In the meantime I'm going to post up few vids I have found on youtube. Ones that keep me enthused about the build- mainly because of the sounds I hope my Honda engine should emulate. This one here I found recently. Now I imagine the aircooled 911s do have a lot more engine noise but the exhaust note is what I'm loving in this vid... This next vid from Harry Metcalfe has some nice bits (in between his lovable waffling on) and the car is just lovely!... And finally here's a clip of a Goldwing that gives an idea of the similar exhaust note when extended. It sounds lush! ... I'm looking forward to the exhaust stage of the build but I do need to learn what's the best layout for sound. I'm also doing continued research into Itbs and injection, plenum chambers feeding itbs, remote air feed etc. That's definitely more of a subject to discuss in the injection thread though. Excited about that stage though!!!1 point
-
sweet! how many watts? i keep seeing some cheap ones pop up, but are only 750W and im hoping for a big one! Shop vac works ace my little CNC, but keen to plumb all my things into one unit. also, BIG fan of cyclones! oh my, my cheap china one does a 10/10 job! and stops you sucking big things through the impeller of your vacuum haha1 point
-
fyi1 point
-
I've got a 4K sitting here with a 7/8 race cam. Makes all the power and ruts like a tang. Revs to 13,000 You can have it for $4k.1 point
-
I really like the two tone paint on this VC, I'm thinking of getting my roof repainted the same burgundy as my wheels are painted.1 point
-
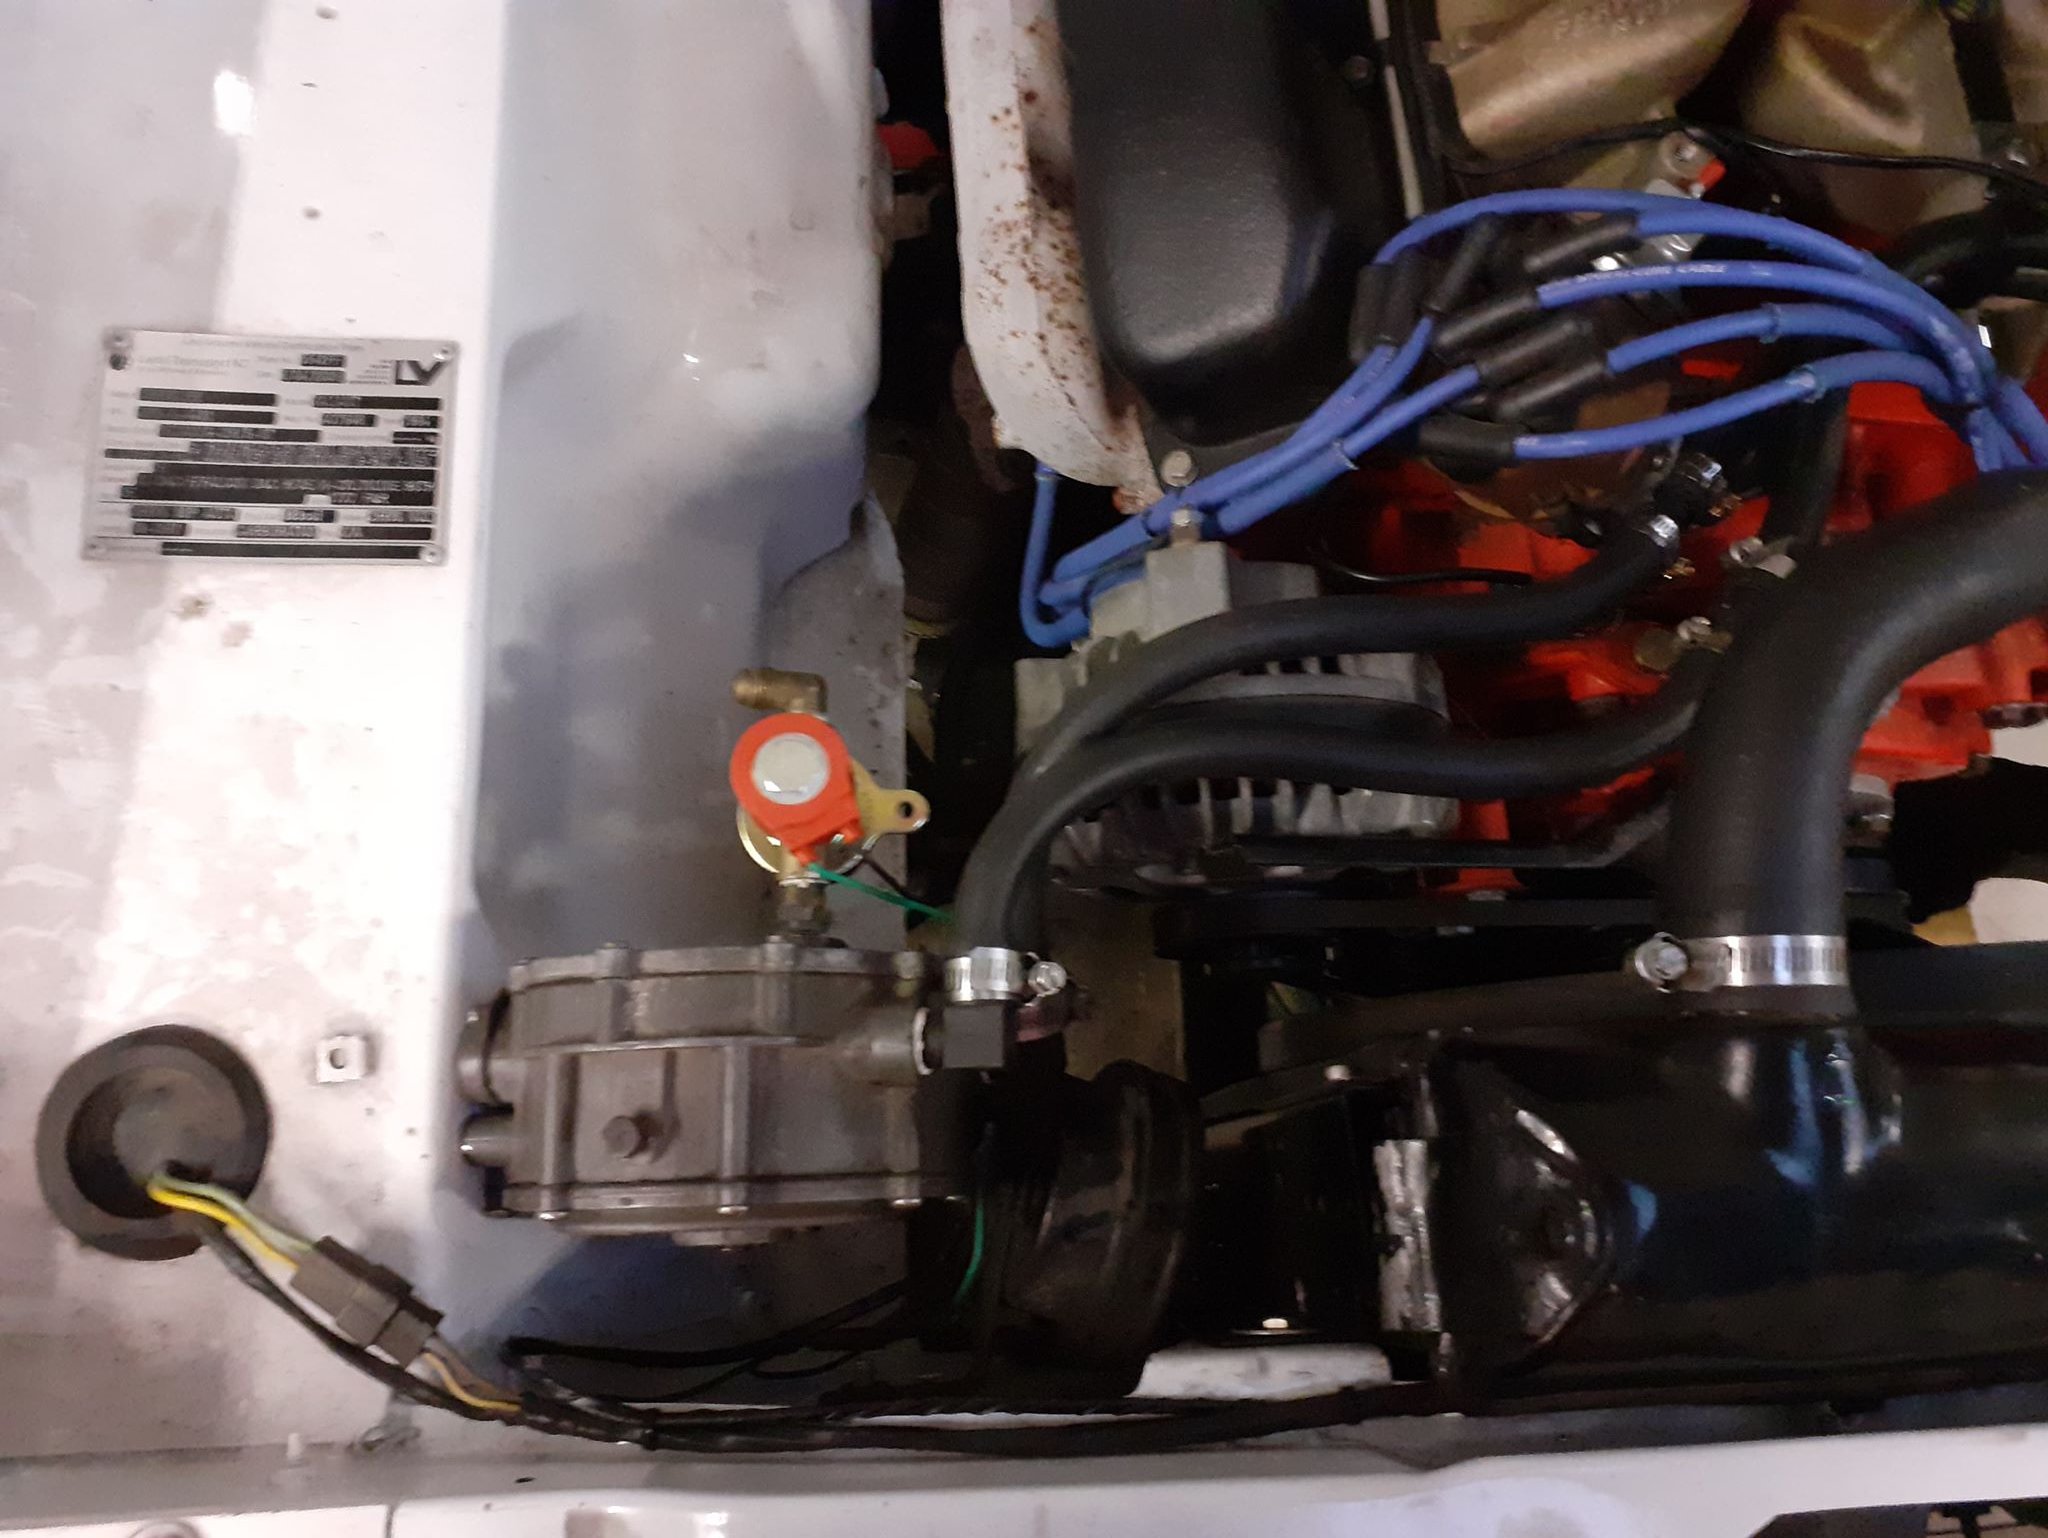
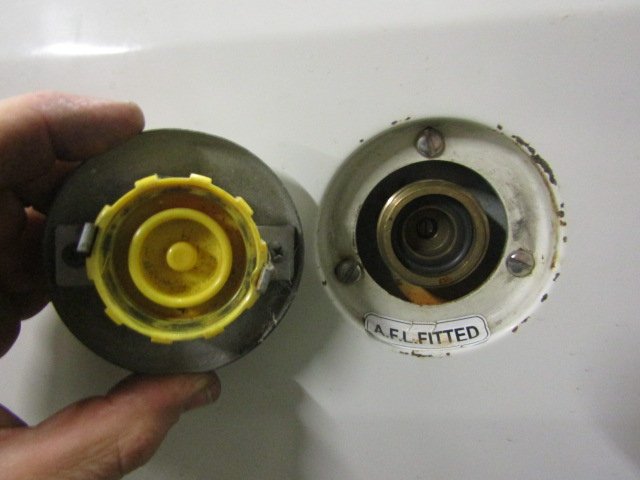
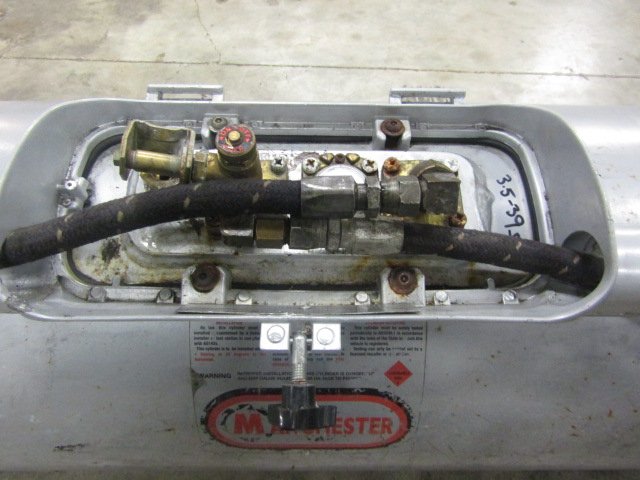
Phase two continues. Things on the LPG front are going well but slowly. Fuel tank is mounted it has to be on a 30 degree angle to fill properly which is a bit of a pain but it's done and I can still close the boot. Filler made up and sorted. Regulator mounted and partly plumbed up. I have some steel bends ordered to make a vapor line from the regulator to the carb, that's the next thing to make. Gas carb is all fitted up, kick down and throttle connected all ready to go. I found I could fit an old Valiant air cleaner to it which is great, it looks nice and stock, seals well and with a bit of work it can have a nice cold air duct like I made for the 6 cylinder one. I'll give the air cleaner a coat of paint before I use it. So that's that. Except. . . At the beginning of lock down I was thinking how cool it would be to have a manual gearbox with an overdrive top gear in this car. I looked around at various solutions, thought quite Seriously about a Toyota R150 but was advised the ratios were no good for a car. I was looking into the R150 ratios when @sheepers made me an offer I couldn't refuse for a R154. As luck would have it someone in Te Awamutu makes R154 to big Chrysler bell housings so I blew all the money and brought one. It looks really good, looking forward to using it. The car is going to take a lot of cutting and welding to fit the big box but I'm confident it will be worth it. Thanks to every involved in getting the gearbox from Auckland to Christchurch!
1 point
-
Project other is going all right. So I bought some wheels. I've long lusted after a set of SSR Type C, however do not like the price that tidy examples command. Some chance Facebook Marketplacing saw these things turn up. The description simply read: Honda wheels 17-inch. Coaxing the seller through a few extra pics confirmed they were SSR Type C, 17x7.5-inch forged wheels. They weigh 5kg a piece. They looked rough. I bought them for next to nothing, and did a roadtrip to Wellington to get them the first weekend we hit Level 2. Great idea to also get out of Auckland, get some driving in, and see some people I hadn't in a really long time. This is what I got. 98272862_10216632842556010_1422751630977138688_o by Richard Opie, on Flickr Assorted tyre sizes. Pretty haggard in the paint department. Some of Australias finest export quality matte black I expect. 99048908_10216650052466247_8180097297808359424_o by Richard Opie, on Flickr With the tyres off things didn't get any less ugly. The full scope of the repairs needed started to become apparent, more of which is detailed below. 99006202_10216650056026336_8451286377600909312_o by Richard Opie, on Flickr 99078092_10216650054786305_4216971291200061440_o by Richard Opie, on Flickr 99138489_10216650053066262_530452122030833664_o by Richard Opie, on Flickr 100086434_10216650053946284_2533449599859818496_o by Richard Opie, on Flickr And more. But anyway I dropped these into Wheelfixit in Wairau for a look and a quote, turned out they were totally repairable and it wasn't even very expensive. Step 3, was acid dipping, kindly taken care of by Kwik Strip in Te Atatu. Again, bargain prices and criminally fast turnaround. As in, these were done in the space of several hours. 100597172_10216707809990149_7015287452575203328_o by Richard Opie, on Flickr 101063927_10216707810710167_197262320282370048_o by Richard Opie, on Flickr 99291047_10216707810350158_3946752332850528256_o by Richard Opie, on Flickr Some were worse than others, with signs of surface corrosion evident on some of the wheels. I also cleaned up the kerb damage on the one non-bent wheel by gently filing and sanding, enough so that the lip retained it's profile and was not 'flattened' too much. But then, for my final trick, paint. Of course I suck at paint. But I know some blokes who don't. Ben and Nick took the job on for me, and gave em a splash with Porsche Weissgold, with a satin clear over the top. To say I am stoked on the result would be an understatement. 101952115_10216857720217811_7586636871987907807_o by Richard Opie, on Flickr 104433228_10216857720617821_5444337198238180490_o by Richard Opie, on Flickr 102458703_10216857721577845_1496879978836587088_o by Richard Opie, on Flickr And that's that, so far. I am going to get some stickers for them in due time, and probably some tyres. Run em for a bit then put them up for sale to the period-correct JDM piners. Unless I decide I quite like 17s and keep them on. But 16s was probably the ideal... anyway, thanks for looking.1 point
-
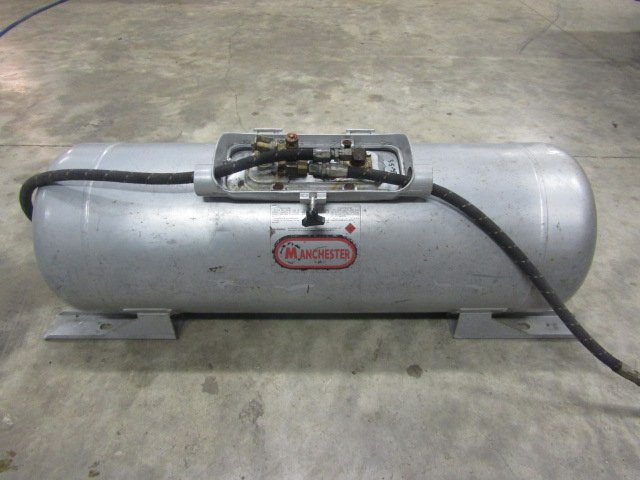
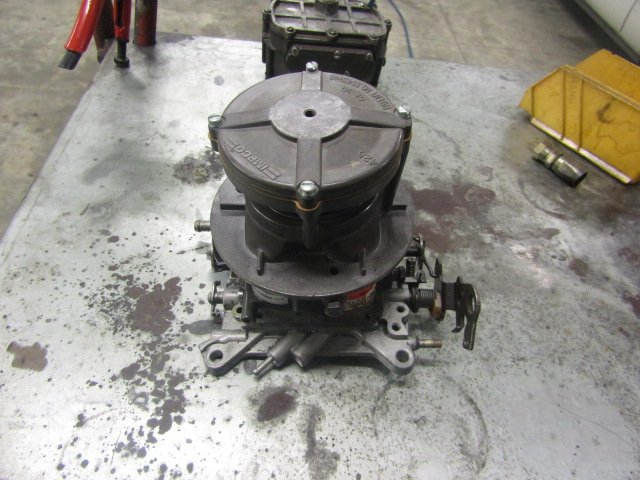
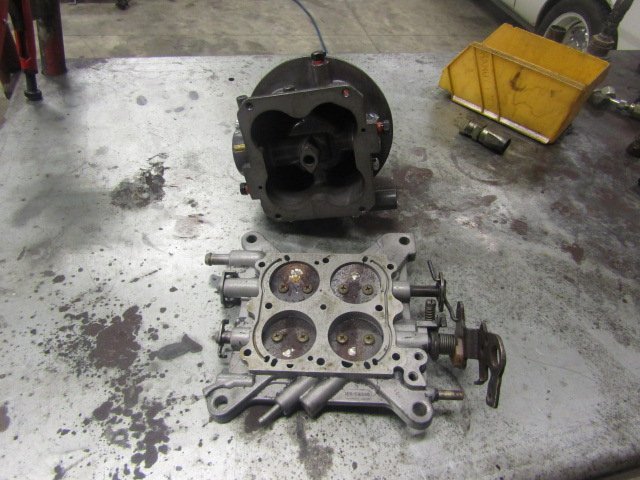
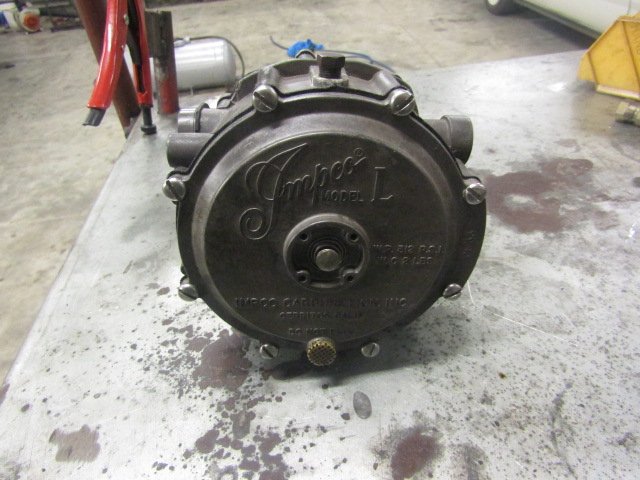
Well that all worked out well, better than I hoped it would to be honest. On to phase two of this project. As I said previously I want to get this running on LPG. I love LPG, and here's why. It's frugal, clean, and old engines love running on it. Sadly the filling network is slowly shrinking but I'm going to take the chance and convert anyway. So here's what I have. One 80 liter tank I picked up off trade me. it's a good volume and an OK size for the boot. It takes up a bit of room but this isn't a car I'd use for boot space. I've had the tank re tested and it's good to go for another ten years. I've clocked the fittings round to where I want them and put 20l in it at the local LPG pump. I want to do the filler like the VG filler. The original filler cap grafted onto the LPG filler cap mounted in the factory spot. Next I'll use this Impco L model regulator in the engine bay, it's the one I had on the VG first off so I know it works. And on the motor an Impco 425 gas carb. These are cool, basically a very large one barrel CV carb that meters LPG vapor. they are designed to fit a Holley 4bbl air cleaner and to bolt straight to the throttle plate of a Holley 4bbl carb. I have the throttle plate from an old 600 Vacuum secondary. Someone has drilled the throttle butterflies in the past but I've soldered the holes up and it's ready to use. I've cleaned the rust off the throttle butterflies since this photo. So there we go, all the elements of a half decent LPG conversion. I have a few odds and ends coming from Australia to tie it all together. So join me as I convert my car to run on a fuel that died with the 80s! Edit: Head over here for a sharn, and a cup of tea. I'll put the jug on now.
1 point
-
Completed the Ride Forever Gold course today with Two Bald Bikers and had a blast 10/10 would recommend1 point
-
Update.. so being stuck at home has got me thinking so the 4 door I bought to chop up to fix the GT, I have decided to build a rat replica GT in order to shake down the running gear that’s going into the 2 Door GT. Plan is to blast the underside, inside, inside the boot and engine bay and paint ermine white and leave the exterior it is apart from maybe a seal coat. Dash and doors inside will be done in satin black.1 point
-
So, without going into too much detail about all the boring shit I have done, it's starting to look quite good. 2000 Honda Integra Type RX-195-Edit by Richard Opie, on Flickr 2000 Honda Integra Type RX-308-Edit by Richard Opie, on Flickr 2000 Honda Integra Type RX-350-Edit by Richard Opie, on Flickr 2000 Honda Integra Type RX-434-Edit by Richard Opie, on Flickr 2000 Honda Integra Type RX-294-Edit by Richard Opie, on Flickr 2000 Honda Integra Type RX-129-Edit by Richard Opie, on Flickr 2000 Honda Integra Type RX-151-Edit by Richard Opie, on Flickr 2000 Honda Integra Type RX-56-Edit by Richard Opie, on Flickr 2000 Honda Integra Type RX-37-Edit by Richard Opie, on Flickr1 point
-
I wanna 635CSi tbh1 point
-
So it failed it's first WOF under my ownership. Typical Honda things. Bushes. Front LCA outer bush on the RHS, and both RTA bushes. Bought the following from Speed Science/Hardrace - Front LCA kit (all 4 bushes) - Front swaybar end links (D-bushes unavailable in 25mm size!) - Front compliance arm bushes - RTA bushes George, being the excellent human that he is let me clag up his hoist for a week. With some help from Dustin (DNG) and Scott (East Tamaki Auto) it's all buttoned up and ready for it's recheck. Feels AMAZING with all the new bushes. Also learned it has a Spoon rigid collar set installed, while I was rummaging around underneath it. Also; Scored some nice clean, unfucked arch liners from Pick a Part. Have since cleaned and gotten rid of all the tar on them, will install this weekend. A few other little pieces. Brent at Doozi in Hamilton organised some showroom plates for me, and a new INTEGRA sticker for the center console. Plates as below, just real stupid nerd/indulgent shit. 20190830_175357-01 by Richard Opie, on Flickr 20190830_175651-01 by Richard Opie, on Flickr Car is looking clean and ok though. Just a few more small jobs and it will be ready for market. Standard suspension is en route but the Stacked! container is having some difficulty with fumigation for the ol' stink bug. DC2R Phone (28)-Edit by Richard Opie, on Flickr1 point
-
This morning, we fanged across to Caffeine and Classics, then rolled straight back home, where I had intentions of mowing lawns and doing general yard work. Anyway I started cleaning something in the engine bay. Next thing you know it was 6:30pm and I'd just finished cleaning up - after giving the whole engine bay a bit of a tickle with some cleaning products and a range of brushes and micro fibre cloths. Shit I used included - diluted Simple Green (beware, some people have had this stain alloy), Armor All Multi-Purpose cleaner (this shit is amazing on damn near anything) and Interflon Foam Cleaner (beyond incredible cleaner, kind to plastics and electronics, also a weapon on upholstery). Brushes ranged from a toothbrush, up to a soft dish brush. Start - this is in the battery tray corner, the general filth on the firewall is indicative of all the painted surfaces in the engine bay when I kicked off. DC2R Phone (18)-Edit by Richard Opie, on Flickr No real in-progress shots. I did snap a wee comparison of the old cam cover and the NEW HOTNESS just prior to fitting it up with new seals/gaskets etc. DC2R Phone (19)-Edit by Richard Opie, on Flickr It looked good before right? But how much is the difference when you line it up against a brand newie! DC2R Phone (21)-Edit by Richard Opie, on Flickr Basically the end result. I am aware I need to remove a few painted brackets etc and get them recoated. I've also put wheels in motion to buy a whole swag of OEM fasteners to replace anything a bit tarnished/rusty etc. Mainly M6x16 factory ones in the grey zinc finish. DC2R Phone (22)-Edit by Richard Opie, on Flickr This thing positively glows. It's a thing of beauty. DC2R Phone (23)-Edit by Richard Opie, on Flickr Even the letters have a shine and crispness beyond anything I've ever seen on a B-series. Machined OEM finish! DC2R Phone (26)-Edit by Richard Opie, on Flickr Likely the most boring photo I've ever snapped. But it illustrates the finish on the firewall/paint at the end of the proceedings. Turned out pretty good. It's not perfect, no, but it's definitely up there as far as 20-year old engine bays go. DC2R Phone (27)-Edit by Richard Opie, on Flickr And a parting shot. Pretty chuffed with it all, will carry on with a few more jobs to sort in the bay, and also clean the underside of the bonnet which is quite grubby. Toodle-oo.1 point
-
DC2R Phone (11)-Edit by Richard Opie, on Flickr Here's a pic from this evening, it basically looks exactly as it did in post 1. But honestly, I have done a lot of things to it.1 point


This leaderboard is set to Auckland/GMT+12:00