
Leaderboard


.thumb.jpeg.384ff72c8d2b0ee0d34a7bdedb55bdcf.jpeg)
Popular Content
Showing content with the highest reputation on 08/25/20 in all areas
-
Well it worked pretty good! Only real defects are on the face with machine allowance. The volume of the chill block didnt really seem to matter so I think going forward I'll size them to at least 100% of the volume that needs chilling.32 points
-
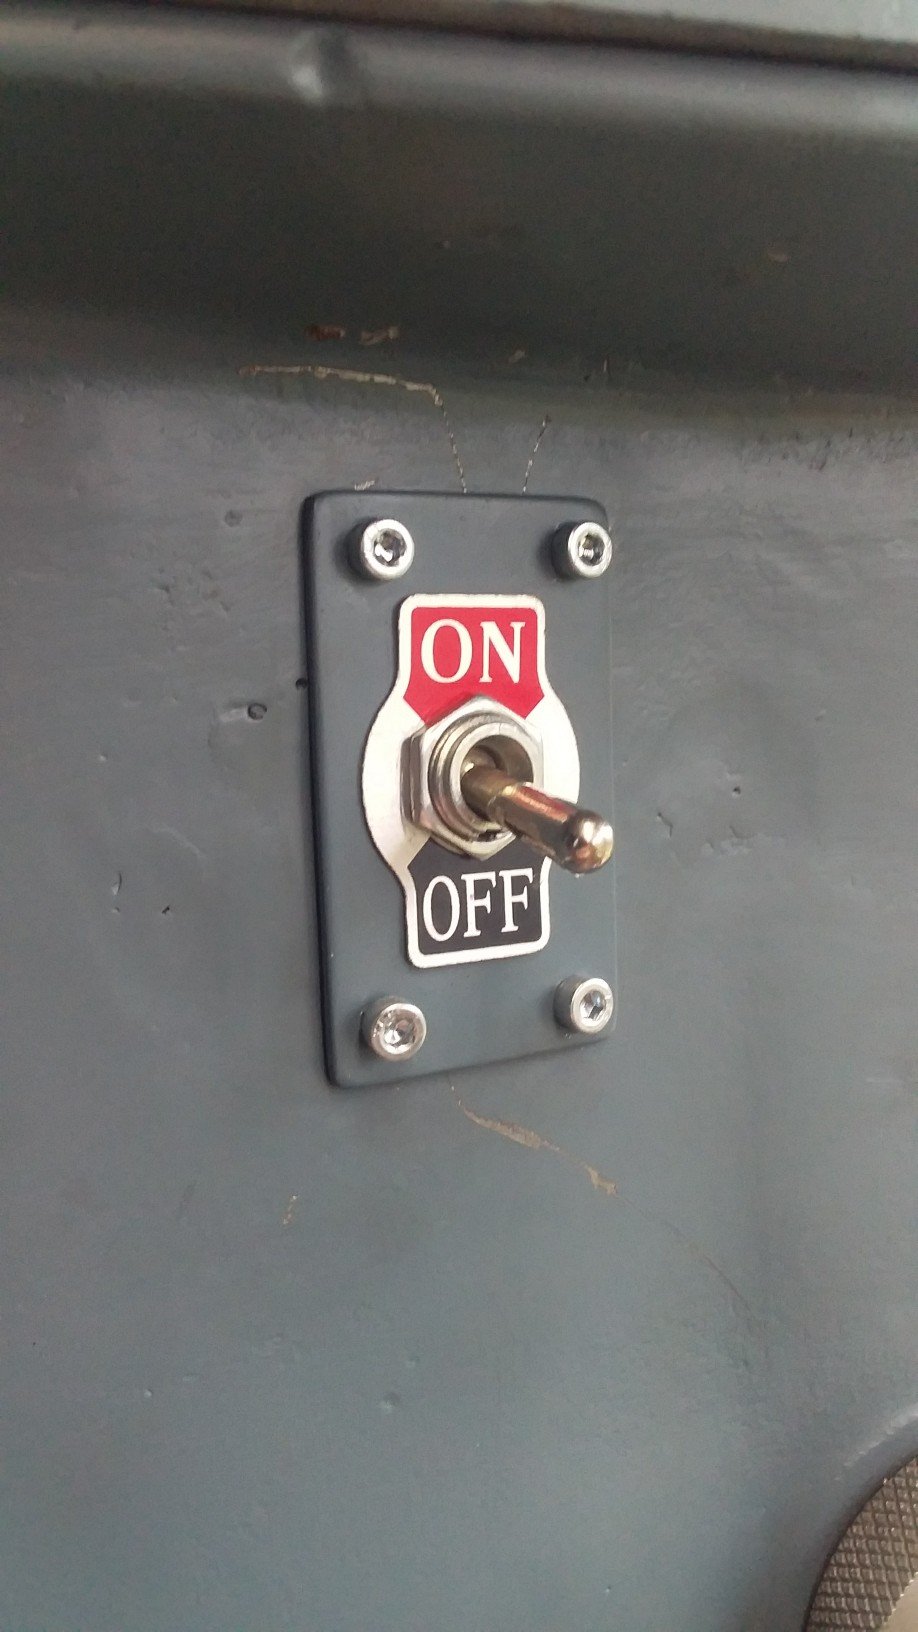
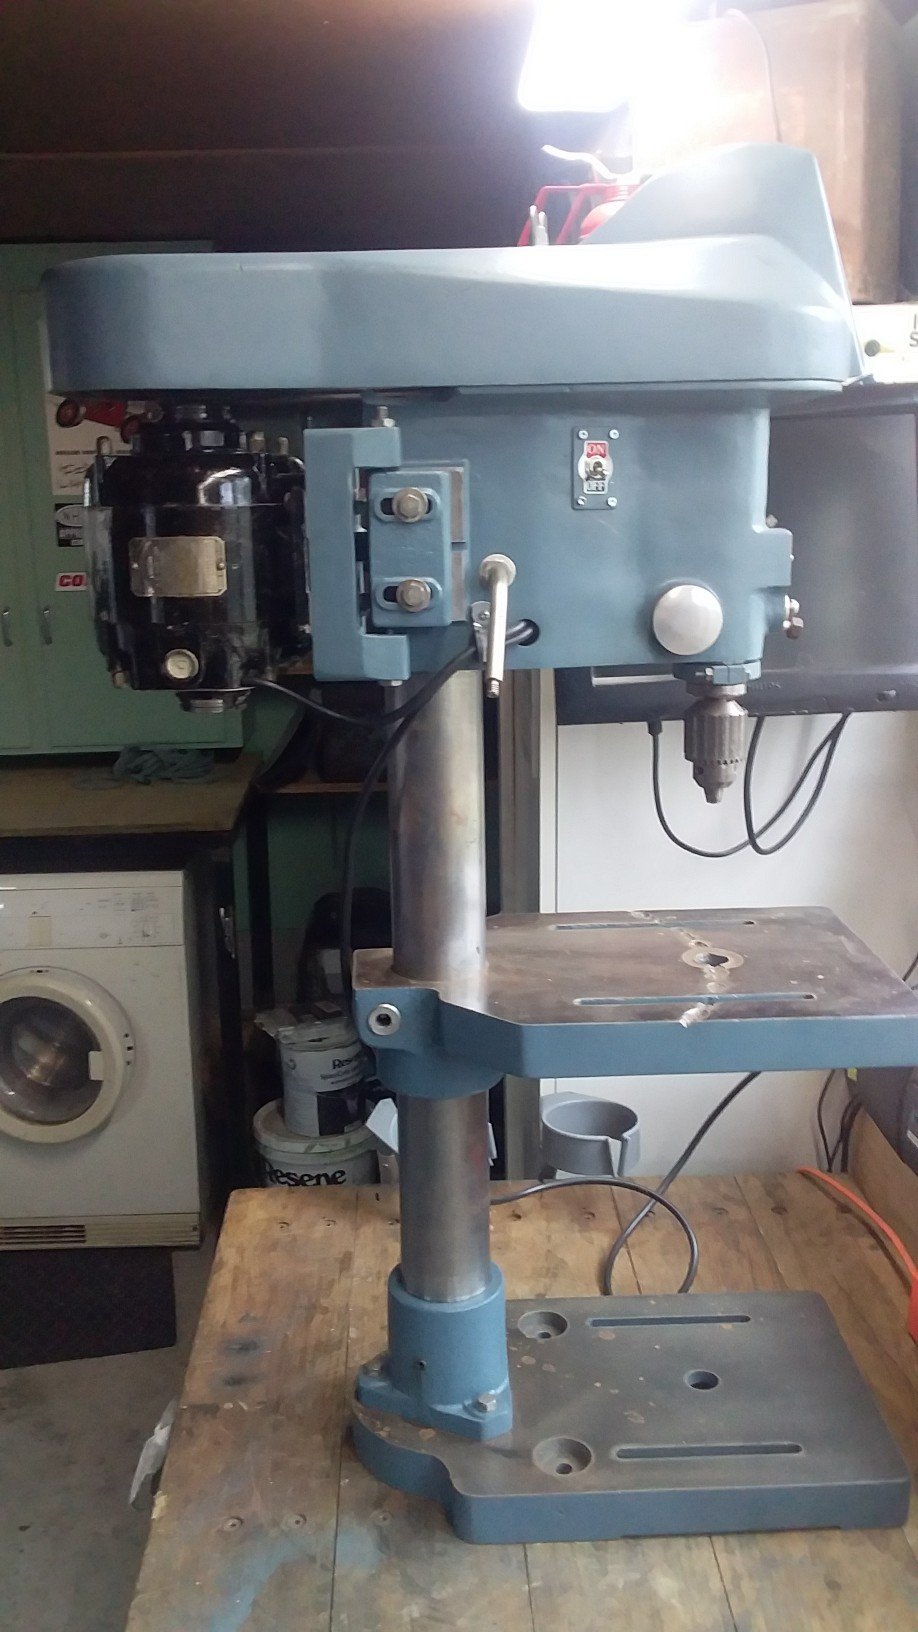
Finally got my old 1950s drill press finished. Had to make up this small plate to mount the toggle switch. Please with how it turned out, looks the part. all wired up thanks to my mate Darrell, and ready to go for another 70 years.
 10 points
 -
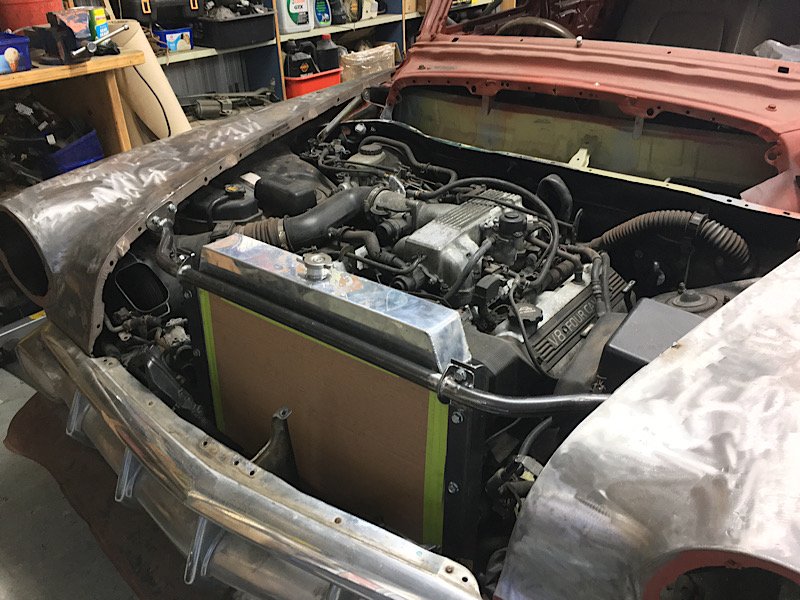
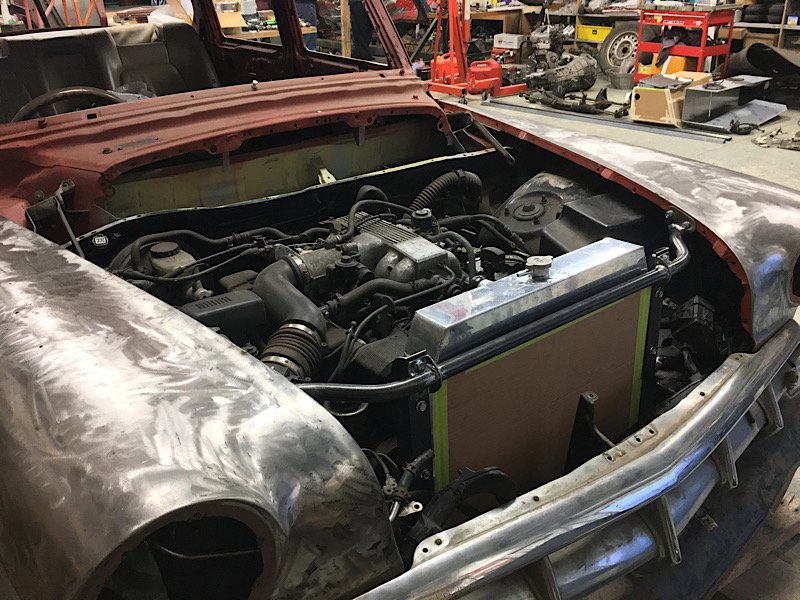
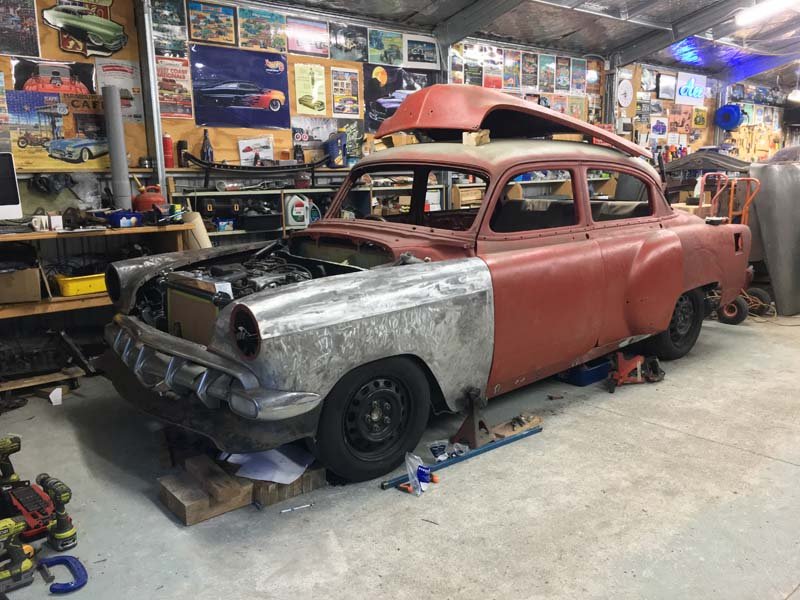
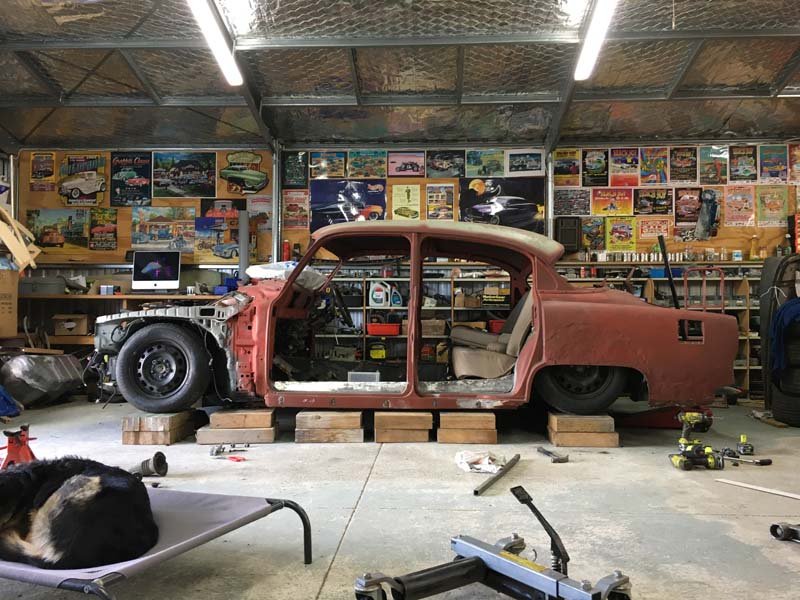
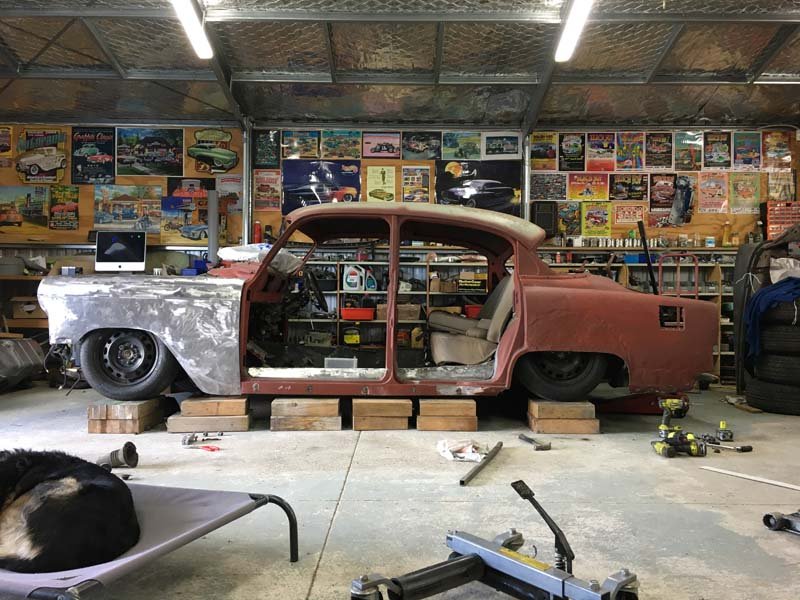
Spent the last few Weekends making a new front lower cross member and Radiator support bracketry. Radiator is a 1954 Chevrolet style aluminium one. It is 2-3 inches further forward now, and now the bonnet doesn't quite close. Should be easy enough to fix with some light trimming. Fitting a transmission cooler and a large enough battery is going to be fun.
8 points
-
Basically I find it pretty hard to justify spending $thousands on one off parts. I might as well spend that money on a tool I can use for lots of parts. Example. To pay someone to make regular patterns for just the crankcase (MDF cnc) was going to be $13K. To pay someone to print just the crankcase patterns was $10K. So instead I bought a massive printer for $10K and printed every pattern for the engine for about $1000 material.6 points
-
Real quick clip. The "Yeah" is Miss 13 recording.5 points
-
Possibly on some smaller parts like the supercharger or waterpump. Maaaaybe! I dont know the cost of Aluminium printing now but when I was doing SS printing it was about $1000/kg. The sump/crankcase are around 20-30kg and would have to be done in multiple pieces and welded together. This camtree part is 5kg and cost $100 to pour. Means once its right they are super cheap. A rough estimate on the cost to do this part: Modeling and pattern design - 250hrs Pattern Printing - $50 material Pattern /corebox prep - 50hrs & $100 material Sand Mould making - 15hrs Sand Mould cost - $20 Pour part - $100 So total its taken about 300hrs and $200 to make 1.5 points
-
So the jaycar module died, I got another and it didn't work out of the box. I did what I should have in the first place and orders the right bosh module Wired it all up and it works like it should5 points
-
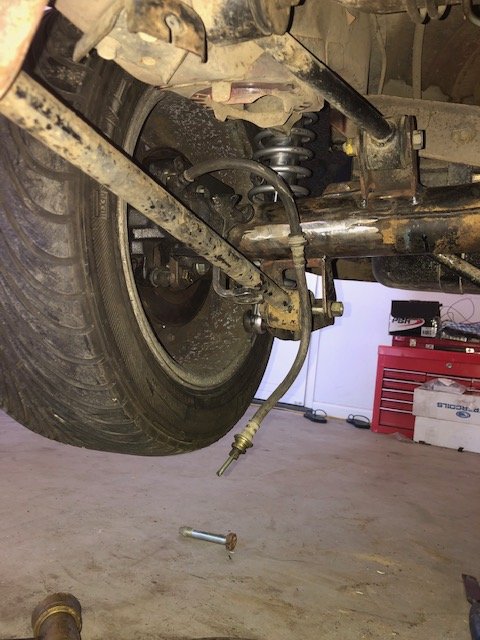
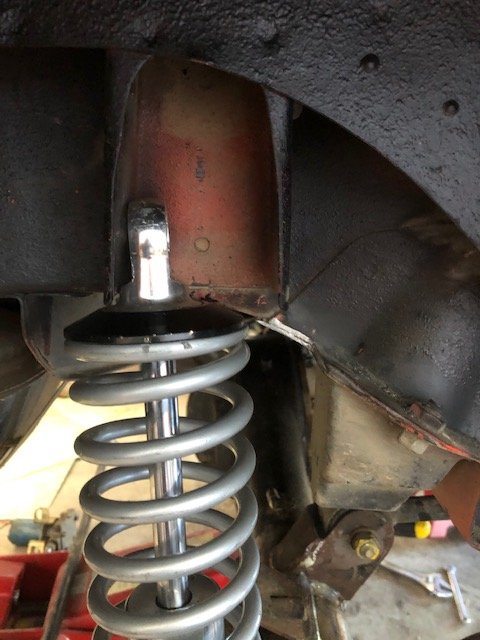
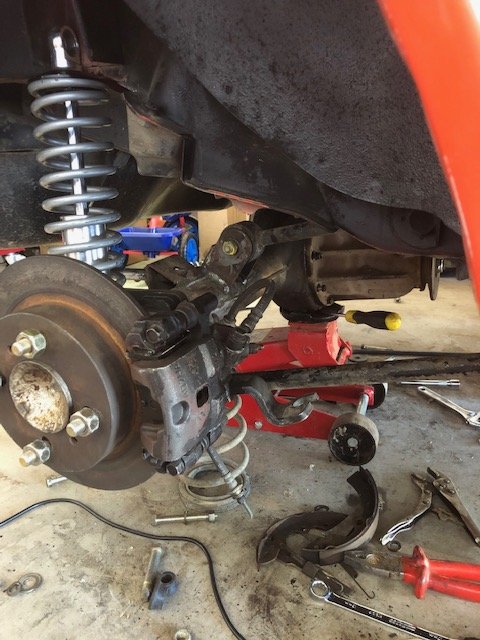
It drives really nice now and brakes are epic. Who would have thought. The tidy bonnet is lovely. The top needs wheeled back and etched but its bloody good to be fair. Next phase is reset the leaves 2in. Have ordered new bushes for these, and some lower control arm bushes so then the whole front is lush and ready for another wheel alignment4 points
-
4 points
-
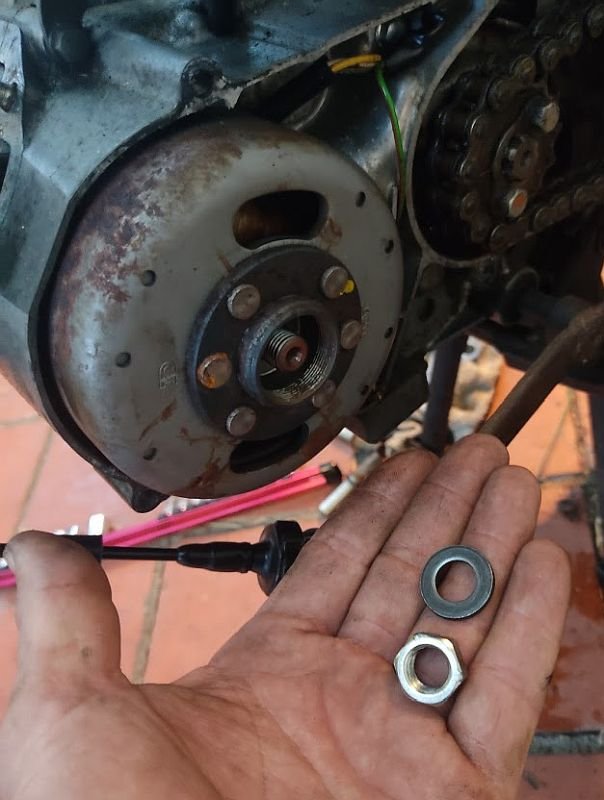
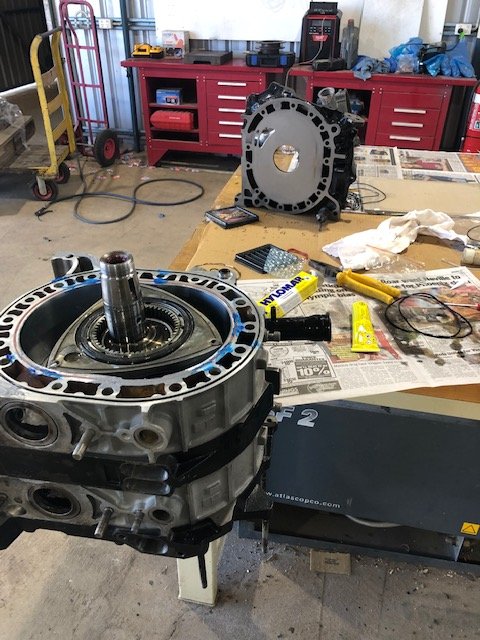
H100S engine is in desperate need of a rebuild First thought was seize, but didn't really make sense as it didn't get warm or anything, still pulled the top end. Found it had a new base gasket, 2 loose head bolts and the washers from the other 2 were missing, lol yeah I'd say someone has been in here before! Piston isn't scored, rings look sweet, cylinder is pretty much mint besides needing a good bit of porting... Remembered it had been making a bit of a nasty noise inside the flywheel, maybe the issue is in there Lol fuck, the nut and washer were just floating around in the center of the flywheel, looking at the marks they have been jamming against the inside of the cover. But it was still locked up, dropped it into gear and giving the rear wheel a whack backwards turned the engine, but forwards again locked it in the same spot, so it's in the clutch side somewhere. And since I've discovered that the crank bearing on the flywheel side sounds abysmal and has enough play to let the magnets hit the stator I've called it for this engine, it can fuck off into storage. So now I'm cleaning the piston dust out of the MB's bearings and putting that bottom end into the H1 along with the 12v conversion and CDI etc.
3 points
-
Results are in on the downsized runners.3 points
-
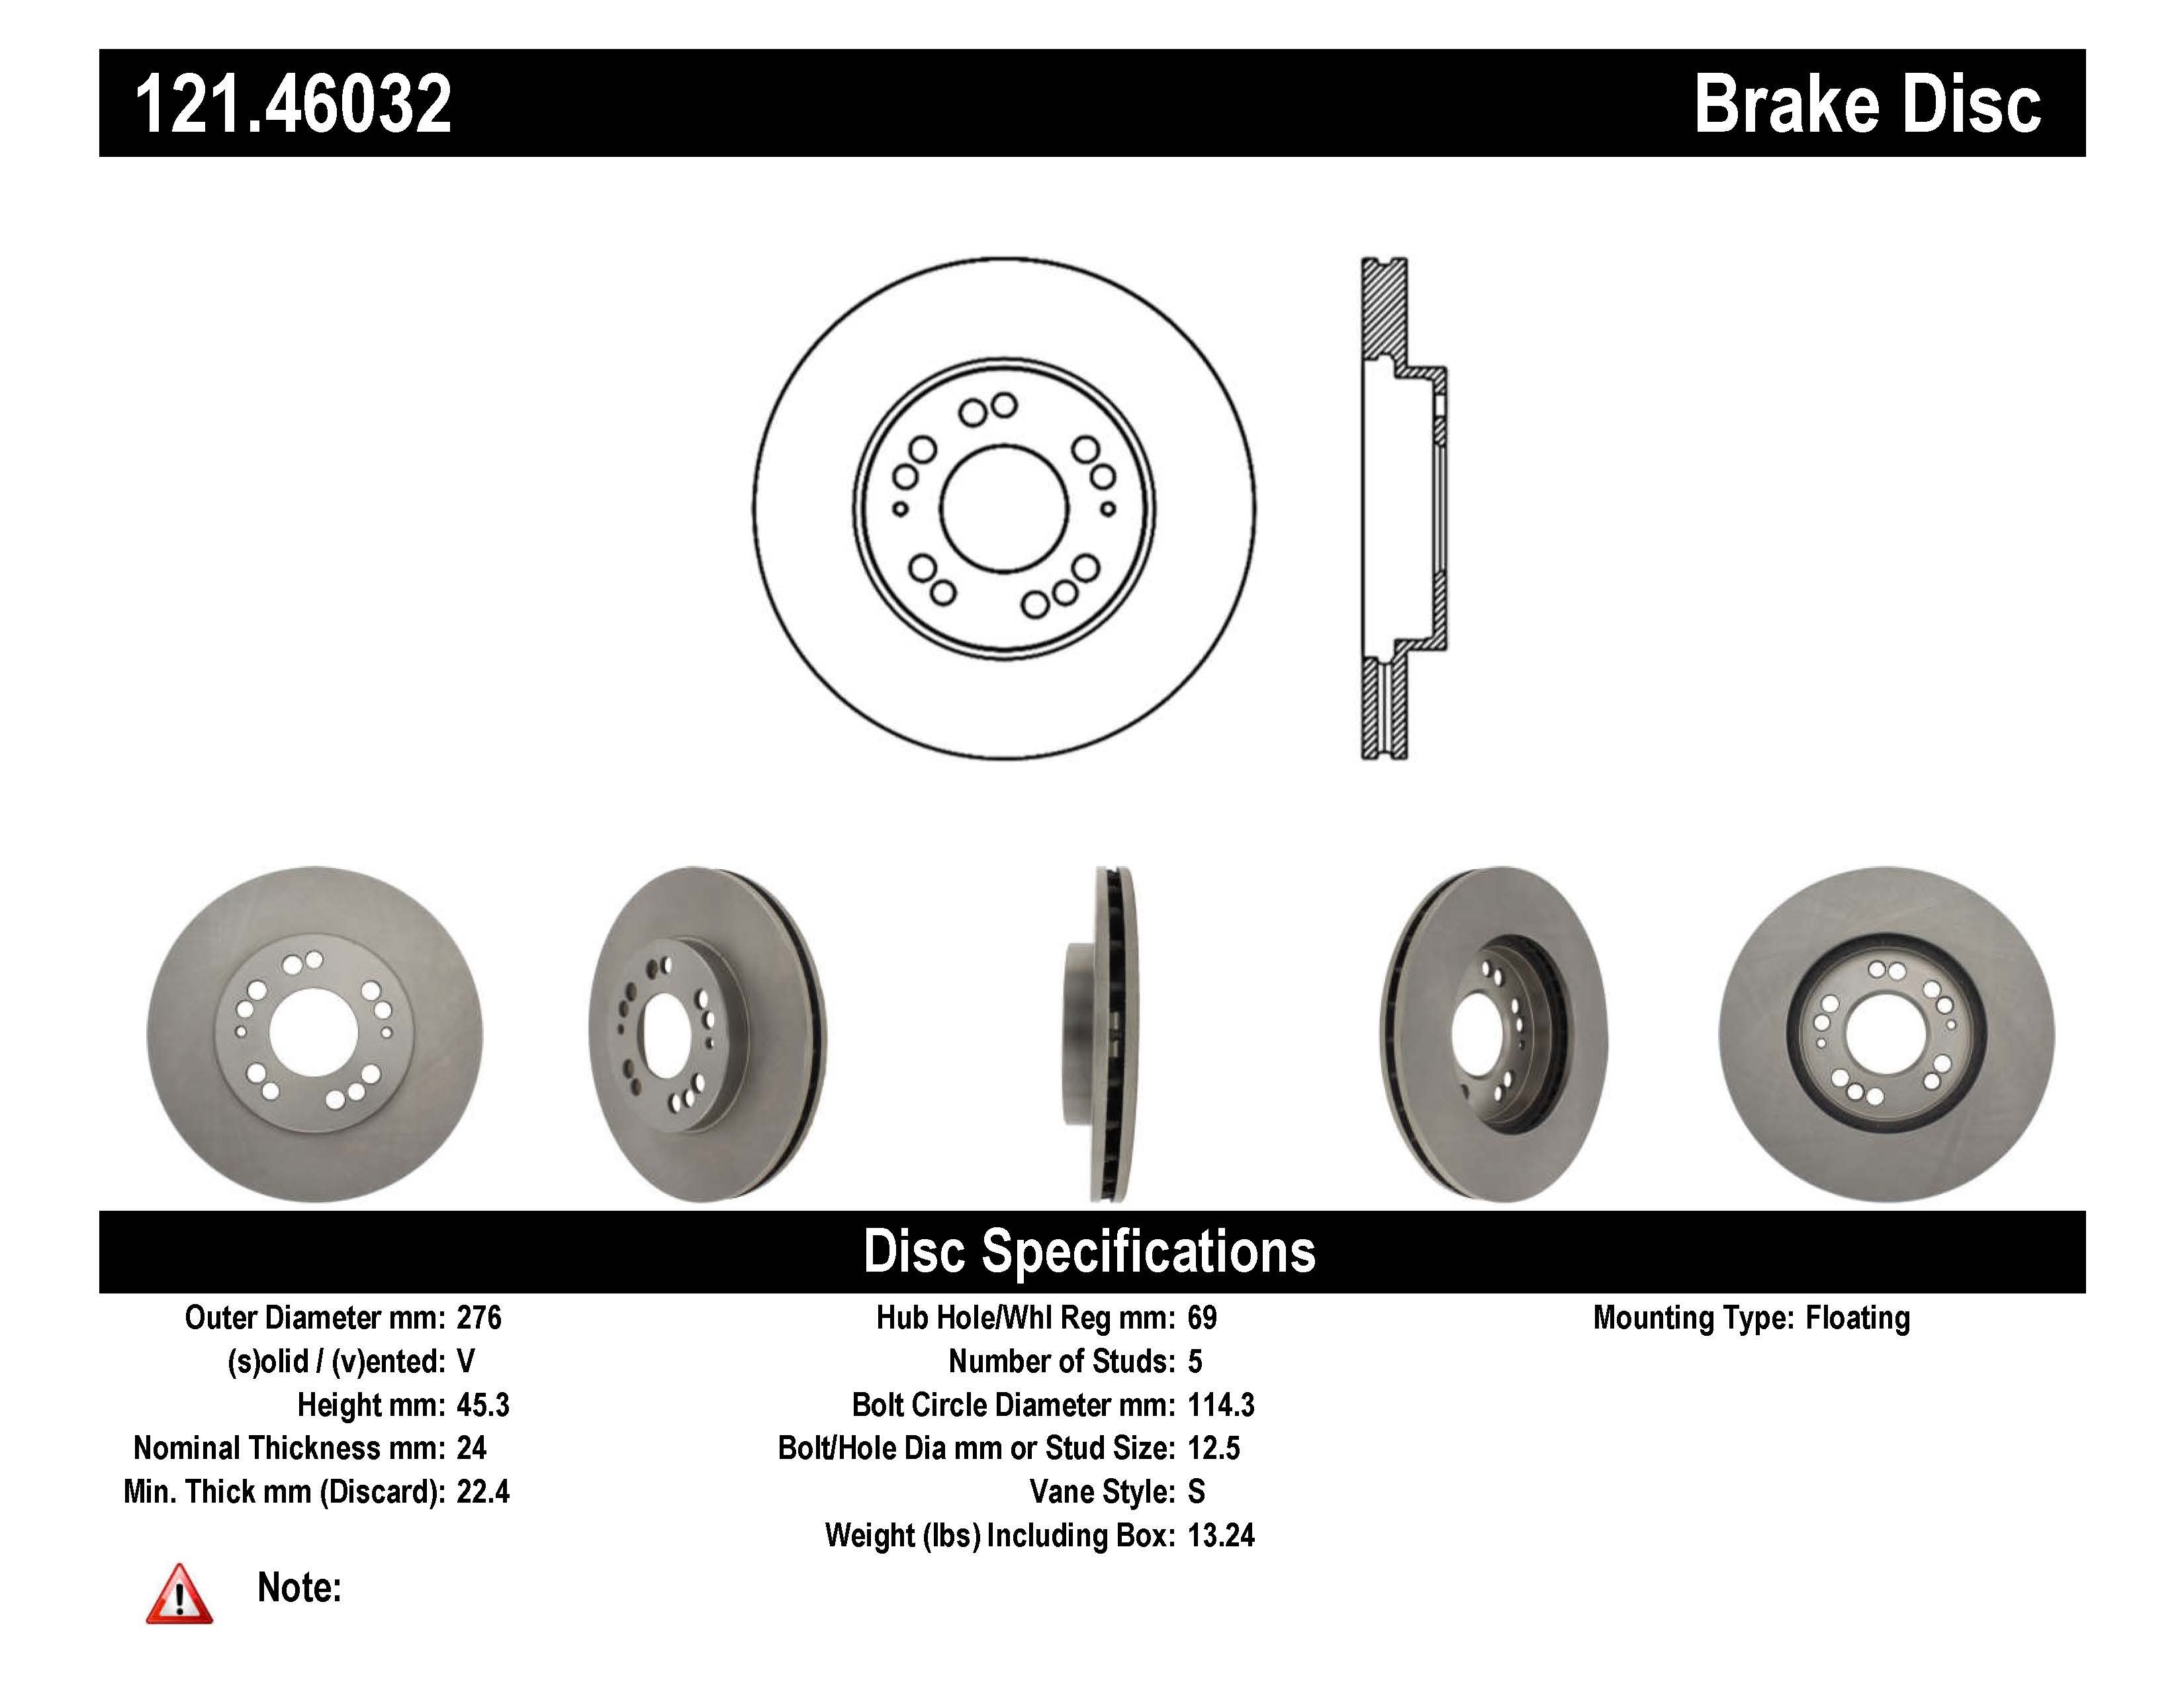
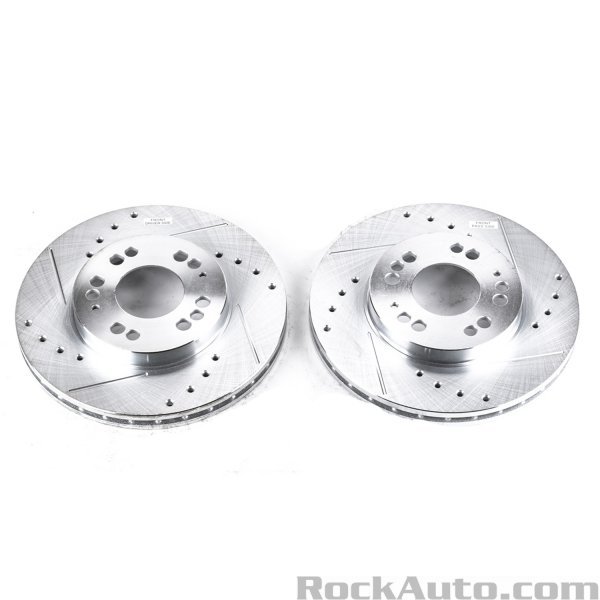
Rotors I am getting are Multistud, will be going 5 stud down the track as well (looking at Rotor options for my AP racing calipers in 5stud or getting a new hat made as they are two piece) Also more then happy to drill holes for 4 stud if I need to anyway :p https://www.apcautotech.com/part-detail/12146032?year=1999&make=mitsubishi&model=eclipse The same rotor is listed for the Galant vr4 due to the multistud Could also go for the fancy ones but they are 100 more and tbh I am happy with factory style https://www.rockauto.com/en/moreinfo.php?pk=4417746&cc=1356634&jsn=275 Pulled the pin and ordered, saved about $100 to buying locally and means I get new front Calipers instead of 2nd hand ones that need a rebuild, also cant source brake shims here anyway. Spent way to much on shipping but oh-well, don't need anything else for a while from the states and it is heavy parts. Need to get back to the fab guy to sort the rear end before I can paint it and put it back in Have a clutch firewall brace on the way from Malaysia as well to stop firewall flex, could have made one but worked out cheaper to just buy one that fits Thinking about getting some smaller wheels but not sure what to get, I actually like the Koya wheels I currently have but they really need to be 7" wide instead of 8" as I won't be running anything bigger then 215, may need to get more factory style/size wheels for RWC but will work that out when its ready to get inspected and has been looked over (sure ill get a list of things to suss) But if I get new rims I would want to go 5 stud anyway :p
3 points
-
excellent news on the good casting result. have made many patterns and tried to get castings to work in various sizes and levels of complexity before and i know how hard/frustrating it can be so great work man. the foundry you're using look like they know their shit too which always helps.3 points
-
@Truenotch taught me how to upload videos so i guess theyre self explanatory. This motor has been sold, im on to that other 13b bridgeport i got ripped off with. Im passing time until my panhard rod is built and i can completely sign off the diff!!! Enjoy3 points
-
3 points
-
3 points
-
Mods, please feel free to take this down if not appropriate. Hi Everyone, I mentioned this in the DIY thread, but it's open to everyone here. I do all the estimating etc for Unity Scaffolding here in Auckland. I can help you out with scaffolds large and small, or simple roof edge protection. I can't do it free, but I can give OSGCs the same rates that the big boys get. If anyone here is a builder/painter looking for scaff on their projects, we're Sitewise accredited and are currently doing all kinds of commercial and residential work. Happy to work out good deals for you too. Just send me a PM, text me - 021 0249 3707, or email sam@unityscaffolding.co.nz. instagram: unity.scaffolding Edit: range is Greater Auckland. We tend to stop being economically viable around Silverdale/Warkworth up north, and Pokeno to the south.3 points
-
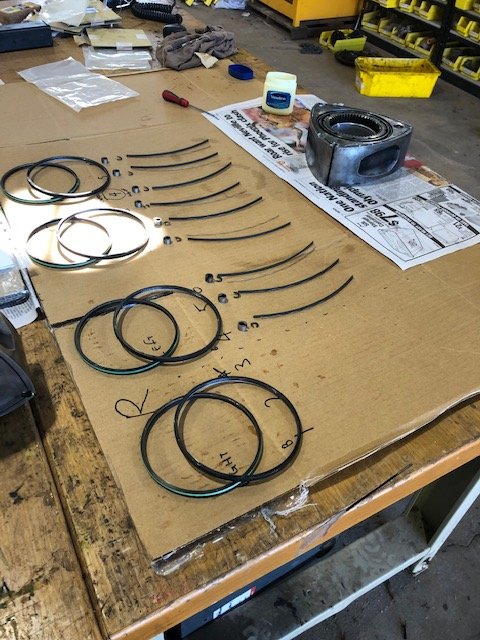
Got the next one ready. Now have 4 chill blocks, 4 risers, 2 main in-gates and 2 small gates. One of the chill blocks didnt pack very well so we'll see what happens there. The sand around that area is pretty thin so theres a chance itll get super hot and fall apart. Bigger problem is I had an issue with the sand strength for some reason and it cracked when bolting up. Hopefully it doesnt fall apart when filled!3 points
-
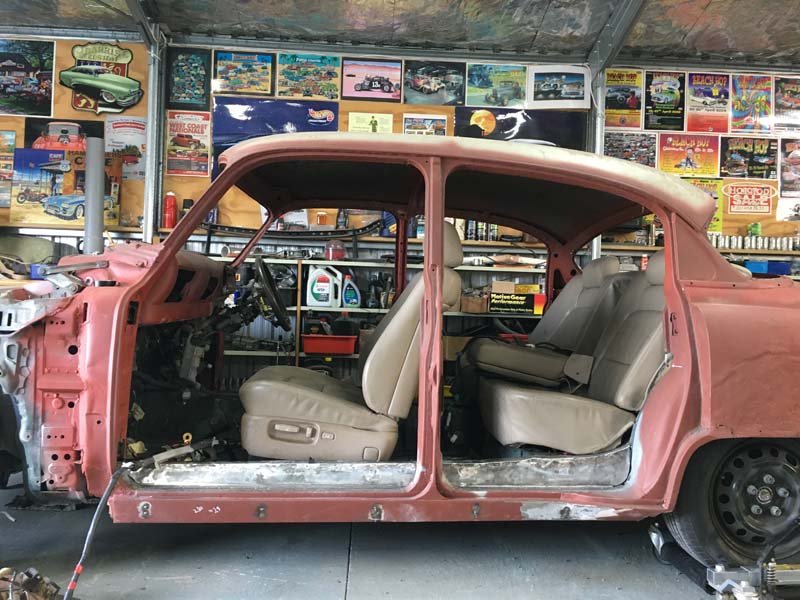
The yellow bonnet wasnt flash in person, the skin is mint but the frame has rusted away around the whole front edge and down the sides some..so it flaps within its self. It’s fixable but I’m not interested right now. i ended up winning the auction for the tidy-as one so will get it this weekend. i had an unholy cunt of a time trying to get the pitman arm off. Broke my pitman puller and several tools along the way, rooted my jack handle from wailing on it with a hammer trying to bash it off the spline. The go was taking the whole drag link off which frees up half the battle and some tension I guess, brought a new puller and introduced more heat and it slid off. Then a bad part number crossover Means the new one turned out to be for a powersteer model, no bueno. Deep breath. saga. Idler arm was easy as, a joy almost. Bottom ball joints.. one was aftermarket so was bolt on, pretty easy. The other side was factory and has fucking great Steel rivets holding it on. Much drilling, grinding, bashing and swears later in a tight spot it started to move but wasn’t pining. Turns out there’s two spotwelds holding the cast part to the bottom arm.. lovely. In the mean time the cable tie holding by the hub and brakes up out of the way snapped and crushed my wrist, so that was cool. Also burnt a finger unexpectedly on a hot drill bit. won in the end but pretty worse for wear. The wheel cylinder for the lame side was fully frozen so binned that and got another set.. ive done one side, the other can wait. Fanged some hose clamps on fuel line too. There was no chance of leakage cause I could barely pull the line off but it does look safer. And a recycled picture So you dont feel too ripped off after reading this shit
3 points
-
Sorted out a lot of bits I need for the next stages, good to find most of them and get things sorted. Crawled under the back end for a look at the leaky diff... I know the brake lines need replaced, that'll happen as soon as the wheel alignment is done. Also dragged the trans into the garage and inspected it, noticed the rear mount was perished so ordered another one, pretty common item, carried in SCA and Repco... And pulled the diff cover off for a cleanup. Needs cleaned, painted and dents taken out of rim... After wire brushing the cover, bolts and drain plug, I just brush painted everything with durepox, came out ok really with a thick mix, will trade again, easier than setting up the spray gun... So I'll put that together and fit new front seal when things are dry...2 points
-
That's the problem though, no one has one that goes2 points
-
Yeh think may pursue the big tapered idea. The 45's look decent in some places. But not so keen how jumps around so much. Kinda cool how can see it brick wall soon as run out of airflow in the runners. Someone bring said beams here and will dyno it for a small fee2 points
-
Nice! The results are basically as expected. Looks like a big tapered inlet has some potential? Cool to see the power climbing and staying level right up to 9k. We really need to get a Beams on that dyno... I’m curious to see the difference between 45-55mm on a 2L engine.2 points
-
All I can tell you is feed it. Put in way more risers then you think and make the Ingate how the foundry tell you, apart from that it really is a case of just trying it and seeing what happens. Maybe use bigger filters thn you think too? Each foundryman is going to have their own way of doing things and most of the time, if they're any good, they'll know what they're on about.2 points
-
They know what theyre doing so that does help. Usually the answer is "you could change X Y and Z and that might help, or it might make it worse you just gotta try it." One of the awesome things with the foundries over here is they are pouring 24/7. I just drive up and take the mould right to the furnace and fill it up straight away! NZ wasnt quite like that!2 points
-
2 points
-
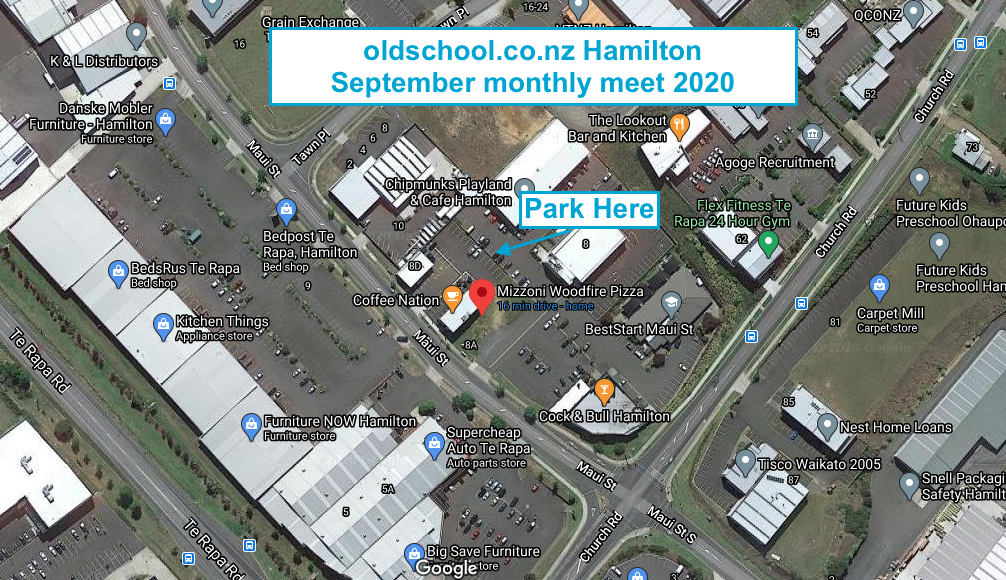
The September meet will be a little different. Thanks to @Beaver and @macabre for the future of our monthly meets. Copy/paste of the first post:
1 point
-
Pretty much get everything from protec? I used their high build urethane a bunch of times for blocking, you can mix it as high build or as a regular thin coat. They are basically the cheap brand but still sell legit automotive paint systems.1 point
-
Im getting pretty good at melting pvc into shape. although melting some electrical conduit and down pipes into a plenum maybe beyond my capabilities. whilst fumes created being the death of my last few brain cells I do keep forgetting to wack the hilux plenum on there. would probably do ok1 point
-
Gotta be a bargain at 23k? Surely would sell on trademe for that no worries but gotta deal with trademe!1 point
-
Feel free to shoot me a PM if you only want a ballpark price to gauge budget etc too.1 point
-
I have a 500cfm on a mild 318 and that works very well. Originally I had an engine with a 500 two barrel holley but wanted a 4 barrel with smaller primaries so it would run more efficiently1 point
-
Na he is sold on this flat 6 thing - commer ts3 it is then lol1 point
-
Yea I say that when it lunches itself we run a poll to decide what the next engine should be, we all chip in to get it to Alex, then sit back and watch the mad antics as he solves all of the unwieldy problems in getting it to fit. To start the suggestions I choose an OM606 with a DPUK 600hp pump.1 point
-
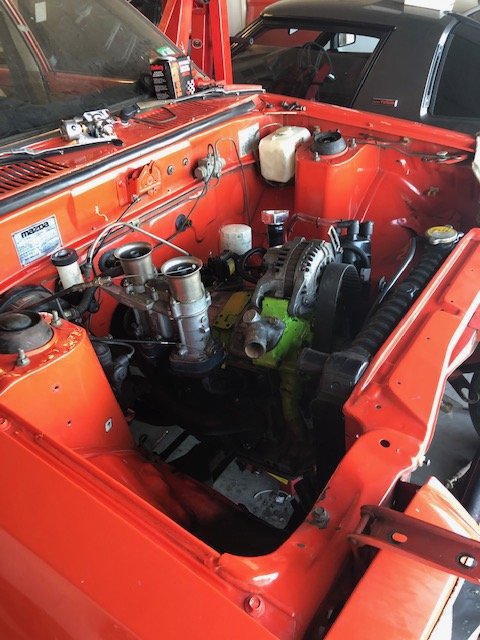
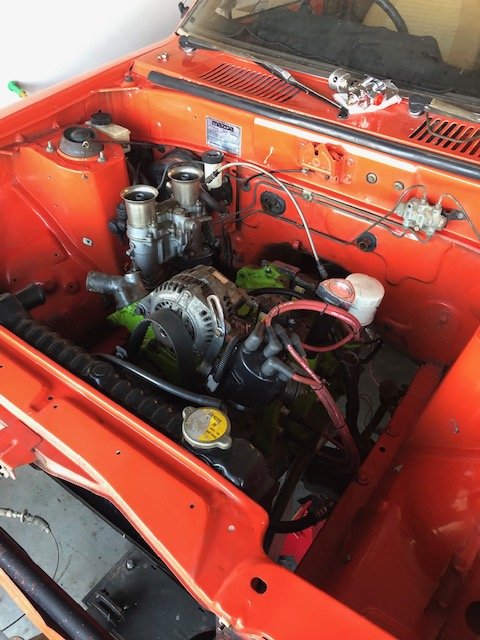
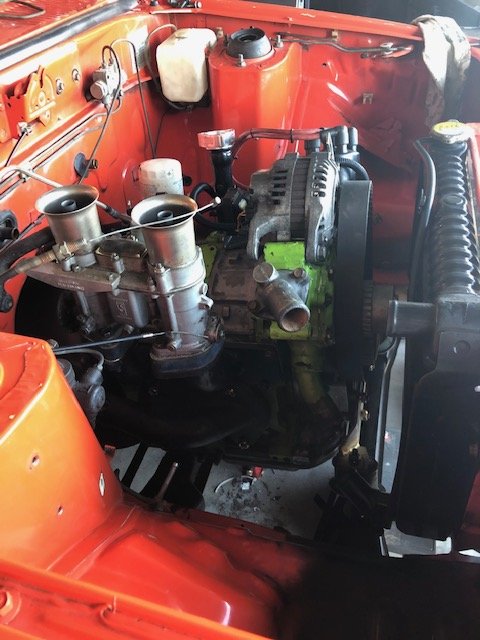
With that all done, and a bit of time up my sleeves it was time for rebuild #2 on the little 12a!! this time with everything being new I was sure it’ll be ok. Everything went together without a hitch. and this time rotating it was the compression I remembered got it thrown back in the engine bay, hooked up and spin up for oil pressure. even got me young fulla off the couch from watching paw patrol to help dad throw it in!!! no dramas. Checked timing, ensured there were no leaks.... then went for a start. started first turn of the key.... smoked the house out and gave the dog a heart attack. Headers only meant it was loud.. just right. I'd upload a video... but I’m shit with technology and don’t know how to.
1 point
-
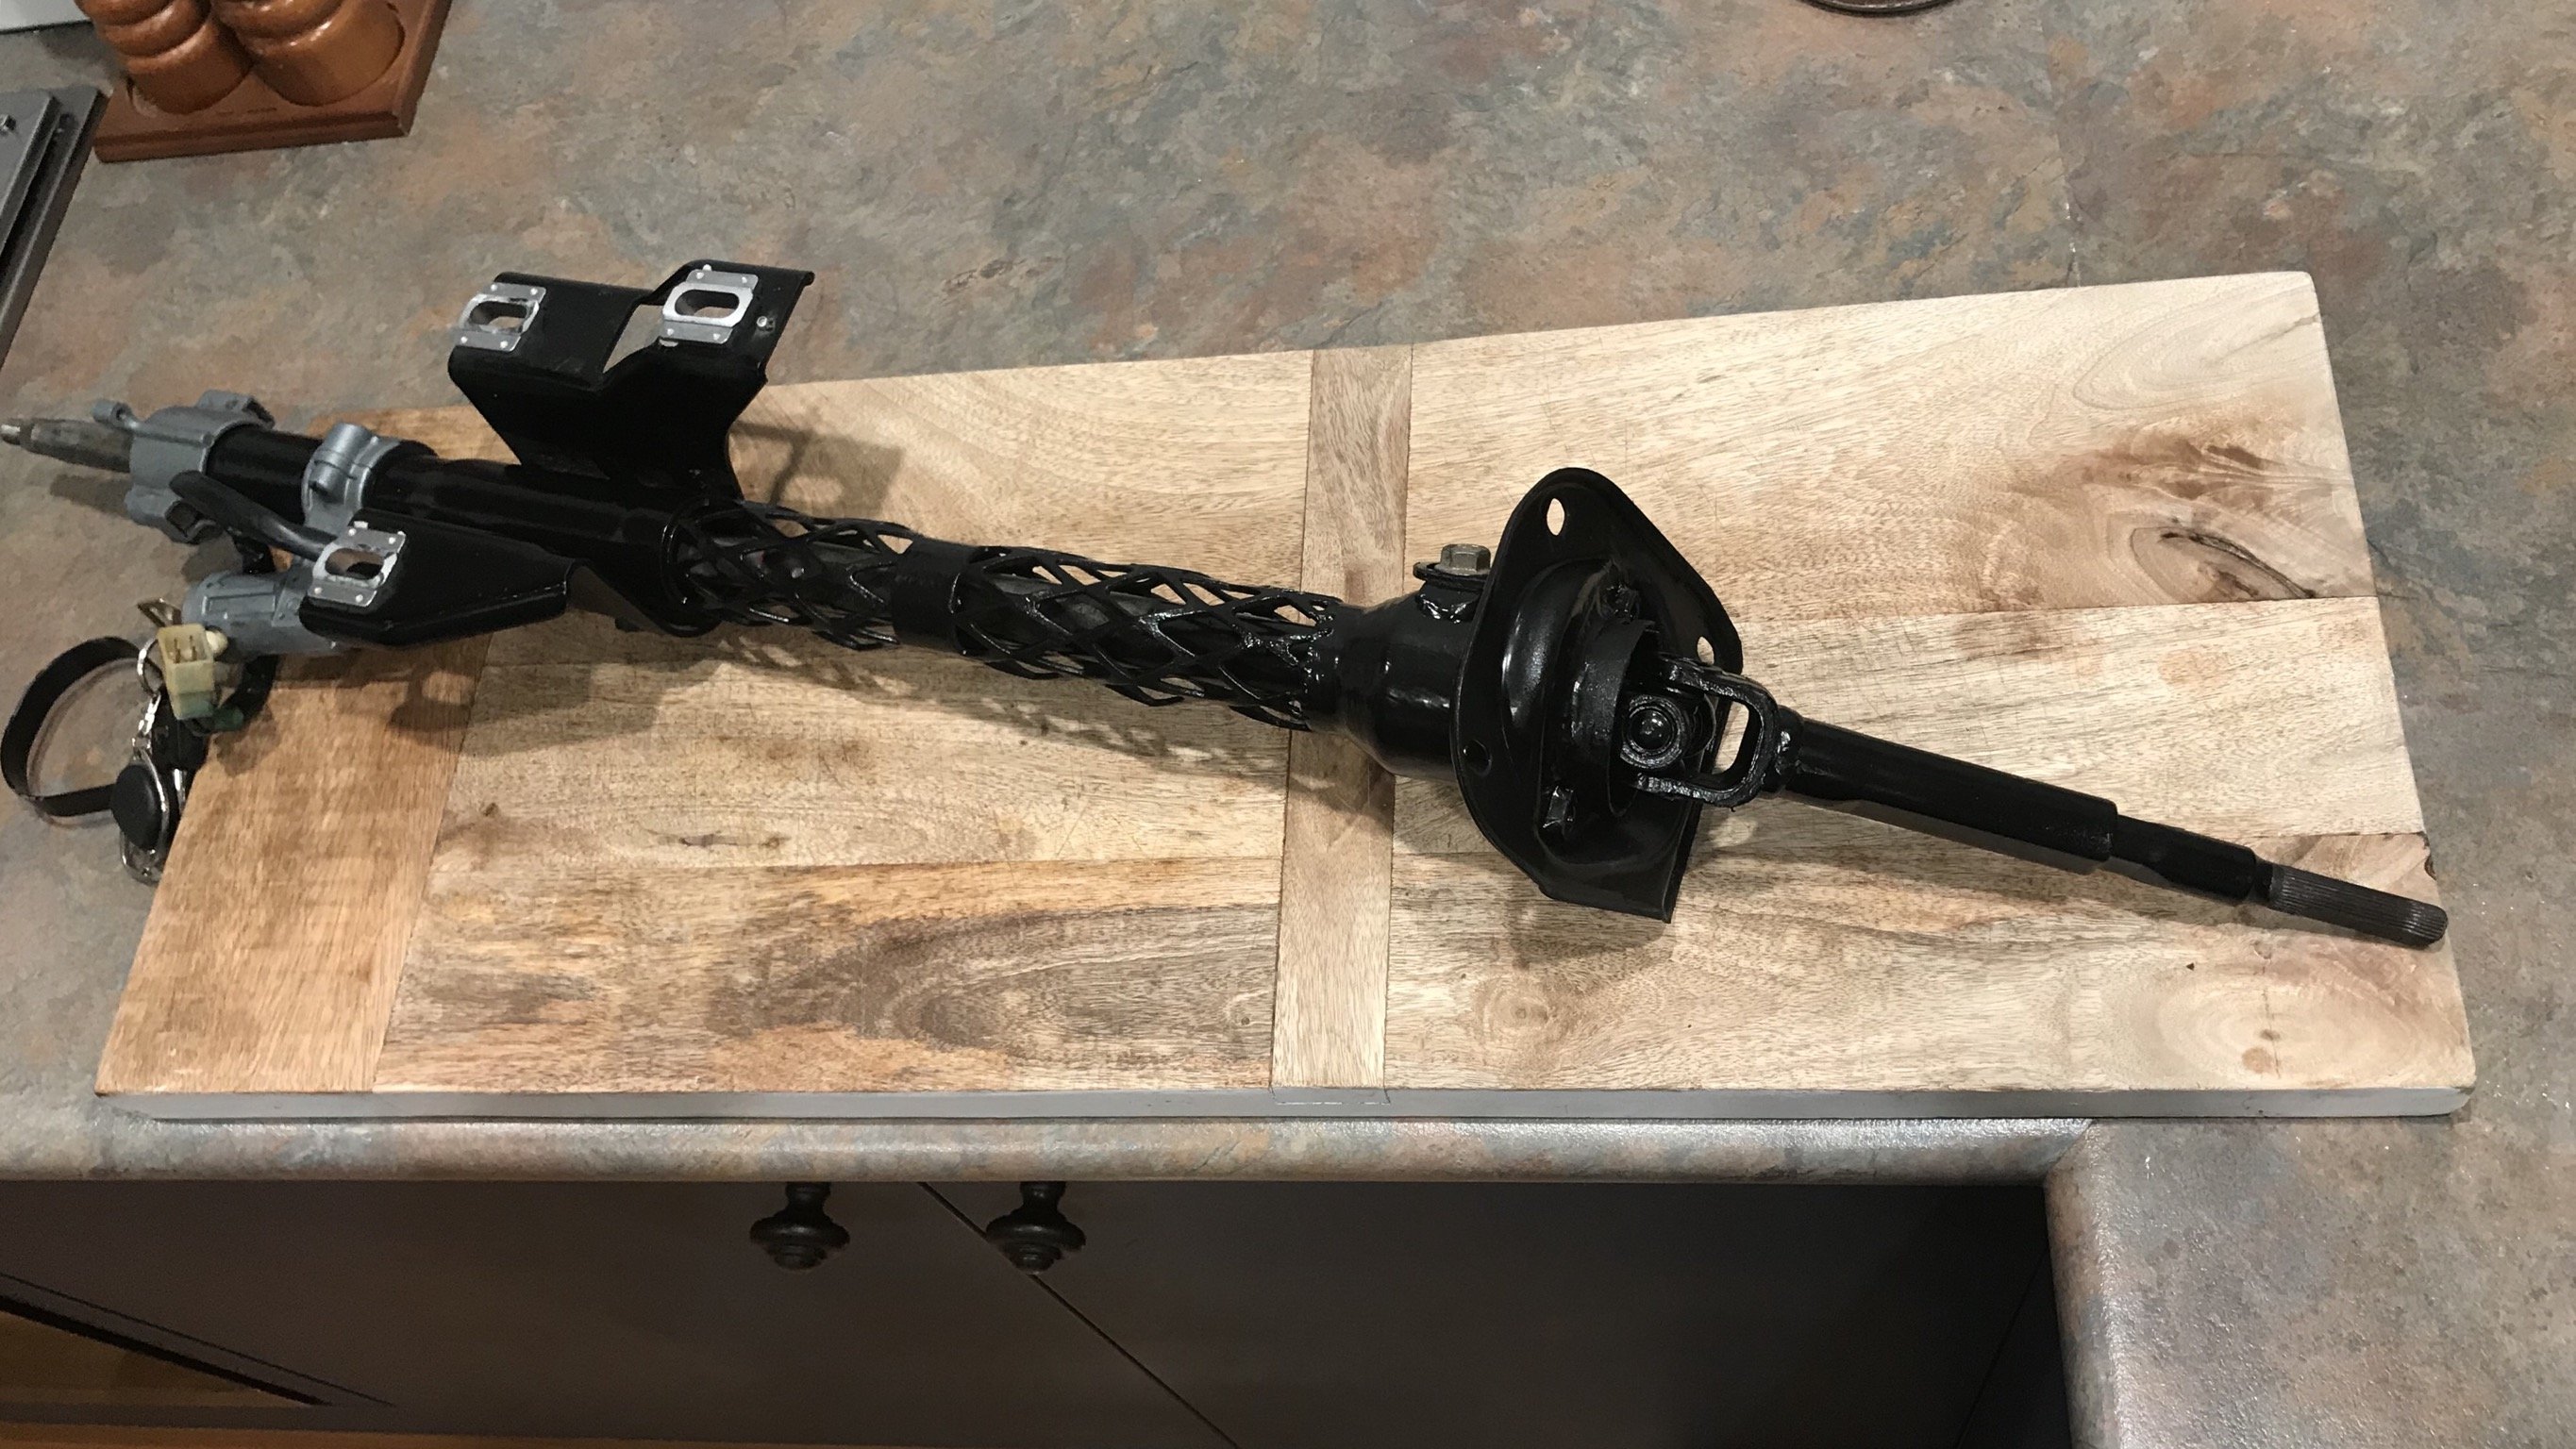
Prepped and used black Por-15 then assembled the column ready for fitting back into the car today. New bearings were installed. No movement now after hot glue.
1 point
-
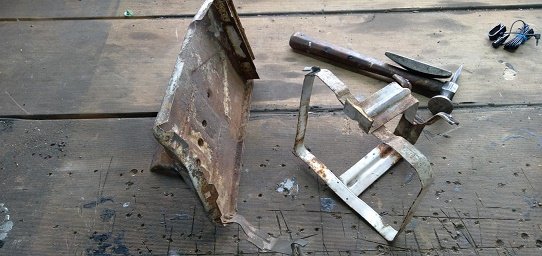
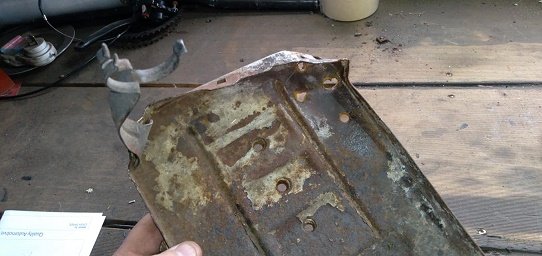
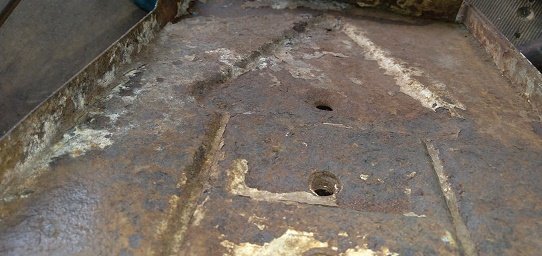
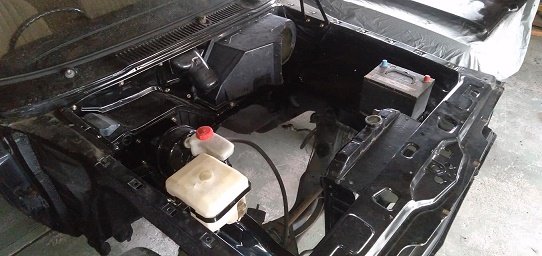
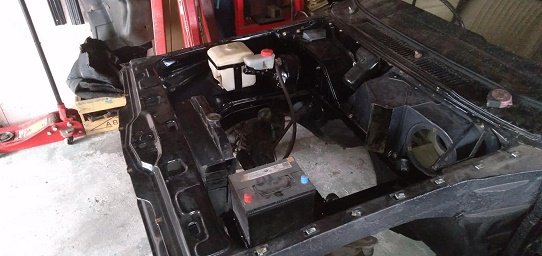
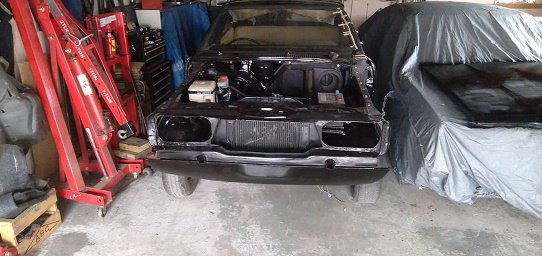
got a few small things done today...the car is missing the battery tray and washer bottle bracket.. luckily i still had them from the white mk3..the tray wasnt in the best condition but i gave it a hammer and dolly,,wire wheel clean and a coat of paint. grabbed some rattle can gloss black and flicked in a few places (95%of the engine bay was already cleaned and gloss black)..also got the wiper mounted and the heater box mounted and sealed. also flicked the front valance in
1 point
-
Pics:
1 point
-
And some snaps of back: Bit of negative camber:1 point
-
Hard to believe but I've finally got this going! Goes really well, goes hard for what it is.1 point
-
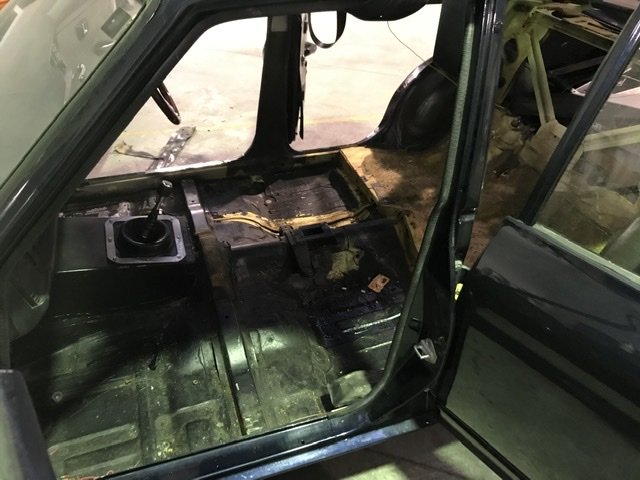
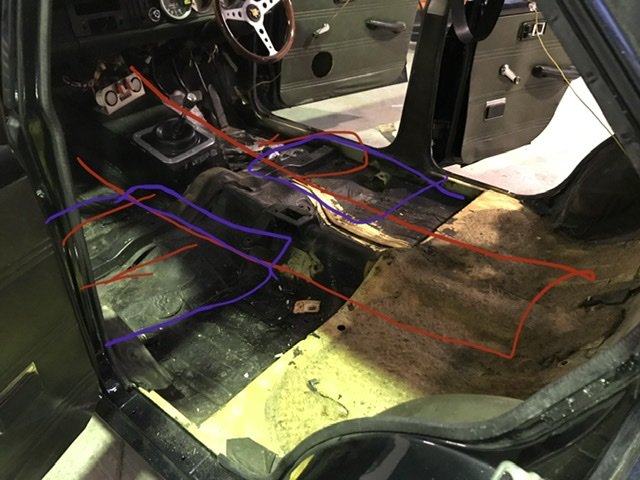
So I’ve been waiting for weeks now to get my grill, mirrors trims and stuff back from the painters before taking the car home but he’s been flat out and I’m getting it done for free so I’ve decided while the cars sitting at work to get into the main fabrication work. Pulled everything out to start dry icing the floor tomorrow after work. Then the plan is to cut the entire gearbox and driveshaft tunnel out, fit all new stuff done properly and that gives extra clearance for the driveshaft when I drop it lower. Then I’m cutting the channel out that runs the width of the car and I’ll fold up a 3mm plate that welds straight to the floor for the seat rails to bolt to which will give me about 60-70mm drop in seat height so my head won’t touch the roof and also stiffen the floor back up since I’ve taken the stiffener out. Wish me luck
1 point
-
1 point
-
Gn125 cam chains are cheap. go on, put GN parts in it1 point
-
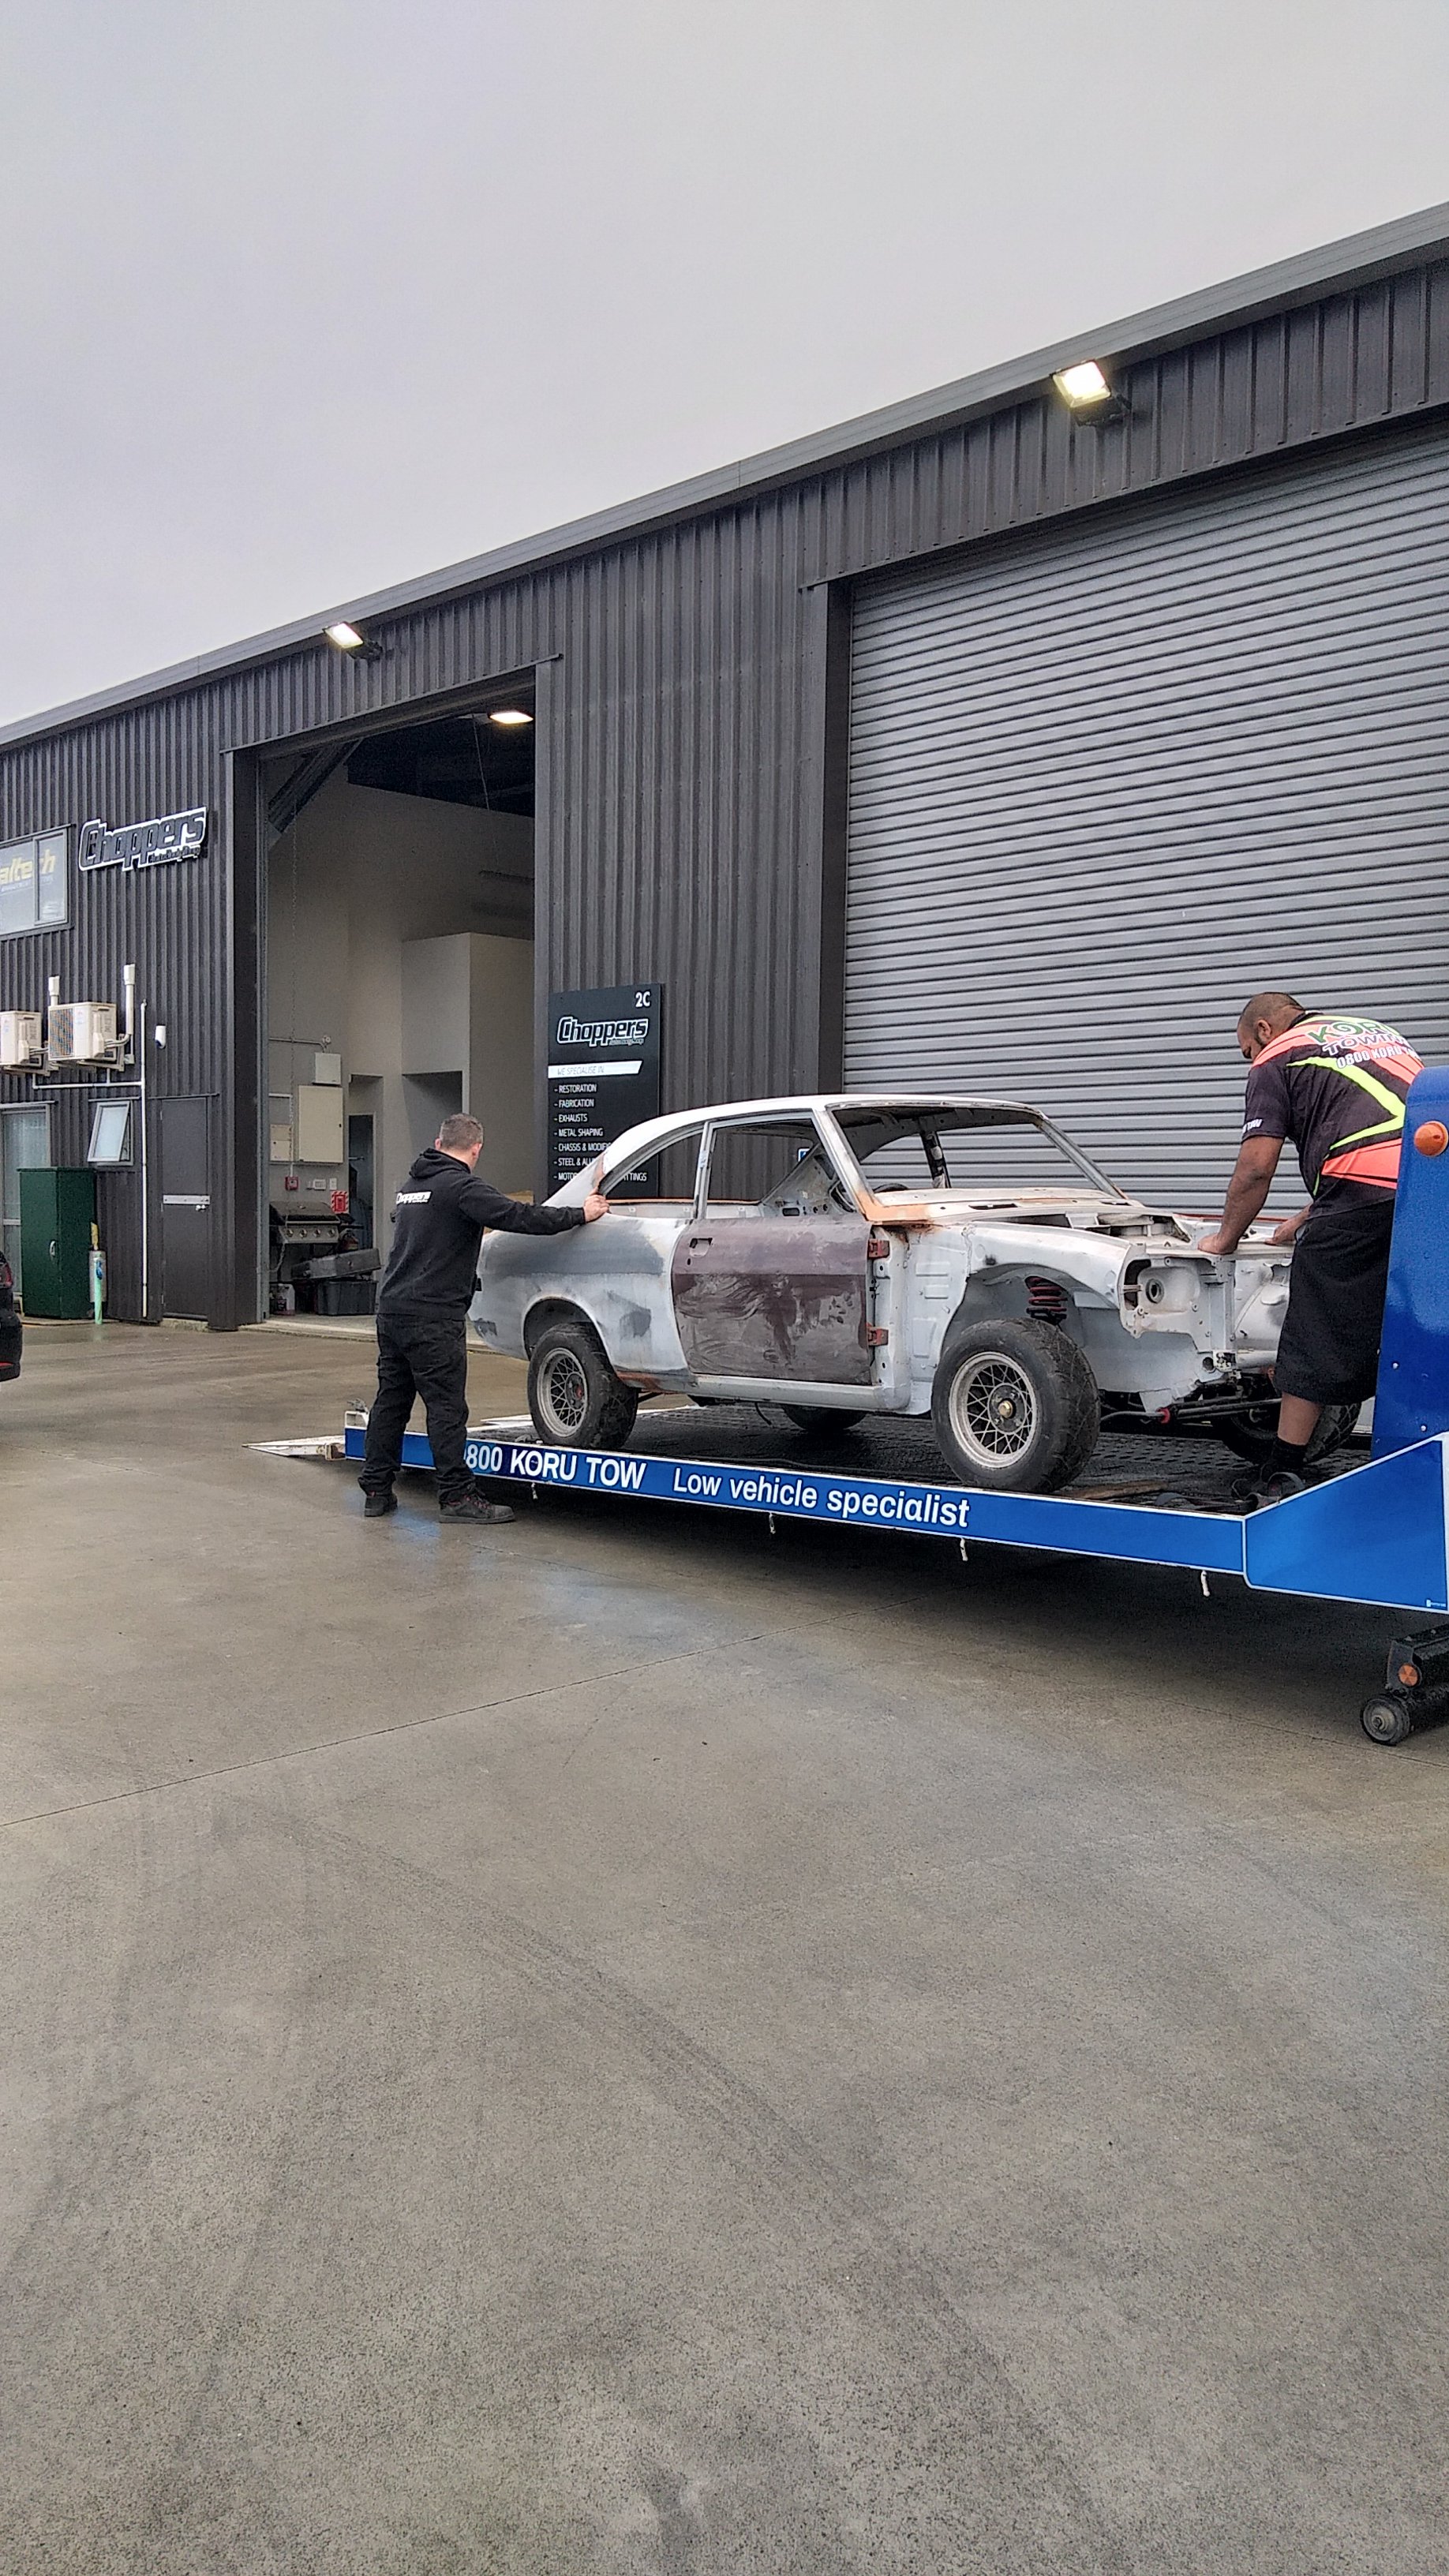
Dropped off the old money pit to choppers, instructions to build exhaust and get through repair cert, maybe skim her up if $ allow ready for paint
1 point
-
Bit slow on progress lately. Removed the factory springs on one side, to see how much suspension travel the factory struts have. Looking at buying some boss airbags to weld onto them. Its motivating to see it so low again. And the rear wheel being too far forward, doesn't look tooo bad this low.
1 point
-
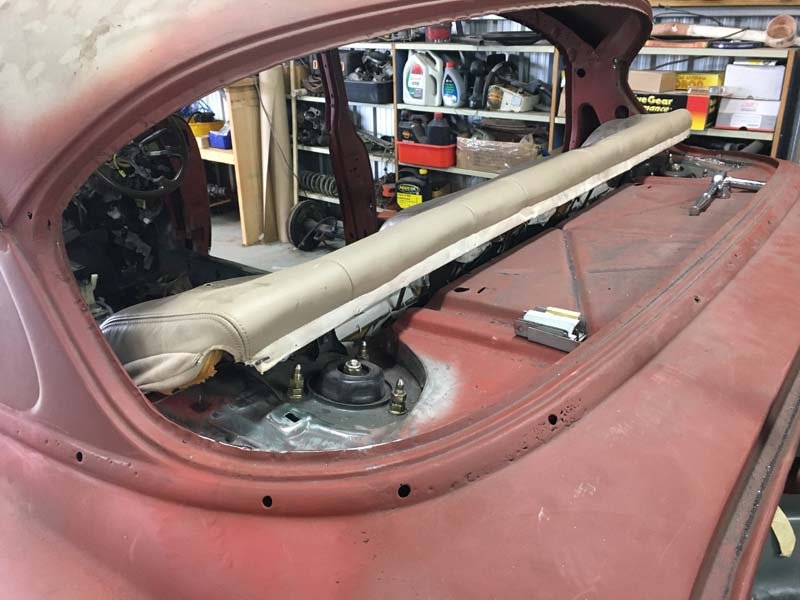
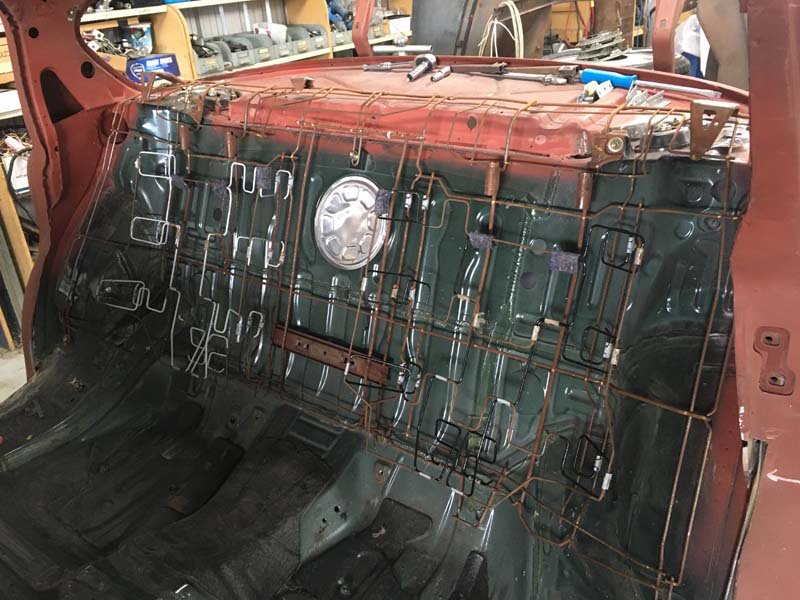
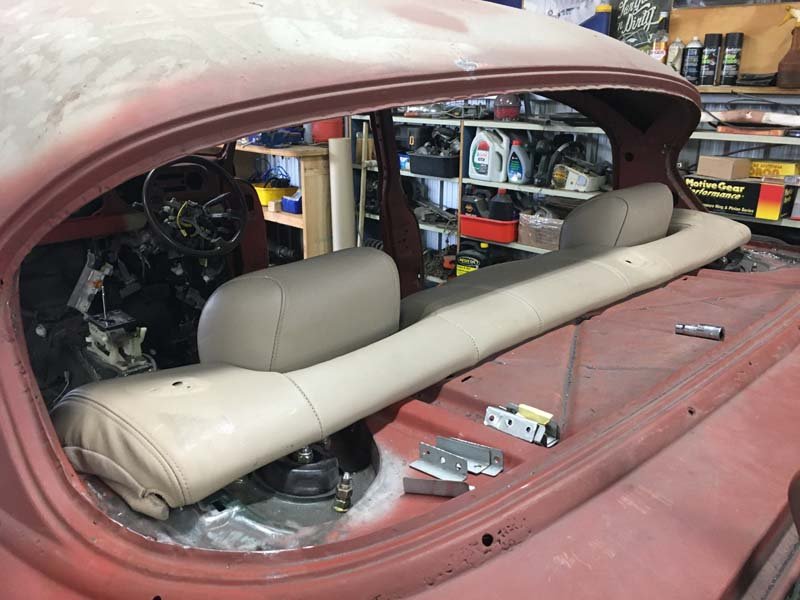
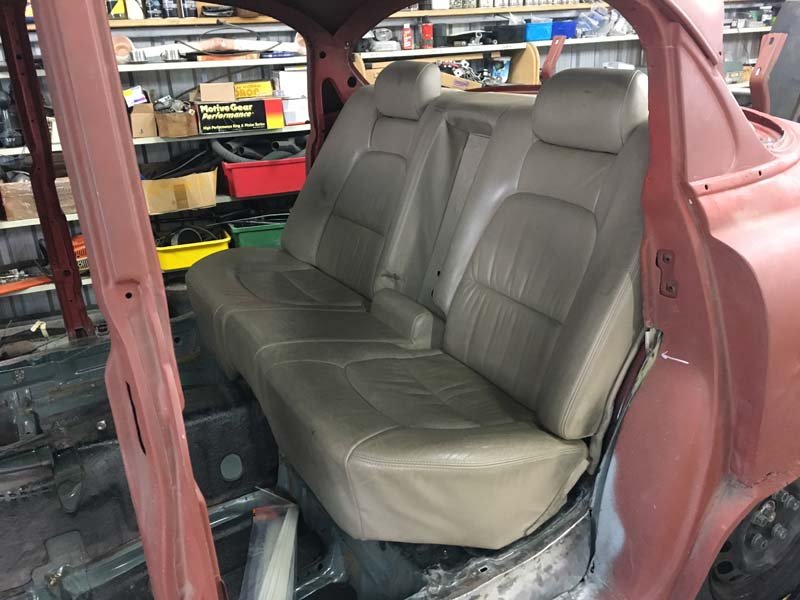
While trying to sort out the seatbelts I test fitted the rear seat. it still fits, but the chevy rear window, and parcel tray is lower than the lexus. So the Seat sat up in the glass. Pulled all the leather and foam off. Bent the frame to new shape using some homemade tools. Re-trimmed, and should be sufficient. Still look too big and plush for an old chevy. But the comfort should be an ok compromise on looks. Front seat Fitted too. This is raised all the way up. Goes much much much lower. Our Certification man came around to have a look at all the projects. From what i hear, he was stoked and shocked at how well this was all working out. And is happy with progress and future plans
1 point
-
Just a bit of sanding and clearancing (I missed seeing a part where they intersect on the model - woops) then good to go.
1 point
-
After finishing the wiring, I decided I’d tackle the diff install after the quick mock up the other day. I did my best to wrangle it in but it just won’t go. I have this weird need to run rear coil overs instead of the standard setup, why... I don’t know. I think it’s because it’s a challenge and I don’t like to let things beat me. anyway, I came to the realisation that it’s a bigger mission than I anticipated, The springs hit the diff preventing the top from mounting, the mounting points need massaging, and a whole lot of other shit. It was at this point I got carried away on the rums, and was a bit too wobbly to swing spanners. so cleaned up the engine bay Instead. im not sure how these others people get their qa1 mounted but they must be smarter than me
1 point
-
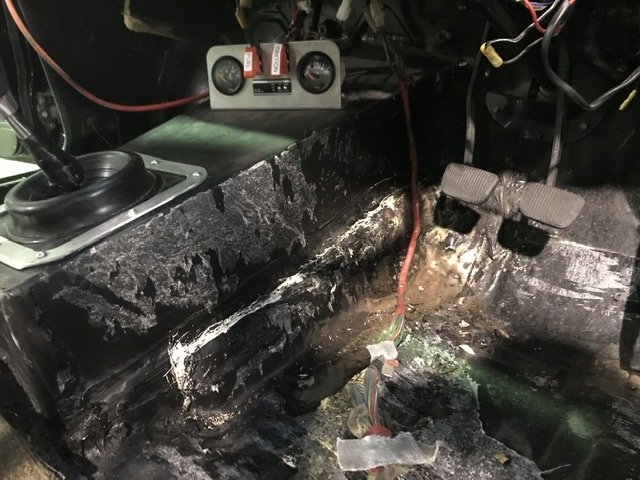
I spent a good couple of hours today fabbing up some tabs to hold a stereo in the slot that was all mangled from a few installs ago when I got it. I've been rewiring the stereo setup and trying to troubleshoot an amp install that isn't working, but may be the amp itself. I also spent some time making a mount and installing a new centre speaker in the dash. It turns out in my boxes of shite I already have an original dash speaker mount (ie I wasted a day) and replacement speaker cover, which made me happy because the current one is missing some bars. And, a week or so ago I went through my many boxes of spares I've been hoarding and found the OE stereo and plate. It got me thinking. I'm wondering if I go buy a mechless BT unit, cut the front off the OE and use it as a face to hide a new unit behind. Hmmm. I've also started stripping the spare bumper I have to paint to match the ute, as the current one is OE black rubber. I'll keep it OE as a spare and put this one on. This is part of a Fairmont front I have. I'm wondering if I go balls deep and put the whole lot on.I have a pair of headlights and a spare standard XE Falcon bonnet i could cut to suit... I stripped off the door trim to check out replacing the window rubbers and found a final bit of rust, so ended up cutting that out. So I need to order the rubbers and felts now. Oops. I pulled off the drivers door handle which is beginning to shit itself and the striker mechanism. I heard you can build up the striker shaft and it relieves some of the stress that makes these outer handles constantly shit themselves. I've replaced about 3 on this thing when it was on the road. Here's the theory.. So I welded some beads on the shaft, but it didn't make much difference to handle travel, so I got a bit smart and pulled out the door handle and added a bead onto the pad on the lever that the handle pushes down. It worked a treat. So now the handle takes sweet Fuck all to engage and pop open. I took some pics but my image host is shite. If you own one I recommend doing this. Mega stoked with the results. Also peeled off the vinyl pinstripe and began sanding the bitch down. Oh yes, it looks like I'm going to teach myself how to paint next. Stay tuned for much cursing and crackled paint shennanagins..1 point
-
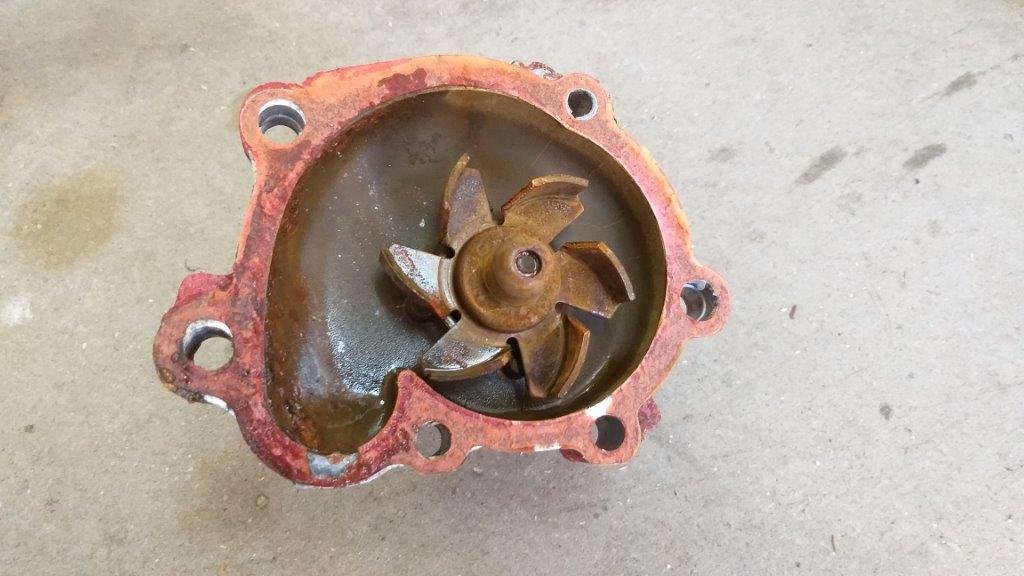
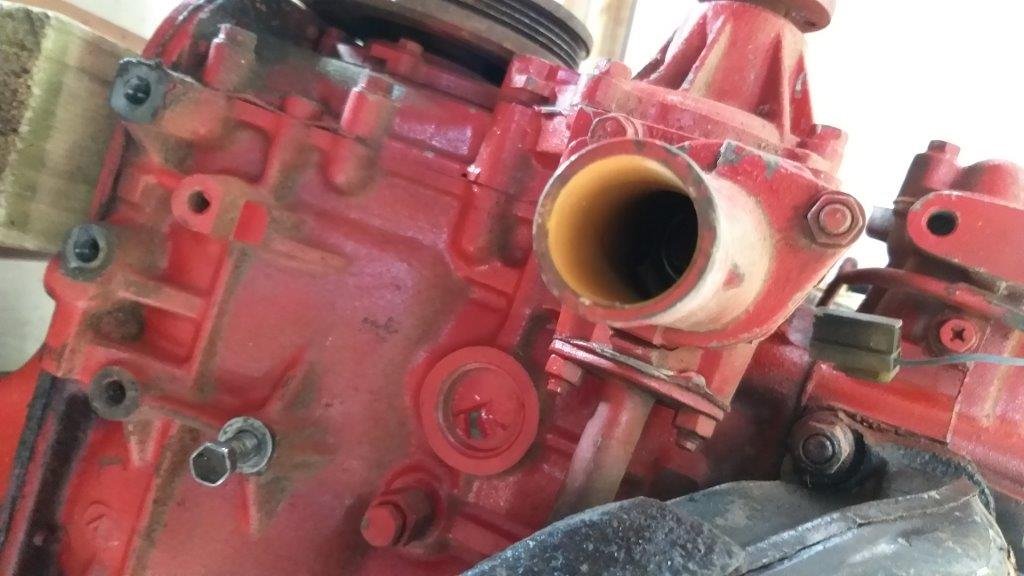
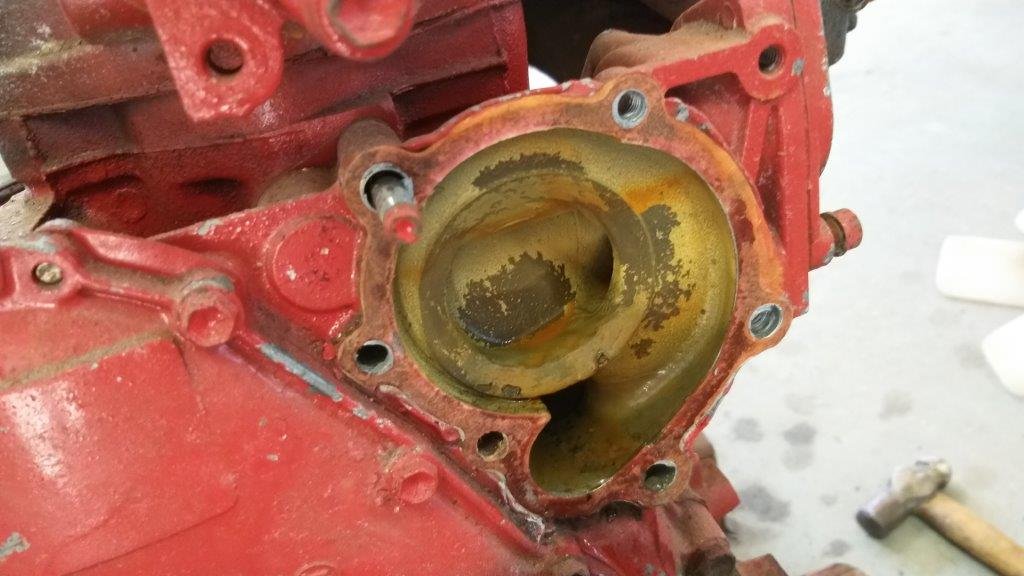
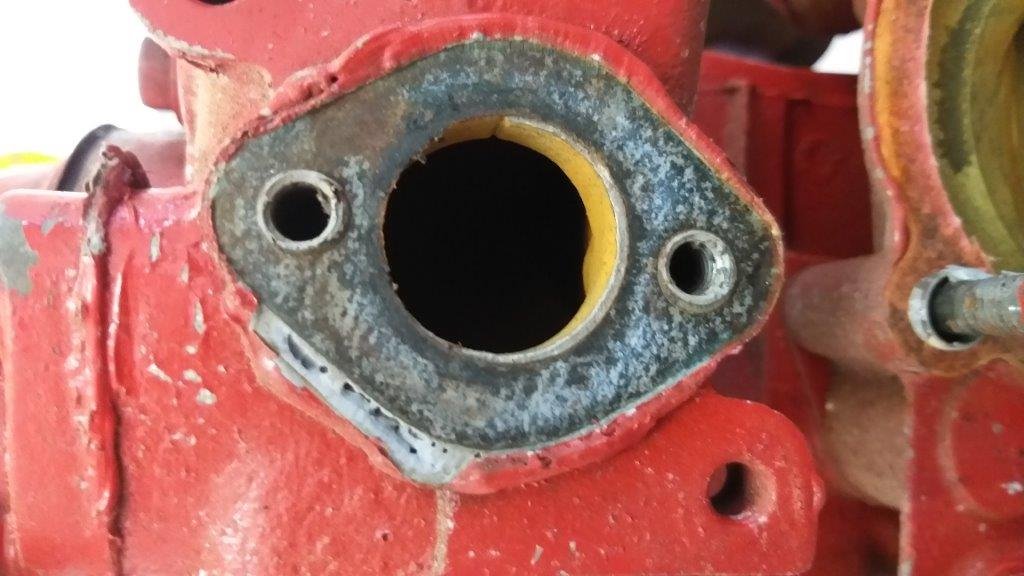
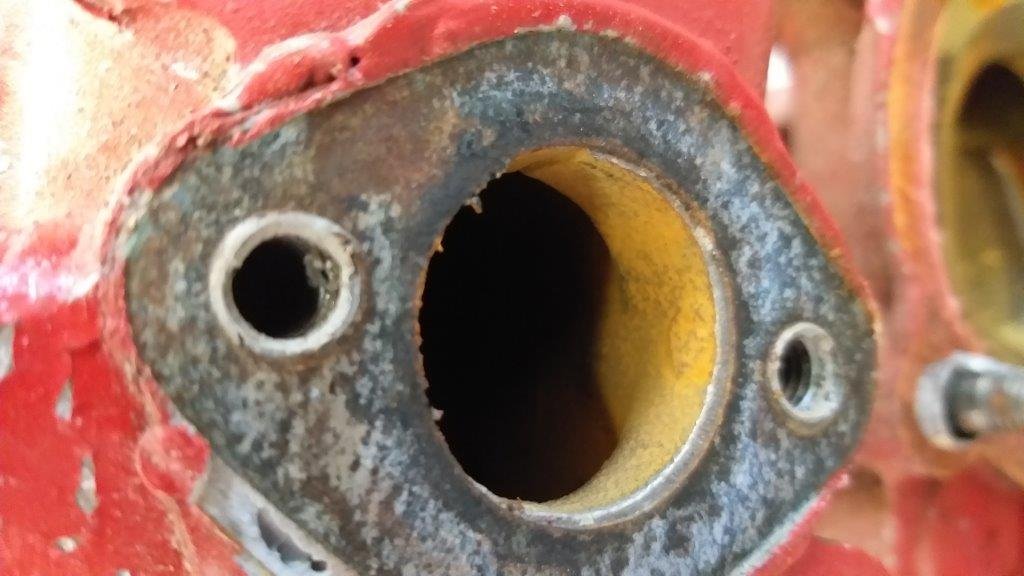
Yesterday: Today: Finest quality rattlecan rebuild. Turns out this was a leaky bung replacing a frost plug, small seep that only really showed up with the paint. So thats out now, and a fair bit of old shit that'd been inside the block. Next up his scrubbing up the bay... I didn't get a before, but believe it or not this is an improvement. Really wanna find a dual plane edelbrock manifold cheap while i got it out. No fucker seems to have one to sell.1 point


.thumb.jpeg.910c6632f6e66e8cba89476e83b41634.jpeg)


This leaderboard is set to Auckland/GMT+12:00