
Leaderboard


Popular Content
Showing content with the highest reputation on 06/30/20 in all areas
-
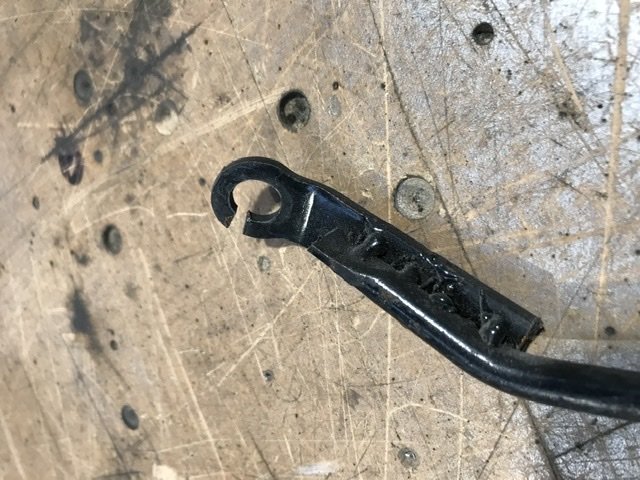
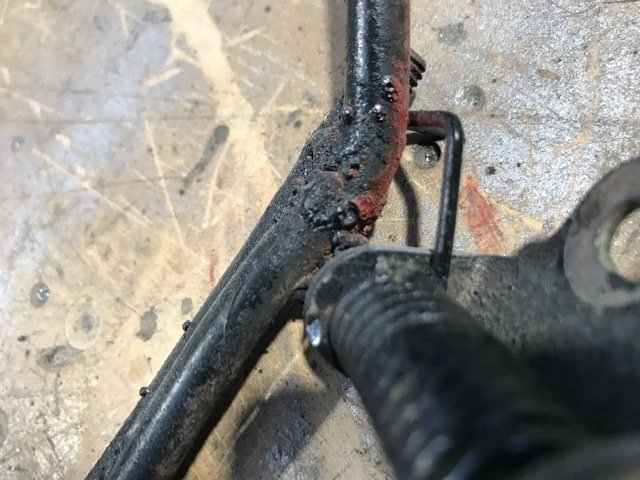
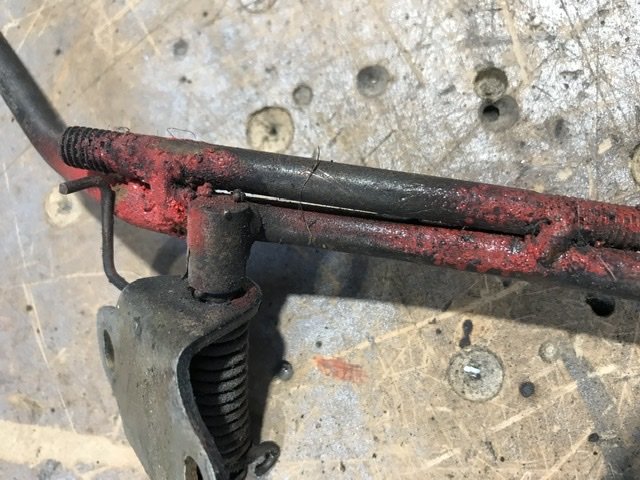
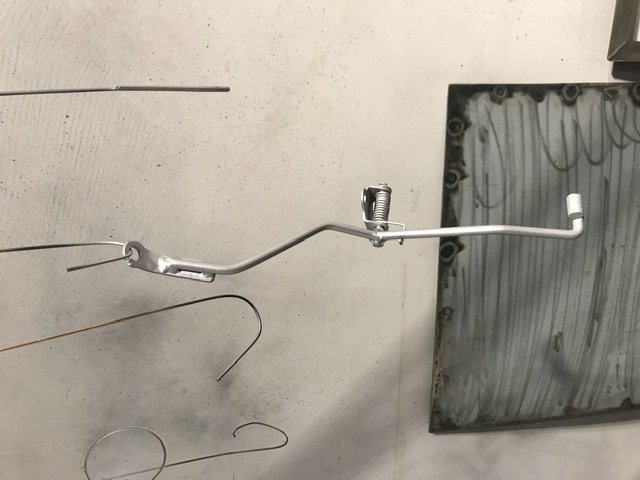
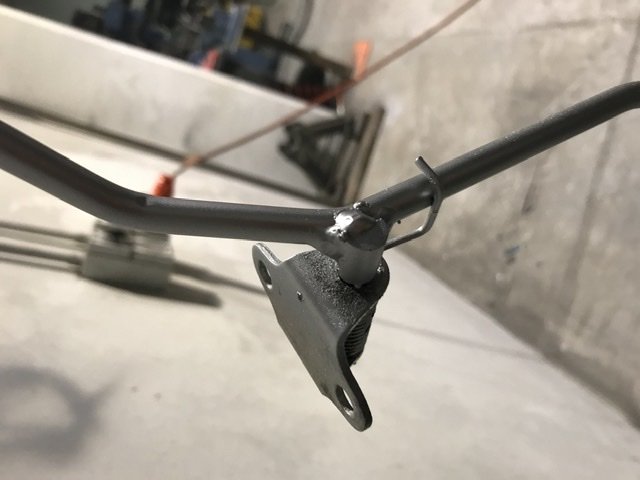
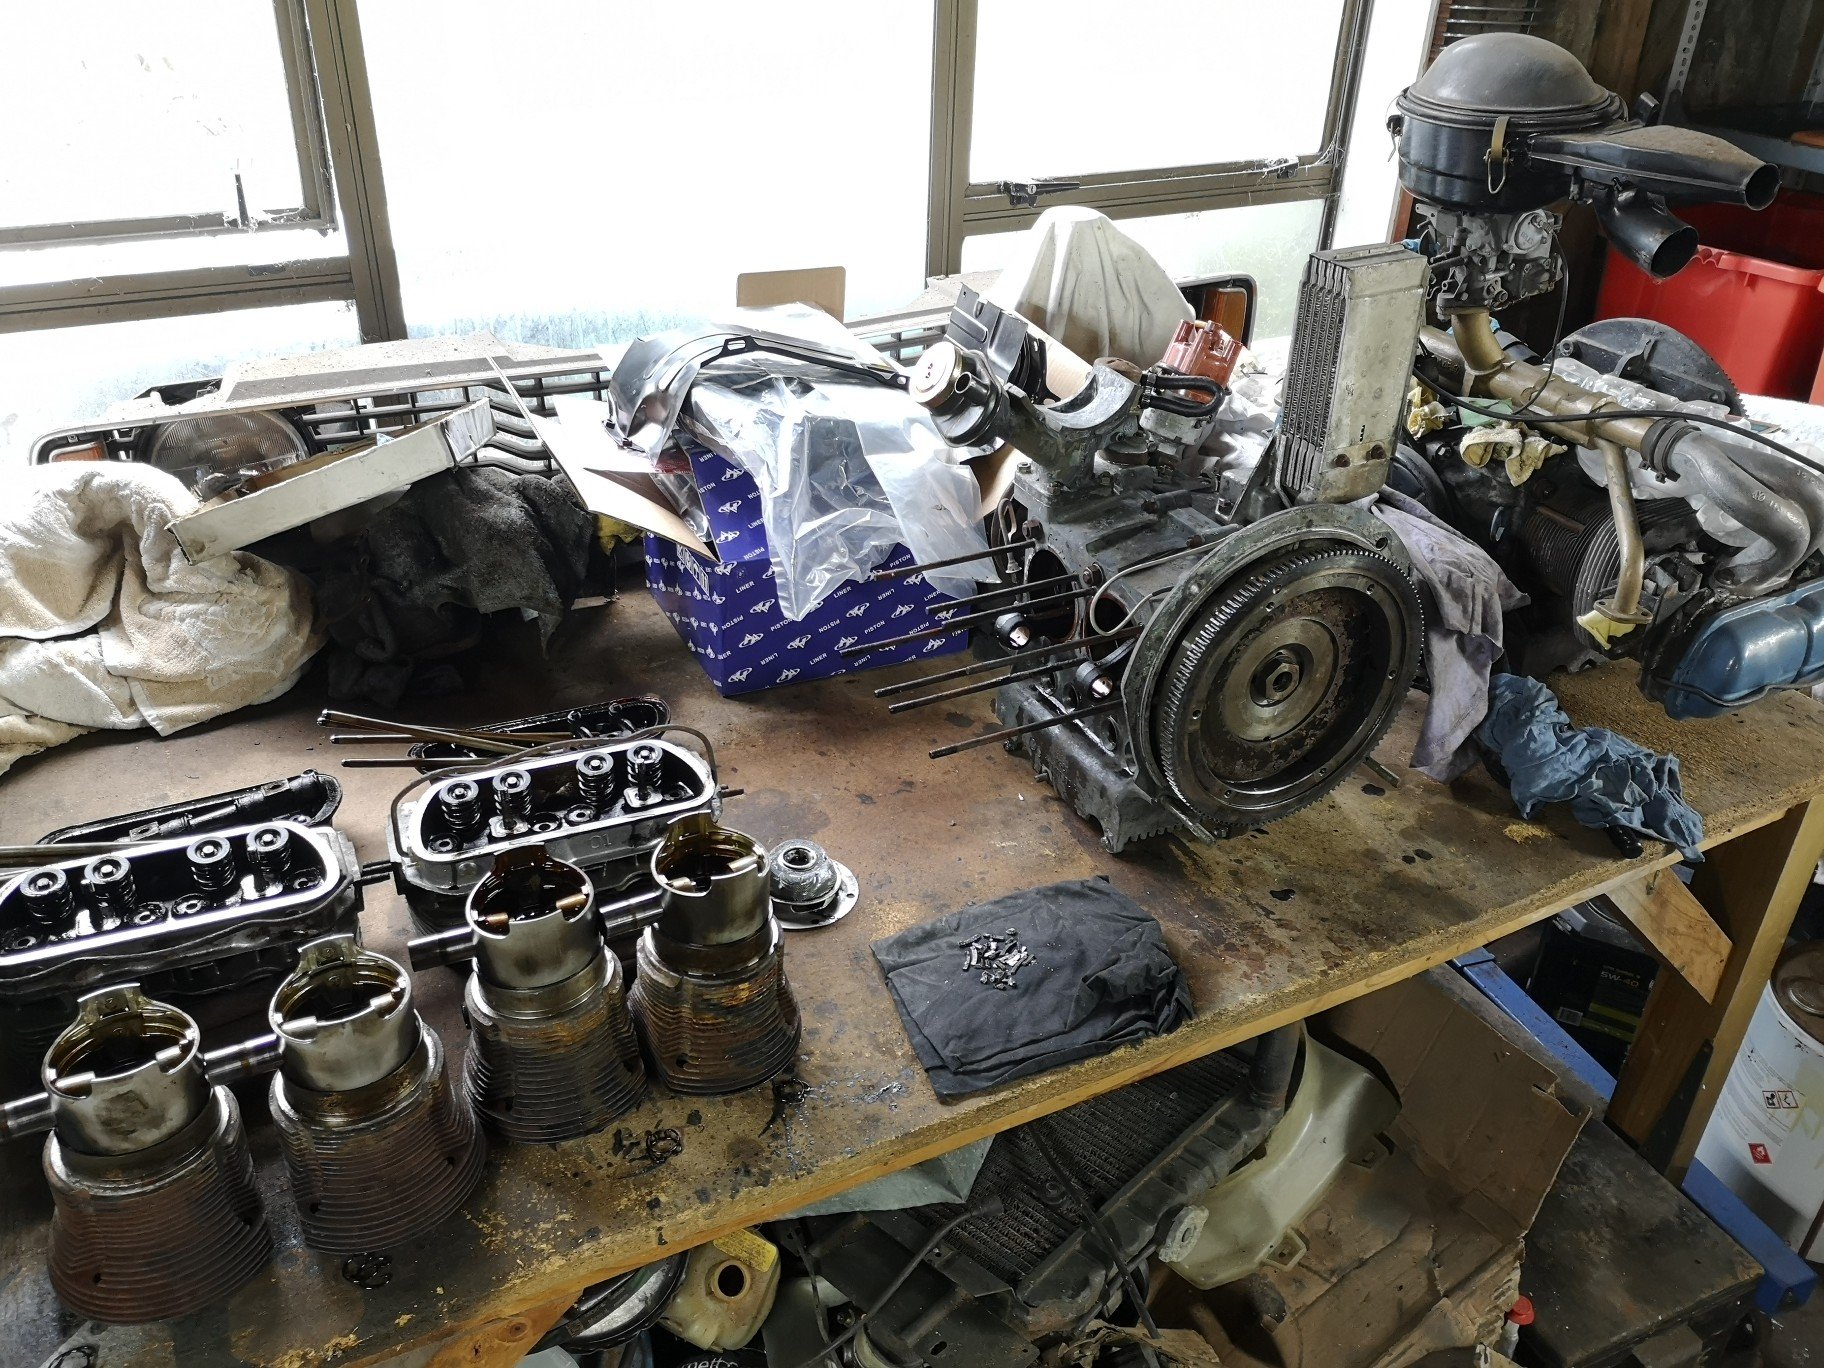
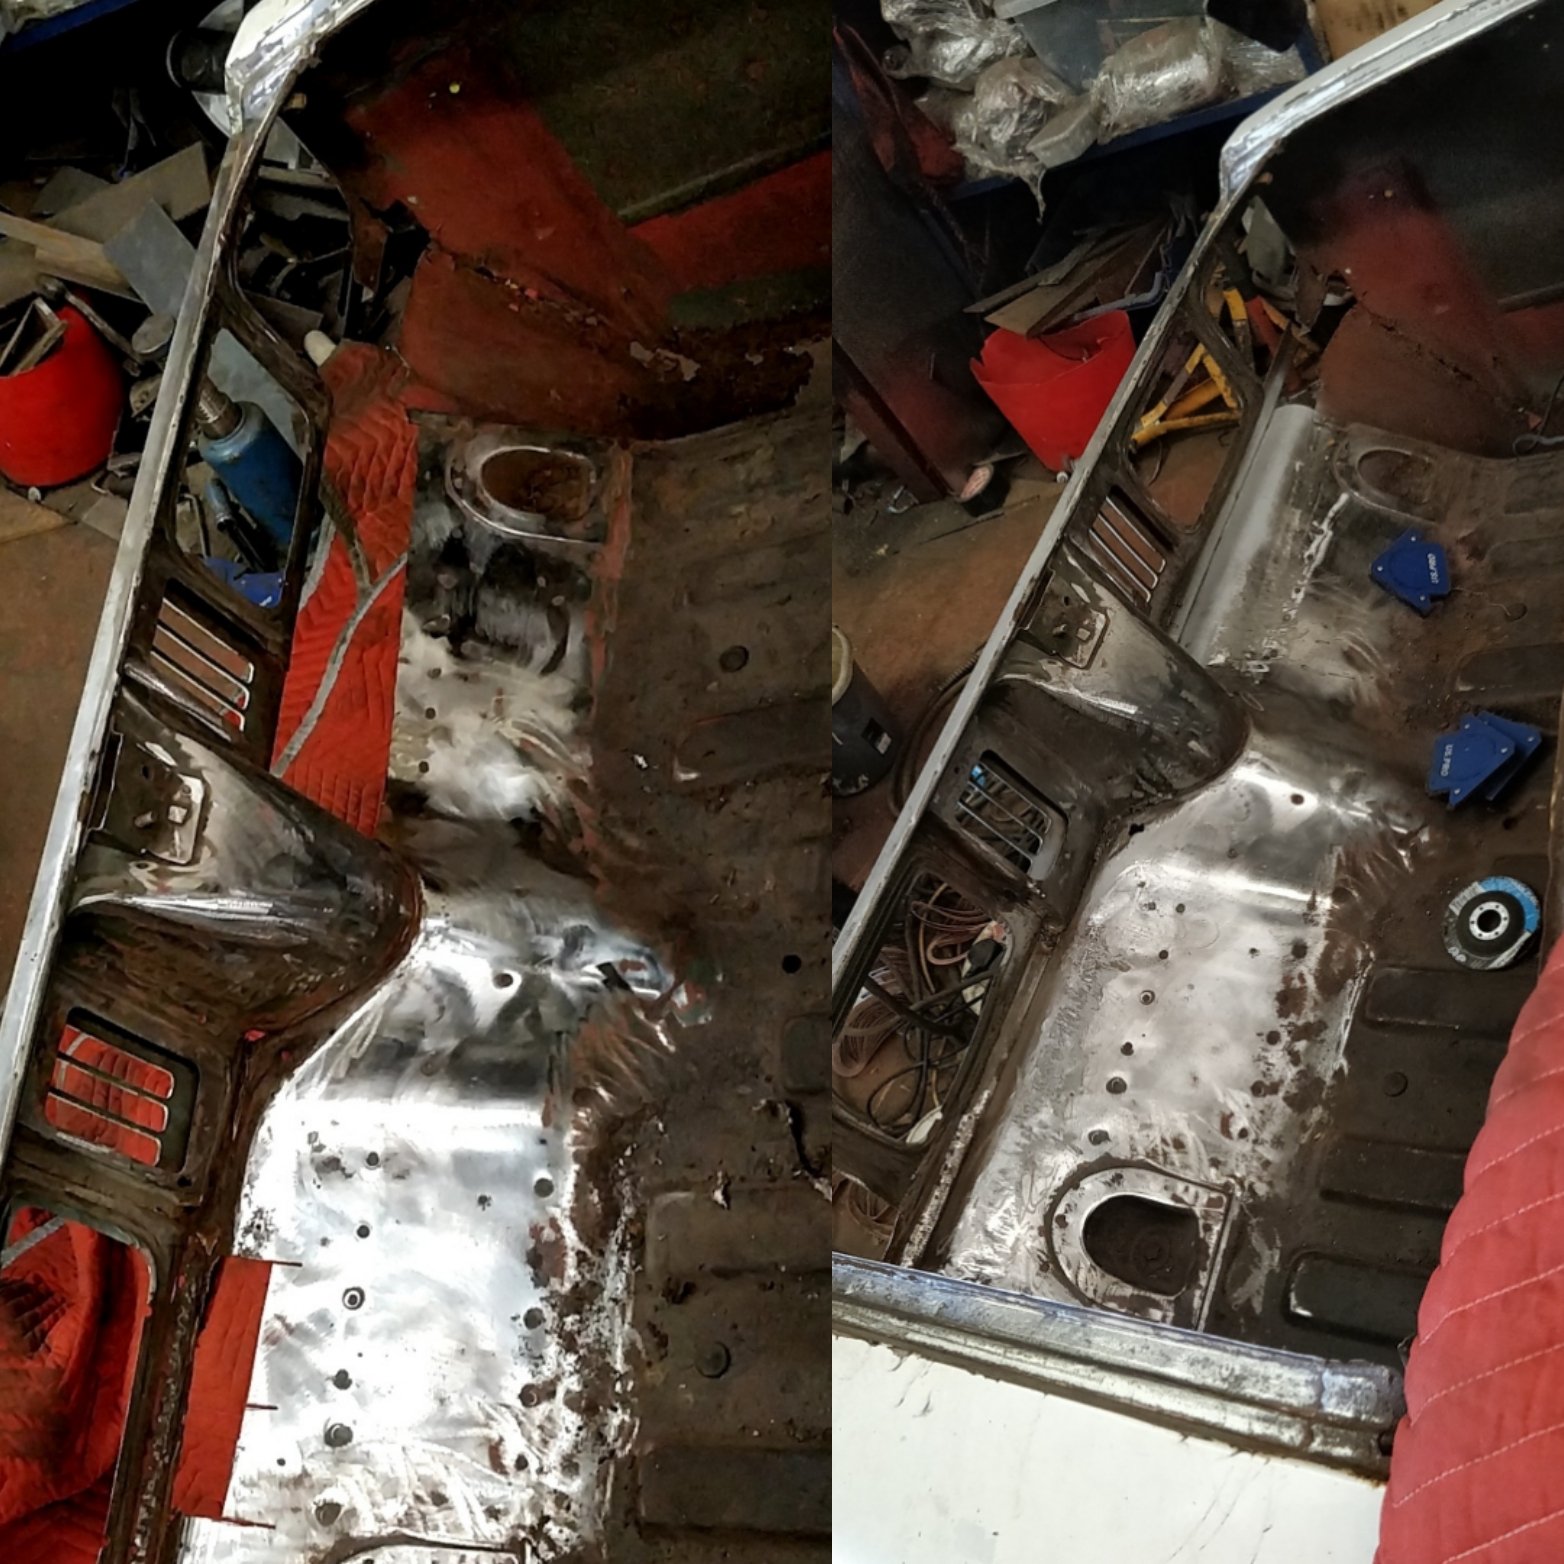
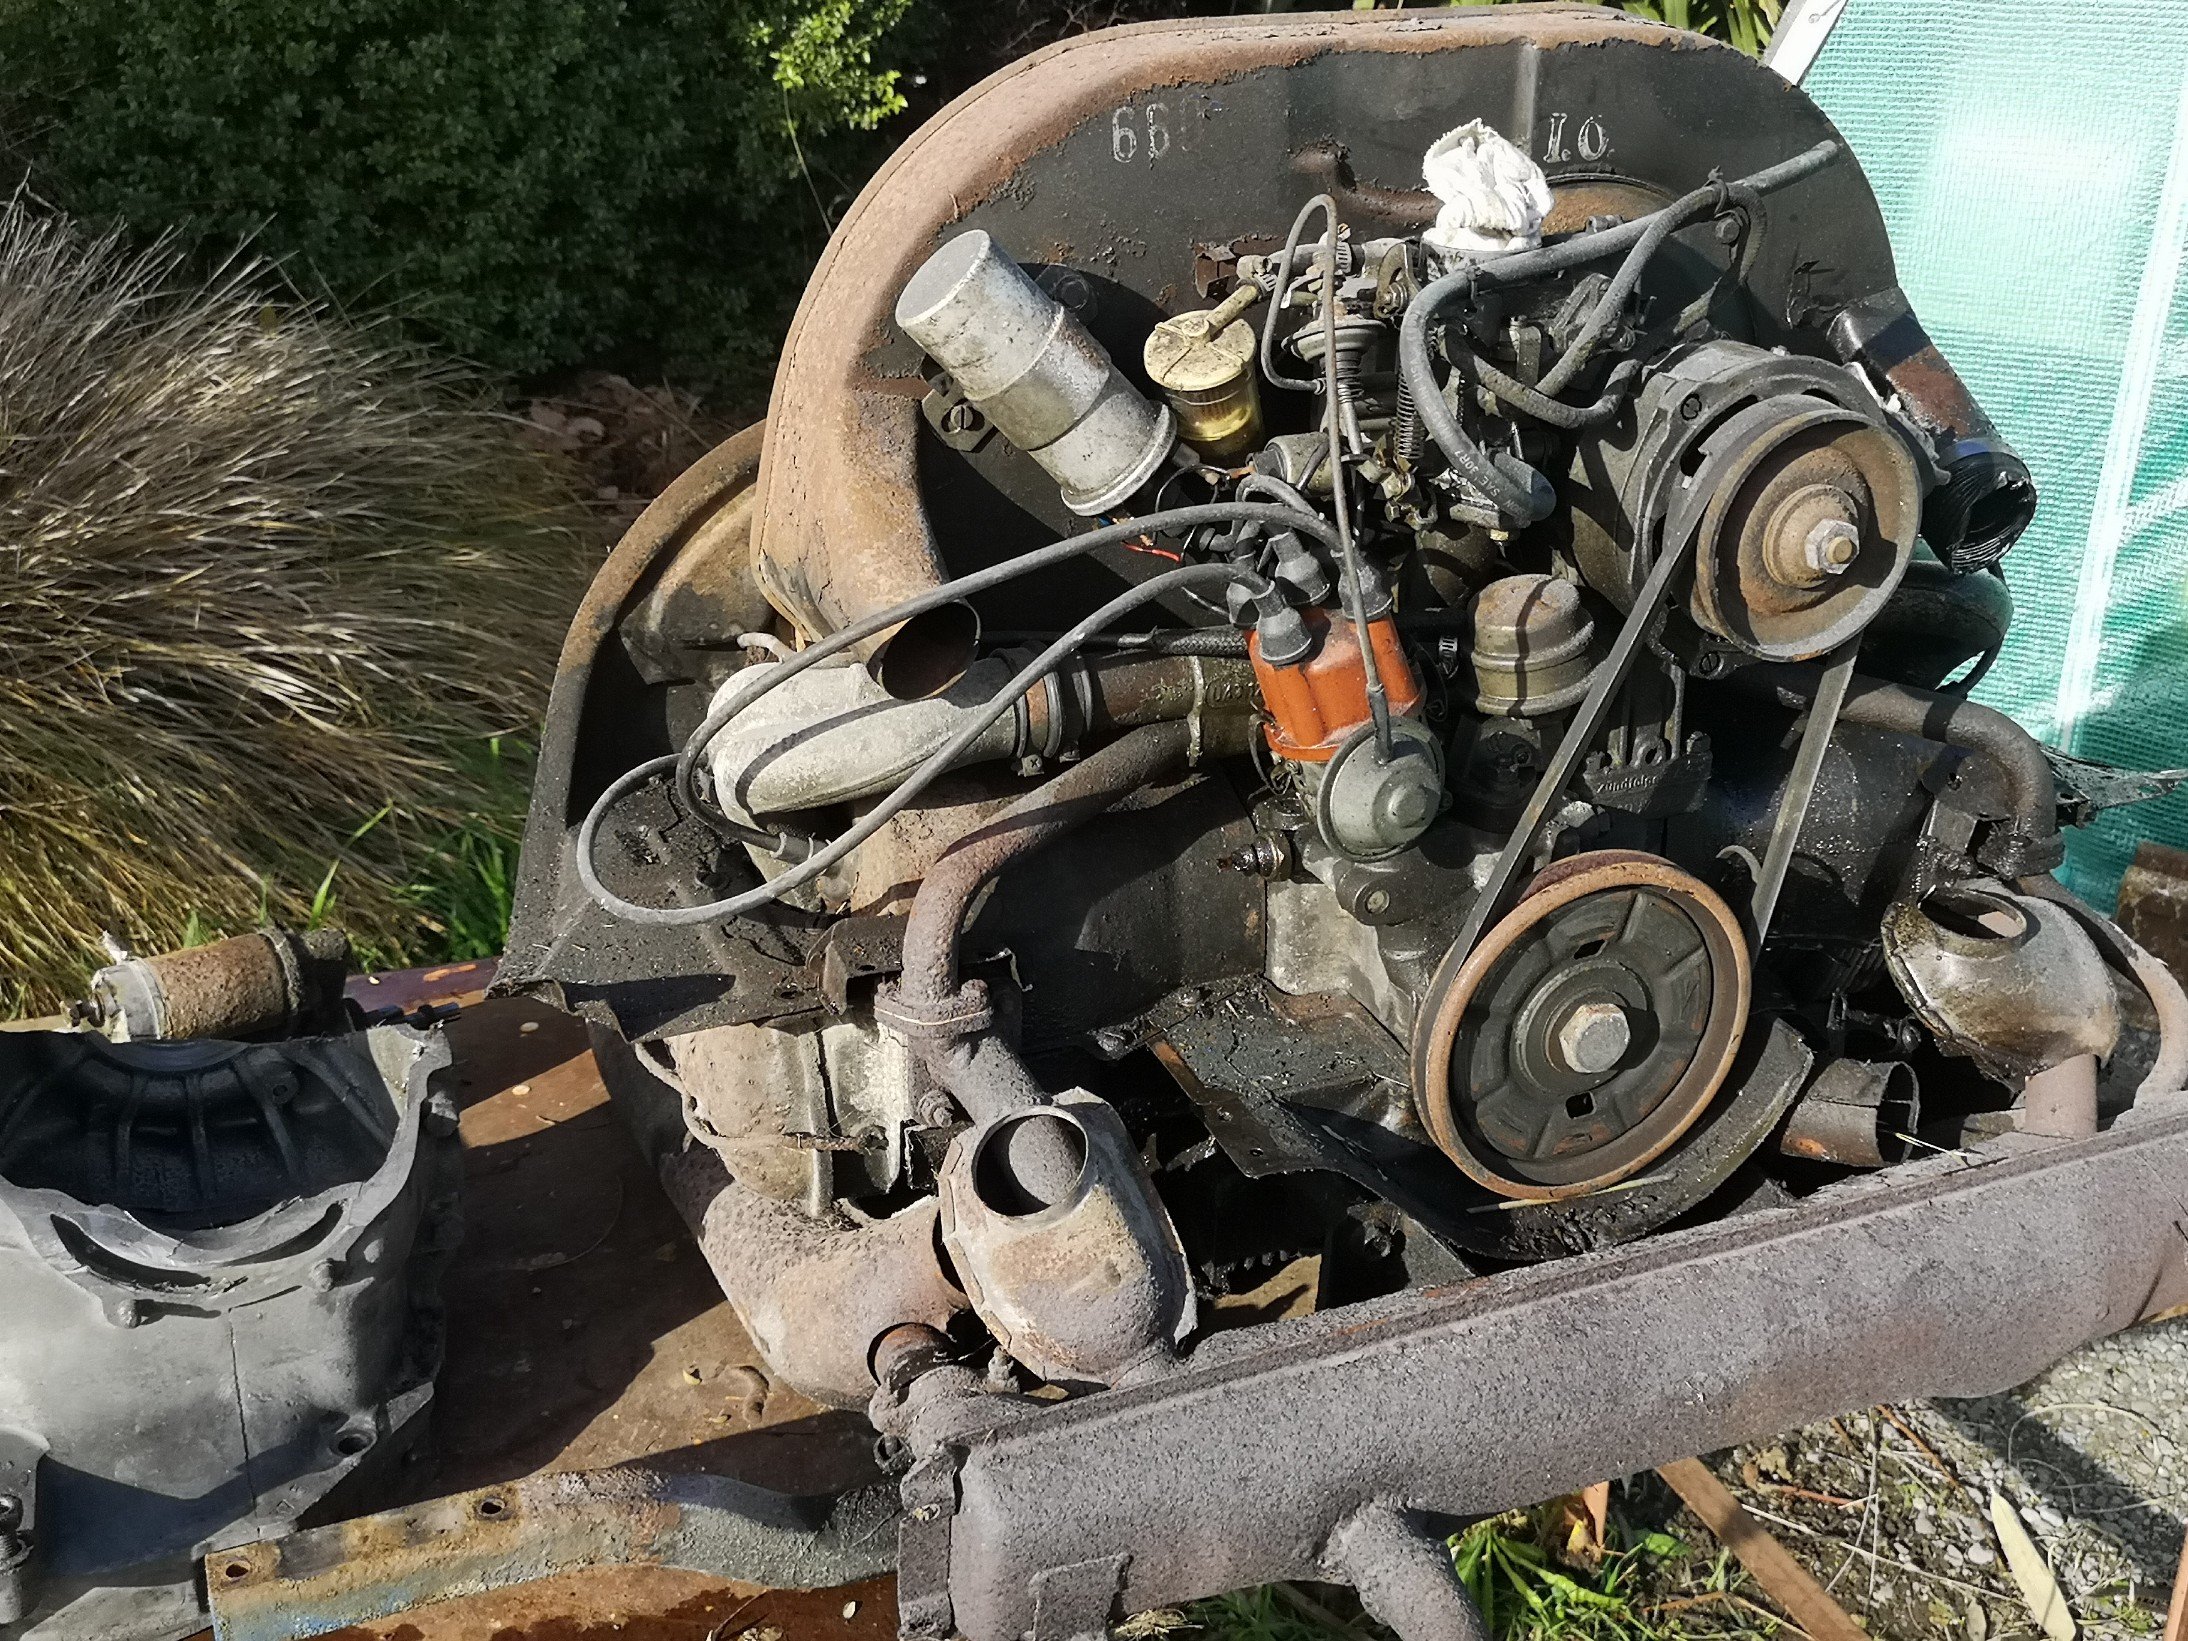
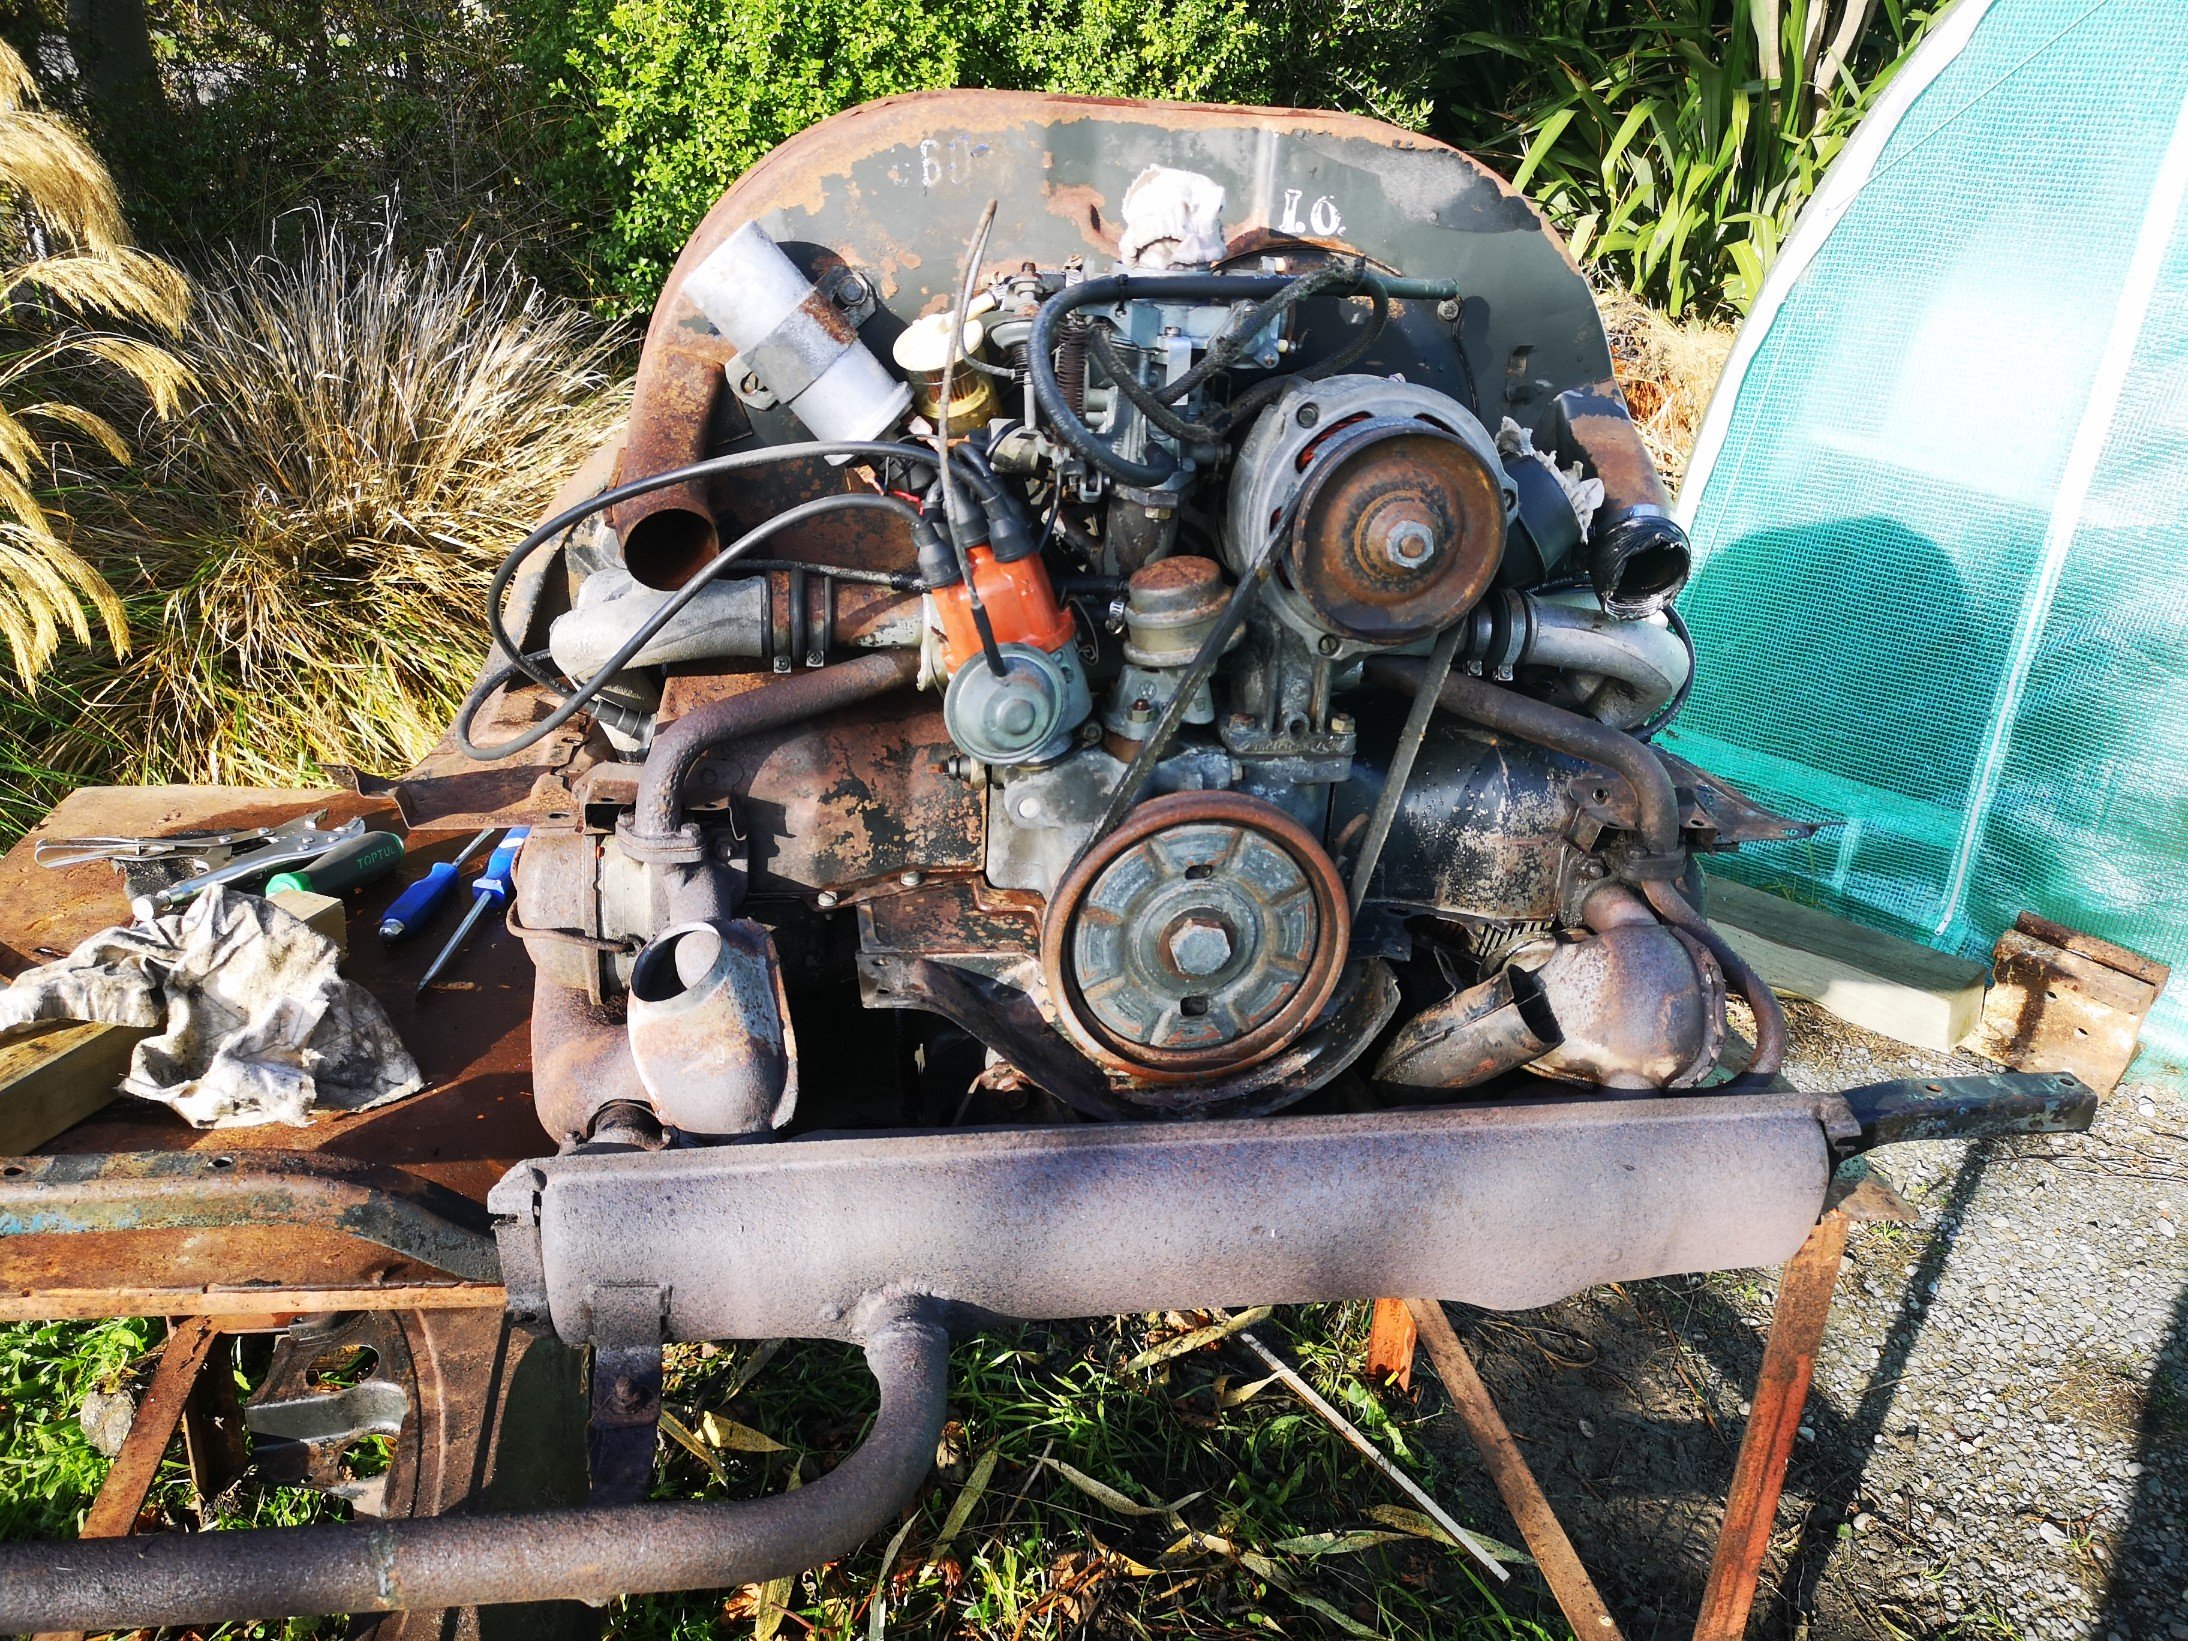
It's off the rotisserie for now! Needed to sort out the driveshaft which require the engine and gearbox to go back in. Got the axles sent away to be shortened and resplined by 105mm a side. That meant I should make an attempt at swapping the Altezza LSD and the 4.1 CWP into the diff head. No pics because I didn't really know what I was doing. But for those that are interested I ended up using the LSD side bearings and swapped the Estima pinion bearings onto the 4.1 pinion. The Altezza pinion bearings where thicker which made the pinion gear hit the diff case. I couldn't get the wear pattern right because I didn't have any shims other than the two that were already on the pinions. Got it close enough for the time being, will buy some shims or give it to someone else to finish off. Decided to run Coil-on-plugs instead of the dizzy relocation kit, mostly just to keep the engine bay looking simple and clean. Got a set of 1NZ coils, I'm thinking of casting up an adapter plate for them. Got the SQ engineering down-pull throttle linkage installed and got the accelerator cable shortened to suit. Made a vacuum block off plate, since I hope none of that stuff is needed anymore. Also at some stage I filled all the unneeded holes in the front radiator panel. Modded the accelerator pedal so it sits a bit closer to the other pedals, as before it was way off to the right. Two-piece driveshaft all mounted now too! Think I got the angles sorted after spending far too long trying to work it all out. It's an Altezza driveshaft with the front half shortened (yes I know the front section u-joint phasing is 90° out). In this photo you can also notice the sills have been strengthened (somehow missed that update somewhere). Used some 3mm angle and welded it the full length and ground back, so it's now really straight! Then boxed it back up to the floor, to try and stop dirt and moisture getting stuck in behind. Makes lifting the car along there way nicer! This is the centre bearing support mount, much thought was also put into this! Hopefully it's fine being welded to the seatbelt mounts haha. Still needs some doubler plates welded on to the other side of the tunnel.19 points
-
Here's a tool I've been making recently. I still need to make a good handle for it, but to be honest the cap screw is probably stronger than any handle I could make. The clutch in the middle is hardened to reduce the risk of galling when it slips (adjustable preload, allows slipping when die binds or you hit a shoulder)
 7 points
 -
Signed up and will sort accomodations tomorrow6 points
-
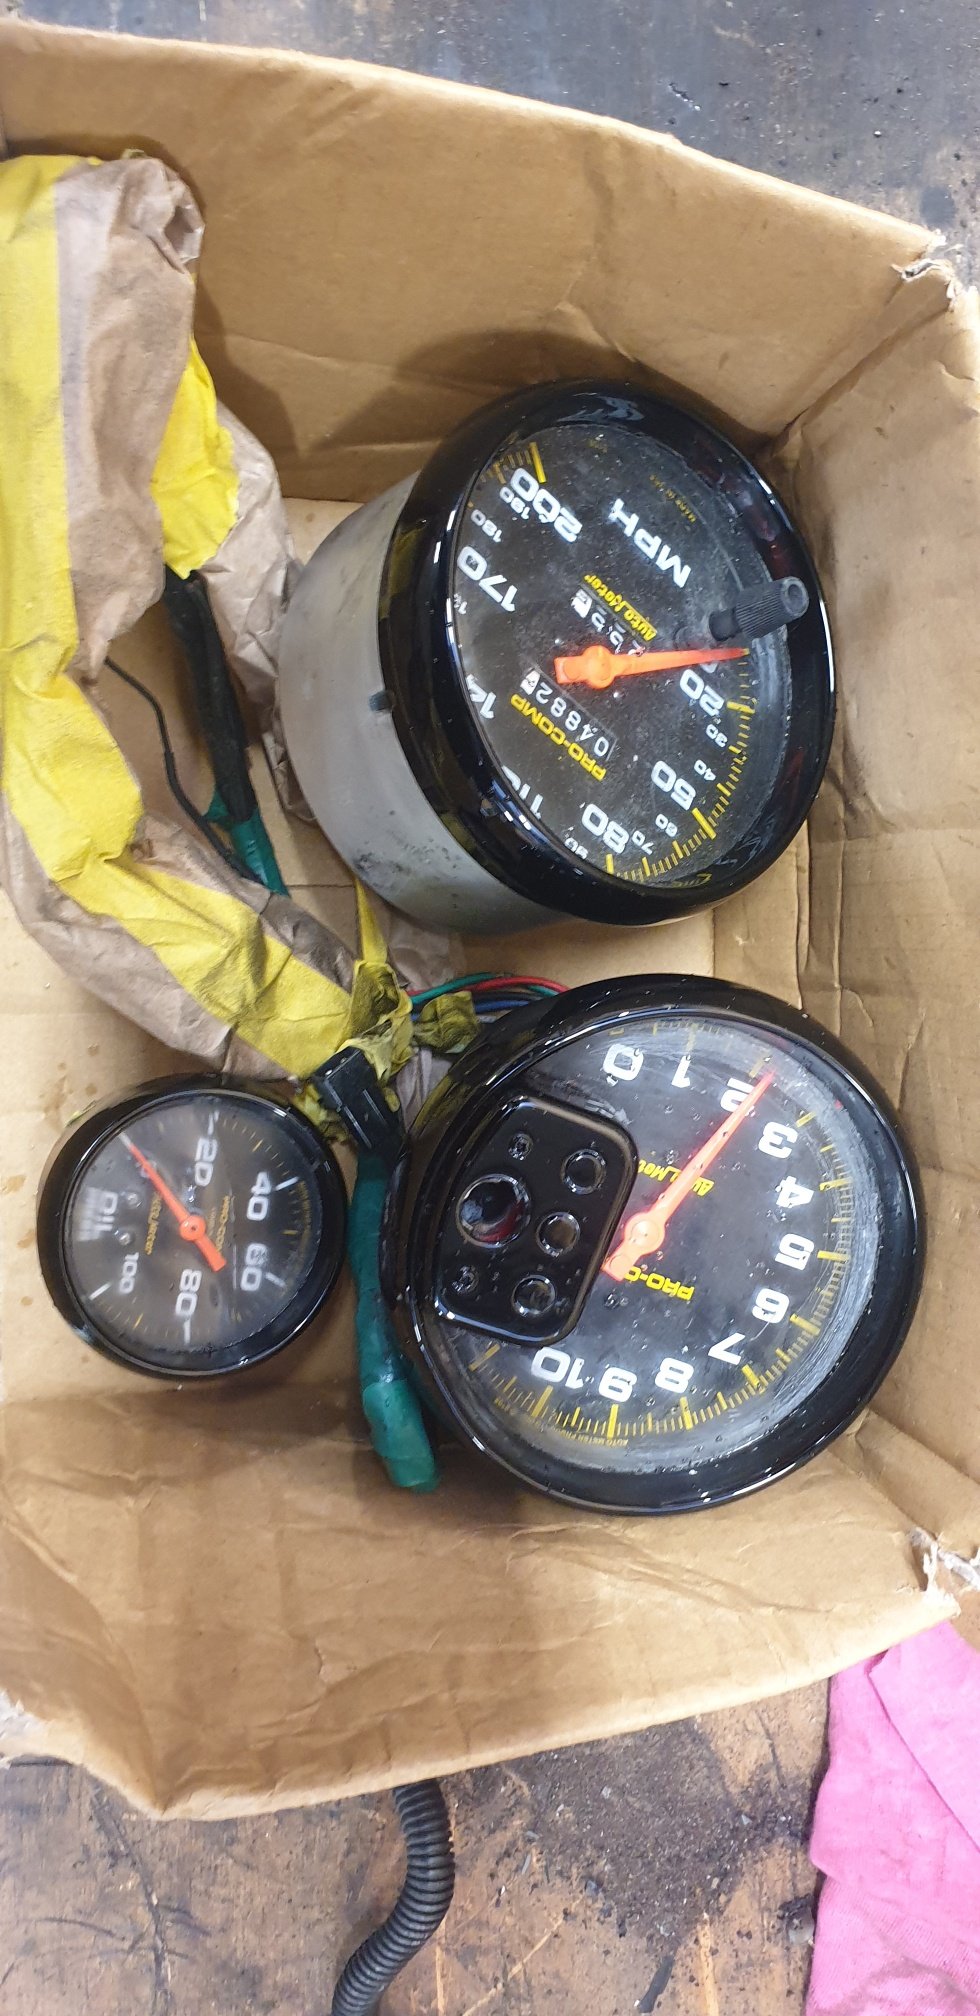
A fair bit has been done since the last update. I spoke to Trevor at Holden Diagnostics. We agreed that the tune was causing the issues, and he could sort it out. The guy who did the original tune has been known to have trouble with VT engines. I had a bunch of people coming round from work on Saturday night and wanted the car running. Trevor sent me a spare memcal and said send your old one back when all is good. Thursday night I fitted the new for the water pump. The old one looked pretty tired. I put the throttle body and everything else back together and fired it up. Then swapped out the Memcal and all good. I spend a lot of Saturday working on the car. a couple of hours went into getting the wiper motor fitted. I had made up an adapter plate ages ago which was fine. The challenge was getting clearance for the motor body on one side and the actuator arm in the plenum chamber on the other side. Using a couple of washers under one side of the adapter plate did the trick. Sorry no photos. I also put in my Dakota Digital interface box to make the speedo work. This is mounted behind where the kick panel will be. Hopefully it wont be annoyingly loud. To night, June 30, had been my goal date to have the car finished. I finished off the wiring for the wiper motor back to the switch, installed the instrument panel, and went for a drive. I consider this a win. It has got some real get up and go, the brakes actually work pretty good and the steering is OK. The exhaust is too loud, so a balance pipe will get made, the engine idles at about 1200 in drive, I'll have to work that out, and there are still lots of finishing off things to do. Not to mention registration and certification. Here is the view from the drivers seat
5 points
-
Right, babies 2 weeks old now so can continue playing with this thing. Worked our I’m still not getting full throttle. It goes well but not as fast as it should. Had a look at the accelerator pedal, found the problem. FUCK OFF, seriously?! Never have I spoken a truer word..... Made a nice new one and gave it more pedal travel. Guess what, full throttle now actually makes power, real power! Wheel spinning, ear grinning neck turning power. I’m a happy man.
5 points
-
Get an NGK LB05F. Your local motorcycle shop should have them for $10-15. Unscrew the old one and fit this with the rubber water proof covers. Should create a solid seal on your plug and eliminate that if it's the cause of the issue. We had it once where either Andrew or Thomas's bike would do the same thing. The other bike that didn't die had a waterproof plug cap. Swapped it over to the one cutting out and it worked a treat. Cheap starting point at the very least.3 points
-
Hey keen rung the campground today will ring tomorrow as no answer. Me and Geophy Jr are in just need to build a non scooter for this year.3 points
-
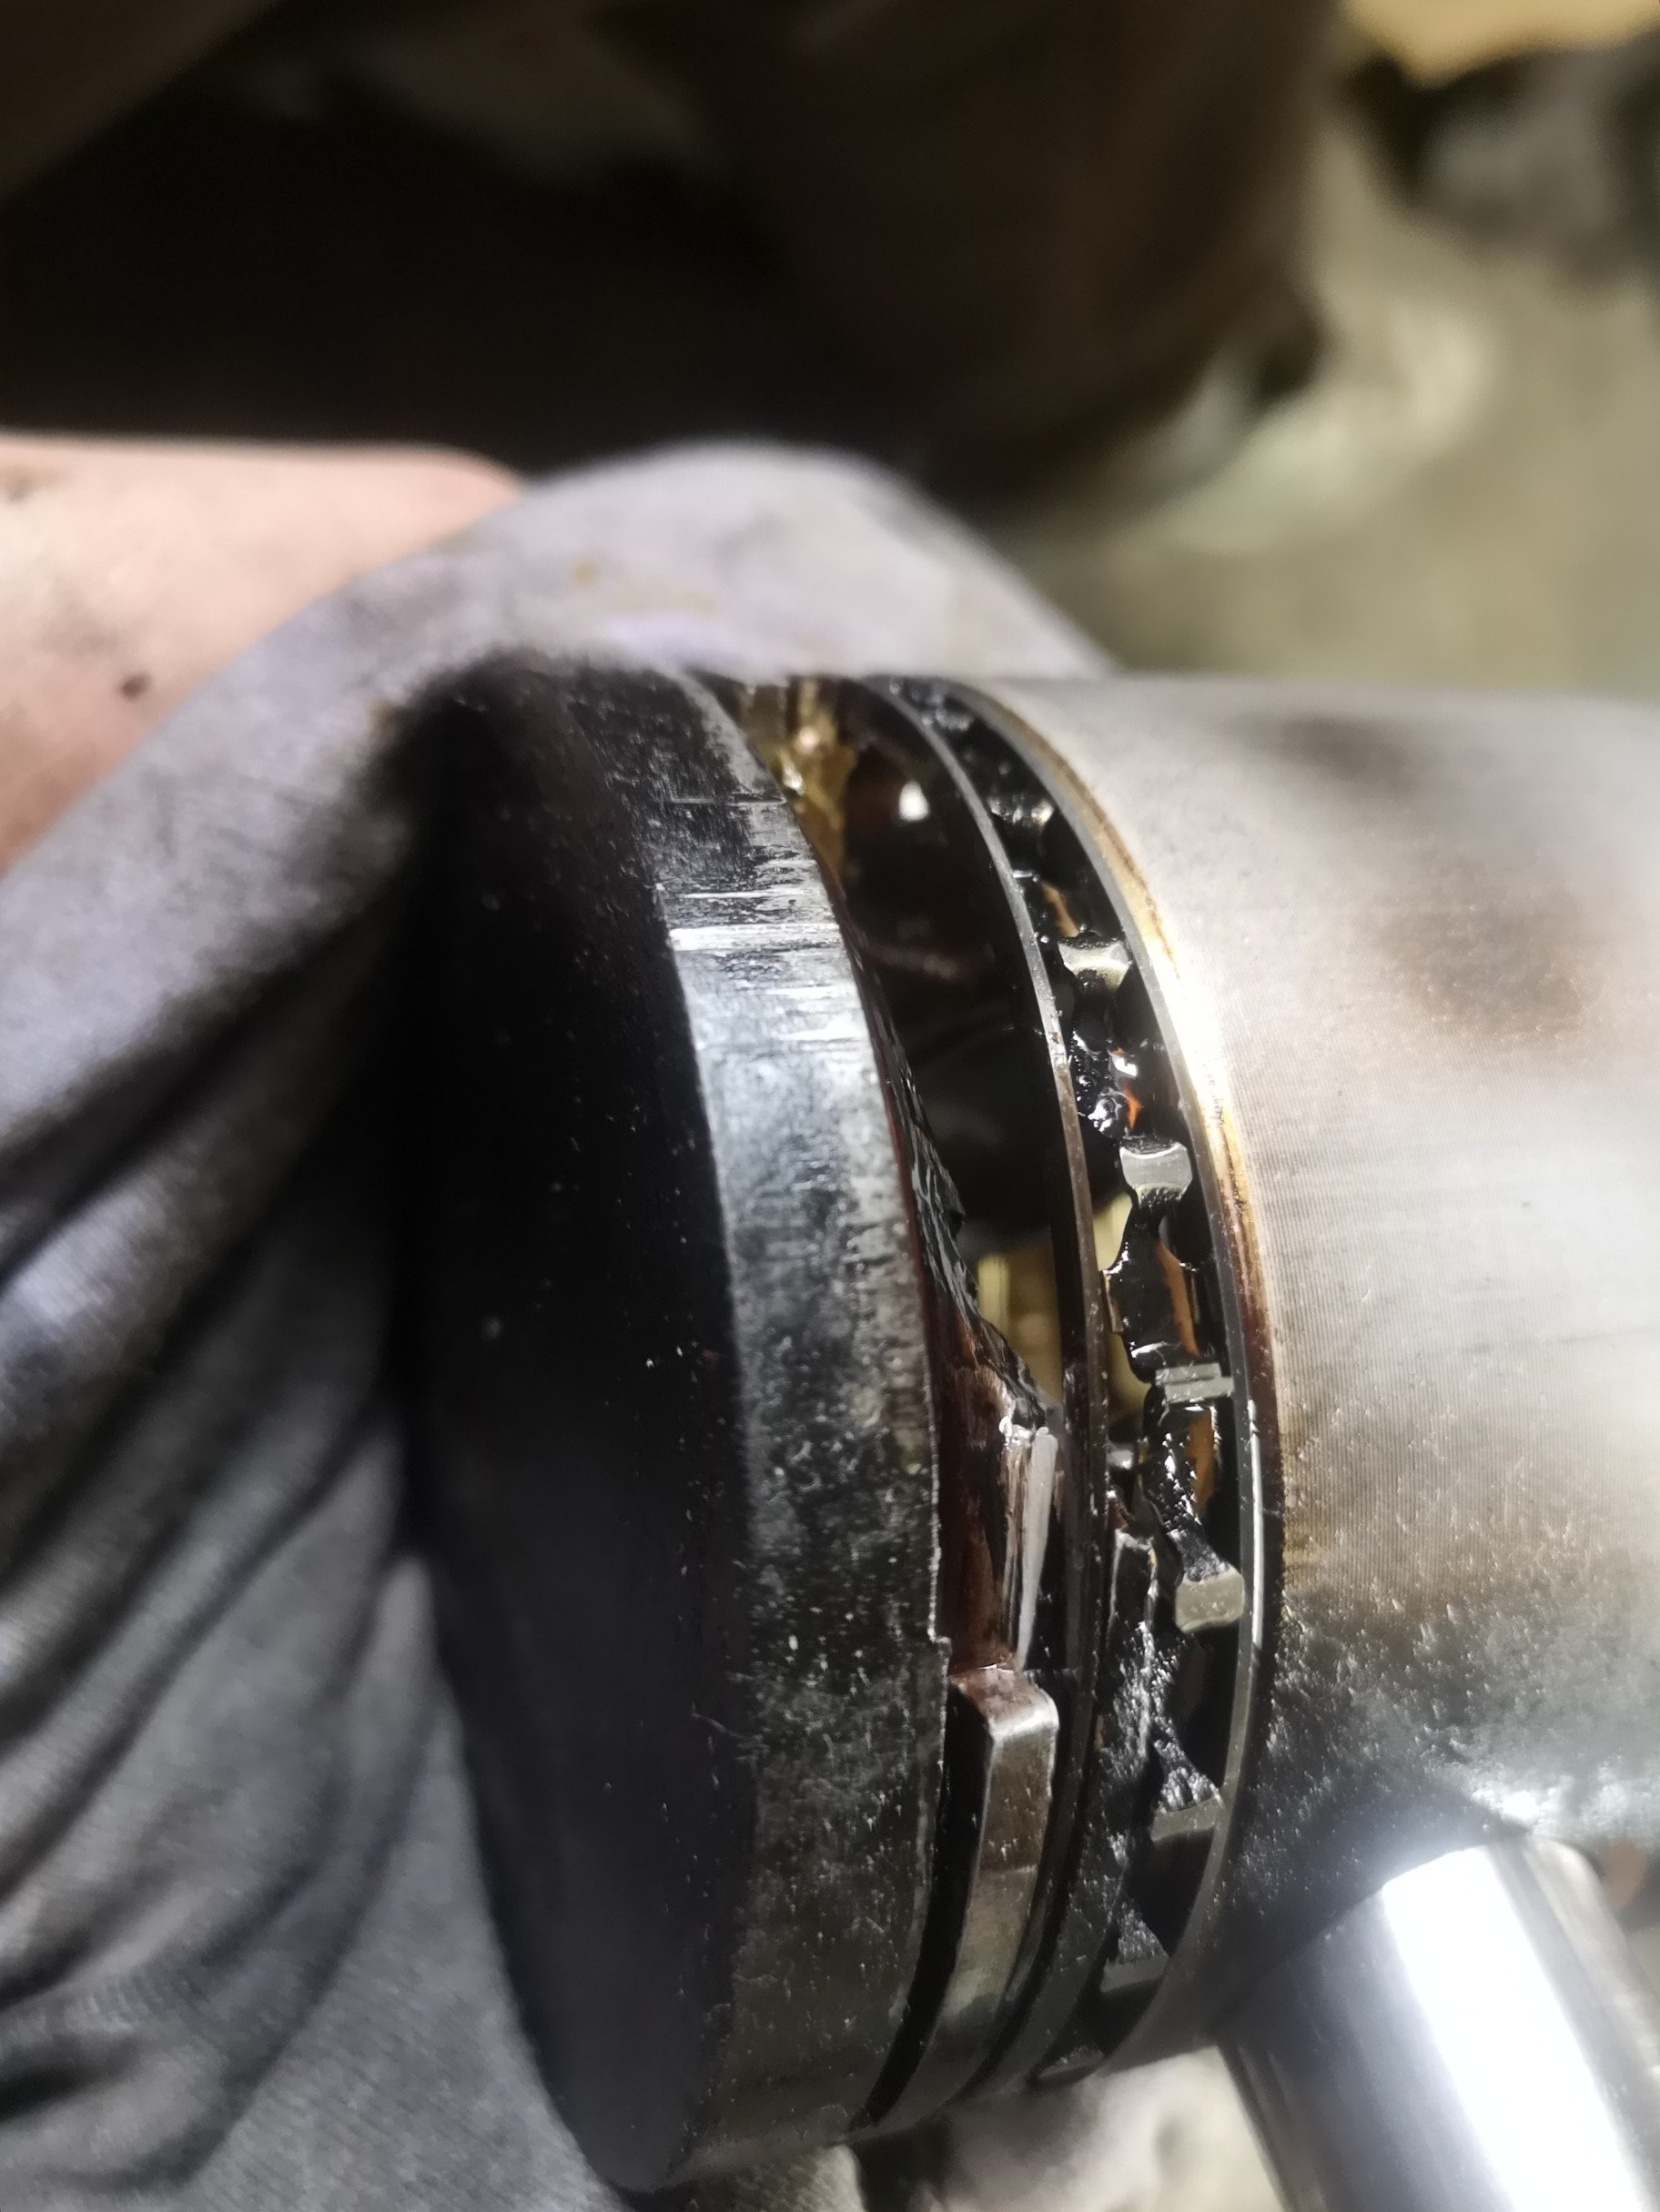
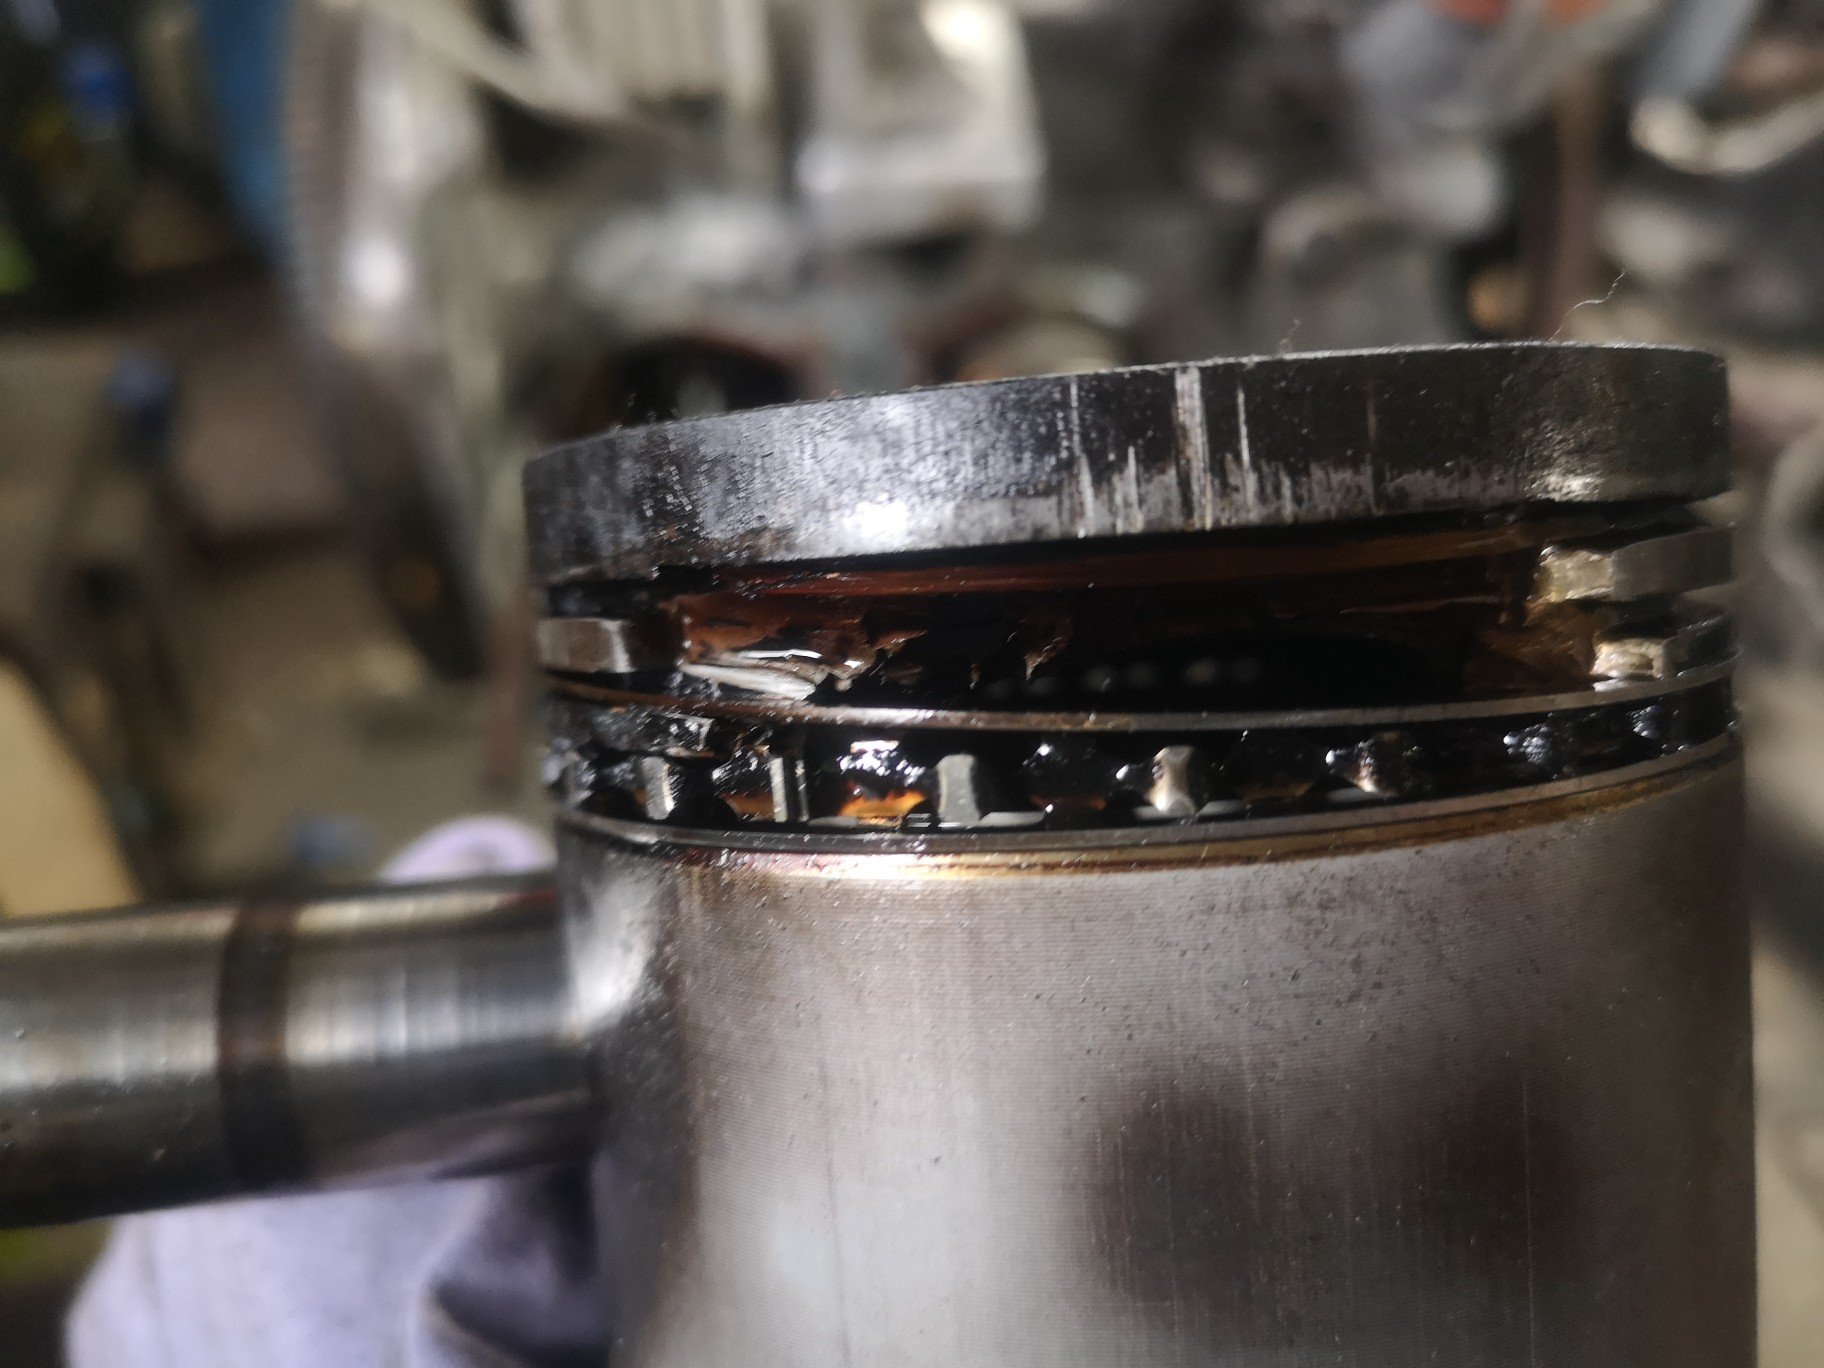
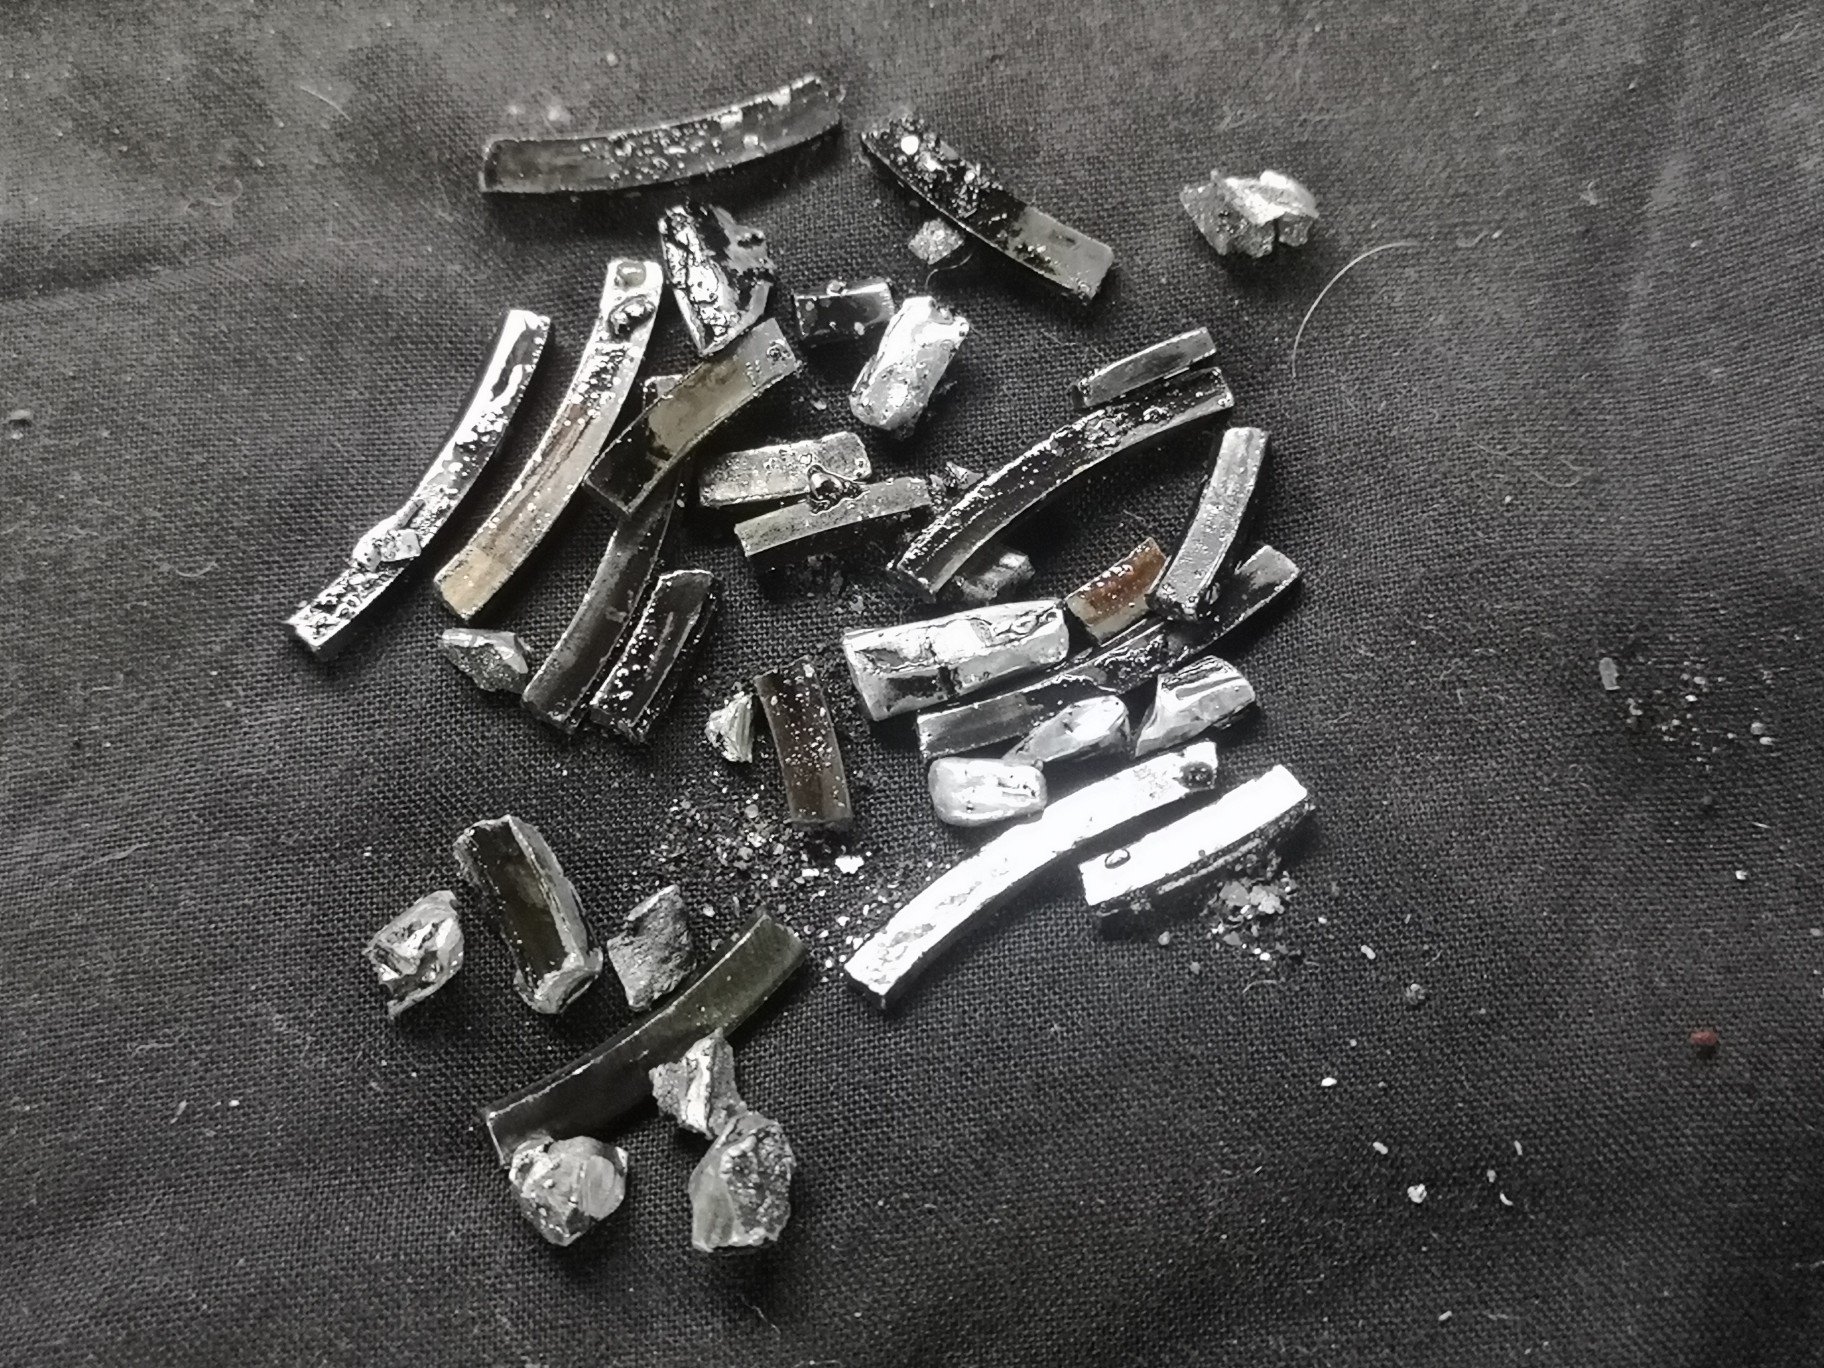
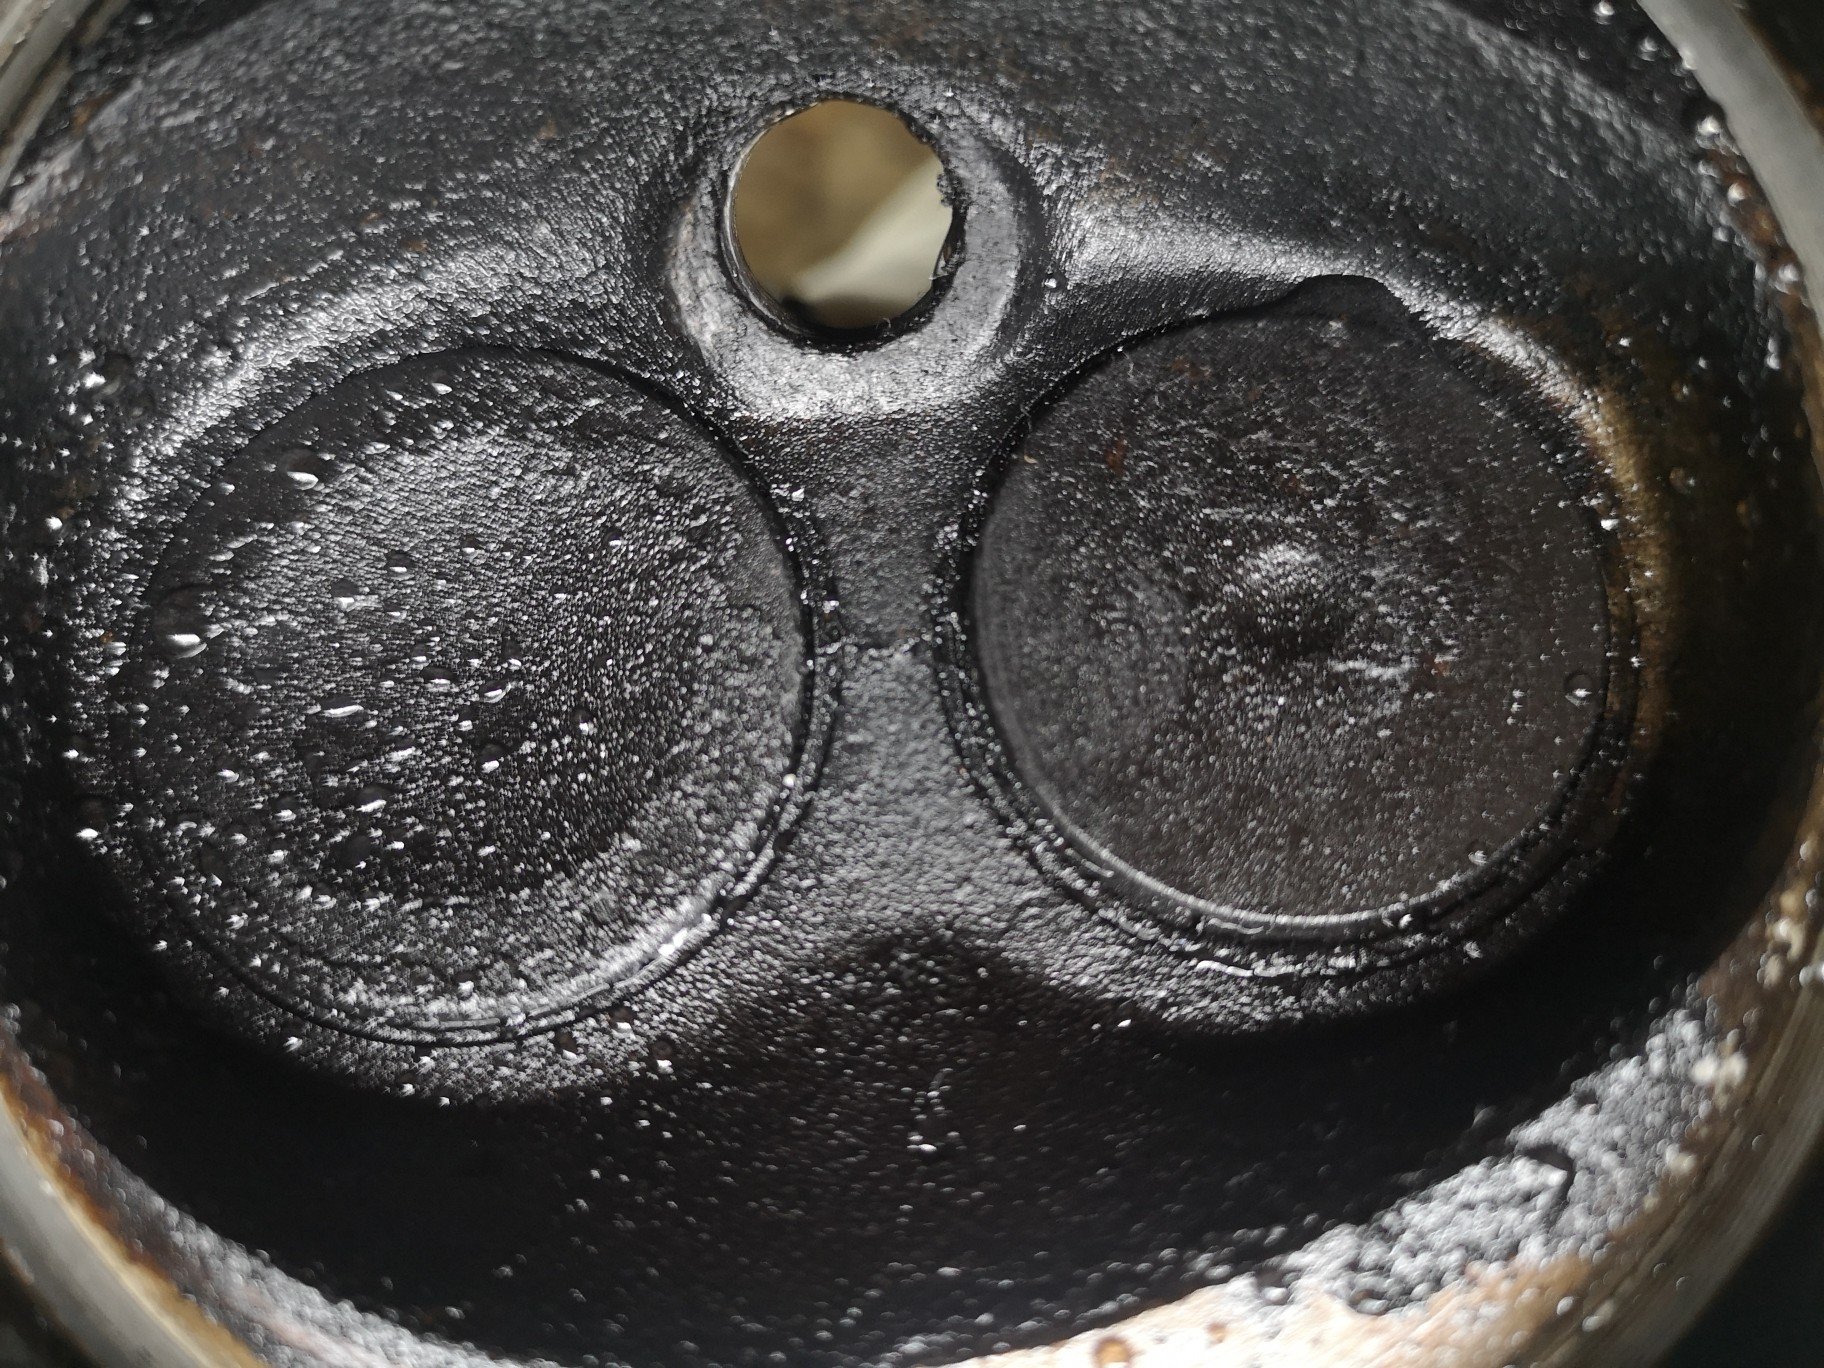
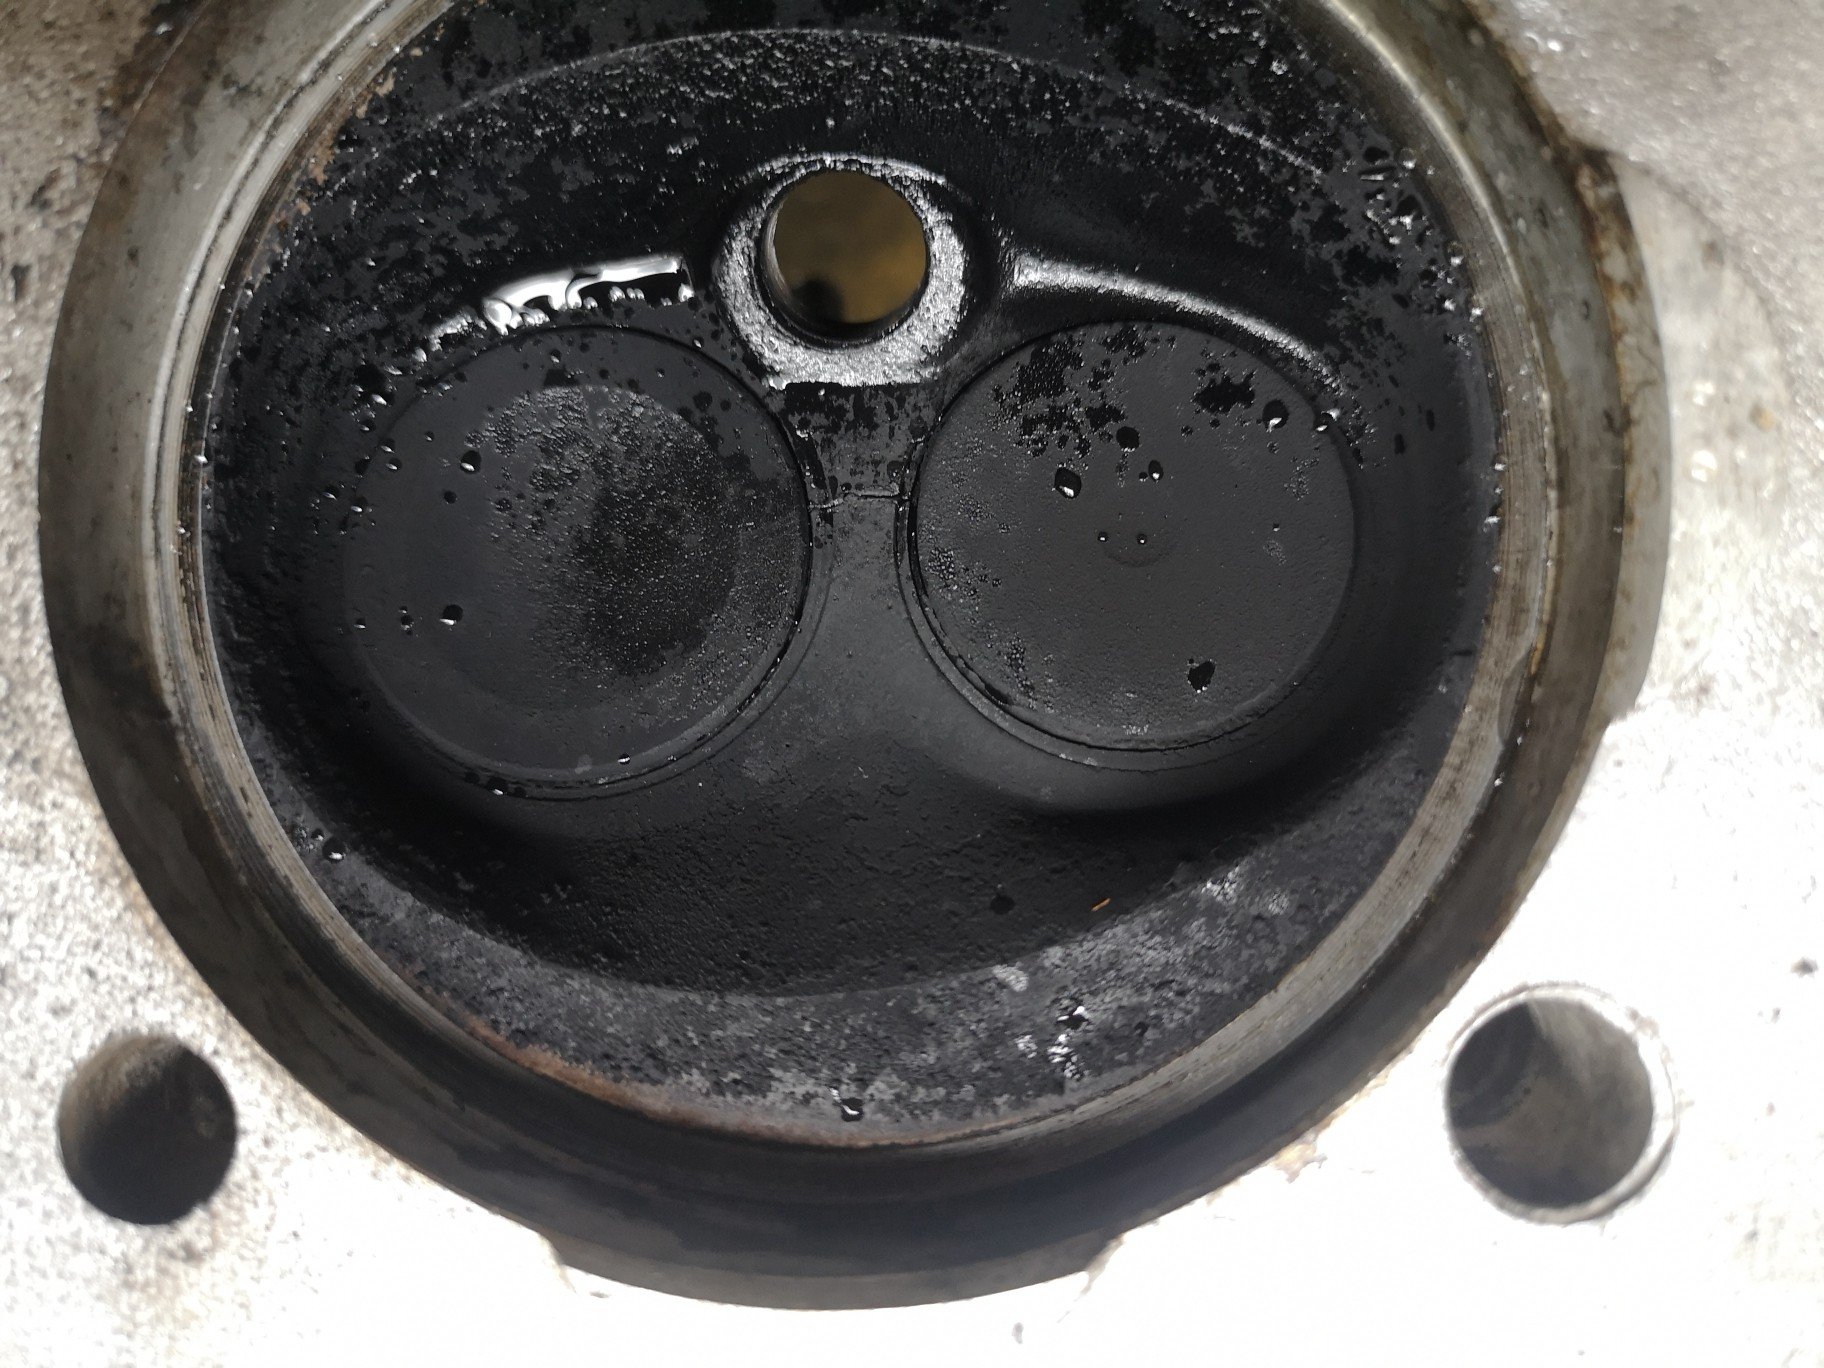
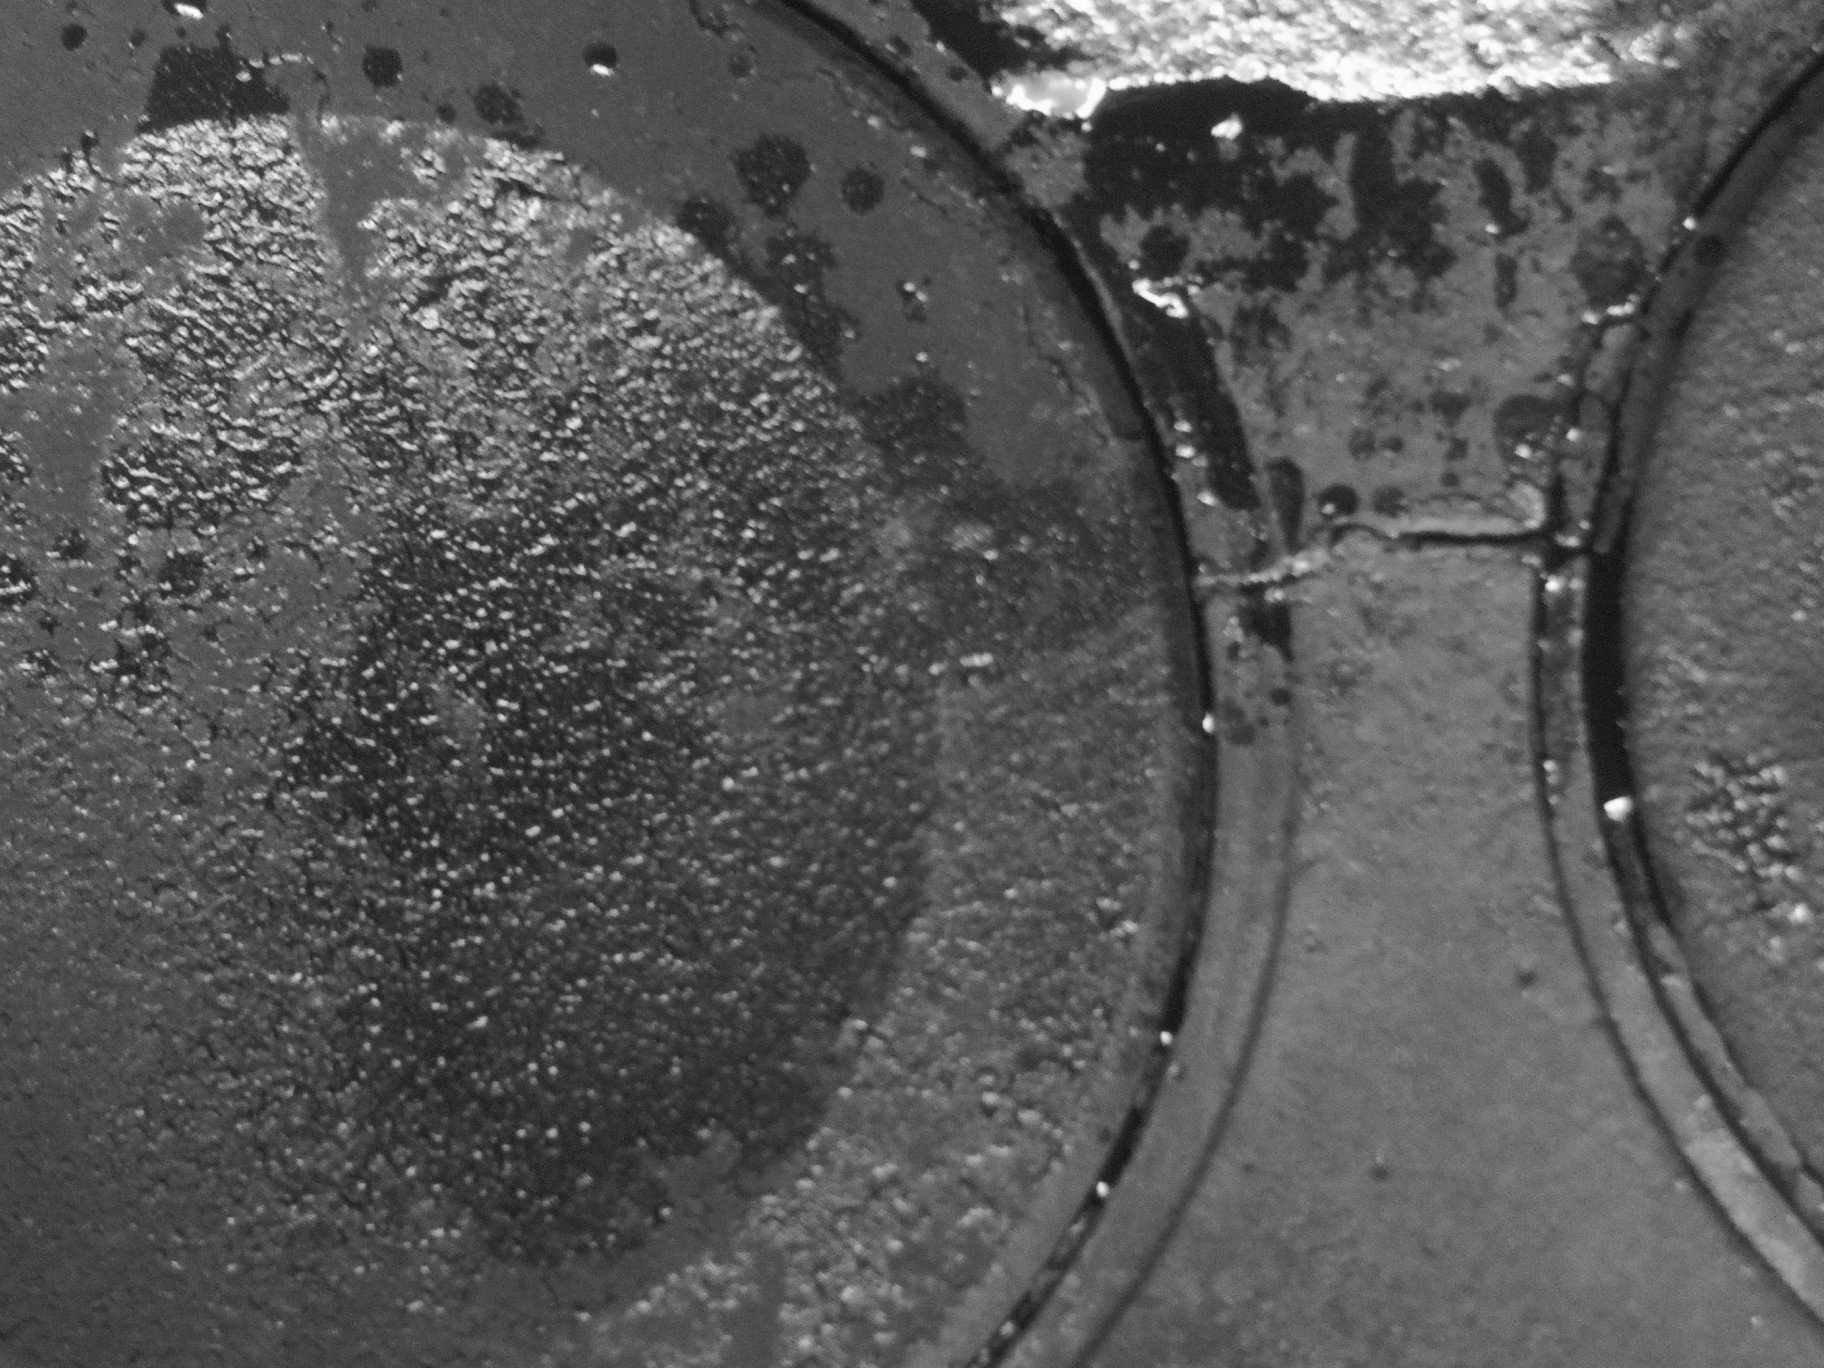
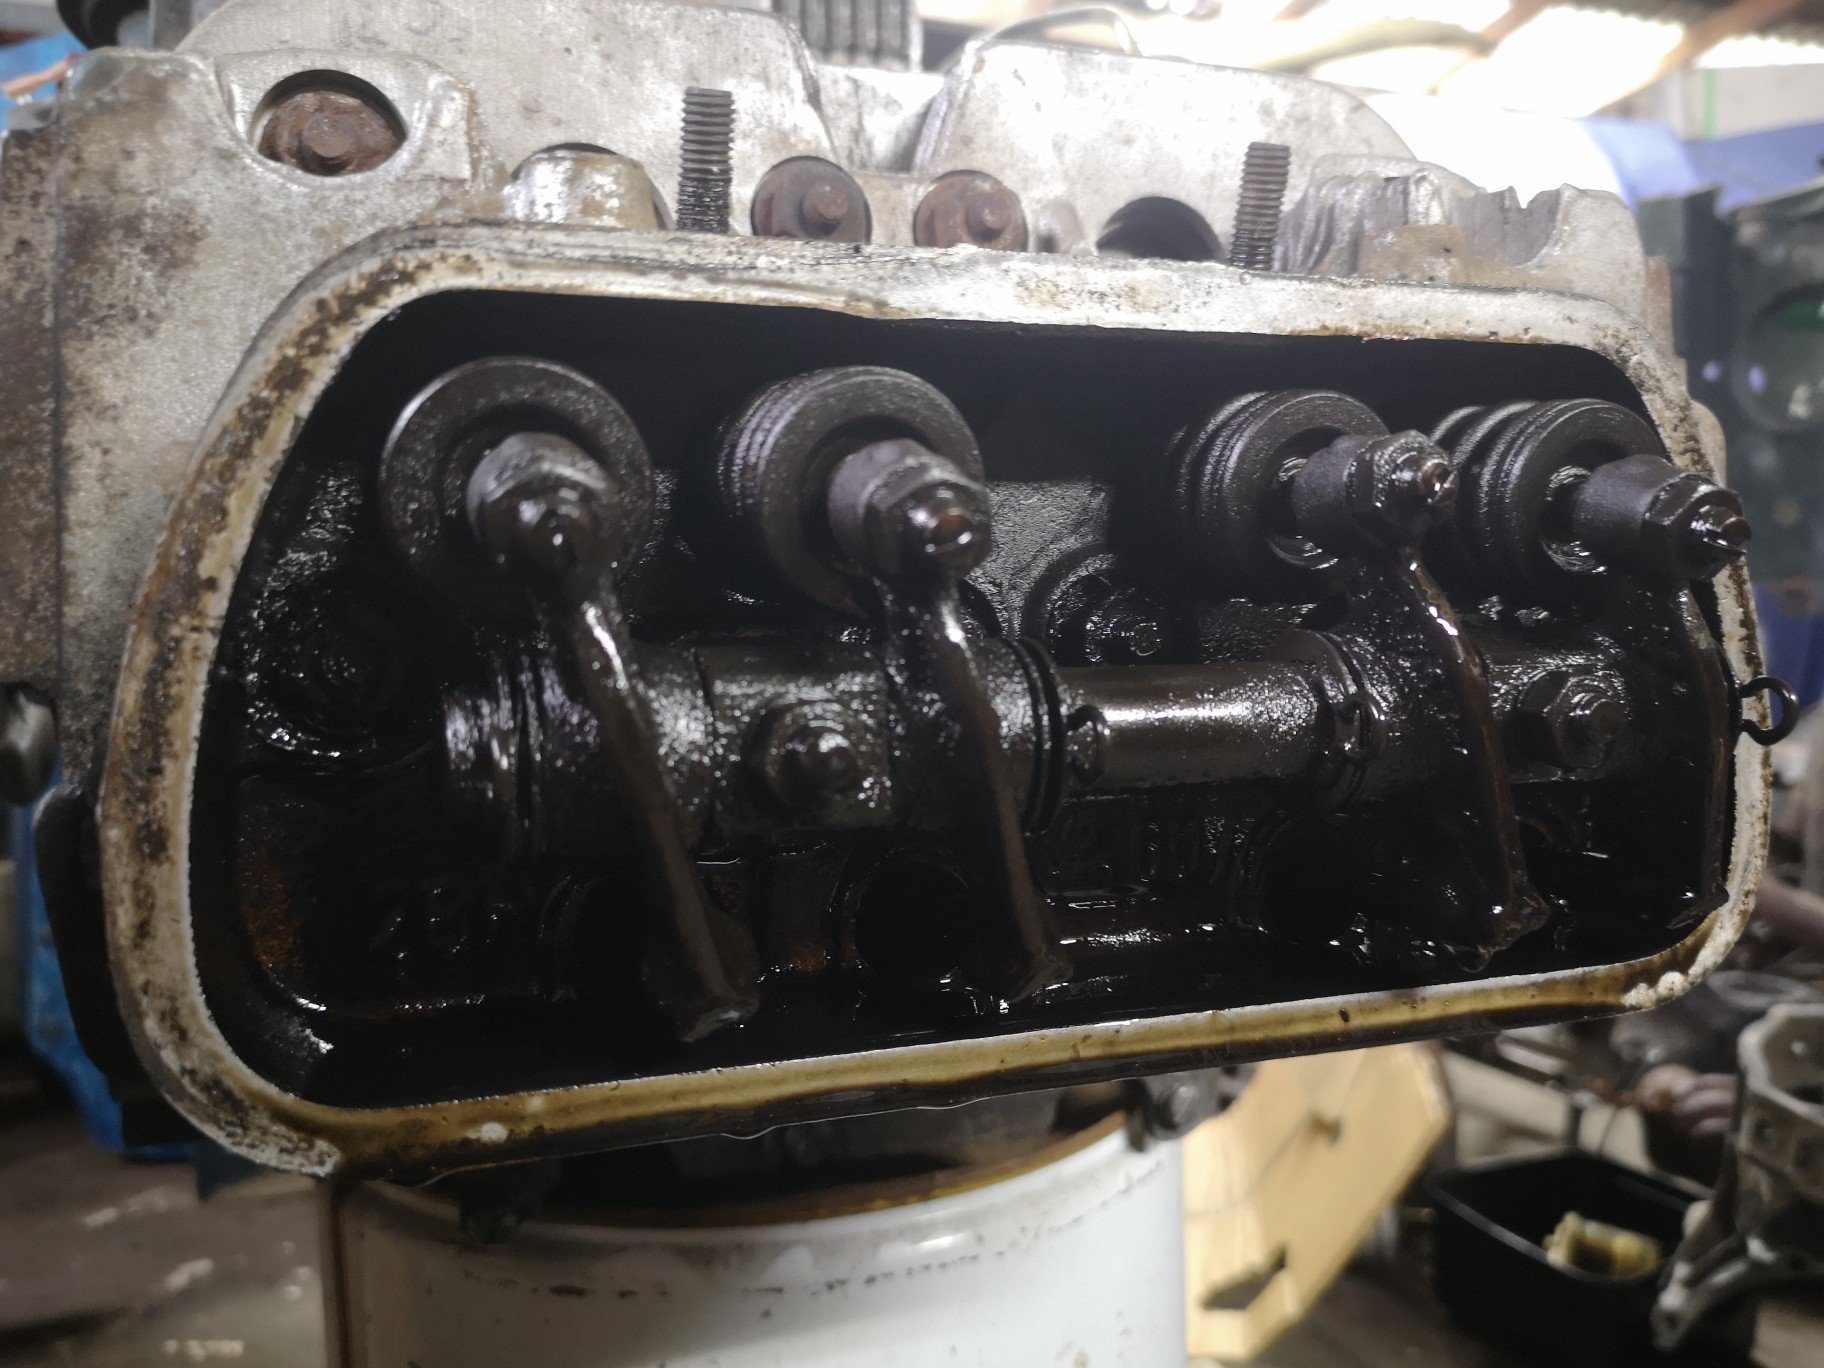
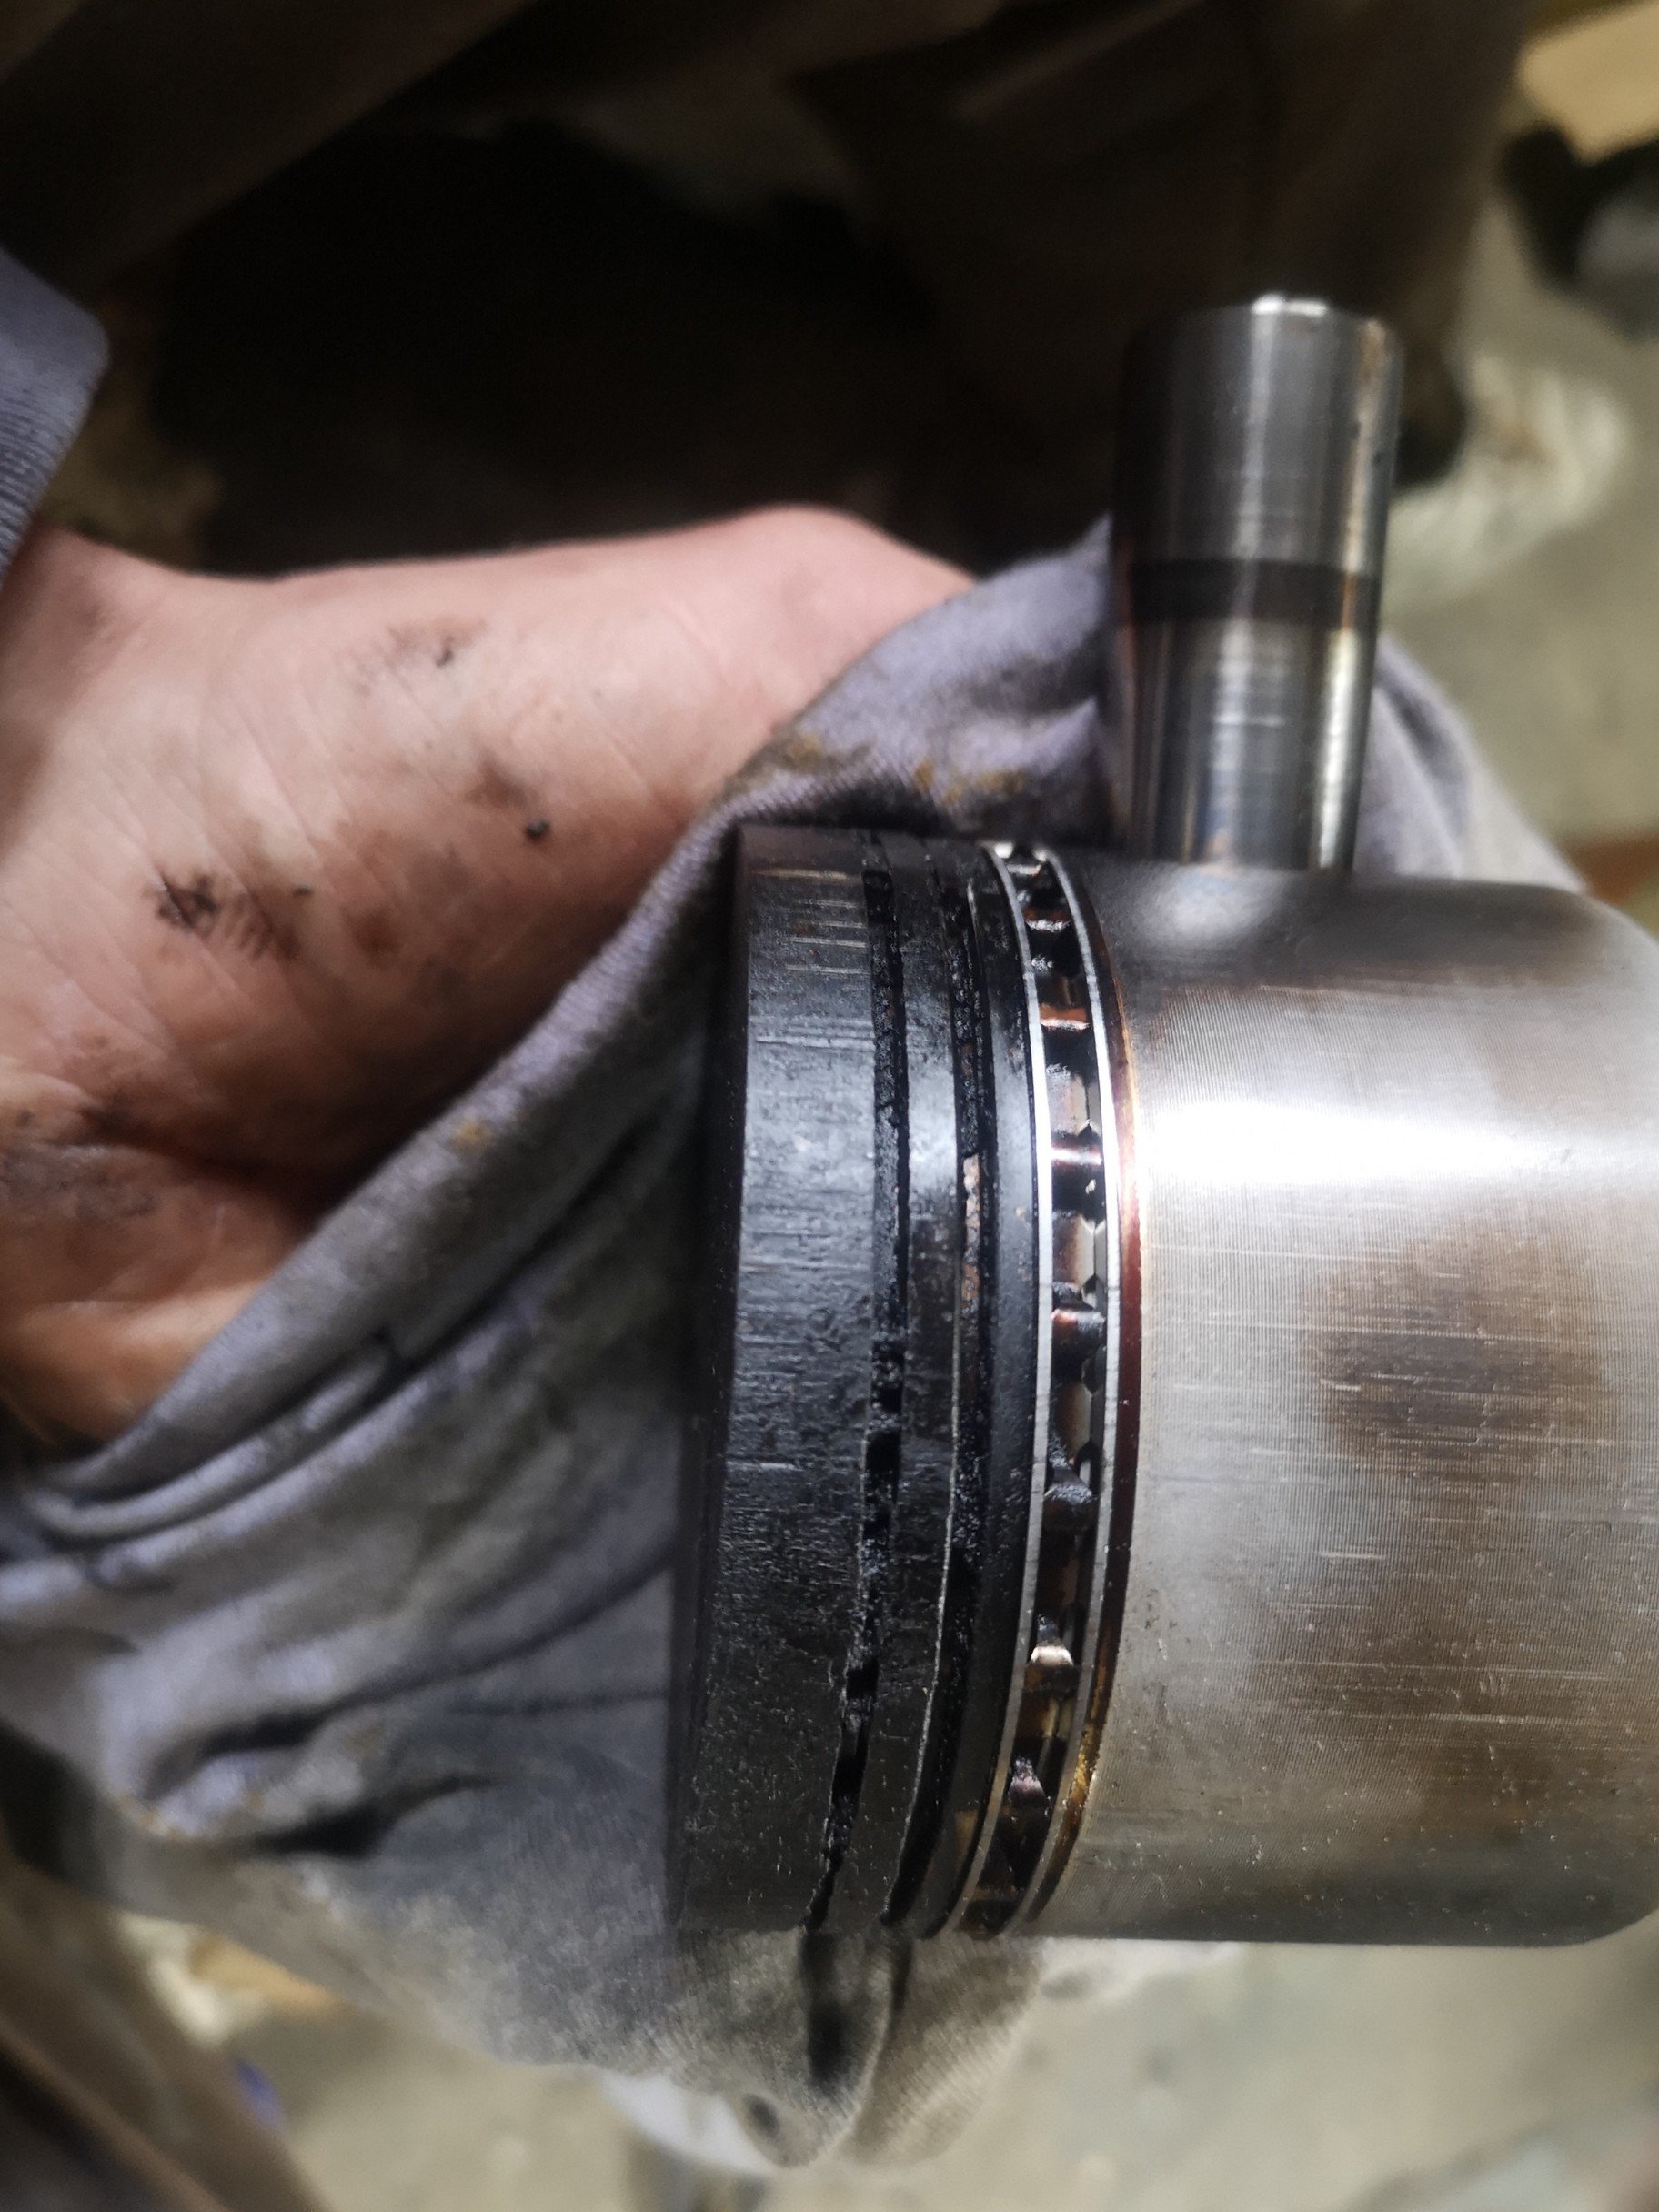
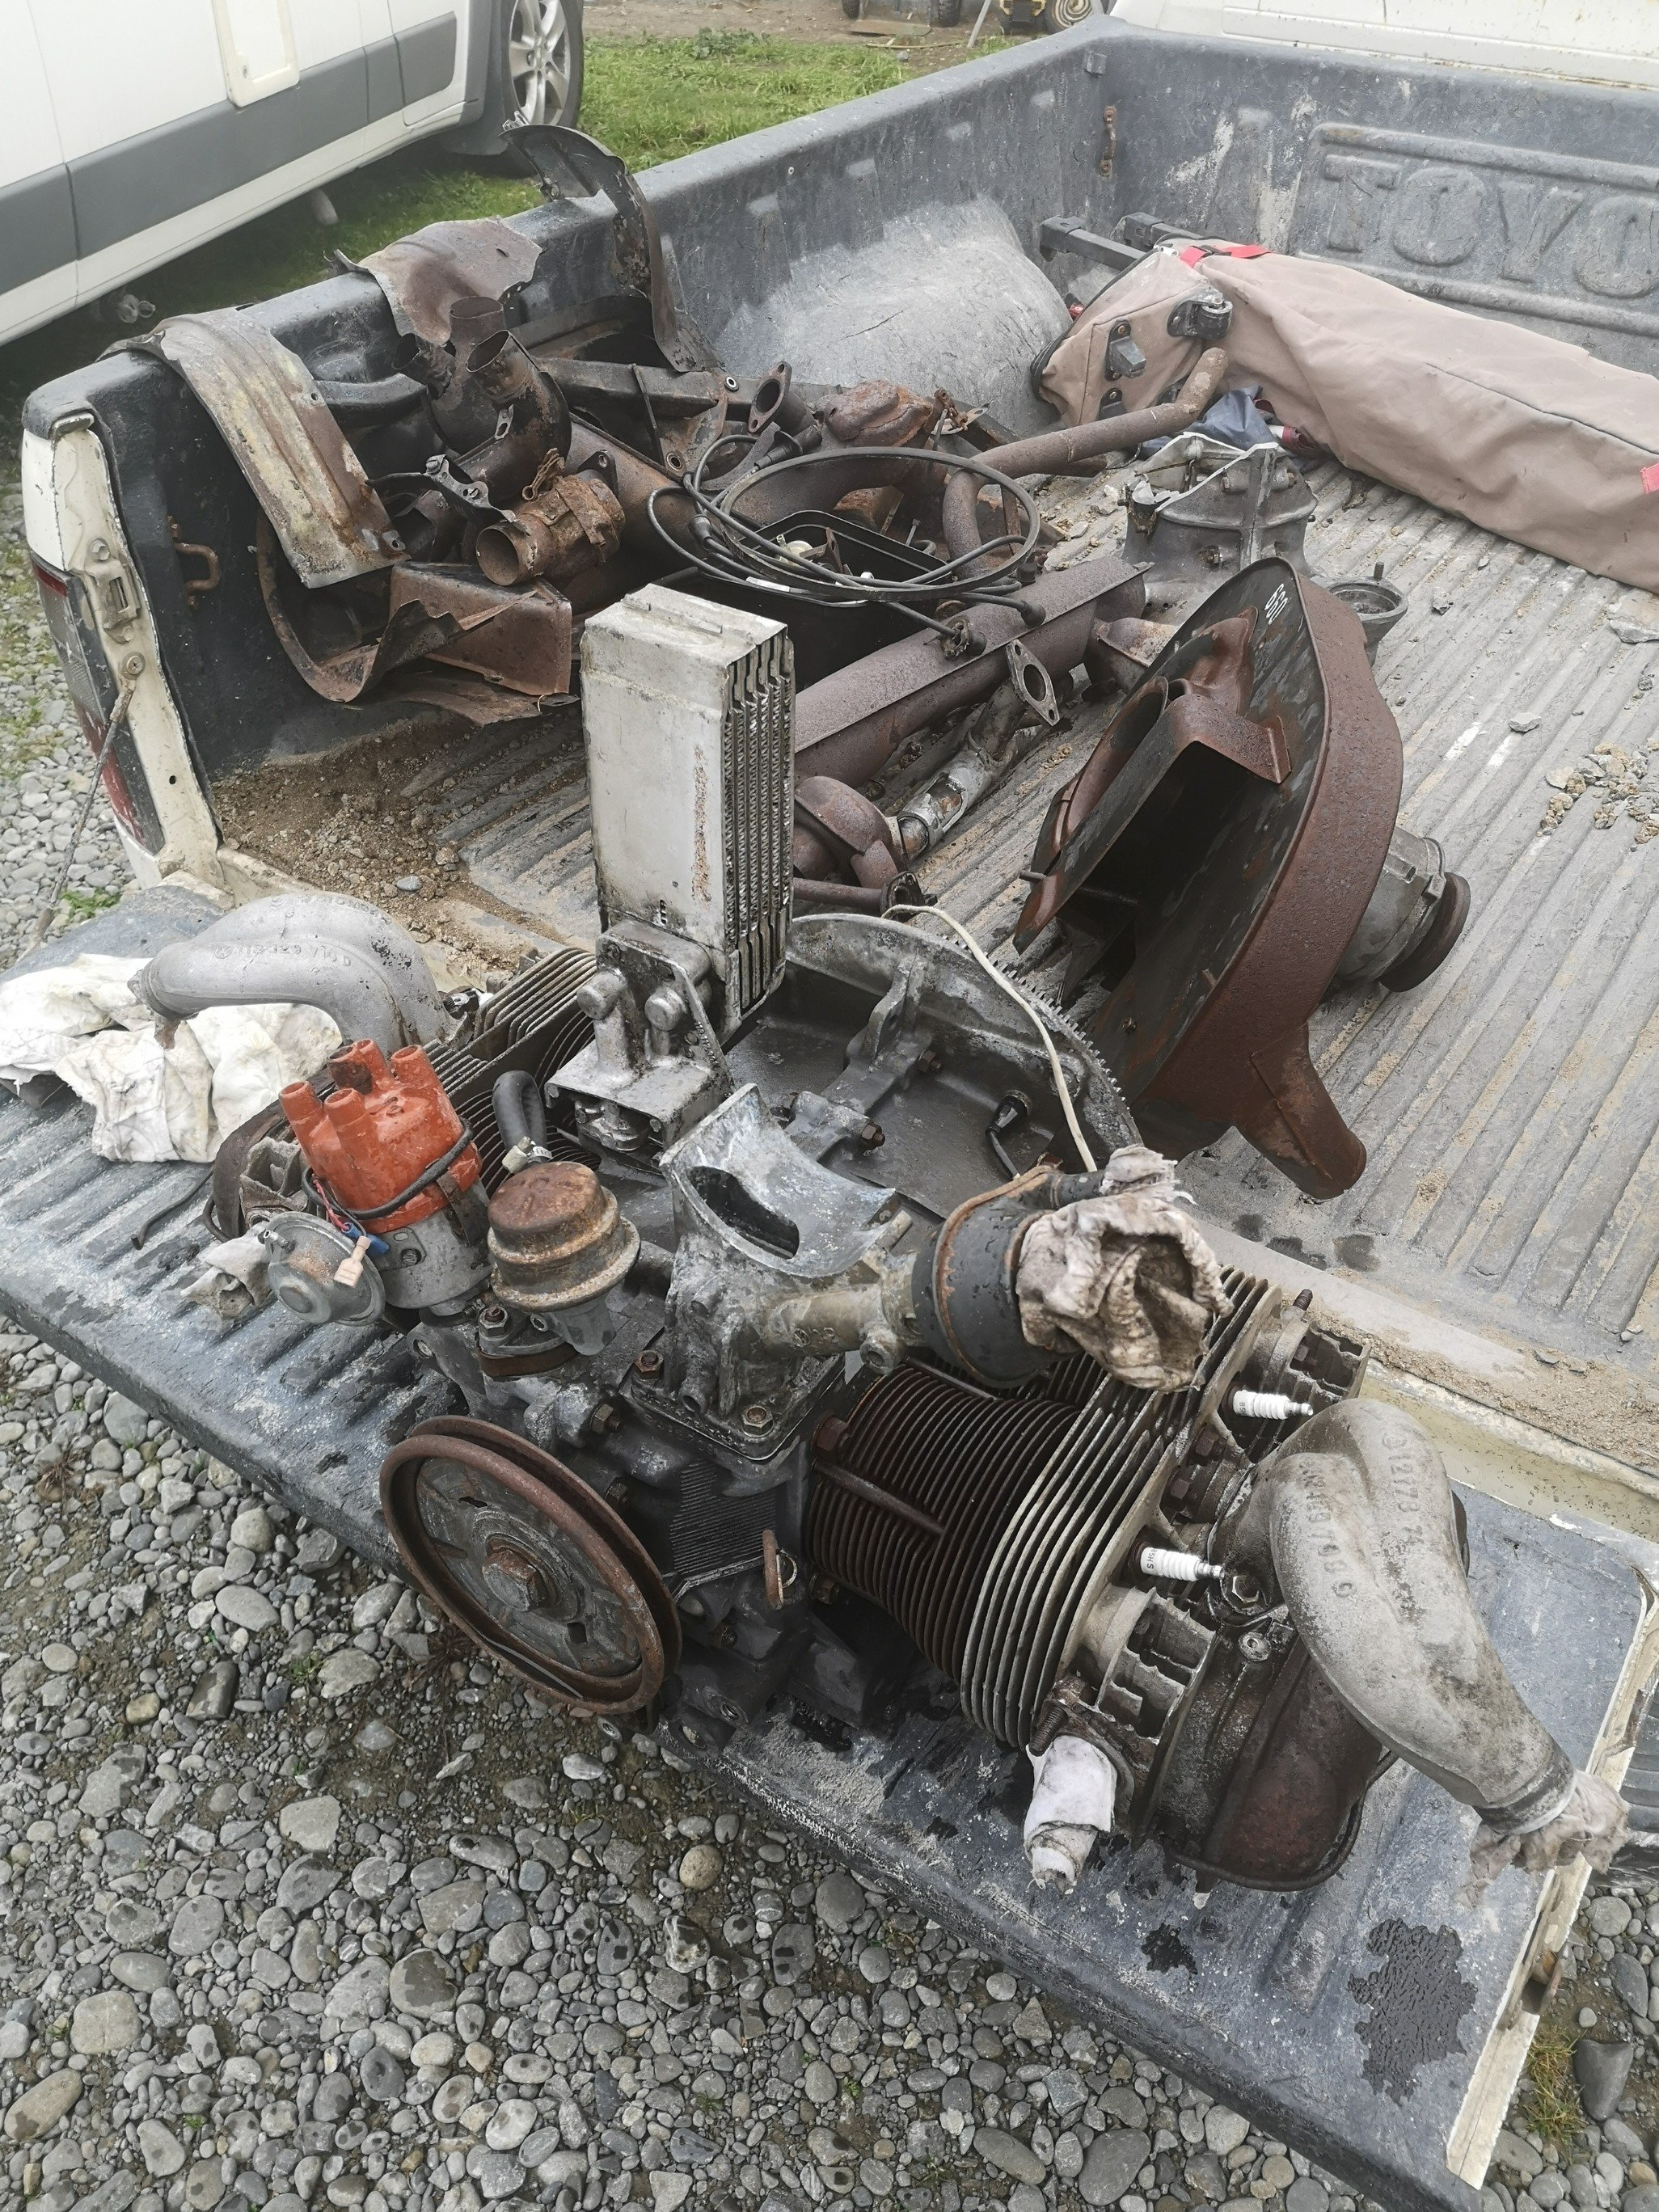
Black hole swallowed the rings.. These bits came clunking out of the sump plate.. Not sure if I should pull the whole case to bits or just flush it.. That's where I'm at for now, need to pull the flywheel, shoulda done it before I pulled everything else really. Endplay is. 04mm which is apparently within spec, the other beetle motor has a full 2mm endplay. Prob needs a full rebuild.
3 points
-
Yep, goes in the tailstock drill chuck, it's free to move on the arbor. Back half takes 2" dies, front half takes 1" dies. I still need to make adapters for 13/16", 1.3" and 1.5", but the cost of dies is so crazy that I probably won't make them until I need to. I had a test hoon with it earlier, it cuts like 80 mm of M8 thread in about 10 seconds. Single point threading that length would take me forever and probably turn to shit due to part deflection.2 points
-
Iv had splashes of water earth out the coil end of the plug too. Ghetto fix of packing it full of grease solved it2 points
-
i just wanted to come and say i like this. Thats all... i have nothing else of value to add to this post/build, you're doing a killer job!2 points
-
Ive got to buy some shipping steez and do a bit of admin, so will organised a packaging night when that sale sorted.2 points
-
so rad also so tiny2 points
-
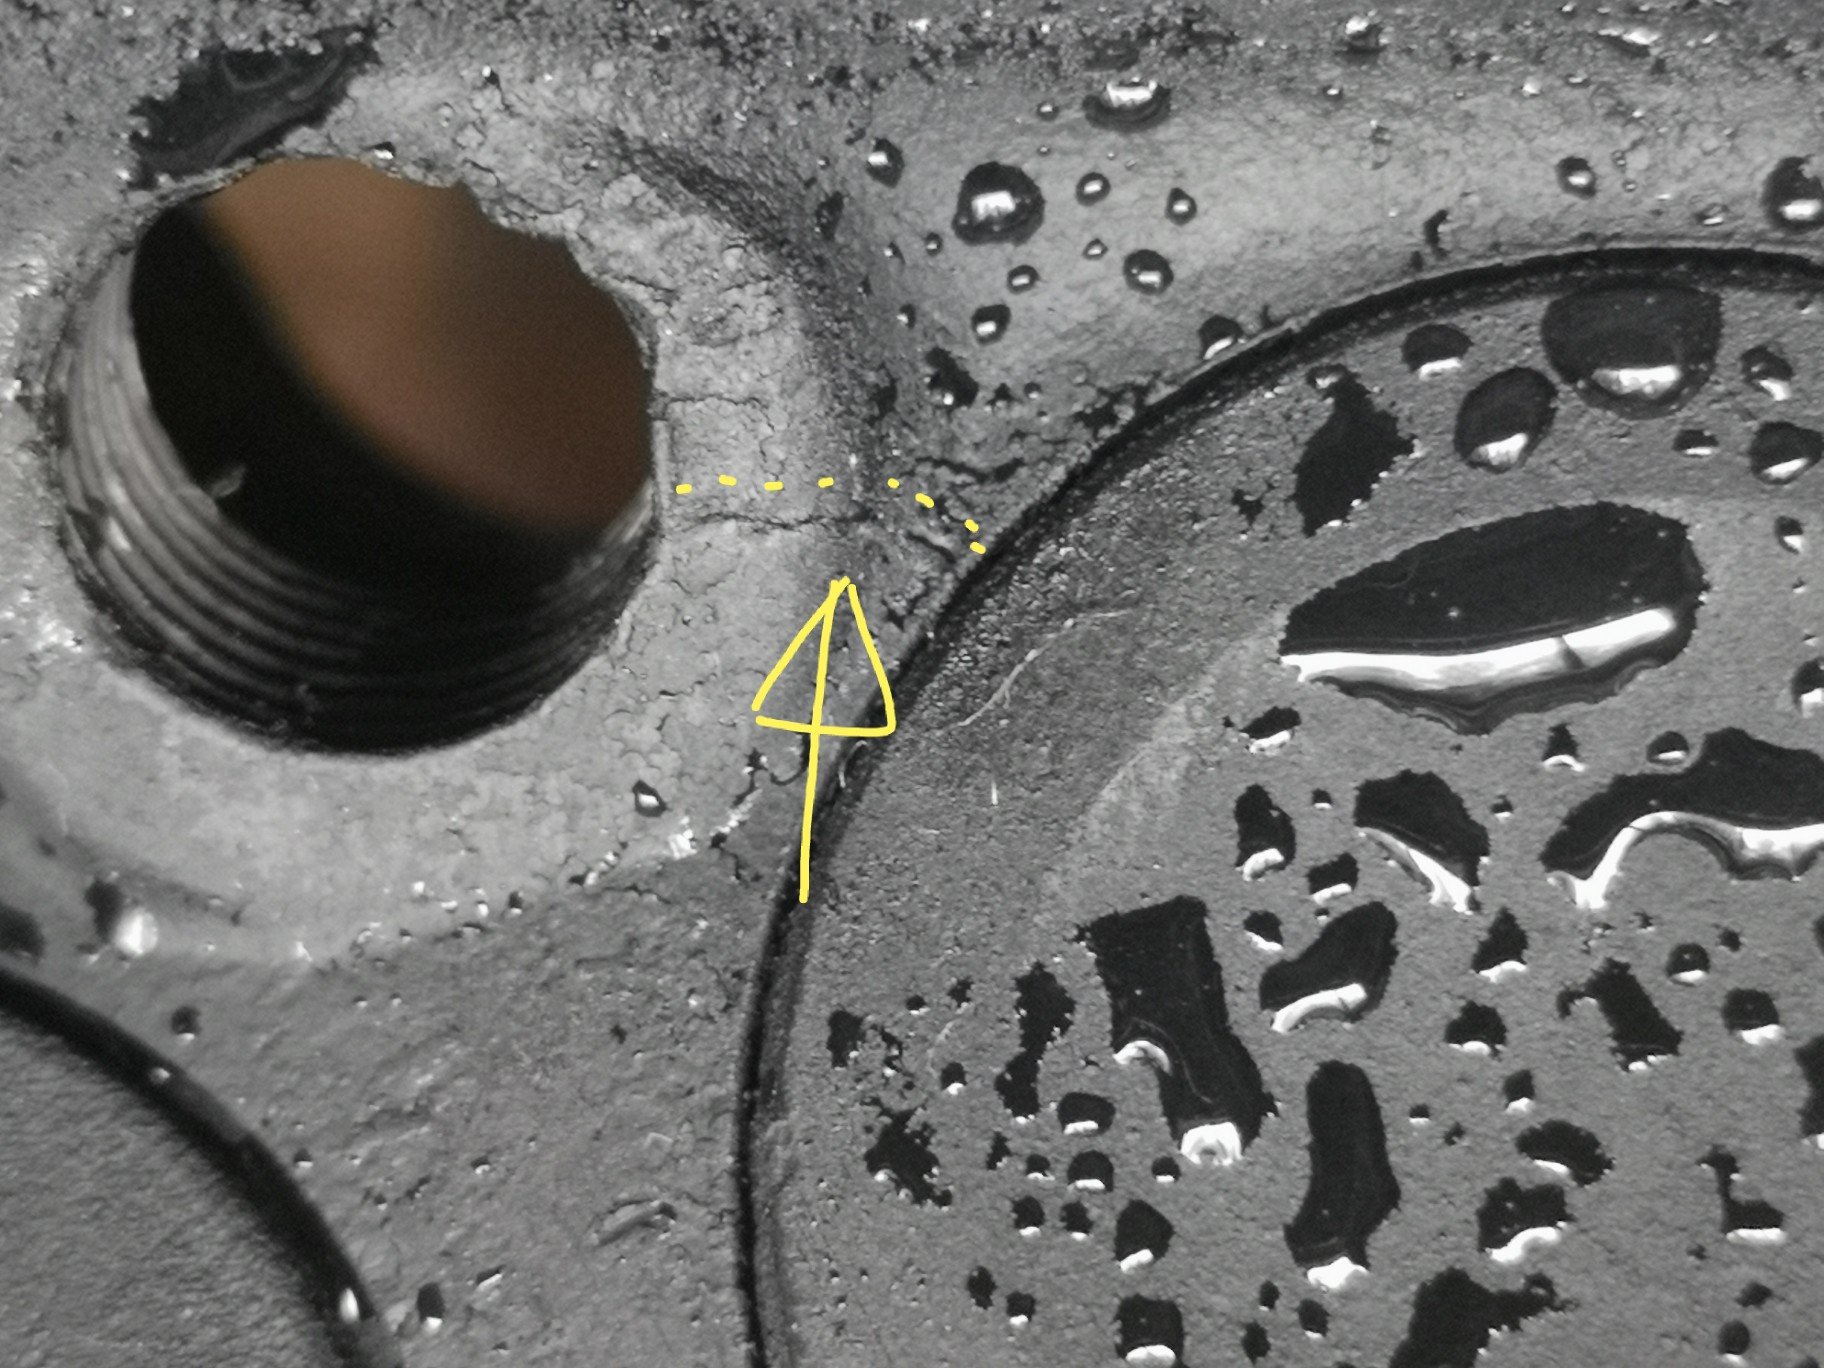
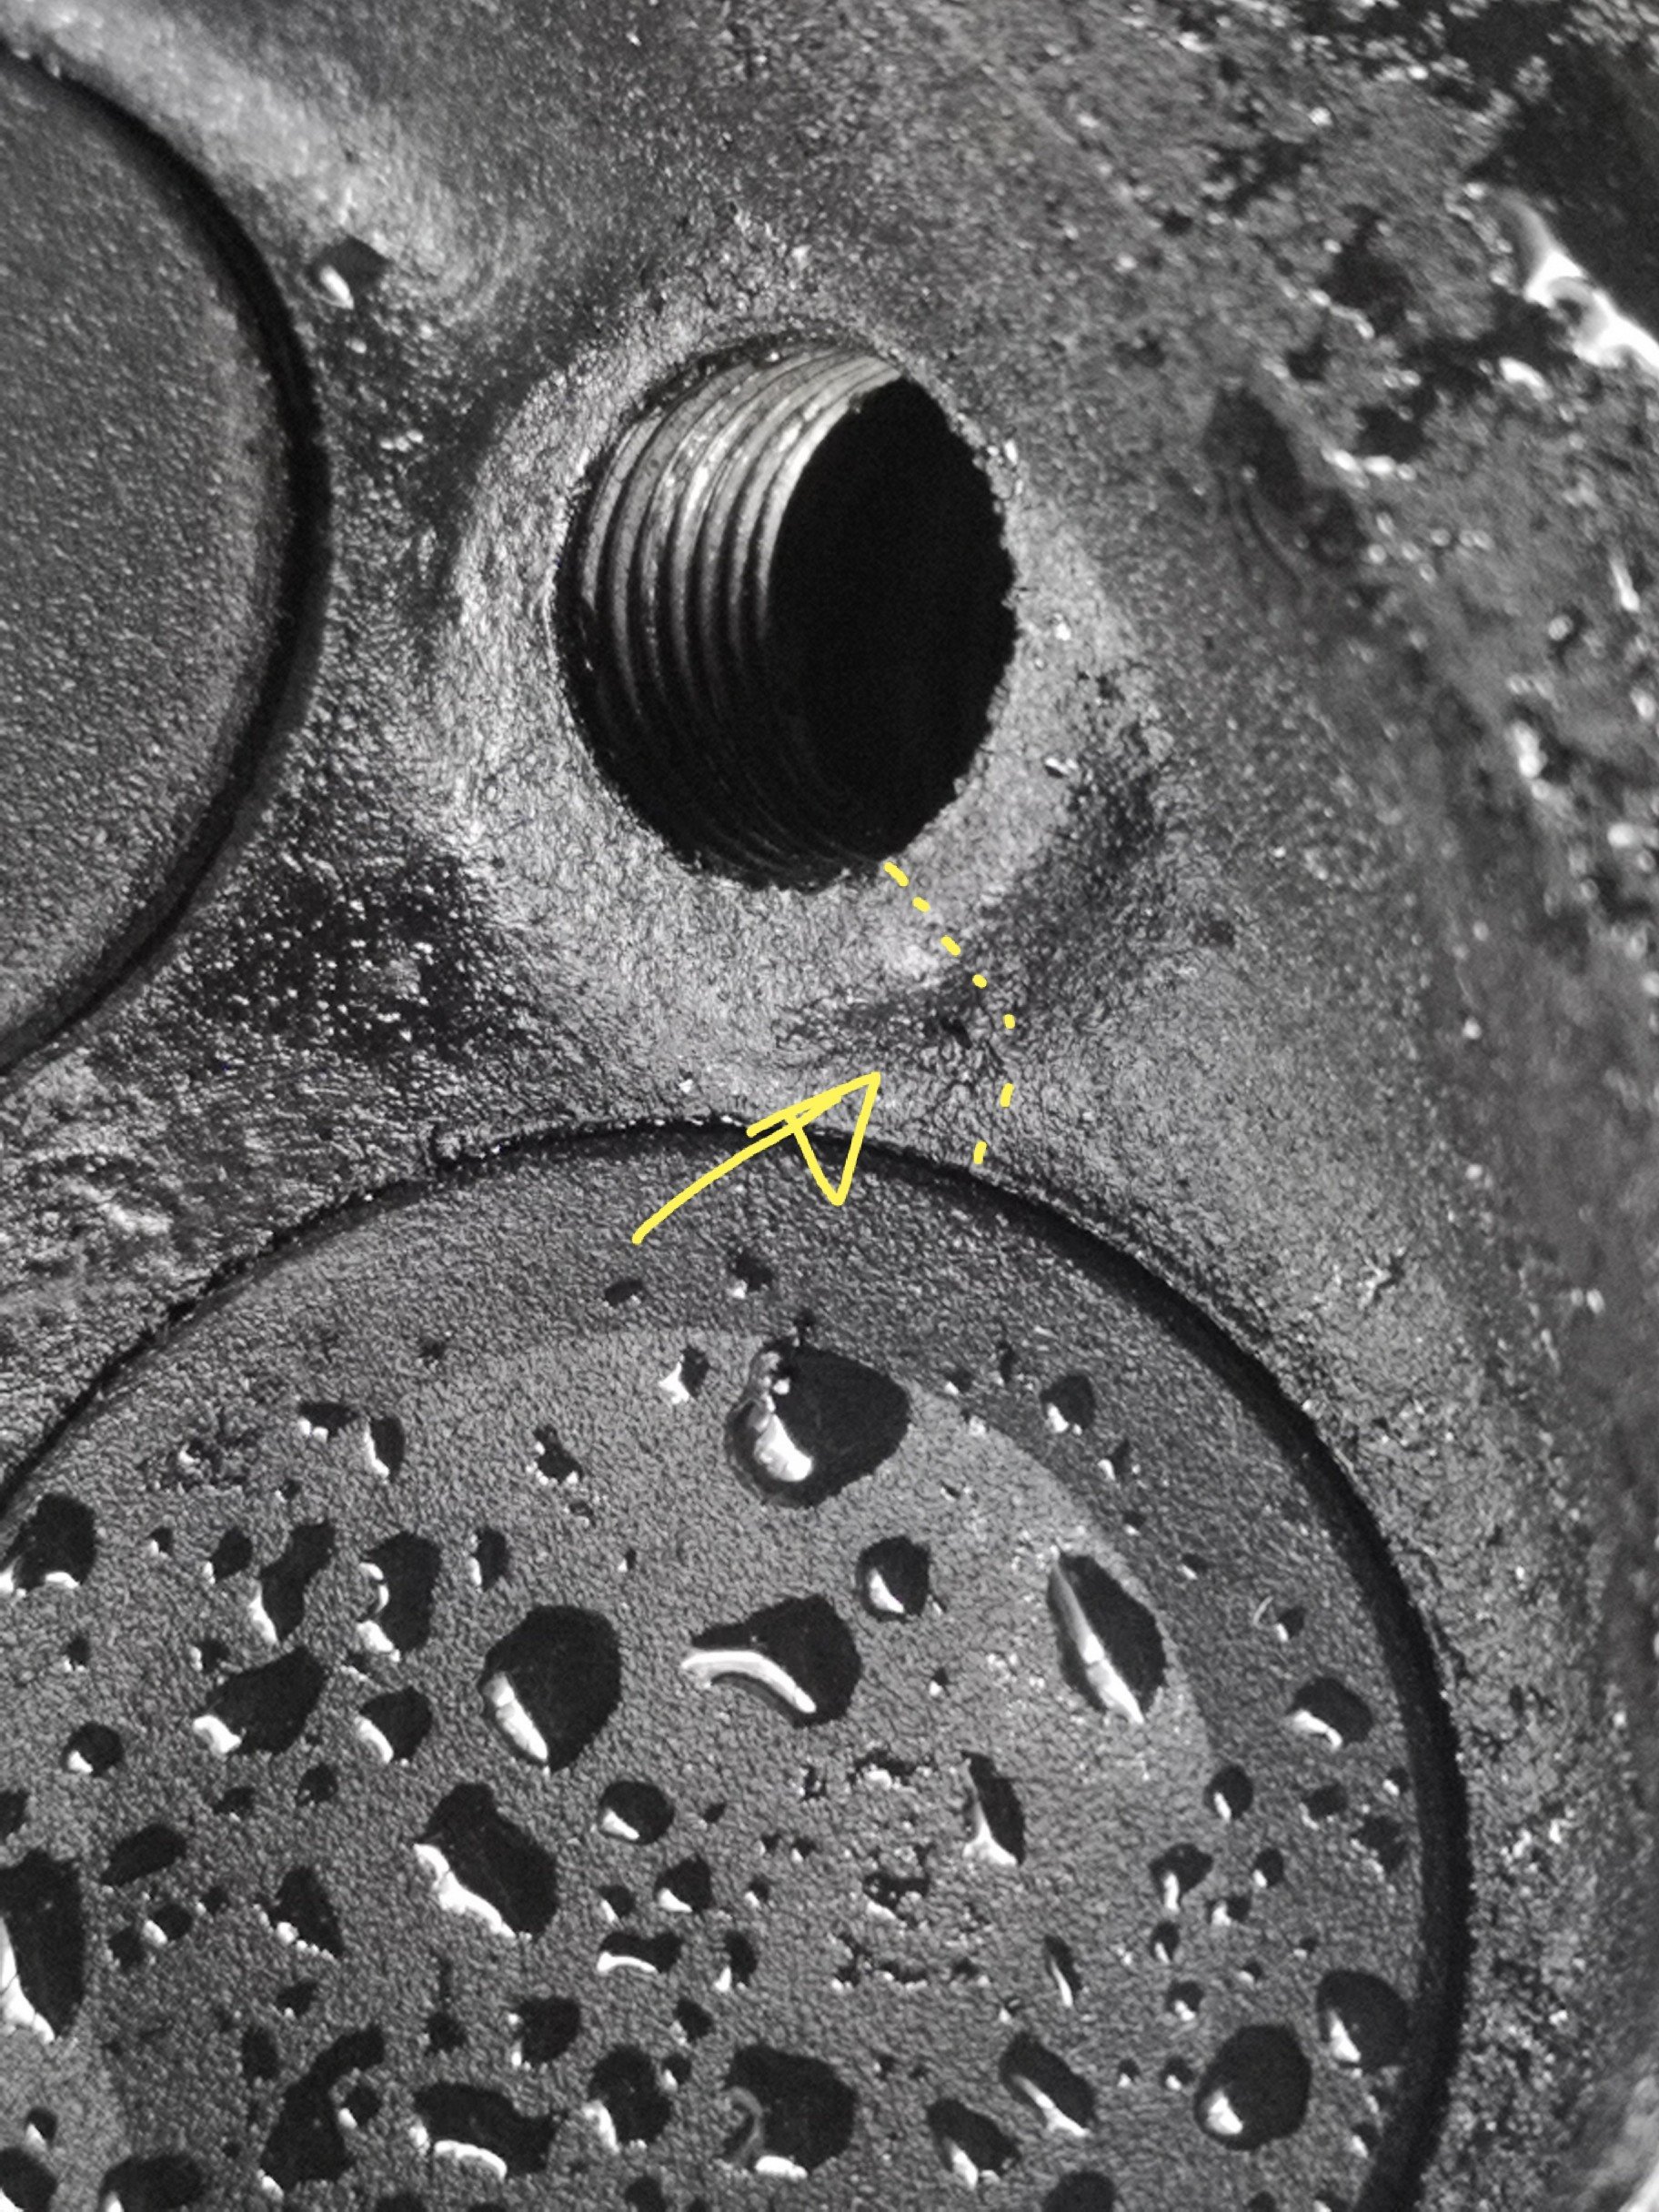
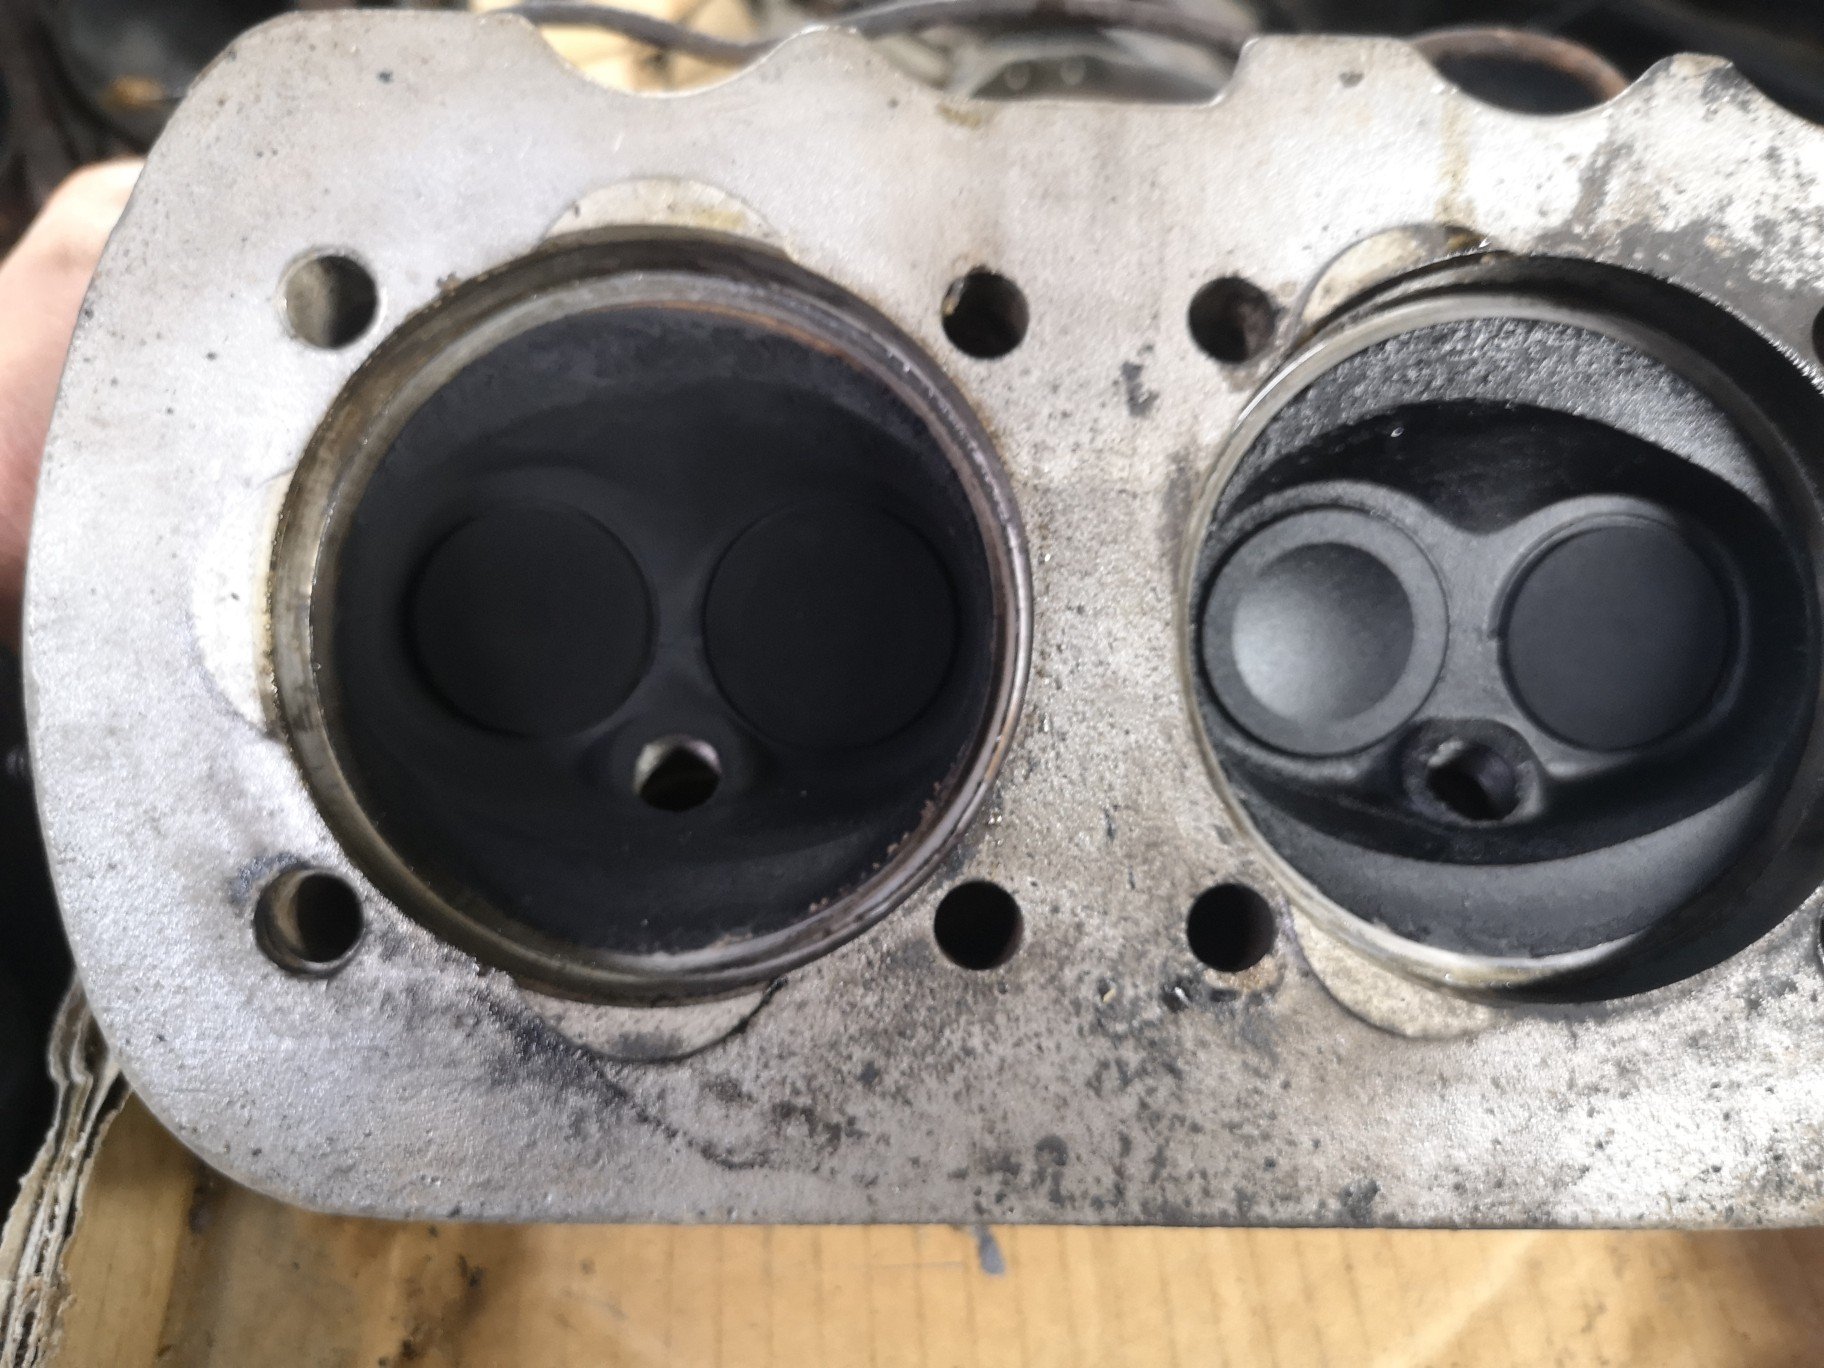
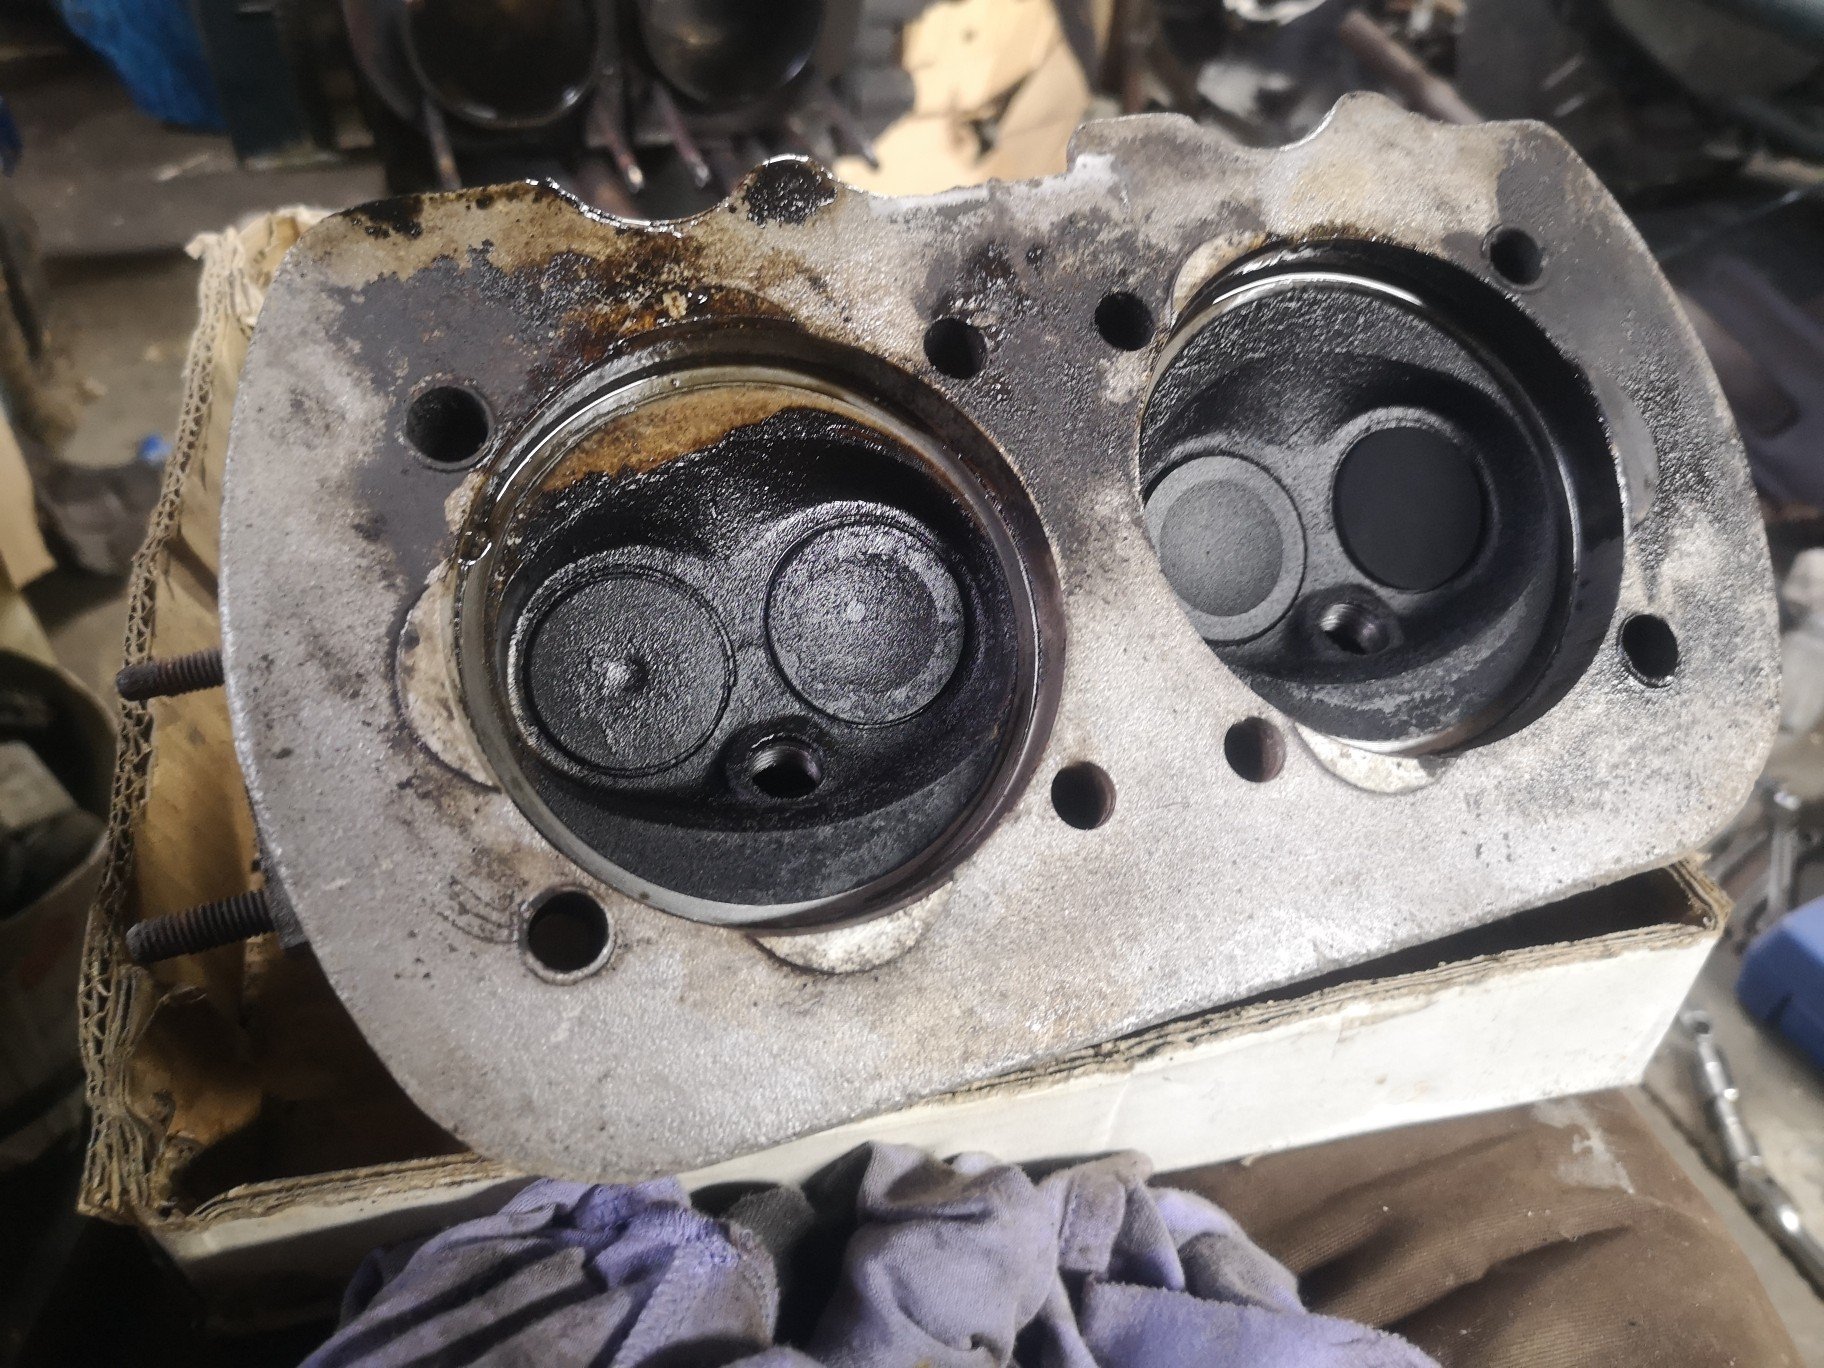
Heads are fucked.. Cracked, Cracked Crack close up.. Cracked in between spark plug and valve.. These are in the same place on both heads So that's pretty annoying but to be expected.. Gonna have to split the case to clean it out, no point doing this only for it to fail later on so with that in mind stroker crank and 1776 barrels should give me 2007cc. Just have to bore the case but also have to bore any heads that replace these.. might as well get a new set already bored for bigger barrels, 9 hundy for a pair ready to bolt on bar bit of port work I want to do. *sigh* Prob about time for this.. https://oldschool.co.nz/index.php?/topic/74619-yetchhs-more-problems-than-i-expected-bay-kombi/
2 points
-
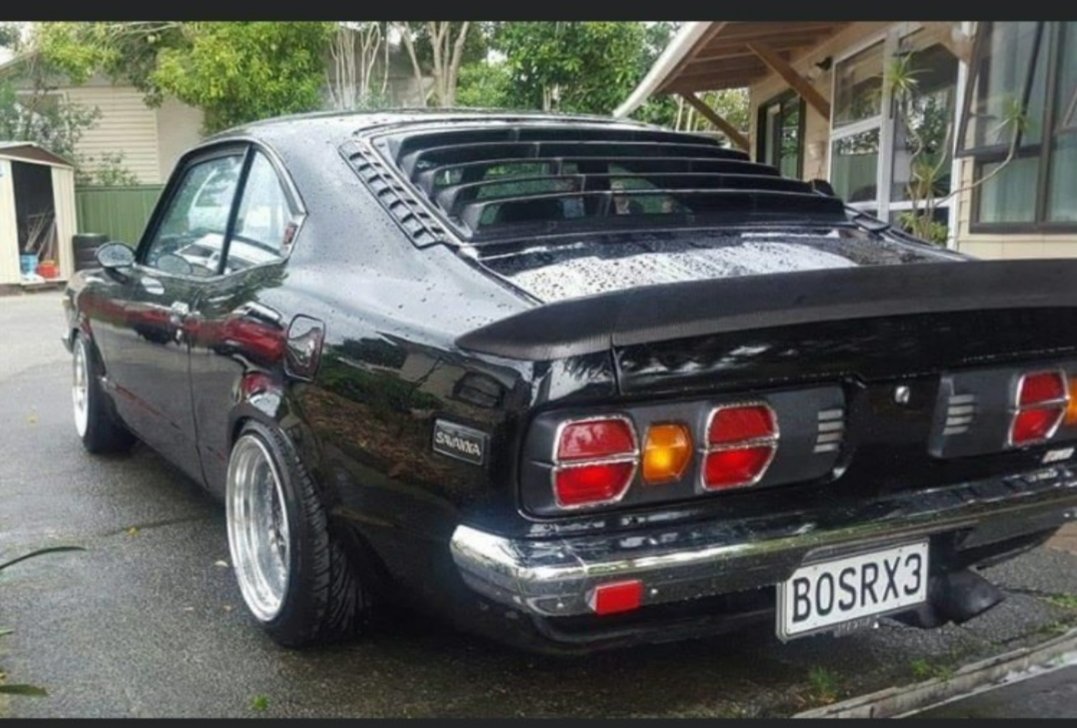
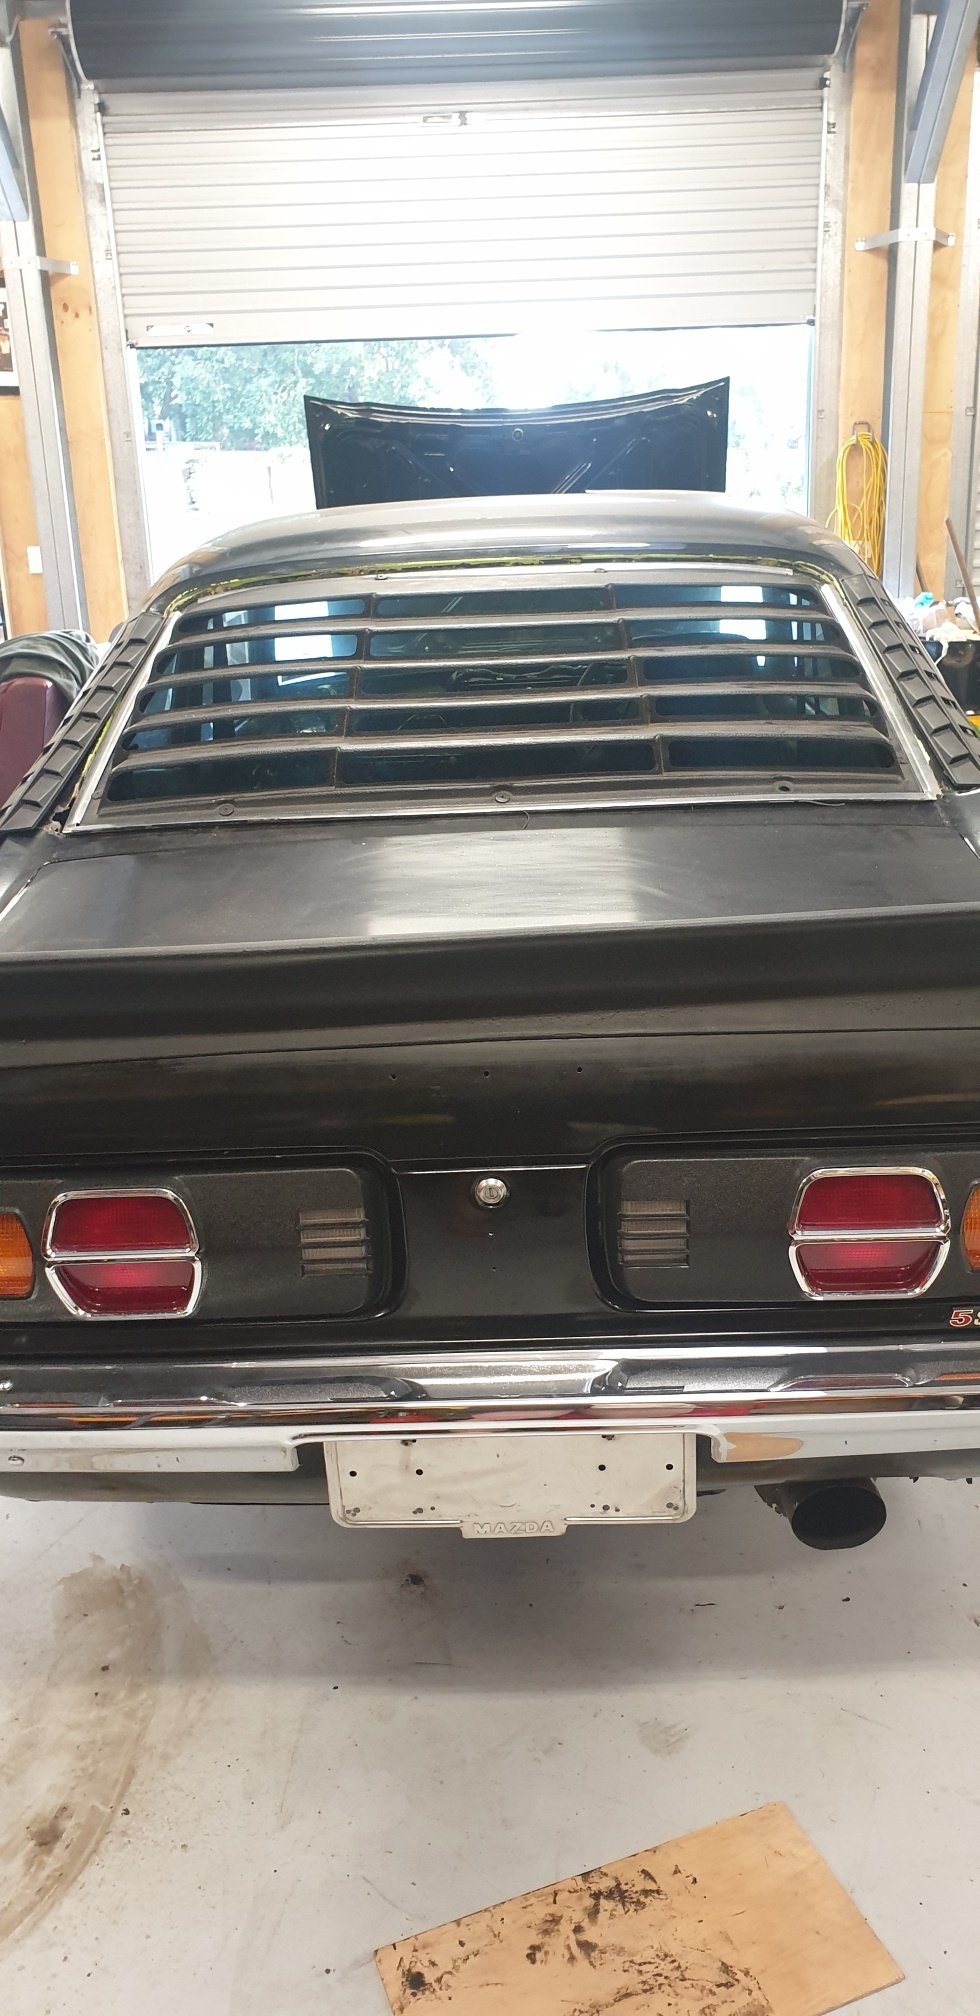
Few bits and pieces sorted in the last week, Scored a set of louvers for it, got sent a photo of it previously when it had them before flares, looked good so grabbed them for a rainy day( will see if i run them with the flares or not yet) Also had a mate repaint the gauge surrounds as i sanded off the black to find the factory silver had been sanded off so didnt have much choice but to repaint it so it was tidy. While he was there got him to repaint the dash topper black. @64valiant has the dash topper for retrimming at the moment, soon as i have that it can go back together. Booked in to go to rust repairs this weekend, I also booked it into Chrome Expression Session so time to get shit moving and get it there haha. Next 4 or 5 weeks going to be all go!!
2 points
-
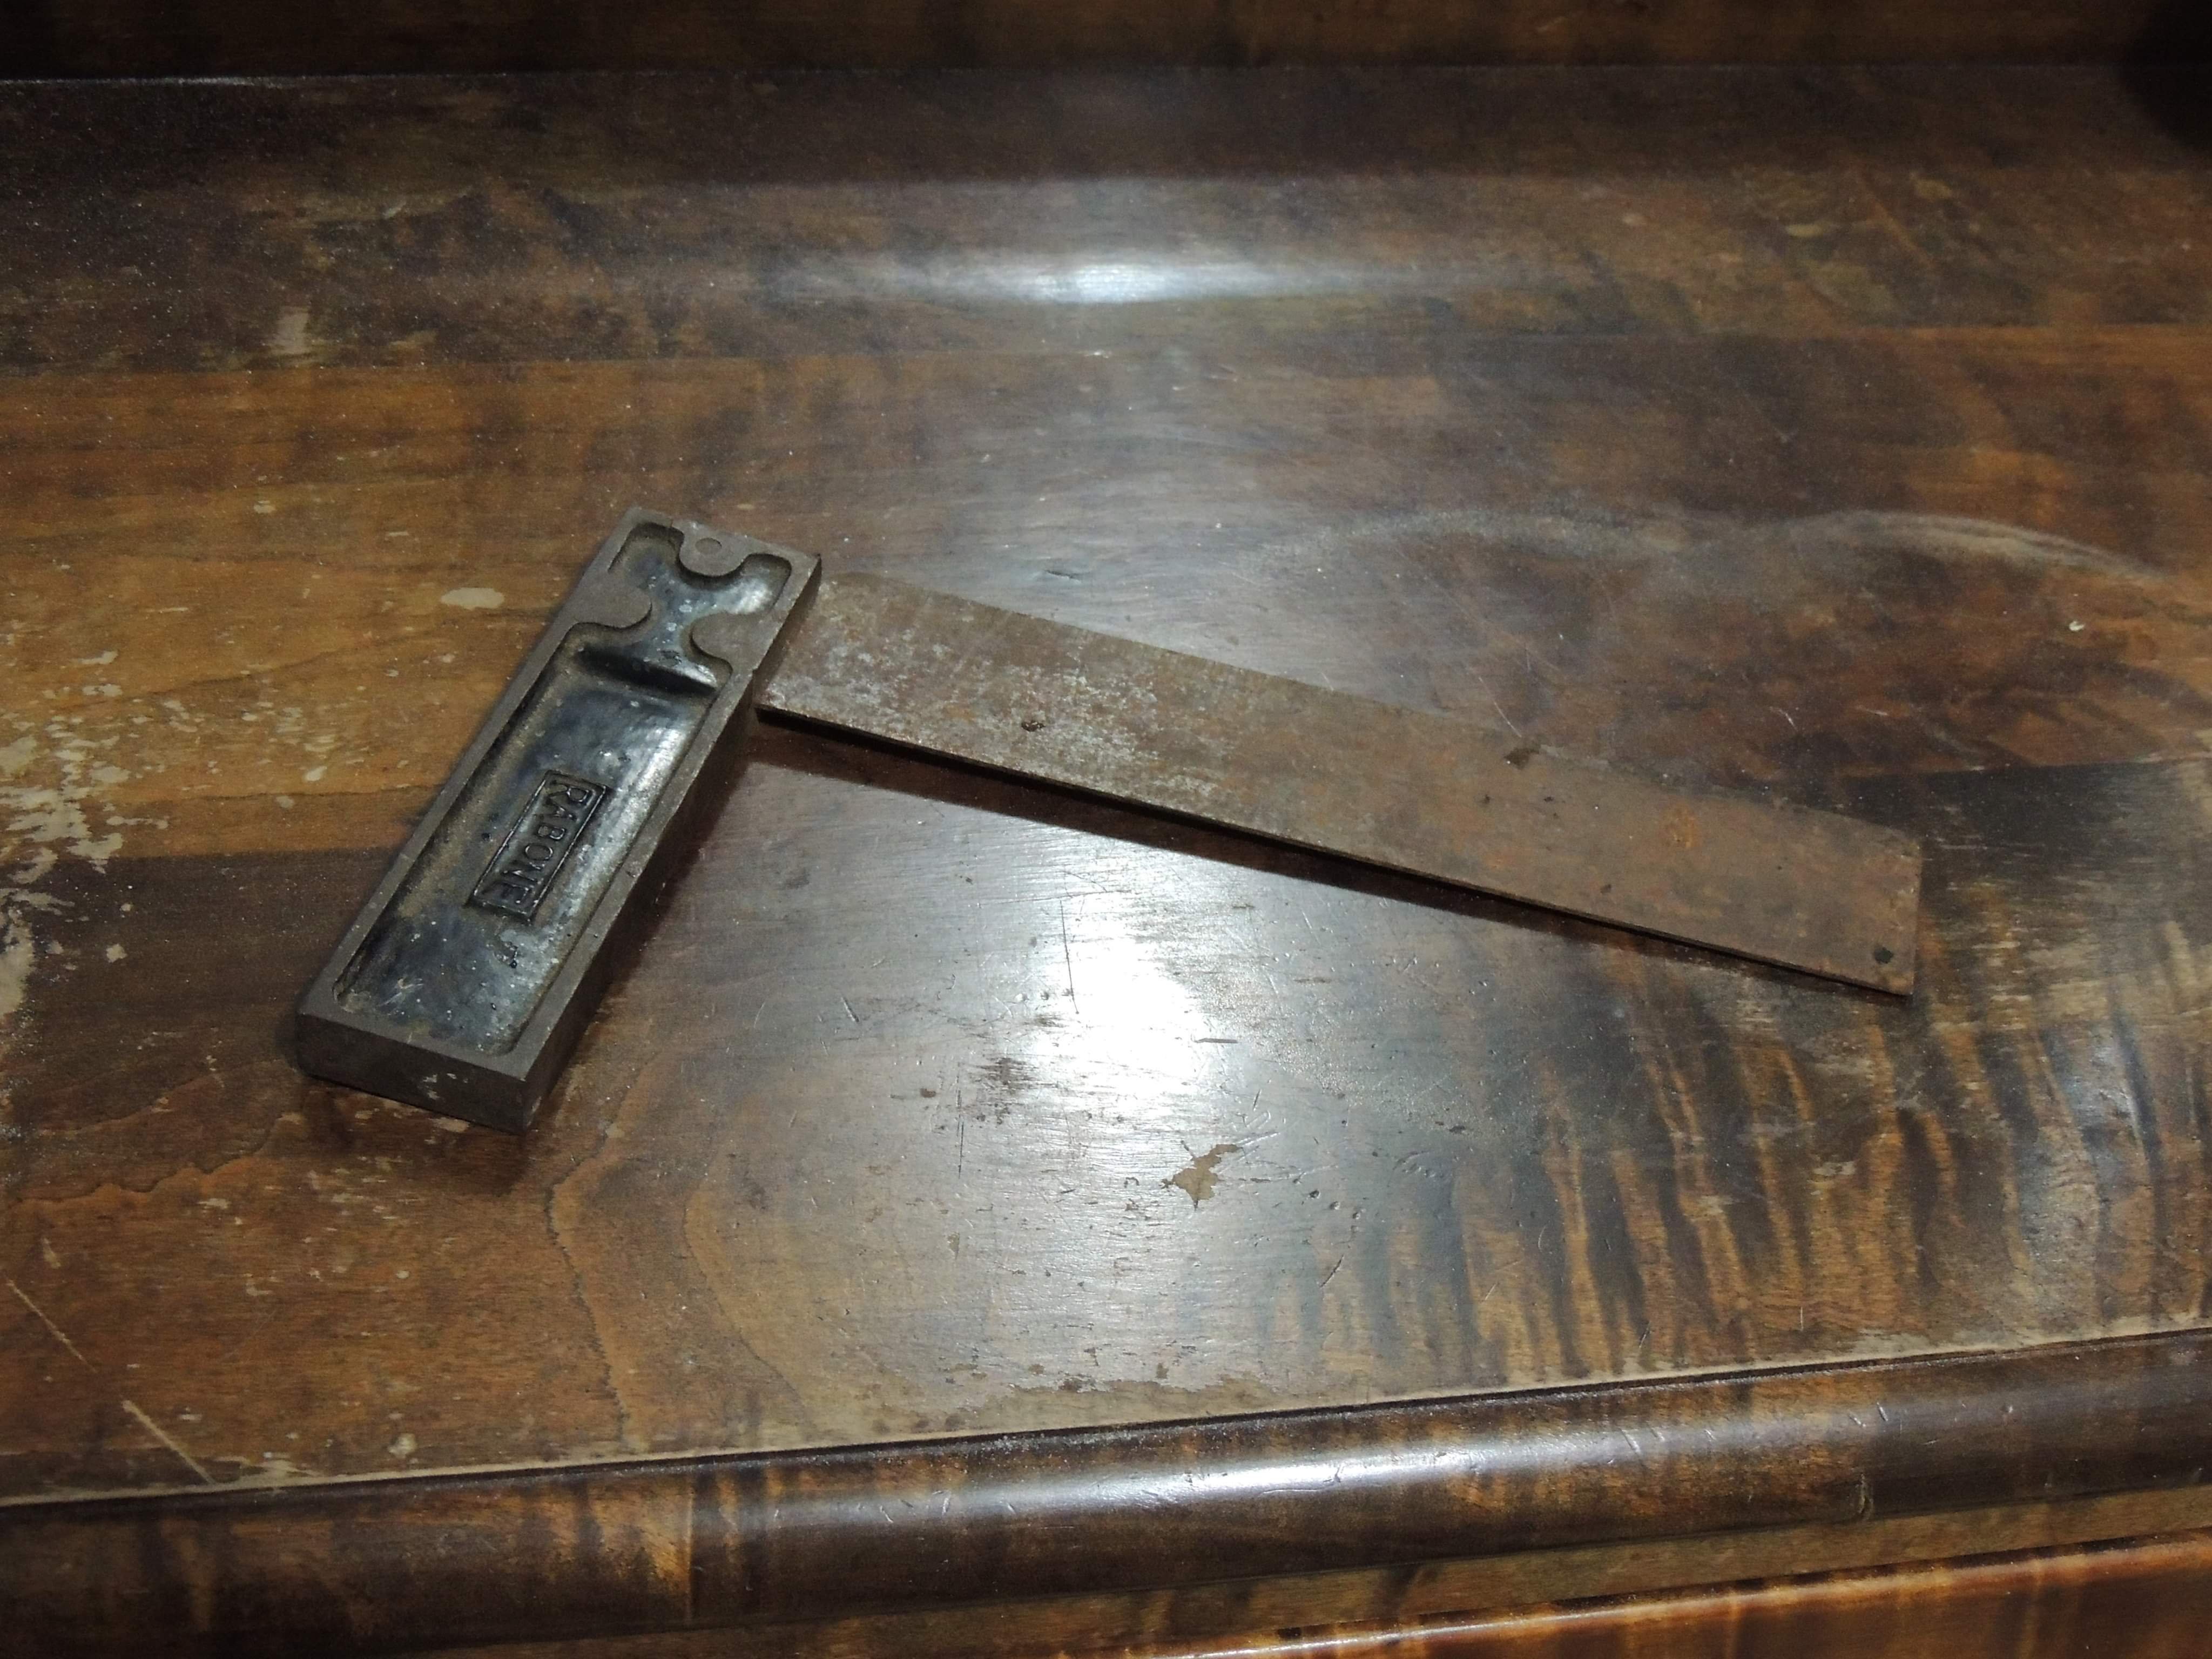
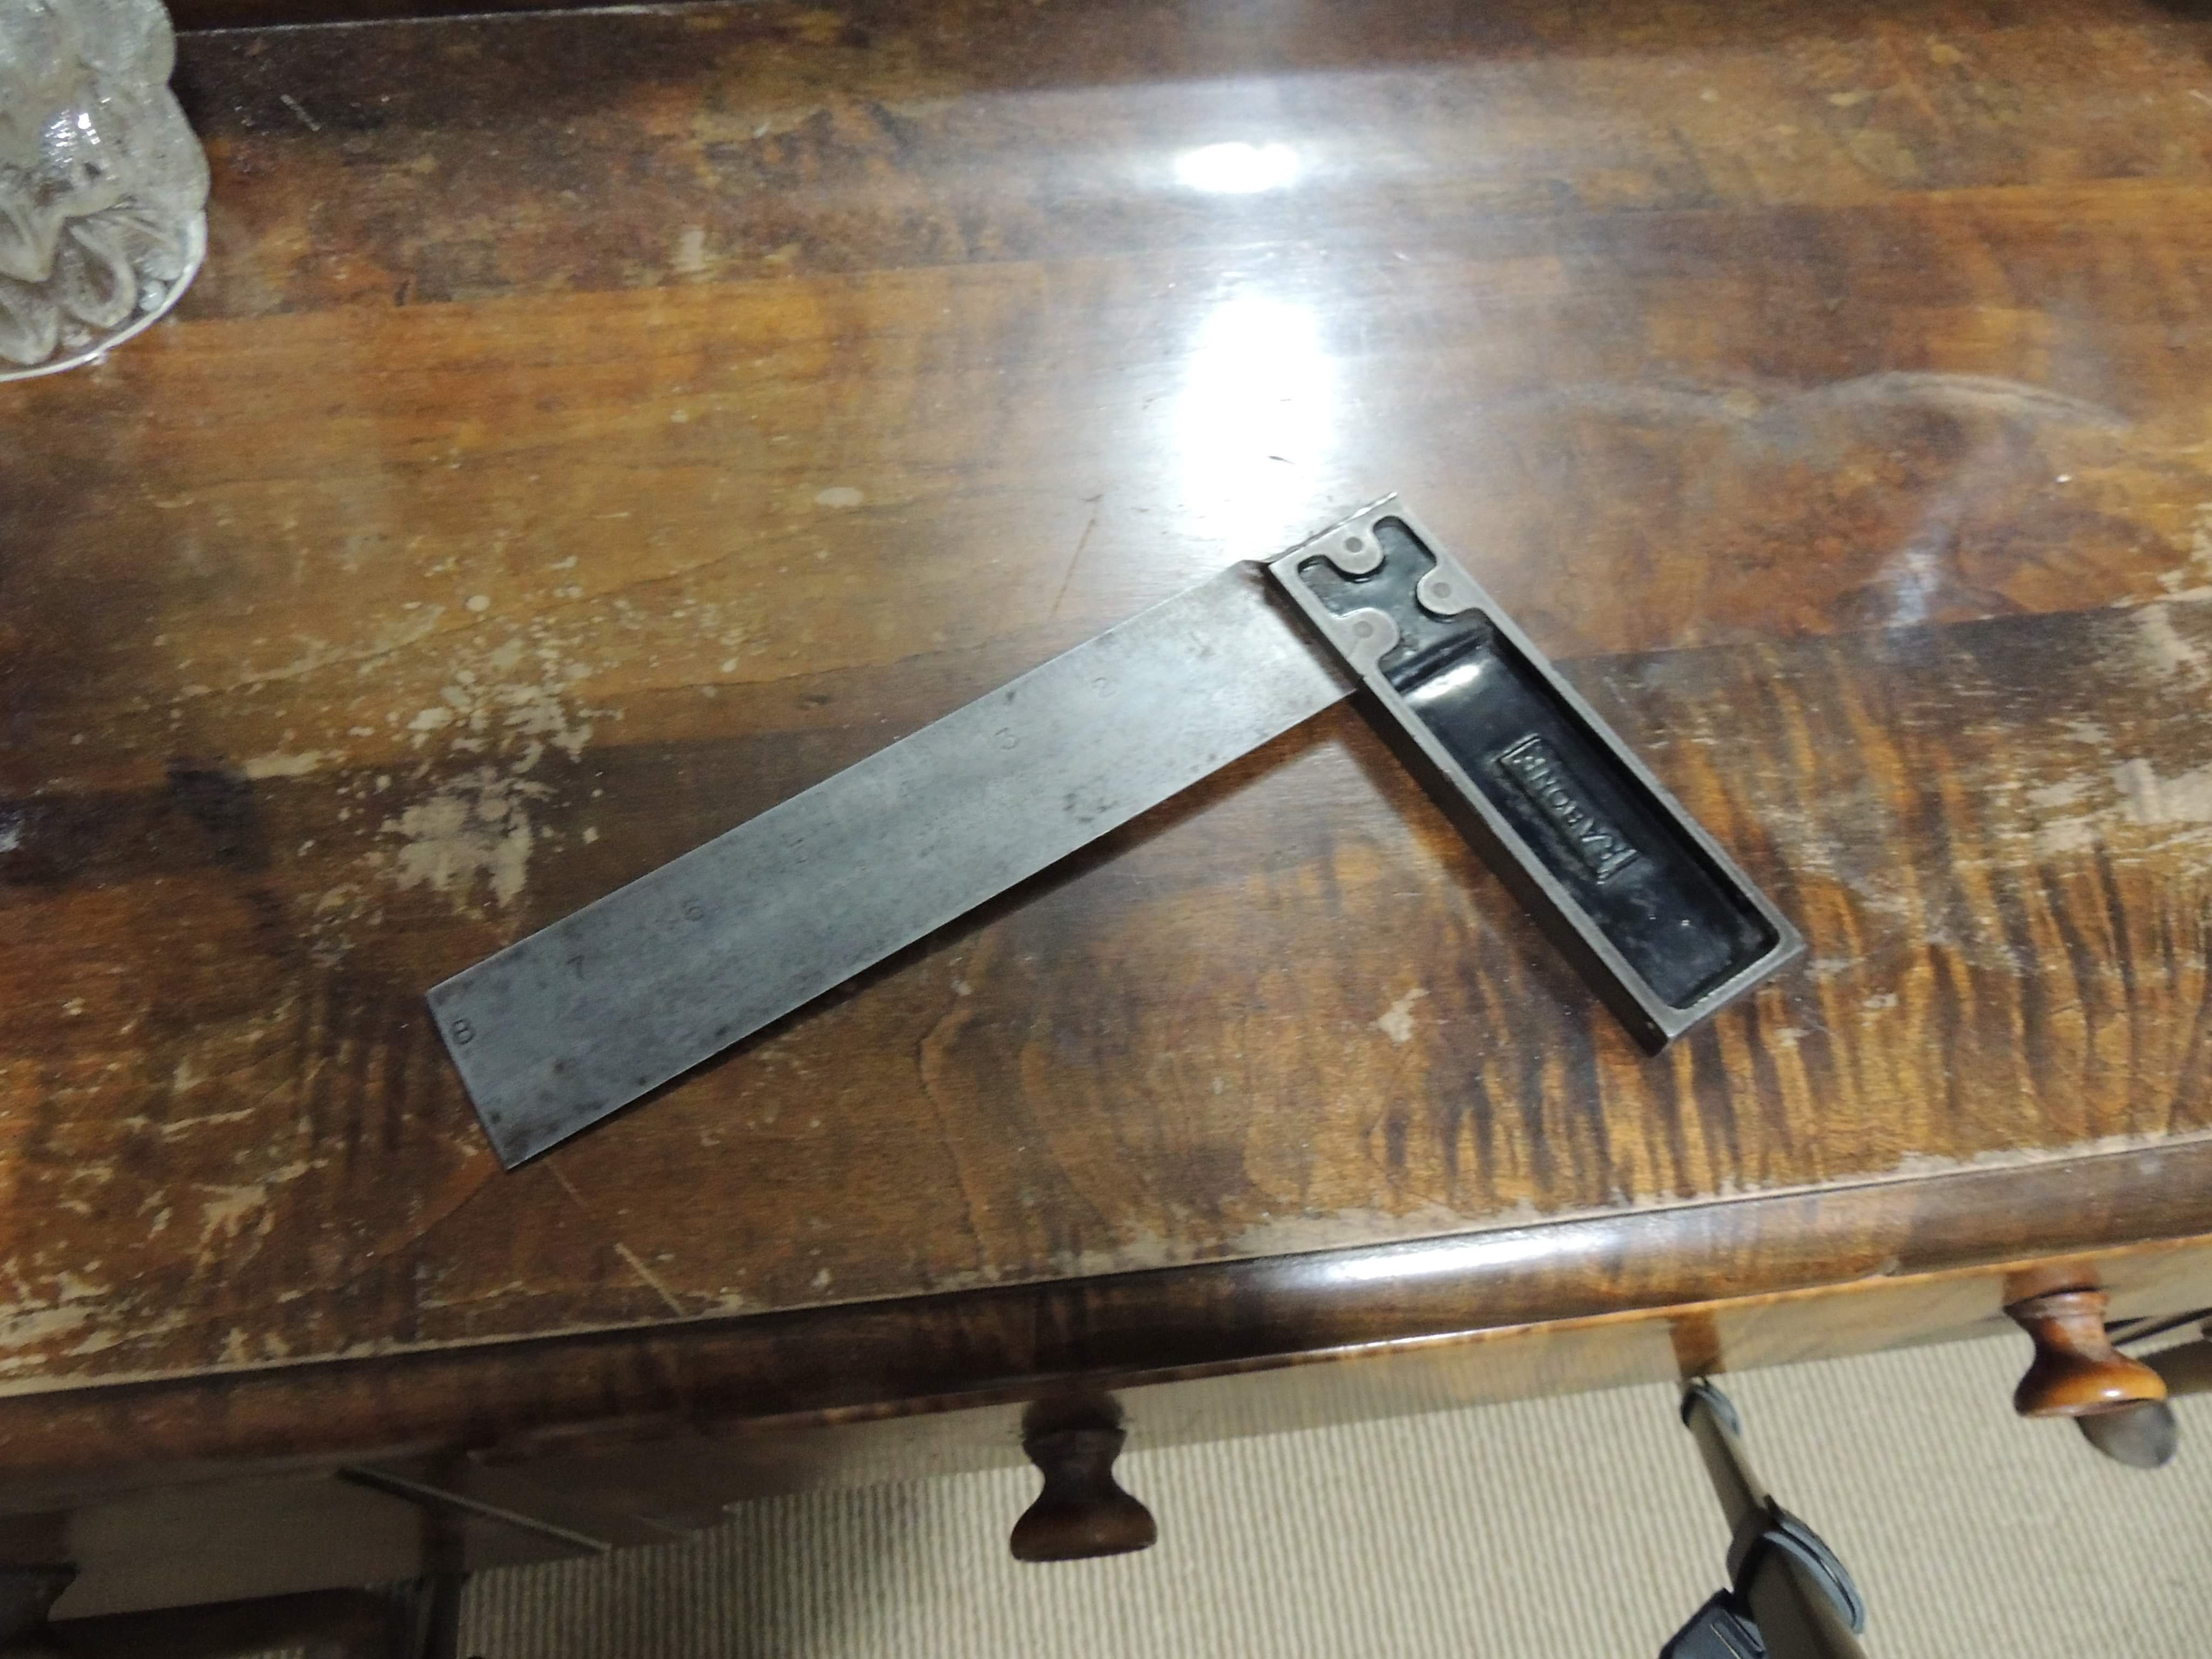
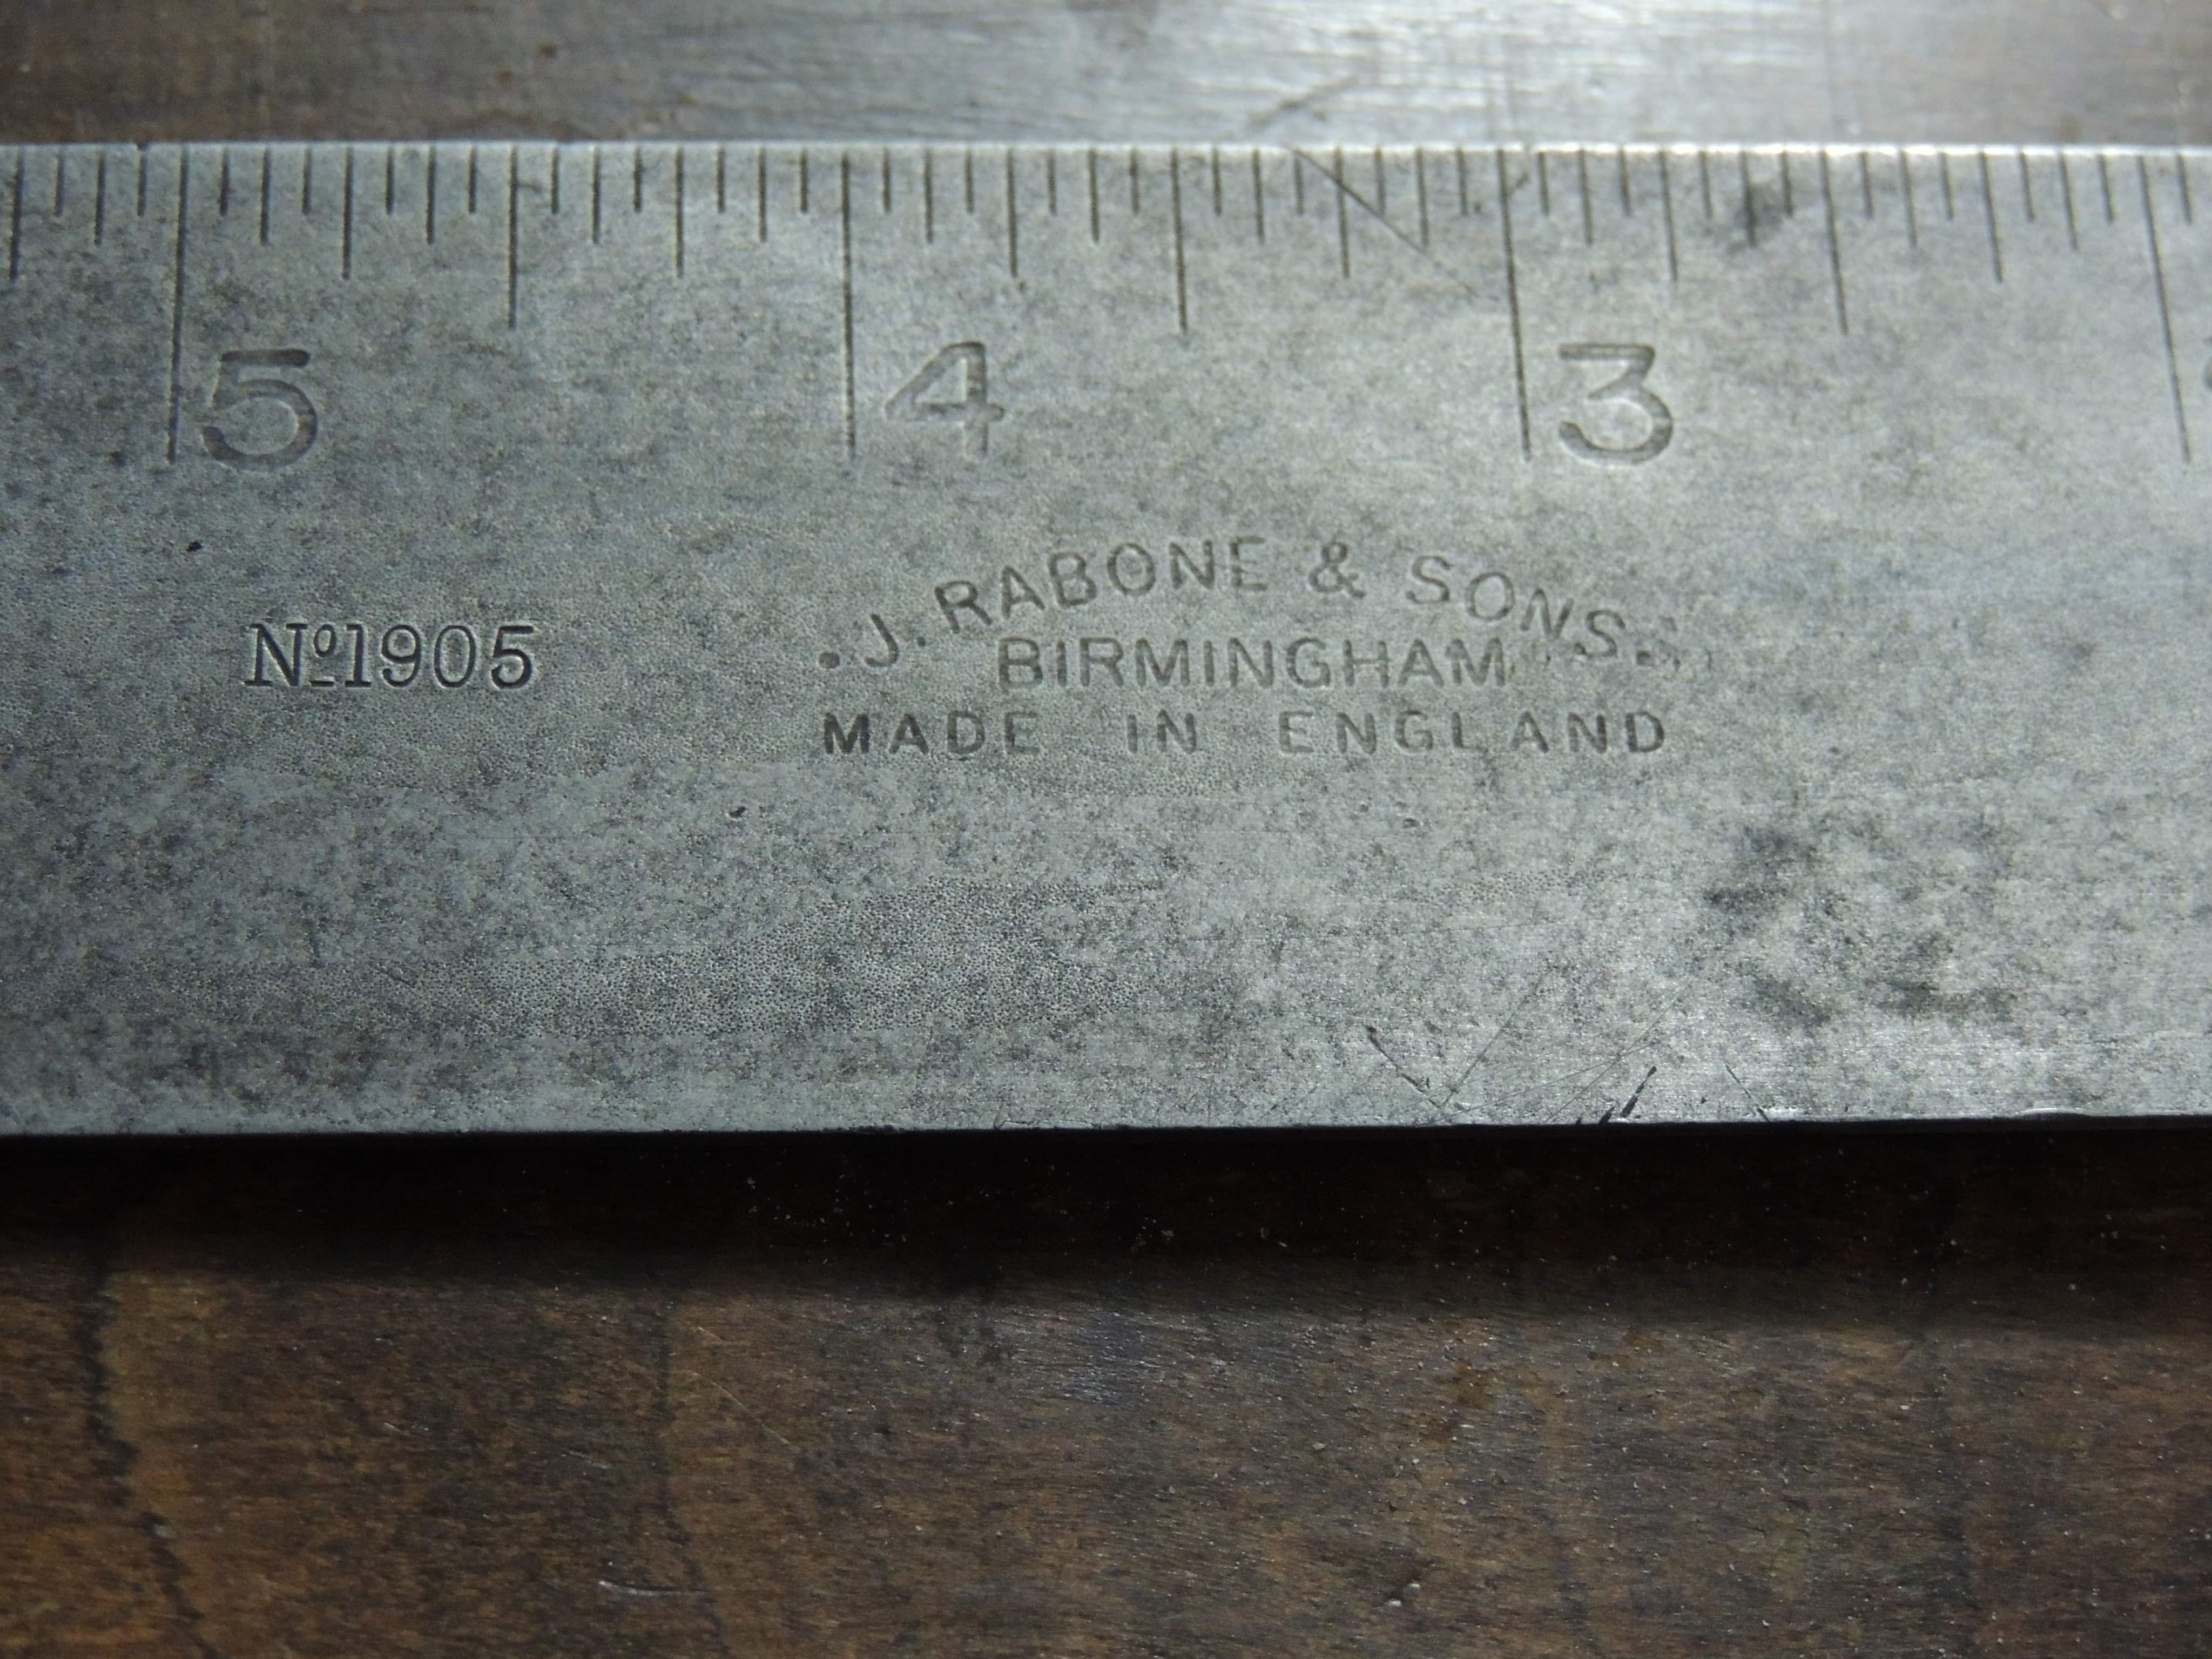
I bought this and a trowel today for $3 . Didnt expect much but it had weight to it. An hr with some wet and dry and it turns out its got some age and was a good make in the good old days. 'Rabone no1905 8". '
2 points
-
I chipped away at the rad piping and associated stuff this week, and finally kicked the old bitch into life on Saturday morning for some functional tests. The setup appears to work better than before, the return pipe is noticeably cooler than the out, and it didn't get hot enough to kick the fan in although I let it idle for quite a while after getting it up to temp. This is positive. During the week I swapped out the locking hubs on the y60 axles, these had some nice manual lockers, whereas the y61 axles came with some factory auto lockers. I did manualise these though. I also made some mesh guarding for the rad to prevent stone damage. I just tek screwed this on but will replace those with rivnuts when I get around to it. On Saturday morning I picked some rotors up and cracked on with refreshing the swivel hubs. I give them some extra loving apart from the swivel scraper, I replaced the bottom swivel bearing on both as they were a little corroded, plus the main inner axle seals plus the inner hub seals. I washed the wheels bearings out and repacked them, everything looked pretty good otherwise. The axles were on a pallet sitting on some trestles, so after doing the first one I moved the pallet outside to spin it around for better access to the other side. At this point my forklift spat the dummy and stopped working, rather inconveniently sitting halfway out the shed door. I had just topped it up with diesel, and a similar thing happened the last time I topped it up. My guess it there is a whole lot of crap in the bottom of the tank and it sucked up something ugly. This annoyed me considerably. I did eventually get it going but it isn't happy, it will need some more loving I imagine At the time I ended up dragging it out of the way and craning the axles onto the truck deck so I could continue work... The results of the weekends work; Mmm shiny. Next job is to strip and check the calipers, I have some EBC yellowstuff pads on the way, they should be here tomorrow, so it should all be together and ready to go into the truck in a couple of days.2 points
-
Pulled the heads and barrels today.. One very unloved motor.. Guess which one had 0psi.. Ruh Roh.... Somethings missing..
2 points
-
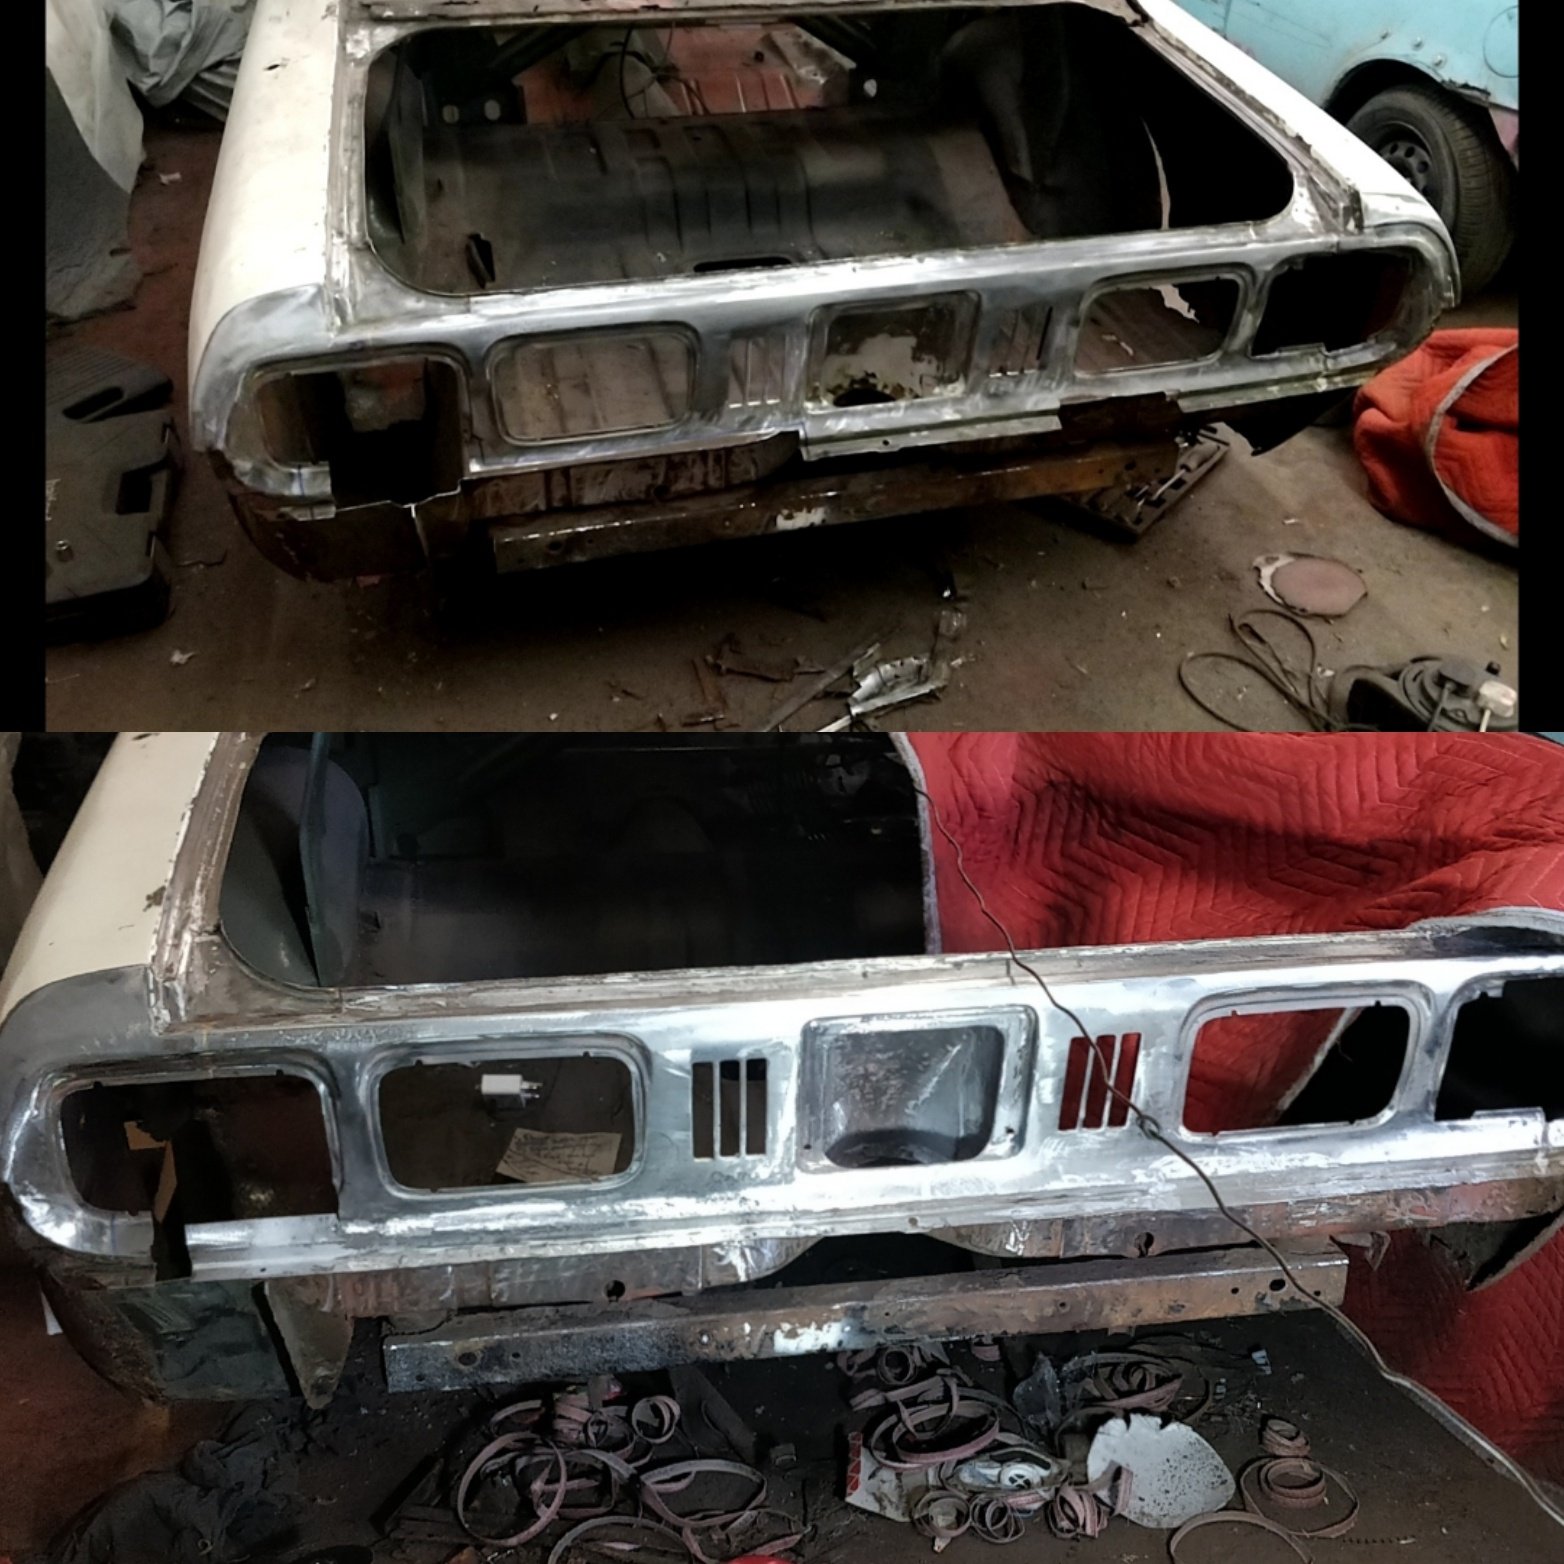
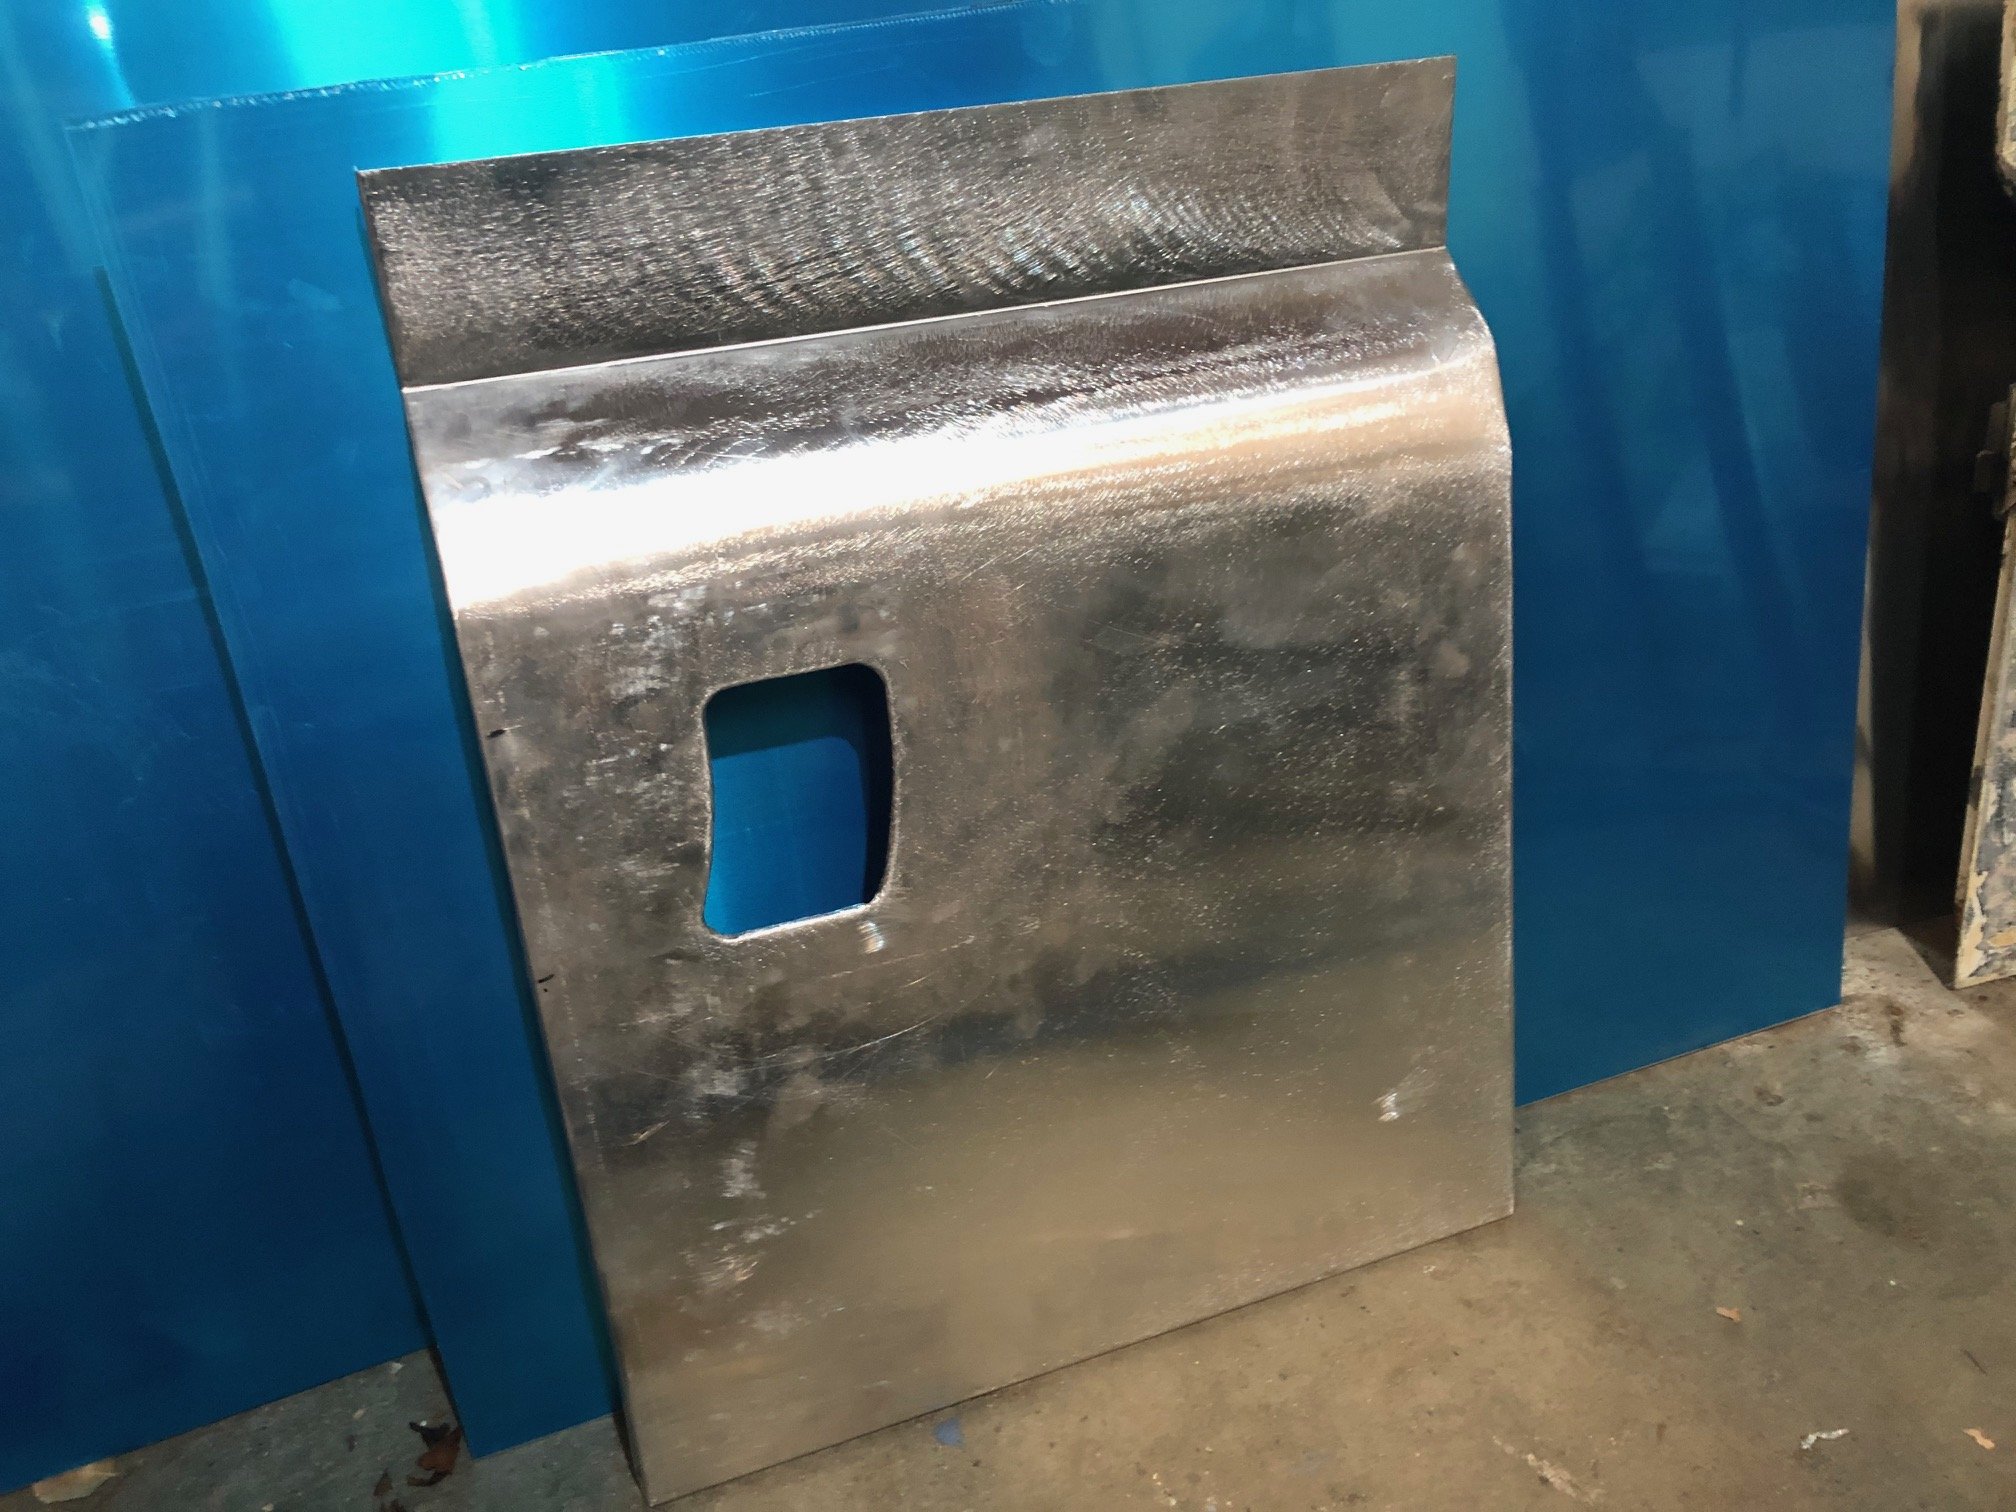
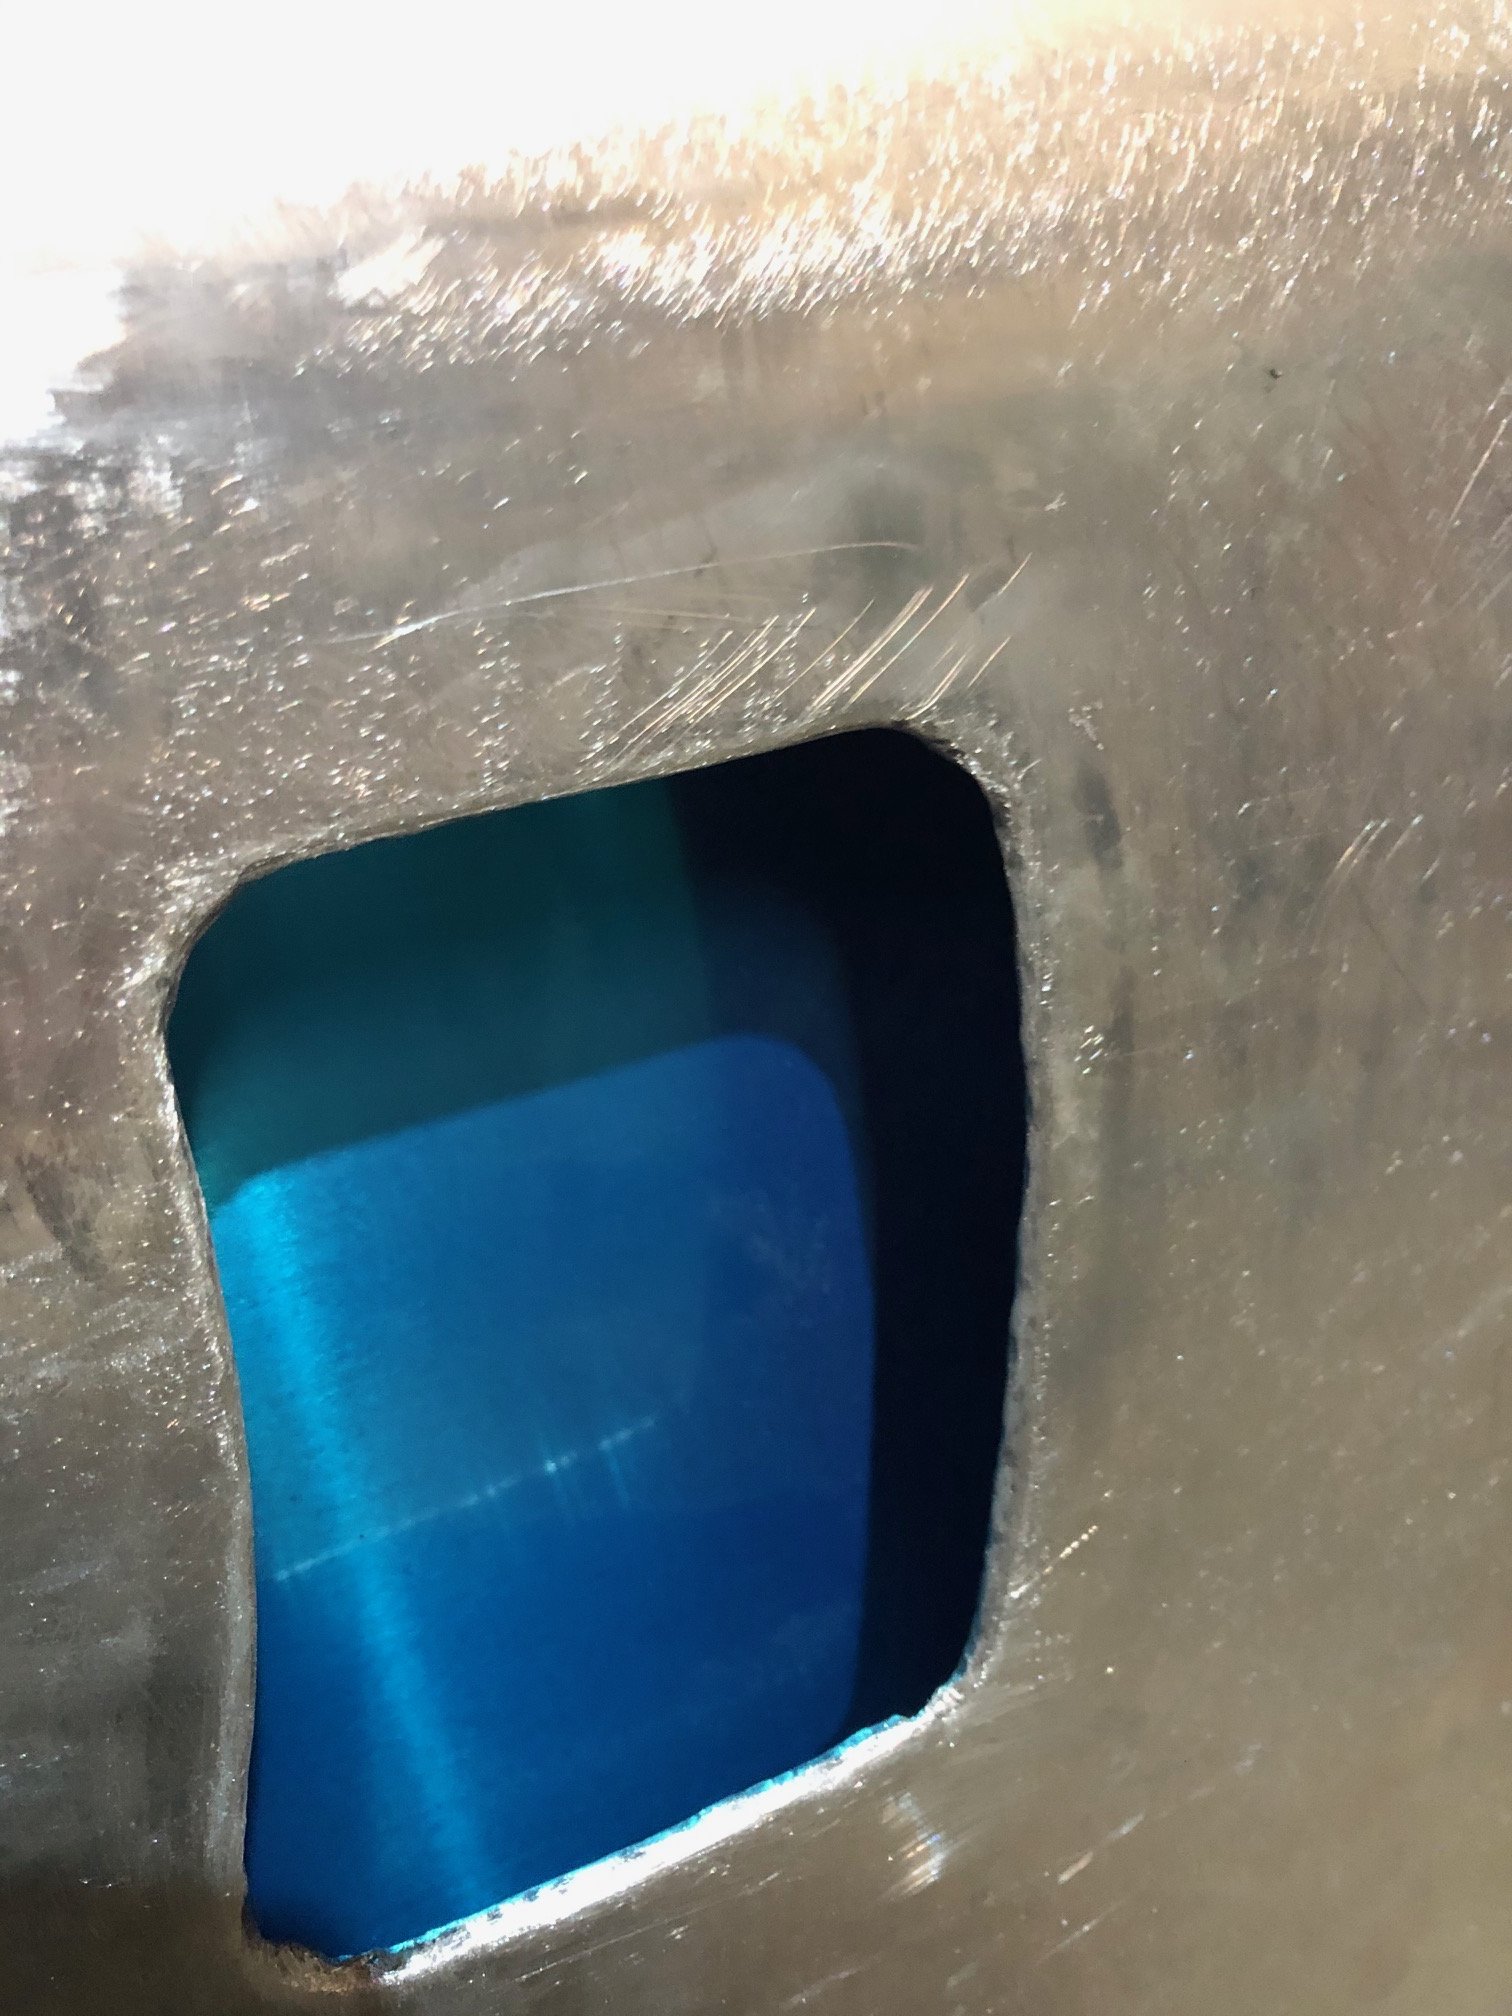
Both back sections of the floor done. Has an exhaust tunnel through it to suit a duel 2" system, should be able to tuck it right up above the chassis rails. Sills and chassis rails are now the lowest point in the middle section of the car. Made a rear strut brace to strengthen the upper shock mounts and to accommodate the extra load of coilovers. Made the exhaust tunnel through the front foot well too. Notched out the crossmember above the diff for clearance. Made a mount for a Wilwood pedal box, need to figure out where to put the reservoirs and move the accelerator pedal over a little. Raised the spare wheel well up 60mm to fit a larger fuel tank. Was a good chance to also drill out the spot welds on that centre mount and tidy up the rust that was forming in between.2 points
-
I would but I'm keeping it, there is something a screwy with it though, can't figure out for the life of me how the spring attaches, so off it comes and I'll stash it for servicing purposes.1 point
-
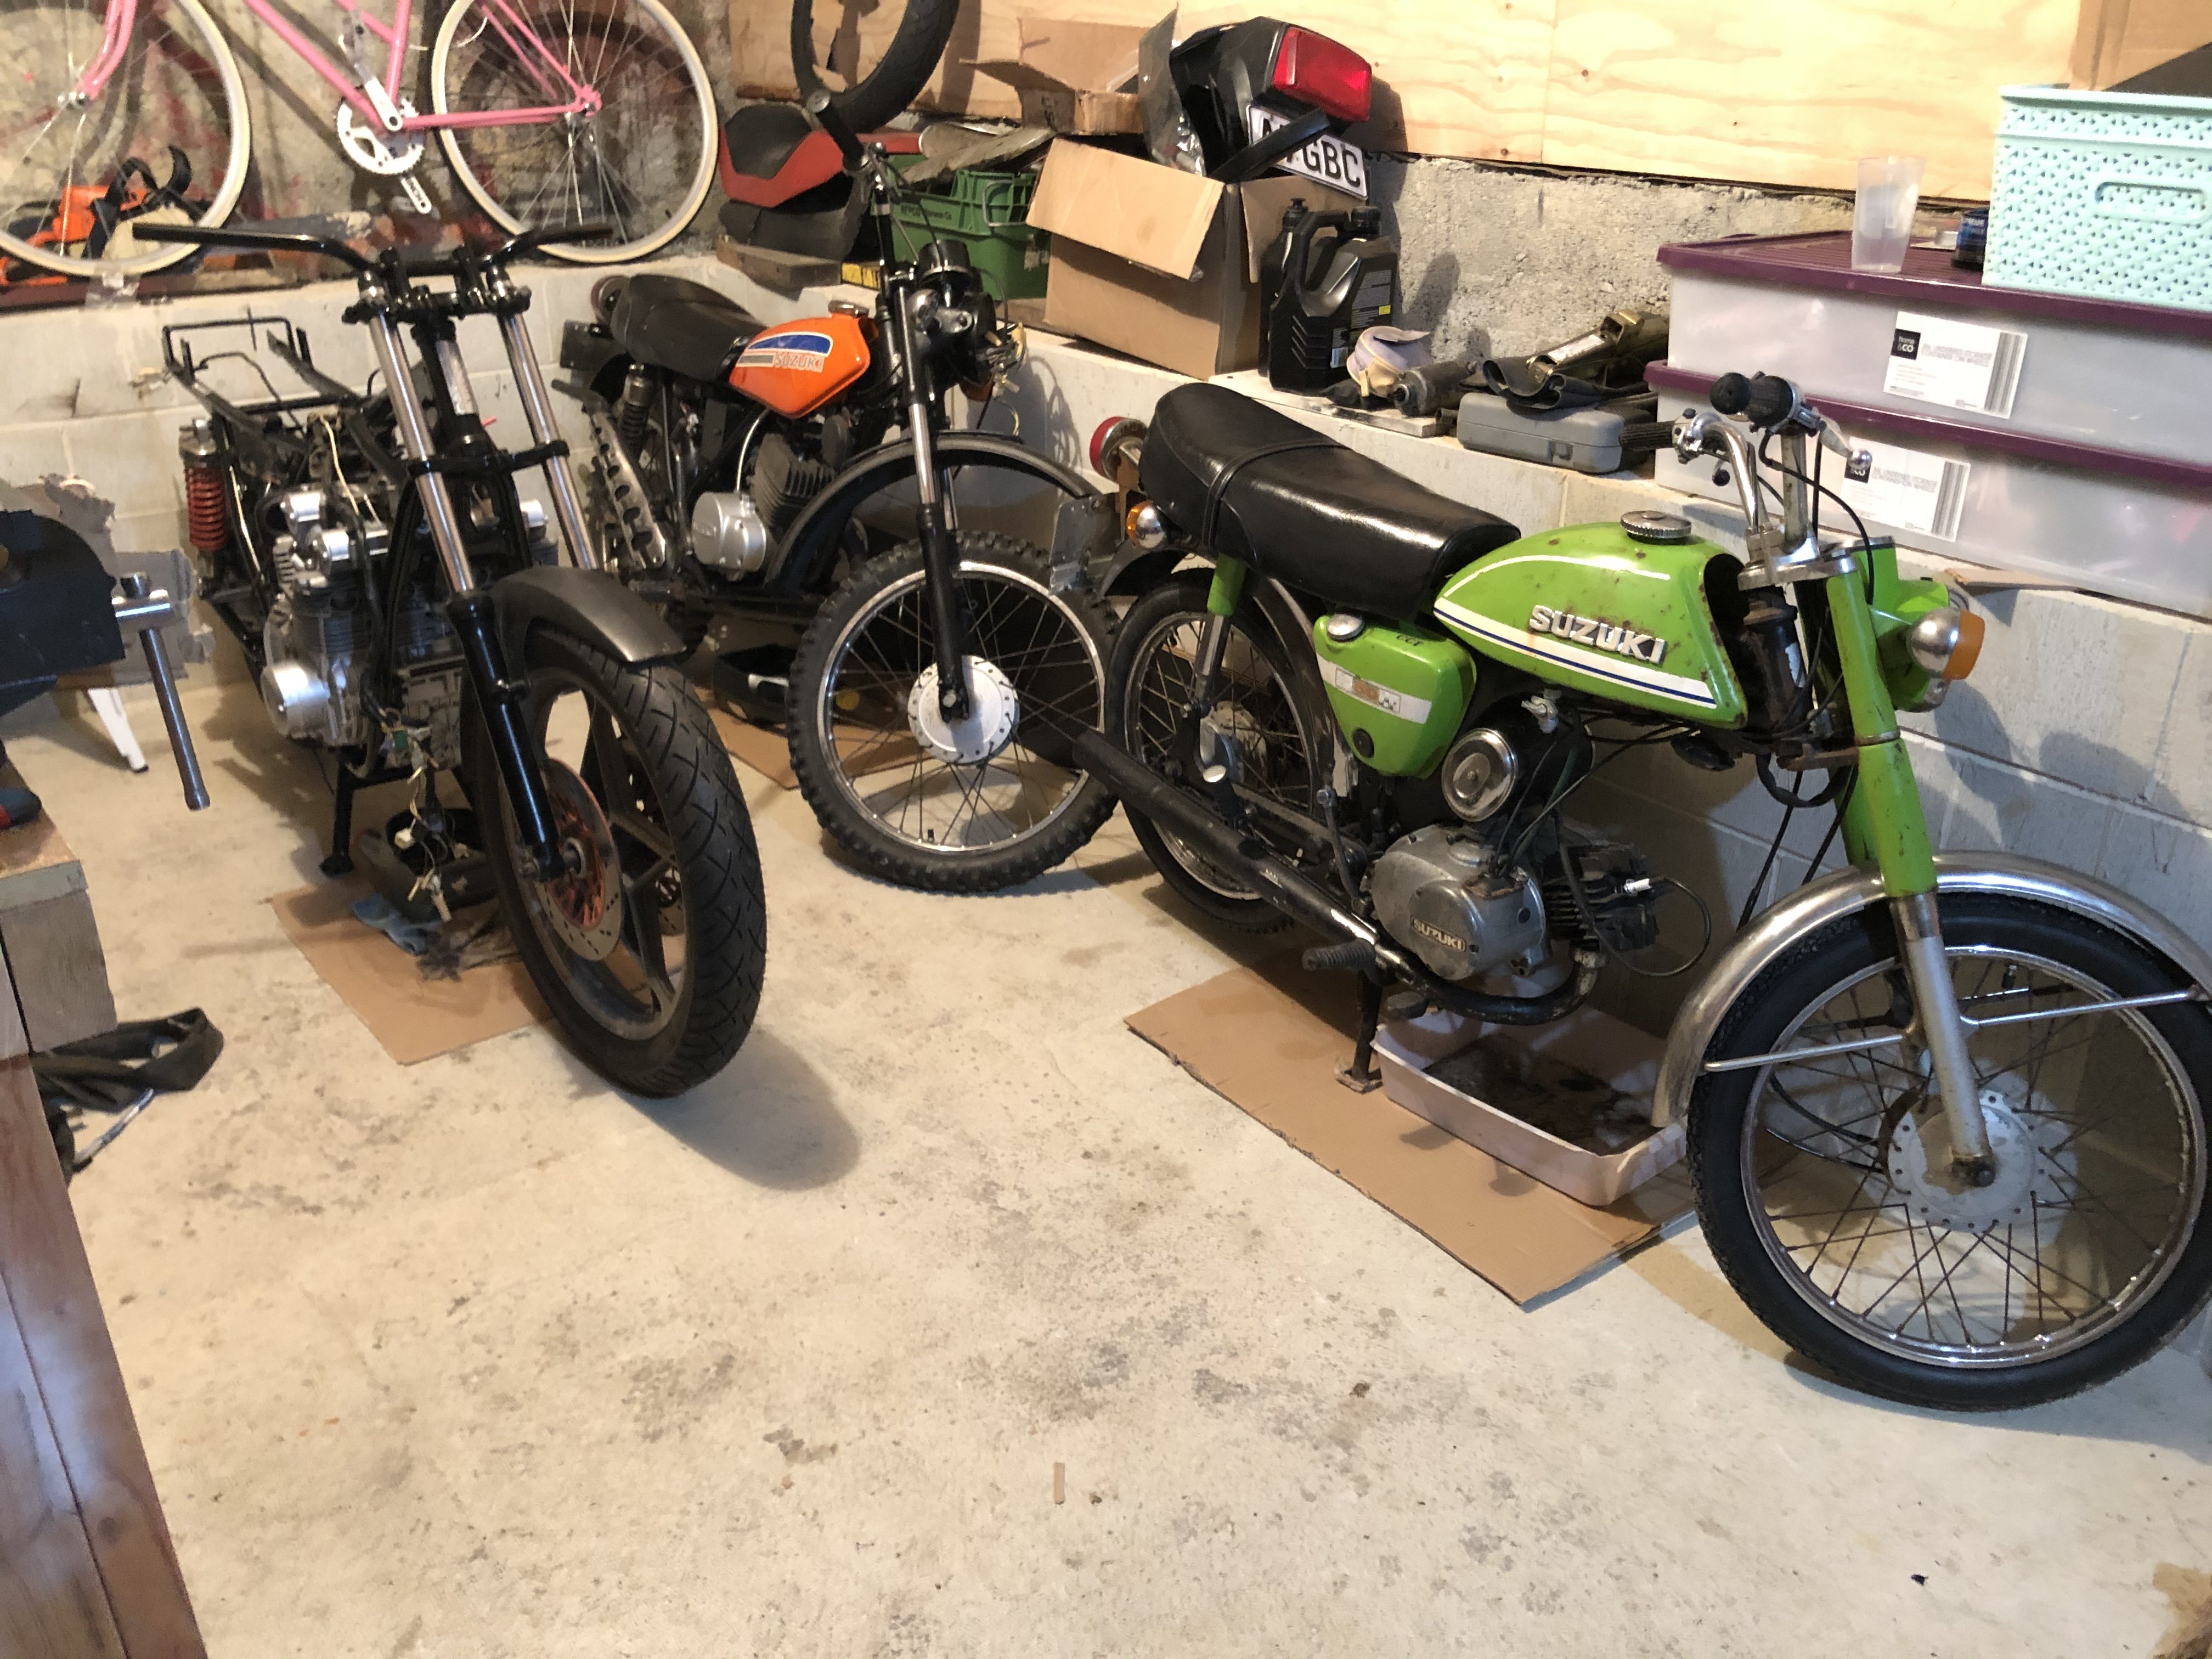
So I’ve been up to fuck all with my bikes. When something gets to hard or doesn’t work I forget about it for a while. Next year my 550 turns 40! and that means cheap rego so I moved around the bikes to make the 550 more accessible and I’ve started bolting bits back on. I want to change the handle bars, I’ve got Hagon shocks for it and I need to rebuild a bunch of stuff to make it more reliable as a daily. Haven’t actually done much but tap out powder coated threads
1 point
-
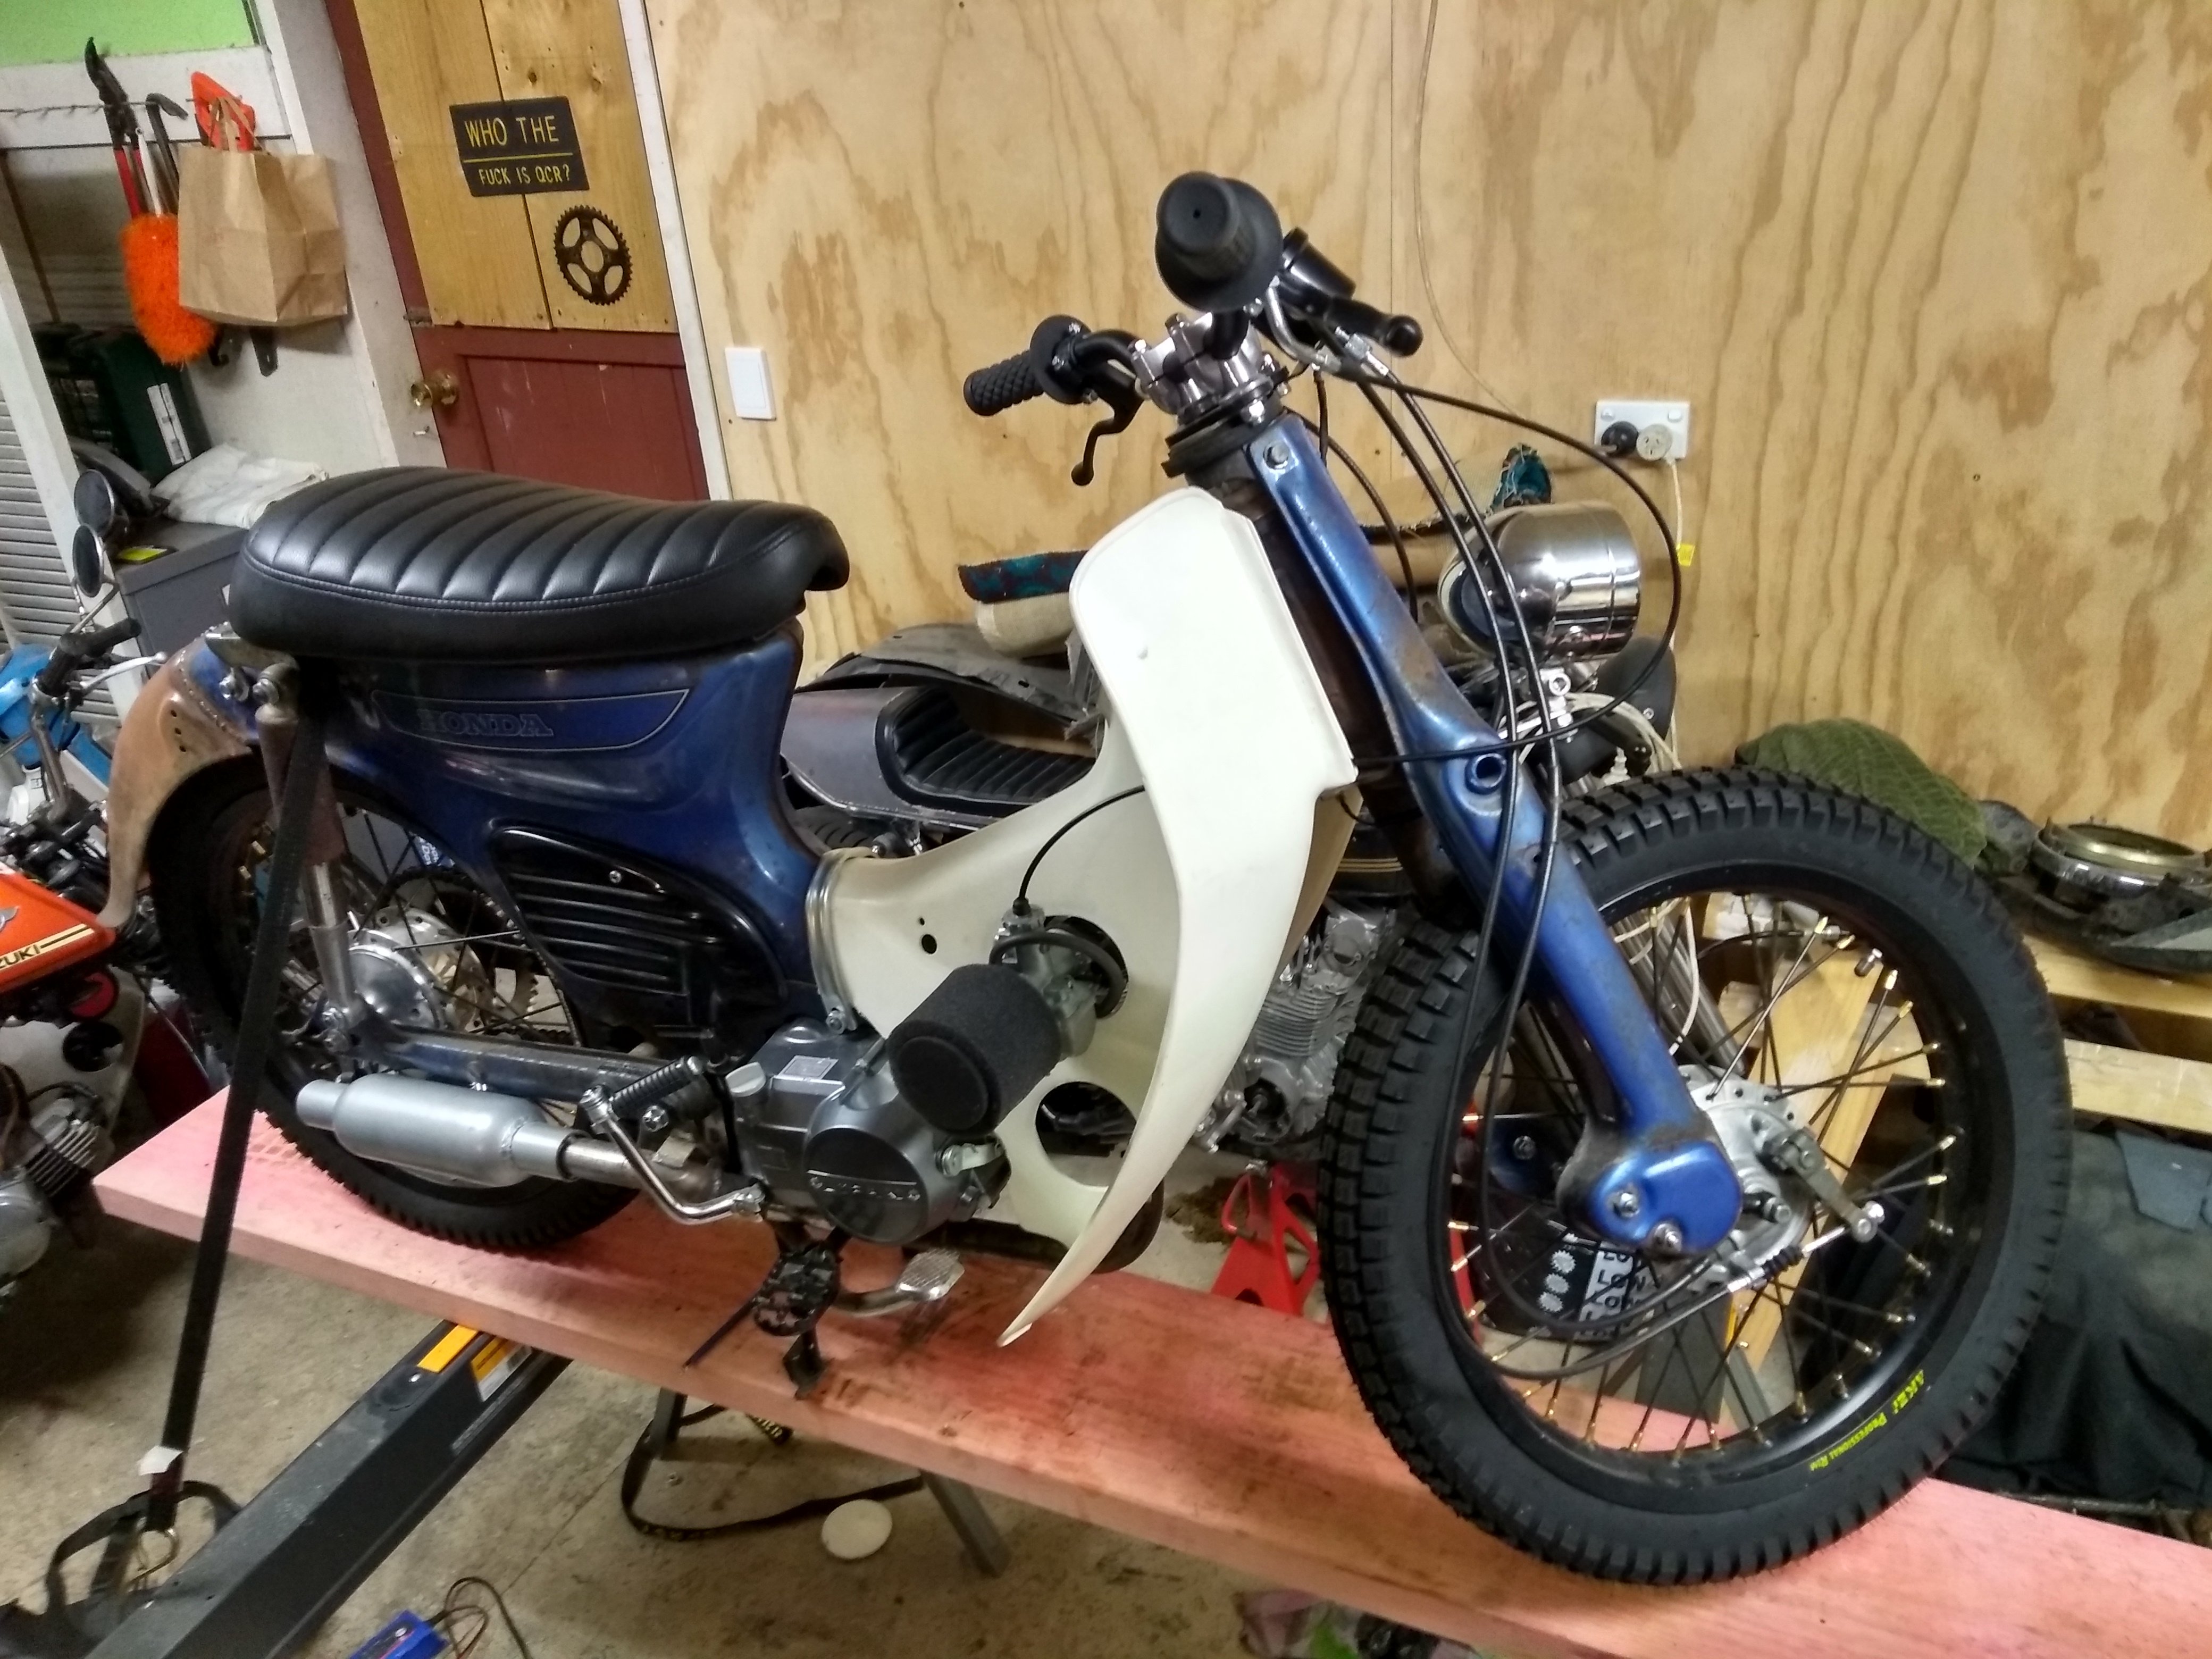
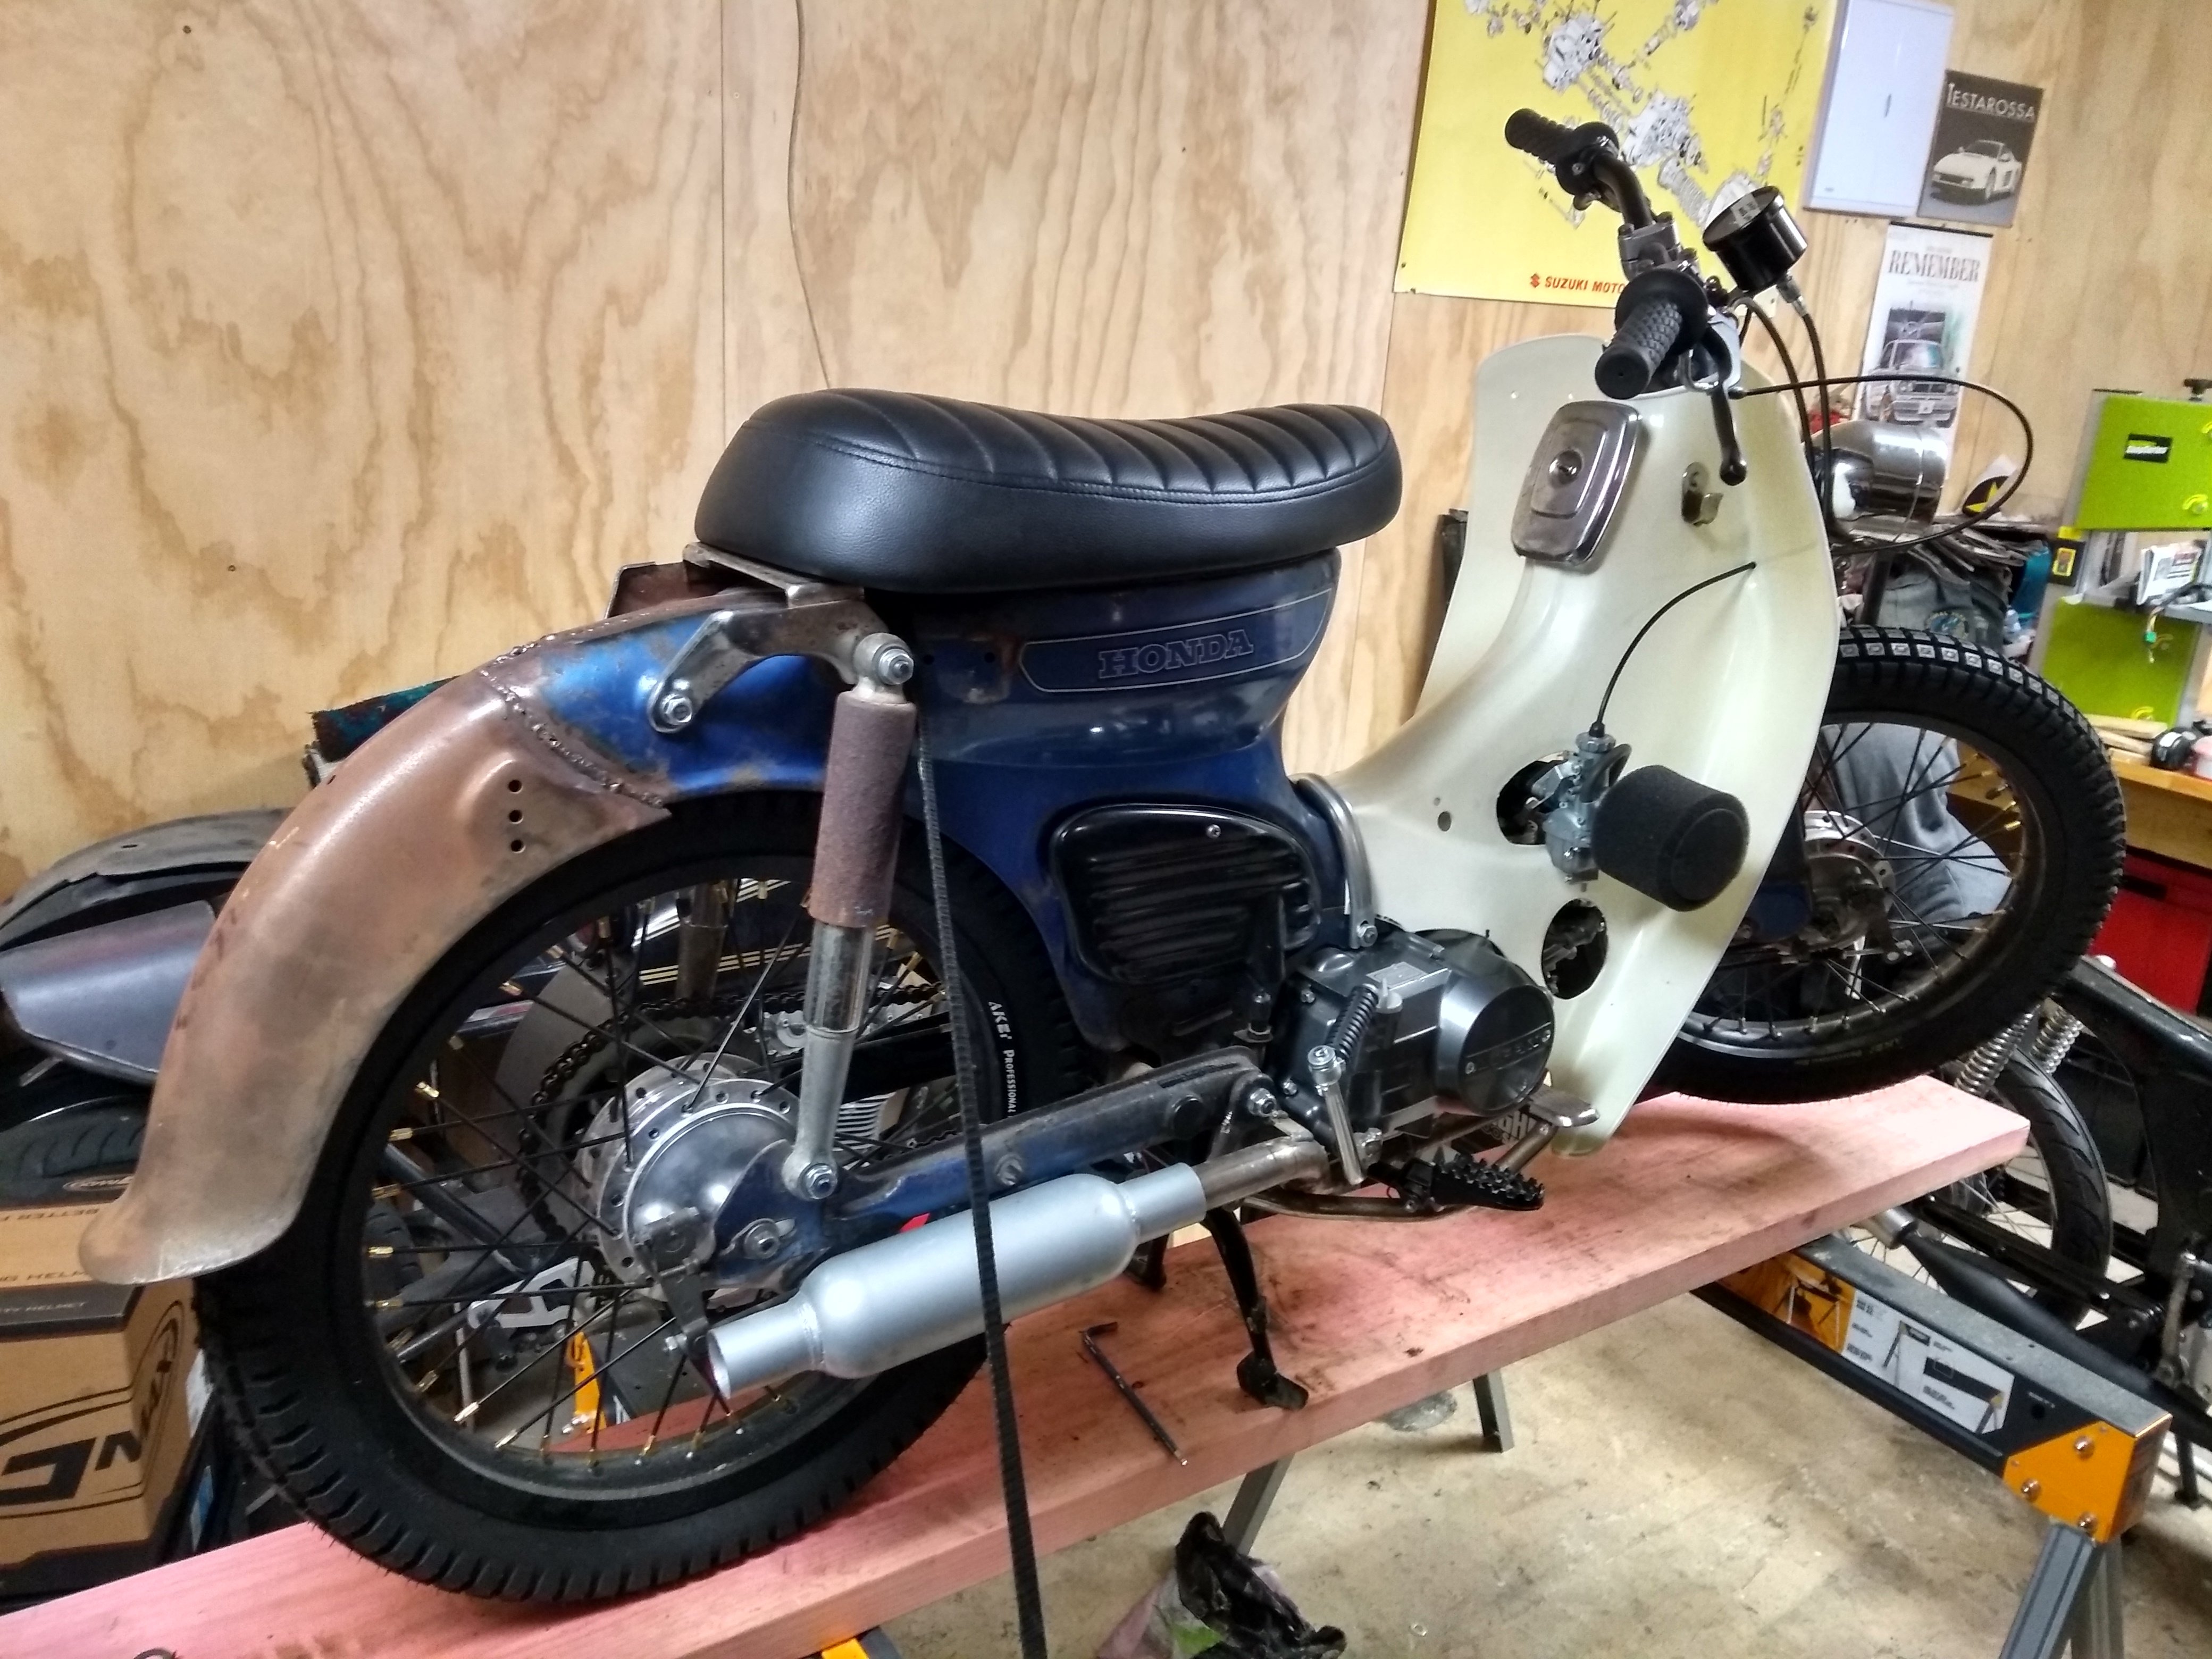
Pretty much ready to roll, need to weld on muffler and lose the centre stand. Then shakedown followed by a bunch of fixes. Thanks a shit tonne to Goat, Seedy and the general peanut gallery who make an appearance each week to encourage me with farts and general wise cracks... PFT After Summer will be the strip down and tidy up, right now I'm going rat-rod spec.
1 point
-
Entrants, as of 30-06-2020 9:26pm @johnnyfive Daniel, aka Ruckus guy, aka Grom guy. @GuyWithAviators @UTERUS @MopedNZ @TimShadboltfan27 Shannon D Daniel W @Shakotom @Threeonthetree @Tumeke Brudda @Tumeke @keltik @Vintage Grumble @Truenotch @Mr Vapour @tortron @WankBankA100 @BLIZZO @anglia4 @mark105 @RUNAMUCK @Duke Blackwood @HighLUX @Mitch.W @Beaver @00quattro00 Bucket Barry on bike @MaxPower (Vehicle) @rumrum @slacker.cam @sentra @Dolan @Itchybear @Deliboylurker @Kass @Chunky_t @Thphantum (vehicle)1 point
-
He tried to sell me everything "just drop your manifold off and we'll do the rest" I stopped listening when he was rattling off prices and it went past the $1000 mark plus gst. Based on the 'they are shit but buy our new stuff' response I'd avoid them as much as possible tbh1 point
-
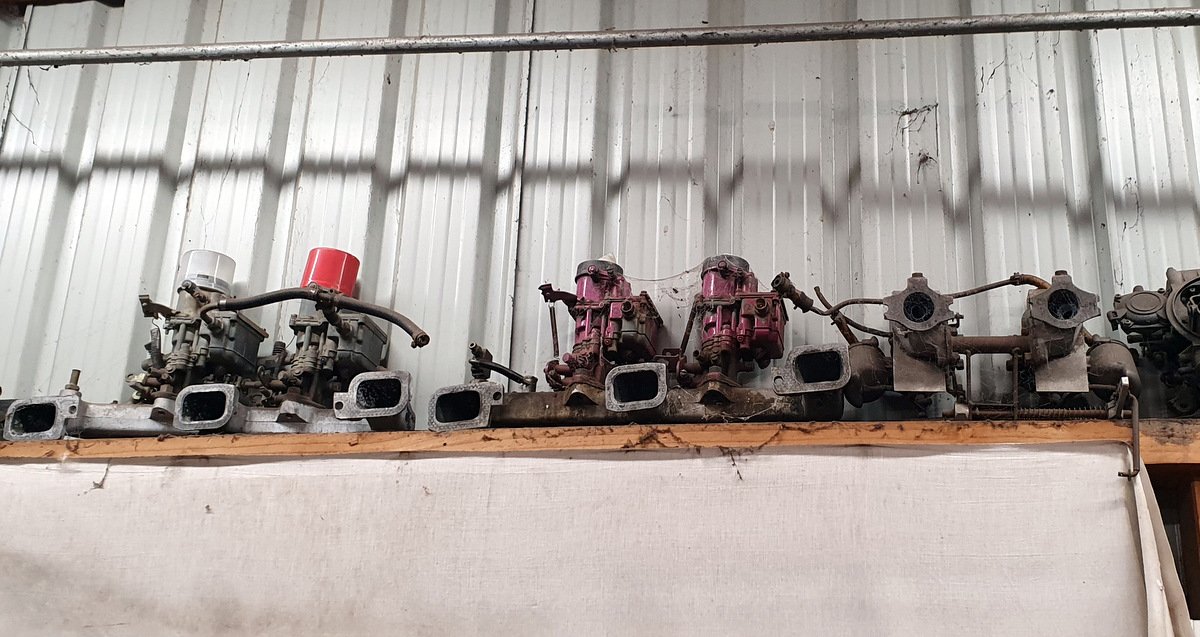
All I took away form him was only interested in selling me a new carb and some other expensive adapter and water line kit for the manifold They also sell a rebuild kit for the 34 adm if they were as shit as they say why do they stock parks for them.... I've found nothing but good reviews about the 34adm in my research It can't be worse than the single barrel stromberg that I took off1 point
-
Twins FTW Strombergs or SU's of course /ling
1 point
-
All I took away form him was only interested in selling me a new carb and some other expensive adapter and water line kit for the manifold They also sell a rebuild kit for the 34 adm if they were as shit as they say why do they stock parks for them.... I've found nothing but good reviews about the 34adm in my research It can't be worse than the single barrel stromberg that I took off1 point
-
Epic thread. I've jumped around in here randomly reading some pages before, but this morning I finally read it from start to finish...so cool!1 point
-
So turns out this thing is allergic to heavy rain. At the end of the first day on last years east cape ride when the heavens opened, it kept dieing and then wouldn't start. (got it going later that night so forgot about it). Then last weekend went on a ride with some dorklanders in the rain and had issues with it cutting out. It was only during the wettest part of the tide, and then later on when it had stopped raining it ran fine. The only things (I can thing of) that are exposed to water/rain/spray are the air filter and the engine head including spark plug and HT lead. I tried riding along with the air filter off in case it was getting soaked but this didn't change anything. Pulling the HT lead off showed a bit of water on the inside of the plug socket, so at this stage I think that's the most likely culprit. its just the OG lifan one, so will try track down a better fitting/sealing one and see if that helps. Anyone thing of anything else I'm missing? The rest of the electronics are tucked up in the body of the bike and no real way to get wet (I think) but will check that. On the basis the bike has been going fine, and was going fine when I started the ride and only started crapping out in the real heavy rain, and then ran fine again after the rain stopped, suggests to be it has to be rain/water related.1 point
-
You're a brave man Rust like that gives me the heebie jeebies1 point
-
Tamed some birds and welded the mufflers on It idles okay but is super rich and backfires Will have a yarn with weber specs at some point and get a idea on what jets I need Yeah she's rich I need to weld up some hangers and wack another flange in so it's easier to remove and refit and weld up a tail pipe1 point
-
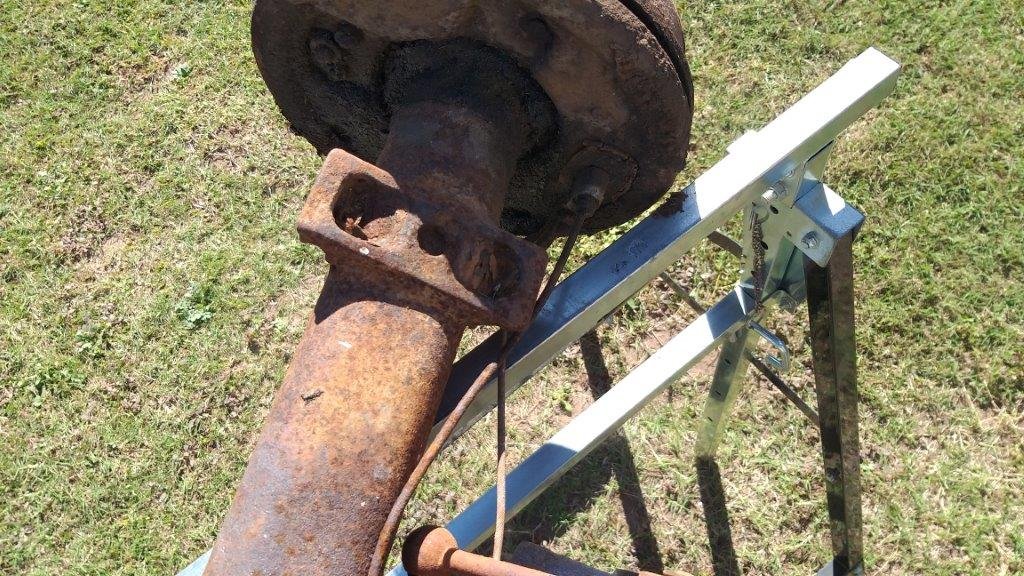
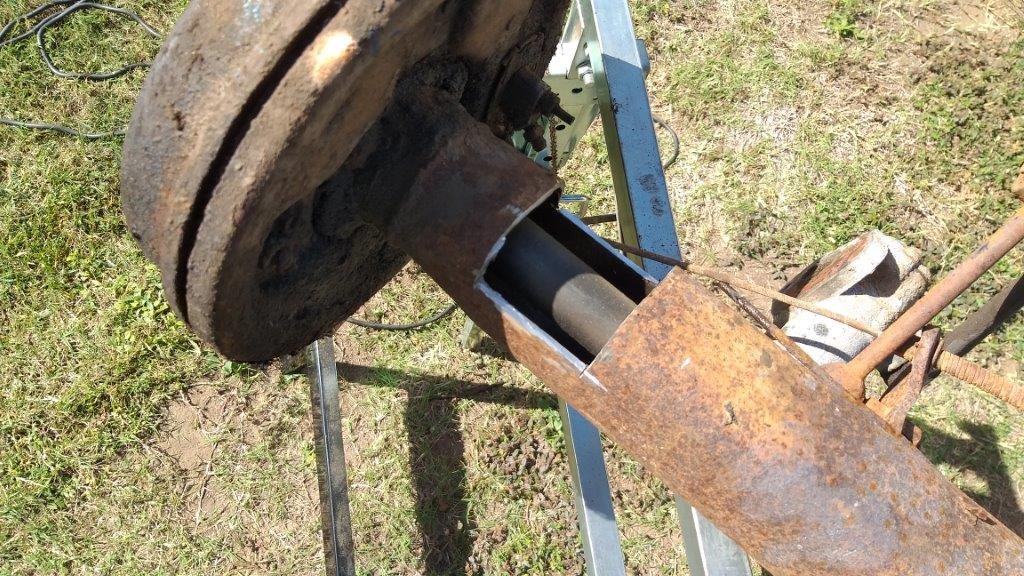
Having set a new direction I started puzzling the next steps. I'm still keen to replace the Thames rear axle with the Toyota. Reasons being greater availability of spares and diff ratios for the Toyota as well as bigger drum brakes. So current thinking is to fit up the diff first and then I can fine tune the front to match by making up some spacers between my newly fabricated front beam mounting brackets and the beam itself. Getting the front beam further away from the chassis gives me the added advantage of dropping the engine and gearbox lower to the ground which not only buys me a lower centre of gravity, but also gives me more clearance between the chassis rail and my clutch slave cylinder which up to now have been in close contact with each other. The gearbox bell housing will also clear the rear wall of the engine box whereas before they were touching and I was looking at having to notch the wall. So all round I'm killing a few birds with a single stone. With this all decided yesterday I set about sorting out the axle perches for the Toyota diff. I took a bit of a short cut by cutting the original Thames mounts off the spare Thames axle that I picked up in New South Wales earlier in the year and that has been languishing in the back of my other HiAce parts van since then. I felt a bit guilty for destroying the old housing, but it's for the greater good. A quick cutty, cutty with my favourite little grinder of angles and I'm half way there. Just need to glue them onto the HiAce axle
1 point
-
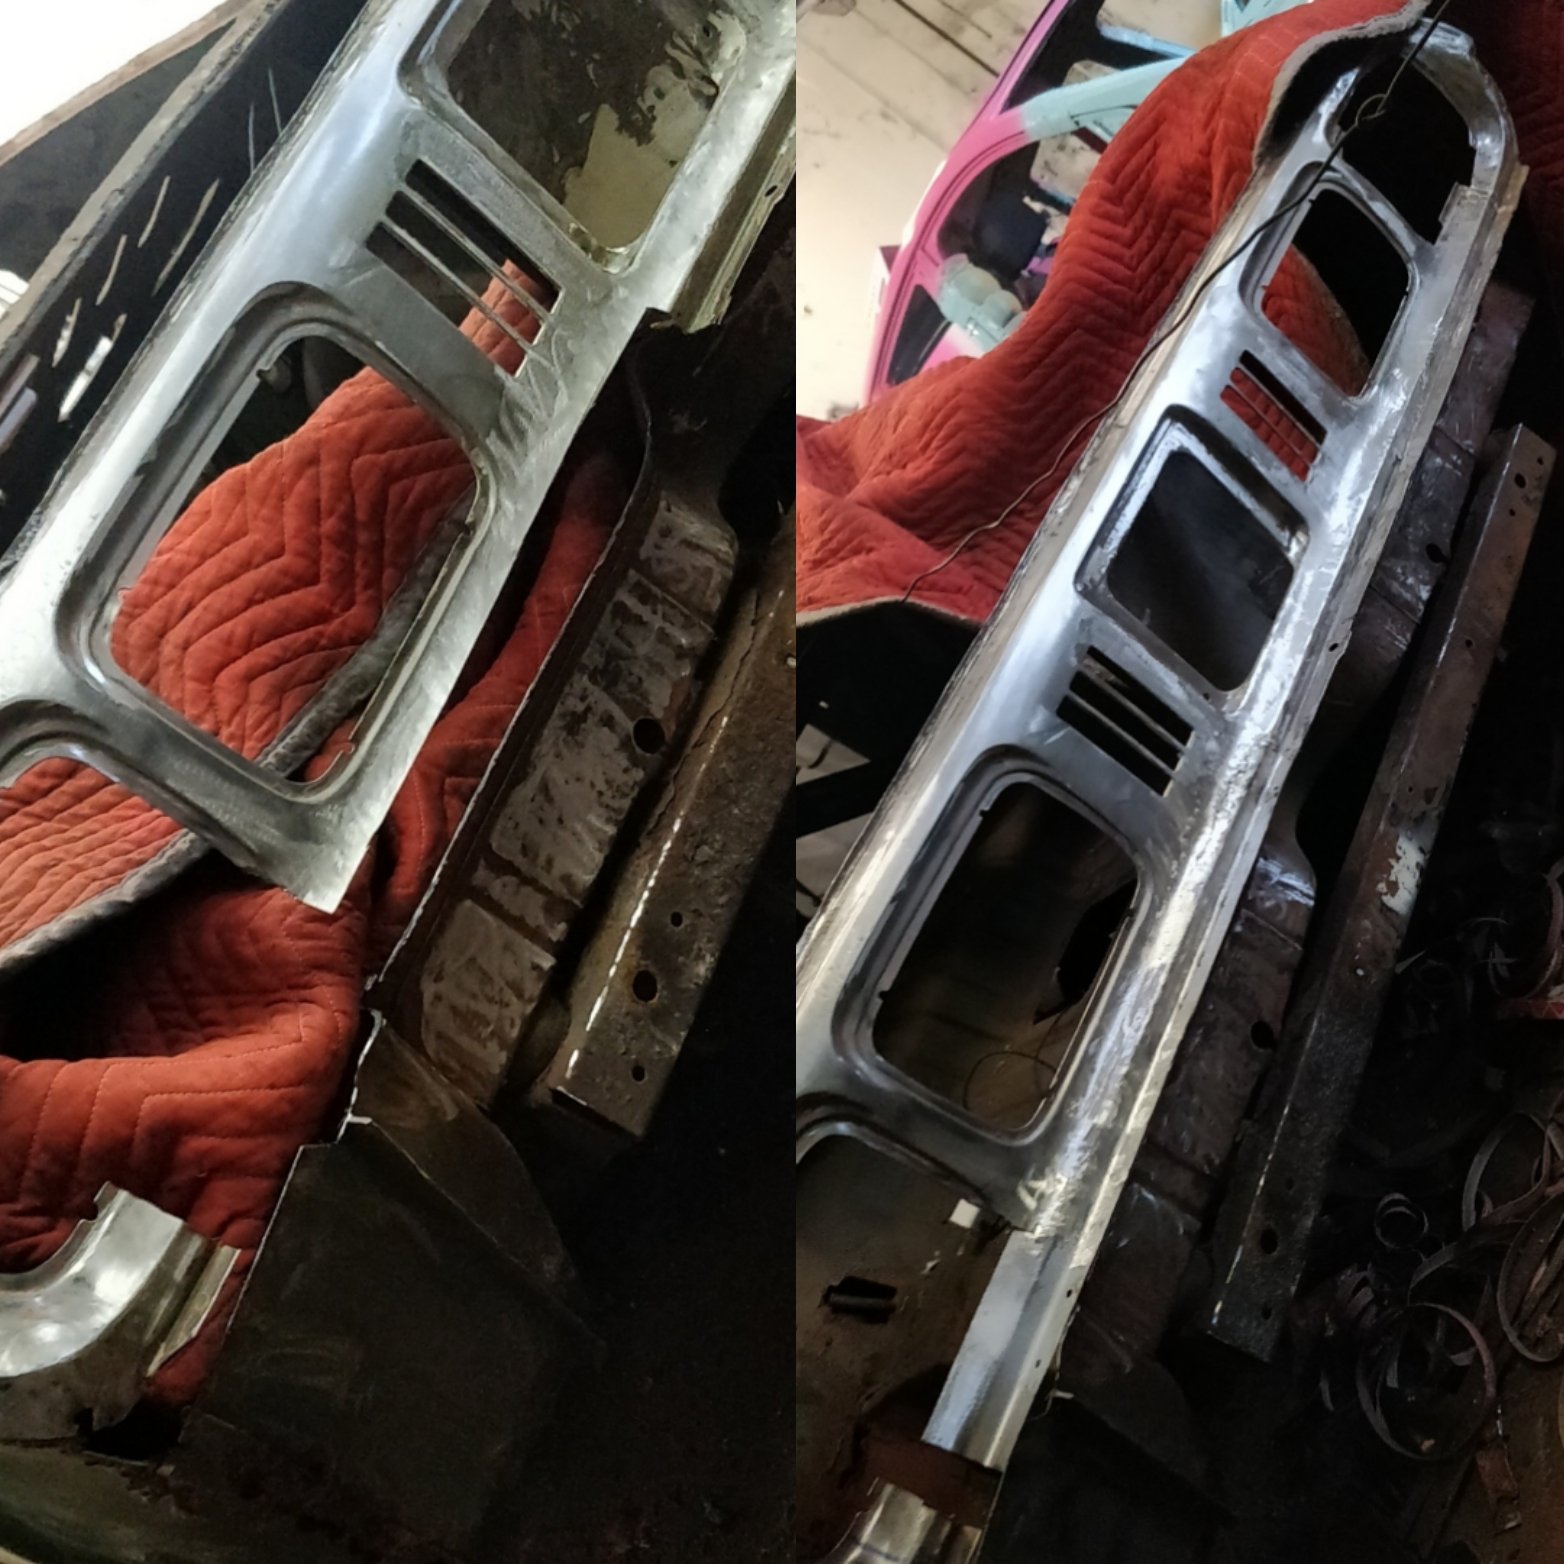
More back panel progress this weekend.
1 point
-
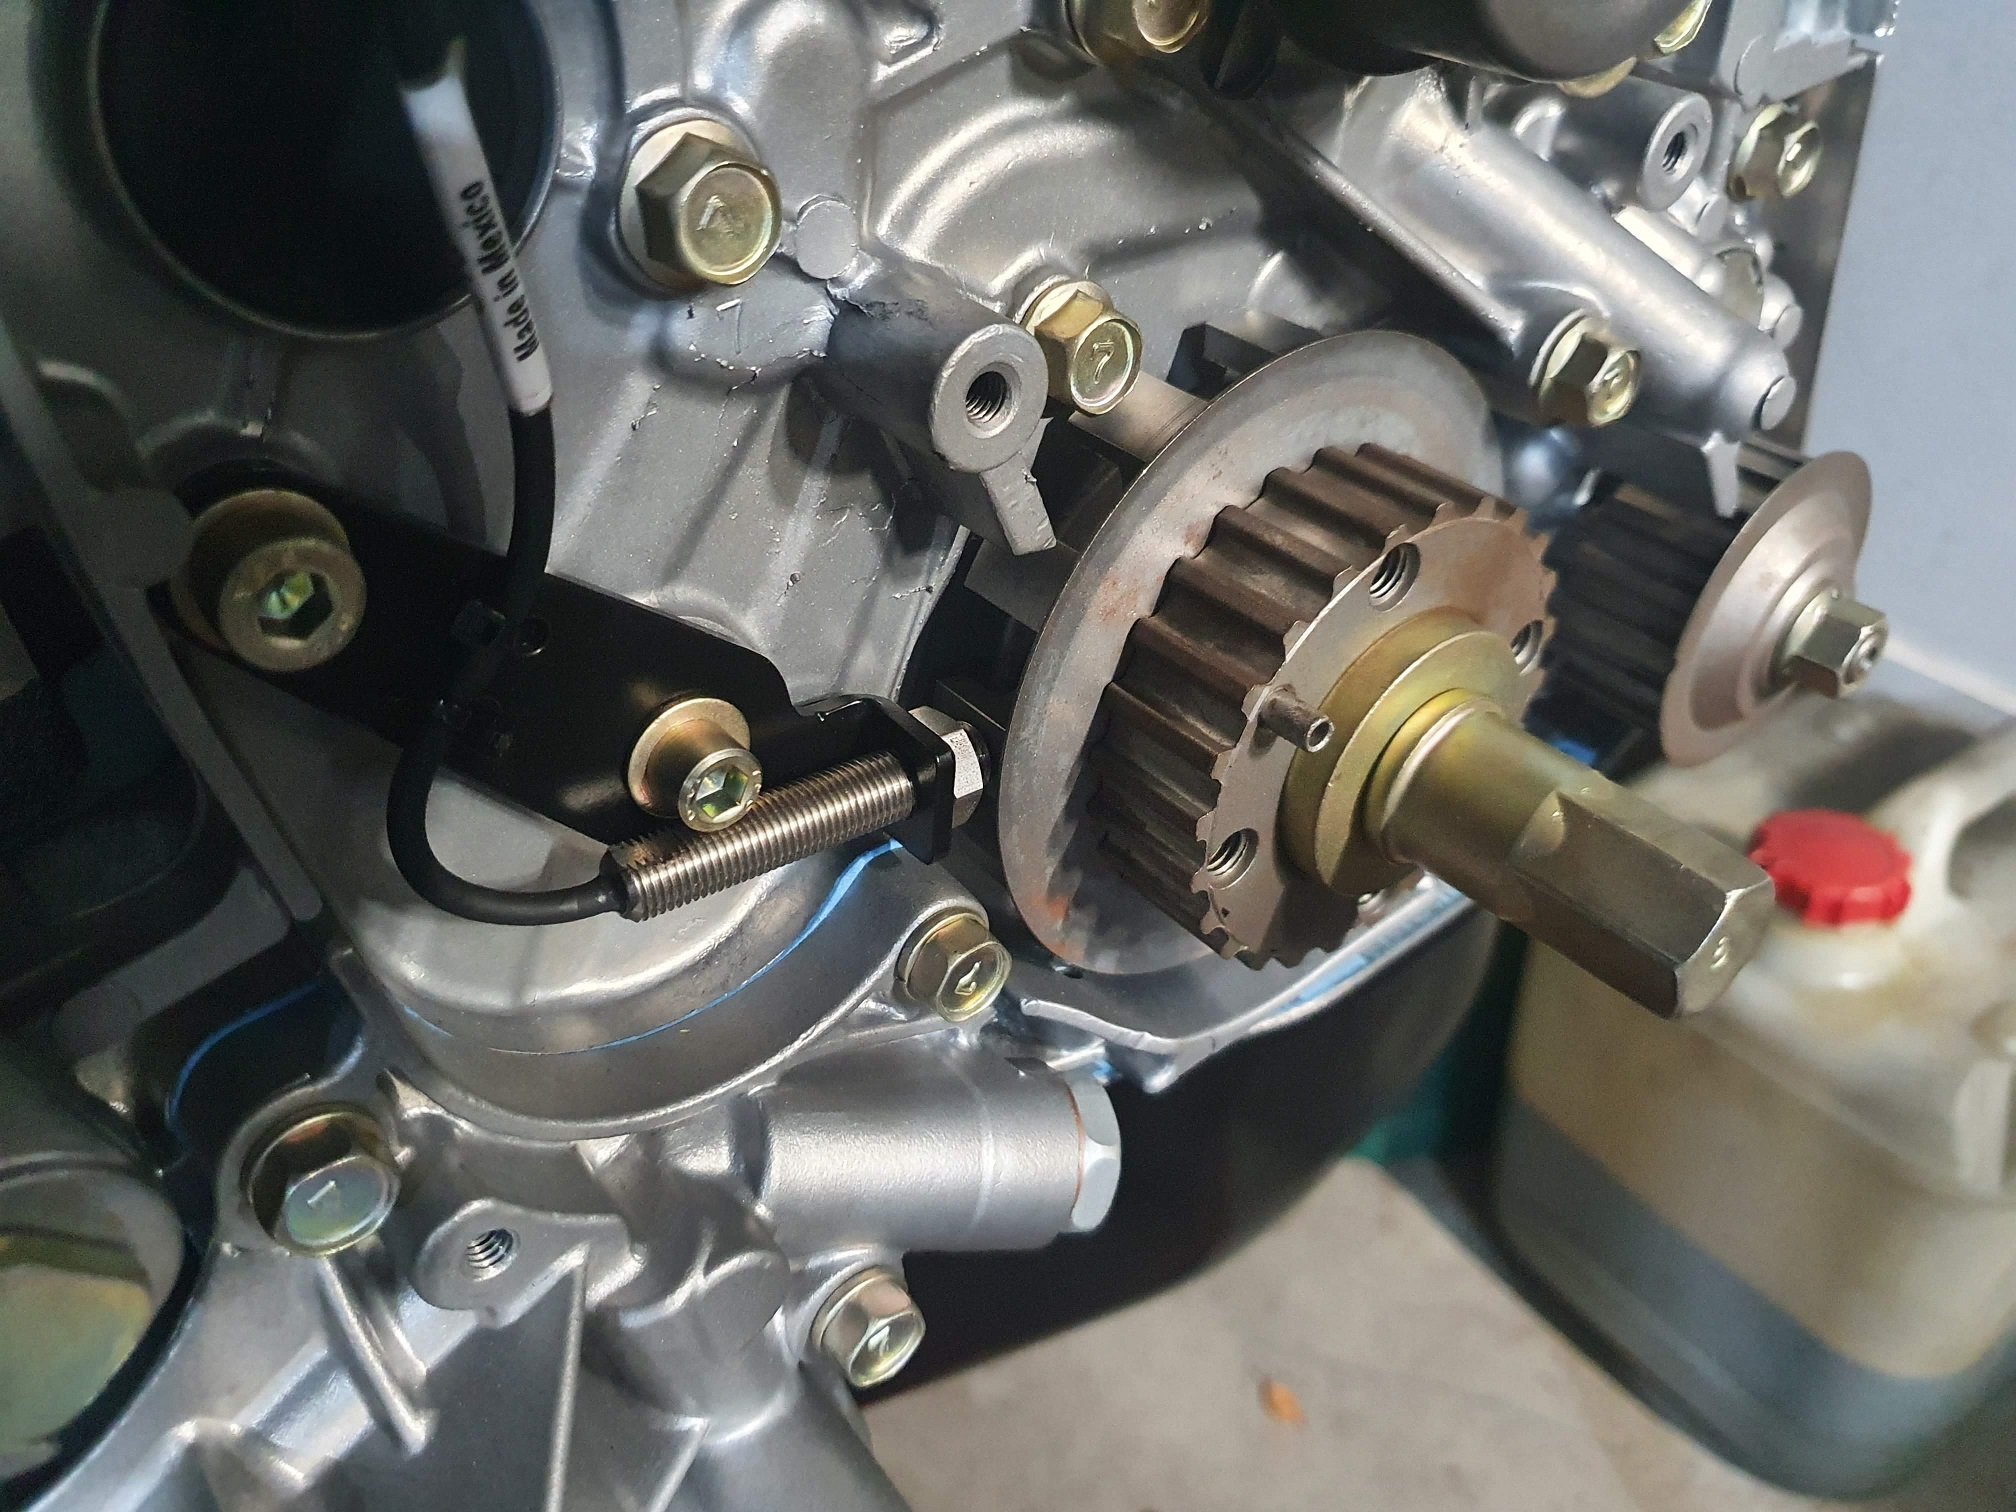
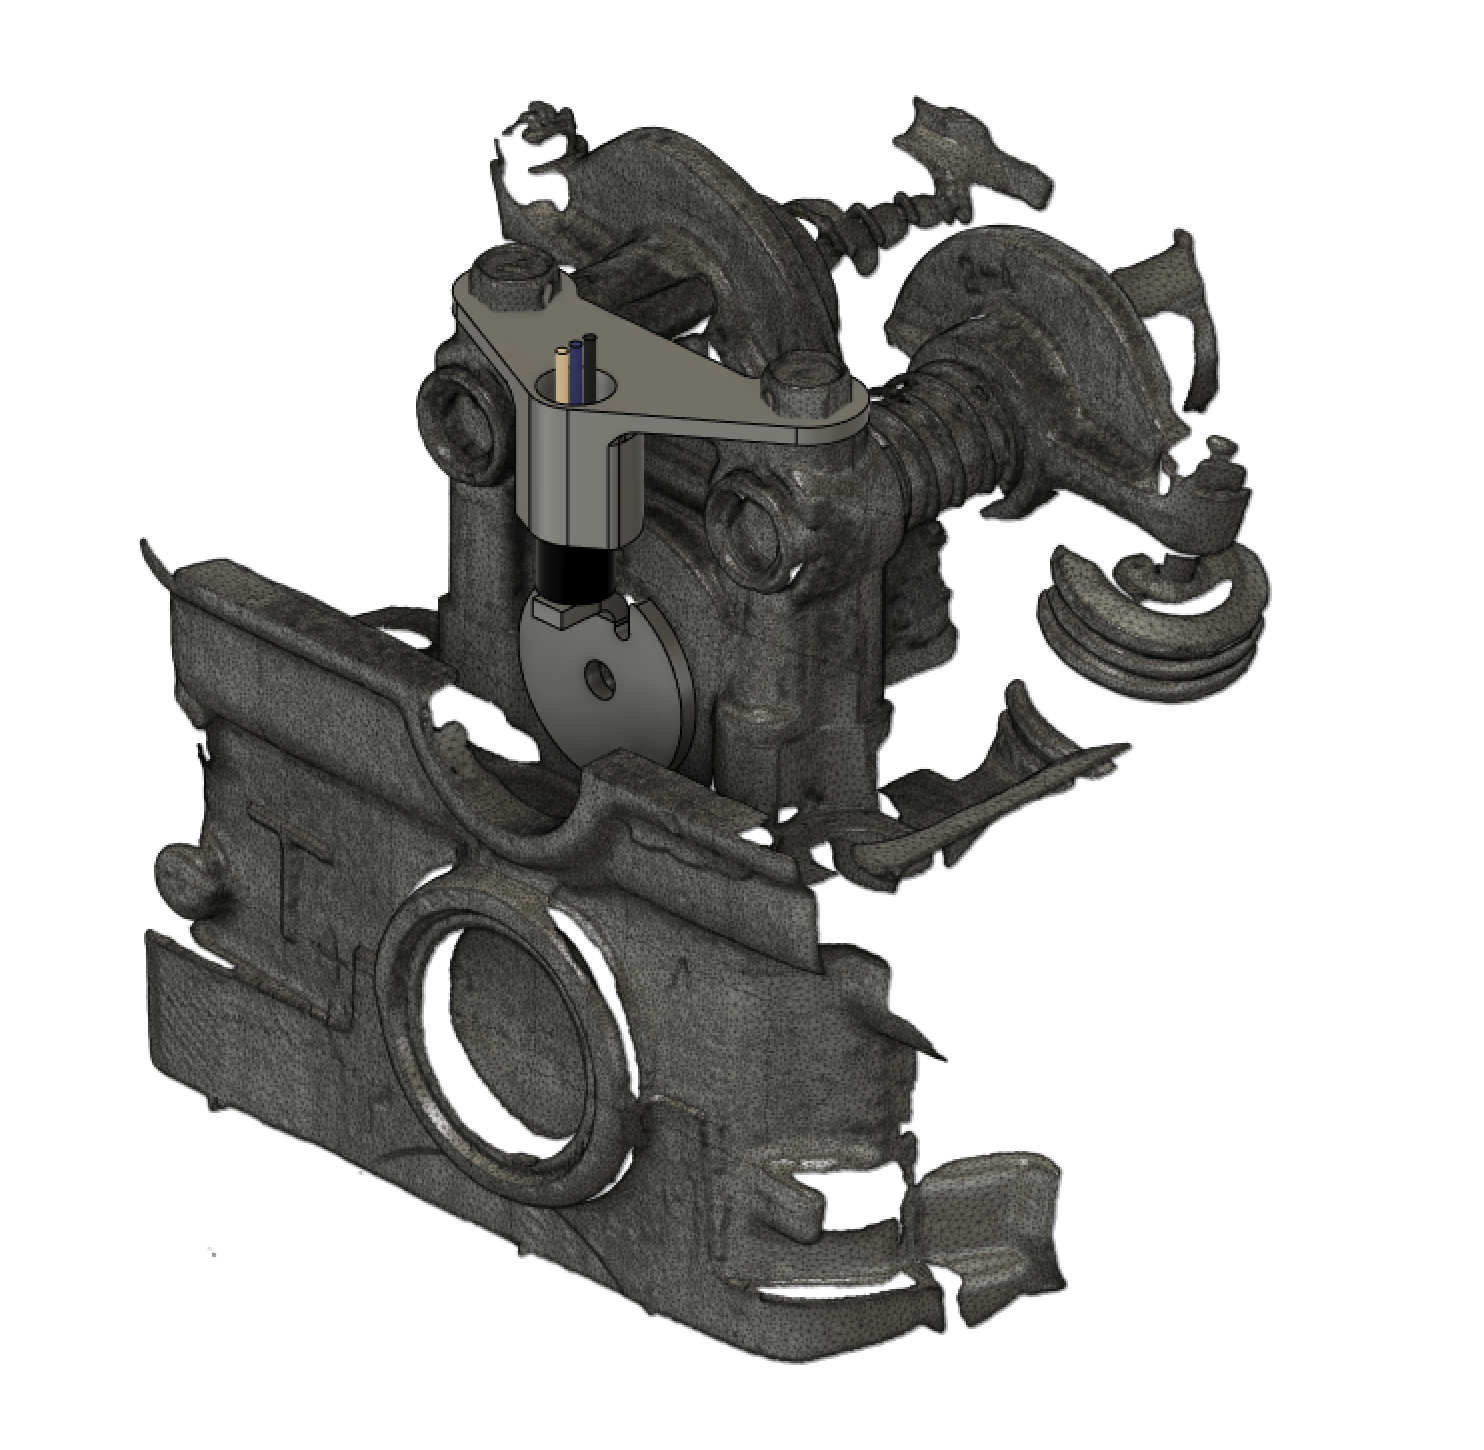
Small update, but this actually took me most of the day to get done... Well, after I was done with daddy duty this morning. The majority of the day was reminding myself how the tool and work coordinate offsets are setup on the mill I'm using. Prototrack controller, would not recommend. I'm not a machinist by any stretch of the imagination, but managed to get the crank trigger wheel carved out without too much bother and nothing broken. I still wish the 32 tooth balance shaft pulley would have worked. If I didn't already have a Link Fury ECU for this thing I would have purchased a Life Racing one just so I could have used it, much cleaner solution. The new one weighs within a bee's dick of the original. I could have made it lighter, but I already had an 8mm drill setup, so that's the size speedholes it got. I set the clearance on the sensor. These hall effect ones aren't as sensitive to the gap as VR sensors, as the ASIC's inside them which convert the VR signal to a square wave have auto calibration logic built in. This is why they don't work well with missing tooth setups, as they calibrate to the big signal spike after the missing tooth, and then miss all the regular teeth. Secured the cable with some ties and it's pretty much job jobbed. I've got yet another idea for the cam sync, I think it could work pretty well, but I need to check the rocker cover clearance. I'll put an IP68 cable gland on the back of the head casting and pot / sheath the wiring to make sure it'll live inside the rocker cover. There are a few diesel vehicles out there that have wiring inside the rocker cover, so I reckon it'll be okay :-). It'd be great if I could pass the wiring out of the half-moon seal, but that space is now occupied by the spinny single toothy thing, which would not end well if the two interacted with the motor running. I'll change the wiring on the sensor to some nice ETFE insulated stuff, twist and sheath it in DR25, pass it out the cable gland (which will be sealed in with something... I think maybe threebond?). Then I can set the clearance, loctite the shit out of it and its jam-nut, pot the top and it should be good. Probably. At least till I'm driving it in the pouring rain one evening in a rush on the way home from work because I'm in trouble for staying late to work on cool shit... and then it's bound to shit out... But that's a bridge to look forward to in the future!
1 point
-
Been a little quiet on the LR front.... Been gearing up with some homebuilt tools to manufacture these door skins, I have a bunch of interest from others who want me to make skins, including someone who has just purchased a Forward Control S2 - they are a unique door to that model which should be interesting. Anywho, made a 'mini' door just to confirm my steps. The door handle opening was done by making a hammerform from a 1/2" plate cut to the correct shape, I radiused the edge on it so it would give me the right kind of 'roll over'. Currently have made these from 1200-H14 but might try and get something stiffer next time which will help with dent resistance.
1 point
-
For the most part I am, cheers. I do still get fairly regular migraines, but that might be more to do with teaching kids, than my brain though...1 point
-
Nah mate, you drive, I drink. Drunken rail Barry sharns ahoy!1 point
-
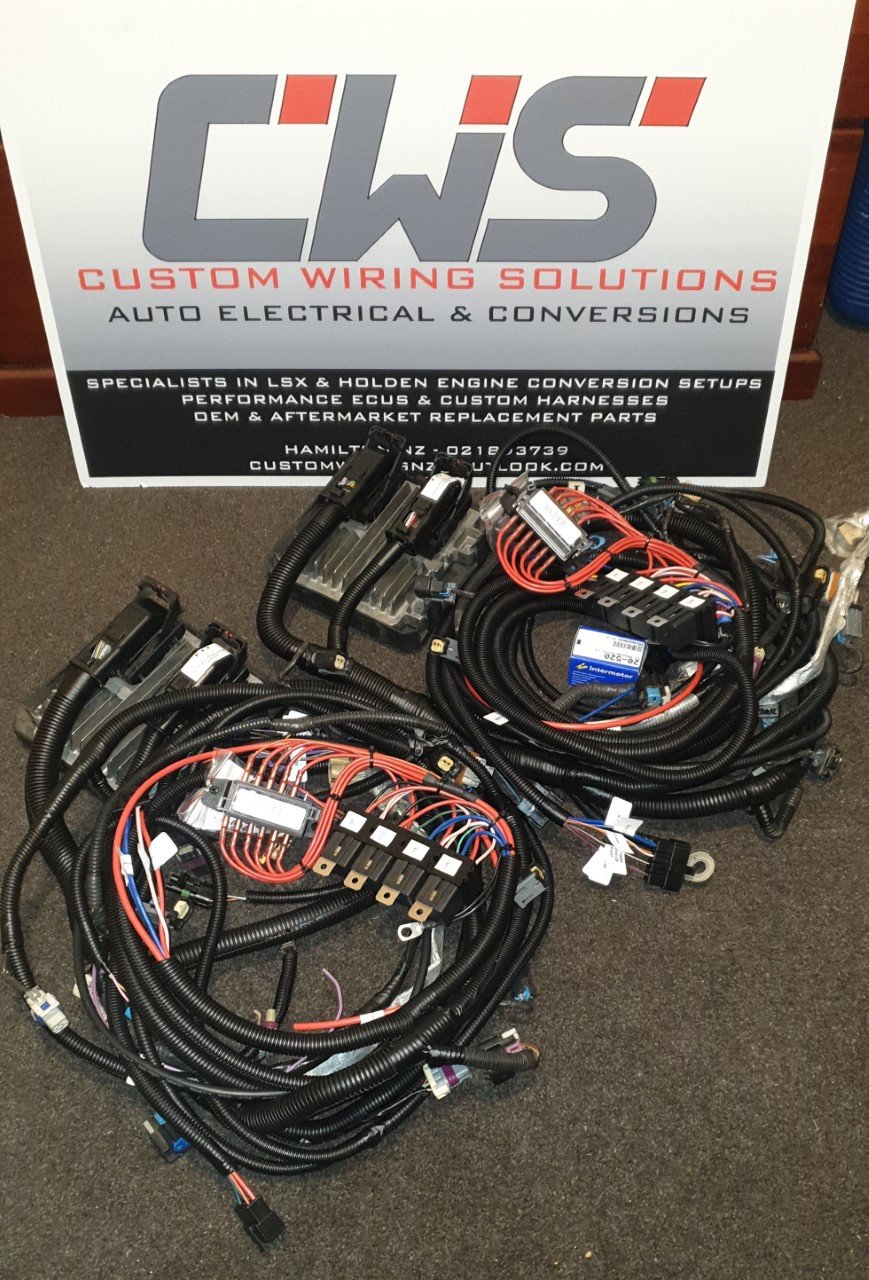
Big thanks to Drew (vk327 on here) for whipping up looms for me and the brother. While I'm sure an LS1 loom isnt toooooo hard, these later model engine ones turned out to be relatively complex and I am so fucking glad I didn't bother attempting it. There are a few little quirks that would have 100% caught me out, like the fact that my loom that came with engine was missing plugs and shit. Drew knows all the ins and outs which meant that the final product is essentially as good as it can possibly be for tuneability and coolcuntness. ECU/PCM now has base tune on it to roughly match cam, so I should be able to drive it down to the tuners for a tidy up and the all important power/torque figures. I should probably do a skid soon.
1 point
-
I will have a yarn with EJ and figure out a date for the next meet, do you guys want a weekend type thing or a weeknight burger meet?1 point
-
Some good looking things arrived, if these bad boys don't sort the brake issue then I'm not sure what will. They look fucking monstrous. This is not even the most expensive brake upgrade available, but definitely not cheap. Some good y60 axles may come available very soon if anyone wants any. Old = 295mm x 20mm rotor, single pot. New = 306mm x 34mm rotor, 2 pot. The splash shields have been adjusted out of shape by the floor, they will need a bit of loving. I'll probably do the wiper seals as one looks a little weepy. It looks like the original 15's will fit over the brake setup, this is good. The axles are a bit wider than the y60 ones but with some 33x10.5 tyres the actual width will be pretty much the same as it currently has 33x12.5s. I did model this in solidworks to make sure that was the case but time will tell. Fun fun.1 point
-
Bits and pieces..
1 point
-
I don't believe in imperial so re tapped the manifold Chopping board carb spacer I tapped the adapter plate but didn't have any bolts long enough. Popped into bunnings for a bit of threaded rod and some loctite All bolted together1 point
-
Pulled the engine this morning.. Took all of about 30 minutes. Took it home and gave it a clean Before, After, doesn't look it but I can assure you it has a lot less oil on it.. After doing some reading I've come to the realisation that my sister probably cooked the engine, there should be an engine seal around the tinware and also the heater pipes weren't on either, according to the gurus that be on the webs the engine bay should be totally sealed otherwise the engine will overheat.. Went out to buzz bug this morning and he confirmed what I thought, was good to chat to someone that knows they're shit. Gonna send him a list through of stuff for the engine, he's also getting in a bunch of rust repair panels which will suit our kombi..
1 point
-
I have been picking away at this radiator piping all week, my back heartily disapproves of grovelling on the concrete, I may have to find a crawler.. First thing I did was create something to make beads on that pipe, this seemed like a good idea but the pipe is 1.6mm wall thickness and quite resistant to change. Fortunately I have a large press, so this seemed a good way to do it; Works fucking sweet, just press and spin, press and spin etc. It is scary when you over do it and the two 8mm weld beads go pop, but otherwise uneventful. Then I just cracked on, some of these boys go complicated; Then I chucked them into place today; They have come up good, hopefully there are no leaks, I was in the zone when doing it but there is always room for a fuckup. A couple of pics up you can see the drain plug I put in a relatively protected spot, but I reckon a skid guard is on the cards regardless. You can also see the vent on the top of the rad which should help get the air out... I just have to get what was the side drawer face mounted on hinges, find a feed for the fan relay then bolt everything back together. Getting to the clutch slave will now be way more fun than it was. In other news I believe I have well and truly sorted the brake situation, things are in transit right now and I will post a pic when that package arrives.....1 point
-
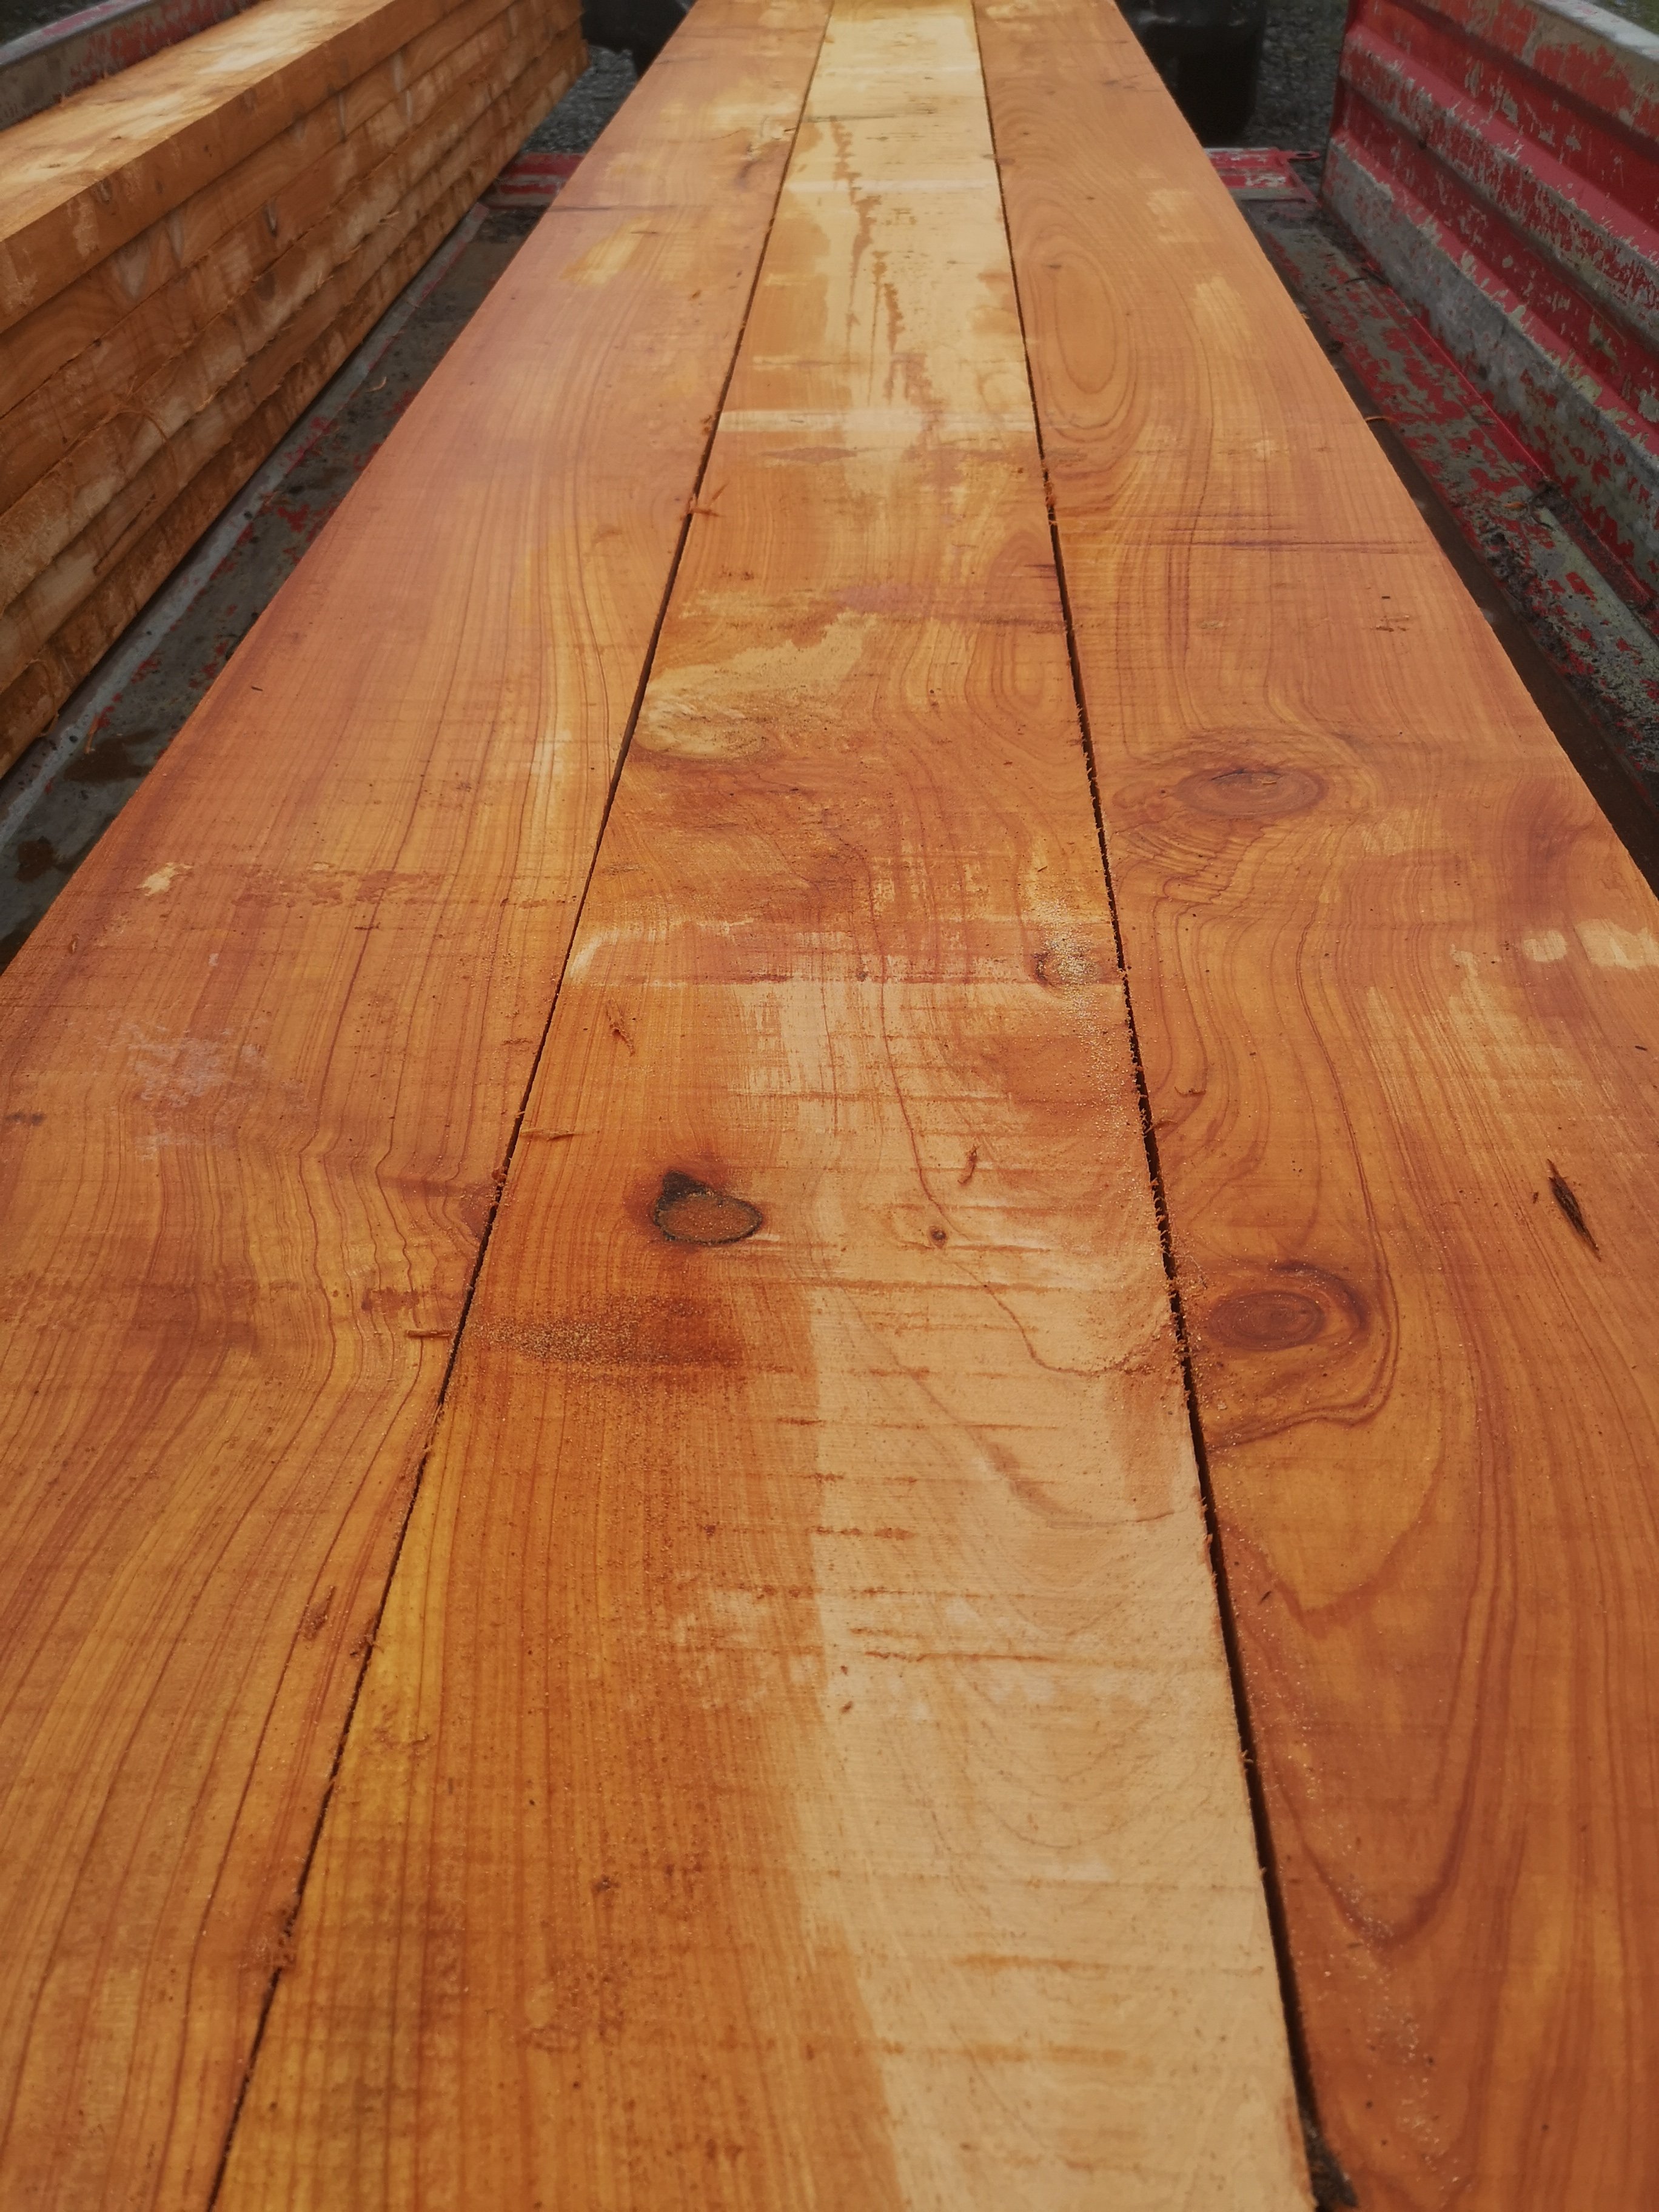
Such nice timber, feel a little bit guilty that I'll be staining it black..
1 point
-
@Deliboylurker has an rv50 with a Lifan 110 and it is lush do it1 point
-
Second that. Your work on this car is bloody amazing.1 point
-
Made a start modifying the 4-link mounts. As you can see they originally hang quite a bit lower than the sill. New mount all welded up. Should be heaps strong enough! Cleaned up a bit. 17mm socket just fits through the channel to tighten/loosen the bolt. Might swap to Allen head screws, as the paint/underseal mightn't leave enough clearance. The lower arm is nice and level now. Next was to do the upper arm mounts. This is it all done coming through the floor under the rear seat. The seat just doesn't fit, but should be an easy fix by bending one of the wire spring things a little. Top arm angle looking much better. The arms should intersect pretty close to where I guessed the instant centre of the car will be. Just have the other side upper mount to finish off. Sent a bunch of stuff of to be zinc plated. Some didn't turn out as shiny as I'd liked, but not all of it's that visible and I think I'll get the engine and gearbox mounts powder coated any way.1 point
-
Stripped most exterior stuff off, except for the doors. Have cut off the a-pillar rain gutters after ajg193's suggestion, cleaned up all the rust underneath and plug welded them back on. Found some spots of rust on the hatch after removing the window. Most of it is just surface rust. Got carried away and stripped all the paint off the exterior side. Previously someone has stripped it and gone over all the rust spots and ground them out. Which I wasn't too happy about, but it seemed to have stopped it rusting further. Has a little patch welded in on the lower right as well. This top bit, just below the water squirter had a few small holes. Cut it out and made a patch to weld in, after I cleaned up the rust inside and painting it. All welded and cleaned up. Picked up a new engine! 4AGE 20V Blacktop!!! And a J160 6 speed. It already has the SQ Engineering adapter plate. The clutch/pressure plate and starter is already set up ready to bolt the two together. Pulled out the old 4K. Empty and dirty engine bay. Gave it a steam clean, came up heaps better. Test fit of the J160, definitely going to need to pull out the grinder! Laser cut out a 12mm stainless exhaust flange. Planning on building some high-rise headers at some stage. Ordered some goodies from SQ Engineering. Bought some Cusco AE86 engine mounts. Also have an AE86 water pump set up and some other bits on the way.1 point
-
Well. People tend not to reply to often on the Bike build threads. But I wanted to say you'se a top cnut. Cheers for being awesome and putting up with our ridiculous peer pressure and not cracking and killing us to death with mopeds. I aspire one day to have a collection and garage like yours. GIZ.1 point


.thumb.jpeg.910c6632f6e66e8cba89476e83b41634.jpeg)


This leaderboard is set to Auckland/GMT+12:00