
Leaderboard


.thumb.jpeg.910c6632f6e66e8cba89476e83b41634.jpeg)

Popular Content
Showing content with the highest reputation on 06/29/20 in all areas
-
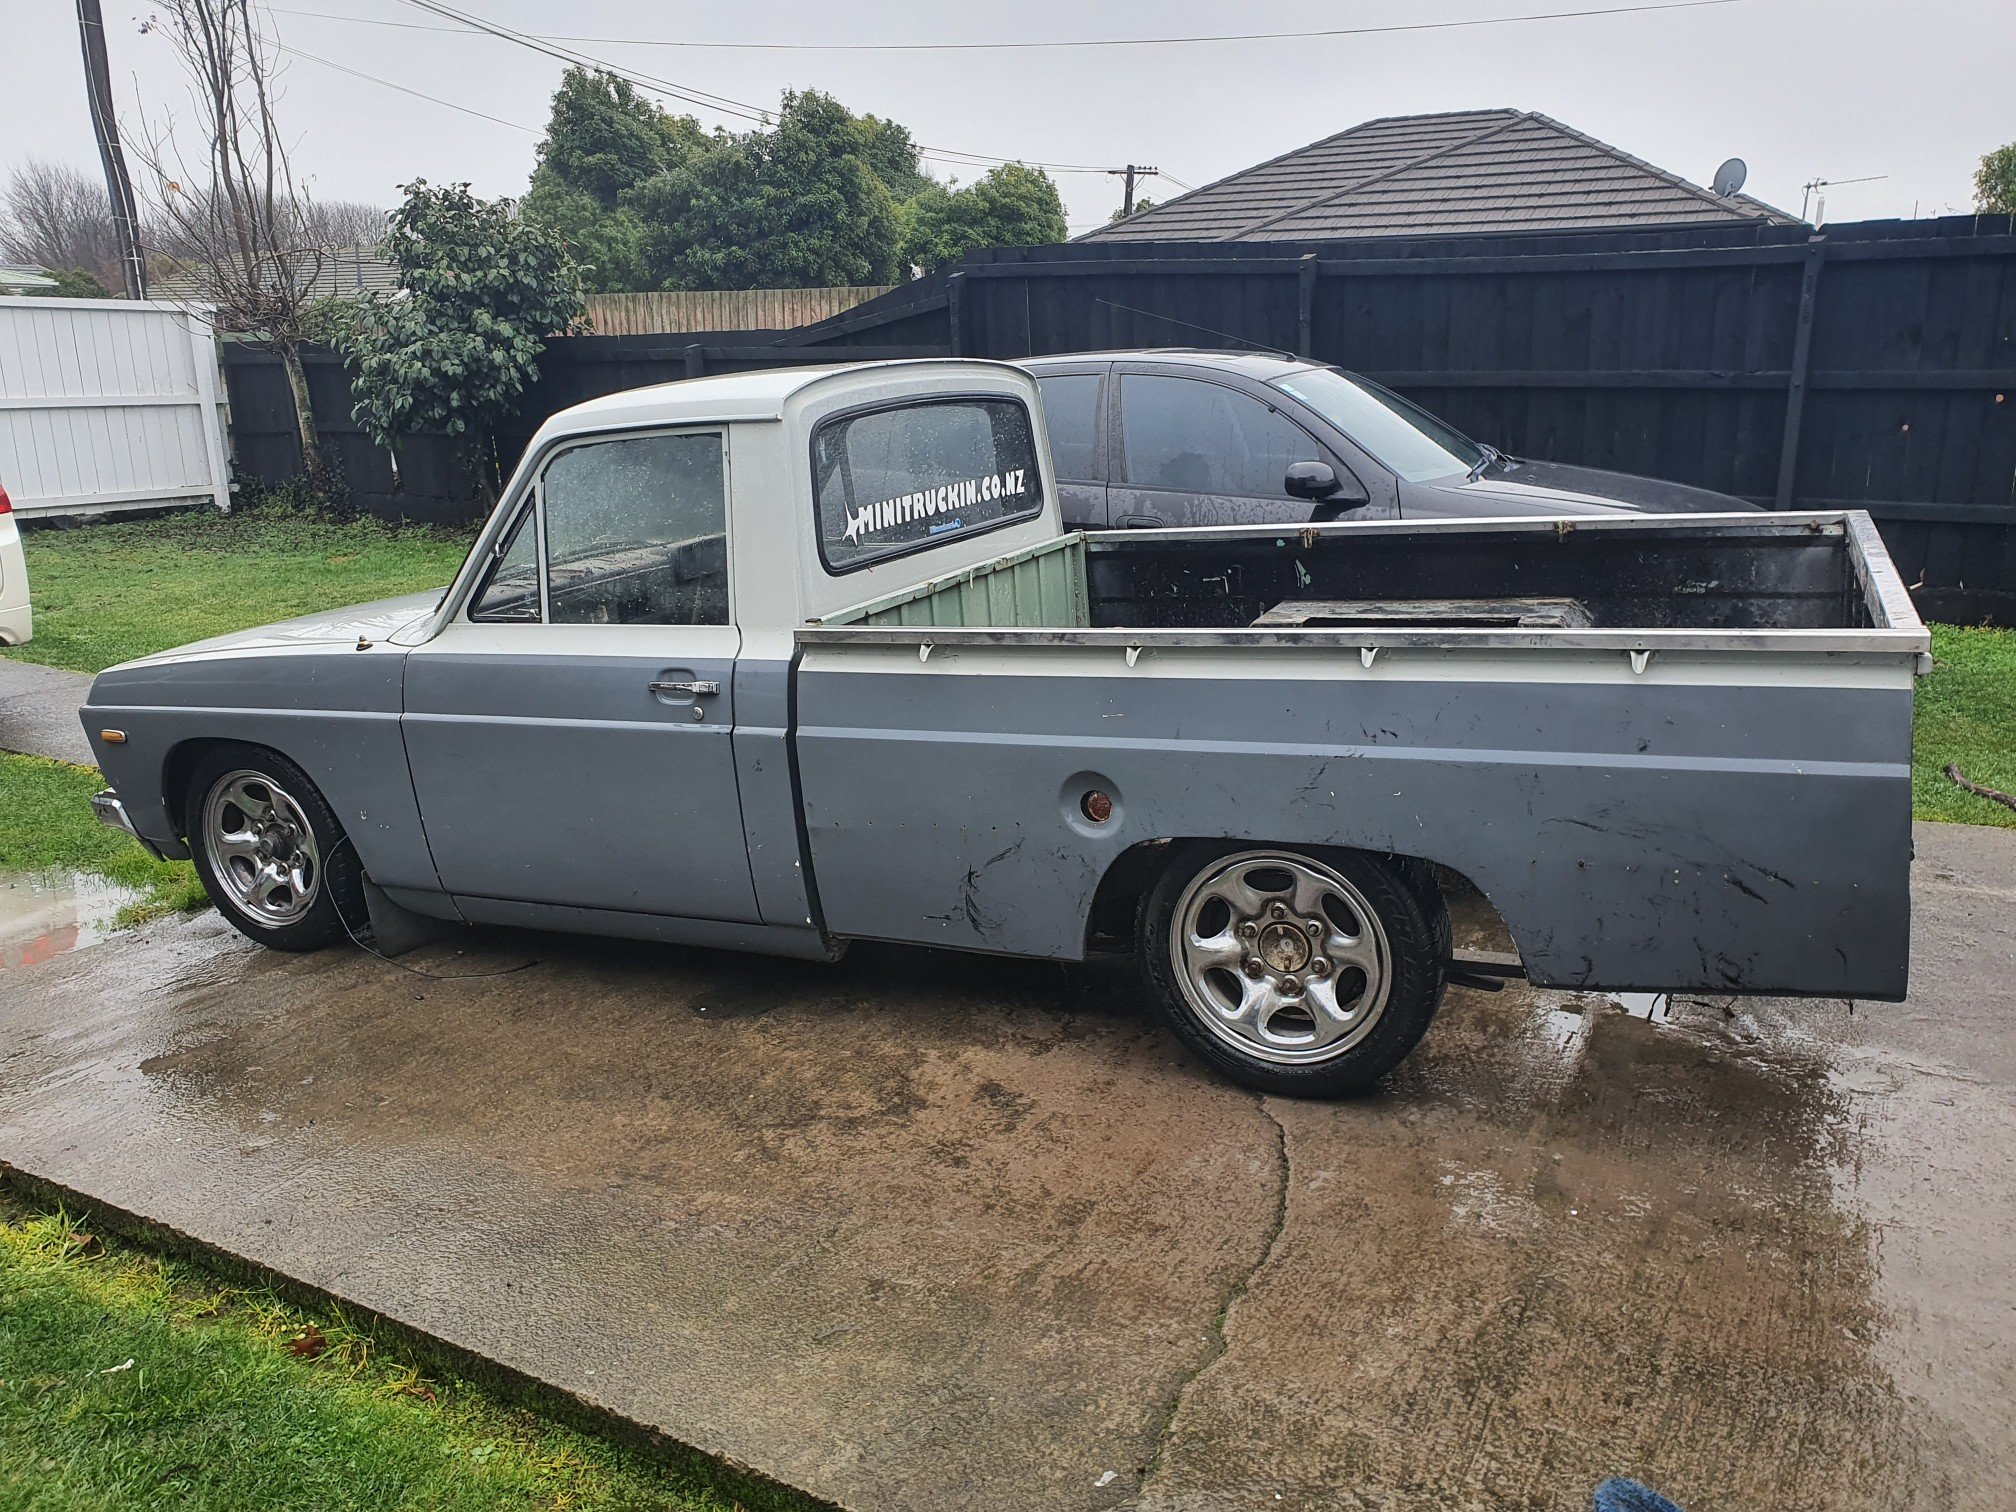
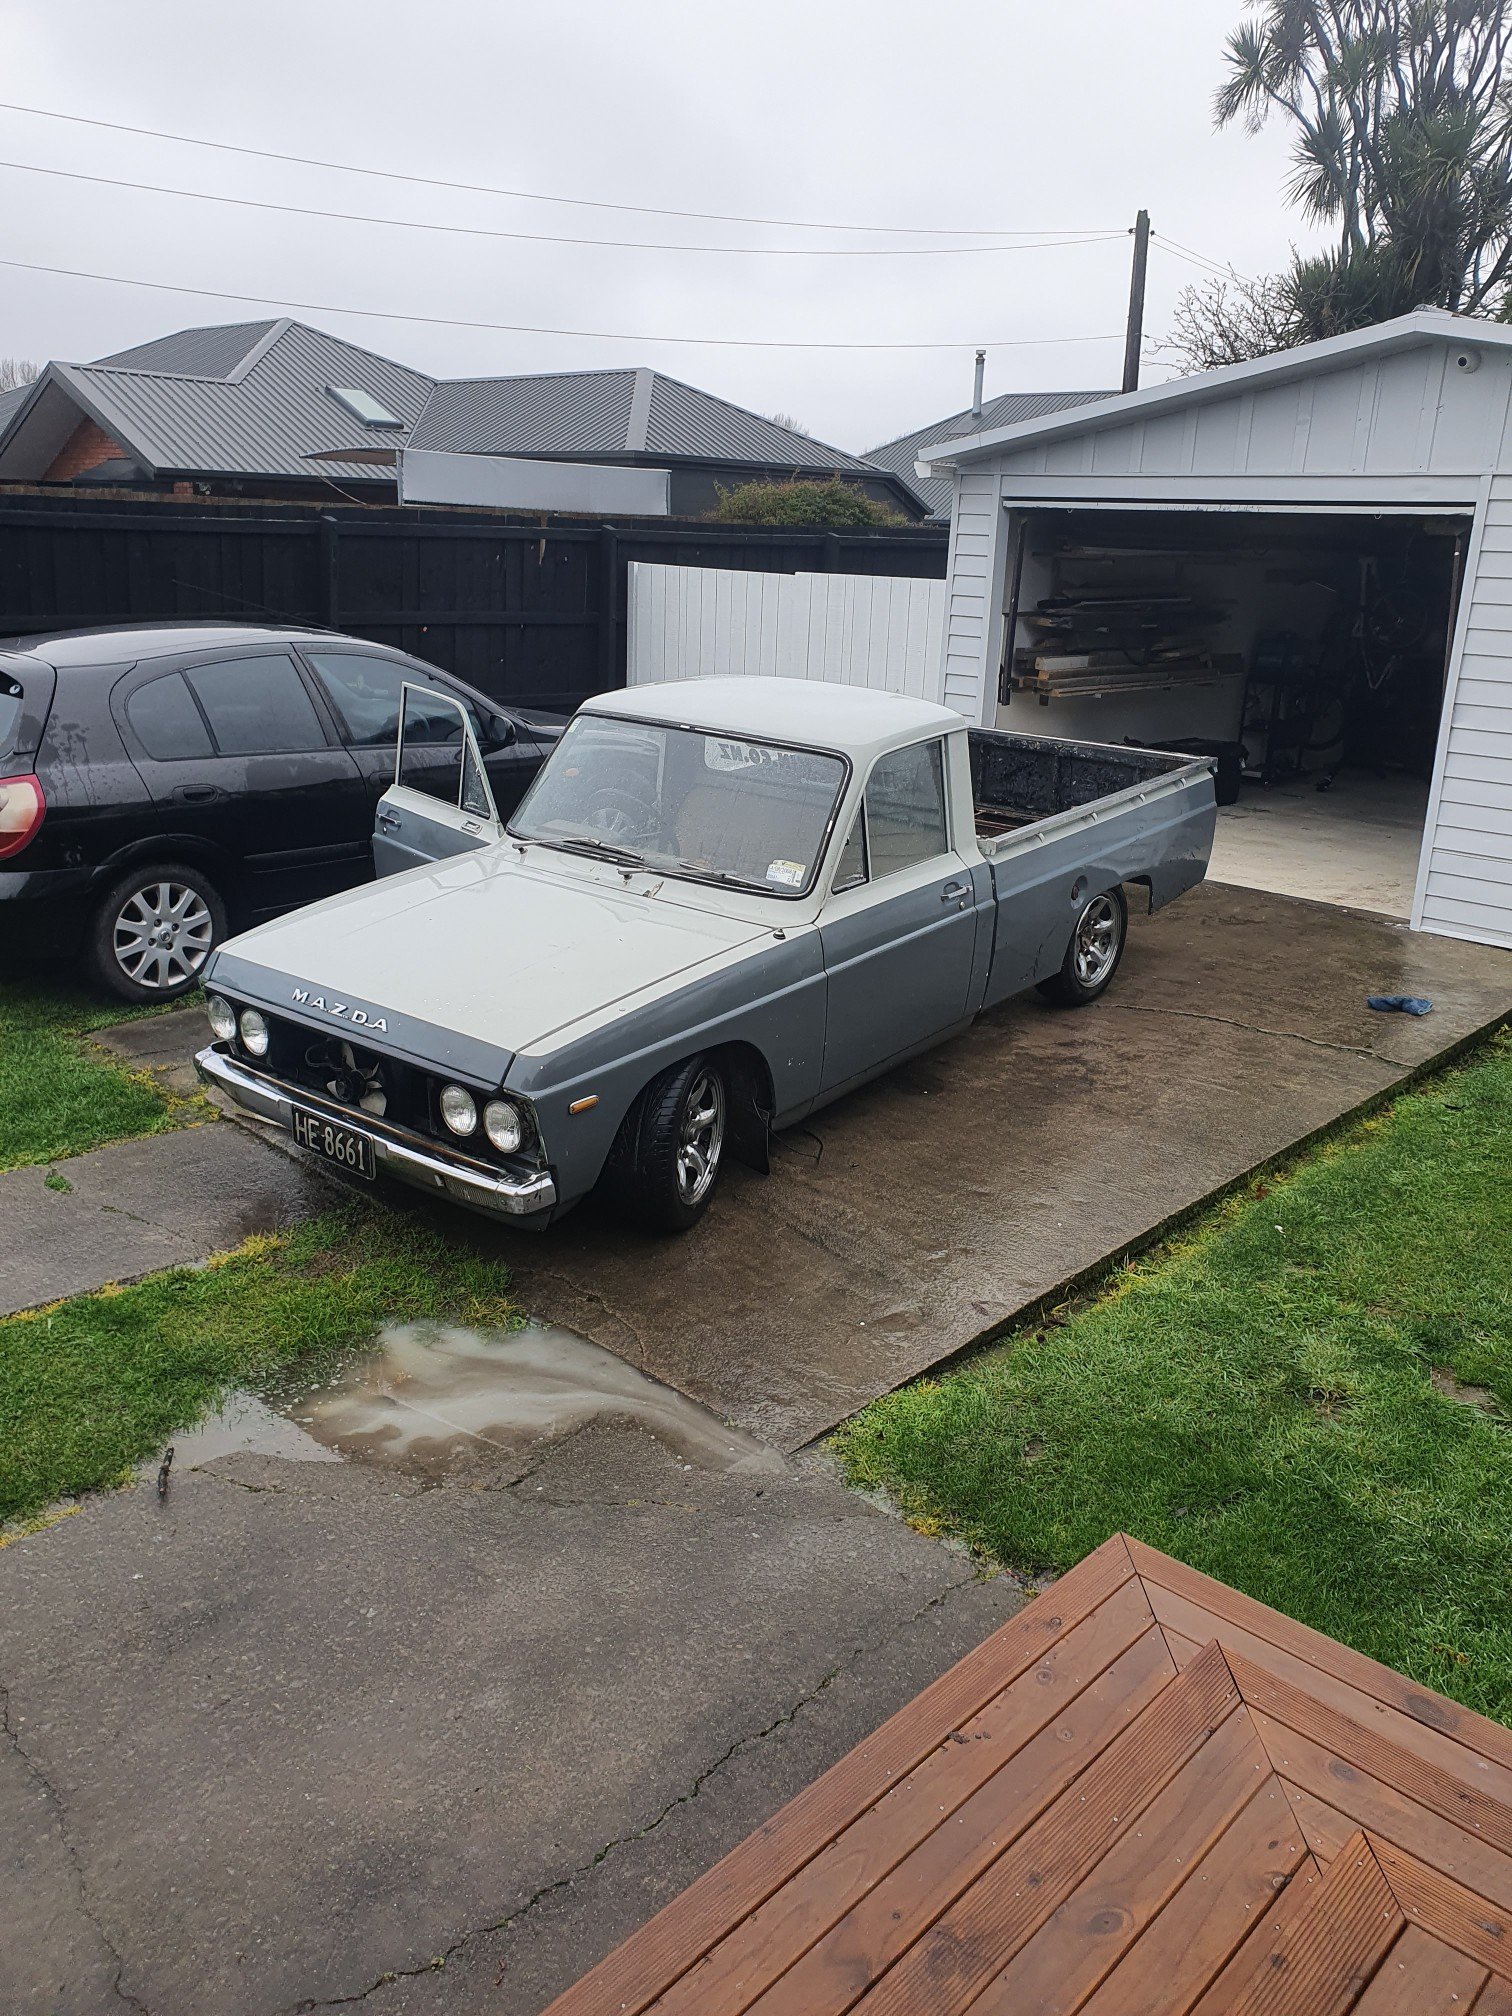
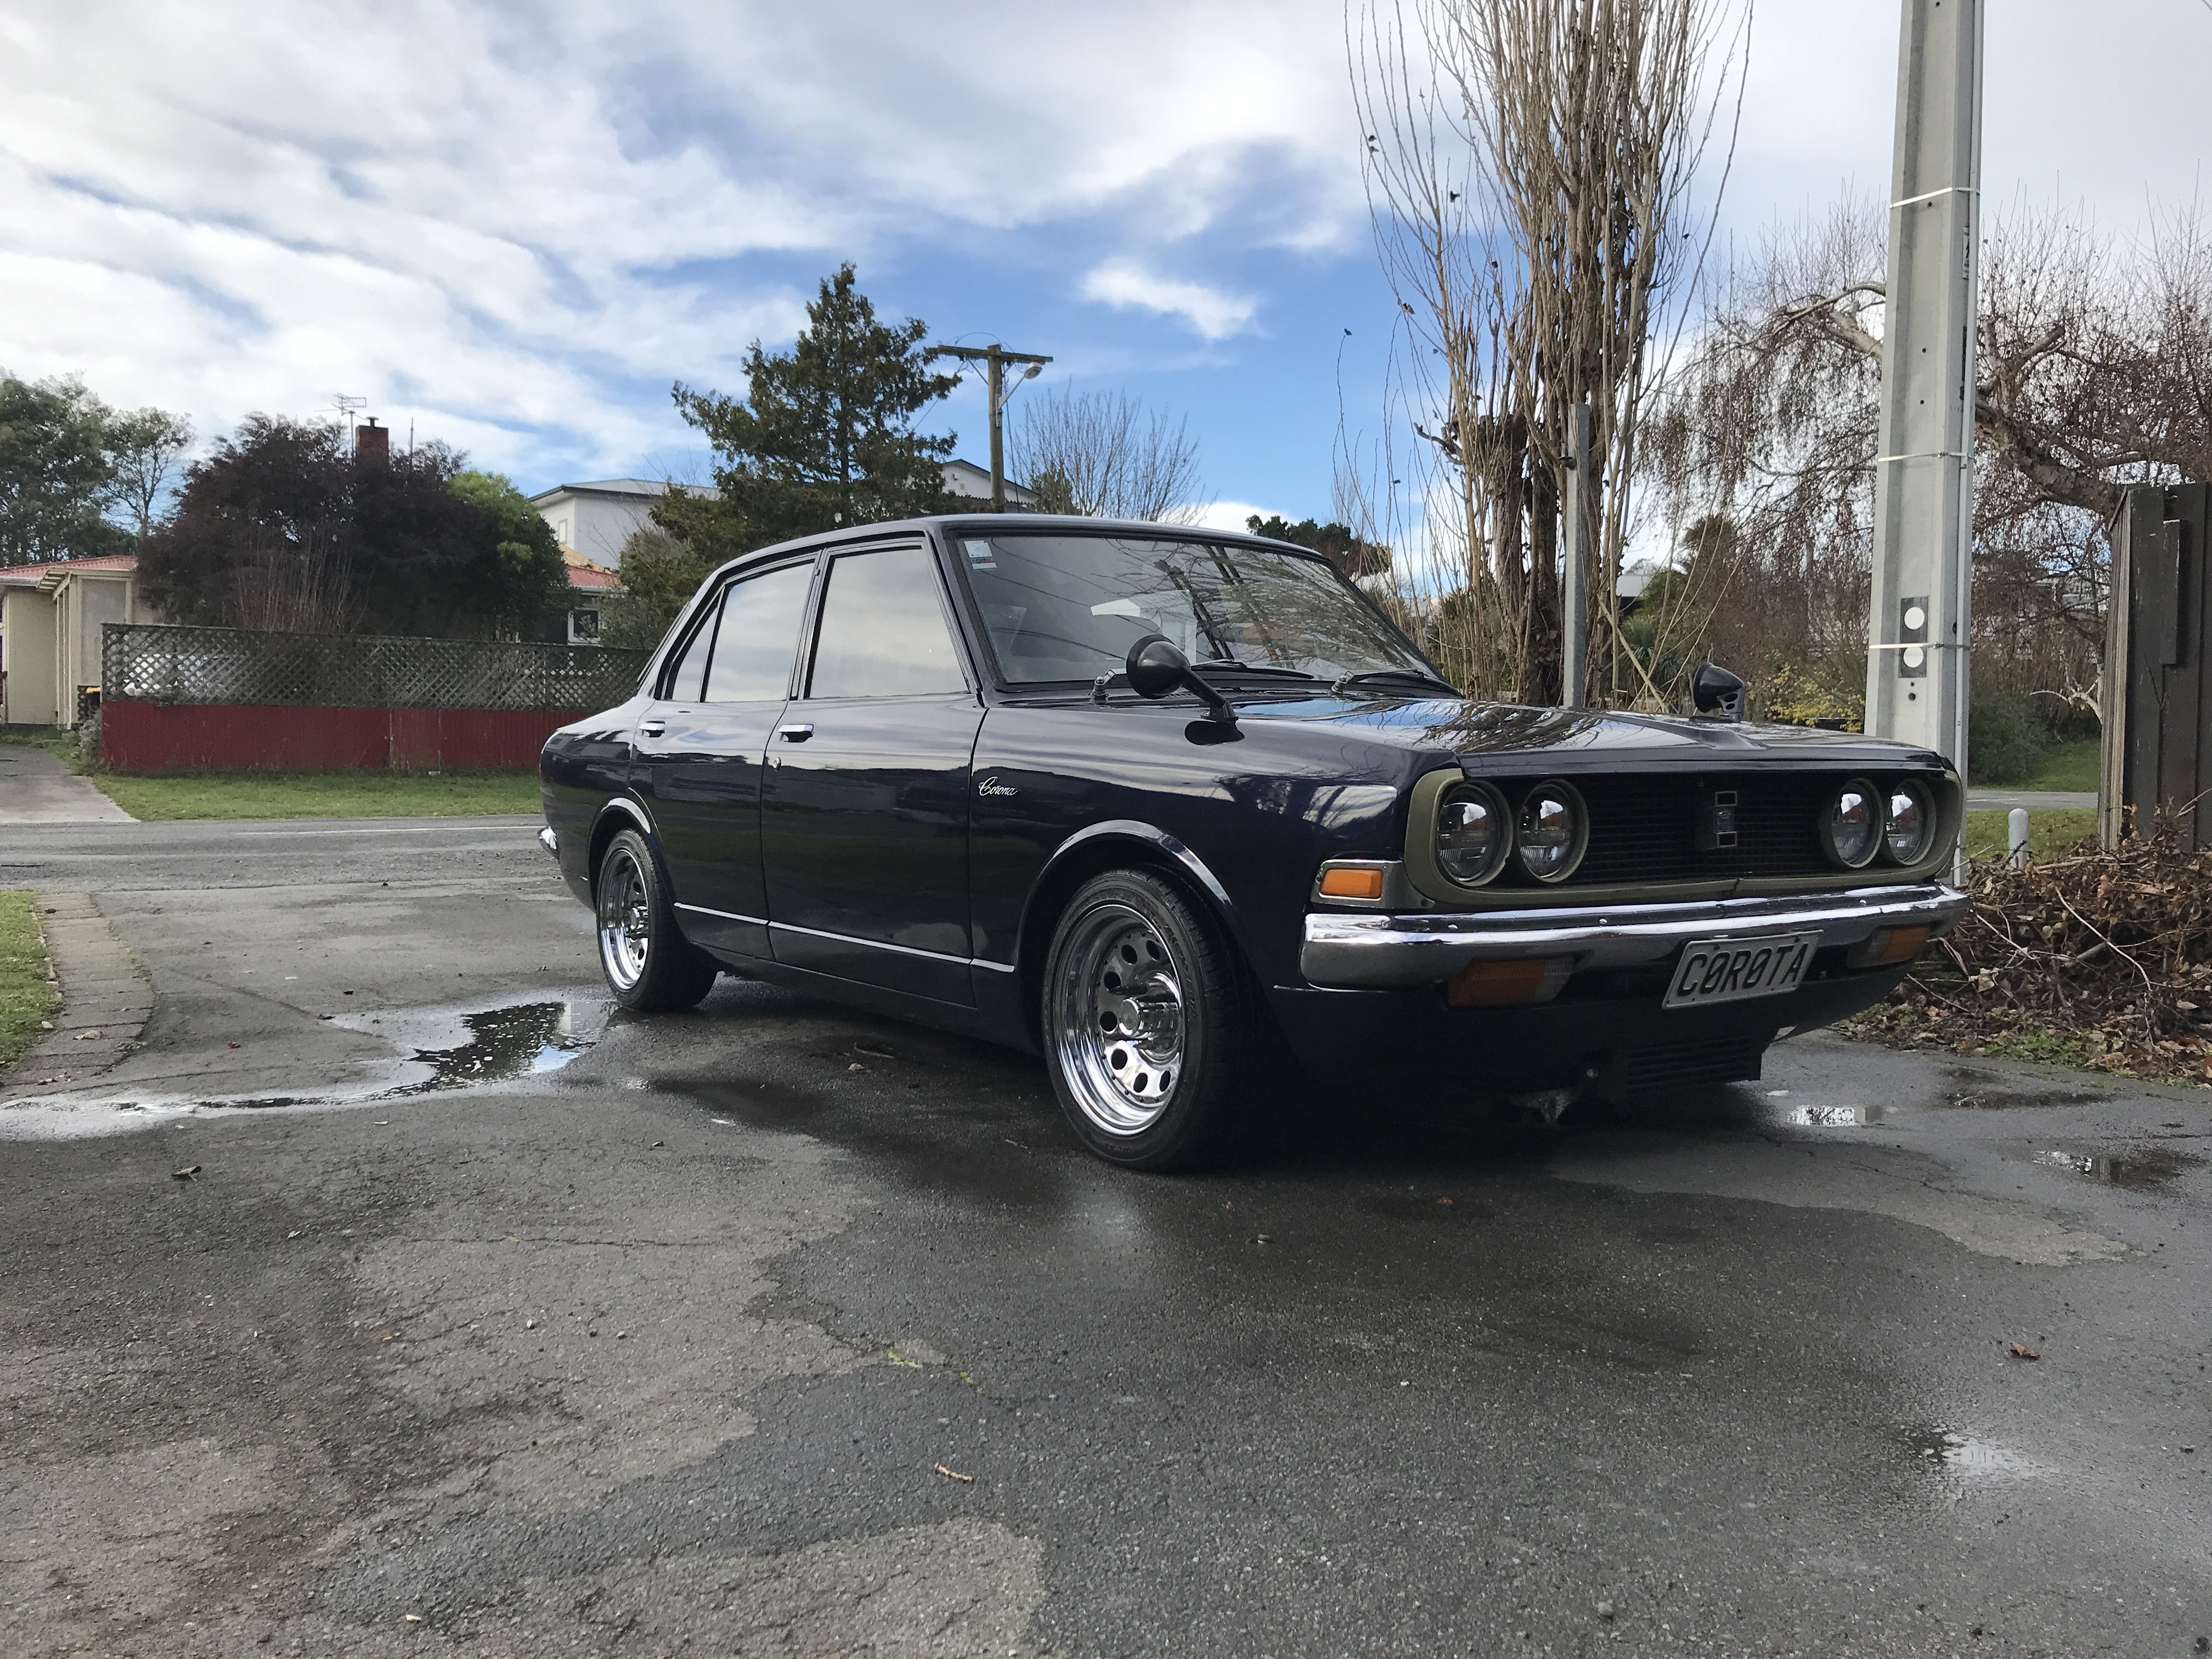
Right, babies 2 weeks old now so can continue playing with this thing. Worked our I’m still not getting full throttle. It goes well but not as fast as it should. Had a look at the accelerator pedal, found the problem. FUCK OFF, seriously?! Never have I spoken a truer word..... Made a nice new one and gave it more pedal travel. Guess what, full throttle now actually makes power, real power! Wheel spinning, ear grinning neck turning power. I’m a happy man.
 15 points
 -
Monkey shot by @Raizer13 points
-
Took the truck for its first major drive on the weekend did a 40km return trip out to Waihi Beach and she run flawlessly! Have had the Artilleries rebarreled as after sandblasting they had a heap of holes in the barrels. Wheel and Frame in Cambrdige rebarreled them with 7 inch barrels instead of 5.5 they were factory. Centres were riveted in from factory so they drilled these out and welded the centres into new barrels. Mate lined up to paint these this week then the whitewalls can go on!
12 points
-
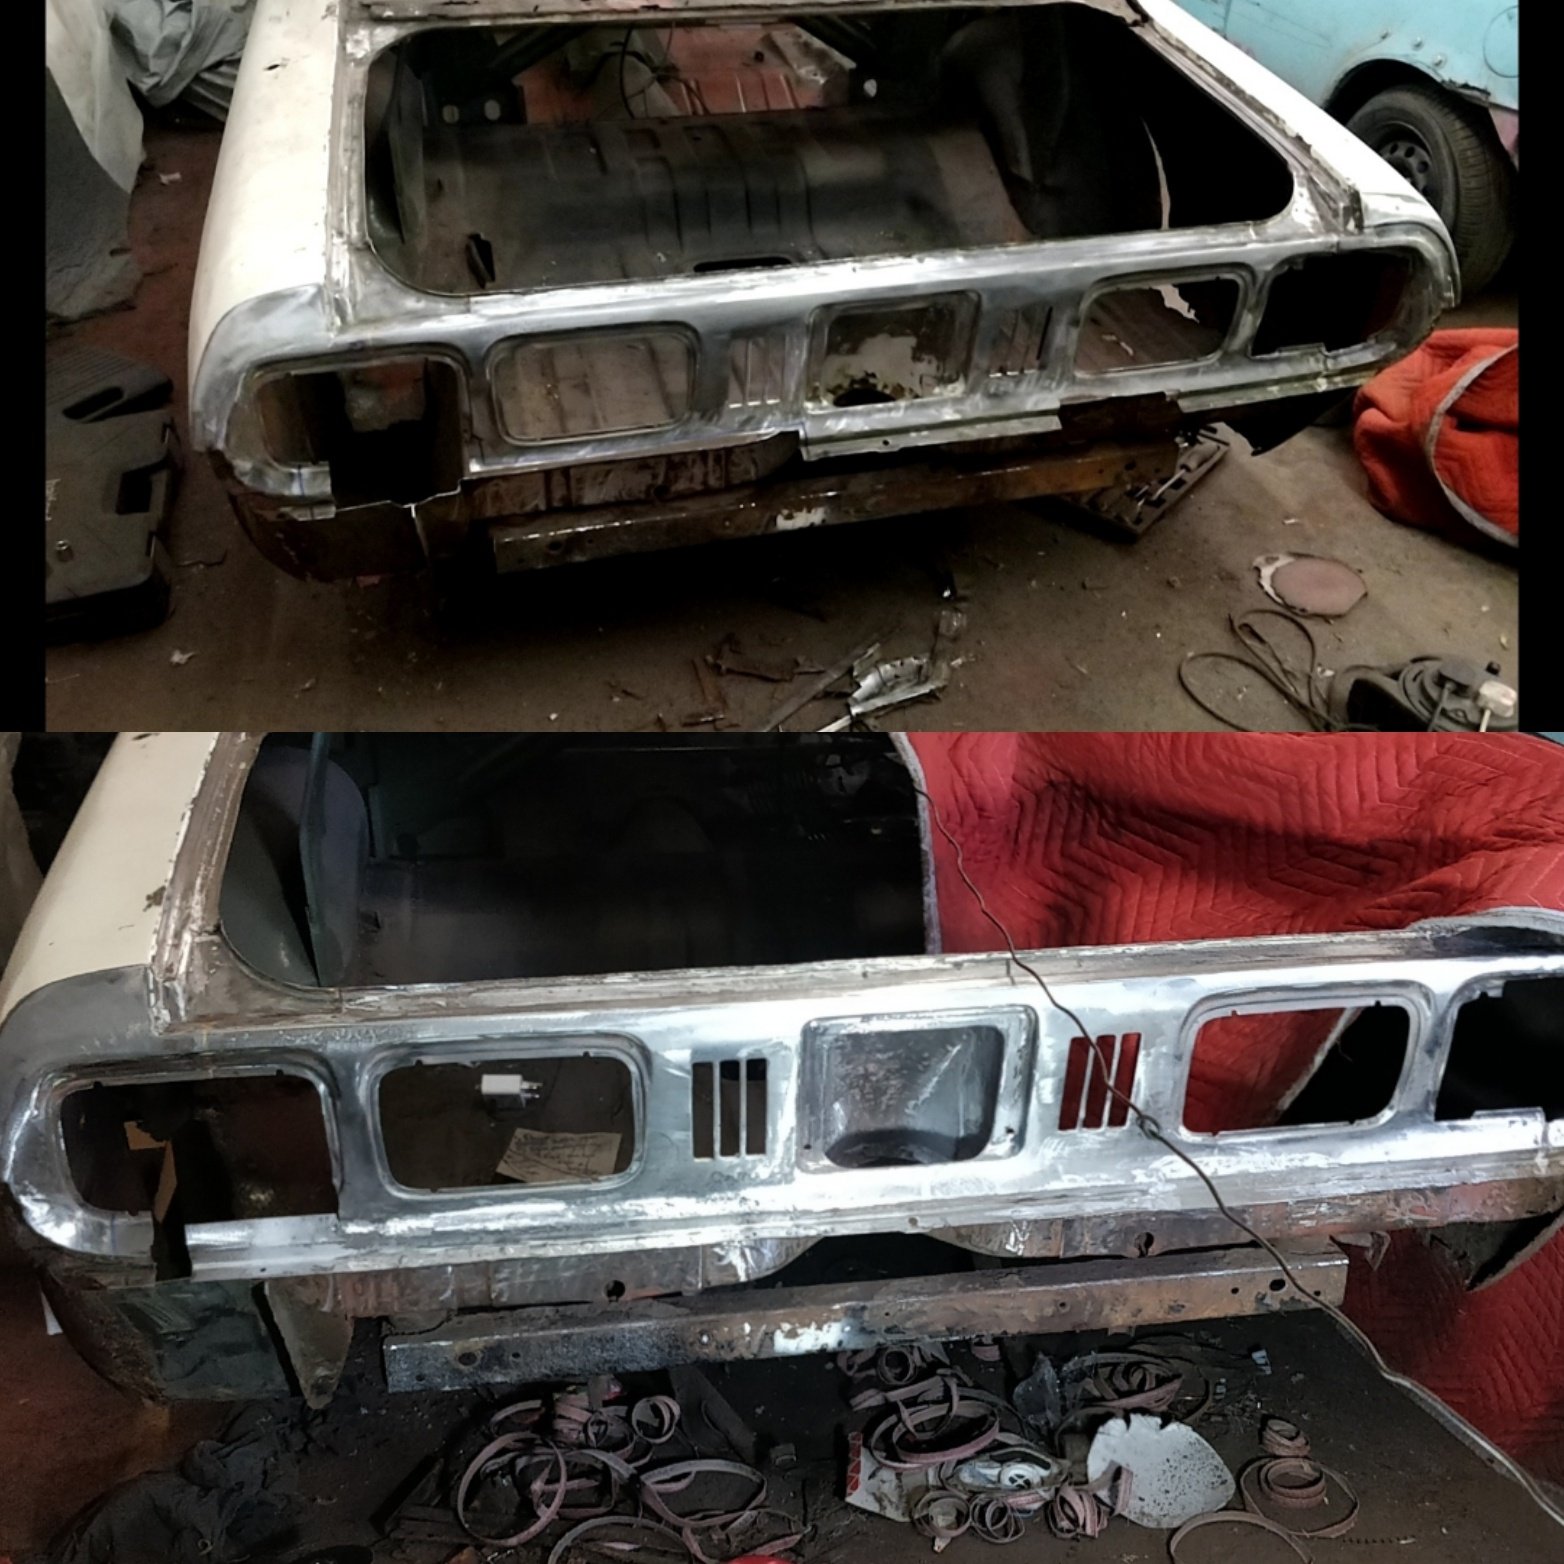
It's off the rotisserie for now! Needed to sort out the driveshaft which require the engine and gearbox to go back in. Got the axles sent away to be shortened and resplined by 105mm a side. That meant I should make an attempt at swapping the Altezza LSD and the 4.1 CWP into the diff head. No pics because I didn't really know what I was doing. But for those that are interested I ended up using the LSD side bearings and swapped the Estima pinion bearings onto the 4.1 pinion. The Altezza pinion bearings where thicker which made the pinion gear hit the diff case. I couldn't get the wear pattern right because I didn't have any shims other than the two that were already on the pinions. Got it close enough for the time being, will buy some shims or give it to someone else to finish off. Decided to run Coil-on-plugs instead of the dizzy relocation kit, mostly just to keep the engine bay looking simple and clean. Got a set of 1NZ coils, I'm thinking of casting up an adapter plate for them. Got the SQ engineering down-pull throttle linkage installed and got the accelerator cable shortened to suit. Made a vacuum block off plate, since I hope none of that stuff is needed anymore. Also at some stage I filled all the unneeded holes in the front radiator panel. Modded the accelerator pedal so it sits a bit closer to the other pedals, as before it was way off to the right. Two-piece driveshaft all mounted now too! Think I got the angles sorted after spending far too long trying to work it all out. It's an Altezza driveshaft with the front half shortened (yes I know the front section u-joint phasing is 90° out). In this photo you can also notice the sills have been strengthened (somehow missed that update somewhere). Used some 3mm angle and welded it the full length and ground back, so it's now really straight! Then boxed it back up to the floor, to try and stop dirt and moisture getting stuck in behind. Makes lifting the car along there way nicer! This is the centre bearing support mount, much thought was also put into this! Hopefully it's fine being welded to the seatbelt mounts haha. Still needs some doubler plates welded on to the other side of the tunnel.10 points
-
It's been an exciting few weeks getting updates on the car as more gets done. Here's a drop of what's going on at the moment. Not long now! To start with, I deloomed the original headlight hardness, removing odds and ends I won't use on there - Ran another wire which controls the fog lights - Relocated the battery wires to inside the cabin, the battery will sit under the passenger seat. I'll get a professional to do the rest from where I got it to - Relocated the alternator wiring so that I can run it with the engine harness 99399211_272930263826147_7742833918717460480_n by phillipbaines, on Flickr Decided to change the wastegate to a v-band style gate just for a bit more flexibility: 105598043_586600778717591_5386424791277872662_n by phillipbaines, on Flickr 106187882_329482148055910_2925692963242702194_n by phillipbaines, on Flickr 105597849_266782644422515_6616275111710471338_n by phillipbaines, on Flickr Dump pipe beginning to take shape: 105615022_644681836127246_411711451309123783_n by phillipbaines, on Flickr 105556436_270675250862943_1630855409840158444_n by phillipbaines, on Flickr 101563946_1663269867160856_6554872224073908224_n by phillipbaines, on Flickr 105411255_719960381903781_5357733621582254053_n by phillipbaines, on Flickr 105704969_2980500301985349_1671724521810053650_n by phillipbaines, on Flickr Bits and bobs: 101919373_692804254841049_2029492130350628864_n by phillipbaines, on Flickr 106179327_3535786496441321_3516887240554195971_n by phillipbaines, on Flickr 105491203_307504940295190_1570212433508974404_n by phillipbaines, on Flickr filter setup: 105522170_268305891113464_4252985428165995917_n by phillipbaines, on Flickr 105587316_1689267811249447_1407559088842431286_n by phillipbaines, on Flickr BOV to go here: 106248020_2354146954894435_1154358153800778069_n by phillipbaines, on Flickr Money shot: hngggggg 106112383_3220843104625837_1220634764419048857_o by phillipbaines, on Flickr Big plug to Glenn, he's doing a bloody good job! https://www.facebook.com/SyndicateFabrication/ Discussions and feedback is always welcome10 points
-
smashed some progress, on this today, thanks heaps to @Mitch.W for doing almost all the work while i stood around, talked shit and drunk beer. Mitch spent ages on the tig and fabbed up this lush new subframe on the bike. thicker rear stays in the same spot as the stock one but the thicker pipe looks way better. a nice flat frame with a wee kink at the end that all ties in nice and level with the tank to give a lush flat backbone to the bike. I cut the mounts off the swingarm for the shocks are remounted them on the inside of the swingarm to narrow the shocks up which also helped heaps with the bikes aesthetic. Nice wee tank mount, unfortunately theI cheapo chinese CG tank isnt level so the left side drops below frame, might grab a Jap CG tank if one ever pops up. m super stoked how it all turned out and cant wait to make a seat base for it. I might still shorten the rear guard out as i dont know if i like it out that far but will see once the seats sorted.10 points
-
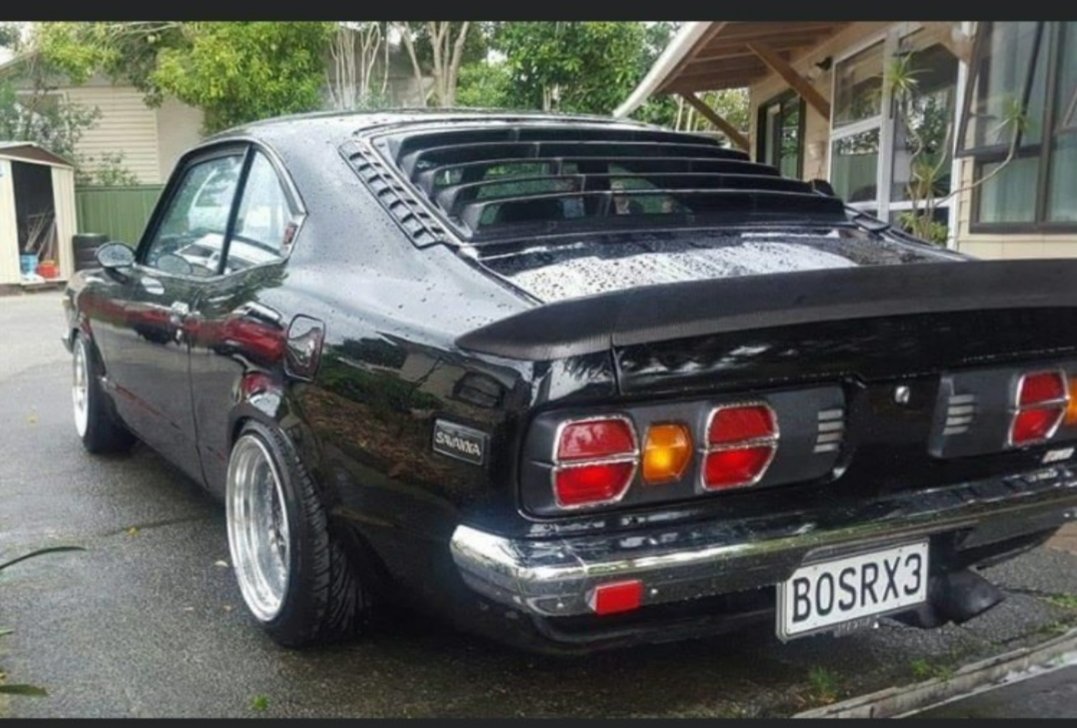
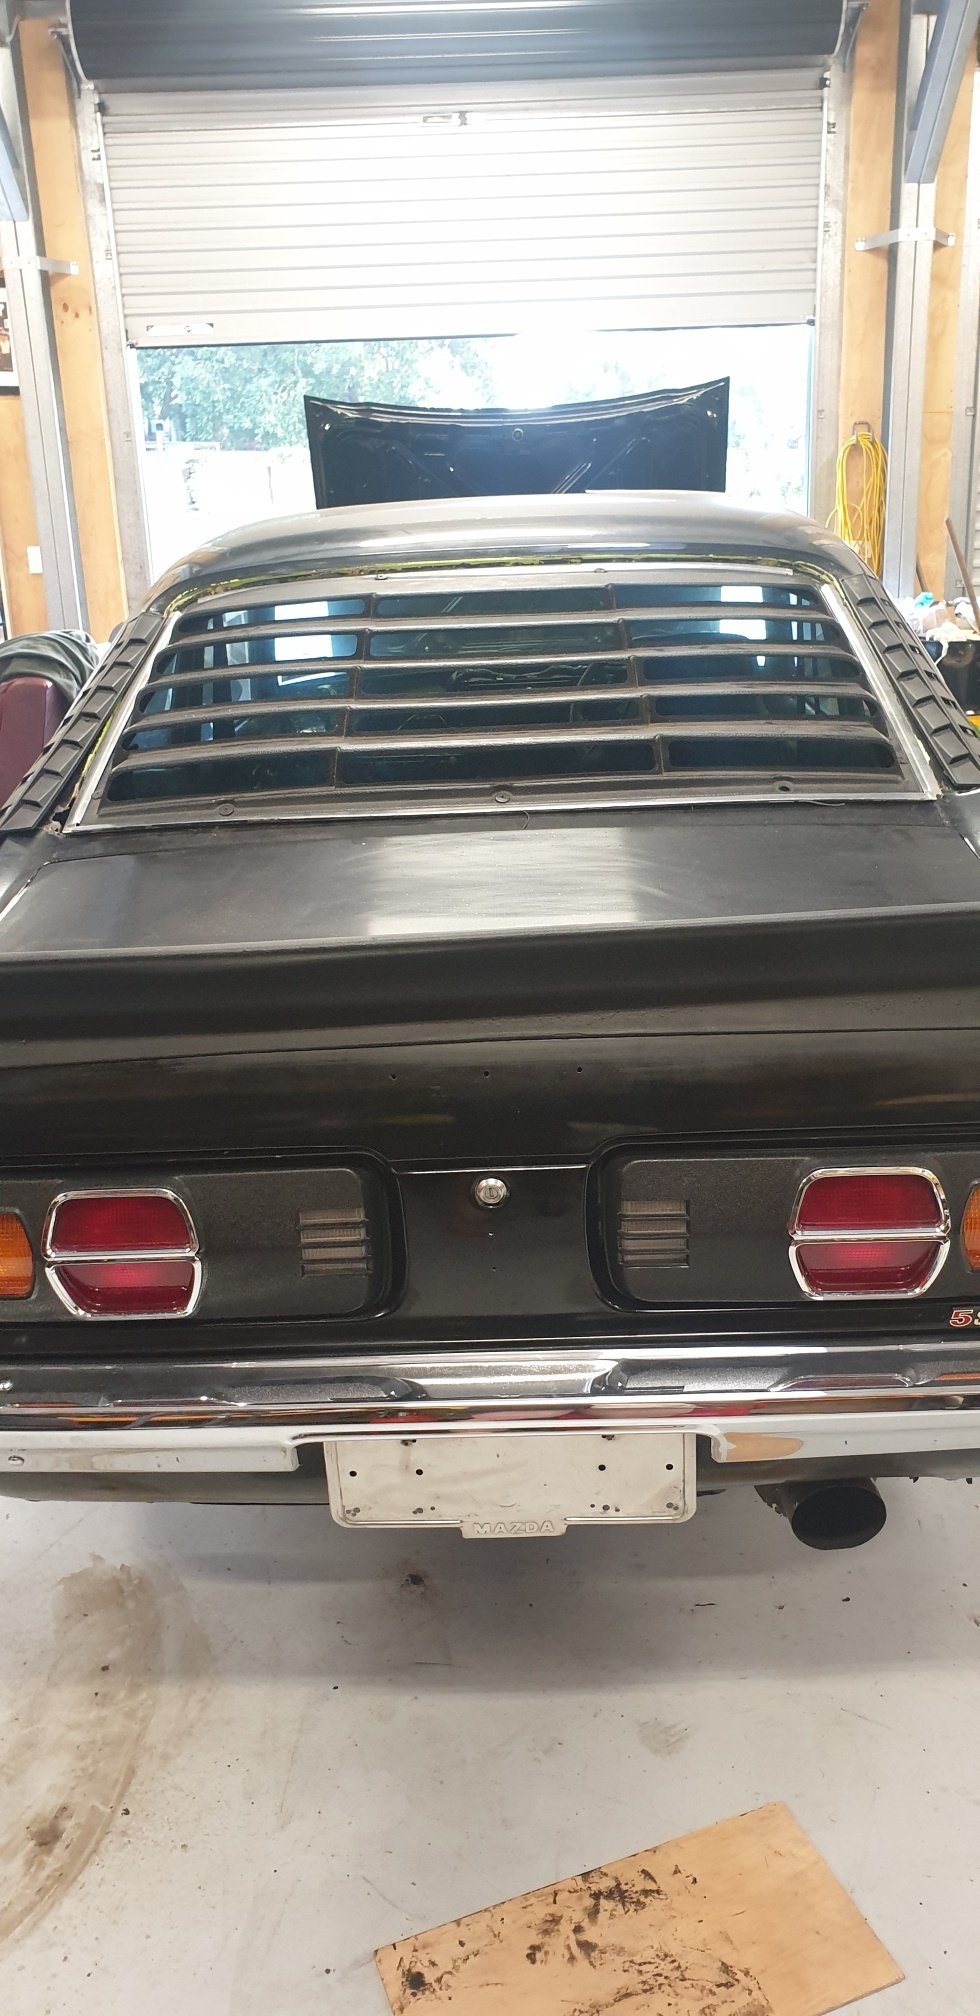
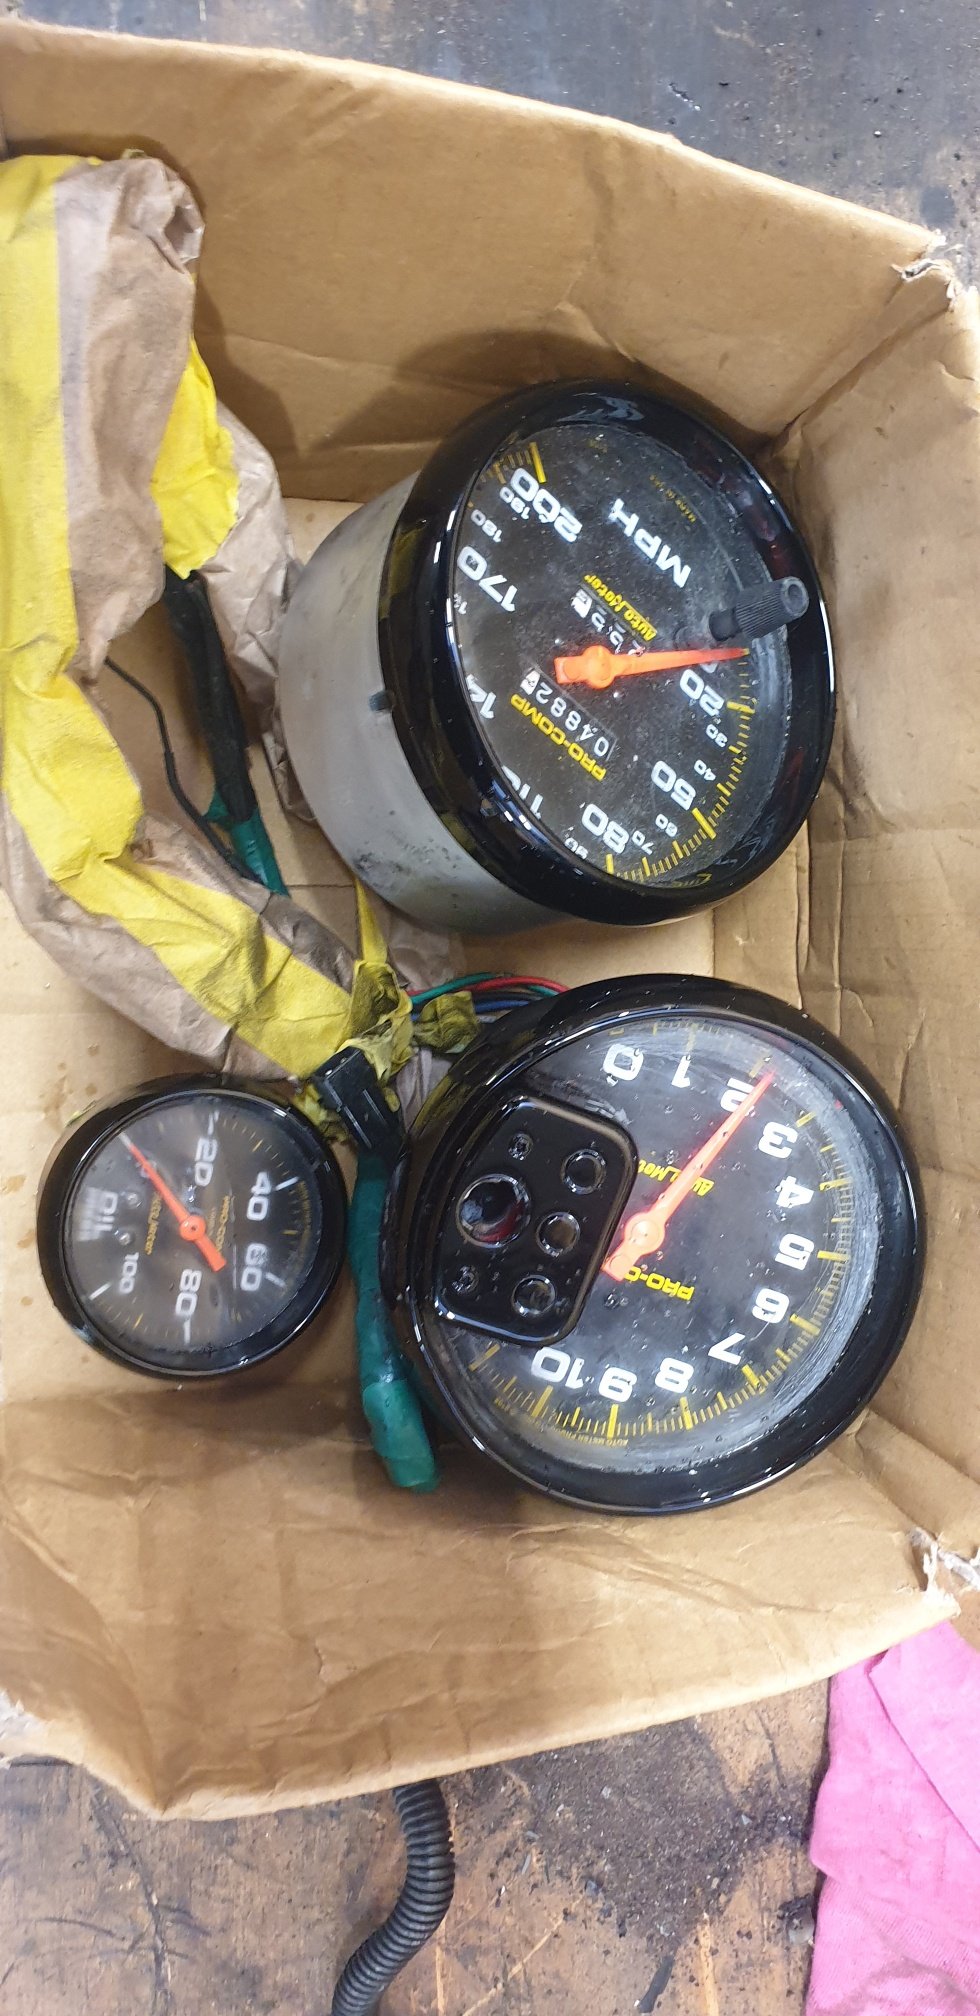
Few bits and pieces sorted in the last week, Scored a set of louvers for it, got sent a photo of it previously when it had them before flares, looked good so grabbed them for a rainy day( will see if i run them with the flares or not yet) Also had a mate repaint the gauge surrounds as i sanded off the black to find the factory silver had been sanded off so didnt have much choice but to repaint it so it was tidy. While he was there got him to repaint the dash topper black. @64valiant has the dash topper for retrimming at the moment, soon as i have that it can go back together. Booked in to go to rust repairs this weekend, I also booked it into Chrome Expression Session so time to get shit moving and get it there haha. Next 4 or 5 weeks going to be all go!!
9 points
-
So looking at the "path of least resistance" I've decided to stick to something closer to standard road height. Not only does it solve my rubbing front wheels, but it addresses a few other smaller challenges including a steering rag joint that is rubbing on a chassis leg. Someone on the Book of Faces posted a pic of their Thames running on 15 inch diameter Torque Thrust 2s at standard road height. He is running 6Js up front and 7J rears. The 15s fill the arches really nicely. The Torque Thrusts give a similar look to the Dragways, but the chrome on my Dragways is flogged and would cost moonbeams to re-chrome. The Torque Thrusts are alloy so no similar problems going forward.
6 points
-
Both sides have the inner re attached to outer and all the pie cuts stitched up. Lots of triming of the metal flare and managed to tack one side on today. Needed to get it out in the open to have a good look at how its sitting. Starts and finishes in the original body line and is same height measured from quarter glass as original, should be able to make the original wheel arch chrome work with a bit of bending
6 points
-
Just picked up this old girl off a mate of mine who had owned it for about 12 years. It's going to be a hell of a lot of work to get it legal ago. He built it as a bit of a skid hack and not alot else. Has a 2l in with with a bit of head work and a cam in it with a 5 speed box. Has been c notched which I'm not sire of i will continue down that route or hunt down a factory chassis . I've got the grill and head light surrounds to throw back on which should make it looks a bit tidier Anyway on to the pics Disco thread
5 points
-
Tamed some birds and welded the mufflers on It idles okay but is super rich and backfires Will have a yarn with weber specs at some point and get a idea on what jets I need Yeah she's rich I need to weld up some hangers and wack another flange in so it's easier to remove and refit and weld up a tail pipe5 points
-
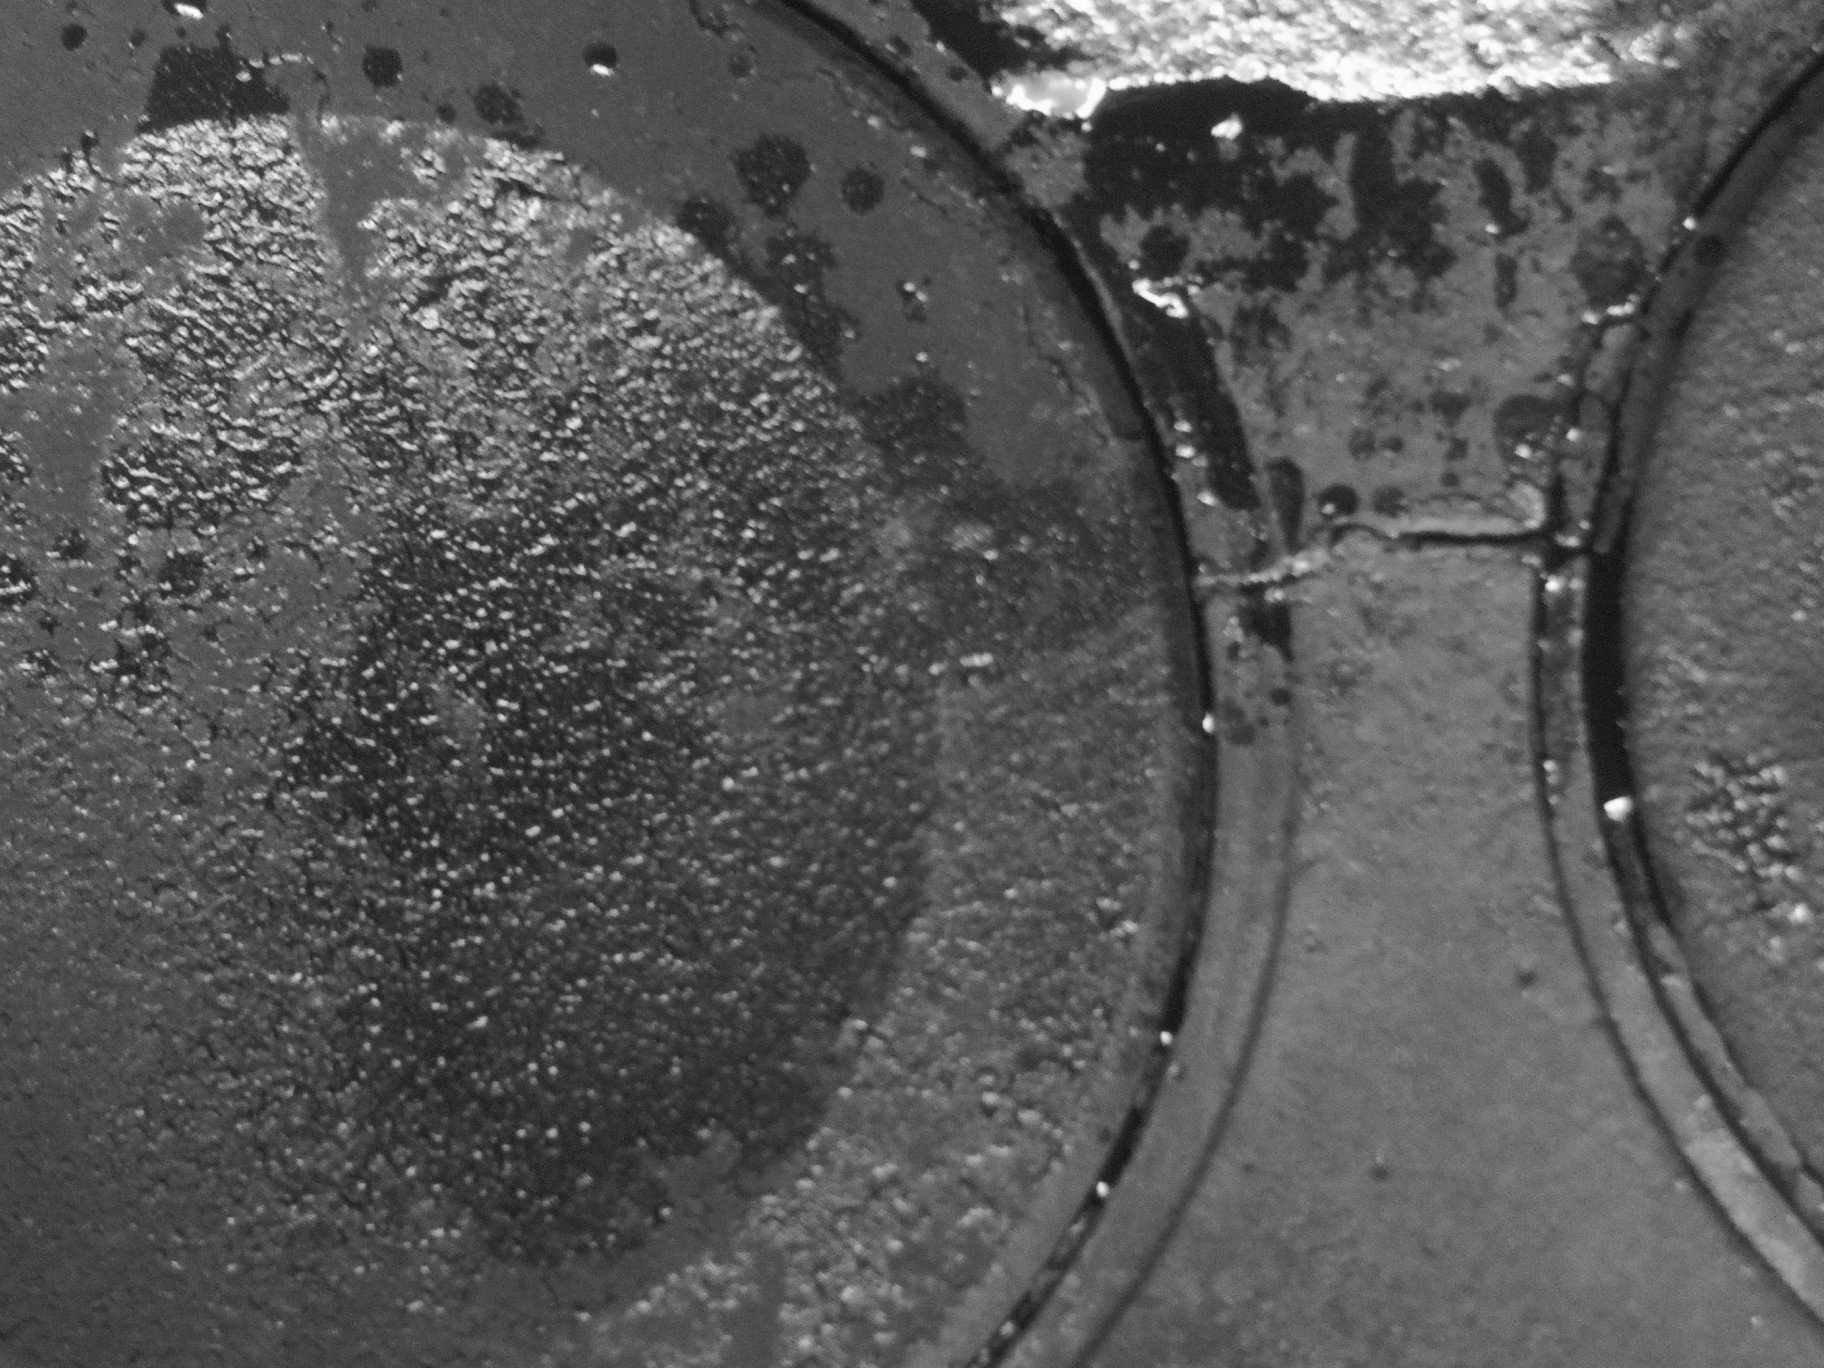
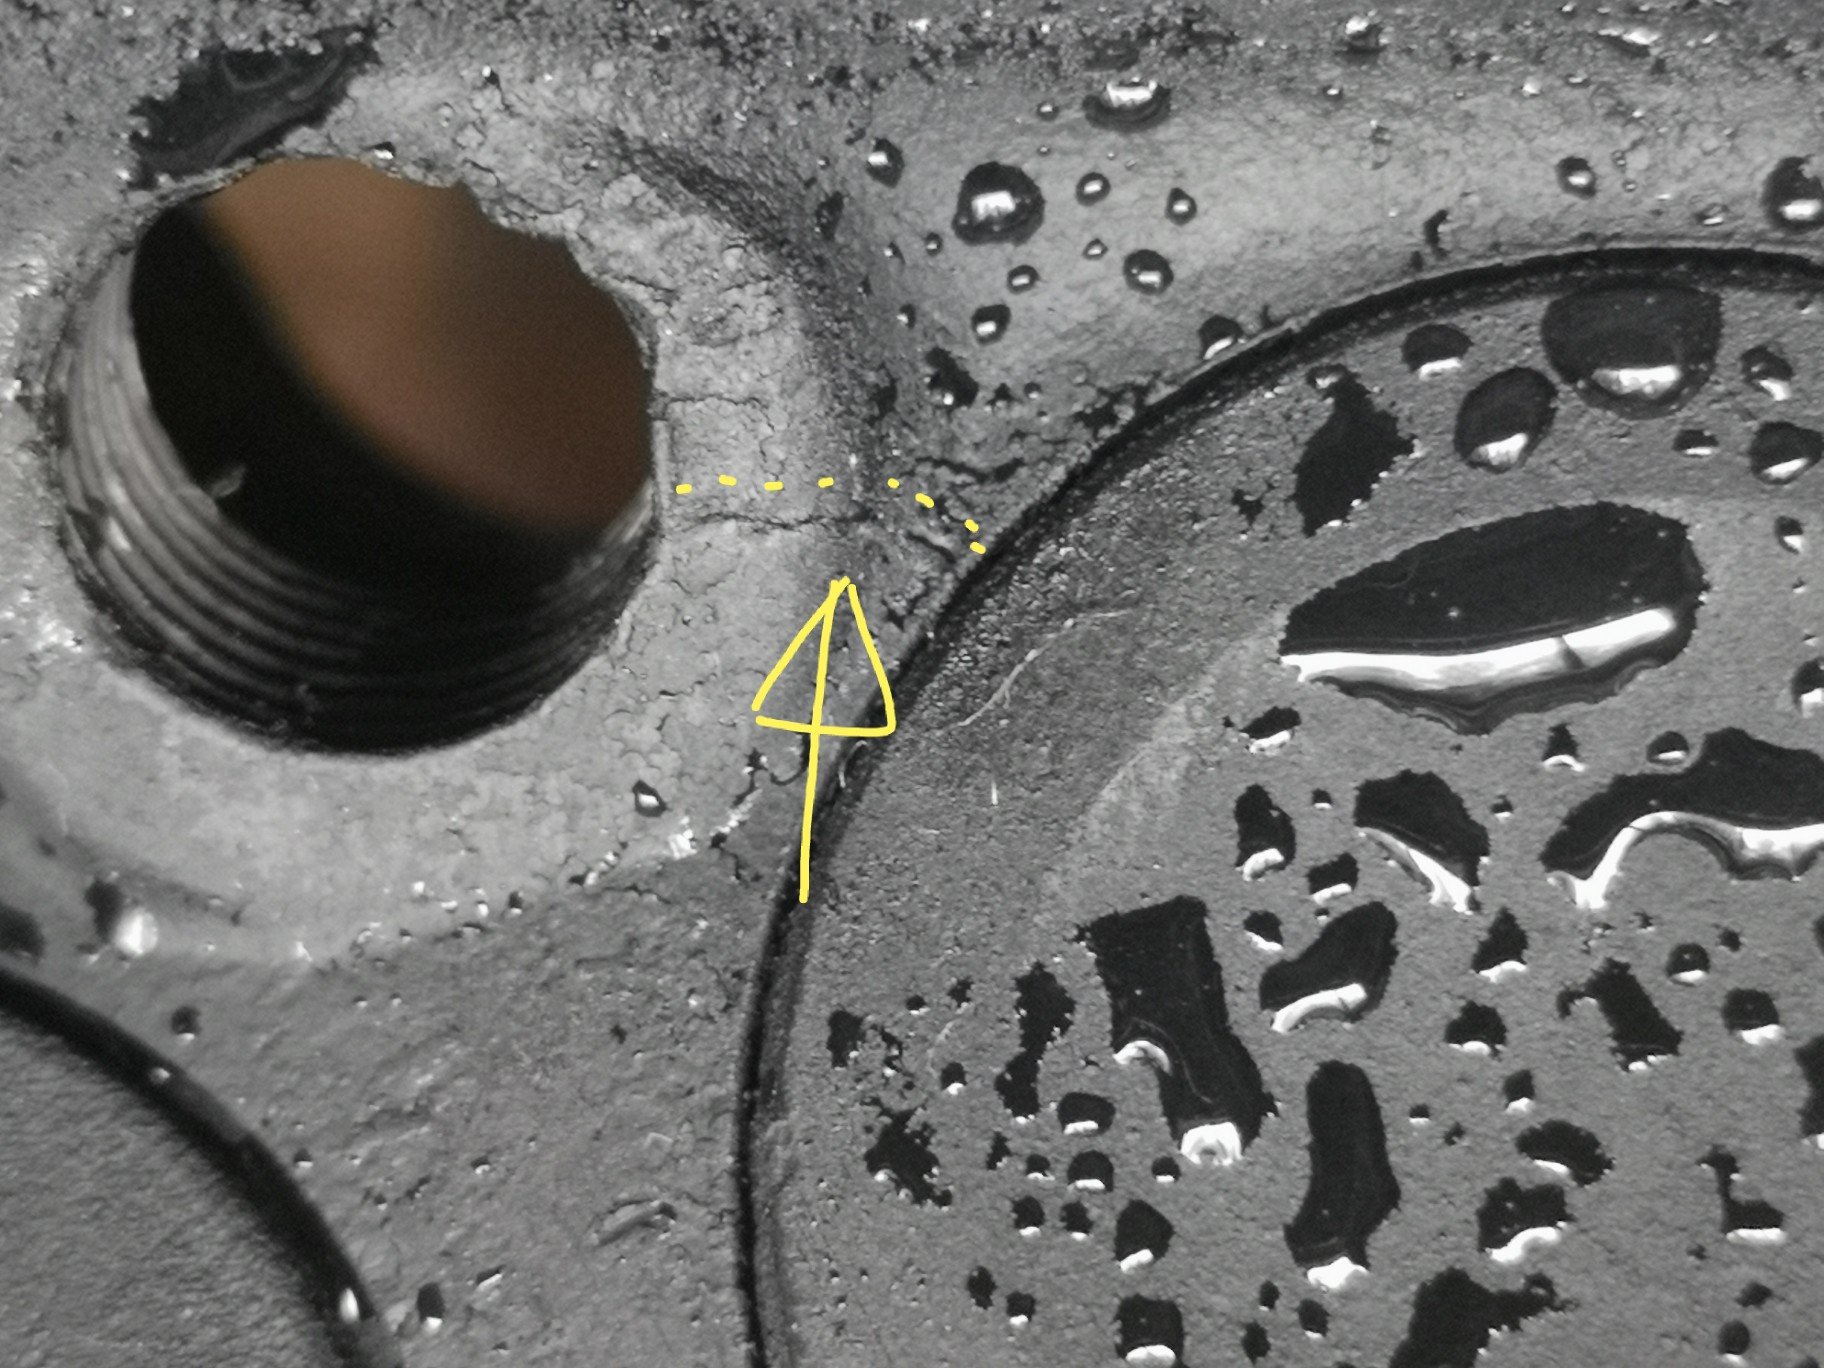
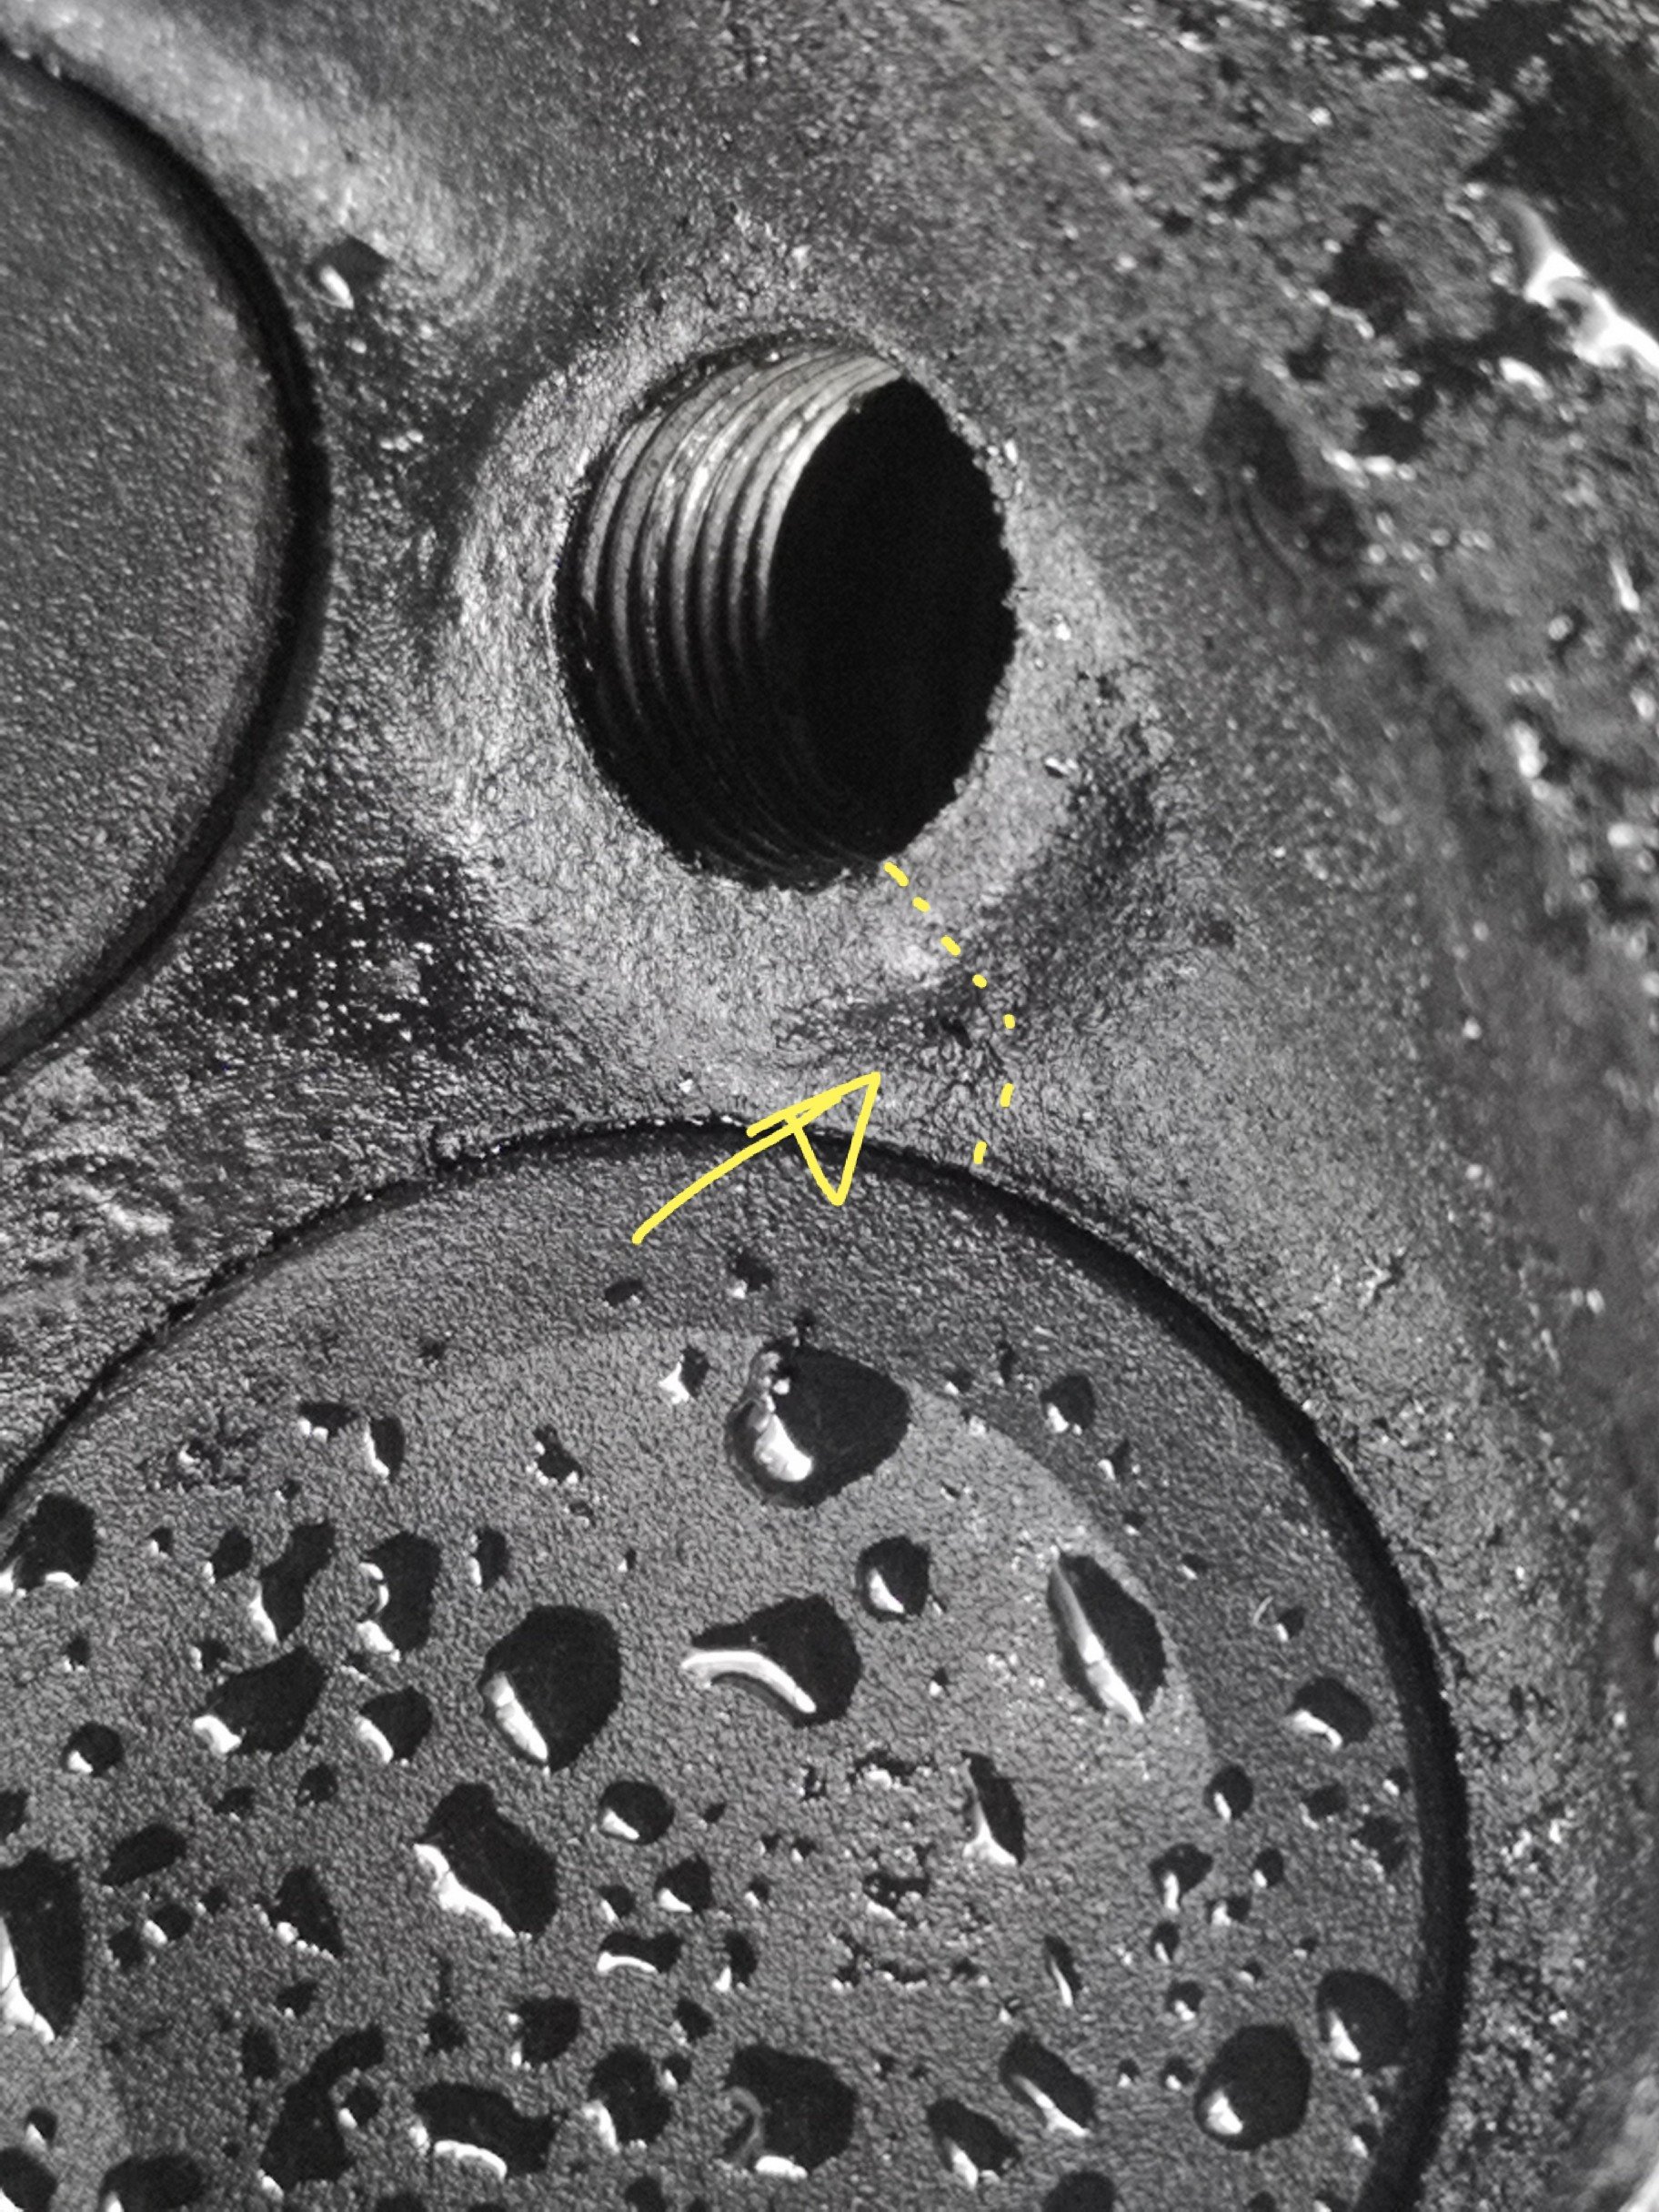
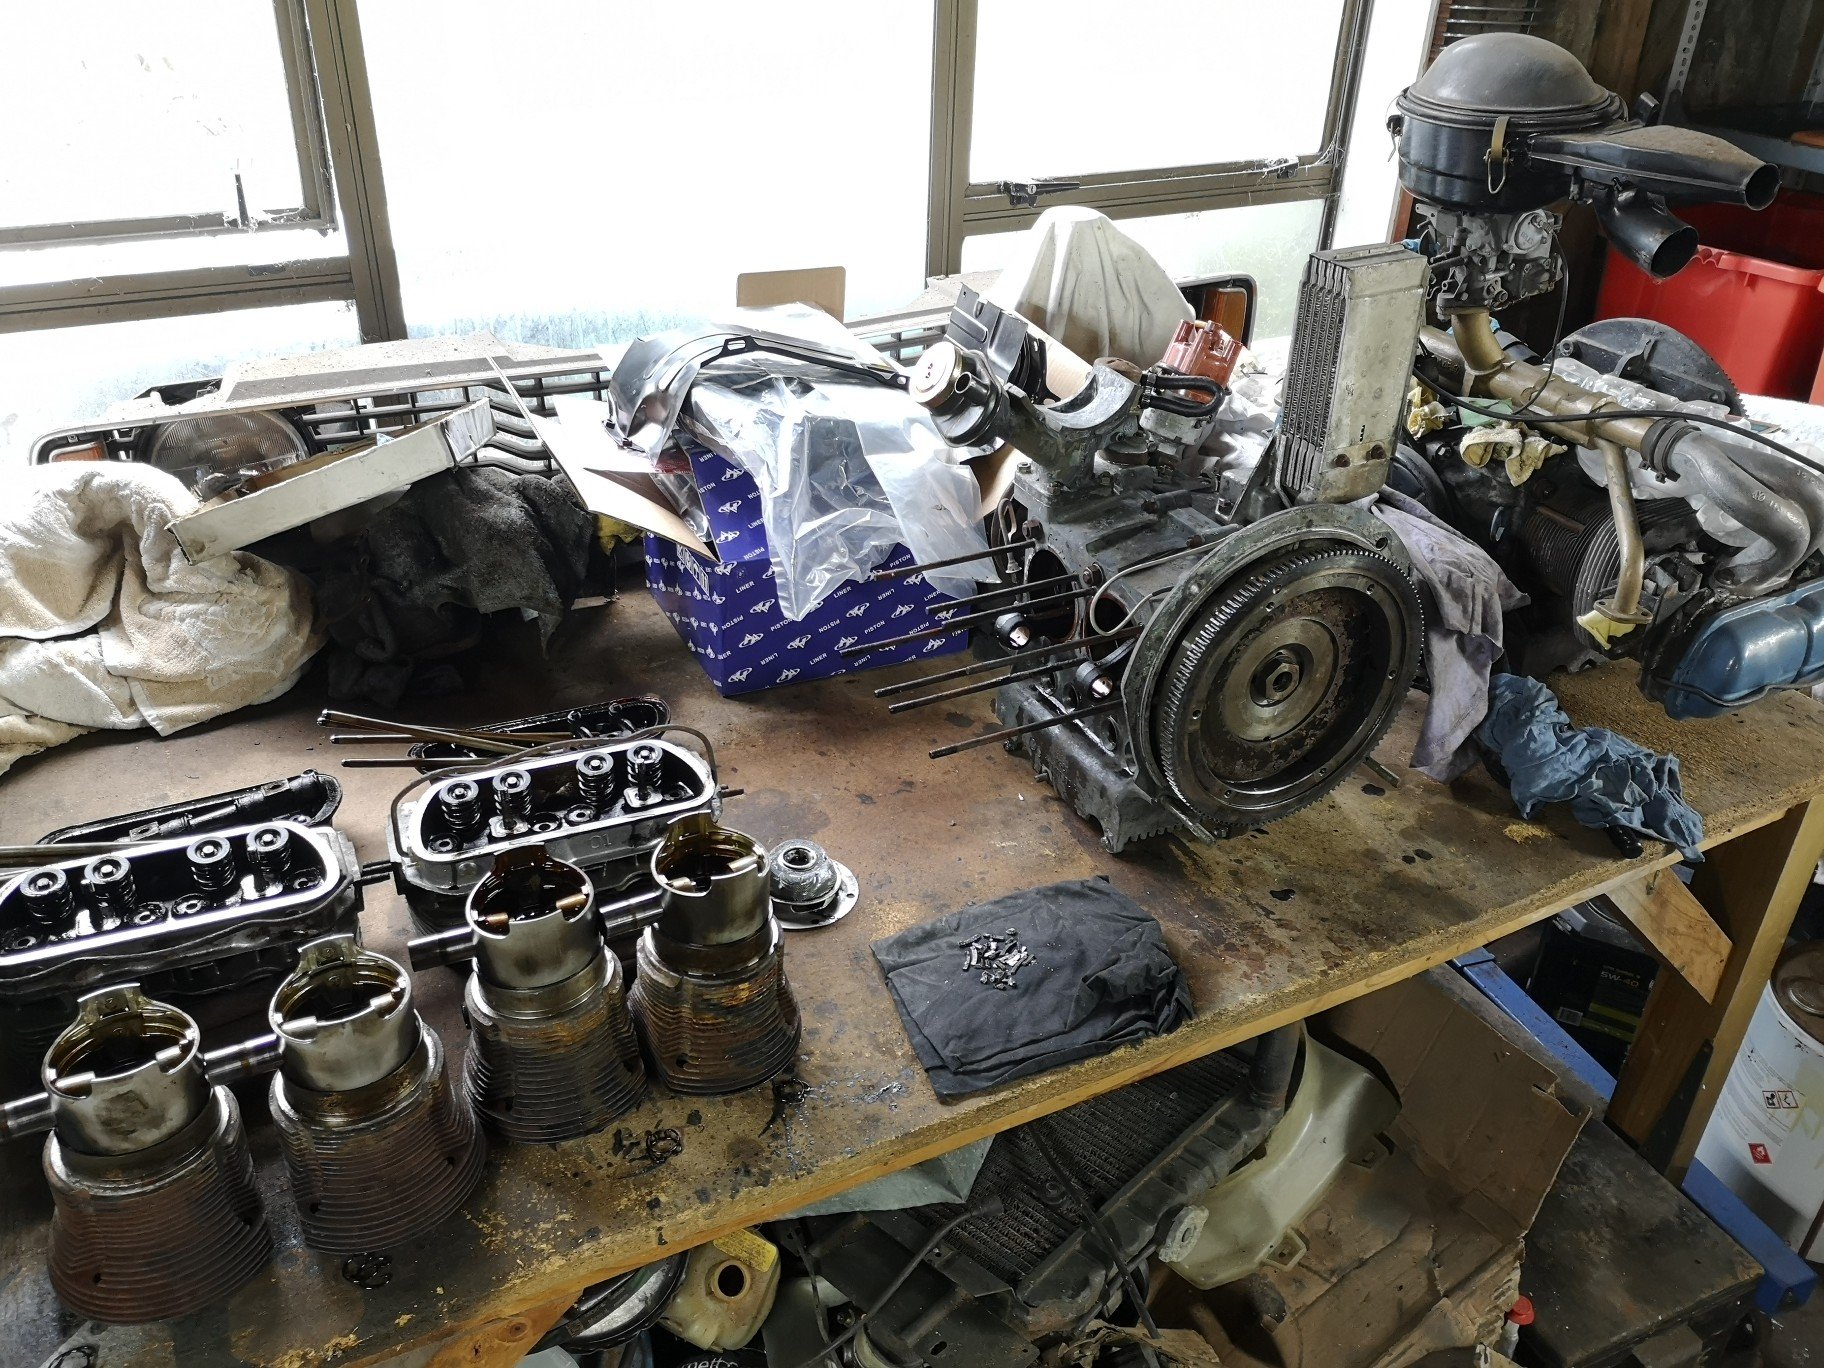
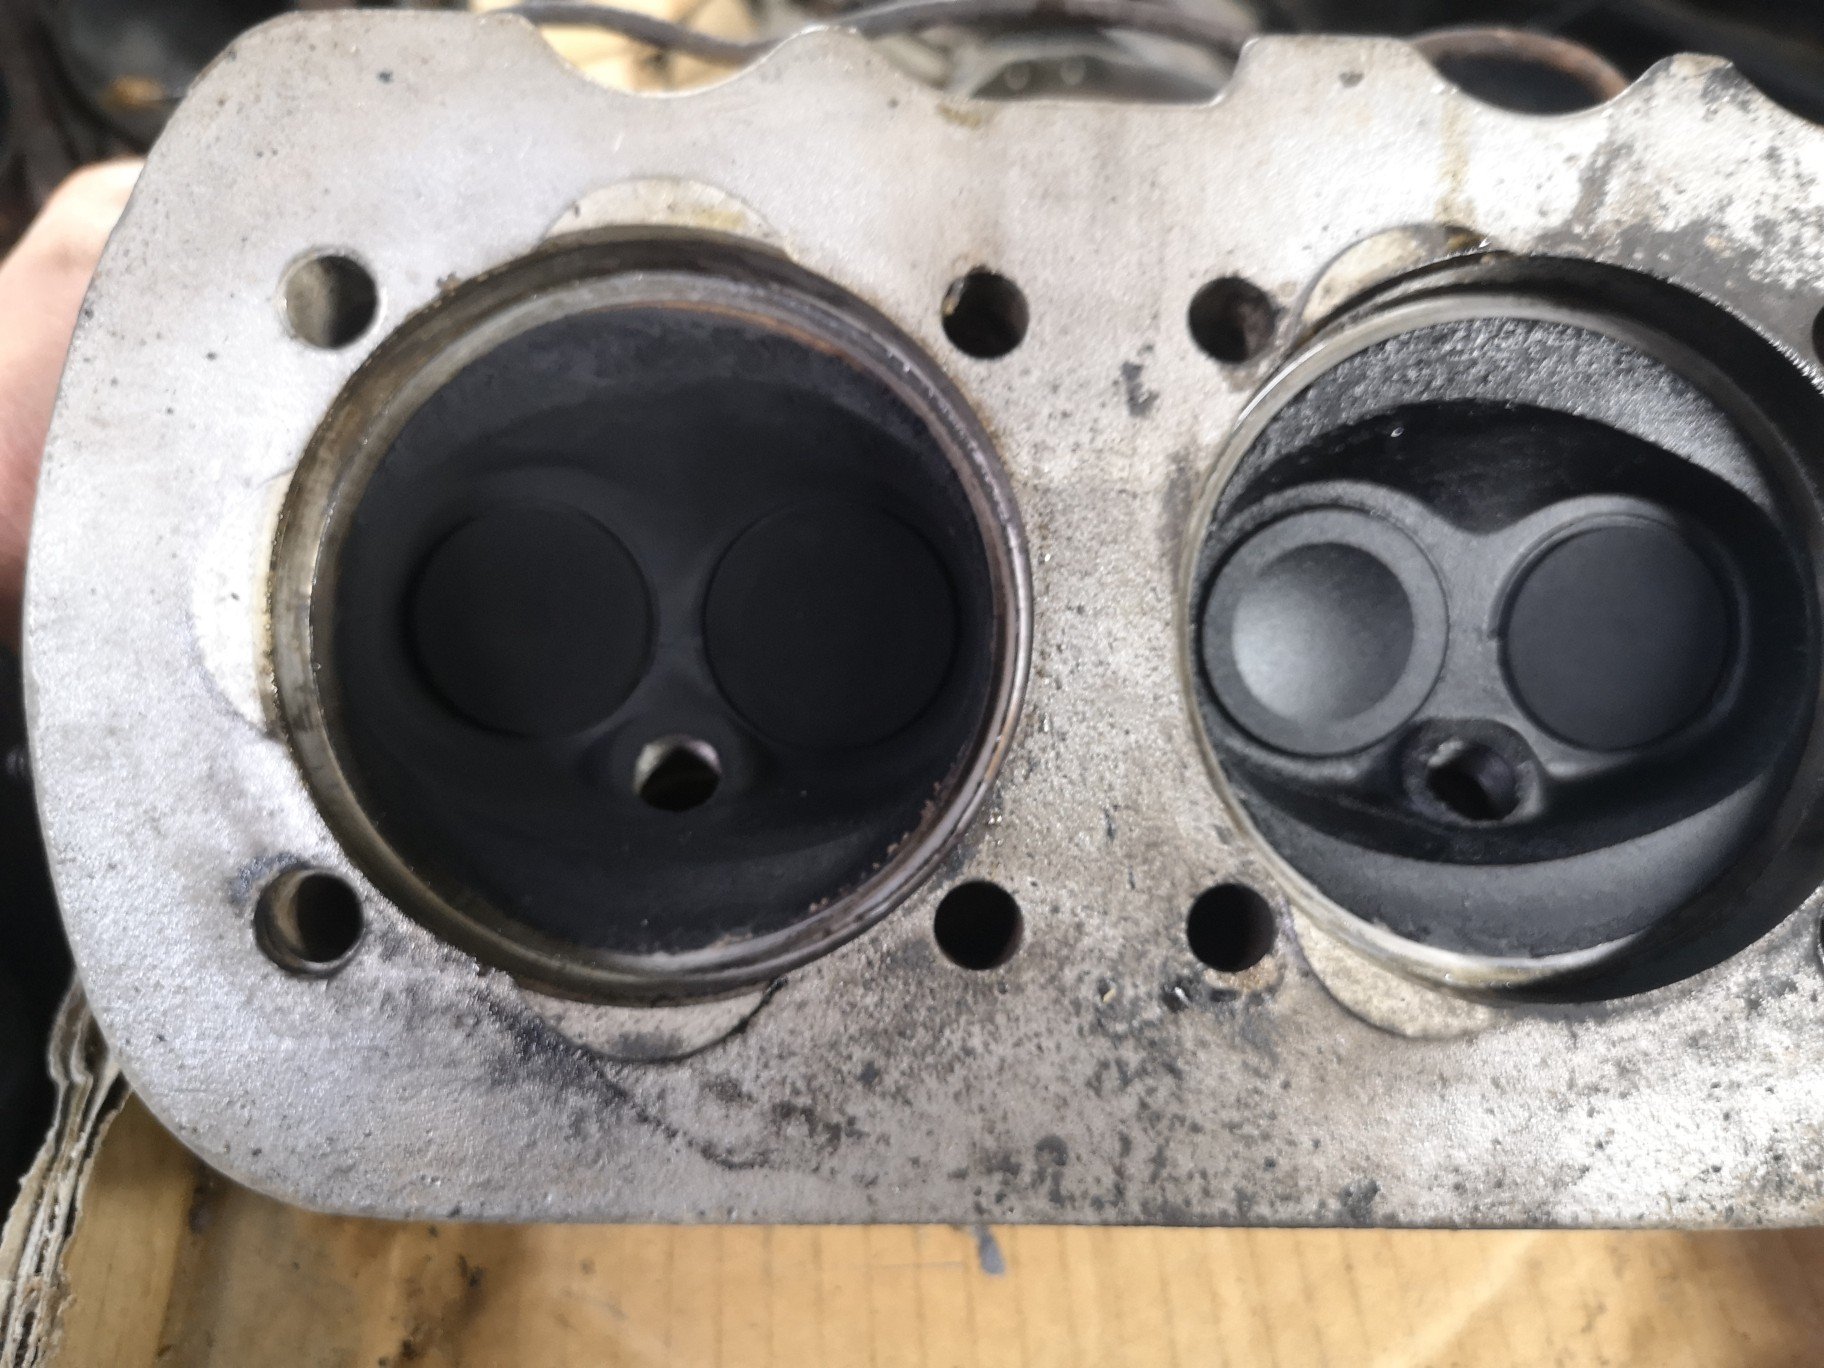
Heads are fucked.. Cracked, Cracked Crack close up.. Cracked in between spark plug and valve.. These are in the same place on both heads So that's pretty annoying but to be expected.. Gonna have to split the case to clean it out, no point doing this only for it to fail later on so with that in mind stroker crank and 1776 barrels should give me 2007cc. Just have to bore the case but also have to bore any heads that replace these.. might as well get a new set already bored for bigger barrels, 9 hundy for a pair ready to bolt on bar bit of port work I want to do. *sigh* Prob about time for this.. https://oldschool.co.nz/index.php?/topic/74619-yetchhs-more-problems-than-i-expected-bay-kombi/
5 points
-
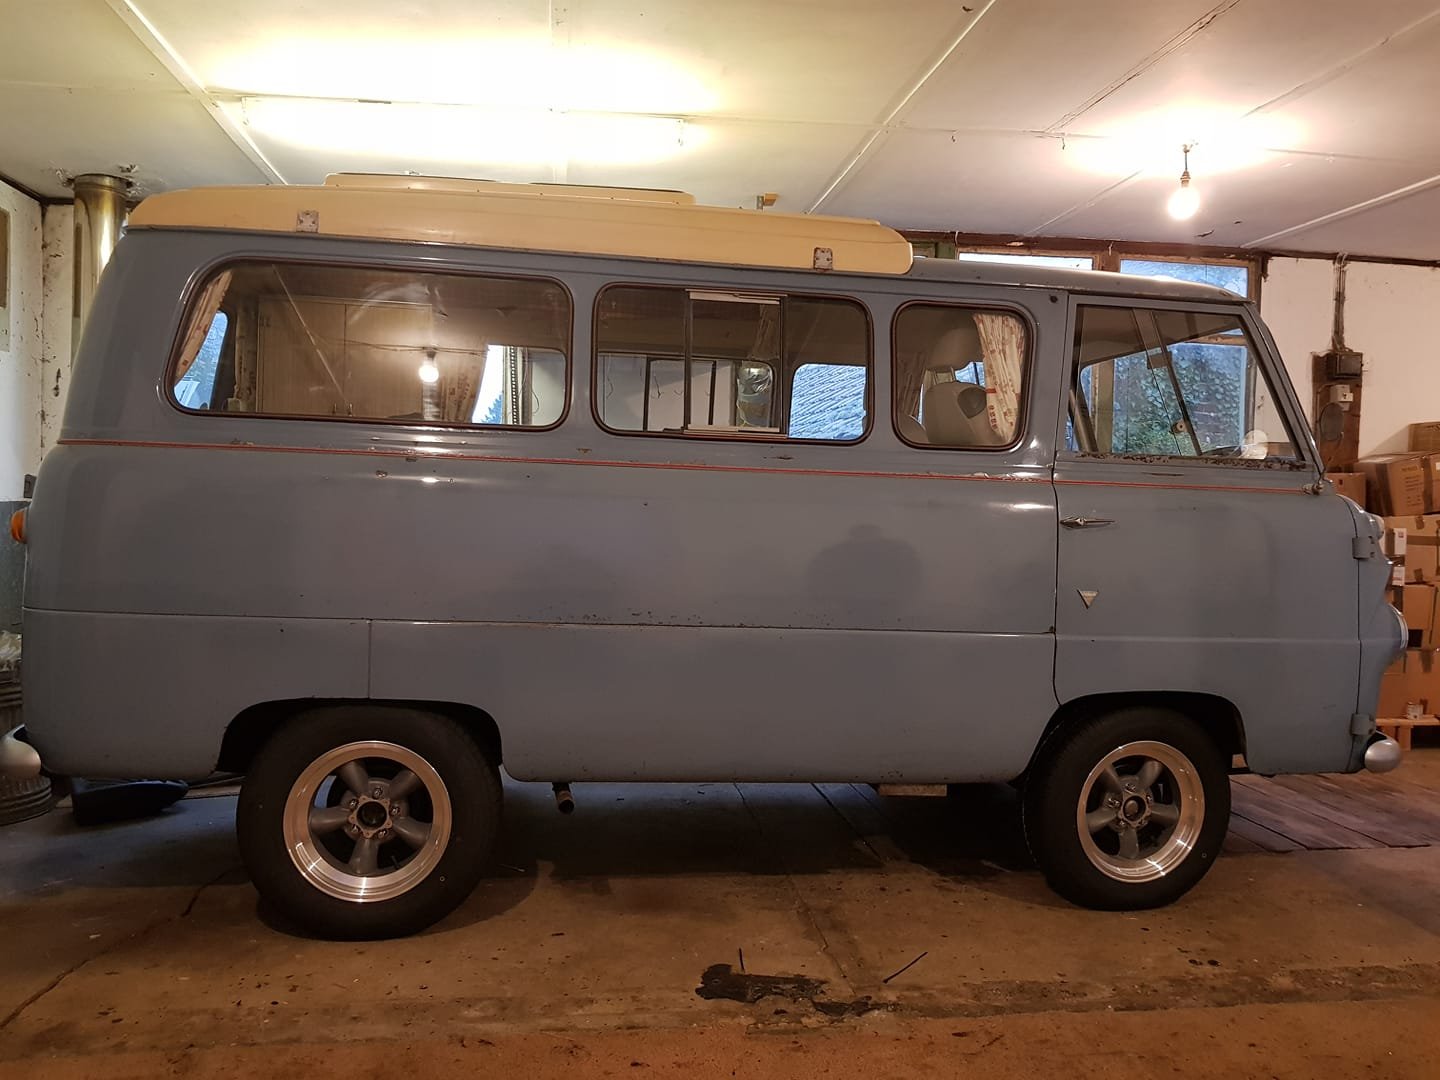
Bit of a shakedown run out to Lake Sumner over the weekend. Back in her natural habitat, gravel roads. Went like a champ!
5 points
-
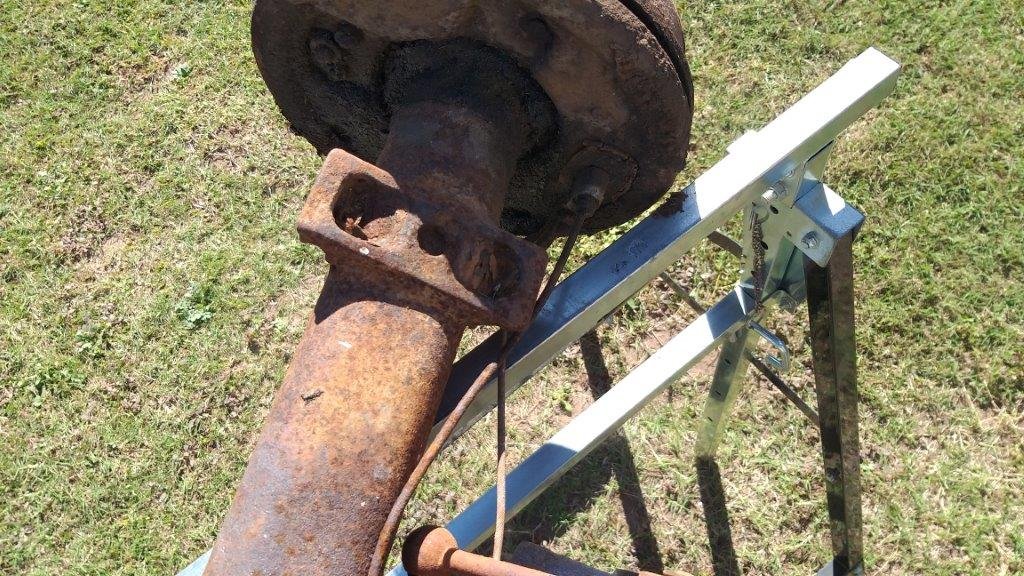
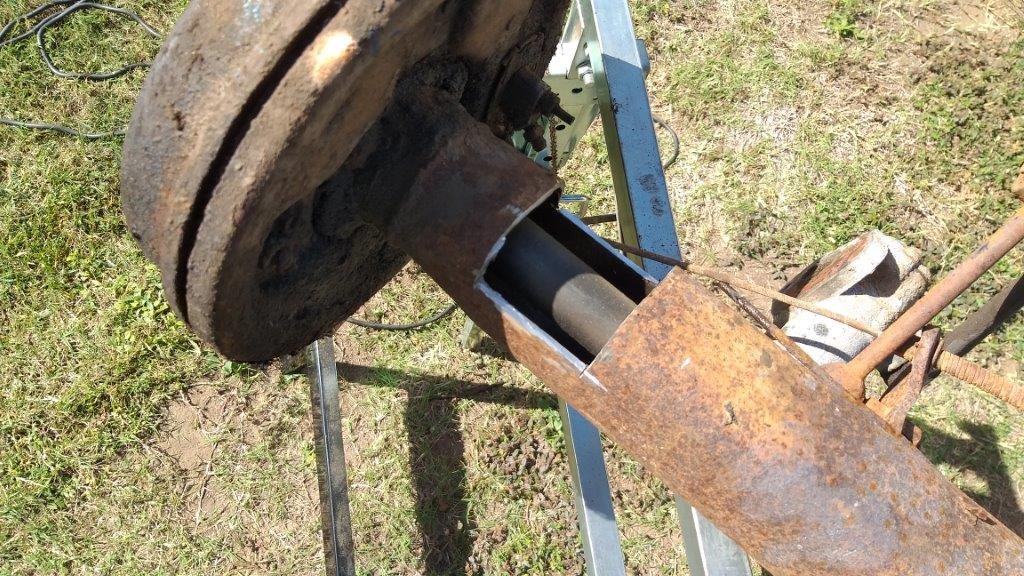
Having set a new direction I started puzzling the next steps. I'm still keen to replace the Thames rear axle with the Toyota. Reasons being greater availability of spares and diff ratios for the Toyota as well as bigger drum brakes. So current thinking is to fit up the diff first and then I can fine tune the front to match by making up some spacers between my newly fabricated front beam mounting brackets and the beam itself. Getting the front beam further away from the chassis gives me the added advantage of dropping the engine and gearbox lower to the ground which not only buys me a lower centre of gravity, but also gives me more clearance between the chassis rail and my clutch slave cylinder which up to now have been in close contact with each other. The gearbox bell housing will also clear the rear wall of the engine box whereas before they were touching and I was looking at having to notch the wall. So all round I'm killing a few birds with a single stone. With this all decided yesterday I set about sorting out the axle perches for the Toyota diff. I took a bit of a short cut by cutting the original Thames mounts off the spare Thames axle that I picked up in New South Wales earlier in the year and that has been languishing in the back of my other HiAce parts van since then. I felt a bit guilty for destroying the old housing, but it's for the greater good. A quick cutty, cutty with my favourite little grinder of angles and I'm half way there. Just need to glue them onto the HiAce axle
5 points
-
I chipped away at the rad piping and associated stuff this week, and finally kicked the old bitch into life on Saturday morning for some functional tests. The setup appears to work better than before, the return pipe is noticeably cooler than the out, and it didn't get hot enough to kick the fan in although I let it idle for quite a while after getting it up to temp. This is positive. During the week I swapped out the locking hubs on the y60 axles, these had some nice manual lockers, whereas the y61 axles came with some factory auto lockers. I did manualise these though. I also made some mesh guarding for the rad to prevent stone damage. I just tek screwed this on but will replace those with rivnuts when I get around to it. On Saturday morning I picked some rotors up and cracked on with refreshing the swivel hubs. I give them some extra loving apart from the swivel scraper, I replaced the bottom swivel bearing on both as they were a little corroded, plus the main inner axle seals plus the inner hub seals. I washed the wheels bearings out and repacked them, everything looked pretty good otherwise. The axles were on a pallet sitting on some trestles, so after doing the first one I moved the pallet outside to spin it around for better access to the other side. At this point my forklift spat the dummy and stopped working, rather inconveniently sitting halfway out the shed door. I had just topped it up with diesel, and a similar thing happened the last time I topped it up. My guess it there is a whole lot of crap in the bottom of the tank and it sucked up something ugly. This annoyed me considerably. I did eventually get it going but it isn't happy, it will need some more loving I imagine At the time I ended up dragging it out of the way and craning the axles onto the truck deck so I could continue work... The results of the weekends work; Mmm shiny. Next job is to strip and check the calipers, I have some EBC yellowstuff pads on the way, they should be here tomorrow, so it should all be together and ready to go into the truck in a couple of days.5 points
-
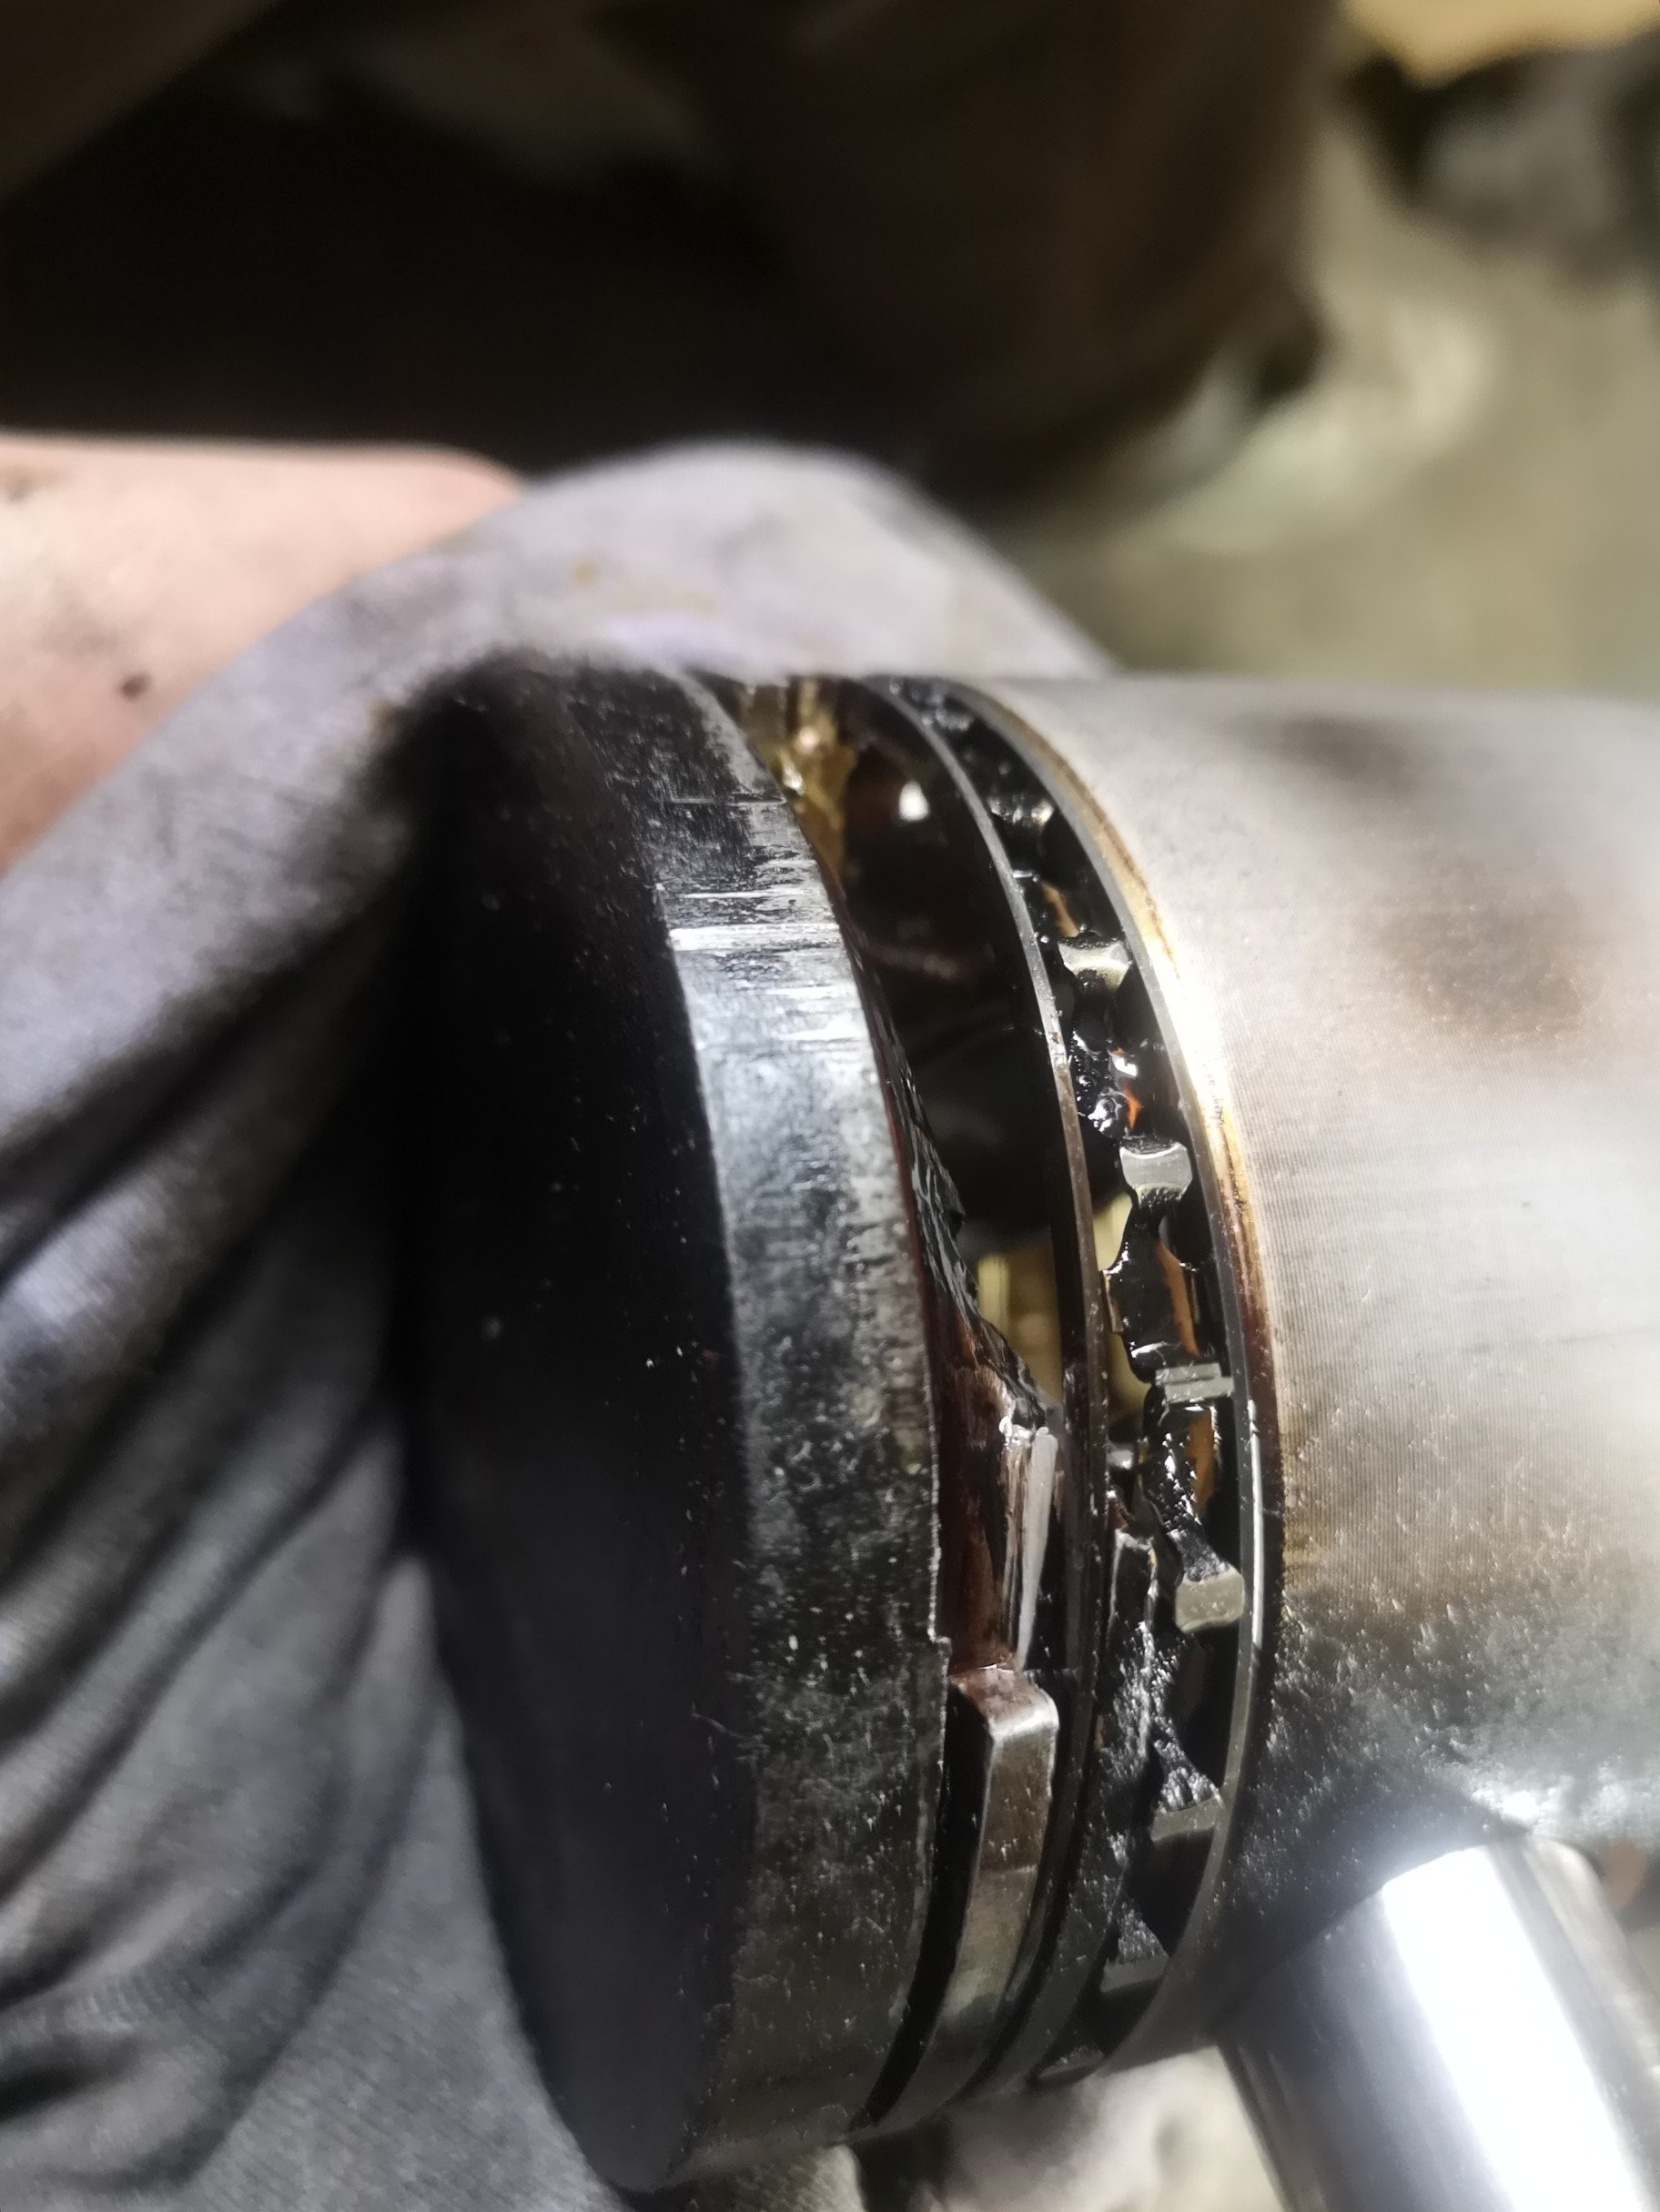
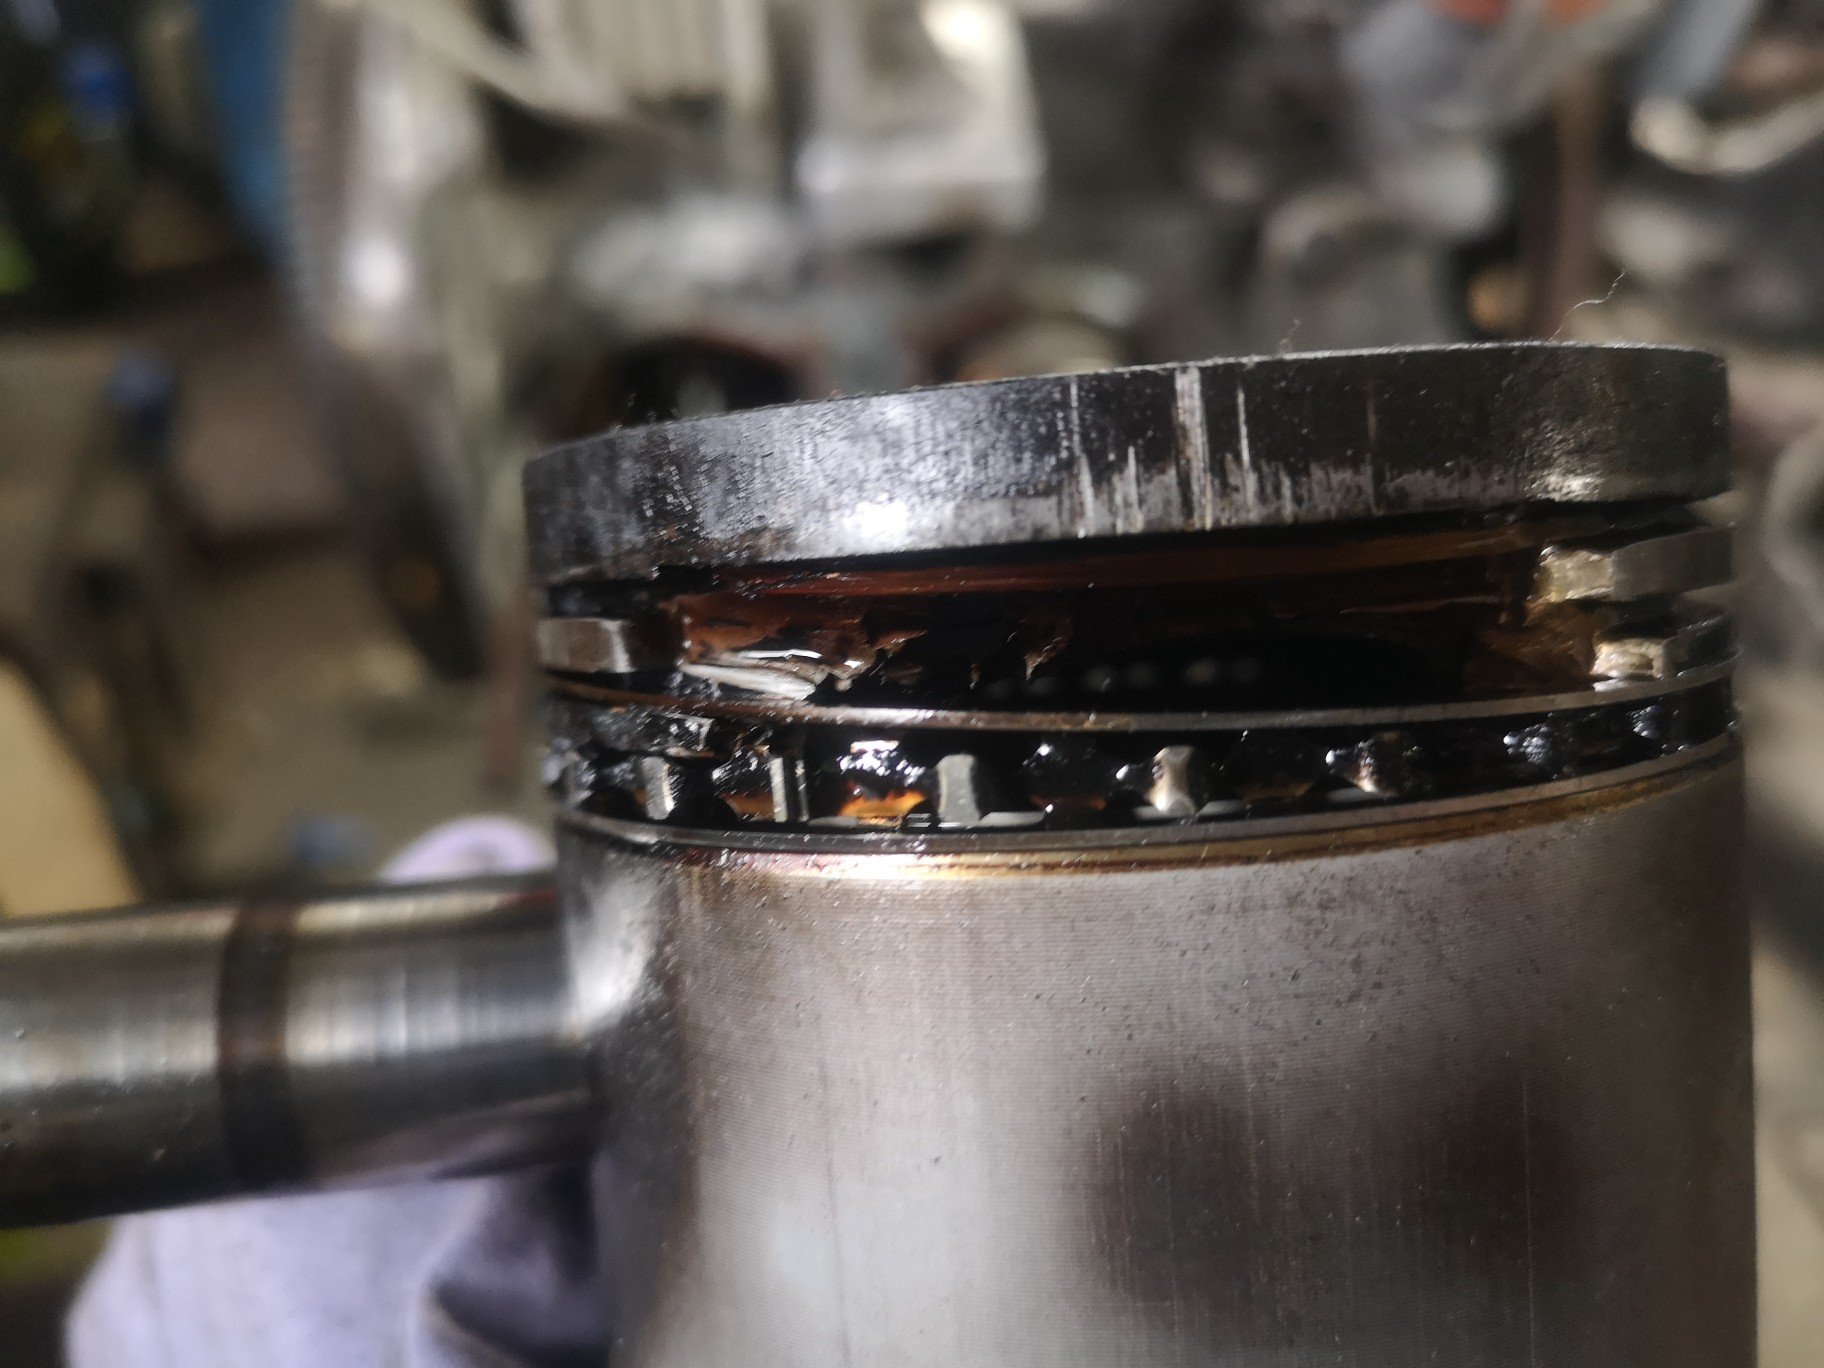
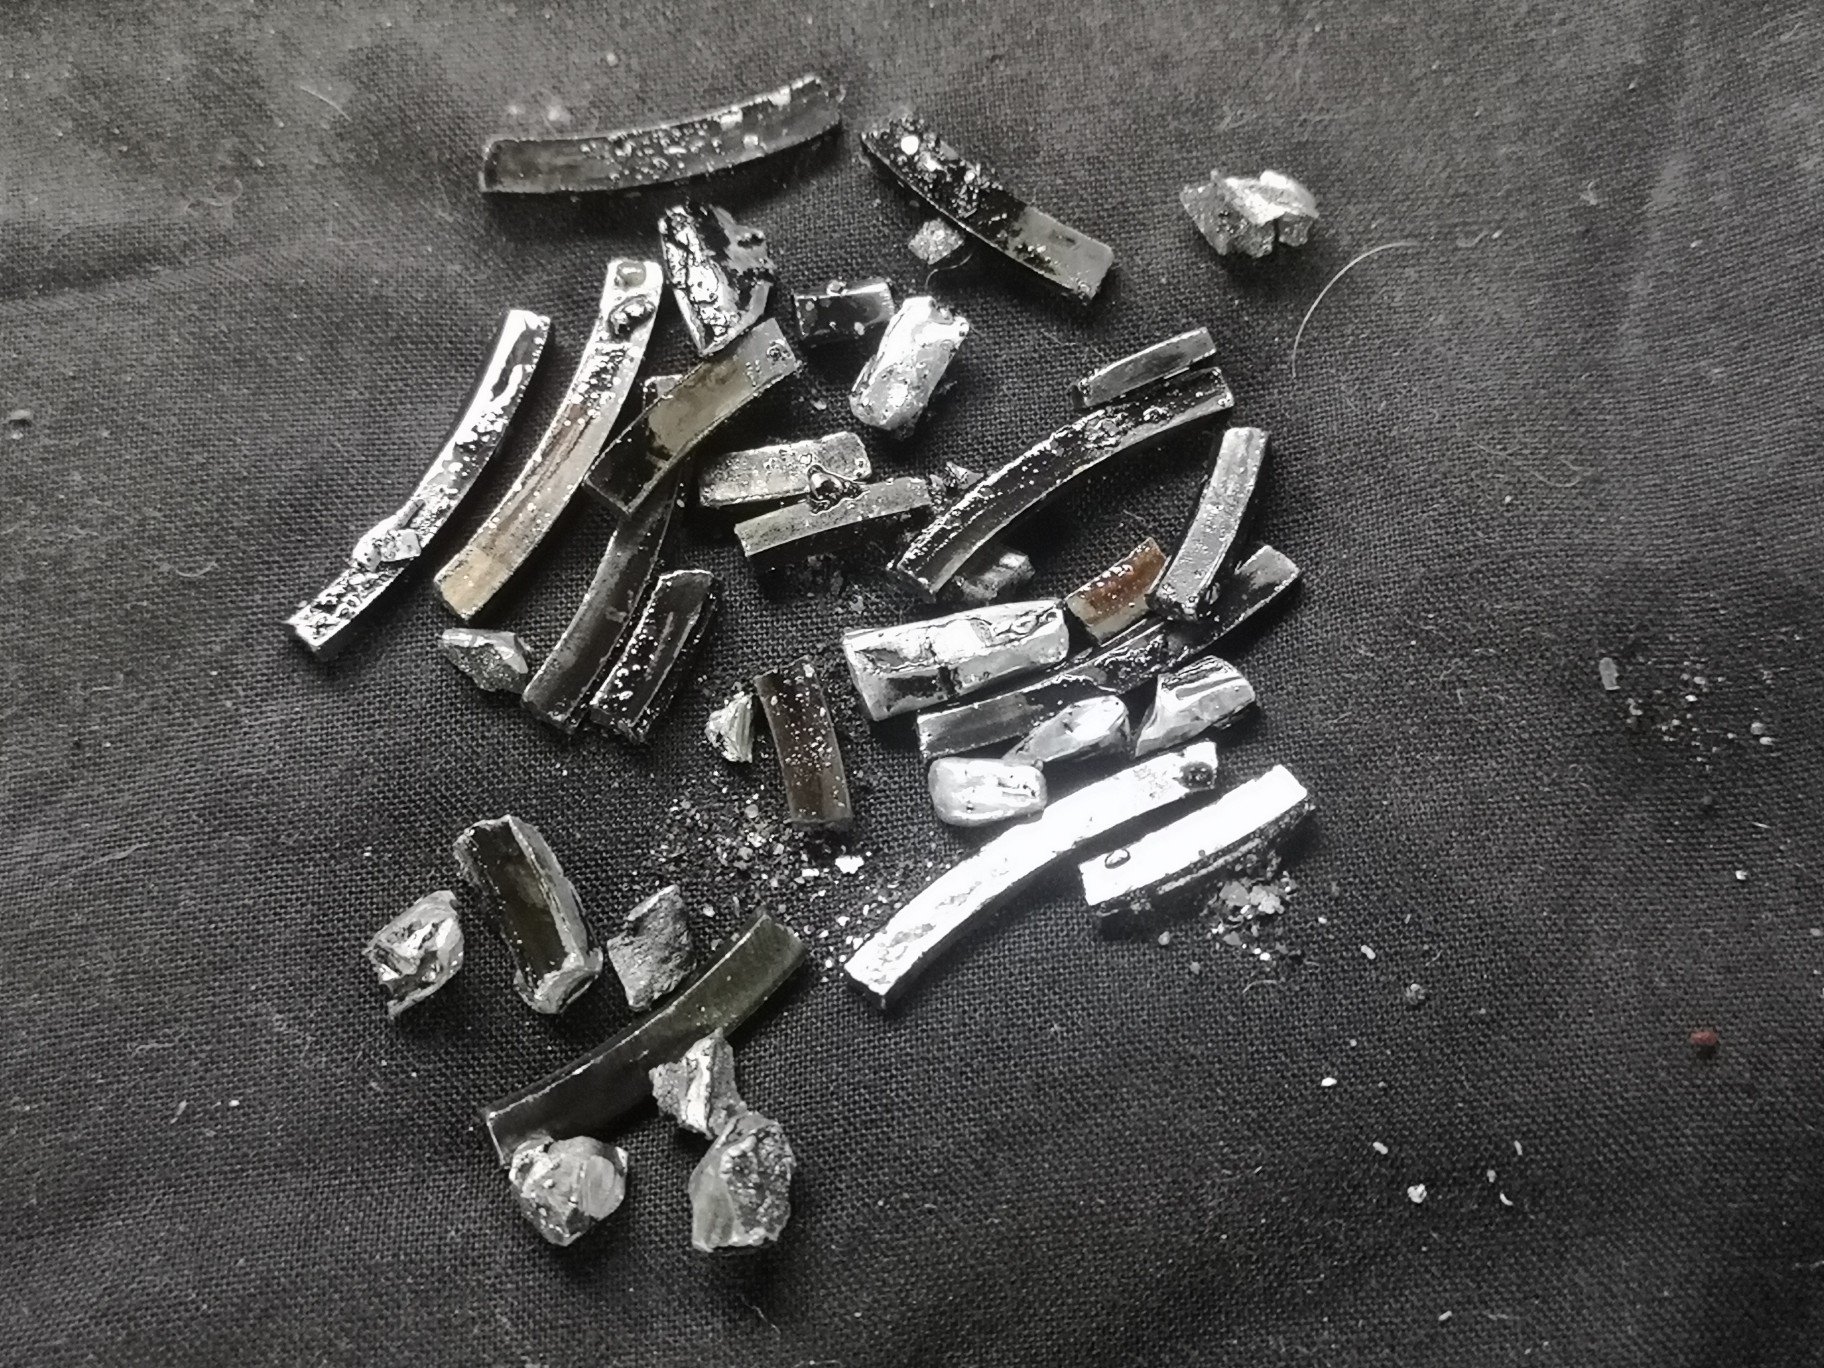
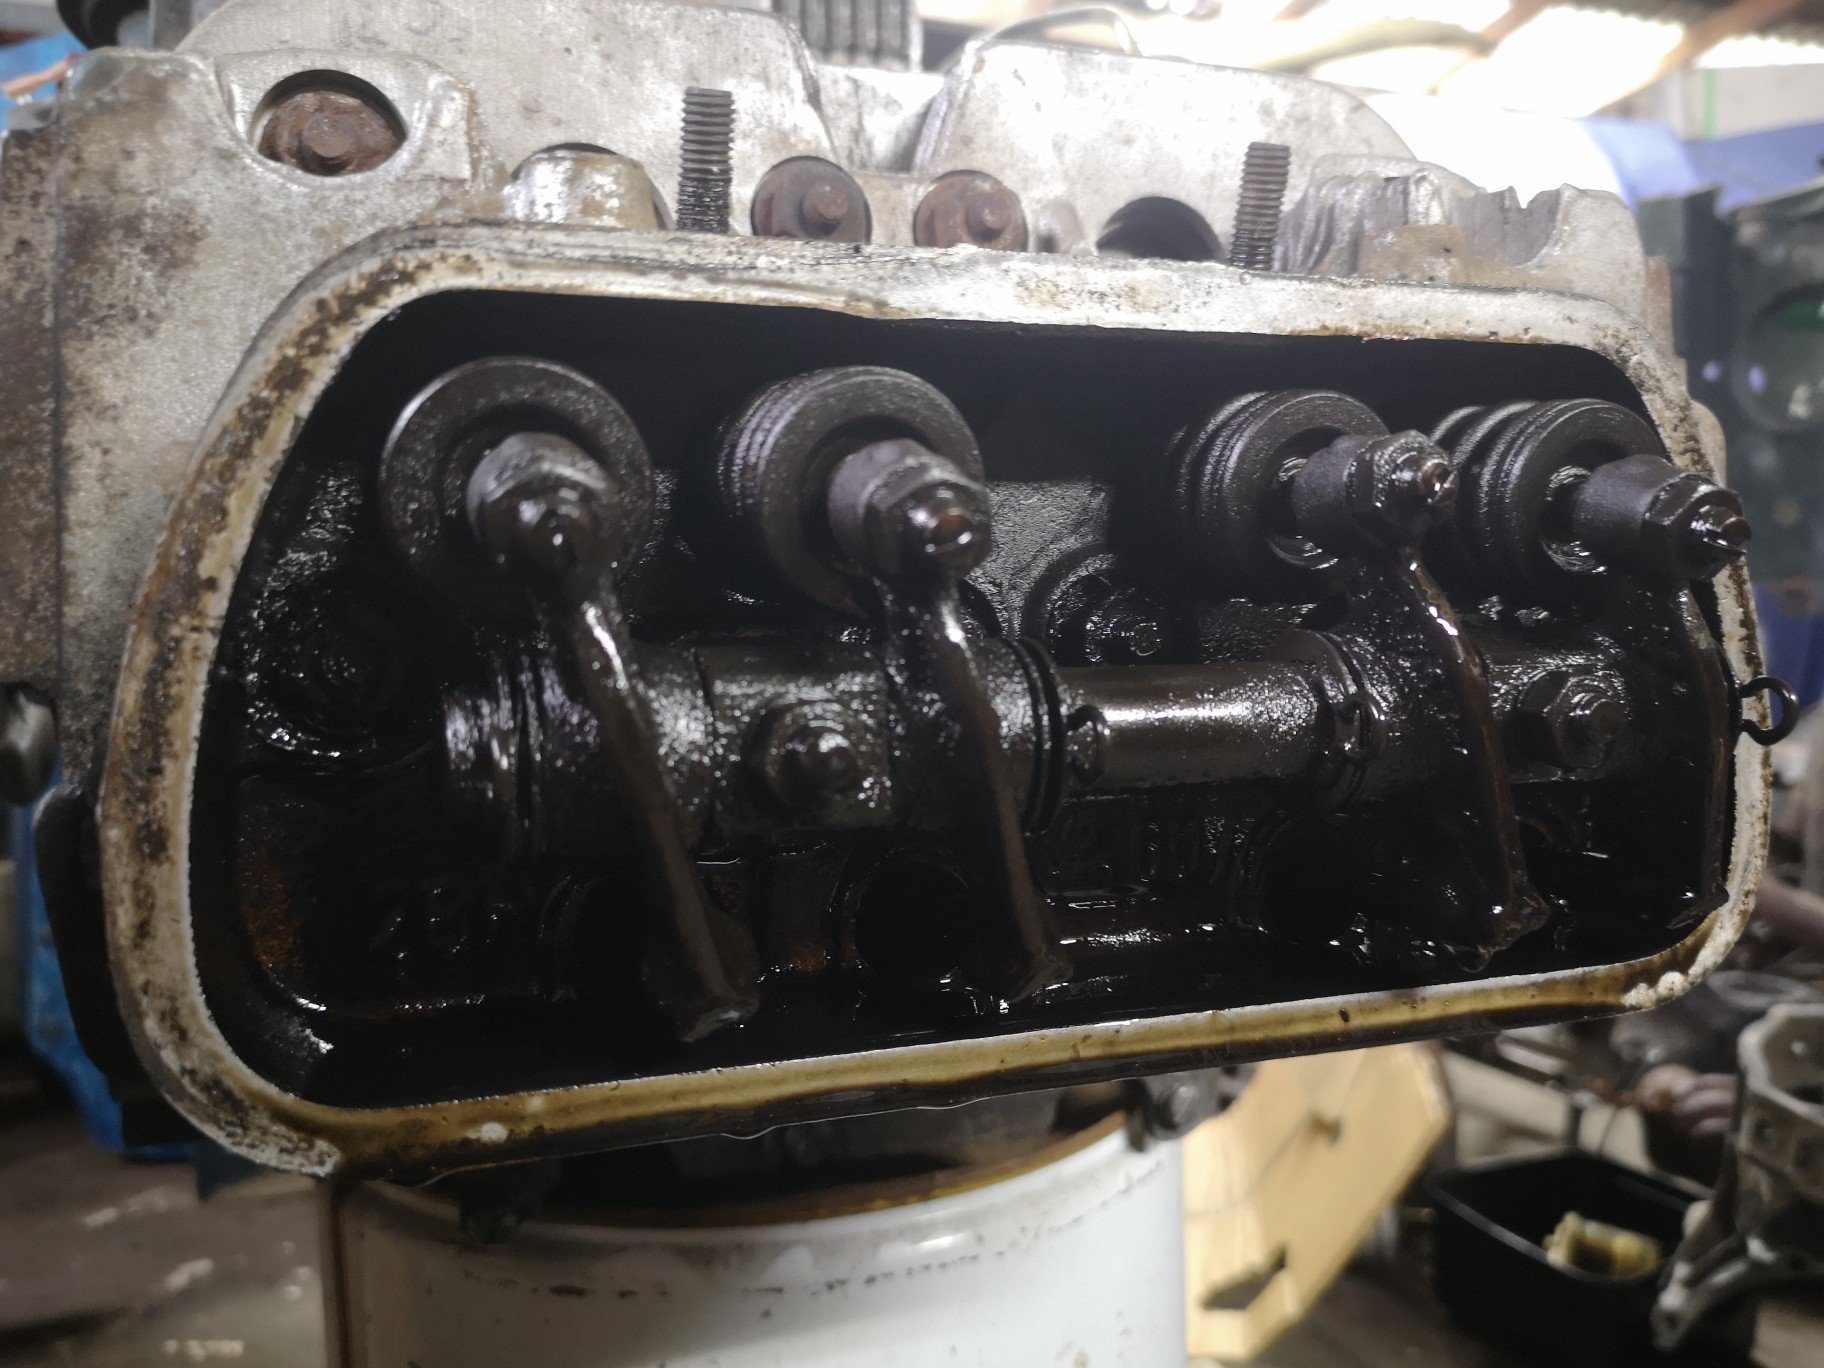
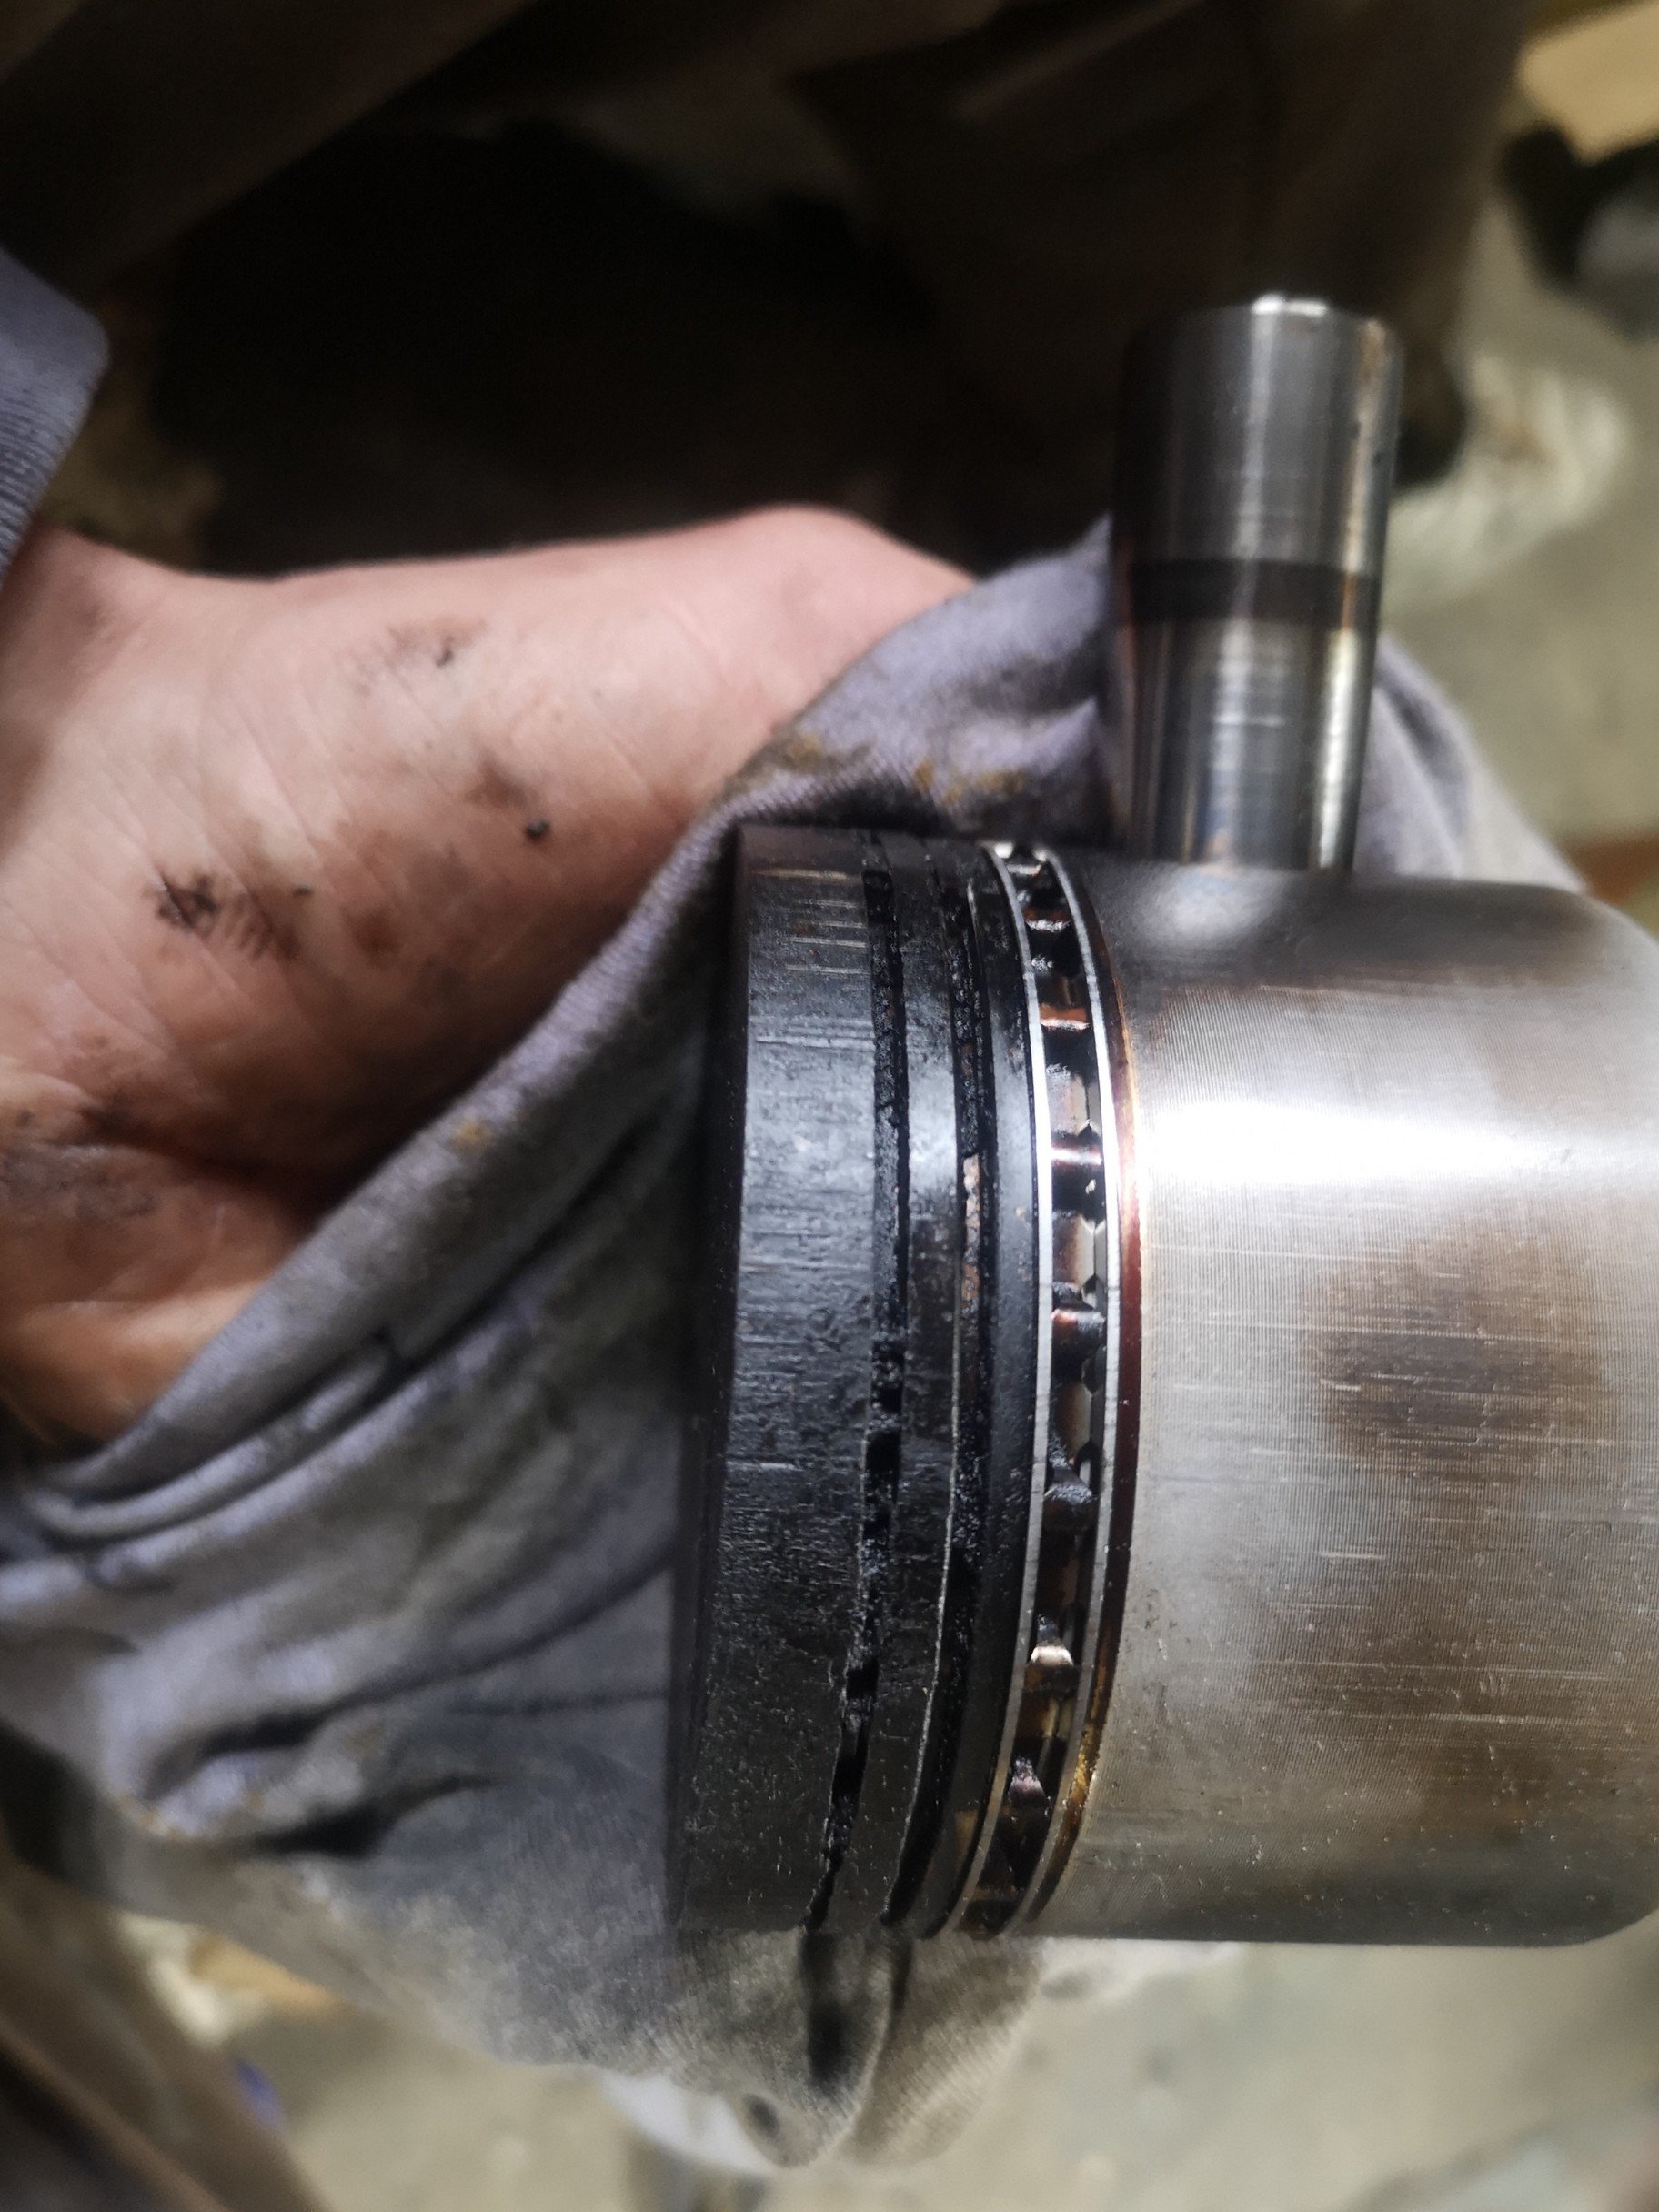
Black hole swallowed the rings.. These bits came clunking out of the sump plate.. Not sure if I should pull the whole case to bits or just flush it.. That's where I'm at for now, need to pull the flywheel, shoulda done it before I pulled everything else really. Endplay is. 04mm which is apparently within spec, the other beetle motor has a full 2mm endplay. Prob needs a full rebuild.
5 points
-
Chuur, at this stage we have a willing MaxPower and Thphantum, which should probably cover it, maybe, hopefully, probably.4 points
-
terrible timing (on my part, i should have considered this!) but we have a little one due on the 9th of Dec... and with Lexys history, there is no way i'm going to be able to make this one sorry. And i was even planning on riding this time hahahaha4 points
-
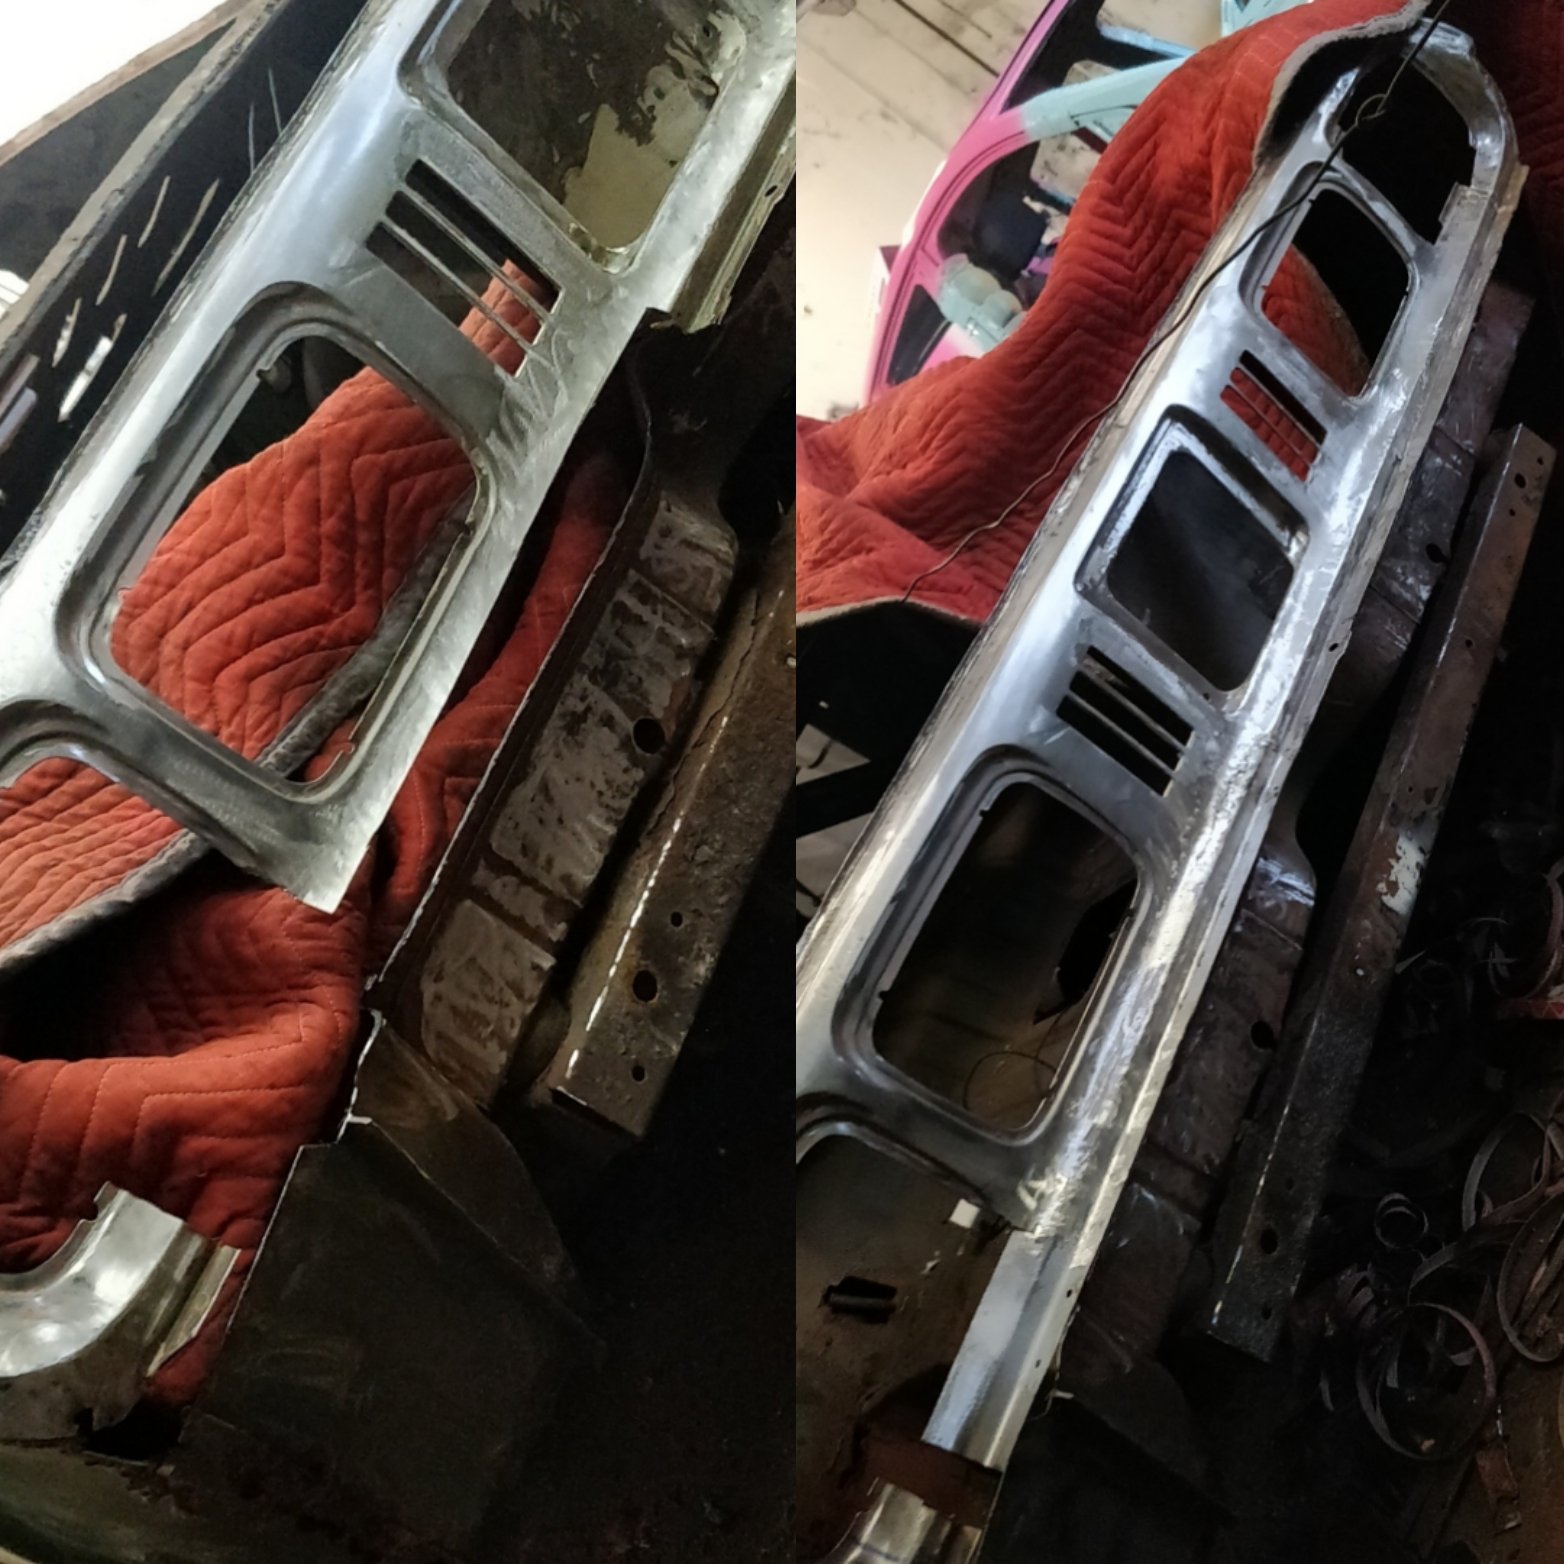
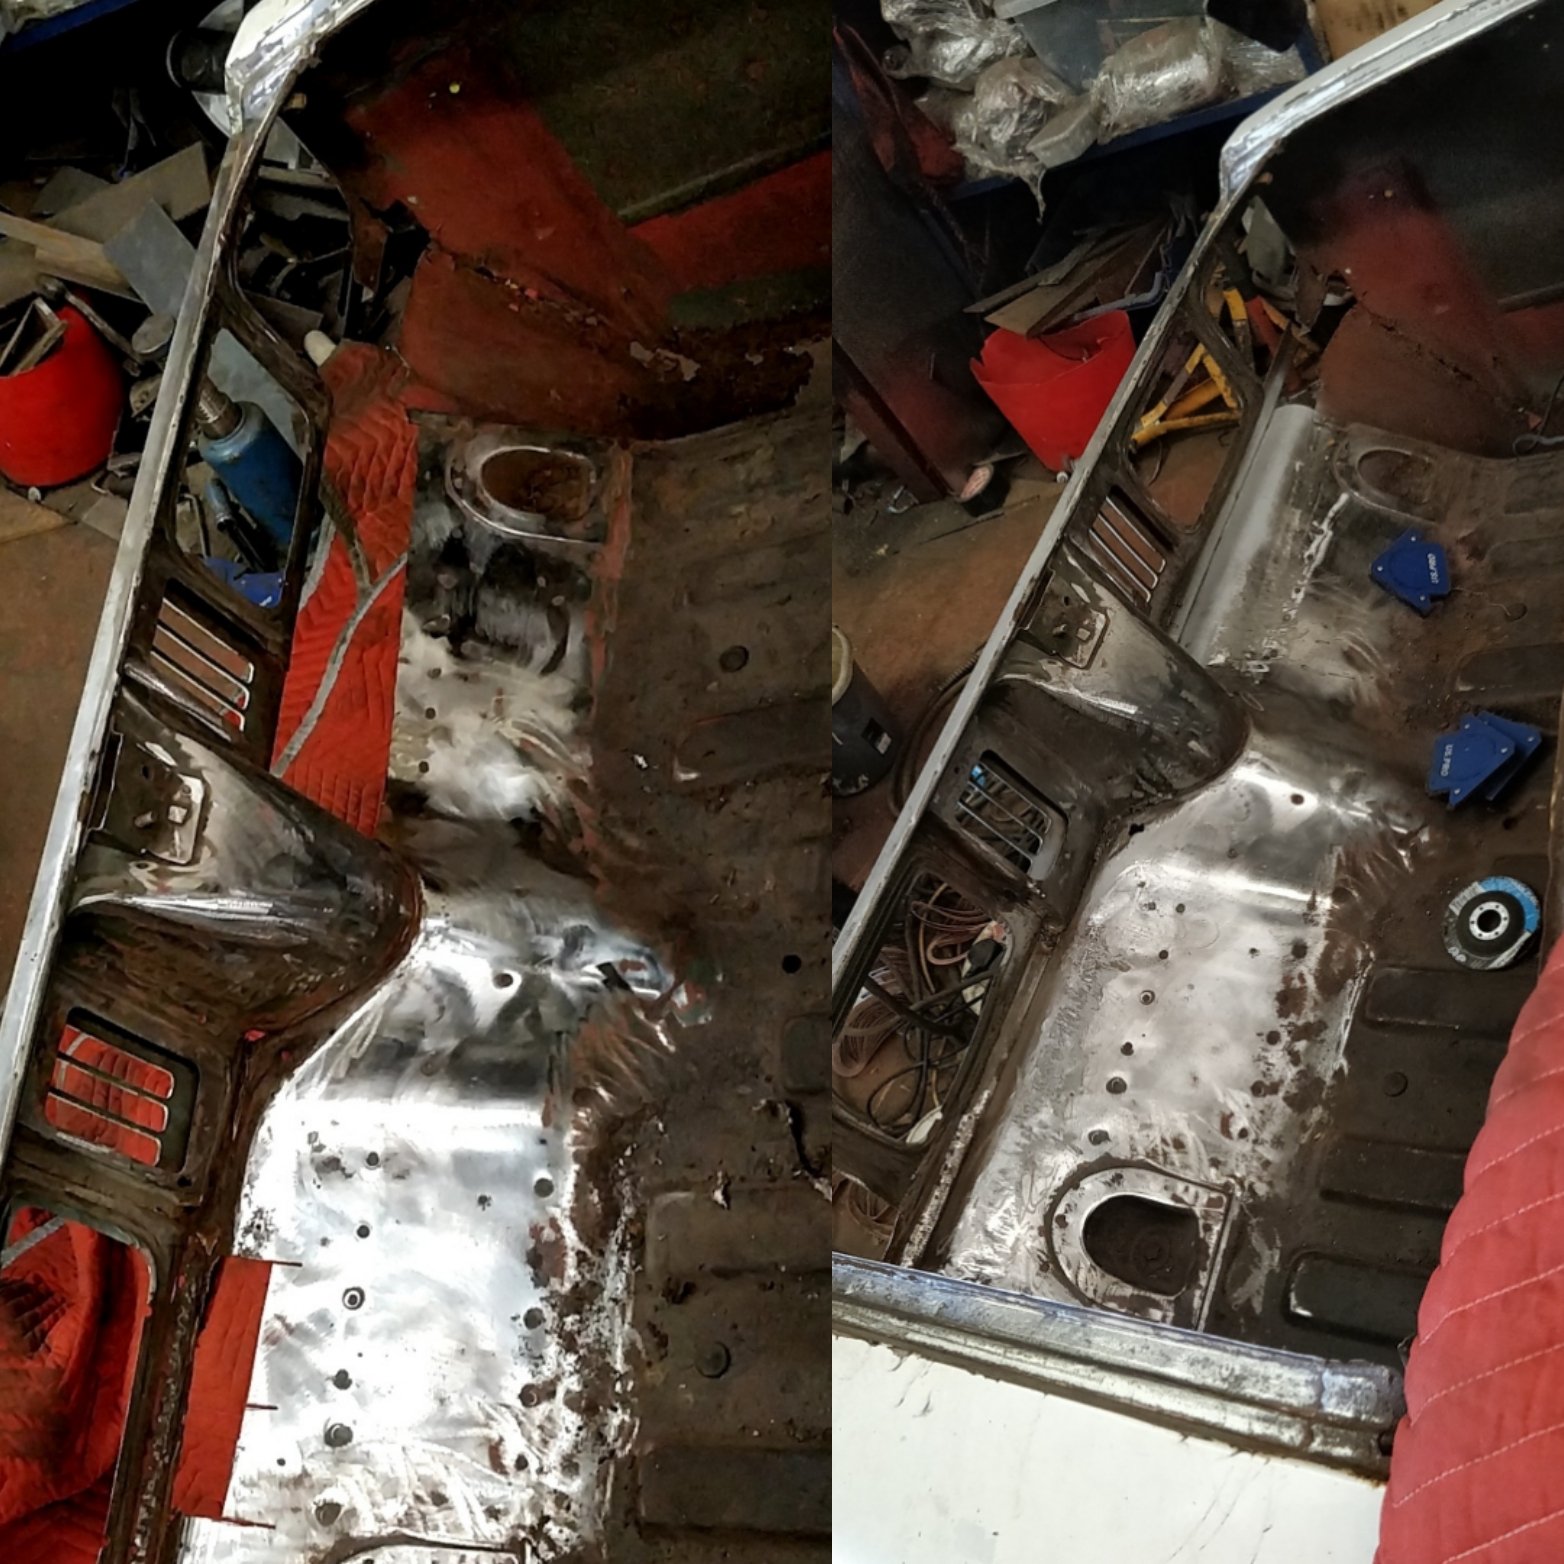
More back panel progress this weekend.
4 points
-
Or how about these ideas?
4 points
-
With the help of a mate today we managed to do a thing4 points
-
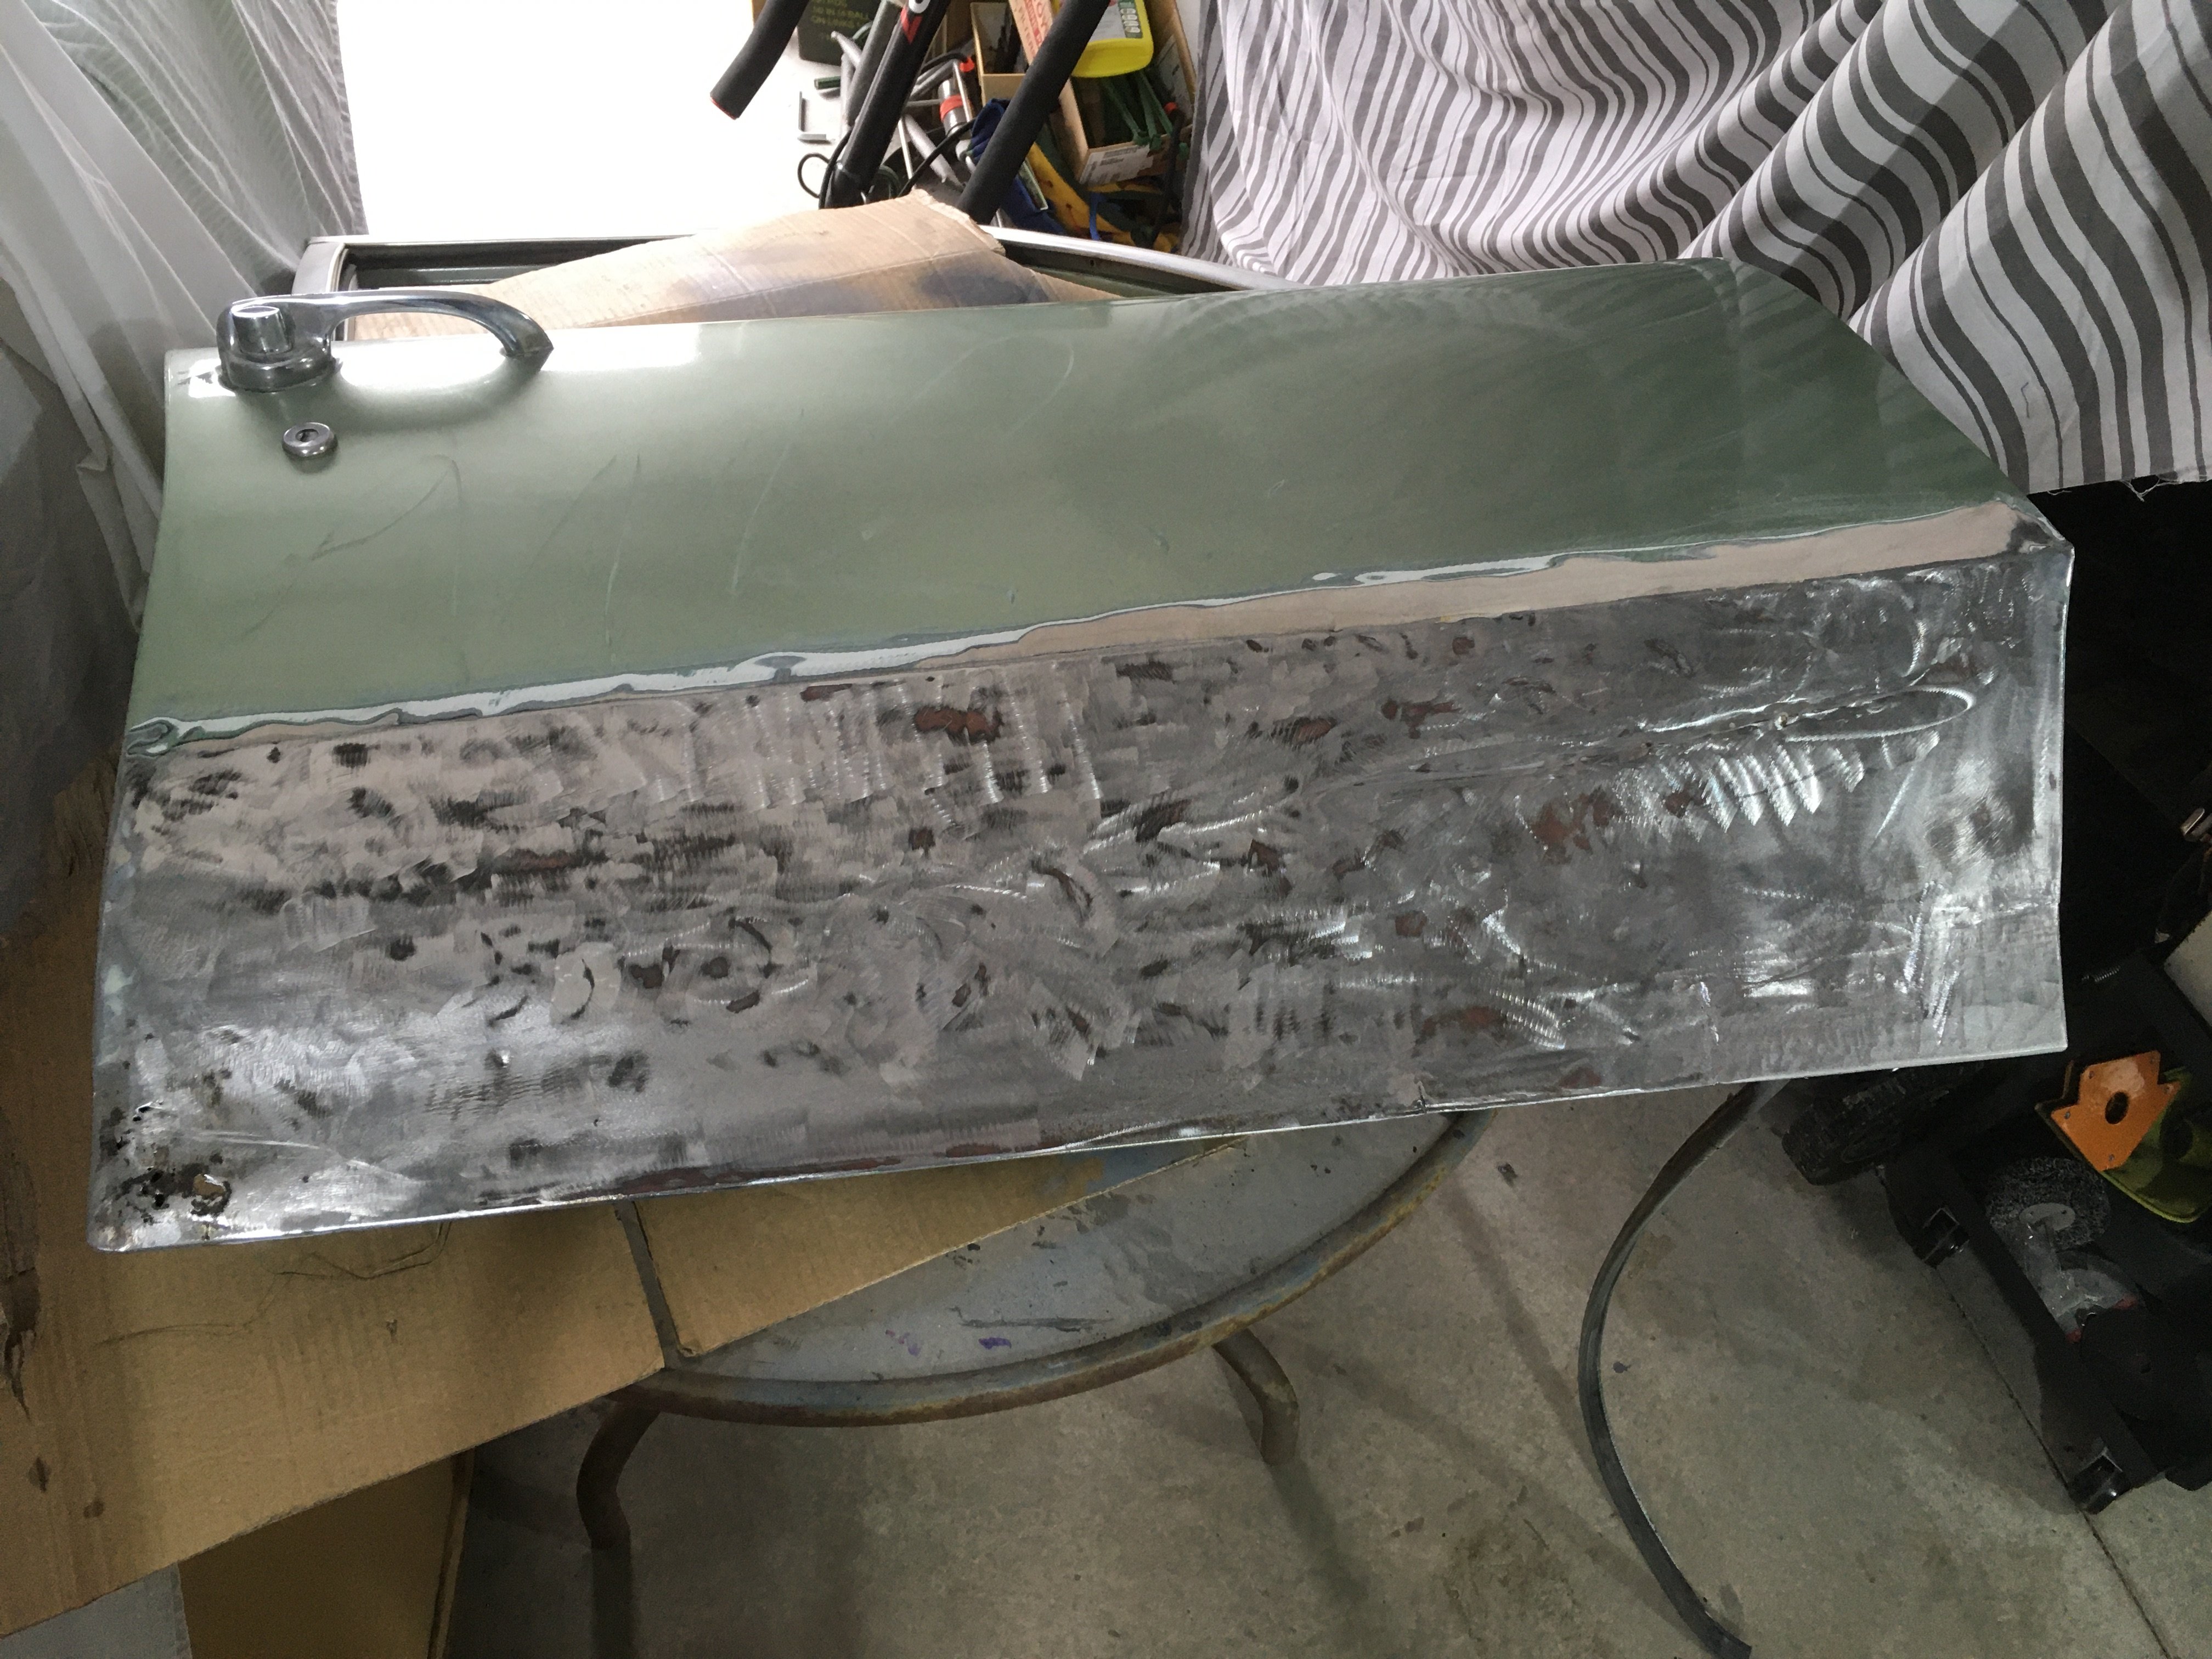
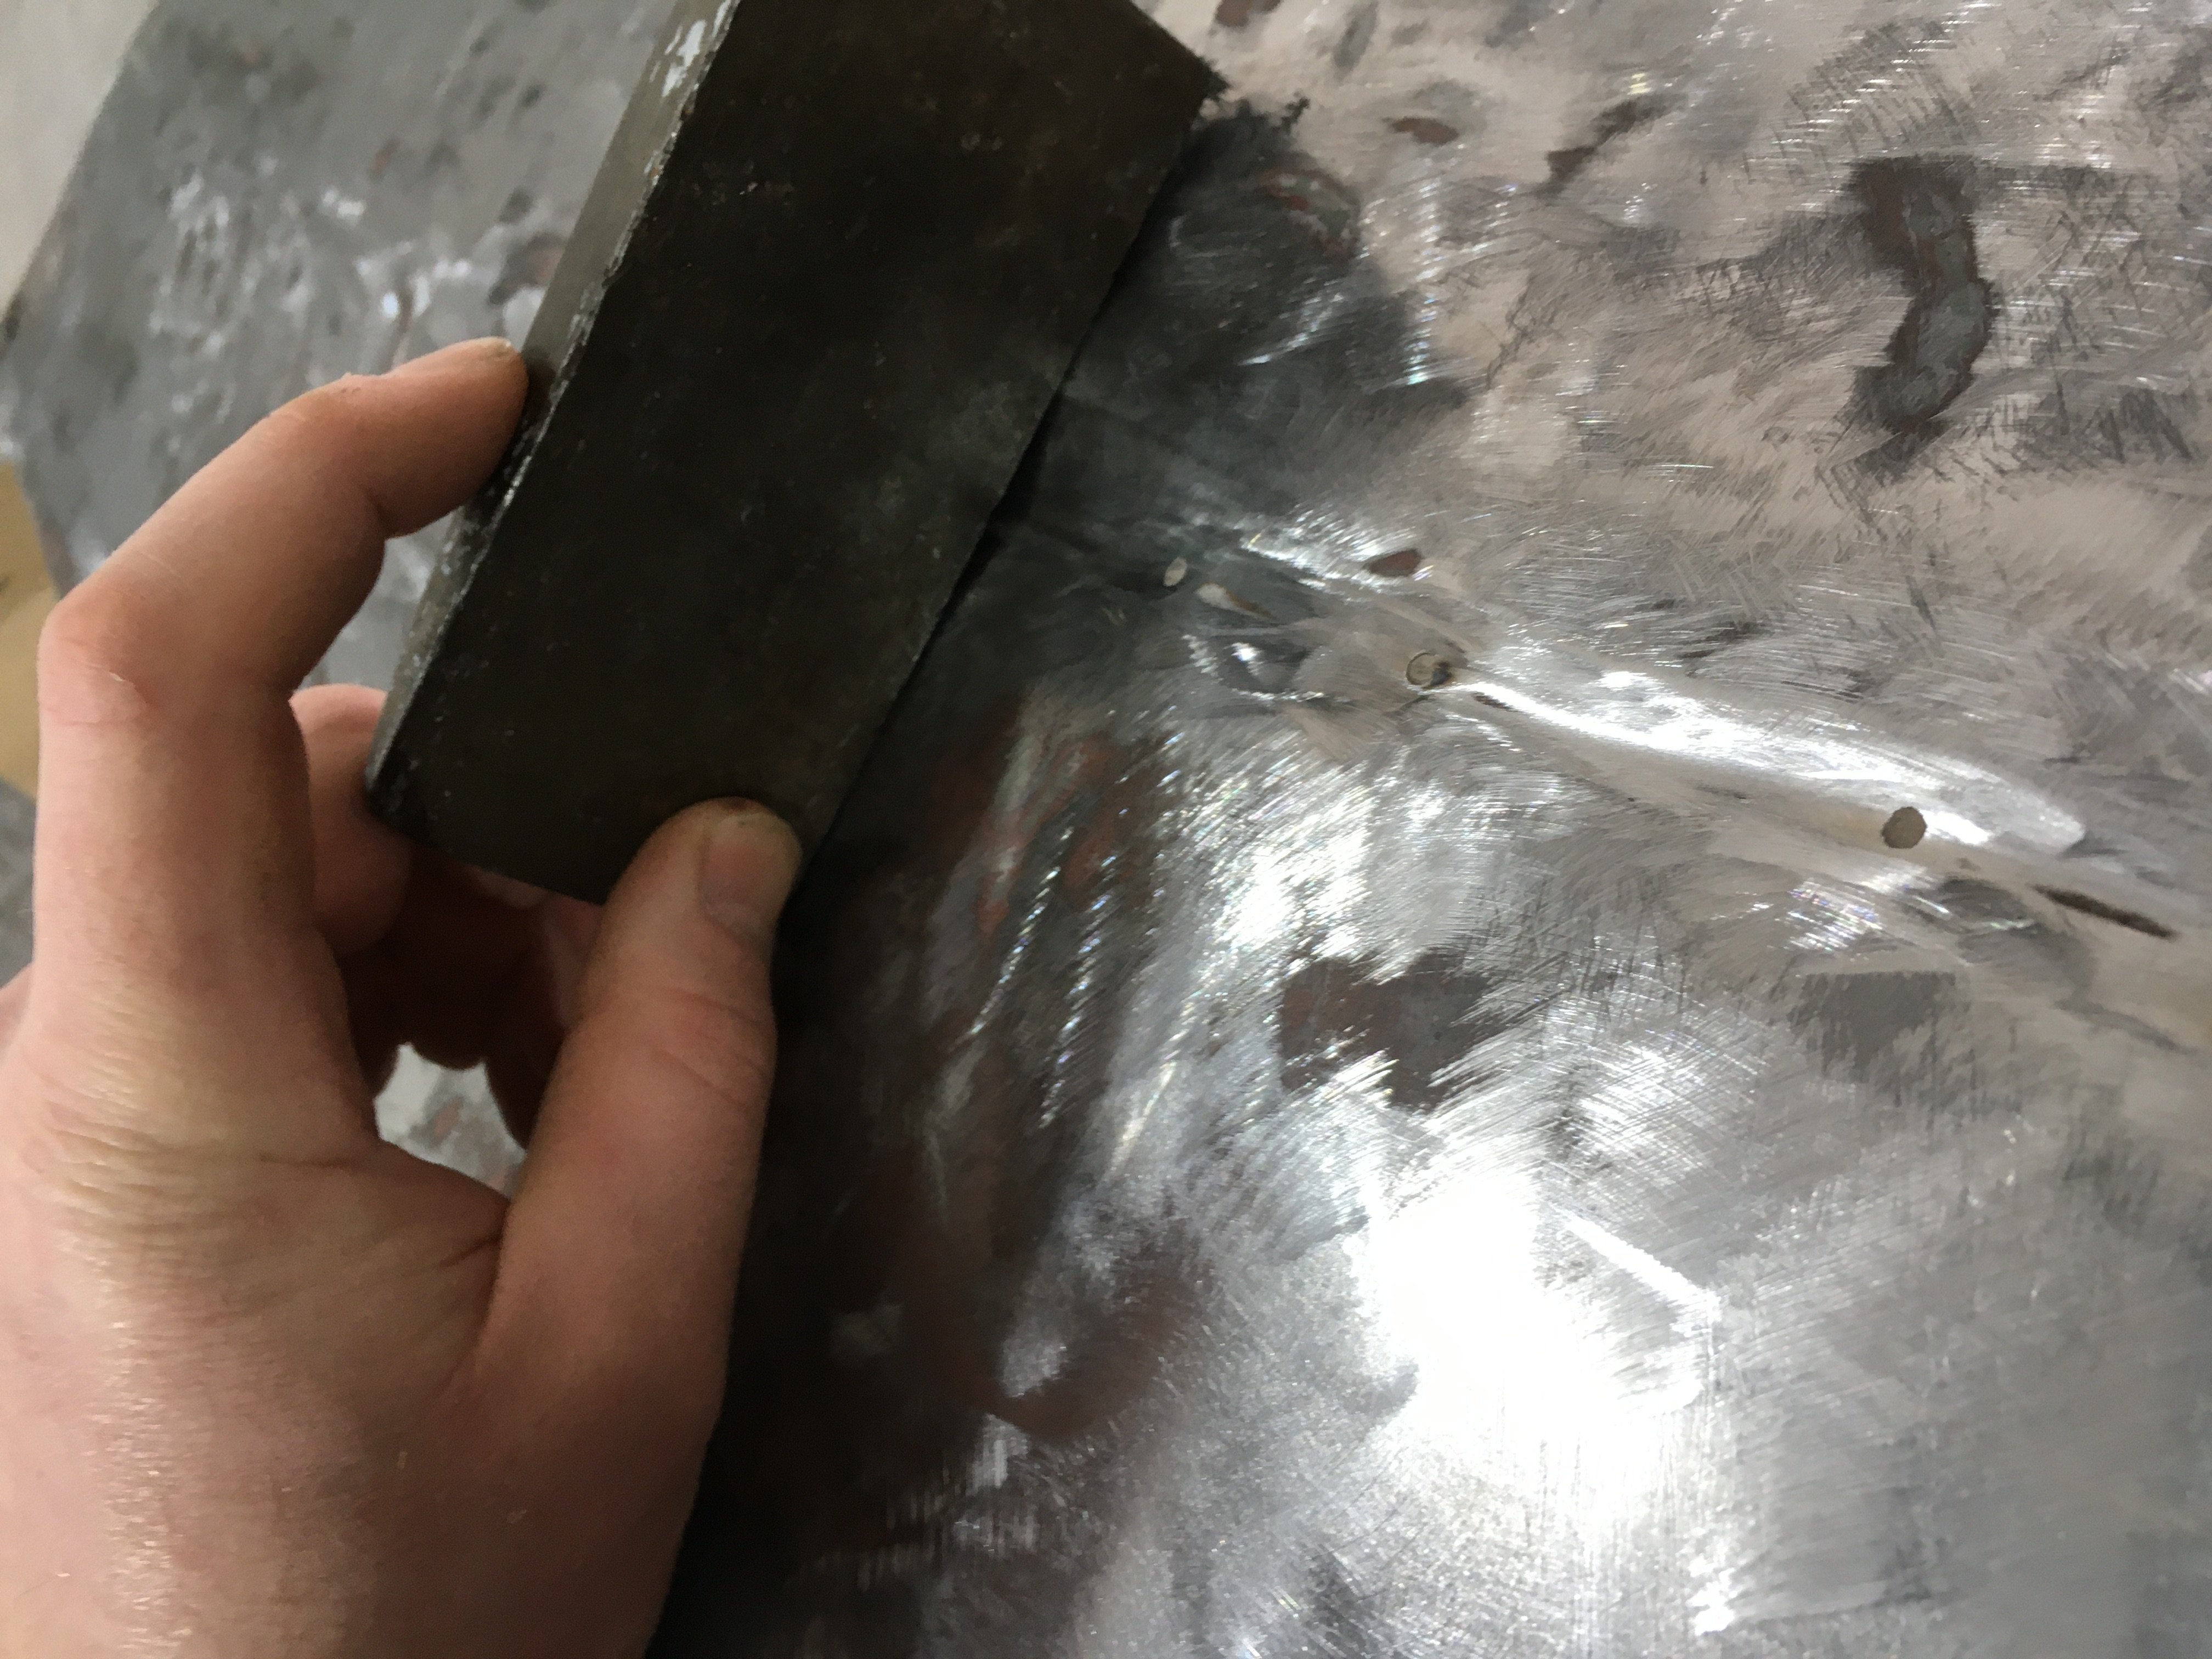
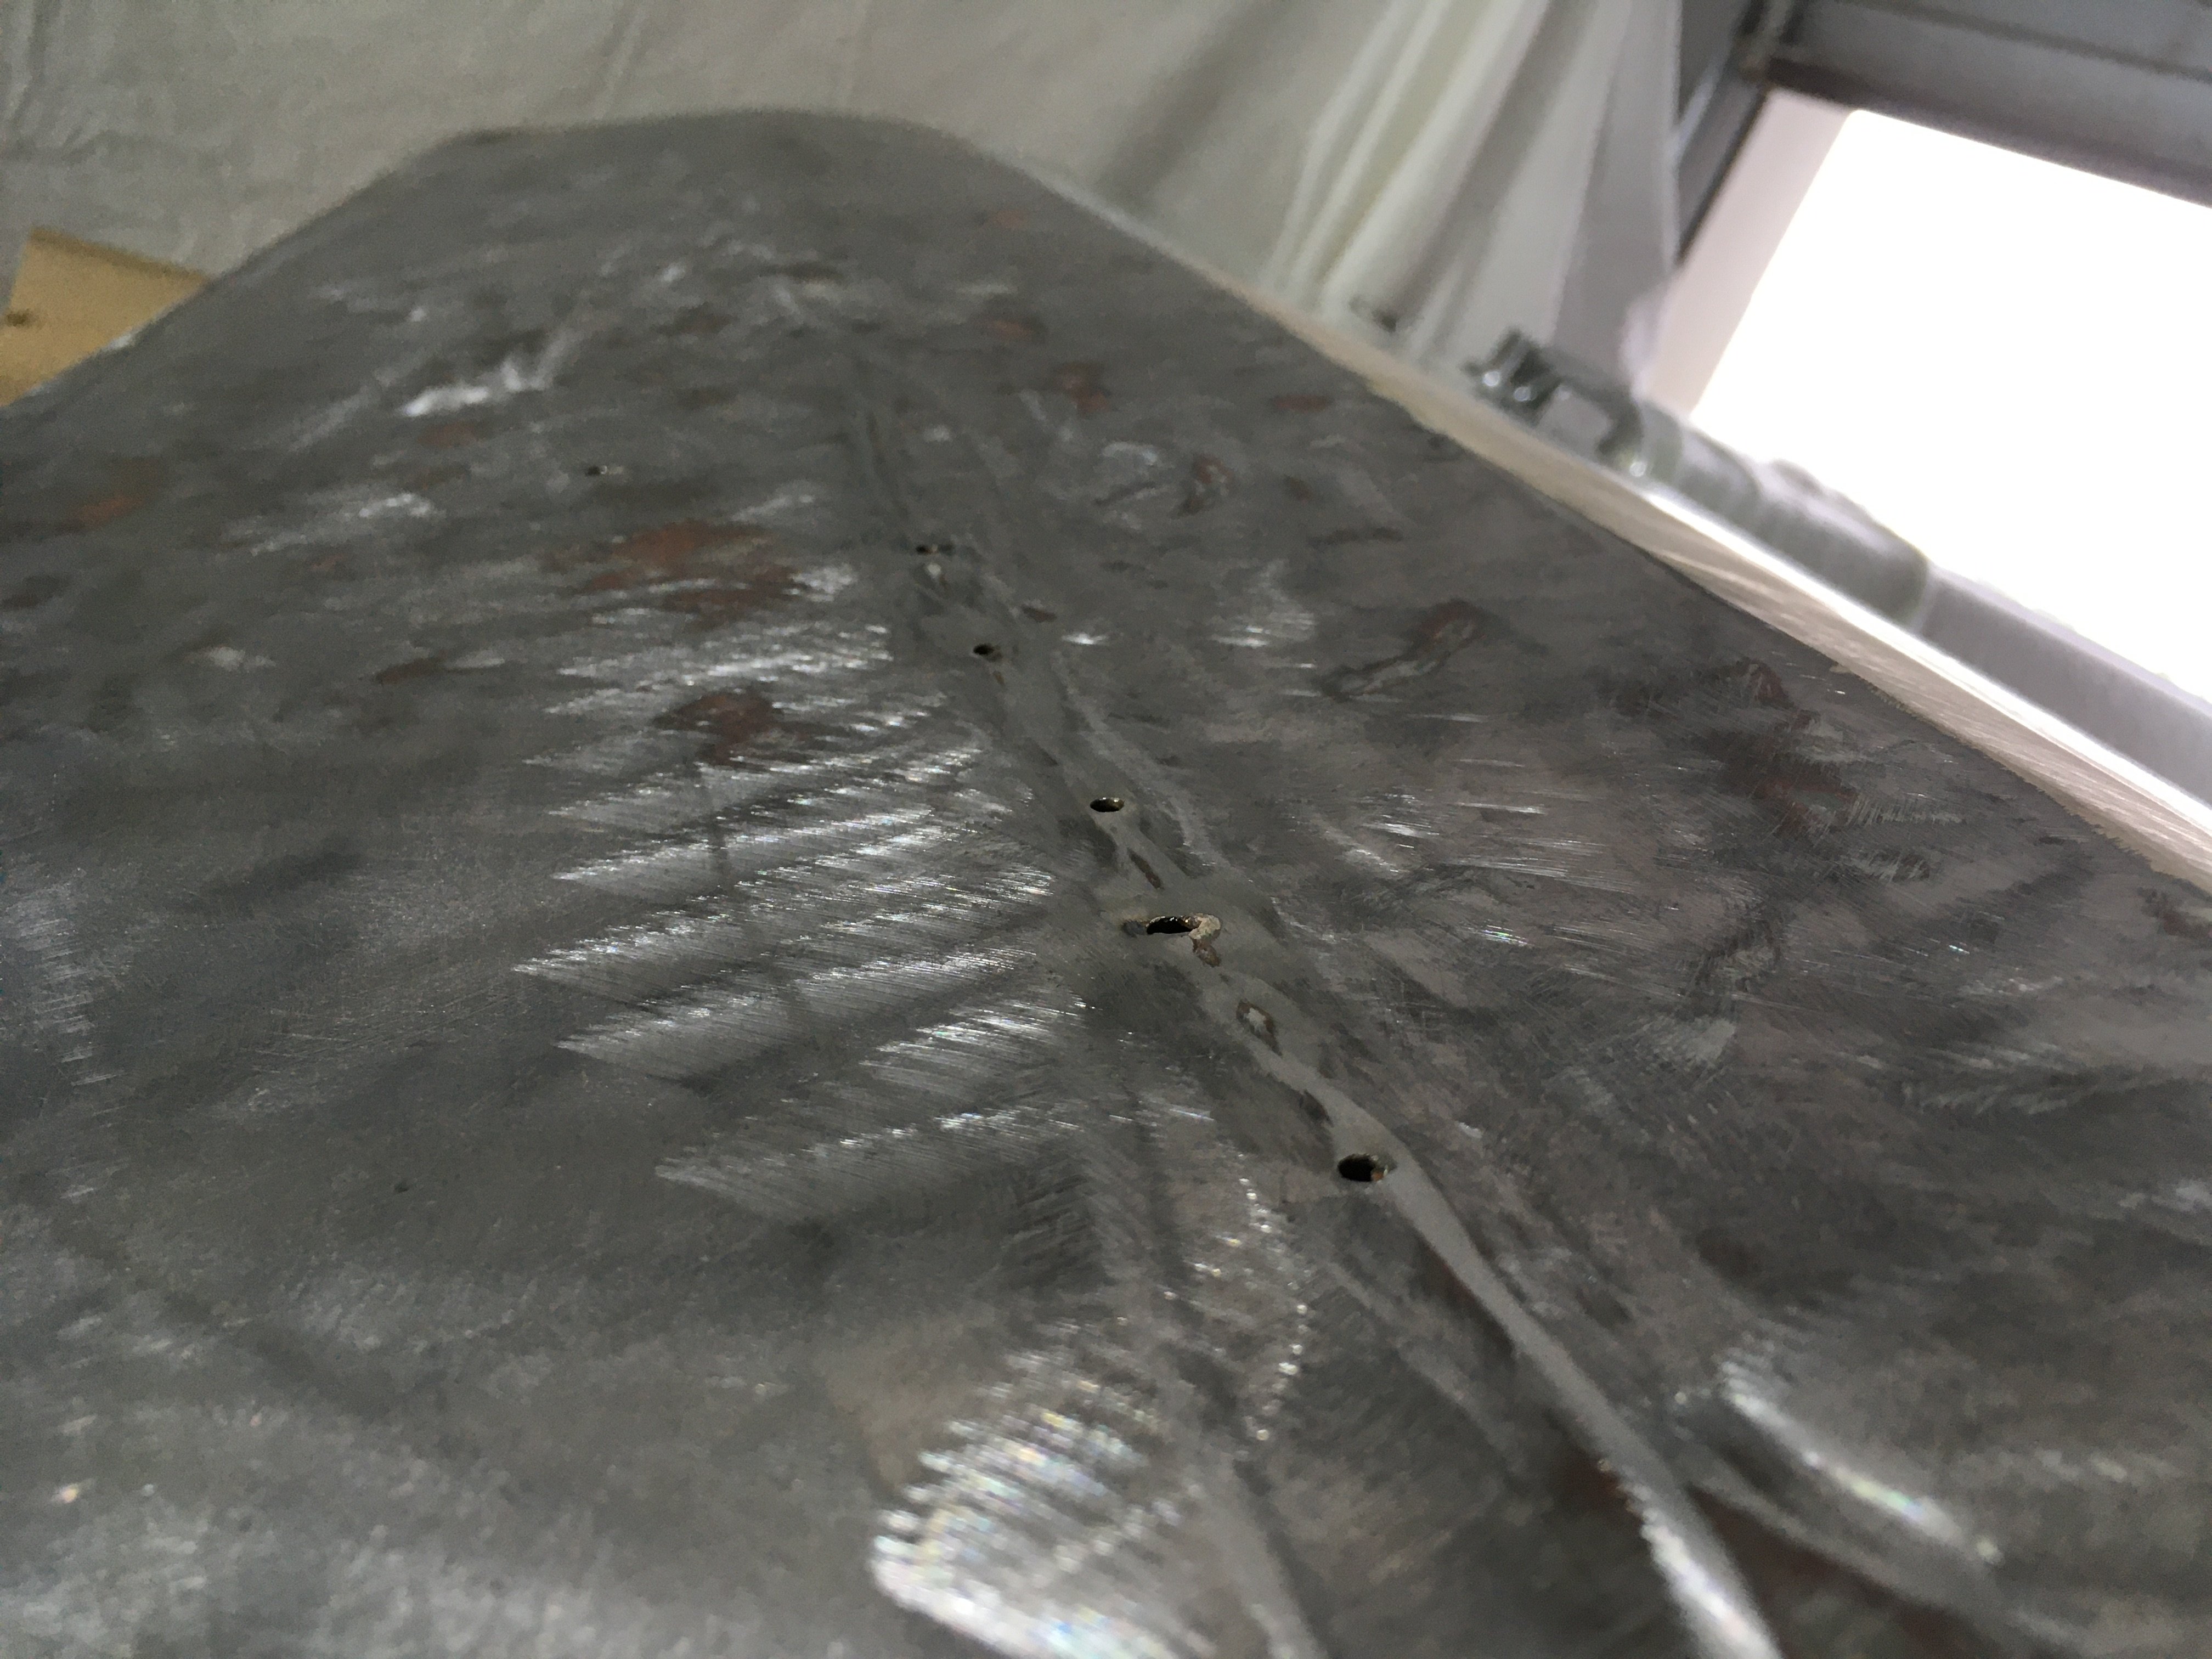
Been a little quiet on the LR front.... Been gearing up with some homebuilt tools to manufacture these door skins, I have a bunch of interest from others who want me to make skins, including someone who has just purchased a Forward Control S2 - they are a unique door to that model which should be interesting. Anywho, made a 'mini' door just to confirm my steps. The door handle opening was done by making a hammerform from a 1/2" plate cut to the correct shape, I radiused the edge on it so it would give me the right kind of 'roll over'. Currently have made these from 1200-H14 but might try and get something stiffer next time which will help with dent resistance.
4 points
-
Entrants, as of 29-06-2020 6:26pm @johnnyfive Daniel, aka Ruckus guy, aka Grom guy. @GuyWithAviators @UTERUS @MopedNZ @TimShadboltfan27 Shannon D Daniel W @Shakotom @Threeonthetree @Tumeke Brudda @Tumeke @keltik @Vintage Grumble @Truenotch @Mr Vapour @tortron @WankBankA100 @BLIZZO @anglia4 @mark105 @RUNAMUCK @Duke Blackwood @HighLUX @Mitch.W @Beaver @00quattro00 Bucket Barry on bike @MaxPower (Vehicle) @rumrum @slacker.cam @sentra @Dolan @Itchybear3 points
-
Hoping to! Probably ride my cub coz povo hah better do the form3 points
-
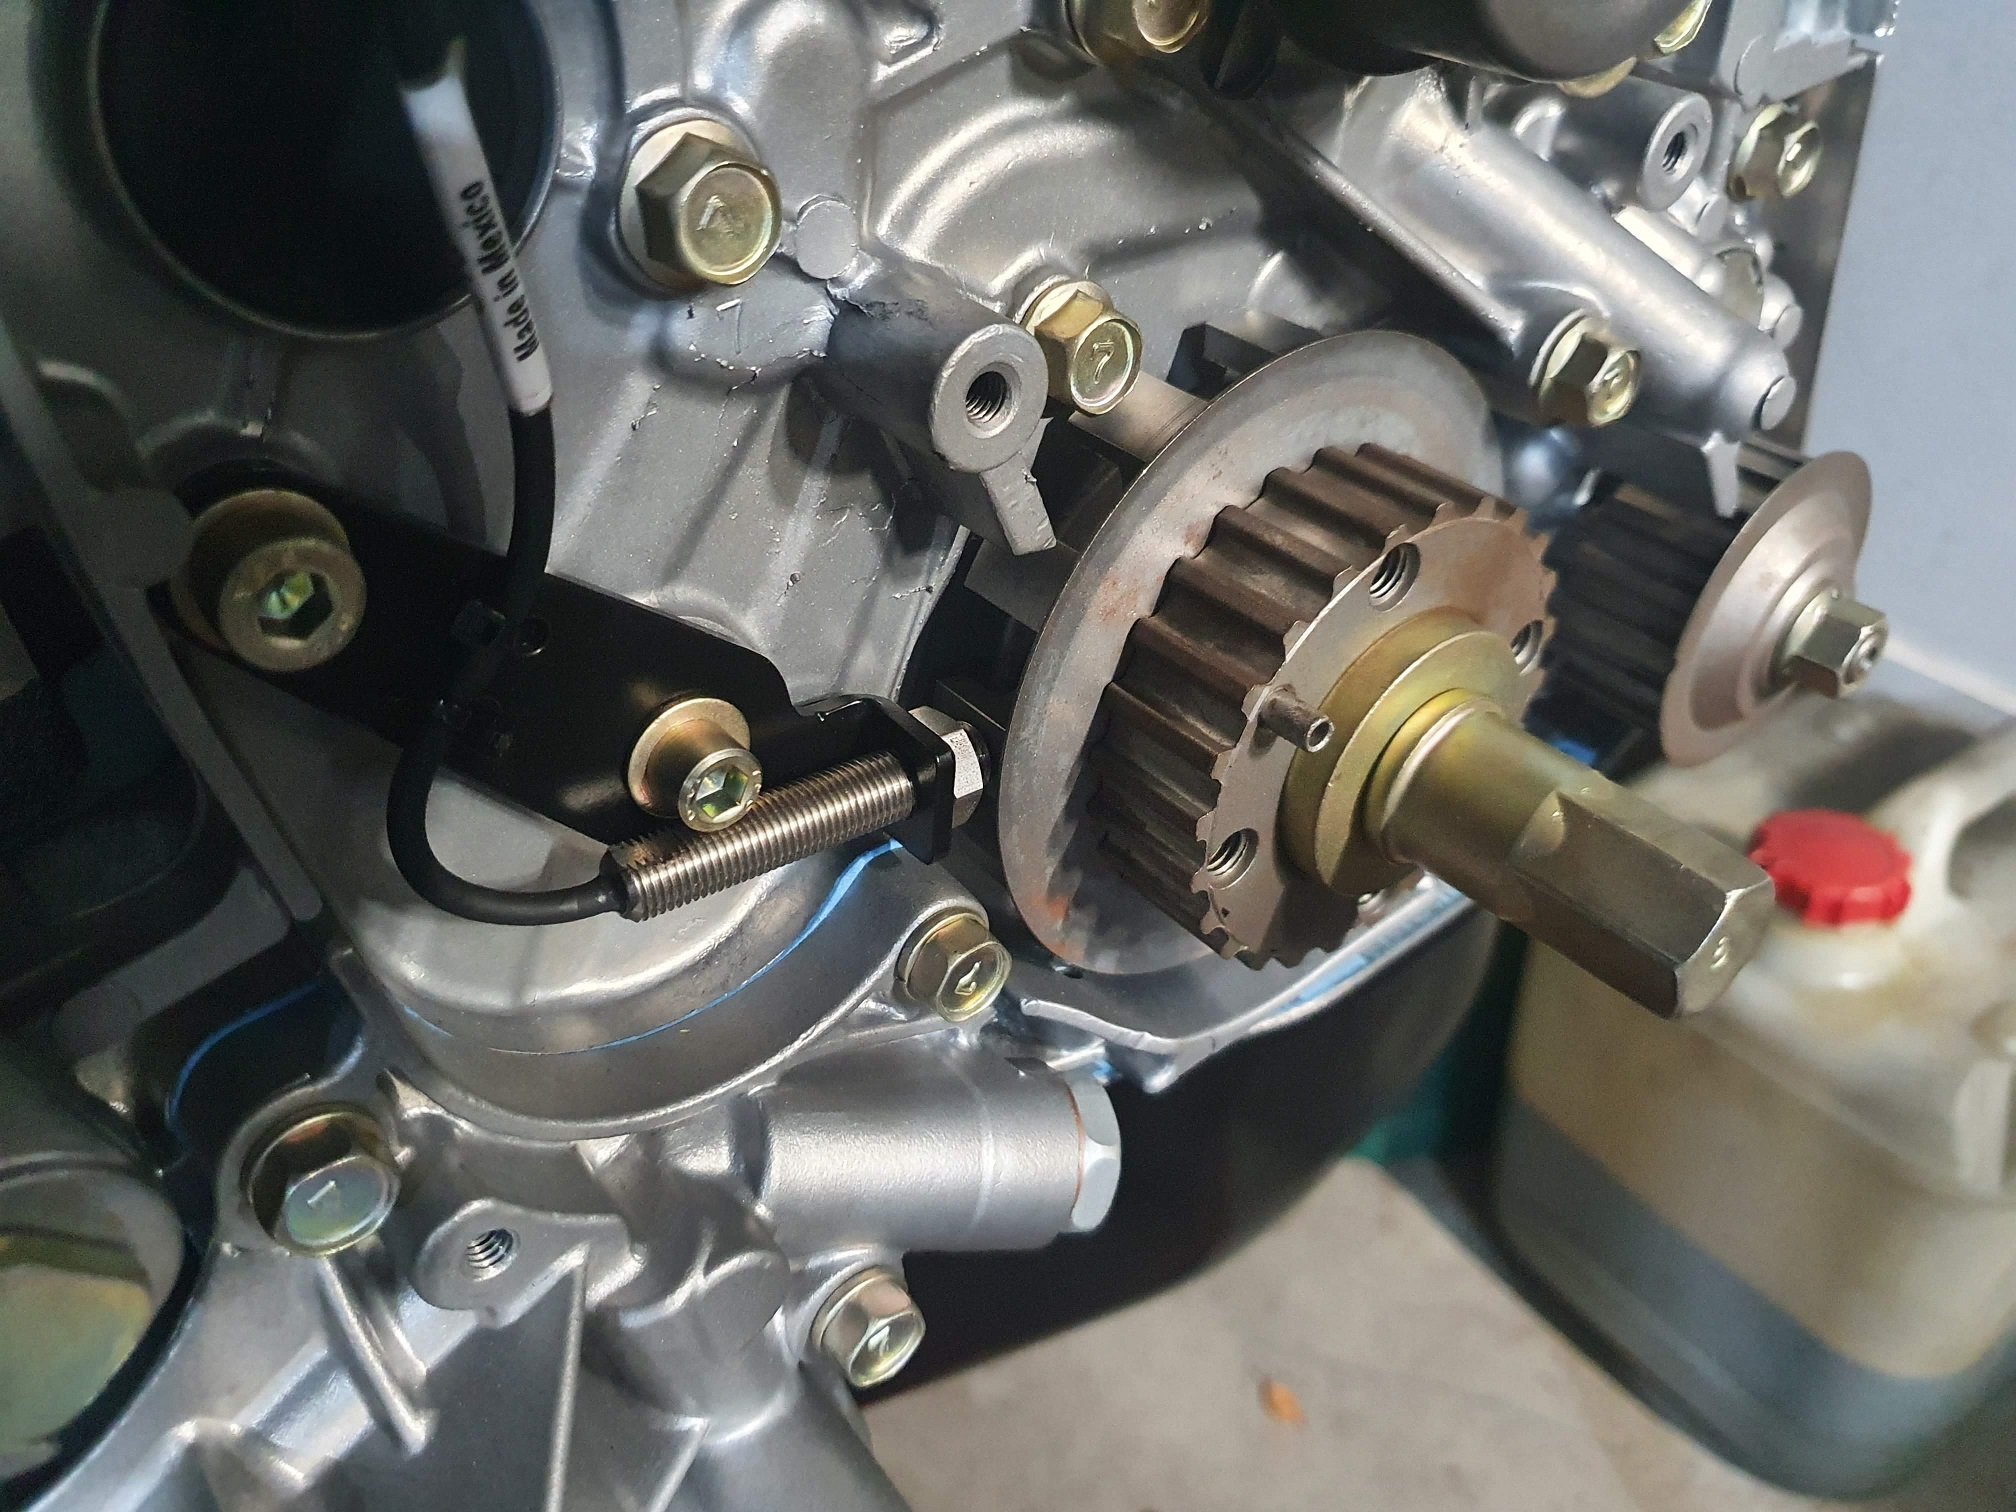
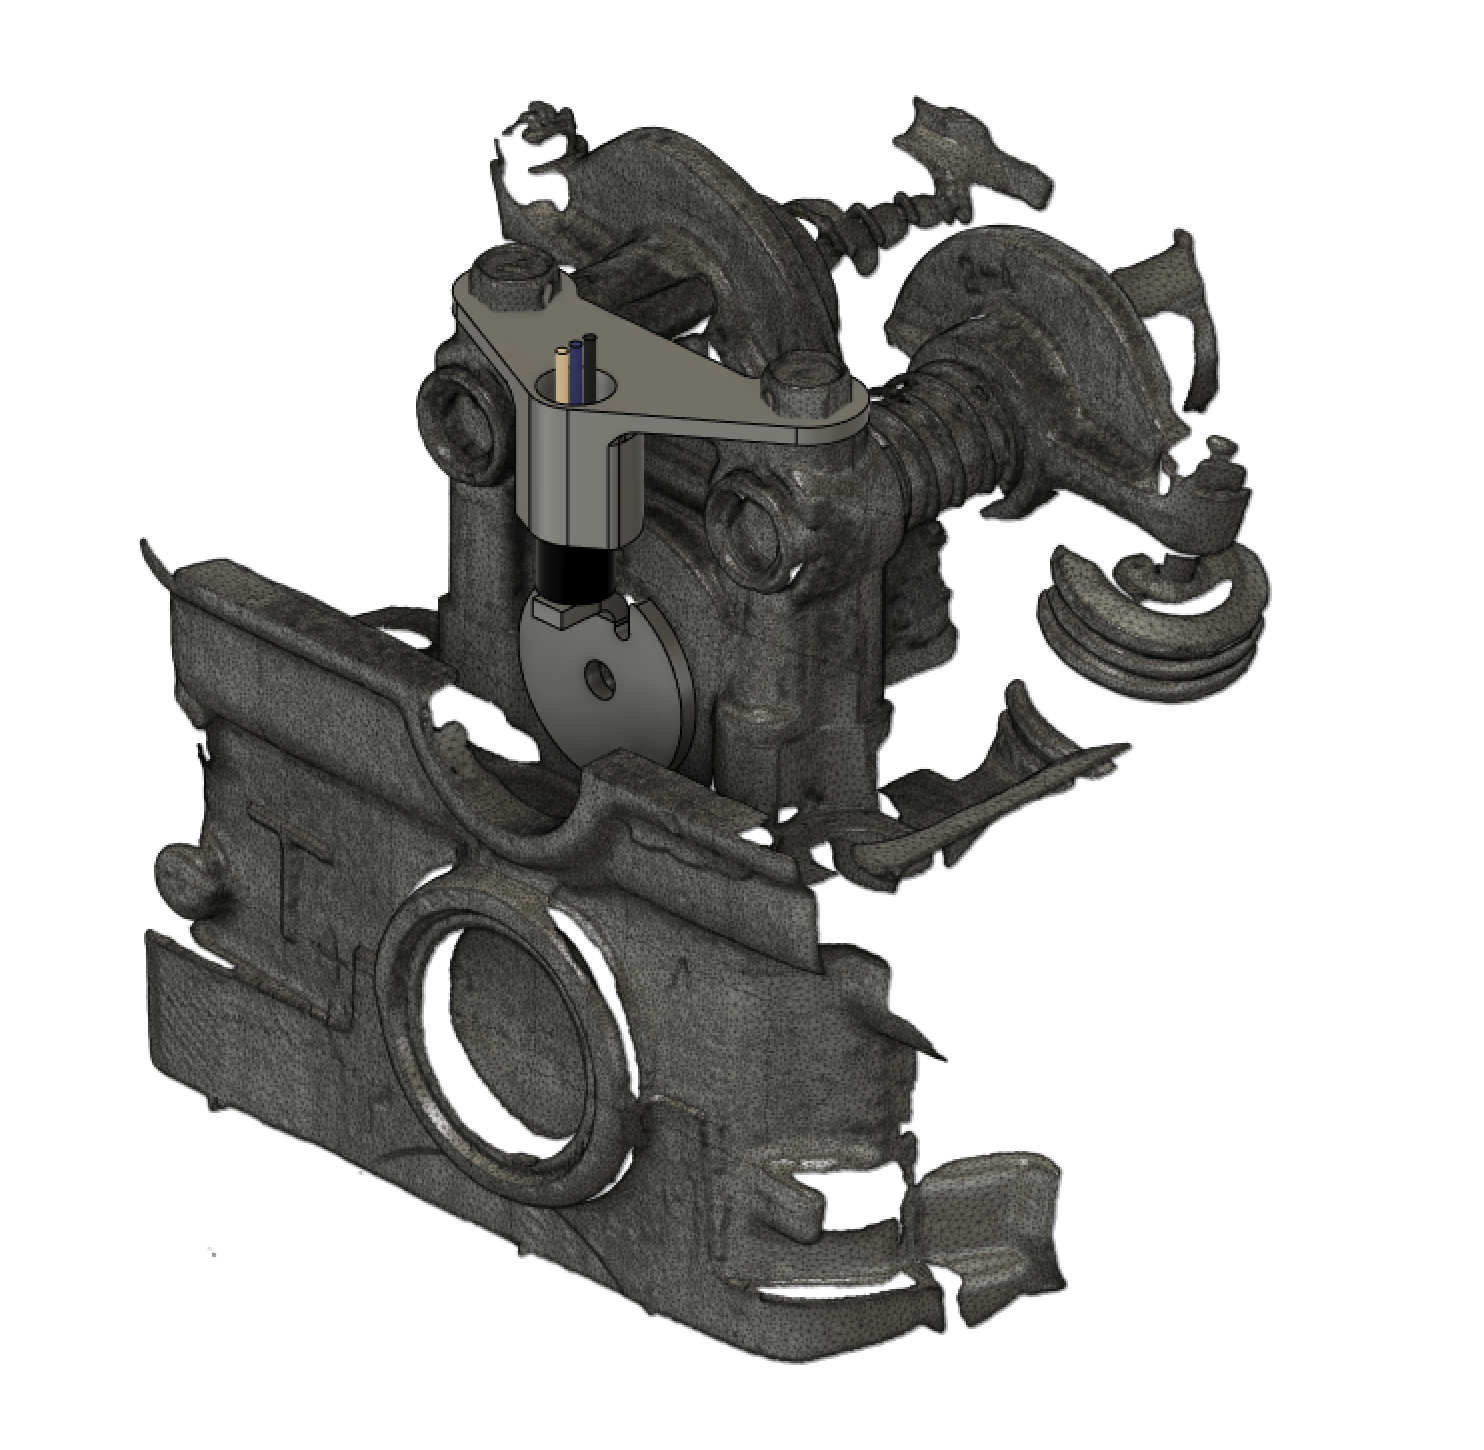
Small update, but this actually took me most of the day to get done... Well, after I was done with daddy duty this morning. The majority of the day was reminding myself how the tool and work coordinate offsets are setup on the mill I'm using. Prototrack controller, would not recommend. I'm not a machinist by any stretch of the imagination, but managed to get the crank trigger wheel carved out without too much bother and nothing broken. I still wish the 32 tooth balance shaft pulley would have worked. If I didn't already have a Link Fury ECU for this thing I would have purchased a Life Racing one just so I could have used it, much cleaner solution. The new one weighs within a bee's dick of the original. I could have made it lighter, but I already had an 8mm drill setup, so that's the size speedholes it got. I set the clearance on the sensor. These hall effect ones aren't as sensitive to the gap as VR sensors, as the ASIC's inside them which convert the VR signal to a square wave have auto calibration logic built in. This is why they don't work well with missing tooth setups, as they calibrate to the big signal spike after the missing tooth, and then miss all the regular teeth. Secured the cable with some ties and it's pretty much job jobbed. I've got yet another idea for the cam sync, I think it could work pretty well, but I need to check the rocker cover clearance. I'll put an IP68 cable gland on the back of the head casting and pot / sheath the wiring to make sure it'll live inside the rocker cover. There are a few diesel vehicles out there that have wiring inside the rocker cover, so I reckon it'll be okay :-). It'd be great if I could pass the wiring out of the half-moon seal, but that space is now occupied by the spinny single toothy thing, which would not end well if the two interacted with the motor running. I'll change the wiring on the sensor to some nice ETFE insulated stuff, twist and sheath it in DR25, pass it out the cable gland (which will be sealed in with something... I think maybe threebond?). Then I can set the clearance, loctite the shit out of it and its jam-nut, pot the top and it should be good. Probably. At least till I'm driving it in the pouring rain one evening in a rush on the way home from work because I'm in trouble for staying late to work on cool shit... and then it's bound to shit out... But that's a bridge to look forward to in the future!
3 points
-
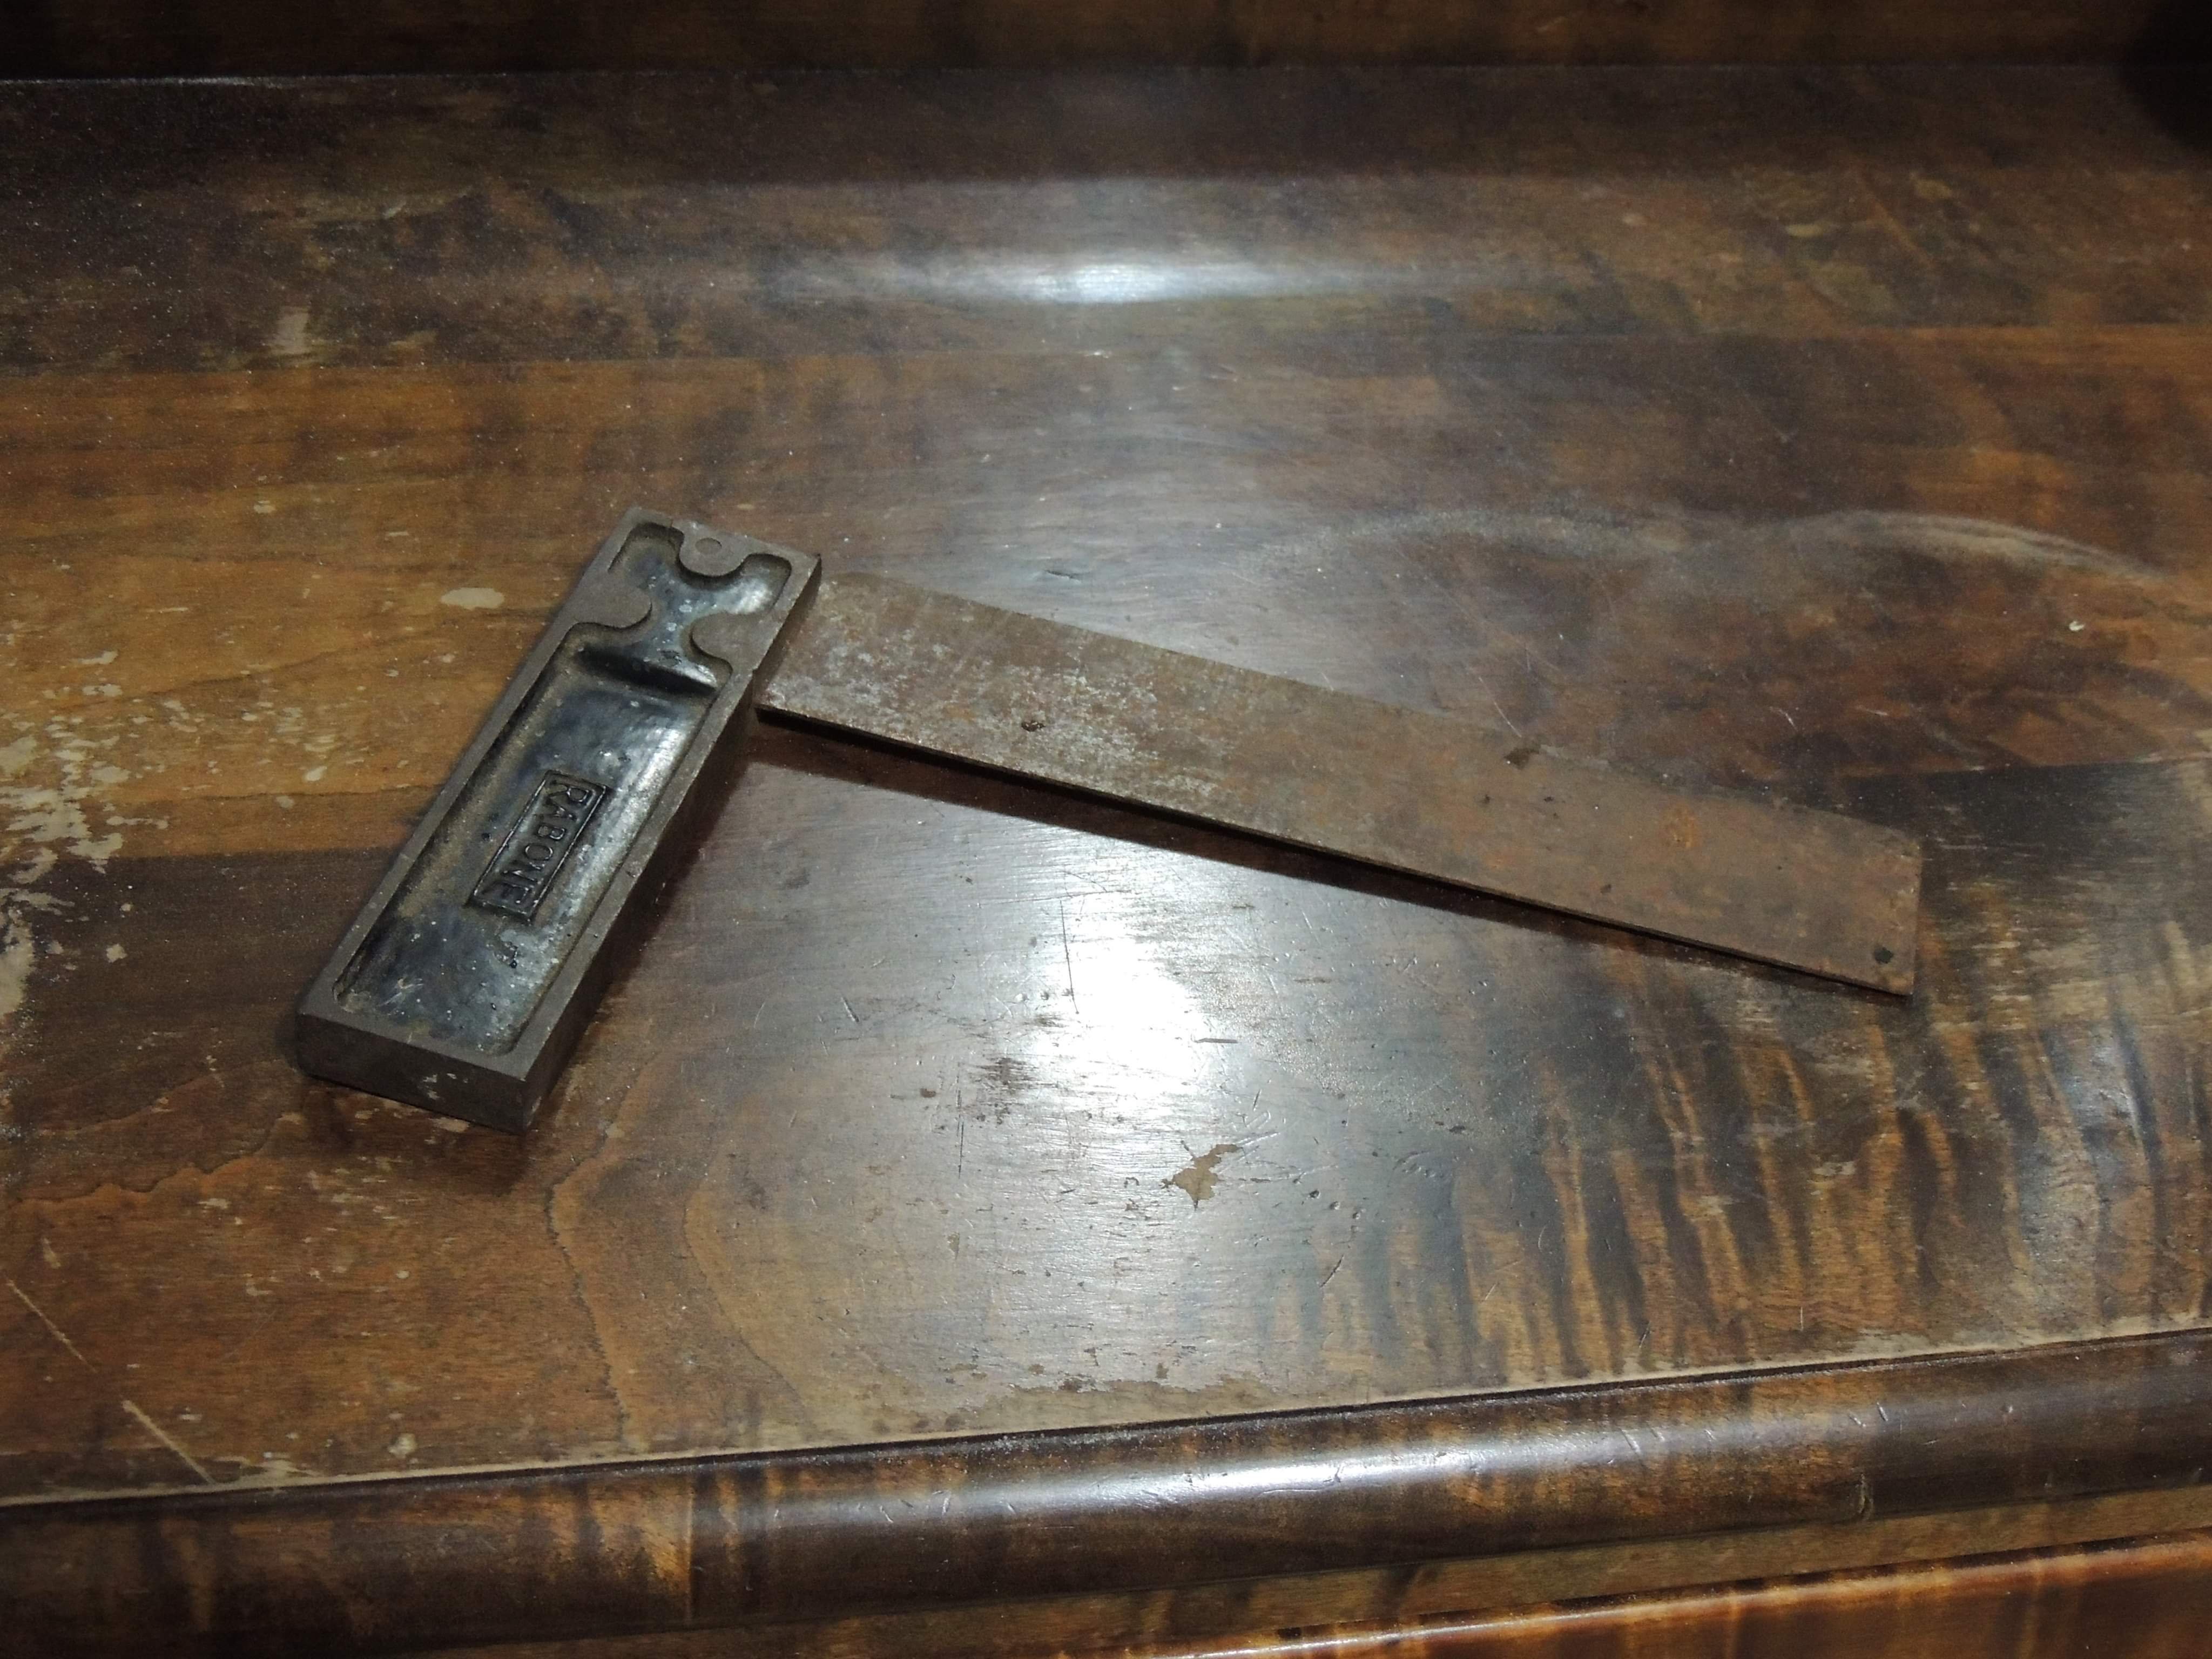
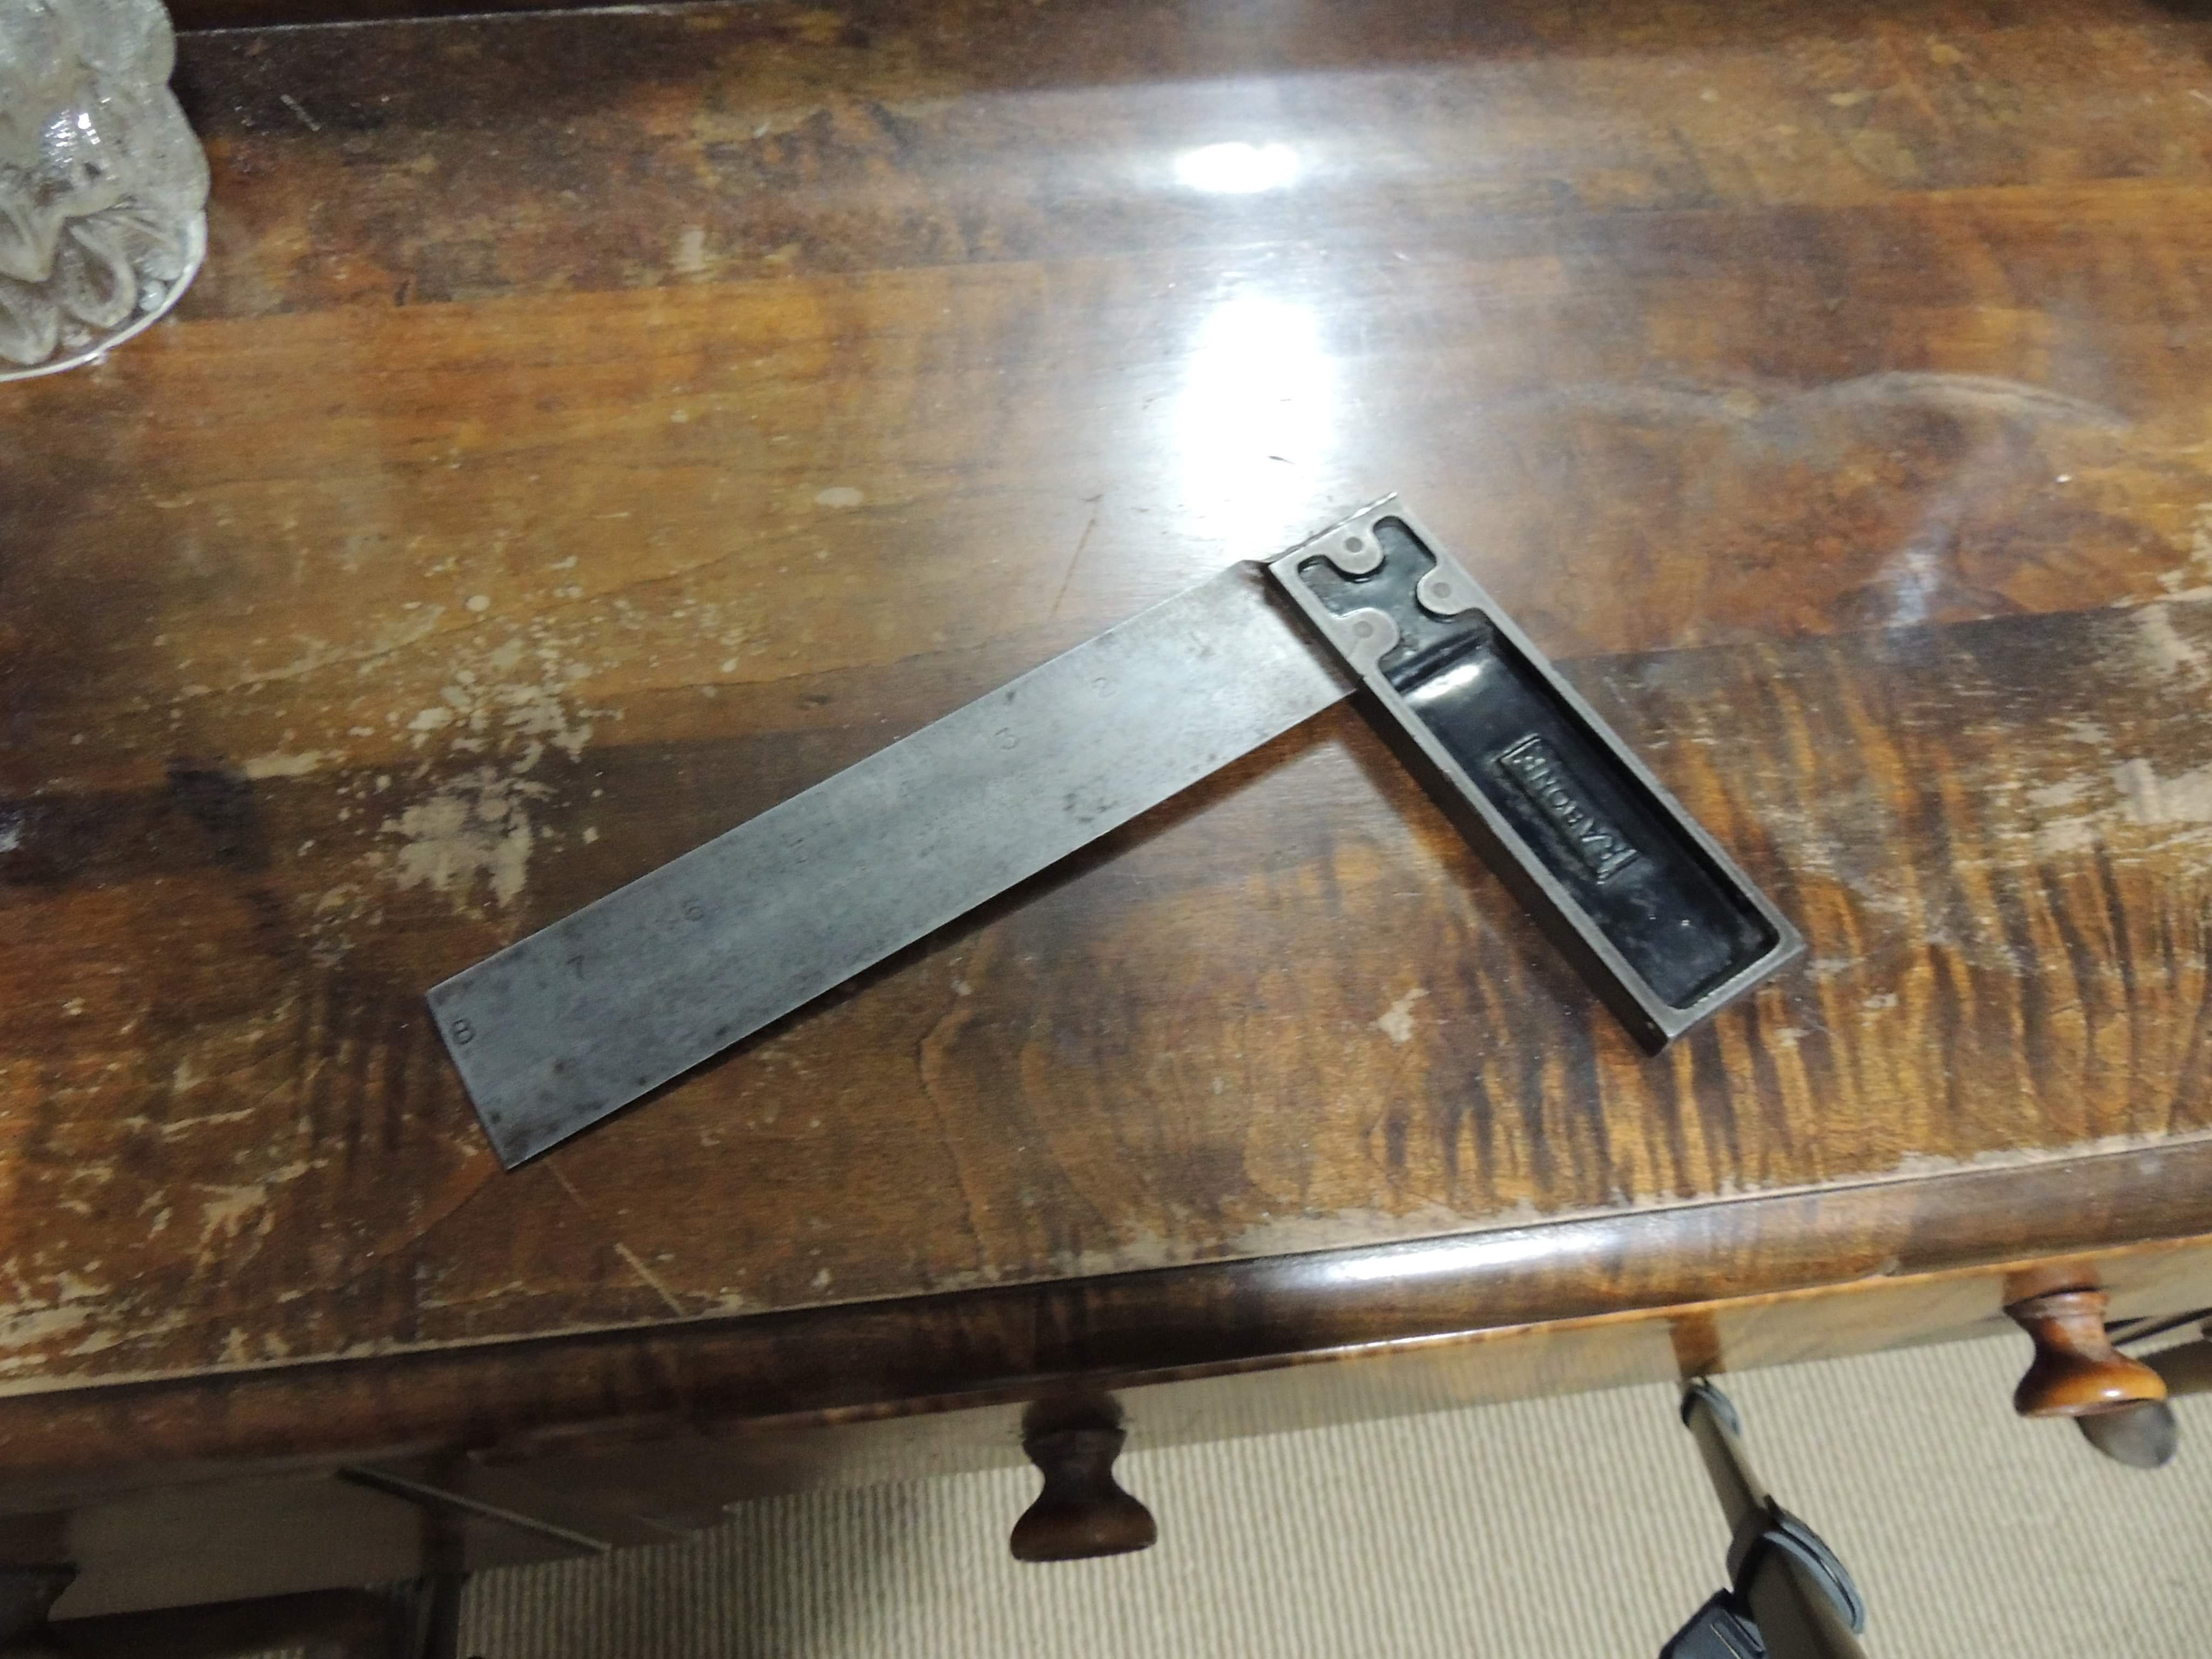
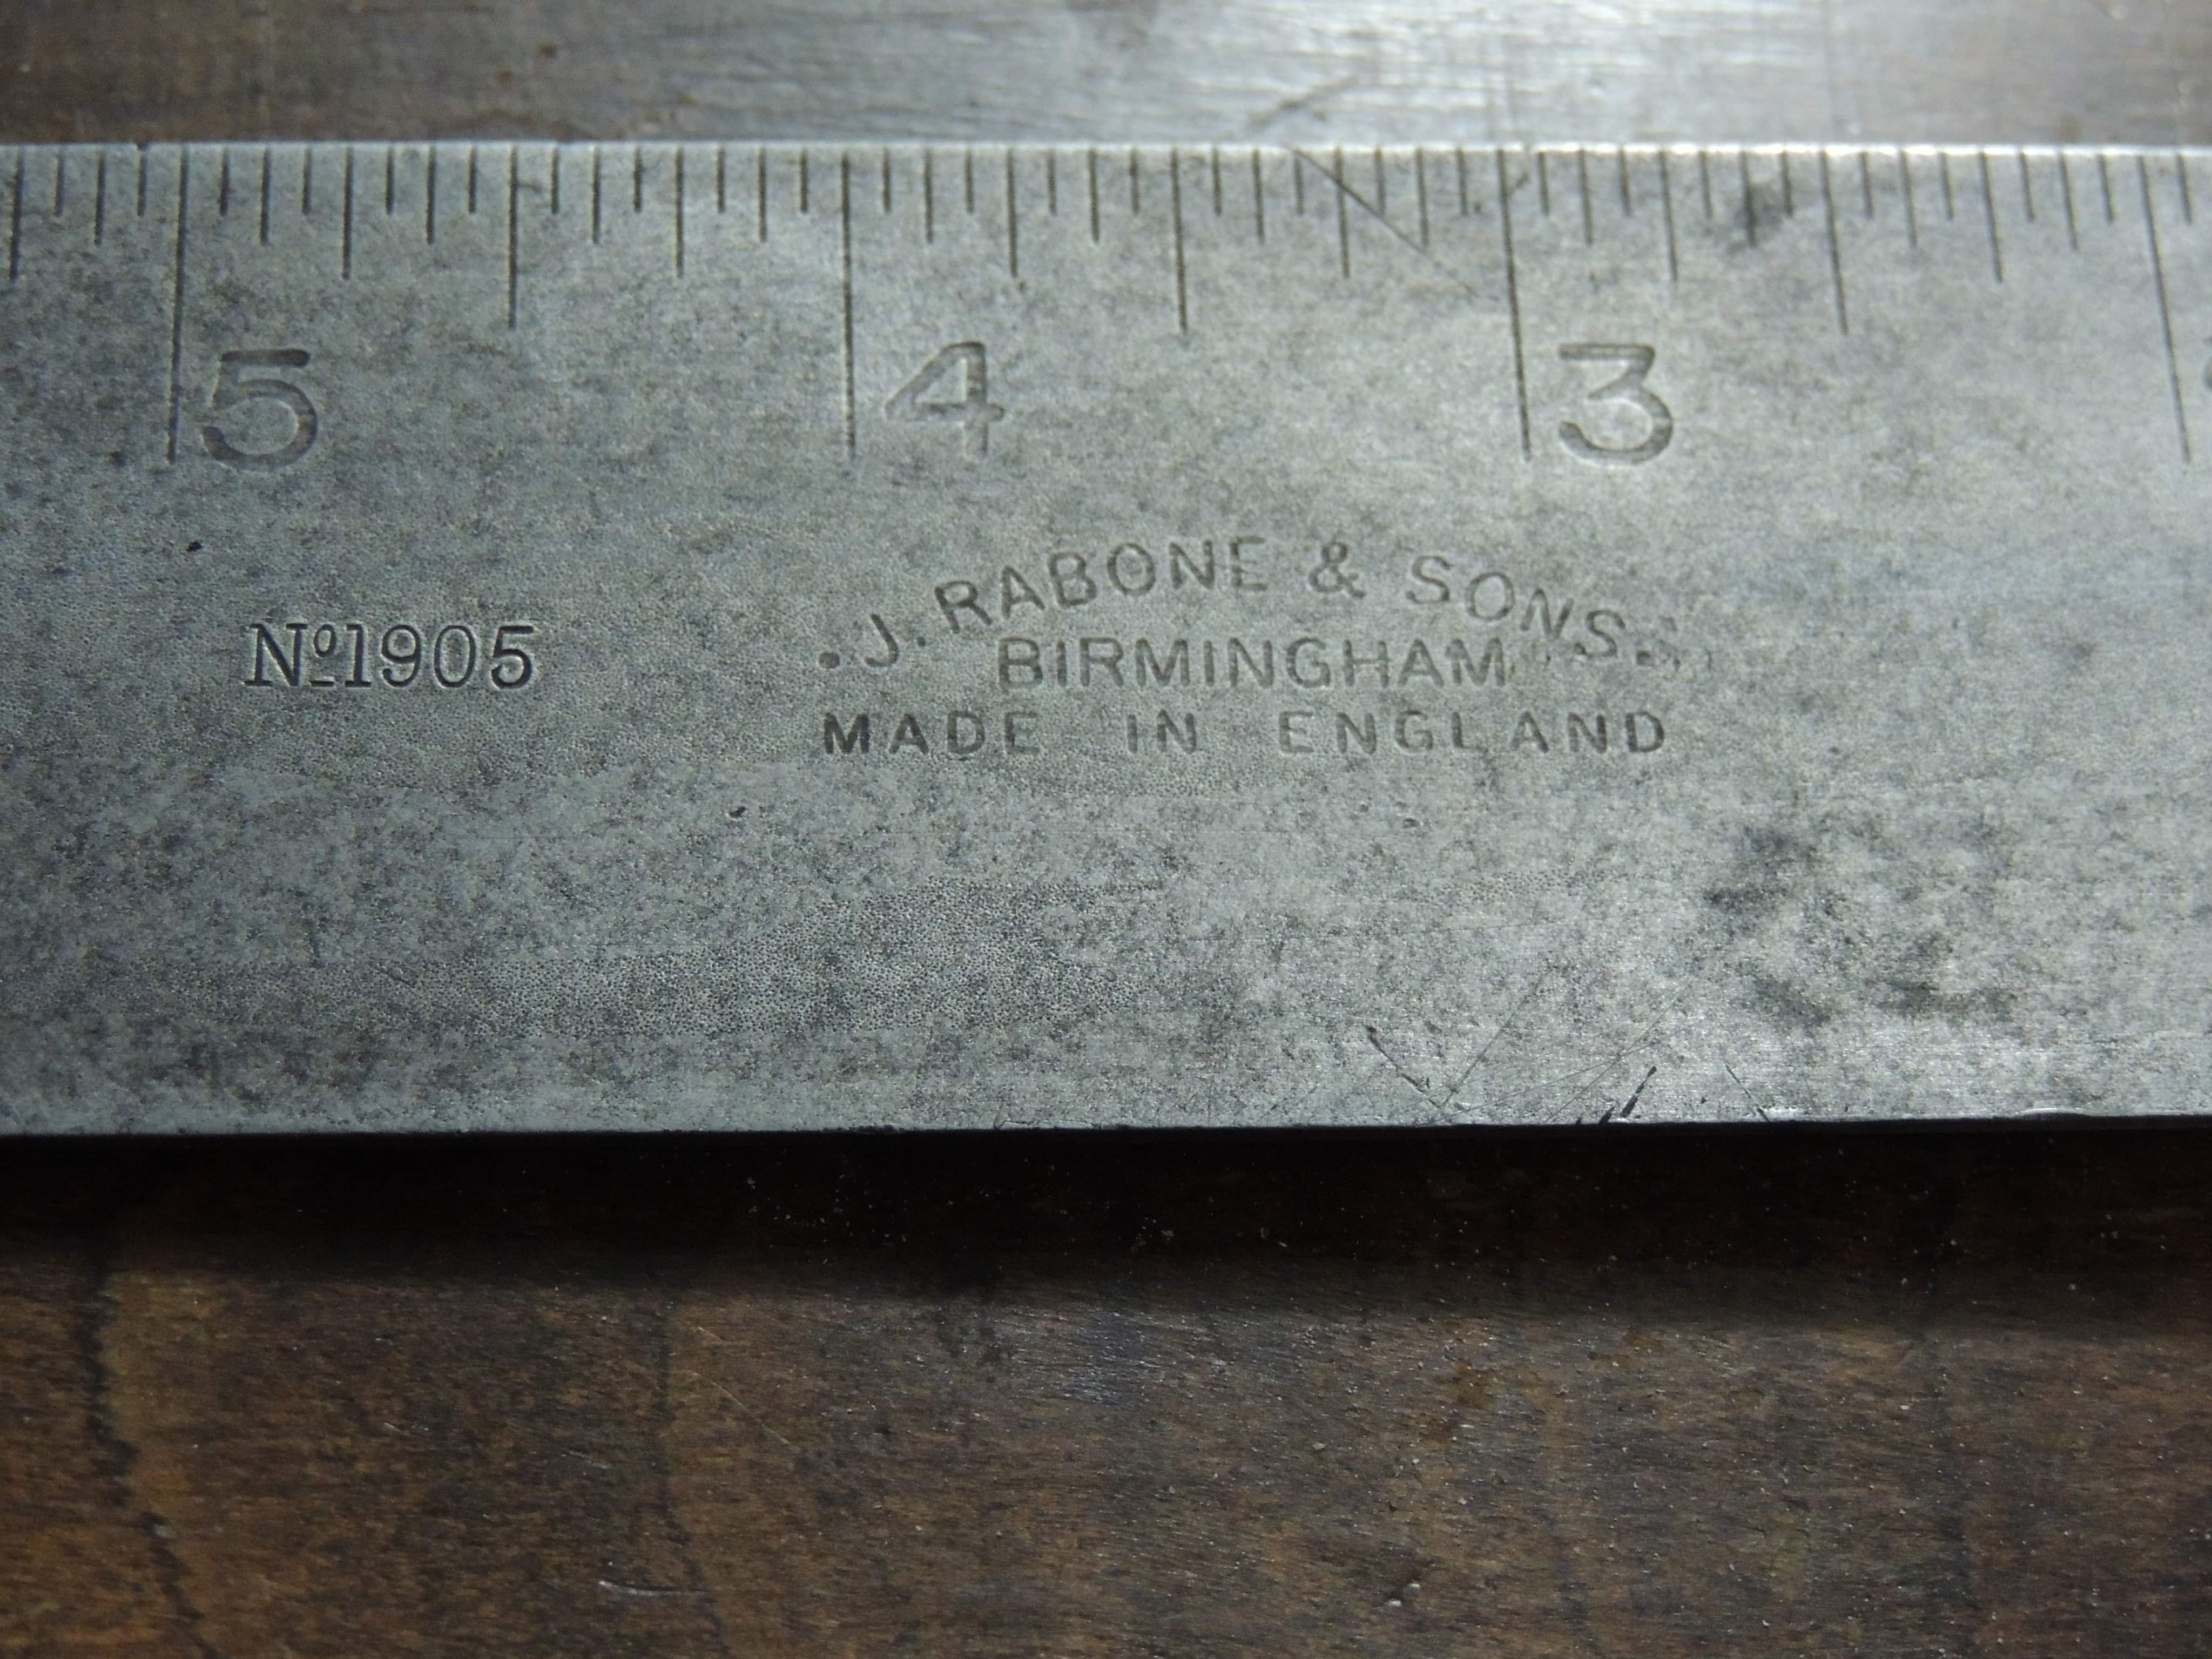
I bought this and a trowel today for $3 . Didnt expect much but it had weight to it. An hr with some wet and dry and it turns out its got some age and was a good make in the good old days. 'Rabone no1905 8". '
3 points
-
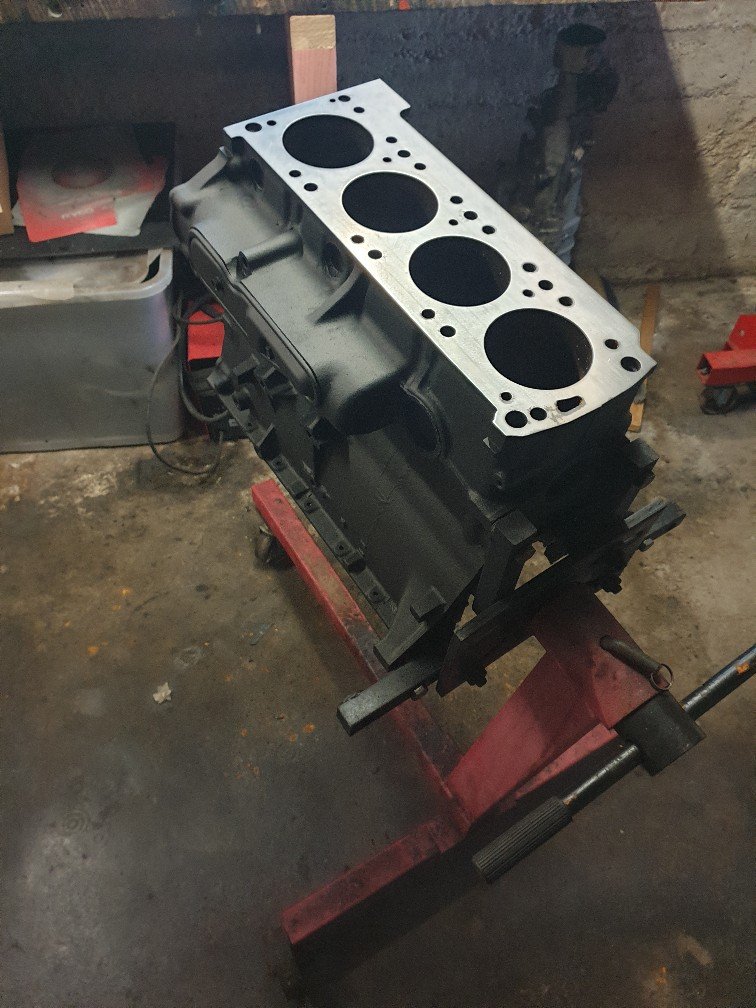
Thought I may as well do an update on this thing, tore apart the new engine a few weeks ago and looks good internally, another one i suspect spun some rod bearings but thankfully no other damage. Have acquired almost everything I need for stock rebuild except new piston rings ( if anyone knows where to find some please let me know), so once I get those and have done a valve job on the head it should all go back together quite quickly. I now have shelfs full of parts I need to work through cleaning, polishing, painting, and or replacing. This weekend Ive manged to clean and paint the block and I painted exhaust manifold after sandblasting it at work. Its only a small achievement but it's got me amped for everything that comes next! Cheers everyone
3 points
-
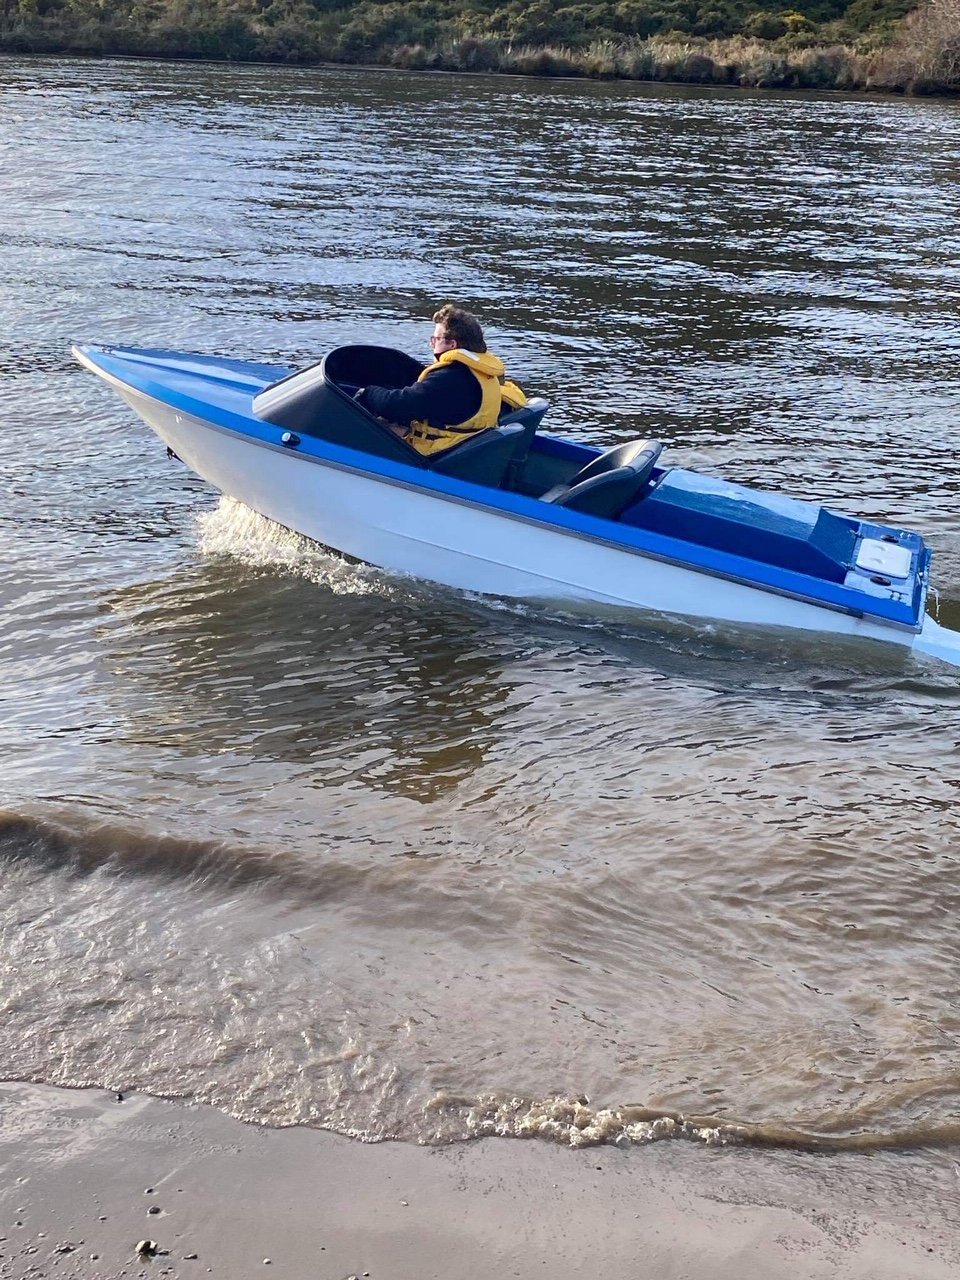
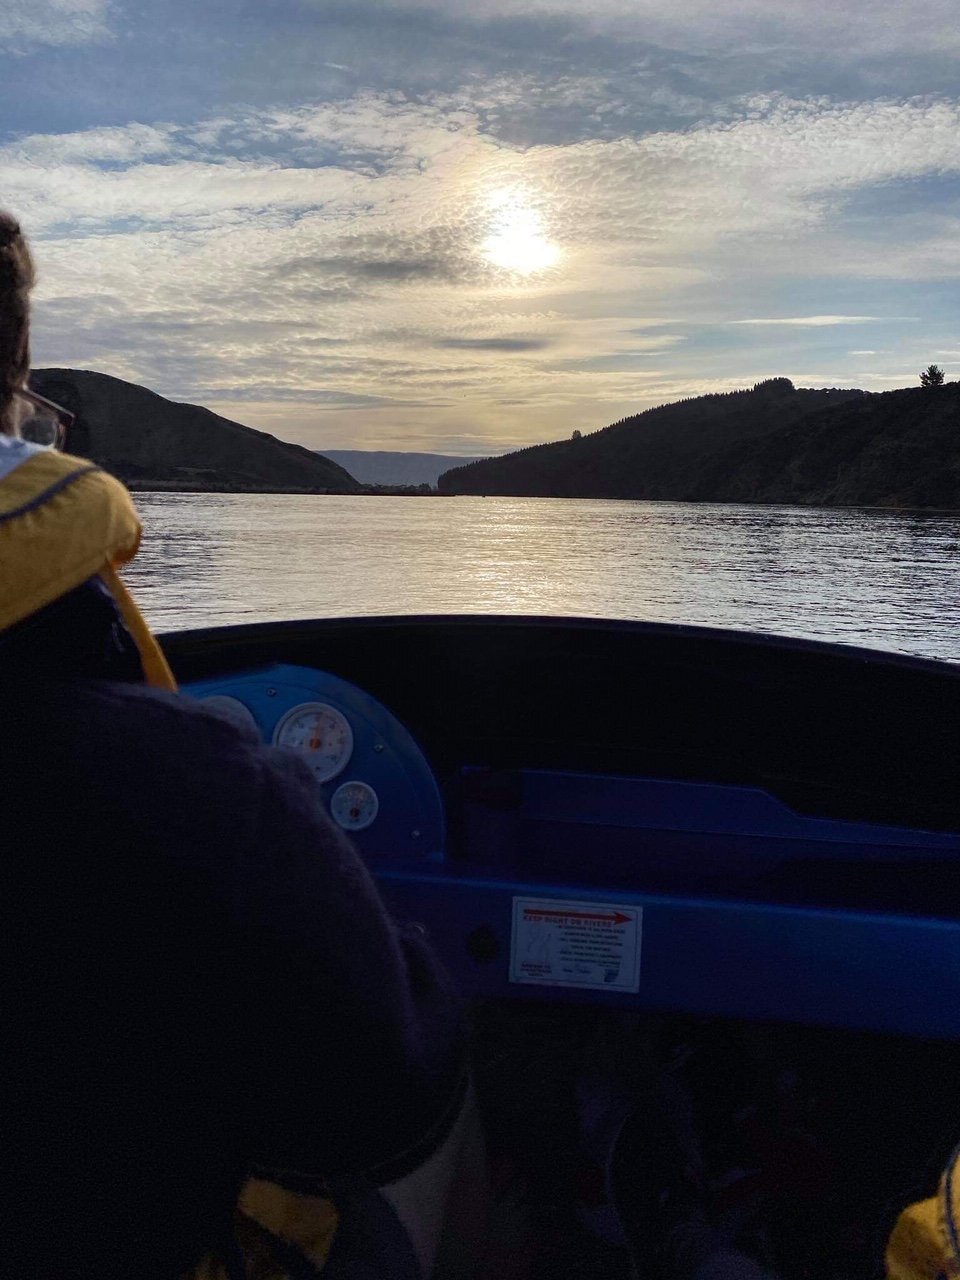
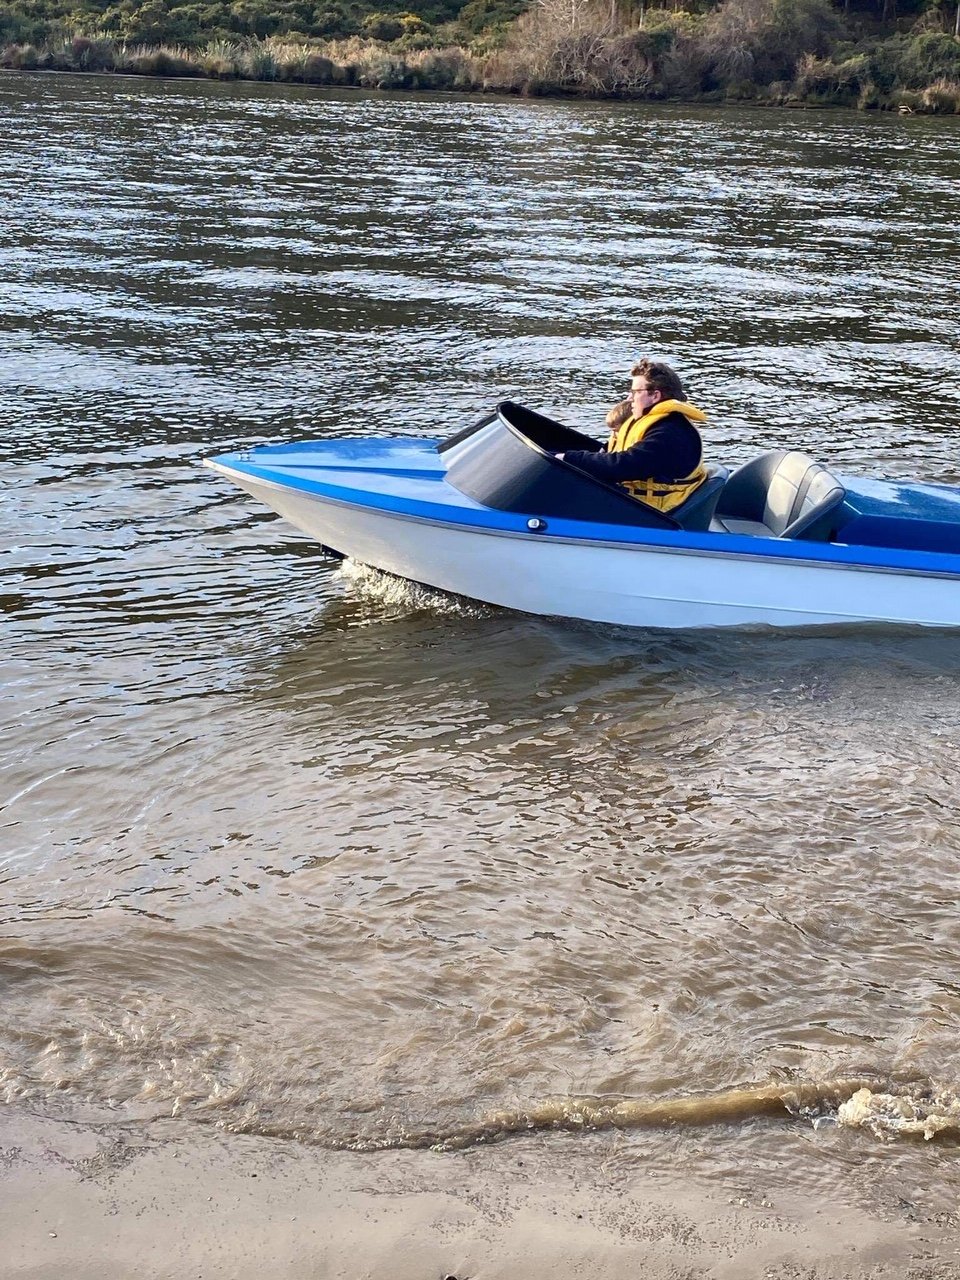
Got it out this weekend.... had reset the tune on it and it starts/idles alot better, still not perfect without ICAV but good enough.... trying to track down a log manifold so I can setup an O2 to do some proper logging/tuning. Also, when I did my sale inspection I noticed a decent amount of water collecting in the bilge. Mr mechanic seller wasnt to phased and was happy to use the pump most of the time to clear the bilge, I used this to negotiate thinking that either the jet unit for the bolts holding the keel plastic on would need resealed. Turns out the solution is way easier... water is fair pissing out of the lower seal on the sandtrap. Where the seal fits to the housing was loaded up with old silt and preventing it from sealing (likely pulled apart in a hurry and never cleaned), likewise the seals are old and caked up with grit. Should be an easy fix....
3 points
-
I am still working on this thing. Took some photos today as I dragged it out of the shed to turn it around to do some work on the drivers side. Don't judge me too harshly, obviously there a lot of things half done on this, but I reckon it's looking good. I call the look Mad Max meets prerunner. Next goal is to get all the bar work finished and drag it in to work to get it blasted and primed so I can put some raptor liner on it.3 points
-
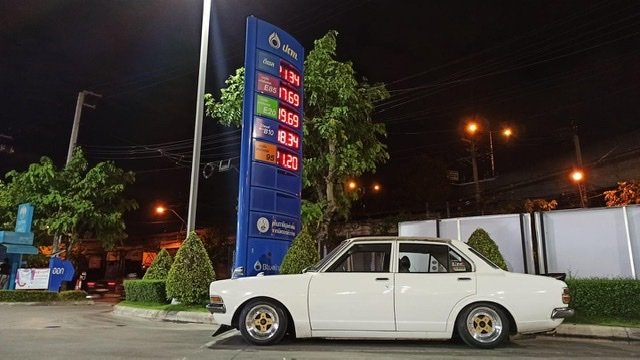
DC2R Phone (33)-Edit by Richard Opie, on Flickr DC2R Phone (36)-Edit by Richard Opie, on Flickr Wheels, meet car. Yeah good. Caffeine and Classics tomorrow if the weather holds!3 points
-
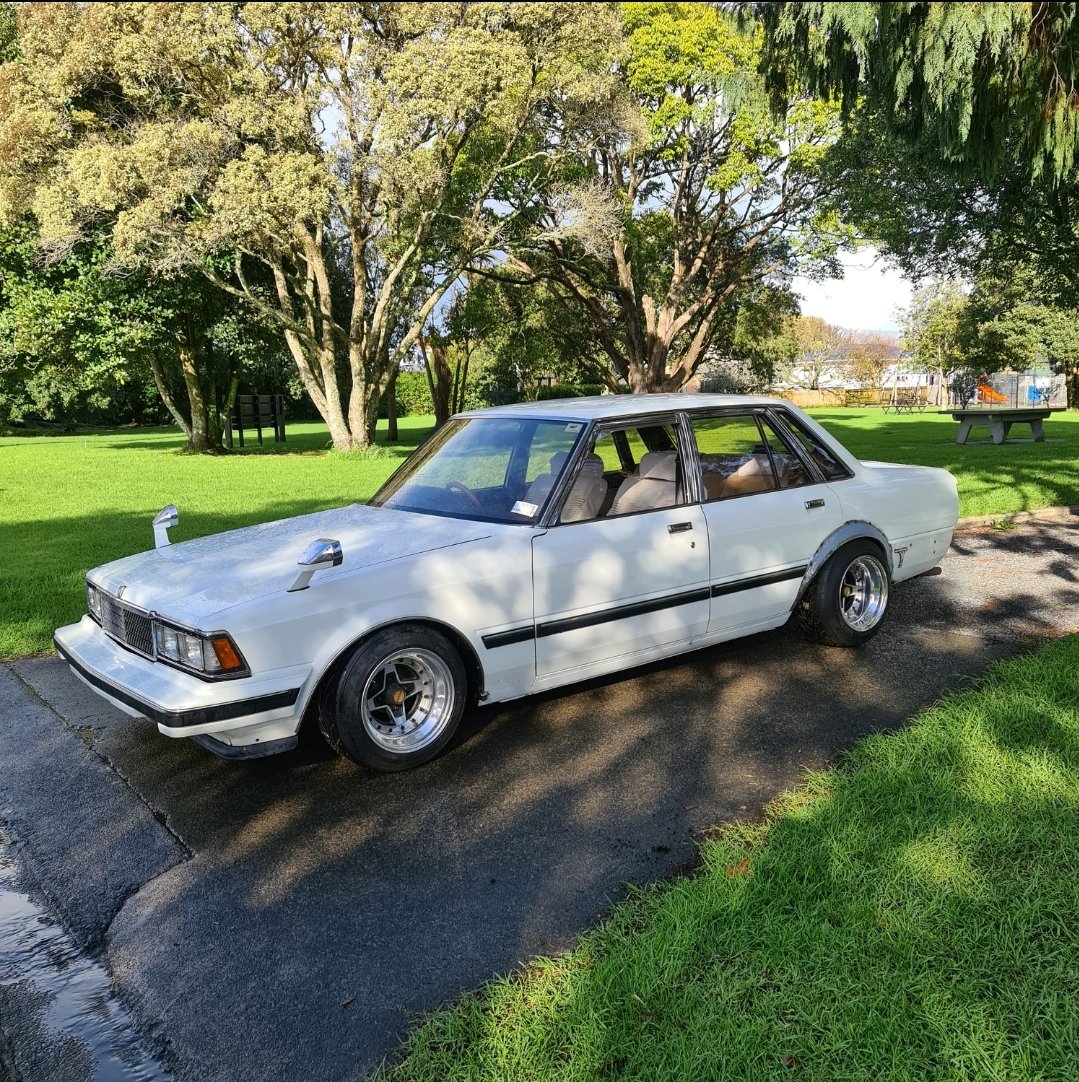
Got my fender mirrors on today. Really happy with how they look. Spaced out the accelerator cable so that I actually get the carby to open up. Wasn’t even pulling secondaries on the way home. Now she goes pretty damn well. Will get onto gauges and tidying up some of the little odd jobs next.
3 points
-
Signed up and will sort accomodations tomorrow2 points
-
@Geophy get in here2 points
-
Im looking forward to bort sharns and road trip superchargers2 points
-
Kinda hoping you can bring the CT for me too?2 points
-
Dads on a bike this year. y’all have to carry your own machine centre haha2 points
-
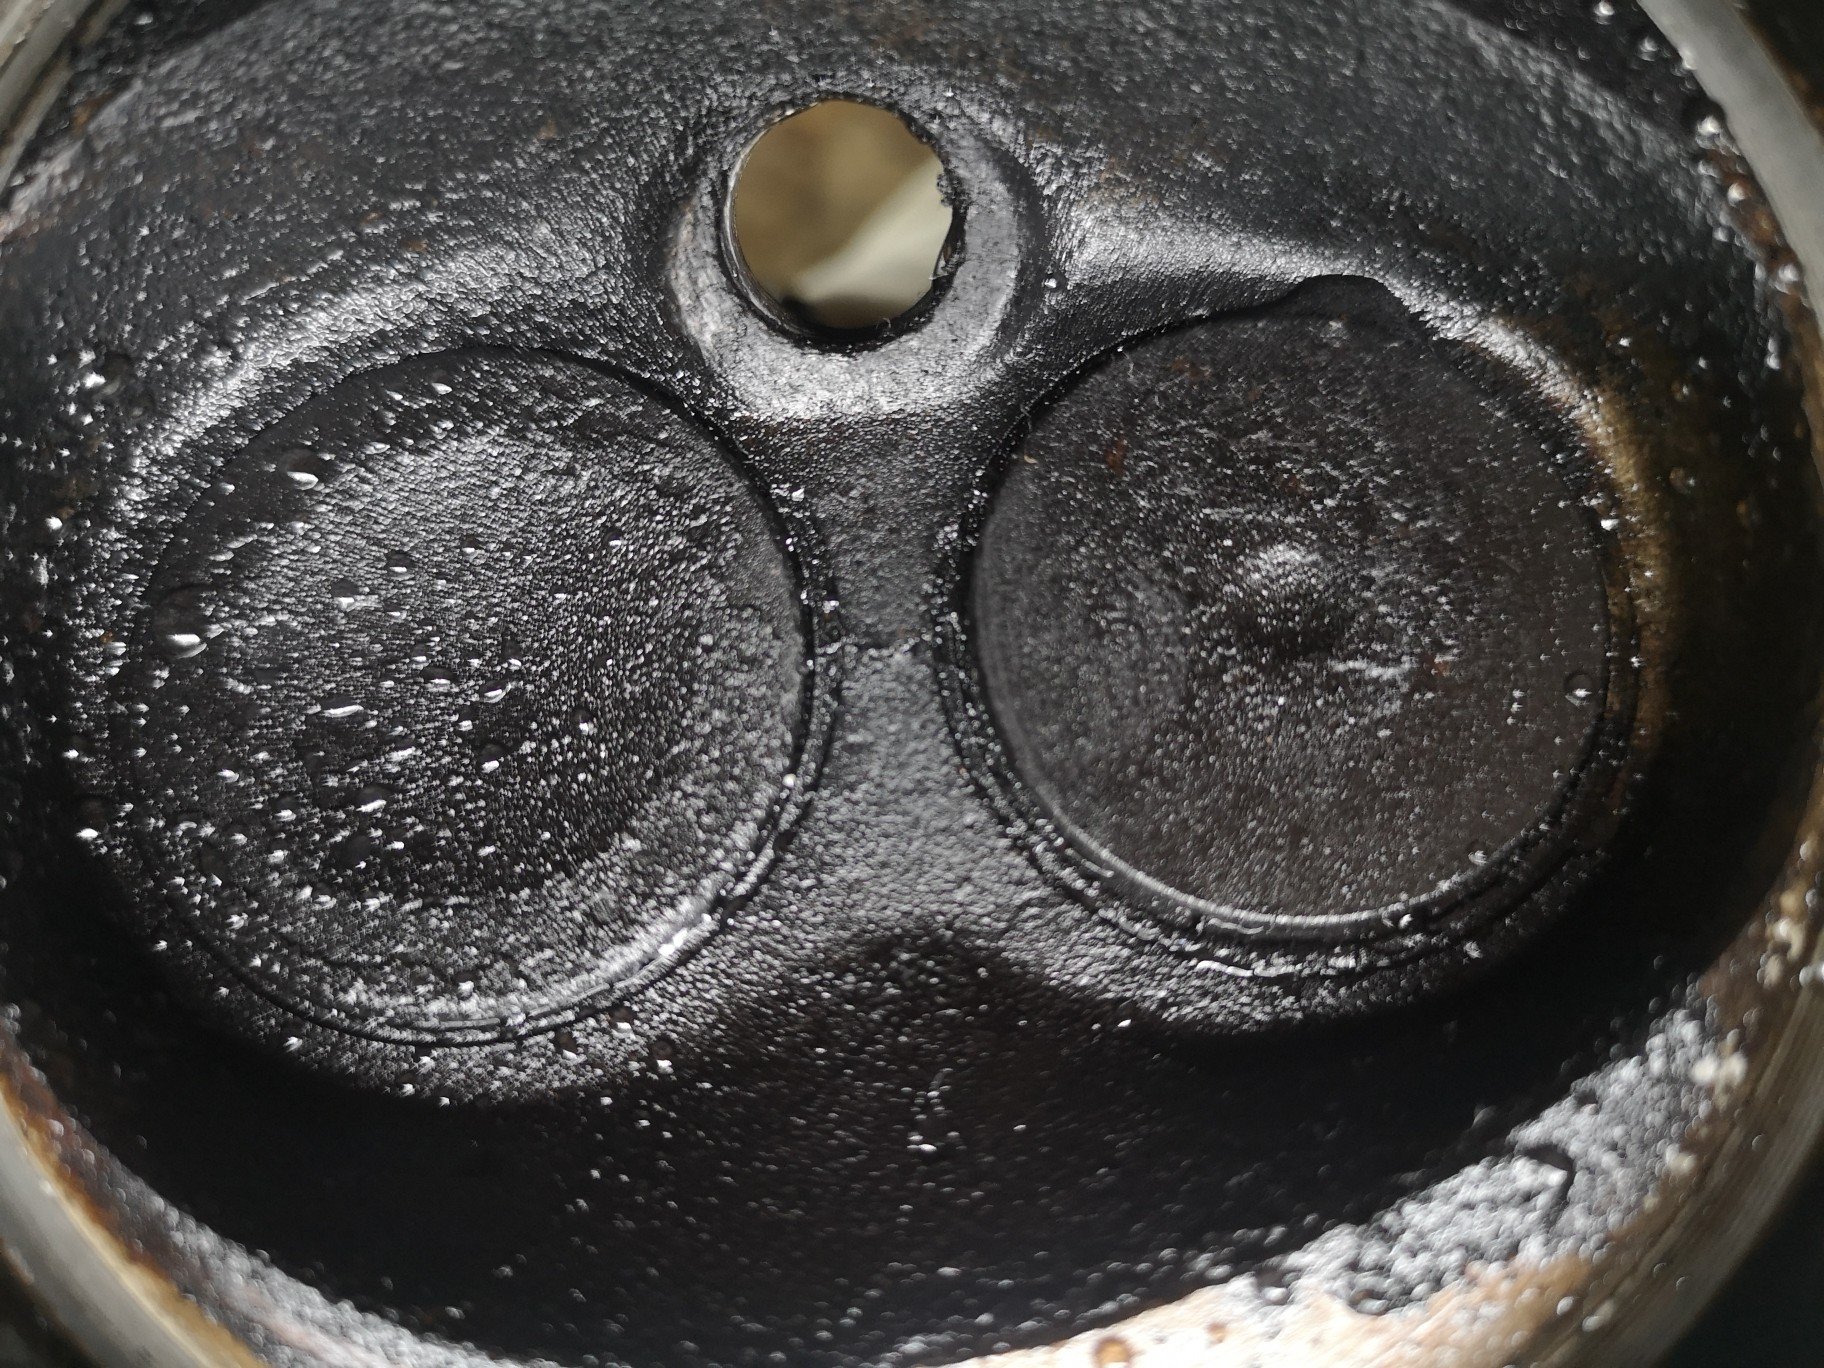
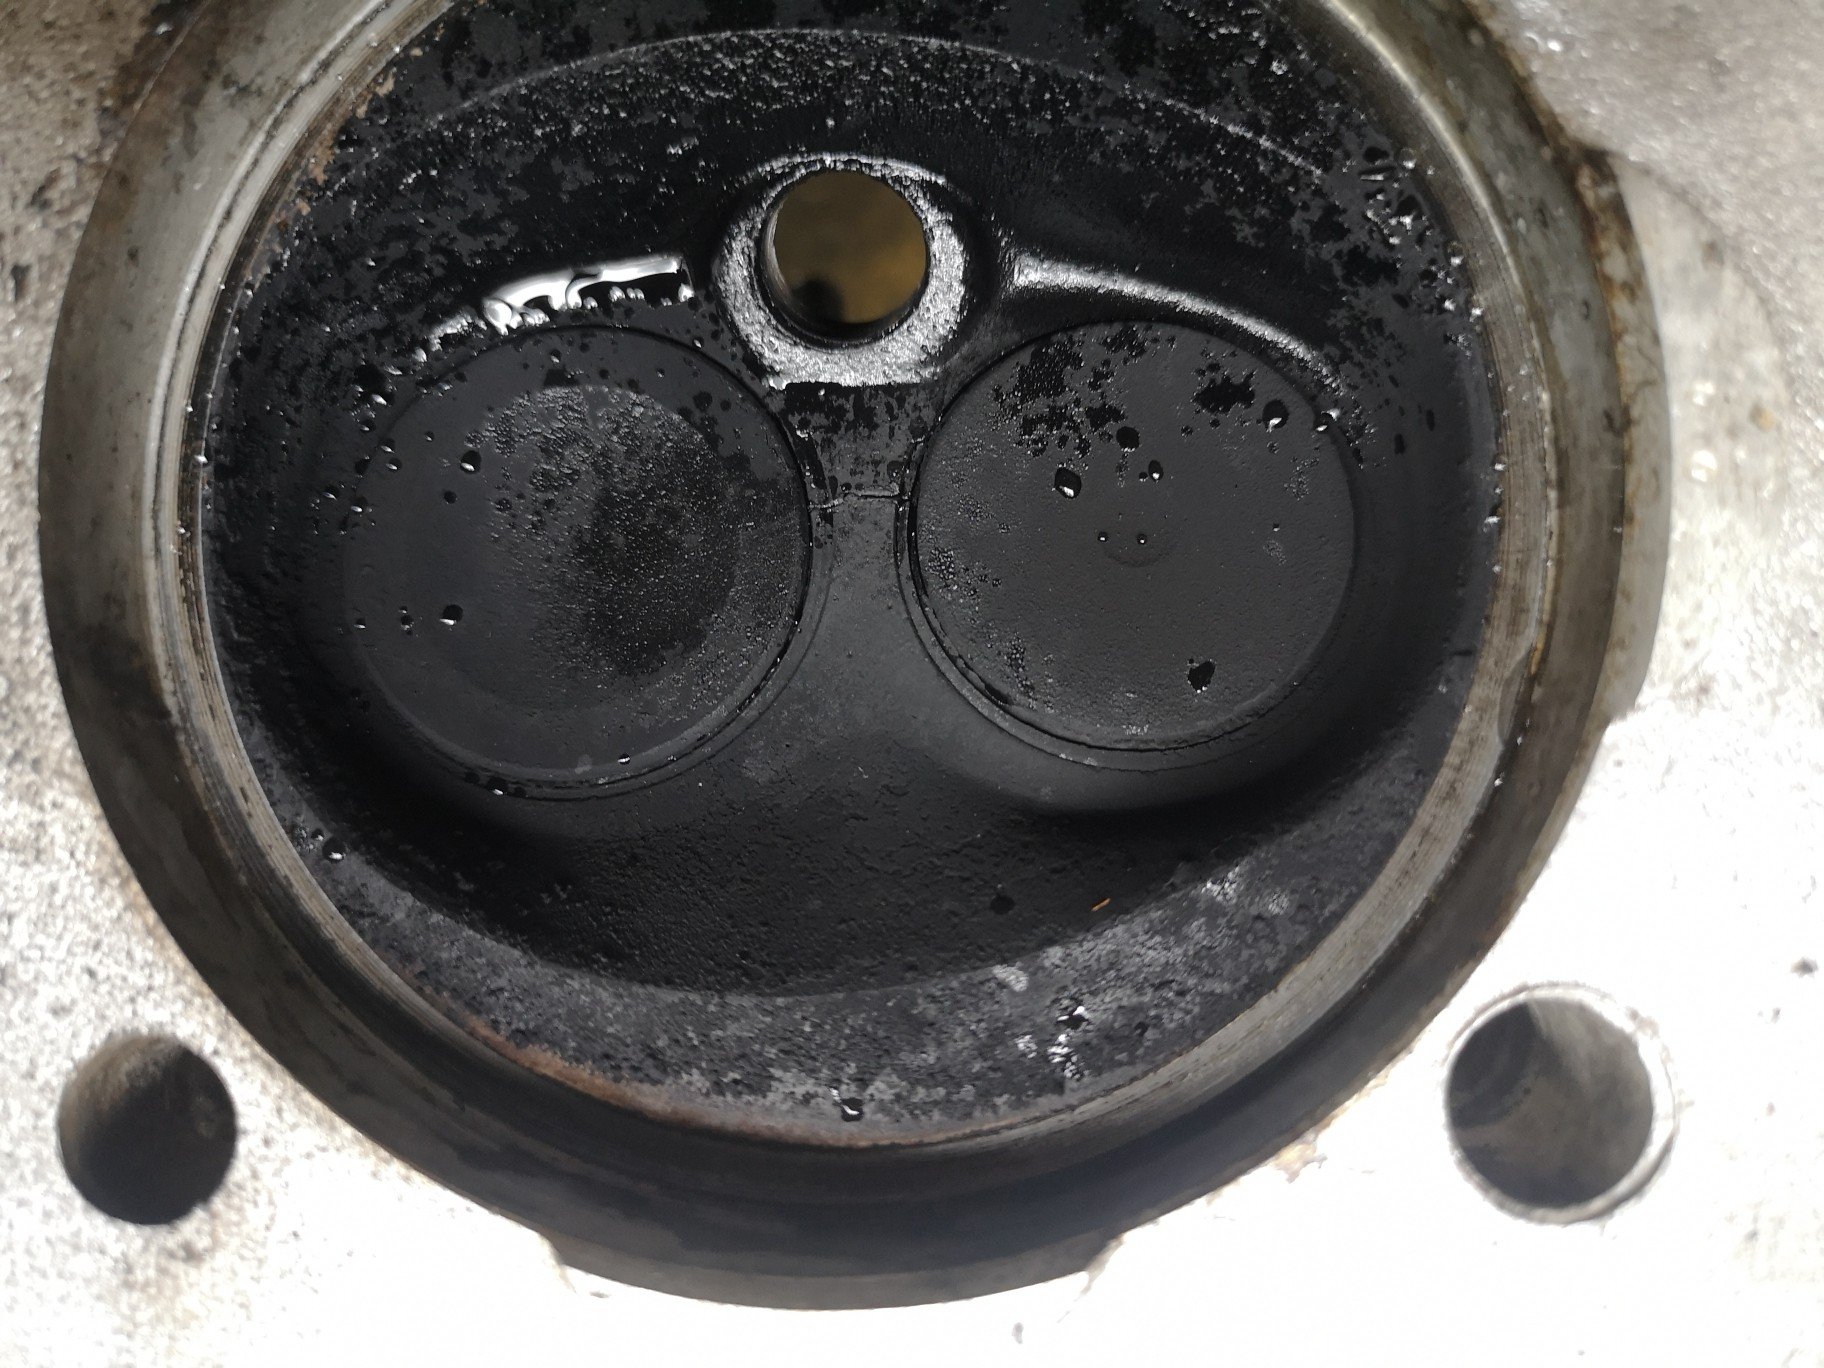
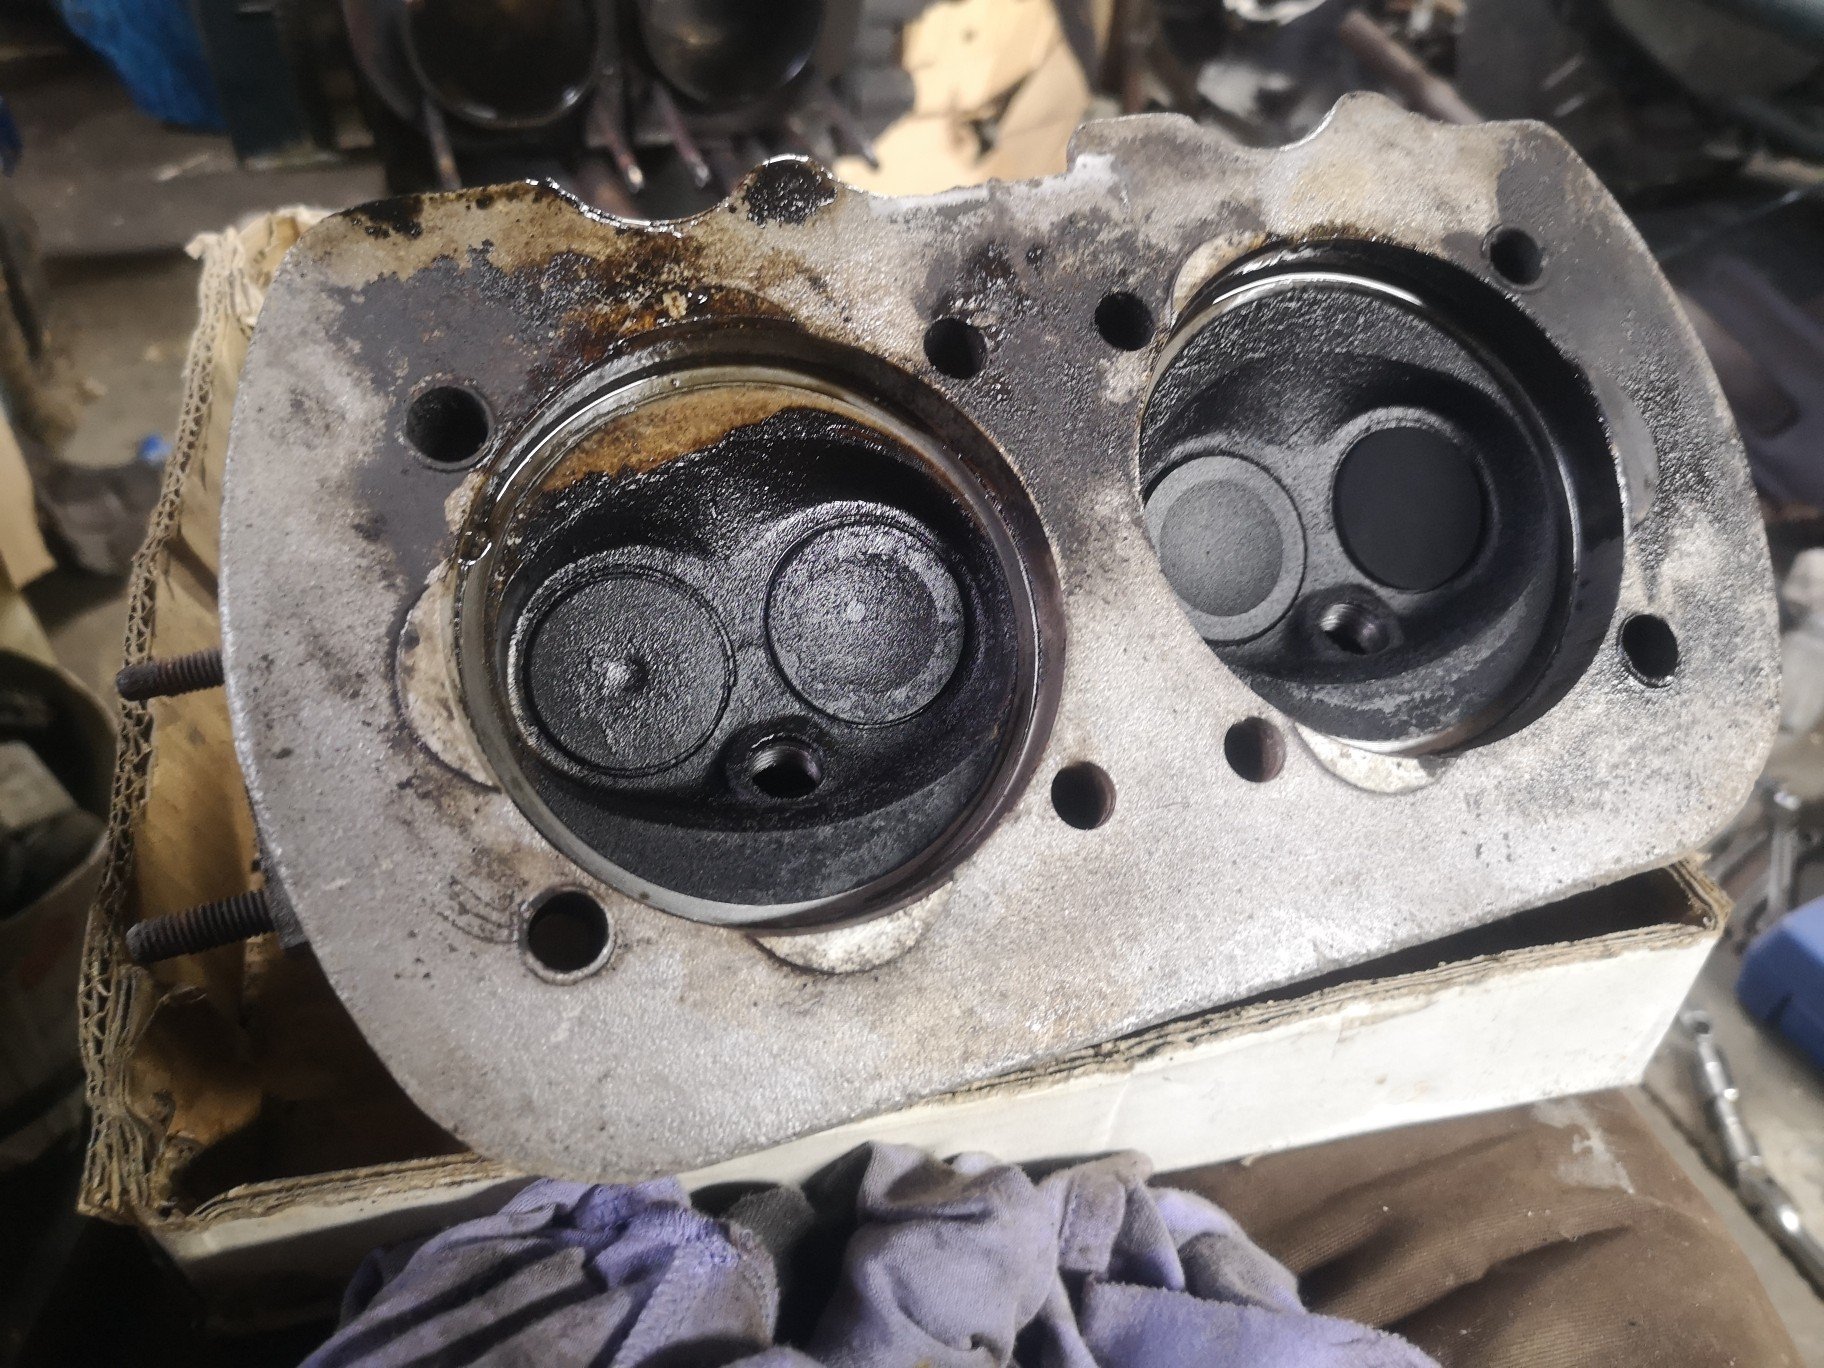
Pulled the heads and barrels today.. One very unloved motor.. Guess which one had 0psi.. Ruh Roh.... Somethings missing..
2 points
-
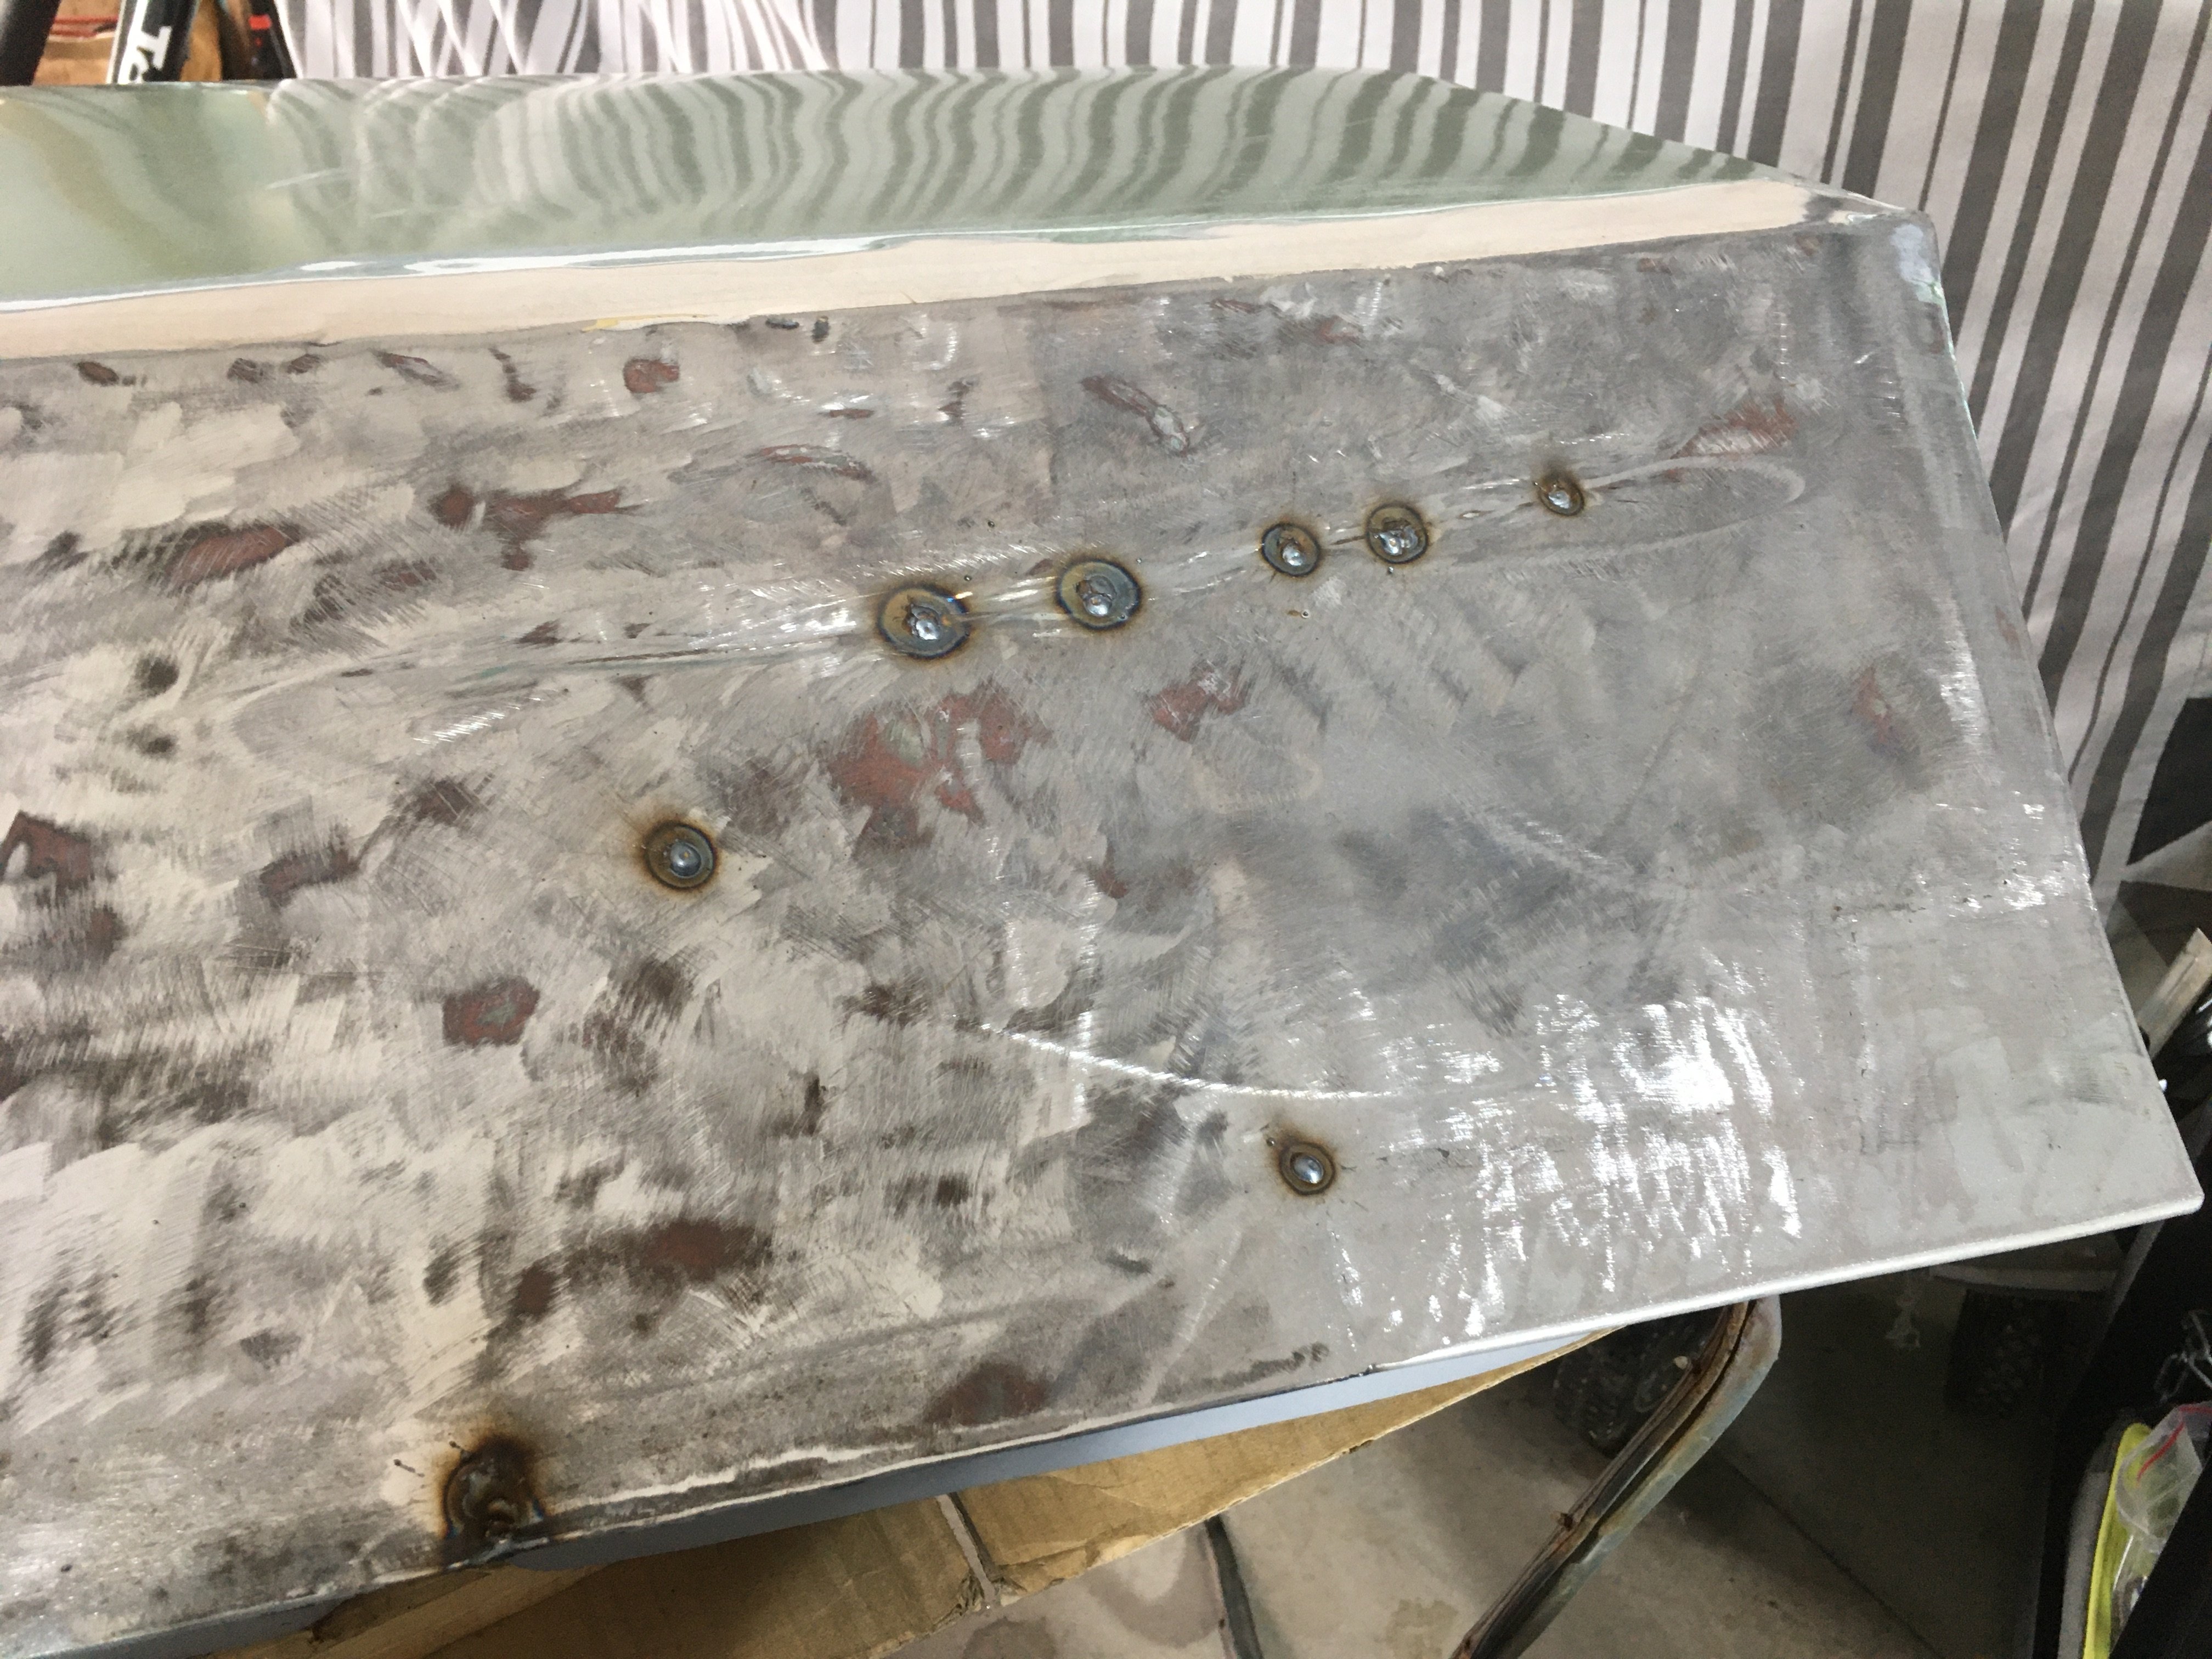
Did some more digging. Managed to make it a bit better with hammer and dolly. Weld up the holes. Power file
2 points
-
It's CHCH... ...someone must have a TE72 with bolt on flares attached to the bottom of the factory flare, rolling on Performance Wheels Spitfires and Eagers?2 points
-
When looking for an XR200 engine this CT185 popped up on here. grabbed it for the engine which was supposed to be an XR200 but was actually a lame mishmash of Xl185/ATC200 parts with boring cam and compression so that went under the bench, but thought i might try work with the frame, which was worked out alright, just needs a new rear section. Rear hoop and stays got hacked off, new one getting made this weekend. to make the front end work with the CG tank without smashing the shit out of it / having no lock i needed so offset triples. after oodles of searching what would fit nicely i found some 80's CB125T triples, snapped them up and whacked them on and was golden. good lock and no knock. You can see here i have whacked some classy golden boys on as well. 3.5-19" front and 4.0-19" rear. front only just fits, but ive got a bit of a plan here to get some more clearance and will run incise dust caps.2 points
-
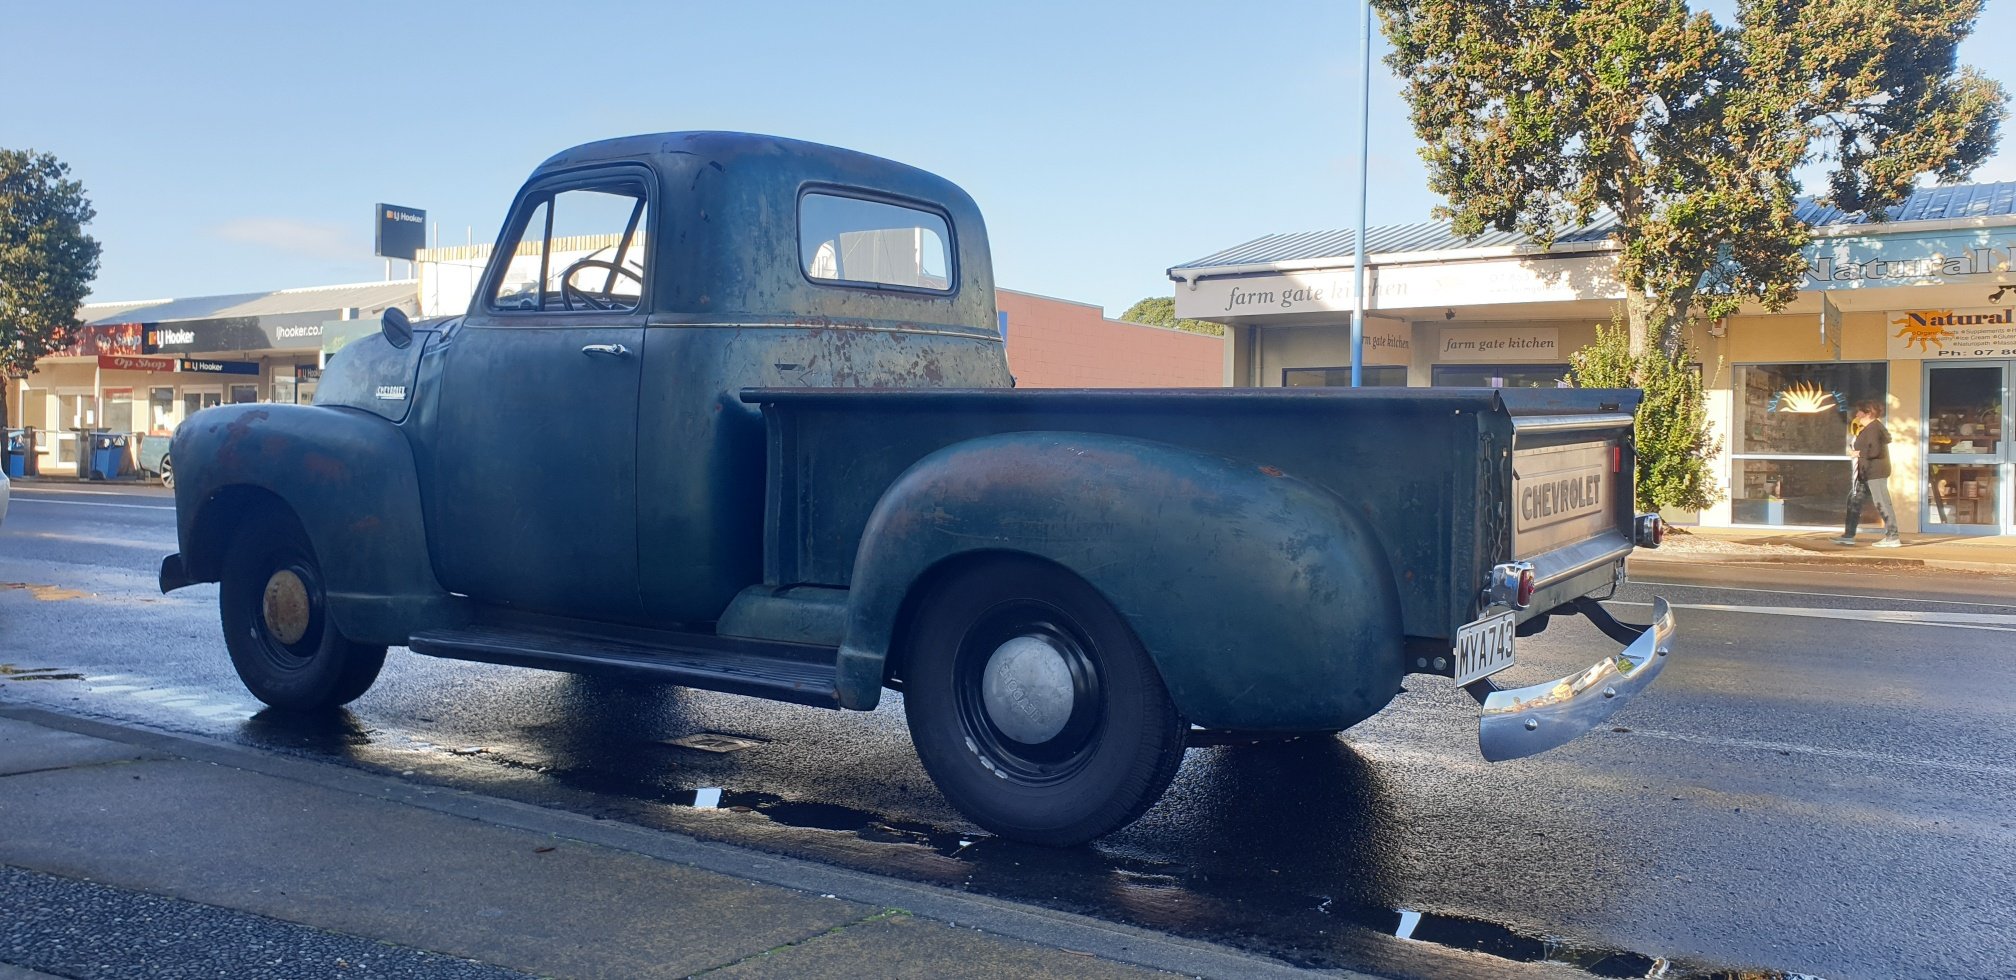
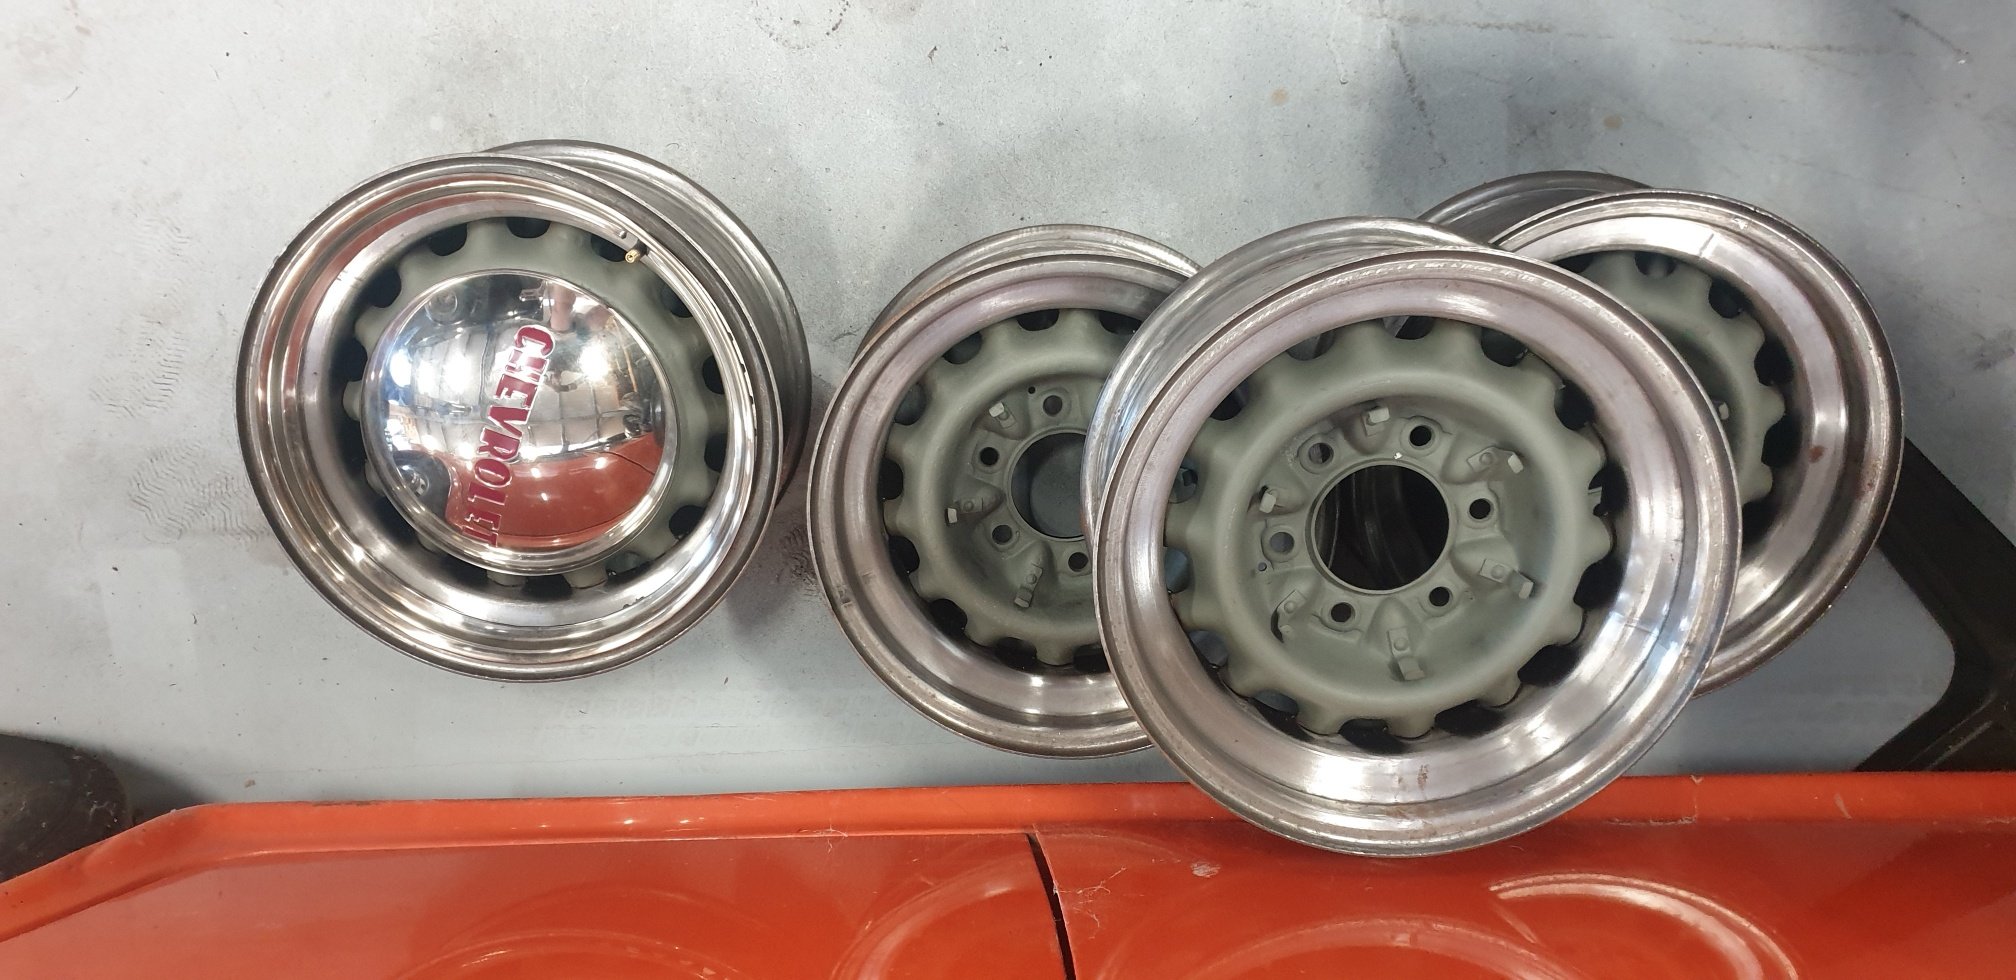
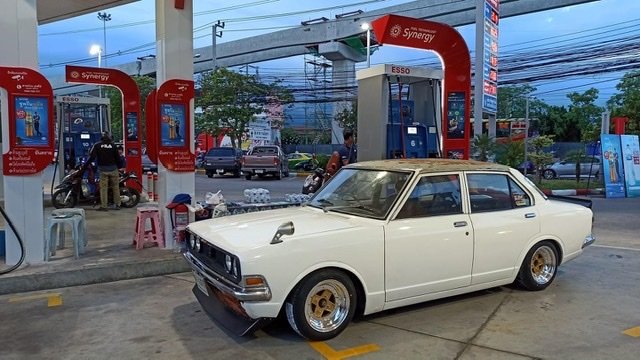
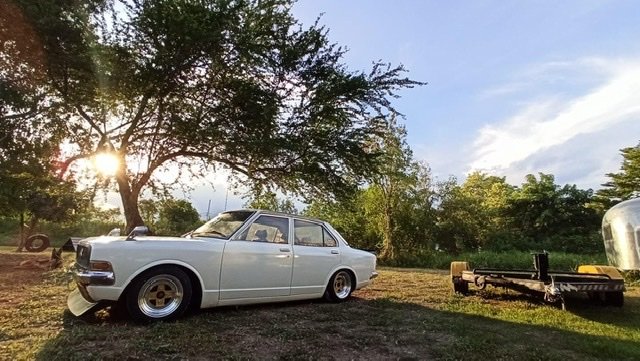
Much success! Got a VIN, Wof and Reg today! All ticked off and ready to roll. Now time for a few mods, Artillieries, whitewalls, hub caps and beauty rings Split manifold and exhaust Fit the Fulton Visor Lower Then she be ready for summer cruising.
2 points
-
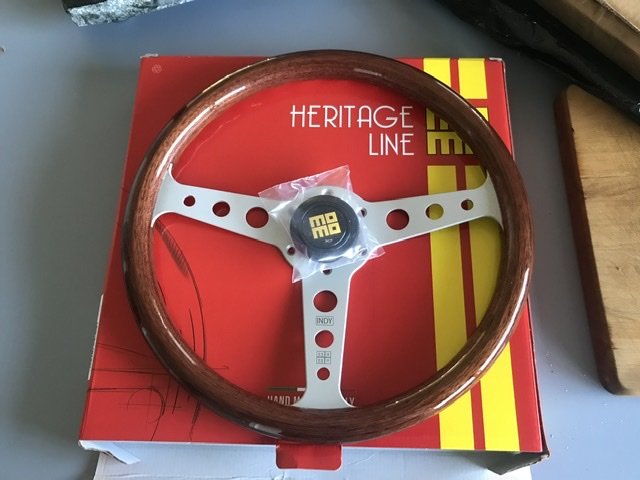
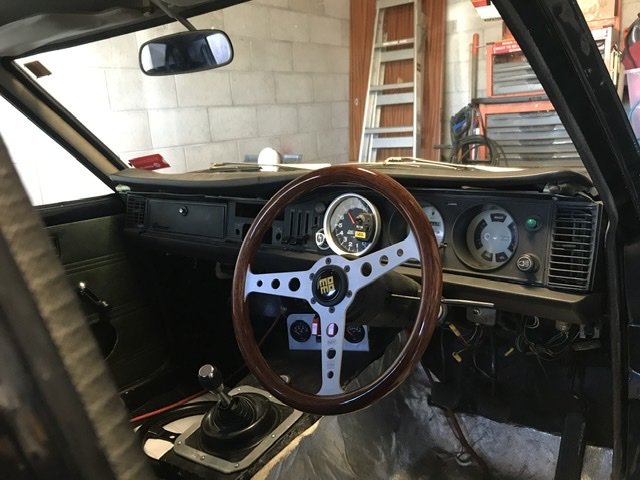
This arrived today! I always wanted a really nice wooden steering wheel for a classic and after uming and ahing over a nardi I decided to go with this momo Indy. I think it looks the part. A shame the rest of the interior doesn’t match yet. also found some inspiration for what I would like to do with wheels and jdm lip.
2 points
-
Alrighty The car has undergone a few changes. Something that drastically needed attention was the rear spring perches on the diff. The diff is an F series out of a Liteace Van and had the AE86 mounts swapped on to it. What a great idea I thought! as I purchased this off TradeMe.. Check out the state of this. No idea what it did to the actual ride of the car being like this but it's always crippled my brain bones when I thought about it 95055142_2587530994857642_8016735613954818048_n by phillipbaines, on Flickr Cut bracket off: 20200502_151932 by phillipbaines, on Flickr Tack in better position: 20200502_153711 by phillipbaines, on Flickr Glue in and appreciate the view: 20200504_134955 by phillipbaines, on Flickr After market cams from Auckland Cams have been acquired and installed: Handee-Dandee printable cam degree wheel. 20200411_125318 by phillipbaines, on Flickr I forgot to get a pic with the dial indicator gauge sitting in there for cool effects but.. they're dialed in! They're a fast street.. turbo cam which leads me to my next photos 20200411_125336 by phillipbaines, on Flickr Into the shop she goes at Syndicate Fabrication in Feilding to get some bloowey stuff sorted: 20200509_123358 by phillipbaines, on Flickr I think i'll be relocated my battery.. 96582311_1183989831941174_4131192127054938112_n by phillipbaines, on Flickr Intercooler mounting: 96234626_1335441543317696_5237312287865307136_n by phillipbaines, on Flickr 97052531_332330944406187_4372249077803384832_n by phillipbaines, on Flickr 96801806_1065109070557228_3969570824079278080_n by phillipbaines, on Flickr 96754189_684652285666769_2128768315122778112_n by phillipbaines, on Flickr 97122736_600582834146913_7398048078931951616_n by phillipbaines, on Flickr 97041947_726147548188757_5675273285609193472_n by phillipbaines, on Flickr 97470685_196968697946098_5761960599114219520_n by phillipbaines, on Flickr I'm excited, it's looking the tits, I will update as I get more pics! Work done by: https://www.facebook.com/SyndicateFabrication/ Discussion:2 points
-
amazingly there has been some more progress! I did manage to track down a spare door and dropped that off a while ago. Then a couple of weeks ago got an email from the panel beater that the rust work was done! And now as of this morning it's tucked up in the garage, now i just need to get off my ass and do stuff I have also acquired this, as a donor off a friendly chap from Hamilton2 points
-
so i have the opportunity to acquire a 1.6 mx5 manual for bugger all, thinking about using it for a donor car. But am unsure if the 1.6 mazda power plant will provide enough grunt in NA form (verses say an SR20de) Thoughts? Also potato photos of the roof and rear windscreen sill, to show there is some progress happening (didn't have time to snap more)2 points
-
couldn't help but troll through Yahoo JP for some unique wheels, Alex won these for me last night, should be here in the next container all things going well apart from shoe shopping, the ute has had the rust soda blasted and is being worked on. Just waiting on progress pics2 points
-
It’s all just kit low2 points
-
There ain't no way I can roll that lip. Although the 6J Dragways aren't the permanent wheels I will be running, they certainly represent the width and offset of my final choice although the Dragways are 14 inch and I plan to go to a 15 inch American Racing Torque Thurst 2. I'm also not a fan of the look where the wheels and tyres are way narrow in the arches and much prefer the look of a filled arch, I could go a lower profile tyre up front but I can't go too low. I could go for a rim with less offset, but the "off the shelf" old style mags in either 14 or 15 inch diameter pretty much have similar offsets. I do like something with a dish and the Thames would look odd with a more modern rim. I could go for widened steelies with bespoke offset and whilst I like that look I wouldn't want to be limited to just the single choice. Custom made alloy wheels would cost moonbeams and are out of my budget range. I could run negative camber up front but that will just chew tyres so not really an option. So whilst I am giving this more thought I figured I would take a closer look at what I am going to do for the back axle. The standard Thames setup was the rear axle sitting underneath the leaf springs like so:
1 point
-
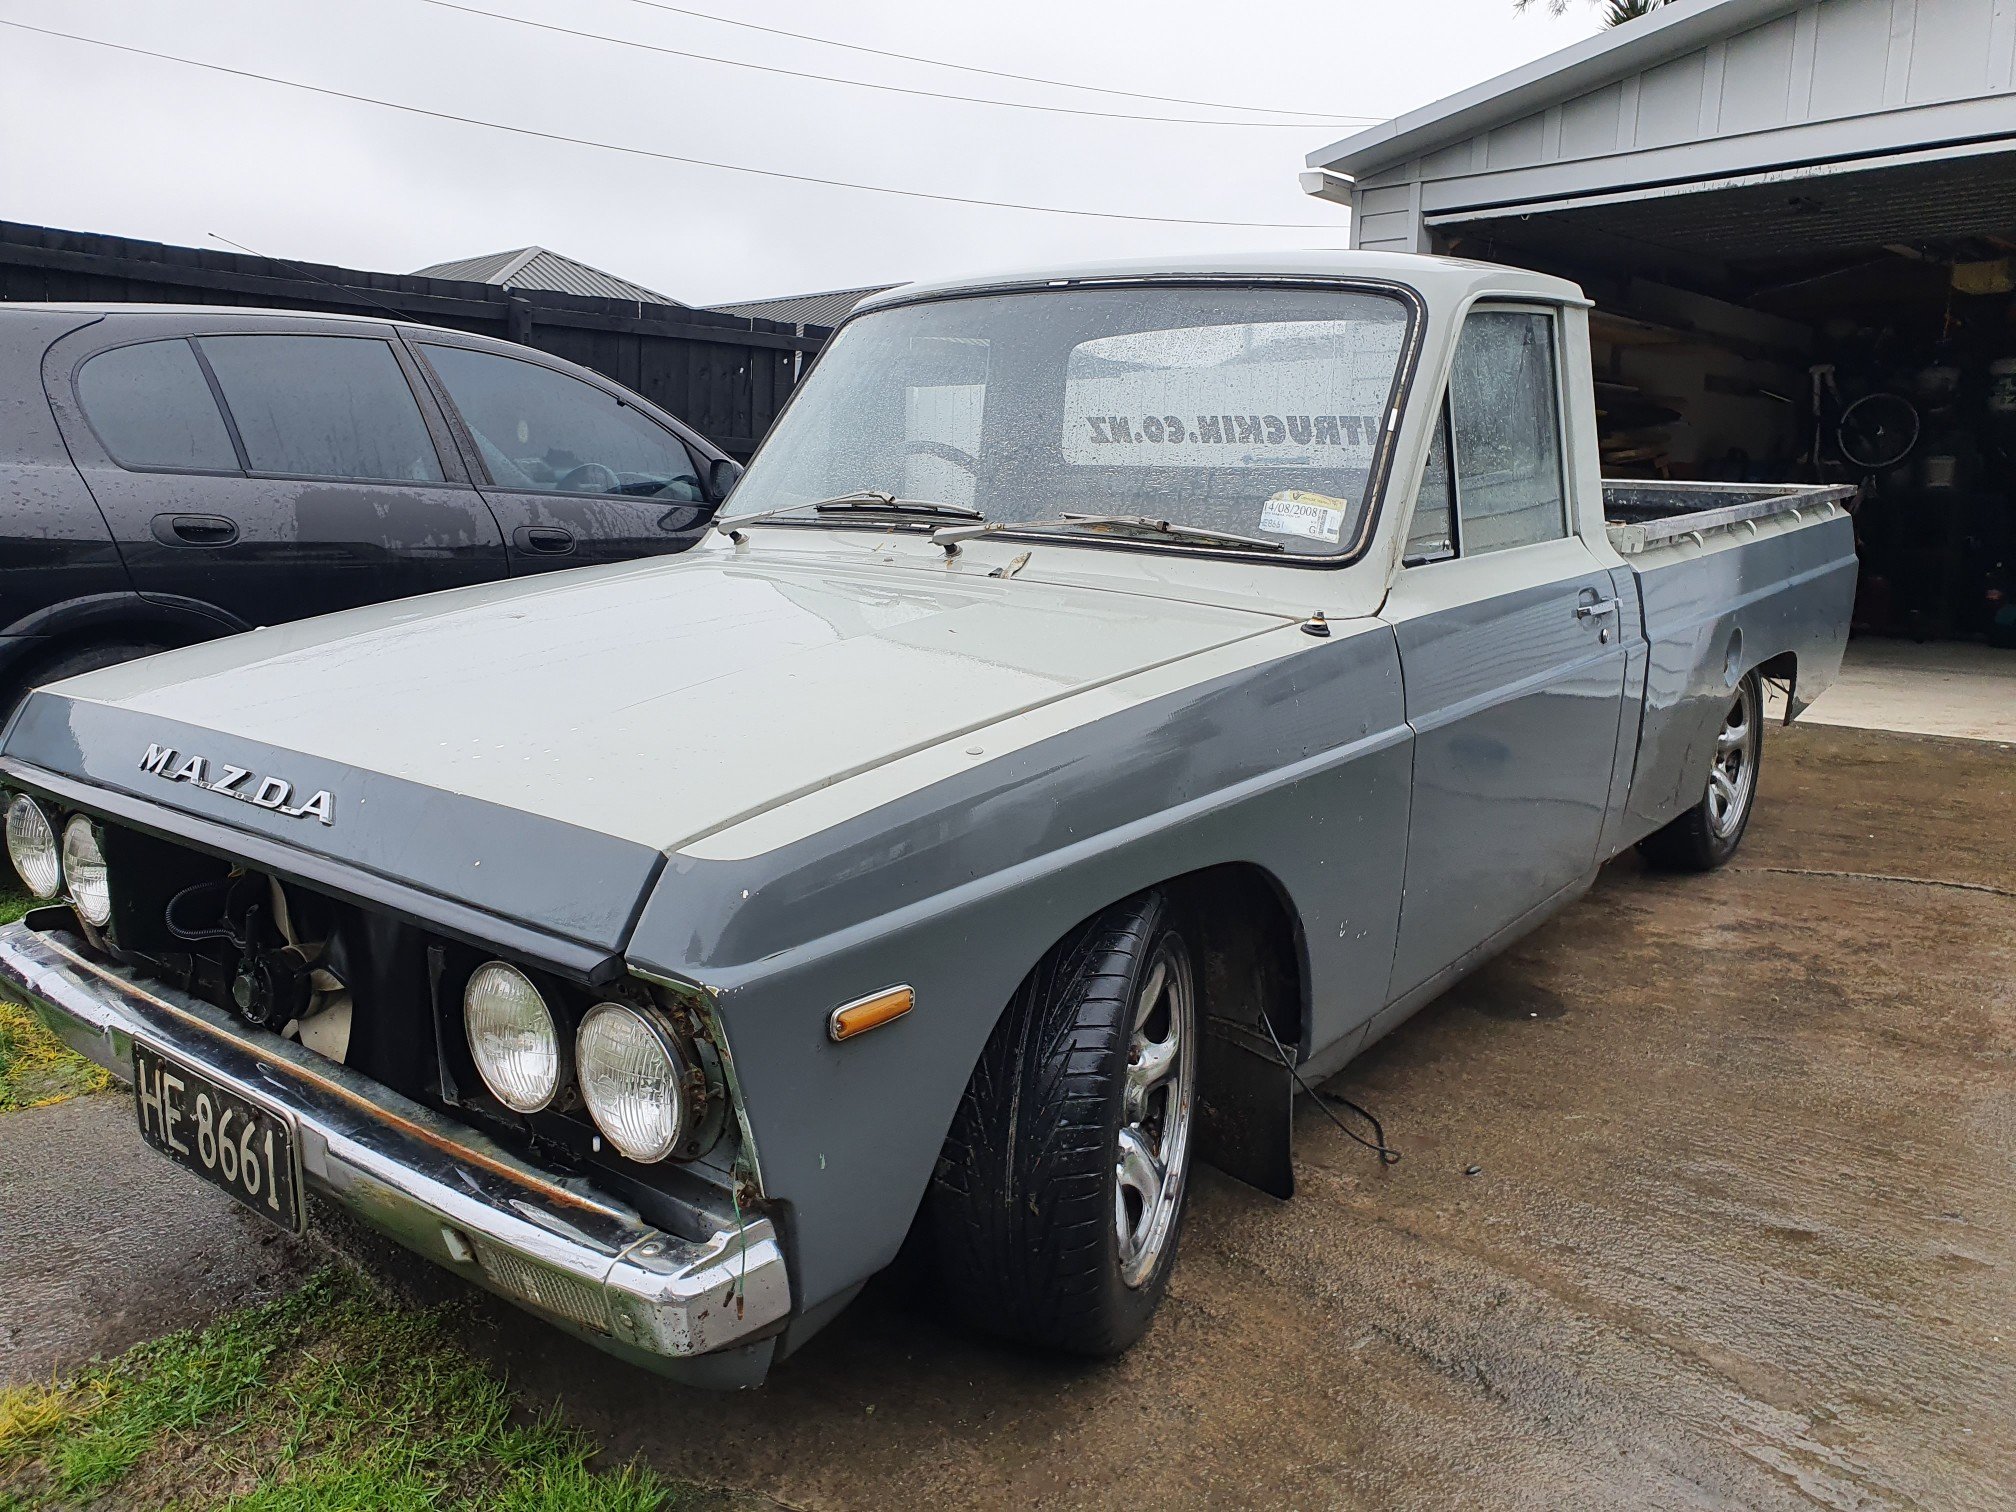
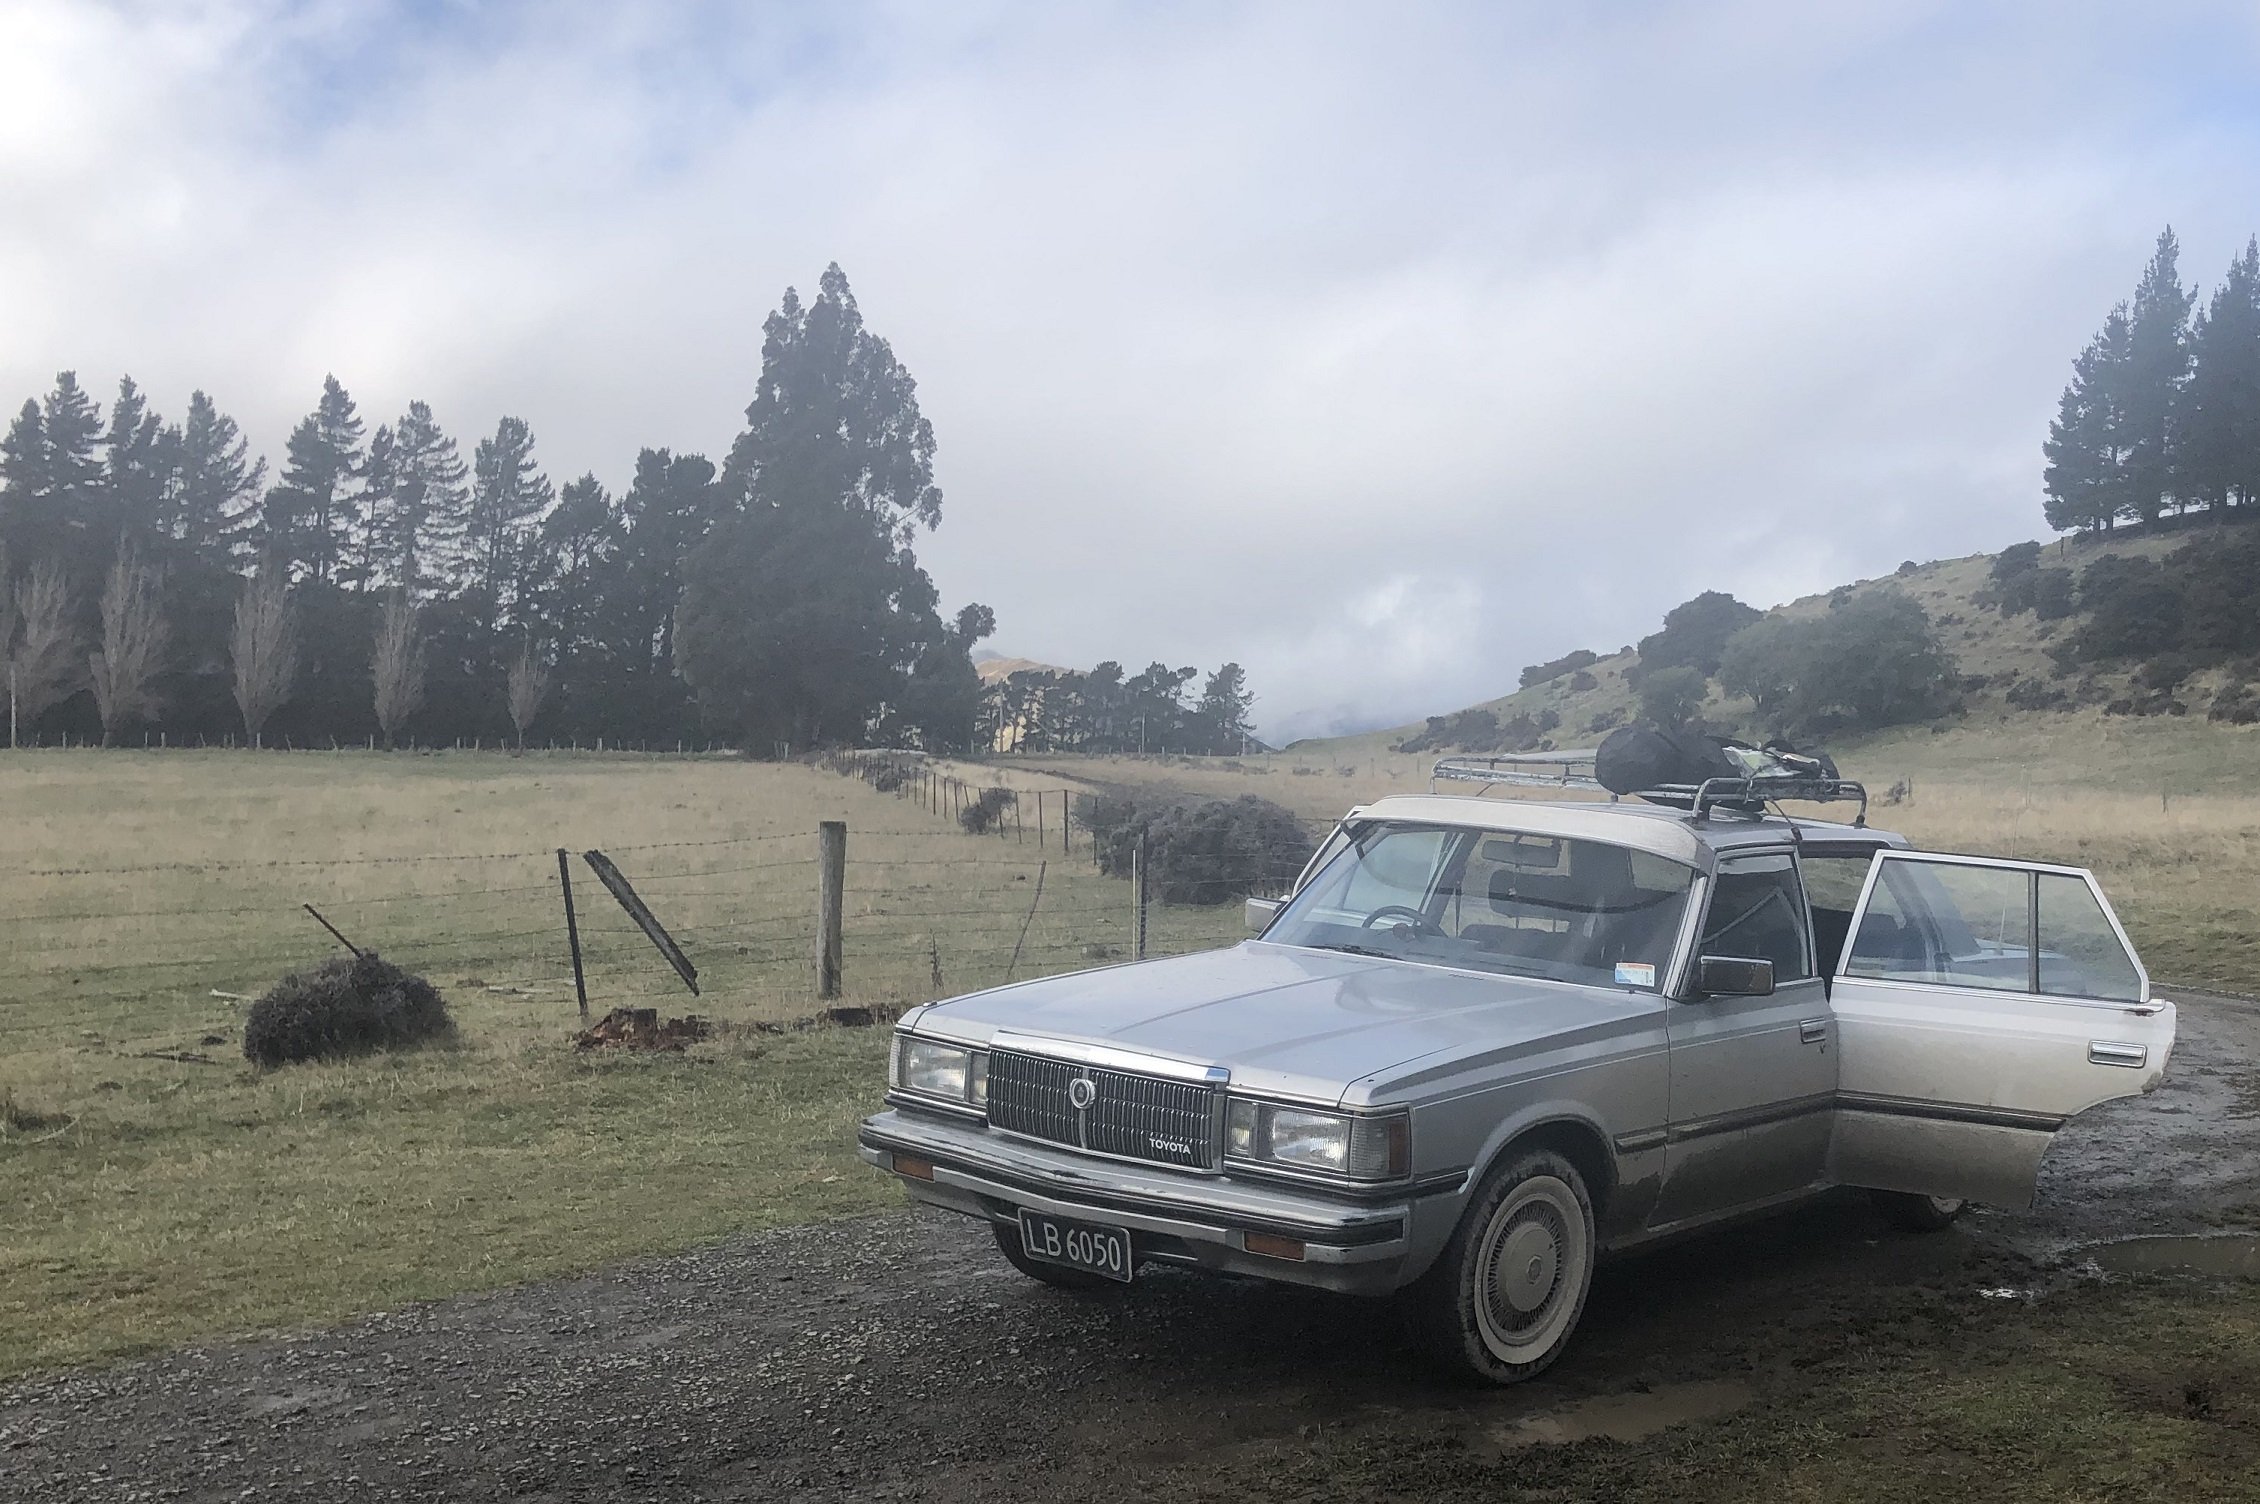
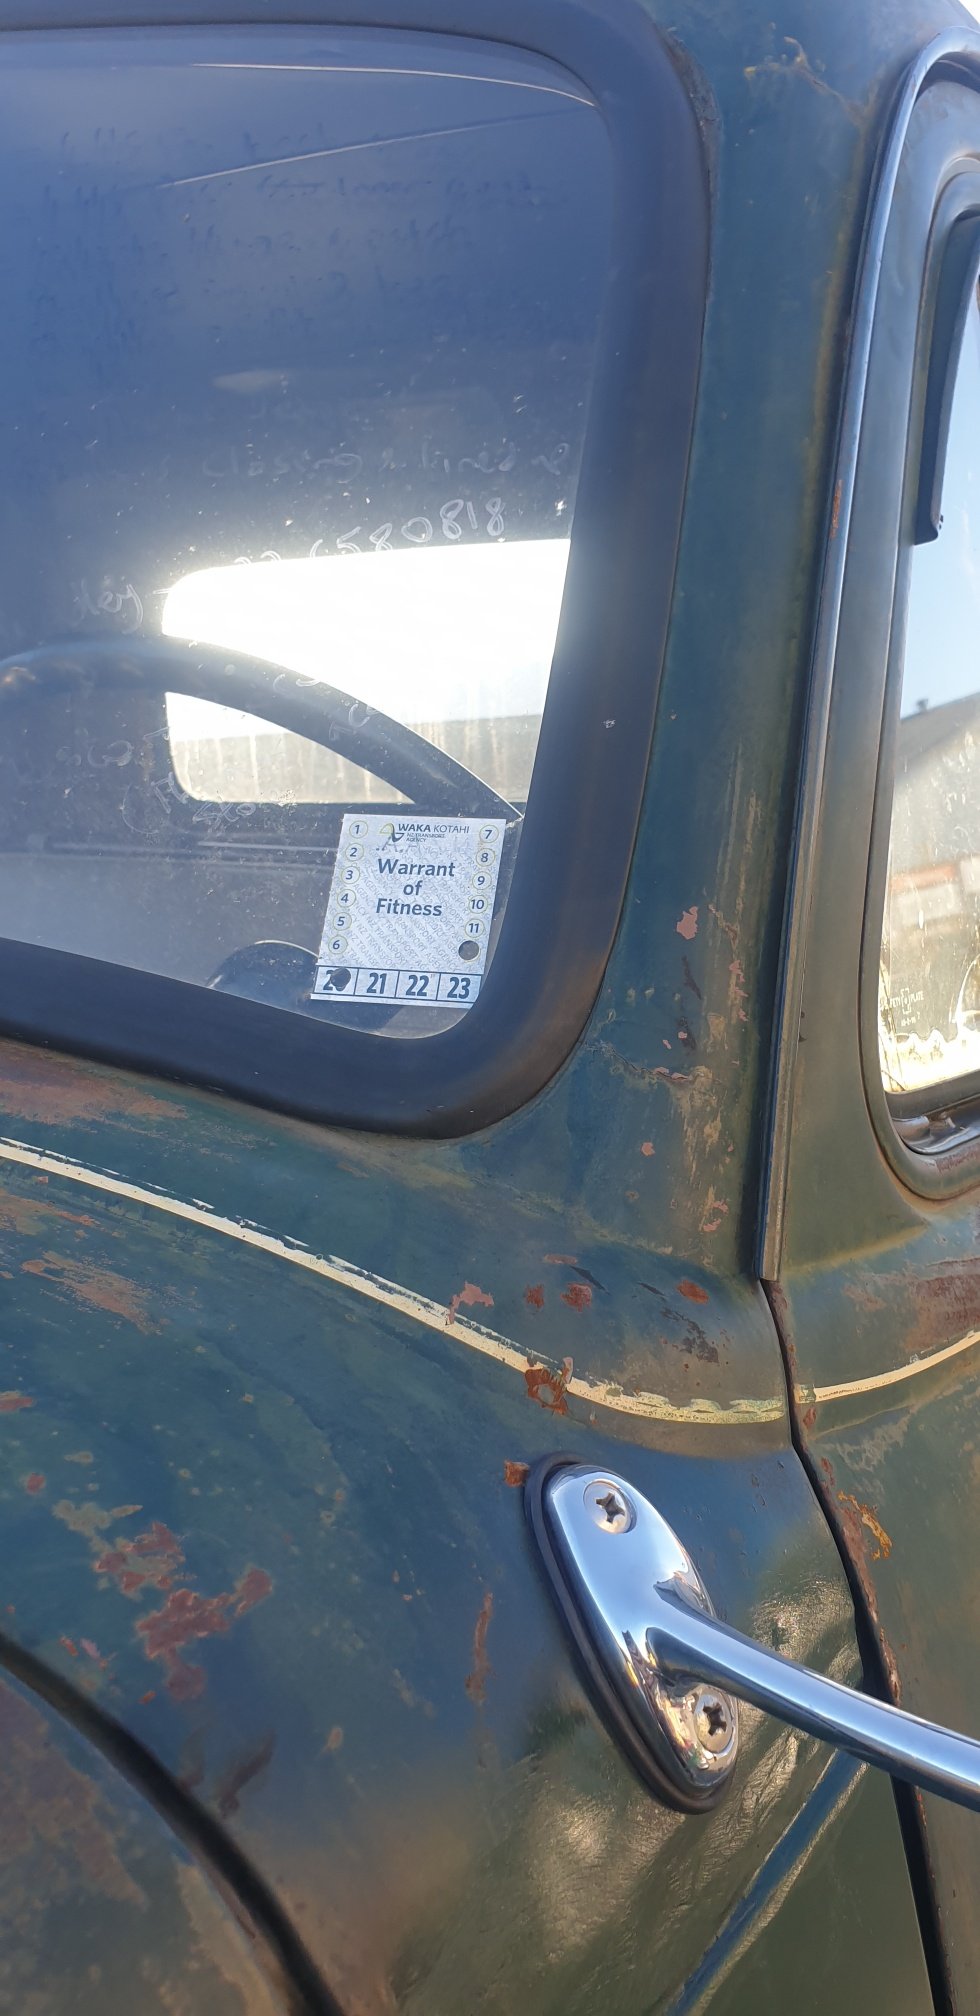
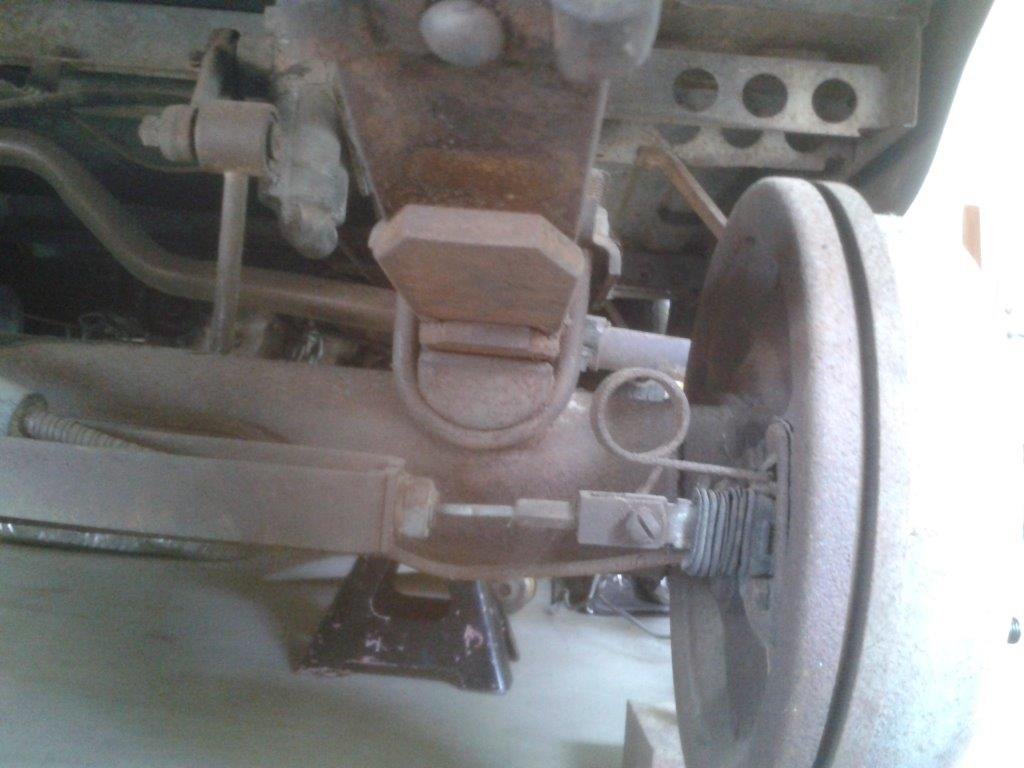
So I swapped out the ancient genuine Toyota pads that obviously weren't up to the job with some Ferodo's and also changed the brake fluid to something a bit overkill. The brakes were completely different after that, so much better. They were able to bring the old boat to a stand still from 100kph in under 4 seconds consistently, and cert man was happy. I've been filling time waiting for the plate by making up new brackets to fit my old Cressida visor and throwing on some clip on white walls for the complete sleeper look! Hopefully the cert plate will arrive any day now and then I'll be hitting the road for some quality road trips!
1 point
-
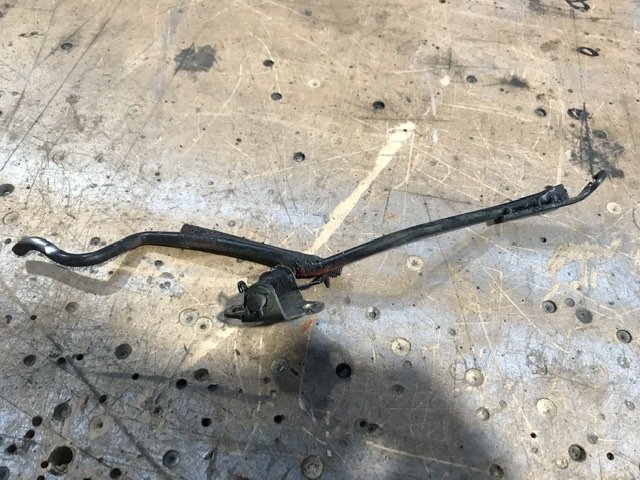
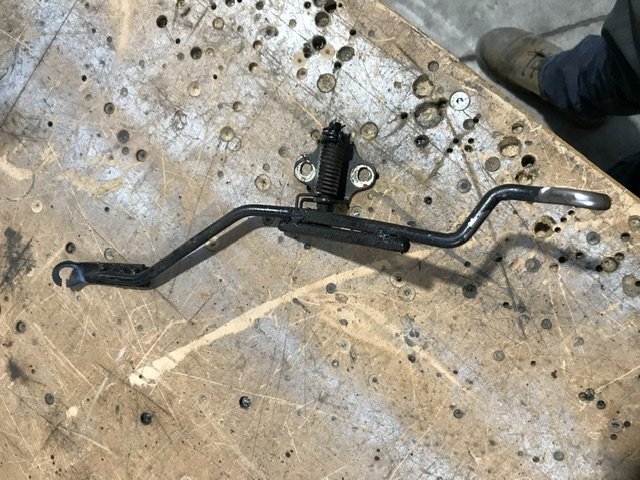
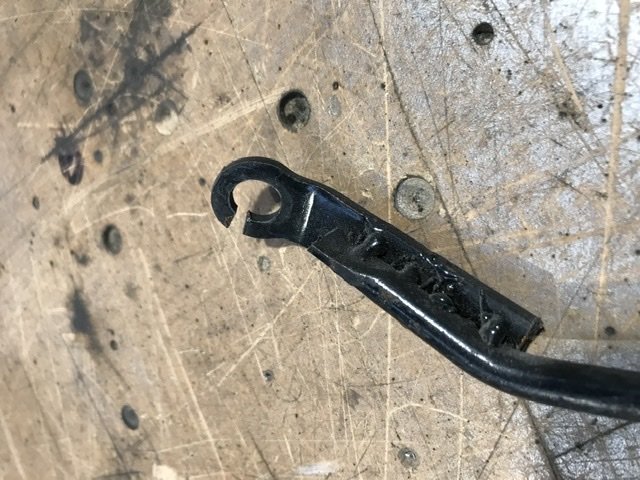
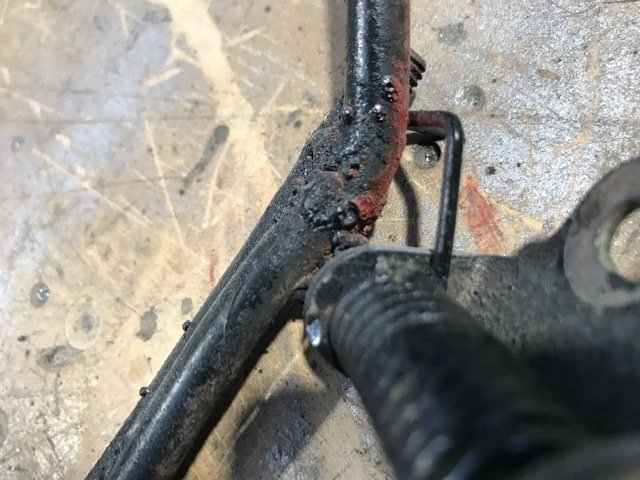
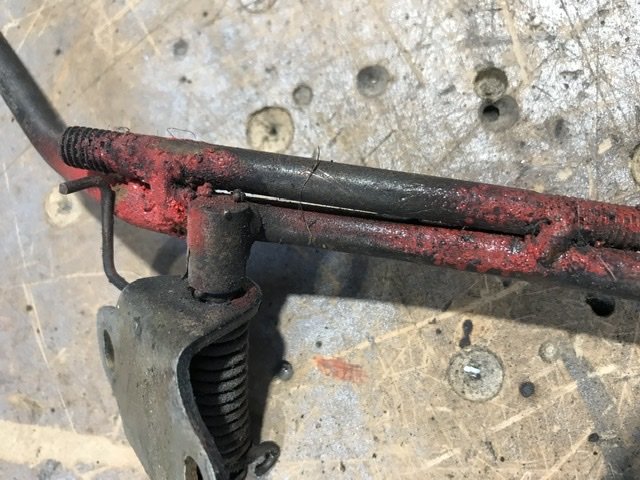
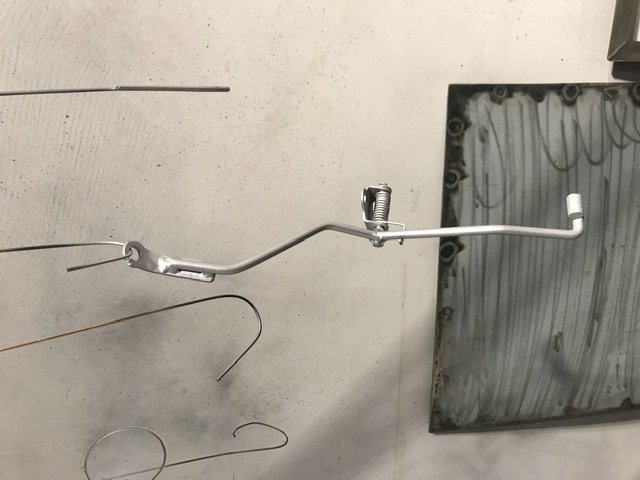
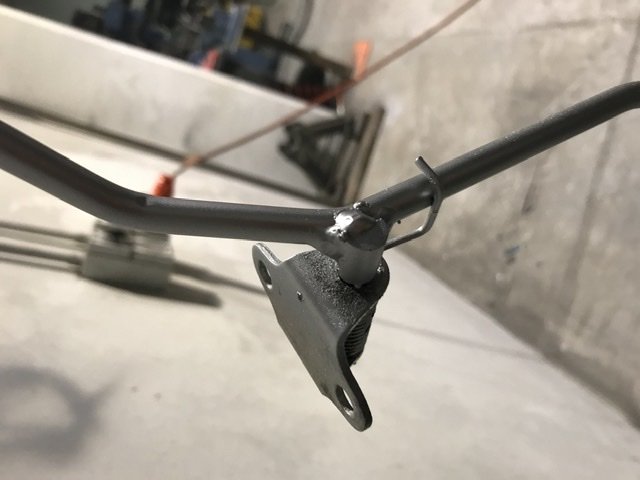
Decided to try and get this thing riding a bit nicer, previous suspension setup was a little soft and hit the bump stops a bit too often, and with the extra weight of a 4age it would of been worse. Went with a set of Fortune Auto's coilovers all around, since I'll end up chucking an F series or similar diff in and I have the skills to strengthen the rear strut towers. Picked up another pair of struts, cut them down and and blasted them. Wound them all the way down and the front ended up a little higher and the back's a bit lower. Might try and get the front down a bit more, to at least were it was. Made a stainless distributor blanking cover. Bought a Flo's upper water outlet, as it looked to be the much simpler and tidier way of doing the cooling system. Needed a RWD waterpump (inc pulley), thermostat housing and a little bypass pipe to complete the setup. And of course with everything else, when you change one thing you have to change something else. The FWD alternator bracket fouled on the thermostat housing, so I got a RWD one from Japan. Borrowed some Flo's 4age to K series engine mounts and made up my own. Sitting in the hole. Had to space the engine mounts out by 8mm, possibly because of the Cusco mounts being thinner than factory ones? Dizzy relocation kit installed, had to cut a bit of a hole in the fire wall for some clearance. Stripped the interior, pulled out the dash, heater, seats, carpet and scrapped off some sound deadening around the gearbox tunnel. Cut a big ol' hole for the J160 to fit. Probably didn't need to cut so much out, but to make it easy to drop out and fit, some extra clearance was needed. Also wanted it to sit up above the sills and chassis rails. Made up a gearbox mount. Added two extra body mounts further back so that it spreads the load a bit. Has heaps of ground clearance as well. The J160 shifter needed moving forward as it lined up with the end of the handbrake. Cut up the original shifter housing and welded it on to some ali tube and 12mm plate. Spent hours on our little lathe turning up the adapter bits. Works mint, barely any flex and feels like it should. Moved it 200mm forward from the Altezza position, 50mm more than the SQ kit and 40mm back from where the factory Starlet one was.1 point


.thumb.png.46e518f714cdc319554c389f990e75a4.png)


This leaderboard is set to Auckland/GMT+12:00