
Leaderboard


Popular Content
Showing content with the highest reputation on 05/12/20 in all areas
-
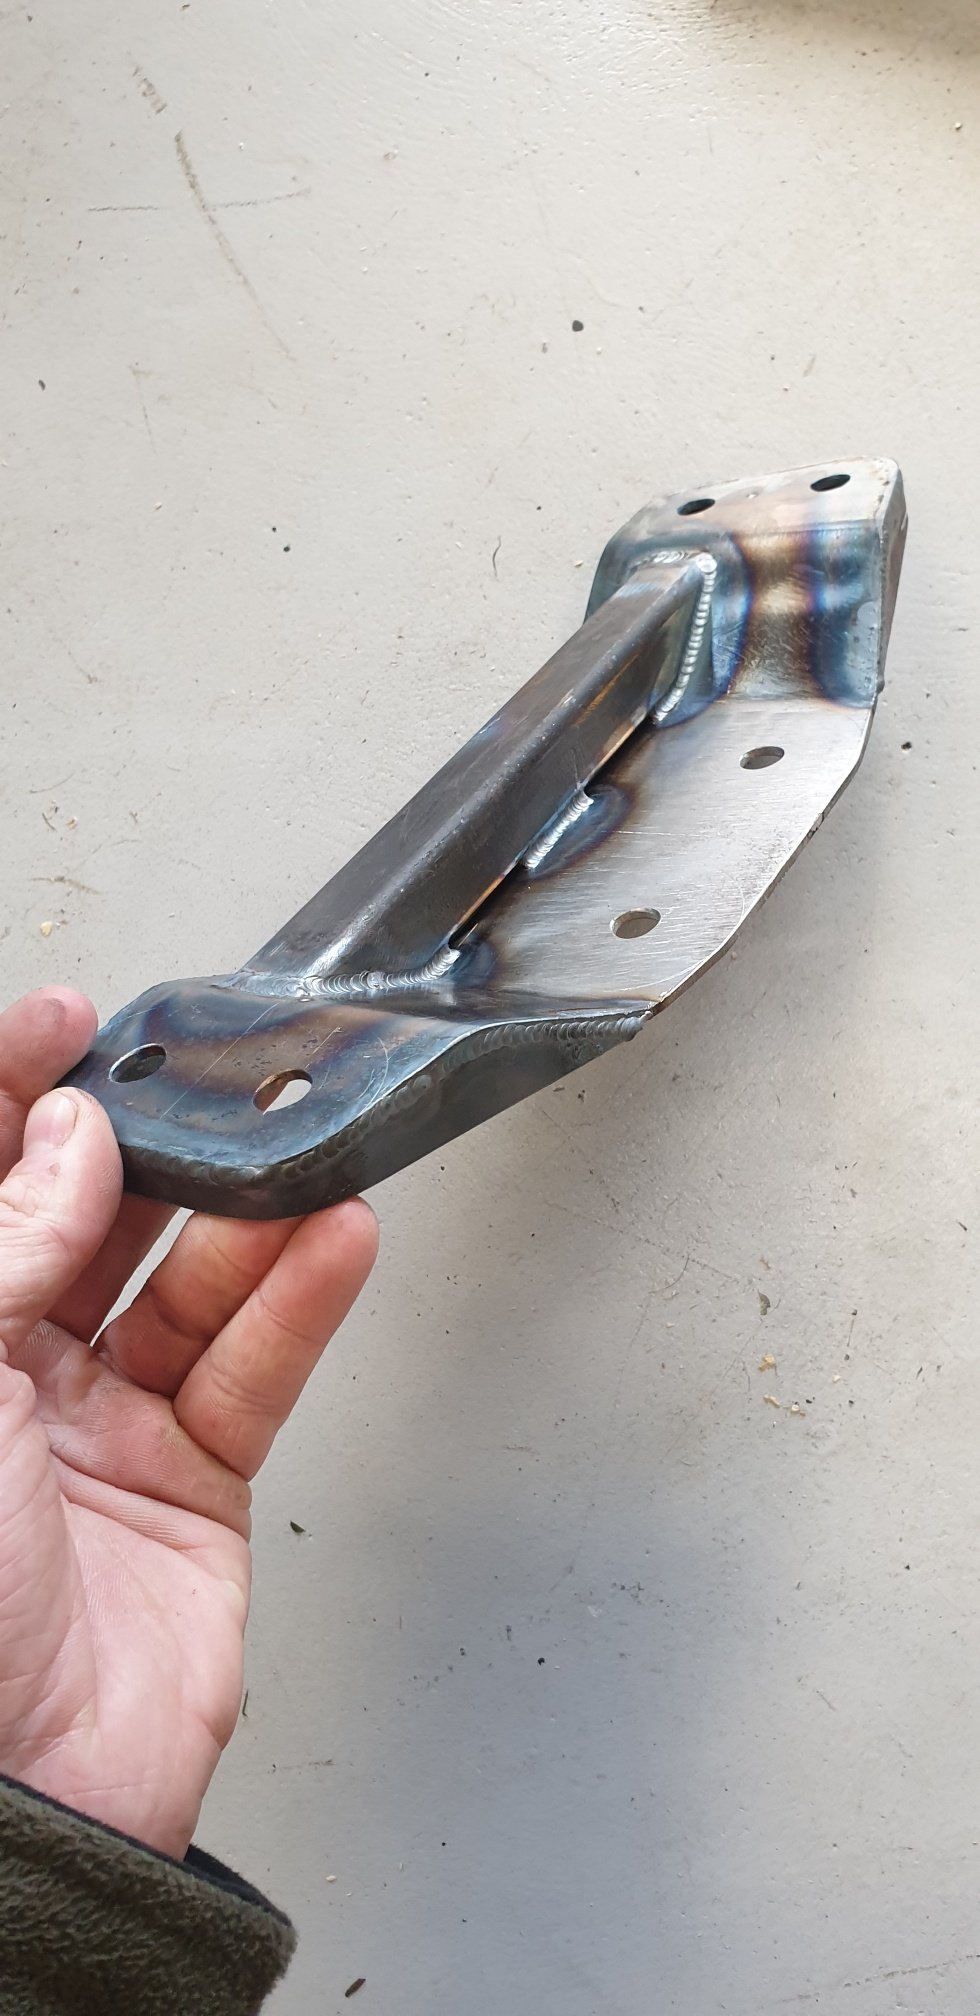
had a good day cutting and welding and ended up with this. pretty happy with them, i just need to weld the 2 into one collector on the end and a flange and its finished. someone on here (i think) was talking about a type of black heat proof paint that may have been for a pot belly stove or something like that? whatever it was please remind me in the discussion because id like to give it a try. 2020-05-12_05-52-59 by sheepers, on Flickr 2020-05-12_05-53-07 by sheepers, on Flickr 2020-05-12_05-53-15 by sheepers, on Flickr 2020-05-12_05-53-23 by sheepers, on Flickr14 points
-
Was funny to scroll through this looking back at how dumb I was. Well let’s keep the trend going then shall we11 points
-
So I took a week or so off work going into level 3 lock down. Yay, get heaps done! Well nah, a lack of motivation turned up, kicked me in the dick and wasted most of my time off staring blankly at all of the things in the garage and around the house that needed attention. anyway I managed to get some things done all be it at a snails pace Up on stands so I can get all the rear end fab done. Will probably make rear section of the exhaust while I’m there and get the fuel tank made and installed. back to work tonight so I’ll bugger around and get the laser cutting drawings sent off to hopefully collect in around a weeks time. Hopefully it all goes together quickly. wiring man is happy to use stock ecu and engine loom so this will keep costs down. also scored bucket seats and harnesses for a steal so stoked about that11 points
-
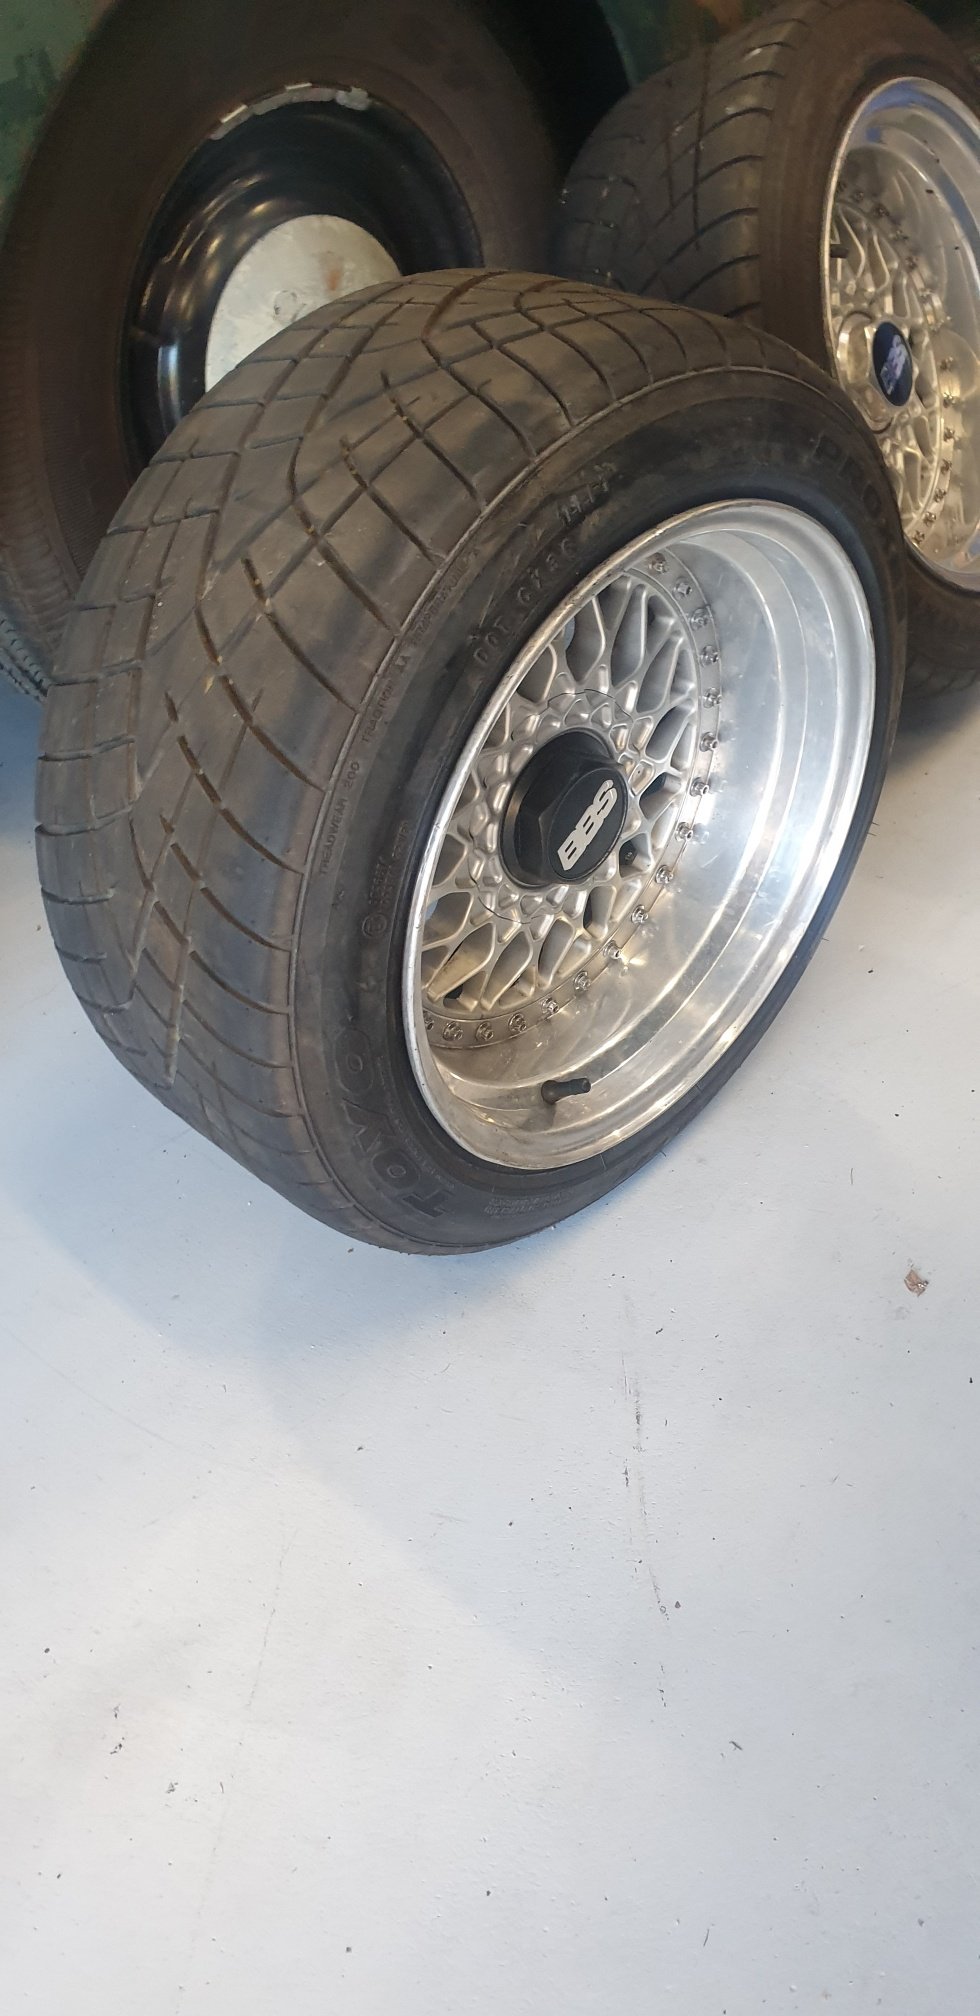
Ended up with 2 x Sets of BBS RS wheels all with tyres. So had a range of tyre sizes and widths to choose from. Have changed it round from 10s & 11s it came on the car to 9s & 10s. The 11s that were on the rear had a streteched as 205/50/R15 Toyo T1R (nice tyre) on them. Have taken them off and put them onto the 9s which will hopefully go on the front. Look alot better not stretched to an inch of their life i think ha! Have been looking around for tyres for the 10s for the rear, Pretty hard to find tyres in a suitable size. From what iv found most people run a 225/45/R15 on a 10. Nobody makes a street tyre for them they are mostly reallllyyy expensive semi slick or slick type options. Have since found a set of Nexens in that size that are on special at the moment till the end of the month that will probably do the trick so will probably grab a pair of those for the rear. https://www.trademe.co.nz/motors/car-parts-accessories/wheels-tyres/tyres/listing-2619605509.htm?rsqid=53e4a84365c14a04902738400c3b0bc7-001 At least it should handle bloody well! Have ended up with 6 x 195/45/R15s left over that will fit on the 8s that can be chucked on the rear for extra curricular activites ha.
 7 points
 -
not even bullshitting
7 points
-
I'm still working on this. Havent had as much time as others, as I've been working from home during lockdown. I sanded back all the guide coat and spot printed areas where I hit metal. Will give this a final sand and then its onto color. Pretty keen to get this done. Well and truly over block sanding.
7 points
-
in today's installment of I'm a tightarse and a Barry 1x $20 clearance muffler. 3" inlet and twin 2.5" outlet. Thats not going to work with the 2.25" piping chop the ends off you don't need chop a piece of plate the right size and hot metal glue it wang the 2.5" end over the 3" taper bit and weld that up too. accidentally do a okay looking weld bit of flap disc and paint love and its as good as new!6 points
-
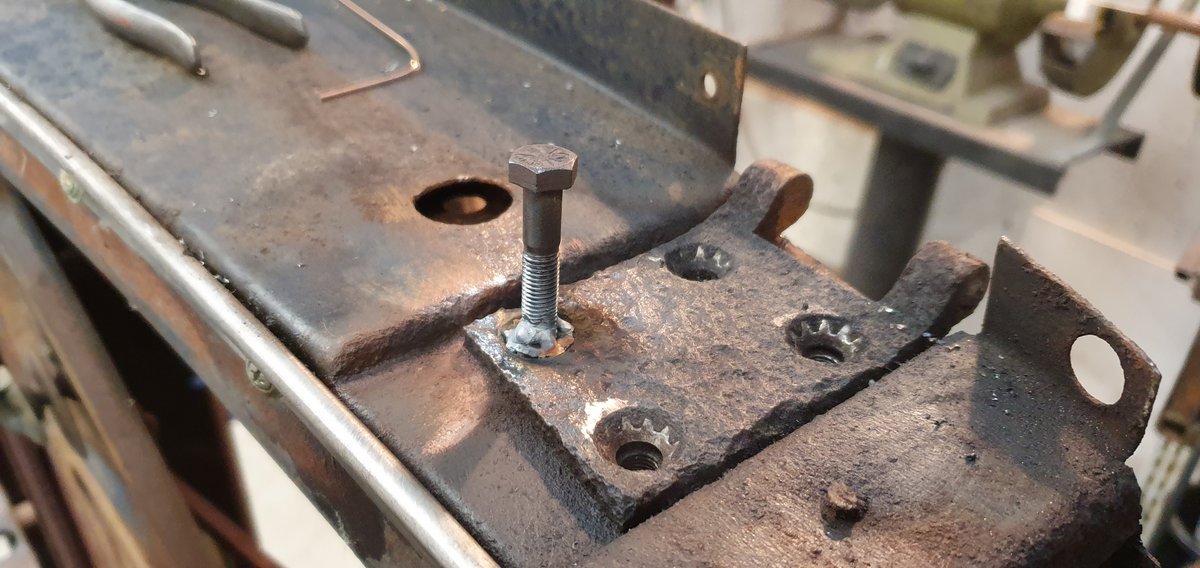
the set of extractors i ordered for it arrived. some assembly required. 2020-05-11_06-07-15 by sheepers, on Flickr 2020-05-11_06-07-27 by sheepers, on Flickr6 points
-
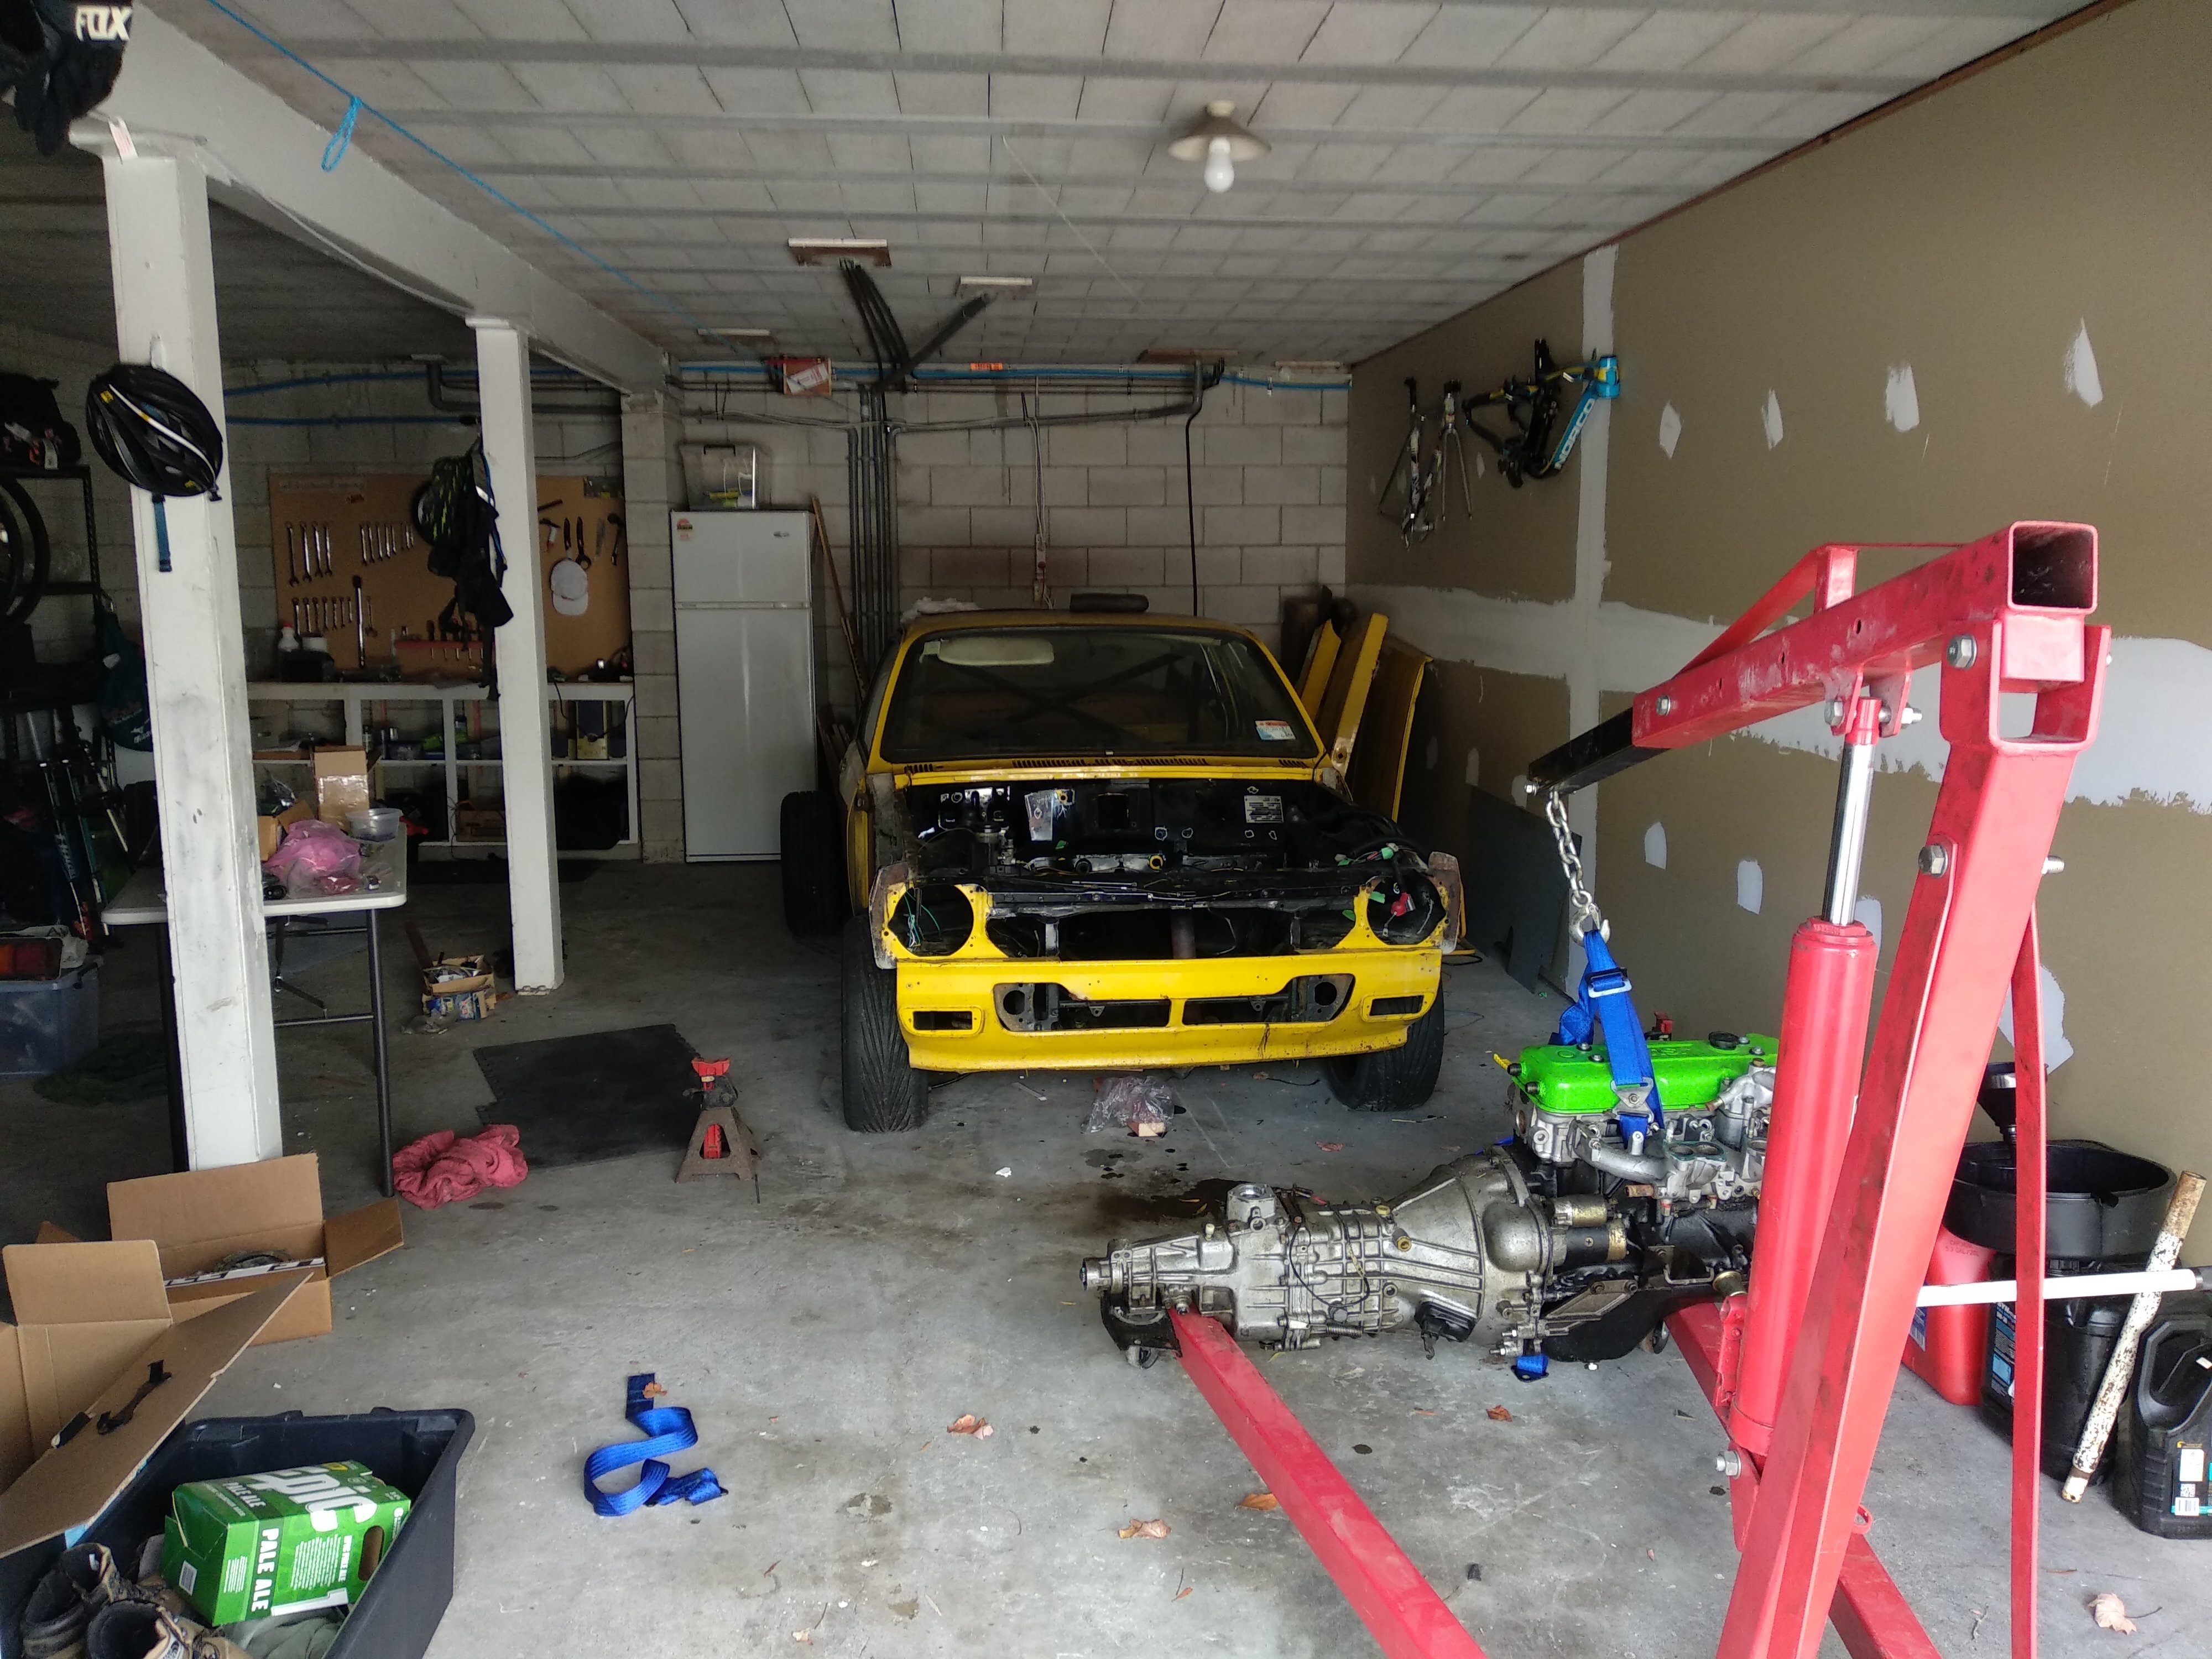
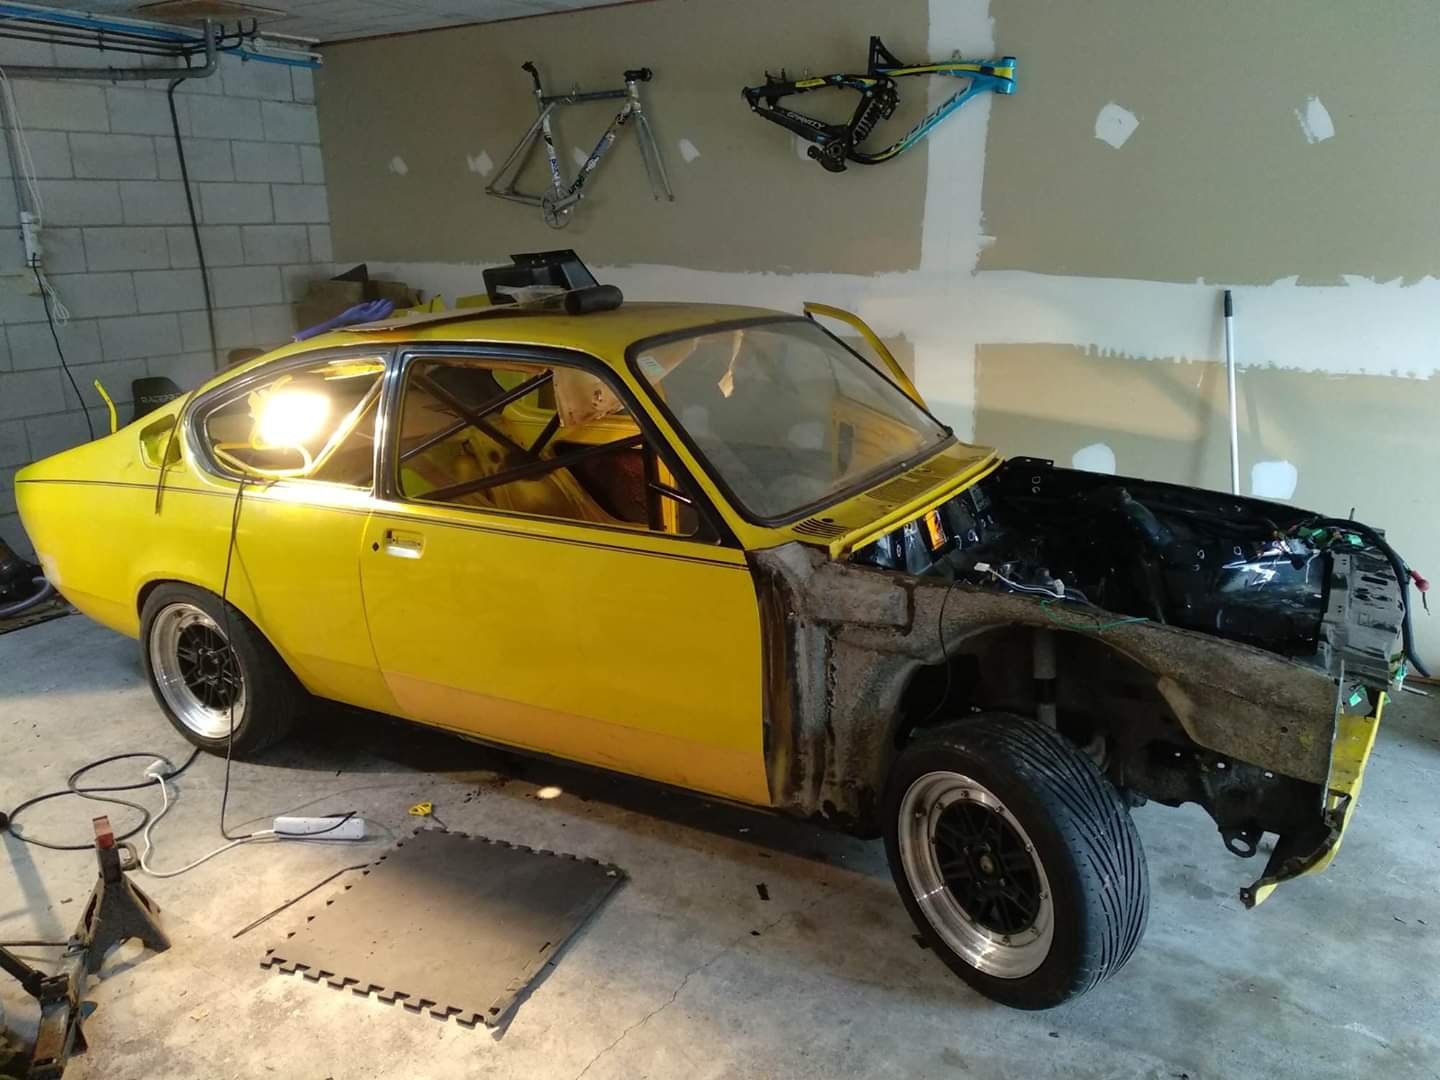
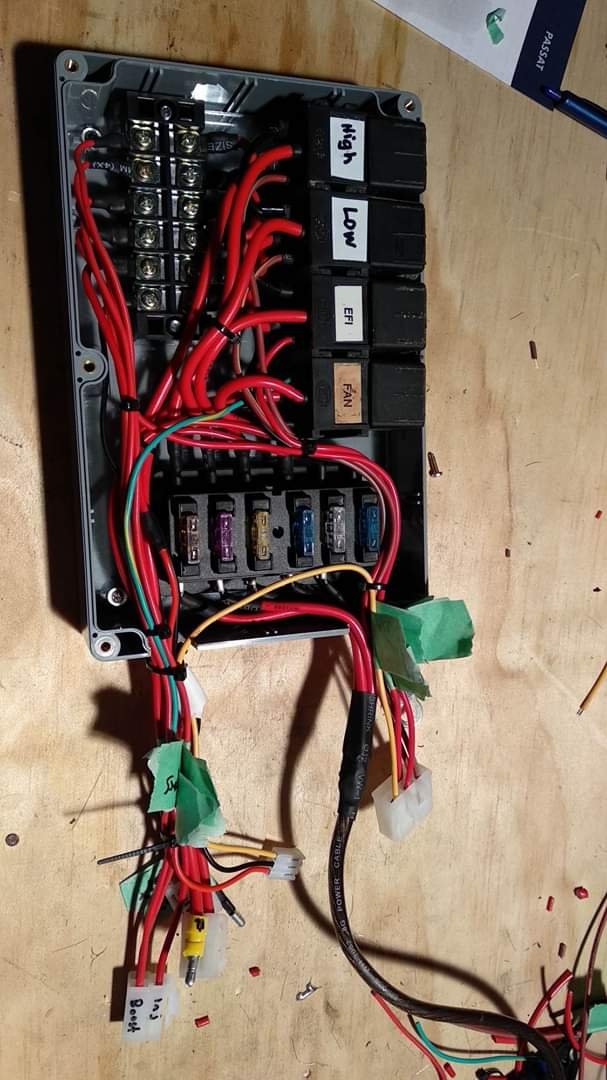
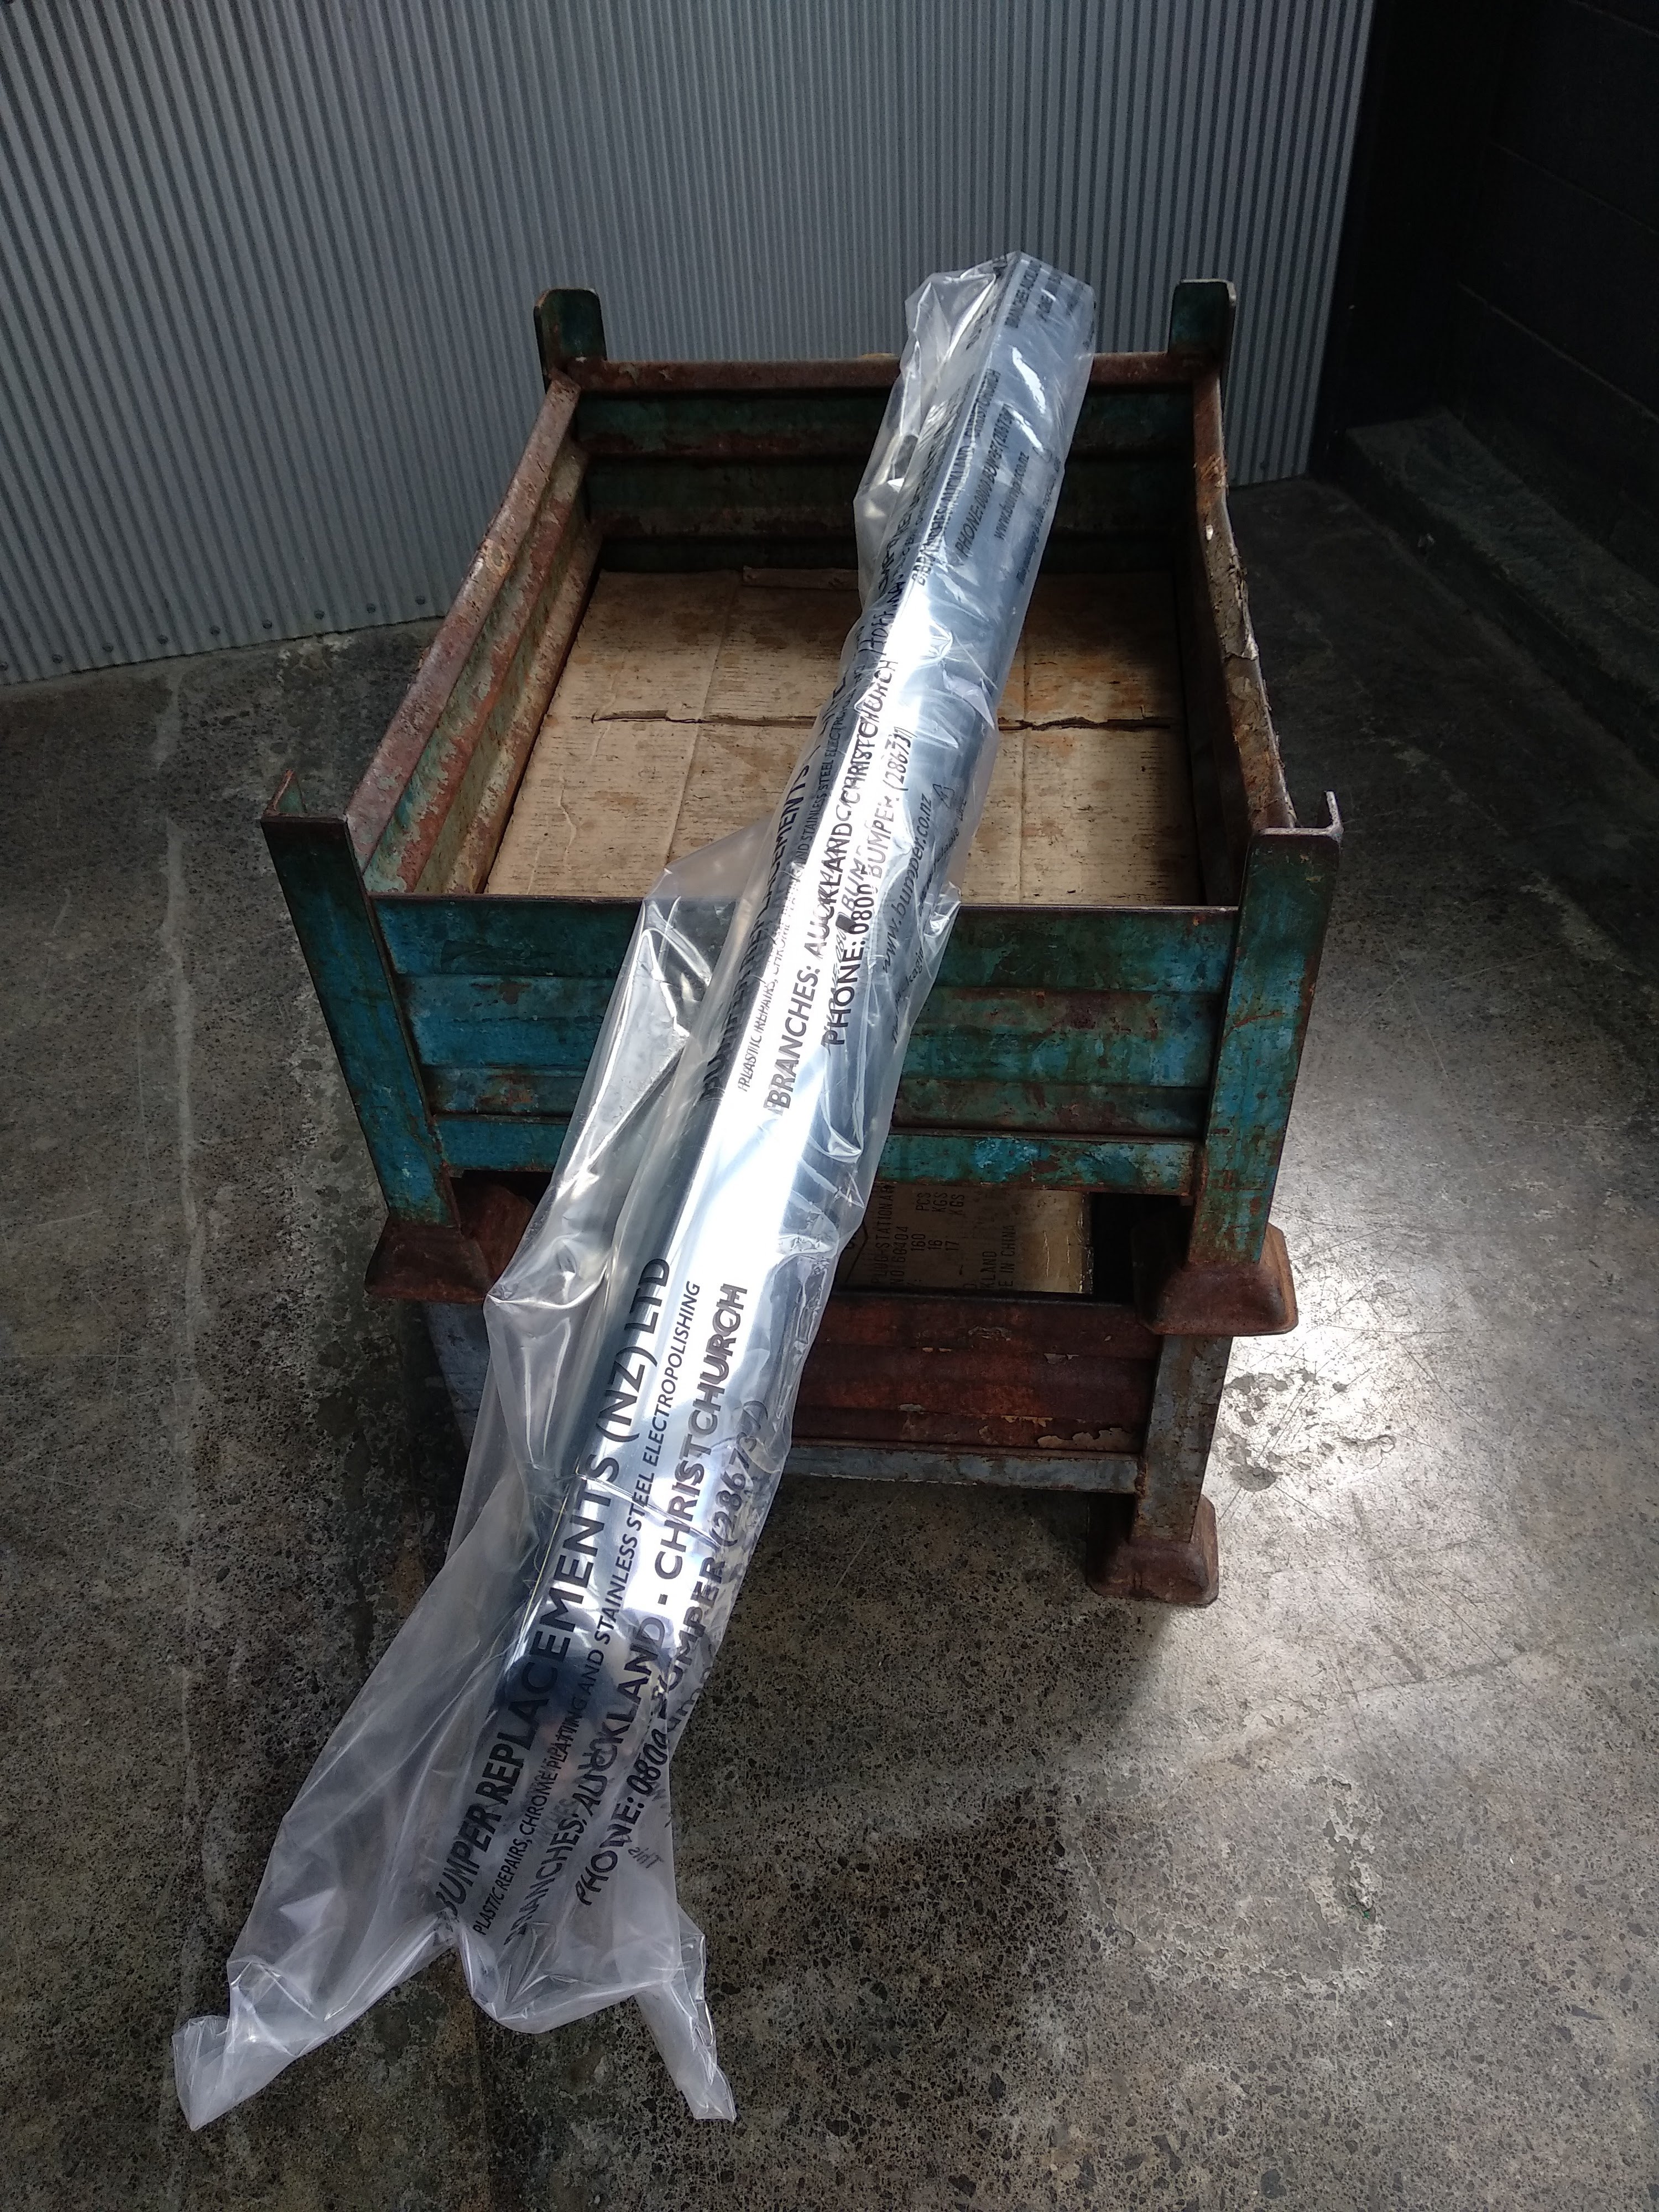
I want to say that I've really got on with this, but mostly I've just taken things apart. The engine is out, most of the panels are off (need help to get the glass out), and I have a huge pile of stuff that needs blasting and painting/powder coating/nickle coating. Can't really do any of that at the moment so I'm at a bit of a stand still. Otherwise I've done a bunch of wiring cleanups, built this box to move the headlight and fan relays into the cabin. Ran out of solder before I could finish tidying up the standard fuse box. And I had the bumpers reconditioned. The current plan is to get on with the panel beating. This is not something I can do myself so I'll be looking for a decent place in Auckland to have this done. Not sure if I will have them paint the car also - it's staying the same yellow/black with pinstripes - will have to see. Any suggestions here? Before I can do that there are a few things I need to sort: - remove glass - weld up some holes in the floorpan from teenage drilling - get a new intercooler and mount it. the current evo 0 one is toast and anything new is not going to mount the same. Engine wise, my initial plan was to rebuild the G161z with some more headwork, better cam, bigger valves. That will kind of get it close to its limit, and I want something most reliable. Also things like tensioners are not easy to come by these days. Fortunately I have a 4ZE1 (2.6) and recently stumbled across a 4ZD1 (2.3) which I will get when we're in Level 2. Assuming the block is okay, I will probably go with the D1, as it has a lot more meat between the bores and is a square engine (90x90), so should be a bit nicer to drive. You only lose 10hp downsizing from the 2.6, so I'm okay with that. The plan is to hang an EFR6758 off the side, which isn't the biggest turbo but I don't want a drag monster that breaks your neck at 4000rpm. It'll also get forged internals and the classic headwork. Not a great update, but figured I'd get something down.
6 points
-
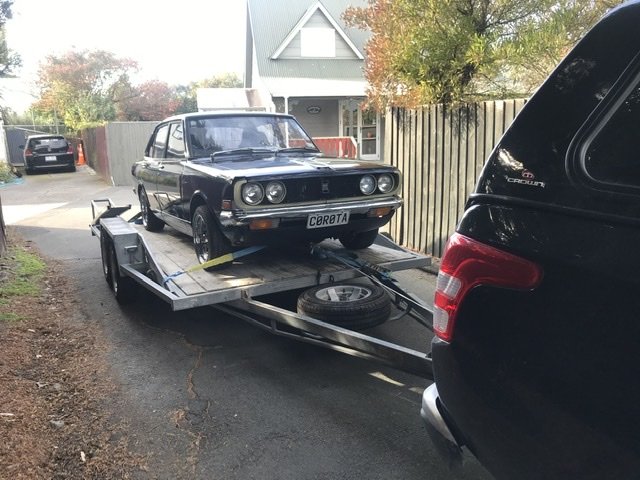
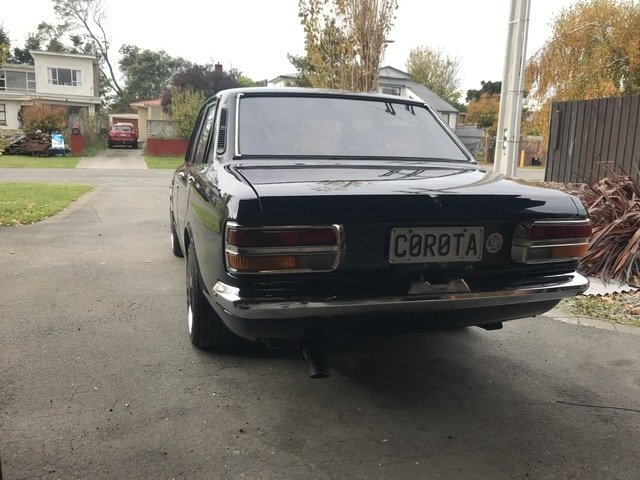
So I dropped a decent chunk of cash today and picked up a 1970 RT80 corona rolling body. Car is set up and certified for a 12A. A few of you may know this car already. I hope to do it justice. Good Points: Fairly recent panel and paint which i would give a 7.5/10 Hilux rear diff with disk brake rear end Decent chrome bumpers and tail lights Reg on hold Certified for 12A Full certified professionally built long header exhaust Mostly new suspension components It's pretty much all there minus engine, gearbox, radiator and fuel pump Brand new 14" modgies and falken tyres. I say a good point because it's got them, but i plan to get rid of them and get something along the lines of starsharks or meshies A decent stack of receipts Nice black vinyl reclining bucket seats that actually look all good Came with C0R0TA personalised plates. Not sure if i'll keep them but if i do i'll get the re-made with the new JDM style plates. Bad Points: Most of the window and door rubbers are stuffed Paint job does show a few small signs of having not been a high cost job (was done through a professional shop just on the cheap i think but pretty good) Certified for a 12A which means I either have to find a 12A or enough parts to build one OR go to a 13B and re-cert. Cert was done a while ago and will need more work for a new cert Grille was re painted and the clear coats apparently reacted and gone yellow. Gearbox tunnel has been hacked up and made bigger to suit the series 1 gear box but it's been done like shit Interiors pretty fucked, dash is stuffed, heaters gone, no carpet, rear seat has standard cracking up the top, front door cards have holes for speakers etc. When you wind down the drivers side window it pushes the door handle open and opens the door. So i've already ordered the door window rubbers and the front windshield rubber, will likely order the rear window rubber and the door rubbers tomorrow. I have a baby due in 4 weeks so this won't be back on the road in a few days but hopefully i'll be able to get her tidy and sort and engine so i can re build it and have it read for summer. I need some input from people on whether to bother with the 12A or just build a healthy 13B and re-cert. I have bid on a series 1 gearbox to go in her so hopefully i'll win that. I also need to know what people think as it has NO mirrors i need something. I'm thinking of fitting a pair of these "JDM style racing mirrors" on the guards but i'm not sure if i should go for guard mirrors or door mirrors and chrome, black or grey? Chuck me some ideas! https://www.ebay.com/itm/NEW-JDM-Style-Black-Fender-Mount-Side-Mirrors-PAIR-UNIVERSAL-FIT-Racing-Mirror-/332716026566 More pics to come tomorrow
5 points
-
Hey @Valiant. Nooice car. I chased high temps in my 440 for quite a while. Have a 4 core copper radiator, similar cam etc to you. 3.73 gearing in a 8.8" Changed to a MrGasket thermostat that failed after 3 heat cycles(Hint, read the Fkn review BEFORE you buy, lad). Fixed it now I reckon, 10 mins idling in Park in Nelsons glorious midday summer sun OK. ( twin china fans.) Biggest gains. Go to www.Flowkoolerwaterpumps.com for one of their waterpumps at about $120 USD, made for bigger flow at reduced R.P.M. and a proper RobertShaw branded balanced thermostat from the same place.(370 series? Don't quote me on that) These balanced thermostats are more of a "sleeve style than a "poppet" type and on my pump housing at least they kinda seal on a second part of the housing 3/4" down with the sleeve part. they circulate the water right round the block when warming up instead of the water just running round and round the bypass. Thus no hot-spots at the back of the block. they were designed for when the big 4-5 tonne motorhomes came out with 440s to aid cooling when lugging up hills etc. A high volume water pump can actually push enough water that a normal poppet thermostat will struggle to open against the pressure, hence the balanced thermostat needing fitted with the pump as a pair. These 2 things, fitted together transformed it. No more anxious coming up to the lights, how far will the needle climb malarkey. Good luck.4 points
-
currently in the middle of wiring a link monsoon into this. The microsquirt cant do sequential injection and the tiny diameter log inlet manifold with short runners has uneven airflow and probably some cylinders scavenging fuel from the others under certain conditions. I also ended up adding a supercharger bypass valve from a supercharged mini as the stock VX setup has no bypass so you get hideous inlet air temps when engine braking with no fuel being added upstream like you would have in the factory carby setup. tbh it really needs a whole new manifold design with integrated W2A intercooler or something. but i'll see if running sequential injection and trimming the cylinder fuelling individually can at least make it run properly without misfiring at some rpm/load combinations. It's really amazing how much abuse it copped with just wrong everything and it never had a chernobyl moment. If you don't have the vx setup lying around I would suggest turbo is easier and more lucrative in terms of horsepower per $. but no weeeewewewewewewe and bark bark exhaust of course. M62/M90, intercooler and a better manifold would be the ticket if you still want to be blown. tl;dr pimpin ain't easy4 points
-
Meat. In my belly.
4 points
-
The bleeding process you're describing is called 'surge bleeding'. It has it's uses but is prone to aerate the fluid, particularly if there is a considerable amount of air in the system (e.g. after replacing a major component) and far more likely to occur in an ABS system (there are a lot of small valves/orifices in there). Aerated brake fluid has had air dissolved in it under pressure (as opposed to air bubbles) and is your 'bleeding enemy' (apologies for the bad pun!). I'm in favor of a more gentle approach; release the bleed nipple with the pedal in the rest position (i.e. compensation port uncovered), have the 2nd man (or the Mrs) smoothly push the pedal to the floor, tighten the bleed nipple, release the pedal and allow to rest for a few seconds - repeat until fluid is clear of bubbles. The air should come out in bubbles, if the fluid looks frothy of milky you're aerating it and things will only get worse. Never re-use fluid when bleeding even if it is new and clean, always allow it to rest for a few days - it takes quite some time for the dissolved air to separate. I'm by no means an XJ40 expert (years since I've worked on one) but don't get sidetracked by the hydraulic booster, it only provides mechanical assistance to the pedal and is not connected to the hydraulics in the braking system. In essence it does the same job as a vacuum suspended mastervac. Hope this helps.3 points
-
I just watched the vid from last year again. I hope brents goat frend is still at the pub for pats and isn’t a special on the menu3 points
-
First order of business today was to remove the stickers. next thing was to address the window they’ve “never been able to fix”. Found that the rod from the external door lock barrel to the door lock mechanism had popped out. Go to put it back into the plastic and found that the plastic was worn. Added a bit of tape for now and pushed it back in and it’s not going anywhere atm. Window now goes up and down. Sweet. found a few more things to add to my list of issues to sort. The felt tracks at the top of the doors are totally stuffed and the rear window has had something etched into the glass free hand. Not sure if you can polish scratches out of glass efficiently but when I go to do the rear rubber I may try find a new back window. Also my old sun visor turned up from Wellington today. This was on my old crown. Thinking I may try and narrow it a bit and fit it. Not 100% sure though yet.
3 points
-
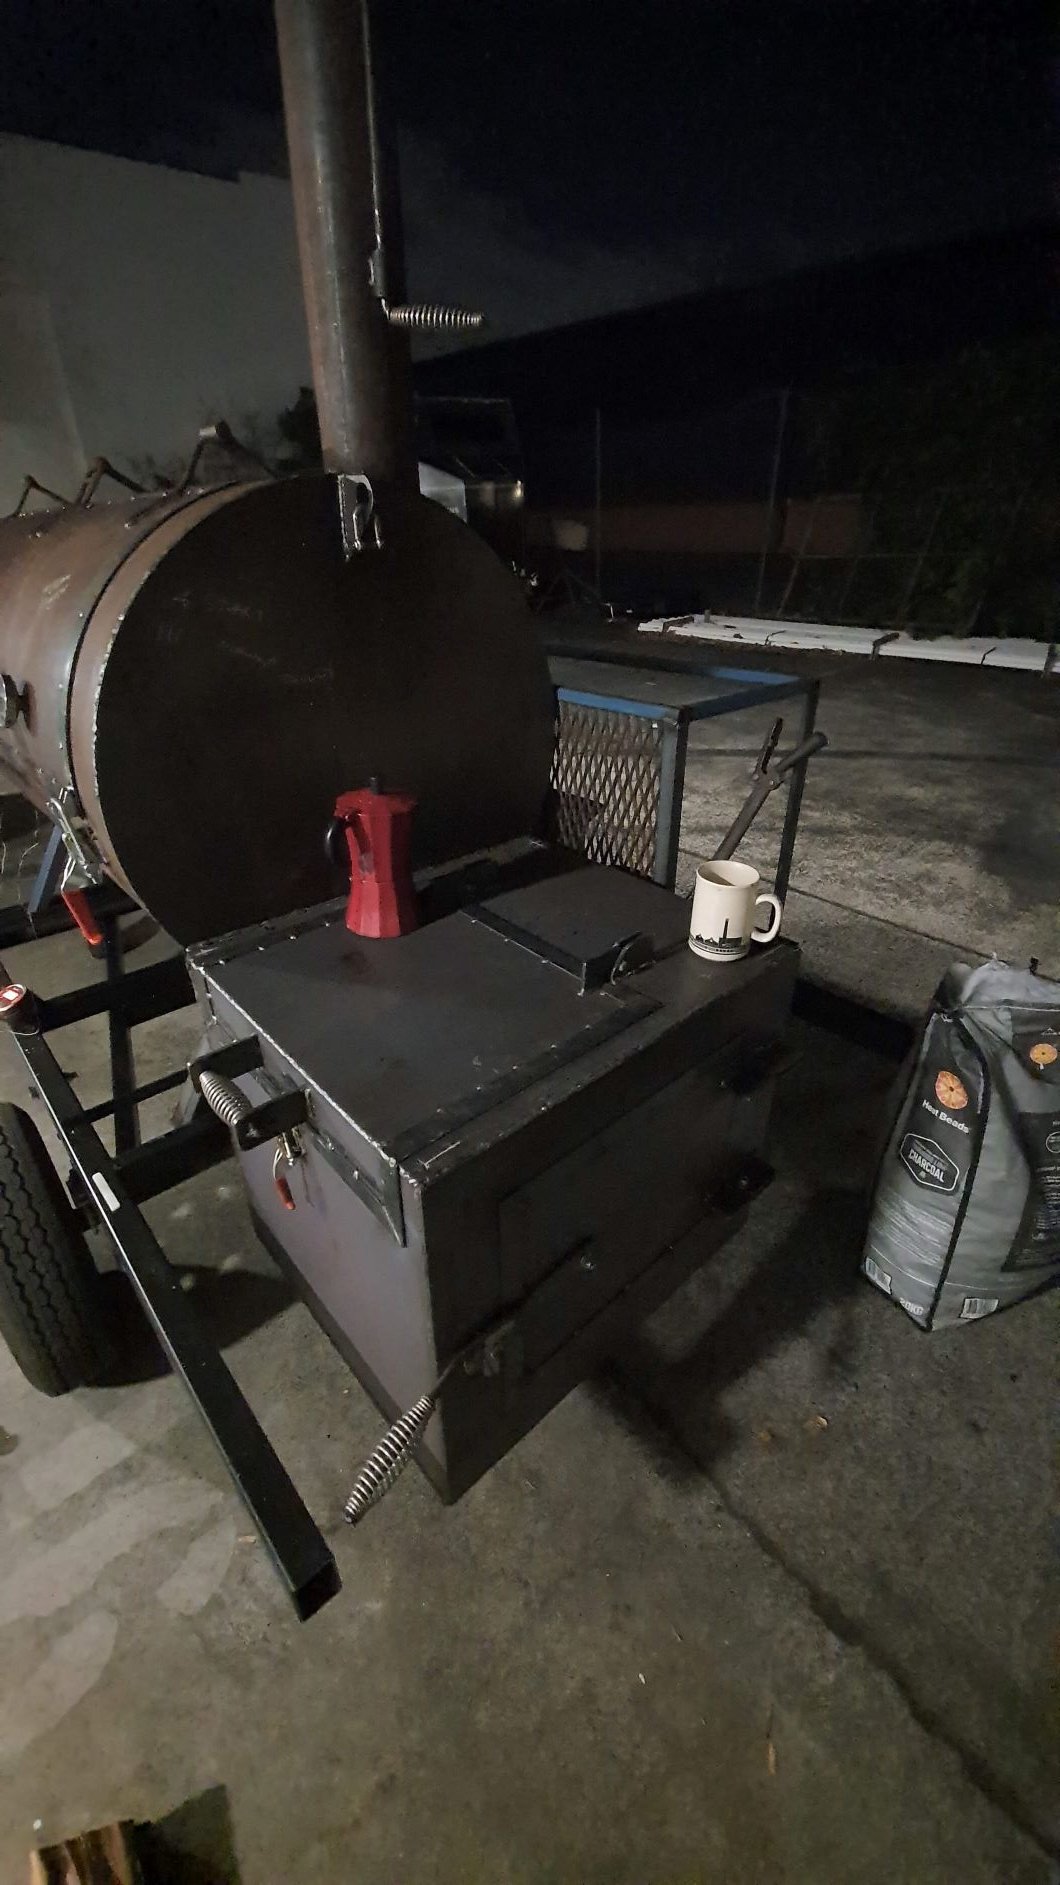
couple more pics. firebox gets hot enough to make coffee (slowly)
3 points
-
I'm more of a build it, test it, then throw it in the bin kinda guy. But if yourself or anyone else wants to use the data from the results, be my guest.3 points
-
Right. That's that bit off there then. Ain't never going back on neither. And that's that other bit primed And that's your lot. Better tidy up that filthy bit at the bottom and nail something else onto it I s'pose. You're welcome3 points
-
i've got one of those vacuum bleeders and they are a bit shit. I've never had success vacuum bleeding brakes with them. works mint for clutches though I got one of these and it works real good for one man bleeding brakes3 points
-
Diff installed and running well! Ended up getting a driveshaft shortened, re balanced and a new joint fitted under level 3! The 4.11 ratio provides a fair bit more torque than the 3.9 and is paired well with the 5 speed box! Anyway, I was asked a while ago to share some photos of inside the car as I'm pretty useless at this... Interior is 95% mint, a tear in the hood lining and a tear in the already repaired drivers seat. Plans to get this tidied up soon! Went for a little drive to the beach!3 points
-
Been a busy few weeks of lockdown. One of the issues the car had i wasnt happy with was the fuel system. Someone had made new alloy hardlines at some point and instead of using a bender to form the bends they must of used pliers or something so there was a heap of crimped bends with restrictions in the fuel line which aint good for noone! To top it off one of the fittings decided it would leak on/off sporadicall, one day it would and the next it wouldnt. Decided to rip it all out and go new braided line system front to back. Got a full setup 247 fittings and black teflon lined braid from Motorsport plumbing supplies and set about remaking it all. Have relocated filter and regulator to boot (run a dead head type return system) and mounted it all on a alloy panel for tidyness. Excuse the disgusting looking boot it needs a repaint in there ha, on the to do list! Got it all back together and fired up last night, no leaks which was i was stoked about ha! The lines under the car where roughly attached previously with the brake lines just cable tied to them which aint ideal! Got a heap of black billet 247 Fitting clamps and clamped the fuel and brake lines under the car which turned out alot tidier. While that was all being done i whipped out the old gearbox crossmember which was a work of art! Someone had used a galv bomex type builders bracket (with logo and barcode still attached hah!) to construct the xmember Got my mate Gav from Precision Workz to fab me up a new one which is 1000% tidier and stronger. \ Anyways thats todays update!
3 points
-
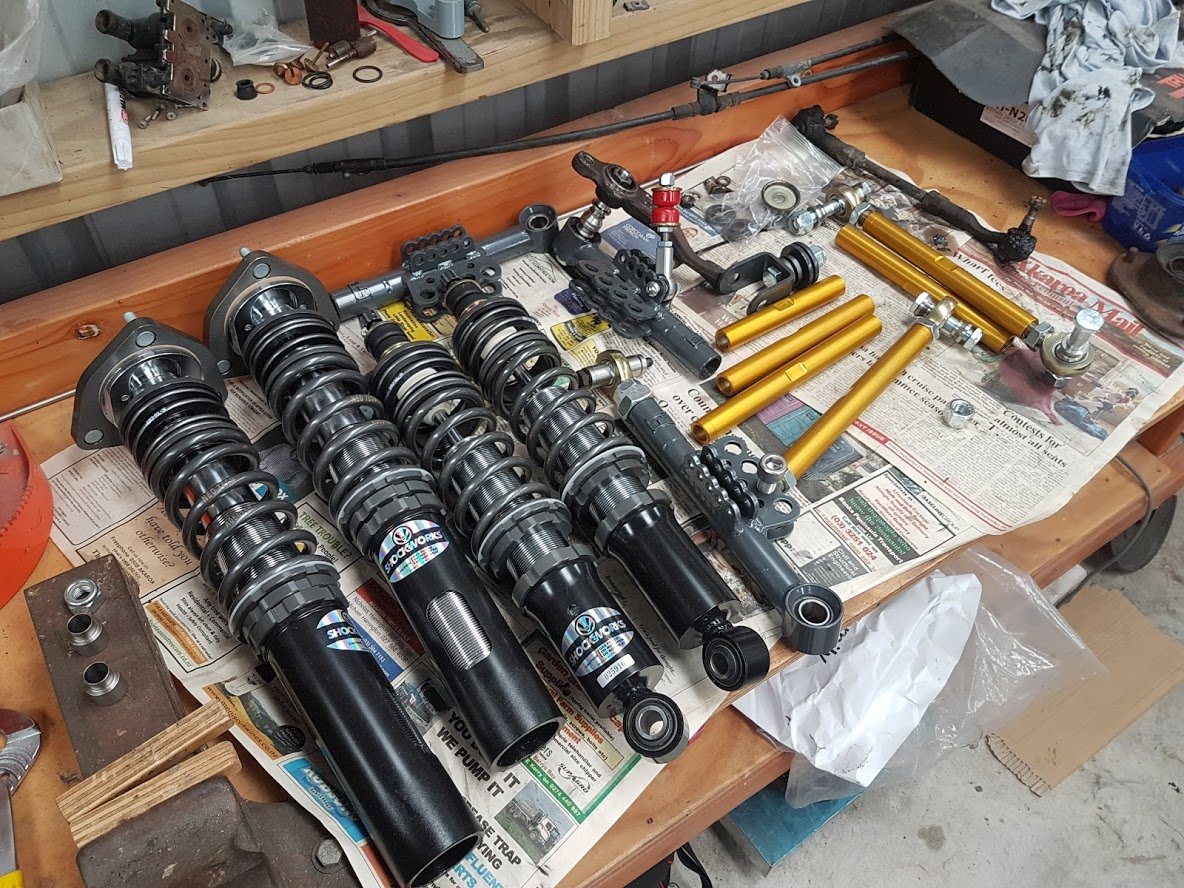
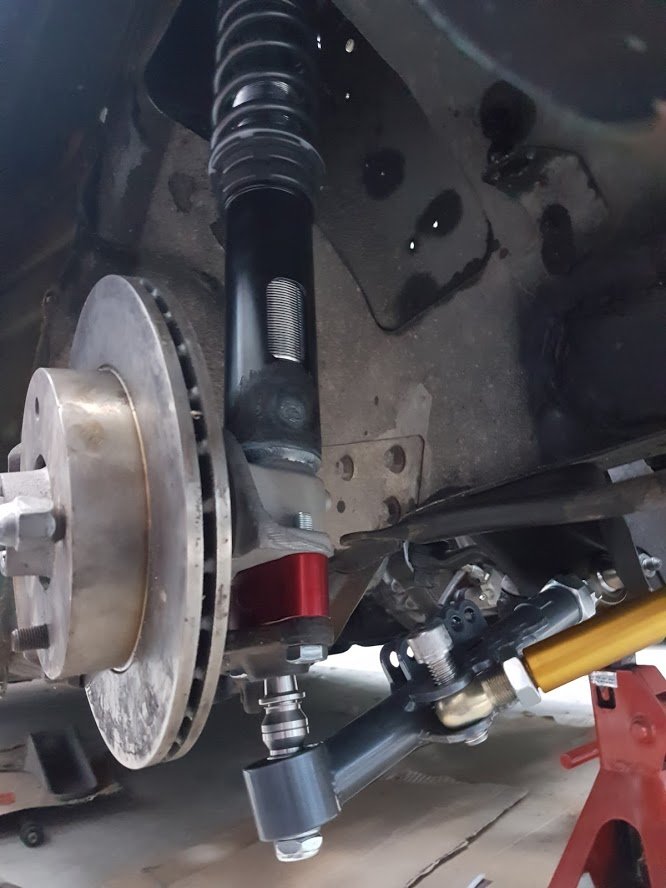
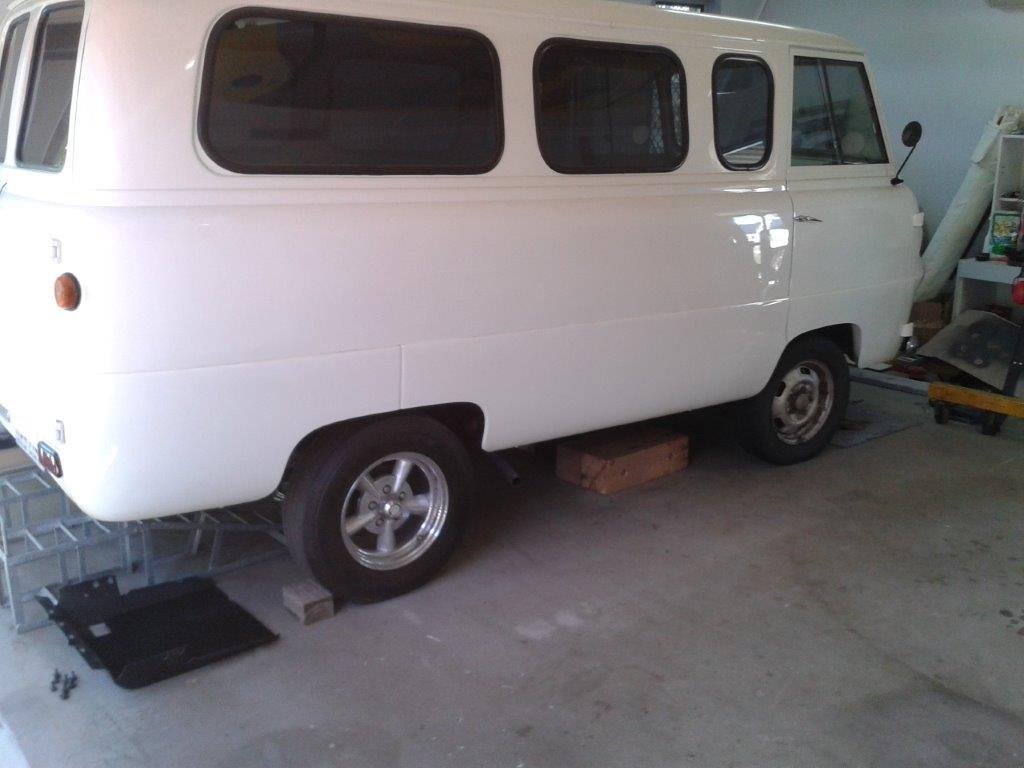
I still have this. Business has been taking all my time and money, but it is about time I had it going. Plan is a basic but very hot street car mainly set up for trackdays, clubsprints and sealed gymkhanas. I'll have some fun in it while I sort some of my other cars and then it will be getting full cage and TS cup treatment as some advertising and engine testing for my company. Just getting the suspension together now. I've had some custom Shockworks coilovers made up for it, valved and length to suit. Front are 50mm inverted monotubes which is cool. T3 GTX2 lower control arms and tension control rods. T3 steering arms & T3 RCA. Rear will be coilover conversion, so turreting is the next mission. Unfortunately the front isn't as low as I'd like and the coilovers are on the limit of how short they could make them. So I am going to cast some 20mm raised strut tops up. Next mission. It won't be as low as it used to be
3 points
-
Made up one of these tools to help with unscrewing a number of phillips head screws, works amazingly well. Just a cheap air hammer from SCA, weld a socket on the end, a torque arm, and an Ali 5/16th bit. Some of the hinge screws needed a bit more persuasion with heat and a bolt welded on. Eventually got everything apart without having to drill any of the hinge screws for the woodie doors.
3 points
-
Hmmm, back with a Oldschool project. It's driving starlets sideways that got me into drifting, there has been a lot of starlet shenanigans going on of late so the proverbial bullet has be bitten When this kp61 sprint rolling body popped up for cheap. I had a couple of motor options in mind and within the week I found Chris EURON8 had a complete set up from an altezza that needed moving on. So no Hesitation, in it went! Hack the tunnel and firewall Shove it in Cowl all in place Had some cultures come in at work so took the dry ice home and chipped out the sound deadner the more I look through my parts the more I realise I don't need to buy. Should be a rather cheap and cheerful build2 points
-
So apparently you can use tennis balls as a tyre tube replacement when you get puncture. Just stuff the right amount for the tyre diameter in there and bang it back on the rim. Sounds like a perfect ghetto fix for the ride2 points
-
Any thoughts on Plasma Cutters? This is on sale for $600 right now https://www.thetoolshed.co.nz/product/3139-toolshed-plasma-cutter-40-amp2 points
-
Ooh, that's the fancy version of what I use
2 points
-
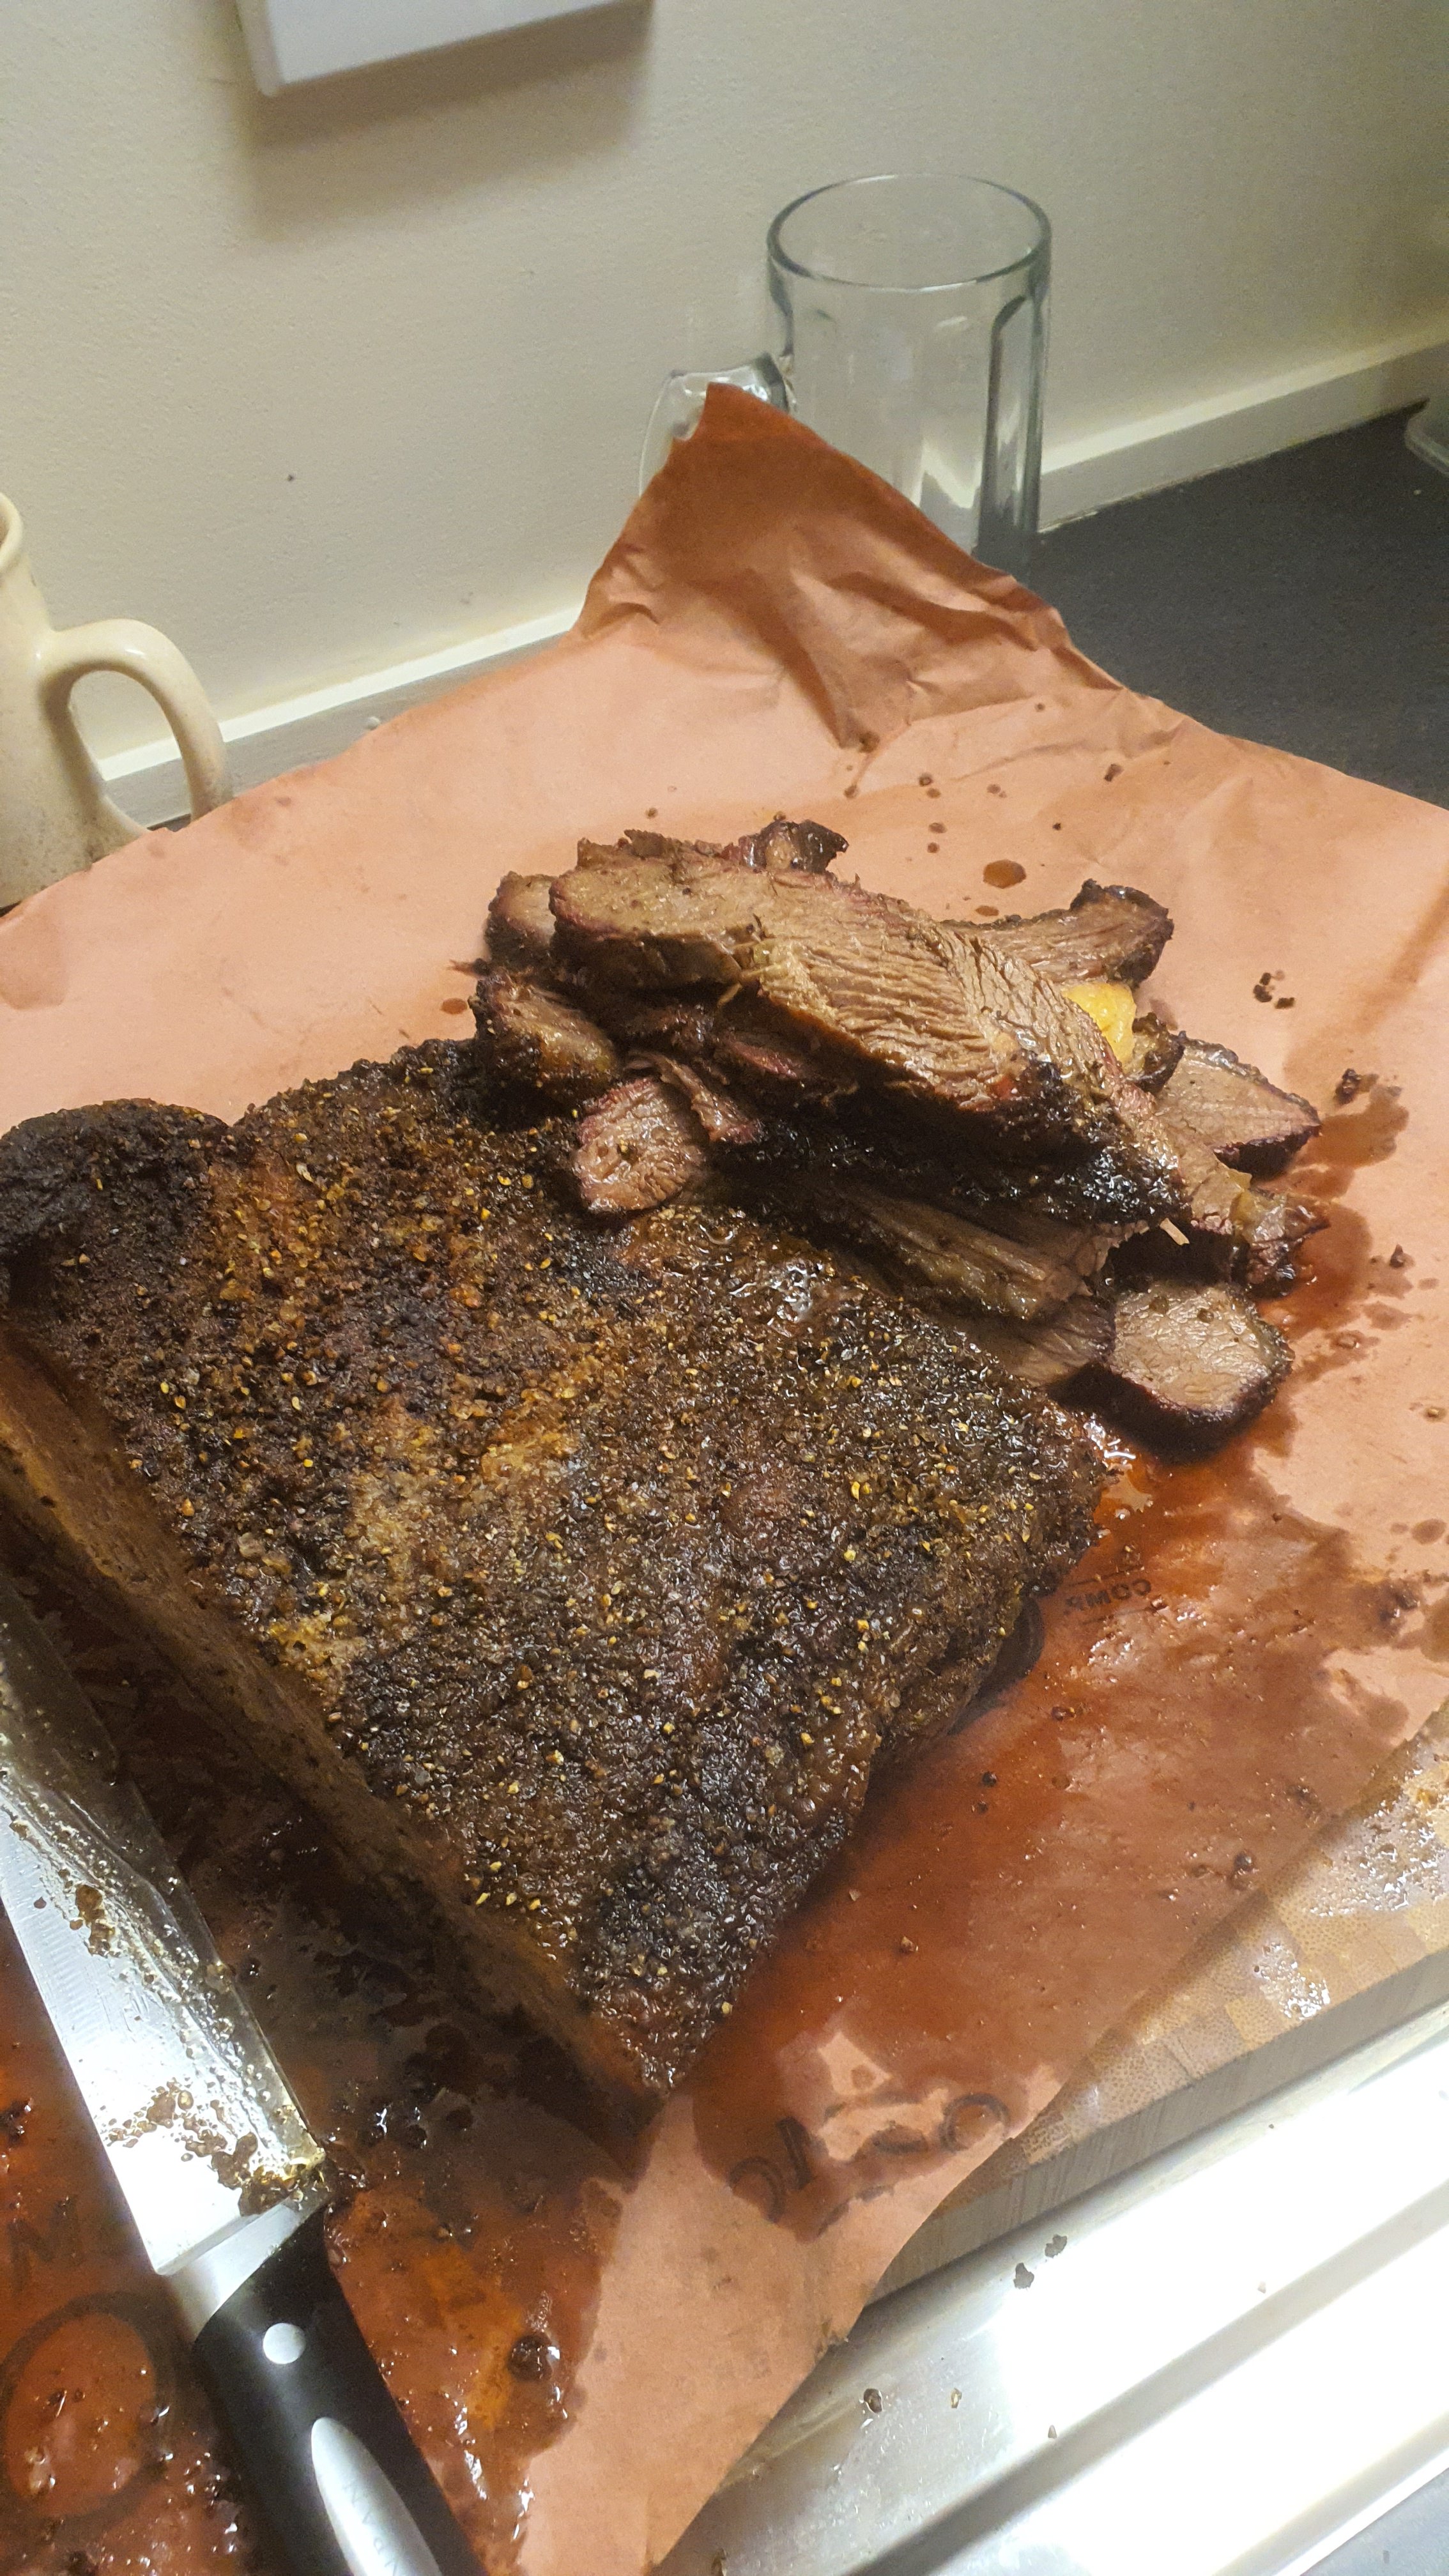
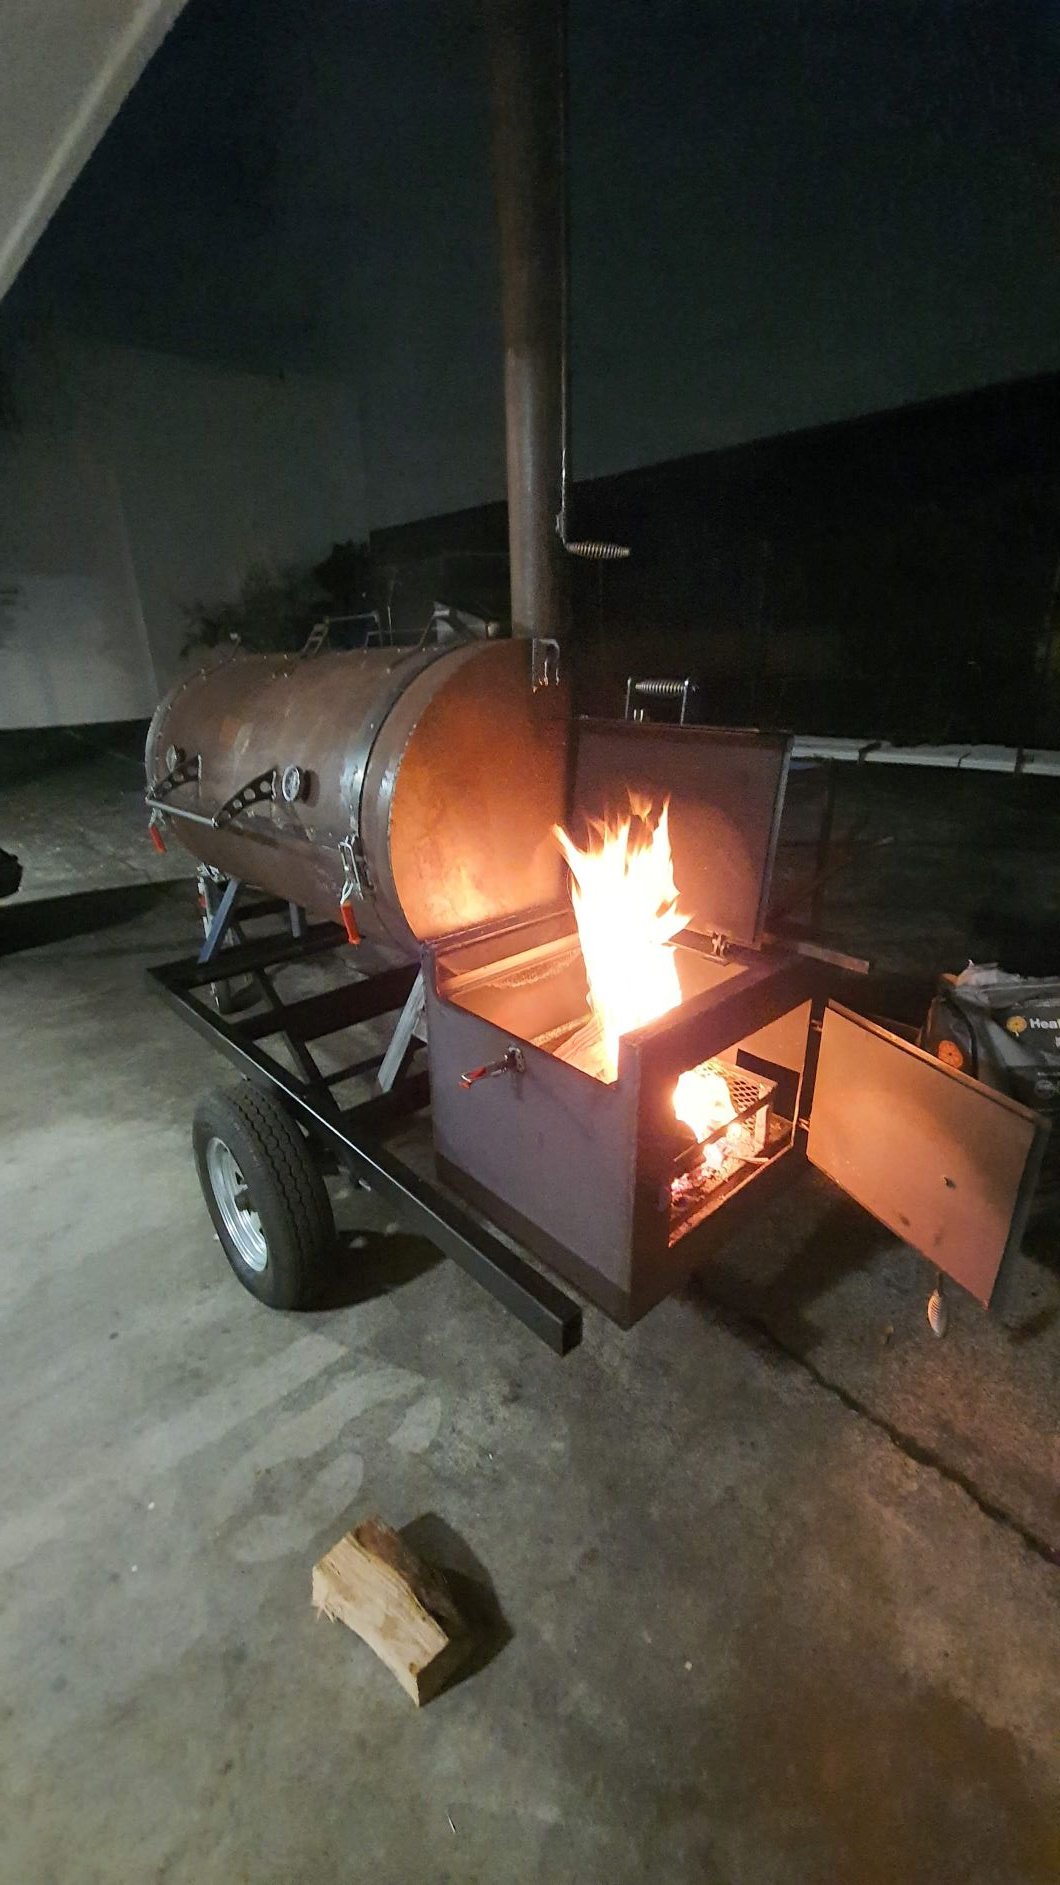
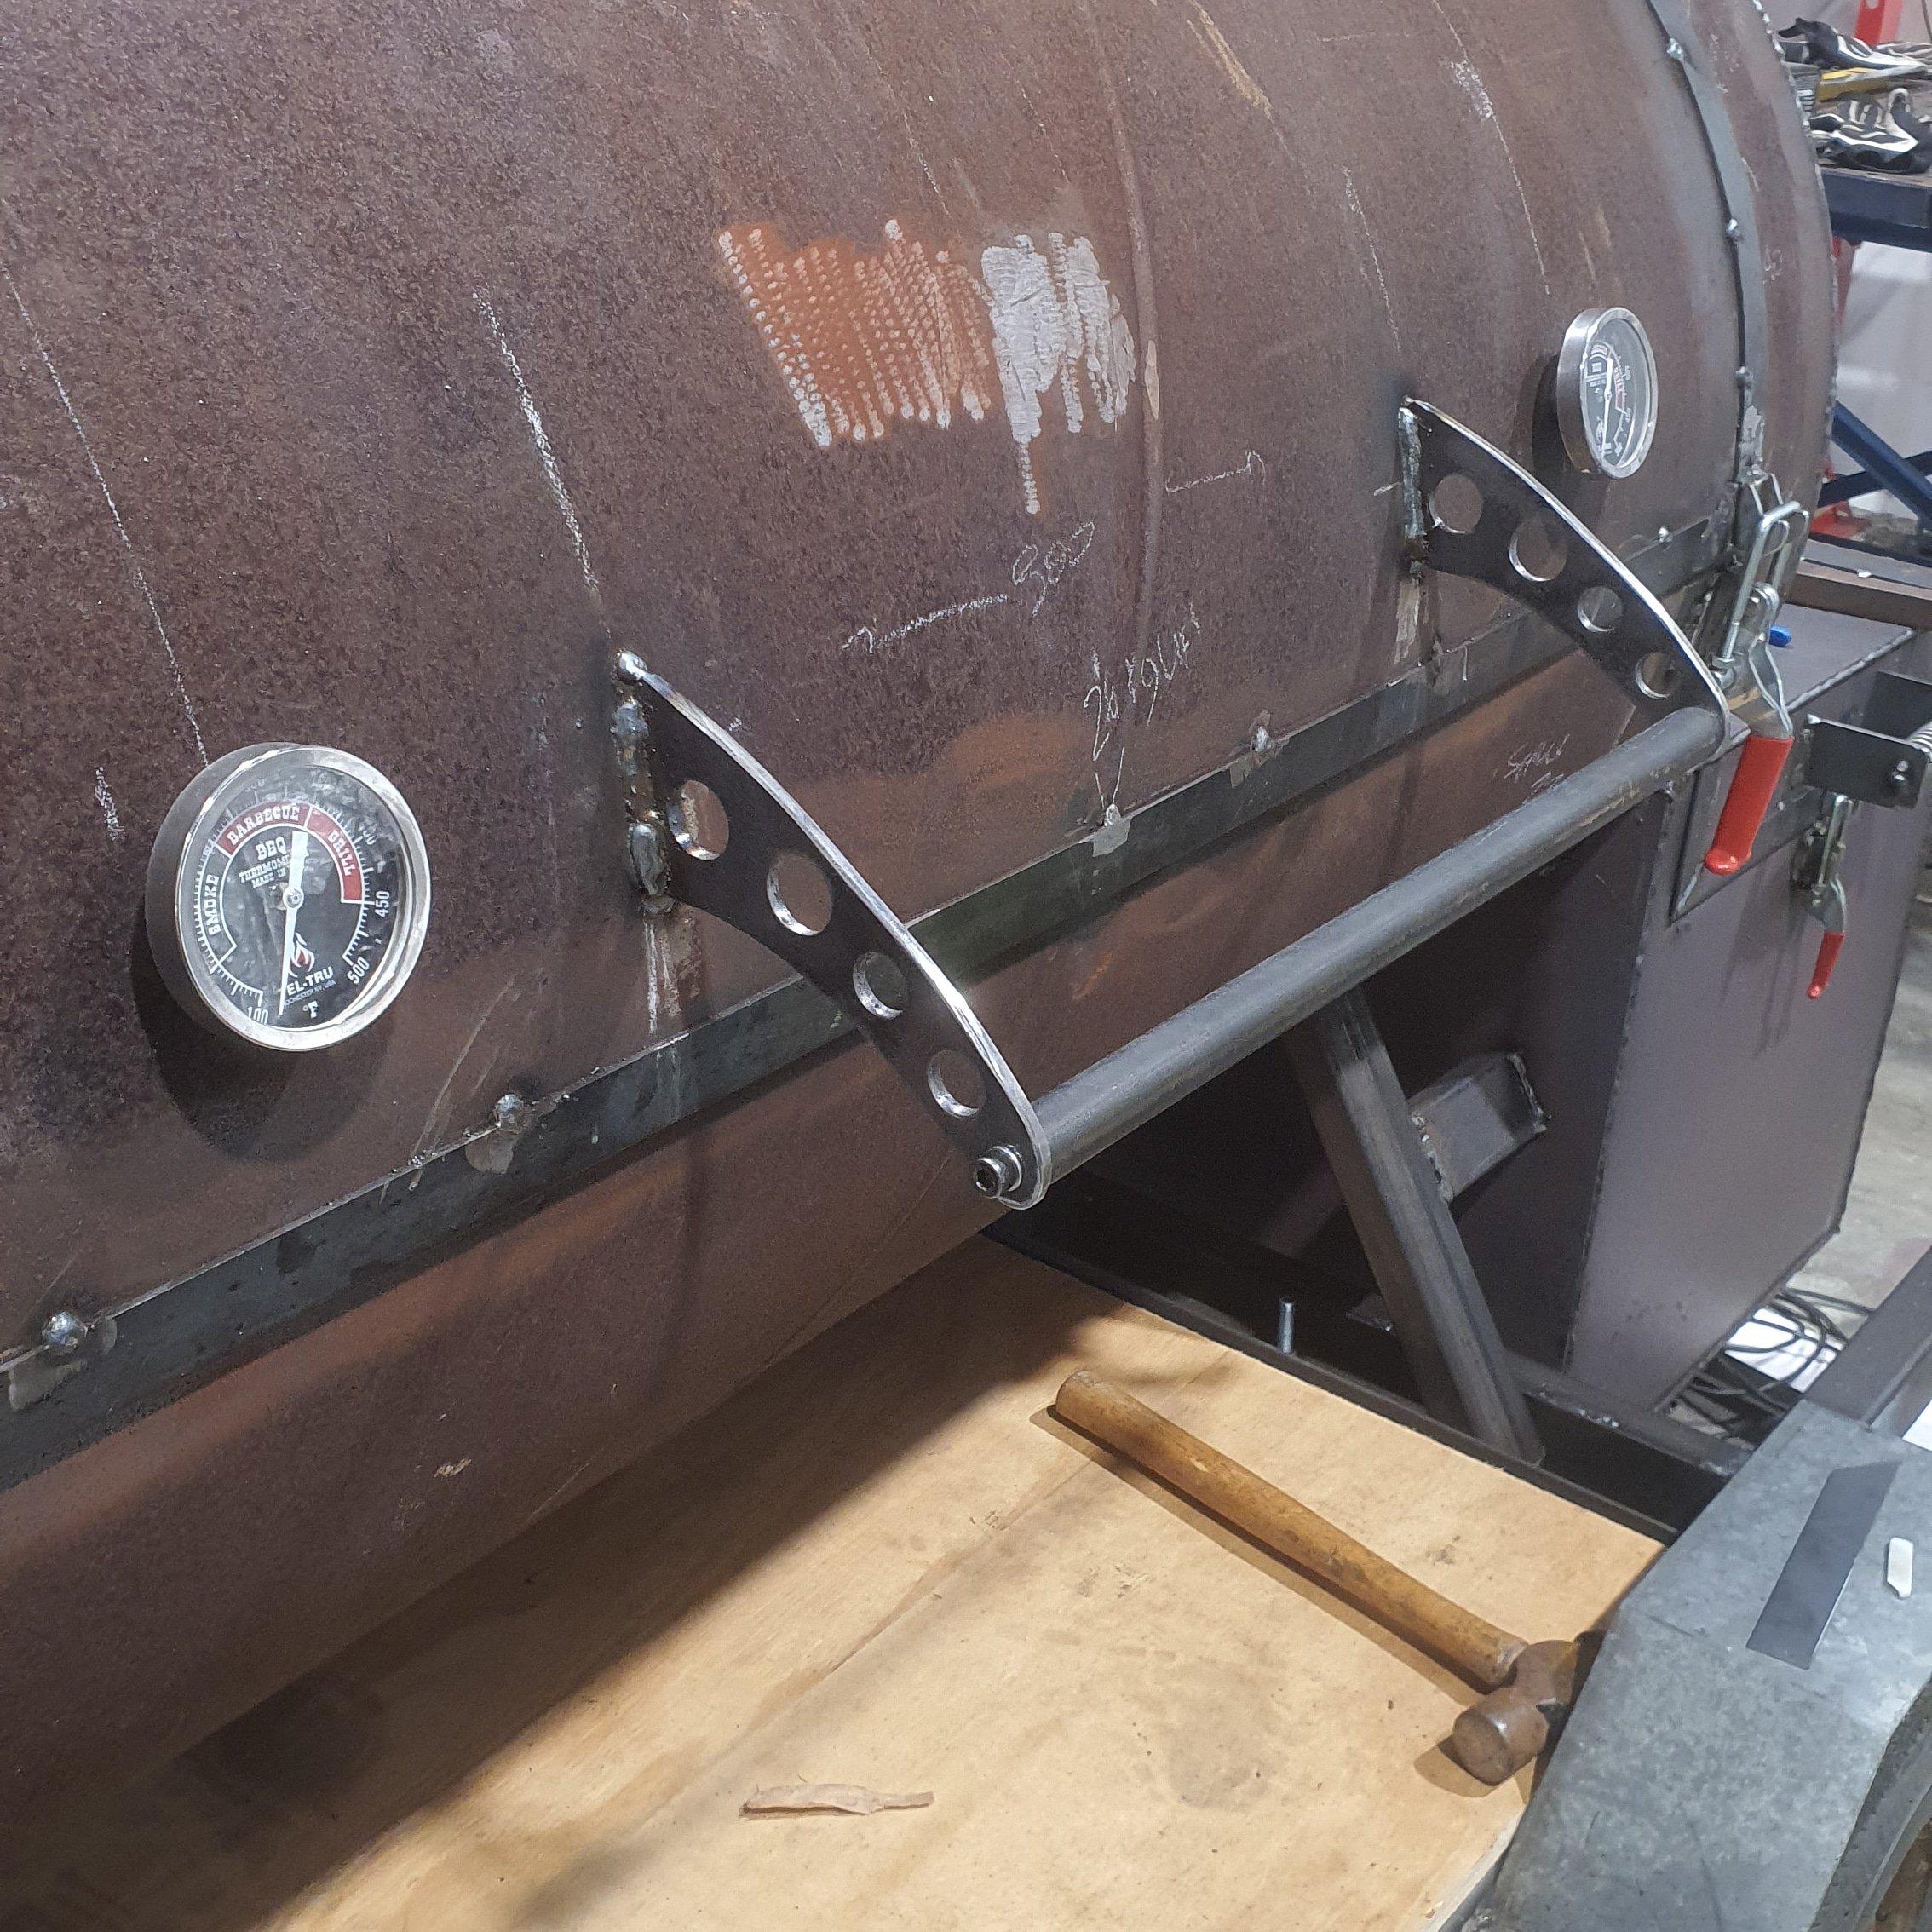
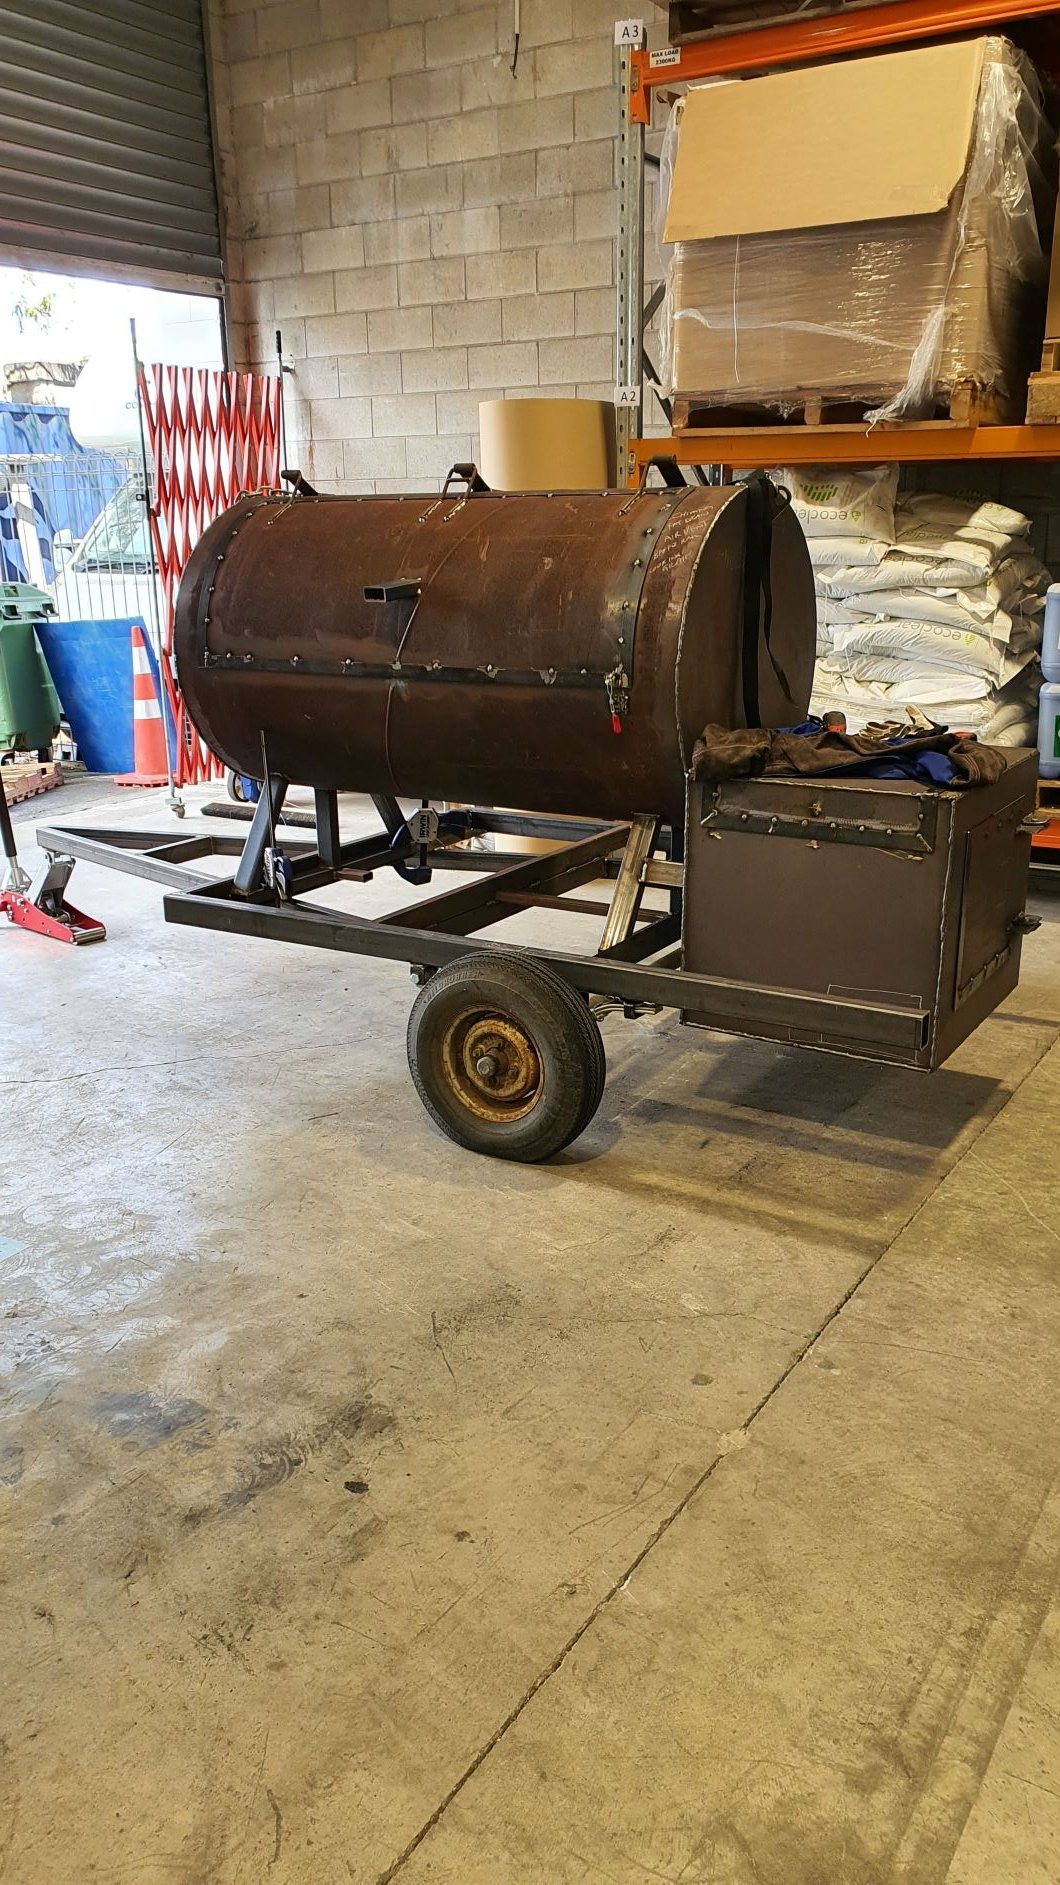
So got the race spec handle installed, painted the trailer rattle can black. Friday 3am, went into work, fired it up, 4.5kg brisket, fed the troops at 2.30pm, was mint as feck. Really happy with how it went, fed about 3 splits an hour to maintain 250 ish F . Picking up a slab of macro tomorrow to make top for woodbox/bar - should be done by end of week, have a 7kg brisket in the fridge that will get smashed by me and my 10 pod level 2 piss up !!
2 points
-
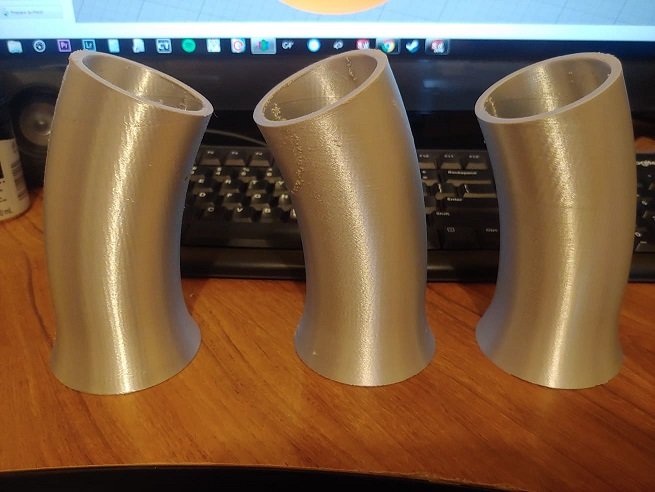
Printing the fourth pipe has nearly finished. (Will tidy up the grotty looking bits first) Then just gotta do the tops then I'll send them up. I was going to glue the ends on, but maybe they could clamp together. That way could try with and without the tops. Or maybe have some different shaped tops for it.
2 points
-
Had this thing out in the weekend, going into storage for a few months until i tidy up some other projects i have on the radar. Be back in use come summer
2 points
-
Race tracks closed, however, front camber plates now giving me -3 deg negative camber, a couple of cosmetic additions with rear diffuser and rear window vents, oh and now with log book and LVVTA cert, fresh wof and reg.
2 points
-
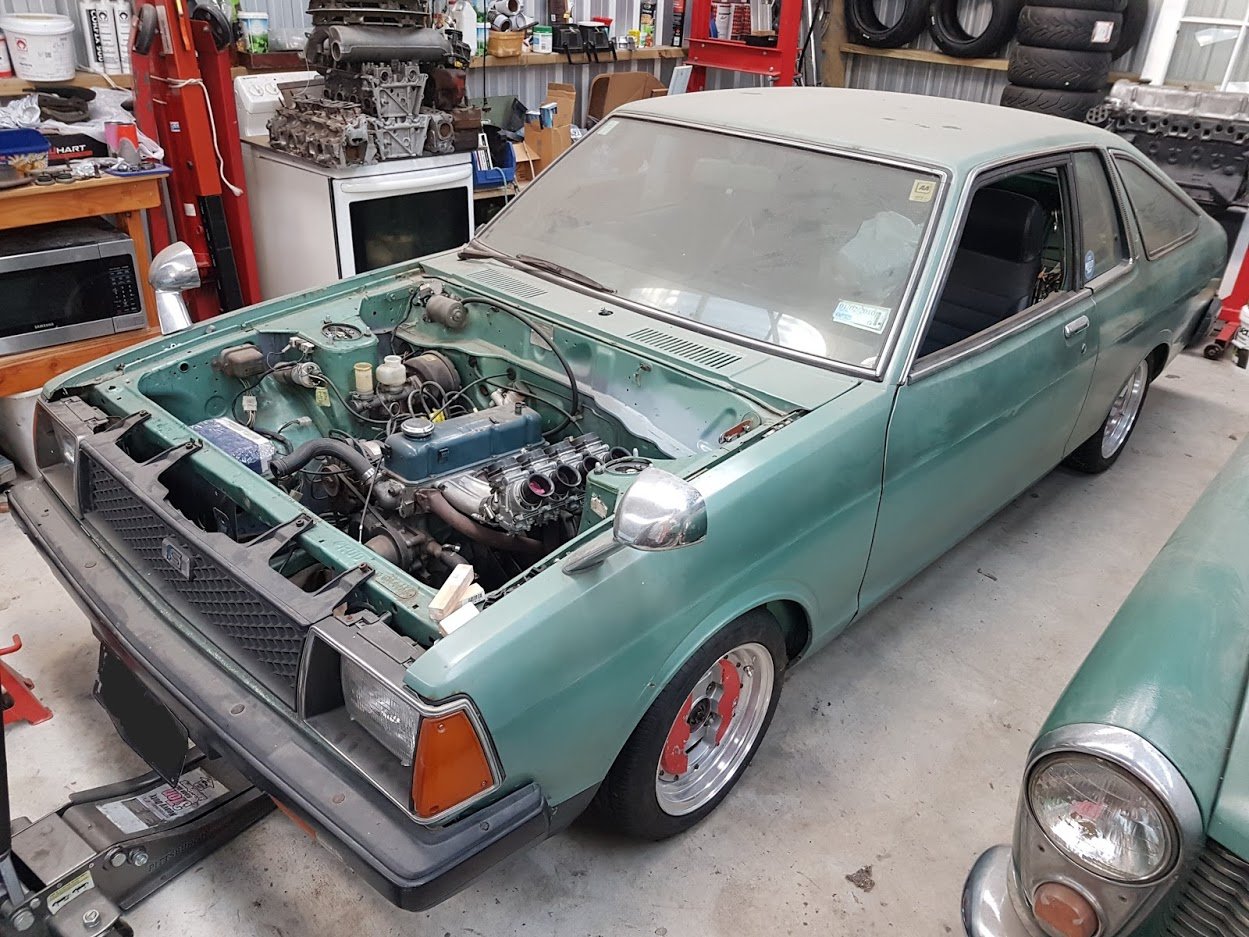
okay. so here is the final product. still a fair bit of work to do but its all sealed up ready for the last few bits to be sorted then one day in the future i may get it into final paint! as you can see. the swages need a fair amount of attention still, but ill get there. have more big plans now that the tube frame is finalized. basically i can lower the motor another 80mm now so i will be making a new cross member to suit an after market rack of some discription (todd/boost+k insert opinion here!) whilst doing that i will be making up a new exhaust manifold to suit a VF twin scroll turbo. finish off the intake manifold and get a link g4 wired in. lets hope it all goes at a steadfast pace while also trying to get my new ke25 project daily road legal2 points
-
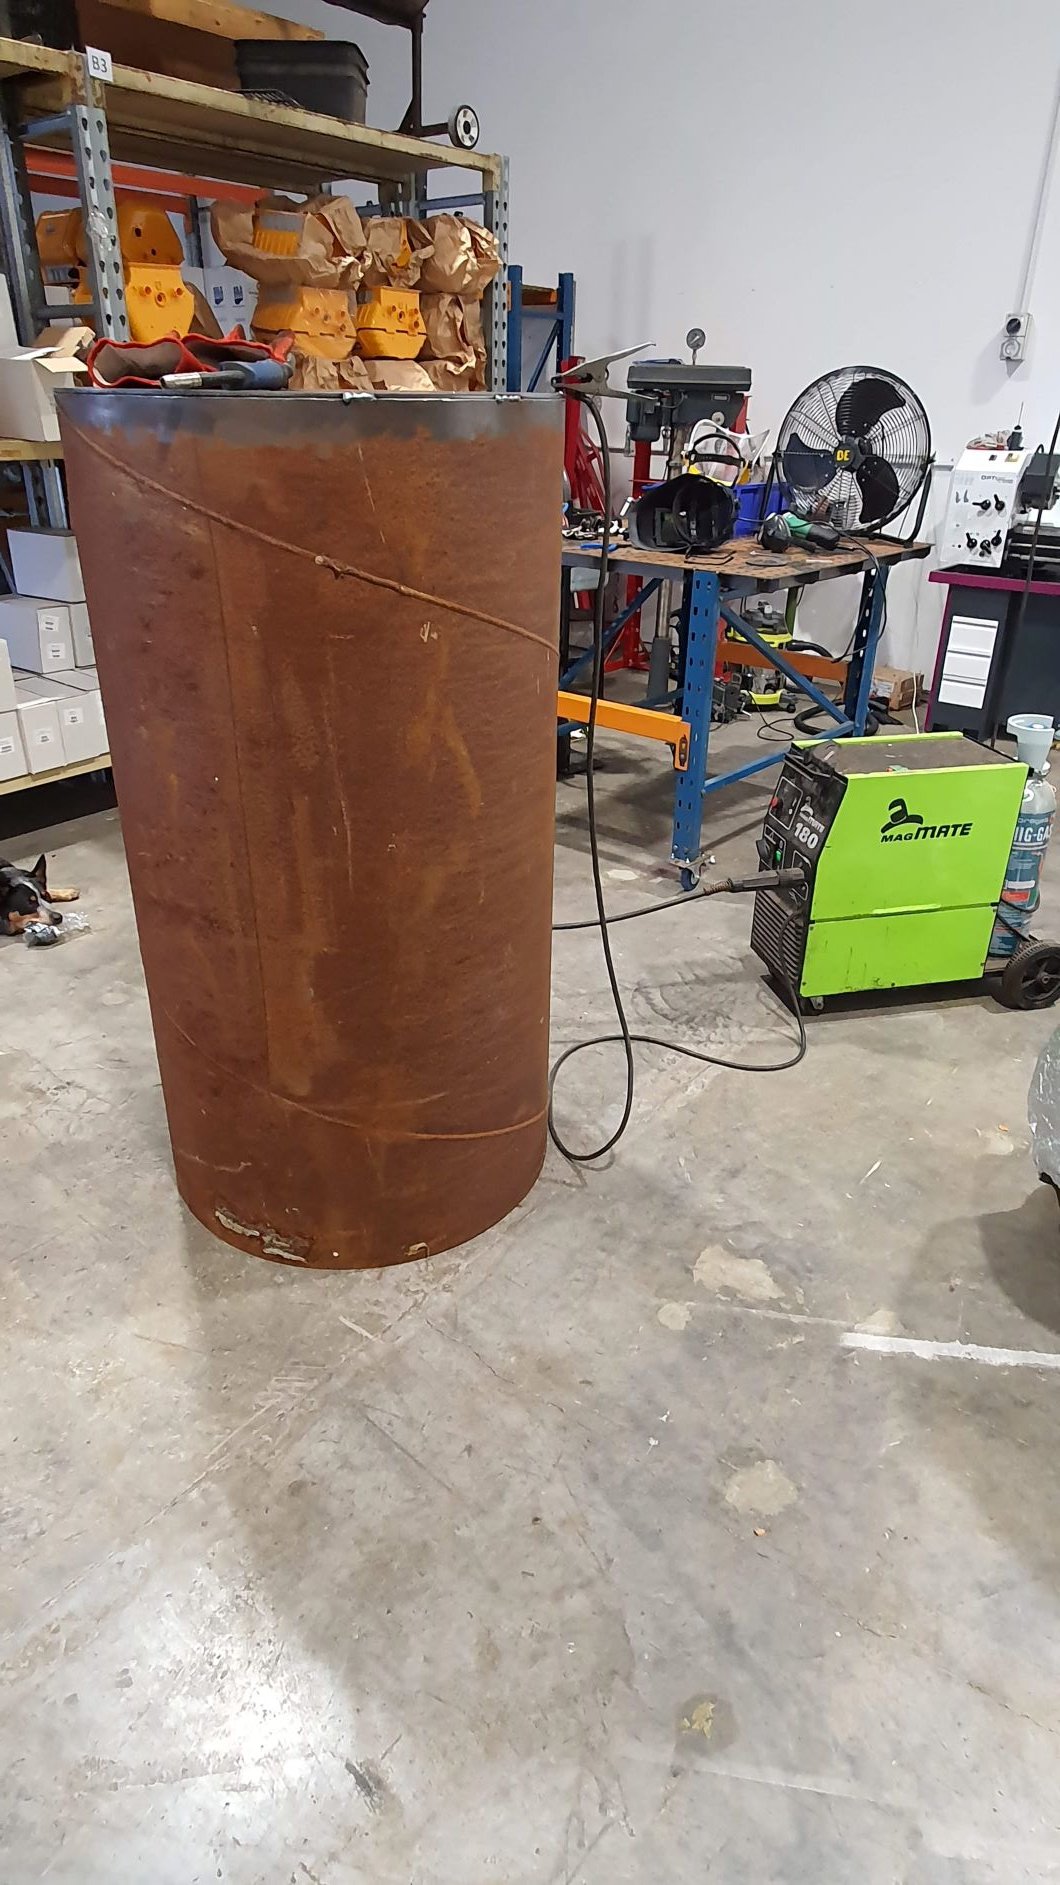
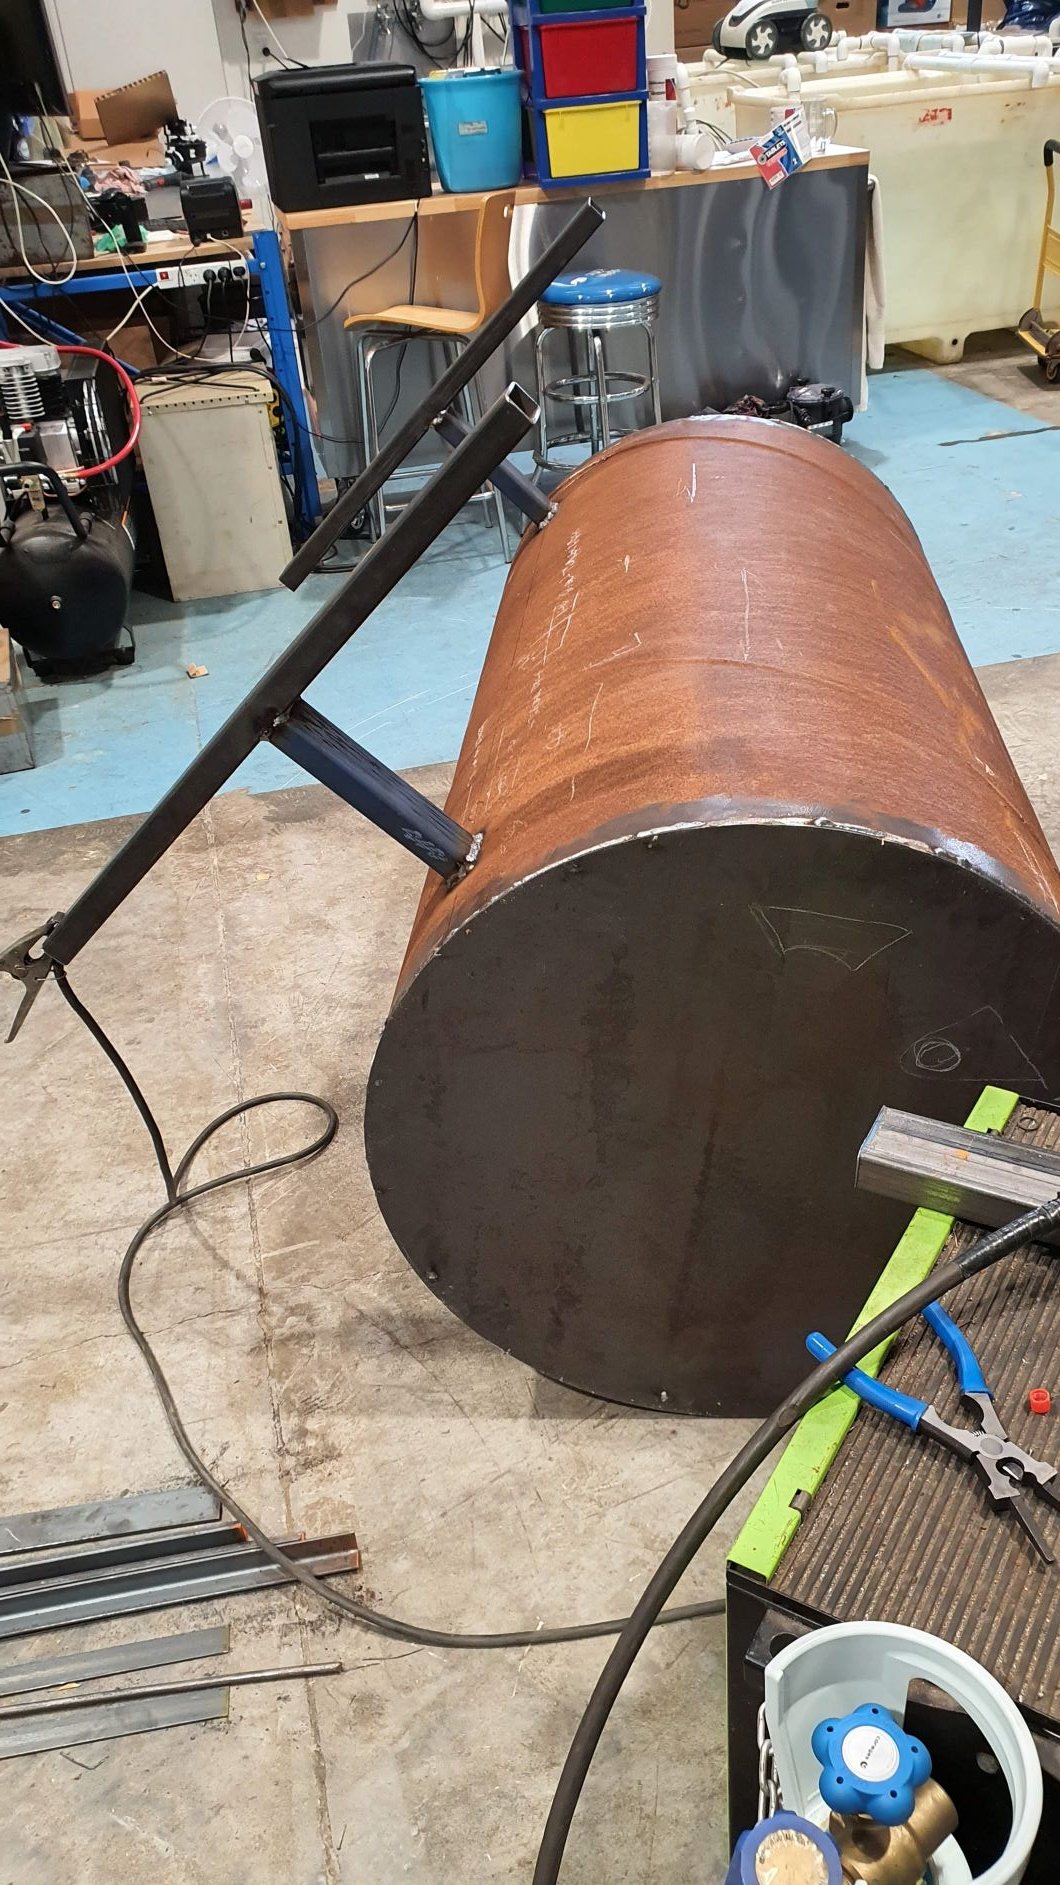
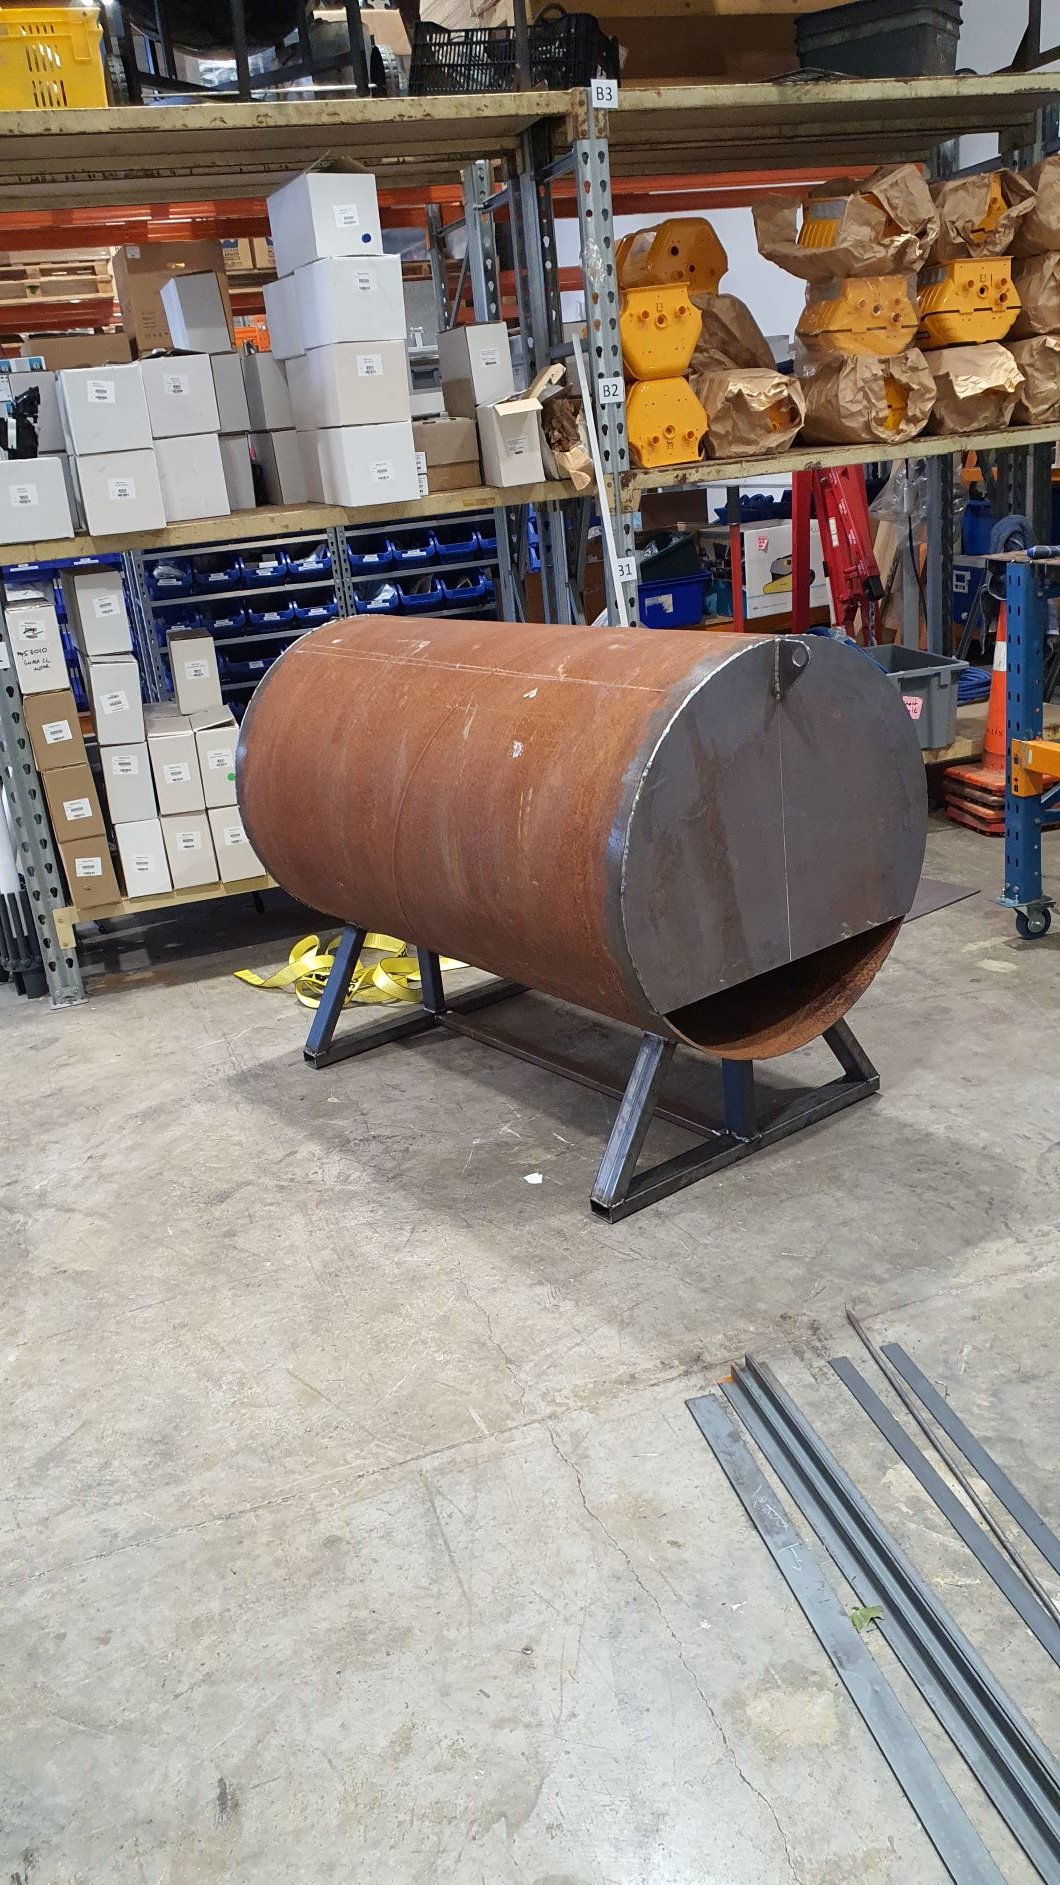
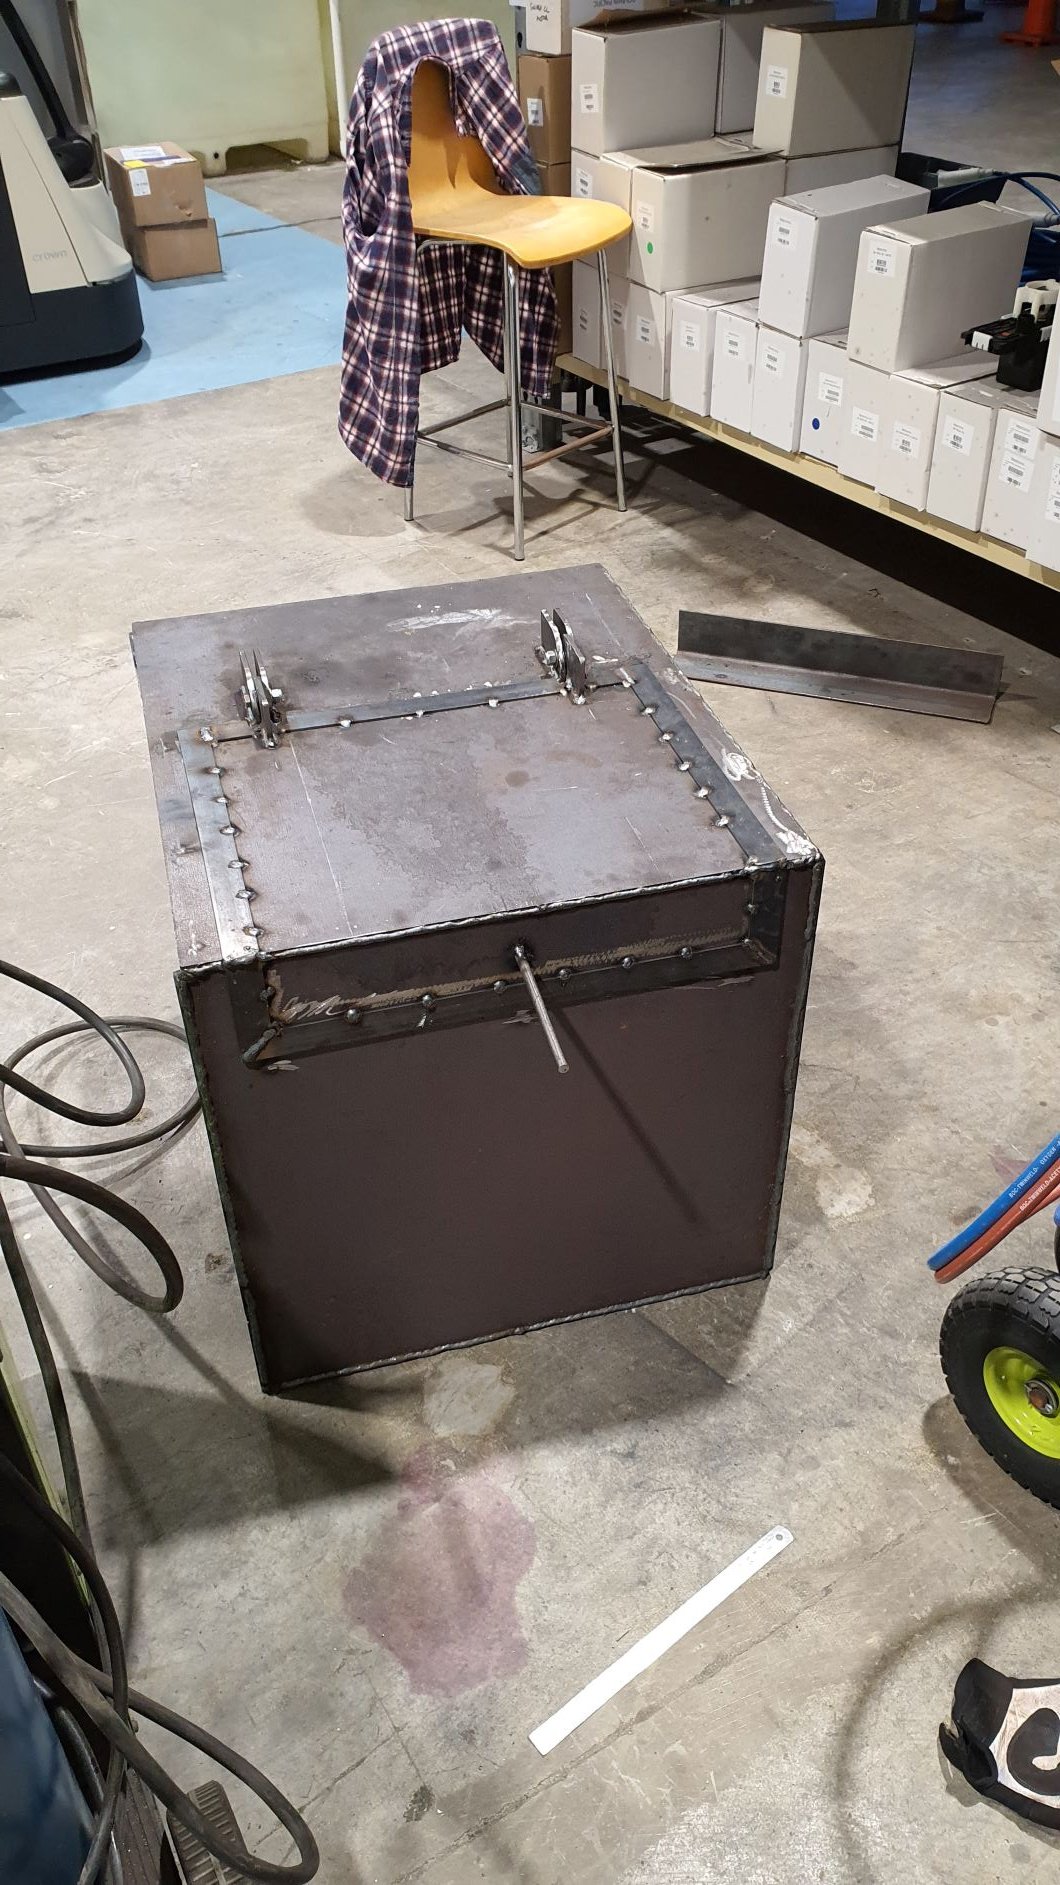
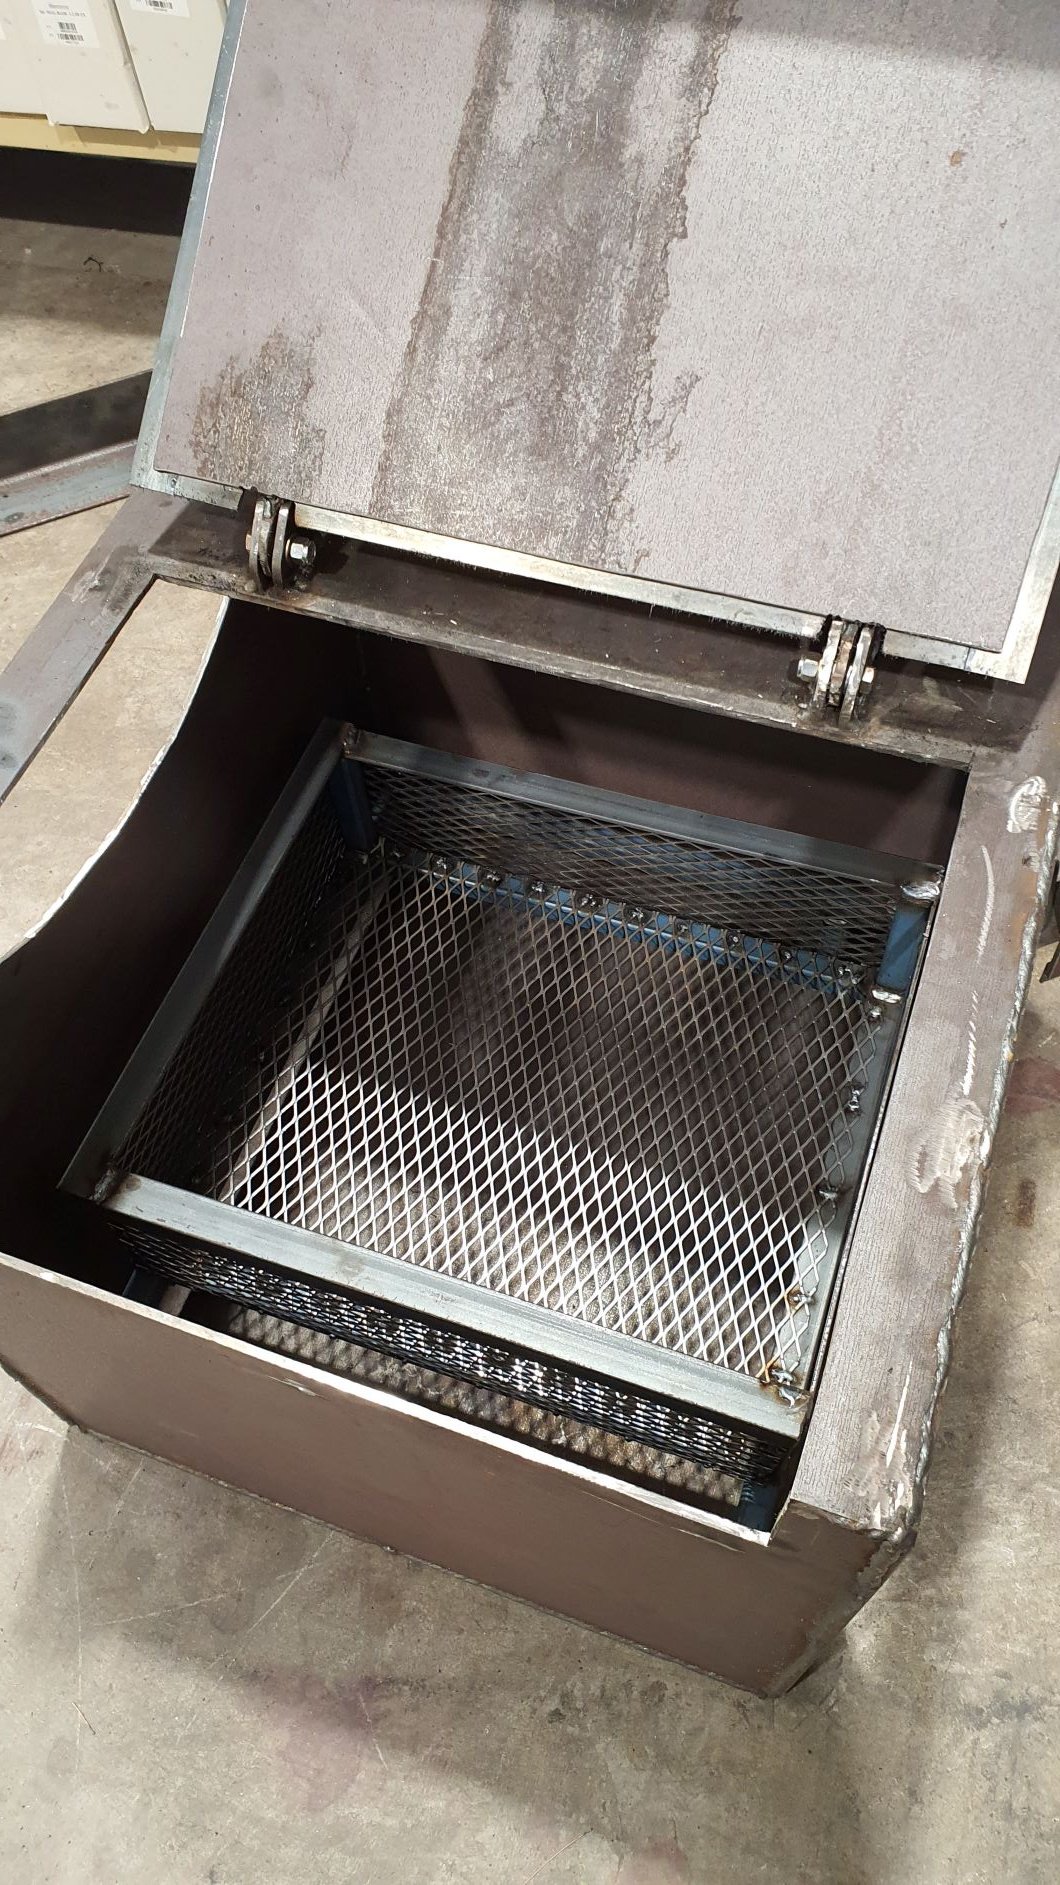
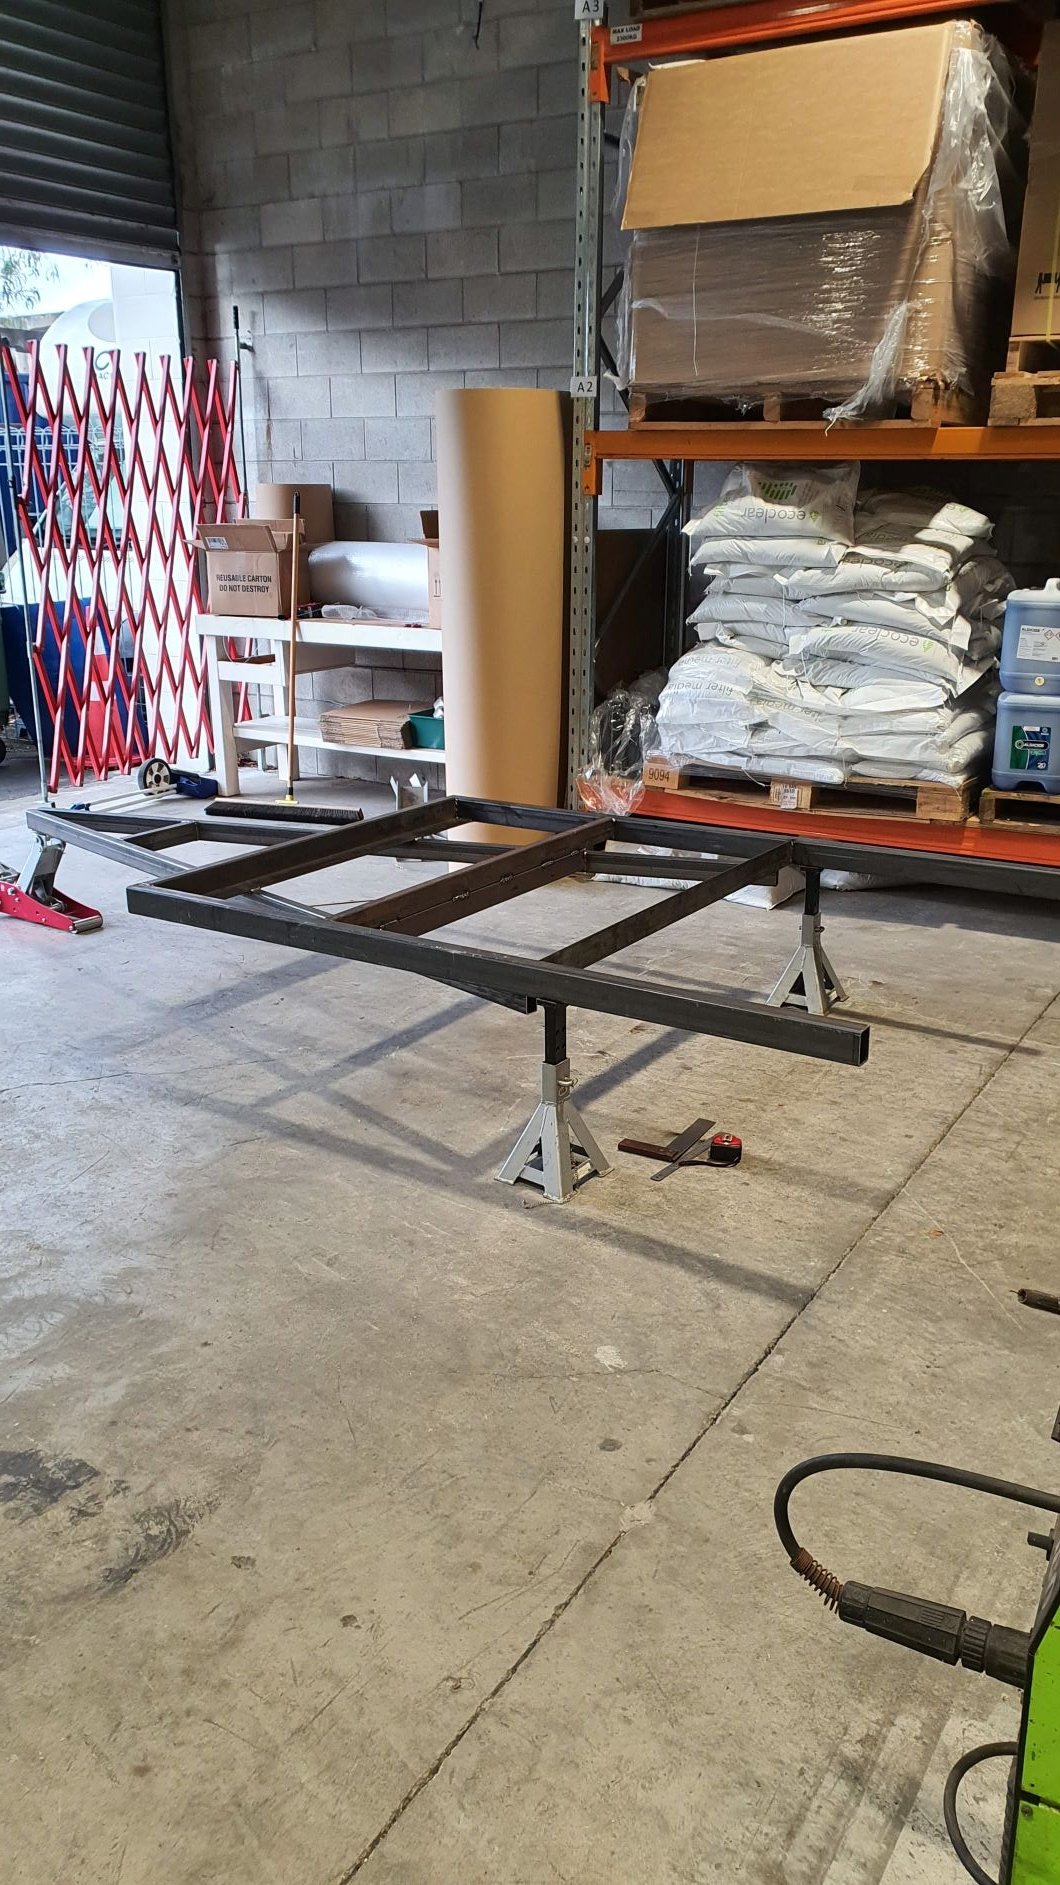
This all started with some reading over Christmas and my general obsession with smoking meat and eating it. Started looking for a bit of steel pipe, ended up with a bit 800 dia x 1500 long. I had some ends and some bits for the fire box water jet cut. All 6mm steel so it weighs a bit, good thermal mass i hope ! . Legs, in retrospect maybe 100mm too long, but it was back of a ciggy packet maths so she'll be right Opening is where the fire box joins on, it will be a reverse flow set up. I used an online calculator for all the sizing, so I hope it draws well and gets some decent heat into it. Firebox is 600 x 600 x 700, all in 6mm, including the main BBQ it weighs in at close to 400kgs. Made a log basket for the fire box. Still have to put a cooking grate in the top of the box for the sear ups. And still need to put the air vent into it, or just open the door. See the outlet from the firebox on the LHS of that photo. I bought a trailer cheap of TM and then decided not to use it barring the axle, so made this to put the smoker on
1 point
-
5mins on 5mins off. Its pretty much the percentage of time it can opertate in a 10min period.1 point
-
I thought this one looks a bit more interesting/better than most flat decks1 point
-
It's possible? Maybe someone swapped the yoke from L series to A series? I ended up getting my other shaft shortened and balanced as that one was slightly too short and way out of balance!1 point
-
Aint that the truth haha. Have found some gems thats for sure. Cheers man i dont like things being done half arse drives me up the wall. Old gearbox mount is going on the wall in the shed thats for sure ha! A+ For kiwi ingenuity ill give them that haha1 point
-
Dicksmith one is probably the same as ones from aliexpress? Which was the same ones resold on trademe, which could be cheaper, worth a look. I got one from Ali like this: https://www.trademe.co.nz/motors/car-parts-accessories/tools-repair-kits/other/listing-2613493571.htm?rsqid=954ab67877364b37be4e457500fcd1d6-001 (requires air compressor) Haven't used it on brakes yet but it worked really well for draining my power steering! I very rarely find someone willing to pump the pedal so just run some pipe into a bottle and open the bleed screw a little bit. Seems to work, once there is some fluid in the bottle, air can't get back up the hose if it's submerged.1 point
-
Still haven't got this running. Got everything assembled to make it run but I think the carb is no good, I have since found another carb that's been rebuilt now to find time to fit it Also for the first time in maybe 8 years I degreased and scrubbed the engine bay clean
1 point
-
Yip will be painting in the same white , wheels engine etc. I actually really like it as is , just need to get the hidden cancer out of it and save her for at least my lifetime.1 point
-
So.. After talking to the panel beater I will be using he recommended a blasting company that he knows and trusts. I went down and had a chat with the guys at the blasting company and they will do the job but are not really that keen on doing car body work , they are more of a commercial set up . Seems that no one in Tauranga really wants to media blast car bodies after talking to a few other blasting outfits. car owners are too high maintenance as far as blasting goes etc etc as well as the risk of damaging panels. To even get the job done (blasting) I will need to remove the paint from any large flat sections of the car myself then they can finish the job with the blasting. I have got myself a bunch of strip disks , the orange coral looking kind and after looking around the forums went with phosphoric acid to protect the bare metal until it gets to the blaster. I got it in the form of deoxidine 624. I just want to make sure that Im doing this right.... apply deoxidine with steel wool or equivalent... wipe off with meths on clean rag ... wipe off again with dry rag. And this will provide a rust protected surface for a while until I get it into the shop ? Anyone who has used deoxidine help a brother out1 point
-
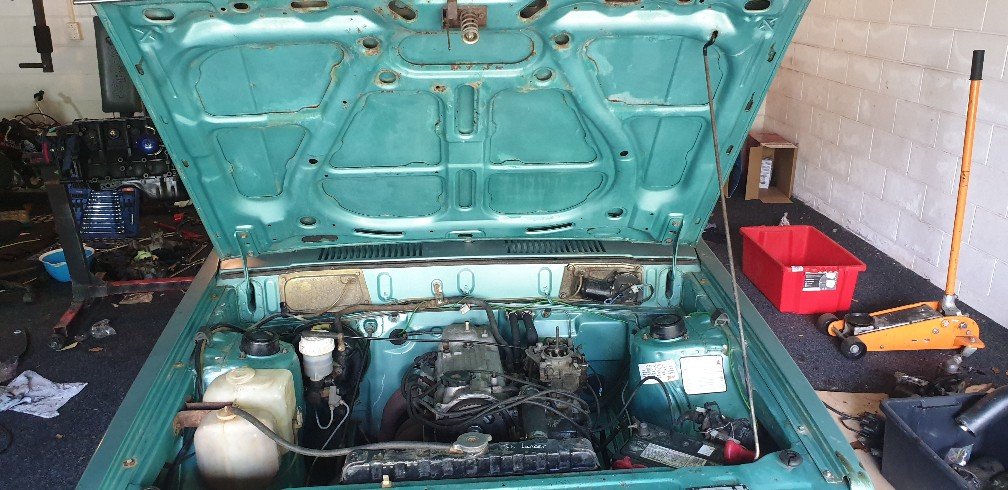
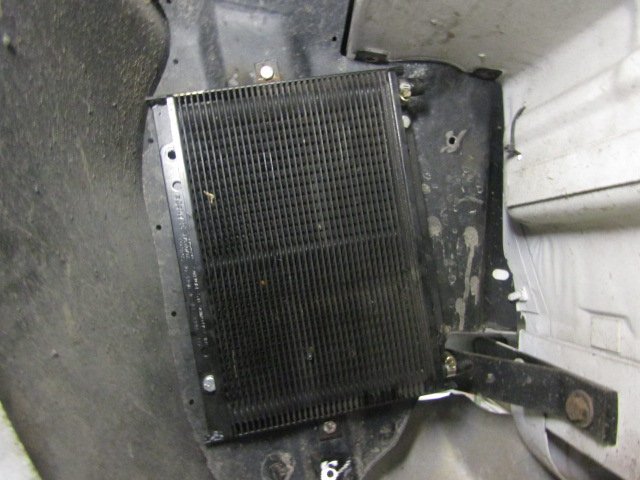
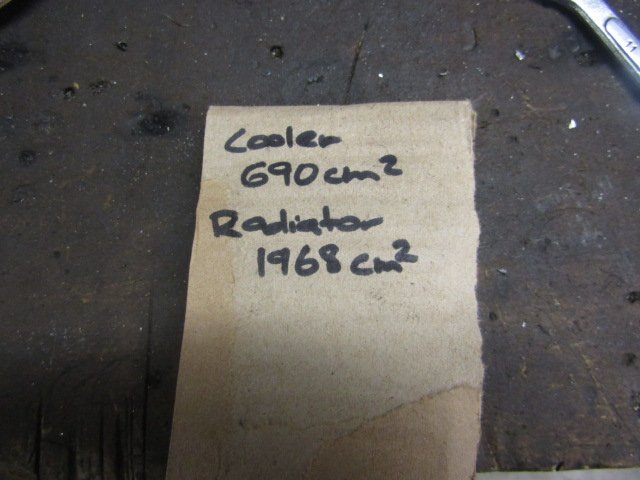
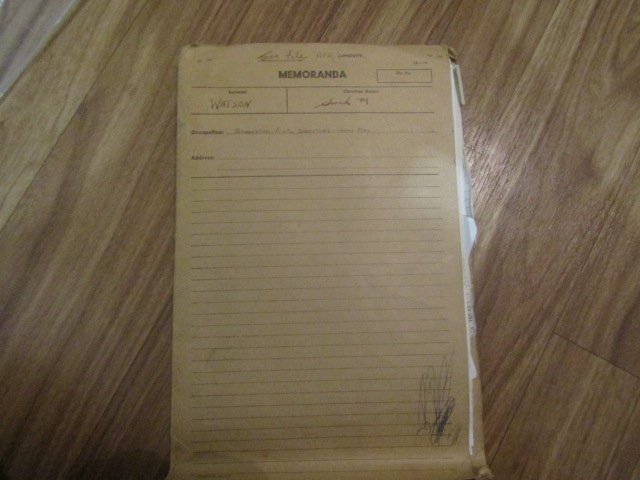
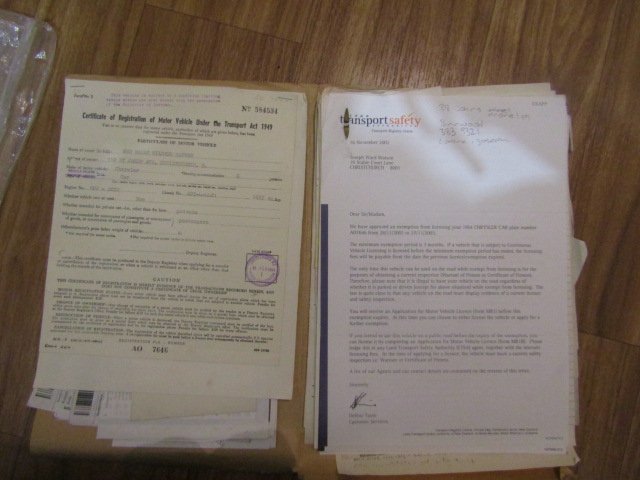
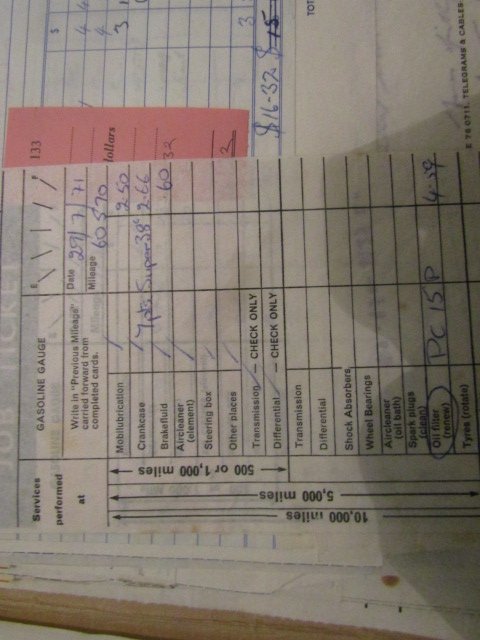
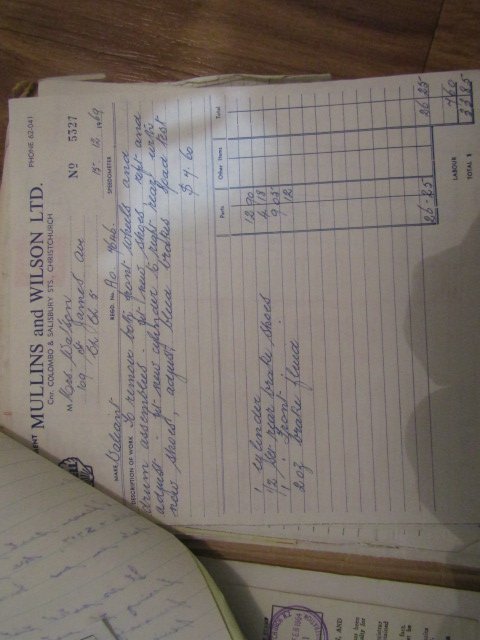
Pretty determined to get this done now. So. as I mentioned in the previous posts dating back to 2010 this overheats at speeds under about 50 kmh which is a huge pain in the ass. For what ever reason I never addressed this, maybe I thought if I ignored it the problem would go away. It hasn't. When I first built the car I spent a lot of money on a 5 core radiator soldered to the AP top and bottom tanks. Made a fan shroud and went to the effort of making the factory fan fit the 383. There just isn't room to fit an electric fan. Anyway because it's automatic I put a big trans cooler in front of the radiator , called it good, and never gave it another thought. Recently I started thinking of things that I could do to solve the issue without spending lots, I had a look at the cooler and decided to move it away from the radiator incase it's causing a restriction. I got it off today and it must flow almost zero air through. So I've cut the mount up and started mounting it inside the L.H inner guard just behind the headlight. Possibly not the best place for a trans cooler but I have a trick up my sleeve on that front that I will share with you later. I'll make a basic shield out of ACM to stop the cooler getting dirty/damaged by crap thrown off the wheel' Just out of curiosity I did the maths to work out how much radiator core the cooler was covering. Lots as it turns out. Just over 1/3 of the radiator core right in the center in ftont of the fan too, it makes me hopeful that I've found the problem. Anyway, that's enough about that. Who wants to hear a sharn? Yeah I thought you might. So here's the story about how I came to own this car. When I moved to Christchurch from Auckland circa 2003 the thing that was foremost in my mind was buying a Valiant, I wanted a VF or a VG most of all (which is another sharn in its self). I'd gone to the bank and organised a loan and was all set to buy a project starter. Anyway every Thursday on the way to work I stopped and brought a copy of the Buy Sell Exchange and went straight to the C for Chrysler then the V for Valiant section, I looked at a few VF/VGs but they were all heavily boganised, I remember one guy with a flat black VG with a 245 hemi doing a hektik neutral drop and then overshooting his driveway because the brakes were fucked on the road test. I wasn't too keen on that one. I saw the AP5 for $500 In the paper one Thursday and ignored it, it wasn't the shape I wanted. It was re advertised the next week for the same price it was a bit of an odd add, not much information etc. My friend Steve saw the AP5 add and went straight to %100 pine. Steve was about 15 years older than me, was a full blown foamer when it came to old Aussie cars. On his insistence I called the number and arranged to go have a look. the old lady who answered the phone was a bit vague about it but I got her address and went for a look. When I got to the house the AP was nowhere to be seen, It was in a garage behind the house, the shrubs had overgrown the driveway making it about as wide as a foot path. The AP was sitting by its self in the middle of a concrete block double garage with almost nothing else in it. The car had been brushpainted with white house paint and was sitting on four flat crossplys. It was in pretty good condition, was totally original, and had been embalmed in white house paint. I knew straight away that I wanted to own it. I told the old lady that yep I'd take it, could she hold on while I went up to the cash machine and got some money out for her. She looked very disappointed and told me that four young men wearing black jerseys had come and looked at it that morning, had said they wanted it because it would make a good street stock and had told her they would be back later that day. Looking back, it was probably Bart and his mates. Anyway I started to panic a bit, no way I was going to miss out and let it become a street stock so I offered her $600 which she declined, so I offered $750, she looked shocked but still declined. I said I'd make it $1000 and get the money to her that day. She said I'd better talk to her husband who was inside. The car had been her husbands mothers car and he'd held on to it after she had died in the mid 80s? He was very attached to the car as I could only imagine. He wasn't coping well with the sale and was basically hiding inside. When he was told that someone was offering double the asking price who didn't want to wreck the car he was as pleased as punch and we sealed the deal. It was then I found out that his mum had owned the car since new, and that he had every document and receipt relating to it from the initial purchase to the present time. I went to the cash machine, got out $500 (all the machine would give out LOL) and told them both I'd be back tomorrow to get the car. Before I left the old fella said "if I liked Valiants I'd really like what they had in the garage attached to the house. He opened the door and there was a Subaru Vortex , I very quickly resisted the urge to say I'd rather drink a warm fish milkshake than look at the vortex, luckily it wasn't the draw card he was referring to. Next to the Vortex was a mint orange and black VH770 charger. I pined so hard it was perfect unrestored about 50,000 miles from new. Dam I pined so hard! It absolutely wasn't for sale, if it was it would have been far more than I could muster. i often wonder what happened to that car. I really hope it's still safely tucked up in a nice garage safe and sound somewhere in Christchurch Anyway Steve and I went back the next day pumped the tyres up, jacked the car up because the old tyres had glued them selves to the concrete floor, and pushed it as fast as we could through the overgrown hedge down the drive. I did have a photo of the day I got it home, it's pretty shitty and double exposed. Anyway that's my sharn about the day I brought an AP5. Heres some pics of all the old documents that I stashed away in a safe place. They make for amusing reading.
1 point
-
We dont work in fractions now, the conversion is 3/4 race cam equals 75%racecam nowadays Stage 3 is probably 31.7%racecam by today's conversion rate.1 point
-
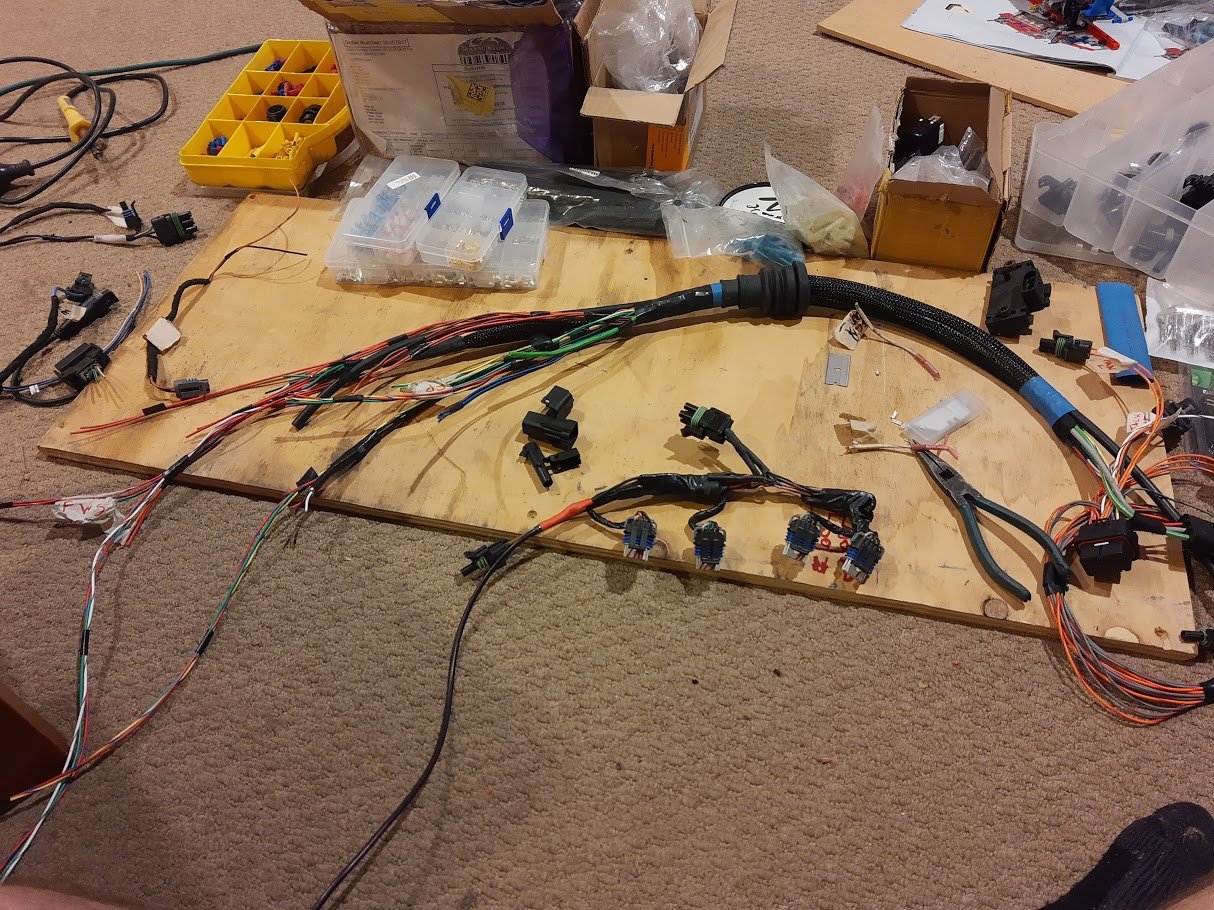
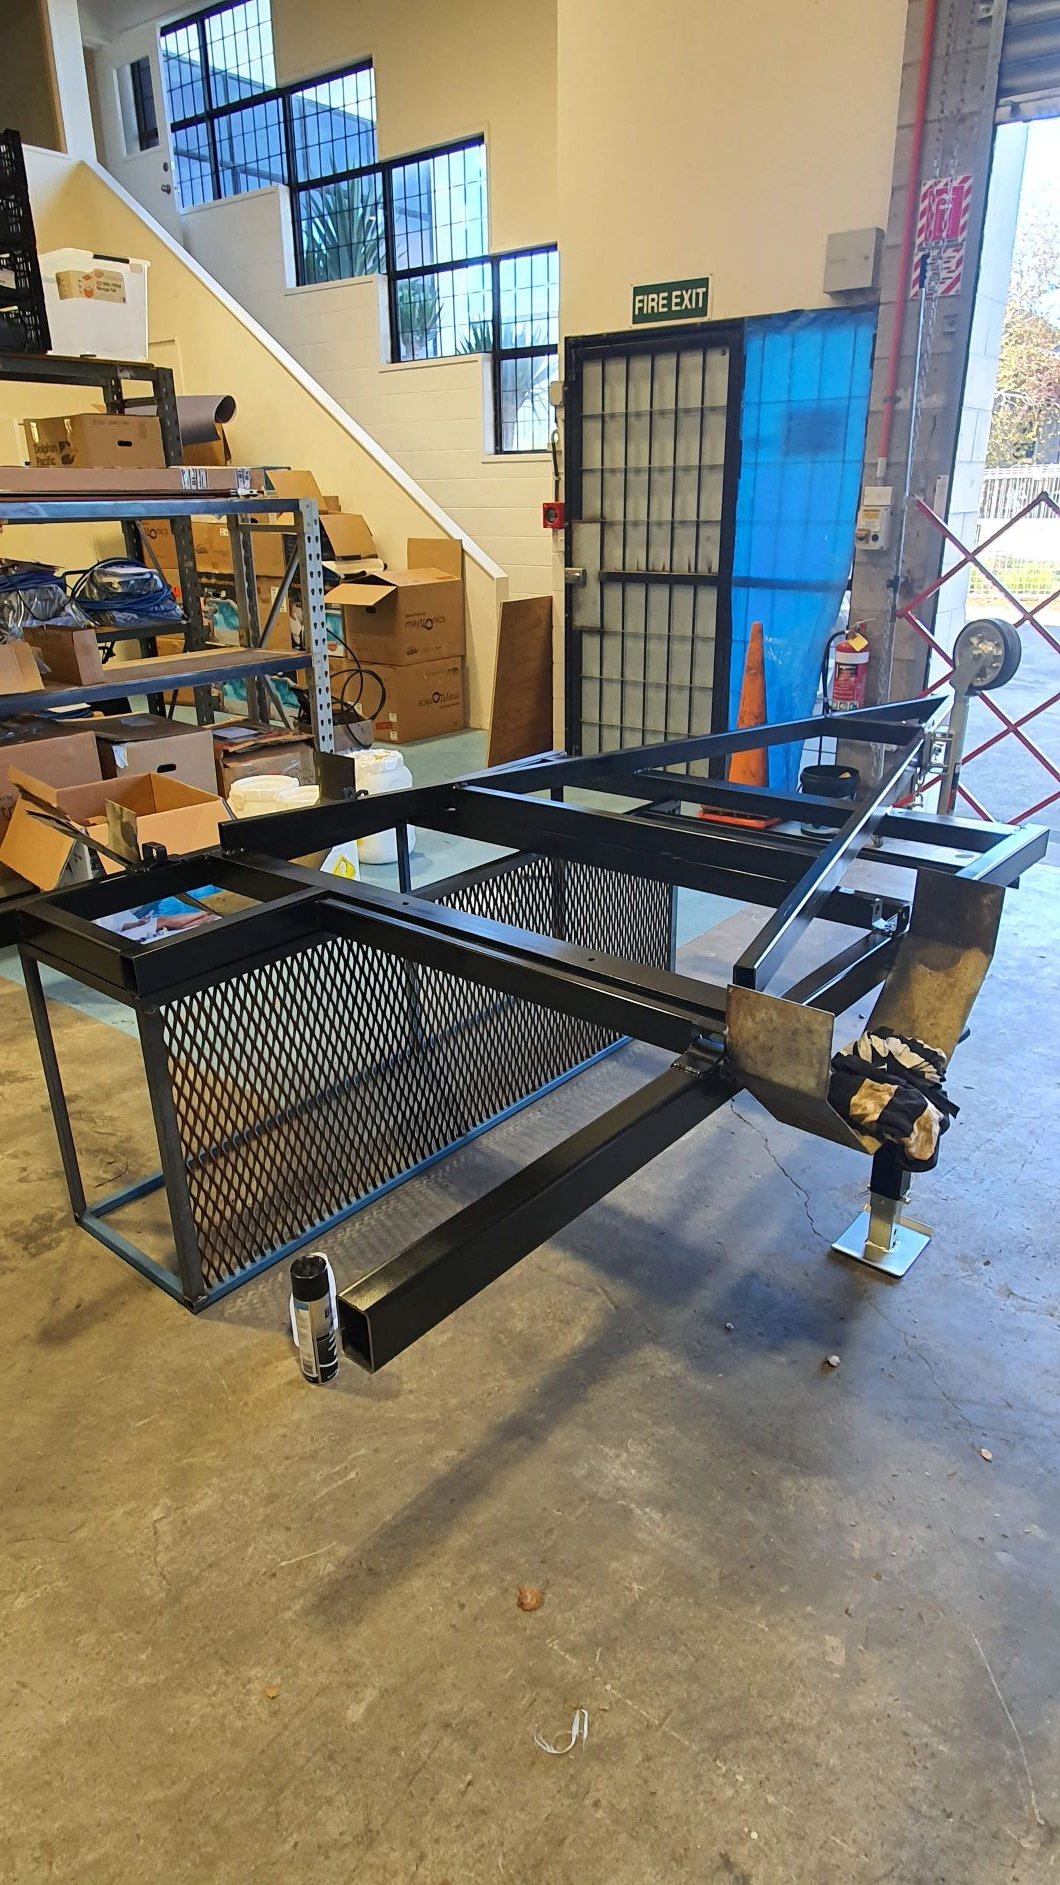
lockdown has kept me busy. Transferred all the suspension from 1vaknd Kp across to the hack rack pushed foward 24mm, drivers mount moved in to better accommodate the 3s engine mounts (solid) Ke70 rack and pinion fitted to the Kp housing and trimmed the rack side flanges for boot clearance need to re build inner tubs for clearance building clearance for max low and can adjust height according to spring rates and travel Waiting for laser cutters to open up so I can get the upper link mounts cut and finalise the driveshaft tunnel So many wires, sorting loom arrangement so it can be all sent away and made to work, gearbox tunnel and firewall waiting on sheet metal to complete1 point
-
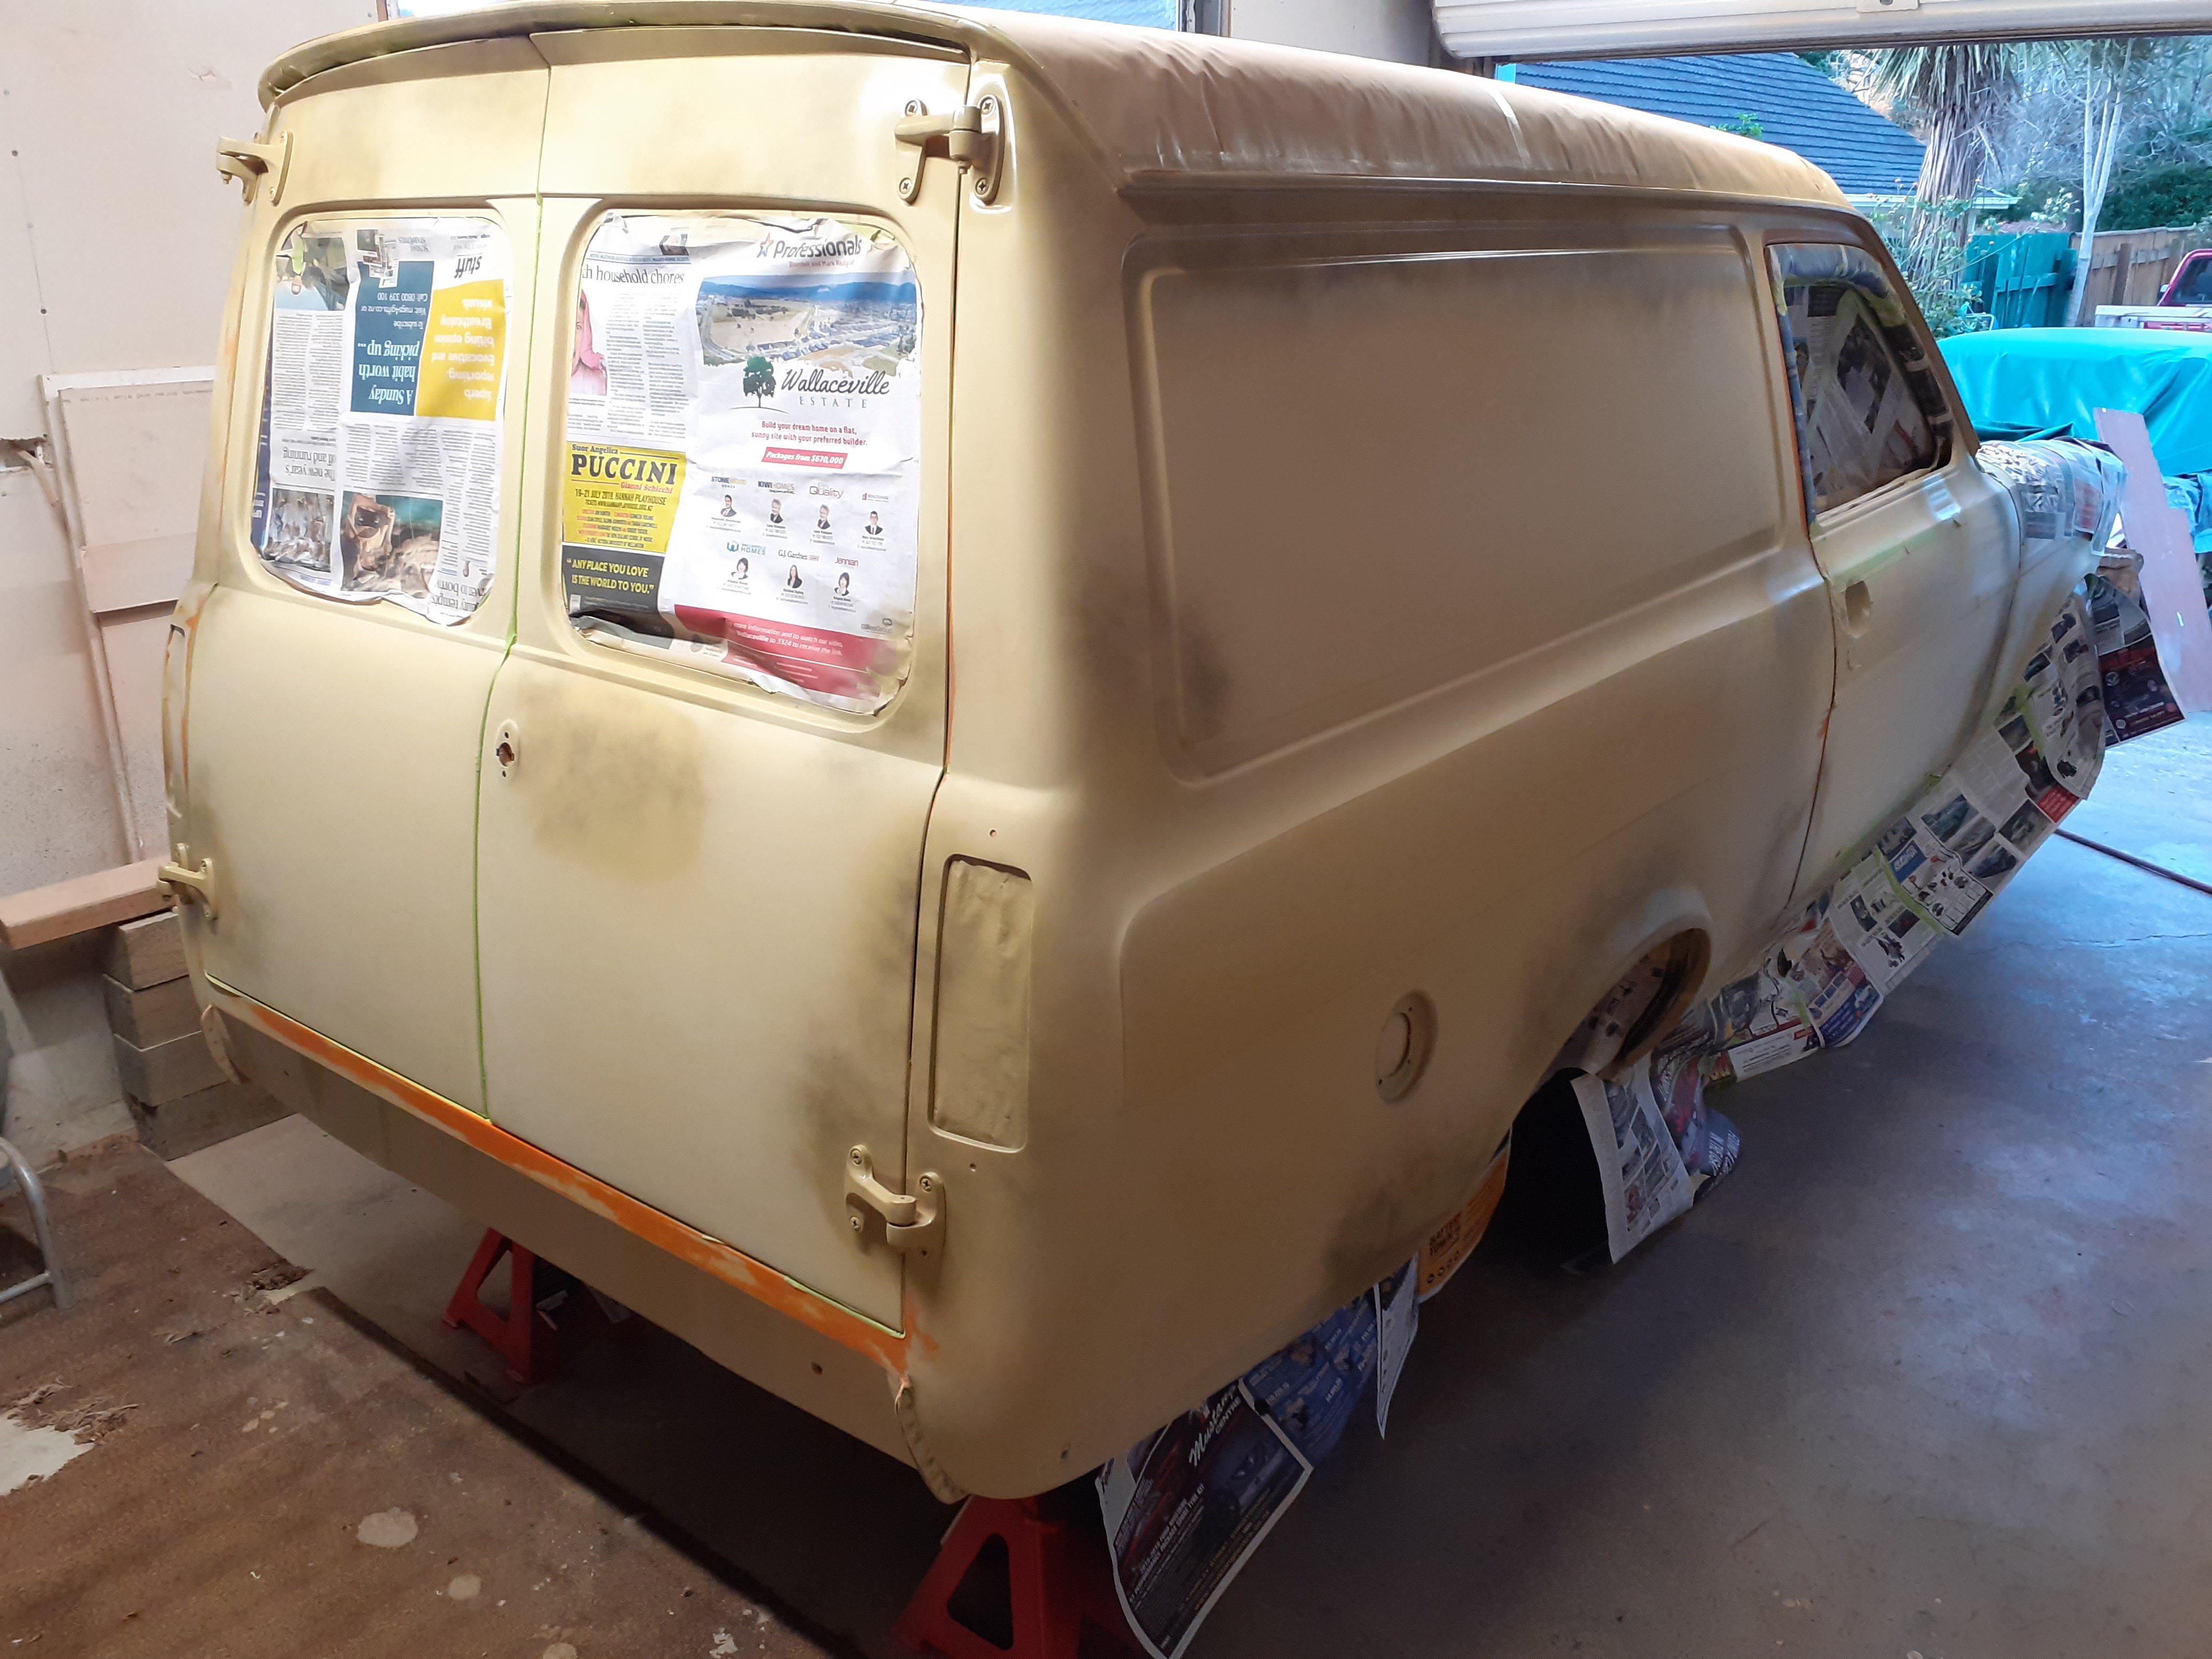
Plugging on today after I got the pip with her stupid car. More primer than patina now... Yeah, fucken awesome rat rod bro ! Nah.... That's the neatest it's ever looked in my ownership, a bit disturbing really. Was trying to decide between "Creme" and Brown, plus stripes as shown earlier Carol pointed out that the brown is pretty close to the colour of a lot modern pickups by Mitsubishi and Toyota, which I sneeringly refer to as "ginger".... So Creme it is then. But not quite yet as I can't go to either of the places I can spray it.1 point
-
Over the weekend I'll embark on Phase 2 of the project. This entails getting my complete donor HiAce drive able so that I can confirm the running condition of the supposedly reconditioned 4Y as well as the condition of the drive train. As part of the exercise I'm also going to convert the HiAce from rod shift gears to cable shift so that I can prove my concept. I'd like to take this opportunity to thank those of you have guided me along the way thus far. I have no physical support mechanism across here in OZ so I greatly value all of the encouragement, comments and suggestions that have been put forward regarding my Thames project. I also value the detail that others have provided in their own build threads as this is often fruit for thought. I really appreciate the oldschool community. Thanks all.1 point
-
I've now pretty much wrapped up the "proof of concept" phase and took a few minutes to update my list of parts that will be used. In summary the list is as follows: Toyota 4Y engine out of a mid 80's HiAce using standard engine mounts cut off the HiAce cross member and glued on to the back of the Mitsi Starwagon suspension beam. Final fueling option still to be confirmed but is either going to be a single side draft carbie on a slightly modified inlet manifold or full LPG. Top hung side shift 5 speed gearbox also out of a mid 80's HiAce. Using a standard gearbox mount that is rotated 90 degrees and shifted slightly forward to clear the Thames chassis cross brace. Clutch actuator will remain hydraulic using the standard HiAce slave and the Thames master (I haven't tried this but if I encounter issues I'll revert to the HiAce master). Gear selection will remain a column shift using a column rod fabricated from the upper portion of the Thames rod using the Thames upper mount and the lower portion of the Starwagon rod using a fabricated lower mount. A second cable sourced from the Express will replace the Starwagon shift rod that connects to the gearbox. Complete rear axle out of a mid 80's HiAce fixed in place using a heavy duty 4 bar rear suspension kit sourced from a Hot Rod shop and fitted with coil overs. Drive shaft out of a mid 80's HiAce cut to the correct length. Mid 80's Mitsubishi L300 Starwagon complete front suspension beam, including all suspension and braking components. Mounted to the Thames chassis using fabricated l brackets that pickup the standard Thames mounting holes along the chassis rails. Mid 90's Mitsubishi L300 Express power steering rack fitted with the earlier Starwagon rack end joints and mounted using the original mounting lugs removed from the Express suspension beam and welded on to the front of the Starwagon front suspension beam. Mid 80's Mitsubishi front beam strut rods mounted rearward facing. Bolted on to the Starwagon lower suspension arms as per standard. Mid 90's Mitsubishi L300 Express stabiliser bar located in front of the suspension beam, with chassis mounting points moved 40mm inwards on each side to line up with the Thames chassis rails. On the suspension side the bar will be joined to the Starwagon lower arms using the mounting lugs cut off the Express lower arms and welded on to the Starwagon arms in the same location. Steering will use the standard Thames column, steering wheel, indicator stalk housing, indicator lever and upper mounting point. With the Thames steering box now deleted, the lower mounting point for the column outer will consist of a fabricated L bracket picking up the Thames plate at the bottom of the outer column and the standard steerign box mounting holes on the Thames chassis. The existing worm gear at the bottom of the inner column will be machined off and a spline cut into the shaft. A new universal joint will be sourced to attach the inner column to the steering angle box out of the mid 90's Mitsi Express. The shorter steering rod out of the Express that uses a rag joint to bolt up to the steering rack at one end and a factory welded universal to mount to the angle box at the other end will be shortened to the correct length for the Thames by cutting off the UJ and machining a spline into the shorter shaft what can be mated to a newly purchased UJ. An electro hydraulic power steering pump (final make to be confirmed) will be sourced from a wreckers to power the Express rack. All credit to go to Browndog for this suggestion. The Toyota HiAce brake master cylinder will be used in conjunction with an aftermarket remote booster setup. Smaller bits and pieces will be selected on an "as needed basis" when final fitting takes place. Hope I haven't overlooked anything major. Please shout if I have. With my list updated I figured it was time to drop the Thames back on to its wheels as I'll need my axle stands elsewhere for the next phase. It's not the greatest picture but this should give an idea of the final front ride height with the L300 suspension in place. The back is still standard Thames ride height as I haven't mocked up the back. The ride height difference is noticeable. Please forgive the manky front wheels. I still need to source metric lug nuts for the Dragways. Thanks for reading.
1 point
-
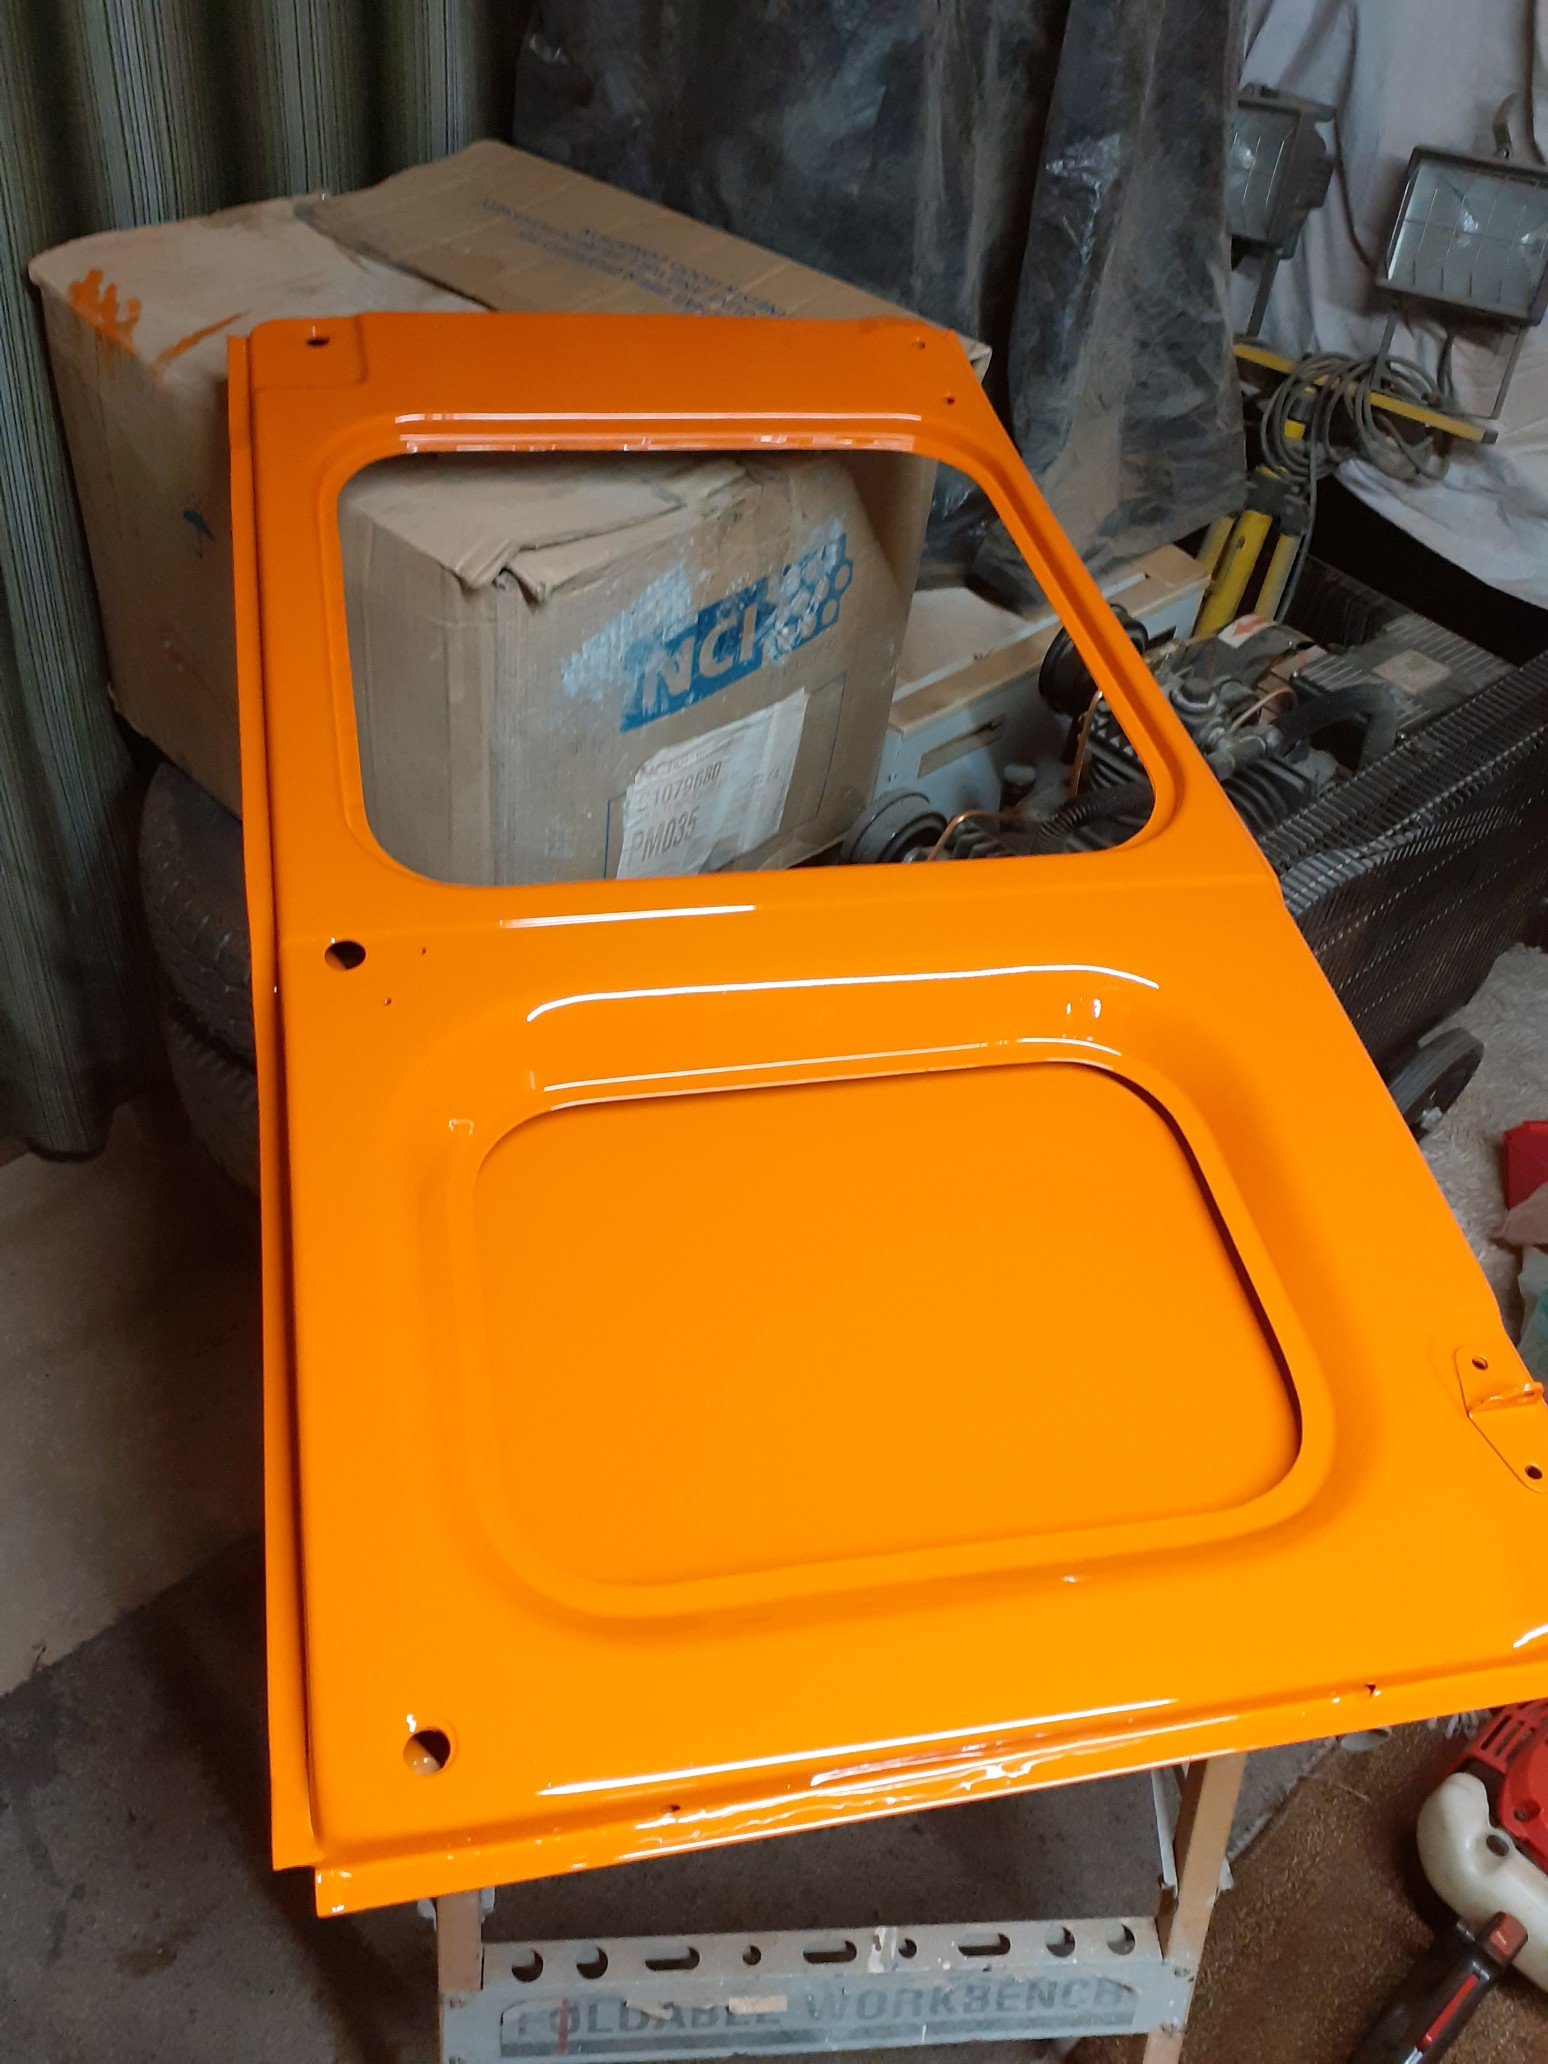
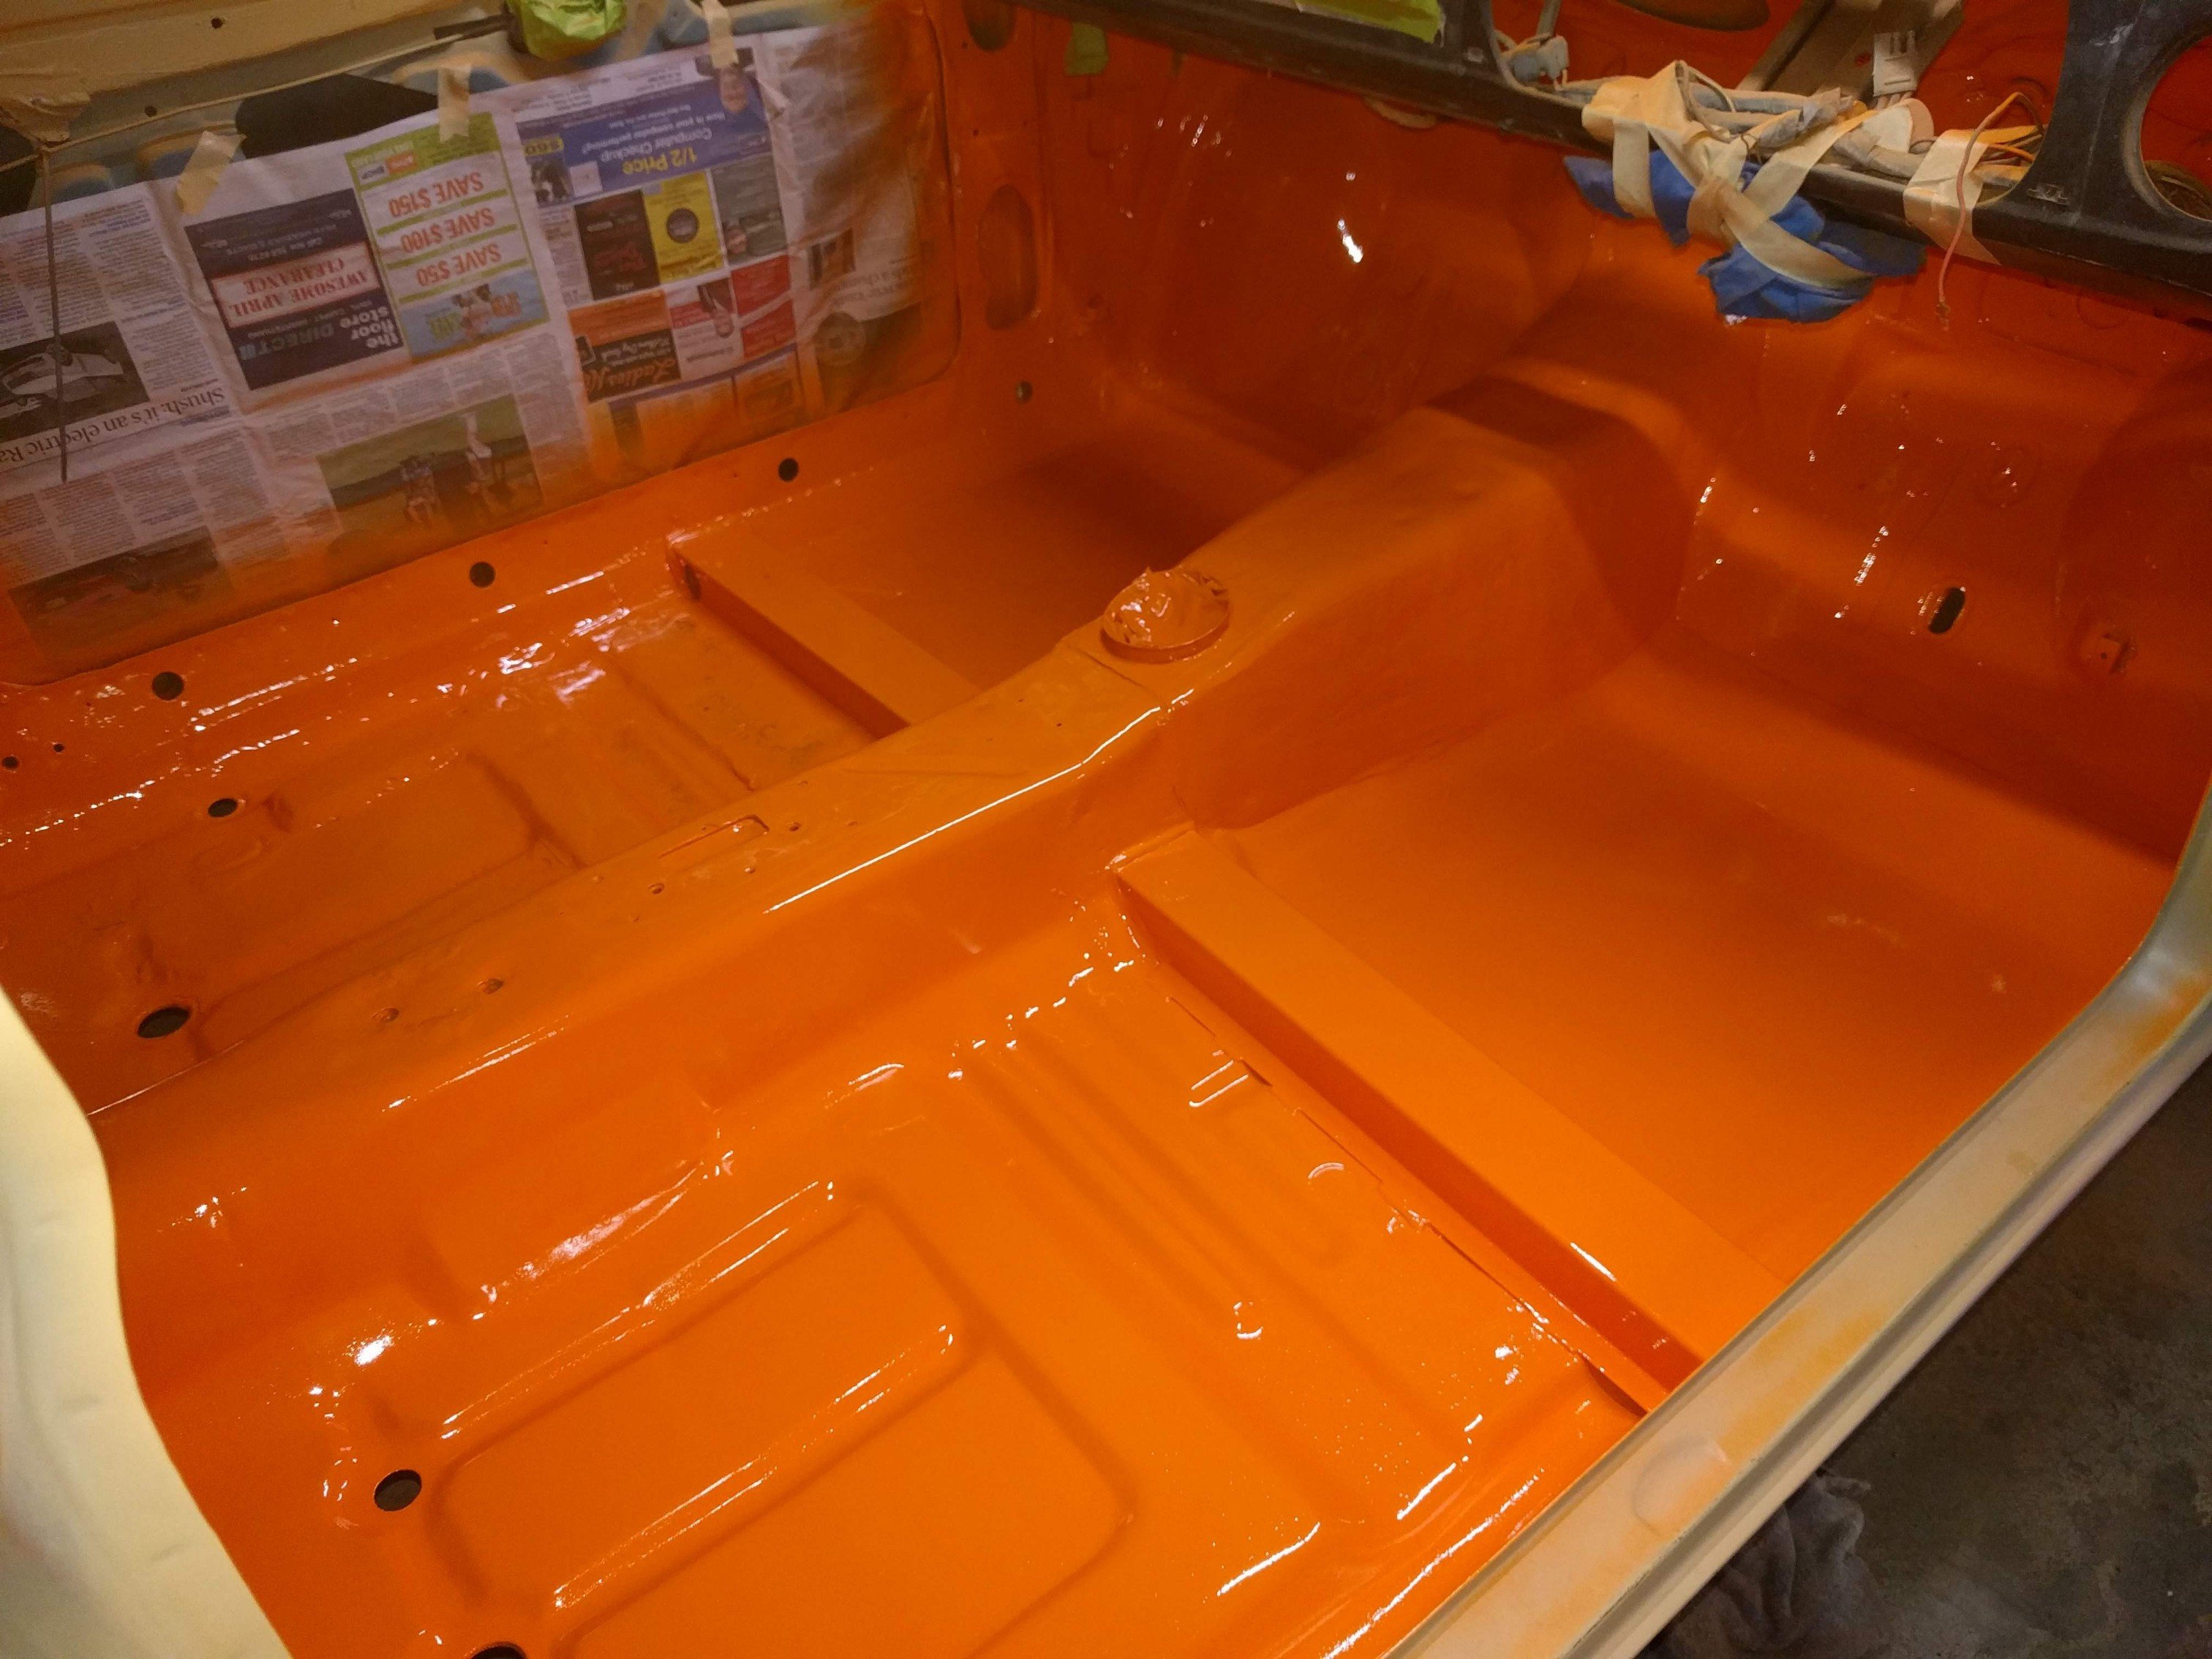
Ended up going with signal orange 79. It's an original color for an escort, but not this van. Sampled a blue and a different signal 77 orange but settled on this. Have been spraying it in sections. Engine bay, interior and inside of the doors. Still a while to go before I can spray the outside but its certainly progress!
1 point
-
I wasn't too happy on the finish on the first underseal. It came out a bit smooth. Admittedly I thinned the product down to put through the gun. The product was normally used to brush on. I tried a different product and left it a bit thicker to give it that true rough underseal look. Chassis rails and inner gaurds got a thick coating, then I gave the previous areas a quick flick. Came out heaps better this time. Was probably laying it on a bit heavy because I went through 6L's. Ha. I learned my lesson of not wearing a face mask the first time round. That shit sprayed everywhere. Last night I was looking around for something to cover my face. Glasses? not enough coverage. Full saftey shield? Bit tricker in small areas. Stockings and masking tape? Bingo.
1 point


.thumb.jpeg.910c6632f6e66e8cba89476e83b41634.jpeg)


This leaderboard is set to Auckland/GMT+12:00