
Leaderboard


Popular Content
Showing content with the highest reputation on 02/16/20 in all areas
-
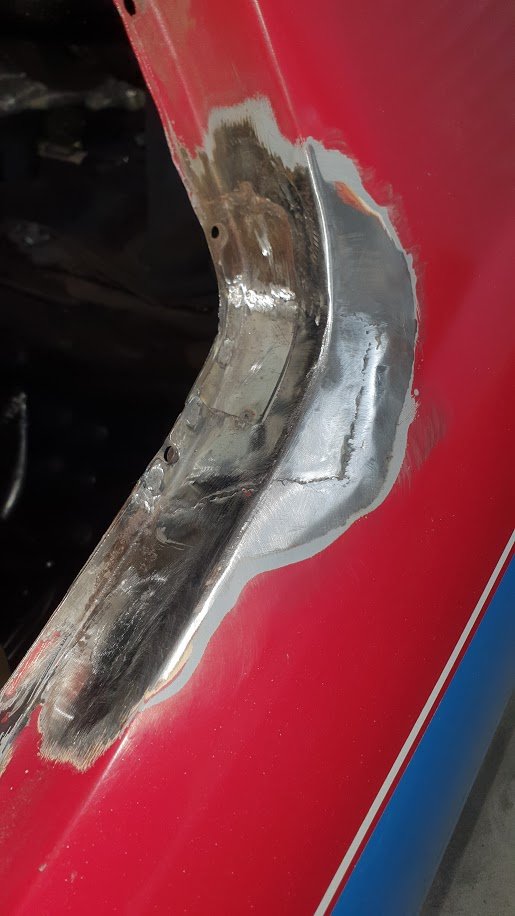
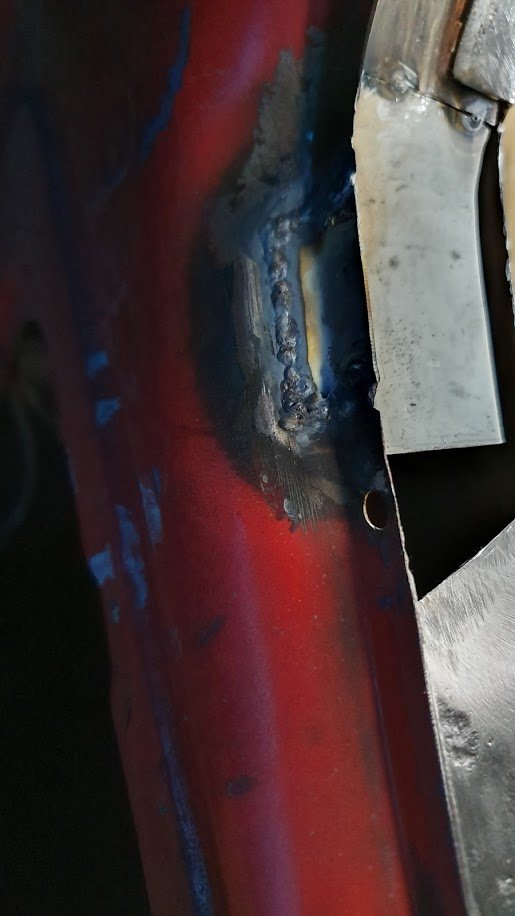
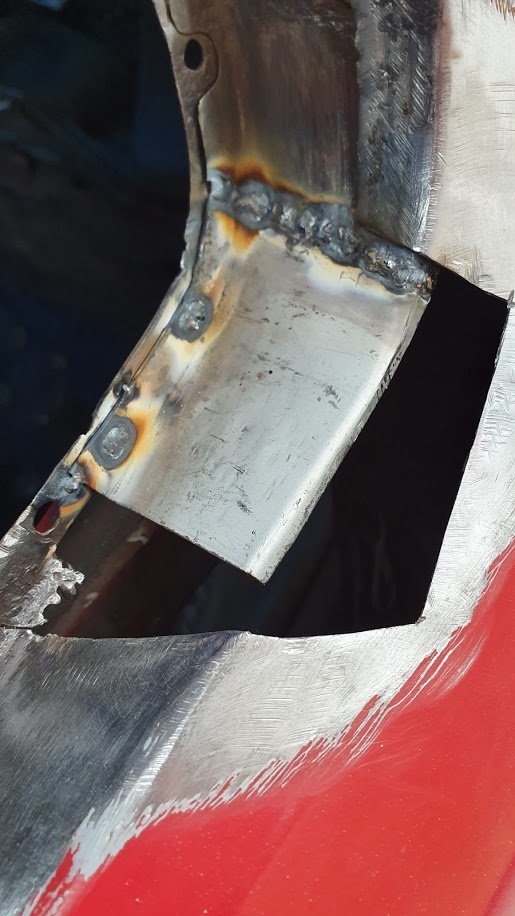
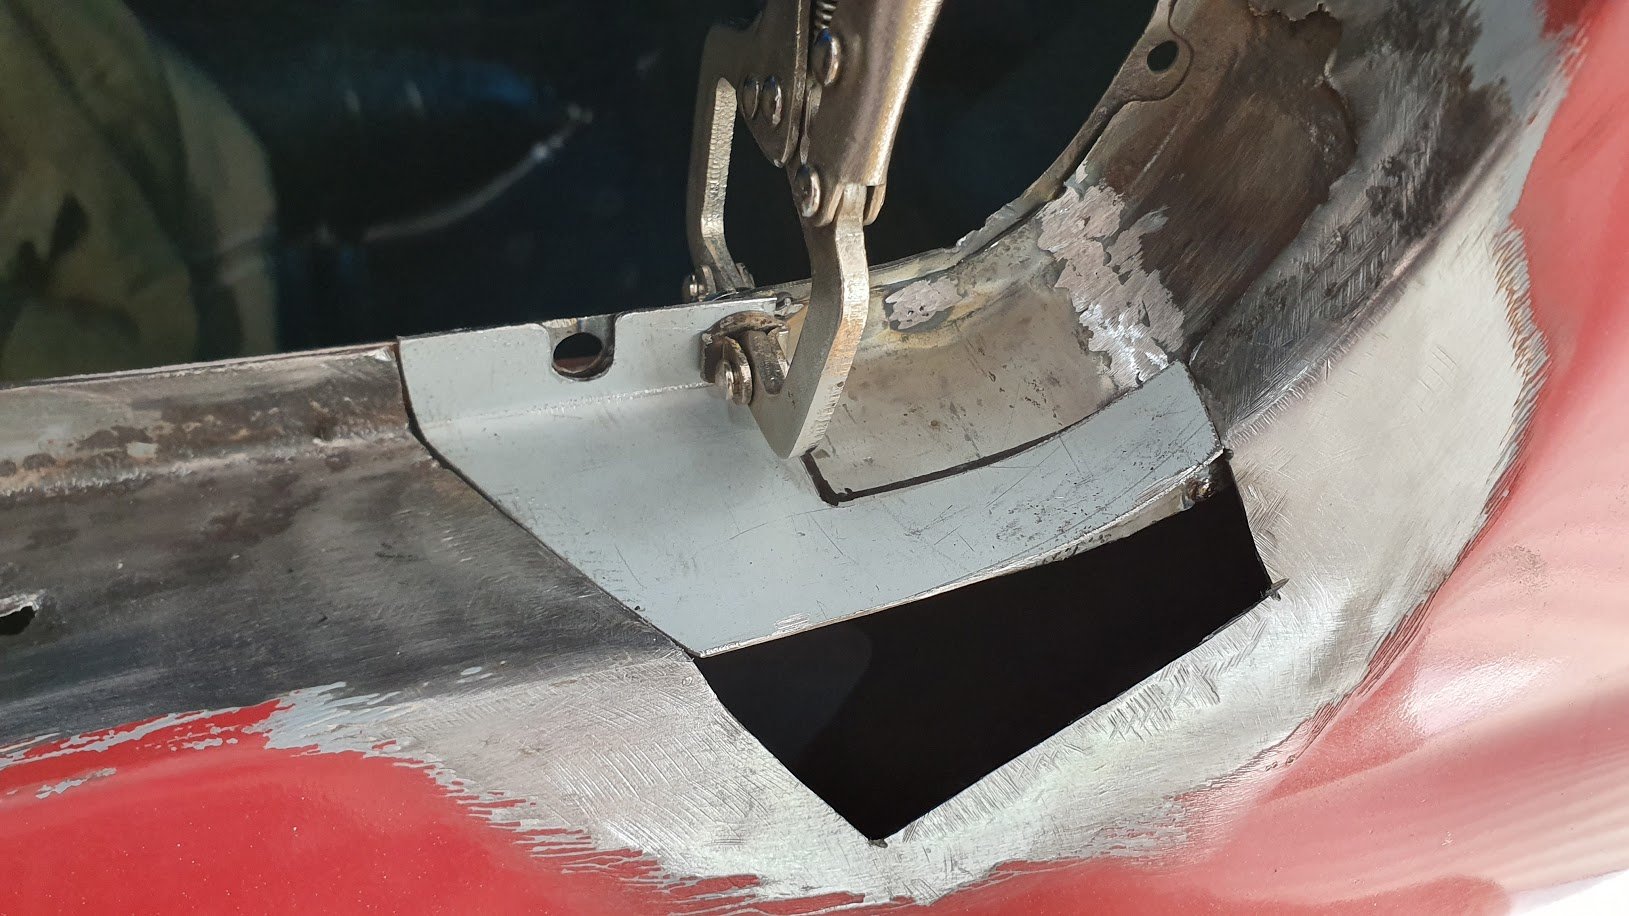
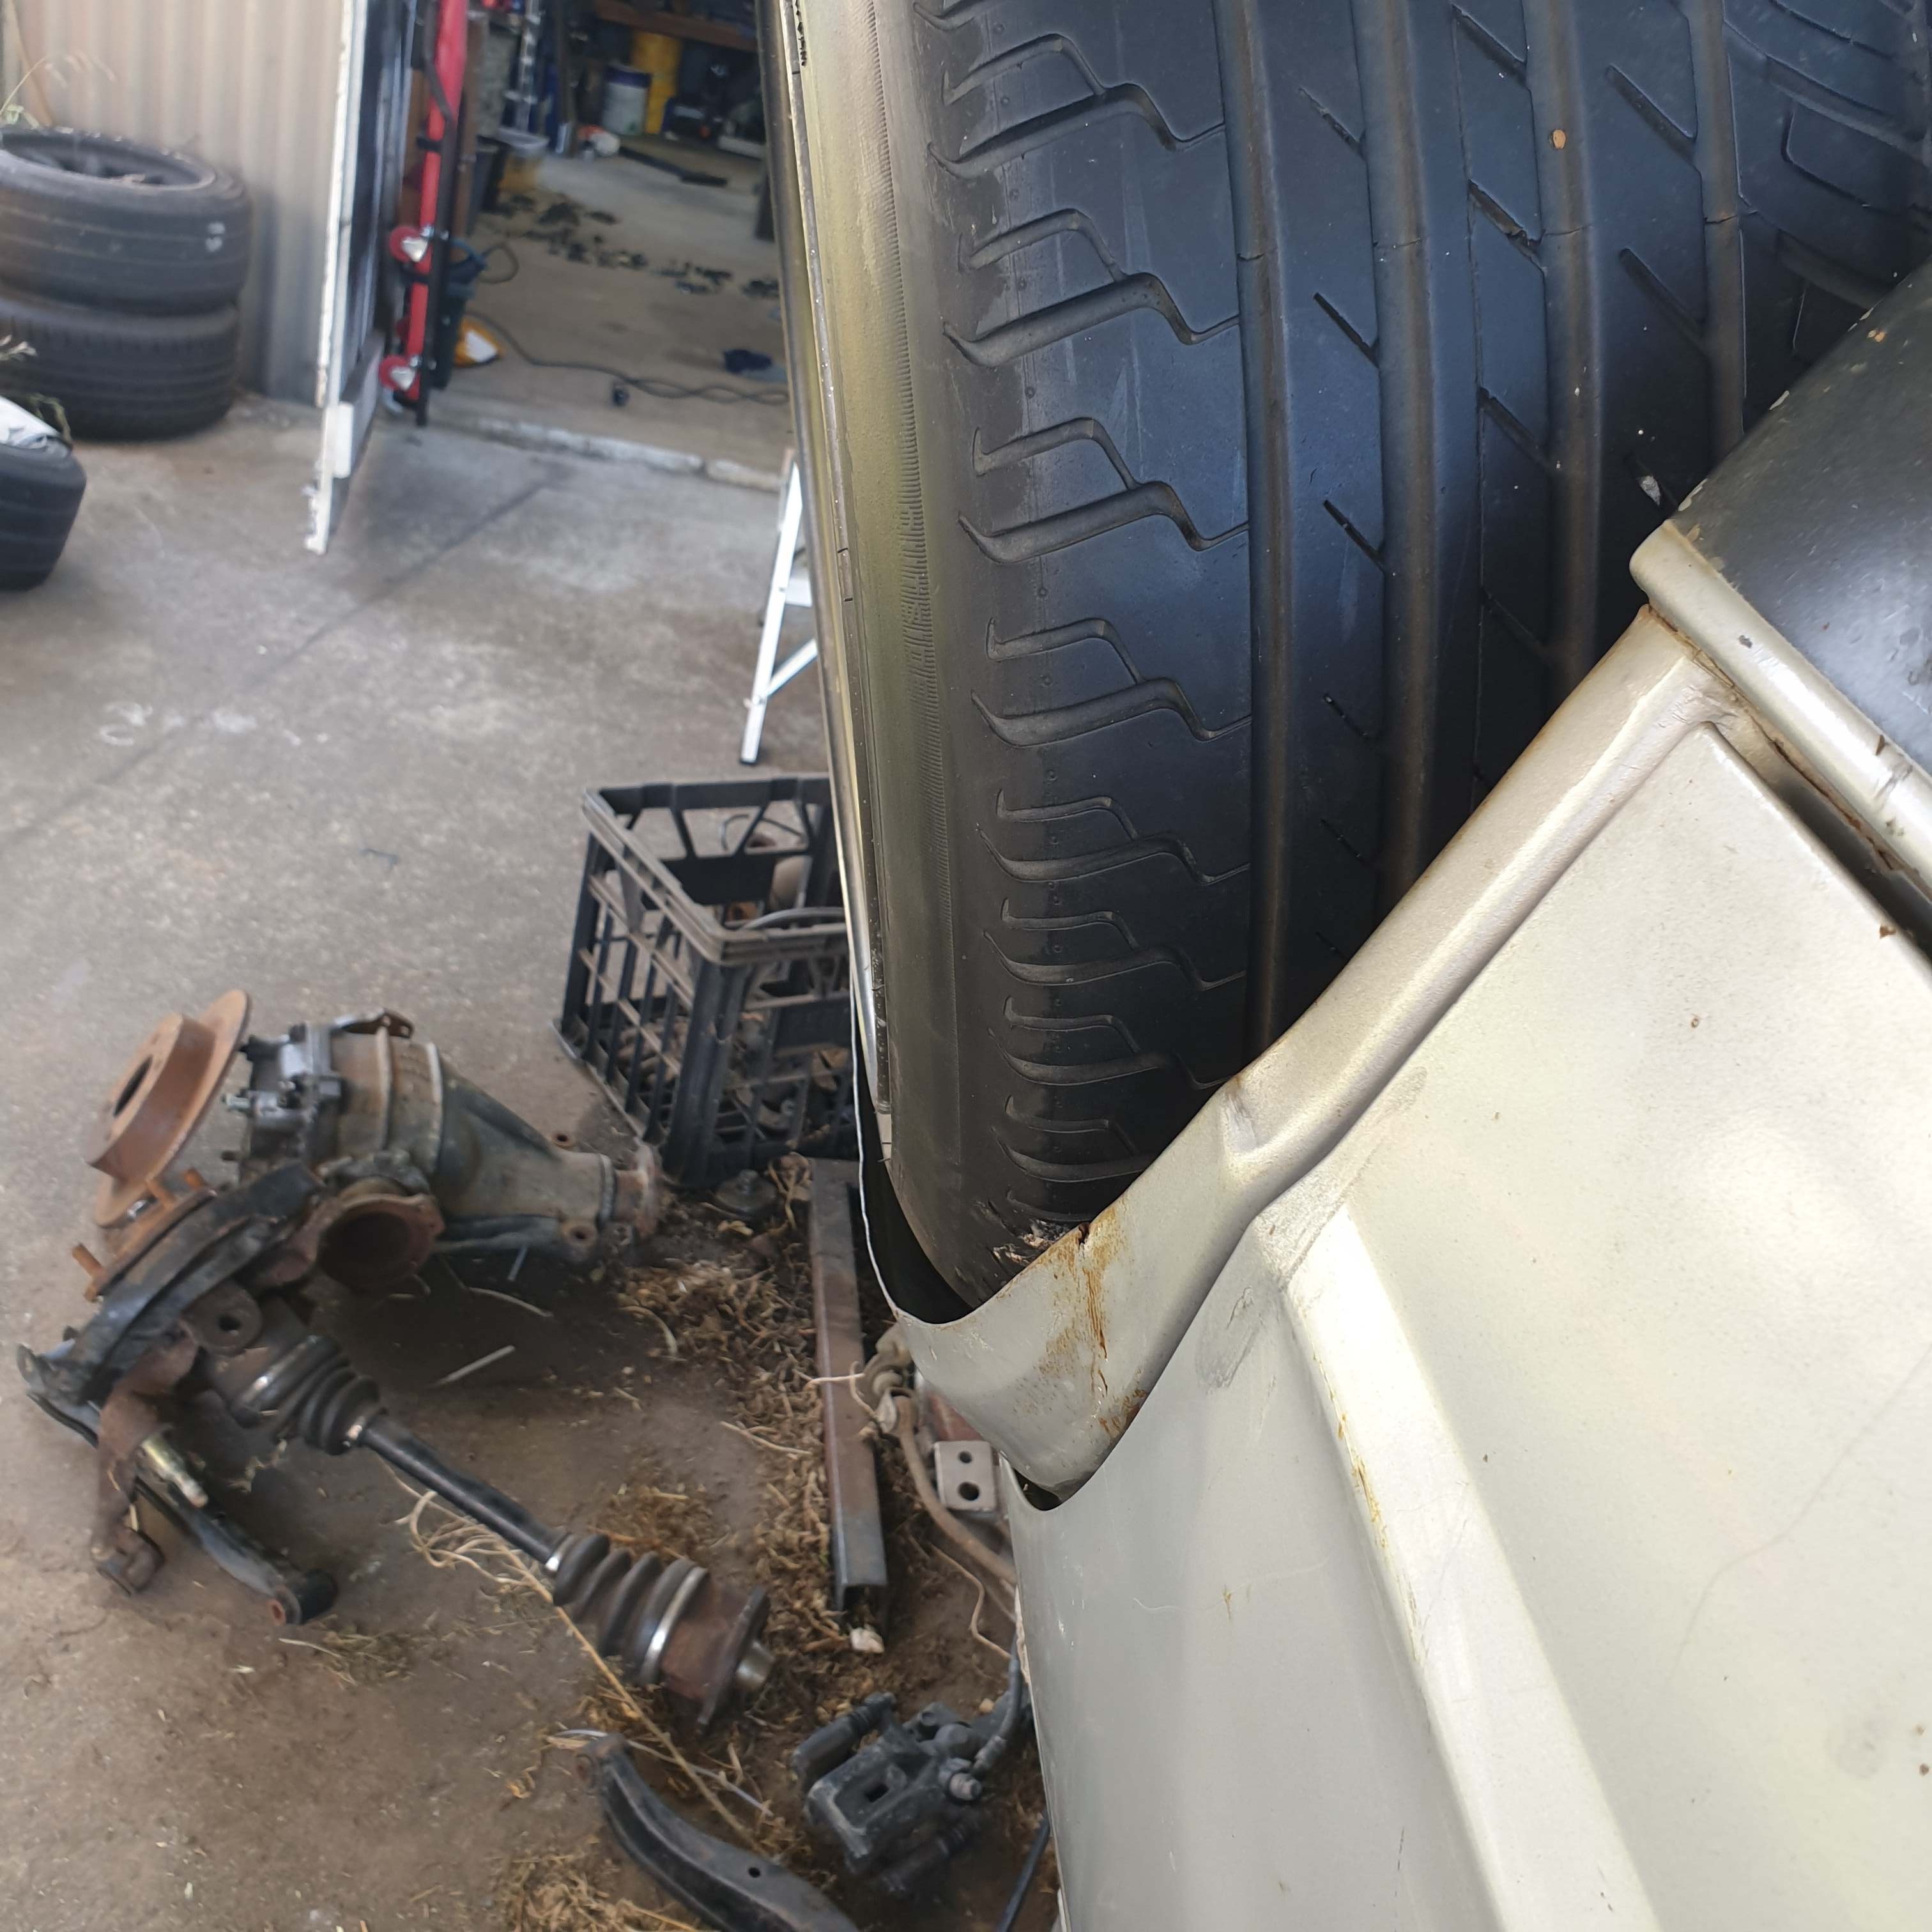
Alrighty, bit of an update lull as it has been way too fucking hot to do anything serious, plus I am broke so cannot fund much stuff that needs to happen. I have been picking away at a a few jobs tho; I added some deck lights. Nothing super bright, but then they don't draw a shit load of amps either. I took it for a stealthy drive down to the weighbridge, it has ended up at 2450kg with a full tank of diesel, not as light as I thought but still lighter than a Safari, pretty happy with that really as the deck is a chunk bit of work. That was the first time at road speed and it feels fucking great. The drive did highlight the need for a bit more airflow to the rad, it was a super hot day but at road speed the fan was still cycling which isn't ideal. Thus I built a pretty serious bit of ducting/shrouding underneath which I don't have a great pic of but which seems to do the trick; This was actually a bit of an effort as I needed it to clear the diff, which meant relocating the brake T block, which meant redoing the front brake lines etc etc. Cool cool. It also got pretty hot in that cab, so I have ordered some heat shield material, I will see how that goes. As an added precaution I created a bit of bodgy HVAC to pull hot air out when things got too much like an oven; This was because I had a 24v 150mm fan that has been in my stash for 10 years - see you should never throw things out but hoard them always. This runs off a bi metallic switch set for some random temperature. I have had a couple of previous comments about my choice of thermofan switch which I chose to cut in at 102deg. I talked to my radiator man about it who said what a cunt I was and that mid 80 degs was where I should be so the cooling system has a bit of headroom to work before boiling. Ok, I am abashed. The cheap easy switches were all M16 thread though and the fitting in the thermostat housing is M12, so I pulled it off and retapped it to suit. This has made the cooling situation feel a bit happier, plus it doesn't get so hot in the cab. This is probably good all round. Being broke and discovering that I had 4x 24v relays from the donor truck I decided to create a trailer plug 24-12v drop down converter; I will get a trailer plug and wire this shit in. There is 12v available at the back of the truck from the dc-dc converter set up for the air pump. Sweet. Lastly there is a leak from the exhaust manifold somewhere, and this will be difficult to sort because of the stupid little adapter I made to go from the OEM manifold to the TD05 inlet. So I drew these up the other day and got them cut. I will purchase some bends when I have some spare casharoonies... Then brace yourselves for some header lovins bitches. Also I made some spares to potentially pay for the cutting, let me know if you need some.... At ease.15 points
-
Work and real life have been pretty busy recently, so haven't found much time out in the garage. Students are back next week too, so work is likely to be a bit hectic for a bit. I did manage to get the ignition leads built this afternoon. It's really starting to take shape. SOOOO many nickle and dime jobs to do though. Still need to machine that trigger wheel. I've tapped the fuel rail for M18x1.5 fittings that I'll seal in with bonded washers... But the M18x1.5 -> AN6 adaptors are coming from China, and everything out of there is on the go-slow due to the virus. Not that I'm complaining (much), its got to be pretty horrific. Once those fittings are here though, and I can permanently fit the fuel lines, I can sort the front thermostat housing. Really really procrastinating about that... :-/. Also, I really need to build a garden shed and get all the gardening gear out of the garage.
 9 points
 -
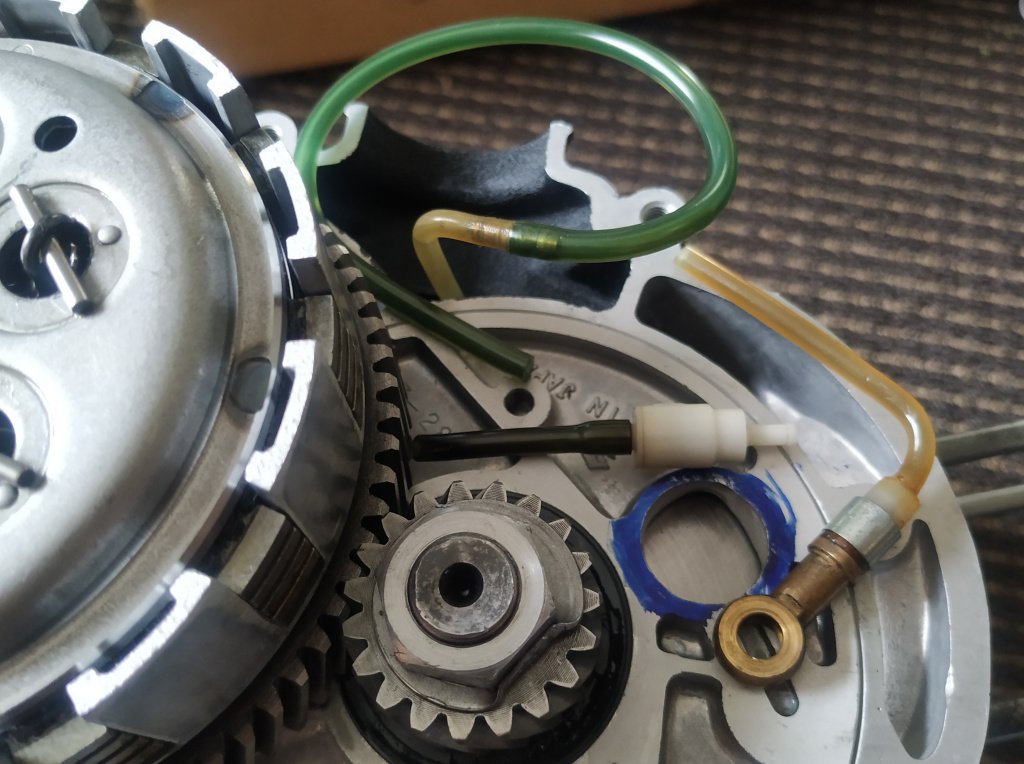
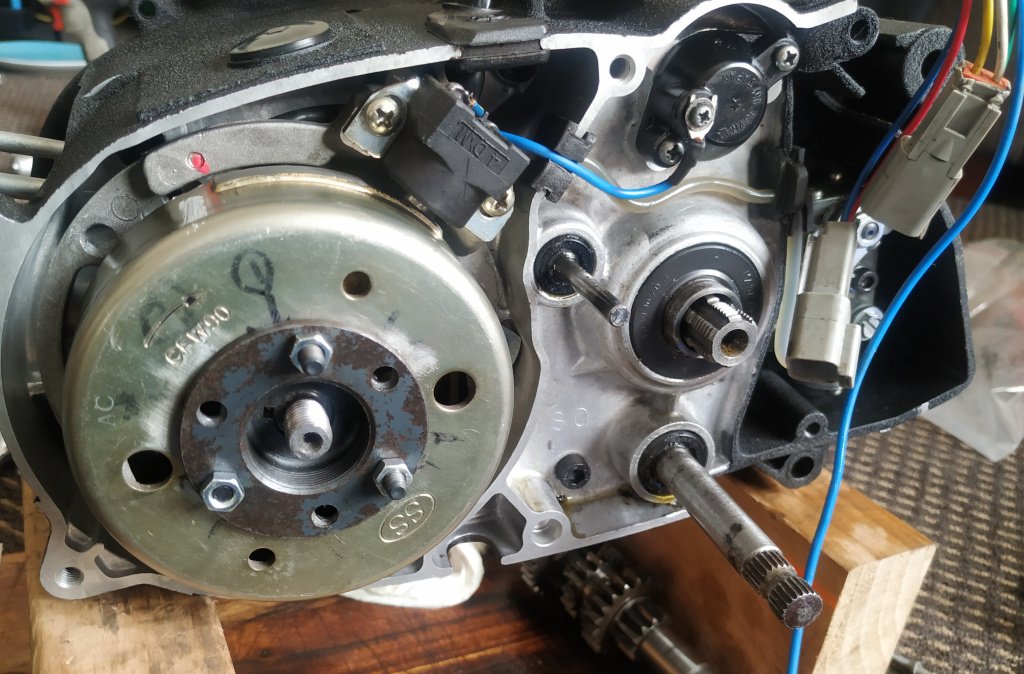
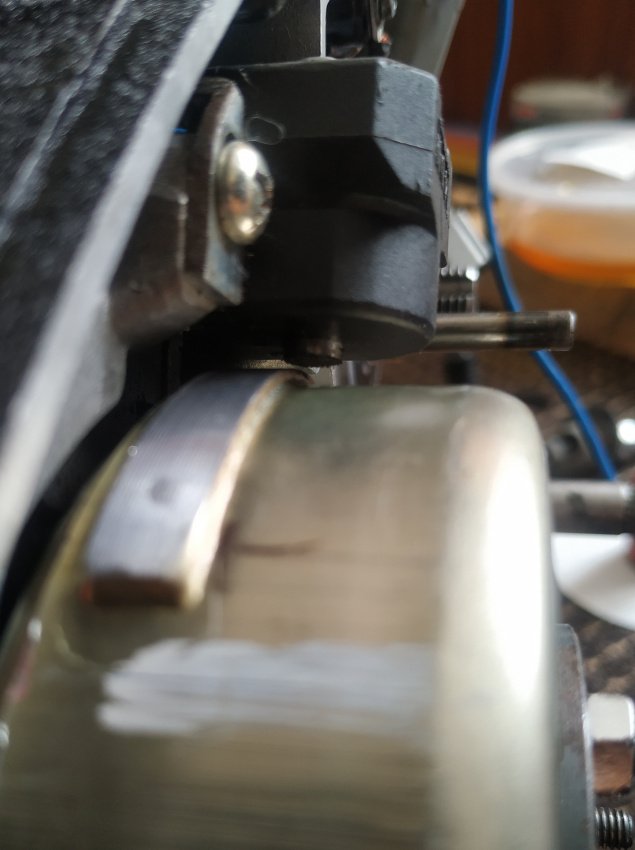
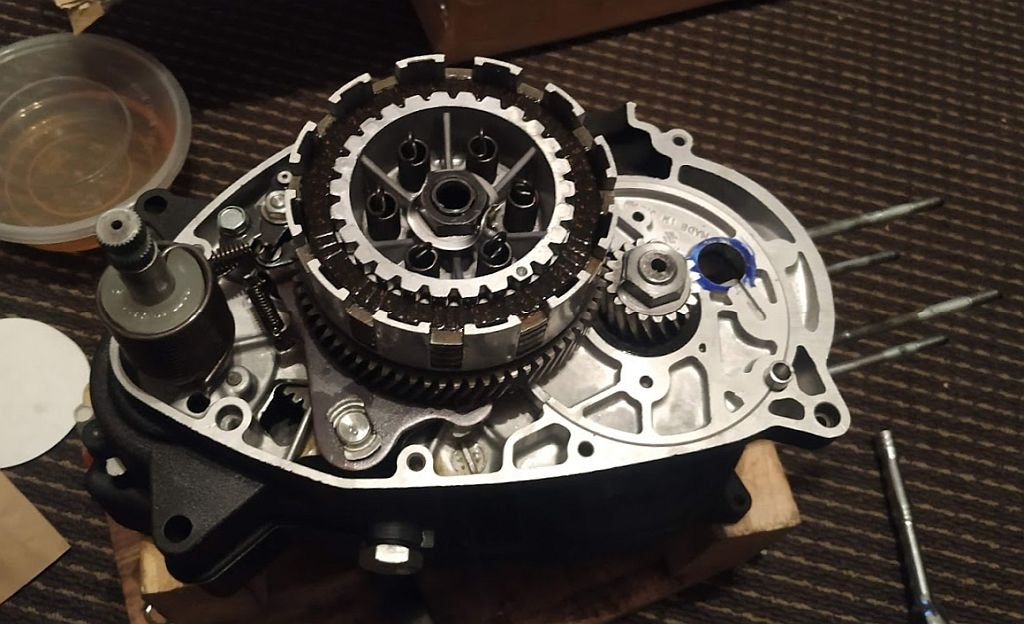
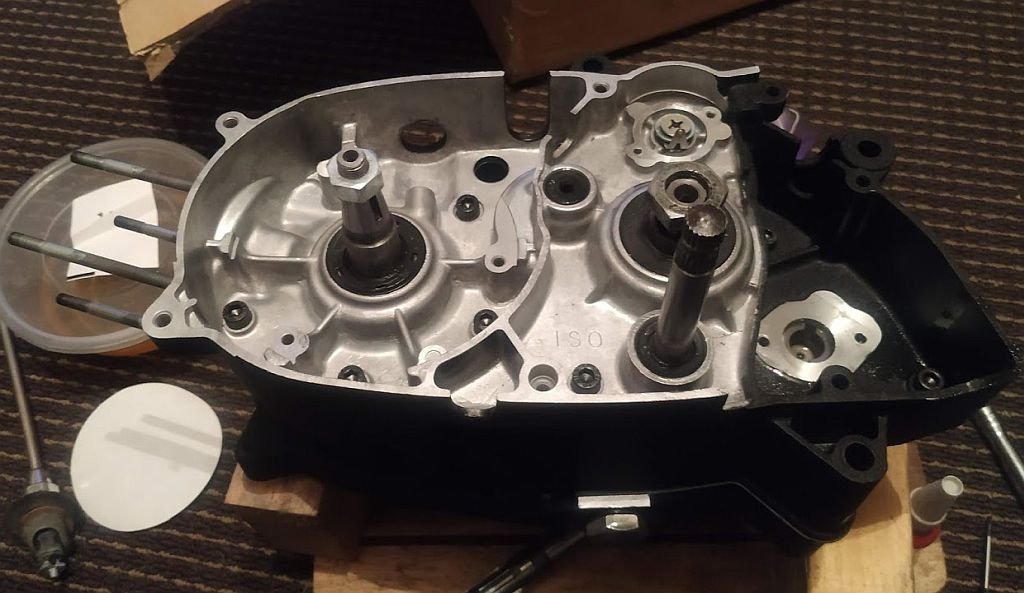
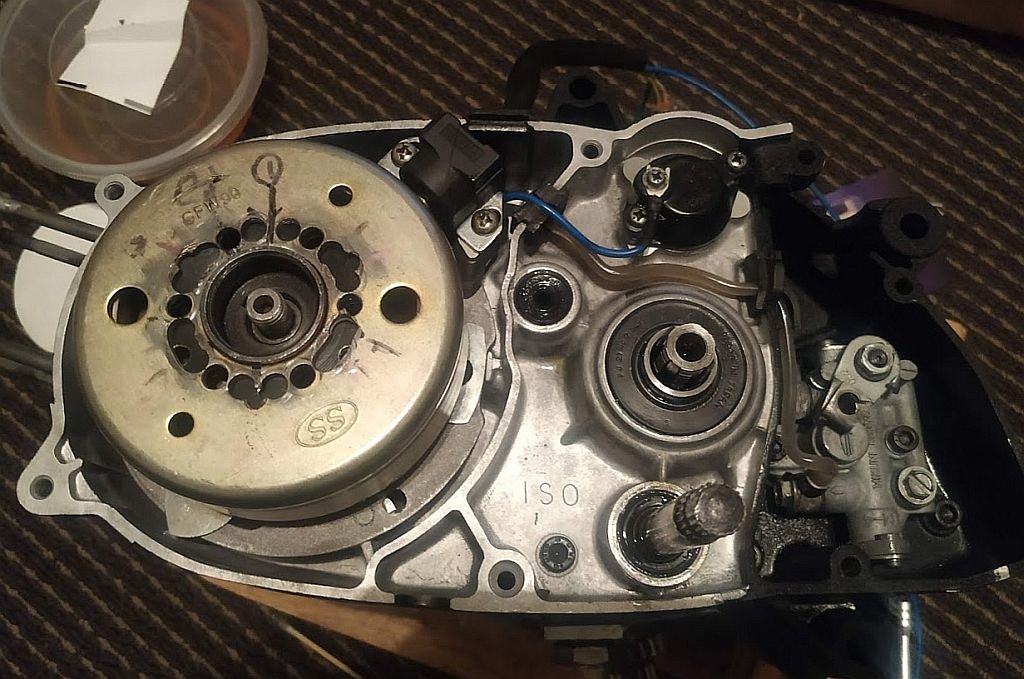
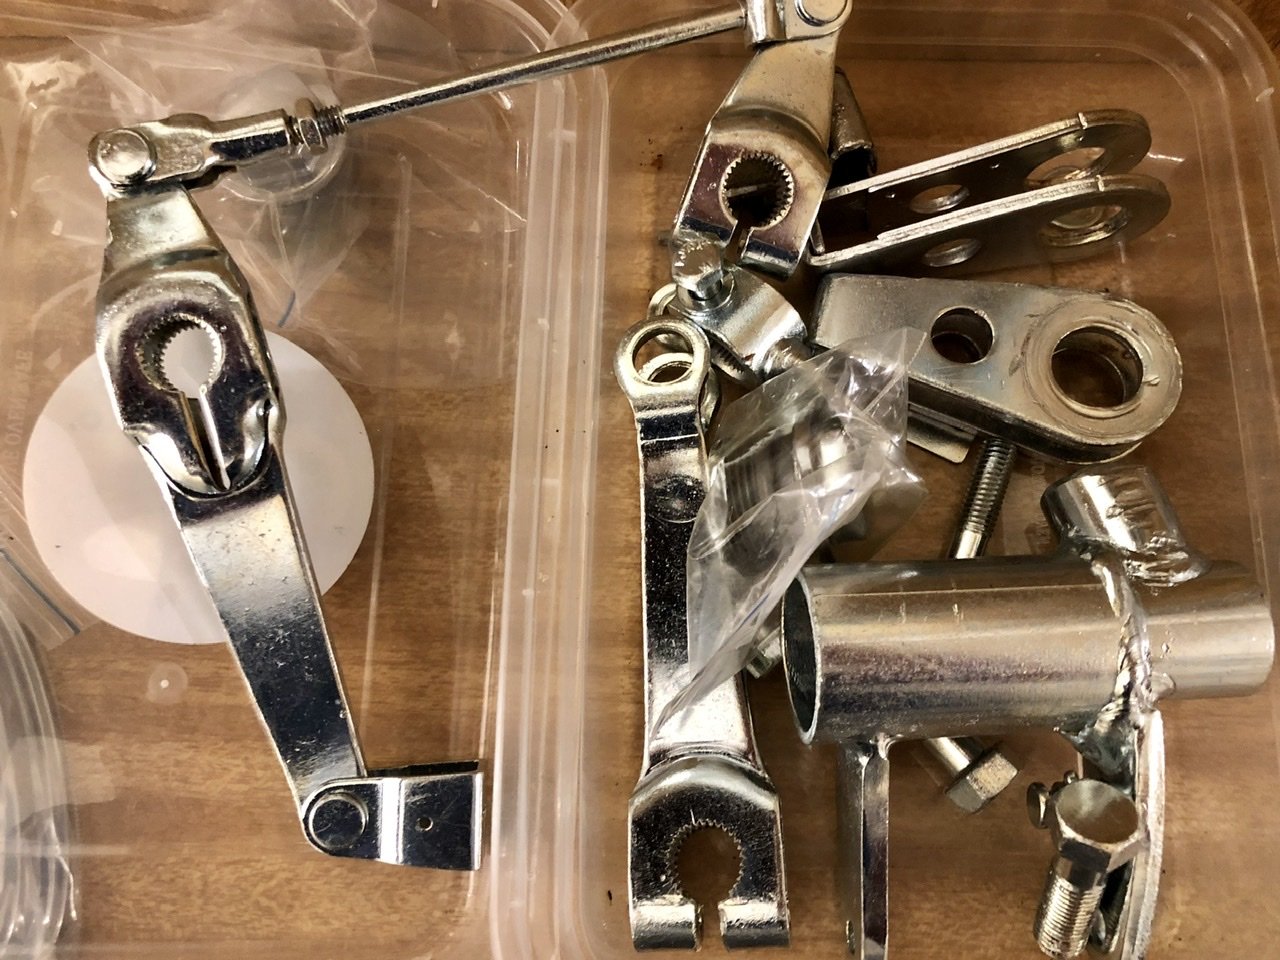
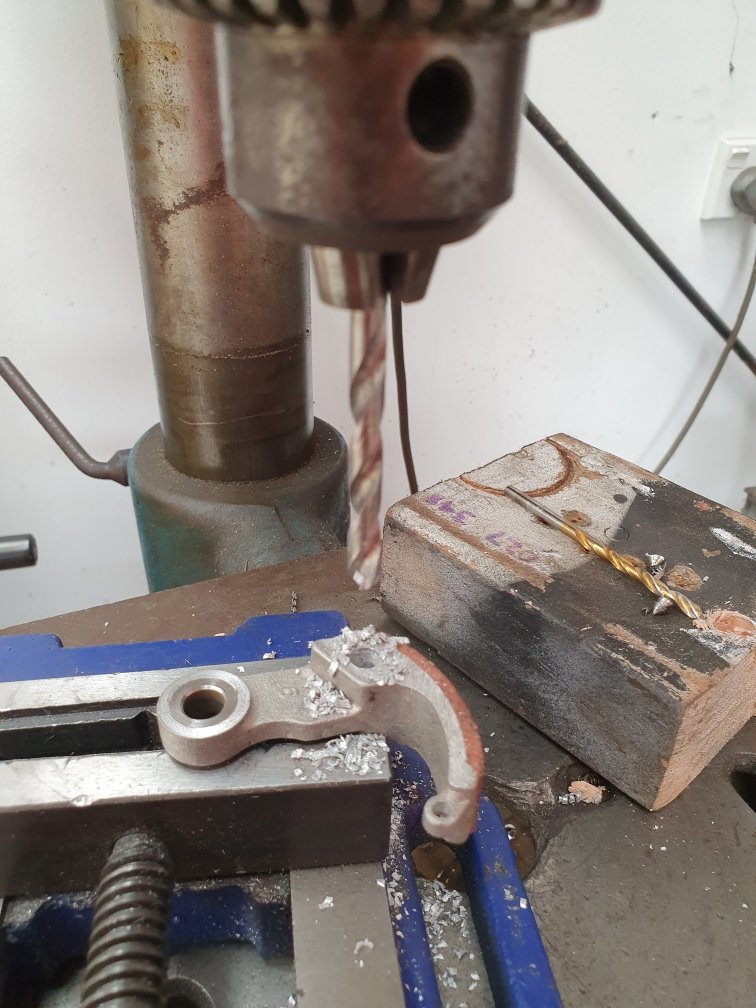
Oil feed into the engine was blocked by the sleeve for the new intake but the new Dellorto carb has an inlet for 2t oil, so I cut the factory one way valve/banjo fitting off the factory hard plastic oil line and managed to adapt a fitting off a Zip oil pump into a hose joiner. Took a fair bit of mucking about to get it into the old Suzuki line, but I got there. That white fitting is a one way valve from a late model Suzuki, going to run it inline same as on a Let's 2/Yamaha Jog etc. Finally got the flywheel sorted, drilled out the rivets from the factory A50 flywheel, bored out the new one to fit over the back of the A50 hub and got it timed up perfect. Not planning on running those 3 M5 bolts, either going to go with 6x m6 + loctite + hope or I think there's a Vespa shop in Auckland with 6mm rivets in stock. Just need to mill/grind 3mm off the pick up mount and it'll be perfect
8 points
-
Edited for PC correctness7 points
-
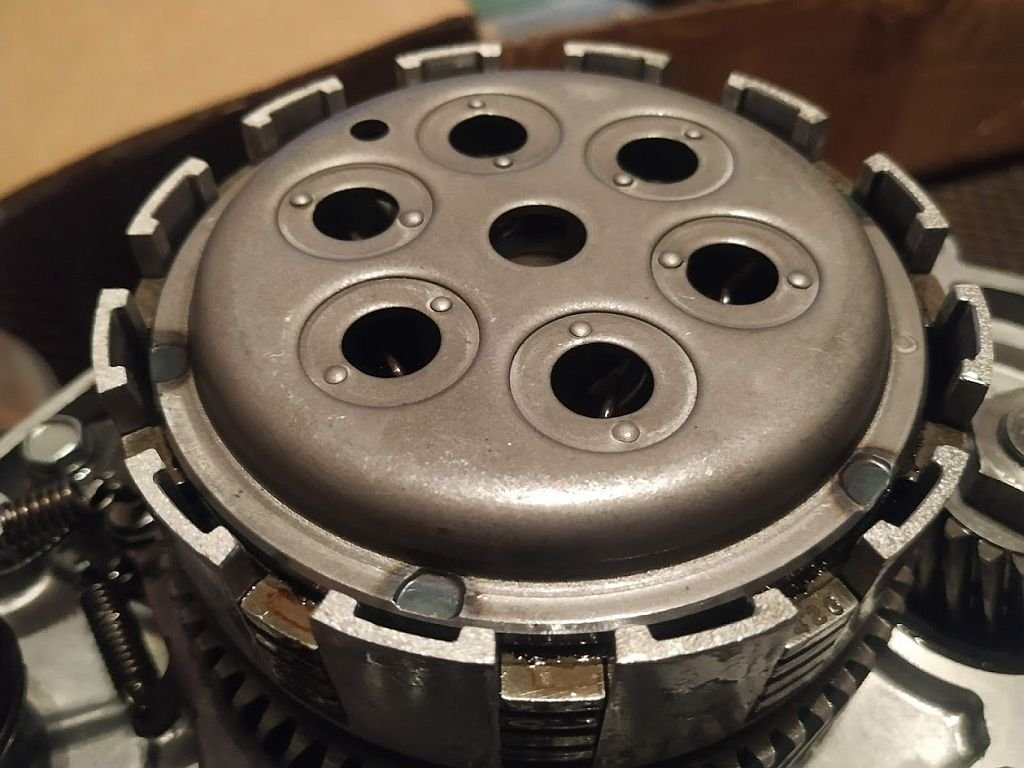
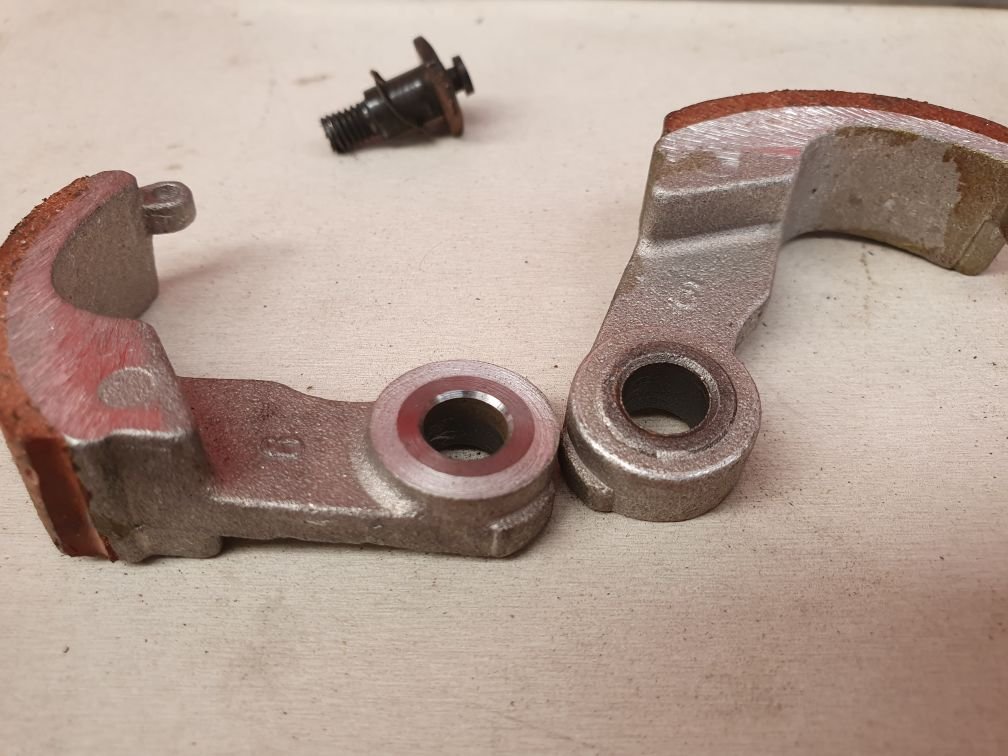
Robbed the R-T spec trimmed disc from my OG engine Really should have forked out for a new clutch basket, bushings in this one have a little play, but they are available so maybe in future I'll swap it out. New springs are up-rated over the originals, which is a nice surprise! Offered up the cylinder, might trim a little off this corner of the sleeve to stop it restricting the port, will measure up first It's not that bad, but more flow is more flow. Not too long now till first nang!!
7 points
-
Started to make a new plenum. 5" donut chop, butchered the old plenum to harvest the bellmouths. so yeh hopefully this works.. Done some more butchery, to the suspension tower cover this time. I did buy some cast elbows, but didn't like them. diameter was slightly too small and real sharp bend. managed to "reshape" the tower cover to gain enough clearance so could use the ali bends i used for testing. They have a id slightly bigger than the throttles, should be good. Still pretty close to the tower, but looks like it will all fit in there. the runners will enter the plenum on a bit of an angle, and same deal with bellmouths, they wont sit parallel with the base of plenum. Seems like a better compromise than using sharp bends6 points
-
Well I finally found some time and got my ass into gear and finished straightening up the roof today. Came out pretty good i recon.
5 points
-
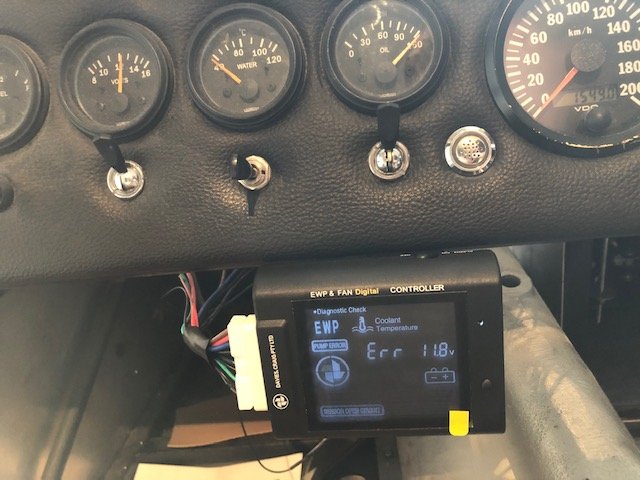
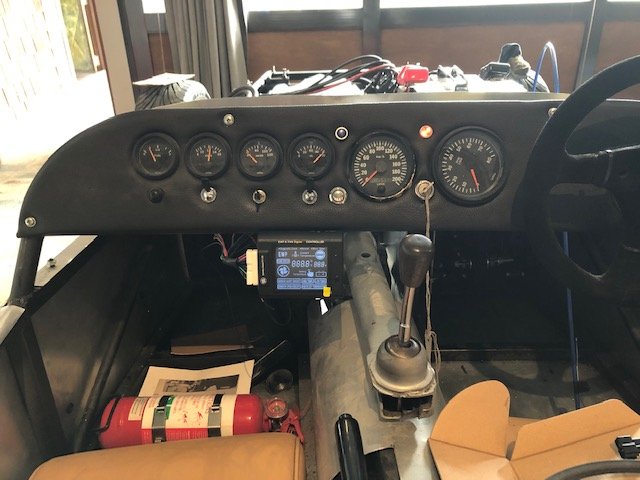
Have rediscovered a bit of love for this the past few weeks. It's odd revisiting your previous work, I guess I was in a rush to get it running but there have always been numerous untidy things that have annoyed me about the car, so it's quite nice to make some improvement. The main source of annoyance was the wiring and the way it was run/cable tied all over the place, so I recovered the whole loom and rerouted most of it. This turned out to be a good move as there is still a lot of oil coating everything after the filter explosion disaster. The cable routing is better, will never be perfect but it is a lot more tidy. Before And after I also decided to follow some good advice from the discussion thread and got a Davies Craig EWP and controller. It may be slightly overkill for this application but I will be happy if the car runs at a reasonable temperature and I can eliminate the mechanical pump - this will probably require some fabrication as you cannot remove the impeller from the factory pump but I think I can get that sorted. Also wired the controller up and made a hinged bracket so the display can be folded up under the dash. Simple but does the job. Sensors aren't plugged in obviously, as I have no cylinder head. Will tidy the rest of the wiring once the pump and radiator are back in. Have been saving up for a new cylinder head, will probably source one from the UK. Going to be an expensive day but likely cheaper than buying a second hand head here then having it crack tested and built up etc. Time for a beer one thinks.... Cheers
5 points
-
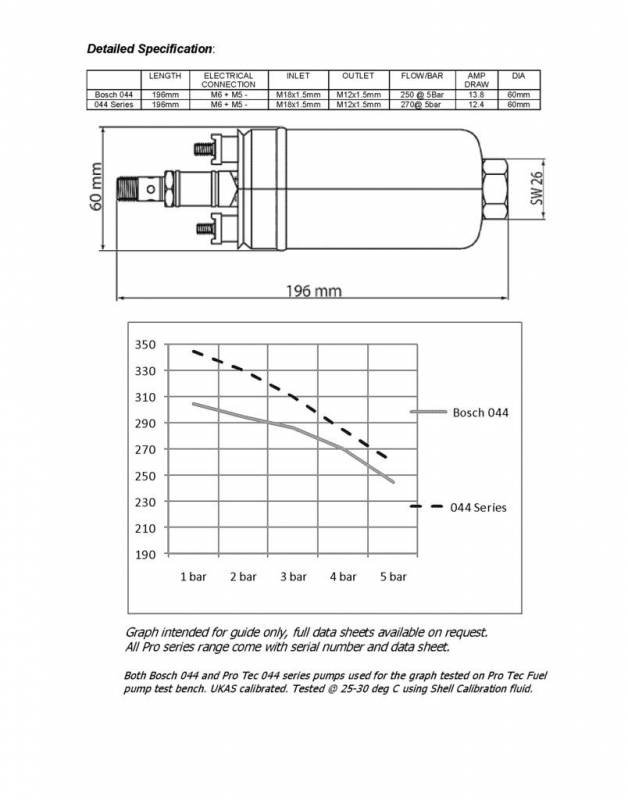
Fusebox all working. But not before I realized I'd wired 9 out of 10 relays backwards. Woops. Lucky was easy to fix. Also, I've always hated the idea of an external FPR, its just so big and shit looking compared to the OEM ones direct on the rail. Since I'm making an effort to keep things tidier though, and this will sneak in behind the cam cover and look discrete. Pinched from the Redtop engine's factory setup. Think I'll give it a hoon. Has the secondary benefit of that I can just run a smaller EFI spec rubber return line hose back to the firewall tucked under the inlet. Rather than a full sized AN-6 line from the rail to the FPR. These FPRs all only regulate to 300kpa (43psi) down from the 60psi I've been using. I havent managed to find a 60psi factory FPR, funnily enough because the only cars that run 60psi or higher are returnless systems. So let me tell you a punishing story about why that is. Traditionally, EFI systems have run at around 43psi. If you're wondering why the weird number, 43.5 psi is 300kpa, and no one in their right mind uses imperial units to design things. Anyway, this pressure range is a good trade off between how hard the pump has to work/reliability, how much fuel it can deliver, and good atomization. As you raise the fuel pressure the l/min rating of the pump decreases. So keeping the base pressure lower effectively gives you a higher flowing pump for same hardware = cheap. Look how much flow rate a Bosch 044 loses when pressure goes up. It also means that as you add boost, and the fuel pressure needs to go up to suit. Spec sheets for electric fuel pumps show that most start to creak and lose heaps of flow after 65psi or so, and with reduced lifespan. With 43psi base pressure and 20 pounds boost only means 63psi required at the pump. Which is considerably better than trying to achieve 80psi. So, why do modern cars run 60psi base fuel pressure instead? When emissions rules are really tight, Fuel vapour emissions are a big problem. When you heat up fuel at the fuel rail and send it back to the tank, it creates heaps of vapour. As well as that when you open the gas cap, this pressurized hot fuel vapour rushes out which is also an issue they need to minimize. A secondary problem here is that fuel isnt just made of 1 thing, it's made of lots of different chemicals which have different boiling points. My understanding is that the additives that turn 95 octane into 98 octane, are the first to flash off into vapour. So minimizing the fuel heating reduces your octane level loss over time. The fix for these problems is to make sure fuel that goes to the rail, never gets back to the tank. Hence returnless. But now the problem is that at 43psi, if it sits long enough in a hot fuel rail it reaches its boiling point. So 60+ psi raises the boiling point above where this is an issue. Which is also why they dont vacuum reference the FPR in the gask tank on returnless, because you never want to drop the fuel pressure below 60psi absolute. And a modern ECU can just deal with a varying differential fuel pressure a lot better than old shitters can. So in my case, going back to 43psi will be fine but with lower pressure the injector duty cycle will need to creep up a bit. As at 60psi Altezza injectors are 450cc/min Injector, at 43psi it's only 370cc. So I'll need 21% more injector opening time. Currently I only get to around 63% duty cycle at lots of RPM so that'll end up around 76% duty cycle instead. No drama. I will just need to be mindful of when controlling the fuel pump with PWM, that I'm not setting the flow rate too low that it'll have time to boil the fuel. Although these engines have a fairly well insulated fuel rail compared to some other engines where they are stuck in a valley or whatever. The other problem is that my fuel pressure sensor now has nowhere to go, as previously went into the FPR. I managed to find an AN fitting that has a pressure port on the side, so I'll mount this with the sensor whacked in somewhere after the fuel filter on the inlet hose when it turns up. I got the Bosch E-throttle all working nicely, it's very snappy testing via ECU. It looks like I'll need to ramp down the PID settings a bit compared to Altezza one. Will take some 100hz logs and try fine tune it. Speaking of which, this PID tuning explanation is bloody amazing So now I've gotta sort an E-throttle pedal. I've got two options so far to try, but isnt looking as easy as I'd hoped. First is RX-8 pedal, on the left. Convenient option but it doesnt really fit nicely in the available space. The other issue is that the APS sensors are built into the entire pedal assembly. So if it shits itself, you have to rebuy the whole thing which seems stupid. The other option I've been looking at is a 350Z APS sensor, which looks like a normal TPS but has a little bar on it to be moved by a pedal somehow. This doesnt particularly look like it wants to cooperate with the factory pedal, so need to figure out something else there as well. However it does make it a lot easier to keep a spare and replace if it packs up. But I like the idea of keeping the factory pedal, so if I end up using a cable again to test something I've still got the option. Although I guess I could just refit the factory pedal anyway in that case haha.
4 points
-
Send some bits away to get chromed and bright zinc plated. Fresh chrome looks amazing, points cover and the suspension fork bolts are now perfect. Wasn’t cheap but those parts aren’t available new anymore. To be fair they were pitted badly and most of the time was probably spent tidying up the parts before chroming. The bright zinc was super cheap to get plated, like $20. However no prep is done. If I’d known I’d have polished out the pitting marks more but for 20 bucks it look a million times better than it did.
4 points
-
Another goped build. Needs tuning to run right, but I lack the space to get it up into powerband where it wants to run. Its showing real potential though with a newly found ability to drift it. It's going to end badly, probably with another broken arm like last year when I taught myself how to do goped wheelies until failing epically...but yolo✌ Specs: Model - Goped Sport Engine - 23cc Zenoah G23LH (rebuilt with new bearings, seals, cylinder, plug, gaskets, piston and rings) Carburetor - Walbro high performance 167A Exhaust - Dominator expansion chamber Spindle - ADA 0.75" (way to big off my small driveway). Other - velocity stack, air filter, aluminum tank mounts, upgraded engine bolts etc... Nothing over the top, but given room to work the powerband it will be a weapon!3 points
-
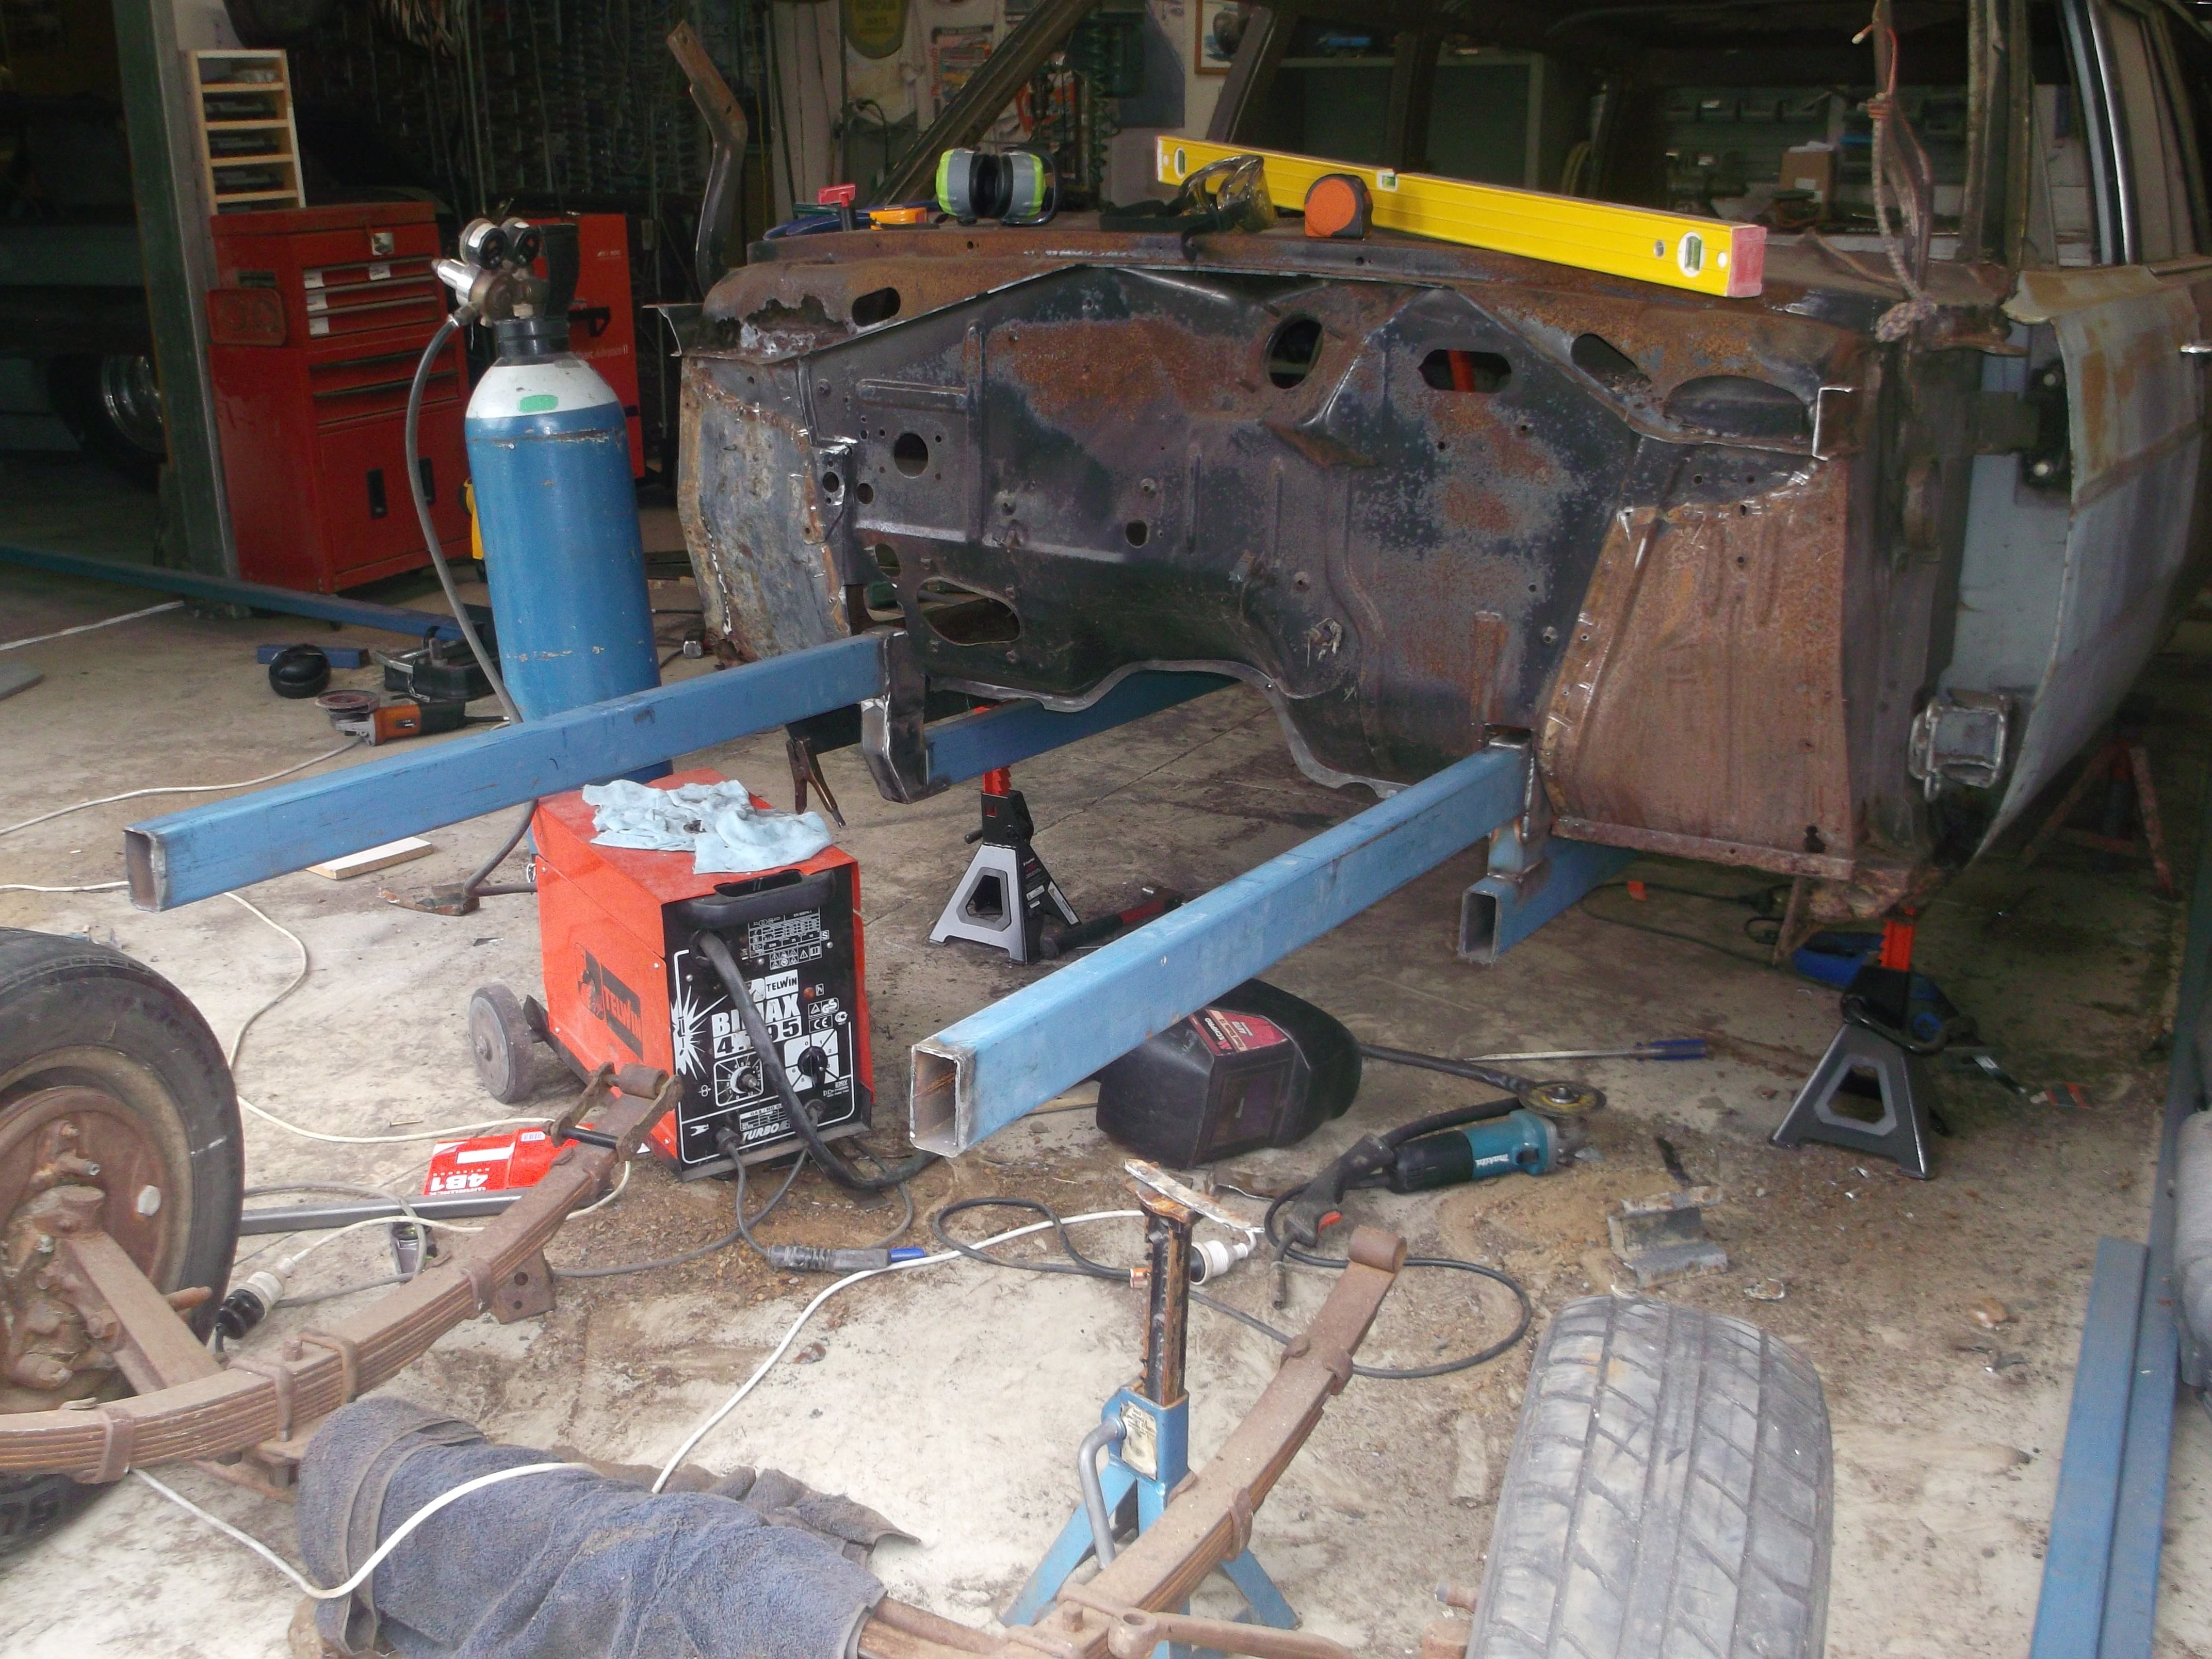
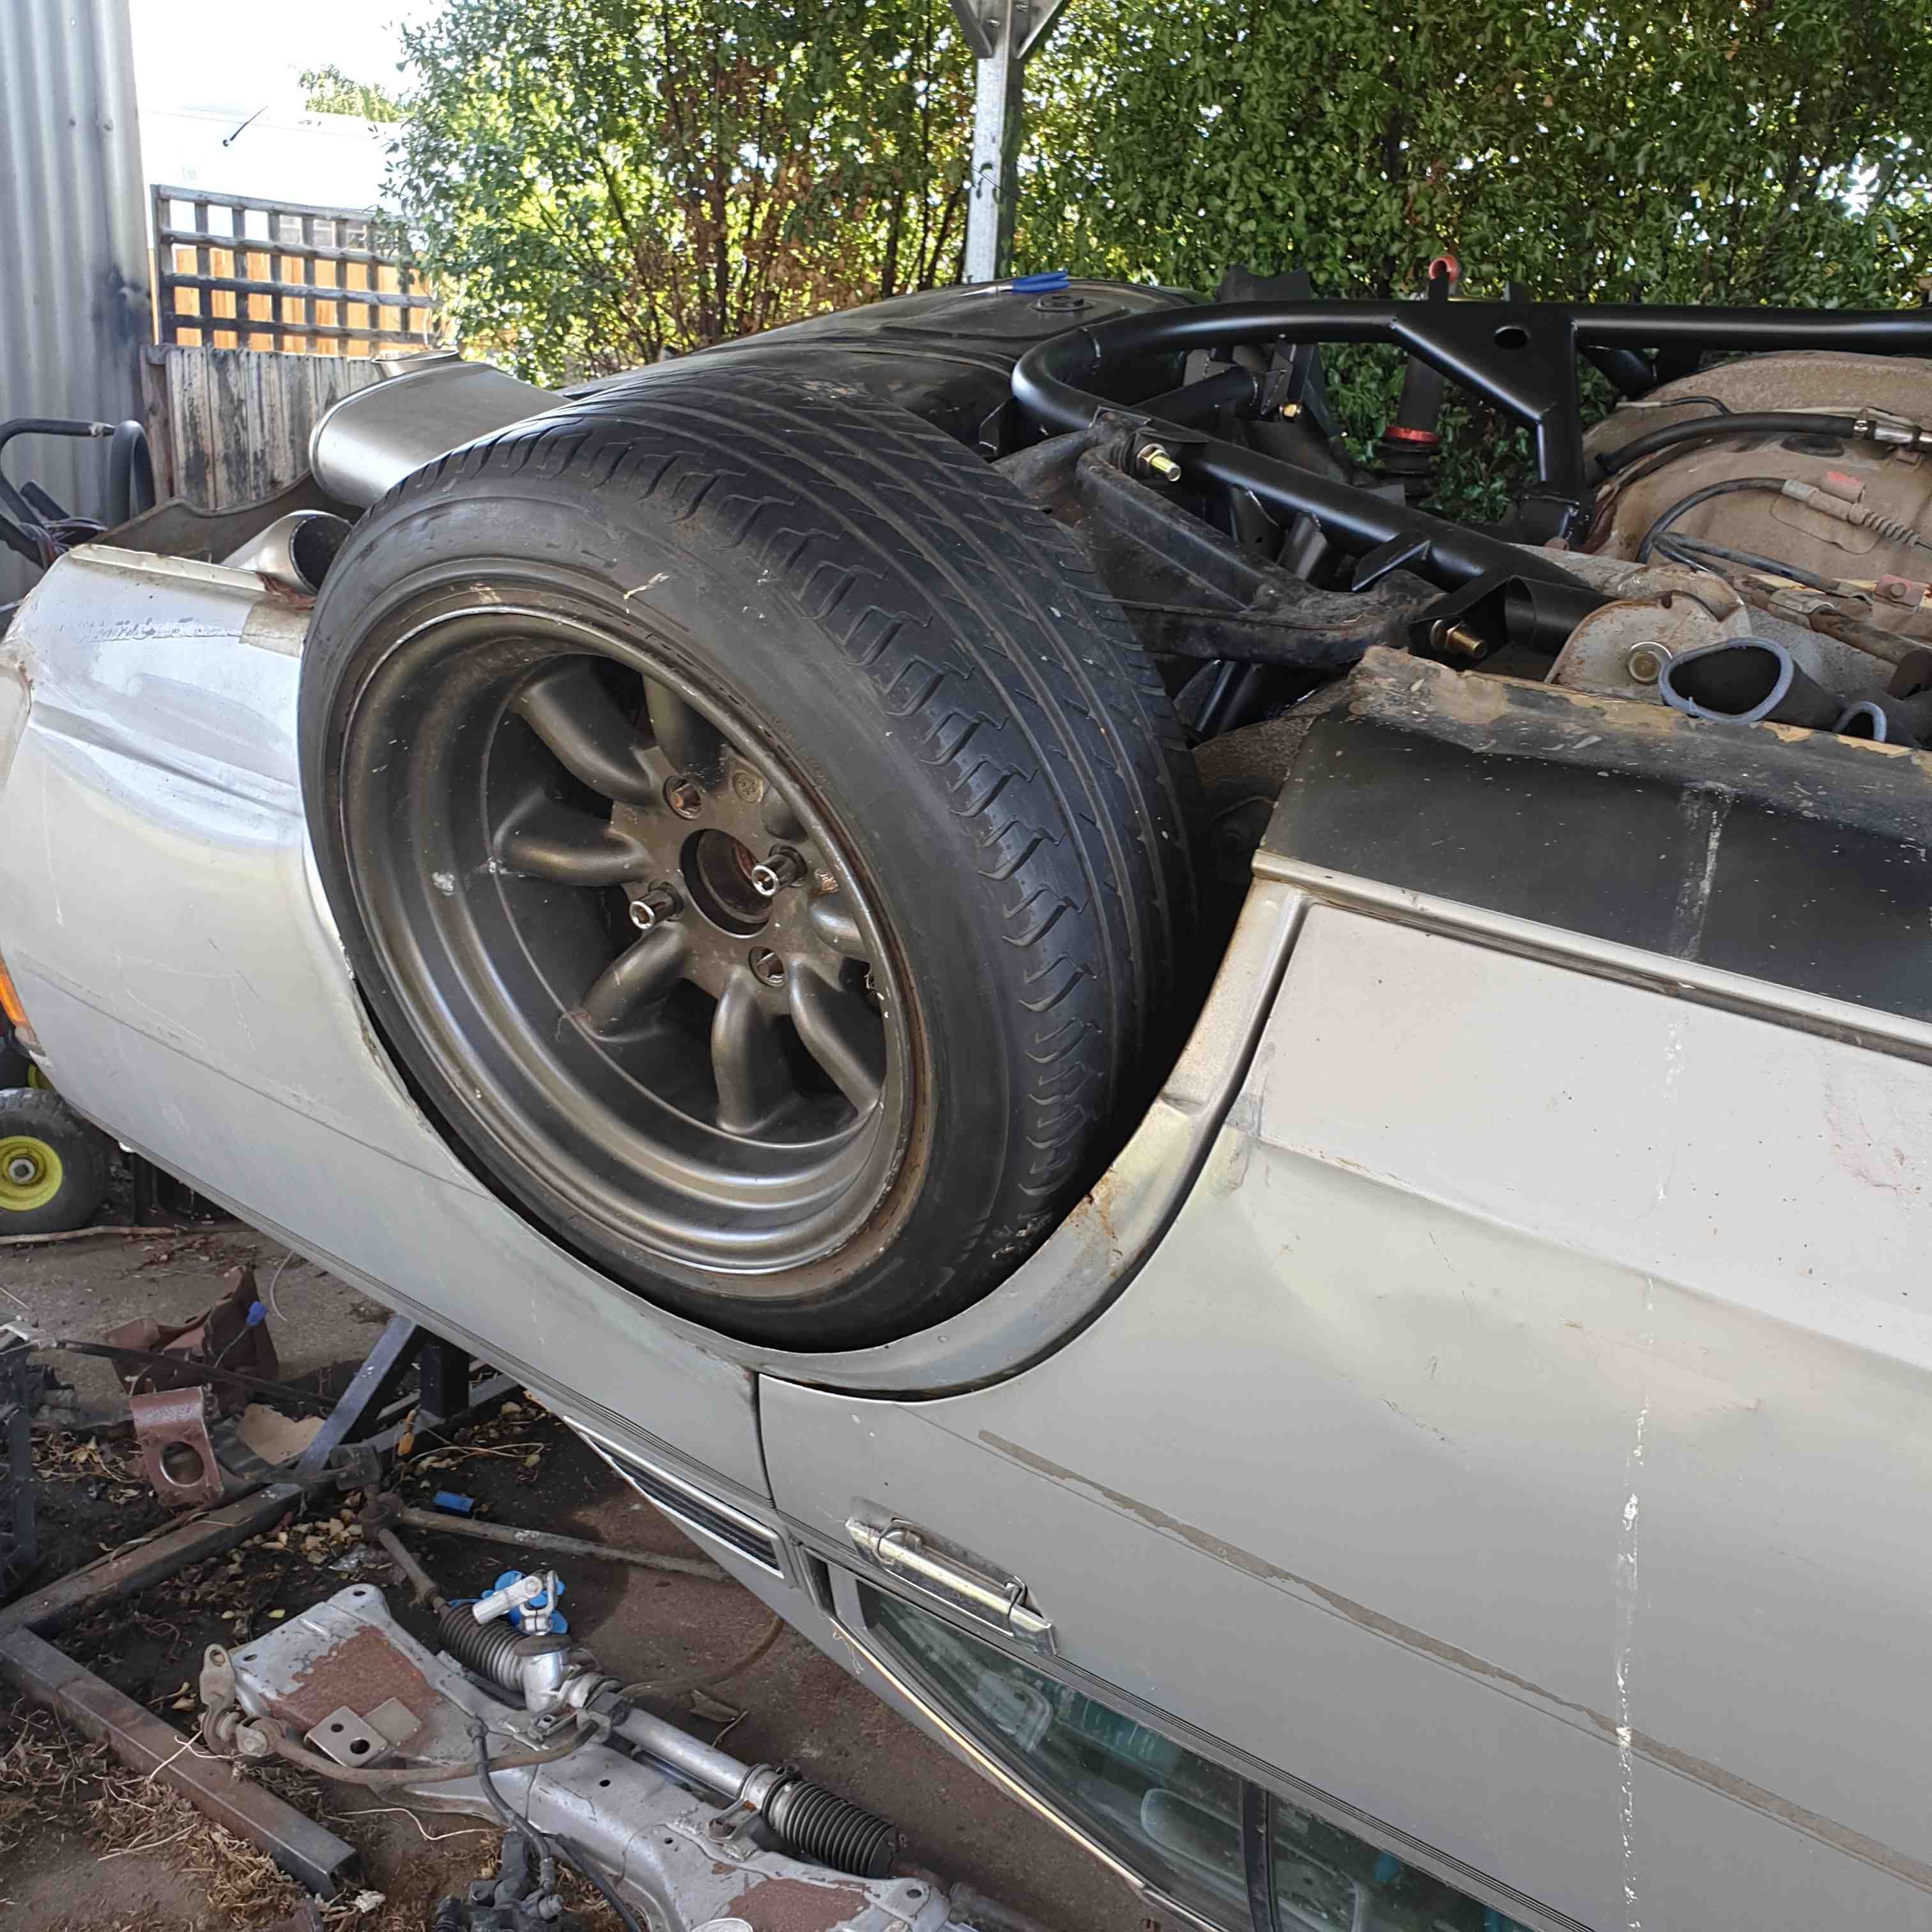
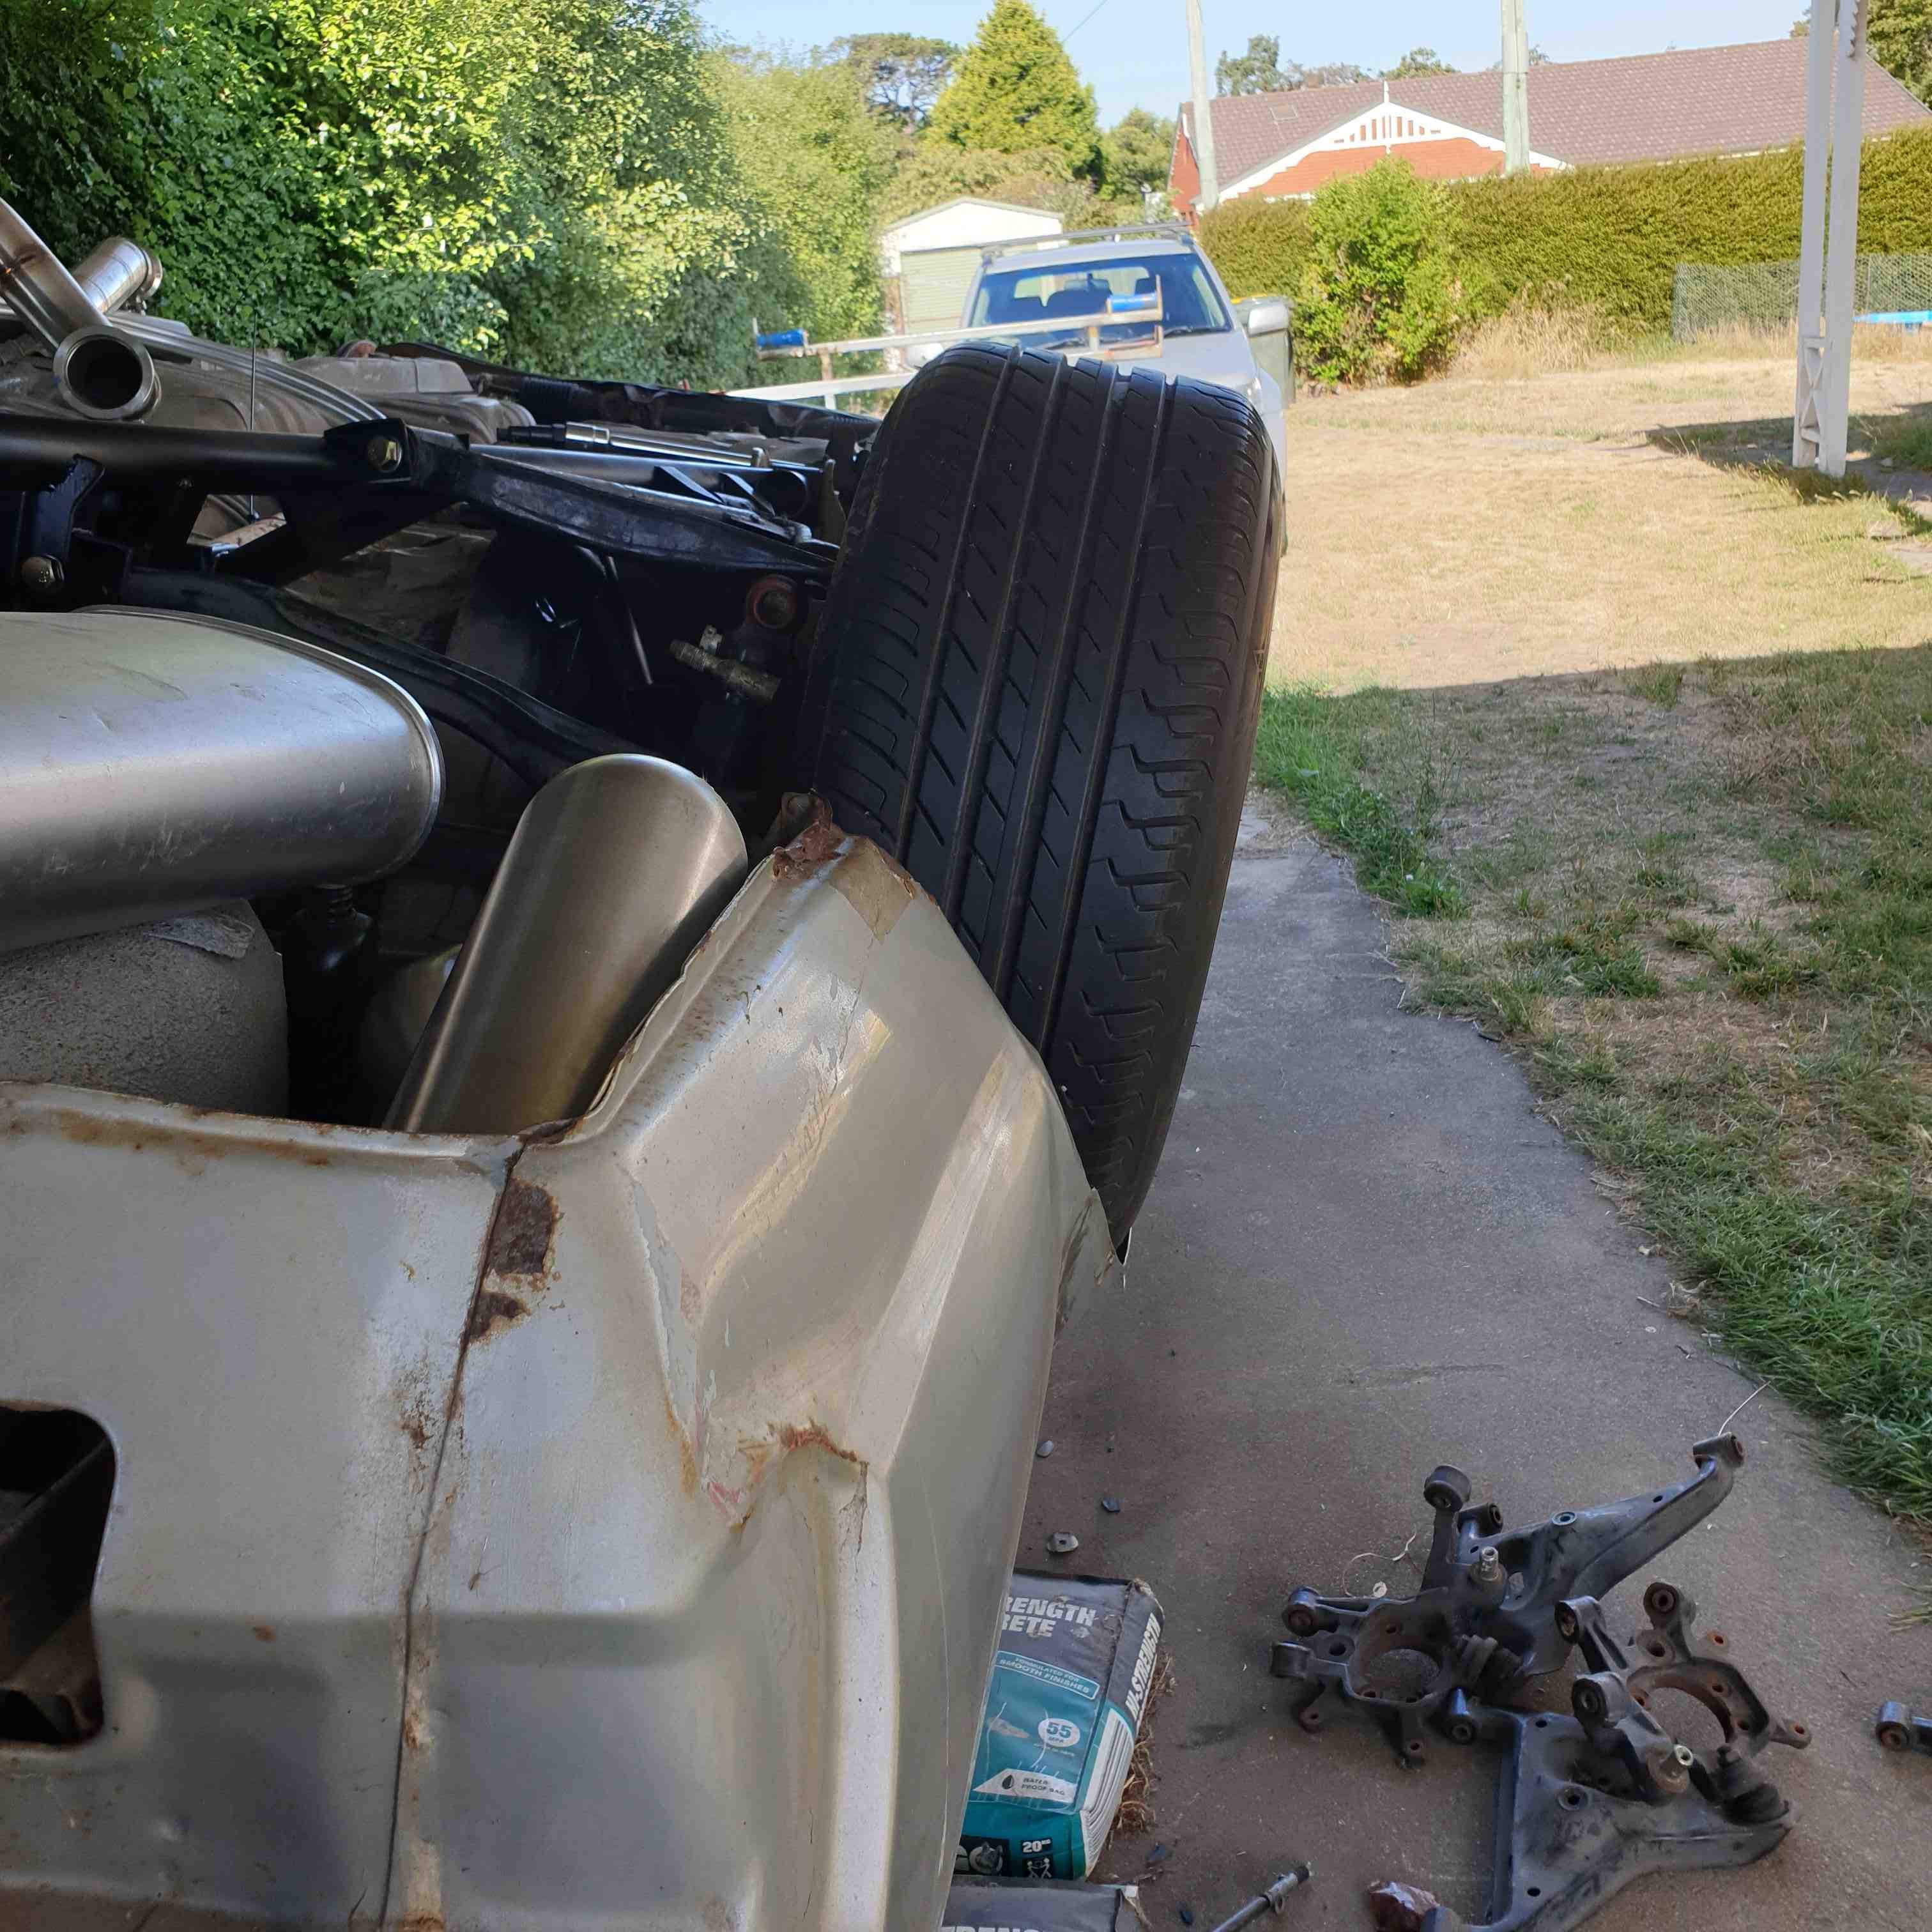
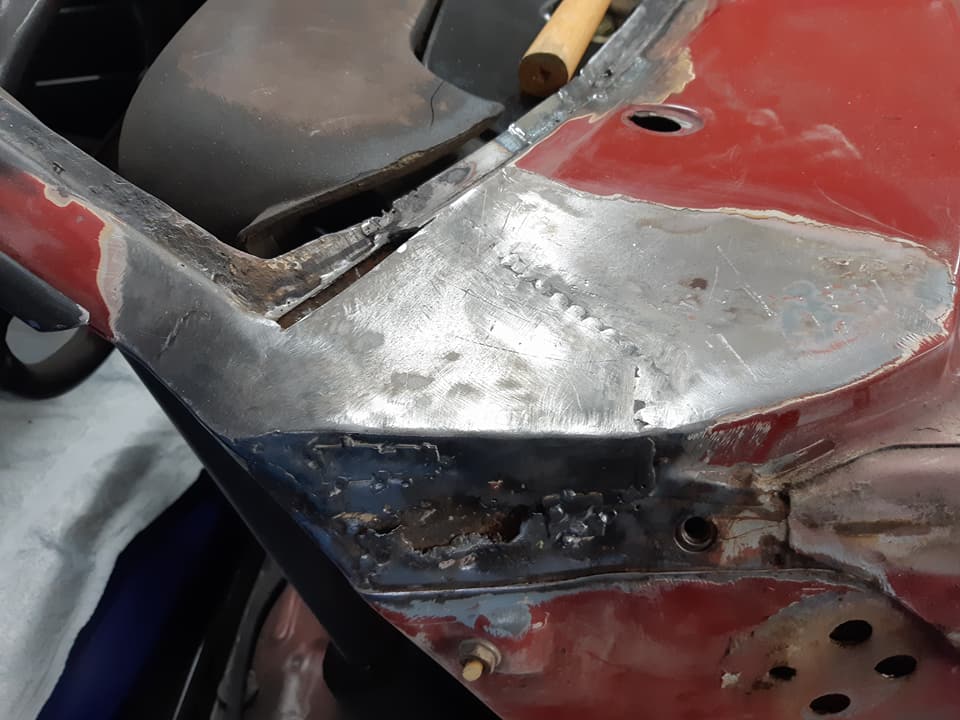
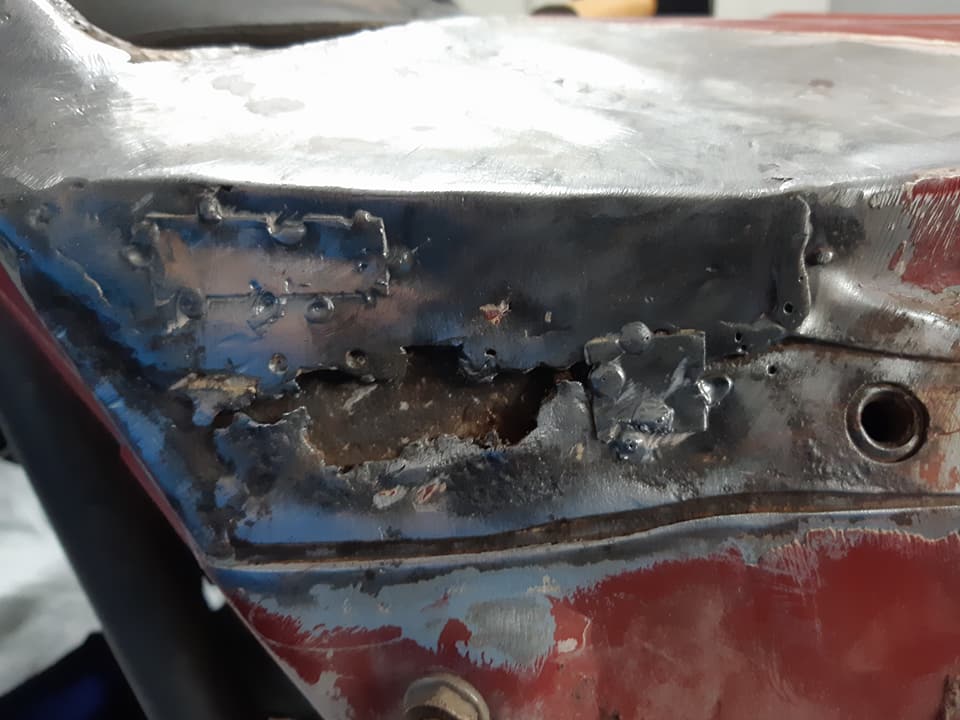
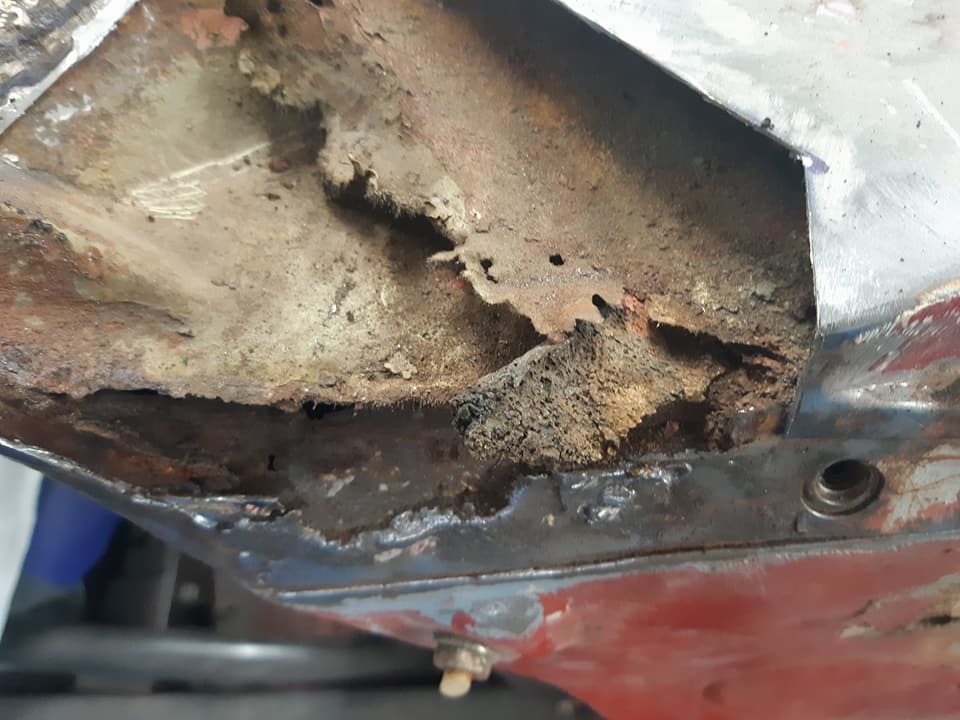
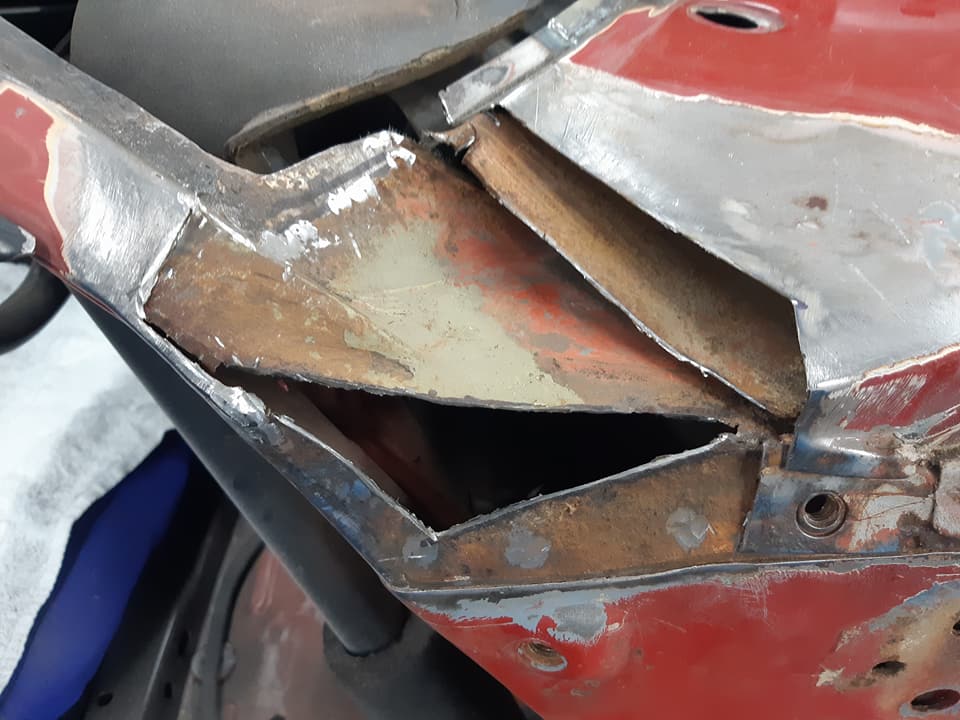
Surprisingly I still own this. I figured i'd better update the build thread now, it has more metal in it now than it did 2.5 years ago. With a year of a long distance relationship, moving house, changing jobs, other cars and a fairly sizeable task ahead to fix all the rot, progress kind of came to a halt not long after the last update. In the last year or so though I have been chipping away at it, so far I have cut and welded the l/h inner guard, heater bubble, l/h floor pan, inner and outer sill section, rebuilt the bottom of the l/h A pillar, l/r wheel arch inner and outer, outer sill section, and probably some other small bits I can't remember. I also cut the front valance off, and I am very thankful for the abundance of pressed panels available new for old Fords in that I got a new valance, front guards, and a myriad of repair sections to stitch in, without these I probably wouldn't have taken this on tbh. Here it is on its way to its new garage: Some repairs to the firewall where every Escort rots - under the heater bubble. I've made an indent in the new heater bubble so water can actually drain away, rather than collecting in the bottom of the bowl and rotting through the seam that joins it. It mightn't look tidy, but it's solid and there's good penetration through to the other side, so I'm reasonably happy. The l/h side floor section was probably the most daunting repair in terms of size, I ended up cutting the floorpan back almost to the seat mount before I found decent metal, but after I zapped in the floor section the outer sill and pillar fitted up pretty nicely. This was the most recent repair - the rear wheel arch - which someone in the past has had a go at, not rust proofed behind the repair, and it's rusted again. There was a patch welded into the outer arch, which someone had beaten in with a ballpein hammer and shaped with bog, and a large patch on the inner which had gone rotten. It all had to go, I ended up cutting away the inner half and remaking it, and welding in a pressed section into the outer. All that's left now is the l/h C pillar and vent, probably the r/h C pillar too, the bottom of the r/h A pillar, a random little hole in the rear apron, make some new front guard supports and attach the front. I have a full set of factory bronze tinted glass and chrome trim mouldings for the windows, which will probably end up on the car too. And this is pretty much how it sits today!3 points
-
All back together2 points
-
I stole the wheels off a goped that I got for $10 at kumeu a few years back. It's called a "Know-ped" and was made by go-ped as an environmentally friendly version for California without an engine. Anyways...I wanted its wheels for my other gopeds, so I just converted the know-ped to use these cheap scooter wheels. Calling it a win! Turning the 3/8unf straight bolt down to 8mm to take the scooter bearings. A spacer made from aluminum. Sweeeeetttt!!!! All done. Calling it a win/win. I get the wheels for use on the motorised gopeds, and still get to use this one with the kids.
2 points
-
Cheers. Bumper Replacements in Onehunga for the Chrome. Final bill was $250 but the condition was pretty bad. Acme Plating also in Onehunga did the bright zinc plate.2 points
-
Cut the whole removable tongue bracket off and glue it onto your towbar, easy. Have done it a few times myself. I've fitted heaps of towbars through my old work, and made a fair few from scratch. The quality on the premade ready to fit kit's is questionable at best. Without knowing your welding ability, I'd say you are more than capable of doing a better job than most.2 points
-
Okay, I'm starting to realise I may be pushing the limits here. There's a lots of motor on this scooter now. It's all but done, but I can't start it as the current pull start can't handle the compression. I tried to start it with a drill and fucked my drill!!! So I've ordered a different "easy pull" that I'll adapt to fit this motor. Basically it shifts the diameter of the pull start outward to increase torque in your favour. So...more waiting on Aliexpress to deliver the goods...
2 points
-
1. Got all the air burps out of the cooling system? 2. Someone told me a yarn about 1uz heater circuits years ago. If you have the heater outlet looped at the back of the engine it needs a restriction in the loop otherwise the water can hoon around the engine getting hotter and not going through the radiator 3. Radiator hoses the right way around? Probably doesnt matter with a cross flow rad but I had a customer with an uppy downy rad where the hoses were the wrong way round at the engine and it got hot 4. Put a bloody 302 in it like it's meant to have, you bloody wanker2 points
-
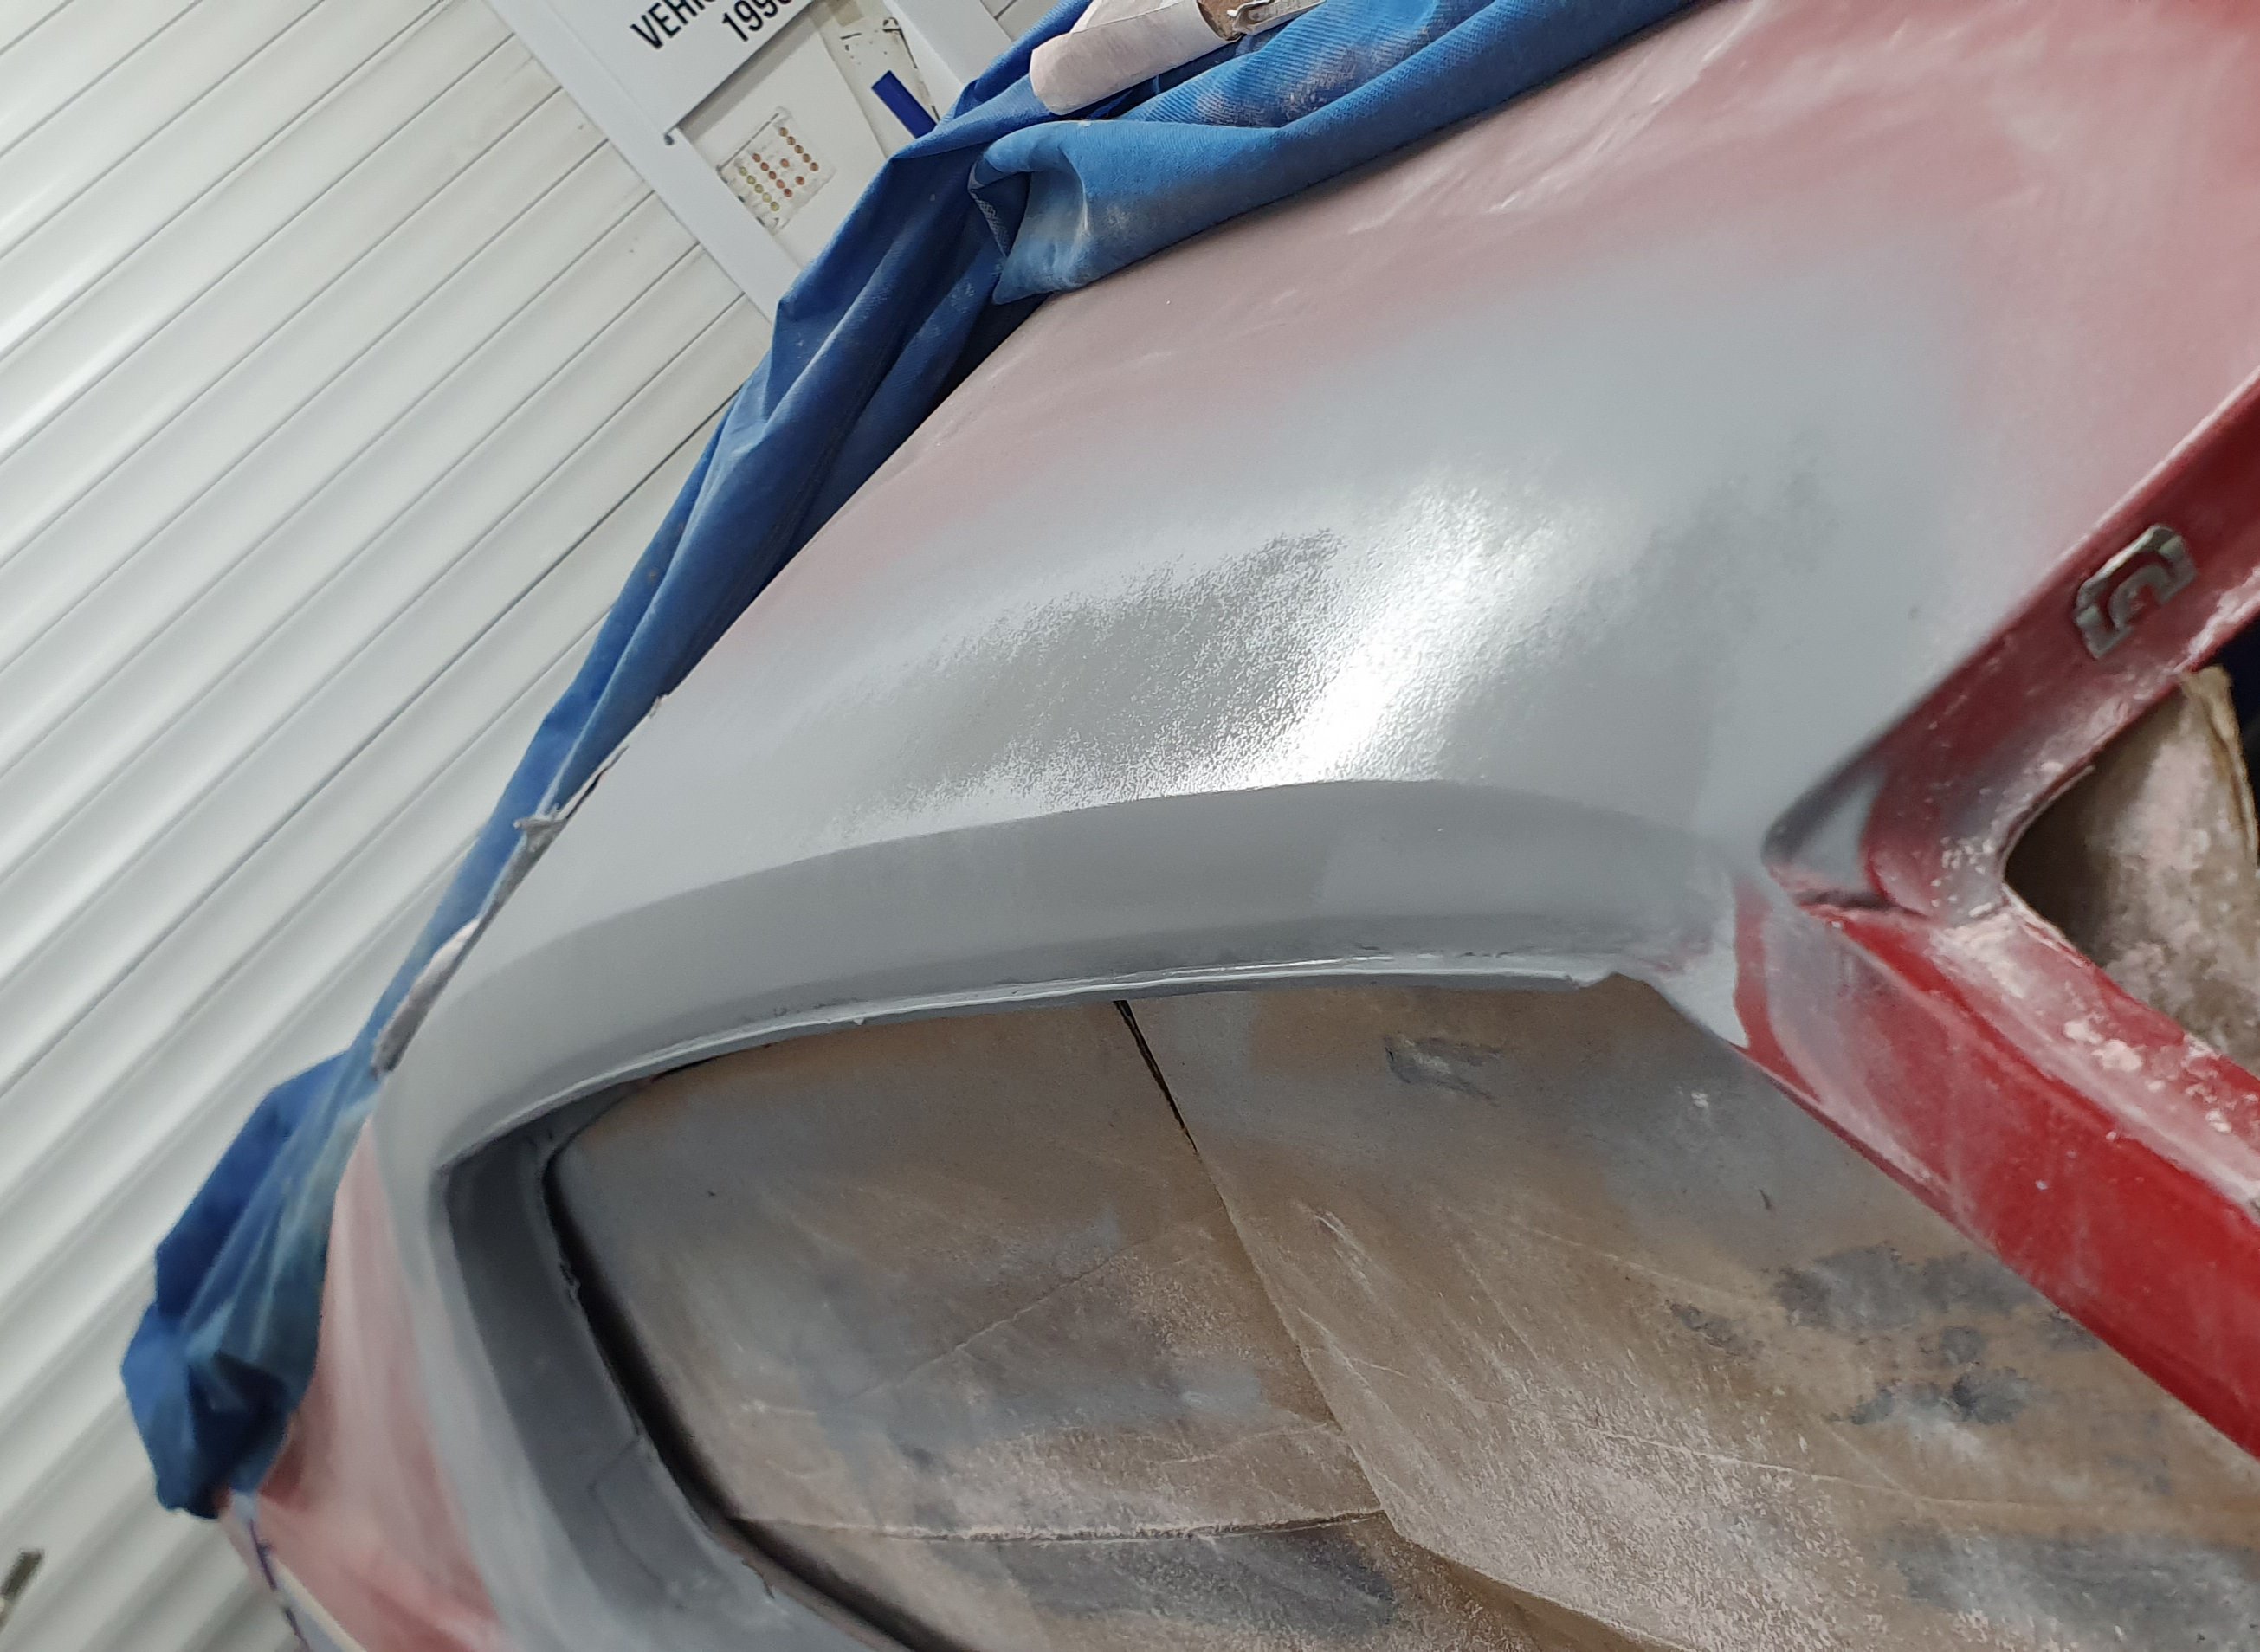
Time ran out. The Diff went in on the Thursday, Sunday was the show. Since we were back together and running, all that was left was a final push to get the car looking as good as it should. The first thing I needed to do was wash the car. I'm ashamed to admit that for the six months I have owned the car, I've never cleaned it. Not once, so it was still covered in the muck from sitting around for a couple of years, and from the trip down on the back of a truck. Oops. So with that in mind, after work Friday I pulled the car out of the garage and into the steep driveway for a wash. The paint came up well, but I noticed the front end felt pretty rough (its the original paint, the rear was painted after but of a shunt years ago), so out came my CarPro clay towel to remove the contaminants on the paint. The clay towel worked great, the paint is nice and slick now. After a quick dry, I left the car overnight, ready to start with the machine polish. Saturday was machine polish day. The whole front of the car was cloudy and dull with almost no shine. The rear was better, but still needed some attention. This is what I was working with Flat as anything. A quick test spot using my favourite combo of a green Hexlogic pad and Ultimate Compound showed promise though It took a bit of work, but it was cutting through the oxidation and bringing the metallic silver paint back. Unfortunately, the paint isn't great (although it is 40 years old now!). There is this large patch in the bonnet where the paint is discoloured And a couple of similar spots on the sides behind the front wheels. Strangely I did find a shadow behind the front wheels of where a TVR sticker would have been on each side The paint isn't perfect but for a 40 year old car I think it's doing OK. It shined up well and is showing a lot more gloss and flake now. Oh, guess what showed up whilst I was polishing the car... the bloody braided lines. Only two days too late. The real test was on Sunday when she was unveiled at the British and Euro Car Day show. This is the third time I have brought a car to one of these shows. I like to try and bring someone special each year if I can. British Car Day doesn't often have many TVRs. At most there tends to be one lonely TVR sitting off to the side, or bundled in with another group (that's where I found the 350i wedge back in 2016). This year, the lone TVR found a friend. Sadly there was a (not so) Mini between us, but I parked up nearby this lovely looking Griffith. This thing makes the Wedge look massive! The Wedge looked great out in the sun, and a lot of people were showing an interest in it. Kids especially seem attracted to its sweet 80s style The TVR was in good company too. The turnout at the show was good, although I'm not so fussed on all the new euro stuff clogging up the field. There was another TVR with weird doors that seemed to get all the attention A Morgan with gorgeous paint This cute little Auto Union DKW An awesome looking Renault Alpine that was parked next to some garish red and yellow things Plenty of Fords were in attendance Including this sleeper with a Lotus twin cam engine Of course, the Porsche crowed had a decent turnout. Most of it was boring to me, except for these two which stood out And I was starting to get worried, but eventually, a lone SD1 arrived. This one has been at the show before, but good to see it again, out and about Anyway, enough of that, back to the Wedge. After we left the show we went for a bit of a hoon to see if there was anywhere nearby that was an interesting spot to take photos. We found this old Ministry of Defence building down a back road That wasn't the end of the car being out and about this week. It was a lovely evening the other day, so since I had a fully road legal TVR, we took it out for the longest run since I've had it. It was about a 60km round trip, which uncovered a few things about the car. Firstly, it's surprisingly comfortable and easy to drive. It loves taking sweeping curves at speed, and makes some great pops and bangs on deceleration. The brakes have a nice firm feel to them now with no shudder. Unfortunately its not all roses. There is an annoying misfire at low RPM cruise. I think it's possibly the ignition system playing up a bit, or it could be running a bit lean at cruise. The only other real issues are the steering being super heavy at low speeds, and the exhaust is excessively loud to the point of being annoying. Nothing too major. I did get some photos in the sunset though There is still work to be done, but in the meantime, I think I will just enjoy being able to jump into the car, fire up the V6, and take it for a drive. I have spent so much time working on the car that I haven't had a chance to enjoy and bond with the car, it gets tiresome sometimes.2 points
-
my mate Adam who is a link tuning wizard gave me a hand to get the e throttle sorted and get it idling and running ok. its getting hot fast which is concerning. the radiator is 11 years old so maybe needs a clean/re-core. ill keep fucking around with it. but anyway today i drove it. it goes mint and makes the whurry noises. tune is rough as fuck at the mo but its good enough to do a couple of Ks and see how it behaves, if i can keep it cool. 2020-02-14_07-18-56 by sheepers, on Flickr 2020-02-14_07-19-05 by sheepers, on Flickr 2020-02-14_07-19-12 by sheepers, on Flickr2 points
-
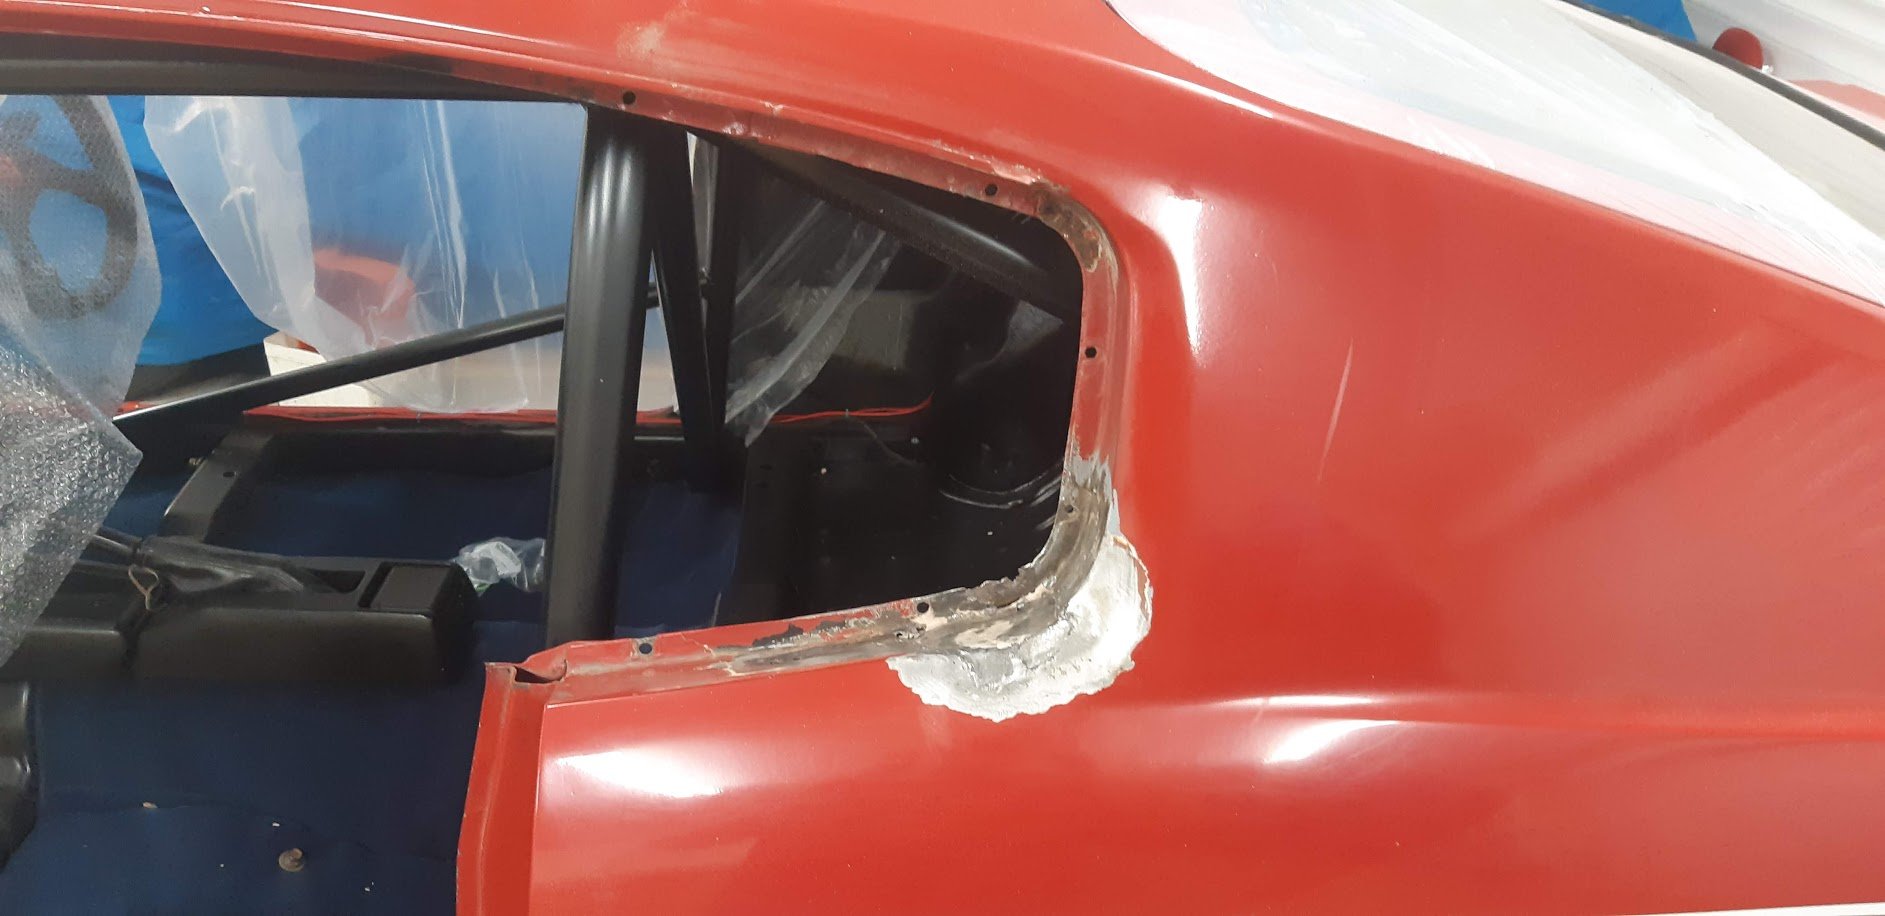
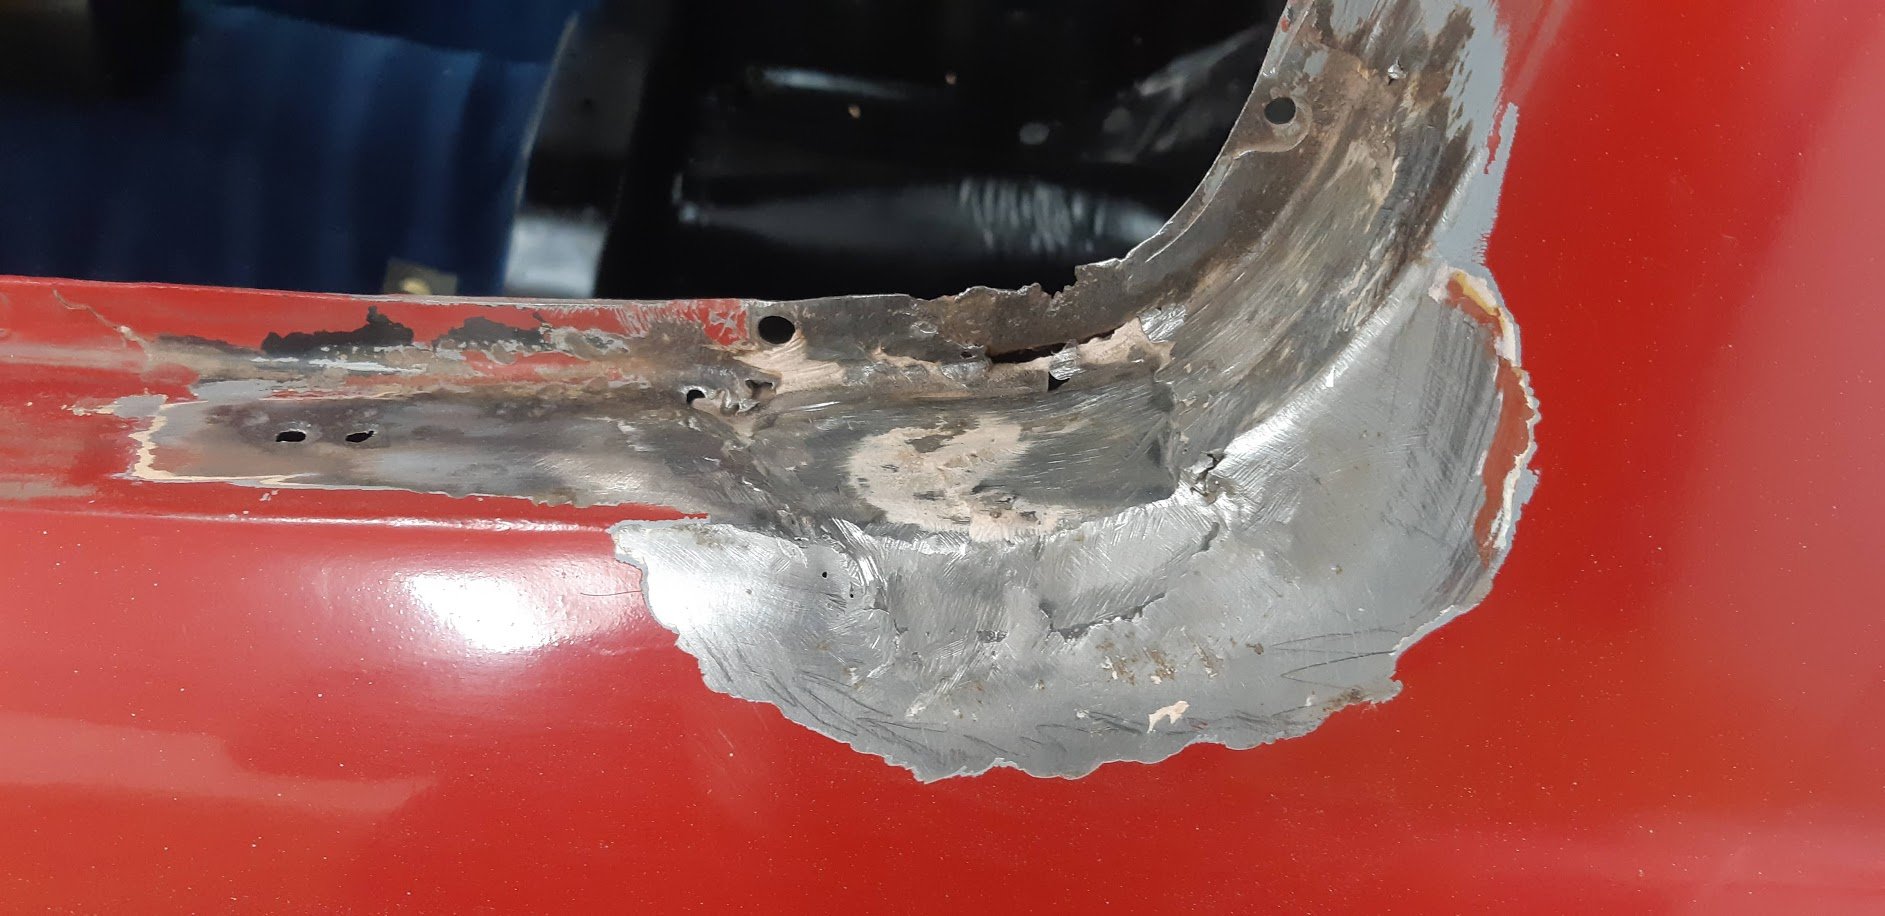
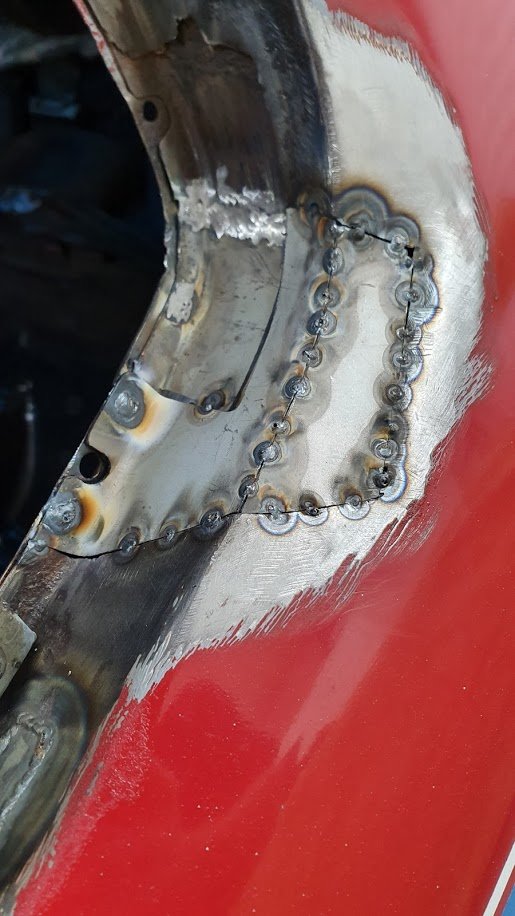
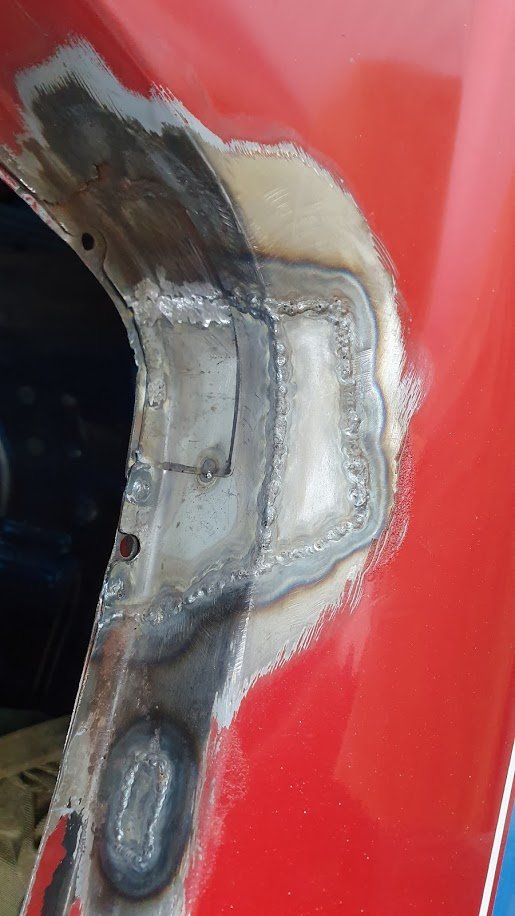
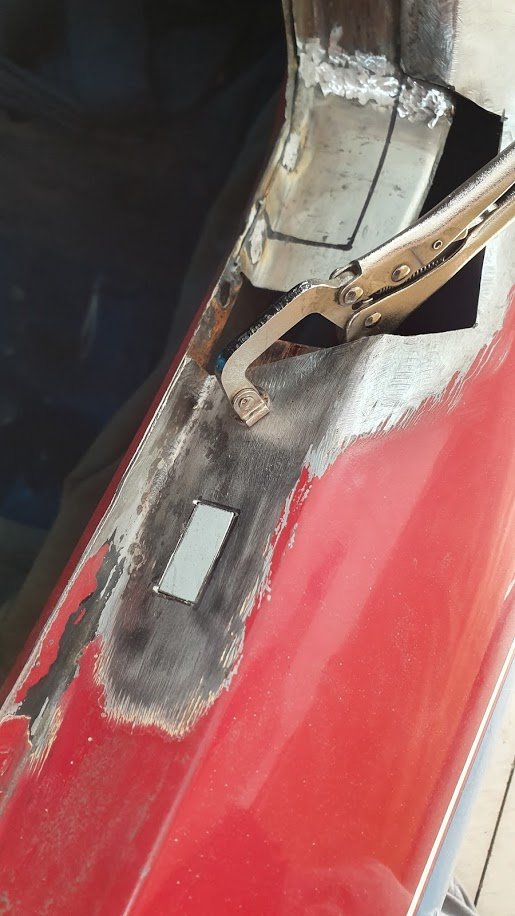
With the welder out for SLEEEK's floor repair, i figured also fixing the other quarter window on the racer was probably long overdue. Some BS repairs from the past that were 90% bog. Repair the inner bit and the reinforcement. Fill other rust holes. Measure and make the outer bits. Glue it up. and 200% betterer...
2 points
-
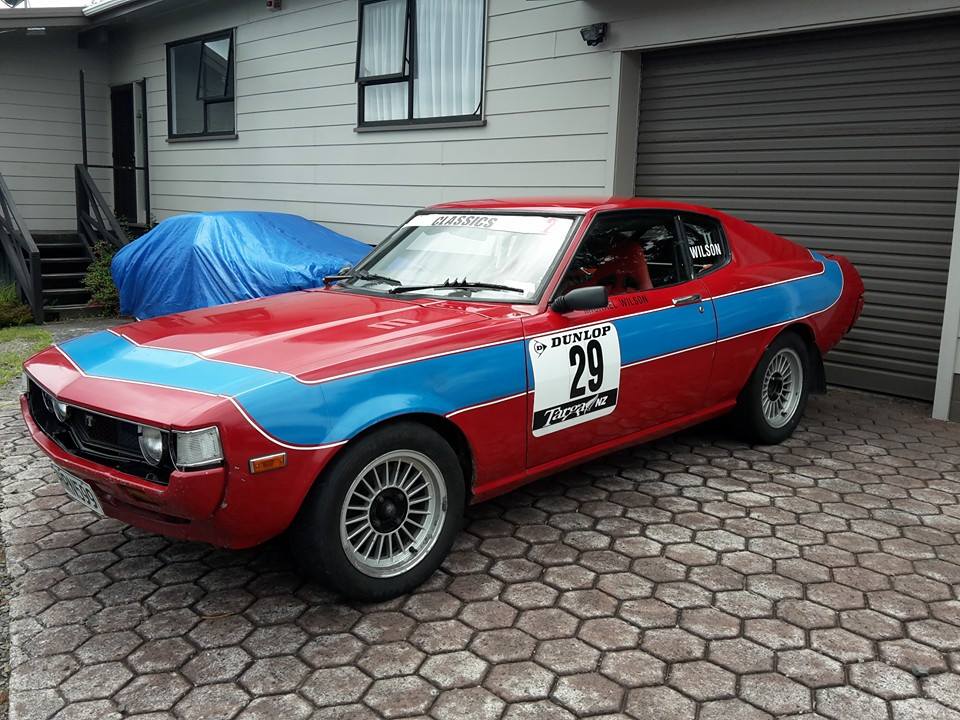
Many moons ago in a place far far away.... I service crewed and co-drove with a fellow celica owner in the Targa Rally NZ - 1999 to 2005 This celica was raced in classic events following that till 2008 when it was put to rest in a garage.. Fast forward 6.5 years I had kept sporadic communication with the owner (used to own my black one too) He offered me the car + parts ... me being me (celicaholic) i couldn't refuse... It being in Wellington, me in Auckland posed a problem as it came with a couple of parts (over 1.5 ton - possibly 2 ton) Logistics of moving the car + all the bits fell to one option only - Big mission to Wellington!! Hired a truck and borrowed a trailer and 3 days later it was in my drive... After sleeping the rest of that week i decided to try and get it going... 1. no spark 2. Very rattly timing chain 3. Flat battery >>replaced with a new one and drove it around the block - engine wasnt happy though So instead i started tidying it up straightened up the front bumper and moved headlights for air intakes. Removed old sponsorship stickers. Changed crazed broken tail lights and added GT. Roll forward a few weeks to labour weekend and i checked the engine thoroughly for what the issue could be. Compression test revealed 30psi in #2&3 and 180 in #1&4 - oil test indicated valves not pistons/rings so ... OFF WITH HER HEAD!!! With bottom end looking really good.. The head was stripped down and the inlet valves were found to be paper thin on the edges and sunk into the head. So new valves were needed. Turns out i have TRD oversize valves a whopping 1.85 inch diameter. Small block chev oversize valves matched so with new guides it was rebuilt and cleaned. The engine had a terrible oil leak too so tracing this was found to be the highly modified sump. Thanks sheepers for welding up the hole in the sump that previously had brazing, JB weld, bog, chewing gum and any other filler to try and stop it leaking. Painted and looking mint here. Turns out this is a very modified engine - H-beam rods, 4mm oversize pistons, high volume oil pump etc etc. Also the engine crossmember was modded so this was changed for an original one (also painted) Finally 1st week of december i got the head back all done so the engine was assembled and thrown back in the hole (after a massive clean and tidy in there) Couple of weeks waiting for other go fast bits and it was all together and ITS ALIIVE!!! I celebrated by rapidly annoying the locals at 8500RPM around the block!! and then washing it for the 1st time since 2008 - what a magic Christmas present for me .. now to get a WOF/REG/Motorsport card etc etc. See you all at the NATS trackday
1 point
-
How retarded is the timing? That can make things overheat1 point
-
That pump controller with huge screen would be overkill in nearly ANY application lol. I vote you get it right then hide or well out of the way.1 point
-
DIY Removable towbar kit. I think the tongue was from a Hiace or something?. Anyway, a bit of welding, grinding and bolting and it's worked fine for a few years, even with some fair loads.
1 point
-
Remember meet time has been changed to 12:30 at the peg, 1pm depart time.1 point
-
I have no idea what three hundred and two tune is.1 point
-
got both new rails on today , next is to build a flip front
1 point
-
Improvements made to bracket. Looked "a little heavy" for my liking...so off to Jenny Craig's she goes! Nice hole, with a cheeky peek up her skirt. Rounded all the corners with a generous radius. Ready for paint now. Much happier with its appearance. If something is ugly, it's best to not draw attention towards it, so by doing these extra steps hopefully it'll become less visible and go unnoticed.
1 point
-
Some good things have happened to the Accord since the last installment! I gave it some CV boots, thankfully the inner and outer are the same size, because both boots on the L/H axle were split. Fun fact - pre-facelift Accords have CVs at both ends, but later ones like this one have tripod joints on the inner. Confused the hell out of the bloke at BNT, anyway. It passed another WOF last week without any hiccups, and we've taken it for decent number of road trips around the upper North Island. I even slept in it after Crate Day, which honestly turned out to be more cramped and uncomfortable than I thought it would be. Still working on tidying up the front end, there's a sedan at a wrecker down country who might be able to supply the grille bits. The passenger side carpet is pretty rotten and it got consistently damp in the rain, which was a pretty good indicator that there were holes somewhere that there shouldn't be holes. I broke the unwritten rule of old car ownership, that being "don't pick at that bathroom sealant, you won't like what's underneath it" and lo and behold after chiselling away the layers of Selley's Bathroom Adhesive in the windscreen plenum chamber there was a decent hole. After taking out the wiper motor I found another hole, so out came the cutoff disc and the welder. Just to be safe I pulled the dash out so nothing caught fire, to be honest this is probably the first time this car has seen the hot end of a MIG torch in its life. I made up a couple of patches, binned them after I found more scabby bits near where I was welding to, and then made up some bigger patches. Glued them in with the metal gluestick, and hit it all with some epoxy. Might spray some underseal in there yet, or I might just spray it all with fish oil and put up with the smell for a couple of weeks. Otherwise it's been plain sailing, the front seats need some more foam because as far as I can see they don't actually have springs in them, just a layer of heavy foam which has disintegrated over the past 39 years. Local content laws dictated that as much trim as possible had to be made here, which is why we didn't get the neat colour coded interior fabrics that everywhere else in the world got, we got beige or beige. I pulled out the amplifier that was tek-screwed through the floorpan underneath the passengers seat and the lil' Johnny spec head unit that was flopping around the dash and wired in with three core house cable, and wired in a period '80s Clarion spindle mount unit - less doof, but more class! It needs a set of TS-Xs for the parcel shelf next time i'm near Buyee.com. Here's some pictures of it enjoying the scenery1 point
-
I have every intention of driving this to Nats.1 point
-
So been chipping away at some tear down. Had a real oldschooler to give me a hand even, @chris r and I pulled off the drivers door and fender. I knew I had a rust hole but as normal it was worse Need to grab a wire wheel and strip off all the old underseal. What I scratched off with a screwdriver had good metal underneath. it appears that the heater core hasn’t ever leaked which is ace Even found some of my missing upholstery And a spare key of all things. Would have rathered a valuable rare coin but eh guess I’ll take what I get
1 point
-
I'm not sure I understand the question. Can you cut steel and weld? Legal: https://vehicleinspection.nzta.govt.nz/virms/in-service-wof-and-cof/general/towing-connections/light-vehicle-towbar-and-fifth-wheel Knock yourself out1 point
-
Just C-Notch your shins at towbar height.1 point
-
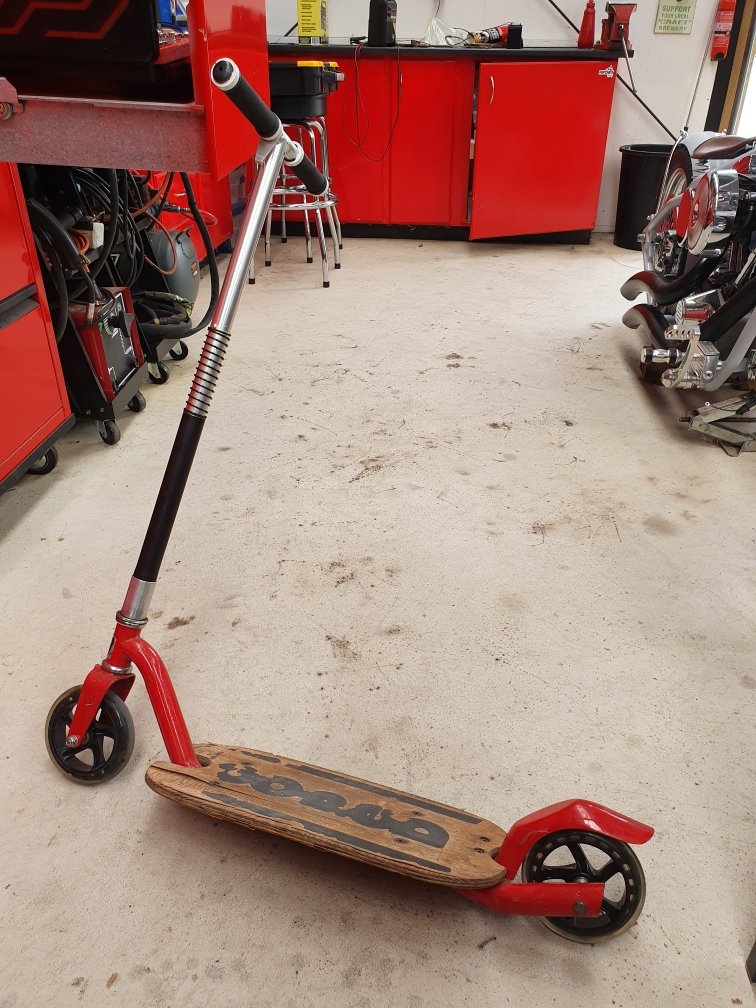
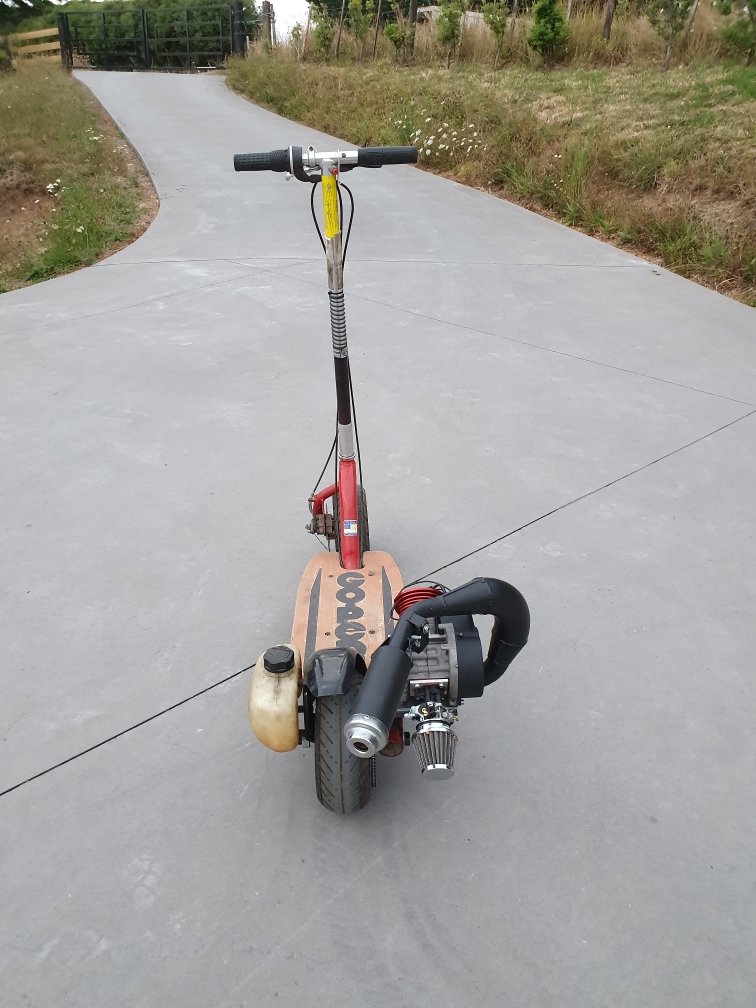
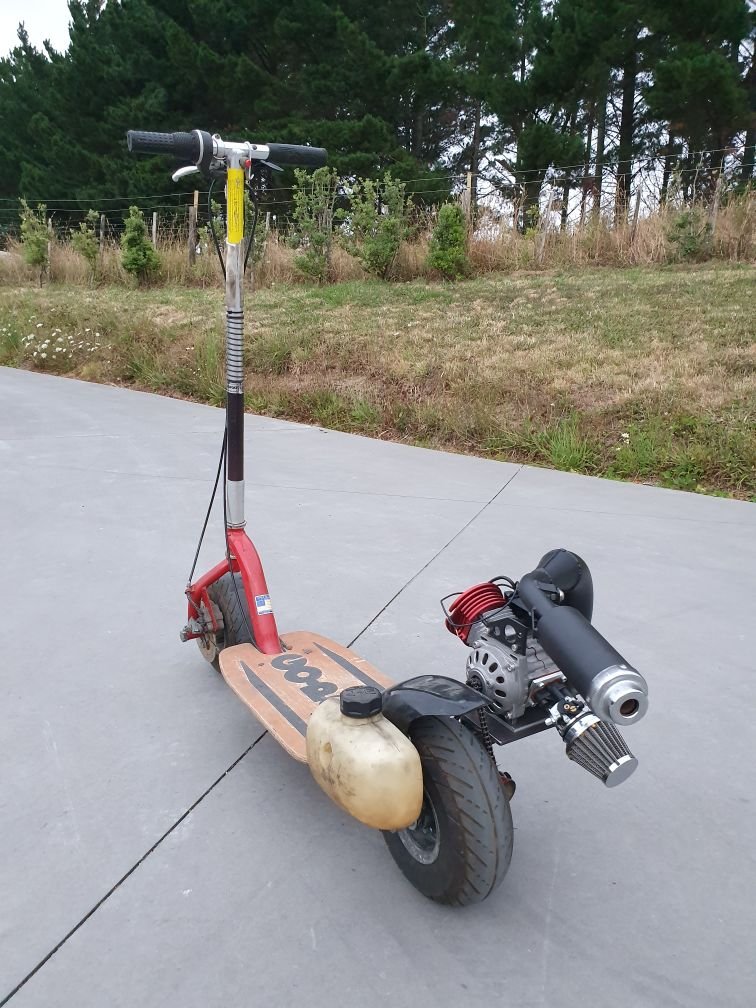
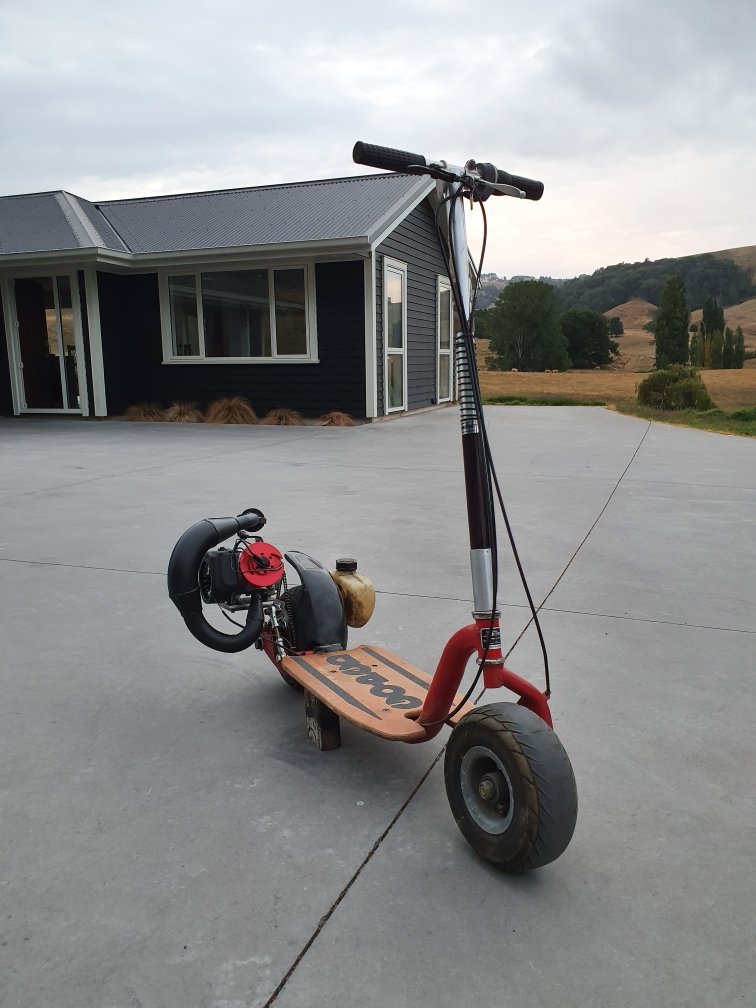
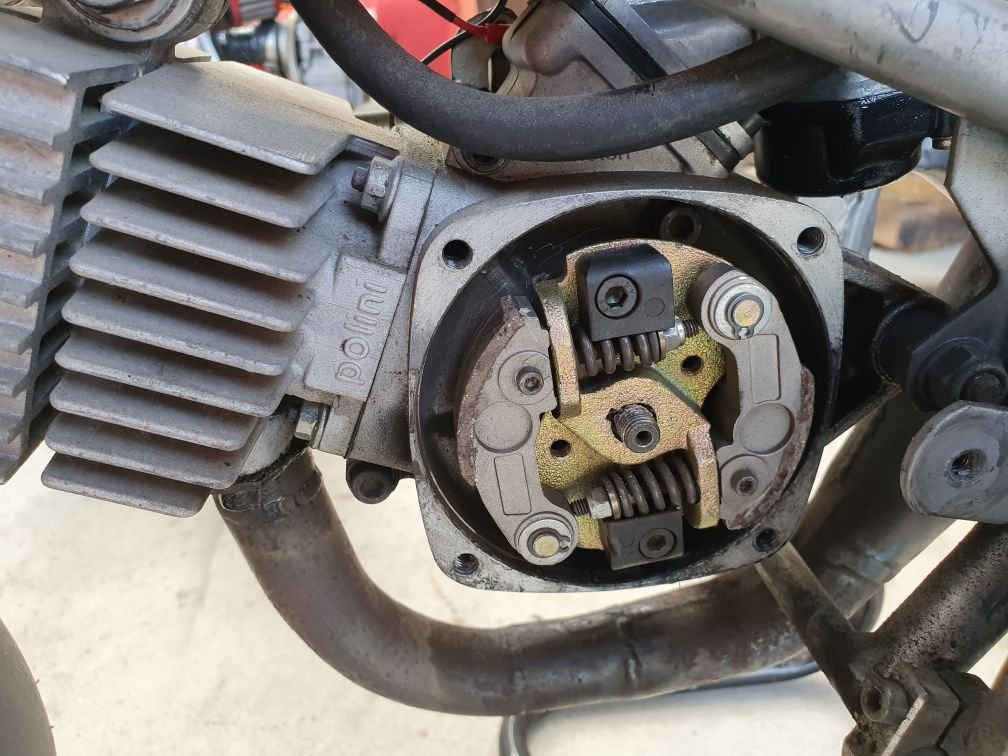
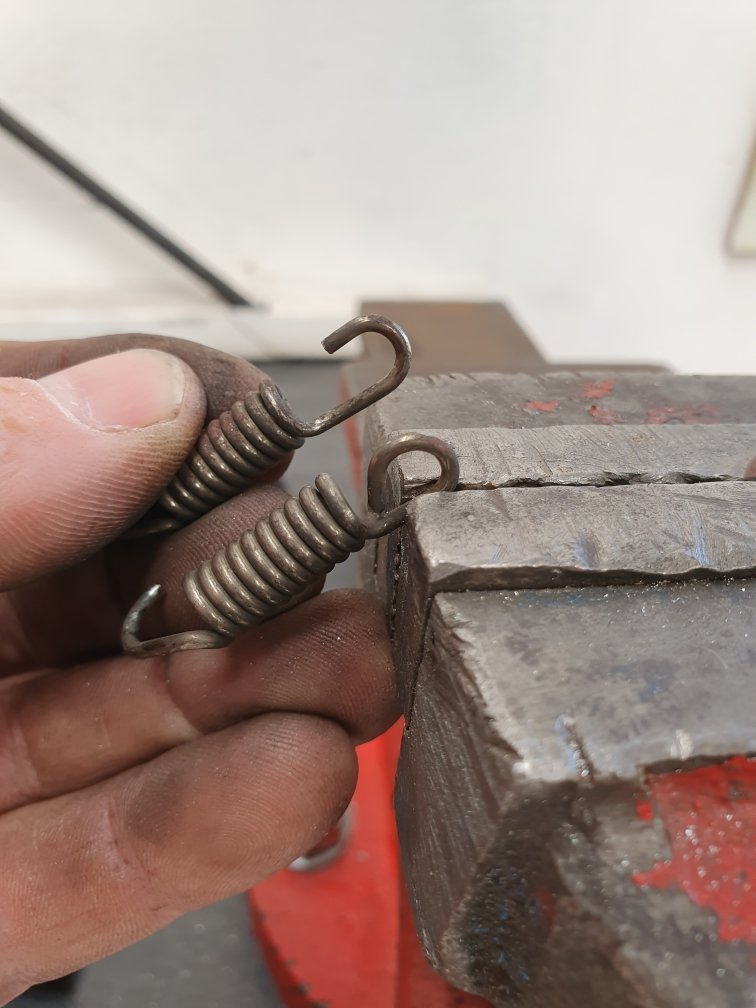
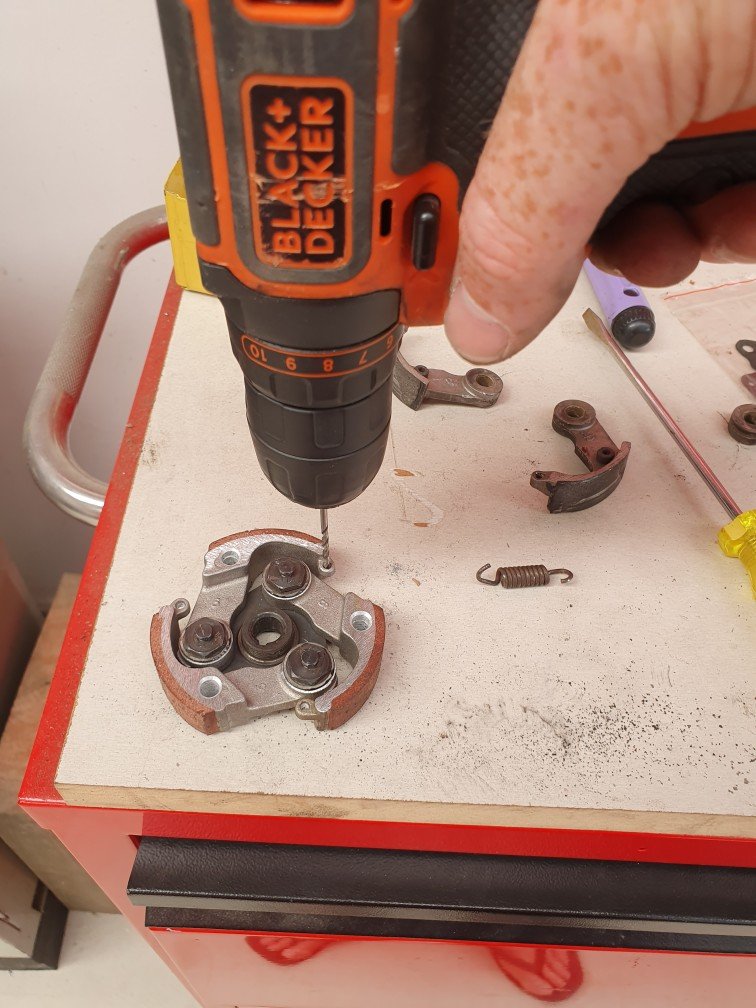
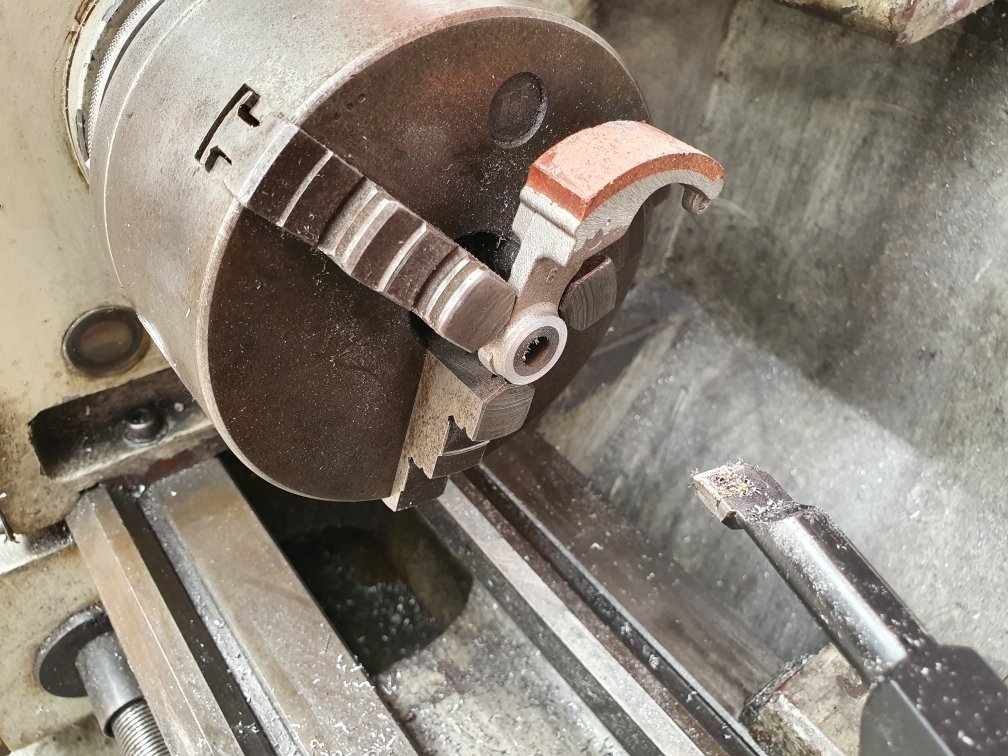
Okay, it's no secret I'm into some pretty niche things. Gopeds, drift trikes, lowrider bikes, skateboarding, gokarts, tallbikes, etc...etc... none of them are popular in NZ by any stretch of the imagination. Now this is about as niche as it gets. 39cc of polini awesomeness! It puts out 6.5hp and sounds like an angry beehive!!! Pops wheelies when the powerband kicks in...its mental. I picked it up a few years ago, with the goal of cutting it up and putting the motor on a goped. As it turns out, its basically the grandfather to the pocket bike craze and is highly collectible in Europe, some selling for over €2500. So needless to say, I won't be cutting it up anytime soon. The clutch fucked out, so I brought this "high performance" clutch. Well if the goal is to add excess weight to the rotating assembly, shift the engagement rpm down low where it's not making power and decrease speed, fun, your will to live as much as possible...then yes, this clutch excels in all those areas. I had other goals, like simply returning it to being awesome like it once was. So, I brought a Chinese clutch for a 49cc kids motorbike, that didn't fit either, then modified it to fit the polini by adapting the new clutch arms to fit the polini hub center. I cut the arms down in the lathe, to fit the polini bolts. Drilling to lighten the arms, this raises engagement rpm. Shortening the springs to put more tension on the arms, this further raises the rpm. Drilling the arm spring pockets to remove the shit casting marks to allow smoother operation, and allow the much fatter polini springs to fit. Back in and running like a dream! I know its ridiculous...I know. However its definitely one of those things that fits the saying "don't knock it until you try it". Not in the way someone may say having sex with men feels awesome "don't knock it until you try it"... no, nothing like that. This is more in the have you ever driven a rotary category... it's only purpose is to make you smile.
1 point
-
Ok so still havent got that relay to work so will make up a new one/buy one. Took the crown for a hoon down the road. Went ok... ish. The steering isnt quite centered and turning right sucked. Need to re center. And apart from the no exhaust and motor running like pooes it was a success. Still need an exhaust if anyone knows someone keen I'm in pukekohe. Wanting mild steel. Will use factory 4m cast extractors. Also cleaned up and painted the grill and surrounds flat black. Also connected up the throttle linkages so accelerator works off pedal. Getting close.1 point
-
So been slowly plodding away at this still. Chrissy is hard to keep some steam up. But the back of the car is nearly finished. Fuel tank is all done and fuel lines sorted to the front of the car. Had to modify some top arms, but the wheels are on and everything kinda basically works lol
1 point
-
so yea, it goes. had to push the throttle by hand because i haven't got the e throttle working yet. pretty stoked tbh, it goes fucking mint. if i can figure out the e throttle setup i might be able to drive it tomorrow. sorry the video is a bit shit, i was trying to doort and film at the same time.1 point
-
Roughed out the porting, N.O.S outer plate, port matched to the manifold and shaped according to Graham Bell's 2t performance guide Inner disk plate Case port Just about couldn't get my little finger through there before! Crank web doesn't shroud it as badly as I was worried it would Jonny told Andrew he tapered his crank to clear the porting and I have since seen a few guides that say to taper that web a bit more for max flow, may yet see if I can get some lathe time, but I dunno if it'll be worth it though as it looks to me that the port should flow more than enough? And it was hard to bring myself to do it But I just couldn't run a silver engine lol
1 point
-
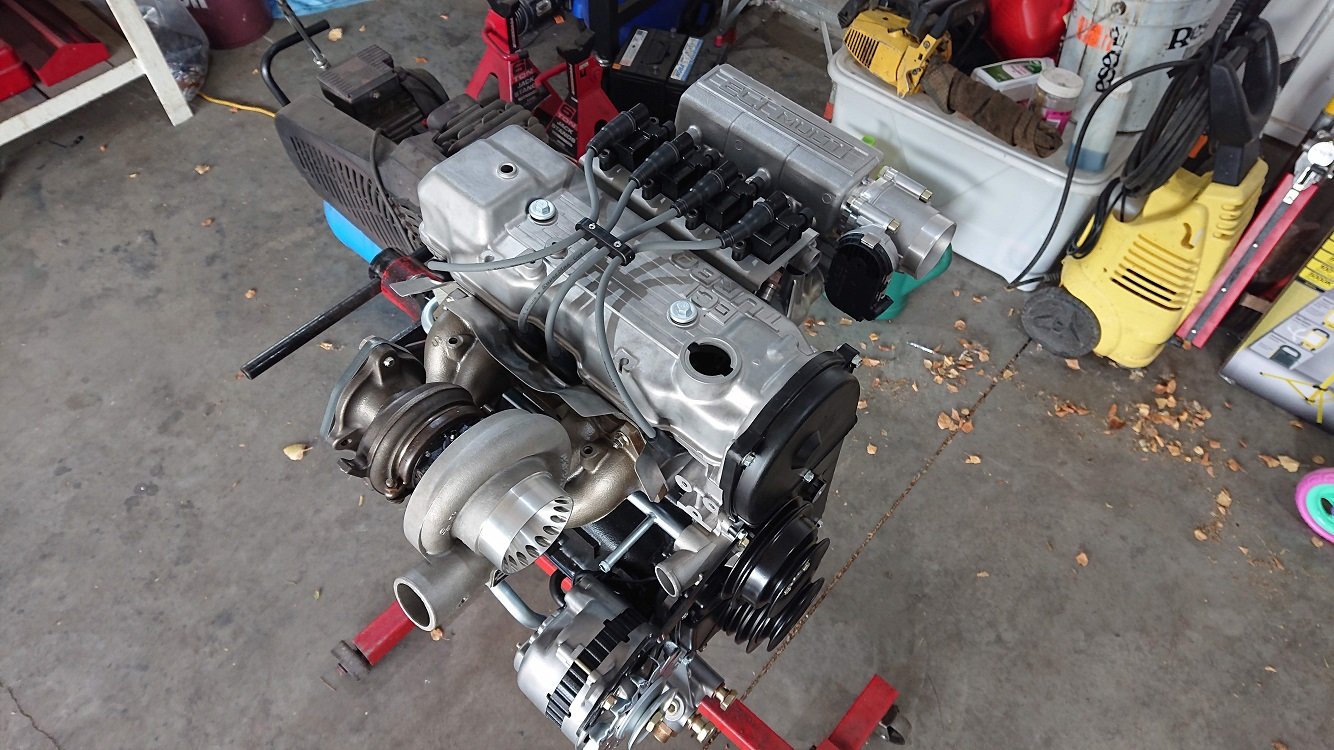
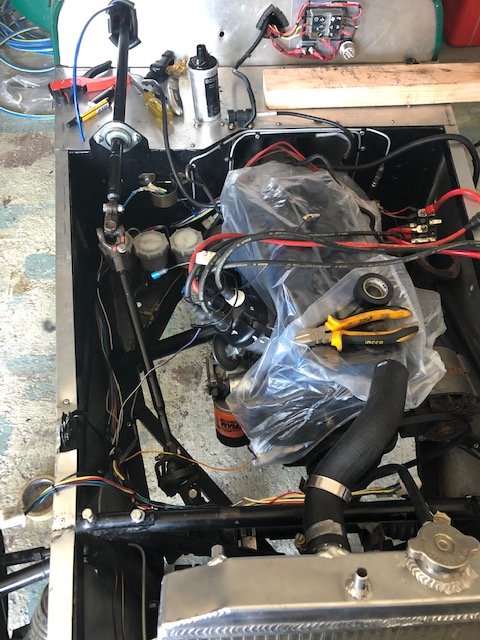
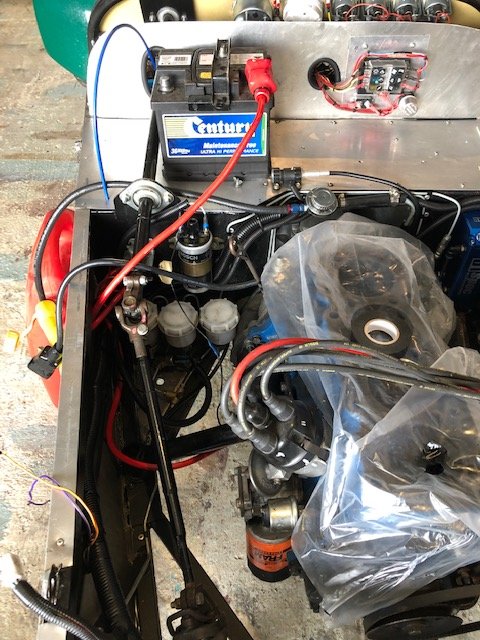
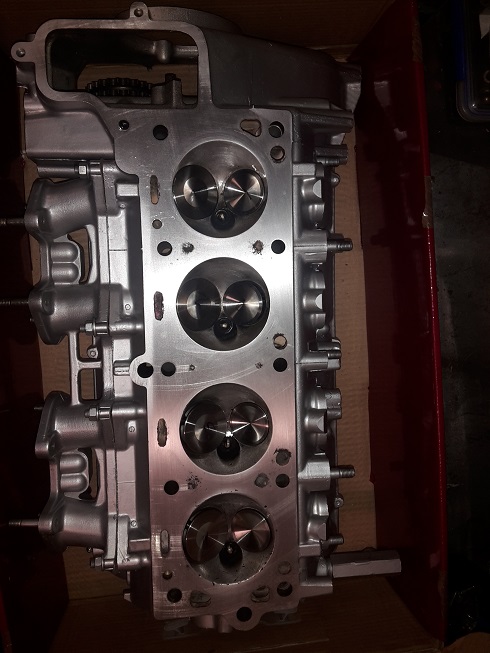
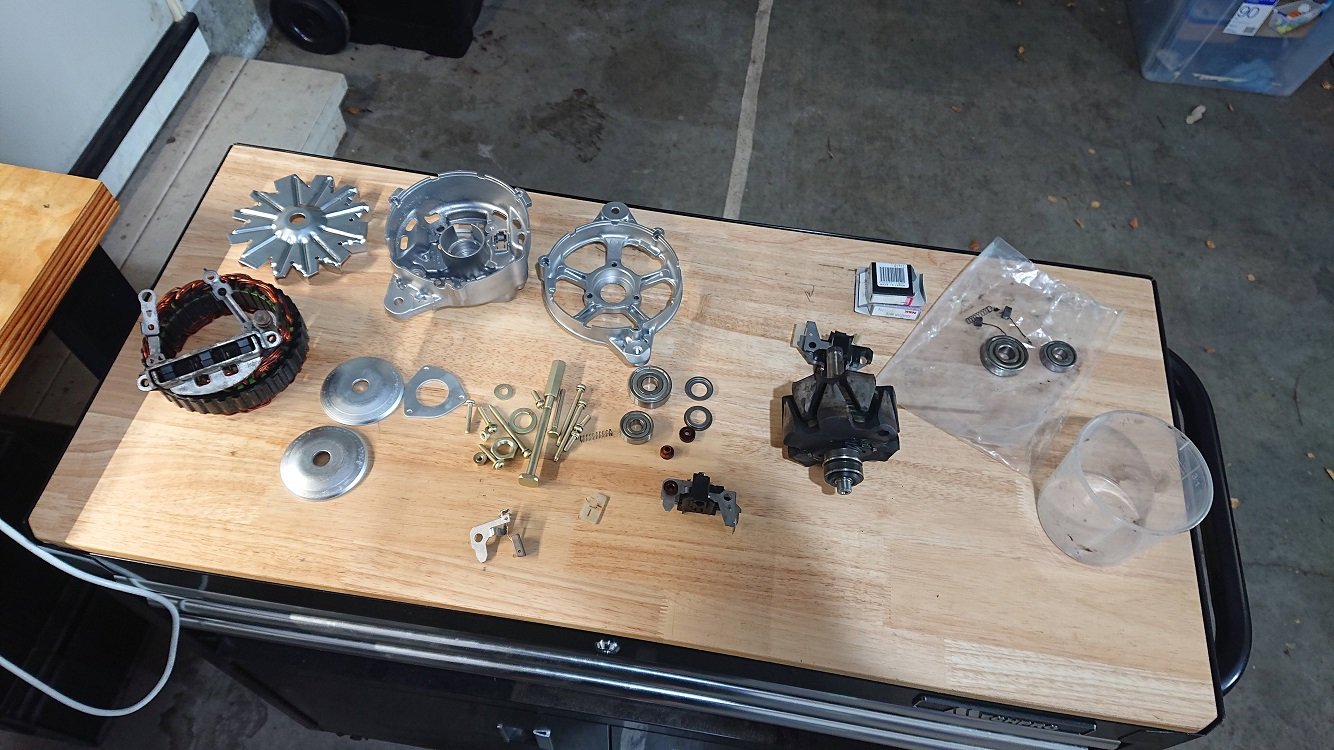
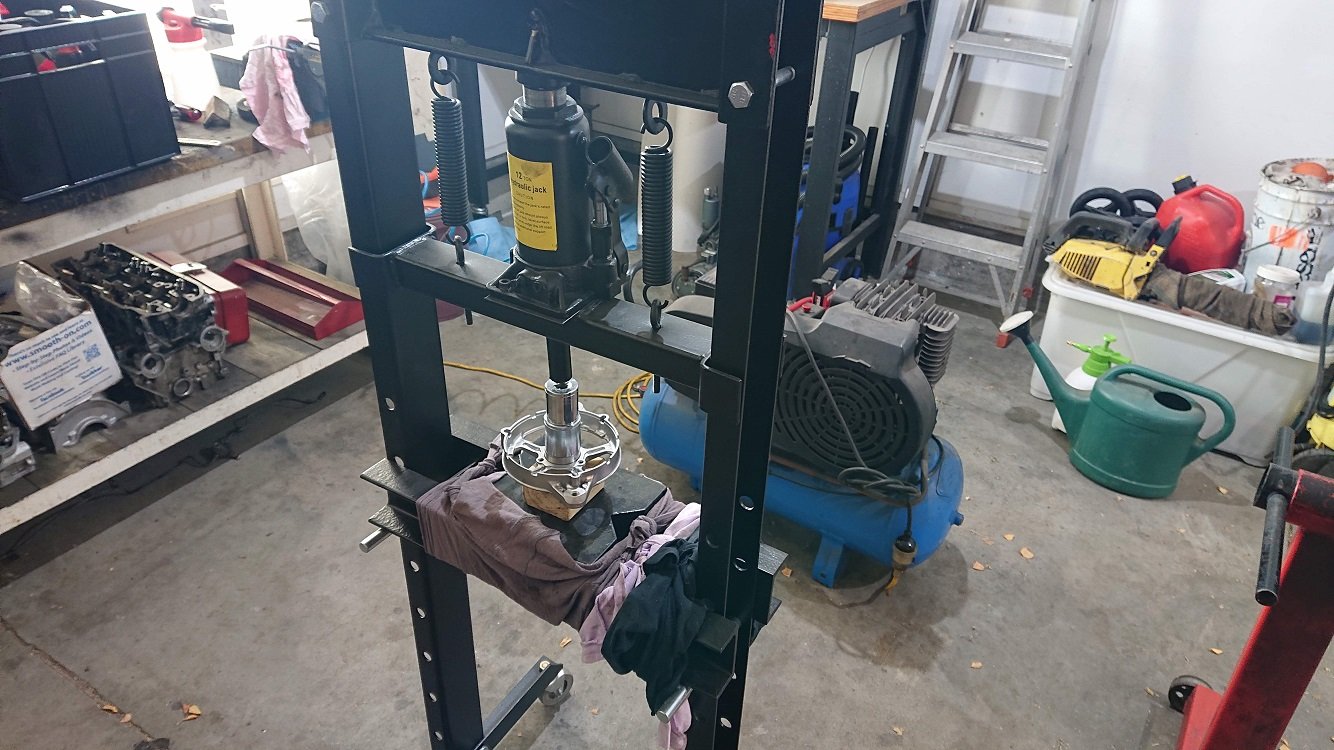
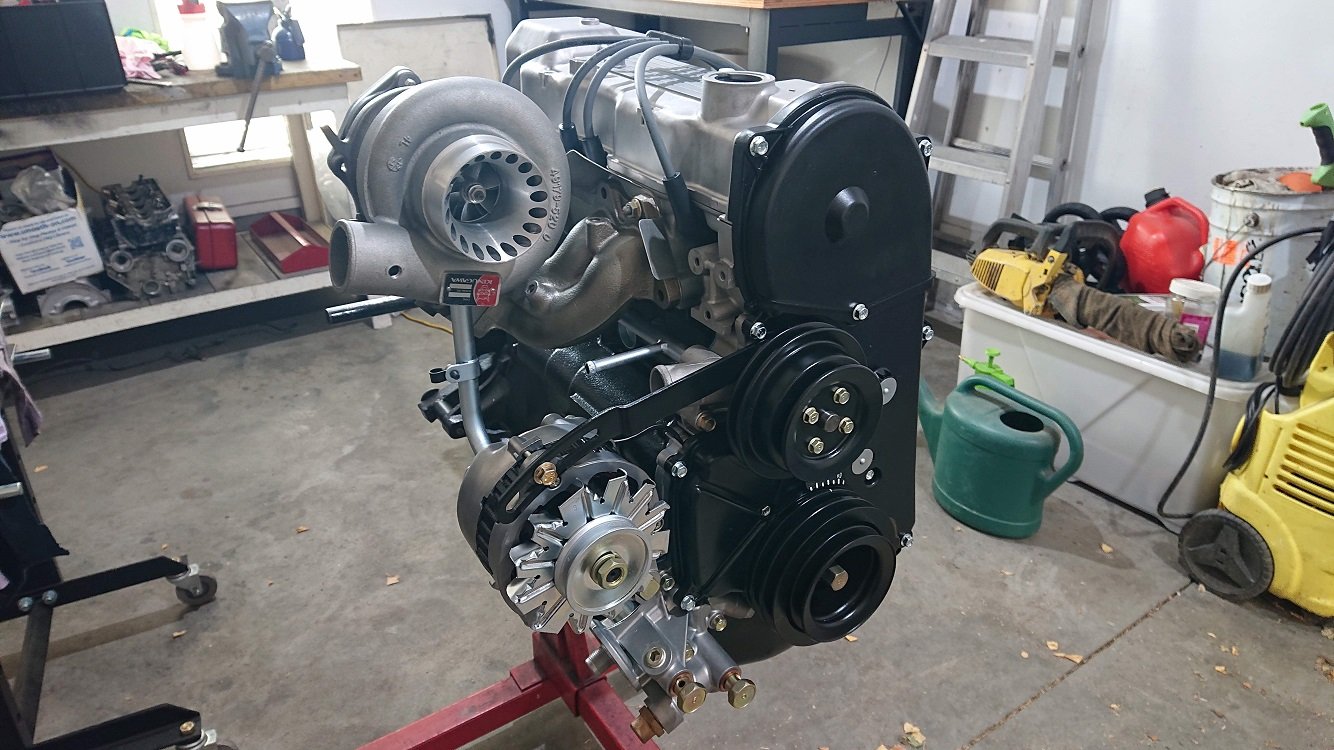
HOLY FUCKING SHIT IT IS HOT TODAY. Needed a quiet easy project to do in the heat, collected up all the bits for the alternator jigsaw. A couple of months back the alternator on the side of the 4g52 in the truck at the moment spat the dummy, brushes were doneburgers. I couldn't find a replacement one second hand locally, as they're different to the ones fitted to 4g63's, which are pretty common. I grabbed a 4g63 one anyway, thinking I could at the least harvest some bits from it. Turns out the voltage regulator / brush holders are the same, so I swapped those over and my truck was charging again. This left me with a super crusty 4g63 SOHC alternator, with worn out brushes and dry bearings. I took it apart, ordered everything it needed and vaporblasted / zinc plated everything. The replacement reg / brush holder I ordered was damaged in shipping, so I harvested the new brushes from it and swapped them into the reg / brush holder that had originally been in the 4g52 alt. Then had to remember where all the plastic isolators went. Got it reassembled with some new bearings pressed into place too. My workspace is just a typical internal access double garage. I don't complain as its better than what many people work with, but It does mean I need to keep things mobile, and stored away when not in use. This is about the cheapest press that money can buy, but does the job for 99% of what I do. Putting it on wheels was one of the best things I've done, as its so easy to store out of the way the 360 days a year its not needed ;-). Nothing more super exciting about the job, everything seems to fit up. The zinc plated fan and pulleys are a little bling though, they might get some rattle can black action. In other news the 1/4 BSPT to AN-4 adaptor turned up, so I could fit that to the back of the oil filter housing the start eyeing up the turbo oil feed. I'll need a 45 on the oil filter housing end, and a right angle on the turbo end, plus some heat sleeving. The bits to make the ignition leads also turned up. I got the spark plug ends all done, but the manifold / coils are still at work, so couldnt do those. Next week maybe, but I'll be away up in the Coromandel for Ledfoot, so maybe not. Now I think it'll be time for come cider in the sun.
1 point
-
Started testing some more intake stuff yeh nar didnt run them that long ^ but made this abortion Red line is one of the best runs i could find from the itb setup Blue line is the run from the setup in picture above Green line is the same as blue, but runners cut down 25mm As can see cutting runners down the 25mm moved the peak higher in the rpm range. and starting to push the big loss off the end of chart Cant cut the current runners shorter due to tower clearance. so awaiting some tighter bends to carry on testing. Goal is to try get it to do the same thing as my na setup. get that peak to sit between 7000 -8000 rpm and gain about 15kw up top. depends if the sharp radius bends are an issue or not1 point
-
So, i did this again using the same coil overs and springs. 8kg springs 210mm long Front compressed 91mm adding both springs together. so 91mm x 8kg = 728kg Front Rear compressed 63mm adding both springs together. 63mm x 8kg = 504kg Rear 1232kg with almost empty fuel tank (60L), no idea how much fuel it had when weighed it last time, but guessing would have been empty because it always is. worst case its about 100kg lighter than the 1376kg it was, All the weight come off the front. Which is what ive slowly been chipping away at. 59% front 41% rear with empty fuel tank. still not great but better than 64/36 Should be able to pull another 10kg out of the front if swap out the brake calipers and intercooler. Anyone got some fc/fd rx7 calipers hanging about ?1 point
-
Hi David . I like that red. However I have noticed a technical issue that I'm not sure you have noticed Your supercharger pulley ribs go the wrong way! Also I cant see where your carburettors are going to go or where your mr garlits 3 hole fake scoop is. Regards, Clinton
1 point
-
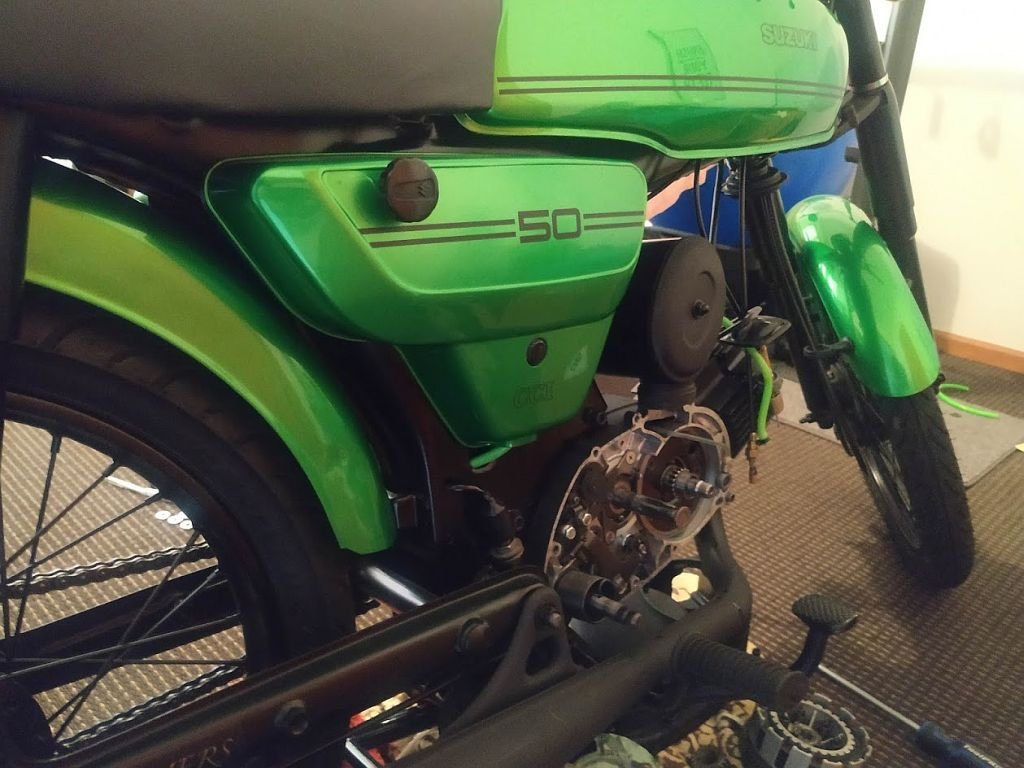
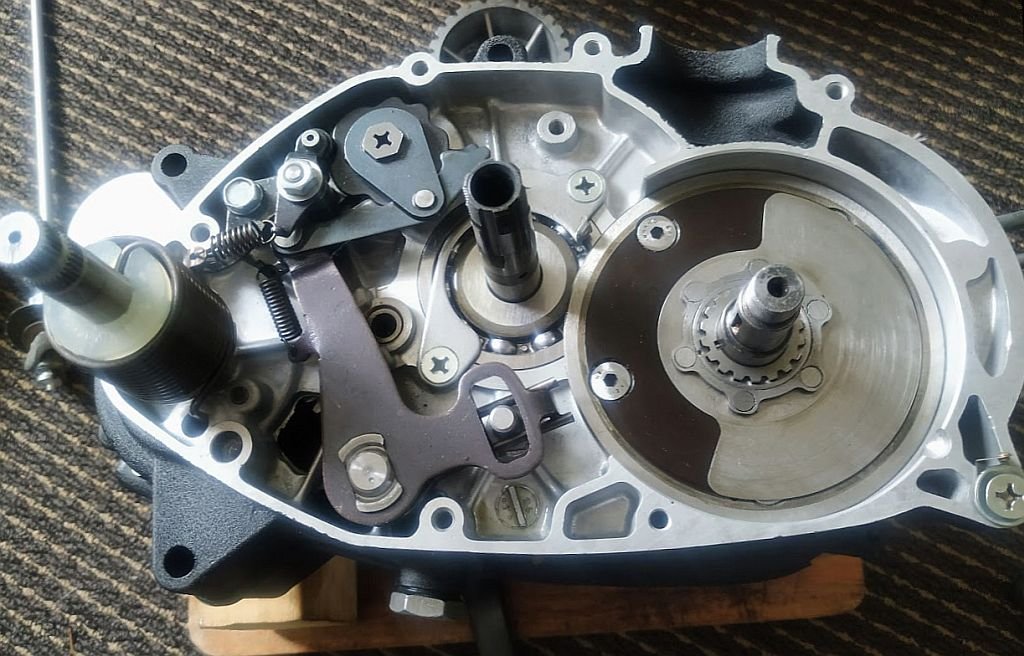
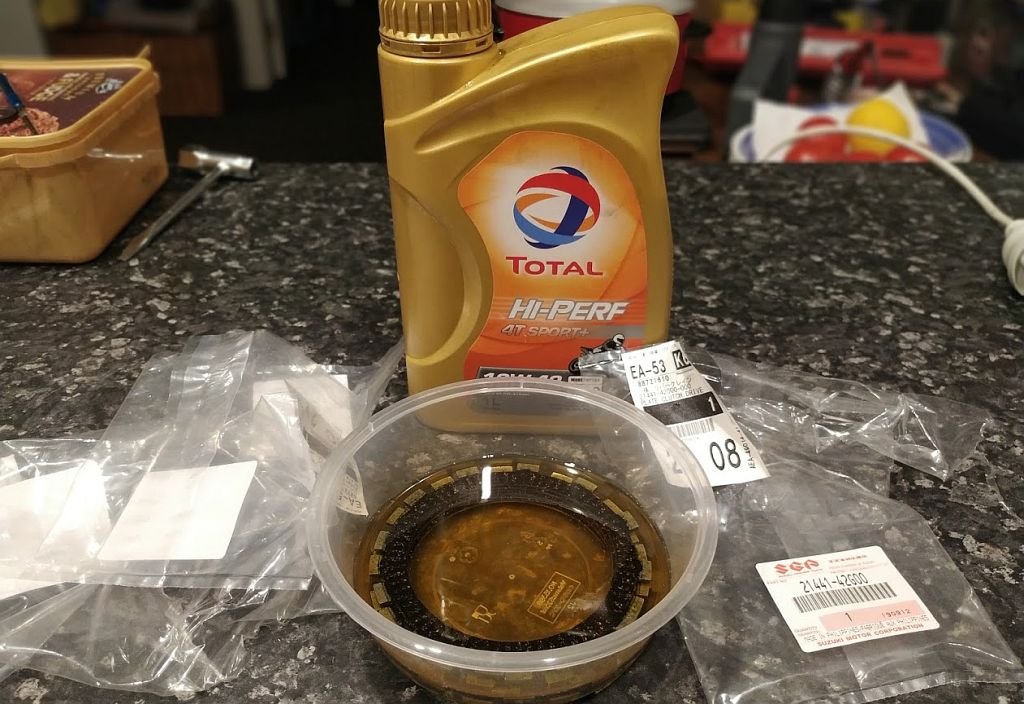
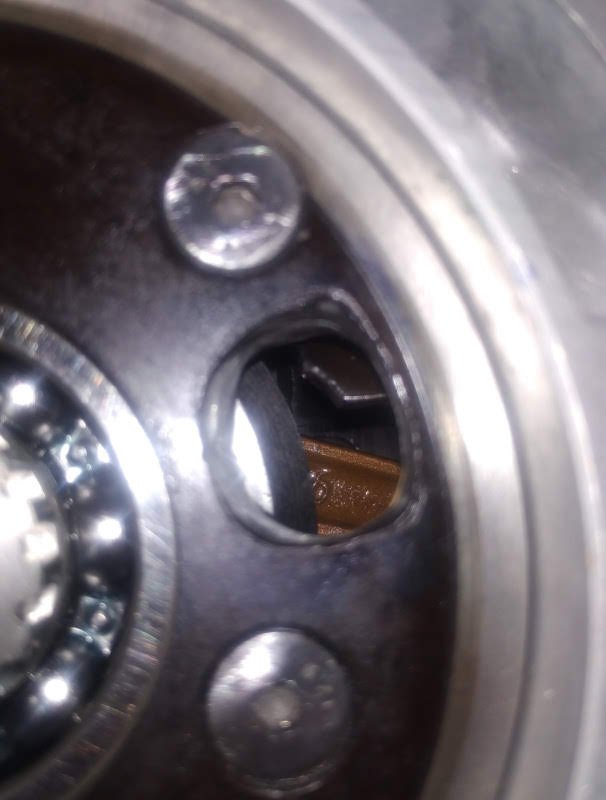
So as it turns out there is NOTHING in the way of a big bore kit for an A50 available, I can find listings for them from no later than 2005 so a bolt on A50 kit quickly became not an option. But I did discover that until recently Suzuki made another model, the K50 that was essentially a 3 or 4 speed low power version that was popular in Europe, main difference seemed to be that the K50 used a reed valve set up instead of the rotary disc valve found in the A series. Pics looked good so figured the 45mm kit would be good to go, so I ordered a kit from Denmark along with a new head, center stand, kick starter and other bits, also learnt that Danish KR is worth almost twice the NZ$ of Swedish KR Looks good right? Wrong Close to throwing a cover over it and walking away for a while a mate took my factory cylinder, welded on a new fin and said he'd hone it out after I ported it to try and get rid of at least the worst of the chamfering gouging. WIN! Or at least a win until I started trying to port it... The cylinder wall was paper thin and crumbly between the bore and the port, even a light touch with the die grinder just ripped chunks off So back to the K50 option... Black K50, Green A50 CNC plasma cut adaptor Cylinder skirt hit the crank webs and the cooling fins fouled the engine cases, so a bit of high precision engineering took place Cut a couple 1.6mm base gaskets to get the port timing right Not great! But we can fix that, we have the technology The kit head seemed to have come from a soup bowl factory Close to 3mm came off that! Fitted the clutch cover etc and gave it a couple kicks to check compression Not great, but better than the factory 95psi rating at least. Fired it up at 10:30pm one night, in the house, using air freshener as engine start so I didn't break my Mrs no petrol or engine start in the house rule... 2nd kick and it burst into life!!! And since it was so late, the exhaust port was all the exhaust it had and I didn't warn her, my Mrs just about had kittens hahahaha Spare room smelt like a warm summer breeze and I'm now banned from the air freshener, but I was so happy to hear it run!! Next day I fitted the pipe and pushed it outside, tipped a few liters of premix in and ran it for a couple heat cycles, once the rings bedded in a bit compression came up to closer to 120psi too. Fuel tap leaked like a sieve though. Sorted! Still a bit more to cover on the engine, it's actually still an ongoing thing, but you've read enough of my drivel for now lol1 point
-
Made a start on the plenum I tested the trumpets on the starlet. red line is straight pipe the same length as the bellmouths (blue). Pretty much no difference till airflow demand is high. after that the bellmouths win. Down on power about 10kw to what starlet makes due to runner length. Some goose put a massive suspension tower in the way, so stuck with this length on the hilux1 point
-
Why are the starlet itb's in this thread? Because the the inlet manifold on the hilux sucks. Not power wise, it seems to work good. but it vibrates, cracks and the big plenum doesn't work with what im trying to do. stalls out easy and any kind of cam setup other than factory, even cam timing changes on stock cams makes it a whole lot worse. wont idle on all cylinders and stalls real easy. not ideal for 4wding itb's will solve the big plenum issue, also will be able to isolate the plenum from the engine with some short silicone joiners. to solve any vibration issues. So had those bellmouths in above picture from another project, recycling; extended them by welding some thick wall tube onto the bottom machined a taper into them to suit the 52mm throttles and slightly adjusted the bellmouth so has bit more of an elliptical shape. machined some of the excess off them. could have taken whole lot more off but was over it by this stage. will probably test them on the starlet before welding them into plenum1 point
-
Primer applied
1 point
-
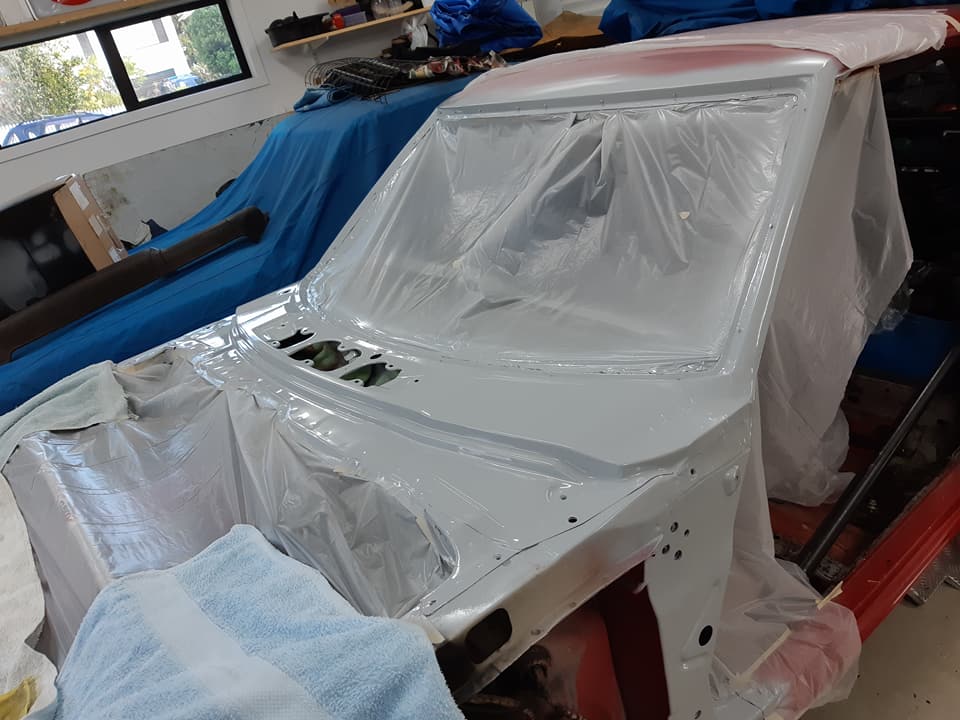
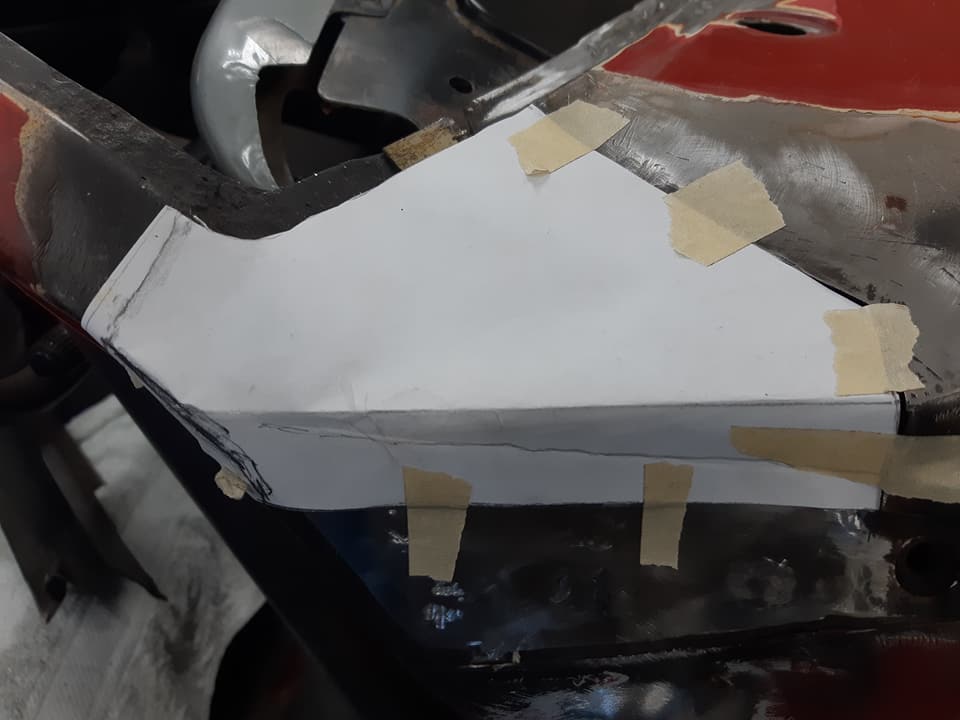
Top layer started today.. Paper template Hammered, bent, twisted and welded - then checked it against the straight shell I have in the shed.. And fitted/tweaked on the car ready to be welded
1 point
-
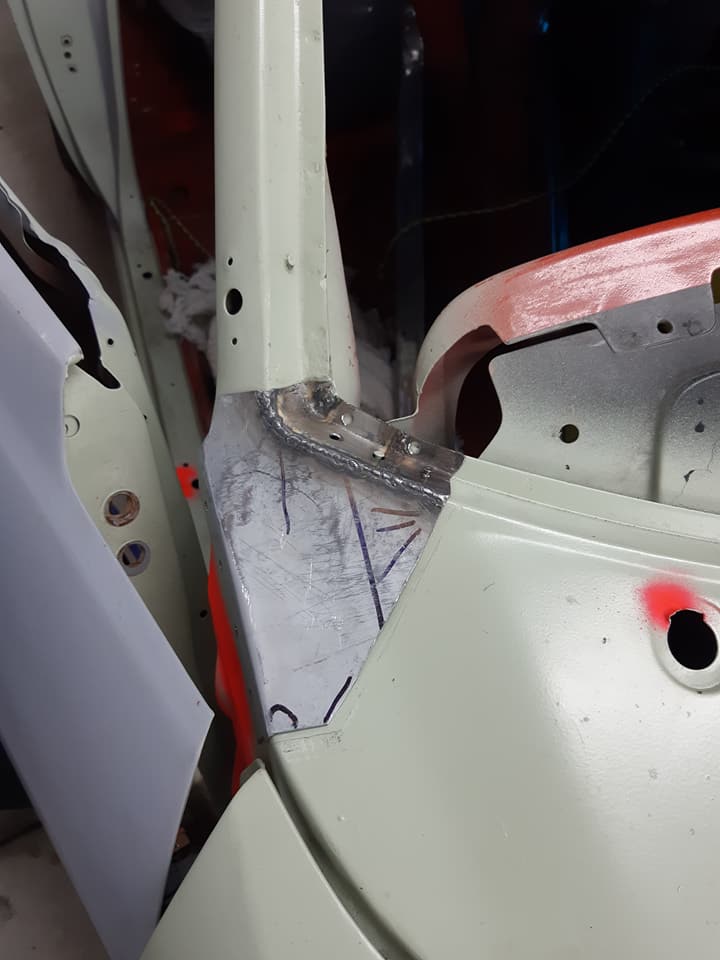
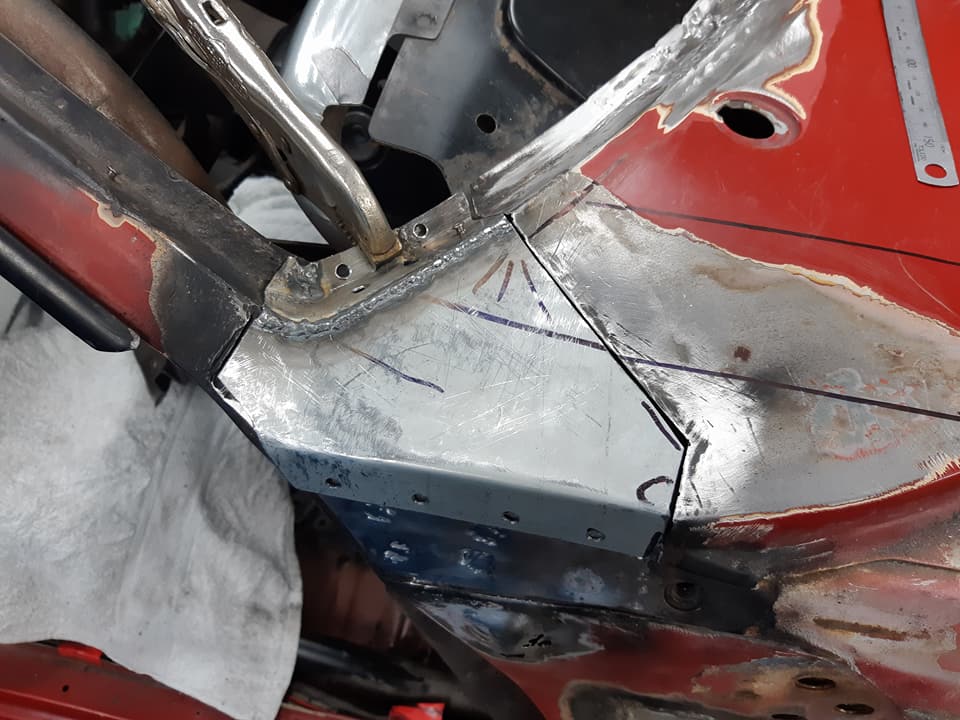
A little digging on the other side revealed more horrors in the drivers side A-pillar So... Rinse and repeat time Top layer to finish yet - ran out of new steel sheet..
1 point
-
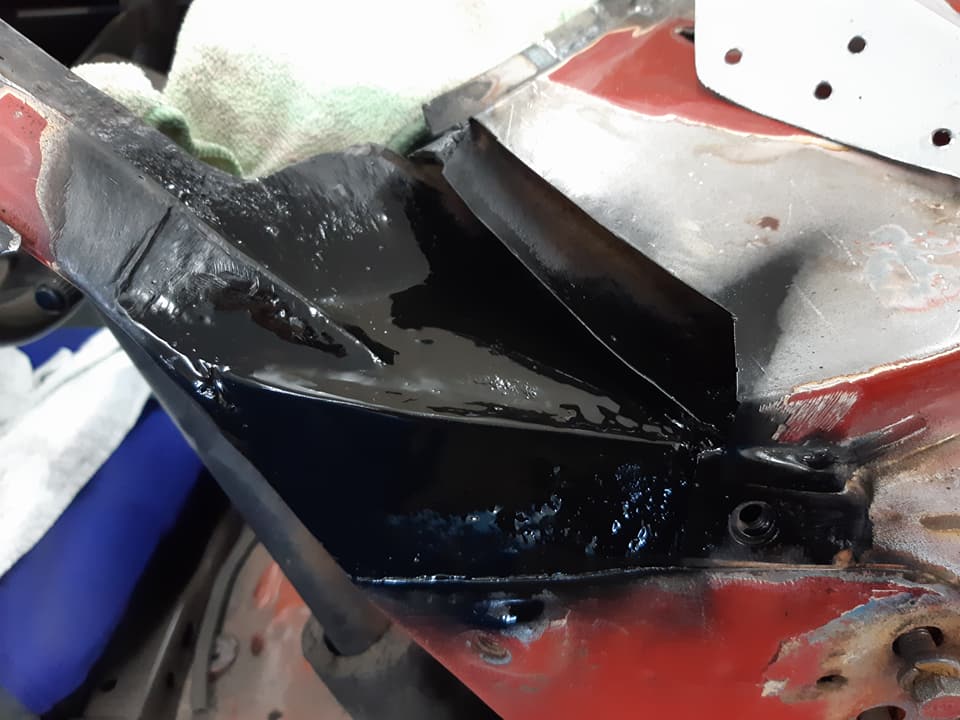
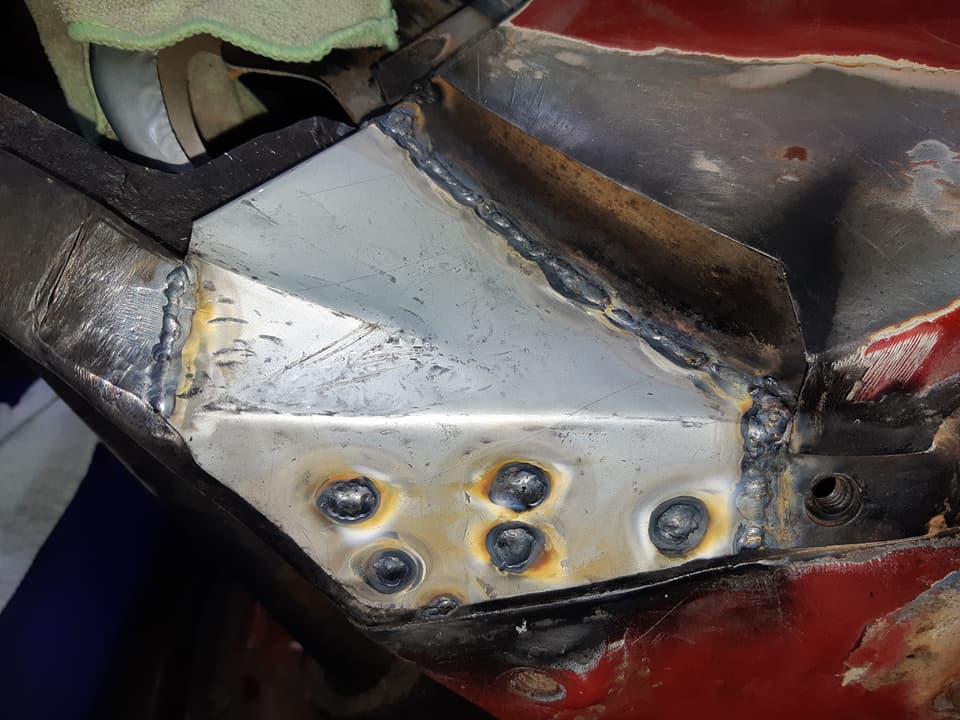
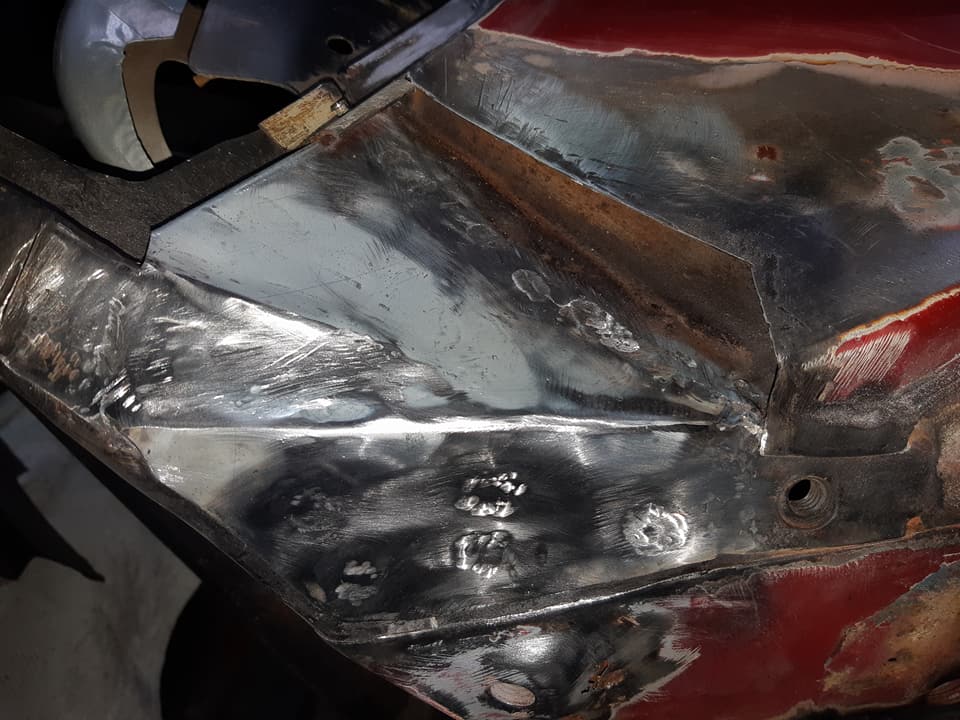
Summertime!slammage.(sitting on a funny angle) cruized around town the other night.me and Bell climbed a tree.birds eye view.since I got it back on the road I've been sure the exhaust didn't sound right, as it had been nearly a decade I just rolled with it but for the last week or two it been starting to sound more and more like a massey ferguson by the day. So on friday night I dropped the whole thing out, which was better easy as half the nuts holding it on were missing and one of the studs, so sorry about that if you were following me at the time!and then I found this on one of the heat exchanger pipes.what the fuckity? luckily I have a welder, also don't weld in jandels, that shit hurts!Should last another couple months, right? got it all back together last yesterday which nearly killed me in this heat! and finally I can hear the actual exhaust note now, brum brum!! I like it alot.Also spring washers where used this time so all the nuts and studs should stay put!1 point


This leaderboard is set to Auckland/GMT+12:00