
Leaderboard


Popular Content
Showing content with the highest reputation on 01/24/20 in all areas
-
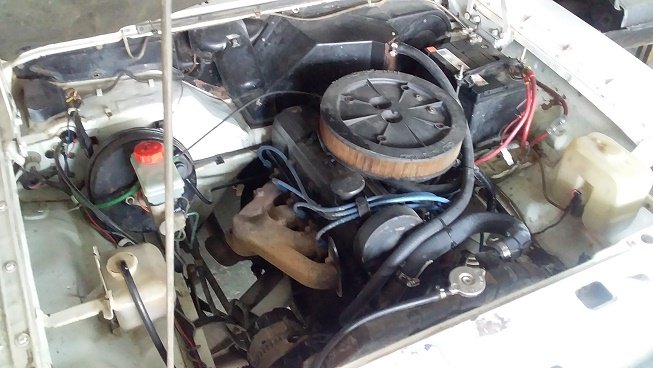
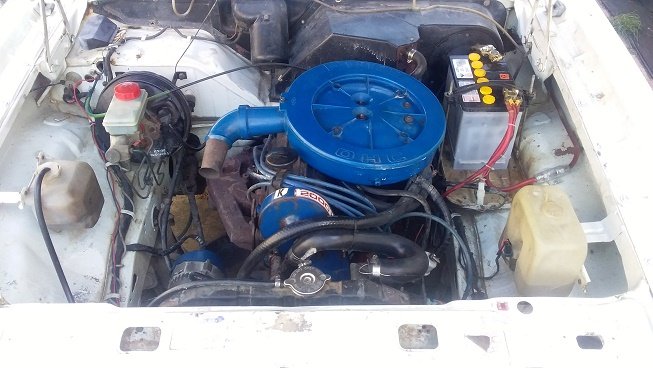
motor in. pretty stoked tbh. its funny how quickly i forgot how little room there is around this thing when its back in the bay. also the bonnet fits. 2020-01-24_05-44-54 by sheepers, on Flickr 2020-01-24_05-45-02 by sheepers, on Flickr 2020-01-24_05-45-10 by sheepers, on Flickr18 points
-
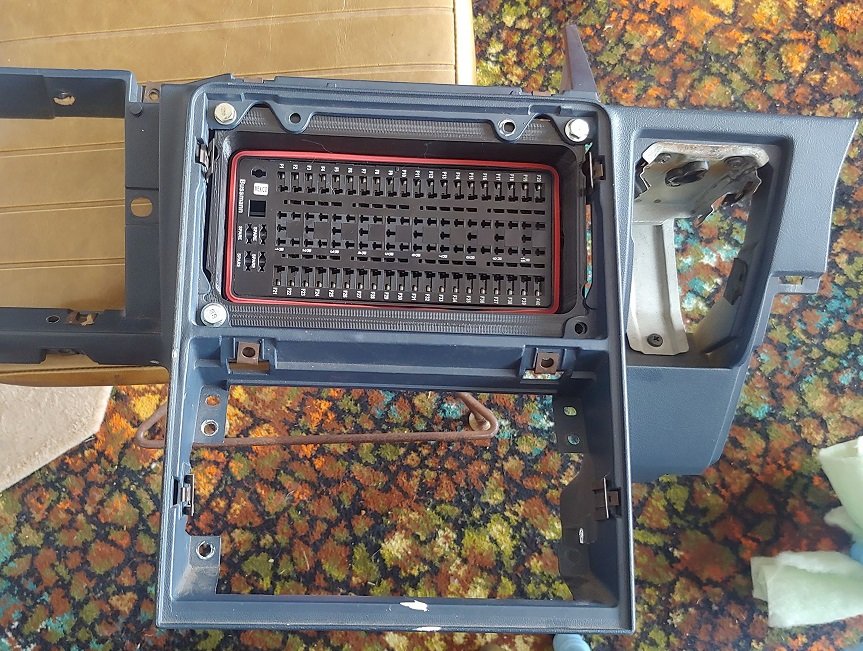
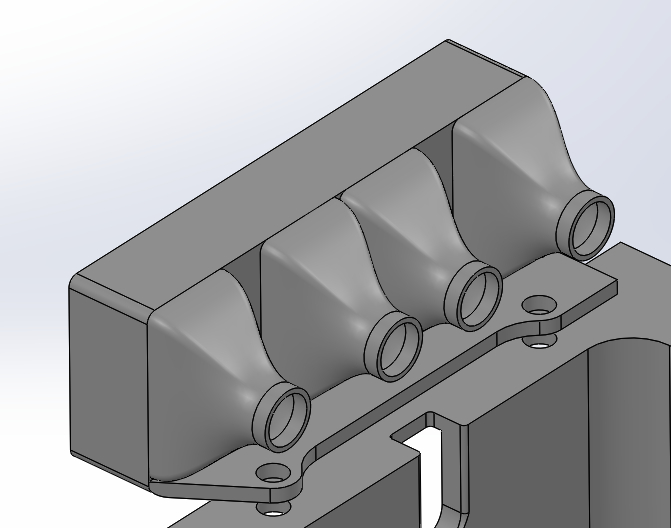
Ok been feeling a bit better, feels like making some meaningful progress again. I've been working on the fuse box situation. Working towards the milestone of getting power to ECU and sensors etc - Think that'll help push along towards first engine start. cool. Been looking at a bunch of different places to mount the fusebox, but I reckon in the center console with a cover over it is going to be best option that's easiest to access. So printed a little holder thingy (will have a cover hiding the bolts and edges etc) Then I've been working out on an Excel spreadsheet where all of the ins and outs of the fusebox will need to go. I've decided I'll run an SSR for the fuel pump and engine fan, so these will need to be seperate. As you cant get SSRs in the form factor of those micro relays. But it looks like I'll need at least 3 12 pin plugs for in/out, so will go for four to leave some space for future stuff / important things I've forgotten about. So for sake of tidiness and making it easy to wire up on the bench / unplug in the car. I am printing a 4 way backshell type thing for Deutsch DT 12 way plugs, that will bolt to back of the fuse box. As per usual with 3d printing it took a few iterations to get the clearances nice. But consistent once you get it right so worth the effort. Fingers crossed works out okay and wiring it up is straight forward. Documentation definitely helps, even just looking at Excel sheet you can see how to group things better so the wiring will be tidier.
 14 points
 -
So I noticed it would always run cold, and never warm up properly. The temp sender had been replaced recently as apparently the temp gauge had stopped working. I thought perhaps the thermostat was playing up or something,. So I drained the radiator in preparation of taking the thermostat housing off....color of water was not promising, very rusty. Then whipped the thermostat housing off.....no thermostat. Awesome. So feared the worst thinking the rad must have been chooched, but figured Id give it a good flush out and see what happened. So went to town with the garden house, whacked a new thermostat it, and boom, now warms up properly and doesn't seem to have nay issues getting too hot or anything. Success. Next item was the speedo which over read by like 20kph. The needle had snapped as sometime and someone had just glued a random piece back on, albeit crooked, which caused the over read. 5 seconds with a lighter and straightened it out. Boom. Tacho also didn't work, and then I noticed the needle was bent as well and jamming on the dash face. So straighten that as well with high hopes. With the key off, it sits on 4500rpm....then when key on it slams to zero. It works in the sense it moves as the revs rise, but it under reads by about 1000-1500rpm. lol. Semi success. Starter motor would occasionally make horrendous noises and sounded like the teeth were engaging properly with the ring gear on the flywheel and wouldn't turn the motor over. Pulled it out expected it to be gummed up or something, but turned out the main 12v feed was just not done up properly. Hopefully this fixes it. PS, the start motors are a nightmare to get off on this, forearms are bruised and battered today haha. Success until proven otherwise. Oddly enough I'm actually enjoying diagnosing and fixing these little things. Is also quite nice working on something that isn't oily, smelly, and diesel for a change. And in other news we sold our VW golf so now have a strict fleet of Nissans (this, my gloria wagon, and a xtrail for adult duties).9 points
-
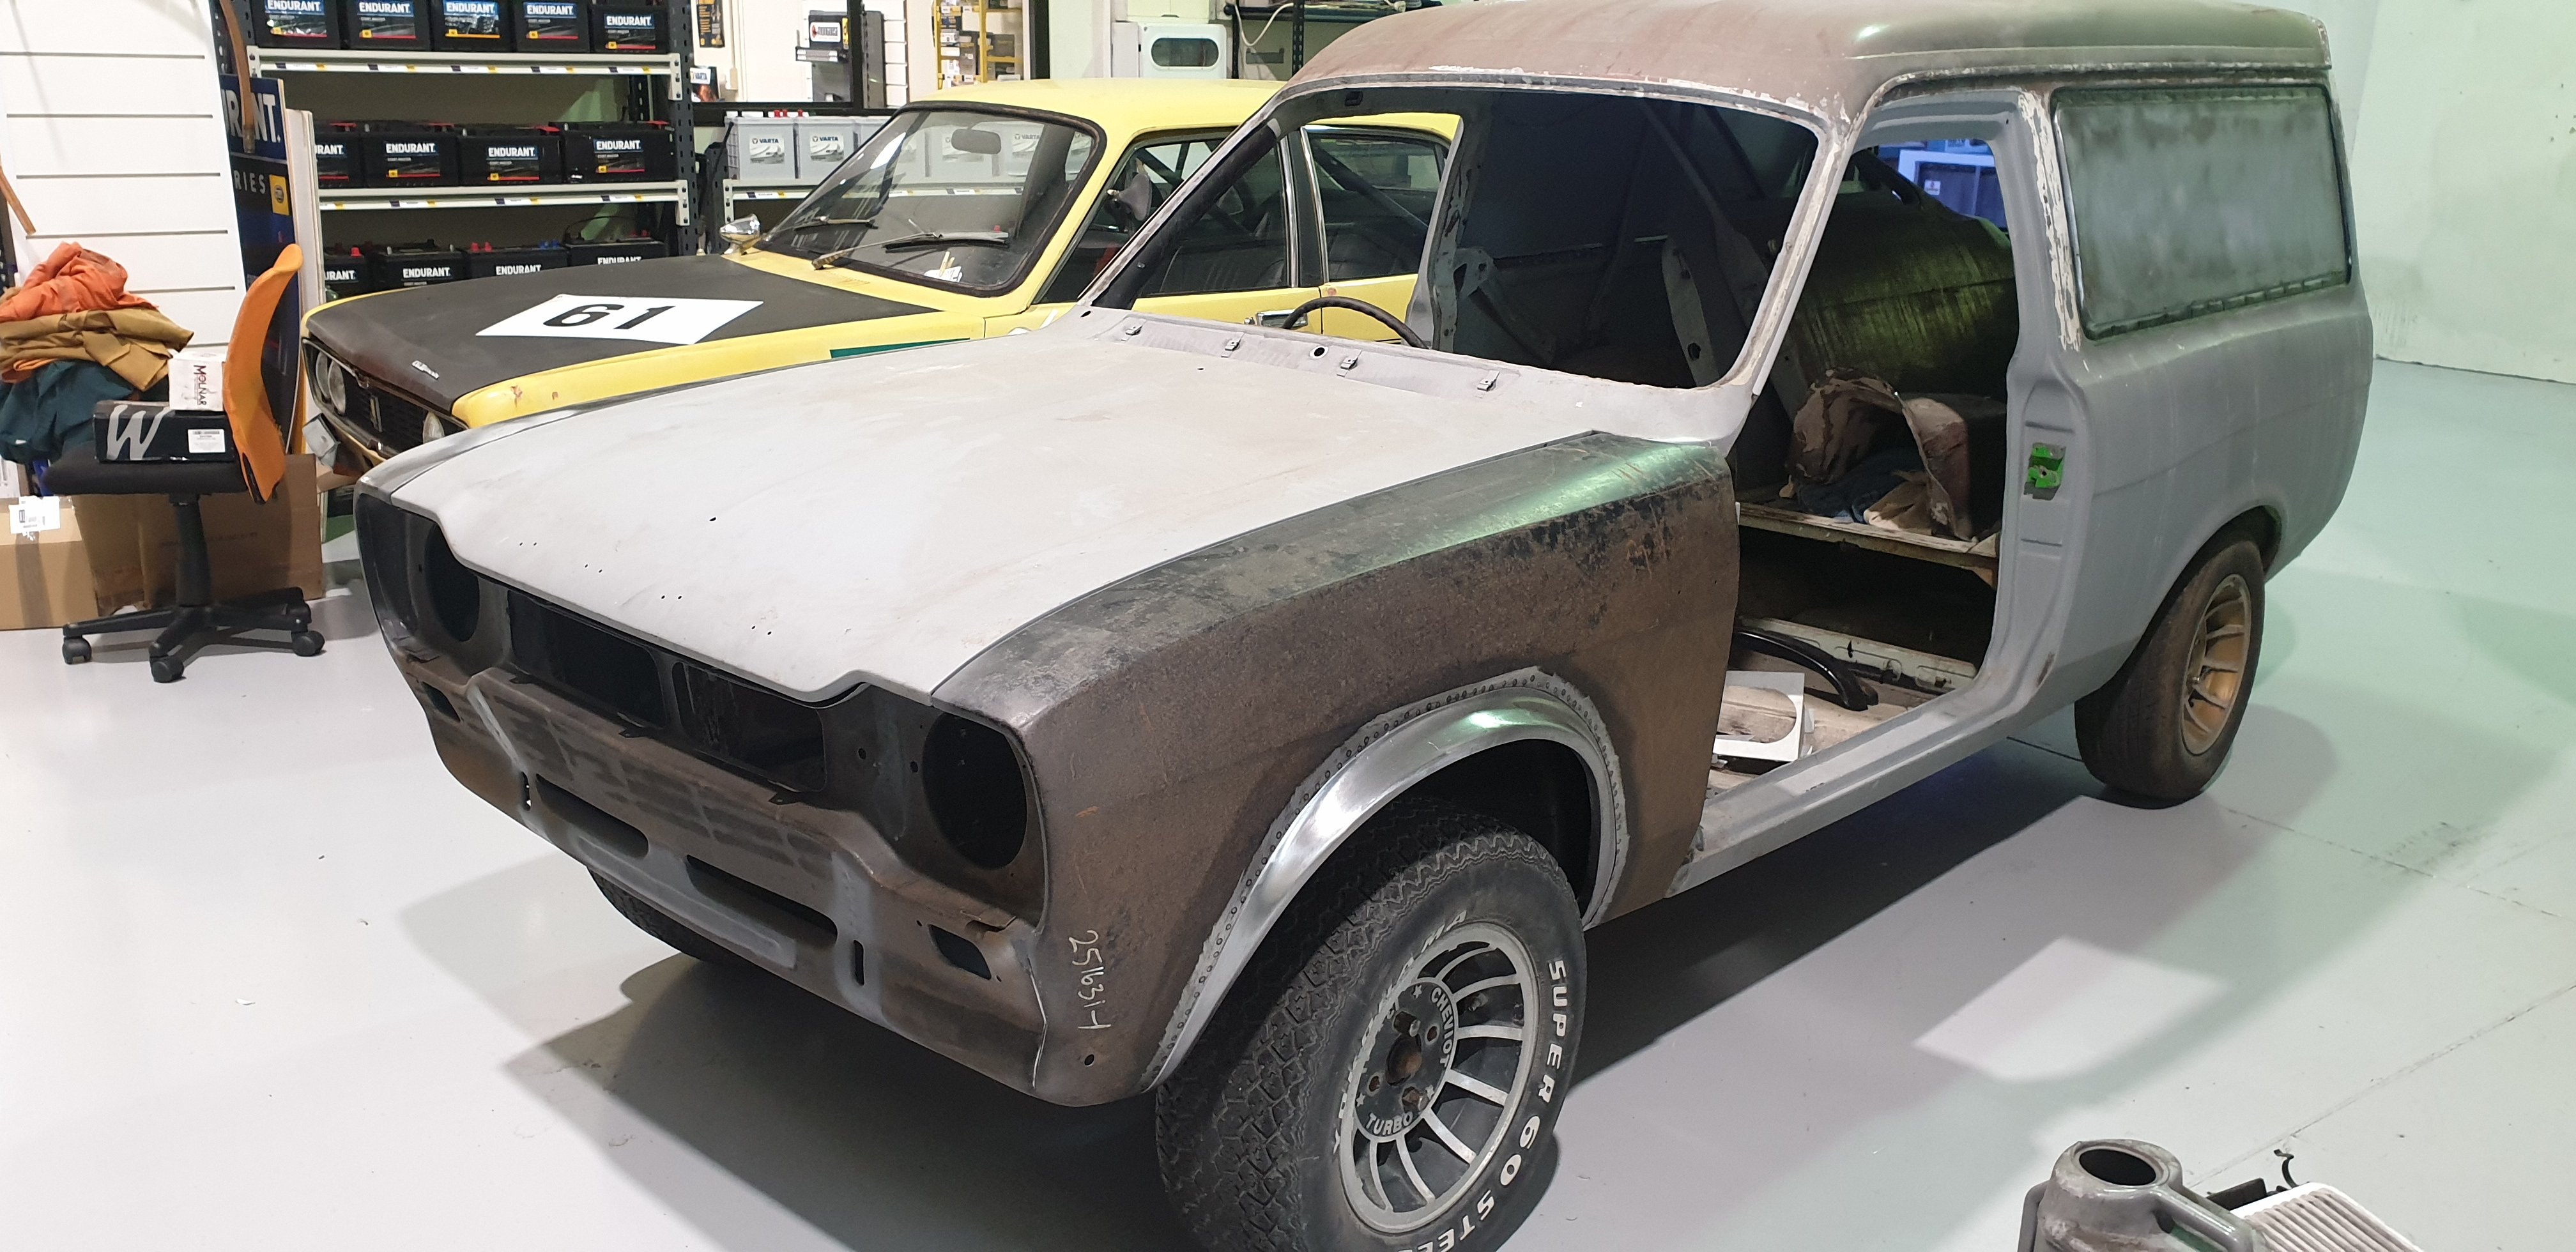
been doing some wiring. i found it pretty hard to take a photo that showed what ive done so the pix are a bit shit really. just imagine i had no loom at all, then i did. its a whole new world having new plugs and looms to make everything. i learned a whole bunch making this and im really happy with how its come out. i now have the body interface to sort out which will be a cool process and ill be able to fix heaps of stuff. bit of fucking around and then i can put the motor back in the car. 2020-01-23_07-16-12 by sheepers, on Flickr 2020-01-23_07-15-57 by sheepers, on Flickr9 points
-
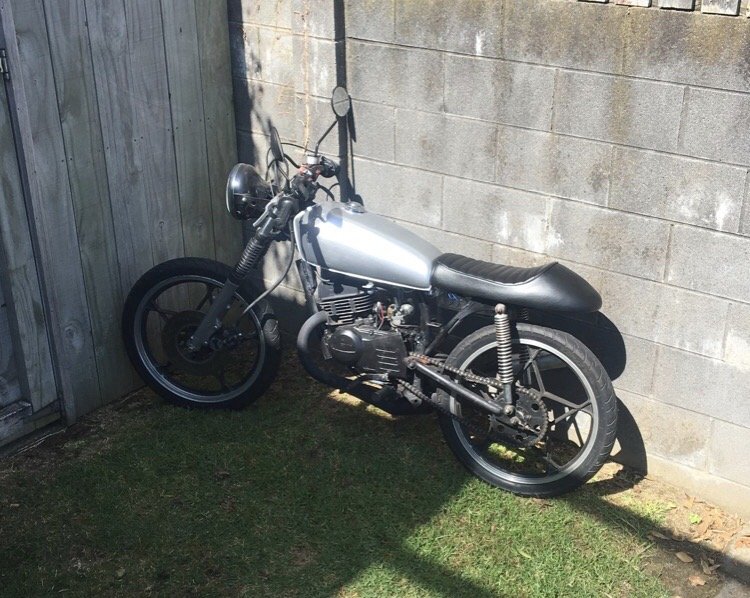
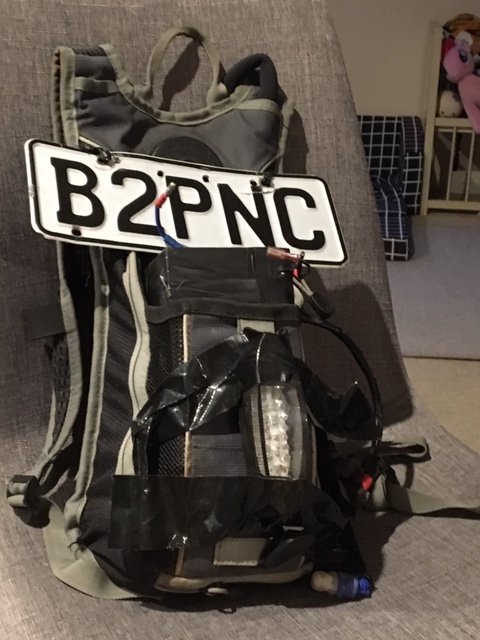
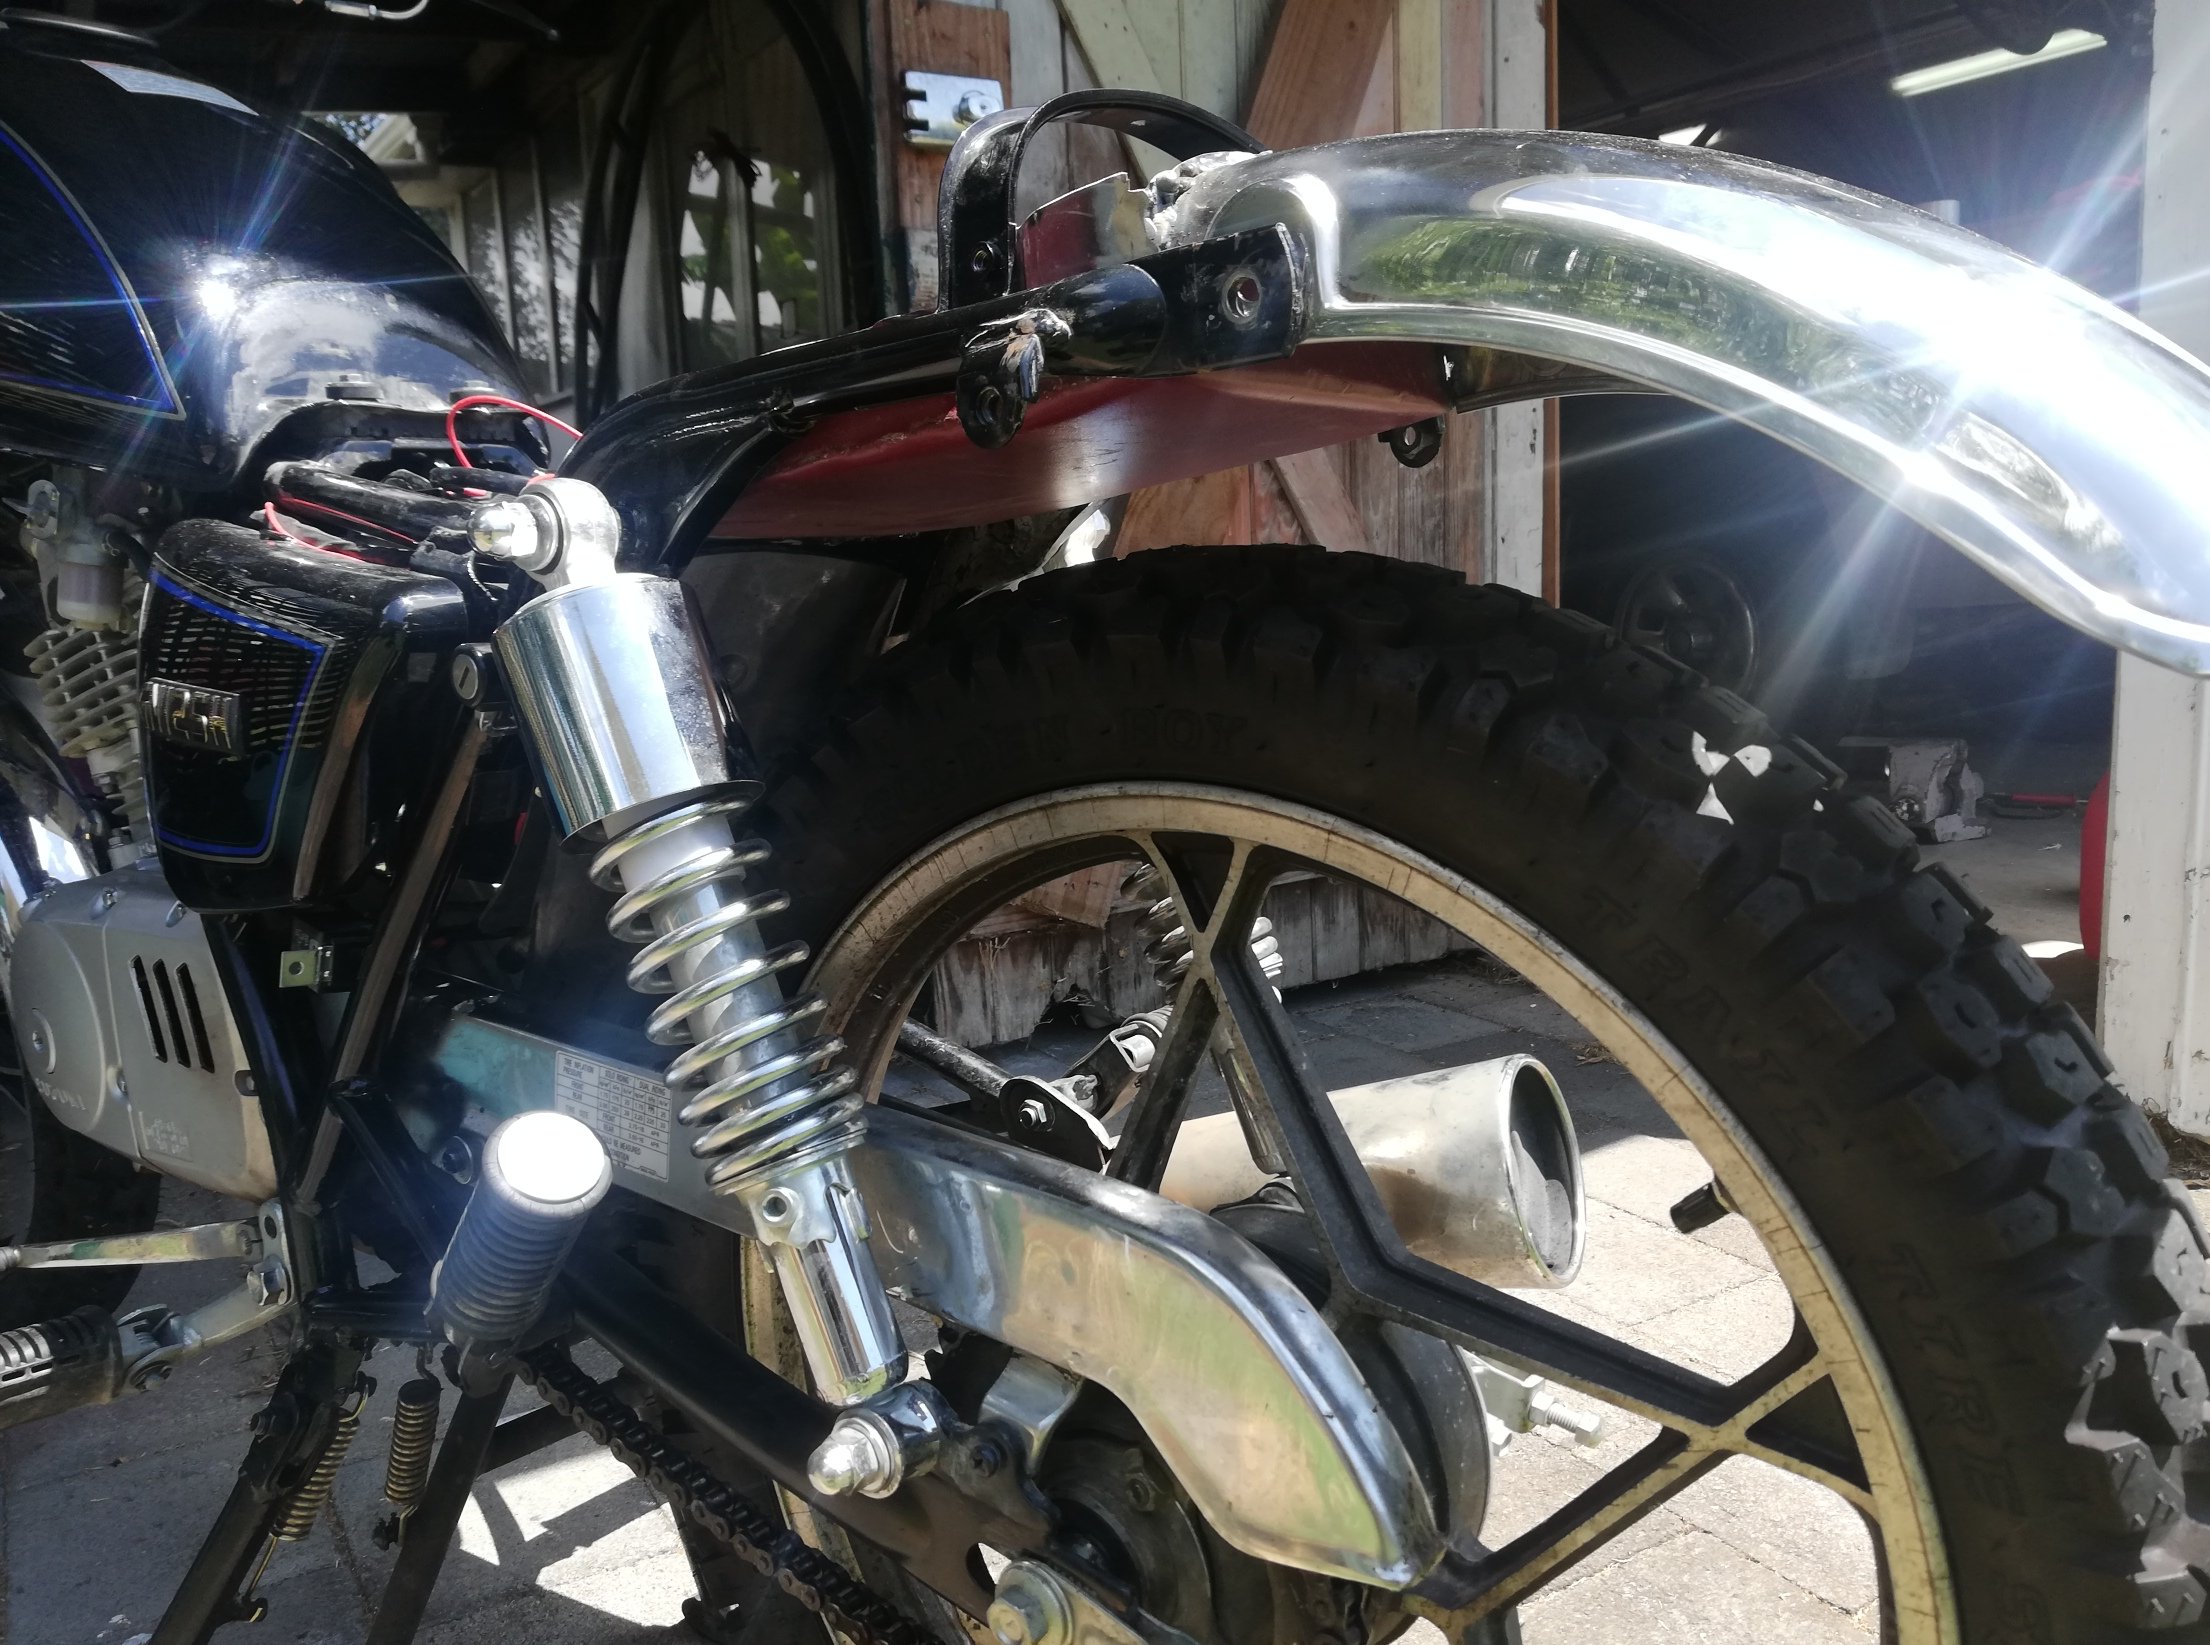
I rode the silver bullet to work today. Plenty of WTF's from my workmates, its rather loud China hooked me up with some nice new mirrors to reduce my chances of dying. I also mounted the number plate in an attempt to draw a little less attention than my previous effort. Tail light for night duties is still back-pack mounted though. I need to fit a reg/rect to get me some DC volts for the LED strip tail light that I'm hoping to hide away under the back of the seat. Hopefully I can do this with some of my mudbug spares. I'd really love a kick stand too, that will be on my to-do list at some stage.
7 points
-
Got a new stainless rear guard and a plastic inner guard from an old gn250 Ruined them and made this never understood why the seat is bolted on a GN. A pull lever and some storage makes more sense. I think I will be able to keep my wet weather suit in here. It's long enough for my tyre irons Rear guard is in the higher position I was trying out in an earlier post. Might go for a slim enduro type rear light once I smash the original one to bits throwing my leg over
4 points
-
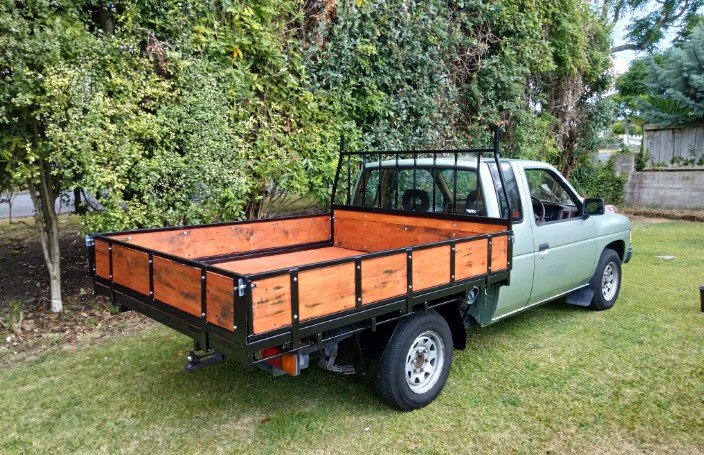
Filled about 50 holes in the engine and removed all the brackets I no longer need. Laser cutting a sheet of all the filler pieces made it way quicker and easier! Where the chassis rail kicks up at the firewall is a known place where cracks can form. There was already one about 8mm long on the passengers side. Made some gussets and welded them in. Found some previous repairs around the rear hatch on the body. I think they just ground out the rust spots here and then bogged it up. Cut out and welded new steel in there. Another one here, this time just a piece of steel brazed over the top of the rust holes. Fixed! As well as a few more bits around the seal. Picked up a pair off TA22 Celica fender mirrors from YAJ, that you can kinda see. I think they look good, but hard to tell when half the cars missing. Bought a Estima F series diff. Stripped in right down, cut off all the brackets and then noticed one of the housing tubes was very bent! One end was out by at least 10mm. Had a go at straightening it, wrapped some chain around the tube and some big u-channel, and then used a bottle jack and heat to push it out. Came out pretty good, close enough to then shorten it. Drew up a jig that held it all square and inline. Shortened it by 105mm a side, so it's the same dimensions drum to drum as the factory diff. Bought some MRP adjustable 4-link arms off @Cdarust Got a Altezza Torsen LSD head to swap in. Made some upper and lower brackets for the diff. Borrowed @oftensideways rotisserie. Going to raise the rear 4-link body mounts up. About 50mm higher for the lower mount, which should make the lower arm level and somewhere between 50-100mm higher on the top arm. The angles are currently far too much and I've gone this far so may as well, will be good to get rid of the lower body mounts as they're the lowest part of the car. It shouldn't effect the rear seat too much either.3 points
-
2 points
-
Van is now back in the workshop in readiness for some long weekend loving.
1 point
-
That guy is a shitcunt.1 point
-
If anyone wants me to check our copy of the ETRTO (I think we have the 2015 edition) then send an email to me at work and I can check for you. (PM me for my work email address) I plan to update the Tyre-Rim infosheet, with all the info from the ETRTO, but its a time/priority thing.
1 point
-
Holy shit I cant believe you snuck that under the bonnet line. Looks awesome man! Good milestone.1 point
-
Fwiw my td27 d21 had wrong temp thermostat in it and temp sender for glow plugs disconnected. Fixed that and replaced water pump with a unit with actual fins on the impeller and it’s mint.1 point
-
Yeah lush whip. Just a thought, if some dweeb has whipped out the thermostat then you would guess it got hot at some point (unless just total durp) if you say the water was gross then high chance the rad has some shit in it, would look into getting it cleaned at minimum. So many old radiators you assume are sweet can cock you over once you load it up.1 point
-
Might be an option? https://www.yaldhurstmuseum.co.nz/storage-services/ Im sure they would love a Niva.1 point
-
reply not aimed at anyone n particular, just slightly relevant here's the OS thread for the fitment chart (yeah it was started around 9 years ago & could probably use an update or fresh links) edit : I've found the current chart & updated that thread and to save a couple of clicks here's the info https://www.lvvta.org.nz/documents/infosheets/LVVTA_Info_01-2009_V3_Tyre_Size_to_Wheel_Size_Compatibility_Guide.pdf1 point
-
#squadgoals https://reddit.app.link/gLmd7UKrt31 point
-
Cheers! It’s most likely going to be done at a diff shop, but I’ll try and get as much info as I can1 point
-
WOF yeaterday...again another clean sheet..so all leagal for anothe 6 months. when i swapped motors i also swapped the 4 speed back in...( live in chch..fuck all motorways...flat....my work school home round trip is 32ks) and i prefer it to the 5 speed. also put a quick shifter in and it makes it heaps better. almost had ghe old gjrl 3 years now and love it...second longest ive owned a car. lol.1 point
-
Making a start on the gearbox and transfer case. The gear box is called a LT95 and is a 4 speed manual box with integrated transfer case. What is cool about the early boxes is they used a Salisbury limited slip differential on all Suffix A vehicles (easy to spot spotted as they were all painted red). In addition to the LSD function in the centre diff, the centre differential could also be locked via a vacuum actuator. But only around 300 vehicles were delivered with this LSD and sadly mine isn't equipped with it. After the first pre production and first year vehicles (1969-1970) they moved away from the limited slip feature with the differential as the gearbox had a serious amount of whine and felt pretty agricultural and stiff. To stop this they removed the friction discs on the differential and replaced them with distance discs instead but still retained the Salisbury differential, only now not limited slip but still retains the locking centre differential. They also managed to retain the agricultural feeling and gearbox whine... Shot of the early friction disc. Shot of the later style with the distance discs. This bit freaks me out a bit so I have a friend Glen giving me a hand on it. It is not his first rodeo with these boxes so I am in good hands! Gearbox and transfer case are now broken down into bits for a check up. Overall it is pretty good apart from a toasted needle bearing, worn intermediate shaft in transfer case and a bit of play in the mainshaft. All the gears are in good condition which is great as they get expensive to replace. Most of the parts have now been plated and all new fasteners. Now waiting on seal and bearing kit as well as the main shaft from the UK. Looking forward to getting it back together and in the chassis. Calipers test fitted and looking great with that HPC coating. Now to fit the rest of the hard lines.1 point
-
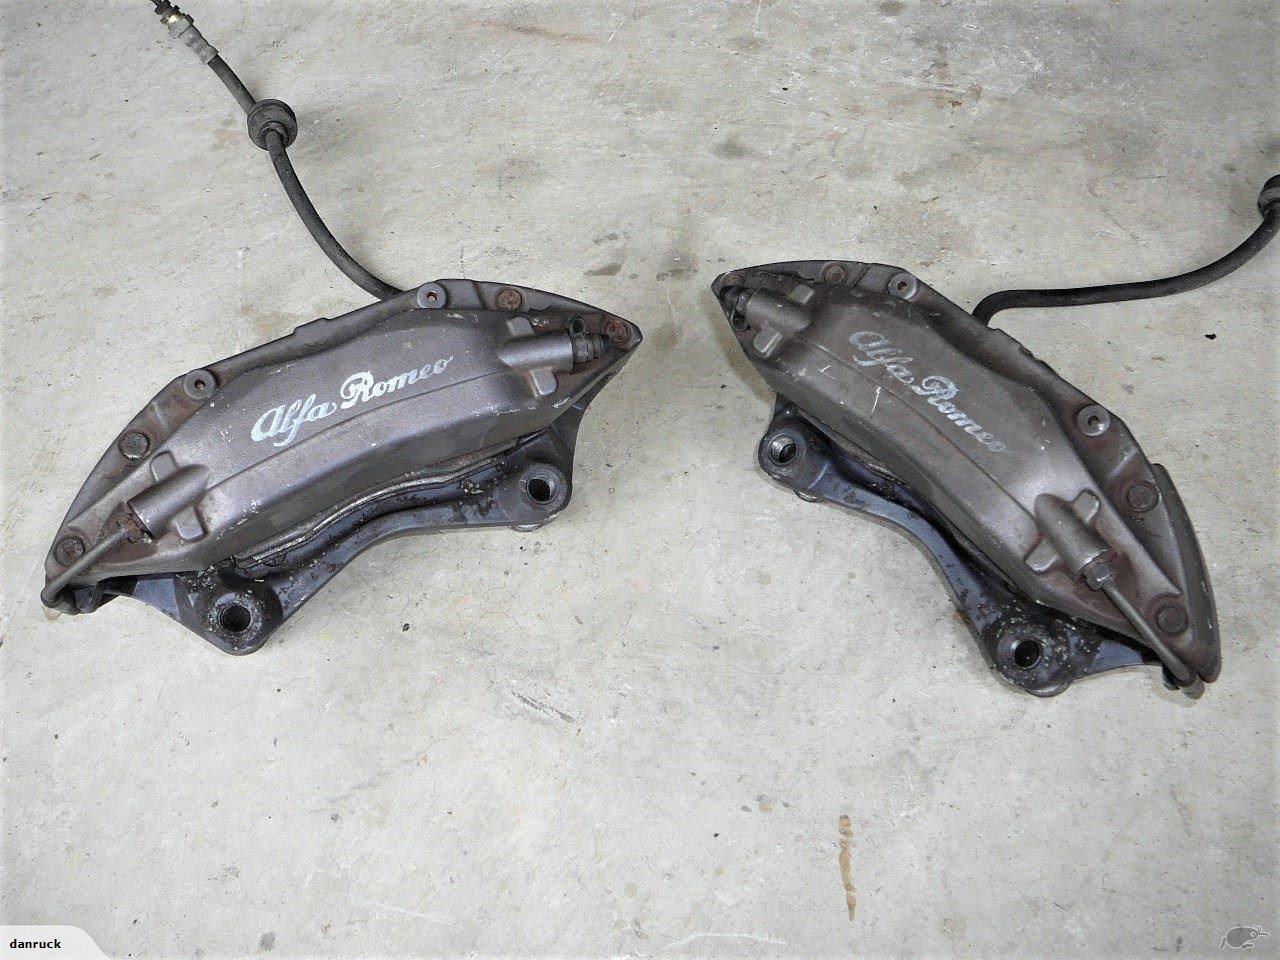
Oh yeah forgot. The brothers car has 4 pots and I got jealous so I bought some alfa romeo 166 brembos. I would assume that being Italian they'll leak until they blow up but painting on a BMW badge might resolve that. My theory is that the alfa brakes mounting holes are parallel (although not concentric) to the BMW ones which will keep the mounting bracket a bit more 2 dimensional. I have no idea if they'll fit but worth a shot for $200. At the risk of sounding shallow I wouldn't mind some larger discs for purely aesthetic reasons, but will see if the current disc is already a stretch. I feel like red Brembos is super cliche but these might end up red if I cant make the original paint look good. I wish the caliper rattle cans came in more colours. At least you can buy heat proof decals for them so they'll look the ducks nuts.
1 point
-
Leave it on for awhile longer, give it a few whacks with the dead blow.1 point
-
Makes a mess but seems to be cutting alright. It's pretty inconsistent on the back side, I'd be surprised if it was actually in balance before.1 point
-
Skitz1 point
-
Great couple of days in Cromwell had a blast on the cruise friday night and had an awesome day baking in the sun looking at some amazing cars today, cant wait for next year definately one of the best shows around these ways. Good news the lip on the skyline survived some big scrapes and plenty of close moments. Cheers @kiwi808 for the car wash and organising our small group of jappas to park up together.1 point
-
@rotorhoe may be an option?1 point
-
painted some things black. booster, hood stay, windscreen wiper motor housing and hood latch. just the normal shit really. now thats done i will probably start working on the new engine loom. ive got new plugs for everything and new link looms so the motor will get a full rewire. 2020-01-17_05-53-42 by sheepers, on Flickr1 point
-
1 point
-
I had to turn the car around to do the other side so thought it was time to give it some sun.
1 point
-
well i havnt build the new motor yet .....because i have other shit to play with.....but the old pinhoe has been getting worse......blows shit loads of smoke and sounds like a diesel... the mk3 parts car i bought had a mighty pinthoe in it... so i pulled it out pulled the clutch ,flywheel,pressure plate,inlet and carb , thermostat and water pump of mine and slapped it on to the other one.... reason being mine ran and i had done them last year. some new plugs and oil.....and man it starts first pop.....no smoke.....and so quiet . old pinthoe other old pinthoe blooody good
1 point
-
Hello all. I now have some first hand experience in re-registering a motorcycle that has previously been registered in New Zealand. so I thought I would re-cap the process for those interested. Note: may vary for cars. the motorcycle in question is a 1979 Yamaha RX125. This particular bike had not been registered since 1986 and was not recorded in the NZTA data. The only proof of previous registration was it’s original plate and attached wof tag. a few months back I walked into the AA testing station in Napier and asked for everything I needed before taking it in. The helpful gentleman told me I required two things; proof of ownership and proof of previous registration in New Zealand. He stated as the bike was pre 1990 I did not require a brake declaration. for proof of ownership, AA provided me with a standard statutory declaration form which I filled out and had declared and signed by a notary public at the Napier District Court. This took all of two minutes to obtain. for proof of previous registration all I had was the wof tag and number plate which the inspector accepted. i rung them up yesterday morning and booked the bike in for the following day (today). Dropped bike off at 8am and by 11:30 they text to say it was finished. When I got there the inspector asked me to show all the lights and indicators etc worked. Then they ran it through what I assumed to be a standard wof check which it passed with no issues. the cost was $180 then registration for 12 months on top of that. they even re-used my original plate, even without having to get the authority myself from that lady at NZTA which was great. all in all a very easy process and the guys at AA Napier were extremely helpful and efficient. hope this helps for anyone who wanted up to date knowledge on how the process works.1 point
-
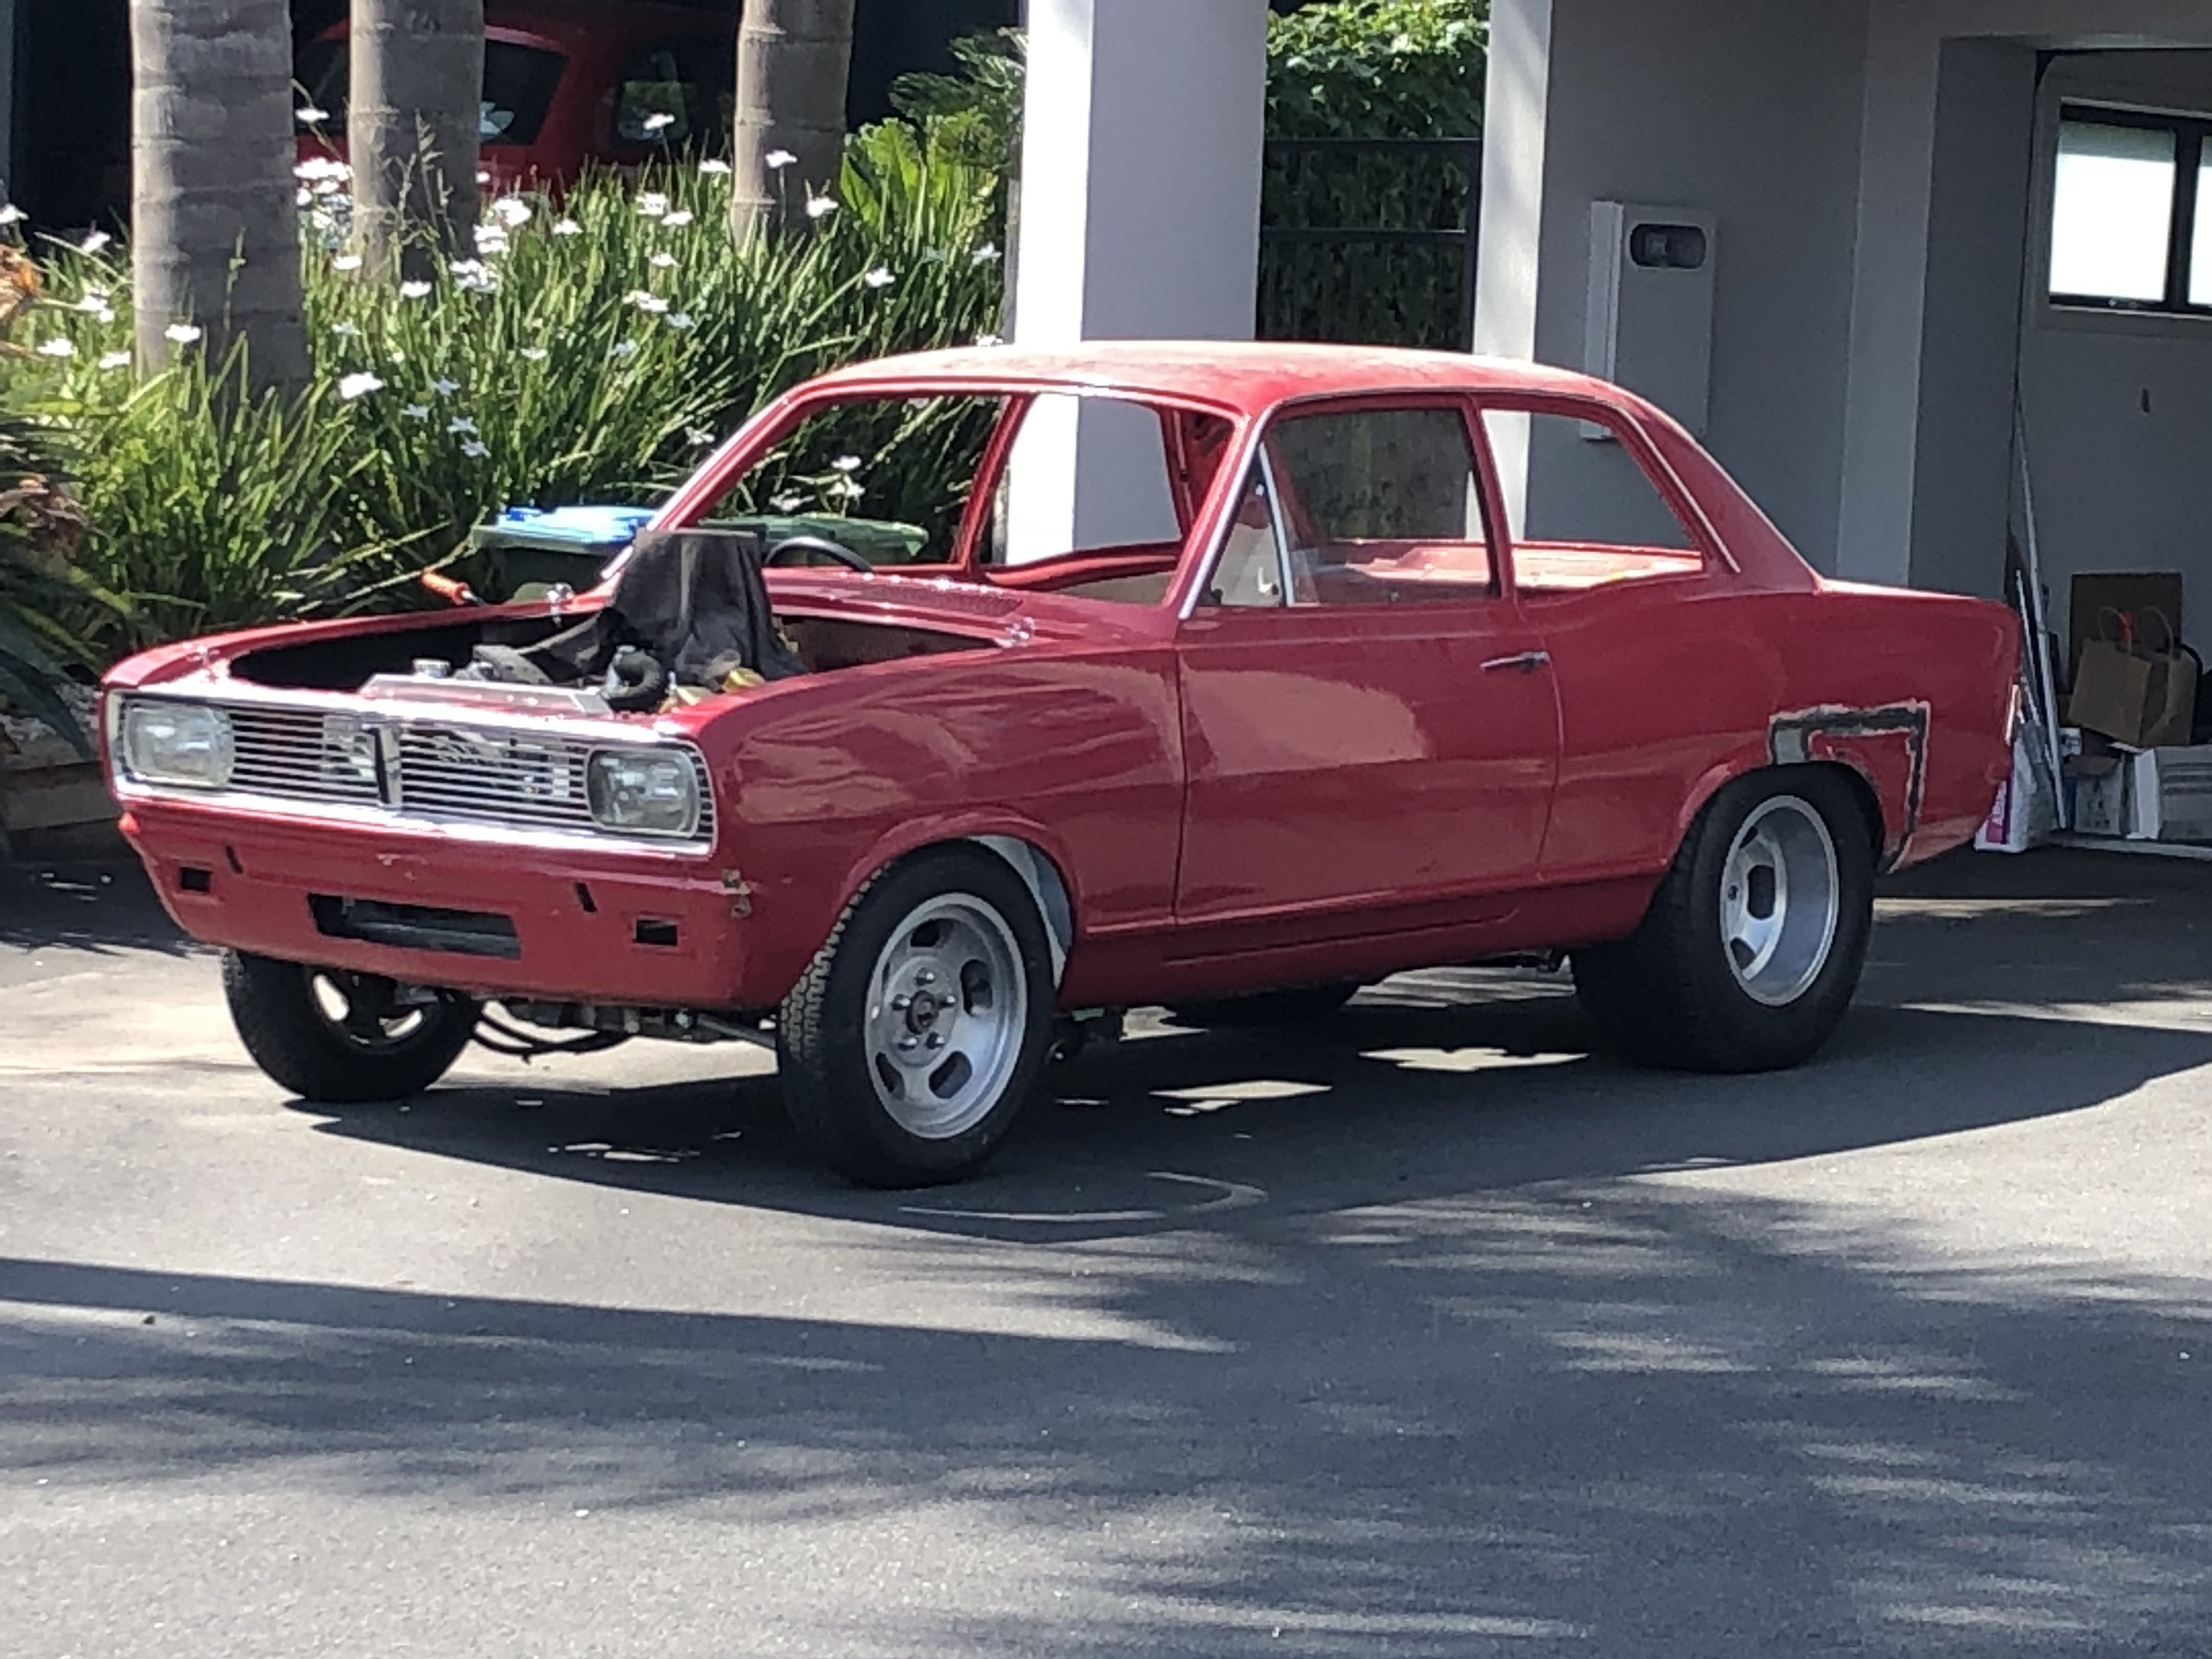
So yeah, I still own this. it ended up getting a full Brake rebuild, new fuel tank etc and some other odds and ends. I have been daily driving it along with the EB Civic. It ended up getting a part respray on insurance thanks to a young driver that pulled in front of me causing a crash... luckily I know of a few parts cars so the insurance company happily repaired it its currently waiting on me to clean up the surface rust on the back of the new bumper and fit it.
1 point
-
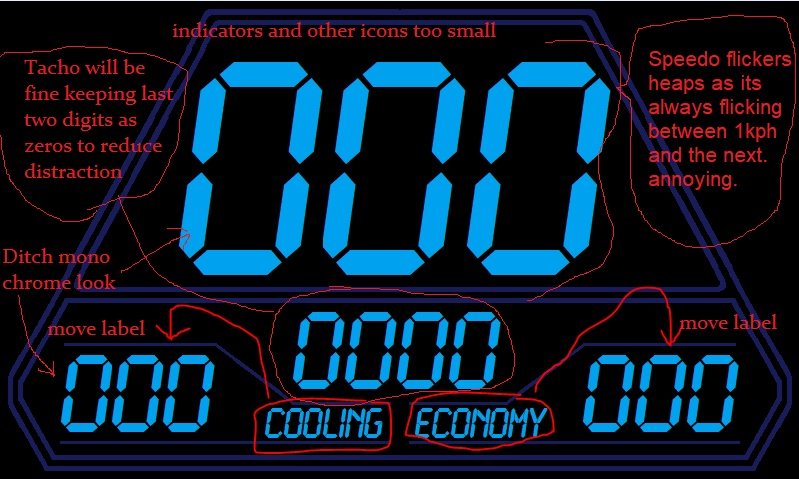
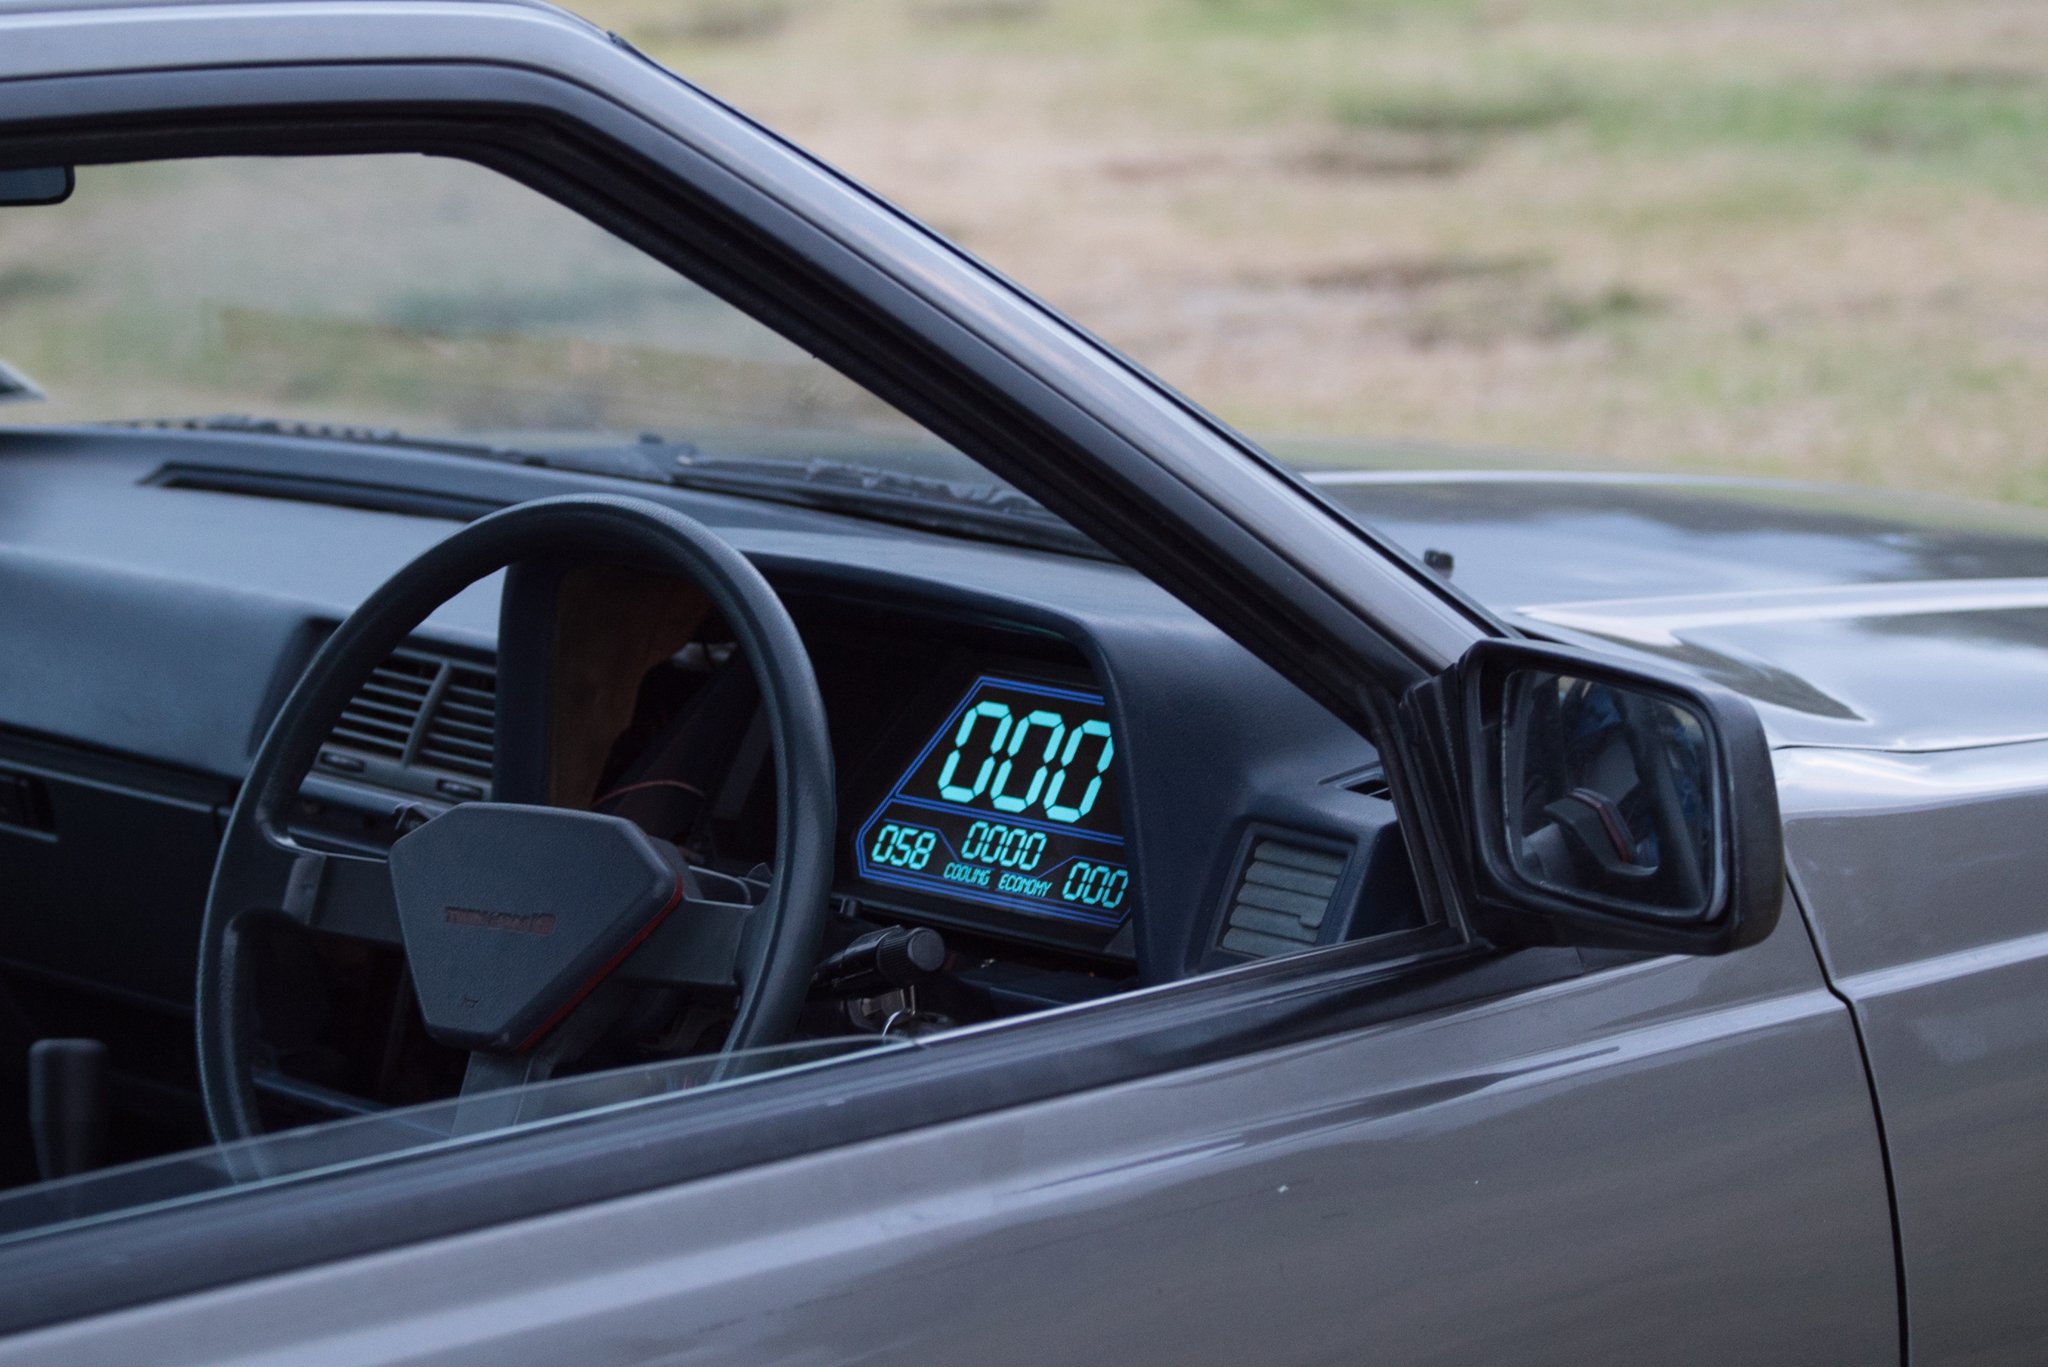
Got a driveshaft sorted until I can get something made up, so went on a roady to test out the dash. Drive up to Uretiti was good! As expected I really need to put some KMs on it and get a feel for what's good or whats annoying or so on. Very quickly a few things became apparent that they are fecken annoying! Also this thread has been severely lacking MSpaint so here we are: So on the plus side, the ~250? Nit screen seemed decent enough even with backlit conditions. I've got a 1000 Nit screen here to try too if I need to burn my eyeballs out! Most of the annoyance came from values flickering. Because you might be hovering on say 89.9kph and then 90.1kph... So it will flicker between 89 and 90. Options here are either that I take a rolling average of the last XYZ amount of speed results and smooth it. Or maybe only change the speedo value if the number goes up or down by 2kph or more. With the tacho, this was annoying for similar reasons in that it can read from the ECU down to a single RPM, so its a constantly moving number which is distracting. I'm thinking that I'll filter it so it only updates the screen in 100rpm increments, so will go 2400rpm, 2500rpm, etc. Because again, does it really matter, do you really need to know that the engine is doing 2451rpm? Not really. Maybe I could make it read in 50rpm increments below 2000rpm or something like that. Also when it was bright you cant actually see any of the outline lines, only the numbers and labels. So will make more sense to move labels closer to the values. I also realised that although a monochrome sort of look is nice. I setup some cruise control displays so that one button goes Red when you've activated CC, and then goes green when CC is turned on. With the colour differentiation you could instantly tell what status the cruise control was in. So I think more colours will make things easier to read. In fairness though this is essentially a low contrast colour scheme that is probably better for night time. Using a white or yellow or whatever text and it's blazingly brigher even with the same backlight settings. I'm also starting to question the merits of having the triangulated sort of face over the screen, when you're driving and it's bright you cant see any of it. Just the values on screen. So may as well just use the extra screen real estate. Good to be making some progress anyway! I'm looking forward to designing some of the more contextually aware screen functions now that the basics are sorted. First on the menu is a secondary screen for when Cruise Control is turned on. Then I'll look at some trackday related stuff and a few diagnostic pages to make life easier. It's cool having all of the standard dash info coming into this, because I can set it so (for example) if you flash the high beams, or push the brake, or whatever, in certain conditions (like while the car is stationary without engine running) you can use those car controls to navigate through menus or switch screens or whatever. Pretty chuffed to have reached that milestone of driving it with a fairly "finished" prototype though.
1 point
-
Factory doesn't mean no bump steer, some factory cars are awful. Also the actual centrepoint of the arc the hub goes through is likely above the LCA pivot and further inboard because the hub stays more upright as the arm goes up. minimise bump steer = minimise toe change through suspension movement. ideal is none but often not achievable. whats acceptable exactly depends on the vehicle and you need to check with your certifier but from the lvvta factsheet. A degrees per mm of travel rule of thumb would be nice but I think this is left open to allow the certifier to make reasonable decisions for different vehicles requirements, e.g a 4x4 or a oldschool hotrod are going to have different acceptable limits to a lotus 7 or sports car with lots of tyre and frim suspension as the limiting factors when making evasive manoeuvres are different. It's really about the handling being consistent and predictable. probably already seen this I am guessing https://www.lvvta.org.nz/documents/infosheets/LVVTA_Info_04-2010_Bump-steer_Measurement_Background_Information.pdf1 point
-
The last few trackday events I've done, they have all been on very hot tracks in summer time... lots of grip for R888s which were coming up to temperature nicely, very quickly! Thanks to all this grip I've had, I've been able to wind the brake bias heaaaapppssss more rearwards than I ever have been able to previously. Which is awesome, it stops the car up great. Then, the Manfield round of Superlap... I was greeted by an intially damp, very cold track. First run out, feeling a little too confident... by lap 3(?) I still had almost no heat in the tyres, was pushing it a little too hard, and the brake bias caught me out. I spun off turn 1, ending up stuck in the kitty litter which was embarassing, and I felt bad for delaying the session while I was towed out. I went back to the pits, took a few winds out of the brake bias (it isnt adjustable in the cabin) Second session, wowzers! Track came up to temp nicely and the car was running great. I was still getting familiar with things as I've never driven there before. But had an awesome time. I was driving conservatively as I didnt want to be "that guy" that crashes twice in a row haha. Feeling confident lining up for the third session of the day, and ready to push a bit harder. I get waved out onto the track and my driveshaft makes a clunk noise. Try go forward again... same thing... shit. I head back to the pits, and it looked as though the hanger bearing had crapped itself, so the centre of the 2 piece driveshaft was free to flop around. It felt okay to drive "normally" so I said my good byes to friends at the track and went back to accomodation (Thanks Lachlan) I packed the car up and started driving home. I got about an hour out of Manfield, and driveshaft noise was getting bad going up a hill when it was under load - Boom! The front UJ broke, and the driveshaft went smashing around in the tunnel like a MFer! Lucky I had driveshaft loops in place or it would have made a bloody big mess. Once I got safely to the side of the road, and had a look under the car. It dawned on me that I am 6-7 hours drive from home, with a car that's fucked haha. About 1/2 an hour later, something magic happened! Some other competitors saw my car on the side of the road, and stopped up. They couldnt really help, but wanted to see if they could assist. Then some more competitors came past - this time with their track car on the trailer behind tow vehicle. They stopped up, unloaded their track car from the trailer so they could tow my car home - and drive their track car instead. These guys lived near Hampton downs, but drove all of the way to Glendene in the pissing rain to help me get my car home by about 2am. Which meant they didnt get back to theirs until 3 or 4am after a very long day. Absolutely blown away by the help. Big thanks to Jakke and Matt for being awesome well beyond the call of duty. Sometimes when you're up to your eyeballs in shit, and someone helps you out - The sort of thing you remember for a very long time. Some good memories and good friends, made by a bad situation.1 point


This leaderboard is set to Auckland/GMT+12:00