
Leaderboard


.thumb.jpeg.384ff72c8d2b0ee0d34a7bdedb55bdcf.jpeg)

Popular Content
Showing content with the highest reputation on 11/14/19 in all areas
-
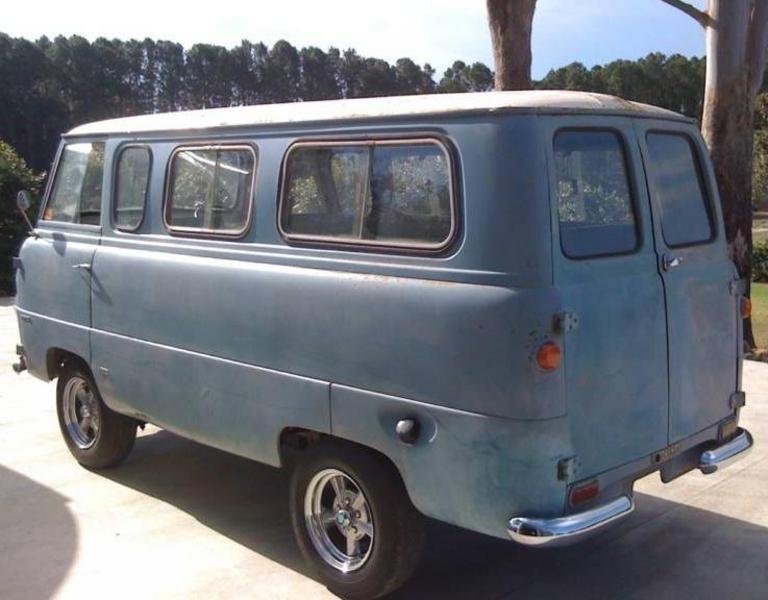
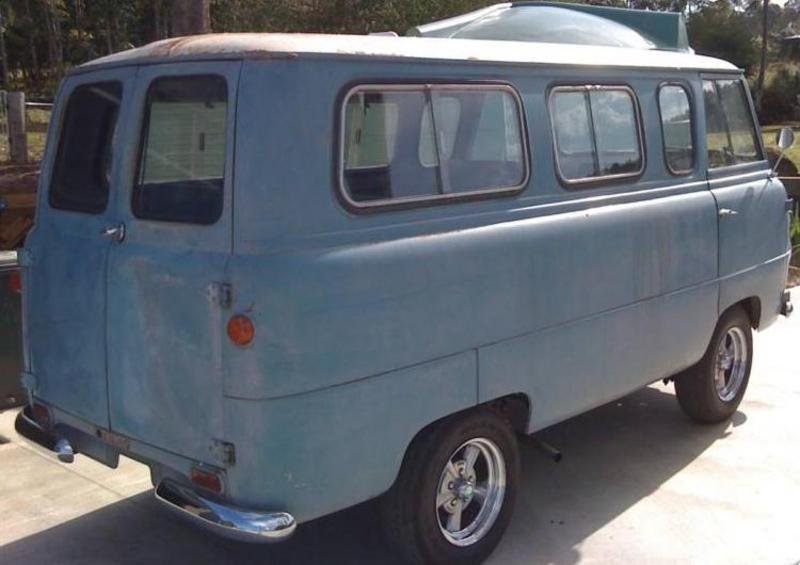
Whilst digging around the internet a few months back I came across a listing for my Thames dated around the end of 2010. This was just before the PO bought it and embarked on the bare metal restoration. At that stage the van was still in its original blue paintwork with heaps of patina. The wording for the listing is in pdf format so I'm unable to upload it, but it makes for interesting reading so I'll transcribe it into a posting when I get a chance. In the mean time here are some pics of the van as it looked back in 2010.
 13 points
 -
So entered this ol thing at the Smash Palace Bike show this yesterday. Seen a bike show near Gold coast earlier in the year and all the bikes had thier own displays so took some inspiration from it and I created a display that was fitting to and a Monty Python skit Im a LumberJack and im ok. I work all night and sleep all day. Quite fitting for me as ive worked night shift the whole time ive been building this bike. So I scored some wood chip from work and a few rounds and put a Axe and Saw into them and had this as my displaye. I won MVP of the show for my display which I was quite surprised about.
8 points
-
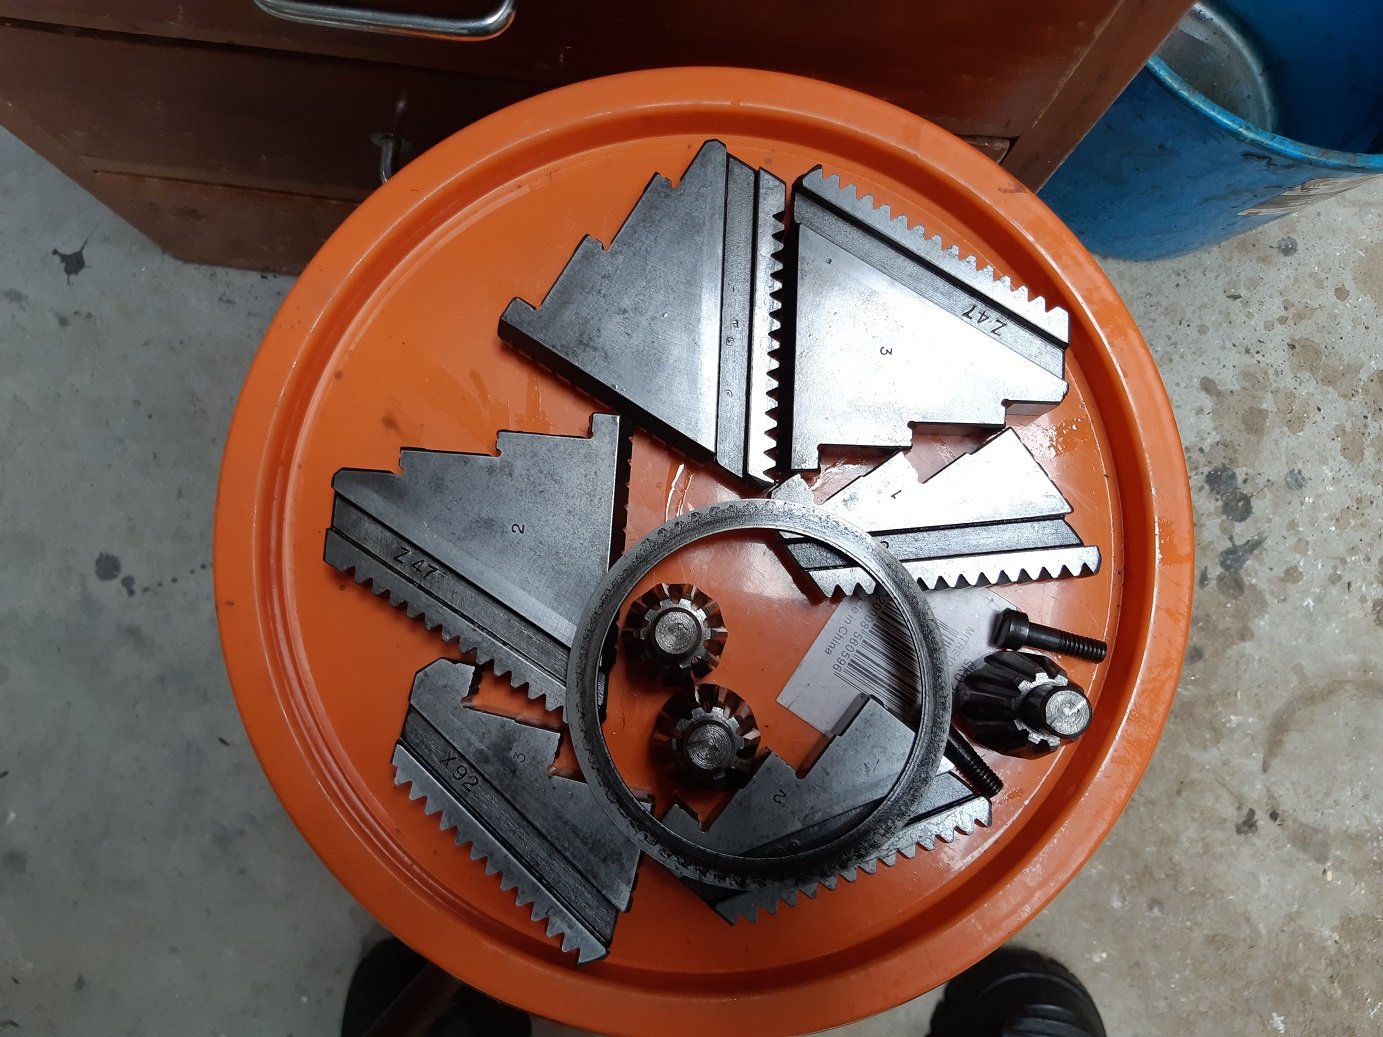
Outer camtree patterns 2 of 27 points
-
Nothing wrong with that, I lowered my wagon using an OBD2 tool, took 30 mins and didn't need to roll around on the ground unbolting grubby suspension parts7 points
-
Stopped at SuperChargers in Hamilton, Taupo and Palmy for about 20mins at each. We went via Hawkes Bay for a night so had a charge up in Hastings on one of the Charge Net chargers for about 30 mins. One quick 20 min charge in Blenheim while we had a toilet break and another in Kaikoura while we had fish and chips and that was it. Basically every time we stopped we got something to eat or drink, had a stretch and a toilet break and maybe waited for 5 mins in the car and that was it. Very stress free and not at all an issue. Some of the charging we probably didn't even need to do it was more just piece of mind and it also meant I could give it a good thrashing from time to time with plenty of juice.7 points
-
That’s the millennial quote of the day there. No more dyno tuning, just windows updates6 points
-
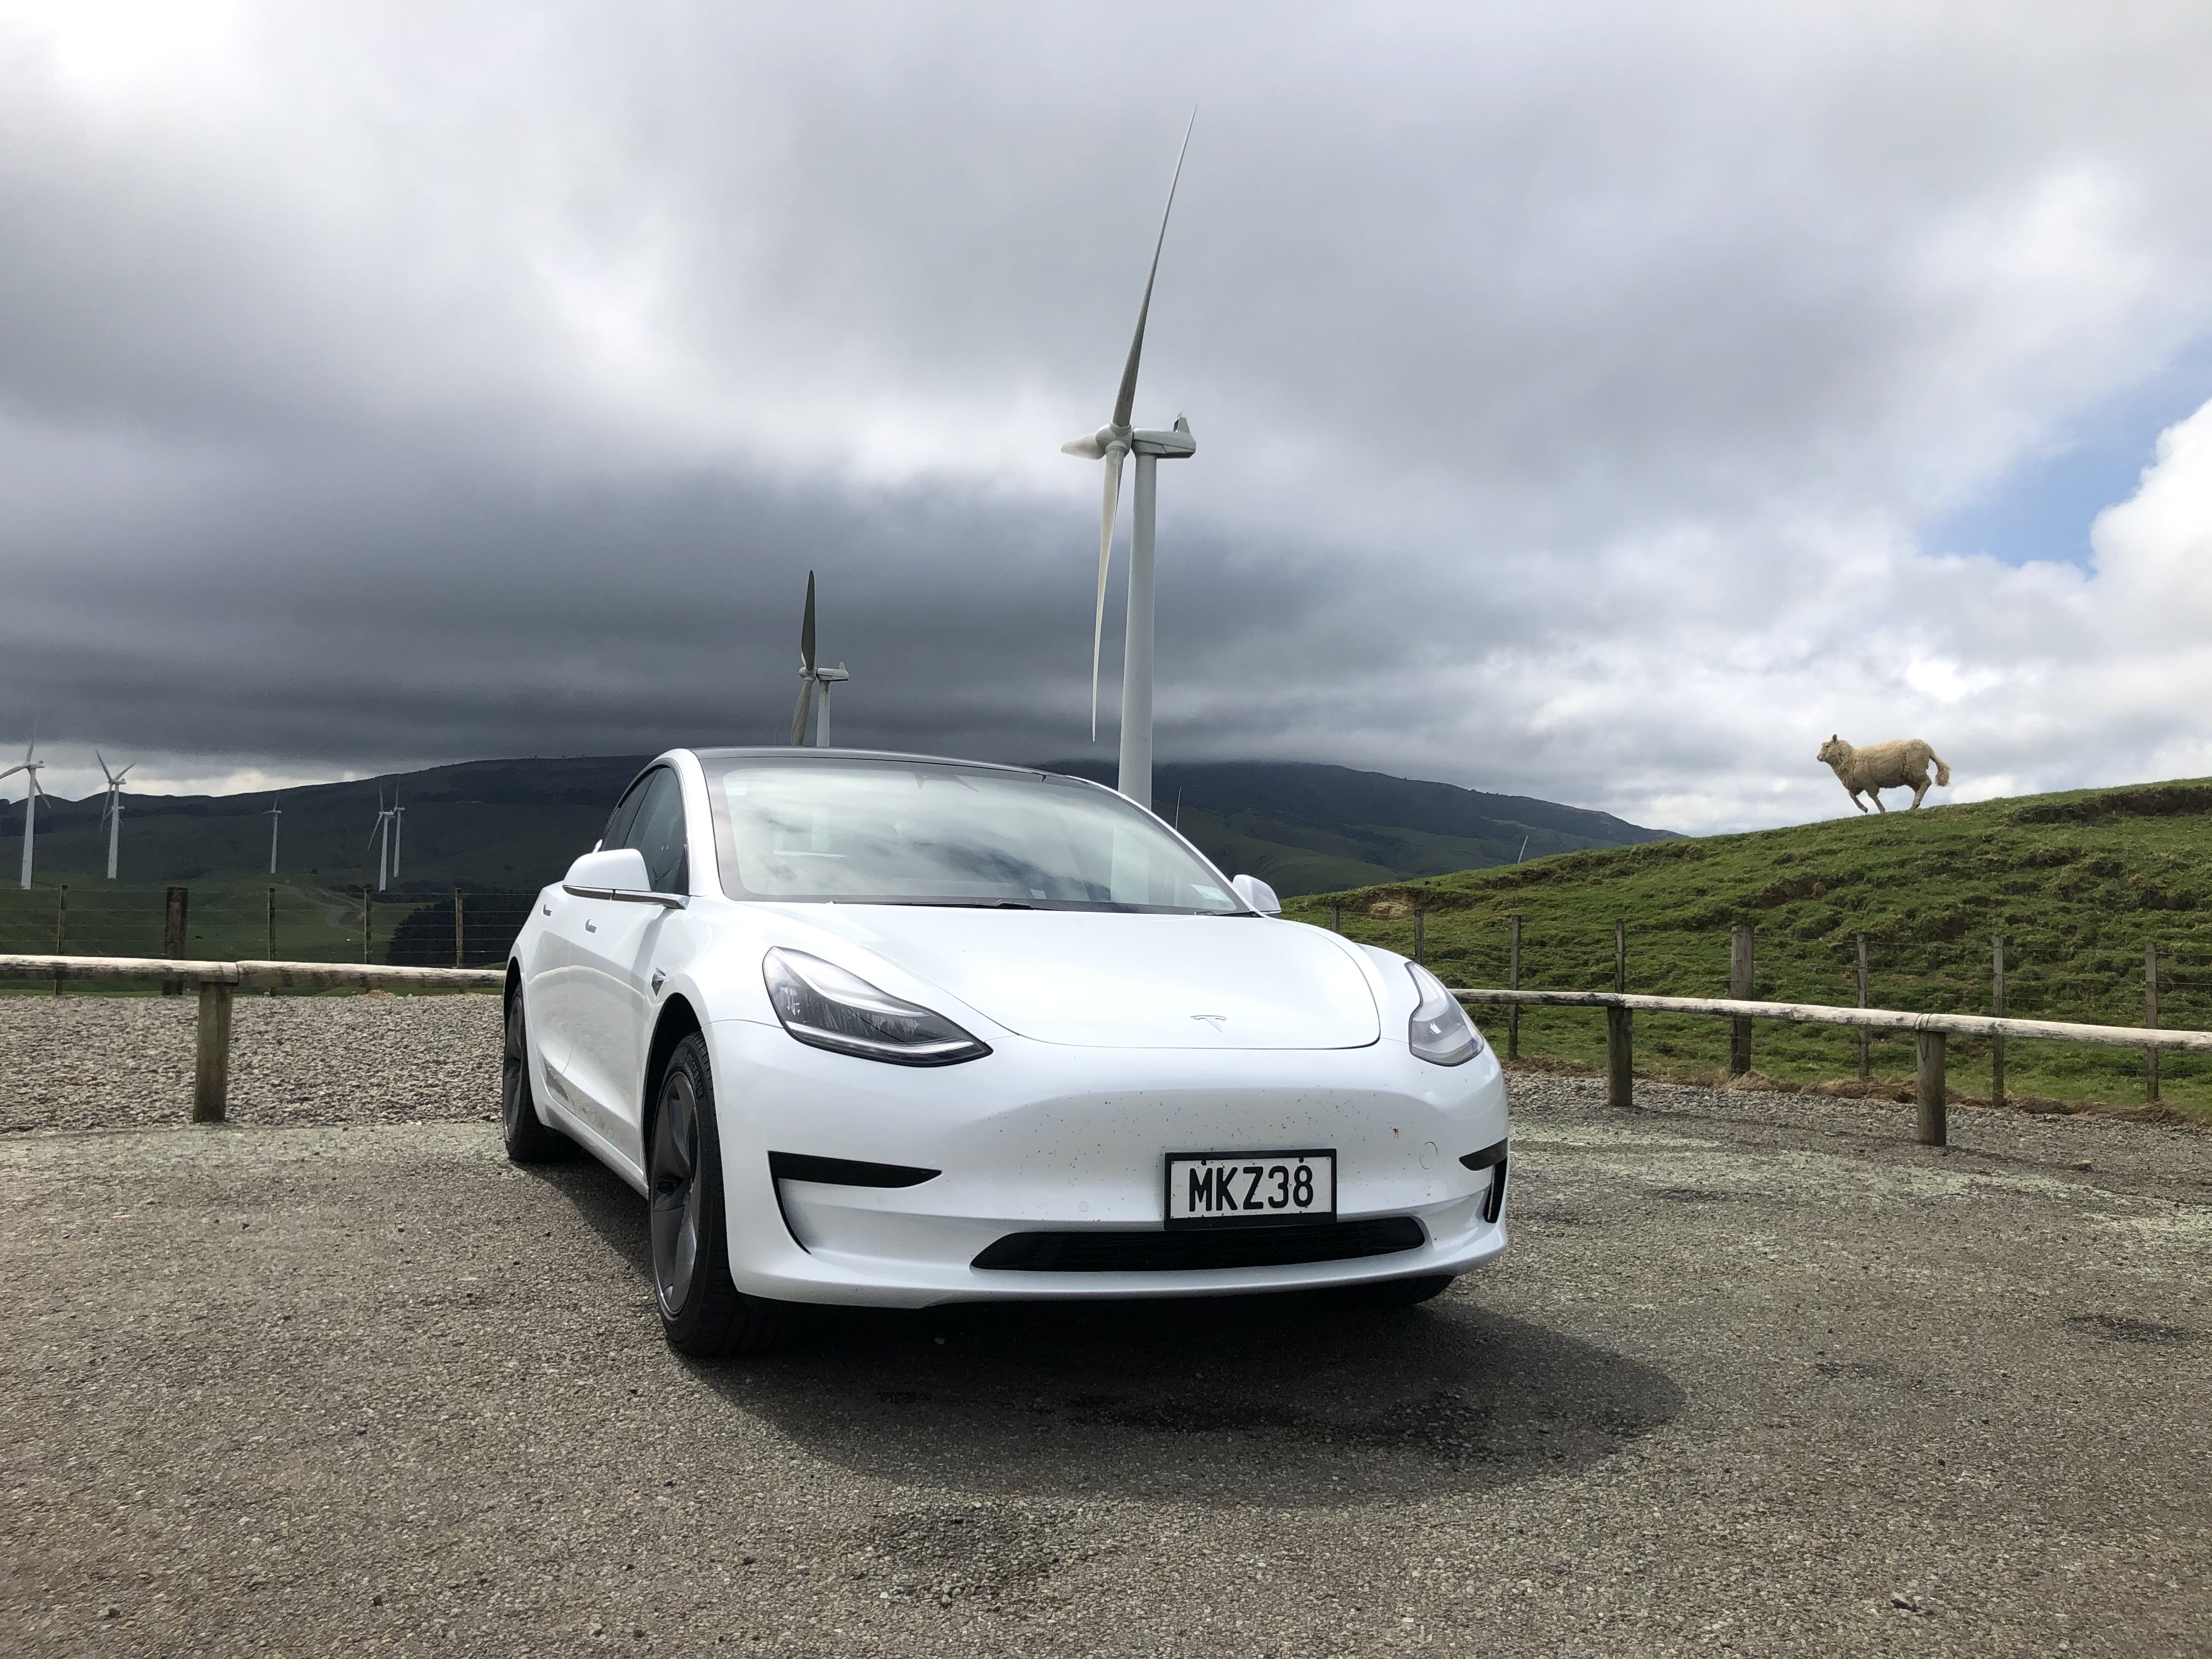
So I went and found the absolute most polar opposite vehicle to something oldschool If mods think this is a boring daily feel free to delete. My now 1 month old Tesla Model 3 Standard Range +. I have been a Tesla fan for many many years and it has been a long term goal to own one. So this is the new daily. All I can say is what an absolutely phenomenal vehicle. All you need to do is drive one of these and you will be sold. I am still into oldschool so dont get me wrong but man, these cars are really next level. Thought I would throw a post up as probably a bit out of the ordinary for oldschool haha. Anyone got an oldschool sticker for the back window ha? Here it is on its maiden voyage down south from Auckland:
5 points
-
5 points
-
Bikes looking sweet, and the display theme was a good idea. But, Are you trying to tell us something? A few lyrics from the lumber jack song, "I cut down trees, I skip and jump I like to press wild flowers I put on women's clothing and hang around in bars I'm a lumberjack and I'm OK I sleep all night and I work all day I cut down trees, I wear high heels Suspendies and a bra I wish I'd been a girlie, just like my dear Papa"5 points
-
This is the slow one. 5.6 seconds. Although it got a 20HP bump in an update on Friday so might be lower now.5 points
-
I'll send you a sticker when you tang and desprang.5 points
-
It took WAY to long to swap the carpet/rear seats etc over along with diagnose why the washer pump wasnt working and replacing dash backlight bulbs. Well worth the effort sorting all the little things that have been annoying me for ages bloody crx exhausts! Pink one was leaking/loud too. Wanged this together this evening out of the leftovers from the black crx. I even had some 2-2.5 reducers in stock which let me use the stock flanges. Yes its quite barry but better than a hole/leak4 points
-
Hey Bob. Ha ha - I bet you've noticed my complete lack of activity on the Viva forum eh? No updates as far as work or mods- it has just been sitting there , barely used even as a daily. Its probably feeling a touch unloved, jealous even (if one is to anthropomorphise ones car that is... yeah. The new objectual four wheeled love in my life , little Impy, has stolen the limelight and poor old Viva has been pushed aside ..) I did move it the other day. Once the engine had been wound over enough to draw up some fuel via the mechanical pump it started fine and everything worked as it should. It now looking resplendent in its new location, safely tucked in front of our house (truck)..... Poor thing. Left outside to fare the storm we had last night while Impy and the latest edition to the fleet, the Datsun 180b got to spend the night safe under cover. (please ignore the Ford Mk3 Viva clone - its just another job)... I am still planning to re-power it and still sitting on the fence as to with what. There is a snarling wailing gusty V6 looking up at me from one side while n the other side I can see a more docile but lighter more economical Mazda/Ford Duratec L4 looking up. Hmmmmmmm? However for the immediate future we might well buy a 1256 that @AttySlungGatty has sitting spare just to give the Viva a little more oomph on the hills. I must add this. The Imp was always meant to be just a quick fling. A little bit of fun on the side. Smaller, more lithe and entertaining then the Viva. I was expecting to grow tired of the sneaky outings at night on country roads while the Viva slept unaware. I thought I'd finally see the Imp for what it was, a fun and youthful but quite impractical bit of dabbling back into my younger years of car hooning and that I would eventually dump it to the next owner and go back to my faithful, honest and practical Viva wagon. But no. The poor old slightly haggard looking Viva just sits there and watches me as I go off on yet another hoon in that 'little cute, energetic car with the pretty paint'. Maybe the Viva really does need a new dress and a better set of legs to win me back? ....
3 points
-
Thats the long term dream for sure. Some Tesla Powerwalls and a solid solar setup.3 points
-
Shannon who is on the list but not on old school has reached out to me re: the second night in Gisborne. He’s from there and has a house; he knows some of the Tauranga engineering crew from last year through work. Sounds like he may be having a wee congregation at his on the Saturday night and if people want somewhere to smoke beers and drink cigarettes then everyone on the ride will be more than welcome. May work out better than 20 hour waits for food and the staff being intimidated by burley bikers at Smash Palace. Each to their own of course; but the offer is there. Edit: Space for skids apparently.3 points
-
https://cleantechnica.com/2019/07/16/lowering-the-tesla-model-3-increases-efficiency-an-astounding-7/ "Lowering The Tesla Model 3 Increases Efficiency An Astounding 7%"3 points
-
Funny how this topic comes up, but a year or two on these are still working sweet, opening and closing several times daily. They are near impossible to move against the air pressure, and if you do, they will slam on you as you try. No locks needed, the air pressure even when low holds them tight as a mofo! I still use the timer overnight to stop the compressor from running at nighttime. In the morning it usually drops to about 100psi which is still plenty enough to open and close the gates all day long even if there was a power cut. It really is a cool system with no real issues. I've adjusted it to open or close in about 5 seconds now. The gate moves fast, then hits the air cushions and soft closes the last part of the stroke. Kind of like a kitchen draw... a lot faster than in that YouTube clip. Overall I'd definitely do it again. The only negative is if you leave it open all day and night it can flatten the battery. I always have a second one ready charged to swap over. If you're careful and only open close as you need to, the battery lasts about 6 months without needing a change. Another possible thing I'd do differently next time would be to use steel posts. The timber swells and shrinks with the seasonal changes. This lifts or lowers the gates about 20mm at the non hinged end. It fucks with my OCD and I find myself adjusting them about 3 times a year to line them up again to meet perfectly in the middle. The joys of OCD3 points
-
Outer camtree patterns 1 of 23 points
-
some exhaust bits turned up so i made a start on my 1st set of headers ive made.... just need to get somemore bits and ill fully make them up.
3 points
-
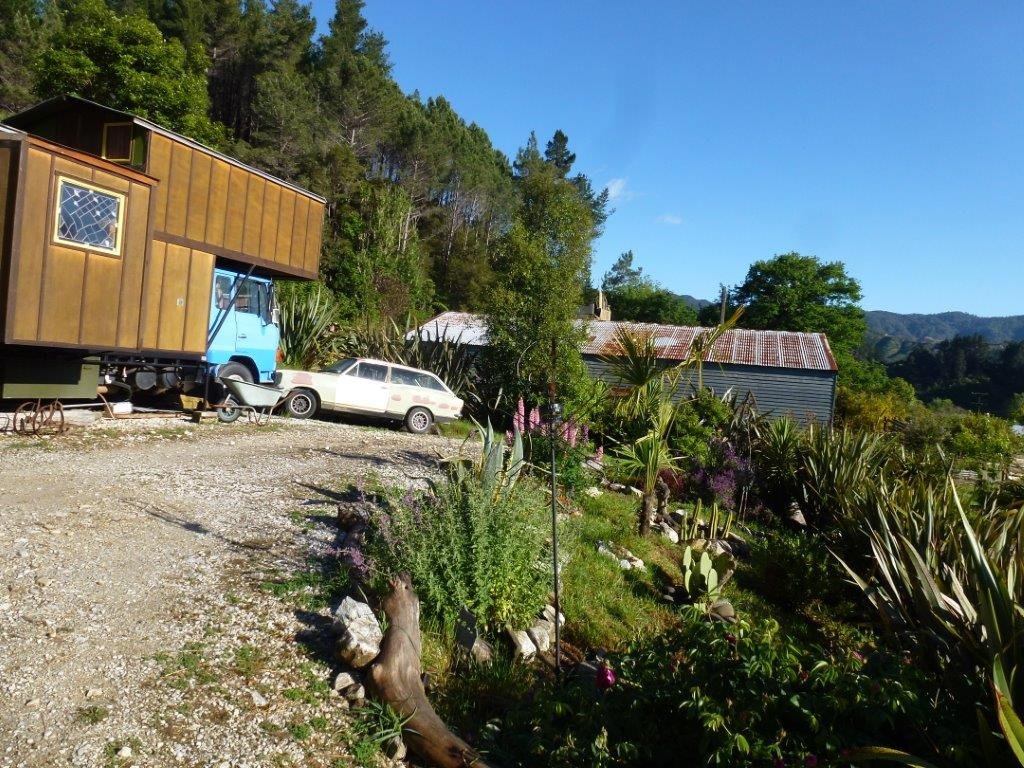
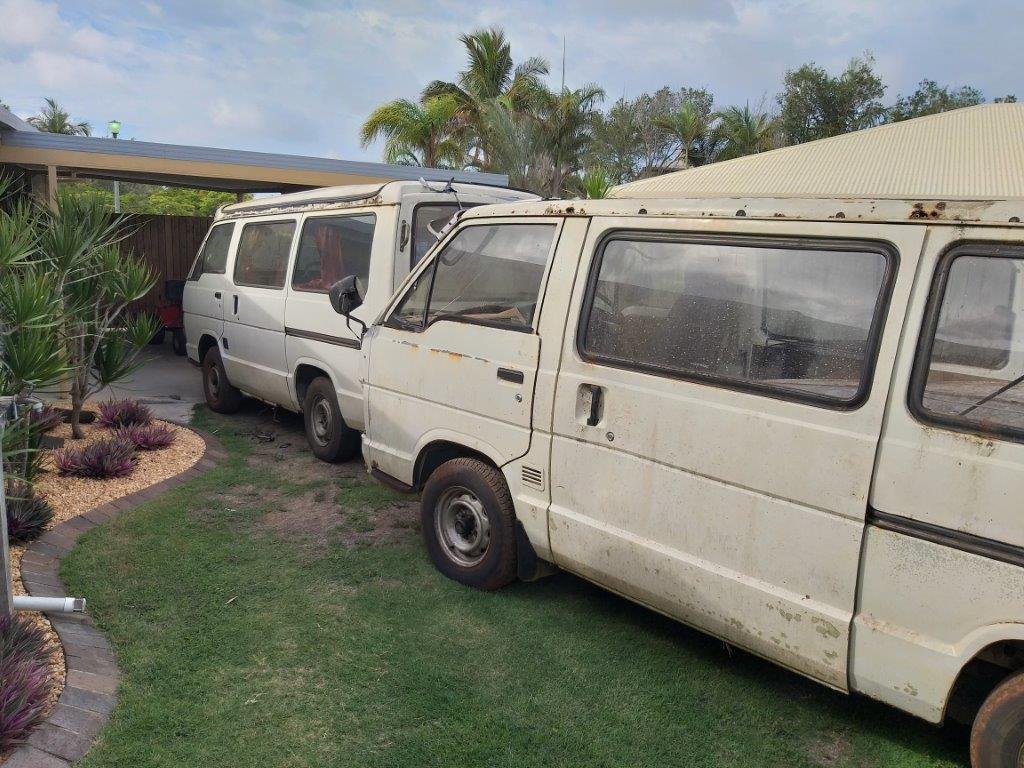
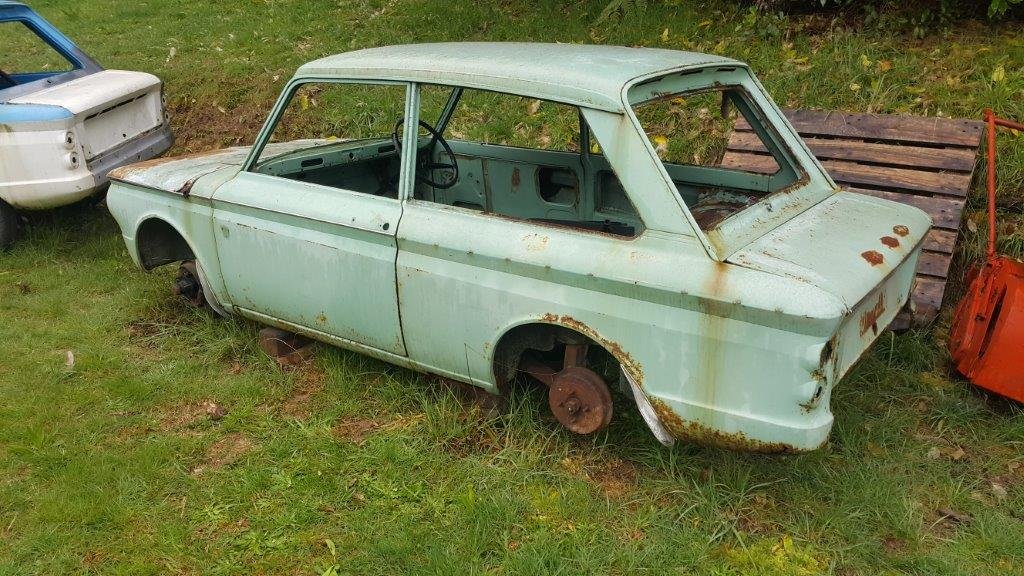
Yikes time flies. Can't believe its almost 10 months since my last post. Our house reno has taken up all of my free time this year, but I did manage to spend some time thinking about the direction I want to take on mechanical upgrades for the old Thames in between and also did a bit of pesting on the tech forum seeking some advice from those more knowledgeable than I am. Result is that I have kind of set my mind on going with some form of Toyota running gear to replace the rather dated original kit. Main reason for this is that the engine box has very limited space so I will need to stick with a non cross flow motor if I want to keep the floor pan stock. Also first prize would be to retain a column shift but go for a 5 speed gearbox. With this in mind I set a target on a mid '80s Toyota HiAce van as these came out with a 5 speed column shift manual box. As luck would have it back in march I tracked down a 5 speed column shift gearbox. Only snag was that the seller wouldn't sell the gearbox on it's own, so I had to take the whole van. To make matters more interesting he offered me a second spares van for free if I took it away. So I ended up with these two beauties sitting in our back garden.
3 points
-
fuck why dont we just camp there haha2 points
-
Yeah the car will find the Tesla Superchargers on its own. Otherwise there is an app called Plugshare which shows you all the public chargers and their locations. Very easy. Have not needed a public charger since we got back to Christchurch though. Wake up each morning with a full battery charging at home.2 points
-
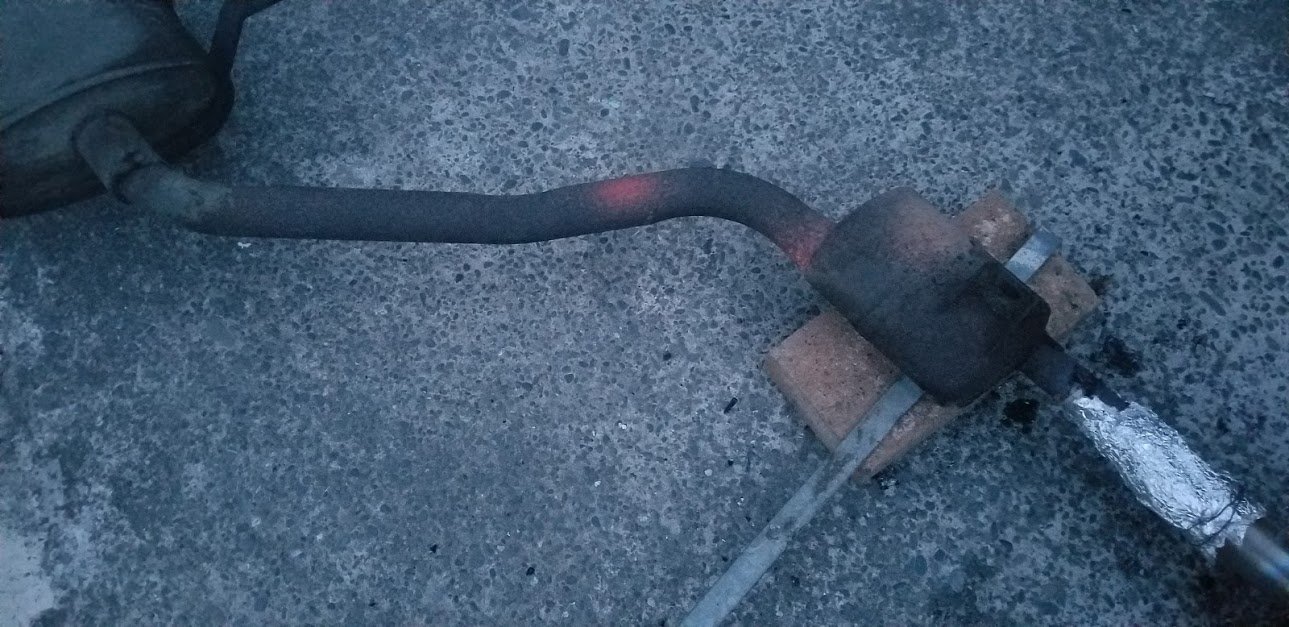
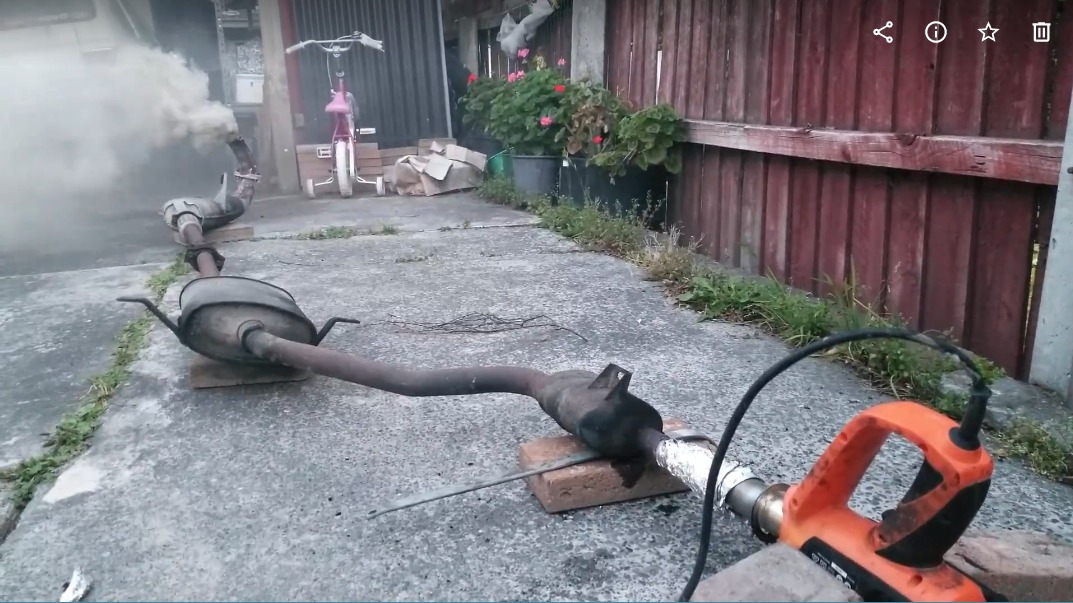
Have split that into assemblies, and had another go. Some observations: It works rather well (6" flames out the oil clagged expansion chamber just now). https://photos.app.goo.gl/t8qnrSrJkiMN4Fev8 The heat gun seems to work well for getting them started, but sometimes needs just a touch of butane into it to ignite the internals (WOOF!) say, about 1 second too much butane trashes the heaters on your heat gun in about 2 seconds (ask me how I know) That crap smells vile! Like creosote. The red band where I presume the internal carbon is burning creeps along the pipe at about 1 foot per 20 min.
2 points
-
I have lowering springs for it already haha. Its not getting 35mm treatment like the Mark II as I am old an mature cunt now and it is my daily. It just sits at a slightly too rude height at the moment so the 1inch drop its getting should help fix that. Apart from that I will probably get the OEM performance spoiler for the rear as I like that look. Chrome delete and tints. That should probably do it for now. Maybe in the future when I get bored it might get some wheels. The wheels in the above picture are actually hubcaps ontop of mags. I kept them on for extra efficiency when I drove it down to Christchurch but they are long gone now. I dont like them. The wheels look like this after removing the aero caps:
2 points
-
Fuck that sheep looks maaasssive.2 points
-
A much better lunchtime experience. I put yesterday's failure down to grabbing an old can out of the shed and not agitating it enough / not testing spray pattern before applying. Same can went mint today anyway... And some bits arrived from Simply Seagulls yesterday, should be able to assemble it over the weekend...2 points
-
Ended up not going to training tonight so decided to get the cam installed and degree’d found TDC, then set the Dti gauge up on the lifter (Ended up welding two old lifters together to make it easier to get the Dti gauge set up) found max lift and set Dti to zero, wound engine back .100” and then forward to .050” before max lift, noted the number the pointer was at on the degree wheel, the wound engine over until the lifter was at .050” after max lift again noted the number the pointer was on again, added the two numbers together and then divided by two, this gave me 112.5° intake centreline. Cam spec card is for 102° so was a bit out. pulled it all apart and advanced the cam 4° and started again, ended up with an intake centreline of 101°, so that where it will stay. Tomorrow night I’ll get the heads on an confirm there is no clearance issues.2 points
-
@piazzanoob Came over and ended up helping (Did all the work) and reshaped the heater hose connection that was leaking. Massive thanks for that! It saves me pulling the dash out and replacing it. The other reso wouldn't clear things nicely so its staying out. Just need to swap the carpet over and finish the radiator mounting and filler off and its good to go.2 points
-
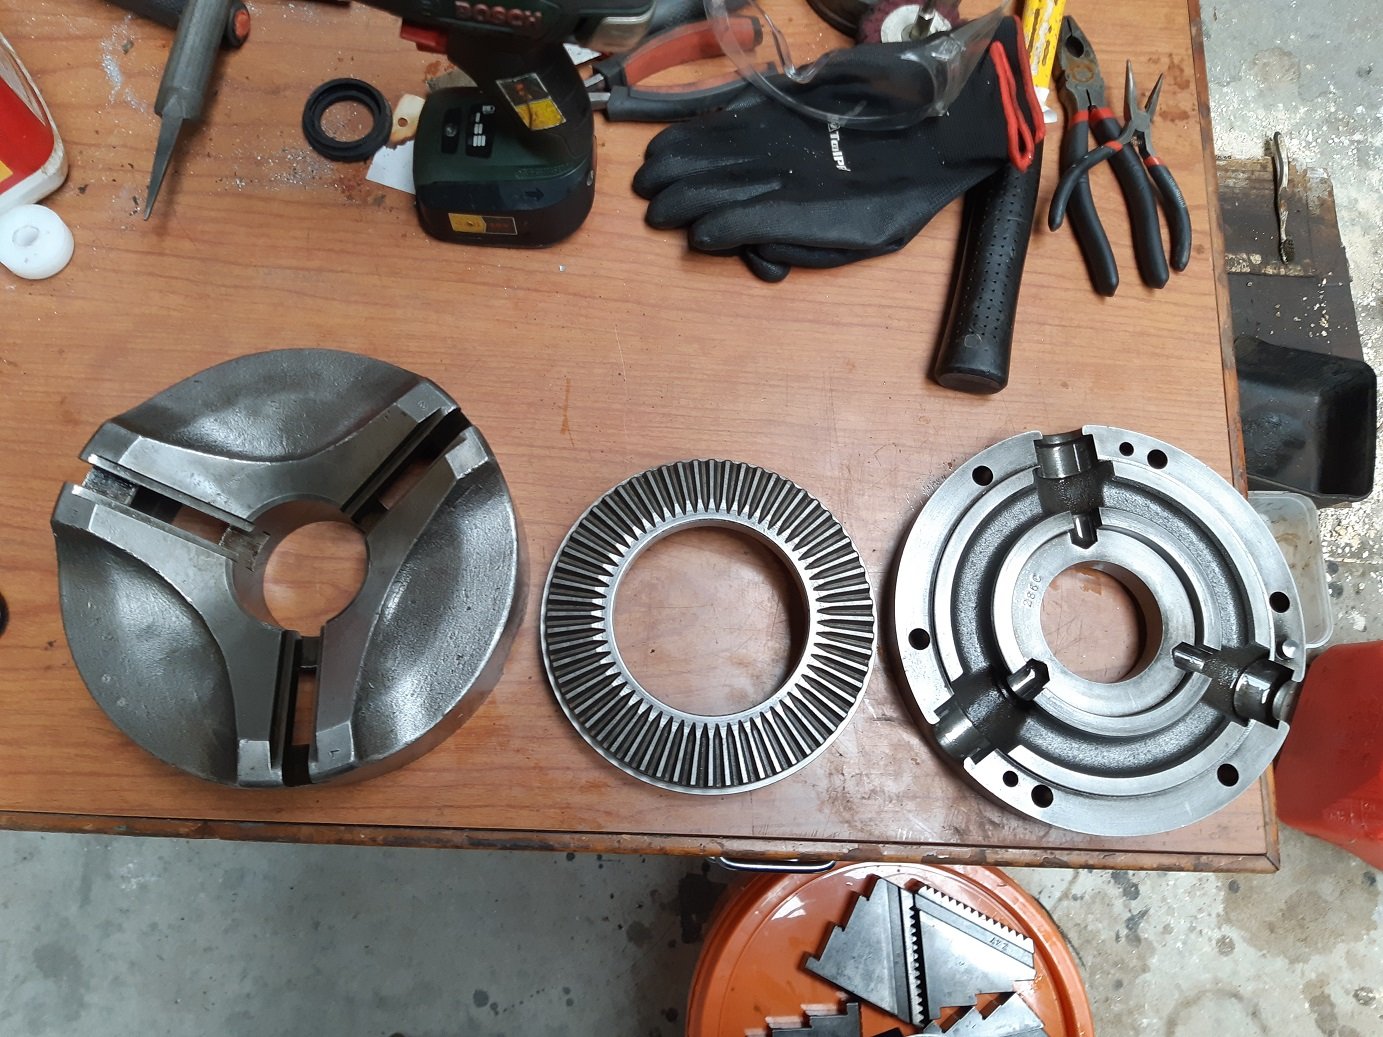
1st half of the inner core pattern printed. Printer is running like a champ at the moment. Nice quality.2 points
-
Cam tree coming along quickly. A real one Patterns2 points
-
Printed2 points
-
The final 2 small sump core patterns.2 points
-
Commonly used Whitworth or B.S.F to SAE / A.F (inches across flats) sizes and conversions to metric and decimal inch dimensions. http://www.baconsdozen.co.uk/tools/conversion charts.htm1 point
-
Don't kink shame, people can ride Harleys if they want to. Good shit dude, display looked good, a bit more interesting than shows where they are just lined up like a car park1 point
-
The standard wiring will be more than adequate. Remember that when running without a ballast the ignition will be receiving approx double the voltage hence a reduction in the amps you'll be drawing. (i.e. watts = volts x amps). It's another reason why HEI coils run cooler and don't necessarily need oil cooling.1 point
-
For sure, ken to see more deets. Was sharning to your bro today on a job funnily enough. Also ken for a burger. Rolla came off hold this week too, might need to get myself a WOF1 point
-
I have the absolute complete opposite of an Oldschool car to bring to the next meet1 point
-
Click the link to make Prius/Leaf owners shudder (video): https://photos.app.goo.gl/uRc2eN1EWPMey9Jp7
1 point
-
Here's the list of repair certifiers: https://www.nzta.govt.nz/assets/resources/specialist-repair-certifiers/docs/specialist-repair-certifiers.pdf Most of them are making any excuse to NOT take on more work, as 3 have been suspended and prosecuted by NZTA in AKL alone, with their current clampdown on rules interpretation or not following the manufacturers approved repair method. There is more leeway with pre 1990 cars, however, the repair certifier will advise what's required, and who can do the work. Welding certificates are those applying mostly to panelbeating, i-Car approved, factory courses for certain models etc, etc. Any signs of previous repair, the certifier will require sanding/grinding back to bare metal. So talk to one of the above before doing any work and follow their advice...1 point
-
Cash in hand mate, always cash in hand1 point
-
Righto bitches. @cletus pointed out the issue with my turbo positioning, ie the drain and the slope and the strong possibility of non draining etc. This caused me to spend considerable time looking for both electric and mechanical scavenger pumps, including a brief talk with Skidfactory's Al about what pumps he uses (which I only mention to give myself the opportunity to let you know that Big Al himself thinks the truck is 'mint'. I know, I am a cunt, but shit its Big Al). Whatever, this all caused me to decide to move the turbo so it can drain properly, it now sits thus; This meant a very stubby adaptor manifold that I forgot to take pics of but you can glimpse in the first pic. You can also see the beginnings of a dump pipe, things looked like they were getting pretty tight for an OEM one so I cracked on with a custom jobbie. Probably not the approved use of a band saw. A long time with the die grinder got me this. I also built an airbox with a prado panel filter; I was going to make a snorkel, but thought it would be a bit wanky. Maybe later. I then made some shit to brace up the rear spring perches as the internet tells me these are weak. I was going to weld some bracing in but I wasnt sure of the airbag situation so thought I had better wait. I have some things going to the powdercoaters tomorrow, I will chuck this in with that so it ends up all pretty like. Lots of other little stuff got done as well, screwing down the decking, running the diff and tranny vents, finishing up some wiring, sorting the heater and vacuum hoses, finding a thermo switch to run the fan etc etc... The list is getting shorter though.1 point
-
I lightly sanded some of the machined surfaces with 400 grit to get the rest of the black off. It opens and closes smooth as now. It had to force it in some spots when I took it apart.
1 point
-
The van furthest away in the pic has the motor and gearbox still fitted. The gearbox is a 5 speed column shift that looks like it has had a rattle can reco. The engine is a 4Y that according to the previous owner has been reconditioned. Both engine and gearbox are bolted up in the hole, but nothing else has been connected up. On the gearbox side of things the linkages are there but not connected, the drive shaft is sitting in the back of the van and the clutch slave cylinder is missing. The speedo drive is also AWOL with the speedo cable just hanging in space. On the engine side the radiator and exhaust are sitting in the back of the van and most of the electrical wiring and fuel pipes are all disconnected. So looks like previous owner lost interest mid job. Makes for an interesting time ahead for me. Anyhow I got today off as we are in limbo at the moment waiting a visit from the building inspector before we can carry on with the house, so thought I would spend a few hours trying to get the donor van running. Managed to find and connect up the wiring on the starter motor and the coil and fiddled around with the connections on the distributor until I successfully got spark at the points. Not getting spark at the plugs yet, but hoping to get some time on it tomorrow. First prize would be to get the engine running to assess it's condition. Thanks for reading.1 point
-
And i have just the thing for you then....
1 point
-
Another big bit done.1 point
-
Stripped down to get some parts powdercoated. Then got fuel fitting to weld to tank and plumb up with new fuel filter. Then fit a couple plugs to the loom. Then final assembly with lots and lots of Nordlock washers & Loctite. Should Coincide nicely with this bike going classic on Jan 1st 2020 and I can actually afford to register it1 point
-
Completed the 57sc Sump Model. Moving onto the pattern making designs now. These should be a lot easier than the crankcase! Casting version with machine allowance and shrinkage compensation First cut of roughly what the sand cores would look like.1 point
-
Havnt updated for a while. Been in the US living up the Freedoms. Ive been working on a lot of CAD over the last 1-2years and have just recently bought a massive 3D printer to make casting patterns. The plan is to stock pile patterns and then hit it hard when Im back in NZ Currently doing patterns for the crankcase. I'll update more on Instagram. @Barlow.Jobs1 point
-
I will now rummage through all my fading memories the happenings of the last few weeks since the wagon became legal, weeks of holidays, drinks, sunshine, fettling of various old car things. Hopefully as I type it will become clearer.. Since getting the car back into life I have just kept using it for all sorts of trips and its been fun. I love the looks it gets. Often I get thumbs up, usually from young folk who might not even know what it is but certainly like the fact its shabby. Older people often smile too. Many comments But it was never 'right'. I felt it had better potential and didn't believe that the engine was knackered. It was not using much oil but enough to make me look further than just the patches it left here and there. Every time I drove it Id discover afterwards a new fresh coating of oil mist over everything. I checked the rocker cover and sure enough that was loose. But still the mystery mist kept appearing.. hmmmmm… Finally I worked out that it was spinning off from the front pulley. Luckily my stash of Viva spares had a new seal. I popped off the timing chain cover and swapped out the very very hard old seal. The nice soft new one stopped the mist. Yay. But that rough idle was annoying me. More so the engine shal=king about and making the exhaust knock the crossmember. This I had to fix. It was too close and sat quite low as well.. So I cut off the down pipe and while it was off I repaired my previous ‘repair’ to the manifold joining flange which had started to leak. Knock be gone but still the car idled rough. I checked the compressions and they were all good @ 150 psi each (which is way higher than the 130 Mr Haynes tells me to expect so I either have a gauge that lies or someone in the past has skimmed the head?) But still the car ran rough. I finally bought a new timing light. A self powered one. So good not having to plug in the battery leads! With my new light I was able to check the timing which turned out to be only about 5 degrees out. So I was happy that Id managed to get it so close just by ear but not happy that it was obviously not the cause of the poor idle. I checked the valve clearances. Now things got messy… the manuals all say check them hot and many sources out there say the best thing is to check them with the engine running….. NEVER AGAIN will I try using feeler gauges on a idling engine! What a kerfuffle and resulting mess! After I had spent many clean rags clearing up the oil from everywhere I set the clearances hot. They were all pretty good actually. I screwed the rocker cover down and started the engine. TINK TINK TINK TINK TINK…. WTF?!!! Where’s that coming from. Oh no.. have I dropped a valve? Sounds like piston slap or a broken piston top but higher pitched? Oh dear I thought. I popped the cover off and started the engine. Sound has gone! What? Looked at rocker cover and I could see marks underneath from where a rocker was just touching my altered breather gallery… Oh OK. So tightening the cover down further on a new hot cork gasket just pulled it down that bit more to touch. One swift smack with the hammer and the sound was gone So what is causing the rough running then. I had been pulling the plugs after every few runs to look at the condition. Always the front 1 and 2 plugs were clean and borderline lean. The rear 3 and 4 always a touch oily. Hmmmm. Then I looked at my servo and breather lines heading into my inlet manifold- remember back when I changed the positions?.. I popped off the servo one and sucked on it. Hang on… no resistance! What? Bugger me.. I have a split diaphragm in the servo causing an air leak. Which also explains the hefty brake pedal ( I’d just put that down to poor brakes bedding in or not being manly enough..) I plugged the tee on the manifold and started the car. Wow!! What a difference!!!! So smooth. I was able to lower the idle speed right down. Then double checked the timing, tweeked the carb jet a little and it was heaps better. Next drive was way smoother, engine had more pull and no lurching. Heaven. But I knew it could be even better. So I undid the breather pipe from the inlet and re-routed it down the back of the block, holding it in place by the bottom of the bell housing with a zip tie. I plugged the remaining takeoff on the tee and started the car… even better! Yes!! Having got rid of another ‘air leak’ helped no end plus was also explaining why the rear two plugs were constantly oily. I will source another HC servo and for now just put up with a harder pedal. The brakes work well but just need a shove. As for the inlet take off I will move the position to just after the carb in the middle so its even across all cylinders. The breather can remain to atmosphere. Now I knew the engine was actually OK I gave it an oil change. The old oil was not too dirty but it did smell. It burns a little oil at start up past the inlet valve stems. I have found out that this earlier engine doesn’t have stem seals but a friend who owns many Vivas said they used to slide an O-ring down the stem so most oil ran over the o-ring rather than down the guide. Nifty idea I might try if I do pop the head off. Im now a little reluctant to take the head off as its running well..but I am a little curious to see how carboned up it might be?. So my once rough running Viva is now a very smooth little car to drive. In fact its an utter joy to drive, allowing for a general lacking in power. My fears about driving up hills have been removed. Yeah it’s a bit slow but only on one very steep section do I need second gear, otherwise its third gear and cruise. Its ideal about town and fantastic for popping to the beach, a trip it has done many times now. I like it. I like it a lot. I just cruise. Windows down. Chilled out. Lifes a breeze. I love the way the car handles with the tiny engine up front. Steering is very light and it fun to flick around. Many more little things to tidy up now and make it a nicer place. Hannah’s mum is over from the UK on holiday so I made the most of her baggage and got her to bring over lots of stuff I got cheap on ebay Uk. See here… New dizzy cap, rotor, a full set of mint Vauxhall service manuals (only £1.50 ), full head gasket set (cheap), a few magazines, adjustable electric fan controller, a chrome air filter which doesn’t quite fit but I’ll sort that. So that’s where I’m at now. Just using it. Transporting mountain bikes (easy pesy).. Going to the beach.. Sitting pretty in the afternoon… Taking me down to my local village for moonlit strolls along the beach.. Just generally being a very good fun wee classic daily1 point


This leaderboard is set to Auckland/GMT+12:00