
Leaderboard


Popular Content
Showing content with the highest reputation on 01/07/19 in all areas
-
Crikey its hot here! Perfect time to spend hours in a workshop filling and sanding then, with the occasional bike ride and swim to keep my sanity. I don't really get too excited about paintwork. In fact- really posh paint jobs, all shiny and bling just dont suit old cars imo. But I realise that if I want to sell this car down the line (to fund the Viva project etc) then its going to need to look nice. But going back a week from now I finished a few tiny welding jobs and added some much needed seatbelt mounting points. This car being a really early one only had diagonal belts and the positioning was horrible along with mounting points that were only holes through thin panel steel. I welded long sections of 20x10 fms inside the A pillars for the top mounts and then some plates to the floor and inner sill in all the appropriate size steel and nuts. I also cut and shut the rear seat base frame so it would clear the radiator pipe tunnel.. I then had to sort out the removable rear valance/cross member. I have three to use. The race car one was hacked about and rusty. A spare one I'd collected from the Christchurch Imp graveyard was rusty and dented. The original one from this shell was just rusty. I chose that one. I started by cutting out the unneeded and quite heavy original engine mount part. Then rebuilt it all, removing the rot, adding in a length folded steel along the width to support a small bit of box section. Why? Well because I like bicycles and I like to travel to places for nice bike rides and why would I choose to do such a thing in a boring modern car! Much more fun to go on road trips to biking places in a interesting old car... So, just like on my Rx3 and my previous Viva I added a mounting point for custom made bike racks to suit each car. For this Imp though I wanted something that will be hidden by the number plate when not in use. I'll make a basic rack to suit. Then together Hannah and I painted this and any other remaining bare steel with industrial 440 epoxy primer. It already started looking better... Now back to that filling and sanding. Its been a week of many 30 degree days here, often hotter at mid day. According to our thermometer yesterday was 34 ! Our place is like suntrap and we don't get the wind that even our neighbours over the road get. Great for winter but can get very hot in summer. Luckily the workshop faces directly north to the sun and with both doors open we get good light and a gentle enough breeze through to keep it from turning into too much of an intense oven. Plus it takes the filler dust out! Inside the 'not so hot' oven... Still a yucky job and to stop giving up I have to keep reminding myself that 'a good paint job is 95% preparation' etc etc. Yawn. pffff. I'll report back in a week or two, broken and covered in dust.15 points
-
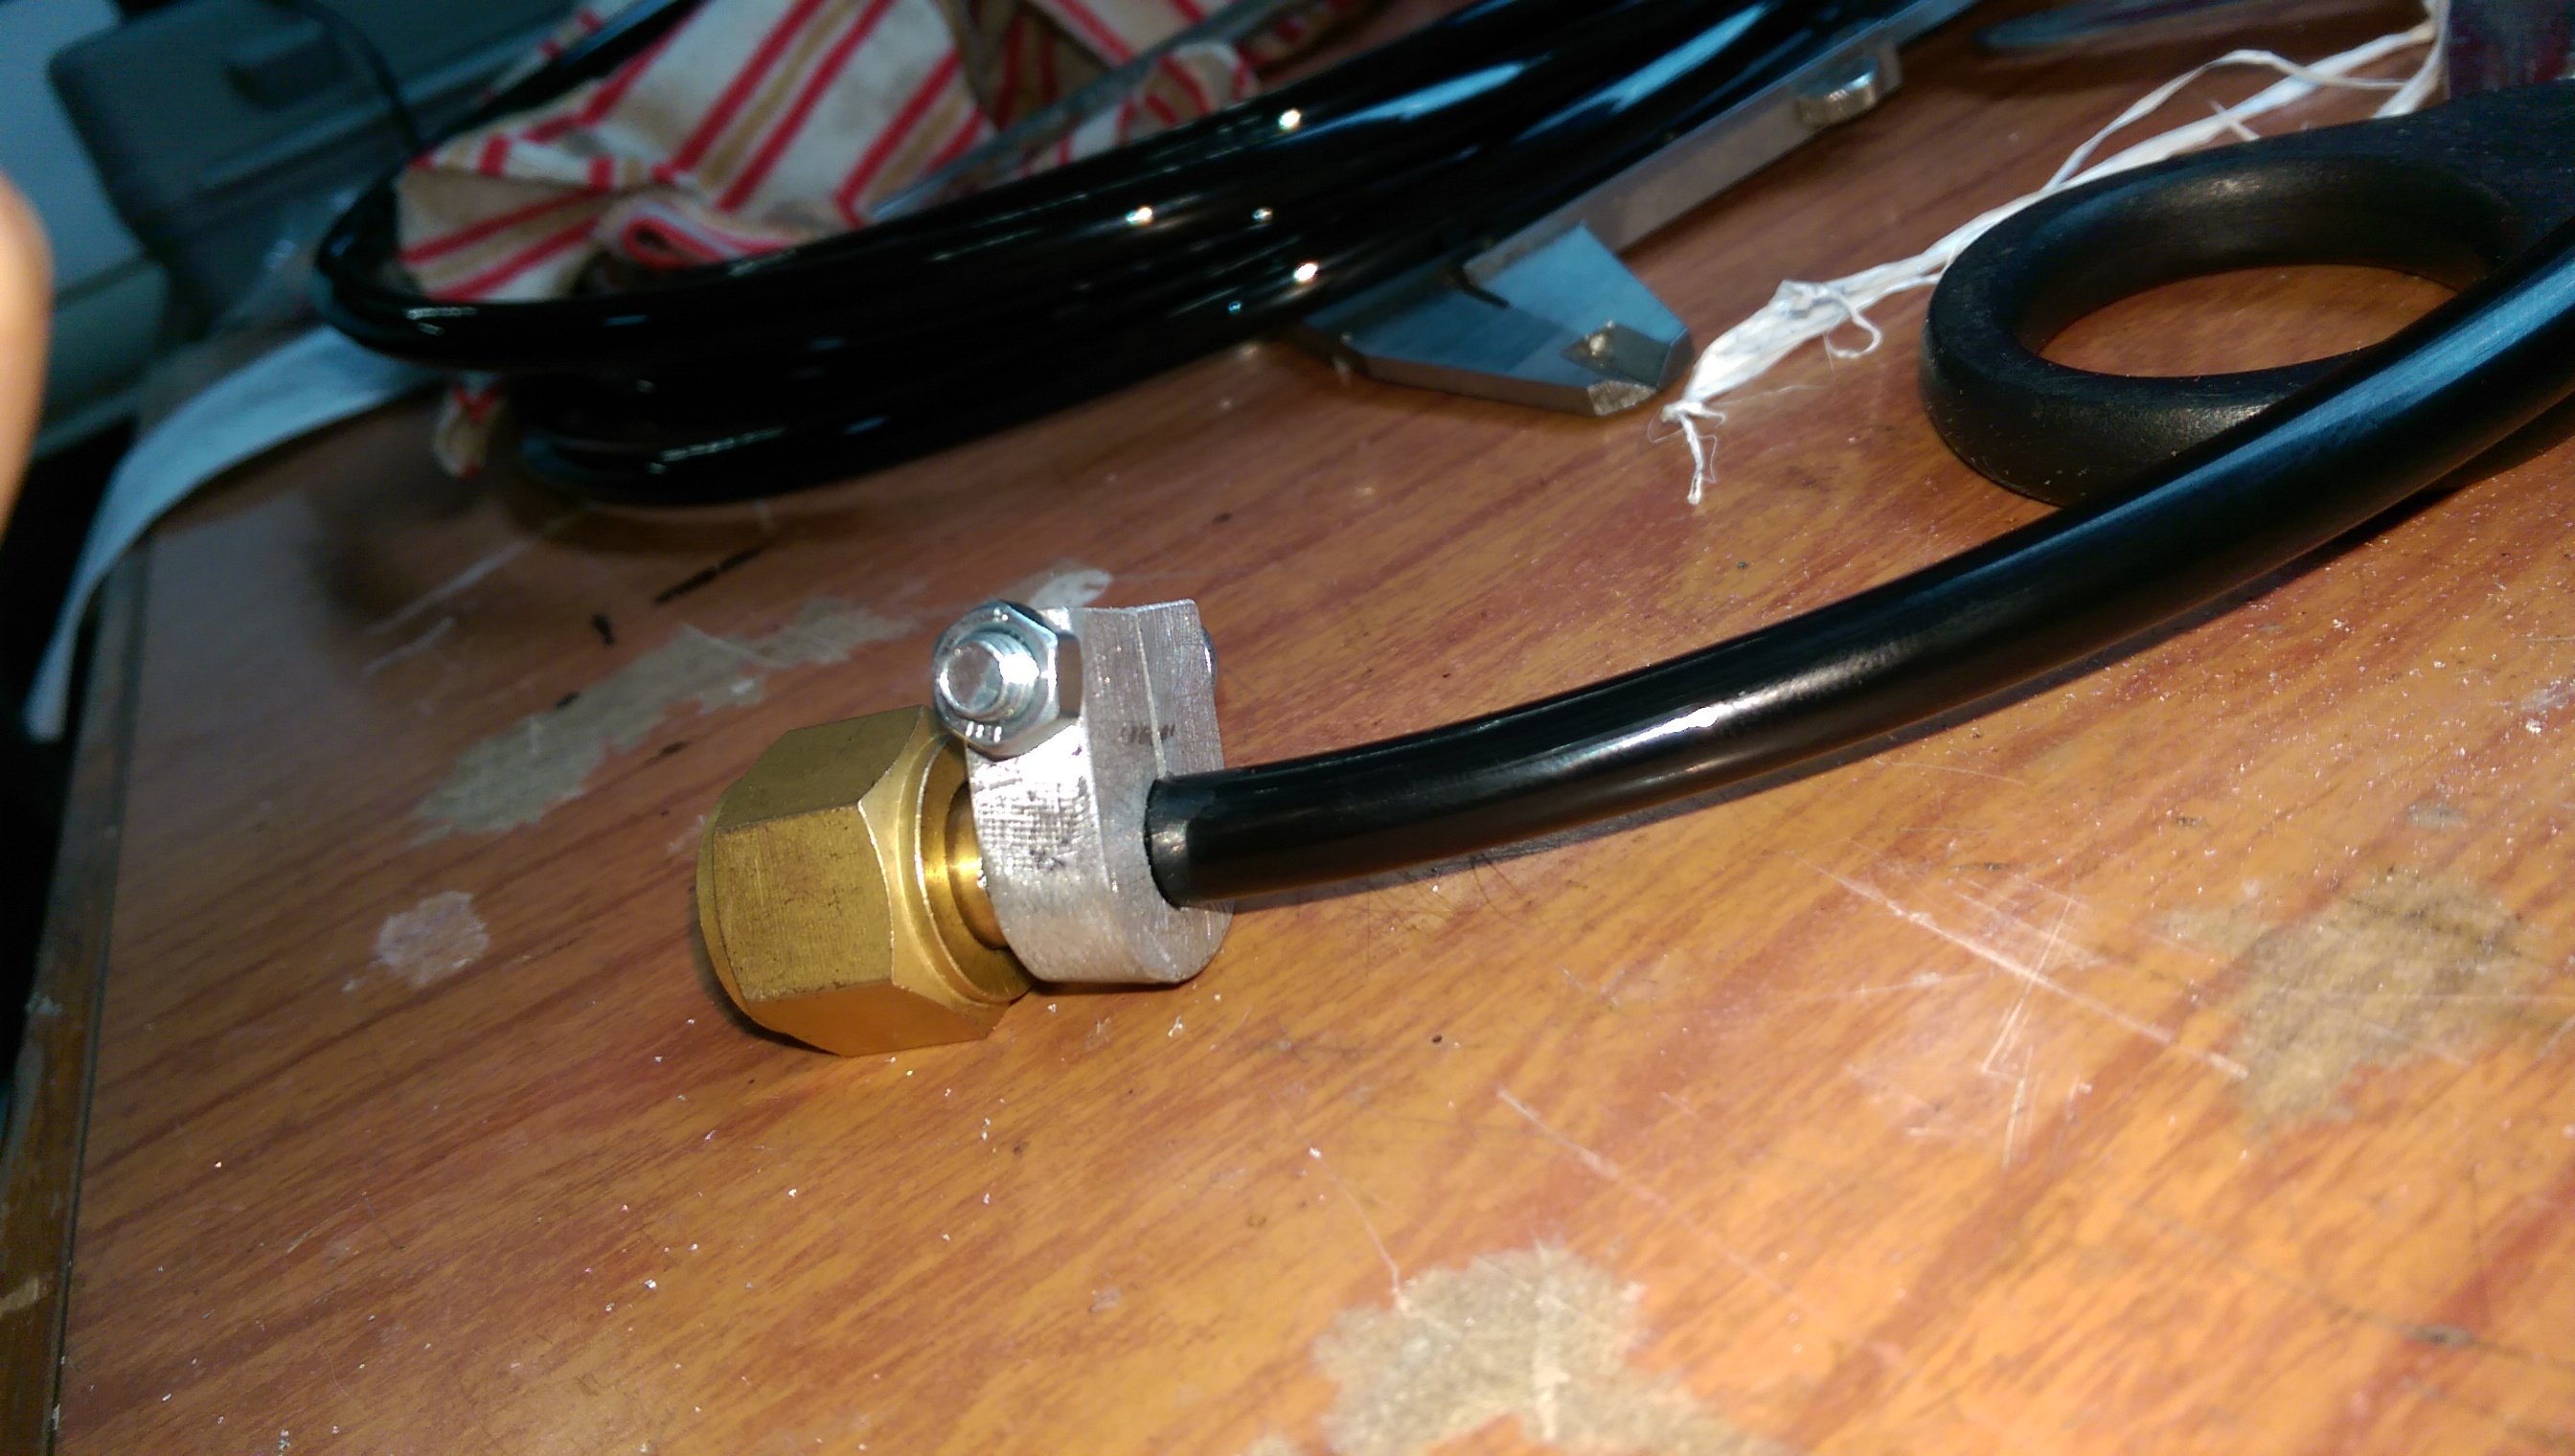
I needed a tiny hose clip, and I didn't have one small enough. I could have just bought one..... but I was expecting a courier deliver my new lawn mower, so didn't want to go out and miss it. So I made one... Works real good. After the mower arrived I did go out to get oil for it. I didn't bother getting a "normal" hose clip while I was out.
 11 points
 -
This is my beautiful 1912 lister and powers my house in winter when there isnt enough sun for the house batteries.
9 points
-
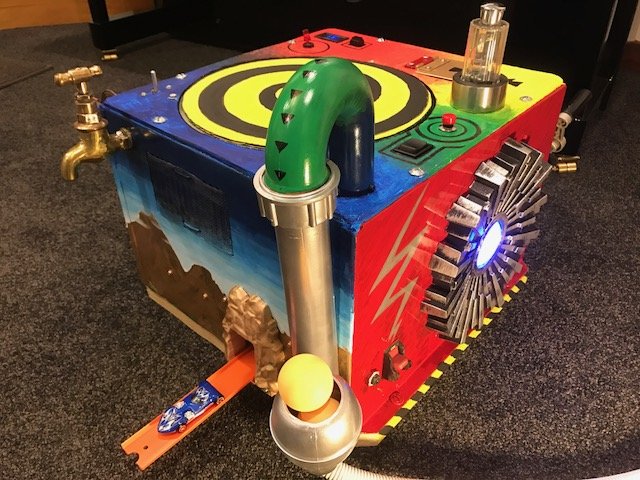
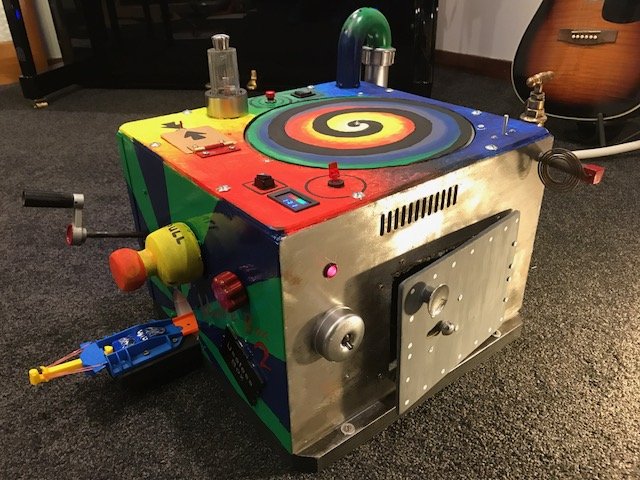
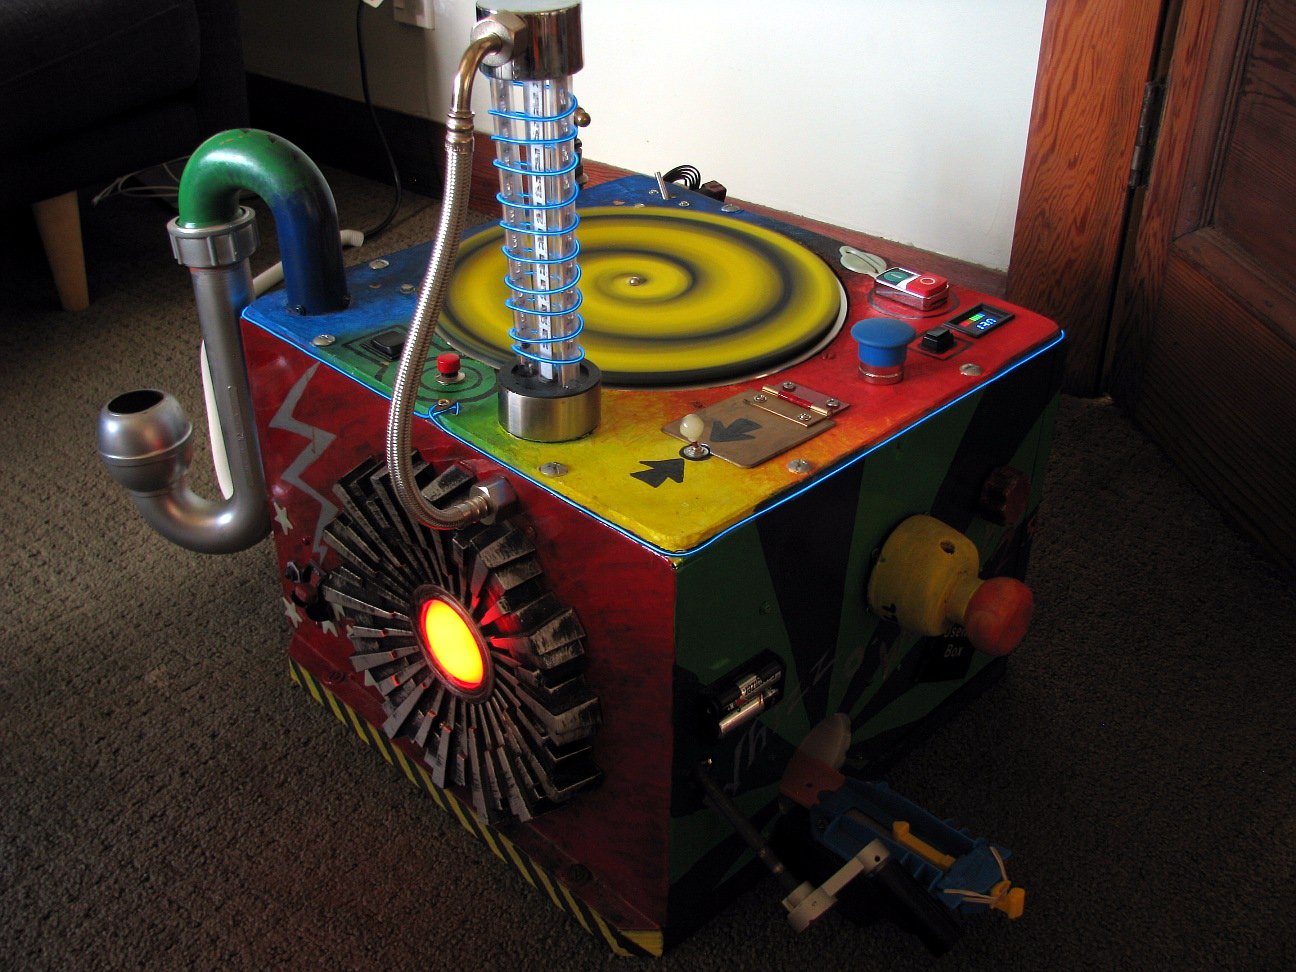
That's basically the story of this other useless object / piece of 'outsider art' I made. My Dad made the first one for me when I was learning to walk, and there's a photo of it somewhere - a wooden box with junk from the garage attached. There was a tap, a turntable, some lightswitches etc, and a lightning bolt was painted on. Here's the first version of my second generation attempt: Since it's the garage equivalent of Fridge Pie, it's mostly made with whatever junk was hanging around. There was some new stuff purchased, but if the bill doesn't add up to much, the labour hours probably do. I made it for my nephew, so some of the features are aimed at his quirks: I incorporated an off-the-shelf 'useless box' because he loves switches - turn the switch on and a hand comes out of the trapdoor and turns it off again A stack of old server fans blow air and pingpong balls out of the plumbing pipe, since he is fascinated with, and terrified by, vacuum cleaners (dun dun dun) The record turntable works (was belt-driven, now gear-driven and reversible) The orange/yellow coffee tamper with 'PULL' written on is connected to a door soft closer Most electrics are off a 12V battery, with an LED volt meter and internal charger LED colour-changing light with bluetooth speaker built in Hotwheels car launcher, storage cupboard, make-believe lever and knob, clock spring chime etc That first version, built for Xmas 2017, got pretty thoroughly busted as you'd expect. I had to fix it for Xmas 2018: Now it's got electroluminescent wire, some waterfall christmas lights, freebie switches from work, and some glow-in-the-dark stars (thanks Oldschool secret santa!).. I went around to my sister's place today to do another minor repair on this, and my nephew is getting close to being able to undo screws. I see trouble ahead. Since his parents drive a Prius, I engineered a situation where I could test him for the petrolhead gene - getting him to watch my Jag's electric aerial go up and down while I started the motor and gave it a few gentle thottle blips. He stared at the rasping tailpipes in amazement and eventually decided it was scary. I'm such a bad uncle.
9 points
-
Woo. So the test drive went well enough that I was able to drive home unassisted. I gave the brakes a quick bleed but they need plenty more work. When I can steal a body Ill do a proper bleed. One of the rear drums felt hot so it needs adjusting. Throttle return spring also isnt up to the job. What a difference a real diff makes. Going from 5.6:1 to 3.7 is amazing. I cant see myself needing 5th let alone 6th. Lowering it has made the handling waaaay better too. Plenty to go but good that it is driving.
7 points
-
Took the day off to do bogan tetris. Finding engines I didnt remember I even had and moving it into storage. Oh if anyone wants a chev 250 inline 6 and 4 speed, shoot me a pm. Anyway, managed to find reverse with a pry bar under the van but not on the gearstick so Ill have to have a tickle. Feels good to have a clean shed.
6 points
-
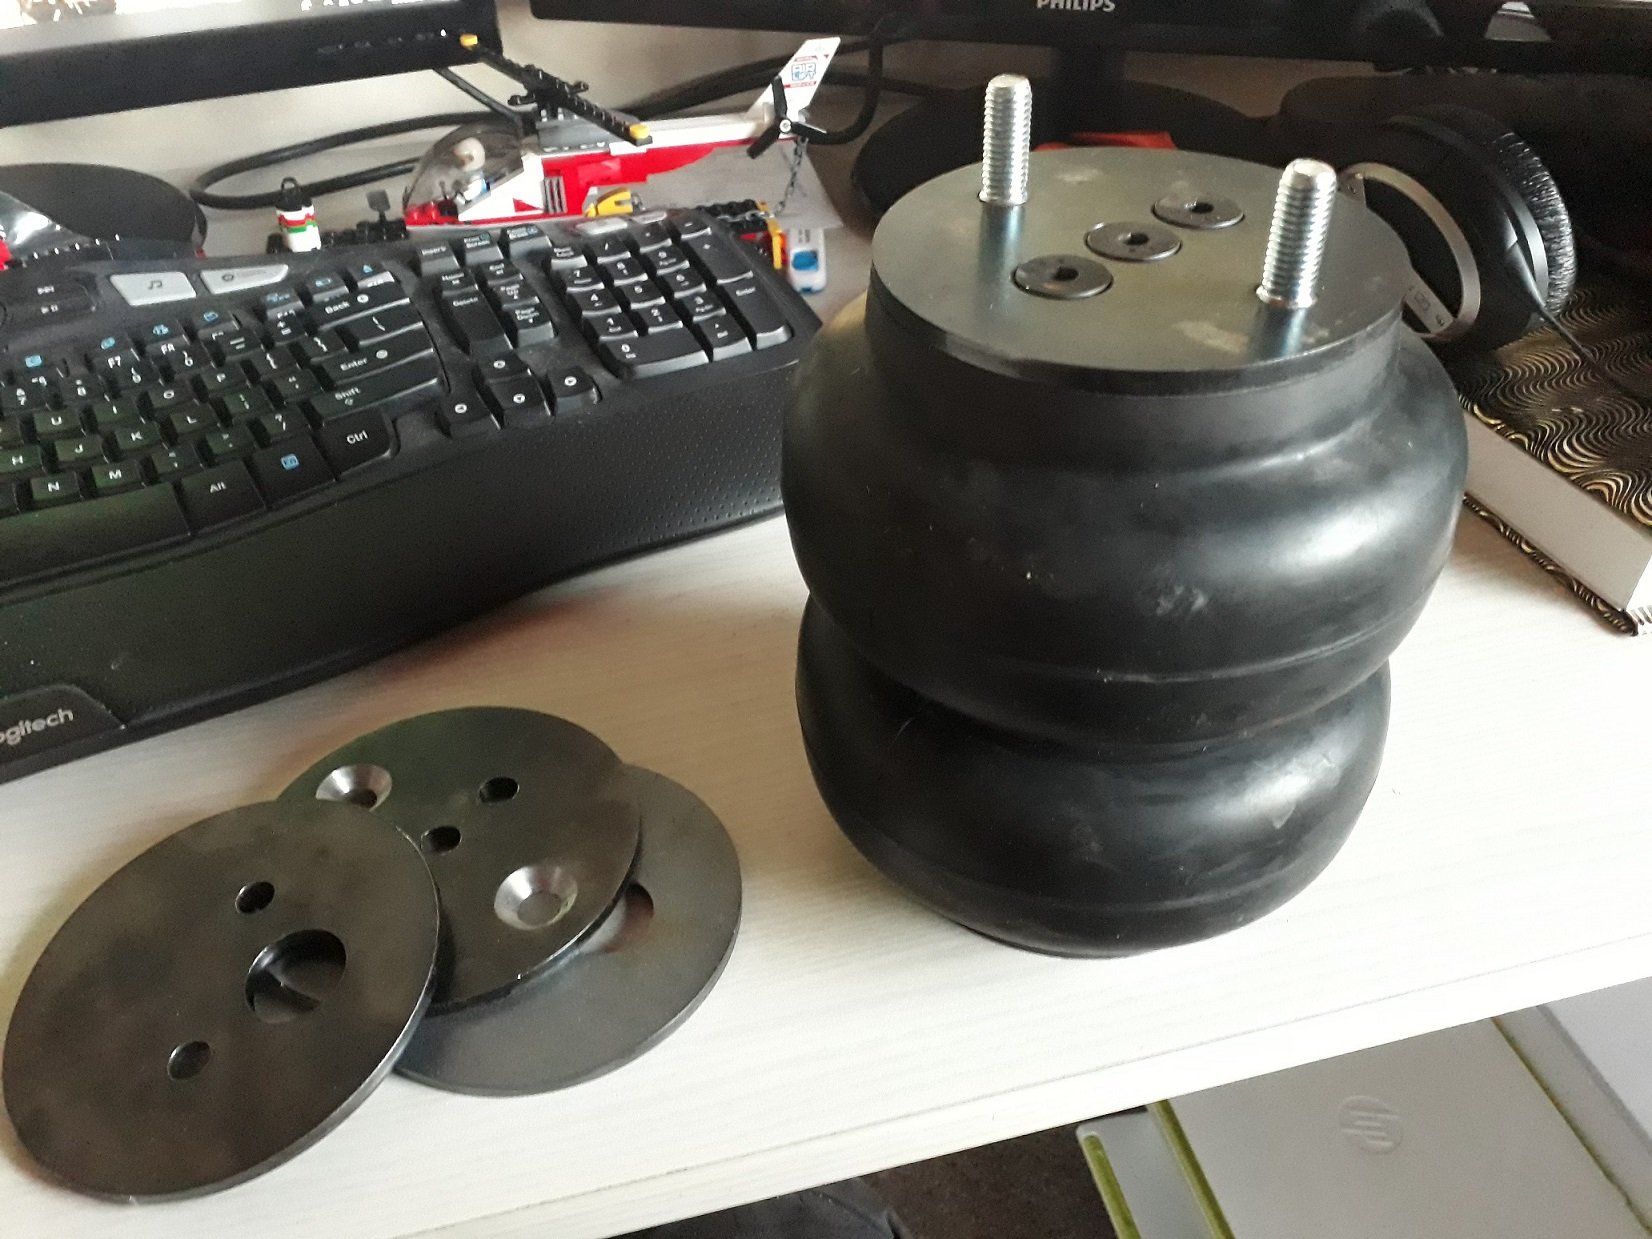
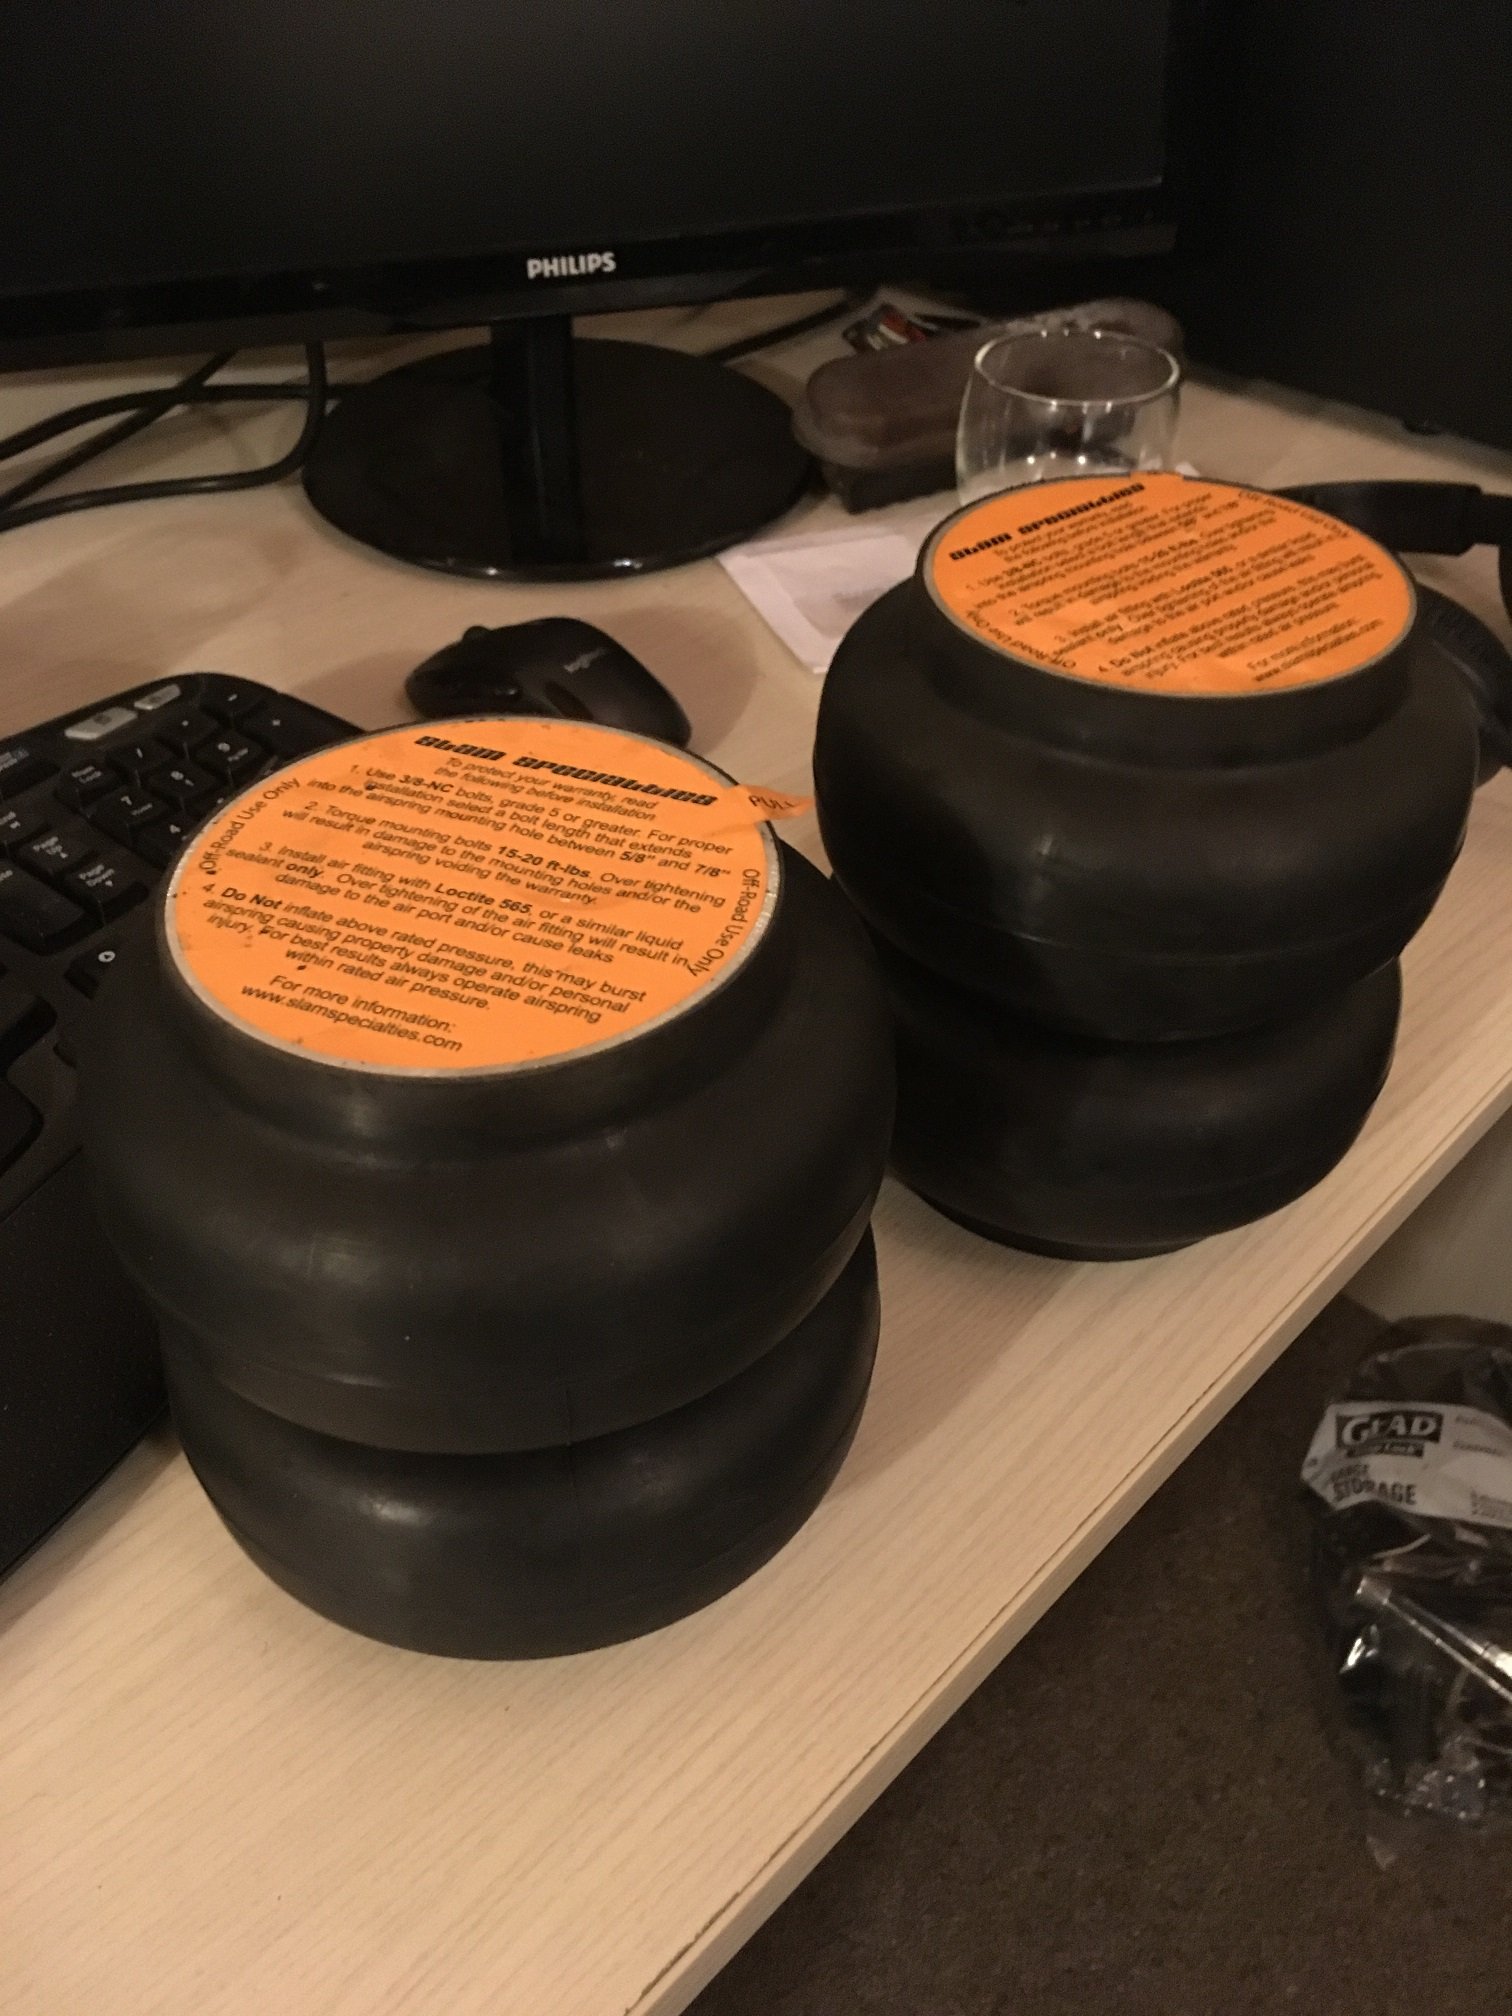
Awhile back I picked up a pair of Slam Specialties RE6s for the back and set about drawing some circles on the computer and getting them laser cut, then I countersunk some holes into them so they can be bolted to the rear arms via the two threads you can see sticking out below I loosely put the diff back in the car today and tricked Dave into coming around by promising him a swim. Put one of the original 13in wheels on it and mounted the bag to the lower arm then dicked around with bits of wood as spacers to work out how tall the cups for the top mounts were going to need to be. Came up with a number but turns out the tube I purchased is too small in diameter to fit over the upper springs perch - must have been holding the wrong end of the ruler or something. Anyway will come up with a work around tomorrow. I won't be running the 13s, I've got some 14in steels from a W108 Mercedes which run the (IMO) better looking single piece hubcap apposed to the 2 piece items that 13in rims run, but the 14s don't have tyres on them so for measuring purposes the 13s will have to suffice etc. will muck around with it some more tomorrow.
5 points
-
Almost done its ridable everything is hooked up just misted it with black and called it a day. What a massive job.
4 points
-
How can there be a test procedure for exhaust volume that can be overruled by some numpty's personal discretion? Surely if they think it's too loud they should get a noise meter on it4 points
-
I heard a rumour that you people like hanging out with other weirdos with old cars at the pub.... well we have a meet up this Sunday to cater for your needs!4 points
-
My Dad made me one of these 35 or so years ago, it was awesome! Now Grandad and I are making my kids two of them. Yes, It's cable tied together. It will get covered over with fiber glass tape soon.4 points
-
wow having a mare. just some more paddock hacking. looks so tame in the vids. ask someone whos been in it.. and they will tell you how they wish they hadn't. @Stu@Snoozin4 points
-
Moved those goofy bloody headlights to 2 random 6mm tapped holes in forks looks way less dorky. If you squint and cock your head sideways it could pass as factory built. No longer has go ped proportions anymore its definitely more of a moped on steroids.
3 points
-
Baffle plates cannot be removable.3 points
-
It is from an IS200 and here is a pic of a similar setup. Realistically I didnt need it with the diff swap but I want this to be bulletproof and the commer gearbox is a leaky shitfight. I'm sure Ill be able to sort reverse. Im just not sure which side it is on so don't know where to look. The gearchange is very crisp and I haven't even tightened it up yet.
3 points
-
Sanded and repeated. Halfway through the gun decided it didnt want to fan so swapped to my el cheapo and got it finished. Quite a mission.3 points
-
Bleh. Looks like finding reverse just jumped up the priority list.
3 points
-
Stock cams back in for now since it idles on 2 cylinders at 2000rpm. At least until i get motivated to make a new inlet manifold. finally cracked 2 hundy on stock cams with few more tweaks. still only 13psi boost3 points
-
Its like 2 freaking weeks away. Wether to caravan all grown up and modern. Or coma in escort for umteenth year2 points
-
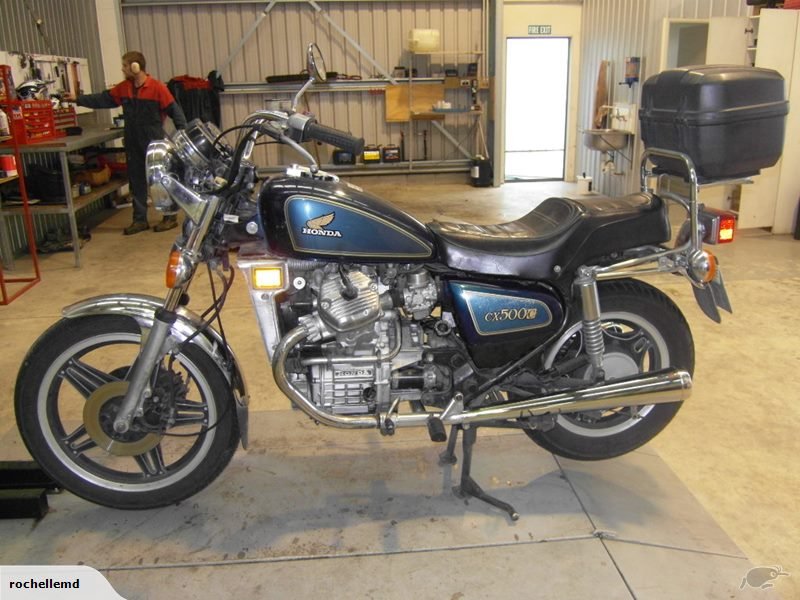
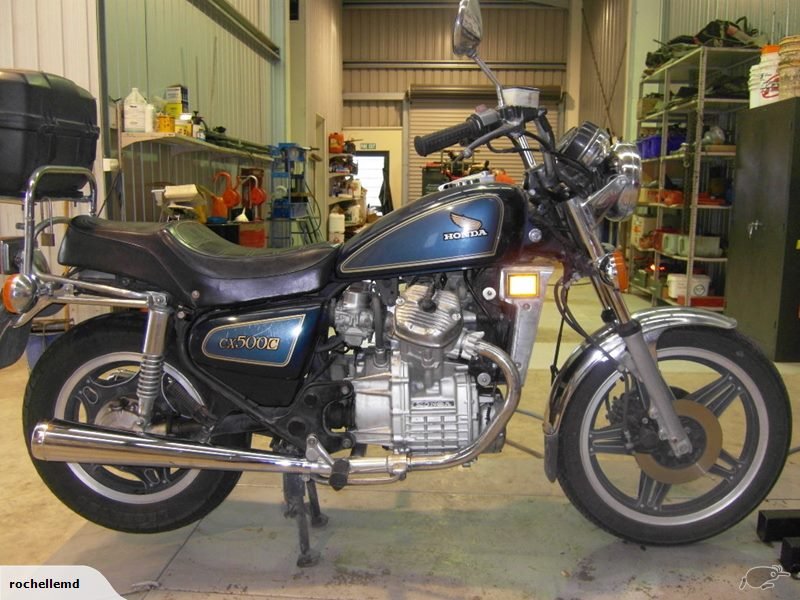
Ben here too, i have 2 cx500s of procrastination and one with engine out but that wont be for long, need one going....lol if i can ever help with anything just let me know....................dont see to many of these bikes around wellington nowdays............
2 points
-
https://vehicleinspection.nzta.govt.nz/virms/in-service-wof-and-cof/general/exhaust/exhaust-system See point 7 for exhaust noise see epecially how the wof inspector can use their judgment as to if is too loud or not.2 points
-
Exhaust noise cert? Tell wof guy to get fucked. Volume is checked as part of the cert process.2 points
-
just bring galaxie down I took mine last year unregistered still on US plates and had no trouble2 points
-
day four. i had cut these lengths last night but i came in and laid them out on the floor, draw some straight line on the floor and then tacked these cross bars so they wouldn't move i had a left over length and it was going to be pretty good for the front part of the draw bar so i cut another one. measured between the front and drew a long line square up the front which i then made my two draw bar section go out to. cut the angle i needed and cleaned it up ready for welding welding some more welding, but this time the back brace welded one of the spring things backwards as @Shakotom pointed out when he arrived so well yea cut that off and put it on the correct way and proceed to do the other side i didn't quite have the drill side i needed so i used @Beavers favorite tool of my shop, the step trill followed up with the dremel as the step drill wasn't quite long enough. assembled most of it and made it roll!!!!!!! put the floor on it! here i am happy as that i had made this so far and its gone pretty darn well also @flyingbrick drew this up while he was at my place while i was working fuck yes2 points
-
A HUGE thanks to @TimShadboltfan27 for bring me a set of wheels down from Auckland. I removed the 20s and on went the OEM M3 Style 24 17x7.5" wheels2 points
-
I can't make this stuff up, I really can't. I found out why the Vanos isn't working, and it's not what I was thinking... I have been messing around for the past few days trying to get INPA and DIS to work properly. I can get INPA to read everything but the DME (ECU), but I finally got DIS working today, and its reading the engine DME. This means I can finally read engine codes and see if there is anything obviously wrong. That's a yes then. This was the only code, thankfully. I had wondered about the TPS since the reading from live data in the VNC (Vanos Control unit) in INPA was weird, but the VNC didn't have codes for those sensors, only Vanos related ones (of which it had an old code for something random in German, which wasn't an active code). So what was weird? Well, the Throttle Position Sensor either read as below, with the engine off And didn't change when the throttle was opened, or did this when the engine was running (also note the two bars at the very top not reading anything) That reading looked familiar.... almost like it was reading engine position. I disconnected the plugs, and checked the wiring colours. This was the plug off the TPS And the Intake Cam Position Sensor These two live right next to each other, and have identical plugs. I check the wiring diagram, and sure enough the TPS colours were wrong. It should be Brown, Brown/Black and Red/Yellow And the CPS should be Yellow, Black and Shielded Brown So, what does that mean? Well, the two connectors had indeed been swapped. I swapped them over, connected them as they should be, and checked in INPA again. The TPS now read correctly, and I also noted that the two top bars now also had a reading, so suspect that's linked to the cam sensor. You can also see from the above photo, that the engine finally idles at the correct RPM now too. Obviously the engine thinking it was at WOT, but not moving, was causing the DME to keep the idle up. The result? Its picked up a lot of down low power, almost like the Vanos is now actually doing something. Funny that. Easy way to gain power, much easier than Type-R stickers or a pod filter. The exhaust sounds different too, I suspect this is down to the cam timing being correct now, instead of the inlet cam just sitting in one spot (or maybe even varying depending on throttle position!) With the idle also correct, unfortunately the misfire at idle is more obvious. Hopefully it's either Vanos, or something simple like spark plugs or coils. I'll check them out shortly. I can only presume this switch happened when the previous owner had everything unplugged to replace the head gasket. That was in 2016, so obviously it's been wrong for a while now, but confirms that I was right about the Vanos not working. It's still slower than my old M3, but hopefully rebuilding the Vanos can make that gap closer.2 points
-
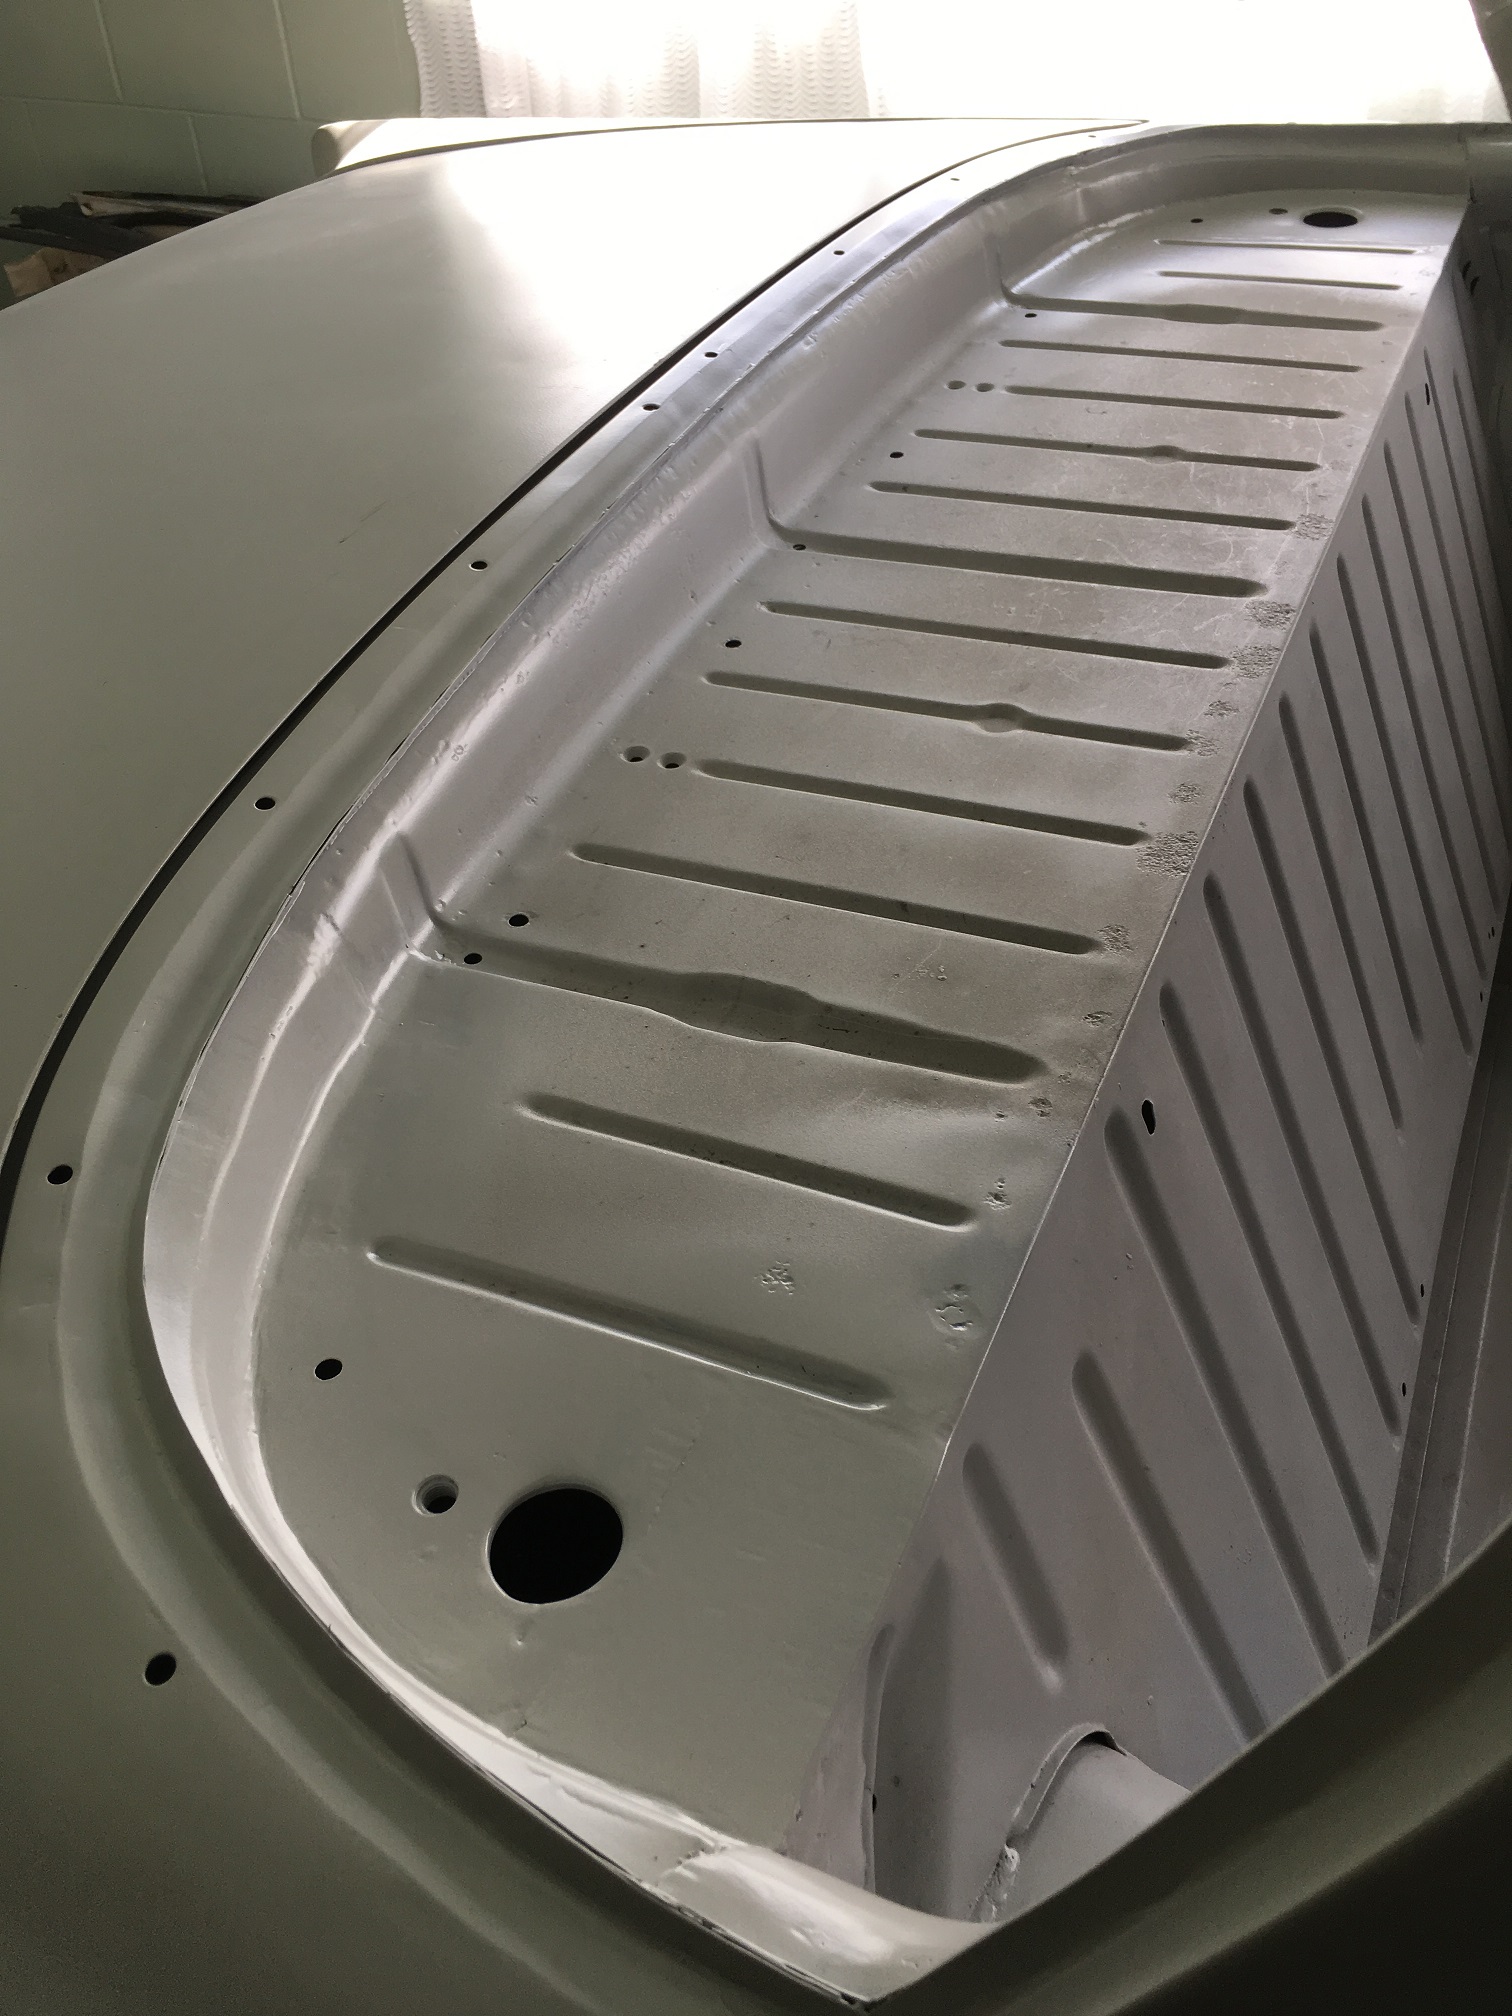
did a bit more. cut open the sill to have a look at the inner piece which was a bit rusty so i cut it out and made a new bit. 2019-01-05_03-17-08 by sheepers, on Flickr 2019-01-05_03-17-43 by sheepers, on Flickr then it was on to making a new outer skin. i cut the whole bottom off and just made one patch to make life easier. i made the arch lip and welded it on first, then stitched it all in. 2019-01-05_03-17-29 by sheepers, on Flickr 2019-01-05_03-17-52 by sheepers, on Flickr 2019-01-05_03-17-58 by sheepers, on Flickr still got a few little bits to do but its nearly finished. tomorrow is my 45th birthday so im not sure if ill work on it tomorrow or not.2 points
-
2 points
-
Rented a compressor. It packed up halfway thru my first side. Supercheap backup to the rescue. Then the gun clogged up. But, got a coat of primer on. Tomorrow i unfuck all the fuck ups a bit and hopefully get it almost primed. I know tigerstripes e'rywhere, and the tailgate is as warped as a warped thing. Thanks.2 points
-
So the engine bay thing kind of took off. Some egging on by a certain lanky Auckland member... Motor out. 20181216_135918 by Richard Opie, on Flickr You can see, there's multiple useless holes in the firewall. These include, but are not restricted to the original heater inlet/outlet, brake booster, loom, aircon and all the other weird shit that I don't need anymore. Same goes for the brackets on the firewall. So what next? KP61 Phone-1 by Richard Opie, on Flickr Trekked down to see @oftensideways with the KP in tow. For those of you who don't know Sean, he's a freakin wizard, and a top bloke to boot. Someone I am privileged to consider among my mates. He'd agreed to weld up the engine bay for me, and with Bex being away visiting her family over the break it was a great excuse for me to get out of the house and go for a bit of a drive. KP61 Phone-2 by Richard Opie, on Flickr I didn't really get many shots in progress, but here's what the firewall looked like when it was time to load up and hit the road (the next day, even!). All of the large holes have been filled with steel patches. MIG'd in place then TIG welded to finish. The little stuff with captive nuts on the other side have been filled by MIG welding. Then a bunch of hammer and dolly work to get the shape back. And so we took off home. Straight into @sheepers shed... as I said, this all happened a bit quicker than I am used to. KP61 Phone-3 by Richard Opie, on Flickr Front off, subframe and suspension out. Then onto the labourious job of prepping for paint. KP61 Phone-4 by Richard Opie, on Flickr This is after the initial prep work for a coat of high build primer. You'll note the brake line holes and etc in the inner guards have also been filled. Thought it was a good idea while I was down at Seans to do it once and properly. This first prep really started to reveal just how good the job Sean did was. High spots at an absolute minimum - which is great, as these are way harder to fix than low spots, for obvious reasons. KP61 Phone-5 by Richard Opie, on Flickr Sheepers sprayed the first coat of primer on the bay that same night. Was a fairly long day, but super cool nonetheless to see an inkling of what the final product was going to be like while the primer was still wet. Promising. Of course, lots, and lots, and lots of sanding still to come... KP61 Phone-6 by Richard Opie, on Flickr This is after a wet sand. A whole days worth of wet sanding. You can see all the red spot filler on the firewall. This is ALL WE NEEDED TO FILL IN. Let that sink in for a while. After the amount of welding heat and bashing that had gone into the firewall, the requirement to crack out the bog was slim to nil in the end. That's how damn good Sean is. Regardless of how good it was, I ended up with trench-hands from being in wet gloves all day, which was equal parts gross and hilarious. But then the second coat of primer went on... KP61 Phone-7 by Richard Opie, on Flickr HOW GOOD. The followup to this was pretty much a rinse and repeat of the earlier scenario. But with more hand sanding, and less power assistance. Definitely a learning process, figuring out how best to make the paper do the work, while maintaining a smooth surface ready for the base coat. KP61 Phone-8 by Richard Opie, on Flickr This was about the moment I began to properly fizz. Couldn't stay in the shed while it was being sprayed as I didn't have appropriate respiratory protection, but when the door rolled up... this shot of the bay coated in a colour matched red was the result. Not bad? Major tent pants moment was still to come, however. KP61 Phone-9 by Richard Opie, on Flickr Look at that! You could bloody go swimming in that gloss. Sheeper was a little bit apprehensive to try the clearcoat I bought (that was recommended by the joker at CarColors Albany) since different product can apparently yield very different results if you're not familiar with spraying it. But how good is the result, testament to the multi-talents of the lanky fella on the gun. A couple of runs for sure, and a little bit of dirt got in the paint - expected for spraying it in a garage. But nothing that can't be very easily fixed. Today was a day off working on it - from go to whoa this took 5 days in total. I'm heading back tomorrow to touch up the underseal in the guards and also reassemble the car, take it back to the shed it lives in and crack on with the engine while I let the paint harden enough to wet sand or cut/polish the imperfections out. Thanks for looking.2 points
-
With the pipework tunnel pretty much finished I moved onto the seat rails. I had bought some MX5 seats a fair while back with the intention of fitting into the Imp. However, rather than have them sit around doing nothing I ended up fitting them into my Viva wagon. They were great but didn't quite suit it. I then bought a lovely pair of Recaros, fitted them to the wagon and have the Mx5 seats once again for this car. I had sort of roughed out how I wanted to fit them a while back but not sure exactly where to mount the supports. I needed a Datum. So I scored this beauty... Strangely it came fitted in a freshly imported Hiace van from Japan that I did a load of rust repairs to. The owner didn't like it and agreed to give it to me if I got a decent standard Toyota replacement. This was harder than I thought as most of the old Toyota steering wheels from that era of Hiace have become loose on the top of wheel and so twist in ones hands feeling horrible. But eventually I found a decent replacement, got my prized wheel and promptly fitted it to a boss kit I ordered from overseas. With it taking pride of place I sat the seats in the car and made some carefully measured brrmmm brrmmm sounds and worked out the seat placement... Before work could continue on fitting the seats I needed to machine some locating spacers. But in order to do that I needed to fit the brand new 16mm centre height tools to our replacement lathe of which the stock tool post was set to an absurdly high 12mm, meaning it could only use the little baby 12mm tools available (odd for what is a fairly medium sized lathe). So I needed to machine the tool post down with our old drill mill ... Then I machined these... Which allowed me to sit the seats neatly onto fabricated supports that I welded across the floor, the rear passenger one strengthening the floor where the new pipe tunnel is... I bolted the seats in and was very happy. The seats can go right back giving heaps of leg room for my lanky body but slide forwards more then enough to get into the back. I have mounted them quite far inboard to line them up as best I can with the pedals... I had finished off the pipe tunnel too, leaving it exposed at the back for fitment of pipes. I'll cover those bits with removable lids and will have to modify a section of the rear seat base for clearance. I'll sort out the finishing details once I have welded up the stainless pipe I have bought. Oh also- ages back when I was stripping out the green Imp (number 3 Imp) I found the build sheet. A neat thing to find... I like this bit...2 points
-
Ta da! That's the last bit of rust on the shell taken care of, you can see some pitting on the parcel shelf but meh, it'll be ok. The whole thing is in primer now and at home while I save some more money before having the actual panel and paint done.
2 points
-
yes if you follow the requirements in here airbags https://lvvta.org.nz/documents/standards/LVVTA_STD_Frontal_Impact.pdf abs removal https://lvvta.org.nz/documents/standards/LVVTA_STD_Braking_Systems.pdf1 point
-
It's more like 10 days away isn't it? And i hope i make it. Probably everyone else will hope i don't but it's still a good day out.1 point
-
Yeh exhaust noise cert - Fairly sure the cert would have been before noise certs existed - but could be wrong. He's got a baffle plate he can shut it up with, so I recon he should chuck that in there and go back with it relatively quiet and see what they say.1 point
-
Tbh close to $1 reserving it on trade me . thing makes a nice shelf in the shed though....1 point
-
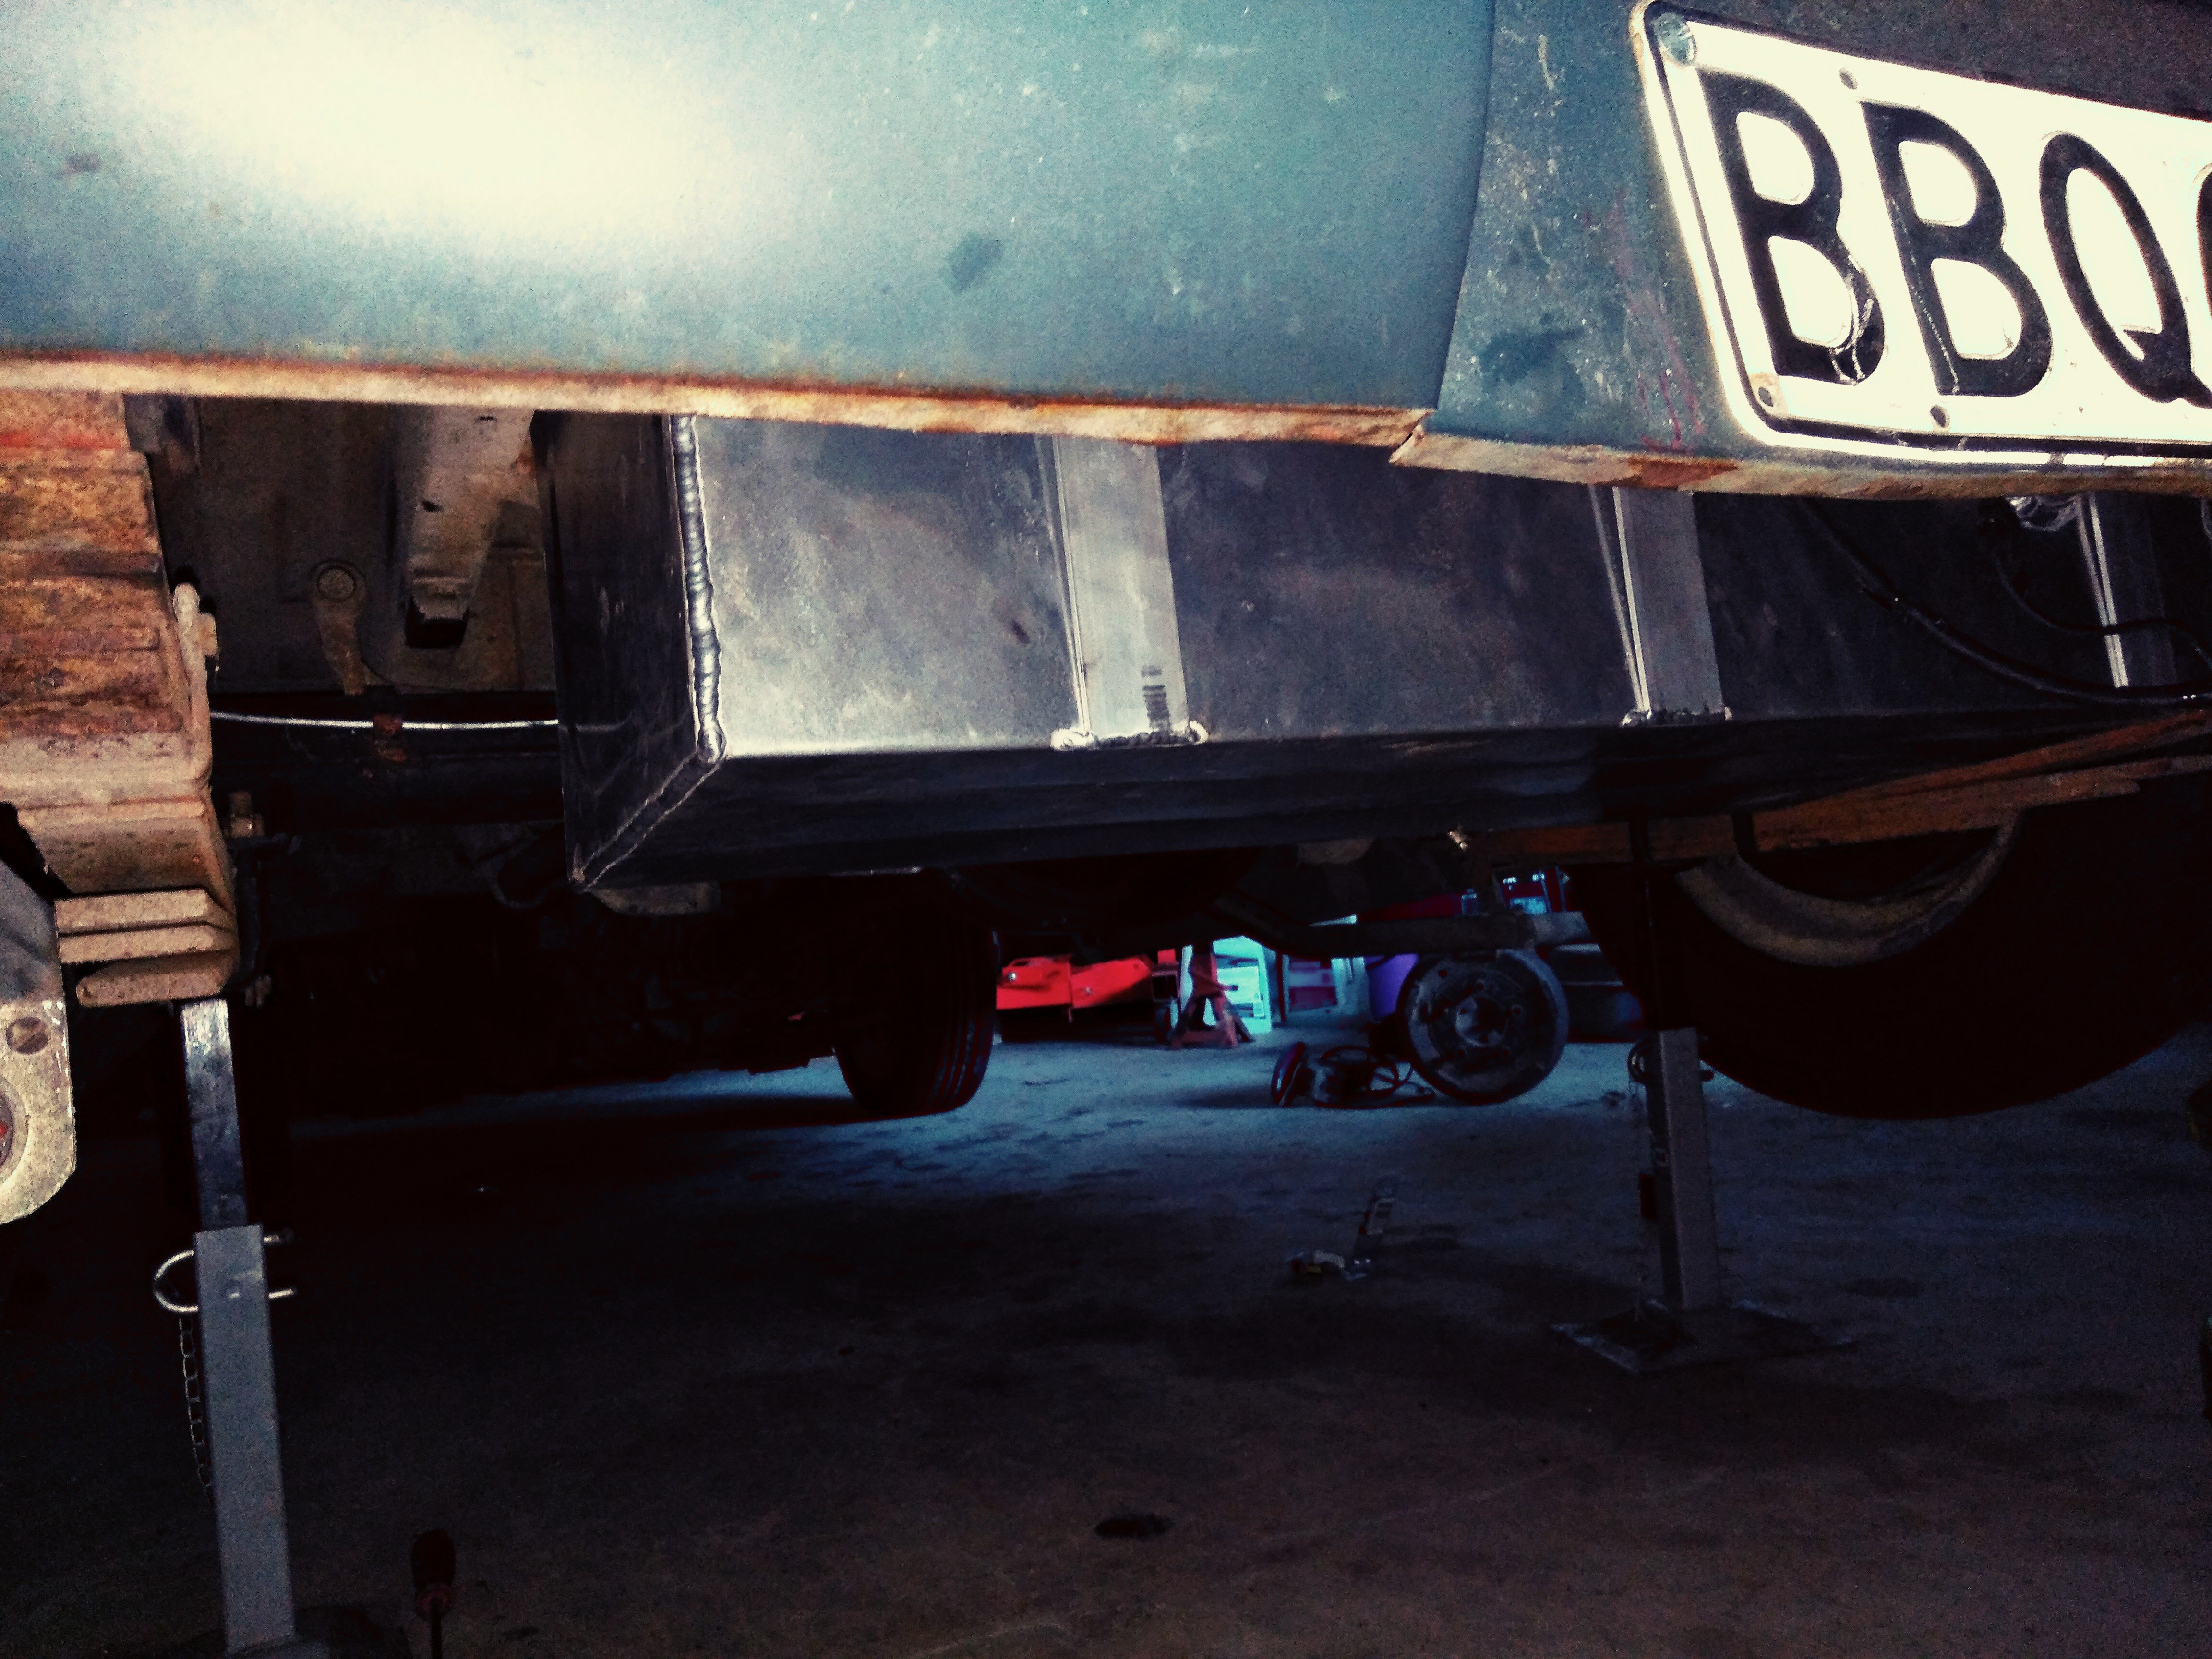
So today I was able to tick a few things off the list. I fitted the rear lever arm shocks properly. I'll see how it goes with cert as I have copied the stock setup, but I wouldn't mind putting in some telescopic shocks. I also fitted the fuel tank and put in a new fuel line. Whilst I was under there I put in the rear brake like. I just need to add fluid and bleed and I can test drive. Next on the list will be a tailshaft loop. The hobbycar manual is too vague so Ill be flipping through the relevant bulletin for the mounting specs. I dont have a cross member there so I assume I'll have to weld some plates to the floor. My grinders ears are burning already.
1 point
-
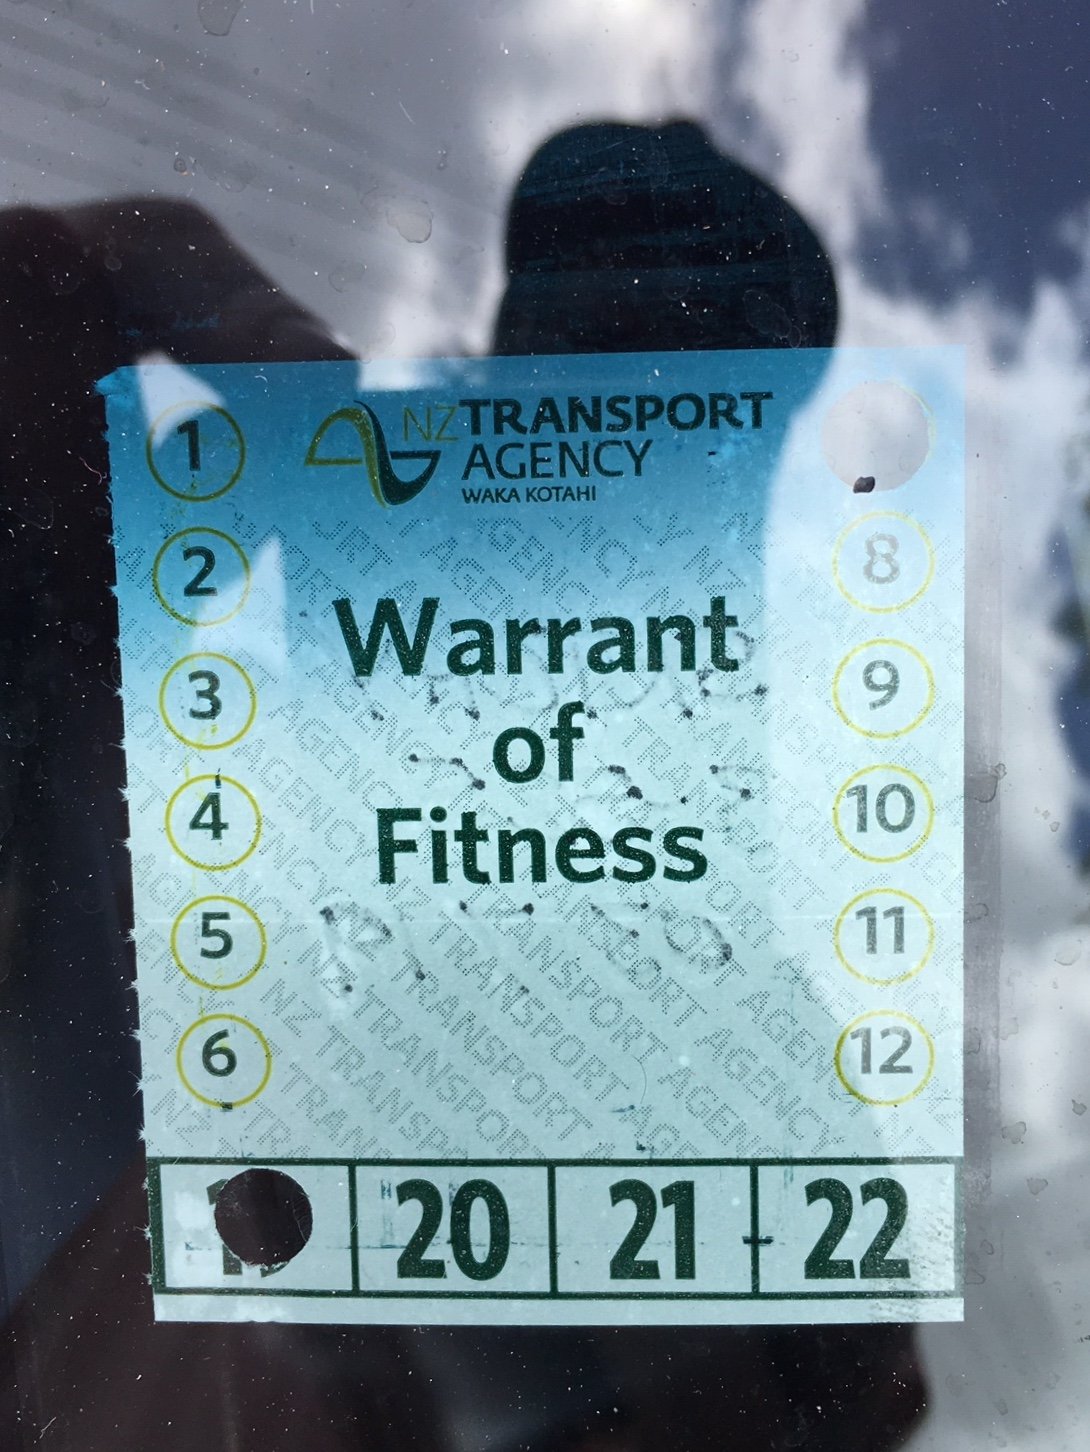
Bam & Bam - always a good feeling getting a fresh wof Quick change of wheels and much better
1 point
-
1 point
-
So as some of you might have noticed in another thread I started over in the dark side of the bike section..I have been having sweet dreams about a future Imp project involving a Honda Goldwing Flat six... For that flat six growl ! Create a Imp 911. Hillman 911? Anyway.. I have spent a fair proportion of good sleeping time recently laying awake going through ideas on how and looking through drawings on a workshop manual I downloaded. It had it all worked out this morning. Worked out how to deal with the oil pump drive, create a Flywheel hub, deal with the alternator and water pump issues etc etc. It was looking good. But then a fella goes by the name of Darkspeed on Retrorides, who's been into Imps for a fair while and had once investigated the same engine, quipped in... "I think they might be counterclockers" Yes. Dammit. He is correct. After all those late night/ early morning ponderings I failed to spot which side of the belts the cam belt tensioners were on... So yeah. Back to the drawing board. Which could mean using the stock transmission and cobble together a neat little diff. The output is offset though. But diff could be offset a little and then extend one axle drive outwards, supported to suit. So long as the uni/Cv joints are in line with the stock position it'll be fine. A sequential shift. Hmmm. Plus some later Goldwings have a electric reverse (how much it can deal with I dont know though) Anyway.. this idea is ways off so back to welding. Oh and also...look who came through and stayed the night on their Tour of love to Nats down south. Fun times were had that night! Very chilled. They all took a quite shine to the alluring beauty of an Imp... Hopefully I will see more Imps turn up on Oldschool in the future1 point
-
LInk to discussion thread: http://oldschool.co....ms-84-vk-mayte/ This is my 1984 VK Commodore, Meet Lana, Shes a four cylinder Commodore. and ill run you through what ive done to her so far I purchased her stock standard on the original 13inch steel wheels! but pretty much the day i got her home i threw on a set of 13x7 Cheviot Hotwires with 205/60 and 215/60R13 tyres My dad and i are members of Manukau Rod and Custom club and not long after i bought her they had a gymkhana coming up at 'Full Throttle' and i wanted to have a go but i though id simply fix the oil leaks first.... And we all know that where that leads... i decided itd be easier to work on out of the car... So oily.. i installed a new hanger bearing on the driveshaft as the old one was perished and got a new clutch dissassembled the motor for new gaskets through out and just a general tidyup and the gearbox... which went from this... to this... then i decided the motor looked too good to go back in the dirty bay and thats when i missed the gymkhana... :] to cut a long story short this was the result... so i drove her around for a while until she got fed up and wanted some attention with so she ate a distrubutior drive gear. so i replaced that Then her hydraulic tappets werent holding pressure. So i replaced those And went to a Gymkhaha! AAAANNNNDDDDD broke a gearbox the next day on the way to work So i replaced that. and then scored some EH Holden hubcaps from a swapmeet and a sunvisor Greg Murphy came into my work so i got a photo with him and Lana And he autographed her dash I made a front lip and added an external cooler... BOSOZUKU LIFE decided the cooler was tacky and that RAKE was way cooler... then went on a road trip on the standard wheels with my girlfriend got these from a swapmeet. ( I see a trend here?) and got these made1 point
-
NATS PREP. Car sat around after drag day because of misfire, Booked in for Nats and really wanna hoon this on the dirt track. after sitting for that long, the battery died so new one was purchased. and replaced plugs and coil to fix miss. Worked sweet for a day, but there must be more to the cause of the fault. Ordered a crank angle sensor and hopefully that shows up tomorrow to fit and fingers crossed that repairs the fault before I fly to Aussie on Thursday. And if so then gotta go buy a pair of 195/55r16s and change brake fluid. Also got some new front shocks which if I get time will go in before Nats, Nothing like last minute prep...1 point
-
I took this out for its first proper drive yesterday, Which turned out quite eventfull for the following reasons 1: didnt make it out of my street before the rear tyres started smoking from gurad rub due to the slightly wider diff. 2: after changing tyres and half way into my excursion, developed a real bad brake shudder from out of no where. 3: limped home only to do this going up my drive. $ 4: inspected brakes to find that the left rear axle seal had let go and poured diff oil all through my brakes contaminating everything. 5: mangaed to do this while kneeling down to pick up a tool that had rolled under the workbench yes... that is one of those clips that is ment to hold the seat upholstery onto the seat frame embedded in my knee. Stupid thing curved on entry aswell. that ll teach me for not keeping my work area clean . YUCK. //oldschool.co.nz/index.php?/topic/36140-shakotoms-84-vk-mayte/1 point
-
Too many photos on one page. I need a second one! anyway... Tell me how Nissan motors dont belong in Holdens //oldschool.co.nz/index.php?/topic/36140-shakotoms-84-vk-mayte/1 point
-
I went to Night Speed Drag Wars last night and thought Id have a go. I started with a first run down the quartermile of 23.007s @ 95.2Km/h and improved that to a best of 21.484s @ 102.39Km/h. But I got knocked out first round of the DYO racing as I dialled in a 21.2 and ran a 21.594s @101.82Km/h. on another note also i scored a super badass APEXI muffler....1 point
-
Photo from Kumeu taken by GARDRB. Thanks for the shot1 point
-
Thanks! yes needs low I know Im working on it very slowly.... And tyre wise lower profiles would be good but the rears were pretty much free and the fronts i bought to match the rears. so theyll do for now. haha Looks good!! Thanks for taking the photos mate! Haha Thanks! I have matching guards too and i swap them on and off as i feel like haha. Gotta keep it fresh yo! Thanks! And yes I know :]1 point
-
shhh oh i want this low too believe me. but the starfire upfront means no lowering springs off the shelf. and adjusties for this are worth more than the car and custom springs, shorter inserts and related shortening of front strut bodys arent far off the price of adjustables. so yeahup. but i have something else in the works for her in the meantime... Is it sad to say then that i had plans awhile back to twin carb the starfire and get the cam ground out of my spare starfire for it?... Hahahaha...ha...ha1 point
-
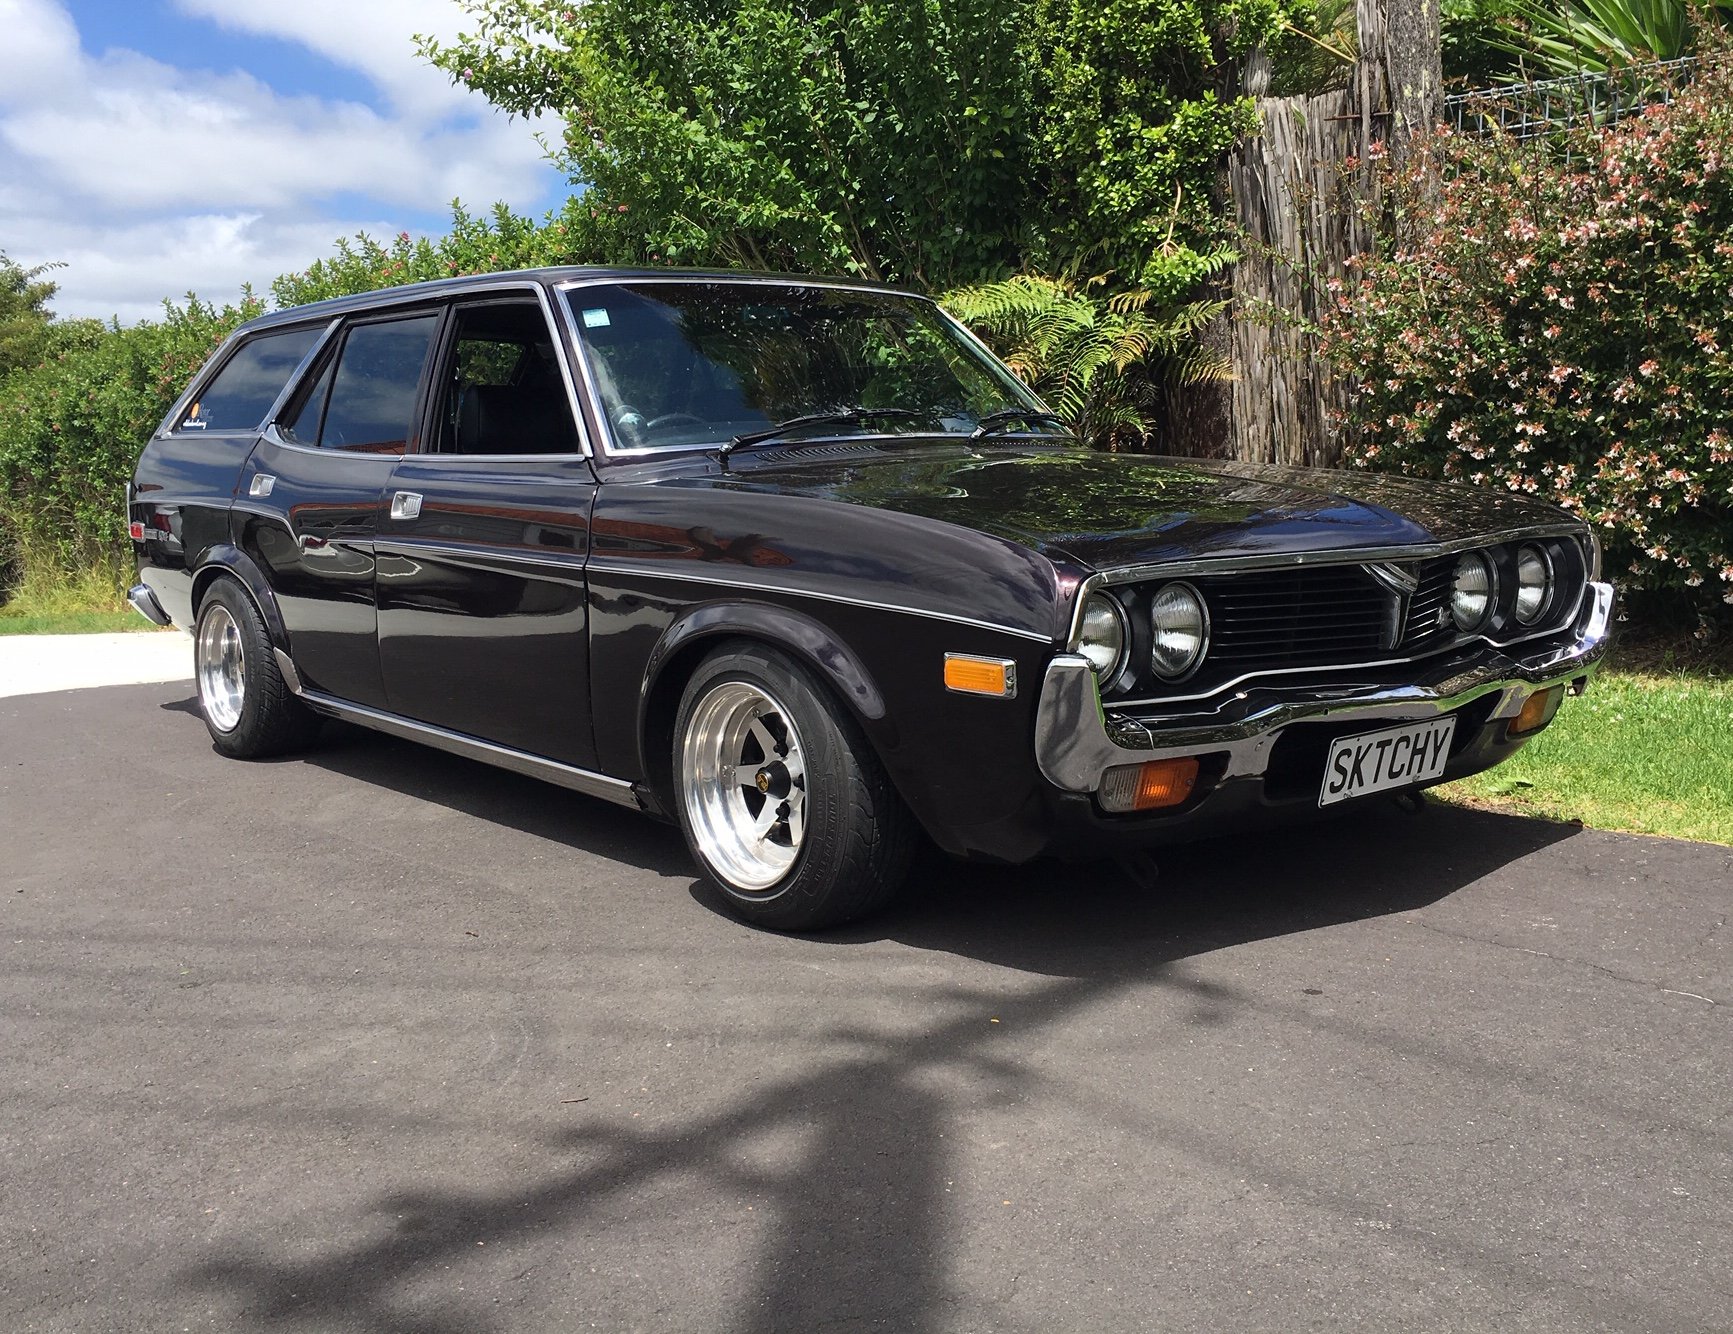
but I think shes quite attractive......1 point


This leaderboard is set to Auckland/GMT+12:00