
Leaderboard


.thumb.jpeg.384ff72c8d2b0ee0d34a7bdedb55bdcf.jpeg)
Popular Content
Showing content with the highest reputation on 11/02/18 in Posts
-
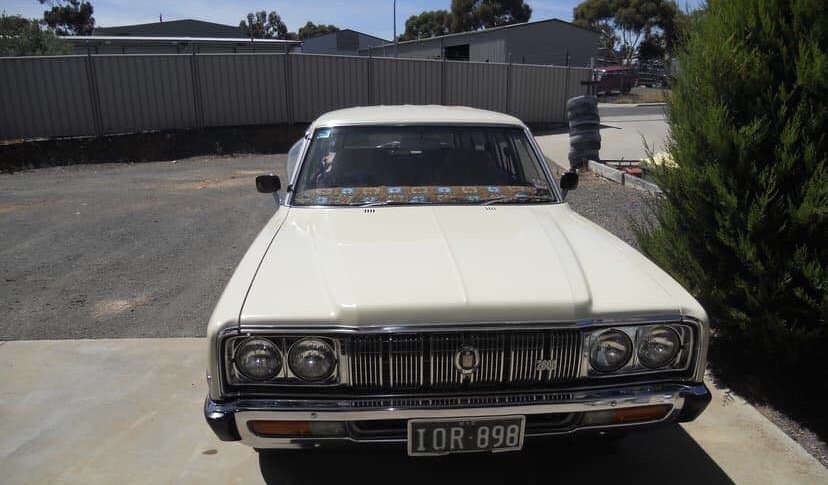
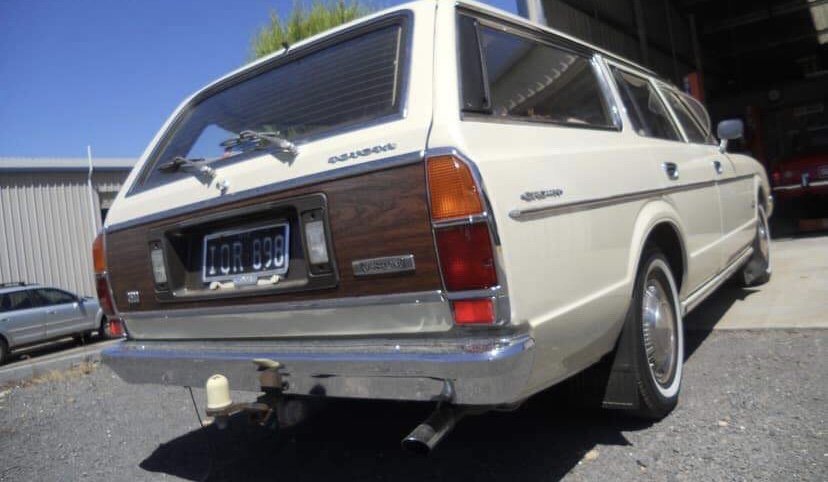
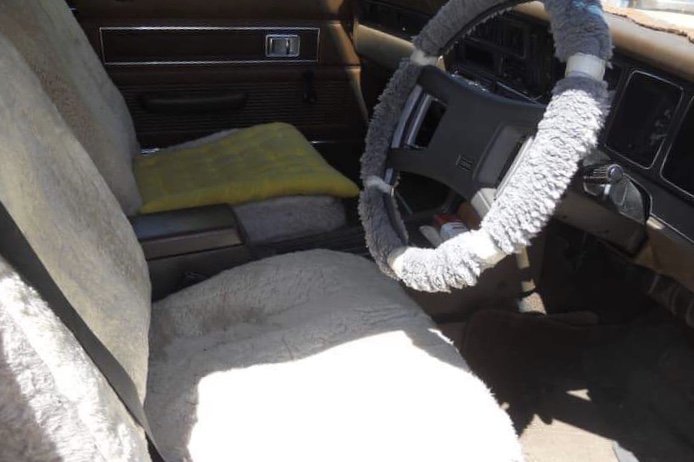
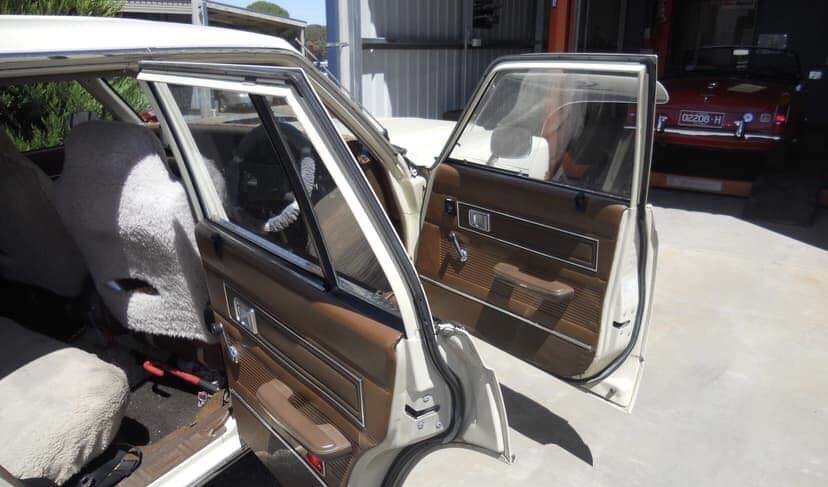
Picking this up in a week, essentially 1 owner; under 100km; plastic taken off door cards a year ago; fitted sheepskins have never been off; rear carpet always covered deceased owner owned a Toyota dealership, which religiously services it every 6 months with full log books. YFactory Air; steer; 7 seater. It’s a honey. Down in Melbourne so a 20 hour road trip coming up. Tried to buy a year ago but grandson selling it was a mess to deal with. This time around his uncle much more reasonable. Too mint to stuff around with too much. prefer the other style grille that i have; but a nice summer cruiser.
 10 points
 -
Put a few centrepunches where the bearing presses into on the alloy housing7 points
-
I'm feeling left out cos I'm not spannering on a ride, I did however take the 19's off the support ute and put the 15's with a lot of sidewall back on in anticipation of the motu.7 points
-
and away it goes. i hope the new owner gets all he wants from the ownership. i learned some things while building this car. mainly that my heart wasn't in it, it had to many doors and i just wasn't in to it. I really struggled for motivation towards the end and thats SO not me. anywho, lessons learned. on to the coupe. 2018-11-02_07-48-39 by sheepers, on Flickr6 points
-
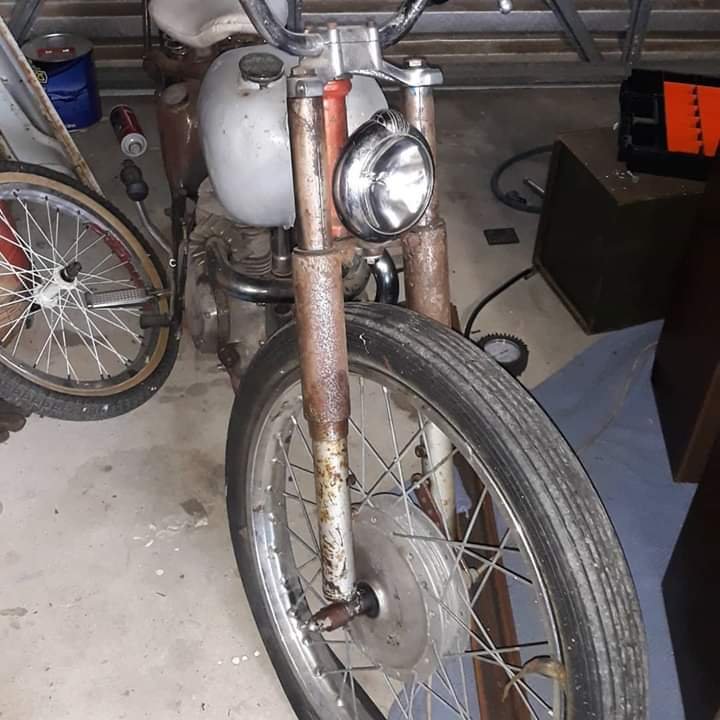
I saw my bike in the shed the other day, aint ridden it in like a month, i'm sure it will be fine/don't fail me Chinese Honda reliability!6 points
-
If you opened the motor, you'd probably find a few more bearings like that/ better not to know.5 points
-
Just ordered a new set of gloves. Planning to ride tomorrow till my tank runs out and get an idea on the distance to a tank. Pining hard. This time next week I’ll be over the other side of the Motu. Hopefully near Rere falls!4 points
-
Fuck yeah forums back. Scooter spam Go!4 points
-
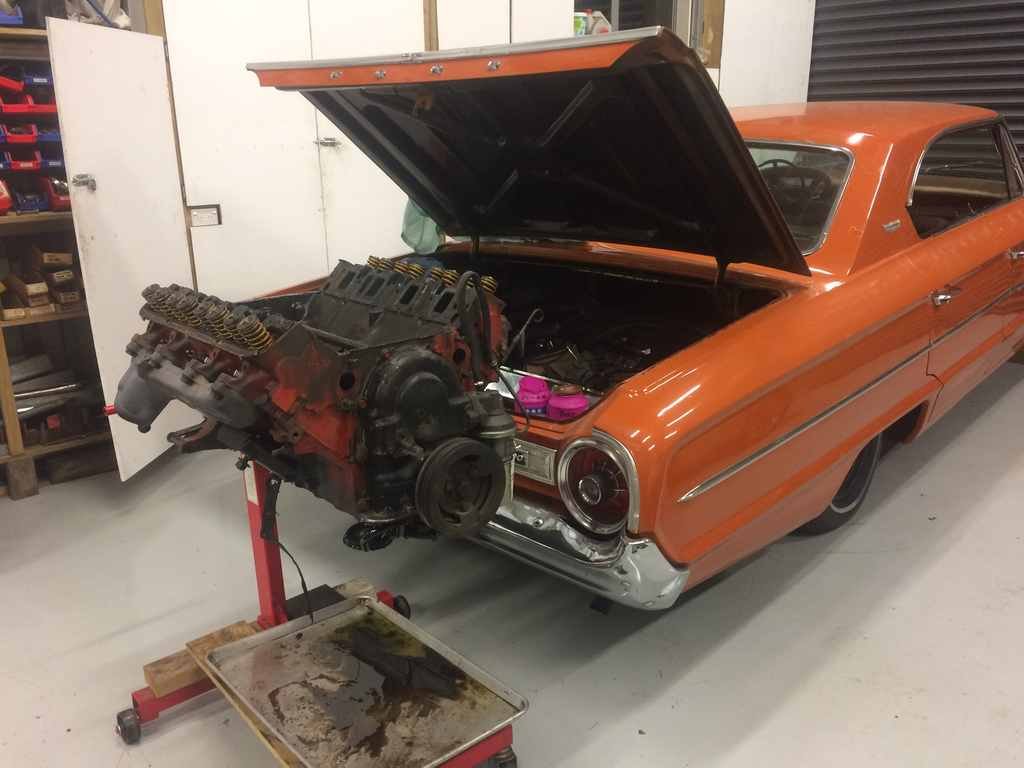
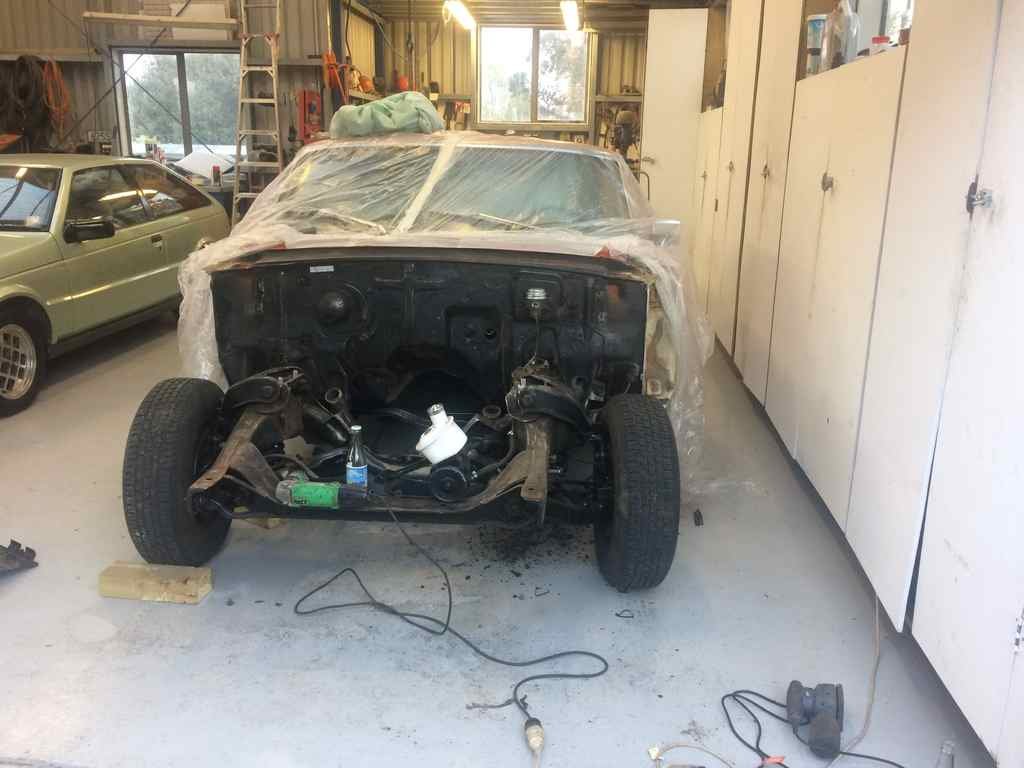
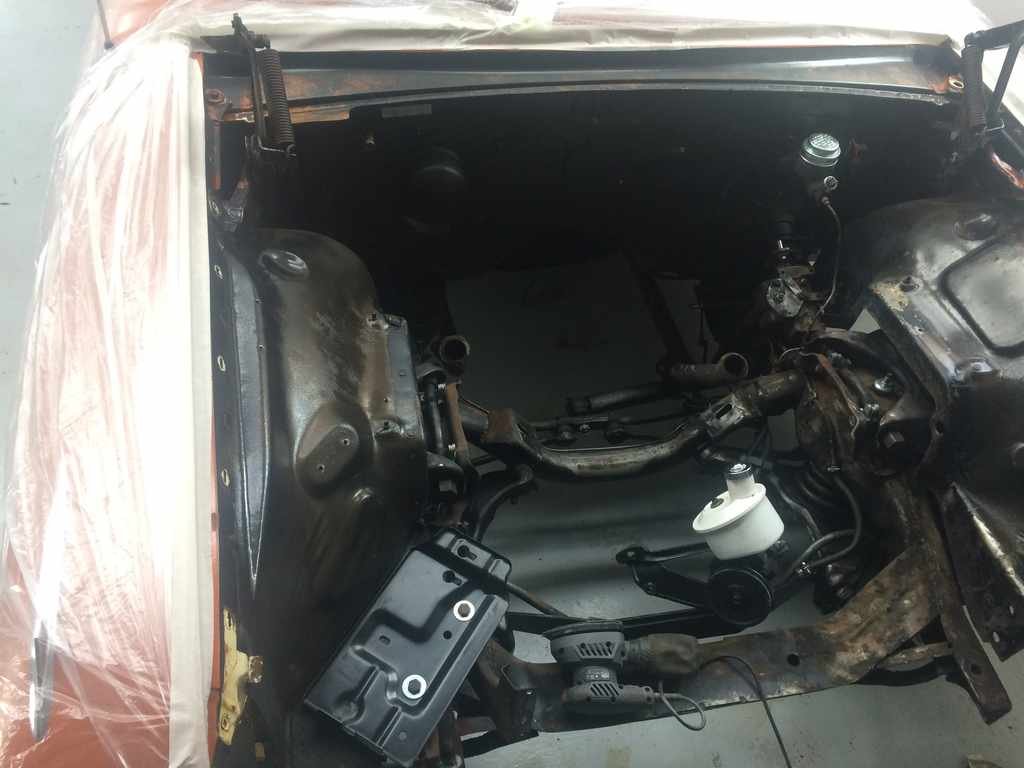
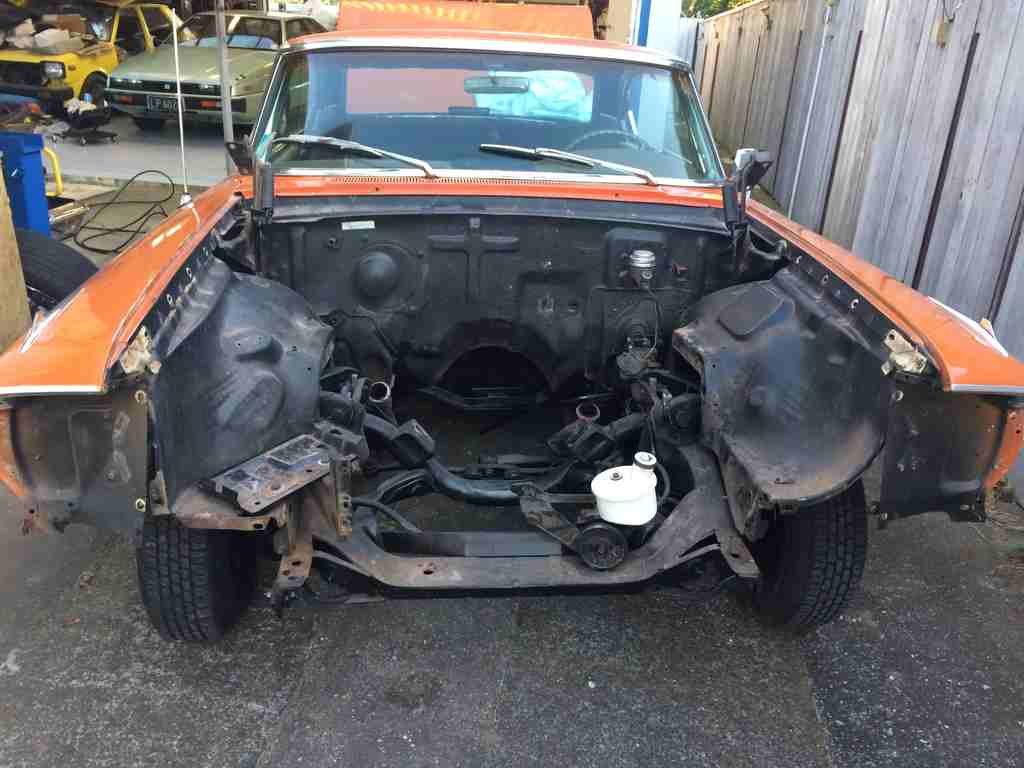
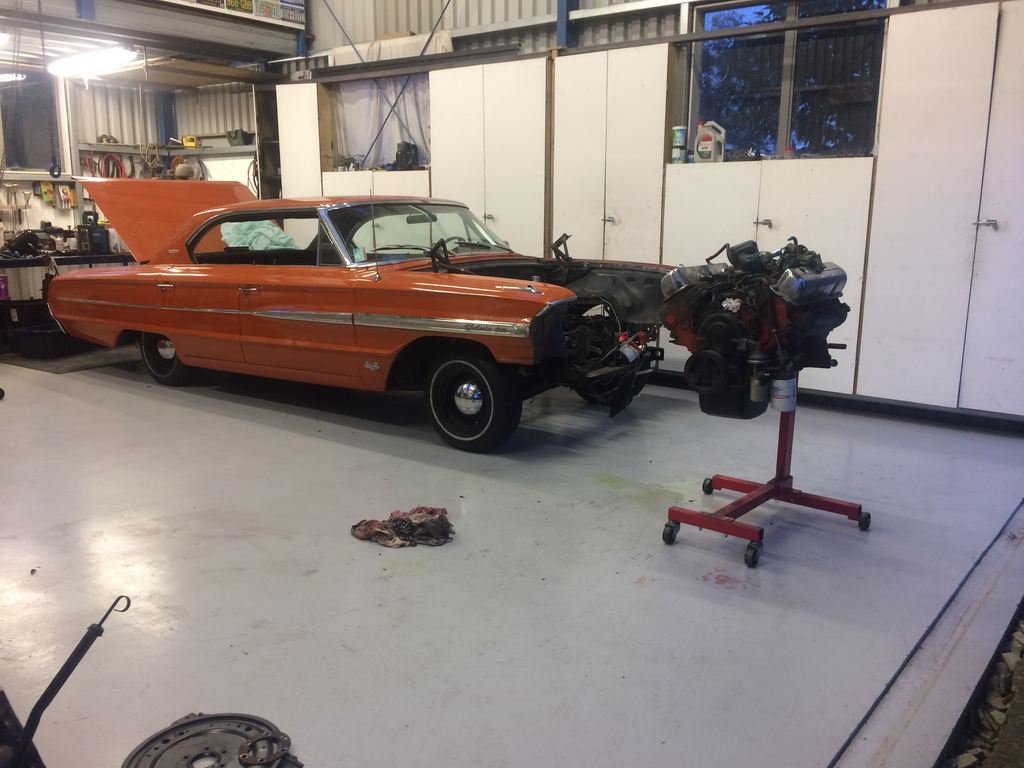
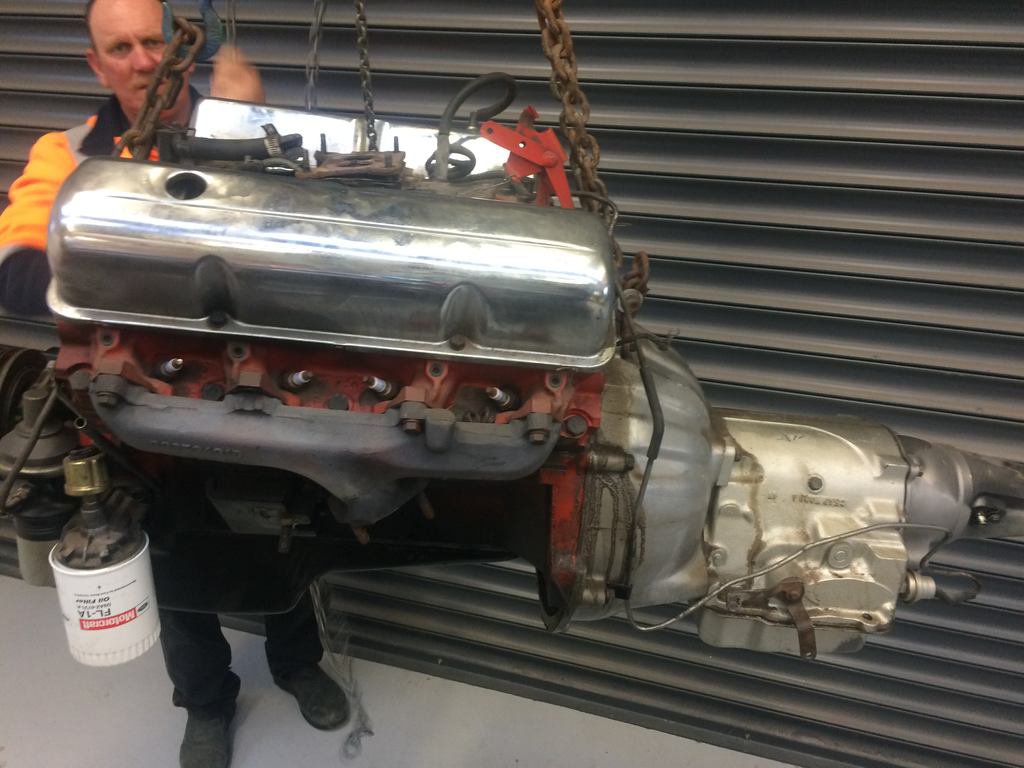
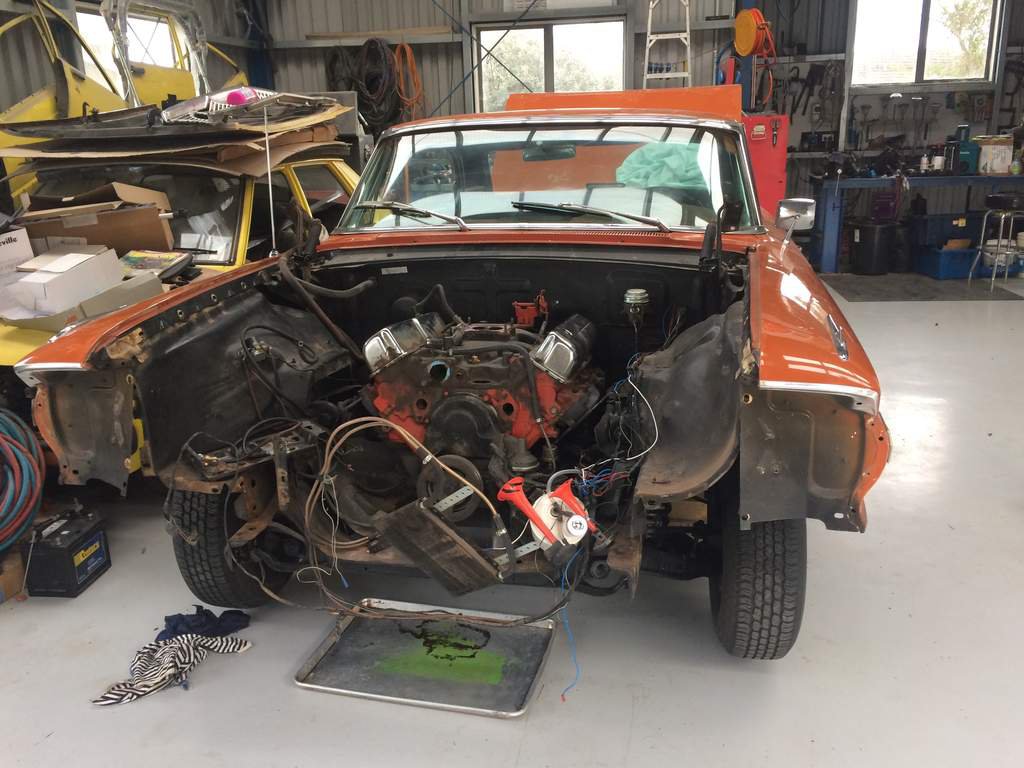
so this thing has turned into a big job... went and pulled the galaxie outside and give the engine bay a full degrease and waterblast. then i wasn't happy with the finish paintwork on the firewall wheel tubs and pretty much everything. was coated was looks to be underbody sealer so looks super rough. so began sanding it off then i pulled it apart some more to help with the sanding process Then when i got sick of doing some sanding i stripped some stuff of the engine so now im at the point where ive fully stripped it and wanting the car ready for an event which is 4 weeks away. so heres to hoping not too much goes wrong right.... with plenty on the to do list
4 points
-
Pulled scooter apart too check back brakes bearings spinning freely in the alloy housing whacked them out and backsides of them are open to absolutely no grease so purchased some new ones on the way home and some loctite 680, I hope that works oh and grabbed some of supercheaps finest lime green rattle can paint3 points
-
Just sing "Get ya motor running" to yourself on repeat, like I do.3 points
-
Waiting on parts and so there is a lot of things half done. Put the face back on, and swapped the big round FSO badge out for a black an old Fiat one, matty b over the pitted chromed plastic to murder it. Tidied up a lot of the wiring, all sorts of hacks and redundant add ons removed! Drivers side wiring wrapped in self amalgamating tape, much better looking than the factory packing tape stuff. Passenger side cant wrap it yet, but - moved the coil position and wiring tidied, - window washer pump relocated and old one it was cable tied to removed - fuel pump wiring and fuel plumbing still to do, but waiting on barbs and bits This was the old exhaust manifold on the secondaries side So i went and got the exhaust manifold from my old 1608 engine from the blue car that i spent a few power file belts on This is the port to the same gasket as above This is the head side gasket to ports took a few mm here and there on the inlet side of the head just to avoid any steps, but otherwise this 'big valve' head already matches up to the gaskets and inlet manifold really well. Should go much better.3 points
-
Need to do updates more often so they're smaller! Put the tray on as I needed to see where I could run the fuel and brake lines. Also borrowed a pair of wheels off one of my parent's cars, to test the tire sizing. Bought a fuel filter and made a stainless steel bracket to hold it. Made some mounts for the rear bumper to bed brackets, as they were welded on before. Got out the LED tail lights that I've had for ages and made up some stainless brackets and polished them. Started running the brake line out of copper-nickel tube. Also got some 5/16" lines for the fuel lines. Made some stainless clamps to hold them all together and to the firewall and chassis. Made some bits for the column change linkage. Top middle piece mounts on the firewall around the column and has some little stoppers that make it so the gear stick needs to be pulled out to change from certain gears. Left bit is what goes over the stoppers and pivots with the gear stick to push the rod bit down, which then pushes the right piece down and change gear. Thought at first it would have to be some super complex system with cables and stuff but this way was actually pretty simple to make work. Then I needed to make up a indicator on the column to show which gear it was in. Drew on up in Solidworks and laser cut it out. The accelerator cable needed some modifying to work, it's wasn't quite long enough to reach the pedal, so made a new bracket that moved the housing closer to the throttle, which allowed for more cable out the pedal end. Then all it needed was a plate with a lot in it that bolted to the pedal to hold the little ball on the end. Have had some big train air horns for ages. Couldn't find anyway with enough space to fit them, as they were originally mounted together in a triangle shape. So pulled them apart, made some new brackets and bolted them up under the cab to the chassis. Need to just run some lines to them. Some boxes of stuff finally arrived from America. They included some front windscreen stainless trim, door panels and the surrounding trim. Might replace the door panels one day as they weren't as good as I thought they'd be for the "deluxe" spec ones. Also arrived were some wheels. 15x8 Artillery steel wheels with baby moons and beauty rings. Spent ages trying to figure out what colour to paint them, didn't really want to go red (what everyone does) or black (spent too much money on them for them to be hidden). Decided a bronze colour would look good and hopefully not too out of place. Then spent more time trying to find a nice bronze.3 points
-
Maybe I should mount the front guard at stock height....
2 points
-
Damn, those are nice! I've been chatting with the joka who owns this (and should be dropping by the forums at some point). Got a wild Z20et build bored out to take z24 pistons etc etc.
2 points
-
I wonder if I get AA plus then sabotage my bike at the end of the ride it'll get shipped home for free? Only kidding, I'm way too mean to buy AA plus.2 points
-
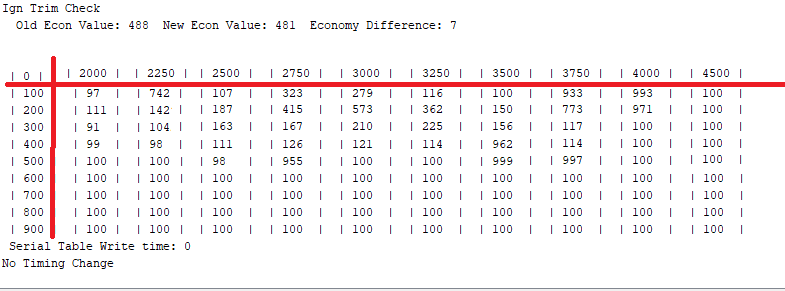
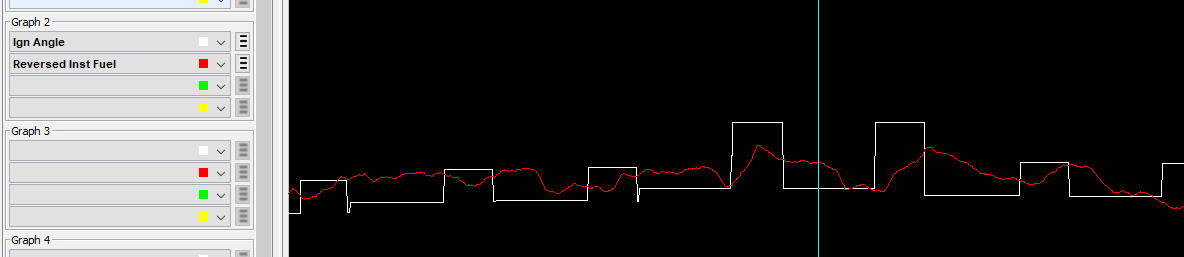
I've been doing a bit more work on my closed loop ignition computer thingy. I've got all of the code working but still fine tuning things like how long each set of tests needs to run for. I've found that it works really well at say 3000rpm and 80kph, but then higher rpm than this it gets confused, lower rpm than this it gets confused. At about the 80kph region with my ignition map set to be 10 degrees across the board. On flat road it stabilizes at 40something degrees advance. Cool! But then at lower or higher rpm, it keeps wanting to pull the timing back even from 10 degrees. I think what happens is that because I'm so far from MBT, adding 3 degrees extra timing gives it a reasonable torque bump so the vehicle speed overshoots, then goes into fuel cut which I've told it to cancel the test and restart if this happens. I need to spend a bit more time fine tuning how long each test runs for though, or allow more of a delay before collecting samples. Looking at the fuel consumption vs ignition angle you can see that theres a bit of a delay until it shows the effects of the change (If red line goes up, thats less fuel) Another problem is that I am only interpolating the results back to the 4 cells in the table that its taking the ignition timing from. But what I really need to do is "waterfall" the results so that for example if you are at mid load 3000rpm. It doesnt make sense that if you back off the throttle you should ever go down to less timing than that. And same with RPM increasing at same load, you are only ever going to be needing more timing. So I'll make it so that every time it adds a new successful result it will spread that to any lower load cells and higher rpm cells if there isnt already a higher value there. I think this will cut down a lot of my false results. None the less I'm pretty chuffed that its showing *some* amount of sensible results and there seems to be clear ways in which it can be improved from here to work better under more circumstances. This is the ignition table that it has generated after about 1/2 an hour of plodding around on the motorway. (Values in table are degrees ignition * 10 )
2 points
-
Soldered trigger wire back on, now back to hooning, need another good ride under its belt before next weekend.2 points
-
reassemmbled it and got the headlight on close enough, Took it for a blat up the road and it cut out on the way back. Don't know if it flooded itself or something fucky is going on but its now tomorrows problem2 points
-
Seat is done. So stoked. Riding to work tonite
2 points
-
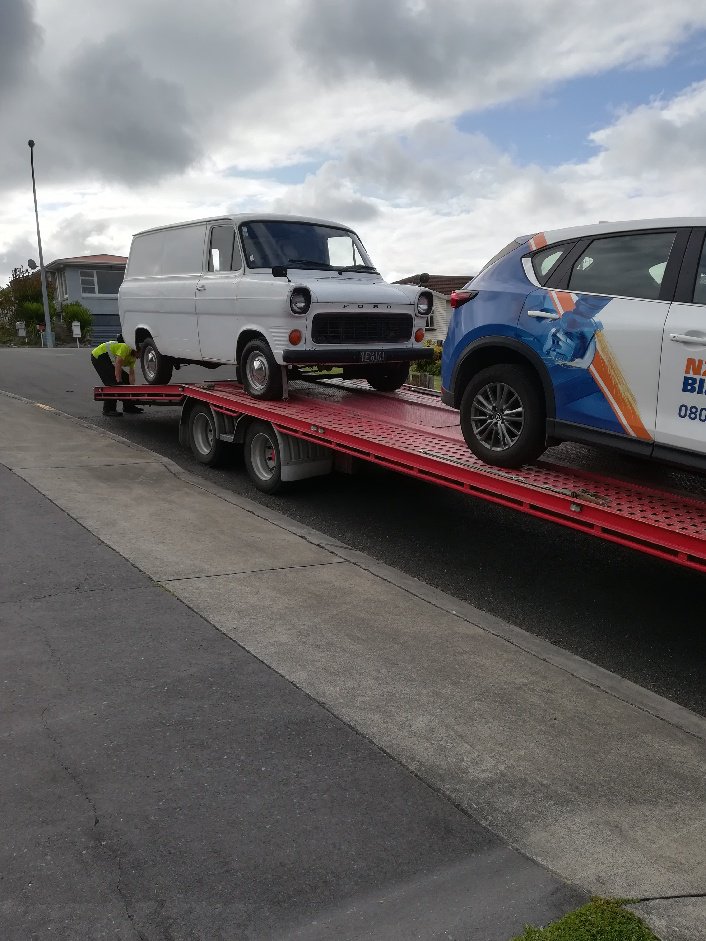
now sold.2 points
-
What have I done recently.... Fuck all! my mate scored a Ute so we stripped it out and as Payment for doing it and storing it at my place he gave me the diff. It’s an H165 which is a bit bigger and gruntier than the standard H145 in it now. Ill get around to swapping it in at some point. It’s not a straight bolt in affair but achievable in a day with some wee mods. its got a new 2in exhaust all the way through with 1 reasonably new muffler that was kicking around, made a decent difference to performance, has a great rasp to it and dosent hit the ground or body! It’s like, slightly too loud but acceptable. I farmed it out to a mate at pitstop cause I fucking HATE exhausts. i put new carb kits in it. I put it on the dyno and made 64hp at the wheels, I thought it would be closer to 80 but no.. power to weight is a wonderful thing! theres a track day this weekend so I whipped the discs off and got them skimmed, kitted the calipers and painted, new pads. Brakes were getting very manual. i finally got that proper wheel alignment done, booked at another local shop and they rang to say nay, and sent me to Tony’s tire service on Blenheim Rd. They have some fancy Hunter machine that can cope with low old cars with small profile tyres. It’s great now! Haven’t driven it much since, it was pissing down when I picked it up so couldn’t cane it properly.2 points
-
so i decided that i would keep up with the normal oldschool tradition and pull my car apart once shes all legal. so the other issue this car had was the carb setup it had some unknown brand cheap carb that you couldn't get it to run mint on. so the plan was to put a four barrel manifold on to help it breathe as it only had a two barrel one currently. but the plan was to do that after the cooling system was done. but when i removed the waterpump it had a pipe that joints the waterpump and manifold well that pipe broke due to being rusty and old so that would've needed to be fixed but figured it would be better just to put a 4 barrel manifold while i was at it seen as it isn't much more work right plus it would've ended up pulling the same stuff off twice. plus it had a oil leak from the sump which required motor out anyway and other areas which made the nice clean rebuilt trans not so clean. oh and how the engine bay and motor didn't look so great so now oh while im there i may as well do that as its not much more work has involved itself into this car haha.
2 points
-
@Hayholes mum hooked me up with a new tank paint job and sticker combo that looks fully sick! (the blue CB tank is for my AX100) free html images1 point
-
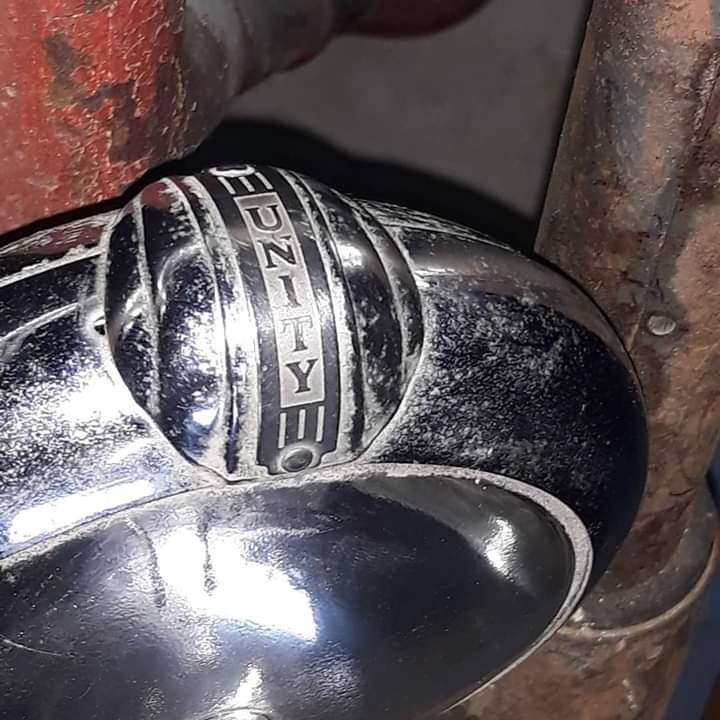
This things been put on hold for a while. Pretty much too many projects and the missus not too happy about me working on them. Plus they're all out at my parents place. I've been trying to spend my time getting my Vauxhall and cf Bedford roadworthy. So it's about time I got started on it again. Put on a headlight I've had stashed for a while. Really suits the style of the bike.
1 point
-
Yip, my c50 has both rear wheel bearings held in using the punch and loctite bearing retainer method, also have an engine that’s holding its main bearings the same way, hasn’t failed yet1 point
-
After having talked to @Gozza about injection and running through some general settings stuff for his megasquirt he's built to run on his Triumph straight six I have realised that I had been running injection timing on the V6 in my previous Viva potentially out of sync. @Guzzi Rat listen up There might be some potential idling improvement to come... So I had set up the injection as batch. Two seperate banks of three injectors. I had 'timed' the injector opening times to coincide with the engines firing order. I was trying to explain this to Steve (Gozza) so he could do something similar with his six. But he pointed out that how could I do this when I was only running a single 36-1 trigger wheel but cam timing pick up so no way of telling the ecu what stroke the engine was on. Ie could be the compression stroke or the exhaust stroke. My ignition timing was wasted spark so that was always OK. So the injector timing would be random. Pure luck when the engine starts as to whether the correct bank of injectors was firing at the right time. Now I know that this wont make that much difference once the revs are up but certainly at idle it would be noticeable. It certainly could explain why my idling was inconsistent. Sometimes after starting the car the idle would be super smooth and clean. Other times it would be slightly lumpy and smell rich. I could never seem to get it spot on. It might also explain the random backfires that happened (twice so hard it blew the lid off! see thread) So am I (and steve) correct? If this is the case then I wonder what injection phasing one uses with a V6 (or any V engine) when only running a single trigger and no cam trigger?1 point
-
Yeah both those options will sort ya out1 point
-
1 point
-
They'll look slick with some small tyres.1 point
-
Man the speedcocks wanted to go for a burn tonight and I said yes. Slapped my speedo cable down the hole and put a bolt in where it needed to go and off I went. But fuck me. My speedo actually works now! Supper smooth and steady. Seems when I'm doing about 100kms that it sits on the 60mph part. Pretty dam happy with slapping it together1 point
-
1 point
-
No updates apart from bottom end of the engine is done. Ended up sleeving the block to use the pistons that were already in it. Next job is reco the head and convert to unleaded. Body is on hold until the 2 Door GT is finished at R3 and then onto this one straight away1 point
-
Looks like the full toolkit is in there... And was going to put new set of points in, but may have to remove magneto...? Not keen to get too far into it if it's running tbh... And more bits for the TT arrived, no real excuse anymore just gotta pick something and get into it...1 point
-
for those wondering what became of the old Tranny.............. My brother bought it, and took it to Tauranga. He has fixed the brakes, and a few other bits and pieces, given it a good clean etc. and got it running and driving well. As I type it is now on its way to Avalon TV Studios in Wellington for its first job, starring in a NZ film about gang life in the 60's and 70's, as a Police van!
1 point
-
Hey Hogan, old thread I know, but I bought this car off you last year and only just saw this thread. The car is going good and it gets driven a fair bit on the nicer days. Not much has changed except the repair to the damage the transport guy inflicted (and refused to pay for), stripped and painted wheels, exhaust etc. Did you manage to get the old plates off the owner?
1 point
-
All the bits are clearcoated. Came up alright, got way too many runs on the cab, but that's okay as I'll be re-coating it all again once it's assembled with some flatter clear. At least it's all sealed up now. Installed some black fender welt between the bed and the guards. Started installing some of the parts. Put the door latches in, had to replace one of the springs behind the interior handle on the left side as it had snapped. Squeezed some Dynamat on to the outer skin of the doors and wooow what a difference that made to the whole door including the inner skin. Couldn't wait to see what the gauges looked like, so in they went. Got the door windows and quarter windows in, what a frustrating time that was, since they had to be installed in the right order and it all has to be fitted through the small slot in the top. Put an LED in the original interior light housing, wired it up and fitted. Puts out some decent light. Pulled apart the old headlight surrounds and put in new spring and seals. Gave them a bit of a polish up as well. Bought some new sealed beams, no-one could seem to find any semi-sealed ones with the domed glass when I was looking. Found some in America after I bought these though, but will try these out for now and if they're rubbish change them later. Fitted one of the inner guards when the engine was in and realised that trying to make headers was waaaay too much effort, time consuming and there really just is no space in there, plus the factory ones already fitted perfectly. So cut off the ugly heat shields on the factory headers, tidied up some of the welding, ground out the lumpy weld on the inside of the flange, painted them with high-temp paint and then wrapped them in heat-wrap, look much better. Would of really liked to build my own headers, maybe on the next project, as I have 20x 1-5/8" U-bends arriving from America next week haha. Put the cab on so I can see where the brake and fuel lines can run. Looks like it could actually be finished sometime soon haha.1 point
-
A bit overdue on an update. Undersealed the cab, came up pretty good! Flipped the cab back over and sanded all of the inside and door jambs. Then put some epoxy primer on. High build primed the dash and a few of the panels that will be visible once done, so they sanded up smooth and just sprayed the primer as a surfacer on the rest. Once I got it all sanded down and filled the little bits that needed doing sprayed some colour on. Pretty happy with how it turned out, other than a couple of small sags on the dash, but I'll sand them out later. Picked up a couple of boxes of Dynamat and covered it everywhere I could get it. Made a decent improvement, just need to get some inside the doors somehow and also do something with the gap in behind where the top seat belt mount is. I needed to sort a radiator as the original one wasn't in the greatest of condition. Tried searching for a couple of weeks to find somewhere to buy an aluminium core the sizes I want, but seemed to be pretty hard to get anything. So went and bought one of those universal Chevy cross-flow things that had a core close to what I needed. Cut off the tanks, drew up the radiator and support in solidworks and designed the mounts and new tanks from there. Top tank is angled at the front and with the gap at the top allows me to bring the air intake through there, as there's not really anywhere else for cold air. Drew up some aluminium brackets to mount the electric fan as well. Should clear the engine if I trim some of the pulley bolts that stick out a bit much. Started on prepping the rest of the body panels for clear coating. Left side is sanded with 800 grit which seems to work pretty well, cleans it up nice. The seam at the back was pretty rusty so gave it a sand, rust kill and then seam sealed it. The blue colour I was using for the rest of painting was quite the same as the patina'd paint some had some different stuff mixed up and used it to blend in the repairs. Came out really well! Fixed up the patches where I welded up the old mirror, spotlight holes and the area around the cowl vent.. The sanding brought back some of the original pinstripping around the cab which is cool. Had to clean up this seam on the tray as well since it was rusty and needed touching up.1 point
-
The ecu has an injector test mode so you can find the dead time without too much hassle anyway1 point
-
EA falcon tbi unit jizzes the fuel on top of the throttle plate. EA falcons raced at bathurst Must be good1 point
-
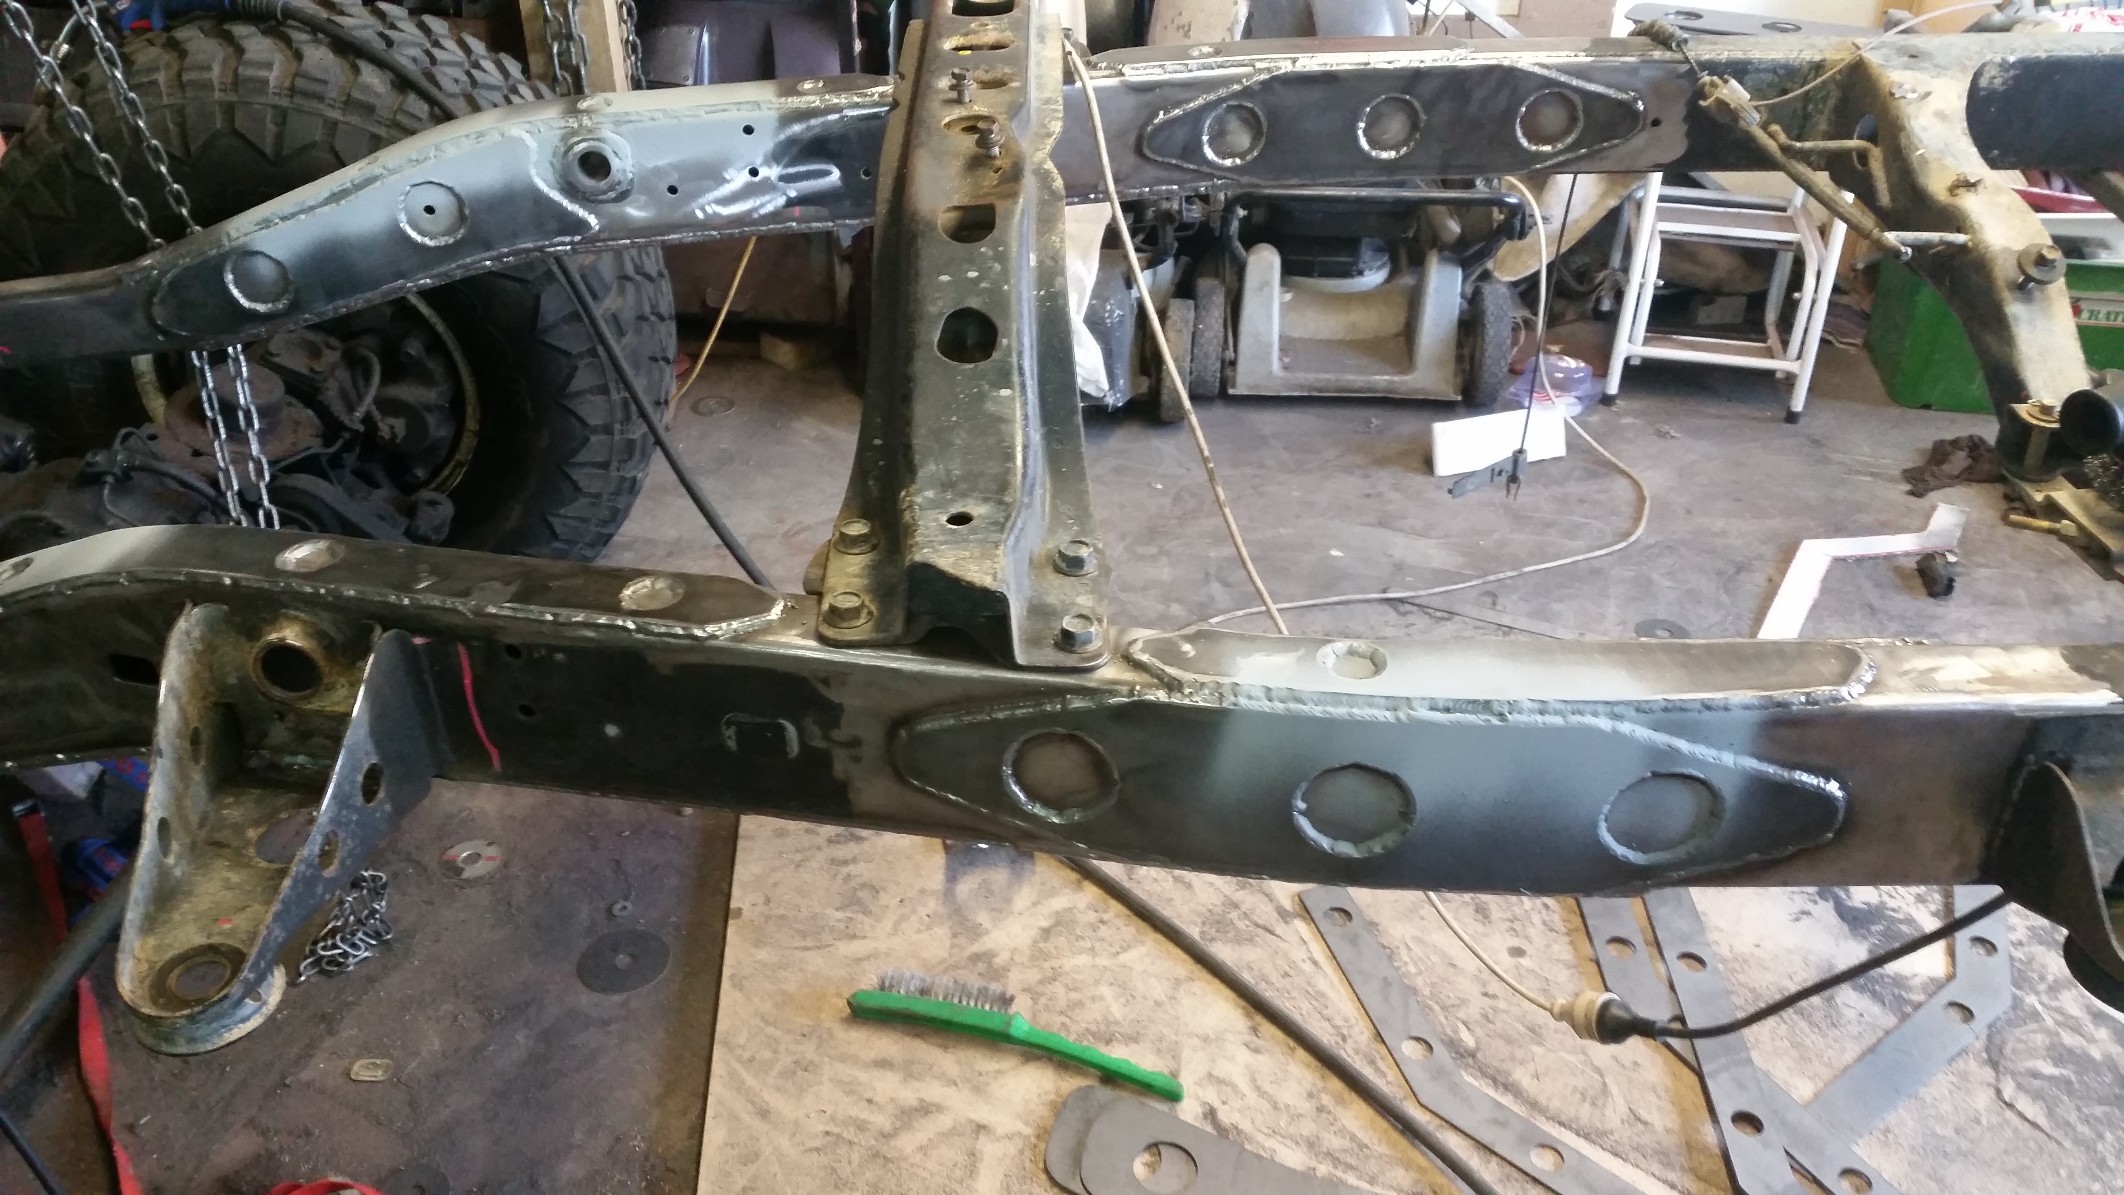
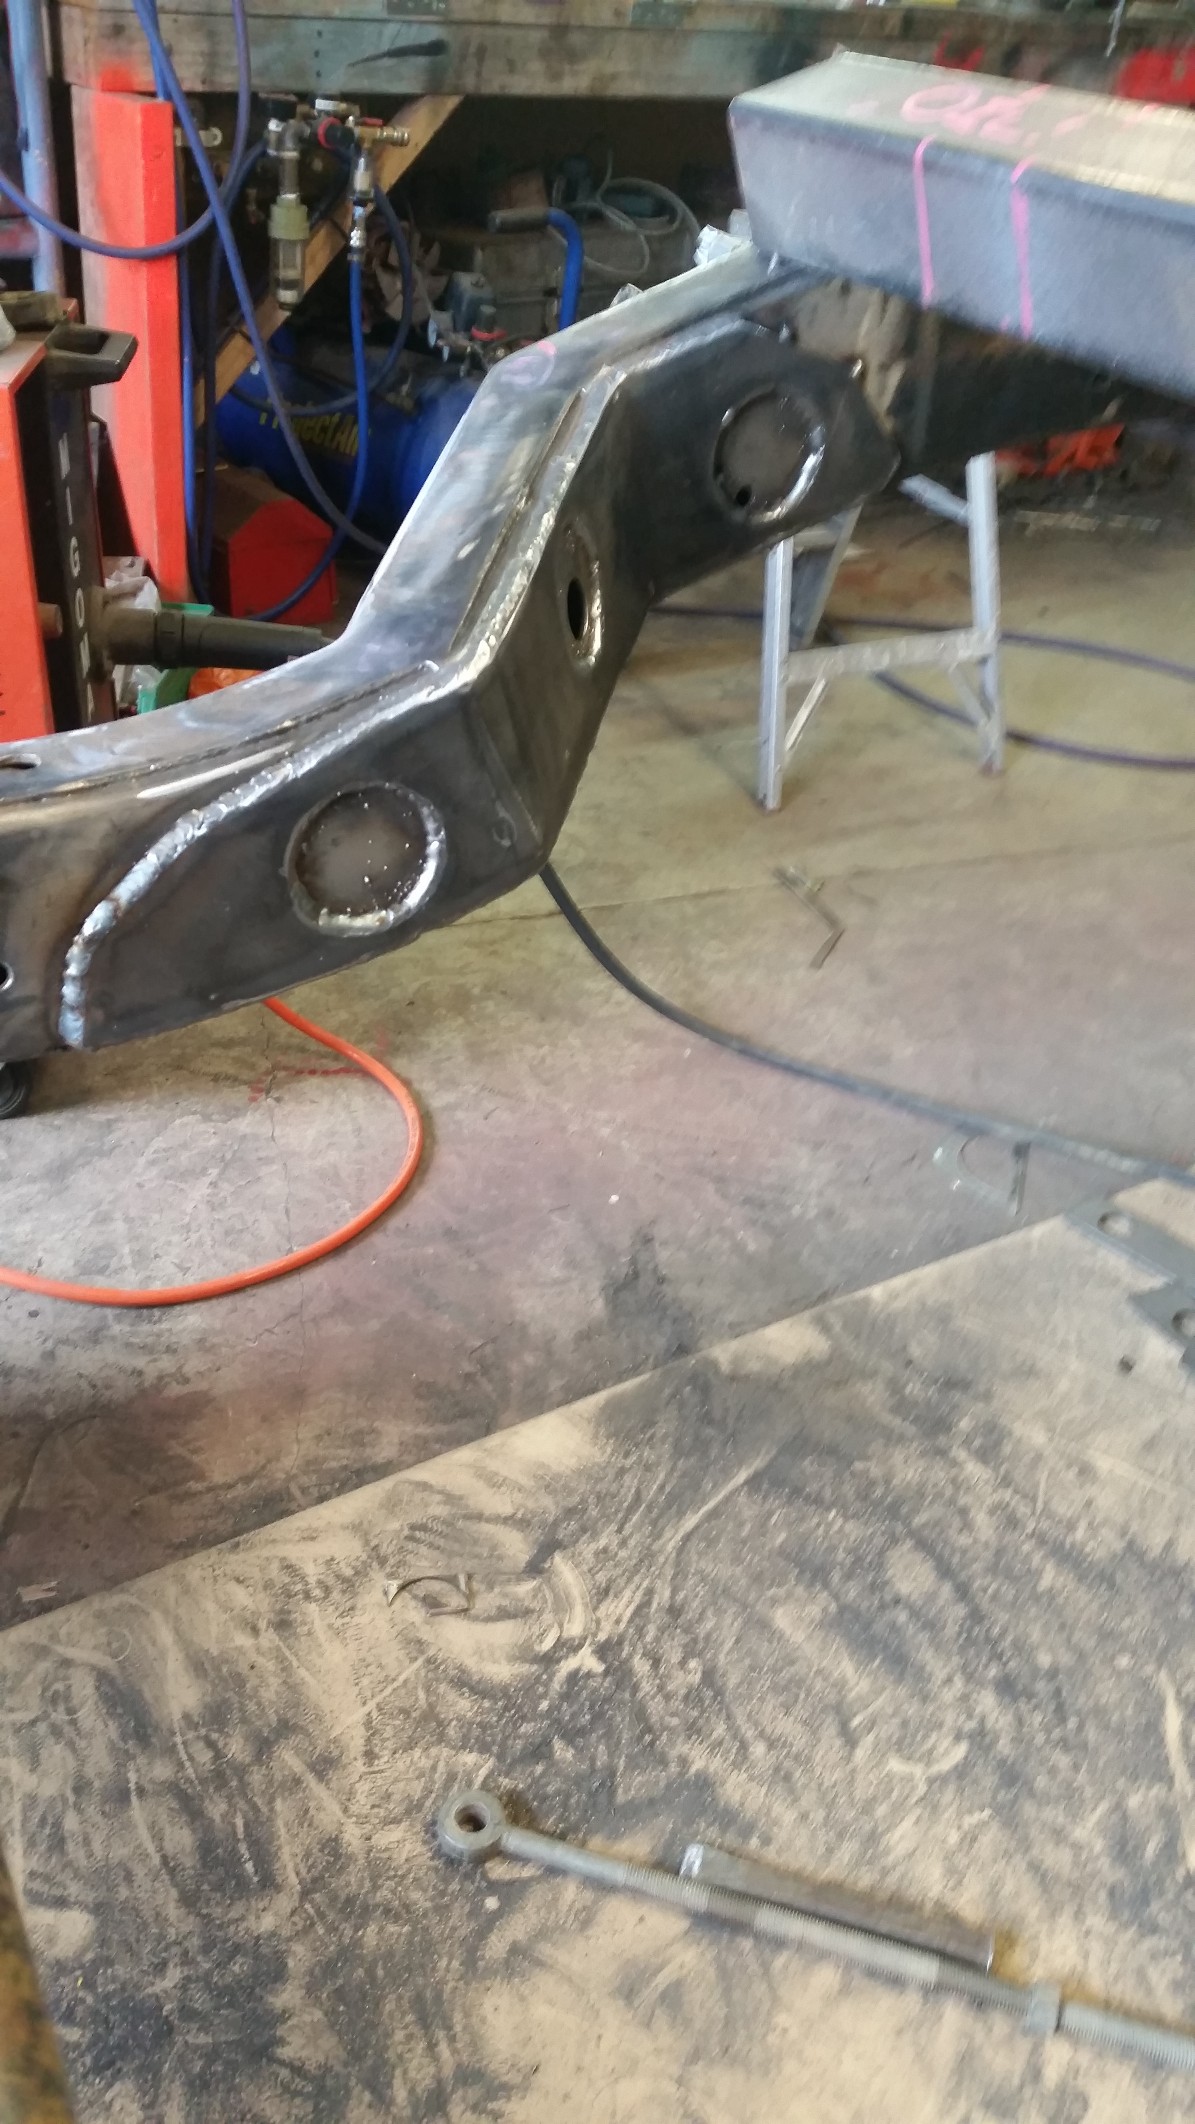
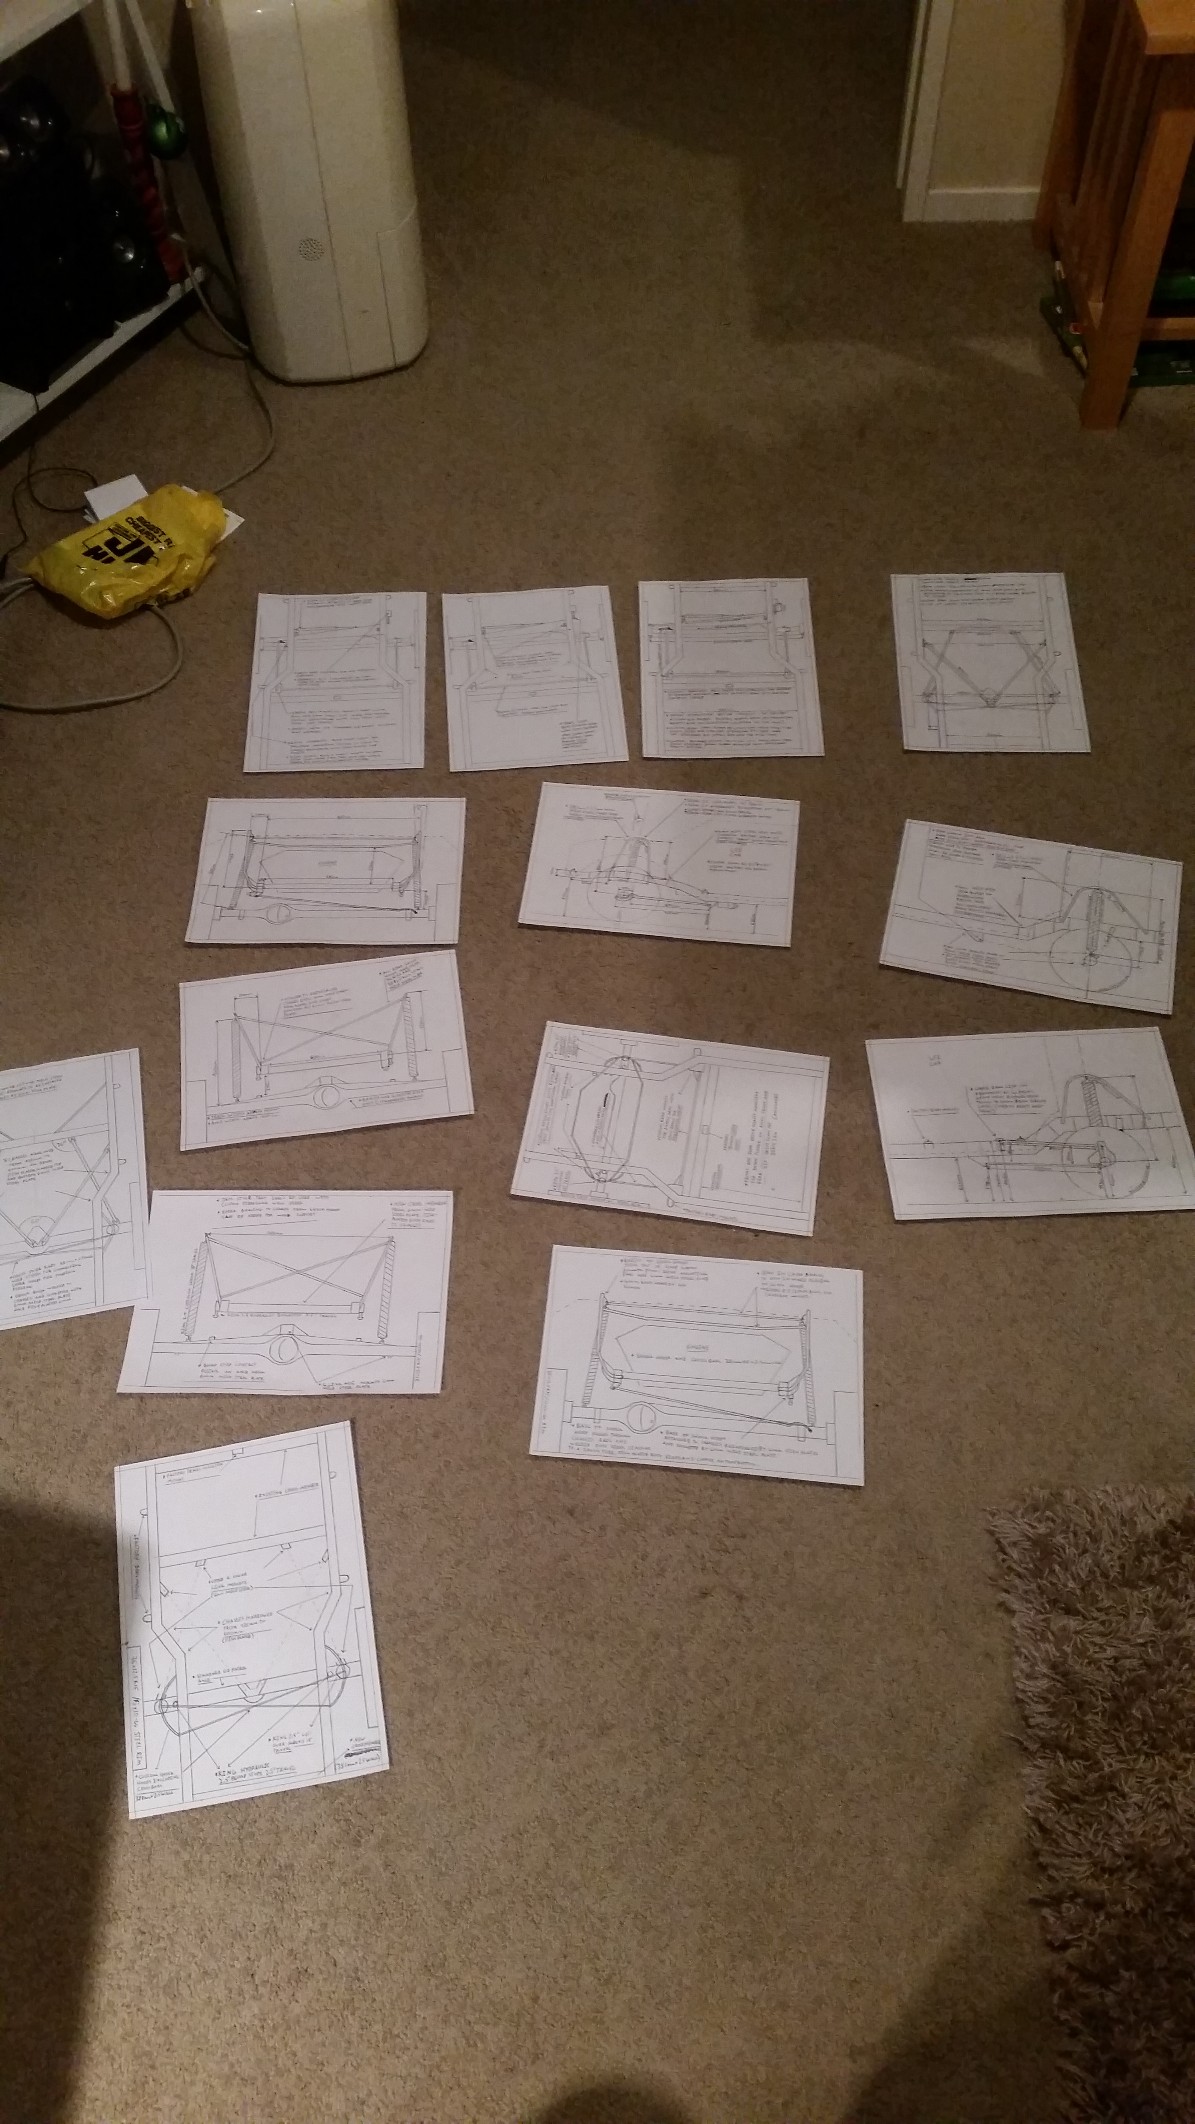
after waiting for the steel to be cut on the laser (so much nicer than old mate with a cutting disk on the grinder) they were finally done and i could start forming them and welding them up to the chassis. now im no fancy engineer but all i am trying to achive is alittle more stiffness and to try keep the chance of cracking to minimum, so at every mounting point or where the rails change direction i fishplated. im also trying to follow the hobby car manual to keep inline with the lvvta reqs.
1 point
-
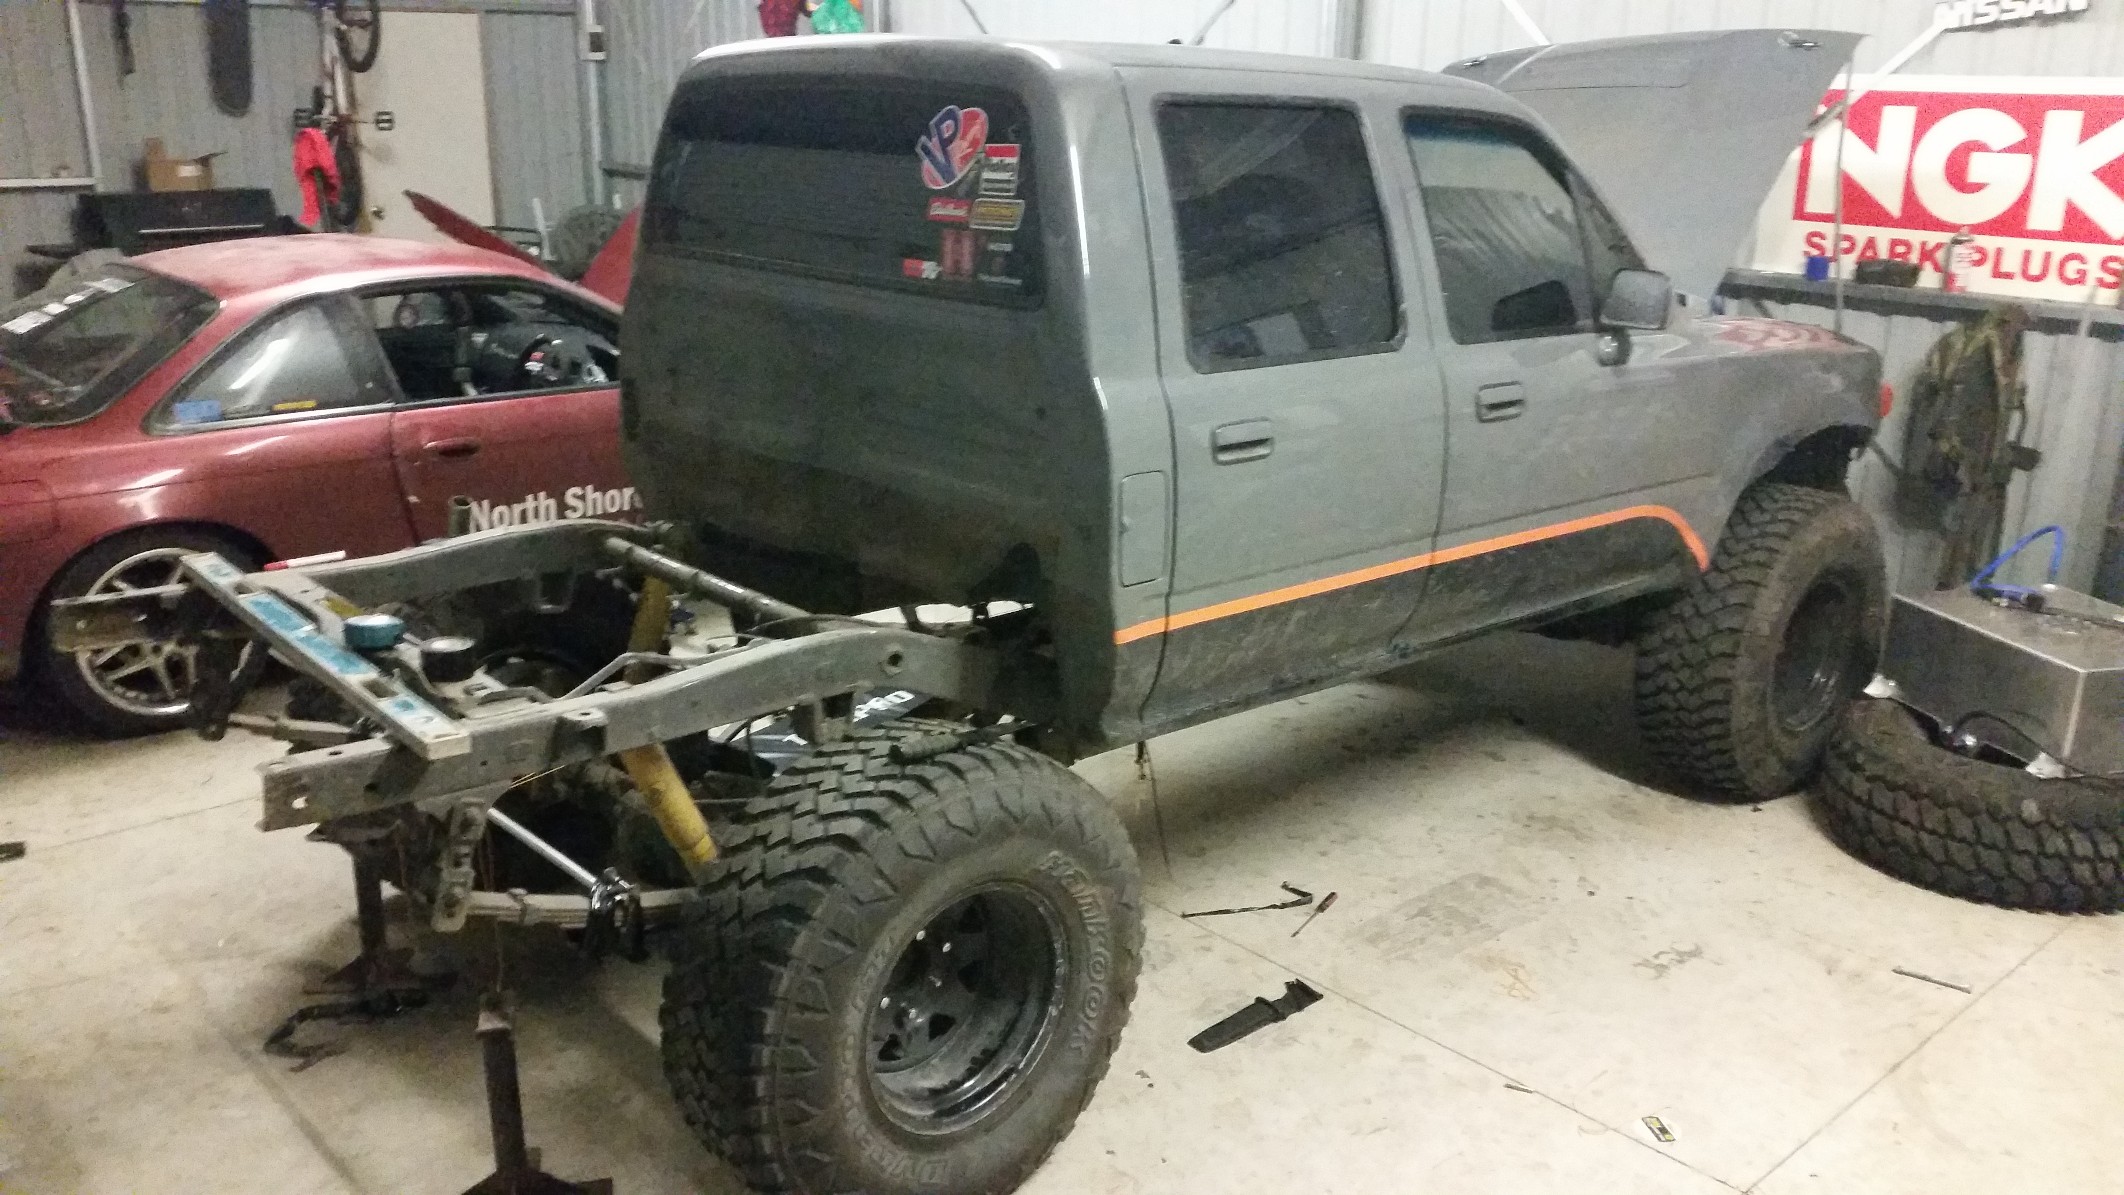
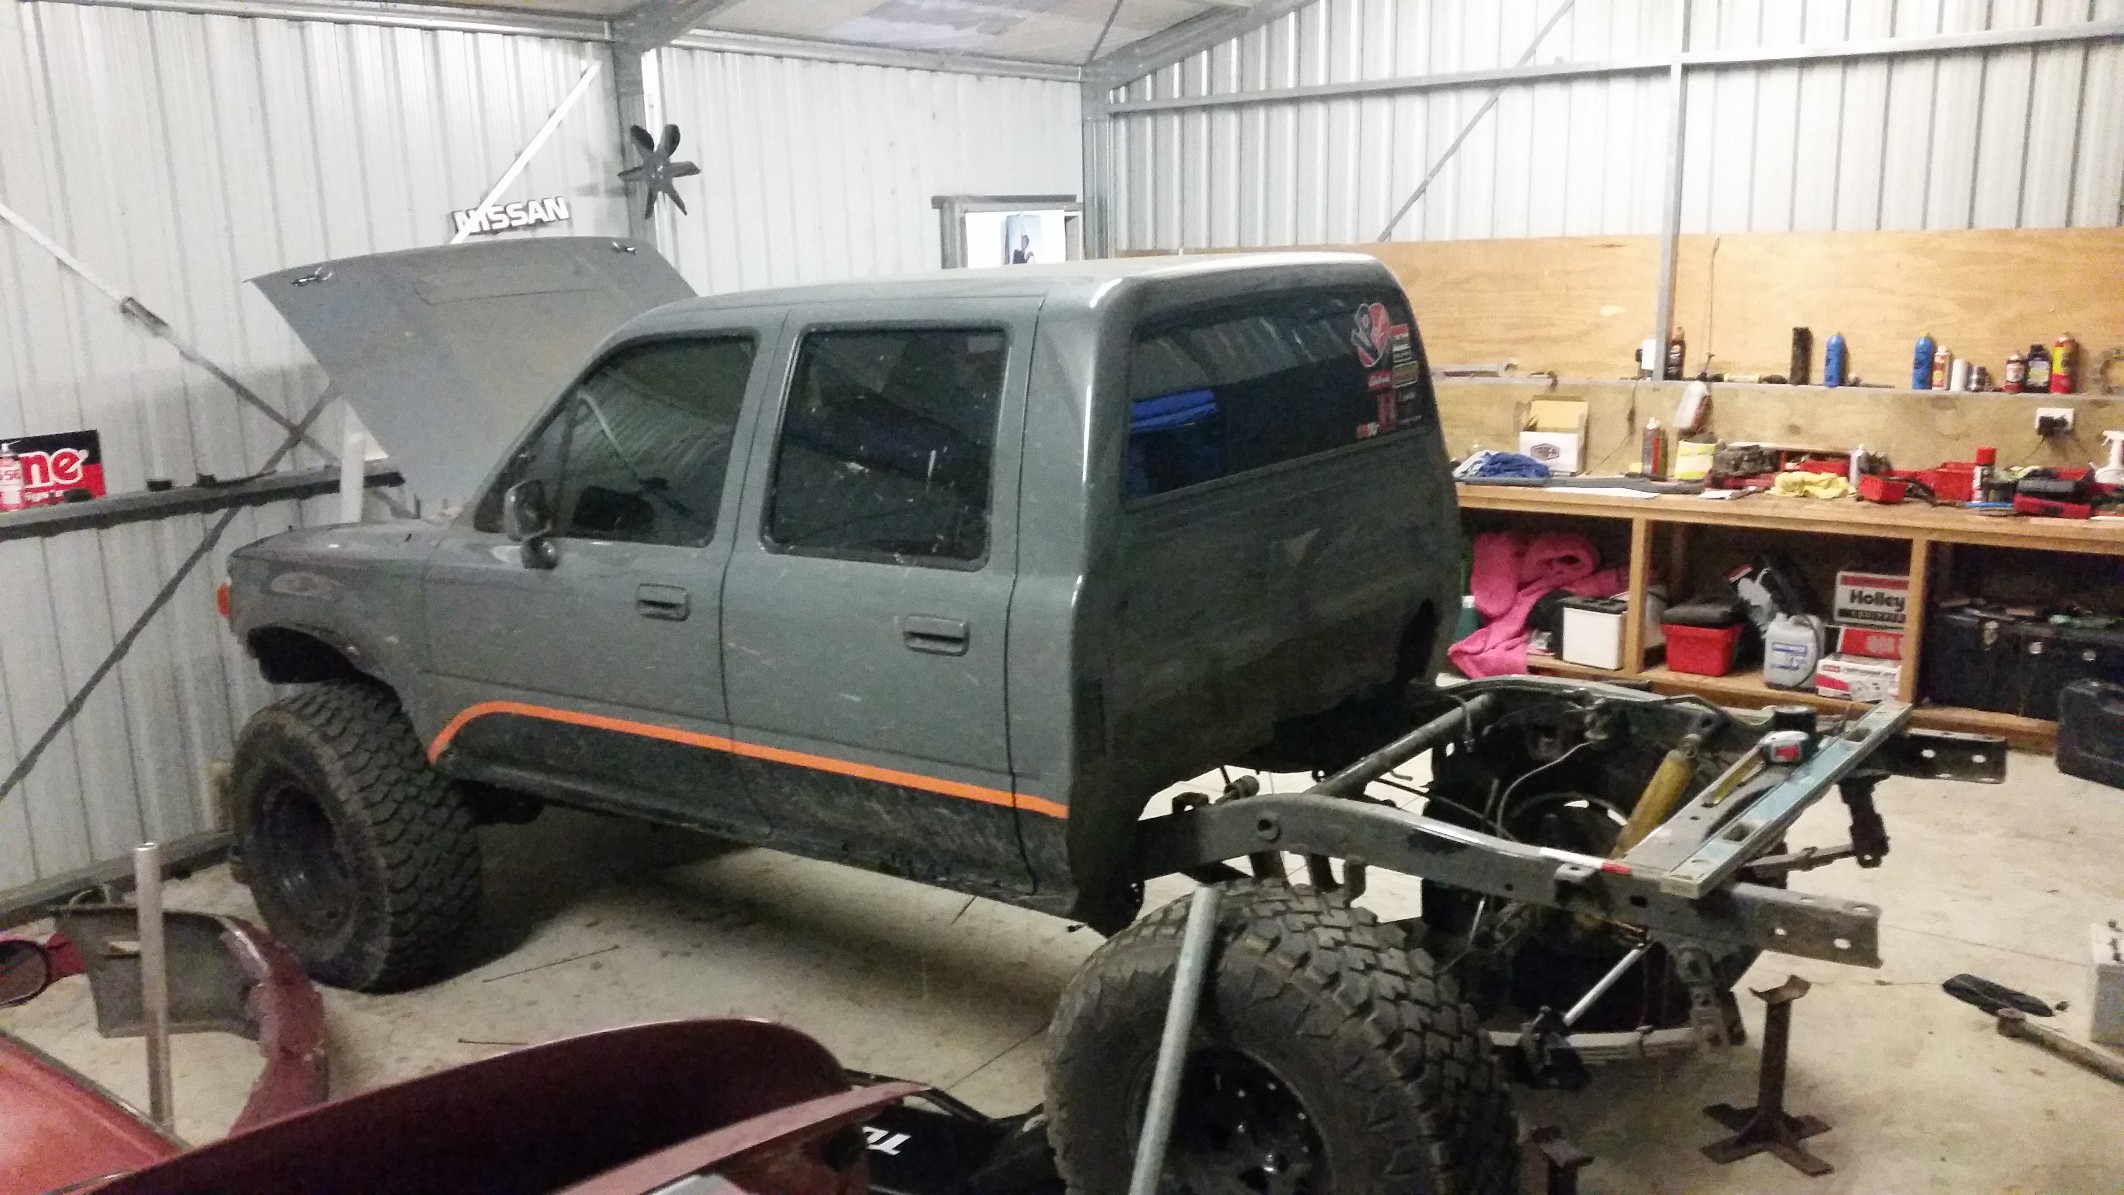
so after making it run well i got used to the power and was super unhappy with the factory leaf set up, twitchy steering, axle tramp, no flex, ride harshness and general truck trying to kill driver. decided it needs coil overs... then the baja videos came.. i spent about 2 months measuring, drawing, reading and thinking about how i was going to undertake this, alot of info regarding building anything to do with speed and offroad is kept under wraps so it takes alot of time to get through whats on forums etc..
1 point
-
My parents came back from America and brought back a bunch of parts for me. Nothing really too exciting, just some headlight parts, steering column rebuild bits and various rubbers that I needed. The slightly exciting parts here were door arm rests and exterior door handles. There is some cool bits coming in a container soon though! They also picked up some NOS optional fog lights for a Chevy truck which are cool. The ignition switch that I got didn't work in the original bracket that fits into the dash, so tried to come up with ideas on where to put it. Came up with this, has the ignition switch and light, rpm gauge, wiper switch and oil pressure light or something. Would probably cover it in black leather to match the door cards, don't know how I feel about it though, sorta looks a bit bulky. Might revisit it later again once the inside is painted. Also needed somewhere to mount the airbag controller. Made it hinge down under the panel and pivot up when it's needed, which worked alright. Other option is to modify the original ash tray and put it in there, which I would prefer but requires more work and cutting up the dash panel. Dropped the engine back in and regretfully put the old rusty jag wheels back on to roll it off the hoist. Bought some Durapox clearcoat with flattener in it awhile ago and have tried it on quite a few different parts with varying outcomes. Unsure what's going wrong but it doesn't seem to flatten off if it's put on more than just a light dusting coat, just stays glossy if too much is put on, but it's sorta patchy/rough if it's too light. Have gotten these bits good enough, but seems like it's going to be a real pain to try and get the whole truck consistent. Had an attempt at patina-ing the grill guard. Doesn't look too bad I think, will have to see once the grill and guards are back on though. As I was having problems with the clearcoat, I did some research and turns out the suction feed gun I was using had a 1.8mm tip which is a bit big for painting/clearing, more used for primer. So we went out and purchased a new decent gravity feed spray gun. Took the rattle can primer off the firewall to put some epoxy primer on. Epoxied. High build primered, and then filled all the spot welds, little dents and welded holes that needed doing. Then spent ages sanding! Once it was smooth enough I remasked it and applied some paint with the new gun, which is quite a bit better. Isn't perfect, but good enough for a firewall. Made up some plates that bolted to the upper door hinge mount on the cab and then welded a long piece of RHS between them. Then used some tie-downs wrapped around the hoist and flipped the cab on it's back, which sits on some inner tyre tubes.1 point
-
Received the order of parts from England, had to pay GST which was a bit annoying. My dad had some spare Jaguar hubs and calipers laying around and they had better condition calipers on them than what my ones were, so swapped them and gave them a sand blast ready to paint. Painted and installed new seals, pistons and dust boots. Fully assembled caliper with all new parts, apart from the pad pins and anti-rattle springs because the ones I bought ended up being too short to fit for some reason. Painted the front end and all the other bits that needed doing. Sent off some small bits and bolts to get electroplated. Hub assembly all together with new wheel bearings, bolts, ball joints and rotors. All bolted together ready to bolt onto the chassis. Brought the chassis back into the main shed to put it back on the hoist to start some assembly. Got the front end mounted on the chassis and all the bolts torqued up. Looks really good I think. Need to rebuild the steering rack and paint the diff now.1 point
-
I ain’t dead. My flatmate gave it a quick flat and buff while I was in ozzy so it looks a lot better now! Also shortened struts all painted and installed with mk1 golf shocks, cleaned up and under sealed the inner guards before that. ended up taking 2 coils off the Dobi springs to get it to where it needed to be. The ride is great, haven’t bottomed out or come close to it. i put the new 1/4 window rubbers in, they are great. Only thing was that they don’t stay open when hooning along, the rubbers too..rubbery and they spring closed. I could leave them open when it’s parked up to see if it helps mould. I drove to wanaka and back to be a wedding car with a couple of other 1200s. got a wheel alignment the morning I went down but they weren’t happy with it and didn’t charge me..blamed the steering box. (Which is fine and I’m sure has adjustment on the very centre of the top but oh well) Resulted in a pretty shit, bump steery, overcorrecty journey in the wind which was a shame, love that inland road. I’ll take it somewhere else. The trip back was better and with the radar detector on we had some good fangs some revolutions were pulled. Had shit gas in it for the journey but back to good stuff now. this weekend I got a mate at pitstop to chuck a full 2” free flow flanged at the headers with single basic sporty muff box I had laying around that was pretty new. I don’t usually farm out stuff I can do but I fucking rage over exhausts and he did a great job, cheap and quick. Now tucked up nice and tight, has a great rasp and crackle to it and goes better!1 point
-
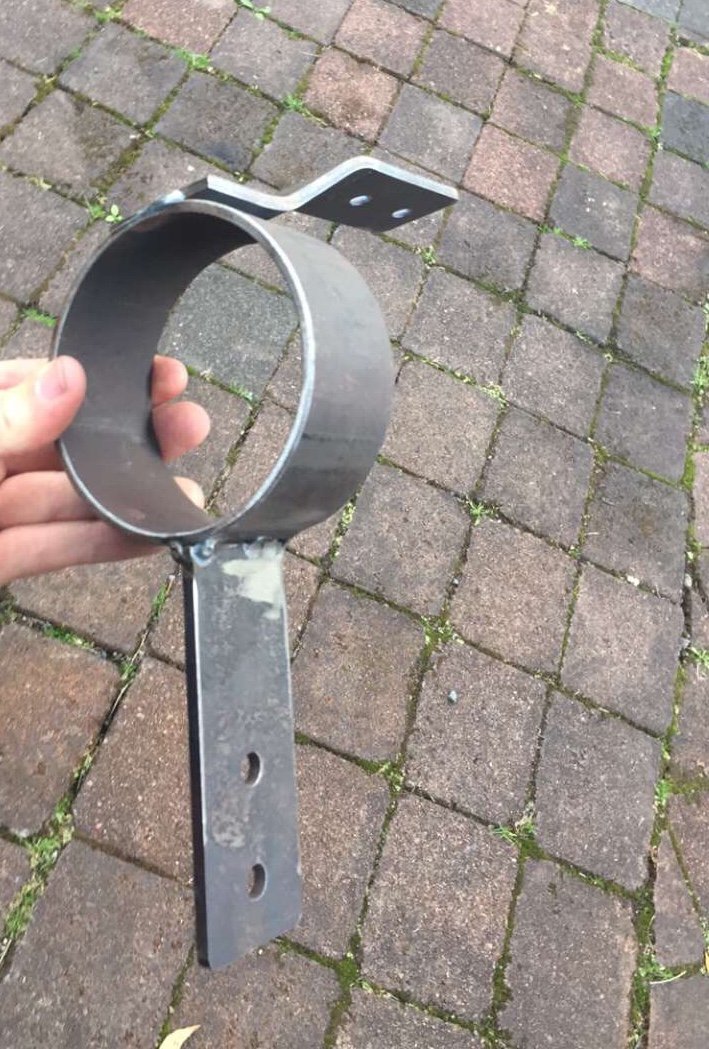
Fixed all the rust holes in the lower radiator panel. Forgot to take photos of the progress but nothing really exciting anyway. Bogged up all the pitting in it and gave it a couple coats of paint, along with the brackets that go behind the grill bars. Made up the air lines that go to the rear air bags. Made the left hand one with not too much trouble and then made the other side incorrect, as it had to go a different route because of the fuel tank fittings, and would of fouled on the deck frame. Got it right the next go though. Of course had to give it a test!1 point
-
Finished off the left side of the inner fender and have nearly finished the other side. Decided on where to put the fuel filler, so went and bought a flush pop-up filler cap so it can be hidden on the c-notch cover. Came with a steel weld-in bung, was really good quality over-all (unlike the chinese one I tried first), but didn't like how the cap had a slight roundness on top, so chucked it in the lathe which fixed that. Bung welded in and cleaned up. Wanted the c-notch cover to be painted some sort of satin black but also to be pretty durable. Decided to try and give some Hammerite a go. Looks pretty good I think. So went a head and painted the airbag tray with it as well. Since I mounted the two compressors too close together to fit standard 90° fittings in the intake ports, I had to make some of my own up. Turned the thread down so they wound all the way in and then cut off the female threaded end and added some turned down hose-tails. Finished fittings welded and painted. The original trim that held the rubber on the bottom inside of the doors were pretty rusty so folded up some new ones and gave them a coat of black paint. While I had the paint ready I gave the fuel tank a coat. Moved on to the latch for the bed that lifts up. Bought a coupe of bear-claw latches from Ebay and made a box for it to fit in, which then gets welded in to the box section frame. Made it that way just so water and crap wouldn't fill up in there. A package arrived last week as well. An Accuair E-level Air Management system.1 point
-
Sandblasted and zinc sprayed all the parts that go inside the doors. Also stripped the rubbers and glass out of the vent window frames, sandblasted, epoxied, primed and painted them in 2K black. Did the same to the door and bonnet hinges except did them in the blue. I have already used just over 3 litres of blue so far! Will need to get some more at some stage. Now that all the glass has been removed I made some wooden templates and sent them off to get some new ones cut. Should be done next week sometime and then the doors can be assembled. I have also made a start on the inner guard where the engine was too wide. Have changed my mind many times about how to go about this. Decided it was easier to try and make in two pieces rather than attempting to get one the right shape and fitting nice enough to weld. Although it ended up being made in 3 pieces, because the front compound curved part ended up too small. Worked out really well this way, as I just started with a rectangular sheet of steel with the edge folded, then just trimmed it down until it fitted in the gap. Once it was fitted and tacked in I could make up the compound curved piece to fit. Test fitted it back on and there is heaps of clearance, wasn't sure if there was going to be enough at first. Took it back off to fully weld and sand. Has come out pretty good and it's all quite smooth/blends in very well. Made a start on the lower flange. Needs to raise up in the middle where those two lines are to clear the engine mounts on the chassis.1 point
-
1 point
-
Replaced the front wheel bearings, and it's now all road legal and still owes me sub a thousand. Now the boring bits over time for some fun. Also took it back to the old owner and he said he still has its original black plates and will dig them out so I'll hopefully get them back on the car
1 point


.JPG.367dd5657aa7cdbf5efb3b5ed629ba86.JPG)


This leaderboard is set to Auckland/GMT+12:00