
Leaderboard


Popular Content
Showing content with the highest reputation on 10/18/18 in all areas
-
Other side. I wanted to keep the channel that the seal sits in. I bought this little bead roller ages ago, first time I've really used it, I fiddled with the wheel spacing to use it as a tipping wheel - setting the curved flange for the door skin. Worked out quite well. Checking the fit of the bottom piece on the car All done, except for the welding, grinding, painting, and refitting............12 points
-
my baggage is strictly for purple Gs8 points
-
Shes got spark, the engines pre-run in from being in the Chaly, shes getting painted this weekend! I'm all go, just got no luggage space anymore. But it's a worthy sacrifice. How long is it for one pair of undies again; 4 days? Normal way, inside out, then wear them backwards for each of those. So yeah, definitely sorted.6 points
-
sooooooooo i took the sweet sticker that VG / Mrs VG designed and have ordered embroided Patches. They are fully stitched 75x75mm glue backed patches with several colours on it. I have ordered 30x pieces, 10x are already spoken for so the rest will be up here, first in first served cost is $8 each, if they come in time ill post them out to some dweebs so ya can slam on ya vests for the ride. tumeke. heres a sneak peak
 5 points
 -
Introducing the newest member to the rotary international auckland, in the form of a super project Mazda Rx2 Coupe straight outta somewhere near Compton but might take a while in the LA traffic. Back in February there was slight intoxication involved when this little red coupe showed up on a Facebook group, and thought 'yes this could be a nice daily'. Not overly reasonable considering it was in LA, and there was no garage space available, but no amount of sense-talking could stop the purchase and after being told our Mexican mate would sell it to another guy for double, I taught him a lesson by sending him money, chucked Stephen's RX7 out in the rain, and arranged shipment. Supposedly from the Arizona desert (yet with several crowbar dents around main entrance points) it has survived hot sun, a brick through the windscreen, and a seemingly nasty break up thanks to Jessica being a tramp and a too-timer: As far as we know it’s a 1973 RX2 S1/S2, with a poorly pulled apart factory 12a twin dizzy which fascinatingly was resting on the crossmember as an engine bracket, surviving a bumpy boat ride and several tow trucks. The list of what it has is far shorter than what it needs as it included the seats, engine and auto gearbox, couple of bits of chrome, old mates dad's truck rear view mirror, half of the Arizona desert in the doors, and a creepy Christmas doll decoration. Sorted: Thankfully don't have to invest in a paint job, as Jessica's ex has done the custom airbrushing. Got an extra windscreen as sadly the brick shattered the one in it. Plans: Not sure of engine yet as deciding between keeping original or moving to a 13B. Received an upholstery quote so that will be instead be mostly done by Rotorhoe's hobby shop. Widened steels, slam as per rules, get on road with guidance of supertrapp and jillyz music (cost effective as no radio required) Your kind thoughts and sympathy are appreciated3 points
-
So picked frame up yesterday and warm today so thought I'd get some primer on at lunchtime, which was a bit optimistic. By the time I'd found everything I needed I had to get back to the orifice. Also, my hardener had, well, hardened, so had to grab some more on way back thru town... Still, managed to tidy up some old and ugly repairs that were noticable with the paint off, will try to get some colour on it tonight while weather is cooperating... And wife away so can use handy backyard rotary frame (prob should take washing in first). I'm sure the kids can feed themselves while I'm chucking paint...3 points
-
Just got back from a succesful 80km test ride, other than almost doing a shakotom and ending up in the native down a bank all is sweet. Bit doughy with the 15t sprocket on but its happy sitting on 70-75kph at 8000rpm on the flat so that better than being tapped at 70kph doing 10000rpm. Still got a weird issue where it sometimes cuts out when you close the throttle at high speed but thinking its too rich on the pilot/idle circuit. Pulled the spanny off to give the head bolts another retorque now Iv done 150kms, piston and bore still look good through the exhaust port so im confident its not going to destroy itself like the first big block kit.3 points
-
One of our guys in the heavy fab shop has a hugong something like that ad. He uses it for tig and stick. Usually wound right up. For hours at a time. Has had a few minor issues. He purchased through duroweld in new plymouth. The 3 years commercial warranty was the main selling point. Any issues he just takes it back and they have sorted it.2 points
-
Looks like a horse smoking a joint? Thats my guess for now anyway.2 points
-
There are liquor outlets at all places we are staying @Chris.QCRso dont have to carry too much between stays2 points
-
I feel lik ive got my luggage carrying ability sorted but just remembered I havent factored in booze. May just stuff a couple of bottles of Rose' in my jacket instead2 points
-
I will put a courtesy animal in the car for you.2 points
-
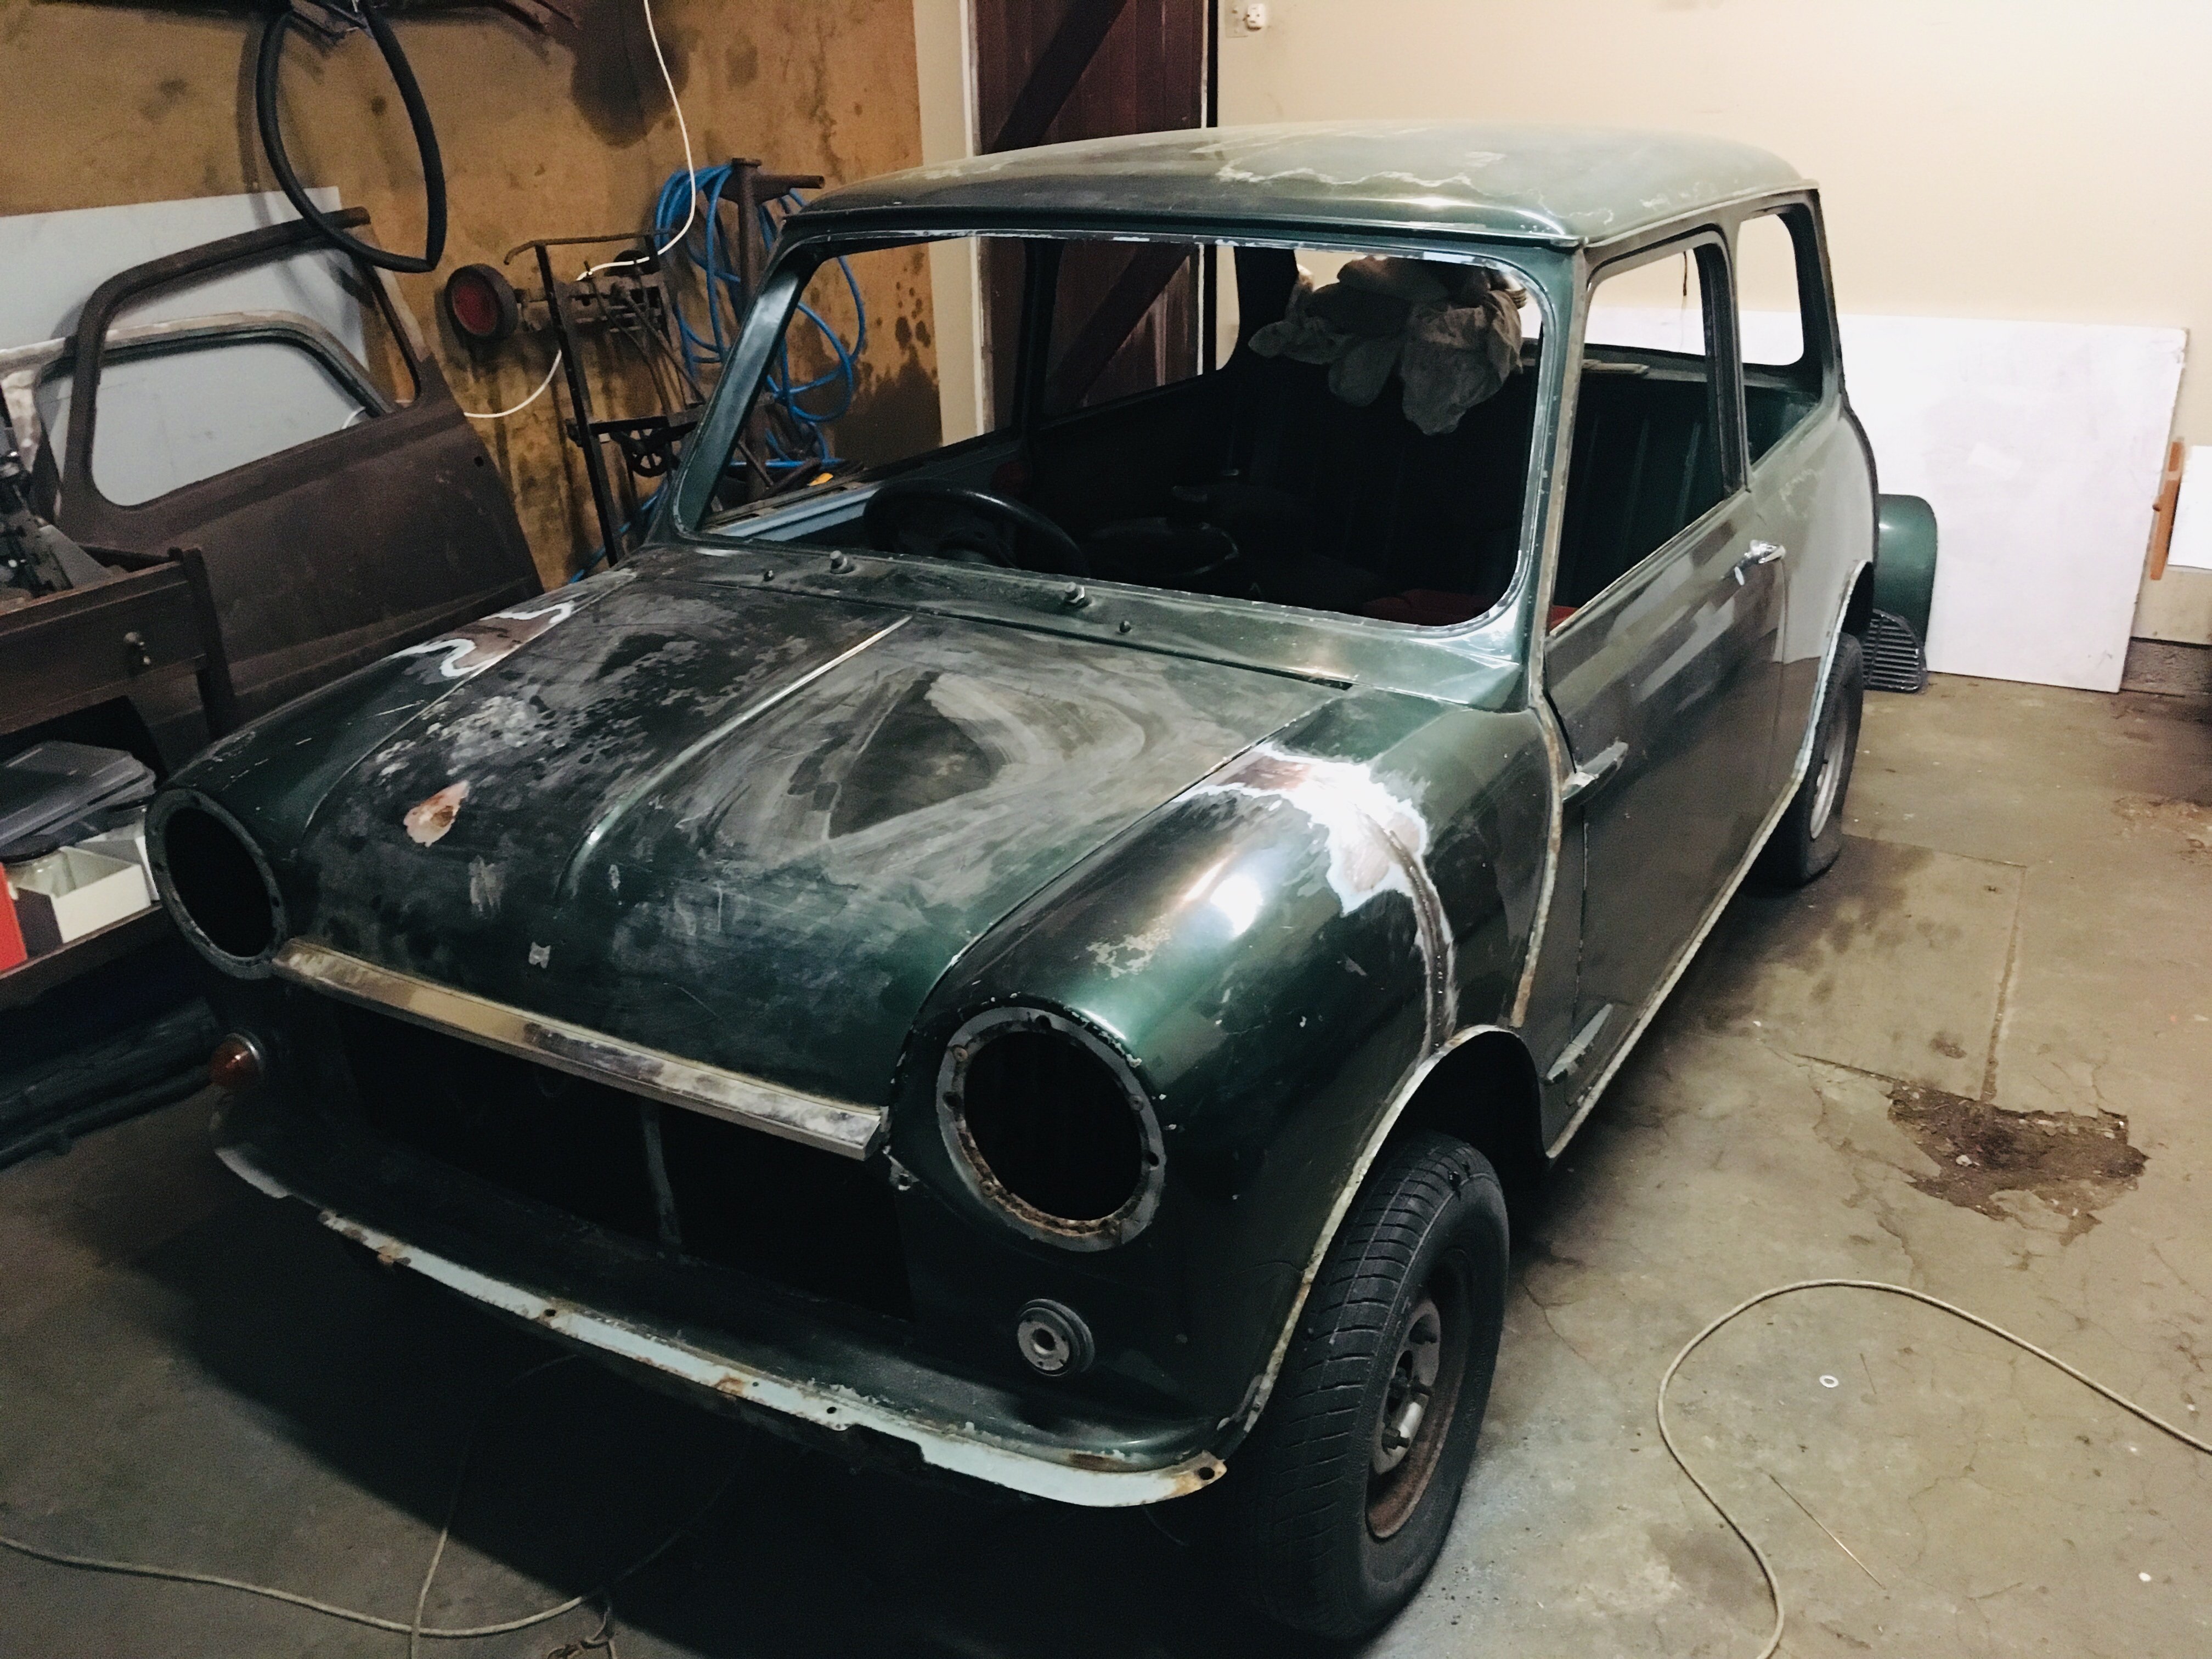
WOF man told me at the last WOF (back in May) that I needed to fix the rust in the back door. Not really sure it should have been a fail point, but oh well. Only a few small holes. Kind of weird where they are too. Seemed easier to remove the door, had some hassles with the hinge attachments, but got it off. Hinges are welded to the door itself. Cut cut cut Patch for the inner frame2 points
-
As the first step to sorting out the issues needed to get Snicket on the road, I decided to remove the radius arms, so it also knocks out two jobs in one. I had suspected there may be some play in the rear arms, as when taking a corner hard, the inside rear edge of the tire would often make contact with the body... and it shouldn't be able to do that. They also look super old and crusty. The first thing to do was to whip the wheel off, and check out the "soft suspension" that was noted. You can also see on the right of the photo, where the tire has rubbed the inner guard. I think I found why it failed on it... The shocks have leaked all their oil out, and are doing nothing. The other side was worse! Ok, so that's fair enough. Next was to remove the drum and inspect the LH brake, which was the one noted as doing nothing. I backed the adjuster right off and pulled off the drum There is a bit of grease on the hub, but nothing inside the drum. The shoes are showing weird markings, but could just be because they havent been used in anger for a while. No obvious signs of brake fluid leaks from the cylinder. As a test I set my camera up and checked what happens when I put my foot on the brake, without the drum on. I should have seen the shoes get pushed out by the cylinder... but I had nothing. Not a mm of movement. Guess that's that; the cylinder is seized. I took the dust cap off, and I'm sure it's not meant to look this grotty Moving along, I proceeded to disassemble the arm for removal. Disconnect the brake lines from the hose. From left to right, is the fixed nut on the hose, bracket on arm, star washer, locking nut to secure hose to bracket, and then the brake pipe nut. Removing the shocks was next. For the LH side I had to move the fuel tank to access the shock, which was a pain. Also found more surface rust, which I brushed back and treated (looks worse in the photo than it is). I used my cordless ratchet to spin the nut off But like most shocks, the shaft will try to spin, so I used a pair of vice grips to lock it in place. Worked like a charm The shocks when removed offer almost no resistance to being moved by hand. Since the arm can now drop right down, I removed the trumpet and cone. On this side I had to use some percussive persuasion with BFH to free the cone from the trumpet, but it was only stuck there, not seized, so didn't take much. The other side came apart easy. Somewhere in here I removed, but forgot to get photos of, the hand brake quadrant. It's on the underside of the arm, and in the left of the photo above with the cable running to it. Mine was held in place by a split pin, onto a pin that goes through the arm. You also need to remove the cable from the bracket on the backing plate of the brakes (and from the lever, just a split pin and remove the pin). Do this by levering the metal collar with the spring, out of the tab on the arm and pulling the cable free. Next I removed the brake hose from the bracket on the subframe, and from the pipe. This is not fun to access, but can be done. I have replacement hoses which will be fitted on reassembly. With the hose out of the way, there is a large nut on the side of the subframe that needs to be removed And another on the outside of the subframe, where the grease nipple is. I have also loosened one of the outer mounting bolts in this photo, above the arm. Another bolt is hidden under the arm Then there are another two under the bracket, and once removed, the arm can be pulled free from the car My arm is pretty grotty. Old grease, dirt, and what I think is a Lanolin based rust protectant. The other side is the same deal, and took me about quarter the time to remove that the first one did, but with one little catch. The brake splitter is close to the RH side, so the brake pipe is very short. There is very little movement in it, so to access the nut on the side of the subframe I needed to remove the bolt holding the splitter to the bracket, and gain some space. You could also just remove the pipe from the splitter, which is probably better, but I didn't want to risk rounding the nut. It looked old. This side was worse when the arm was removed I'm going to have to chip all that out before I refit the refurbished arms. Oh well. So the arms are out, I have ordered two new brake cylinders (RH side cylinder didn't look any better, so doing both) and a new set of shoes. I'll be dropping the arms into the local Mini specialist to have him fit the rebuild kit, as I don't have the tools to ream the new bushing out, and I'll get him to fit the new brake cylinders too. Once they are done and back I can reassemble the rear, and start work on the front.2 points
-
Talk about cutting it close. I finished everything on my list of stuff I need to finish before my road trip tonight, and I leave in the morning!! Not much of an exciting update, just tidying up the last few things. Did some road testing over the weekend and tweaked the ECU a little bit. I found that some of the settings like the overrun/deceleration fuel cut and idle had too much of a deadzone for my application. For example the overrun fuel cut was set to cut the fuel if the TPS was below 0.7% but the problem is that because the car is so light and the engine is so powerful, you are quite often cruising around at 0.1-0.5% throttle. My TPS is really accurate and stable so I just turn all that sort of stuff way down so for the fuel cut or idle the TPS needs to be below 0.1% now. Drives like a dream now, it has such awesome throttle response with the ITB's. Also did some tweaking with the brakes. Reconnected the booster and then wound the brake proportioning valve to the maximum reduction, which is 57% and the brakes feel really great now. Super happy with the brakes now. In other last minute things. Got the spare tyre fitted. Had to make little drop downs for the front because there used to be a 155 width tyre and now it is a 205. Still fits sweet in between the fuel system and exhaust. Put on some clear protective take where the air cleaner touches the bonnet. In real life you can't see it like you can in the photo Made a little rubber mat for the back so everything won't slide around as much on the trip. I also go on road trips with my friends and their dogs so it will be nice and easy to clean. Made a new bonnet stay like the one on my other Avenger And a little holder for it. Also went to a car show in the weekend. Got really good feedback. people were pretty impressed with how well everything fits in there. And YAY!! Road trip tomorrow. It's been an epic build and I am so stoked I got it all finished the night before I leave. Such a relief. Still more to do when I get back, like the proper wheels, but now it is time to enjoy the car!!2 points
-
WOOHOO!!! FRAK YEAH!! SHE IS ALL ROAD LEGAL!!!!! I'm going away to the South Island next Wednesday so it has been a mad rush to get it finished in time. Still a little list of things that I want to finish of but it drives really nice. I took it for it's first proper drive today and it is such a fun car to drive, stupidly quick and OMG does it ever sound amazing!! Got the cert plate back today, passed with flying colours. Here is the cert plate listing all the mods Got it's warrant of fitness. And registration First night back at home Here is a before shot, I love how you can barely tell I put the V8 in it. Such a sleeper. The big back wheels are pretty much the only thing that gives it away, they look so cool. Back in the garage with my other cars Other little updates. Painted the centre caps of the temporary front wheels. Doesn't actually look too bad now that it is all murdered out. Swapped over the front bumpers. The early Hillmans used a much smaller bumper than the late model Chrysler's. They don't bolt straight up, you need to drill a couple of holes then after that it bolts right up. You can see a good shot of the old bumper in the before photo above. Finished mounting the brake bias valve.2 points
-
And now the front is reconnected.... amazed I still know how to TIG There are a few minor spots to deal with the body but this is a big step
1 point
-
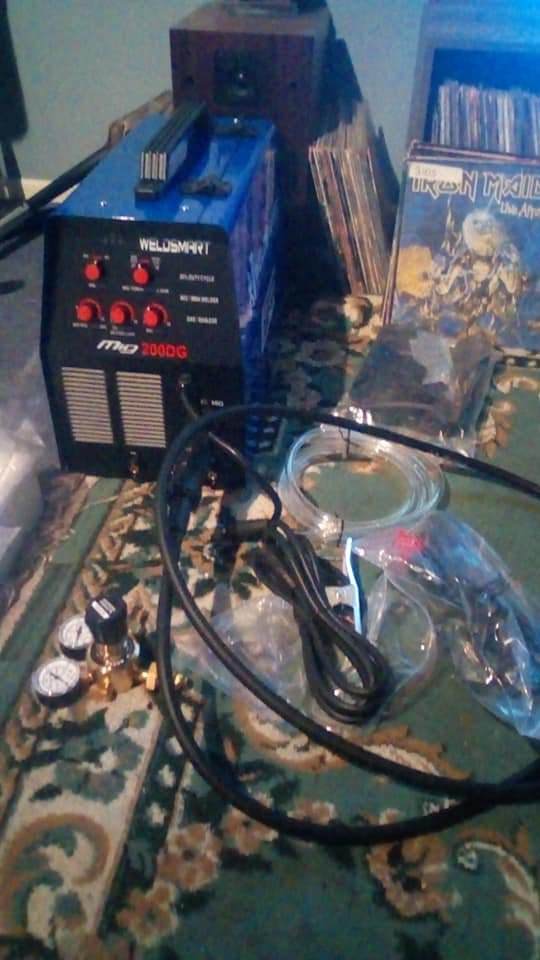
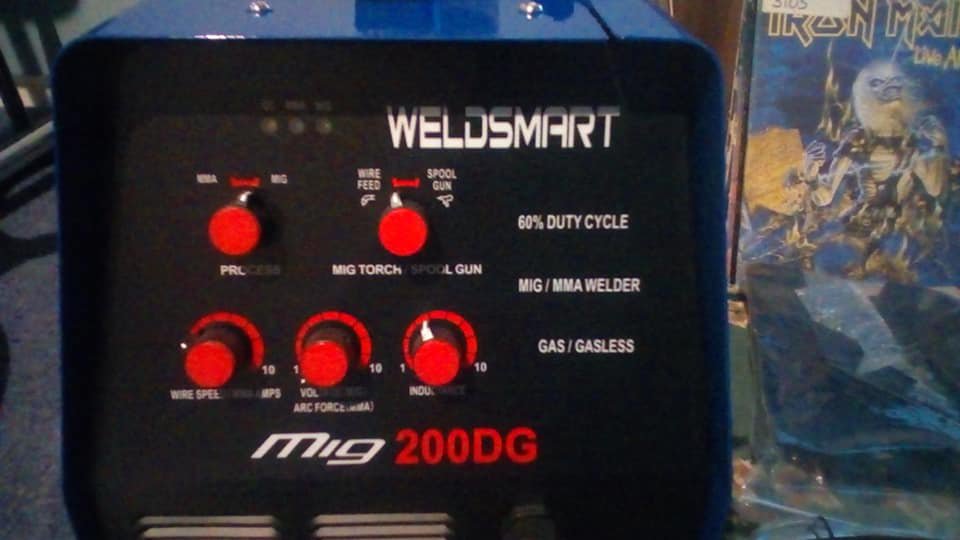
I got myself one of these Weldsmart 200A on one them $1 res listings on trademe for $525 and $14 shipping on the face of it it looks to be very good welder.Cant wait to try it out (no god dam 15a socket in the garage)
1 point
-
Packing a 6 pack of Elle's finest...
1 point
-
And got a coat on after work, the durepox sticks bloody well, I'll just put a few coats on and see how it goes as a top coat. It's only a trail bike, will just touch up as it get dings and scrapes. And frames are buggers to paint, all nooks and crannies. Balanced it on the old cable drum and did the under side before hanging up to get the top and sides done... And it's red again. Not a bad match for the original colour either... That's a win, always good to get paint on a blasted surface asap, hopefully I'll get another couple of coats on tomorrow and it'll be all good to start putting bits back on... [edit] and finally mixed just the right amount of paint, usually run out or have far too much. Made up mix to150mls then added 20% reducer to 180mls. Almost the perfect amount...1 point
-
Nail me down for one please chap. I'm glad the feature pictured showed up in stitch format.1 point
-
More a case of forcing myself to pack super light than not wanting to attach boxes etc. Will probably strap stuff to the rear seat dip and have a little front rack I'm gonna try make fit tonight. Been watching the video of us in Chch riding with you dudes @Chris.QCR and it's got me pining hard.1 point
-
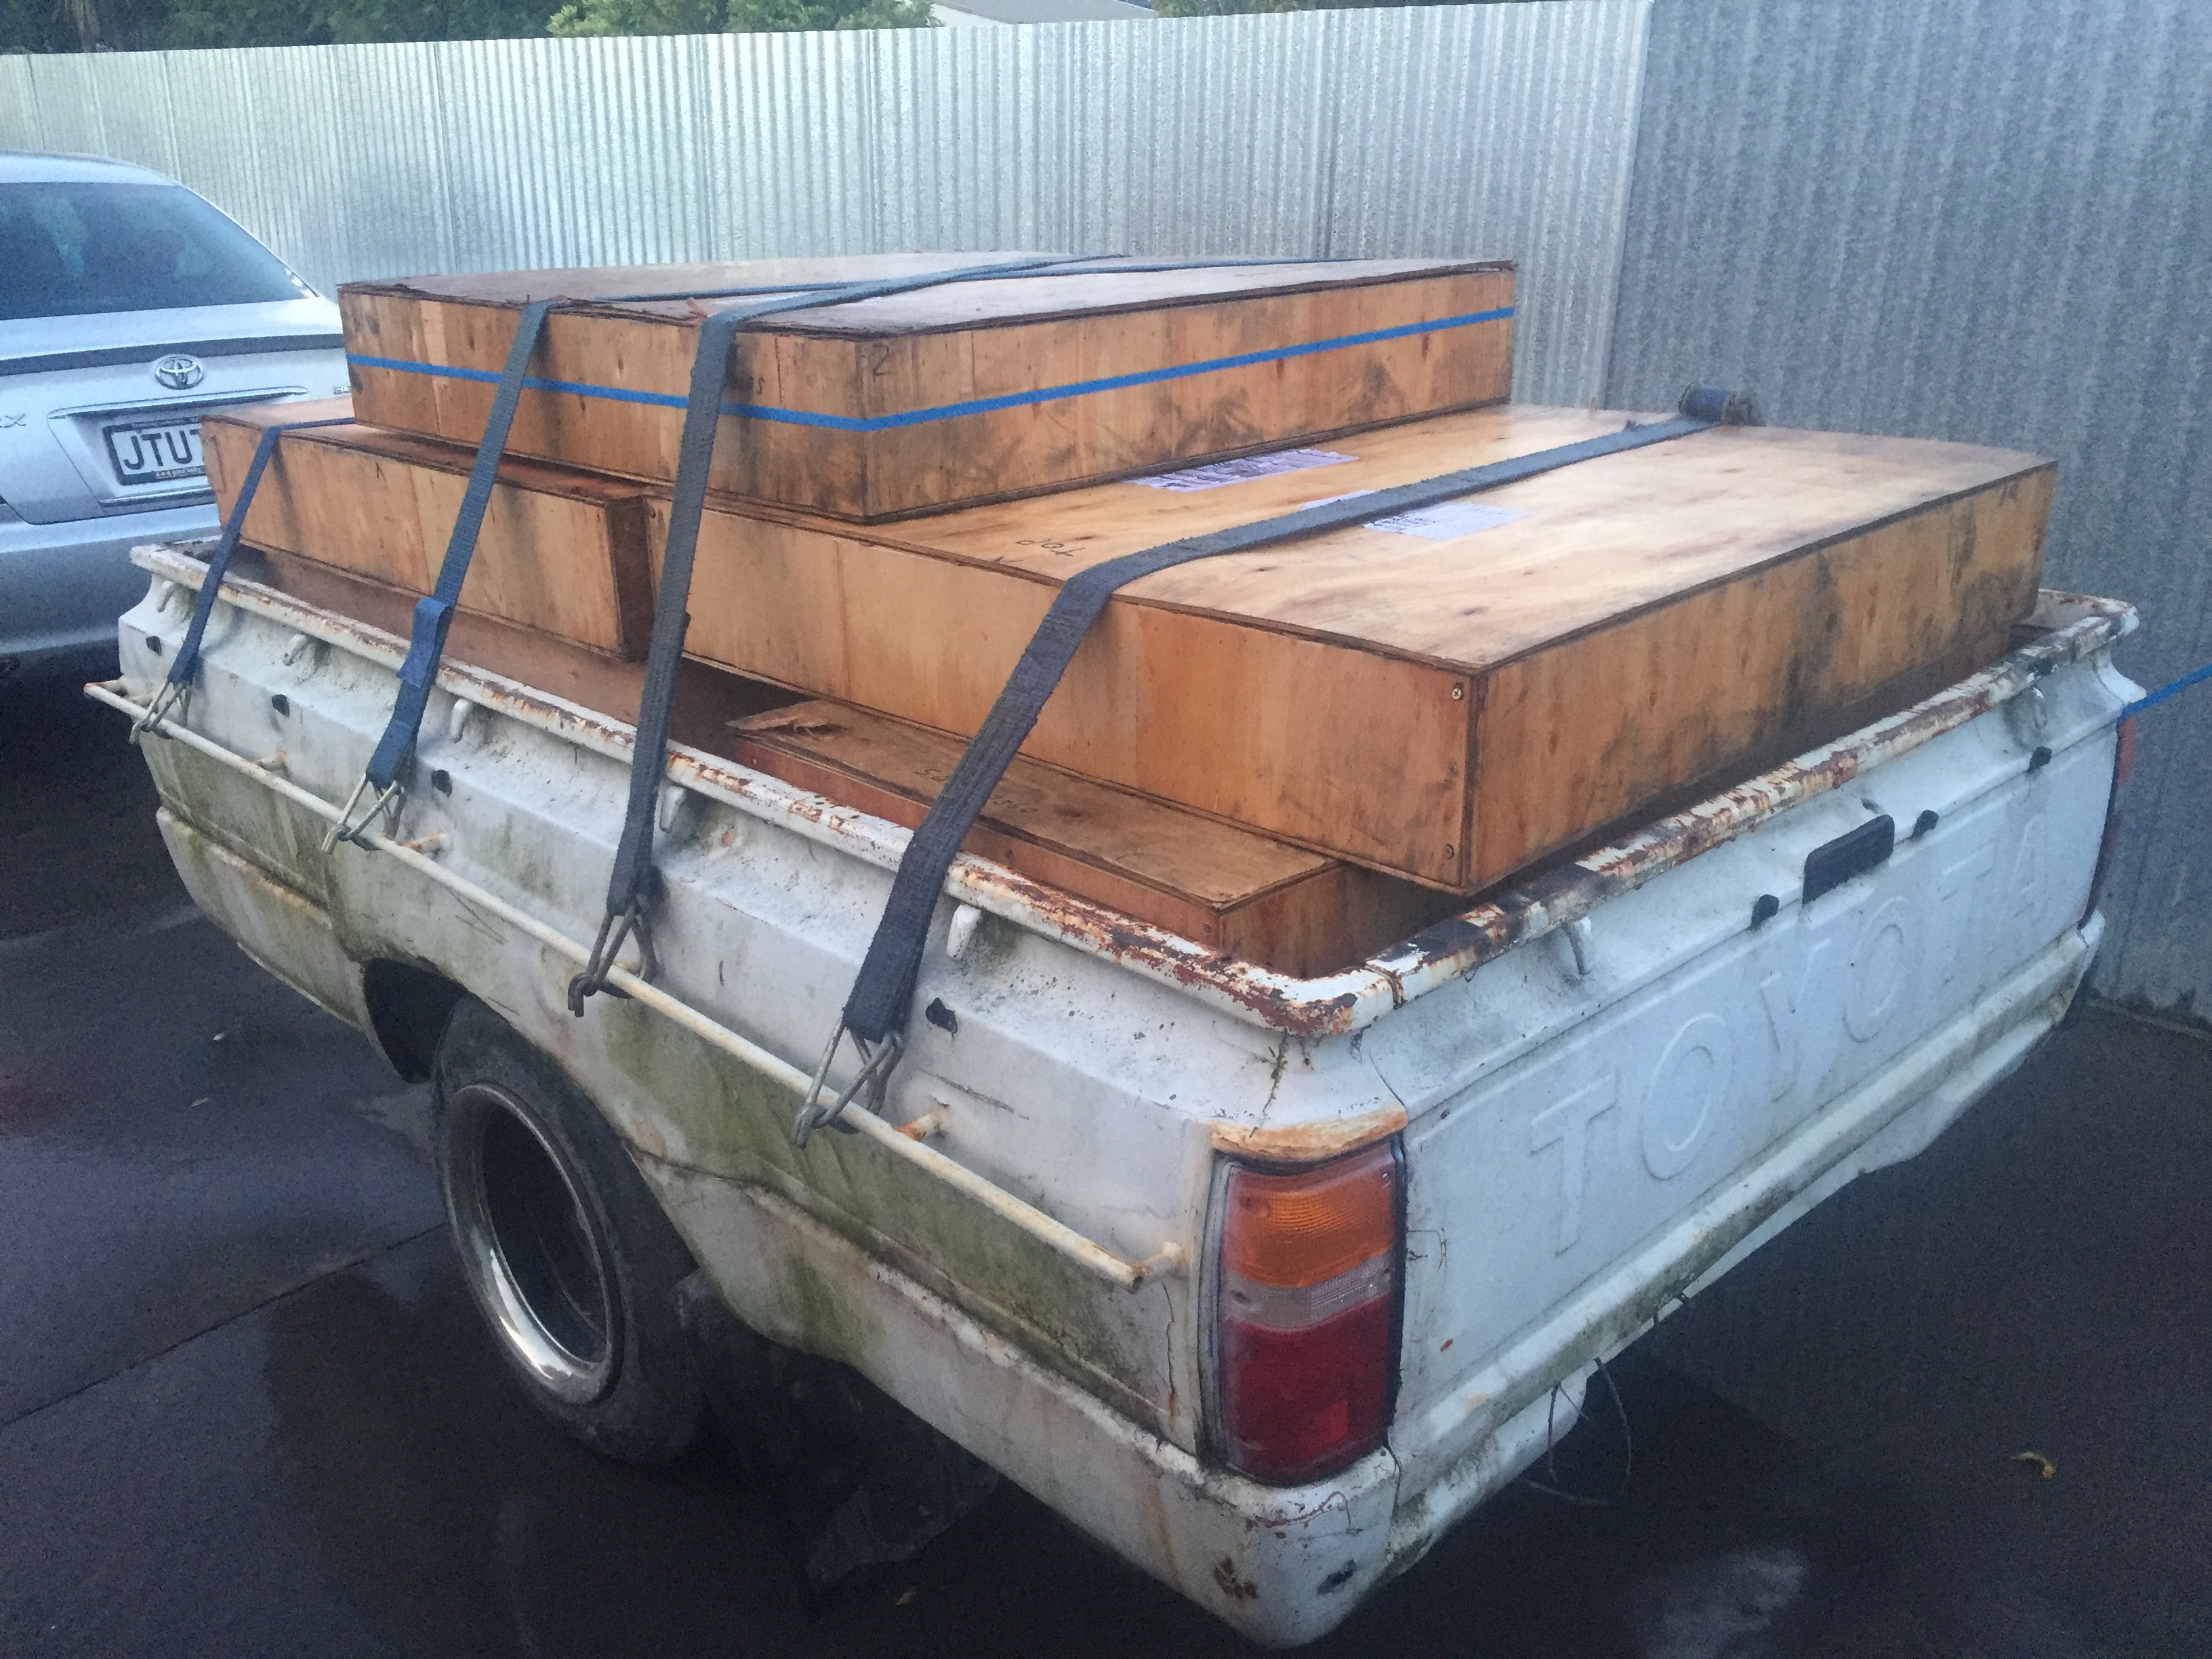
Lookin good. I can see so many luggage carrying spots bro. Need to think out of the square1 point
-
Standard front is 12t and havent counted the rear but its got lots of teeth dirtbike spec. Im hoping with a less rich tune and a tutu with squish it will improve the performance but that can wait til after east cape1 point
-
The finest sleepy cat from kitty valley?1 point
-
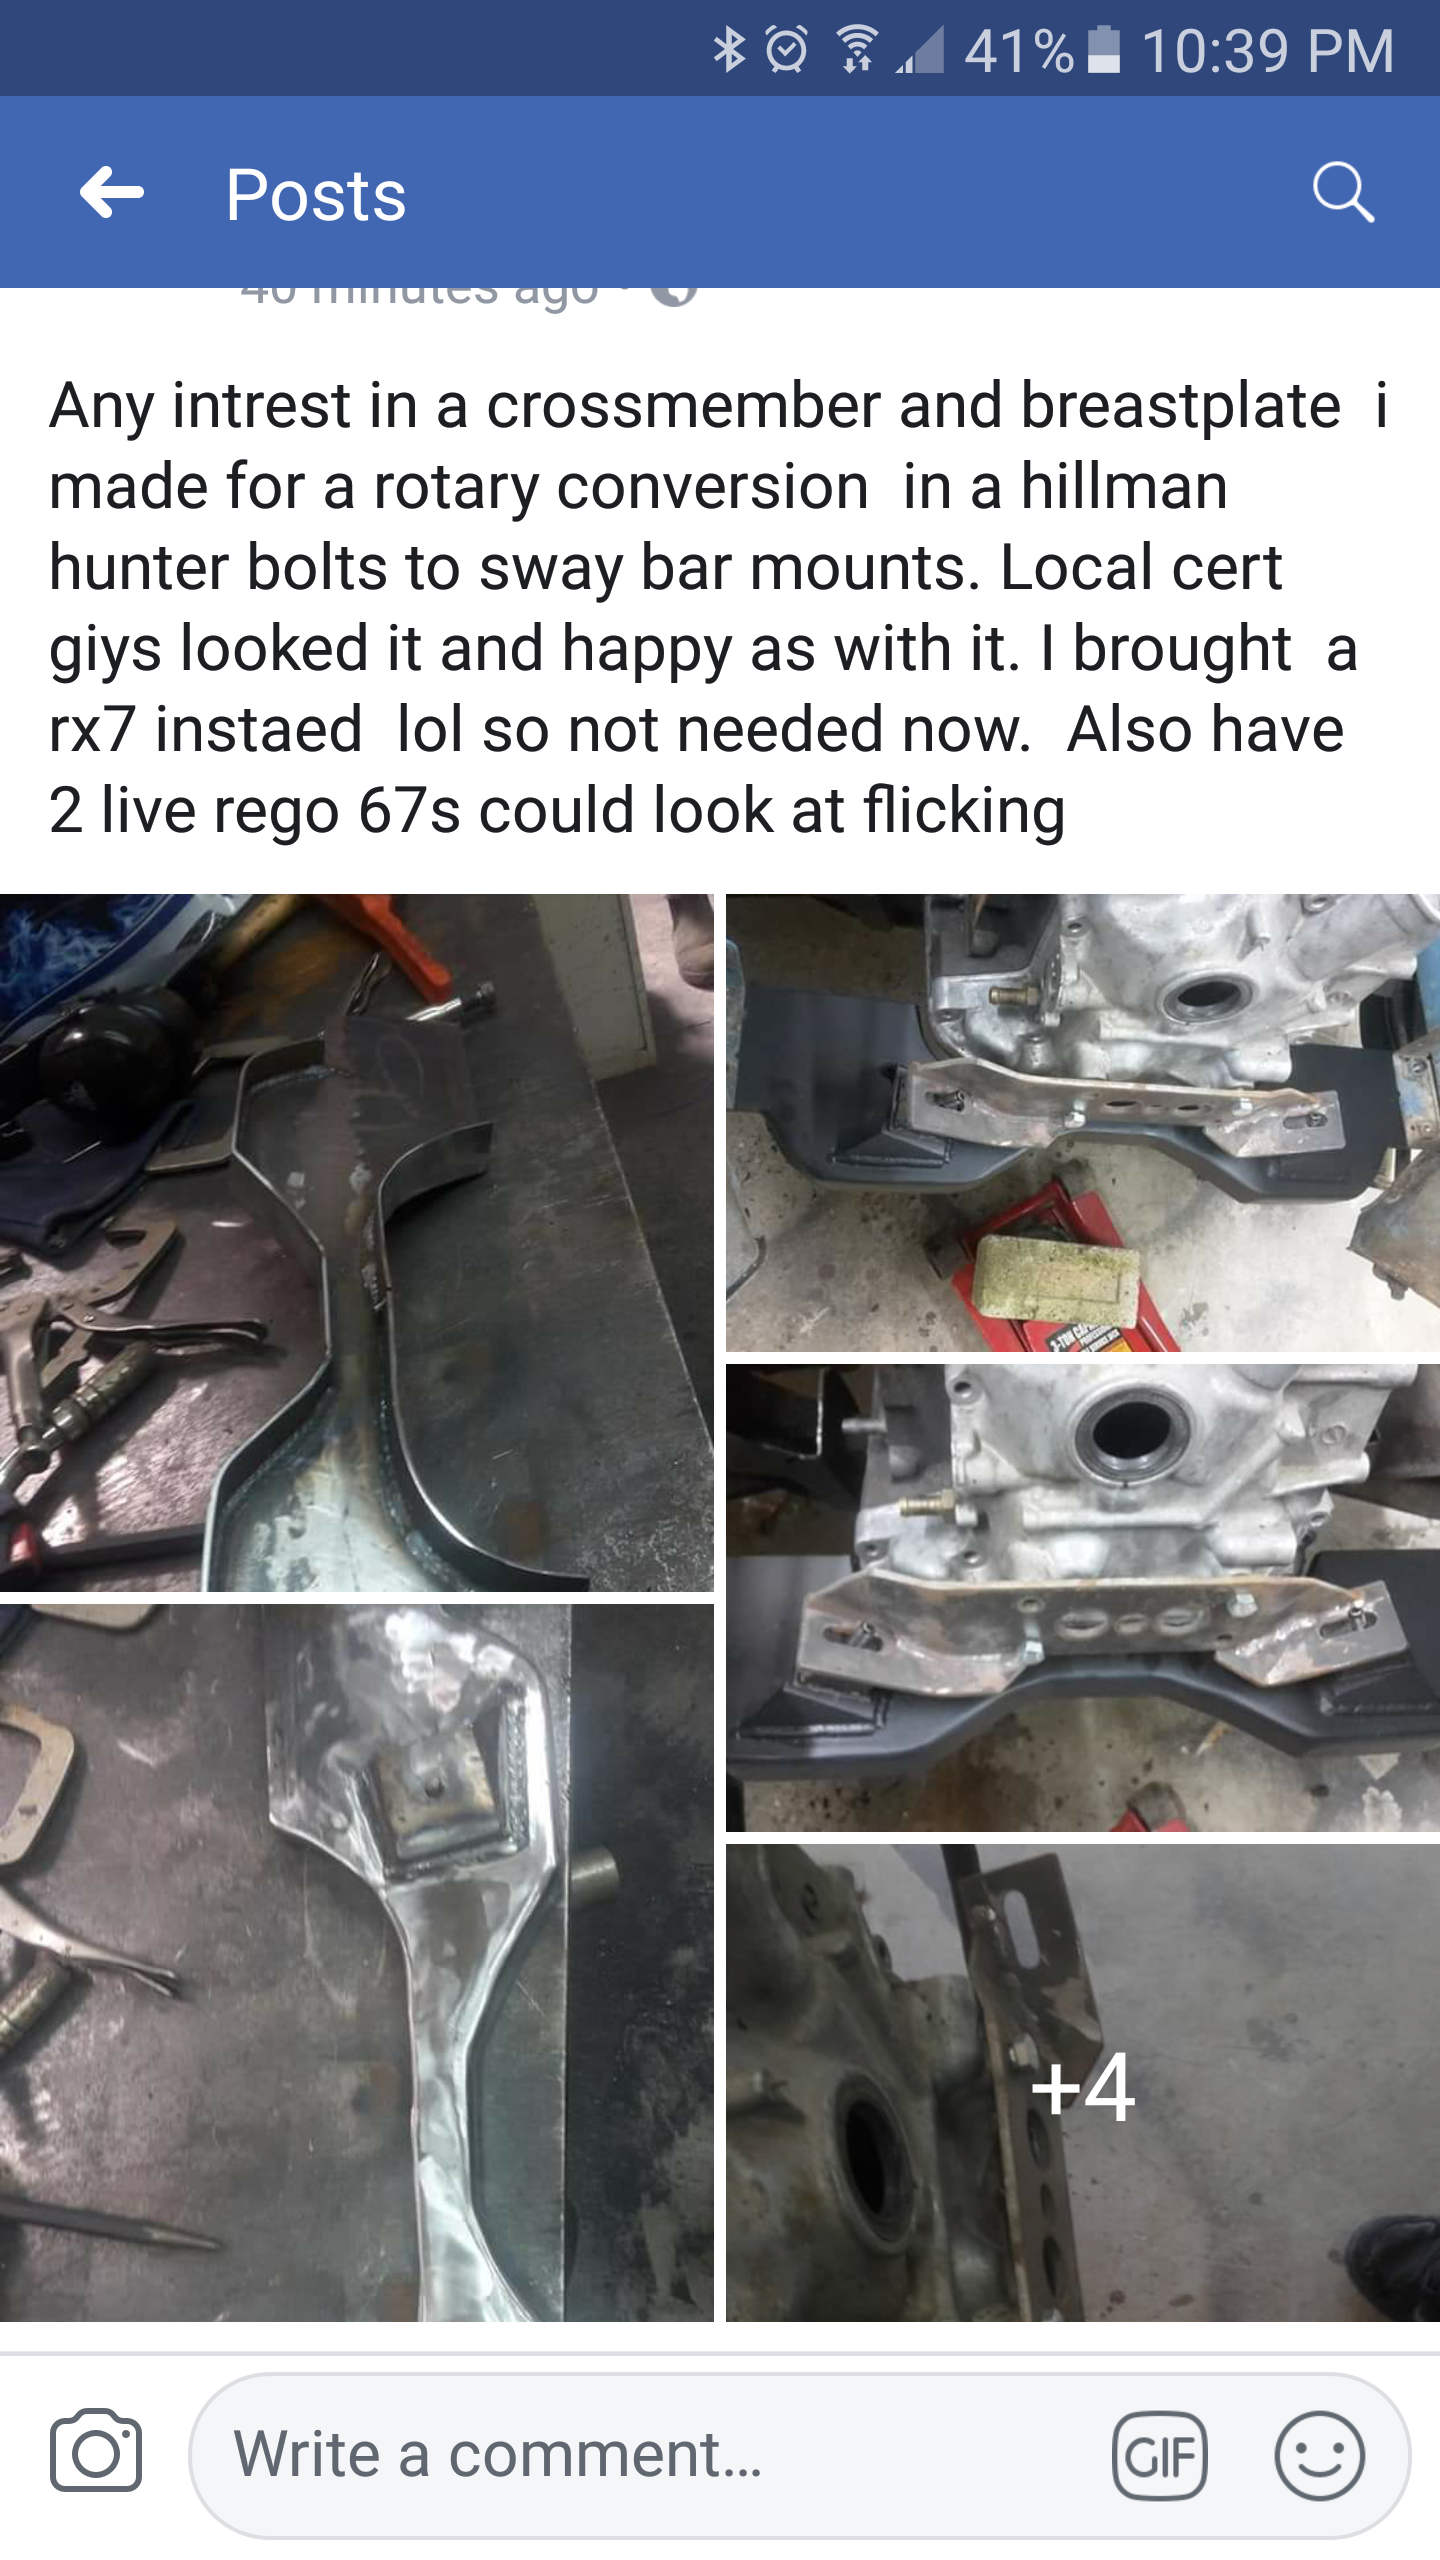
This popped up on fb tonight.. Someone is selling a crossmember for a rotary conversion.. a s1 box will fit in with the stock tunnel providing a hydraulic release bearing is fitted, or add a bulge for the slave to operate. Obviously a early hilux diff will need to be put in. Thoughts?
1 point
-
Didn't get it, bit of a bog bucket, so it's a pass on it, thanks for the offers guys. Avenger, someone musta used a rose tinted camera for the pics1 point
-
How do you deal with the engine moving around on its mounts with a bonnet sealing box? Do you just use really thick cushy rubber to line the sealing edges?1 point
-
If I had a bulldozer there would be alot of work for it around my place, about 2.5 KMS of gravel driveway witch all ways needs work as there are 24 houses off it, A bulldozer with a grave digger on the back would be ideal.1 point
-
Stock JZ, 350Z gearbox. ProbleM solved.1 point
-
I want to see a 43 dude train going down the Rere rockslide1 point
-
What do you do when you have a big list of things to do and a deadline? Buy another project of course. I filled it with fresh fuel and noticed the oil tank also filled itself with fuel so duped some 2 stroke oil in the tank. Bit of crc down the carb and it started. The throttle cable was seized so off to the hoard and I found one that was less seized and fitted it, It only sticks on half throttle now. The exhaust was missing and the motor looked similar to the one in the melody, surprisingly it actually fitted. Went for a test ride and goes pretty good, my feet only just fit on the foot rest I gave the garage a quick tidy and lined them up for a family photo1 point
-
Ahhhh progress I randomly one day last year stubbled across a guy on FB selling newer crown parts,in the back of a pic was a ms53. I messaged him and he was willing to sell me some bits,after nearly a year of organising and conversions I imported 8 boxes of parts!! 4 doors,a tailgate,a superdeluxe benchseat,trim pieces and other parts that my car needed for the resto. This car has been abit of an international affair .being 1 of 2 known in NZ ive had to get used and nos parts from Thailand, finland, norway, the netherlands, japan and canada . Hopefully that should be it for now.... for anyone wondering i used CFR line in auckland to bring the parts in. Super helpful and great pricing
1 point
-
Big milestone. Fired the engine up for the first time. A few issues. The biggest problem is that the TPS doesn't work, The shaft on the throttle bodies spins the opposite way to the standard 1UZ TPS. Need to do some research to figure out what TPS I can run. In other news. Got the gearbox boot and gear knob. Tried this one but it was a little high for my liking. Swapped it out for a smaller knob which feels much better (Ladies!! See, a bigger knob doesn't always feel better) It also has the correct H pattern on the top which is cool because it is different to the 5 speed sierra gearbox in my 75 Avenger and the old standard Hillman 4 speeds, they both have reverse next to first instead of below 5th, so I'm sure I will forget where reverse is on this one if I didn't have the H pattern there. Also got the dash up and going. It still has the protective screen protector on it so it looks a bit fuzzy. I will take that off once it is all mounted in the car.1 point
-
Started work on the loom. Just laying it out at the moment then once I have everything finalised I will wrap it. Made a little bracket for the cable grommet. Mounted the ECU mounting plate Put the old body loom back in to see how it all fits. Again, when I have everything finalised then I will wrap everything up. Finished off the fuel tank Added in a new fuel pickup Ran the fuel lines. For certification you need to run the lines 150mm away from the drive shaft. Made some quick spacers for the rotors so we could figure out what hat to buy. Brought all of the brake gear. Wilwood 4 pot calipers and the hat for the hub. Also brought the rotor but I haven't unboxed it yet1 point
-
One tool I forgot to mention in my last post about tuning, was the Gunson Colortune. In a world where everything is digital, with sensors and readouts, it's fun to be learning how it was all done back before all this. The Gunson Colortune was basically an analogue, visual, Air to Fuel Ratio display. These days you would use a Lambda, or O2 sensor to detect the AFR, but they didn't have them back then (or if they did, they must have been crazy dollars). The Colortune is, for lack of a more technical description, a see-through spark plug. This allows you to see into the cylinder, and see what the combustion flame looks like. You screw it into the cylinder in place of the normal 14mm spark plug, connect an extension and connect the ignition lead to that. The kit also has a periscope sort of mirror device to make it easier to see in awkward spaces If the cylinder is burning lean, the flame will be a pale blue/white. Like this (oops) Perfect is a dark blue And rich is orange I picked up a Colortune from an awesome member of a forum I'm on (thanks @Steelies), and set it up when I was changing the jet adjustment on the carb. I started with a very light blue since the mixture was very lean, and now I'm on the edge of dark blue and orange. If I lean the mixture out a little it'll be a solid dark blue. There is a lot that can be learned from looking at how the flame reacts to different situations. This is the instructions for the Colortune that identify what could be causing different issues It's a pretty cool little tool, and I will continue to use it when playing with old cars. I may even try it on Tess at some point.1 point
-
Having repaired the Drivers seat, I needed to carry out some more work to get it back into the car again. The first issue I had to fix was the hand brake mounts. These had been torn out of the floor by some muppet, so I needed to get my weld on and stick some metal glue on it. Now, I warn you, I have never welded with electricity before, and although I am enrolled in a welding course, that doesn't start until next month. I couldn't wait that long to get this little zap of a repair done, so I cracked on anyway. The first issue I had to deal with was using the dreaded flux core wire. I didn't want to get a gas bottle yet, so chose this for the task. I know its frowned upon by many, but it seems to have worked (just) for this task. Another issue was that despite having watched many YouTube videos I didn't initially get the welder settings right, so I think I didn't give it enough power right off the bat. This meant I got some nice blobby rubbish that didn't really stick too well. I did crank some power into it to make it actually stick, but by then I had already made the mess. I'm not kidding myself here, I doubt I got good penetration in the metal, so it probably wont stand up to time, but it doesn't really matter. As long as it holds up long enough to get through the inspection I can weld it properly once I know what I'm doing. The final result is this. I gave it a blast of zinc paint to cover the bare metal, and I wont give a close up photo It works though. I have the handle adjusted to three clicks, and it can hold the car on my steep driveway with no issue. With that done, the carpet went down again It's a good feeling finally putting it back together. The next thing to go in was the gauge cluster. Before this could go in though I had to replace the oil feed hose to oil pressure gauge. The old one was removed because it was damaged and leaking. The new nylon cable is VERY long, so I couldn't route it the normal way (to the left from the fitting, over the clutch housing and up to the gauge). I don't know why its this long, surely it could have been made the correct length before having the ends fitted? I routed it around the valve cover, next to the thermostat (it's the white pipe in the photo) Of course nothing is easy though, so I couldn't just screw the hose into the block. The old hose fitting used a tapered fitting to seal The new hose requires a flat face with a fibre washer. I didn't know this at the time so had to scramble to get an adaptor. Thankfully they are available from local Mini part suppliers, so out went the old fitting, and in went the new one with the washer If everything goes to plan I'll likely fit a tee there anyway to fit an oil temp gauge too, but that's down the track. The new hose went on easily with the right fittings I still needed to have a loop in behind the gauges I refitted the speedo cable, and fit the new hose to the oil pressure gauge and fit the binnacle. And like magic, everything works. In went the repaired drivers seat. The passengers one is still to be fixed The carpet vacuums up well, but it's completely buggered so will need replacing. It'll stay for now though as carpet sets aren't cheap.1 point
-
Visited the Basis shop in Renwick and got a new fuel sender gasket, and some new pinch weld trim (not the furry stuff at $30 a metre though) Met some tourists in Cheviot (where the wheels don't come from) Conducted a sneaky search for more door locks, but nothing good was found. Natsed And returned home. Finally picked up the keyed lock (locksmith had a good gripe about weirdly engineered British locks) and fitted it this week. Can now lock the car fully, but only unlock it from the passenger side. Will have to do for now. Wagon went well on the whole, used a few litres of oil on the trip - I'm guessing we did close to 2000km though). Never failed to start except on the way home at Seddon. I think driving all day with lights+heater fan+CB+cellphone chargers exceeded the capacity of the generator. Started fine when we left the ferry later. Needs a WOF soon.1 point
-
Took this oil-burner to Nats. I really wanted to be able to lock the doors to keep my junk inside while parked in towns etc. The drivers door lock barrel seemed to be well seized up, and the passenger front door was missing a spring for the locking lever. Back doors were OK. We stopped at Horopito on the way home from the Beach Hop and had a hunt around. Nothing much good in the yard But I found this rather amazing lock that looks like NOS (the one on the right) in a box of door locks in the upstairs storage area. Bought it for $40. There's a lot going on inside these locks with multiple levers and springs. The new one didn't come with a key, so I dropped it off at a locksmith before Nats. Didn't get it back before we left so.... We headed off south on the Ferry at Easter for a family love tour. Stayed right by the Blenheim substation. Good 50Hz hum. Did a bit of touring around Marlborough, including the HVDC link lines1 point
-
looks like number 6 inlet valve seized in the guide and had an un-scheduled meeting with Mr piston.' im fucking stoked about it as you could imagine. 2018-10-17_06-44-14 by sheepers, on Flickr 2018-10-17_06-43-57 by sheepers, on Flickr0 points
-
0 points


.thumb.jpeg.384ff72c8d2b0ee0d34a7bdedb55bdcf.jpeg)


This leaderboard is set to Auckland/GMT+12:00