
Leaderboard


Popular Content
Showing content with the highest reputation on 05/12/18 in all areas
-
Sooo decided about a fortnight ago I needed to rip into this XR and give it a good tidy up, have ordered all new bearings and bushes, fork kits etc. gunna just tidy everything and bring it back to its former glory but not with the red seat and blue features The stripping really is the easy part. I have all alloy bits a good buff with scourer pads and a very casual low effort polish once the frame was completely bare I sent it to the sandblasters and then straight to powder coat where it has a phosphate rust cover, a zinc rust preventative powder coat and then an arctic white UV resistant top coat Even managed to get the engine back in without chipping anything.9 points
-
Proper with studs, tiny bit of perforation but still got many thousands kms in them I would think, which translates to years of driving in my case. Someone more computery than me needs to start a givealittle or whatever for Cletus so he can drink beer for free for ever for all this free advise, seriously imagine driving your terrible daily (well mine is terrible) to the certifiers and awkwardly asking them all this shit every time we post here.7 points
-
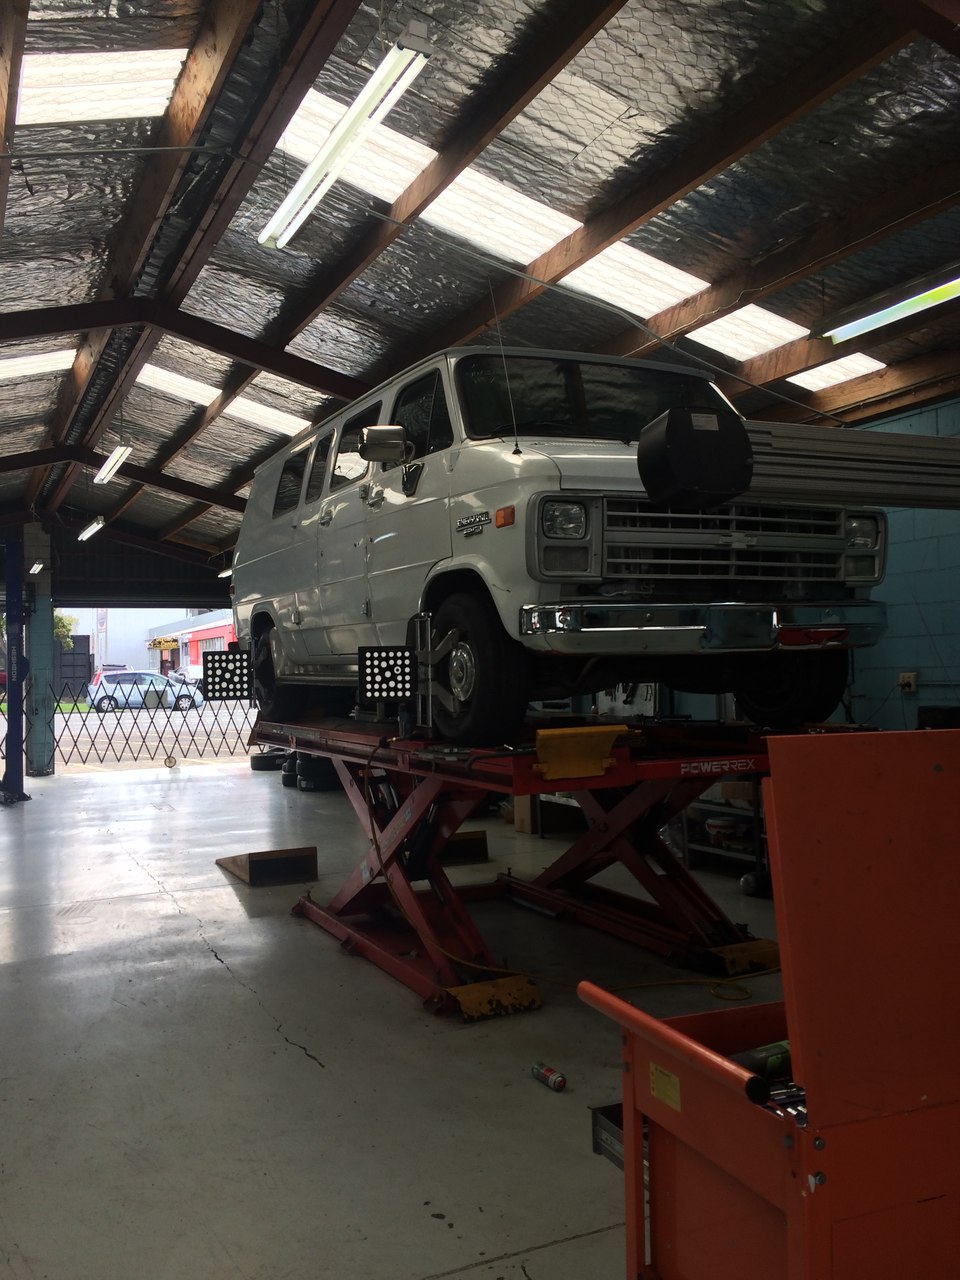
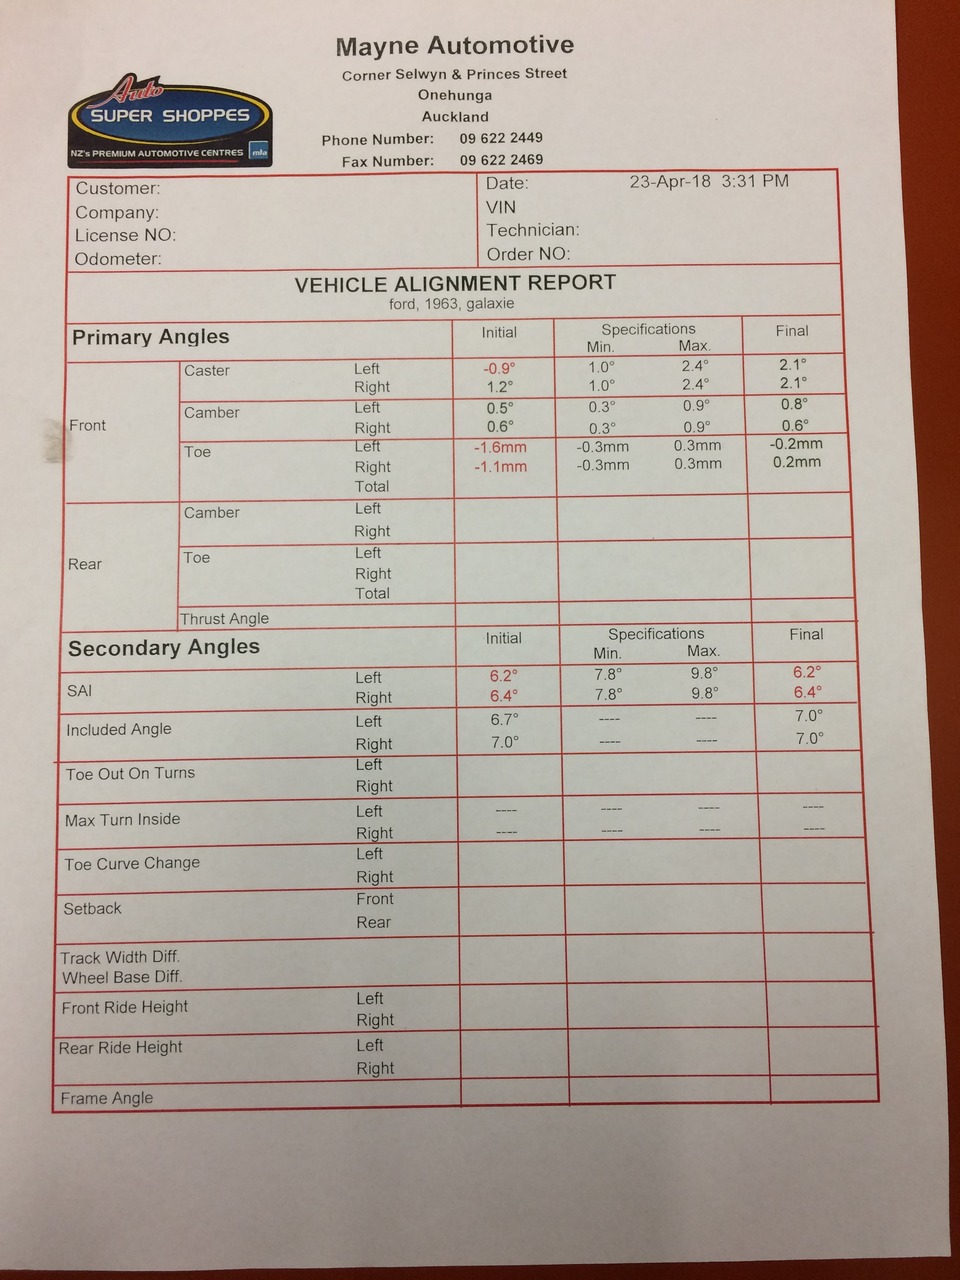
Another job on the to do list done but again took way too long. One of the jobs that needed to be completed for the engineer's sign off was a wheel alignment. Not that is any what related to the chassis repair but i guess is a standard on any repair. seen as i work in a shop and have to do wheel alignments on a daily basis why not do it myself right. well we don't have the spec's for any car of that era. so i gave the guy at northwestern ford a call to see if he had any spec's to which he found some and sent them via email which was choice. so spent way too long trying to convert the measurements over to millimeters from inches then into our alignment computer. only to make 3 different ones with different spec's on each one to making one for better drive ability. then thinking some more and changing it again. so then on one of my days off i took it in to do the alignment. well it started off with not being able to put the rear sensors on the car due to the rear wheel arches. That's cool seen as there is no rear adjustment anyway. then set the computer up for front alignment only... but ive only done one other car that way so had to figure all that out again. then computer had a spaz and wouldn't do the full procedure so try again and again then decides to play ball. so then get to do the alignment only to find its miles out and requires shim's in the front for both camber and caster. so jack it up slightly to release the suspension load then loosen the nuts and remove and insert shims until within spec. so that was about 2 hours work to finish that alignment. woohoo. only to find the computer would not communicate with the printer. so just figured i would sort it the next day as it gets kept on the database. so check on the database only to find that the spec part of the alignment is blank. great. we had then got the IT guy in to check the printing issue only to find that it had a issue with the ip address being a wireless printer but all of this was caused by the Auckland storm causing the power cut. so when the printer was working i figured i would just chuck the car on the alignment hoist run it through the procedure then not have to adjust anything due to doing it the week before. but nah off again and where i would have to shim it again... so off it went and brought it back in to work another day to do it. then edited the spec's again but really made a new lot of spec's altogether then spent a few more hours getting it to the new spec And then printed 2 copies of the new spec's and is still on the database which is good. And now noticeably drives and steers better than the last alignment. but i also tried to correct the steering wheel location as it is far off from straight. but couldn't pull the wheel off even left some puller tension on it overnight with no luck so have put that in the too hard basket for now. oh and one i was doing on @chris r van a few months back for engineer's sign off was also shim's and a long alignment job.
 6 points
 -
This little Imp has now got a nice solid floor I really needed to get some solid work done on the Imp so I can get it off the hoist. I also wanted to see the end of a rotten floor so yesterday I decided would be nothing but Imp day (in between important coffee, music listening and posting cat photos on social media of course) Oh and also reading the latest Impressions magazine that arrived ( I joined a club!...) I finished the last bit of rot on the side of the tunnel behind the drivers seat area. Then moved on to the passenger side. Not anywhere near as bad as the drivers side but bad in different places. I pondered for a while at which bits I should keep or chop out. Then I set to work.. Hannah kept busy with an ever so exciting ball joint replacement on a customers van so I could I fritter away on the Imp I remade the wheel well bottom... Then I wheeled over the magic machine and made a snake.. Snake thing goes here... Followed by the beginnings of the firewall heel... The heel bone connects to the floor bone... Before I knew it there was a nice new floor upon which I can mount the MX5 seats I have recently bought Next step while its on the hoist is to deal with the parcel shelf which is rotten. Luckily most of it gets chopped away to allow for the top of the Datsun engine to peek its little head through. I think I'll also be a lovely fella and gift the job of slapping Por15 on the underside to Hannah. Because I'm nice like that.4 points
-
Before After Will probably use this pair on the front and get the other pair welded a little wider on the rear This engine is not actually for the cortina***3 points
-
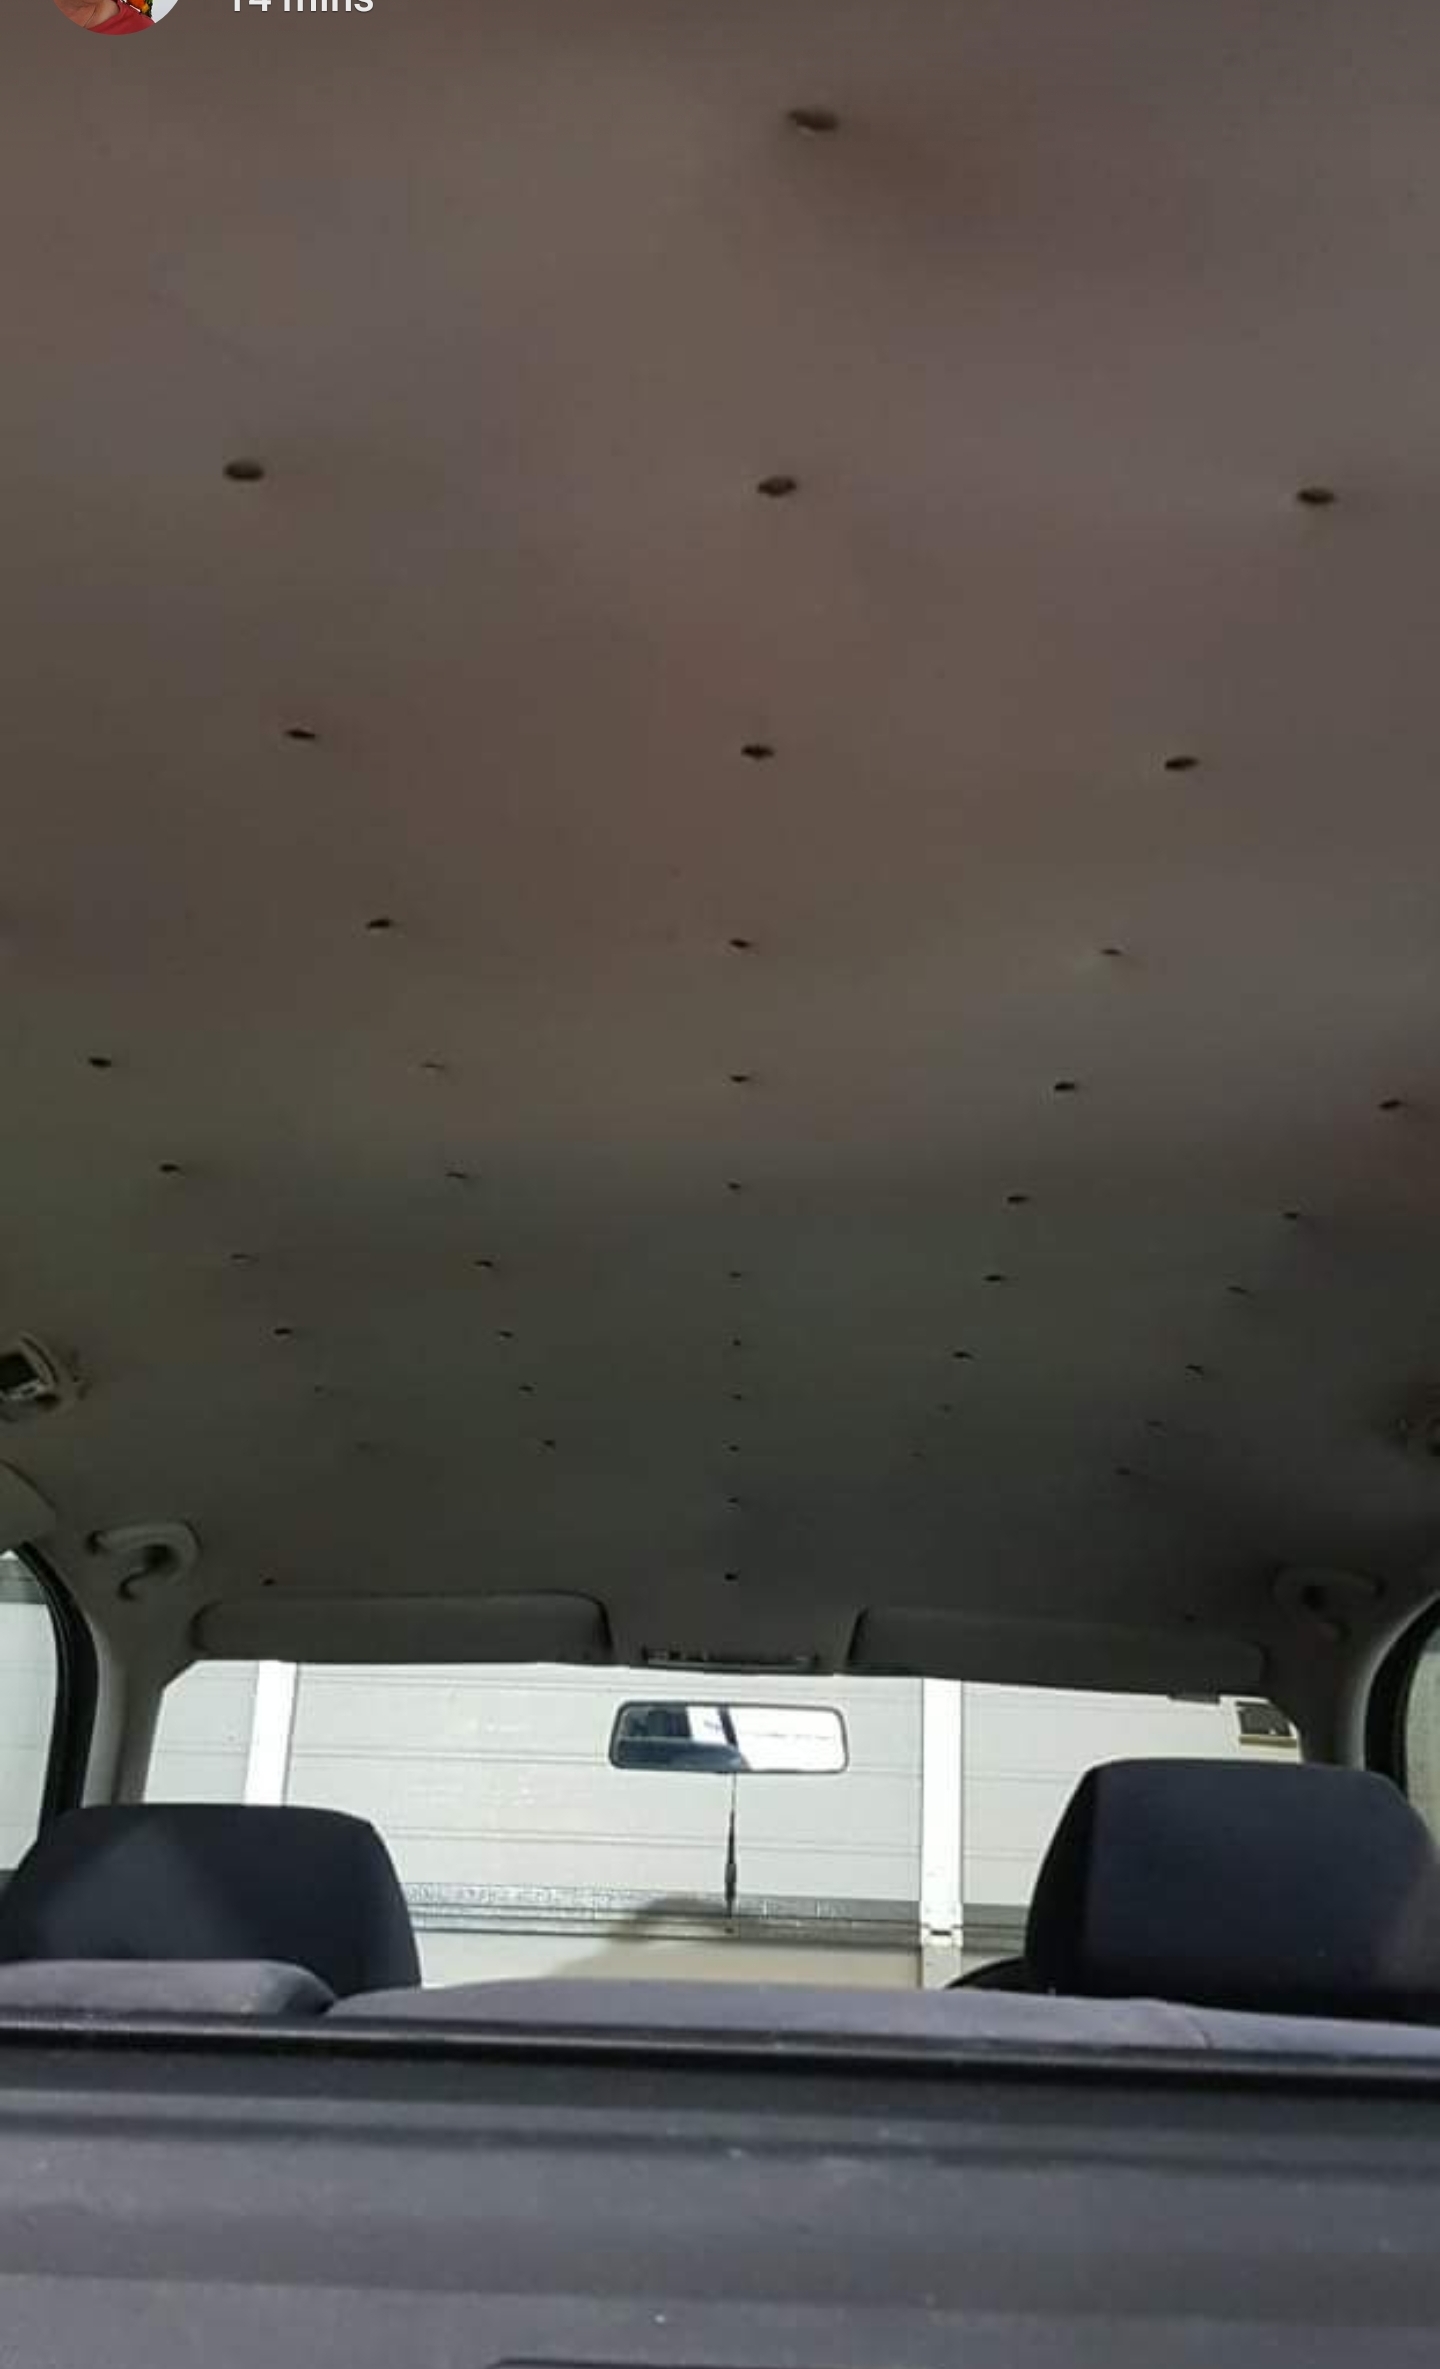
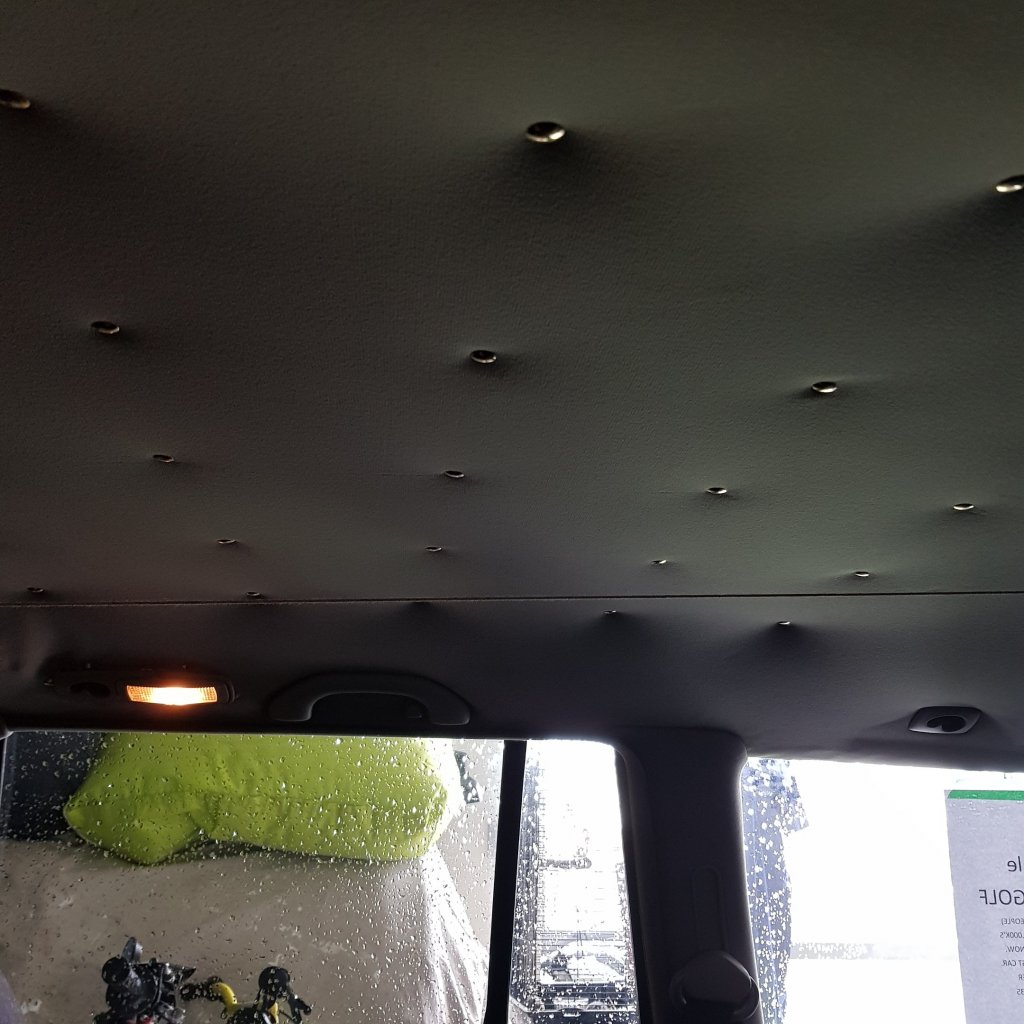
Going to post this here for anyone whose putting up with a sagging hood lining as it turned out better than I was expecting for $7 only one spot I hit a roof structure and had to shorten the brass thumb tacks haha. Stringlined the center rear view mirror to center of rear hatch then used a 1m ruler to place tacks every 150mm it settled nicely. Wont be putting any upholstery specialists out of business but it beats driving with cloth on ya head.
3 points
-
3 points
-
Twirl it around your waist m83 points
-
Hippy trailer now evicted and time to do some on this before a big dirty Toyota Dyna van turns up with a rotten roof The sills on both sides are all solid again! I was halfway into the passenger side on my last update. So continuing from there.. I had to remake the bottom of the outer A pillar/sill end first. I was going to re-use a tricky step down part within the repair but even after cleaning it up it just didnt appear solid enough among all the new steel. In pictures.. I then folded up some more outer sill panels, using the gauge/template I had made for the other side and started welding them in.. When I got down to the other end I had some issues I needed to tend to. Mainly to see what was going on behind the bottom of the where I had cut the rotten arch away to and also what lay beneath a frilly looking area inside the well. I called in my new toy/tool. A teeny tiny holesaw for removing spot welded panels. Cheap on Aliexpress.. I went deeper.. ..and deeper. How many layers?.... Not surprised there was rot lurking. So many moisture traps. So I started fixing it all up.. I could now finish the last section of sill.. Then the final bit- the lower guard. On both sides of the car these had rotted away from crap getting through a gap at the front where they overlay the sill. I painted the back with zinc and welded the front edge on both sides. Its not like original but going by the amount of dirt and water traps Ive found original wasn't best. Just cheap. This along with a future flooding of wax penetrant inside the once the car is all painted and it should last much better Its all done. Yay. Now I have to replace a section of floor where it meets the inner sill- rot had been cut away. Then I think while the car is on the table I'll tend to a horrible mess under the dash that was once a heater plenum area. Then it can go up on the hoist to fix a rotten chassis rail. Greg will be taking it on from not long after that, budget soon to be met. But first I must finish some bits on the Imp project so I can remove that from the hoist.3 points
-
so after some pretty cool missions pesting on the ct in the last 6 months - So after some long thought I have decided to get rid of it for a couple of reasons, A, i have too many bikes. B, its worth a lot of money (comparatively speaking). C, its a bit slow. D, i wanted a slighty larger dual sport bike and E, im a bit tall for it and have to have the bars raked forward on a massive angle. So in trademe it went and it is now sold for a very tidy sum. So that got me onto what i replace it with, im a Honda fan boy so it started there and also i wanted to spend fuck all. Was looking for road legal XR250s for a while when i noticed this haggard as fuck one on trademe local, so i popped down for a look thinking it was going to be rooted was owned by a british expat who had had it for the last 5 or so years and his mate had it before that since pretty much new. it has been road legal since 1993 (its a 1991 XR250R), the fact its an R is quite ideal as it has no battery to go flat and is a bit lighter. Turns out its got super low kms for one of these, genuine 11,000kms, mechanically it is ace and has no smoke or anything. the guy was a bit of a dweeb that thought he would make it look better by rattle canning the faded plastic black, so it needs a full aesthetic tidy up. he had the airbox and stuff so that will all go back on, so after a short test ride where i determined it went very hard for what it is and suspected a 280cc upgrade i grabbed it on the trailer since getting it home i have got some second hand side cover plastics en route, have ordered a polisport enduro headlight setup, CRF250 white front guard and a second hand rear guard which @Shakotom is gunna be the man and collect for me. I pulled the carb apart and the main jet is drastically bigger than stock and pilot one size bigger than stock so i think the feeling of a 280cc kit might be right, the cycleworks exhaust is also an added bonus, and the fact the entire thing cost me $1200 with rego on hold. Plan is to finish the ST90 100% and push that in the corner then strip the XR back to bare frame, slap some black paint on it, assemble with new plastics and replace some bearings and shit. i already sanded the tank right back and it has the yellow fuel stains that these all get so will get a cover off ebay for it, might go with a white/black/grey color scheme. then go smash some cool trails on it! just need @Dolan to get a 250 now too3 points
-
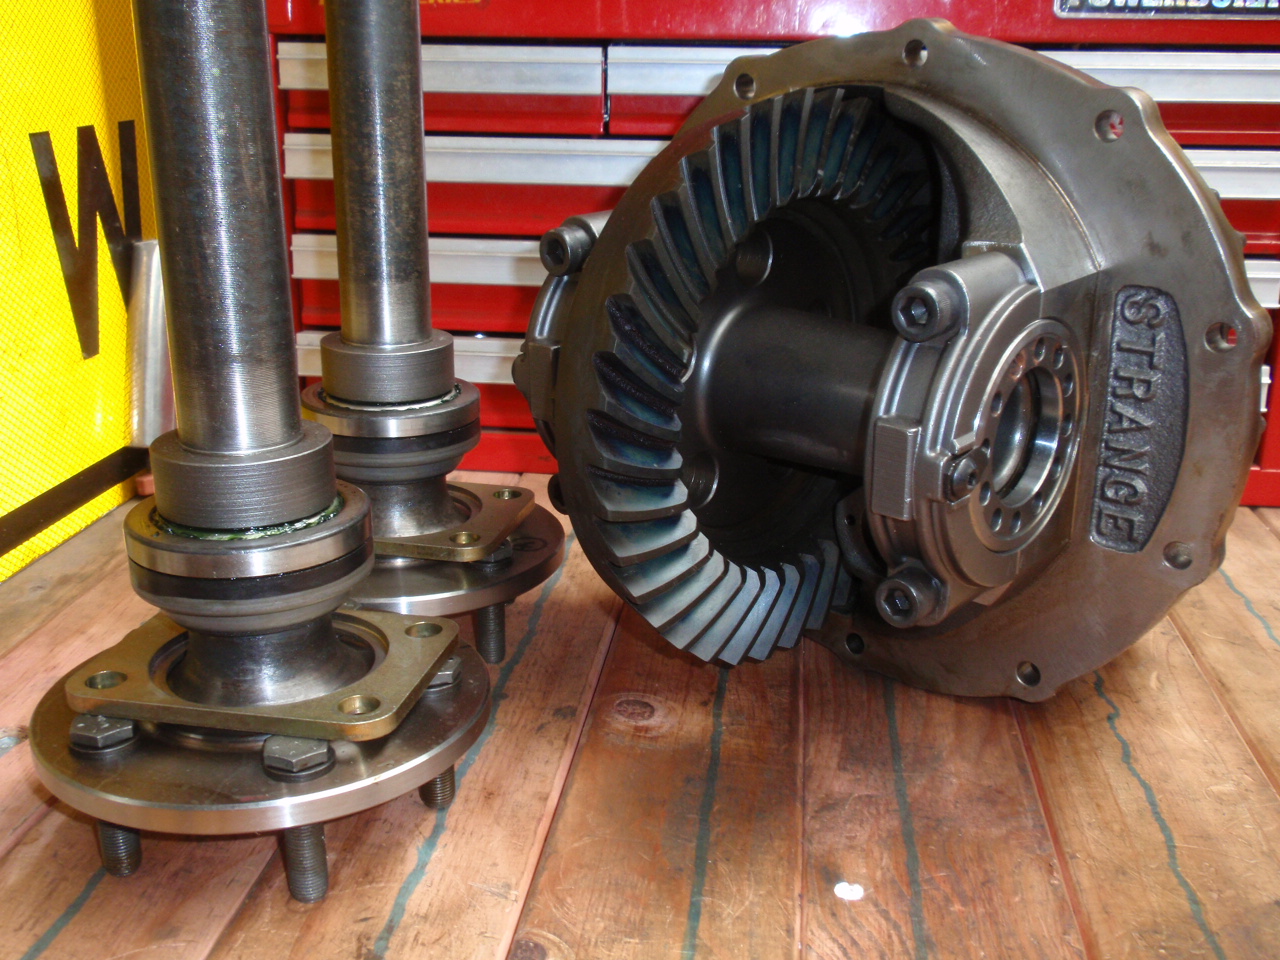
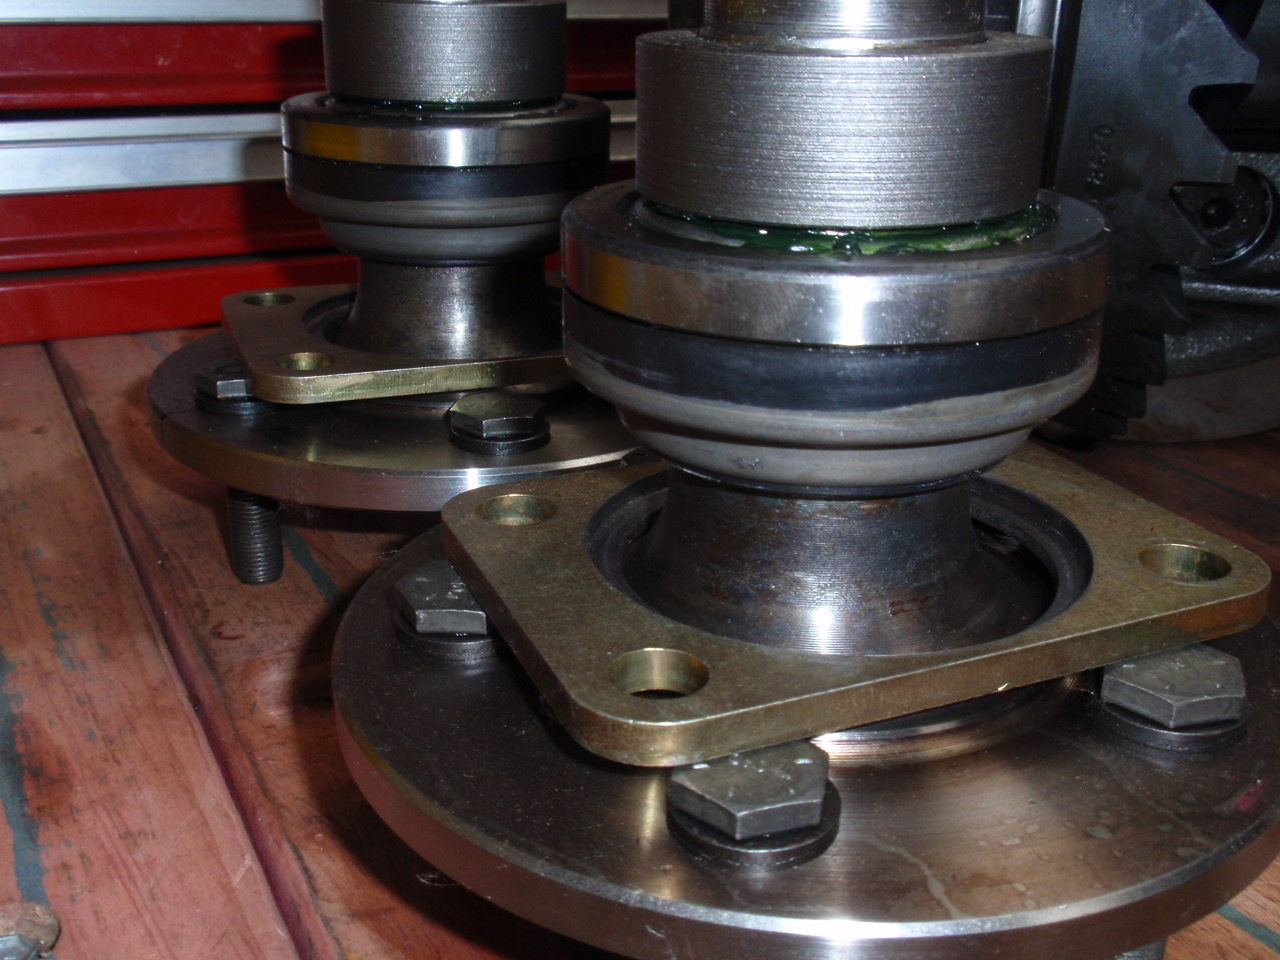
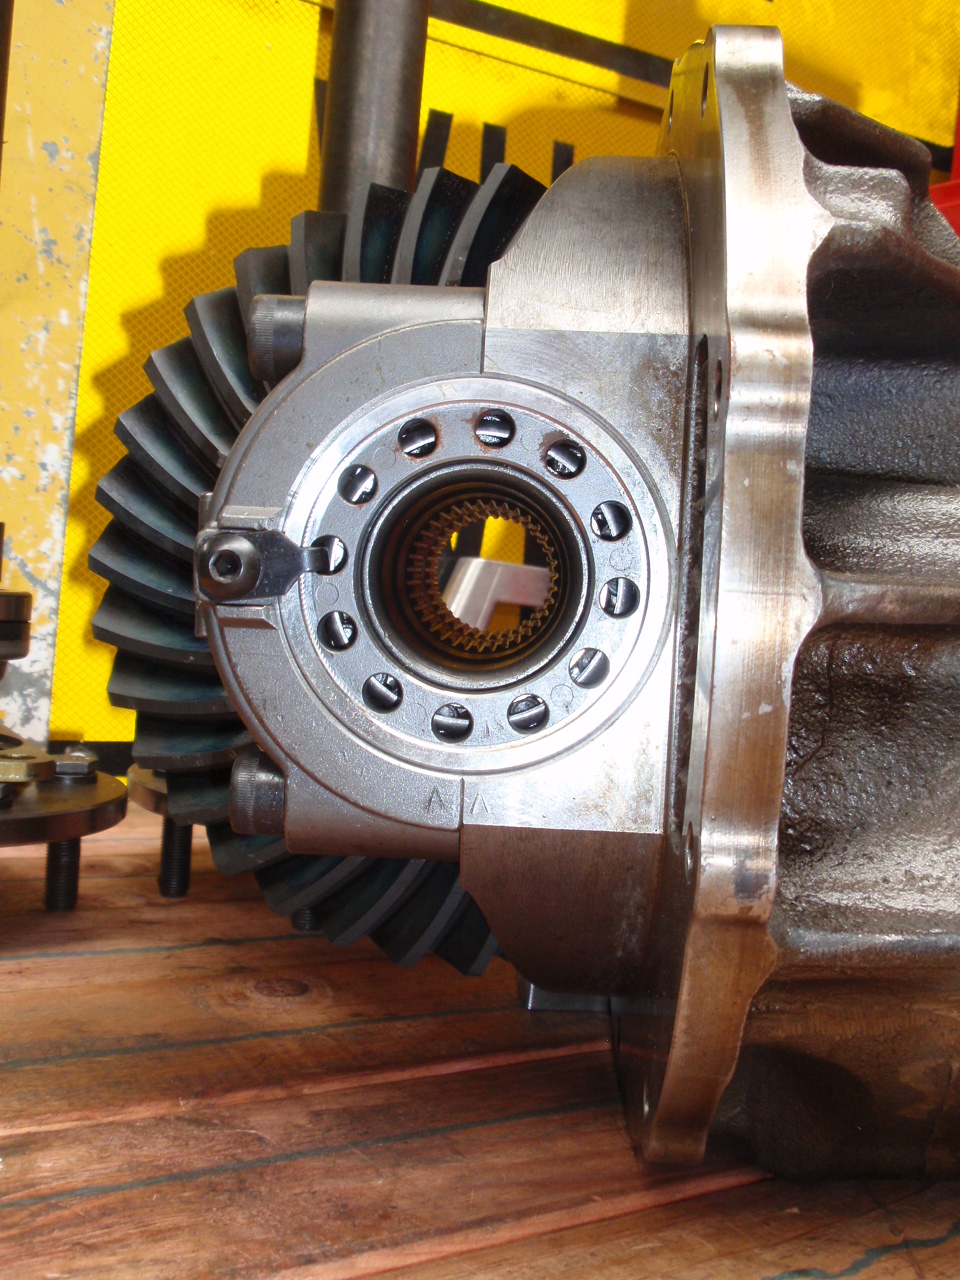
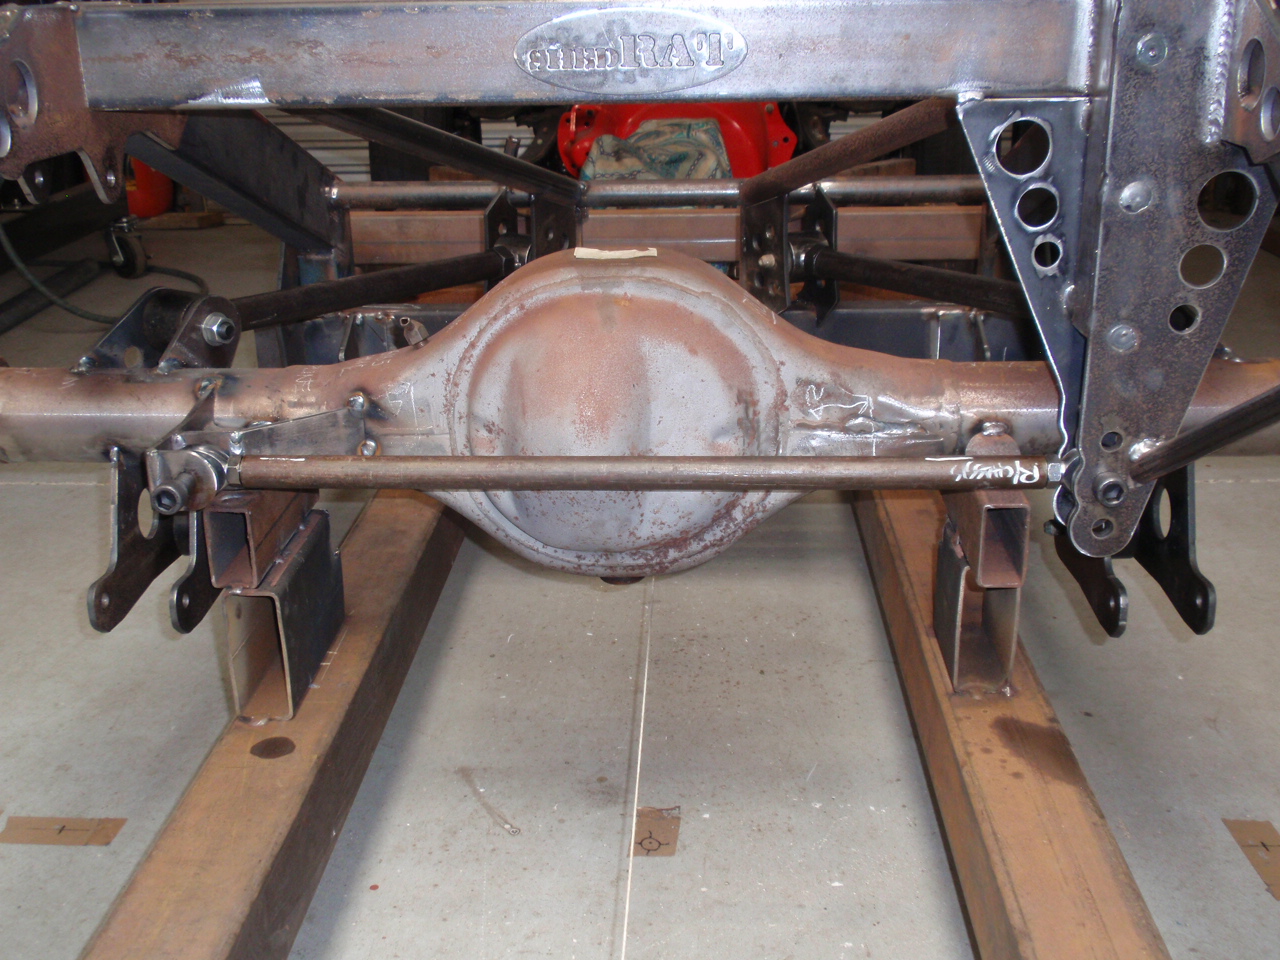
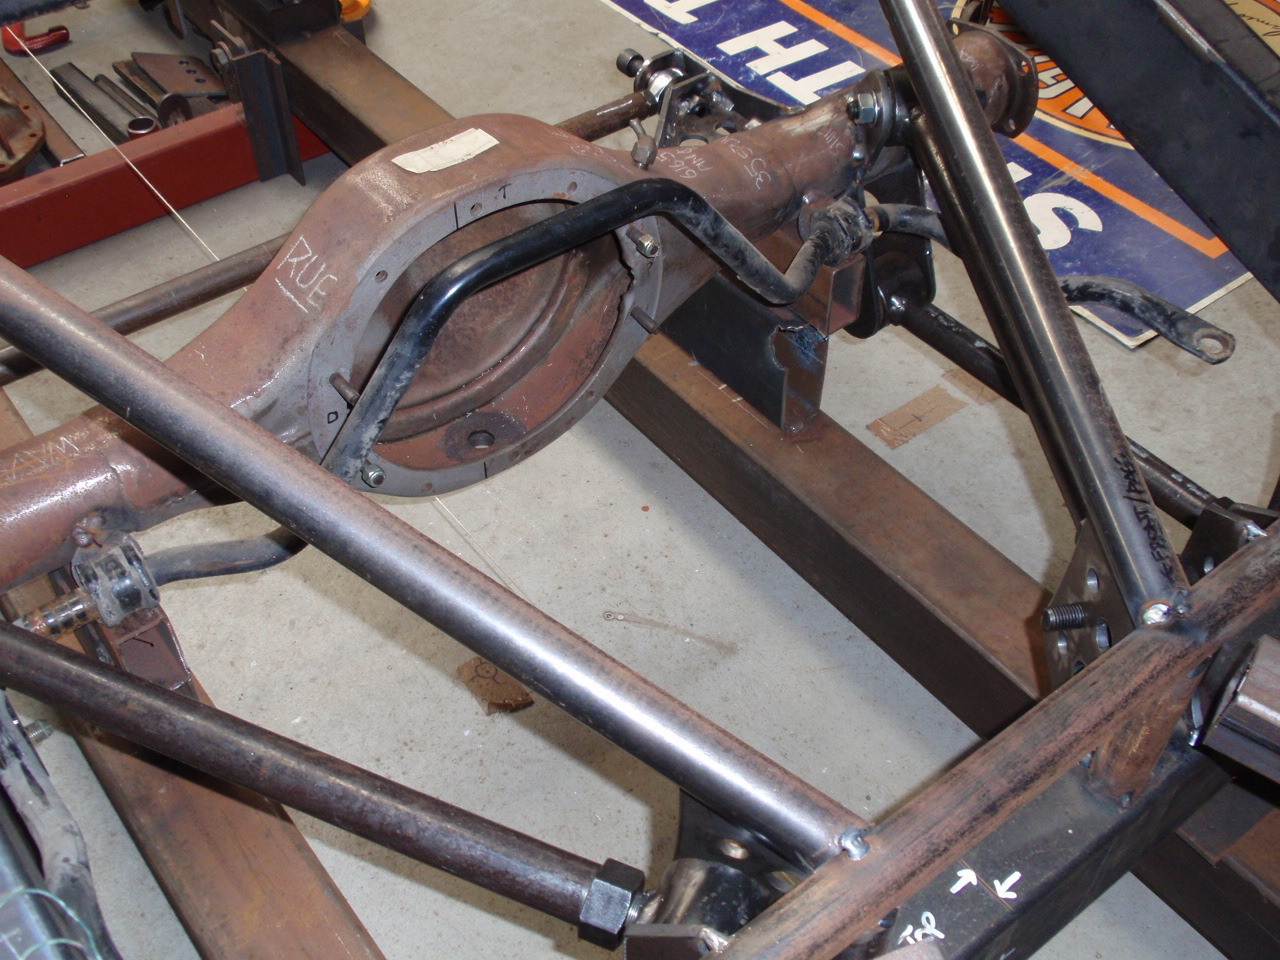
The plan after the K members are fitted is to assemble the diff enuff in order to fit wheels to the rear. After this the body is going to be fitted over the chassis in order to measure for the outer sill rails, position fuel tank, rear bumper fit up, and to position the engine. Then the body will come off. The fitting of the body will represent a milestone for me. I pulled out the diff bits and pieces today in readiness for fit up. I like this shit. This is not the head I will be tooling around the street with. If you are into 9"'s then the following will mean something to you. If you aren't then its just blurb. Anyway; Strange Pro Nod iron 3.250 Case, Strange 35 Spline Spool, Daytona Pinion Support, Richmond 5.14:1 Ring, 1350 UJ. Timkin Set20, HD Retainers, Currie Ent. There is a reason you run the 3.250 Case or bigger. Check out the size of the pinion support. This is the head casing I use for aligning diff's to gearbox. It came out of a bro's 9 sec car. It let go after years of being behind a trans brake. It took everything else out with it too. Not fit for use anymore but ok for alignment jigging. Check out the size of the OEM pinion support compared to the race spec one above. Alot of dudes swear by the 9" while others swear at them, lol! Bought some of those blank rotors from off TM. Drilled them to suit the axles I am using. They are dognuts on the same spec as 90's/00's Commodores. Plan on using these in conjunction with FXGT AE92 rear calipers so I can utilize the handbrake feature..
2 points
-
Old ones run off the back of the alternator modern prob run off the computer laurel is prob off alternator it will have a terminal marked tach if it does2 points
-
It rides just like a normal(ish) bike once you're on it and moving. Even slow speed is easy, you tend to forget you are on a tall bike. The only thing to watch out for is going uphill where the front can lift. When you stomp down to power up a hill...if and when the front lifts...it's flips real quick! Any more than about 200mm of front wheel lift off the ground and you be in trouble as the leverage is positioned much further back and higher than normal. Good news is if it does flip you tend to just pop backwards and land on your feet while still holding the bikes handlebars. I'd say it was well worth the half a day to make it:)2 points
-
Set the gillies to pinging.2 points
-
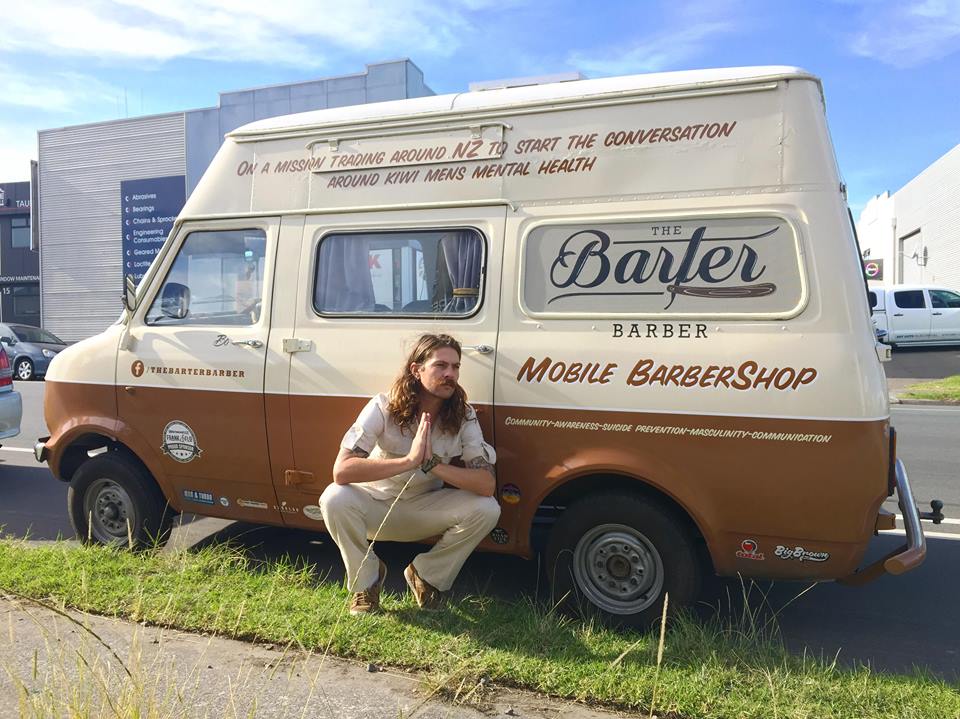
Someone just came and visited me at work, 202 powered even. Not my thread I know, but Sam isn't always online so I thought I'd chuck an update here. You can expect to see Sam around the country in his van over the remainder of the year. I highly suggest following his facespam page if you're on there; that'll give updates on his location throughout the massive journey. The Barter Barber on Facebook
2 points
-
The plan is to fix rust, get it running with 360cc engine and get it on the road. But I can't stop thinking about what I could do to it, the fact its so light keeps me coming back to a bike engine using the bike gbox. Ideas so far: 1. Tiny turbo RHB31 VZ21 the 360cc. 2. Tiny supercharger AMR300 the 360cc 3. FWD bike engine car (BEC) using R1 1000cc and modified Civic fwd diff and shafts (might need to cut firewall). 4. VFR800 rwd if I can move the engine far enough to the passenger side to get the output shaft close enough to the middle, then a live axle with normal diff. Problem is the ratio needs to be at or less than 3.0:1 which isn't going to happen since most small diffs are around 4:1 or 5:1 5. Semi copy that vfr800 one of youtube and use an IRS rear end (mx5 or S13), run normal prop shaft and no reverse. This would be at best 3.6:1 so it would be revving its tits off at 100kph. 6. IRS rear, modify the diff to run a sprocket like they do with the fwd ones. That way the diff ratio is open to what ever size sprocket(s) are used. This also means it would need to be a mid mounted engine for the chain and it's much further than I wanted to go with the car, not even sure it could be road legal. A sprocket diff solves the diff ratio problems and makes it easier to have electric reverse but it also has its own problems. I could possibly run an inline car gearbox but again it gets very complicated with driveshafts So..... the easiest options: FWD - leave it factory and 27hp. FWD BEC R1 (compact) and sprocket diff RWD The easiest way to make it rwd is a no reverse, live axle leaf sprung, 'normal' prop shaft, front engine (has to be compact enough to mount north south). This literally keeps me awake at night.2 points
-
2 points
-
I might do a bit of a ramble for this, partly for my own enjoyment, I'll see what pics I can dig out Well I once again own a CB250RS, it has been 19 odd years since I last swung a leg over one. The relationship ended the day I got my full license when I roared off on my newly purchased CBR600 leaving my trusty little 250 on the yard of the bikeshop. To be honest I never missed it, I had lusted for something faster long before my restricted license was up but over the years, looking back on pictures and memories, I realised how good it actually was and how big a part it was of my formative years. My family were all into bikes so it was no surprise when I announced I was going to buy one, my old man said he would get his mate John to check them over as he had "raced and worked on bikes for years", which I think actually stood for "he rides like a nutcase on the road and has had to fix a lot of bikes that he has crashed or blown up". After some hard saving and a brief reduction in funds after I spent $420 on a pair of doc boots (hey this was the mid nineties) I finally had $1300 burning a hole in my pocket. I had been scanning the Trade and Exchange for months, carefully underlining ads that caught my eye, this was pre-lams of course so I was hunting for the full 250cc allowance. I had no idea about all the bike models available and being the early days of the internet, pics on a 28.8k modem were a no go so the Motorcycle Trader was my main resource. The CBR's, GSXR's, FZR's, ZXR's, NSR's, TZR's and RGV's were so tempting but they used to run 5k+ and my $5.25 per hour was going to take too long. Finally I got word that John had a free weekend and could help me and it just so happened on that week the only decent offering was a Honda, 1982, CB250RS, red, 27,000ks, $1200. Anyhoo for reasons I can't remember the old man and John went to check it out without me, John reckoned it was running a bit lean but they were happy with it and said if we could get it for $1100 then we'd do the deal. A week after that I had the keys in my hand. I had jumped the gun and was a wee way off obtaining my learner license so in order to get some practice in my old man would ride it around to a vacant yard at the old General Motors assembly plant while I pedaled there on my push bike. The above pic was taken on one such visit. So after hooning around an empty carpark a few times I booked my basic handling skills test. The test passed without drama, there were a few other young guys tootling about on the rented CG110's, I felt a bit cool cos I had my own bike even though my Mum had to drive me there while Dad rode it but way cooler was the old biker who had been ordered by the courts to get his bike license, he rocked up on a Triumph Commando, smashed the test on one of the 110's then left with a fist full of rpms and open megaphones. Swoon.1 point
-
1 point
-
1 point
-
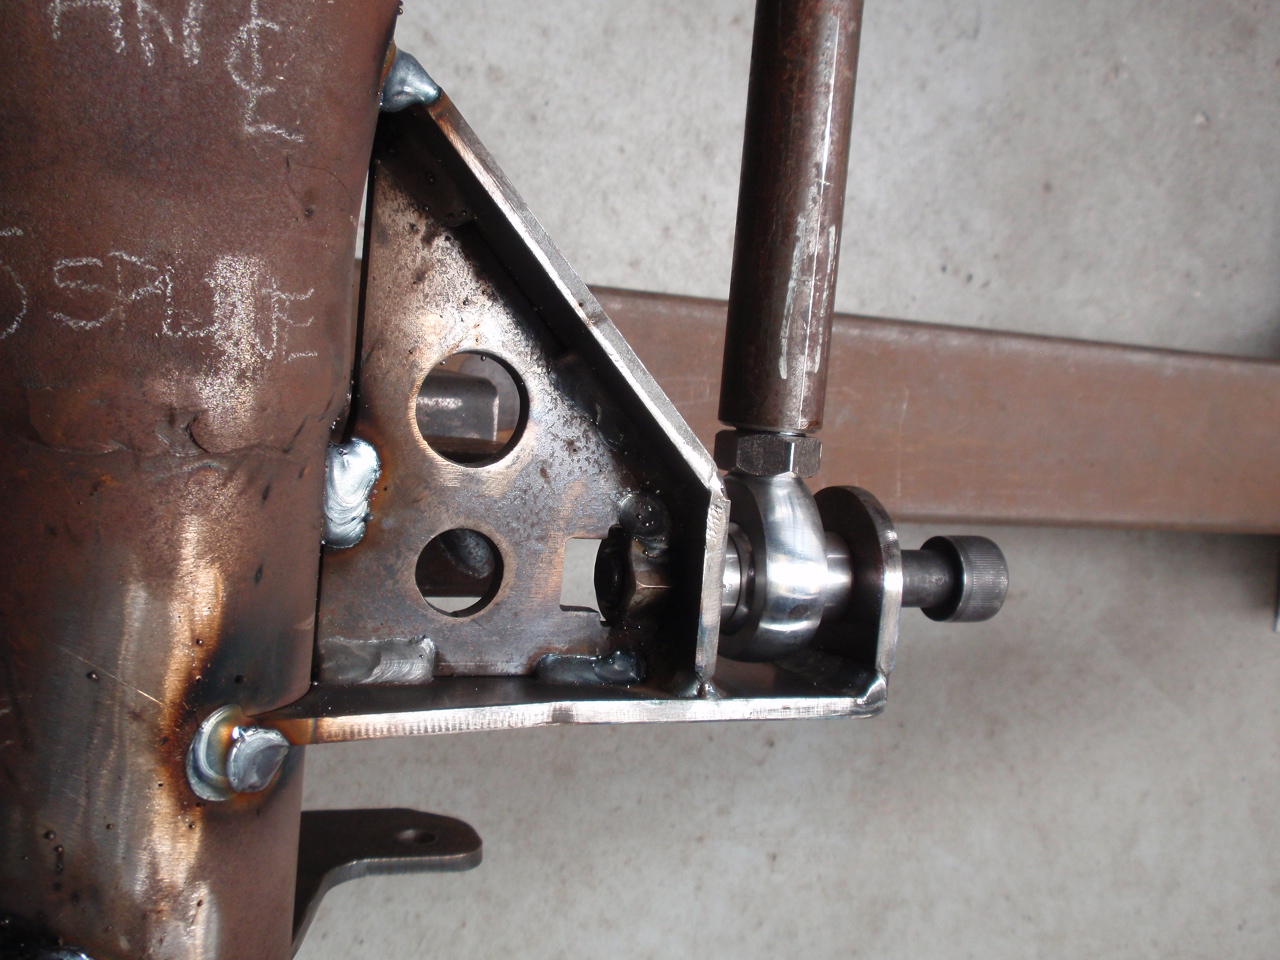
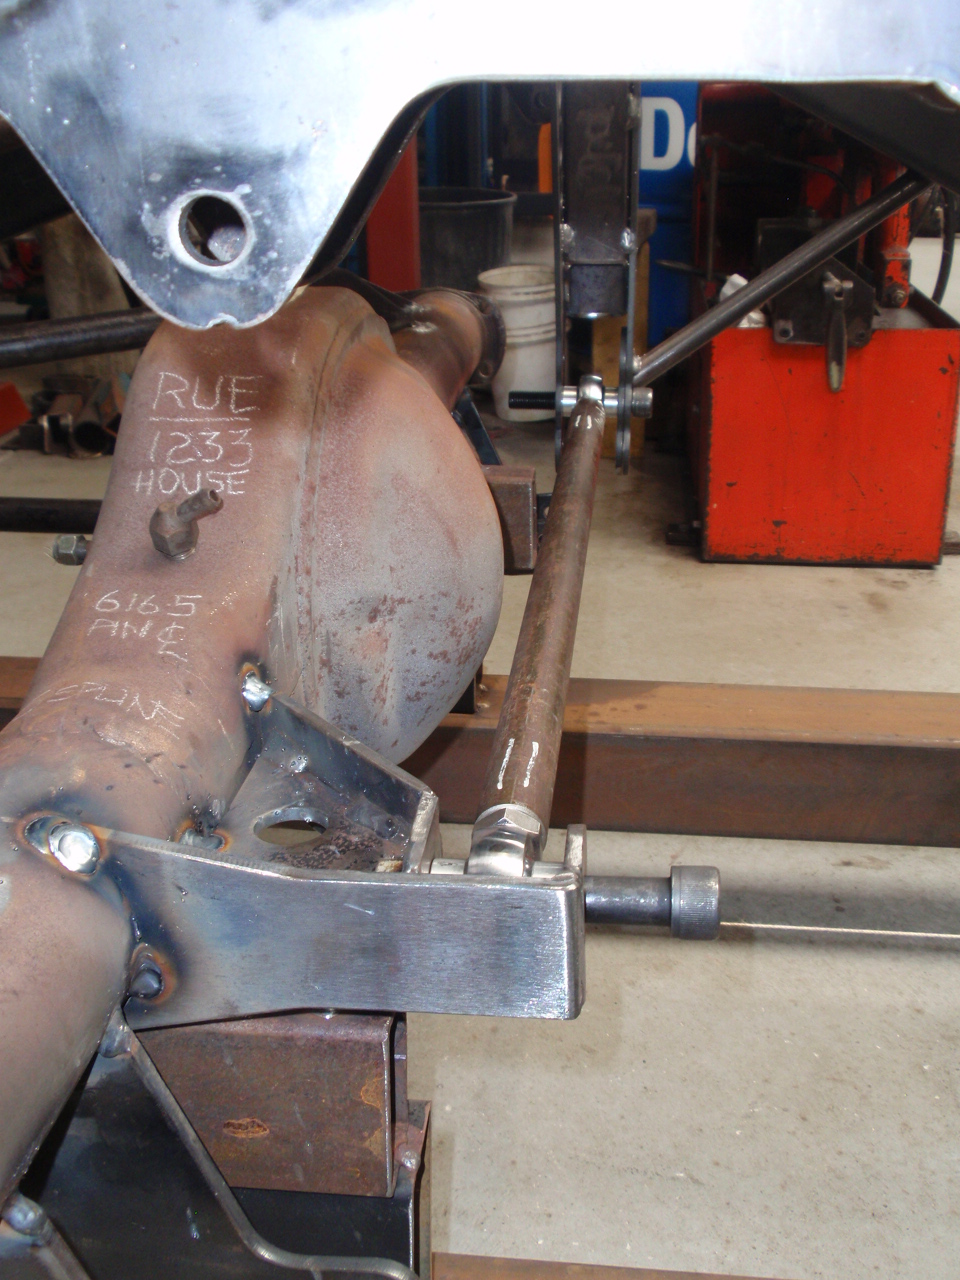
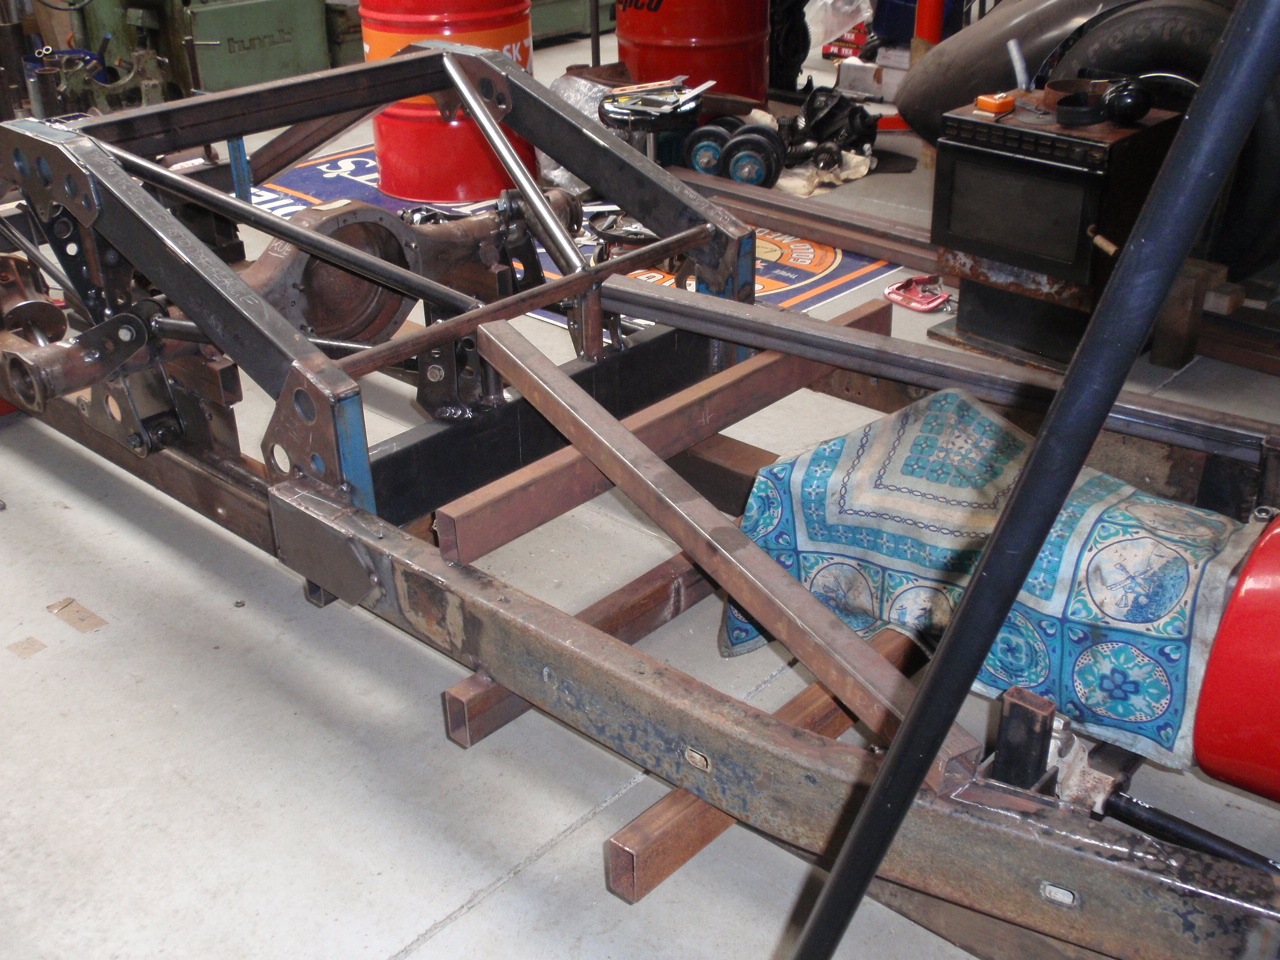
Made this for the diff end. It turned out alright. It positions the bar parallel and level to the axle center line. There is a fair bit of work hanging these things where you want them to hang. Got a sway bar from of an AU Coon' (I think it was) It looks like it might fit like a bought one. I am going to fit a head and axles into the diff soon. I might revisit this sway bar fit up once the head is in place in order to see if there is room. Next thing to fit are a couple of chassis K members. These will allow the gearbox cross member to be attached to something once final engine position is determined. I am working towards fitting the body soon. This will allow final engine position to be determined.
1 point
-
And for the non believers, dual senders.1 point
-
Classy saggy hood lining repair for the outgoing wagon..... brass tacks every 150mm used string lines and everything to space them nicely.
1 point
-
I've got a factory service manual here if you need anything from that. My experience in getting computer alignment setups to work on the Mercury was a bit similar - clamps don't fit inside arches, can't roll it forwards and back enough, etc etc. The printer did work OK though. Bring back string/tape measure/spirit levels!1 point
-
compound turbo L200 eh1 point
-
Makes me want to do something with this hoard:
1 point
-
Protec is now a PPG owned company which sucks as i've been a Protec die hard since 94-95 and i hate giving PPG $ but i'll continue useing Protec. Protec's Epotec is a very good epoxy. At work we use Cromax 840R for our automotive stuff and Resene 440 for our industrial stuff, both great products.1 point
-
Went for a longer ride, brake still feels a bit weak so will definitely try new pads next. Also gonna make some removable baffles for the exhaust, it's pretty loud which isn't too bad but it reverberates around inside my helmet1 point
-
Beagle did well, typical video edit in that it shows me almost spinning out, at least it wasn't going over the two cones, beat the student by 12 seconds, whew!
1 point
-
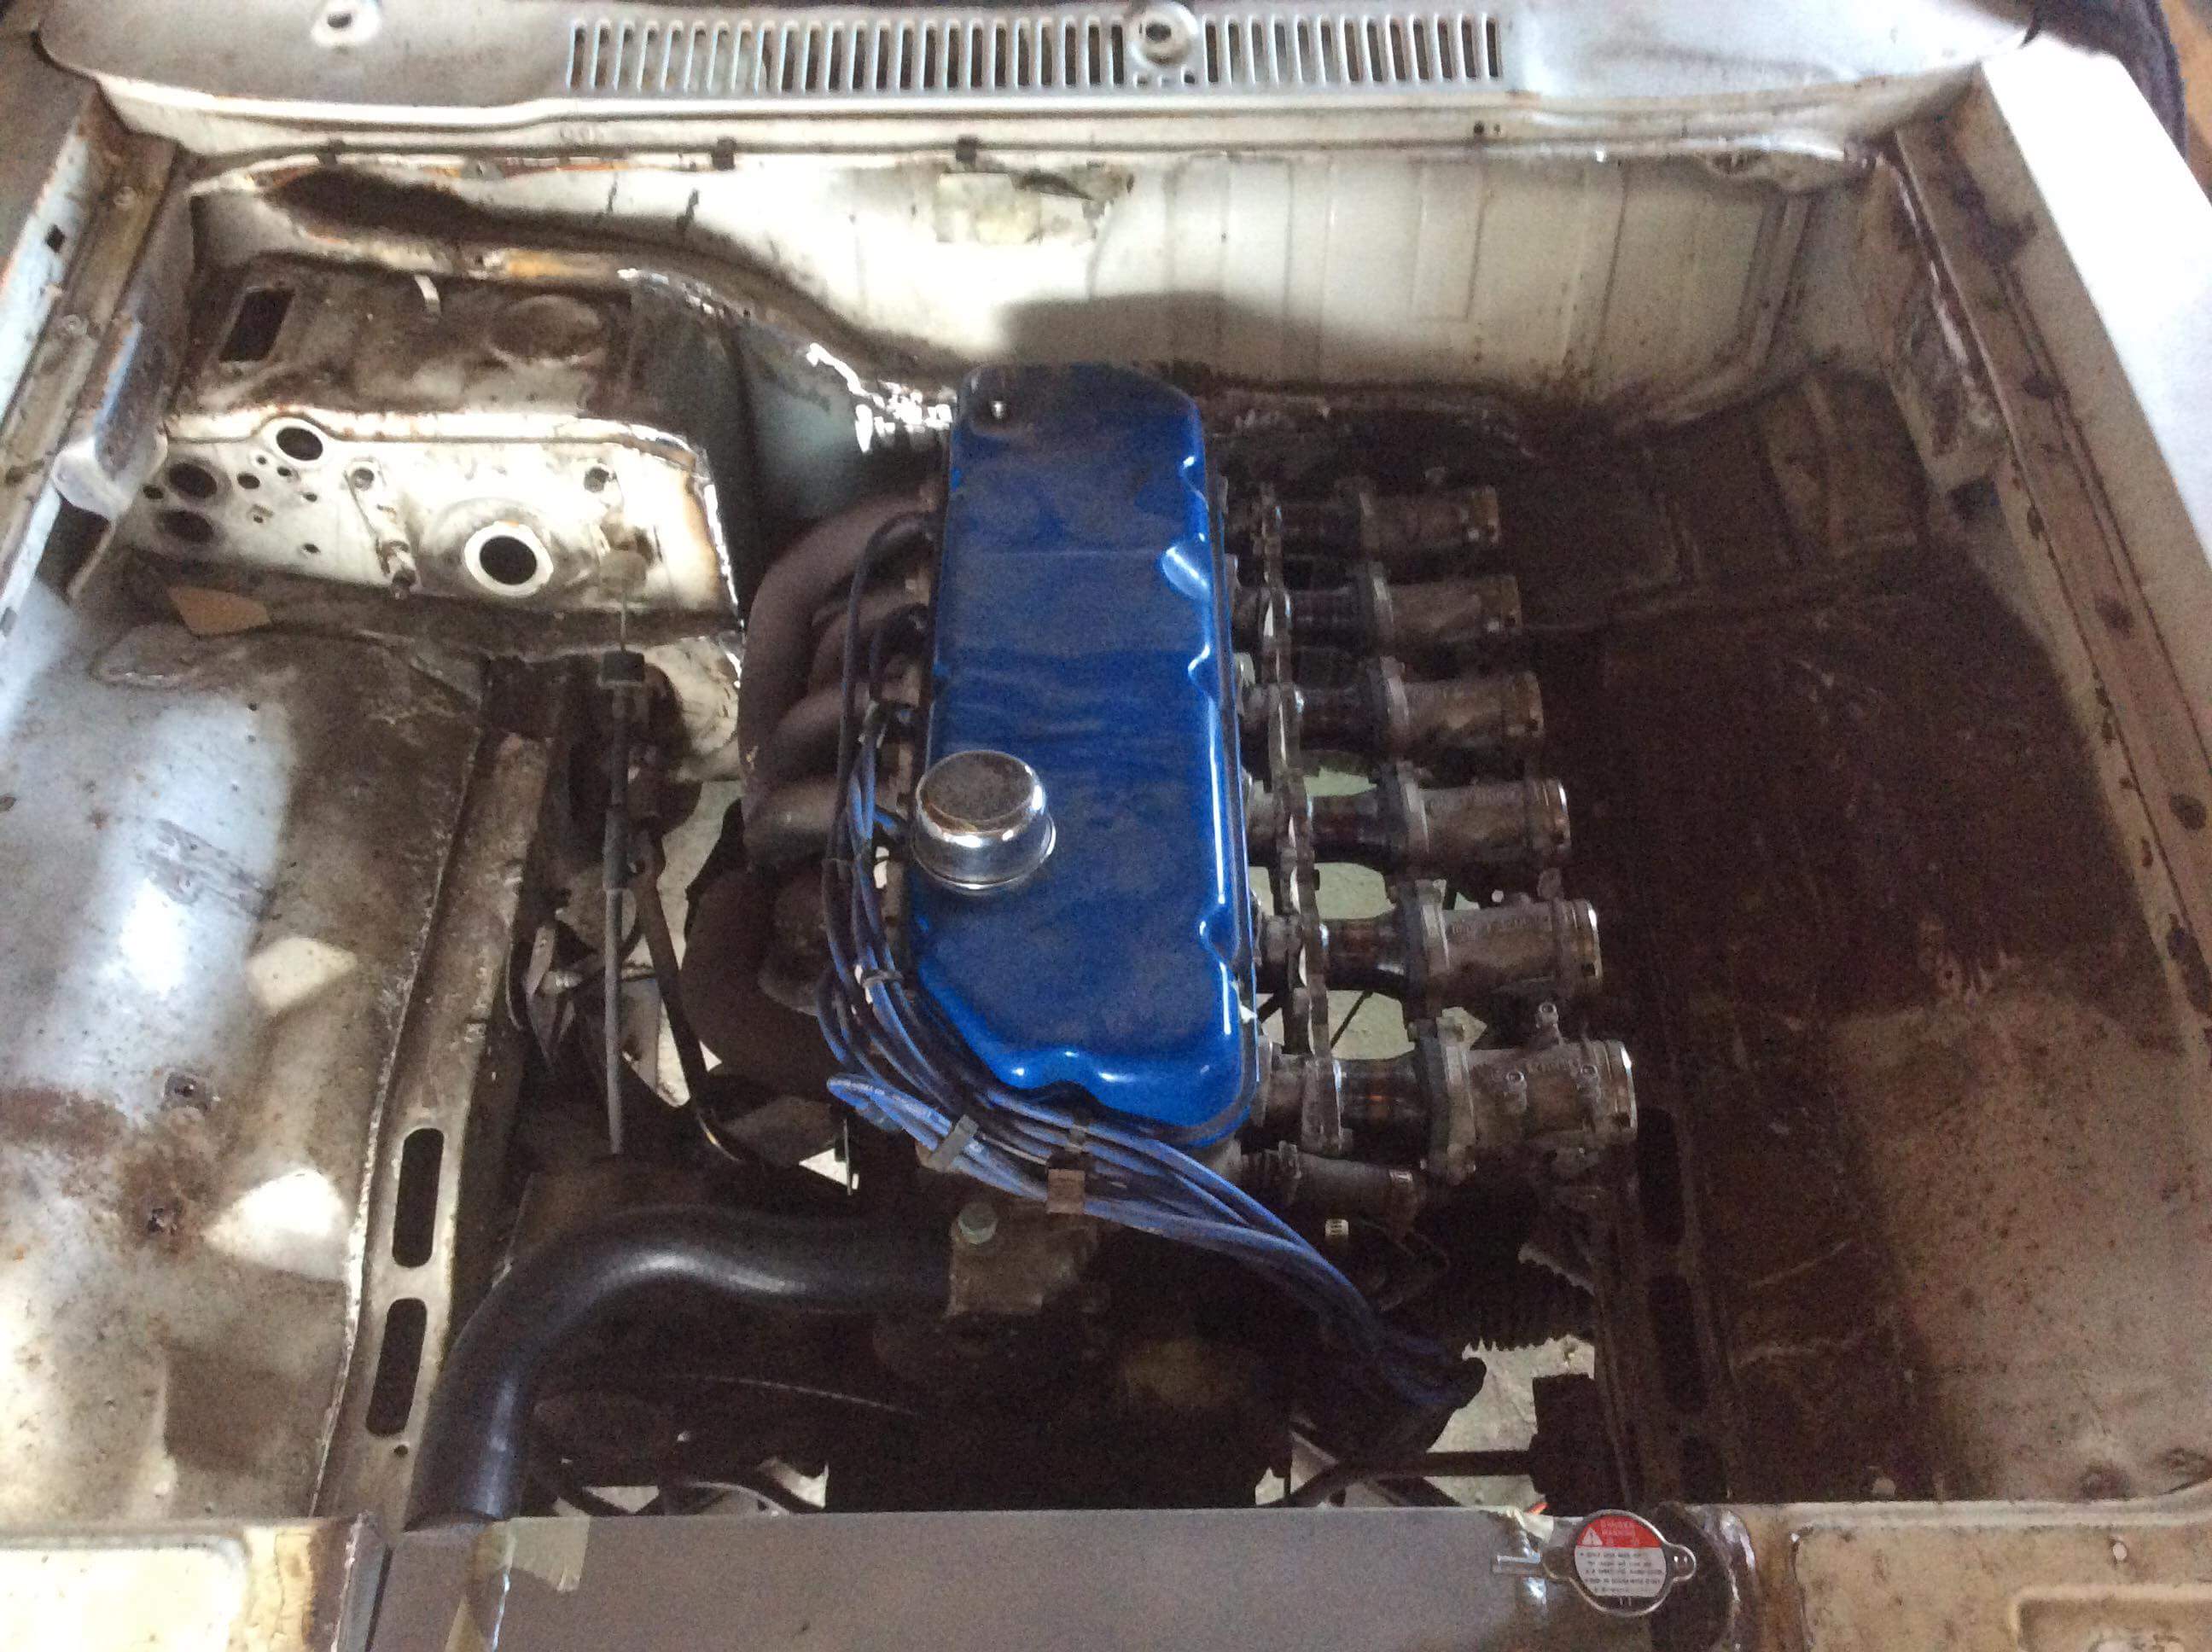
Look what turned up today.... Still a little work to do.but love it. Shame the trumpets I watched for fucking agers to find don' fit.
1 point
-
Lerl. 6 months later... No pics but: Motors in and its rolling. Have an agreement with the missus that i spend 3 nights a week in the shed so i can make some progress. Pretty keen to get this running in the next few weeks. Because no pics heres a pic of some sharks yep some acting pedigree right there1 point
-
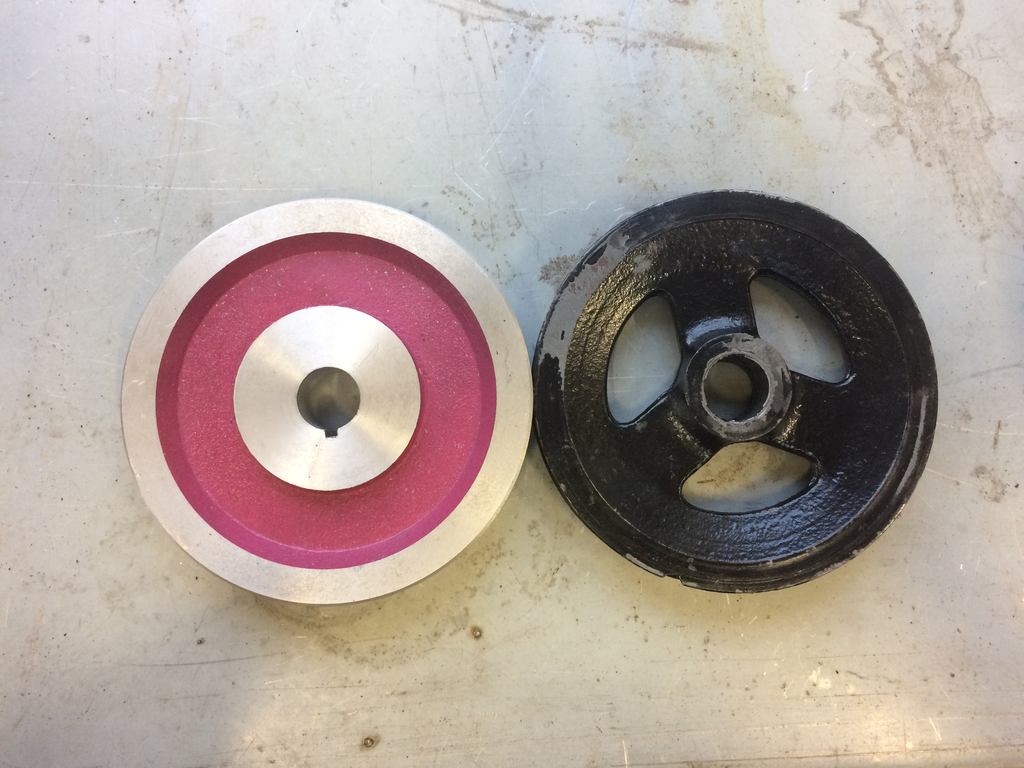
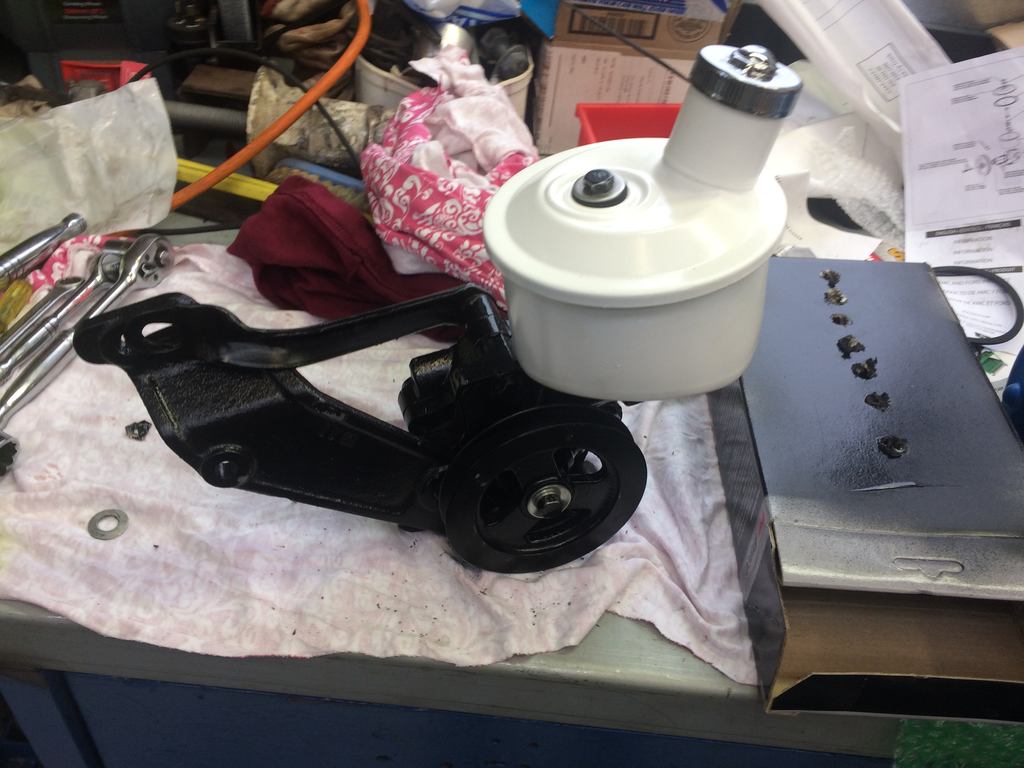
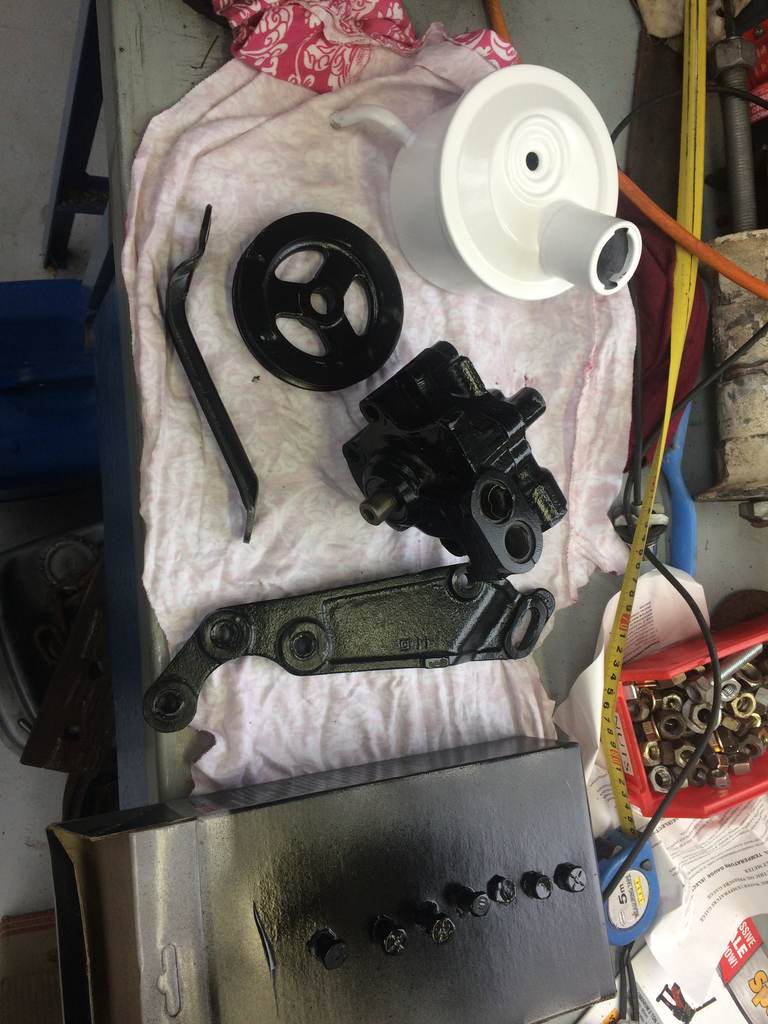
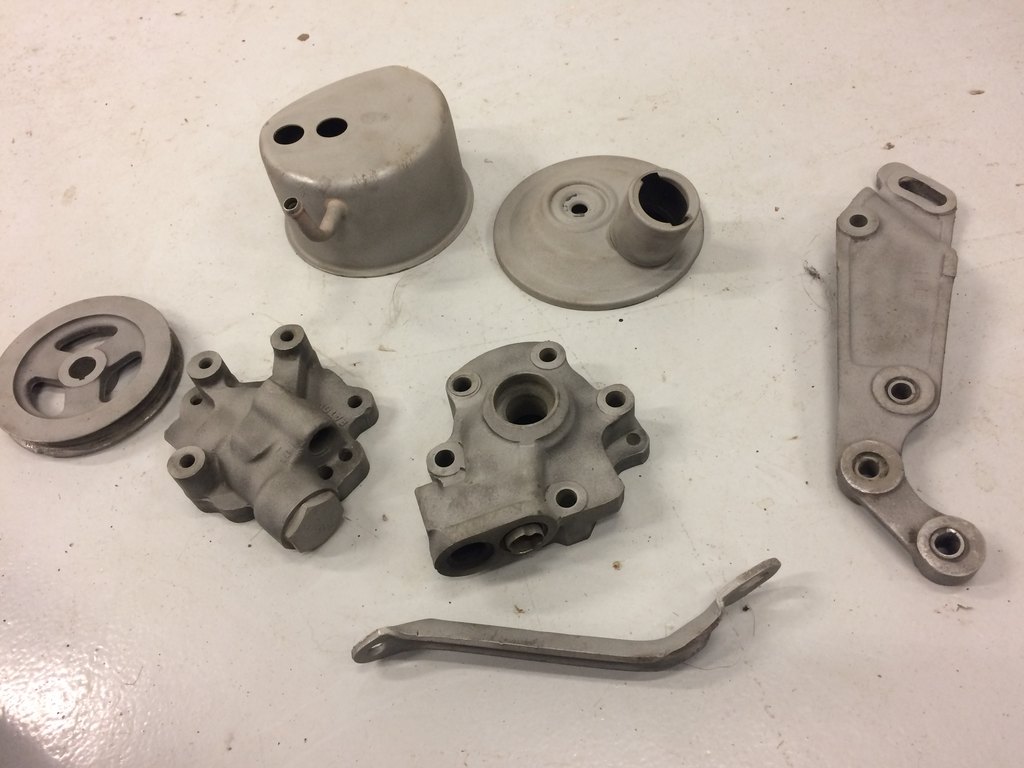
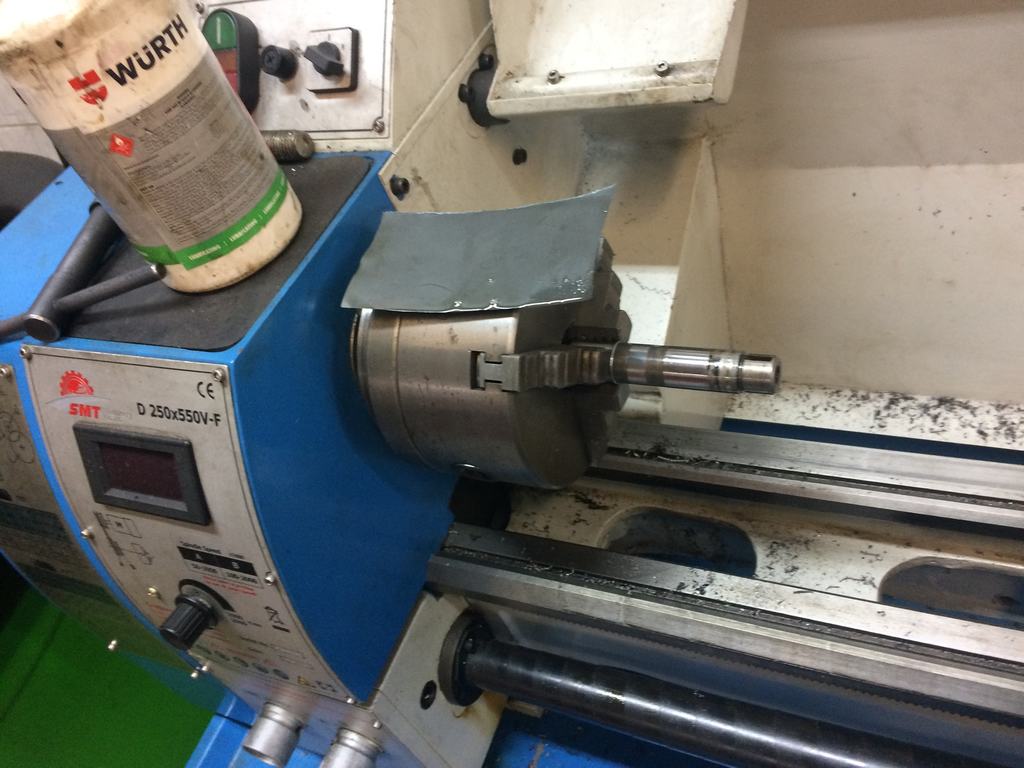
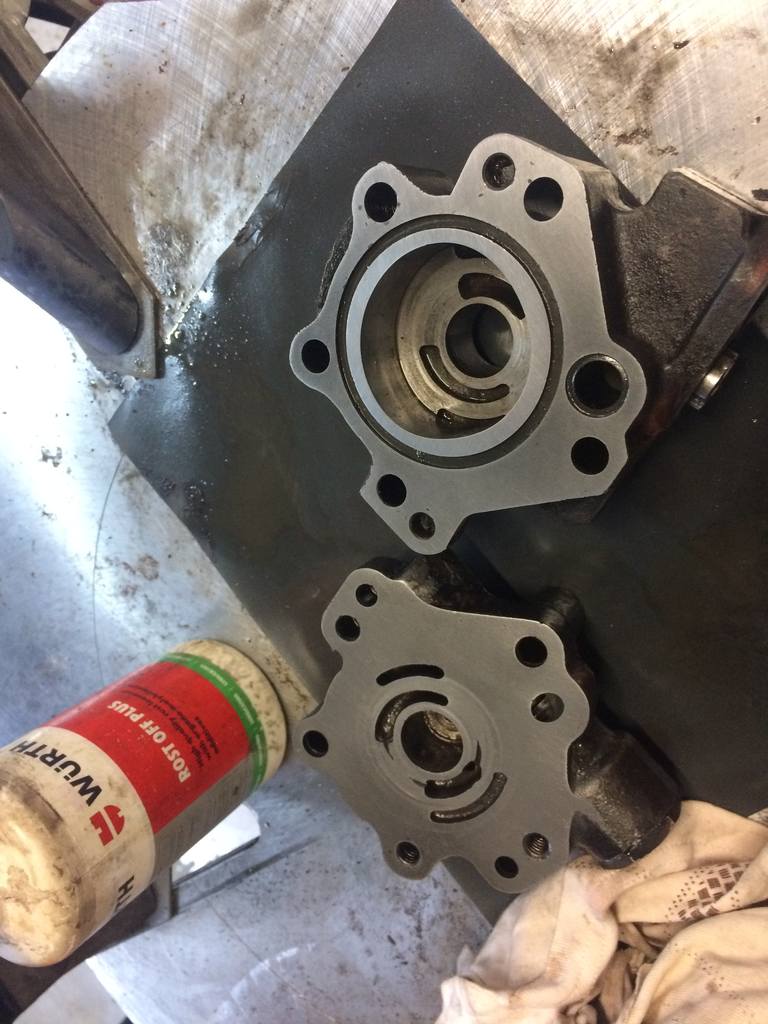
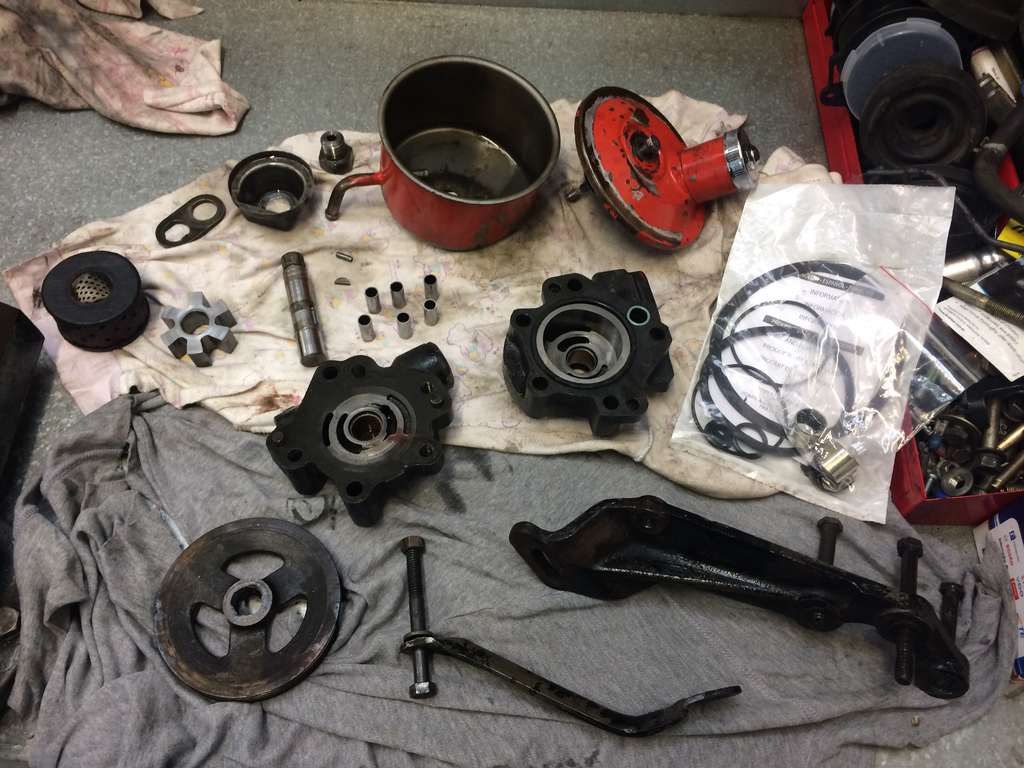
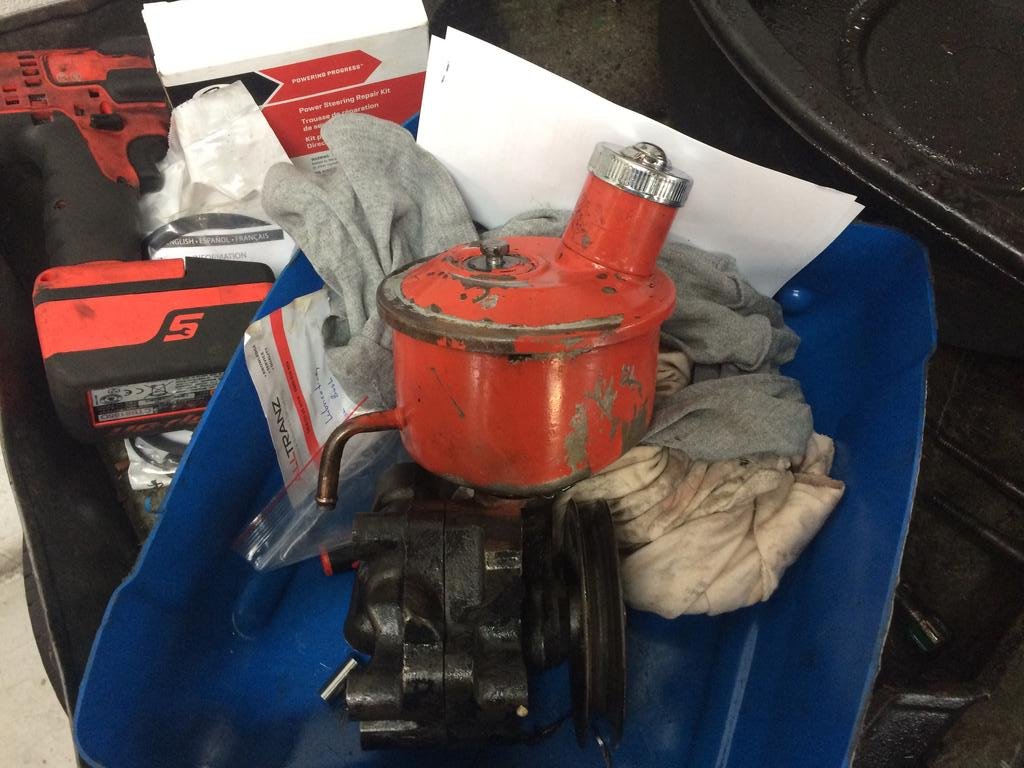
Finshed doing one of the jobs i was going to do then half assed fixed it then decided i will fix it properly as would of most likely bite me in the ass if i didn't power steering pump was leaking out of the front seal so put some morey's in there and no more leaky but the pump pulley ran way out of true and to the point i knew something was worn and fucked so off it came. had got a seal kit out of rockauto for this job seen as they are the cheapest. then stripped the pump into as many pieces as it could be I then found that it had bushes and they were worn out so i stopped in to my local transmission and steering parts supplier (being tranz) to see weather they had any bushes or not but they didn't but spent some time sharning as they got an ex trans and steering mechanic there so he gave me some tips on the pump And told me where to get the bushes. oh and also gave me the bush sizes off the top of his head so went to seal imports with a bit of paper with the size needed and job done. so ended up getting some teflon coated bushes rather than the standard brass bushes as they are easier to fit and much nicer on the pump components when wear occurs. I then removed the old bushes and prepped the pump for fitting new seals and bushes by using some wet and dry sandpaper A flat surface being a tyre machine being the most ideal And some wurth rust off for the lubricant so we do this by moving the item you are sanding in a figure 8 shape so that the item gets sanded EVENLY And then the otherside too so now the both sides are hand machined flat so the seal will seal! I then also polished up the main pump shaft as it had score marks from the worn out bushes and years of use. Ran it up on the lathe and sprayed the wet and dry sandpaper with rust off again and used the sandpaper to polish the marks out. I then threw the parts in the blasting cabinet and gave them a sandblast at home I then fitted the new bushes and new seals and the rest of the stuff back into the pump And gave the components a lick of paint. ended up coming out super average being from a spray can. should've just bought some white and sprayed in my spray gun. then joined the two halfs back together And then at this point when i fitted the pulley realised the internal hole in the pulley had worn out offset. so off so saeco wilson so buy a blank pulley in the same size. then sent the pulley off to a engineering shop to have the pulley offset hole size and keyway done on the pulley. Done to a tight fit mate also notice in the photo how worn that pulley is! the key way had mostly worn away. I then prepped and sprayed the new pulley black. then used the oxy acetylene to heat the pulley to expand the pulley enough so it would nicely fit onto the shaft. being that it was a machined fit. then refitted back onto the car and bleed the system. so i now have a good functioning pump with no more wobbly pulley. I also added some morey's back in too as the steering control valve is leaking also.
1 point
-
Some say he can assess how much boost a supercharger has made, just by smelling the oil inside it1 point
-
Driving the other day I noticed it wasn't pulling as smoothly as normal, so replaced the fuel filter again (still evidence of a bit of shit in the system) so will keep keeping an eye on that side of things. I really should pull the pickup out of the tank and give it a clean out too, although from what I can gather its just a tube down into the tank with no filter or anything (as it doesn't run a lift pump) so likelyhood of blockages there are pretty slim. Also had a fiddle with my diddle the fuel screw and wound it up in increments until I was just getting a hint of smoke on full noise. Has definitely made it a bit peppier and comes on boost better as well. Fuck I love this thing.1 point
-
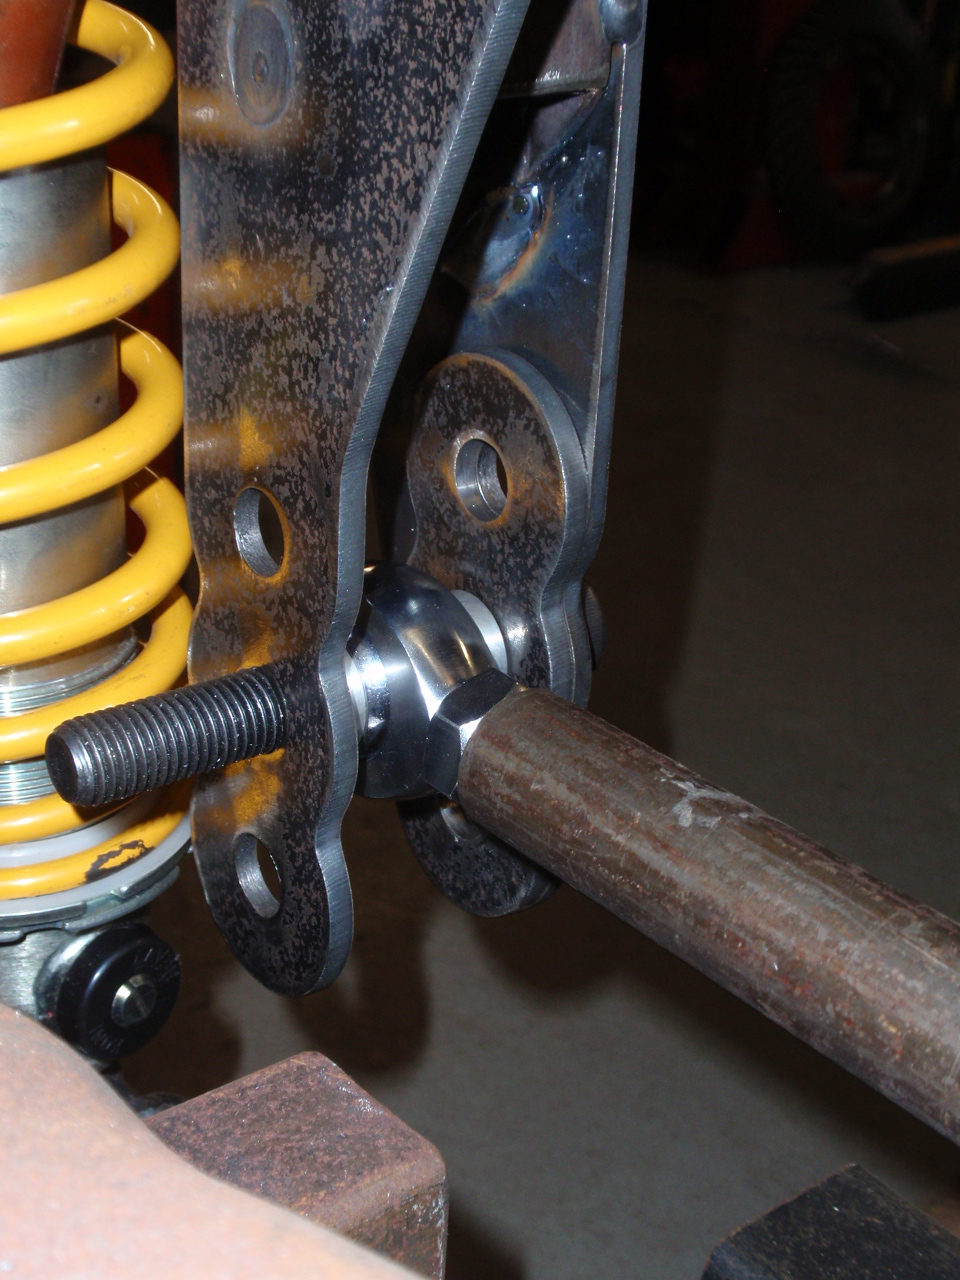
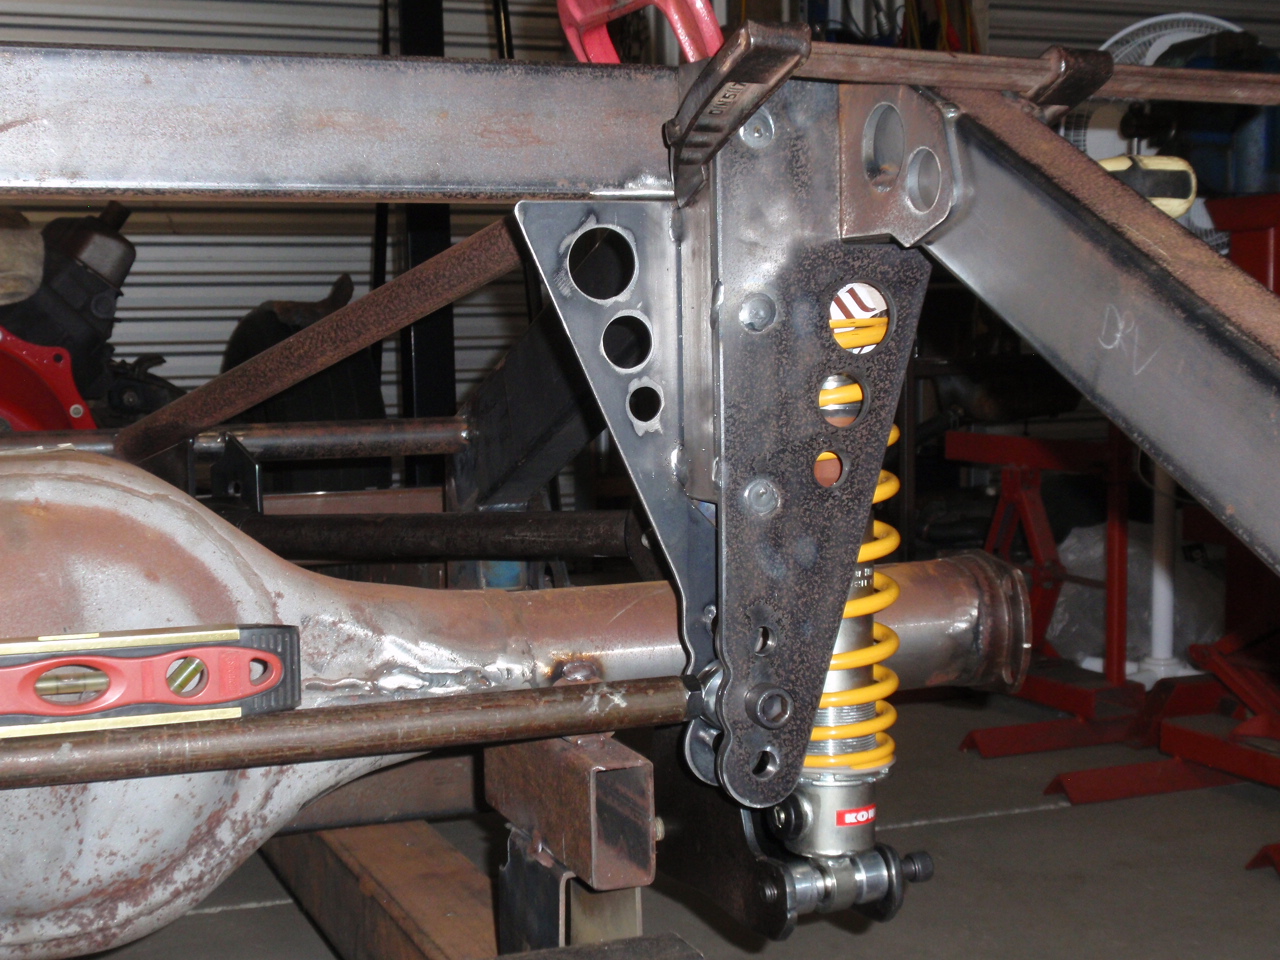
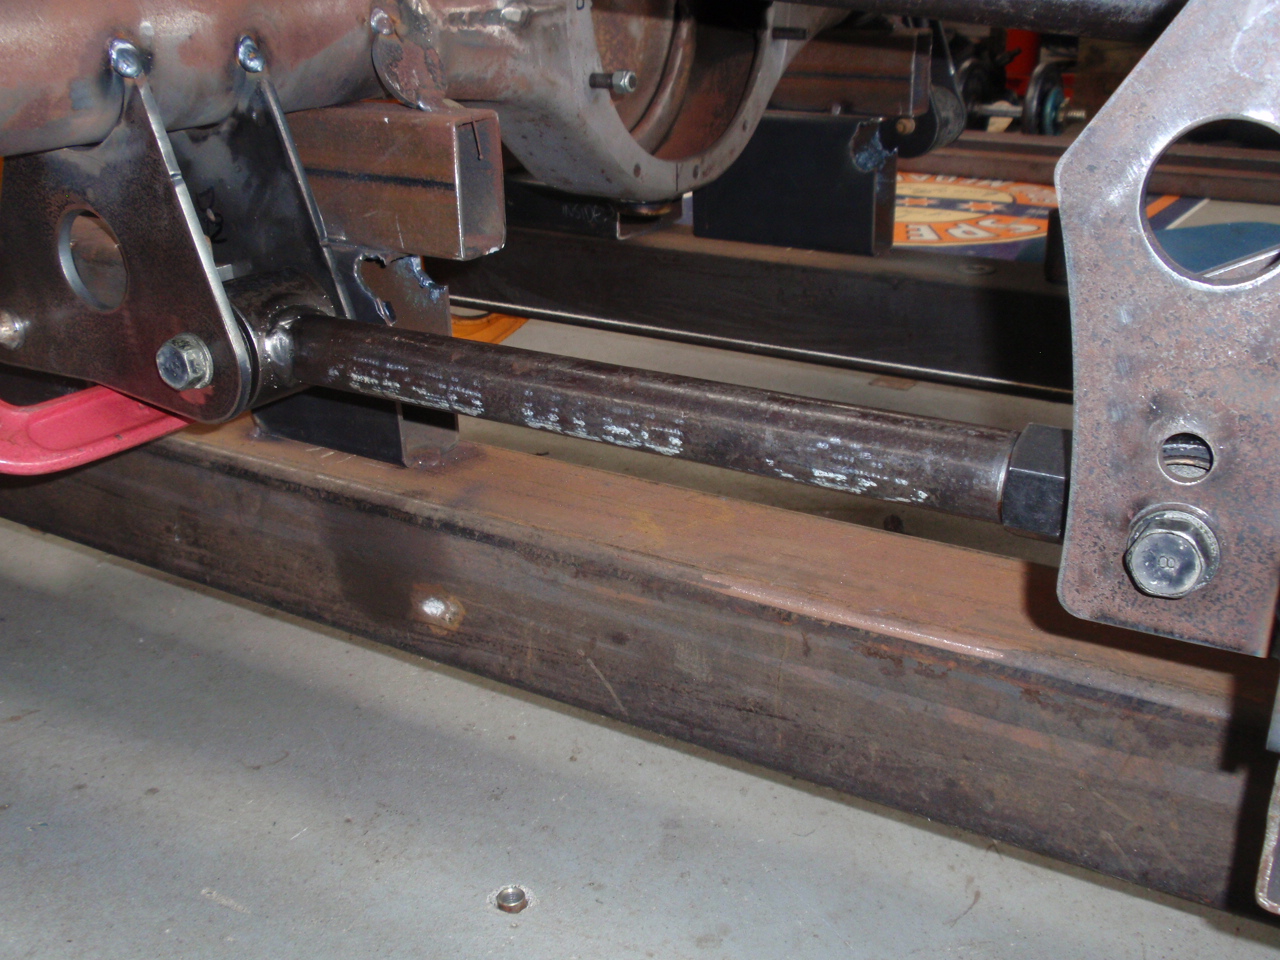
Located and measured up where I wanted the chassis end of the bar to sit. I ended up with it sitting aligned to the axles. Drew it up and cut it out. I blow undersized holes through using plasma but finish them to size on the mill. Want your panhard bar running parallel to the diff and at axle height, but you have big chassis kickup in the arse of your car? Then you end up making big arse brackets like these. They turned out alright but they are imposing. I built in plenty of gusset in order to brace against the direction the force is going to come. Not in the pic - but i intend to run a piece of small diameter pipe to gusset/brace the rear facing face of the bracket to the chassis. Triangulate. I included a 5mm spacer plate in order to tighten everything up. I used a 50mm x 50mm piece of box as part of the panhard bracket hanging off the chassis. The cross section width of the 3/4" rod end is 45mm. Turned up spacers to center the shocks. Direct threaded the panhard bar to take the rod end. Need to do the diff end next.
1 point
-
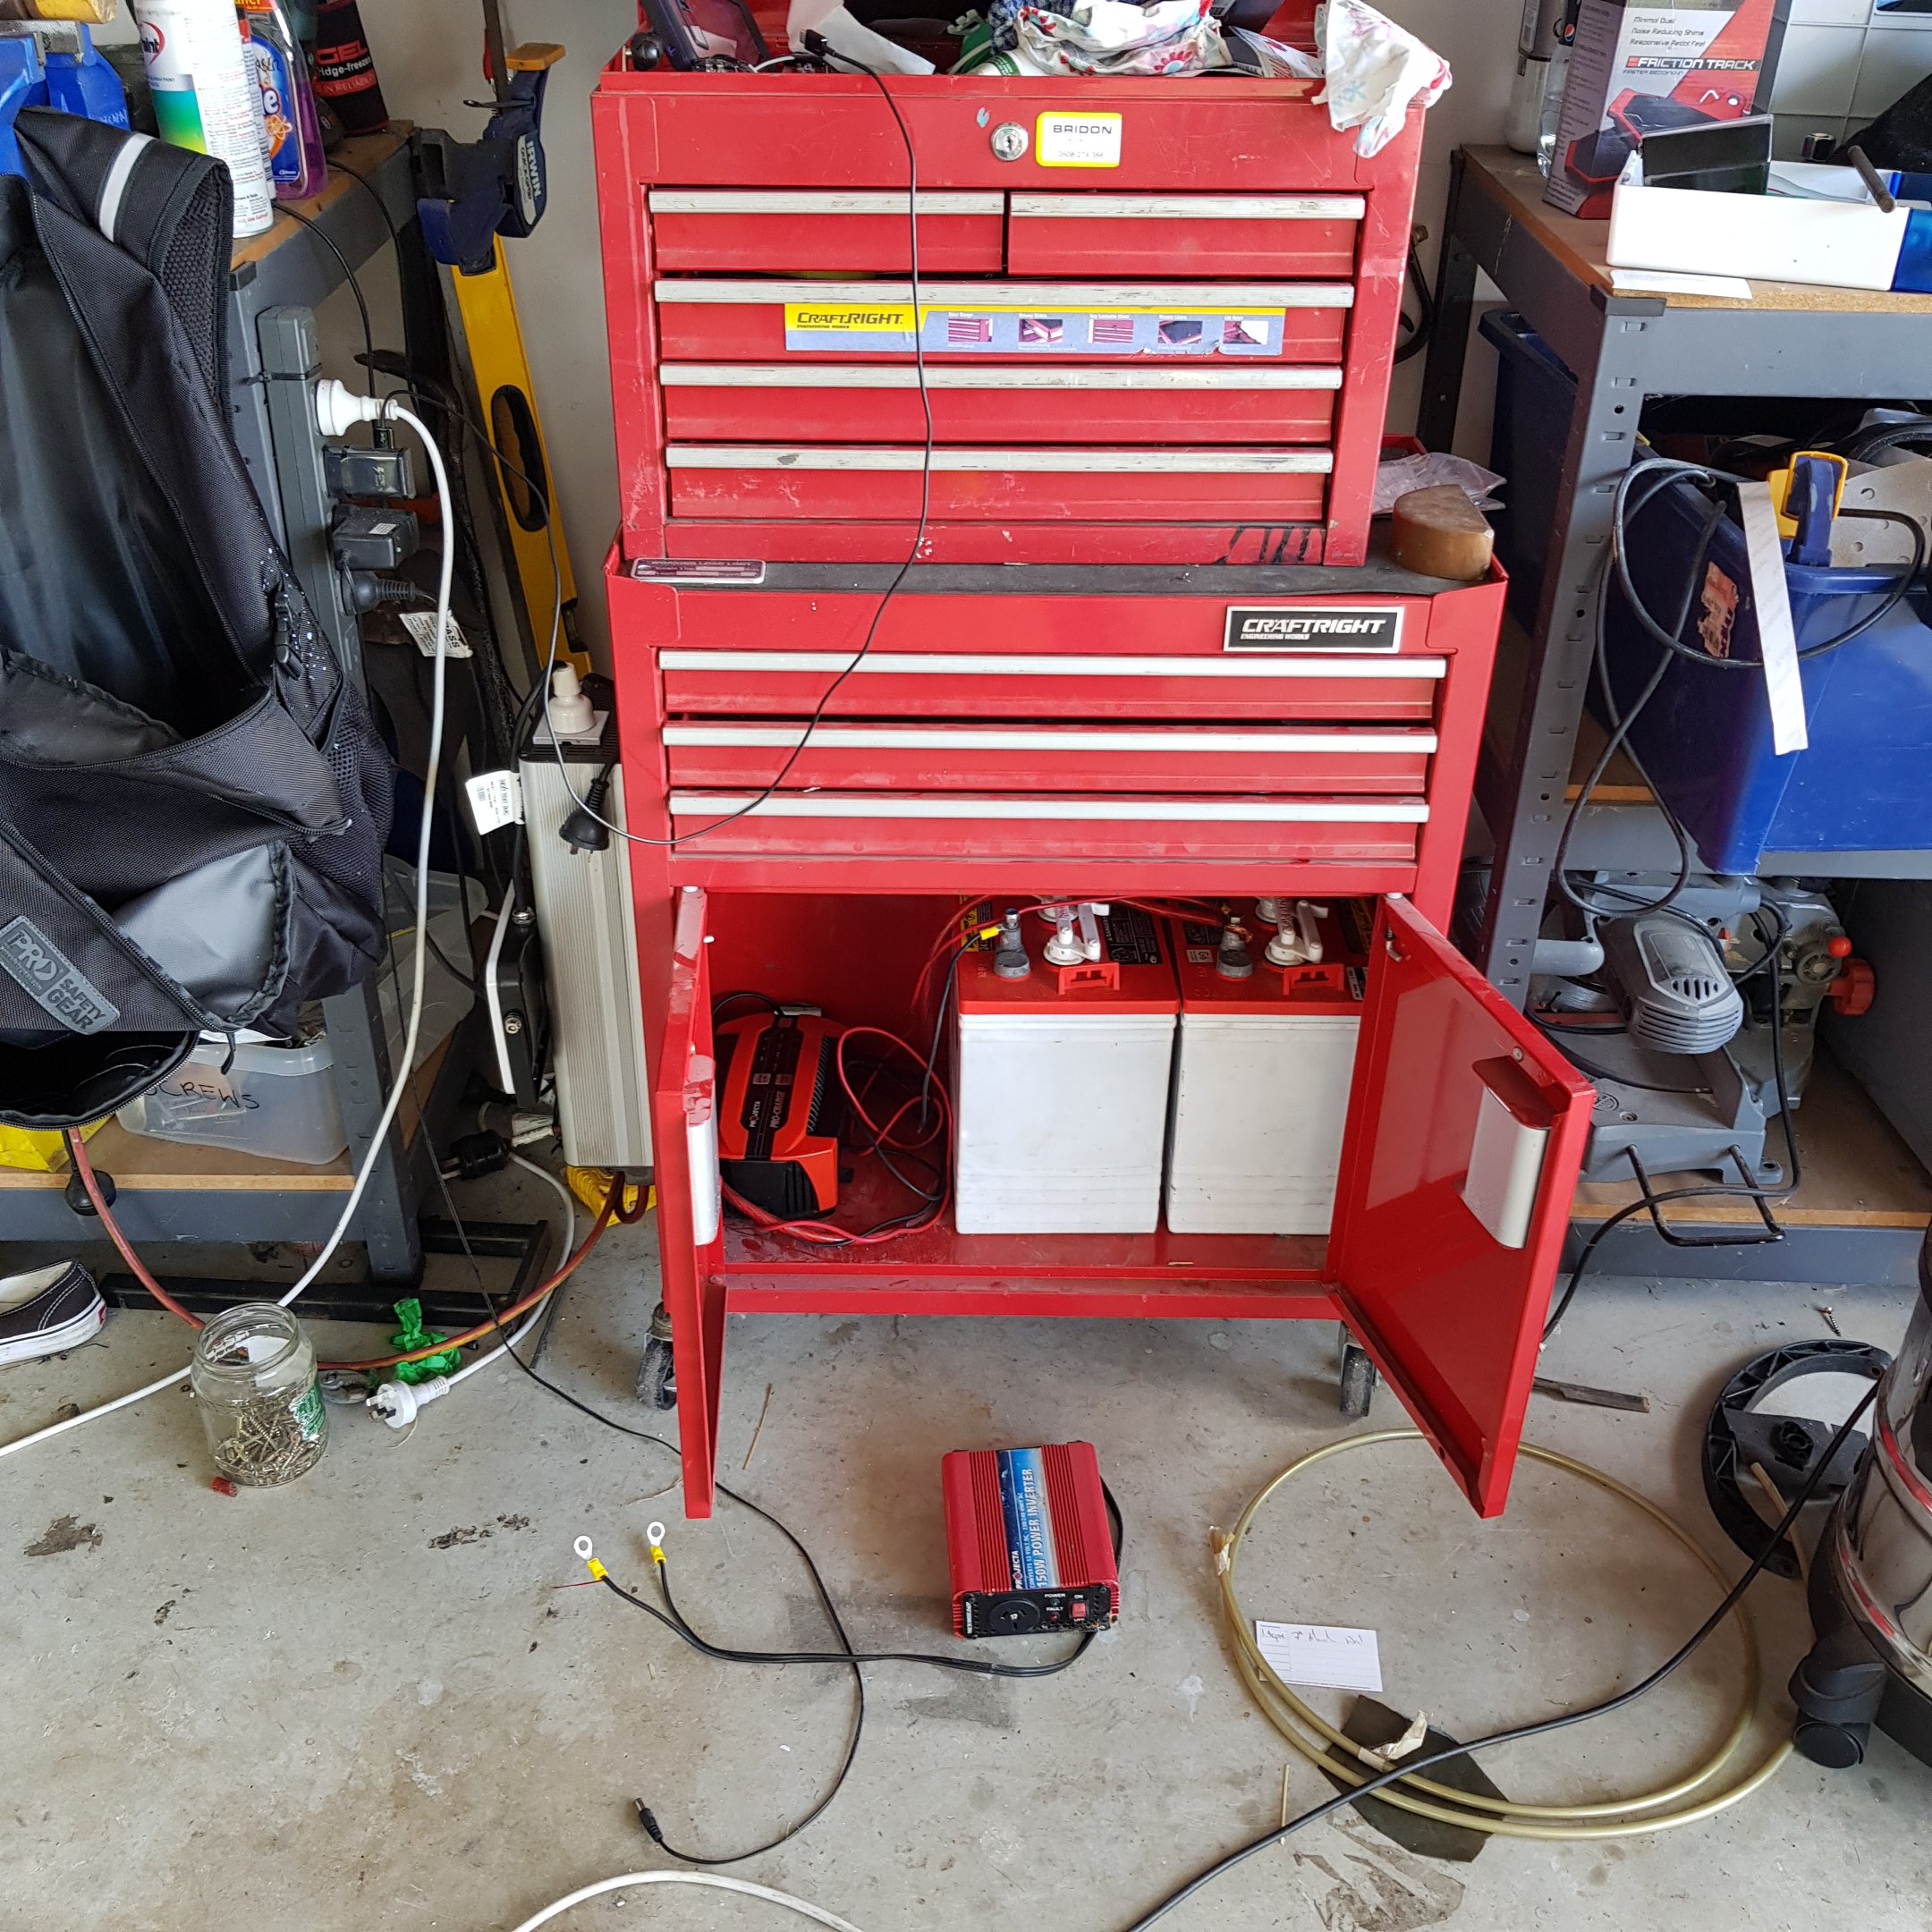
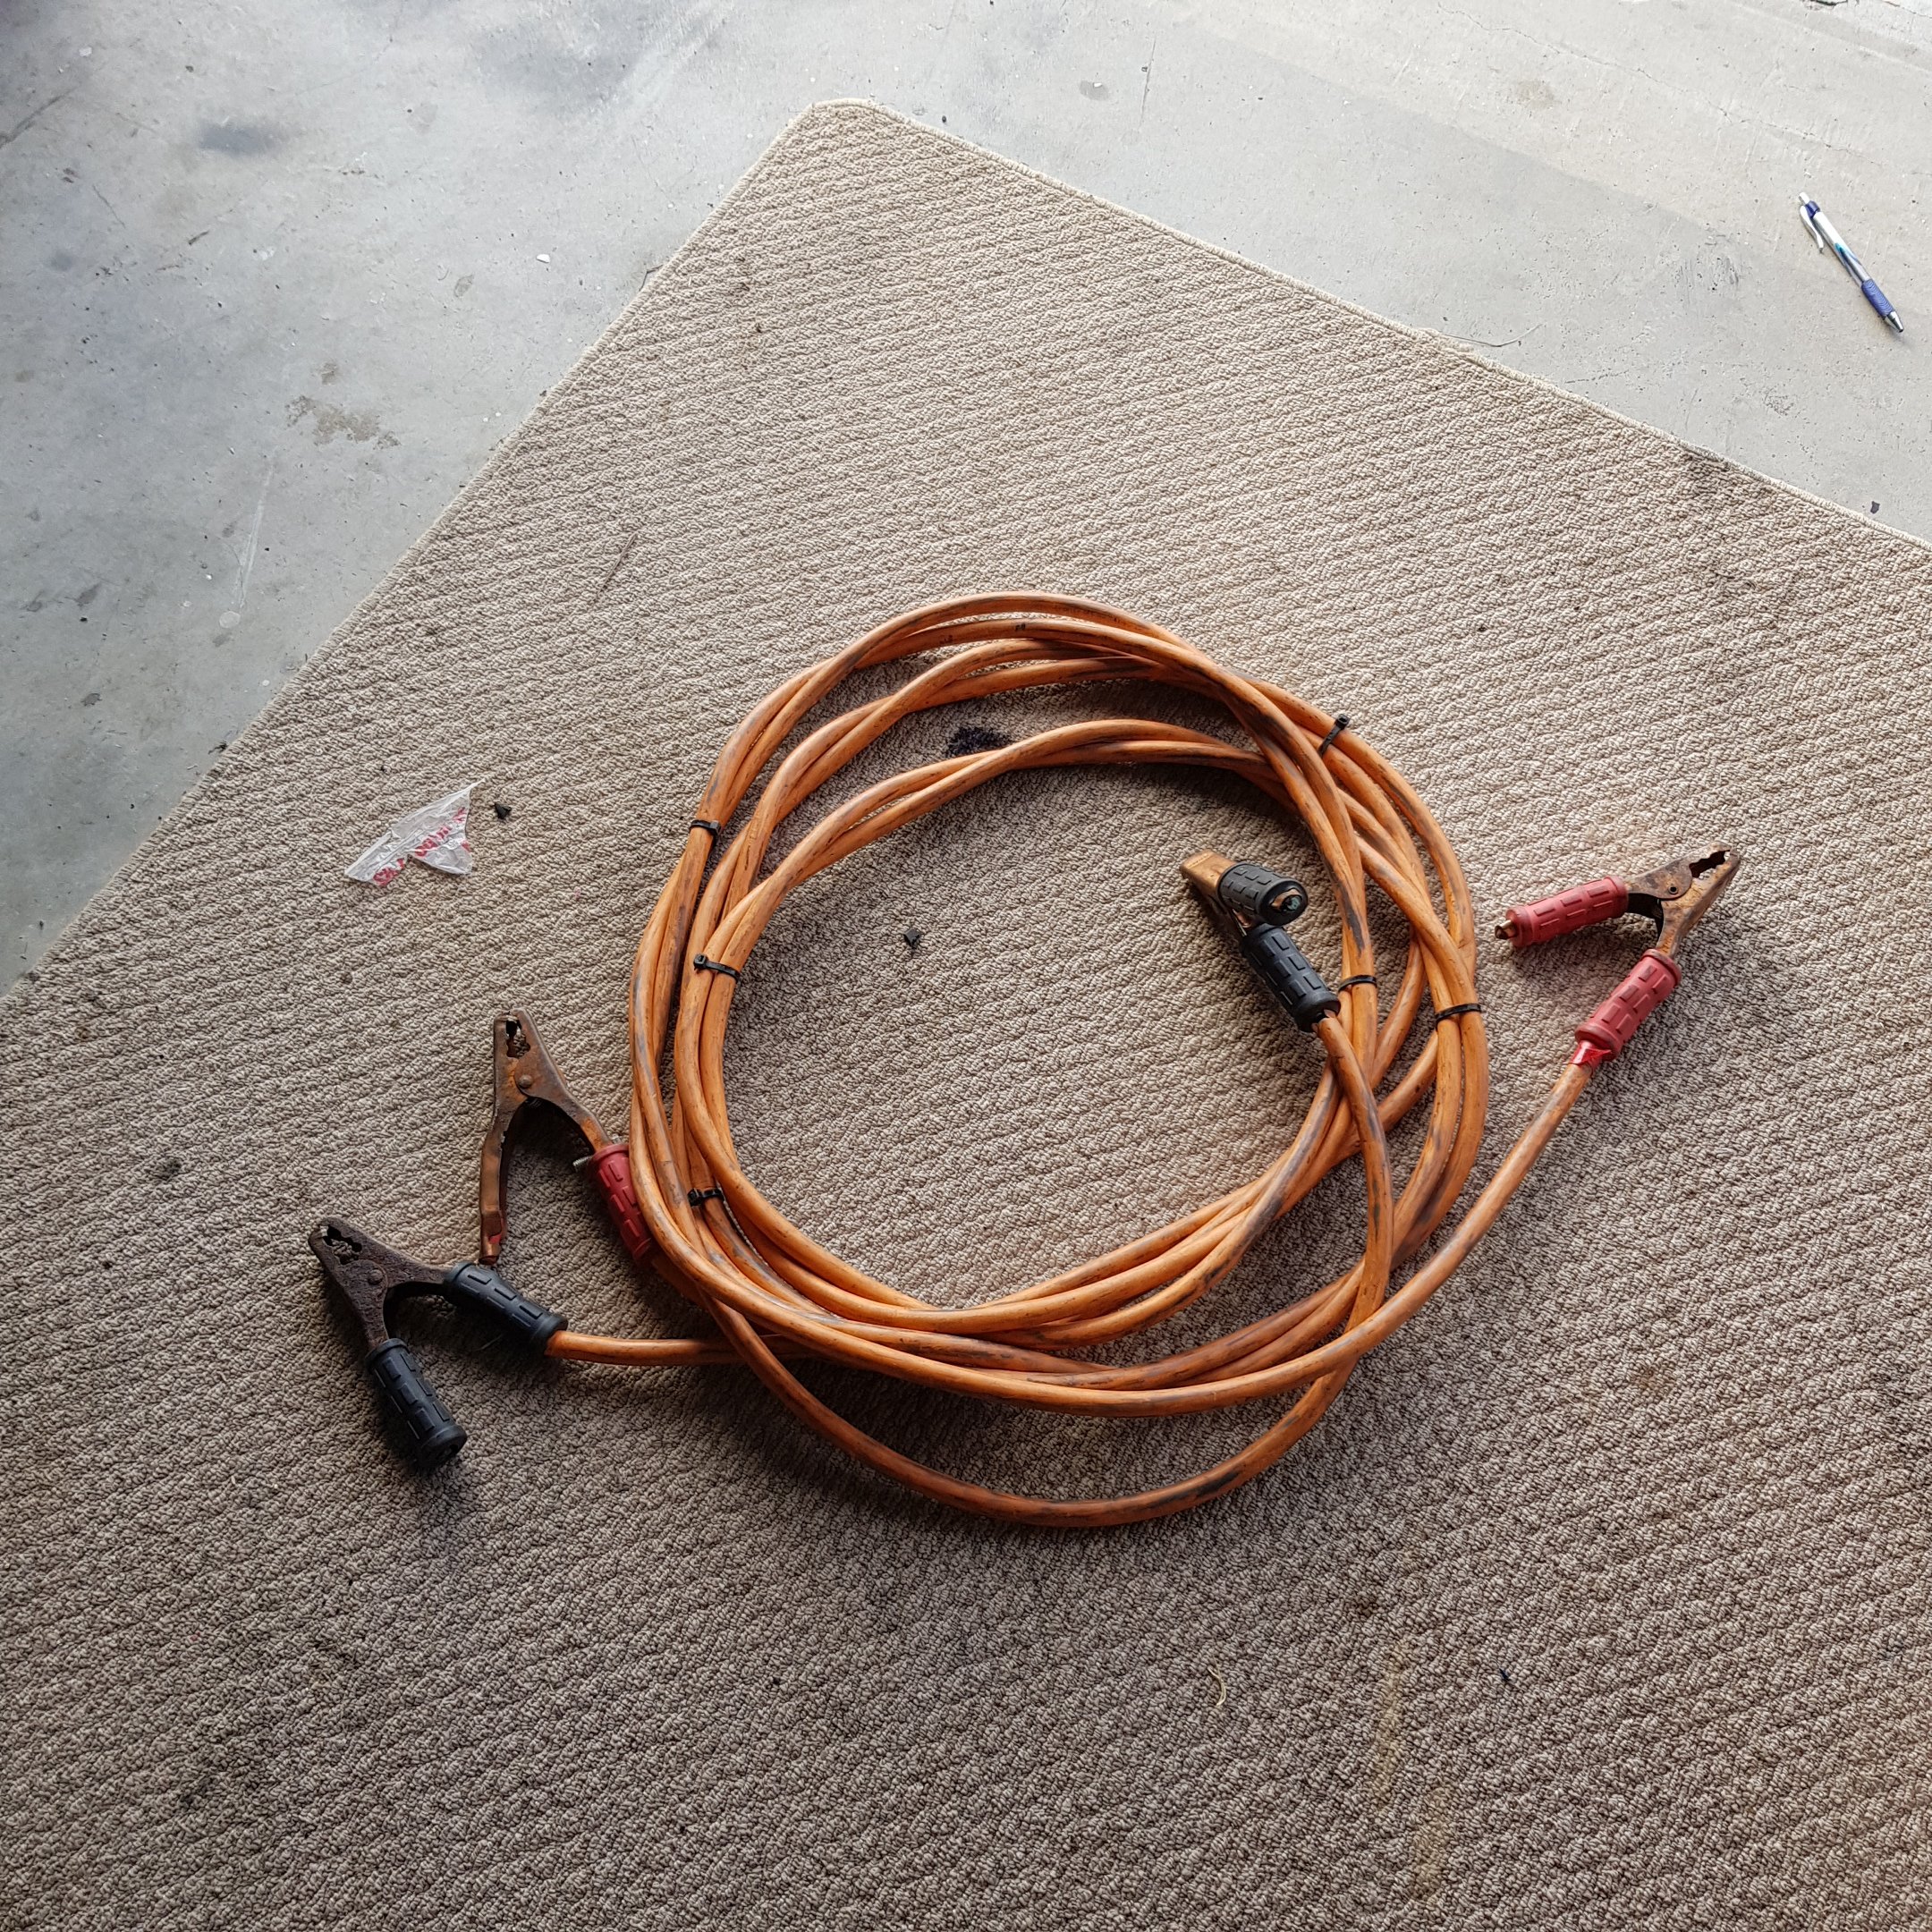
The bottom of my toolbox had been useless too small to fit my power tools and socket sets in finally had a brain fart moment and a purpose for some stuff I had been hoarding. Mini power station. 2 big arse 6 volt batteries a hardwired charger and a big boy inverter and a smaller one to run smaller stuff a bit more efficiently, I have had a few power cuts where I am with builders spearing underground cables with diggers it's been pretty damn handy. Plan is to add a solar panel and run a few circuits in the house off it lights etc possibly a 12v setup to avoid diving in to the mains stuff. It's also a mint as a jump pack with these 6metre 35mm cable leads (every one needs these)
1 point
-
Made some headway in the rewire. The back ends all done, and the wires are run to the engine bay. Also got the car up to the panel beater so he could share some wisdom. He said come back at the end of June with some new floors and we will sort them and the heater panel out.1 point
-
I ain’t dead. My flatmate gave it a quick flat and buff while I was in ozzy so it looks a lot better now! Also shortened struts all painted and installed with mk1 golf shocks, cleaned up and under sealed the inner guards before that. ended up taking 2 coils off the Dobi springs to get it to where it needed to be. The ride is great, haven’t bottomed out or come close to it. i put the new 1/4 window rubbers in, they are great. Only thing was that they don’t stay open when hooning along, the rubbers too..rubbery and they spring closed. I could leave them open when it’s parked up to see if it helps mould. I drove to wanaka and back to be a wedding car with a couple of other 1200s. got a wheel alignment the morning I went down but they weren’t happy with it and didn’t charge me..blamed the steering box. (Which is fine and I’m sure has adjustment on the very centre of the top but oh well) Resulted in a pretty shit, bump steery, overcorrecty journey in the wind which was a shame, love that inland road. I’ll take it somewhere else. The trip back was better and with the radar detector on we had some good fangs some revolutions were pulled. Had shit gas in it for the journey but back to good stuff now. this weekend I got a mate at pitstop to chuck a full 2” free flow flanged at the headers with single basic sporty muff box I had laying around that was pretty new. I don’t usually farm out stuff I can do but I fucking rage over exhausts and he did a great job, cheap and quick. Now tucked up nice and tight, has a great rasp and crackle to it and goes better!1 point
-
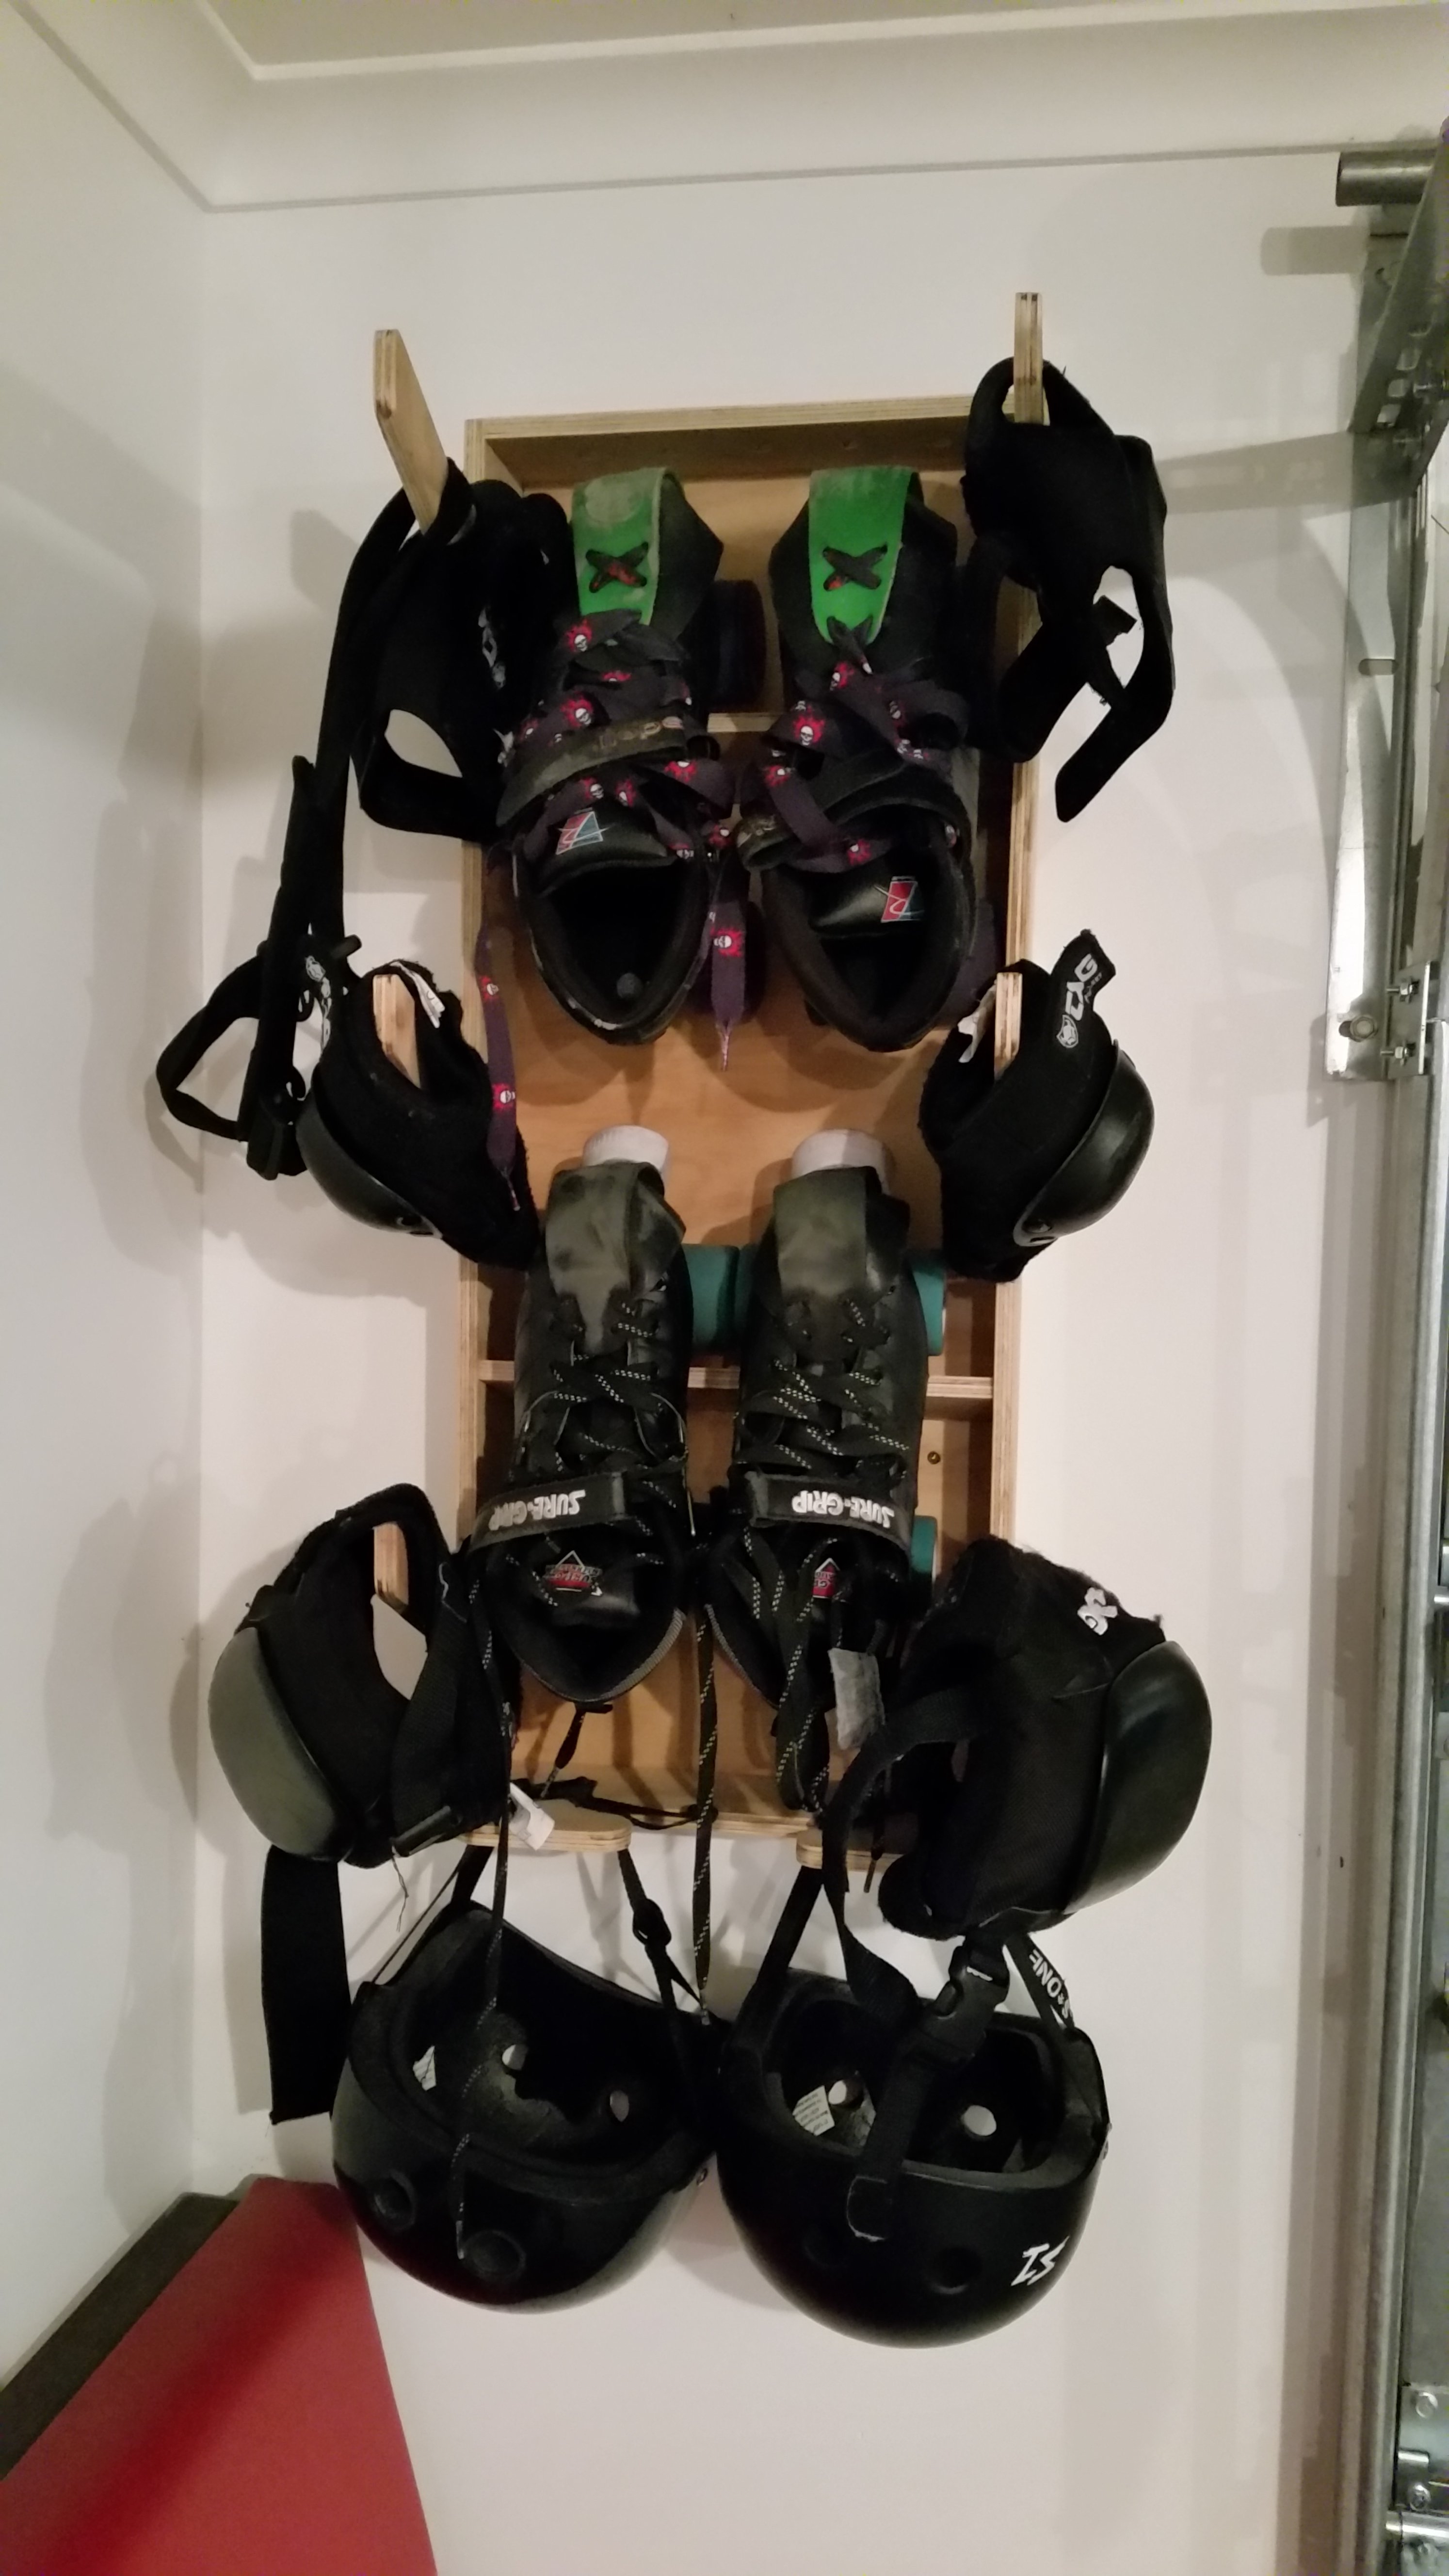
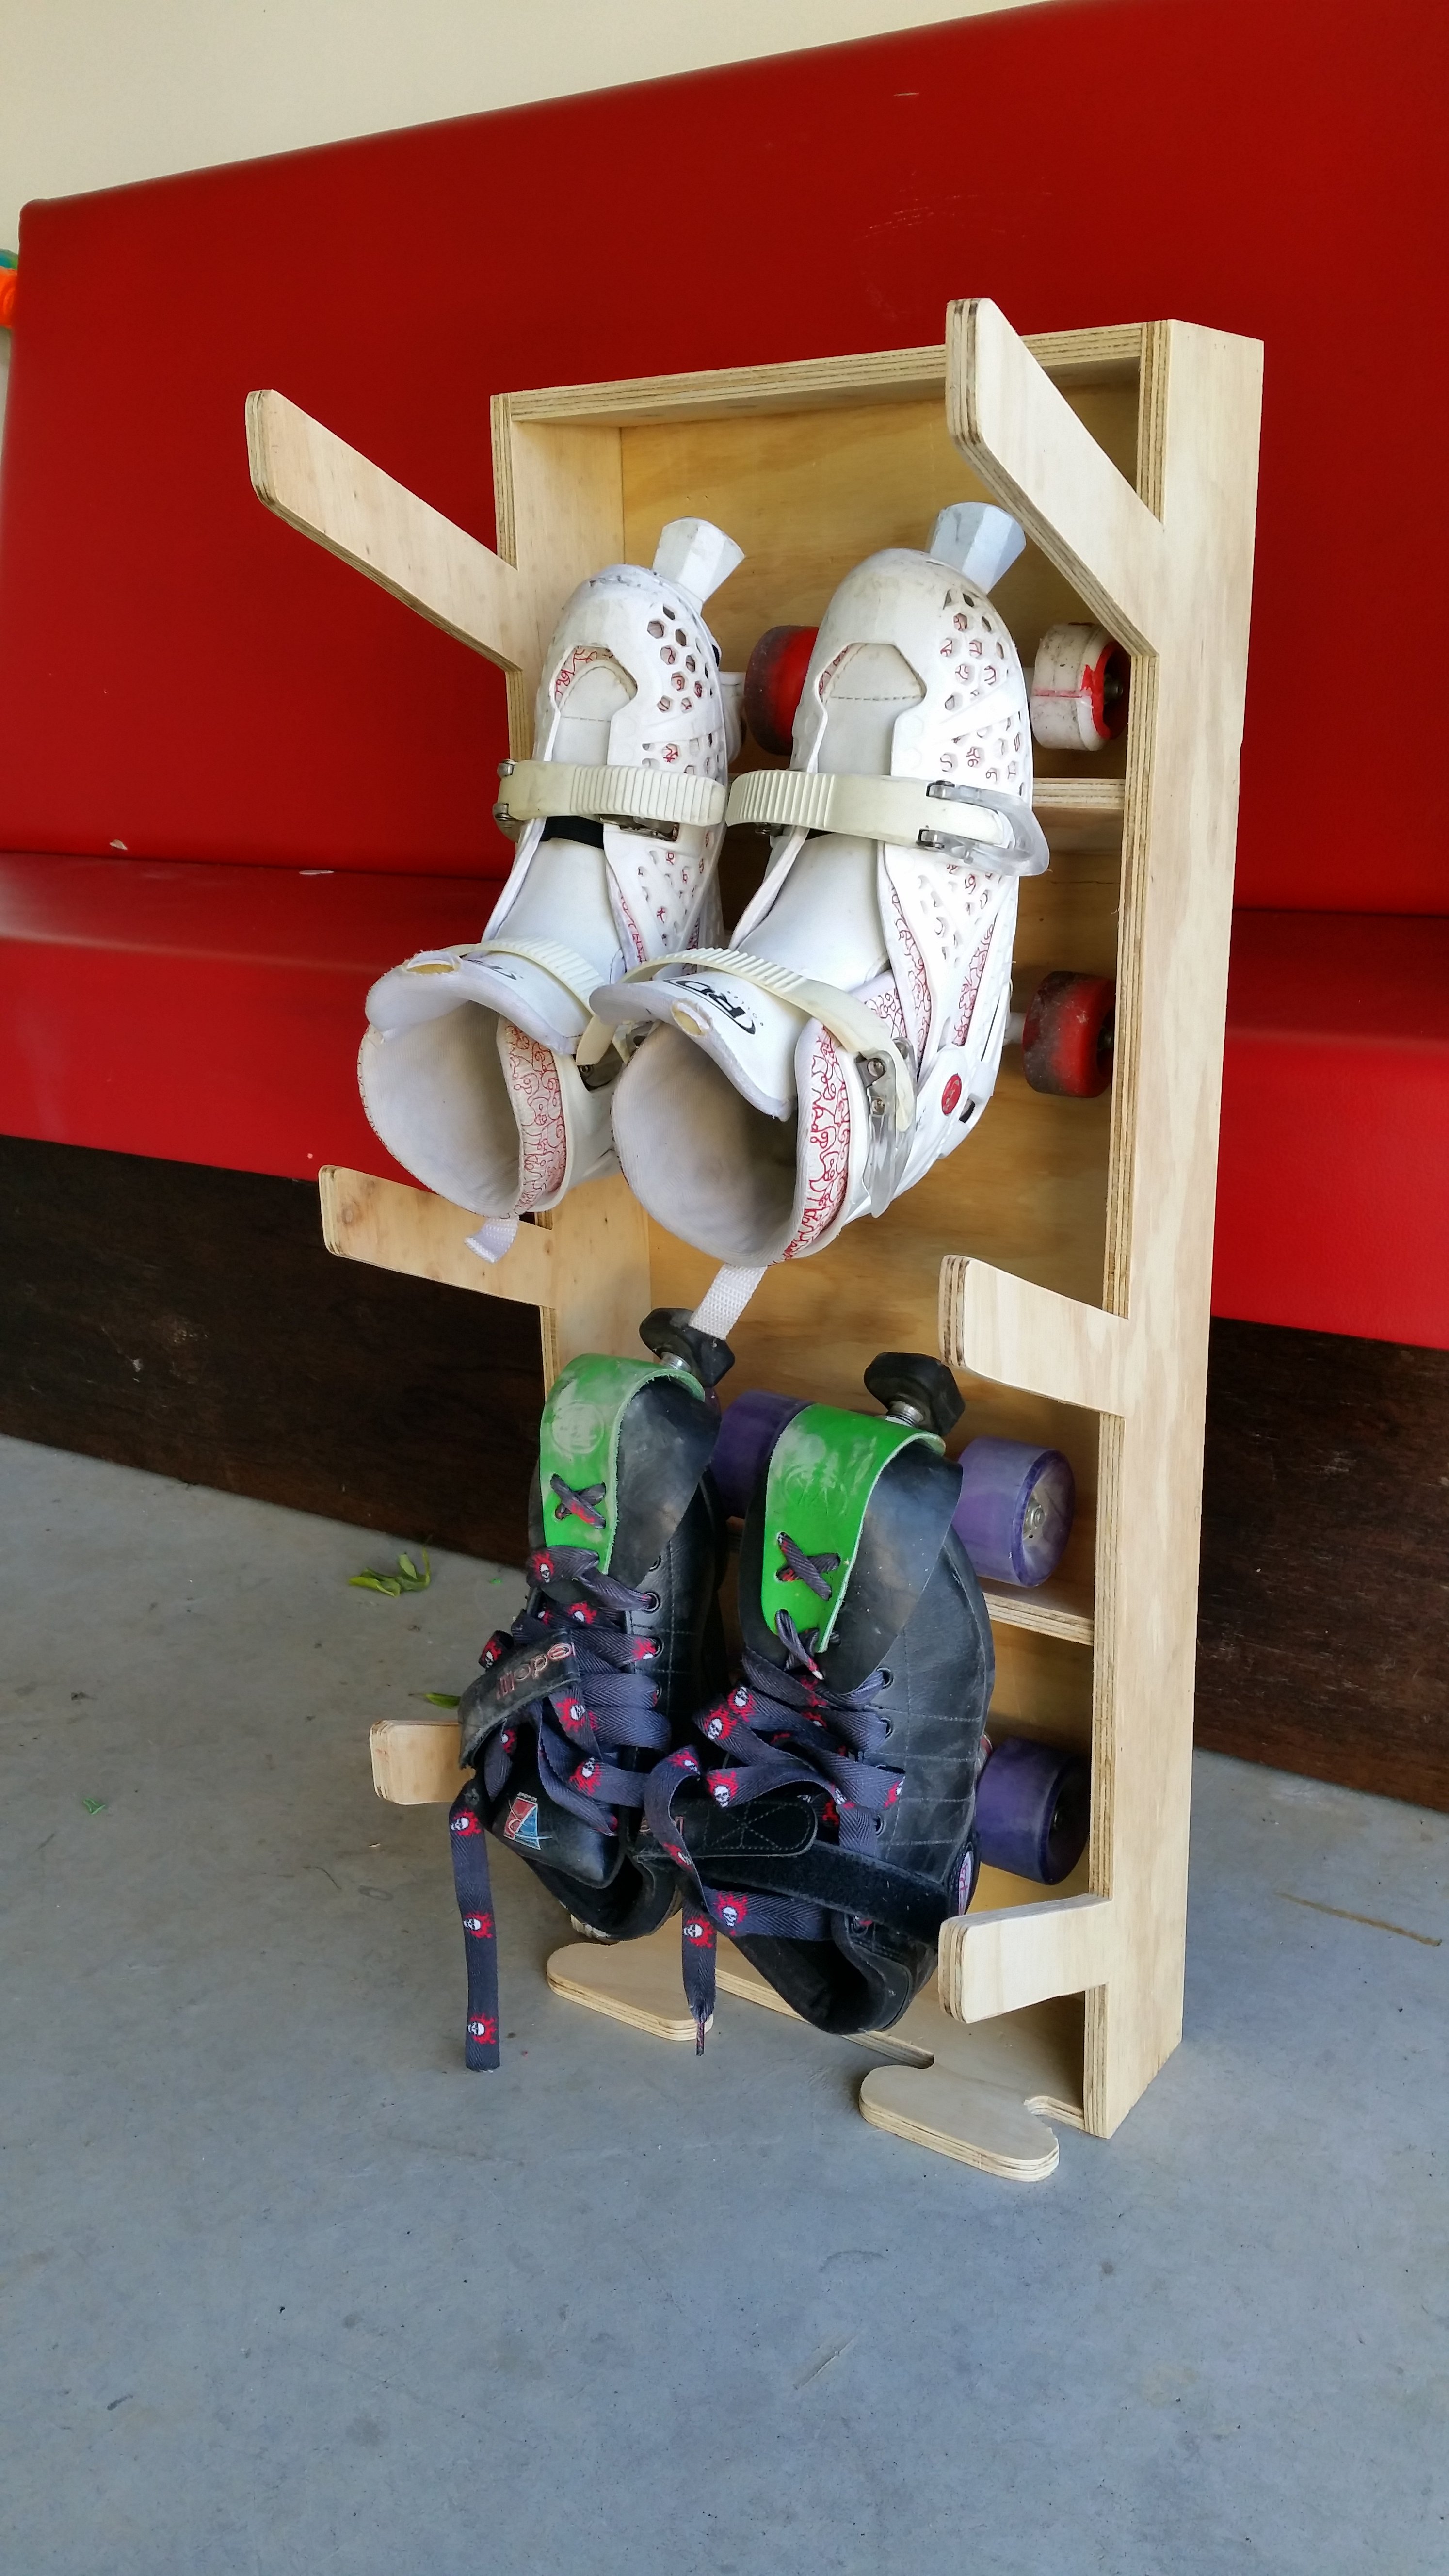
My wife plays roller derby. She needed a place to store her gear. So: Boom...getting me some tonight
1 point
-
Seen as the trans got a rebuild I had to give it a stall test right? well I guess it won't stall cheers m81 point
-
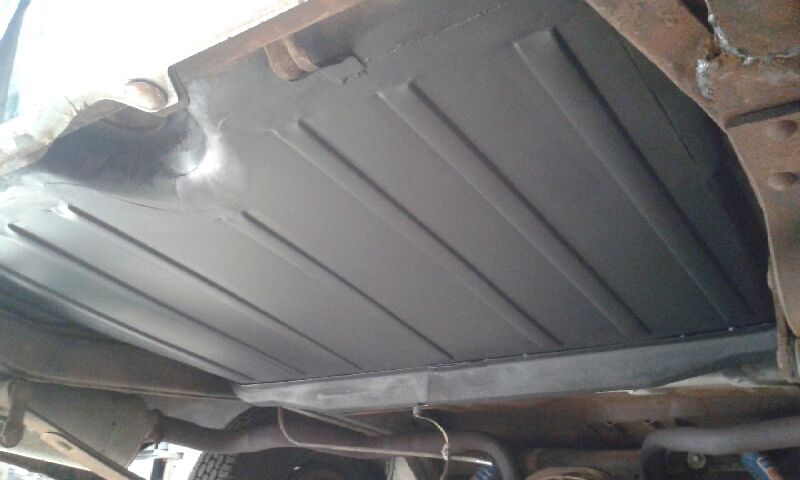
So i was now at the point where i was talking to my panel beater about my rubbish panel And already being past the engineers cut off date for a recheck only for compliance which was the 28th of February and we are now the 10th of march ( As my posts are well overdue) so i took the car in left it with him and uber'd home so this gave him time to put the car in the workshop which was on a monday then went back that evening to drop the fuel tank out for him to keep my bill lower and spin some yarns. I also took the trunk pan i bought to him to see if he could make it work as i stated the amount and hassle it owed me And i think he felt a bit bad about it too as he had recommended me to order a GOOD one from the USA as others had too He then flicked me a texted early Wednesday morning saying it was done following with a photo and invoice. paid 80 percent of the invoice and left the remaining as i couldn't see the numbers properly on the photo invoice he had sent. and planned to come pick it up friday evening. went in friday evening with some burbons to place the tank back in and put the drained gas in and unloaded off the axle stands. done that then explained about the payment i had done when he asked and said i would put the rest through tonight then spun some yarns and drank some beer he supplied and drove the old girl home. And this was the job he did for me. And he didn't end up using my panel as it wasn't going to work. so he made one from some flat 1.3mm zintech steel and used a Trekka swage die to make the swages which is one of these so now my car has Trekka designed floor pan swages in it. but was overall very impressed with the job And the price was fair considering the work involved and is a two man job to weld it in place. And the quick turnaround And also A+ YARNS so thanks to Tony at custom metalshapers LTD In East Tamaki for doing the job.
1 point
-
So im thinking about a gallon of flake and 12miles of endless lines1 point
-
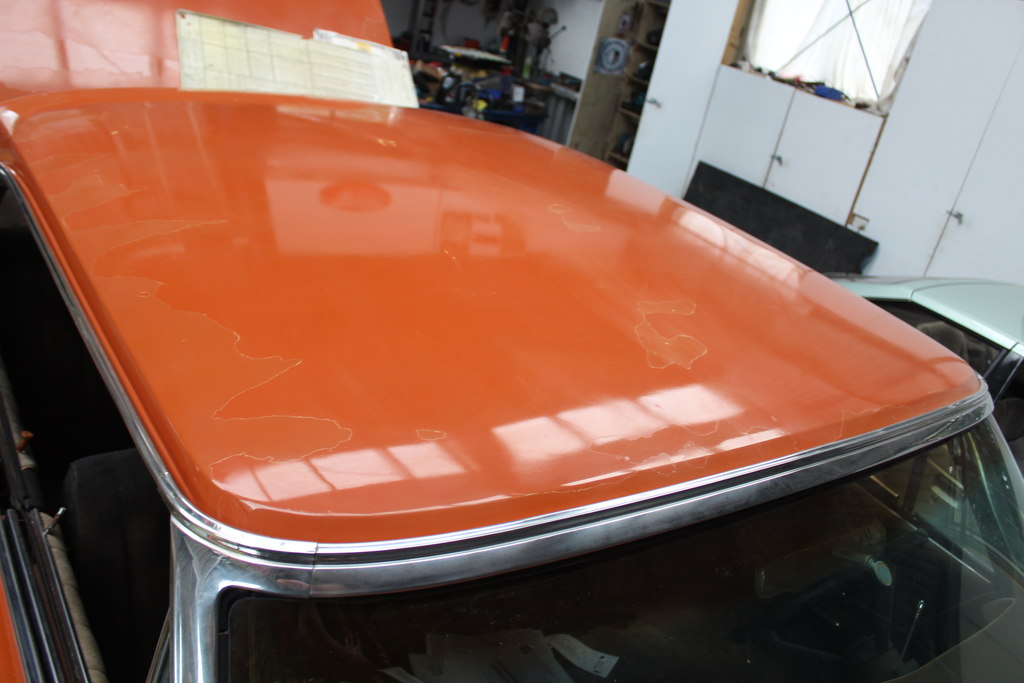
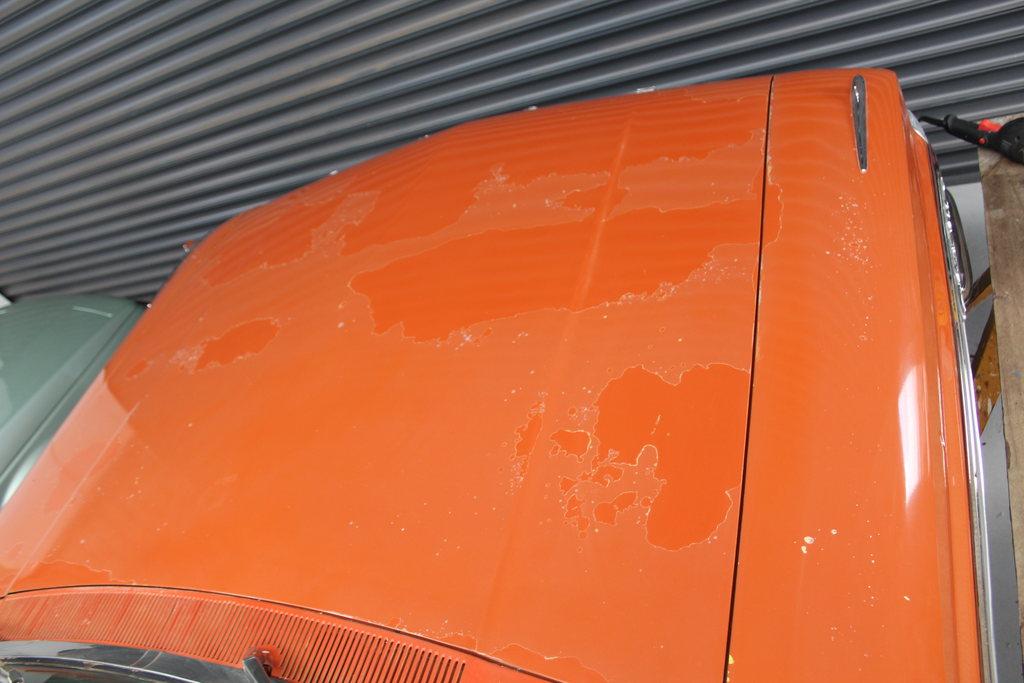
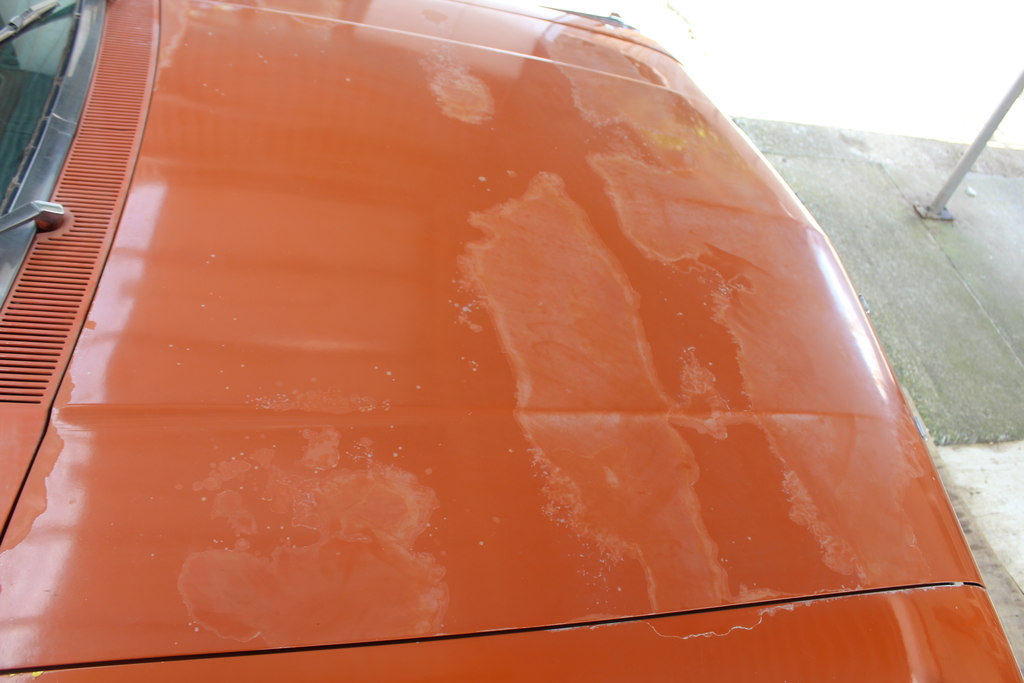
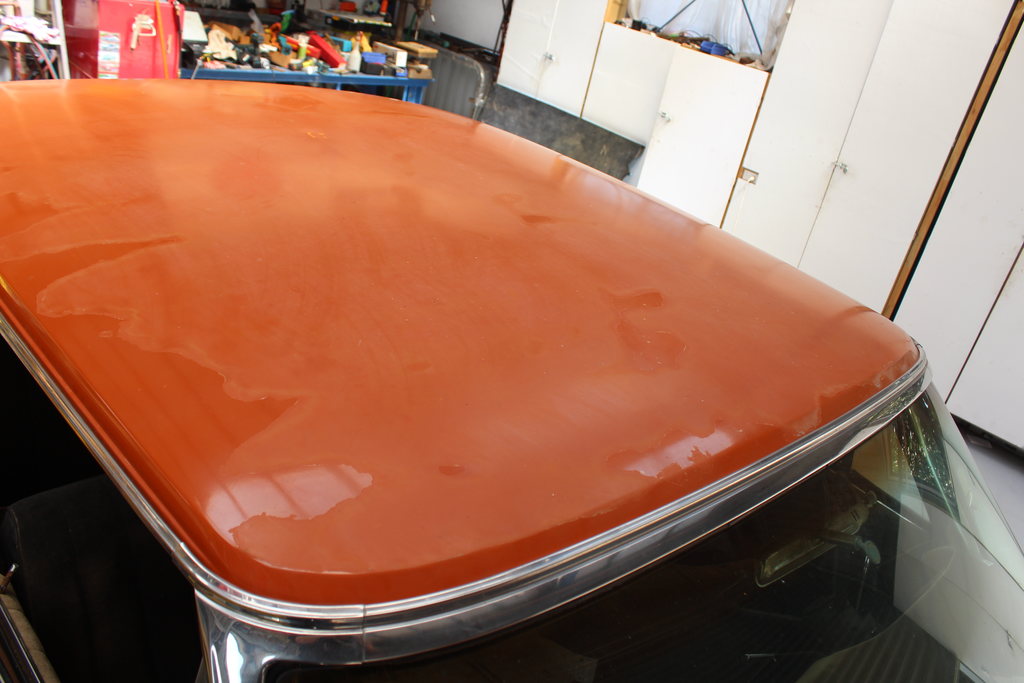
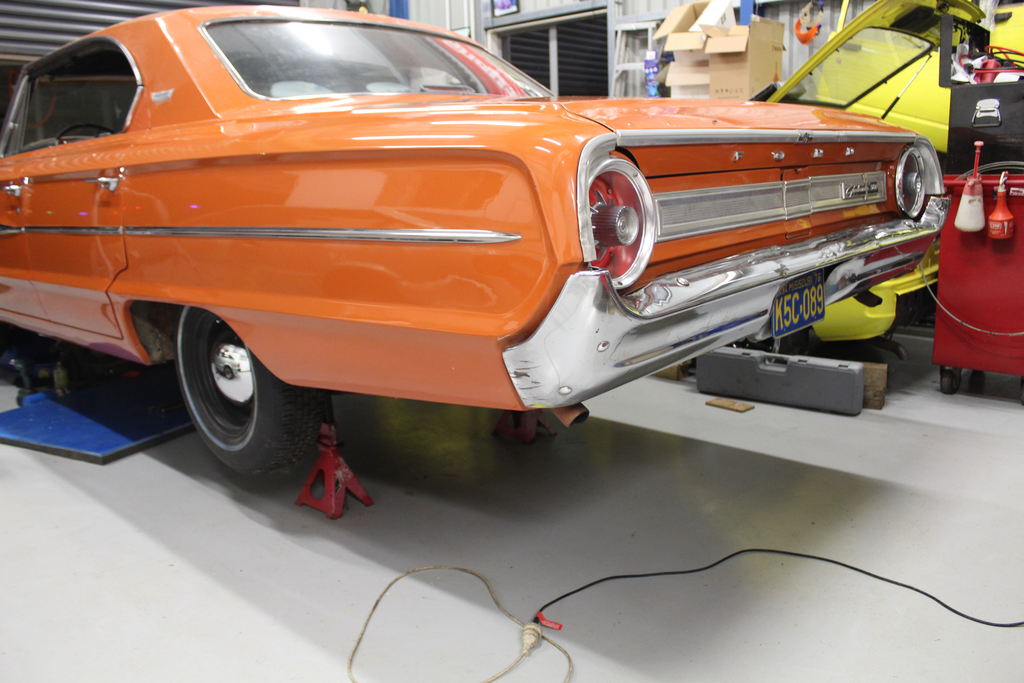
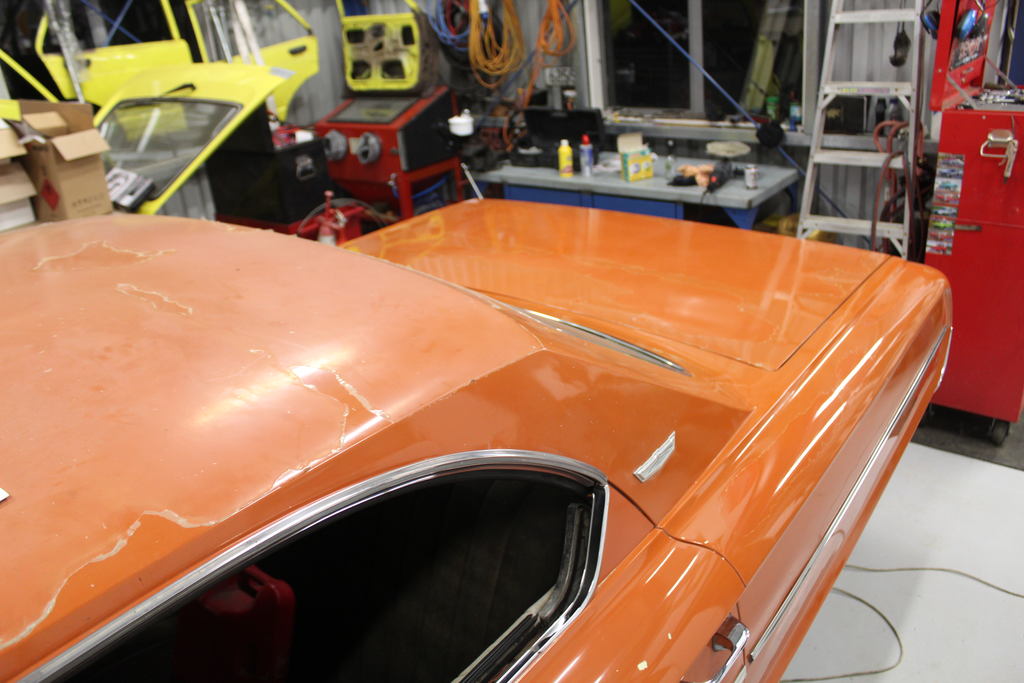
One thing that had always bugged me with this car was the paint. The clear coat on the paint has come off on the bonnet boot and roof and some other smaller areas so it looks like crap. ive decided that the car will not get a respray from me as ive got to many other projects and would rather not know what is below the paint. nor have the time or money to do the job. so to start with i got the compressor with the air duster on it it and blew off the remaining clear coat that was not stuck down as they were the bits that stood out I then used the electric buffer with the sheep wool pad on it and some cutting compound and a mist of water on the surface so the cutting compound would not dry out so now the aim was to restore the current paint as good as i could so this was before any work had been done on it when it was in the USA still which is the best photo comparison for the paint work without looking at it in person so this photo shows the gaurd has been buffed and the bonnet has not i then over a few nights buffed the whole car and having to go over some bits again too And the roof yet to be done in this photo then after buffing the whole car i then buffed on some polishing wax to give it a bit more shine and paint protection And tried on some 17inch cragar's which look crap so now the paint looks a whole lot better than before but is still good from far but far from good. but now to keep it clean as it doesn't get taken in the rain much is just to give it a wipe over with some detail wax and a microfiber cloth and it keeps its shine and helps to stop dust staying on it. now tell me how i should matty B it
1 point
-
Because Honda.1 point
-
Well this has been stashed away and kept itself quiet a while then eh? however recently things have had a shuffle round here in Datsun land and this little car now has a new owner. Meet Greg. Oldschooler for long time. He is a bit of a Datsun fan and kicks about in a CA18det powered 180b... This is him here.. (not the wombat) A fair while ago I had realised that the restoration of this car was not going to happen in a hurry under my hands and I should really find it a new home. The advert stipulation was that it was to be sympathetically saved and not just split for parts. I had a few people enquire about it but no one actually committed. Then Greg rang. He needed a new project in his life and always liked the shape of this wee car. I was really happy to see it go his way has his ideas for it are pretty much what Id do. Ie; Nice wheels (13".....), lowered and a sweet engine upgrade (13b PP brapper Greg!!! - joke. It has to be an LD28) Greg is gonna take it on as a project to learn some more skills from but to start with I'll sort out some of the more critical nasty bits of corrosion which are a lot easier to deal with having a hoist for starters. Then when he comes up here to pick it up (and deliver my 3rd Imp for me ) we'll do a few welding lessons teach him some hopefully handy skills to help him out the continuation of the repairs. So a couple of months ago (maybe longer..my brain is all muddled up by Imp projects) Hannah and I stripped the Datsun right down to an empty shell. This had to happen so I could get a proper look at the corrosion and not have bits in the way while dealing with it. Typically we found a bit more rot but overall is all pretty easy stuff to deal with. Surprisingly not rot under the windscreen. Very lucky considering the seal leaked and had all the flexibility of a Crunchie bar. I carefully packed it all into our van and we took it down to Gregs on the way to the Oldschool nats. We stayed at my parents on the way through. I just had to get a pic of them holding a wing from a car they bought new but until more recently thought was crushed and not seen in many decades.. Greg now has some stuff to sort through while I start on the shell. Now after having sorted through some other work and dealt with a spot of IMP fettling I started proper on this shell two days ago. First off... those sills. Yuck... I want to get some real strength back in place so then it can be lifted happily on the hoist without fear of crumpling. I started on the drivers side sill. There was a previous repair hiding in here... The rear lower wing that covers the sill looked like this inside.. It looked terrible inside the main sill but luckily once cleaned out the inner is solid. I Painted it in Por15 last night and continued on with the repairs today. The sill tops were really good and the shape was pretty basic too. So many spot weld holes to drill. I must get an air punch/joggler tool! Greg can grind the welds down so saving a heap of my time/money.. The rear arch bit was a slightly awkward shape on the car. Luckily the otherside, although rusty too, has kept its shape enough to copy. Then the outer skin of the lower wing (guard..) which is where I finished off with this evening. In order to stop the thin panel it attaches to above from warping I folded over a tight bend. This will add some stiffness there. The bend faces down so condensation cant collect. Its almost finished enough to start on the other side. I'll be sorting through the repairs so that once Gregs pot of gold runs out he can continue on with less daunting stuff1 point
-
Bottom bars done. The top ones are going to be a cunt to position in correct alignment. Everything's on angles. My sins are going to catchup with me, lol. Bring it.
1 point
-
Good torque too- in a lightweight car. It ramps up on the torque really quickly from 3000 to 4000. Right in the rev range you'd be at when cruising along in 5th. It must be awesome at easily passing cars without breaking a sweat!1 point
-
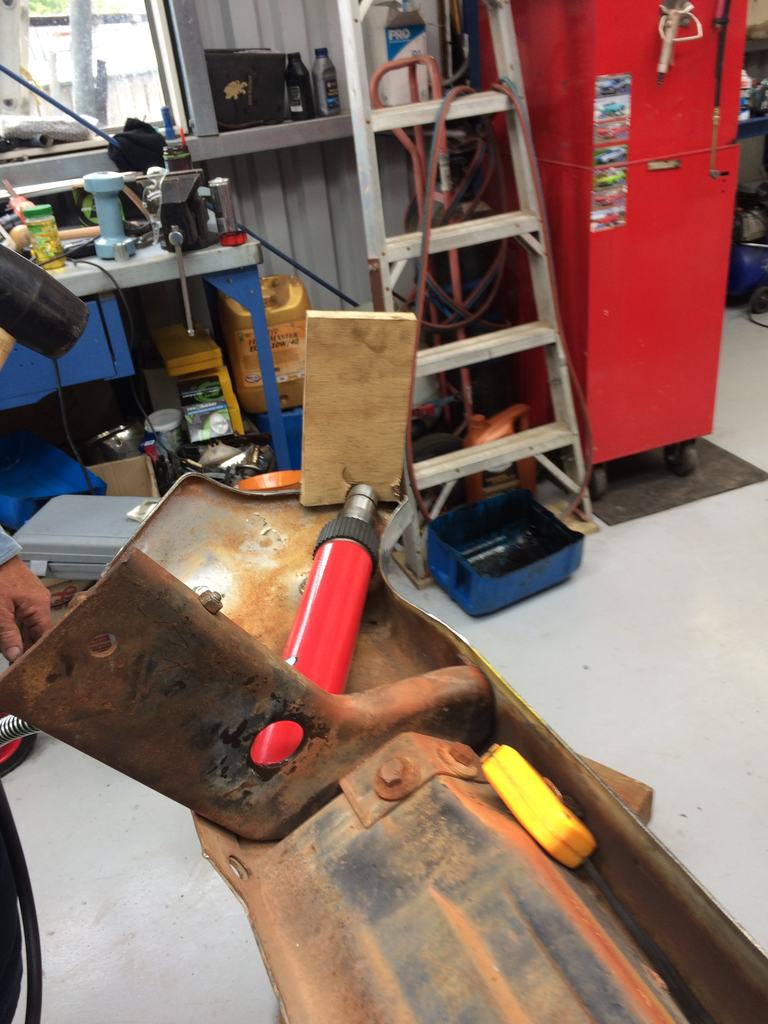
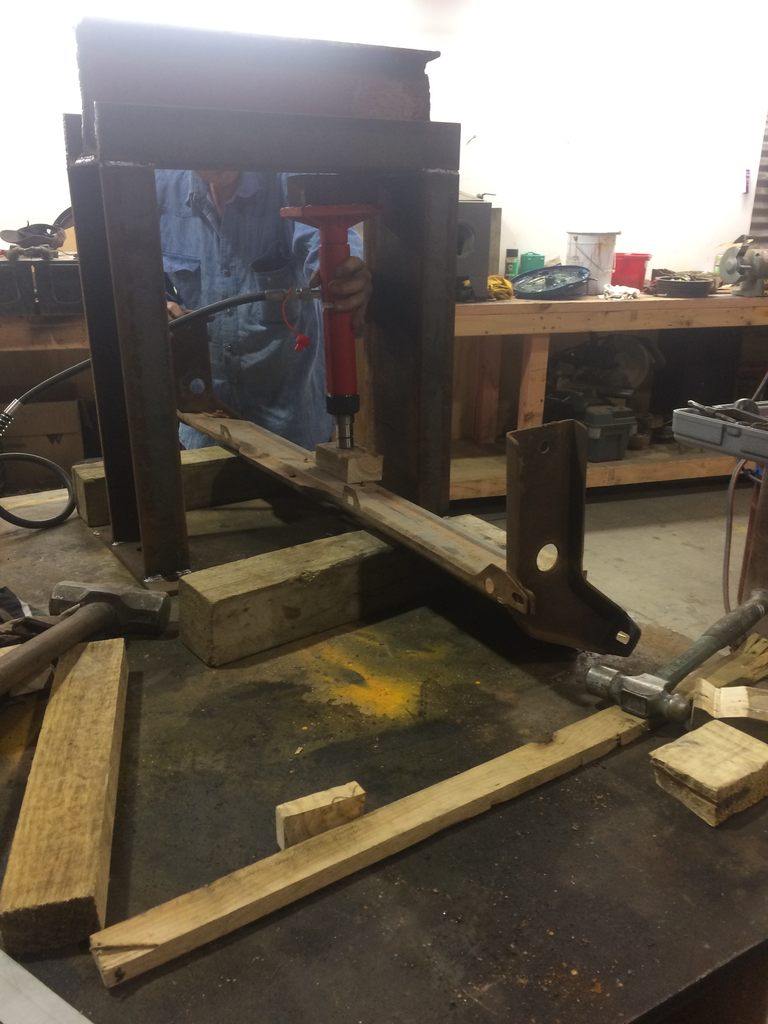
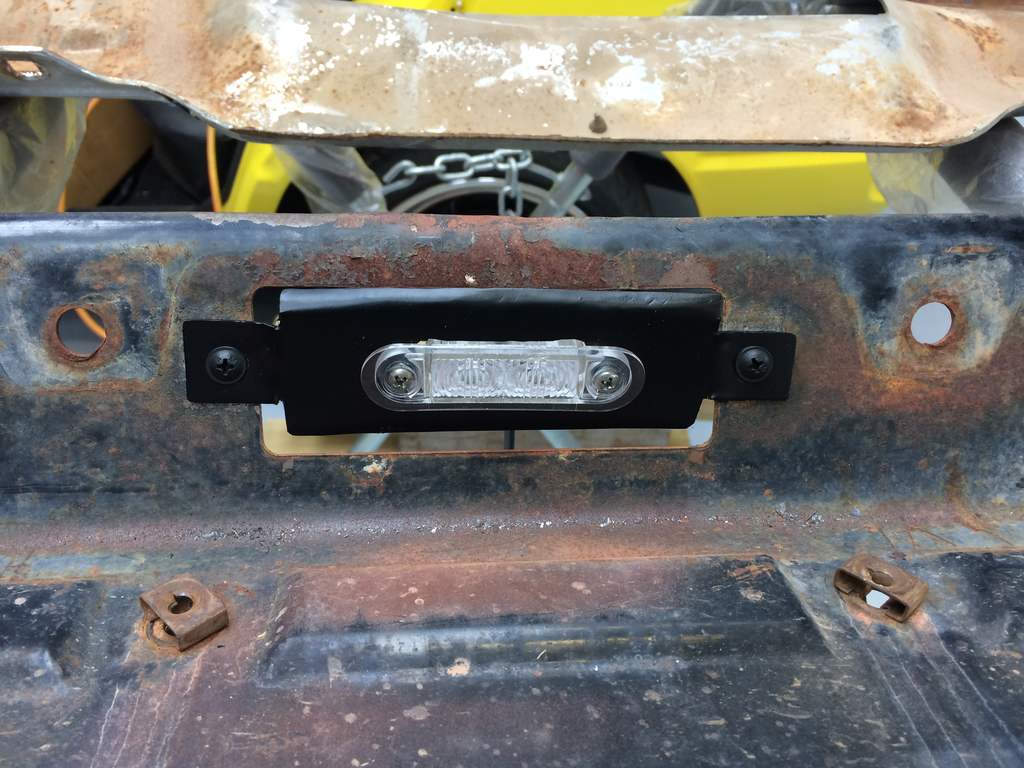
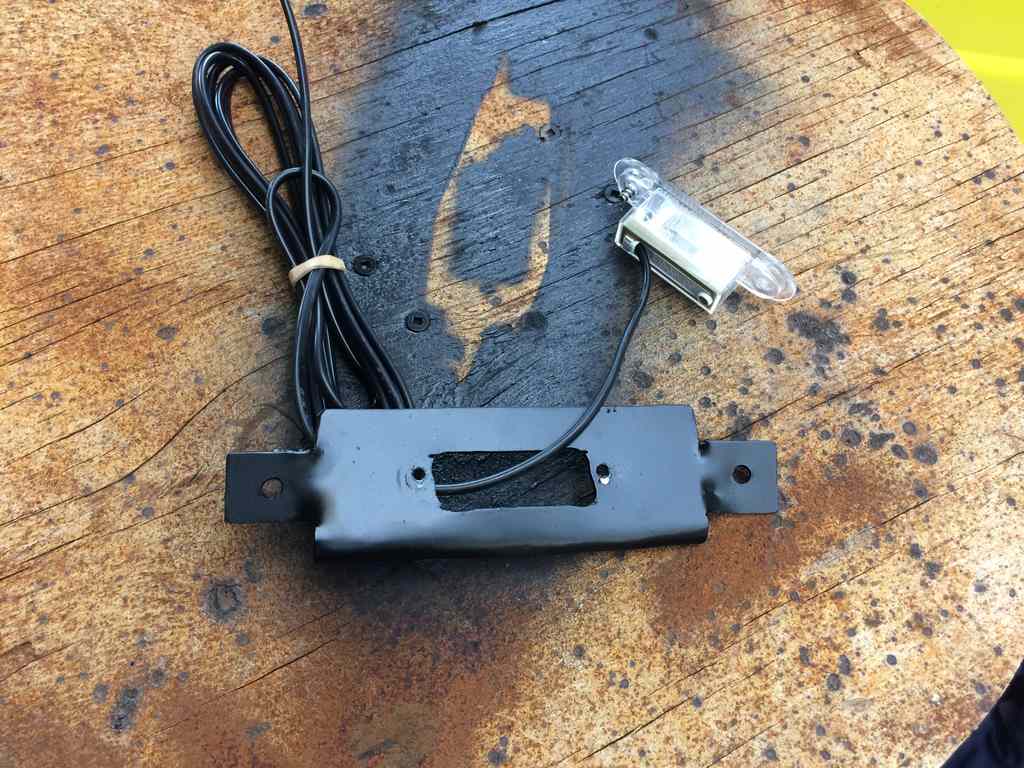
So after fixing the chassis rail i placed the car back on its frame and tighten her up. but seen as it had been hit in the past causing the poor chassis repair the bumper was also bent and twisted upto shit. so we made up a jig so that we could fit our porta power and bend it back into shape. so yeah big ol gap other side you could fit your fingers where the bumper wraps around the car where the side you can see (R/H) side is hard up against the rear quarter so i split the the bumper into pieces so it could be straighten out then placed one at a time on our pressing jig also made up some blocks of wood for underneath in the shape of the bumper. then spent a bit of time pressing the bumper then removing and checking and back in again. while this seemed like a straight forward exercise it took alot of time and we did it by using no heat as we didn't want to damage the chrome on the bumper and had a problem where the top face of the bumper would bend quite noticeably so while we had some pressure on the bumper we used a piece of wood and a big hammer and hit where the big bend was. This worked although it was time consuming as it had to come on and off the jig several times. Then this inner bumper frame was inserted in the jig and bent back into shape. This piece was alot more straight forward and less time consuming. we also had to bend out the corners of the bumper as they were set too far inwards but just did that using the porta power. so when that was done another thing i had to tick off the list for compliance was the rego lamp as when i went back for my recheck he said i had to have a rego lamp lense. would of been a whole lot easier if they had told me in the first inspection. not in the recheck so seen as the cost of a new lense and gasket was much the same cost of a new led generic rego lamp. so i went out and got one. sometimes its better to update and not continue fucking with old crap. although i should have got one from ali tbh. made a real average spec holder for the led one out of some panel steel. then painted it and fitted it. also gave it a bit of angle to face the plate. not really a nice tidy finish i was hoping for but kinda couldn't be bothered making another better one. so on it went. then placed the two halfs of the bumper back on and fitted it too the car. so now has some more even gaps and looks a whole lot tidier.
1 point
-
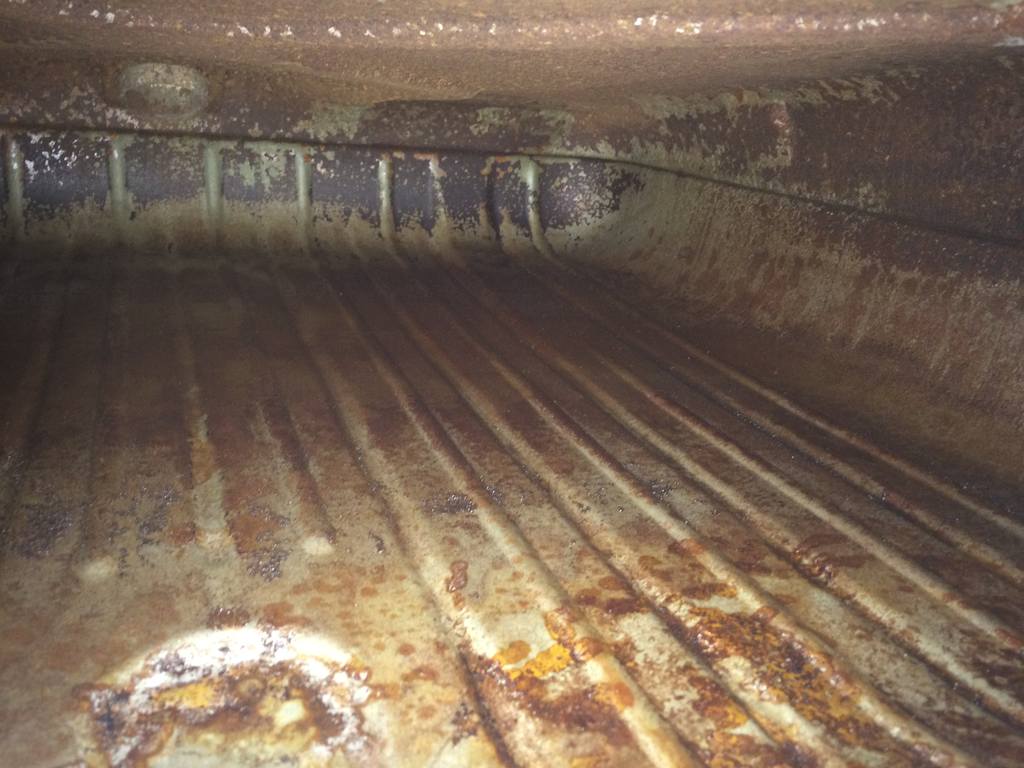
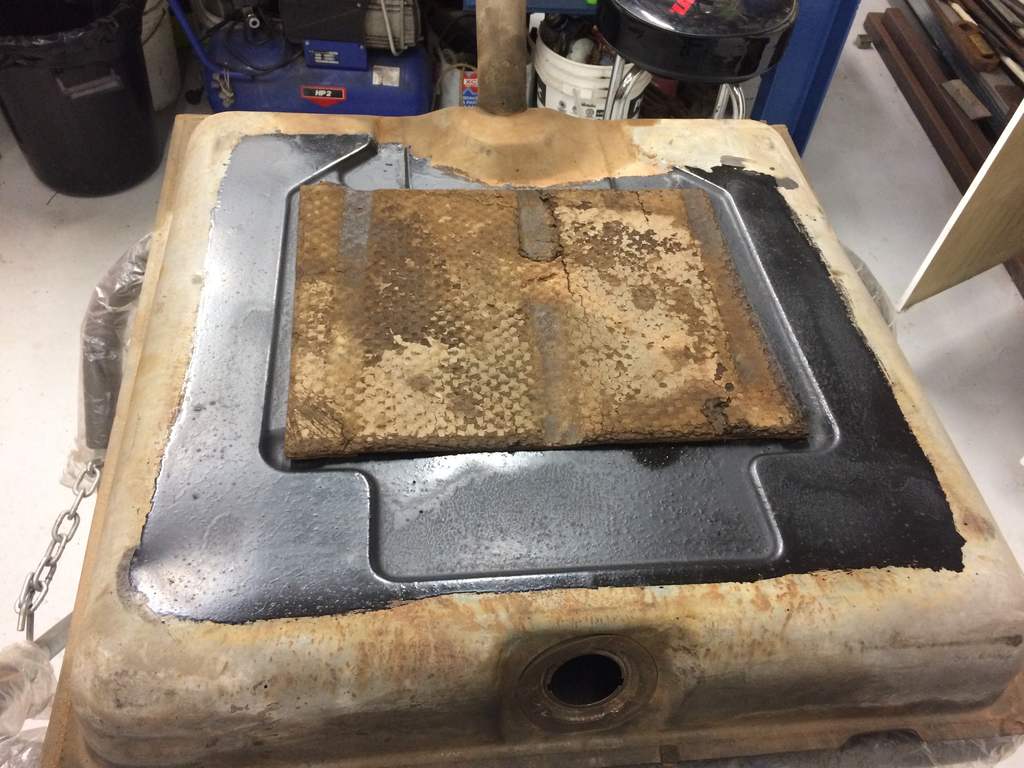
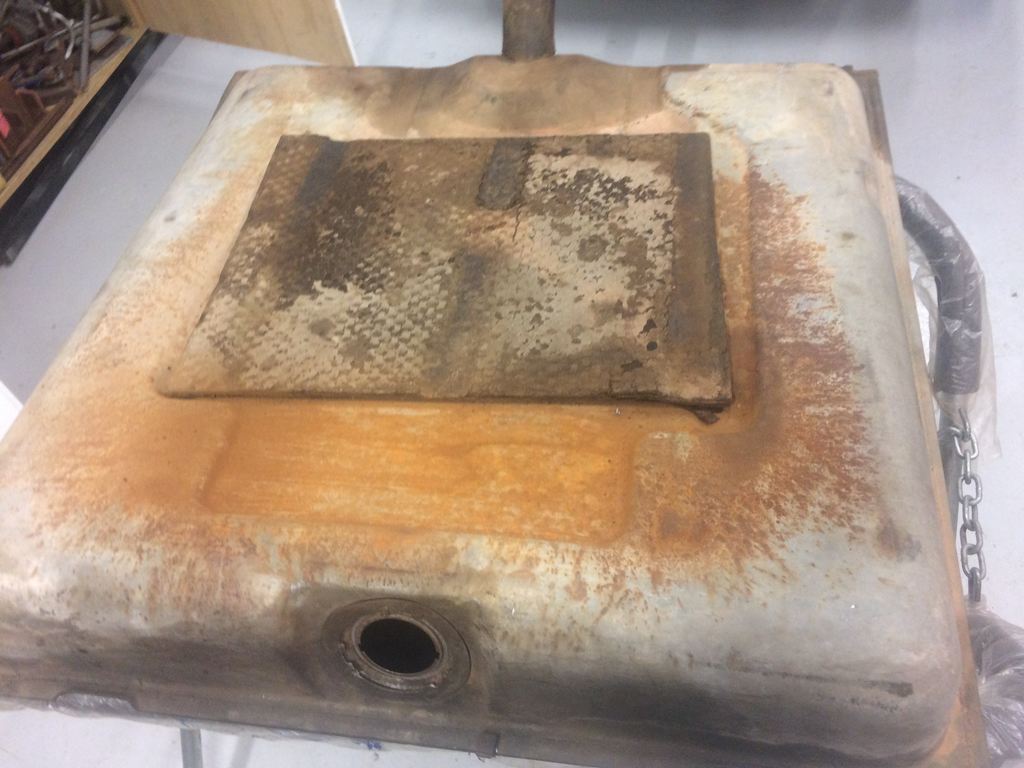
so seen as i already broke this car getting it out of the driveway i may aswell fix it some more. seen as the fuel strap come off i figured i would pull the other one off too and clean up the thread so out came the tank too And drained all of the petrol out of it too had about 30 litres in it. so i also pulled the sender out of the tank to test and check its condition and to check the inside of the tank. well it has quite alot of shit in it. but seen as the last rego tag on the car says 2013 its been doing some sitting around causing the fuel to turn into a solid form. so whipped in some rocks while the tank was dry and shook them around. then shook all of that out I then added some smaller rocks with water and spend about 20 minutes shaking it all around. Ended up getting alot of the crap out of there but the remaining surface rust was left. But at some point in the future i will be pulling the tank out again and giving it the por15 tank treatment to seal up all the rust. but after the 20 minutes of shaking it i must of spent the next hour trying to get all the rocks and crap out by shaking it and flushing it with water and some shitty old petrol i had lying around. was not a fun experience at all. so a bit more cleaner. but i will need to add a filter somewhere in the line to stop it getting to the carb. also gave the top of the tank some por15 to treat some of the rust it had on it. and removed the rubber pad off it too and did underneath as well. so now your asking why i didn't do the whole tank? i did it as the compliance inspectors don't like new paint as it tend to to show its hiding something underneath. so just did that piece as you shouldn't be able to see it when the tank is in place. but again will do the whole thing in por15 and respray over that in silver like the factory to prevent any further rust.
1 point


.thumb.jpeg.910c6632f6e66e8cba89476e83b41634.jpeg)


.jpg.59d91e6fde13f11d1a9d14628ab66c8a.jpg)
.jpg.44b6af475bf9a7fc230b8438bfeb461c.jpg)

This leaderboard is set to Auckland/GMT+12:00