
Leaderboard


Popular Content
Showing content with the highest reputation on 10/18/17 in all areas
-
Got word from the machine shop that I can pick my engine up on Thursday! it came in at under half what I expected to pay so I’m fizzy! they did new bearings throughout, frost plugs, ground crank, acid tanked block, resized rods, measured up the rotating, removed + cleaned + tapped and bunged the crank. tore the engine out after work in preparation, jazzed on a long weekend refit and run in. also got some lock nuts and maybe some freebie chrome wheel nuts. good week7 points
-
Thanks, lingor.6 points
-
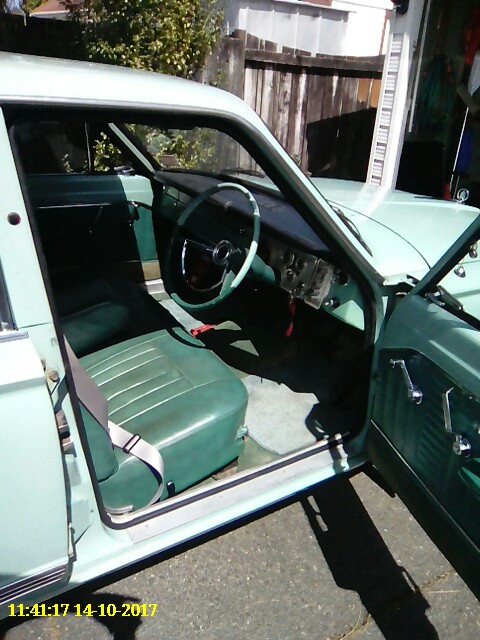
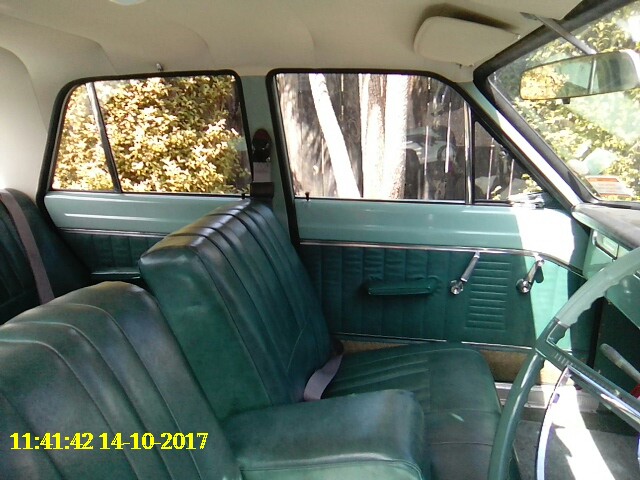
G'day All, Figured I may as well make a little project log thingy for my newest project, a '62 Morris Mini Minor. I picked this thing up not too long ago and have been getting stuck in with ambitions to have it done early next year. I've been on the hunt for a MK1 for ages now so I'm super stoked to get into it. The car had been stripped down and semi-restored some 20 years ago by the previous owner, but never quite finished. This has led to the paint deteriorating, and heaps of parts disappearing over time. This prompted me to buy a '62 parts car from some guys lawn for its engine/interior bits/suspension parts. I've got almost all of the parts for it now! Its just a matter of painting it and getting it back together and on the road again As far as plans go I'm still not totally sure what color id like it to be. Wheels can be changed to suit, but I guess paint's a different story. Was thinking something along the lines of a light metallic blue with an old English white roof, wide steels/mags and a mesh sun visor for that retro mod kinda look. Something that could be taken back to original spec if need be. Was even thinking of doing it black or just standard white, but I'm not too sure. Cheers guys, looking forward to getting more involved on the forum. -Jack. -The 850cc engine in the front end of the less than fortunate parts car. 25 years of sitting on a lawn didn't stop it from running - it fired right up the day after it fell out of the van and onto the driveway. Wasn't seized, and has only done 40,000 miles. Just hoping that the 850 will be enough for me to keep up with traffic!3 points
-
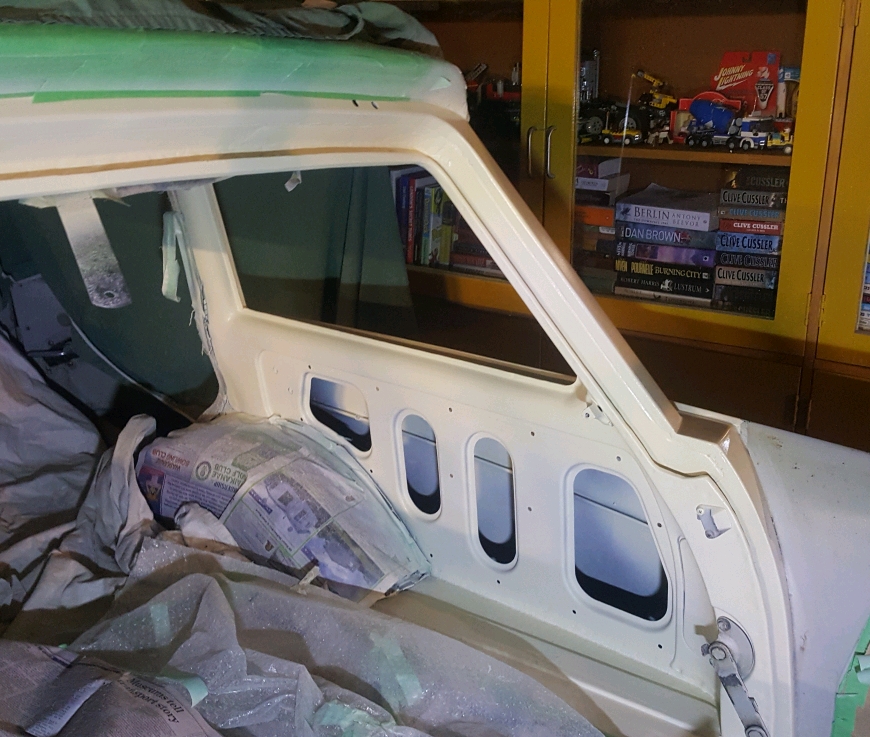
Mixed the paint a bit thicker this time. 13 seconds through the Din 4 cup. Easier to spray I guess. So did that last night and clear tonight.
 3 points
 -
Swanndri MotoX helmet Jeans Steel caps3 points
-
https://www.trademe.co.nz/motors/motorbikes/motorbikes/dirt-bikes/auction-1437134367.htm closes soon3 points
-
Oh no the wof has run out on my car! Guess I'd better come along anyway.3 points
-
Denim shorts and denim vests3 points
-
Time for some go-fast bits! After a bit of searching around I managed to pickup a pair of twin SU carbs on a genuine cooper S manifold, accompanied by the 12G202 head, which supposedly flows much better than the original 850 head. A few months ago I also scored a full cooper style exhaust system including LCB extractors that lead to a single muffler in the rear. Of course, I couldn't wait to test out my new bits so I threw them on a thrashed (had a really hard life) 850 and attempted to tune my twin carbs. Long story short this didn't really work out as my manifold is missing its locating rings (which should arrive tomorrow). This meant that I destroyed two inlet gaskets, which created a huge air leak, and ultimately prevented the motor from running properly. Instead, it started up, revved until the valves couldn't let it go any harder, before quickly calling it quits and turning off again. Doing this multiple times with different gaskets yielded the same result. However, it gave me a good indication of what the car will sound like! The situation with the cylinder head is quite tricky. The standard compression ratio for an 850 is 8:3:1, which I understand is fairly low. Throwing my 12G202 head on there, which is from an 1100, will drop my ratio to 7:9:1! I believe this is really low, and am debating whether or not to get it milled, or to leave it as it is and bolt it down. Some say to bolt it on, some say to bring my compression up to 9:1 by removing 4.1cc from my combustion chambers. Has anybody put a 12G202 head on an 850 engine before? I'd really love some advice as cylinder head machining and compression ratios are new to me. The neat part about the twin carbs would have to be the interesting air filters. They're called a "Pressmaster" and are New Zealand made. Not sure if they're a rare piece nowadays, but they look neat. I've never seen them before. I've also ordered a heap of new bits which should be arriving tomorrow and will allow me to make some more progress on the engine. Cheers, Jack3 points
-
Right! I've made a good start on the mechanical's by getting into the little 850, and the front sub-frames. The engine is rumored to have traveled a mere 40,077 miles since it's birth in early 1962. It even had its original cast iron water pump and fan belt! I've deconstructed it enough for my liking (Short Block, the crank doesn't need to come out), and as soon as the gaskets and assorted new bits arrive it will be going back together. No lip on the lifters, bore, or any other parts. The clutch has a ton of meat left on it, and I didn't even snap any of the bolts off in the strip down That's always a plus! The grand plan is to give the engine a big birthday, new gaskets, thermostat housing and thermostat, water pump, hoses, fan belt, paint up, plugs, points, leads, extractors and a better carburetor. If the engine is anything to go by, then I'm expecting the gearbox to be in great shape too! As far as subframes go, I'm happy to have a pre '64 Mk1, as 1964 was the year hydrospastic suspension was introduced to the mini. Since my two front rubber cones sat still for 23 odd years, they've been naturally compressed and are holding their, so I'm expecting the car to sit a little lower in the front. After we construct a rotisserie, the body will be properly rust proofed and under-sealed. Then paint will follow. Even though I can understand doing a period correct colour, there aren't many solid colors that I actually like. I'm liking the looks of the light metallic blue on the new BMW mini's. Was thinking I could do this with an old English white roof for a sort of modern take on a classic (old mini with a new mini colour scheme kinda thing). Anyways, I don't currently have enough money to splash out on paint at the moment so I have plenty of time to think! Cheers -Jack3 points
-
Go green mate, safest colour.2 points
-
Headhunters, Greazy Dogs. Some mongrels I think. I plan on just using my bike as a weapon for any gang fights.2 points
-
Sweet I have boots, motocross gloves and a swanndri. Easy.2 points
-
Need to get a set of Bluetooth headphones off Jack Ma so i can crank easy rider on repeat2 points
-
This is such a sweet name for an event. Would be lols to throw nobblies on the MC21 and come along. One day...2 points
-
2 points
-
I can probably rustle up a propa bike jacket/pants/gloves for ya, though they may be a bit small for ya. ya.2 points
-
There’s no artistic ability here, just scribbles tbh can giz a hoon next week though and pm a scribble through to you If you want though j52 points
-
Leave booked Weathers getting better Exciting2 points
-
@Shakotom2 points
-
I'm quite looking forward to this. Have just been reminded also, does anyone with an artistic ability or creative streak want to throw together some crayon scribbles for stickers/t shirts/posters?2 points
-
THIS IS JUST OVER A MONTH AWAY, OW MER GERD.2 points
-
Not a bad idea, maybe I could vape into it then sniff out the source of butterscotch and hipster2 points
-
Gave the hinges a bit of a polish and made some nylon washers, it all should work well I hope. Need to find some wood for the bed now. Decided I should go back and finish mounting the front sway bar. Started by making some new mounts since the ones that came with the rubbers weren't very nice. Bolted it all down in the right place and stole the sway bar links off the rear since they need to be changed anyway. Needed to cut out the side of that gusset sorta thing on the front end that I made ages ago since the sway bar hit it when the front raises up. Another thing that my parents picked up in America was an ashtray that goes in the middle dash panel, since neither of the RHD dashes came with one. Could of used the LHD one but wanted to keep that dash complete to hang on the wall or something haha. Had to get a second hand one since they don't sell them separate from the whole dash panel, and they were never made in stainless so it will need to be painted or chromed.2 points
-
Progress Progress... My plan of attack is to get the front & rear sub frames + the engine completed by the end of the year. On my college budget this will be a stretch but I think I'm capable of getting it done! I have new lower arm bushes, engine stabilizer bushes, cv boots and dust covers all ready to be installed. Yesterday engine paint was brought. It's not the original engine color (or even close really) but I think it's an improvement over the standard military looking green engines that minis came with. Certainly brighter than what the cap on the tin said! But I'm liking it. The car isn't being restored to complete factory spec, so I'm not too fussed. I picked up another complete 850, this one's a 1964. Whilst it runs, its been run hot, and hard. Plus its really sludgy on the inside, so it'd probably make a good rebuilder, but for now it's provided me with some really good parts, namely a generator that's dead silent when it spins (quite hard to find quiet ones!) and a tidy starter motor, both of which I have restored. So far, I've got most of the front sub frame parts painted and ready to go back into the frame. The rear sub-frame is virtually finished bar one brake hose! Wish me luck. Jack.2 points
-
I have two AW11 MR2's - one turned into a mule, and the other is my daily. This thread is about how one turned into the other. The project started seven years ago, when I bought a silver AW11. It was tidy enough, but had a bad engine that kept overheating. I attended a Toyspeed meet in '11 down in Manfield, and after the journey there, doing a few laps of the track, and the journey back again, and having to put up with blowing coolant everywhere every so often, I had had enough, and arranged to buy a 4AGZE smallport, with the intent to rebuild it over a summer and within a year of that, throw a turbo on it. It would be my first engine build to be completed, though I had practiced a few times with various 4AGE's that never made it to completion. Summer arrived and departed, and the engine was in pieces. Money and time were the issues, but I kept at it, gradually acquiring parts, planning etc. I realized this would take a lot longer than I figured, so a year later, I swapped the overheating 1st gen bigport out for a 2nd gen bigport, which was a supreme workhorse and lasted the next four years without any problems. Progress continued on the 4AGTE build as time and money allowed, but was interrupted for a few years, and stored at my brothers workshop. At this point it was an assembled short block and reconditioned head with bigport cams. Financials improved in 2015, and my brother was moving, so I arranged to pick up the engine, and immediately I got the itch again. Within a week or so, the head was torqued down on the block, timing belt set, and turbo slung on the side. It should be noted that the turbo at this point was a T3 flanged China special with a stainless steel manifold that was highly likely to bend. But its what I had. I had some oil and water lines made up, and then started planning the supporting mods. * Adjustable rising rate FPR * 440cc 7MGTE injectors * MTX-L wideband gauge * Megasquirt * Celica W2A intercooler, radiator, pumps, and hoses suitable for an MR2 * DPR blowoff valve * 2.5in twin-outlet exhaust with 20v headers At first I tried using the dual coil packs and CAS that came it, using a Mitsi dumb ignitor with the Megasquirt. The intent was to get this I didnt have much luck getting it to run, so tried a coil-on-plug setup, with the Megasquirt set up for sequential ignition. This also proved hard to perfect, so while I havent given up on it, I figured the distributor based system that was in the car was good enough for now. And it ran, and I was getting bored with ignition. The engine itself is mostly stock. It was bored over 0.5mm, acid dipped, crack tested, shot peened, fully balanced, align bored, skimmed, the works. I wanted this thing to be bulletproof. I fitted brand new factory forged pistons and ACL Race Series bearings to the block. The head was reconditioned to factory specs, but with some slightly bigger bigport cams that I had lying around. I fitted some adjustable cam gears, a Cometic MLS head gasket, and ARP head studs and flywheel bolts. Soon enough, there was nothing left to do, so it went in. And fired up. And it was glorious. The engine that I built from scratch was living and breathing. Its now done about 5000km, and hasnt missed a beat - its been a huge success. Im so happy that nothing has gone wrong with it.. because any kind of engine failure would probably kill the project, and it proves I did everything right. If Im honest, I had reservations that the engine wouldnt destroy itself as it sat there about to be fired up for the first time. But no, its proven to be a perfect runner. Around 8.5:1 compression, 160psi on all cylinders. As I was having issues getting the Megasquirt running well, due to dodgy grounds, mostly, I ran it on the stock ECU for the past couple of years. I attempted to mount the turbo (venting to atmosphere), and had a return bung welded to the sump, but it was too restrictive and resulted in smoke billowing out of the exhaust. Its possible I could have fixed things by just using a much bigger oil drain, but I decided to go down a different route. A year ago, it failed a WOF for structural rust, and when I went hunting for the worst of it, discovered most of the front firewall was being eaten away. I figured I could sink money into it in an attempt to revive the car, or find a pristine AW11 instead. Well, I found one. It has been completely de-rusted, a top quality paint job applied (dont care about color so much), 205-wide 5-spoke deep dish wheels, wheel arches, adjustable suspension, Bride bucket seats, braided brake lines, and (the finishing touch) a Silvertop 20v with open throttle bodies and a Blacktop ECU. Pretty much everything I wanted in an MR2 that I hadnt already done to the silver car. I snapped it up in a heart beat. So the project officially is now the yellow car, and the silver car is deregistered, but still in use as my test-bed. It still holds the rebuilt smallport as its heart, for now, but that will be swapped into the yellow car in the near future. Earlier last year, I found a good turbo setup, previously used on a race spec Corolla. It had a wicked low profile tubular manifold that sat the turbo, a TD05HR, quite high, which is exactly what I was after. Unfortunately, when attempting to fit the thing, I discovered that while it bolted on ok, the inlet to the turbo was blocked by all of the AW11 gearbox linkages, making any attempt to use an air filter impossible. I sold that turbo and manifold for what I bought it for, and considered going back to the original turbo, and sourcing a scavenge pump to solve the smoking, but then as luck would have it, while bitching about this situation on the MR2OC forum, one of the members had the solution - again, a TD05HR, but this time with a manifold designs specifically for AW11 MR2's. The manifold sits the turbo slightly skewed, and so clears everything it needs to, and the inlet is freely accessible. Bought it immediately. Test fit, no problems. Went ahead and started planning a foolproof oil drain for this unit. Took the sump off and drilled out a hole for a large brass fitting, sealed on both sides, and had the turbo outlet bung modified with a -12AN full flow bung, and a matching AN-to-hose barb fitting. Initially I wanted to see what the oil was doing, so am using a length of transparent hose entirely unsuitable for the application, but its serving its purpose. Itll be replaced with something more suitable for heat and oil very soon. Also had exhaust downpipe and turbo uppipe sections made, and finalized the rest of the intake charge piping, intercooler hoses, wiring, etcetc. Just recently, I managed to fix the remaining issues the Megasquirt was having, and got it running well, so there wasnt much left holding me back from going for the first run with the turbo. No smoke! Despite having a guesstimate tune (rich and retarded), and an exhaust leak at the manifold, it boosted for the first time up to 5psi. Great power delivery, though a little late in the game - guessing its due to the aforementioned exhaust leak, and possibly boost leaks. Also probably the tune. Everything can be improved upon from here. So thats where the project is at for the time being. More to come. The ultimate goal is 15psi and near-enough 200kw.1 point
-
@azzurro A solid 3-4 minutes of intense sniffing, and high frequency tail wags as we discussed
1 point
-
Shit even I made it1 point
-
Woooop mother funkers this is tomorrow. Citment.1 point
-
buy two speights, get the third shanked through your leg. sounds like a deal!1 point
-
Yea avoid day 1&2 should be ok on day 31 point
-
Van x2 edit: beaten x21 point
-
Headhunters out there m81 point
-
I can't remember what gang lives around those parts, but remember to bring weapons to defend your patch.1 point
-
@stillway Brooooo1 point
-
You got a place lined up for stickers/posters? I can prolly get a deal through Steve, or you thinking Christian?1 point
-
RIDE STICKER DESIGN HAS BEEN SENT AWAY TO THE PRINTERS! BRING SOME CASH MONEYS ON THE DAY TO GET THIS ONE TIME ONLY OFFER ECT NEXT SUNDAY!?1 point
-
Going to attempt to make my new motorsickle travel down the road to this. I also have some of my junk for @Mr Vapour & @piazzanoob.1 point
-
It's likely phosphoric acid based.1 point
-
That would be great! Yeah man, please do. @Sambo and @locost_bryan the Pioneer Stereo that @j.e.d. was giving away will be with me at the meet tonight should either one of you want it.1 point
-
Electric ignition fricking rocks!! The dizzy must be tired because electric ignition made it run how it should at TDC without needing shitloads of advance! Would it be a good idea to try get another dizzy? Or this be sweet now it's electric? dizzy is a delco 202 later model, the electric ignition kit was for a delco so direct bolt in kit! Car seems to be running unbelievably better lots more power with no hesitation like it use to have, am thinking of opening spark plug a up a little and see if any difference again! now that she's running mint I thought it would be a good idea to grab the triple carb setup for it! Stromberg CD150 x3 2 of them had been dropped some years back and had cracked with the brass barb fitting where it threads into the carb, the bodies on these carbs are super super soft After having a good look I noticed they were cast quite deep into the carb body so I hacksawed off the broken bit leaving 5mm~ to be re threaded! Too easy you reckon? yeah nah aye. This is prince ownership, nothing is that easy. after I had em re threaded very carefully it blew the arse off the body so that's them stuffed! only very small but they wont seal so decided to go back to plan A and look for some others. mind the JB weld was previous owners attempt at the fix. box of spares... Was quite a successful day auctually, ol mate @Threeonthetree put me in touch with someone who had a set kicking about so they are currently on the courier to my place! Look to be in good nick but insure if they work or not but I plan to just swap it all over anyway as the current 3 on manifolds have been jetted for the Vauxhall 3.3 hopefully be able to chuck em on over next few weeks n make the 0-100 km top speed that little bit faster! Fun in times ahead! Discussion thread!1 point
-
.1 point
-
Swapped the 175/50/13 yokohamas onto the starsharks. It's so slammed now haha. It's also nicer to drive in most ways because it sits at slightly higher revs, apart from high speed cruising which still isn't too bad. Speedo is waaaay out now though!1 point
-
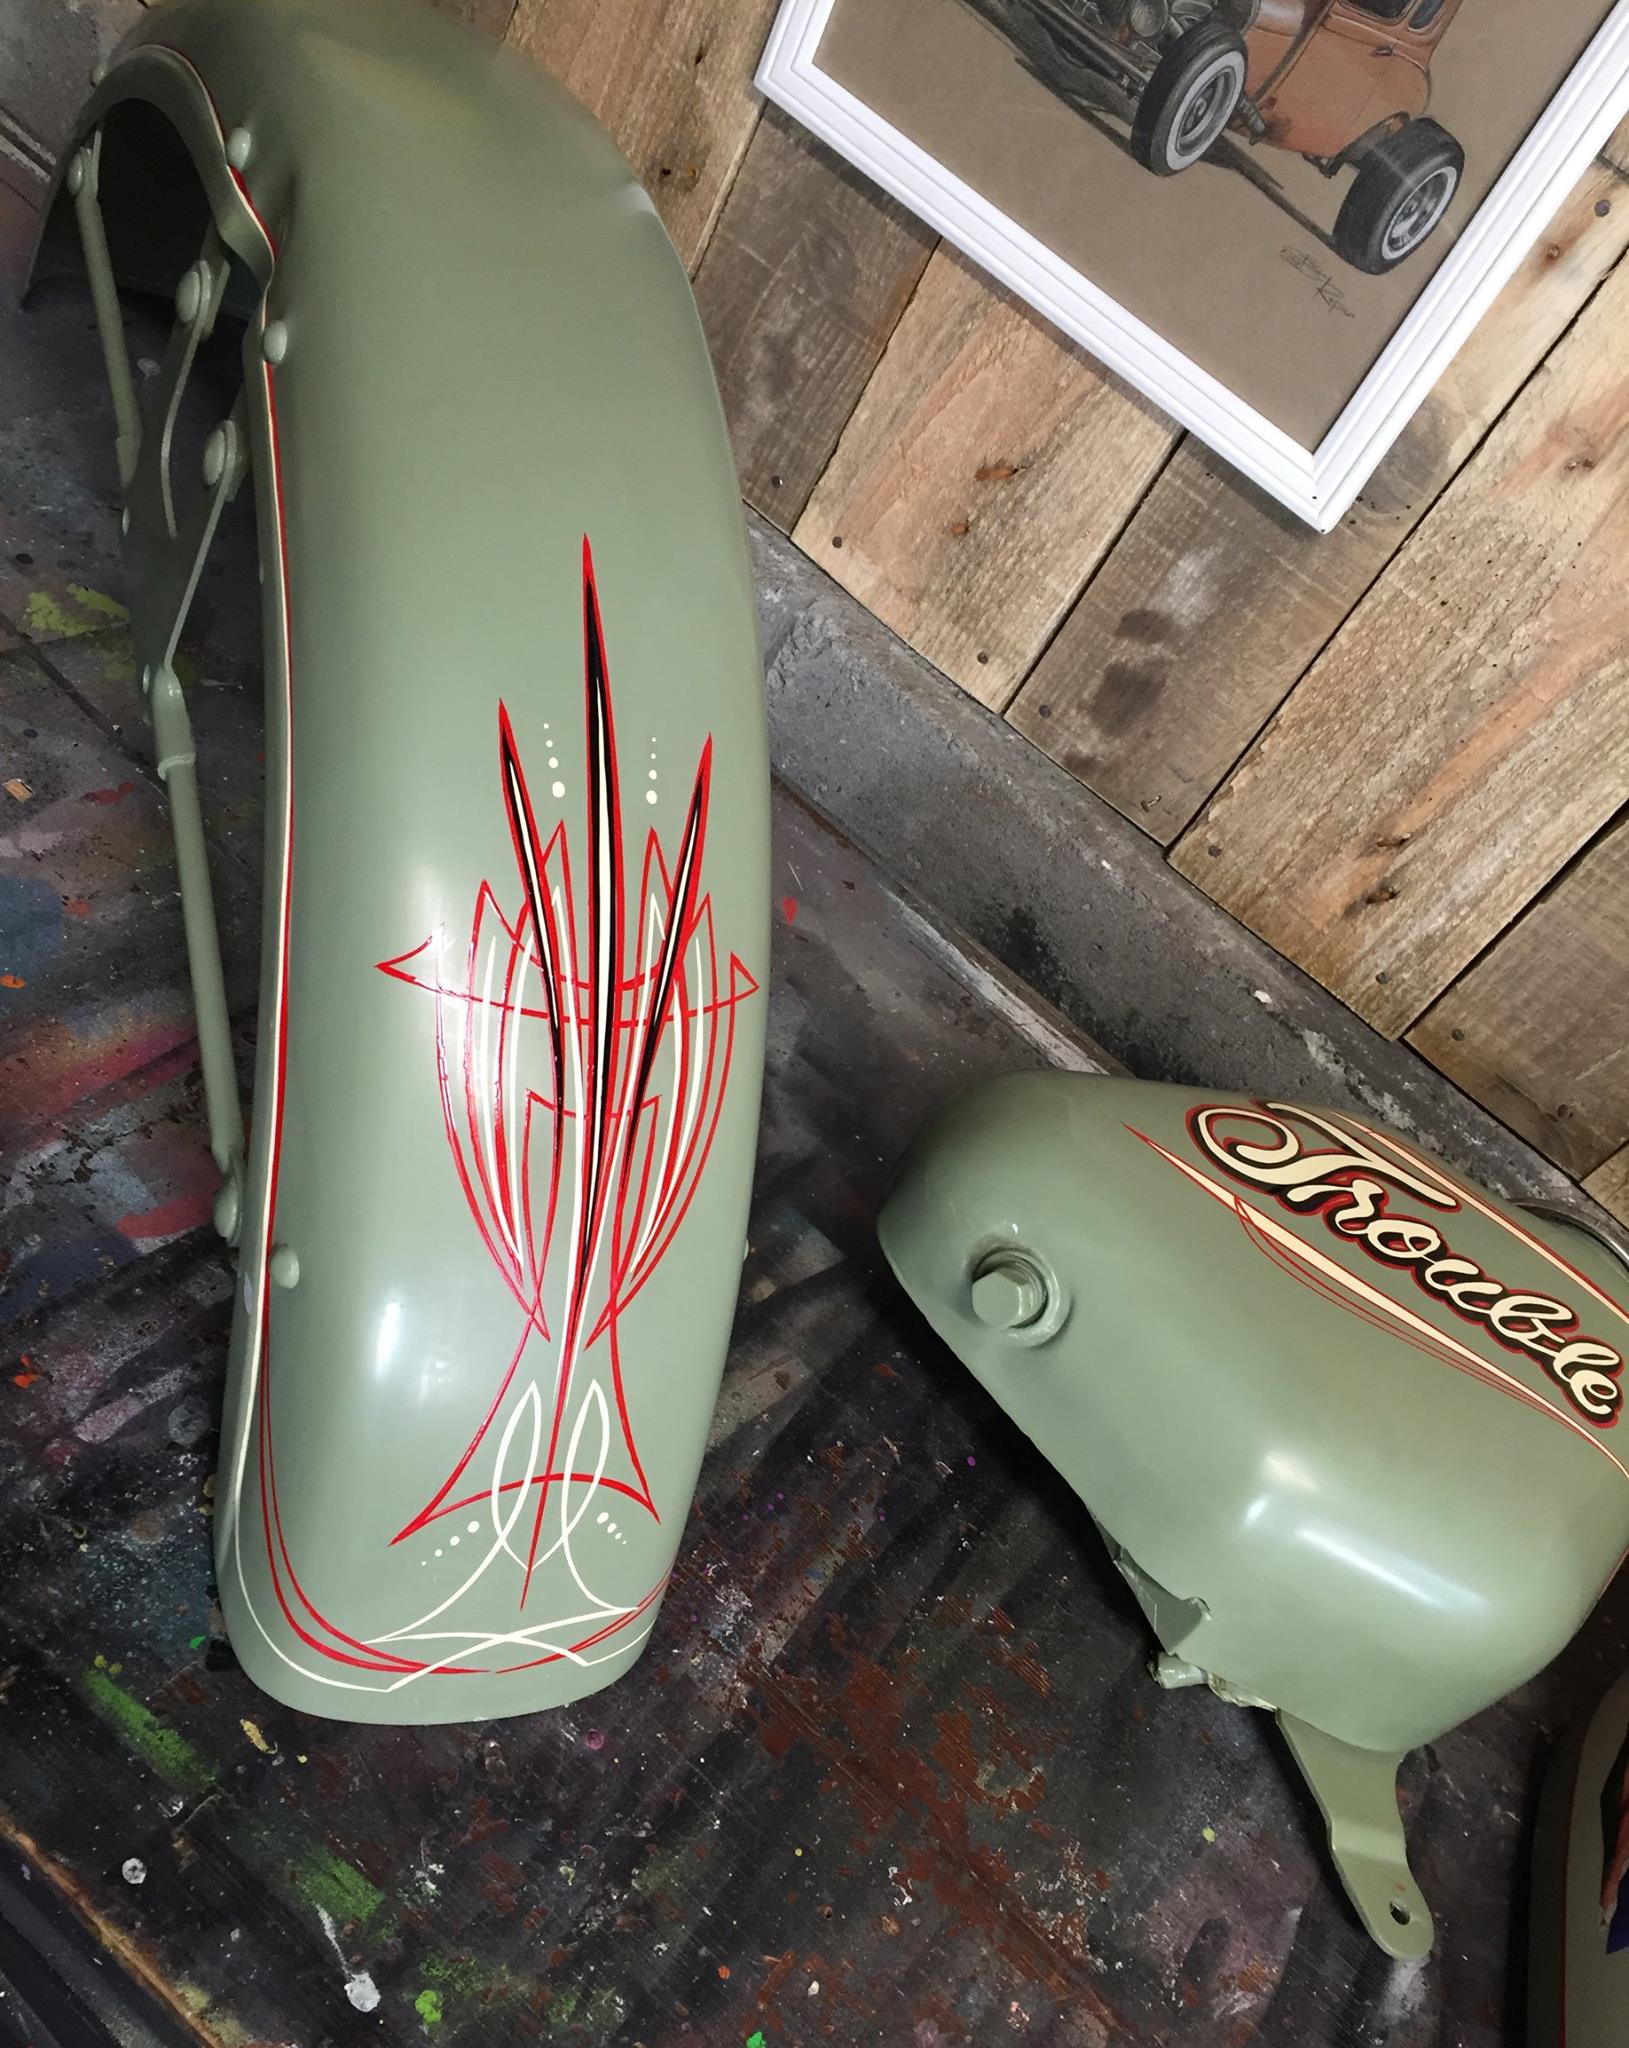
If you've ever wanted to have a decent hoon at pinstriping but wanted some pro-tips to get better results sooner, well... I'm working with a friend, Stace the Ace, to put on a bit of a Pin-striping school in my shed. There's going to be a Tuesday Night Class starting on the 7th November and running for 4 weeks, or a 2 day intensive course on the 11th and 12th of November. The basic idea is you get taught the basics of line work, how to use and hold the brushes, how different brushes create different lines, all sorts of other black-arts stuff, and at the end, apply it all on a small project of your own to take away and show your mates. It should be pretty good, she's got a clear timetable and knack for explaining stuff to make sure you get to feeling confident about what you're doing. It's $180, and you'll need some brushes and whatnot but we can help with those at a cheap rate. November 7th for 4 weeks, 6.30 - 9.30pm November 11th/12th from 9am - 4pm Website: http://www.tinker.co.nz/newclasses Facebook: http://bit.ly/2ynBDmE And please feel free to share those links... Chur.
1 point
-
Spring is here, sun is shining and the welder is sending beautiful sparks in the air. Progress is picking up. Engine is out as is obvious from the above pic. The jig that was made up way back when the Hudson was still whole to mark out the holes to mount any panel work is in place and everything is looking good. A few tweaks will be needed but other than that pretty happy with it. A better look at the trans mount and brace that strengthens up the frame so the whole thing dosnt collapse inwards as the sides flay outwards like some molten pudding. (im on a bit of a sweet vibe at the moment- would totally demolish a pack of licorice). Any who this shows the top hat cross sections way better than the last posts pictures. They will be out soon so the frame can be strengthen up. Pic above is for Hnstray on HAMB (I post this build on multiple sites). Showing the diagonal "braces" and how they are mounted on conveyor belt rubber at the bottoms so don't really add anything in the way of bracing. From the jig you can see how they are used mainly to mount the inner guards. That bracket up top held the horns. A better look at the jig that marks the mounting holes. Once everything is marked out the front clip will be taken off. Braced up where needed at the back. Holes cut - both for mounting the panels and rad but also larger ones to help add a crumple zone. Part of the NZ cert rules say we must have a crumple zone to help absorb an impact. So those nice big ol holes we used when doing the rear end will be brought forward up front. The half pipe notching for the steering arms will also add to the whole crumple zone. Then weld it all together, add a lick of paint, put it all together along with the engine panels, rad etc to make sure it all fits.1 point
-
Apart from the poor palmy turnout, it was good! More same pics1 point
-
Also installed the new door seals this weekend. These have been sitting on my work bench for months so it's about time. I removed the old seals and was very happy to find all the sheet metal in good condition. New seals fitted and looking way tidier.
1 point
-
So a bit more digging today, i pulled out the interior, seats and carpets are fine to reuse, floors and sills and pillars are excellent. but there was a suspicious amount of no more gaps with a coat of bitumen spray over it on the rear cab/floor join, inside and the tray side. After lots of thinners soaked rags to get rid of the black tarry shit, and about an hour of wire brushing, and emptying the vacuum twice. That no more gaps sure is is sticky stuff! This is the passenger side from inside the cab and is the worst, drivers only has a couple of spots This is the drivers side from the tray side, and is the worst, but passenger side has a couple of hole too. Might be easiest to cut and shut ~100mm wide sections from a sedan floor as they never rust there. My red 125 body is in now in Hamilton and ive been meaning to grab some bits back off it so i guess thats moved up the list. This are will probalby be the last to do as a result. The cab wall itself is fine. More rust chasing I think i found the 'custombuilt' part of this truck. The vertical shock mounts have actually been removed and the angled setup installed. I didnt have a very good look underneath but it looks factory, so i wonder if its got 1500 bits under there. There are a few holes to fill in both inner arches due to the torn spot welds rusting. There are also matching holes in front of each arch where ive never seen a sedan rust. As well as adding rusty holes to the list, I crossed some off. The tail gate was rusted though in one corner, but now it isnt! I was in the zone and forget to take pics till i put the first coat of primer on, but you get the idea. Will need a skim of putty (especially to fill my wonky edge line!) but im pretty happy with that for the first patch.1 point
-
nail biting time. sorted.1 point
-
Have also made a start on the rear quarter outer part. I found that it had been leaded the past (I stopped and put a proper mask on quick smart) so I cut out the leaded part as I didn't want to deal with it in welding and grinding. Turns out there was quite a big dent there that had been lead filled. As on the other side the vertical closing piece is mostly gone so I've ground that off. Patched the rear panel extension And patterns ready for tomorrow. The spare wheel goes into the compartment which is surprising in at least 3 ways. 1. Good packaging design. 2. The lower screw still works 3. It's not rusted out. It did have some dents which have been roughly bashed out now with a big hammer and piece of steel bar.1 point


.thumb.jpeg.384ff72c8d2b0ee0d34a7bdedb55bdcf.jpeg)


This leaderboard is set to Auckland/GMT+12:00