
Leaderboard


Popular Content
Showing content with the highest reputation on 07/25/17 in all areas
-
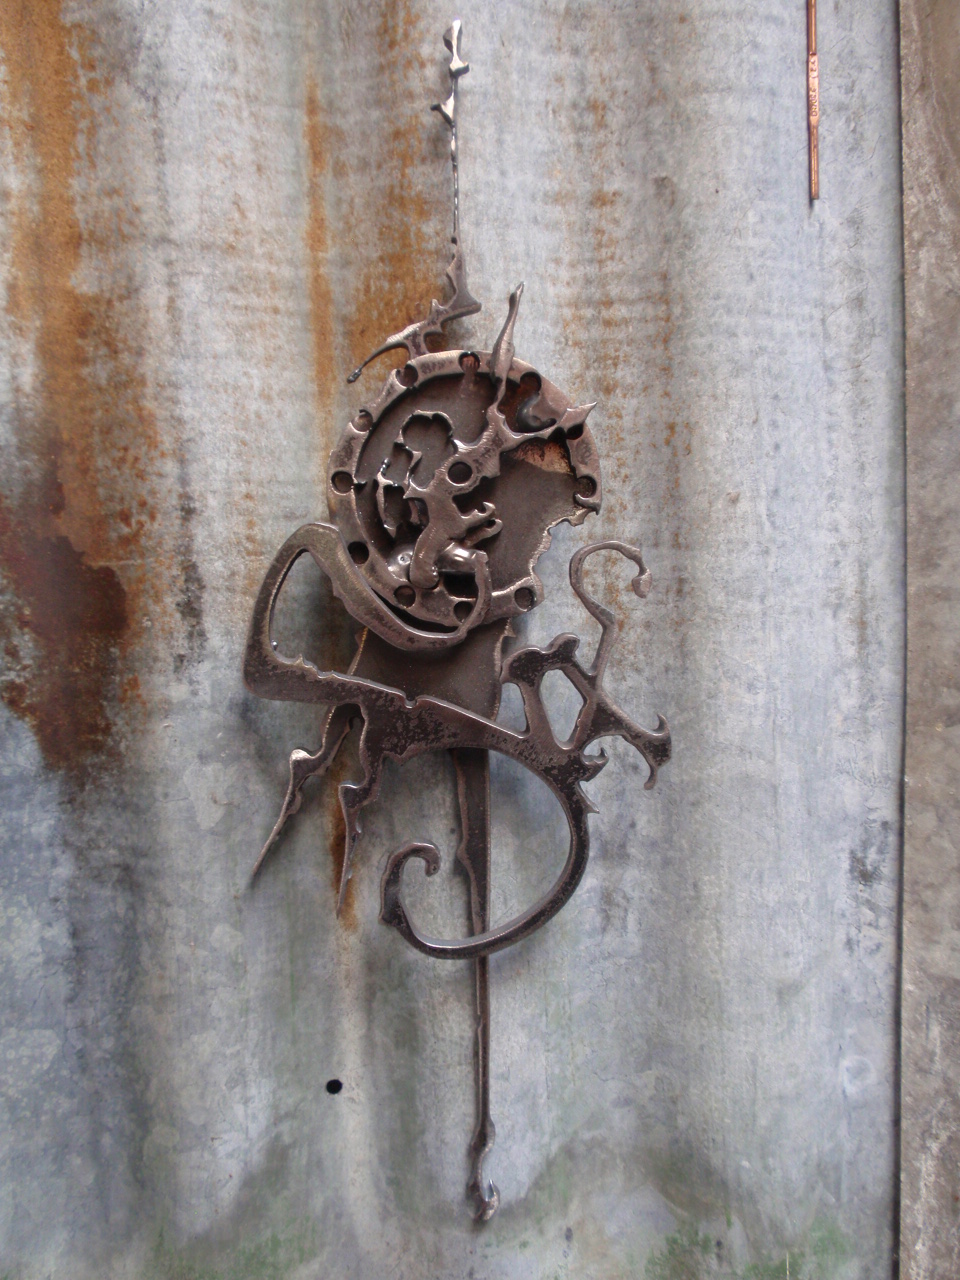
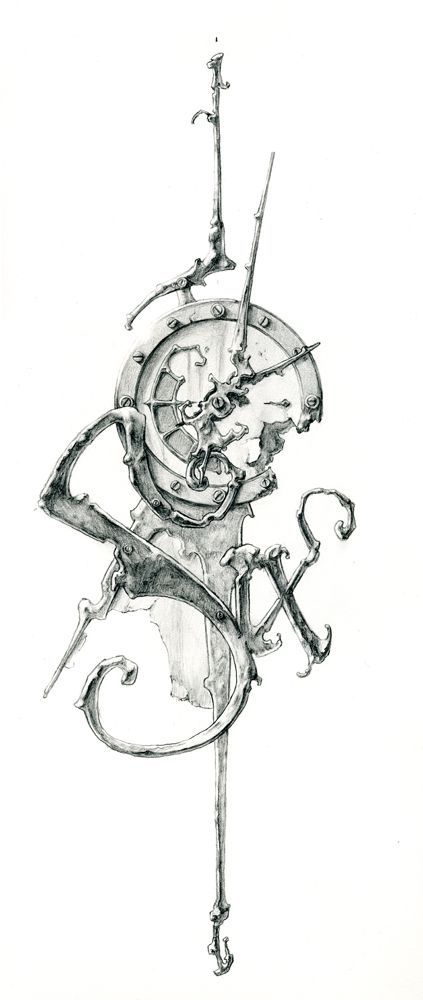
Saw this Steampunk genre drawing and made a real one.
 15 points
 -
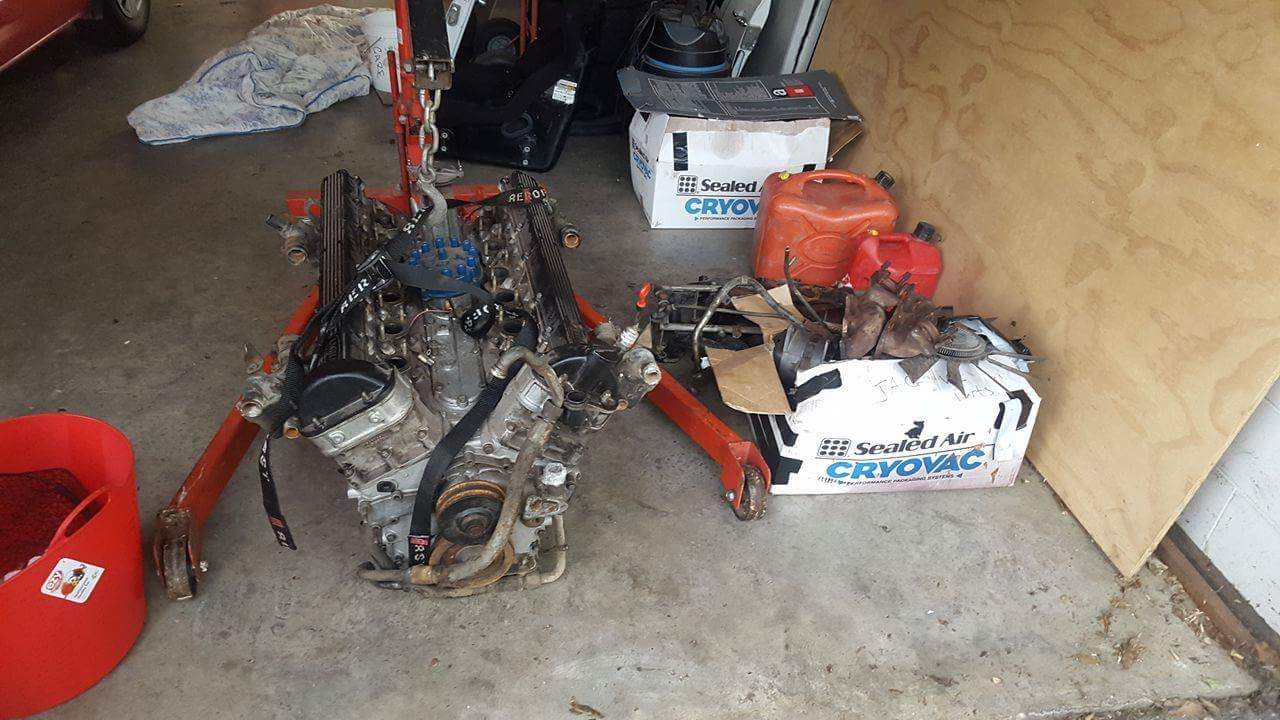
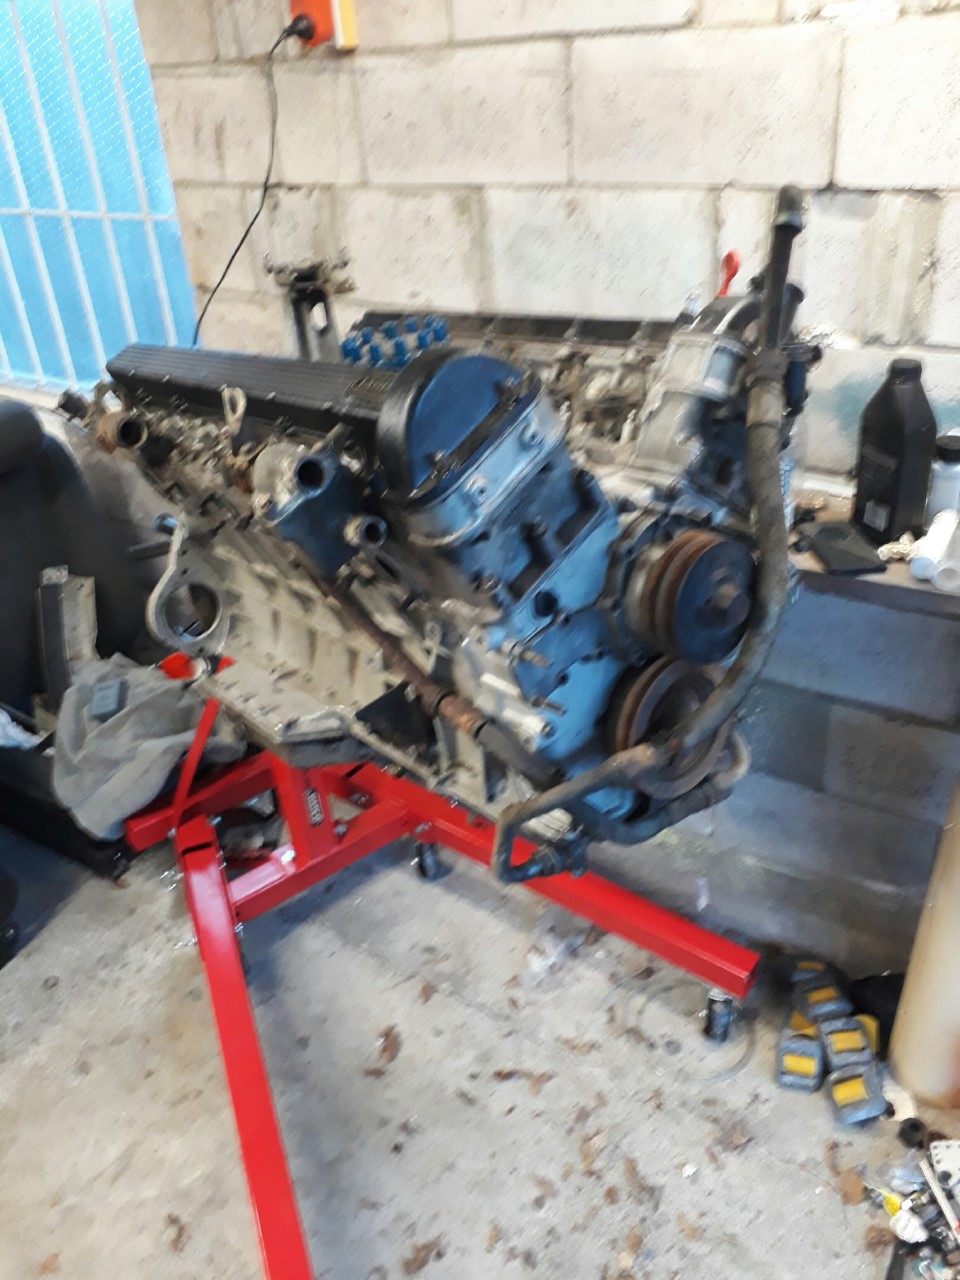
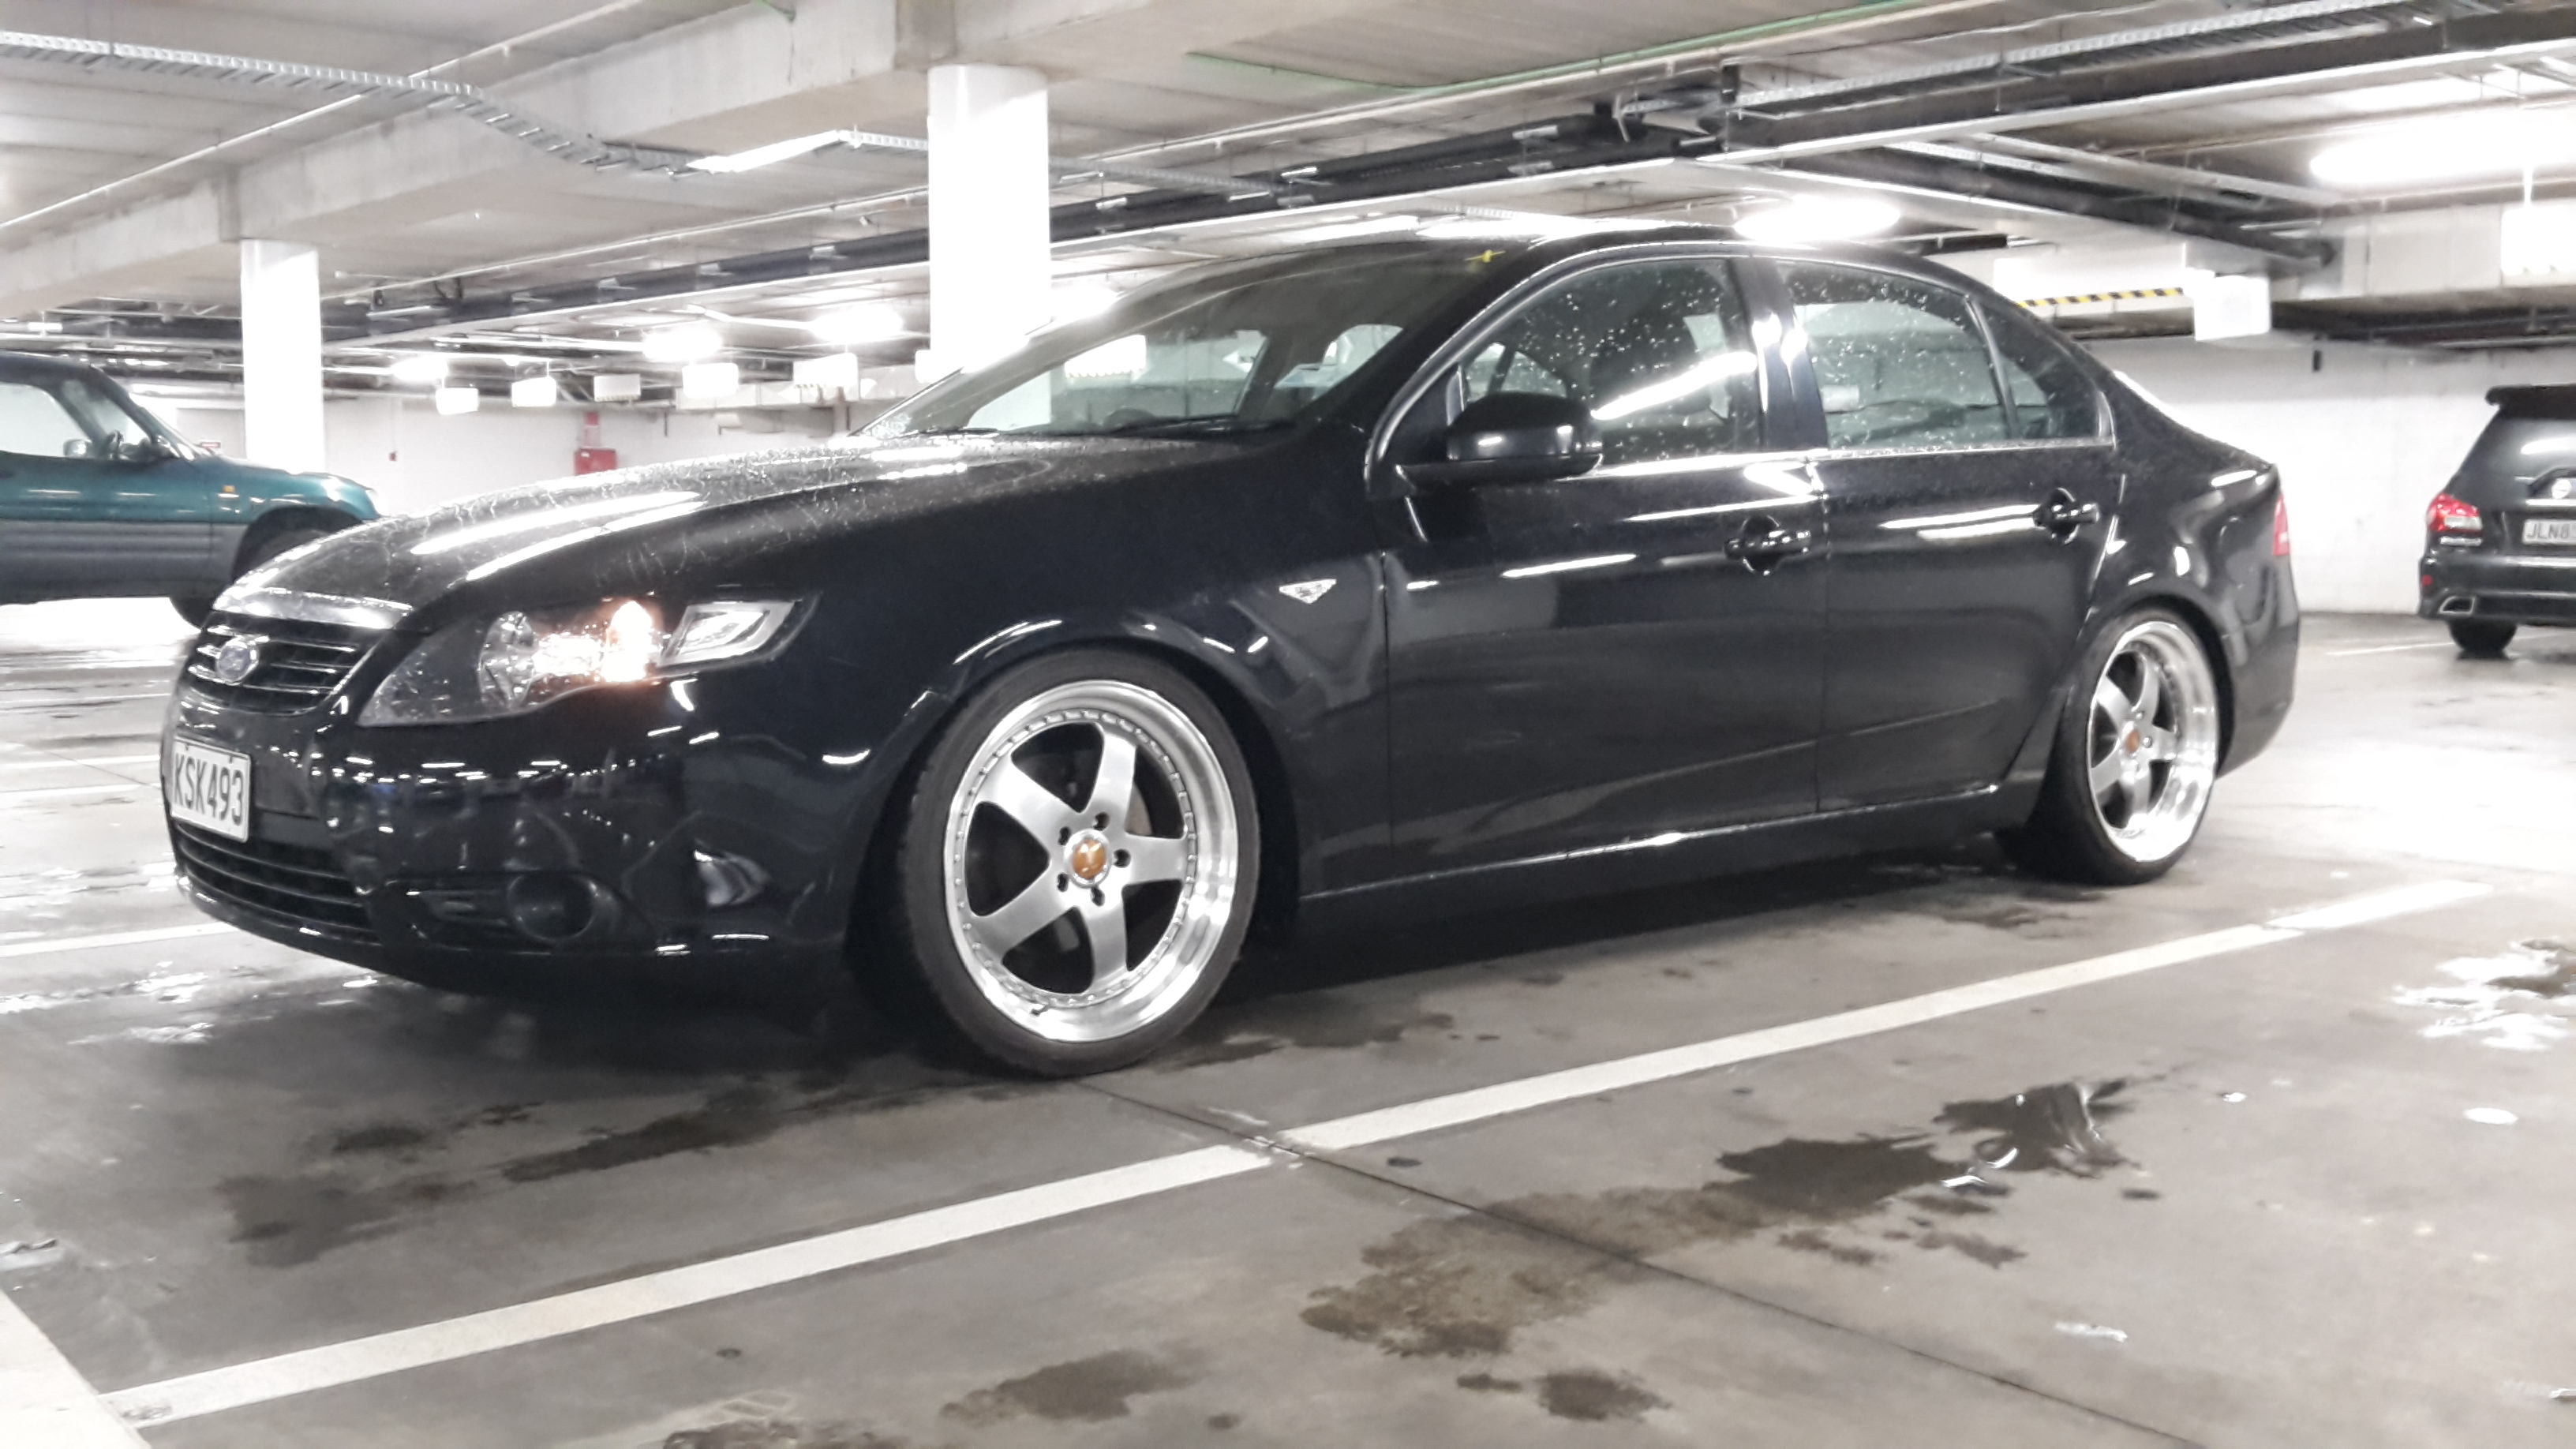
Kegan came over last Friday night and we got busy. He put a new brake master cylinder in. Bled the brakes up and we have great stopping power now. We also chucked the bonnet latch on chucked the bonnet on. Works out and clips on and off super easy. I need to tighten a few more bolts that I kinda just put in for the car shows. And put the engine lid on also. Really thought this was going to help with stopping the crap getting into the engine bay. Turns out nah. Shit still gets in there from underneath. Engine bay was a shambles when I got to the car show on Saturday. Travelling engine forward in the rain sucks. Also asked a few people if they had made engine lid removal things and a mate came back with this set up. Shit it's great. Works great to keep the water out say at a car show and saves me having to cover up the trumpets every time I think it's going to rain. Although I gave up and just put my water bottle covers on them. Just a tad easier. Day went well. Went to load it on the trailer and everyone lost there shit. People came from all over and phones where everywhere. As I loaded it into the trailer the hand brake button popped out and fucken was a cunt to get sorted while half loaded trailer..... Then I managed to do it at home twice unloading the trailer and then fouled the plugs gave up and then the cable for the Accelerator broke. God dam it. So a few more things to do on it again. Might take it to caffeine and classics this weekend so got a bunch of crap to get done this week make it work again and it's already up on axle stands. Haha.
10 points
-
I got the new window seals from the metric nut on Friday but didn't have time on the weekend to start fitting them, I did clean and prime the sunroof bows and fit the speedo cable.So some progress made. pictures.like the surface of the moon.orange primer is better than the other orange stuff.cleaned rear glass, tired to put seal on, couldn't, went to bed.I finally fixed the lights in the shed, the three lights that run down the middle have always been dodgee as, the bulbs never sat right and never seemed to last very long, didn't really bother as with the spit I could just turn the shell to the light if a needed to see a certain area, a week or so the last bulb popped with a bang and I've been using my phone/worklight heaps and losing everything in the gloom, so after work on Saturday I dropped into the supermarket to pick up some bulbs and bugger me if old school bulbs a hard to find now!?Anyway I replaced all three fittings without dying, and stuck two(pair were on special) LED bulbs in.Let There Be Light!! Jausis they bright, 1400 loomans each, bright white, fuck I wish I'd done this before I'd built the door up! so much better.9 points
-
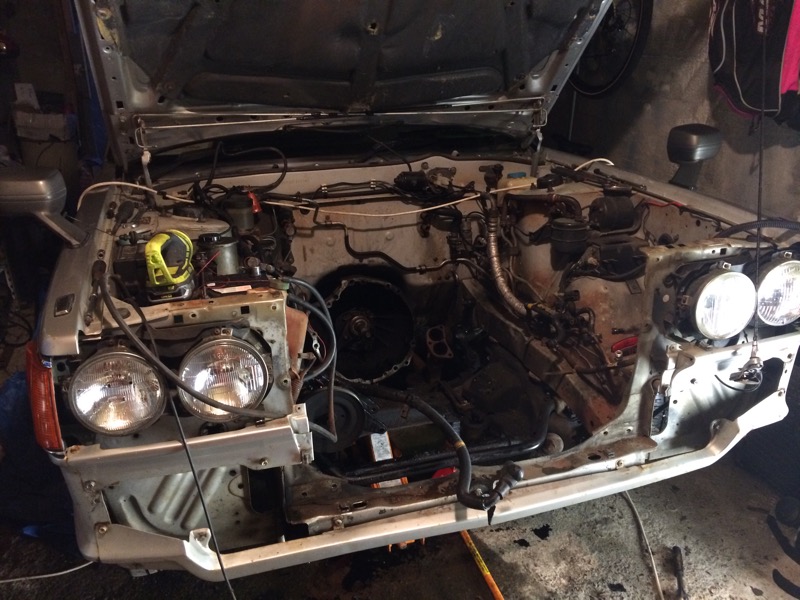
Today, I installed a clutch, and dropped the old girl in. Finally! I also installed the missing headlight bracket as it is different for the corolla vs trueno. It's taking shape now! Next will be getting the diff shortened. For the yarns https://oldschool.co.nz/index.php?/topic/52401-pbaines-1971-toyota-corolla-ke25/5 points
-
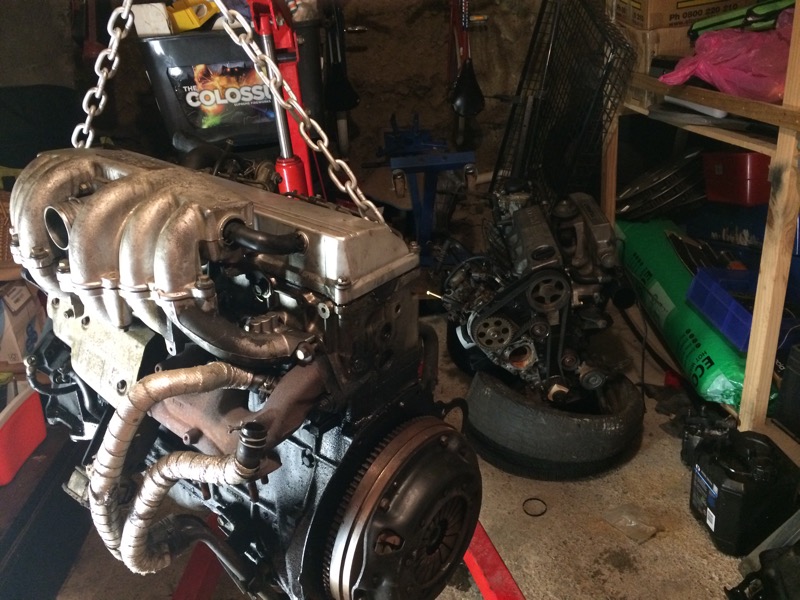
Have been tinkering away, some parts on their way (new clutch kit, cam belt, water pump etc). Need to try and find some engine mounts that will work (cant find any listings funny enough, anyone have a catalouge with dimensions?). Need to move dipstick tube/fit one from old motor in the right spot). And find a handy dandy engineer/machinist to modify some oil lines for me. Thats about it really. Then chuck in back in the hole and hope it works.4 points
-
Boring update. Did abit more tonight. I heat shielded the starter motor which hopefully will keep heat out. Also started to check all the wiring removed earth n checked resistance. Seemed OK. No motor to body earth so will get one of them this week. While removing the earth wire i noticed a wire had fallen out of a crimp on the solanoid. This particular wire is the alternator to battery wire!! Might be why it wasnt charging properly. I re crimped it few times for good measure and decided to check the rest. Yup. The one going to starter motor/loom was also loose as a goose. It came out of the crimp without any force at all hmmmmmmm.. Hopefully im one step closer to not breaking down every drive lol.4 points
-
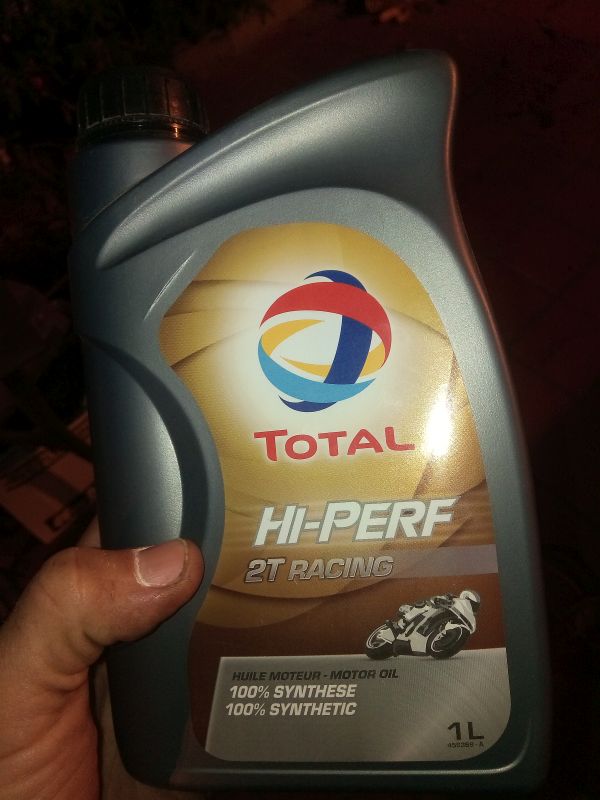
The last 3 days when I've tried to start the Gyro it's taken a hit of either to get it fired up, and the idle has been a bit hit and miss etc, since it's now road legal I figured it was time to fix it up. Stripped the shitty stock carb and gave it a proper scrub out, the idle circuit was filthy and the auto enrichment jet and another air hole were blocked solid. Factory carb is about 14mm, and has fixed jetting, so besides the idle mixture there is 0 tuning options, even the needle height is fixed, thinking 21mm PWK or 19mm Dellorto... Drained the ancient 2t oil and added a litre of full syn Total Now it fires up instantly, runs smooth and has gain another 6k on the top end, so max is 51kph now lol. Took it down to BNT and got a new battery, tail light bulb and fuel line, the manager seemed to love it "it's so ugly it's amazing!" "It's like an AW11, so odd looking it's cool!" Made a pin to keep the battery cover on, beats the mass of duct tape it had previously! Just in an hour blatting around town I counted 2 point and laughs, 3 "WTF is that" looks and multiple thumbs up haha. Now to find wheels/plastics/cylinder etc...
4 points
-
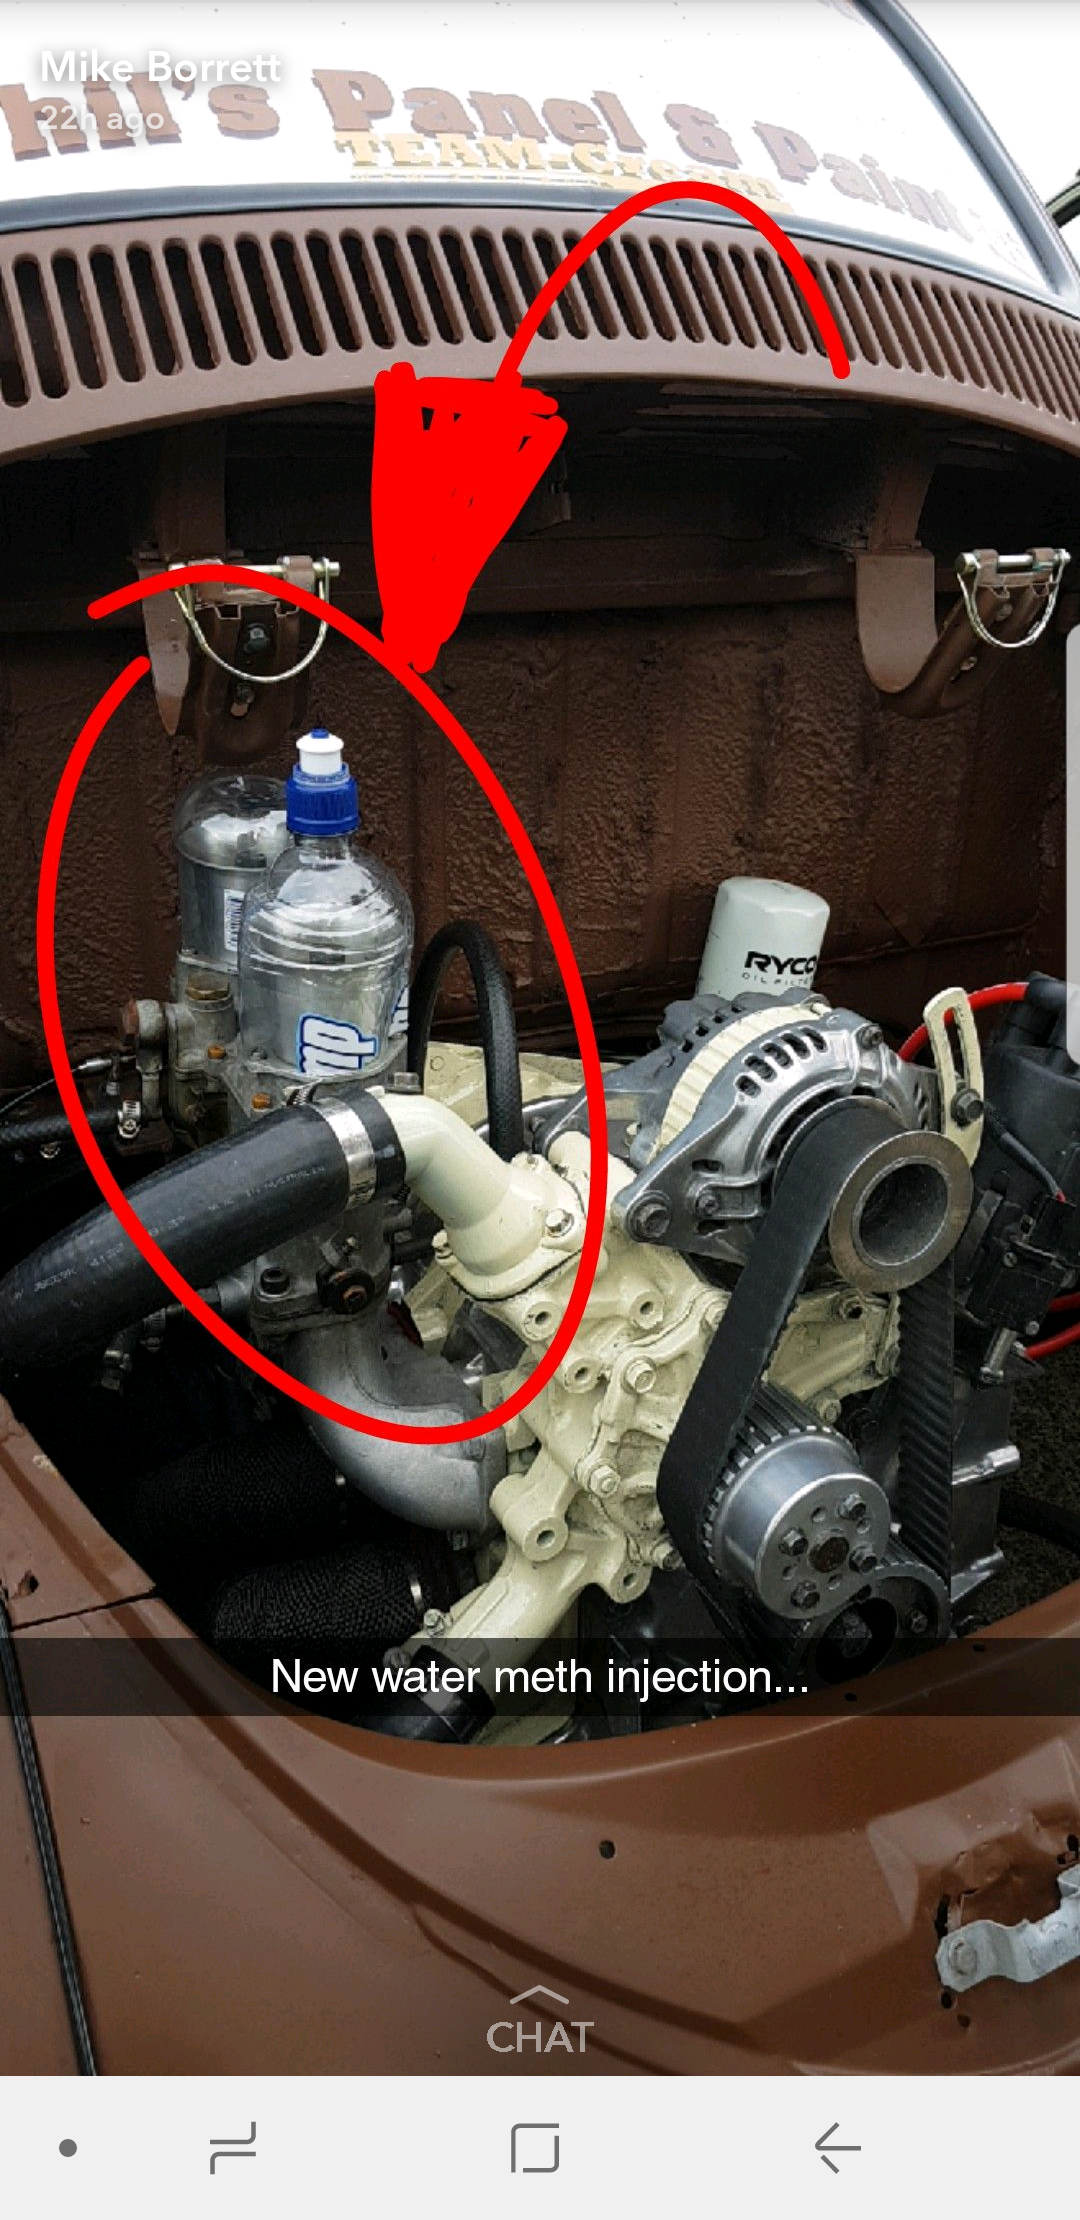
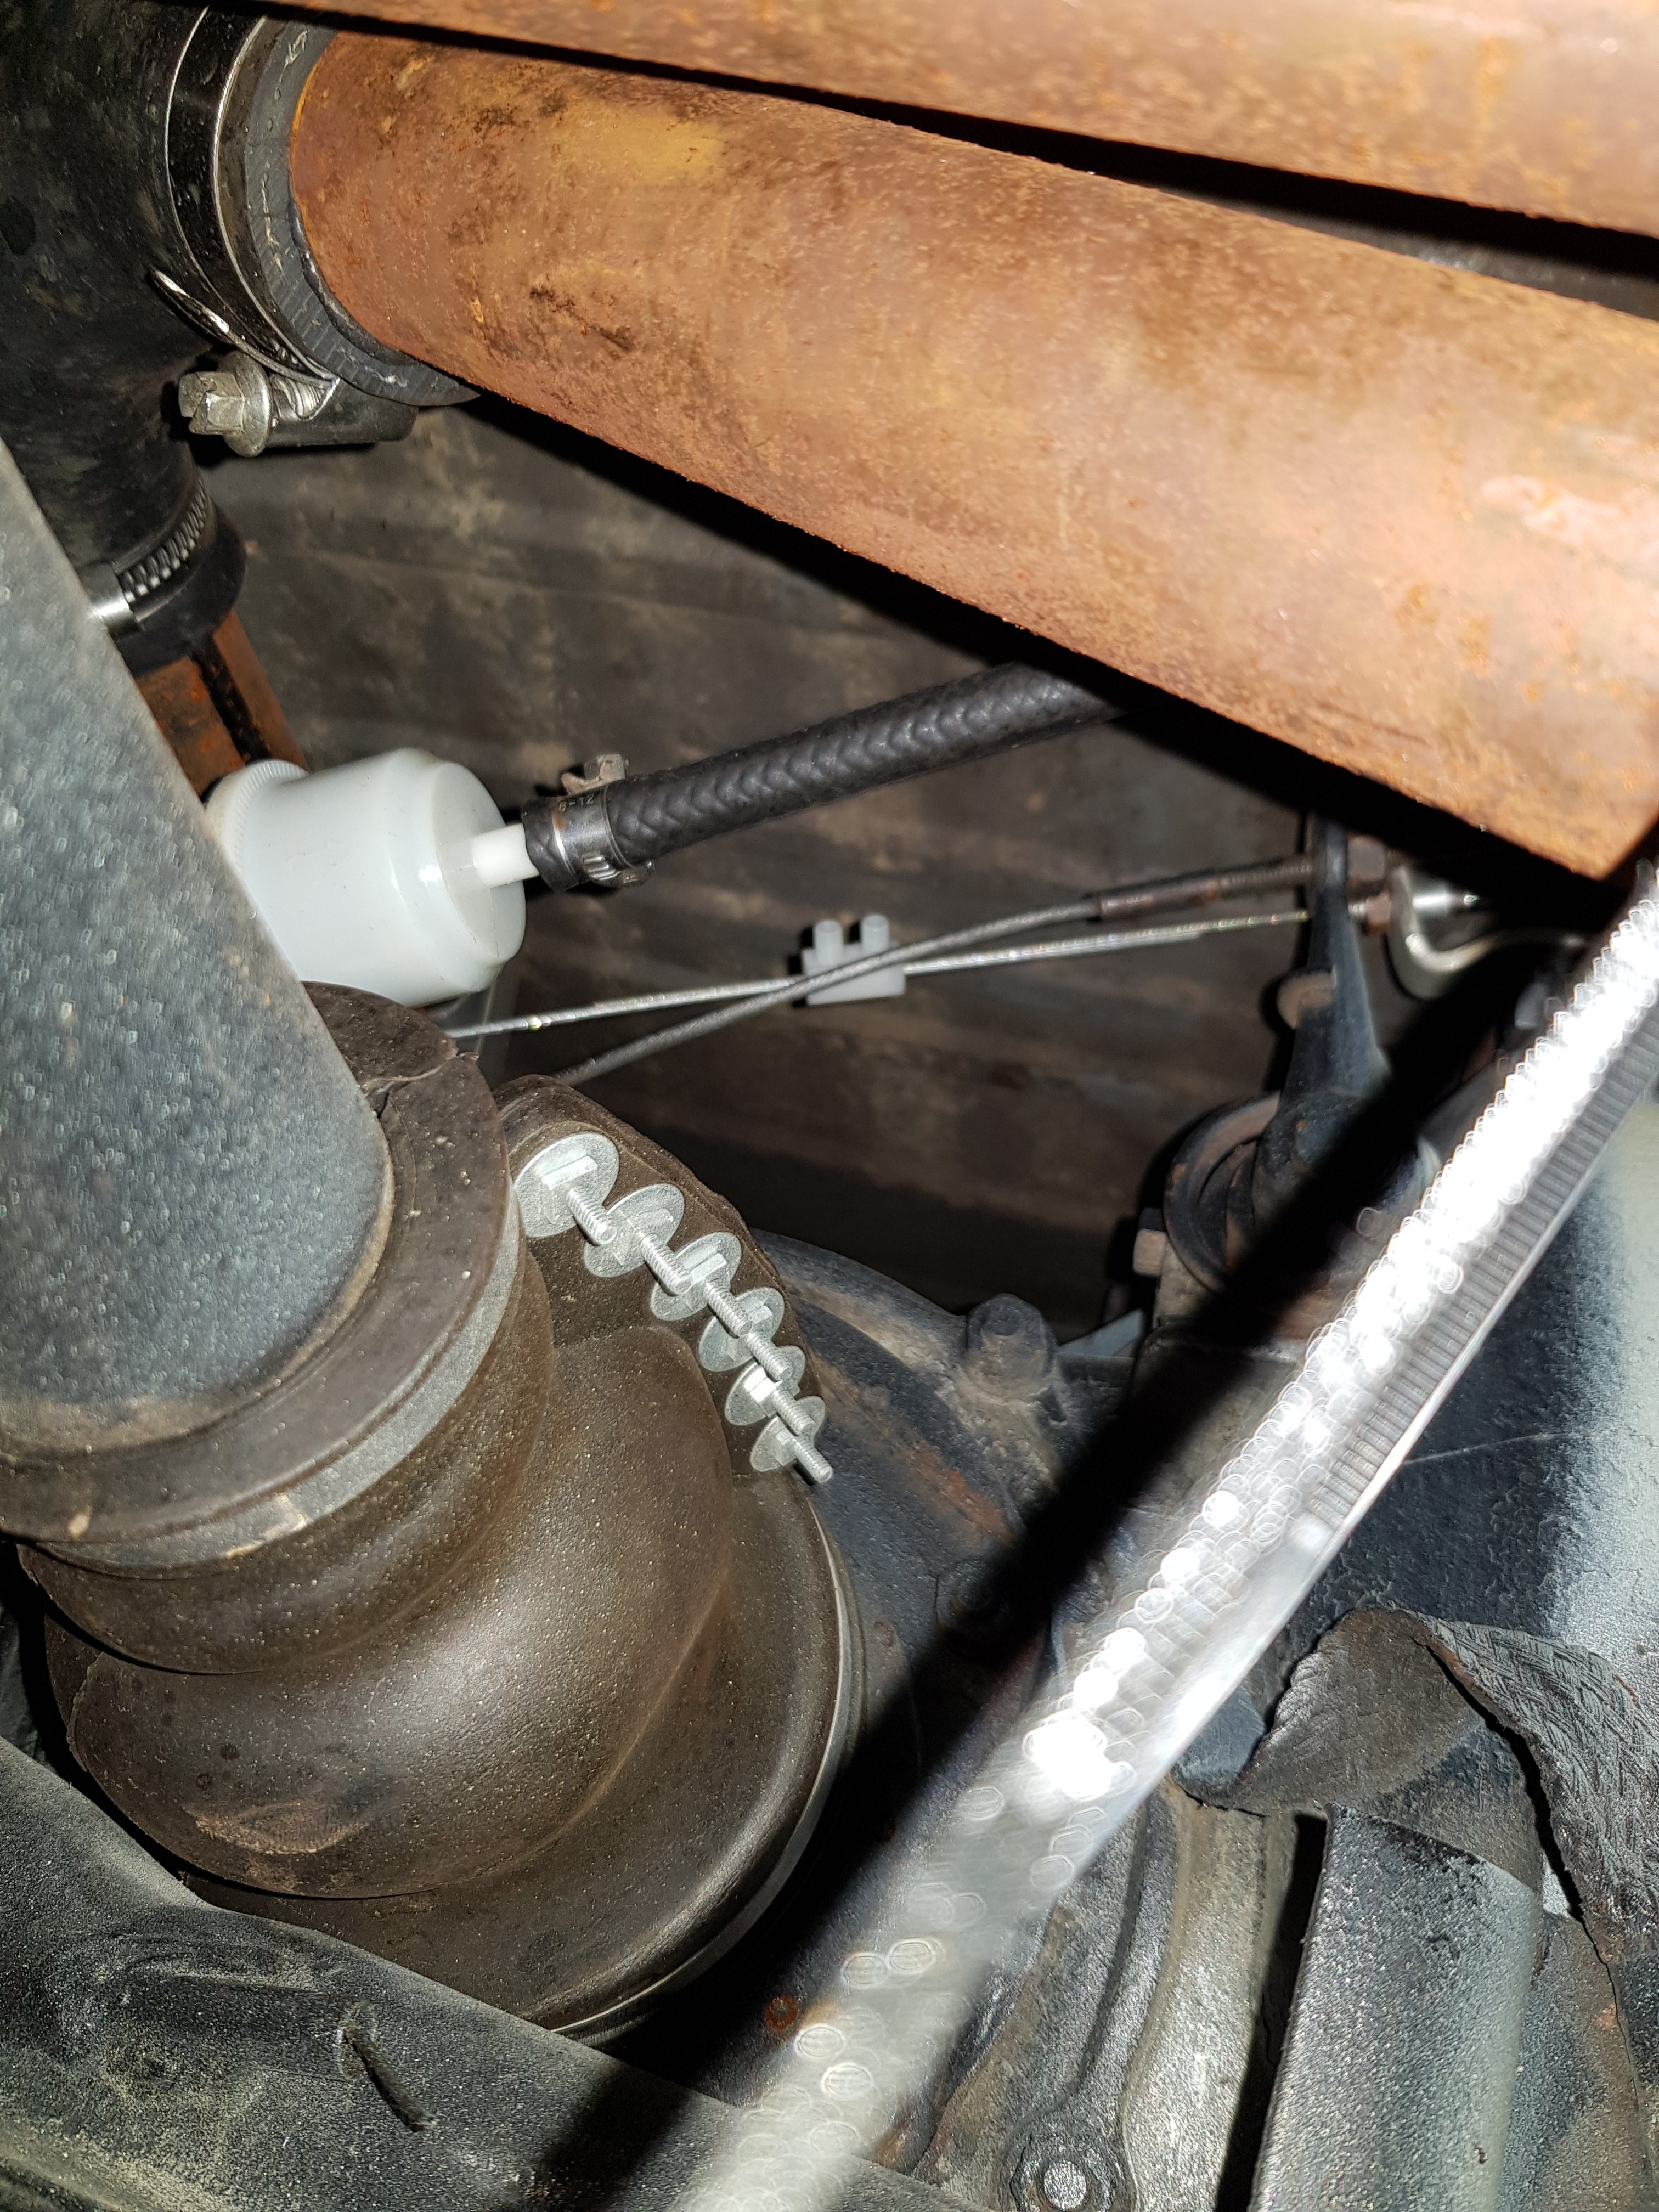
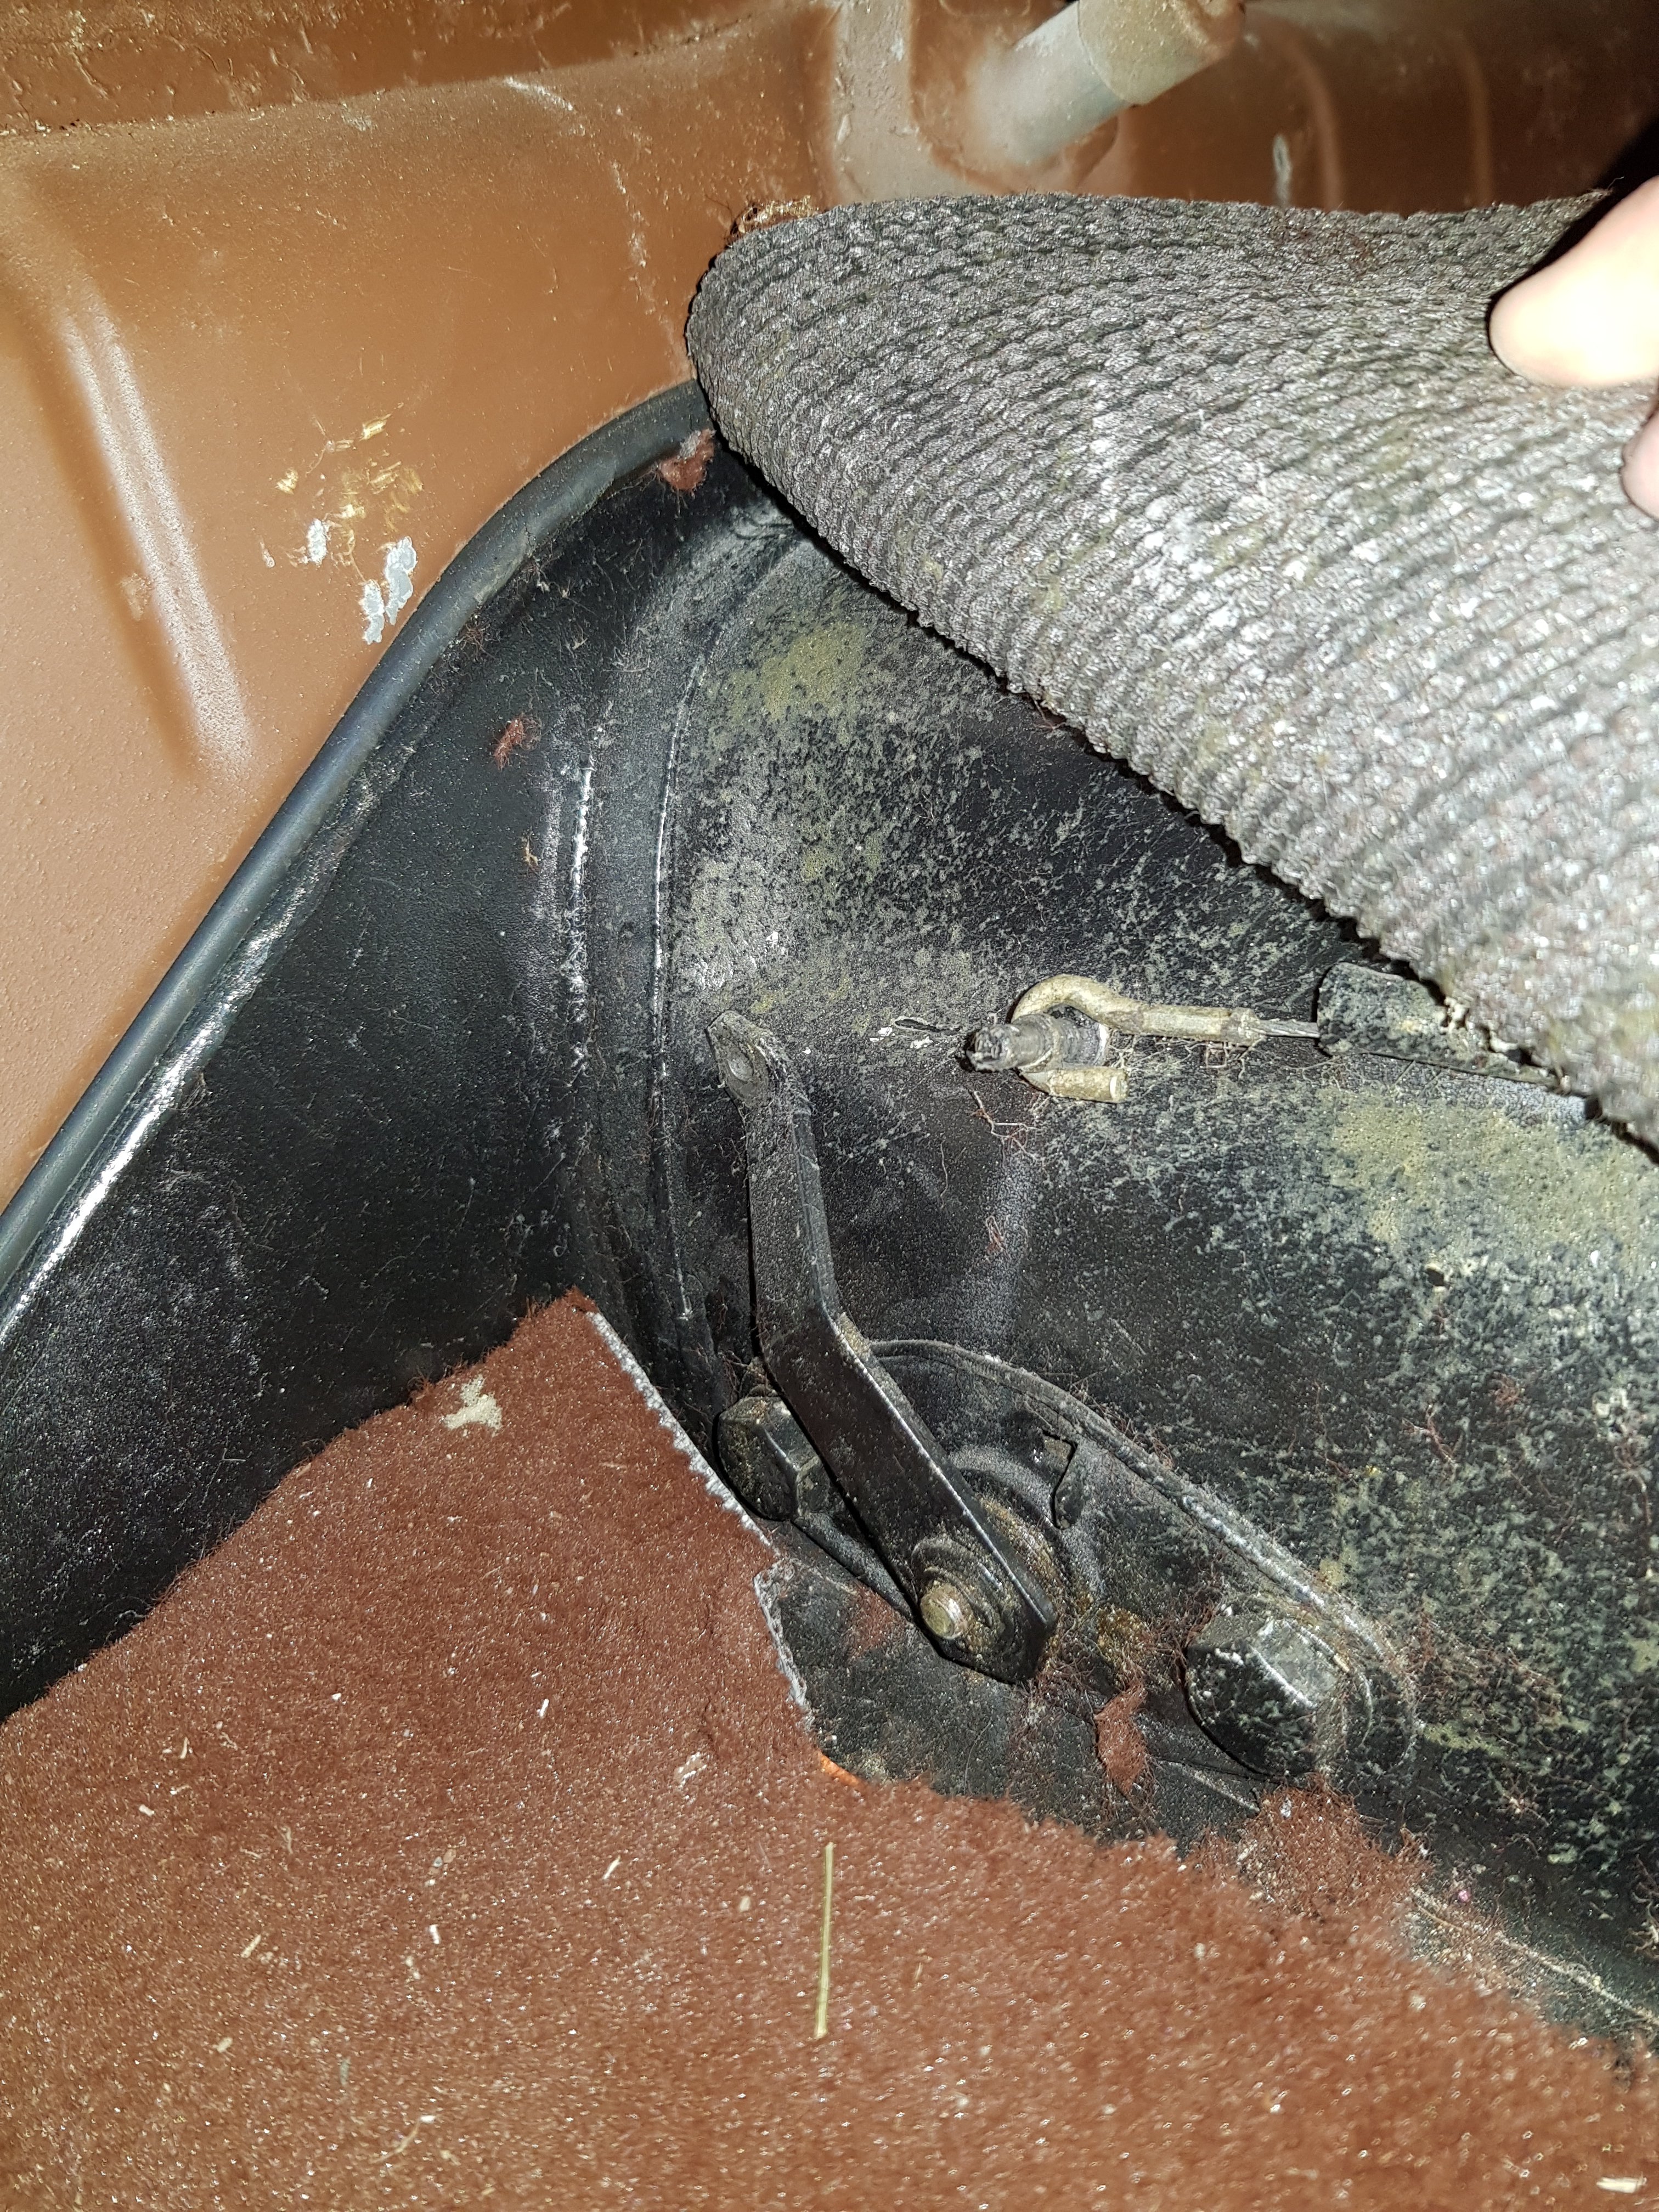
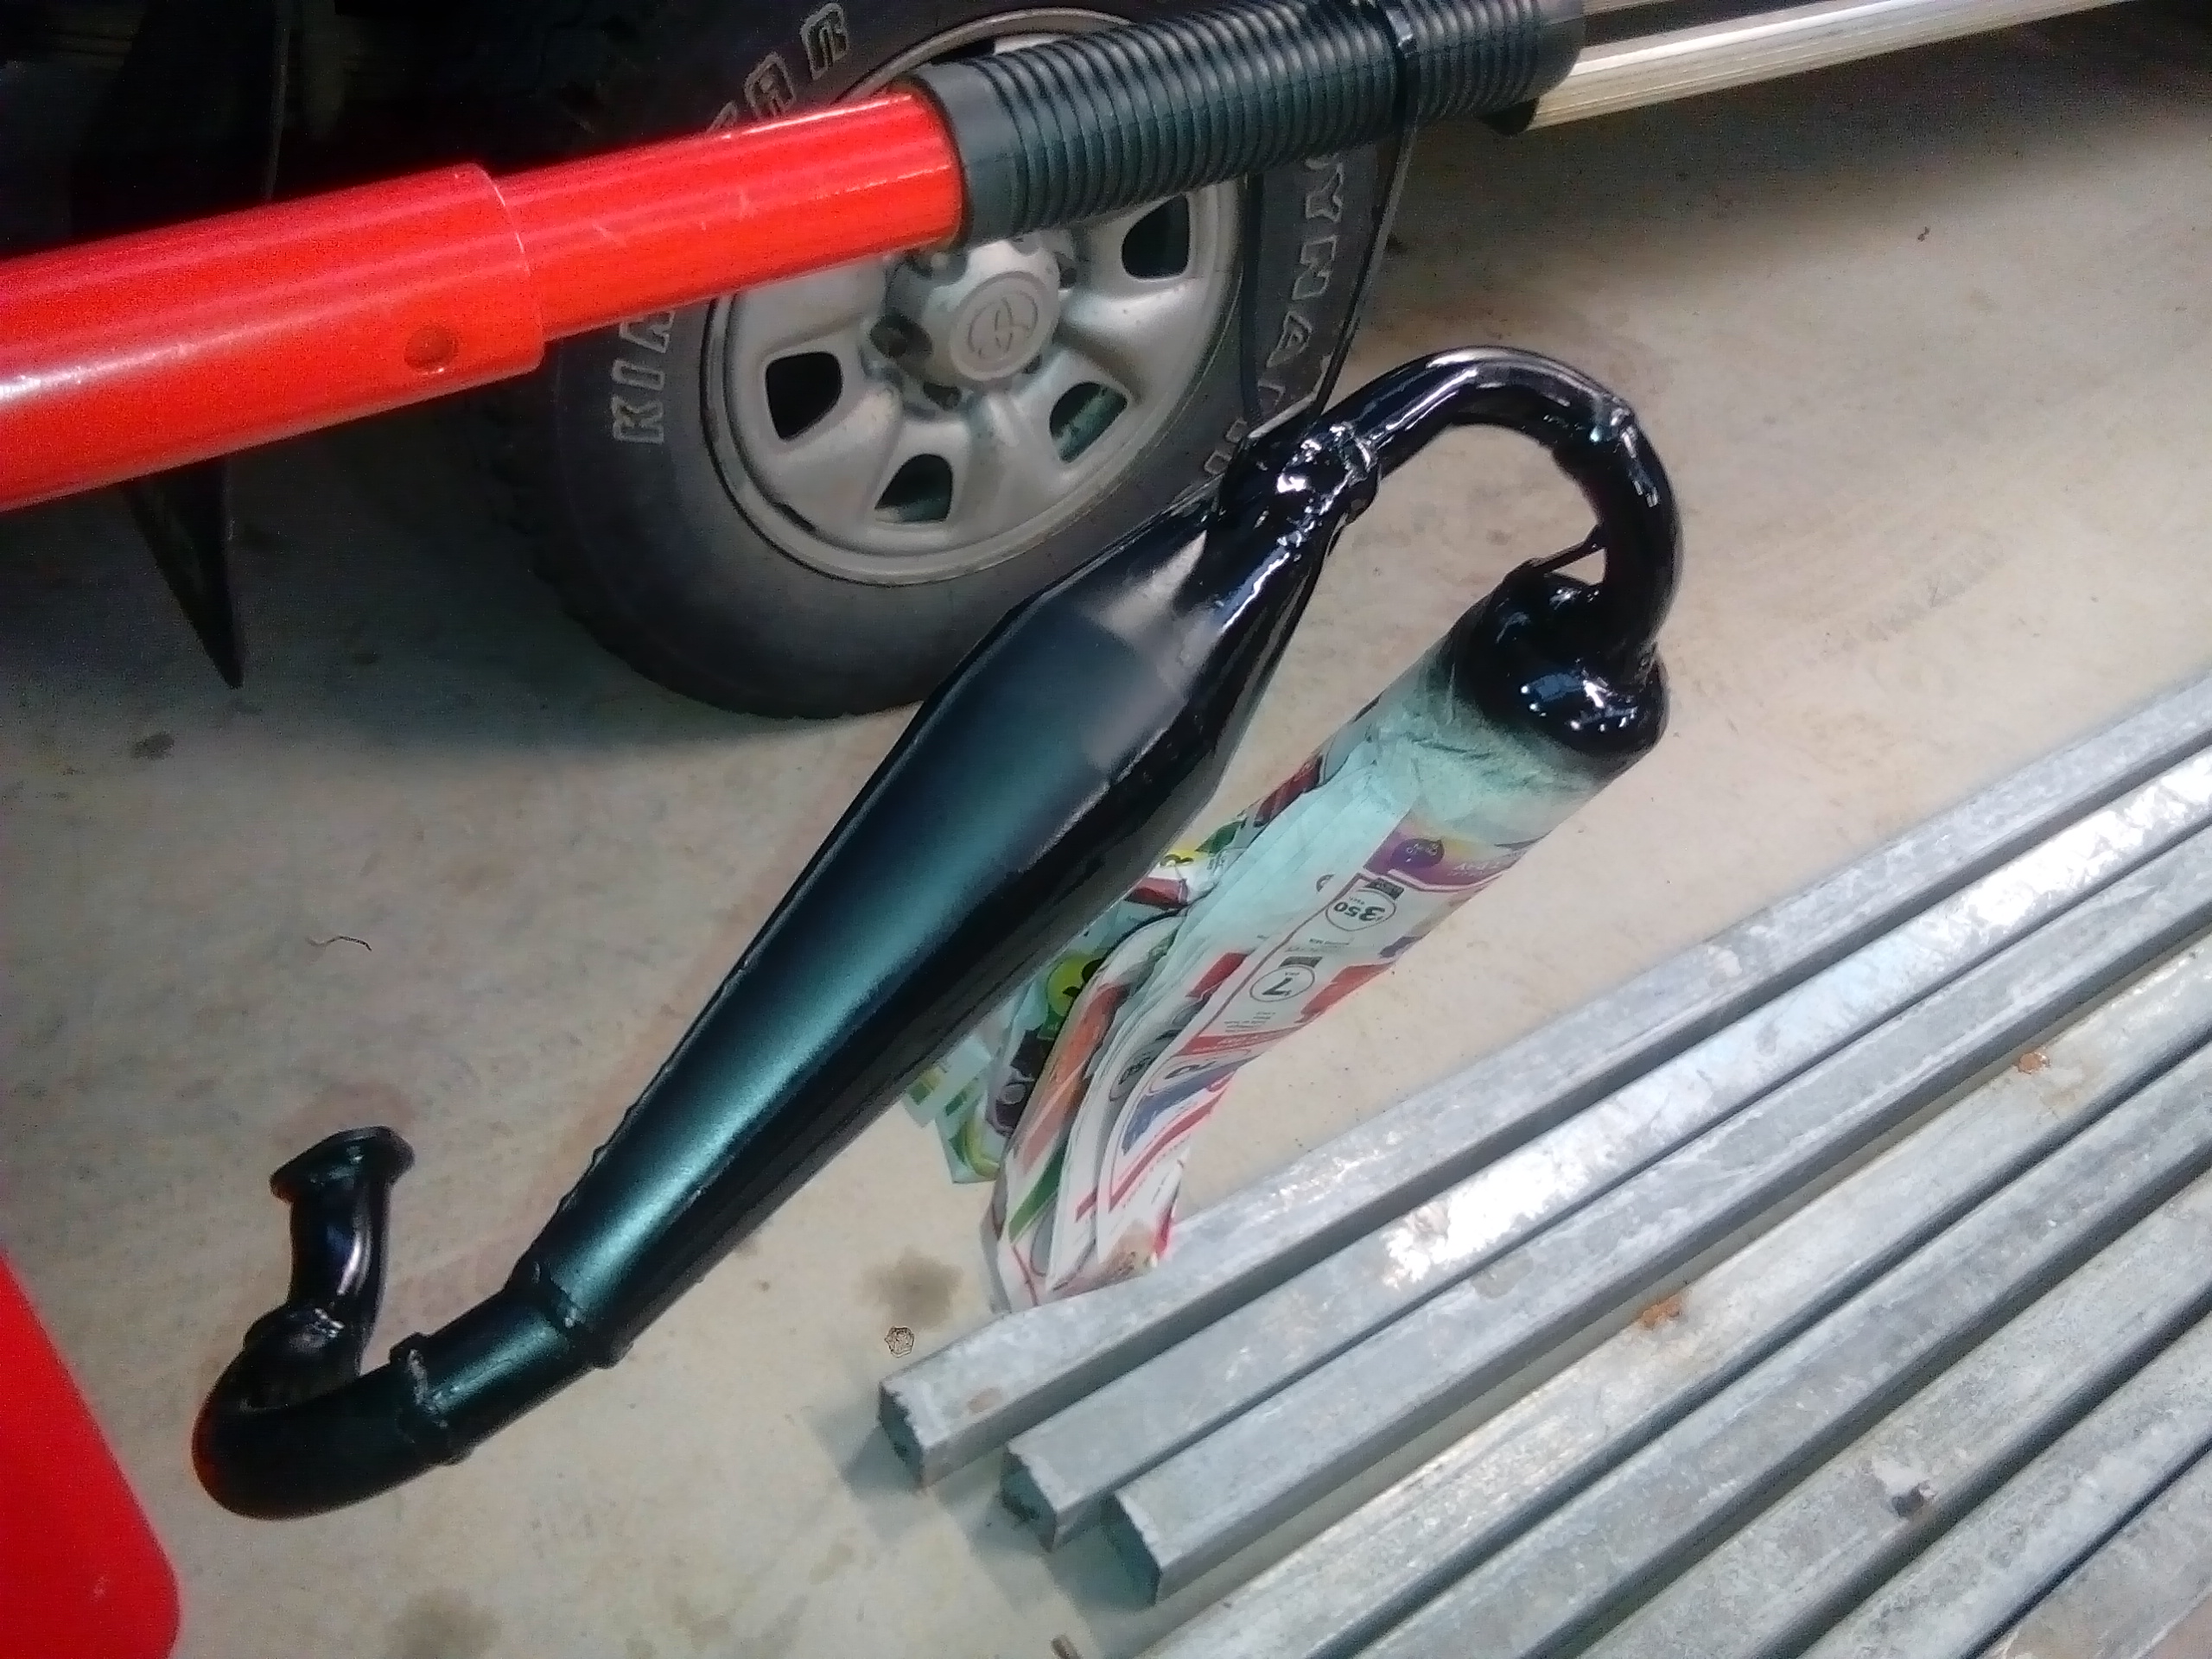
Found the reason why my Accelerator cable stopped working. It probably got something to do with the sparkie wiring block that's holding it together....... Hold up. Closer inspection says it wasn't my kiwi ingenuity collapsing. Turns out split pin up the front of the car gave up and decided to run away. Chur. vw 0 Greg 1
2 points
-
Only if you don't do them properly or use the cheaper tools2 points
-
Supercharged and NA cams aren't too different, should be able to get the gains regardless. Screw sacrilege. The car still looks sweet and original, IMO a bit more poke from the engine just complements it.2 points
-
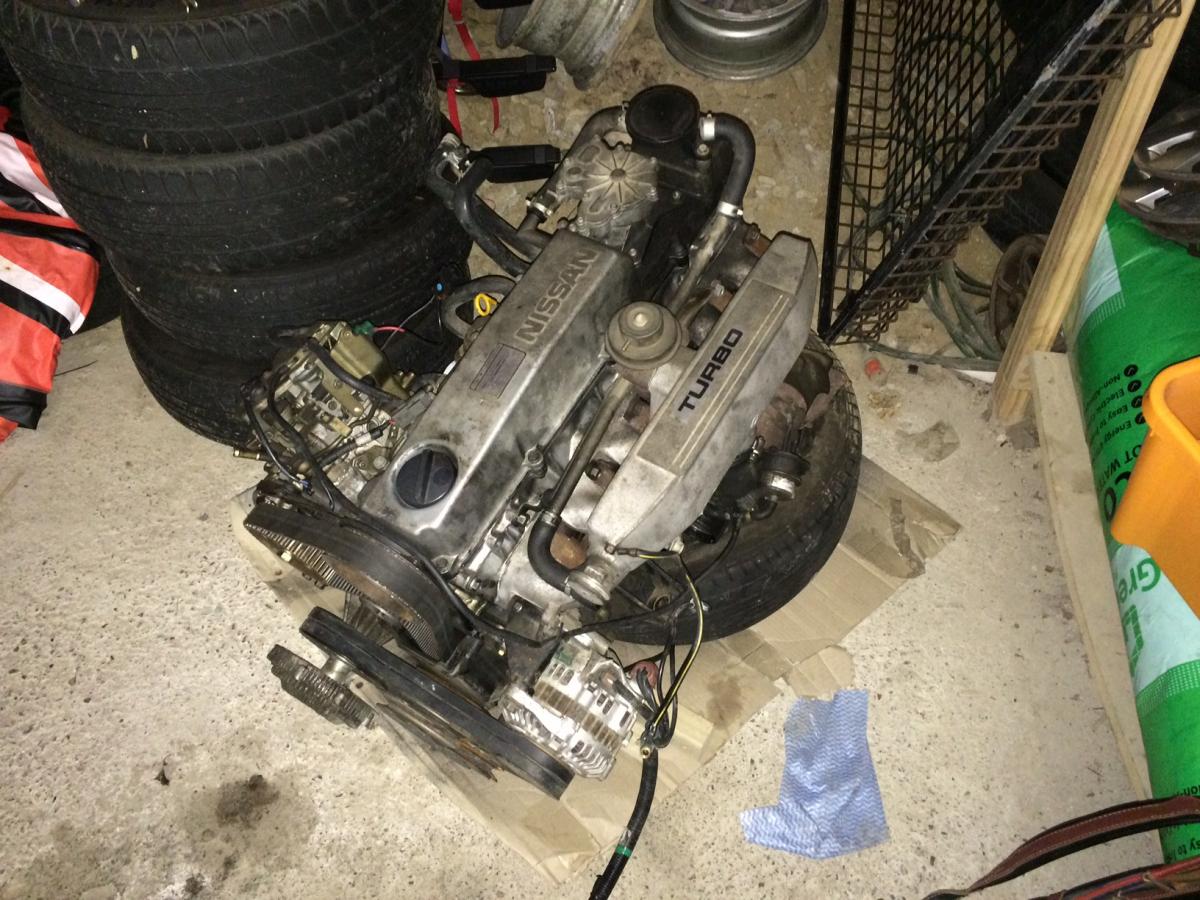
So one day I decided that the power wasn't enough and I needed MOAR so have decided to build a turbo motor which will be around 250kw expected BHP using MRP bolt on pieces. ps - I am shit with making up my mind...... motor goes in, motor comes out. rinse and repeat Motor specs are: Stock bottom late GZE setup with ACL and ARP internals Mildly ported head and oversized valves, stock cams for now but will go with some Kelford to suit Turbo engine ARP goodness Pistons go in Covering her up Late model GZE pistons which are 9.0:1 and are factory forged. that is lubricant making them look dented, they aren't... More ARP's I will probably end up going with kelford cams, but I just wanted to get everything setup for the time being I will also paint the rocker covers... One day!! Discussion: https://oldschool.co.nz/index.php?/topic/49929-pbaines-1985-ae86-corolla-levin/2 points
-
Because everyone likes laughing at my misfortune, let's have another look at those big-end bearings. Yeah. The crank was also scored seven ways from Sunday, and the machinists next door were reluctant to skim it, so now it's a big ole paperweight. These were the worst ones but pretty much every single journal was rooted. We did work out the root cause of all this pain - the factory oil pump had eaten itself, apparently a common thing with the 1st gen motors. I never realized the 4A-GE also suffered from this weak point - it's a common thing to occur on the old Mazda B6Ts as well, although those tend to blow the relief valve and spring first. Lots of deep scoring against the cover: Take note of the area around the vivid mark: In the meantime, things got busy... and my wallet got empty. We acquired a donor 4A-GZE bottom end (from an AE101 this time) and Karl attempted to make a good one out of two. The end result: my block, pistons and sump + donor crank and rods = this. He also sourced a brand new oil pump from Toyota and a couple of other bits and pieces. Head has been sent for a skim, as there was a 0.004" bow in the face (eek). Toyota purists may note the AE101 4A-GZE rods are actually weaker than the preceding AW11/AE92 4A-GZE rods, but I was assured that for my application it wouldn't make a shred of difference. Different story if I was planning to go 7A and/or turbo I suppose. The first photo below should answer the age-old question of whether 1st gen 4A-GZE (AW11) blocks were 7-rib or 3-rib. Generic oil filter for the running in period. Better get more than 100,000km out of this shiny new TGP pump! Thanks to fellow oldschool member @Dell'orto I now have a SC12 from an AE101. They look very similar at first glance to the one that came off the AW11 but note the radius of each pulley face; AE101's is slightly smaller. If this translates into a slight boost increase, it won't be a bad thing I'm sure. When I next go back to the workshop I'll dig the verniers out and compare the inner diameter of each pulley, but I'm pretty confident they are different sizes, and the Toyota wizards on the internet also seem to indicate the same. This clutch also arrived. Sadly, Toyota no longer stocks a genuine clutch kit for the AW11 SC Next step is to speak to Mark at Toyota to see if I can find a suitable 1.1mm or thicker MLS head gasket before the engine can be fully reassembled. And do some more overtime in the mines to pay for all this faffing about. Discuss the colossal fail here: //oldschool.co.nz/index.php?/topic/49412-80s-kid-part-ii-eds-aw11-sc-chit-chat/2 points
-
And adult supervision arrived and advised me that the exhaust also needs to be detached haha, thanks Al! Nek minute
2 points
-
And after a bit of tinkering, replaced the dud coil... and boom! Hell yeah, so then I employed a human test pilot to act as a crash test dummy So: far more work than anticipated, way more money than I should've...but priceless, watching your kid drive a toy you've made yourself.2 points
-
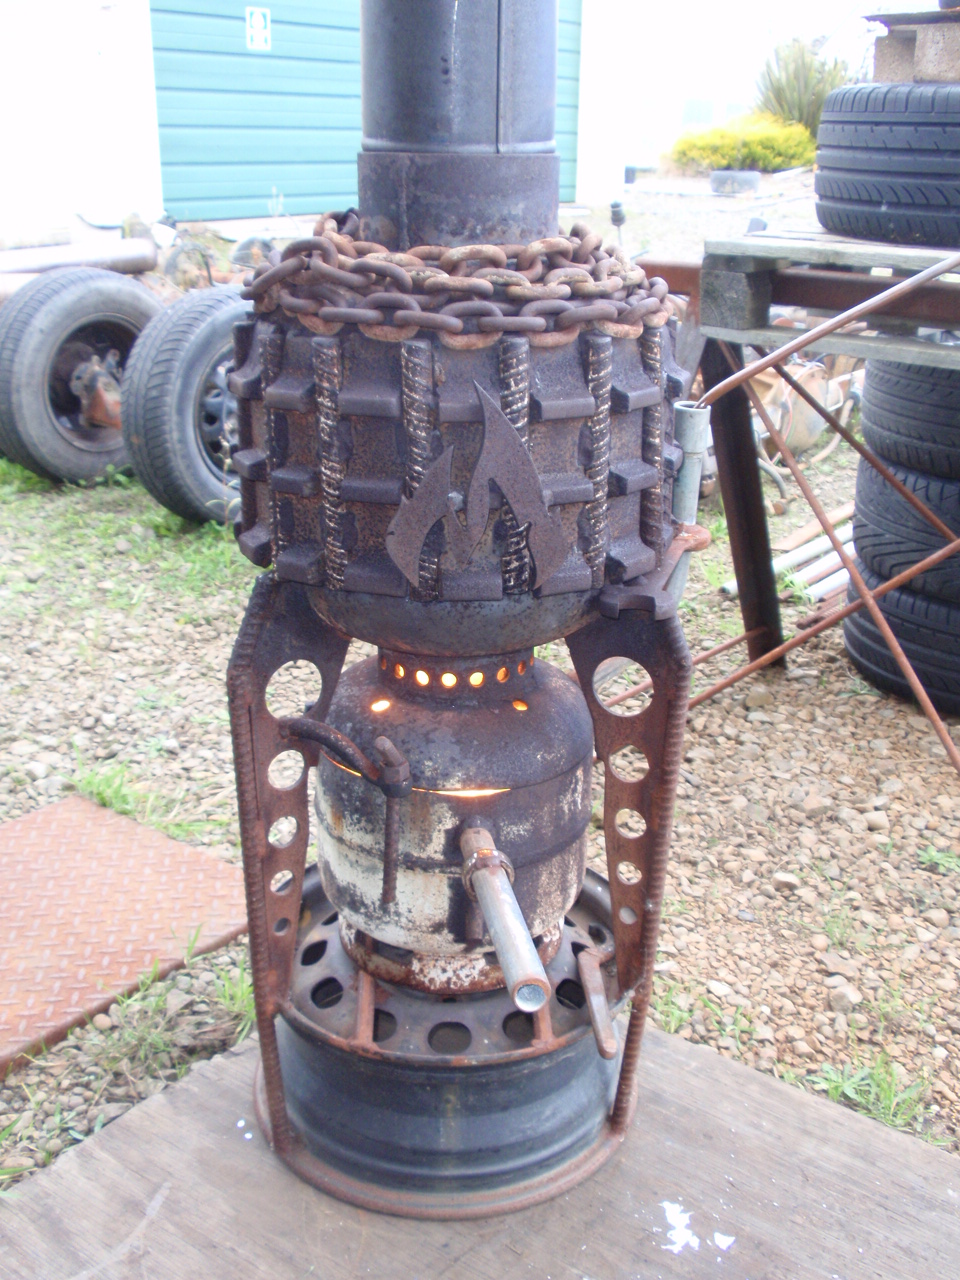
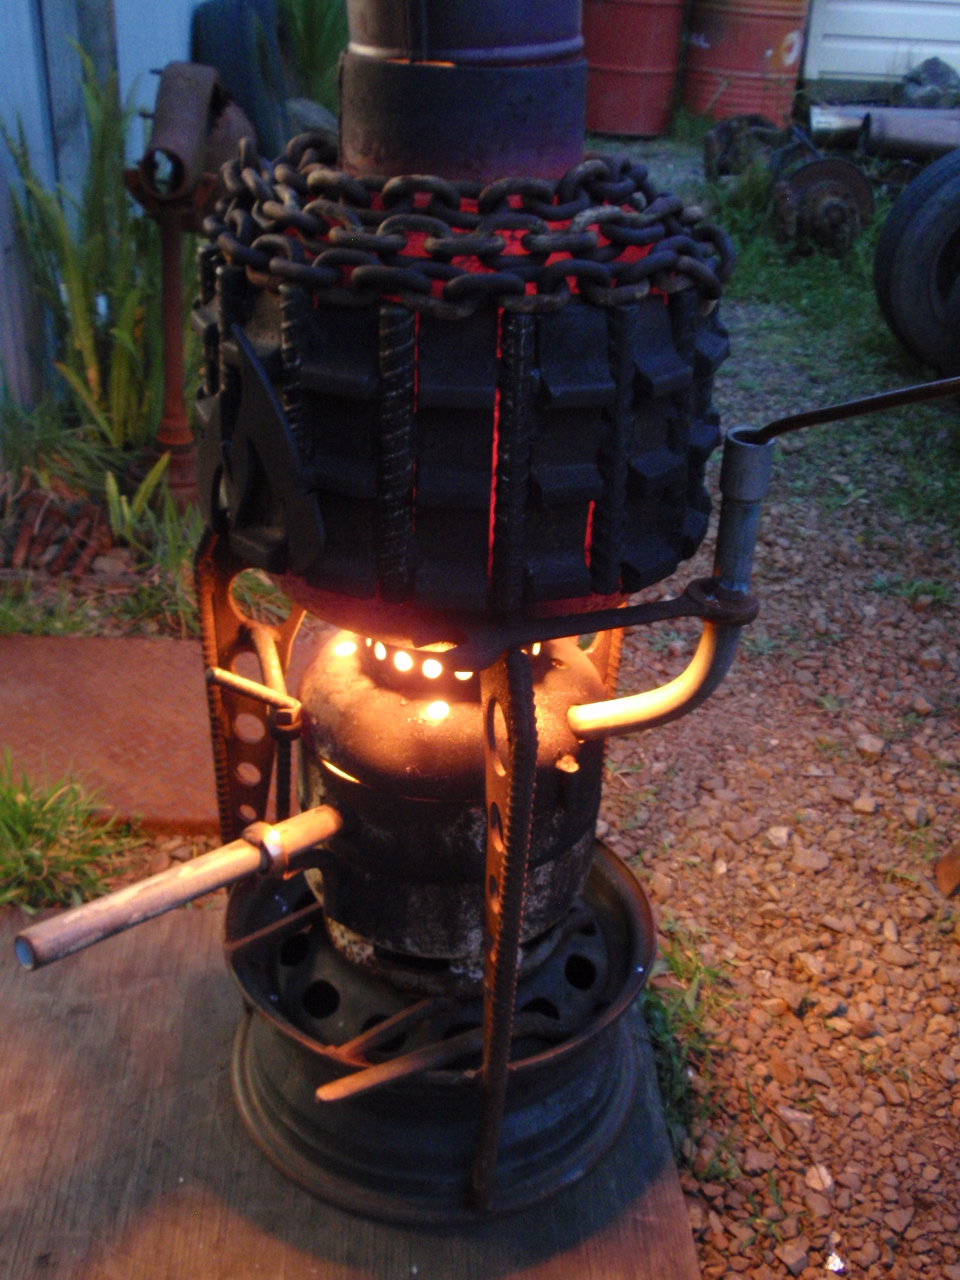
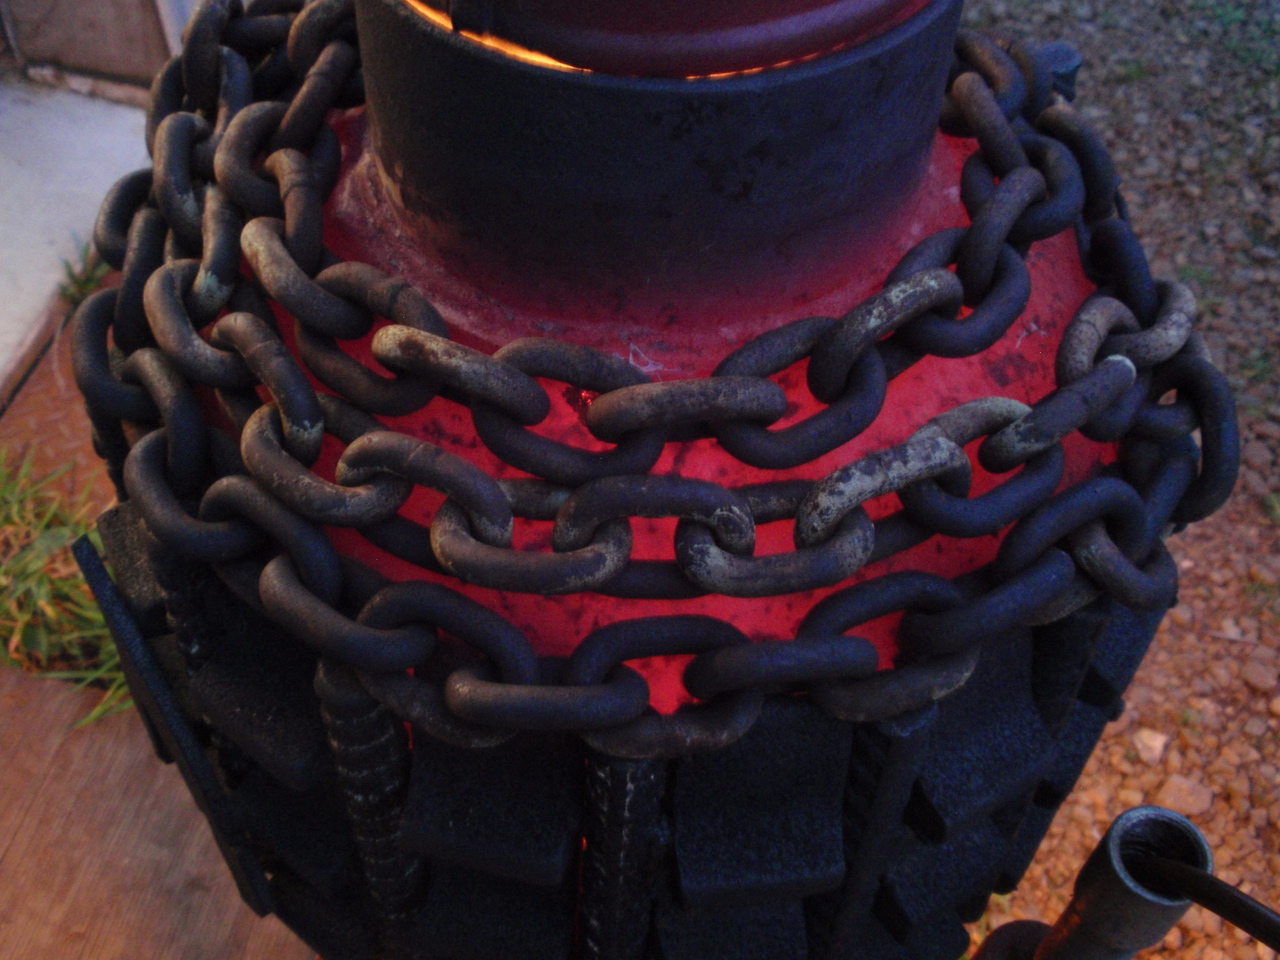
I bought a coal factory!
2 points
-
Oh yeh, Hanmer was rad. (PS Ive figured out how to make it not do this anymore) Much like Al's mum, this thing loves the abuse and keeps on trucking. Was meant to bid on a low km RD28 on tradme the otherday but forgot and it sold for $200 which pissed me off. Woudl be nice to not smoke so much (blue smoke, yum). Test fitted turbos, look like it will be mint, just need some tyres.2 points
-
So I've mentioned in spam a few times over the years that my great uncle owns an immaculate Nissan Gloria wagon that I've wanted to own for years. Well sadly he passed away last weekend, but it turns out the wagon was left to me! Went down to a small town past Wairoa today to pick it up, and well I found that its kind of gone down hill a bit in the last couple of years since I saw it last and can no longer be classed as immaculate This is how we found her, parked up since last October besides the odd little run to keep everything working: Hard to make out in the pic but there is a massive layer of dust coating the car here! Also found when we went to start it there was a lot of fuel pissing out of various places on the diesel pump and it had a near dead battery. So after pinching the 3 week old HD battery out of the Toyota dog kennel and getting the diesel leaks down to one drip every 5 seconds it fired up and promptly enveloped most of the district in thick blue smoke! -guessing oil had seeped past the valve stem seals while it sat, it cleared up pretty quickly. With that it was time to hitch up the trailer that came with it, drive the Toyota Kennel to it's final resting spot, thank my auntie and head off to Wairoa for some diesel and a $7 "Ultra Deluxe Supreme" car wash Looking a bit sharper for sure! Really need to get it up onto some 15's I think, once those 82 series tires are swapped out for something a bit more respectable I think the 14's are going to be tiny on it haha. Once on the road back to Gizzy my misses took over camera dutys, so here's some cows Here is about the point near the top of the Wharerata's that I realized turning the heater on full and thinking happy thoughts was NOT going to get the temp needle out of the H zone or the speedo over 40 lol So while we stood around the rest area at the top of the "Forys" waiting for the car to cool down with its coolant system full of rust with a touch of water and a shiny chrome radiator cap that doesnt fit or seal I took these Gisborne is the dots on the coast in the distance 20min later we were good to go So yeah the rest of the trip was pretty much uneventful really. Plans now include sticker bombing the roof and doors, sanding both front guards, probably mirror tint it out.... ...yeah fucking right! Nardi wheel + 15" wheels, some low and fix up the few dings and it should be a decent/slow cheap to run cruiser RDWaaaaT And thats my story Raizer aged 28. Discussion1 point
-
Those colored crimp terminals are all ways lose.1 point
-
I suspect I left mine in the sun prior (but to be honest it was so long ago I might be imagining it). Also, when you do get them on the window, make sure the corners aren't stretched too tight/thin or the outside of the rubber won't sit on the body. And finally be glad you're not dealing with the extra work the chrome brings1 point
-
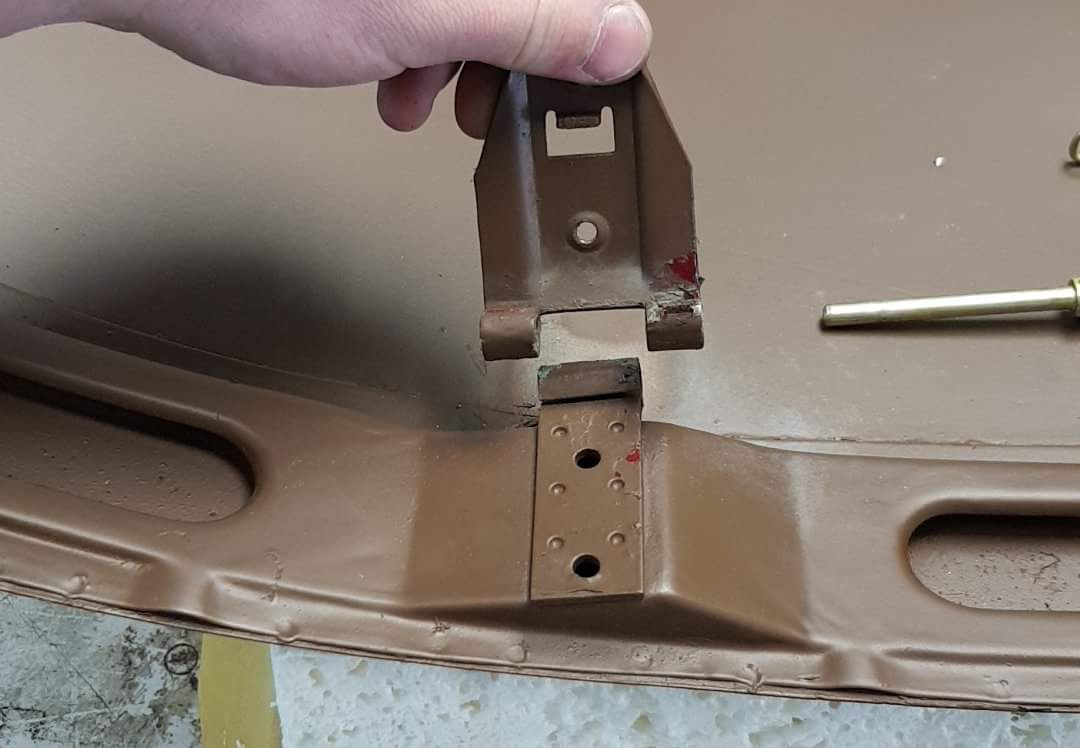
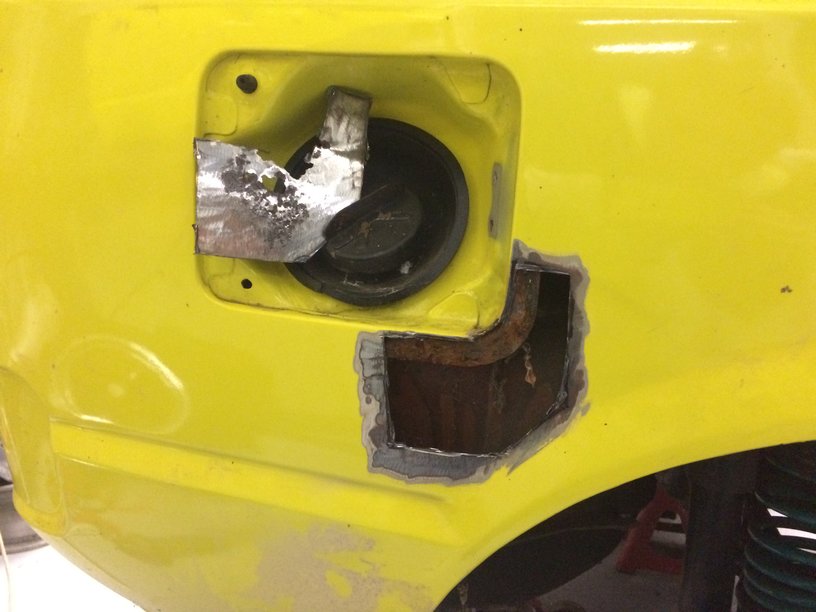
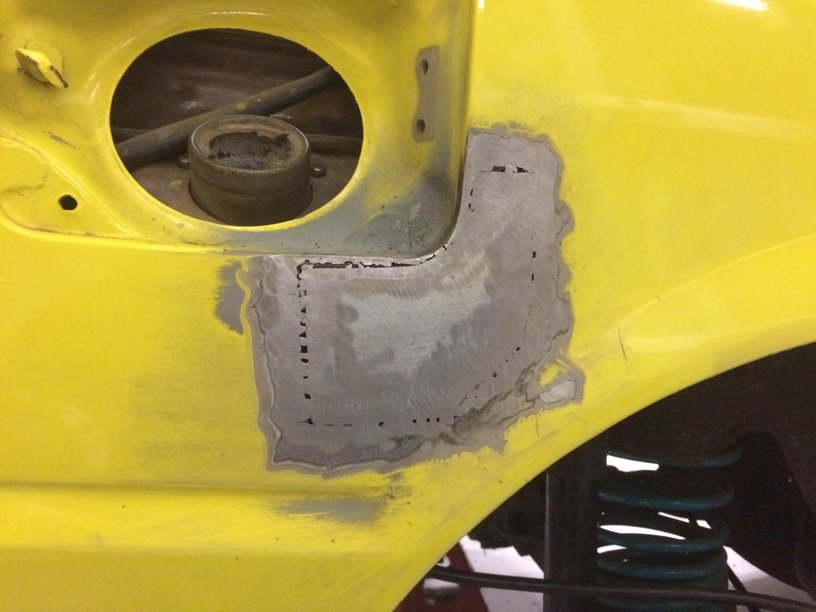
And with the other 2 doors being sent off to be sand blasted i thought i would do some of the body patches so i started with the one around the fuel flap area but before i could start grinding and welding i thought i would be safe and remove the fuel tank as was abit close but gave me a chance to give that a cleanup also and lick of paint so i cut the old rusty crap out then gave the inside a sandblast then applied some rust converter before welding this patch in one down another million to go
1 point
-
If the genuine gasket doesn't have it, then its no used. Will find they either over engineered it in manufacturer and possibly to efficient. But anyway, that's fine. I don't really know what to tell you, but 30 percent is enough to cause an issue, as is a leaking water pump, a thermostat, or a fucked radiator cap. As you mentioned the head bolts, if you happen to have a spare, I would cut a slit up the side of one of them up the threads, then use it to clear out any shit stuck in the threads in the block. Make sure you use oil or anti seize on the head bolt threads and under the heads. Cant remember if these use washers but if so make sure they are lubed also. Based on everything you have done and it still has issues then yes could simply be a shitty temp gauge. In which try an aftermarket item and see how you go.1 point
-
cool, il dig around in the shed this weekend and make sure its not gone missing1 point
-
Cheers mate i will take you up on that! Im in pukekohe so not too far from you! That maay just be long enough. Had a fiddle and i think i may have found the problem! Dave did some shitty crimps. Exhibit A: You can see on the left the wire not in the crimp fitting. That one went to starter motor. I only noticed it because the one on right was the same. So i decided to check this one n it just fell out too lol. not sure how long that has been like it but right one is alternator to battery lol.. In conclusion id say that could be why battery not charging properly and why it didnt start while warm(maybe) i also heat shielded starter motor for good measure1 point
-
Nice project! Looking forward to see what you come up with when its time to turn them to aluminium. Took me probably 50 castings to get my process reliable so expect some setbacks. Well worth it in the end though!
1 point
-
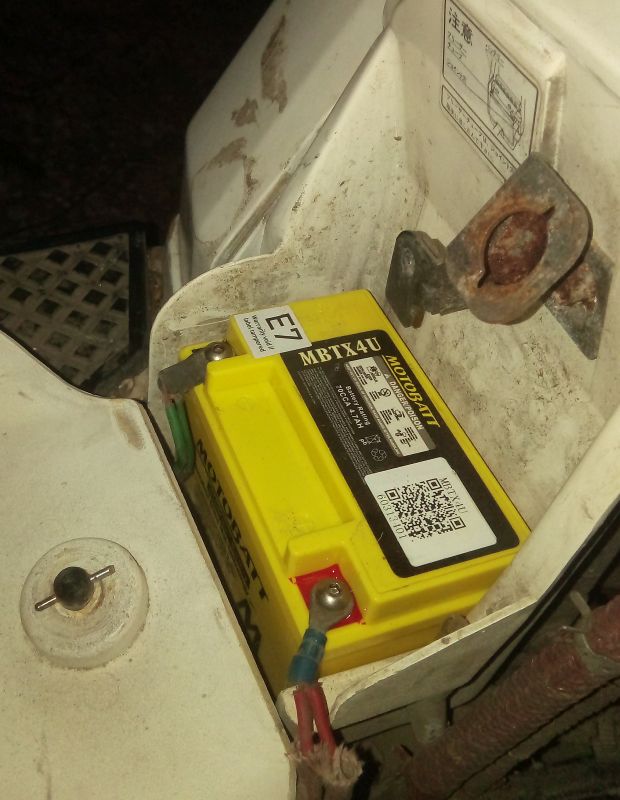
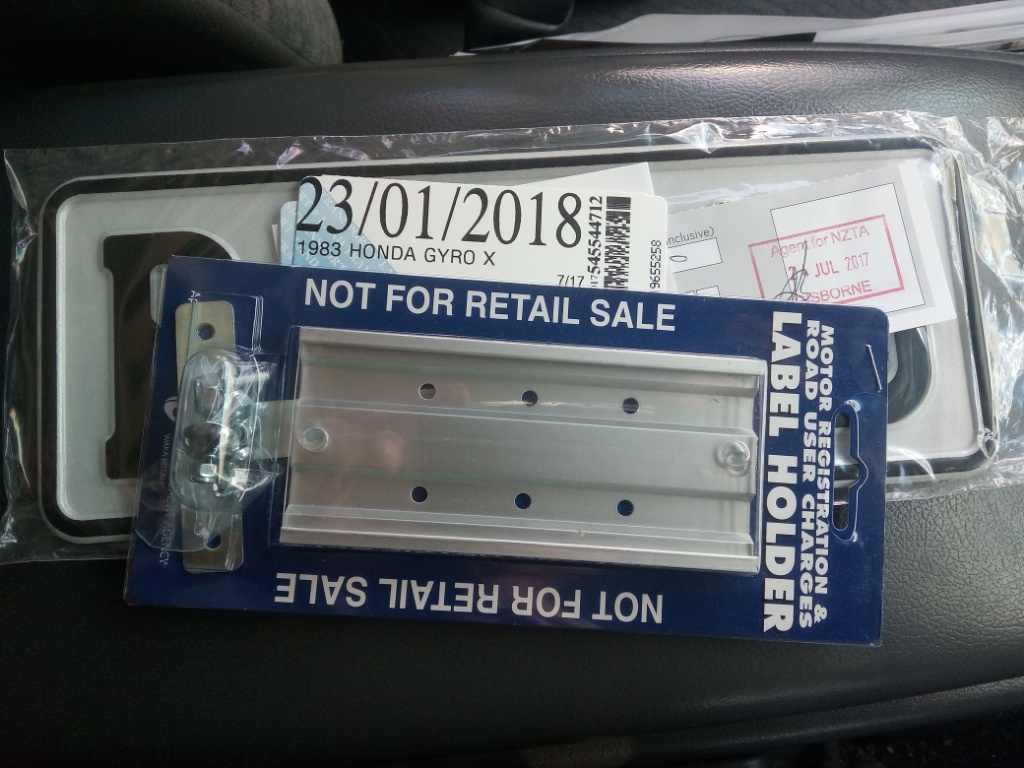
Found a couple Honda documents on the Gyro last night, my vin puts it as either late 82 or early 83, so since they started making them in 82 it's an early one! 1990 may have been when it was first rego'd in NZ. @Shakotom flick me an offer, I'm fucking useless at coming up with prices/I'll send you some decent pics etc first if you want.
1 point
-
That where my mind went, and I was wondering why you were fucking with crabs when you're sposed to be injecting it..1 point
-
Oh, I read it as the important part was you were trying to get a Jag V12 to run with home made injection rather than the crux being the sextuple of downdraughts on it.1 point
-
MRP stroker kit1 point
-
I've fixed the first post so the pictures actually work now. I've put the radiator support panel on and started bolting everything up. I thought I probably should turn it over since its been sitting for so long. With glens help I chucked the battery cables on and it fired up with a good dose of ether. Thats probably going to be all I do on it for the next few months1 point
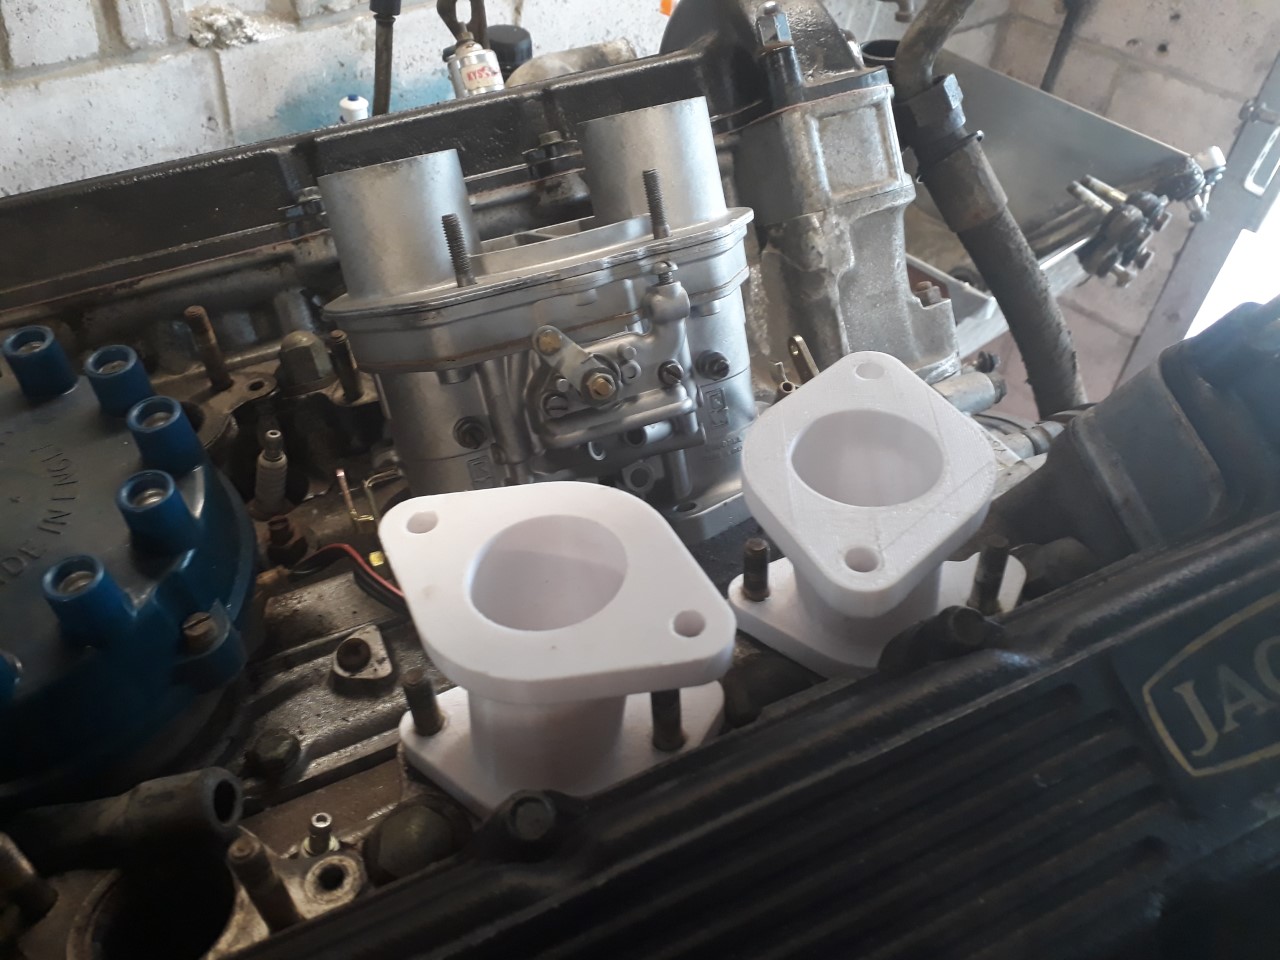
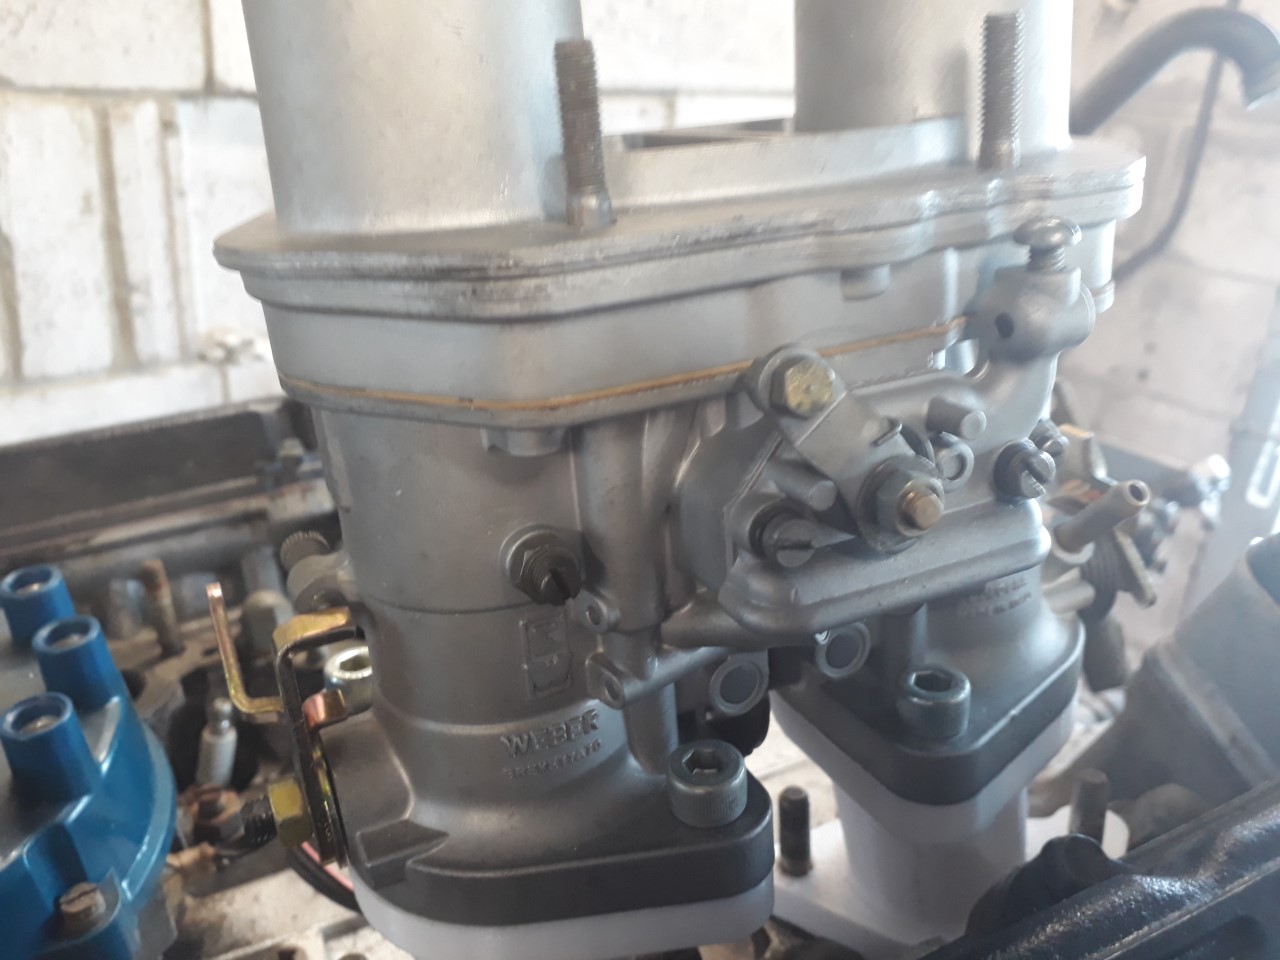
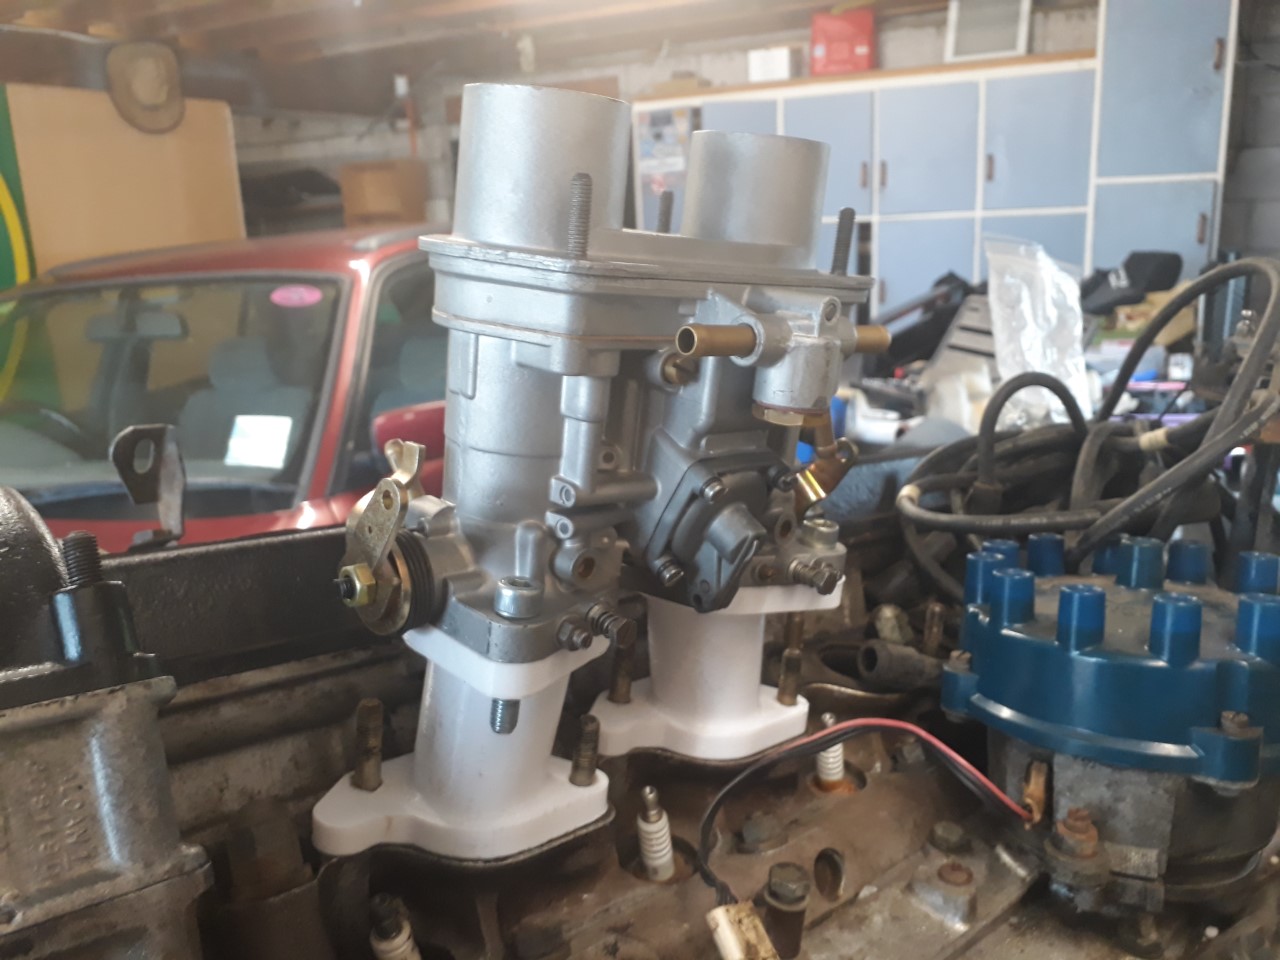
-
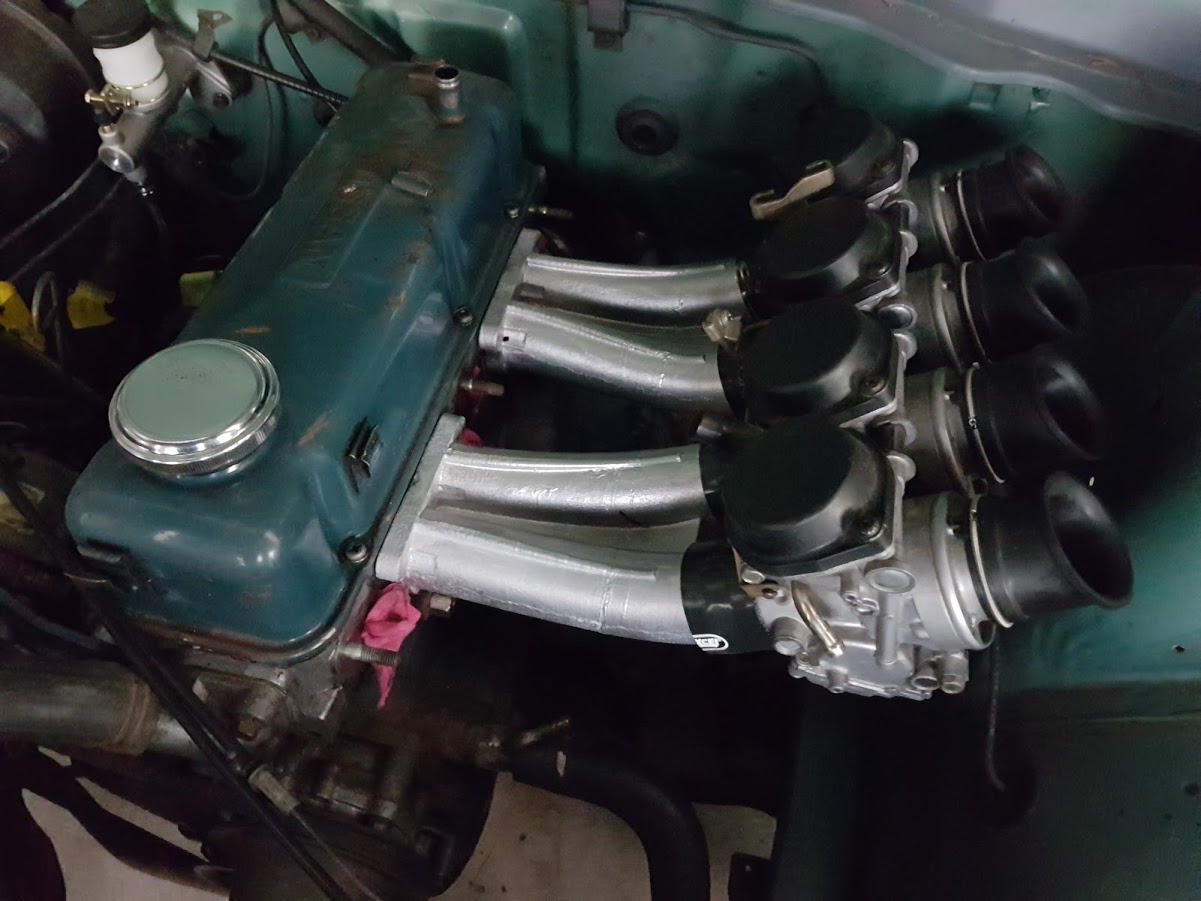
Now, Will it fit? Well, by crikey, it might just work... Of course it's all good having one side line up, the real test is when #2 is made and whether or not it will simultaneously line up. On the desk it looks plausible. And with some minor filing of the holes on the cylinder head flanges (I haven't fixed the spacing issue with the stud holes) they even fit on the head, with the ID on the intake runner being on the money with the intake port on the cylinder head. It all looks plausible, but just to be sure I drop some bolts of conveniently the right diameter through the holes to see if they line up. Magic, The butterflies open like they should and it appears the intake runner and bottom of the carb line up as they should, not bad for a rookie if I do say so myself.
1 point
-
I fitted the spring today without too much drama I also replaced the sway bar bushes too. The lights turned up from aliexpress last week I mounted them today and ran out light so I'll wire them up tomorrow1 point
-
While that is going on, a couple of months back another weirdo (I say weirdo because you have to be to own one of these things) lists a V12 Jaguar engine for sale here on Oldschool. On this particular night I'm 3 or 4 Coronas deep, which to me is the perfect amount to assist in making rash decisions without worrying about the consequences. So I message the guy and say I'll take it, and fire some money away. Oh man, It's in Dannevirke. How is this going to work, luckily a buddy was going to a wedding down Wellington ways and picked it up for me on the way back, I then picked it up from his place in the Waikato. It is a Pre HE motor, out of a Series 2 XJ12 sedan according to the block number, The internet led me to believe the Pre HE motors are the ones to get when it comes to these motors, which was it's big selling point. I made a day trip to pick it up and got it back to Auckland and on an engine stand, I swear it was the worlds longest day
1 point
-
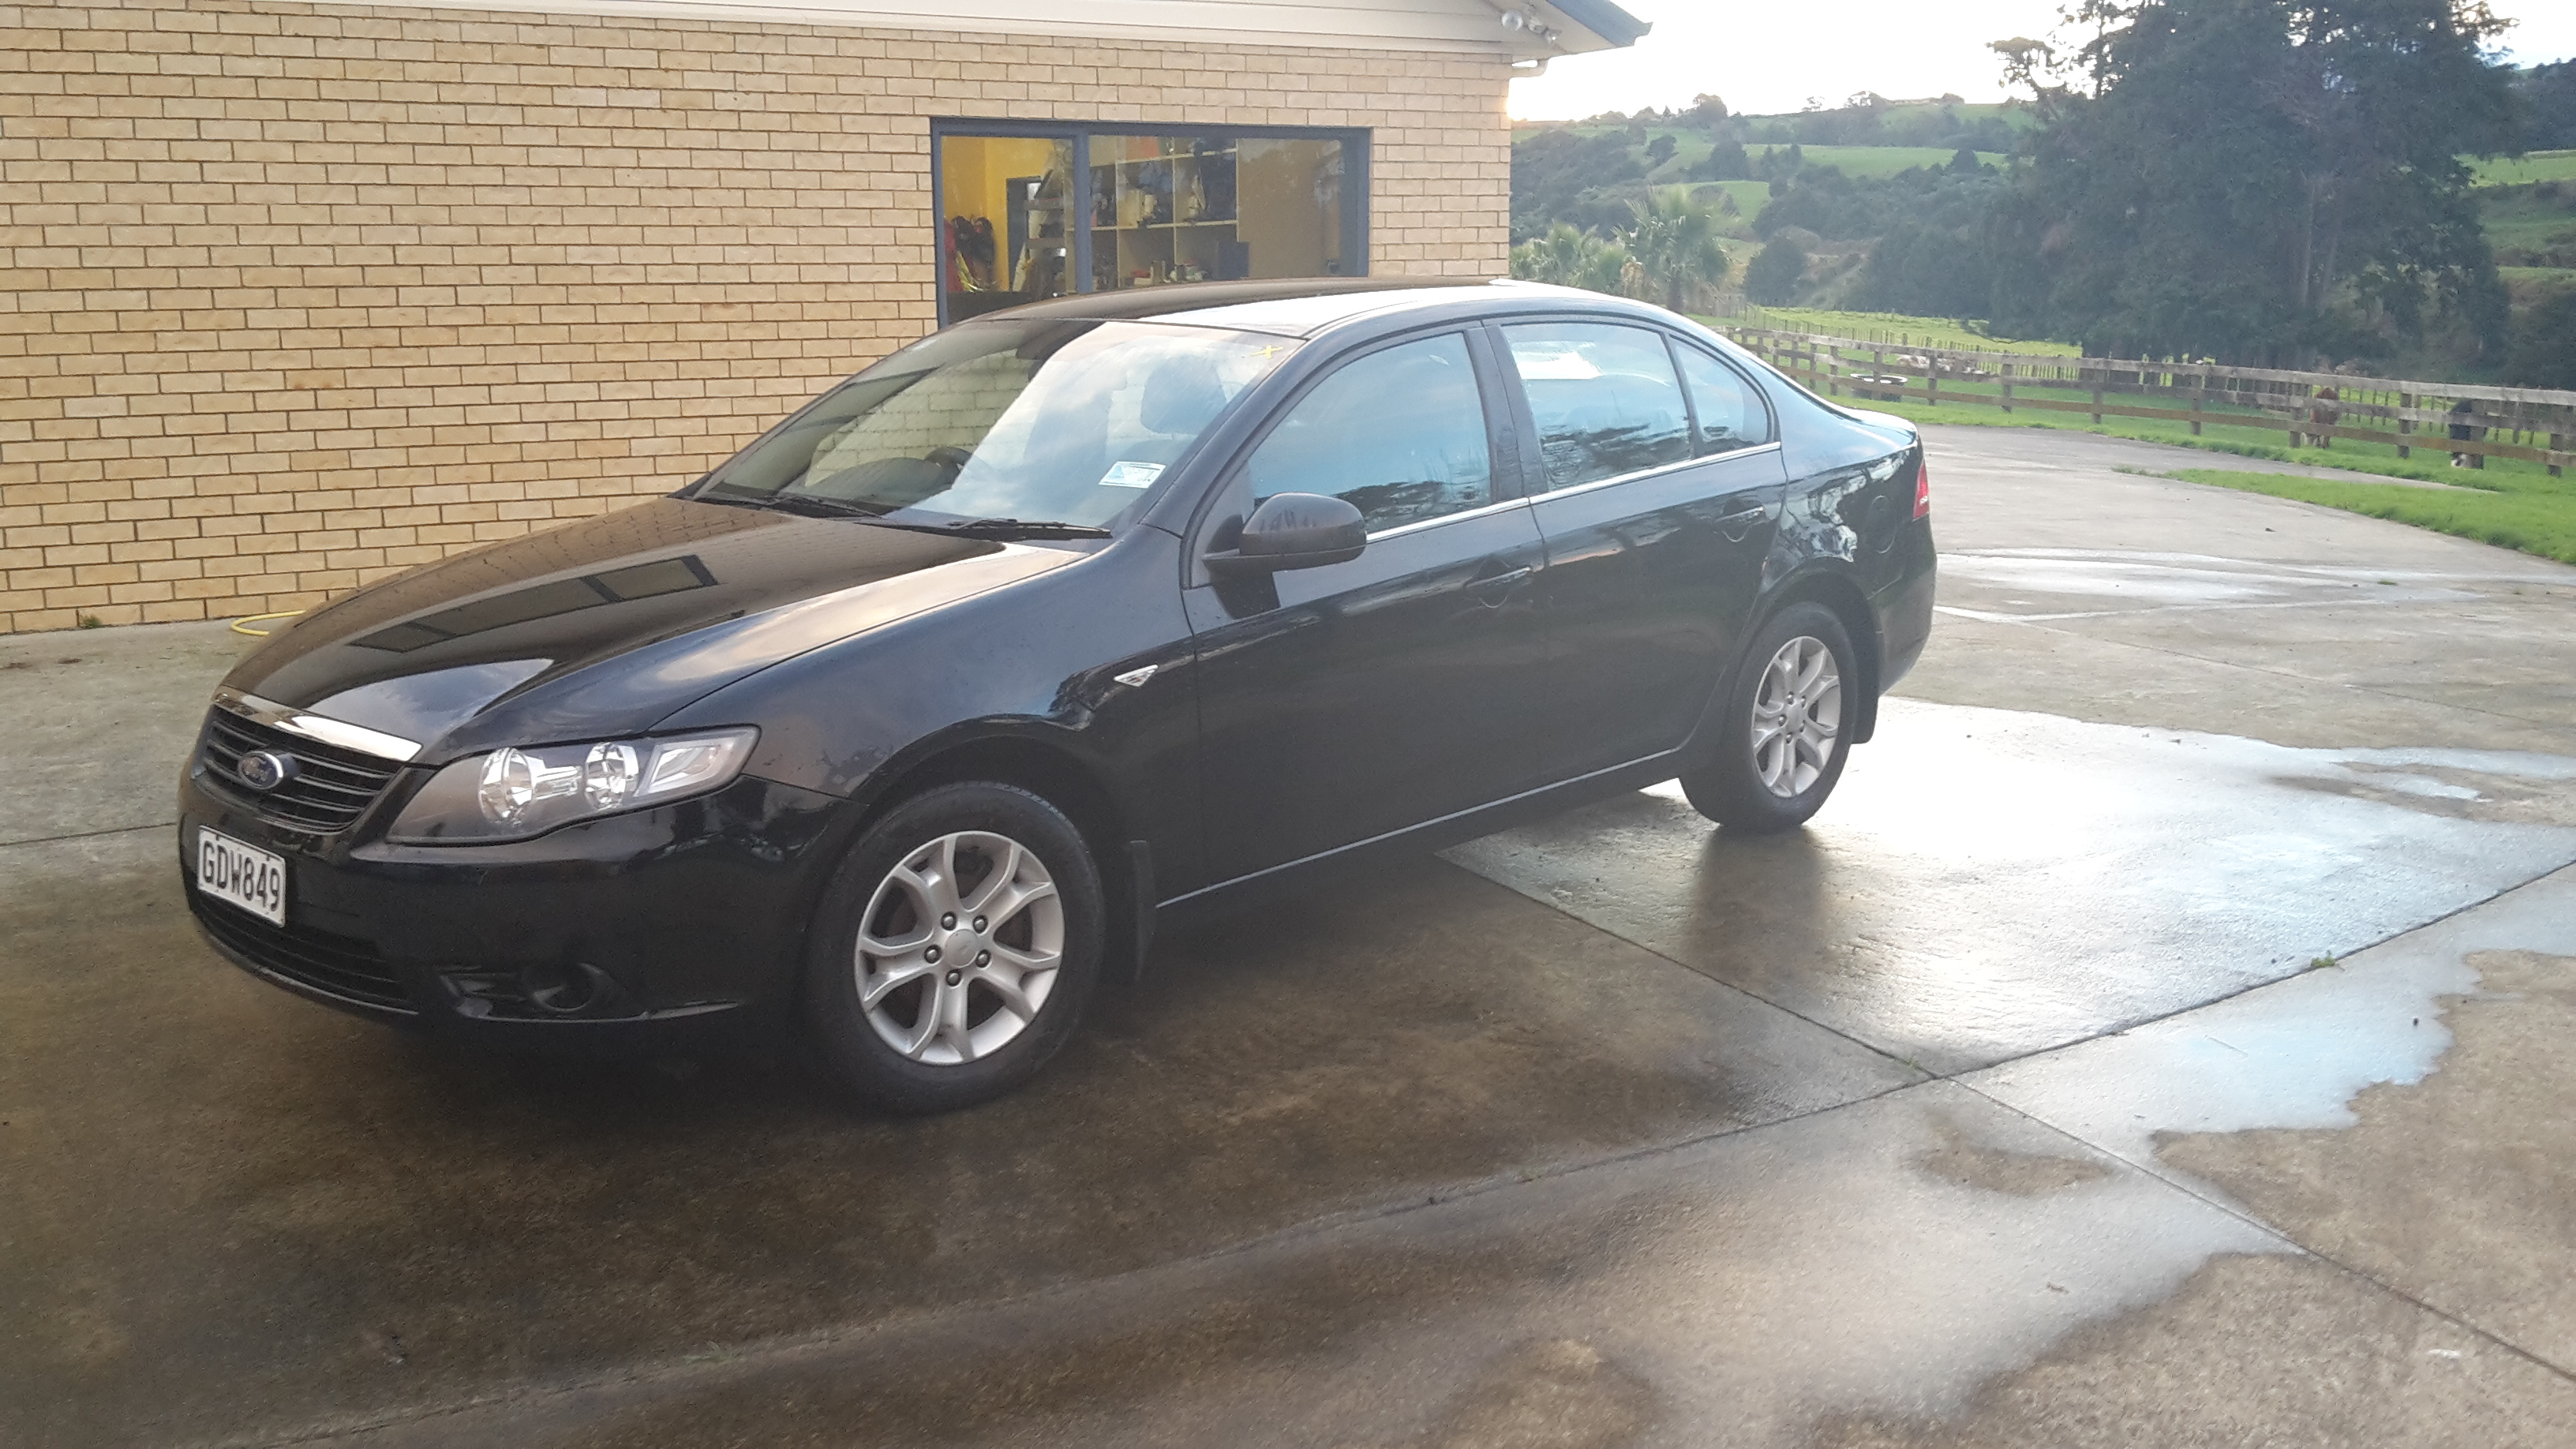
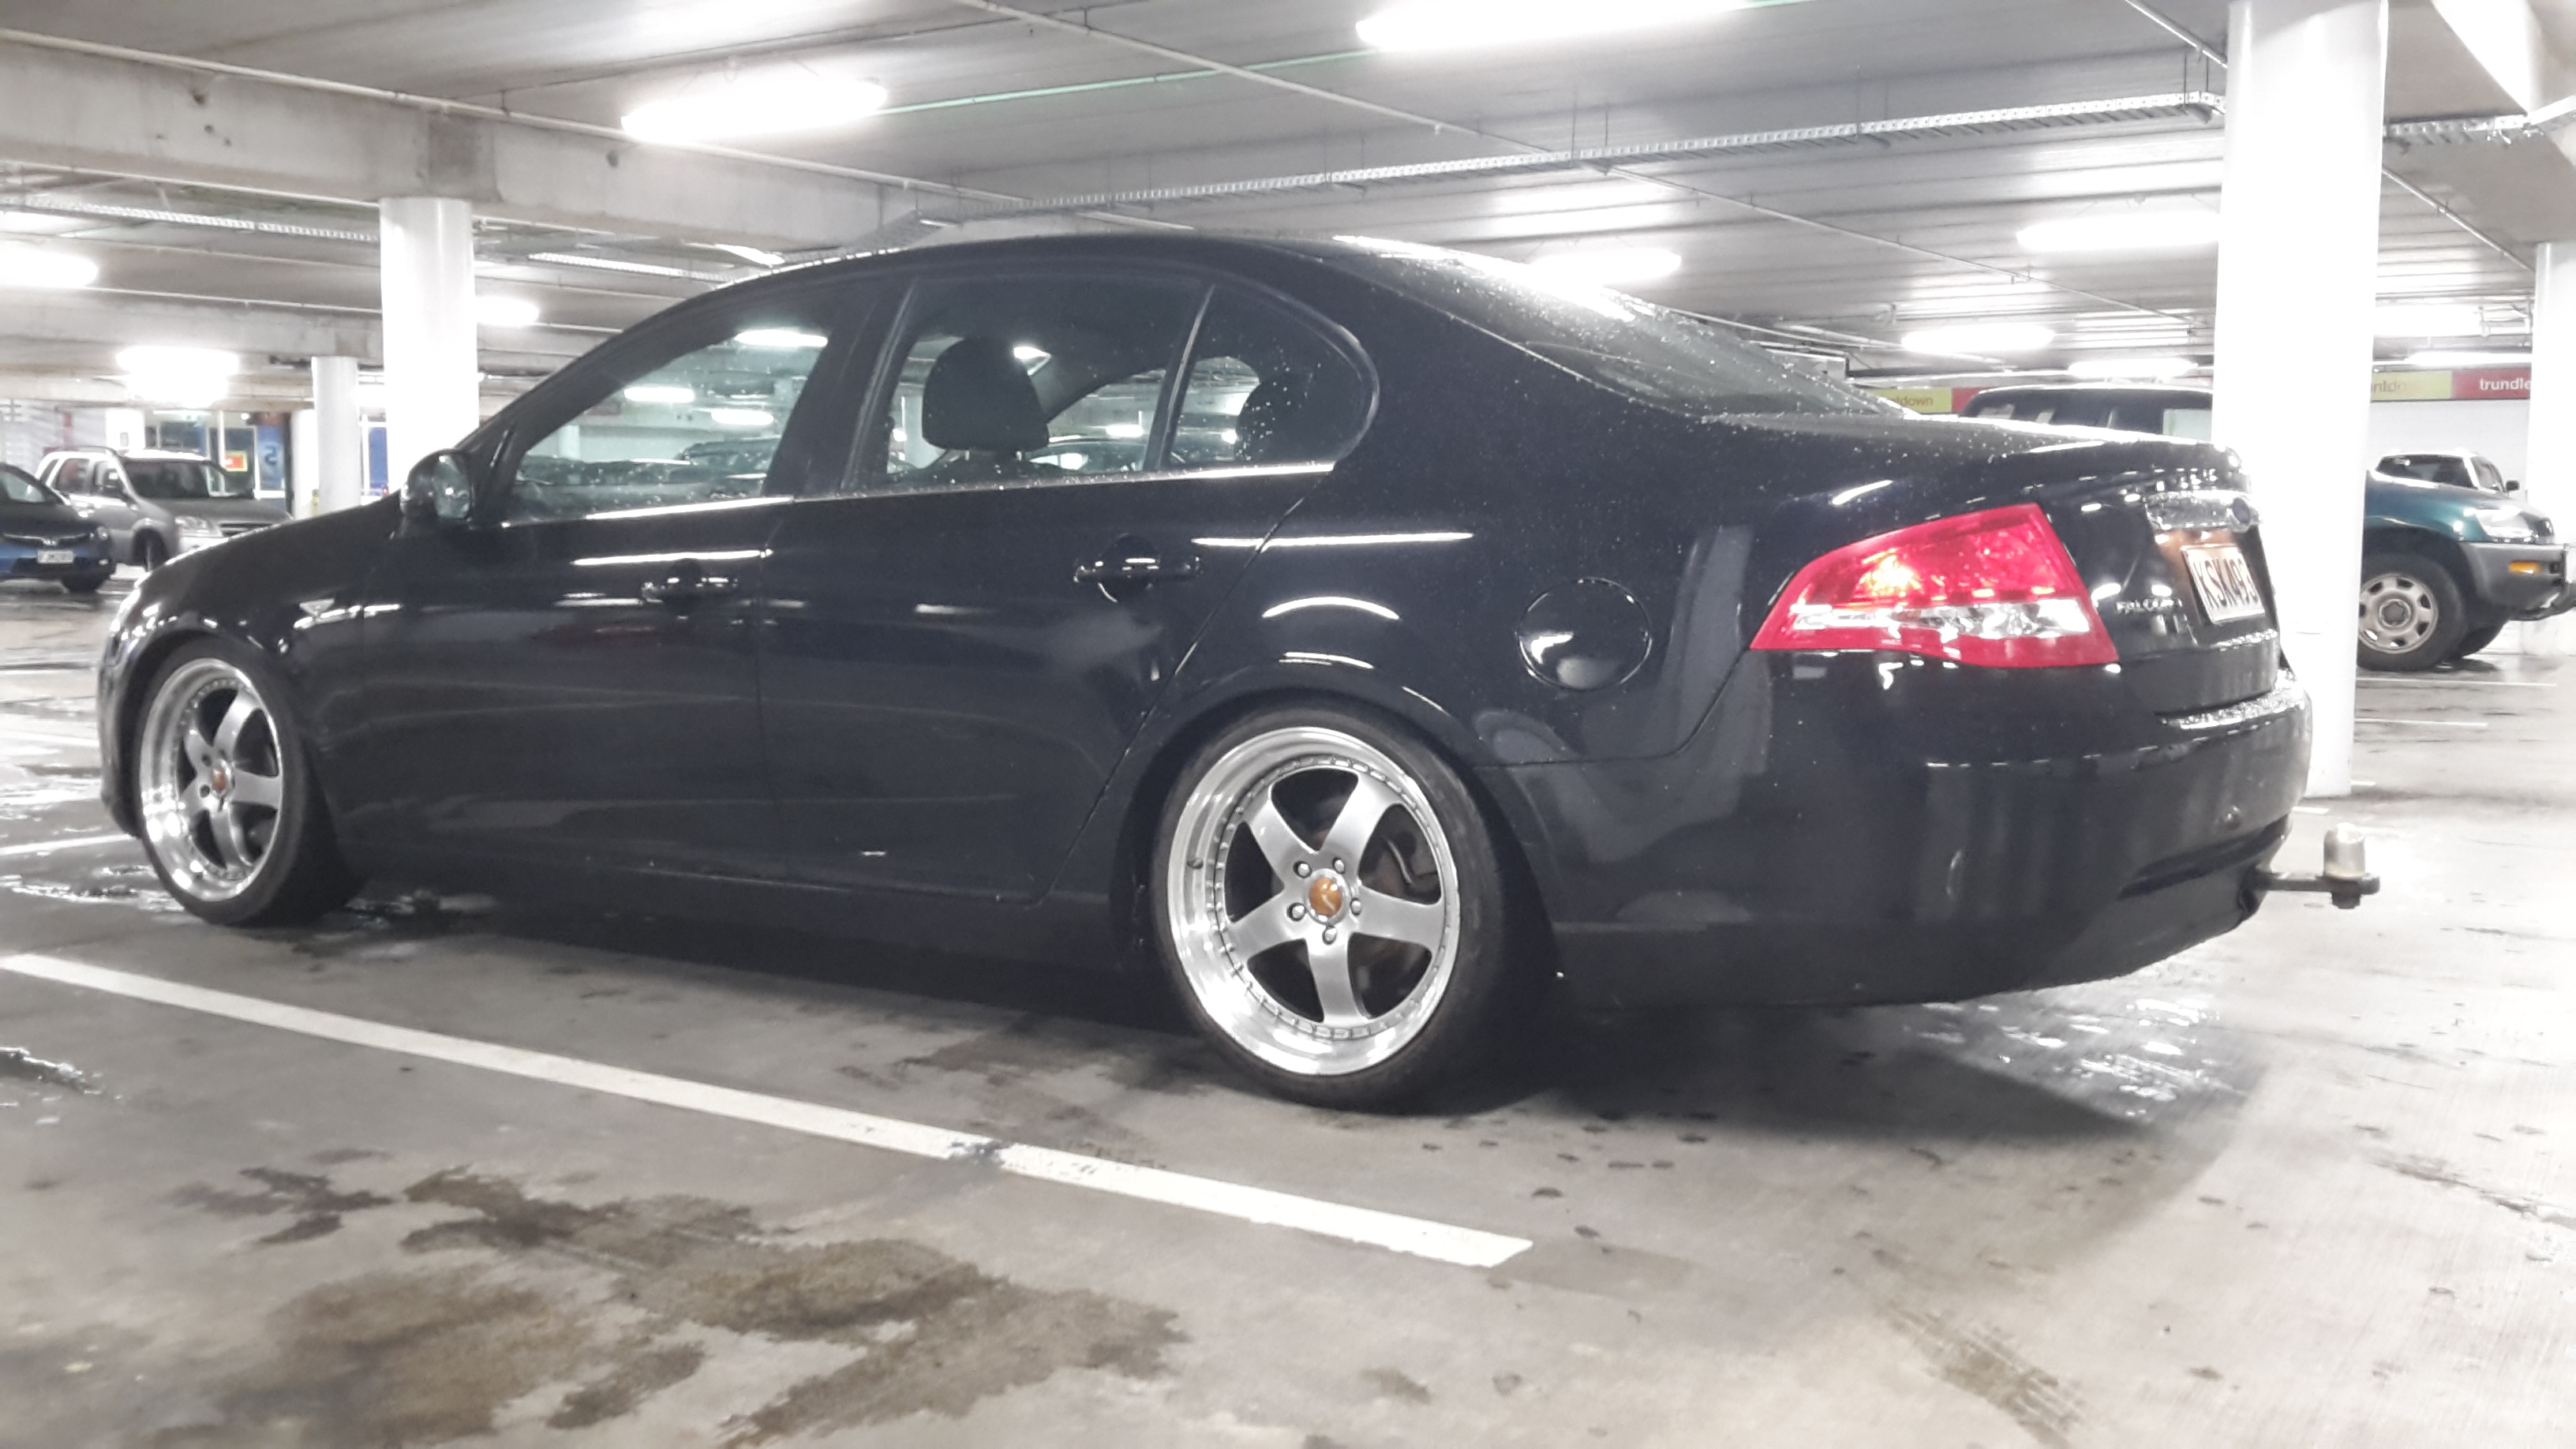
Got a new car for work to replace the wagon which was getting a bit tired. I told my boss it needed a headlight bulb and a couple of other small things and by the end of the discussion we were looking for a new car I figured I didn't really need a wagon so that made choices a bit easier, I like falcons despite the issues I've had with the wagon, they are big comfortable things that go ok and are pretty cheap, and don't cost much to fix when they do have dramas. When I got the wagon it had already done 240ish kms so I wanted something with more life in it, I looked at a couple of xr6 s but this one was similar money with 125kms and a bit newer, it's an xt which is the basic spec but it was always going to get the wheels off the wagon and some springs anyway so I did that today. Much betterer
1 point
-
And boom! That's it, everything is hooked up...ready to go. Will let paint touch ups cure overnight. Fingers crossed for better weather???? But it should just work??? I'll take a video (when we get better weather) of it going and link it in later.
1 point
-
still chipping away / chipping one out on this thing. More parts have arrived Headlight that isnt redic massive, have a stronger LED bulb en route for this New 428 pitch sprocket, have gone from a 41 tooth to a 34 tooth for all of the road speeds, stronger chain is ideal also importantly with the more legs on the gearing, stopping becomes a bit more of a problem, im not that good / cant polish a turb but new honda brake pads should help and probably the most exciting piece is the local wheelwright here in the ding has finished truing up my wheels. I laced them myself but probably would have been cheaper to get this barry to do the whole lot as i had a whole bunch of inners / outer spokes the wrong way around. anyway old mate here from Hamco industries / Hamco wheels saved the day. Had some sweet yarns and was a GC im loving the look of the trials tyres, cant wait to get these on the bike. gunna smash some work this weekend hopefully1 point
-
Should put fittings in that beam for engine lifter. Then you can do 2m engine swaps in the lounge while Mrs sheepers makes chicken nuggets and small red sausages etc1 point
-
1 point
-
1 point
-
When you should be trying to earn an income or advancing progress on your hotrod ... your mind wanders and this shit happens, lol! More recycling/re-purposing. I fucking love it! Of late, I have dragged my toosh to a couple of art craft show/market thingies and had a look round. Attended a Steampunk thing too. Decided I had enuff dirt under my fingernails, the gear and resources to have a go at doing it myself. Free heat from scrap mixed with waste oil. I love living the life of a fucking shedrat.
1 point
-
Small update. Massive thanks to old man KY for sending up a camshaft (thats not in two bits). Whacked that in and chucked the belt back on, engine turns over by hand with no odd noises or oddities (such as sudden loss in compression) which is a good start. I was hoping to compression test it but turns out its not really practical to do out of the car (cant bolt up starter etc without bell housing). Although might see if I can find a rb bellhousing for a loan as it will likely bolt up. Recent trip to Japan sourced a few goodies (crystal shifter, lace seat covers, stickers etc), and got my pine back on for some nice wheels so spent last night browsing yahoo japan. Also found a mooneyes visor haha https://wing-auctions.c.yimg.jp/sim?furl=auctions.c.yimg.jp/images.auctions.yahoo.co.jp/image/dr000/auc0212/users/7/0/8/5/mackys_1-img383x263-14818565326td6al22809.jpg&dc=1&sr.fs=20000 Need wof for nats so thats the primary goal (booked in for next weekend). Have done some work already that needed sorting so shoudl be straight forward.1 point
-
Wow, what a fantastic sharn. Almost shed a tear. *clap clap* I did tell myself when I got this that I must save it from an untimely end. So count on me to give it a new lease on life. Will be keen to here the directors cut of said sharn over a bevvie or 2. Perhaps I may get that subframe just as an excuse to do so. When I was going through the back of it having a geez, I noticed something odd around the tail lights etc. Then it clicked, this old bitch as taken one up the arse!! Heaps of seamsealer in and around aswell as some pinched bits of steal. Took a look under it and some of the old seams were split and showing some car cancer, luckily this seems to be the only part of the car thats really bad. Explains why the back quarter panels have cracked bog n such. Only other rust I found is bottom left sill, top of the boot seal, inside rear left guard and engine bay where the battery tray used to be (looks to be both leaky battery and possible home jobbie intercooler cut?). Other then that its quite a solid car really. Tbh, I actually bought it because it had a full set of Kei Office coilovers and was gonna hack the front end off to fuse onto a 200sx s13 shell I had for a little bit (bought off @ELEVNS) but after looking over it it was just too good to cut up and the 200sx was well and truely fuckered. But it gave me an idea. See, the first plan was to make a "Cef-hundy" or in other words a Cefiro front on a 180/200sx body. Since that fell through I then thought "how bout the s13 front on a cefiro!!" Fucking light bulb I tell ya. Early pignose 180sx front with pop up headlights and all. I was trying to come up with a name for it. 2firo? Tu-whero? Stay with Cef-hundy? Cefsx? CEFSEX!!!!!
1 point
-
Well the starlet ended up getting the move this evening but not under its own power due to no radiator and a bit of a cunt to get started had to jack the back up and pull it round to get it out as old shed hasn't got wide doors and fence is close by Old shed Into the new shed When we have finished putting everything into and away in the shed the car will be moved into a more suitable loaction in the corner where its rust surgery will go underway
1 point
-
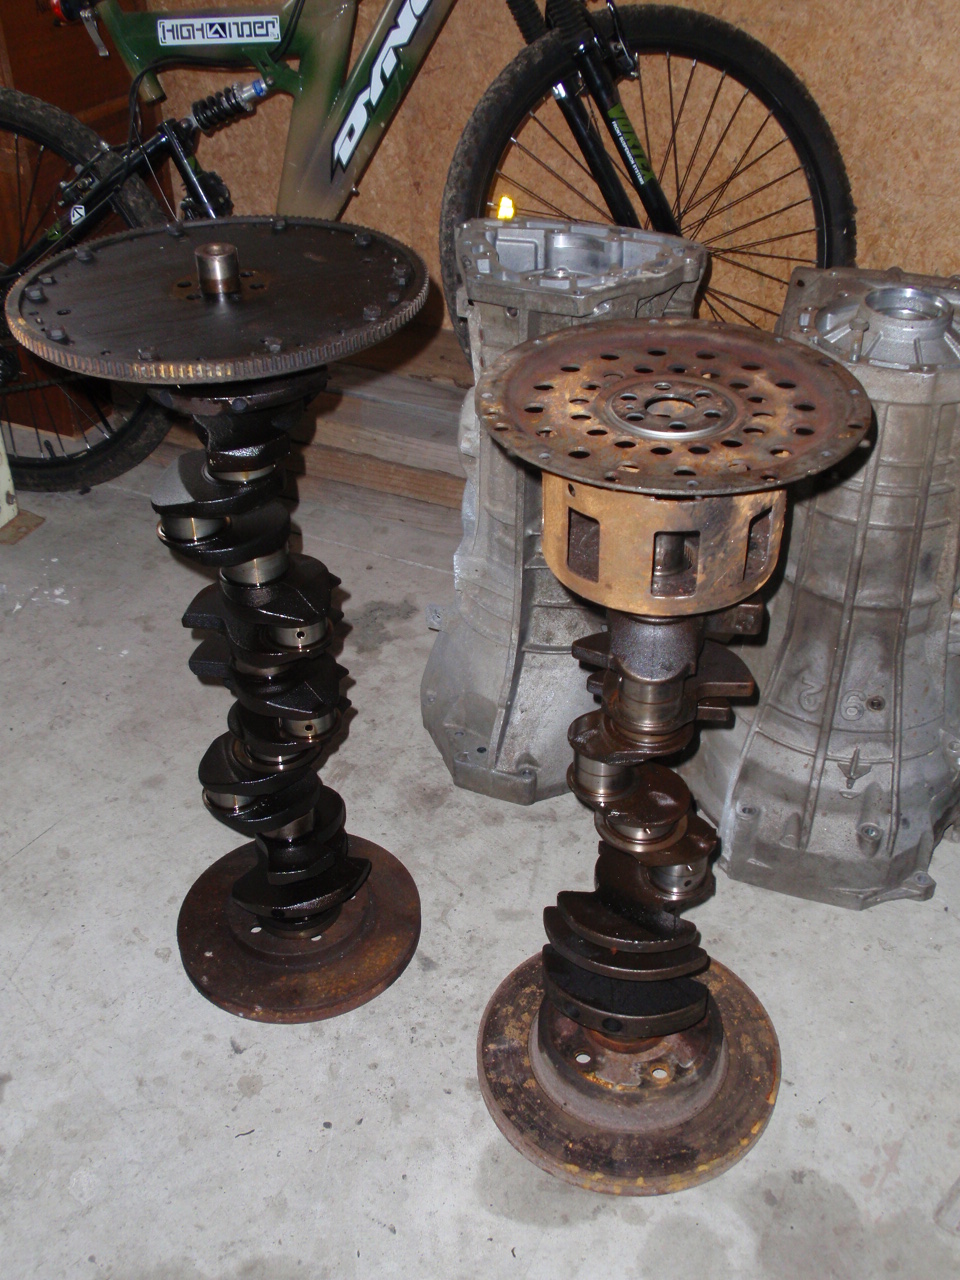
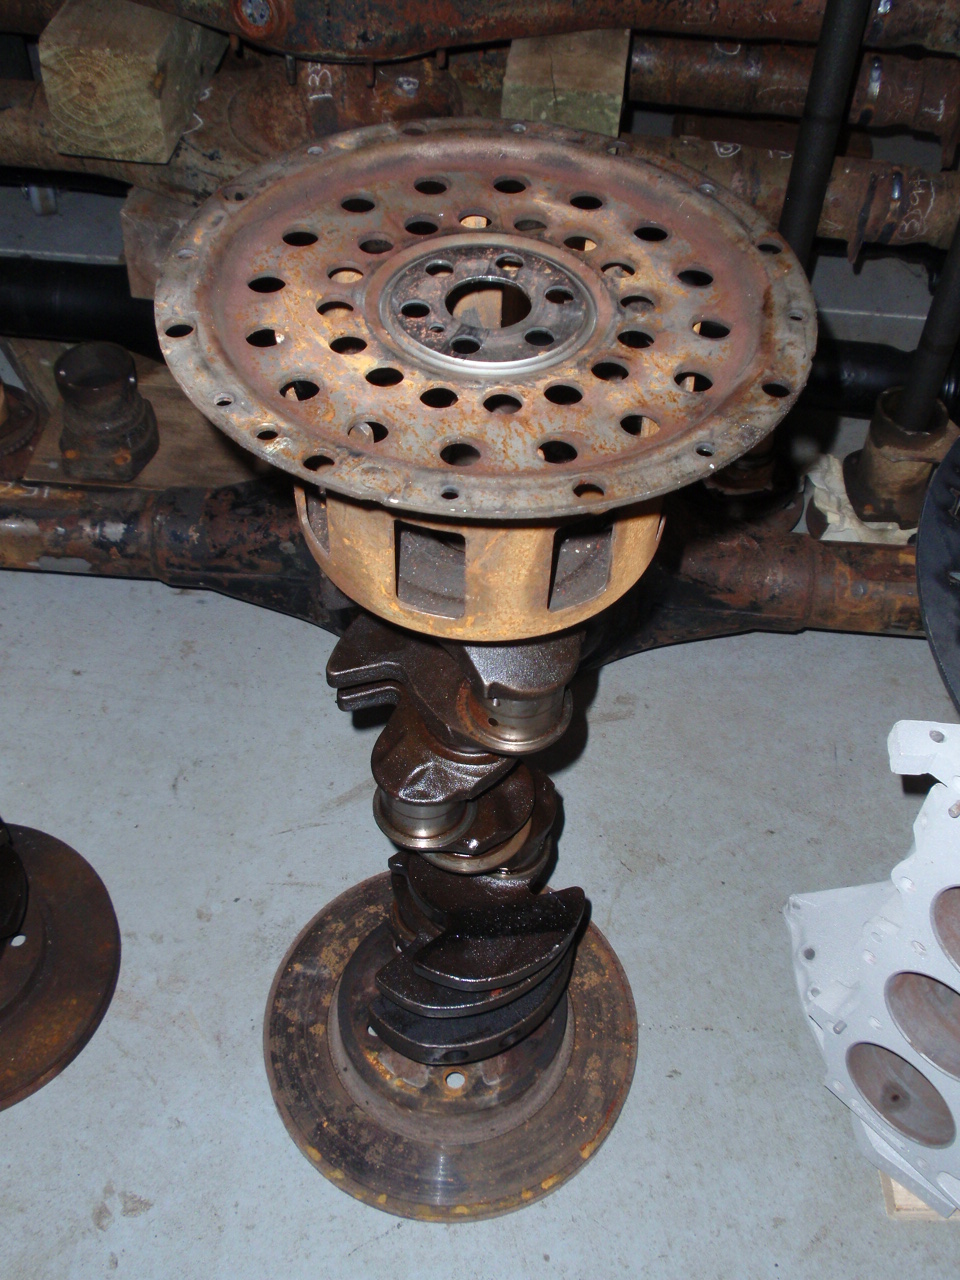
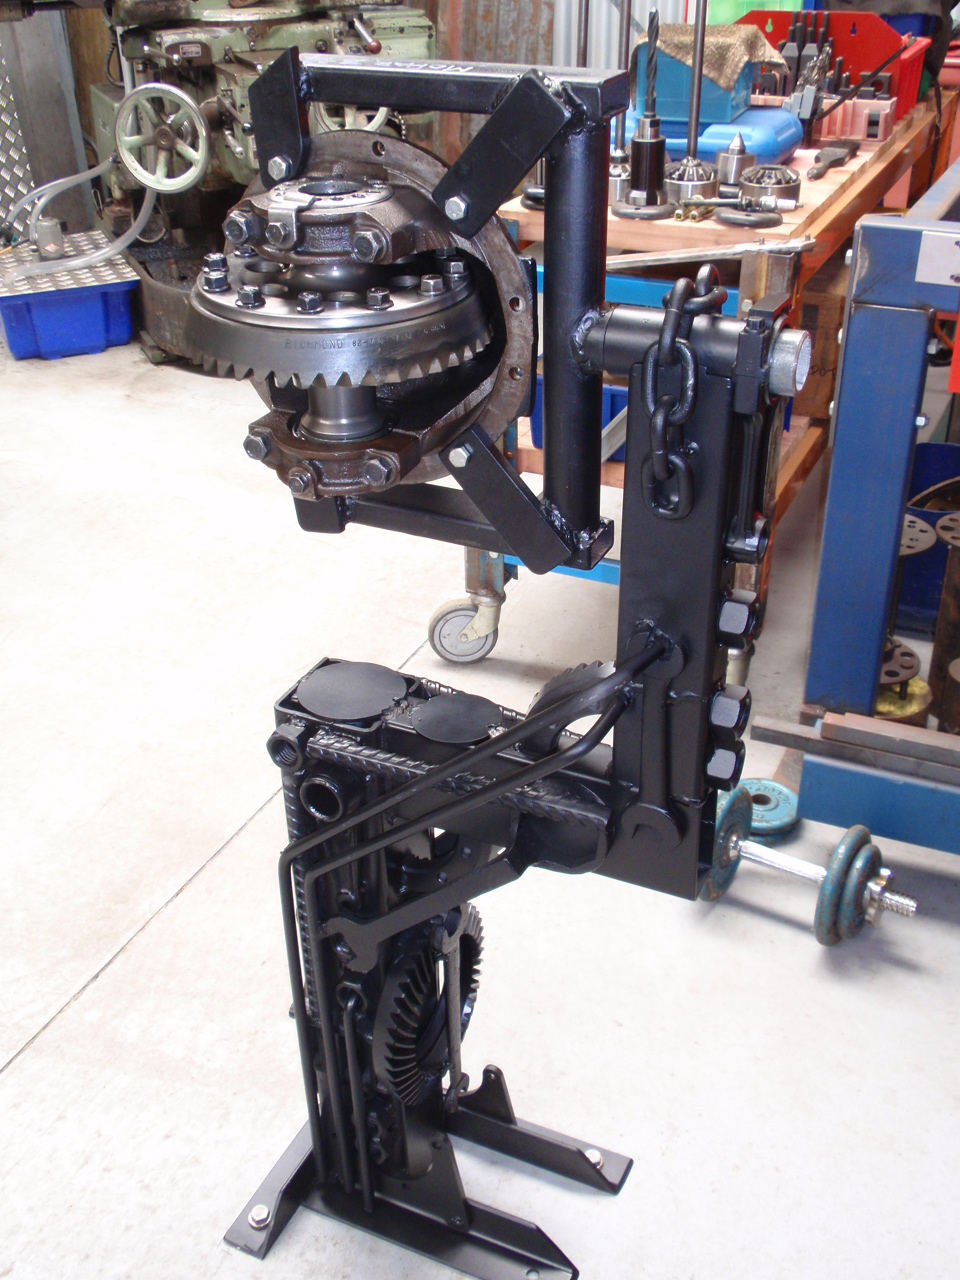
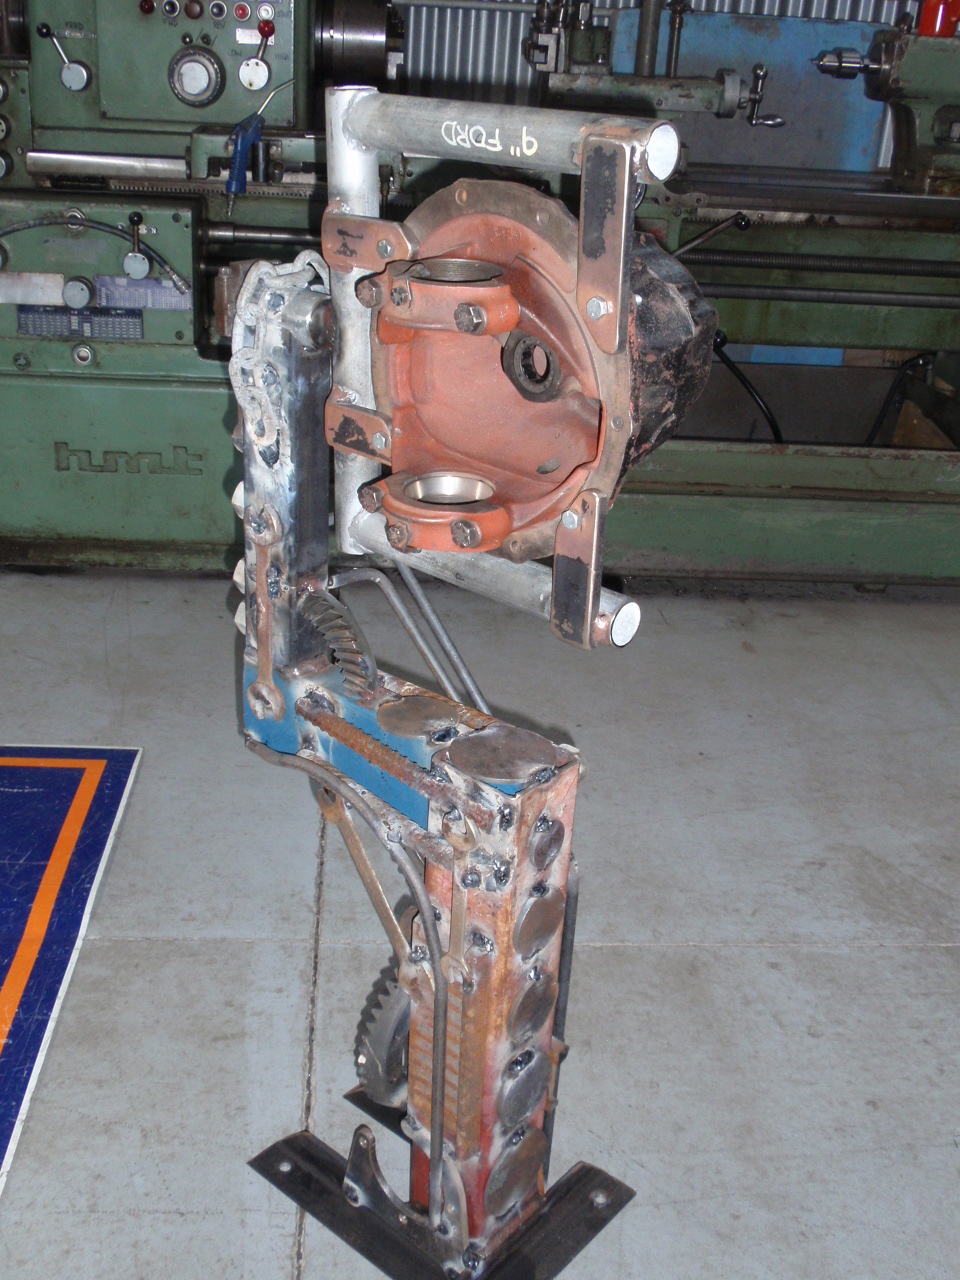
More practical application of scrap in the shed. Sick of chasing diff heads across the table when torquing down the cap screws? Do more than a few heads at times? Get one of these. Bolted to the deck with nothing going nowhere. Head able to be rotated 360 degrees for spanner application anywhere you might want to try some. Have multiple jig thingie/head holders to suit the differing heads i muck with. Looks Steampunky/Shedratty cool. Makes me dosh. Put together with the same loving care and dirty arsed 50's era stick welder all the heavy iron projects get around here. Churr.
1 point
-
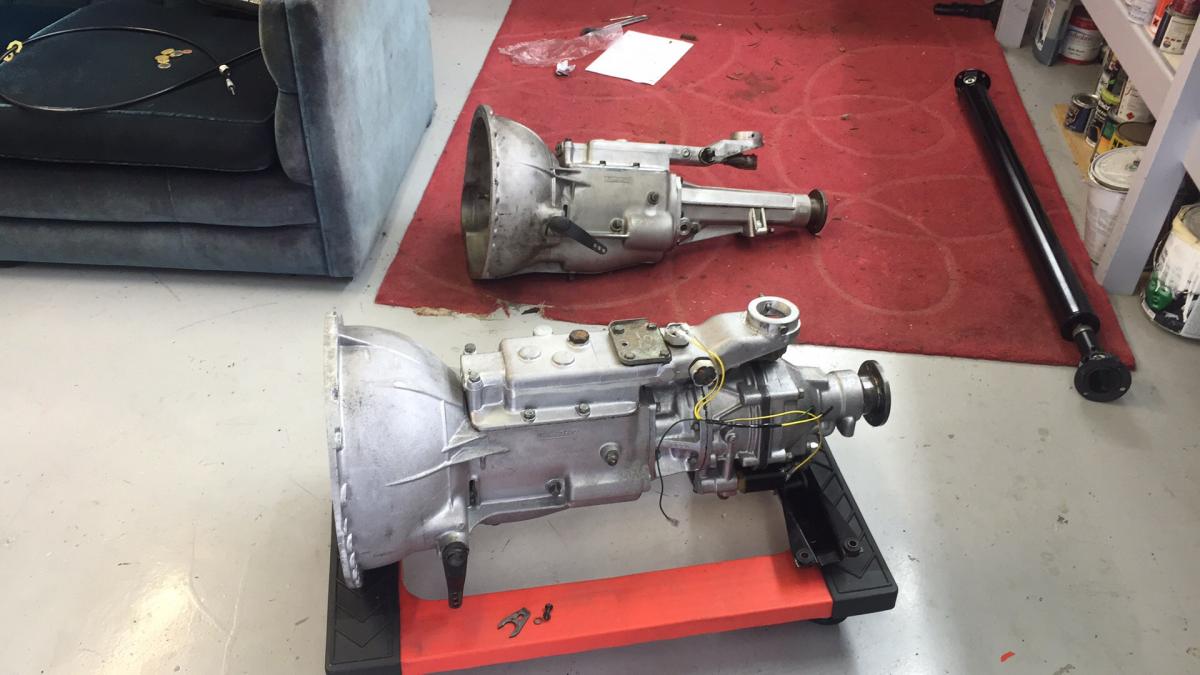
Had a productive weekend. Pulled the gearbox on Sunday morning and went in search of my oil leak. Had to remove the clutch and flywheel and also the engine backplate to gain access to the crank seal housing that I thought was leaking. When I got in there it was dry as a bone so back to square one on that... It must be coming from the sump gasket but I was sure it was somewhere further up:( Anyway, with the old box out of the way I made a start on getting the OD box back in. Not easy by myself with minimal room but managed to wrestle it back in and got it bolted up. Did run into a small problem though in that I didn't realise that there are longer bolts and spacers required to lower the gearbox crossmember and keep things aligned properly. Result is that the new box is too high up at the rear and strikes the floor when bolted up. Got the bits on the way.... Old and new...
1 point
-
1 point
-
Off for some poser pics...
1 point
-
Get out of my thread fool Edit: its official, I now own this. Its currently on the back of a big ass truck. Hopefully get delivered sometime this week.1 point
-
Not much of a update But this is progress right?1 point
-
Photoless update, but the wagoon is fully road legal. I've also started scrubbing the interior clean, have added an alarm and central locking + wired it up for speakers. The coolant system was a mess! Chick full of rusty poos, so ran it with 3 cups of soda crystals for a few days, flushed it out and fitted a new cap (old one didn't fit/seal), now running it for a few more days with more crystals, new hoses and thermostat to follow! Going to start polishing up the wheels in the next few days, so pics to come when I make some progress there! Reckon paint stripper would hurt the window monsoon trim things? Mine have been introduced to Mathew Black at some point. /kinda pointless update! so inspiration:1 point
-
Today's progress has consisted of 2 steps forward, 1 step back. Cleaned out 20+ years of crap from out of it = step forward x1. Getting the roof lights working = step forward x2. Breaking the window winder handle while resetting its position = step back. (it dug into my knee when the window was right down or up) Getting the tailgate to close against the seal = step forward/step back if the car was intended to be a covert gas chamber? Found the motor for the for the "loading window" while not dead, isn't far from it. Apply power and it makes a sick humming noise but nothing else notable happens. It looks like a pretty standard window motor, but its tucked in a pretty crap spot to get at with big hands!! -just realized I've got a 9 year old with little hands and a taste for pocket money... Nothing else of excitement to report as of yet, but stay tuned... Ooh yeah figured I might as well show you guys the insidey bits too! The vacuum in our workshop = less suck than a $2 whore, will give it a proper clean out soon. First time the seats have been uncovered since 1992! I'm sure that's still a relevant map! Brand new/2 year old fender mirror Sounds like an RB gargling a bucket of ball bearings ie: Awesome! A krafty piece of Kiwi ingenuity It's only about 1/2 a meter longer than the Altezza, it feels about 5 meters longer to drive though haha The eagle eyed among you will have noticed the factory AM only radio and possibly the 1" speaker siting in the ash tray thats connected to my ipod. Plan there is to install a period correct tape deck in place of the AM set up, some modern speakers in the doors covered with old grills that are yet to be acquired from a local wreckers yard. If it's a working tape player a Theodore Huang style line in will be the go, otherwise I'm thinking of stashing one of those mechless headunits in the glove box.1 point


This leaderboard is set to Auckland/GMT+12:00