
Leaderboard


Popular Content
Showing content with the highest reputation on 04/29/17 in all areas
-
So 2 weeks before moving to the US this happens! Guy in OZ is rebuilding a T57 and needed a new block. So got to and cast one up! Didnt go 100% but still really well. On a plane to LA in 3days!18 points
-
Got the fwd alternator bracket to work with the rwd water pump. this lifts the alternator up out of the way of top suspension link. and bit further away from mud and crap. just had to modify the top mount to bolt to top water outlet and waterpump. also make a new inlet for water pump fwd bracket already had some racing holes in it from when it was on the starlet? Started making some towers to go around the towers. getting the sheet to do what i wanted wasn't much fun,, but turned out alright after being thrown on the floor a few times not much clearance to turbo is main issue6 points
-
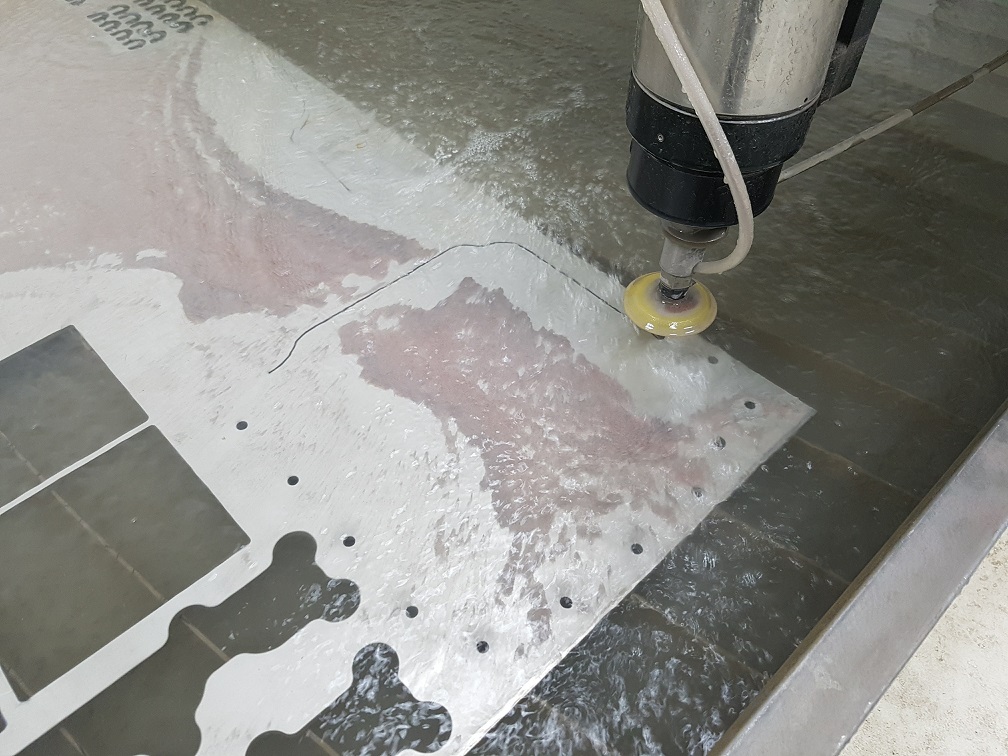
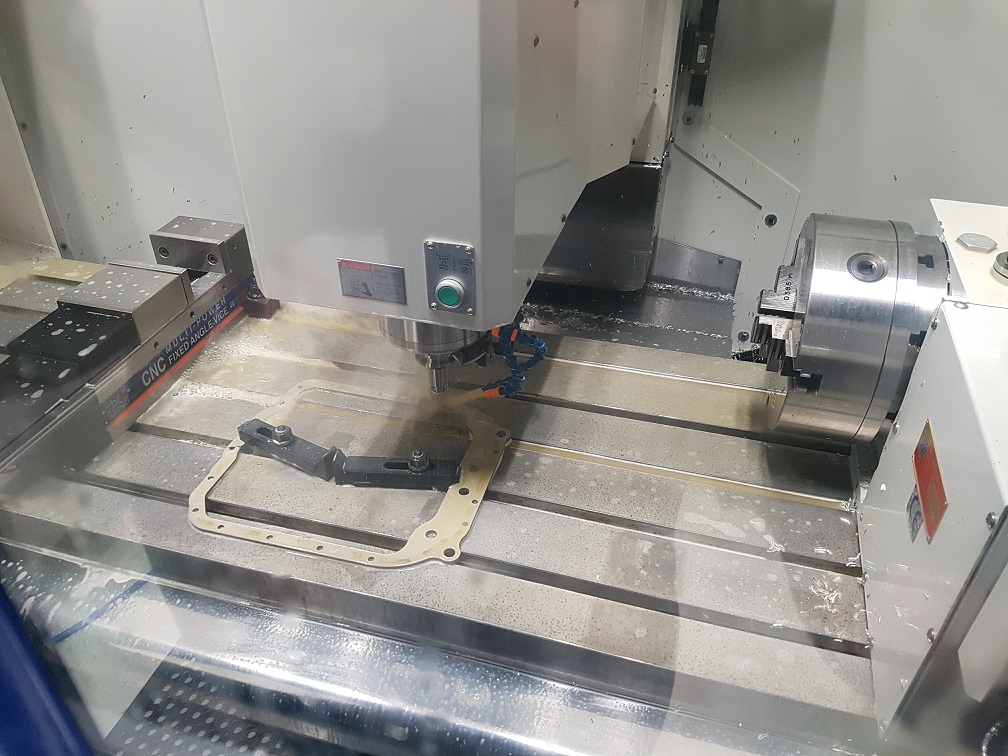
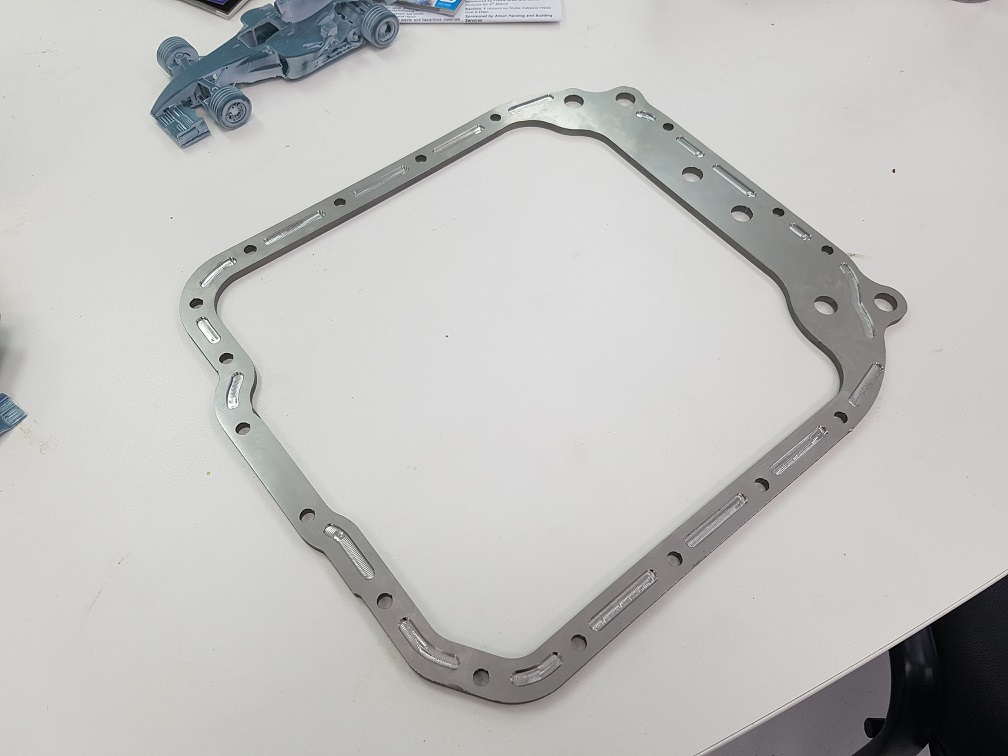
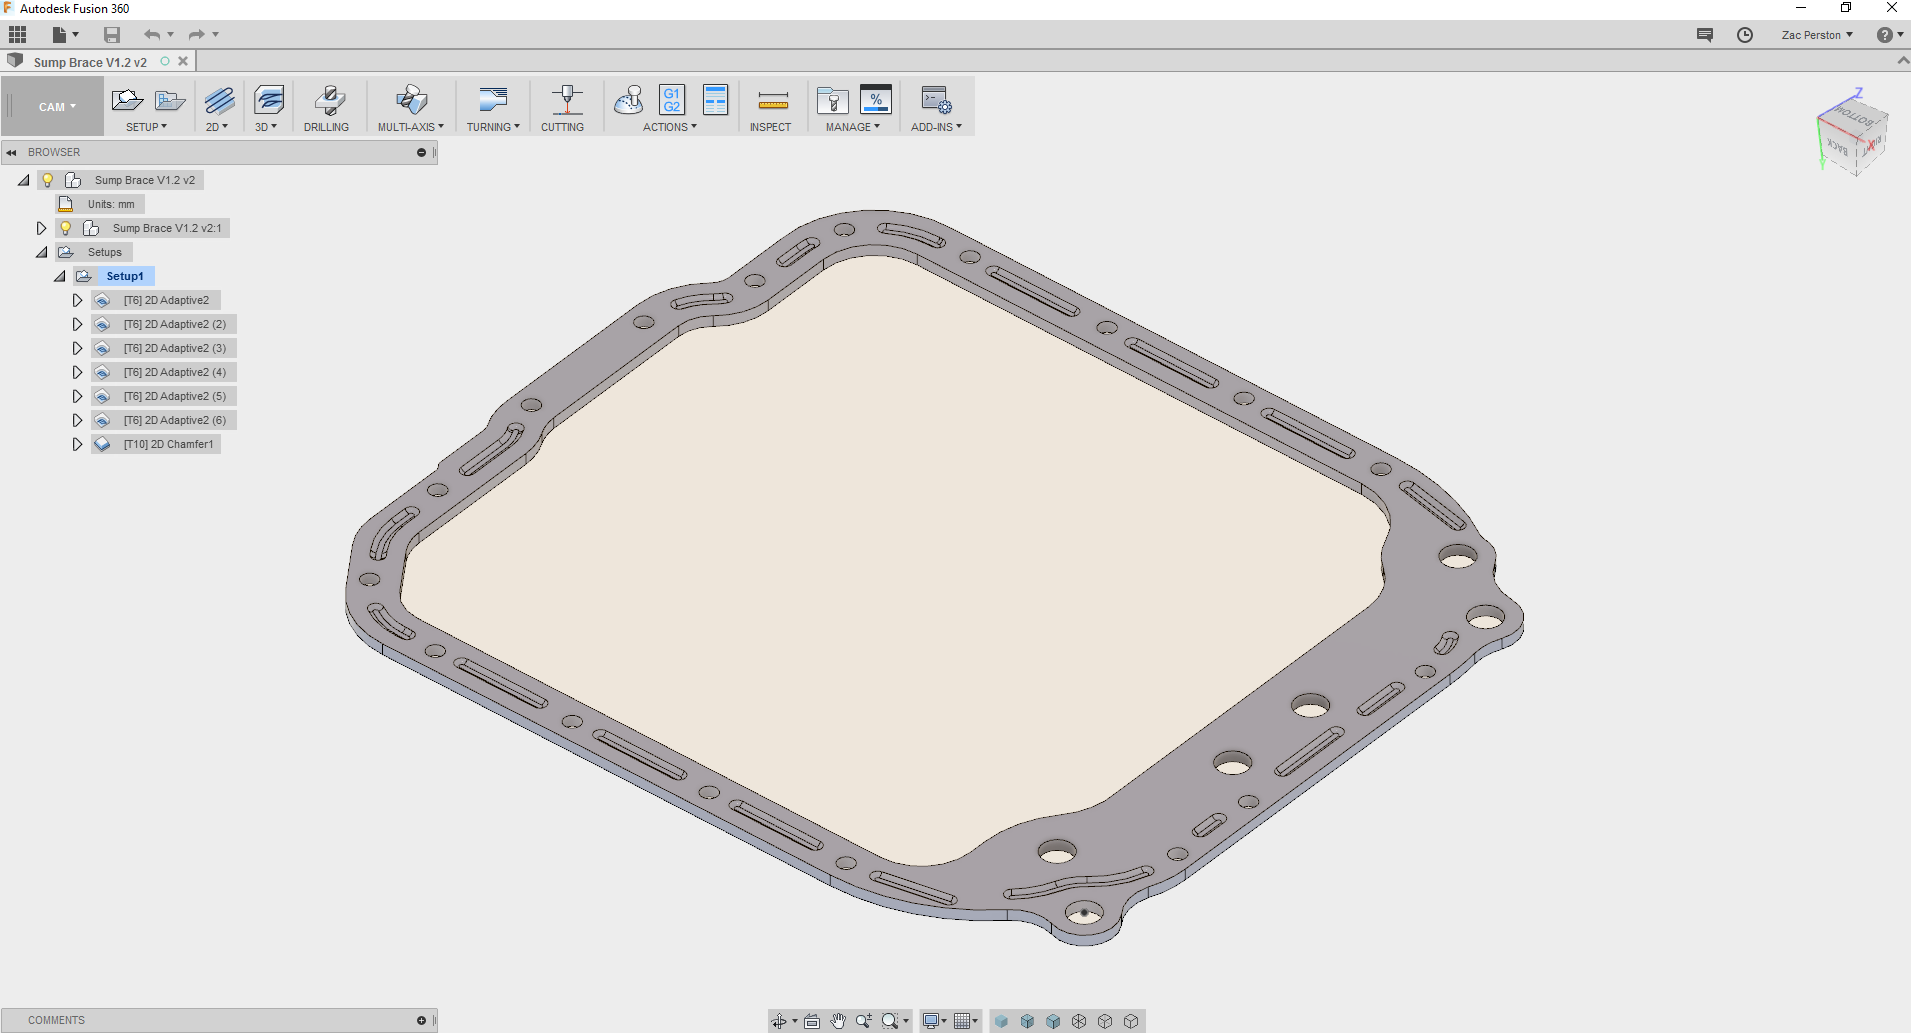
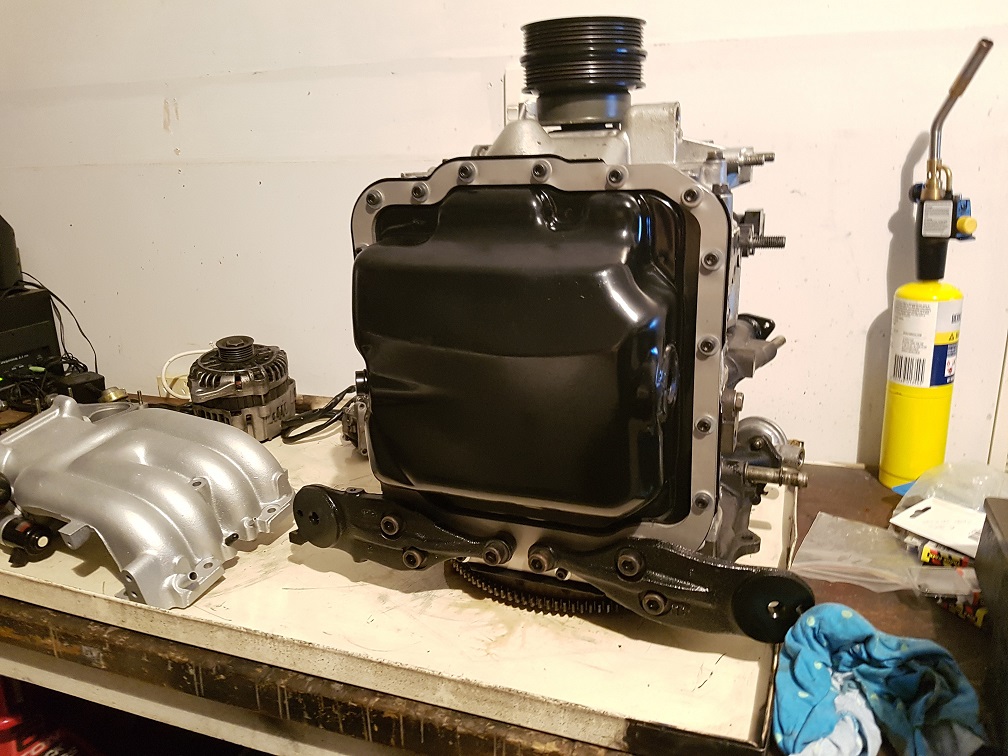
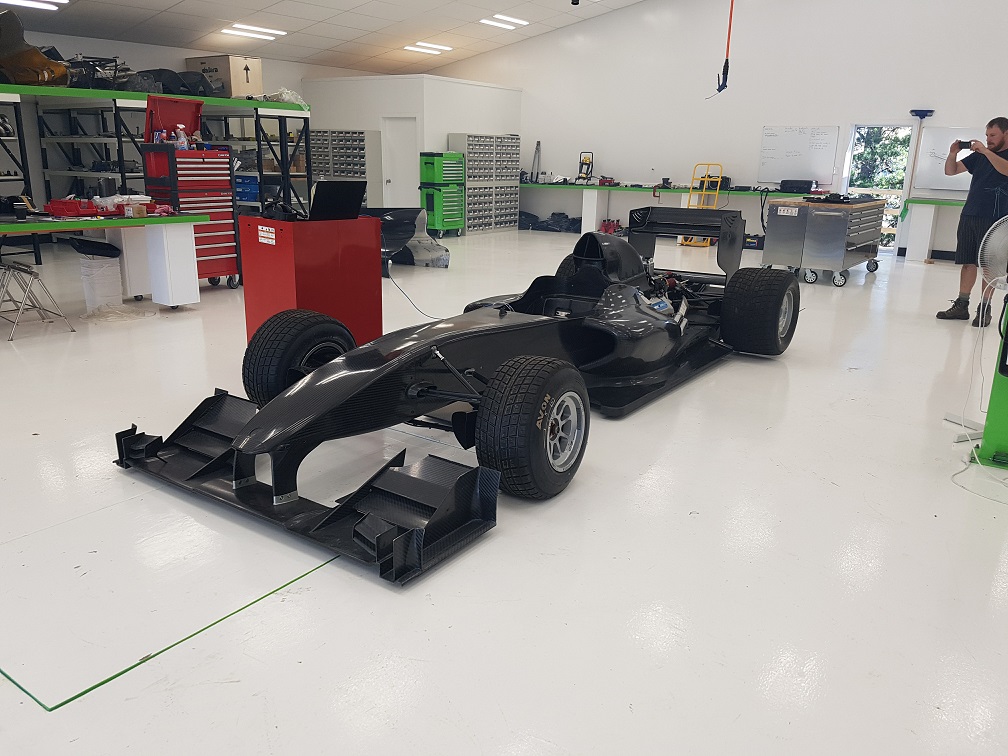
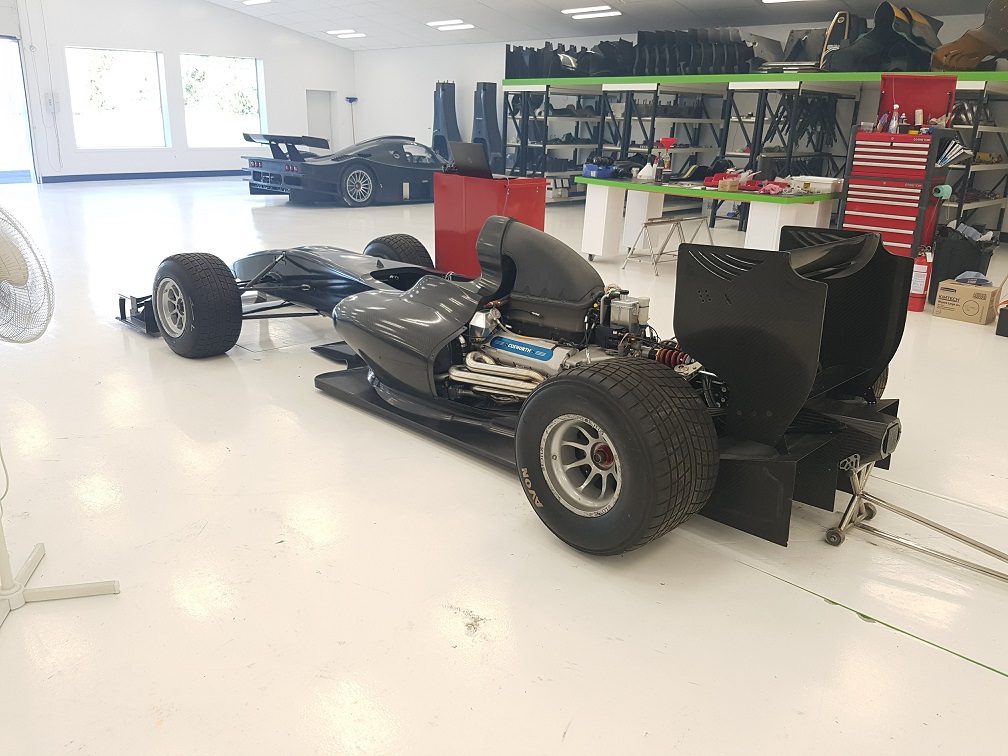
Right, to get back to where I was lastnight before I was called away for Pizza and Wine (oh, gosh, what a chore my life is....) Babies. Go have one. Now, honest, totes legit an awesome time :-). There are shit parts, but wow, overall its actually pretty awesome. Work has been really busy, surprise surprise. I did _a lot_ of this: In order to get the car we've just finished building going: And go it does. The new track at work has been sealed, its got an (almost) straight that is about 1k long. Listening to this thing bang gears down there is pretty awesome. We've all been promised a drive, but I'll believe that when it actually happens. Sooo, back to RX7 related things :-). Because I'm an idiot and could just go the easy way, I gave making (instead of buying) a sump brace a go. Lots of tracing and scanning got me a cad model of what I wanted. I used a table cutter to cut out an outline of what I'd cad'd on paper, to see if I was on the right track. It all matched up to the gasket, so I committed and cut the profile out of 1/4" 316 stainless on the waterjet: One of the first jobs I had when I got to work was to get the waterjet cutter sorted. Its a Chinese machine, with some terribly translated NCStudio software on the controller PC. With a bit of finesse though, I can hold a pretty decent tolerance on it, around 5 thou or so if I really try. This job didn't require such accuracy though, so I didn't replace the orifice or nozzle or anything, 0.25mm is close enough! The profile cut out really nicely, and matched the gasket spot on. One thing that bugged me though, and seems to be the same on most of the commercially available sump braces, is that they don't have reliefs cut for the stiffening ridges pressed into the FD sump flange. As you bolt the brace up, it would just squash them flat into the block. With a bit of white paint to outline the ridges, and a few photos, I got the location of the ridges onto my model, and cam'd up some toolpaths for the CNC mill: Yeah, an example of brilliant fixturing once more, but it worked and didn't chatter... much. Was my first time machining stainless, with a 3mm end mill none the less. No breakages and actually a really good surface finish. GWizard is my friend. I grabbed some new fastening hardware, as the bolts originally holding the sump on were a bit of a eclectic collection. A coupe of them were actually too long and weren't clamping the sump flange at all, no doubt contributing to the leaky leaky... A thorough cleaning later, tapping out all the holes to remove old sealant and the sump went back on. There was also a broken 6mm tap incident that put a hold on play for a couple of days till I figured out how to get it out... heh. I used grey 3-bond sealant, as it is 100% the best stuff I've ever dealt with. Its one of those products that has a distinctive smell. You know if you ingest of inhale it, its going to be really bad for you, so that means it must do a fantastic job. Honestly though, if you're sealing a sump on, its the only way to go. So that will be the oil leak from the rear of the sump fixed, woohoo. The engine mounts will now be sitting 1/4" lower then they were (thickness of the sump brace), raising up the motor 1/4"... However, when I took the motor out I wasn't really happy with the condition of the factory mounts. They were 'ok', but could be better. Some googling later, and I discovered that factory replacement mounts are really really bloody expensive! Some more googling of engine mount suppliers, and I found that 1979 - 1997 land rover engine mounts are a similar studded hockey puck design, and almost expactly 6mm shorter than the factory RX7 mounts... Perfect, that'll sit the motor back in its original location :-). I'll post another update later on with some info on where the intake / sensor system is up to, and the turbos. Cool stuff going on there :-). Cheers all.
 6 points
 -
It was OK, a few nice race cars and classics downstairs. EV's everywhere. Needs more JDM... A few shots:
3 points
-
yep train nerds are the worst, hanging round the gates, perving at the defensless loco's you should see it when the royal scotsman is in, foamers everywhere. only train i like is a dead train... or the 55 class napier deltics that come in, mainly because of the engine, could take or leave the train itself, but it has a cool retro shape, so ill forgive it when it was in3 points
-
Before I could commit to any further work on the bike, I needed to know if the engine even ran. Before I can even see if the engine runs I need to remove the fuel tank, drain it and see if im getting fuel to the carbs. The tank is pretty easy to remove once the seat is off. You need to remove the little cubby box at the front of the tank Under that, and at the rear of the tank under where the seat would be, are four bolts. Two long at the rear and two shorter at the front (they are removed in the photos already) The guide I was using said to take the handle off the fuel tap. Not sure why, maybe just to reduce the chances of breaking it. The top fuel hose on the fuel pump is the inlet, so off that comes, and then it’s a matter of lifting off the tank. I forgot to take a photo, but under the tank is the air box (big black box in above photo). The filter in it was in good shape, so that’s one less thing to buy. I pulled the air box off, and finally had access to the carbs Before doing anything else with the carbs, I drained the fuel tank. I had issues draining through the fuel tap and filter, there just wasn’t any flow, so I resorted to just tipping it out the filler. This was a bit messy, but quick. The bad news? The tank is rusty. What I thought was half a tank of gas, turned out to be about a litre of petrol and half a tank of rusty water. Guess that explains the flow issue. The inside of the tank is rusty. Not too flaky, but will need to be worked to get rid of the rust. It doesn’t look deep, and there are no signs of it coming through that I have noticed. I can still see patches of clean metal around the place, which is a good sign. There are a few different methods for removing the rust. You can fill the tank with water, nuts, and bolts and shake like mad. The preferred method (because I like to make everything more difficult) is electrolysis, or removing the rust using a sacrificial bit of metal and lots of electricity. I’ll look further into this, but I think the tank can be saved. The other thing I had to do before I could crank the engine, was to drain the oil and fill with fresh oil and a new filter. Remember the old filter? Yeah that’s been replaced And although the oil was thick, black and really bad smelling, it had no chunks or metal flakes in it. I filled up with 2.7L of Penrite MC4ST 10W50 semi-synthetic motorbike oil. Nice golden colour. Now, because I still haven’t purchased a new battery (don’t want to invest $100 into a battery if the engine is poked), I had to use the big 500CCA one I removed from the Rover…… Lets just say I don’t have a photo as it was bit of a dodgy setup using really long home-made jumper leads and clips just hanging on the bikes battery terminals…. but it worked We have power! All the lights work, even the hazards Speaking of dodgy, this was my “fuel tank” to try to supply fuel to the carbs Yeah, that’s probably not that safe. Oh well, fire extinguisher was near by! Anyway, the carbs didn’t take much fuel at all during the testing. Whether that’s because they need to be fed with the fuel pump, or because they just aren’t in good shape, I don’t know, but I ended up feeding fuel straight down the throat of the carb. After much cranking, something amazing happened…. It made vroom vroom noises. First start in at least 2 years (if not 4, depending on when the owner last started it). Engine ran good for the couple of seconds it was running, with no bad noises. Exhaust sounds awesome, even when it’s only hitting 5000rpm or so. Cant wait to hear it at 15,000rpm! So the engine runs. The carbs are in dire need of a rebuild and the tank needs the rust removed, but otherwise its all fairly straight forward now. I don’t know if the gearbox does gearbox stuff, but I’ll deal with that later.2 points
-
Bed ridden with the floozy?2 points
-
Wow. This must be the worst publicly advertised car show ever. You would assume being in the trade I would have heard about it. No one I know even knows it's on. Meh.2 points
-
reckon it'll be quite lame & a barry fest, their buildup on the FB seemed to be all around the water car aqua thingy as the "thing to see" 100 years of us giving them money to drive on roads we built...2 points
-
Just run steelies and white walls.2 points
-
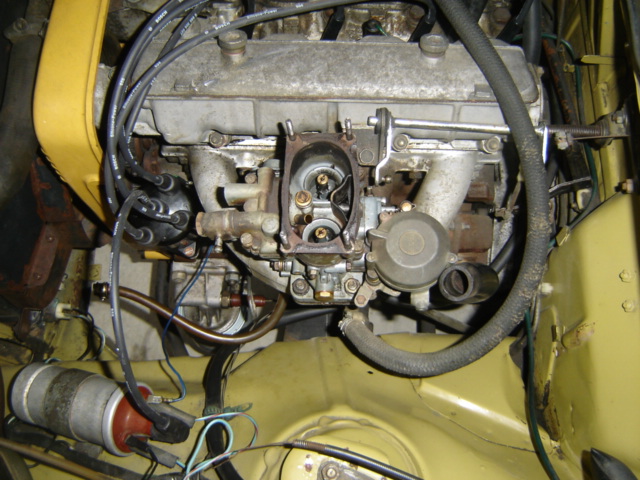
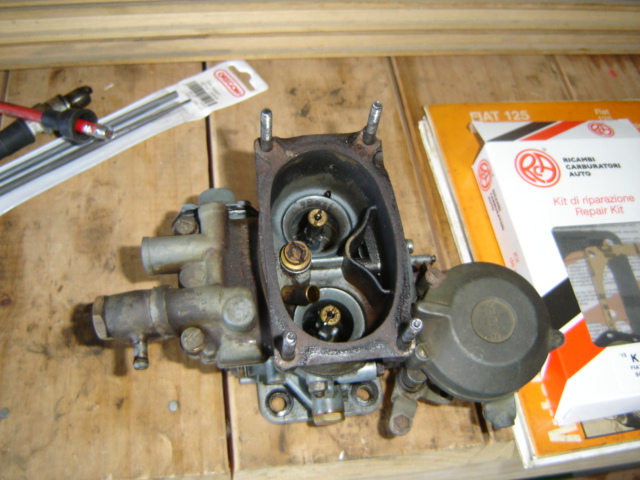
The little Fiat seemed to be running horrendously rich. There was fuel oozing out around the emulsion tube due to a bad seal. Also, it turns out the mixture screw was set 7 full turns out... 6 and a half turns in later and it's much better. I took it for a good fang up the road and the plugs are a much nicer colour. 3 days after this, a carb kit turned up. So easy to get at, I love it. Minutes later... Take one of these and call me in the morning.
2 points
-
2 points
-
Spent some time on the weekend with the help of @kempy with good results. Some of the stuff I remember: Changed one-way valves on injector pump, cleaned points, bled injectors, replaced injector, adjusted fuel regulator to 110psi pressure, cleared return line, adjusted overfuel lever, replaced 6 (yes 6) totally dead spark plugs, re-timed and marked ignition, swapped distributors, lost all the hair on my arms and temporary hearing whilst fireball from backfire on intake gave @Geophy and @Threeonthetree a good laugh (possibly due to me holding a can of engine start that was also on fire) and then started car. Next steps - sounds like slight miss on one cylinder but no cooling system plumbed in, so, reinstall radiator, tweak, and do skids / road test / fix all the other stuff I find broke. Finally making progress = win.2 points
-
Paint a massive cock and balls on it please before you cover it up2 points
-
You can't just say "build space stuff" then bugger off. SPACE STUFF!!2 points
-
Finished! Bit of machining porn for you!2 points
-
Suzuki Owners Group, Take One Tried to order everything I could think of at once, hopefully more than half of it works / fits. List for future reference / if anyone wants to do similar and for myself to order replacement parts. Por15 tank sealer NOS leg shield inddicator assemblies BIG BLOCK! GPX 140cc Motor MIKUNI - PZ30 30mm Carb CDI - 8 Pin Race Wiring Loom - 8 Pin x2 Vesrah brake shoes VB312 Clutch, Brake and Throttle cable Dual Layer Pod 44 x 102 15deg Angled Uni Filter Domino Tommaselli Throttle Petrol tubing neoprene 3/16"i.d. black (m) Fuel Filter x2 Brake & Clutch leavers 2008/09 Hayden Paddon poster "signed . . . oh what! x2 275-17 HF307 Trail tyres x2 Tubes & Rim Tapes for rusty rim jobs New side stand Carb Manifold Intake Rotator Adapter image hosting websitescertificity.com Frame water blasted and ready for re assembly ish. how to take a screenshot on a pccertificity.com The plan is to try and retain some patina with new running gear in places required. So far the frame is a fair bit more different than from the Honda CUB family so this might not be the simple bolt in job I expected, hence the grinder on standby. Getting the carb to fit will the least fun! Que Rotator Adapter If anyone speaks to the wife . . . all the above only cost a box of beer! LETS DO THIS1 point
-
Trimmed each side of frame. Left hand side slightly more than right. screen capturecertificity.com And probably the most important note, make sure the motors drive shaft is aligned with the centere of the swing arm for the chain to clear either side. This pic show the motor 30mm to low. Also make sure the motor is mounted parallel to frame otherwise the output shaft will drive on an angle can cause the seal to leak picture hostingcertificity.com Cut some tabs upload images freecertificity.com temp image uploadcertificity.com Add some kneed-it or LPG mig them in place (Rusty chain is temp to confirm all aligned ok) uploadimagecertificity.com Cross fingers they don't fall off. Looking at pic's probably should have made the tabs have a slightly larger lap onto the frame, feels solid enough for now.1 point
-
Nah it will be Hindustan electrics. Indian knockoffs of lucas1 point
-
Barrys1 point
-
It's how most of our ended up here! Except for those fancy flying bird types1 point
-
Laid them all out on the workbench so they went back in the right holes1 point
-
3T doesn't work, at least not easily, rear main journal is actually smaller diameter than avengers, so.................................. it's been back to the 2Y search. Trademe just coughed up a whole 2Y motor the other day. Plan to pick up next weekend sometime from Dunedin. Engine build will be finally under way!1 point
-
"With a standard tyre, the sidewall height is usually 82 percent of the nominal section width." https://www.tyre-shopper.co.uk/tyre-information/tyre-information-understanding-and-reading-a-tyre-size-and-load-index First result on Google lol1 point
-
Hey OS Trying to find a replacement leg shield. Anyone seen any Suzuki F50 or F70 leg shields for sale? The one I have has been trimmed at the bottom. EBay used to sell them I'm sure. image sharecertificity.com capturecertificity.com SLURP SLURP1 point
-
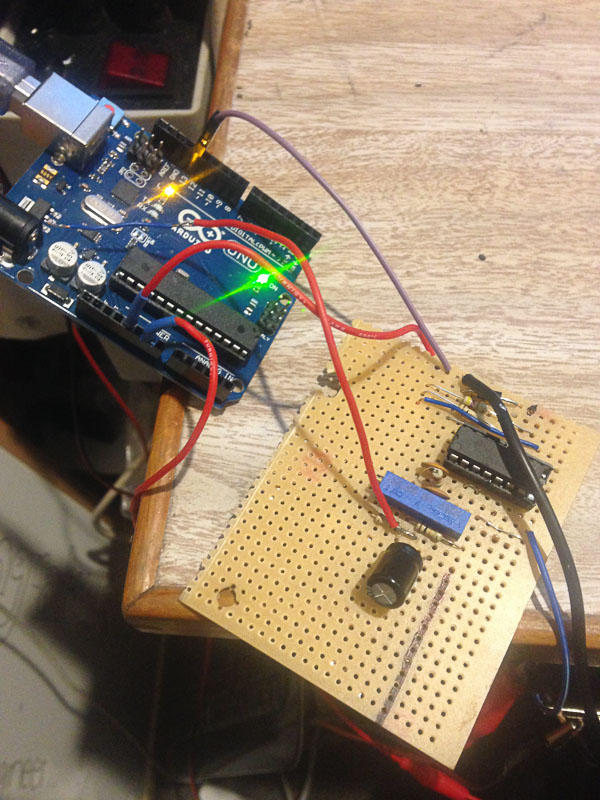
Made some progress getting the rpm signal to the car, brought an LM2917 IC and put it together, the datasheet and maths was a bit much for after work so I messed about with it until I figured out how it worked. I then rigged up the arduino to generate 5 seconds of 1000rpm followed 5 seconds of 6000rpm as a test signal with a multimeter on the output, its now outputting roughly 1V/1000rpm, just in time for the weekend to try it in the car.
1 point
-
I'll have to get a sideways hat and join them there pages1 point
-
I filled out the online form for getting this collected from goat, they called last night saying they would collect it today. its a bit too soon as it still needs to be moved out of the shed and I still haven't paid them to pick it up. The tow truck driver is named barry which I thought was appropiate. I should hopefully get it late next week1 point
-
It's exactly what the above is, the Intercity 125. Fastest diesel train in the world @ ~145mph (125mph design speed - hence the IC 125 designation) Myself I'm all about the Deltic's.... geoooogh *foam* (and the Pendolino's are pretty sweet too *schwing*)1 point
-
Oosh, cool job. looks like the same train as my Hornby my G-pops gave to me for being born in 19811 point
-
Pretty much. But I thought maybe it might be in the higher single or low double digit numbers of deaths. LOL/not LOL1 point
-
well its a train that has killed a couple of people, once you'd be forgivien for thinking it was an accedent . but twice.. well a pattern is starting to emerge, 308 is thomas's murderous cousin high on diesel and mere human souls was that along the line of what you were thinking? or something else ?1 point
-
The rear callipers are now secured to the diff and were spot on using the brackets I had fabbed up. Old School FXGT callipers (fit under 13” wheels) Series 2 RX7 new discs 4 x 110 I’m replacing the countersunk stainless brake disc screws for more high tensile options and probably moving away from the allen key also. The old hard line is in place however I need to cut and flare/adapt to suit soft lines. These will need to be custom as the FXGT callipers are fine thread and the old Mazda is coarse thread. I might be able to fire the LH soft line directly to the T junction if I play my cards right… Another step closer…..keen as to button up the rear end so I can move onto the fuel system and wiring.1 point
-
Well sorry guys. I never did update this thread, Needless to say it all went swimmingly And I managed to get it all wired back up. I never got to see it start up, as I had to go on my bike trip, and they had to do a service on the motor, Bike trip was epic, way more epic than fixing a train. But fucked train paid for the trip so yey for fucked trains Apparently it started first try with no wiring faults. So pretty happy about that. Especially since I was a month under best estimate and 4 months ahead of what they expected. It's back in for a service (I got a permanent job out of the cab replacement, and doing a bit of servicing and fault finding to the coaches) So work for them full time now. Any way. Here's some pics Yeah so that's it, It's also taken out some other retard who jumped in front of it, but they went under the murder train so no real damage.1 point
-
The sandwich plate is quite rusty, and encrusted with dried on liquifaction. I started scraping it off today, but ran out of fucks.1 point
-
I dont have anything in particular to say right now, except for that I've started working at HP Academy in Queenstown. I have learned a mind blowing amount of stuff from Andre and co already. Motec M150 is just some next level shit. Sheezus. With the M150 you can write your own code for the firmware, today we were trying idea of IMAP / EMAP as a load axis. (intake manifold pressure divided by exhaust manifold pressure pre turbo) Which is a bit of a mind bender to me but apparently this compensates for VE changes etc relating to altitude and turbine efficiency way better than just MAP or MGP. Next step is to take the GT86 for a hoon up a mountain and see how well the AFR stays on target. I'm not sure if it's obvious from this post yet but holy crapping Christ. What a company to work for. The other day Tony Quinn's Pikes peak car was in for a tune before heading off again. It runs a VR38DETT mid mounted, runs two turbos > two intercoolers > two plenums (connected with a balance pipe) Looking at the intercoolers with the thermal camera we found a 20 degree temp difference left to right. Some more poking around from there and we found that one of the intercooler hose clamps was loose, so intercooler on that side had lower mass flow so lower temp. TL;DR: This thing is a fucking weapon, Andre got another 100hp out of it just with tuning. Same boost. ~950kg and now ~605hp atw with plenty of head room. Just stopped there because he wasnt sure if it will still be drivable, going to Highlands for testing on Saturday.1 point
-
I have been doing a little on this when I can & today since I have finished refitting the rare option (for NZ new) heater I was able to fill the car with coolant & run it until warm I can report no leaks from heater & thurmostat still works. Water stains shown are from driving around with wiper spindles removed many years ago & the new goal is to get this back on the road before I restore interior etc. So while outside I gave it its first car wash in over a decade then drove for a few 100m's round the carparks1 point
-
I've put a Tezza torsen diff in my Cressida and it is awesome. MS65s have the 2.6L 4M btw. Pumps out a staggering 130ish hp.1 point
-
im out. its the last day of a combined school holidays, easter, anzac extended holiday and getting into Auckland from the south on that day will be purgatory. and TBH im not that enthused about the roads to hamilton. was keen as to retrace the north to Waipu route we took last time so the next time we go up there im in!1 point
-
Chassis end panhard mount. Yep the drag link goes through the middle of the bracket Ive given up on the whole offroad thing. going stance spec still got about 3" of droop and 2" up to go. need a forklift. likely have to go softer on the front springs, will see what happens once all the junk on the tray goes back in the engine bay1 point
-
mounts all on the diff for good. cant paint over the chrome..1 point
-
Happy days. Of to kaikoura for 3 nights with the kids tomorrow in this thing. Pics will come1 point
-
so the drain layers worked until 1am to get the new pipe installed. so i didn't get much sleep Wednesday night. but its done and dusted. there is still a pile of clay to be removed from the front yard and the digger is still here but thats minor stuff. after the drain was finished i did some more smash. tomorrow ill take down the last piece of wall (which will take all of about 10 minutes) and then clean up the mess. 2017-04-20_03-18-29 by sheepers, on Flickr 2017-04-21_05-28-54 by sheepers, on Flickr 2017-04-21_05-29-12 by sheepers, on Flickr 2017-04-21_05-28-34 by sheepers, on Flickr and thats where we are up to. im hoping the builders will start next week.1 point
-
gasser Its way less finished than it looks1 point
-
Manged to squeeze in a panhard rod today. may need a few tweaks, but should work. Will leave it half finished till get the coilovers mounted, to make sure everything works together bit hectic under there, yep.1 point
-
This will probably be my last interesting post for a while. Will be moving to California in a month to build space stuff. Visa came through today after months of paperwork!So good! So making parts will slow down, but hopefully CAD work will speed up! Anyway, these are spring hangers and a trunion hanger CNCd from 4140. Having a mill in your shed is key to building shiny stuff!1 point
-
Nothing too exciting going on with this. just working my way through all the stuff in the way, to get the extra up travel. Driver side engine mount got chopped off and new one made higher up to clear the top link. Alternator had to go as well. will use a fwd bracket to move it up. a new inlet on the water pump should make it work with the rwd pump. Last thing giving me drama is one of the steering links and the the sump. if can get another 30mm clearance between the 2, this will be max up travel on bumpstops. kinda lost count but got around 3 inch more up travel than the leaves other than that just been welding... bottom chassis link mounts are on for good. i forgot to drill the lightweight hole in this one. Crossmember was way too much to weld with tig, and was to lazy to drive an hour to my old boys to use mig. Arc it was. still got a little work to go on it1 point
-
Almost finished! Bores have cleaned up without any defects. Ports look a fraction off on some of the bores though so hopefully I can cut some valve seats that work! Not going to lie, its quite exciting!1 point
-
Shes a pretty big job. Been at the machine shop for a week. 1 more week to go! Casting is looking good. Yet to find any lumps of sand or porosity apparently!1 point
-
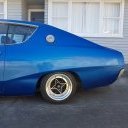
Fitted my Nissan S12 Turbo body kit that I had imported ages ago. Looks good having some 80's aero on there now. Was good to take it to the Classic Japan car show here in Melbourne recently but it was running like crap that day especially. I've had a lot of trouble getting the carbs running right since the conversion, they were always running super rich after trying everything. I even took it to someone else who supposedly dyno tuned it but he just pissed me around and gave it back to me running exactly the same...1 point


(Custom).thumb.jpg.50cbfadc2369f551fe14d9ec26aac0d5.jpg)
.JPG.6741590db760519db1efa917a602473e.JPG)
.JPG.3595873944154e7650e307ad9bd8c5fc.JPG)
.JPG.8814e5610aa634165b9037820dc39cf3.JPG)


This leaderboard is set to Auckland/GMT+12:00