
Leaderboard


Popular Content
Showing content with the highest reputation on 12/31/16 in all areas
-
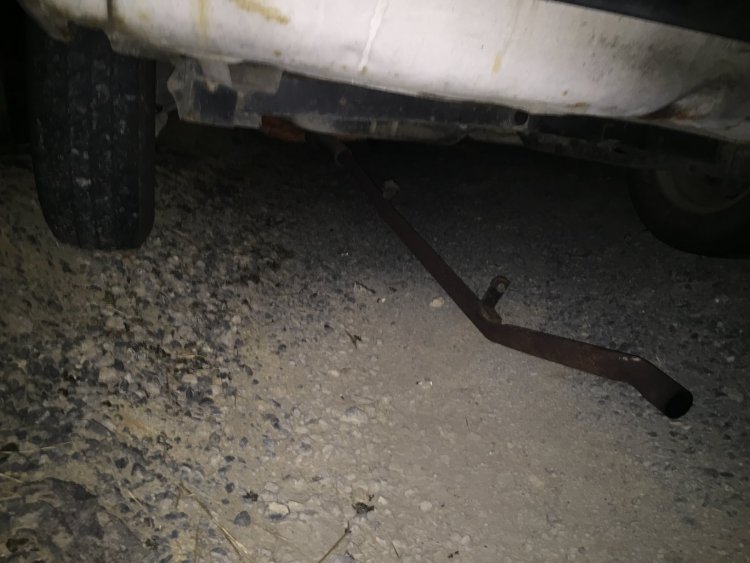
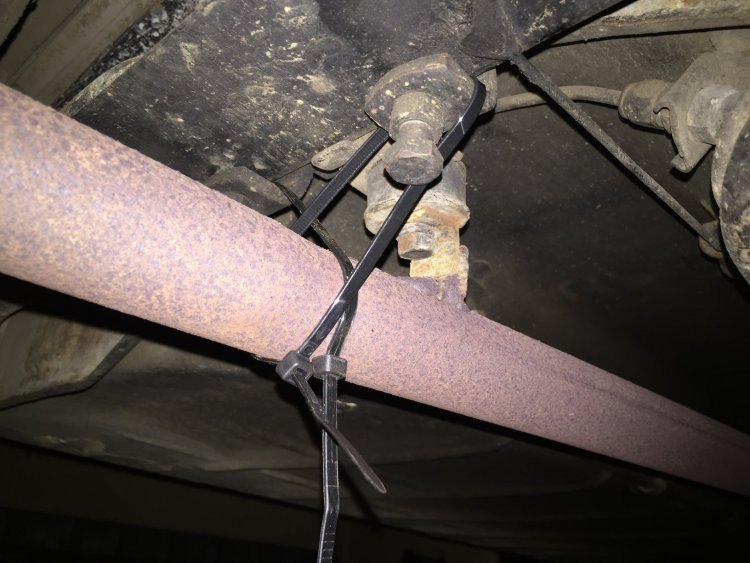
So this isn't an issue anymore... Went for a short wee drive last night. And then this happened about 45 mins from home. Cable ties only melted once on the southern motorway 5k's from home.
 4 points
 -
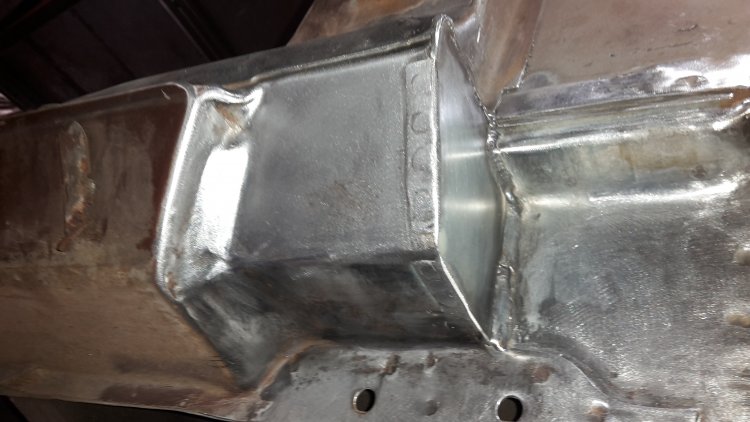
One front bit of sill done. I decided brown valiants don't need that bit to look the same any more so that made it easier. Any strength lost (I cant see it doing fuck all) by it not being there will be made up for by the cage anyway
3 points
-
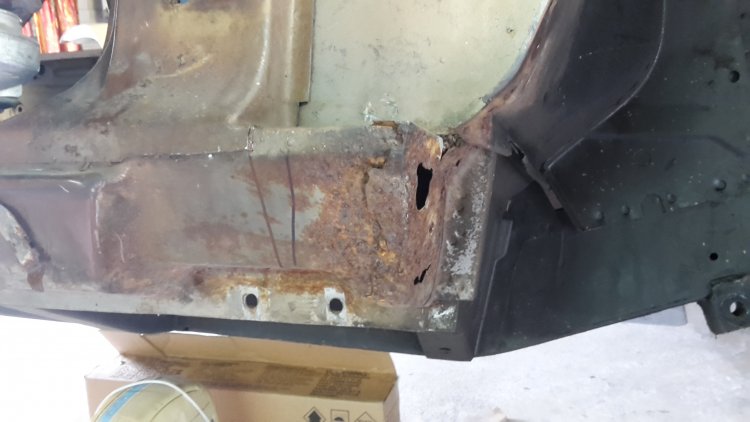
Took the cab outside for the first time in 6 and a half years to sand blast the firewall. Look at all the holes!! Right hand side floor and lower firewall are getting replaced with some new panels that are on the way from the USA. Have filled about a third of the holes so far, out of about 50 holes in total!2 points
-
Discussion Thread - //oldschool.co.nz/index.php?/topic/53921-bugatti-t5759-engine/ Embarking on an ambitious project to build a Bugatti T59 Replica. Using modern manufacturing techniques, 3D scanning, 3D printing, CNC machining but keeping all visual details authentic to the original.1 point
-
Looking likely we might still be in the area. Keen fo sure if we still are :).1 point
-
Happy to help mate1 point
-
FFFFFFUUUU I was yarning to a Barry just this afternoon about how Holden sixes use a shitty fibre timing gear and distributor gear which tend to strip when they get old. Sorry, that doesn't help but I hope you have something sorted Mayte. They are NOT an interference motor. The fibre timing gear on the camshaft is pressed on. So the camshaft may need to removed. They can be done in place though, by smashing off the remaining fibre cam gear and drilling holes in a line along the metal collar left behind on the camshaft. Then split that with a cold chisel. A bit rangi but it works every time. Then tap the new one on with a block of wood and a helper pushing the cam forward through the fuel pump hole. I would definitely install a new alloy timing gear set (crank and cam gears) as they will genuinely last forever and thus quell what is essentially one of only a few potential weak links that a normal duty Holden 6 will have. The proper way however is to have the new gear pressed on with the cam out of the engine, but the aforementioned method works well and will be as accurate as the gears originally fitted to the engine hahaha. The sump may have bits of fibre timing gear through it too, it loves to clog up the oil pickup. The crankshaft timing gear can be removed with the crankshaft in place. A gear puller does the job. Or a bit of heat and two screwdrivers. Keen to lend a hand when I'm there in a couple of days if you need it.1 point
-
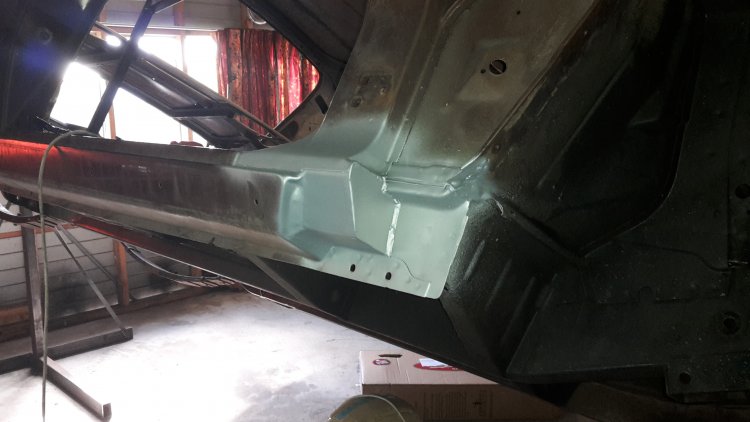
New metal No Metal Always a bit distressing to see the outside from the inside. Have also run new brake lines from the M/C to the rear, including the diff lines and flex hoses (except the passenger front).1 point
-
1 month in of driving. The gearbox is making bad noises, the carb is not working properly but running in a reasonable AFR range so its ok, all the door and heater vent seals leak and it fills up water, IT IS SLOOOOOOOOOOOOW. 45kw makes it no rocket ship. Time to change that. Watch This Space...1 point
-
Have a spare car if you want to borrow it. 86 mirage hatchback, has reg and WOF. In governors bay, but can drop off tomorrow afternoon. Try butler auto spares for parts, has a lot of old school stock. Usually very helpful, got a good website too. Think there is going to be a car working bee at i500gt's (karl) place in the next few days, maybe we can sort it out there? Depends if they are an interference motor or not. 3onthetree will be there, think he knows a bit bout those motors...1 point
-
Yeah I think we are potentially taking this option! Cheers.1 point
-
When one of my cars shat the trans on boxing day many years ago the AA guy towed it to a suitable workshop and we just locked it up and left it there until they reopened after the holiday period. Is that an option in this instance?1 point
-
Belfast auto have treated me well, but they seem to be closed ATM. Am enquiring with North Canterbury Engine Reconditioners (98 williams, Kaiapoi). I've had good work from them too.1 point
-
I can bring slamaque +/ charcoal.1 point
-
Tuesday the 3rd, the guys recon they will arrive around 1Pm, so i'm thinking from 12 onwards, then we can move the car into a better spot for destruction before they arrive1 point
-
Bit of CAD. Slowly slowly getting there. Most major parts are detailed. A lot to go.1 point
-
Haha I think a company called powerzone? Do a heap of performance bits for 4g15 sohc motors from there pretty cool at least some people like the 2nd gens haha1 point
-
Finished off the front shock mounts. Made some driveshaft hoops.1 point
-
1 point
-
I'm getting new tyres tomorrow so really should let some of the smoke out.1 point
-
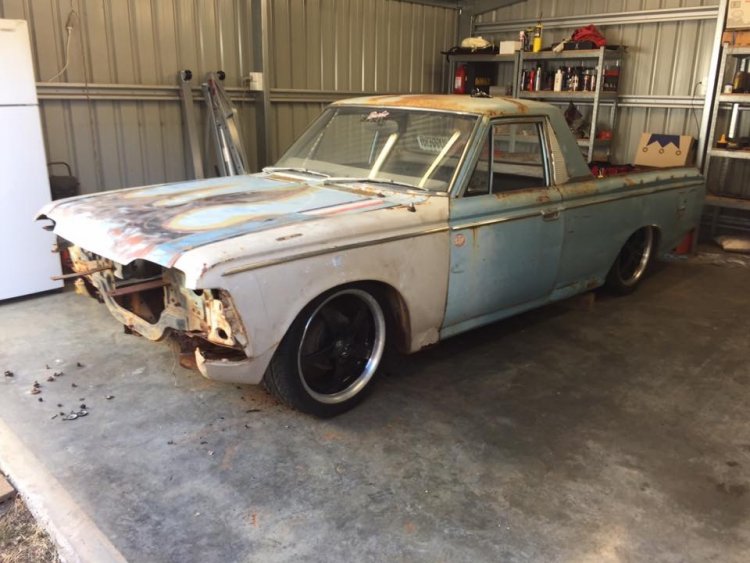
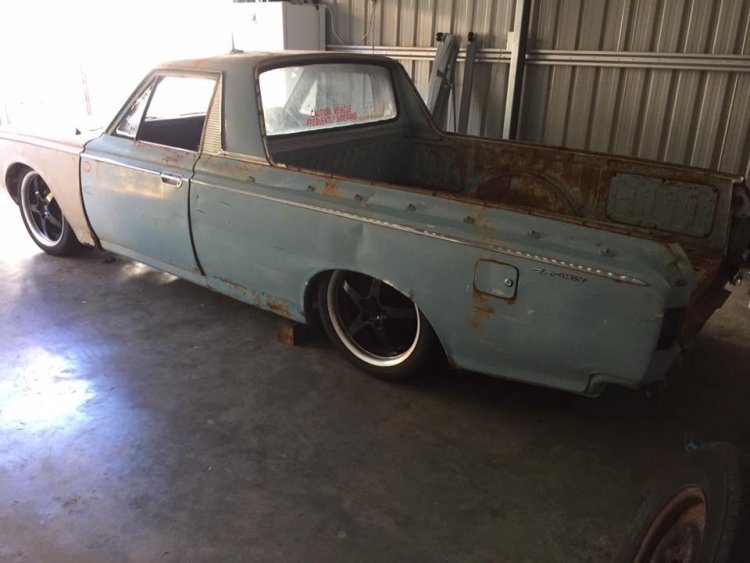
As promised! this is no diff, no front springs, but 100mm in rear (sitting on 100mm wooden blocks) and held up by the jack in the front (run out of blocks, but a little higher) so achievable ride height on springs in a 50 series crown. its purely for mockup, the wheels are so fucking shit, but came free with my hilux so will do for jobs like this. Definitely got me leaning towards 18's for the finished product though, but will be something a lot more traditional looking, billets would be nice but the stout taught me that I hate polishing wheels comparison height pic cheers Matt
1 point
-
Have also made a start on the rear quarter outer part. I found that it had been leaded the past (I stopped and put a proper mask on quick smart) so I cut out the leaded part as I didn't want to deal with it in welding and grinding. Turns out there was quite a big dent there that had been lead filled. As on the other side the vertical closing piece is mostly gone so I've ground that off. Patched the rear panel extension And patterns ready for tomorrow. The spare wheel goes into the compartment which is surprising in at least 3 ways. 1. Good packaging design. 2. The lower screw still works 3. It's not rusted out. It did have some dents which have been roughly bashed out now with a big hammer and piece of steel bar.1 point
-
When the pattern fits closely to the metal then you are about there. I panished it as much as I can using a rounded panel hammer on the inside against a steel block, and also bent the flange along one edge. It's not perfect but will do for now. The pipe did a bit of damage to the surface finish but a filler skim should hide that. It's mostly behind the bumper anyway. I need to make the other half too.1 point
-
This back corner has been smacked at some point and not really repaired at all. A replacement bumper must have been fitted as it would have been damaged as well. Off with it. It's made in two pieces (luckily I guess), and has a lot of shape in it. I made a pattern from some low-tack tape and masking tape on the good side, then turned it inside out to use for this side. Started beating on it with a heavy ball pien hammer over a short bit of exhaust pipe (a sandbag would be better but I don't have one) Not pretty, but effective1 point
-
Messed about with the new pit for a while, fine tuning the fit. Hopefully it works out OK. Point of no return passed. The side shape is off here as it isn't on the inner frame. I'm trying a different approach to the welding, more like the StreetNeat bloke on FB. Welding about 20mm at a time then grinding/sanding it flat followed by a hammer/dolly session to get it to the correct shape. Seems to be going OK-ish. It's nice to have access to both sides of the panel for a change. Slow process though, I'm only about 30% of the way across so far.1 point
-
Who else is doing rust repairs these holidays? Luckily the weather has been fairly crappy. With the tailgate split, and the rust holding it together removed, the profile (even when assembled together) is way off. This should be flush, not have room to sit a socket. I zapped some spacing tabs to the inner and got it close again.1 point
-
Do we have any times and dates sorted?1 point
-
Count me in Karl, I can bring some of snap-on's finest leaver bars to brake stubborn fixings.1 point
-
With holidays comes actually time to get stuck in and work on this thing.Its been nothing but problems lately but i have been working though them.I had notched the JZ rear sump and made the engine/gearbox mounts but i wasn't happy with how it was sitting,the steering was only mills away from hitting.I tracked down a crown JZ mid sump,notched the front corners.Everything misses but needed to make another set of mounts.happy with the result ,so now i can get onto making the exhaust,alternator bracket and do all the other small fiddly bits.I hope to go into work tomorrow and push in the new Superpro polyurethane bushes for the ms112 front suspension arms and give it all a nice coat of paint.1 point
-
The wagon has received some love lately.I managed to find a series 1 wagon getting wreaked in OZ .He had everything i was missing so the wagon is now complete.I will probably look into getting the badges scanned and 3d printed as they're pretty brittle.He also had a spoiler which looks to be period aftermarket,whats your guys thoughts on it? nothing/roof racks/spoiler? ( spoiler sits a little further out the back) .Also got a NOS grille from Thailand and a bunch of ms112 parts from Seedy AL that will improve the wagons braking. took it for a spin round the block goes well considering stale fuel,no brakes and 20 year old engine oil front to back is filling up with parts1 point
-
Back on the panel bashing. There were some dents in the panel below the tailgate, so I used a clamp and some bits and pieces to push them out before a slapper session flattened things out to a reasonable level. Spent money on new tools (18v brushless drill and a spot weld drill) and attacked the tailgate. Between the inner and outer rust, and dents in the outer skin it seemed best to split the two parts. Came apart without too much trouble. Inner frame is in pretty good shape, apart from the lower edges. I'm going to repair it in sections, so first patch is for the worst of the inner section. This piece will repair the shaped area at the inner bottom of the tailgate Also made a start on the hinge brace. Probably the hardest part of this will be the channel section that I guess retains the seal. What's left of it is still attached to the outer skin. A challenge for tomorrow.1 point
-
Throw it through there window and tell them there is something wrong with there ventilation1 point
-
I too am keen - since I don't get a chance to work on my own car!1 point
-
No we're bringing one down especially for you. Hell let's make it 2!1 point
-
You get to keep the Borgy 351 point
-
Hmm well I have been thinking about a trip to Geraldine over the xmas break... maybe I should set a date so I can participate in Triumphant destruction1 point
-
damn look at all these happenings and going onses!! reschedule for the 6th so i can be there, if not, make sure the degree to which the triumph stag handled like it was on rails is discussed thoroughly. regards1 point
-
Will check if I have anything on but real keen to come. Been a while since I came to an oldschool meet so will be cool to meet some more of you guys in person. Bring extra tools/brews/snags?1 point
-
We'll be arriving on the 3rd, I reckon about lunchtime/1pm ish. Keen to get amongst it then!1 point
-
All the outer moulds made with runner/sprue etc. Time to work on the inner core patterns and hopefully pour one early new year. Working out runner system Lower half of the mould Upper half with sprue and filter1 point
-
Yes, quite a few years ago now. Upper wheel is a crane castor of some sort. Frame is all scrap steel bits. Lowers were machined from a hydraulic ram piston rod. Design was based on wheelmachines.com in the early days. Pretty easy to do, mostly from steel plate.1 point
-
Making patterns for the spring hanger. Got a 3D printer! Does work for you while youre at work! So good.1 point
-
Front shock mounts are nearly done. Spun up some sleeves and spacers for them, since the hole in the rubber bushes was 3/4" and wasn't keen to use bolts that size. Modified the lower mount, needed to be wider to fit the larger shock eyes. Shock at full extension. Slammed. Just need to weld a plate of some sort between the two upper mounts for some extra strength.1 point
-
Going to do that next time someone wants their lawns done show up and kick the doors in1 point
-
Been talking a bit with the guy that owns the Hamilton car museum. He bought the T57 from the Baillon collection in France. His engine is essentially the same as what im building. Hes given me access to any parts I want when hes got it in bits. To copy and 3D scan etc. So Ive got some pretty cool parts sitting around the living room now. The sump is a beast First ali bit cast! Right hand cam gear cover. Using a David 3D light scanner. Sort of useful to help with drawing in CAD More 3D printed moulds. Perfect for part this big with this detail. Would of taken me days to machine it. Still have to do a lot of sanding and paint to get a good finish. Playing with different filter runner designs. Think im getting a better idea of how to do it. 2016 on the left and 1938 on the right! 70hours from start to finish. But only bout 3 hours to make another one. So I plan to make atleast 3 of each part.1 point
-
Dropped the second half on with no drama. So its all bolted up now and ready to go to the foundry at the end of the week. Nailed it Thats like 1000hrs work right there!1 point
-
done some more stuff. Mounting the front of the springs was a bit more of a head scratcher because there was a few different ways to do it, was thinking about another rhs crossmember like the back but would get in the way of exhaust etc, another was to put a crush tube in the rail and just bolt the spring to the rail. Ended up doing this though make 4 plates the same 2 are 5mm, need a thinner bit where it sits over a double skin, so put some new 'tooling' in the 'stone mill' and do that make a gusset and weld it all in spring on other side of rail and welded in the rear crossmember, with a jacking point thing that my jack plugs into have made the other side so just have to stick it all together. Because ive put the springs inside the rails I will fit a decent rear swaybar to stop it falling on its doorhandles when it goes around a corner. most people who shift the springs put them directly on the rail so they end up all jacked up which is obviously will probably get another leaf added to stiffen it up as well. The other plates go on the top of the floor, then i can weld something that ties the upper plates into the roll bar.1 point
-
picked up most of a 9" diff for it today, I was thinking about using a 28 spline BW or possibly an 8.8 out of an explorer, but this came up for $200. Its missing a few bolts, no axles, and it is way too wide, but narrowing was going to have to be done regardless of what diff I use, can get axles for 9'' easily, same with parts for the center, can get any ratio, etc. its huugemungus and weighs a million heavys, but should be strong enough for what im doing.1 point


This leaderboard is set to Auckland/GMT+12:00