
Leaderboard


Popular Content
Showing content with the highest reputation on 12/28/16 in all areas
-
All reged wofed and certed! Secondtune with vvti turned on. Made 6hp more but moved all the previous power to instant. Time to start using and abusing19 points
-
Merry Xmas! The latest Stacked/Moonlight container arrived just in time for the festive season, and so did my shiny new AW11 Recaro seat rails. When Xmas morning dawned bright and early I busied myself in the shed, and eventually ended up with this: Not many people realize that you can swap the centre fabrics around on just about any Recaro L-series seat as long as the bases match - I cobbled these together from a pair of good Lancer GSR LX-B seats that I bought off Dirk about six or seven years ago, and a pair of munted BF Familia Infini LS-Bs that still had relatively good centres. It's a pretty time consuming process if you're being careful to re-attach all the hog rings and trying not to rip or damage anything. Thinking back to when I originally assembled them it probably took a good hour and a half per side. As you can see, the effort was worth it. They're surprisingly comfortable, have just the right amount of firmness in the padding, and are much more supportive than the factory AW11 seats. Plus as an added bonus - the eye-watering red stripes are totally '80s spec and stay in line with the character of the car. Next I'll probably have to give them a good scrub to make the red fabric really pop against the blue exterior. N.B. if anyone is wondering what the Recaro LX and LS guff is all about, I direct your attention to the following image: Discuss: http://oldschool.co....1-sc-chit-chat/8 points
-
With holidays comes actually time to get stuck in and work on this thing.Its been nothing but problems lately but i have been working though them.I had notched the JZ rear sump and made the engine/gearbox mounts but i wasn't happy with how it was sitting,the steering was only mills away from hitting.I tracked down a crown JZ mid sump,notched the front corners.Everything misses but needed to make another set of mounts.happy with the result ,so now i can get onto making the exhaust,alternator bracket and do all the other small fiddly bits.I hope to go into work tomorrow and push in the new Superpro polyurethane bushes for the ms112 front suspension arms and give it all a nice coat of paint.3 points
-
The wagon has received some love lately.I managed to find a series 1 wagon getting wreaked in OZ .He had everything i was missing so the wagon is now complete.I will probably look into getting the badges scanned and 3d printed as they're pretty brittle.He also had a spoiler which looks to be period aftermarket,whats your guys thoughts on it? nothing/roof racks/spoiler? ( spoiler sits a little further out the back) .Also got a NOS grille from Thailand and a bunch of ms112 parts from Seedy AL that will improve the wagons braking. took it for a spin round the block goes well considering stale fuel,no brakes and 20 year old engine oil front to back is filling up with parts3 points
-
Great little video but if I may, a few comments. I'm not sure where the '900 to 1200 psi' came from, it's a meaningless number unless you're taking into account total swept piston area, pad area and compound, rotor diameter, etc. (I've seen 2,500 plus psi on many occasions). The choice of master-cylinder diameter is not simply one of how hard of soft you want your pedal to be, the critical issue they failed to address is one of pedal travel and in some setups not getting a pedal at all! Bottom line is if you reduce master-cylinder size you increase pedal travel; a soggy feeling pedal that only firms up close to the floor is anything but ideal. There is a good reason why the majority of cars produced 50 plus years have had servo assisted brakes. Until recently (when we have access to ABS systems that are comfortable in a completion environment) I've always run non assisted brakes in our race cars. It's a very fine line between a firm enough pedal, minimum pedal travel and sufficient front/rear hydraulic pressure but we achieved it with a lot of track testing, a spares kit with a selection of master-cylinder sizes and a service crew that could swap them out in a 10 minute service stop. IMO (for a street car) removing the booster from a standard braking system and reducing the master-cylinder bore with the expectation of retaining sufficient braking and pedal firmness will probably end in tears. To put some figures on the equation a VH44 increases boost by an approximate factor of 190% a VH40 300%, achieving the same amount of unassisted braking would involve 2-3 times the amount of pedal travel. Yes a tandem master-cylinder is a great way of adding redundancy to a braking system but bear in mind (if running a booster) if you have no firewall space to run the standard Mastervac you’ll need to fit two VH44 Hydrovacs to retain brake proportionality.2 points
-
Working on the control board some more, apart from the one button that was missing wired up all the buttons and joysticks. Picked up a 28" lcd moniter at the boxing day sales, hoping to test out the jamma units and contols just sitting on the coffee table. Turns out that jamma puts out such a low resolution picture a lcd moniter can't load it. After a bit of research online I can run a cga to vga converter which I have orderd along with some spare buttons for the cabinet. Also playing around with a raspberry pie which I will attempting to run in the cabinet as well.2 points
-
This did make my build page blow up again today haha. Im so glad Im hiding behind it. 1.5 million views in a week is outta control. This generation will get bored with it in a few months then back to JZ LS erthang.2 points
-
So she got a tune the other day. Vvt not activated due to solinoid issue an time constraints. Still made 367hp and 450nm. Going for cert next week then back for vvt tune https://m.youtube.com/watch?v=HaLmpLiUPUI2 points
-
Also added an Altezza LSD but changed the crown wheel from 4.1 to 3.7 to help out the revs with the 14s. Was the lowest I could find. Out of a 2004 Hilux front diff.2 points
-
2 points
-
You reminded me. Found my Acuspark ignition conversion for mine yesterday. So fitting it now. Note of reference. Unless yours is different. Get some longer mounting screws. The points ones are too short for the exciter mount...... Everything but that size atm all the way upto 1.5" thread... lol. May have to raid one of my rc cars.... lol ** if you got the ignition coil with it be careful. The stud ontop is just a hollow weak thread. Young fella next door was assisting and it snapped off while being tightened with a 1/4" set. Wasn't over tightened either as he ain't that strong. Being only 7 lol. Best cars to learn on are old cars. He cant do squat on his mums Kia lol.1 point
-
Yeah bowl I will be around. Flick me a txt. Go for a dort1 point
-
Discussion: //oldschool.co.nz/index.php?/topic/36522-oldnathans-mx41-mark-ii-grande-talkie-talkie/ Out with the old and in with the new I guess. Before this one gets started, as most would know old brown is sold but not forgotten. I just want to say a huge thanks to everyone that help with advice, labour and parts supply for that build. You know who you are. Next please. So even though the RX30 was my first love, I was limited with what I wanted from her. Always dreamed of a MX41 JDM version for the fact of IRS, Aircon and power steering electric windows etc. And an amazing interior. And with the help from Crustywhip and Rupz (SKOOLN) I now have one. So far Im planning on paneling and painting her back to her former green glory but that will be after she is going. Currently deregistered, so I have taken the front windscreen out to do a few small rust repairs. There were a few parts missing when I got it, but the next day managed to pillage pretty much everything I needed off a few Cressida wrecks I knew of. Lights, mirrors, manual pedal box etc. On the way home I spotted a SX60 at a wreckers so I went back the next day. Grabbed the fender mirrors and the full W55 manual conversion so Im all set to go. Well now that I have purchased a bellhousing/flywheel etc to go from W55 to M series off HighLUX I am. But this will be after the re vin. Motor is a M-EU 2.0 6cyl. Future plans will be one of the UZ family again. Will all depend on how funds go on this one and may take a bit longer. So for a while she will be some form of deep dish 14's and manual with the stock engine. Here she is....1 point
-
I was planning to do the next round of superlap with just a temperature probe fitted to the existing setup to get a baseline of what the oil temps get to. Buuuutttt smashing the windscreen brough plans forward a bit! As I had to pull most of the dash out anyway so it makes sense to get wiring changes etc done sooner than later. I have finished building a shroud for the oil cooler fan and the brackets to hold it in place. Unfortunately the cooler is too damn big to fit anywhere except for ahead of the radiator panel, but I've placed it behind the bumper / numberplate and quite far forward so it shouldnt get too much airflow through the core without the fan going. Also I chose black AN fittings where possible and put some fibreglass heat sleeving stuff over them. Mainly because it looks a bit nicer I reckon. Nearly finished the physical install of it, then just the wiring to sort out. Dad has provided me with a PWM fan controller, it's really easy to setup so that should be cool to have a play with! Markku has loaned me another speedo drive to test with, hopefully this makes everything work nice again and cruise control will be back up in running in time for the next Superlap round at Taupo.1 point
-
you know, i think the best course of action is to hook up my original master, minus all the booster stuff, and just see what its like, i should then be able to make a more informed decision on what needs to be changed1 point
-
Thanks to the most powerful image manipulator on the internet - MSPaint. I have mocked up how it looks in my brain. From To
 1 point
 -
well i will start off with the fact that i took a week or so away from the project. Didn’t want to walk in the garage or acknowledge the existence of the motor or trans. Using the ol if i dont see it then it never happened reasoning. All this was brought about by the rather unpleasant sound of cast aluminium cracking. Now if you have never had that distinct displeasure of hearing this then im jelouse. So the story goes i was having a great ol time. tunes blaring, woodstocks sunk and it seemed like the best time to mate up the trans to the engine. Pop some fluid in the torque converter & slip it on hearing the clunks as it fitted on snugly. Place the newly worked trans on a trolly jack and position it. Easy i think and start tightening it up. CRACK!!! I freeze as heart skips a beat. Trans bellhousing around one of the bolt holes has a crack. I didnt swear or curse. just stared at it in shock. laid down my tools. Stood up. collected my tools and put them away then exited the garage to find a beverage. My dearest who was helping balance and hold stuff had the sense to not say a word as i went about these duties in silence. So guessing the dowls didn’t line up as well as i thought. Not the end of the world. Can be TIGed back up. Just frustrating, annoying and plain old Grrrrr…… This was done a few weeks ago. I have taken a lesson from our cat. that being ignoring it. So its still in the same place i left it – that being middle of garage and even though i walk around it i have chosen not to look at it. This method seems to work well for the cat. “I ignore your existence and you reward me with temptations” So I have moved on from that debacle to the ignition system. I dont like the HEI nailhead distributors. Big and ugly. dont look old school for my tastes. I had two old GM Delco distributors. Media blasted, reconditioned to make one good & smooth operating with no end play. New cap and rotor along with a paint job and its looking better than new. Will use the other as an oil primer once i get to the fluids phase. Ripped out the old points and condenser and have put in a Pertronix Ignitor II electronic ignition unit. So should never need to worry about that side of things again. Although i have kept the old parts to keep in the cars tool box just encase the new electronic ignition ever plays up. The conversion is all done inside the distributor so i can always swap back with no issues. Also got the Pertronix Flame Thrower II coil. Its like 45k Volts so way more than i need i guess but i decided to get the coil made to work with the new electronic ignition. Black of course ( i really cant help my self) yet the thing is going to be covered by the finned metal coil cover anyways. For leads i went with Taylors ThunderVolt 8.2MM custom wire kit. things run at 40ohms so will carry the spark to problems. Nice and black so wont be an eyesore under the hood. The lengths of wire are ubber long whats good i guess. I sure did have alot of left over wire after cutting to length & crimping all the terminals up. Only down side with the kit is that it dosnt come with a crimper. But have a MSD one so that wasnt a biggie. The wires will be out of sight mostly due to the finned spark plug covers. Also the old Nailheads have the dissy at the back behind the intake so the duel carbs and airfilter will hide it all whats great. tested my leads and ALL had 39ohms or lower resistance. think the lowest was near 37ohms. Alot of people seemed to recommend the old AC Delco R45S sparkplugs to work for Nailheads. So i went for those. The R45S are a tad longer than the normal ones. And thats basically it for the ignition side at the moment. As for the car it self. I need to get in contact with Flockie to talk over the plan of attack i guess. With luck he has had a good ol poke about underneath and came up with a few ideas. Im chaffing at the bitt to finally get things going. Patience has never been one of my strong points – a trait i believe i picked up from my father then compounded by working in ICT where everything progresses fast if not instantaneous. Constantly telling my self slow down (or i may break something like a transmission…)1 point
-
Worked on English car today. They have this weird overcomplicated thermostat and a common problem is for the moulded rubber bit to come adrift, effectively meaning the thermostat is always passing. Noticed it wasn't coming up to temperature as readily as it should so ordered a new one and opened it up. Lo and behold...1 point
-
Working away on the tailgate. Pretty fiddly stuff. Have finished repairing the inner braces and the 'inside' structure at both corners. Started with the channel for the seal. I'm doing this in pieces to suit my folder (i.e. bench vise and angle iron). It needs to be curved to match the tailgate opening. Taking the rest of the day off to go to the beach (even though its cold and damp, the beer will be good)1 point
-
Hi Elliot, very nice job you've done on your car, can't wait to see it. My Dad ( John Metford ) is always telling me how nice it is. Where do you get the wheel alignment turn plates from? I'm on the lookout for a set.. Cheers, Andrew.1 point
-
So what did it run on the 1/4 mile? I'll take a guess & say 16sec1 point
-
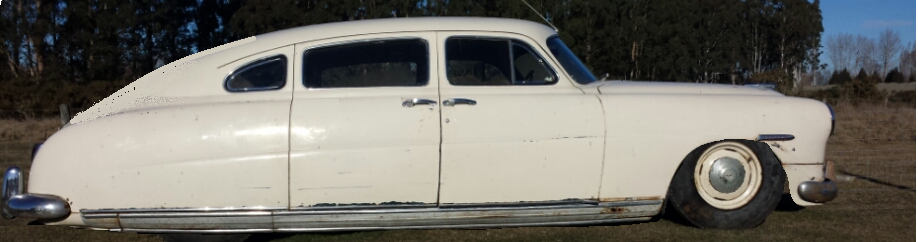
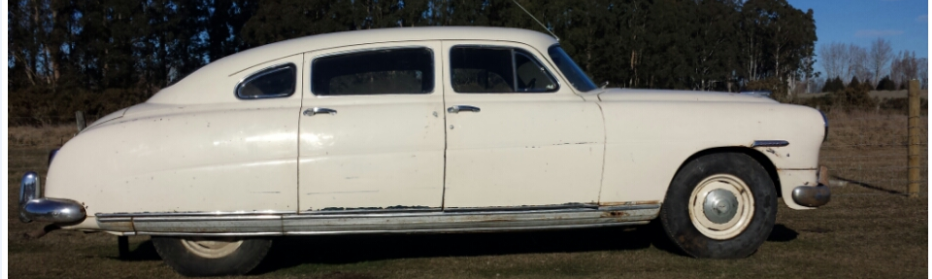
As often is the way~ life and work are getting in the way of what i really want to be doing: saving this heap of steel from restoration. Time of the year i guess with Christmas fast approaching and clients suddenly deciding its the end of the world if XYZ isn’t done like yesterday. i just stand there baffled as there mouth is moving wondering to myself “yes all very good and nice but come on surely they must agree the old car is more important… LEADSLED GOD DAMN IT!!!!” Its really starting to get out of control. I take it for granted its completely normal and sane if not even healthy for a guy to dream of cars n shift like that. But my dearest the other morning commented she is dreaming of cars. Cool i think to my self but whats that say about us o.0 – should note here we do live in a Bogan town so this may be common with in the local female populace..(you yanks think redneck i guess just dont youtube Bogan please) Anyways with said working life getting in the way i haven’t done sweet jack all. Popped on the Trans adapter, ordered a few small parts i needed is about all. Dropped more stuff off to Flockies Chassis Shop. Some of the projects the maestro is tinkering away on: Not much room at the moment but with luck he will have some of the projects cleared soon and the Hudson chassis etc on its way.1 point
-
Few things I played around with. Found a point on the bottom of each throttle body to drill and tap to get vacuum. Screwed in clip in connectors and ran 4mm PVC, 6 to one vacuum block to run the Link and FPR and the other 6 to run the brake booster. Also had a play with making my own exhaust. Bought a tig and away I went. Sounds a bit loud being twin 2.5 inch 2mm mild steel so looks like ill add a balance pipe. Full AdrenalineR resinators and muffler.1 point
-
Hey guys. So if anyone on here isnt on facebook Im sorry I haven't updated on here. Ive tried to many times to try and start up new picture hosting sites but never got anywhere. Ended up starting a dedicated Facebook build page so people from everywhere could follow it. So this update is just words so sorry about that. But shes running. Last Friday age fired up and finally got her running on all 12. Sounds amazing. So all going to plan now she will be going for tune in 2-3 weeks and ill be building coilovers for her. Once the dyno is done Ill make a youtube video which will be easier to put in here as well. Watch this space.1 point
-
Received a new TGP "Caution Plate" decal through a contact in Japan. The one on my driver's door is a bit ratty looking and some of the lettering has rubbed off. Fucking annoying. Didn't think you could still get genuine ones and was originally searching around for reproductions, so this is handy. It basically tells you not to do stupid shit like park on long dry grass, stop driving the car if the catalytic converter overheats or the check engine light comes on, and make sure to read the owners' manual before operation! There's no caution against burnouts though, so I guess those are allowed. Hashtag: jaydeem-az-fvkk. Discuss: http://oldschool.co....1-sc-chit-chat/1 point
-
Design approval is all drawn up,just waiting for the LVVTA to come back with a plan.This weekend ive mounted the powersteer unit,but that wasnt without its own dramas.After abit of internet research i needed the ms112 steering column just for the end 'T' piece as the steering box is longer on the power model. Abit of a walk through for people who may want to do the conversion If your lucky enough to get a whole ms112,get the steering column,pump,steering box and lines. 1.take out the column from the ms6* .it needs to be completely stripped down,now is a good time to repack the steering bearings with grease (word of caution,the bottom bearing has about 40 small ball bearings,whack it out to hard the balls go everywhere ). 2.removing the ms112 end 'T' piece is alot easier,just undo the end circlip and pull it out 3. the two end 'T' pieces that attach to the steering box from the column.ms65 is alot longer 4.now put the end 'T' piece into the ms65 shaft.this is quite fiddly . 5.when fitting the steering unit the bottom arms need to be swaped over.the arms are on a tapered spline and will need to be pressed off,i used my works 50ton press but a small shop press should do it.also note the location were the arms were facing as the steering unit doesn't rotate 360. pretty much it,i think next time ill take photos of the process but any questions im more than happy to help. better pic for thread,a bunch of rusty crowns 2x ms65s and a crushed ms751 point
-
Picked this bad boy up a few weeks ago. 1GZ-FE from a Toyota Century 5.0 V12 These things make 480nm and 400 of that from 1200rpm!!!!! This should be fun. So next mission once work slows a bit is to whip the M series out and dummy fit this in. If it doesn't clear the bonnet I'll look at going down the ITB route. So far the plans are going to be to run a link and R154 and try and run it stock otherwise to see what it's like. Then later start playing with the engine. But as said before if it doesnt fit height wise I'll have to start playing earlier. Here we go again.1 point
-
Cough cough. So this is happening. In the next container. Give me something to do through the winter. (shout out to the wife for surprising me with this last night as my 10 year wedding anniversary!)
1 point
-
Had an issue on the way home from a road trip. Car died and had to get towed home by old mate dan. Was a good 3 hours in the dark and rain with dead battery. Such fun. Put a new dizzy on last night plus a new ecu. Never run better. Oh and new higher profile tires! Back Rollin1 point
-
Long over due update. Sent the car over the road to a mates and he ripped into a few bits I wont have time to do. Goal is to have her revinned by the end of August. Replaced front struts and rear springs to put it all back to factory. Also all the front steering parts have been sorted now. Diff mount fitted to. Had a bit of trouble getting her started but mechanic went to get his torch out of the car while it was up on the hoist. Looked up and saw a kill switch.(Probably shouldn't put that on here haha but she will be alarmed anyway) Pushed the button and she fired into life instantly. Purred like a kitten. So yesterday I drove here home across the road and around the paddock for a bit. Few steering column things to sort, chrome and mirrors on etc. Bonnet should be getting dropped off to get painted soon and also drop the car to panel beaters to fix the chassis rail( bit crushed). Then time for a revin. So will keep this updated now as we are on the home run. Plans will be to manual, lower an longchamps on with bigger tires for the summer.1 point
-
Tonight I got most of the fidly interior bits sussed back on. Rubbers, handles etc. Tomorrow night Im hoping to get the bumpers an lights ect on and reall see what this bad boy is going to look like. Until then here is the guard with a 1200 sand and quick polish.1 point
-
1 point
-
1 point
-
1 point
-
my custom made rain guards turned up from the Philippines,they fit perfectly and have a high polished finsh1 point
-
Rust hole is finished and primer and underseal applied. Wayne had a big weekend an then last night the car gain 9kg in weight. 4 litres of spray filler. Next step is to mask off the jams an spray them in green in the next few days. Then block back the car read for paint.1 point
-
Panel beater is a legend and has gone nuts. Im getting very exited..... More to come on the weekend.....1 point
-
Rights its time I added to this. So pulled the screen out to find a huge amount of rust in behind the firewall. Just the other night i finally got a mate of mine who is a professional panel beater/painter to asses the damage. No major for him, so tomorrow he starts the mission. Shes getting all the rust cut out etc. Full panel with filler primer coat and then sprayed factory green in a booth. So the motivation took hold and I started to again strip it further. Have most of the chrome off and hood lining ready to come out to lap out the dents as well. As she sits.... Also have managed to get some factory MX41 mirrors ready to fit after painting. Aslo a full set of factory Mark 2 Grande badges. Not cheap from Japan. Got the front over riders off the old Cressida (yeah the one that met its demise). Also all the manual gear ready to go. Also got a M-TEU off crustywhip that might find its home under the hood. This is all to cruise round in until I get the 3uz sorted. Oh also purchased my ld longchamps off my old Cressida (thankfully before it was rolled) so they will make their way on for a while. More updates to start rolling in in the next few weeks Im sure. Watch this space.1 point
-
Due to massive rush for trackday there is a serious lack of pictures of the gearbox/clutch assembly. It is however, all working. Apart from the fucking car. This video was taken saturday before trackday. It was my first drive of it. And as you can see, this made me think it would be all g for trackday. But aparently not... Anyway. It just needs a propper exhaust and a dynotune. And an interior. And suspension sorted..... A fuck load more work really. but it does drive. And it does lush skids too Anyway. here it is. My first drive of this car ever! And i wasnt even reving it out1 point


This leaderboard is set to Auckland/GMT+12:00