
Leaderboard


Popular Content
Showing content with the highest reputation on 11/27/16 in all areas
-
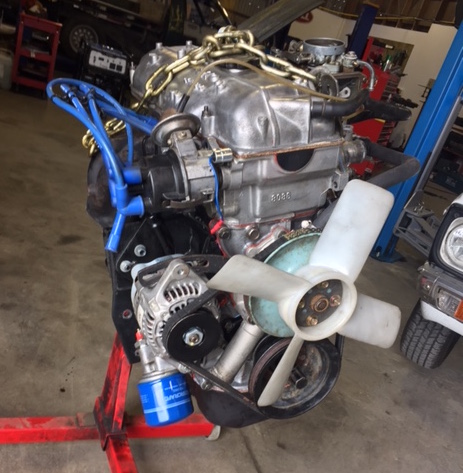
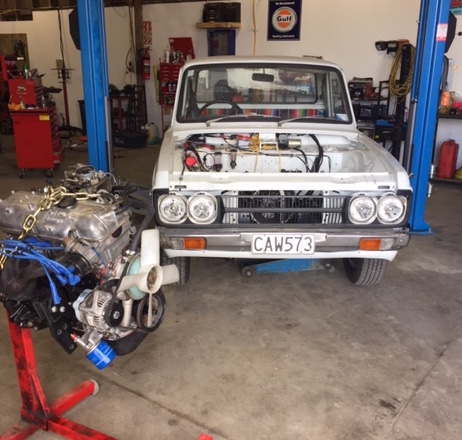
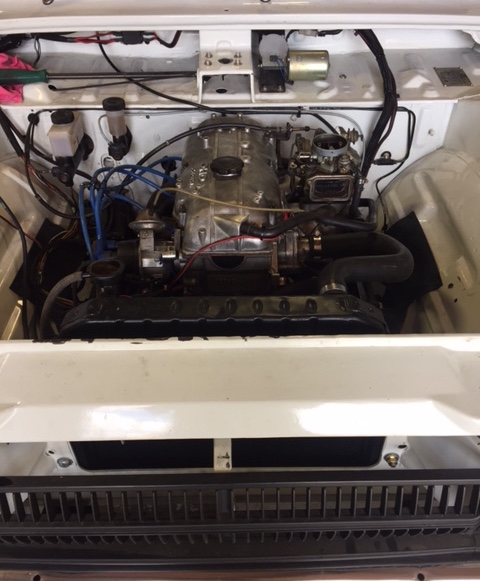
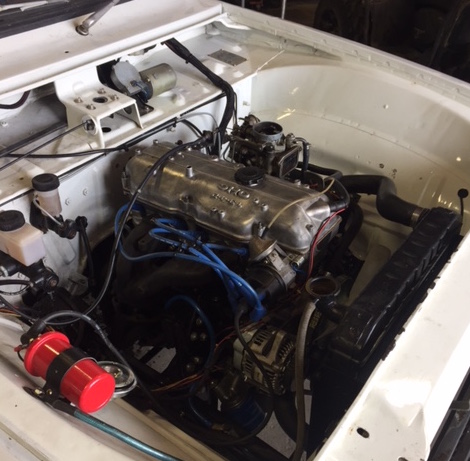
Happy update time.. it runs! After chasing around electrical gremlins which ended up in a instrument cluster swap among other things I finished yesterdays efforts by filling the carb with fuel, pulling the choke out and turning the key. Two seconds later and it fired up easily. I'll get a video later. Couldnt run it for long as Id not filled it with coolant yet. I'm so happy. I'll be happier when Ive taken it for a drive and confirmed it has not got any issues like BHG etc. So going back a few days here's some things that have been finished.. First off. I finished the wiring and mounted the solenoid, tucked out of the way under the servo.. Then I thought I'd better fit the speedo cable. But it didn't turn. It was seized solid in one spot. I tried so many things to free it up, lots of wd40, plusgas, twisting, wiggling, pulling, pushing etc and finally it freed up but only one half... Luckily I had a spare cable from when Viva one was swapped over from cable speedo to my home made electronic setup. But it was really long, made to suit the Mazda rx7 gearbox and how do I shorten the inner down? I tried years ago to grind a new square end and it doesn't work. So I looked it up and the square end is actually squeezed into shape! I made a little form tool from some steel and at 5mm a time I squeezed my new cut down inner into shape... It worked a treat!.. The sparkplug leads that came with the car are horrible old red Repco branded items. Not a chance they will get fitted... I priced up leads in NZ and the prices were stupidly high, even at trade. Plus most are coloured blue or red. So Ebay Uk and the nice people at.. http://stores.ebay.co.uk/The-Green-Spark-Plug-Co?_trksid=p2047675.l2563 .. had just what I needed. 7 days later and I had a nice new set of good quality black leads for only $25.50 inc postage!!! Its great this weak Pound Sterling thing! Yesterday was finishing little things and sorting out why instruments didnt work. I found a defective circuit strip thing plus a broken plastic casing on the cluster so I swapped the parts across from a spare.. While I did that Hannah did some other jobs.. like clean the mucky sunvisors.. That is it really.. I'm hoping to do a bit more today and then take it for a drive to check it out. Very excited. It currently sits here waiting..14 points
-
I've been chasing a crown ute since I moved to Aussie 5.5 years ago, I actually checked out a real tidy one the first week I got here but it was in Bundaberg, I was headed to Perth, and the motor was fucked, so I couldn't drive it. Seen a few come up for sale over the years but nothing local, and the few ones I knew of that were local were all either fairly rusty or there's one that's absolutely mint, with a UZ swap, but way out of my price range even if he would sell Then there was this one. I actually lived with it for about a year in a house share situation, where the house owners son had a bunch of old Toyotas on the property. This was body off chassis and set up on a rotisserie, but that's as far as it got. I talked to him about buying it at one point, but he wanted stupid money because it was pretty clean body wise, and it was an M powered chassis, which are way harder to find than the R ones in ute form Fast forward a few years and it's up on gumtree for a grand, so I whip around to check it out. It's been out in the weather for the last 3 years after he had to move it when his parents knocked the house down, the rotisserie ends are still bolted to it, and they're plonked on top of the chassis, with straps holding it on. There's a bunch of extra surface rust, but the only holes I can find are a couple in the sills. It's missing a driveline but I'm not worried about that. All the body parts come with, there's a good tailgate, rear lights and rear bumper. Everything else I can get from a sedan if they're fucked so I'm pretty happy I've got a shitload of work ahead of me, and I'm really struggling with deciding what exactly I want to do with it, but IVE GOT A CROWN UTE!!!! Gumtree pic, it's been at least 5 years since I first saw it, and it has never been this assembled in that time When I went to check it out I knew it!!! Poor Ken Clint has got a hoist, and didn't want to give up his rotisserie ends so he got the body sitting back on the chassis before I picked it up Hi my name is Matt and I'm a crownoholic And at home next to the girlfriends Celica Initial thoughts are sedan chassis (get rid of the leaf rear end), MS112 diff and front brakes (already have the diff), maybe 17" widened steelies, maybe 18" billets (but I fucking hate polishing wheels), tidy up the body and paint it, maybe bags, probably 3RZ turbo, but it's all up in the air at this point This is a fucking massive project, it's going to take years, and a lot of $, and there will be a LOT of questions and upskilling. Lucky you guys are awesome and know what you're doing when it comes to old rustbuckets! Cheers Matt13 points
-
yesterday we managed to get the motor back in the ute, ran it up to temp and took it on a few test runs, it goes well and ticks over nicely and most importantly no smoke! it started up really easy, wound it over until the oil light went out, then it fired up, adjusted up the timing and it idles nice and drives well. the ute has so many rattles from having no door rubbers on and need to sort out the tailgate latches to go tight, but pretty stoked its finally good to use need to take it for a good drive then re-torque head and check valve lash, then its on to doing the little jobs to tidy it up
 10 points
 -
Made things a bit more cruise worthy over the course of the last week. Trump 2500S-5 by Richard Opie, on Flickr Slapped a lush JVC mechless head unit in, this bitch has 4V preouts and a reasonable EQ. It's also super compact depthwise so I can fit it in the limited space behind the sumptuous veneer of the Triumph center console. Trump 2500S-1 by Richard Opie, on Flickr A swag of cables run under the carpet and through holes I mangled in the sheetmetal to the boot, to this primo Image Dynamics 4 ch amp, which I am running with 2 channels bridged into this: Trump 2500S-7 by Richard Opie, on Flickr A dual 2ohm voice coil 10" Image Dynamics sub, in a box cut for me by Dave Jackson, and trimmed by Greg at Midnight Upholstery in a sweet shade of Triumph tan. Trump 2500S-6 by Richard Opie, on Flickr Trump 2500S-4 by Richard Opie, on Flickr The front 2 channels run these old Pioneer TS-X11 I've had for years, they sound incredible for their size and vintage. I have them running through a high pass filter, so nothing under 100hz makes it to them so hopefully it prolongs their life a bit. Trump 2500S-3 by Richard Opie, on Flickr Trump 2500S-2 by Richard Opie, on Flickr After Raizer posted the Krusty Seal of Approval in the discussion thread, I went on an e-search looking for someone who surely, made these as a sticker. I found these on a tumblr style site thing and sent an email then boom all of a sudden a couple of them ended up at my place, all the way from Ireland of all places. Then George went to Goodwood, and I requested a Goodwood sticker so I could apply as so to the rear screen of my British automobile. TL;DR? Doof and stickers. I also got a new 2" exhaust (the guy stuck a 2" on it of his own accord) but I didn't take any pics. It sounds fruity.9 points
-
Fitting out the interior this evening. Hannah has cleaned the seats and they came up great. Now contemplating just having rear seats only and simply extending the pedals and steering wheel back.. so comfy in there being able to stretch out. Kevin agrees...7 points
-
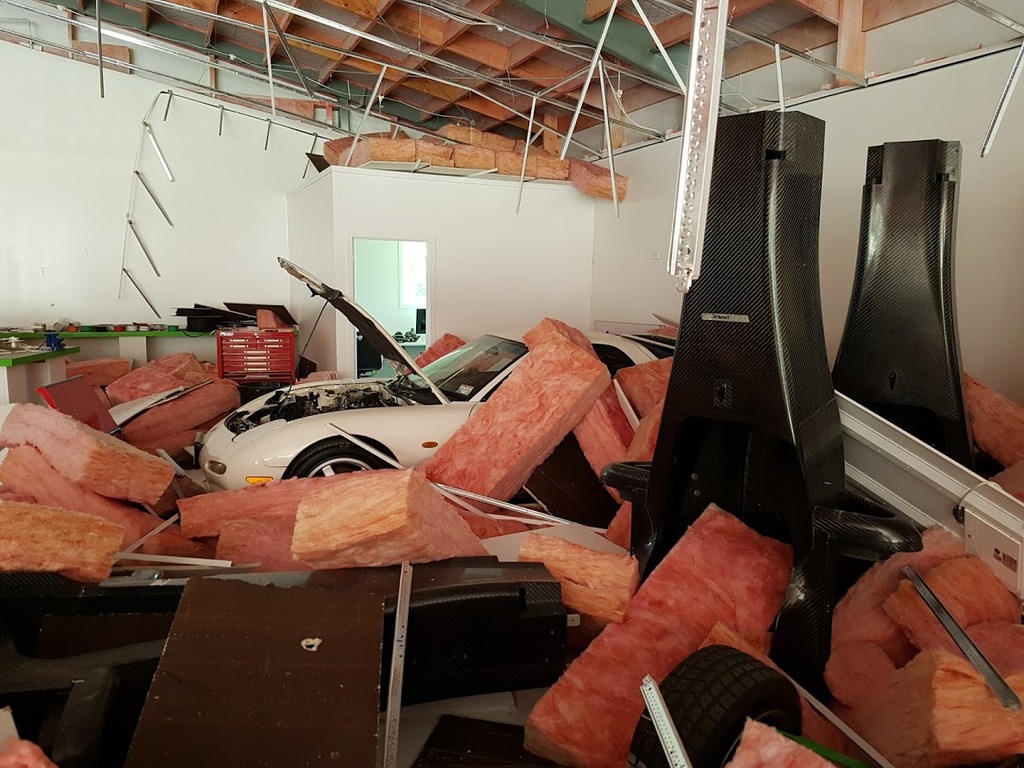
This arrived and got smashed back into the hole; While all the seats were out I smashed a bit of black zinc in the cockpit to get it looking less patchy, then reassembled it all, forgot to take a pic tho. Then on to the solar panel, first bit was to cut and drill some mount angles to fit along the sides; Then i needed to mount the angles by drilling through the roof and I didn't want the holes to leak. Plus I also wanted the angle to sit off the roof a bit so that no water sat between the angle and the roof and corroded things, so I made these out of bits of tube I found and leftover rubber water pipe from a couple of replacements I did while the rad was getting fitted. The rubber is 5mm longer than the tubes so it compresses to the point it comes up hard against the steel pipe. Which appears to work, sweet; Then today I made this to seal the cable entry, my TIG skills are a bit rusty, but plenty good enough for the task at hand; Then I cut a hole and put some split plack pipe around the edge so the cable does not fret; Then I dragged the wires through and glued it on; Then I hooked up a bit more wiring, checked some things then flicked the switches; And it all just worked.... yay for me! I need to calibrate the battery monitor, and install the house/start battery charge thing, but basically that is it. The only things left are the curtains/insect nets and some shelving and storage. And a bike rack. And blank off a couple of windows. And no doubt some more shit I have not remembered.7 points
-
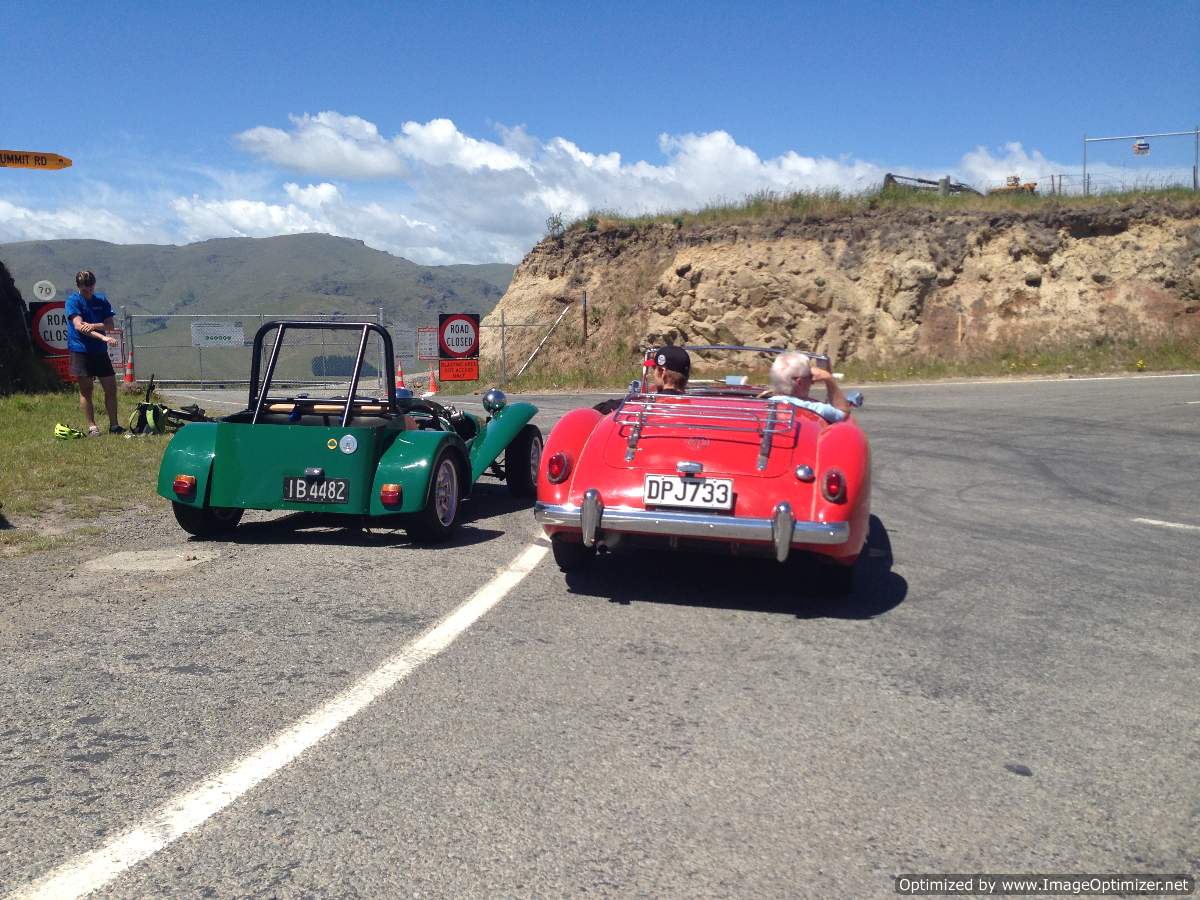
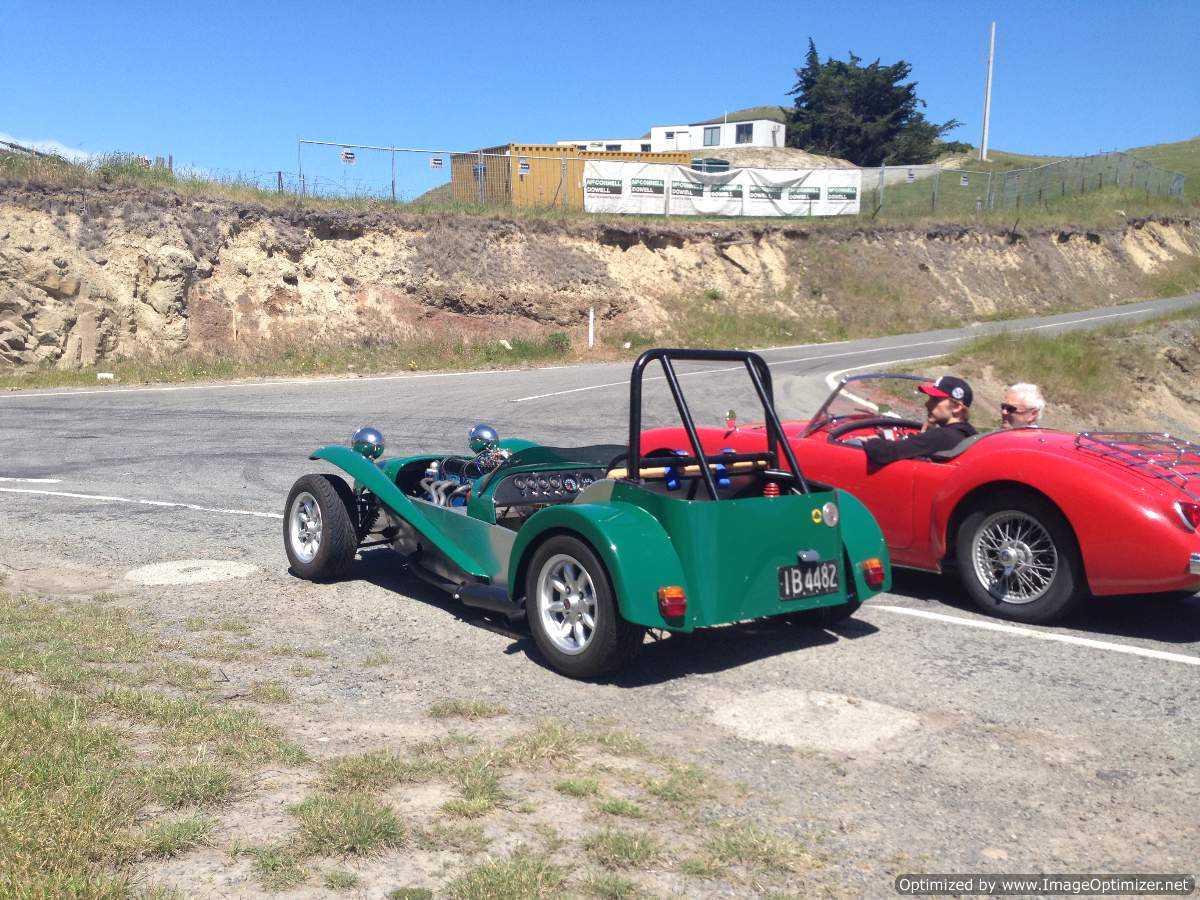
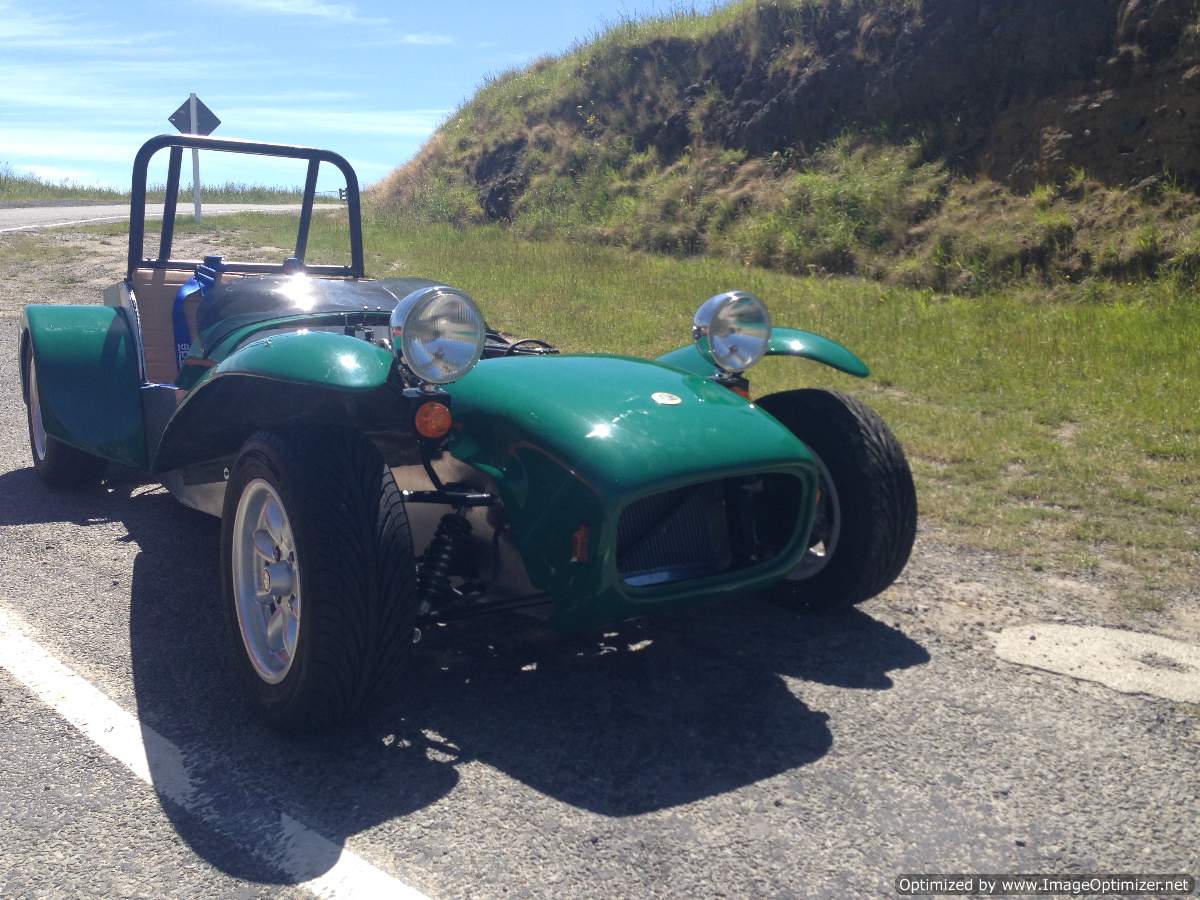
So have driven this successfully several times now. Proof that it actually happened Appropriate chase car also... There are a few final niggling things that it will need for a WOF- but it's got to the point where a mechanic spending half a day on it is worth the cost, as such it's going in Monday morning for the last few bits- then hopefully he will put a sticker on it and it will be officially road legal. Also need a grill for it... needs a laser cut 7 in it I feel for authenticity purposes. I like rego on hold a lot at this point in time. Off for one more spin shortly to make sure all the things that were working are still working. Then tomorrow- D Day. http://oldschool.co....tus-7-series-3/ Chairs.
7 points
-
So last Sunday morning saw an early start after a big night, catching a plane to Auckland to pick up a new purchase. Had a lovely skate in the sun from the airport to Mangere with a pleasant tailwind and a couple of nice downhills along the way to dull the hangover. I have told myself multiple times I would never buy a car sight unseen again, but this time it was worth it – a few nice surprises making this a nice little peek back into the era of car production in New Zealand. With my interest in Valiants and the Todd Motors story generally, my only real knowledge of the Sigma was that it basically killed big Chrysler demand and production both here and in Australia once Chrysler/Todd Motors decided to make and market them. In Australia, perhaps there was more of an emphasis on them as a Valiant replacement, with the first of them were marketed as Chrysler Sigmas. For new car buyers, the modern, more economical and better appointed Sigma probably seemed the more sensible option over the “new” CM Valiant parked on the other side of the lot – with an engine that dated back to 1969 and most of the sheet metal back to 1971. I can understand the mind-set of the 1981 new-car buyer, but it still rips my undies a bit that for the purchase price of $15,000 you could have probably negotiated and got two Valiants for the price at run-out special prices. Or, ya know, they could headed over to the Nissan dealership and actually got something cool. On paper, this should be cool – Japanese, RWD, manual 5 speed, rev counter even, and easily some of the best looking steel wheels ever made, behind the charger/pacer steel rim. I’m not a huge fan of the styling, for me it’s just interesting - the history and how it has managed to survive. Looking at the paperwork, it was bought new and at some point passed along to the original owner’s son, making it a 2 owner/1 family car. I bought it as part of a deceased estate so just dealt with the lawyer, never met the family unfortunately. Super high KMs but looks like they never dropped the ball when it came to maintenance – service stickers all up to date and even has a VTNZ WoF. Excellent modern repco-special hubcaps to bring the car into the 21st century. So much awesome NZDM-ness, including all-original NZ-standard security etched glass and original dealer sticker and badge intact and in place. The old LPG gear is still sitting under the bonnet, as well as the redundant primer switch under the dash. Has the sticker confirming internal Tectyl saturation, so just the tiniest amount of rust and no sign of any old repairs. Most exciting bit for me is the original bill of sale – listing all the options. Bonnet ornament? $65. Go fast side stripes? $70. The radio didn’t come cheap. In polytech when I was researching Chargers for a video doco, I did a bit of reading on NZ’s heavy trade restictions before imports, so buying a new car was a true luxury, with wait lists for locally produced vehicles or having to deal with purchasing car “parts” using overseas funds to jump the queue. Probably the only time the ol’fulla was gunna get his hands on a new car, so he made it count, even splashing out for metallic paint which has lost its lustre somewhat. $15,000 comes to over $60,000 today running the numbers through the inflation calculator. Compare that with $25,000ish today for the equivalent lancer/camry it’s easy to see how local production rapidly became unsustainable up into the 90s. Handling wise it’s a total boat – a real similar feel to a Valiant actually, except there’s a certain majesty to captaining a big car with an auto box and effortless low down torque as it ambles through and just eats up the hills. For the Sigma you have to employ the small engine manual techniques of high revs and clicking back and forwards between third and fourth. With a small car and a stiff rear end this can be quite fun, but when you can’t feel the rear wheels at all there’s simply no warning before it gets into a tail-happy oversteer party. Cruised alright but was a ten-hour mission in the end, only found one hitchhiker who got a lift with me from Bulls to Sanson. Lucky that because he was a real champion, it sounds like a sharn but he had no shoes, one eye, no voice (coming off a 3 day bender apparently) and bent the air with the alcohol fumes emanating from his person. Had a T-Shirt with a picture of a swastika and George Bush with one of those “same shit different person” type slogans, and apparently had been kicked out of his car back to Dannevirke because he’d got into a drunk fight with his mate in the back seat. I had grave fears for the box of DoBros in the back seat as he didn’t look like he was slowing down, and no amount of self-defence training can match straight up superhuman-meth-strength. And that's my story. Bonus extreme patina shot6 points
-
This is the worst cylinder, (#4) the horizontal markings are just that, rust marks from where the piston was parked, and I cant feel them. The vertical score that ends just above the marks in the center just catches my fingernail. I think a quick hone and new rings, while not ideal will be fine for now Crank is very good, factory markings Factory stampings on the block, never skimmed I degreased the whole block and gave it a water blast with hot water. OMG the rusty crap that came out of the jackets was next level! After that a Quick clean up with a paint stripping disc on the drill: Ive cleaned up all the components and once i get a hone it will be reassembly time. Cant wait.5 points
-
Tonight I did some welding. This was the result.4 points
-
A client said to me “got to make Hay whilst the sun is shinning” the other day. Fek the hay give me a wrench and a cool bourbon i thought and promptly went home to rip into the Crudson. With a tag team effort my better half and I removed the front panels. Was told when we brought the car it was brought into NZ by a farmer. Im guessing he lived on a gravel road by the accumulation of dirt and stones inside the body and rails. Said dirt would rain down into the hair and down the back of the neck as you try to unseize old bolts under those big ol guards. The amount of dried old gorse was a tad unsettling and made me wonder what the fek he actually used the car for. Visions of drunken paddock missions chasing sheep and running over fields of gorse flickered through my mind as i plucked the thorns from my hands. The patch of rust up the front looks easy. Cut off, form up a new bit of metal and weld back in jobbie. that whole lower panel under the doors unbolts and is currently full of dirt and stones. i think by the end of emptying the car of road dirt n gravel I will have enough to build the small wall out the front like i have been wanting to do for the last few years. Should also lighten the car by a bit as well i would imagine. The missus also did some fine devastation to the old brake lines, some wiring and god knows what was ripped out. Most amusing & I wouldn’t have it any other way. about ready i to get Flockie involved. Will be casting my eye over the engine and trans next. painted up and put together so we can work out placement etc more on that latter.3 points
-
Started to bare metal the crown
3 points
-
great success. car ran really well and made good power, 375RWKS to be exact and 520lbft of torque. which is a lot. the poor little turbo just couldn't flow any more air. it tried its best but thats the absolute max it will do. I'm happy with that. the car is going really really well, not that i could give it the jandels in the rain, but its running faultlessly. 2016-11-25_12-31-05 by sheepers, on Flickr this is old 2.5L vs new 3L 2016-11-25_12-31-19 by sheepers, on Flickr3 points
-
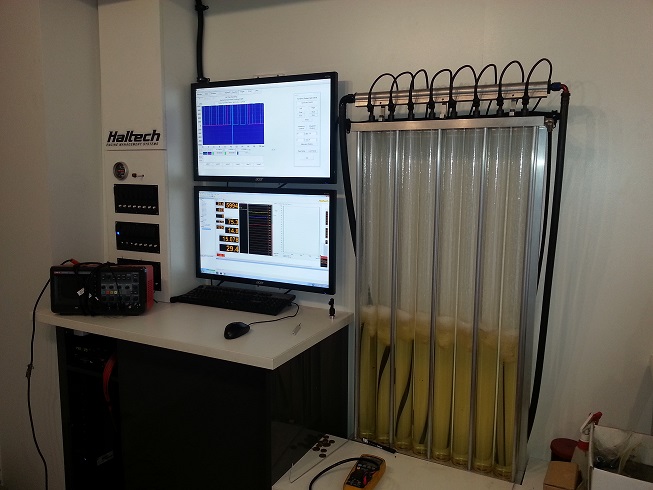
Hey Guys. I'm so new it's not even funny to old school. I thought id start a thread on a shed project that started out as something simple and has turned into a thing that is now taking over. All I wanted to do was test fuel injectors. I'm a mechanic by trade so I have the basics. I get that you can touch a injector on a 12v battery and get it to click. But what if we need to find out things about our injectors? I could out source them for a quick service and drop $30 per injector for a quick buzz in a ultrasonic bath.... But I think we are only scratching the surface. What if we need to find out some data? I think these little clicking givers of fuel are more important than you think. for a start: Battery offset standard dynamic service of injectors deviation vs pulse width injector latency injector linearity This will get us started. I am going to build a injector test rig that will do far more than a injector test machine. Im at a total loss why a quality test bench like a ASNU costs $12.000 kiwi. It's just out of control and will give no control over injector voltage. So with that for a intro i'll just leave a few pics and come back in the weekend. This is the pic that started this all off. It's a big dollar bench that is run on a haltech. It has the grunt to handle injectors of 5000cc it's the balls if you run methanol or if you want to know about injectors. What I will build will be first of all the prototype and a proof of concept that I can develop out. many more pics to come.
2 points
-
put the 38mm extractors back on below is comparing the big and small extractors, both runs done on the same tune. looking at afr (pink line 38mm. blue line 44mm stepped) massive lean spot and no reversion with the 38mm. then from about 6500 onwards the big extractors make a little more power. but interesting thing is the gain isn't from the bigger tube. its the 38mm stepped section that has made the gains over the 38mm extractors. Also before i swapped back to the small extractors. I adjusted the cam timing to reduce overlap, hoping it would tame some of the reversion and gain some top end. but no deal, just made it slower.. for reference these are the 38mm's, the merge is nothing fancy, same 2.5" collector. dont really have any idea, other than the 44mm tube being to big thats causing the reversion ??2 points
-
Not quite shuttle related but I got another honda, Figured I'd keep them both in this thread. I missed my old crx so much I needed to get another. I had a look at this one earlier this year and couldn't justify spending the money. I texted the guy and he still had it and was interested in selling it. It needs a bit of work to be legal but its mostly straight and rust free. It has a b18c out of a integra type R. goes like a cut cat mayte. First thing to go was the bonnet, Alternator wasn't charging so I got someone to whip it out and tested it. I've replaced the regulator as everything else checked out ok. The wiring isnt the tidiest but thats easy enough to sort out. I have pulled out the leaky d2 adjusties and stuck stock stuff in for now. The wheels are on tardme as they are too big and i've put some on from my hoard. I have a stock radiator to replace the alloy one. Also have a muffler to replace the bigbore. Today I put the stock front struts in and a replacement bonnet catch panel. Surprisingly the one off my parts shuttle fitted (after a few pieces of encouragement from the hammer)2 points
-
Didn't do a lot today. I pulled the fuel reg down for a look. Found the inside where the fuel comes in was a wall. Great for making heat and hurting flow if not creating turbulence. This reg may not work out to well but I got stuck into it with a die grinder and made the best of it I could... It might surprise me and hold a rock stable fuel pressure. But if it can't i'll be binning it in favor of a turbosmart reg. I will also boost reference the rig. So that means I can run any fuel pressure like in a vehicle. The fittings were bad... my son who is 2 could have cut better threads with a hack saw.. so they have been binned in favor of -8 stainless fittings.2 points
-
2 points
-
That rad hose T piece is a Mazda one Cos I have one here2 points
-
Chur. Yeah, was good times. Hopefully it wont be too tricky to sell. It basically a completely stock, unusually tidy S7 Type RS. It'll have a couple of under the bonnet mods though, better intercooler, upgraded twin turbos, so should go a little better than stock, but still look really standard.2 points
-
Well, that's not what you want. Lots of dings and scratches, but no real damage as far as I can tell. Punched the wall pretty hard, but hurt the wall and not the car. Luckily I updated the insurance on this thing just a couple of weeks prior to the EQ. Classic cover are purportedly really good, and their policy says the car is insured anywhere in NZ, so shouldn't be a problem to get it tidied up again. Then, I'm going to have to sell it. There is a mini-me on the way in a couple of months, so all the moneys is needed as we move down to one income for a while. Dang grown up issues!
2 points
-
Awesome progress. I wish I had the time and motivation you have so I could get more of my fleet of Vivas running.2 points
-
Tonights war effort.2 points
-
Now I have the pictures figured out I might as well go on to my top and bottom plates. This was tricky far to tricky for myself and a drill press. It's important for the next part before I go on that I have had outside help. Tony from Entech engine reconditioners gave me a huge hand. When I say huge he did it all for me. So I can't take any credit I just told him what I want and then a few days later I had the alloy back in my hand cut spot on. He is very clever. All cutting I understand was done on a Serdi. A serdi is a machine that is used for cutting valve seats on cylinder heads. I did buy the o rings first and then gave him a tube for a final test fit. But I think you guys will be able to see how it all ended up. Alloy is a pain it can chatter when being machined. So how it has turned out is nothing short of amazing. Tony has also built himself a head flow bench. I can't remember what it pulls but it's up there. If you want to talk race heads I can put you in touch with a very good engine builder who has a lot of passion it. anyway check this out! Far out what is a better photo share site? Photo bucket is going to make me cranky it's so slow.2 points
-
Well, have sold the KE20 and the guy wanted the original running gear in it. Removed the hilux rear end and coil over front end (from a starlet I think originally). Had some TA63 LCA's lying around and though I would try them with the struts I had, they are about 25mm longer than standard and mated up the the struts so chuffed about that! Now as you can see the tie rods don't really reach that far... would wind them out if they weren't rusted and acually let me to turn them out. ah well. Looks quite staunch for the time being. On the list over the coming weeks #Rebuild 4A-GE Small port. have bought heaps of OEM bolts and a few things from Bazza at MRP and also some TODA gear in from Japan. Should be a beautiful engine bay somewhere down the line **Spin a yarn** //oldschool.co.nz/index.php?/topic/52401-pbaines-1971-toyota-corolla-ke25/2 points
-
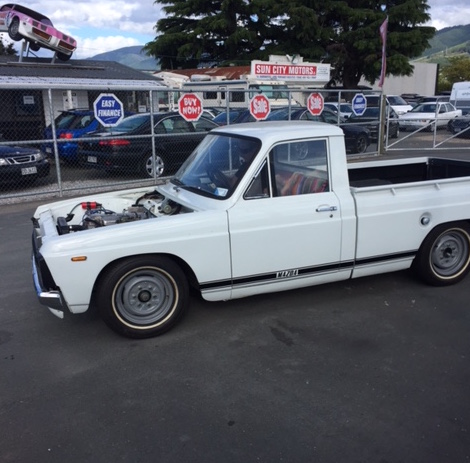
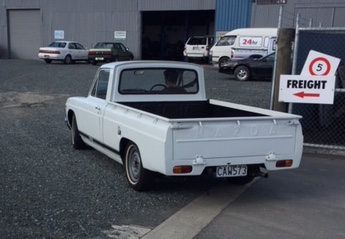
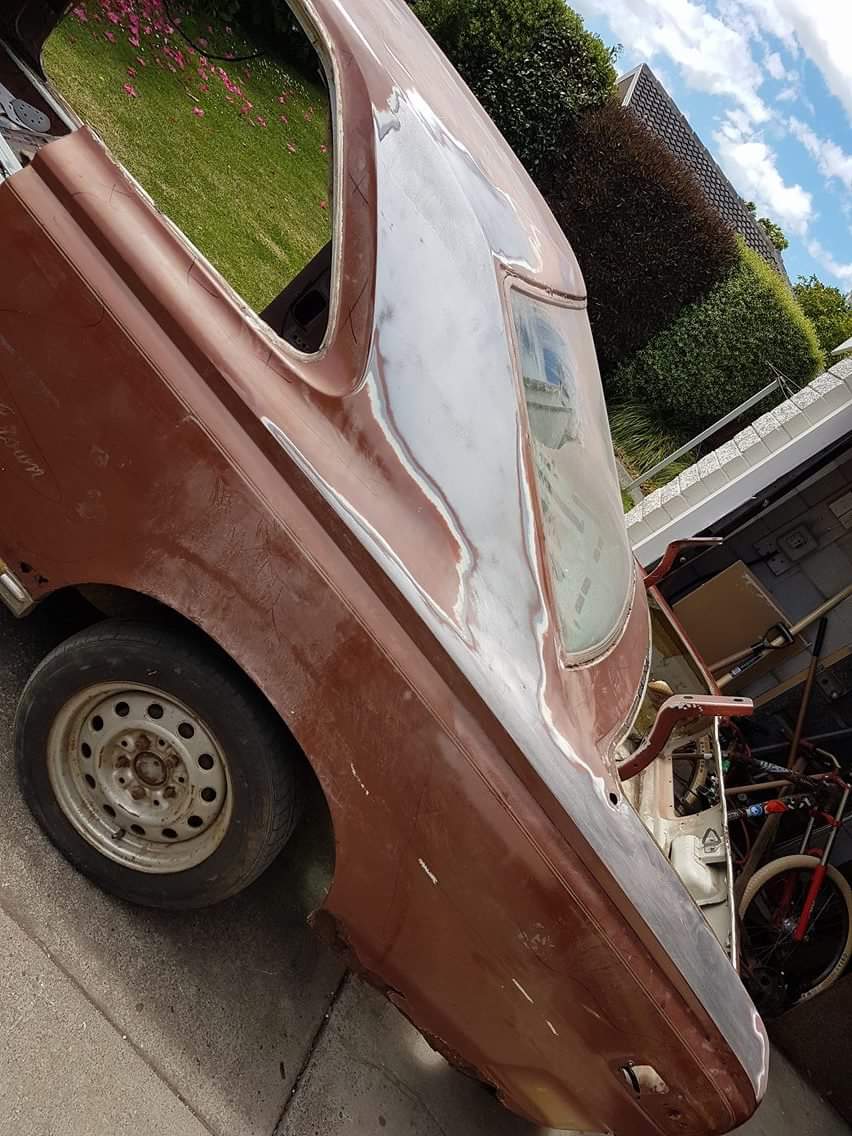
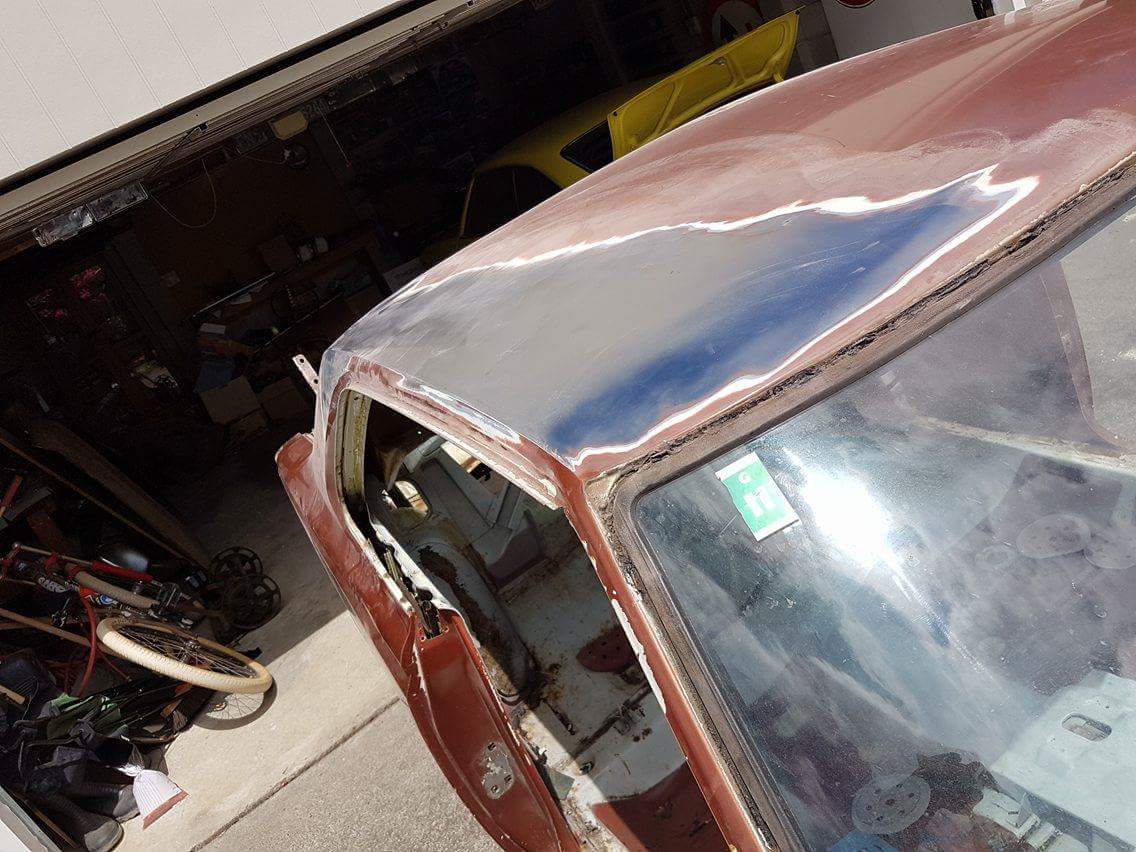
I am quite happy to say that I have managed to get quite a bit of work finished on this little wagon. With the evenings being brighter and warmer and having a new dose of enthusiasm I have spent more time on it and its been fun. So where was I last update. Lets start with the doors. I knew they had rust but not too bad and in places that’s easy to get to. I have been putting off repairing them so now is the time after having just finished the last few bits on the tailgate (hatch..) Luckily the rust was mainly on the outer skin wrapping over the inner strengthening panels that the hinges are welded to. I cut it away and let in some nice new thick sheet. I actually ground back the welds afterwards because it it made sense to have it all finished properly in a place that is hard to get to once the doors are back on. Plus the seals, speaking of which I will need to get some decent second hand ones with the originals having fallen apart, will need a good smooth surface to squash against. There was minimal rust along the inner bottom of one door and they fixed up well. Really glad they are in good condition otherwise with minimal dents on the outside (just dented enough I say..) While I was working on them I also had one of those ‘expecting it to be a arse but it was actually easy’ moments when I had to remove a broken screw from a window winder stub. The screw was small, broken unevenly and I sure that Id not be able to drill it central enough. But I did, it worked and I was happy.. With the doors repaired and the repairs painted over I put them aside and started on the wiring. I enjoy wiring and have always planned to tidy all the original stuff up. I got carried away and its now pretty well hidden from view. I added some extra wires for the fan etc and decided to run the main loom out of sight via a hole I added in the tunnel. The original bulkhead grommet worked perfectly. Once I started hiding things I got even more carried away. I disliked the look of the fan wires running externally along the top of the bulkhead so they were carefully re-routed then back through the heater box and through another added hole. The main loom sorted back through inside the car and I was happy with it all. So onto the heater hoses. First I fitted them as per original. Oh dear. No, no ,no.. this will not suffice !… Damn they are ugly hoses, just running over the engine like an afterthought, looking like a scaled up version of a badly designed Lego tecnics kit with poorly scaled pneumatics. Nup. No sir..I don’t like it! So I rummaged through my always handy supply of random hoses and found a few Mazda items that will help in my quest for neatness, a Toyota bottom hose and a ideal tee piece. I also found a heater pipe from the Crysler Northstar quadcam V8 I have been gifted (another story…). Still not enough pieces to complete my puzzle. Back to the wreckers then… I love going to wreckers, especially when they let you roam about by yourself and get your own bits, a rare thing these days with so many OSH rules. Luckily Hannah enjoys it too because she was along for this sortee. We found a variety of hoses from a Datsun something, a Mitsubishi Mirage, a Honda Shuttle and also scored an ideal inline heater valve from said Honda. A few hose clips and other handy bits. All this for $10 free image uploading Back home and I assembled my scavenged findings together and came up with a design. I cut that steel pipe down, welded on a bracket so it mounts onto the carb support bracket beneath the carb. Chopped the excess bits off the heater valve and mounted that in the original place using various bends from my even more awesome stash of bends. Added the Tee into the Toyota bottom pipe. It worked out fine except for one thing.. the heater valve works backwards. Hot is cold and vice versa. Luckily my other Viva, with its Chevette sourced heater valve is exactly the same. So no confusion for us.. just everyone else.. After finishing them I noticed my exhaust was not yet connected to the manifold. Then I discovered holes. Bugger! So old towels out to protect things and I carefully welded in some repairs. I am a bit upset in that the blobby welds might well restrict things and lose me a pony or two. However I shall learn to deal with this. Then on to the breather and brake servo hoses. I have decent PCV valve to use and some pipe now. But nothing matches. Out with my stock of alloy bits and I worked out a plan using my 1/8th bsp taps. I machined up an adaptor and it worked a treat. Finished and mounted.. With that lot finished and looking a lot neater it was now it was time to sort out the throttle pedal to carb interface system. I am using a HC Viva floor mounted pedal like in Viva one. The original top mounted pedal system uses rods and is..ugly. I copied the design of cable clamp and pedal mount from Viva one. Noted how much cable pull was offered by the pedal. Did some maths and worked out the diameter of pully needed. Then I machined up a pulley from a lump of alloy on the trusty old, leaky, English lathe. Made a new cable bracket and used some old bike barrel adjuster. It was an easy enough job but just time and I’m glad its done. Cable clamp so the nipple will go at pulley end for neatness... Measure cable pull.. Pedal mounts here on new base... A leaky (because English made) old but trustworthy lathe and a lump of alloy.. A new pulley.. I wont mount it yet as some wiring to do for the starter solenoid yet to be done. But I’m not far from firing the little 1159cc block of fury up and I’m quite excited. Here's a photo of the new hose layout. I'm much happier with it and it was worth the hassle... Back soon2 points
-
In completion of my AE86 project (which has been promoted to my 'Sunday Fun-day car, this is a very high rank) I have bought myself a pre-facelift KE25... for some reason. Have scored myself so far, KE20 1200 HI-Delux front guards, bonnet (not pictured) and grill setup from Japan TE27 Trueno rear tail lights from Japan 4k and K40 locally Going back to a K series engine but will probably upgrade to a K50. Barely any rust overall which is sound. Bit behind the rear tail lights but for a novice like me should be pretty easy as it's all flat in that area. Pretty keen to get this panel and primed myself (learn along the way), take it to somewhere in a booth to get exterior done properly. I predict that this will be a 2+ year long project, but looking forward to it none the less! Big thanks to Olds Cool Autos for supplying 90% of everything, including the shell.\ Discussion thread here: //oldschool.co.nz/index.php?/topic/52401-pbaines-1971-toyota-corolla-ke25/1 point
-
A fine question thanks for making me think. Being that the injectors are not sitting in a manifold with air rushing past there has been no real reason to make the tubes full sealed. The injectors sit in the black alloy adapters (for top feed) and the side feed rail fits straight into the top without the need for the black adapter. In both cases with the adapter and the side feed rail the fit is good but it's not going to be air tight. If the tubes were going to fill in less than 1 second with all that air needing to be displaced in a short amount on time id be in a state of panic. But the tubes fill at a slow rate of 3.7 cc per 1 mm of fluid height. How fast the tubes fill is depending on what the injector is rated to at static flow... ie 1500cc injectors is 1500cc per min. which if I do that I will burn them out because injectors wont last at 100% duty. So the air will make it's way out slowly as the tubes fill. Any dust contamination that may get in while switching injectors out will be caught by a series of fuel filters.1 point
-
After sanity was restored (fighting entropy!)1 point
-
Bent up angles for the lower edges and curved them with the shrinker/stretcher do-dad. Trimmed them to size and welded to the end of the lower valence (both sides). Next was the top. Sides first About this point I had to pause to clean up the work area.1 point
-
sos for no updates yet, i'm sure you're all desperately waiting to see how i'm getting on with a poxy falcon lol. its broke down, fixed itself, leaked about 4 litres of oil, leaked fuel an stuff, yeah, all usual shite. i've also got number 6 spark plug sitting at a mad angle in the head, yay! so that's a problem that's pissing me off cos i cant take it out unless i want to take the head off and fix that, massively uneconomical on a 330k engine that i don't really want anyway. but i'm hoping its gonna stick it out until i put something else in it, i'm wanting a clevo v8 now, we'll see. and yeah anyways, bought another falcon yesterday. I now have an XE bonnet, guards, bumpers and dashboards, so thats gonna happen too. did a deal with a mate so i bought it, take the XE bits i want, swap them out for my xf parts back to that one and he's bought it off me for same money. i'm calling that a win. cos i cant be fucked bits-and -piecing out the car, although there are loads of extras that i'm getting rid of anyways, doors, doorcards, guards, headers, etc, coming to a for sale post near you soon! took the canopy off and fitted a tonneau. much improvement. other car. [/url] i'm going to build one good dash out o the two, and i love these clocks! so much nicer than the XF shite. rev counter and an oil pressure gauge too. sweet. Discussion //oldschool.co.nz/index.php?/topic/54385-mighty-joes-xf-falcoon-of-filth/%C2%A01 point
-
This week I've been disconnecting stuff and finally got the box and engine out today. Pulled the head off complete and got into the bottom end to see whats up with low compression on 3. Err, that'll do it! An average of slightly greater than one broken ring per piston... (piston 6->1) Anyway, other than a broken ring on almost every cylinder (and all 3 on 3!), the bottom end seems good, if a bit grubby. - all original STD sized bearings, big ends look like new, mains have some slight wear (engine had excellent oil pressure) - all original pistons, on piston 6 the first compression ring groove is a bit splayed, i guess from the broken ring, other pistons seem ok. - cylinders all look really good with no lipping, apart from some horizontal lines halfway down most cylinders but esp cylinder 4 (probably from water sitting on the ring when it was parked up), and the odd vertical score that i can just feel with my fingernail. Ideally it needs a rebore and upsized pistons, decked block etc , but I have been looking for new pistons (in any size) since i got the car and no luck to date. As i have a couple of sets of std piston rings 'in stock' I will probably just give the cylinders a quick wazz with a flexi-hone, give it a good clean and put it back together with new rings, maybe main bearings and big ends if i can find them, but i might just keep collecting bits as i find them for a proper rebuild 'one day', cause im quite keen to actually drive this bloody thing, and the Kumeu Hot Rod Show is in January. Also 125 got a WoF, so that's summer driving sorted, and OldSchool Drag Day on the 10th December1 point
-
Carpark was almost totally full when I left today, took the Torana up.1 point
-
Awesome man!1 point
-
I am so happy right now. Almost justifies importing the stout so I can get side by side pics1 point
-
Thanks. I'll have to pay attention to the Mazdas next time I visit PaP.1 point
-
Fucking stoked for you brother! Finally got yourself one! That's awesome. Looking forward to see it progressing.1 point
-
I didn't realise that it was you on that hpacadamy page. I have in fact trawled over this page a few different times. I'm glad we both agree that a scope on it's own is a bad way to characterise a injector. Hang time is just as important as the turn on time and needs to be included. What is also great and I am still very much a noob... is the power of excel. And how once it's set right it's good for all the heavy lifting. In your case I can understand the frustration of trying to stage injectors when there is no data. They can set up the batt offset table by looking at the air fuel ratios at idle and changing the electrical loading conditions on the vehicle. As i'm sure you understand this gets them in the ball park and it's ruff enough to get a semi stable idle and most people are never going to find out how close it is until they get a flat battery. But to stage a second set of injectors in at a nominated boost point (or other) is tuff going as things are moving around to much for air fuels to be useful for finding out about injectors. It's all good stuff. Finding out how simple the humble injector isn't.1 point
-
So, a little welding, hammering and cursing at springs (damn you Volkswagen and your multi spring rear brake setup) later the new wheel bearings and brake shoes were installed as well as a couple extra hangers for the exhaust. It went for a recheck earlier in the week and today I picked up some plates for it. So now its road legal HOORAYYYYYY With new plates cable tied on I, as any sensible car enthusiast would, decided the first thing on the agenda was to go blasting up the main street of Ashburton with the little 4 at full song. The car was dirty as shit but it had the desired effect as lunchtime shoppers looked round to see where this symphony of amazingness was originating. Agenda item no.1 marked off the next step was to address the issue of rather neglected paint. A bit of aggressive cleaner, water blaster, car wash and super sheen later and the car looks much better, not great but better. A bit of before and after The maiden voyage of sorts will be on Sunday where I shall embarrass myself with my noisy piece of dented gloriousnss at a large euro meet.1 point
-
http://imgur.com/ http://www.iforce.co.nz/1 point
-
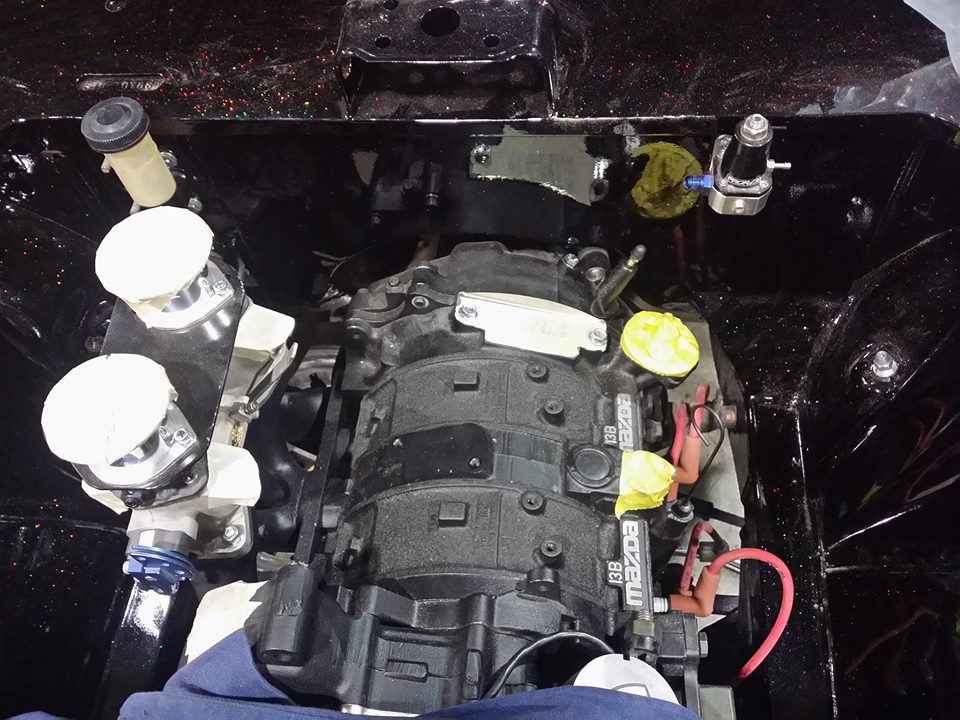
Oh yeah, also we now have the clutch slave cylinder mounted and FPR sitting in place. Engine bay is already so dusty from sitting in the shop. Will need a good clean once it's all sorted! Please excuse the potato pics. Peace
1 point
-
On the subject of glass I might as well start with that. My tubes have a bigger diameter than the tubes in the first photo. Glass tube is a odd beast. Sometimes the smaller the more expensive it is. Also you buy glass tube length x wall thickness. So you can also do yourself in if your not careful. It's very important with a rig like this that both ends are parallel ground. If they are not you might as well just throw your glass tube at the floor. Parallel grinding does usually add to the cost. The reason that I picked tube and not a graduated cylinder is because once you start dealing with 2L of liquid decanting it becomes a issue after each test. It wont be long before my muppet fingers drop it. Also a hollow tube means I have provision for a drain. As I was saying to will the other night. China seams to value good relationship when dealing with the online market rather than the actual dollar figure. Things like "dear sir" and "please answer me" and "thank you" seam to go a very long way when dealing with them. So here is a pic of my glass. Final figures are: 675mm Length 75mm OD 3mm wall.1 point
-
Swapped the old commodore driveshaft for a station wagon one which is slightly longer and pretty much the perfect length. So then picked up a new yoke and universal joint to mate up to the transmission. Even clears the floor by ~2mm! Made a driveshaft mount to dummy it up, which worked alright but the driveshaft angled quite a lot when the bags are right down. Need to make another that's about 30mm higher. Running gear basically complete!1 point
-
1 point
-
Day after the warrant sticker went on cube racing bush arrived and installed as well as the marlin crawler shifter seat.gearbox feels like it should now! Before and after Full set of facelift chaser doorcards arrived from Todd down the line along with one of the headlights, corner lights and grill that match the bonnet already on my car. Doorcards cleaned up nicely with the turtle wax interior cleaner Few more photos to post over the next few days of recent acquisitions. Things are moving quickly!!1 point
-
Picked up the diff and front disc brakes out of a ms112 crown ready to go in to the ms51
1 point
-
Had a sand and clean up then sprayed etch primer around the traps. Including the valence and the front crossmember parts Welded those bits into place And the sill panel. Still need to finish the new bit of guard, but its nearly there. Next thing is to fill the gaps here, should be fairly easy as it's a flat area with flanges. Also need to replace the end bits that connect to the inner guards. I need to get some top coat paint for these bits, will probably get the Resene Lucite LC 400 as I don't fancy breathing isocyanates.1 point
-
Sill repair panel is done. To get the curve I used a couple of strips of inner tube on the upper wheel of my english wheel (home made a few years ago). This lets the metal curve over the lower anvil without stretching it so you get an arc in the panel rather than a compound curve. It's not perfect because my lower anvils have a flat piece in the centre (which you need for normal wheeling) but the linear marks are pretty light / should sand out I think. I welded some tabs to the remaining parts of the sill so I could clamp the new bit in with clecos. Also made the inner sill closing panel up, but its a bit ugly so no pics. It won't be seen once it's all together. Have picked up the front panel from Metal Immersions but it hasn't made it out of the Nissan's boot yet. Next is to make a new piece for the bottom of the guard. I could probably weld the old bits back in, but I had to make two cuts (didn't cut far enough up the first time) so it's probably better to renew it all. Have a paint issue I'll ask about elsewhere.1 point
-
So I should have said before, this is the look I'm aiming for. So working towards that I needed some drop outs. As far as I can tell all Pantha used the same drop outs on all their bikes so I copied the dropouts on one of the kids Cubs. And scientifically worked out their ideal location. Where by I could start to make some seat and chain stays. More later.1 point
-
1 point


This leaderboard is set to Auckland/GMT+12:00