
Leaderboard


Popular Content
Showing content with the highest reputation on 01/02/16 in all areas
-
Whoa, a whole new year! 2016 is shaping up to be a pretty exciting one, automotive wise. Just want to put down the thoughts here on 2015, and what I'll be doing with the RX7 in 2016. The end of 2015 was pretty awesome. We took our FSAE car to Melbourne for the Australasian competition, kicked some ass, and had a bloody good time. We came third overall, which for a team that has only been competing for three years, is unprecedented. I'm a bit biased, but I reckon we had the fastest car on the day, just not quite enough luck! But that's racing. That's me, getting my hands dirty fixing up a slight issue with the brake over-travel switch. My role in the project was the electrical system, I ran a Link Fury ECU, a Nautech PDM, and a MoTeC C185 Dash/Logger. I designed, spec'd and constructed a fully sealed and shrunk loom using all the good gear, as it was on the universities dime . The electrical system was rock solid reliable, which was my own personal goal for my part of the project. I also undertook a lot of the engine tuning... Tuning a turbocharged single cylinder raciing dirtbike motor with an aggressive cam is not something I'm looking forward to ever having to do again. Very very pulsey and lots of challenges to overcome. We got a great result in the end though, with lots of mid-range to top end grunt which is what we really needed to meet our goals. Shame it still sounds like a lawnmower, hah. Car is a full carbon monocoque, with a very effective aero package. Weighed just shy of 200kg's, made just over 40kw's (all the air has to pass through a 19mm restrictor). If anyone out there reading this is at uni, and has an opportunity to become involved with FSAE. Do it. It's a massive commitment, a huge time-sink and extremely addictive, but I met some awesome guys, and got two fantastic job offers out of it. The one I've taken is a real unicorn job, I wont say much about it, as I don't start till the 11th, but it's automotive related, and will provide opportunities that I wouldn't have dreamed of a year ago. On to the RX7! I've been using it as a daily fore the last three months, and it's been great. Not as thirsty as I was expecting, better than my old 81 L200 sport (but that really needs another tickle up). I've replaced a few interior pieces to tidy it up further; new door skins, speakers, stereo, steering wheel, etc. Reverting as much as I can back to stock mazda stuff as I find tidy pieces. It's got a pretty decent oil leak from the rear of the sump. It's on my immediate list to fix this week. The turbo's are also on the way out, particularly the secondary, as it's a bit smokey. Something has gone wrong in the sequential setup, and the boost pattern is a bit intermittent, I'll hunt down that issue too. I've got a couple of good condition spare turbos pulled apart, and will get some rebuild kits for them on the way. They have a different type of front seal to the other hitachi turbos, so the kits are a bit more expensive than I'd like, but still not massively expensive. I've got a replacement downpipe to go on, and I'll build a decent exhaust for it while I've got the turbo's off. I bought a cheap shitty stainless muffler off the tard a few months ago, because it has awesome twin tips on it. I'll cut them off and use them on a decent muffler. Will make the exhaust look pretty factory from the back, but with slightly larger tips. Should look cool . According to teh interwebzzz I can expect boost control issues once I modify the exhaust. I'll port out the factory wastegate system, and hopefully that will help out. Cross that bridge when I come to it . Happy new year, 2016 is going to be a kickass one .
 5 points
 -
On to the power steering ram. I jacked the car up, grabbed the ram and surprisingly it rotated about 10 degrees... This was surprising as it basically needs to not rotate to function correctly, and sure enough the rotation translated into about 5 degrees of toe in/out. This could explain some of the wanderyness as the ram would push one way and have a certain toe, then push the other way and change the toe 5 deg. Shithouse. I removed the offending item; This is such a hilarious design, the ram is the tie rod between the wheels, it gets pushed directly by the steering box, and the end of the ram is connected to the chassis. The push from the steering box also moves a control piston in the ram so there is a fucking complicated joint in there to achieve this and get some adjustment. I dismantled it with some difficulty as the reason it was all moving was a wee pin that stopped the rotation had slogged itself out and had wedged itself in there. The fucked pin fits in this wee hole; Various innards; Shit was in basically pretty good nick, the o ring on the control piston was a bit poo and causing the ram to leak a bit so i replaced it as well as the two joint ball bearings. About this time I realised the the pin was the root problem anyway, it was wedging itself against the control piston and preventing it from moving freely when under pressure..... This is the offending pin; i turned down a cap screw to act as a pin, nutted it on and tacked it in place to make sure it stayed there.... Chucked it all back together checked it all worked and got yet another alignment The steering is now super effective, them Brits sure as fuck knew how to overpower steering feel with hydraulics.... Thats it for now.4 points
-
Took the car down to Milford Sound/Bluff over the last two days. 1700 km in 36 hours and the only issue was yesterday morning when the carburetor iced up when leaving Milford, switched to "Winter Mode" and the engine started back up. Averaged 6.4 L/100 km with two people, equipment and open windows, going the speed limit the majority of the time. This cheeky little bugger had a go at eating my car:4 points
-
Sick of my good engine getting covered in so much crap. Filled the holes between chassis and body with some rubber and ali where the rubber would melt, by drop pipe etc. Along with the under tray, should stop most of the crap going on front half of engine at least. Made a heat shield. Goes here It heat soaked pretty bad when driving around slow/parked up, when 4wding/waiting for geezers having a chat and 12 lunch breaks. I had thought about mounting the radiator under the tray. but feeding it air and not mud was too much drama. plus half the problem is heat from manifold and turbo. heat wrap would turn into a big mess. so rather elaborate heat shield it is. seems to work pretty sweet so far. These things are pretty squishy at 4psi. have something on the way to sort that.3 points
-
Hi everyone, managed to get a few things done in the madness between christmas and new years. I folded the gutter seams back over the new metal, tidied up alot of small details like s few of the spot welds had burned right thought both layers of metal so I had to plug them up, tidied up the inside of the window, pretty happy. Stripped the bog off the weld to the rear of the sunroof, shit was over a cm deep in places. it's a bit of a mess, heaps of warpage, dents surface rust and even a nice rust hole to fix. Then the other day I finally bit the bullet and fixed my cockup were I had tried to weld up a 1 inch hole in the firewall, I think I had the welder on the wrong setting and just kept trying and trying to plug up the holes, but just blasted more and more holes in the flippin thing! so I cut it all out. and very carefully welded in a patch. much better! also, Santa (Beaver what a GC!) brought these up from kapiti for me. they fit good, are comfortable as and not nearly as fucked as I thought they would be. right i gotta go pack for a week of family camping, after which I'll be hanging out for more shed time! All the best for 2016 people!3 points
-
After a play this afternoon, the engine bay went from this To this guards and front back on, just need to sand and paint the bullbars and do a quick service and it will be ready for re-reg . Oh, and cut the rest of the paint to match the guards.2 points
-
I have just gotten the car back from the panel beaters, and the team at Friend & Wistrand (Palmerston North) have done a fantastic job overall. Colour matching wasn't necessary as the car uses the original colours. You wouldn't know where the areas that they touched up so very pleased with the results. Not the greatest of photos, but here are the photos that Steven (Person in charge of my car) sent through to me, feel free to have a look I decided it would be nice to take a photo of the ol' girl on top of a hill in one of my parents paddocks, now i've lost the panda in the foliage.2 points
-
Scored this from the huntly transfer station today for 20$ its solid as! some surface rust on the frame but easily buffed up. Tyres were a bit perished so my old triumph wheels went straight on. http://i.imgur.com/czjVEJT.jpg Cant decide to tidy up or leave as is tray is off a 110 landy i think and is all alloy weighs sweet fuck all i changed wheels over 1 handed holding trailer up with the other.1 point
-
Starting a slow and steady build of a early 70's CB100 running full CR 85 suspension.... Will be running a smaller 17in wheel on the front and shortening the forks a little. Maybe someone wants to swap for my 19? Also if anyone is after any cb 100 parts let me know as I'm only really keeping whats in the last picture.1 point
-
Is it possible to run the cable inside the sill to bypass the crossmember? By the looks of your pic you might just get away with it.1 point
-
I have relocated the battery to the boot. The cable is quite large and thus the bend over the crossmember shows up through the carpet. is it okay to cut a hole in the crossmember in order to route the cable through, or is this considered a structural change? It already has several holes from the factory, just not in convenient places for me.1 point
-
The key there is to bang out the stud with a hammer and punch. Jack the g box up a bit and the mount should be free.1 point
-
I calibrated torque equipment at my last job and pneumatic stuff could vary rediculously so banging a torque stick on to a rattle gun that may or may not be working correctly is just waiting for trouble. The best torque wrench i came across was a warren&brown so accurate next is norbar teng are shit the rest are barely reusable after 12 months. Buy one of the above if your using it at work get it calibrated youll sleep better.1 point
-
Another interesting use in this form, when it's not creating future customers for the local hearing aid supplier its an awesome weed blower. Very effective on concrete, not so much on grass as it has a tendency to scorch things which in itself in another bonus as there's not usually a lot of weed/rubbish left to throw in the bin either.1 point
-
Seeing as the clutch has been slipping for a while you might want to get the flywheel machined to prevent juddering. But you probably don't give a hoot.1 point
-
Front wheels off, Drain box, Pull axles, Pull all the shit off the box (plugs, speedo cable and slave), undo bellhousing bolts. Remove and replace clutch. Smash it back together. Done and dusted1 point
-
Really wished we could have done a build thread while I was involved, so much learning being done and to have access to any tool you can imagine removed all restrictions on creativity, most of the solutions that came out of that workshop are simply genius! Enjoyed watching the live stream on the day, you guys killed it!1 point
-
this is the best thing to happen this christmas1 point
-
Have those seats just had the top 1/3rd hacked off em? I think you should send off to midnight!1 point
-
picture-less update, pretty much haven't achieved a lot on this lately, have put the pistons and crank back in with new rings, bearings and thrust washers. just getting the head back together to go back on, its been away to get planed as it had a small bow in it, tore down the spare gearbox to find a bad bearing so have replaced that and its ready to go back together also thinking of putting the internals in the housings of the gearbox in the ute already cleaned up. hopefully have it on the road shortly!1 point
-
Love those round the block problem solving runs.. not so good when you limp back. But fuck yeah anyway bro..1 point
-
You can drag logs home from the paddock to split at your leisure1 point
-
*rebuilds engine* over REALLY long time. Thanks CAM. Making new engine mounts. Old ones were a bit not right.1 point
-
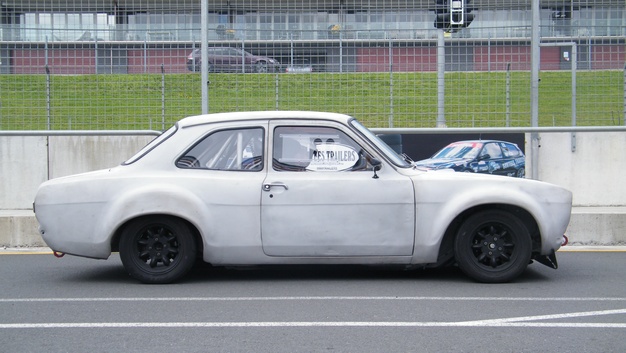
Unfortunately, not really. It's not super secret or anything, but as it's a competition, we never really released any details about it till it was unveiled at the end of October... so no build-thread type stuff . Lots of pics here though: https://www.dropbox.com/sh/vax4j5nm8q74eow/AAALvwcgwovN6j5PZzl88YH_a?dl=0 Credit to Toby White for the photos. He's a talented man . There was some video coverage of the event, available on YT now: Saturday Morning: Saturday Afternoon: Sunday Morning: Sunday Afternoon:1 point
-
Quiet times here, an update is in order. Both rams were different shades of blue, now they are dark green and blend in much better. I made a mistake when I built the log splitter and brought right angle hydraulic fittings and found they cost a fortune. This time I've brought black steel right angles and plain 3/8s nipples, much cheaper! Did a deal at work and scored a nice battery, it's perfect fit in the chassis, I made a nice base and clamp to hold it safely. The suction side of the pump needed to be redirected, done. This needed some thing to rev the engine. It would have had a hand throttle but it was long gone, when I got it it had a lawn mower throttle which was a pile of crap. I've made a foot throttle, it seems to work well, and it mounts to the hand throttle bolt holes. Return springs look a bit average. Meh. Luckily this MX5 fan I had floating about in the garage was a nice width to fit the radiator. The hydraulic tank is finished, mounted and connected to the pump. It looked too new though so I splashed some paint and a bit of salt water at it. It's better but not a perfect colour match. Put the control valve on it too. That was where things got really exciting! This thing runs! I got it going this afternoon. Drove it out of the garage, up the drive, on a little adventure down the road and back. Wow, yeah. It feels great to drive, I put the auxiliary gear box in first and the dozer box in third and it pulls away easily from idle, first/first is very very slow which will be great when I get the blade on. The steering works nicely, PTO engages easily, all the tractor gears are there and engage easily. It starts and runs well, not very loud but nice and tractor sounding. I'm so pleased. And the bad news. I think it has a blown head gasket. I got it warm, shut it off and went inside for tea. When I restarted it some water came out the exhaust. I took it for a drive anyway and it overheated big time, whistling like a kettle. No problem, I'll pull the head off soon.1 point
-
Cant remember the price of it at work, will check on tuesday1 point
-
today i started final sanding the outside of the car ready for colour. I've never dry sanded a car for the final prep before so i spent the morning trying different things and in the end it became apparent that i could use the 150mm DA for the big flat bits. so I've been using the DA with 400 to knock the tops off then going back and finishing it with 600. this has worked a treat on the big flat surfaces and is about two billion precent faster than doing it by hand with water. I've finished the boot lid, the roof and the bonnet. early in the day i was still trying to see if i was fucking up the lines using the DA so I've been wiping the panels with prepsol quite a lot and everything looks good. so i started on the rear quarter and thats about 80% finished. once again I've been using prepsol heaps to see how the lines look and so far so good. dunno if ill get anything done tomorrow. it was cripplingly hot today and for a while i was long boarding it by hand which nearly killed me. i might take a day off tomorrow.1 point
-
WOAH, Page 34 - Last post 2012 So yeah, I still have this thing and has been hiding away in my little shed filled with crap. Neglected all these years. I found out with the Sigma wagon that if I give myself a deadline that I have a better chance of completing something. So I have set one out for the Lancer. The deadline is Early December 2016 - OS Drag Day Nothing has been done to this car for the past 3+ years except obtain parts. Yesterday I went for a stroll around Zebra Car Parts as Bigfoot told me about a Lancer that had arrived. Managed to score the grill which is actually in real great shape, a digital clock and a cool bonnet emblem which probably wont find its way on the Lancer, but cool none the less. Ive collected other bits and pieces and will get to those later. The only thing to do really is save a whole lotta cash and get this thing panelled and painted Happy New Years Y'all1 point
-
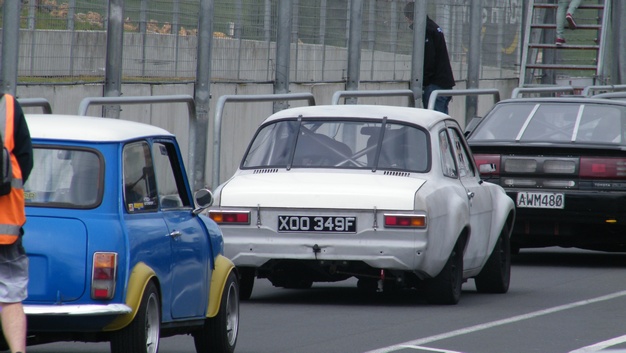
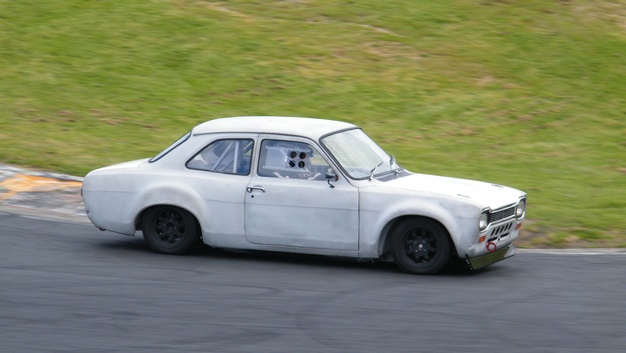
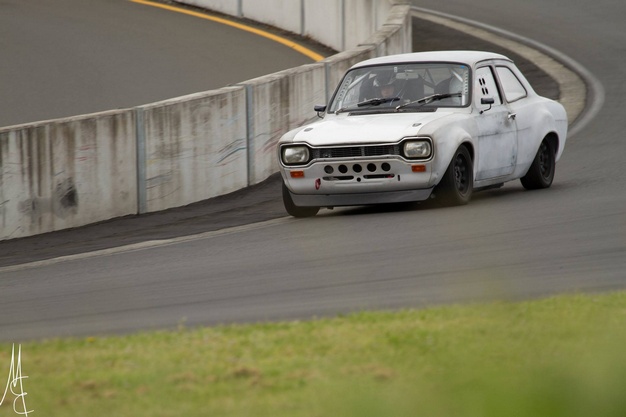
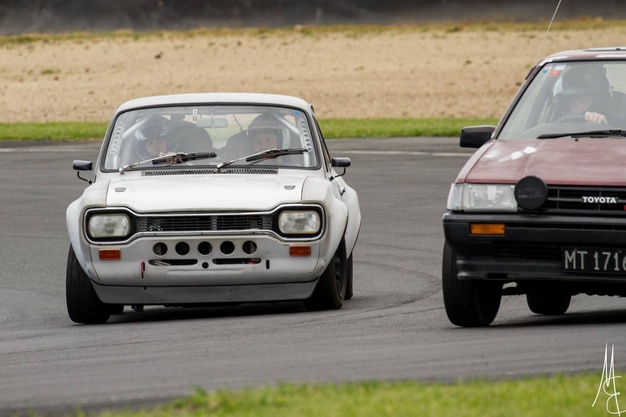
Hampton Downs
1 point
-
i have used them, best to set your gun on low/1, give it some nungas nungas , then set your torque wrench on like 80 nm, check it and wind it up till you find where its actually torqueing the nut to. and adjust your rattle gun setting to the best position. I did find when I went to a much better quality rattle gun I had to dumb it down to the lowest setting to get the right torque i went away from using them in the end because for my own peace of mind knowing that you torqued the nuts up helped me to sleep at night. especially on them long as days were your doing 14 jobs and you cant get of to dream land cause you cant remember if you did up the nuts on the last rush wheel bearing job. thankfully that has never happened to me, but as i said peace of mind knowing its right was worth the extra 2 mins . I do things the same way every time , so if I haven't put the torque wrench back in the draw I know I haven't torqued the nuts, its a good system, same goes for sump plugs, and brake caliper bolts, all ways put the spanner on the drainer, or ring end on the hub, if the spanner is on the drainer/hub then the plug/bolts aren't tight. I may be a little ocd but I have never left wheel nuts loose or fucked an engine cause the plug fell out . my 2 cents , got a little of topic sorry1 point
-
im not sure how much longer i can keep this up. 2015-12-30_03-19-36 by sheepers, on Flickr 2015-12-30_03-18-51 by sheepers, on Flickr 2015-12-30_03-18-37 by sheepers, on Flickr1 point
-
Discussion thread //oldschool.co.nz/index.php?/topic/51310-rhubarb77s-1970-escort-coupe/ Here's a few recent pics of my Escort that I've owned for the last 5 or so years. I'm the second owner so most of the body and interior is untouched except the RS front end, some gauges, new carpet etc. I first took interest in Escorts growing up in Central Otago. I think my first car, bought for $100 was a MK1 four door with house paint all over it. Lots of gravel roads = lots of great memories So now, 20 years on I have this escort. It took a long time to find the right car as I didn't want to do any bodywork. The current engine, 2.0L Pinto was professionally built at an Escort performance shop here in Queensland. It pushed out 150rwhp on the rollers and runs a 14.5sec 1/4 mile with standard diff and standard Sierra 5 speed. A few weeks ago I stumbled across a custom Pinto turbo exhaust manifold when I was buying some escort spares. So that's kicked off a whole new chapter. I've crunched the numbers for the turbo route and it looks expensive. So my MK2 Escort project will have to go and the 150HP motor is up for sale. Going turbo with the car is going to change it. A lot. Fuel injection, big diff, big brakes etc. I'm in two minds about going ahead with it really as the car is so well balanced & very original. That's partly why I started the thread, to get some opinions about it so please place a vote in the discussion thread. Cheers Turbo project- T28 ball bearing Turbo on custom stainless manifold, Sierra EFI inlet manifold, YB pistons, YB rods, YB distributor, Holden LS1 coils, Toyota Supra W55 gearbox with adaptor bellhousing. Shopping list is still huge.1 point
-
things went well and now its beer o'clock. 2015-12-29_03-58-30 by sheepers, on Flickr 2015-12-29_03-58-40 by sheepers, on Flickr 2015-12-29_03-58-52 by sheepers, on Flickr 2015-12-29_04-13-24 by sheepers, on Flickr 2015-12-29_04-13-39 by sheepers, on Flickr1 point
-
How can you tell you are turning into a grumpy old man? When you pay good money to have the A/C system rebuilt in a crummy 1980s car. Cheers to Kevin from Alert Auto Air in Devonport. Best person to talk to about A/C - especially if you have an old car. Discuss: http://oldschool.co....1-sc-chit-chat/1 point
-
A few proper photos of the wheels and headers. IMG_7046 by Richard Opie, on Flickr IMG_7056 by Richard Opie, on Flickr IMG_7063 by Richard Opie, on Flickr IMG_7381 by Richard Opie, on Flickr IMG_7378 by Richard Opie, on Flickr Brendan makes his own collectors - in this instance it collects to a 2" V-band flange, I will probably run a 2.25" exhaust after the headers however. Can't speak highly enough for the build quality of these however, I think I'll polish them in due course ie. closer to startup time. IMG_7344 by Richard Opie, on Flickr IMG_7336 by Richard Opie, on Flickr IMG_7285 by Richard Opie, on Flickr Absolutely enamoured with the final aesthetic - these are EXACTLY what I wanted, and I super enjoy the way the engine bay is sorta 'split' into thirds with all the functional/beautiful things going on in the engine bay. Inlet trumpet and throttle doorts ---> individual coil pack bangs ---> swoopy 'takoashi' header exit doorts. IMG_7241 by Richard Opie, on Flickr I gave the Watanabe's a brief polish with a fine paste - it was probably always going to be a given they'd come up massively AWESOME but they did anyway. And rolled the car out for a wipe down with Quik Detailer and a run over the bumpers and plastic trim with Kleers trim dressing or detailer or whatever it's called, but it's choice. IMG_7253 by Richard Opie, on Flickr Back looks higher than it is in this shot for some reason, I think in part it's to do with the wider track in the front and less shadow from the guards. Either way, the front actually needs to come up very slightly to get the lower arms to parallel. IMG_7255 by Richard Opie, on Flickr IMG_7260 by Richard Opie, on Flickr Nom. IMG_7455 by Richard Opie, on Flickr At the conclusion of today, I began removing the dash so wiring and construction of a pedal box mount can begin. This bit scares the shit out of me if I'm honest, but thankfully I have some good guidance/people on the case to help. Thanks for looking.1 point
-
today i took the motor out and in traditional OS tradition here is a picture of me playing actual guitar in the hole. you probably can't tell but I'm playing a fine rendition of the sound of silence. 2015-12-24_04-25-34 by sheepers, on Flickr 2015-12-24_04-08-58 by sheepers, on Flickr so, onward. whats wrongs with this picture?? 2015-12-24_02-54-59 by sheepers, on Flickr thats right keen eyed reader! the pipey bits should line up with the slots in the fire wall, but they don't. id been intrigued by this oddity for some time and today after i got the motor out i decided it was time to investigate. i have no fucking clue how this was assembled in this way, i could not get it out without breaking the housing. its the wrong heater core but i suppose that much was obvious. there just was no way of getting it out without breaking it. so i broke it. 2015-12-24_03-02-46 by sheepers, on Flickr whatchaaaa gonna do now? well, tomorrow is Christmas day so ill probably take tomorrow off. boxing day however is prep engine bay day.1 point
-
Put the front back together this evening and fitted my latest wheel acquisition, 13x7 Watanabe Falcon Turbo. See Steeb, I got "turbo's." The wheels are brand spankers - never been fitted to a car and date stamped with August 1980. IMG_7085 by Richard Opie, on Flickr1 point
-
So the very day the dirty old bitch got an alignment and i had decided some sweet summer cruising was in order the power steering decided to become a bit dog, working then not working etc. I decided the first thing I would look at was the pump as it needed some loving anyway, it was only being held on by 1 bolt when it needed three; That pump was a right cunt to get off, I had to remove the radiator to get to the lock tab on the pulley nut to remove the pulley cos the stupid fucking brits thought that the mount bracket needed to be nuclear bomb proof rather than just slot the fucker so you could just lift the pump out. The pump is a beautifully made bit of kit, although about 3kg worth for unknown english reasons. I am remembering why I fucking hate british vehicles and love boring Toyotas, that is 1/4" folded and welded steel plate; I have purchased the parts car shown in a previous post and went to Takaka to collect a few bits, but I stupidly forgot to take all the tools I needed to remove the pump off the parts car. My poor little truck was shitting its ring out coming back over the hill I must say, it was second gear most of the way up... a ton of steel on an 1800 townace ute will do that. Now, the innards of my pump were actually pretty immaculate once i stripped it, in fact they they looked like new, so I decided I could utilize my mediocre machining skillz to make a backing plate to attach more bolt holes, rather than waste an afternoon going back over the hill; Some time consuming blunt holesaw action; Turning the shit to the size of the spigot on the back of the broken mount Matching the plate hole positions to the existing hole and half holes, I tapped the new holes to match the half holes, I figured the half holes would do something then. Et voila! I wont be able to crank those bolts up hard cos it is only 6mm mild steel with the equivalent of an M10 going through it, but it will be heaps better than before. I put it all back together tonight, I gave the rad and the engine a bit of a flush before reassembly and used a slightly longer V belt on the pump drive as it was a bit short to get on and off easily. It has not fixed anything power steering wise but at least I know that the pump is ok now. So fucking stoked I got an alignment approx. 4 kms before need to pull the steering rack to fix it, top planning there dickhead. /end transmission1 point
-
the red looks really good in the sun. i don't think its too black, in fact i think its just right so thats that sorted. Rosso red it is. 2015-12-13_12-41-44 by sheepers, on Flickr 2015-12-13_12-41-53 by sheepers, on Flickr 2015-12-13_12-41-30 by sheepers, on Flickr1 point
-
long night was long. 2015-12-09_09-10-54 by sheepers, on Flickr not prefect yet but its getting there. i reckon ill block this back with 180 and then maybe 1 more coat of primer.1 point
-
and then i painted it. got rid of all the shit that was on the roof jut to make sure there was no nasties hiding under there. found a couple of patches of bog straight on the steel that were rusting so i got rid of that. then, paint. 2015-12-06_12-33-39 by sheepers, on Flickr 2015-12-06_01-26-47 by sheepers, on Flickr 2015-12-06_01-26-57 by sheepers, on Flickr 2015-12-06_01-27-06 by sheepers, on Flickr1 point
-
Car is officially now worthless. Time to scrap it or trade in for an Audi S4. Discuss: http://oldschool.co....1-sc-chit-chat/1 point
-
Shit yarn #2. Factory AW11 boot mat. Apparently these are rare, and foamers foam over them. Gonna hit it with some Jif and Simple Green then it should be mint, mayte. Discuss: http://oldschool.co....1-sc-chit-chat/1 point
-
just going to stick this here, I like this. a lot.1 point
-
FUCK YES!!!!!!!!!!!!!!! got up early and went up to peters shop this morning to fold up some new drip rails. this went very well indeed and by about 10am i had two drip rails and two new roofy side bits. peter then instructed me on how to fit it all up without fucking it up so i went on my merry way. i followed what he told me and now one side of the roof is fixed and back to factory. its rust free, has heaps of primer in between the layers and its fairly straight. all these things make me very happy indeed. new drip rail. new drip rail, roof side thing and the trim that goes onto it. 2015-10-31_03-04-54 by sheepers, on Flickr checking the fit with the A pillar trim. 2015-10-31_03-04-14 by sheepers, on Flickr 2015-10-31_03-04-06 by sheepers, on Flickr then plug weld it on. 2015-10-31_03-04-22 by sheepers, on Flickr and this is the inner all welded in and primed ready for the outer to go over it. 2015-10-31_03-03-41 by sheepers, on Flickr next fit the outer 2015-10-31_03-03-59 by sheepers, on Flickr 2015-10-31_03-03-50 by sheepers, on Flickr tack in place and fuck around for ages getting it sitting right then weld. 2015-10-31_03-03-25 by sheepers, on Flickr 2015-10-31_03-03-17 by sheepers, on Flickr 2015-10-31_03-02-59 by sheepers, on Flickr 2015-10-31_03-07-52 by sheepers, on Flickr 2015-10-31_03-32-22 by sheepers, on Flickr 2015-10-31_03-32-30 by sheepers, on Flickr so i still have to finish the front and rear parts but thats minor. I'm super stoked that the roof now has drip rails and its all factory and right. you know when you worry about how your going to fix something for ages and it becomes bigger in your head than the actual? well anywho i had stressed about the roof for ages but its all coming together nicely. ill do the other side tomorrow an then I've just got a couple of patches in the corner and the sun roof and were done!!!!!!!! fuck and yes.1 point
-
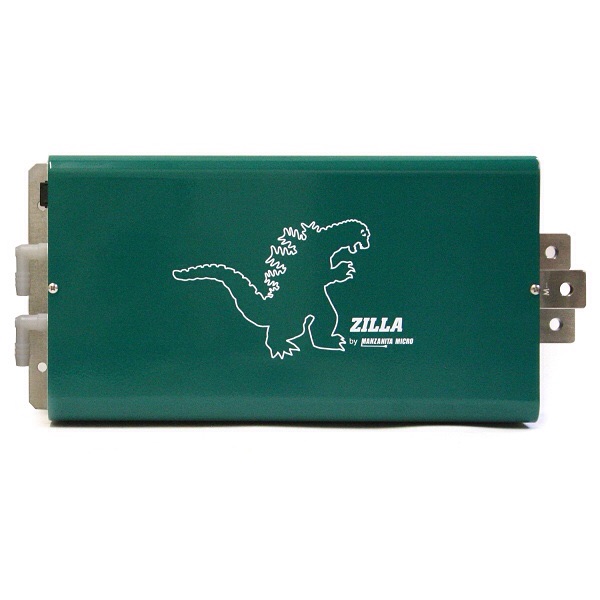
So a simple rundown We will have 2x Warp9 motors series wound DC. These are pretty much your electric forklift motors but pack more punch. They put out 150kw and 360Nm each. Any more in this chassis and it would snap in half! They'll look abit like this minus the transmission. We will also have a special motor controller the Manzanita Micro Zilla 2k-HV which is the EV equivalent of an ECU, this will allow us to shove 192v and 2000amps into the motors. We also have Li-ion batteries 192v of batteries, which is 60 batteries with 160ah of storage. The result will be an overly torque beast in a overly light but robust KE70. I call it KEV70 or just Kev. Now I haven't talked cost much at all. This KEV70 is largely funded by sponsors we have: ETCO Kumho Tyres NZ Good ride Tryes NZ Geraldine Auto Restorations Barber Well Drilling Electro flash Hammer Hardware. Along with my after school work at the local convenience store/dairy. Which has left the project 75% funded. We are looking for just the last few grand to pay for batteries and we'll be ready in November to debut this beast and its 300kw and 720Nm of torque.
1 point
-
both of the above parts have been moved to the next stage. the drivers door has now got some bog in it to make the shape right and its got another coat of primer on it. the boot lid has been long boarded with 250 and the shape is tip top so its got its final coat of primer on it. Untitled by sheepers, on Flickr Untitled by sheepers, on Flickr Untitled by sheepers, on Flickr1 point
-
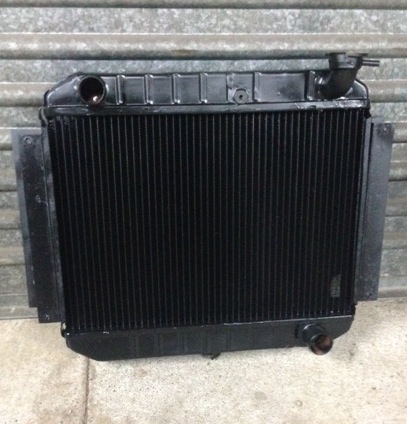
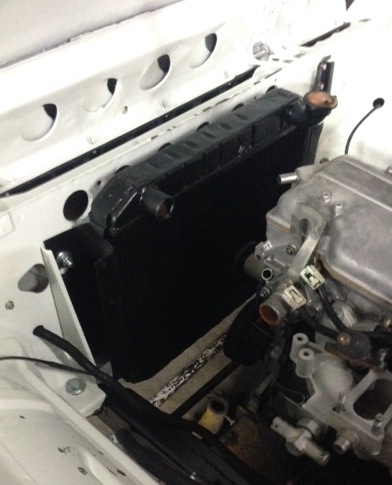
picked up the radiator from being recored today, looks good. not cheap but wanted to keep original copper jobby. sat it in, need to source some new hoses, and hook up the heater hoses also next job is to get the exhaust done
1 point
-
i dun this. Untitled by sheepers-ra28, on Flickr Untitled by sheepers-ra28, on Flickr Untitled by sheepers-ra28, on Flickr1 point
-
i did a bit more tonight but only an hour or so because i wanted to watch top gear. so the drivers side sill was a disaster of fucked up mongrelisation which i cut off. iside i found mystery and woe. and a comb. Untitled by sheepers-ra28, on Flickr Untitled by sheepers-ra28, on Flickr thats the shit that came out of the sill. i reckon its never been cleaned out and that pile of garbage has been building in there since it was new. the thing that really boils my piss about how this thing has been repaired in the past is that it must have been pretty good on the whole with a little bit of rust but not to bad. why do i say this? because when you get rid of the awful repairs and the rust that should have been removed the last time round you find that the car is actually in very good condition. this is inside the sill once i cut the hammered in bit off. its better than my blue car looked. Untitled by sheepers-ra28, on Flickr so anyway i folded a new piece for the sill and began fitting it but didn't get to far with it. ill carry on tomorrow night. Untitled by sheepers-ra28, on Flickr1 point


This leaderboard is set to Auckland/GMT+12:00