
Leaderboard


Popular Content
Showing content with the highest reputation on 08/24/14 in all areas
-
this is the billet supercharger manifold all finished. well, needs a bit of fettling here and there but as you can see its pretty much there. Untitled by sheepers-ra28, on Flickr Untitled by sheepers-ra28, on Flickr Untitled by sheepers-ra28, on Flickr Untitled by sheepers-ra28, on Flickr Untitled by sheepers-ra28, on Flickr17 points
-
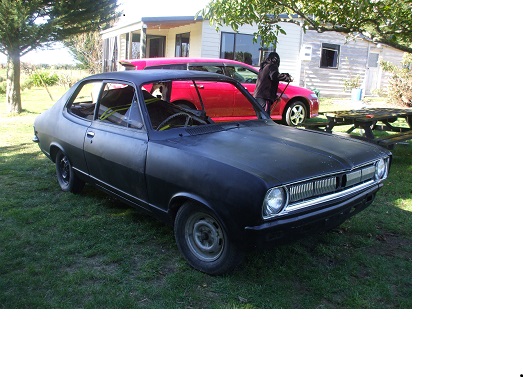
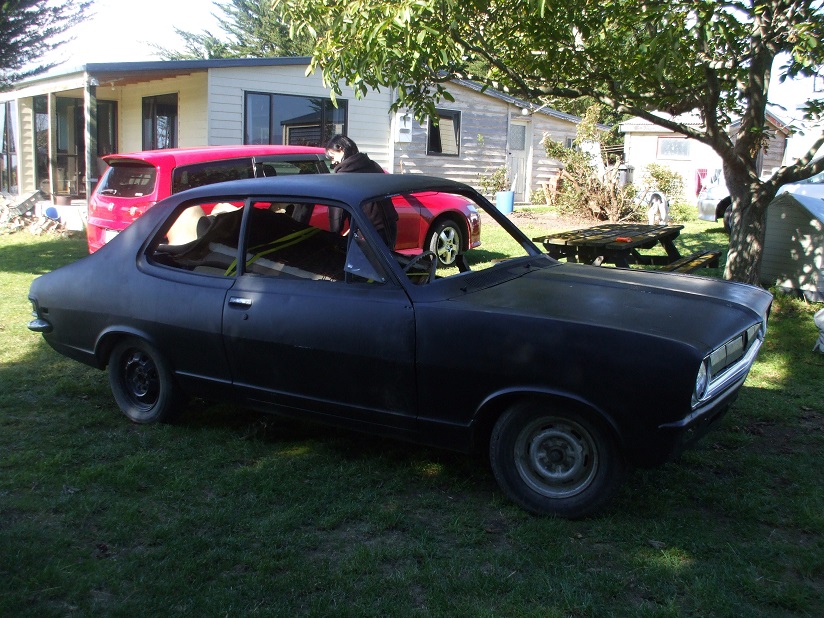
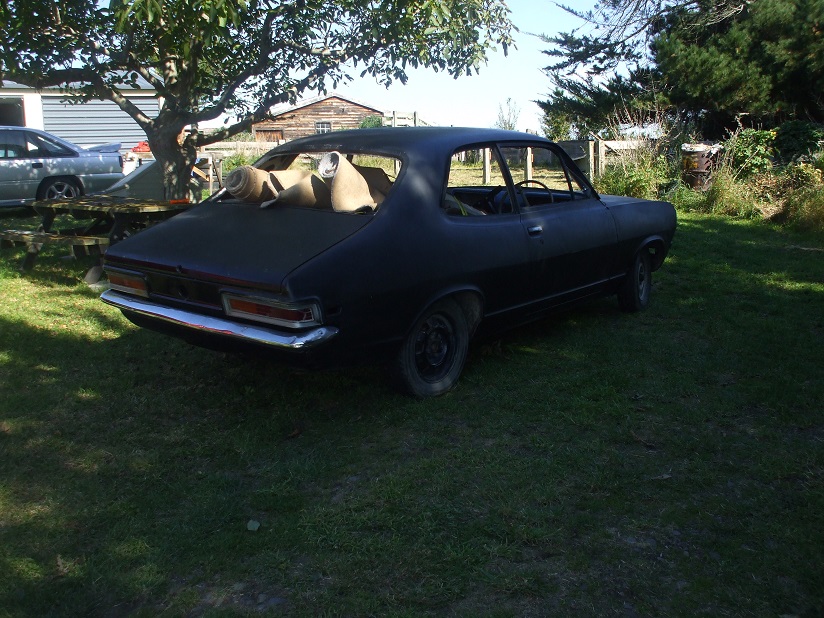
Discuss //oldschool.co.nz/index.php?/topic/44865-dadams-73-ke26-discussion/?hl=ke26 Hi! After deciding that the old faithful 1200 wagon was way to far gone for me to attempt to save on my budget and skill level I decided to go pick up the next best thing, behold, the mighty ke26! Pick it up off a fellow oldschooler up in the 09 area, flew up, talked some shit, turned the key and drove back to wellington with zero dramas, so pretty much the best start you could wish for! Specs are that shes pretty much stock, will kinda. Has a big block 4k with a little head work, mild cam and Weber carb, which has around (at a guess) 10,000k on it from rebuild, 5 speed k50 box, 50mm blocks and lowered front springs with new shortened shocks. Shes no rocket ship but does go fairly well for a 4k. As it was when I got it.. Decided that I wasn't to keen on the 12's and white walls so decided to clean up some ssr star formula's I had in the garage. So out with a bunch of masking and a couple of tins of paint, a set of 165/50/14s and we're back in business. In the process also swaped it up from 4x110 to 4x114.3, so in went some ke30 front hubs and re-drilled rear axles.. Result Yea I know, need to lose another 40mm or so off height, but thats a story for another day...9 points
-
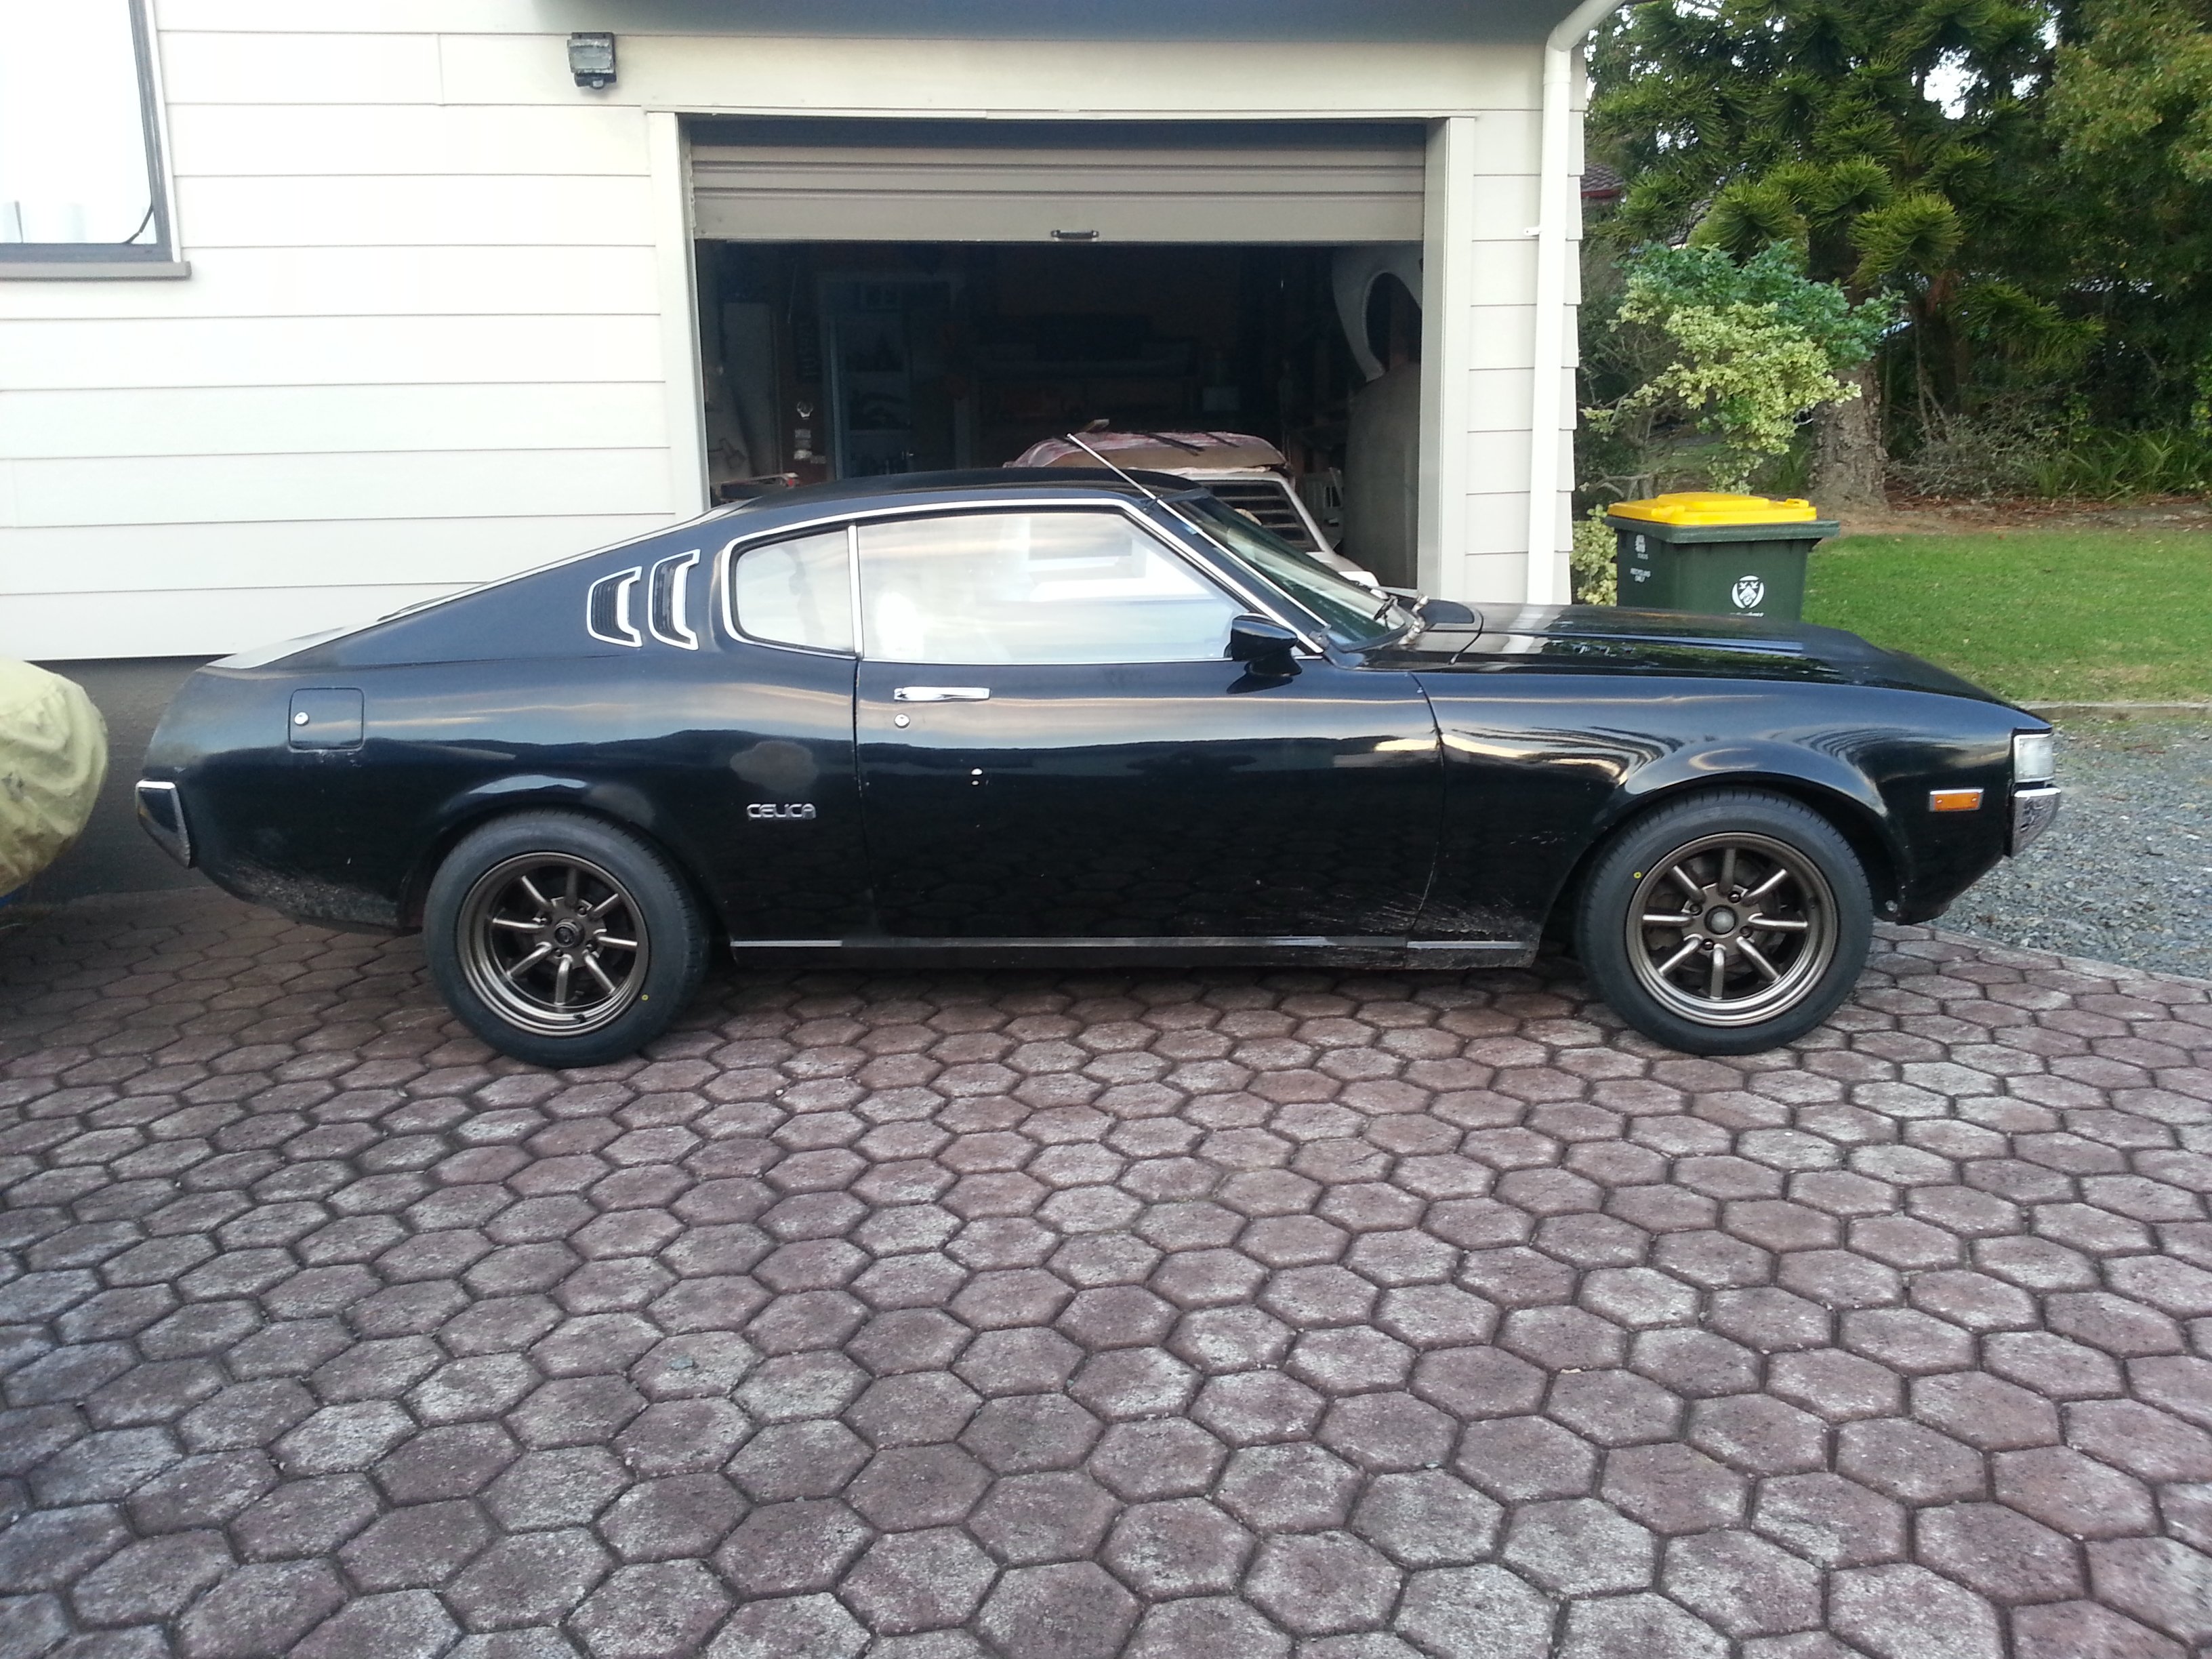
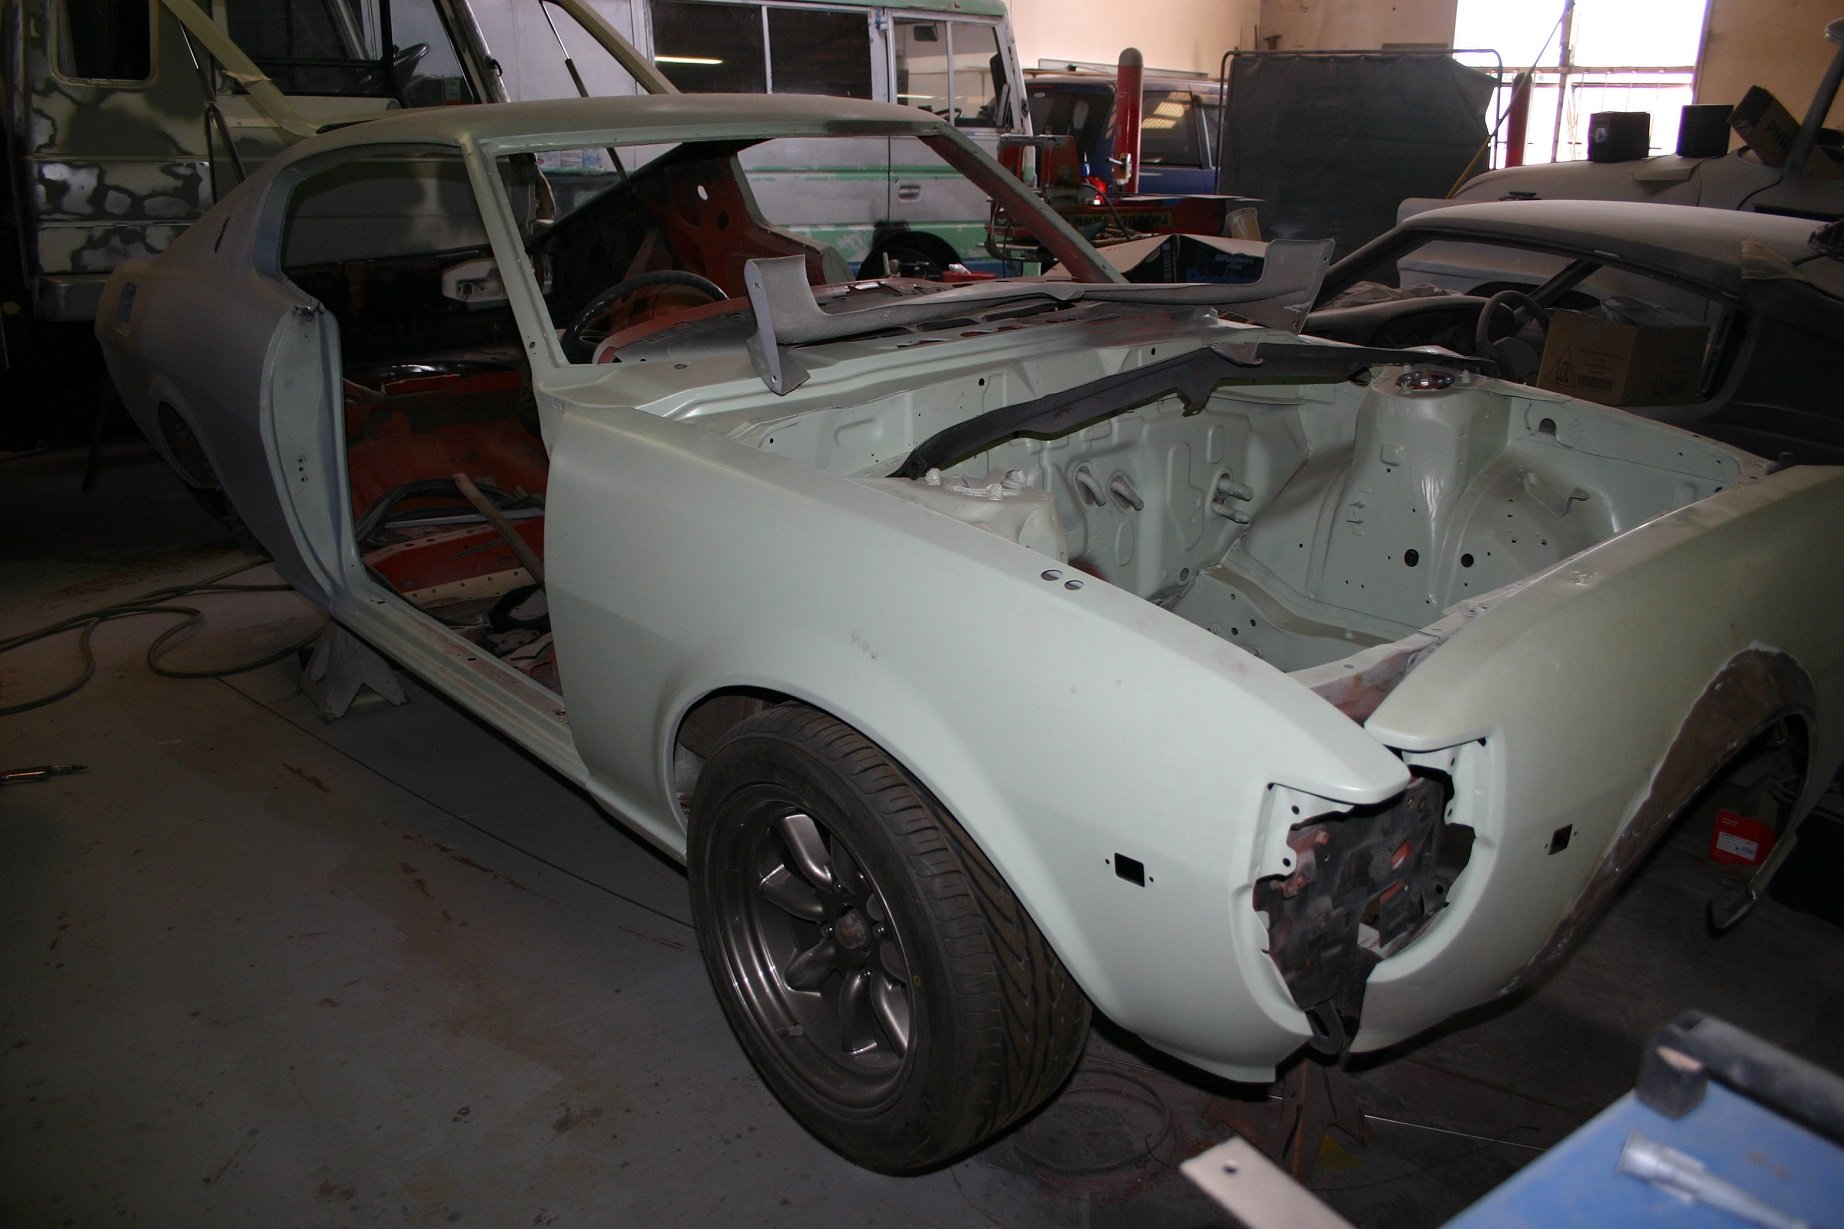
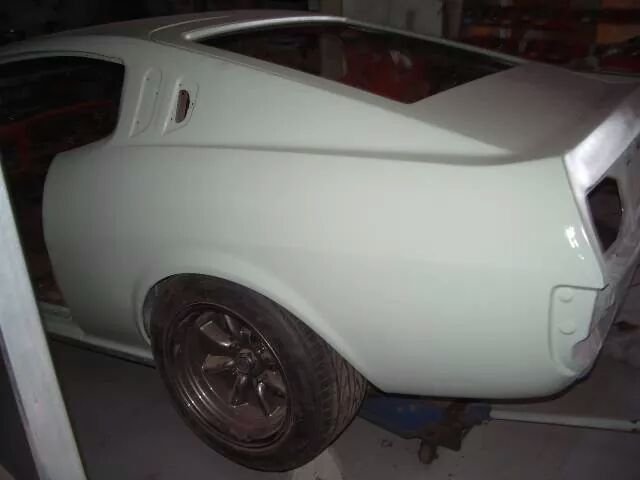
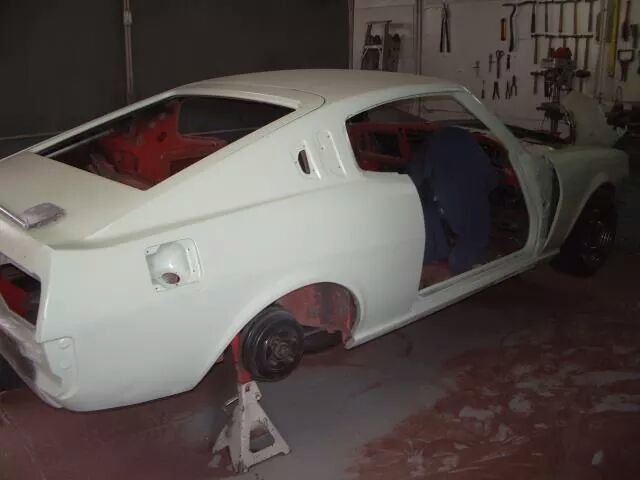
continued... Fixing it bit by bit wasn't really working so i bit the bullet in May this year and stripped it down and sent it to a panel shop to be fixed. (6 1/2 hours drive to drop it off) New wheels 1st - to get the body massaged to make them fit Dropped off at BigA's dads shop to get all fixed up. Nice to have 2 Celica liftback's together (BigA's RA25 in the background) Some of the work done - very pleased
 5 points
 -
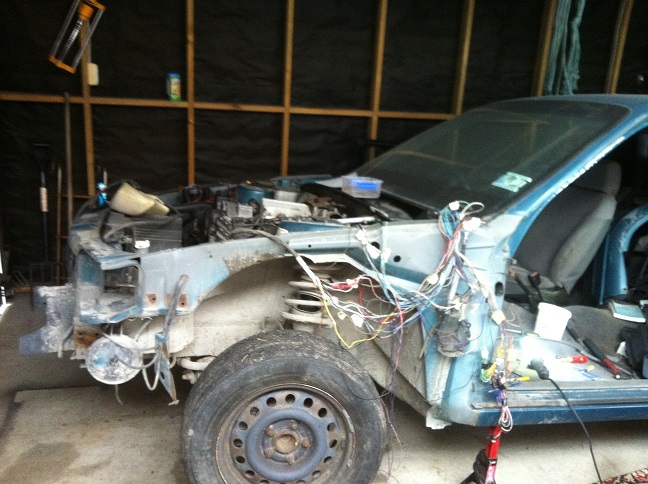
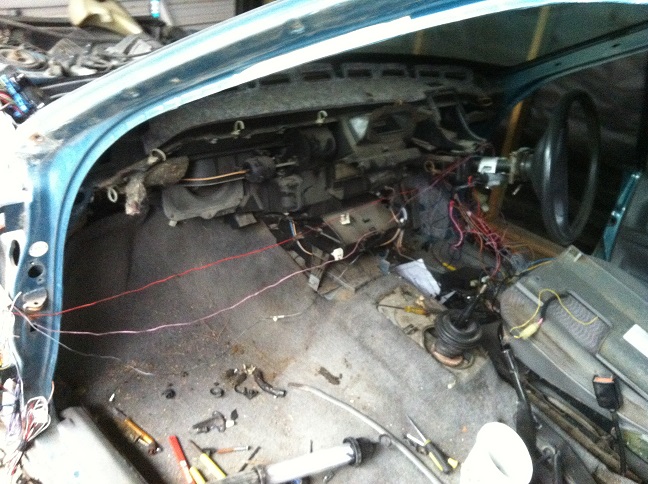
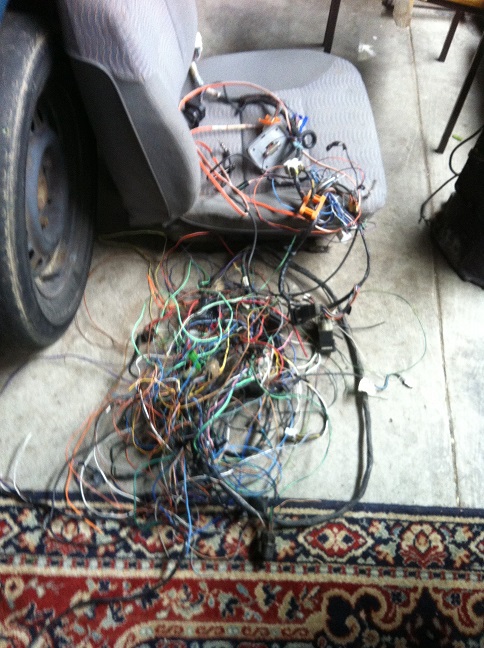
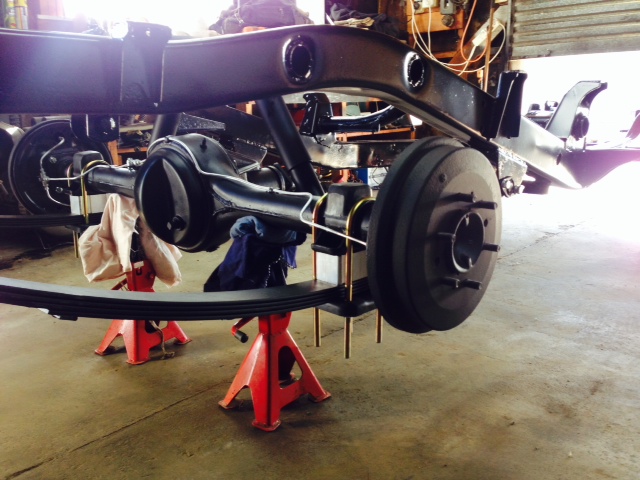
Hi All This is my LC Torana / Hb viva hybrid, it was my first car at the age of 15 and I rolled, bowled and arseholed it until I blew up the 1256 viva engine it had to pieces. Since then I Have taken it everywhere with me except for a few years stored in a tractor shed with the rats and birds! I've had it for 17 years now and after buying a bloody house I sold all my toys except the Torana, so now its time to get stuck in! I've been trolling the site for years, but never posted so be gentle with me!!! Any help, tips or abuse is always welcome!! The plan is....... -Fix rust in windscreens from dodgy 80s patch repairs -Fix floors because of leaking windscreens -buy new door skins from oz -buy chassis strengthening kit from oz -Find a shitload of bits missing from th 30 odd times I've shifted it -Find a viva 1800 magnum from somewhere for front suspension/ brakes -Chop narrow and mod the VR rear end to fit -Chop the shit out of the firewall/ tunnel -Fit a VR commy 3.8 V6 and 5speed and diff I just bought (holden/Vauxhall 4cylinders are shit and of the rocking horse type) -Do some skids I'm halfway through chopping the loom out of the VR as I write this taking a break from the coloured spaghetti!! Here's some pictures I found when I moved her back to Timaz way for a year, cheers for looking. Steve
4 points
-
3 years no update. I last drove this one year ago, to Hanmer knowing it had a leaking gasket. I pulled the head off the next weekend, one thing lead to another and a year went by. So, my head gasket had been leaking for some time and made a mess of the head and one bore. The block had been bored to +.090 to 4.000 inch and fitted with 351c stock sized pistons. I should probably have had it honed but hindsight is a wonderful thing. My E49 cam was worn out, valve springs soft and lifters rooted. New motor time. Blah blah 10.25 to one compression, new cam, sump baffle, oil pump brace etc etc. Put it all back together, oil pump air locked, luckily it was being turned over on the key with the plugs out. I still had to pull the push rods out again out of worry about the cam. Sorted that out more trials and tribulations ensued, nothing that some line towing, pulling the gearbox out a couple of times, and buying a new ignition system couldn't solve. It all came together today for the first decent drive in a year, I was very pleased. 245 head fitted with larger 265 valves. Decked block to push the compression up. Now the pistons come proud of the block at T.D.C. ARP Head stud kit and rod bolts. With an oil pump brace. New custom length pushrods, all the metal off the head and block meant my stock pushrods were too long. Sump baffle. All together and nearly all sorted. //oldschool.co.nz/index.php?showtopic=280913 points
-
I had good fun times. Bbq with bacon related things would be tops!3 points
-
Another overdue but not terribly significant update on this car..it really needs to come off the road some stage soon for a body restore but having not long done my Firenza the memory of endless nights of bodywork again is still a little fresh...maybe next year.. Anyway, meantime I have had the MG rims widened to 7.5" for the rears and 6.5" for the fronts. Because the wheel stud adapter is about 20mm thick I couldn't give them the offset I would have liked for that extra wide rim look, but they still look good. Even as they are I will have to stretch the tyres to roll the walls a bit and give clearance to the guard lip. My guards aren't rolled and I really don't want to have to do that. Will likely need to try a few different tyre combos for best fit. Test fit pics. They now need to be sandblasted clean and re-painted, which will begin this week. I bought some paint masks some years back in anticipation of doing this conversion and for making the job of masking the silver/black easier, so should save my painter some time. Also need to decide whether to install chrome trims or not to these when all done. Thoughts? More pics when painted.3 points
-
#LikeaBoss Raised heaps of money for Breast Cancer Research at the wife's netball club on Saturday and went for a cruise through the local arts markets today. So many people stopped us for photos or to ask where I got it, many jealous dads2 points
-
It's amazing how clean LPG motors stay inside. I really hope it's a lot of years before I get to find out how clean this one is inside. it went well before, I think I'll book it at the LPG shop for a tune in a week or two and see how it goes after that.2 points
-
Fuck yeah will be rad to convoy with you Alex. Will hace to also grad pie. As far as car work goes. Do need to get time to cut out inner wheel arches on crown. But. I did buy 8 cds of gross 90s style music for the trip today from the tip shop.2 points
-
always wanted to give it a go:2 points
-
Its almost been a month of, sanding, buffing and polishing, i'm beginning to worry what kind of social life I have now.. The past month has been a bit of a waiting game, one of my friends was kind enough to lend me his air powered die grinder and I went on the hunt for some cartridge sanding rolls. Quickly found nz is too cabbage in the way of port polishing kits and sourced one from muurica. That arrived today so got stuck in Some may usually stop here but I'm far from done! I used the two stages of cross buffs to give it the shiny finish, still waiting on a set of Dremel abrasive finishing buffs to get into the smaller nooks & crannies. Once thats done i'll finalize the ports with a polishing wheel for that extra bling Some more shnazzy shots As for the intake ports here is my current plan: After some research/advice/youtube I found this to method to result with good figures for the job that I am doing which is nothing serious. First of all 'raising the roof' rather than taking more away from the 'floor' of the ports is more effective so that has to be taken into account whilst carrying out the job. The 'floor' of the intake ports will be left slightly rough where as the sides and roof will be polished essentially making the short radius the long radius & the long radius the short radius to create a tumbling effect when the air enters the ports. (feel free to correct my ideas if they seem whack) Besides the head work, nothing else will be happening till the engines done and fitted. TRD Big end bearings, Main bearings & 0.8mm Headgasket are on its way from our friends in Japland. Only need to send head away to engineers, purchase cam pulleys, cambelt, High flow oil pump gear and Sam-q's rwd cooling kit then assembly can begin!! On another note, found this gem from when I did my first ever engine job at work. Moral of that story, Dont buy an holden/izusu that has oil pressure fuel injection..2 points
-
Best winter weekend weather I ever did see!2 points
-
Cheers, happy with how it came out. The engine was a bargain really, but like most things european buying them is the cheap part, repairing or buying bits for them is where it gets expensive! Hopefully I can get this running without doing a rebuild for a while, when that time comes I will be doing the 2.3 crank swap and get some real hp out of it, well around the 200 mark at least. Sad part is that this car once had a genuine Vauxhall TC unit in it, but was was swiped for an HSR Chevette by previous owner. Apparently the Vauxhall head out performed the Lotus one too. Oh well, the weight saving should balance things out. This is the Vauxhall unit.2 points
-
Hard to believe it's been 15 months since my last post of this project! Crashed computers, new baby, work.....but pretty sure you don't want to hear any weak excuses so I will do a quick pic dump to show how the car came out. My goal was to have it ready for the road by Labour Weekend last year to make it to the Vauxhall Nationals in Tauranga, which I did, with just a week to spare. This didn't leave much time for road testing, but I had no need for worry as it made the trip from Nelson to Tauranga and back without missing a beat. Anyway, this is here all put back together. This is when I pushed her outside for first time with most of the assembly done but minus the headlight lenses and bumpers. ` Then I had later model reclinable seats bolstered up for more lateral support and painted them with vinyl paint. Old versus new. Getting close to all done at this stage. Lights working! Interior shot. Not great but you get the idea. Some pics of the car beside some other flat front Firenza's at the nationals in Tauranga. And some pics on our way back down the North Island. So I have barely done a thing to the car since then except put some more miles on it and plan the final stage, which is the engine and engine bay, which is still green. The plan had been to build up a good 2300 slant motor with some goodies I have collected over last few years...but then this little gem came up on TM and it was too tempting to pass up... This is a Lotus 907 all alloy twin cam 2.0L out of a Jensen Healey.These engines are basically an alloy version of the Vauxhall unit, but with the extra cam. Lotus actually developed the head on the iron Vauxhall block before casting their own alloy blocks. They are rated at about 140hp and considerably lighter than the Vauxhall unit. You can install the Vauxhall 2.3 crank to strock it up to 2.2L. It is a bit of an unknown as far as condition, but I have hooked up a starter motor and battery to do a compression test and it came up good on 3 cylinders, with the 4th a little low, but hopefully that will come up with some use. Regardless it should run. It just needs a few bits like headers and water pump. The sump will have to be cut around the crossmember too, which is the biggest job. Luckily it came with a twin sidedraft manifold and I have a new set of 45 Webers to go with that. Could resist mocking those up for a quick pic too. So that's where I am up to with this, just sorting the bits needed to complete the conversion and then to rope Alex (yoeddy) into doing the tricky bits for me. Hopefully this stage won't take another 15 months... better pull finger!2 points
-
Skim of filler will sort it2 points
-
1 point
-
Aaaahhhh yep this has all been a kick in the balls haha. About 5 weeks off the road which isnt too bad I guess. Completed: -Diff set to one way, preload reduced, clutch friction reduced -Replaced axle wheel bearings -Reran the brake hard lines so its easier to get the calipers off -Fixed the issue of the discs pinching on the axles and not sitting straight -Fixed the issue with the Pinion gear having end float instead of preload on the bearings So there was actually a fair amount to do, I guess I'm glad I pulled it out and found these things rather than have them fail somehow later on. Good news is though... Diff's on it's way back in! I've got the housing mounted on the 4 links loosely at the moment, doing it with axles and everything else off has definitely made the job a lot easier. Fingers crossed that nothing leaks/breaks/whatever, hopefully the diff now turns the car better, not noisy under decel, and hand brake should work a bit better too. Cant wait!1 point
-
Glad to hear things are finally going well for you Pete. Need to get that engine run in so you can stretch it's legs, and make it angry! (Insert emoticon doing a skid)1 point
-
Just weld it together again with the correct colour zip ties1 point
-
Mouldem plastics in palmerston north do a paint for ldpe. Have seen it used in the rotational molding industry. http://www.mouldem.com.au It is normally used on freshly cooked parts and always gets best results with virgin plastic. Sounds like that's not what you've got so it would be worth giving it a good heat up with a heat gun or even go down to a local rotational moulder and chuck it in their oven for 10mins at the end of the day when they turn them off. They are always pretty friendly guys. As a best guess you'd want to aim to get the plastic to at least 70deg as this is when the plastic will start to accept new material. The guys and mouldem will be able to give you a more definite temp you'll want to get it to.1 point
-
Yep done cf. Vac bagging is cheap. All you need is the plastic and a pump plus a catch can for the resin. Fridge pumps are perfect for this. The vac infusion method is cool BUT you can still end up with dry spots. Just as easy to wet it out by hand and then place in bag. The bag ensures that everything is sucked tight into the mould and only the bare minimum of resin remains. You really need to vac it to get the layers of cloth and the fibers really tight together. It also must be hard separating the two rigid moulds from each other with your part in the middle!1 point
-
Hey just putting this out there. If any one needs something taking down to hanmer from Wellington let me know. That includes anyone flying that might need sleeping gear or whatever moved. Pm if needed. Hearts Seedy al.1 point
-
here is the donor.....
1 point
-
For sure, we're on lock for meet up, pies and cruise with your fine selves!1 point
-
New Wof on the Torino, heater working good. Just have to get the red wall flappers fitted this week & will be away. I was hoping to meet Alex & Hannah in Wakefield like last time & cruise to Nelson lakes.....I'll also need to Stop for gas in Murch.1 point
-
Yea i understand that an ecu will be alot better but im trying to look at the cheapest option, and it apparently doesn't run it as bad as people think. If ive read the pick a part website correctly i can get an esc module for $14 dollars1 point
-
Good times. Let's do it again soon.1 point
-
Nelson lakes. St Arnaud. I think we met manu etc there about 1pm last year. Then cruise together.1 point
-
Tidy day, Good cruise. Park was a tad boggy still but no one got stuck We will definitely have another BBQ up there. Lots and cars and bikes cruised past so we will probably encourage all the bring seats and we can line up along edge and judge/critique/comment/bitch/laugh about the state of vehicles that tootle past. Photos please attendees1 point
-
Made some decent progress today, re-assembled most of the rear end back together, pretty happy with how its coming along , waiting on some wheel cylinders to turn up to get the brakes back together. starting to clean up all the front end now. found replacement floor pans in aus and sills here so need to get some of them and start getting the cab rust free
1 point
-
Do you know shane at chch radiators? He has had 40-50 Hbs over the years and has done many engine swaps (Inc 3.8 supercharged commie v6). Go chat to him- he'll help with parts. What rear axle you planning?1 point
-
Big bonfires. Much fun and warmth. Discovered that the new burning area is a neat little 'sitting around the fire' amphitheatre. Will have to make a sweet decking/seating arrangement there.Bling- fear not. We never ever leave the gas bottle on. It's turned off straight away- a habit we have long been into.1 point
-
Very Jealous mate ! Such a sweet wee wagon ! Wheels look spot on ! Tire choice is great too! Can't wait for another day.1 point
-
I'm taking my daily as I have a bit of stuff to take up and my oldschool car failed its wof on rust1 point
-
Heater plumbed up, temp sensor working, reverse lights working. Hell I might even get the roof light hooked up. There should be more hanmer events, it actually makes me get things done!1 point
-
It all essentially boils down to the fact that FCs rule. Get this going stat Mitch. Mitch knows the cage is shit. Doesn't intend it to hoon the car in anything official. Basically Mitch just wants to look the part, do some skids and do it all for less than the cost of a weekend for two in hamilton. This will be you in a few months. Good lad. Which, because its an FC will lead to:1 point
-
Kereru Brewing. They're both near each other. Would need to research whether they do tours as well.1 point
-
No No. Thank you for removing his face from my collection!!!!! God he's creepy!1 point
-
lightning pipe goes in, care of friendly sparky also, check out the rainbow of rainforest within the container floors1 point
-
Pic unrelated to NY1 point
-
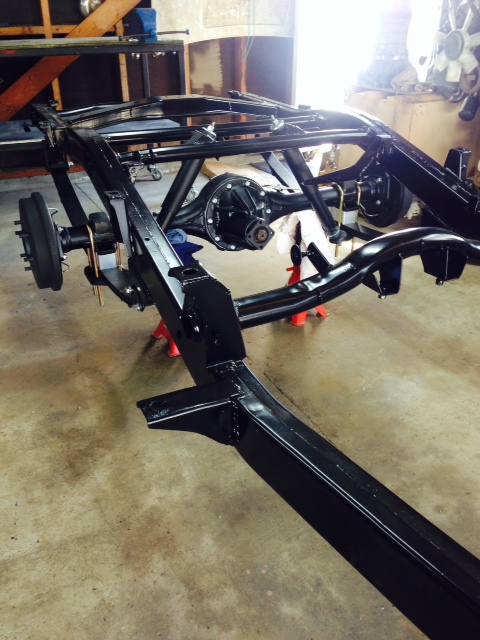
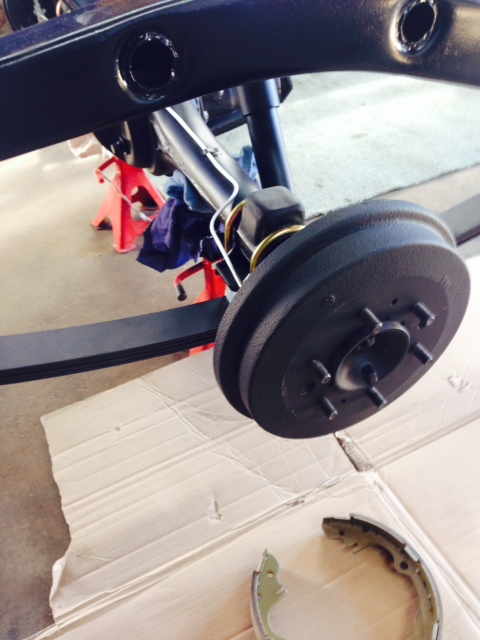
after many many years in storage while i built my crown and stuffed about with the V8 ive finally done some work on this thing. whats been done? new flywheel, 10" clutch and hydraulic throw out bearing. convert from steering box to power rack and pinion. Link G4+ ECU install. engine bay de-loom. so as usual i dont have many pictures because i just dont think of it at the time but i do have a few. so the power steering. its AE86 and i use AE86 power rack, crossmember LCA's and radius arms. to mount the crossmember you need to cut the ends off it and re-drill the mounting holes. you can also make spacers and drop it down by 40mm. some people dont do this and mount the AE86 crossmember straight to the bottom of the celica chassis rail. you can do this but it raises the steering and engine up quite a bit. the steering is no issue but raising the motor by around 40mm is more than im comfortable with. to re-drill the AE crossmember is quite a tricky process. what i did is to clamp the celica crossmember upside down on top of the AE crossmember. then i clamped straight edges to the mounting points for the LCA's on both crossmembers and aligned them. once you have them aligned you have effectively made sure the LCA mounting points are exactly the same on both crossmembers. then transfer the holes through from the celica crossmember to the AE. side note, when you space the AE crossmember down you need to put crush tubes for the bolts to go through into the spacer. its very hard to get the holes aligned exactly so what i do is drill the hole at 8mm. then i clamp the AE crossmember into the car using 6mm all thread. measure it and adjust it so its aligned with the car, then one by one i remove the 6mm rod and match drill down through the celica chassis rail into the crush tube with a 13 (i think its 13mm) drill bit. this makes sure the holes line up perfectly. some other points to note, AE86 crossmember and rack is 20mm a side wider than celica but the LCA has a kick in the end and the ball joint is angled which pulls the wheel back in. if you use all the AE86 parts the total increase in track is 7mm per side which equates to just under 1 degree of neg camber BUT, the bottom of the LCA will be closer to the disk by approx 6-8mm so check you have room. there are plenty of ways around this, like using stock celica LCS's and dealing with the track increase in other ways, or using offset RCA's (once again increasing your track) so its not the biggest issue in the world. the steering column needs to be modified so it has a bearing in the bottom end to support the shaft. there are lots of ways of doing this but i welded the tube from a AT141 corona (i think) to the bottom of the celica steering column outer tube. the steering shafts in the early toyota (and lots of other things, PG hydraulics sell the steering shaft bar stock) all have the same plastic rivet with flats style sliding joint so its pretty easy to use the parts to get the right length with the universal joint on the end. here are the few pictures ive taken, this is the crossmember all finished ready to bolt in. you can see the spacers ive used to move it down. it also has the engine mounts on it and ive seam weleded the whole thing. Untitled by sheepers-ra28, on Flickr Untitled by sheepers-ra28, on Flickr this is the steering shaft with the new end showing the unis. Untitled by sheepers-ra28, on Flickr and this gives you an idea of clearance Untitled by sheepers-ra28, on Flickr so the rest. the flywheel and clutch all came from Brendan at night parts and you can get all those parts on trademe. the throw out bearing it a Tilton 6000 series one coupled with a Willwood 7/8 universal brake master cylinder. the Willwood part is really short and fits nicely to the firewall with a little opening out of the hole. as for the link thats ongoing but its not a difficult thing to get working if you follow the instruction. so yea, soon it will be supremely more drivable and i intend to daily it again for a while and park up the V8 whilst it gets some love and forced induction.1 point
-
A throat that looks like David Bowie swirling balls with one hand.1 point
-
1 point
-
cheers alex. are you coming to hanmer? I can meet you there for a screw...1 point
-
Bit of an update. After having a weekend off from gorse clearing due to Viva engine swaps etc we spent last weekend out there and got heaps done. But before I talk about that I will first mention what we had been up to in previous weekends. One major thing happened- this appeared... Its 25,000 litres and its bloody big- about 4m diameter by 3m high. Luckily our friendly neighbour who has been doing all the digger work for us made a nice big pad for it to sit on and then move it for us. Otherwise it would have stressed my wheelbarrow to within its meagre limits. While he was about he dug a trench for the future shed storm water pipe. It would have taken me ages. I like these digger things! Plus he skimmed all the muck off the stone based driveway. Hopefully soon we will get fresh stone down on the whole driveway making it supercar friendly. Next thing we got hooked into was removing this bloody ugly pine tree. It blocks the early summer sun and just looks horrid. I only wanted to chop below the height of the hedge but keep it alive. I love climbing trees, like seriously if I can get to a bottom branch I'm up there. But chainsawing up high I was a bit sketchy on. But funtimes anyway. We borrowed my tree felling friends signage and cones and pretended to be all official and all that. We even stopped some traffic (not that we have much traffic...) So tree got chopped... ...and then the lesser branches got turned into smoke (which brother Duncan enjoyed because he's a pyro) .... On the Sat night we sat on the ridge with Kevin and some beer (but not for Kevin because cats cant be trusted when drunk) and watched the sunset. In the evenings we fitted lights like this... ($5 for several actual Italian made lights- thanks recycling centre. Although being Italian means they will most likely fail) Or watched the evening sky... and I fitted an inverter so we now have 240 volts. Note my amazing wiring. I tried to shape some mouse ears... We also went bush bashing and did some exploring. My brother found an old benched track from about 40 years ago down at the south end of the block. Great mtb track potential! It heads up from the gully floor to another ridge then disappears. Duncan will continue clearing it back in the future. While walking about we made it to the base of one of the large pines on another ridge. Bloody huge things. I aint cutting these buggers down in a hurry.. Whats that there???... Oh its the other side of this gully! Wow- that will be where a main track to the ridge will climb up through them tree ferns then. So back to the weekend just gone. Lots of clearing of gorse and blackberry (there is a theme going on here...) and creating of more space while freeing natives. As always so very satisfying. I think part of the reason is because while it is very hard, back breaking work its also not at all taxing on the mind. Just drink coffee, whiskey, beer or whatever, turn up the ipod and hack away. All good harmless fun and at the end of the day we get to sit around a big fire and drink more beer. This weekend had an awesomely massive moon too which just added to the occasion. Next morning we get to see a whole new play area of grass. Over the next two or three years we will just poison these areas each spring with Tordon which wont affect the grass. This will stop the cycle of gorse coming back. I can mow some of these areas for lawn bowls. So before... Then after (Monday mornings effort here)... Next weekend we want to finish off this area and then its some big trees due to come down. I will be trading skills.. I will build my friend a inlet manifold for his 1940 dodge army truck and he will chop down trees. We are hoping to be applying for consent on a 15x7.65 double story shed soon. Will be interesting to see what bollocks the council come up with...1 point
-
New Orleans, most excellent for general shenanigans every night of the week. Here's a photo from a recent trip, this was 2 in the afternoon. Vegas is also worth a look.1 point
-
Used to have a 1275 GT - what fun. You'll want to install a 'custom dizzy shield'(*) before winter and rain comes along. *. Actually an Ice Cream Container, black one preferably1 point
-
got some alternate wheels...1 point
-
will post this here too, that is all.1 point


This leaderboard is set to Auckland/GMT+12:00