Not-a-number
-
Posts
236 -
Joined
-
Last visited
-
Days Won
7
Everything posted by Not-a-number
-

Bugatti T57/59 Engine Project
Not-a-number replied to Not-a-number's topic in Projects and Build Ups
Dads finished up a radiator shell. Looking great. The original cores are made from hex flared tube to make a honey comb bundle which is all soldered together. There are about 5000 tubes! The plan is to make a false tube core /front but use a custom aluminium multi pass radiator to work as the real radiator. It will be nickel plated once the core brackets are figured out and any other tweaks.- 128 replies
-
- 58
-

-

-
Bugatti T57/59 Engine Project
Not-a-number replied to Not-a-number's topic in Projects and Build Ups
Type59 Engine. Its a little different to the T57. Not as tall. The crankcase and sump seem a bit easier to make.- 128 replies
-
- 27
-
-
Thanks. Doing a proper 'functional' detailed CAD takes a lot of time. I think what I have now will keep me going for a while once I can start making things again!
-
Bugatti T57/59 Engine Project
Not-a-number replied to Not-a-number's topic in Projects and Build Ups
Its looking more like a car now!- 128 replies
-
- 52
-
-
-
Bugatti T57/59 Engine Project
Not-a-number replied to Not-a-number's topic in Projects and Build Ups
The body work was difficult. Far from complete but the overall dimensions are now 'close to' correct.- 128 replies
-
- 29
-
-
Bugatti T57/59 Engine Project
Not-a-number replied to Not-a-number's topic in Projects and Build Ups
Got a lot of CAD done this winter. Radiator: Diff/Axle Rear end assembly. Just external. Fuel Tank: Bulkhead/Steering: Gearbox: External- 128 replies
-
- 27
-
-
Yeah it’s probably not plane sailing. But I know of at least 2 Bugatti replicas and 1 Alfa replica in NZ that have been through LVV cert. Things like wheels have to be approved by VAC, drive shaft hoops, seat belts, mud guards, no welded steering components.
-
If it has 3 original major components (with serial numbers) it can potentially be regarded as a ‘real’ Bugatti. Ie chassis, crankcase, gearbox. But they don’t even have to be from the same car. If you’re talking about registering a scratch built car in general then that’s LVV rules.
-
Any update on this? Is this happening in NZ?
-
Thanks appreciate it.
-
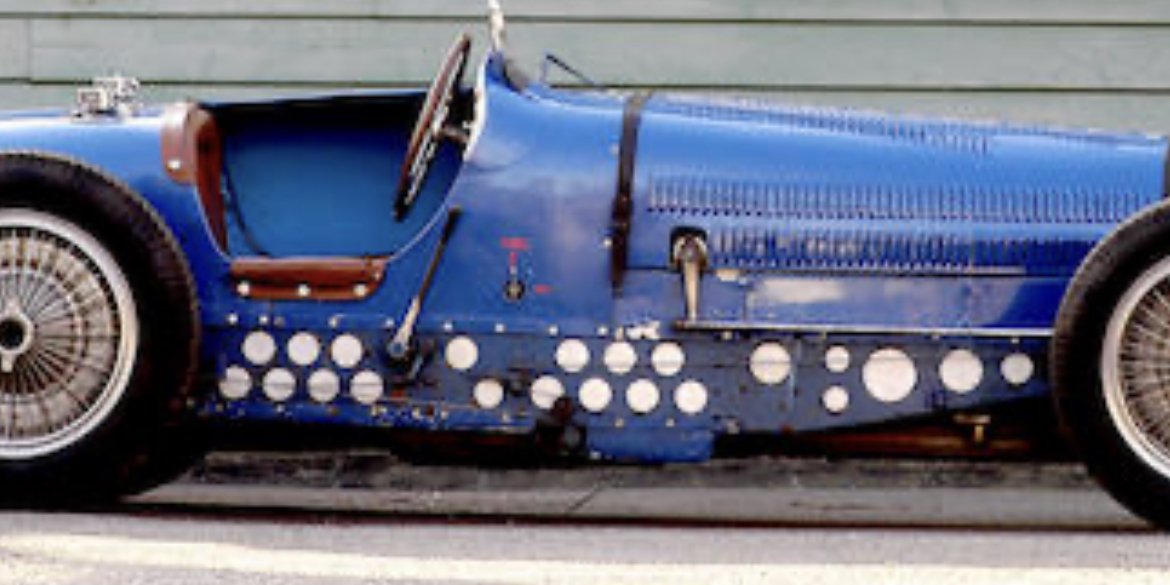
Seems like they put them everywhere they could except for main mounting points. Like engine, gearbox, bulkhead and braces. Left about ~30-40mm material from the edges and to each hole. Not dimpled just straight through. The holes save 7kg total. Which is a bit when the whole car had a max weight limit of 750kg. The Ali backing to the holes keeps everything closed off. Since thats the cockpit. Aero/keeping junk out Not that Ive ever driven anything with positive camber but the prewar cars usually had it so that there was no scrub radius. Puts the contact patch right through the king pin to give light steering.
-
Yeah they do have speed holes. Backed with an ali sheet. Can see them here. Original material was a mild steel. Probably low grade (in todays standards and variable. ‘Low background’ pre war stuff so you can’t really buy that. So they’re done from G250 mild steel (I think, maybe it was G300). Either way, in theory significantly more consistent and stiffer than the original.

-
Yeah its gotta get a lot more out of hand if I want to have a chance of finishing it!
-
Bugatti T57/59 Engine Project
Not-a-number replied to Not-a-number's topic in Projects and Build Ups
Bit of an update as requested. See Discussion thread for a 'Life' update. My dad finished a second set of chassis rails (gotta both have a car right!) They were actually done close to a year ago now! Time flies! I came across some original Bugatti drum brake backings and pads. Not sure if theyll be useful but atleast theyre a cool to have. Finished a lot of proper detailed CAD on the front end. Wheels, hubs, axles, springs, hangers. The wheels are 8 main pieces, big radial spline onto the rim. They dont look easy to make!- 128 replies
-
- 58
-
-
-
Yeah good. Had a 'break' for a bit and planning on getting back into the CAD over the winter. Updates would be: I bought a continuous sand mixer at a government auction for ~$2k. Cost $90k new! Couldnt believe it! Its missing controller and pumps though so thats a significant cost but I should be able to figure something. Foundry guys had a look and said it looks brand new. Also got several crucibles in deferent sizes because I plan to make a couple of furnaces. The bigger plan is to setup my own small foundry. So ill have a proper industrial sand mixer (since its continuous I can do any mould size) then some furnaces to do my own Aluminium. I would stick with a foundry to do Iron. Ive started the move back to NZ. I packed up the whole shed into 4 large custom crates, have them in storage at a friends in LA. From July I have been traveling the US in my RV with the family. Plan to do that for another year and then move back to NZ end of 2024. So yeah its been on hold for a bit but Im going to go full time on it when im back in NZ. Ill add some cad screenshots to the main one. Sand mixer Started in SoCal and have been all over the Westcoast and top states for the last 4mths. So far done 6k miles. Currently in Michigan
- 233 replies
-
- 40
-
-
-
Yeah and that’s just the overflow storage!
-
Bugatti T57/59 Engine Project
Not-a-number replied to Not-a-number's topic in Projects and Build Ups
Chassis update: I managed to make it back to NZ for a bit, a couple of months ago, to have a go at this chassis building thing my Dads been raving about! Turns out it is actually hard work! Hes just finished both rails! I just got a bunch of machined parts done. Spring mounts and braces that go between the rails. Just have two sheetmetal braces to figure out then all of it can be bolted/riveted together (with a few more holes and some tweaking I'm sure!)- 128 replies
-
- 79
-
-
-
Couple of videos. Finally got it running well. Cold start https://imgur.com/mt0axWX A few revs https://imgur.com/T7NPQKq ---> I cant figure out how to embed an Imgur video on this forum. Usually theres a media button. Anyone know how to do this? Is there a more advanced reply section? <---
-
Haha nope it’s just for show. Everything is there but it’s not going to work any time soon.
-
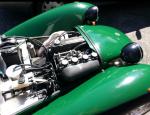
Basically all done. Engine went in a few weeks ago and have been ironing out all the issues. There have been alot! Put a fancy Progressive Ignition in to sort a 'dieseling' issue. Now it starts and runs great. Little more accelerator pump work and the trans needs a bit of tuning. 700r4 has a governor with weights/springs to tune shift points. It was also so loud I had to put a new exhaust on! Ill get a video at some point. Can spin the tires without much issue!
- 13 replies
-
- 27
-
-
Bugatti T57/59 Engine Project
Not-a-number replied to Not-a-number's topic in Projects and Build Ups
Chassis update. My Dads been working away on this in his spare time. Many press tools, dies, hammering and probably injuries later a chassis rail is formed! Looks like the real deal! Pretty impressive. The other side should be a lot easier, so he says This is how you make a 40Ton backyard press to do some final tweaking.- 128 replies
-
- 66
-
-
Decided I should allow some time to have fun with the car before considering Webers. So I got a new Holley Double Pumper. Looks the business. Went with an old 50s Cadillac air cleaner. Not a fan of the normal round ones. Its quite dangerous having Summit Racing, Original Parts Group, Classic Industries etc on your door step! Next day delivery on anything!
- 13 replies
-
- 32
-
-
-
Went with black wrinkle. I think it looks good. Always a fan of the Lotus TC look. So thats the inspiration.
- 13 replies
-
- 32
-
-
-
Did some painting and started assembling things. I have another vote. Should I just clean up the rocker covers or go black wrinkle with ali fins? Black with ali fins = Confused Raw ali patinaed = Sad This is the raw look. Black ali fin look.
- 13 replies
-
- 22
-

-

-

-
Im thinking of doing the whole engine (including heads) this Grey. Then just clean up the covers but leave them a 'patinaed' kind of raw look. Same with the Webers.
- 13 replies
-
- 24
-