DAD
-
Posts
149 -
Joined
-
Last visited
Everything posted by DAD
-

Discuss here about Yoeddynz's little Imp project...
DAD replied to yoeddynz's topic in Project Discussion
Looks so smart with the combination of crinkle covers and the 'ribbed for his pleasure' machined infills! -
Suspect this lives/works at the ford dealership next to the fuel station where this photo was taken, I popped a snap of it back in December shortly after we visited you guys!
-
Love this. We did a 6 day intro to sailing/competent crew course in BoI last summer and it was fantastic. 3 days of tuition followed by 3 days of just tooling around by ourselves. It was in a little 70's Davidson 20' centreboarder and it was so much fun pulling up the board and anchoring knee-deep in the bays. It's sparked a desire to do more, I'll be keeping an eye on this thread for inspo.
-
Not sure if you got your Carter lift pump wires sorted? I had the same problem with the same pump on the KP. Looped some long, skinny zip ties over the body of the pump to hold the wires in place on the terminals. Can't find any photos of the arrangement but it worked. Sorry to see some little scrots tried to break in, but glad they failed. Awesome little van.
-
This thing is mega! Re the Carter fuel pump; I can't speak for use with carbs but I used one on my 4age starlet to bring fuel from main tank to a remote surge tank and it was faultless and pretty quiet (much quieter than Facet-type ones I've used). Keep up the good work!
-
DAD's 1984 Hino fire appliance house truck pikey project
DAD replied to DAD's topic in Project Discussion
Late for my homework deadline, but I read both builds last night. Really well documented and nice to see his rationale and choices along the way. Thanks for the link! -
DAD's 1984 Hino fire appliance house truck pikey project
DAD replied to DAD's topic in Project Discussion
Thanks for the input @Geophy! The plan is indeed to make a steel frame with aluminium cladding (actually pondering using aluminium signboard rather than bare ali sheet, but similar concept). Will use wooden battens and ply interior cladding, with rigid insulation (polystyrene or polyurethane) in the voids. In related news some of the steel arrived this week!
-
DAD's 1984 Hino fire appliance house truck pikey project
DAD replied to DAD's topic in Project Discussion
The double-cab is the fly in the ointment for sure. Note the past-tense in my previous reply, foldy-tilty-fuckery is off the table at present. -
DAD's 1984 Hino fire appliance house truck pikey project
DAD replied to DAD's topic in Project Discussion
That's a really neat method. I had pondered something along the lines of the last one you mentioned using something like this https://www.topmaq.co.nz/8-ton-double-action-hydraulic-long-ram-jack-hyra2050?gclid=Cj0KCQjw8IaGBhCHARIsAGIRRYoW2ZUkaXhw362LU5o7ZCOqoGHUOxV3OF6X1AMLfIYYBcbVn_uG2bgaAuIFEALw_wcB -
New toys! We are extremely grateful to have a space to work on our truck - it's not a small project. However, there is no power at the part of the property where it lives. We've reached this point using 18v DeWalt powered aggression, but that won't cut the mustard when metal needs sticking together rather than chopping to bits. Enter this big bastard. This is hopefully punchy enough to run anything we can chuck at it, and after the build is finished will serve as the backup generator for our solar setup. However, quality control was a bit sub-par. While testing the generator I noticed it was dripping diesel, and it was pooling inside the case. Removing some of the panels revealed the culprit, a poorly placed hose clip. Snugged up and reassembled, we had power! The next big box to arrive was this: Which contains one of these https://www.thetoolshed.co.nz/product/560-toolshed-metal-cutting-bandsaw After the saw was assembled, it started to earn it's keep straight away by sectioning bits of angle iron (cut from the massive frame that originally housed the pump). Combined with a stainless steel roller from the hose reel, it spawned a roller stand for easier handling of the 8m long steel box section that is supposed to be arriving imminently. Another job that got ticked off today was what to do with the isolation wood that lived between the chassis rails and original tank body. You can see one of the original wood runners modelling the bandsaw setup above. When I discovered this originally I thought it was a bit of a bodge, but research revealed that it's a pretty common practice to use wood for this for a few reasons - isolating harmonics, stopping metal/metal squeaking as the chassis flexes, and allowing a convenient standoff for the raised rivets and captive nuts that dot the upper surfaces of the chassis rails. After some mulling, we've decided to stick with this setup for our build too. If it was good enough for Mills Tui and lasted 3 decades... The frame we are building will be longer than the original body, extending forward through where the pump section (between cab and tank) was originally. The contact area will be just under 3.7m long, while the current wood sections are just over a metre short of that. A tour of the local timber merchants lead to one of them rummaging through some shelves out back and finding the perfect piece of hardwood timber - exactly 3.7m long, the same thickness as the originals, and wide enough to get 2 strips from. We will use the originals as templates for the holes, then drill more at the 'front' ends to accommodate the lumpy bumpy chassis rails. Steel box section for the body is (allegedly) arriving any day now, current plan is thus; Ignore the lack of roof, luton floor, and incomplete 25x25mm wall verticals - the former two are hidden on this view as the picture was too cluttered, and the latter hasn't been finalised yet until we pick up some doors and windows to plan around. Following the chat in the discussion thread, we've decided to follow @yoeddynz's sage advice and have the body pop-off-able incase of spectacular mechanical failure. Should make construction easier anyway! Thanks for the discussion and tips so far.
- 1 reply
-
- 21
-

-
DAD's 1984 Hino fire appliance house truck pikey project
DAD replied to DAD's topic in Project Discussion
Good question! At the moment erring towards a false floor in the luton. Other idea under consideration is a 'mild tilting' house that pivots at the back and can be raised somewhat at the front on bottlejacks/rams to provide clearance. Need to get my Pythagoras out. -
DAD's 1984 Hino fire appliance house truck pikey project
DAD replied to DAD's topic in Project Discussion
Yes, can get all the extruded bits in aluminium from Ullrich (other places too I imagine). The 2 other estimates I've had for the GRP/Foam composite panels for a project of this size have been in the $20k+ range. Better than the 'finished box' price, but still... -
D'ya like dags?
-
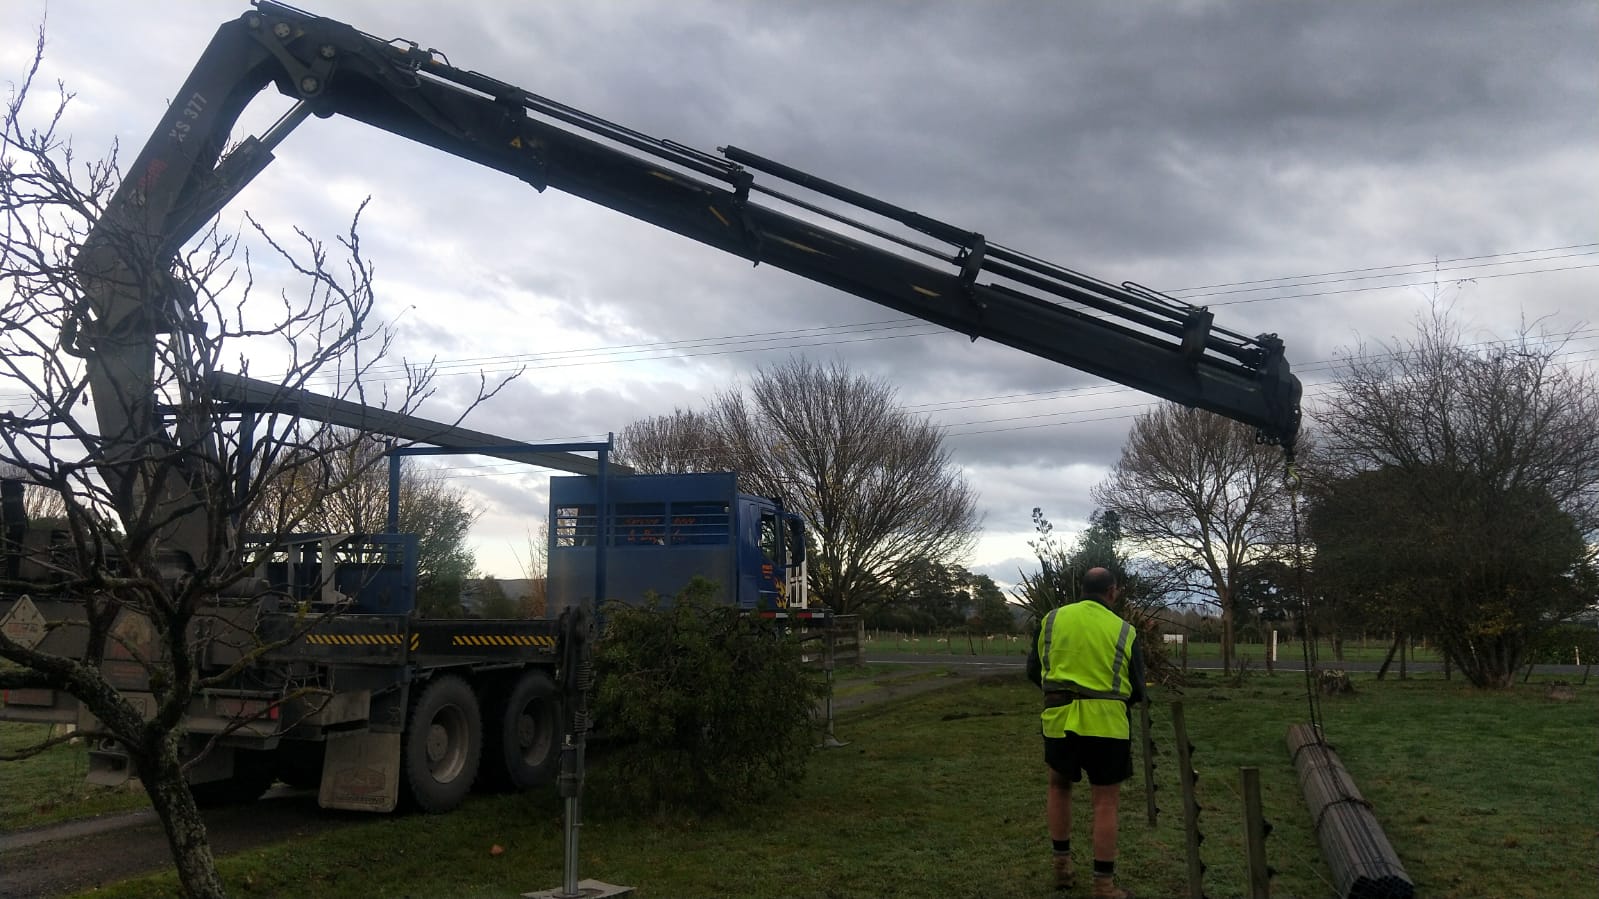
Hi all, I've been meaning to post this up for some time, but was finally inspired to put finger to keyboard after a sharncall with @yoeddynz last night. @PastyDynamite and I bought this for ourselves as a Christmas present, with the goal of housetruck conversion and living the pikey dream. She (the Hino, not Meg), is a retired Hino FF173 double cab. She was converted into a fire engine by Mills Tui in Rotorua, and served time in Bulls, Foxton, Ratana and Kaiaua and racked up approx 43000km in that time. She was listed locally on TM, and it turned out the guy selling her was the husband of one of my co-workers. He owns a heavy/ag machinery sales company, and bought this a couple of years ago and stashed it in his shed because he liked it. Unfortunately his wife didn't, hence the sale. As you might expect from a low-mileage ex-fire truck, it seems mechanically solid and drove really well on our test drive. By the time we took posession, she had been gutted of her pump, but its cradle and rad dials/hardware remained, as well as the beautifully constructed 2700L water tank/gear stowage section. Also missing are the beacons and siren, though there is still a sweet toggle that makes the front marker lights flash in a left-right alternating pattern. Deconstruction started in earnest - without any heavy lift gear we decided to remove as much bulk as possible. We also want to retain as much of the more interesting bare materials for exterior/interior reuse. Initially the pump cradle (all steel) came out in two bits. Thanks to @Goat for the assist and regular help/brainstorming! Next, the hosereel, ladder mounts, tank lid and baffles were removed. After much mulling, we removed the aluminium cladding and decided to split a third of the tank section (lateral to the chassis) off, then tip the remaining two thirds off of the other side. This brings us to the current state of play, where we have a rather stumpy looking doublecab on a bare chassis. Another job that needed doing was repair or replacement of the fuel tank. The old girl is pretty low on ferrous oxide, but had accumulated water in the (absorbable) padding between (steel) tank and (steel) tank straps, and rotted both sides of the equation out. Found a compatible, marginally better nick version from a breaker and tarted it up. On the subject of crusty bits, the cab has a few areas where water has sat beneath chequer plate and eroded the firmament beneath. Meg got to cutting and sticking. We have considered a number of designs for the body and its mounting method. The construction style that seemed most promising was a composite box, a la expedition trucks, chiller trucks etc, as they are strong, light, and really well insulated. Something like this: However, they're also super expensive; we got a rough estimate of $50-60k for the box alone from one place, others that would supply panels for self assembly were cheaper (but not significantly) and would come with the added logistical headache of assembling a monster structure. Back to the drawing board (aka Fusion 360). New-old plan is to make up a simple flat bed, then construct a frame-and-cladding house box on top of it. The old tank body was attached with 6x chunky bolts through the plate bridging the back of the chassis rails, and some monster sprung-bolts at the front to allow for chassis flex, similar to this but much heavier duty: Suspect we'll end up re-using this method for the bed. If it's good enough for a lump of aluminium and 2.7t of water it'll probably be enough for the house module. Some older versions of CADding that I've got screenshotted, the subframe between chassis and body is likely to be quite different to these, but it gives the idea... ...so that's where we are up to! Will update as things progress. Input and suggestions gratefully received! Discuss -
- 1 reply
-
- 35
-
-

-
On my 20v 4AGE swap I needed to provide the ECU with a switched earth speed signal to stop it throwing error codes. Eventually did it by hacking up a bicycle computer setup - you know the ones, magnet on a spoke and sensor on the forks jobby. Attached a small neodynium magnet to the prop and the sensor to the driveshaft hoop. Bit of a bodge but worked for my purposes, not sure if it would work here?
-
Nice to see this thing getting love, it's a little gem. The rust repairs look smart.
-
When I was slapping everything together back at the end of 2017 to get this thing on the boat to the UK, I did a bit of a hash job splicing the wiring looms (4age engine and ECU loom, and the Starlet body loom) together, just to get it into a running state to load. It worked, so I left it as it was for 12 months and just enjoyed the car, but it bugged me knowing what a shitfest it was under the dash. Take a look at this mess: So I ordered a nice fuse/distribution box and set about shortening wires, routing them properly, and generally making the whole thing easier to troubleshoot and less of a fire risk and OCD nightmare. Made up a simple backing plate for it that I welded to one of the dash braces: Tucks away under the dash nicely, conveniently close to the body fusebox: The thing I liked about this box is the ability to run 2 +12v busbar lines; one permanent live and one ignition switched. Nice to keep everything in one place and minimise connections. Much happier. Oh, was overdue another run out to Caffeine and Machine, so went there for some demon nachos last Friday
-
This was tucked away over winter having some tickling. It was running really well last year, but was drinking a bit of oil, and would let out a puff of smoke when opening the throttle wide after a period of pootling. Compressions were good on all 4, symptoms pointed to valve stem seals, which is a common issue for these engines at this age. As a 'while I'm here' job, I decided to replace the inlet cam VVT pulley, as this had developed a rattle (again, extremely common due to wear of the internal teeth that engage to actuate the vvt timing change). NOS pulleys are available, but expensive , but the only other choice would be going standalone management and aftermarket vernier pulleys with a VVT delete - something I wasn't particularly keen on as I like that it runs so sweetly on stock management. I bit the bullet and bought a pulley and set of Supertech valve stem seals from Battle Garage in the US. Oh, and also a TRD 0.8mm high compression head gasket. Got the head off: Cleaned up the block surface. Take a look at the top of the pistons and take a guess at which ones have been burning oil... Head was in good nick, but the valve faces were all quite badly coked. Pulled these out, and cleaned them back to being mint, then lapped the valves/seats, reinstalled stem seals, valves, springs, clips, shims and buckets. All moved nicely and looked much fresher than when it came off. Refitted the head on the block, using the thinner HG - this is supposed to raise compression ratio to approx 11.5:1 (from 11:1 stock). Minimal gainz expected as it's on stock management, but is good futureproofing and is a small enough bump to not worry about detonation (I only put Super in it anyway). Replaced the VVT pulley, fitted cambelt (kept old tensioner, as this has only been on there for 1yr/1000km and was still mint), and got it all timed up and back at factory specs. Have driven it several times since and it feels just the same, seems to be using a negligible amount of oil (i.e I haven't noticed a drop at all so far, win!), and doesn't produced an annoying VVT pulley rattle at idle. Quite happy all in all! Have a recent snap from a local breakfast meet:
- 29 replies
-
- 15
-
-
Lime! This is a cool car. Was the neighbour of my Starlet for a while in it's previous shed location. Good choice of wheel, I like a Longchamp.
-
Oops, missed one. This is it next to one of my dad's Triumphs, and my brother's MX5. Fun little family jaunt!
-
Long overdue update. Essentially I've just been driving this on sunny days. It's great, it's been very well behaved so far, and I love it. Plans over winter include a head-off tickle up with new valve stem seals, a thinner 0.8mm TRD metal head gasket, and a new VVT pulley (the old one is worn and rattles like hell). Chuffed really.
-
I won't argue with either of these sentences. Doing it well enough, at least (I hope) Brapbrapbrap. Gonna see how well it drives stock first, but porting not out of the question when its roadworthy. Hi Al.
-
Discuss at leisure.
-
Matching pair Discussion thread:
- 1 reply
-
- 26
-
-
Hi all, We weren't back in the UK long before everything got a bit daft. The Starlet arrived from NZ, and Meg started craving a project car of her own. This popped up about an hour away from us, on FB marketplace. Low mileage, UK market S3 FB that had been (garaged) off the road for 12 years, following an MOT failure for rust (obviously). Here, have the shit picture that made me drive out to see it. Allegedly a runner, the chap couldn't get it running when I arrived. Had some nasty areas of rot, particularly on inner/outer sills, and some annoyingly crusty non-structural cosmetic holes, but the majority of it was not to bad for a UK-living 80's japper. Paid 1500pounds for it to be delivered to my door, and the detective work began. Body - tired and sad, but has potential. Interior - mint (brown velour!) Engine - managed to get it running nicely from a 12v pump/jerry can. Either needs a fuel pump or just filters changing. Result. Driveline - unknown, seems to work at low speed Brakes - fucked Suspension - probably quite fucked Wheels + tyres - bent and perished, respectively. Plan: Repair rust, fix brakes, fix fuel system, weld on coilovers or superlows, doorts. ======================== A few months pass ========================= Current progress: Meg loves rx7 Remove bad, add good Valance back on Fixed some pinholes in tank, rust repairing this week, outside protected More to follow.
- 1 reply
-
- 9
-