
Leaderboard


Popular Content
Showing content with the highest reputation on 04/30/17 in all areas
-
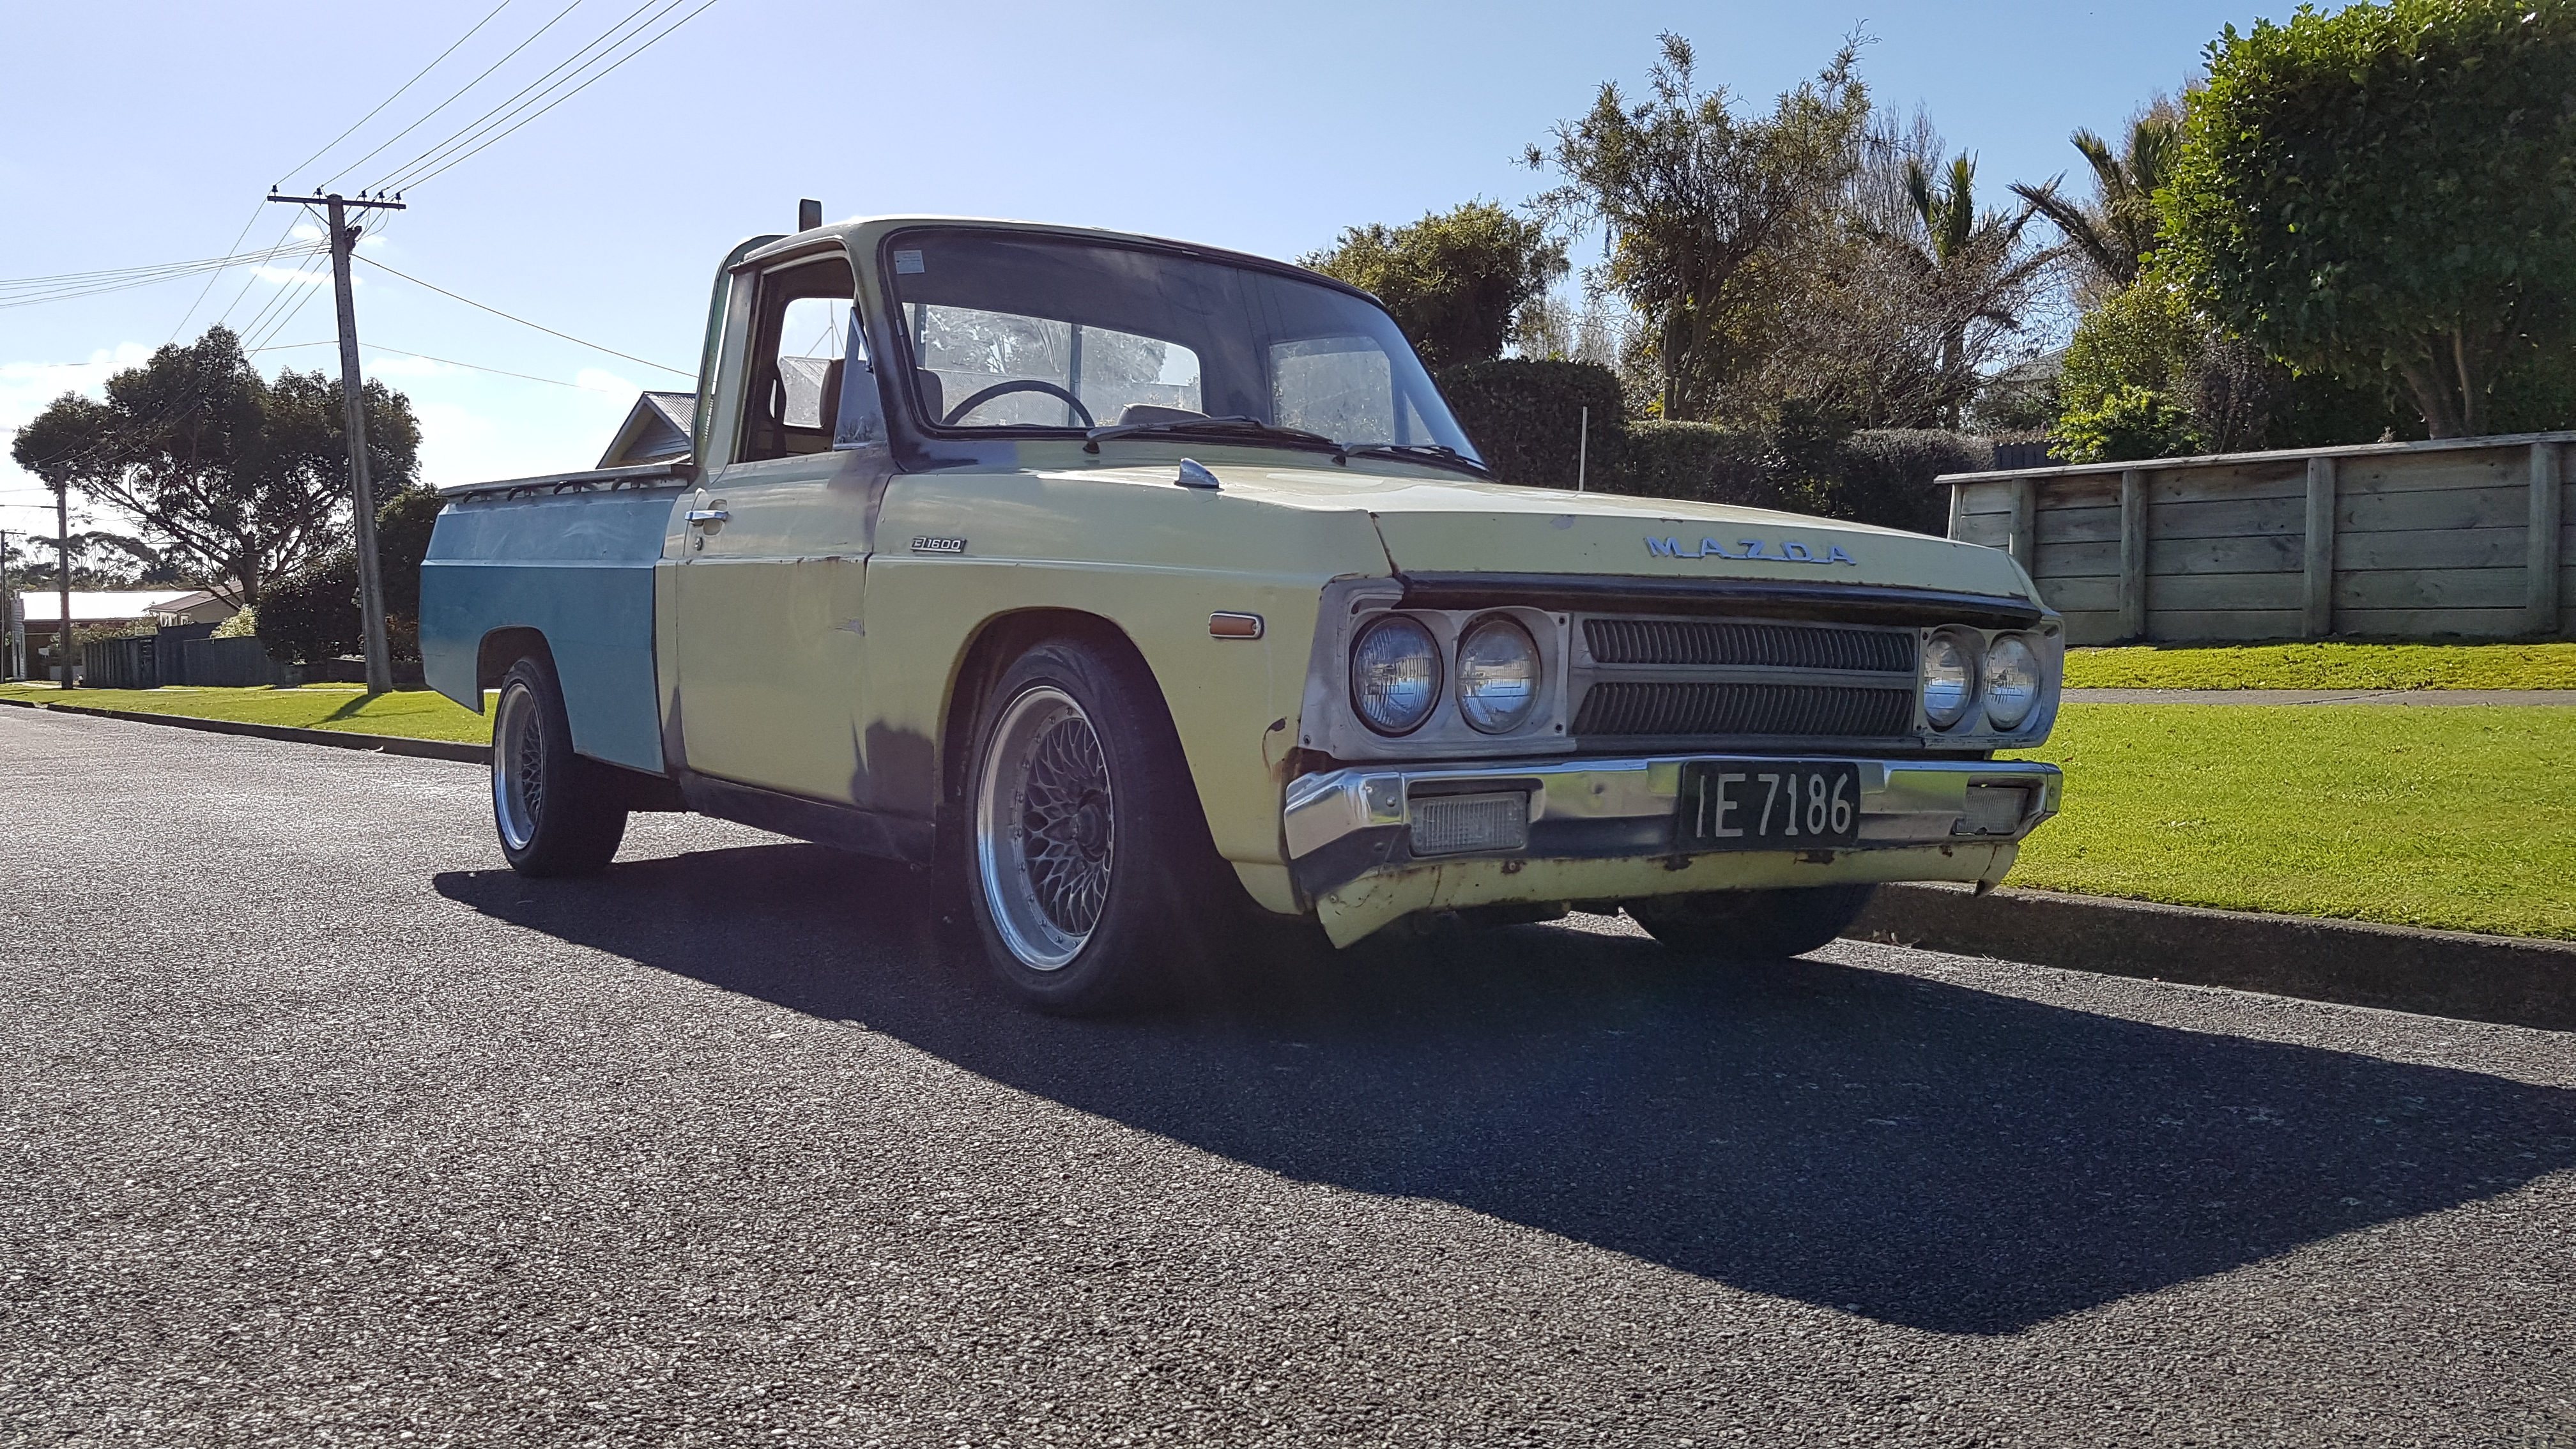
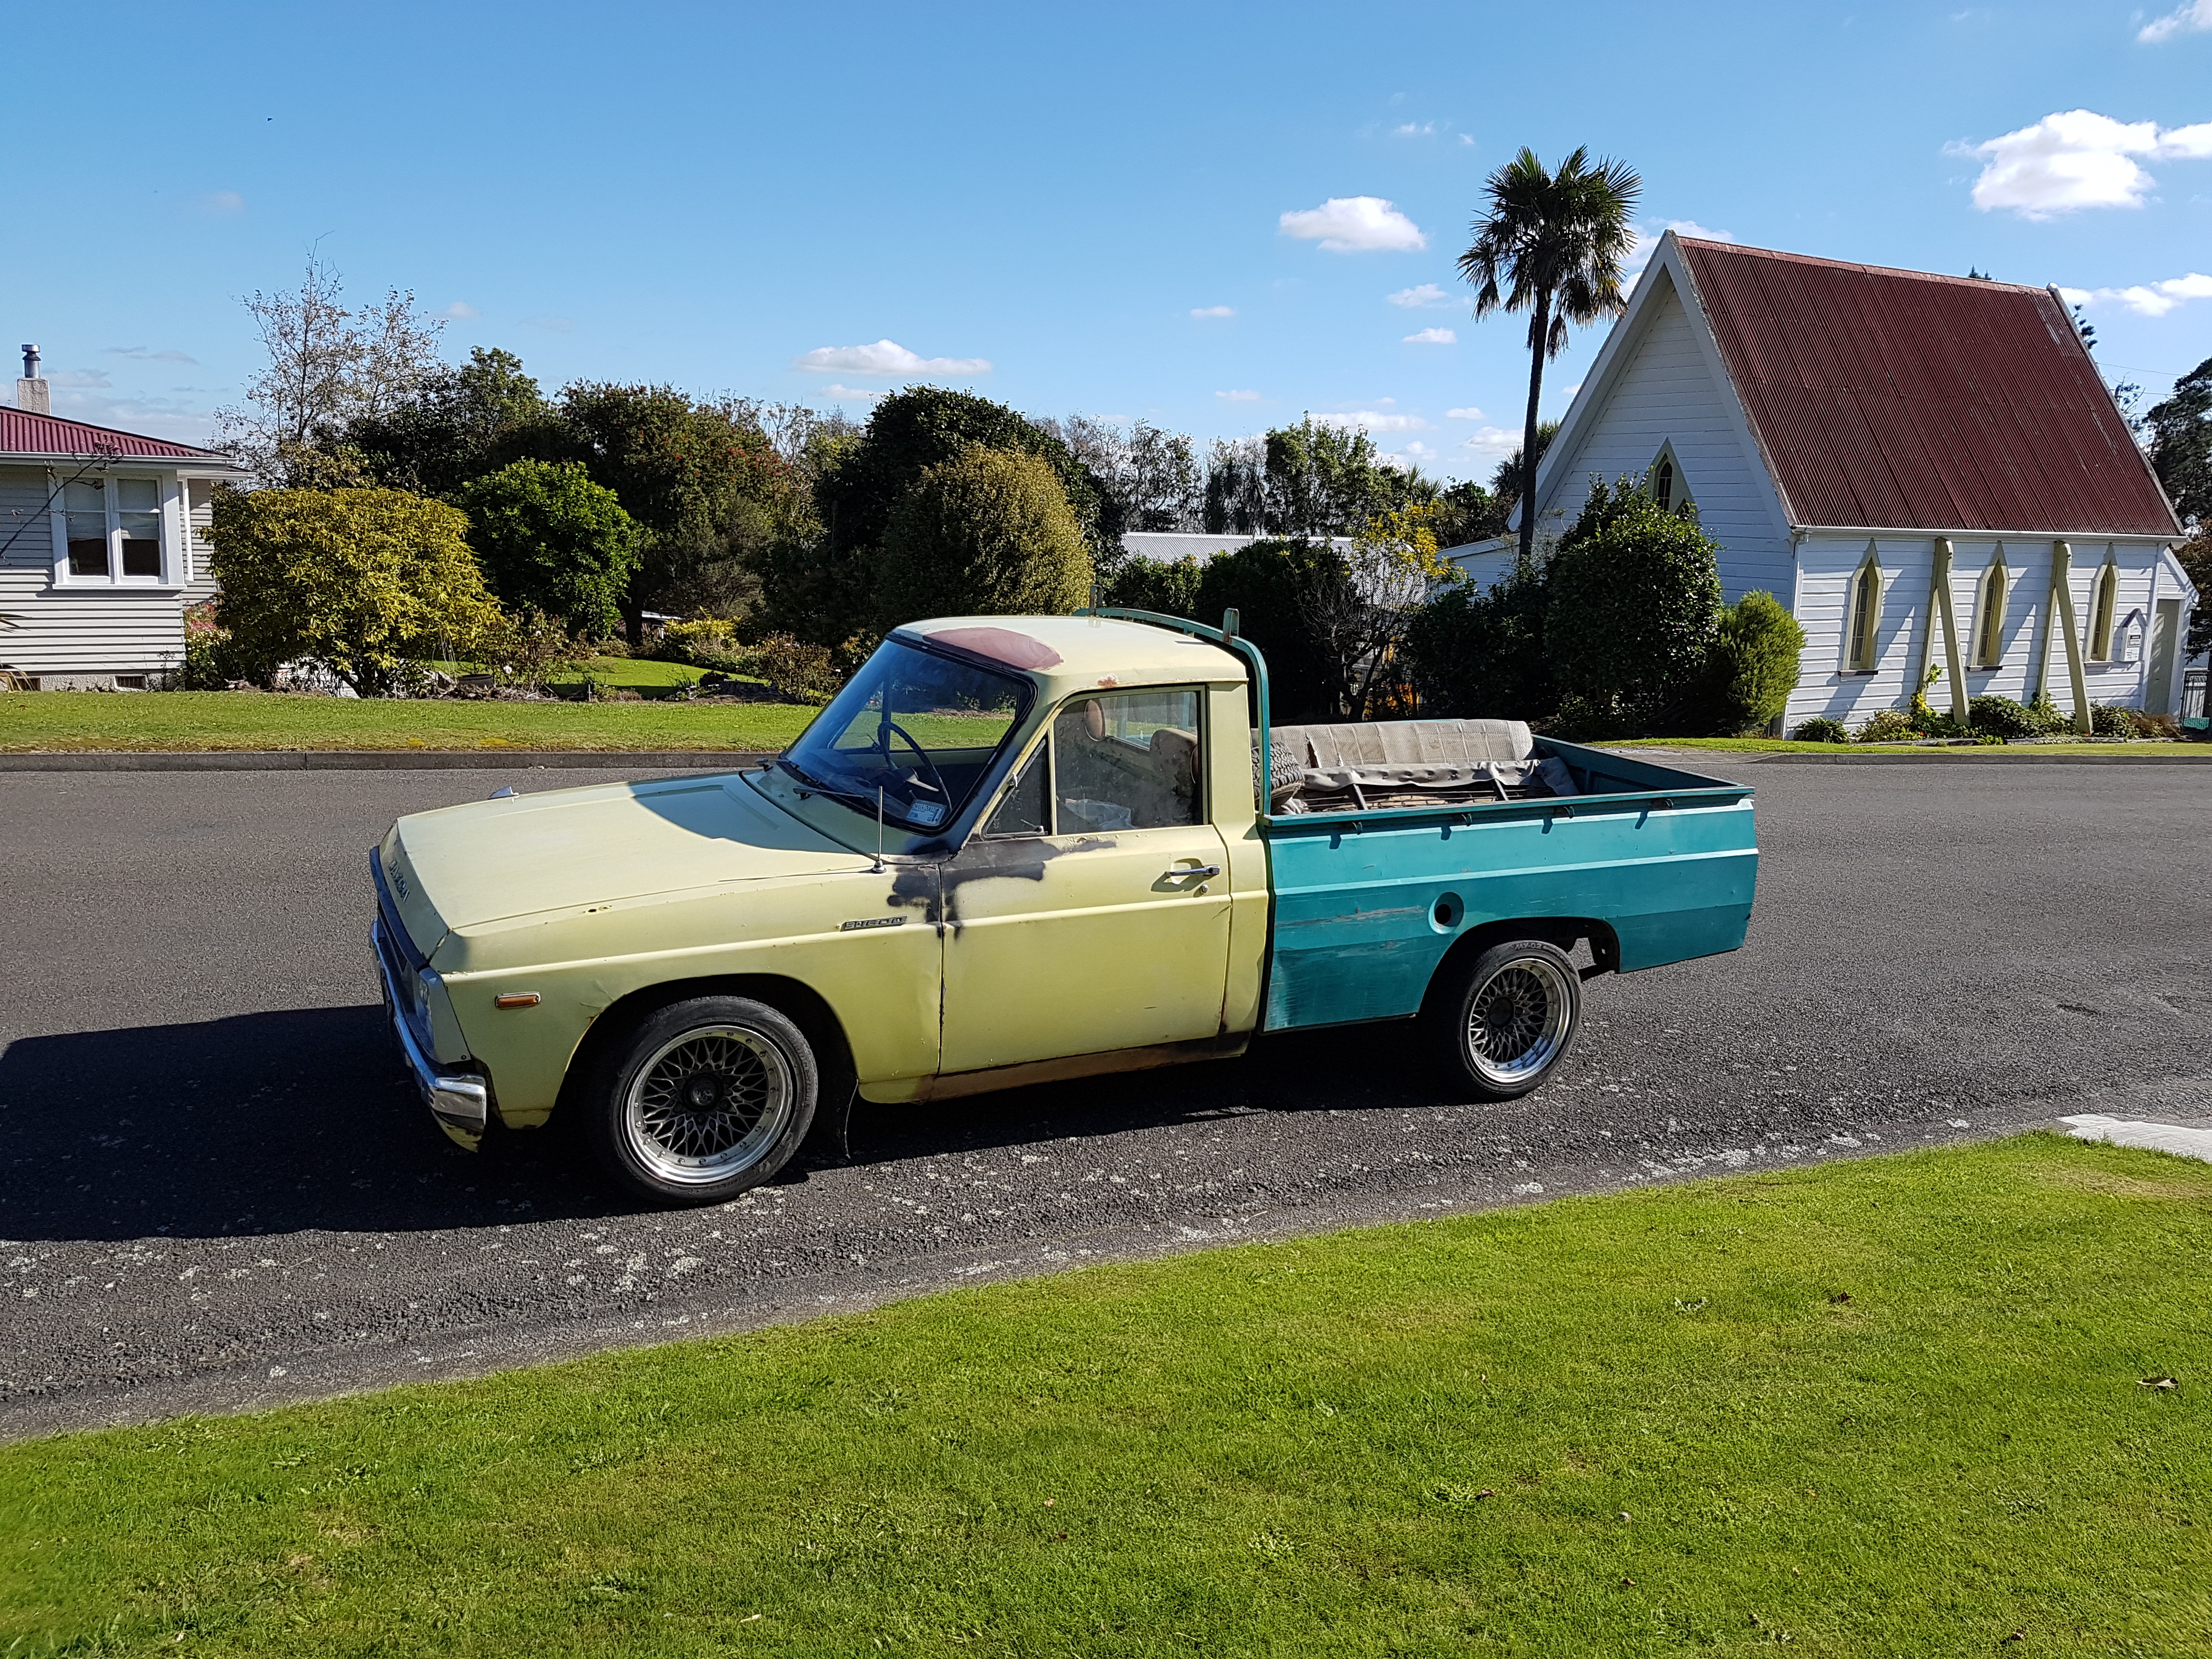
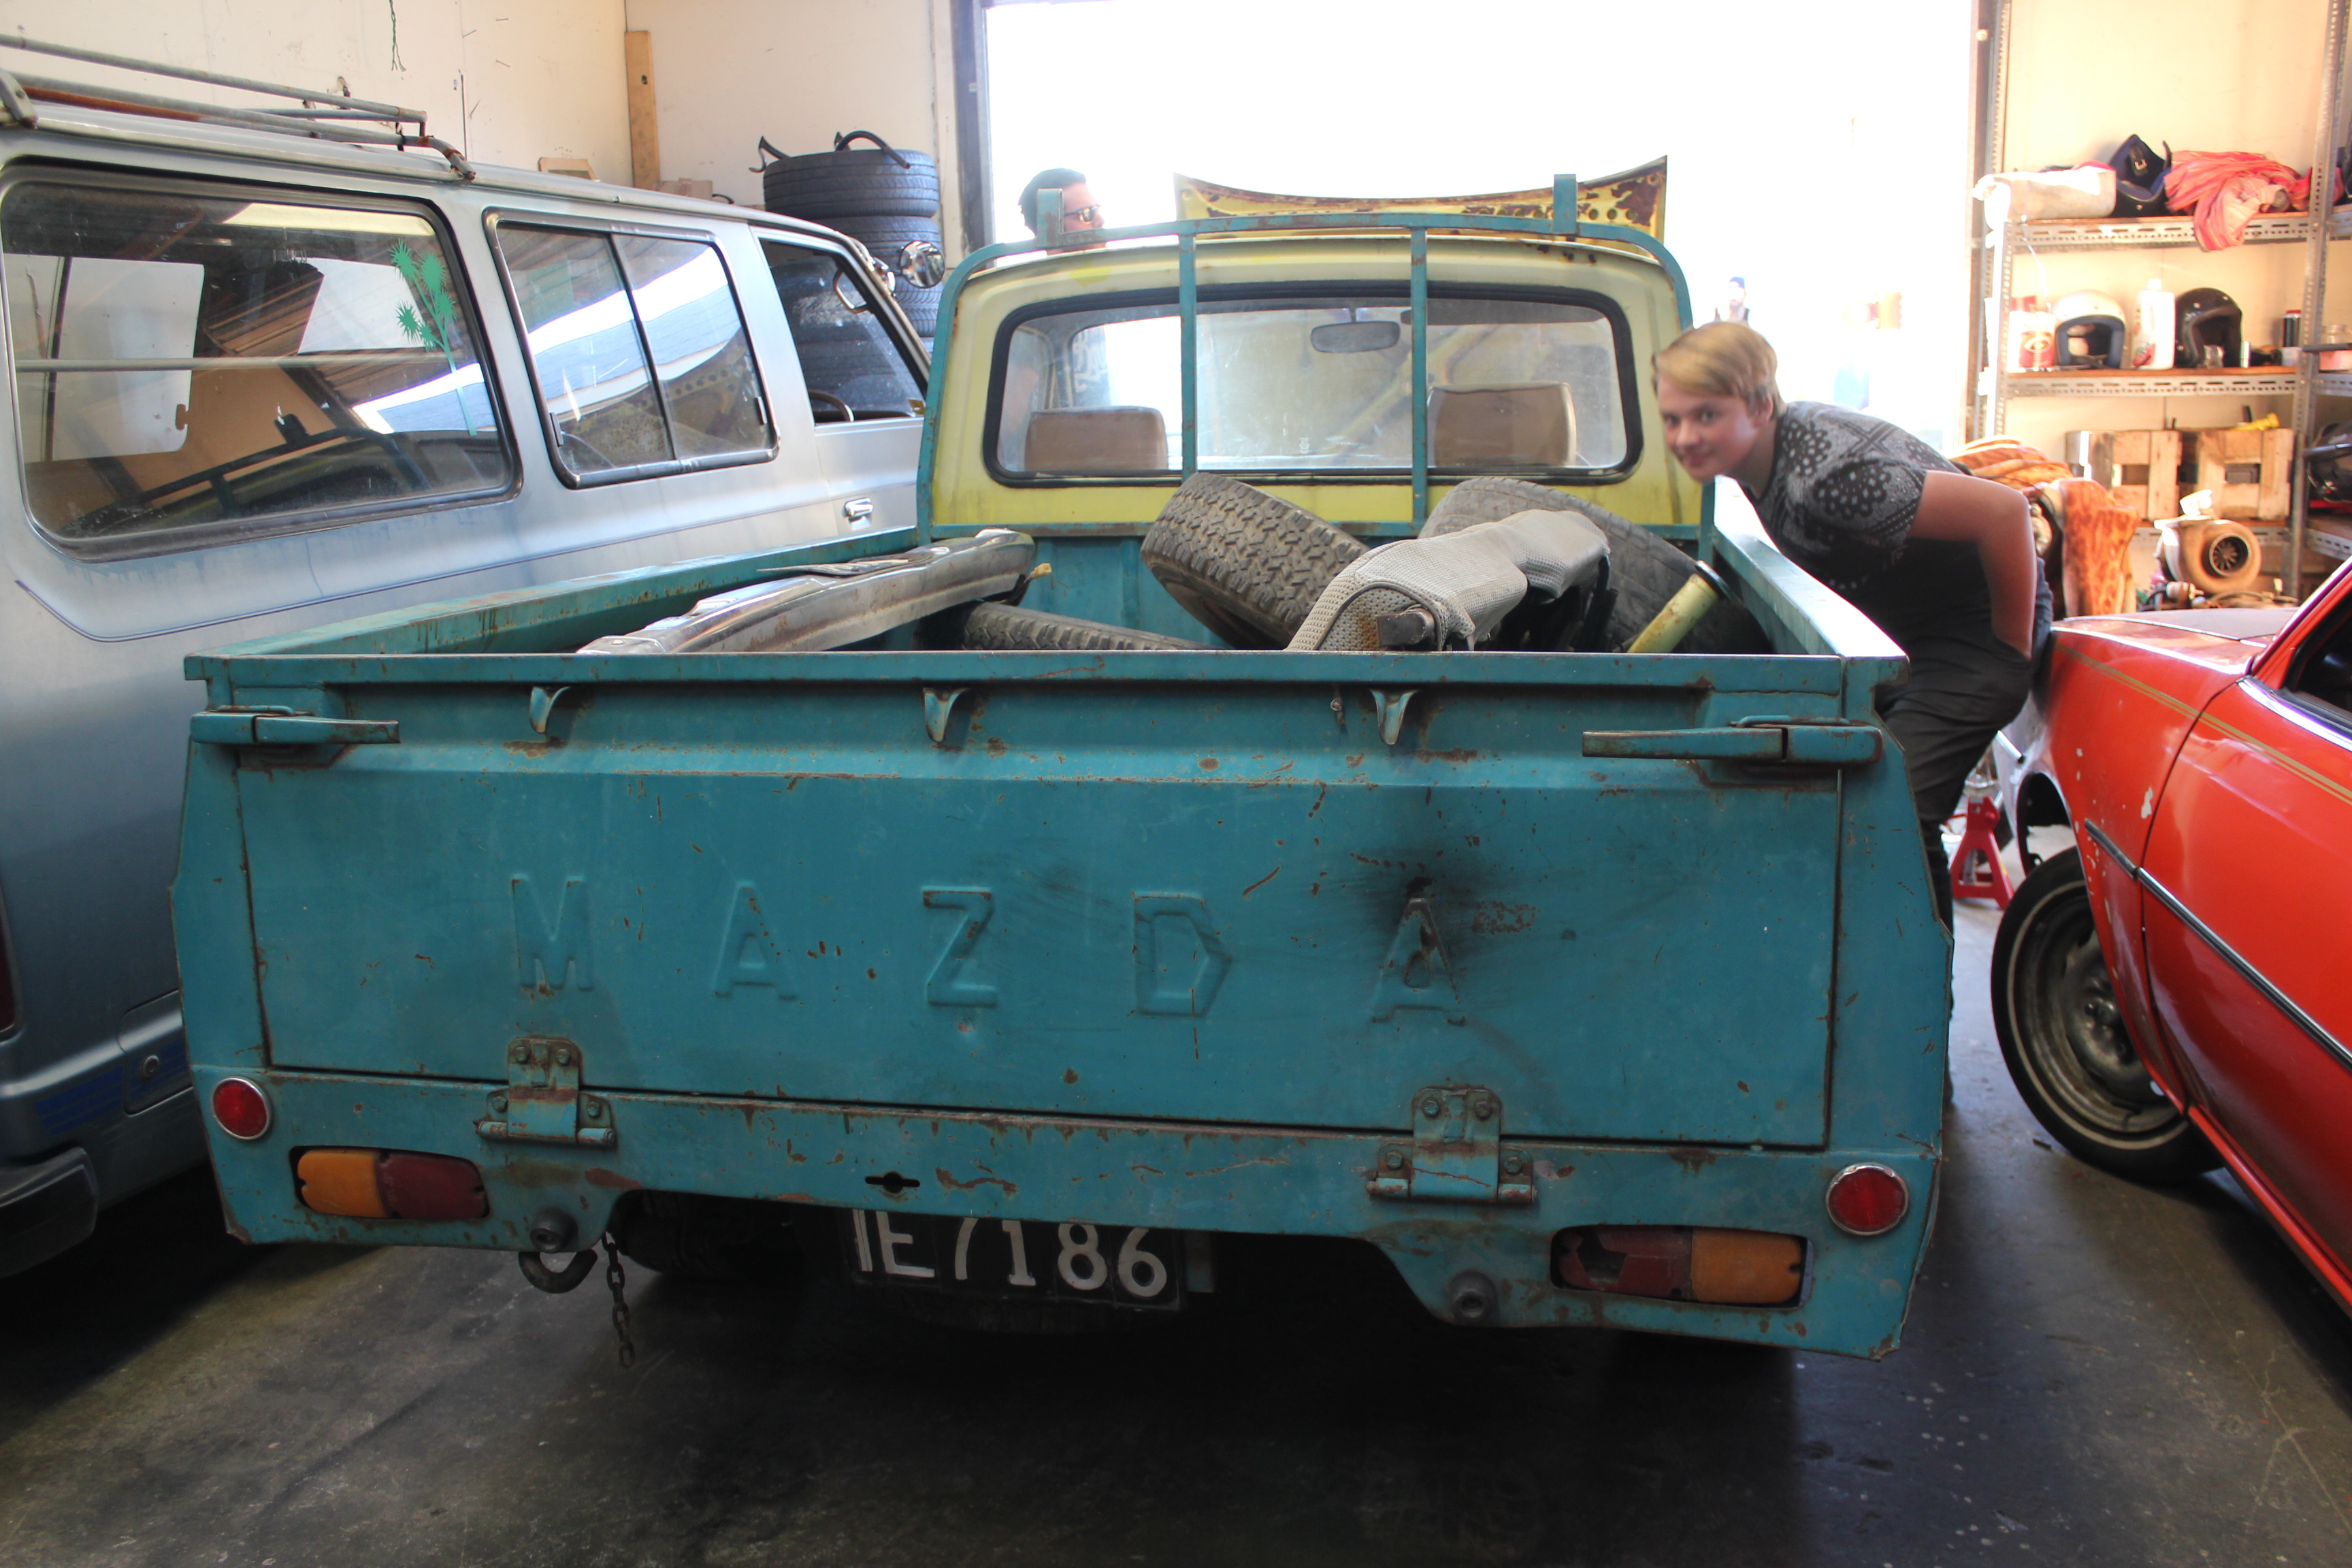
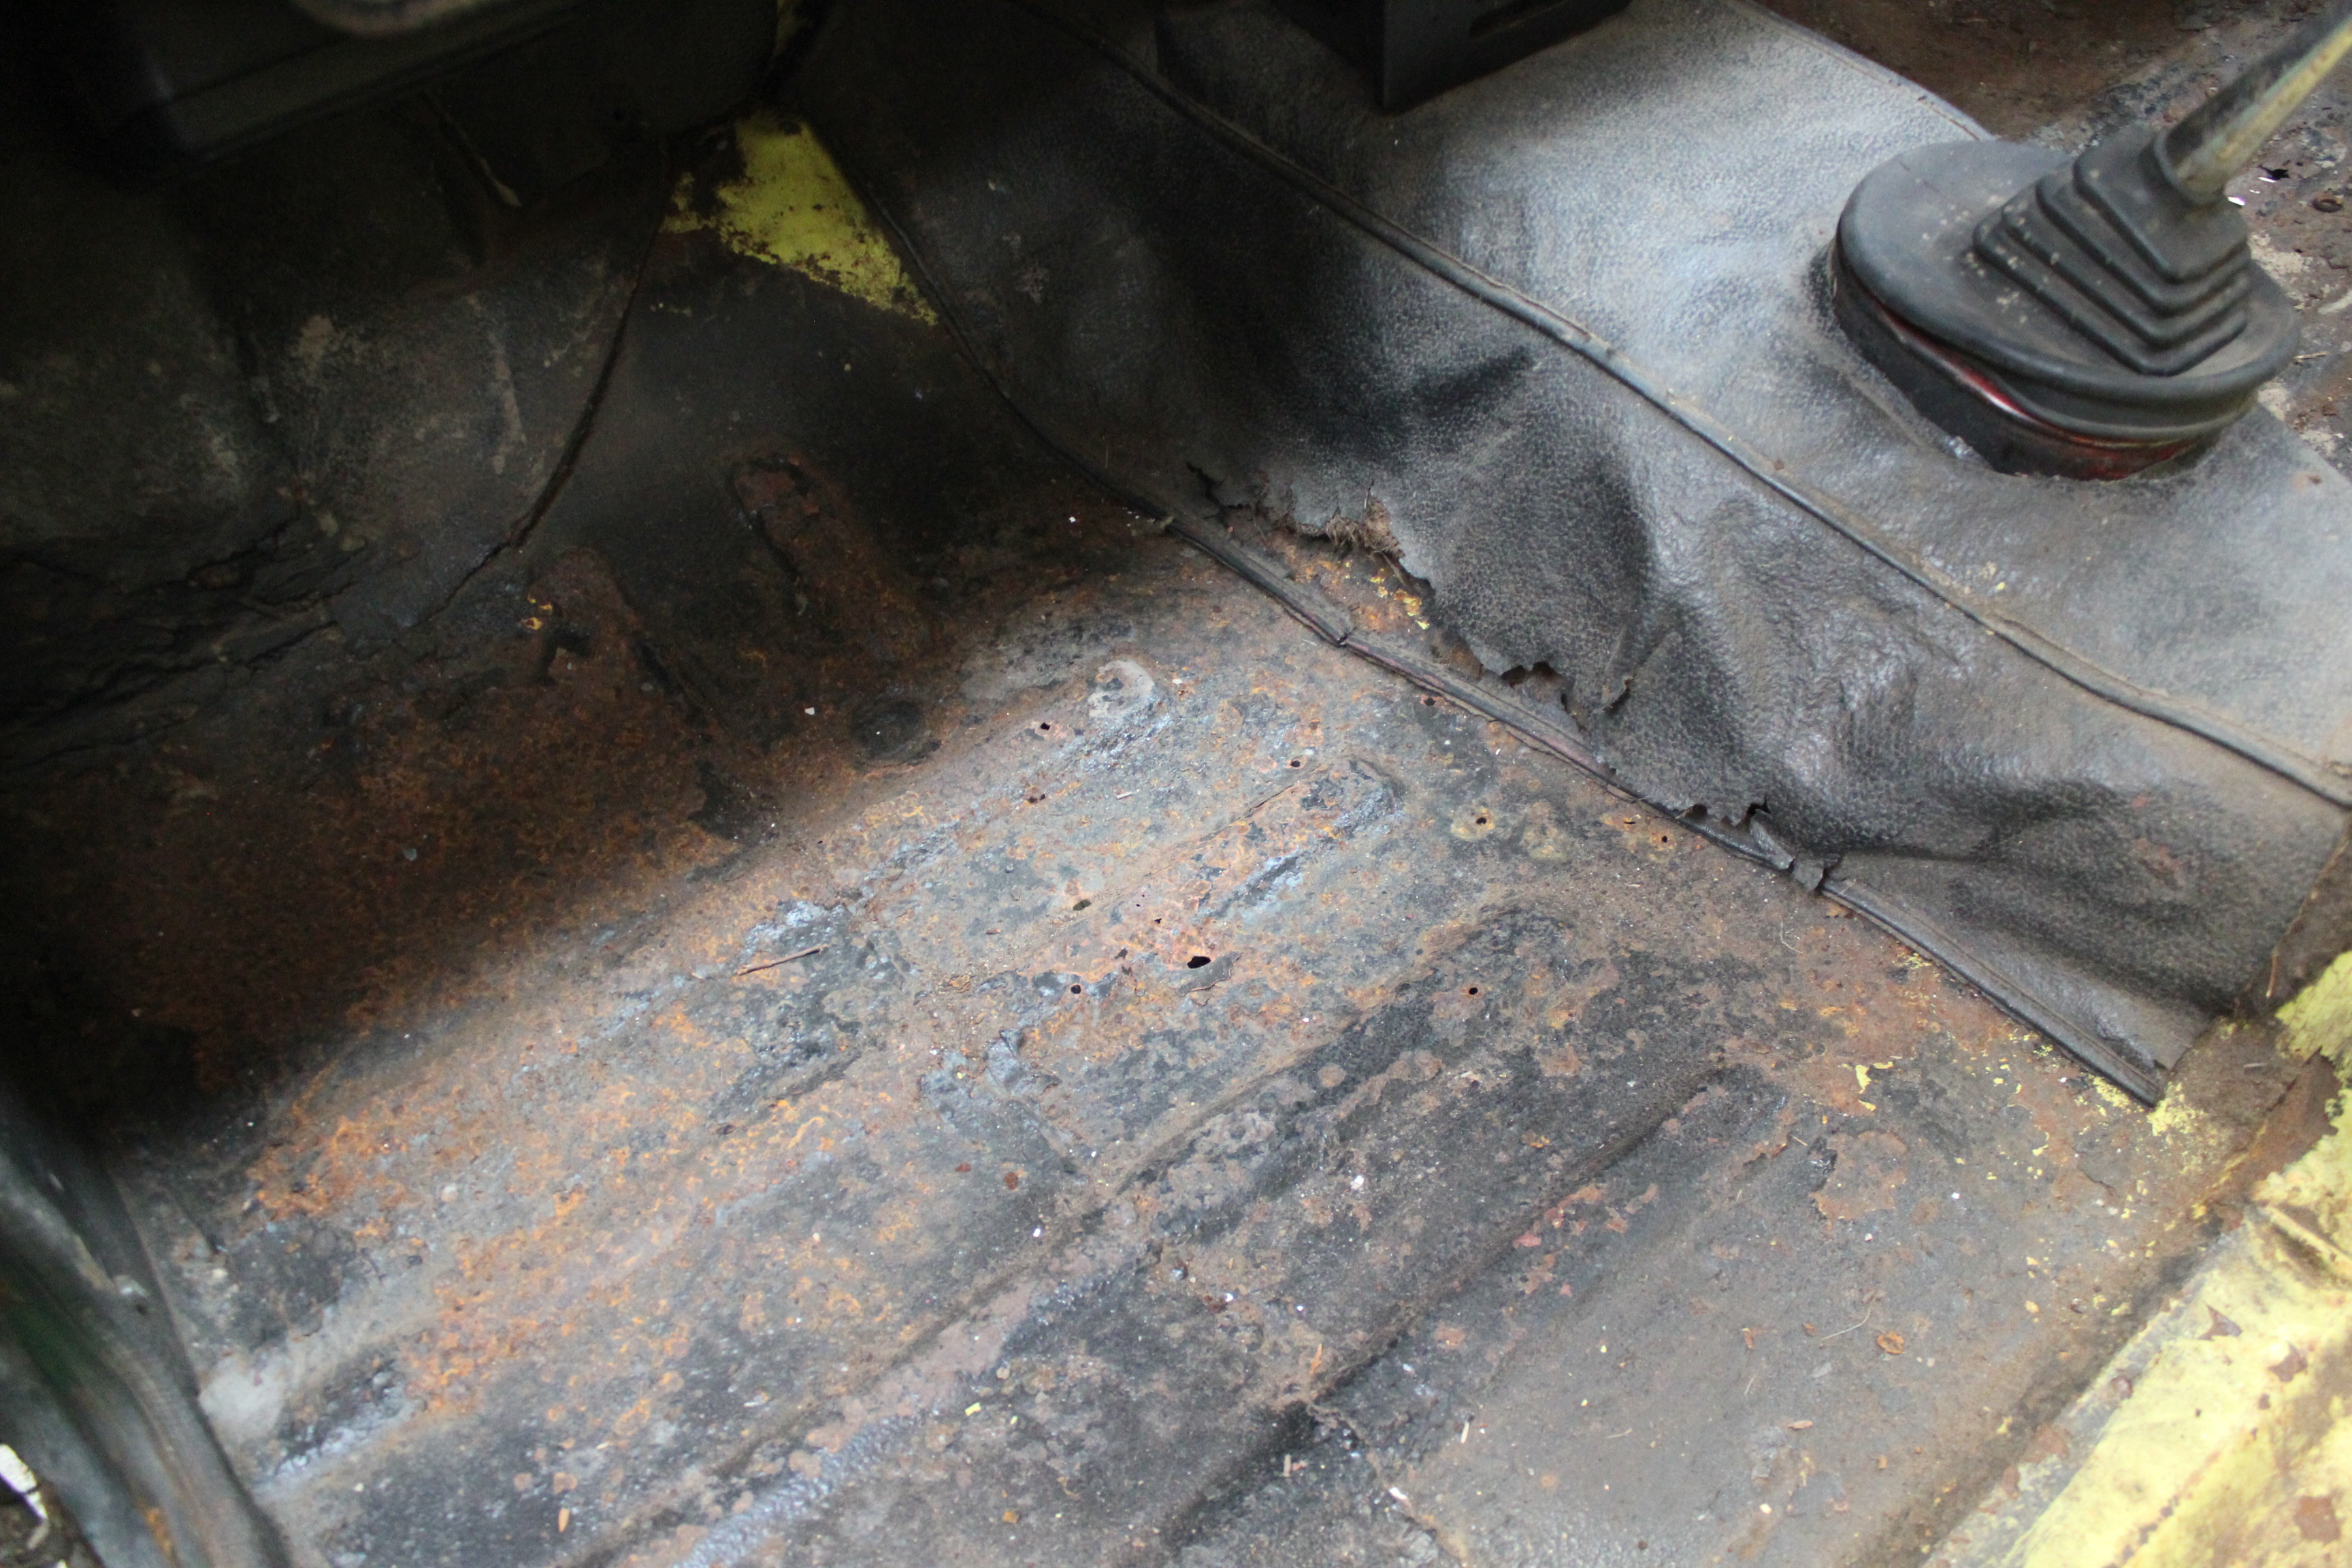
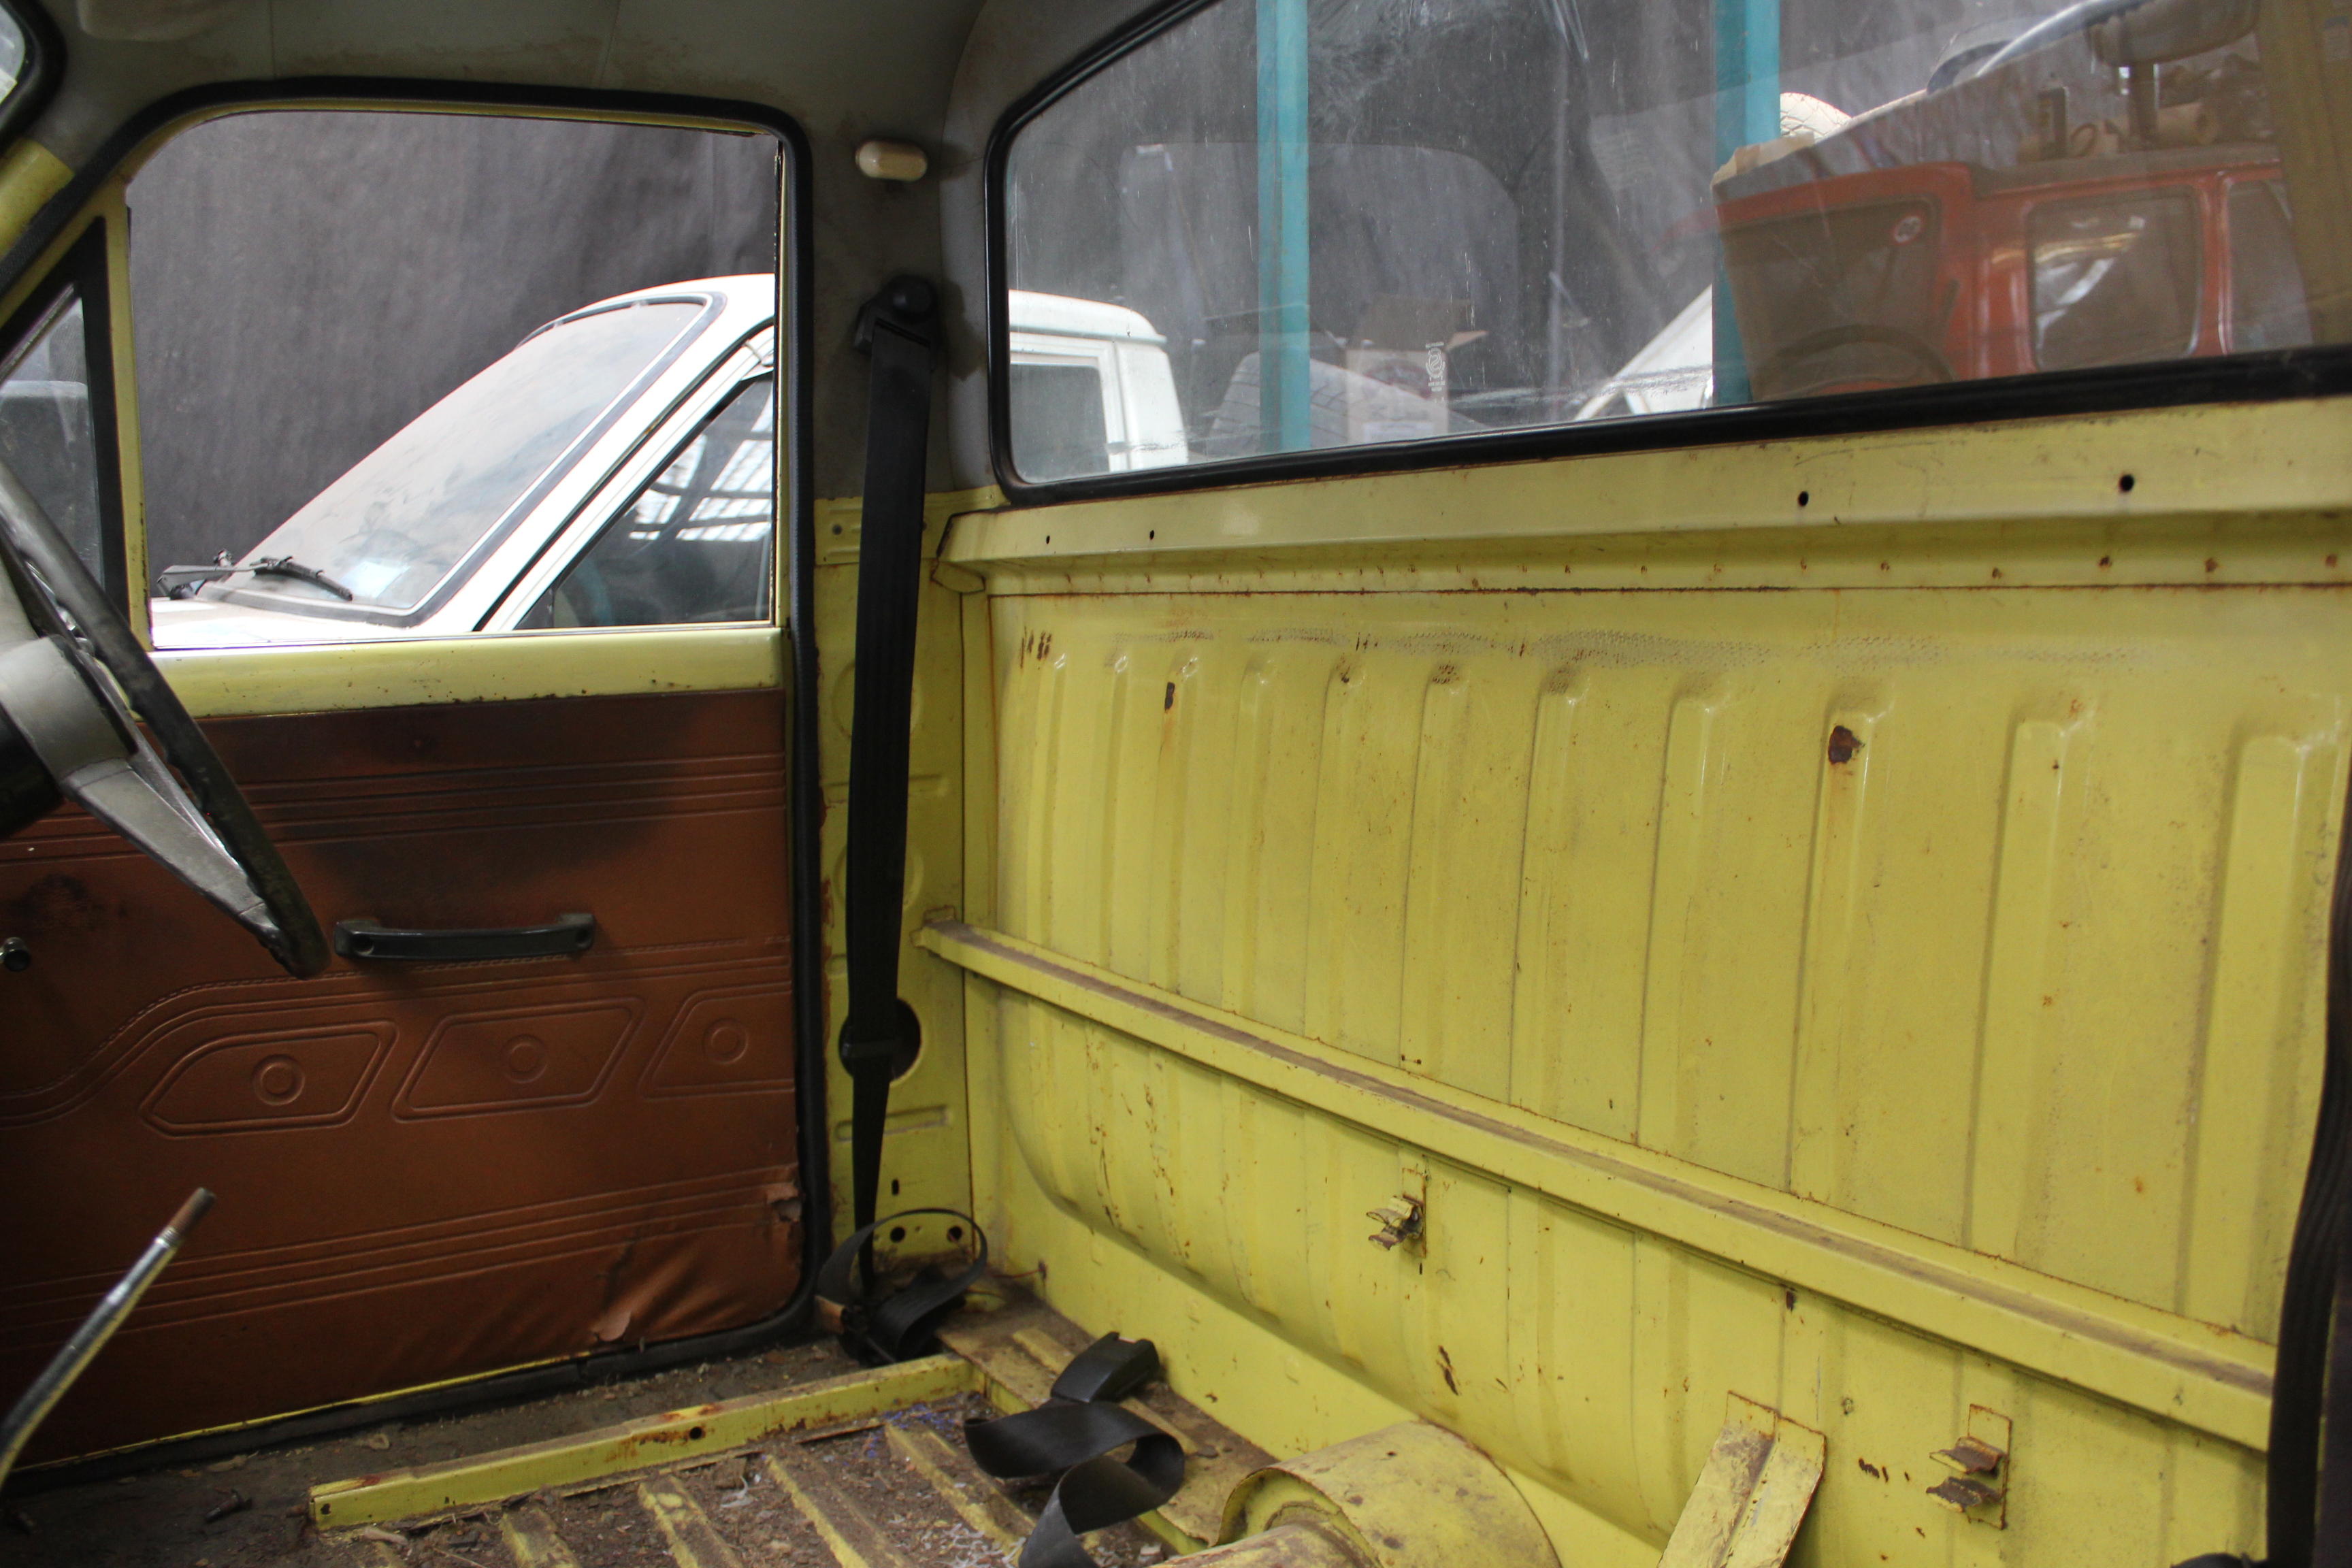
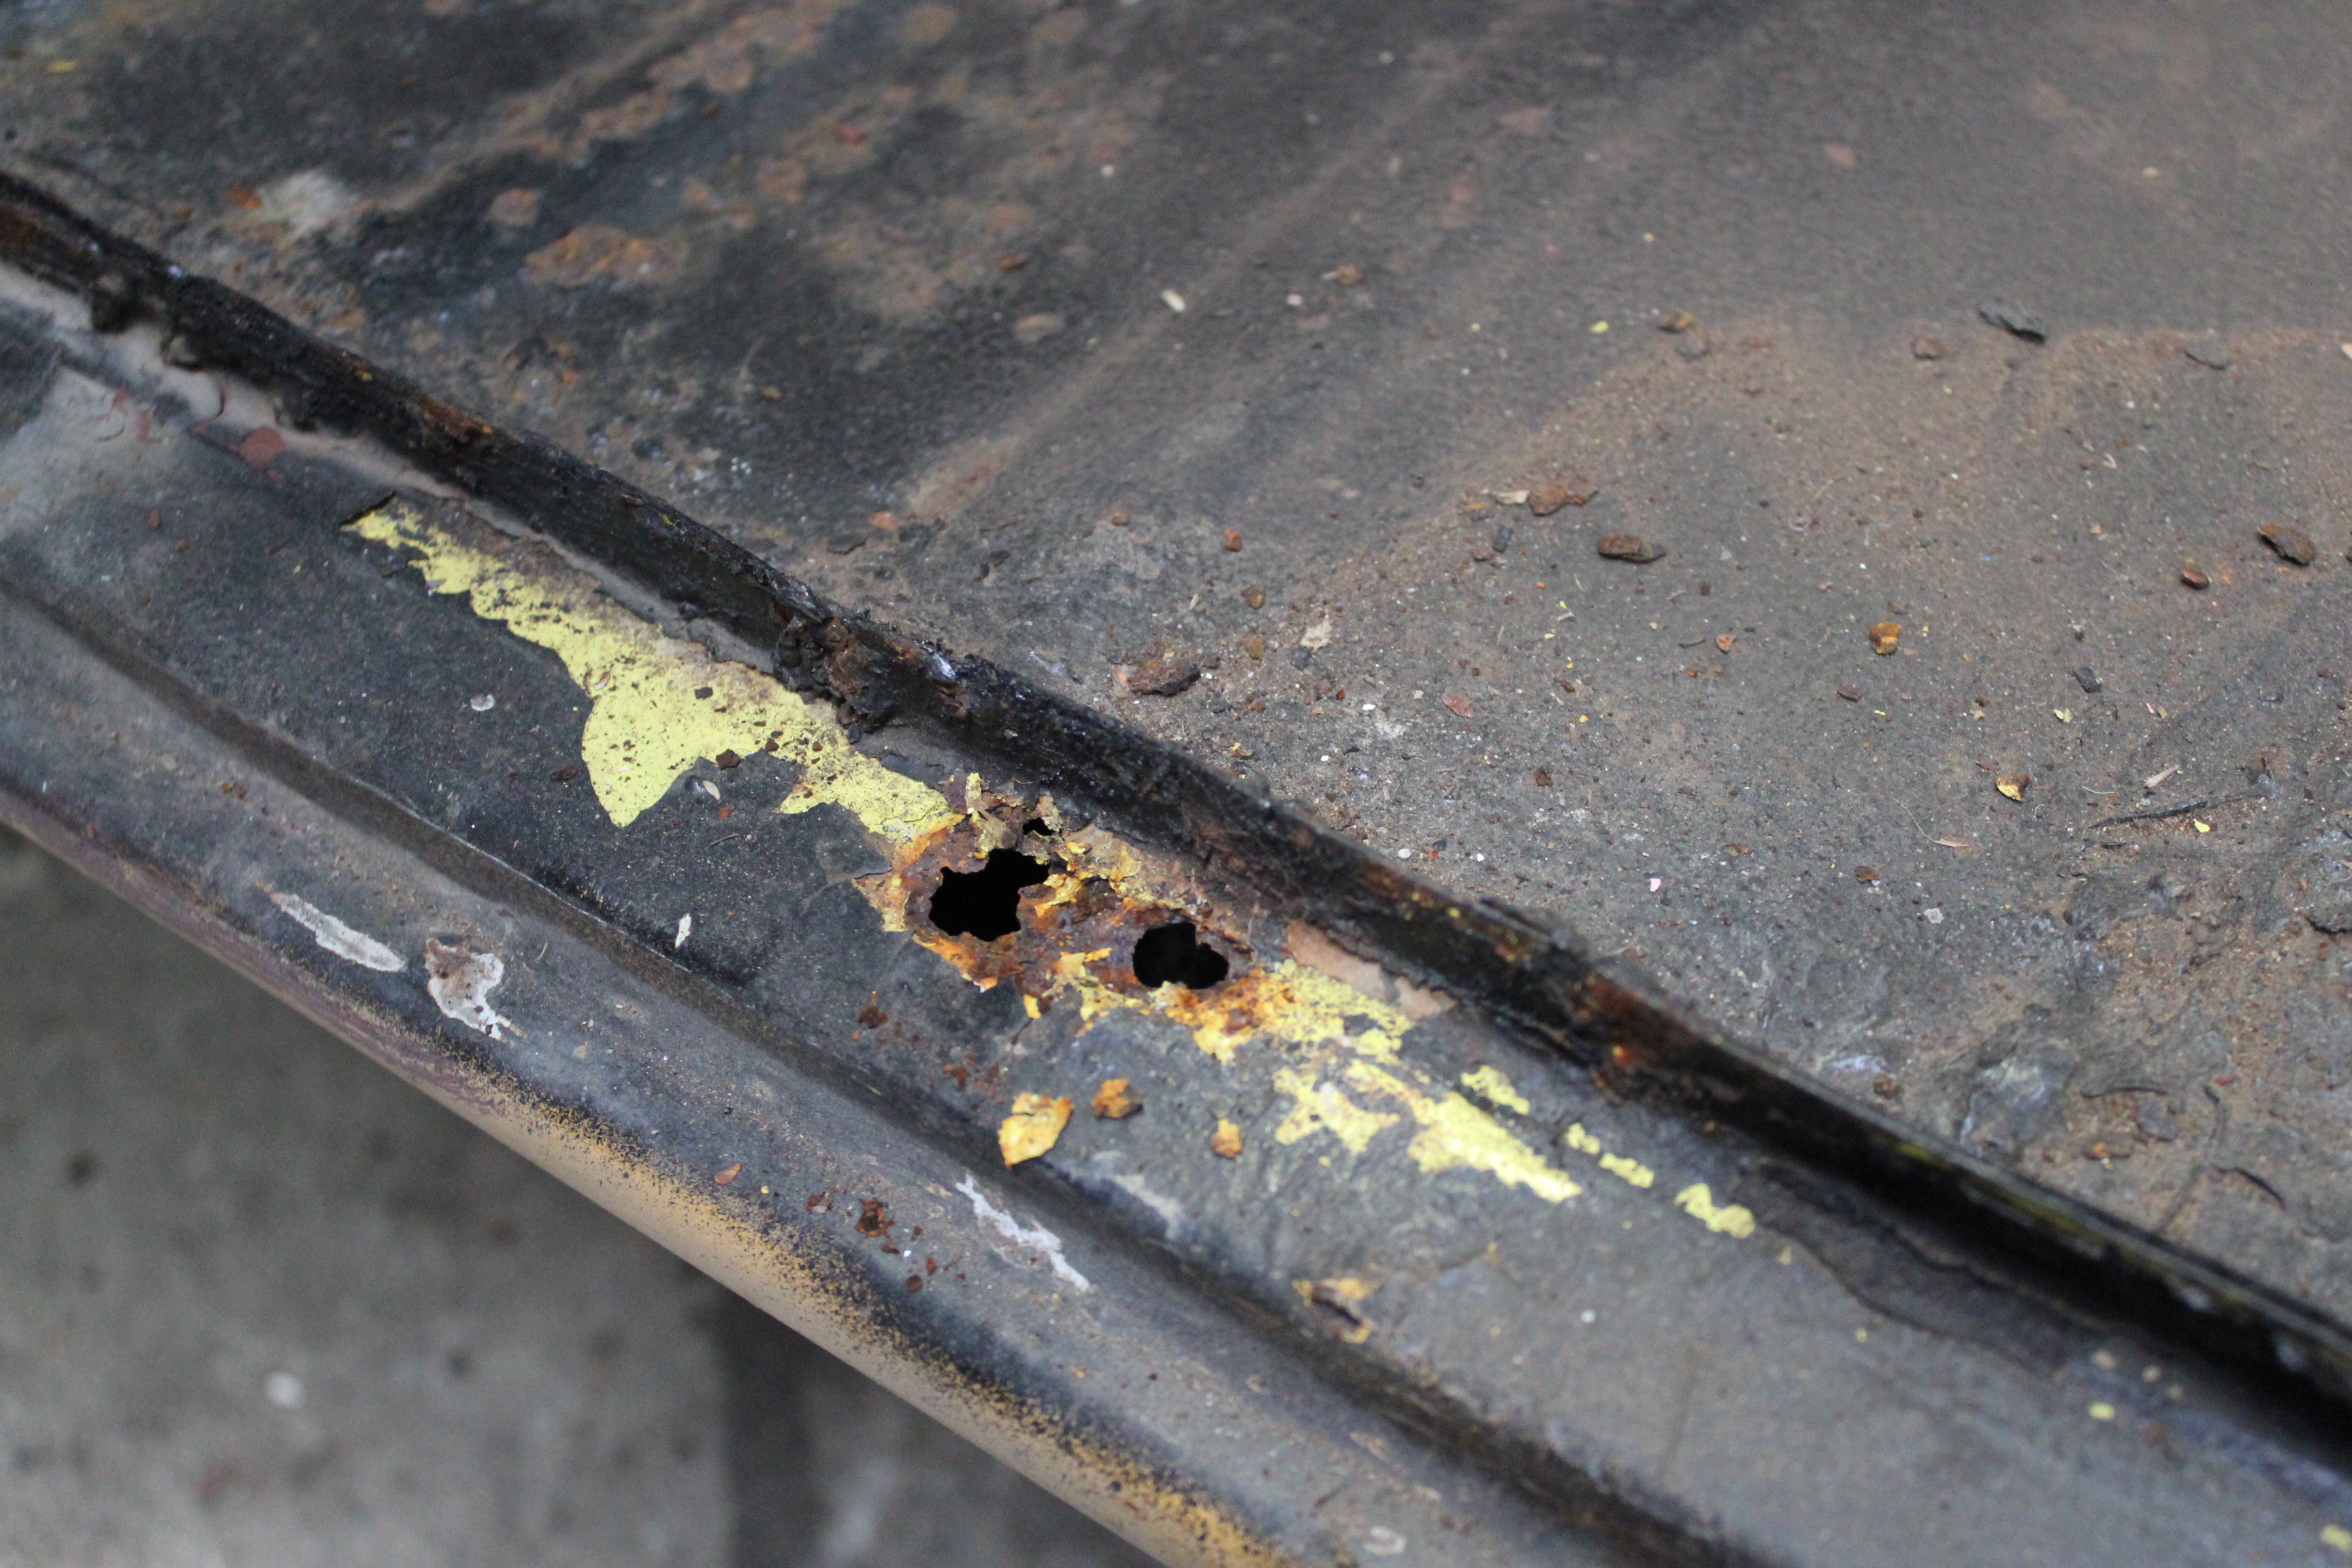
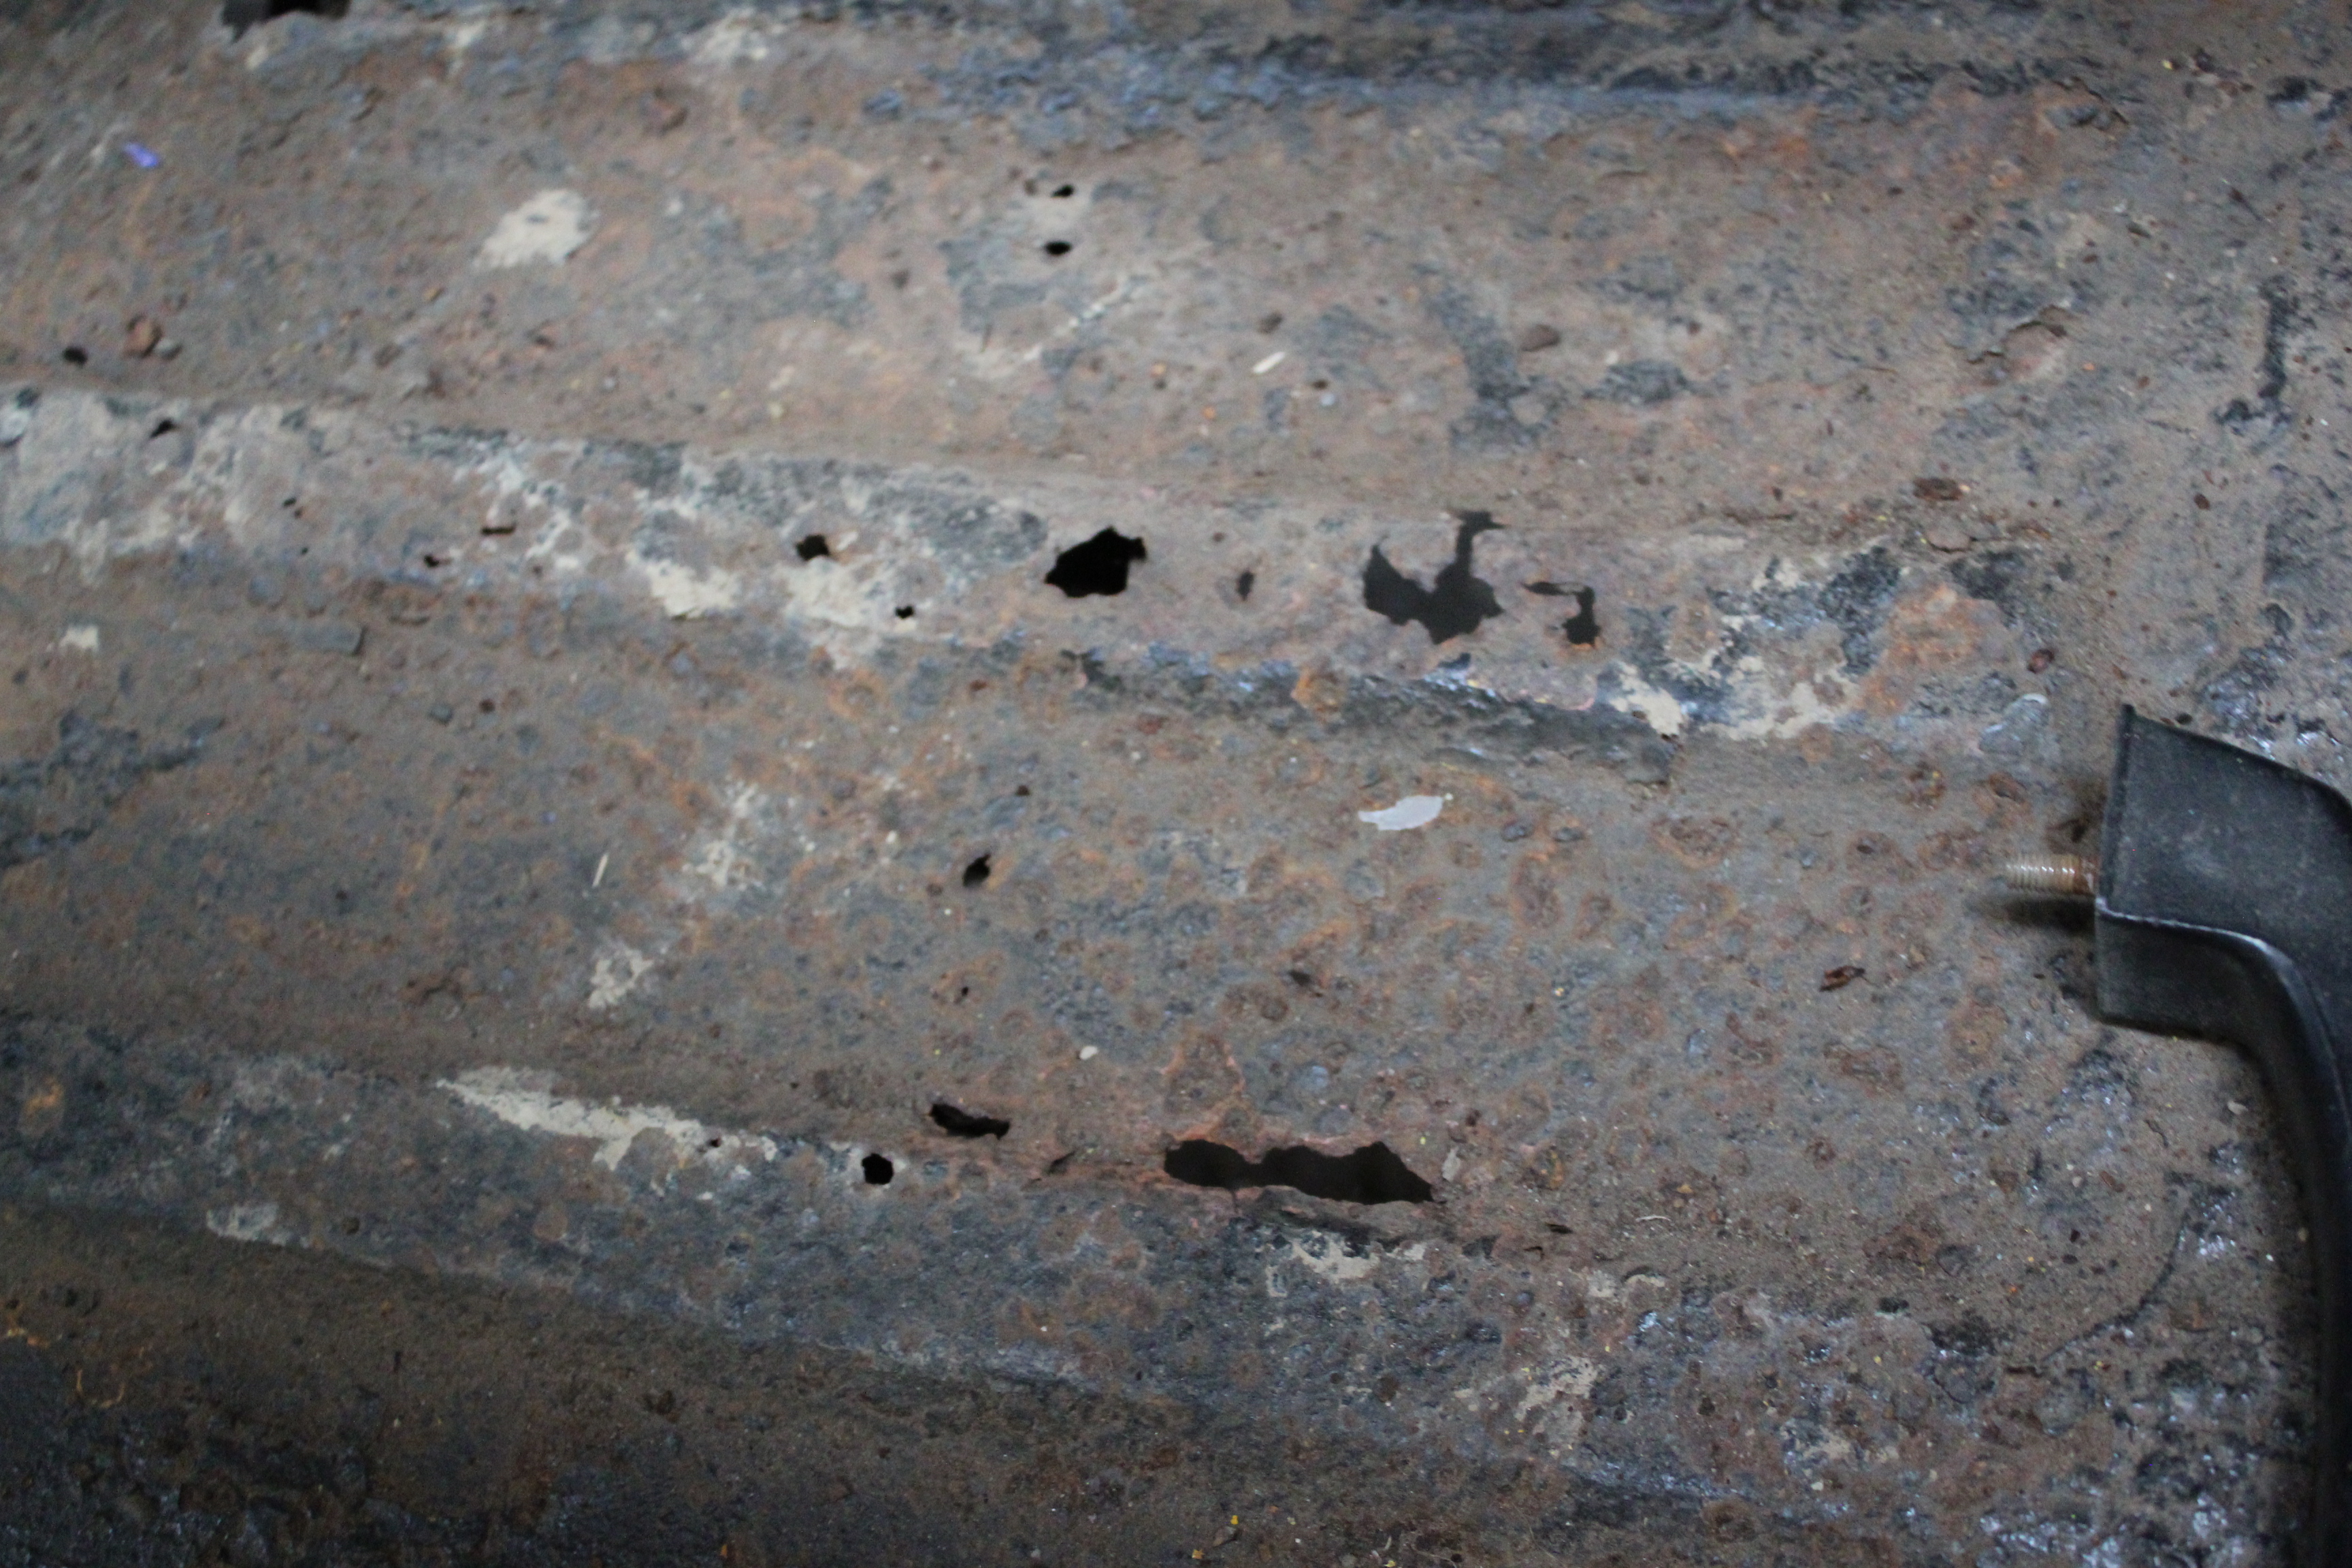
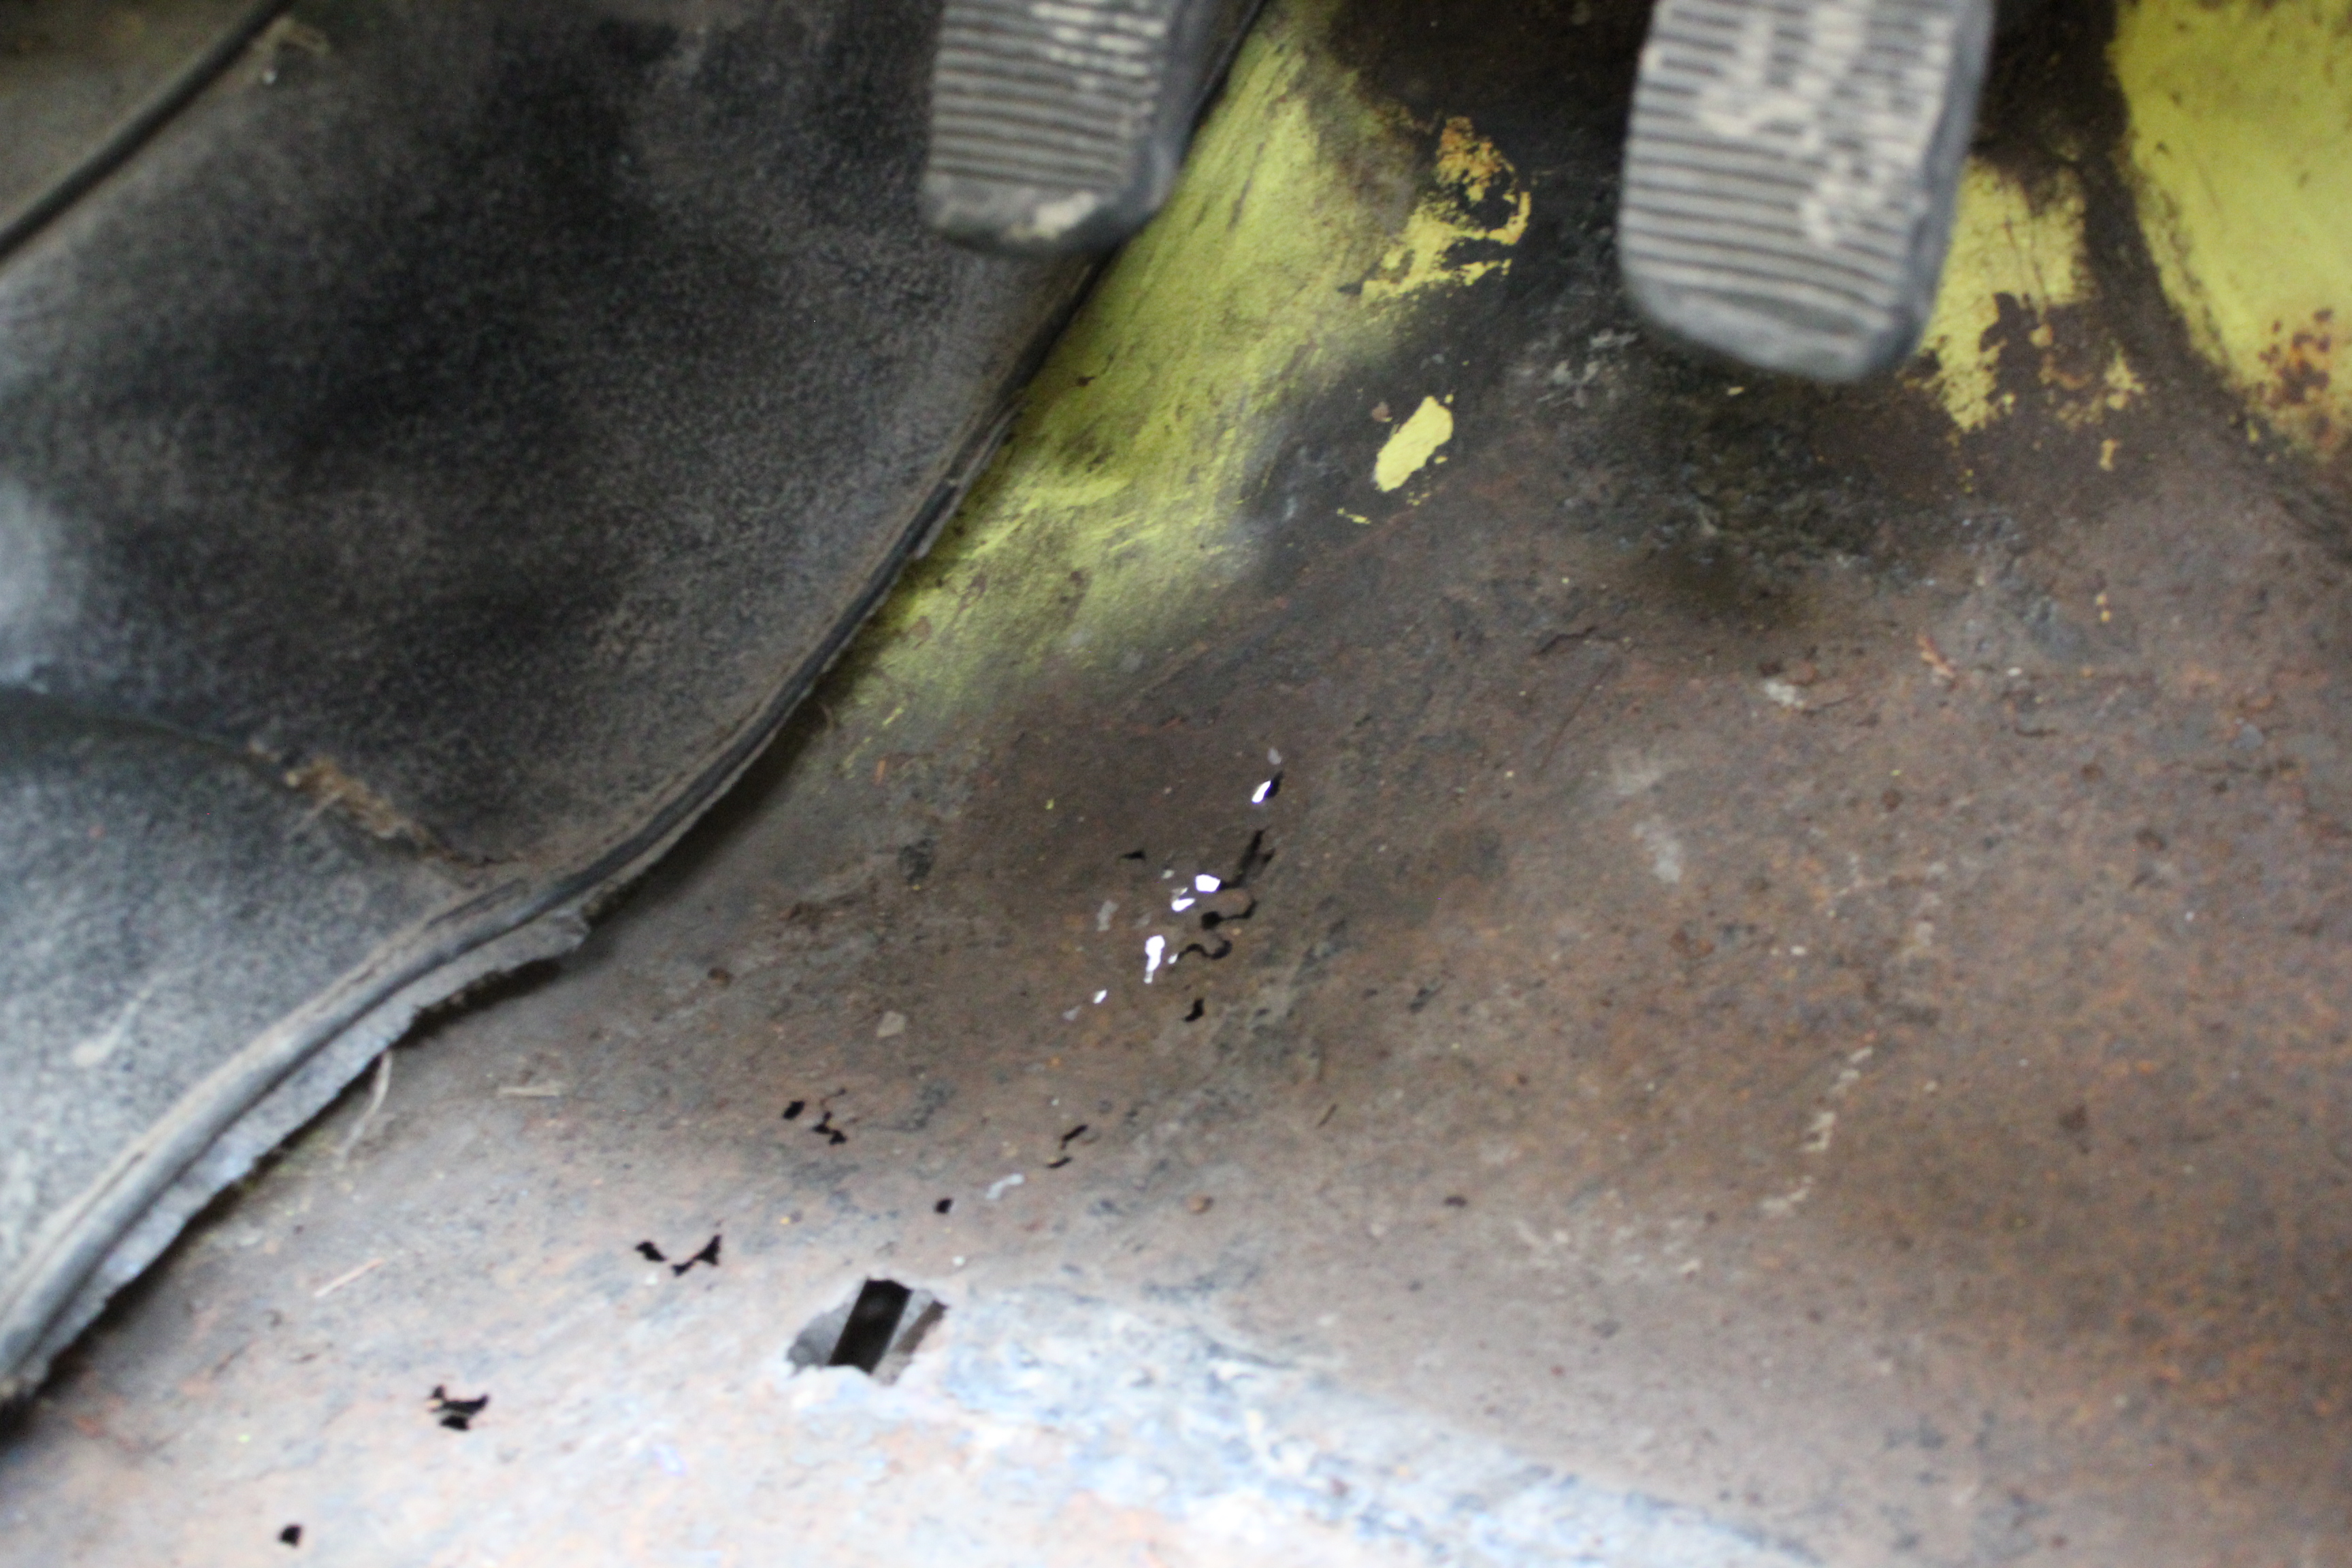
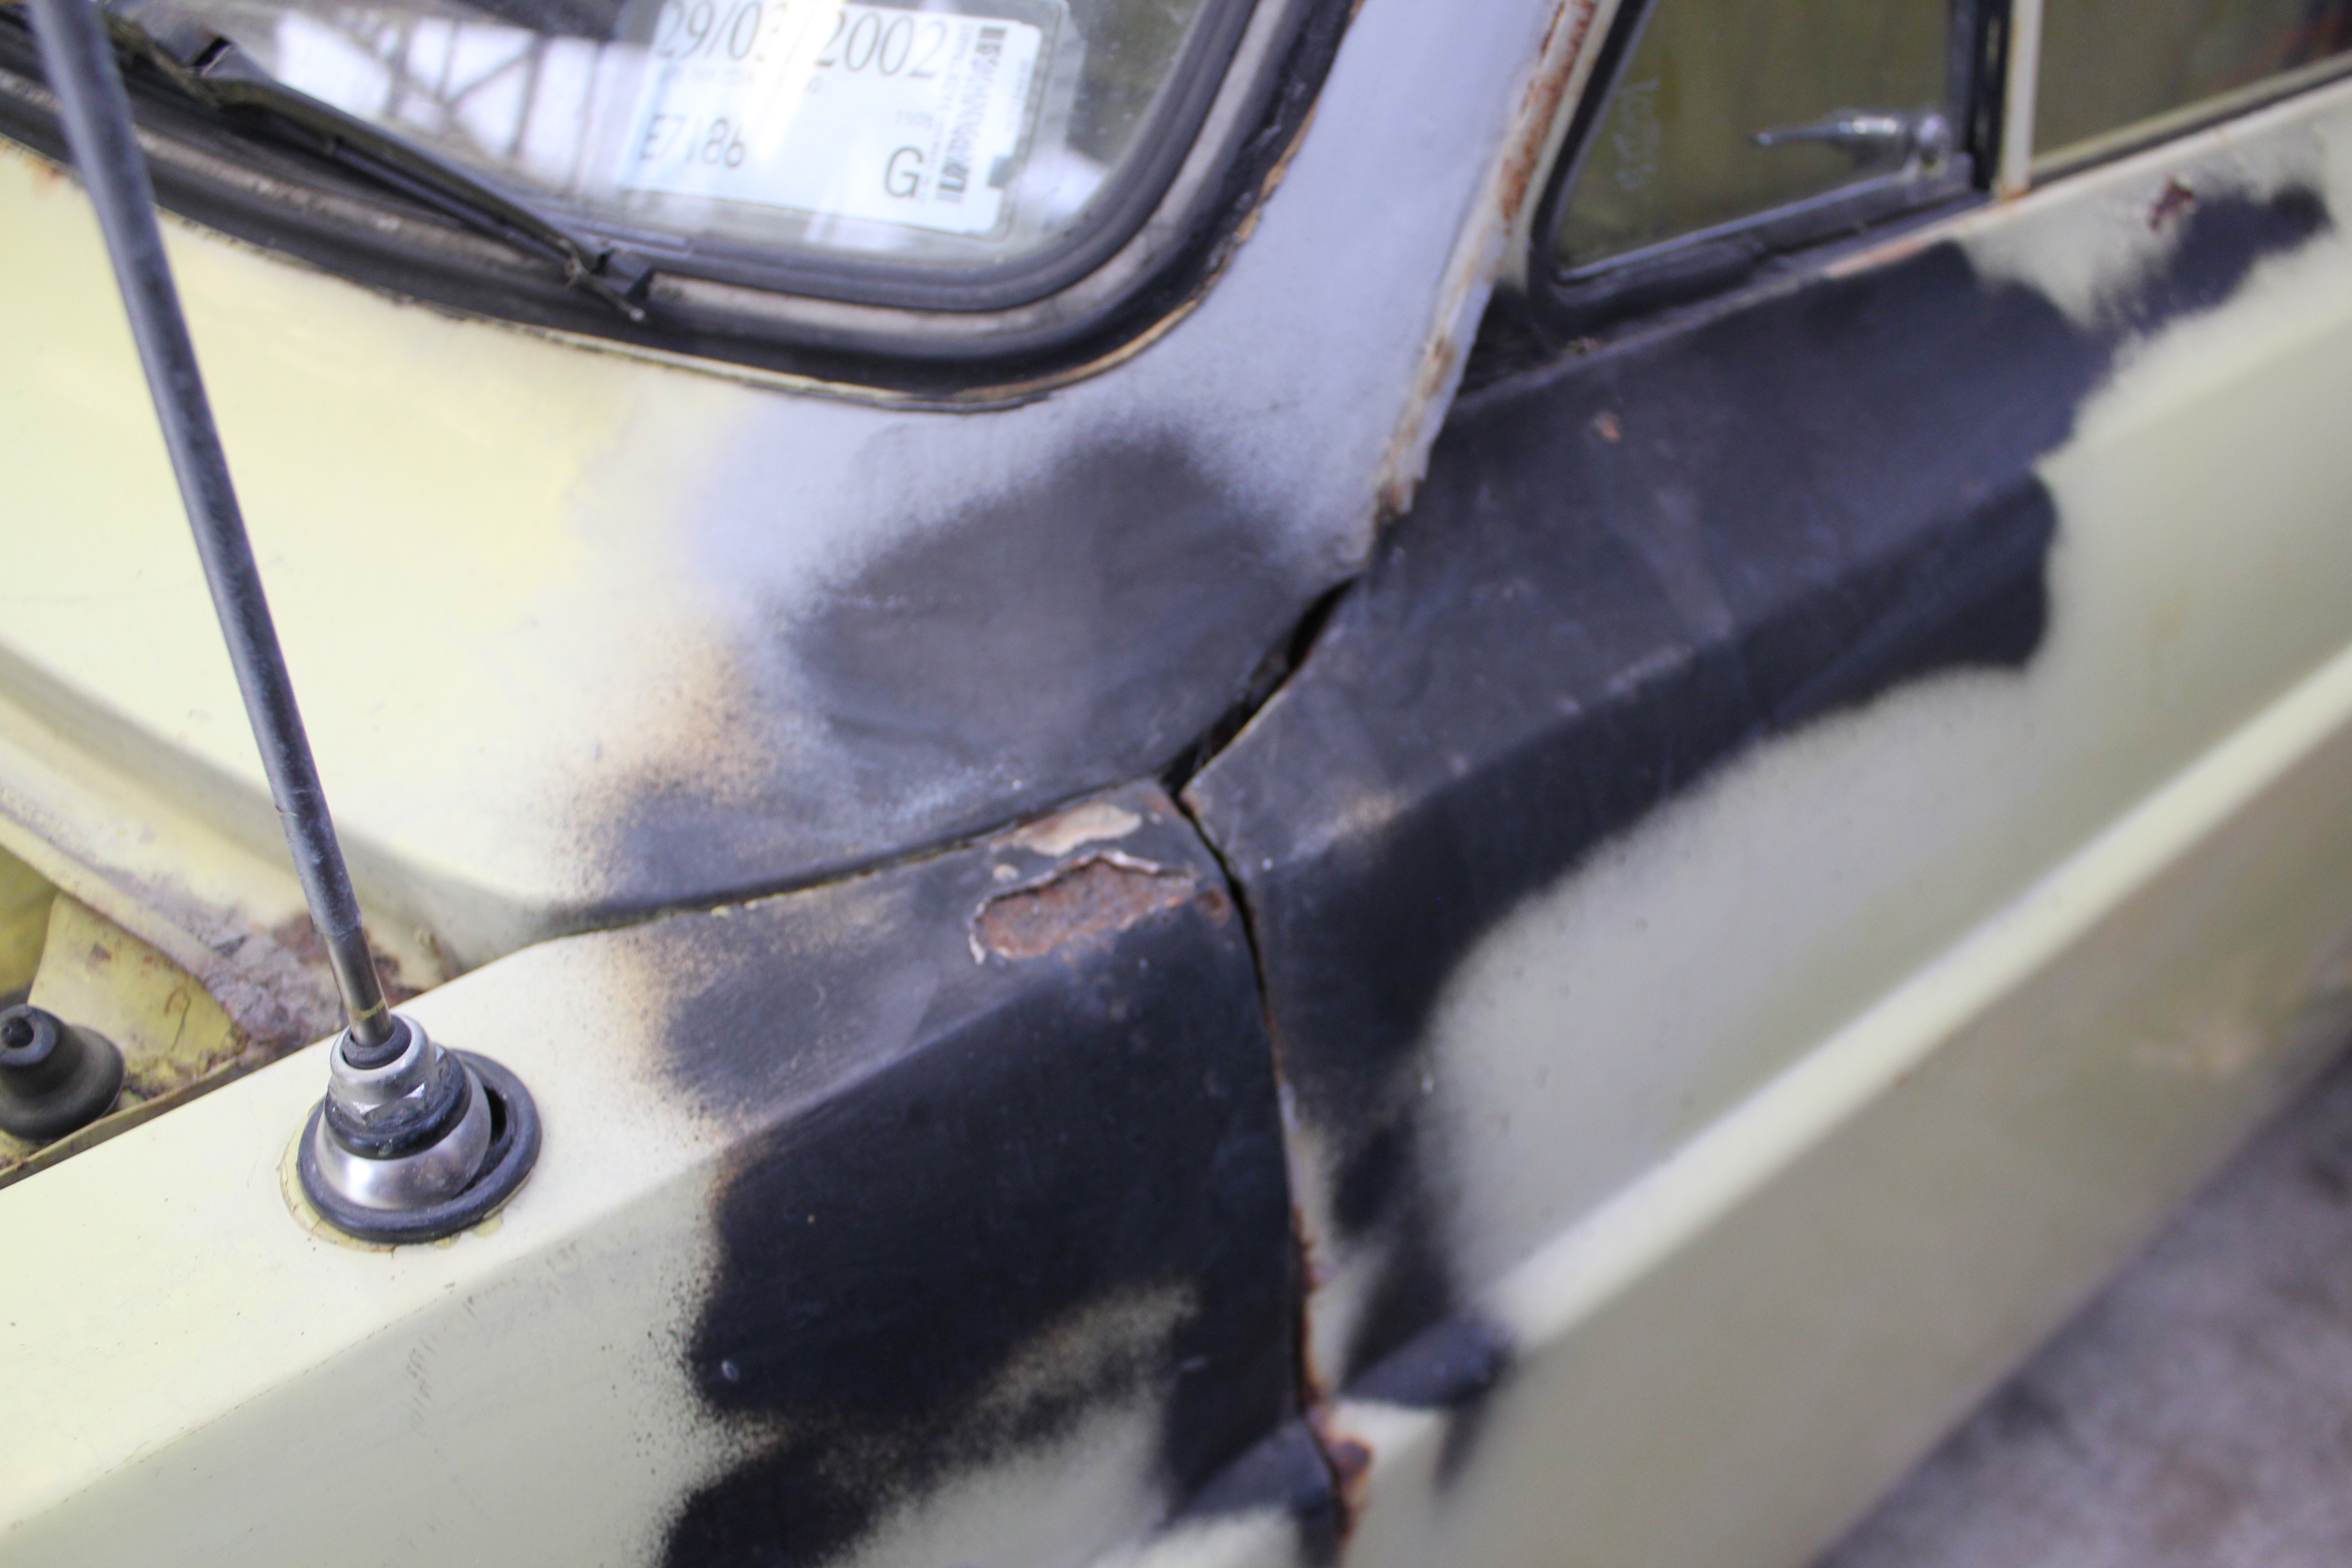
This beauty popped up on Facebook. I say I want it. Allan says (without even knowing what it is) buy it. Next thing you know Allan, Joe and I are sitting in traffic on our way up to Tokomaru to have a look at this magnificent beasty. Wellside is in pretty good condition, no concerns with that. The cab however is a different story... Swiss cheese floor pans and the passenger sill is a similar story. But no worries they said! So buy it I did. The bench seat that was in it looks to be out of an older model, but he had the original one, so plan to whack that back in. Also came with some more leaf springs to get the back sitting even with the front. First thing to do, learn how to weld! Discussion
 21 points
 -
So I ordered a carb rebuild kit and new plug wires with the objective of seeing if I could make her run. Carb was a bit sketchy, the instructions showed a washer that I never saw on tear down. But cleaned out a ton of varnish an junk an slapped er back together. It's a one barrel Carter carb feeding 196 ci FLATHEAD STRAIGHT 6. Yep 90 ponys! so the plug wires were a bust. Way wrong. Oh well, took em back an got a universal diy kit. Till then we made due . Fed it with a portable boat fuel tank and shorted the starter with a screwdriver, as one does. She fired up straight off and idled nicely. Blew a bit of smoke an all but quite happy. The fuel pump discharged all the old gas into an EPA approved bucket and after running for a couple minutes I changed the oil and filter. Had one spare tire so slapped it on front and aired up the back one, it holds air for about 10 min or so. With a quart of atf it backed off the trailer/work station, I made a half assed attempt to bleed the brakes before hand ( with a 8 yr old for a helper) but just used the hand brake. by this time the cars fuel tank was empty so hooked it back up and added a few gallons. And drove down the driveway and back. Yep gravel driveway handbrake skids more as it happens dont hold yur breath an more pics next time hopefully15 points
-
First update, coz lazy it's the same day as finally starting this thread. Today Ty helped me pull out the bench seat and clean up all the crap and assorted rust flakes from in the cab so we could get a proper look at the swiss cheese. Can definitely see alot of daylight through there. We also (with some assistance from the lovely Allan) pulled off the door cards to take a look at how bad they are. Not too bad it turns out. Most of the rust is from mid cab forward. The rear is pretty good. With just one hole on the outside where I may or may not have been poking around with a screwdriver....
13 points
-
Hey oldschool, first let me say yuall are a terrible influence on a simple American. Been pining for something old to tinker with. Have a few dream projects/rigs I want someday but mostly for now was looking for something cheap and different. Saw this Rambler American 220 on Craigslist, shot 'em a text an actually got a reply. It was 1.5 hrs away which is purty close for us but was busy so never pursued it further. Week or two later they text back an went down 50 bucks. Now it was a bargain so I jumped on it. Supposedly was running when parked, 20 years ago. We hand winched her up on my trailer with two flat tire, Benjamin's for title it was home again. quite straight really and a lovely color. All the glass is good tho sadly none of the seals are. Lights, blinkers, bees nest, yep all the boxes ticked. Lotsa trash inside hope the misery is kept to a minimum found a 1963 penny under the flooring, slipped in at the factory maybe?5 points
-
I bought it some new wheels because I've always disliked the ones on it. 18x9.5, +24 offset fits perfect, I re used the tyres that were on it already, 245-40-18 I also spent a few hours touching up all the paint chips and scratches. Looks tidier.
5 points
-
Got the fwd alternator bracket to work with the rwd water pump. this lifts the alternator up out of the way of top suspension link. and bit further away from mud and crap. just had to modify the top mount to bolt to top water outlet and waterpump. also make a new inlet for water pump fwd bracket already had some racing holes in it from when it was on the starlet? Started making some towers to go around the towers. getting the sheet to do what i wanted wasn't much fun,, but turned out alright after being thrown on the floor a few times not much clearance to turbo is main issue5 points
-
I got this off trademe, it has possibly the worst welding I've ever seen...but with minimal effort myself and mate of mine got it going last night. My mate reckons it looks like something out of a war torn African province, just gotta add a few machine guns and a flag! Hence the nickname. Now anything that goes is a rarity in my life...so this bad boy is fast becoming a favorite. Kj3 points
-
Had a good time at the Beach Hop, took a relaxing approach and only did one of the major runs (to Whitianga). Car went well, except for a little driver error where I took a slight short cut across the lawn of the place next door to the one we were renting (huge grass frontage with no fences in this area) after dropping a couple of people off on Saturday afternoon. Suspension was on low driving position, fine for road use but not so fine when there are low-level tree stumps hidden in the grass. I collect two of them, one right in the sump, and the other along the drivers side sill (which I didn't even notice for a few weeks). Made a hell of bang! Anyway, there we no leaks or knocks and the oil pressure was good so we drove home with no problems over the next couple of days. Car needs a WOF so I wanted to take a look underneath and also fix the sump so I moved it onto the lift yesterday. I couldn't see any other damage though so moved on to lifting the engine up again to remove the sump. I was a bit smarter this time and didn't drain the radiator and remove the hoses. Instead I unbolted the mounts so the radiator could lift up with the engine. Much less messy, and cheaper too as I just but $50 of antifreeze in it a few weeks ago. The sump gasket stayed stuck to the engine block so that was good. Also the oil pump driveshaft stayed in place so it was much easier overall. Oopsies So I beat that mostly flat again (still a small kink in the corner but I didn't want to cause a split/leak) The pickup is pressed into the flange and I think it had twisted up a bit. I tweaked it back down and put a couple of tacks on it so it won't fall off. To protect the sump - I don't want to take it off again anytime soon) I've made a skid plate from some 6mm steel plate that was lying around. I don't think it will bend much. It bolts on so I can change the oil. There didn't seem a good way to make space for the oil drain, but I can always do that in the future. Normally this area is well above the ground even with the suspension right down (can just drive like that if the road is smooth) but anything that is sticking up would be a problem. Now it should slide right over, although I'm slightly bothered that the steering linkage is just behind that round crossmember. I might weld an angle-iron 'breaker' across the plate to protect that. Just need to fill it with oil and charge the battery and it should be WOF-able.3 points
-
I squashed a non-dominant finger yesterday so didn't weld rust like I was going to, instead felt light dutys included cleaning and engine stuff. Everything is cleaned, bolts are still soaking, Block is honed and painted, pistons spotless and new rings on, mate took my front cover away to bead blast. I'll likely throw the bearings in this week and button up crank. Also pulled the Mazda carbs apart and cleaned, came up good so now to bribe someone to fizz together a manifold. Cam and followers are away to be gooderized and head stripped for a skim to bump up compression a little.3 points
-
Well even without oldschool company it was a good cruise down to Hamilton. Thanks to the good guys n girls at Midnight Upholstery for feeding my family and also thanks to everyone who put their cars on display at the open day. Decided to come home the long way and kept off State Highway 1 nearly all the way back, there are actually some great roads between Auckland and Hamilton and we should make an effort to have another go at this in the future. Hopefully we can get a few more cars on the road next time.3 points
-
Oh wow I've never had a page 2 on any of my threads before must be going up in the world!!!!! After I got the warrant I did a couple of tow missions even though I have yet to pay the rego. Now before I go on I wil say that things thing has always read a bit hot on the temp gauge and I always thought it was just wonky Holden thing (many of my previous Holdens were like this). so a Fortnight after the warrant I I went to Oamaru to pick up a fridge with trailer in tow, was an awesome drive there1 well going anywhere is awesome when your in a big old car. Temp was good Sitting just on the edge of the "normal Operating band" on the gauge. I then picked up my fridge and headed back through town. In Town i noticed the temp gauge rising when sitting idle in traffic it would stop rising when on the move. but it would not go down. On the outskirts of town I noticed that the rear was making a grinding sound and the engine was labouring to maintain speed. shit gets hotter again!! heaters on full noise!!! this helped got home 15km later and she blew the water pump hose. fucking coolant goes fucking everywhere! unloaded and parked the old bitch in the garage. By this stage I knew that it was time to sort out the cooling system. and investigate the rear brakes again as I had not long fixed the dragging issue it had after failing my warrant last June. I had a spare radiator out of an hq so I hoaried that in along with some spare radiator pipes I had laying around But That had a hole in it and didn't hold water!!. FUCK! so much for a temp fix on another note I got sick of the chrome shit under the bonnet so I dug out some spare rocker covers and repainted them along with the chrome air filter in wrinkle black. cos all the cool kids wrinkle shit these days moving on I sent my radiator Up to timaru to be cleaned out turns out it was 30% blocked according to the radiator shop. still yet to fit this right and finally the brakes finally got round to looking at this today (Always busy with other things hence why I dont do as much car work as I'd like to) one of the caliper bolts had decided to go AWOL so I pulled its mate out looks like I will have to take a trip to the engineering shop for another bolt also Scored some other goodies I have an 85A Alternator off a VP V6 that with a pulley change a few wiring mods will go on to the car as its exactly the same as the Factory alt. And some Twin AU thermo fans that will go in at a later date if shit continues to run hotter than I like. On another not I came across an Photo of my old Mini from 10 years ago had a very hot cam, exhaust and a Sidedraught Weber. It went that fuckin' hard it was3 points
-
So 2 weeks before moving to the US this happens! Guy in OZ is rebuilding a T57 and needed a new block. So got to and cast one up! Didnt go 100% but still really well. On a plane to LA in 3days!3 points
-
not an exciting update today, more cutting, welding and grinding. i made my first ever patches that weren't flat pieces today too. had mad fun doing it too, Stan would draw the outline of the piece he wanted on the steel, then i'd make the cardboard template, cut out the piece with a nibbler (crazy fun to use) and attempt to bend and hammer it into a shape that resembled the original before cutting out the rotten piece. Stan would look at it, frown, give it a few taps after me spending 20 minutes on it and it looking like shit, within 20 seconds he had a perfectly shaped panel. thats experience for you. I had awesome fun learning basics of how to shape, shrink and stretch though. inimal pictures too cos the day just flew but i'll take some more soon anyway. she's looking like she might turn out alright after all. this picture really doesnt do justice to the work it took to rebuild the whole inner sill at the front, but most on here are far more skilled than me and know exactly the time and steps it takes anyway. plus with welding sparks and grinding dust all over the place i kept my camera across the workshop so it was a ballache to keep getting it. i wonder why this piece rotted out! also i've scored a sedan rear axle with lsd diff and disk brakes, i'm unsure out of what though. it was fitted to an XF sedan, did these come with rear disks? and i know i cant swap the whole thing over cos coil and leaf springs difference but does anyone know it i can swap the insides like for like? i havent started to look into it yet, but just after some info. chur. //oldschool.co.nz/index.php?/topic/54385-mighty-joes-xf-falcoon-of-filth/2 points
-
Trimmed each side of frame. Left hand side slightly more than right. screen capturecertificity.com And probably the most important note, make sure the motors drive shaft is aligned with the centere of the swing arm for the chain to clear either side. This pic show the motor 30mm to low. Also make sure the motor is mounted parallel to frame otherwise the output shaft will drive on an angle can cause the seal to leak picture hostingcertificity.com Cut some tabs upload images freecertificity.com temp image uploadcertificity.com Add some kneed-it or LPG mig them in place (Rusty chain is temp to confirm all aligned ok) uploadimagecertificity.com Cross fingers they don't fall off. Looking at pic's probably should have made the tabs have a slightly larger lap onto the frame, feels solid enough for now.2 points
-
Before I could commit to any further work on the bike, I needed to know if the engine even ran. Before I can even see if the engine runs I need to remove the fuel tank, drain it and see if im getting fuel to the carbs. The tank is pretty easy to remove once the seat is off. You need to remove the little cubby box at the front of the tank Under that, and at the rear of the tank under where the seat would be, are four bolts. Two long at the rear and two shorter at the front (they are removed in the photos already) The guide I was using said to take the handle off the fuel tap. Not sure why, maybe just to reduce the chances of breaking it. The top fuel hose on the fuel pump is the inlet, so off that comes, and then it’s a matter of lifting off the tank. I forgot to take a photo, but under the tank is the air box (big black box in above photo). The filter in it was in good shape, so that’s one less thing to buy. I pulled the air box off, and finally had access to the carbs Before doing anything else with the carbs, I drained the fuel tank. I had issues draining through the fuel tap and filter, there just wasn’t any flow, so I resorted to just tipping it out the filler. This was a bit messy, but quick. The bad news? The tank is rusty. What I thought was half a tank of gas, turned out to be about a litre of petrol and half a tank of rusty water. Guess that explains the flow issue. The inside of the tank is rusty. Not too flaky, but will need to be worked to get rid of the rust. It doesn’t look deep, and there are no signs of it coming through that I have noticed. I can still see patches of clean metal around the place, which is a good sign. There are a few different methods for removing the rust. You can fill the tank with water, nuts, and bolts and shake like mad. The preferred method (because I like to make everything more difficult) is electrolysis, or removing the rust using a sacrificial bit of metal and lots of electricity. I’ll look further into this, but I think the tank can be saved. The other thing I had to do before I could crank the engine, was to drain the oil and fill with fresh oil and a new filter. Remember the old filter? Yeah that’s been replaced And although the oil was thick, black and really bad smelling, it had no chunks or metal flakes in it. I filled up with 2.7L of Penrite MC4ST 10W50 semi-synthetic motorbike oil. Nice golden colour. Now, because I still haven’t purchased a new battery (don’t want to invest $100 into a battery if the engine is poked), I had to use the big 500CCA one I removed from the Rover…… Lets just say I don’t have a photo as it was bit of a dodgy setup using really long home-made jumper leads and clips just hanging on the bikes battery terminals…. but it worked We have power! All the lights work, even the hazards Speaking of dodgy, this was my “fuel tank” to try to supply fuel to the carbs Yeah, that’s probably not that safe. Oh well, fire extinguisher was near by! Anyway, the carbs didn’t take much fuel at all during the testing. Whether that’s because they need to be fed with the fuel pump, or because they just aren’t in good shape, I don’t know, but I ended up feeding fuel straight down the throat of the carb. After much cranking, something amazing happened…. It made vroom vroom noises. First start in at least 2 years (if not 4, depending on when the owner last started it). Engine ran good for the couple of seconds it was running, with no bad noises. Exhaust sounds awesome, even when it’s only hitting 5000rpm or so. Cant wait to hear it at 15,000rpm! So the engine runs. The carbs are in dire need of a rebuild and the tank needs the rust removed, but otherwise its all fairly straight forward now. I don’t know if the gearbox does gearbox stuff, but I’ll deal with that later.2 points
-
Well, ive been trying to get this old nugget going again. I have been working on it off and on over summer, when it wasnt too hot and I could be bothered. Firstly, i put some decent wheels on it : SSR Longchamp XR4 15x7.5 -14 Rear. 15x7.0 +11 Front. Was a real hassle getting them polished and machined up locally but got there in the end. Fitted the biggest front mount intercooler that I could for the size available. 3 full days of cutting carefully, making mounts etc. and I probably had the fucking thing in and out 20 times. 300X600X76 Aeroflow core with 3 inch end tanks. It was cheap and should be ample for my needs. Sorted a turbo smart 38mm external wastegate, Started the wiring, pretty basic really. I bought a new N14 GTIR alloy radiator - fits this engine bay pretty well and am about to start mocking up the aluminuim intercooler pipes next. Also fitted a genuine Walbro 255L fuel pump, was a bit of pissing around but got it mounted eventually. No rust in the fuel tank, not a single spec! Pretty happy with that. The saga continues, should be running in a few weeks hopefully.2 points
-
Evidence it moved: Engine bay, some stuff is still temporary: My washing line:
2 points
-
Post Nats update: Tightened front left wheel bearing, rolled guards a bit more, installed oil, de-greased some bits, changed polarity of windscreen washer so that it squirts instead of sucks. Will remember to take pics next time. Things to do: Fix brake shudder. Still driving it lots. Weekend jaunt on some closed roads (it said ROAD CLOSED AHEAD, not road closed....) around the Clevedon coast with some OSGCs.2 points
-
I dont have anything in particular to say right now, except for that I've started working at HP Academy in Queenstown. I have learned a mind blowing amount of stuff from Andre and co already. Motec M150 is just some next level shit. Sheezus. With the M150 you can write your own code for the firmware, today we were trying idea of IMAP / EMAP as a load axis. (intake manifold pressure divided by exhaust manifold pressure pre turbo) Which is a bit of a mind bender to me but apparently this compensates for VE changes etc relating to altitude and turbine efficiency way better than just MAP or MGP. Next step is to take the GT86 for a hoon up a mountain and see how well the AFR stays on target. I'm not sure if it's obvious from this post yet but holy crapping Christ. What a company to work for. The other day Tony Quinn's Pikes peak car was in for a tune before heading off again. It runs a VR38DETT mid mounted, runs two turbos > two intercoolers > two plenums (connected with a balance pipe) Looking at the intercoolers with the thermal camera we found a 20 degree temp difference left to right. Some more poking around from there and we found that one of the intercooler hose clamps was loose, so intercooler on that side had lower mass flow so lower temp. TL;DR: This thing is a fucking weapon, Andre got another 100hp out of it just with tuning. Same boost. ~950kg and now ~605hp atw with plenty of head room. Just stopped there because he wasnt sure if it will still be drivable, going to Highlands for testing on Saturday.2 points
-
You're welcome to message me if you need to tackle something you can't find online1 point
-
either way, your rolling through it at a cracking pace. it's embarrassed me into doing stuff.1 point
-
After all the organisation, only one of us went. Ouch. Oh well. Screw that stupid foot of mine.1 point
-
top work on that 1/4 window area - I cut that shit out and got someone to shape it because of all the complex curves; looks like you got it nailed.1 point
-
Question is with the bits left over do I attempt to build one up from virtually scratch . I'll need a frame for starters . TM has one but it's way down the bottom of the South Island , so freight is the killer
1 point
-
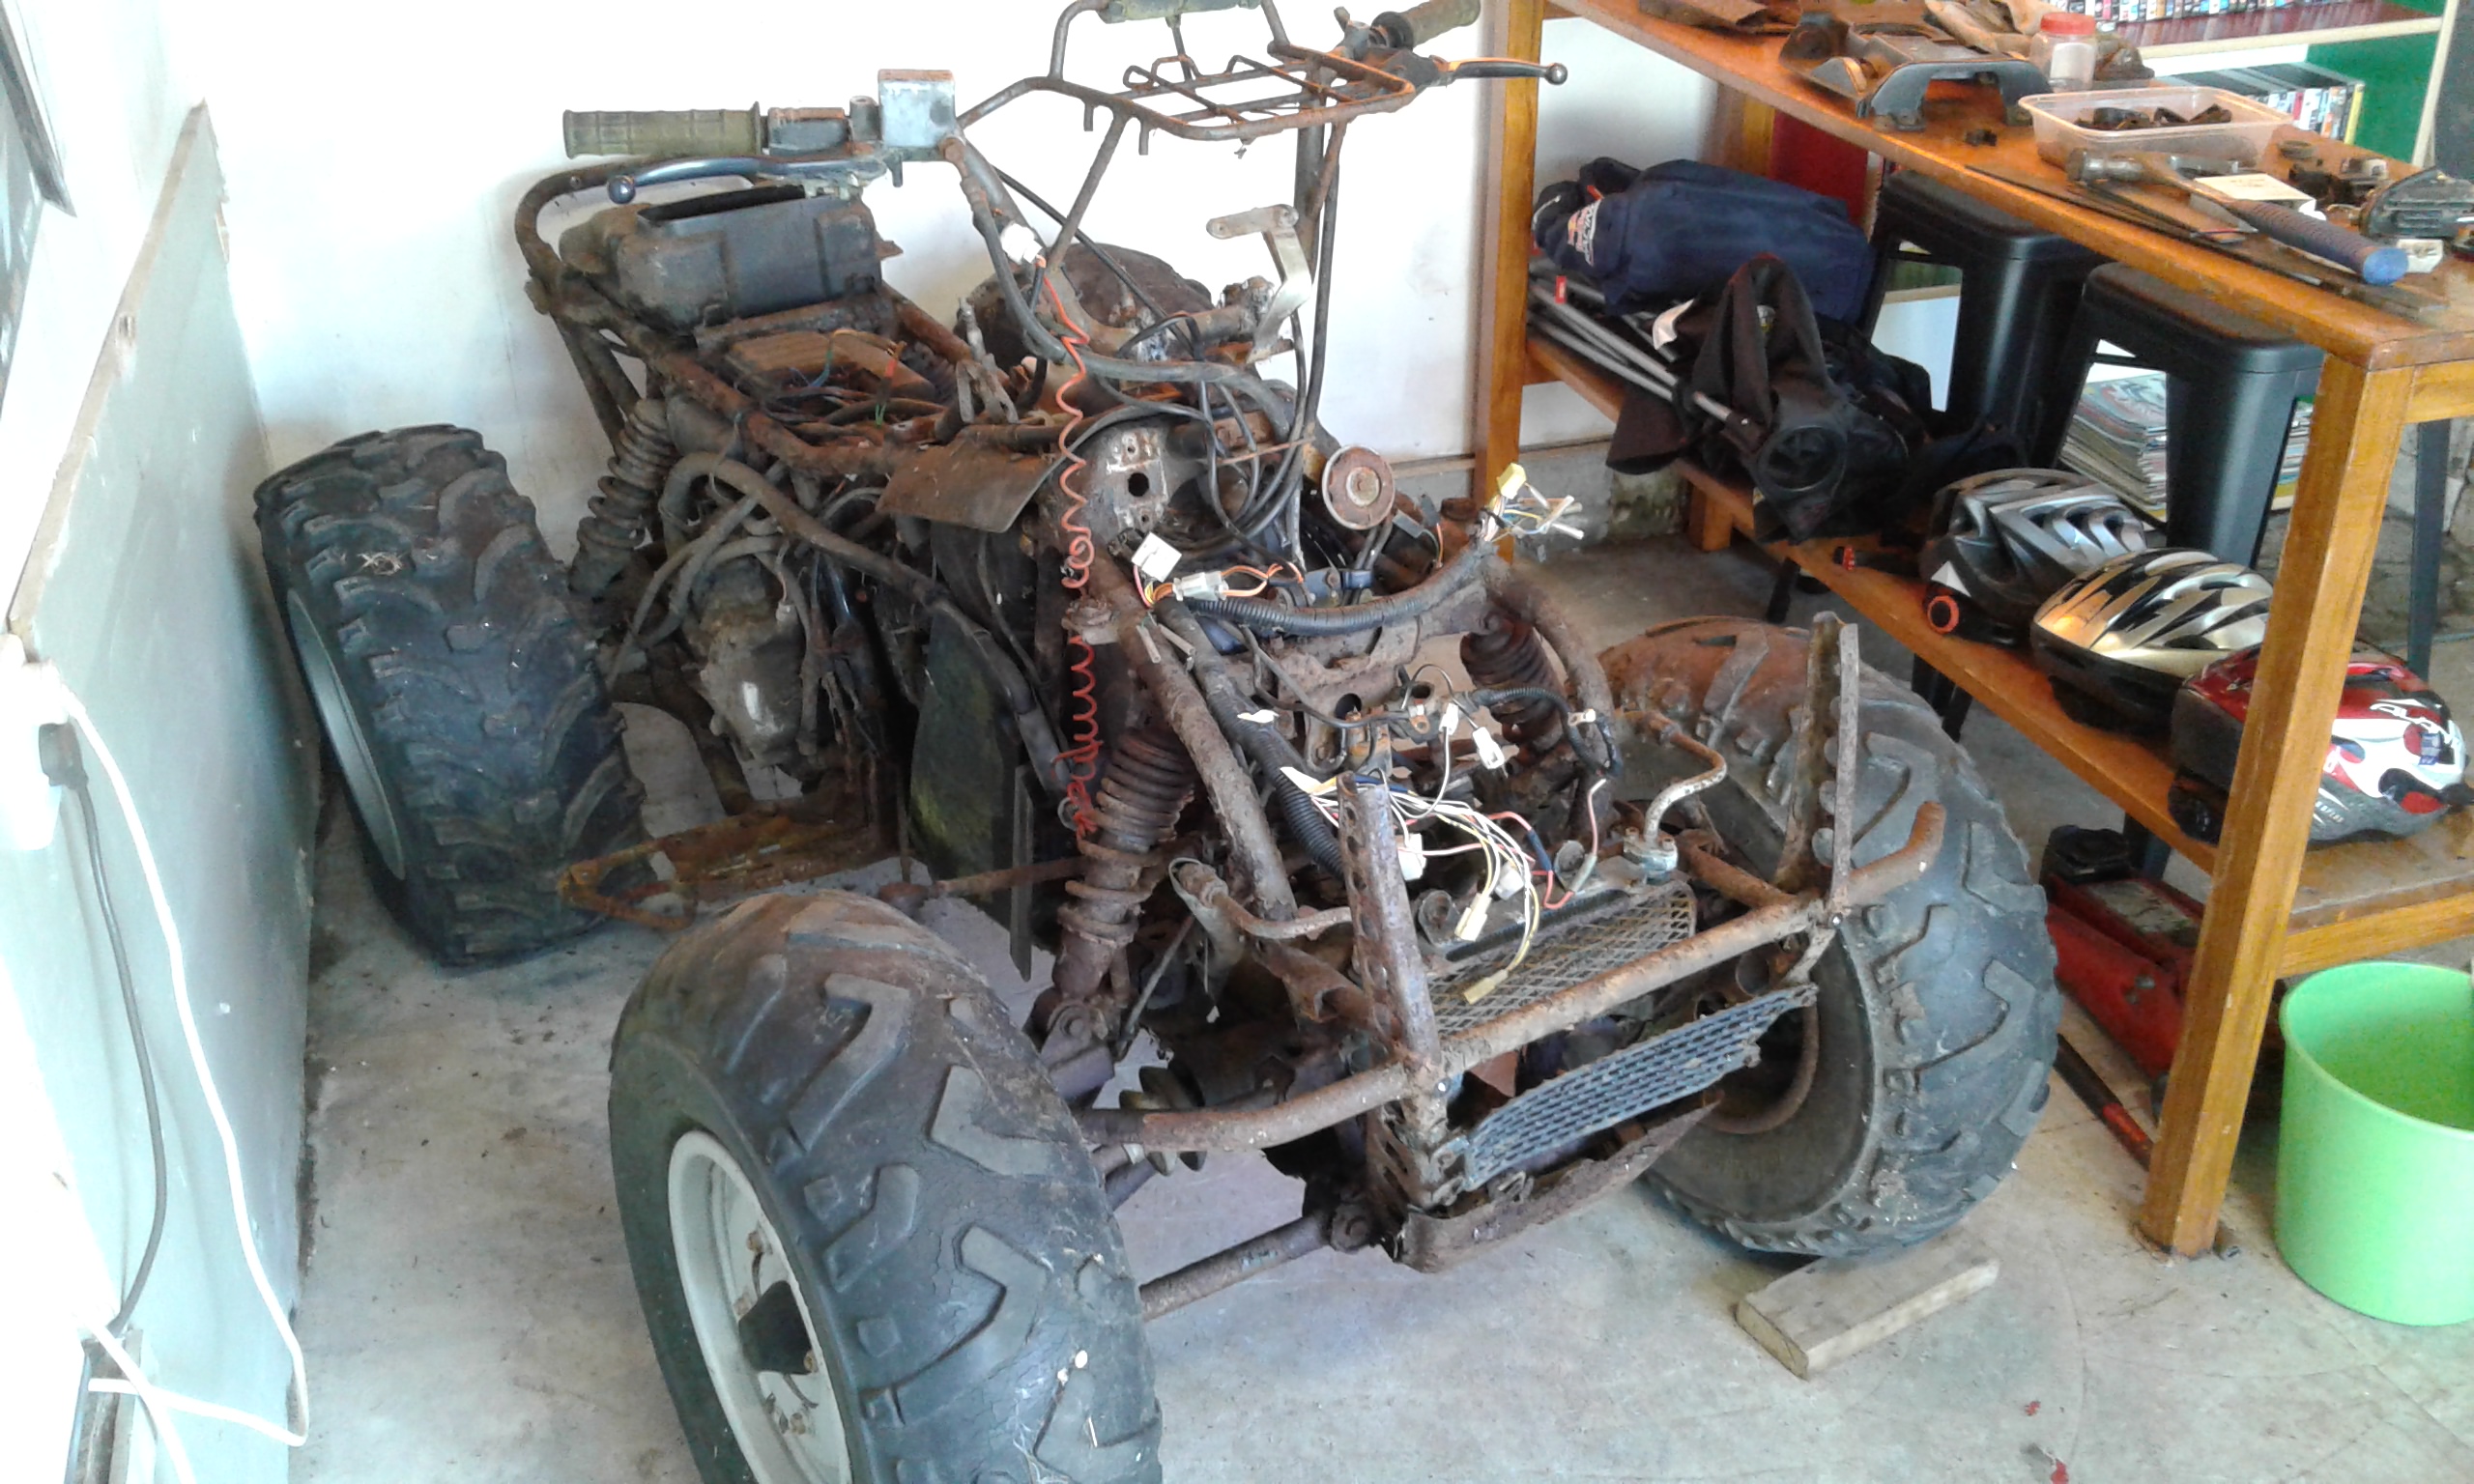
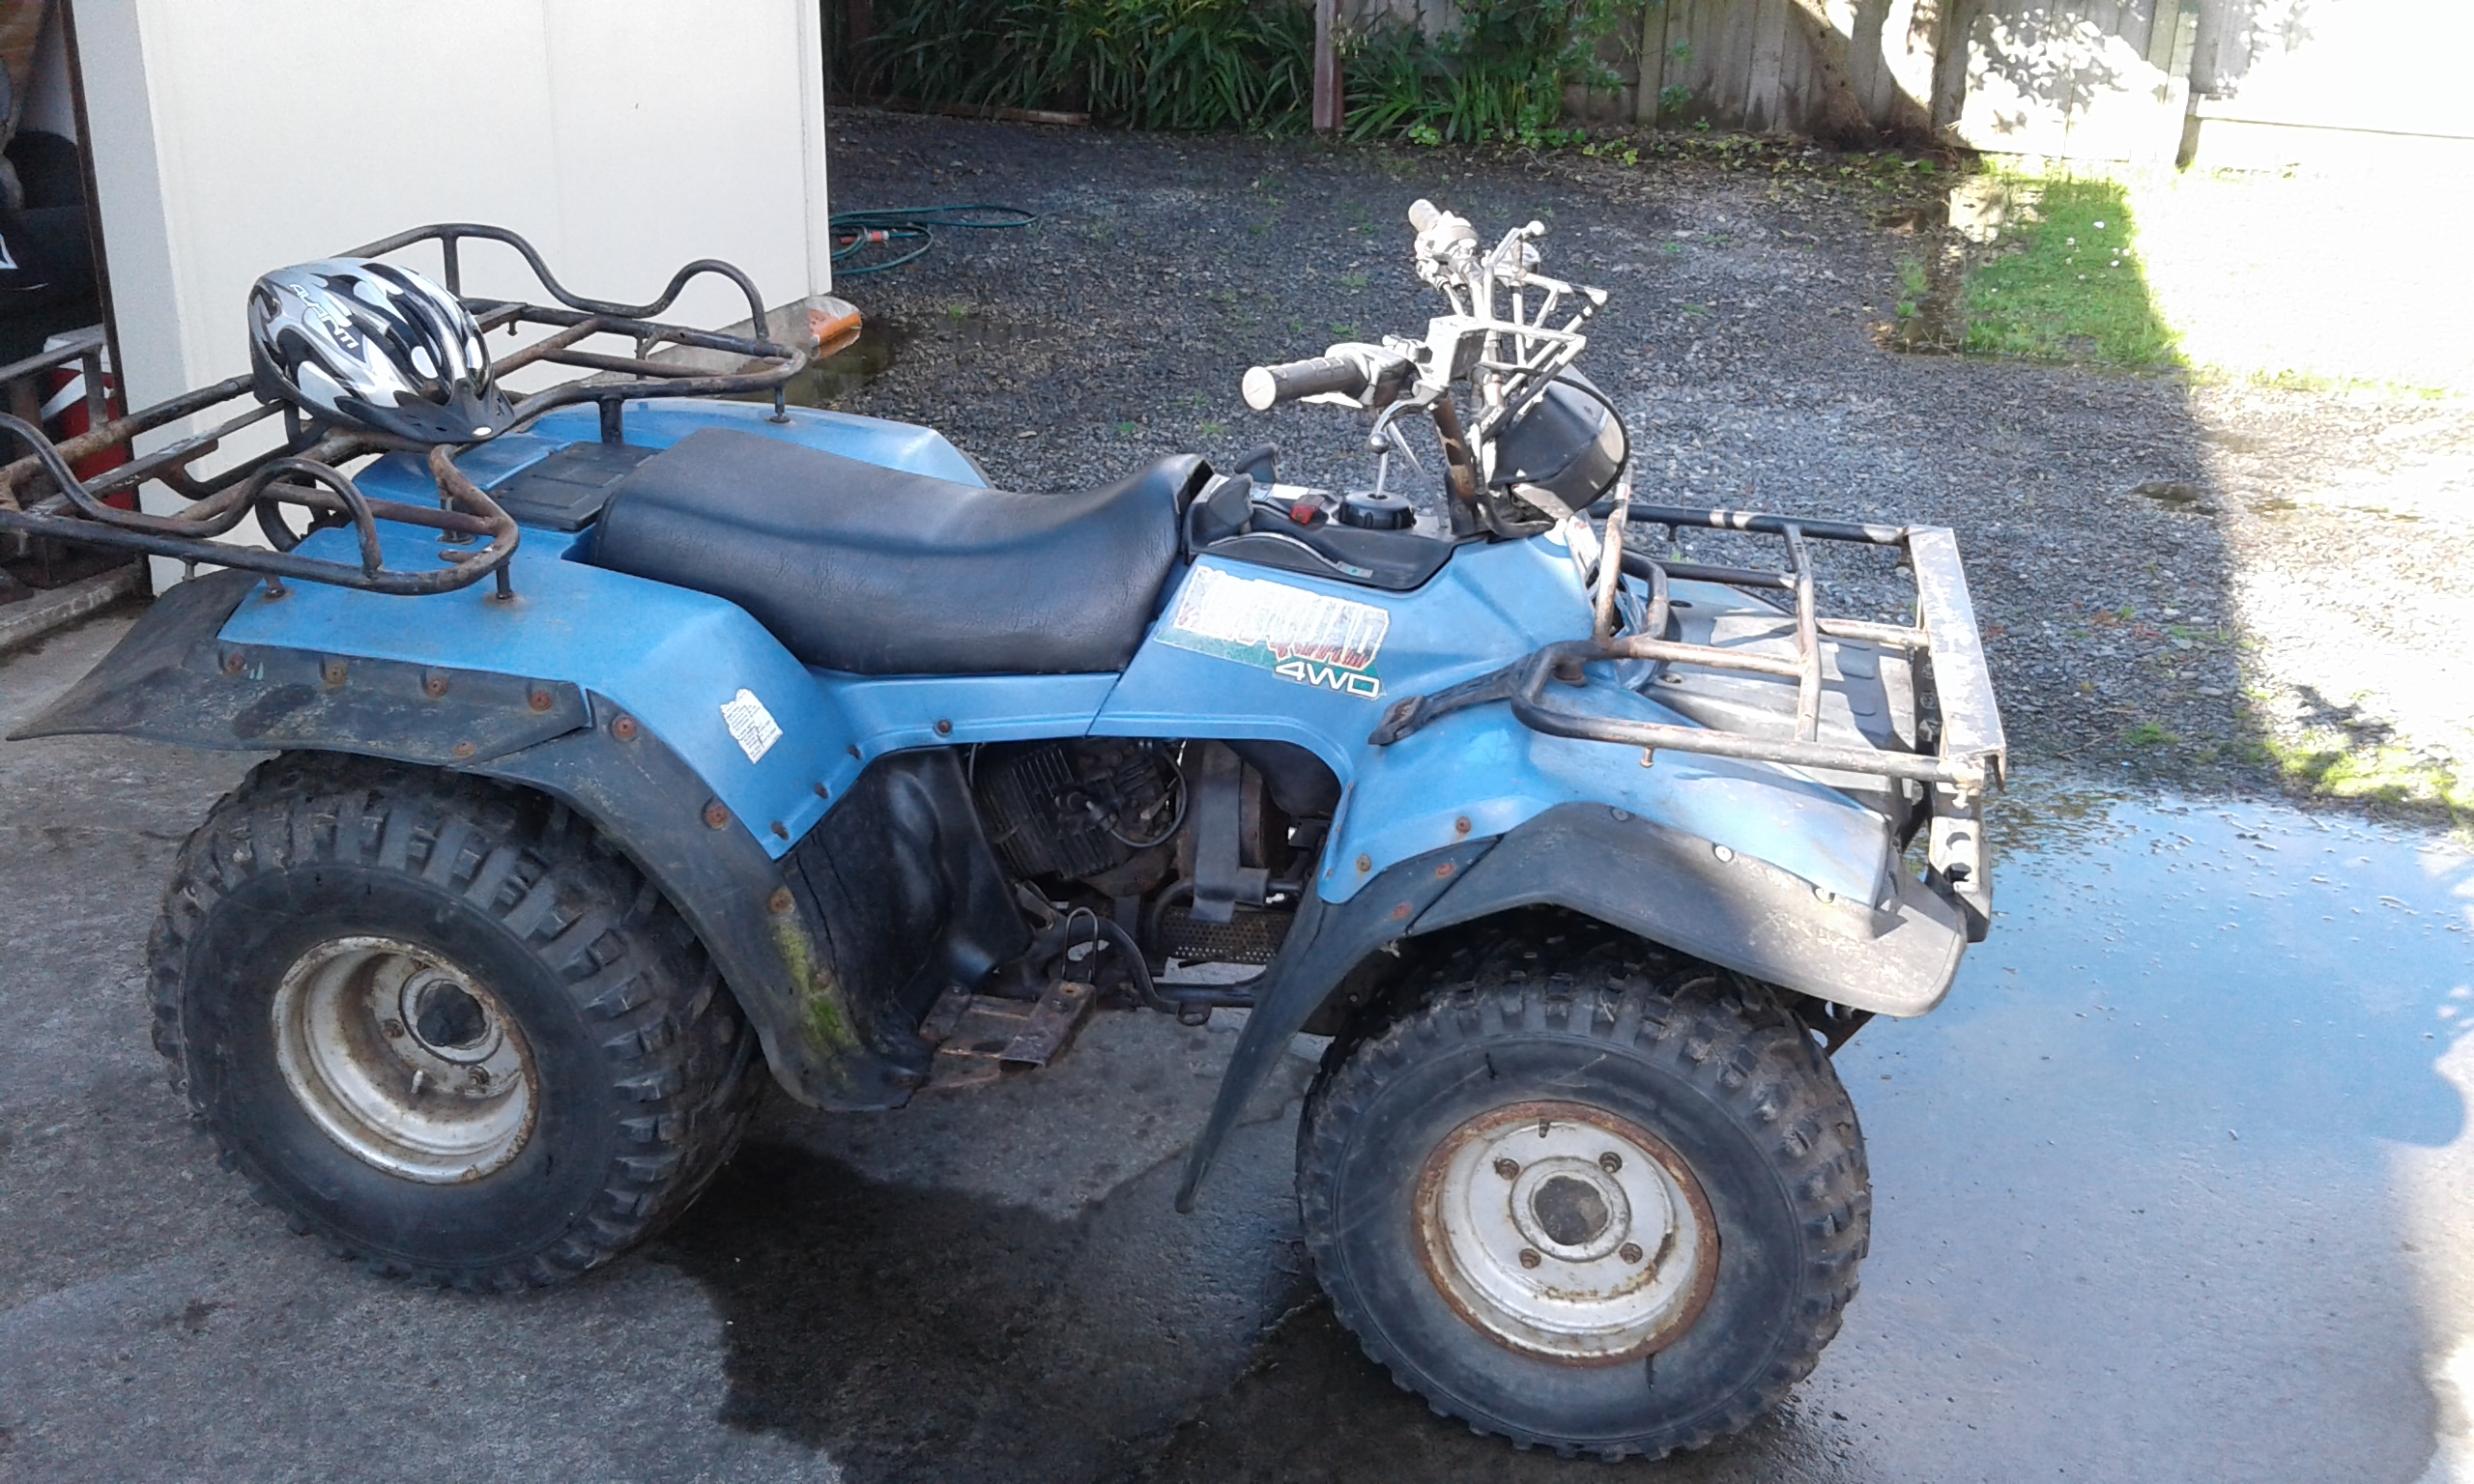
Sizes will be important especially in 4WD. Have almost finished reassembling the Quadrunner ...now it's a King Quad!
1 point
-
Looks to be a standard Bosch EV1 plug? Should find them on Holdens and Euros at Pick A Part / Zebra. Worth a try anyway.1 point
-
AWESOME! It's alive, it's alive! Google tells me there are heaps of ways to remove rust from fuel tanks. Be interested to see what method you go for and how well it works.1 point
-
Picked scabs while waiting for paint to dry on the fuel tank that needed a tidy.
1 point
-
It cannot be stoppedThe train is fueled by chopped bodiesFilled with sorrowThere is no tomorrowTicket is your lifeEnded by a knifeCalled the murder trainEternity of painOh yeah, you know what I'm talking aboutThere is no escape but deathYour life is justA murder train a-comin Nice job on the cab! My condolences on being shanghaied into railways lyf.1 point
-
Nah it will be Hindustan electrics. Indian knockoffs of lucas1 point
-
I used to be a train nerd, then worked for the company...it gets beaten out of you pretty quick when its the daily slog.1 point
-
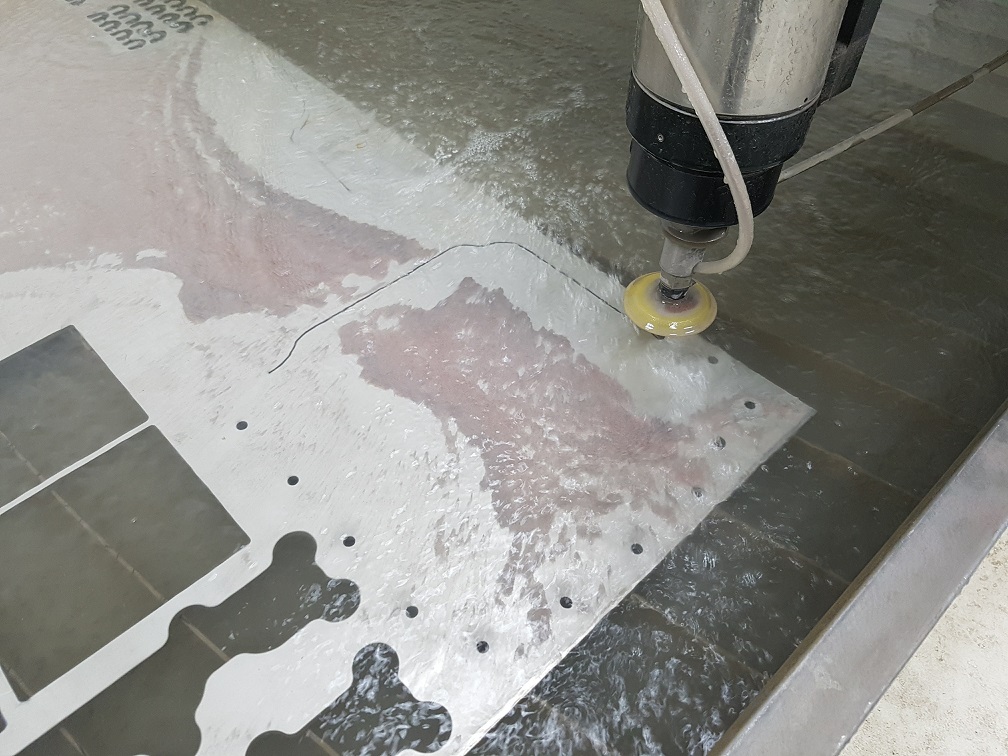
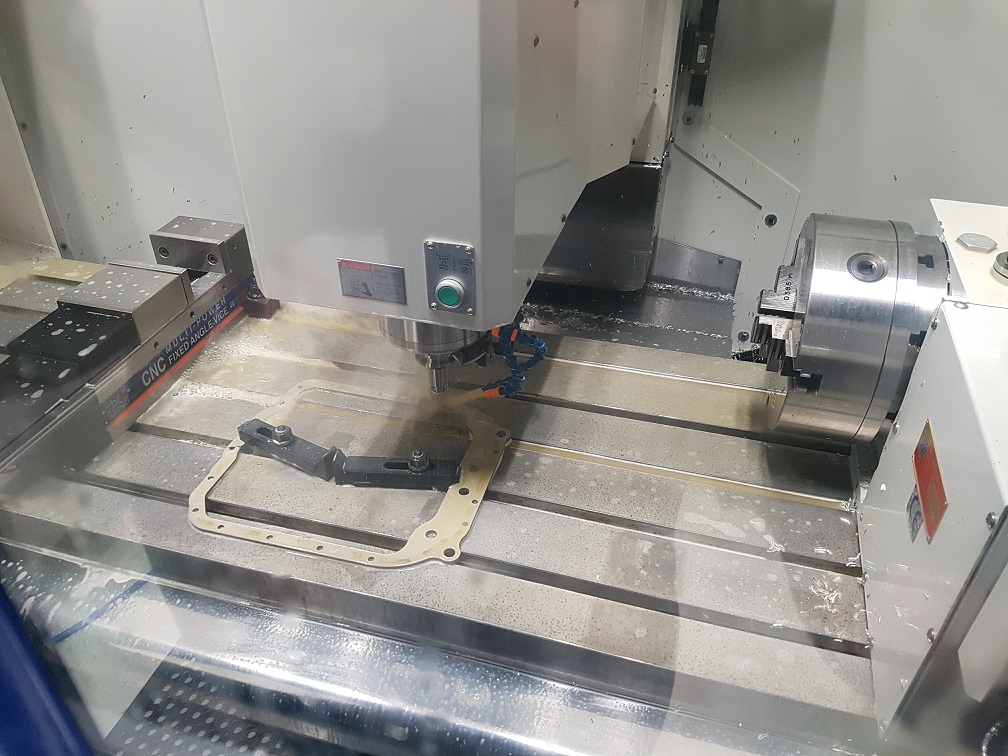
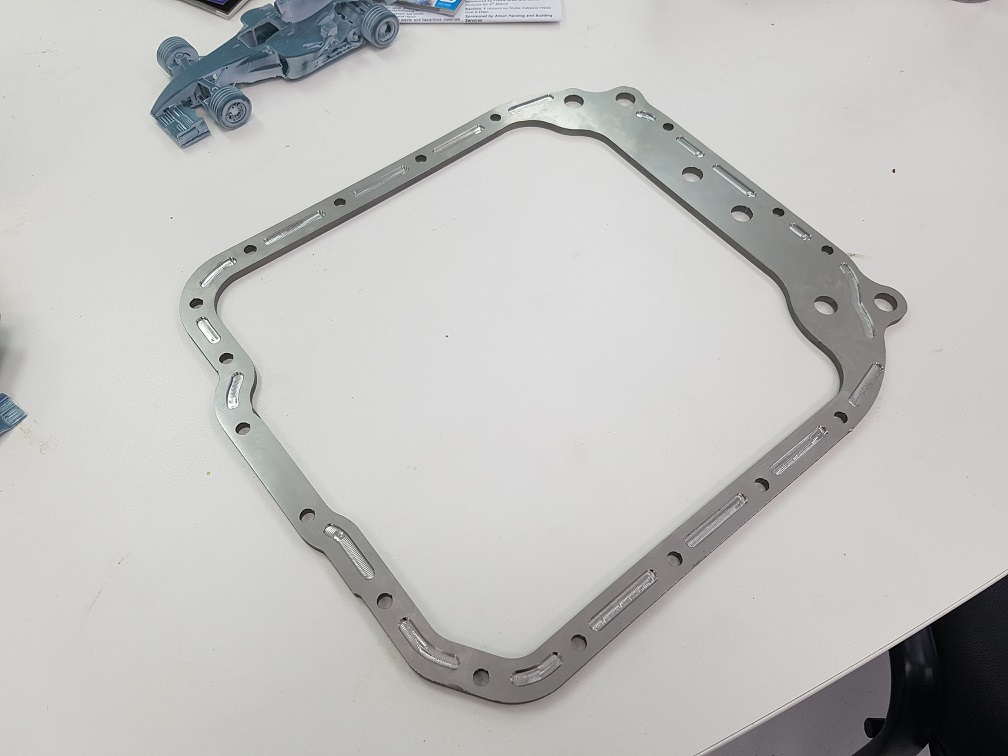
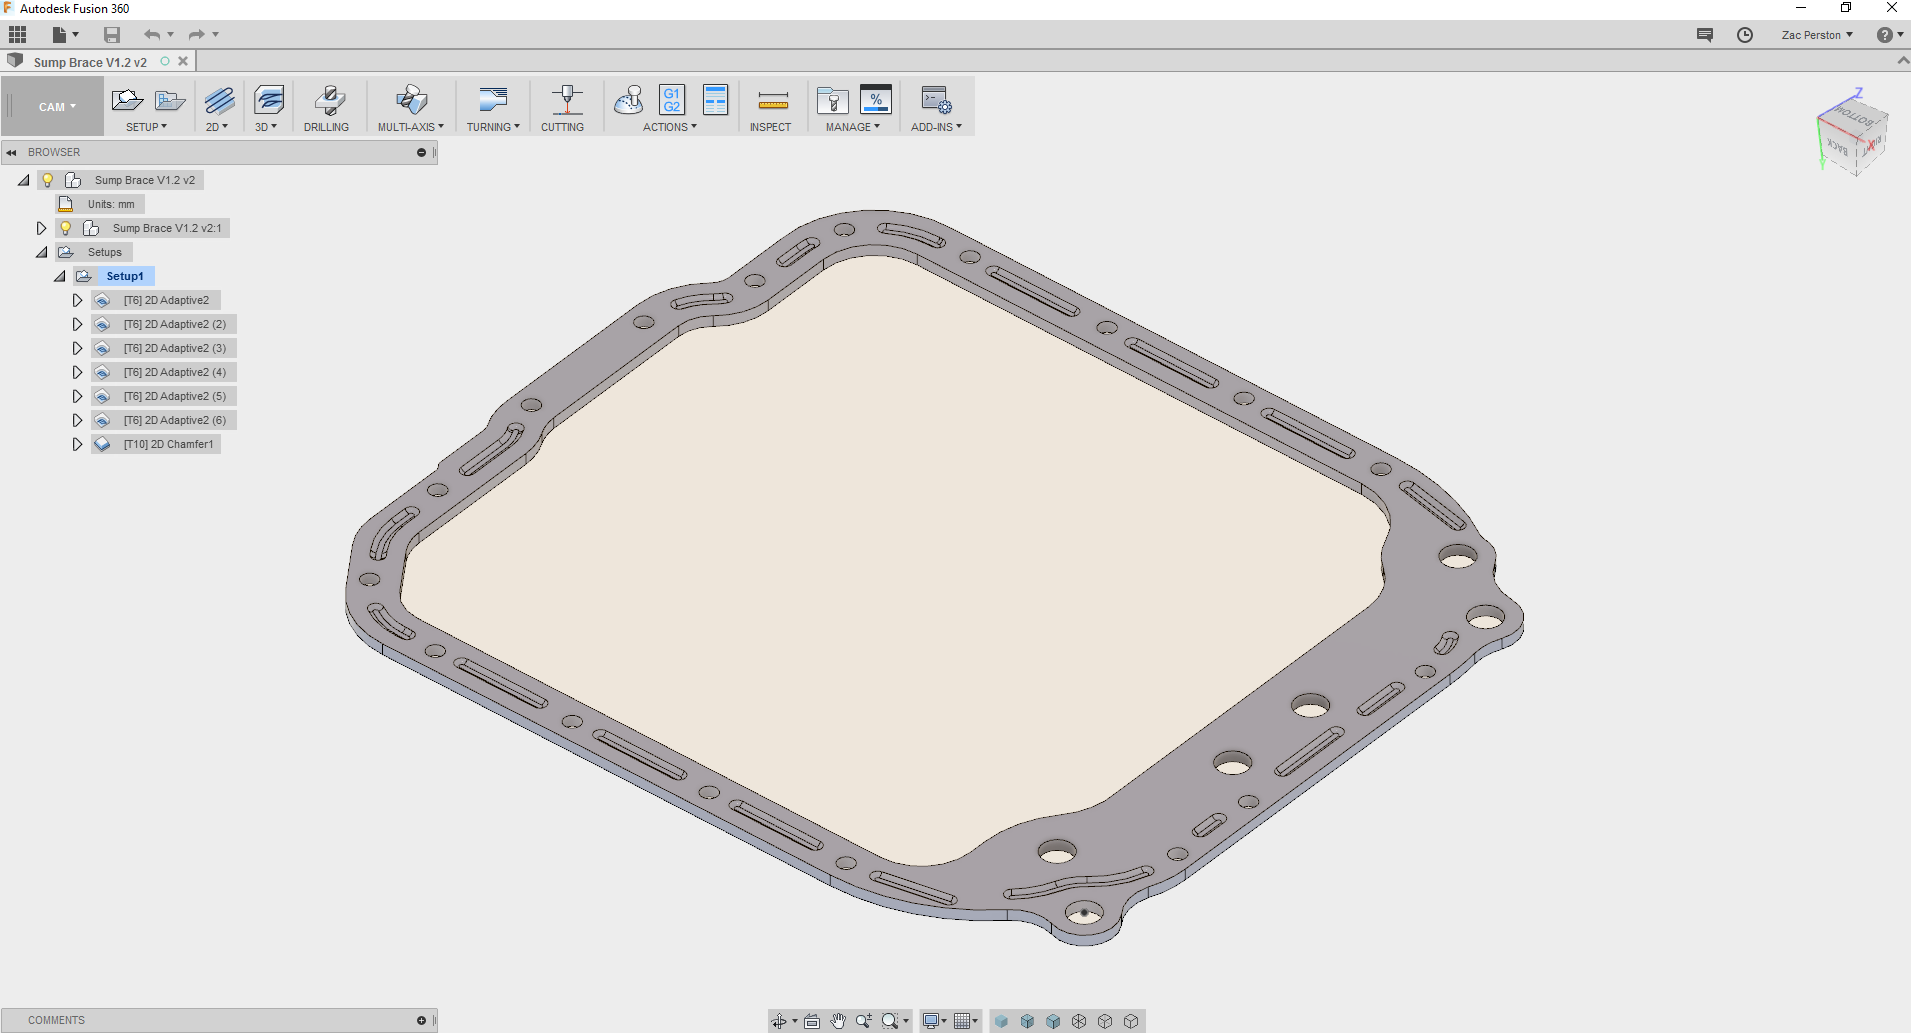
Right, to get back to where I was lastnight before I was called away for Pizza and Wine (oh, gosh, what a chore my life is....) Babies. Go have one. Now, honest, totes legit an awesome time :-). There are shit parts, but wow, overall its actually pretty awesome. Work has been really busy, surprise surprise. I did _a lot_ of this: In order to get the car we've just finished building going: And go it does. The new track at work has been sealed, its got an (almost) straight that is about 1k long. Listening to this thing bang gears down there is pretty awesome. We've all been promised a drive, but I'll believe that when it actually happens. Sooo, back to RX7 related things :-). Because I'm an idiot and could just go the easy way, I gave making (instead of buying) a sump brace a go. Lots of tracing and scanning got me a cad model of what I wanted. I used a table cutter to cut out an outline of what I'd cad'd on paper, to see if I was on the right track. It all matched up to the gasket, so I committed and cut the profile out of 1/4" 316 stainless on the waterjet: One of the first jobs I had when I got to work was to get the waterjet cutter sorted. Its a Chinese machine, with some terribly translated NCStudio software on the controller PC. With a bit of finesse though, I can hold a pretty decent tolerance on it, around 5 thou or so if I really try. This job didn't require such accuracy though, so I didn't replace the orifice or nozzle or anything, 0.25mm is close enough! The profile cut out really nicely, and matched the gasket spot on. One thing that bugged me though, and seems to be the same on most of the commercially available sump braces, is that they don't have reliefs cut for the stiffening ridges pressed into the FD sump flange. As you bolt the brace up, it would just squash them flat into the block. With a bit of white paint to outline the ridges, and a few photos, I got the location of the ridges onto my model, and cam'd up some toolpaths for the CNC mill: Yeah, an example of brilliant fixturing once more, but it worked and didn't chatter... much. Was my first time machining stainless, with a 3mm end mill none the less. No breakages and actually a really good surface finish. GWizard is my friend. I grabbed some new fastening hardware, as the bolts originally holding the sump on were a bit of a eclectic collection. A coupe of them were actually too long and weren't clamping the sump flange at all, no doubt contributing to the leaky leaky... A thorough cleaning later, tapping out all the holes to remove old sealant and the sump went back on. There was also a broken 6mm tap incident that put a hold on play for a couple of days till I figured out how to get it out... heh. I used grey 3-bond sealant, as it is 100% the best stuff I've ever dealt with. Its one of those products that has a distinctive smell. You know if you ingest of inhale it, its going to be really bad for you, so that means it must do a fantastic job. Honestly though, if you're sealing a sump on, its the only way to go. So that will be the oil leak from the rear of the sump fixed, woohoo. The engine mounts will now be sitting 1/4" lower then they were (thickness of the sump brace), raising up the motor 1/4"... However, when I took the motor out I wasn't really happy with the condition of the factory mounts. They were 'ok', but could be better. Some googling later, and I discovered that factory replacement mounts are really really bloody expensive! Some more googling of engine mount suppliers, and I found that 1979 - 1997 land rover engine mounts are a similar studded hockey puck design, and almost expactly 6mm shorter than the factory RX7 mounts... Perfect, that'll sit the motor back in its original location :-). I'll post another update later on with some info on where the intake / sensor system is up to, and the turbos. Cool stuff going on there :-). Cheers all.
1 point
-
The little Fiat seemed to be running horrendously rich. There was fuel oozing out around the emulsion tube due to a bad seal. Also, it turns out the mixture screw was set 7 full turns out... 6 and a half turns in later and it's much better. I took it for a good fang up the road and the plugs are a much nicer colour. 3 days after this, a carb kit turned up. So easy to get at, I love it. Minutes later... Take one of these and call me in the morning.
1 point
-
The rear callipers are now secured to the diff and were spot on using the brackets I had fabbed up. Old School FXGT callipers (fit under 13” wheels) Series 2 RX7 new discs 4 x 110 I’m replacing the countersunk stainless brake disc screws for more high tensile options and probably moving away from the allen key also. The old hard line is in place however I need to cut and flare/adapt to suit soft lines. These will need to be custom as the FXGT callipers are fine thread and the old Mazda is coarse thread. I might be able to fire the LH soft line directly to the T junction if I play my cards right… Another step closer…..keen as to button up the rear end so I can move onto the fuel system and wiring.1 point
-
Spent some time on the weekend with the help of @kempy with good results. Some of the stuff I remember: Changed one-way valves on injector pump, cleaned points, bled injectors, replaced injector, adjusted fuel regulator to 110psi pressure, cleared return line, adjusted overfuel lever, replaced 6 (yes 6) totally dead spark plugs, re-timed and marked ignition, swapped distributors, lost all the hair on my arms and temporary hearing whilst fireball from backfire on intake gave @Geophy and @Threeonthetree a good laugh (possibly due to me holding a can of engine start that was also on fire) and then started car. Next steps - sounds like slight miss on one cylinder but no cooling system plumbed in, so, reinstall radiator, tweak, and do skids / road test / fix all the other stuff I find broke. Finally making progress = win.1 point
-
Well now it looks good in and out its time to make it move faster! (Yes i still haven't cut and buffed it because I feel I can put it off for a lot longer X-D) As part payment for hacking the rust out of Bart's Val, he's given me this A15. I got the headers a while back in preparation. I tore it to bits today and she is a pearler! Still standard everywhere and bores are sweeter than a hot damn. Im making moves to grind a wee cam to help it along and will run GT 323 twin carbs on a modified manifold. They are a veeery similar design to standard Datsun but likely updated a bit, mine have airbox and linkages and all that shit to make it easier. (sitting on a spare A12) It's a bit like the twin K-series Toyota carb conversion which used to be the go-to mod when they were more common.1 point
-
More positive post1 point
-
yeh hilux lsd's are junk. they have no ramps, just rely on preload. so once you go past the preload they will single spin. can preload the shit out of them, but then its just a locker. unlike a proper clutch type lsd, the more power you throw at them the harder they will lock up1 point
-
Chassis end panhard mount. Yep the drag link goes through the middle of the bracket Ive given up on the whole offroad thing. going stance spec still got about 3" of droop and 2" up to go. need a forklift. likely have to go softer on the front springs, will see what happens once all the junk on the tray goes back in the engine bay1 point
-
After much contorting, sweating and swearing, the side glass and rubbers are all in on the coupe. I just need to fit the door cards and window felts and jobs a goodin. I tore my hood lining the other day….sooo I’m having to buy another $300-$350. I’m not entirely looking forward to fitting it… The engine front mount bracket has been ditched…..the engine was at 8 degrees which is way too much of an angle. This was due to the fact that I’m running a 13b turbo box (89-91 FC RX7) which is substantially taller in the main body than the series 1-3 box. This means it limits the angle as the top of the box contacts the tunnel roof. I’m now getting a custom front bracket that will lover the block 5cm ish which puts the drive train at an acceptable angle. The sump is sitting on a spacer 20mm off the cross member at the moment - now the clutch slave clears the tunnel. Now I need to get a drive shaft made to suit and then set the entire drive train up so that I’m happy with all the angles. THEN the front bracket can be made…THEN the custom quad throttle body intake manifold can then be made to suit the angle of the block. I got a drive shaft off a mate however it appears to be 20mm too short unfortunately - when you are talking about a high revving engine, you really want the drive shaft to be on point etc. Yes I have a loop to go in. I also tidied up and prepped the diff brake line and fitted a new hose I had hanging about the place 4 steps forward, 6 back….1 point
-
That's why we banned the 1100 Kent with extractors. Driveshaft twisting torque.1 point
-
Got this bike a few months ago. Pretty sweet. Probably going to keep it stock as its pretty mint but might be swayed into some cheeky mods if I can easily revert the bike back to stock. Sounds good and found out a couple of weekends ago that it does good burnouts.
1 point
-
You can't just say "build space stuff" then bugger off. SPACE STUFF!!1 point
-
Diff is all together apart from the odd bolts here and there. I just need some high tensile ones for the flange ends as these will hold on my caliper brackets therefore the standard ones won't do. This is also good as I can't find them. FML. Hopefully this week, I can have the rear end rolling and the adjusties wound down A few of the Rotor West lads chipped in and got a tyre machine and balancer off trademe. We fired it up last Friday and now I have tyres on my hotwires. Oh, my custom rad and cooler turned up the other day - quality bit of kit right there1 point
-
24 spline old school Mazda LSD rebuilt with new bearings etc and a 4:4 crown wheel and pinion from an RX7. Should give it more snap from the old 3:91 point
-
Yeap Soooooo I caved and tidied up my pedal box - passivated bits, paint and new rubbers…. The door window mechanisms got some lovin also The door felt metal trim got a spruce up also - good old black paint anti rust I painted the rusty door frame, as I am a firm believer of black door frames on RX2 coupes - as much as I liked the patina Glass in and all rubbers excl the door card Suspension is done any day now. S5 13bt box has had another mod with MX5 remote shifter, so it should fit in the tunnel hole now. Mazda 24 spline LSD rebuilt with 4:4 gear and new bearings etc New rad and cooler coming up this week http://www.iforce.co.nz/1 point
-
Soooooo I caved and tidied up my pedal box - passivated bits, paint and new rubbers…. The door window mechanisms got some lovin also The door felt metal trim got a spruce up also - good old black paint anti rust I painted the rusty door frame, as I am a firm believer of black door frames on RX2 coupes - as much as I liked the patina Glass in and all rubbers excl the door card Suspension is done any day now. S5 13bt box has had another mod with MX5 remote shifter, so it should fit in the tunnel hole now. Mazda 24 spline LSD rebuilt with 4:4 gear and new bearings etc New rad and cooler coming up this week1 point
-
13’s Muffler Lovin Guards Car mocked on Spitties Steering NOS v used Before paint Prep the bay Another couple of primer filler coats then sunrise red Suspension this week from Koni Diff getting rebuilt and rear brake brackets sorted GAME ON!1 point
-
I can confirm this is Red and Japanese. P.S - Your boy is more switch on about cars than I am.1 point
-
It was a disaster in his rocky driveway and the cars kept trying to fall over so I said fuck it, the cars not as you described it so I'm taking your mags too and need to head off ASAP as it's getting dark/this things dodgy/ there's an epic gorge to cross/dunno if it charges or anything? Sweet as, put all my gear in, strapped the spare bonnet to the racks and headed out on dusk. About 200m down the gravel road there was a few decent thumps, a bang and the LR wheel fell off and jammed in the guard! It's worth mentioning the wheels were 15x10 with HUGE mcCreary tyres. There was one broken stud and nothing else! He didn't try and swap tyres on that wheel and I didn't notice any missing nuts nor did it drive weird on the test drive so I don't know what the go was there. It was full on horror movie rape scene spec, middle of nowhere, dense bush, dogs barking. Mrs went ballistic and Walked off to find nuts/ go back to their house. I put the tridents on the rear. She came back with 2 nuts. Then we gapped it! I was made to pull over and check all the nuts and the roof load every half an hour. Had trouble selecting 1 & 2 because the shifter bushes were gone so ended up starting in 3rd a bit until I got used to it. Because of this, we stalled on deaths corner on the steepest part of the gorge! I just loaded it up and rode it until we got moving, clutch smoke everywhere but crisis averted. Had some smokey lock-ups coming up to one lane bridges but no stress. Then the tailpipe broke off so wired that back up and carried on. Made it home, had whiskeys! Was shattered. Woke up to this:1 point


This leaderboard is set to Auckland/GMT+12:00