
Leaderboard


Popular Content
Showing content with the highest reputation on 04/25/17 in all areas
-
More positive post14 points
-
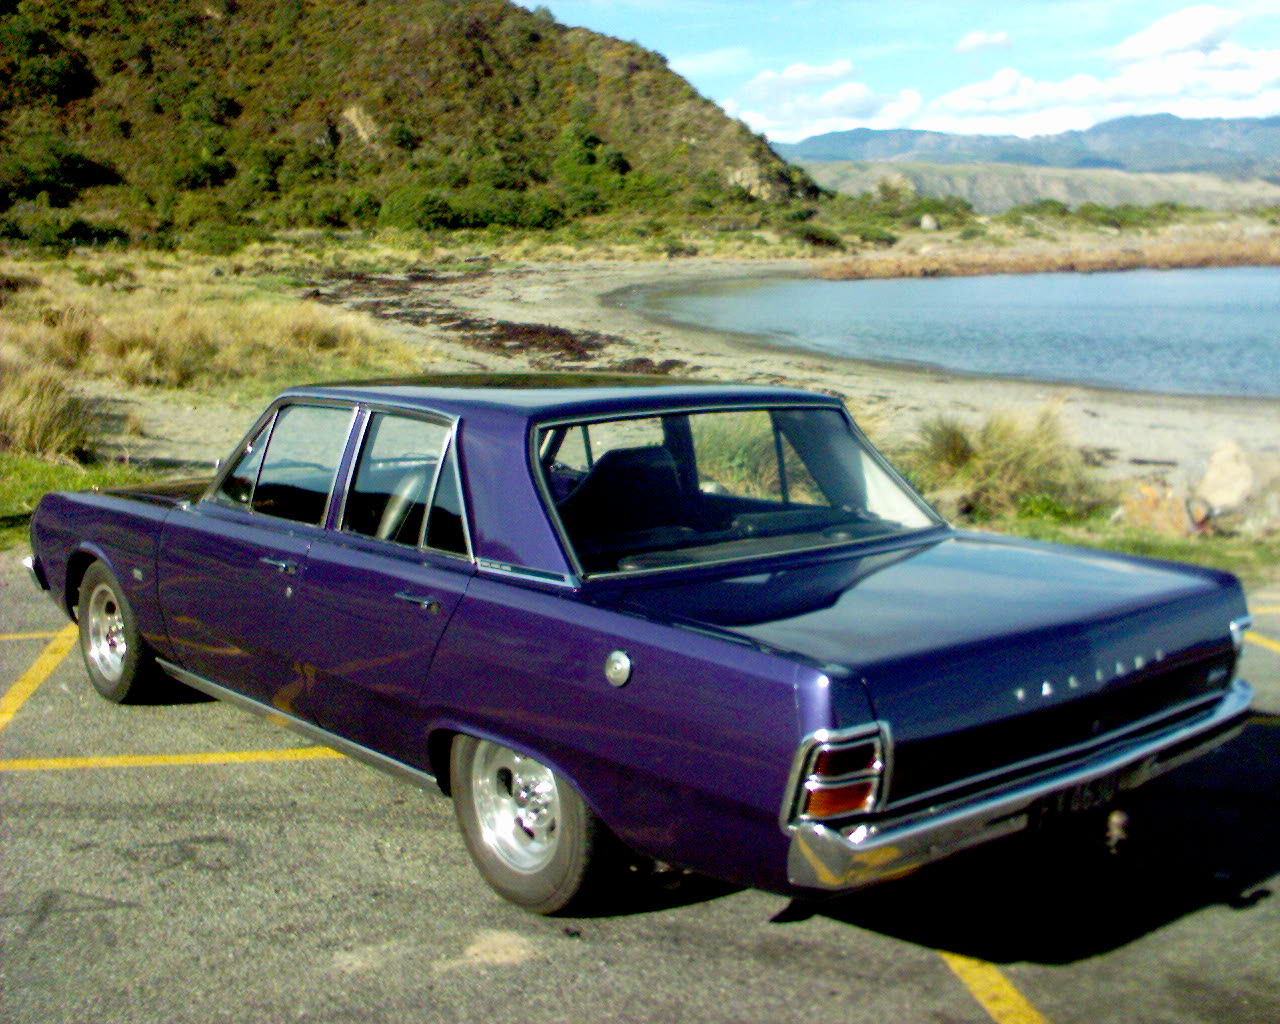
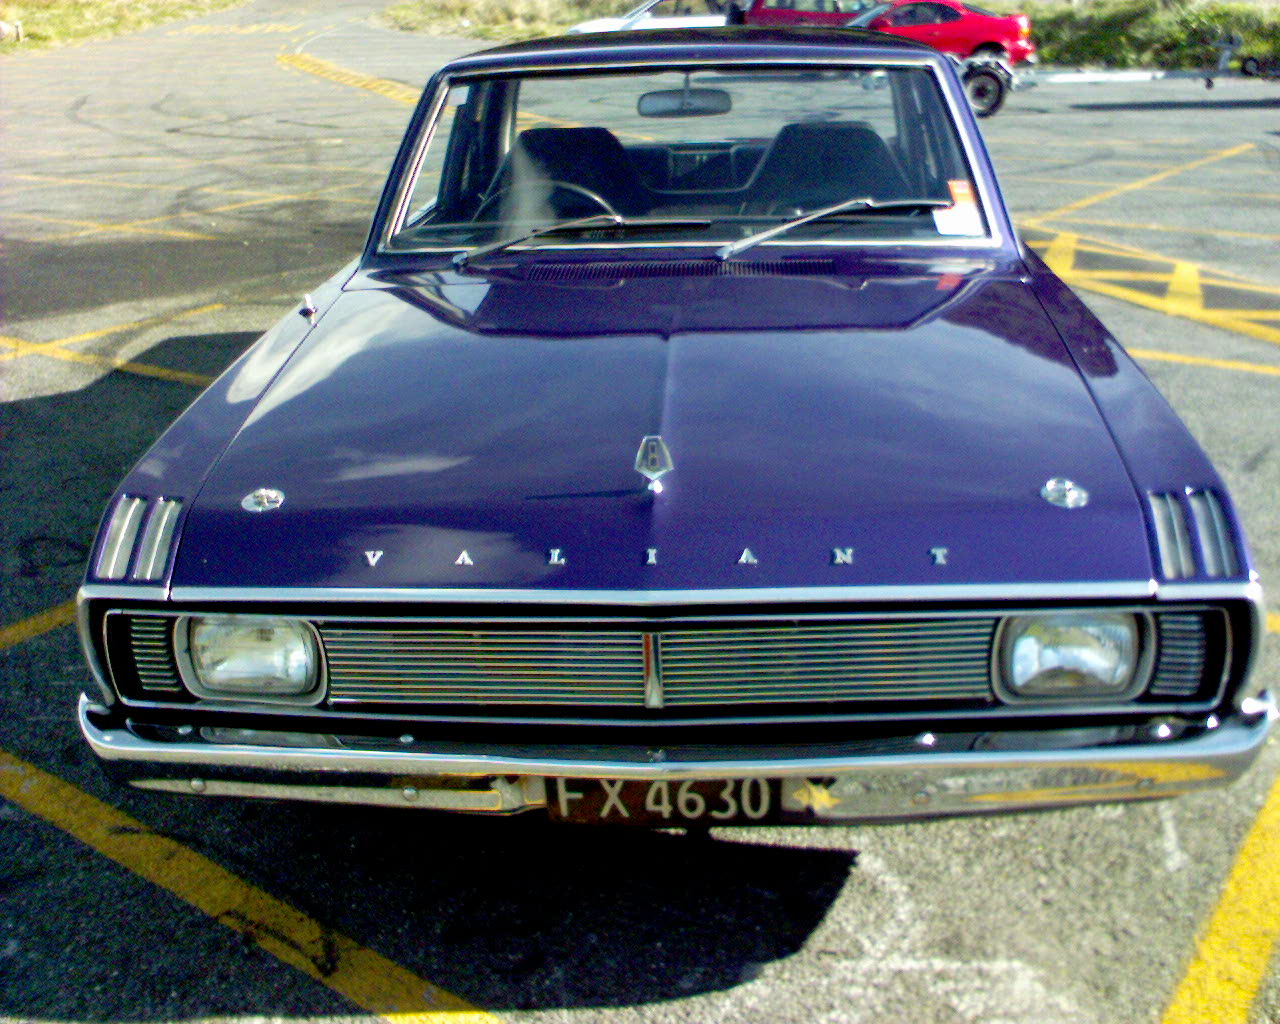
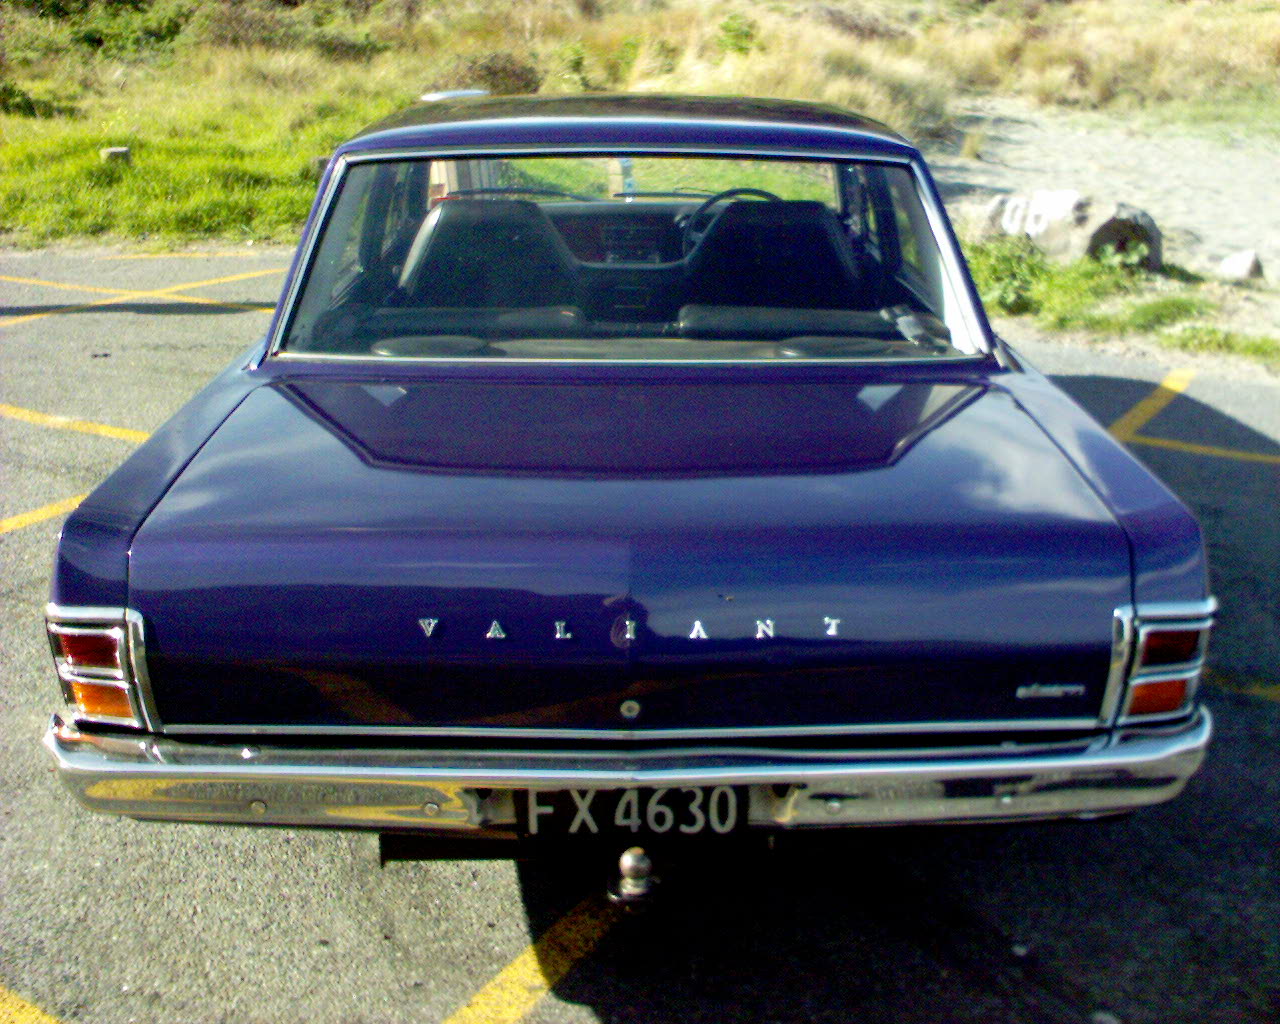
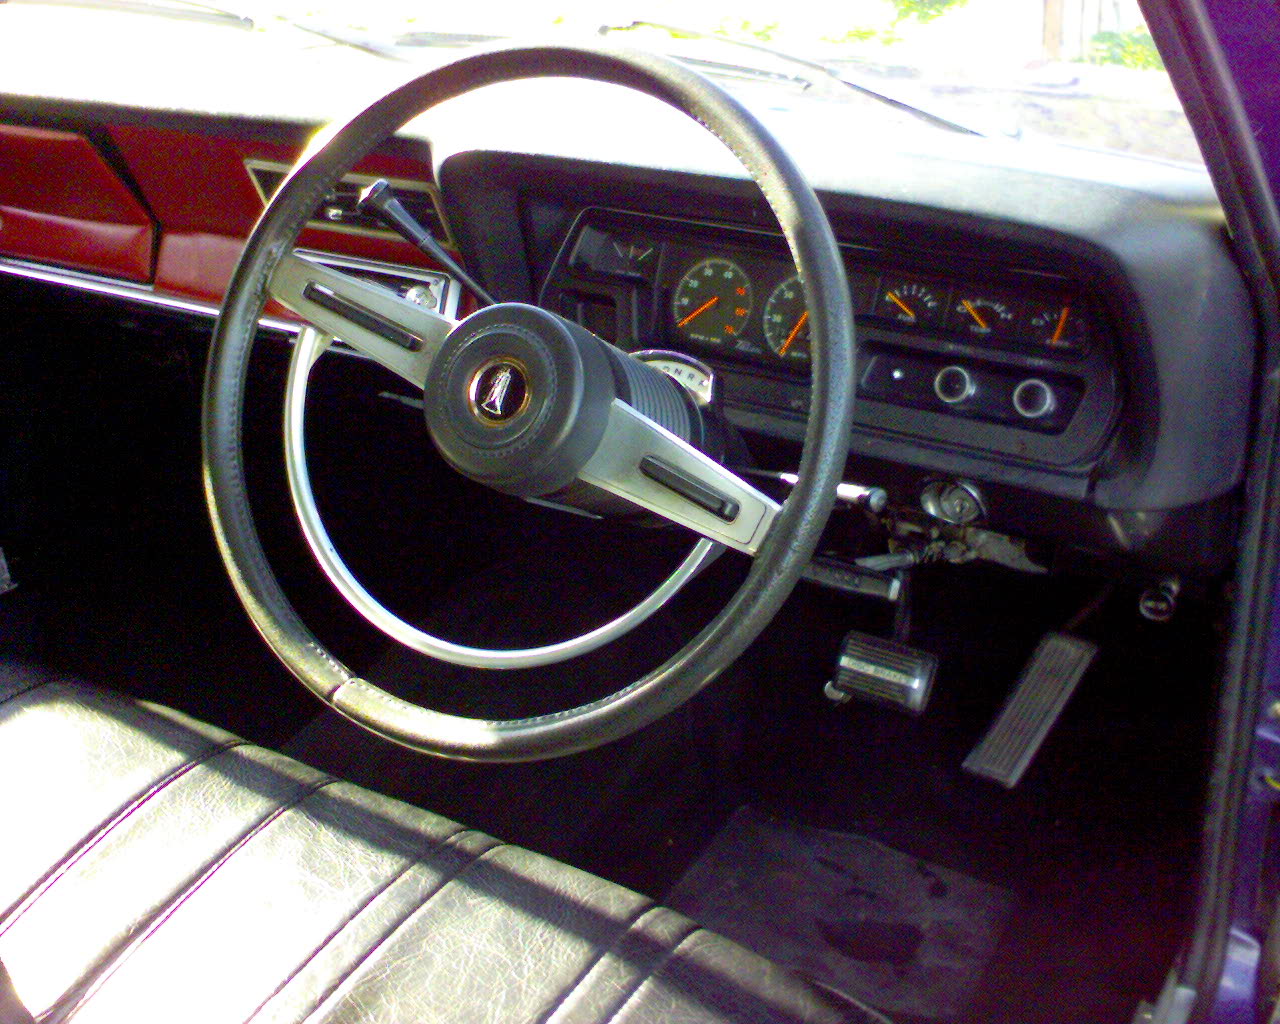
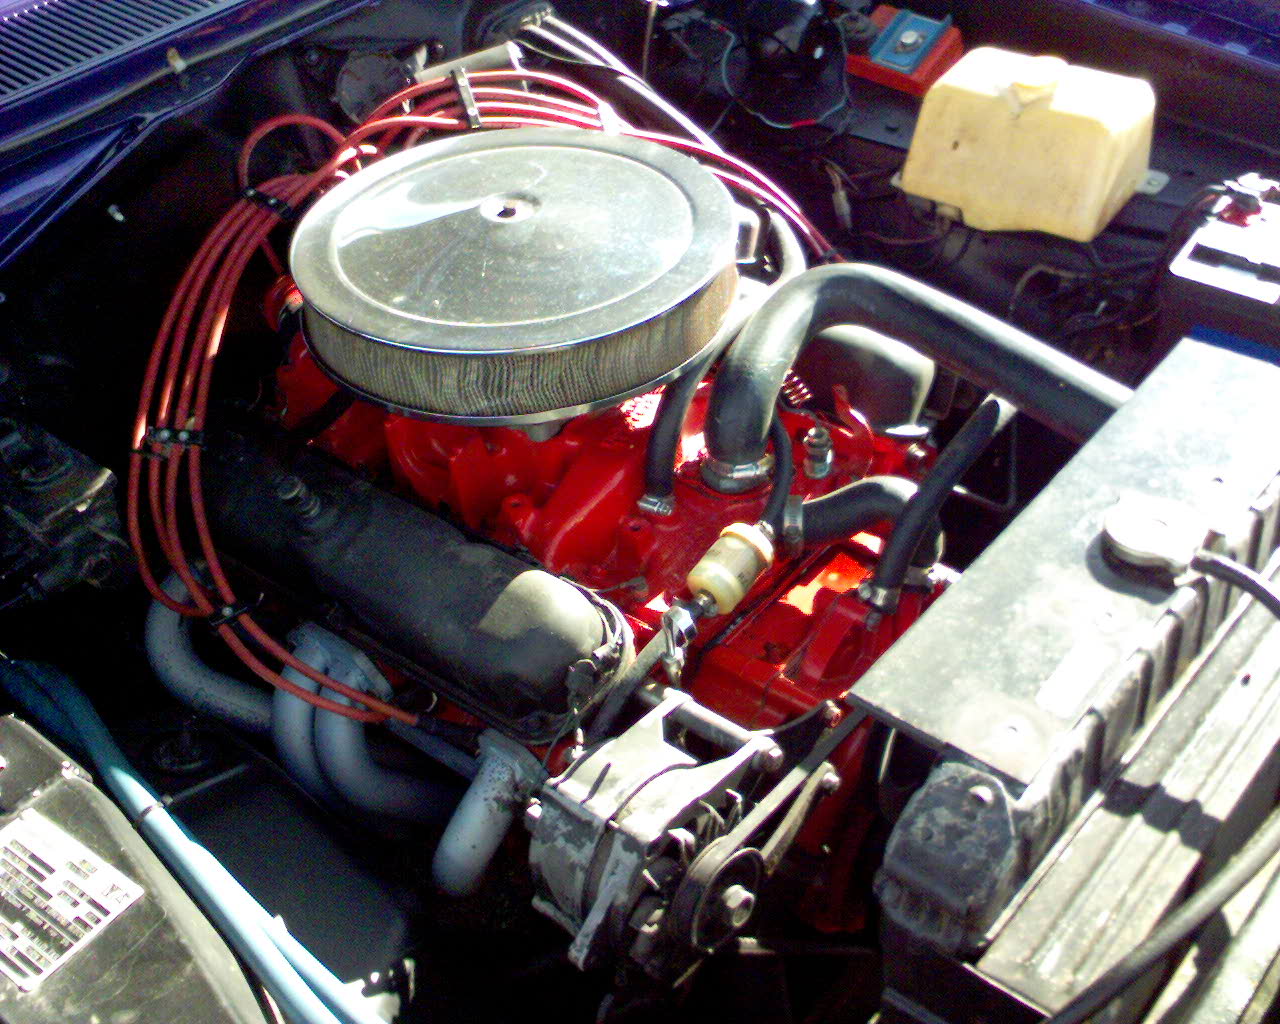
Well now it looks good in and out its time to make it move faster! (Yes i still haven't cut and buffed it because I feel I can put it off for a lot longer X-D) As part payment for hacking the rust out of Bart's Val, he's given me this A15. I got the headers a while back in preparation. I tore it to bits today and she is a pearler! Still standard everywhere and bores are sweeter than a hot damn. Im making moves to grind a wee cam to help it along and will run GT 323 twin carbs on a modified manifold. They are a veeery similar design to standard Datsun but likely updated a bit, mine have airbox and linkages and all that shit to make it easier. (sitting on a spare A12) It's a bit like the twin K-series Toyota carb conversion which used to be the go-to mod when they were more common.8 points
-
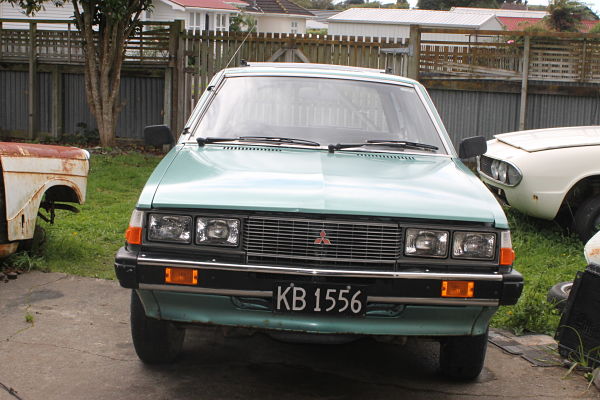
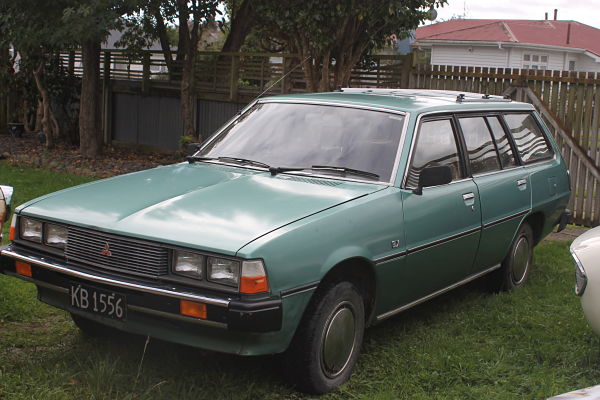
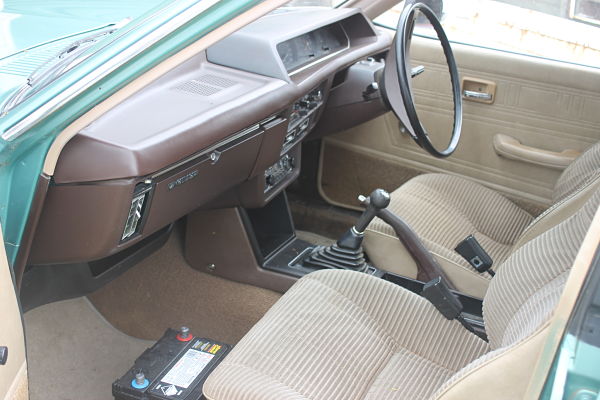
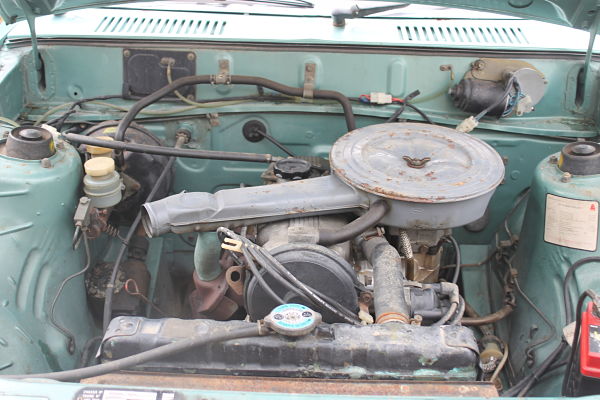
I have been doing a little on this when I can & today since I have finished refitting the rare option (for NZ new) heater I was able to fill the car with coolant & run it until warm I can report no leaks from heater & thurmostat still works. Water stains shown are from driving around with wiper spindles removed many years ago & the new goal is to get this back on the road before I restore interior etc. So while outside I gave it its first car wash in over a decade then drove for a few 100m's round the carparks7 points
-
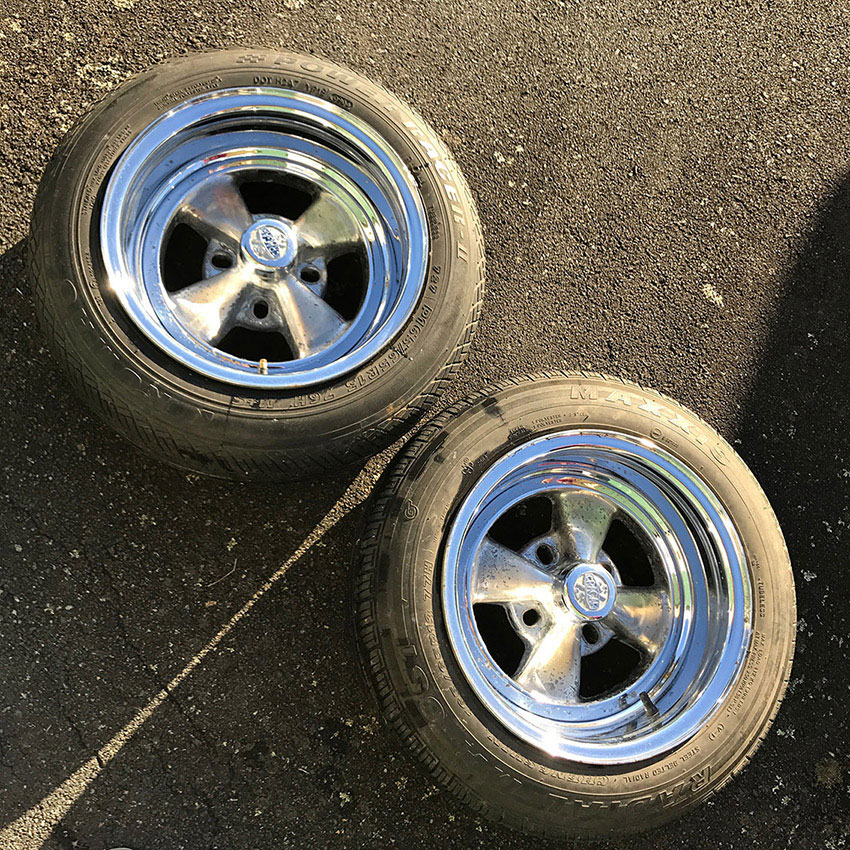
A little progress... Met with @dave a while back and bought 2 more 13x7 Cragar's from him. Thanks man. Gave them a good clean, the rims came up pretty good but the centres are pretty corroded. The centres were painted silver, who ever painted them sanded the chrome so they're pretty dull. Overall condition isn't to bad. Still on the lookout for a cleaner pair... Stoked I have a set now though! Did a quick test fit. I was a little worried they'd be too wide and poke out but turns out they're sweet. Still need to get the proper tyres I want to run but gives you an idea... Discuss here, Cheers!
 7 points
 -
The 130 alloys are 14"x6" and with 205/60 tyres the rears rub on the inside of the outer guard, and are quite low geared compared to the factory 175/80 or 85 series tyres. I do like the look of them tho! So had a set of 14"x4.5" factory steelies blasted by @Mr Vapour and they turned out pretty good. as collected from Burger Fule meet, good ol Mr V rattle can primed to stop flashing i ran a strip disc over the tyre sealing area and then primered them And then top coated. I used the light grey that i did the floor and engine bay with with a bit more roof white in it (not quite enough grey left!) I didnt sand them at all, but it turned out ok and they have had way more attention than they deserve already. I have some 185R14C tyres that ive been saving for this since getting them from @kiwi808 when he moved down sarf that have a thin whitewall on them to install when the paint is dry, as well as trim rings and dog dishes. Presidentiale! Should mean i can drop the front a bit to even out the nose high stance and still steer, as presently the front is wound up as high as it goes.6 points
-
6 points
-
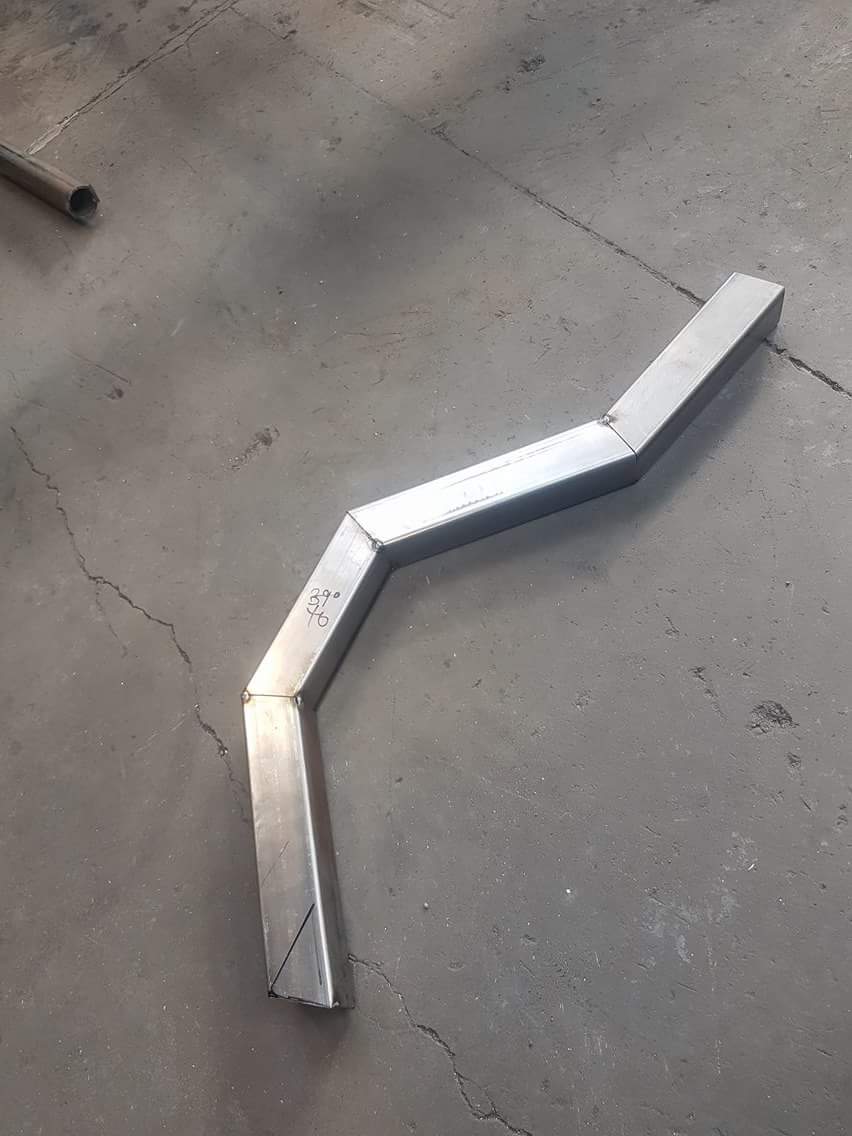
I have been getting down and dirty getting my gearbox sorted lately. My back hasn't been happy but I don't care car comes first. Well me and the old man got the adapter finished and have been doing mock fit up for it. I new I might have to do some cutting but not much in the end but what I didn't expect was the cost. $640 for custom driveshaft. Was looking at gearbox insides and a circling had pop loose and bopped all over the gearbox but looks ok. Took to gearbox place and getting full treatment but that costs $500 so wallet looking sad. Here's a small visual display for you.....6 points
-
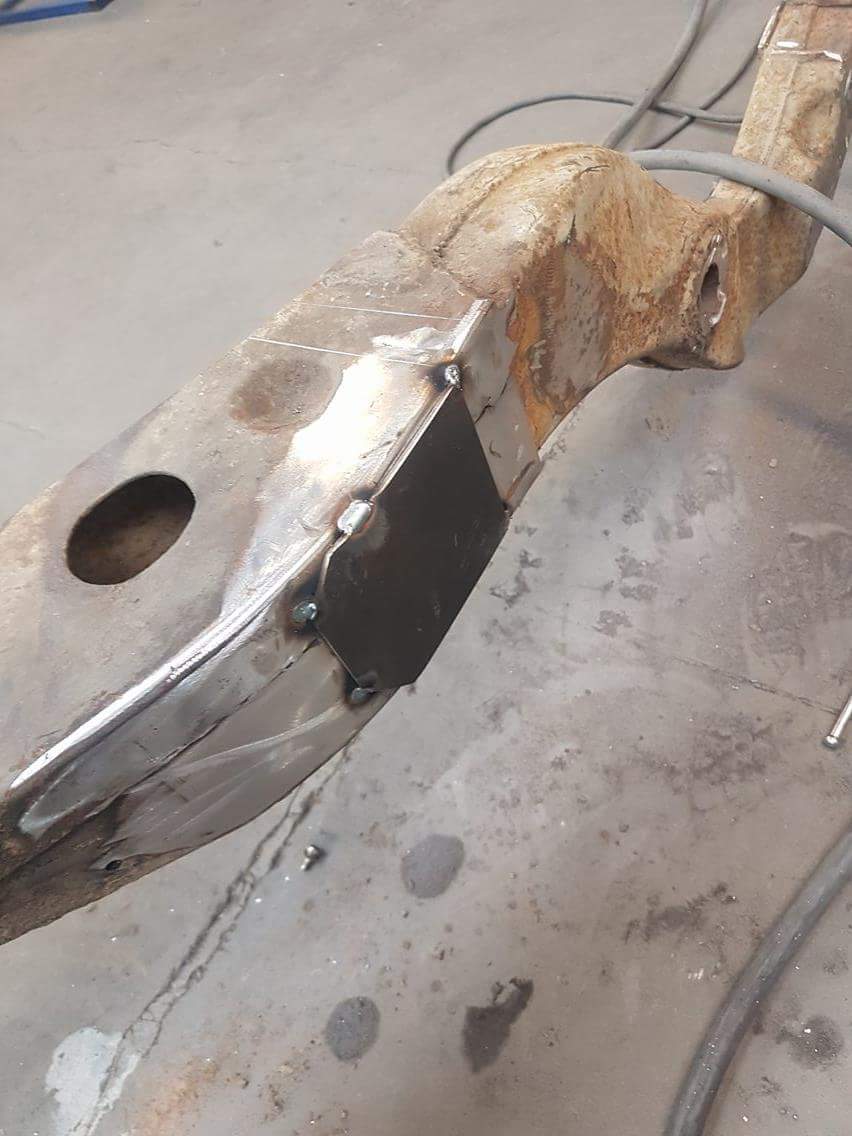
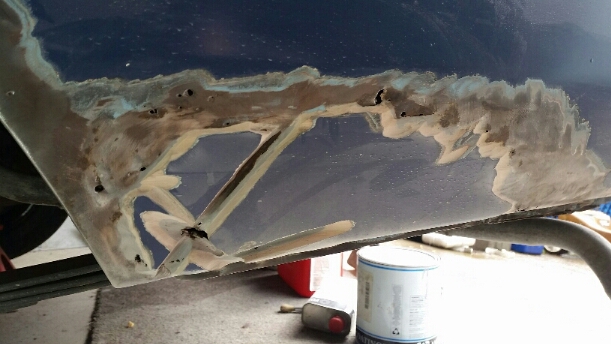
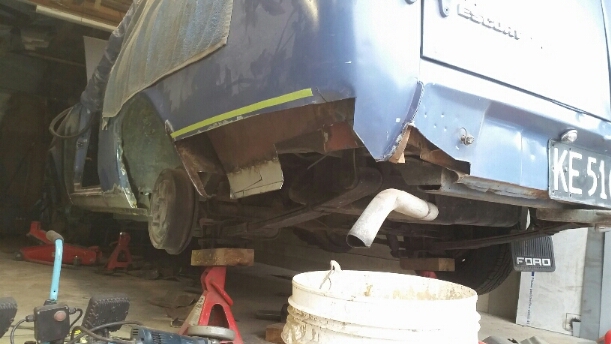
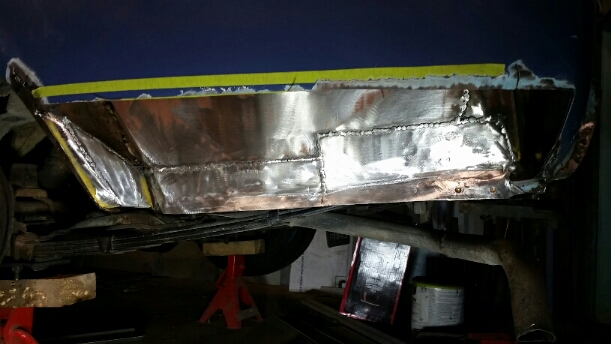
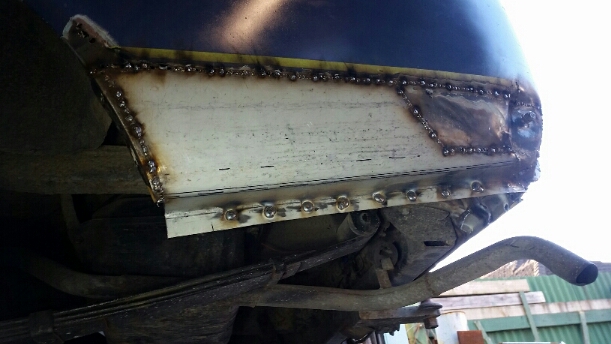
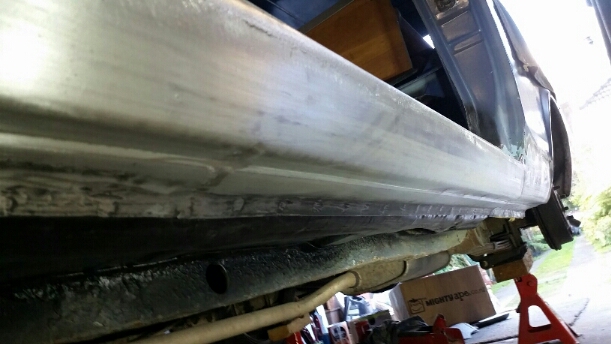
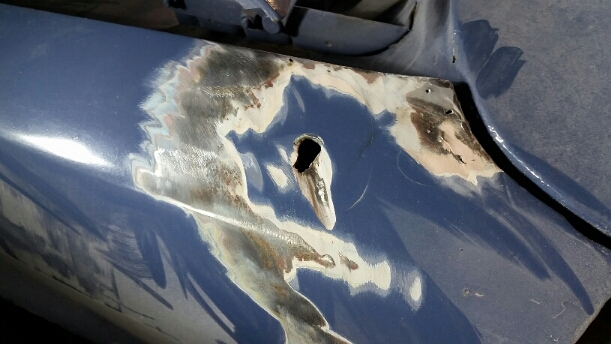
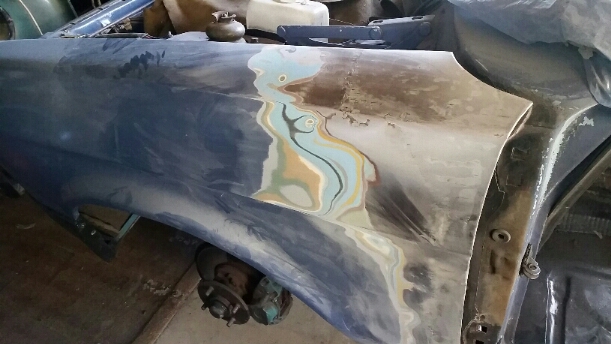
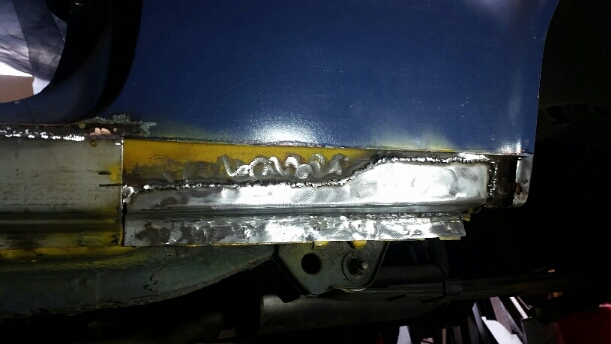
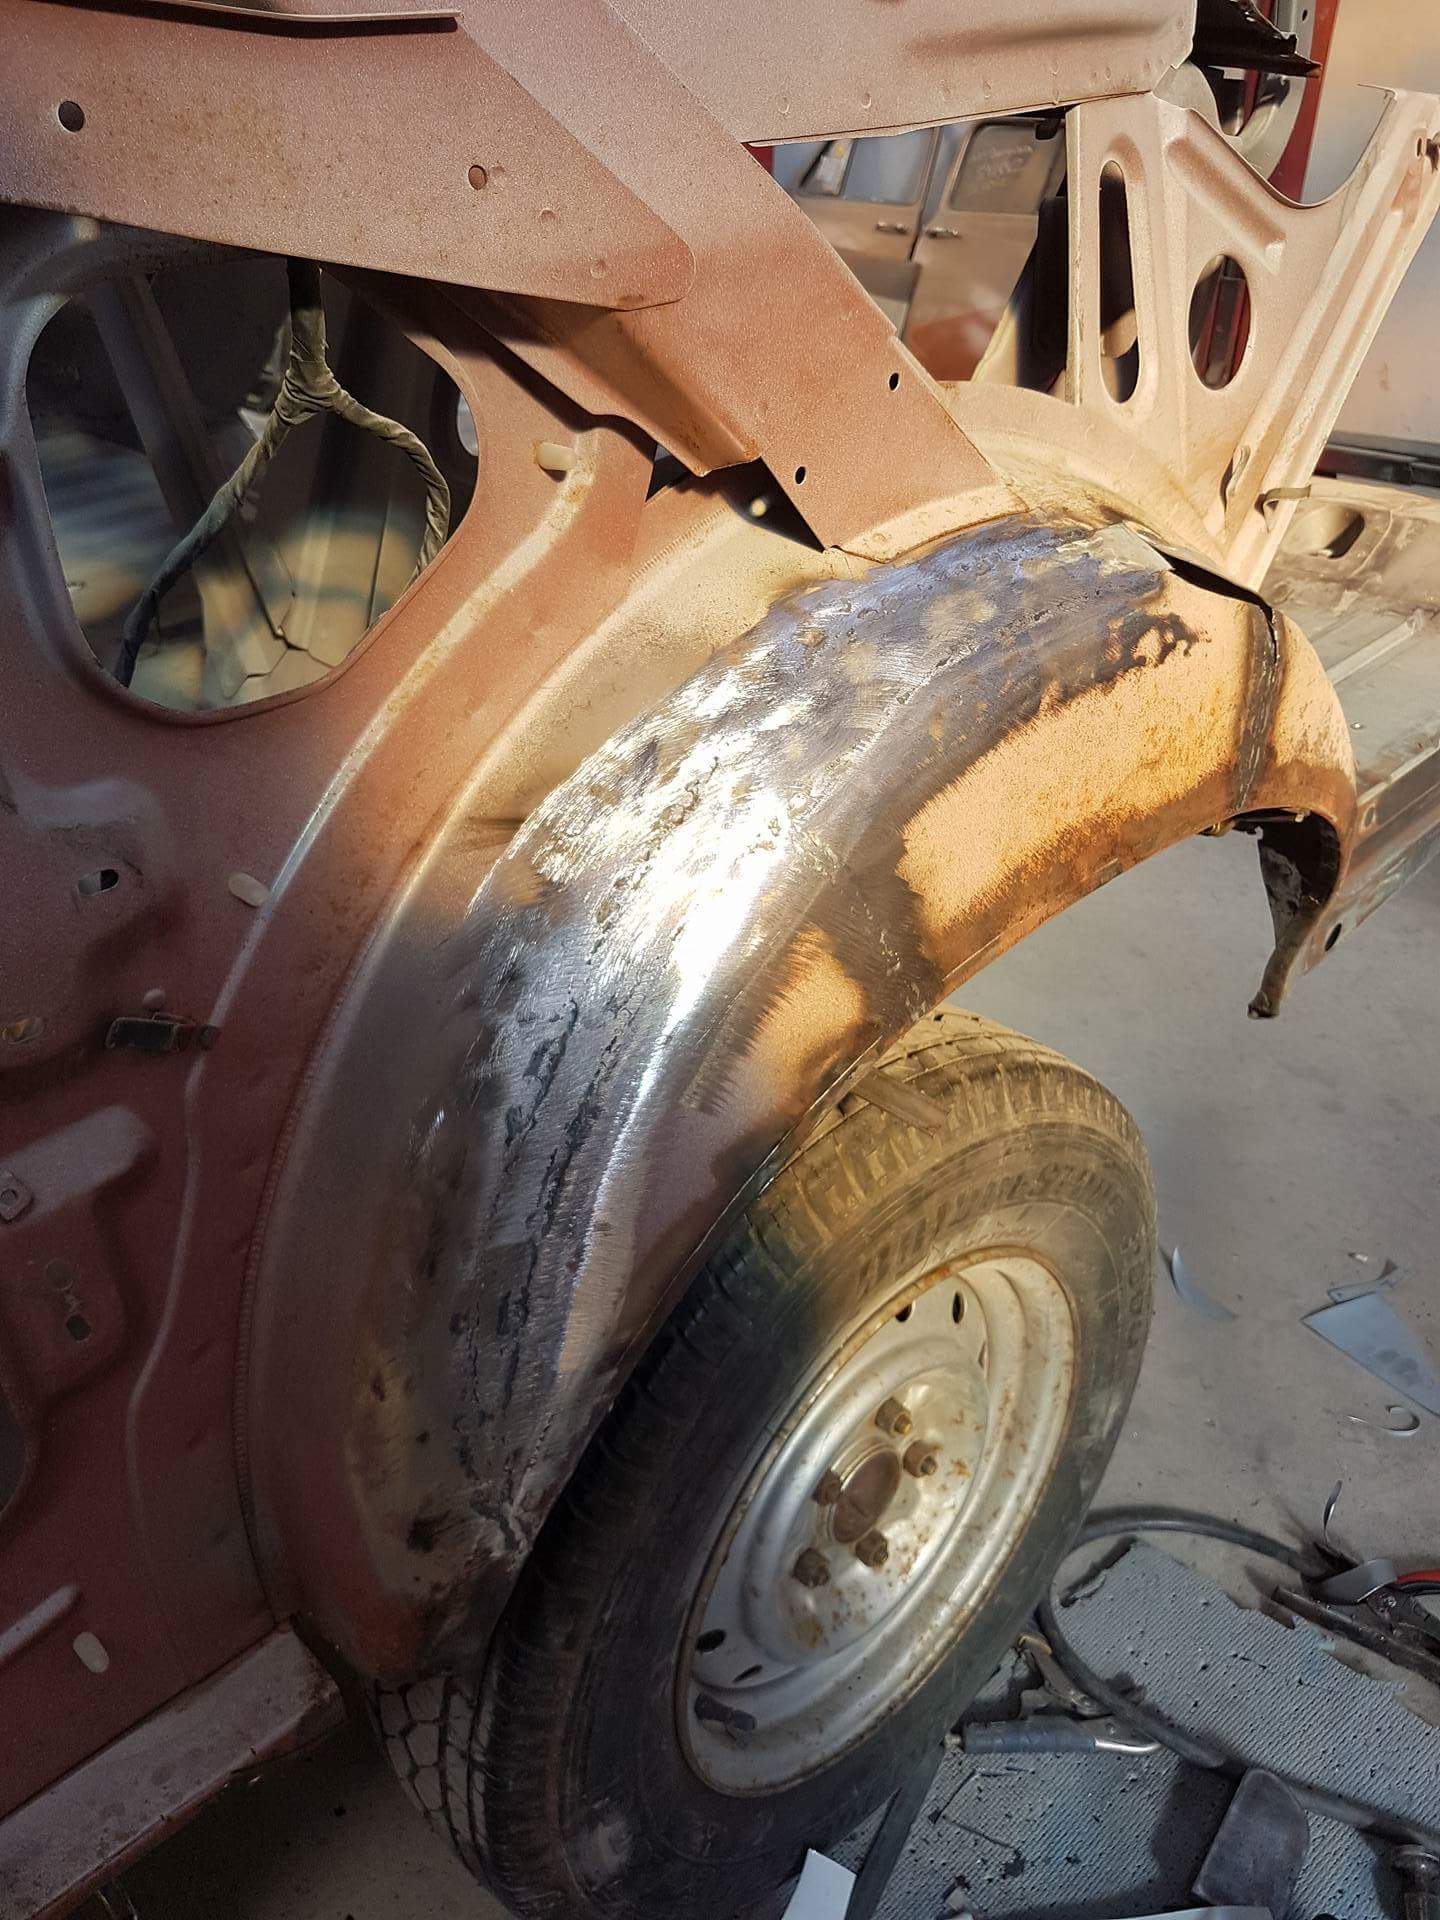
Last repair to do on the passenger side was the rear section, behind the wheels. The bog here was over 15mm thick in places. Fucken rough. As it goes with chasing rust, this ^^ soon turned into this. The outer and inner skins were rooted where the dirt and shit had been sitting for years. New inner skin was sused. Then the outer was made, including around the back behind the bumper. And before it was hit with the rattle can. Short story, the passenger floor annoyed me so I replace the entire lower half of the van. Tomorrow I'll put it back together and drive it for a week before I replace the drivers rear wheel arch section. When is enough, enough?
4 points
-
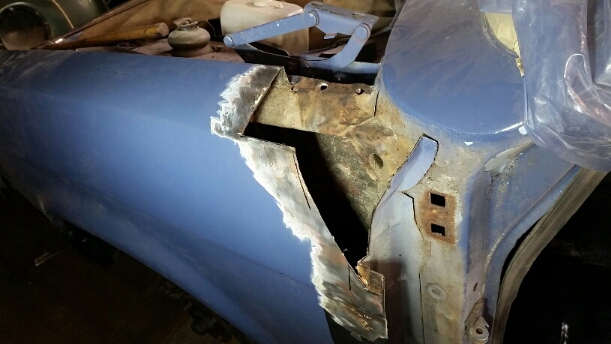
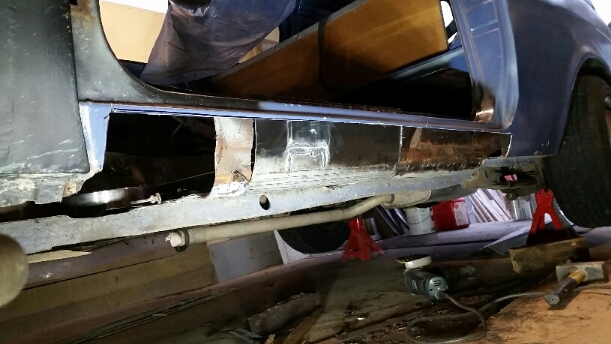
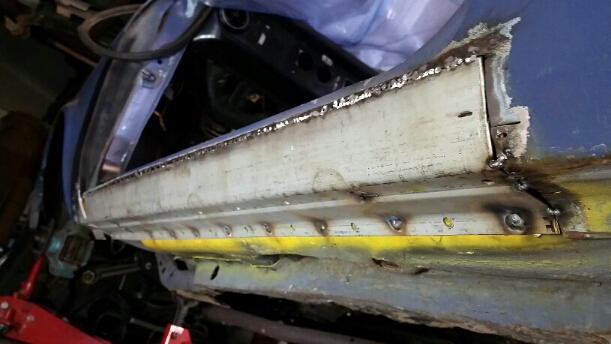
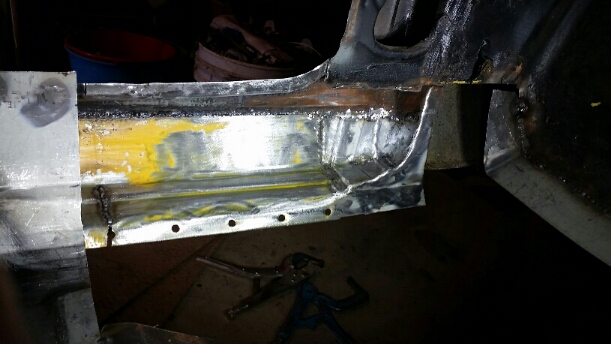
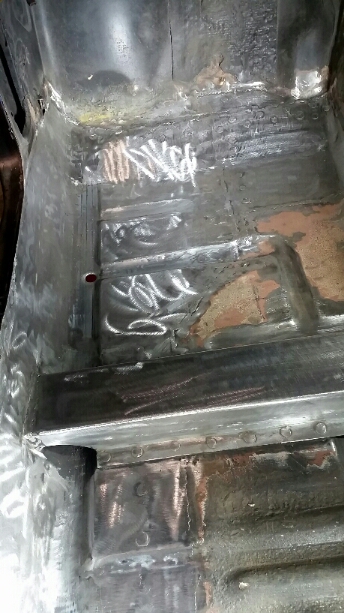
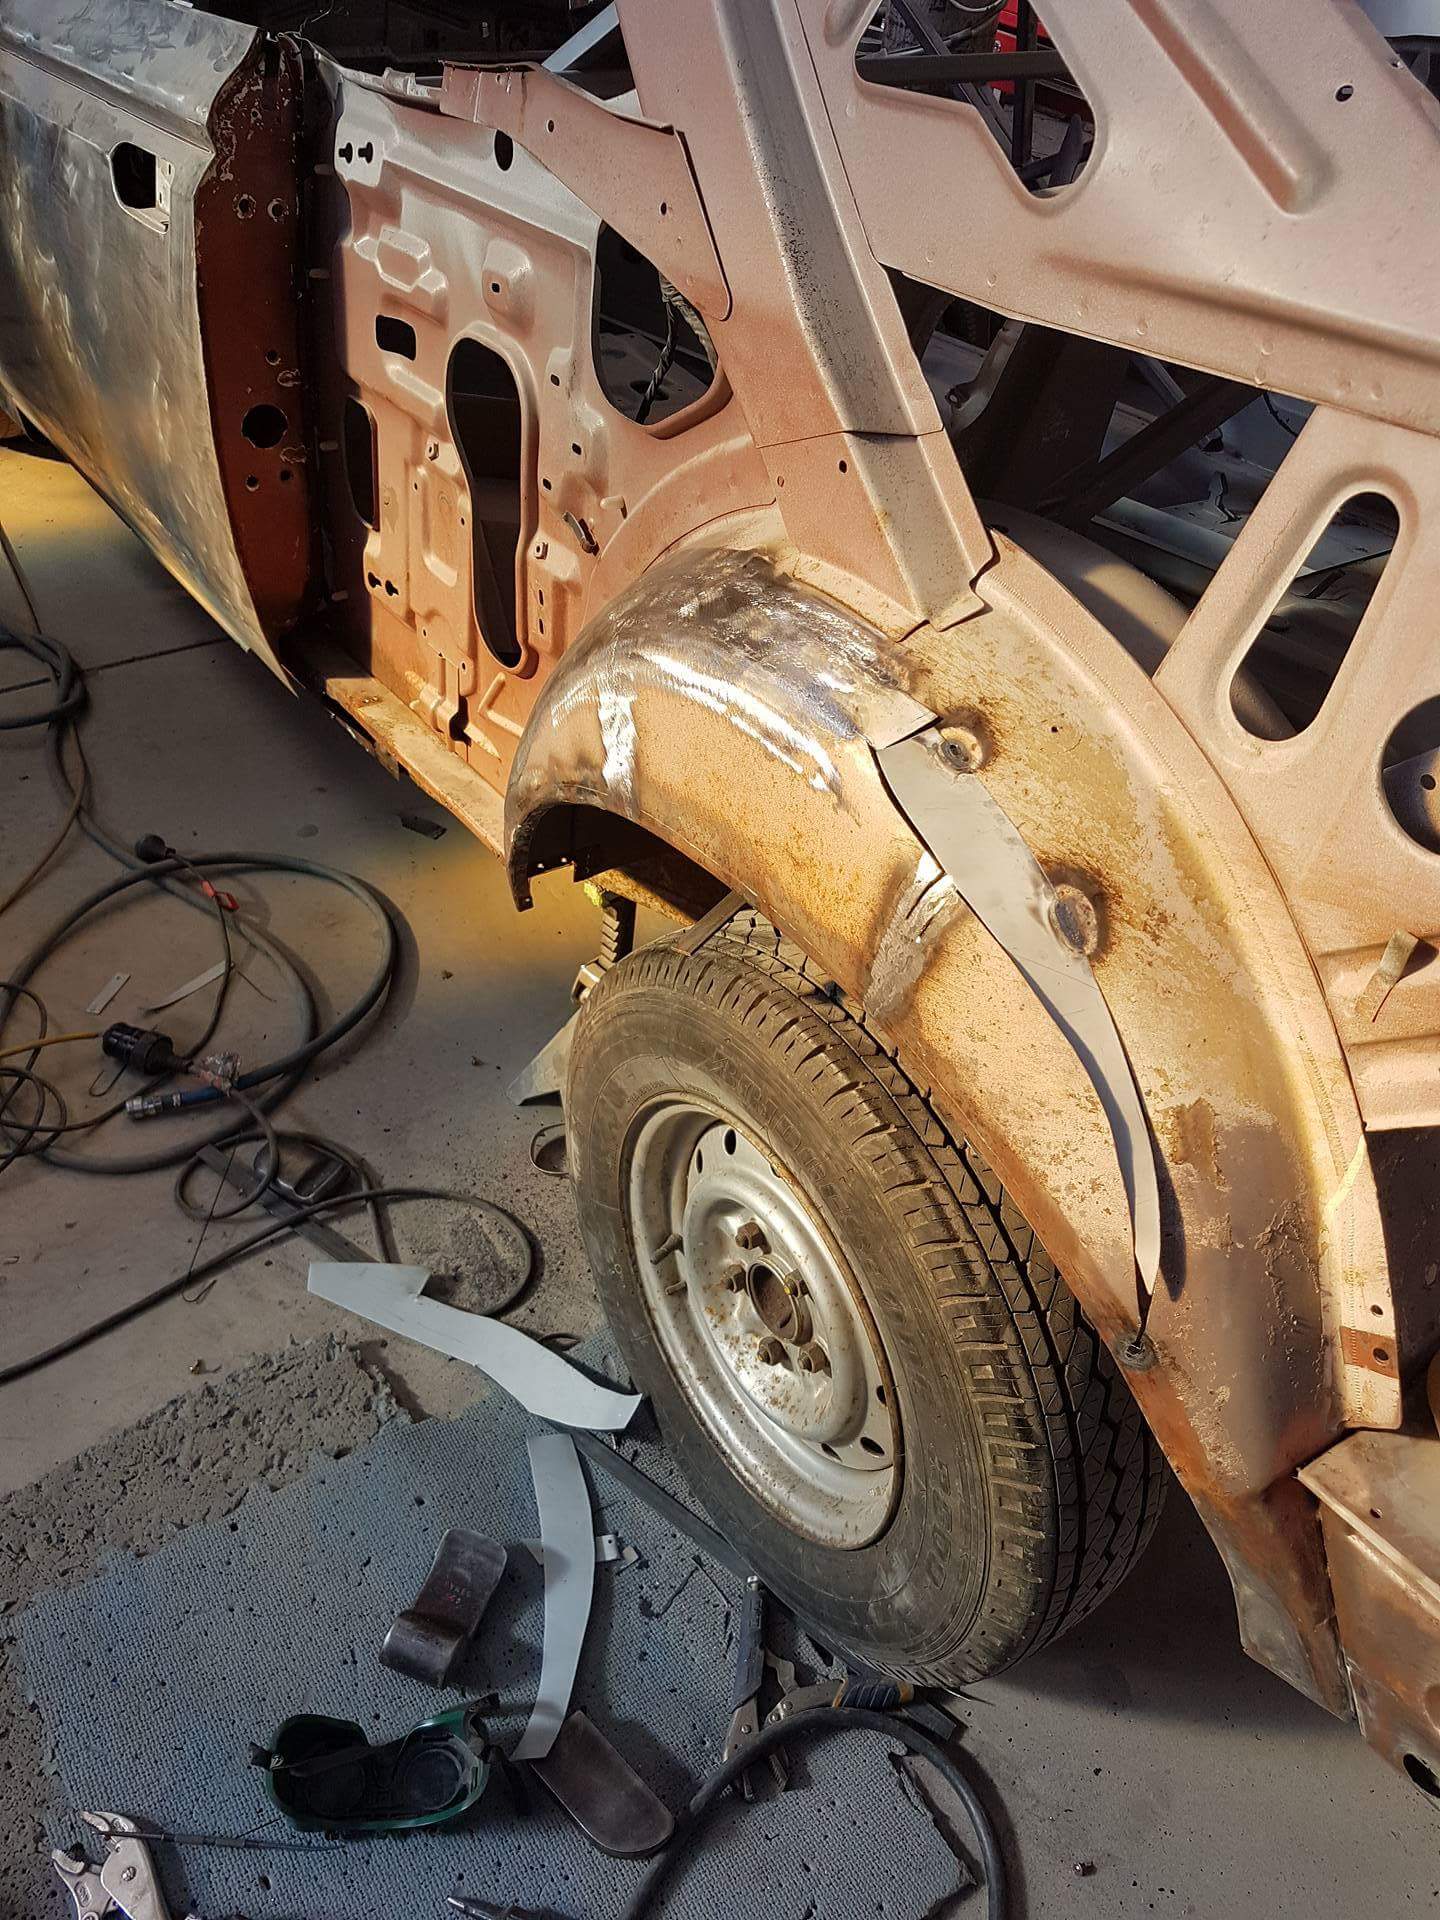
New sill. I then had to tackle the top of the passengers guard. To keep the theme up is was rust covered over with bog. Cut all the shit out. Made up a new inner section before making up the outer skin. I tried to take my time shaping the metal to the correct specs. I was pretty stubborn about not wanting to put anymore bog into this, so I tried to make all the repairs as correct as I could.
4 points
-
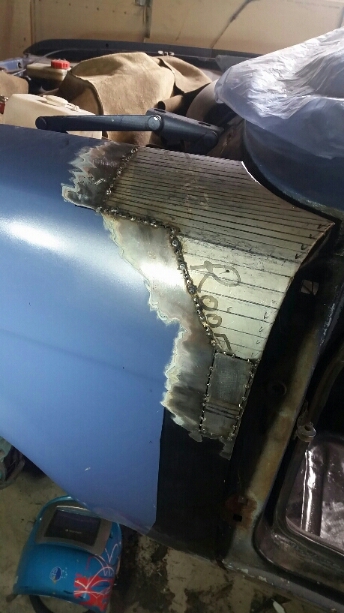
Bit slow on updating but that doesn't mean I haven't been working. I made up and welded in another seat rail. I then folded up some sills out of lengths I had laying around, which happened to be thicker then the original steel. I also replaced the bottom of the guard, and made up the remaining floor panels. Photos or it didnt happen. Cut the drivers sill out. Replaced with a new sill. The remaining original sill was cut out after this. Back of the sill and guard before being primed etc. There was a crazy amount of dirt in behind the sill. Replaced the inner rusted strengthening piece. The passengers floor looking better.
4 points
-
man i'm poked. managed to get the passenger sill on with massive help from Stan, the guys a legend i cant thank him enough. i still need to tidy up the ends but the strength is there. they're not bad repo panels either. theres a 5mm difference in one of the lines which is huge, granted, but somehow it doesn't look too bad when fitted. shut lines like a mercedes! this weekend we'll be back into it. discussion4 points
-
Made a start on the passengers side door. When it sat on the car it looked lumpy and sticking out a mile but rest of the door sat nice. So pulled it off stripped it down and sanded bottom of door down. I would say I sanded 1.967km of filler out and uncovered a terrible patch job. Chopping old patch out starting a fresh here's a picture update.4 points
-
3 points
-
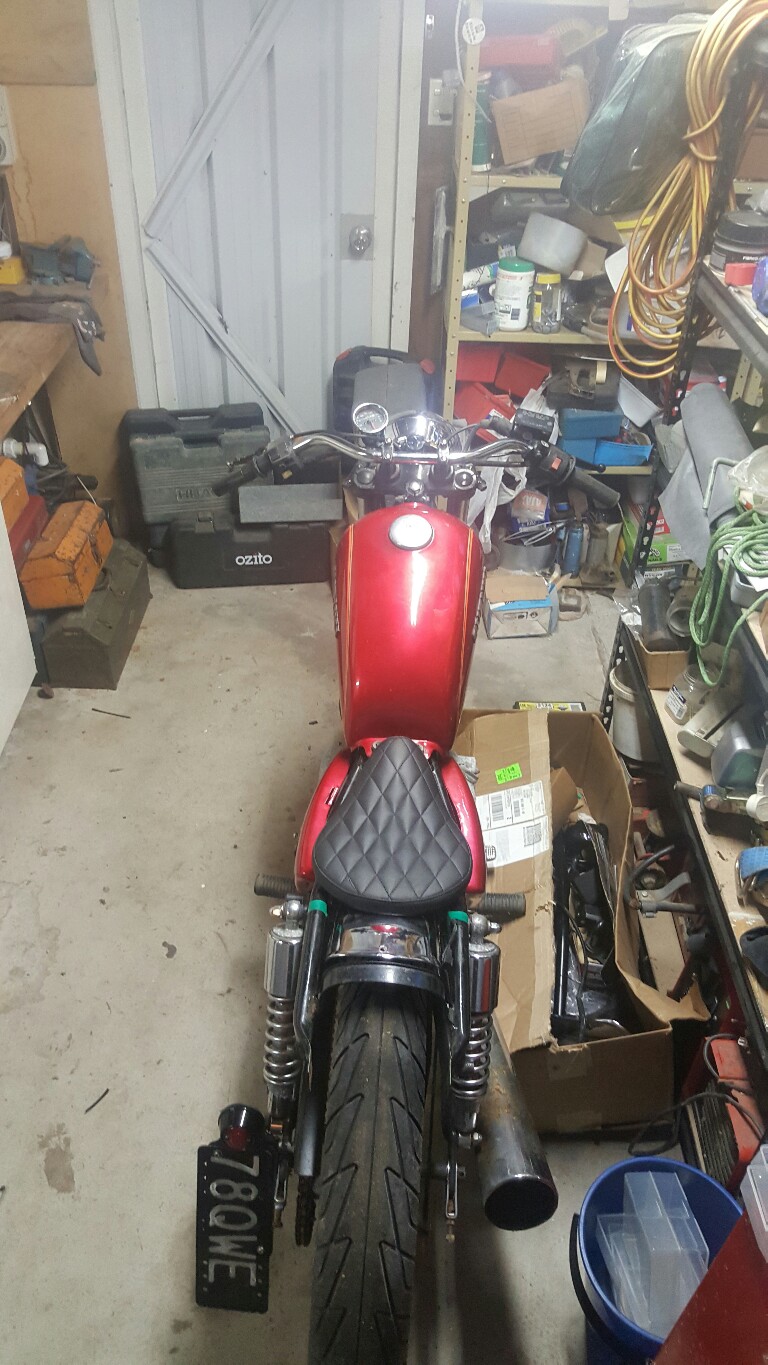
This pics ar from sunday after i cleaned up for the day. So far ive only put the old bars back on (flipped) and re atteched all the controls. Ive wired up the head light, contrals, gauges and ignition. Mounted the tank and rear number plate holder and also the new speedo. Now i just have to buy a battery, wire up and mount the indicators, mount the seat some how, remount the rear gaurd (because atm its been held with zip ties) and cut the excess rear frame off,cut the exhaust, as well as most importantly ->MAKE IT RUN AGAIN!
3 points
-
Looks like it has had the bash. No good. Will chew the pads off in no time. Needs a grind/ take it back. Possibly bent/cracked too. She's rooted mate.3 points
-
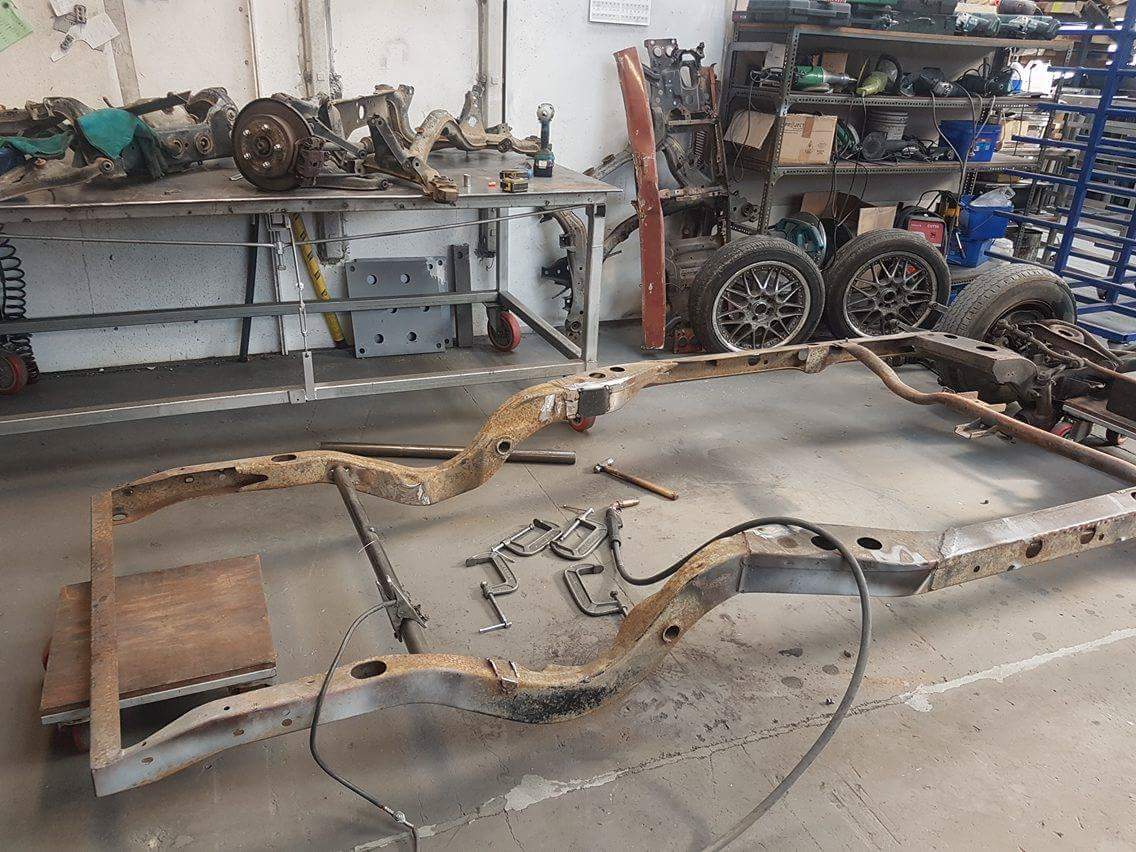
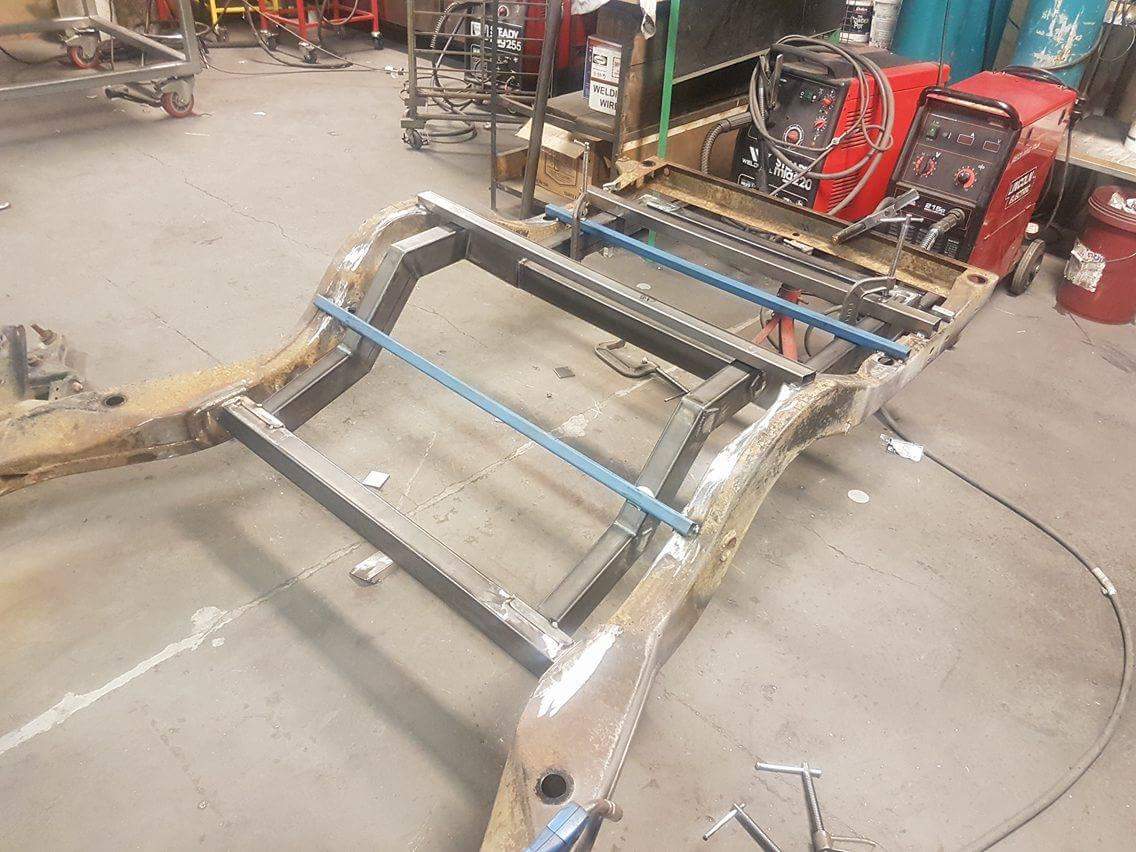
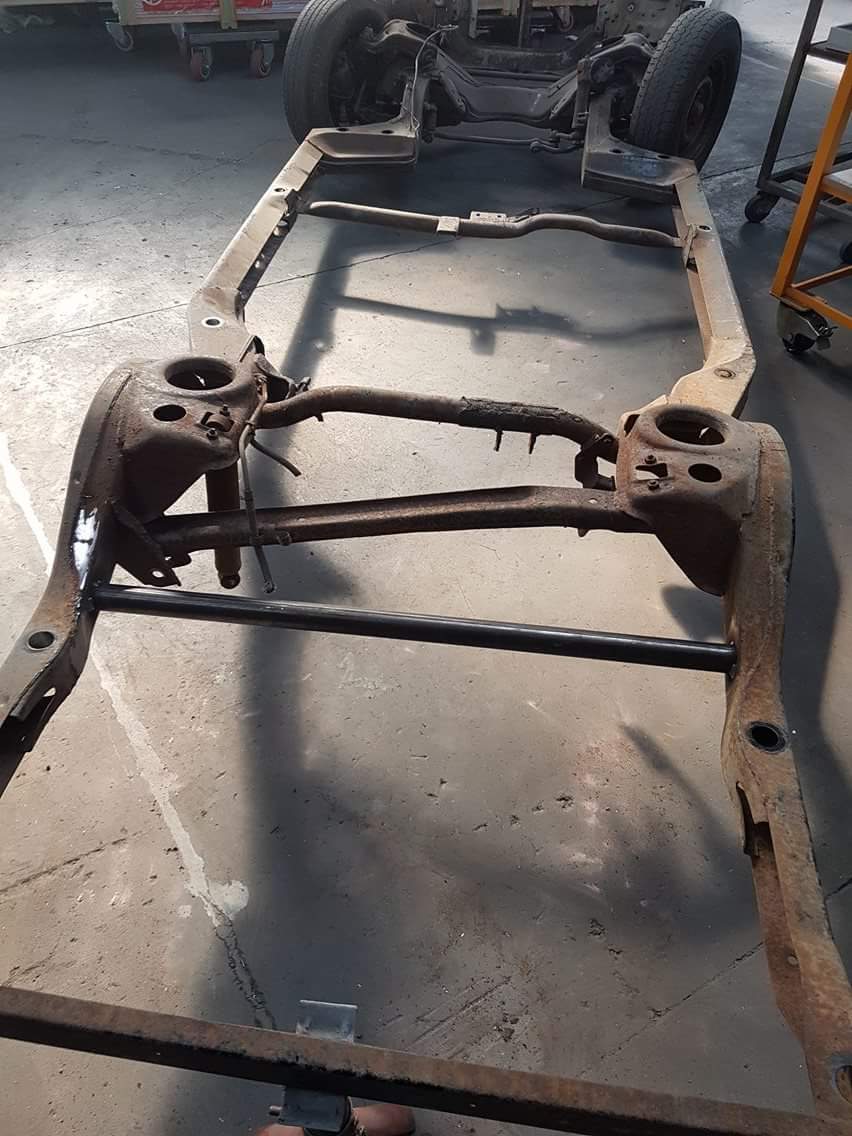
Chassis end panhard mount. Yep the drag link goes through the middle of the bracket Ive given up on the whole offroad thing. going stance spec still got about 3" of droop and 2" up to go. need a forklift. likely have to go softer on the front springs, will see what happens once all the junk on the tray goes back in the engine bay3 points
-
That rust really has runamuck3 points
-
I was waiting for the long weekend to cross some bigger jobs off the list and managed to! - Put good dash pad in - Cleaned and painted instrument cluster - Cleaned and rust killed floors and etch painted, sealed up screw holes and seams, rubber bungs in - Cleaned and painted glovebox hinge panel (left as much as I could of the factory sticker with key info and tyre pressure/fuel chart) - Made covers for the rear wheel arches, lower B pillars and exposed parts of the floor the carpet does not cover with some patterned plastic sheet - Painted dash top and the area under the rear screen which are visible. - New carpets - Vinyl died seats. Don't know how long it will last but we will see. The cans sprayed too narrow so I emptied them into spray gun and got a great even application. - Put stereo in properly - Epoxy glued splits in the centre console - Factory accelator pedal back on Still need to make a shifter boot and pick up another demister vent from a mate.3 points
-
lush. next meet will be somewhere local so i can hoon my little 2 tang. everyone keeps getting too jealous of my plush comfort sedan2 points
-
Jesus! That would take a shit load of force to do that damage!! Refund time.2 points
-
I thought i was looking at my old VG when i first read this thread! I sold it to a guy down in gore before i moved to Melbourne in 2006 but you have had your one a lot longer obviously. Mine had a 360, it went pretty hard. Hopefully all that rust doesn't put you off too much, you should see the 68 impala im currently restoring...
2 points
-
Moral of the story is don't leave your freshly paneled and painted old car on the lawn for a decade.2 points
-
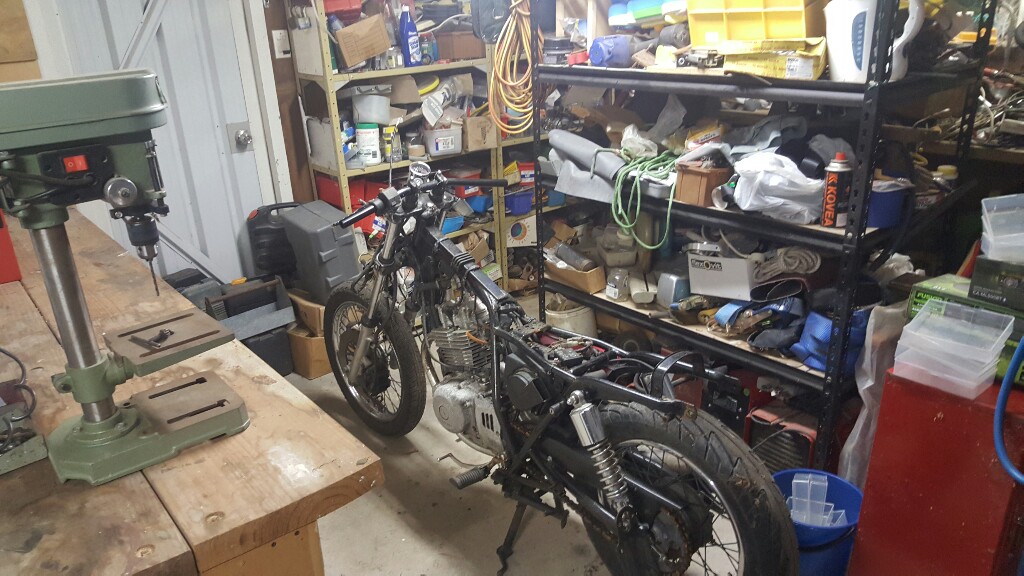
Hey everyone havnt been doing much lately towards any of my projects but since ive gotten my ass into gear ive dug this my old gn250 out from the back of the shed. So i brought it about 3-4 yrs ago in order to get my bike lieces (which never happened) but instead, being me i decided change everything and pulled the bike to bits, with no knowhow to finish the job. Following that she was put under a tarp out back and parts were put away. But recently I took on the challenge of clearing enough space in my grandad's shed to bring it inside so i can work on it. Overcoming that ive been able to store / work on it indoors and have acquired some parts in hopes to finish what i started yrs ago! Goals this time is to turn it into so kind of bobber style bike but with little money,skill or experience..... so wish me luck! I didnt get any before photos from when i brought it but it was a completely stock 88 Suzuki gn250 and was absolutely mint! The fist photo is of it when i first got it inside, it still has the 1" drag bar i got when i first got the bike (which dont fit so had to go). And as youll see the state of the shelves in this shed youll realize what i was dealing with to get a work bench and enough floor space to get this inside...
1 point
-
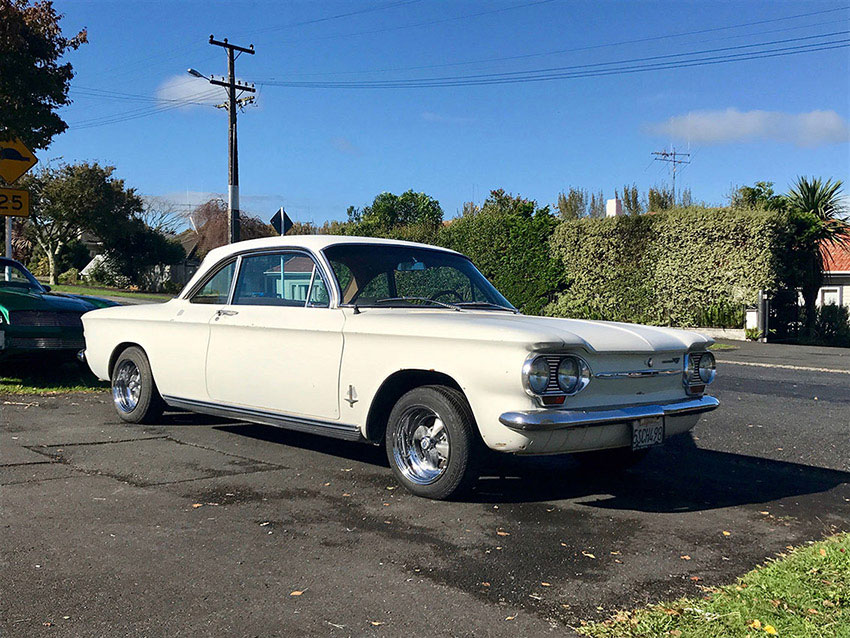
I've wanted an RX7 since I was about 11 years old. I think the first FD I ever saw was a bright red one parked in a driveway, while I was walking to school. I had no idea what it was, but its beauty stuck in my mind. One of my classmates was a big car fan, due to his father running a workshop, focused on rotaries, and had an RX2 rally car, and a HB Cosmo, and an RX7 dirt track car...! So my friends influence really set me on the path to RX7 obsession. 20 years later and I have bought an FD. I've daydreamed about it for a few years as my savings grew bigger. Since 2016 I've been looking seriously, having inspected 5 cars for sale. Then this one turned up. 1994 Type R with 45,000 genuine, verified kilometres. It was imported last year by an old guy who is an old-school rotary fan and serial car collector. big photo album: https://goo.gl/photos/1KavduxG5q638suD7 The current mod list is short, and were all from Japan. - Fujitsubo 3" cat-back exhaust, which sounds perfect to me. Quiet at cruise and idle, no droning, and a good sporty tone when pushing. - 17" x 8.5" / 9" Racing Beat RB-02 wheels. Allegedly made by Work Wheels, they are a nice 3 piece set. I have to measure the offset as the labels have worn off, and the centre caps are missing. - Apexi RevSpeedMeter mk1. This nifty but useless device shows a digital readout of revs and speed. It can estimate acceleration times and flash speed and rev warnings. I need to investigate if the ECU is standard. The sills have "Blitz Access Super Computer" stickers, which was apparently a plug-in ECU upgrade from the '90s. My current modification plans for the car, after tonnes of research: water temperature and boost gauges alarm & immobiliser - mandatory for insurance aluminium AST aluminium radiator full set of tyres (eg. RE003 245/40/17). The current ones are over 10 years old and still have the coloured streaks from when they were brand new... not safe! auxiliary injection (e.g. AEM water injection) General maintenance comes first of course. Then, just drive it. I love track days so I'll be getting into those as soon as I can. I don't have any desire for more power, as I drive quite sedately on the street. The car is only a weekend ride so it always feels special to use.1 point
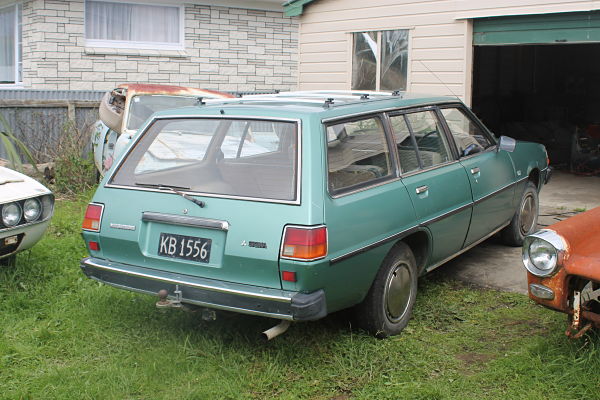
-
After selling my hillman hunter estate i wanted to find another suitable daily. I found a Triumph 2500pi estate, but that has turned into more of a project then a expected. So then this sweet Sigma popped up for a fair price. Its pretty straight and tidy. interior is immaculate, Its only done 115,000.kms from new. still has the original 1600 4g32 4 speed Manuel. Plans are to give it a cut and polish, some lowness and either some banded sigma steels or some nice alloys. Does anyone know the best way to lower these cars? is there any other springs i can use? And is it worth converting it to five speed? is it a easy job? I then fitted some 14x6.5 work equip 02,s on. The car needs to be lowered so bad its looks ridiculous at this height.
1 point
-
if a barry modifies a car in the woods, is it still a lash up?1 point
-
It does need a cert but if no-one ever notices, why waste $700?1 point
-
A few years ago I took a Ford Anglia for a reVIN, it failed on brake performance but it has a 1600 motor in it witch they didn't notice, would that need a cert, or would no one ever notice? I need to finish it and get them to do another inspection.1 point
-
Ended up selling the ms112 diff and going r200 Nissan irs and subframe .that's all so brought up some big problems on it's own
1 point
-
You can grind a regular drill-bit to suit.1 point
-
http://tradetools.co.nz/search/spot weld iv gotten by using panel steel drill bits and some care though1 point
-
good luck with that one bud. hats off to you for taking it on the chin and getting on with it... eventually1 point
-
Yeah! Keen sounds good.1 point
-
Those 770/pacer instrument clusters use a different loom. (More like a vh loom) when I parted out my hardtop I kept the loom out of it especially for the guy who bought my cluster. (Almost wish I'd kept it tbh) he was confident he wouldn't need it. I think he was pretty stoked when I said here this is for you. But he did give me a v8 hood emblem. Those fetched reasonable coin at the time too.1 point
-
2 piece rotors? Could be spendy- unless what you paid was a good price for whatever you got minus discs i would be taking them back as those discs are only good for scrap.1 point
-
@Roman are you in town when this goes down (to Southland).1 point
-
Nice work man! Looks snuggly. Like living in a sub box.1 point
-
Alex - you could re-locate the air temp sensor to inside the air filter element somewhere, as this is usually where many other factory cars have their IAT sensors (ie Mitsubisi AFMs used by Mitsubishi, Mazda, Ford etc). You could run some extended wiring underneath the pipe and it should still be hidden somewhat.1 point
-
https://www.nzta.govt.nz/vehicles/licensing-rego/number-plates/ http://legislation.govt.nz/act/public/1998/0110/latest/DLM3701906.html http://www.legislation.govt.nz/regulation/public/1995/0136/latest/DLM201140.html http://www.legislation.govt.nz/act/public/1998/0110/latest/DLM3705398.html#DLM3705398 Here is an email reply from the NZ Police regarding this matter. A bit out of date: Thank you for your email dated 21 September 2011. Registration plates with a black background and silver lettering were produced until November 1986, no further black and silver plates were manufactured after this date. A plate with a 3 letter 3 number combination (i.e. ABC123) would not have been manufactured on Black and Silver plates. Legislation states that only official registration plates may be used. Therefore the plates displayed on this vehicle will not be legal. My understanding is that it is not legal. The legislation doesn't account for people painting later plates to look like the early ones however due to the reflective background on modern plates, painting them (legal on older plates to 'restore' them)is modifying them from their original purpose. They will no longer work as intended (the 'distinguishing mark/marks' are no longer visible). I have seen a driver receive a ticket for using them, but he was a cunt. I've been pulled over with them and the cop didn't mention them. It hasn't really been targeted specifically.1 point
-
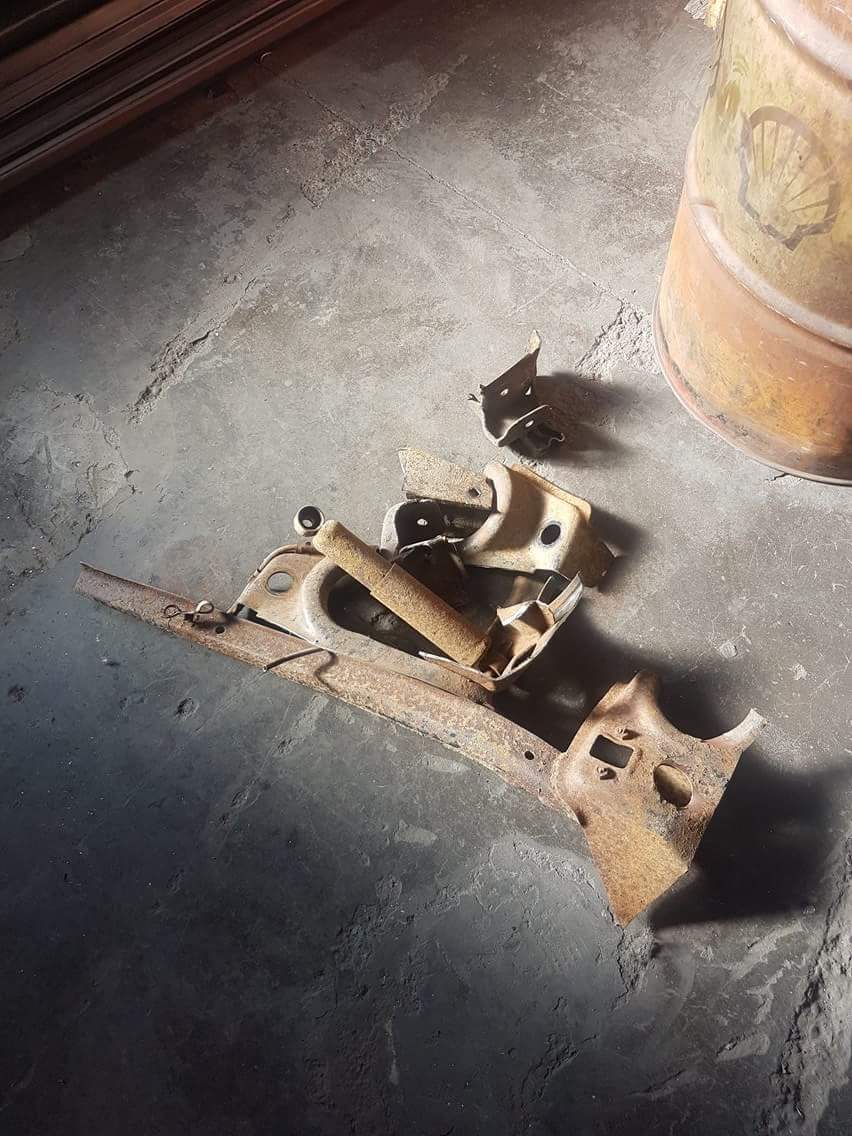
RR door striker RR door/sill LR door/arch/pillar. Shocking! RR guard RR C pillar RR C pillar LOL so fragile and thin. RR wheel arch RR sill RF door RF door/sill/guard RF A pillar lower RF A pillar LF door LR guard LR C pillar LR C pillar LR sill/pillar LF C pillar lower LF guard LH bonnet RH bonnet RH bonnet RF guard1 point
-
Still to get some action pics and video but took this up to the local school with the kids the other day. Bad news: The boy isn't too keen to try it yet. He's a cautious type but once he's ready I'll have trouble getting him off it. Good news: I had a blast hooning around the asphalt. Has fairly good traction even on the hard tires. Bum got a bit saw sitting on the bars (I don't fit comfortable with the seat in) and started getting a hot back due to the exhaust being almost against the back. So a heat shield and more hooning required I downloaded a GPS speedo app to clock this. It's no power house but can do a donut, skids and feels fast. Ticking all the boxes.1 point
-
I think the front doors good, I'll have to check the fender. I think we might dollar reserve the lot. I'll keep you posted I'm in hawkes bay1 point
-
all gone. 2017-04-22_02-37-50 by sheepers, on Flickr1 point
-
Here's another rushed and average pic of my new carpet. its much darker than it looked in the auction pictures, I like it.. so I think I'll rock it as is, reminds me of my old valiant.1 point
-
Minitubing started
1 point
-
WARRANT STATUS ACHIEVED!1 point
-
If you do it anything like me, you might as well just let it run out on the floor as that's where most of it will end up when the house flips out of the container or I knock it over.1 point
-
New page brings new energy into building this tho there wont be many photos to post up as my 15yo digi camera is takestoo good of photos to upload on Os have to slave through photopucket adds insteed1 point
-
Always feels good to put boxes down on concrete beside a tap.1 point
-
Merry Xmas! The latest Stacked/Moonlight container arrived just in time for the festive season, and so did my shiny new AW11 Recaro seat rails. When Xmas morning dawned bright and early I busied myself in the shed, and eventually ended up with this: Not many people realize that you can swap the centre fabrics around on just about any Recaro L-series seat as long as the bases match - I cobbled these together from a pair of good Lancer GSR LX-B seats that I bought off Dirk about six or seven years ago, and a pair of munted BF Familia Infini LS-Bs that still had relatively good centres. It's a pretty time consuming process if you're being careful to re-attach all the hog rings and trying not to rip or damage anything. Thinking back to when I originally assembled them it probably took a good hour and a half per side. As you can see, the effort was worth it. They're surprisingly comfortable, have just the right amount of firmness in the padding, and are much more supportive than the factory AW11 seats. Plus as an added bonus - the eye-watering red stripes are totally '80s spec and stay in line with the character of the car. Next I'll probably have to give them a good scrub to make the red fabric really pop against the blue exterior. N.B. if anyone is wondering what the Recaro LX and LS guff is all about, I direct your attention to the following image: Discuss: http://oldschool.co....1-sc-chit-chat/1 point


.thumb.png.46e518f714cdc319554c389f990e75a4.png)


This leaderboard is set to Auckland/GMT+12:00