
Leaderboard


Popular Content
Showing content with the highest reputation on 02/14/17 in all areas
-
12 points
-
So cool! I never knew any made it over here. have worked with them a bunch in Europe, just the ticket for snow at odd angles. It was pretty much the secret allowing us to build this thing
 10 points
 -
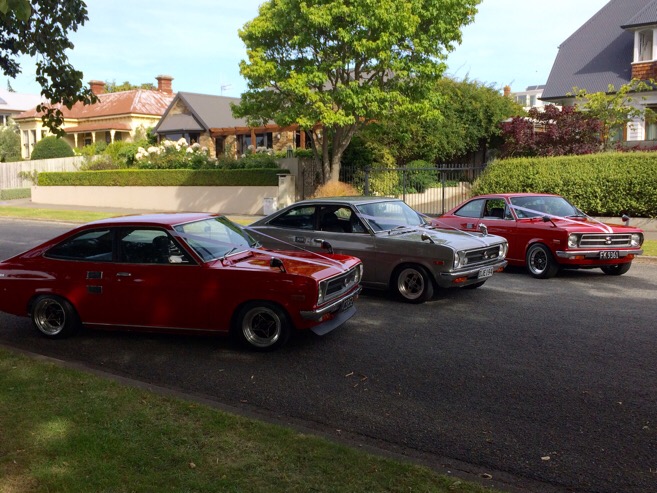
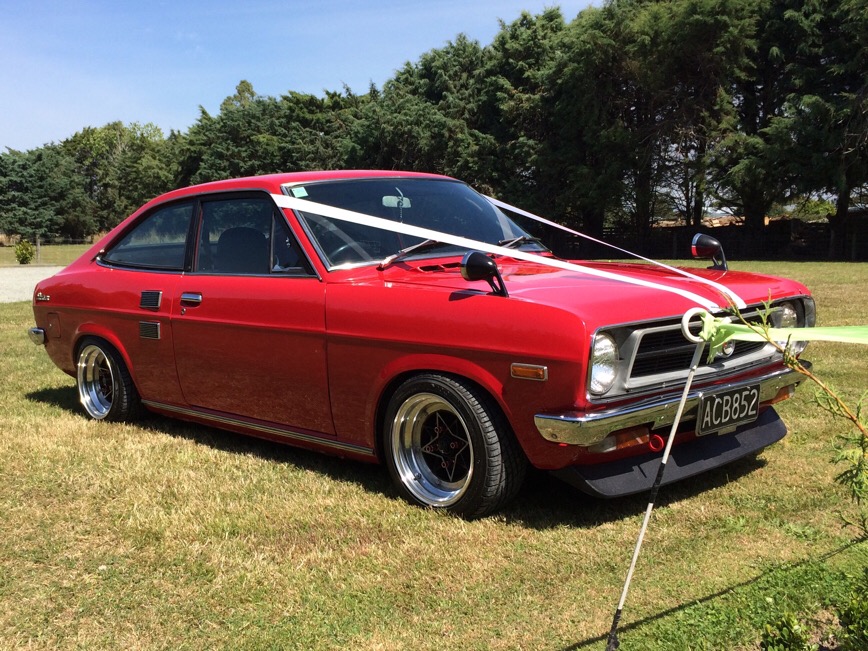
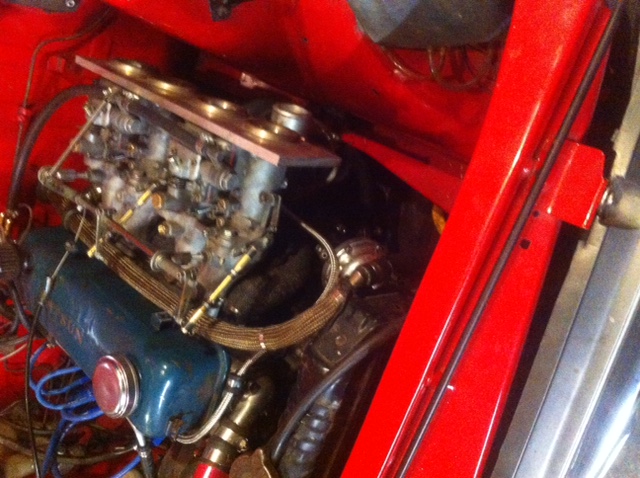
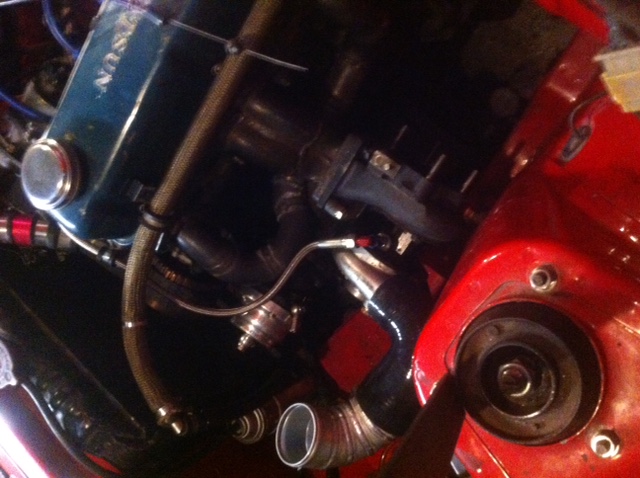
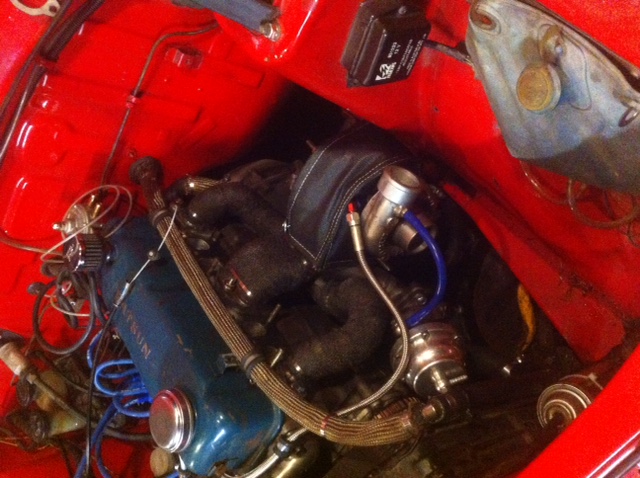
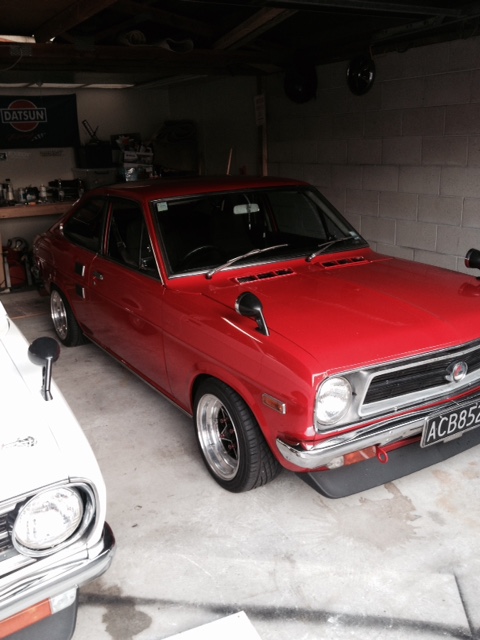
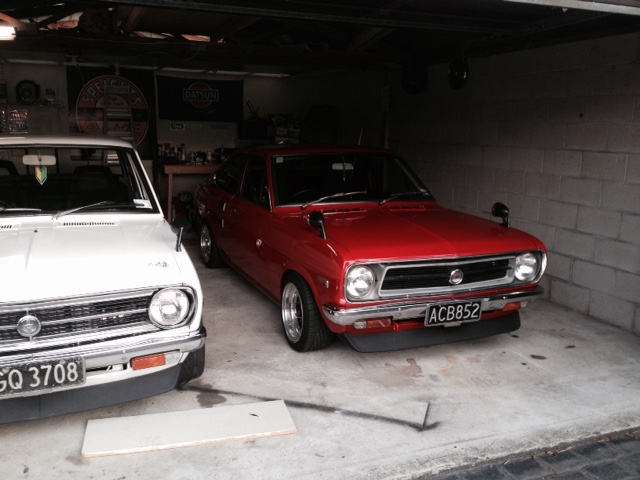
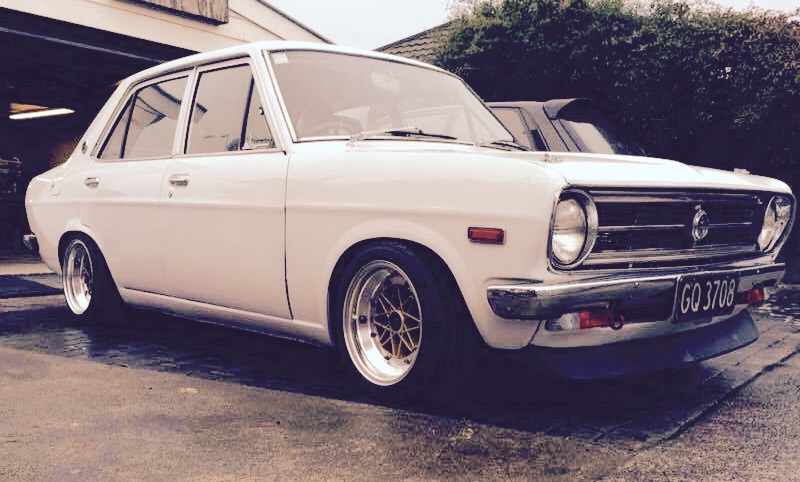
So the water pump packed up and started poozing water out from where the bearing was. Ordered a new one from Witors, fitted that, a new thermostat, new coolant and radiator hoses, new cap and gave the rad a damn good flush. Car runs cooler than ever (just below half on the open road on a hot summer day) so I'm happy. Cleaned the bay up a little bit more and fitted the rocker cover with a new gasket as the old one was leaking. Waxed it then parked it in the rain. But wait! What is going on with the bumpers etc? Neal and I went down the line to dismantle a PI he purchased, and haul the parts back. It was super rusty and beyond salvage. Anyway long story short, I grabbed the bumpers off it as it had the early bumpers. Polished them up after their 20 year plus stint in a paddock and they came up totally presentable. Needed to enlist the magical metal stylings of sheepers to repair the brackets but once that was done, they fitted up pretty easily. I've also slapped an early grille on the car, and topped it off with a pair of Wipac 5 1/2" driving lights, which aren't yet functional but they look shit hot. Finally, I have a set of polished 14x7 -7 offset tridies (Enkei versions) which will be on the car real soon like as part of a "stage 2" aesthetic. Next step is replacing all the front bushes, I've got all that junk and new balljoints sitting at home and just need to source a round tuit so I can get the job done. Oh I also fanged it Leadfoot, and it ran super sweetly without drama. //oldschool.co.nz/index.php?/topic/53732-snoozins-79-two-point-five-s-its-for-sporty/ <------ yarn link6 points
-
Installed a control box for fuel pump and mounted it under car this weekend. Running much better now. Also had it in a wedding with Kitches and Luke's coupes.
6 points
-
Picked up the new car and threw some of my bits in. Just need to find time to pull all the running gear out, hopefully this week sometime. Also dropped my FCRs off to get a manifold made up, which shouldnt take too long.6 points
-
So last Wof I was told the angry box needed new seat belts, gearbox mount and a leak in gearbox fixed.. Also alternator shat itself. By eND of Feb I will have all the bits I need. How does a Saturday morning working bee with a BBQ lunch sound? I can put on some chops snags salad and bread. As well as a couple of boxes of dobros? Possibly 1st or 3rd weekend in March?4 points
-
So this happened, nothing too major, and the smaller parts of the list should be done by the end of the week, leaving only sorting the rear airbags fouling on the diff/ brake line, and reworking the front shock mounts should sort 3 of the issues on the list, Guess there is a few more late nights and weekends in the garage,3 points
-
Finally decided to do the coilover setup in the front, after forgetting how much work the rear was. But yeh the front is going to even more work, mostly because there is so much stuff that needs to be moved and shuffled around. Unless i was to do it half assed. Had to get in and chop a few things up before i could even order the coilovers, to make sure everything was going to fit, with the coilover length i want. Turbo was the first thing in the way. cut up manifold to relocate turbo closer to engine. Manifold is done. still need to finish sorting out the airbox and exhaust. After thinking the drivers side was going to be easy, turns out the brake master was going to be in the way. Had a wilwood reverse mount pedal box hanging around, i had brought for the trueno that didn't really fit. Looks like it will solve the problem in the hilux though. should fix the brake bias issue also. Still gotta make another bracket to mount to fire wall but this is where it will sit Ends for the link setup.3 points
-
Left hand hanger done. Second time lucky to get this one.2 points
-
Must remember not to hoon to work tomorrow...2 points
-
The last point doesn't need to be remedied right.. video of hopping please!! Also, bloody good work!2 points
-
fat finger corrected.2 points
-
this reminds me, i should get onto organising another meat... lingling2 points
-
Mr Vapor, you need to move the typing finger a little to the right, its an EJ not an EH.2 points
-
I'll have six MkII 2000, 2500 and 2500S models coming into my yard soon to be dismantled for parts so just sing out if you need bits.2 points
-
Chapter 3 - Winter After solving the majority of the oil consumption I continued to use the rebel daily, took it on a few day trip, and competed in the end of season drags at Ruapuna. The more I used the bike the more things broke and needed fixing. It was a constant battle. Due to kms I was doing I was doing oil changes every month, the 15 year old rear tyre and chain were fast wearing out and the suspension bushes had disintegrated. The tyre and bushes were replaced but I have yet to touch the chain. I used the bike on and off during winter when the weather was clear. When the Ashburton lake got a large dumping of snow I decided to go for a day trip out there. The scenery was epic, the hills were silent, and it was a little chilly but I enjoyed myself. When the rego ran out at the start of spring I put it on hold and focused on my Golf as the bike needed work doing to it.2 points
-
Chapter 2 - Queenstown I may have lied a bit about not missing a beat. The Banks Peninsula trip showed up a couple problems the main one being the tune. It got further and further out and kept dropping off onto one cylinder at 100k. The wrap on the exhaust looked cool but was hiding a terrible. The exhaust had rotted out and required a new section to be added in. After fixing the exhaust and re jetting the carbs it was time for another roadie. I wanted to go over the crown range so a trip to Queenstown was organised. The problem was I had to be at a riding cause in a few days and the weather for the rest of my Christmas leave period looked a bit rubbish so we only had 2 days to do it in, no problem. Pack racks were hastily knocked up out of bunnings alloy box section and steel bar lying around the farm. I also stripped off the last of the pipe wrap and painted the exhaust black. My poorly designed pack rack proceeded to break during the trip and by the time we returned to Christchurch it was held together with string and duct tape. No joke, that's literally what happened. Also what became apparent is the engine seals didn't enjoy doing more kms in 3 weeks than it had done in the last 10 years. The valve stem seals were leaking so much I burnt all my oil during the trip. Top end rebuild time2 points
-
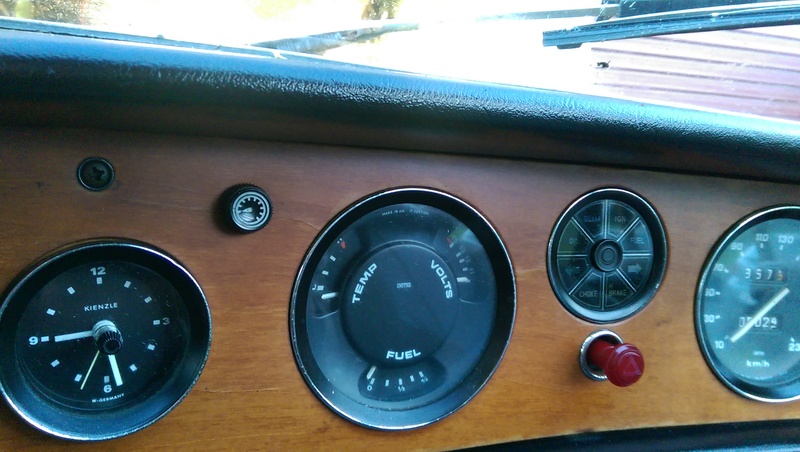
What does that knob near the clock do? Need another brake master cylinder. Mine has been sleeved before, in brass which makes it harder to sleeve again. Also, I damaged the piston trying to remove a circlip, so that would also have to be sleeved. Woops. Removed the front calipers. Needs new pads, they are super crusty and very worn. Needs new caliper pistons, they are rusting on the exposed bits and the chrome is coming off. Needs new brake hoses, they are not cracked, but look real old. I ordered a fuel pump repair kit and a new speedo cable from Chris Witor. I got some new rear wheel cylinders, need to take the drums off to see if they are oversize before ordering new shoes.
2 points
-
Thanks pete. I will swap you pepes for it? And I put my hand up for help as you've seen me hammer in tek screws2 points
-
Then I bought another NZ New 200sx! WTF AM I DOING? 7hr road trip to get it, get home and an hour later I get a phone call to saying I might need to take my trailer to fckn Taihape to pick up a damn Triumph with no brakes.... wife gave me the worst look ever.2 points
-
Looked at the ring gap at lunchtime - took the top ring off, levelled it down bore with a vernier, and measured, just looks too big... Bloody hell, kept sliding more feelers in... So it's over 50 thou. I think at 4.030" bore diameter the top ring should be around 0.016 - 0.018" - so that may be where the problem lies. Prob been like that for years, I just never picked up as never had a catch can telling me how misty the crankcase was. I'll try to get block into machine shop this week and get it inspected, hopefully a hone, ring and bearing job will sort her out...2 points
-
Made things a bit more cruise worthy over the course of the last week. Trump 2500S-5 by Richard Opie, on Flickr Slapped a lush JVC mechless head unit in, this bitch has 4V preouts and a reasonable EQ. It's also super compact depthwise so I can fit it in the limited space behind the sumptuous veneer of the Triumph center console. Trump 2500S-1 by Richard Opie, on Flickr A swag of cables run under the carpet and through holes I mangled in the sheetmetal to the boot, to this primo Image Dynamics 4 ch amp, which I am running with 2 channels bridged into this: Trump 2500S-7 by Richard Opie, on Flickr A dual 2ohm voice coil 10" Image Dynamics sub, in a box cut for me by Dave Jackson, and trimmed by Greg at Midnight Upholstery in a sweet shade of Triumph tan. Trump 2500S-6 by Richard Opie, on Flickr Trump 2500S-4 by Richard Opie, on Flickr The front 2 channels run these old Pioneer TS-X11 I've had for years, they sound incredible for their size and vintage. I have them running through a high pass filter, so nothing under 100hz makes it to them so hopefully it prolongs their life a bit. Trump 2500S-3 by Richard Opie, on Flickr Trump 2500S-2 by Richard Opie, on Flickr After Raizer posted the Krusty Seal of Approval in the discussion thread, I went on an e-search looking for someone who surely, made these as a sticker. I found these on a tumblr style site thing and sent an email then boom all of a sudden a couple of them ended up at my place, all the way from Ireland of all places. Then George went to Goodwood, and I requested a Goodwood sticker so I could apply as so to the rear screen of my British automobile. TL;DR? Doof and stickers. I also got a new 2" exhaust (the guy stuck a 2" on it of his own accord) but I didn't take any pics. It sounds fruity.2 points
-
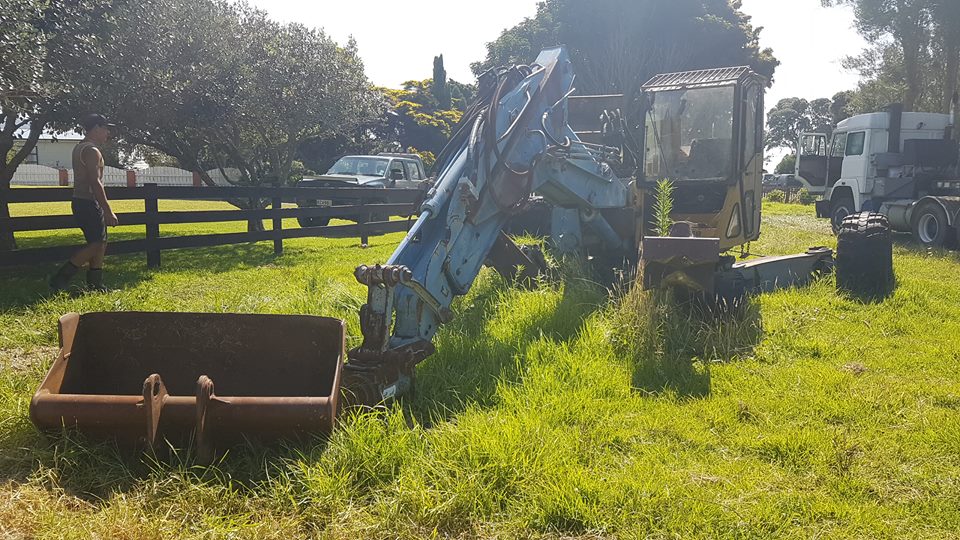
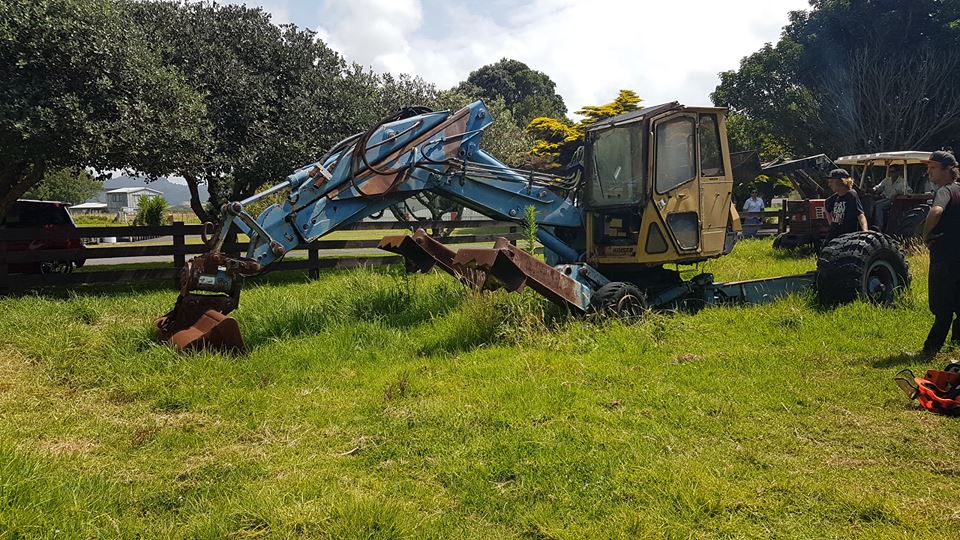
Gather round children I'll tell you a tale... I'll try updating this thread as I go both for your own interest and my sake to document the build. Ive been crazy about diggers and trucks since before I could walk, and back when I was about 10 years old my dad took me up from New Plymouth to the Field days in Hamilton for my birthday. As we went through the gate one of the first machines I saw was what I later learned to be the Kaiser X4 Turbo walking Excavator. This thing was mind blowing back then, in fact I was so enamored I returned home and built one out of Lego which won me second prize in a contest at Toyworld (prize was a technic Helicopter which I believe I still have at the olds place). Anyway fast forward 20 years and through some searching I became friends with the man who back then owned my dream machine, since then hes owned several other versions. He sold it to a lovely guy up past Opotiki, so with some rough directions and a lot of hope I set off on an adventure with my poor girlfriend to find it. I knew it was up east cape way, past a school, over a bridge and up to the right "you can see the beach from the machine"... cant be that hard right?? First trip we drove right up the coast from Whakatane to a little past Waihau Bay, and up every road on the right that looked hopeful but with no luck. It later turned out we drove straight past it (behind a row of trees), and were intently looking at a shed full of things on the opposite side of the road!! Upon returning home I quizzed the old owner again, and he told me you could see it on Google maps Two more trips up there id not only found it, but found the owner and struck a deal. Yesterday myself, the missus and my mate set off to retrieve it.. How shes sat for 10 years:
1 point
-
Link to Discussion Thread Hello team, Thought I would start up a project thread for my old Range Rover project. It all started with my parents vehicle choices. They had a bunch of rad old cars (most all sold now unfortunately) from Triumph TR2's & 6's, split window Kombi's, old Mercedes and Jags and a bunch of old english motorbikes. The ones that really got me were the Land Rovers. It must have been the family holidays bouncing around the back in the SIIa Dormobile camper or their old Range Rover. Anyhow, long story short, I have a couple now that I am working on that you will see in the following posts but this will mostly be for the 1971 Rover. This truck is Masai Red and was brought over from the UK in 1973 and then sold to the chap I got it off in the same year. They used it regularly to pull their jet boat and horse floats up until around 2000 when they purchased a diesel vehicle and parked the rover in a shed. During their ownership around the mid 80's they added the stripe down the side, re trimmed the interior and wrapped the C pillar in vinyl to make it look like a later model one ( it should be painted to match the body colour like in the first photo). As it sat in the shed, untouched for around 18 years! I purchased it of them around November last year and have been slowly chipping a way at it ever since. Great thing as it was shed stored it is pretty rust free but I will need to do the sills for a WOF. Another bonus is that the registration is still on hold! Bunch of small jobs done (coolant and radiator flush with all new hoses, new distributor, coil and condenser and a few other bits needed to crank an engine that hasn't moved in so long.) Good progress this weekend, Leak in the coolant system sorted and clutch bleed and we now have it moving under its own steam! Still a long way too go... Next weekends job is replacing the old discs and pads and some of the brake lines and look at giving it a bit of a tune.1 point
-
Long story short. Had this Did a few track days in it. Crashed it. Drove a friends Ke70 at a track day while i was repairing it. Decided i wanted another one so bought this. Pulled the 2T out, bought a smallport and T50. Got rid of the shit on the cam covers Bought wheels. Got knuckles and LCAs made. PSM coilovers Engine in. Coilovers in. Need to pull the front apart again to chuck in my 86 brakes, new tie rods etc. Hope to have it running soonish.1 point
-
Dont think this car is old enough for the main forum, 1989??? So I decided to get another project to muck around with to stop me pulling things apart on the 280Z plus Craig is building lots of cool shit and I am jealous. Requirements were it had to be Nissan, be cheap, have 4 seats (the 280Z is not overly family friendly) and be cheap. I have always liked the old Z32 300zx's so decided to go down that path, they are a love it or hate it car but Im cool with that. Upsides of the Z32 are obviously you can pick them up for next to nothing these days, there are lots of spare parts available for them and they are quite a lot of car for the money. The downside is they are are a bitch to work on due to engine layout/space restrictions, you have to pull the engine to change the washer fluid. Plan for this thing is just a fun budget build, use cheap or second hand parts where possible, take to the odd track day and drive it. So knowing it was probably a stupid idea i started looking around and found cheap semi tidy 2+2 NA manual in Christchurch. So site unseen, Craig and I jumped on a plane flew down, met the guy at the airport, dropped some cash on the thing and road tripped it back to Aucks which was mint. When we picked it up Mean trip home The car has over 200K Kms on it and leaked oil from every seal imaginable, interior was filthy and it had an horrific pitstop special exhaust system that was stupidly loud and totally shit. Good points were body was fairly tidy, came on some rough 18x9.5s, gearbox felt ok and car drove pretty sweet. At home with the 280 When i got it home the first thing that needed attention was the bio-hazard of an interior. It was disgusting, the drivers seat was torn and the dash was lifting around the windscreen air vent which I believe is fairly common. Every old 300zx has a torn drivers seat which looks crap, i wanted to keep the seats as they are cool 90s retro with motors in them so decided to re skin the drivers seat. I found a tidy passenger seat online then proceeded to strip it down and swap the skin over to the original drivers seat. This was a mission that took forever, I dont recommend. Spare passenger seat I found after ripping it to pieces lots of scrubbing out years of filth, ended up with two fairly tidy seats with no rips etc. They are still wet in this pic One non torn drivers seat back in the car Rest of the interior got a full on scrub down, it was unreal how much crud came out of everything. I also pulled out the dash and glued down the area that was lifting around the air vent. Another job I did was to tidy up the vinyl trim on the rear quarter panel interior trims that were torn. Next job was address the ride height. The car was rocking full on 4x4 spec stock suspension which had to go. Cheapest option I found was some dodgy ebay style coil overs, yep they are probably made from recycled watties baked bean cans but they were cheap so they were in. Threw them in and adjusted height to something that looked more respectable There is still scope to go lower but looks better for now The car came on a set of 18x9.5 +15ET china spec Cosmis wheels. They were were in a pretty sad state with some curbing and stone chips etc. In an ideal world I should replace them with something decent but thats not happening so decided to tidy them up as best I could. You have to be a mogul when you are racing modern...WTF Spent a fair but of time sanding down all the chips and marks. Then sprayed gloss black to hide the evidence. They look 100 times better than they did so they are staying for now. Need to change the wheel nuts to something non chrome Old mate Craig had a super legit set of Defi gauges gathering dust on his shelf so i stole them, hacked up the center console and made them fit. Gauges are worth more than the whole car, cheers bro! Next thing to address is the engine. The tired VG30DE had to go, it was leaking oil real bad and is slow. I had initially thought of throwing in a RB25 for something different but by chance ended up getting hold of a supposedly low km VG30DETT twin turbo motor for super cheap from the Mrs uncle who randomly had it sitting around in his shed. Fitting a VG30DETT into a NA Z32 is meant to be relatively straight forward, you can use the NA loom etc. My car is factory manual, the NA and TT gearbox internals are identical but the TT version has a slightly larger bell housing, the internet told me it should all fit somehow... The turbo engine had been sitting in his shed for years so was looking a little worse for wear. It turned over freely so figured I would take a chance on it. This was how it looked when i got it home. I also tracked down a complete stock intercooler plumbing kit I gave it a good de-grease and waterblast then started stripping things off to tidy it up a bit. I didnt know anything about VGs so was going to be interesting. I ordered a timing belt kit, water pump and rocker cover gasket kit from the states. Then proceeded to pull things off, clean, sand, prime, paint, refit, repeat... Fitted new timing belt, idlers, water pump, thermostat etc Painted up the timing covers so they look a but different, every VG i have seen has the stock black covers. The stock T25 turbos looked in fairly good condition, no large amounts of shaft play and rotated nice and freely I ordered a set of dump pipes from ebay in the states, they were ridiculously cheap and seem OK. Painted the water inlet and outlet pipes black just to mix things up from the normal alloy finish most are Pulled the injectors and replaced the o-rings and pintle caps Painted the fuel rail gloss black Nissan engineers were on acid back in the 90s and decided to try and include lots of crazy technology into the VG engine. The engine has an exhaust recycling system to reduce emissions on startup. It is known to fail over time so I deleted it and welded up the pipe on the manifold. I also removed the PCV plumbing and welded up the ports on the rocker cover. I will be using an external oil breather tank. I also deleted all the additional water cooling lines that run under the plenum. Again these apparently begin to leak over time and arent needed. I stripped down and painted the plenum exoxy gloss black to match the rest of the engine colors. Also painted up the heat shields and other small bits, waste of time really as you will never see any of it. The factory NA engine mounts from my old engine were shot, they had cracked right through. I found some cheap nolathane ones online, I made some alloy heat shields for them as some threads online said the nolathane mounts can fail due to heat. Also replaced the rear main seal while everything was apart I reused the flywheel from the old NA engine, it is smaller than the one that comes with the TT motor but it fits with my gearbox so had no option there. NA VGs use the same clutch layout as RBs so I fitted a heavy duty Clutch Industries RB25DET clutch. Out came the tired old DE, getting at some of the plugs was a real bitch. You really need to be the size of a leprechaun to work on these engines. removed the gearbox and its 20+ years of grime Used degreaser and oven cleaner to clean it up as best I could Engine and gearbox mated up, ready to go in car In goes the DETT Boom Factory twin turbo cars have a stock external oil cooler, NA versions dont so raided Craigs parts bin again. Added a few AN fittings and sorted. I was going to used the stock intecoolers that I scored but ended up buying a dirt cheap ebay split front mount cooler for some stupid reason. I think it is a copy of the Greddy version? It is a tight fit, had to cut away some of the plastic bumper support to make room Then I made up a set of cooler pipes to fit by cutting up the stock ones I had, combined with some silicone joiners it worked out pretty sweet My car came with a china spec Greddy copy twin mushroom intake pipe I needed to fit an oil breather tank somewhere in the engine bay so decided to run with a small batter setup and combine that with a breather. Knocked up with this disaster Painted up and installed Will do the job Next job was to make up an exhaust. The dump pipes i bought off ebay included mid pipes so i was one third of the way there. Picked up a bunch of 2.5 inch bends and mufflers etc Started piecing it all together, just tacked in place to suss out the layout Went with a crossover section and two small mid resonators Once i had the layout sorted welded it all up and painted. Fitted the NA loom up to the motor. Some of the old coil plugs were broken so replaced them with new ones. I had to relocate the lower radiator mounts as the TT radiator is narrower and thicker than the NA version. I had one small issue with one of the loom grounds resulting in no power to the coils but once I sorted that the engine fired up nicely which was awesome. Used a consult cable to make sure everything was working as it should. Adjusted CAS to match engine timing to ecu timing. Oil pressure seems good, temp OK and idles nice and smooth so fingers crossed. I am waiting on a few small parts to arrive, alloy radiator as the factory one I have is a bit sketchy, factory fan shroud and radiator top mounting brackets. I have taken for a few drives up and down the road an everything seems OK so far. Car is only on wastegate boost at this stage (7psi) but I have a profec boost controller installed so will have a play with that and turn it up a bit. Washed it for the first time in forever, was such a mint weekend 280 got a clean also Next step is tidy a few small things and get a new warrant for it. Then I will fit a wide band to it and may have a play with the ECU using Nistune software or romulator. I will need to upgrade the injectors at some stage and it will need a bigger fuel pump also. Fun times1 point
-
Hey guys has anyone got any info on a way to change something like my stock revcounter in the MX41 to read off the V12? Pretty broad question but where would I start? Chur1 point
-
Anyone keen on a get together for said event? When I say "get together" I just mean going and watching the racing and hanging out like faggots. I'll take the Mercedes (unless it's raining, then I'll take the Gloria)1 point
-
I attended the British Car Day with my SD1 http://www.tasteslikepetrol.net/2017/02/rover-sd1-british-car-day-2017/1 point
-
*disclaimer on Barry Engineering shed* If the owner has got rid of everything / shed empty by then / we might have to go to the pub. Or @kempy's. Unlikely but being upfront as it's a bit out of my control.1 point
-
^^ Top bloke. Quick to reply that he probably wasn't the most economic choice, and recommended another outfit. Still keen on suggestions for painting etc!1 point
-
Since the problem started with the change in springs I would be checking the diff angle. Use a proper gauge (I have seen people use the built in angle gauge on an iPhone) and make sure that the gearbox and diff are parallel. It is amazing how 1 or 2 degrees of miss alignment will make things vibrate.1 point
-
ATTENDING Kempy Punkout Mirage man Bigfoot with shed PIAZZONOOB Sentra Tumeke Oldrx7 Poo Chris r Kiwibirdman Onthreetrees Mr vapour NZED Straight6pete Marty bean Mrk2marty. Tiparacer Mr locost Sheepers. Xspeed. So that's 21/22 going to have to lock it up there.1 point
-
On my XC the dashlight dimmer went from a pale glow to nothing at all.1 point
-
Got a spare key? Could be immobilized..1 point
-
It's probably in worse nick than you remembered, it's just that dealing with OS cars has desensitized you to rust in recent years. You're on your way to Barryism.1 point
-
Here is some of the footage I got, on my new 4K camera1 point
-
There are a few bubbles around the car that suggested rust, but of course they CAN'T be, because the old Barry I purchased the car off said that all repairs were done with SOLID STEEL MAYTE. NO BOG IN THIS CAR. Thought I'd have a look at the solid steel, so hit it with a disc and found this. Thanks Barry - Roger. Ok, exploratory surgery required I guess. There's your problem The Rootes Group, in their vast intelligence, put a lump of foam sponge in between the inner and outter skin. This is the rust filled sponge. Pulled said sponge out, Rust converted all the inner stuff (still very solid thank goodness) and put some fish oil type stuff throughout all the cavities. Notice the factory inspection hole on the inner guard (sans rubber grommet) so that I can do the same in the future. Ran out of panel steel, however no one can see the BACK of my filing cabinets, so there might be some missing now. Bent and cut into shape. Did a welding. The hole above the tacked panel has meat around it so will be a secondary repair after this one. A third repair will be done on the inner door jam as well. I don't have the skill to do it all as one. I'm also sure my work is a bit shit by other peoples standards... But I try! Seam welded (a few holes still to be finished) and grinded to make sure I was doing stuffs right. So, first bit of welding done on the car. I have since done the other two repair patches above this one and tidied things up. Etch primer seems to be the same colour as the paint which is handy as I've got a few other patches to tackle when i can be bothered and would rather do all the painting at the end, so it can stay in primer without being too noticeable! Tell me I'm doing it shit in the 'discuss'. Happy to learn stuffs1 point
-
http://www.trademe.co.nz/a.aspx?id=12596010321 point
-
Hey bud, I had the exact same problem on my cortina a few weeks ago and I was worried it was gearbox too but I took my driveshaft (which looked mint and so did the universals) to a driveshaft place for a balance and universals replaced and said said it was way outta bal and the joints were screwed. Mint as now. Give that a try. I paid about $285 to get it done. Cheers Cam1 point
-
Driveshaft bent or rear bush in gearbox worn?1 point
-
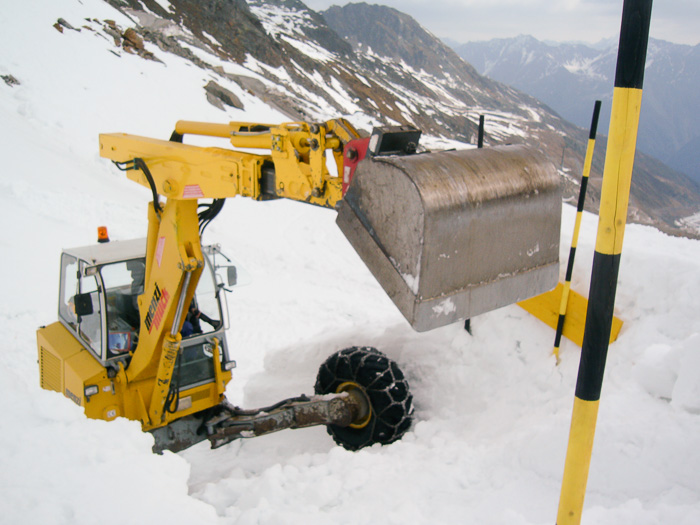
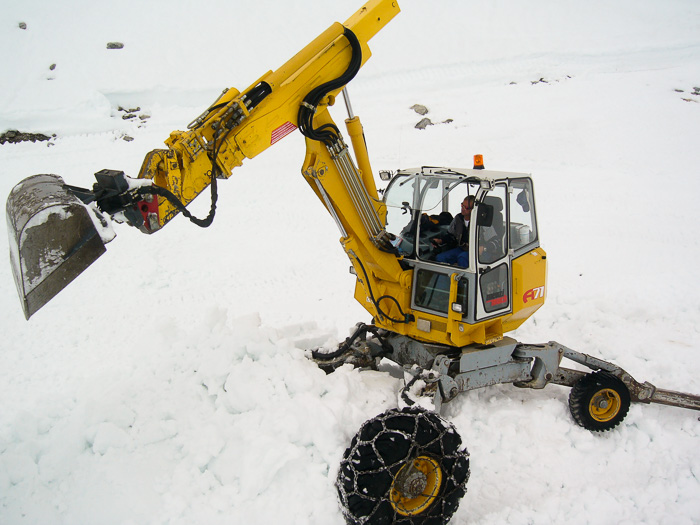
Stability, maneuverability and working envelope. It weighs 7 tonnes, uses a 12 tonners attachments and has the hydraulic punch of a 20 tonner. They work in water as they can jack themselves up, and work on steep terrain as the legs allow it to level out on the hillside where a normal machine would tip over.1 point
-
Not mine obviously, but this is a pretty good way to shed some light on what they are and do, and how they "walk" compared to a regular machine.1 point
-
Then once that looses all excitement you can try whacking it on the neighbours lawn.1 point
-
Fixed some rust and filled some holes. Along the bottom isn't rusty holes, just pitting unlike what it looks like it the pics. Both patches had seams filled with lead through them which was annoying! Fixed them up the best I could, will figure out a way to paint/blend them back in.1 point
-
Went back to this possum palace place again, super muddy and slippery. Only one way to get around the place, max rpm. I also mowed their lawn, since im such a good cunt1 point
-
Alright this is the beast. Someones disconnected the oil mixer I think, can someone have a look here and tell me whats up? Do I have just to go fuel tank with premix -> carb -> success?1 point
-
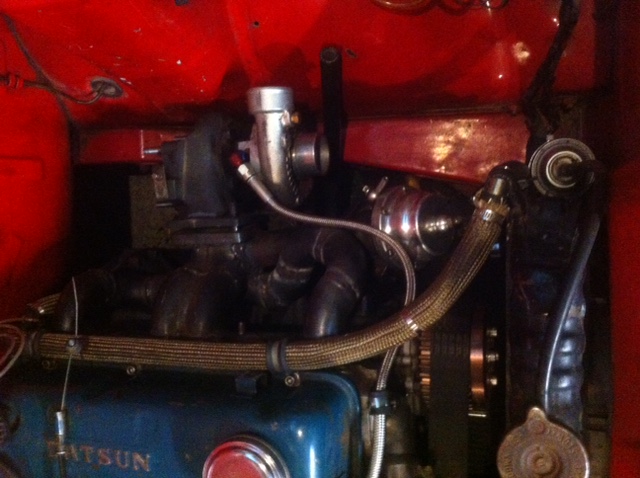
inside plenum
1 point
-
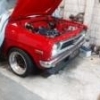
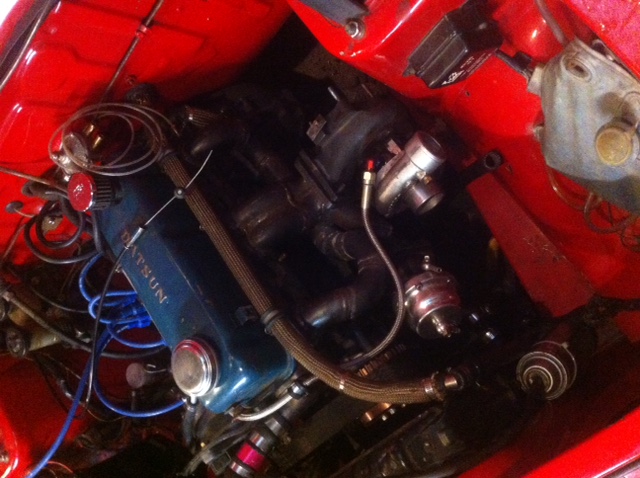
engine bay
1 point
-
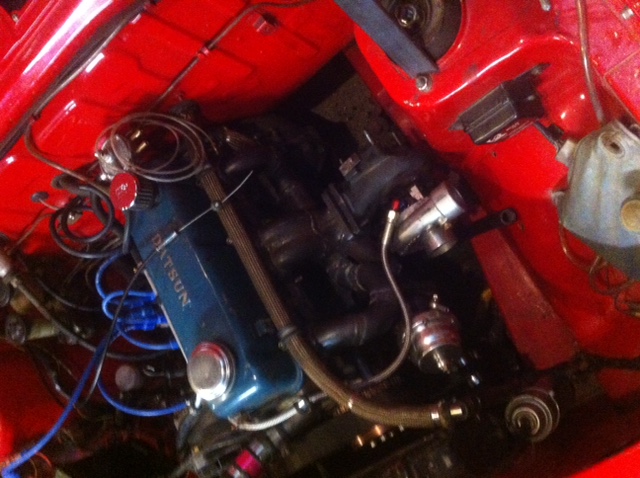
sorry about the order of photos
1 point


This leaderboard is set to Auckland/GMT+12:00