
Leaderboard


Popular Content
Showing content with the highest reputation on 11/28/15 in all areas
-
OK well now that I have some time between paying jobs (which have almost all been other old rusty cars and general rot removal) I have sneaked the Viva up on the hoist and got cracking with its rear end. But first here's a pic of the rust I have removed so far. We did a run to the metal scrap place so I had a clean out. This lot had to go. There will be more.... Now this rear valance panel looks a bit thin on it.. Which it certainly was. Not quite as bad all the way across as my other Viva when I repaired that one. Again just like the other Viva its weird that only the rear panel rots but the inside shaped vertical panel stays solid?. Not that Im complaining. Anyway. I cut it open and then cleaned out all the rust flakes, wire brushed it and then neutralised it all. I discovered that the new can of Brunox I had bought happens to accept the extension lance that comes with my cavity wax cans. Sweet- I was able to spray it right into the Lh corner. Then I painted the interior to help the car last another 40 years. Then a local mate wanted to use my hoist so the Viva came down and I cleaned up the front panel. Its been repaired before and had been done neatly enough but then covered in bog. The corners near the rails were gone again so that will be attended to once back up in the air and Ive finished the rear. Back to the bum. I carefully cut and shaped new steel to fit in with only butt welds. Vivas have quite a tricky multiple compound curved rear end but I was able to work it out using two pieces of steel and lots of hand shaping after getting the main curve set with the folder. I tidied up the bits that were under the reverse lights, which wont be going back on, then one more vacuum out. For the final fit of butt welded close fit panels it helps to use a butter knife to line the edges up.. I grind off the lowest weld which could hold road muck but otherwise I will leave all the welds untouched. Grinding welds down sucks. The exposed welds are sort of part of the overall patchwork car I'm after for now... Then I moved round the side and this bit looks a bit dodgy. This has had a previous decent enough looking repair but sadly was covered in filler straight onto bare metal- as was the way in the good old days eh. So the bog absorbed moisture and rotted steel. Bugger. I cut it out and treated the inside with luckily only a few bits that need to be cut out. Then while the Brunox epoxy spray was setting I moved over onto the opposite side. This time its the very bottom corner of the arch that looks a touch rotten... So I cut it out. It was pretty frilly after all.. The arch corner in pieces. Note my ever evolving welding table. I recently added the uprights to hang my angle grinder, Dremel machine and other bits that were always getting in the way, falling off or never at hand. Its then once opened up to day light that I discovered a little seam sealer Jabba the Hut!!! Wow. * I then had to carefully shape a new corner and arch bottom out of several bits of steel. It was all so rotten I wasn't quite sure what the shape was meant to be like. It didn't really have to be factory original looking, just neat. So I have sort of just made it up as I went along.. Once this arch repair is done I'll go back to the other side and finish that. Then I will drop the car down and turn it around so I can having it facing the sunny end of the shed. Then I can work through the engine bay rust with nicer light with better access to the coffee machine/biscuits/sunshine/music. * that is actually a lump of factory seam sealer. I might have added the eyes..12 points
-
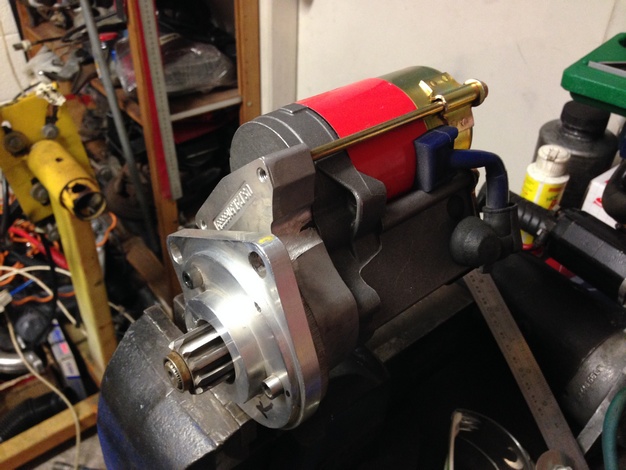
Found the reason the car wont turn over Lack of clearance between teeth on flywheel to starter motor causing it to bind Made some mods to the starter gear Turns over but but wont start properly checking over the carbs and found the accelerator pump assembly had come apart Back together again First start up....finally http://www.youtube.com/watch?v=94XKnQGsmwM]
 4 points
 -
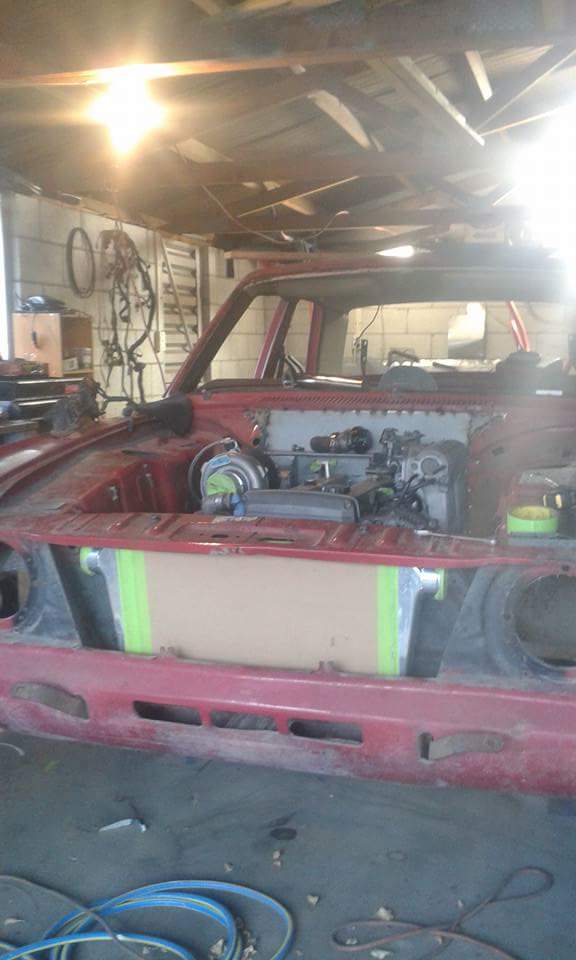
Well long time no see guys. After taking a couple of years to learn the guitar properly ive decided i can get back into the crown project. But i had changed my mind a bit in the meantime. I purchased and Altezza comlete rear subframe to convert the car to IRS and things have spiraled majorly out of control now. (as they always do) I went to the wrekcers to have a chat about getting a beams 3sge and 6 speed instead. I thought the weight being less and further back would help the handling. While i was there the topic came up that he had wrecked a 4wd altezza. thought nothing of it, went home to t think about the 3sge. I had previously made plans that i was also going to fit the fron subrframe and suspension from an altezza, that way i could have a real power steering rack and decent suspension. good handling etc. then i started thinking about the 4wd he wrecked and did some research. well now i have a COMLETE 4wd 2JZGE package waiting for collection. That means the front subframe, engine, trans, driveshafts, ecu, loom, suspension etc etc. The plan is: Modify chassis heavily to accept front and rear subframes and suspension from altezza Bolt parts up Replace the auto box with an R150f long shaft manual gearbox 1jz flywheel and clutch setup altezza transfer case lengthen driveshaft (suspect 20mm as thats the wheel base difference) Use Link ECU Standalone Big single turbo, modify fuel system with return line new fuel tank etc Replace factory dash with custom made unit utilising factory altezza instrument cluster aim for around 450hp replace front seats with something that hugs! Cert Drive that bitch Now i know in theory thats all fairly straight foward but i am also well aware of the impending issues (mostly with wiring tbh) At the end of this i should have the only MS65 4WD 450hp crown in the world Why 4wd you may say, well 1: because i can, 2: Because it's different, 3: I love corners. some photos of what im keeping of the chassis
4 points
-
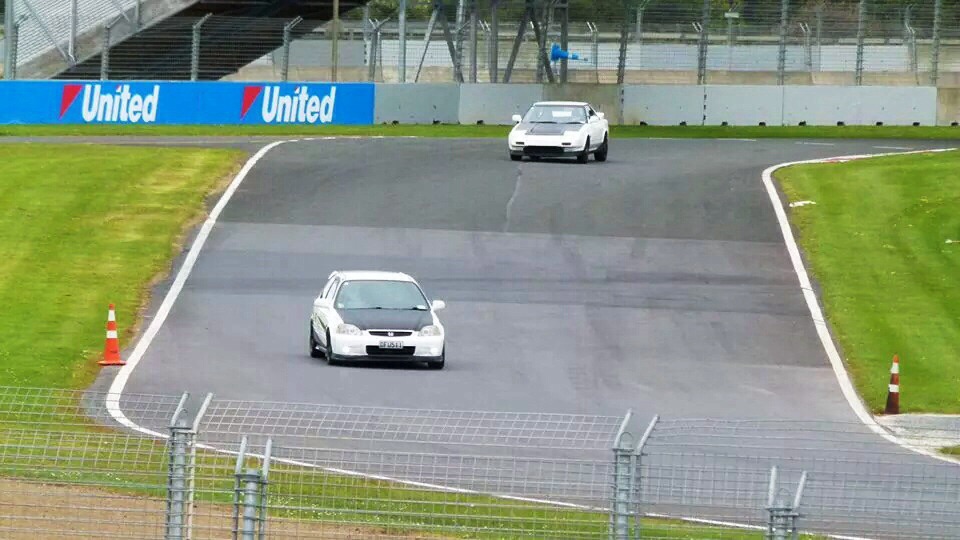
Spare seat in the AW11 too if Cam decides he doesn't want it.3 points
-
//oldschool.co.nz/index.php?/topic/49929-pbaines-1985-ae86-corolla-levin/ Well, I have bought myself an AE86 in from Japan. Always wanted a Sprinter Trueno but ended up with a Levin as it costs a lot more for the Trueno (probably 4-5k NZD) but to be honest, after getting this Levin here I am over the moon. As an AE86 always does, there's a bit of rust here and there. It does need a repair cert but the fella i'm dealing with is very helpful so should be good to work with him to get it all sorted. Engine is built to N1 spec, and goes like the clappers! Needs a new CW & P though, as it is massively high strung at the moment and I sit at around 4200rpm at 100k so definitely not ideal at all. As it was in Japan at Stacked (best guys to deal with, highly recommended. Was shipped via AutoHub which was 100% hassle free) THEN It was time to get it on the boat. But not after removing the side skirts and raising the suspension, with the greatest method of adding nuts as spacement. It was on the top of the list to go 'remedy' from the VINZ inspection too Lastly Here is the VINZ inspection sheet.2 points
-
Few weeks ago pulled the engine apart to just put this in: engine hasn't seized yet so must be legit Almost a year later i actually made the air duct thing, from ali rather than beer boxes . Had to make it 3 parts to get it all in there. bottom bolts on trumpets are a bit of a diddle to get to. Done. complete with bmw boot seal. Seems to be working good. Even looks to be getting a touch of positive pressure at speed, maybe a kpa. which is piss all but better than nothing. Chucked a hose down by the filter from the link's map sensor, since its not being used. to measure pressure vs the baro sensor in the link. need to figure out its possible to get more resolution out of the map sensor as it 1kpa increments. vs the baro 0.1 increments. / probably just drive it2 points
-
Delete this please someone. What a stupid dur dur head2 points
-
seats. yay. the BMW seat is lush as fuck. its megga comfy and lush to sit in and its too high. the exhaust is approx 3mm away from the seat rail, it aint going any lower in the car but its just too high, the sun visor is now non functioning because I'm so high in the car that i literally can't see anything but bonnet if i put the visor right down, tis gay. so I've decided to pull the pin on the bimmer seats. i ordered a racetech seat instead. didn't know they were NZ made but when i found that out i was sold. i went and tried a couple out thanks to the nice people at Chicane racing something or other and ordered an RT4000W (the W probably stands for wide) which will take 3 weeks to make. so ill stick that in when it gets here. no idea what imma do with the passengers seat as this stage. my one will be like this but all black. in other news i got a wheel alignment done by the good people at racelign suspension and while it was there i asked them to see if they could see anything that needed attention suspension wise. Ian reckoned most things were good but the rear trailing arm bushes had a bit of movement. i thought about when they had last been replaced and it occurred to me that they had been in the car since 2001. so i bough some new ones and swapped them out. the old ones looked fine but with the new bushes holding the diff in place it feels much better in the back end. and thats all.2 points
-
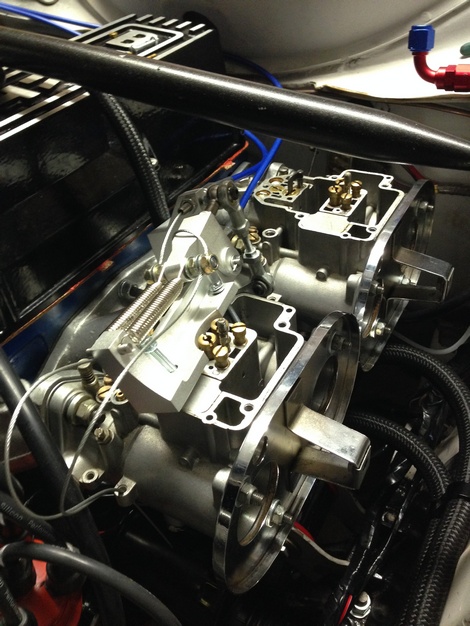
Well, two mini-projects which have been dragging on for a while are having some meaningful progress made in last few weeks. Link updated their firmware to allow for staged injection to work how I want it, so I dug out the manifold that Sentra Dave made for me (Big thanks!) and then using limited tools available currently (drill & rivets!) bodged together some crappy mounts for the first half of my airbox thingy. Behold, my disastrous looking rats nest engine bay: The first rule of trying to establish if something makes a difference for better or worse, is to isolate it as the variable, no other changes. But meh, got both of these things sorted at the same time, and that's what I'm planning to run so will just chuck it all together haha. I can switch back to a pod filter when it's all tuned nicely to see if the differences come from the airbox or from the injection. After some tinkering to get the AFRs correct, my fuel map is a very different looking place compared to before. Oh, did someone say "Post some graphs Roman"? This is the comparison of fuel maps, with new setup vs old: interesting to note the peaks and dips by comparison, especially around that mid range area. I'm going to concentrate on adjusting the injector timing around these areas where its showing a big change, because I doubt that I could have lost or made that much extra power... It could be that fuel is spitting back out the top of the runners, so you need to make it "richer" to get the correct AFR. No idea why how it could be so much leaner in that mid range part though, unless I've lost power there or this situation was happening previously and now isnt. Although, the car no longer feels like it runs out of puff at 8100rpm so it could be a mix of that, + bellmouth intake doing its thing to breath easier at the top end. Cant wait for drag day, and also Waipu cruise tomorrow!2 points
-
I just realized its been the better part of a year since an update on this! i haven't done very much but i have done things. Like this Some aggressive guard rolling by yours truly has revealed a nasty bit of a repair on the drivers rear guard. Me being me picked and prodded at it and now it looks like that. That will be getting fixed early January! also this happened.. https://www.instagram.com/p/82XYKKKZSl/?taken-by=be4ver Flashing stuff is fun. Got tyres for my 10s!! Now running 14x9 -25 front and 14x10-25 rear. I will look at getting a lower profile tyre at some stage for the front but for now im pretty happy. 185 55s are a dam good fit on a 10" rim2 points
-
the vw went for its venture out of town last night. it went to raglan and back via the long way home. didnt miss a beat!!! ran like a camp. and the gavel rough as hell road on the way home didnt rattle anything loose that i know of yet but back to square one. we dont have any tail lights now haha. so time to find out the problem there and try raise it back up for a wof. ah also my rear air shocks have holes in them from bolts rubbing on them. so il order some more and get some nice dome headed bolts flip them threw the other way and be away luaghing hopefully. thats that. here is a pic from but fuck know where late and night on a gravel road and the moon oh and proof i made it to raglan2 points
-
Edit; oh thanks Tinypic..... FFS Well now... I have just gone and bought another Viva. This time its an HB wagon. YES!! I have been after one for ages and ummed and erred over the one that was for sale on Trade me up in Taupo about a month ago for quite some time. But factoring in transport to get it south put me off plus Hannah and I then ended up buying a MK1 Triumph wagon from Christchurch, a car we have always wanted for a long long time but had never seen one for sale at a sensible (read cheap) price. Then Shane, my viva HB mad friend in christchurch offered me his one. Its very rusty but with reg on hold plus a set of Cheviot Turbos I was keen. Hannah offered to go halves on it and that was it. So now we have two very rusty wagons, both circa 1969, to restore. The Triumph is still waiting for our collection. So this HB wagon eh?... yeah its pretty rusty. I had no real idea what it was like but for two photos. Shane brought it up from Chch today and we drove over to Blenheim in my Viva last night to meet him. He was unloading it when we got back from a walk in the hills this morning and my first impression when I slowed to a halt behind it was good. In fact great- it just looks so much cooler in the flesh than I thought it would. The shape is soooo choice. The turbo mags really set it off too. The back was filled up with the doors and the original tailgate. I grabbed some photos then we pushed it into my parents yard. Ha- the look on my parents face. 'FUCK' I had a quick look over it then we went for lunch. Shane and I just chatted Vivas and other old cars. He is a wealth of info on these Vivas having owned something like 40 of them and having done many engine conversions. Anything that is missing he'll sort me out with. After lunch they left to go pick up a Chevette wagon that he has had stashed away in the north island some where. I then took some time to go over the new toy with Hannah and see what we have let ourselves into. Yep- rust. It has rusted in the usual Viva places but is also solid in many of the places I would expect to see rust. Luckily the main chassis rails are not too bad. Drivers side has holes but passenger side solid. The boot floor boot and spare wheel well are great. Weird. The sills are shot, comically so with holes right through inside to out. A smear of filler and she'll be right... The floors are frilly along the inner sill edges. Head lamp areas not too bad luckily- these have welded on front wings so repairs are more time consuming there. Shane has supplied me with a spare whole right front wing cut as the car has a pretty dented one. The roof and gutters are good- just surface rust. Bulkhead good but holes in a few places closer to the inner wings. The very common spot for rust n these is behind the bonnet hinges but it looks to be solid there. Rear valence a bit thin. But it does have a stainless exhaust The engine apparantly runs but really I dont care as its most likely going to be swapped out with something more modern. Maybe I might get it going and driving with it first though. Luckily it has a disc brake front end and a servo. These will help haul back those 54 ponies. I have found a few pieces of the missing puzzle... I love these wheels. In fact I looked for a set ages ago for my Viva before I got the widened steels and couldn't fnd any in 4" pcd. Very rare. One of the few styles of alloys that I think suit these cars. So I am chuffed to bits to have these. two have quite bad curb scrapes so I will have to weld them up and machine them back but nothing major. Curves and sweet wheels.. It comes complete with ICE The dash needs a little bit of amourall... It is now safely parked in my parents carport- having relegatted one of thier manky modern cars out. I think it looks tiny next to what is meant to be a smallish suzuki. My parents think Im a bit nutty. But they know I'll sort it out... We wont start working on this for ages yet. The Triumph will be first in the queue and before that happens we have to get our shed up on the land and move out there. So for now the Viva will wait patiently. I am however quite keen to try out those alloys on my HB so I might fix them up soon. Bed time now as I am exhausted form so much excitement. I wont be back to view any responses (like "you idiot!" and "why that?!!!") from you lot till we get back from more gorse clearing on the bush block on monday night. Until then suggestions and mockery more than welcome Btw- we both love the colour so that will be its future shade- but maybe with a cream roof. Discussion1 point
-
A while ago I picked this POS up from PStar The reminants of a 1952 Rudge Sports, which had clearly been residing in a scrap heap for a while I even had people chasing me down the street to insult my new purchase Perfect I stripped off what remained of the accessories A front guard, basket mount, bell bracket, and a broken front brake - I wont be needing those Installed Cork grips Vintage brooks saddle and seatpost replaced bottom bracket spindle Hammered bent stem into shape filed out the drop outs for new track wheelset sakae cranks and toe clips Now it looks like this 1 point
-
This car started off as a project race car with my flatmate at the time, picked up from his work colleague as a body with front subframe removed for the princely sum of $500. I will try track down the photos I had and update over the next few days.1 point
-
I'm not sure how you managed to do that with the link haha1 point
-
Keen, just put the sensible racks on and the mal on the roof will see yous at C&C for a 10.30 departure. Surf is gonna be better after lunch. That If i can still swim. mmm pizza.1 point
-
450hp is barely breaking a sweat, medium frame turbo will do this, and still spool quickly. I heartily approve1 point
-
This idea of 4WD JZT IRS Criz gets me excited1 point
-
This is a story post, not a question or anything, keep your non constructive opinions about my crappy workmanship and setups to yourselves - yes you are a master machinist - i dont care. For years i have been frustrated at my lack of facilities to cut splines due to not having good access to a form grinder, so making and maintaining a hss form hob to spline axles has been in the too hard basket and i have mucked around with adaptor plates and trying to mishmash stuff to work around it. In a pinch the other day i decided to try contour milling a involute spline form with a 60deg threadmill. This worked amazingly well & i Decided to write a story about it. total investment: 1x Iscar 60 deg cutter. $60. (my only arbor is too long, you can hear it struggling in the video later on the case hardened steel) Plan of attack - one million little passes per spline. Microscopic view of resulting stress raisers. meh. overlay chart. looks fine. machine down celica axles outboard end outside dia and length. the reason the transition is not tapered at the stage is that it will be used as a clamping surface as you want to avoid using a center when splining so you can test fit your thing without taking it out, Mill and crummy little indexer setup, see last step. (axle doesnt fit inside indexer past chuck) keep your comments about my awesome stack of clamps to yourself. thats some deep case hardening . (end gets cleaned up in a later op) cutty cutty completed 30 mins later. some knowall threw the plates away for this indexer and was relying on the pin holes in the chuck mount. fark. i put an encoder on it at the 11th hour. next time i will just use a vice and encoder with no indexer. horay/even a broken clock etc. in car in summary, i was amazed how easy and cost effective this is after spending so long humming and harring about it. there is no reason you couldnt do this on a little tormach machine. (or if you were a real sicko on a turret/dro.) two things to note- one for the love of jeasus i cant get camera to focus and they look all weird, however they look sweet as and fit up mint - and two: the cam side pics arent involute correct, "magic of tv."1 point
-
Mate, if this question is for me then I can respline 9 Inch, Hilux and BW78 axles - this is all. And even then I only offer to respline when there is meat there that allows a new spline to be cut. I don't offer to build up a shaft using low hyd rods or similar in order to get a certain length. So pretty limited in one respect but good to know for the users of these 'most popular differentials' I can also narrow diff housings (again 9 Inch, Hilux, BW78) and oddly enuff Ford Courier/Mazda1600 housings. I use jigs that run true, my work is decent and I have usually a way quicker turn around on stuff than you will get from an engineering workshop in town. And why is the print about using a Lux diff in small print, lol ... are you a dyed in the wool Hotrodder that has been brought up on nothing but Ford diffs? Haha! Let you in on a little secret ... factory 9 Inch axles have the consistency of cheese a lot of times. Jap iron from the 90's leaves yank iron from the 60's in the dust. The diff heads are a different story though..1 point
-
looks like ill have a spare seat too.1 point
-
Would you make unbreakable axle shafts in exchange for money? (trying to decide if i should go hilux diff' or not)1 point
-
I'm going to be by myself if you want a ride in the crown?1 point
-
Perhaps earths to the case via a screw or mounting terminal?1 point
-
Haha nah all good. So you started an AW wide body?! Any photo's? You weren't on the old clubAW were you?? I really wanted to copy Audi rs4 2014 rear guards, their kind of a cross between a box guard and a flare. Un-believably I couldn't find anyone willing to let me smother their new Audi in epoxi. thoroughly disappointed! Maybe next time...1 point
-
Hi Guys, I know we more on the internal combustion side of things around here - but a friend of mine told me about this and it looks pretty interesting. Figured I'd put it up in here in case anyone else hadn't heard of it who might be interested. http://evolocity.co.nz/1 point
-
Well she has been in the Panel Beaters for a few weeks now with some good progression. The guy doing the work reckons one more week and should be all done (they are doing this in their spare time as apposed to main priority to save me a little $$$) The chassis was straight in the front, but out in the back so needed to be straightened up. Such an awesome bit of technology how they can measure up a car, tell that it isn't straight and pull it back into shape. We had this section here which was all bubbly under the surface Which has turned into something which looks like it hasn't seen a particle of water This section here turned out to be nothing more than surface rust which was relieving. From initial inspection it looked horrible The most peculiar thing about this all was.... the entire hollow section of the hatch was filled with pink foam... WHY?!! What is the purpose of all the foam!! The panel beater spend an hour and a half picking it all out because it is extremely flammable. And finally the front right bumper mount has had a little bit of work done. Overall there is no where near as many problems in terms of rust and bent bits as I was expecting with the car. Apart from a new replacement front quarter, and a replacement rear quarter (I've got 3 cars in one, YUSSSS) it's all been pretty straight forward. Once this is done, Cert for adjusties and then on the road she is.... That's the plan anyway1 point
-
BIG cam pushrod is the way. Good work Ned. Really interested to see how you get on with your own EMS once Microsquirt is ironed out.1 point
-
I have done the following, new wheel cylinders, oil change, reindex the rear suspension and bleed the brakes. Shit, I may make this. edit; flatmate may attend in his early beetle as well. Charging GoPro - and packing lenses1 point
-
Oh and forgot to include this, te27 180km/h cluster, stripped and prettied up. Basically painted dials with paint pen, painted face black and detailed in white. turned out quite nice. Te27 because it has the writing around the hazard light switch1 point
-
Find yourself the local British car enthusiast garage (MGA, MGB, etc). They'll hate that you have a Japanese car but they will be able to tune your SU's so crisply that it won't matter their thoughts about the car itself. That's how I got mine done. "Blardy Japanese SUs" but he got them running so well it was ridiculous. I'd spent hours myself trying to sort it using books and my derp brain.1 point
-
Slow progress Put some switches on the dash that do aboslutly nothing. Started on mounting the radiator and making an exhust Also started making a seat out of copper. Petrol can that i aquired that will hopefully sit on a small roof rack and gravity feed the engine. Parts to hopefully turn into a rear axle1 point
-
i love me some backwoods engineering theres a dude on a NZ hunting forum that does some wicked stuff with just a lathe to make black powder guns ect http://www.nzhuntingandshooting.co.nz/f53/making-sharps-barrel-my-lathe-16567/ http://www.nzhuntingandshooting.co.nz/f53/hawkins-plains-rifle-project-8740/1 point
-
I attended a classic car auction a few weeks ago and purchased quite a few vehicles on behalf of others. There was only really one vehicle that I wanted to buy for myself and thankfully I managed to purchase it for a mere $200. It's a 1981 Series One Rover SD1 3500 in Barley Yellow. The car was assembled in New Zealand at the New Zealand Motor Corporation's assembly plant in Stoke, Nelson. It's a 3.5 Rover V8 engined model with a Borg Warner 65 automatic transmission. The only other person bidding on the car at the auction was a scrap metal dealer that I have had numerous run ins with in the past. He was going to send the car to be scrapped complete. And while my plans aren't to save the car, I will at least be removing everything of use and using the parts to keep another three SD1s on the road. In thses engine bay shots of the yellow car, you can see Zebra Dude removing the usable radiator. He blipped the throttle V8 in his manual SD1, the fan flew off the end of the water pump and ripped a hole in his radiator! Great British Leyland reliability. This replacement should get his car up and running and we'll cut the huge extension on the water pump off as it's only there to bolt a mechanical fan to. Electric fans will do a better job. I also bought a second Series One Rover SD1 at the very auction that I purchased the yellow one from. This one is a UK assembled 2600 2.6 Six cylinder automatic model with manual windows. It's actually a rather tidy car and is now owned by Zebra Dude. The colour is 'Pharaoh Gold' and is probably my favourite colour of all the Series One SD1s. I'm going to remove the good usable parts from the yellow car. The rear bumper, some trim pieces and a few other small parts will make their way onto Zebra Dude's Brown/Gold SD1. The entire interior, complete doors, glass and rubber will be fitted to Zebra Dude's other SD1 (A Series One 5 speed manual V8) which will then be painted white and turned into a UK police car. The engine and all V8 specific parts will be removed and used as part of my V8 transplant into my Series Two Blue SD1 2600. The alloy wheels on the yellow car will also be removed and stored for use later on, probably on the gold/brown car. The gold/brown car also came with a complete 3.5 Litre Rover V8 in pieces. The heads came with the much better looking (in my opinion) early style rocker covers which I will eventually paint black with the raised alloy fins polished silver. So I now have a complete 3.5 V8 in pieces, a complete and fully assembled (ready to run) 3.5 V8 in the yellow car and the dummy assembled but not very complete 3.5 long block with heads that I removed from along with the K frame from the silver Series Two at the wrecking yard. Rover used an LT77 manual gearbox in every manual SD1. Therefore with the correct bellhousing, clutch fork pivot pin and release bearing sleeve I can adapt the current LT77 in the Series Two 2600 to work behind the 3.5 V8. So now that I have the engine(s), K frame(s) and everything else, I need to source a V8 manual bellhousing, flywheel and the aforementioned small parts and in theory I should have everything I need. Discussion: //oldschool.co.nz/index.php?/topic/26722-threeonthetrees-rover-sd1-2600se/1 point
-
..........BREAKING NEWS.......... The cortina is home. After being at work for a month or so I hired a trailer on saturday and dragged the hollow shell home. It will be the last trailer ride home for it and now its fit up time. While it was at work I got the windows put in and it actually looked weird for a couple of days. Its been so long without glass. I had a couple of hours free so started putting the dash in and it looks awesome but without further a dieu heres the pics That is all for now......1 point
-
Start it, the suspense is killing me!1 point
-
Cheers guys!! Pretty much done apart from Handlebar control wiring & Seat upholstry Have parked it up until after xmas as ive got other commitments that need $$ And a comparison shot from before i took it off the road to chop it up1 point
-
Such an amazing build, I hope I get to see it in the flesh one day!1 point
-
Hey all..... Last couple of weeks have been real busy. Blocking then primering and more blocking and then I finally got the paint on the cortina. Its come up brillant and am so stoked. ive bought new screen rubbers should be here early next week and should have windows in by friday. So if all goes to plan ill have it home by saturday. Im looking foward to the fit up now and will keep posted the details. Theres no pics of the blocking because I wish to forget that part. Enjoy...1 point
-
Tyres are now mounted (thanks to everyones favourite Christchurch Mag and turbo rep) and they will do for now. Took alot more cutting to make it fit.......1 point
-
Let's talk about toyo T1R's. There is much talk about how the tread blocks move around and they feel weird when hot. I have run multiple sets of T1Rs on the v8 and never found this characteristic but for some reason the same tyre in a different profile (215 45 15 on a 9"rim) felt so bad that I was convinced there tyre shop had not tightened my wheel nuts. I've never experienced a worse feeling in a way a car changed with the simple addition of a pair of T1Rs on the back. What I'm getting at I suppose it's it must have allot to do with the sidewall stiffness of the tyre. I put some crappy tyres I had on the car and the difference is night and day. The tyres on the car now are comical in there inability to convert torque to forward momentum but they are 2 billion percent better at going around a corner. Just some food for thought. Like I say, I have these tyres on the v8 ands I have never experienced this before.1 point
-
I got some parts in from Yahoo! Japan. Mainly just interior bits to replace broken or the stupid hydrodipped carbon fiber panels. But wow on shipping from Japan, 4 days to the door?! Also got some new feet rubbers too, the clutch one is quite worn out... heavy previous track abuse? Still have to get an ash tray, no rush though. The main piece is sorted Broken flap on bottom, genuine Toyota replacement fitted genuine Toyota water piping. Not sure if I will use this for replacing my current one or to chop it a bit to work with my newly formed 7A-GE Probably my happiest buy. My current one is split horizontally bleating out white light into my delicate eyes at night time Love seeing the Toyota labeling on there so I know it's not some chinga-lau replica I also bought a new sway bar and tension rod setup. Just a stock setup with relatively new urethane bushes all round. I would have gotten my current rose-jointed tension rods certed but they are both just cut and welded on pretty horey so wouldn't be confident in saying they would be good for cert. I might turbo this thing one day so will do more with it later if I go for a recert, for now i'll just get the front suspension certed for now. It'll be years before I poor a large amount of money into it Converse with me: //oldschool.co.nz/index.php?/topic/49929-pbaines-1985-ae86-corolla-levin/page-21 point
-
Also for anyone that didnt realise, this car is small.....1 point
-
Right, so everything is done on the list apart from the cert for the adjusties and the rust repairs. Got the tints re done to 35% but they didn't put the back screen back in due to this beautiful amount of rust in the back hatch. The car has been stipped out and will be off to the panel beaters next week. I'll make sure that the guy takes lots of photos as it would be good to see everything that gets done with before/after etc Have also got a big list of things coming over from Yahoo! Auctions including original trim (replacing all the carbon dipped stuff), stock front tension rods as the ones are there are rose joints but don't look like they've been done the greatest. Have got a new heater control valve setup, hard to find the auto-air model unit, then a few bits and pieces (i've forgotten all ready).... oh. Black carpet to replace the browny/reddy one that's in there at the moment so should look a lot nicer in there Looking forward to getting it back so I can put the sideskirts on and the chin spoiler, looks so much better!1 point
-
Puke
1 point
-
Ahhhh OK, that makes sense. Also, this piece of shit just passed its fucking cert, zeeeeeeeeeeeeoooooooooowwwwwwwwwwwwww!!!!!!!!!!!!!!!!!!!!!!!! Towed it alllllllllll the way to Tauranga, drove it into his shed, he looked at it for around 1.47 minutes, and said it was good to go. He was more worried about arguing the origins of the wild bunch with some old dude, than having a good look at my work. Didn't even give me a high five for my sweet engine check light. Glad its all done thought, neat. All was not without incident though. When I went to load the ute onto the trailer last night, the fucking thing unhitched somehow (brother in law attached it, so I blame him, lols) and made a mess of the boot of his car, so that's going to be at least $500 to fix, bugger. Next on the list is to fit the alarm, and banging high fatality sound system, then get the cert plate stuck on, and DO SUM SKUDS. Regards, V "fuli hektik" G.1 point
-
I made more progress on this today. No interruptions. Just me, music, coffee, welder, grinder. First off. I spotted this little fella making a go at life in the side window seal. I like it there and will try to nurture it along. Back to rust. This looks a slight iffy.. Yep. Im loving this perfectly shaped wing. I shall keep that as is. Someone has put a lot of effort into creating that. So I cut out the sill and this was inside... I have kept it all and can sell it on to someone who needs an original sill for a future build.. Luckily the front end of the outer sill was solid so that stayed in place so keeping a nice datum point to weld to. Inside the sill it was all really pretty good. Just needed a wirebrush and some paint. Again, much like the other side, it was foolish to attempt to use the very bottom of the inner sill so I chopped it off and welded in fresh steel. I also had to re-make two sections along the top of the sill structure that were just a bit too iffy to use. I then folded up two more sill sections to suit. Painted the inside and then welded them in place. I then chopped out the rear end rot areas. Much better condition at the very end on this side. Good Just two patches but I ended up doing the larger one right back to the bottom edge because it took no longer and means the whole sill bottom along there is new. Pinted and welded up. Its now looking like a proper patch work quilt I finished tonights effort by welding up the last section in the floor. There was an area that was a touch too thin.. I think there will be little hedgehogs sticking out out through the underside.. Then I swept up and moved the car onto the hoist. Next area is the bottom of the a post/sill end which luckily is not too bad. Once that is done I can attack the rotten chassi rail/rails. So far it seems to be that only the drivers side is rotten but I will find out soon. I need to buy more sheet steel though and will get some good thick stuff for the rails while I am at it.1 point
-
Finished the triple tree mods today...1 point
-
Intercooler turned up this morning.. So mounted it when I got home.....so much more room in the front compered to the escort.
1 point
-
Manual conversion is underway! 14x9 fits on the front easy! Tidyed up my engine bay Nah not really. hope and dreams! Found the source of the leaking coolant though. Swollen and split where i done the hose clamp up too tight. Also thought i had better replace the crank seal while I'm in here, and this other gasket too The seal has apparently been superseded a couple times and is now a bit narrower than the original?? whatever, it still works. Well itbetter work so clutch kit should be here in the next week or there abouts so it should be driveable again in no time! according to back to the future it will be back on the road next year1 point


.thumb.jpeg.910c6632f6e66e8cba89476e83b41634.jpeg)


.thumb.jpeg.384ff72c8d2b0ee0d34a7bdedb55bdcf.jpeg)


This leaderboard is set to Auckland/GMT+12:00