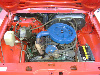
crazy_rich Posted April 8, 2007 Share Posted April 8, 2007 Hey, thought id show a few pics of progress. Here it is just after the engine was removed to attack the rust caused by the leaking battery The tiny V4 almost looks lost in the engine bay, I reckon I could have fit 2 of them in there. With the engine out, i got stuck in to welding up the rust and fabricating some new radiator support panels to suit the commodore radiator. While I was in there with the welder, i decided to strengthen the strut tops, and seam weld the firewall re sealed the inner guard as well 2 Quote Link to comment Share on other sites More sharing options...
crazy_rich Posted April 20, 2007 Author Share Posted April 20, 2007 I decided to send the capri out to an experienced panel beater to get the guards welded back on and some new sills welded in, came back nice n straight and completely rust free while it was gone, I made a few bits up at work. Billet flywheel custom HD clutch based on a GT-4 celica/supra. engine mounts/ gearbox mounts camber plates I also started making a rail kit, copying this one 1 Quote Link to comment Share on other sites More sharing options...
crazy_rich Posted November 20, 2007 Author Share Posted November 20, 2007 bought time i got stuck back into the ol capri after being sidetracked somewhat. running a carter electric lift pump with a bosch 910 HP pump into 3/8 lines, should do the trick until i twin turbo it quite stoked i managed to get hold of a v6 fuel tank with the extra 10 litres i'll sure need it. Gonna run a surge tank in the gap between the 2 pumps. almost finished my radiator mounts too, but of an improvement over the garden twine, Should be alot of progress made on this car over the next few months, so stay tuned. chur. Quote Link to comment Share on other sites More sharing options...
crazy_rich Posted December 4, 2007 Author Share Posted December 4, 2007 not much of an update.. I'm just stoked to be getting back into it again. sinco customs sure make some pretty gear.. theres no way I could have made a tank look that good for the kind of money he sells them for. Put a return into my tank. I finally finished making and modifying everything and was able to bolt the gearbox up behind the engine, saved alot of money doing all this myself, but it sure took alot longer. heres a pic of the chassis kit i started on a few months ago, should be able to finish it off now i've got another welder sorted out. going to stop talking and thinking about my diff and take a grinder to it later this week.. lets hope for the best eh? Quote Link to comment Share on other sites More sharing options...
crazy_rich Posted December 23, 2007 Author Share Posted December 23, 2007 scored all the bits i needed to rangi up some coilovers last week so did a dummy run, they should work with some heavier springs, also fitted the new bearings into my falcon hubs and slapped them on. Stoked to see it sitting low on the new rims, still way too high though... Durty old truckers yo Fury soon to be added... Quote Link to comment Share on other sites More sharing options...
crazy_rich Posted March 13, 2008 Author Share Posted March 13, 2008 Due to taking guidance from the wrong "expert" and not doing enough research regarding the power steering conversion i had planned for I've basically had to start the engine conversion again, and will have to make a sump from scratch. which will be a cunt. (cheers to Eke_zetec and gaz for putting me straight, I'd be understeering into a powerpole otherwise) anyway, i got a fresh crossmember, modified it to suit the standard lexus/ cortina mounts this time, modified my chassis kit to suit, then welded that all together, just got the engine mount tacked atm, gotta make sure it'll work with the teeny amount of clearance ive given for my as yet unmade sump. had to chop up my gearbox x member too cos the oil filter was hitting the steering rack, ah well its all further back now anyway = good. was looking at fitting a booster under the dash, really cant be fucked so when i tried a p10 master in the factory location and it fit, well with a spacer/ remote reservoirs so fuckit no booster, she'll be right, can always rangi something up once the cars goin. so yeah fuck all progress over the last few months. gay. but i have chopped 160mm out of my diff and made new mounts and tramp rods for that, mate resplined the axles for me = G C. guess thats better than a kick in the pants. no photos, hmm, might get some later. check out the rust i got rid of.. . farr/ meh 1 Quote Link to comment Share on other sites More sharing options...
crazy_rich Posted June 17, 2008 Author Share Posted June 17, 2008 ^^ lies.. all of it. fuck i've got one disjointed project thread haha. anyway, i decided to have a crack at a brake booster after all and by merging a liteace and capri pedalbox i reckon it'll work, this is as far as i got before the wire feed on my mig fucked out (thought buying a decent one would avoid that kind of thing.. looks like i was wrong ) its tighter than a nuns cunt up there, but she'll be right, just gotta pinch a oxy plant from somewhere so i can bend the pedals to the right place, no point having the stop pedal where the go pedal's meant to be, then i can try get a go pedal to work, looking at my corty i reckon one of those will do the job. I'll know in time. other than that i painted the inside, and the boot and pulled a nismo and baremetalled the underside. fuck knows why. never gonna do that again. so yeh, gona get my welder fixed, por15 the underside, paint the engine bay and start throwing the bitch together, getting fuckin sick of building this car. Quote Link to comment Share on other sites More sharing options...
crazy_rich Posted July 29, 2008 Author Share Posted July 29, 2008 Ive been up to a bit, got the pedalbox all in and working, had to change it a bit to give the accelerator pedal some room, strengthened it up alot too. Hope the cert man likes it, though a hiace booster was his idea. Mounted the fishnets so ive got somewhere to sit and think about where the fuck all the spaghetti goes. fuck i hate wiring, doesnt help that i pulled it all apart when i was a noob teenager, oh well. stoked the dash doesnt need modifiying to clear any of the brake stuff, gonna look stock as. put some cobra lowering springs in the front, no room for coilovers. they sacked it out immensely, shot cobra. Quote Link to comment Share on other sites More sharing options...
crazy_rich Posted July 29, 2008 Author Share Posted July 29, 2008 viewtopic.php?f=18&t=6255 Quote Link to comment Share on other sites More sharing options...
crazy_rich Posted January 6, 2009 Author Share Posted January 6, 2009 been working on a sump from scratch, been an interesting and time consuming experience, lets just hope it works, good thing about lexus v8's is cheap replacement longblocks. also started making a loom for the engine, and under the dash, never done any wiring before, other than the odd stereo etc so its also been a big learning curve. im hoping to get the sump finished off and tig welded next week, then i can bolt it in place, fill her with oil and see if it cranks. it'll be monumental. Quote Link to comment Share on other sites More sharing options...
crazy_rich Posted April 19, 2010 Author Share Posted April 19, 2010 woah been a while! anyway, I've finished the sump complete with haggard looking pickup, fortunately I didnt get a piccy before it all got bolted up, ended out welding another section into the sump to add a bit more volume, or at least to keep the oil level down lower away from the crank. Lets hope it turns out ok eh, dont want any of that oil surge crap. might see something in this pic, even painted it. some of you may have noticed my penchant for re-engineering my engine mounts every few weeks. no excuses. good spotting. I've also made a start on the much feared and put-off headers I've inevitably had to make. I wont lie. It was a cunt of a job, and they are nowhere near being any kind of equal length mega power fostering design, but I had fuck all room, and as long as the hot stuff eventually makes its way out a hole under my rear bumper I dont really give a shit what they look like. I've also put fresh waterpump, cambelt, plugs, rotors etc on the engine, and bought an a1 turbos bellhousing, as my rangi 'made by a 2nd year apprentice' adaptor plate was sitting the gearbox on the piss. Either way, whatever fucked me up had the same effect on A1 because their bellhousing is just as bad. which means it was a complete waste of money. Yay. next step will be the rear end. unfortunately I've discovered the P10 brakes are going to foul on my rear shocks due to me narrowing the diff too much and fords retarted idea of mounting one shock on the front of the diff and one on the rear. Due to this, I have to move a shock tower. this concerns me most due to the fellows who have said things like "If you move one tower, you may as well turret it,.... and if your adding tramp bars you may as well 4 link it, and all that shit. fuck peer pressure. you know what I mean. see how we go eh? 1 Quote Link to comment Share on other sites More sharing options...
crazy_rich Posted May 4, 2010 Author Share Posted May 4, 2010 Started on the rear end over the weekend, I set the diff up to get an idea of how much room I had up there, decided to reset the springs 2" for a start, so they're away getting done this week. Then managed to remove the rear shock turrets without too much butcherage. Hopefully next weekend I can look into welding the new ones in. Spent tonight messing around fixing a fuckup involving placement of my o2 sensors. Pity I dont have much room under there for the exhaust. Also dummied up a brake on my diff to figure out what rotors I need to run with the mounts a mate threw my way. Turns out the early 90's maxima rear brakes share the same dimensions as the p10 but with an extra hole, should do the trick. I have a feeling the P10 handbrake cable is going to be just too much long enough to be a cunt, but I'll cross that bridge when I come to it. So yeah, hopefully I'll have some leafs back soon and I'll put the rear end together, I've started making a jig to hold the diff straight while I weld it up, should be interesting to see how that goes. I'll keep ya'll posted. Quote Link to comment Share on other sites More sharing options...
crazy_rich Posted August 3, 2010 Author Share Posted August 3, 2010 Managed to get the engine all together again, gave it a lick of paint, looks like new eh? Finishing off the wiring before bolting on the intake and slotting it back in the hole to fire it up. Still a few niggly things to do in the engine bay & fuel lines to run first though. Had some problems with the rear end, suspension guys snapped a leaf, so I had to find a replacement, should get them back this week. Has anyone bolted an alternator off a smaller toyota on a 1uz? was thinking maybe a corona or similar, mainly because mines rooted and an ls400 alternator is most certainly overkill for my capri with its wind up windows and lack of anything modern & electrical. Have to get some mounts welded to the new radiator too. Quote Link to comment Share on other sites More sharing options...
crazy_rich Posted March 30, 2011 Author Share Posted March 30, 2011 I've started welding the new shock turrets in, they needed moved back slightly to allow the shocks to be run on the rear of the diff to clear the brake calipers. I'll be running some tramp rods on the top of the diff to hold everyting steady down there, I'll be interesting to see how well it works. Quote Link to comment Share on other sites More sharing options...
crazy_rich Posted March 30, 2011 Author Share Posted March 30, 2011 http://www.oldschool.co.nz/phpbb/viewtopic.php?f=18&t=6255 Quote Link to comment Share on other sites More sharing options...
crazy_rich Posted May 1, 2011 Author Share Posted May 1, 2011 WooHoo update time!! I've finished welding the turrets in, With the shock turrets finally welded, undersealed and out of the way I got hold of some J30 maxima rotors and fitted up the rear brakes. I still wasn't happy with the ride height in the back, so I made up some lowering blocks to drop it another 30 something mm, They may be taken out down the track once the weight of the fully assembled car is finalised, but for now its giving me a much better idea of how everything is going to sit. I also turned up some bushes to locate the diff on the springs properly. Unfortunately I'm going to have to hack out the rear of the driveshaft tunnel to clear the diff head. I'm not too worried about doing this though I'm slightly concerned about having to move the seatbelt mount in the picture. It'll be worth it though. Quote Link to comment Share on other sites More sharing options...
crazy_rich Posted June 12, 2011 Author Share Posted June 12, 2011 Done a few wee things I thought I'd share. Had a driveshaft made up the other week, it fits well, though it certainly confirms the need for some rear end tunnel modifications. As you can blurrily see the oversize land cruiser UJ actually hits the inside of the tunnel. Its nothing I can't fix with the grinder, some steel and the welder, though im not sure about what to do with the seatbelt mount. Legally cars first rego'd before November 1979 dont need to run rear belts, but I feel its the kind of car that needs them. I'll have to have a look into the rules and regulations surrounding seatbelt mount repostioning. Does anyone have any experience with this sort of thing? Otherwise I've started looking at the front suspension. I'm going to keep it simple with adjustable platforms, 65id springs, uprated swaybar, probably 24mm, and some flash shocks. Urethane throughout of course. I've also got some adjustable camber plates I made up years ago to add to the mix. I splashed out and bought all the new bushes and ball joints etc I'd need for the front end. I also got new bushes installed into the rear tramp rods, so I'll be able to weld the brackets for those to the diff now. Managed to find some xy falcon hubs to modify to fit the capri struts too. I wanted to strengthen the crossmember and fix the dented up mess on the underside caused by years of poorly placed bottle jacks and vice jaws, so I cut out a bit of 5mm plate and welded it on top. I feel as though I can lend alot more confidence towards its strength now. I also finished welding the engine mounts on. So this week ill rip into those struts, paint a few things up and take another leap towards getting her rolling. Cheers for your time- Rich Quote Link to comment Share on other sites More sharing options...
crazy_rich Posted January 16, 2012 Author Share Posted January 16, 2012 Well its been a busy few months having finally found a new house & having to pack up all my shit and move, but last week I finally dusted off the capri and started swinging some spanners. I decided to have another go at doing a basic coilover setup in the front, with tyre clearance being a major constraint. I dont want to have to piss around moving spring perches or getting custom springs wound to maintain ride height while I'm dialing in the spring rate. I got chamberlains to get the struts shortened, welded and supply some shocks, kinda wish I'd done it myself in retrospect but hey its done, and it didnt take much futher machining to actually work. + they passed NDT= choice! I then made the camber plates fit & work. Next up is brakes and a swaybar to complete the front end. Have a terrible pic. or 2. I'll be grabbing some nylocs next time im at blacks and I'll machine some flats on the shock to aid disassembly. Can also see my sweet reservoir holder. It holds the reservoirs. Bit of a bullshit update really. Driving the Cortina around is making me want to get this thing going more and more. Maybe 2012 is the year? Cheers - Rich. Quote Link to comment Share on other sites More sharing options...
crazy_rich Posted March 19, 2012 Author Share Posted March 19, 2012 I've fixed the driveshaft UJ vs floor problem, though unfortunately it was one of those wonderful problems that snowballed once I realised I only had 35mm of driveshaft travel with the car unladen/ stripped. So i cut the tunnel out, removed the centre bearing mounts, straightened the tunnel out and welded it back in 25mm higher. So with the tunnel straight and the extra 25mm strip down the side the diff can move about 70mm, which should be sweet. Have some pics. took the opportunity to slap a nissan handbrake on the tunnel while it was out as well. I'll be fully welding everything tomorrow, its just always nice to share photos during the tacking phase, everything just looks so much neater. Cheers - Rich. Quote Link to comment Share on other sites More sharing options...
crazy_rich Posted May 27, 2015 Author Share Posted May 27, 2015 I finally got it rolling! and I baremetalled it! Its coated in kephos in the pics, to stop it from rusting. I've spend a lot of time on this over the last year to get it to this stage ready for painting. Unfortunately I dont know what happened to many of my photos. I changed the front brakes, to skyline R33 fronts with au rotors on XY hubs, then changed the back brakes to sw20 to keep the piston diameter in the rear about 50% of the front, I also installed a brake bias valve in the rear line for a bit of adjustablity. I also revised my pedalbox to add some more strength and increase the pedal ratio up to about 4.3:1 up from 3.2:1. strut brace. I reinforced in behind the heater bubble, its nice and solid. I also made an exhaust, made a new surge tank that fits under the car, mounted up a fuel system, fuel lines etc, finished the chassis rail kit, with integrated driveshaft loop, painted the underside, and put all the suspension in with new bushes, new strut tops and a 24mm swaybar. The main reason I'm updating the thread after so long is because I've finally accepted that I don't have the time, money or passion left to finish this, and I will be offering it up for sale, I'm not really too sure how to go about selling off a project like this. I have a figure in mind that I'd like to recover (though still at a loss), whether I have to part it out to get it depends on how much value anyone else places on what has already been done. So if anyone is keen to take over and finish this, or wants a very solid Capri that has already been cut up a bit, to turn into their own vision of a v8 capri monster, get it touch. Cheers - Rich. 3 Quote Link to comment Share on other sites More sharing options...

Recommended Posts
Join the conversation
You can post now and register later. If you have an account, sign in now to post with your account.